
Choosing a room color is basically choosing a mood you get to live inside every day. I’m sharing my favorite room color ideas that look beautiful in real spaces—furniture, art, lighting, and all—so you can picture the whole vibe before you ever pick up a brush.
Warm White That Doesn’t Feel Stark
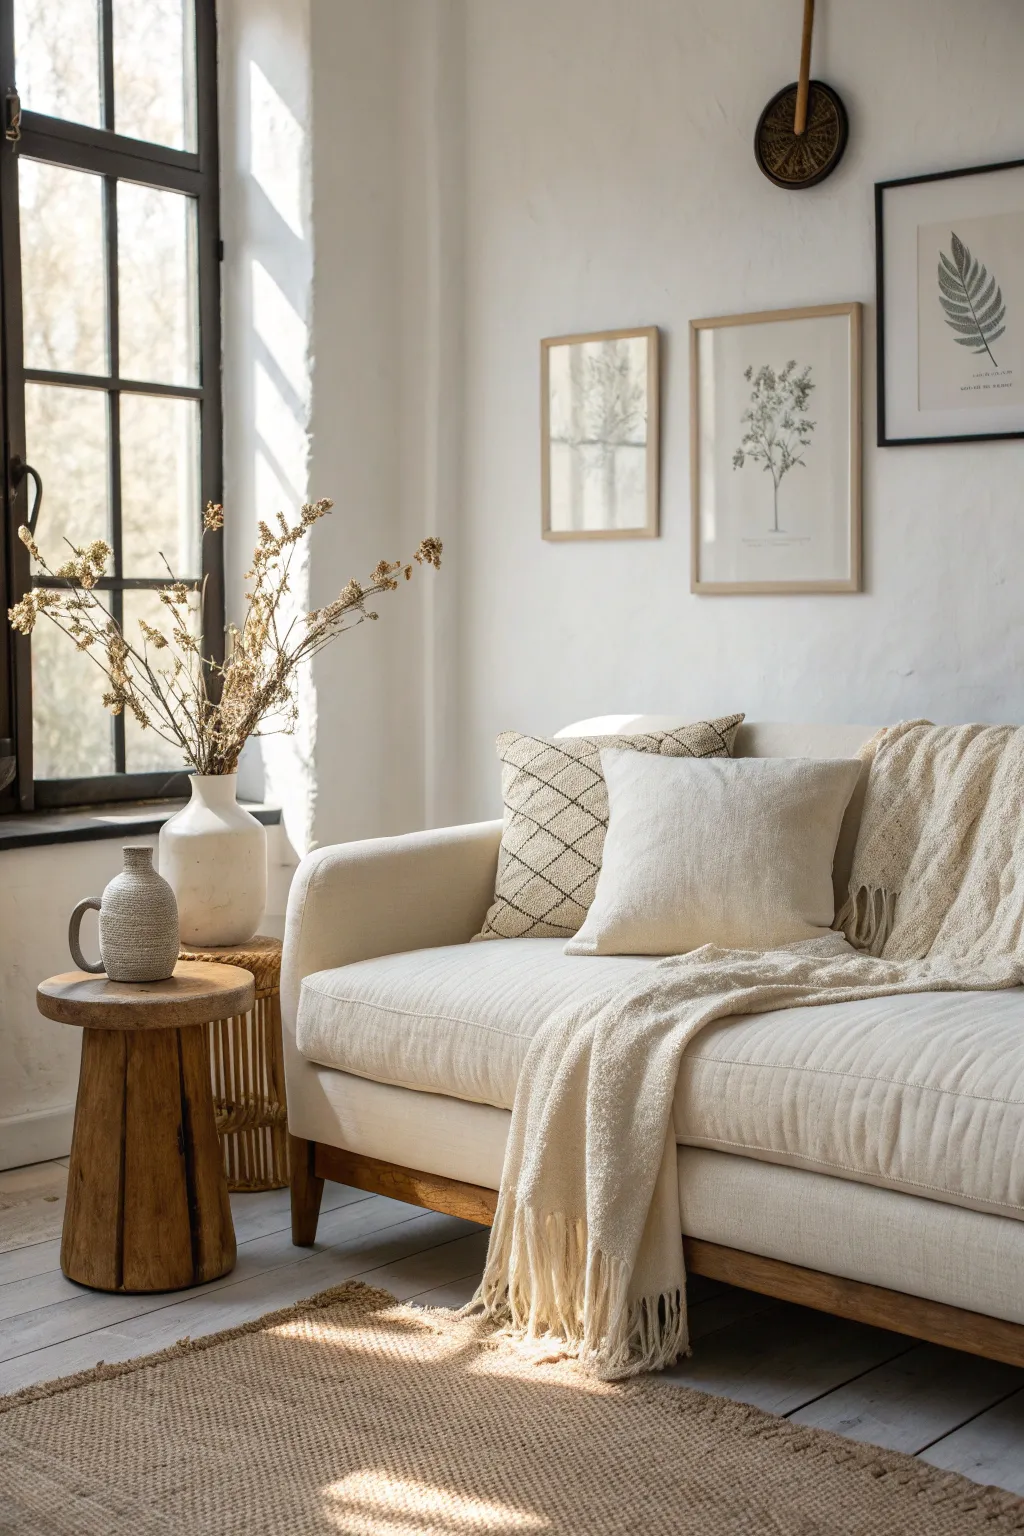
Transform your living space with this soothing, warm white palette that balances brightness with cozy texture. By layering creamy textiles, natural woods, and subtle botanical art, you’ll create a welcoming sanctuary that never feels stark or cold.
Step-by-Step
Materials
- Warm white interior wall paint (eggshsell or satin finish)
- White trim paint (semi-gloss)
- Painter’s tape
- Drop cloths
- Paint rollers and extension pole
- Angled sash brush
- Sanding block (medium grit)
- Cream textured sofa or slipcover
- Chunky knit throw blanket (cream or beige)
- Patterned toss pillow (geometric brown/cream)
- Solid linen toss pillow (natural/cream)
- Rustic wooden side table (stump style)
- Heavy ceramic vases (reactive glaze finish)
- Dried botanical stems (grasses or branches)
- Jute or sisal area rug
- Floating wood frames (light oak)
- Botanical prints on textured paper
Step 1: Setting the Stage & Painting
-
Prep the room:
Clear the room of furniture or move pieces to the center and cover with drop cloths. Remove artwork and hardware from the walls to ensure a clean slate. -
Protect surfaces:
Apply painter’s tape carefully along the window frames, baseboards, and ceiling edges. Press the tape edges down firmly with a putty knife to prevent bleed-through. -
Cut in the edges:
Using an angled sash brush, paint a 2-3 inch border of your warm white paint along the taped edges, corners, and around any outlets. I like to keep a damp rag handy for quick cleanups. -
Roll the walls:
While the cut-in paint is still wet, use a roller to fill in the large wall areas. Use a ‘W’ motion to distribute paint evenly, overlapping your strokes to avoid visible lines. -
Apply second coat:
Let the first coat dry completely according to the can’s instructions, then apply a second coat for full, rich coverage that hides any previous color. -
Paint the trim:
Create subtle contrast by painting the window frames and baseboards. Using a contrasting dark charcoal or black for the window mullions, as shown here, adds a modern industrial touch.
Uneven Paint?
If your white paint looks patchy, it likely needs another coat. White often requires 3 coats over dark colors. Ensure each layer is totally dry first.
Step 2: Layering Textiles & Furniture
-
Position the main furniture:
Place your cream sofa against the main wall. Choose a piece with visible texture, like a linen weave or bouclé, to add depth to the monochrome palette. -
Lay the foundation:
Roll out a textural jute or sisal rug in front of the sofa. This introduces an earthy, organic element that grounds the airy white tones. -
Add rustic accents:
Position a rustic wooden side table next to the sofa. Look for unrefined, stump-style tables with visible grain and imperfections to contrast with the clean walls. -
Arrange the pillows:
Style the sofa with a mix of pillows. Combine a solid linen pillow in a natural tone with a patterned geometric pillow in brown and cream for visual interest. -
Drape the throw:
Casually drape a chunky knit cream throw blanket over the arm or back of the sofa. Don’t fold it too neatly; a relaxed puddle of fabric looks inviting.
Texture Play
Swap the plain jute rug for a wool shag or a vintage Turkish kilim in faded neutrals to instantly change the vibe from coastal breezy to boho cozy.
Step 3: Curating Decor & Details
-
Select botanical art:
Choose 2-3 botanical prints featuring simple line drawings or muted green tones. Using high-quality textured paper makes the prints feel vintage and authentic. -
Frame and hang:
Mount the prints in light oak or birch frames. Hang them in a relaxed grid or side-by-side above the sofa, keeping the spacing consistent but not rigid. -
Style the ceramics:
Place a large, heavy ceramic vase on the side table. A reactive glaze in white or stone complements the theme without stealing focus. -
Arrange dried florals:
Fill the vase with tall dried stems, branches, or grasses. Let them splay out naturally to add height and an organic silhouette against the window light. -
Final lighting check:
Open the curtains to let natural light flood in, which is the secret ingredient that makes warm white paint truly glow.
Enjoy relaxing in your serene, light-filled retreat that feels fresh yet wonderfully lived-in


Soft Greige for a Calm, Flexible Base
Capture the calm, inviting atmosphere of a modern living room bathed in natural light with this acrylic painting tutorial. You’ll learn to render soft textiles, sheer curtains, and subtle shadow play using a limited, harmonious color palette.
How-To Guide
Materials
- Canvas or primed canvas board (12×16 inches recommended)
- Acrylic paints: Titanium White, Unbleached Titanium, Burnt Umber, Mars Black, Yellow Ochre, Ultramarine Blue, Payne’s Grey
- Brushes: Large flat brush (1 inch), medium filbert (size 6), small round brush (size 2), liner brush
- Palette knife for mixing
- Water cup and paper towels
- Painting palette
- Pencil for sketching
- Ruler
Step 1: Sketching the Layout
-
Establish the horizon:
Begin by lightly drawing a horizon line about one-third up from the bottom of your canvas to represent the floor level. This grounds the furniture. -
Outline the sofa:
Sketch the large rectangular shape of the sofa on the right side. Include the rounded armrest and the divisions for the seat and back cushions. Keep the lines loose. -
Add vertical elements:
Use your ruler to mark the vertical lines for the window frame on the left and the curtain folds. Draw a thin vertical line for the floor lamp stand positioned behind the sofa. -
Place accessories:
Sketch the oval shape of the side table to the left of the sofa. Add the simple shapes of the vase, candle, and the floor cushion in the foreground.
Straight Lines Trick
Struggling with the lamp stand or table legs? Use the edge of a piece of cardstock as a guide for your brush, or use painter’s tape to mask off the lines for perfect sharpness.
Step 2: Blocking in Base Colors
-
Mix the greige wall color:
Create a soft greige by mixing a large amount of Titanium White with a touch of Unbleached Titanium and a tiny dot of Payne’s Grey. Paint the entire back wall area. -
Paint the floor base:
Mix Titanium White with a bit of Payne’s Grey and Burnt Umber for a cool, grey-wood floor tone. Apply this to the floor area with horizontal strokes. -
Block in the sofa:
Mix a warm cream color using Titanium White and Unbleached Titanium. specific step is just for coverage, so fill in the sofa shape completely. I find it helpful to ignore the shadows for now and just get the local color down. -
Establish curtain translucency:
Paint the window area with pure Titanium White. While wet, brush vertical streaks of very pale grey over the curtain area to suggest folds.
Adding Warmth
To prevent the ‘greige’ from feeling too cold or sterile, mix a tiny dot of Yellow Ochre into your white highlights on the sun-facing sides of the sofa and curtains.
Step 3: Developing Shadows and Depth
-
Define the sofa shadows:
Mix a darker beige using your cream mix plus a little Burnt Umber. Paint the shadowed side of the armrest and the deep crevices between the cushions. -
Create soft wall shadows:
Using a glaze of watered-down Payne’s Grey, add a vertical shadow in the corner of the room and cast shadows behind the lamp and sofa to add dimension. -
render the pillows:
Paint the left pillow with a muted blue-grey (Ultramarine Blue + Burnt Umber + White). Paint the middle pillow beige. For the textured pillow, paint a dark grey base. -
Paint the intricate rug texture:
Mix a sandy color (Yellow Ochre + White + Burnt Umber). Apply this to the rug area and floor cushion. Use a stiff brush to stipple color, creating a rough, woven texture.
Step 4: Refining Details
-
Add the black accents:
Use Mars Black with a small round brush to paint the floor lamp head and stand. Paint the side table legs and surface, keeping lines steady. -
Detail the vase and botanicals:
Paint the vase dark brown. Use a liner brush with a mix of Yellow Ochre and White to paint the delicate stems and dried leaves. Keep them airy and sparse. -
Texturize the grey pillow:
Once the dark grey pillow base is dry, use your smallest brush to dot tiny white or light grey specks across the surface to mimic the weave patterning. -
Enhance curtain light:
Mix a bright white with a tiny bit of water. Paint crisp vertical highlights on the curtain ridges where the light hits them most intensely. -
Add floor cushion details:
Using a slightly darker beige mix, paint the tufted texture and fringe details on the foreground cushion with short, directional strokes. -
Final highlights:
Add pure white highlights to the top of the lamp shade, the rim of the vase, and the brightest part of the sofa cushions to simulate the soft window light hitting the surfaces.
Enjoy the peaceful ambiance your finished painting brings to the room


Light Taupe for Instant Warmth
This serene botanical watercolor captures the organic beauty of leafy stems with a sophisticated, monochromatic palette that perfectly complements taupe interiors. The piece uses varying shades of olive and sage green to create depth and movement, resulting in artwork that feels both modern and timeless.
Step-by-Step
Materials
- Cold press watercolor paper (140lb/300gsm)
- Watercolor paints (Olive Green, Sepia, Sap Green)
- Round watercolor brushes (Size 4 and Size 8)
- Pencil (HB or H)
- Kneaded eraser
- Two jars of water
- Paper towels
- Light wood picture frame with mat
Step 1: Sketching the Composition
-
Light Outline:
Begin by lightly sketching the main stems of your composition. Aim for an asymmetrical layout starting from the bottom center and fanning slightly outwards to the left and right. -
Adding Leaf Shapes:
Sketch the leaves attached to the stems. Vary their sizes and angles—some facing forward, some sideways—to create a natural, unposed look. Keep pencil lines very faint so they disappear under the paint. -
Refining the Drawing:
Gently lift up any dark graphite lines with your kneaded eraser, leaving only a ghost image to guide your painting.
Fixing Water Blooms
If you get a ‘cauliflower’ bloom where water pushed pigment away, dampen a stiff brush and gently scrub the edge to soften it, or simply paint a darker leaf vein over the imperfection.
Step 2: Painting the Foliage
-
Mixing Greens:
Create three puddles of color on your palette: a pure Olive Green, a darker mix of Olive Green with a touch of Sepia for shadows, and a lighter, watered-down Sap Green. -
First Leaves:
Using the size 8 brush, load it with the medium Olive Green mix. Paint the larger leaves using a single stroke method: press down at the base of the leaf to widen the stroke, then lift gradually as you reach the tip. -
Adding Contrast:
While the first leaves are still damp, drop a tiny amount of the darker Sepia mix into the base of the leaves to create a natural gradient and depth. -
Variation:
Switch to the lighter Sap Green mix for some of the background leaves. Painting these with a more translucent wash helps push them visually into the distance. -
Stem Work:
Switch to your size 4 detail brush. With the dark Olive/Sepia mix, paint the thin stems connecting your leaves. Keep your hand loose to avoid stiff, unnatural lines. -
Layering:
Once the first layer is completely dry, paint a few overlapping leaves. The transparency of watercolor allows the bottom shapes to show through, adding complexity to the arrangement. -
Negative Space:
Be mindful of the white space between branches. This breathing room is crucial for maintaining the airy, elegant feel of the piece.
Step 3: Finishing and Framing
-
Final Details:
Examine your painting for any gaps. Use the small brush to add tiny stems or vein details on a few focal leaves, but don’t overwork it—simplicity is key here. -
Drying Time:
Let the paper dry completely flat for several hours to prevent buckling inside the frame. -
Mounting:
Center your artwork behind a clean white mat. Secure it with acid-free tape on the back of the mat board. -
Framing:
Place the matted artwork into a light wood frame (oak or birch works best) to match the warm, organic aesthetic shown in the inspiration image.
Gilded Touch
For a luxe twist, trace the very tips of a few leaves or the main stem with liquid gold leaf or metallic watercolor paint to catch the light.
Hang your new botanical piece in a spot receiving soft natural light to enhance the subtle transparency of the greens


Soft Blue for a Restful Bedroom
Transform your bedroom into a tranquil sanctuary with this soft blue color palette and rustic accents. This project focuses on painting the walls and styling the bed to achieve a cohesive, restful atmosphere.
How-To Guide
Materials
- Soft baby blue interior latex paint (eggshell or satin finish)
- White semi-gloss trim paint
- Paint rollers and roller covers (3/8 inch nap)
- Angled sash brush (2-2.5 inch)
- Painter’s tape
- Drop cloths
- Spackling paste and putty knife
- Sandpaper (120 grit)
- Paint tray and liners
- Rust-colored knit throw blanket
- Decorative pillows (rust velvet and brown linen)
- Crisp white cotton duvet cover and sheets
Step 1: Preparation
-
Clear the room:
Begin by removing all furniture, or moving large pieces like the bed to the center of the room and covering them with plastic sheeting. -
Protect the floors:
Lay down heavy canvas drop cloths to protect your flooring from paint splatters. Ensure they are flattened out to prevent tripping hazards. -
Patch imperfections:
Inspect the walls for nail holes or dents. Fill these with spackling paste using your putty knife, letting it dry completely before sanding smooth. -
Clean the walls:
Wipe down the walls with a damp cloth or a mild TSP solution to remove dust and oils, ensuring the new paint adheres properly. -
Apply painter’s tape:
Carefully apply painter’s tape along the baseboards, window trim, and ceiling edges. Press the edges down firmly with a credit card or putty knife to prevent bleed-through.
Uneven Edges?
If paint bleeds under the tape, wait for it to dry fully. Then, use a small artist’s brush and your trim color to carefully touch up the line.
Step 2: Painting the Walls
-
Cut in the edges:
Using your angled sash brush, paint a 2-3 inch border of the soft blue paint along the taped edges, corners, and around window frames. -
Roll the first coat:
Pour your blue paint into a tray. Load the roller evenly and apply the paint to the large wall sections using a ‘W’ or ‘M’ pattern to distribute it evenly. -
Blend the sections:
Work in small sections, blending the wet edges back into the previously painted areas to avoid lap marks. I find it helps to maintain a ‘wet edge’ at all times. -
Allow to dry:
Let the first coat dry for at least 2-4 hours, or as recommended by the paint manufacturer, before assessing coverage. -
Apply second coat:
Repeat the rolling process for a second coat to ensure a rich, opaque finish and true color depth. -
Remove tape:
Ideally, remove the painter’s tape while the second coat is still slightly tacky to peel it away cleanly without chipping the paint.
Step 3: Styling the Bed
-
Make the base:
Fit the bed with crisp white sheets and a matching white duvet cover. Smooth out any wrinkles for a hotel-like finish. -
Layer the pillows:
Place two standard white pillows against the headboard. In front of them, arrange one square brown linen pillow and one rust-colored velvet pillow for contrast. -
Add texture:
Drape the rust-colored knit throw blanket across the foot of the bed. Ensure the fringe hangs down naturally over the sides. -
Install lighting:
Place wooden nightstands on either side of the bed. Add simple metallic or warm-toned lamps; adjusting their position to cast a cozy glow. -
Final touches:
Place a small potted plant on the far nightstand and hang simple artwork on the adjacent wall to complete the serene look.
Warm Up the Look
Swap the white duvet for a cream or oatmeal linen set to soften the contrast and make the room feel warmer and earthier.
Step back and enjoy the calming atmosphere of your freshly updated bedroom sanctuary
BRUSH GUIDE
The Right Brush for Every Stroke
From clean lines to bold texture — master brush choice, stroke control, and essential techniques.
Explore the Full Guide
Sage Green for a Fresh, Lived-In Look
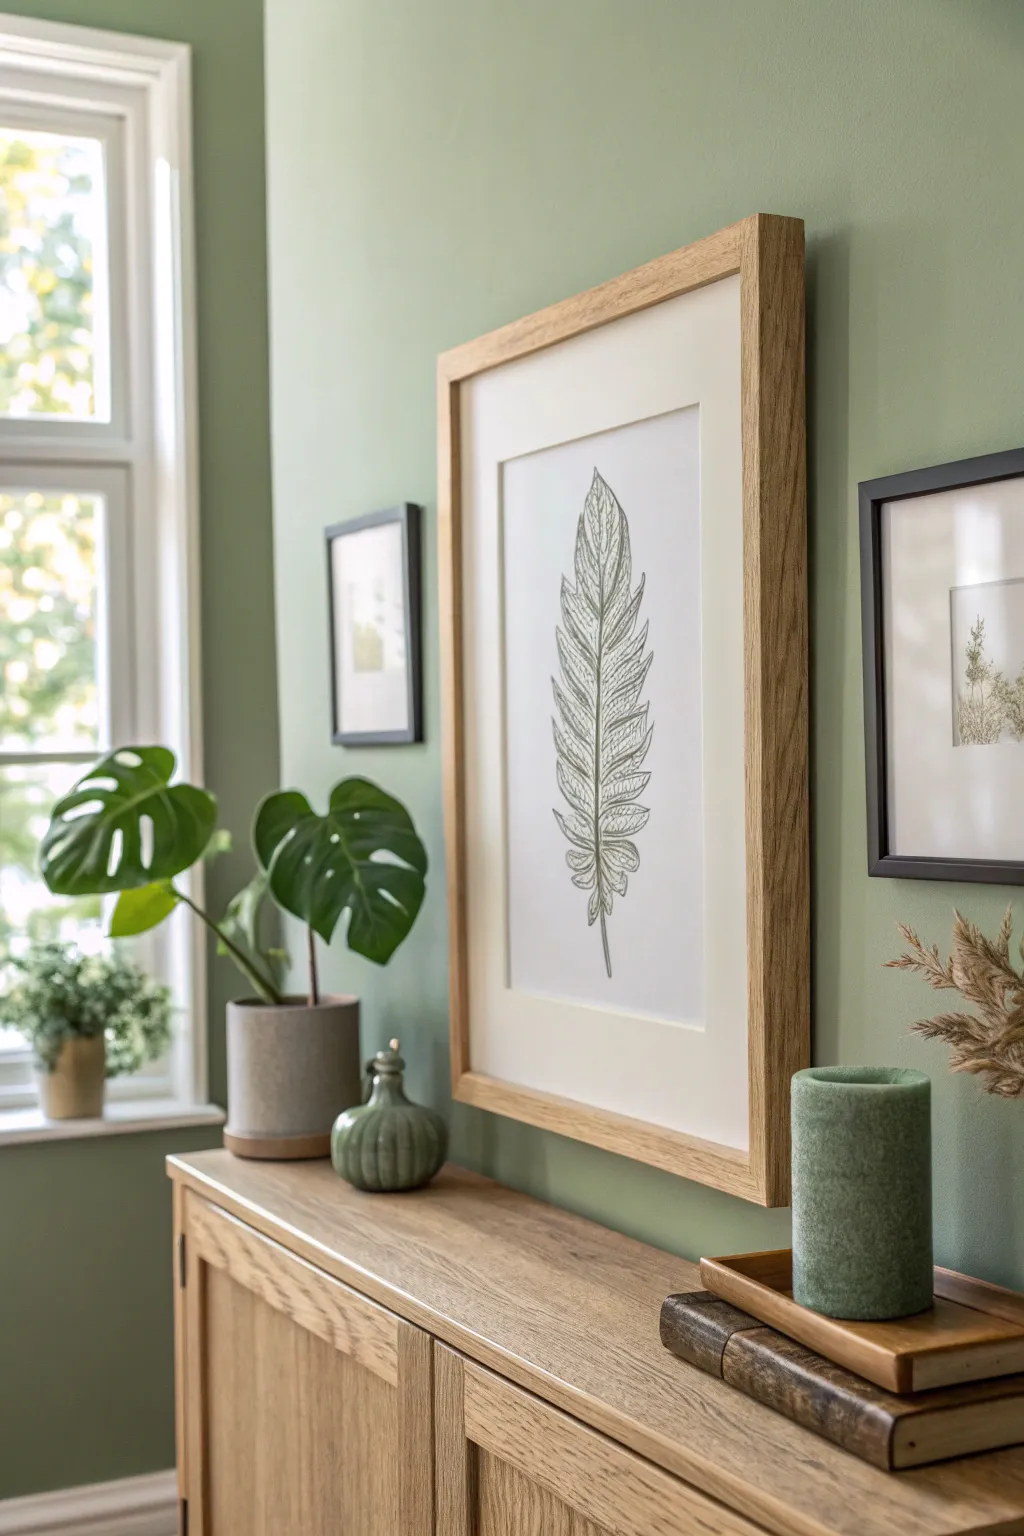
This elegant botanical illustration captures the delicate texture of a single feather through fine line work, perfectly complementing a calm, sage green interior. The stark black ink against crisp white paper creates a modern yet organic focal point that brings a touch of nature indoors.
Detailed Instructions
Materials
- Hot press watercolor paper or smooth bristol board (A3 size)
- HB pencil
- Kneadable eraser
- Fine liner pens (sizes 0.05, 0.1, and 0.3mm, black archival ink)
- Ruler
- Reference photo of a feather (optional)
- Masking tape
- Light colored wood frame with white mount
Step 1: Sketching the Structure
-
Prepare your surface:
Tape your paper down to a flat work surface using masking tape on the corners. This prevents the paper from shifting while you draw. -
Mark the boundaries:
Using your ruler and HB pencil, lightly mark the top and bottom limits of where you want the feather to sit to ensure it stays centered. -
Draw the rachis:
Sketch a slightly curved vertical line down the center of your page to represent the rachis, or the central shaft of the feather. Let it taper to a fine point at the top and leave a thicker stem at the bottom. -
Outline the vane shape:
Lightly sketch the outer contour of the feather. Aim for an elongated oval shape that tapers near the top, keeping the lines loose and imperfect to mimic natural growth. -
Add separation details:
Along the edges of your outline, create small ‘V’ shaped notches where the feather barbs have naturally separated. This adds realism and prevents the shape from looking too perfect.
Natural Taper
When drawing barbs, use a ‘flicking’ motion with your wrist. Lift the pen at the end of the stroke to create a naturally tapering line that mimics hair.
Step 2: Inking the Outline
-
Define the shaft:
Switch to your 0.3mm fine liner. carefully trace the central shaft, thickening the line slightly as you move toward the base to give it weight. -
Ink the outer edge:
Using the 0.1mm pen, go over your pencil contour. Use broken, slightly jagged strokes rather than a single continuous smooth line to suggest the texture of individual barbs. -
Erase pencil guides:
Once the initial ink is completely dry, gently run your kneadable eraser over the drawing to lift the graphite sketch, leaving just the clean ink lines.
Step 3: Detailing and Texture
-
Start the barbs:
With your 0.05mm pen, start drawing fine lines extending outward from the central shaft toward the edge. These lines should curve slightly upward as they move up the feather. -
Create sections:
Don’t fill the entire space uniformly. Instead, group your strokes into small sections that follow the ‘V’ notches you created earlier. -
Add cross-hatching:
I like to add tiny, diagonal cross-hatching marks near the central shaft in select areas. This adds shadow and suggests that the feather has volume rather than being perfectly flat. -
Vary line density:
Leave small gaps of white space between some groups of barbs. This negative space is crucial for making the feather look light and airy. -
Detail the downy base:
At the very bottom of the feather, near the quill, use loose, curly, and scribbly lines to represent the soft, fluffy down feathers that differ from the stiffer upper vanes. -
Review and refine:
Step back and look at your drawing. Use the 0.1mm pen to darken any areas that need more definition, particularly where the barbs meet the central shaft.
Try Sepia Tone
For a vintage scientific illustration vibe, swap black ink for dark sepia or warm grey. It softens the contrast while keeping the detail.
Step 4: Framing
-
Cut to size:
If necessary, trim your paper to fit your frame’s mount. Ensure the drawing is perfectly centered within the window. -
Mount the artwork:
Secure the artwork behind the mount using acid-free tape, ensuring no dust is trapped between the paper and the glass. -
Final assembly:
Place the mounted work into the light wood frame to complete the organic, gallery-style look.
Now you have a sophisticated piece of nature-inspired art ready to hang in your serene green space
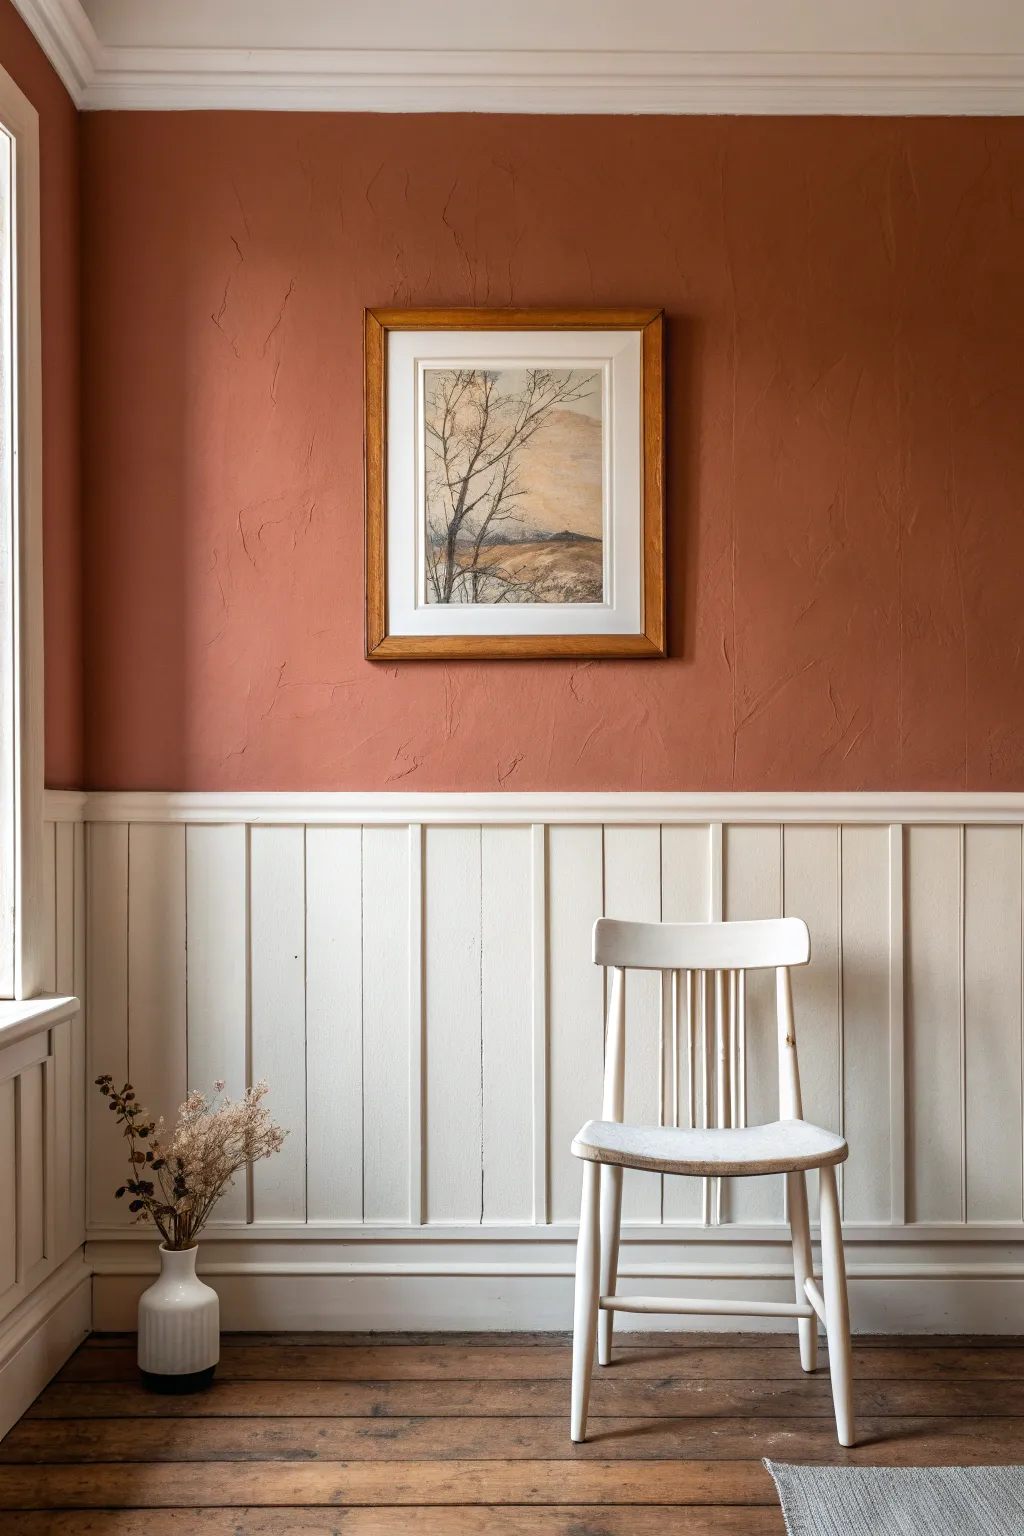
Navy Walls With Crisp Light Trim
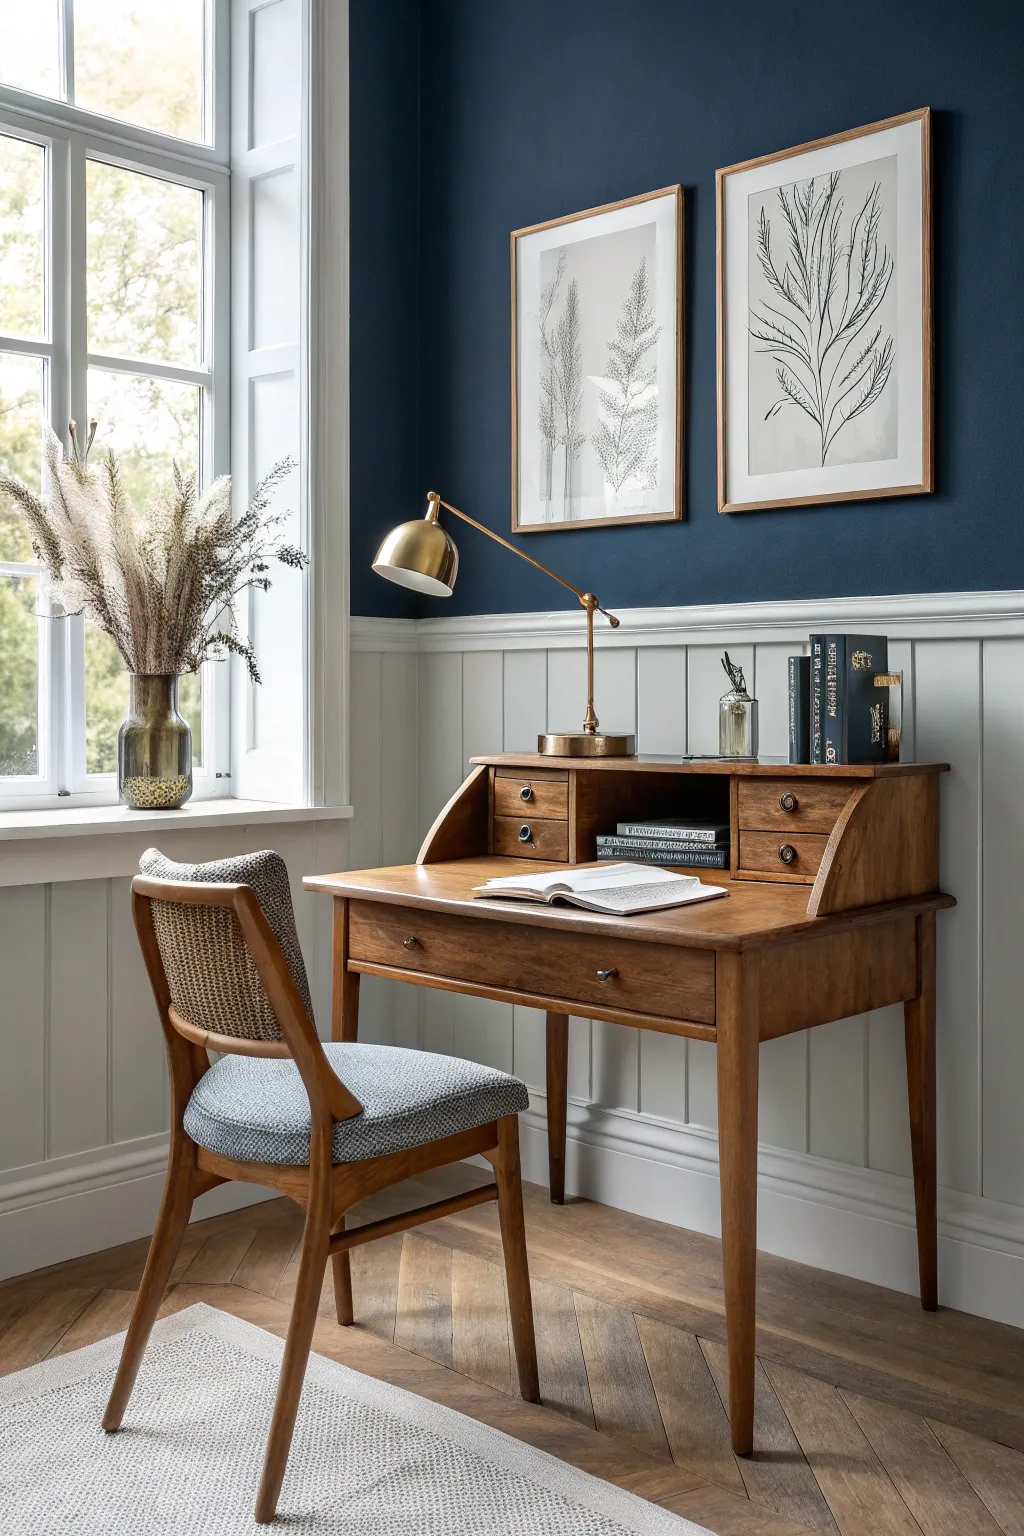
Transform a plain room into a sophisticated study by combining deep navy walls with bright, architectural wainscoting. This project balances the drama of dark paint with the traditional charm of board-and-batten paneling to create a timeless workspace.
How-To Guide
Materials
- Navy blue interior matte paint
- High-quality white semi-gloss trim paint
- Primer (especially if covering dark colors)
- 1×4 MDF or wood boards (for battens and rails)
- Small molding strip (cap molding)
- Construction adhesive (Liquid Nails)
- Brad nailer and 1.5-inch brad nails
- Wood filler and putty knife
- Caulk and caulk gun
- Fine-grit sandpaper (220 grit)
- Painter’s tape
- Level (laser level is best)
- Tape measure
- Paint rollers (smooth and semi-smooth nap)
- High-quality angled sash brush
Step 1: Preparation & Wall Layout
-
Clean and prep the walls:
Begin by removing all switch plates, outlet covers, and any existing baseboards if you plan to replace them. Gently sand the entire wall surface to ensure better adhesion for both the adhesive and the paint, then wipe down with a damp cloth to remove dust. -
Determine wainscoting height:
Decide on the height for your white paneling. A standard chair rail height is around 32 to 36 inches, but going slightly higher can add drama. Mark a level horizontal line around the entire room at your chosen height to serve as the guide for the top rail. -
Plan vertical spacing:
Measure the total length of each wall and divide by your desired spacing (typically 12 to 16 inches apart) to determine where the vertical battens will go. Mark these vertical lines lightly with a pencil, adjusting slightly at corners to avoid awkward slivers of space.
Uneven Walls?
If your walls are wavy, gaps may appear behind the boards. Don’t force the wood back; instead, fill the gaps with paintable caulk for a seamless look.
Step 2: Installing the Woodwork
-
Install the top horizontal rail:
Apply construction adhesive to the back of your 1×4 top rail board. Press it firmly against the wall, aligning the top edge with your level line. Secure it into the wall studs using your brad nailer. -
Install vertical battens:
Cut your vertical 1×4 pieces to fit snugly between the top rail and the baseboard. Apply adhesive to the back of each piece and nail them into place over your marked vertical lines. I find using a scrap block of wood as a spacer helps speed this part up significantly. -
Add the cap molding:
For a finished look, install a small piece of cap molding or a simple routed strip along the very top edge of the horizontal rail. This creates a tiny shelf-like detail that elevates the look from basic to custom. -
Fill and sand:
Fill every nail hole with wood filler and let it dry completely. Once dry, sand the filler smooth until it is flush with the wood. Also, sand any rough cut edges or joints. -
Caulk the seams:
Run a thin bead of finish caulk continuously along every seam where wood meets wall and board meets board. Smooth it with a wet finger or a damp rag. This step is crucial for that seamless, built-in appearance.
Sharp Lines Pro Tip
To prevent paint bleed, verify the tape is sealed tight by running a damp rag over the edge. Then, paint a thin layer of the base color over the tape edge before adding the navy.
Step 3: Painting & Finishing
-
Prime the wainscoting:
Apply a coat of high-quality primer to the raw wood (or MDF) and the wall section beneath the chair rail. This ensures the topcoat will have a consistent sheen and finish. -
First coat of white trim paint:
Using a semi-gloss white paint, carefully cut in the corners and edges with an angled brush. Follow immediately with a smooth roller for the flat sections of the wall and boards. -
Second coat of white:
Once the first coat is fully dry, apply a second coat of white semi-gloss. This layer will provide the durable, crisp finish that contrasts so beautifully with the dark upper wall. -
Tape off the trim:
Allow the white paint to cure for at least 24 hours. Then, apply delicate-surface painter’s tape along the top edge of your cap molding to protect your fresh white work. -
Cut in the navy paint:
Dip your angled sash brush into the navy blue paint and carefully outline the ceiling line, corners, and window frames. Take your time here; dark paint shows mistakes easily. -
Roll the navy walls:
Use a roller with a slightly thicker nap (around 3/8 inch) to apply the navy paint to the upper walls. Work in ‘W’ patterns to distribute the paint evenly without creating roller marks. -
Apply final navy coat:
Dark colors often require two or even three coats for full opacity. Apply the final coat, ensuring rich, even coverage. Remove the painter’s tape slowly while the paint is still slightly tacky to ensure a razor-sharp line.
Step back and admire how the crisp white woodwork makes the deep blue walls feel cozy yet incredibly polished

PENCIL GUIDE
Understanding Pencil Grades from H to B
From first sketch to finished drawing — learn pencil grades, line control, and shading techniques.
Explore the Full Guide
Ochre Yellow That Glows at Night
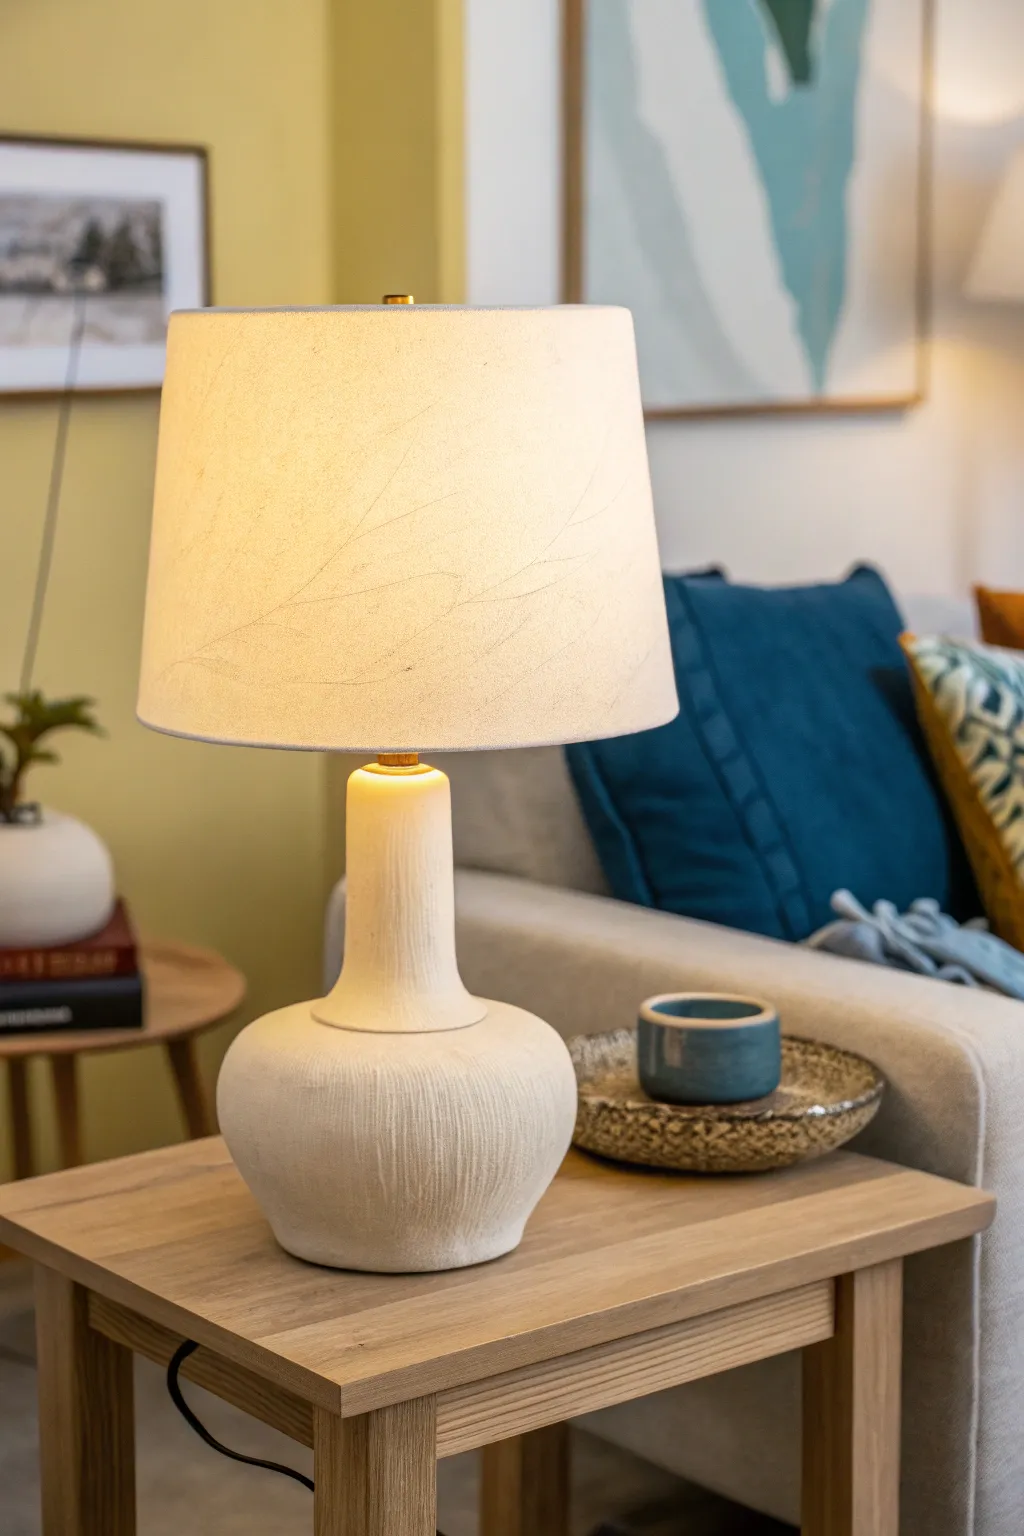
Transform a plain thrift store lamp into a high-end designer piece with this faux-ceramic texture technique. The result is a substantial, organic-looking base with a creamy matte finish that perfectly complements warm ochre spaces.
Detailed Instructions
Materials
- Old lamp base (ceramic, glass, or metal)
- Baking soda
- Acrylic paint (warm cream or bone white)
- Paintbrush (flat, medium size)
- Sandpaper (medium grit)
- Clean cloth
- Primer spray paint (white or beige)
- Clear matte sealer spray
- Disposable mixing cup
- Mixing stick
- Painter’s tape
Step 1: Preparation
-
Clean the lamp:
Begin by thoroughly cleaning your lamp base with warm soapy water to remove any dust, grease, or oils. This ensures the primer adheres correctly. -
Disassemble hardware:
If possible, unscrew and remove the socket and cord. If they aren’t removable, carefully cover the socket, cord, and any metal hardware you want to keep visible with painter’s tape. -
Scuff the surface:
Lightly sand the entire surface of the lamp base using medium-grit sandpaper. You just want to rough it up slightly to give the primer something to grip, especially if the original surface is glossy. -
Wipe down:
Use a damp, lint-free cloth to wipe away all the sanding dust. The surface must be completely dry before moving to the next step. -
Apply primer:
In a well-ventilated area, spray a thin, even coat of primer over the entire base. Let it dry according to the can’s instructions, then apply a second coat if the original color is still showing through.
Fixing “Muddy” Texture
If the paint clumps too much, let it dry, lightly sand down the highest peaks, and apply a thinner topcoat of just paint to smooth it out.
Step 2: Creating Texture
-
Mix the texture paint:
In your disposable cup, mix your acrylic paint with baking soda. I like to start with a 1:1 ratio, aiming for a consistency similar to fluffy cupcake frosting or mousse. -
Test the consistency:
Dip your brush in. If it’s too runny, add more baking soda; if it’s too clumpy to spread, add a drop more paint. You want it thick enough to hold brushstrokes. -
Apply the first layer:
Start painting the mixture onto the lamp base. Use short, horizontal or vertical strokes to mimic the hand-thrown pottery look seen in the photo. Don’t worry about smoothness; texture is the goal. -
Build surface character:
As you work around the curves, dab the brush occasionally to create little peaks and valleys. This mimics the organic imperfections of raw clay. -
Let it cure:
Allow this first thick layer to dry completely. Because of the baking soda, this can take longer than regular paint—usually about 1 to 2 hours. -
Prepare the second batch:
Mix a fresh batch of paint and baking soda. Acrylic paint dries fast, so your first batch has likely hardened by now. -
Apply the second coat:
Paint over the first layer. This time, focus on filling any accidental bald spots while enhancing the ridges you created earlier. -
Refine the texture:
While the second coat is still wet, you can use a dry brush to lightly drag across the surface vertically, creating faint striations that look like wheel-turned pottery.
Try a Wash Effect
Mix brown paint with water (1:5 ratio) and brush over the texture, then wipe off quickly. It settles in crevices for an aged look.
Step 3: Finishing Touches
-
Dry overnight:
Let the lamp sit overnight to ensure the textured mixture has hardened fully. It should feel rocky and solid to the touch. -
Seal the surface:
Apply a clear matte sealer spray over the entire base. The baking soda mixture can be brittle and prone to flaking if left unsealed, so don’t skip this. -
Remove tape:
Carefully peel away your painter’s tape from the hardware. If paint has bridged the gap between the tape and lamp, score it gently with a craft knife first. -
Reassemble:
Reattach any hardware you removed. Add a lampshade—preferably a linen or textured fabric one—to complete the soft, layered aesthetic.
Now you have a bespoke lighting element that adds warmth and texture to your nightstand
Muted Lilac for a Dreamy Corner
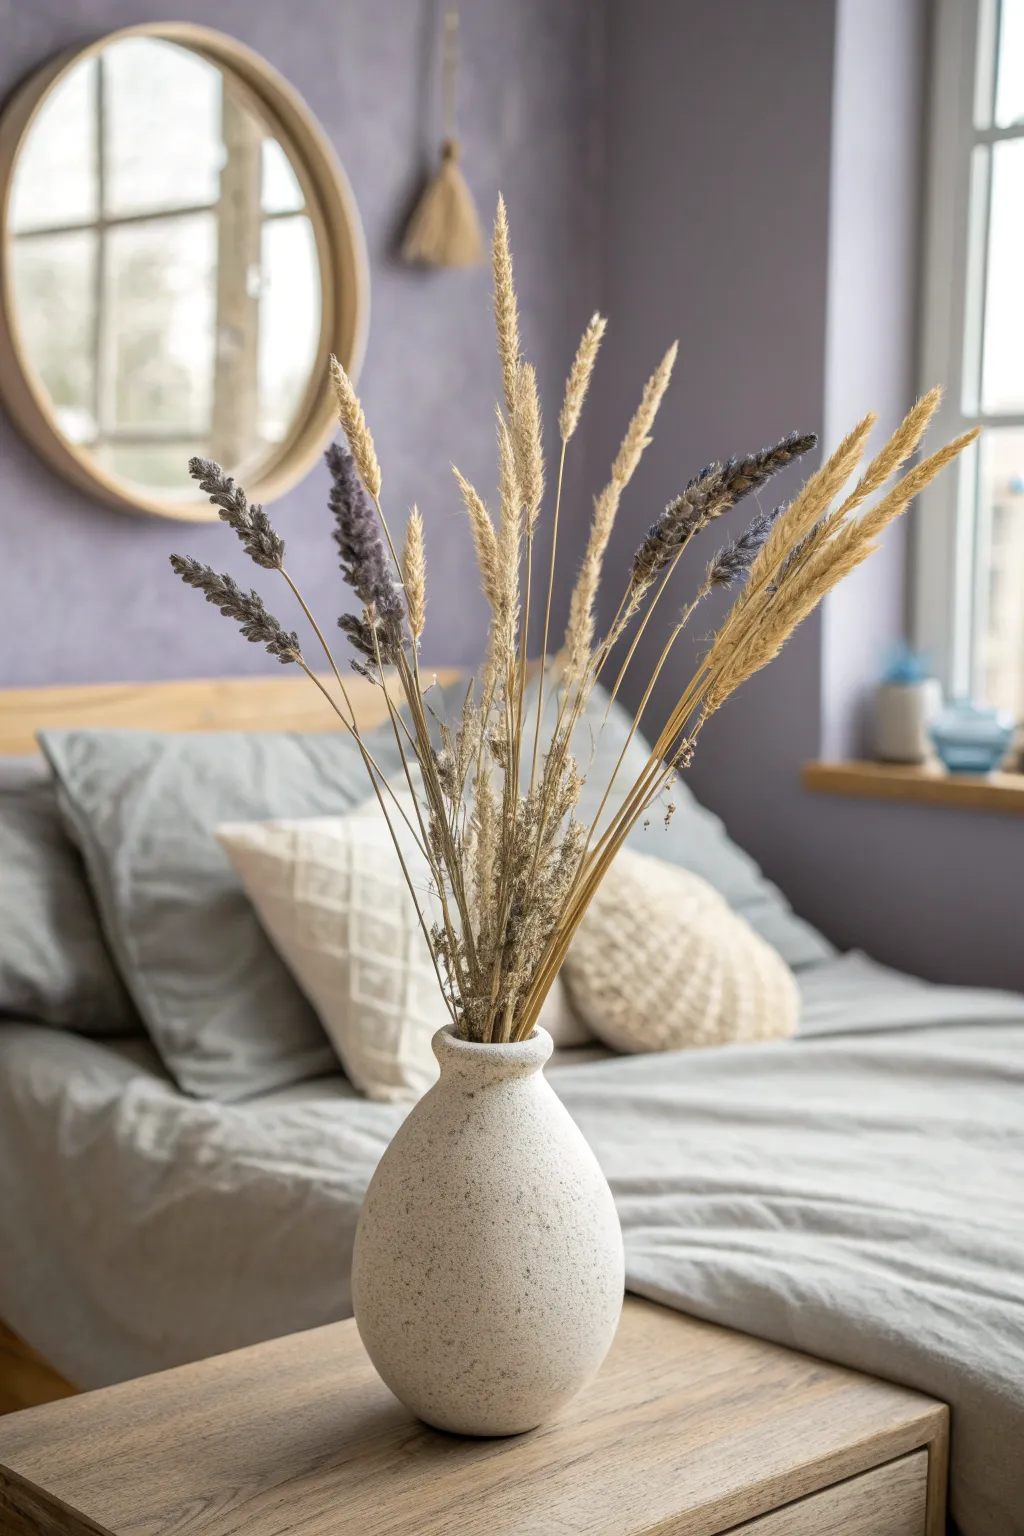
Bring the calming essence of a summer meadow indoors with this effortless dried arrangement. Combining the structural height of wild grasses with the soothing texture of dried lavender, this piece perfectly complements soft lilac interiors.
Step-by-Step
Materials
- Matte white or speckled ceramic bud vase (approx. 8-10 inches tall)
- Dried lavender stems (preserved or air-dried)
- Dried reed grass or oat grass stalks (neutral beige/tan)
- Dried phalaris grass (canary grass) in natural color
- Floral shears or sharp scissors
- Floral tape (optional)
- Jute twine (optional)
- Hairspray (aerosol)
Step 1: Preparation
-
Clean and Dry the Vase:
Ensure your ceramic vase is entirely clean and dry inside. Moisture is the enemy of dried florals, as it can cause mold on the stems over time. -
Sort Your Grasses:
Lay out all your dried botanicals on a clean flat surface. Separate them by type: the tall reed grasses, the fluffy phalaris, and the lavender stems. -
Check Stem Lengths:
Hold the tallest reed grass pieces next to your vase to gauge height. The tallest point should be roughly 1.5 to 2 times the height of the vase itself for a balanced look. -
Pre-Trim Stems:
Give the bottoms of your stems a preliminary trim. Remove any leaves that would sit below the vase rim, as these create unnecessary bulk.
Drooping Stems?
If stems won’t stay upright in a wide-mouth vase, create a grid across the opening using clear floral tape. Insert stems into the grid squares for instant support and structure.
Step 2: Building the Structure
-
Establish the Height:
Begin with 3-5 stems of your tallest reed or oat grass. Place them centrally in the vase so they stand upright. These act as the backbone of your arrangement. -
Add Secondary Layers:
Select slightly shorter grass stems and insert them around the central pillar. Angle these slightly outward to start creating a V-shape. -
Incorporate the Lavender:
Take your dried lavender bunches. I like to separate them into single stems or very small clusters of two. -
Position the Purple Accents:
Tuck the lavender stems in amongst the beige grasses. Aim for asymmetry—place some higher up near the tall grasses and let others sit lower. -
Create Depth:
The lavender shouldn’t be a solid block of color. Ensure some grass stems weave in front of the purple buds to soften the visual impact.
Scent Boost
Over time, dried lavender loses its potency. Revitalize the arrangement by placing a few drops of lavender essential oil onto the hidden stems inside the vase neck.
Step 3: Refining the Shape
-
Add Volume with Phalaris:
Use the shorter, fluffier phalaris grass to fill in the gaps near the neck of the vase. This hides the bare stems of the taller elements. -
Check the Profile:
Step back and view the vase from a few feet away. The arrangement should fan out gently, feeling loose rather than stiffly packed. -
Adjust Angles:
Gently nudge stems with your fingers. Encourage the outer stems to lean naturally towards the sides, mimicking how they grow in a field. -
Trim for Scale:
If any stems stick out too aggressively or disrupt the flow, snip them down now. It’s always better to trim gradually at the end.
Step 4: Final Touches
-
Secure the Base (Optional):
If the mouth of your vase is wide and stems are flopping, you can tie the bundle loosely with jute twine before dropping it back in. -
Preserve the Set:
Take the arrangement to a well-ventilated area or outdoors. -
Apply Fixative:
From about 12 inches away, lightly mist the dried heads with aerosol hairspray. This prevents the grasses from shedding and keeps the lavender buds intact. -
Final Placement:
Once dry, place the vase on your bedside table. Rotate it until the best side faces the room.
Enjoy the tranquil atmosphere this natural piece adds to your bedroom sanctuary


Moody Olive for a Grounded, Library Vibe
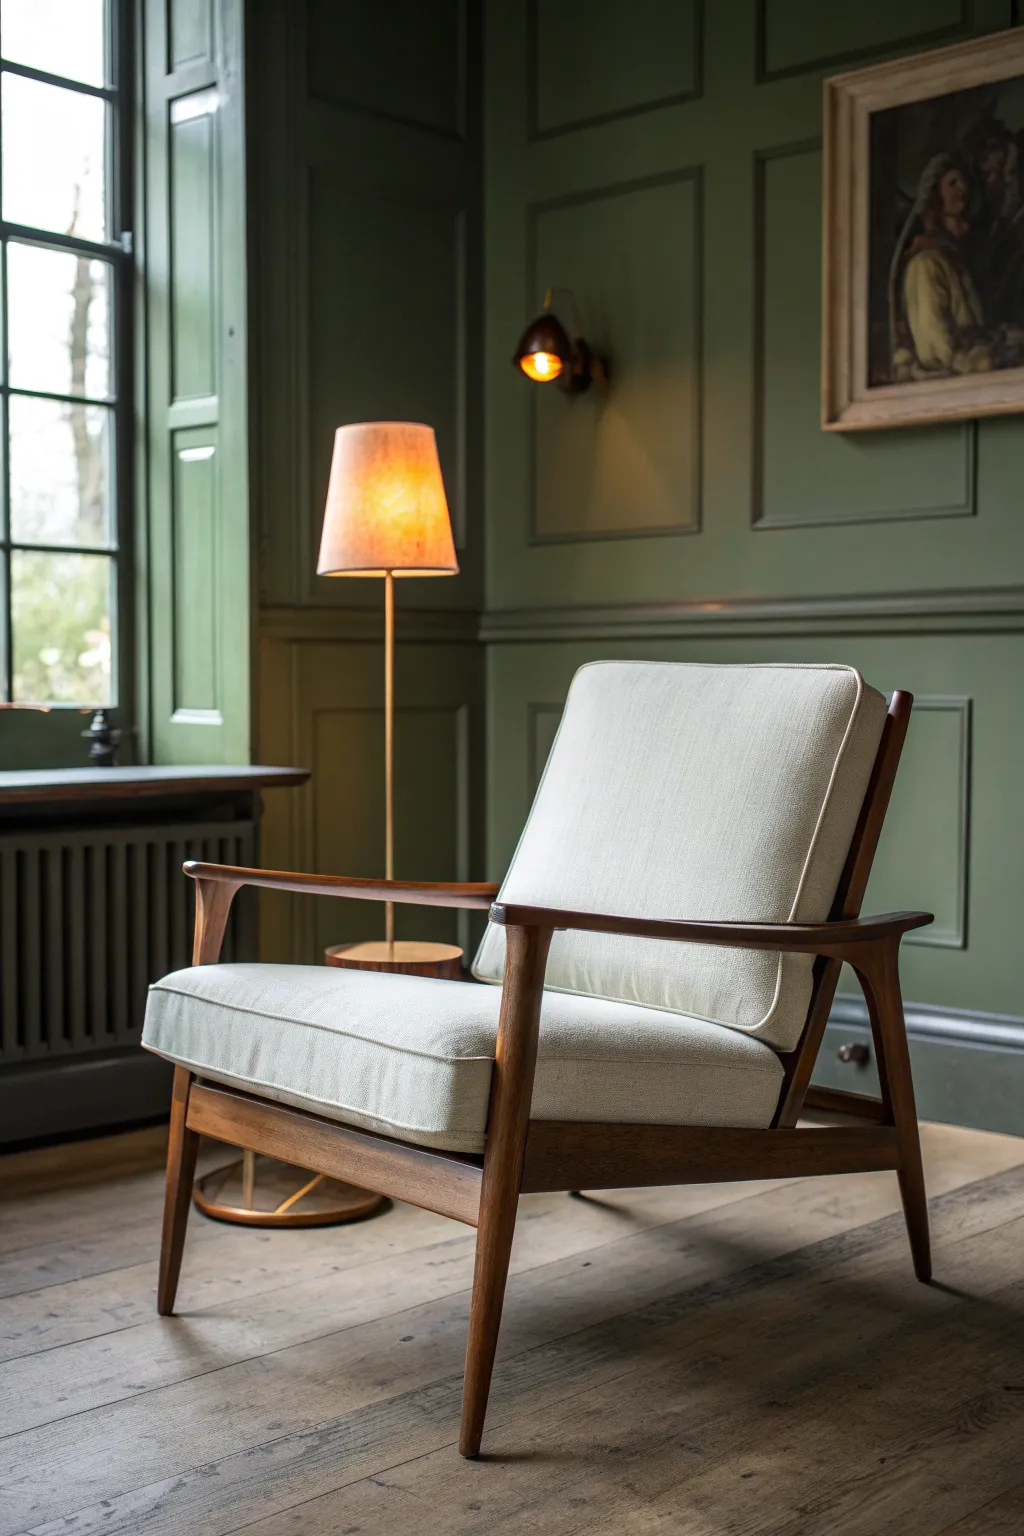
Capture the quiet elegance of a mid-century interior with this acrylic painting tutorial, focusing on the interplay of moody olive tones and warm, glowing light. You’ll learn how to build up the depth of the paneled walls and render the sleek textures of polished wood and soft upholstery.
Step-by-Step Tutorial
Materials
- Canvas or primed panel (11×14 or similar)
- Acrylic paints: Olive Green, Sap Green, Burnt Umber, Raw Sienna, Yellow Ochre, Titanium White, Mars Black, Cadmium Orange, Phthalo Green
- Brushes: Flat shader (varied sizes), round brushes (size 2 and 4), liner brush
- Palette and container for water
- Pencil for sketching
- Ruler
- Retarder or slow-drying medium (optional)
Step 1: Sketching and Underpainting
-
Establish the Perspective:
Begin by lightly sketching the corner of the room. Use a ruler to mark the vertical line of the corner and the horizontal lines for the wainscoting and radiator cover. Place the window frame on the far left. -
Outline the Chair:
Sketch the mid-century modern chair in the foreground. Focus on the sharp angles of the wooden legs and arms versus the soft, boxy shapes of the cushions. Don’t worry about perfect details yet, just get the proportions right. -
Base Tone the Walls:
Mix a dark, muddy green using Olive Green, a touch of Phthalo Green, and Burnt Umber. Apply this as a thin wash over the entire wall area to kill the white of the canvas. It doesn’t need to be opaque. -
Block in Floor and Dark Areas:
Mix Burnt Umber and a little Mars Black to block in the dark radiator area and the deep shadows under the chair. Paint the floor area with a wash of Raw Sienna.
Straight Lines Secret
For crisp paneling lines without wobbly hands, use a ruler as a guide for your brush, but elevate the ruler slightly off the canvas with coins so paint doesn’t bleed under.
Step 2: Building the Environment
-
Develop Vill Wall Color:
Mix your main wall color: Olive Green, a little Titanium White to lighten it slightly, and a tiny bit of Yellow Ochre for warmth. Paint the wall sections, avoiding the panel moldings for now. -
Create the Paneling Depth:
To make the wainscoting pop, mix a darker version of your wall color (add more Green/Umber) for the shadows inside the panel frames. Use a lighter, mintier version (add White) for the top edges where light catches the molding. -
Paint the Window Light:
For the window panes, use Titanium White with the tiniest drop of blue or grey. Keep it bright to suggest daylight coming in. Paint the window frames with a dark grey-green mix. -
Render the Floorboards:
Using Raw Sienna and Burnt Umber, paint long horizontal strokes for the floorboards. Leave gaps between them, then deepen those gaps with dark brown to create the rustic, planked look. -
Painting the Hanging Art:
Roughly block in the picture frame on the upper right using a tan/beige mix. Treat the painting inside the frame loosely with muddy browns and a few highlights—it shouldn’t distract from the main chair.
Step 3: Lighting the Scene
-
Create the Lamp Glow:
For the floor lamp shade, mix Cadmium Orange, Yellow Ochre, and White. Paint the shade, making the center brightest and blending out to darker orange at the edges. Add a glowing yellow dot for the bulb. -
Add Wall Sconce Light:
Paint the small wall sconce with dark bronze tones. Add a bright dab of Yellow Ochre and White for the vintage bulb, and gently glaze a warm halo on the green wall surrounding it to show illumination. -
Cast Shadows:
Observe where the chair legs touch the floor. Use a transparent glaze of black/brown to paint soft shadows underneath the chair and radiator, grounding the furniture in the space.
Adding Atmosphere
Mix a tiny amount of glazing medium with yellow-white paint and apply a very sheer layer over the area near the lamp to emphasize the warm, cozy atmosphere.
Step 4: Focusing on the Chair
-
Base Coat the Wood:
Paint the wooden frame of the chair with a solid coat of Burnt Umber mixed with a little Red to warm it up. Let this dry completely. -
Highlight the Wood Grain:
I like to detail the wood with a liner brush here. Mix lighter tints of Raw Sienna and drag thin lines along the arms and legs to simulate grain and light reflection on the polished surface. -
Block in Upholstery:
Mix a creamy off-white using Titanium White and a very small touch of Yellow Ochre or Unbleached Titanium. Fill in the seat and back cushions. -
Add Cushion Texture:
To make the fabric look woven, use a dry-brush technique. Take a slightly darker beige paint on a dry brush and lightly scumble it over the white cushions to create a textured, fabric appearance. -
Define Cushion Seams:
Use a liner brush with diluted grey-brown paint to carefully draw the piping (seams) around the edges of the cushions. -
Final Highlights:
Add pure white highlights to the very brightest points: the light bulb in the sconce, the rim of the lamp shade, and the most reflective curve of the chair arm.
Step back and admire how the warm lighting brings your moody olive room to life.
Two-Tone Walls for Easy Structure
Transform a plain wall into a cozy, textured masterpiece by combining classic white wainscoting with a warm, earthy terracotta tone. This two-tone approach adds instant architectural interest and a grounding atmosphere to any room.
Step-by-Step Guide
Materials
- Ready-to-install beadboard paneling sheets
- Top cap molding (chair rail)
- Baseboard molding
- Construction adhesive (Liquid Nails)
- Finishing nails & nail gun
- Wood filler
- Caulk & caulk gun
- Fine-grit sandpaper (220-grit)
- Painter’s tape
- Primer (high-quality bonding primer)
- White semi-gloss paint (for beadboard)
- Terracotta/Rust colored matte paint (e.g., Farrow & Ball Red Earth or similar)
- Paint rollers (foam for smooth, nap for texture)
- Paint brushes (angled sash brush)
- Drop cloths
- Level
- Tape measure
- Circular saw or jigsaw (for cutting panels)
Step 1: Preparation & Wall Treatment
-
Clear and clean:
Remove all furniture, switch plates, and existing baseboards from the wall. Ensure the surface is clean, dry, and free of dust or grease to help the adhesive bond properly. -
Measure and mark:
Decide on the height of your wainscoting. A standard height is often around 32-36 inches, or roughly one-third of the wall height. Use your tape measure and level to draw a horizontal line across the entire wall at this height. -
Cut the panels:
Measure the horizontal length of your wall. Cut your beadboard sheets to fit the height (from floor to your line) and width. Remember to account for electrical outlets by measuring and cutting out holes with a jigsaw before installation. -
Apply adhesive:
Apply a generous zigzag of construction adhesive to the back of your first beadboard panel. I find it helpful to focus on the edges and the center to prevent bowing. -
Install panels:
Press the panel firmly against the wall, aligning the top edge with your level line. Secure it immediately with finishing nails into the studs. Continue this process across the room, butting the panels tightly against each other.
Seamless Seams
When caulking the molding, cut the caulk tube tip at a 45-degree angle. Keep a damp rag nearby to constantly wipe your finger clean for the smoothest possible finish.
Step 2: Trim & Finishing Details
-
Add baseboards:
Install your new baseboard molding along the bottom of the beadboard using adhesive and nails. This hides any uneven gaps between the paneling and the floor. -
Install the chair rail:
Place the top cap molding (chair rail) on the upper edge of the beadboard. This piece is crucial as it creates the visual separation between the paneling and the upper wall. Nail it securely into place. -
Fill and conceal:
Use wood filler to cover all nail holes. Once dry, sand the filler smooth. For the seams between panels and where the trim meets the wall, apply a thin bead of printable caulk and smooth it with a wet finger for a seamless look. -
Prime the woodwork:
Apply a coat of quality primer to the beadboard, baseboard, and chair rail. Even if the panels came pre-primed, a fresh coat ensures a uniform finish and better paint adhesion. -
Paint the bottom section:
Paint the entire lower section (beadboard and trim) with a crisp white semi-gloss paint. The sheen will make it durable and easy to clean. Apply two coats for solid coverage.
Step 3: Painting the Upper Wall
-
Tape for precision:
Once the white trim paint is completely cured (wait at least 24 hours), run a strip of painter’s tape along the top edge of the chair rail to protect your fresh work. -
Cut in the color:
Using an angled sash brush, carefully ‘cut in’ the terracotta paint along the ceiling line, corners, and along the taped edge of the chair rail. -
Roll on the texture:
For the upper wall, use a roller with a slightly thicker nap (3/8 or 1/2 inch) to create a subtle texture that mimics plaster, or simply roll on standard matte paint. This earthy terracotta color creates immediate warmth. -
Check coverage:
Let the first coat dry according to the can’s instructions. This bold color often needs a second coat to achieve that deep, saturated look seen in the photo. -
The final reveal:
Peel off the painter’s tape slowly while the paint is still slightly tacky to prevent peeling. Clean up any minor bleeds with a small artist’s brush.
Plaster Effect
To mimic the textured wall in the photo, mix a paint additive like silica sand into your terracotta paint or apply a layer of joint compound before painting for an old-world feel.
Step back and admire how this simple structural change has completely redefined the character of your space
Paint the Ceiling for a Surprise Pop
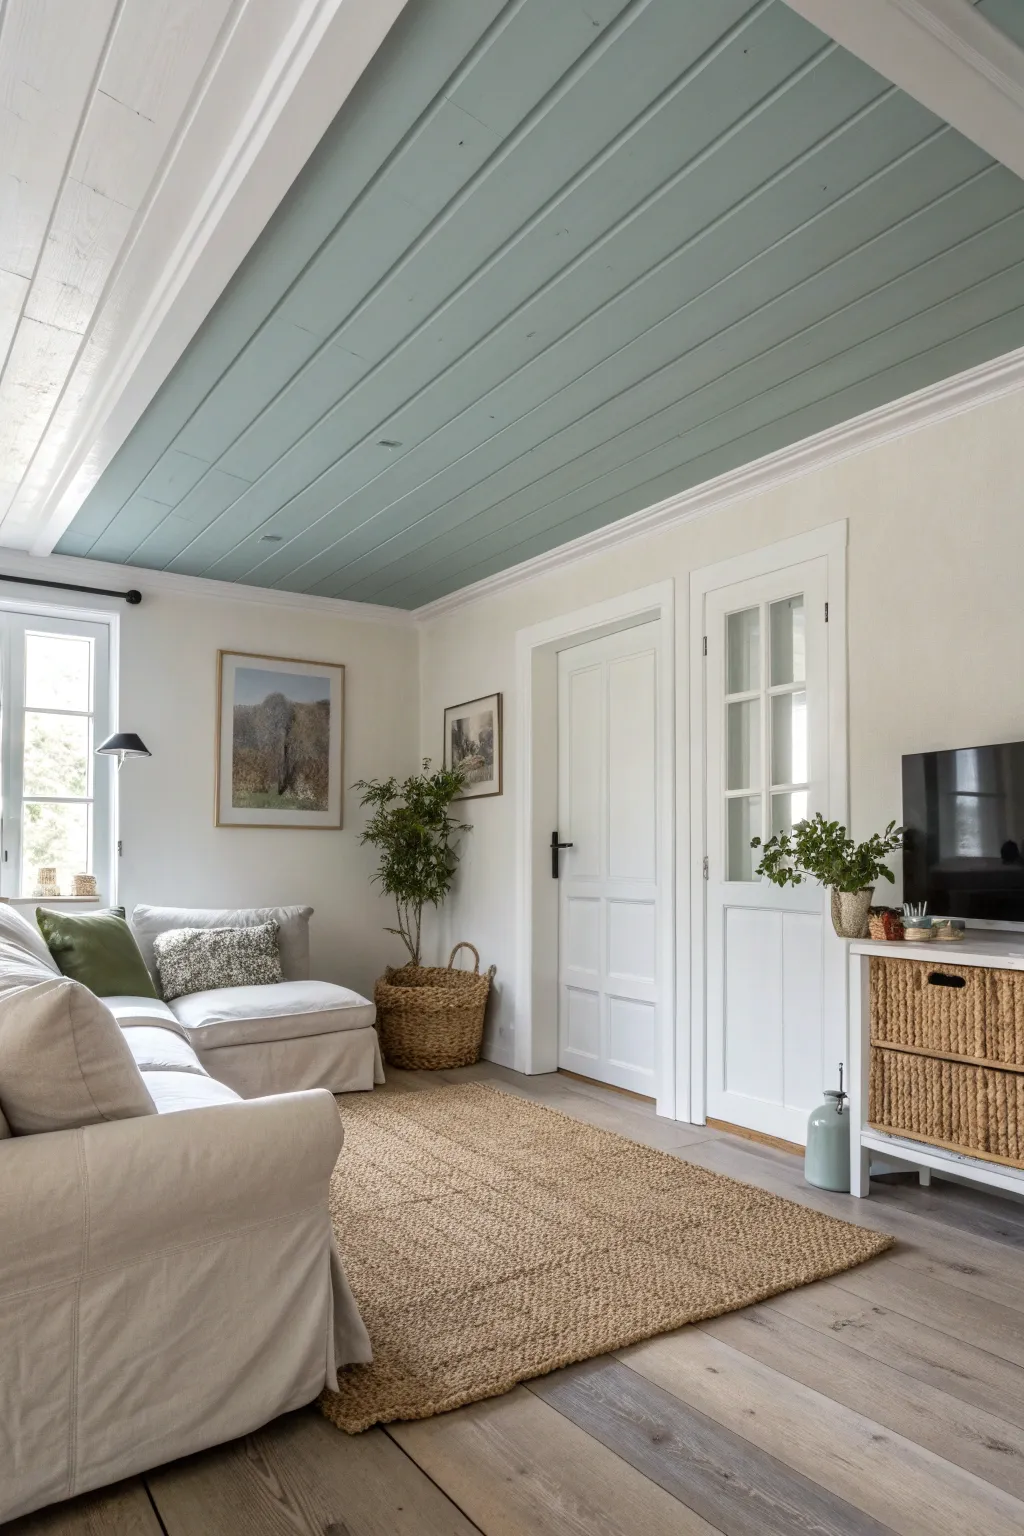
Transform a plain room into a cozy retreat by painting the ceiling a serene, dusty teal while keeping the walls crisp and white. This unexpected pop of color draws the eye upward and highlights architectural details like wood paneling or beams.
Step-by-Step
Materials
- Interior paint (Satin or Eggshell finish, dusty teal color)
- Interior paint (Semi-gloss finish, pure white)
- Angled sash brush (2.5 inch)
- Painter’s tape (delicate surface)
- Drop cloths
- Paint roller frame and extension pole
- Microfiber roller covers (3/8 or 1/2 inch nap)
- Paint tray and liners
- Sanding sponge (medium grit)
- Mild detergent or TSP substitute
- Primer (stain-blocking if painting over raw wood)
Step 1: Preparation
-
Clear the space:
Move all furniture, including the sofa and cabinets, to the center of the room or out perfectly. Cover everything remaining with heavy-duty drop cloths to protect your floors from overhead drips. -
Clean the ceiling:
Using a sponge mop or a rag on a pole, wash the ceiling paneling with a mild detergent or TSP substitute. Dust and grease can prevent adhesion, especially on older wood ceilings. -
Sand the surface:
Lightly run a medium-grit sanding sponge over the ceiling planks. You aren’t trying to strip it, just scuffing the surface to give the paint something to grip. -
Tape the edges:
Apply painter’s tape along the top of the crown molding where it meets the ceiling planks. Press the edges down firmly with a putty knife to ensure a crisp line.
Uneven Coverage?
If the V-grooves look lighter than the planks, the brush didn’t penetrate deep enough. Use a thinner artist brush to dab paint specifically into those deep crevices.
Step 2: Painting the Ceiling
-
Cut in the perimeter:
Dip your angled brush into the dusty teal paint. Carefully paint a 3-inch border around the edge of the ceiling, getting the bristles into the grooves where the planks meet the molding. -
Paint the grooves:
Before rolling, use your brush to paint inside the deep V-grooves between the planks across the entire ceiling. A roller often skips these recessed areas, so brushing them first ensures full coverage. -
Load the roller:
Pour your teal paint into the tray and load a microfiber roller. Use an extension pole to save your back and neck strain. -
Roll the first coat:
Roll the paint onto the ceiling planks, moving parallel to the direction of the wood. Apply broadly, then gently back-roll to smooth out any texture. -
Let it dry:
Allow the first coat to dry completely according to the can’s instructions, usually about 4 hours. It might look patchy effectively, but don’t worry. -
Apply second coat:
Repeat the cutting-in and rolling process for a second coat to achieve that rich, opaque color shown in the photo. -
Remove tape:
While the second coat is still slightly tacky, carefully peel away the painter’s tape at a 45-degree angle to reveal a clean edge.
Step 3: Refining the Trim and Walls
-
Prep the trim:
Once the ceiling is fully dry (I like to wait 24 hours just to be safe), tape off the ceiling edge you just painted to protect it from white paint. -
Paint crown molding:
Using a clean angled sash brush, paint the crown molding with semi-gloss white paint. The sheen contrast between the molding and the matte ceiling adds elegance. -
Refresh the walls:
Paint the walls in a flat or eggshell warm white. This neutral backdrop is crucial for letting the colorful ceiling capture the attention. -
Final inspection:
Check for any drips or missed spots in the grooves. Use a small artist’s brush for tiny touch-ups if needed.
Level Up: Beams
Install faux wood beams across the painted ceiling in a white wash or natural oak stain. The contrast against the teal creates incredible depth.
Step back and admire how this splash of overhead color completely changes the atmosphere of your room
Color Drenching for Total Drama
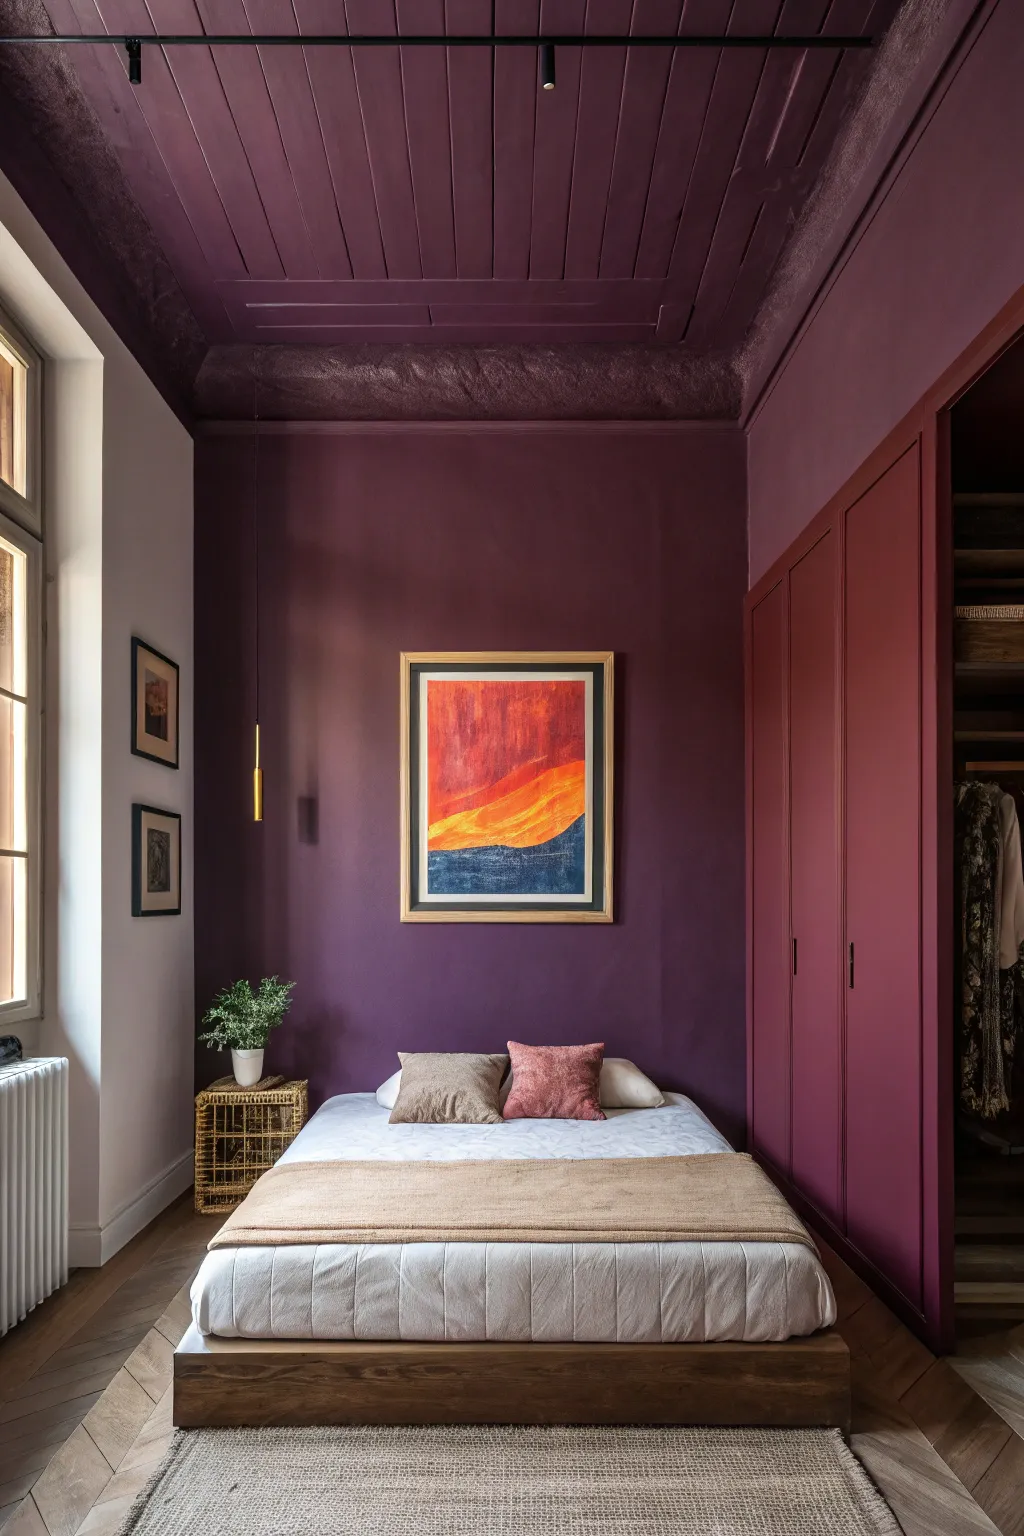
Transform a basic room into a moody sanctuary with this dramatic color-drenching technique. By carrying a deep plum shade from the walls up to the ceiling and onto built-ins, you create an enveloping, jewel-box effect that feels both cozy and sophisticated.
Step-by-Step Guide
Materials
- Deep plum/burgundy interior paint (matte finish)
- Deep plum/burgundy interior paint (eggshell or satin for wood/metal)
- Painter’s tape
- Drop cloths
- Spackling paste and putty knife
- Fine-grit sandpaper (120 and 220 grit)
- High-quality angular sash brush (2.5 inch)
- Paint rollers (microfiber skins) and extension pole
- Paint tray and liners
- Primer (tinted gray suggested)
- Ladder
Step 1: Preparation
-
Clear and clean:
Remove all furniture, rugs, and artwork from the room. Wipe down walls, baseboards, and ceiling moldings with a damp cloth or sugar soap solution to remove dust and oils, ensuring the paint adheres perfectly. -
Patch imperfections:
Inspect the walls and ceiling for any holes or cracks. Fill these with spackling paste, let dry completely, and sand flush with fine-grit sandpaper for a smooth canvas. -
Tape and protect:
Apply painter’s tape carefully along the floor edges, window frames, and any electrical outlets. Cover the entire floor with drop cloths. Since we are drenching, you don’t need to tape off the ceiling line—that’s the beauty of this method.
Patchy Purple?
Deep reds often streak. If the finish looks uneven after two coats, don’t panic. A third thin coat usually solves it. Ensure you let each layer dry fully.
Step 2: Priming
-
Prime the surfaces:
Because deep reds and purples are notoriously translucent, apply a coat of gray-tinted primer to the walls and ceiling. This creates a neutral base that helps the rich topcoat achieve true opacity faster. -
Sand the trim:
While the wall primer dries, lightly scuff-sand any glossy wood surfaces, like closet doors or baseboards, to help the new paint grip.
Level Up: Texture Play
Swap the standard matte wall paint for a limewash or plaster-effect paint in the same plum shade. This adds subtle movement and an old-world feel to the color drench.
Step 3: Painting the Ceiling & Upper Walls
-
Cut in the ceiling:
Start at the highest point. Use your ladder and sash brush to cut in around light fixtures and corners of the ceiling. Don’t worry about the line where the wall meets the ceiling; paint right over it. -
Roll the ceiling:
Use an extension pole and roller to paint the ceiling planking and flat surfaces. Work in small sections, maintaining a wet edge to avoid lap marks on the large overhead surface. -
Address the molding:
The image features heavy crown molding. Use your brush to work the matte paint into all the crevices and curves of the molding, ensuring no white spots remain visible.
Step 4: Painting Walls & Built-ins
-
Cut in the walls:
Move down to the walls. Cut in around windows, outlets, and the floor line. I find it helpful to do one wall at a time to keep the cutting-in fresh. -
Roll the walls:
Roll the main wall surfaces using a W-pattern to distribute paint evenly, then smooth it out with vertical strokes. Depending on the paint brand, you will likely need two to three coats for this depth of color. -
Paint the cabinetry:
For the closet or wardrobe shown on the right, switch to your satin or eggshell finish paint in the exact same color. Paint the doors, frames, and side panels. The slight sheen difference adds texture while maintaining the monochrome look. -
Don’t forget the baseboards:
Paint the baseboards in the same satin/eggshell finish as the cabinetry. This makes them durable against scuffs but keeps them visually seamless with the walls.
Step 5: Finishing Touches
-
Remove tape:
Once the final coat is tacky but not fully dry, carefully peel back the painter’s tape at a 45-degree angle to get clean lines around the floor and windows. -
Install artwork:
Hang a large, vibrant piece of art centrally on the main wall. The orange and yellow tones in the example create a striking contrast against the purple backdrop. -
Style the bed:
Place a low-profile wooden bed frame in the center. Use neutral white bedding with textured throw pillows in terracotta or mauve to tie into the wall color without competing with it. -
Accessorize:
Add a gold pendant light for a metallic pop, and place a small potted plant on a side table to bring some organic freshness to the deep, moody palette.
Step back and enjoy the incredible warmth and depth this bold color technique brings to your space
Ombré Walls for a Painted, Handmade Look
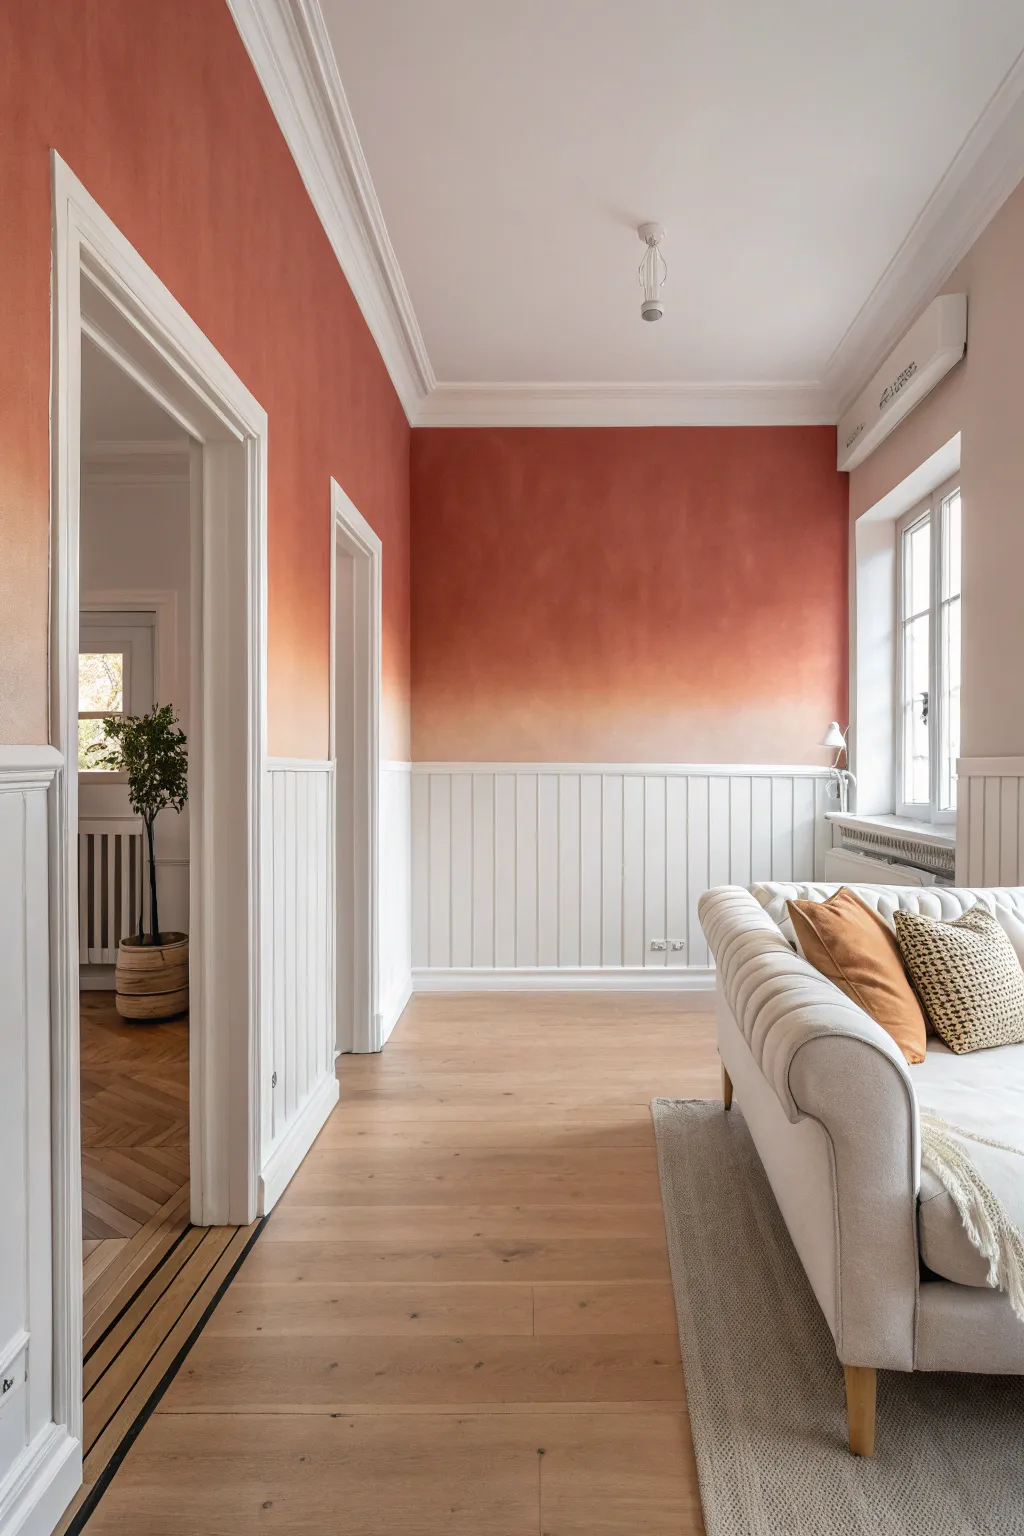
Transform a simple painted wall into a warm, glowing focal point with this two-tone ombré technique. By blending a deep terracotta hue into a soft white, you create a horizon-like effect that adds height and artisanal charm to even the most minimalist spaces.
Step-by-Step
Materials
- High-quality interior latex paint (Terracotta/Rust color)
- High-quality interior latex paint (White or Off-White base)
- Painter’s tape
- Drop cloths
- Two paint rollers and trays
- Wide paintbrush (4-inch, synthetic bristle)
- Spray bottle with water
- Clean, dry blending brush or large sponge
- Step ladder
- Measuring tape and pencil
Step 1: Preparation and Base Coat
-
Protect the space:
Begin by removing furniture and covering floors with drop cloths. Since you will be working with a wainscoting line, ensure the top edge of your wainscoting or dado rail is meticulously taped off with painter’s tape to prevent drips. -
Tape the ceiling line:
Apply painter’s tape along the ceiling cornice or molding. Run your finger firmly along the edge of the tape to seal it tightly so the terracotta paint doesn’t bleed upward. -
Clean the surface:
Wipe down the wall area above the wainscoting with a damp cloth to remove dust or grease, ensuring the new paint adheres perfectly for a smooth gradient. -
Measure your blend zone:
Decide where you want the fade to happen. In the image, the transition starts about a foot above the wainscoting. Mark this transition zone lightly with a pencil so you have a visual guide.
Step 2: Applying the Colors
-
Apply the top color:
Pour your terracotta paint into a tray. Using a roller, paint the upper section of the wall, starting from the ceiling and working your way down. Stop just above your marked transition zone. -
Cut in edges:
While the terracotta paint is wet, use a brush to cut in along the ceiling line and corners. Getting this sharp edge done now helps the roller work blend better later. -
Apply the bottom color:
Using a fresh roller and tray, apply the white base color starting from the wainscoting and rolling upward. Stop just below the terracotta section, leaving a gap of about 6-10 inches between the two solid colors. -
Connect the colors:
Quickly use the rollers to bring the colors closer, lightly overlapping them in the empty gap. Do not worry about a perfect blend yet; just get the wet paint on the wall.
Pro Tip: Keep it Wet
Work in small 3-4 foot sections horizontally. If the paint dries before you blend, the ombre effect fails. A partner can roll paint ahead of you while you focus solely on blending.
Step 3: The Blending Technique
-
Mix an intermediate shade:
On a spare plate or tray, mix a small amount of the terracotta and white paint together to create a 50/50 mid-tone. This isn’t strictly necessary but I find it helps bridge the gap more smoothly. -
Apply the bridge color:
Brush this mixed shade horizontally across the line where the two main colors meet. This acts as a buffer zone for your gradient. -
Mist the wall:
Lightly spritz the blending zone with water using your spray bottle. This keeps the latex paint wet longer, giving you critical working time to manipulate the finish. -
Cross-hatch blending:
Take your wide, dry brush (or a large sponge) and use a crisscross ‘X’ motion over the transition line. Work rapidly to blur the hard edge where the colors meet. -
Feather upward:
Using the dry brush, pull the lighter paint slightly upward into the darker section using light, sweeping vertical strokes to soften the mix. -
Feather downward:
Wipe your brush off on a rag, then pull the darker paint slightly downward color into the white section. The goal is to eliminate any horizontal stripes. -
Step back and assess:
Move away from the wall to look at the gradient from a distance. If you see blotches, lightly mist again and stipple the brush over the uneven area. -
Repeat for second coat:
Let the first layer dry completely. Repeat the painting and blending process exactly as before. The second coat adds depth and makes the gradient look truly seamless.
Troubleshooting: Visible Lines
If you see harsh horizontal lines, your brush was likely too loaded with paint. Clean and dry the brush thoroughly, re-wet the wall slightly with mist, and blend again using a lighter hand.
Step 4: Finishing Touches
-
Remove tape carefully:
Once the paint is tacky but not fully hardened, slowly peel off the painter’s tape at a 45-degree angle to reveal crisp lines at the ceiling and wainscoting. -
Touch up:
Inspect the wainscoting for any accidental splatters and wipe them away immediately with a damp detailing cloth.
The result is a sophisticated, dreamy backdrop that mimics the calming hues of a late summer sunset


Have a question or want to share your own experience? I'd love to hear from you in the comments below!