Roses can look intimidating, but once you break them into simple shapes and a spiral center, they’re honestly relaxing to draw. I pulled together these roses drawing ideas so you can practice petals, stems, and all those rose-specific details without overthinking it.
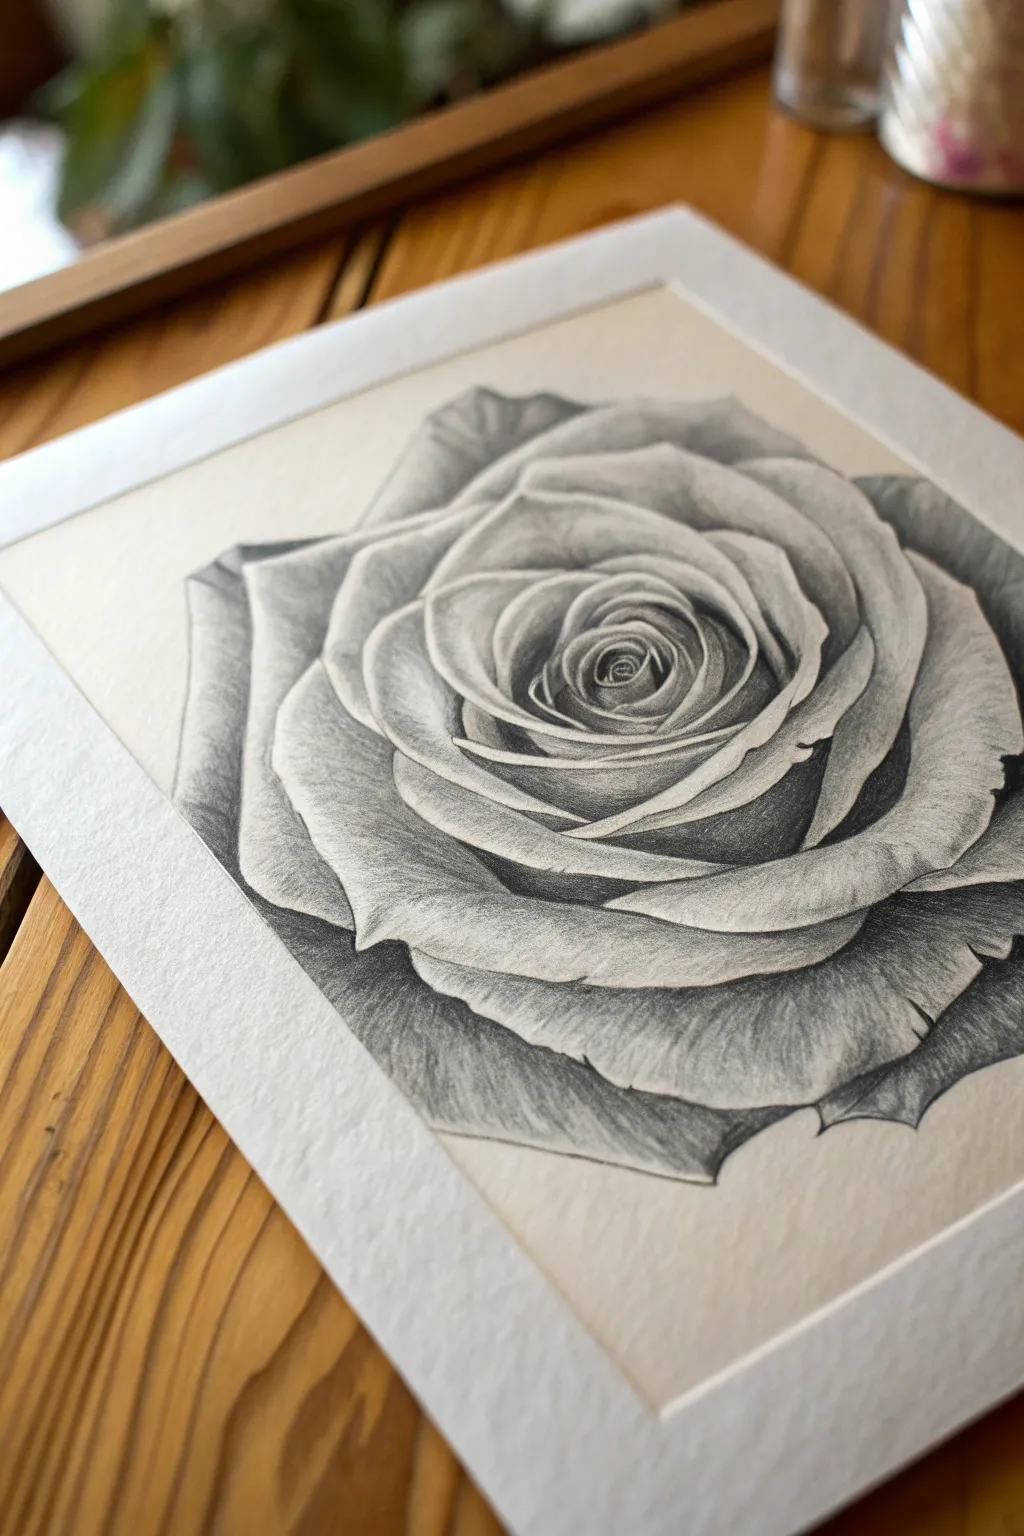
Classic Spiral-Center Rose From the Top
Capture the delicate beauty of a blooming rose with this study in shading and line work. This project focuses on the intricate, spiraling petals at the center and uses fine hatching techniques to create a realistic sense of depth and softness.
Step-by-Step Guide
Materials
- High-quality drawing paper (smooth or vellum finish)
- Graphite pencils (HB, 2B, and 4B)
- Fine-point mechanical pencil (0.5mm, HB)
- Kneaded eraser
- Pencil sharpener
- Blending stump (optional)
Step 1: Laying the Foundation
-
Map the center:
Begin lightly with your HB pencil. Draw a small, tight oval in the center of your page. This will be the very heart of the rose where the petals are most tightly furled. -
Create the spiral:
Starting from the edge of your initial oval, sketch a loose, expanding spiral line moving outward. This doesn’t need to be perfectly geometric; it’s just a guide for petal placement. -
Sketch inner petals:
Along the spiral guide, start drawing the shapes of the inner petals. These should be crescent-like shapes that hug the center tightly. Keep your lines very faint so they can be adjusted or erased layer. -
Expand outward:
Draw the mid-range petals. These are larger and start to open up more. Unlike the tight inner curve, these petals should have slightly wavy edges to look organic and natural. -
Define the outer rim:
Sketch the largest, outermost petals. These petals droop slightly and encompass the whole flower. Ensure the overall shape isn’t a perfect circle; give it some irregularity. -
Add the leaf:
At the bottom left of the rose, sketch a simple, serrated leaf shape extending outward. Add a central vein line curving gently towards the tip.
Tip: Watch Your Hand
Place a scrap piece of paper under your drawing hand while you work. This prevents oils from your skin from smudging your delicate pencil hatching as you move across the page.
Step 2: Refining Lines and Texture
-
Clean up the outline:
Take your kneaded eraser and dab the drawing until the sketch lines are barely visible. Switch to a sharper pencil (HB or mechanical) and re-draw the outlines with intricate details, observing how petals overlap. -
Detail the petal edges:
Go over the petal rims. Add tiny dips, cracks, or recurved edges (where the petal rolls back) to break up smooth lines. This imperfection makes the flower look real. -
Start the center shading:
Using a 2B pencil, begin shading the deepest crevices in the very center spiral. Use firm pressure to get dark values here, creating immediate depth. -
Establish directional grain:
For the petals surrounding the center, use very fine, parallel hatching lines that follow the curve of the petal. These lines act as texture, mimicking the velvety surface of the rose. -
Deepen the shadows:
Identify where one petal casts a shadow onto the one below it. Darken these areas significantly with your 4B pencil. The contrast between the bright petal edge and the dark shadow below is crucial. -
Soften the mid-tones:
Transition from the dark shadows to the paper’s white highlights using softer hatching. I find lifting a bit of graphite with the kneaded eraser highlights the curvature best.
Make It Antique
Instead of bright white paper, try drawing this on cream or tan toned paper. Use a white charcoal pencil to add highlights on the petal tips for a stunning vintage 3D effect.
Step 3: Final Details
-
Texture the outer petals:
The large outer petals need subtle texture. Use your sharpest pencil to draw widely spaced, faint contour lines wrapping around the form of the petal. -
Refine the leaf serrations:
Go back to the leaf and sharpen the jagged edges. They shouldn’t be uniform triangular cuts; vary the size of the teeth for realism. -
Vein the leaf:
Draw the secondary veins branching off the center line of the leaf. Shade lightly between the veins to make the surface look slightly quilt-like and uneven. -
Evaluate contrast:
Step back and look at the drawing. Strengthen the darkest darks in the deepest recesses of the petals one last time to make the image pop. -
Clean edges:
Erase any stray smudge marks or construction lines around the outside of the drawing to leave a crisp, professional finish.
Looking at your finished rose, you can appreciate the intricate dance of light and shadow captured in graphite


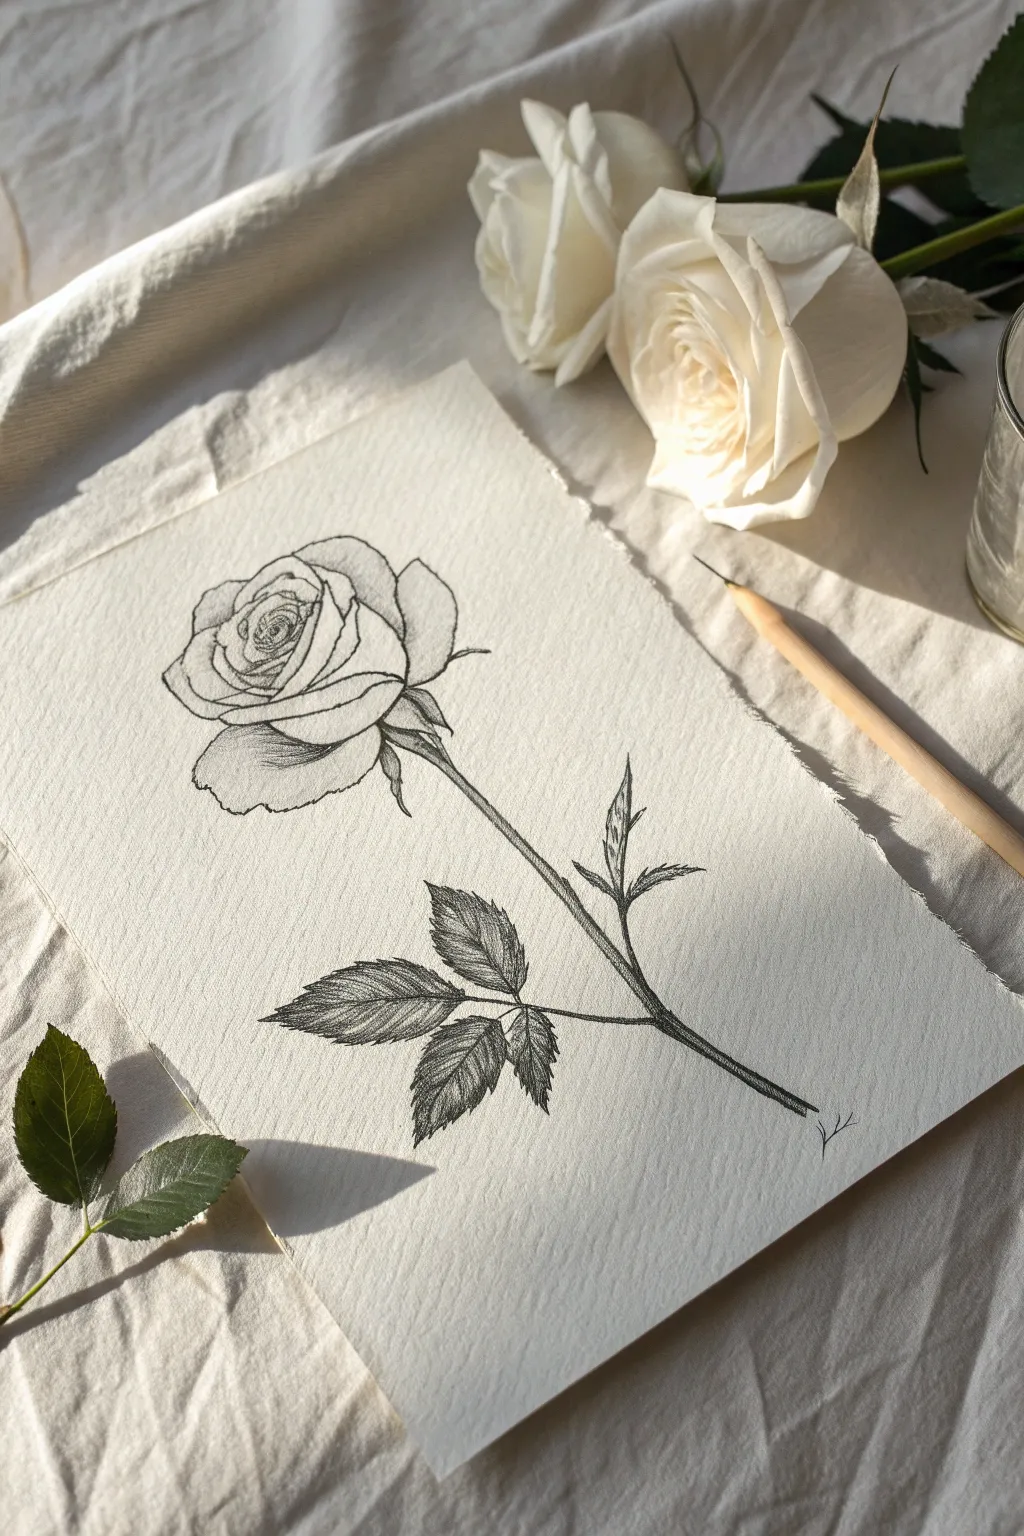
Simple Rosebud With Sepals
This tutorial guides you through creating a sophisticated ink drawing of a rose in partial bloom, focusing on clean lines and texture. The stark contrast of black ink on cream paper gives this botanical study a timeless, classic feel.
Step-by-Step Tutorial
Materials
- Smooth bristol or mixed media paper (cream or white)
- HB or 2H graphite pencil for sketching
- Fine liner pens (0.1mm, 0.3mm, and 0.5mm)
- White vinyl eraser
Step 1: Penciled Foundation
-
Lay down the central axis:
Start by drawing a long, slightly curved diagonal line across your page. This will act as the ‘spine’ for your stem, ensuring the flower has a natural flow rather than standing stiffly upright. -
Outline the bloom shape:
At the top of your stem line, sketch a U-shape for the base of the flower cup. Above that, lightly draw a tight spiral that indicates the tightly wrapped petals at the center of the bud. -
Add petal volume:
Surround the central spiral with two larger, overlapping petal shapes that flare outward slightly. These should look like they are just beginning to unfurl from the tight bud. -
Sketch the sepals:
At the base of the flower cup, draw three or four long, slender, leaf-like shapes (sepals) that curve downward and backward, hugging the top of the stem. -
Define the stem and thorns:
Thicken the initial stem line by adding a parallel line alongside it. Add small, sharp triangles along the stem at irregular intervals to mark the placement of thorns. -
Placement of leaves:
Sketch two main branches protruding from the right side of the stem—one higher up, one lower down. Add oval shapes for the leaflets, typically arranged in groups of three.
Step 2: Inking the Outlines
-
Trace the main bud:
Switch to your 0.3mm fine liner. Carefully trace the outer contours of the rose petals. Keep your hand steady but allow for slight natural wobbles to simulate organic texture. -
Refine the inner spiral:
Use a finer 0.1mm pen to ink the tight spiral in the center. The lines here should be delicate, as the petals are tightly packed and delicate. -
Ink the stem and thorns:
Go back to the 0.3mm or even a 0.5mm pen for the stem to give it visual weight. Outline the thorns sharply, making sure they curve slightly downward. -
Detail the leaf edges:
When inking the leaves, don’t use a smooth line. Instead, use small, jagged sawtooth strokes to mimic the serrated edges typical of rose leaves.
Natural Imperfection
Don’t make your stem perfectly straight or your leaves perfectly symmetrical. Nature is rarely perfect; adding small bumps or tears makes the drawing more realistic.
Step 3: Shading and Texture
-
Erase pencil marks:
Wait until the ink is completely dry—I usually give it a full five minutes just to be safe—then gently erase all visible graphite lines with your white vinyl eraser. -
Hatching the petals:
Using the 0.1mm pen, add fine, curved hatching lines on the petals. Follow the curve of the form; for example, on the outer cup, the lines should wrap around the volume to make it look round. -
Stippling the petals:
Add density to the shadows by using stippling (tiny dots). Concentrate the dots at the base of the petals and where the petals overlap to create depth. -
Texture the stem:
Add linear shading along one side of the stem to indicate a cylindrical shape. Leave the center of the stem mostly white to act as a highlight. -
Veining the leaves:
Draw a central vein down each leaf. From there, branch out with lighter, broken lines for the secondary veins. Don’t connect every line; a broken line looks more natural. -
Shading the leaves:
Apply light hatching on one half of each leaf (relative to the central vein). This slight tonal difference adds instant dimension and makes the leaves look less flat.
Ink Smearing?
If you are left-handed or find your hand smudges the ink, place a clean scrap piece of paper under your drawing hand to protect the wet lines while you work.
Step back and admire the stark beauty of your botanical ink drawing


Half-Bloom Rose With Unfurling Petals
This project focuses on rendering the delicate yet complex form of a half-bloom rose using fundamental shading techniques. You will create a stunningly realistic graphite drawing that emphasizes soft petal curves and deep, dramatic shadows on textured paper.
Step-by-Step
Materials
- High-quality textured drawing paper (e.g., Bristol Vellum or cold-press watercolor paper)
- Set of graphite pencils (ranging from 2H to 6B)
- Kneaded eraser
- Precision mechanical eraser (optional but helpful)
- Blending stumps (tortillons)
- Soft tissue or cotton swab
- Artist tape
- Drawing board
Step 1: Setting Up and Outlining
-
Prepare your surface:
Begin by taping the edges of your textured paper to a drawing board. This not only keeps the paper flat but creates a crisp white border which frames the finished piece beautifully. -
Establish the center:
Using a hard pencil like a 2H, extremely lightly sketch a very small, tight spiral in the center of your page. This will be the absolute heart of the rose where the petals are most tightly wound. -
Map the inner petals:
Draw the shapes of the first few layers of petals unfurling from that center spiral. Keep your lines faint; these petals should look like overlapping cups or bowls. -
Expand to outer petals:
Sketch the larger, looser petals that form the outer perimeter. Pay attention to how the edges curl back or fold over; these folds are crucial for realism. Ensure the overall shape isn’t a perfect circle but has the natural irregularity of a blooming flower.
Fixing Muddy Shadows
If shadows look shiny or grey instead of black, you’ve burnished the paper. Dab with a kneaded eraser to lift excess graphite, then re-layer patiently.
Step 2: Defining the Core
-
Start the shading:
Switch to an HB pencil. Begin shading inside the very center spiral. The gaps between the petals here should be quite dark, but leave the top edges of the petals white to catch the light. -
Deepen the shadows:
Use a 2B or 4B pencil to push the darkest crevices of the center. I find that pressing harder isn’t as effective as layering; build up the graphite slowly to get that rich black without damaging the paper tooth. -
Blend the core:
Use a small blending stump to soften the graphite in the center. Pull the graphite slightly upward from the shadows into the petal body to create a smooth gradient, but keep the very tips of the petals clean and bright.
Step 3: Developing Texture and Form
-
Shade the mid-layers:
Move to the middle ring of petals. Observe how the light hits the curve of each petal. Shade the base of each petal (where it tucks under another) with a B or 2B pencil, fading out as you move toward the rim. -
Texturing the petals:
Instead of smooth blending everywhere, use directional strokes that follow the curve of the petal. This mimics the microscopic veins found in rose petals. -
Create folded edges:
Many petals in this reference have a ‘rim’ where the edge curls backward. Shade the underside of this curl darkly, but leave the top face of the curl almost white. This contrast creates the 3D illusion. -
Work on the outer petals:
The largest petals need broad, soft shading. Use a softer pencil (4B) for the deep shadows where these large petals overlap. Use a tissue to gently blend these larger areas for a velvety look. -
Refine the edges:
For the outer perimeter, use your H or HB pencil to define the serrated or slightly jagged edges of the rose. The outline shouldn’t be a solid dark line, but rather defined by the shading ending abruptly.
Add Dew Drops
Draw tiny circles on a petal. Shade the top inside dark and add a crisp white highlight at the bottom to create realistic water droplets.
Step 4: Final Touches
-
Enhance contrast:
Take your darkest pencil (6B) and revisit the deepest crevices one last time. Crisp up the shadows right next to the brightest highlights to make the image pop. -
Lift highlights:
Using a kneaded eraser formed into a sharp point, or a mechanical eraser, dab away graphite on the topmost curves of the petals and the folded rims. This ‘subtractive drawing’ brings back the paper’s white for intense highlights. -
Clean up:
Erase any stray smudges from the white background area. Gently peel off the artist tape to reveal your clean edges.
Now you have a timeless floral study with dramatic depth that captures the elegance of nature


Full Bloom Rose With Layered Petal Rings
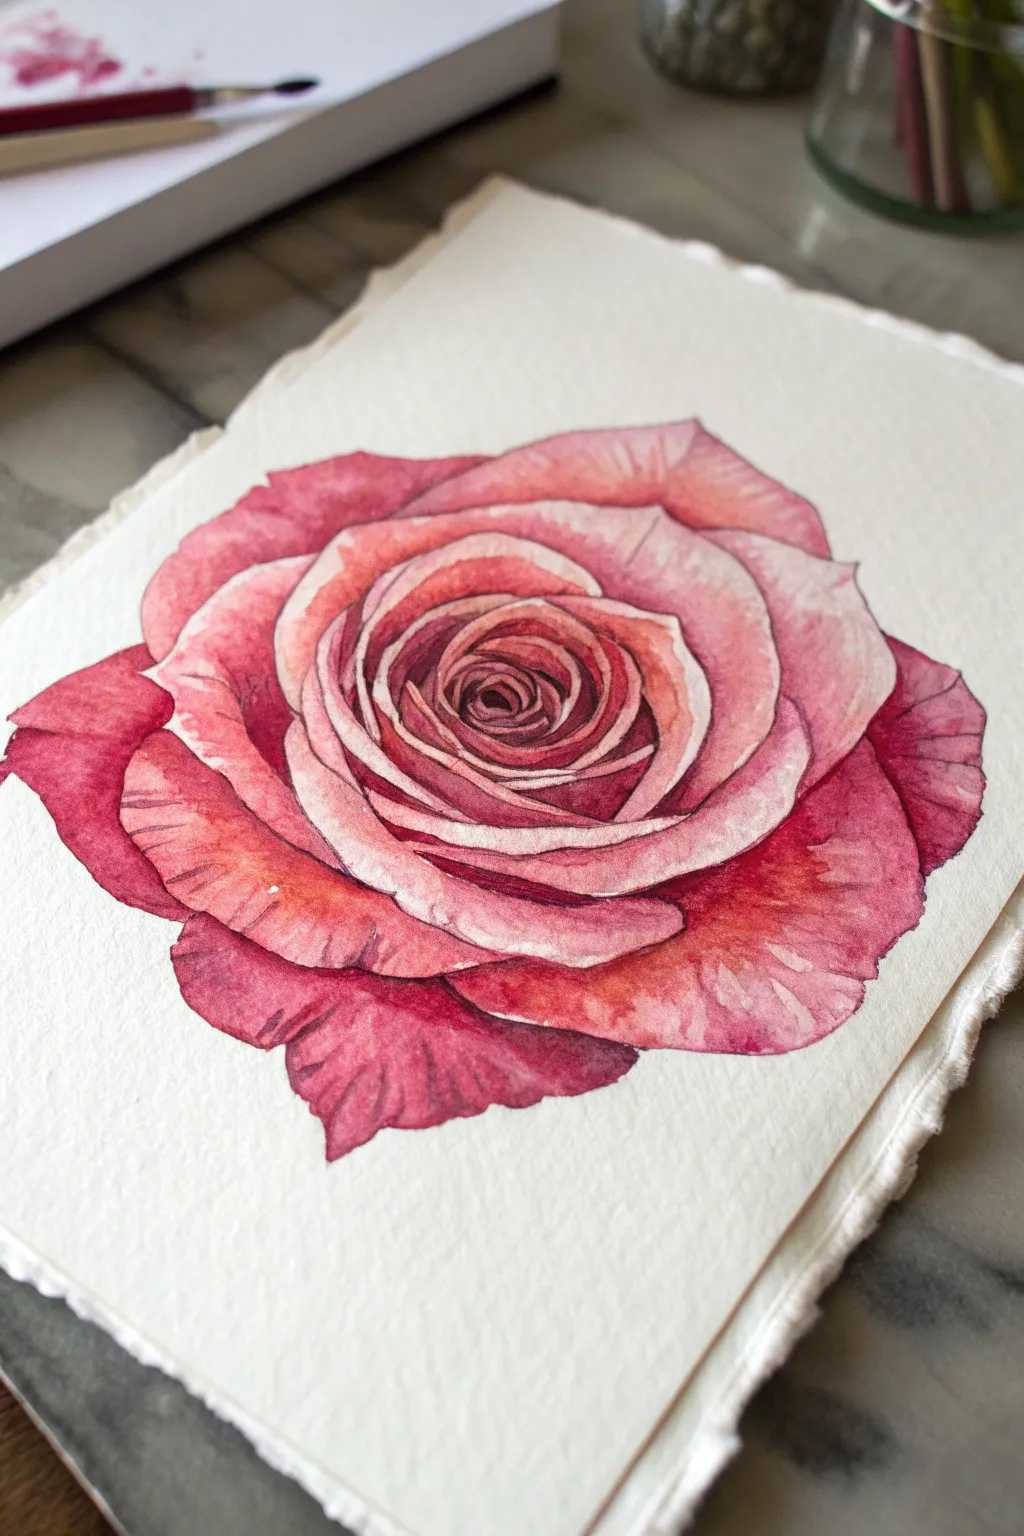
Focusing on the beauty of a fully bloomed rose, this tutorial guides you through building deep, realistic rings of petals. Using semi-transparent watercolor washes, you’ll create a glowing effect where light seems to shine from within the flower’s center.
Detailed Instructions
Materials
- Cold press watercolor paper (300 gsm or 140 lb)
- Pencil (HB or H)
- Kneaded eraser
- Watercolor paints (Alizarin Crimson, Quinacridone Rose, Cadmium Red, Burnt Sienna)
- Round watercolor brushes (sizes 2, 4, and 6)
- Two jars of water
- Paper towel or cloth
- Palette for mixing
Step 1: Sketching the Structure
-
Establish the Center:
Begin by lightly sketching a small, tight spiral in the very center of your paper. This tightly wound shape represents the innermost petals that haven’t unfurled yet. -
Build the Inner Rings:
Draw the first ring of petals around the spiral. Keep these shapes curved and overlapping, like cups hugging the center. Make sure the lines are extremely faint, as watercolor is transparent. -
Expand the Bloom:
Continue drawing concentric rings of petals, getting larger as you move outward. For this ‘full bloom’ look, the petals should start to open up, becoming wider and slightly flatter rather than tight cups. -
Add the Outer Petals:
Sketch the final, largest petals around the perimeter. These should be imperfect and organic, with slightly wavy or folded edges to mimic the natural wilting and curling of a mature rose. -
Clean the Sketch:
Use a kneaded eraser to gently lift the graphite until the lines are barely visible, leaving just enough of a ghost image to guide your painting.
Preserve the Glow
Don’t overwork the petal tips. Leaving the paper white or very pale pink at the edges creates the illusion of light hitting the bloom’s surface.
Step 2: Initial Washes
-
Mix Your Base Tone:
Prepare a watery mix of Quinacridone Rose with plenty of water. You want a very pale, soft pink for the first layer. -
Wet-on-Dry for Outer Petals:
Starting with the large outer petals, paint the base shape using your size 6 brush. Leave a tiny sliver of dry white paper between adjacent petals to prevent them from bleeding into each other. -
Soften the Edges:
While the paint is still wet on the outer petals, drop in a slightly more concentrated mix of Alizarin Crimson near the base of the petal (where it meets the inner ring) to create immediate depth. -
Work Inwards:
Move to the middle rings using a size 4 brush. Paint these segments carefully, maintaining those white separation lines. The color here should be slightly warmer, so mix a touch of Cadmium Red into your pink.
Step 3: Building Depth and Contrast
-
Darken the Center:
The center spiral needs the most contrast. Mix Alizarin Crimson with a tiny bit of Burnt Sienna for a deep, shadowy red. Apply this to the deepest crevices of the central spiral using a size 2 brush. -
Layering Middle Petals:
Once the first layer is completely dry, glaze a second layer of pink over the middle petals. This time, focus the color at the bottom of each petal and fade it out with a clean, damp brush as you move toward the petal tip. -
Define Petal Folds:
Look at where the petals curl over. Paint the underside of the curl a darker shade of red, leaving the top edge of the flap very pale or white to capture the light hitting it. -
Enhance the Shadows:
Mix a thicker, less watery consistency of Alizarin Crimson. Paint thin, crisp lines right underneath the white separation gaps you left earlier. This casts a shadow from one petal onto the one beneath it. -
Add Texture Details:
Roses have delicate veins. With a predominantly dry brush (wipe it on a towel first) and diluted red paint, gently drag the brush from the base of the large outer petals outward to create subtle striations.
Dew Drops
Add 2-3 small water droplets on a few petals. Paint a tiny dark shadow circle, lift the center color for a highlight, and add a dot of white gouache for reflection.
Step 4: Final Touches
-
Deepen Outer Contrast:
The tips of the outer petals often have intense color concentration. Add a wash of pure Quinacridone Rose to the tips of the widest petals to frame the flower. -
Refine the Center:
I prefer to go back to the center one last time with your darkest red mix to sharpen the tiny geometric shapes inside the spiral, ensuring the focal point is crisp. -
Check Highlights:
If you lost too many white highlights, you can careful lift a little pigment with a damp, clean brush or use a touch of white gouache on the very edges of the inner petals. -
Final Dry:
Let the entire piece dry completely before erasing any remaining visible pencil marks that might be distracting.
Now step back and admire the soft, layered depth of your beautiful watercolor rose.
BRUSH GUIDE
The Right Brush for Every Stroke
From clean lines to bold texture — master brush choice, stroke control, and essential techniques.
Explore the Full Guide
Side-View Rose Profile
Capture the delicate beauty of a blooming rose with this detailed side-profile study. Using simple shading techniques and precise line work, you will create a timeless botanical illustration that looks lovely on textured paper.
Step-by-Step
Materials
- Textured sketch paper (white or cream, approx. 140gsm)
- HB graphite pencil (for initial sketching)
- 2B or 4B graphite pencil (for shading)
- Fine liner pen (black, 0.1mm – optional for a distinct ink look, though image suggests graphite)
- Kneaded eraser
- Pencil sharpener
Step 1: Constructing the Basic Forms
-
Establish the stem line:
Start by lightly drawing a diagonal line stemming from the bottom right towards the center left. This will serve as the central axis for the flower’s stem. -
Outline the bloom limit:
At the top of your diagonal line, lightly sketch a rough oval or egg shape. This shape defines the overall boundary of the rose head so you don’t run off the page. -
Sketch the center spiral:
Inside the oval, slightly off-center to the left, draw a tight, small spiral. This represents the tightly packed inner petals of the rose. -
Mark petal placements:
Around the spiral, loosely block in the larger, outer petals using curved, organic shapes. Focus on capturing the way the petals cup outwards rather than perfect circles.
Fixing Smudges
If graphite smudges on the textured paper, use a sculpted kneaded eraser to blot, not rub, the stain. Place a clean sheet of paper under your hand while drawing to prevent future transfer.
Step 2: Refining the Rose Head
-
Detail the inner whorl:
Switching to a sharper point, define the spiral in the center. Give the edges of these petals a slightly jagged, natural look rather than smooth, perfect curves. -
Draw the middle petals:
Work your way outward from the center. Draw the petals that are beginning to unfurl, ensuring they overlap the center section. Add small folds at the top edges where the petals curl back. -
Define the outer petals:
Sketch the largest petals at the bottom and sides. The bottom-most petal should curve downward like a bowl, supporting the rest of the flower head. -
Add texture lines:
Within the petals, draw very faint, curved lines that follow the contour of the petal. This helps indicate the rounded volume of the flower.
Paper Texture Tip
Let the paper grain do the work. When shading, reduce pressure so the pencil skips over the paper’s ‘valleys,’ creating natural white speckles that mimic light hitting the texture.
Step 3: Drawing Stem and Foliage
-
Thicken the stem:
Go back to your initial stem line and double it up to give it thickness. Make the connection point under the flower head slightly thicker to represent the sepals. -
Add sepals:
Draw small, leaf-like structures (sepals) drooping down from the base of the rose head, hugging the top of the stem. -
Branch out stems:
About halfway down the main stem, draw a secondary, thinner stem branching off to the left. Then, add a smaller shoot branching to the right, slightly higher up. -
Outline the leaves:
On the left branch, sketch three leaf shapes: a terminal leaf at the tip and two side leaves. Use serrated (saw-toothed) edges for a realistic rose leaf look. -
Add thorns:
Place a few small, sharp triangles along the main stem. Keep them subtle and downward-curving.
Step 4: Shading and Final Details
-
Clean up the sketch:
Take your kneaded eraser and gently roll it over the drawing to lift the darkest preliminary graphite, leaving just a faint guide. -
Commit to final lines:
Using a freshly sharpened pencil (or fine liner), trace over your refined shapes with confident strokes. Vary the line weight—thicker on the shadowed undersides, thinner on top. -
hatching the petals:
Start shading the rose head. Use fine hatching lines in the deepest crevices between petals. I find it helps to follow the curve of the petal with your strokes to emphasize the form. -
Darken the leaves:
The leaves in this image are quite dark. Use dense cross-hatching or close parallel lines to fill them in, leaving slight white gaps for the veins. -
Shadow the stem:
Add shading along one side of the stem (usually the bottom or right side) to make it look cylindrical rather than flat. -
Final assessment:
Step back and look for balance. Deepen the darkest shadows—specifically inside the center spiral and under the main leaves—to make the drawing pop off the page.
Your beautiful botanical study is now ready to be framed or gifted to a friend
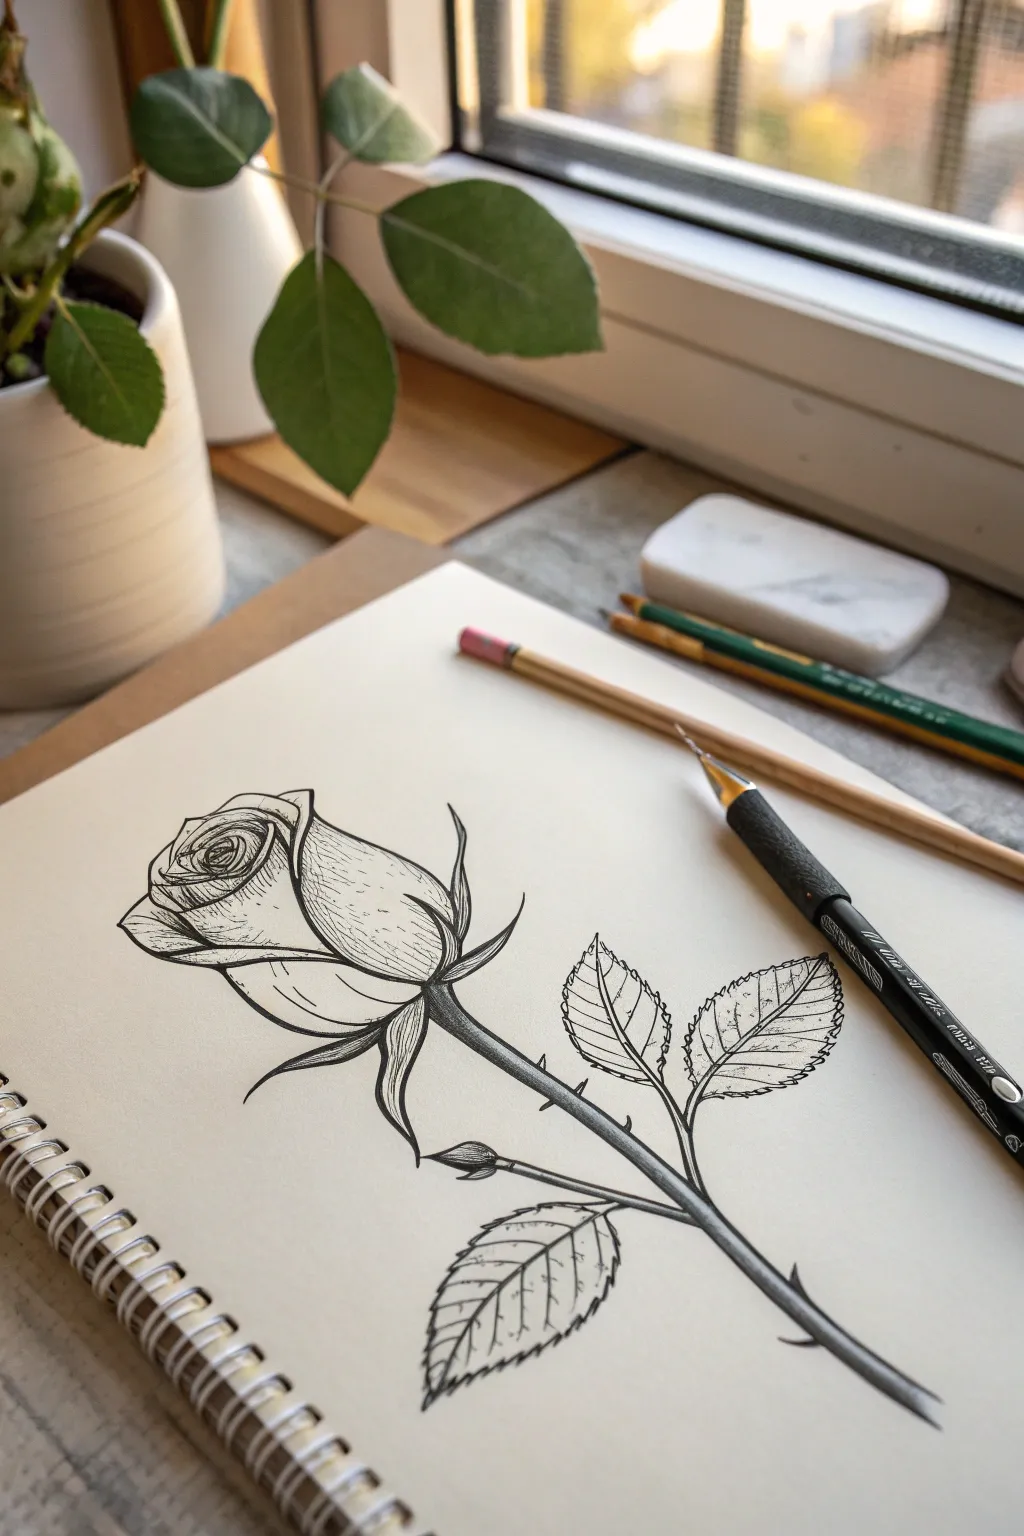
Single Stem Rose With Thorns and Leaves
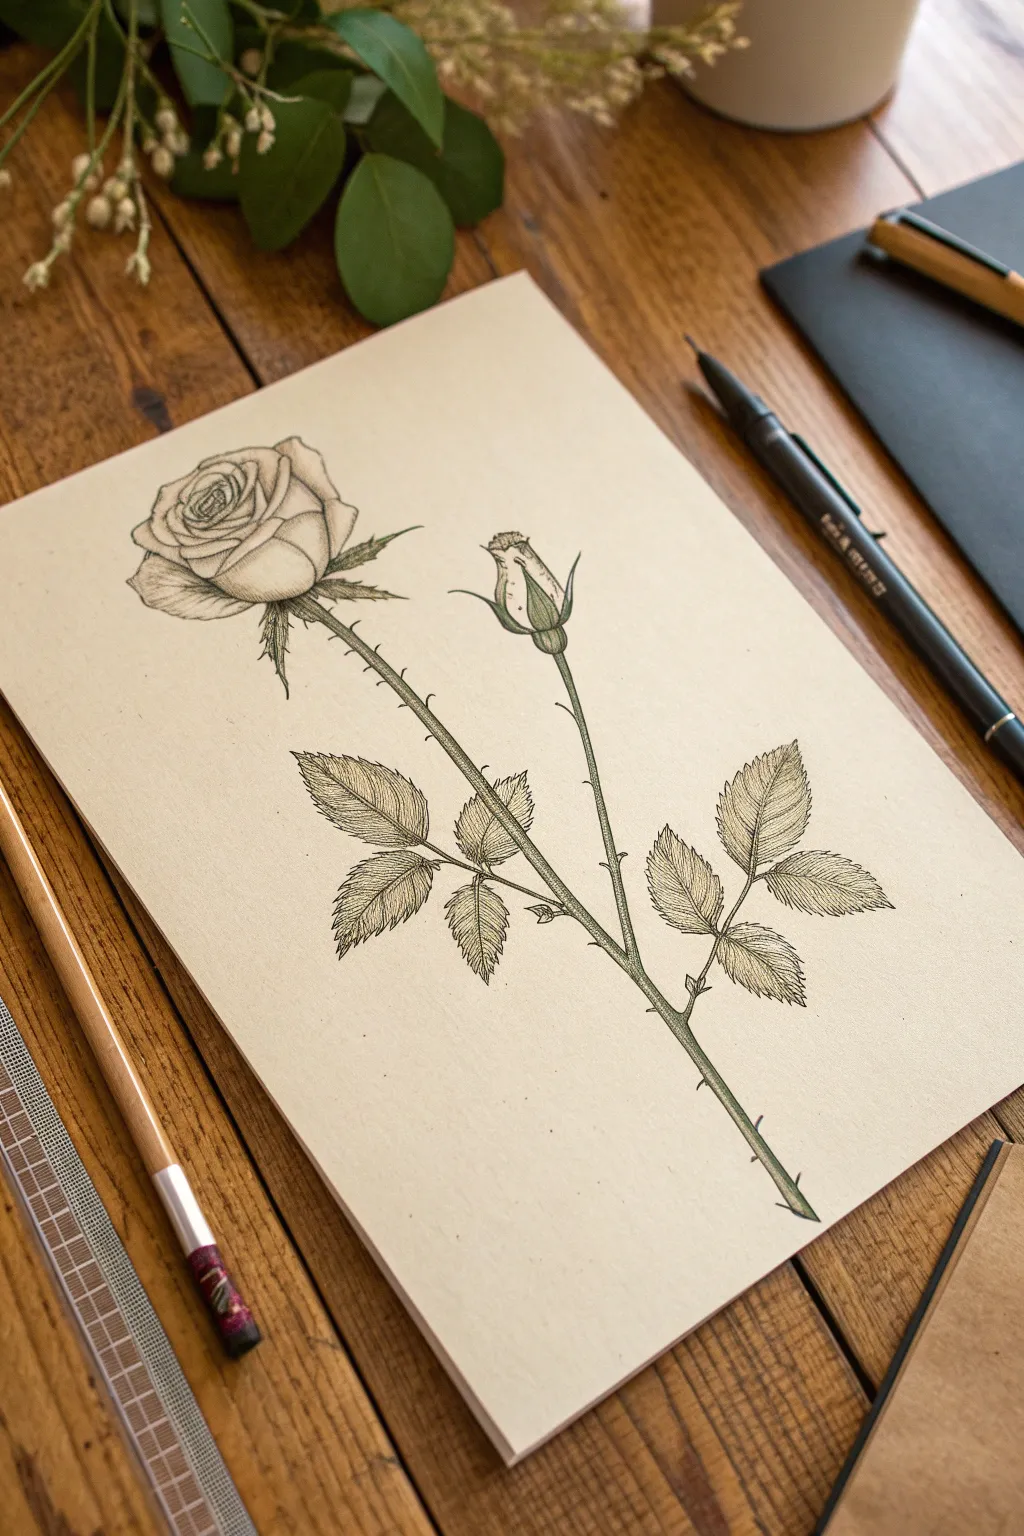
Capture the elegance of botanical illustration with this detailed single-stem rose drawing. Using precise fine-line techniques on cream paper creates a timeless, vintage aesthetic perfect for framing or gifting.
How-To Guide
Materials
- Cream or off-white drawing paper (heavyweight, smooth surface)
- HB Graphite pencil
- Kneaded eraser
- Fine liner pens (sizes 0.05, 0.1, and 0.3)
- Ruler (optional for stem alignment)
Step 1: Sketching the Framework
-
Map the Main Stem:
Begin by lightly drawing a long, diagonal line from the bottom right to the upper left with your HB pencil. This defines the primary movement of the rose stem. -
Locate the Bloom and Bud:
At the top of your diagonal line, sketch a rough oval for the main bloom. About halfway down the stem, draw a smaller, thinner offshoot branch to the right, topped with a small teardrop shape for the bud. -
Position the Leaves:
Sketch the placement of the leaf clusters. Mark out a cluster of three leaflets on the lower left of the main stem, and another cluster on the lower right. -
Refine the Rose Head:
Inside your main oval, start defining the spiral of the petals. Draw the tight inner center first, then loosely sketch the larger, unfolding outer petals that cup around it. -
Detail the Sepals and Thorns:
Add the star-shaped sepals (the green leaves directly under the flower head) for both the main bloom and the bud. Lightly mark small triangles along the stem for thorns.
Pro Tip: Directional Strokes
Always stroke your shading lines in the direction the petal or leaf grows. Following the form creates a 3D effect rather than just a flat shadow.
Step 2: Inking the Outlines
-
Outline the Main Petals:
Switch to a 0.1 fine liner. Carefully trace your pencil lines for the rose petals, using a broken, delicate line for the softer edges where petals overlap. Avoid heavy, solid outlines here. -
Define the Bud:
Outline the closed bud. Ensure the sepals hugging the bud are crisp and pointed. Leave the very tip of the petals peeking out slightly open. -
Stem and Thorns:
Ink the stems using confident, steady strokes. When you reach a thorn, curve the line outward into a sharp point and back in. Don’t forget the secondary stem leading to the bud. -
Serrated Leaf Edges:
For the leaves, use a slightly jagged, sawtooth motion to create the serrated edges characteristic of rose foliage. Ink the central vein of each leaflet clearly.
Troubleshooting: Shaky Lines?
If your long stem lines are shaky, try ‘ghosting’ the motion with your hand in the air a few times before actually touching the pen to the paper.
Step 3: Adding Texture and Shading
-
Erase Guide Lines:
Once the ink is completely dry (give it a few minutes to be safe), gently erase all your graphite pencil marks with the kneaded eraser. -
Shading the Petals:
Using your finest 0.05 pen, add very light hatching marks at the base of the petals where they curve inward. I like to follow the curve of the petal with these lines to suggest volume. -
Texture the Sepals:
The sepals under the bloom have a rougher texture. Use short, dense vertical lines (hatching) to darken them, making them visually distinct from the soft petals. -
Veining the Leaves:
Draw fine veins branching out from the center line of each leaf to the serrated edges. Add shading on one side of the central vein to give the leaf a folded, realistic appearance. -
Darkening the Stems:
Use the 0.1 pen to add stippling (tiny dots) or fine cross-hatching along one side of the stem. This cylindrical shading creates depth and roundness. -
Detailed Thorns:
Darken the tips of the thorns slightly to make them look sharp and hard. Add a tiny shadow line underneath each thorn on the stem. -
Final Contrast:
Take your 0.3 pen and selectively thicken lines on the shadowed side of the stem and the deepest recesses between petals to make the drawing pop.
Admire how the delicate ink work brings your botanical study to life on the page

PENCIL GUIDE
Understanding Pencil Grades from H to B
From first sketch to finished drawing — learn pencil grades, line control, and shading techniques.
Explore the Full Guide
Floating Rose Head Practice Study

Master the art of delicate shading with this detailed graphite study of a single rose blossom. This project focuses on capturing the velvety texture and complex spiral geometry of petals using simple pencil techniques.
Step-by-Step
Materials
- Sketchbook with smooth or medium-tooth paper
- HB graphite pencil (for outlining)
- 2B and 4B graphite pencils (for shading)
- Kneaded eraser
- Blending stump or tortillon (optional)
- Pencil sharpener
Step 1: Establishing the Structure
-
The central spiral:
Begin with your HB pencil using very light pressure. Draw a tight, small spiral in the center of your page to represent the innermost petals of the rose. -
Building the core:
Around the initial spiral, sketch three to four tightly wrapped, C-shaped petals overlapping each other like a cup. These should not yet flare out but hug the center closely. -
Expanding the bloom:
Draw the next layer of petals slightly larger and opening outward. Pay attention to the jagged, slightly curled edges that characterize a partially open rose. -
The outer perimeter:
Sketch the largest, outermost petals. These should look heavier and droop slightly at the bottom. The overall shape of the flower head should be roughly circular but slightly flattened. -
Adding the sepals:
At the bottom right and left of the rose head, lightly sketch small, pointed leafy shapes (sepals) peeking out from underneath the petals. -
Refining the outline:
Go over your light sketch to define the final petal shapes. Add tiny dips, tears, or folds to the petal edges to make them look organic rather than perfectly smooth.
Follow the Form
When shading, always curve your pencil strokes in the direction the petal is curling. Straight strokes will make the flower look flat and stiff.
Step 2: Shading and Texture
-
Mapping the shadows:
Switch to a 2B pencil. Identify where the petals overlap; the areas underneath a petal will be your darkest points. Lightly mark these shadow zones. -
Deepening the center:
The very center of the rose is the darkest area. Use a 4B pencil to firmly shade the deepest crevices of the spiral, creating a high-contrast focal point. -
Mid-tone shading:
Using the side of your 2B pencil lead, shade the body of the petals. Use curved strokes that follow the contour of the petal to suggest roundness. -
Creating highlights:
Leave the very tops and curled edges of the petals white. I prefer to shade right up to these edges and then stop, creating a distinct separation between petals. -
Adding texture lines:
Draw excessively fine, faint lines radiating from the base of each petal outward. These striations mimic the veins found in rose petals. -
Enhancing depth:
Go back in with your 4B pencil and darken the cast shadows where one petal sits on top of another. This ‘occlusion shadow’ is crucial for the 3D effect. -
Softening the transitions:
If the pencil strokes look too scratchy, use a blending stump or just a light touch with your finger to smooth out the gradients, blending dark into light. -
Lifting highlights:
Take your kneaded eraser and mold it into a sharp point. ‘Lift’ graphite off the high points of the petals to reclaim bright white highlights if you shaded too much. -
Finalizing edges:
Sharpen your 2B pencil to a fine point and crisp up the outer edges of the drawing. Add a tiny bit of shading to the sepals underneath. -
Clean up:
Erase any stray construction lines or smudges around the outside of the flower to ensure it looks crisp against the paper.
Add Dew Drops
For a fresh look, draw tiny circles on a few petals. Shade the top inside of the circle and add a cast shadow underneath to create a water droplet.
You now have a realistic floral study that captures the elegance of a classic rose
Rose Petals Built in Clear Steps
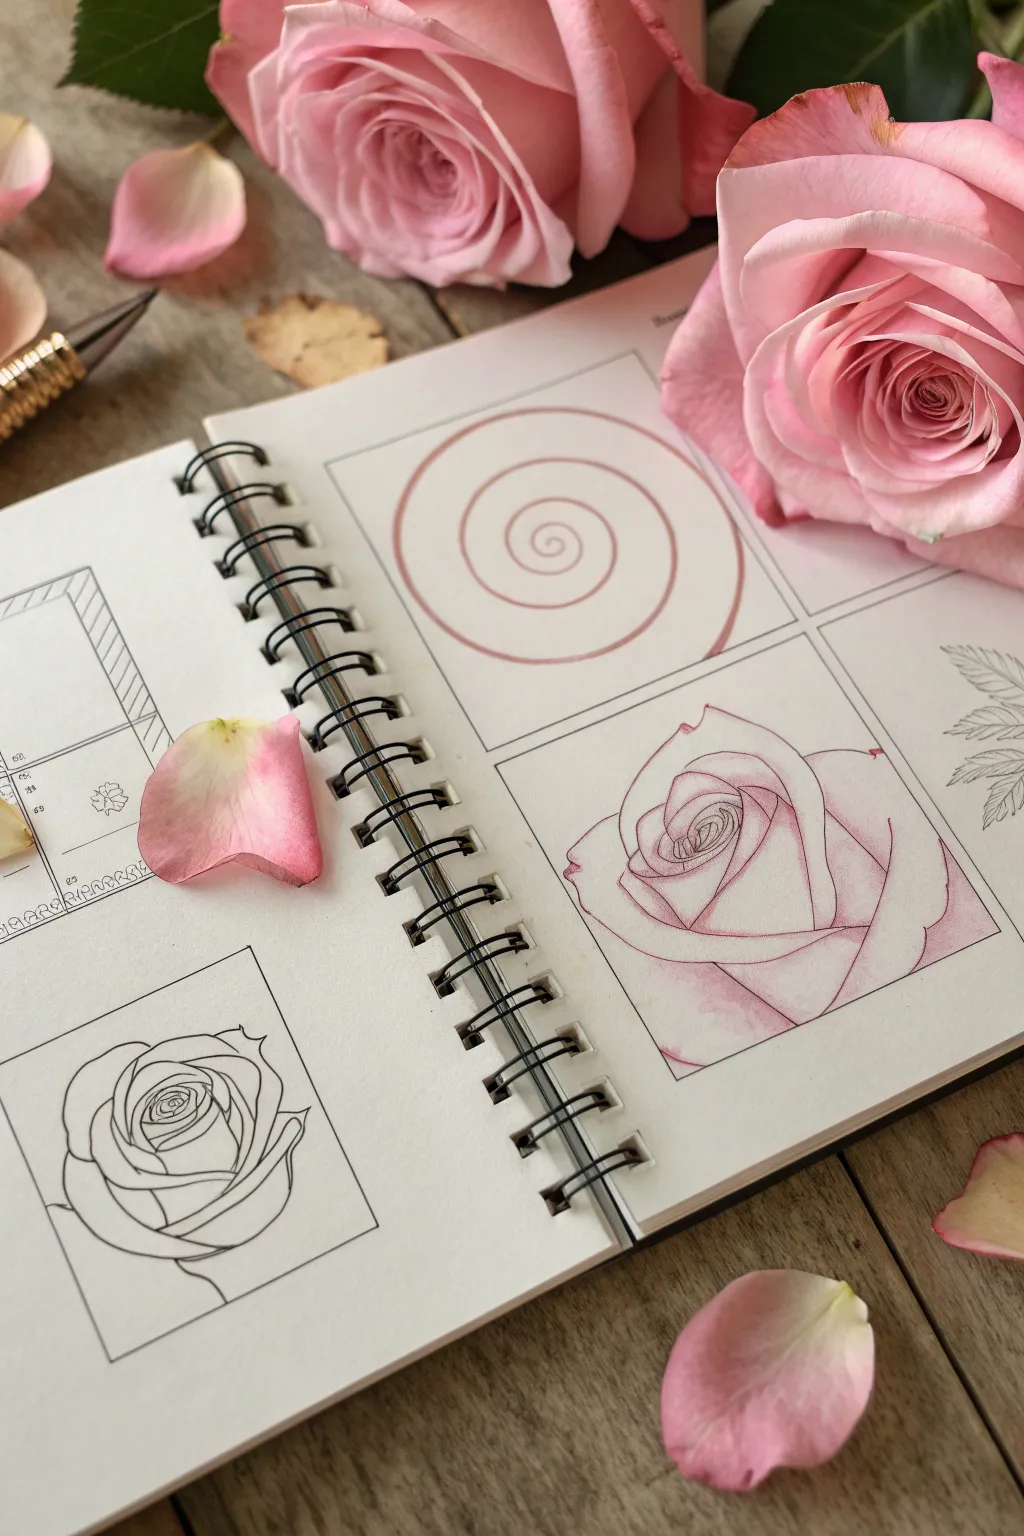
This tutorial breaks down the complex beauty of a rose into manageable geometric shapes, starting with a simple spiral and evolving into a fully shaded bloom. The result is a delicate pink study that captures the softness of petals using structured line work.
How-To Guide
Materials
- Spiral-bound sketchbook (heavyweight paper)
- HB or 2B graphite pencil
- Fine-liner pen (black, 0.3mm or 0.5mm)
- Pink colored pencils (light pastel pink and a deeper rose shade)
- Ruler
- Eraser
Step 1: Setting the Framework
-
Create the grids:
Begin by drawing three square boxes on your sketchbook page using a ruler. These frames will hold the different stages of the rose construction. Ensure they are evenly spaced for a clean layout. -
Draw the foundational spiral:
In the top right box, draw a loose, continuous spiral starting from the center and working outward. This doesn’t need to be mathematically perfect; a slightly organic curve mimics nature better. -
Sketch the center bud:
Move to the bottom left box for the line-art stage. Lightly pencil in a tight spiral in the center, but this time, connect the edges of the spiral with small vertical lines to create the look of tightly wrapped petals. -
Add the first outer petals:
Surrounding that central bud, draw curved lines that cup around the center. Think of these shapes as overlapping hearts or wide ‘U’ shapes that hug the middle structure. -
Expand the bloom:
Continue adding larger petal shapes radiating outward. Make the outer edges of these petals slightly wavy or folded over to give them a realistic, organic appearance.
Step 2: Refining the Line Art
-
Inking the outlines:
Once you are happy with the pencil sketch in the bottom left box, trace over your lines with a black fine-liner pen. Keep your hand steady but allow for slight variations in line weight to add character. -
Erase guidelines:
Wait a moment for the ink to dry completely to avoid smearing. Gently erase the underlying pencil marks to reveal a clean, crisp line drawing. -
Prepare the final study:
In the bottom right box, replicate the rose drawing you just practiced. Sketch it lightly in pencil first, focusing on the same spiral-to-petal progression. -
Ink the final rose:
Go over your final sketch with the fine-liner, but consider using a lighter touch or a thinner pen nib for the delicate inner details compared to the outer silhouette.
Natural Imperfections
Don’t make your spiral or lines perfectly smooth. A shaky hand actually helps mimic the slightly crinkled texture of real rose petals.
Step 3: Adding Color and Dimension
-
Base layer shading:
Using your light pastel pink pencil, gently shade the entire rose. Keep the pressure very light to create a soft, even wash of color. -
Define the shadows:
Switch to the deeper rose-colored pencil. Identify where petals overlap—usually the base of the petals and the very center of the spiral. -
Deepen the center:
Apply more pressure with the darker pink in the tightest part of the center spiral. This high contrast draws the eye immediately to the heart of the flower. -
Mid-tone blending:
Blend the darker pink out towards the edges of the petals, fading it into the lighter base pink. I find circular drawing motions help blend these pigments smoothly without harsh streaks. -
Highlighting edges:
Leave the very tips of the outer petals extremely pale or even white. This suggest light catching the delicate edges of the bloom. -
Final touches:
Review your drawing for balance. If the rose feels too flat, add a tiny bit more dark pink to the deepest crevices between petals to pop the 3D effect.
Add Dew Drops
Use a white gel pen to add tiny dots or highlights on the petals after coloring. It creates a fresh, morning-dew effect.
Now you have a structured method for drawing roses that you can apply to any floral composition


Hand Holding a Single Rose
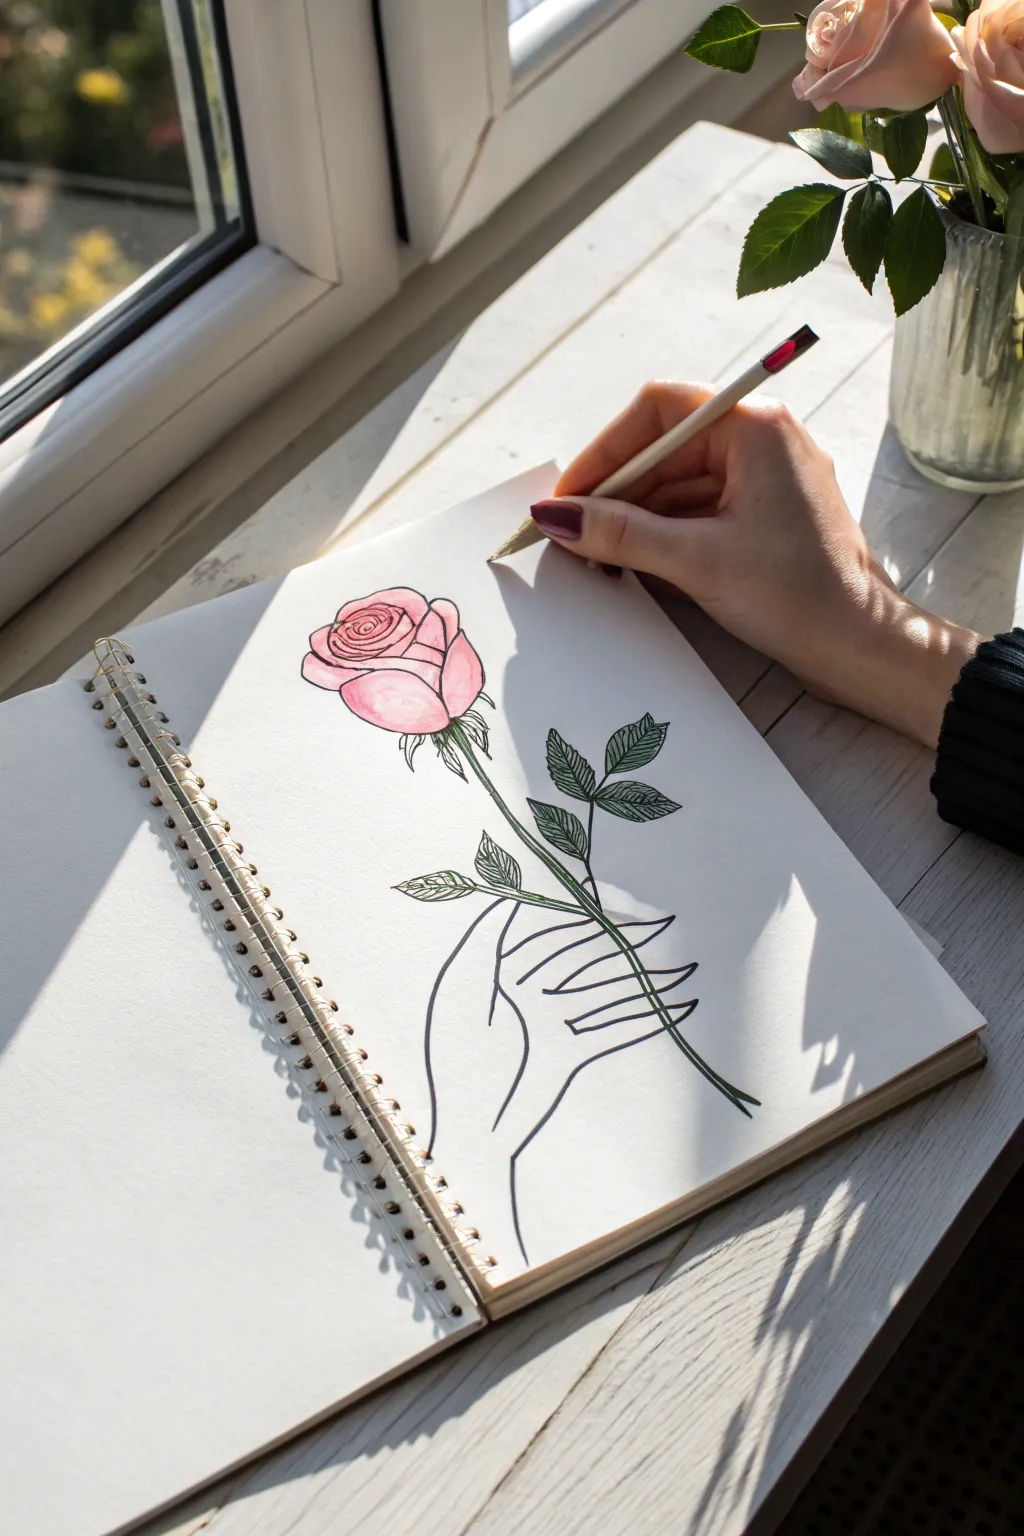
This elegant drawing combines clean line art with a splash of soft color to create a romantic visual. The minimalist outline of the hand contrasts beautifully with the fully realized pink rose, making it a perfect project for practicing botanical illustration and figure sketching together.
Step-by-Step Tutorial
Materials
- Spiral-bound sketchbook (heavyweight paper suitable for mixed media)
- Graphite pencil (HB or 2B)
- Eraser
- Fine liner pen (black, roughly 0.5mm)
- Watercolor paints or watercolor pencils (Pink and Green shades)
- Small round paintbrush
- Water cup and paper towel
Step 1: Drafting the Shapes
-
Position the flower head:
Start near the upper-middle of your page. Lightly sketch a slanted oval-like shape that will become the rosebud. This acts as the anchor for the rest of your composition. -
Sketch the stem line:
Draw a long, gentle diagonal line extending downwards from the rosebud. Let it curve slightly to the right, creating a natural flow for the flower. -
Map out the hand shape:
To place the hand, visualize where the stem is being held. Sketch a simple C-shape curve for the thumb on the left side of the stem, and longer, slender ovals on the right side to represent the fingers wrapping around it.
Uneven Petals
If your rose looks too symmetrical or stiff, purposefully vary the size of the outer petals. Make one side slightly larger or more open than the other to mimic nature’s imperfections.
Step 2: Drawing the Rose
-
Define the center swirl:
Inside your initial rose oval, draw a tight spiral. These are the innermost petals that haven’t unfurled yet. Keep your lines varying in thickness for a more organic feel. -
Add outer petals:
Draw larger, cup-shaped petals surrounding the center spiral. Make sure some petals overlap others, and let the top edges curl outward slightly to give the flower volume. -
Draw the sepals:
At the base of the rose head, sketch small, leafy green spikes (sepals) pointing downwards. These connect the heavy flower head to the slender stem.
Step 3: Detailing the Stem and Leaves
-
Thicken the stem:
Go back over your initial stem line and give it some thickness. It should be sturdy enough to hold the flower but still look elegant. -
Add leaf branches:
About halfway down the stem (above the hand), draw two smaller shoots extending outward. Add oval leaf shapes to the ends of these shoots. -
Detail the leaves:
Draw serrated (jagged) edges on the leaves. Add a central vein down the middle of each leaf and tiny diagonal veins branching off.
Add Highlights
Once the watercolor is dry, use a white gel pen to add tiny highlights on the curved tops of the rose petals and the tips of the leaves. This makes the drawing pop.
Step 4: Refining the Hand
-
Outline the fingers:
Refine the finger shapes. The index and middle fingers should be clearly visible wrapping over the stem, while the ring and pinky fingers can be tucked slightly behind or below. -
Complete the palm and wrist:
Connect the thumb and fingers with a smooth, continuous line for the palm. Extend a line downward to suggest a graceful wrist entering from the bottom of the page. -
Ink the outlines:
Take your fine liner pen and carefully trace over your pencil lines. I prefer to use confident, continuous strokes here rather than sketchy dashes. Let the ink dry completely, then erase the pencil marks.
Step 5: Adding Color
-
Paint the rose pink:
Using a light wash of pink watercolor, fill in the rose petals. Keep the color lighter at the tips of the petals and slightly darker near the base where shadows would naturally fall. -
Layer darker pinks:
While the paint is still damp or after the first layer dries, add a deeper pink or red into the crevices of the spiral and the base of the outer petals to create depth. -
Color the greenery:
Use a muted green for the sepals under the rose. Carefully paint the leaves, staying within the inked lines. If you like, leave the stem itself mostly uncolored or very faintly green to keep the focus on the bloom. -
Final drying:
Let the paint dry completely before closing your sketchbook to prevent smudging.
Now you have a timeless floral illustration that captures a gentle moment of beauty
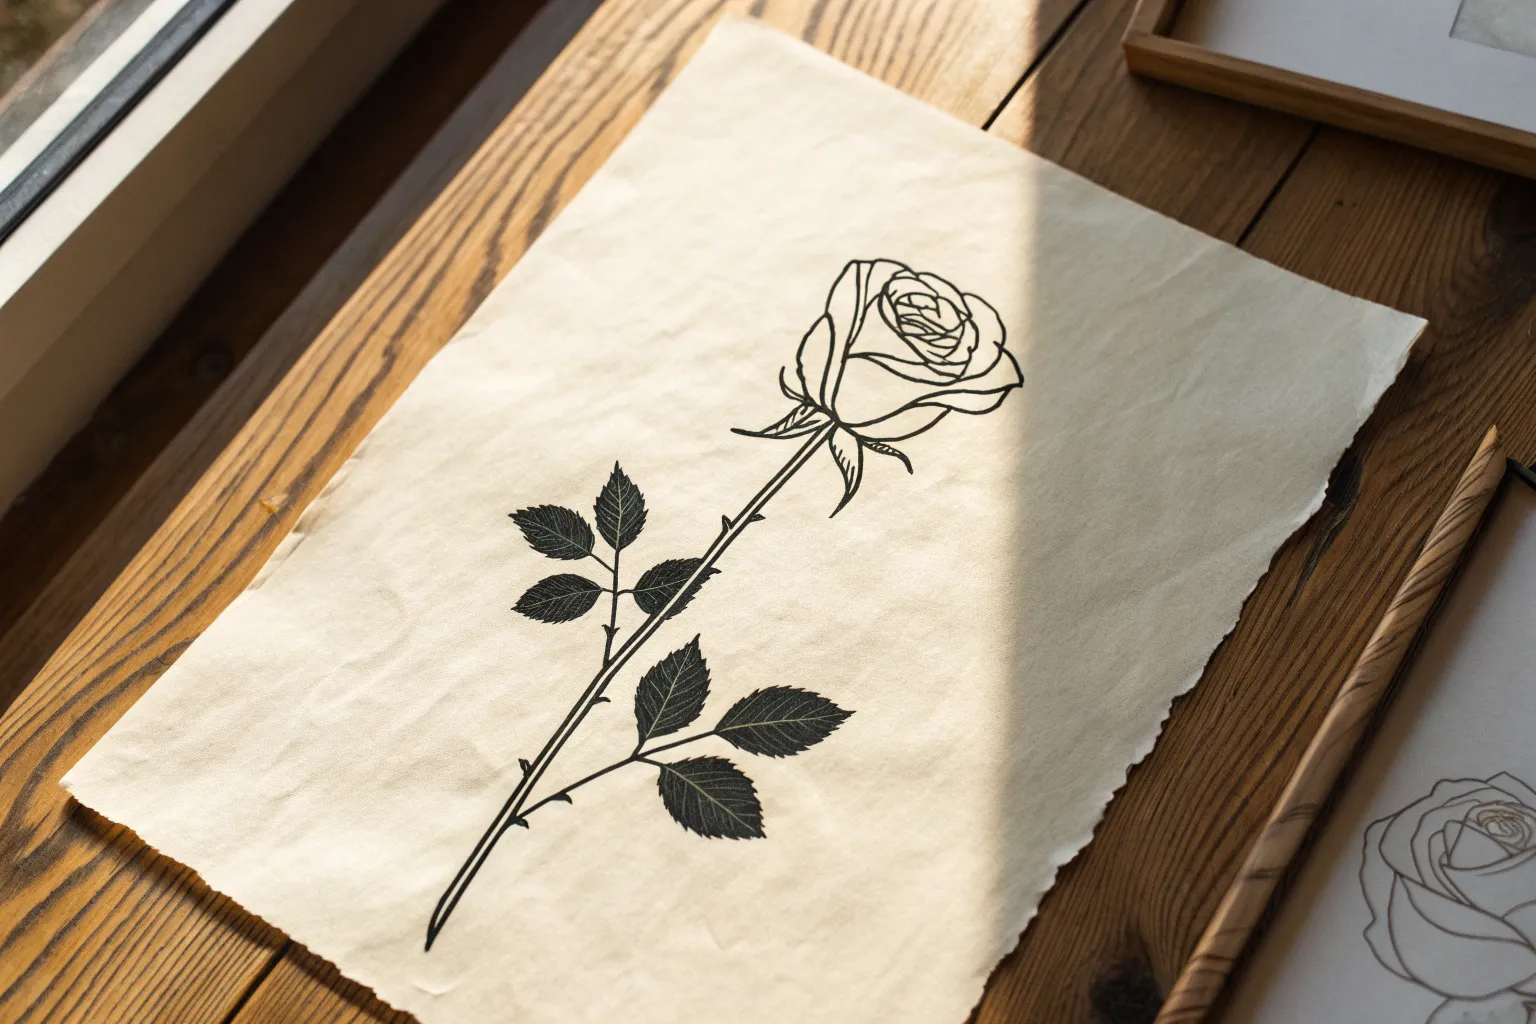
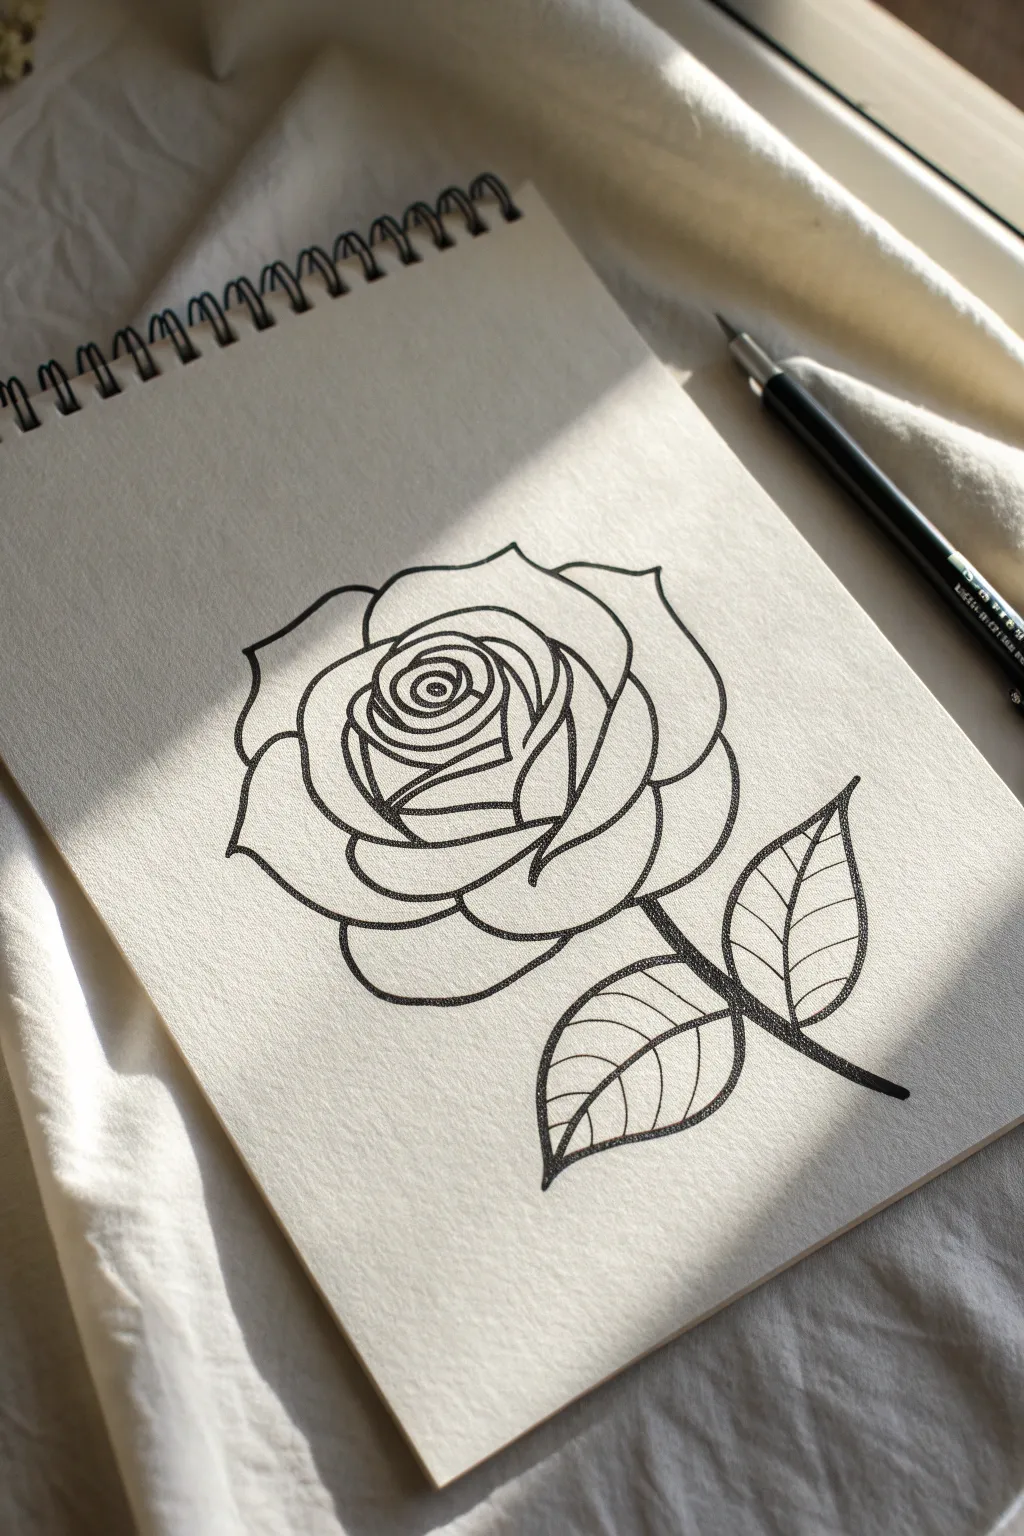
Clean Line-Art Rose Outline
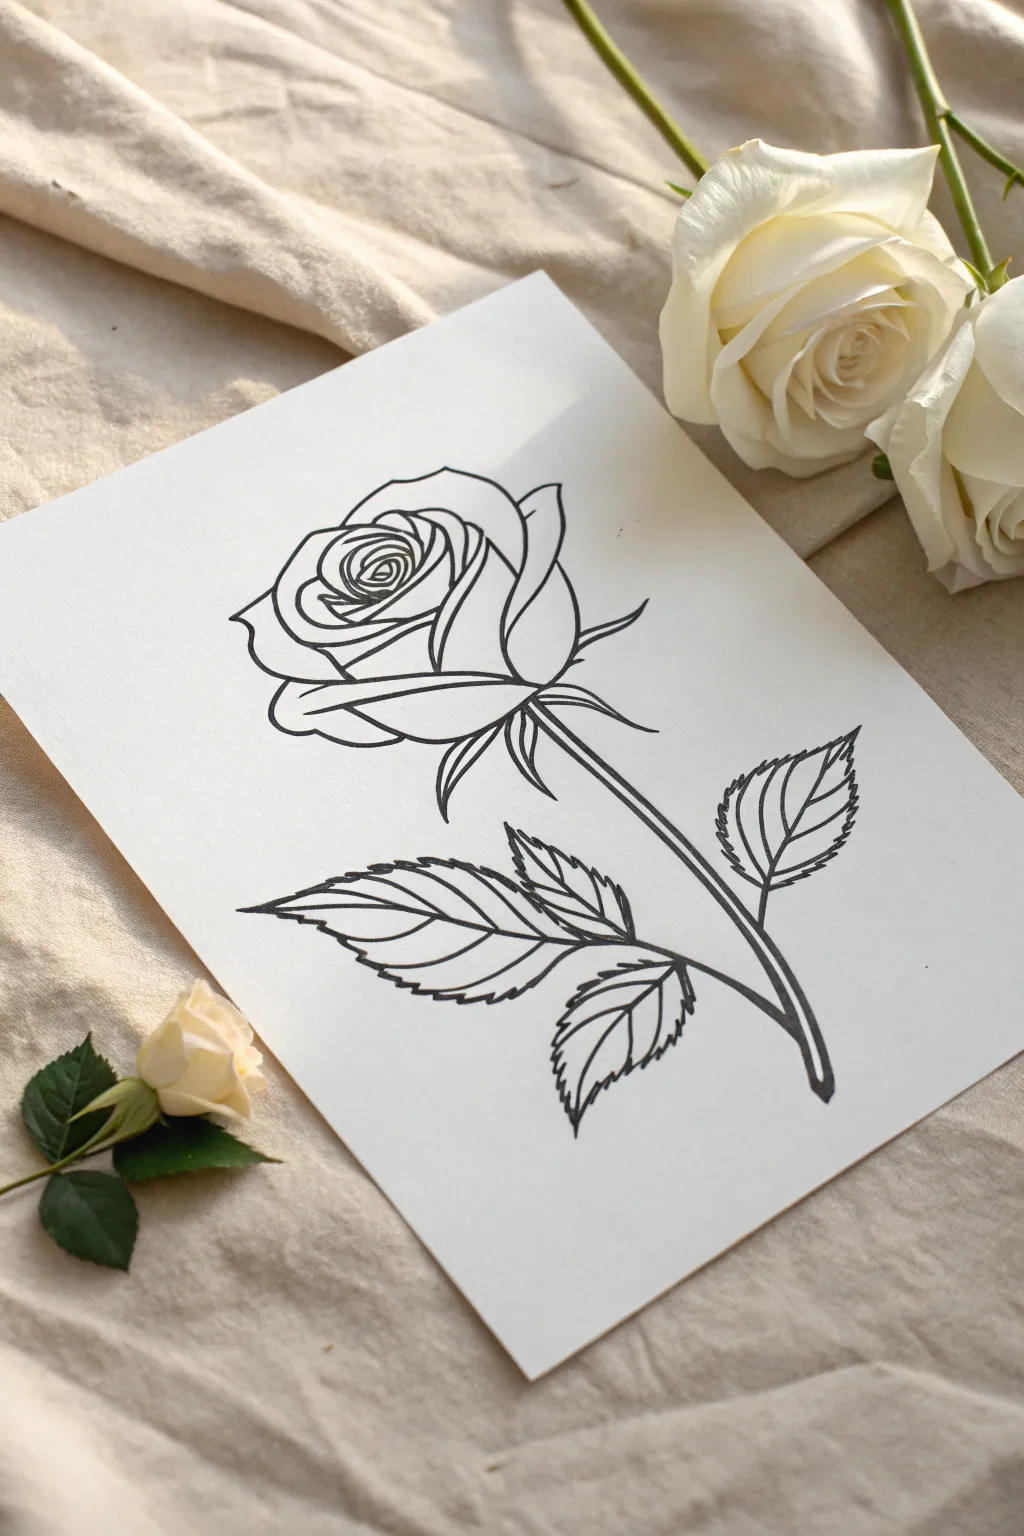
Master the art of simplicity with this clean, stylized line-art rose drawing. By focusing on fluid contours and crisp black lines, you’ll create a sophisticated botanical illustration perfect for framing or card-making.
Step-by-Step
Materials
- High-quality white drawing paper or cardstock (smooth finish)
- HB pencil for sketching
- Fine liner pen (black, size 0.5mm or 0.8mm)
- Kneaded eraser
- Drafting masking tape (optional)
Step 1: Sketching the Core Structure
-
Start the Center:
Begin lightly with your HB pencil in the upper center of your page. Draw a small, tight spiral that resembles the very heart of the rose bud. -
Inner Petal Layers:
Around that initial spiral, sketch three or four tightly packed, overlapping curved lines. These should hug the center closely, forming the cup shape of the blooming bud. -
Draft the Outer Bloom:
Expand outward by drawing larger, swooping U-shapes that represent the more open petals. Keep the overall shape somewhat circular but allow natural irregularities. -
Add the Sepals:
Directly beneath the main bloom, lightly sketch three pointed, leaf-like shapes (the sepals) that curve downward, connecting the flower head to the stem. -
Stem Placement:
Draw a long, gentle S-curve extending from the base of the flower down towards the bottom right corner of the page. Don’t make it perfectly straight; a slight organic curve looks more natural. -
Leaf Skeleton:
Mark the position of the leaves. Draw a small curved line branching off the left side of the stem, and another branching off the right side slightly higher up.
Step 2: Refining the Leaves and Petals
-
Define the Petal Edges:
Go back to your pencil petals. Unlike the smooth initial sketch, add small dips and points to the edges of the petals. Real roses have slightly folded or recurved edges, not perfect circles. -
Structure the Leaf shapes:
Sketch the outline of the leaves around your branch markers. Aim for a distinct teardrop shape that tapers to a sharp point. -
Serrated Edges:
Along the perimeter of your leaf teardrops, add small, sharp jagged teeth. This serrated edge is characteristic of rose foliage and adds great texture. -
Refining the Stem:
Thicken the single stem line by adding a parallel line. It should be thickest near the bloom and slightly tapered as it goes down. I like to add a tiny thorn or two just for character.
Steady Tip
Draw the long stem line by moving your entire arm from the shoulder, not just your wrist. This prevents shaky, wobbly lines on long strokes.
Step 3: Inking and Polishing
-
Start Inking the Center:
Take your fine liner pen. Begin inking from the central spiral outward. Use confident strokes; hesitate as little as possible to keep the lines smooth. -
Varying Line Weight:
As you ink the outer petals, try pressing slightly harder on the bottom curves of each petal. This subtle line weight variation suggests shadow and weight. -
Inking the Leaves:
Trace over your serrated leaf edges. Be precise with the points. For the veins inside the leaves, use a very light touch or switch to a thinner pen (like a 0.3mm) if you have one. -
Connecting the Stem:
Ink the long stem lines carefully. Ensure the connection points where the leaf stems meet the main stalk look sturdy and joined, not floating. -
Fill the Stem Base:
At the very bottom cut of the stem, create a small oval and fill it in black or use hatching to show the thickness of the cut branch. -
Erase and Clean:
Wait at least 10 minutes for the ink to be completely dry. Gently rub your kneading eraser over the entire drawing to lift all graphite marks, leaving only crisp black ink.
Elevate It
Use a metallic gold marker or watercolor to fill just the center of the rose or one specific leaf for a modern, mixed-media pop.
Now you have a timeless floral illustration ready for display.
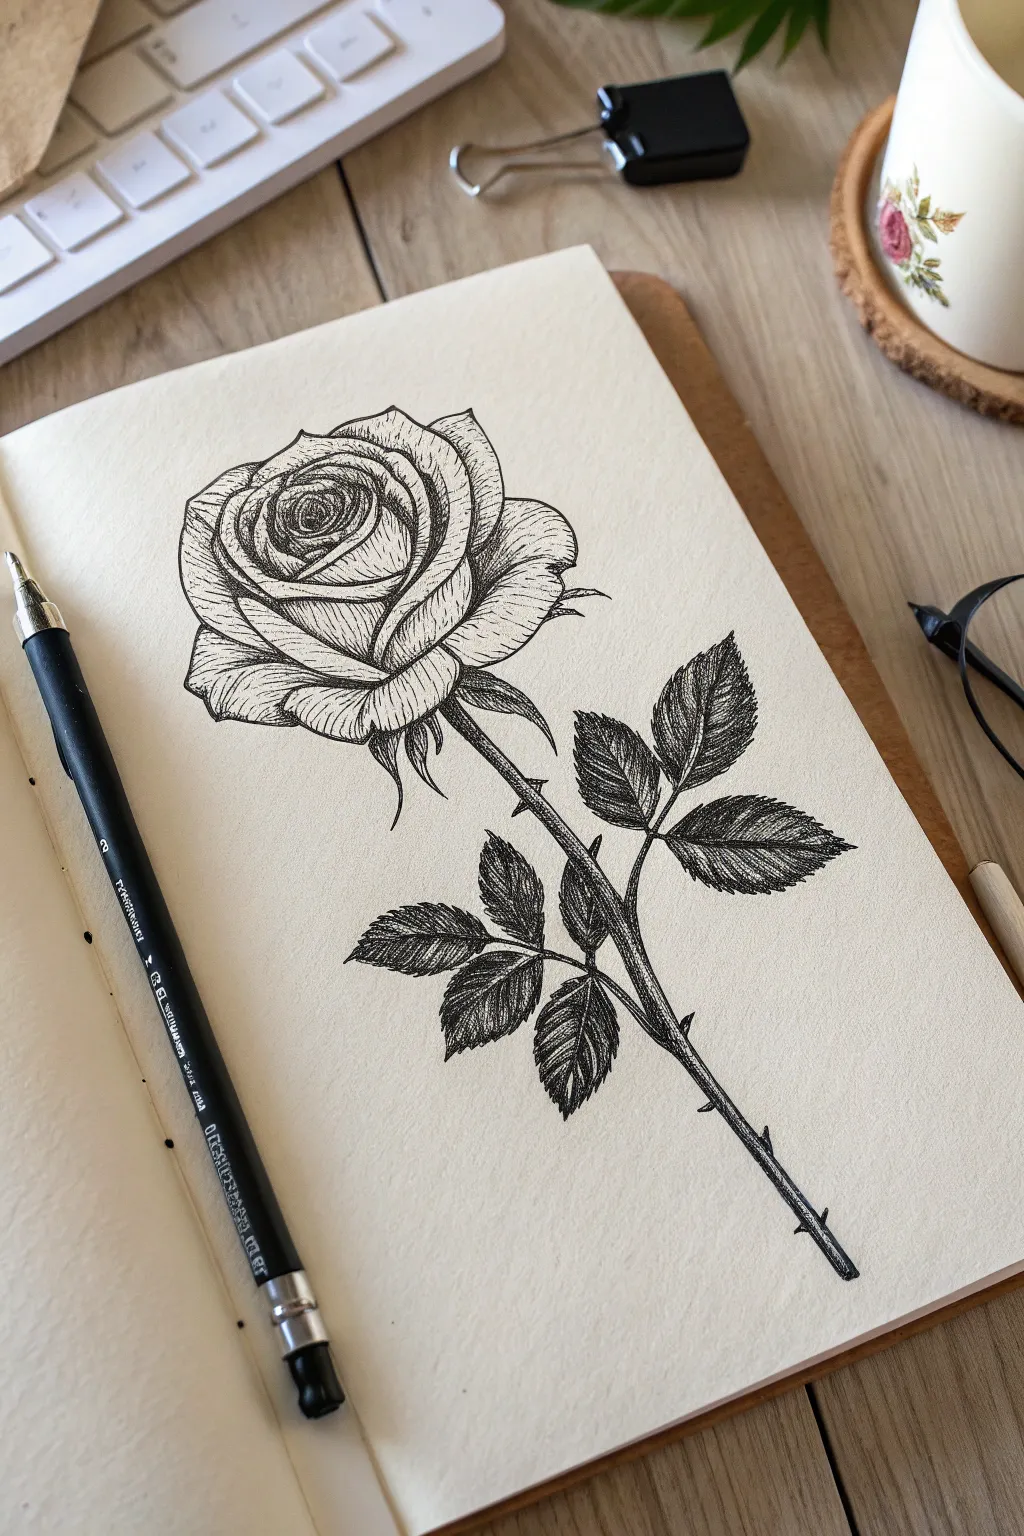
Realistic Graphite Rose Shading Study

Capture the delicate folds and dramatic depth of a rose blossom with this realistic graphite study. By focusing on deep contrast and soft transitions, you’ll learn to make petals feel velvety and three-dimensional on the page.
Detailed Instructions
Materials
- High-quality drawing paper (smooth or vellum finish)
- Graphite pencils (HB, 2B, 4B, 6B)
- Mechanical pencil (0.5mm, HB or 2B) for details
- Kneaded eraser
- Blending stump or tortillon
- Pencil sharpener
Step 1: Laying the Foundation
-
Outline the spiral:
Begin with a light HB pencil to map out the center of the rose. Draw a tight, small spiral shape that will become the innermost petals. -
Build the petal structure:
Work outward from the center, sketching overlapping, curved shapes. Remember that rose petals unfurl, so make the outer shapes larger and more open than the inner ones. -
Refine the edges:
Go over your outline to add character to the petal edges. Instead of perfect arcs, add small curls, distinctive dips, and soft points to mimic organic growth. -
Sketch the leaves:
Add a few serrated leaves tucking out from underneath the bloom to ground the composition.
Step 2: Establishing Core Shadows
-
Identify the deepest focal points:
Switch to a 4B or 6B pencil. Look at the very center of the spiral where the petals are tightest; darken the gaps between them to create a sense of depth immediately. -
Shade the petal layers:
Move to the mid-layers. Use a 2B pencil to shade the areas where one petal overlaps another. The shadow should be darkest directly under the overlapping edge. -
Create gradients:
Ease the pressure on your pencil as you move away from the shadow’s edge, creating a gradient that fades into the highlight of the petal. -
Define the outer depths:
Locate the large pockets of shadow beneath the widest outer petals. Fill these in firmly with your softer B pencils to push the background away.
Keep it Clean
Place a scrap piece of paper under your drawing hand. This prevents skin oils and friction from smudging your careful shading as you move across the page.
Step 3: Texture and Details
-
Sculpt with blending:
Use a blending stump (tortillon) to smooth out your graphite shading. Rub in small circles starting from the dark areas and pulling gently toward the light to create a soft, velvety texture. -
Lift highlights:
Take your kneaded eraser and mold it into a fine point. Dab or stroke along the top ridges of the petals to lift off graphite and reclaim bright white highlights. -
Add petal veins:
With a sharp mechanical pencil, draw incredibly faint, branching lines on the larger petals to suggest delicate veins. Keep these consistent with the curve of the petal. -
Detail the leaves:
Darken the leaves significantly, leaving lighter veins visible. The leaves should generally be darker than the rose petals to make the flower pop.
Dew Drop Effect
Add 2-3 small water droplets on a petal. Draw a tiny oval, shade the top inside dark, and leave a super bright highlight at the bottom for instant realism.
Step 4: Final Polish
-
Deepen the blacks:
Do a final pass with your darkest pencil (6B). Reinforce the deepest crevices in the center and under the heavy petals. High contrast is key to realism. -
Clean the edges:
Ensure the outer perimeter of the rose is clean and crisp. Use an eraser to remove any smudges on the surrounding white paper. -
Soften harsh lines:
I like to scan the drawing for any outlines that look too much like ‘lines’ rather than edges. Blend them slightly into the shadow side so the form looks turned, not outlined. -
Add imperfections:
For extra realism, add a tiny tear, a folded edge, or a small spot on an outer petal using stippling or a slightly darker gray patch.
Step back and admire how the deep shadows contrast with the bright paper to make your rose bloom right off the page
Crosshatched Rose for Strong Values
This stunning rose study relies on patient liner work rather than complex shading tools, using directional lines to build volume and drama. The result is a classic, engraving-style illustration that looks beautiful in any sketchbook journal.
Step-by-Step
Materials
- Fine liner pens (sizes 0.05, 0.1, and 0.3mm)
- HB graphite pencil
- High-quality eraser
- Smooth cream or off-white sketchbook paper
- Ruler (optional for stem alignment)
Step 1: Penciling the Structure
-
Establish the rose center:
Start lightly with your HB pencil by drawing a tight, spiraling swirl in the upper third of your page. This will act as the tight bud at the very heart of the bloom. -
Build the inner petals:
Draw several overlapping, cup-shaped curves surrounding the central swirl. Keep these shapes tight and compressed, as if the flower hasn’t fully opened yet. -
Expand the outer bloom:
Sketch larger, wider petal shapes that flare outward from the center. Make the edges slightly uneven and ruffled to mimic the organic texture of real rose petals. -
Draw the stem:
Extend a long, slightly curved line downward from the base of the flower head. Keep the width consistent, widening just slightly where it meets the bloom. -
Add leaves and thorns:
Sketch three main leaf clusters branching off the stem—two on the right, one on the left. Add small, sharp triangle shapes along the stem and the base of the flower head for thorns and sepals.
Step 2: Inking the Outline
-
Outline the petals:
Switch to a 0.1mm fine liner. Trace your pencil lines for the petals, but don’t just draw a straight line—add tiny jitters or breaks to give the petal edges a velvety, natural look. -
Refine the stem and leaves:
Outline the stem and leaves. When drawing the leaves, ensure the edges are serrated (saw-toothed) rather than smooth. -
Define the veins:
Draw a central vein down the middle of each leaf, then add faint side veins branching out toward the serrated edges. -
Erase guidelines:
Once the ink is completely dry (give it a few minutes to avoid smudging), gently erase all underlying graphite pencil marks.
Uneven Shadows?
If your hatching looks too uniform, vary line length. Start strokes at the shadow’s deepest point and lift your pen as you move toward the light, creating a natural fade.
Step 3: Building Value with Hatching
-
Start the center shading:
Using a 0.05mm pen, begin shading the deepest crevices of the central spiral. Use tight, curved hatching lines that follow the direction of the petal’s curve. -
Hatch the inner petals:
Move to the petals immediately surrounding the center. Apply hatching lines that start at the base of the petal (where it tucks under another) and flick outward, lifting the pen at the end of the stroke. -
Create mid-tones:
For the larger outer petals, use longer, sweeping hatch marks. I find it helpful to curve these lines slightly to exaggerate the bowl-shape of the petal. -
Deepen shadows with cross-hatching:
In areas where shadows would be darkest (under the petal overlaps), add a second layer of lines perpendicular to your first set. This cross-hatching creates the deep blacks. -
Texture the stem:
Use short, vertical strokes along the sides of the stem to make it look cylindrical. Leave a thin strip of white space in the middle for a highlight. -
Shade the leaves:
The leaves are generally darker than the petals. Fill them with dense hatching, ensuring the lines flow from the central vein outward toward the tips. -
Darken leaf edges:
Go back over the leaves with a 0.1mm pen to add deeper shadows near the central vein and the base of the leaf clusters, creating a high-contrast look. -
Thorn details:
Fill in one side of each thorn with solid black or very dense hatching to give them sharpness and dimension. -
Final assessment:
Step back and look at the overall contrast. Use a 0.3mm pen to thicken the very outermost outline of the entire flower and stem to make it pop off the page.
Level Up: Vintage Vibe
Once the ink is fully dry, gently dab a wet tea bag over the paper. The tea stain adds an antique, parchment-like quality that complements this classic illustration style perfectly.
Now you have a timeless floral illustration that captures the delicate complexity of nature through simple ink lines
Stippled Rose for Soft Texture

This project embraces the meditative art of stippling to create a rose that feels incredibly soft and velvety. By building up thousands of tiny ink dots instead of traditional shading lines, you’ll achieve a beautifully smooth gradient and a hyper-realistic floral texture.
Step-by-Step Guide
Materials
- Smooth Bristol board or high-quality drawing paper (heavyweight)
- HB graphite pencil
- Kneaded eraser
- Fine liner pens (sizes 0.05mm, 0.1mm, and 0.3mm)
- Ruler (optional for layout)
- Reference photo of a rose
Step 1: Planning and Sketching
-
Light Graphite Outline:
Begin with a very faint sketch using your HB pencil. Start by drawing a small, tight spiral in the center of your page to represent the innermost petals of the rose. -
Petal Expansion:
Gradually add larger, C-shaped curves radiating outward from that center spiral. These petals should overlap naturally, just like a real flower blooming. -
Outer Petals:
Sketch the largest, outermost petals with slightly wavy, uneven edges. I like to give a few of them a slight curl or fold at the tips to add dimension and realism. -
Refine and Erase:
Review your shape. It should look somewhat hexagonal or circular overall. Once happy, gently roll your kneaded eraser over the sketch to lift most of the graphite, leaving only a ghost image to guide your pen.
Wrist Relief & Pacing
Stippling is repetitive. To prevent cramping and ensure round dots (not dashes), keep your pen vertical. Take breaks every 15 minutes to stretch your hand.
Step 2: Stippling the Core
-
Select the Finest Pen:
Pick up your 0.05mm fine liner. This phase requires the most delicate touch. Begin placing tiny dots along the very deepest crevices of the central spiral. -
Building Shadows:
Concentrate your dots heavily where petals tuck underneath each other. The closer the dots are, the darker the shadow; as you move toward the center of a petal, space the dots further apart. -
Establishing the Gradient:
Work petal by petal in this central area. Ensure that the transition from the dark, dense edges to the light, open centers is smooth. It doesn’t need to be solid black yet, just establish the form.
Step 3: Developing Texture and Depth
-
Switch to 0.1mm:
Switch to the 0.1mm pen to work on the mid-sized petals surrounding the core. Outline the very edge of a petal with a broken line of dots rather than a solid stroke. -
Deepening Shadow Pockets:
Identify the ‘V’ shapes where petals meet. Pack dots densely in these corners to create high contrast, which pops the petal above it forward. -
Following the Curve:
When stippling the surface of the petals, arrange your dots in subtle curves that follow the shape of the petal. This directional stippling helps define the cup-like shape of the flower. -
Creating Texture on Folds:
For the petals that curl over at the top, leave the very top edge almost pure white. Start your gradient just below the fold to show that light is hitting that ridge. -
Layering for Darkness:
Go back over the deepest shadows with a second or third pass of dots. Patience is key here; rushing will lead to tails on your dots.
Add a Dew Drop
Leave a tiny, perfect circle blank on a petal. Stipple a shadow underneath it and a dark curve inside the top edge to create a realistic 3D water droplet.
Step 4: Final Definition and Details
-
Outer Petal Drama:
Use the 0.3mm pen for the darkest shadows beneath the largest outer petals. This heavier weight creates a solid anchor for the drawing. -
Softening Edges:
On the very tips of the outer petals, switch back to the 0.05mm pen. Allow the dots to fade out into the white of the paper so the rose doesn’t look like a cutout. -
Correcting Consistency:
Scan the drawing for any uneven patches. If a gradient looks jumpy, add a few widely spaced dots in the transition zone to bridge the gap between light and dark. -
Defining the ‘Veins’:
If you want extra texture, add very faint lines of dots radiating from the base of the larger petals to simulate delicate floral veins. -
Final Contrast Check:
Squint at your drawing. The contrast is what makes stippling work. If the darks look grey, add more density to the shadows until they feel deep and velvety.
Step back and admire how thousands of individual points have merged to create a unified, blooming rose
One-Line Continuous Rose Doodle
This elegant floral study features clean, bold lines and a striking play of light and shadow, capturing the essence of a blooming rose with simplicity and style. The high-contrast black ink against cream paper creates a timeless look that is perfect for sketchbook practice or card designs.
Detailed Instructions
Materials
- Sketchbook with cream or off-white paper (heavyweight roughly 120gsm+ is ideal)
- HB or 2B pencil
- Kneaded eraser
- Fine liner pen (specifically a brush pen or felt tip size 0.5mm to 0.8mm)
- Optional: Ruler for framing (though not used in this freehand piece)
Step 1: Pencil Sketching
-
Mark the center:
Begin by lightly marking a small spiral or circle slightly above the center of your page to represent the tight inner bud of the rose. -
Draft the inner petals:
Sketch a series of overlapping, curved shapes blooming outward from that center spiral. Think of them as hugging the center tightly. -
Expand the bloom:
Draw larger, looser petal shapes surrounding the core. These should start to open up, with slightly wavy edges to mimic natural organic forms. -
Define the outer silhouette:
Create 4-5 large, sweeping petals that form the outermost boundary of the flower head. Give these faint points or dips to add character to the outline. -
Add the stem line:
From the bottom drawing right side of the flower, drop a single curved line extending downwards towards the bottom right corner of the page. -
Sketch the leaves:
Add two leaf shapes branching off the stem near the bottom. One should point left and slightly up, the other strictly upwards to the right. Include a center vein line for each. -
Refine the lines:
Go over your sketch and firm up the lines you want to keep. Erase any confusing stray marks so your inking path is clear.
Smoothing Shaky Lines
Work from your elbow, not your wrist. Long, confident strokes are smoother than slow, careful ones. Using a slightly thicker pen nib also hides minor wobbles better than a fine point.
Step 2: Inking the Rose
-
Ink the spiral center:
Using your fine liner or brush pen, carefully trace the central spiral. Keep your pressure consistent to create a solid, thick line. -
Trace inner petals:
Move outward to the next layer of petals. Where a petal tucks behind another, ensure your line stops cleanly at the intersection. -
Vary line weight:
I like to press just a tiny bit harder on the underside of the petals. This creates a subtle shadow effect and gives the flower drawing more weight. -
Outline the full bloom:
Ink the large outer petals. Use confident, sweeping strokes rather than short, scratchy ones to keep the look smooth and graphical. -
Detail the stem:
Draw the stem. Notice how the stem in the example thickens slightly where the leaves attach; try to replicate that natural swelling. -
Ink the leaf outlines:
Outline the two leaves. Make the tips pointy and the edges smooth, contrasting with the slightly wavier rose petals. -
Add leaf veins:
Draw the central vein in each leaf, then add simple, angled lines branching off for the secondary veins. Keep these lines slightly thinner if your pen allows.
Step 3: Finishing Touches
-
Let the ink set:
Wait at least 5-10 minutes for the ink to dry completely. This is crucial to prevent smudging. -
Erase pencil guides:
Gently rub your kneaded eraser over the entire drawing to lift the graphite sketch, leaving only the crisp black ink. -
Evaluate contrast:
Check for any gaps in your lines. If you see a spot that looks too thin or disconnected, carefully go back over it to thicken the connection points.
Ink Smearing?
Check your paper surface. Glossy or very smooth marker paper absorbs ink slowly. If it smears, place a scrap sheet of paper under your hand as a ‘bridge’ while you draw.
Once the graphite is gone, you’ll have a beautifully clean botanical illustration ready to frame or fill with color
Geometric Rose With Faceted Petals
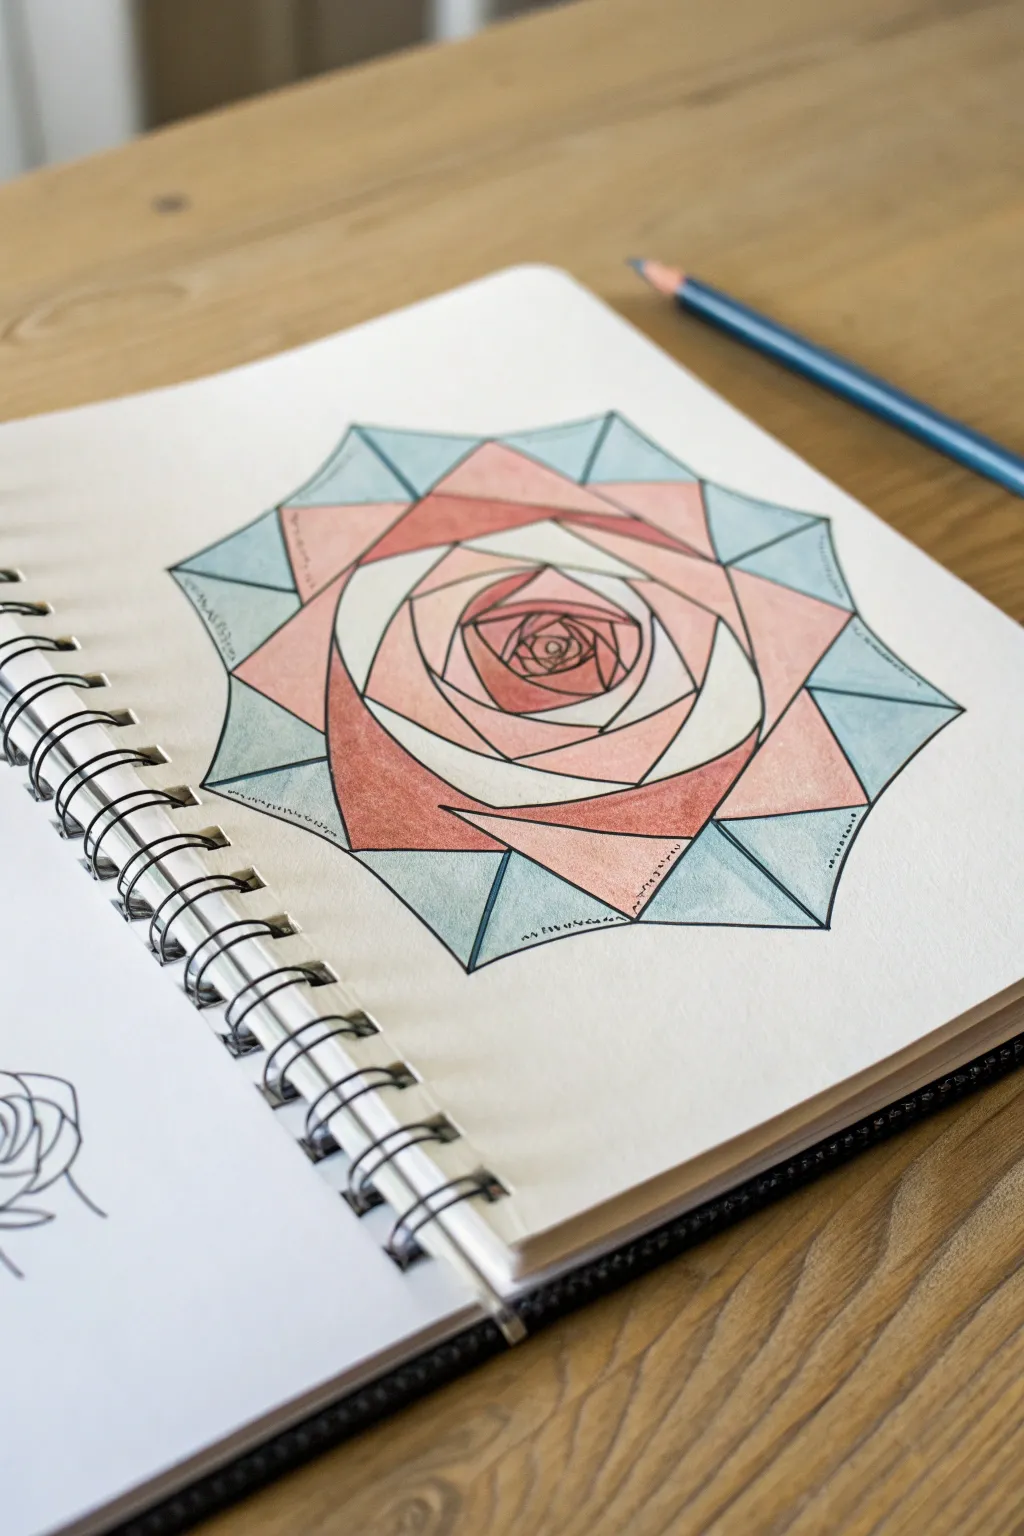
This tutorial guides you through creating a striking geometric rose that resembles stained glass or folded origami. By combining crisp, straight lines with a soft watercolor palette, you’ll achieve a modern floral design that balances structure with delicate color.
How-To Guide
Materials
- Heavyweight sketchbook or watercolor paper (smooth texture preferred)
- Ruler or straight edge
- Pencil (HB or lighter)
- Fine liner pen (black, 0.3mm or 0.5mm)
- Watercolor paints or alcohol-based markers (Pale pink, deep rose, light teal)
- Small round paintbrush (size 2-4 if using paint)
- Eraser
Step 1: Drafting the Geometric Framework
-
Establish the center:
Begin by lightly sketching a small, slightly off-center pentagon in the middle of your page with your pencil. This will serve as the tightest bud of the rose. -
Build the inner spiral:
Around that central pentagon, draw straight lines that connect to its corners but extend slightly past them, creating a spiraling effect. Think of this as drawing a series of overlapping triangles that rotate around the center. -
Expand the middle layers:
Continue adding faceted shapes moving outward. Unlike a real soft rose, use your ruler or straight edge for every single line. These shapes should be irregular trapezoids and triangles that interlock. -
Create the outer petals:
Draw larger, wider geometric shapes for the blossoming petals. As the rose expands, the shapes should become less dense and more open. -
Add the background structure:
Surround the main rose shape with a final ring of sharp, triangular points pointing away from the center. These will serve as the teal geometric leaves or background halo.
Step 2: Inking the Structure
-
Outline the design:
Using your black fine liner pen, carefully trace over your pencil lines. I find it helpful to rotate the sketchbook so my hand is always pulling the pen in a comfortable direction. -
Create connection points:
Pay close attention to where lines intersect; ensure the corners meet crisply without overshooting or leaving gaps, as this maintains the ‘faceted’ look. -
Clean up:
Once the ink is completely dry (give it a few minutes to avoid smudging), thoroughly erase all pencil marks from the page.
Clean Edges Trick
If you struggle with staying inside the lines while painting, use small strips of washi tape to mask off adjacent sections. It creates razor-sharp edges.
Step 3: Adding Color
-
Color mapping strategy:
Plan your palette before painting. We will use a gradient effect: darker reds/roses in the center, transitioning to pale pinks in the middle, and white or very pale blush for the highlights. -
Paint the core:
Start with your deepest rose color. Fill in the smallest central shapes. If using watercolors, keep the pigment concentrated here. -
Fill the mid-tones:
Move to the next ring of shapes using a medium pink or terracotta shade. Paint alternate facets, leaving some white or applying a much lighter wash to creating a shimmering, 3D effect. -
Add the highlights:
For the largest petal shapes, use a very watered-down pink or a pale blending marker. Leave several facets completely uncolored (white paper showing) to act as where the ‘light’ hits the geometric planes. -
Paint the halo:
Finally, color the outer triangular spikes with a cool, watery teal or light blue. This contrast makes the warm tones of the rose pop forward. -
Let it dry:
Allow the entire piece to dry completely before closing your sketchbook to prevent color transfer.
Go Metallic
Trace over the final black ink lines with a gold or silver gel pen. The metallic shine turns the drawing into a faux stained-glass masterpiece.
Now you have a structured, modern floral design that looks complex but is built from simple shapes


Have a question or want to share your own experience? I'd love to hear from you in the comments below!