I love turning an old saw blade into a piece of art because the teeth and metal patina already bring so much character to the painting. If you’re craving ideas that actually fit the blade’s shape (and even that center hole), these are my favorite saw blade painting ideas to try.
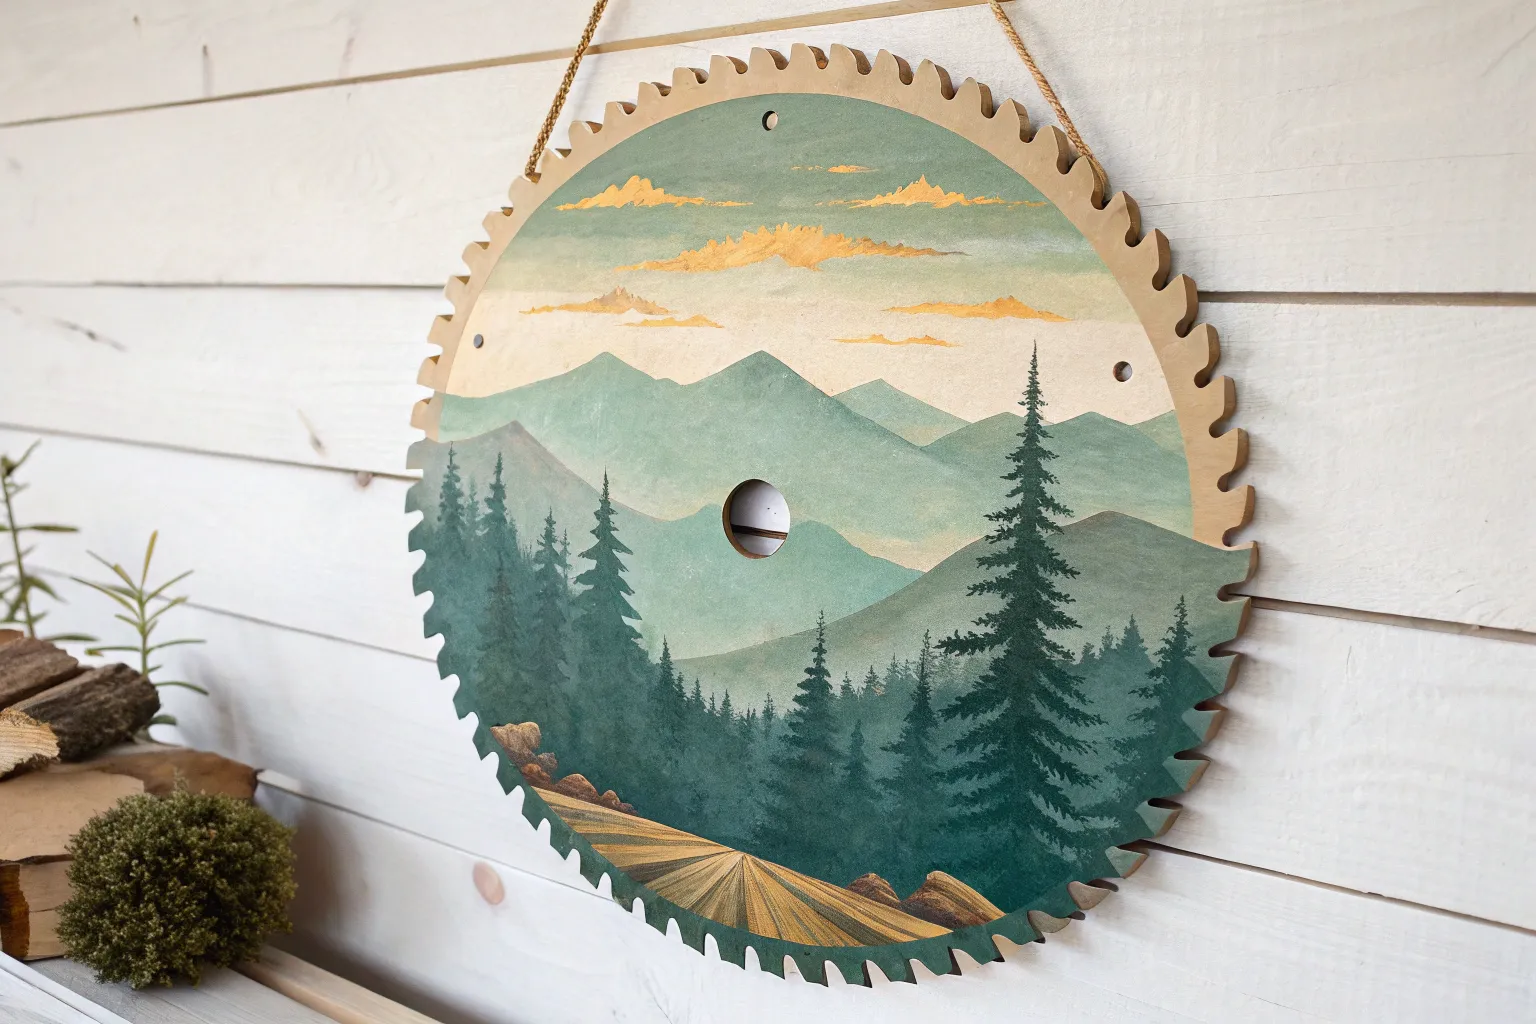
Mountain Landscape With Center-Sun
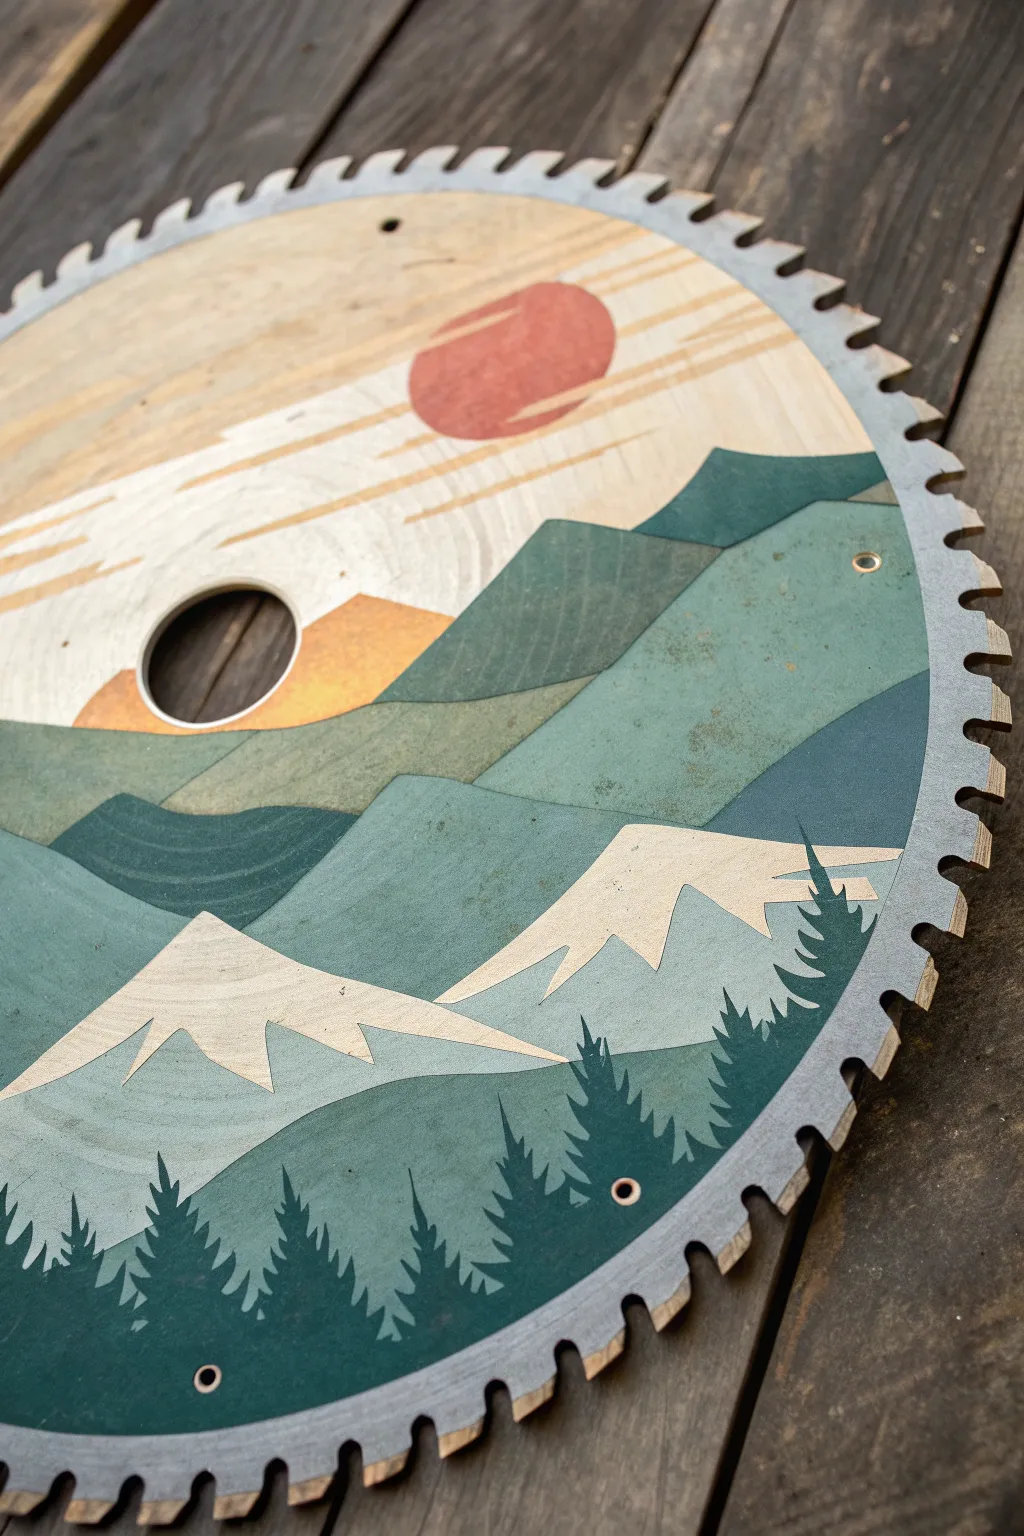
Transform an old circular saw blade into a stunning piece of wall art with this serene mountain landscape. The geometric layering creates depth while the warm sunrise balances cool teal tones, making it perfect for a workshop or cabin decor.
Step-by-Step Guide
Materials
- Circular saw blade (cleaned and de-greased)
- Metal primer (spray or brush-on)
- Acrylic paints: Teal, Dark Green, White, Black, Terracotta/Red, Mustard Yellow, Pale Cream
- Assorted brushes (flat wash, angled shader, fine liner)
- Painter’s tape or stencil film
- Pencil or white charcoal pencil
- Clear sealant (polyurethane or acrylic spray)
Step 1: Preparation and Background
-
Clean the Surface:
Begin by thoroughly cleaning the saw blade to remove any sawdust, grease, or rust. A wire brush can help with rust patches, followed by a wipe-down with degreaser or rubbing alcohol. -
Prime the Metal:
Apply a coat of metal primer to the entire front surface. This is crucial for adhesion and prevents future rust from bleeding through your beautiful artwork. -
Draft the Horizon:
Once the primer is dry, lightly sketch your horizon line just below the center hole. Draw the large sun circle off-center towards the top right. -
Paint the Sky Base:
Paint the upper section (sky area) with a pale cream or very light unfinished wood tone. This mimics the look of raw wood grain seen in the inspiration piece. -
Add Sun Details:
Fill in the sun circle with a muted terracotta or rusty red paint. For that stylized look, leave thin, horizontal gaps unpainted to create the ‘cloud lines’ cutting across the sun. -
Strengthen Sky Texture:
Using a very dry brush and a slightly darker tan color, streak horizontal lines across the pale sky to simulate wood grain or thin stratus clouds.
Paint Peeling?
If paint lifts off the metal, the surface was likely too oily or smooth. Sand the blade lightly with fine-grit sandpaper before priming to give the paint ‘teeth’ to grip onto.
Step 2: Layering the Mountains
-
Block in Distant Ranges:
Mix a mid-tone teal green. Paint the rolling hills just below the horizon line. Ensure the edges are crisp; painter’s tape can help create those sharp geometric slopes. -
Create the Sunset Reflection:
Paint a small, triangular section near the center hole (below the horizon) in mustard yellow to represent the sun’s reflection on a distant slope. -
Paint the Mid-Ground:
Mix a slightly darker, cooler teal shade. Paint the next range of mountains, overlapping the distant ones. Keep the shapes blocky and angular rather than realistic and rocky. -
Add Snow Caps:
While mapping out the foreground mountains, leave triangular spaces blank or paint them with a pale cream color to represent stylized snow caps. -
Define the Foreground:
For the closest mountain layer at the bottom, use your darkest teal-green mixture. This anchors the painting and adds significant visual depth. -
Add Texture Details:
Use a dry brush or a sponge to dab faint texture onto the green mountain sections. This creates a weathered, granular look rather than a flat plastic finish.
Clean Lines Hack
For those ultra-sharp mountain ridges, use low-tack painter’s tape. Press the edges down firmly with a credit card to prevent paint bleed-under.
Step 3: Adding Trees and Finishing
-
Sketch Tree Placement:
Lightly mark where your foreground pine trees will go along the bottom curve. Group them in clusters of varying heights for a natural look. -
Paint Pine Trees:
Using a fine liner brush and your darkest black-green mix, paint the silhouette trees. Start with a vertical line for the trunk, then use quick, downward strokes for branches. -
Refine Edges:
Go back with your liner brush and tidy up any messy intersections between the mountain layers. Sharp, clean lines are essential for this graphic style. -
Seal the Blade:
Allow the paint to cure fully (at least 24 hours). I recommend finishing with a clear matte or satin spray sealant to protect the paint from scratches and dust.
Hang your rustic masterpiece securely on a wall or display it on a sturdy easel to enjoy the view


Rustic Barn and Open Field
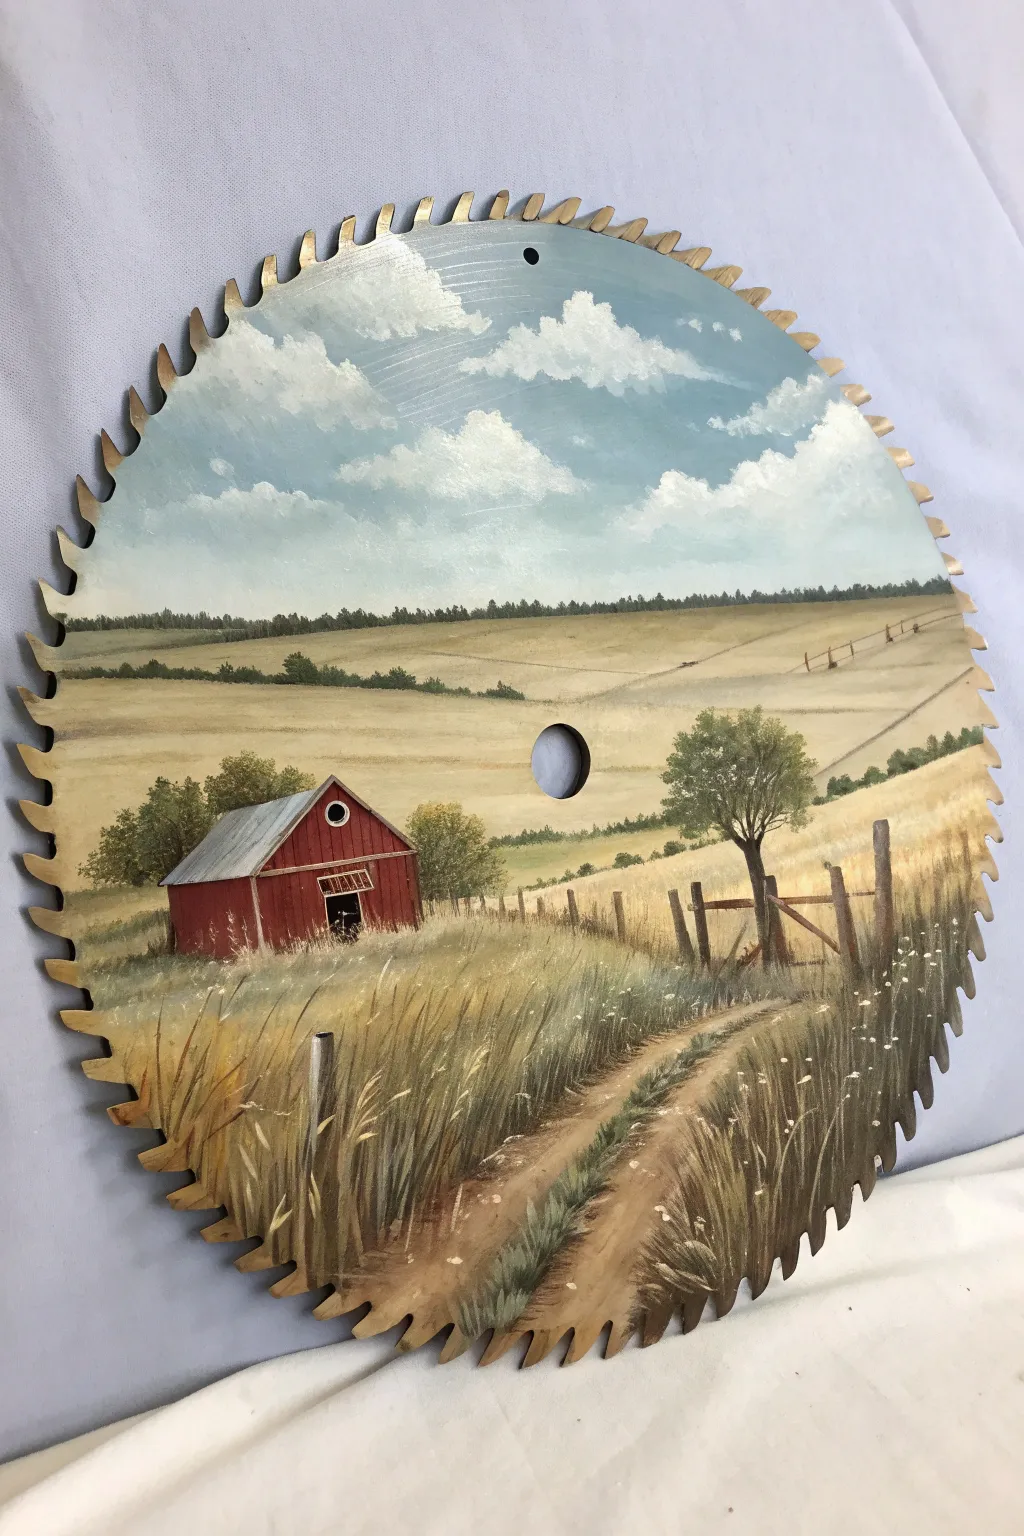
Transform an old, rusty saw blade into a stunning piece of rustic decor with this peaceful landscape painting. The circular canvas naturally draws the eye inward, leading viewers down a dirt path toward a classic red barn nestled among rolling golden hills.
How-To Guide
Materials
- Old circular saw blade (cleaned and primed)
- Metal primer (spray or brush-on)
- Acrylic paints (Titanium White, Phthalo Blue, Yellow Ochre, Burnt Sienna, Burnt Umber, Hooker’s Green, Cadmium Red, Black)
- Set of paintbrushes (1-inch flat, medium filbert, small round, liner brush, fan brush)
- Palette for mixing
- Water cup and paper towels
- Clear acrylic sealer spray (matte or satin)
- Sandpaper (medium grit)
Step 1: Preparation and Sky
-
Prep the Surface:
Before painting, ensure your saw blade is free of loose rust and oil. Scrub it thoroughly, let it dry, and apply a coat of metal primer. Once cured, basecoat the entire front surface with a thin layer of Titanium White to help your colors pop. -
Block in the Sky:
Mix Titanium White with a small amount of Phthalo Blue. Using your 1-inch flat brush, paint the upper half of the blade, starting with a deeper blue at the top teeth and gradually adding more white as you move down toward the horizon line to create atmospheric perspective. -
Paint Clouds:
While the sky is still slightly damp or dry, use a medium filbert brush or a fan brush loaded with Titanium White to stipple in fluffy cloud shapes. Keep the edges soft and irregular. Scrub a tiny bit of grey on the bottom of the larger clouds for shadow.
Step 2: Background Landscape
-
Establish the Horizon:
Mix a distant green using Hooker’s Green, White, and a touch of Blue. Paint a thin, uneven line of distant trees slightly below the middle of the blade. This establishes your horizon line. -
Basecoat the Fields:
For the rolling hills, mix Yellow Ochre with plenty of Titanium White. Use the large flat brush to sweep in horizontal strokes, filling the space from the horizon down to the bottom third of the blade, leaving a darker tan area near the bottom for the foreground. -
Add Hill Detail:
Mix a light wash of Burnt Sienna and Ochre. Paint faint, swooping lines to suggest the contours of the hills and distant fence lines. These should be subtle to push them into the background.
Natural Edges
Don’t paint the sharp teeth of the saw blade. Leaving the metal tips exposed frames the painting naturally and enhances the rustic, industrial farmhouse aesthetic.
Step 3: The Barn and Trees
-
Sketch the Barn:
Using a small round brush and dilute Burnt Umber, lightly outline the shape of the barn on the left side. It should sit comfortably in the middle ground, slightly angled. -
Paint the Barn Siding:
Fill in the barn walls with Cadmium Red mixed with a speck of Burnt Sienna to tone it down. Paint vertical strokes to mimicking wood siding. -
Add the Roof:
Paint the roof with a light grey (White plus a touch of Black). Add highlights on the top edge where the sun hits it. -
Barn Details:
Use your liner brush and Black or dark Umber to paint the door, the loft window, and the shadow under the eaves. Add a tiny white circle for the vent near the peak. -
Mid-Ground Trees:
Stipple in bushes and trees behind and around the barn using varied greens. Place a prominent tree to the right of the center hole using a fan brush for the foliage and a liner brush for the trunk.
Seasonal Switch
Turn this into an autumn scene by swapping the green foliage for oranges and reds, or add snow to the roof and fields for a winter version.
Step 4: Foreground and Details
-
Create the Dirt Path:
Mix Burnt Sienna, White, and a little Umber. Paint two winding tracks starting wide at the bottom right and narrowing as they lead toward the barn. Leave the center of the path lighter. -
Paint Tall Grass:
Using a fan brush loaded with Yellow Ochre, Burnt Sienna, and touches of Green, flick upward strokes all across the bottom foreground. Vary the direction slightly to make it look natural. -
Shadow and Light:
Add darker grass deep in the corners and lighter, yellow-white grass tips where the sun hits. Overlap the bottom edges of the dirt path slightly so the grass looks like it’s growing over the road. -
The Fence:
With a liner brush and thinned Burnt Umber, paint the fence posts and rails in the foreground on the right. Make the posts jagged and uneven for a rustic feel. -
Final Highlights:
Add tiny white dots for wildflowers in the foreground grass and highlight the fence posts with a touch of tan paint on the sunlit side. -
Seal the Project:
Ensure the paint is completely dry (wait at least 24 hours). Spray the entire surface with a clear acrylic sealer to protect the paint from chipping and prevent the exposed metal teeth from rusting further.
Hang this heavy-duty masterpiece on a sturdy nail or display it on a stand to bring a touch of the countryside into your home


Moonlit Lake Using the Arbor Hole

Transform a rustic saw blade into a serene nocturnal landscape where the blade’s central hole plays a clever role in the composition. This project contrasts the hard, industrial edge of the steel with the soft, ethereal glow of a moonlit lake and starry sky.
Step-by-Step
Materials
- Circular saw blade (cleaned and de-greased)
- Metal primer (spray or brush-on)
- Acrylic paints (Phthalo Blue, Ultramarine Blue, Black, Titanium White)
- Medium flat brush
- Small round brush (size 1 or 2)
- Fine liner brush (size 0 or 00)
- Fan brush (optional, for trees)
- Old toothbrush (for stars)
- Clear acrylic sealer (matte or gloss)
Step 1: Preparation and Base Coat
-
Clean the blade:
Before painting, scrub the saw blade thoroughly with soapy water and a stiff brush to remove any sawdust, resin, or loose rust. If it’s very oily, wipe it down with mineral spirits or rubbing alcohol. -
Prime the surface:
Apply a coat of metal primer to the entire front face of the blade. This ensures your acrylics will adhere properly and prevents future rust from bleeding through your art. -
Establish the horizon:
Mix a dark blue using Phthalo Blue and a touch of Black. Paint a horizontal line about one-third of the way up from the bottom edge to establish where the water meets the sky.
Don’t Rush the Rust
If your blade is very rusty, consider leaving the outer teeth unpainted and rusty. I think the contrast between the rough, aged metal teeth and the smooth painted center adds incredible rustic character.
Step 2: Painting the Sky and Moon
-
Create the gradient sky:
Starting at the top edge, paint a deep midnight blue. As you work your way down toward the arbor hole, gradually blend in Ultramarine Blue and then mix in a little White to create a glowing halo effect around the central hole. -
Blend the lower sky:
Continue the gradient below the arbor hole, getting lighter as you approach the horizon line. The sky should be brightest near that central hole and just above the horizon where a setting moon might be. -
Paint the upper moon:
Using pure Titanium White, paint a distinct circle in the upper left quadrant. While the white is wet, dab in tiny amounts of very light grey or diluted blue to create crater textures. -
Add a setting sun or moon:
Right on the horizon line directly below the central hole, paint a small semi-circle in white or very pale yellow, suggesting a heavenly body just dipping below the edge.
Step 3: Creating the Reflection
-
Paint the water base:
Fill the bottom third of the blade (below the horizon) with a dark blue mixture. Use horizontal brush strokes to mimic the surface of calm water. -
Create the glimmer path:
Load a small flat brush with Titanium White. Starting from the small setting moon at the horizon, paint horizontal zig-zag strokes downward. Make the strokes wider as you move down the blade to simulate light reflecting across the water. -
Dry brush the reflection:
Go back over the white reflection while it’s slightly tacky with a nearly dry brush to soften the edges, blending the white slightly into the dark blue water.
Glow in the Dark
Mix glow-in-the-dark medium into your white paint for the moons and the water reflection. The scene will look lovely by day and magically illuminate when the lights go out.
Step 4: Adding Silhouettes and Details
-
Paint the treeline:
Mix a solid black with a tiny drop of blue. Along the horizon line, dab your small round brush or the corner of a flat brush to create the jagged tops of pine trees. -
Add tree reflections:
Directly below the tree line, paint faint, darker vertical strokes into the water area to suggest the trees’ shadows. Keep these soft and slightly blurry compared to the crisp trees above. -
Paint the foreground trees:
Using a fine liner brush and thinned black paint, create two larger, bare trees on the left side and one on the right. Start from the bottom as the trunk and flick the brush upward to create tapering branches. -
Add fine branches:
Add smaller twigs branching off the main limbs. Let some branches reach across the sky, overlapping the blue gradient for depth. -
Create the stars:
Dilute a small amount of white paint with water until it’s inky. Load an old toothbrush, hold it over the ‘sky’ portion of the painting, and flick the bristles with your thumb to spray tiny stars. Be careful not to spray too much over the trees. -
Add specific stars:
Use the tip of your smallest brush or a toothpick to dot a few larger, brighter stars in the darker areas of the sky. -
Seal the artwork:
Allow the painting to cure for at least 24 hours. Coat the entire blade with a clear acrylic sealer to protect it from scratches and moisture, especially if it will hang outside.
Hang your industrial masterpiece on a shed wall or fence to add a touch of artistic mystery to your garden


Deer Silhouette in a Meadow

Transform a rustic saw blade into a serene evening scene featuring a majestic buck silhouetted against a cotton-candy sky. This project combines smooth blending techniques with crisp details for a stunning piece of cabin-style decor.
Step-by-Step
Materials
- Clean circular saw blade (rusty or new)
- Metal primer (spray or brush-on)
- Acrylic paints (Titanium White, Lavender, Deep Purple, Salmon Pink, Orange, Black)
- Flat shader brushes (large and medium)
- Small fine liner brush
- Fan brush (optional, for clouds)
- Water cup and palette
- Clear acrylic sealer (matte or satin)
- Sandpaper/steel brush (for prep)
Step 1: Preparation and Base Coat
-
Clean the blade:
Before painting, ensure your saw blade is free of loose rust and oils. Scrub it down with a steel brush or sandpaper and wipe it clean with a degreaser or alcohol. -
Prime the surface:
Apply a coat of metal primer to the front of the blade. This prevents future rust and gives your acrylics a toothy surface to grip onto. Let this dry completely according to the can’s instructions. -
Base sky gradient:
Start by mixing a salmon pink with a touch of orange. Using a large flat brush, paint the bottom third of the sky area (above where the ground will be), sweeping horizontally. -
Transition to purple:
While the pink layer is still slightly wet, mix lavender with a little white. Paint the middle section of the blade, blending it downward into the pink to create a soft, seamless haze. -
Darken the top:
For the upper third of the blade, use your deep purple. Blend this down into the lavender section. You want a gradient that goes from dark purple at the saw teeth down to bright pink near the horizon.
Step 2: Painting the Clouds
-
Mix cloud colors:
Create a soft violet-grey by mixing deep purple, white, and a tiny dot of black. You’ll also need a lighter pink mix for highlights. -
Form the cloud shapes:
Using a smaller flat brush or a filbert, dab in irregular cloud shapes across the upper purple section. Keep the edges soft and fluffy rather than hard lines. -
Add under-lighting:
To make the clouds look like a sunset, paint the bottom edges of your purple clouds with the salmon pink color. This mimics the sun reflecting off them from below. -
Soften the edges:
I like to take a clean, dry brush and very gently whisk over the clouds while the paint is tacky to blur the edges slightly, making them look wispy.
Paint Slipping?
If paint streaks or won’t stick to the metal, your primer coat is likely too thin or glossy. Lightly sand the primer to roughen it, then try painting again.
Step 3: The Silhouette Layer
-
Block in the ground:
Using pure black paint, create the rolling hill at the bottom. The ground level should cover the bottom teeth area and curve gently. -
Sketch the deer:
Use a piece of chalk or a very light pencil to sketch the outline of the buck. Position him slightly off-center to the right, with antlers reaching up into the pink sky zone. -
Fill the silhouette:
Using a medium round brush and black paint, carefully fill in the deer’s body. Ensure the paint is opaque; you may need a second coat after the first dries. -
Detail the antlers:
Switch to your fine liner brush for the antlers. Paint the main beams first, then add the tines. Keep the tips sharp and tapered for realism. -
Add delicate grasses:
Using the liner brush with slightly watered-down black paint, flick quick, upward strokes from the ground layer. Vary the height and angle of these grass blades. -
Paint wheat stalks:
Identify a few taller grass blades and add small, V-shaped dashes along the top inch to resemble wheat or heavy seed heads. Paint a few of these leaning to suggest a gentle breeze. -
Highlight the foreground:
Mix a tiny amount of brown or dark grey into your black. Use this to add faint highlights to just a few grass blades in the very front, giving the dark mass some depth. -
Final touches:
Add a few tiny white dots in the dark purple section for early evening stars. If needed, touch up the rim of the center hole with black for a clean finish. -
Seal the artwork:
Once the painting is fully dry (give it at least 24 hours), apply a clear spray sealer to protect the metal from oxidizing and the paint from scratching.
Add Depth
Mix metallic copper or gold paint into the salmon sky color. It will make the sunset shimmer nicely when the light hits the metal blade.
Hang your rustic masterpiece on a barn wall or display it on a sturdy easel to enjoy the view.
BRUSH GUIDE
The Right Brush for Every Stroke
From clean lines to bold texture — master brush choice, stroke control, and essential techniques.
Explore the Full Guide
Woodland Cabin in Snow
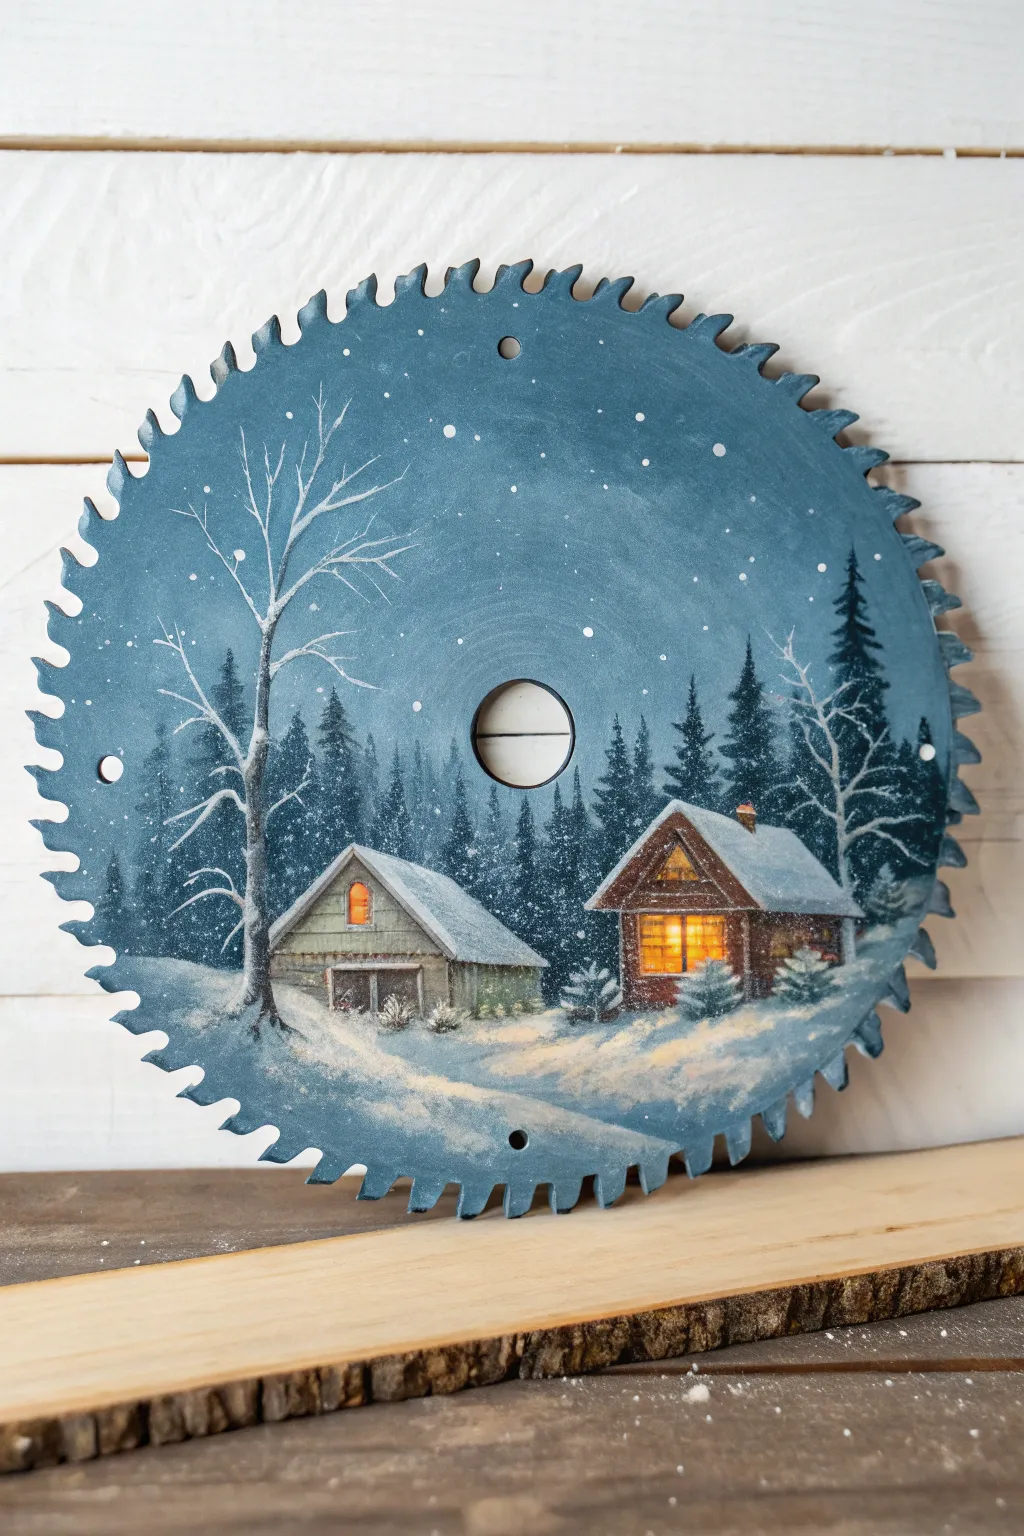
Transform an old, rusty saw blade into a serene winter landscape featuring glowing cabins nestled in a snowy forest. This project uses the cool blue tones of twilight contrasted with warm window light to create a cozy, nostalgic piece of rustic decor.
Detailed Instructions
Materials
- Circular saw blade (cleaned and primed)
- Acrylic craft paints: Deep Navy Blue, Titanium White, Burnt Umber, Yellow Ochre, Cadmium Orange, Forest Green, Black
- Gesso or metal primer
- Flat shader brushes (medium and large)
- Round detail brushes (sizes 0, 2)
- Fan brush (optional)
- Palette for mixing
- Cup of water and paper towels
- Clear spray sealer (matte or satin)
Step 1: Preparation & Background
-
Prepare the surface:
Before painting, ensure your saw blade is clean and free of loose rust. Apply a coat of metal primer or gesso to the entire front surface to help the acrylics adhere properly. -
Paint the base sky:
Mix a gradient of Deep Navy Blue and a touch of White. Start at the top of the blade with the darkest blue mix, and gradually add more white as you work your way down towards the bottom third, creating a natural twilight fade. -
Add background trees:
Using a dark mix of Forest Green and Black, paint a row of distant pine trees along the horizon line. Keep these shapes loose and slightly hazy to suggest depth, allowing the blue sky to peek through slightly.
Snow Splatter Tip
Make sure your white paint is thinned to an ink-like consistency for splattering. Test the flick on a paper towel first to avoid large globs ruining your artwork.
Step 2: Cabins & Foreground
-
Blocking the cabins:
Sketch the basic shapes of the two cabins using a diluted Burnt Umber. Place the larger cabin on the right and a smaller shed structure on the left. -
Form structure:
Fill in the cabin walls with Burnt Umber. For the roofs, use a mix of White with a tiny dot of Blue to create shadowed snow, ensuring the roof angles follow the perspective. -
Adding the glow:
Paint the window squares with pure Yellow Ochre first. Once dry, add a center of Cadmium Orange and a rim of White to mimic the intense glow of a fire inside. -
Detailing the logs:
Use a fine liner brush and dark brown paint to create horizontal log lines on the cabin walls. Add lighter brown highlights on top of each log to simulate dimension. -
Creating the snowdrifts:
Using your large flat brush, paint sweeping mounds of snow in the foreground with Titanium White. Blend a little of the sky blue into the shadows at the bottom of the drifts for realism.
Level Up: Glitter
While the snow paint is still wet, sprinkle a tiny pinch of iridescent fine glitter or diamond dust over the drifts to make the snow sparkle under lights.
Step 3: Trees & Vegetation
-
Tall pine trees:
With a fan brush or a small flat brush turned sideways, paint the taller evergreen trees on the right side. Start with the tip and tap downwards, getting wider at the base. -
The prominent bare tree:
On the left side, paint the large leafless tree using a mix of Grey and White. I like to use a rigger brush here to get those chaotic, thin branches reaching up into the blue sky. -
Tree highlights:
Add touches of pure White to the top of the bare tree branches and the pine boughs to show where snow has settled. -
Small bushes:
Dab small clumps of White and Grey near the base of the cabins to represent snow-covered bushes or shrubs.
Step 4: Atmosphere & Finish
-
Softening the light:
Glaze a very thin wash of yellow around the windows onto the snow to show the light casting outward. -
Adding texture:
Stipple some texture onto the snowy ground with a dry brush to make it look fluffy rather than flat. -
Falling snow:
Dilute Titanium White with water until it’s inky. Dip an old toothbrush or stiff brush in it and flick the bristles with your thumb to splatter tiny snowflakes across the entire scene. -
Larger flakes:
Hand-paint a few larger, distinct snowflakes using a fine detail brush to create a sense of depth in the snowfall. -
Seal the artwork:
Once fully dry, spray the entire blade with a clear acrylic sealer to protect the paint from scratching and moisture.
Hang your repurposed masterpiece on a wall or prop it on a mantel to enjoy that quiet winter feeling all year round
Waterfall and River Curve Composition
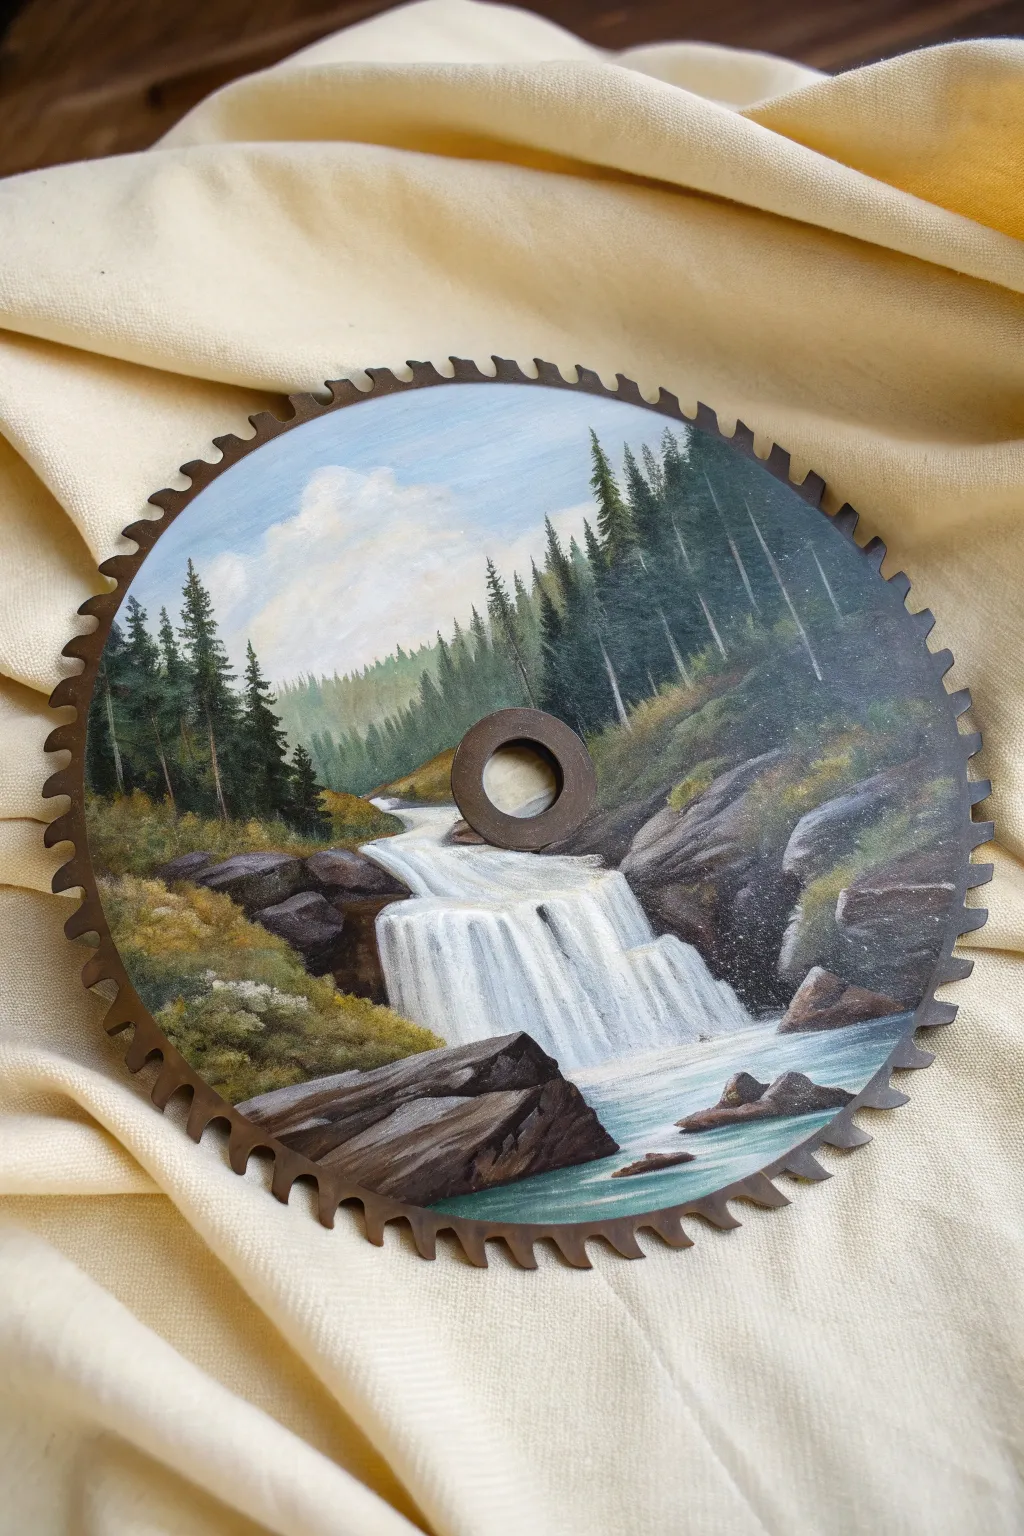
Transform a rustic, rusty saw blade into a stunning window overlooking a serene forest river. This project uses the blade’s circular shape to frame a cascading waterfall nestled between evergreen trees and rocky banks.
Step-by-Step Guide
Materials
- Old circular saw blade (cleaned and primed)
- Metal primer (spray or brush-on)
- Acrylic paints: Titanium White, Phthalo Blue, Sap Green, Burnt Umber, Mars Black, Yellow Ochre
- Assorted brushes: 1-inch flat, fan brush, filbert brush, liner brush
- Palette
- Water container and rags
- Clear acrylic sealer spray (gloss or matte)
Step 1: Preparation and Sky
-
Prime the Surface:
Before painting, ensure your saw blade is free of loose rust and grease. Apply a solid coat of metal primer to the entire face of the blade. This prevents rust from bleeding through your art and gives the paint something to grip. -
Establish the Sky gradient:
Mix Titanium White with a tiny touch of Phthalo Blue. Start painting at the very top edge of the blade, working your way down about one-third of the surface. Gradually add more white as you move lower to create a fade. -
Add Cloud Textures:
Using a clean filbert brush or even your finger, dab pure Titanium White into the wet blue sky to form soft, fluffy clouds on the left side. Soften the bottom edges of the clouds so they blend into the distance.
Pro Tip: Depth of Field
Make colors lighter and bluer the further back they are in the painting. Your foreground rocks should be the darkest and warmest tones to push the background away.
Step 2: Background Forest
-
Paint the Distant Trees:
Mix Sap Green, a little Phthalo Blue, and white to make a hazy, light blue-green. Using the tip of a flat brush or a small fan brush, tap in a line of distant treeline shapes across the middle horizon. -
Layer Mid-Ground Trees:
Darken your green mixture by adding less white and a touch of Burnt Umber. Tap in a second row of trees slightly below and in front of the first layer to create depth. -
Create Large Evergreens:
On the right side of the blade, use a fan brush with a dark mix of Sap Green and Mars Black. Use the corner of the brush to tap in tall pine trees that reach almost to the top teeth of the blade. I like to keep the center fairly open for the water. -
Building the Left Bank:
Mirror the process on the left side with smaller evergreen trees using a flat brush turned vertically. Keep these darker than the background but slightly lighter than the large right-side trees to show perspective.
Troubleshooting: Paint Sliding?
If paint slides off the metal, your primer layer might be too slick or thin. Gently scuff the primed surface with fine sandpaper before painting to give it ‘tooth’.
Step 3: The Waterfall and River
-
Block in the Water Path:
Mix a light blue-grey using White, a touch of Phthalo Blue, and Black. Paint the general S-curve shape of the river flowing from the center horizon, widening as it reaches the bottom right. -
Create the Falls:
Load a flat brush with pure Titanium White. Starting at the ‘drop’ of the waterfall, pull the brush straight down quickly. Do this across the width of the falls to create the look of rushing water. -
Add Splash and Mist:
At the bottom of your vertical white strokes, use a dry brush to tap and blend upward slightly. This simulates the mist and foam created where the water hits the pool below. -
Detail the River Current:
In the river area below the falls, add horizontal streaks of white and light blue to suggest movement. Allow the water to wrap around where the rocks will be.
Step 4: Rocks and Foreground
-
Basecoat the Rocks:
Using Burnt Umber mixed with a little Black, paint the large angular shapes of the rocks framing the waterfall and the large boulder in the foreground. -
Highlight the Rocks:
Mix White with a little Burnt Umber and Yellow Ochre. Using a flat brush or palette knife, gently scrape this lighter color onto the top edges of the rocks where the light would hit. -
Add Grassy Banks:
Mix Yellow Ochre and Sap Green. Use an old bristle brush or fan brush to tap in grassy textures on top of the rocks on the left bank and along the river’s edge. -
Refine the Foreground:
Add extra definition to the large front rock using your darkest brown-black mix for deep cracks and shadows. This high contrast makes it appear closest to the viewer.
Step 5: Finishing Touches
-
Enhance Water highlights:
Take a liner brush with thinned white paint and add very fine lines to the crest of the waterfall and ripples around the rocks to make the water look wet and glistening. -
Clean the Center Hole:
If paint got onto the metal washer area in the center hole, wipe it clean or paint it a solid dark grey to look intentional. -
Seal the Painting:
Once fully dry (give acrylics at least 24 hours), spray the entire blade with a clear acrylic sealer to protect the metal from future rust and preserve the colors.
Hang your heavy metal masterpiece securely on a wall or prop it on a sturdy stand to enjoy the view

PENCIL GUIDE
Understanding Pencil Grades from H to B
From first sketch to finished drawing — learn pencil grades, line control, and shading techniques.
Explore the Full Guide
Bird on a Branch With Negative Space
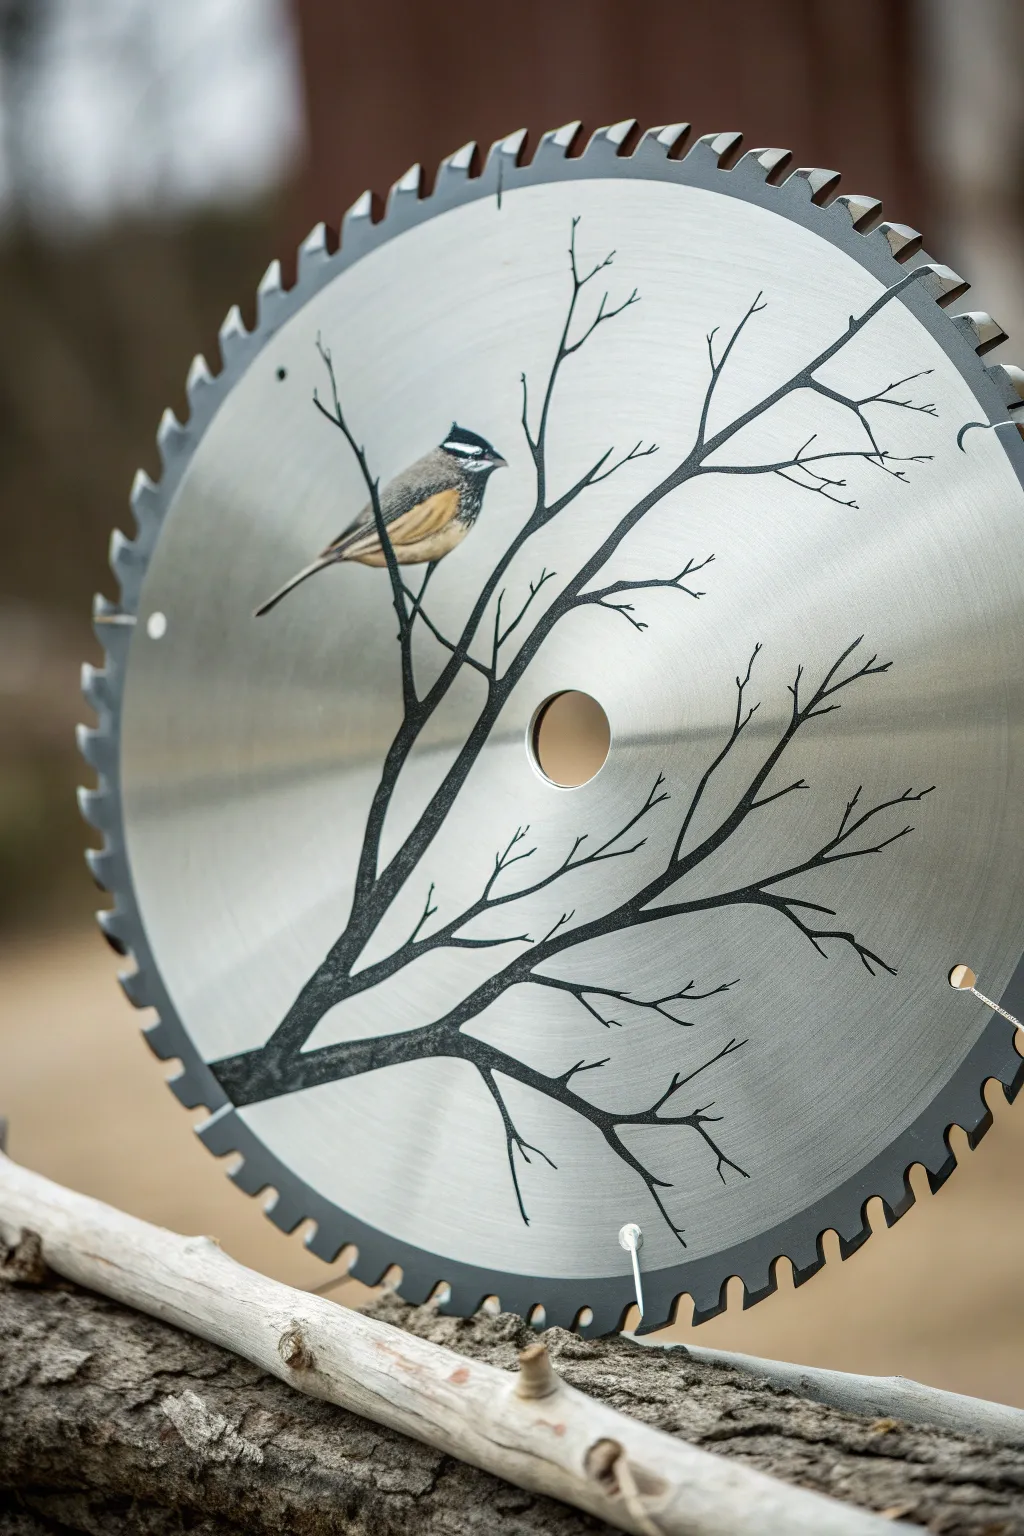
Embrace the sleek, industrial look of a circular saw blade by using the metal itself as your sky. This project combines stark black silhouettes with a touch of realistic wildlife painting, creating striking negative space artwork perfect for a workshop or rustic den.
How-To Guide
Materials
- Used circular saw blade (cleaned)
- Metal primer (clear or spray)
- Acrylic paints (Carbon Black, White, Burnt Umber, Yellow Ochre, Ultramarine Blue)
- Small round brushes (Size 0 and 00)
- Medium liner brush (Size 1 or 2)
- Permanent black marker (fine tip)
- Graphite transfer paper
- Reference photo of a bird and branches
- Masking tape
- Clear spray sealant (gloss or satin)
Step 1: Preparation & Layout
-
Surface Prep:
Begin by scrubbing your saw blade thoroughly to remove any grease, rust, or sawdust. Since we are keeping the bare metal visible, you want it as shiny and clean as possible. -
Apply Clear Primer:
Unlike most paintings where you basecoat with white, here you need a clear metal primer. Spray a thin, even coat over the entire front surface to help the acrylics adhere without hiding the metallic sheen. -
Plan Composition:
Draft your tree design on paper first. Aim for an asymmetrical look where the main branch enters from the bottom left quadrant and spreads upwards and outwards, leaving the center hole somewhat open. -
Transfer or Sketch:
Tape your paper sketch onto the blade and slide graphite paper underneath. Trace the main lines of the branches. Alternatively, use a fine-tip permanent marker to freehand the skeletal structure directly onto the metal.
Prime Time
Before painting, wipe the metal with rubbing alcohol to remove oils. If paint beads up, lightly scuff the painting area with fine sandpaper for better grip.
Step 2: Painting the Silhouette
-
Outline the Trunk:
Load your liner brush with Carbon Black acrylic. Start at the base of the thickest branch and carefully outline the perimeter of your tree design. -
Fill the Branches:
Fill in the main trunk and larger branches with solid black paint. Don’t worry about texture yet; we are looking for a sharp, flat silhouette. -
Add Fine Twigs:
Switch to your smallest brush or even the fine-tip marker to draw the delicate tips of the branches. Make your movements quick and flick the brush at the end to taper the twigs naturally to a point. -
Refine the Edges:
Check your silhouette for any shaky lines. Clean up the edges with black paint to ensure the distinction between the metal background and the dark tree is crisp.
Shadow Play
Mix a tiny drop of glazing medium into your black paint for the branch tips. This makes the tips semi-transparent, creating a sense of depth and distance.
Step 3: Painting the Bird
-
Block in Base Colors:
Locate where your bird will perch. Paint the basic shape in white first to block out the silver background; this ensures your colors will be vibrant. -
Establish the Dark Areas:
Once the white is dry, use black to paint the bird’s head cap, eye stripe, and beak. Leave a small white dot in the eye for a lifelike reflection. -
Layer the Belly:
Mix White with a tiny touch of Yellow Ochre and Burnt Umber to create a soft, warm beige. Paint the chest and underbelly, blending it slightly into the darker wing area. -
Detail the Wings:
Using a dark grey (Black mixed with White) and Burnt Umber, paint the wing feathers. Use short, downward strokes to mimic the texture of feathers rather than painting a solid block of color. -
Add White Accents:
With your smallest brush, drag very fine lines of pure white through the black head markings and along the wing edges to create definition and contrast. -
Paint the Tail:
Stroke a long, thin tail extending downwards past the branch. Keep the line straight and purposeful to balance the bird’s posture. -
Ground the Bird:
Paint tiny black feet wrapping around the branch. Ensure the toes look like they are gripping the wood, not just floating on top of it.
Step 4: Finishing Touches
-
Clean Up:
Inspect the metal background. If any paint smudged onto the silver areas, gently scrape it off with a damp toothpick or cotton swab before it cures completely. -
Seal the Work:
Once the paint is fully dry (I usually give it overnight to be safe), spray the entire blade with a clear acrylic sealer. This prevents the exposed metal from rusting over time and protects your fine brushwork.
Hang your industrial masterpiece in a spot that catches the light so the metal background can really shine
Tree of Life Centered on the Hole
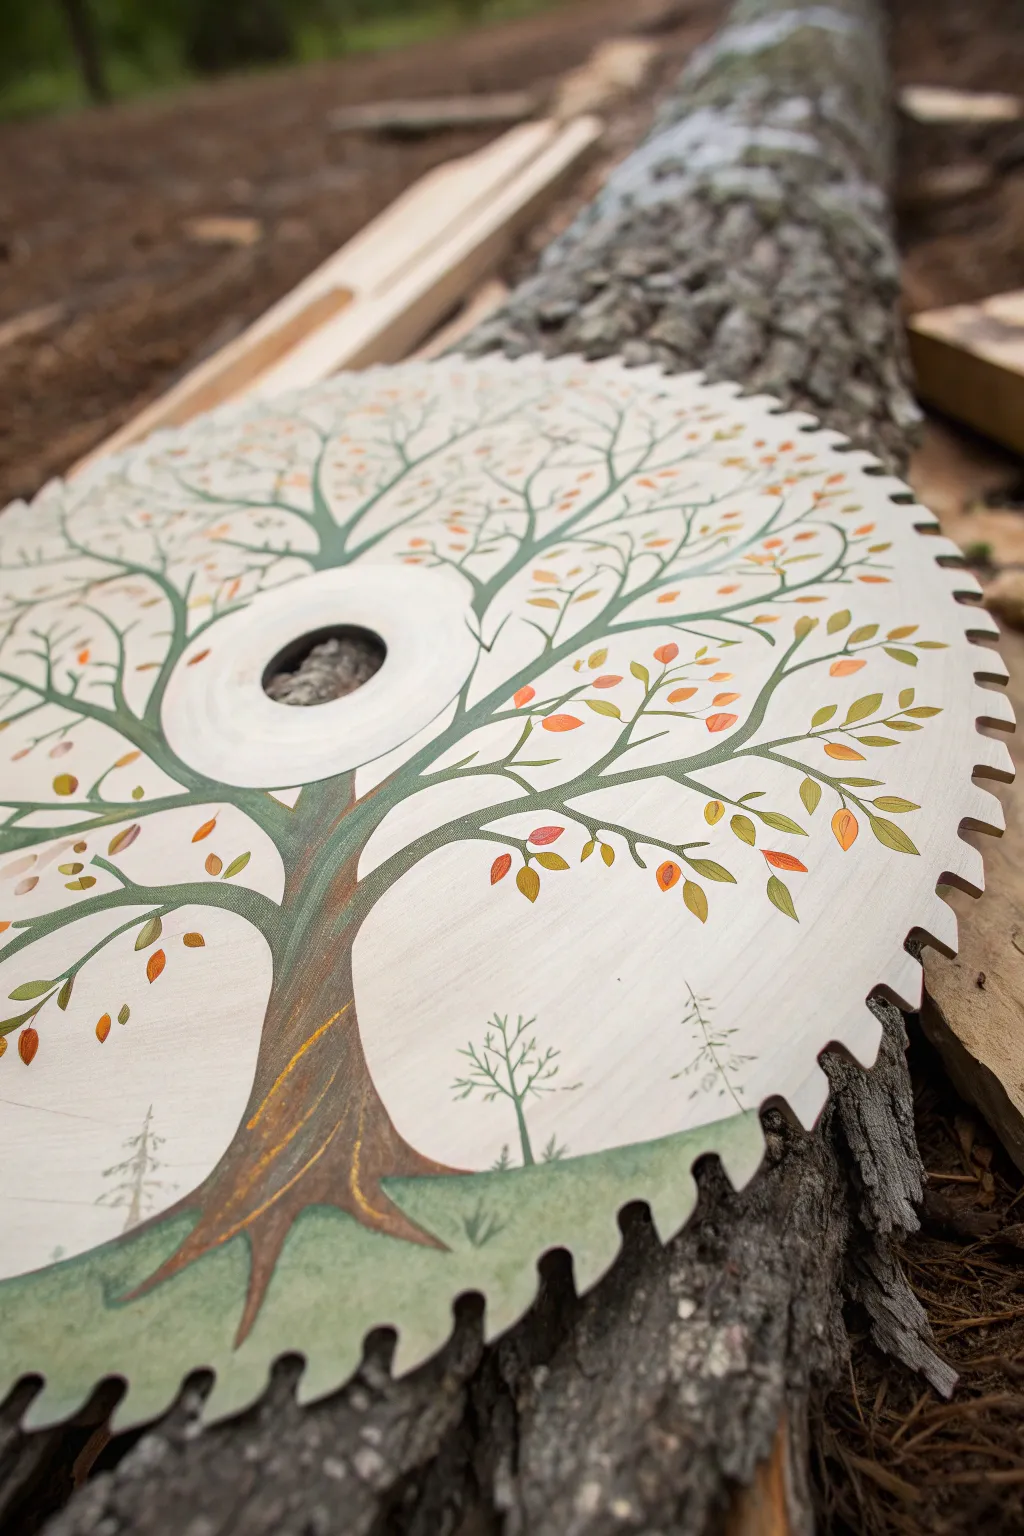
Transform a rustic, rusty saw blade into a stunning piece of wall art by centering a Tree of Life design around the blade’s arbor hole. This project combines the industrial look of jagged teeth with delicate botanical painting for a striking contrast.
Step-by-Step Tutorial
Materials
- Circular saw blade (cleaned and rust-free)
- Metal primer (spray or brush-on)
- Acrylic paints (Titanium White, Burnt Umber, Raw Sienna, Sap Green, Olive Green, Orange, Yellow Ochre)
- Variety of paintbrushes (1-inch flat, #4 round, #0 liner)
- Pencil and eraser
- Clear acrylic sealer (matte or satin finish)
- Palette for mixing
- Sandpaper (medium grit)
Step 1: Preparation and Base Coat
-
Clean surface:
Begin by scrubbing the saw blade thoroughly to remove any loose rust, grease, or sawdust. If the rust is heavy, use a wire brush or steel wool. -
Sand for adhesion:
Lightly sand the surface of the metal with medium-grit sandpaper to create a ‘tooth’ for the primer to grab onto. -
Prime the metal:
Apply a coat of metal primer. This is crucial for preventing future rust and ensuring your acrylics stick. Let it cure completely. -
Apply background color:
Mix Titanium White with a tiny drop of Raw Sienna to create a warm, creamy off-white. Apply two to three thin coats over the entire face of the blade, letting each coat dry fully before the next. -
Sketch the guides:
Using a pencil, lightly sketch a horizon line near the bottom edge. Draw the main trunk flowing up into the center hole, and sketch rough branch lines radiating outward from the center.
Smooth Moves
To make painting thin branches easier, mix a drop of flow improver or water into your brown paint. It helps the liner brush glide smoothly without skipping.
Step 2: Painting the Tree Structure
-
Block within the trunk:
Using your #4 round brush and Burnt Umber, fill in the shape of the trunk. Widen the base where roots would anchor into the ground. -
Add trunk dimension:
While the brown is still slightly wet, streak in some Raw Sienna and a touch of black along the bark edges to create a rounded, textured 3D effect. -
Paint primary branches:
Extend the brown paint from the trunk, wrapping around the center hole. Paint the thickest branches first, letting them curl naturally toward the outer teeth. -
Add secondary twigs:
Switch to your #0 liner brush. With thinned Burnt Umber paint—add a drop of water to make it flow like ink—paint delicate twigs splitting off from the main branches. -
Paint the ground:
Mix Sap Green with a little white and fill in the bottom curve of the blade to create a grassy hill. Allow the tree roots to overlap this green slightly.
Seasonal Shift
Instead of autumn colors, paint pink and white clusters for spring cherry blossoms, or use heavy white textured paint on the branches for a winter scene.
Step 3: Adding Foliage and Details
-
Paint base leaves:
Load a small round brush with Olive Green. Press and lift the brush tip along the branches to create simple, almond-shaped leaves. -
Add autumn colors:
Intersperse the green leaves with touches of Orange, Yellow Ochre, and rust tones. I like to focus these brighter colors near the outer tips of the branches. -
Refine the center:
Paint a clean white ring immediately around the center hole to cover any messy brushstrokes where the branches meet the opening. -
Add distant trees:
Using a very dilute grey-green mix, paint tiny, faint evergreen shapes on the horizon line to give the scene depth and scale. -
Highlight the bark:
Add very thin, broken lines of light tan or gold on the sun-facing side of the trunk and main branches to simulate caught light. -
Seal the artwork:
Once the painting is completely dry (wait 24 hours just to be safe), apply two coats of clear acrylic sealer to protect the paint from scratches and fading.
Now you have a piece of rustic decor that perfectly balances industrial strength with natural beauty


Four Seasons in One Circular Blade
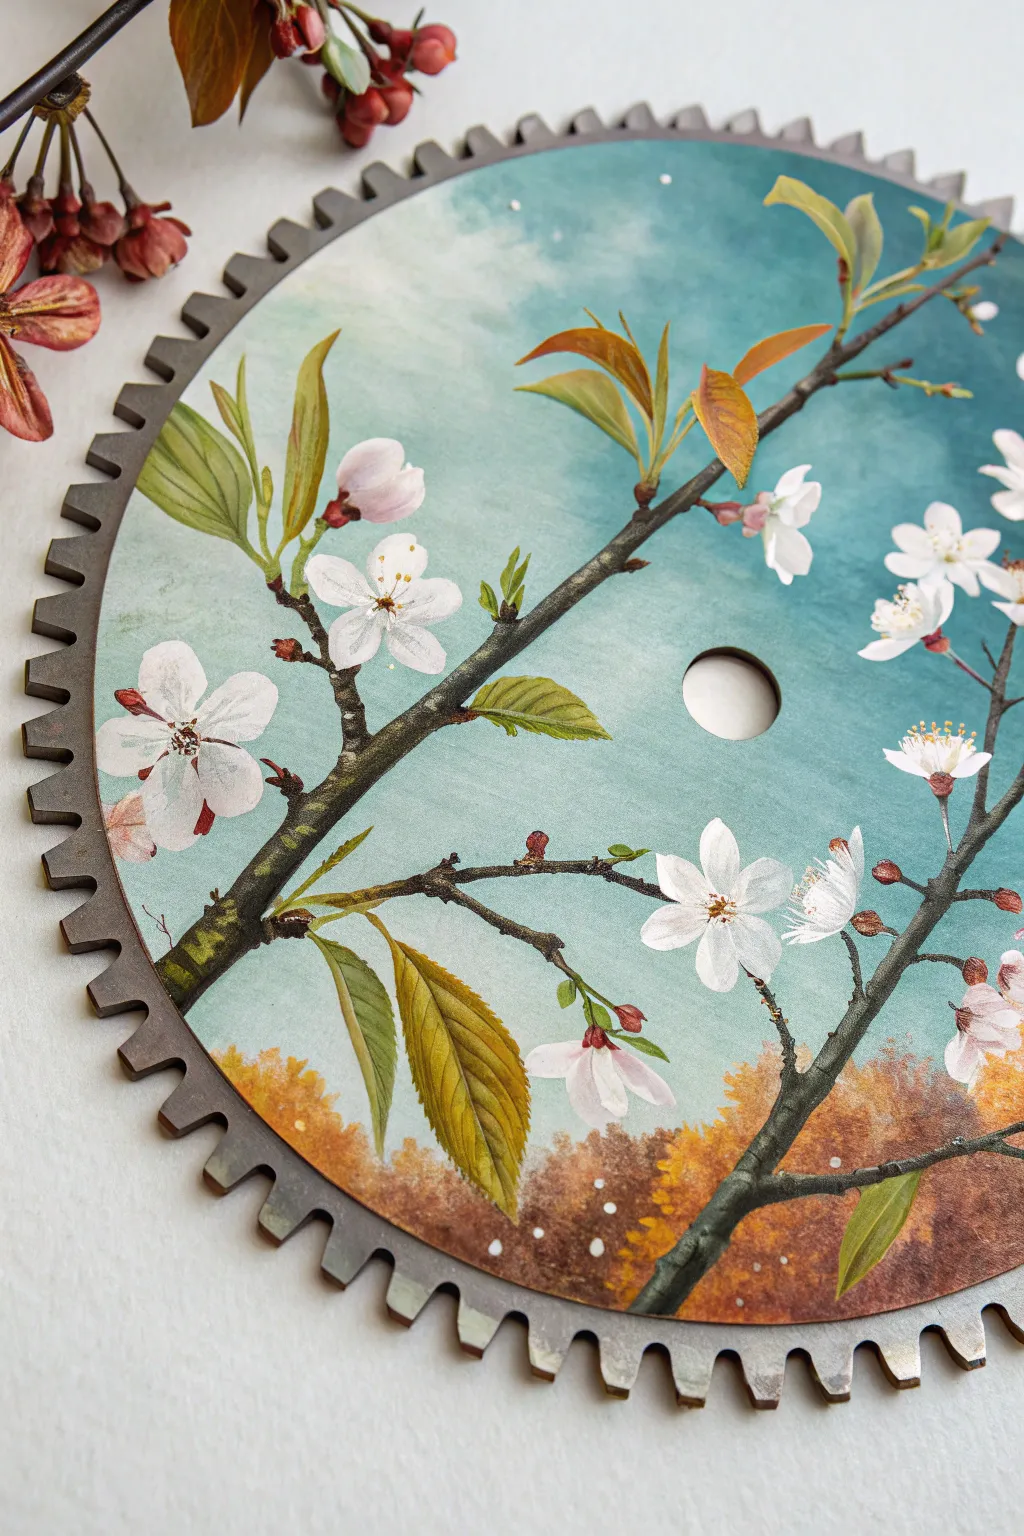
Transform a rustic circular saw blade into a delicate window to spring with this cherry blossom scene. The contrast between the industrial metal teeth and the soft, painted florals creates a stunning piece of wall art that captures the renewal of nature.
How-To Guide
Materials
- Circular saw blade (cleaned and deloused)
- Metal primer (spray or brush-on)
- Acrylic paints (Titanium White, Burnt Umber, Yellow Ochre, Teal or Turquoise, Paynes Grey, Sap Green, Burnt Sienna)
- Flat shader brushes (medium and large)
- Round liner brushes (size 0 and 00)
- Sponge or stippling brush
- Clear acrylic sealer (matte or satin finish)
- Sandpaper (medium grit)
Step 1: Preparation & Background
-
Prepare the Surface:
Before touching a brush to metal, scrub the saw blade thoroughly to remove rust or grease. Sand the surface lightly to give it ‘tooth,’ wipe it clean, and apply a solid coat of metal primer. Let this cure completely according to the can’s instructions. -
Paint the Sky Gradient:
Mix a soft teal using Turquoise and ample Titanium White. Start painting from the top center, using broad, horizontal strokes. As you move downward, gradually mix in a tiny touch of white or water to make the teal more transparent and hazy. -
Add Atmospheric Clouds:
While the blue layer is still slightly tacky, take a damp sponge or a dirty brush with a hint of white paint. Softly dab in cloud formations near the top, blending them out so they look wispy rather than solid. -
Establish the Forest Floor:
At the very bottom arc of the blade, stipple in a base of Burnt Sienna and Yellow Ochre to represent distant autumn foliage or ground cover. Keep the edges soft where the ground meets the sky to create depth. -
Add Ground Texture:
Once the base ground color is dry, use the tip of a small brush to dot in tiny specks of white and lighter ochre, suggesting fallen petals or light filtering through the underbrush.
Smooth Metal Tip
If your saw blade is pitted or very rough, sand heavily and apply a ‘filler primer’ from an auto parts store. This fills minor scratches for a smoother painting surface.
Step 2: The Branch Structure
-
Sketch the Main Branch:
For the primary branch, mix Burnt Umber with a touch of Paynes Grey for a deep, almost black brown. Using a liner brush, paint a diagonal line starting from the bottom right, sweeping up towards the top left. Let your hand shake slightly to give the wood a natural, gnarled look. -
Branch Off:
Add secondary twigs growing off the main branch. Ensure the connection points are thicker and taper out to needle-thin ends. I like to vary the angles to keep it looking organic rather than geometric. -
Highlight the Wood:
Mix a lighter brown using Burnt Umber and White. With a very fine brush, paint thin, broken lines along the top edge of the branches to indicate where the light hits the bark. -
Add Knots and Texture:
Use the dark Paynes Grey mix to add small knots or emphasized shadows on the underside of the branches, particularly where smaller twigs join the main stem.
Step 3: Leaves & Blossoms
-
Paint Base Leaves:
Mix Sap Green with a little Yellow Ochre. Paint elongated, pointed oval shapes for the leaves. Place them sporadically along the branches, grouping some together. -
Add Autumnal Touches:
To mimic the seasonal transition shown in the image, paint a few leaves using Yellow Ochre or Burnt Sienna, or glaze over existing green leaves with these warm tones. -
Detail the Leaves:
Using a liner brush and diluted dark green, paint a central vein down each leaf. Add tiny serrated edges if you want extra realism. -
Create Blossom Petals:
Load a small round brush with Titanium White. Press and lift the brush to create teardrop shapes. Arrange five of these in a circle to form a flower. vary the sizes, making some fully open and others just tight buds. -
Whiten the Petals:
Depending on your paint quality, the first layer of white might be translucent. Go back over the petals with a second coat of opaque white, perhaps adding a tiny hint of pink to the centers of a few flowers. -
Add Flower Centers:
Once the white petals are dry, use a tiny dot of Burnt Sienna or deep red for the very center of each flower. -
Paint Stamens:
With your thinnest liner brush (Size 00), paint extremely delicate lines radiating from the flower centers. Top each line with a minuscule dot of yellow or gold paint for the pollen. -
Final Polish:
Check for any areas where the metal shows through unintentionally and touch up. Once completely dry (give it 24 hours), seal the entire blade with a clear matte sealant to protect it from rust and dust.
Fixing Shaky Lines
If your branch lines look too wobbly or thick, use a damp Q-tip to instantly wipe away acrylic paint before it dries. You can ‘erase’ edges back to the blue background.
Hang your finished blade proudly to bring a permanent touch of spring to your workshop or home.
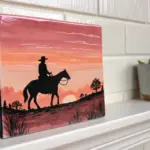
Desert Sunset With Cactus Silhouettes
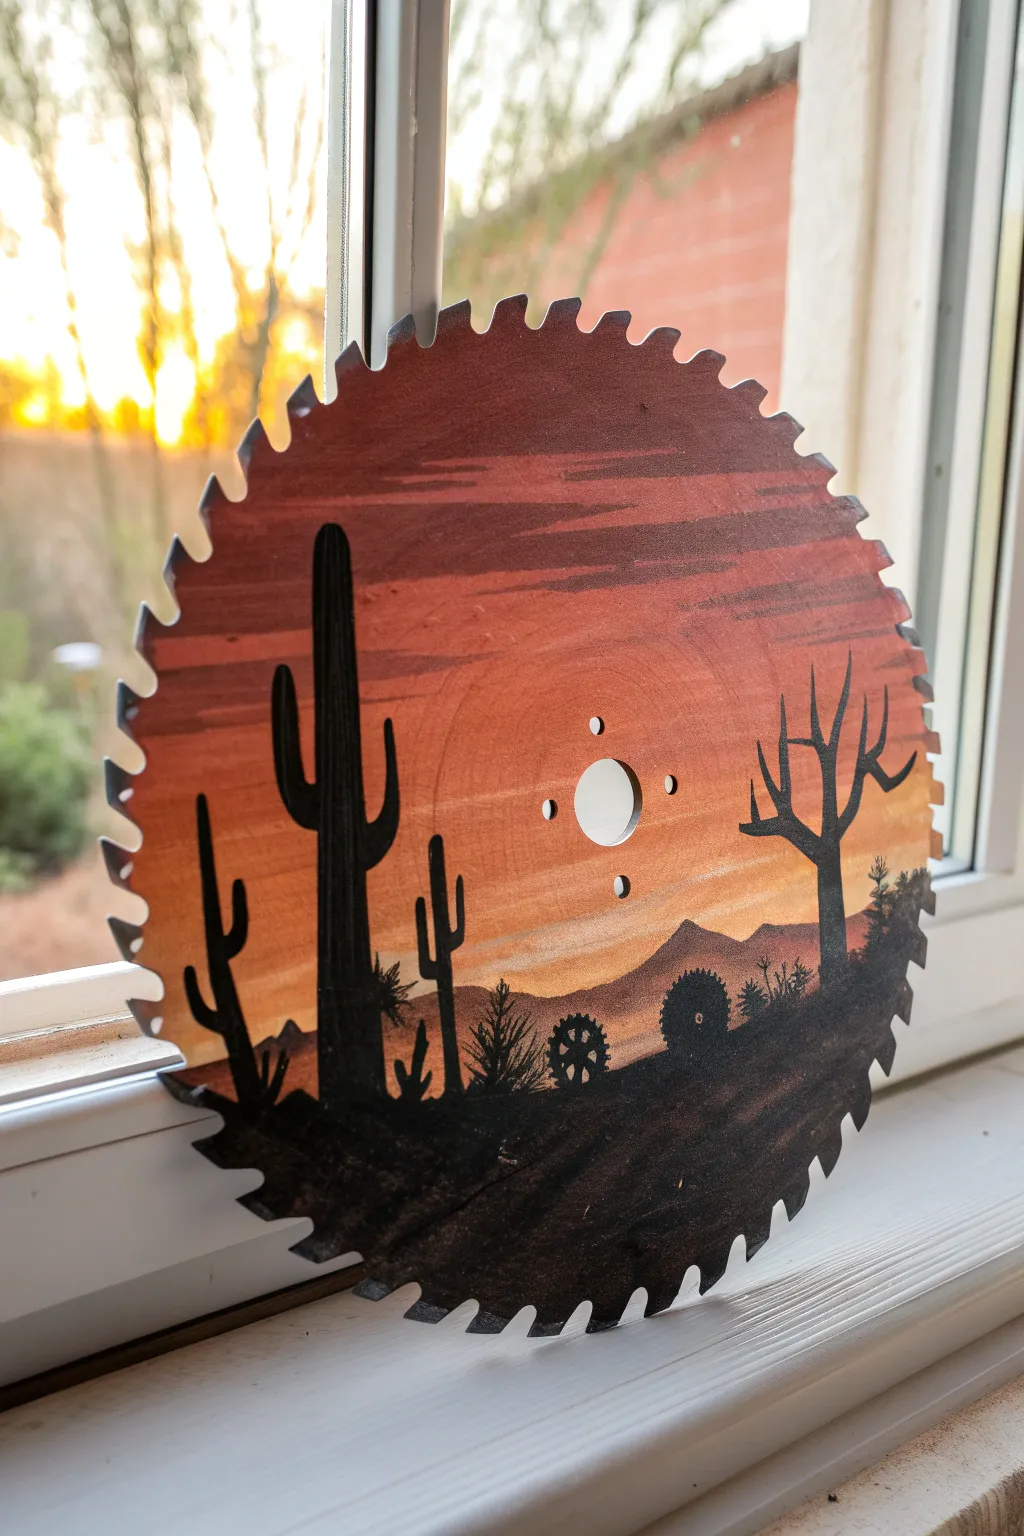
Transform a rustic saw blade into a stunning piece of Southwestern decor with this warm sunset landscape. The circular metal canvas perfectly frames the silhouetted saguaro cacti against a glowing gradient sky.
Step-by-Step
Materials
- Used circular saw blade (cleaned and de-greased)
- Metal primer (spray or brush-on)
- Acrylic paints (Titanium White, Cadmium Yellow, Orange, Burnt Sienna, Burnt Umber, Black)
- Flat shader brushes (large and medium)
- Fine liner brush or detail brush
- Clear acrylic sealer oil or spray
- Sandpaper (medium grit)
- Palette for blending
Step 1: Preparation
-
Clean surface:
Begin by scrubbing the saw blade thoroughly to remove any old sawdust, rust, or grease. A degreasing soap works well here. Rinse and dry completely. -
Sand the metal:
Lightly sand the surface with medium-grit sandpaper to create a ‘tooth’ for the paint to grip. This is crucial for adhesion on smooth metal. -
Prime the blade:
Apply a coat of metal primer specifically designed to prevent rust. Let this dry fully according to the manufacturer’s instructions before starting your color work.
Paint Slipping?
If paint slides around without sticking, the metal is too smooth. Let it dry, sand that area gently again, and apply a second coat of primer.
Step 2: Painting the Sky Gradient
-
Mix sky colors:
On your palette, prepare your sunset shades: deep burnt sienna, bright orange, cadmium yellow, and a touch of white. -
Paint the top dark band:
Using a large flat brush, paint the top third of the blade with a horizontal stroke of Burnt Sienna mixed with a little Black or Burnt Umber to create a dusky upper atmosphere. -
Blend the middle:
While the top paint is still slightly wet, blend in your pure Orange and Burnt Sienna mix immediately below it. Use horizontal back-and-forth strokes to create a seamless transition. -
Add the horizon glow:
For the area just above the midway point (the horizon), blend in Cadmium Yellow mixed with White. This creates the light source effect just behind where the mountains will go. -
Refine clouds:
While the layers are wet, streak a few thin, darker horizontal lines of the burnt sienna mix through the orange sections to simulate wispy strata clouds.
Step 3: Creating the Landscape
-
Draft the mountain line:
Once the sky is dry to the touch, mix Burnt Umber with a tiny bit of Orange. Paint a low, undulating mountain range roughly across the lower third of the blade. -
Fill the foreground:
Use pure Black paint to fill the bottom section of the blade, covering the bottom teeth area completely. The horizon line of this black section should dip slightly to look like a hill. -
Add texture to ground:
While the black is wet, I sometimes dab it with a dry brush or sponge to give the ground a slightly rough, sandy texture rather than a perfect glossy finish.
Level Up: 3D Elements
Glue small real metal gears or washers onto the painted silhouette gears for a mixed-media 3D industrial effect.
Step 4: Silhouettes and Details
-
Paint the main cactus:
Using a medium flat brush turned sideways or a round brush, paint a large Saguaro cactus silhouette on the left side. Start with the main vertical column. -
Add cactus arms:
Paint the characteristic bent arms of the cactus. Ensure the connections to the main trunk are slightly curved, not sharp right angles, to look organic. -
Add secondary cacti:
Paint a smaller, thinner cactus further back in the ‘distance’ (higher up on the canvas) and to the right of the main one to create depth. -
Create the dead tree:
On the right side, use your fine liner brush to paint a jagged, dying tree. Use shaky, uneven strokes for the branches to make them look brittle and dry. -
Add ground vegetation:
Use the very tip of your liner brush to flick tiny vertical strokes along the black horizon line, simulating desert scrub brush and grass. -
Paint industrial details:
To mimic the specific stylistic element of the original piece, paint small gear or cog silhouettes sitting on the horizon line using black paint. -
Final sealing:
Allow the painting to cure for at least 24 hours. Apply a clear acrylic spray sealer (matte or satin works best for this rustic look) to protect the paint from scratching off the metal.
Hang your repurposed saw blade in a sunlit spot to let the warm colors truly glow
Galaxy Sky With Star Splatter
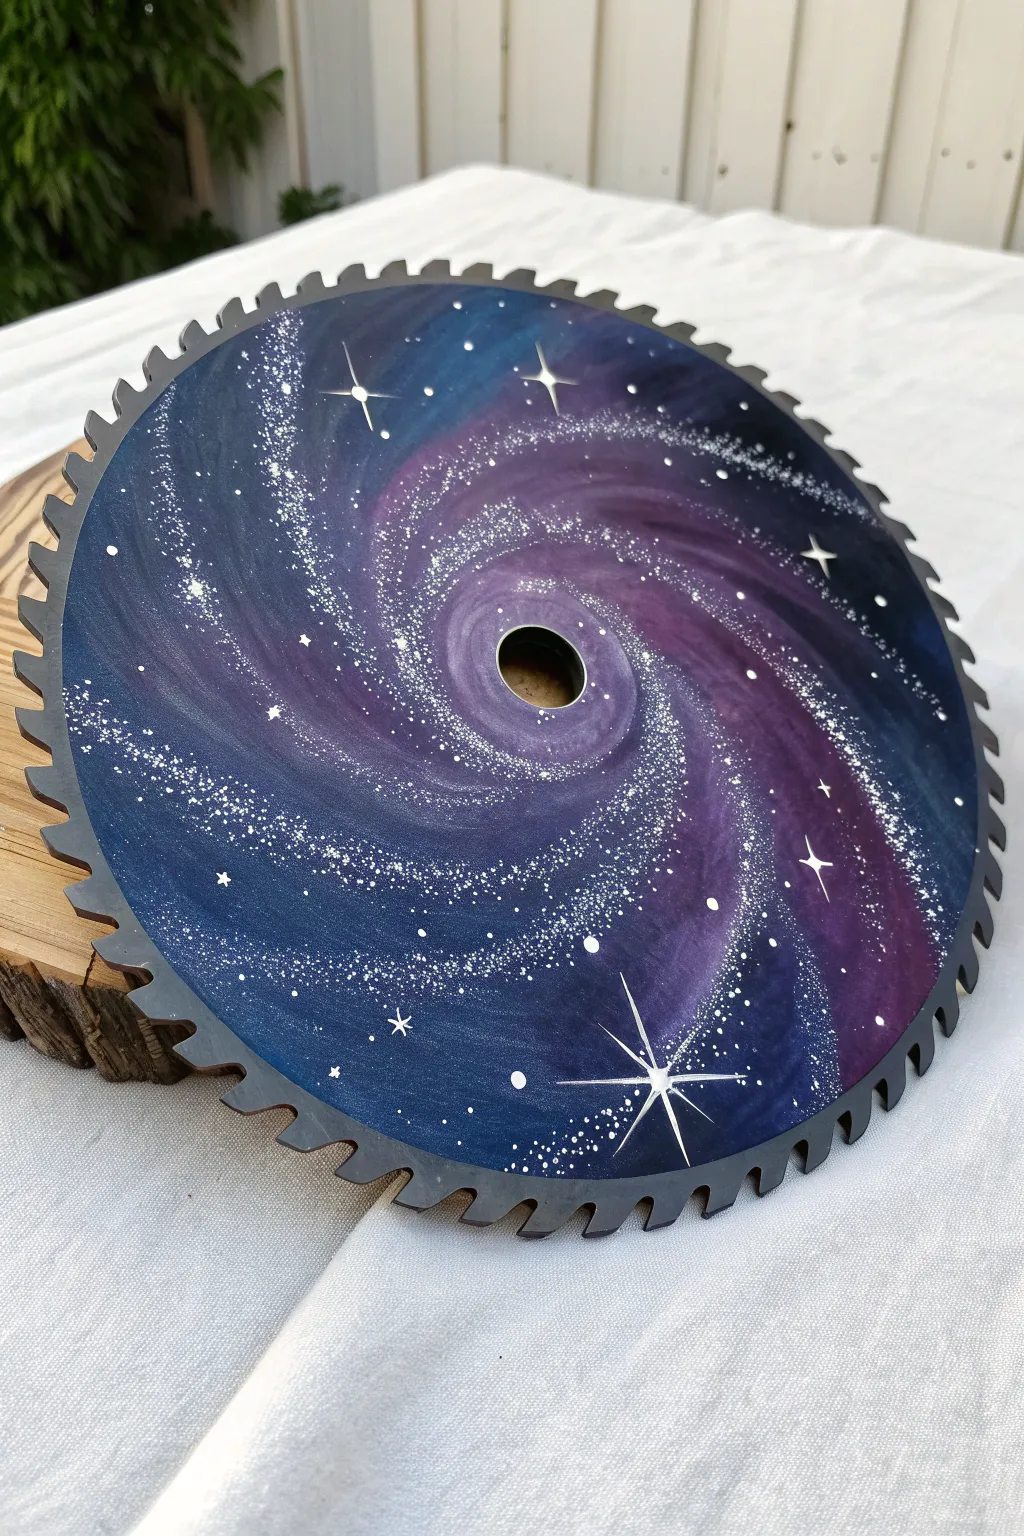
Transform an old, rusty tool into a window looking out on the universe with this galaxy-themed saw blade painting. The natural circular shape of the blade perfectly complements the swirling motion of a distant spiral galaxy.
Step-by-Step Tutorial
Materials
- Used circular saw blade (cleaned and de-greased)
- Metal primer spray pair (black or dark grey)
- Acrylic paints (Dark Blue, Phthalo Blue, Purple, Magenta, Black, Titanium White)
- Assorted paintbrushes (medium flat, small round, fine liner)
- Old toothbrush (for splattering)
- Sponge or foam dabber
- Clear acrylic sealer or varnish (spray or brush-on)
- Cup of water and paper towels
Step 1: Preparation & Base Coat
-
Safety Preparation:
Before anything else, handle your saw blade with extreme care. The teeth can still be sharp even on an old blade, so wear thick work gloves while cleaning it. Clean off any rust, grease, or sawdust using a wire brush or steel wool and soapy water, then dry thoroughly. -
Priming the Surface:
Lay the blade on a drop cloth in a well-ventilated area. Apply a coat of metal primer. A matte black primer is ideal because it acts as the deep background of space, saving you a painting step later. Let this dry completely according to the can’s instructions. -
Establishing the Background:
If your primer wasn’t black, paint the entire front surface with black acrylic paint. Ensure full coverage, getting into the gullets between the saw teeth. Allow this base layer to dry before adding color.
Starry Control
Test your toothbrush splatter on a piece of cardboard first. The distance from the canvas changes the size of the stars—closer makes clumps, further away makes fine mist.
Step 2: Creating the Galaxy Swirls
-
Mapping the Spiral:
Visualize a spiral shape originating from the center hole. Using a slightly damp sponge or a medium brush, lightly dab dark blue paint in a swirling motion, curving outward towards the blade’s edge. Keep this layer translucent so the black background peeks through. -
Adding Purple Depth:
While the blue is still slightly tacky or just after drying, load your sponge with purple paint. Dab this over parts of the blue swirl, focusing on the middle sections of the classic spiral arms. This creates the rich, nebulous gas clouds typical of galaxy art. -
Brightening the Core:
Mix a little magenta with purple to create a lighter, vibrant violet. Apply this closer to the center hole and in streaks along the spiral arms. The goal is to create a gradient from the dark edges of space (the outer blade) to the brighter, energy-filled center. -
Blending Techniques:
If your color transitions look too harsh, use a clean, slightly damp sponge to gently dab the edges where colors meet. This softens the look, making it appear more like gaseous clouds rather than stripes of paint. -
Deepening the Shadows:
I like to go back in with a little black paint on the edges of the colorful swirls. This negative space helps define the spiral shape and adds contrast to make the colors pop.
Glow Up
Mix glow-in-the-dark pigment into your white paint for the splatter step. During the day it looks normal, but at night your galaxy will faintly illuminate the room.
Step 3: Stars & Details
-
Preparing the ‘Star’ Paint:
Dilute a small amount of titanium white paint with water until it reaches an ink-like consistency. It needs to be thin enough to fly off bristles, but opaque enough to show up against the dark background. -
The Splatter Technique:
Dip an old toothbrush into your thinned white paint. Hold it over the saw blade and run your thumb across the bristles to flick tiny specks of paint onto the surface. Focus the heaviest splatter along the painted spiral arms to represent star clusters. -
Adding Major Stars:
Using a fine liner brush or a toothpick, dot larger individual stars randomly throughout the galaxy. Place a few larger dots in the dark negative spaces to create depth. -
Painting Starbursts:
Select 3 to 5 of your larger white dots to turn into twinkling stars. Using your finest liner brush, carefully drag the wet white paint outward in four directions (north, south, east, west) to create a cross shape. Make the vertical lines slightly longer than the horizontal ones for a realistic flare. -
Adding the Central Glow:
Mix a tiny bit of white with your lightest purple. Dry brush a very faint glow around the central hole of the saw blade to simulate the bright galactic core.
Step 4: Finishing Touches
-
Final Inspection:
Step back and look at the composition. If the galaxy feels unbalanced, you can add small patches of blue or purple sponge-work, or splatter a few more stars in empty areas. -
Sealing the Artwork:
Once the paint is completely dry (give it at least 24 hours to cure fully), apply a clear acrylic sealer. A glossy finish works beautifully for space themes as it mimics the depth and shine of the cosmos. -
Display Preparation:
If you plan to hang the blade, attach a heavy-duty picture hanger to the back using strong epoxy, or simply use the center hole to hang it on a sturdy nail or screw.
Your recycled cosmic masterpiece is now ready to bring a touch of the infinite universe to your workshop or living room
Radial Mandala Pattern on the Blade
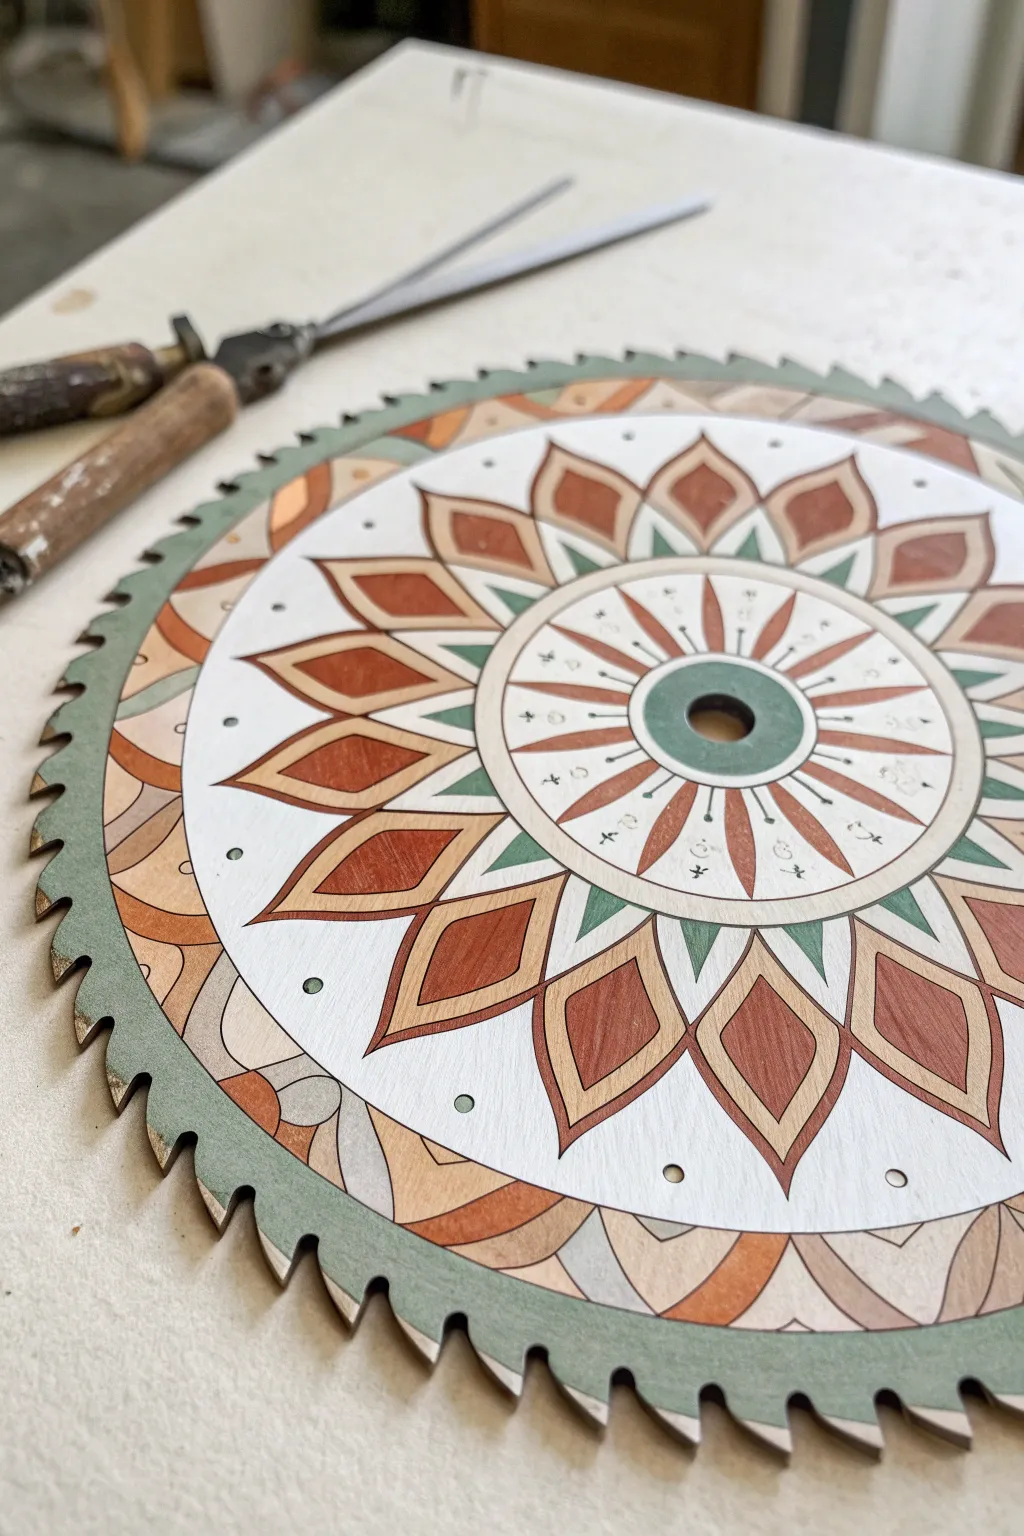
Transform a rusty old tool into a stunning piece of geometric art with a calming, earthy color palette. This project repurposes a circular saw blade into a precise radial mandala, blending industrial grit with delicate, folk-art inspired patterns.
How-To Guide
Materials
- Used circular saw blade (cleaned and degreased)
- Metal primer (spray or brush-on)
- Acrylic paints (Titanium White, Burnt Sienna, Raw Umber, Sage Green, Copper Metallic)
- Fine grit sandpaper (220 grit)
- Compass and ruler
- Pencil
- Synthetic stylized round brushes (sizes 0, 2, and 4)
- Flat shader brush (size 6)
- Clear acrylic sealant (matte or satin)
- Damp cloth
Step 1: Preparation and Base Coat
-
Clean the blade:
Before painting, scrub the saw blade thoroughly to remove grease, sawdust, or loose rust. A degreaser works wonders here. Ensure it is completely dry before moving on. -
Apply primer:
Give the entire front surface a coat of metal primer. This ensures your acrylics will stick to the steel and prevents future rust from bleeding through your artwork. -
Create the canvas:
Paint the entire face of the blade with two coats of Titanium White or a very light cream color. This provides a bright, neutral background that makes the geometric colored sections pop. -
Sand for smoothness:
Once the white base is fully dry, lightly sand the surface with 220-grit sandpaper. This creates a buttery smooth surface for your detailed line work.
Step 2: Drafting the Geometry
-
Mark the center:
Locate the exact center of the blade hole. Use your compass to draw a series of concentric circles radiating outward. These will serve as guidelines for your petals and rings. -
Divide the circle:
Use a ruler and protractor to lightly mark radial lines, dividing the blade into equal pie slices (16 or 32 sections work well for this density). This symmetry is crucial for the mandala look. -
Sketch the primary petals:
In the middle ring section, sketch large, pointed petal shapes within your grid. Ensure each tip touches the guideline circle perfectly. -
Add detail elements:
Sketch the inner sunburst pattern near the center hole and the scalloped border shapes near the blade teeth. I usually keep my pencil lines very faint so they are easy to cover later.
Uneven Lines?
If your hand shakes while outlining, try resting your pinky finger on a dry section of the blade for stability. Alternatively, use a fine-tip paint marker instead of a brush.
Step 3: Painting the Mandala
-
Paint the blade teeth ring:
Start from the outside. Use a flat brush to paint the outermost rim and the saw teeth in Sage Green. Be careful to get clean coverage right up to the edge of the teeth. -
Fill the primary petals:
Using a size 4 round brush, fill the large central petals with Burnt Sienna. Keep your strokes even to avoid ridges in the paint. -
Add the secondary petals:
Paint the smaller, inner diamond shapes with a mix of Raw Umber and a touch of Copper for a subtle shimmer. -
Define the center:
Paint the ring immediately surrounding the central hole with the same Sage Green used on the rim. This ties the design together visually. -
Detail the spokes:
Using your smallest size 0 brush, paint the thin, radiating spokes in the very center area with Burnt Sienna. Precision is key here, so steady your hand against the table. -
Add Green accents:
Paint the small triangular spikes between the large petals using Sage Green. These sharp points add contrast to the curved flow of the petals. -
Create the outlines:
Once the color blocks are dry, use a size 0 liner brush and slightly thinned dark brown or black paint to outline every shape. This ‘stained glass’ effect sharpens the entire image. -
Paint decorative dots:
Using the back end of a paintbrush, dip it into Sage Green or White paint and dot small accents into the negative spaces or along the dividing lines. -
Add runic details:
If you want to replicate the specific look in the image, use a fine liner to add tiny, rune-like symbols or simple dashes in the white ring between the center and the main petals. -
Seal the artwork:
Allow the paint to cure for at least 24 hours. Finish with two light coats of clear matte or satin acrylic sealer to protect against dust and scratches.
Clock Crafter
Turn this art piece into a functional clock! Buy a simple quartz clock mechanism kit online. The central hole of the saw blade is usually the perfect size to mount the hands.
Hang your reclaimed industrial mandala on a workshop wall or garden fence to enjoy your handiwork
Ocean Wave Ring Around the Teeth
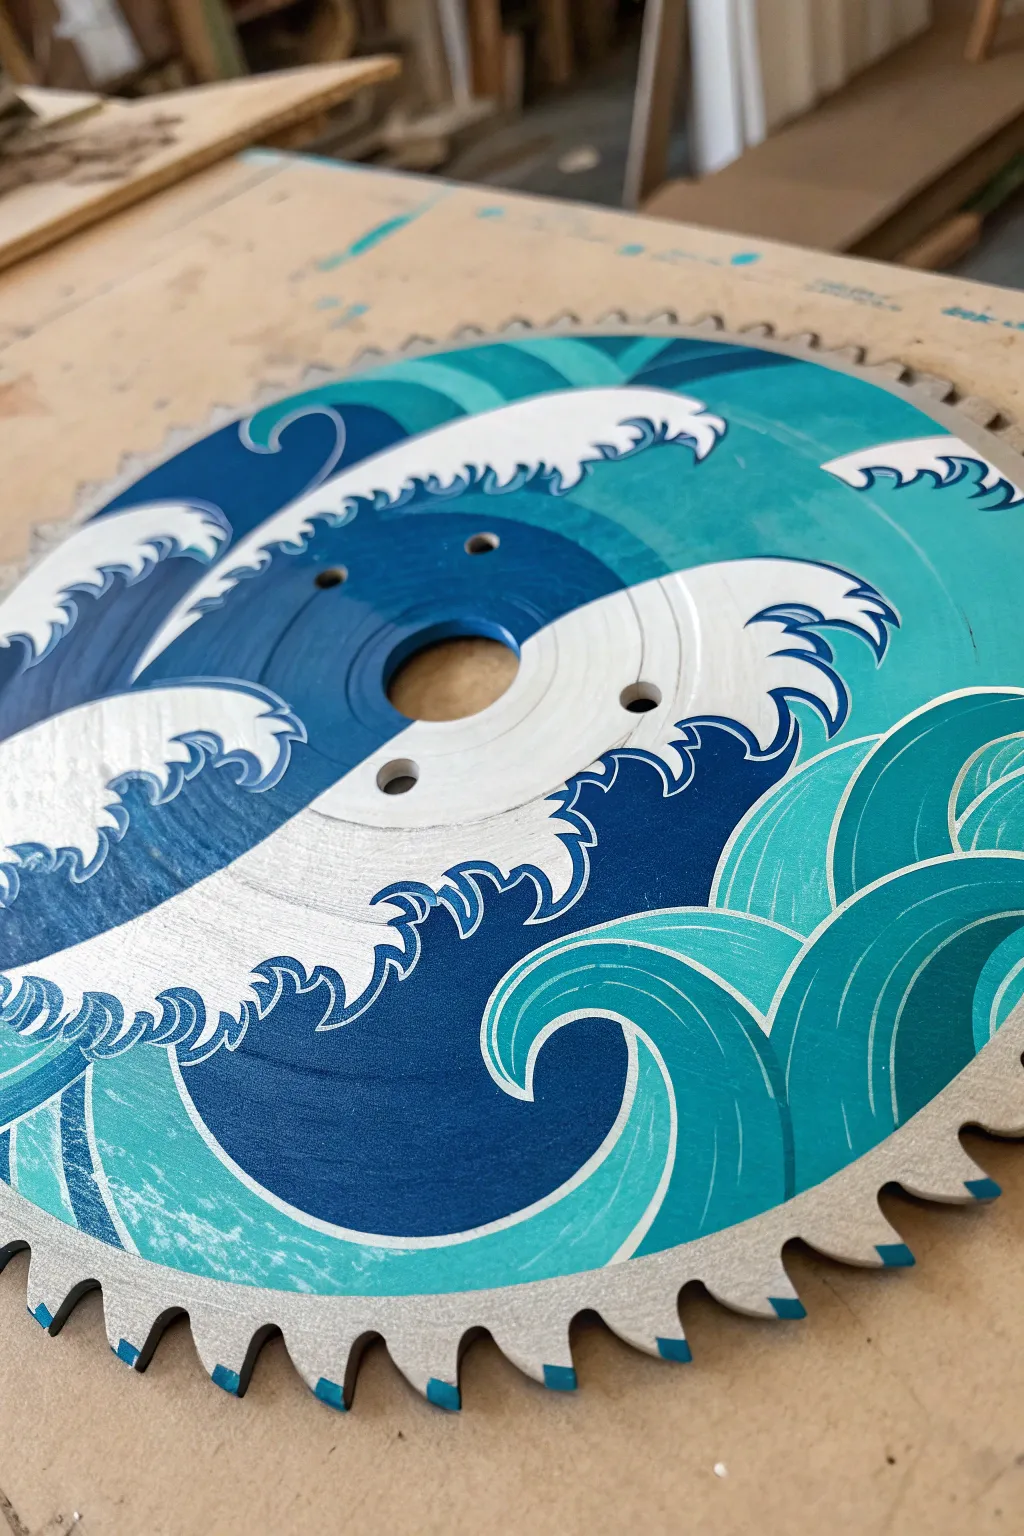
Transform a retired workshop tool into a dynamic piece of wall art with this striking ocean-themed design. The natural metallic finish of the blade complements the bold blues and crisp whites of the crashing waves, creating a modern twist on classic Japanese woodblock prints.
Step-by-Step Guide
Materials
- Used circular saw blade (cleaned and degreased)
- Metal primer (spray or brush-on)
- Acrylic craft paints (navy blue, turquoise/teal, white)
- Medium flat paintbrush
- Small round paintbrush
- Fine liner brush (size 0 or 00)
- Pencil for sketching
- Clear acrylic sealer spray (gloss or satin)
- Sandpaper (fine grit)
- Rag and rubbing alcohol
Step 1: Preparation and Base Coat
-
Clean the surface:
Begin by thoroughly cleaning your saw blade to remove any sawdust, oil, or rust. A quick scrub with rubbing alcohol and a rag works wonders to ensure the paint adheres properly. -
Sand for adhesion:
If the blade has a smooth coating or rust spots, lightly scuff the surface with fine-grit sandpaper. This creates a ‘tooth’ for the primer to grab onto. -
Prime the surface:
Apply a thin, even coat of metal primer to the face of the blade. Let this dry completely according to the can’s instructions before moving on to the sketching phase.
Step 2: Designing the Waves
-
Sketch the layout:
Using a pencil, lightly draw your wave patterns directly onto the primed blade. Aim for three main swirling sections that flow around the center hole, creating a sense of rotational movement. -
Define the foam caps:
Draw the jagged, claw-like shapes of the wave crests (the foam) at the top of your large swirls. Keep these shapes fluid and organic. -
Section the colors:
Mark out which areas will be deep navy and which will be the brighter turquoise. I usually like to alternate these bands to create depth and contrast.
Paint Peeling?
If paint lifts off the metal, the surface was likely too oily. Sand the spot down to bare metal, clean thoroughly with acetone or alcohol, re-prime that specific spot, and paint again.
Step 3: Applying Color
-
Block in the Navy Blue:
Start with your darkest navy blue acrylic. Using a medium flat brush, fill in the deepest parts of the waves, carefully painting around the areas you reserved for the white foam. -
Paint the Turquoise sections:
Fill the adjacent wave sections with your teal or turquoise paint. Ensure the paint is opaque; you may need two thin coats rather than one thick one to avoid brush strokes. -
Add the White foam:
Using a smaller round brush, fill in the crests and foam caps with bright white paint. Take your time here to get sharp edges against the blue zones. -
Paint the blade teeth:
Carefully paint the tips of the saw blade teeth that align with your blue sections. Match the color to the wave touching the rim to make the art expand beyond the circle.
Add Metallic Sparkle
Mix a tiny drop of iridescent medium or pearl white paint into your turquoise sections or the white foam caps. It catches the light beautifully when the blade hangs on the wall.
Step 4: Detailing and Outlining
-
Outline the waves:
Once the base colors are fully dry, use your fine liner brush and navy blue paint (thinned slightly with water) to outline the white foam shapes. This mimics the woodblock print style. -
Add inner details:
Paint small, curved lines inside the white foam areas using the same navy blue. These little hooks and swirls give the water texture and volume. -
Separate color bands:
Use a white or very pale blue thin line to separate the navy sections from the turquoise sections if you want a more graphic look, or leave them touching for a softer transition. -
Clean up edges:
Check the perimeter of your design. If any paint smudged onto the silver metal where you didn’t want it, scrape it gently with a craft knife or clean it with a wet cotton swab.
Step 5: Finishing Touches
-
Let it cure:
Allow the painting to dry for at least 24 hours to ensure all layers are hardened. -
Seal the artwork:
Spray the entire blade with a clear acrylic sealer. A gloss finish looks particularly good here as it makes the water look ‘wet’ and protects the metal from future rusting.
Hang your repurposed industrial masterpiece in a workshop or living space to add a splash of rugged artistic flair
Glow-Style Constellations on a Night Blade
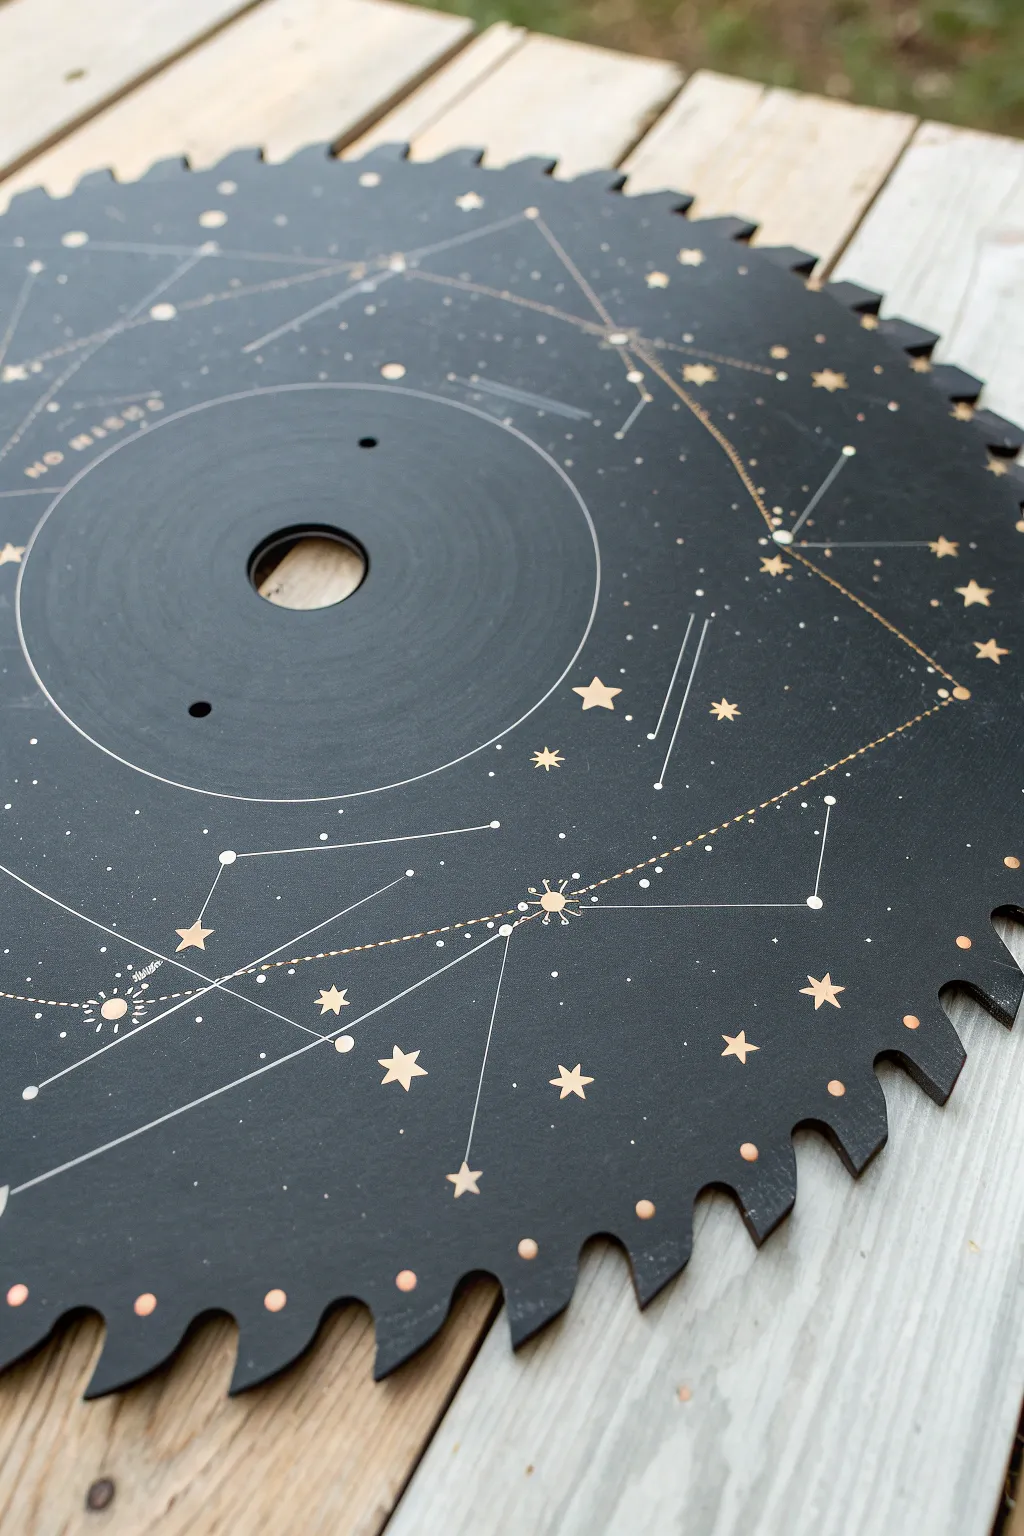
Transform a retired saw blade into a piece of industrial stargazing art with this striking celestial design. The deep matte black background provides the perfect void for metallic gold constellations and geometric star charts to shine.
How-To Guide
Materials
- Used circular saw blade (cleaned and degreased)
- Matte black spray paint (primer + paint combo recommended)
- White colored pencil or chalk pencil
- Gold metallic paint marker (fine tip)
- White or silver gel pen (ultra-fine)
- Ruler or straight edge
- Compass (drafting tool)
- Clear matte sealer spray
- Isopropyl alcohol and rag
Step 1: Preparation & Base Coat
-
Clean the surface:
Begin by thoroughly cleaning the saw blade to remove any sawdust, oil, or rust. Wipe it down with isopropyl alcohol and a rag to ensure the surface is completely degreased for better paint adhesion. -
Prime and paint:
Lay the blade on a drop cloth in a well-ventilated area. Apply several light, even coats of matte black spray paint. Let each coat dry for about 15 minutes before applying the next to avoid drips. -
Flip and repeat:
Once the front is dry to the touch, flip the blade over and paint the back side if it will be visible. Allow the final coat to cure fully for at least 24 hours to create a hard, workable surface.
Step 2: Designing the Cosmos
-
Draft the center rings:
Using a compass with a white chalk pencil or very light pressure, draw a large circle centered around the blade’s arbor hole. This creates the primary orbit line visible in the design. -
Sketch the geometric frame:
Use a ruler to lightly sketch large triangles or diamonds across the blade surface. These straight lines will serve as the backbone for your constellation connections. -
Mark star positions:
Plan out where your major stars will go. Place small dots at the intersections of your geometric lines and scatter random dots in the empty spaces for background stars.
Smudge Patrol
Metallic paint markers can take surprisingly long to dry on non-porous spray paint. Work from the center outward to avoid dragging your hand through fresh ink.
Step 3: Detailing the Constellations
-
Draw primary constellation lines:
Switch to your fine-tip gold metallic paint marker. Use a ruler to trace over your sketched lines, connecting the major star points. Keep the pressure consistent for clean, sharp lines. -
Create dotted trails:
For a varied look, connect some of the stars with dashed or dotted lines instead of solid ones. This mimics the look of vintage star charts and adds visual texture. -
Add major stars:
Draw five-pointed stars or solid diamonds over your major plotted points using the gold marker. Fill them in completely so they stand out against the black. -
detail the central circle:
Trace the large central circle you sketched earlier with a thin white gel pen or silver marker. This separates the design layers and gives depth to the composition. -
Add burst elements:
Choose a few key points on your lines to create ‘sunburst’ icons. Draw a small open circle, then add tiny radiating lines around it.
Glow Up
Use glow-in-the-dark paint for the smallest white stars. During the day they look white, but at night, your constellations will actually light up.
Step 4: Finishing Touches
-
Fill the void:
Using the white or silver gel pen, add tiny pinpoints of light in the negative spaces. Vary the size of these dots to create the illusion of a distant galaxy. -
Highlight the teeth:
Add small gold dots or accents near the gullets—the valleys between the saw teeth—to integrate the blade’s mechanical edge into the artwork. -
Clean up sketches:
Once you are certain the ink is completely dry, gently wipe away any visible chalk or pencil guidelines with a damp cloth or soft eraser. -
Seal the work:
Protect your galaxy by applying two light coats of clear matte sealer. This prevents the metallic markers from oxidizing and protects the black paint from scratches.
Hang your industrial star chart on the wall and enjoy the view


Have a question or want to share your own experience? I'd love to hear from you in the comments below!