If you want your fall decor to feel cozy instead of creepy, painting a scarecrow pumpkin is such a sweet way to do it. I’m sharing my favorite scarecrow pumpkin painting ideas that keep things beginner-friendly while still looking charming and detailed.
Stitched Smile With Hatch Marks
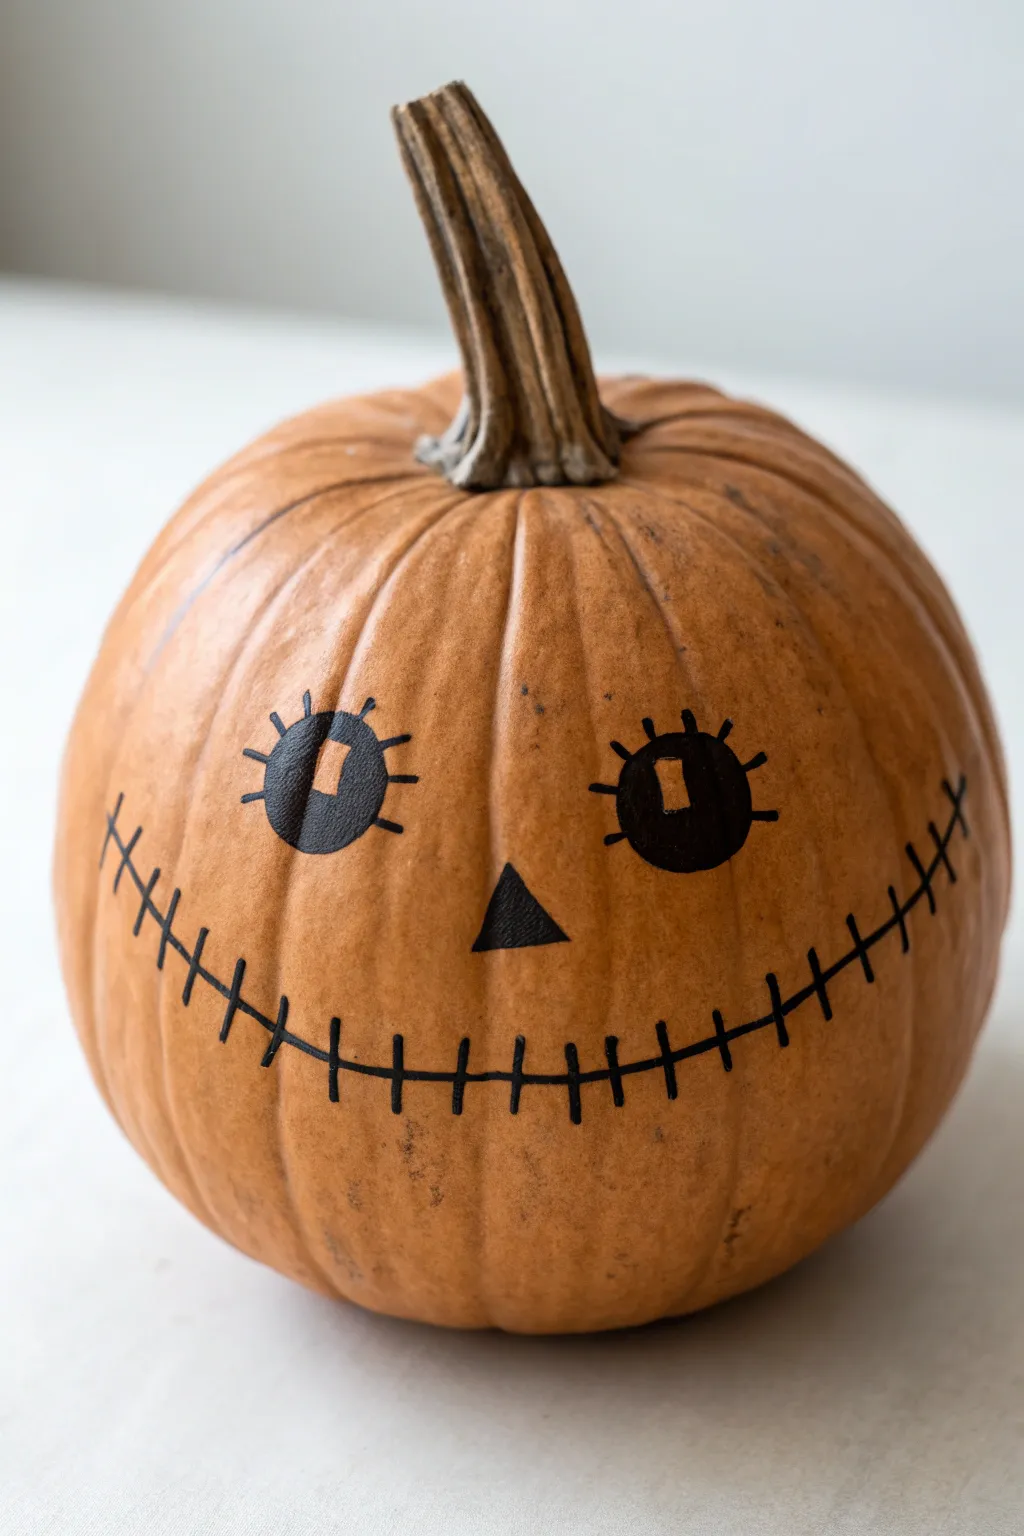
Give your pumpkin a touch of handmade charm with this stitched-smile design that evokes classic ragdoll scarecrows. The bold black lines against the orange skin create a striking, graphic look without the mess of carving.
Detailed Instructions
Materials
- Medium-sized orange pumpkin
- Soft cloth or paper towel
- Pencil (HB or lighter)
- Black acrylic paint or a broad black paint marker (oil-based works best)
- Fine-point paintbrush (if using paint)
- White paint pen or small brush (optional highlights)
Step 1: Preparation & Mapping
-
Clean surface:
Begin by wiping down your pumpkin with a damp cloth to remove any dirt or field dust. Dry it completely to ensure your marker or paint adheres properly. -
Set the height:
Visually divide the pumpkin face into thirds. You want the eyes to sit just above the midline and the mouth to swoop through the lower third. -
Sketch the eyes:
Using a pencil, lightly sketch two large circles for the eyes. Space them fairly wide apart to give the face a friendly, open expression. -
Outline the nose:
Draw a small, equilateral triangle for the nose right in the center, positioning it slightly lower than the bottom curve of the eye circles. -
Draft the smile:
Sketch a wide, generous curve for the mouth. Start low in the center and extend the lines upward toward the ‘cheeks’ on either side, almost reaching the height of the nose.
Clean Lines Pro Tip
If you make a mistake with a paint marker, quickly wipe it away with a damp Q-tip before it dries. If it has already dried, you can gently scratch excess paint off the pumpkin skin with a fingernail.
Step 2: Drawing the Features
-
Fill the nose:
Start with the easiest shape. Use your black paint marker or brush to fill in the triangle nose completely solid. -
Define the pupils:
Inside your eye circles, draw a slightly smaller circle, leaving a small rectangular gap near the top center uncolored. This negative space will act as the ‘gleam’ in the eye. -
Color the eyes:
Fill in the rest of the pupil area with solid black, being careful to preserve that uncolored highlight rectangle. The contrast is what makes the character look alive. -
Add the lashes:
Draw short, straight lines radiating outward from the top and sides of each eye. Aim for about 5-6 lashes per eye for a simple, doll-like effect. -
Trace the smile:
Go over your penciled mouth line with a steady hand. Make this main line slightly thicker than your lash lines to serve as a strong anchor for the stitches.
Level Up: Texture
To make the ‘stitches’ look more realistic, add tiny white dots at the intersection of each hatch mark on the mouth. It mimics the look of thread passing through fabric.
Step 3: Stitching Details
-
Center stitch:
Place your first vertical ‘stitch’ line directly in the center of the smile. -
Work outward:
Continue adding vertical hash marks moving outward from the center, spacing them about half an inch apart. Try to keep them perpendicular to the curve of the smile line. -
End caps:
Add a final cross-hatch or slightly longer vertical line at the very tips of the smile to frame the mouth. -
Refine edges:
Look over your work for any jagged edges. I like to smooth out the curve of the pupils one last time to make them perfectly round. -
Final drying:
Allow the paint or marker to dry completely undisturbed for at least 30 minutes to prevent smearing.
Now your pumpkin greets visitors with a timeless, handcrafted charm that celebrates the harvest season


Button Nose Look With Painted Texture
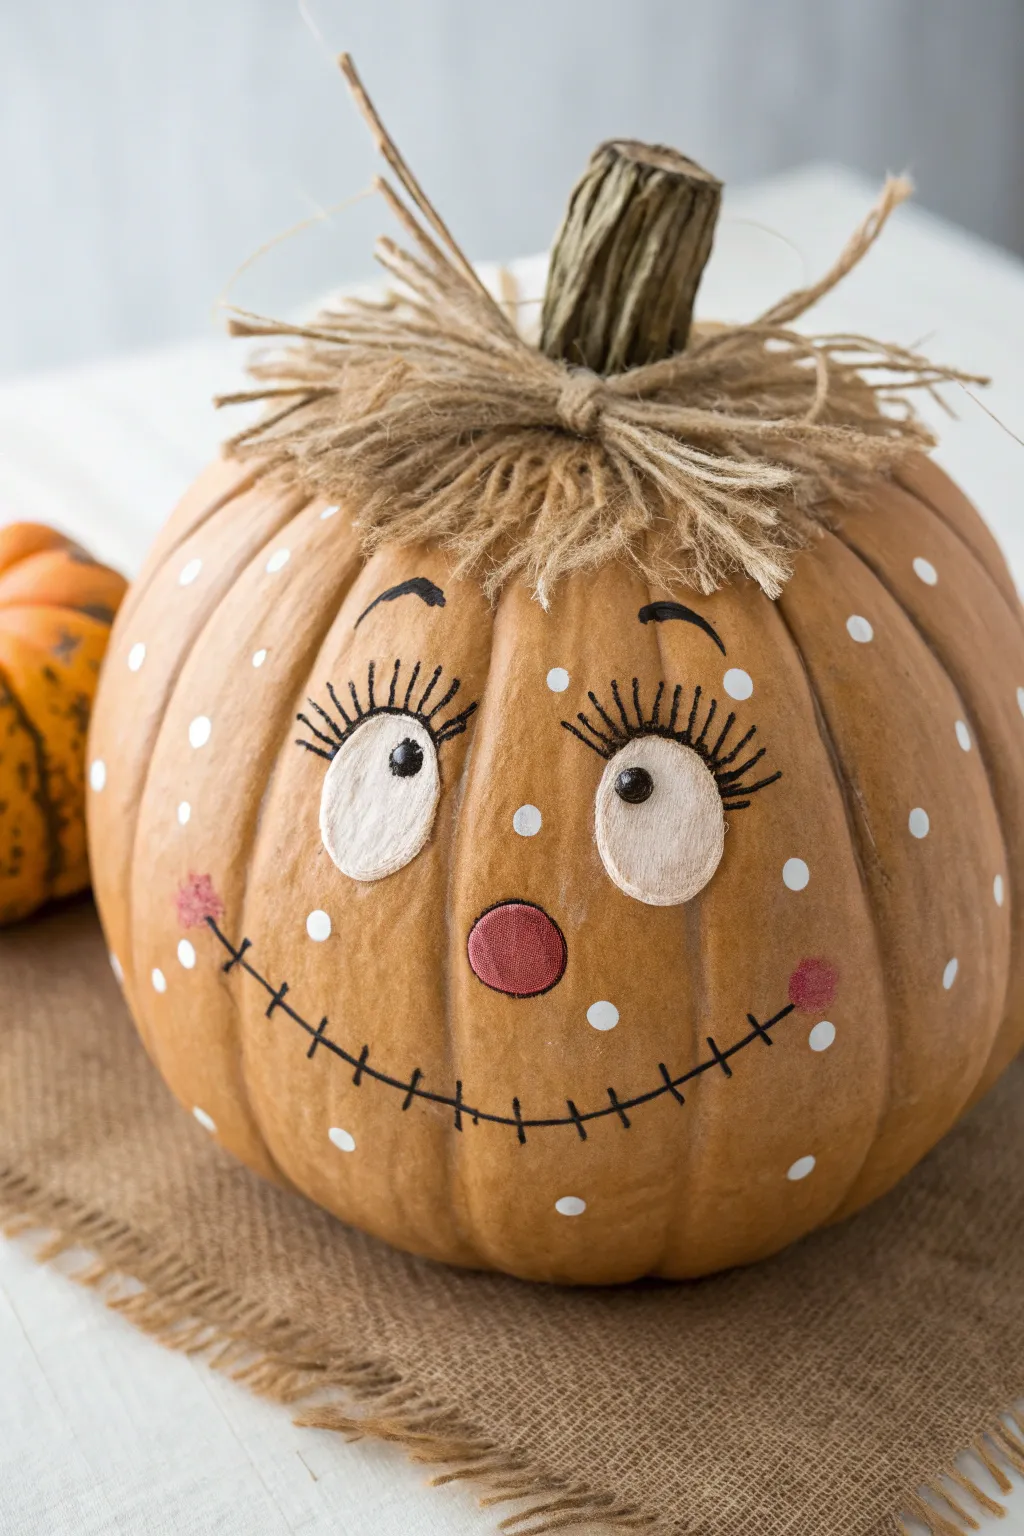
Transform a simple faux pumpkin into a charming scarecrow character complete with a fringed twine haircut and playful polka dots. This design features large, expressive eyes and a classic stitched smile that brings instant personality to your fall decor.
Step-by-Step Guide
Materials
- Large craft pumpkin (orange or tan)
- Felt sheet (cream or off-white)
- Small fabric scrap (red or pink)
- Jute twine
- Acrylic paint (white, black, pink)
- Small round paintbrushes
- Fine-tipped detail brush
- Hot glue gun and glue sticks
- Scissors
- Pencil
Step 1: Preparing the Face
-
Trace the eyes:
Start by positioning two oval shapes for the eyes on the upper third of the pumpkin. Using a pencil, lightly trace these shapes onto the pumpkin’s surface. Placing them slightly askew adds a bit of quirky character. -
Cut the felt eyes:
Cut two oval shapes from your cream-colored felt sheet that match your traced outlines. Felt adds a soft, textured dimension that paint alone can’t achieve. -
Attach the eyes:
Apply a thin layer of hot glue to the back of each felt oval. Press them firmly onto the traced areas on the pumpkin, smoothing out any bumps before the glue sets. -
Create the nose:
Cut a small, perfect circle from your red or pink fabric scrap for the nose. I like to use a coin as a template to get the shape just right. -
Glue the nose:
Adhere the fabric nose centered below the eyes, positioning it right on a pumpkin ridge if possible to emphasize the 3D effect.
Fray Your Ends
To make the hair look more like authentic straw or hay, manually untwist the ends of the jute twine after gluing. This creates a fuller, fuzzier texture.
Step 2: Painting the Details
-
Paint the pupils:
Using black acrylic paint and a small round brush, paint large circles inside the upper part of the felt eyes. Looking upward gives the scarecrow a sweet, innocent expression. -
Add white highlights:
Once the black pupil paint is dry, dip the handle of a paintbrush into white paint and dot a small highlight into the corner of each pupil. This makes the eyes look wet and alive. -
Outline the nose:
Take your fine-tipped detail brush with black paint and carefully outline the fabric nose to define it against the orange pumpkin skin. -
Draw the lashes:
Using the same fine liner brush, paint long, thick eyelashes extending from the top of the felt eyes. Curve them outward slightly for a whimsical look. -
Add eyebrows:
Paint short, curved eyebrows floating above the lashes. Keep them fairly high to maintain that surprised, happy expression. -
Paint the mouth:
Draw a long, thin black line that curves gently upward across the lower half of the pumpkin face. I find it helpful to follow the natural curve of the pumpkin. -
Stitch the smile:
Paint small vertical hash marks along the mouth line to create the classic ‘stitched’ scarecrow mouth appearance. -
Add rosy cheeks:
Using pink paint and a dry brush technique (wipe most paint off first), dab small, rough circles at the ends of the smile line for cheeks. -
Create the polka dots:
Using white paint and a round brush, scatter polka dots all over the pumpkin’s surface. Keep the spacing random and varied for a playful pattern.
Step 3: Constructing the Hair
-
Cut twine lengths:
Cut approximately 30 to 40 strips of jute twine, making them about 4 to 5 inches long each. These will form the messy straw hair. -
Create bundles:
Group the twine strips into small bundles of 5 or 6 strands. Tie a separate piece of twine tightly around the center of each bundle. -
Glue hair bundles:
Apply hot glue around the base of the pumpkin stem. Press the center of your twine bundles into the glue, arranging them so the ends flare out like bangs. -
Trim the bangs:
Give the scarecrow a haircut by trimming the front pieces of twine so they don’t cover the eyes. Leave the back and sides a bit longer and messier. -
Secure the style:
Take a long piece of twine and tie it around the entire hair arrangement at the base of the stem to cinch the hair and hide the glue points.
Add Fabric Patches
Enhance the rustic look by gluing small squares of burlap or plaid fabric onto the pumpkin cheeks or forehead, outlining them with black faux ‘stitches’.
Place your adorable new friend on the porch or a mantel where his cheerful face can greet everyone who passes by


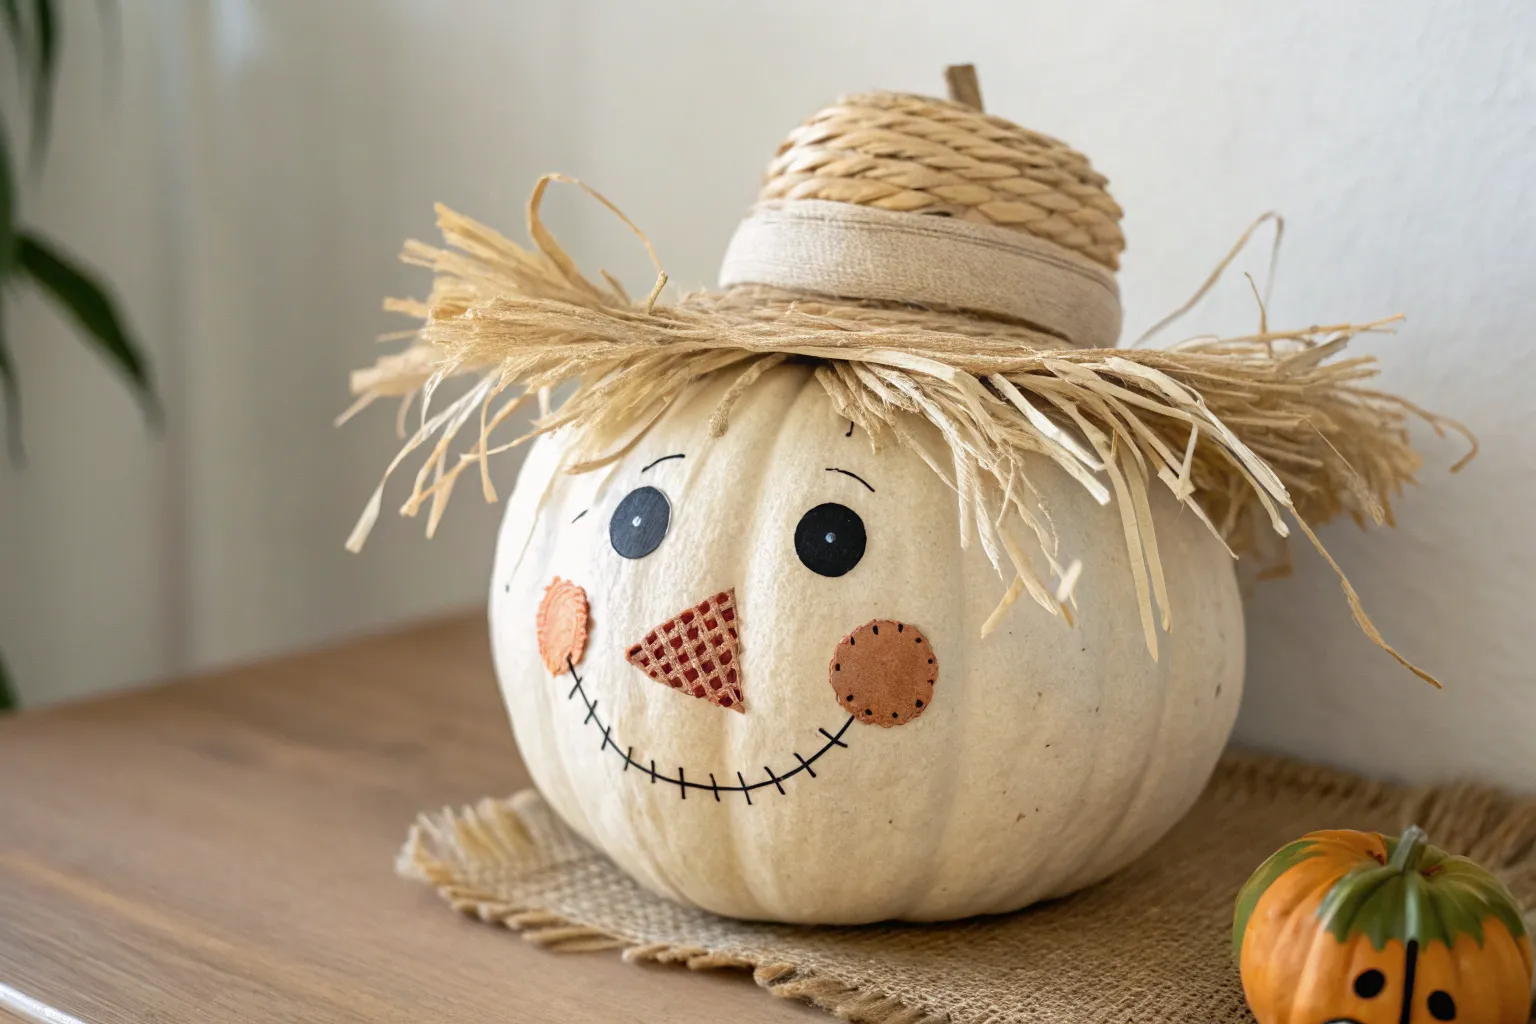
Raffia Hairline With Painted Shadows
Transform a simple white pumpkin into a friendly fall character with this rustic scarecrow design. By combining natural textures like raffia and dried leaves with a sweet painted expression, you’ll create a cozy porch decoration that captures the heart of the harvest season.
Detailed Instructions
Materials
- Large white artificial or real pumpkin (with a defined stem area)
- Acrylic craft paint (black, burnt orange, white)
- Round paintbrushes (small fine-point and medium)
- Artificial fall leaves (browns and muted oranges)
- Natural raffia
- Small bundle of dried wheat or straw
- Thick jute rope or burlap strip
- Hot glue gun and glue sticks
- Pencil
- Scissors
Step 1: Painting the Friendly Face
-
Map out the features:
Before committing to paint, lightly sketch the face directly onto the pumpkin skin using a pencil. Draw two oval eyes, a triangle nose centered below them, two circular cheeks, and a stitched mouth curve. -
Paint the nose base:
Using your medium brush and burnt orange paint, fill in the triangle nose shape. You may need two coats for opaque coverage, especially if the pumpkin surface is glossy. -
Add the rosy cheeks:
Mix a tiny bit of white with your burnt orange to create a softer, terracotta peach color. Dab this onto the circular cheek areas using a dry brush technique to give them a slightly textured, stippled look rather than a solid block of color. -
Fill in the eyes:
Switch to black acrylic paint and fill in the tall, oval eye shapes. Keep your edges smooth. -
Outline the nose:
Using a fine-point brush and black paint, carefully outline the orange triangle nose to make it pop against the white pumpkin. -
Create the stitched smile:
Paint the main curve of the smile in a thin black line. Then, paint short vertical hatch marks across the smile line to create the classic sewn scarecrow look. -
Add the eye highlights:
Once the black eye paint is completely dry, dip the handle end of a paintbrush into white paint. Dot a single white highlight near the top of each black oval to bring the character to life. -
Detail the nose:
For a little extra dimension, you can sponge a tiny bit of darker orange or brown speckles onto the nose to mimic fabric texture.
Soften the Glow
Mix a drop of water into your peach paint for the cheeks. A wash creates a natural blush effect compared to heavy, opaque acrylics.
Step 2: Creating the Hat and Hair
-
Prepare the leaf layer:
Select several artificial leaves in varying shades of brown. If they are too large, trim the stems off so they lay flat. -
Glue the foliage hairline:
Hot glue the leaves in a ring around the top of the pumpkin, about 2-3 inches down from the stem. The tips of the leaves should point downward, creating a fringe that frames the forehead. -
Cut the raffia strands:
Cut a generous amount of natural raffia into lengths of about 8-10 inches. You want enough to create a full, messy mop of hair. -
Attach the raffia:
Working in sections, hot glue the raffia strands directly over the stems of the leaves you just attached. Let the raffia hang down loosely over the leaves and the sides of the pumpkin. -
Create the top knot:
Take your bundle of dried wheat or stiff straw. Trim the bottom ends so they are even. -
Secure the stem:
Place the wheat bundle directly on top of the pumpkin stem (or over the hole if you removed the stem). Secure it heavily with hot glue to ensure it stands upright. -
Wrap the base:
To hide the glue and the cut ends of the wheat, wrap a piece of thick jute rope or a strip of burlap around the base of the wheat bundle. Glue it tightly to create a finished ‘hat’ brim effect. -
Give a haircut:
Finally, trim the ends of the hanging raffia so they aren’t too long, giving the scarecrow a raggedy but deliberate hairstyle that doesn’t obscure the painted face.
Leaf Adhesion Issues
If the faux leaves won’t stick to the waxy pumpkin skin, lightly sand the area where you are applying glue to create a rougher surface for better grip.
Place your charming new friend near your entryway to greet guests with a festive autumn smile


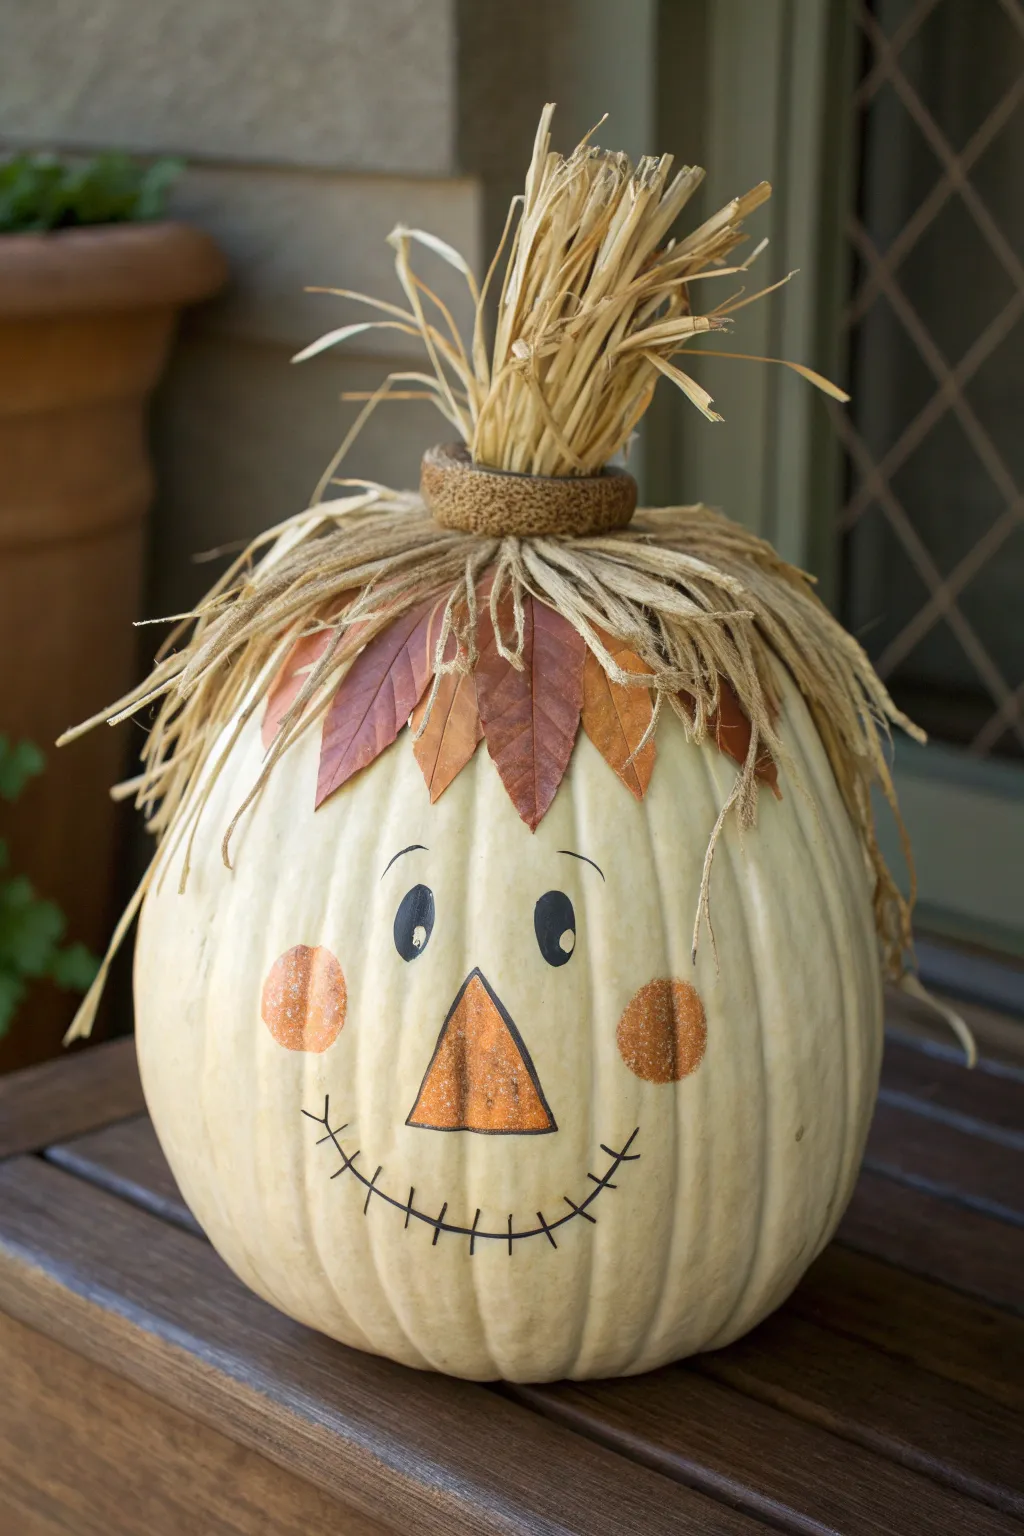
Straw-Hat-Topped Scarecrow Pumpkin
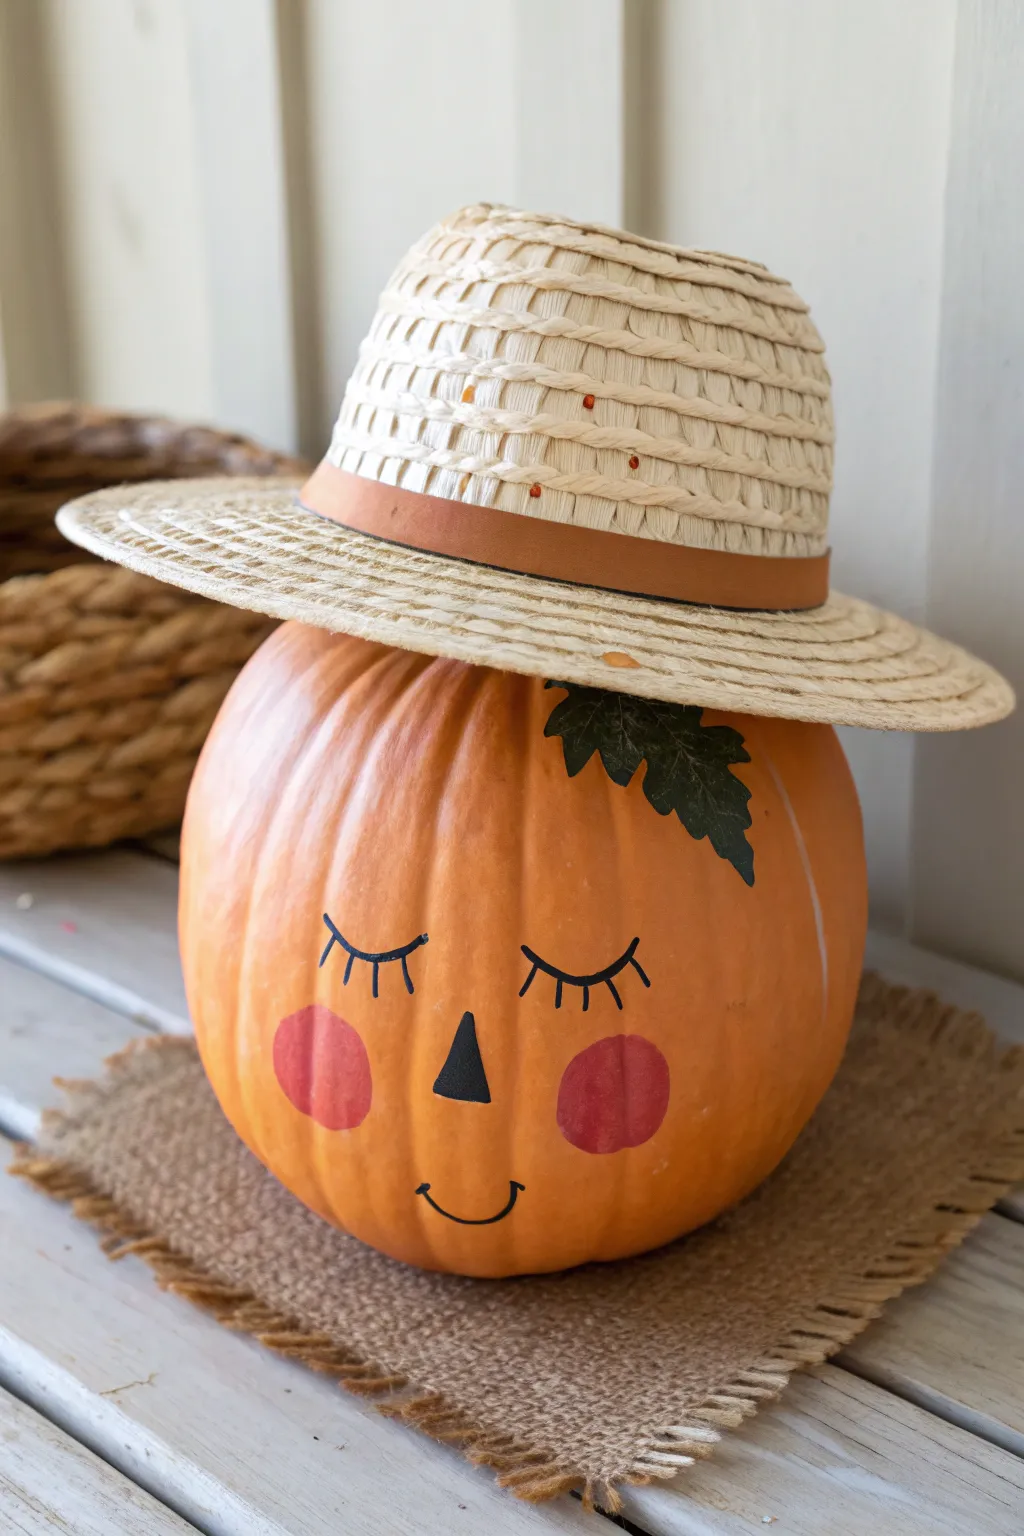
Transform a simple orange pumpkin into the sweetest scarecrow on the patch with just a few strokes of paint and a charming accessory. This adorable, simplified design features sleepy eyes and rosy cheeks for a look that is more cute than scary.
Step-by-Step Guide
Materials
- Medium-sized orange pumpkin (real or faux)
- Small straw hat (sized to fit the pumpkin top)
- Black acrylic paint or black permanent paint pen
- Pink or coral craft paint
- Round sponge pouncer (approx. 1 inch)
- Fine liner paintbrush
- Small flat paintbrush
- Faux green leaf (optional)
- Strong craft glue or hot glue gun
- Square of burlap fabric (for display)
Step 1: Painting the Face
-
Clean the surface:
Before starting, wipe down your pumpkin with a damp cloth to remove any dust or dirt. If you are using a real pumpkin, ensure it is completely dry so the paint adheres properly. -
Plan the placement:
Place the straw hat on top of the pumpkin temporarily. This helps you gauge exactly where the face should sit so the hat brim doesn’t cover the eyes. -
Sketch the features:
Use a pencil to very lightly sketch the closed eyes, the triangular nose, and the small smile. Keep the lines faint so they don’t show through the paint later. -
Outline the eyes:
Dip your fine liner brush into black acrylic paint, or use a medium-tip black paint pen. Carefully trace the curved lines for the closed eyelids. -
Add the lashes:
From the center of the eyelid curve, paint three simple, straight lashes extending upward on each eye. Keep them evenly spaced for a classic sleeping scarecrow look. -
Paint the nose:
Using a small flat brush and black paint, fill in the triangle shape for the nose. I find it easiest to outline the triangle first and then fill the center to keep the edges sharp. -
Create the smile:
Switch back to your fine liner brush (or paint pen) and draw a small, simple ‘U’ shape for the mouth. Add tiny tick marks at the ends of the smile line for extra character. -
Create the cheeks:
Load your round sponge pouncer with a small amount of pink or coral paint. Dab it onto a paper towel first to offload excess paint—you want a soft, stamped look, not a globs of paint. -
Apply the blush:
Press the pouncer gently onto the pumpkin surface just underneath and slightly outside the eyes. Rotate the sponge slightly as you lift it to create a perfect circle. -
Let it dry:
Allow the painted face to dry completely for at least 30 minutes. Be careful not to smudge the wet black paint.
Stamp Perfection
Don’t have a foam pouncer? A circular piece of potato or the flat end of a wine cork makes a perfect makeshift stamp for those rosy cheeks.
Step 2: Adding Accessories
-
Prepare the hat:
Take your small straw hat and check the fit again. If the hat sits too high, you can carefully trim the pumpkin stem shorter (if using a real pumpkin) or cut a small hole inside the hat to accommodate it. -
Secure the hat:
Apply a ring of hot glue to the inner rim of the hat or directly onto the top of the pumpkin. Press the hat firmly into place, tilting it slightly backward so the face is clearly visible. -
Add greenery:
Take a single faux green leaf. Apply a dab of glue to the back of the leaf stem. -
Attach the leaf:
Tuck the leaf underneath the brim of the hat, slightly off-center near the forehead area, and press until the glue sets. This adds a nice pop of contrasting color. -
Create the base:
Cut a square piece of burlap fabric. Pull at the edges of the fabric to specific threads, creating a frayed, rustic fringe along all four sides. -
Final assembly:
Place the burlap square on your table or shelf, and set your finished scarecrow pumpkin centered on top to complete the rustic autumn display.
Wobbly Lines?
If painting curved lines on a round pumpkin is tricky, use a black permanent marker or paint pen instead of a brush for much easier control over the details.
Now you have a delightfully cozy decoration ready to welcome the autumn season
BRUSH GUIDE
The Right Brush for Every Stroke
From clean lines to bold texture — master brush choice, stroke control, and essential techniques.
Explore the Full Guide
Sunflower Accent for Harvest Charm
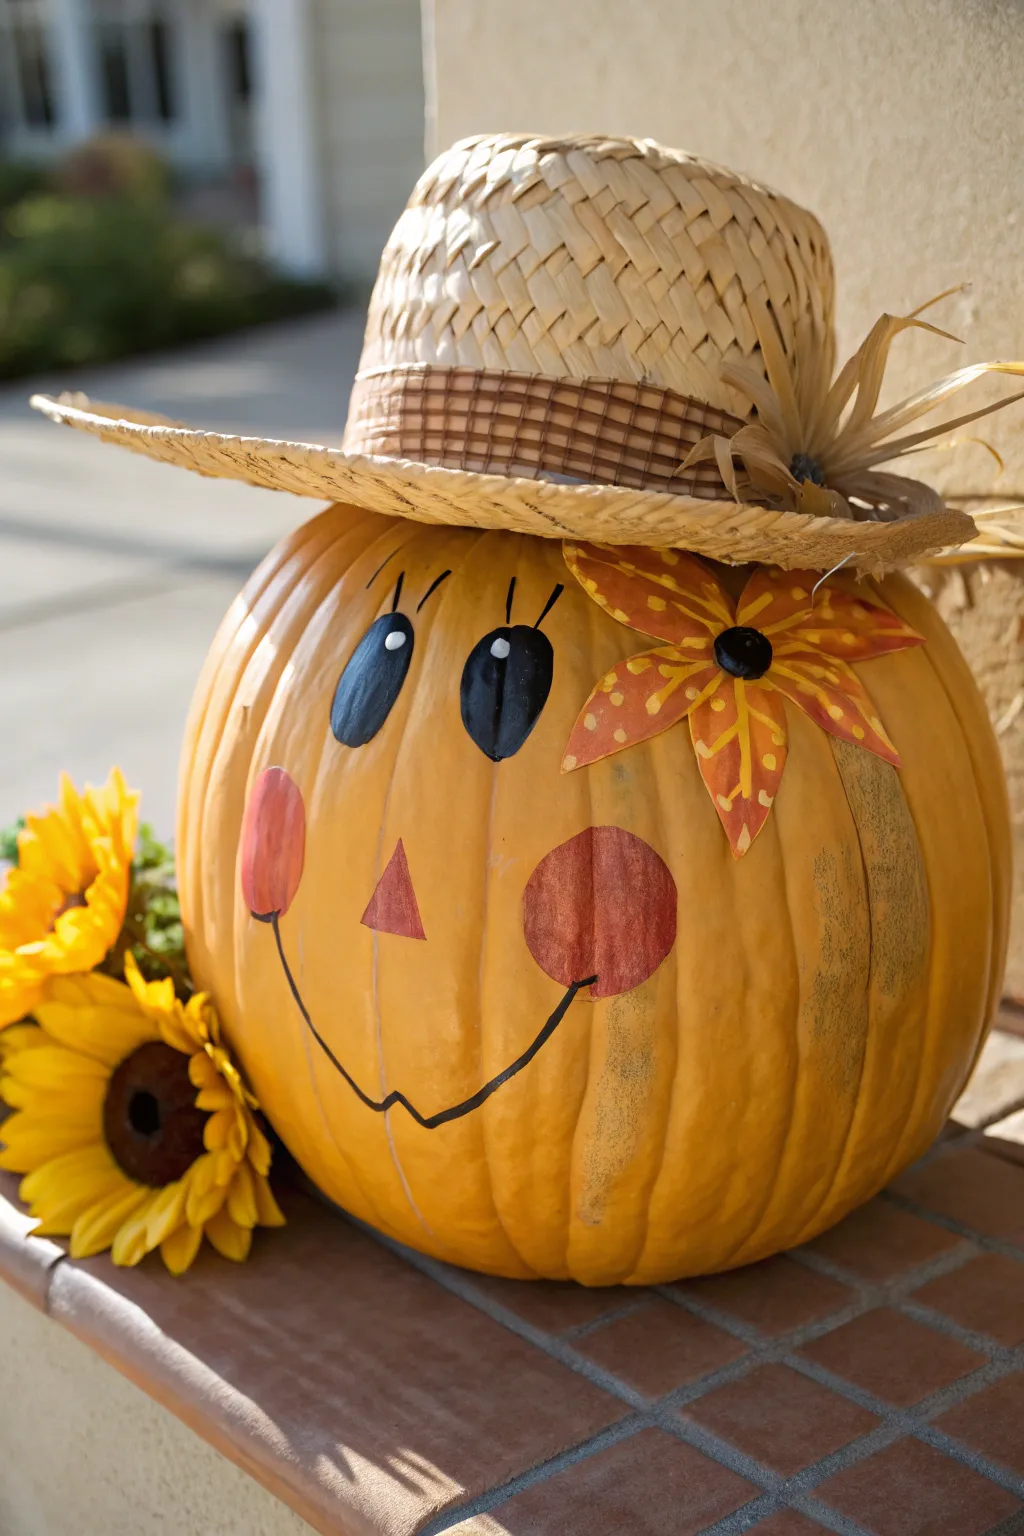
Transform a simple pumpkin into a cheerful harvest character with bright, expressive features and charming sunflower details. This scarecrow inspired design uses classic straw accessories and bold painted shapes for a friendly face that welcomes autumn guests.
Step-by-Step Guide
Materials
- Large orange pumpkin (real or faux)
- Straw hat (sized to fit the pumpkin)
- Artificial sunflower stems
- Acrylic craft paint (black, white, red, deep orange, yellow)
- Small round paint brushes
- Medium flat paint brush
- Hot glue gun and glue sticks
- Pencil or chalk
- Raffia or preserved straw
- Fabric flower or felt (for the hair accessory)
Step 1: Preparing the Base
-
Clean surface:
Begin by wiping down your pumpkin with a damp cloth to remove any dirt or waxy residue. If using a real pumpkin, ensure it is completely dry before applying any paint. -
Dry fit the hat:
Place the straw hat on top of the pumpkin to see where it sits naturally. This will help you determine exactly where to position the face so the features aren’t hidden by the brim. -
Mark the brim line:
Lightly mark the bottom edge of the hat brim with a pencil or chalk, then set the hat aside so you have a clear workspace.
Step 2: Painting the Features
-
Sketch the eyes:
Using your pencil or chalk, draw two large oval shapes for the eyes. Position them slightly tilted inward toward each other to create a friendly, inviting expression. -
Start the nose:
Draw a small triangle right in the center of the face, slightly below the eyes. -
Outline the mouth:
Sketch a wide, sweeping “U” shape for the smile. I find it helpful to start from the center and curve upward on both sides to ensure symmetry. -
Fill in the eyes:
Use a medium flat brush and black acrylic paint to fill in the oval eye shapes completely. You may need two coats for a bold, opaque finish. -
Add eye highlights:
Once the black paint is dry, use a small round brush to add a small white dot near the top of each oval eye. This ‘sparkle’ brings the character to life. -
Paint the nose:
Fill in the triangular nose with deep orange or reddish-brown paint. -
Create distinct lashes:
Using a fine liner brush and black paint, add three long, dramatic eyelashes extending from the top outer corner of each eye. -
Define the mouth:
Trace over your pencil smile line with black paint using a steady hand. Add small perpendicular hash marks at the ends of the smile to mimic stitching. -
Add rosy cheeks:
Using a round sponge dabber or a round brush, paint large red or deep orange circles at the corners of the mouth for cheeks.
Pro Tip: Smooth Application
Pumpkins have deep vertical ridges. When painting across them, use a dabbing motion rather than dragging the brush to get paint deep into the crevices without skipping.
Step 3: Accessorizing
-
Attach the hair accessory:
Paint a large flower shape on the upper right side of the forehead, or glue a fabric flower in place. Add yellow dots or petals to make it look like a sunflower. -
Prepare the hat:
If your straw hat is plain, use hot glue to attach a few sprigs of raffia, dried wheat, or scraps of burlap around the band for texture. -
Secure the hat:
Place the hat back onto the pumpkin. Apply a few dabs of hot glue under the brim at the back and sides to keep it from sliding off in the wind. -
Arrange the sunflowers:
Take your artificial sunflower stems and tuck two large blooms next to the pumpkin on the left side to balance the composition. -
Final touches:
Check your painted lines one last time. If the pumpkin ridges caused any gaps in the paint, do a quick touch-up with a small brush.
Level Up: 3D Elements
Instead of just painting the flower on the pumpkin’s forehead, hot glue a real fabric sunflower or a burlap flower there for added dimension and texture.
Now you have a charming autumnal greeter ready to brighten your porch or entryway
Mini Scarecrow Pumpkin Set With Expressions
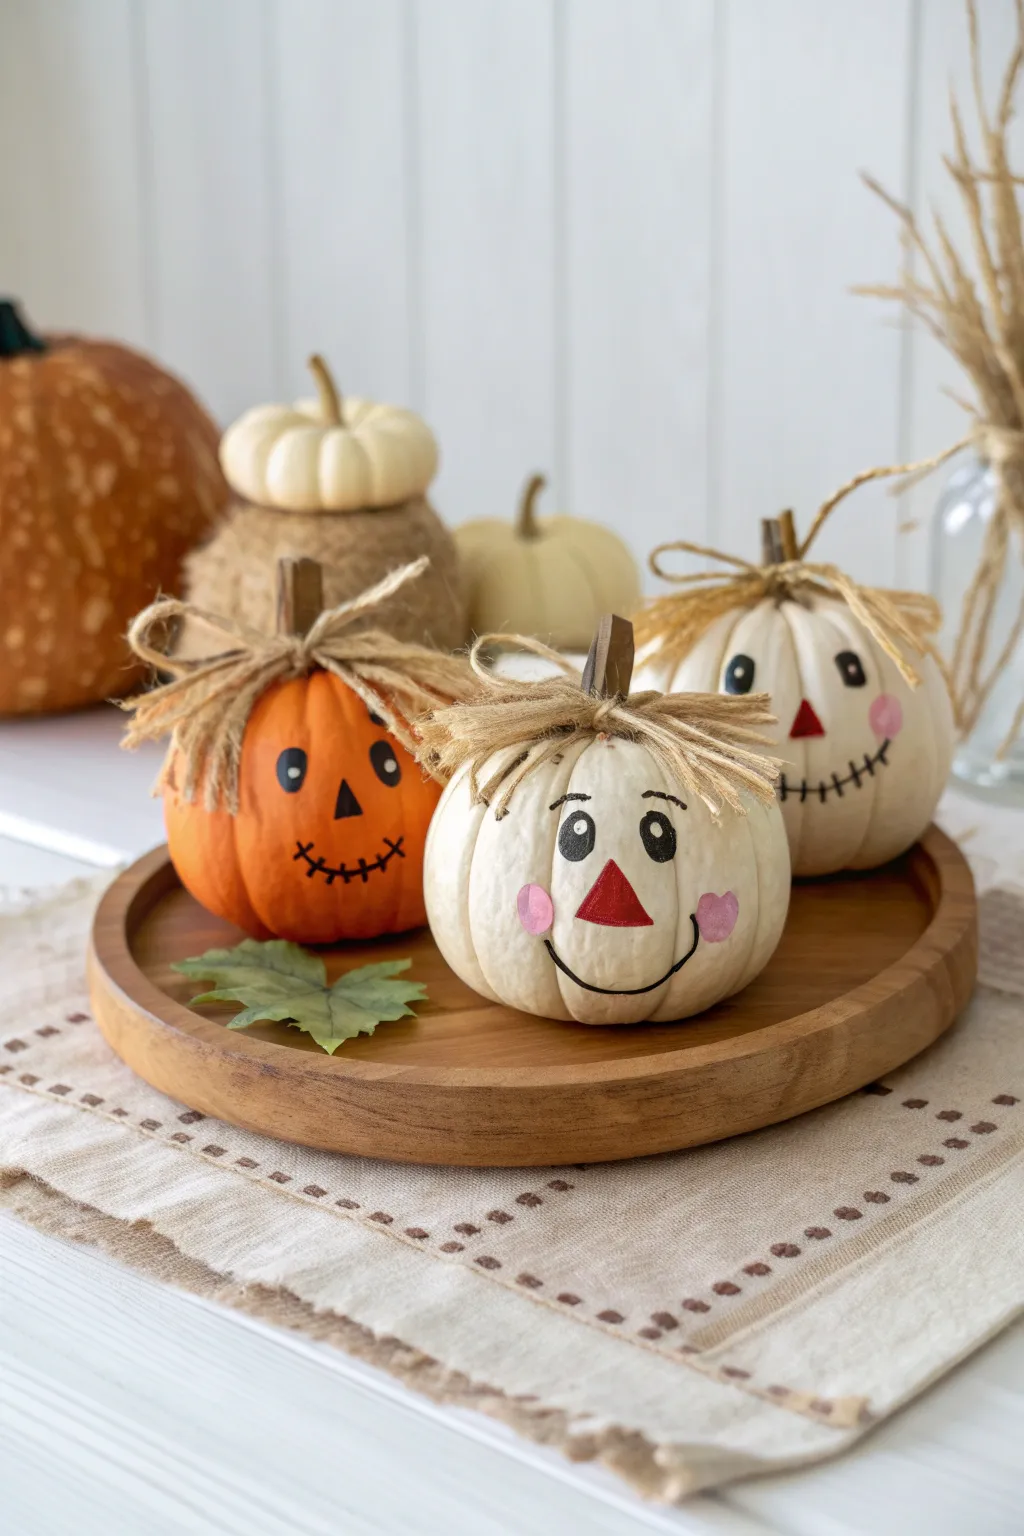
These adorable mini pumpkins transform into friendly scarecrows with just a few strokes of paint and some rustic twine hair. This trio features distinct expressions, from a cheery smile to a stitched grin, creating a charming autumnal display perfect for a table centerpiece.
Step-by-Step Tutorial
Materials
- 3 mini pumpkins (one orange, two white/cream)
- Black acrylic paint or paint pen
- Red or dark orange acrylic paint
- Pink acrylic paint (for cheeks)
- Small flat brush
- Fine detail brush or liner brush
- Jute twine or raffia
- Hot glue gun and glue sticks
- Scissors
Step 1: Painting the Faces
-
Prep the surface:
Begin by wiping the pumpkins clean with a damp cloth to remove any dirt or oils that might prevent the paint from sticking. Let them dry completely. -
Outline the noses:
Using a small flat brush and red or dark orange paint, paint a small triangle in the center of each pumpkin face. For variety, you can make the orange pumpkin’s nose black, as shown in the left pumpkin. -
Create the eyes:
Switch to your black paint. For the two white pumpkins, paint slightly oval shapes for eyes. -
Add eye details:
Once the black eye ovals are dry, add a tiny dot of white paint (or leave a negative space if you are steady) to create a ‘sparkle’ highlight. For the orange pumpkin, paint simpler, solid black oval eyes. -
Paint the mouths:
Using a fine liner brush or a black paint pen, draw the mouths. For the center pumpkin, paint a simple, wide ‘U’ curve. -
Add stitched details:
For the pumpkin on the right, paint a curved line and cross it with small vertical hatch marks to create a ‘stitched’ look. Do the same for the orange pumpkin on the left. -
Add rosy cheeks:
Dip a fingertip or a small round brush into pink paint. Gently dab circular ‘blush’ marks onto the cheeks of the two white pumpkins. I like to blot the paint on a paper towel first so it goes on sheer. -
Dry completely:
Allow all paint to dry fully before moving on to handling the pumpkins for the hair step.
Natural Texture Hack
Unravel the ends of the jute twine slightly with your fingers. This separates the fibers and makes the ‘hair’ look frizzy and more authentic.
Step 2: Adding the Scarecrow Hair
-
Cut the twine:
Cut 15-20 strips of jute twine, each about 3-4 inches long. You’ll need a bundle like this for each pumpkin. -
Create the bundles:
Gather a group of twine strips together in your hand, ensuring they look somewhat messy and straw-like. -
Tie the bundles:
Take a separate, longer piece of twine and tie it tightly around the center of your twine bundle. It should look like a small bow tie. -
Secure the hair:
Apply a generous dab of hot glue right at the base of the pumpkin’s stem. -
Attach the twine:
Press the center knot of your twine bundle into the hot glue. Hold it in place for a few seconds until the glue sets. -
Arrange the strands:
Fan the twine strands out so they drape over the ‘forehead’ and sides of the pumpkin face. You can use a tiny dot of glue to tack down unruly strands if necessary. -
Add a bow:
Cut one last piece of twine and tie a shoelace bow around the existing stem and hair bundle to finish the look and hide any visible glue. -
Trim the bangs:
If the twine is covering the eyes too much, give your scarecrow a little haircut with scissors until the expression is clearly visible.
Fixing Smudges
If you make a mistake while painting the face, quickly wipe it away with a damp Q-tip before the acrylic paint sets completely.
Arranging these three distinct characters together creates a delightful family of harvest friends for your home

PENCIL GUIDE
Understanding Pencil Grades from H to B
From first sketch to finished drawing — learn pencil grades, line control, and shading techniques.
Explore the Full Guide
Garden Post Scarecrow Pumpkin Totem Look
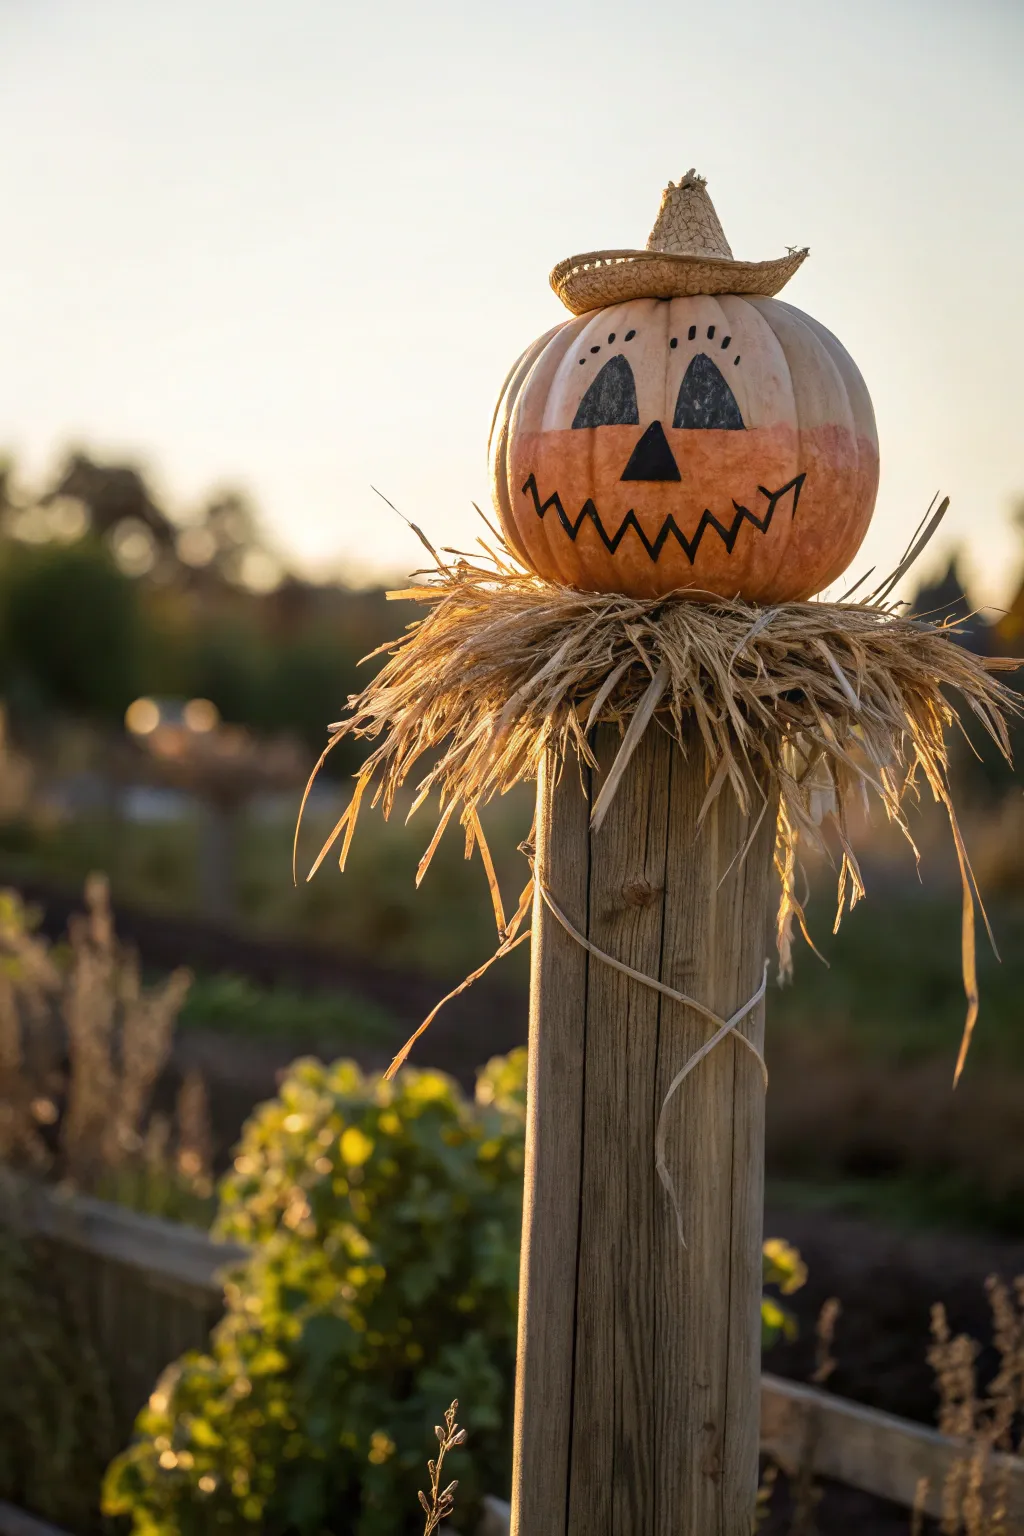
Transform a simple fence post into a festive garden guardian with this rustic scarecrow project. The combination of a partially painted pumpkin, loose hay, and natural wood creates a charming, handcrafted look that welcomes autumn visitors.
Step-by-Step Guide
Materials
- Medium-sized round pumpkin (real or faux)
- Wooden fence post (round, approx. 4-inch diameter)
- Black outdoor acrylic paint
- Medium flat paintbrush
- Small detail paintbrush
- Pencil
- Dried straw or raffia
- Small straw hat (doll or craft size)
- Hot glue gun and glue sticks
- Pale orange or peach acrylic paint (optional for tinting)
- Rough twine or jute string
- Clear matte sealer spray (if using a real pumpkin)
Step 1: Preparing the Pumpkin Head
-
Clean surface:
Begin by wiping down your pumpkin with a damp cloth to remove any field dirt or dust. Let it dry completely before painting. -
Optional color wash:
If your pumpkin is too bright orange, you can lightly brush a watered-down pale peach or cream paint over the top half to give it a sun-faded look, as seen in the photo. Wipe away excess with a rag. -
Sketch the face:
Using a pencil, lightly sketch two large triangles for eyes and a smaller triangle for the nose. Draw a wide, jagged zigzag line for the mouth that stretches across the lower front. -
Add eye details:
Above the eyes, sketch three small vertical dashes on each side to represent eyelashes or eyebrows. -
Paint the features:
Fill in the eye and nose triangles using your black outdoor acrylic paint and the flat brush. I find two thin coats cover better than one thick glob. -
Detail the mouth:
Switch to a smaller detail brush to carefully trace the zigzag mouth line. Keep the line thickness consistent for a bold, stitched look. -
Seal the paint:
Once the black paint is bone dry, spray the entire pumpkin with a clear matte sealer to protect it from the elements.
Paint Drips?
If black paint drips on the uneven pumpkin surface, quickly wipe it with a wet Q-tip. If it dries, scrape it gently with a craft knife.
Step 2: Assembling the Scarecrow
-
Prepare the hat:
Take your small straw hat and apply a ring of hot glue around the inside rim. -
Attach the hat:
Firmly press the hat onto the top of the pumpkin, slightly tilted to the side for a bit of personality. -
Create the collar:
Gather a large handful of loose straw or raffia. Arrange it in a ring shape on top of your wooden post. -
Secure the straw base:
Apply a generous amount of hot glue to the top of the wooden post and press the straw ring down, letting the ends hang messily over the edges. -
Mount the head:
Apply heavy-duty outdoor glue or a large amount of hot glue to the center of the straw-covered post top. -
Position the pumpkin:
Set the painted pumpkin firmly onto the post, pressing down so it nestles into the straw bed. Hold it in place for a minute until the glue sets. -
Add rustic ties:
Cut a long length of rough twine or jute string. -
Wrap the post:
Wrap the twine loosely around the upper section of the wooden post, just below the straw collar. -
Final adjustment:
Pull at the straw strands to fluff them out, ensuring they look like a messy, stuffed scarecrow neck.
Customize It
Add a fabric bandana around the ‘neck’ area where the hay meets the wood for a pop of autumnal color like plaid or burlap.
Place your new scarecrow totem in a garden bed to watch over your late-season harvest


Have a question or want to share your own experience? I'd love to hear from you in the comments below!