Painting on a window screen is one of my favorite ways to get that instantly rustic, airy look that canvas just can’t do. The mesh texture makes even simple shapes feel special, and you can let light peek through for a really magical finish.
Big Bold Sunflowers on a Window Screen
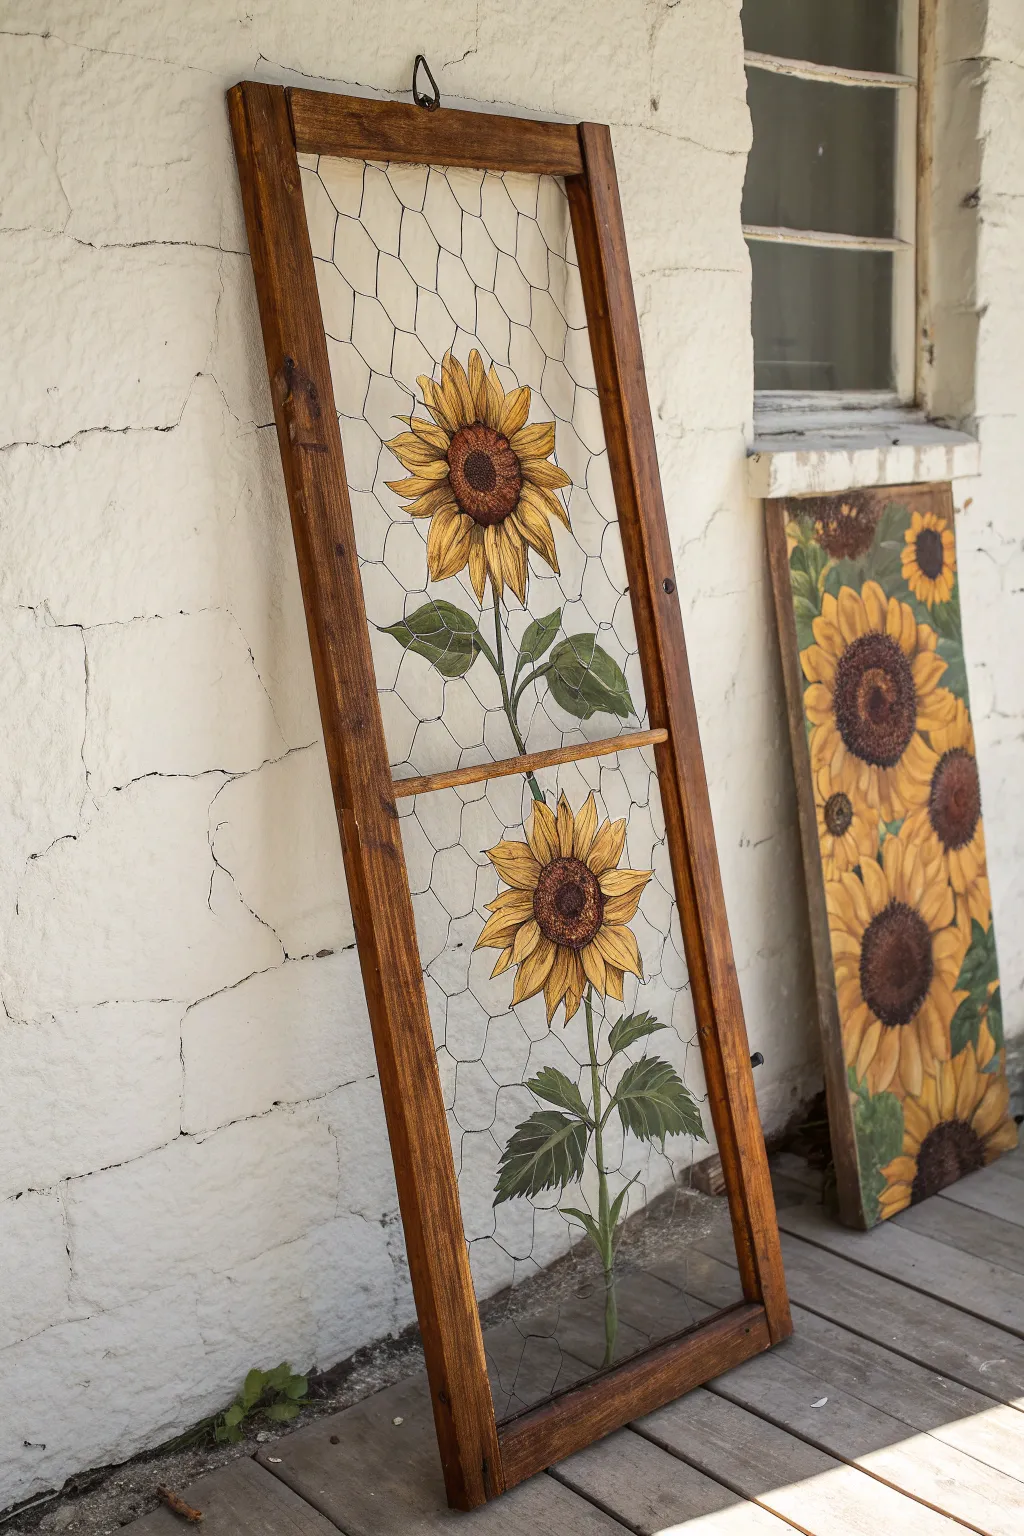
Transform a rustic wooden frame and hexagonal chicken wire into a stunning piece of farmhouse art with this painted screen project. The open mesh creates a unique, floating effect for the bright yellow petals and deep brown centers, perfect for hanging on a porch or garden wall.
Step-by-Step Tutorial
Materials
- Large wooden frame (reclaimed or new)
- Chicken wire (hexagonal poultry netting)
- Wire cutters
- Staple gun and staples
- Acrylic paints (various yellows, browns, greens, white, black)
- Clear acrylic medium or Gesso (optional primer)
- Assorted paintbrushes (flats and fine liners)
- Chalk or a white pencil
- Dark wood stain (for the frame)
- Paper towels or rag
- Reference photo of sunflowers
Step 1: Preparing the Frame
-
Clean and sand:
Begin by cleaning your wooden frame thoroughly to remove any dirt or old finish. Lightly sand the wood to create a smooth surface, wiping away any dust with a tack cloth. -
Stain the wood:
Apply a dark wood stain using a rag or brush, working with the grain. Wipe off any excess stain after a few minutes to achieve a rich, weathered look, and let it dry completely according to the manufacturer’s instructions. -
Attach the wire:
Roll out your chicken wire over the back of the frame. Use wire cutters to trim it to size, leaving about an inch of overhang on all sides. Pull the wire taut and secure it firmly to the back of the wood using a staple gun. -
Secure loose ends:
Tap down any protruding staples with a hammer and carefully fold or trim any sharp wire edges so they don’t snag your clothes or skin while painting.
Thicken Up
If the paint keeps dripping through the holes, mix your acrylics with a little bit of cornstarch or modeling paste. This thickens the body of the paint, helping it cling to the thin wires better.
Step 2: Blocking in the Design
-
Establish the composition:
Visualize where your two main flowers will sit. Since you can’t sketch easily on wire, you can place a detailed sketch underneath the wire frame as a guide, or lightly mark the center points of the flowers on the wire with a bit of white chalk. -
Base coat technique:
Painting on wire requires a thick consistency. Do not dilute your acrylics. Load a small flat brush heavily with white paint (or gesso) to create a base silhouette for the flowers and leaves. You need enough paint to bridge the gaps in the wire mesh slightly, or at least coat the wires thickly. -
Fill the shapes:
Paint the entire shape of the petals, center disks, and leaves in white first. This crucial step ensures your colors will pop against the dark background instead of disappearing into the metallic wire. -
Let it cure:
Allow this white base layer to dry completely. It acts as a primer and gives the colored paint something substantial to grip onto.
Layered Dimension
Attach a few silk sunflower petals or cut-out fabric leaves to the wire using varying spots of glue. This mixed-media approach adds literal 3D texture to your painted illusion.
Step 3: Painting the Sunflowers
-
Apply yellow base:
Once the white is dry, coat the petal areas with a medium yellow tone. Don’t worry about shading yet; just get a solid, bright color down. -
Paint the centers:
Fill the circular centers with a dark brown. Stipple the paint on with an old, stiff brush to mimic the rough texture of seeds. -
Add the greenery:
Paint the stems and leaves with a mid-tone green. I like to add a touch of brown to the green mix for the stems to make them look more woody and realistic. -
Layering shadows:
Mix a darker golden-orange color. Paint this near the base of the petals where they meet the center, and along the undersides of the leaves to create depth and dimension. -
Highlighting petals:
Mix a pale yellow or creamy white. Add strokes to the tips and outer edges of the petals to simulate sunlight hitting the flower. -
Detailing the seeds:
Using a fine liner brush, add tiny dots of lighter brown and black within the dark center disk to suggest individual seeds.
Step 4: Refining and Sealing
-
Outline for definition:
Because the background is transparent, your edges need to be crisp. Use a very fine brush with diluted black or dark brown paint to loosely outline the petals and leaves. This adds a illustrative, vintage botanical feel. -
Clean up drips:
Check the underside of the wire. Painting on mesh often causes globs to form on the back. Gently smooth these out or wipe them away while the paint is still tacky if possible, or trim dried drips with a craft knife. -
Protect the art:
Once completely dry (give it overnight to be safe), spray the entire painted area with a clear, UV-resistant acrylic sealer. This protects the paint from chipping off the slick wire and prevents fading if displayed outdoors.
Hang your beautiful wire painting in a sunny spot where the light can filter through the mesh
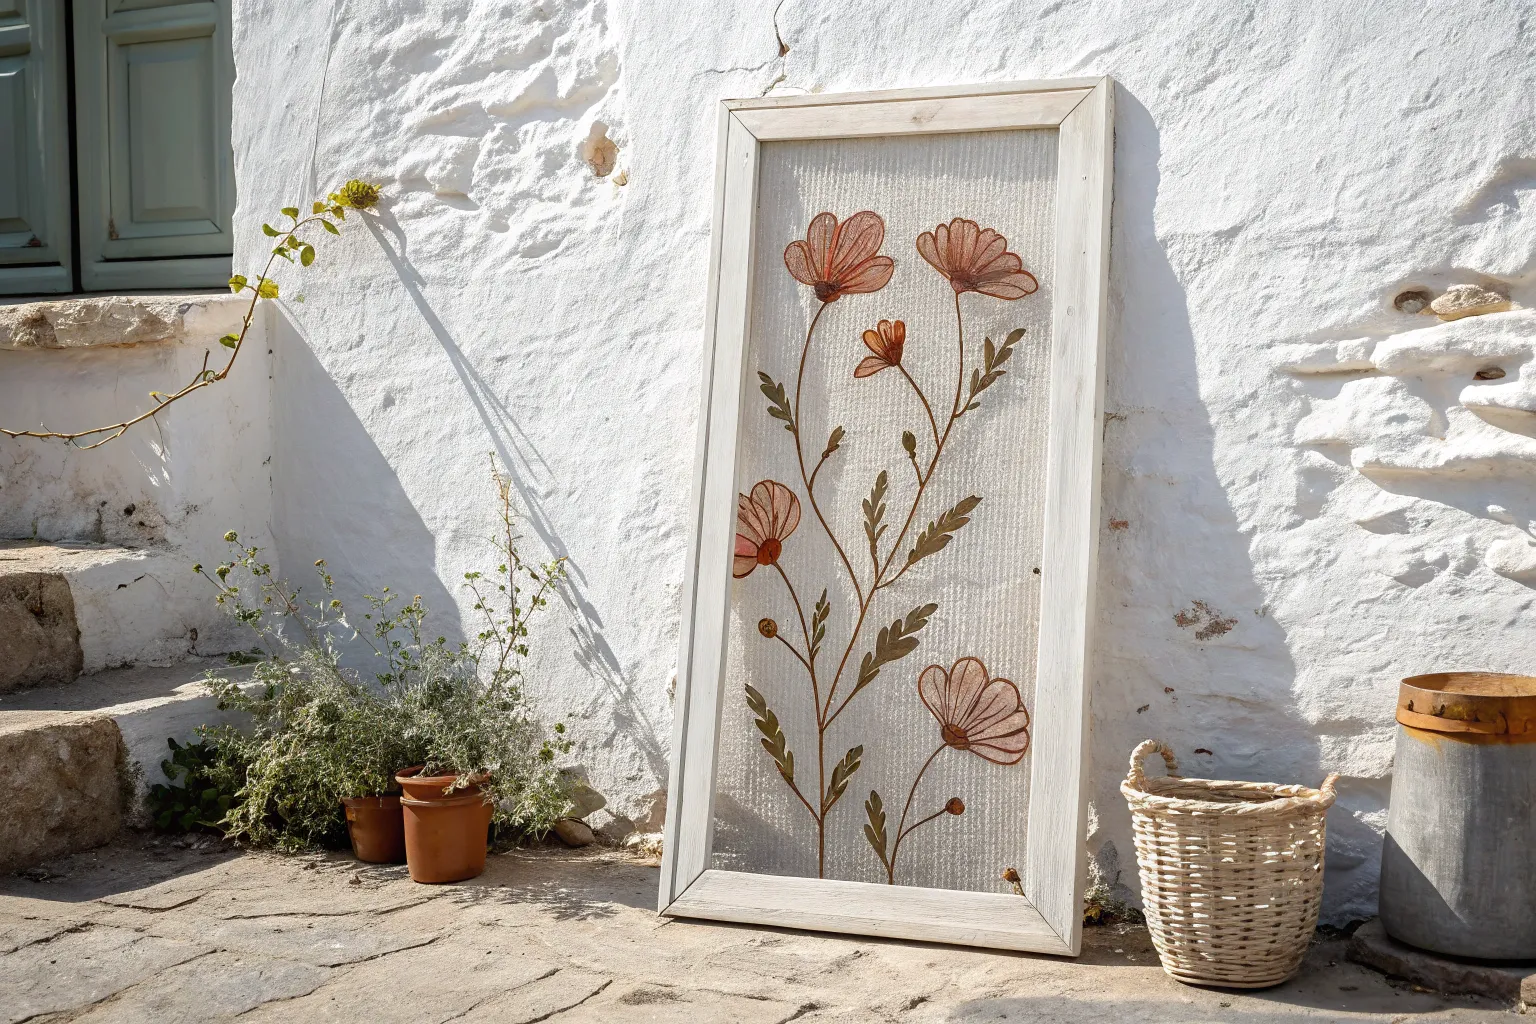
Loose Wildflower Meadow on Mesh
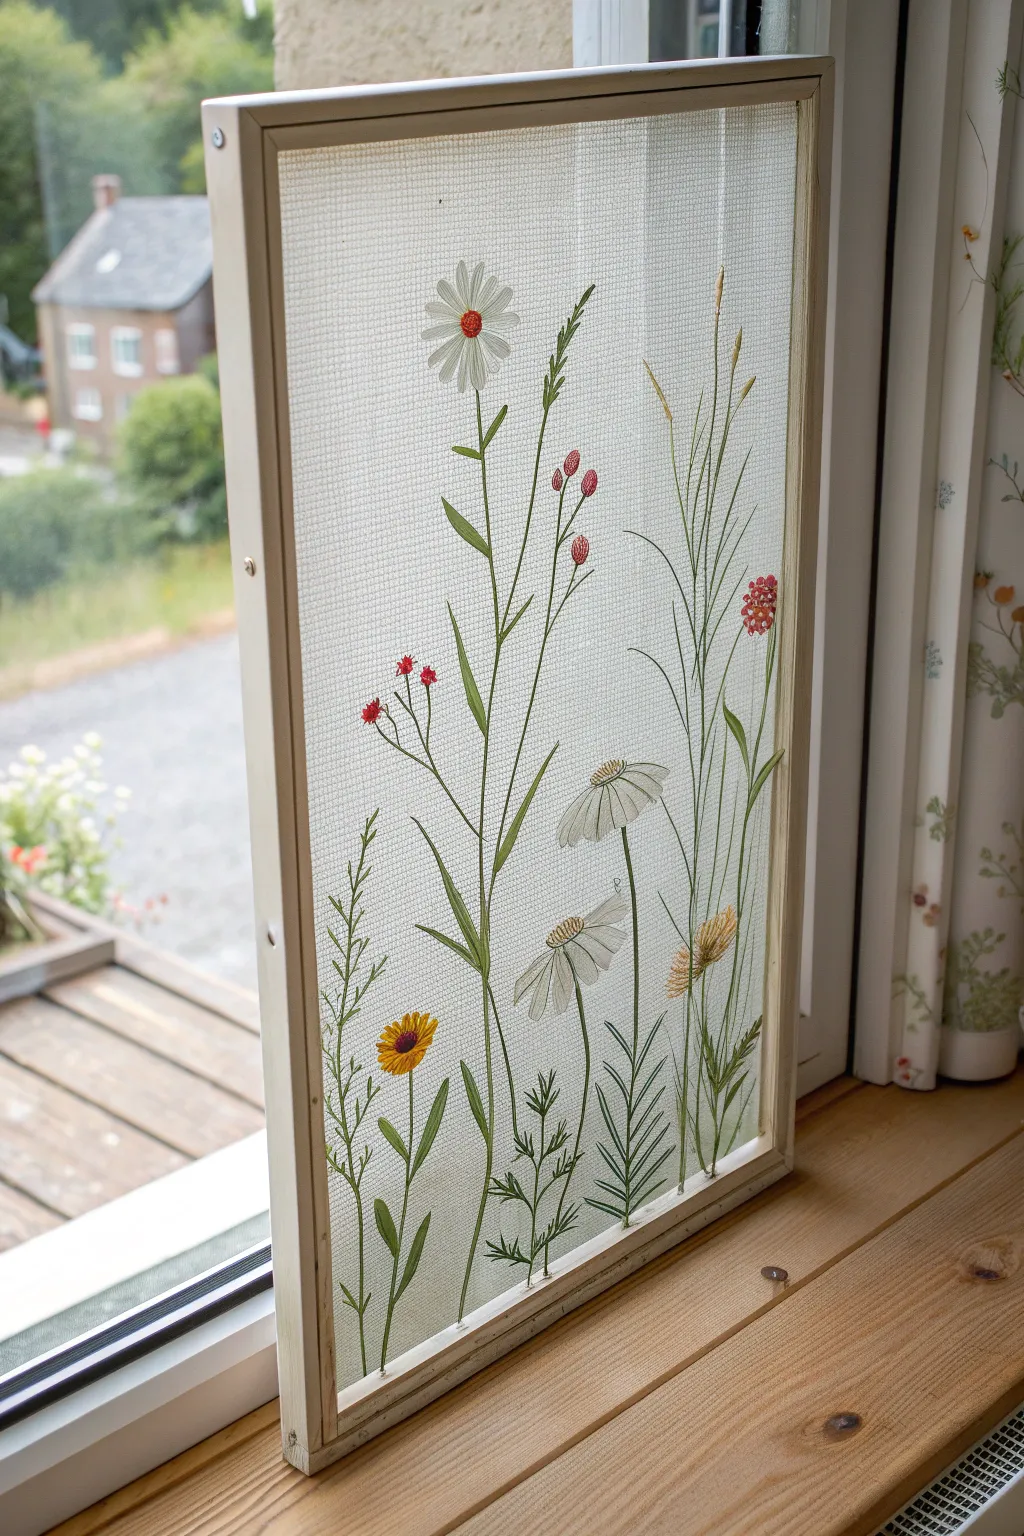
Bring the effortless beauty of a meadow indoors with this unique decorative screen. By embroidering delicate wildflowers directly onto mesh, you create floating botanical art that catches the light beautifully when placed on a windowsill.
Step-by-Step
Materials
- Rectangular wooden frame (pre-made or DIY with pine strips)
- Fine fiberglass window screen (white or light grey)
- Staple gun and staples
- Embroidery floss (white, yellow, orange, varying greens, red)
- Embroidery needles (size 5-7)
- Water-soluble fabric marker or white chalk pencil
- Small scissors
- Beeswax (optional, to condition thread)
- Reference photo of wildflowers
Step 1: Preparing the Canvas
-
Assemble the frame:
If you aren’t using a pre-made frame, cut your wooden strips to size (approx. 12×20 inches is good for a window sill) and secure the corners with wood glue and finish nails. Ensure it is sturdy and square. -
Cut the mesh:
Lay your fiberglass screen over the frame. Cut it so there is an overhang of about 2 inches on all sides to give you something to grip while stretching. -
Secure the screen:
Staple the mesh to the back of the frame. Start in the center of one side, pull taut, and staple the opposite center. Work your way out to the corners, keeping the tension high like a drum skin. -
Trim excess:
Once fully secured, use sharp scissors or a utility knife to trim the excess screen material flush with the back of the wood frame for a neat finish.
Mesh Management
If the mesh warps while stitching, your thread tension is too tight. Keep stitches relaxed, just resting on the surface, rather than pulling them taut.
Step 2: Drafting the Design
-
Plan your composition:
Sketch a loose arrangement of wildflowers on paper first. Aim for varying heights; tall grasses in the back, medium daisies in the middle, and shorter blooms near the bottom. -
Transfer lightly:
Using a white chalk pencil or very light marker, sketch the main stems onto the mesh. Don’t worry about perfect details here; serve as a guide for placement.
Step 3: Stitching the Greenery
-
Start the main stalks:
Thread a needle with 3 strands of medium-green floss. Use a stem stitch or a long backstitch to create the primary vertical lines for your tallest grasses and flower stems. -
Add leafy details:
Switch to a lighter green floss. Stitch small, angled straight stitches branching off the main stems to create lance-shaped leaves. Keep these stitches somewhat loose to avoid distorting the mesh. -
Create fern-like textures:
For the feathery foliage at the bottom, use single strands of dark green floss. Make V-shaped fly stitches stacked vertically to mimic fern fronds or yarrow leaves.
Natural Variation
Vary the number of floss strands (1-6) for different plants. Use 6 strands for bold focal flowers and single strands for delicate, distant grasses.
Step 4: Flowering the Meadow
-
Stitch the large daisy:
For the white daisy near the top, use satin stitch. Work from the center outward for each petal, ensuring the white floss covers the mesh grid completely. I find checking the back helps ensure coverage. -
Create the daisy center:
Fill the center of the daisy with French knots using bright orange or red floss. Pack them tightly to create a raised, textured center. -
Add drooping blooms:
For the drooping white flowers, use long satin stitches that curve downward. Add a small green calyx at the top of each bloom where it meets the stem using satin stitch. -
Form the yellow buttons:
Use golden-yellow floss to create the small round flower heads. You can spiral a stem stitch in a circle or use a cluster of knots to give them dimension. -
Detail the red buds:
Using red floss, add small scattered buds on the thinnest stems. A simple detached chain stitch (lazy daisy) or a single heavy knot works well here for tiny pops of color.
Step 5: Finishing Touches
-
Secure the threads:
Weave your thread ends carefully into the back of your existing stitches. Avoid knotting if possible, as knots can be visible through the translucent screen. -
Clean up stray fuzz:
Inspect the front and back of the screen. Snip any tiny floss tails that might be poking out to keep the silhouette clean against the light. -
Erase guidelines:
If any chalk marks are still visible, gently dab them away with a damp cloth or a soft brush.
Place your finished screen on a sunny ledge and enjoy the permanent blooms all year round


Classic Pumpkins and Vines for Fall Screen Art
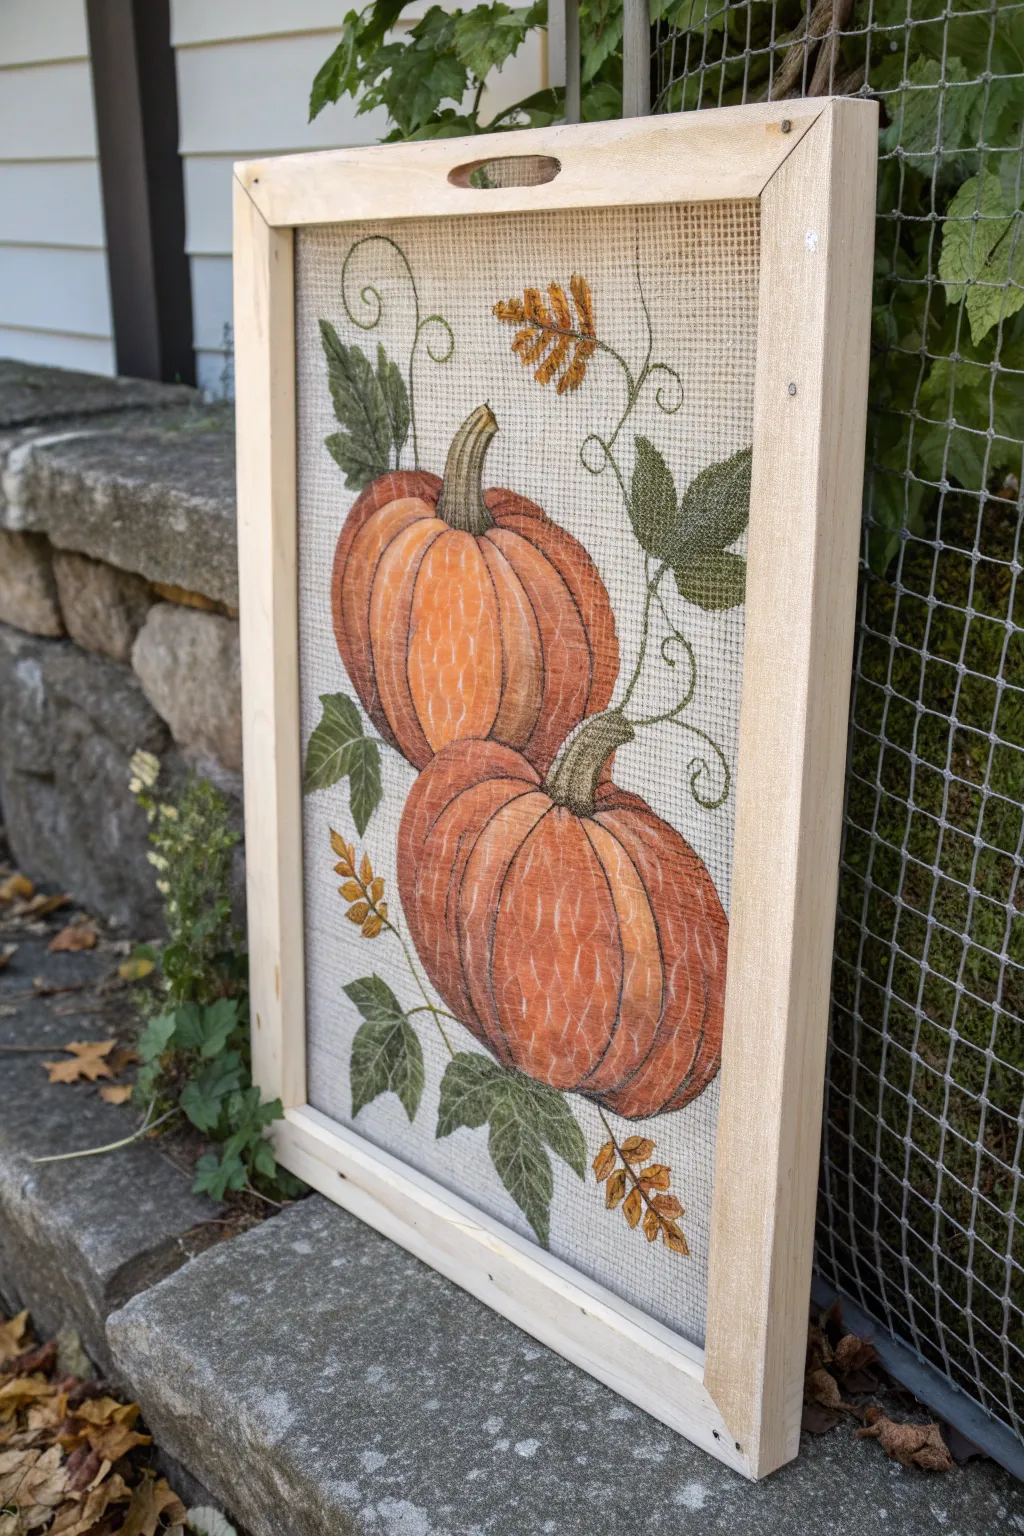
Transform an ordinary window screen into a charming piece of autumn décor with this painting technique that uses the mesh texture to its advantage. The result is a vibrant, dimensional pumpkin duo that looks beautiful propped against a wall or hung in a window to catch the light.
Step-by-Step Guide
Materials
- Wooden screen frame with mesh (pre-made or DIY)
- Acrylic craft paints (burnt orange, bright orange, deep red, forest green, olive green, yellow ochre, golden yellow, raw umber, white)
- Textile medium or screen painting medium (essential to prevent clogging)
- Assorted brushes (flat shader, round liner, dry brush)
- Chalk or white charcoal pencil
- Paper plate or palette
- Water cup and paper towels
- Clear acrylic sealer spray (matte finish)
Step 1: Preparation & Sketching
-
Prepare Your Paint Mix:
Before dipping your brush, mix your acrylic paints with a textile or screen painting medium according to the bottle’s instructions. This thins the paint slightly so it coats the wires rather than filling the holes, maintaining that crucial transparent screen effect. -
Sketch the Composition:
Using a piece of chalk or a white charcoal pencil, lightly sketch the outline of two large pumpkins in the center of the screen. Place one slightly higher and behind the other for depth. -
Map the Foliage:
Sketch broad, jagged shapes for the pumpkin leaves extending outward. Add swirling lines for vines and smaller, fern-like shapes for the dried decorative sprigs shown in the example.
Step 2: Painting the Pumpkins
-
Base Coat the Pumpkins:
Load a flat shader brush with your bright orange mix. Paint the main body of the pumpkins using vertical, curved strokes that follow the natural shape of the fruit. Apply a thin coat first; you want to color the wire, not clog the mesh. -
Shadowing the Segments:
While the orange is still slightly tacky or just dry, mix a little deep red or burnt orange. Paint thin, curved lines to define the vertical ribs of the pumpkins, blending slightly outward to create roundness. -
Adding Highlights:
Mix a touch of white with yellow ochre or bright orange. Apply this lighter shade to the center of each pumpkin rib to make them look plump and three-dimensional. -
Deepening Shadows:
Use a small amount of raw umber mixed with orange to darken the very bottom of the pumpkins and the areas where the two pumpkins overlap. This separation is key for clarity.
Don’t Clog the Mesh!
Keep a dry, stiff-bristled brush nearby. If you accidentally apply too much paint and fill the screen holes, immediately dab the area with the dry brush to lift the excess paint out.
Step 3: Leaves and Vines
-
Base Coat the Leaves:
Switch to a clean brush and fill in the large leaf shapes with olive green. As before, keep strokes light to avoid blocking the screen holes. -
Detailing the Foliage:
Once the olive base is dry, use forest green to paint veins and shadowed areas on the leaves. I like to dry-brush a tiny bit of yellow ochre on the tips to suggest early autumn fading. -
Painting the Stems:
Use a round brush and a mix of raw umber and olive green to paint the thick, woody stems atop each pumpkin. Add vertical streaks of lighter green to give them a fibrous texture. -
Creating Vines:
With a fine liner brush and thinned green paint, trace over your swirling vine sketches. Add little looped tendrils that extend into the empty space of the screen. -
Painting Dried Sprigs:
For the feathery, golden accents, use golden yellow mixed with a touch of brown. Use short, dabbed strokes to mimic the texture of dried wheat or fall grasses.
Fuzzy Edges?
Painting on wire can leave jagged edges. Step back five feet to view your work; screen art is meant to be viewed from a distance, where the jagged texture naturally blends into smooth forms.
Step 4: Refining and Sealing
-
Correcting Clogs:
Hold the screen up to the light to check for clogged mesh holes. If you spot any, gently poke them open with a toothpick or a dry brush while the paint is still pliable. -
Final Highlights:
Add tiny, crisp touches of white or very pale yellow to the tops of the pumpkin curves and the edges of the leaves for a final ‘pop’ of contrast. -
Clean Up Edges:
If any paint strayed outside your intended lines, use a damp Q-tip to gently wipe it off the wire mesh. -
Seal the Artwork:
Once the painting is fully dry (give it at least 24 hours), take the screen outside and spray it lightly with a matte clear acrylic sealer to protect it from the elements if you plan to display it outdoors.
Place your finished screen on a mantel or porch and enjoy the rustic warmth it brings to your autumn display


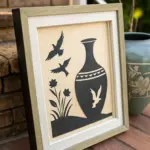
High-Contrast Bird Silhouette on Wire Mesh
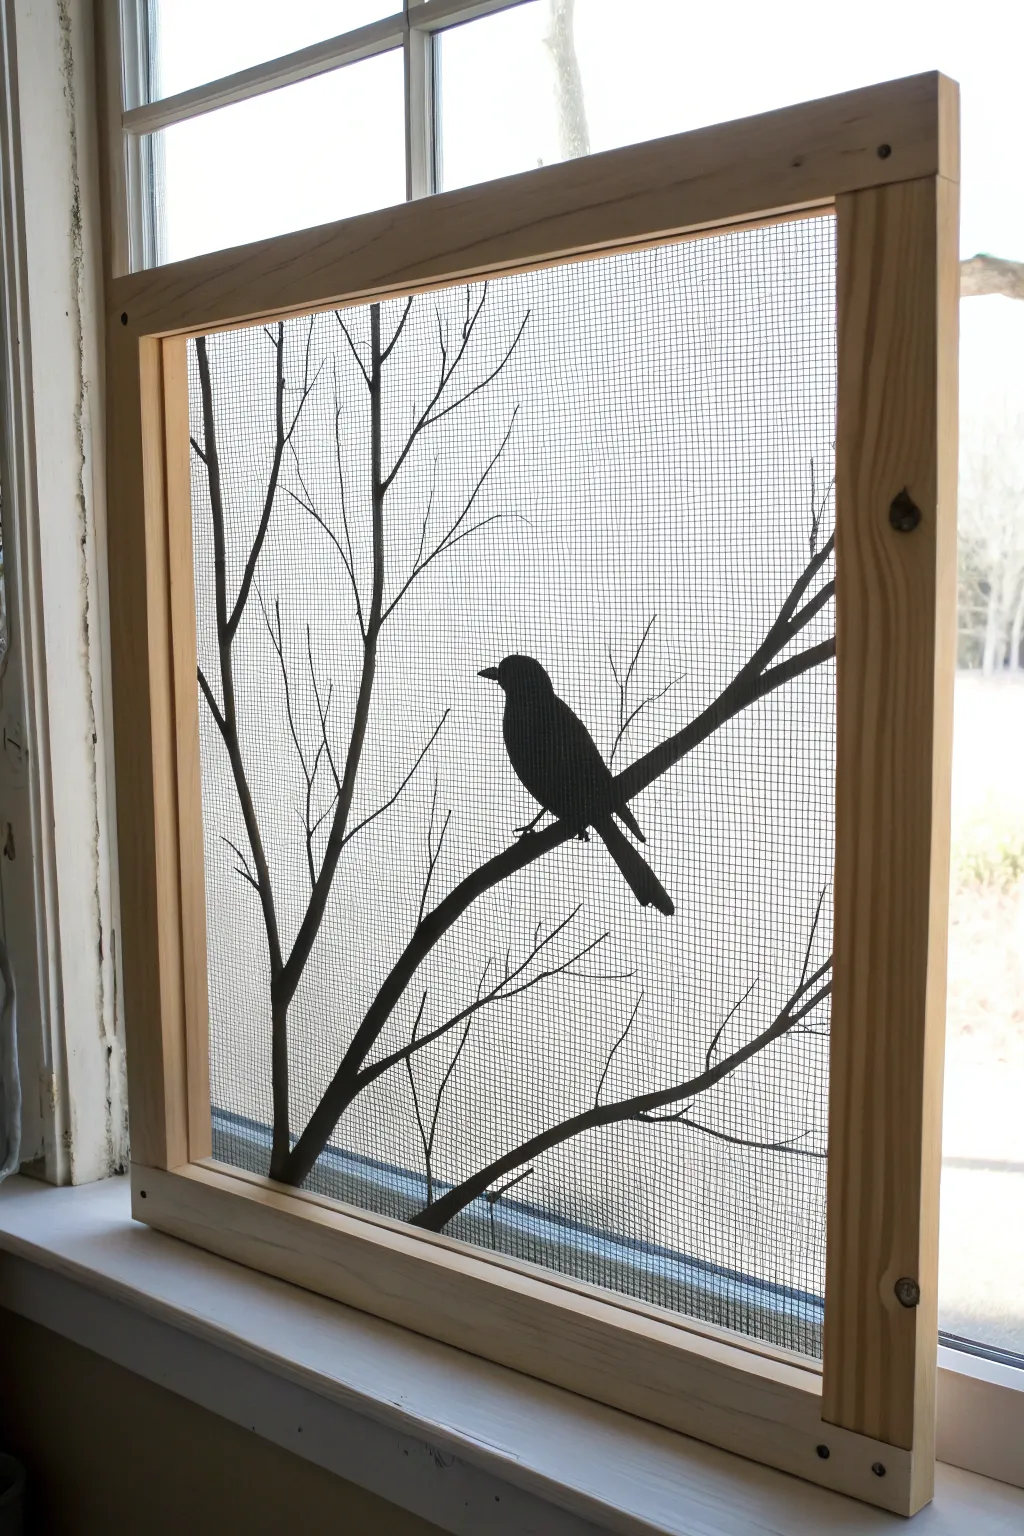
Transform a plain window screen into a piece of functional art with this striking silhouette project. By painting high-contrast black imagery directly onto the wire mesh, you create a beautiful illusion of a bird perched outside your window, visible from the inside looking out.
Detailed Instructions
Materials
- Wooden screen frame (pre-made or DIY with pine 1x2s)
- Fiberglass or aluminum window screen mesh
- Staple gun and staples
- Screen spline and spline roller tool (if using a routed frame)
- Black acrylic outdoor craft paint or screen printing ink
- Stencil adhesive spray (repositionable)
- Cardstock or heavy paper
- X-Acto knife with fresh blades
- Self-healing cutting mat
- Small flat paintbrush (1/4 inch)
- Fine liner paintbrush
- Painter’s tape
- Pencil
- Printer (for the template)
Step 1: Preparation and Framework
-
Build the frame:
If you aren’t using a pre-existing screen, construct a simple wooden frame using 1×2 pine boards. Cut them to your desired window dimensions and join the corners using pocket screws or simple butt joints with wood screws. -
Stretch the screen:
Lay your screen mesh over the frame. Pull it taught and staple it securely to the back of the wood, starting from the center of opposite sides and working outward to ensure tension without warping the frame. -
Trim excess mesh:
Use a utility knife or sharp scissors to trim away the excess screen material overhang, leaving a clean edge along the back of the frame. -
Clean the surface:
If using an old screen, wash it thoroughly with soapy water and let it dry completely. For new mesh, wipe it down with a lint-free cloth to remove any manufacturing dust.
Pro Tip: Clog Prevention
Keep a dry rag handy. If paint accidentally fills a mesh square completely, quickly dab it with the dry rag to open the hole back up. The effect relies on the mesh staying open.
Step 2: Creating the Stencil
-
Find a reference image:
Choose a silhouette image of a bird on a branch. High-contrast clip art works best for this; look for distinct shapes where the beak, tail, and branch forks are clearly defined. -
Scale and print:
Scale your image on a computer so it fits nicely within your frame’s dimensions. You may need to tile the image across multiple sheets of paper if the branch design is large. -
Assemble the template:
If you printed multiple sheets, tape them together carefully to form the full design. Place this full sheet over a piece of cardstock. -
Cut the stencil:
Using your X-Acto knife and cutting mat, carefully cut out the negative space—meaning you want to remove the bird and the branch shapes, leaving the surrounding paper intact. -
Apply adhesive:
Take your cardstock stencil to a well-ventilated area. Lightly mist the back with repositionable stencil adhesive spray. I find waiting about 60 seconds lets the glue get tacky rather than wet, which prevents residue.
Step 3: Painting the Silhouette
-
Position the stencil:
Place the stencil onto the front side of the screen mesh. Press down firmly, especially around the edges of the bird and the thin branch lines, to ensure good contact. -
Protect the frame:
Use painter’s tape to mask off the wooden frame edges where the branch design meets the wood, preventing accidental smudges. -
Place a backing board:
Put a piece of scrap cardboard or paper underneath the screen frame. This catches the paint that will inevitably pass through the mesh holes. -
Begin painting the bulk:
Dip your flat brush into black acrylic paint. Use a stabbing or stippling motion (up and down) rather than brushing side-to-side. This pushes paint into the mesh weave without clogging the holes entirely. -
Detail the edges:
Switch to a smaller brush near the edges of the stencil. Apply clearer, sharper strokes here to define the beak and tail feathers crisp against the stencil edge. -
Check for opacity:
Hold the screen up to a light source. If the black looks patchy, lay it back down and apply a second coat to the silhouette area. -
Remove the stencil:
While the paint is still slightly tacky (but not wet), carefully peel away the cardstock stencil. Pulling it off now prevents the paint from drying and bonding the paper to the screen. -
Touch-ups:
Use your fine liner brush to fix any bleed-under areas or to sharpen the points of the branches. You can also connect the branch naturally to the wooden frame edge if the stencil gap left a space. -
Let it cure:
Allow the screen to dry flat for at least 24 hours before installing it in a window to ensure the paint hardens and becomes weather-resistant.
Level Up: Seasonal Scenes
Make the screen inserts interchangeable! Create a separate frame for autumn featuring a squirrel silhouette, or a winter version with a cardinal shape painted in deep red.
Once installed, the natural light will backlight your painted design, creating a permanent, peaceful visitor for your window view
BRUSH GUIDE
The Right Brush for Every Stroke
From clean lines to bold texture — master brush choice, stroke control, and essential techniques.
Explore the Full Guide
Simple Coastal Shells and Sea Grass

Transform a plain screen panel into a tranquil window to the coast with this lovely sea shell and grass design. The translucent screen material gives the long swaying sea oats a delicate, airy quality while the bold shells add focus and color.
How-To Guide
Materials
- Wood-framed screen panel or window screen
- Gesso or white acrylic primer
- Acrylic paints (sand/tan, sage green, olive green, cream, burnt sienna, coral/rust, teal, aqua)
- Textile medium (optional, for smoother flow on screen)
- Chalk or a white charcoal pencil
- Assorted brushes: 1″ flat brush, medium round brush, fine liner brush
- Painter’s tape
- Stiff stencil brush
- Palette or paper plate
- Water cup and paper towels
Step 1: Preparation and Base
-
Prepare the screen:
Clean your screen surface gently with a damp cloth to remove any dust. If your screen is loose, ensure it is pulled taut within the wooden frame before you begin, as painting on a sagging screen is difficult. -
Sketch the layout:
Using white chalk or a white charcoal pencil, lightly sketch the placement of your main elements. Draw the horizon line for the sand dunes near the bottom, position the two large floating shells, and mark where the scattered smaller shells will rest. -
Apply the blocking layer:
Mix a small amount of white gesso or heavy body white acrylic. Paint the filled-in shapes of the shells and the main thick stalks of the sea oats. This crucial step fills the holes of the screen mesh, creating a solid canvas for your colors to pop against.
Step 2: Painting the Dunes and Grass
-
Stipple the sand:
Mix a sandy beige color. Using the stiff stencil brush, stipple (dab straight up and down) the paint along the bottom section to create the textured look of sand dunes. Keep the top edge irregular to mimic shifting sands. -
Add depth to the sand:
While the beige is still tacky, stipple in small touches of darker tan and burnt sienna near the bottom and around where the shells will sit to create shadows and volume. -
Paint the base grass stalks:
Using a medium round brush and a sage green mix, paint long, sweeping strokes upward from the dunes. Let your hand stay loose to capture the natural curve of swaying grass. -
Highlight the grasses:
Mix a lighter olive or yellow-green. Add highlights to one side of each grass blade to suggest sunlight hitting them, giving the foliage dimension. -
Create the sea oat seeds:
For the distinct seed heads (the chevron-like shapes at the top of the stalks), use a small flat brush. Load it with a creamy tan color and press rhythmically along the upper stems in a V-shape pattern. I find starting from the top and working down the stem helps maintain the taper.
Mesh Mastery
Place a piece of cardboard behind the screen while painting. It gives you a firm surface to press against and catches any paint that pushes through the mesh holes.
Step 3: Detailing the Shells
-
Base coat the large shells:
Paint the large left shell with a base of cream or light rust, and the right shell with a warm golden tan. Ensure the white blocking layer underneath is completely covered. -
Add the ribs (Rust Shell):
Using your fine liner brush and a deep rust or burnt sienna paint, carefully draw the radiating lines (ribs) of the scallop shell. Start from the bottom center point and fan them outward to the scalloped edge. -
Add the ribs (Gold Shell):
Repeat the process for the right shell using a lighter cream color against the golden tan background to create the ribbed texture. -
Paint the bottom shells:
Fill in the smaller shells scattered on the sand. Use cool tones like teal, aqua, and dusty blue to contrast with the warm sand. Paint simple fan shapes. -
Detail the blue shells:
Once the teal base is dry, use a thinned darker blue or black to add the defining lines and ridges on these smaller shells. Keep these lines fine and delicate. -
Add faint shadows:
Mix a very watery grey-brown. Gently paint a small shadow underneath each shell where it meets the sand to ground them, so they don’t look like they are floating in mid-air.
Level Up: Real Texture
Mix a tiny pinch of real fine sand into your beige paint for the dunes. It adds authentic grit and texture that catches the light beautifully.
Step 4: Finishing Touches
-
Clean up edges:
Step back and look at your composition. If any paint clogged the screen mesh in areas you wanted transparent (like the sky), use a clean, stiff dry brush to gently poke it out or wipe it away carefully. -
Seal the work:
If this screen will be exposed to the elements, brush a clear, matte outdoor sealer over the painted areas once they are fully dry to protect your artwork from weathering.
Hang your screen in a sunny spot and enjoy the coastal vibe regardless of how far you are from the ocean
Layered Leaves in Two-Tone Stencil Painting
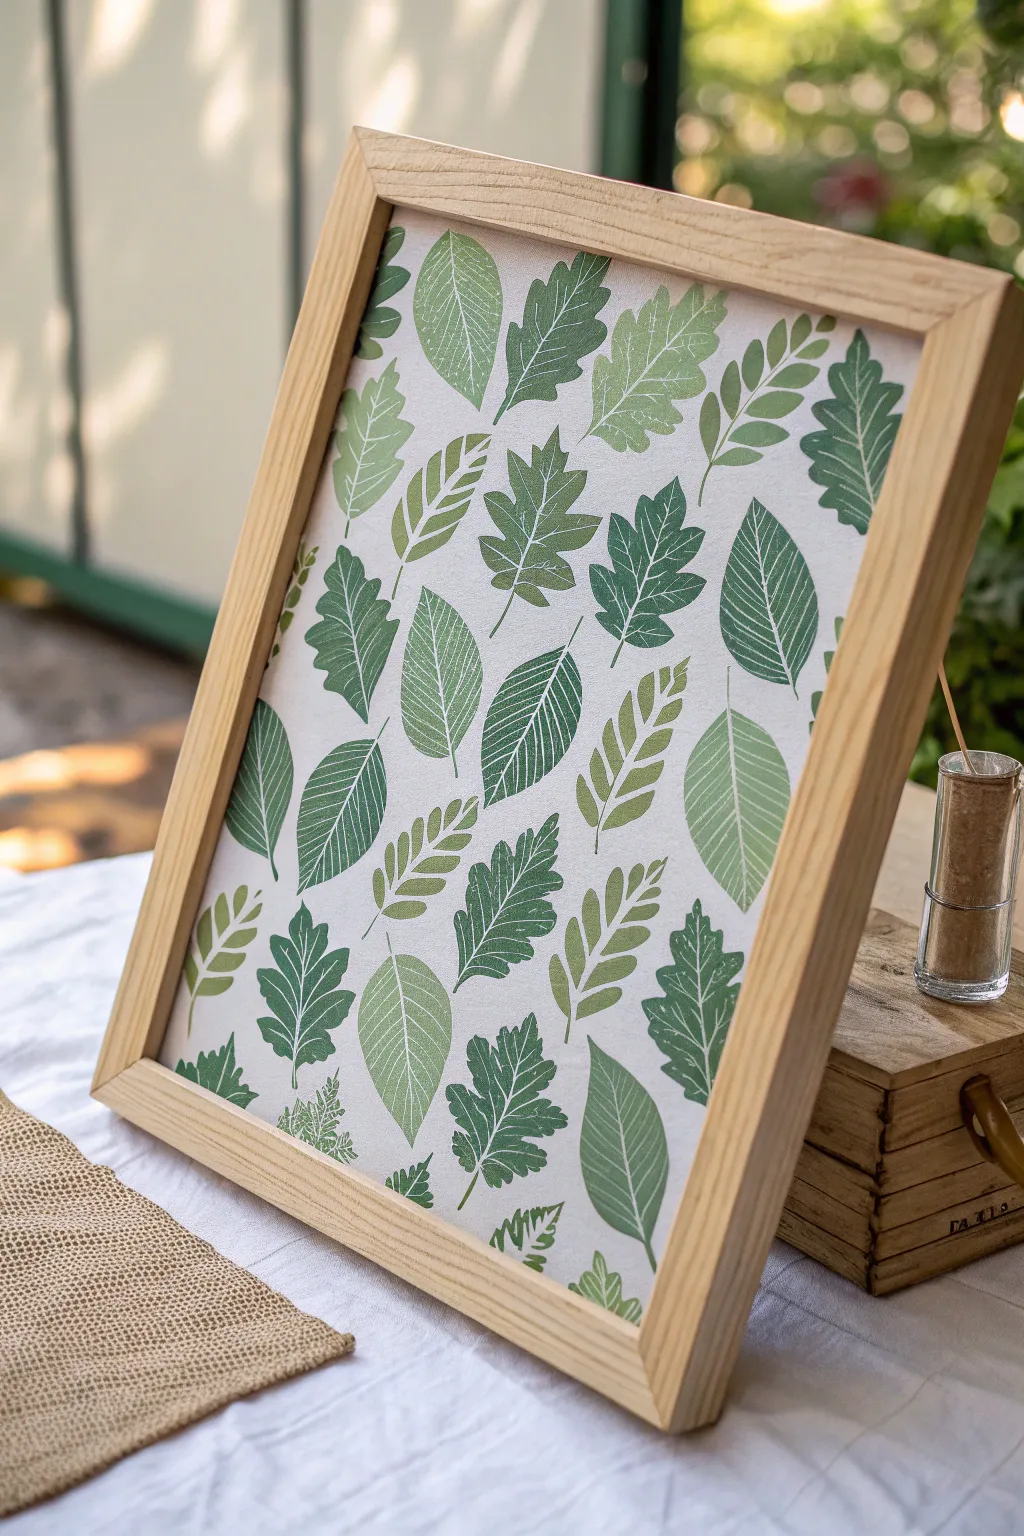
Bring the calming essence of a forest canopy indoors with this layered leaf project. Using a two-tone stencil technique, you’ll create a sophisticated botanical print that balances crisp definition with soft, natural textures.
How-To Guide
Materials
- White or cream canvas fabric (or heavy cardstock)
- Wooden picture frame (light oak finish)
- Acrylic screen printing ink (Forest Green, Sage Green)
- Silk screen frame and squeegee
- Leaf pattern stencils (vinyl or acetate)
- Painter’s tape
- Palette knife or spoon
- Hairdryer (optional for speed drying)
- Spray adhesive (repositionable)
Step 1: Preparation & Design Layout
-
Prepare the substrate:
Cut your canvas or heavy paper to size, ensuring it fits perfectly within your chosen wooden frame. Iron the fabric if needed to ensure a completely flat printing surface. -
Plan the composition:
Before committing to ink, arrange your leaf stencils loosely on the surface to visualize the flow. Aim for a random but balanced scatter pattern, rotating the leaves so they point in different directions. -
Secure the material:
Tape your canvas down to a flat work surface. This prevents shifting during the screening process, which is crucial for crisp edges.
Step 2: First Layer: The Light Canopy
-
The first stencil placement:
Apply a light mist of repositionable spray adhesive to the back of your first set of leaf stencils. Press them firmly onto the canvas. -
Mix the lighter hue:
Prepare your lighter green ink—a soft sage or mint tone. If using standard acrylics, mix in a textile medium to prevent cracking. -
Load the screen:
Place the silkscreen frame over the stenciled area. Spoon a bead of the sage green ink across the top of the screen, just above the design area. -
Pull the print:
Holding the squeegee at a 45-degree angle, utilize firm, even pressure to drag the ink down across the screen. I find one smooth pass is usually better than multiple choppy ones. -
Reveal and repeat:
Carefully lift the screen and then peel away the stencil. Move to a new section of the canvas to continue the light green layer, ensuring you leave gaps for the darker leaves later. -
Dry completely:
Allow this first layer of light green leaves to dry fully. Use a hairdryer on a cool setting if you are eager to move to the next phase.
Pro Tip: Masking Magic
Use masking fluid or bits of painter’s tape to block out specific tiny veins within the stencil if yours lacks detail. This creates intricate white lines.
Step 3: Second Layer: Depth & Definition
-
Position the dark layer:
Once the first layer is dry, arrange the stencils for the second pass. Place these in the empty spaces, occasionally letting a leaf tip slightly overlap a dried light green leaf for depth. -
Prepare the dark ink:
Mix a deep forest green ink. Ensure it contrasts significantly with the sage tone to create that vibrant pop seen in the image. -
Screen the dark leaves:
Repeat the screening process: place the frame, load the bead of dark ink, and pull the squeegee firmly across the stencils. -
Check for vein clarity:
As you lift the stencils, check that the fine white lines (the veins) remained clear. These negative spaces are essential for the realistic look. -
Fill the gaps:
Continue adding dark leaves until the composition feels full and balanced. Don’t be afraid to add partial leaves emerging from the edges of the paper.
Troubleshooting: Bleeding Edges
If ink bleeds under the stencil, your ink is too thin or you used too much adhesive. Thicken ink with a medium and stick to a 45-degree angle pull.
Step 4: Finishing & Framing
-
Final cure:
Let the entire piece cure for at least 24 hours. Heat set the ink with an iron (using a pressing cloth) if the ink manufacturer suggests it. -
Clean the frame:
Ensure your light wood frame is clean and the glass is streak-free. -
Mounting:
Center your artwork in the frame. If you used fabric, wrap it taut around a cardboard backing piece before inserting it into the frame. -
Secure the back:
Close up the frame back, ensuring the artwork hasn’t shifted and is perfectly aligned.
Hang your new botanical artwork near a window to let the natural light highlight the organic textures

PENCIL GUIDE
Understanding Pencil Grades from H to B
From first sketch to finished drawing — learn pencil grades, line control, and shading techniques.
Explore the Full Guide
Cottage Poppies With Thick Paint Strokes
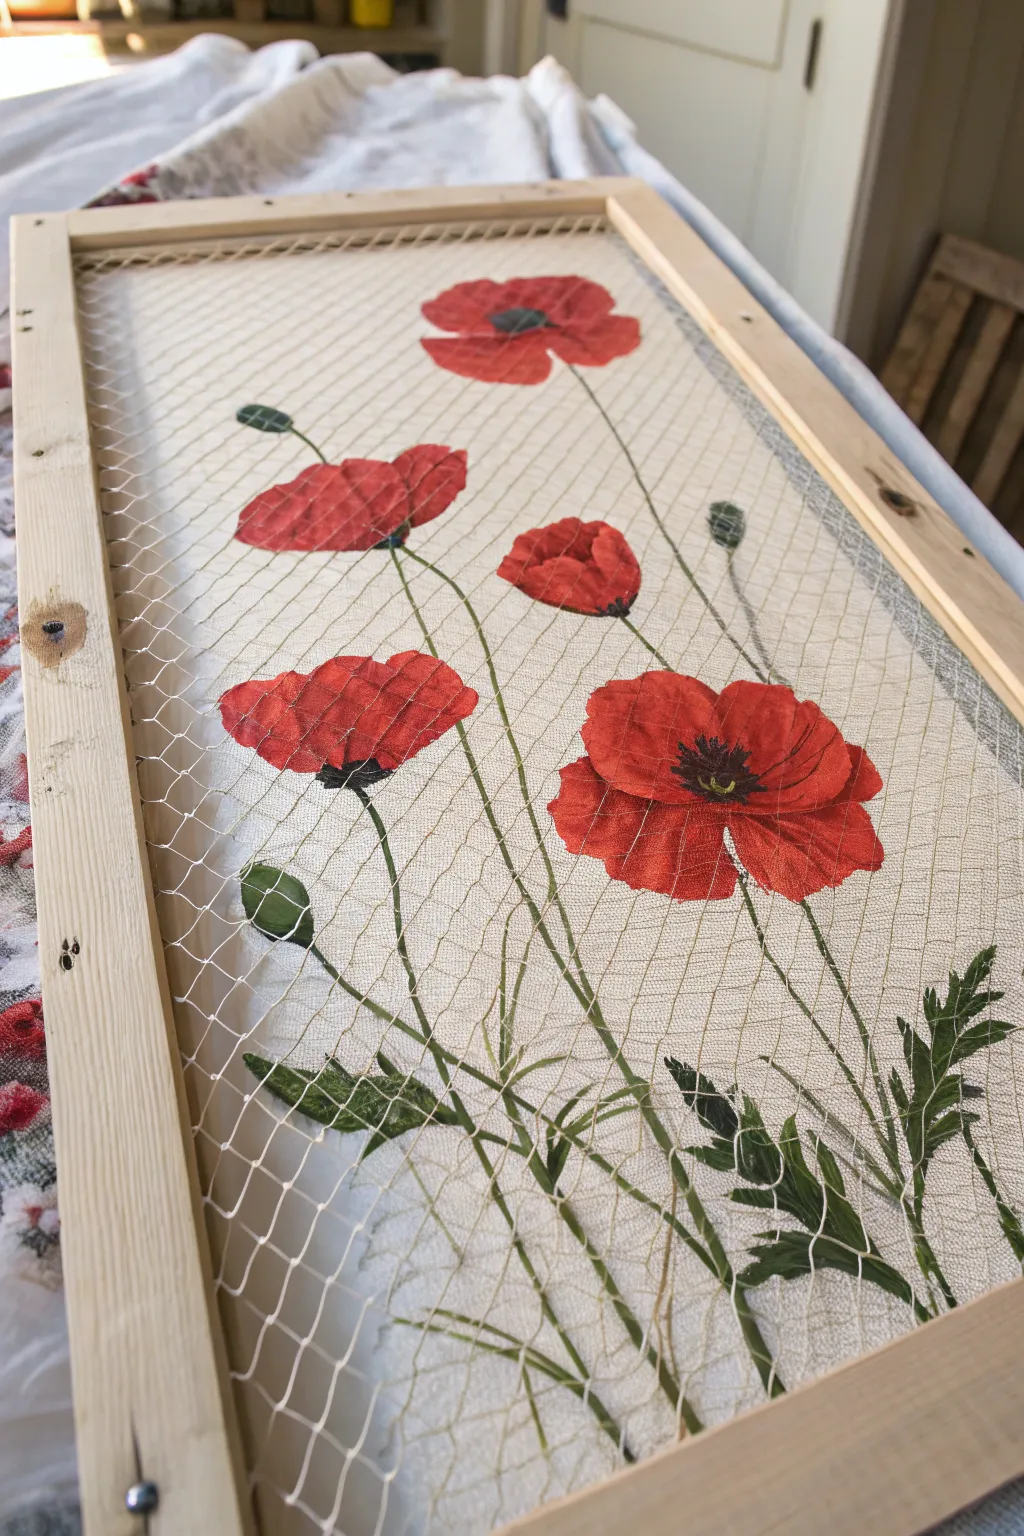
Transform a simple utility item into a rustic masterpiece with this window screen painting project. The coarse mesh texture adds incredible depth to the vibrant red poppies, making them seem as if they’re floating in your window frame.
Detailed Instructions
Materials
- Wooden frame with stretched wire or fiberglass screen (pre-made or DIY)
- White gesso or acrylic primer
- Heavy body acrylic paints (Cadmium Red, Alizarin Crimson, Sap Green, Hookers Green, Titanium White, Carbon Black)
- Assorted brushes: stiff bristle flats (size 4, 8), filbert brushes (size 6), and a fine liner brush
- Chalk or a white pastel pencil
- Cardboard or drop cloth
- Palette and water cup
- Clear acrylic matte spray sealer
Step 1: Preparation and Layout
-
Establish your workspace:
Lay down a piece of cardboard or a drop cloth on your table. Place the framed screen flat on top of it. The paint will push through the mesh holes, so protecting the surface underneath is essential. -
Sketch the composition:
Using a piece of chalk or a white pastel pencil, lightly sketch the placement of five main poppy blooms. Position three fully open flowers and two smaller buds or side-facing blooms at varying heights to create a natural, flowing composition. -
Draw the stems:
Sketch long, curving lines extending from the bottom of the frame up to each flower head. Let them cross over each other slightly to mimic a wild garden look.
Step 2: Painting the Blooms
-
Block out the white base:
Because screens are dark or transparent, red paint won’t pop immediately. Use a stiff bristle brush to apply a layer of white gesso or white acrylic strictly within your flower outlines. -
Fill the mesh holes:
As you apply the white base, gently push the paint into the holes of the mesh. You want to create a semi-solid surface for the color to rest on, but don’t worry if some pores remain open. -
Let the base dry:
Allow the white base layer to dry completely. This is crucial so your red doesn’t turn pink. -
Apply the first red layer:
Mix Cadmium Red with a touch of Alizarin Crimson. Using a filbert brush, paint over the dried white areas. Follow the curved shape of the petals with your brushstrokes. -
Add shadows:
While the red is still slightly wet, dip the corner of your brush into Alizarin Crimson or a tiny bit of Black. Paint the inner depths of the flower cup and underneath the petals to create dimension. -
Highlight the petals:
Clean your brush and pick up pure Cadmium Red mixed with a speck of Titanium White. Brush this brightly onto the upper edges of the petals where the sun would hit.
Paint Won’t Stick?
If paint falls through the mesh too much, your mix is too thin. Don’t add water to your acrylics. Let the paint sit on the palette for 5 minutes to thicken slightly before applying.
Step 3: Stems and Details
-
Paint the stems:
Mix Sap Green with a little White to make it opaque. Using a liner brush or small round brush, trace over your chalk stem lines. I find it helps to hold the brush vertically for a smoother line. -
Add foliage:
Switch to a small flat brush to dab in the jagged, fern-like leaves near the bottom. Use a mix of Hookers Green and Sap Green. Use choppy strokes to mimic the poppy leaf texture. -
Create the flower centers:
For the open blooms, paint a dark center using Carbon Black. Make a small, fuzzy circle in the middle of the red petals. -
Detail the stamens:
Using your finest liner brush and black paint, pull tiny lines outward from the black center. Dot the ends of these lines with tiny specks of white or yellow to represent pollen. -
Paint the buds:
For the unopened buds, paint an oval shape in green at the top of the stem. Once dry, add a tiny sliver of red peeking out at the very tip to show the flower is about to burst. -
Refine the edges:
If any paint bled outside your lines, use a clean, stiff brush dipped in water to scrub the mesh gently, or simply paint over the mistake with a color that matches the screen wire if it’s visible.
Clogging Prevention
Keep a dry rag handy. If you accidently clog the background mesh while painting edges, immediately blow sharply on the wet paint or dab it with the rag to clear the holes.
Step 4: Finishing Touches
-
Clean the frame:
Check the wooden frame for any stray smudges of paint and wipe them away with a damp cloth or sand them off lightly. -
Seal the work:
Once the painting is fully cured (give it 24 hours), take the screen outside or to a ventilated area. Spray the entire mesh surface lightly with a clear matte acrylic sealer to protect the paint from chipping.
Hang your screen in a window or against a light-colored wall to see your garden bloom year-round
Butterfly Mosaic Using the Screen Grid
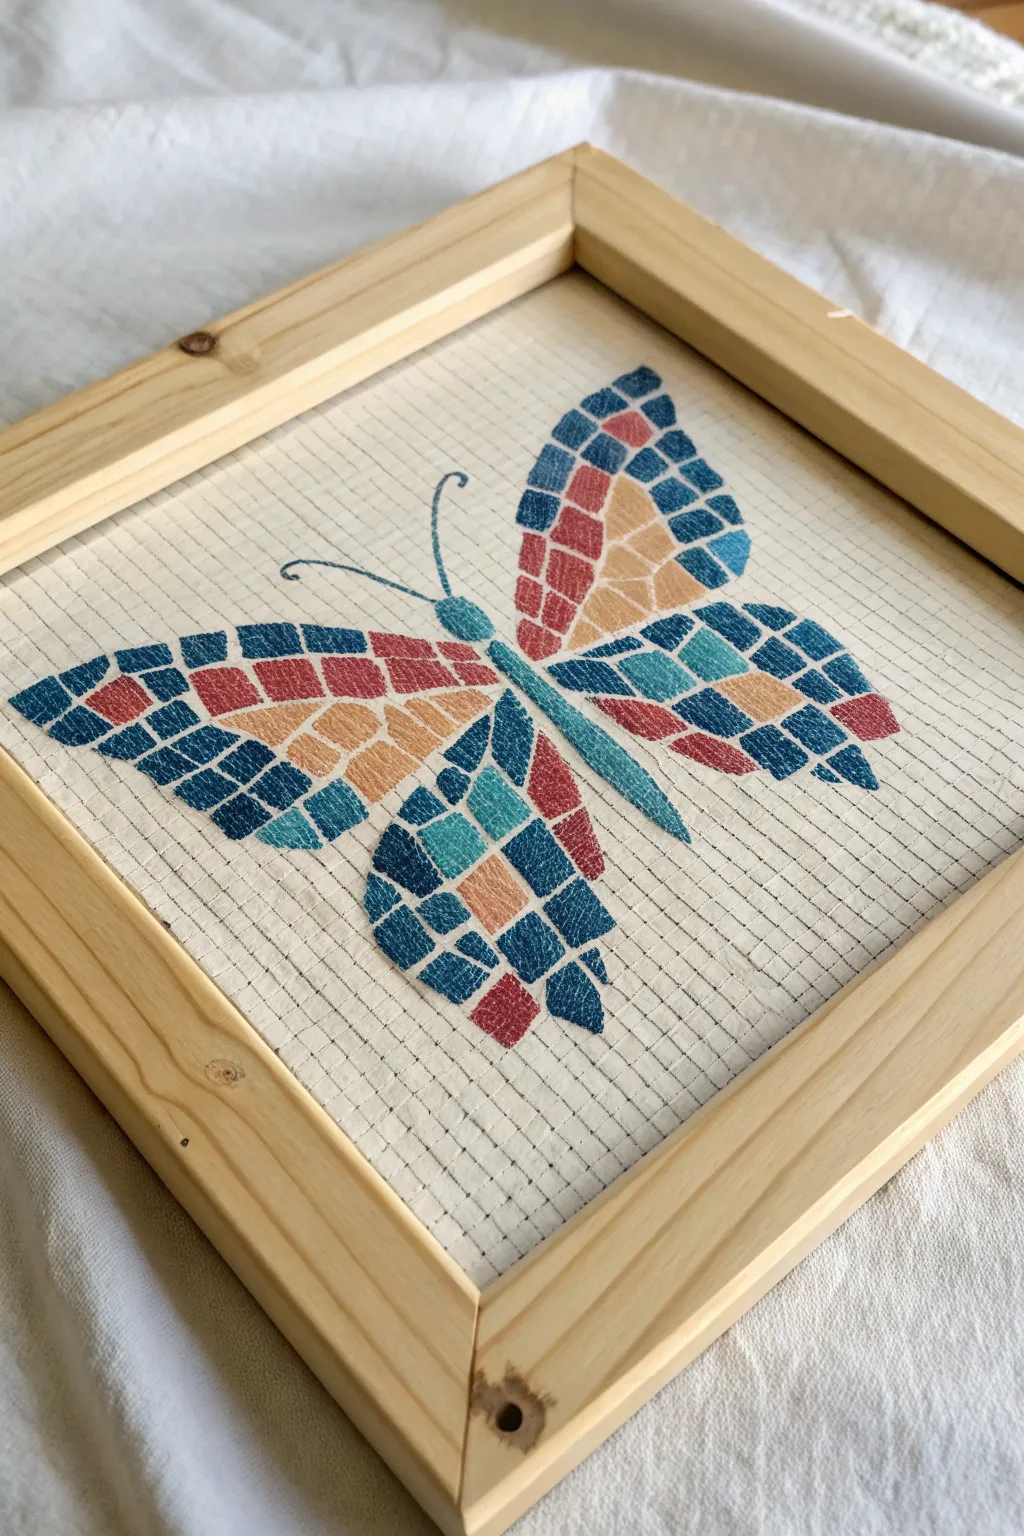
Transform a simple mesh screen into a stunning piece of mosaic art with this clever technique. By using the natural grid of the screen, you can create a pixelated, geometric butterfly design that looks suspended in mid-air.
Detailed Instructions
Materials
- Wooden canvas stretcher frame (square)
- Window screen mesh (fiberglass or aluminum)
- Staple gun and heavy-duty staples
- Scissors
- Acrylic paints (navy blue, teal, coral red, soft peach)
- Fine detail paintbrush (size 0 or 1)
- Pencil or white charcoal pencil
- Graph paper (optional)
- Painter’s tape or masking tape
Step 1: Preparation and Framing
-
Prepare the screen:
Cut a piece of window screen mesh that is about 2 inches larger than your wooden frame on all sides. This extra material gives you something to pull on to ensure tight tension. -
Attach the screen:
Lay the screen flat and place the frame on top. Fold one side of the screen over the back of the frame and staple it in the center. Pull the opposite side taut—really tight—and staple the center there as well. -
Secure the corners:
Work your way out from the center staples to the corners, pulling firmly and stapling every few inches. Keep the grid distinct and straight; you don’t want the squares to look warped. -
Trim excess:
Once fully secured, use scissors to trim away the excess screen material on the back, cutting close to the staples for a clean finish.
Paint Clogging?
If paint fills the holes and you want an open look, blow gently on the wet paint or use a dry brush to poke through the mesh holes immediately.
Step 2: Drafting the Design
-
Plan your pattern:
It helps to sketch your butterfly on graph paper first. Since the screen acts like a grid, think of your design in terms of blocked-out squares or ‘pixels’ rather than smooth curves. -
Lightly sketch outlines:
Using a white charcoal pencil or very soft graphite, lightly map out the general shape of the butterfly wings on the screen. Don’t worry about filling details yet, just get the placement centered. -
Define the body:
Mark the central line for the butterfly’s body and the two antennae curving outward. This anchors your symmetry.
Add Metallic Flair
Swap the peach or teal paint for a metallic gold or copper acrylic. The grid texture makes metallics catch the light beautifully.
Step 3: Painting the Mosaic
-
Mix your palette:
Prepare your acrylic colors. You’ll need a deep navy for the edges, a bright teal, a muted coral red, and a soft peach for the inner wing sections. Adding a tiny drop of water can help the paint flow into the mesh holes better. -
Paint the body:
Start by painting the central body column using the teal paint. I like to dab the paint gently to fill the mesh squares without clogging them completely, though a solid look works well here too. -
Outline the wings:
Using the navy blue and your fine brush, paint the outer ‘blocks’ of the wings. Follow the grid lines of the screen to keep the edges geometric and stepped, avoiding curves. -
Fill the upper wings:
Move inward on the upper wings. Create sections of color blocking: place the coral red next to the navy, followed by the teal, and finally the peach near the center body. -
Fill the lower wings:
Repeat the color blocking on the lower wings. The pattern doesn’t need to be perfectly identical to the top; vary the size of the color blocks slightly for visual interest. -
Check opacity:
Hold the frame up to the light. If the paint looks too thin or streaky, apply a second coat to the filled squares once the first layer is dry to make the colors pop. -
Detail the antennae:
With the very tip of your brush and navy paint, carefully paint the thin curved lines for the antennae. These won’t be blocky; try to paint a smooth line directly onto the mesh threads. -
Clean up edges:
If you accidentally painted outside your intended grid squares, you can use a clean, stiff brush dipped in water to gently scrub the wet paint out of the mesh holes.
Step 4: Finishing Touches
-
Dry thoroughly:
Let the screen sit undisturbed for at least an hour. Acrylics dry fast, but thicker globs in the mesh holes might take longer. -
Erase guidelines:
If any of your charcoal or pencil marks are still visible around the painted butterfly, gently wipe them away with a damp cloth or soft eraser. -
Seal (optional):
For longevity, especially if hanging near a window, you can lightly spray the painted area with a clear matte acrylic sealer.
Hang your piece in a sunny spot where the light can filter through the unpainted screen for a beautiful translucent effect


Graphic Pet Portrait in Pixel Style on Screen
Transform a simple window screen into a canvas for textile art by painting a charming, pixelated pet portrait. This project combines the retro appeal of 8-bit graphics with tactile screen painting for a unique piece of modern home decor.
Step-by-Step Tutorial
Materials
- Picture frame (with glass removed)
- Fiberglass or aluminum window screen mesh
- Staple gun and staples
- Acrylic heavy body paints (Black and Beige/Cream)
- Small flat shader brush (size 2 or 4)
- Fine liner brush
- Graph paper and pencil
- Masking tape or painter’s tape
- Cardboard or poster board (for background)
- Utility knife or heavy-duty scissors
- Rust-colored cardstock or fabric (for backing)
Step 1: Preparation and Design
-
Draft the Pixel Design:
Begin by sketching your pet’s face on graph paper. Treat each square on the paper as one ‘pixel’ on your screen. Keep the design simple with distinct shapes for ears, eyes, and snout, mimicking the wolf-like style shown in the reference. -
Plan Borders:
Add a checkerboard pattern to the top and bottom of your graph paper design to frame the portrait. This adds a nice geometric balance and reinforces the pixel art aesthetic. -
Prepare the Frame:
Disassemble your picture frame, removing the glass and backing board. You only need the outer wooden rim for the screen stretching process. -
Cut the Screen:
Roll out your window screen mesh. Place the frame over it and cut a piece of mesh that is about 2 inches wider than the frame on all sides to allow for pulling and stapling.
Step 2: Stretching the Screen
-
Anchor the Mesh:
Place the mesh over the back of the frame. Staple the center of the top side first, then pull the mesh taut and staple the center of the bottom side. -
Tighten the Sides:
Pull the mesh firmly to the left side and place a staple in the center. Repeat for the right side. The screen should be drum-tight without warping the frame. -
Complete Stapling:
Work your way out from the center staples toward the corners, pulling and stapling every inch or so. Trim away the excess screen material with a utility knife for a clean finish.
Grid Counting Trick
Use white chalk to lightly mark grid lines every 10 squares directly on the dried black paint. This makes transferring your graph paper design much faster.
Step 3: Painting the Grid
-
Define the Work Area:
Use masking tape on the front of the screen to block off the rectangular area where your black background will go. This ensures crisp, straight edges for your main panel. -
Base Coat Application:
Load your flat shader brush with black acrylic paint. Instead of brushing typically, dab the paint into the holes of the screen. You want to coat the wire grid itself, but usually, leaving the holes open creates a better mesh effect. -
Dry and Repeat:
Allow the first coat of black to dry completely. Apply a second coat to ensure the mesh is fully opaque and the background is solid black. -
Remove Masking:
Carefully peel away the masking tape while the second coat is tacky (not fully dry) to prevent outlining peeling. Let the black background cure fully before starting the detail work.
Level Up: Gloss Finish
Once the paint is fully cured, carefully apply a layer of specific ‘3D crystal lacquer’ or glossy dimensional glue over just the beige pixels to make them look like tiles.
Step 4: Pixel Detailing
-
Map the Portrait:
Using your graph paper reference, lightly count the grid squares on your screen to find the center. You can use a tiny dot of beige paint to mark the center point of the nose. -
Paint the Subject:
Switch to the beige/cream paint. Using a small brush, paint the ‘pixels’ of the wolf’s face. I find it easiest to paint square by square, filling the grid holes slightly more here to make the subject pop against the black. -
Create the Checkerboard:
Move to the top and bottom borders. Paint the beige squares first, carefully counting the grid lines to keep the checkerboard pattern consistent. -
Refine Edges:
Use a fine liner brush with black paint to clean up any beige mistake pixels or to sharpen the corners of the eyes and ears.
Step 5: Final Assembly
-
Prepare Backing:
Cut a piece of rust-colored cardstock or fabric to the size of your frame’s opening. The warm tone will show through the unpainted areas of the mesh, providing visual warmth. -
Mounting:
Place the colored backing behind the painted screen. Secure it in place using either the frame’s original flex points or a piece of cardboard stapled to the back. -
Display:
Set your frame on a stand or hang it near a window where natural light can interact with the texture of the screen mesh.
Enjoy the unique texture and geometric charm of your new handmade screen art piece
Mountain Sunset Gradient Across Wire Mesh

Capture the serene beauty of a fading sunset over layered peaks with this mixed-media embroidery project. By combining sheer mesh with appliquéd fabric layers and textural stitching, you’ll create depth that feels both modern and timeless.
Step-by-Step Guide
Materials
- Large wooden embroidery hoop (12-inch or larger recommended)
- Sheer synthetic mesh or organza fabric (blush or neutral tone)
- Assorted linen or cotton fabrics in a gradient palette (dark teal, hunter green, slate blue, warm grey, rusty pink, blush pink)
- Embroidery floss in coordinating colors
- Embroidery needles (various sizes)
- Fabric scissors
- Fabric glue or fusible web (optional)
- Water-soluble fabric marker or chalk pencil
- Iron and ironing board
Step 1: Preparation and Background Layering
-
Prepare the base:
Stretch your sheer mesh fabric tightly into the wooden hoop. Ensure it is drum-tight to prevent puckering later on. Trim the excess fabric from the back, leaving about an inch, and secure it with a running stitch or glue to the inner ring. -
Sketch the layout:
Using a reference photo or your imagination, lightly sketch the mountain ranges onto paper first to create a template. You want about 5-7 distinct layers of mountains, starting from the top (furthest away) to the bottom (closest). -
Cut the fabric layers:
Trace your paper templates onto your colored fabrics. Remember to leave a small 1/4 inch overlap at the bottom of each piece so they can be tucked behind the layer in front of it. The top-most peaks should be your lightest pinks, transitioning down to dark teals. -
Treat the edges:
If your chosen fabric frays easily, apply a very thin line of fray check to the top edges of your cut mountain shapes, or plan to use a satin stitch later to cover raw edges.
Step 2: Appliqué Assembly
-
Position the top range:
Place your highest, furthest mountain layer (the light blush pink) onto the mesh. Position it so the sheer mesh remains visible above it as the ‘sky’. Pin it securely in place. -
Secure the first layer:
Stitch the top edge of this first mountain range using a matching thread. A simple whip stitch or a neat running stitch works well here. You want the fabric to lay flat against the transparency. -
Layer downward:
Place the next layer (the rust/warmer pink) slightly overlapping the bottom of the first layer. This creates the illusion of distance. Pin and stitch the top edge of this new layer. -
Continue the gradient:
Repeat this process for the middle layers (greys and slate blues). As you move down, the mountains should get slightly larger and more detailed in shape. -
Add texture through fabric direction:
I find that if you cut some fabric pieces on the bias (diagonally across the grain), it adds a subtle visual texture that mimics the ruggedness of rock faces.
Fabric Puckering?
If the fabric layers are causing the mesh to sag, tighten the hoop screw gently and pull the mesh taut again. Be careful not to distort the mountain shapes while pulling.
Step 3: Embroidery and Detail
-
Enhance the peaks:
Using embroidery floss that matches your fabric layers, add vertical running stitches or long-and-short stitches to the mountain faces. This shading adds topographical detail and emphasizes the slope of the hills. -
Define the ridges:
For sharper definition, backstitch along the very top ridge of the darker, foreground mountains. This separates the layers visually. -
Create the foreground forest:
On the darkest bottom layer (the deep teal), use 2-3 strands of dark green or black floss. Stitch tiny vertical lines or small triangular satin stitches to suggest a distant pine forest silhouette along the ridge. -
Add the bottom hill texture:
For the closest hill at the very bottom, use a full thread painting technique or closely packed running stitches in horizontal waves to give it a grassy, textured appearance different from the rocky peaks above. -
Highlight the path:
Stitch a contrasting thin line (like the copper one in the example) across the bottom foreground hills using a stem stitch to suggest a winding trail or a highlight catching the last bit of light. -
Final secure:
Check the back of your work. Trim any loose threads and ensure all fabric layers are securely stitched down at the edges of the hoop. You may need to trim excess fabric bulk from the back if the layers are thick.
Add Sparkle
Use a single strand of metallic gold or silver thread to add tiny stars in the sheer mesh sky area or to highlight the snowy tips of the highest peaks.
Hang your finished hoop near a window where natural light can filter through the sheer sky, illuminating your landscape from behind
Rainy Window Illusion With Painted Droplets
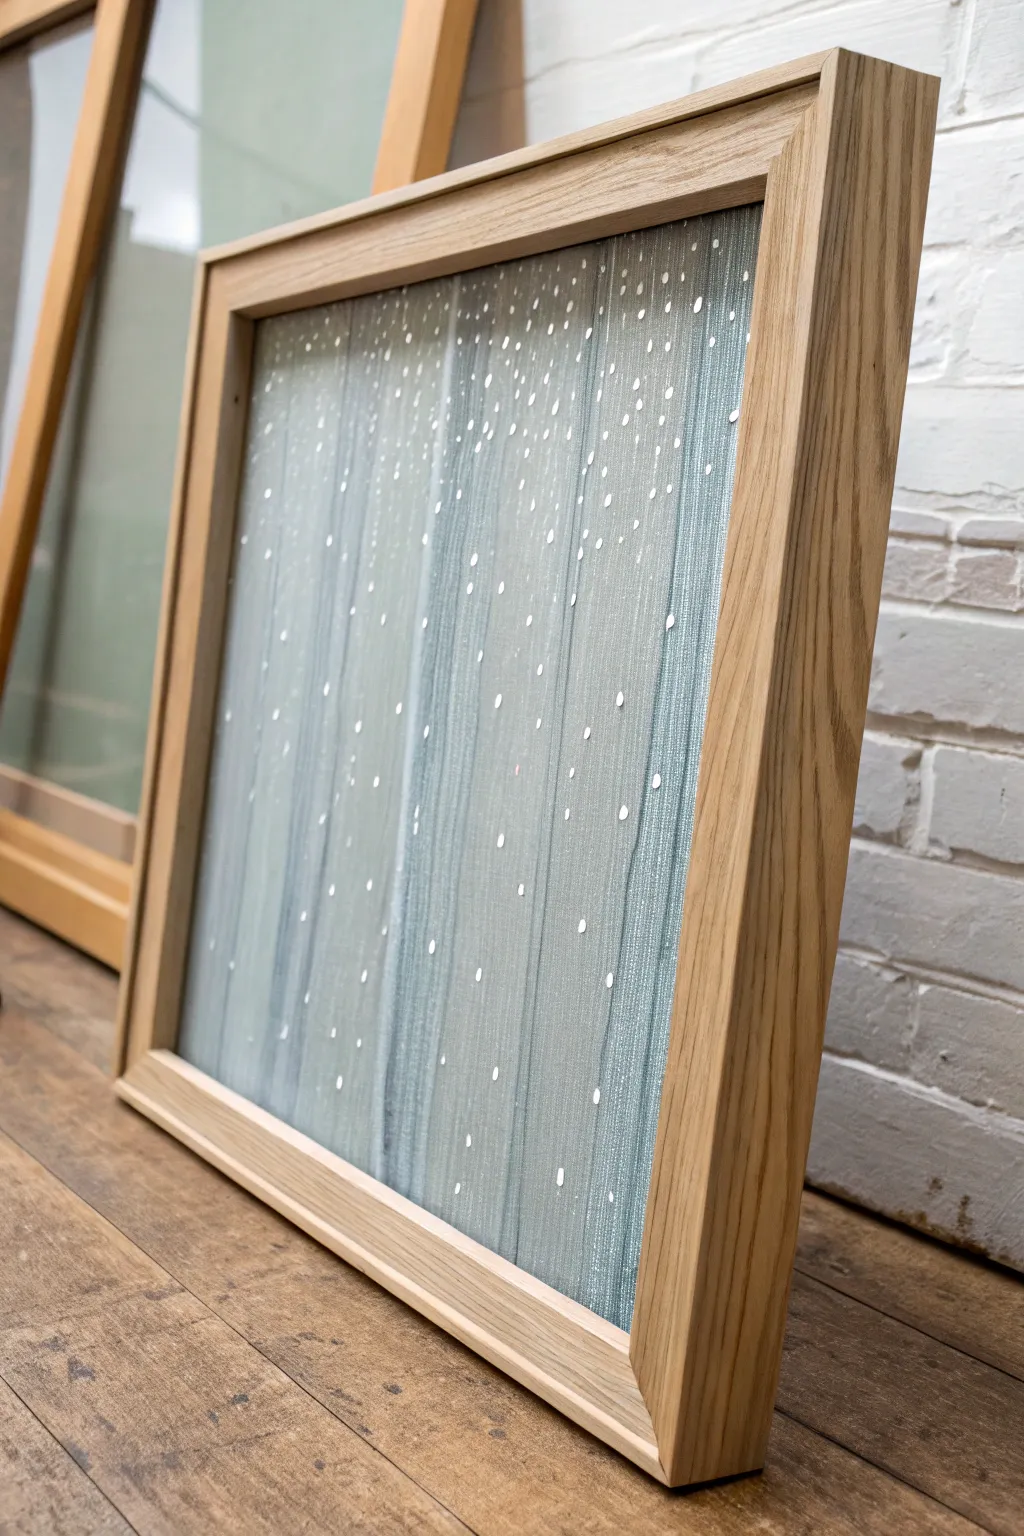
Capture the moody elegance of a storm without the gloomy weather using this clever screen painting technique. By layering vertical washes and crisp droplets on a mesh surface, you’ll create a convincing illusion of rain sliding down a window pane.
Step-by-Step
Materials
- Fine mesh window screen material (fiberglass or aluminum)
- Deep floating wooden frame (unglazed)
- Light blue acrylic paint
- Grey acrylic paint
- Titanium white acrylic paint
- Gloss medium or clear gel medium
- Wide flat synthetic brush (2-3 inch)
- Fine point detail brush (size 0 or 1)
- Staple gun and staples
- Scissors or utility knife
- Palette or mixing plate
- Water cup
- Rag or paper towels
Step 1: Preparing the Canvas
-
Measure and Cut:
Begin by unrolling your window screen material. Lay your frame face down on top of it and cut a piece of screen that is approximately 2 inches larger than the frame on all sides to allow for stretching. -
Initial Anchor:
Position the screen centered on the back of the frame. Staple the center of the top edge first, then pull the screen taut and place a staple in the center of the bottom edge. -
Stretch and Secure:
Move to the sides, pulling the screen tight to eliminate any ripples, and staple the centers. Continue working your way out toward the corners on all sides, stapling every few inches. -
Trim Excess:
Once the screen is drum-tight, use your utility knife or scissors to trim away the excess material flush with the frame’s edge for a clean finish.
Step 2: Creating the Atmosphere
-
Mix the Background Wash:
On your palette, mix a small amount of light blue and grey acrylic paint with plenty of water. You want a very watery consistency, almost like watercolor, rather than thick paint. -
Apply Vertical Streaks:
Using the wide flat brush, drag the watery paint mixture vertically down the screen in long, continuous strokes. The goal is not to fill every hole in the mesh but to tint the fibers. -
Add Tonal Variation:
While the first layer is still damp, mix a slightly darker grey-blue wash. Apply this selectively in vertical bands to create depth and the look of shadows or thicker streams of water. -
Soften the Edges:
If any brushstrokes look too harsh, use a damp, clean brush to gently feather the edges of your painted bands, maintaining that vertical motion. -
Dry Completely:
Let the screen dry fully. The mesh should look hazy and streaked, mimicking condensation on glass.
Clogging the Mesh
To make the droplets pop, ensure your white paint is thick enough to actually fill the holes of the screen mesh. If it drips through, mix in more gloss gel.
Step 3: Painting the Rain
-
Prepare the White:
Mix titanium white paint with a small amount of gloss medium. This adds body to the paint so it clogs the screen holes effectively and dries with a liquid sheen. -
Start at the Top:
Dip your fine point detail brush into the white mixture. Begin placing random dots near the top of the canvas, varying their size slightly. -
Create Gravity Trails:
For some of the larger droplets, gently drag your brush downward to create a thin, trailing tail, simulating gravity pulling the water down the glass. -
Cluster the Droplets:
As you work your way down, group some dots closer together and leave other areas sparse. Nature rarely distributes rain in perfect grid patterns. -
Vary Opacity:
Paint some droplets solid white for highlights and others with a thinner wash to make them appear translucent and receding. -
Add Tiny Specs:
Use the very tip of your brush to add tiny, pin-prick sized dots around the larger droplets to represent spray or fine mist. -
Review and Refine:
Step back to view the piece as a whole. Add more droplets in empty areas if needed to balance the composition, keeping the density somewhat uniform but organic. -
Final Drying:
Allow the droplet layer to dry completely for at least 24 hours. The gloss medium may take longer to cure than standard acrylics.
Background Depth
Mount a painted board or a mirror behind the finished screen frame. This adds a layer of color or reflection behind the ‘rain’ for a deeper effect.
Hang your finished piece near a light source to let the painted droplets catch a subtle, realistic glimmer
Faux Stained Glass With Negative Space
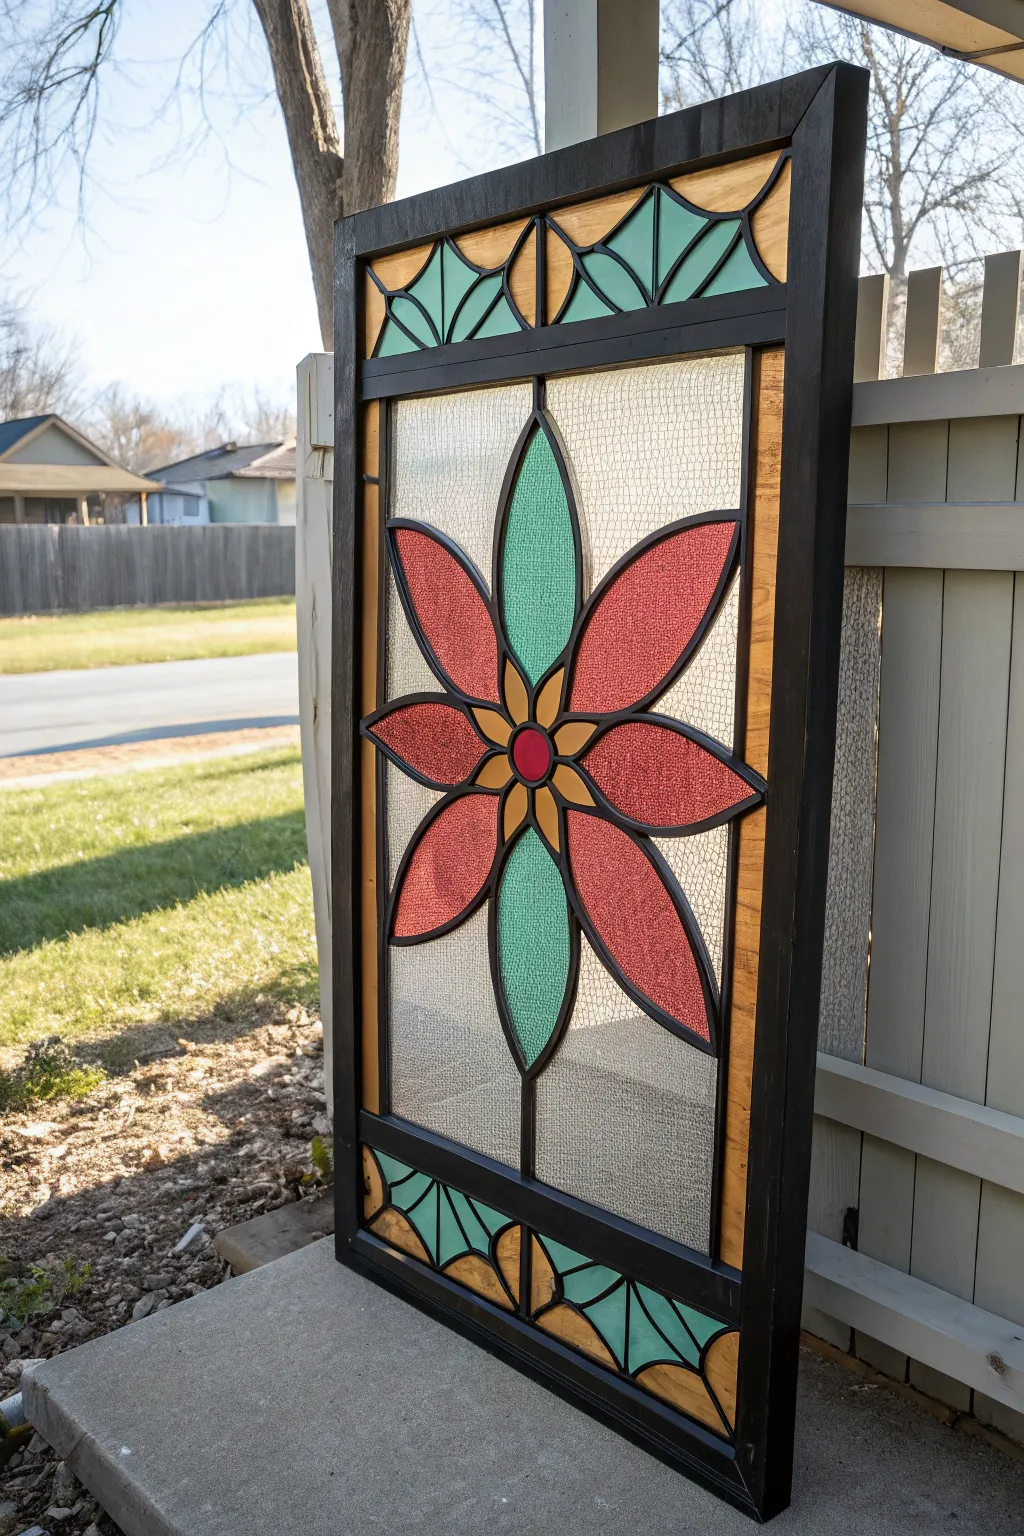
Transform a simple window screen into a vibrant piece of art that mimics the glowing beauty of stained glass. By using the screen’s mesh as negative space, this project combines bold geometric lines with translucent color for a striking outdoor or indoor accent.
How-To Guide
Materials
- Large wooden frame (repurposed window frame or DIY)
- Window screen mesh (fiberglass or aluminum)
- Black acrylic paint (outdoor rated if for exterior use)
- Acrylic paints (red, teal, yellow)
- Textile medium or screen printing medium
- Flat artist brushes (various sizes)
- Detail liner brush
- Staple gun and staples
- Chalk or white styling pencil for sketching
- Ruler or straight edge
- Cardboard or drop cloth
Step 1: Preparation and Framing
-
Prepare the frame:
Begin by cleaning your wooden frame thoroughly. If building from scratch, cut 1×2 lumber to size and join corners with wood glue and screws. Paint the entire wooden frame with a solid coat of black outdoor acrylic paint and let it dry completely. -
Attach the screen:
Flip the frame face down. Stretch your window screen material across the back, pulling it taut. Staple it securely along the edges, ensuring there are no wrinkles or loose spots. Trim any excess screen material with scissors or a utility knife.
Pro Tip: Clogging
If paint isn’t filling the mesh holes, let it sit on your palette for a few minutes to thicken slightly, or use less water on your brush.
Step 2: Drafting the Design
-
Create guidelines:
Using a ruler and a piece of chalk or a white charcoal pencil, lightly mark horizontal lines to separate the top and bottom border sections from the large central panel. -
Sketch the borders:
Draw the geometric scallop shapes in the top and bottom bands. These should look like quarter-circles or fan shapes interacting with triangles. -
Draw the central flower:
Find the exact center of the main panel. Sketch a small circle for the flower’s heart. Radiating outward, draw eight petals using elongated teardrop shapes. Four should be vertical/horizontal, and four diagonal. -
Add connecting lines:
Draw a vertical line connecting the bottom petal to the bottom border frame, simulating a leaded stem.
Level Up: Gloss Finish
Apply a coat of clear high-gloss outdoor varnish over only the colored sections to mimic the shine of real glass.
Step 3: Creating the ‘Lead’ Lines
-
Mix the outlining paint:
Mix your black acrylic paint with a small amount of textile medium. This helps the paint adhere to the mesh without cracking. -
Paint the outlines:
Using a liner brush or a small flat brush turned on its edge, carefully paint over your chalk sketches. Make these lines thick and bold to mimic the look of lead came used in real stained glass. -
Refine the edges:
Go over the lines a second time if needed to ensure they are opaque and solid black. I find it helpful to look at the screen against a light source to catch any pinholes in the black lines. -
Clean up borders:
Paint a thick black border around the inner edge of the wood frame where it meets the screen, creating a clean transition.
Step 4: Adding Color
-
Prepare color mixes:
Mix your red, teal, and yellow acrylics with textile medium. The ratio should be roughly 2 parts paint to 1 part medium, or follow the bottle instructions. You want a consistency that fills the mesh holes but remains slightly translucent. -
Paint the red petals:
Using a flat brush, fill in the four diagonal petals with red. Use a dabbing or stippling motion to push the paint into the screen mesh holes rather than just brushing across the surface. -
Paint the teal petals:
Fill the four vertical and horizontal petals with teal paint. Be careful near the black lines; try not to overlap into the ‘lead’ work you just finished. -
Detail the center:
Paint the very center circle of the flower red. Then, paint the small petal-like shapes immediately surrounding the center circle in yellow. -
Fill the borders:
Move to the top and bottom sections. Paint the fan/scallop shapes in teal and the remaining triangular background shapes in yellow. -
Second coat:
Once the first layer is dry to the touch, hold it up to the light. If the colors look too patchy, dab on a second light coat to even out the opacity while maintaining that stained-glass glow. -
Touch up:
Finally, use your small liner brush and black paint to neaten up any ragged edges where the colors might have bled onto the black outlines.
Place your finished screen in a spot where the sun can shine through it to fully reveal the brilliant colors
Splatter-and-Drag Abstract on a Window Screen
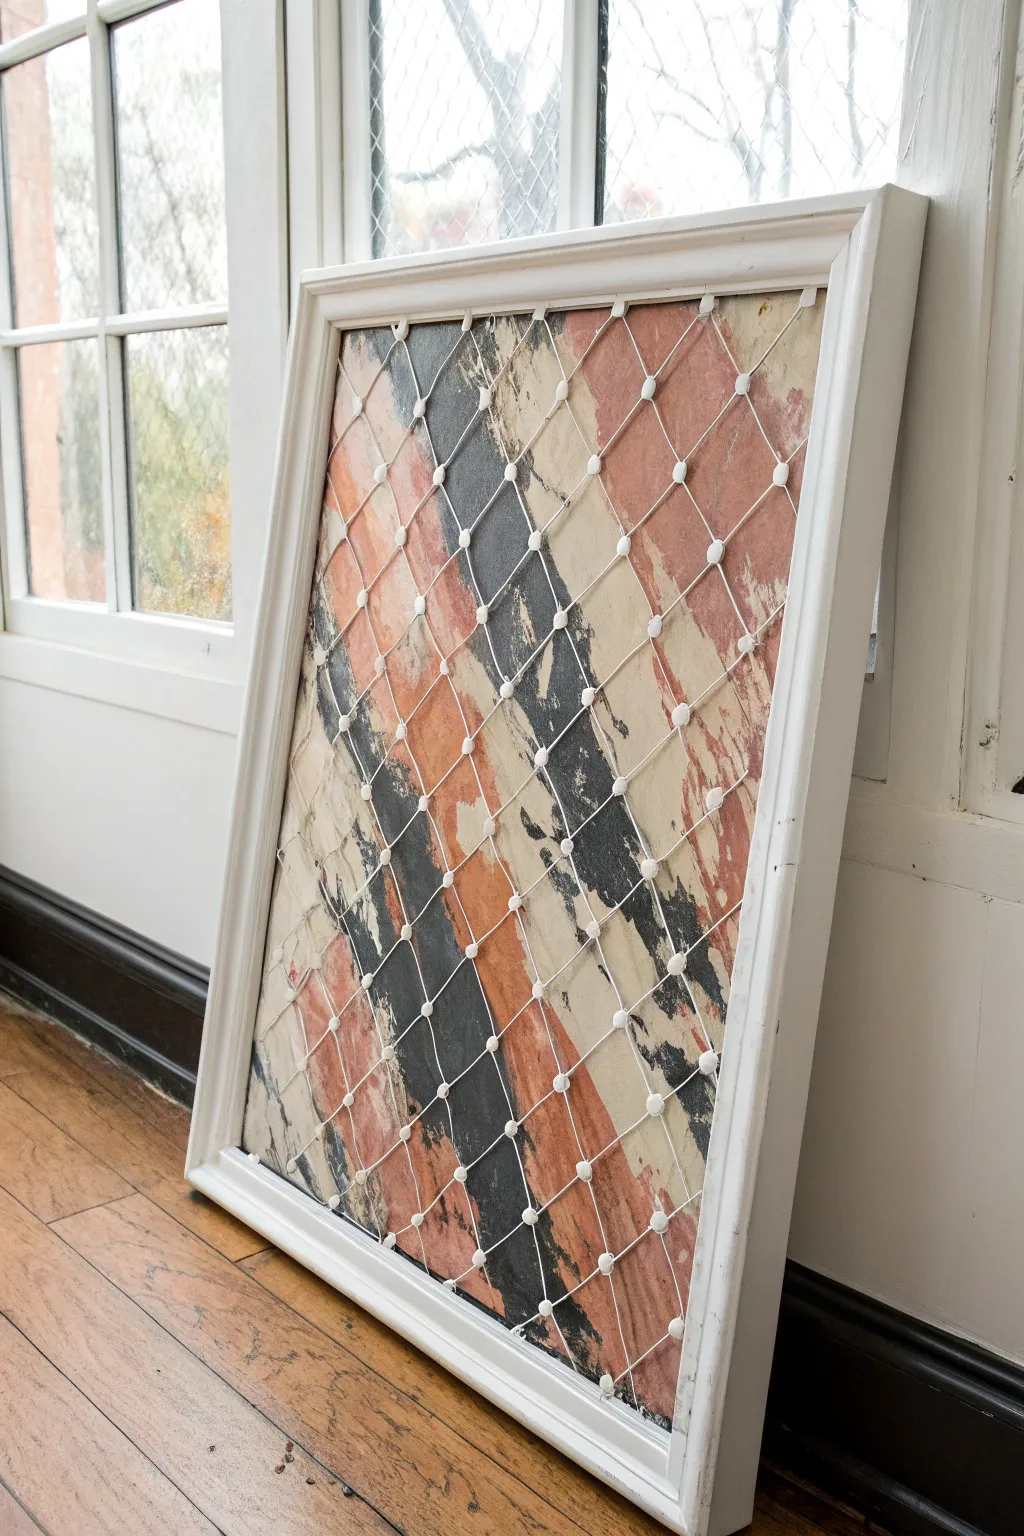
This industrial-chic project combines rustic textures with modern abstract art by layering painted chicken wire over a bold, splatter-and-drag canvas. The result is a dimensional, mixed-media piece that adds architectural interest and a pop of terracotta warmth to any room.
Step-by-Step Guide
Materials
- Large wooden picture frame (white)
- Canvas board or heavy plywood cut to frame size
- Chicken wire or hexagonal wire mesh
- Acrylic paints (black, terracotta/coral, cream/beige)
- Wide putty knife or drywall scraper
- Wire cutters
- Staple gun and staples
- Hot glue gun and white glue sticks
- Drop cloth or newspapers
- Gloves (for handling wire)
Step 1: Creating the Abstract Base
-
Prepare the surface:
Lay your canvas board or plywood flat on a protected surface. If using plywood, apply a coat of white primer first to ensure the colors pop. -
Apply the first color:
Squeeze a generous amount of the cream or beige acrylic paint directly onto the board in random spots. Don’t overthink placement; organic is better. -
Add contrasting hues:
Add dots and lines of the terracotta/coral paint, interspersing them with the beige. Finally, add smaller, distinct lines of black paint to create depth. -
The drag technique:
Take your wide putty knife or scraper and place it at the top edge of the board. Pull it firmly down or diagonally across the wet paint. -
Layer and blend:
Continue dragging the paint across the surface in long, confident strokes. Allow colors to mix slightly on the board, but stop before they turn muddy. -
Create texture:
For added interest, you can lift the scraper mid-stroke to create ridges or ‘chatter’ marks in the paint. I sometimes lightly tap the flat side of the scraper on wet areas to add texture. -
Dry completely:
Set the painted board aside to dry fully. This may take several hours depending on the thickness of the paint layers.
Step 2: Assembling the Wire Layer
-
Measure the wire:
Unroll your chicken wire mesh over the empty wooden frame. You want it to cover the opening with about an inch of overhang on all sides. -
Cut to size:
Using sturdy wire cutters, snip the mesh to the correct size. Wear gloves here, as the cut wire edges can be surprisingly sharp. -
Secure the mesh:
Flip the frame face down. Place the cut wire over the back opening. Use a staple gun to secure the wire to the back of the frame, pulling it taut as you go to prevent sagging. -
Trim excess:
Once stapled securely, trim any sharp wire ends that protrude past the frame edge so they don’t scratch your wall or the artwork backing. -
Add decorative nodes:
Flip the frame face up. Using a hot glue gun with white glue sticks, carefully apply a small, neat dot of glue at every intersection where the wires cross. -
Shape the nodes:
As the glue cools but is still slightly tacky, you can gently tap the tops to flatten them slightly, creating uniform ‘studs’ on the grid. -
Paint the nodes (optional):
If your glue isn’t opaque enough, use a small detail brush to dab a little white paint onto each cooled glue dot to make them stand out.
Clean Swipes
Wipe your putty scraper clean with a paper towel between every few swipes. This prevents colors from blending into a single brown tone and keeps the streaks distinct.
Step 3: Final Assembly
-
Insert the art:
Place your dry, painted board face-down into the back of the frame, pressing it directly against the stapled wire mesh. -
Secure the back:
Use framing points or small nails to secure the board into the frame rabbet, locking everything together. -
Check fit:
Turn the piece over and ensure the wire mesh sits flush against the abstract painting. The shadows cast by the wire on the paint add a wonderful 3D effect.
Metallic Touch
Swap the white glue sticks for metallic gold or silver hot glue. The wire intersections will look like soldered metal joints for an elevated industrial look.
Now you have a striking, layered art piece that brings texture and color to your space
Metallic Highlights for Screen-Painted Constellations
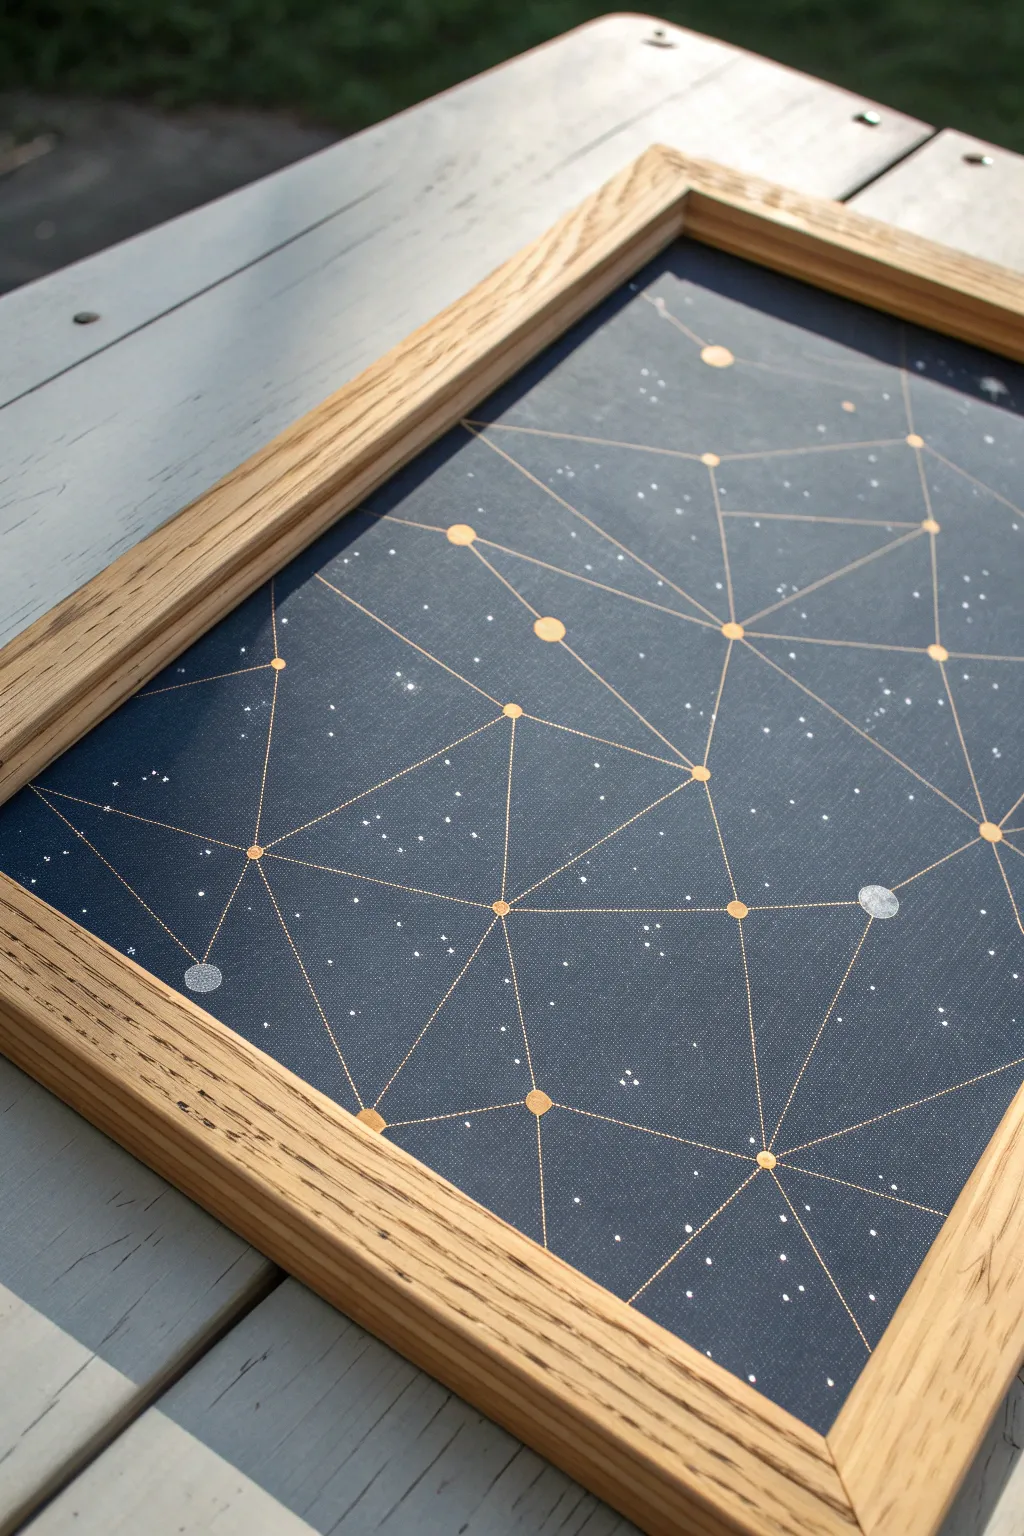
Bring the cosmos indoors with this elegant, geometric screen painting. By combining a deep midnight blue backdrop with shimmering metallic accents, you’ll create a sophisticated piece of wall art that catches the light beautifully.
Step-by-Step Tutorial
Materials
- Wooden canvas frame or old silk screen frame
- Screen printing mesh or finely woven polyester fabric
- Staple gun and staples
- Midnight blue acrylic paint or fabric ink
- Fine-point metallic paint markers (gold and silver)
- Metallic gold acrylic paint
- Small round paintbrush (size 0 or 1)
- Ruler or straight edge
- White chalk or watercolor pencil
- Painter’s tape or stencil film (optional)
- Light Oak wood molding for outer frame
- Wood glue and clamps
Step 1: Preparing the Canvas
-
Frame and Mesh:
Begin by stretching your screen printing mesh or polyester fabric tightly over the wooden inner frame. Secure it firmly on the back using a staple gun, pulling taut as you go to ensure a surface that bounces back like a drum. -
Base Color Application:
Mix your midnight blue acrylic paint. Since we’re screen painting, you want full coverage but not a thick, gloppy layer that clogs the mesh perfectly. Apply an even coat across the entire fabric surface using a foam roller or wide brush. -
Drying Time:
Allow the blue base coat to dry completely. This is crucial; if the base is tacky, your metallic lines will drag and smudge. I usually let this sit for at least an hour or two. -
Creating the Texture:
For that subtle ‘starry’ background texture seen in the image, lightly flick a stiff toothbrush loaded with watered-down white or light grey paint over the dry blue surface. Keep the splatter very fine and sparse.
Bleeding Lines?
If the metallic marker bleeds into the fabric mesh, the base paint layer is too thin. Apply a clear matte medium over the blue paint to seal the ‘pores’ before drawing lines.
Step 2: Mapping the Constellations
-
Planning the Grid:
Visualize your geometric pattern. You don’t need real star charts; just aim for a balanced network of triangles and varying angles. Use a small piece of white chalk to lightly mark where your main ‘stars’ (dots) will go. -
Connecting the Dots:
Using a ruler and your chalk, lightly draw the connecting lines between your planned star points. This acts as your roadmap so you don’t make a permanent mistake with the metallic ink later. -
Wiping Errors:
If a chalk line looks disjointed or a triangle looks too squashed, simply wipe it away with a slightly damp cloth and redraw. Adjust until the composition feels balanced.
Step 3: Applying Metallics
-
Drawing Gold Lines:
Take your fine-point gold metallic paint marker. Place your ruler along the first chalk line. Run the marker along the edge carefully. The texture of the screen mesh might cause skipping, so go slowly and re-trace if necessary for a solid line. -
Line Variation:
Continue tracing all your chalk lines with the gold marker. Try to keep consistent pressure so the line width remains uniform throughout the piece. -
Painting the Stars:
Dip the handle end of a paintbrush, or use a very small round brush, into the metallic gold acrylic paint. Dab a solid circle over every intersection point where lines meet to create the ‘stars’. -
Adding Silver Accents:
Select a few random, larger intersection points to highlight as distinctive planets or major stars. Paint these circles using silver metallic paint instead of gold to add visual depth. -
Cleaning Up:
Once the metallic ink and paint are fully dry, use a barely damp cloth to gently wipe away any visible chalk guide lines remaining between the constellation patterns.
Make It Glow
Mix a tiny pinch of glow-in-the-dark powder into your silver paint for the larger planets. During the day it looks metallic, but at night your constellation will subtly illuminate.
Step 4: Framing and Finishing
-
Measuring the Border:
Measure the outer dimensions of your painted screen frame. You will be building a simple outer frame to hide the staples and give it a polished look. -
Cutting the Molding:
Cut your light oak molding to size, using a miter box to cut 45-degree angles at the corners for a professional join. -
Attaching the Frame:
Apply a thin bead of wood glue to the back of the oak molding pieces. Press them firmly onto the front edges of your canvas frame. -
Clamping:
Secure the decorative frame with clamps while the glue dries. Wipe away any excess glue that squeezes out immediately with a damp rag. -
Final Inspection:
Check for any final touch-ups needed on the gold dots or lines. If the wood frame looks dry, you can lightly sand any rough corners for a smooth finish.
Hang your celestial map in a spot that receives natural light to see the metallic elements truly shine
Double-Screen Shadow Box Scene
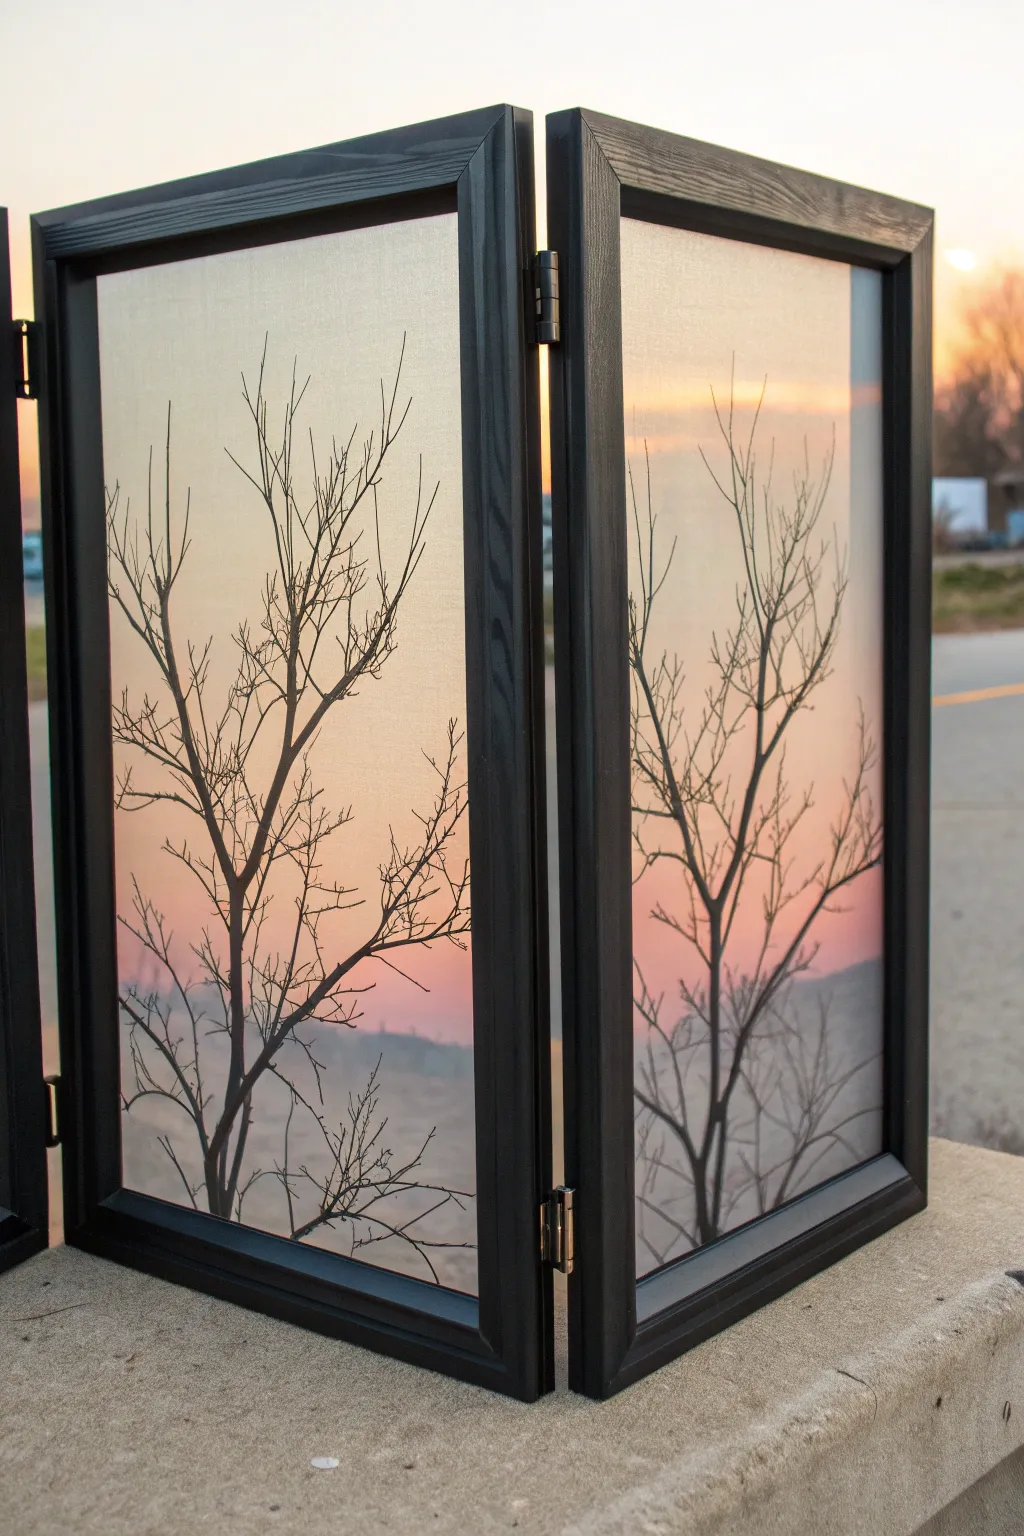
This elegant double-pane project captures the serene beauty of bare winter branches against a warm, glowing sunset. Using a semi-transparent backing within dark frames creates a lovely stained-glass effect that changes with the ambient light behind it.
How-To Guide
Materials
- Two identical deep-set black picture frames (8×10 or similar)
- Small brass or black hinges with screws
- Screwdriver
- Translucent vellum paper or sheer linen fabric
- Heavy-duty craft adhesive or staple gun
- Acrylic paints (black, orange, pink, lavender, pale yellow)
- Glazing medium or water (for blending)
- Fine liner brush (size 0 or 00)
- Wide flat brush (1 inch)
- Palette for mixing
- Pencil
Step 1: Preparing the Structure
-
Disassemble frames:
Begin by removing the backing board, glass, and any matting from both picture frames. You will only need the empty wooden frames for this project, though you can save the glass for future use. -
Plan the screen material:
Cut your translucent vellum or sheer linen to fit the inside lip of the frames exactly. It needs to be large enough to be glued or stapled to the rebate (the inner recess where the glass usually sits) but not so large that it sticks out the back. -
Attach the hinges:
Place the two frames side-by-side on a flat surface, face down. Mark the position for two hinges connecting the inner vertical edges. Pre-drill small pilot holes if necessary to prevent the wood from splitting. -
Secure the join:
Screw the hinges into place securely. Test the folding mechanism to ensure the frames can stand open at an angle like a book. Once tested, lay them flat again for the painting and assembly process.
Step 2: Creating the Sunset Background
-
Mix the sky gradient:
On your palette, prepare your sunset colors. You’ll need a pale yellow, a soft orange, a dusky pink, and a muted lavender. Keep the paint relatively thin; I like to mix in a little glazing medium to help the light filter through. -
Paint the bottom section:
Starting at the bottom third of your vellum or fabric, apply the lavender and pink tones horizontally. Use long, smooth strokes with your flat brush to create a hazy, distant horizon line. -
Blend upwards:
While the bottom section is still tacky, introduce the orange and finally the pale yellow as you move toward the top. Blend the transition zones gently so there are no harsh lines, mimicking the soft glow of twilight. -
Dry completely:
Allow the background gradient to dry fully. If you are using paper vellum, weight the corners down so it doesn’t curl as it dries.
Pro Tip: Atmospheric Haze
For a misty look, add a tiny drop of white to your black paint for the lowest, furthest branches. This makes them appear recessive compared to the stark black foreground tree.
Step 3: Painting the Silhouettes
-
Draft the tree structure:
Lightly sketch the main trunks of your trees with a pencil. Position the main split of the trunk low on the panel to create a sense of height. The design should span across both panels visually, even though there is a frame break in the middle. -
Paint the main trunks:
Using straight black acrylic paint and a medium round brush, fill in the thickest parts of the tree trunks. Ensure the paint is opaque enough to create a solid silhouette against the light. -
Add major branches:
Switch to a smaller brush to extend the limbs outward. Remember that trees in winter look jagged and somewhat angular, so avoid making the lines too curvy or unified. -
Detail with fine twigs:
This is where patience pays off; use your finest liner brush to add the delicate end-twigs. Use a very fluid black paint consistency (almost like ink) to get crisp, thin lines that crisscross naturally.
Troubleshooting: Warped Paper
If your vellum buckles from the acrylic moisture, paint the BACK of the sheet with a clear matte medium first to seal it, or tape the edges down firmly while painting.
Step 4: Final Assembly
-
Check transparency:
Hold your painted sheets up to a light source to check for any pinholes in the black paint or streaks in the sunset. Touch up any areas now before installation. -
Install the artwork:
Place the dried artwork face-down into the rebate of the frames. Apply a strong craft adhesive around the inner wooden edge or use a staple gun to secure the material tautly. -
Clean up edges:
If you used glue, wipe away any excess immediately. If stapling fabric, trim any frayed edges for a neat finish on the back. -
Display:
Stand your hinged screen on a surface near a natural light source to see the sunset colors ignite.
Enjoy the calming atmosphere this little window into nature brings to your desk or mantelpiece
Painted-and-Stitched Mixed Media on Mesh
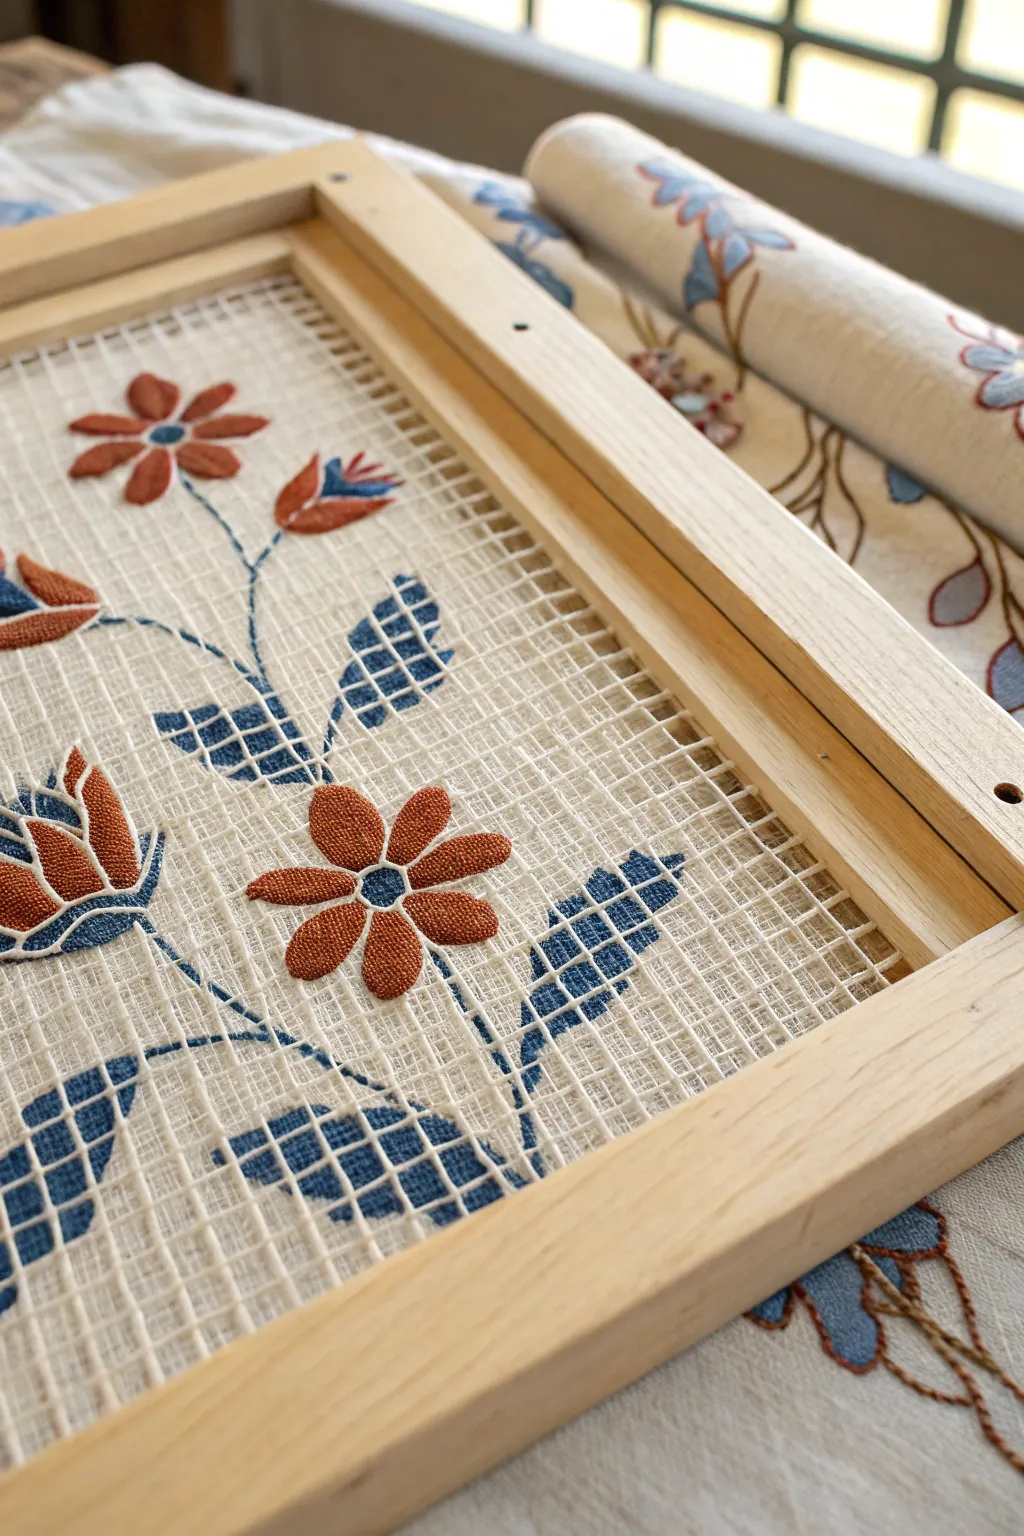
This project combines the clean lines of a screen printing frame with the rich texture of hand embroidery for a unique mixed-media piece. The open mesh creates a delightful floating effect, where structured floral designs seem suspended in air against the semi-transparent grid.
Detailed Instructions
Materials
- Wooden screen printing frame (small to medium size)
- Polyester monofilament screen mesh (110-160 count)
- Staple gun and staples (if building frame from scratch)
- Fabric glue or clear acrylic medium
- Fine-tip paintbrush
- Acrylic screen printing ink (blue, dark blue)
- Embroidery floss (terracotta, burnt orange, off-white)
- Tapestry needle (blunt tip)
- Water-soluble fabric marker or chalk pencil
- Sketchbook for planning
Step 1: Preparation & Planning
-
Prepare the Frame:
Ensure your mesh is stretched taut across the wooden frame. If you are stretching it yourself, pull tight and staple securely on the back, ensuring the grid lines of the mesh remain straight and perpendicular to the wood. -
Draft the Design:
Since you can’t erase easily on mesh, sketch your floral pattern on paper first to perfect the layout. Aim for distinct flowers and clearly separated leaves. -
Transfer the Guide:
Place your paper sketch underneath the mesh frame. Using a very light touch with a chalk pencil or water-soluble marker, trace the main stems and flower centers directly onto the mesh surface.
Paint Bleeding?
If paint bleeds along the grid lines, your paint is too watery. Let it thicken on the palette for 5 minutes or mix in more acrylic medium to increase viscosity.
Step 2: Painting the Structure
-
Mix the Stem Color:
For the blue foliage, mix screen printing ink to a deep, vintage blue shade. I prefer adding a tiny drop of fabric medium to ensure it bonds well to the slick mesh fibers. -
Paint the Stems:
Using a fine-tip brush, carefully paint the thin lines of the stems. Don’t overload the brush; you want the ink to coat the threads without clogging the holes of the mesh completely. -
Fill the Leaves:
Paint the leaf shapes using a ‘grid-fill’ technique. Instead of a solid blob of paint, carefully dab the ink only onto the grid intersections or fill alternate squares to mimic a cross-stitch or woven look. -
Create Depth:
Once the first layer is dry to the touch, add accents of a darker blue ink to the base of the leaves and stems to create shadow and dimension. -
Let it Cure:
Allow the painted sections to dry completely. Screen printing ink can take up to 24 hours to fully cure, but it should be dry enough to handle after an hour or so.
Step 3: Stitching the Blooms
-
Anchor the Thread:
Thread your tapestry needle with all six strands of terracotta floss for a plush look. Anchor your thread by weaving it through the mesh holes near a flower center, tying a small, discreet knot on the back. -
Satin Stitch Petals:
Begin the satin stitch for the flower petals. Bring the needle up at the outer edge of a petal and down near the center. Because the mesh is a grid, you’ll need to follow the squares carefully to keep curves looking smooth. -
Manage Tension:
Pull the floss taut enough to lay flat, but not so tight that it warps the delicate screen mesh. The mesh has less give than fabric, so gentle tension is key. -
Layering Colors:
For the two-tone petals, stitch the bottom half in a darker burnt orange first. Switch to the lighter terracotta for the top half, blending the stitches slightly in the middle. -
Adding Definition:
outline the petals with a simple backstitch using only 2 strands of off-white or light blue floss. This separates the embroidered texture from the mesh background. -
Stitch the Centers:
Create the flower centers using a small cluster of French knots or a tight padded satin stitch in a contrasting blue or white to tie in with the painted leaves. -
Secure the Back:
Weave your loose ends under the back of the dense petal stitches. Avoid carrying threads across the open mesh areas, as they will be visible from the front.
Double Sided Display
Make the back as neat as the front by covering the back of your stitches with a second identical layer of satin stitch for a piece that can float in a room.
Step 4: Finishing Touches
-
Inspect the Grid:
Check for any accidental paint clogs in the open mesh areas. You can carefully push a clean pin through blocked holes to clear them while the paint is still slightly pliable. -
Clean the Frame:
Wipe down the wooden frame edge to remove any fingerprints or stray chalk marks. -
Seal the Stitching (Optional):
If the piece will be hung in a high-traffic area, dab a tiny amount of fray check or clear glue on the knots at the back to ensure they never slip against the smooth mesh.
Now you have a stunning, transparent botanical artwork ready to hang or prop up on a sunny shelf
Glow-Behind Screen Panel for Porch Nights
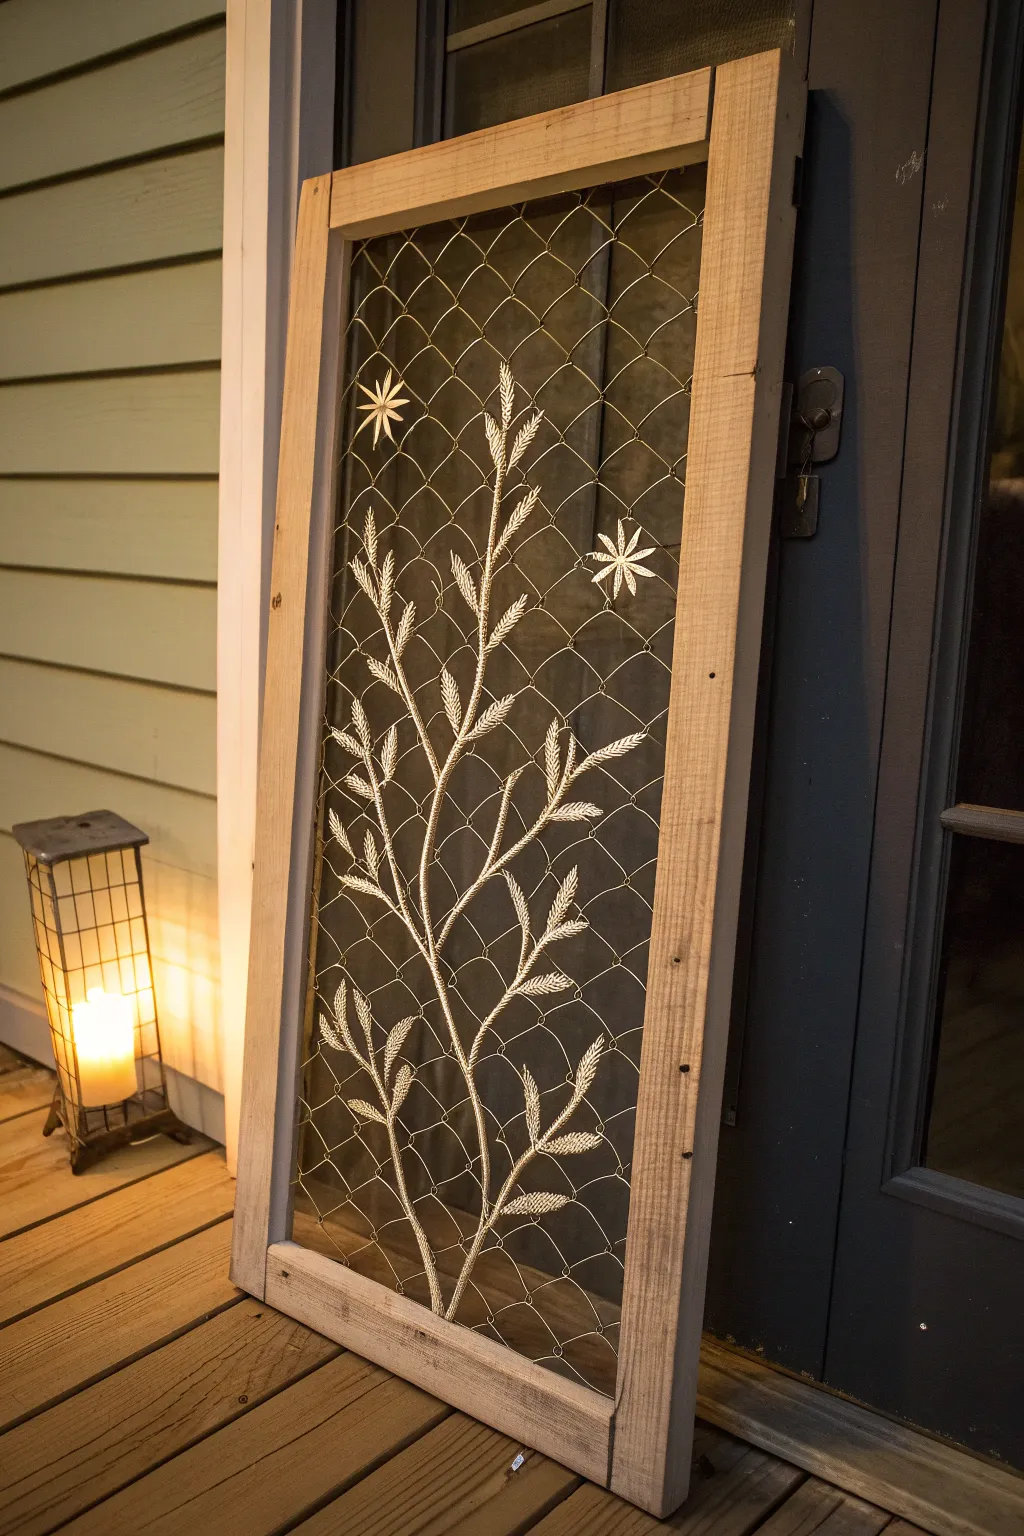
Transform a simple wooden frame and ordinary chicken wire into a stunning piece of porch decor using heavy-duty embroidery techniques. This project creates a silhouetted botanical design that looks especially magical when backlit by warm candlelight.
Step-by-Step Guide
Materials
- Large wooden frame (reclaimed window frame or custom built 2×4 frame)
- Chicken wire (1-inch hexagonal mesh)
- Heavy-duty stapler and staples
- Wire cutters
- Thick cotton macrame cord or chunky yarn (cream or white)
- Large-eye tapestry needle (metal or plastic)
- Scissors
- Pliers (optional, for pulling needle)
- Masking tape or painter’s tape
- White chalk or soapstone (for marking)
Step 1: Preparing the Frame
-
Select or Build Frame:
Begin with a sturdy wooden frame. If you’re building one from scratch, use 1×4 or 2×4 lumber cut to your desired dimensions (e.g., 24″ x 48″). Assemble with pocket screws or corner braces for stability. -
Sand and Finish:
Sand any rough edges of the wood to prevent splinters. Leave the wood raw for a rustic look as shown, or apply a light stain if you prefer a darker finish. -
Measure Wire:
Roll out your chicken wire over the back of the frame. You want enough mesh to overlap the wooden border by at least an inch on all sides. -
Attach Wire Mesh:
Staple the wire mesh securely to the back of the frame. Start in the center of one side, pull the wire taut to the opposite side, and staple. Continue working outward to keep the tension even. -
Trim Excess:
Once the mesh is fully secured, use wire cutters to snip off any excess wire overhang. It’s helpful to hammer down any sharp cut ends so they don’t snag your clothes or the yarn later.
Loose Stitches?
If the macrame cord slides around too much on the slick wire, add a tiny drop of hot glue or clear superglue to the back of the key knots to lock them in place instantly.
Step 2: Creating the Design
-
Plan Your Stem:
Visualize a central curving stem rising from the bottom center. You can use small pieces of masking tape on the wire to mark the key curve points before you start stitching. -
Anchor the Cord:
Cut a long length of macrame cord (about 4-5 feet is manageable). Tie a knot securely around a wire junction at the bottom center of the frame. -
Stitch the Main Stem:
Weave the cord in and out of the hexagonal holes to create the main stem line. For a thicker, more visible line, I like to double back or whip-stitch around the wire itself rather than just weaving through the holes. -
Branching Out:
From the main stem, begin creating smaller offshoot branches. Stitch upward and outward, keeping the lines fluid and organic rather than perfectly straight. -
Creating Wheat Heads:
To make the ‘wheat’ or leaf shapes, use a looping technique. Bring the needle out, form a loop about 1-2 inches long, and anchor it back at the base of the loop. Fill the shape by adding 2-3 straight stitches inside the loop. -
Add Texture:
For the denser parts of the wheat heads, wrap the yarn repeatedly around a single segment of wire mesh to create a bulky, raised texture. -
Stitching the Stars:
Identify empty spaces in the upper corners for the starbursts. Start from a central wire junction and stitch outward rays like spokes on a wheel, always returning to the center point. -
Secure Ends:
When you run out of cord or finish a section, weave the tail end back under several existing stitches on the backside to secure it. A dab of clear craft glue can help hold slippery cord in place. -
Refining the Shape:
Step back and look at your composition. Add smaller connecting branches or extra leaves to balance the negative space. The beauty is in the asymmetry. -
Clean Up:
Trim any loose thread tails close to the knots. Check the back of the frame to ensure no sharp wire ends are poking out. -
Final Display:
Place your finished screen on the porch. Position a lantern or candle behind it to cast the intricate shadows of your yarn work.
Pro Tip: Doubling Up
For a bolder look that stands out from a distance, use two strands of yarn held together. It fills the mesh gaps faster and makes the botanical shapes look much lush.
Enjoy the gentle glow of your handcrafted screen as the sun goes down
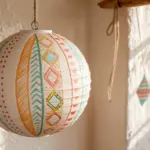


Have a question or want to share your own experience? I'd love to hear from you in the comments below!