Transforming the unique ribbed texture and natural curvature of seashells into miniature canvases is one of my favorite ways to spend a creative afternoon in the studio. Whether you are looking to create sophisticated coastal decor or dive into playful creature crafts with the kids, these marine treasures offer endless possibilities for artistic expression.
Watercolor Ridge Washes
Enhance the natural elegance of sea treasures with this delicate painting technique that highlights texture without hiding the shell’s beauty. By using watered-down pigments in the grooves, you create a stunning, sun-bleached effect that looks right at home in a coastal display.
Step-by-Step Tutorial
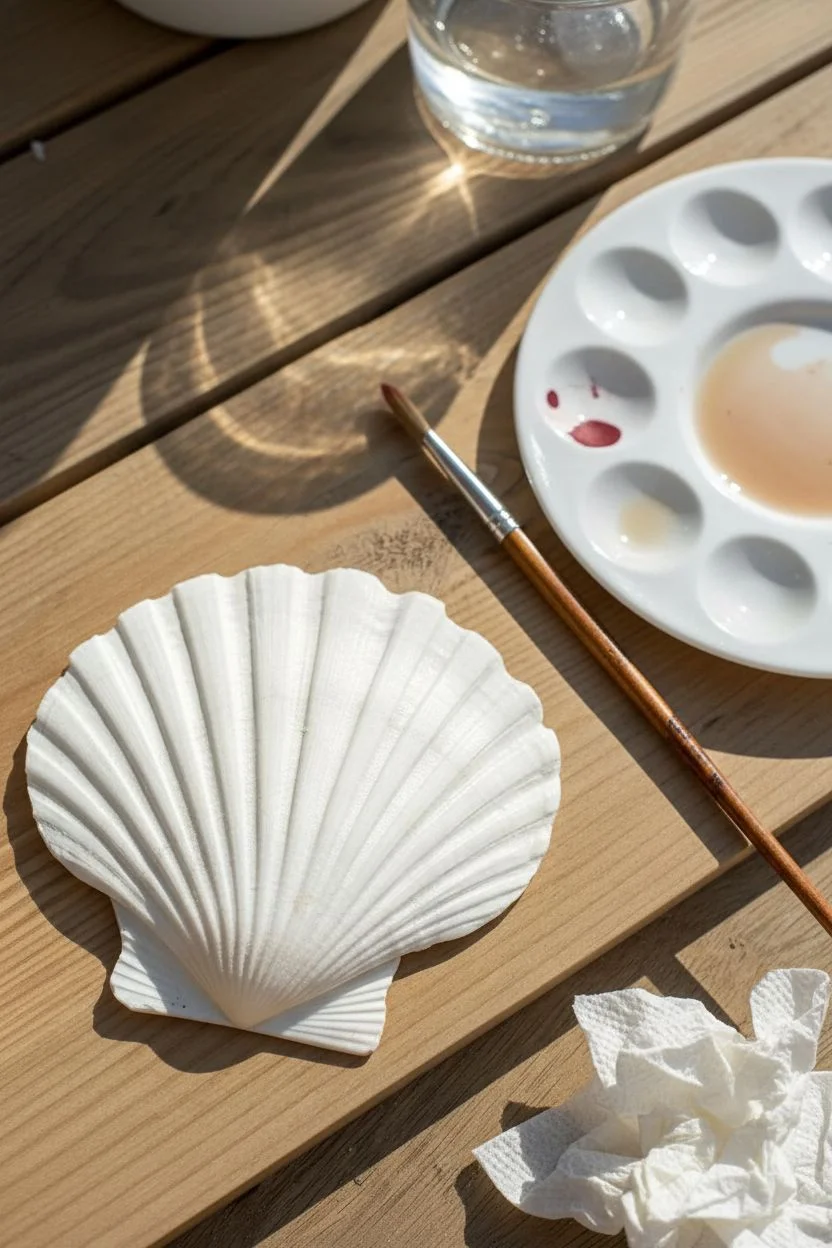
Materials
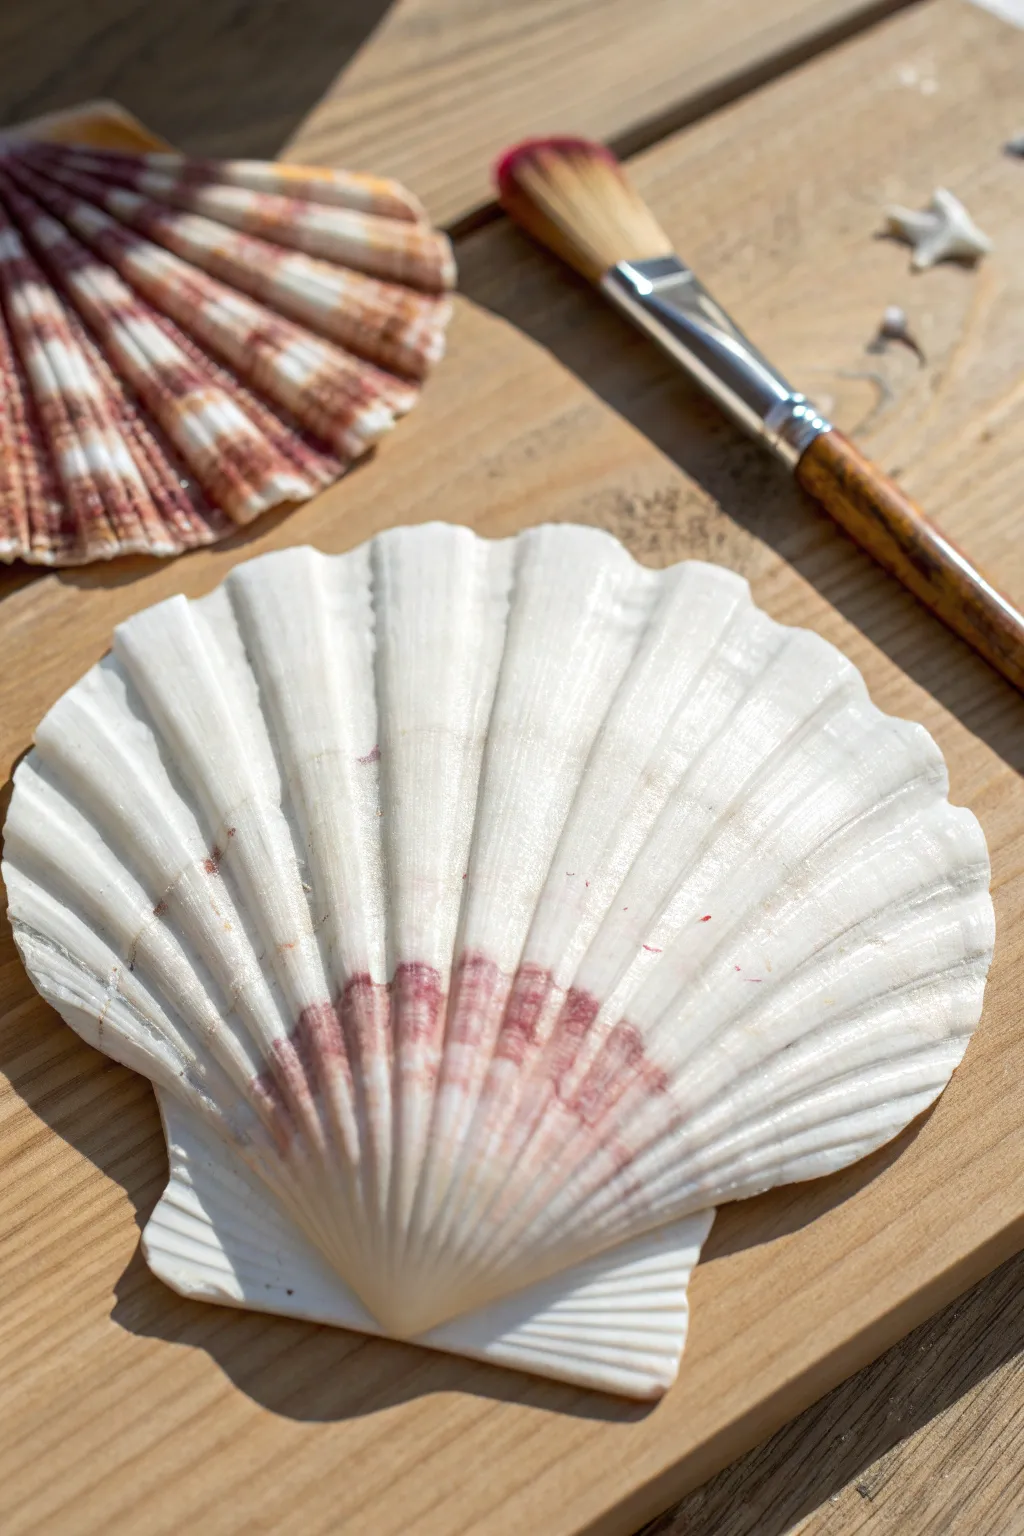
- Large white scallop shell (cleaned and dried)
- Watercolor paints (Alizarin Crimson and Burnt Umber)
- Soft round paintbrush (size 4 or 6)
- Water container
- Mixing palette
- Paper towels
- Matte clear acrylic spray sealer
Step 1: Preparation & Mixing
-
Clean the canvas:
Scrub your scallop shell gently with warm soapy water and an old toothbrush to remove any sand or grit from the grooves. -
Dry completely:
Pat the shell dry with a towel and let it sit in a sunny spot until no moisture remains in the crevices. -
Prepare the palette:
Squeeze a small dot of Alizarin Crimson and a smaller dot of Burnt Umber onto your palette. -
Create the custom hue:
Mix the two colors together to achieve a warm, dusty mauve or reddish-brown tone similar to natural sea rust. -
Dilute for transparency:
Add plenty of water to your paint mix until it has the consistency of tea—you want a wash, not opaque coverage.
Thirsty Brush Trick
If you apply too much color, rinse your brush, dry it on a towel, and use the clean damp bristles to ‘drink’ up the excess paint from the shell.
Step 2: Applying the Ridge Wash
-
Load the brush:
Dip your round brush into the watery paint mixture, ensuring it holds a good amount of liquid. -
Start at the hinge:
Touch the tip of your brush to the very bottom center of the shell (the umbo/hinge area) inside one of the deep grooves. -
Let gravity help:
Allow a small pool of pigment to settle at the base of the groove before moving the brush. -
Drag the color upward:
Gently pull the paint up the groove toward the outer edge, lifting your pressure as you go to let the color fade out. -
Feather the end:
Stop painting about halfway or two-thirds up the shell, letting the color disappear into the white of the shell. -
Repeat the process:
Move to the next groove and repeat the process, working your way fan-wise across the shell. -
Mind the ridges:
Try to keep the raised ridges (the high points) clean and white to maximize contrast. -
Correct mistakes:
I like to keep a damp paper towel nearby; if paint gets on a high ridge, just quickly wipe it off while it’s wet. -
Layer for depth:
Once the first pass is damp-dry, dip your brush in slightly more concentrated paint and touch just the very bottom hinge area again. -
Blend the layers:
Use a clean, damp brush to soften the edge of this darker application so it blends seamlessly into the lighter wash above.
Level Up: Gilded Edges
Once the watercolor is dry, run a thin line of liquid gold leaf along the very top scalloped edge for a luxurious, high-end finish.
Step 3: Finishing Touches
-
Check consistency:
Look over the shell to ensure the gradient looks relatively uniform across all grooves. -
Blot excess pools:
If any paint has pooled too thickly at the bottom, lightly touch the tip of a paper towel to it to soak up the excess. -
Allow to dry:
Let the shell sit undisturbed for at least 30 minutes until the watercolor is bone dry. -
Seal the artwork:
Since watercolor can reactivate with humidity, take the shell outside and give it a light coat of matte clear acrylic spray. -
Final cure:
Let the sealer cure according to the can’s instructions before displaying your artwork.
Place your beautifully painted shell on a bedside table or in a shadow box to bring a calm, coastal vibe to your room.


Dot Art Mandalas
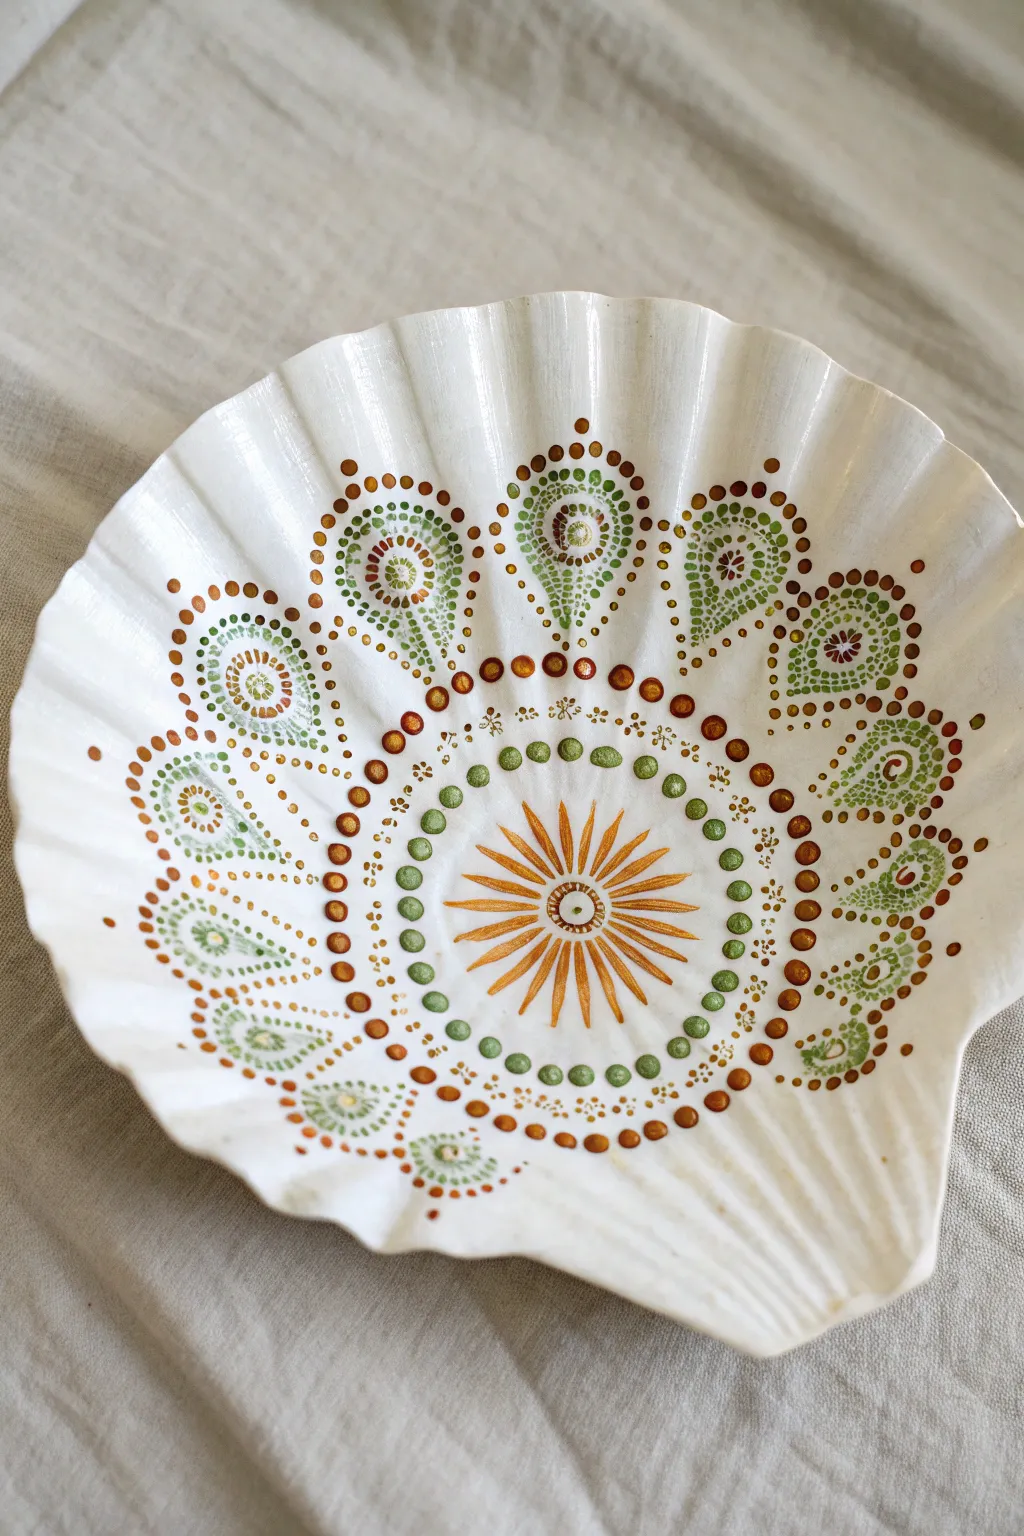
Transform a simple scallop shell into a stunning piece of bohemian decor with this dot art project. Using metallic gold and earthy green tones, you will build a radiating mandala pattern that highlights the shell’s natural beauty.
Step-by-Step
Materials
- Large scallop shell (cleaned and dried)
- White acrylic paint (matte or satin)
- Metallic acrylic paints (Copper/Gold, Olive Green)
- High-gloss varnish
- Set of dotting tools (or makeshift tools like pencil erasers, brush handles, toothpicks)
- Fine liner brush
- Palette or small plate
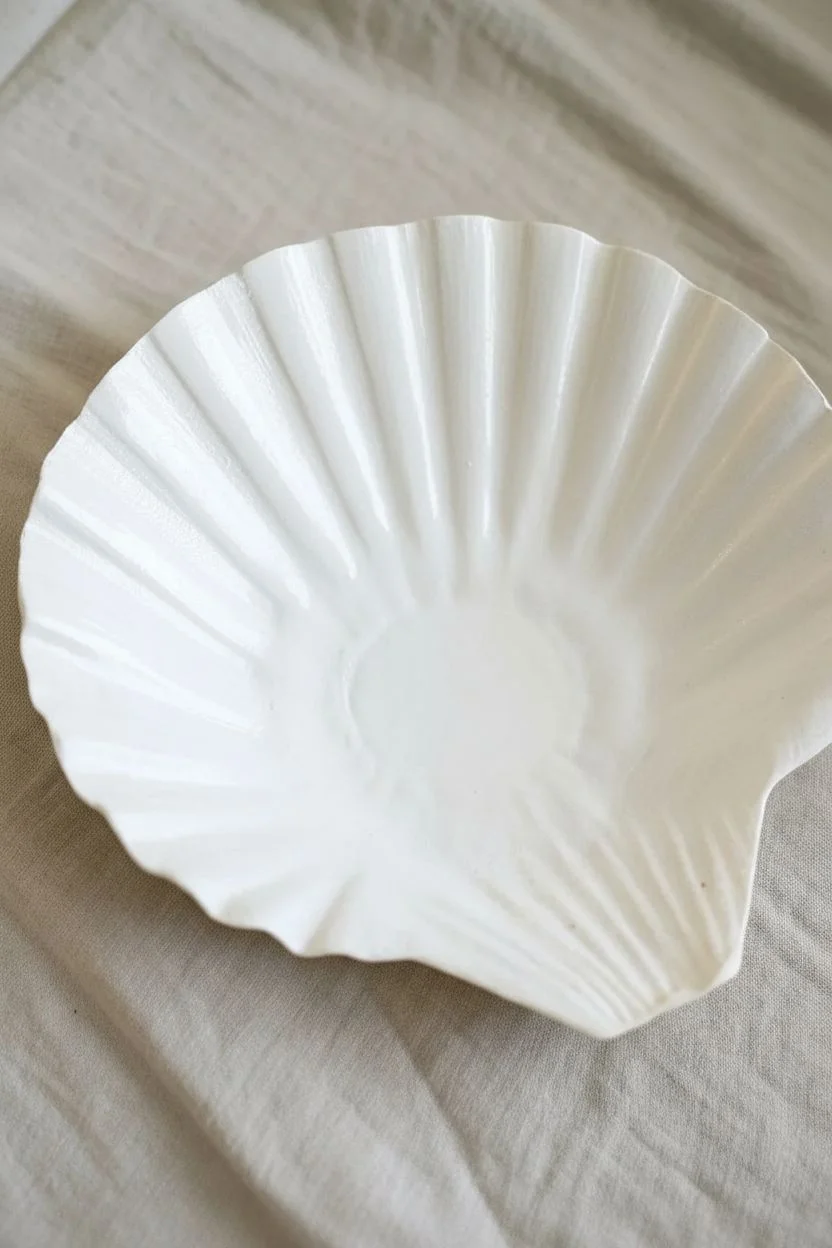
Step 1: Base Preparation
-
Clean the surface:
Wash your scallop shell thoroughly with soapy water and let it dry completely to ensure the paint adheres well. -
Apply base coat:
Paint the entire interior of the shell with white acrylic paint. You may need two or three thin layers to get a solid, opaque coverage. -
Smooth the canvas:
Allow the white base to dry fully between coats so you have a smooth, crisp surface for your detailed dot work.
Peak Problems
If your painted dots dry with sharp pointy peaks using standard acrylics, try mixing in a tiny drop of pouring medium or water to encourage them to self-level into smooth domes.
Step 2: The Center Sunburst
-
Paint the core:
Using your fine liner brush and copper paint, create a small circle at the very bottom center of the shell. -
Create the rays:
From the central circle, flick thin lines outward to create a starburst effect. Alternate between long and short strokes to add dynamic energy. -
First ring of dots:
Dip a medium-sized dotting tool into olive green paint and place a ring of dots encircling the tips of your sunburst. -
Second ring:
Switch to a smaller tool and use gold or copper paint to create a second, tighter ring of dots just outside the green ones.
Texturize It
For a more tactile experience, swap standard acrylics for ‘Liquid Pearls’ or dimensional fabric puff paint. The dots will remain raised and distinct even after drying!
Step 3: Paisley Patterning
-
The transition ring:
Use a larger dotting tool to place bold copper dots in a circle further out. Space them so they align generally with the ridges of the shell. -
Outline the teardrops:
Visualize large paisley or teardrop shapes radiating outward. Use a small dotting tool and gold paint to stipple the outline of these shapes. -
Fill the motifs:
Inside the widest part of each teardrop, place a central copper dot surrounded by a ring of tiny green dots to look like a small flower. -
Detail the tails:
I like to fill the narrowing ‘tail’ of the teardrop with a line of graduating green dots that get smaller as they point toward the shell’s center. -
Add gentle accents:
If there is empty white space between the teardrops, add a single large copper dot or a tiny cluster of three small dots to balance the design.
Step 4: Finishing Touches
-
Refine edges:
Check the outer rim of the shell. You can leave it white or add a final border of tiny spaced dots to frame the artwork. -
Let it cure:
Allow the paint to dry completely. Dot art usually takes longer to dry because the paint is thicker, so give it at least 24 hours. -
Seal the deal:
Apply a coat of high-gloss varnish. This creates a beautiful ceramic-like finish and protects your intricate work from chipping.
Display your shimmering shell on a stand or use it as a chic trinket dish for jewelry.


Nautical Blue and White Stripes
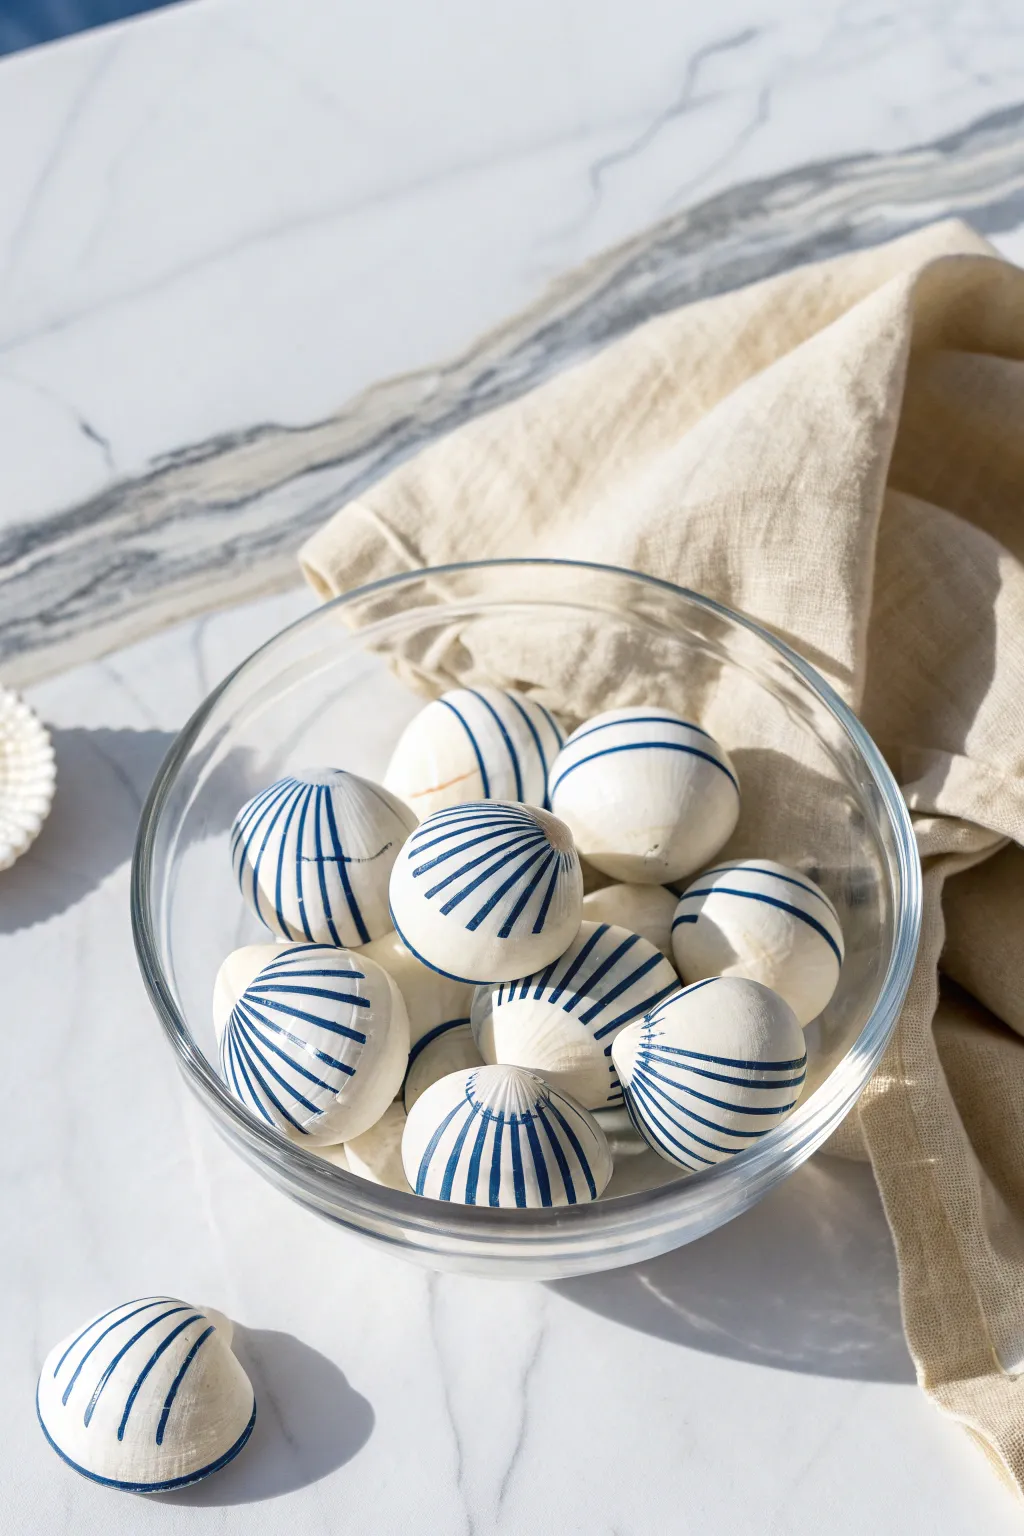
Transform ordinary clamshells into chic nautical decor with this simple painting technique. The crisp contrast of deep navy stripes against a matte white create a sophisticated look that fits perfectly in a glass bowl or scattered on a table.
Step-by-Step Tutorial
Materials
- Clean clamshells or cockle shells (2-3 inches wide)
- Matte white acrylic paint
- Navy blue or Cobalt blue acrylic paint
- Flat shader brush (size 6)
- Fine liner brush (size 0 or 00)
- Small paint palette
- Cup of water
- Paper towels
- Matte spray varnish
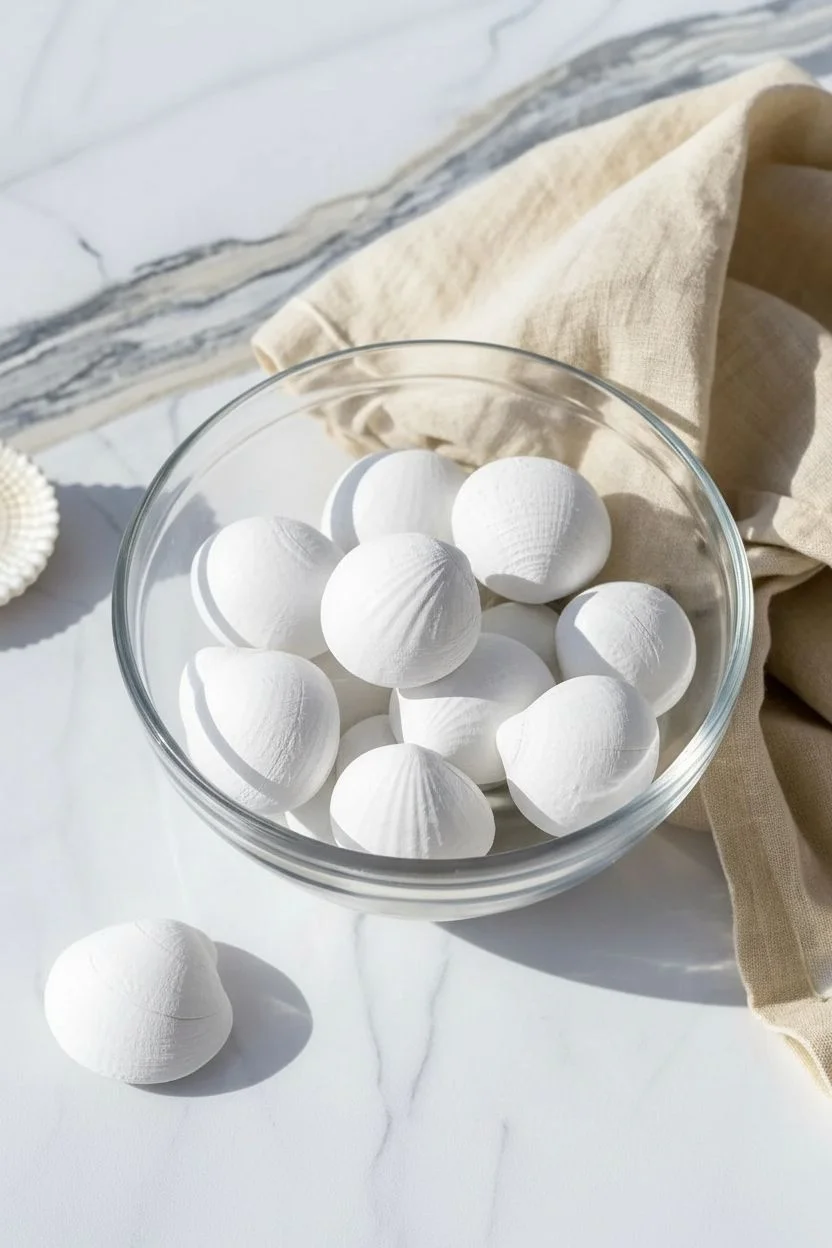
Step 1: Preparing the Canvas
-
Clean the shells:
Scrub your shells thoroughly with warm soapy water and let them dry completely to ensure no sand or salt residue remains. -
Prime the surface:
Using your flat shader brush, apply an even coat of matte white acrylic paint to the entire top surface of the shell. -
Smooth coverage:
Inspect the shell for any natural dark spots showing through; apply a second coat of white if necessary. -
Drying time:
Allow the white base coat to dry completely for at least 30 minutes so the moisture doesn’t interfere with your detailed lines later.
Step 2: Painting the Stripes
-
Prepare the blue paint:
Squeeze a small amount of navy paint onto your palette. -
Improve paint flow:
I like to mix a tiny drop of water into the blue acrylic to get an fluid, ink-like consistency that drags smoothly without skipping. -
Load the liner brush:
Dip your fine liner brush into the thinned blue paint, rolling it slightly on the palette to shape the bristles into a sharp point. -
Locate the center:
Identify the distinct central ridge running from the hinge (the pointy back part) to the front edge of the shell. -
The first stroke:
Starting at the hinge, gently pull your brush along that center ridge all the way to the edge of the shell. -
Follow the form:
Use the shell’s natural ridges as physical guides for your brush, letting the bristles settle into the slight grooves. -
Work outwards:
Move one ridge over to the right and paint your next line, originating from the same hinge point but fanning out slightly. -
Maintain spacing:
Continue adding lines towards the right edge, skipping every other ridge if your shell has very tight texture, or painting every ridge if they are wide. -
Balance the design:
Return to the center and repeat the process on the left side, mirroring the spacing you established on the right. -
Check the edges:
Ensure the lines extend all the way over the lip of the shell for a finished look. -
Correcting mistakes:
If a line goes astray, quickly wipe it with a damp paper towel or wait for it to dry and touch it up with white paint.
Shaky Lines?
If you struggle with brush control on rounded surfaces, you can swap the liner brush for a waterproof fine-tip blue paint marker. It offers more stability while giving the same visual effect.
Step 3: Finishing Touches
-
Dry thoroughly:
Let the blue stripes dry for at least an hour to prevent any smudging during the sealing process. -
Protection:
Take the shells to a well-ventilated area and apply a light coat of matte spray varnish. -
Final cure:
Allow the varnish to cure according to the can’s instructions before placing them in a bowl.
Pro Tip: Anchor Your Hand
Stability is key for straight lines. Rest your pinky finger on the table surface (or a dry part of the shell) to create a pivot point, which steadies your painting hand as you pull the stroke.
Arranging these in a clear vessel instantly brings a fresh ocean breeze to your living space.


Sunset Silhouette Scenes
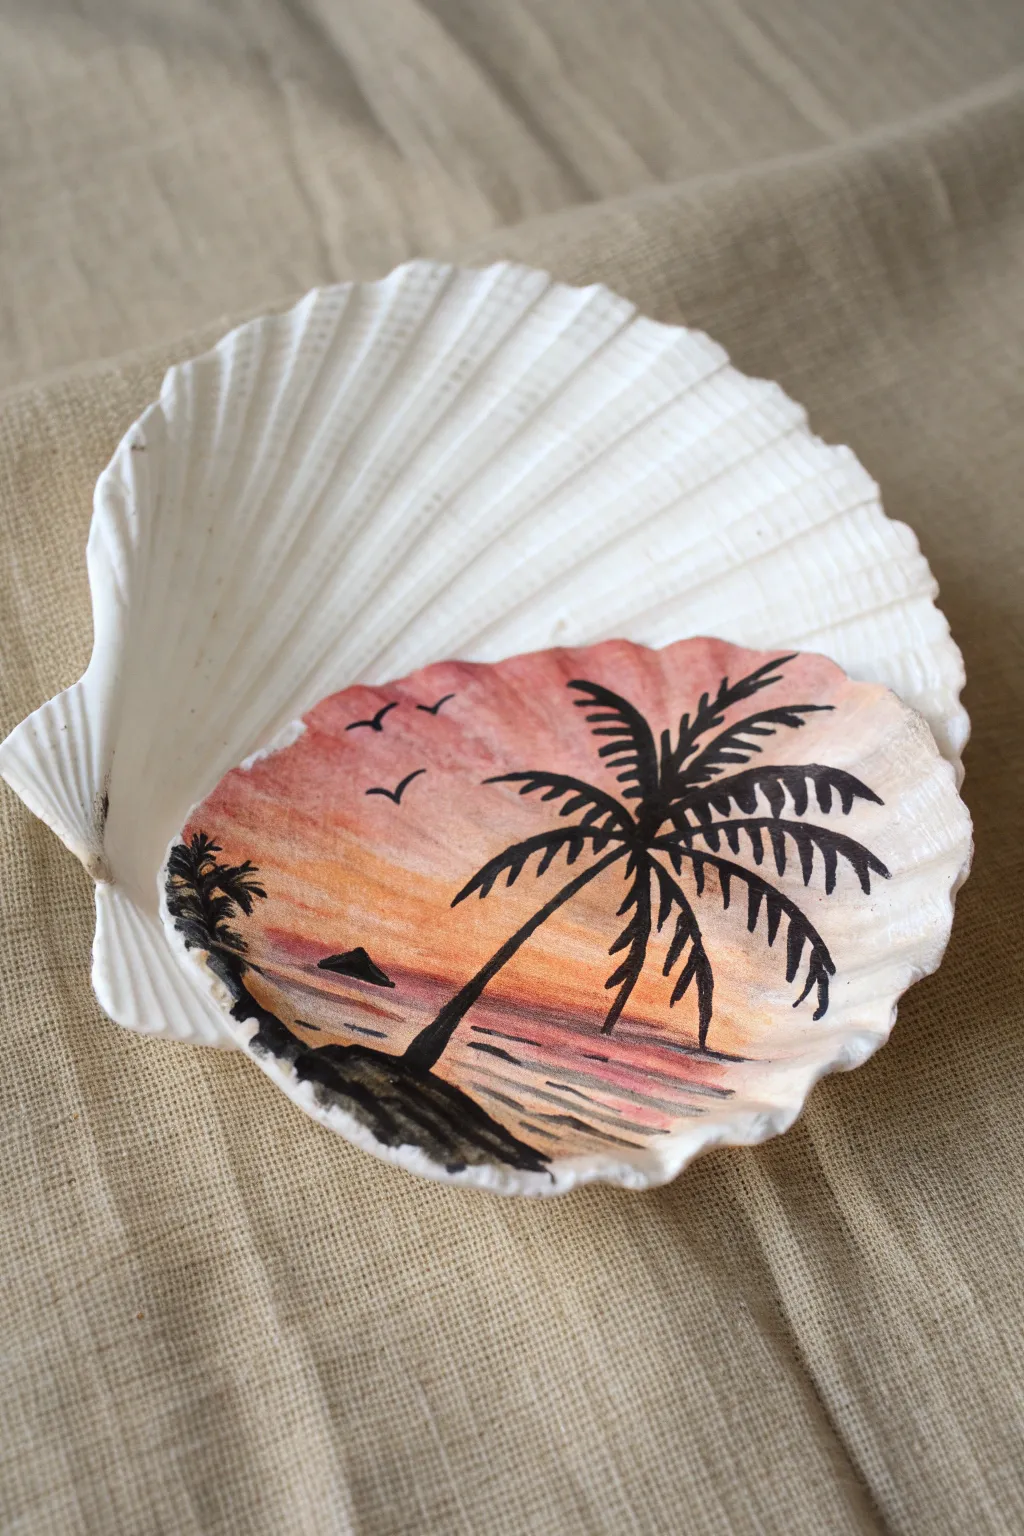
Capture the magic of the golden hour in the palm of your hand with this detailed seashell painting. By blending warm acrylics and adding a crisp black silhouette, you will transform a simple scallop shell into a tranquil tropical window.
Detailed Instructions
Materials
- 1 Medium scallop shell (clean and dry)
- 1 Large scallop shell (optional, for display stand)
- Acrylic paints: Coral pink, orange, yellow, black, white
- Flat shader brush (size 4 or 6)
- Fine liner brush (size 00) or extra-fine black paint pen
- Palette or paper plate
- Water cup and paper towels
- Spray matte varnish (optional)
Step 1: Preparation and Sky Gradient
-
Clean the canvas:
Ensure your medium scallop shell is thoroughly scrubbed of any sand or salt and completely dry before you begin. -
Base coat:
Apply a thin layer of white acrylic paint over the entire inside of the shell to prime the surface. This helps the sunset colors appear more vibrant. -
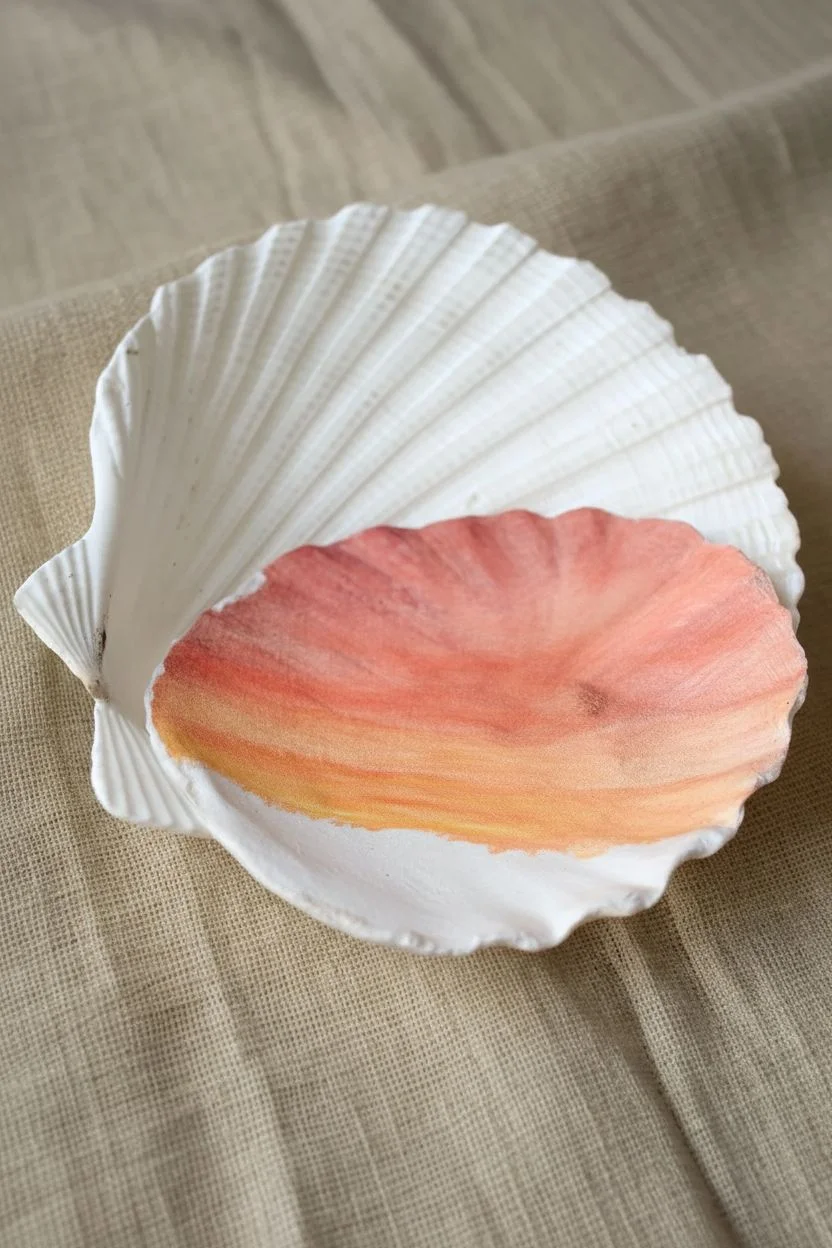
Apply the top sky:
Load your flat brush with coral pink paint and cover the top third of the shell’s interior. -
Add the middle sky:
Without cleaning the brush entirely, pick up some orange paint. Apply this to the middle section, overlapping slightly with the pink. -
Create the horizon:
Use a mix of orange and yellow for the bottom third of the sky area, stopping just above the bottom rim where the water will be. -
Blend the transition:
While the paint is still wet, gently stroke the brush back and forth over the lines where colors meet to create a soft, seamless gradient.
Step 2: Painting the Reflection
-
Define the water line:
Visualize a straight horizontal line across the lower quarter of the shell; everything below this will be the ocean. -
Mirror the colors:
Paint horizontal strokes of orange and pink in the water area, mirroring the sky above but using a looser, choppier stroke. -
Add water texture:
Dip a clean, damp brush into a tiny bit of white paint mixed with pink. Add very thin, dashed horizontal lines across the water to mimic light reflecting on waves. -
Dry completely:
Let the background dry fully. I usually wait about 15 minutes here, as painting black over wet background paint will ruin the crisp silhouette effect.
Ridges getting in the way?
painting inside a shell feels bumpy! If the brush skips over the deep grooves, thin your paint slightly with a drop of water to help it flow into the shell’s natural texture.
Step 3: Silhouettes and Details
-
Paint the foreground land:
Using your fine liner brush and black paint, create a small, sloping mound of land in the bottom left corner. -
Draft the palm trunk:
Paint a thin, arched line starting from the land mound, curving upwards toward the right side of the shell. -
Thicken the trunk:
Go back over the trunk line, making it slightly thicker at the base and tapering it as it reaches the top. -
Start the palm fronds:
At the top of the trunk, paint five or six main curved lines radiating outward like fireworks. -
Detail the leaves:
along each main curved line, paint tiny, short strokes pulling downward to create the jagged look of palm leaves. -
Add distant elements:
Paint a very small, flat triangle shape on the horizon line to the left of the tree to represent a distant island or sailboat. -
Painting the birds:
Using just the very tip of your brush or a paint pen, tap two or three tiny ‘V’ shapes in the upper left sky. -
Final assembly:
Once the artwork is dry, nest the painted shell inside the larger white scallop shell to enhance the presentation.
Level Up: Golden Shimmer
Mix a tiny amount of metallic gold paint into your yellow horizon line before it dries. It adds a subtle, realistic sparkle to the water reflection when the light hits it.
Now you have a permanent piece of paradise to display on your shelf or give as a thoughtful gift.
BRUSH GUIDE
The Right Brush for Every Stroke
From clean lines to bold texture — master brush choice, stroke control, and essential techniques.
Explore the Full Guide
High-Gloss Ladybugs
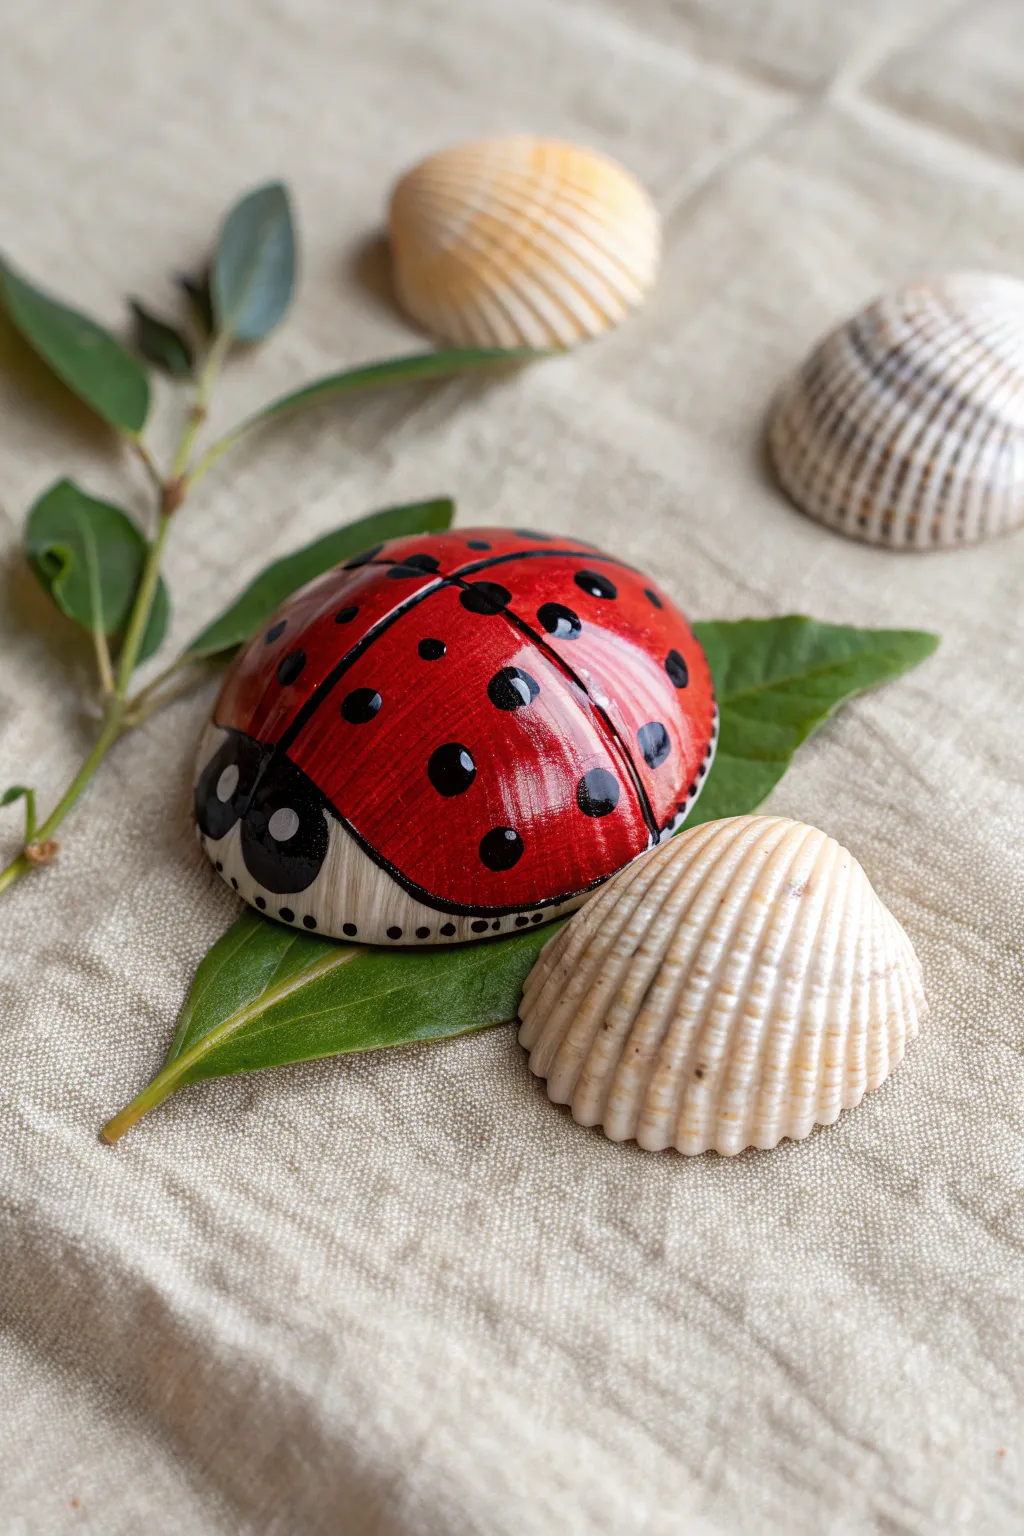
Transform simple rounded seashells into vibrant garden critters with this enamel-style painting project. The natural ridges of the shell add wonderful texture to the ladybug’s wings, while a thick glossy topcoat gives the finished piece a professional ceramic look.
How-To Guide
Materials
- Smooth rounded seashells (cockles or clams)
- Bright red acrylic paint
- Black acrylic paint
- White acrylic paint
- High-gloss varnish or Triple Thick glaze
- Small flat paintbrush
- Fine liner detail brush
- Dotting tool or toothpick
- Pencil
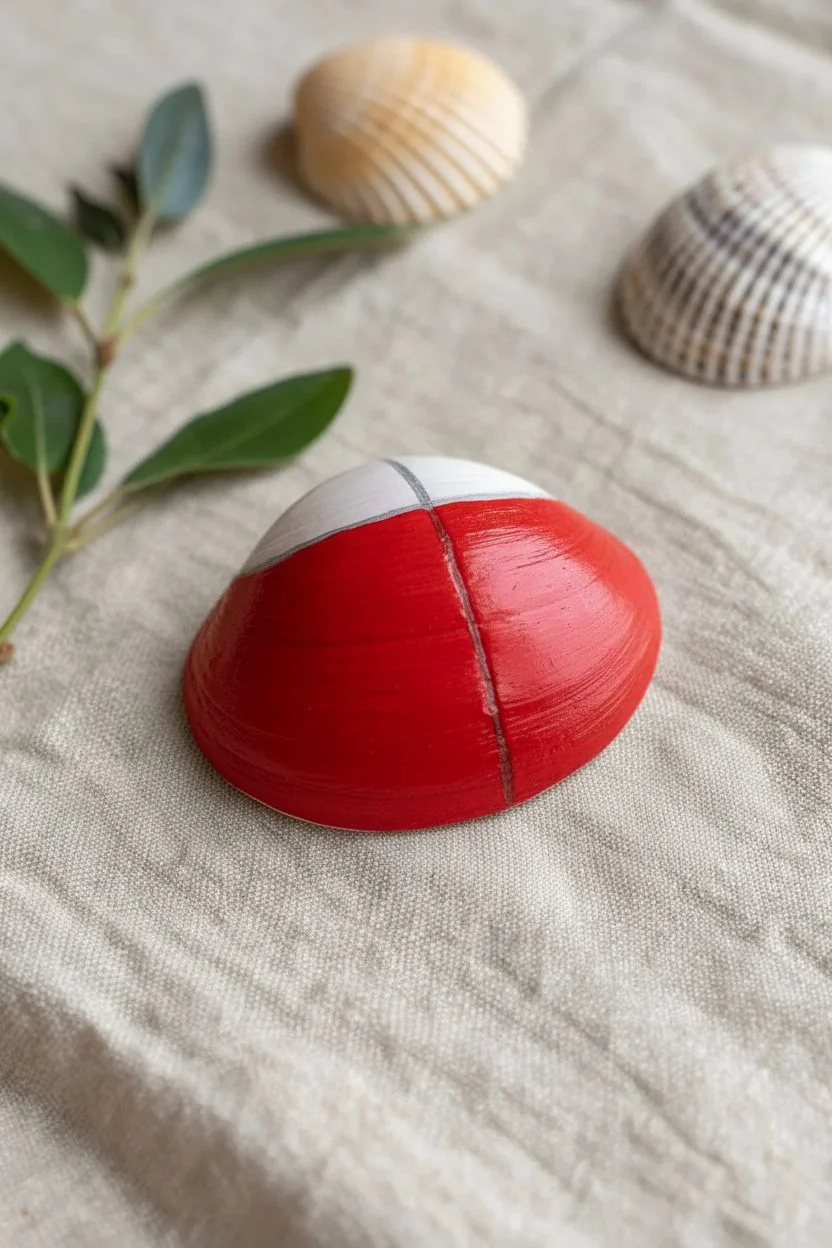
Step 1: Preparation & Base Color
-
Clean the canvas:
Scrub your seashells thoroughly with soap and water to remove any sand, salt, or debris that might prevent paint adhesion. -
Dry completely:
Set the shells out to dry fully; any moisture trapped in the porous surface can cause the paint to bubble later. -
Sketch the guides:
With a pencil, lightly draw a curved line across the top quarter of the shell for the head, and a straight line down the vertical center for the wings. -
Paint the wings:
Use a small flat brush to paint the area below the head line with bright red acrylic. -
Ensure coverage:
Work the paint into the ridges of the shell so no white shows through. -
Apply a second coat:
I usually let the first layer dry and apply a second coat of red to get a really rich, opaque color.
Ridges Catching Paint?
If paint pools deeply in the shell grooves, it may crack when drying. Use a dry brush to sweep out excess paint from the deep ridges before it sets.
Step 2: Detailing the Face & Spots
-
Block in the head:
Paint the top section of the shell solid black, carefully following the curved line you sketched earlier. -
Draw the center line:
Using a fine liner brush, paint a thin black stripe down the middle of the red wings to separate them. -
Outline the wings:
Paint a thin black curved line along the bottom edge of the red section, separating the wings from the unpainted rim at the very bottom. -
Add the spots:
Use a dotting tool or the back end of a brush handle dipped in black paint to stamp varying sizes of dots onto the red wings. -
Detail the border:
Add a row of tiny black dots along the bottom curved black line for a decorative touch. -
Create the eyes:
Dip a larger dotting tool into white paint and place two distinct circles on the black head area. -
Add pupils:
Once the white is dry, place a smaller black dot inside each white circle, positioning them slightly inward for a cute expression. -
Add eye highlights:
Place a minuscule dot of white paint inside the black pupil to make the eyes look shiny and alive.
Glass-Like Finish
To get the ultra-glossy wet look in the photo, use a ‘Triple Thick’ glazing medium or a clear craft resin rather than standard decoupage glue.
Step 3: Glazing & Finishing
-
Allow to cure:
Let the painted details dry completely for at least an hour so the black doesn’t smear during glazing. -
Apply gloss:
Brush on a heavy coat of high-gloss varnish or a glazing medium over the entire painted surface. -
Final dry:
Place the shell on a non-stick surface and leave it undisturbed overnight to achieve that glass-like finish.
These cheerful little bugs make excellent garden markers or playful decorations scattered across a potting table
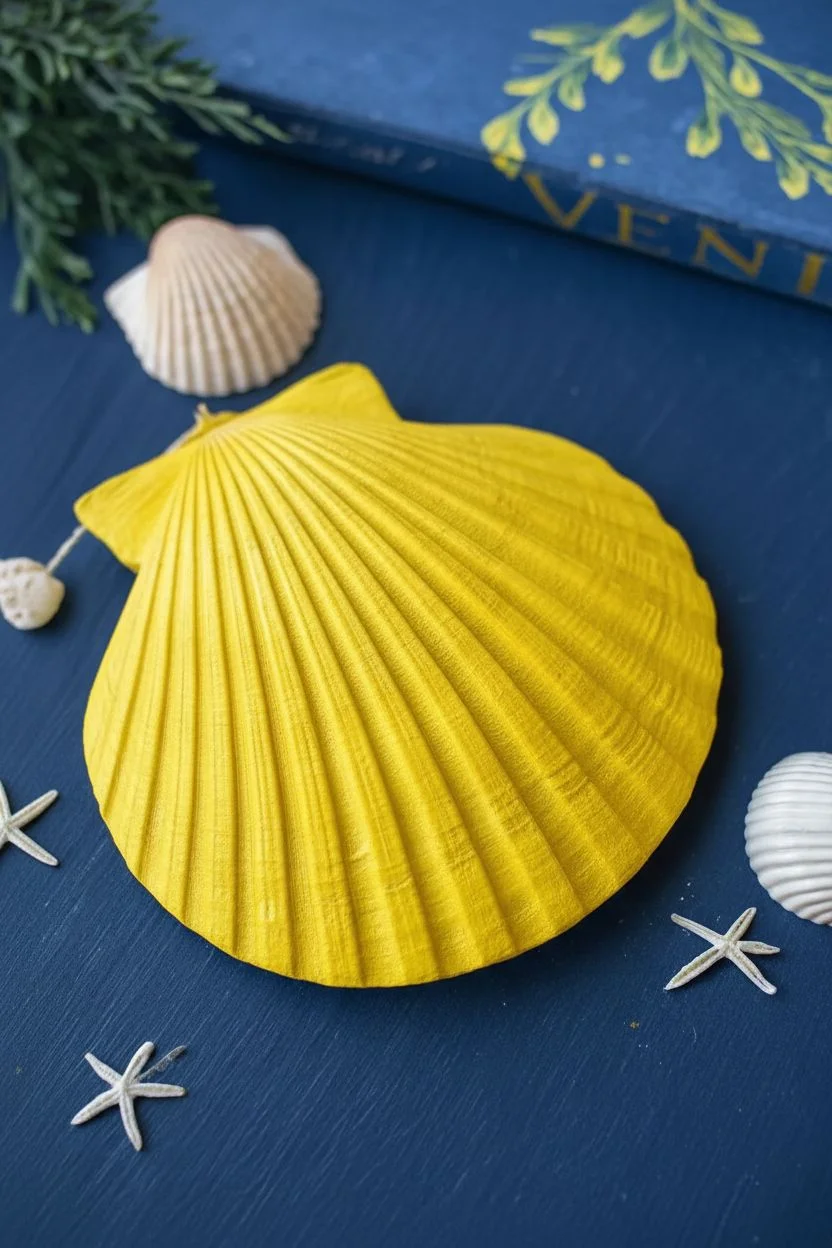
Tropical Fish Creations
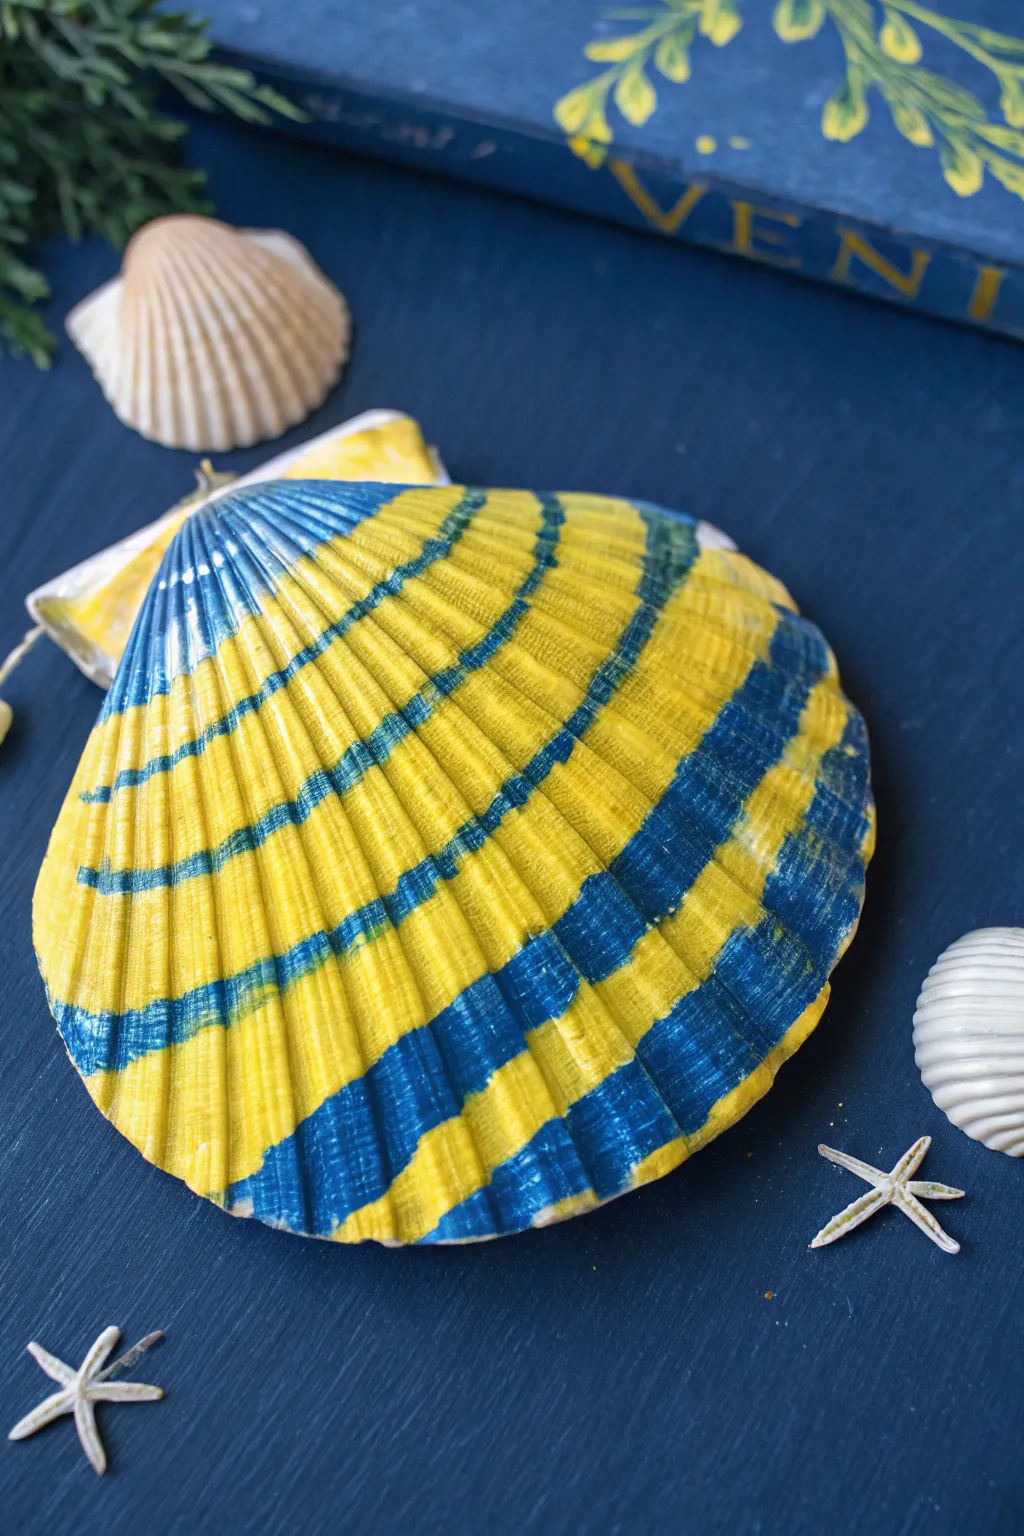
Transform a simple scallop shell into a vibrant piece of art inspired by the bold patterns of tropical fish. This project uses high-contrast yellow and blue stripes to highlight the natural ribbed texture of the shell.
Step-by-Step
Materials
- Large scallop shell (clean and dry)
- Bright yellow acrylic paint
- Royal blue or deep cerulean acrylic paint
- Medium flat paintbrush
- Small round detail brush
- Water cup
- Paper palette or plate
- Paper towels
- Matte spray varnish (optional)
Step 1: Base Coat Application
-
Clean surface:
Ensure your scallop shell is completely free of sand and dust so the paint adheres smoothly. -
Load yellow paint:
Squeeze a generous amount of bright yellow acrylic onto your palette and load your medium flat brush. -
First layer:
Apply an even coat of yellow over the entire front surface of the shell, brushing vertically along the ridges. -
Drying time:
Allow this initial layer to dry for about 10 to 15 minutes. -
Second layer:
Apply a second coat of yellow to ensure full opacity, hiding the natural shell color completely. -
Check coverage:
Inspect the deep grooves between the shell ribs to make sure no white spots remain. -
Full cure:
Let the yellow base coat dry completely before moving on to the stripes to prevent color muddying.
Step 2: Creating the Stripes
-
Prepare blue paint:
Clean your brush thoroughly and dispense a small amount of royal blue paint. -
Plan the spacing:
Visualize three to five horizontal bands across the shell, leaving equal widths of yellow in between. -
Top stripe:
Starting near the hinge (the narrow top point), paint the first blue horizontal curved line. -
Follow the form:
Curve your brush stroke slightly to mimic the fan shape of the shell’s outer edge. -
Middle stripe:
Move down about an inch and paint the central, widest blue band across the ridged surface. -
Navigating texture:
I find it helpful to dab the paint gently into the grooves as I pull the brush across to ensure a solid line. -
Bottom stripe:
Paint the final blue band near the bottom edge, leaving a rim of yellow at the very scalloped tip. -
Refine edges:
Use the small round brush to touch up the edges of your blue stripes if the shell texture made them uneven.
Ridge Running
Painting across ribs can be bumpy. Use a slightly wetter paint consistency on your brush to help the color flow down into the deep grooves of the shell.
Step 3: Finishing Touches
-
Touch ups:
If any blue paint strayed too far, wait for it to dry and paint a little heavy body yellow over the mistake. -
Rim painting:
For a polished look, run the side of your brush along the sharp edge of the shell in yellow. -
Final dry:
Allow the shell to sit undisturbed for at least 30 minutes until the paint is dry to the touch. -
Sealing:
Lightly mist with a matte spray varnish to protect the colors without adding too much artificial gloss.
Make it a Fish
Turn this pattern into a full fish character by gluing a small googly eye on the side and cutting a triangle of yellow cardstock to glue on the back as a tail fin.
Now you have a brilliantly colored shell that captures the spirit of a tropical reef

PENCIL GUIDE
Understanding Pencil Grades from H to B
From first sketch to finished drawing — learn pencil grades, line control, and shading techniques.
Explore the Full Guide
Galaxy Night Skies
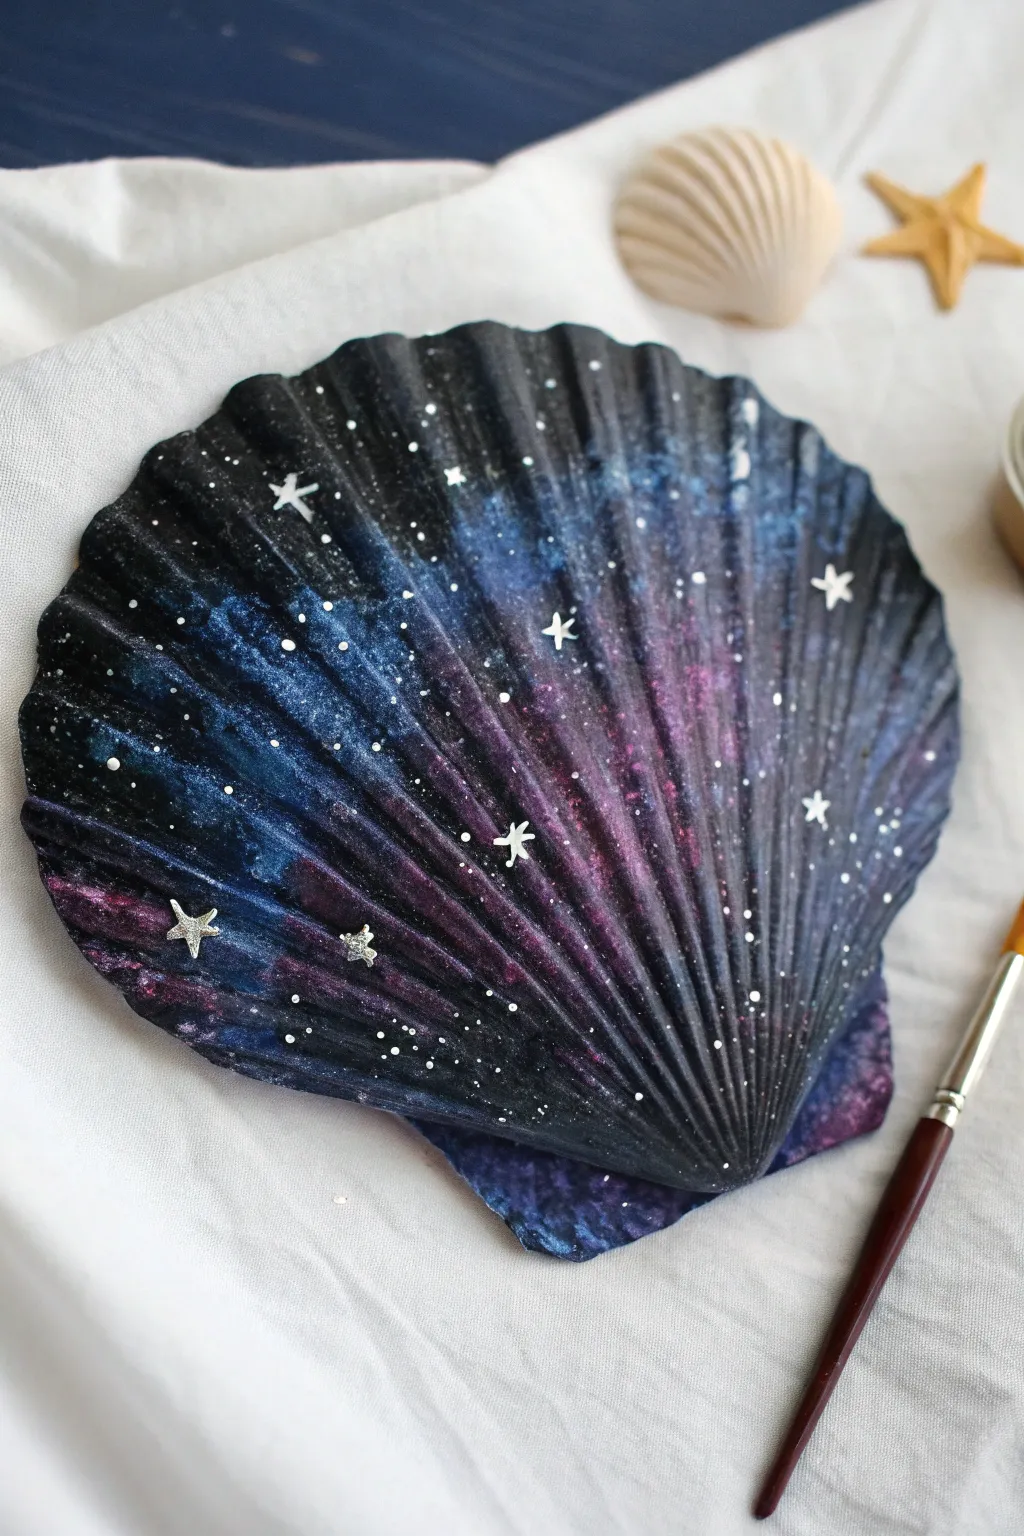
Transform a simple beach find into a stunning piece of the cosmos using acrylics and blending techniques. This project turns the natural ridges of a scallop shell into a textured backdrop for a deep, shimmering nebula.
Step-by-Step Tutorial
Materials
- Large scallop shell (clean and dry)
- Acrylic paints: Carbon Black, Prussian Blue, Dioxazine Purple, Magenta, Titanium White
- Flat shader brush (size 6 or 8)
- Fine liner brush (size 0 or 00)
- Old stiff toothbrush
- Gloss varnish or sealer
- Water cup and paper towels
- Palette or paper plate
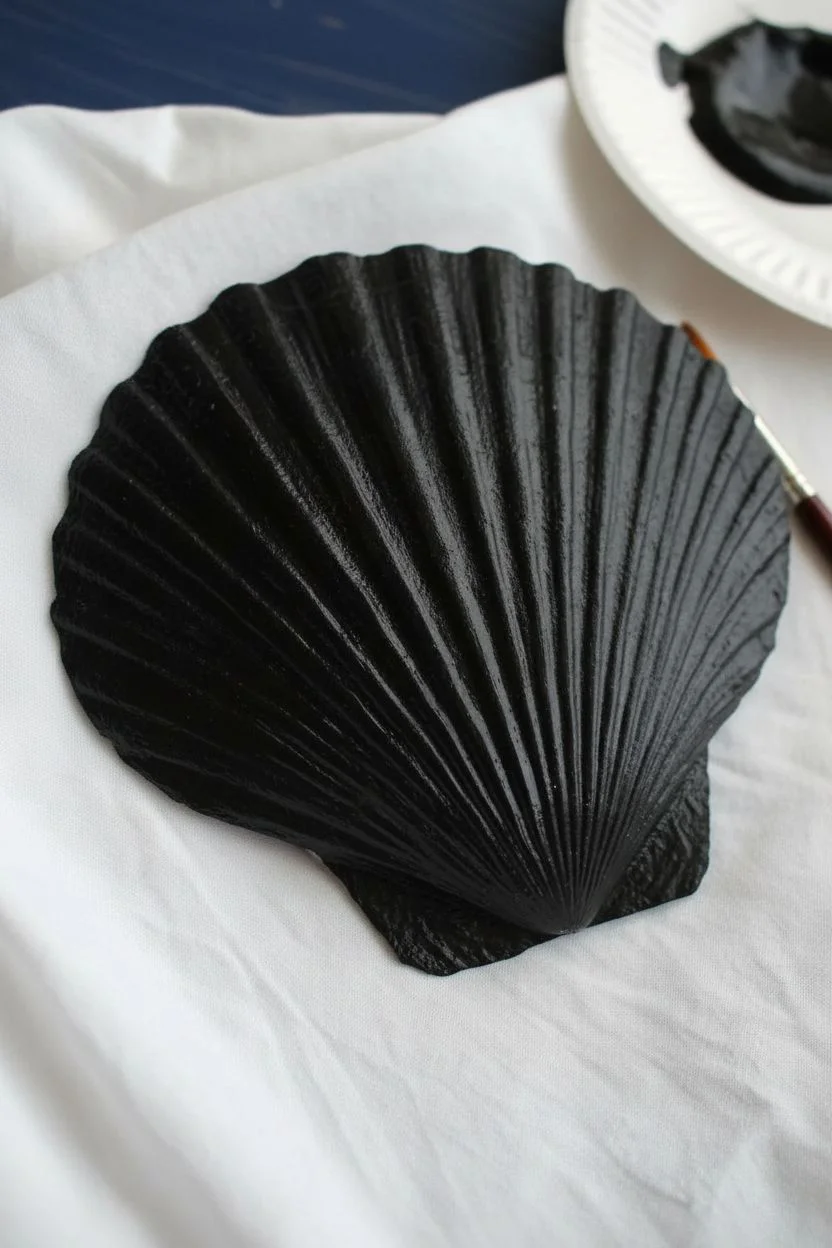
Step 1: Preparing the Void
-
Clean surface:
Ensure your seashell is completely free of sand and salt. Wash it with warm soapy water and let it dry fully before starting. -
Base coat:
Using your flat brush, paint the entire front surface of the shell with Carbon Black. -
Verify coverage:
The ridges of the shell can be tricky; make sure you push the black paint into deep crevices so no white shell shows through. -
Second layer:
Once the first coat is dry, apply a second coat of black to ensure a completely opaque, matte background.
Star Blobs?
If your splattered stars look like large blobs instead of mist, your paint is likely too thick or your brush is overloaded. Thin the paint more and dab the brush on paper before flicking.
Step 2: Painting the Nebula
-
Apply the blue:
Load your flat brush with Prussian Blue. Start from the left side and brush diagonally toward the center, allowing the paint to fade out over the black background. -
Feather edges:
While the blue is still slightly wet, gently feather the edges with a clean, damp brush so it blends softly into the black darkness rather than having a hard line. -
Introduce purple:
Take your Dioxazine Purple and paint it next to the blue, moving toward the center and right side of the shell. -
Blend colors:
Overlap the purple slightly with the blue section to create a seamless transition between the colors. -
Add highlights:
Dab a small amount of Magenta into the center of the purple areas. Use a dry brush technique here to keep it soft and cloud-like. -
Deepen contrast:
If I feel the colors are too bright, I like to glaze a tiny bit of watery black over the edges to push them back into the shadows.
Step 3: Creating Stardust
-
Prep star paint:
On your palette, mix a small amount of Titanium White with a few drops of water until it reaches the consistency of thin ink or milk. -
The flick technique:
Dip an old toothbrush into the thinned white paint. Test it on a paper towel first by running your thumb over the bristles. -
Create distant stars:
Hold the toothbrush over the shell and gently flick the bristles to spray a fine mist of white specks across the nebula. -
Larger stars:
Switch to your fine liner brush. Dip it into unthinned white paint and place specific, deliberate dots on the darker areas for brighter stars. -
North stars:
Choose 3 to 5 spots for major stars. Paint a small vertical line, then cross it with a horizontal line to create a four-point star shape. -
Star centers:
Add a tiny extra dot of white in the very center of your four-point stars to make them glow.
Level Up
Mix a tiny pinch of fine iridescent glitter into your final varnish coat, or use metallic silver paint for the larger hand-painted stars to give the galaxy a true holographic shimmer.
Step 4: Finishing Touches
-
Dry time:
Allow the paint to cure completely. The thicker dots of white may take longer to dry than the base layers. -
Seal the work:
Apply a coat of gloss varnish. This will not only protect the paint but also make the dark colors pop and look like wet glass.
Now you have a piece of the night sky held right in the palm of your hand
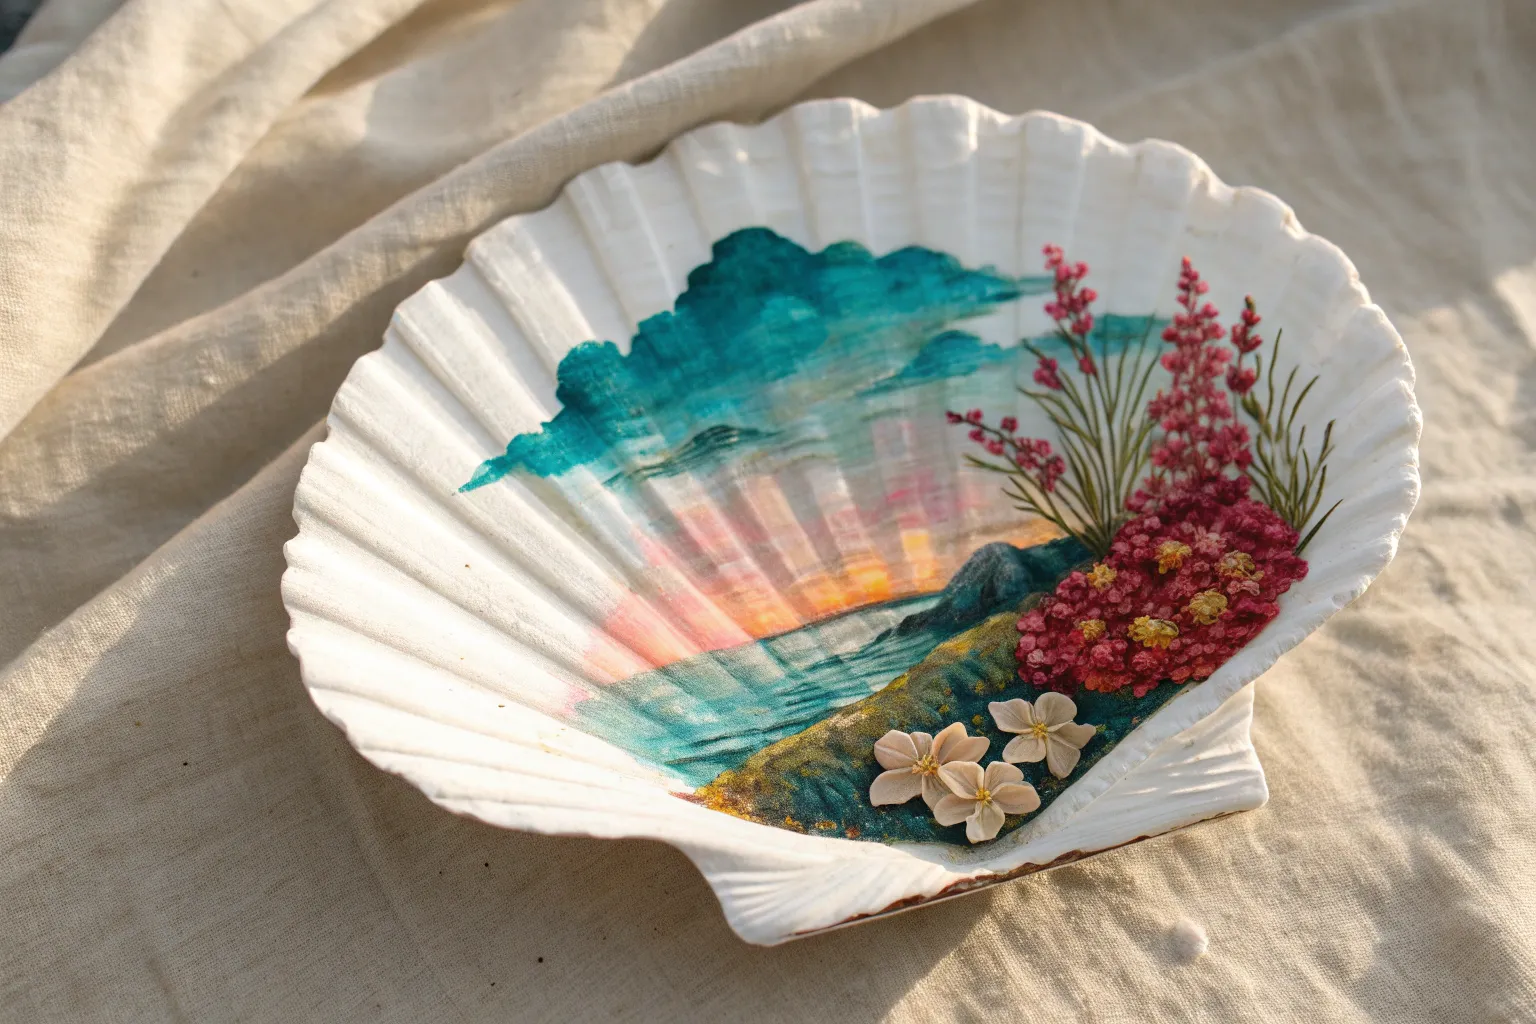
Decoupage Floral Shells
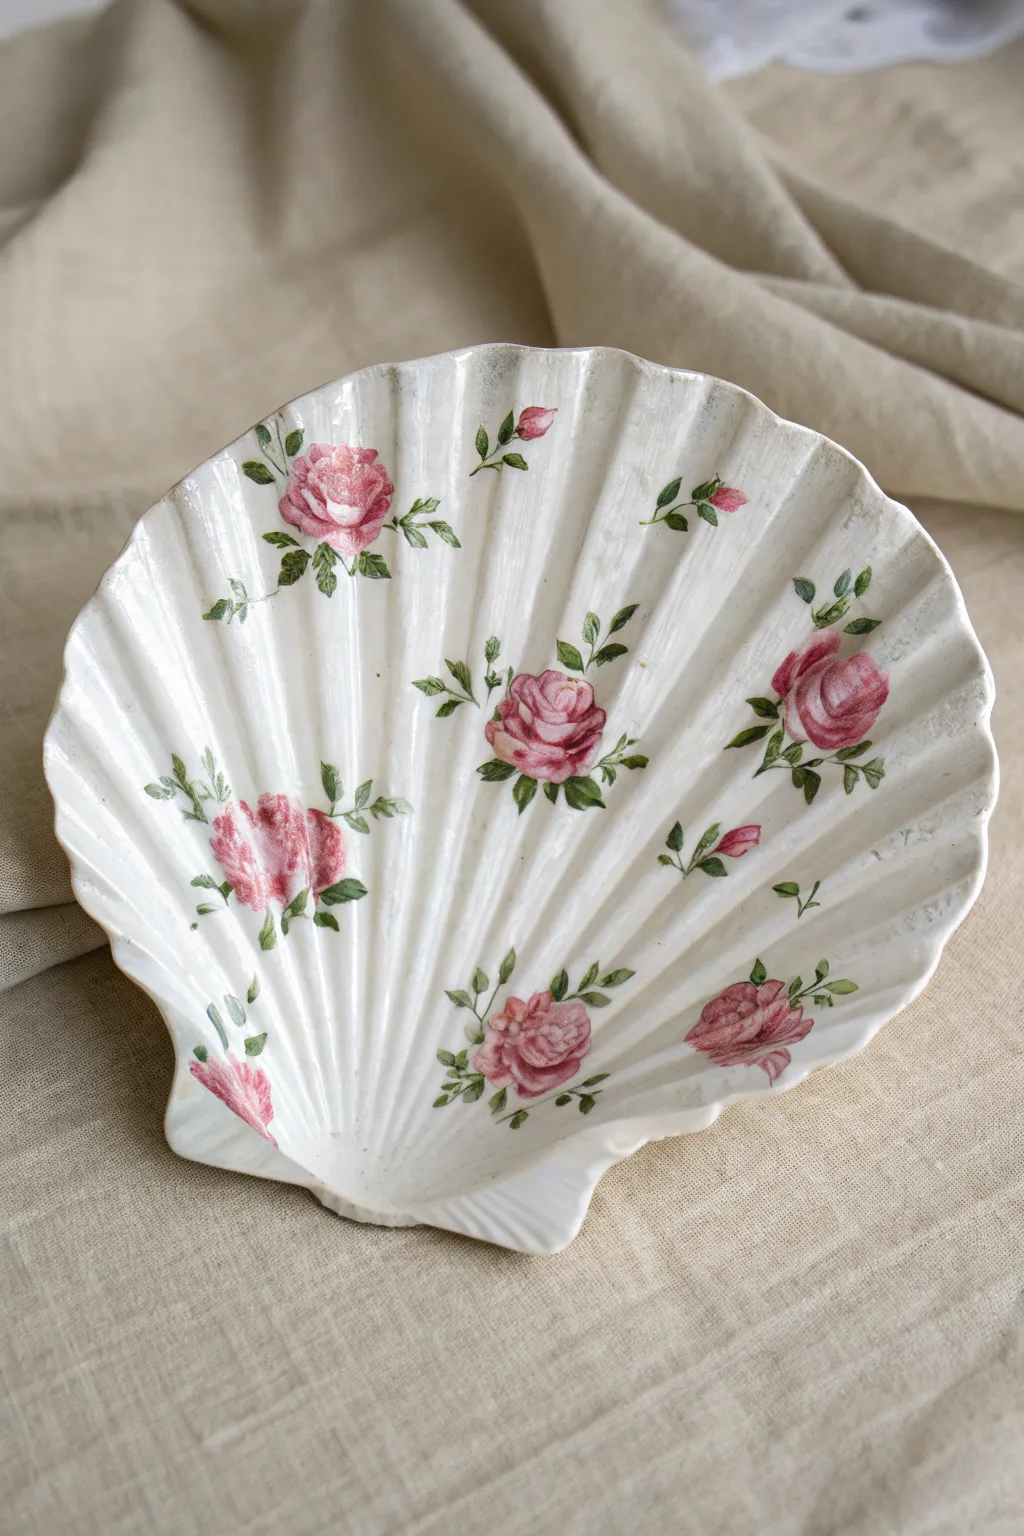
Transform a simple seashell into a piece of faux porcelain art using the gentle art of decoupage. This project captures the romantic look of vintage botanical china by layering delicate paper napkins over a painted scallop shell.
Step-by-Step Guide
Materials
- Large scallop shell (approx. 4-6 inches wide)
- White or cream matte acrylic paint
- Paper napkins with small pink rose motifs
- Decoupage medium (like Mod Podge Gloss)
- Small, sharp precision scissors
- Soft flat synthetic paintbrushes
- Cling wrap (plastic wrap)
- Fine-grit sandpaper (optional)
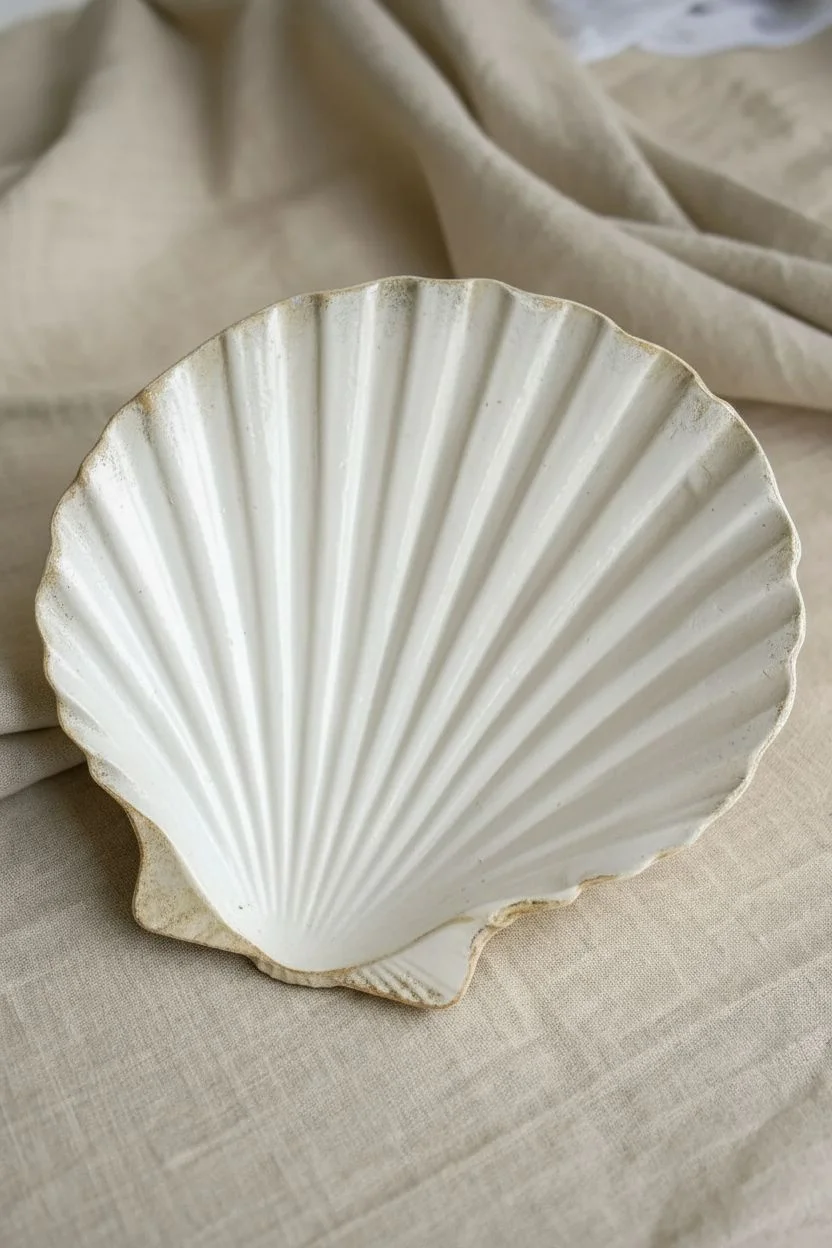
Step 1: Preparing the Base
-
Clean the shell thoroughly:
Wash your scallop shell with warm soapy water and a scrub brush to remove any sand, salt, or debris. Let it dry completely. -
Sand imperfections:
If the shell has very rough patches or barnacles inside, gently sand them down to create a smoother surface for your artwork. -
Apply the base coat:
Paint the entire inside of the shell with white or cream acrylic paint. This opaque base is crucial because napkin paper is translucent and the design needs a bright background to pop. -
Let the paint cure:
Allow the first coat to dry fully. If the natural shell color is still showing through, apply a second coat for a solid, porcelain-like finish.
The Water Pen Trick
Instead of scissors, use a wet paintbrush to trace the outline of the rose on the napkin. The paper will tear easily along the wet line, creating a feathered edge that blends invisibly.
Step 2: Preparing the Roses
-
Select your motifs:
Look at your paper napkin and identify the specific rose clusters you want to feature. You’ll need a mix of larger blooms for the center and smaller buds for the edges. -
Isolate the layers:
Most decorative napkins are 2 or 3 ply. Peel away the unprinted white backing layers until you are left with only the single, ultra-thin printed top sheet. -
Fussy cut the designs:
Using precision scissors, cut carefully around the flowers and leaves. Get as close to the printed edge as possible so you don’t have a halo of white paper.
Step 3: Applying the Design
-
Plan your composition:
Lay your cut-out roses dry onto the painted shell to create a pleasing arrangement before any glue is involved. -
Apply medium to the shell:
Brush a thin, even layer of decoupage medium onto the shell in the spot where your central rose will go. -
Place the first flower:
Gently lay the cutout rose onto the wet medium. Do not press down hard yet. -
Use the cling wrap trick:
Lay a piece of cling wrap over the wet motif. Using your finger over the plastic, gently smooth the paper from the center outward to remove wrinkles without tearing the fragile napkin. -
Mold into the ridges:
I find it helpful to use the handle of a paintbrush or a soft tool to gently press the paper down into the deep grooves of the scallop shell so the image follows the texture. -
Seal the individual motif:
Immediately brush a thin layer of decoupage medium over the top of the adhered rose to seal it in place. -
Continue adding florals:
Repeat the process for the remaining roses, working from the center outward to the edges. -
Trim the edges:
If any leaves or stems overhang the edge of the shell, wait until they are dry and crisp, then use sandpaper or a small craft knife to trim them flush with the rim.
Fixing Tears
Napkin ripped in a deep ridge? Don’t panic. Push the torn edges together while wet, or simply patch it with a tiny scrap of matching color from the leftover napkin material.
Step 4: Final Finish
-
Dry thoroughly:
Allow the shell to sit for at least an hour until the glue is completely clear and dry to the touch. -
Apply top coat:
Brush a final coat of gloss decoupage medium over the entire inside surface of the shell to unify the sheen. -
Check for pooling:
Inspect the deep ridges of the shell; wipe away any excess varnish that may have pooled in the bottom of the grooves to prevent cloudiness.
Display your beautiful new trinket dish on a vanity or bedside table to hold your favorite jewelry pieces


Have a question or want to share your own experience? I'd love to hear from you in the comments below!