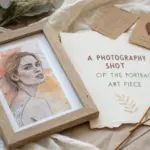
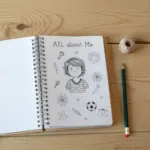
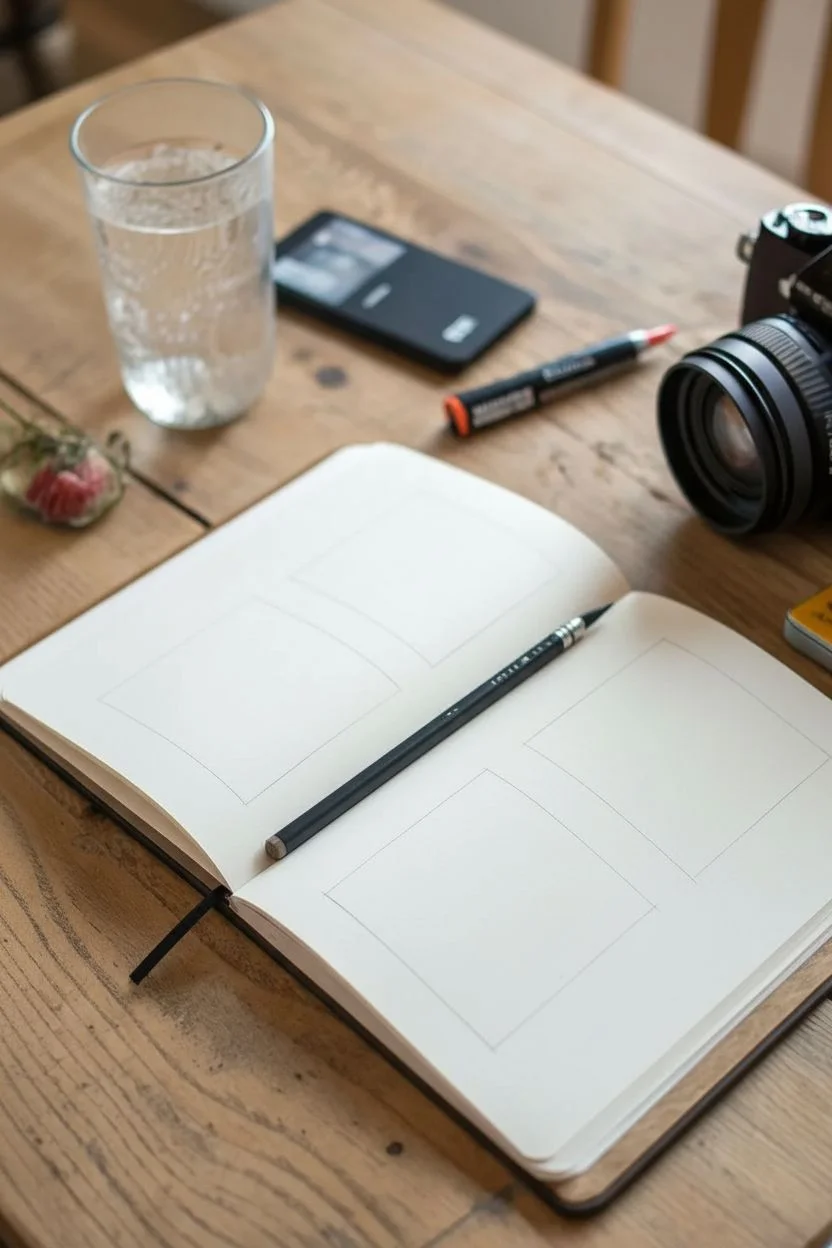
When I’m stuck or craving a creative reset, I always come back to a self-portrait—not to chase perfection, but to capture something true. Here are my favorite self portrait drawing ideas that go way beyond a basic likeness and help you tell your story on paper.
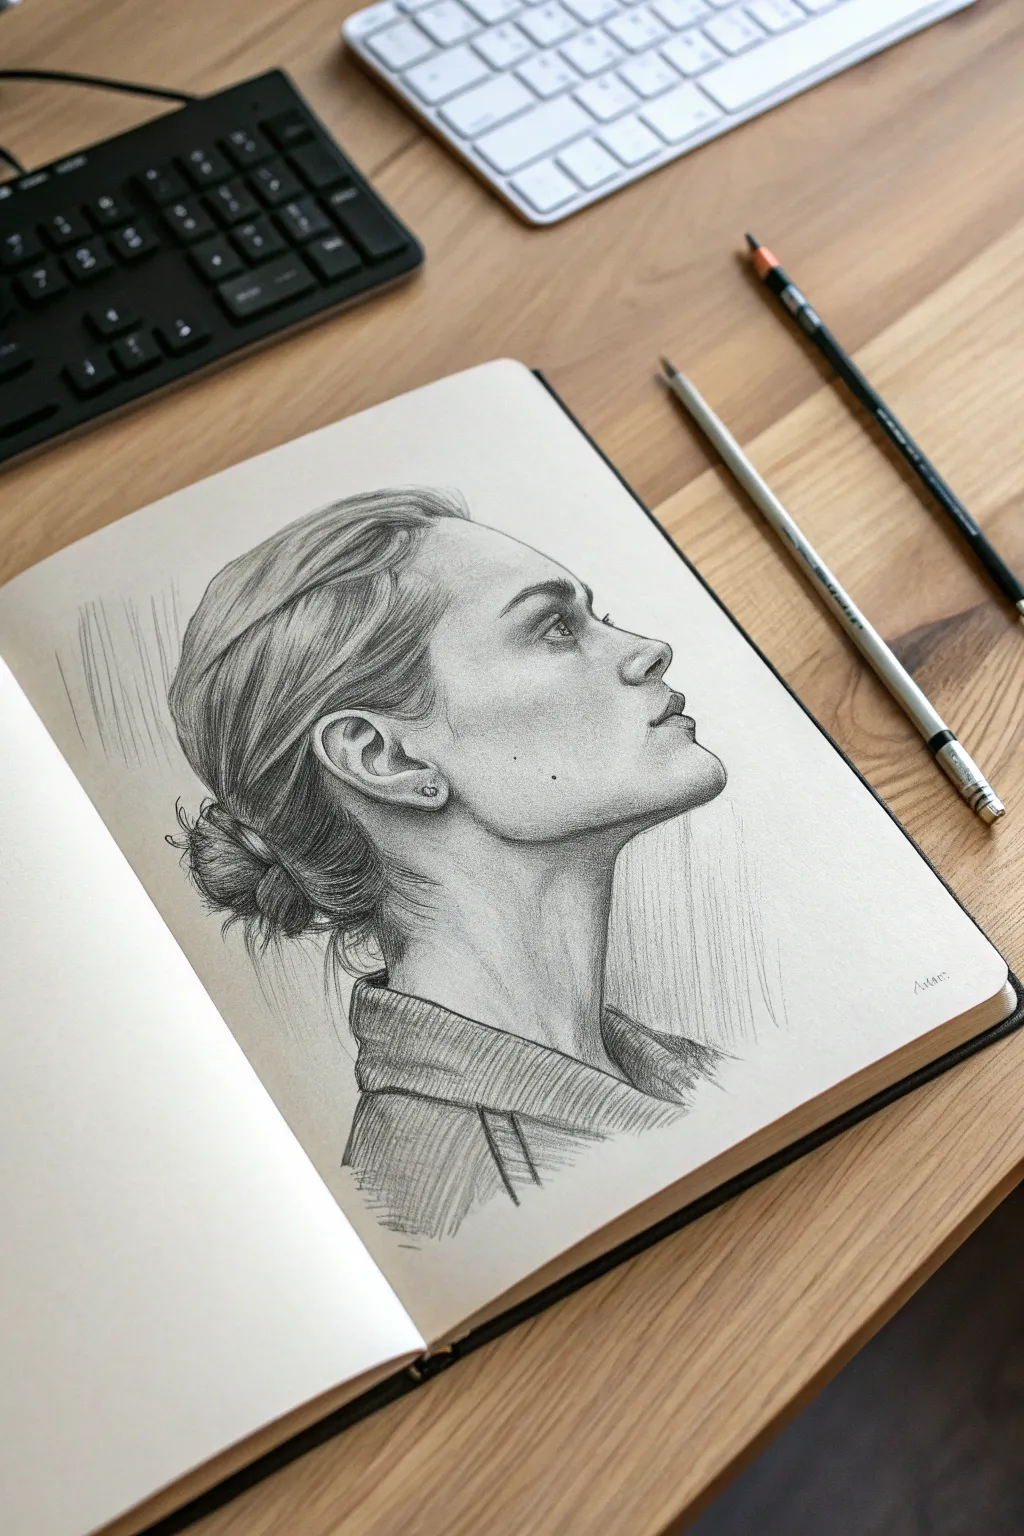
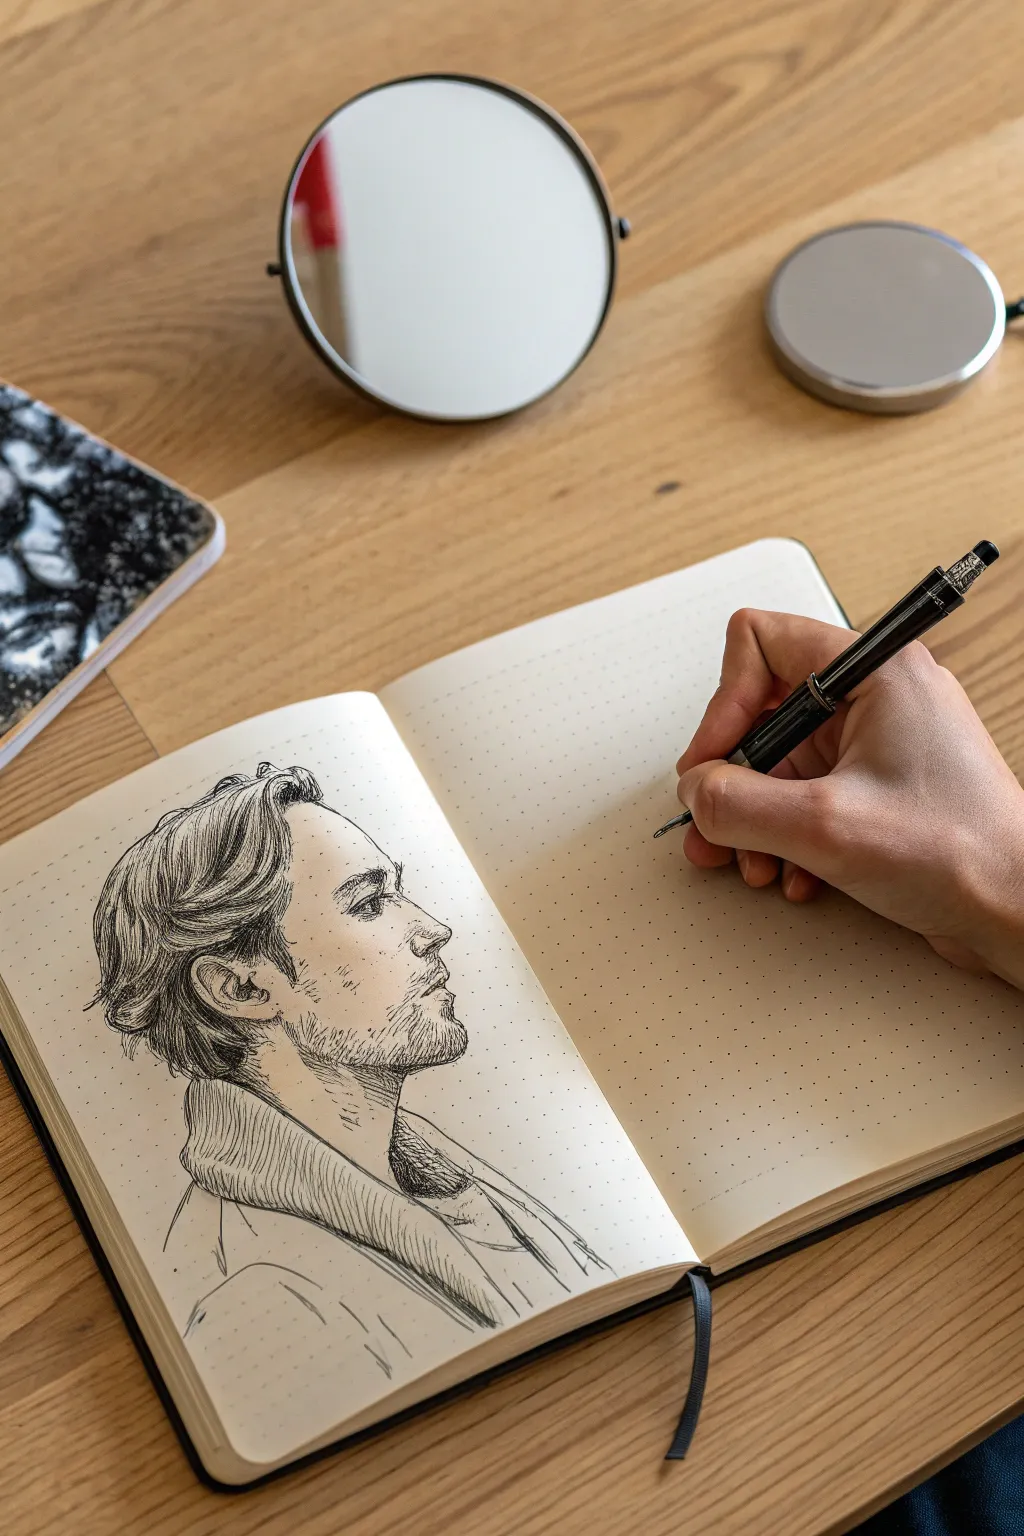
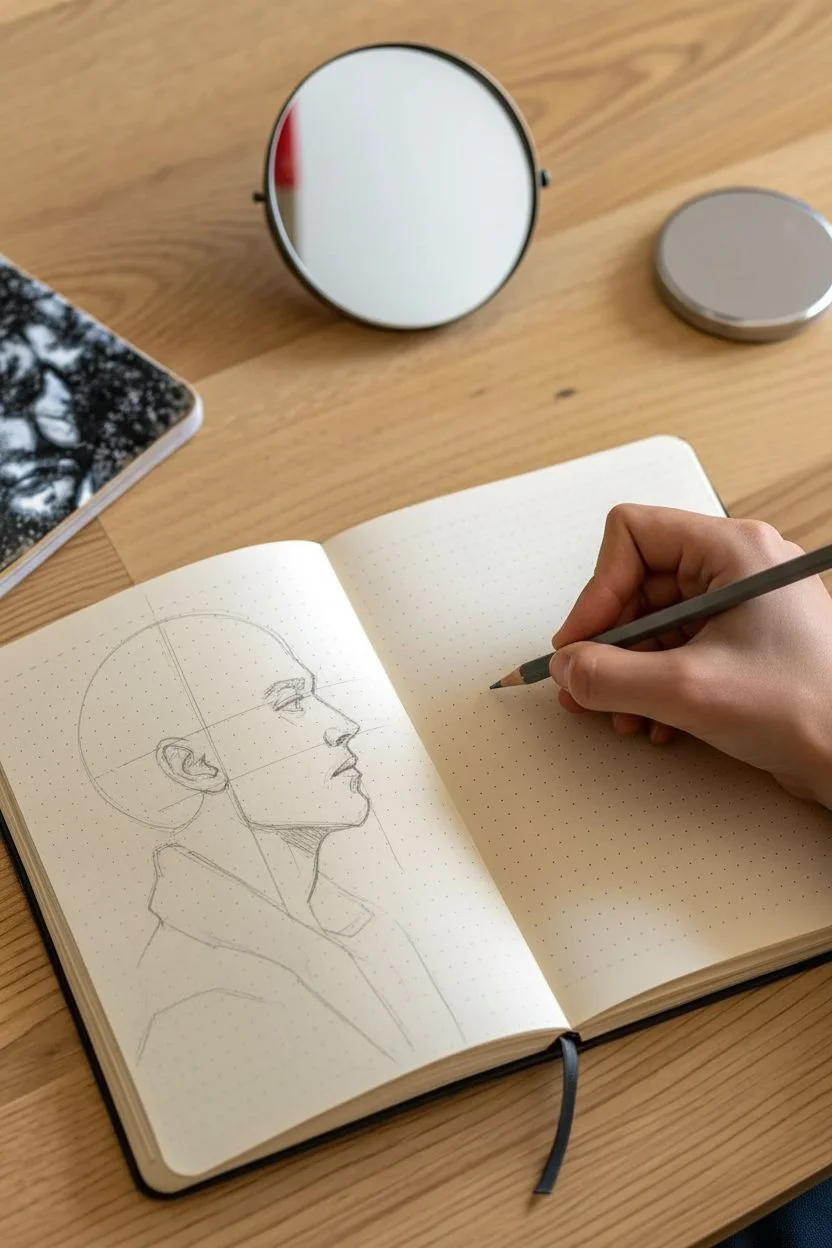
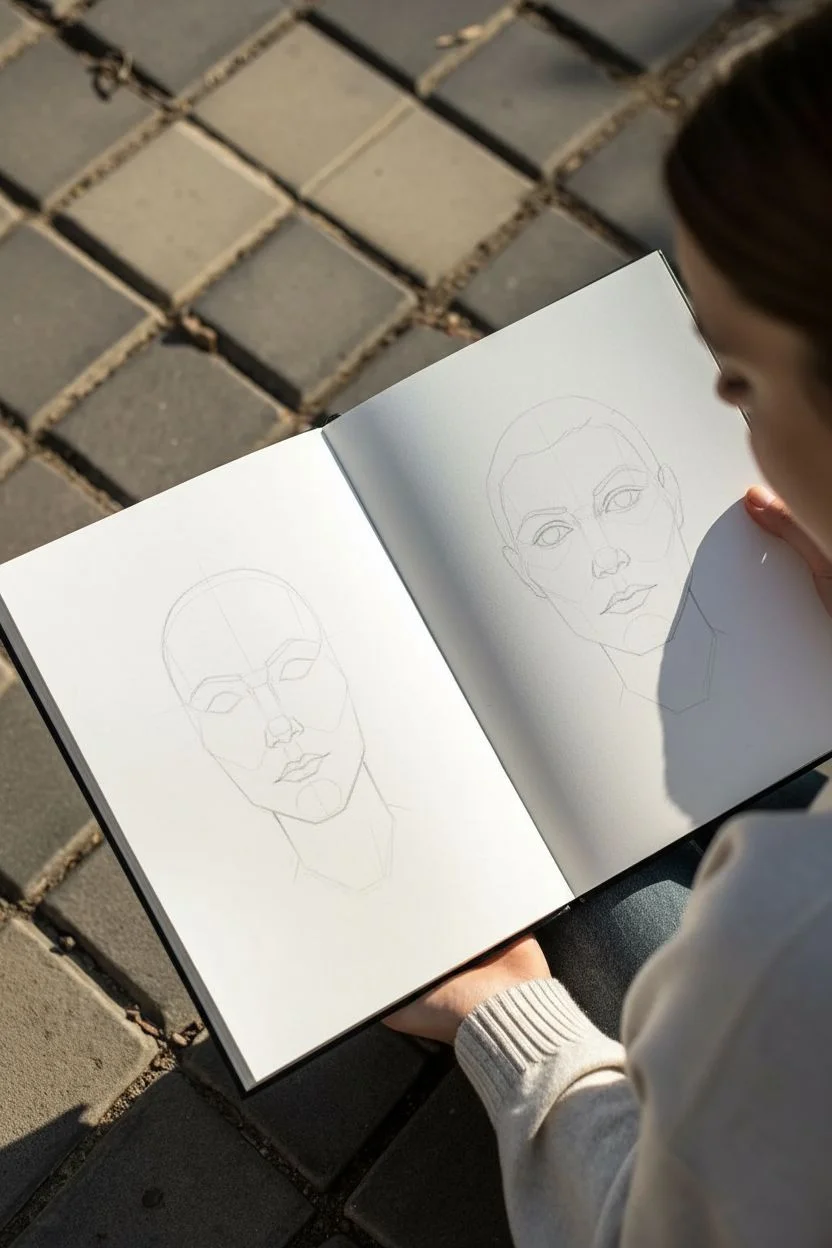
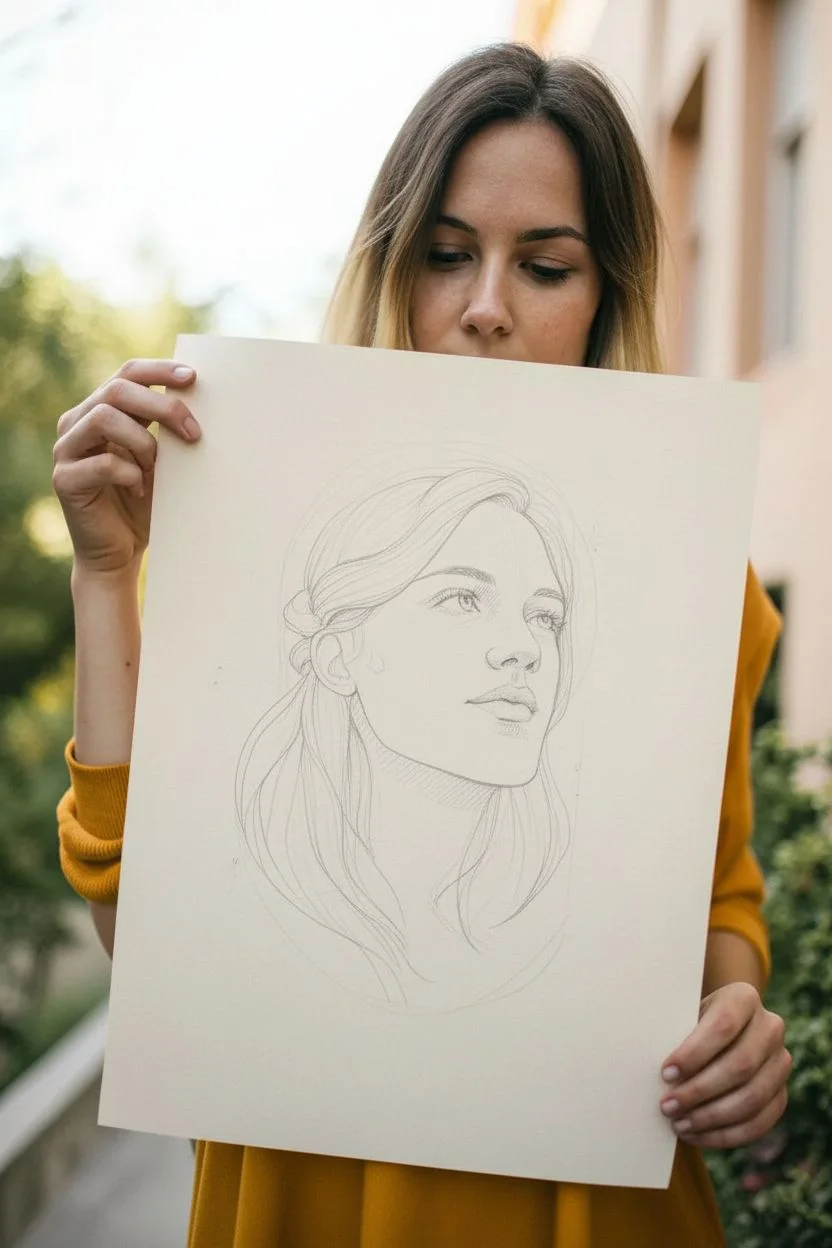
Classic Mirror Self-Portrait in Graphite
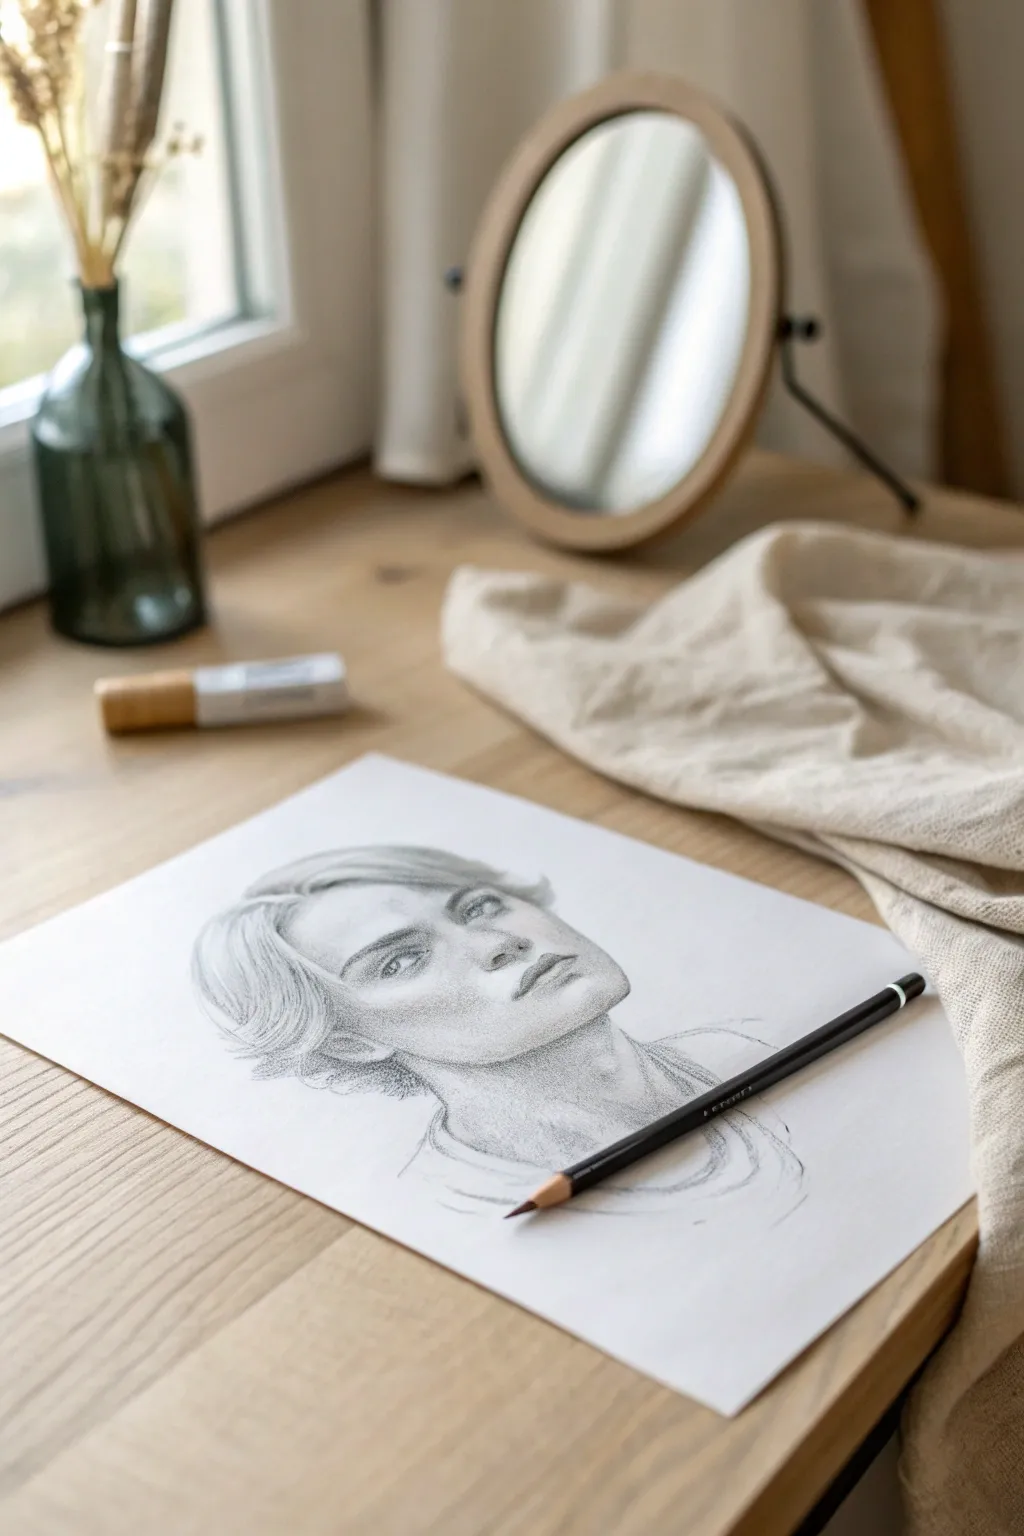
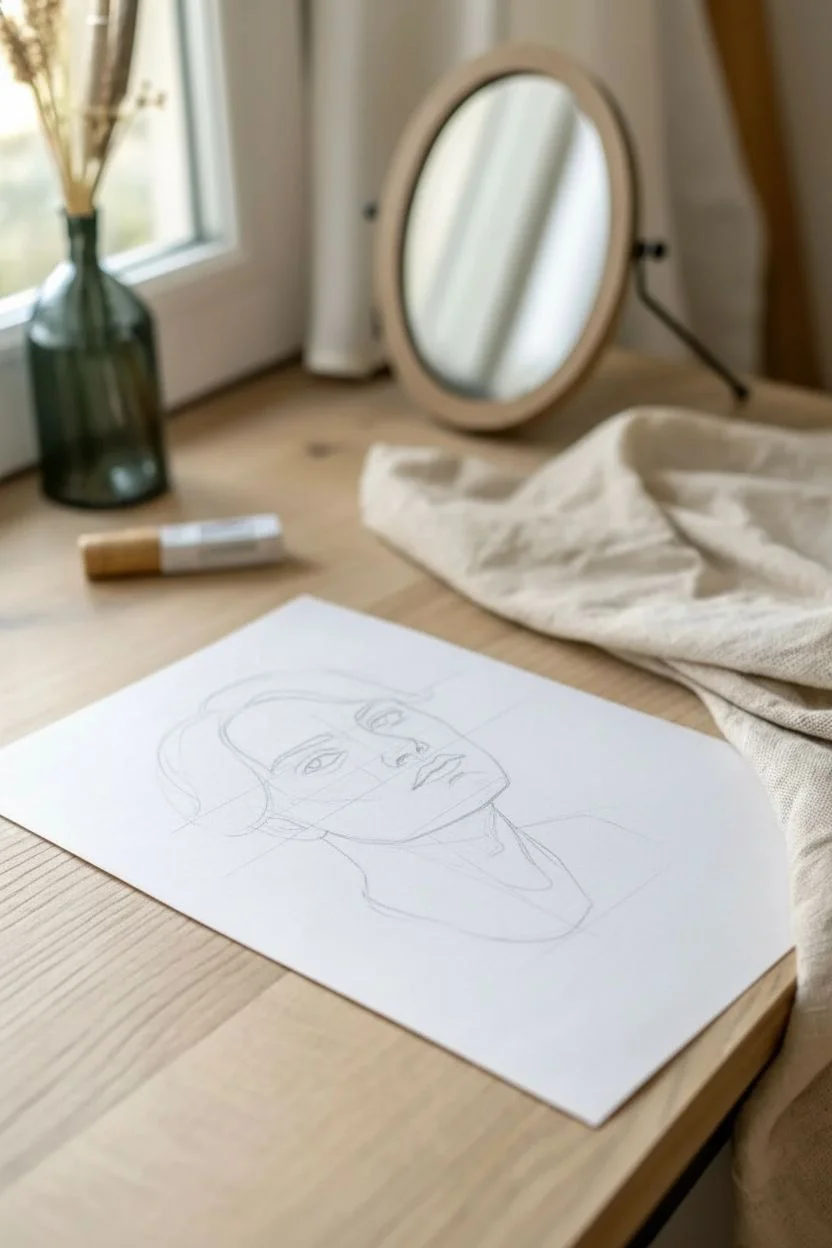
Capture the subtle nuances of your own reflection with this classic graphite self-portrait study. Using soft shading and delicate linework, you will create a timeless monochromatic piece that emphasizes form and emotion.
Detailed Instructions
Materials
- Quality drawing paper (smooth or medium tooth)
- Graphite pencils (ideally HB, 2B, and 4B)
- Kneaded eraser
- Pencil sharpener
- Mirror (tabletop or handheld)
- Blending stump (optional)
Step 1: Laying the Foundation
-
Observe and Analyze:
Sit comfortably in front of your mirror. Tilt your head slightly upward and to the side to match the dynamic angle shown in the example. Take a moment to really study where the light hits your cheekbones and nose. -
Initial Gesture:
Using a sharp HB pencil and a very light touch, sketch a loose oval for the head. Add a vertical centerline that curves with the angle of your face to guide feature placement. -
Mapping Features:
Mark the horizontal lines for the eyes, nose, and mouth. Keep these marks faint. The eyes should be roughly halfway down the head oval, with the space between them equal to the width of one eye. -
Blocking in Shapes:
Lightly sketch the basic shapes of the eyes, nose, and lips. Don’t worry about eyelashes or details yet; focus on the geometric forms and their relationships. -
Hair Outline:
Draw the general volume of the hair rather than individual strands. Outline the main masses of hair sweeping back from the forehead and tucking behind the ear.
Fixing Smudges
Hand accidentally smudged the cheek? Press a kneaded eraser firmly onto the spot and lift straight up—don’t rub! It picks up graphite without damaging the paper tooth.
Step 2: Developing Form and Value
-
Defining the Eyes:
Switch to a 2B pencil. Carefully darken the upper lash line and the pupil. Leave a tiny white circle in the pupil for the catchlight, which brings the eye to life. -
Nose Construction:
Avoid drawing hard outlines for the nose. Instead, shade the nostrils and the underside of the nose tip. Use light shading on the bridge to suggest form without strict lines. -
Shaping the Lips:
Define the line where the lips meet. Shade the upper lip slightly darker than the lower lip, as it usually angles away from the overhead light. -
Initial Shading Pass:
Using the side of your HB pencil, lay down a base tone for the shadowed side of the face. This will likely be the side furthest from your light source. -
Building Contrast:
Deepen the shadows under the chin, in the eye sockets, and under the nose using a 4B pencil. I find building these darks gradually prevents the drawing from looking heavy-handed. -
Softening Transitions:
Use your pencil or a blending stump to smooth out the transition between the light and shadow on the cheek. Aim for a soft gradient that mimics the curve of skin.
Step 3: Texturing and Refining
-
Hair Texture:
Return to the hair with long, sweeping strokes that follow the direction of growth. Concentrate darker strokes near the roots and where hair layers overlap, leaving lighter areas for highlights. -
Refining Edges:
Use your kneaded eraser to clean up the edges of the face and lightened areas. You can also press the eraser into the paper to lift graphite and create subtle highlights on the cheekbones. -
Neck and Shoulders:
Sketch the suggestion of a shirt collar and neck muscles loosely. Keep these lines sketchier and lighter than the face to ensure the viewer’s focus remains on the portrait. -
Final Balances:
Step back from your drawing. If the eyes need more pop, darken the lashes and pupils one last time. Ensure your darkest darks (usually nostrils and pupils) are truly black. -
Signature Touch:
Add a few stray hairs for realism and sign your work near the bottom edge.
Level Up: Texture
Try using the ‘hatching’ technique for the background shading instead of smooth blending. It adds an artistic, classical sketchbook feel to your portrait.
Place your finished drawing alongside your mirror to admire the conversation between reality and art


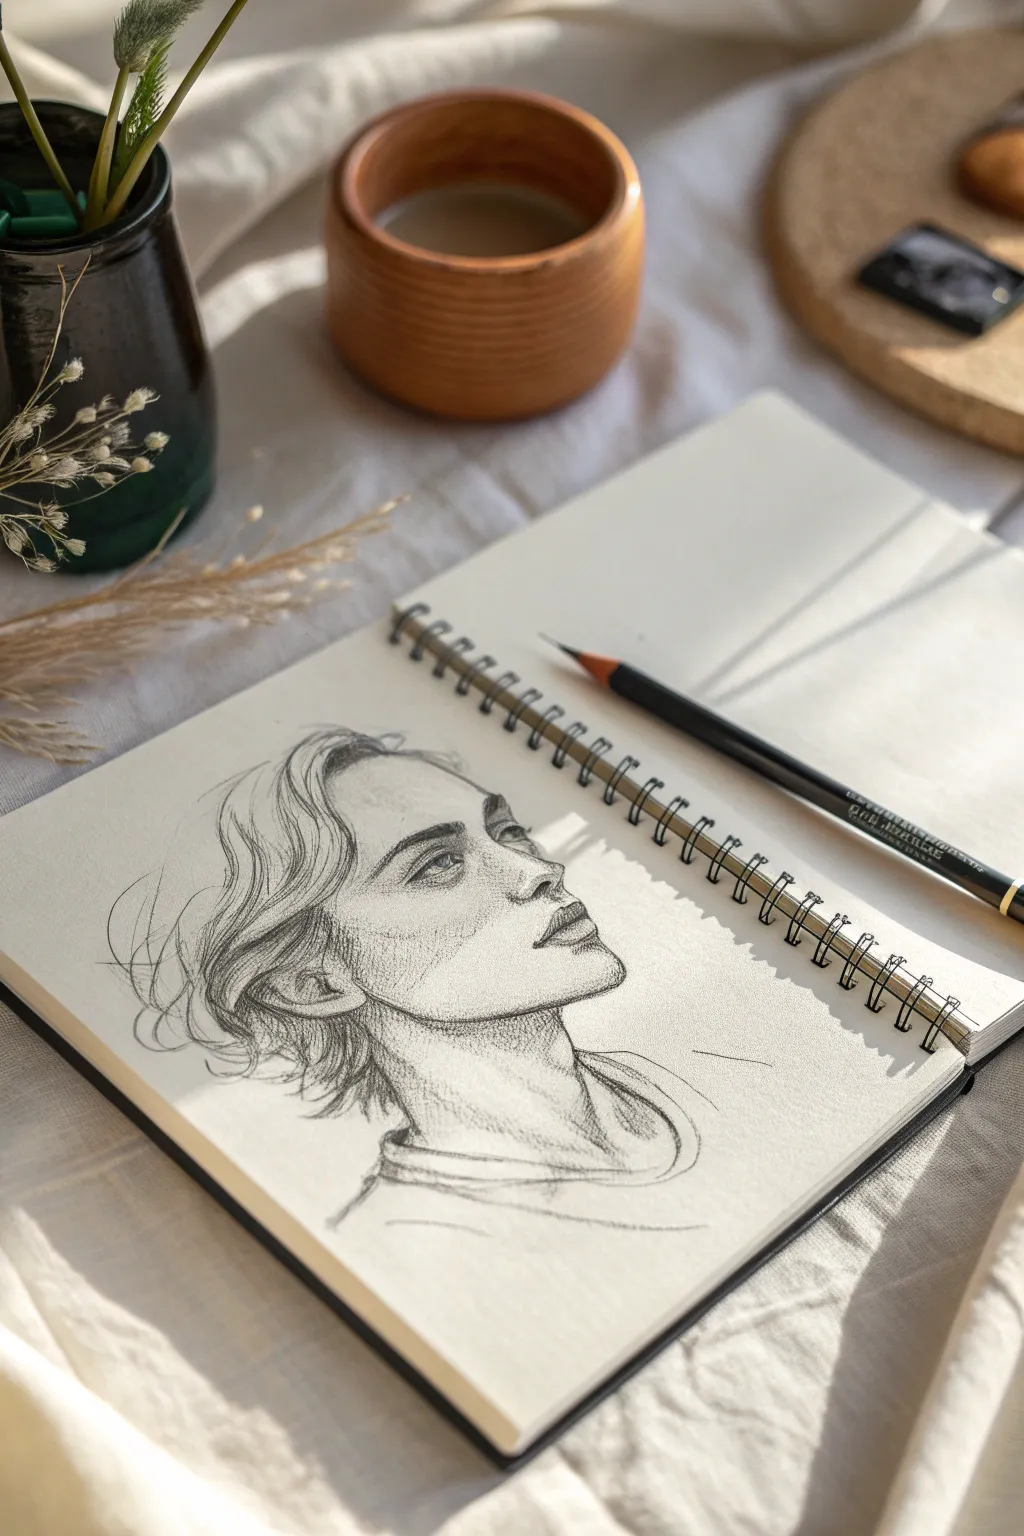
Three-Quarter View Self-Portrait for Instant Depth
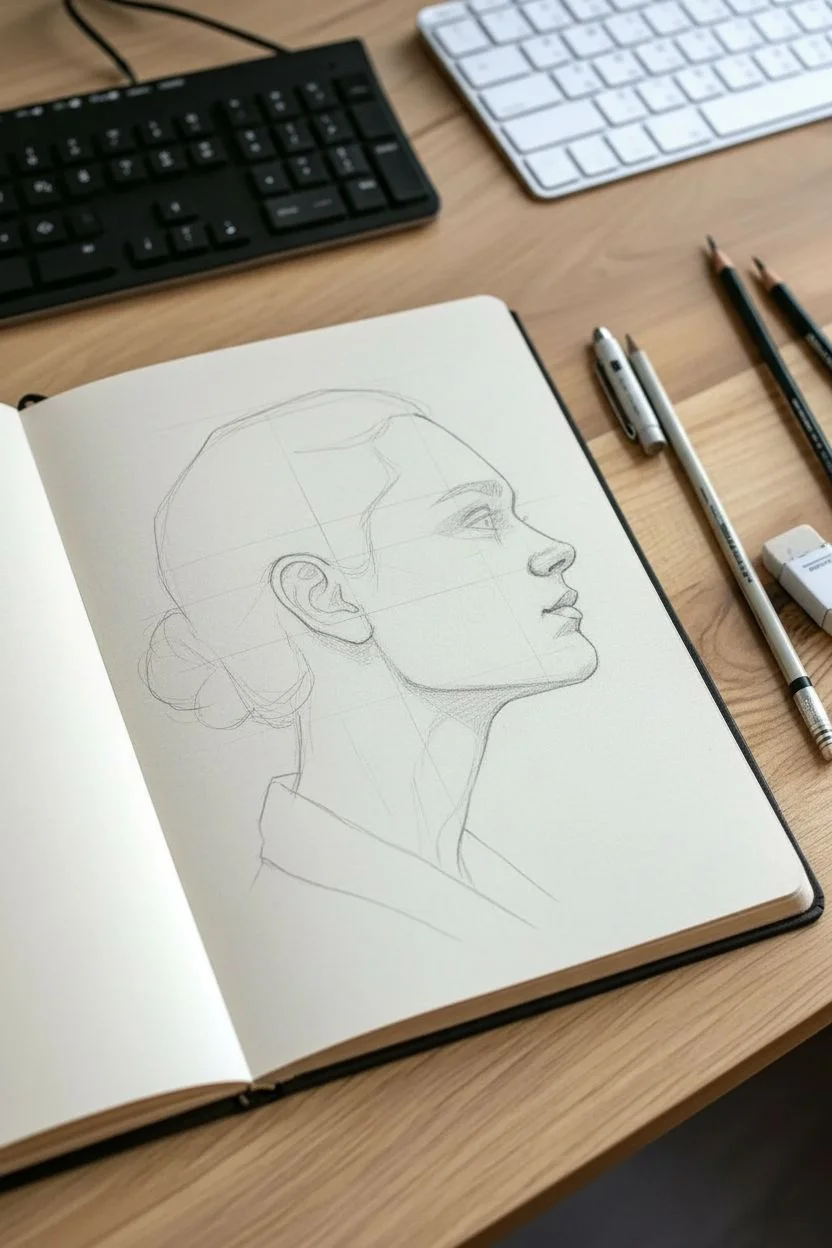
This tutorial guides you through creating a striking profile drawing that captures a sense of longing or contemplation by tilting the head upward. The focus is on capturing the subtle planes of the face and the flow of hair using classic graphite techniques on toned paper.
How-To Guide
Materials
- Sketchbook or heavy drawing paper (off-white or light cream preferred)
- Set of graphite pencils (HB, 2B, 4B, 6B)
- Mechanical pencil (0.5mm HB or 2B) for fine details
- Kneaded eraser
- Precision eraser (pencil style) for highlights
- Blending stump or tortillon (optional)
- Pencil sharpener
Step 1: Laying the Foundation
-
Establish the Gesture:
Begin with a very light HB pencil to map out the overall curve of the neck leading into the head. The key here is the angle; the chin should be lifted, creating a diagonal line from the jaw to the collarbone. -
Block in the Head Shape:
Draw a loose circle for the cranium and attach the jawline. Since this is a near-profile view, the jawline will be sharp and distinct. Ensure the chin projects forward slightly to emphasize the upward gaze. -
Place the Features:
Mark horizontal guidelines for the eyes, nose base, and mouth. Notice how the perspective changes when the head tilts back—the nose will appear slightly shorter, and the distance between the eye and eyebrow might compress. -
Draw the Profile Outline:
Refine the contour of the forehead, the bridge of the nose, and the lips. Pay close attention to the philtrum (the space between nose and lip) which becomes more prominent in this upward angle.
Step 2: Rendering the Features
-
The Eye and Gaze:
Switch to a mechanical pencil for precision. Sketch the eye shape, focusing on the upper lid which creates a heavy shadow. The pupil should be directed upward to match the head’s tilt. -
Nose and Mouth Construction:
Define the nostril wing and the soft curve of the nostril opening. For the mouth, focus on the corner—it often hints at a slight expression. Shade the upper lip darker than the lower lip to indicate volume. -
Ear Placement:
Position the ear relatively low and far back due to the head tilt. Sketch the complex curves of the helix and lobe carefully, as the ear acts as an anchor for the jawline. -
Defining the Jaw and Neck:
Strengthen the line under the chin. Depict the sternocleidomastoid muscle (the large neck muscle) starting from behind the ear and stretching down toward the collarbone to show tension in the varied pose.
Fixing Flatness
If the face looks flat, your mid-tones are likely too uniform. Darken the shadow under the jaw and near the ear significantly. High contrast creates volume.
Step 3: Building Tone and Hair
-
Initial Shading:
Using a 2B pencil, apply a light wash of tone across the shadow side of the face (under the chin, the side of the cheek, and the eye socket). Keep your pencil strokes directional to follow the skin’s curvature. -
Deepening Shadows:
Switch to a 4B pencil to darken the deepest areas: inside the ear, the nostril, the pupil, and the crease of the neck. This high contrast brings the drawing to life. -
Mapping the Hair Flow:
Look at the hairline. Draw long, sweeping strokes with an HB pencil to map out the main masses of hair pulled back into a bun. -
Texturing the Bun:
Use short, curved strokes to create the tangled, woven look of the messy bun at the nape of the neck. Don’t draw every strand; suggest the texture through clumps of shadow and light. -
Refining Hair Strands:
With a keen mechanical pencil, add individual stray hairs (flyaways) escaping the bun and near the ear. This adds realism and softness to the drawing.
Level Up: Tonal Paper
Try this on tan or gray toned paper. Use white charcoal or a white gel pen for extreme highlights to make the skin glow realistically.
Step 4: Clothing and Final Touches
-
Suggesting the Shirt:
Sketch the collar of a jacket or shirt. Use broader, rougher hatching marks here compared to the face. This textural contrast helps keep the focus on the portrait itself. -
Cross-Hatching the Clothes:
Use diagonal cross-hatching with a 6B pencil on the clothing to create a dark, solid base that anchors the portrait at the bottom of the page. -
Background Hatching:
Add some vertical hatching lines behind the head. This negative space shading pushes the profile forward and adds an artistic, ‘sketchy’ finish. -
Highlighting:
Use your precision eraser to pull out bright highlights on the tip of the nose, the forehead, the lower lip, and the top of the ear cartilage. -
Final Polish:
Step back and assess the values. I like to darken the eyelashes and the corner of the mouth one last time to ensure the expression really pops.
Now you have a dynamic self-portrait that captures a fleeting, contemplative moment with elegance


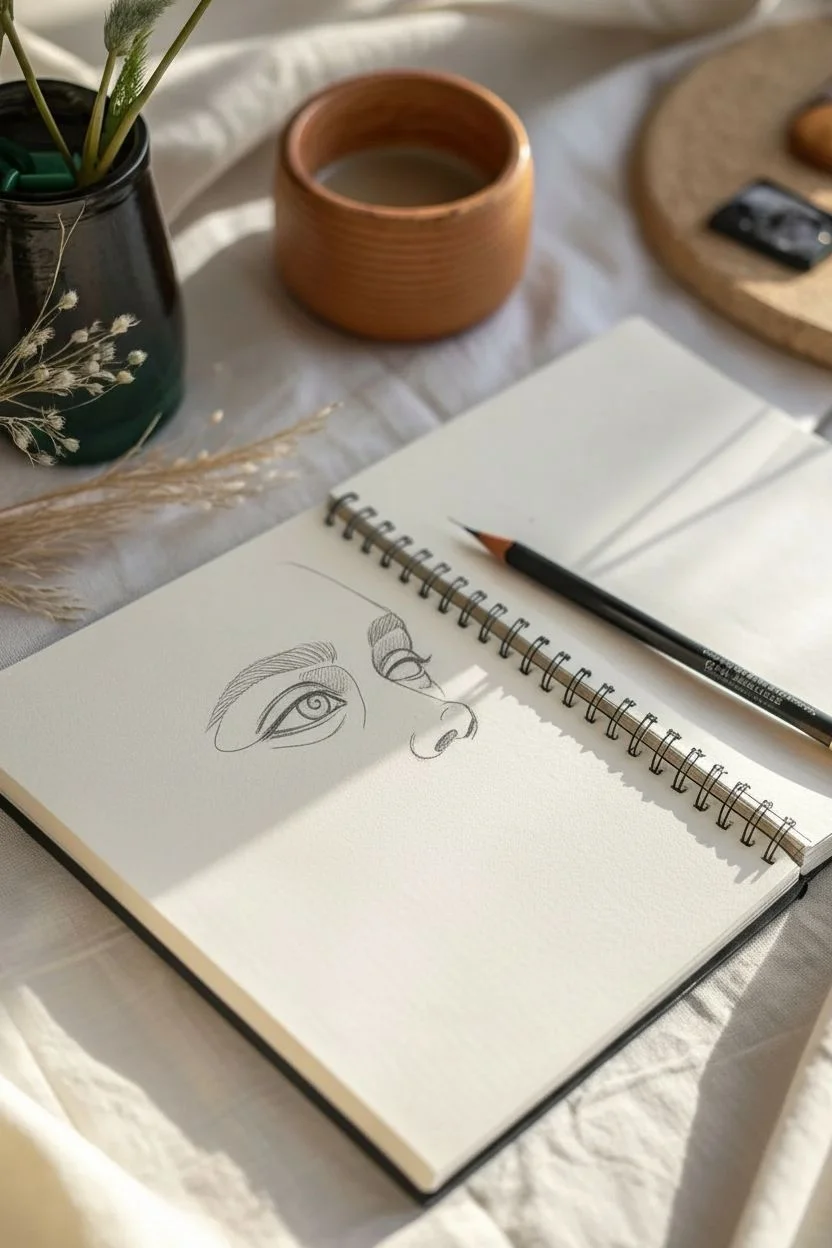
Close-Up Self-Portrait Focused on the Eyes
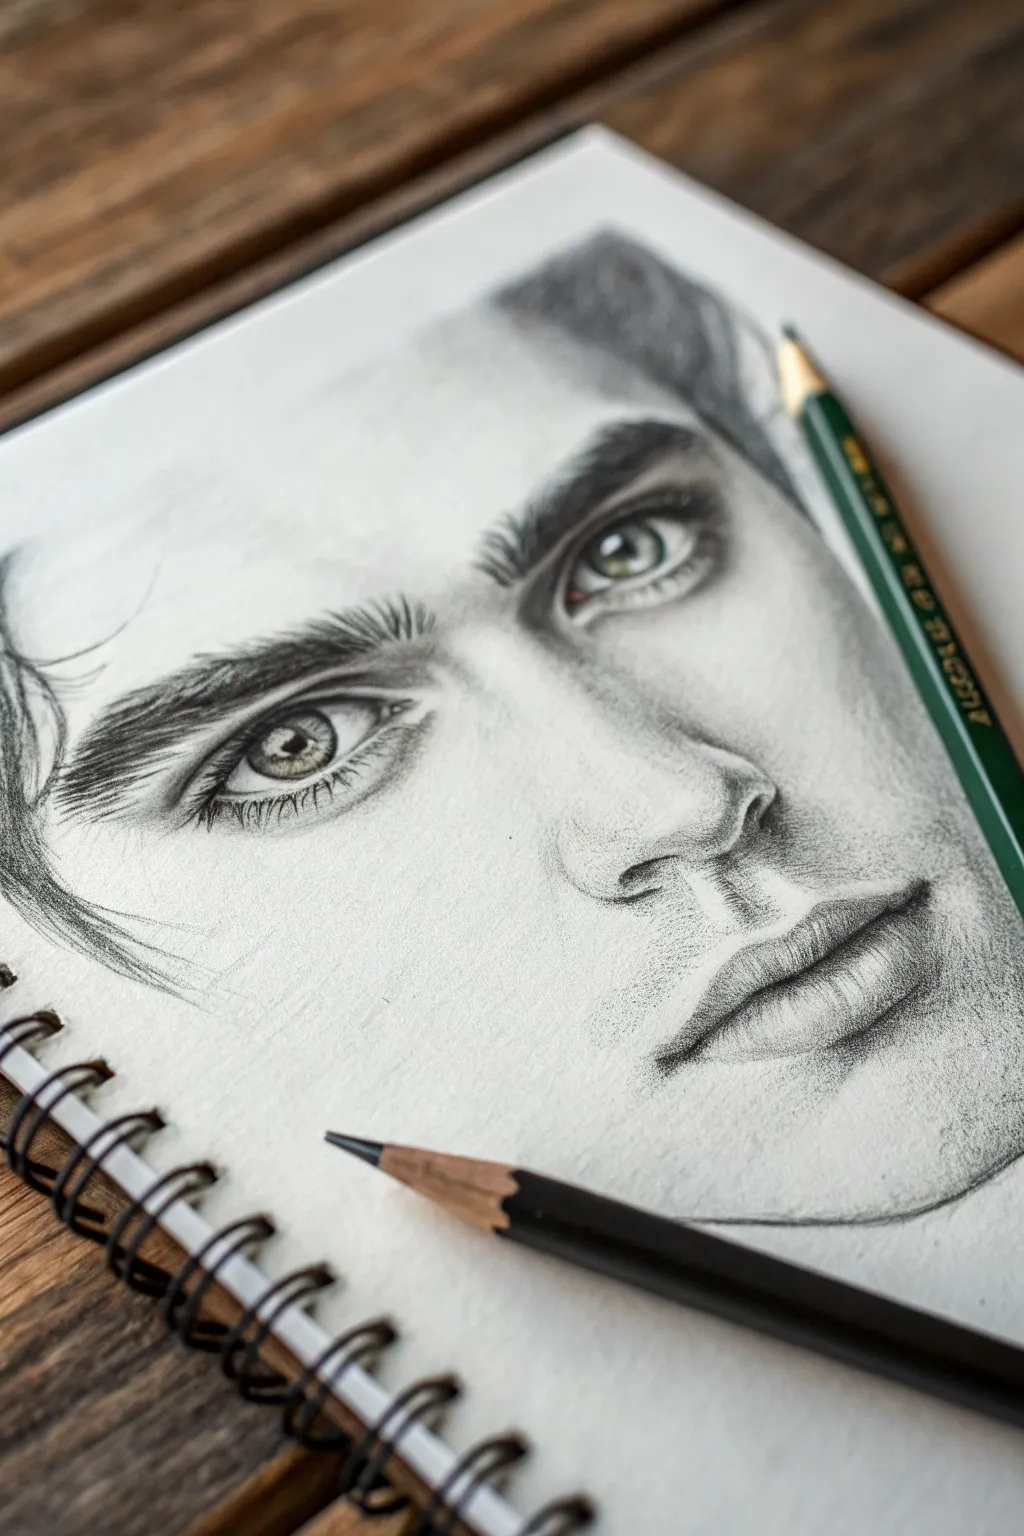
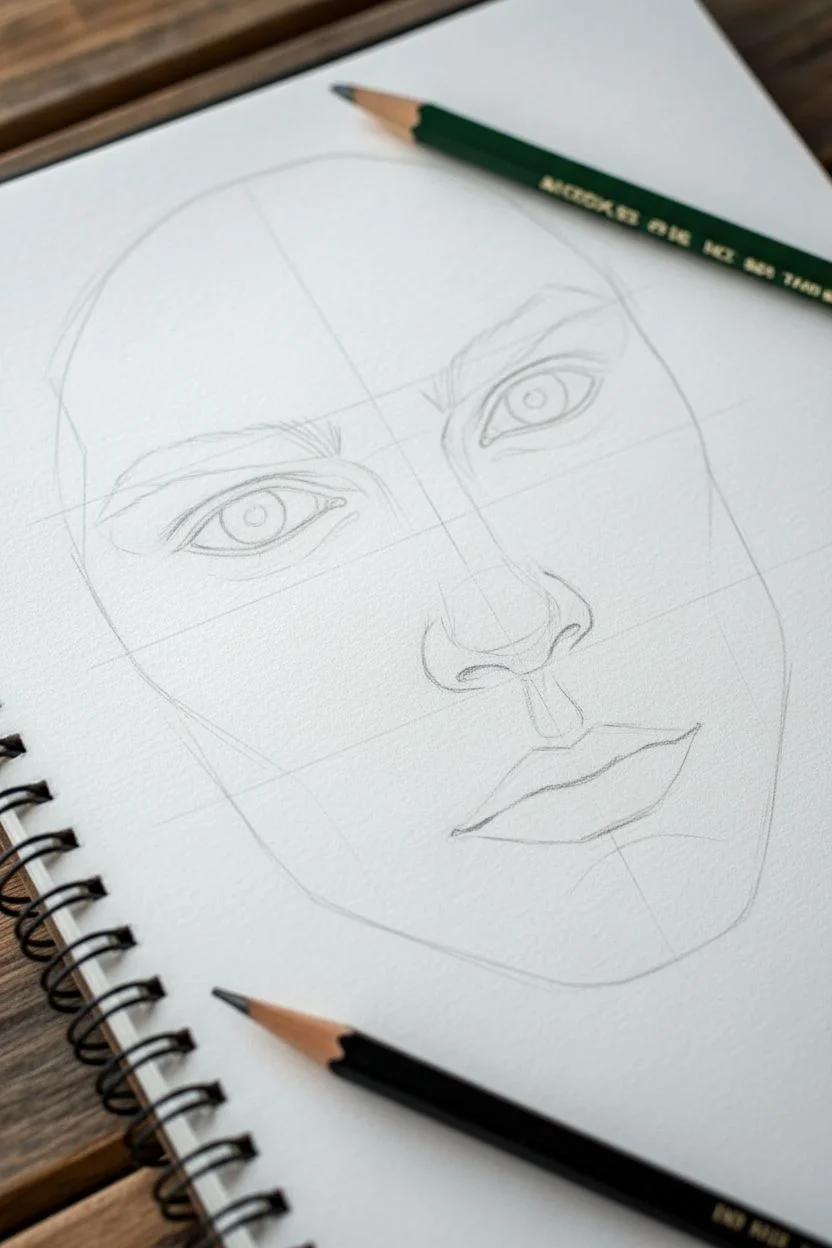
Capturing the intensity of a gaze is the hallmark of a great portrait, and this project focuses zoomed-in attention on the eyes and brow structure. Using graphite pencils to build layers of soft shading, you’ll create a realistic, emotive drawing that emphasizes depth and texture.
Step-by-Step Tutorial
Materials
- Sketchbook or drawing paper (heavyweight, smooth surface preferred)
- Graphite pencil set (HB, 2B, 4B, 6B)
- Mechanical pencil (for fine details like eyelashes)
- Kneaded eraser
- Blending stump or tortillon
- Tissue or chamois cloth
- Pencil sharpener
Step 1: Structured Beginnings
-
Map the proportions:
Begin with a very light HB pencil. Sketch a large oval for the face shape, ensuring it fills the page. Draw a vertical center line to help with symmetry and horizontal guidelines for the eyes, nose, and mouth placement. Since this is a close-up, the eyes should be positioned slightly higher than the center. -
Outline the features:
Lightly block in the shapes of the eyes, eyebrows, nose, and lips. Pay close attention to the distance between the eyes—typically one eye-width apart. Don’t worry about details yet; focus on getting the shapes and angles correct relative to each other. -
Refine the eye shape:
Go back into the eye outline. Mark the tear ducts and the thickness of the eyelids. Remember that the iris is rarely a perfect circle; the top is usually slightly covered by the upper lid.
Step 2: The Windows to the Soul
-
Establish the iris:
Switch to a 2B pencil. Define the pupil in the center of the iris, but leave a small, crisp white shape for the catchlight (reflection). Fill the pupil in dark, then draw the outer ring of the iris. -
Texture the iris:
Draw radiating lines from the pupil outward to the iris edge, mimicking the muscle fibers of the eye. Use varied pressure to create depth. I find it helpful to squint at my reference here to see the major contrast areas within the eye color. -
Shade the sclera:
The ‘white’ of the eye is never purely white. Lightly shade the corners of the eyeball using an HB pencil to suggest its spherical form, leaving the center brightest. Blend softly with a tortillon. -
Deepen the crease:
Use a 4B pencil to darken the crease of the upper eyelid. This creates the illusion that the lid is folding back into the eye socket. Soften the edges of this line upward.
Muddy Shading?
If your skin shading looks dirty or smudged, your blending tool might be overloaded with graphite. Clean your tortillon with sandpaper or switch to a fresh tissue for lighter skin areas.
Step 3: Building the Face
-
Define the brows:
Instead of drawing a solid block, use short, flicking strokes with a sharpened 2B or mechanical pencil to simulate individual hairs. Follow the natural growth direction—upward at the start, then angling outward. -
Contour the nose:
Avoid outlining the sides of the nose. Instead, use shading to suggest the bridge and nostrils. Use an HB pencil to lay down a base tone on the shadowed side of the nose, blending it out towards the cheek. -
Sculpt the lips:
Use vertical, curved strokes to shade the lips, mimicking their natural texture. The upper lip is usually in shadow and darker than the lower lip. Use a 4B pencil for the line where the lips meet, and shading gently underneath the bottom lip to push it forward. -
Add skin tone:
Using the side of your 2B pencil, lightly shade the rest of the face. Focus on the shadows around the eye sockets, under the brow bone, and along the cheekbone to give the face structure. Use a tissue to rub this graphite into a smooth, skin-like texture.
Hyper-Realism Hack
Use a white gel pen to add tiny dots of moisture to the tear duct and the very brightest point of the catchlight in the eye for an instantly wet, glassy appearance.
Step 4: Detailing and Contrast
-
Enhance the lashes:
Take your sharpest mechanical pencil or a freshly sharpened 4B. Draw the eyelashes in quick, curved strokes. Ensure they originate from the eyelid rim, not the white of the eye. Group some lashes together for a natural look. -
Suggest hair:
For the hair framing the face, use broad, confident strokes with a 6B pencil. You don’t need to draw every strand; capture the flow and volume of the dark masses versus the highlights. -
Final highlights:
Use your kneaded eraser to lift pigment. Dab it on the tip of the nose, the center of the lower lip, the brow bone, and the forehead to create bright highlights that simulate oily skin or strong lighting. -
Deepen shadows:
Do a final pass with your darkest pencil (6B). Reinforce the pupils, the darkest parts of the nostrils, and the corners of the mouth to maximize the contrast and make the drawing pop off the page.
Now step back and admire how those small details have come together to create a striking, soulful portrait.


Dramatic Lighting Self-Portrait (One Light, Big Shadows)
This striking charcoal drawing relies on heavy contrast to create drama, sculpting the face with deep shadows and bright highlights rather than outlines. By darkening the entire background, the lit portions of the face will seem to emerge directly from the darkness.
Step-by-Step
Materials
- Large sheet of smooth Bristol or drawing paper (approx. 18×24 inches)
- Vine charcoal sticks (soft and medium)
- Compressed charcoal (2B, 4B, and 6B)
- White charcoal pencil or white pastel stick
- Kneaded eraser
- Blending stump (tortillon) or chamois cloth
- Paper towels or tissues
- Workable fixative spray
- Mirror or a focused reference photo with strong side lighting
Step 1: Planning the Light and Shadow
-
Setup your lighting:
Before putting charcoal to paper, setup your reference. If working from life, position a single strong light source to one side of your face to create deep shadows on the opposite side. If using a photo, cast that same dramatic shadow during the shoot. -
Establish the outline:
Using a stick of soft vine charcoal, very lightly sketch the basic contour of the head and shoulders. Don’t worry about tiny details yet; focus on getting the scale right on your large paper. -
Map the shadow shapes:
Look closely at your reference and draw distinct lines separating light areas from shadow areas. You are essentially creating a map of where the darkness will go. -
Initial tone lay-in:
Use the side of your vine charcoal to gently shade in all the shadow areas you just mapped. Keep this layer light and hazy; it’s just a base coat.
Too Much Smudge?
If your drawing gets muddy or grey, you’ve over-blended. Stop rubbing! Lay down fresh, dark marks with compressed charcoal and leave them rough for texture.
Step 2: Building the Dark Background
-
Fill the negative space:
This style relies on a pitch-black background. Take a piece of compressed charcoal (4B or 6B) and begin filling the space around the head. Use broad, confident strokes. -
Blend the background:
Use a chamois cloth or a folded paper towel to rub the charcoal into the paper grain. This creates a smooth, matte black void. Repeat the charcoal application and blending until the background is solid and consistent. -
Define the silhouette:
As you sharpen the edge where the background meets the face, let the background merge with the shadow side of the face (the ‘lost edge’). This connects the subject to the environment.
Tinted Paper Twist
try this same technique on grey or tan toned paper. The mid-tone is already there for you, so you only have to draw the dark shadows and white highlights.
Step 3: Modelling the Face
-
Deepen facial shadows:
Switch back to your compressed charcoal sticks. Darken the core shadows on the face—under the nose, inside the eye socket, and under the chin. These should be nearly as dark as the background. -
Create mid-tones:
Apply vine charcoal to the transitional areas between your deepest shadows and the highlights. I like to smudge this with my finger to create a soft gradation that mimics skin texture. -
Refine the eyes:
Use a sharpenable charcoal pencil for the eyes. Pay close attention to the iris and pupil, but leave the small white reflection alone—preserving the white of the paper is crucial here. -
Sculpt the nose and lips:
Avoid drawing outlines for the nose. Instead, build its shape solely through shading the side planes. For the lips, focus on the shadow line between them and the shadow beneath the lower lip. -
Lifting out lights:
Take your kneaded eraser and shape it into a point. ‘Draw’ with the eraser by lifting charcoal off the paper in areas that need to be lighter, such as the bridge of the nose or the cheekbone. -
Add texture to hair:
For the hair (or shaved head texture), scumble the charcoal lightly over the paper. Don’t draw every strand; capture the mass and the way light hits the curve of the skull.
Step 4: Final Touches
-
Push the contrast:
Stand back and squint at your drawing. Identify areas that look washed out. Re-apply 6B compressed charcoal to the darkest darks to ensure maximum impact. -
Heighten highlights:
If the white paper isn’t bright enough for your strongest highlights (like the tip of the nose or forehead sheen), use a white charcoal pencil or pastel sparingly to make them pop. -
Clean the edges:
Use a clean eraser to tidy up the outer margins of the paper if smudges have occurred, ensuring the drawing looks deliberate and framed. -
Fixative application:
Take the drawing outside or to a ventilated area. Spray a light coat of workable fixative to prevent the thick charcoal layers from smudging or dusting off.
Step back and appreciate how the dramatic interplay of light and dark brings a powerful, emotive quality to your self-portrait

PENCIL GUIDE
Understanding Pencil Grades from H to B
From first sketch to finished drawing — learn pencil grades, line control, and shading techniques.
Explore the Full Guide
Gesture Self-Portrait in 5 Minutes
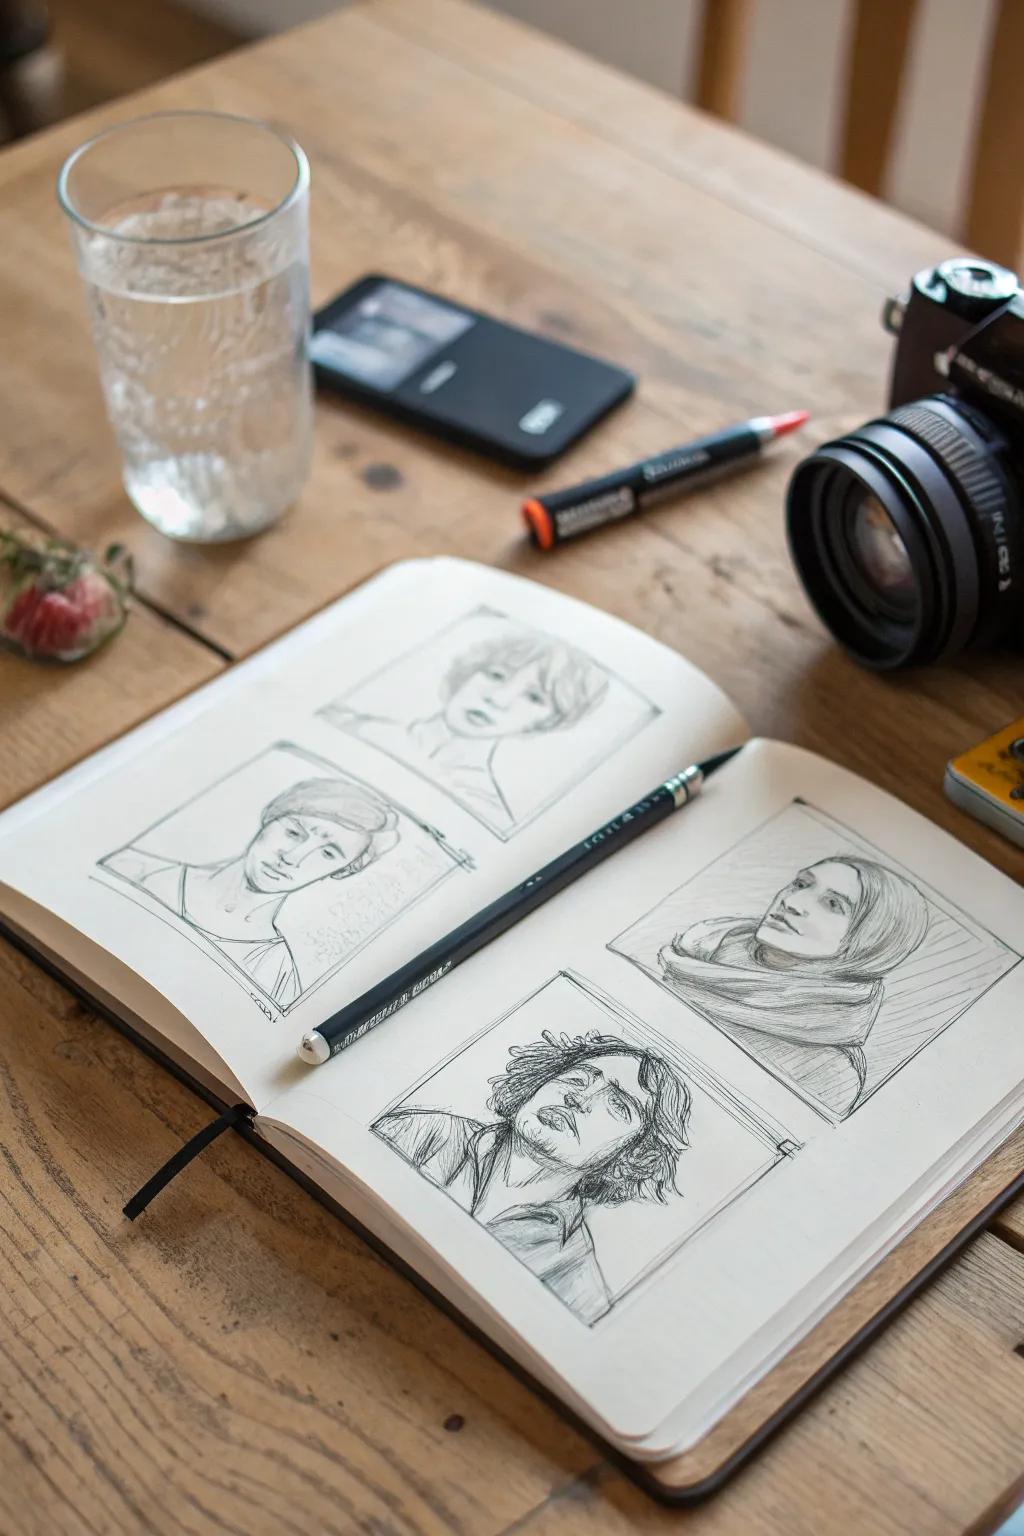
Capturing the essence of a face doesn’t require hours of labor; these four distinct gesture portraits demonstrate how rapid, loose sketching can convey personality and emotion instantly. This exercise fills a sketchbook spread with four unique character studies, focusing on line economy and expressive shading rather than photorealism.
Detailed Instructions
Materials
- Hardcover sketchbook (approx. A5 or A4 size, smooth paper)
- Graphite pencil (HB or 2B for initial lines)
- Graphite pencil (4B or 6B for darker accents)
- Fine-point black ink pen (optional, for crisp outlines)
- Eraser (kneaded or stick)
- Ruler (optional, for framing)
Step 1: Preparation and Layout
-
Prepare the spread:
Open your sketchbook to a clean double-page spread. Visualize four equal quadrants where your portraits will go. You don’t need to measure perfectly, but having a mental grid helps balance the composition. -
Draft the frames:
Using your HB pencil, lightly sketch four rectangular boxes—two on the left page, two on the right. These boxes will act as boundaries for your portraits. Keep the lines faint so they don’t overpower the drawings later. -
Determine the angles:
Decide on four distinct head angles to maximize variety. For this project, aim for: a front-facing view, a slight 3/4 turn looking down, an upward-looking dreamer pose, and a profile or deep 3/4 view. This variation makes the spread dynamic.
Keep it Moving
Set a timer for 5 minutes per face. The pressure forces you to ignore details and focus only on the big shapes and the gesture of the head.
Step 2: Drafting the Upper Left Portrait
-
Block in the head shape:
Start with a simple oval for the head in the top-left box. Sketch a centerline to orient the face looking slightly to the side. -
Map the features:
Lightly mark horizontal guide lines for eyes, nose, and mouth. Keep the eyes wide and soft. This portrait has a gentle, youthful quality, so focus on rounder shapes and less angular jawlines. -
Add hair volume:
Sketch the hair as a mass rather than individual strands. Create a soft, short hairstyle that frames the face. -
Refine with darker lines:
Switch to a slightly softer pencil or press harder to define the eyes and the separation of the lips. Keep the lines sketchy and loose.
Try Different Mediums
Do one portrait in pencil, one in ballpoint pen, one in charcoal, and one in fineliner to see how tools change your style.
Step 3: Drafting the Lower Left Portrait
-
Structure the jaw:
In the bottom-left box, draw a stronger, more angular jawline. This figure looks straight ahead, perhaps slightly guarded. -
Draw the features:
Place the eyes under a slightly heavier brow. Keep the mouth neutral. I find that simplifying the nose into just a shadow shape works best for quick sketches like this. -
Refine the contour:
Go over the neck and shoulder lines with confident, sweeping strokes to ground the portrait within its frame.
Step 4: Drafting the Right Page Portraits
-
Start the lower right dreamer:
In the bottom-right box, tilt the oval head axis backward. This ‘chin-up’ perspective is tricky; focus on the underside of the jaw and the nose. -
Detail the messy hair:
Use erratic, squiggly lines to create a textured, curly hairstyle. Let the hair overlap the frame slightly if you want to break the fourth wall. -
Shade the neck:
Add specific hatching shadows under the chin to emphasize the upward tilt of the head. -
Draft the top right observer:
For the final top-right box, draw a figure looking up and away. Wrap a scarf or high collar around the neck to add textile interest and hide the neck anatomy. -
Define the gaze:
Ensure the pupils are directed firmly toward the upper corner. This creates a strong sense of longing or thought.
Step 5: Final Definition and Shading
-
Add hatching:
Using your 4B pencil, add diagonal hatching lines to the background of one or two portraits. This ‘negative space’ shading pops the bright faces forward. -
Deepen the blacks:
Go back to the eyes, nostrils, and corners of the mouths on all four sketches. Darken these key points to anchor the expressions. -
Strengthen the frames:
Re-trace your initial rectangular borders. You can make them look ‘sketched’ by using double lines or letting the corners overlap, rather than using a ruler for perfection. -
Clean up:
Gently erase any distracting construction lines that cross through the faces, but leave the loose exterior construction lines to maintain that authentic ‘studio sketch’ aesthetic.
Now you have a dynamic spread that captures four different moods in a cohesive style
Continuous Line Self-Portrait (No Lifting the Pencil)
Challenge your hand-eye coordination with this contemplative profile sketch created using a continuous line technique. This method forces you to commit to every mark, resulting in a fluid, expressive drawing that captures the essence of the subject with honest spontaneity.
How-To Guide
Materials
- Spiral-bound sketchbook (medium weight paper)
- Graphite pencil (2B or 4B for softer lines)
- Kneaded eraser (optional, mostly for cleanup around the drawing)
- Pencil sharpener
Step 1: Setting the Eye Line
-
Position your pencil:
Place your pencil tip on the paper where you want the eye to be. Remember, the goal is to keep the pencil moving without lifting it, so finding your starting point is crucial. -
Sketch the eye shape:
Begin drawing the almond shape of the eye in profile. Keep your line light initially. Loop back around to define the pupil and the heavy upper lid. -
Connect to the brow:
Without lifting the graphite, drag your line upward to form the eyebrow. Use a back-and-forth scrubbing motion to add texture and thickness to the brow hairs.
Step 2: Mapping the Profile
-
Trace the nose bridge:
From the inner corner of the brow, guide your line downward to create the bridge of the nose. Keep the line slightly erratic and fluid rather than ruler-straight. -
Define the nose tip:
Curve around to shape the tip of the nose and loop underneath to suggest the nostril. Use a slightly harder pressure here to anchor the feature. -
Form the lips:
Travel down from the nose to the philtrum and create the upper lip. I find that layering the line over itself here adds necessary volume to the mouth. -
Complete the mouth:
Continue the line into the corner of the mouth and the bottom lip, looping back to add a small shadow beneath the lower lip.
Stuck in a Corner?
If you box yourself into a corner, don’t lift the pencil. Simply trace back over a previous line to move to a new area. The double line adds interesting visual weight.
Step 3: Jaw and Neck
-
Carve the jawline:
Sweep the line backward from the chin to define the jaw. Move with confidence here; a hesitant line can make the structure look weak. -
Outline the ear:
Move up the jaw to sketch the ear. Use tight, intricate loops to suggest the complex cartilage structure inside the ear. -
Draw the neck:
Drop your line down from the jaw and the back of the ear to form the neck muscles. Let these lines be looser and more gestural. -
Add the collar:
Continue the movement to sketch the collar of the shirt, using broad, sweeping curves to imply fabric folds.
Varying Line Weight
Twist the pencil slightly as you draw to use different sides of the lead. This naturally creates thick and thin variations without needing to override your drawing pressure.
Step 4: Hair and Shading
-
Build the hair volume:
From the ear or forehead, push your pencil into creating the hair. Use large, flowing loops to mimic waves and strands. -
Detail the strands:
Go back over the hair areas (retracing your path if necessary) to add darker accents and flyaway strands, giving the hair movement. -
Add cross-hatching:
Using the continuous line, move back to the face’s shadow areas—under the jaw, the side of the nose, and the neck. -
Deepen the shadows:
Create value by layering squiggles or tight zig-zags within the shadow areas, never breaking contact with the paper. -
Final accents:
Press harder in the darkest areas—pupils, nostrils, and deep hair folds—to add contrast before finally lifting your pencil.
Celebrate the imperfect nature of your sketch and the unique flow that occurs when you let the line take the lead
BRUSH GUIDE
The Right Brush for Every Stroke
From clean lines to bold texture — master brush choice, stroke control, and essential techniques.
Explore the Full Guide
Blind Contour Self-Portrait for Looser Marks
Capture the distinct character of a side profile using precise ink lines and subtle hatching techniques. This project focuses on building a realistic portrait on dotted paper, using the underlying grid to help with proportion and alignment.
Detailed Instructions
Materials
- Dotted grid sketchbook or journal
- Fine liner pen or fountain pen (black ink)
- Pencil (HB or 2B) for initial sketching
- Kneaded eraser
- Reference photo of a profile (or a mirror setup as shown)
Step 1: Structural Setup
-
Reference preparation:
Set up your mirror to see your profile, or have a reference photo ready on your phone or printed out. The goal is a clear view of the jawline, nose bridge, and ear placement. -
Initial pencil outlines:
Lightly sketch the basic head shape using your pencil. Start with a circle for the cranium and attach the jawline. Use the dots on the page to keep your vertical alignment straight. -
Placing features:
Mark the eye line roughly halfway down the head. Position the bottom of the nose and the mouth line. I find it helpful to draw a light vertical line from the brow to the chin to check the profile’s angle. -
Ear placement:
Sketch the ear shape, ensuring the top aligns with the eye line and the bottom aligns roughly with the nose base. Keep the lines very faint at this stage. -
Refining the silhouette:
Go over your light marks to define the specific bumps of the nose, the curve of the lips, and the angle of the Adam’s apple. Erase any distracting construction lines.
Uneven Ink Flow?
If your lines look inconsistent or skippy, clean the nib with a damp paper towel. Fountain pens need a consistent angle; try keeping your wrist positioning steady.
Step 2: Inking the Contours
-
Starting the ink work:
Pick up your pen. Begin with the forehead and hairline, using confident, broken strokes to suggest hair texture rather than a solid helmet-like line. -
Defining the facial profile:
Carefully trace the profile line—down the forehead, the bridge of the nose, and the lips. Use a thinner line weight here if possible, or articulate the line gently. -
Drawing the eye:
Ink the eye looking forward. Since it’s a profile, remember the eye shape is a triangle or wedge, not an almond. Add a few quick lashes and the eyebrow above it. -
The ear detail:
Ink the complex curves of the ear. The cartilage creates specific shadows, so outline the inner folds clearly but don’t overwork them. -
The flow of hair:
Draw the main masses of hair. Use long, sweeping strokes that follow the direction the hair grows. Leave gaps for highlights to suggest shine.
Step 3: Shading and Texture
-
Hatching basics:
Begin adding shadow using distinct hatching lines. Start under the chin and jawline to separate the head from the neck. -
Creating dimension:
Add hatching near the temple, inside the ear, and in the eye socket. Keep your lines parallel and evenly spaced for a clean, graphical look. -
Stubble texture:
For the beard area, use short, quick dashes or stippling (dots) rather than long lines. This mimics the texture of facial hair compared to the longer hair on the head. -
Clothing contours:
Sketch the collar of the jacket or shirt. Use loose, sketchy lines here to imply fabric folds without drawing every single seam. This keeps the focus on the face. -
Deepening shadows:
Go back in with a second layer of hatching (cross-hatching) in the darkest areas: specifically under the jaw, behind the ear, and in the hair mass. -
Final cleanup:
Wait at least five to ten minutes for the ink to fully cure. Gently erase any visible pencil guidelines with your kneaded eraser to leave a crisp ink drawing.
Add a Spot Color
Use a single watercolor wash or a colored pencil in a muted tone (like blue or ochre) to fill in the background or just the clothing for a pop of contrast.
Enjoy flipping through your sketchbook to see your progress in capturing likenesses
Emotion Chart Self-Portrait in a 6-Panel Grid

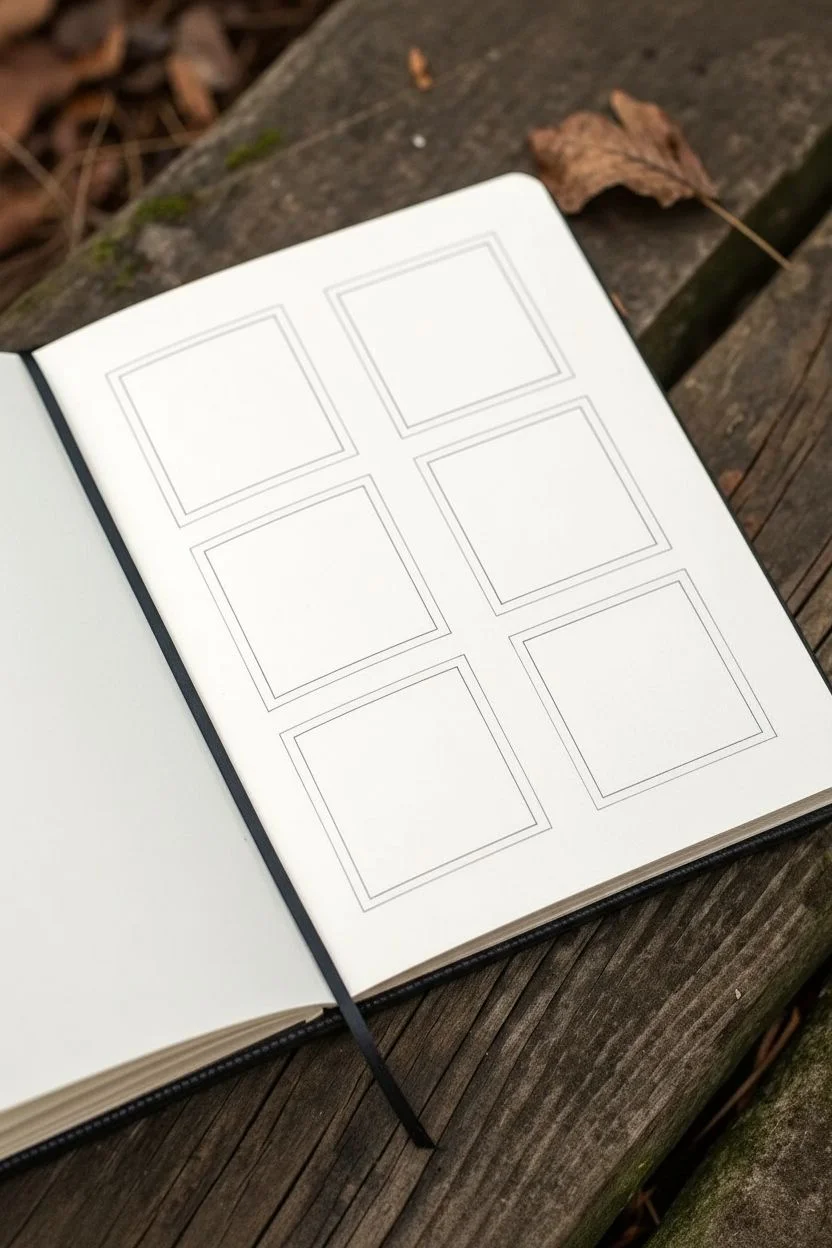
This study in observation captures subtle shifts in expression across a six-panel grid, creating a cinematic storyboard of emotion. Using soft graphite on smooth paper, you’ll render the same subject from multiple angles to practice facial anatomy and storytelling.
How-To Guide
Materials
- Hardbound sketchbook (smooth or vellum bristol finish)
- Graphite pencils (HB, 2B, 4B)
- Mechanical pencil (0.5mm, HB)
- Ruler
- Kneaded eraser
- Blending stump or tortillon
- Fixative spray (optional)
Step 1: Setting the Stage
-
Measure the grid:
Begin by lightly marking out your workspace. Use a ruler to measure a 2-column by 3-row grid. Leave generous white space between each box to frame the drawings cleanly, just like the Polaroid-style frames in the reference. -
Draw the borders:
With an HB pencil and ruler, draw the six distinct rectangular boxes. Keep your lines crisp and straight, as this structure provides a necessary contrast to the organic shapes of the portraits.
Consistent Features
To keep the person recognizable across panels, measure the distance between the eyes and the length of the nose. These ratios must stay the same even as the angle changes.
Step 2: Sketching the Foundations
-
Establish head angles:
For each panel, lightly sketch an oval to represent the head. Vary the tilt and rotation for each one: look up to the left, look straight ahead, tilt down, or gaze over a shoulder to create variety. -
Map facial features:
Use guidelines to place the eyes, nose, and mouth. I like to keep these marks incredibly faint so they disappear later. Ensure the perspective matches the head tilt—curved guidelines are essential for looking up or down. -
Refine the outlines:
Switch to your mechanical pencil to carefully outline the specific features. Focus on the unique shape of the jawline and the flow of the hair, ensuring the subject looks consistent across all six panels.
Add a Narrative
Try arranging the panels to tell a silent story. Panel 1 creates a problem, panel 3 involves a reaction, and panel 6 shows the emotional resolution.
Step 3: Shading and Depth
-
Start with the eyes:
Using a sharp 2B pencil, fill in the pupils and define the lash line. The eyes anchor the expression, so pay attention to the direction of the gaze. -
Layering skin tones:
Lightly hatch areas of shadow using an HB pencil. Focus on the triangular shadow under the nose, the recess of the eye sockets, and the curve of the cheekbones. -
Defining the hair:
Instead of drawing every strand, block in the hair’s overall volume first. Look for the main chunks or waves of hair and shade the dark areas between them using a 4B pencil. -
Adding texture:
Go back into the hair with the mechanical pencil to add sharp, individual stray hairs over the shaded masses. This adds realism and movement. -
Deepening contrast:
Use your 4B pencil to darken the deepest shadows—nostrils, the line between the lips, and the cast shadows on the neck. High contrast makes the drawings pop off the page.
Step 4: Finishing Touches
-
Clothing and context:
Sketch the suggestion of clothing, like a scarf or collar, at the bottom of each frame. Keep the clothing sketchier/looser than the face to direct focus upward. -
Background blending:
In scenes where the subject looks up, add a very soft, blurry background texture (perhaps implying trees or sky) using the side of your pencil or a dirty blending stump. -
Clean up borders:
Take a ruler and a hard eraser to clean up the edges of your rectangular frames. The drawing can break the frame slightly (like hair flowing out) for artistic effect, or stay strictly contained. -
Final highlights:
Use the kneaded eraser to tap out highlights on the tip of the nose, forehead, and chin to bring the form forward.
Close your sketchbook knowing you’ve captured a full spectrum of emotion in a single spread


Pattern-Filled Silhouette Self-Portrait Instead of Shading
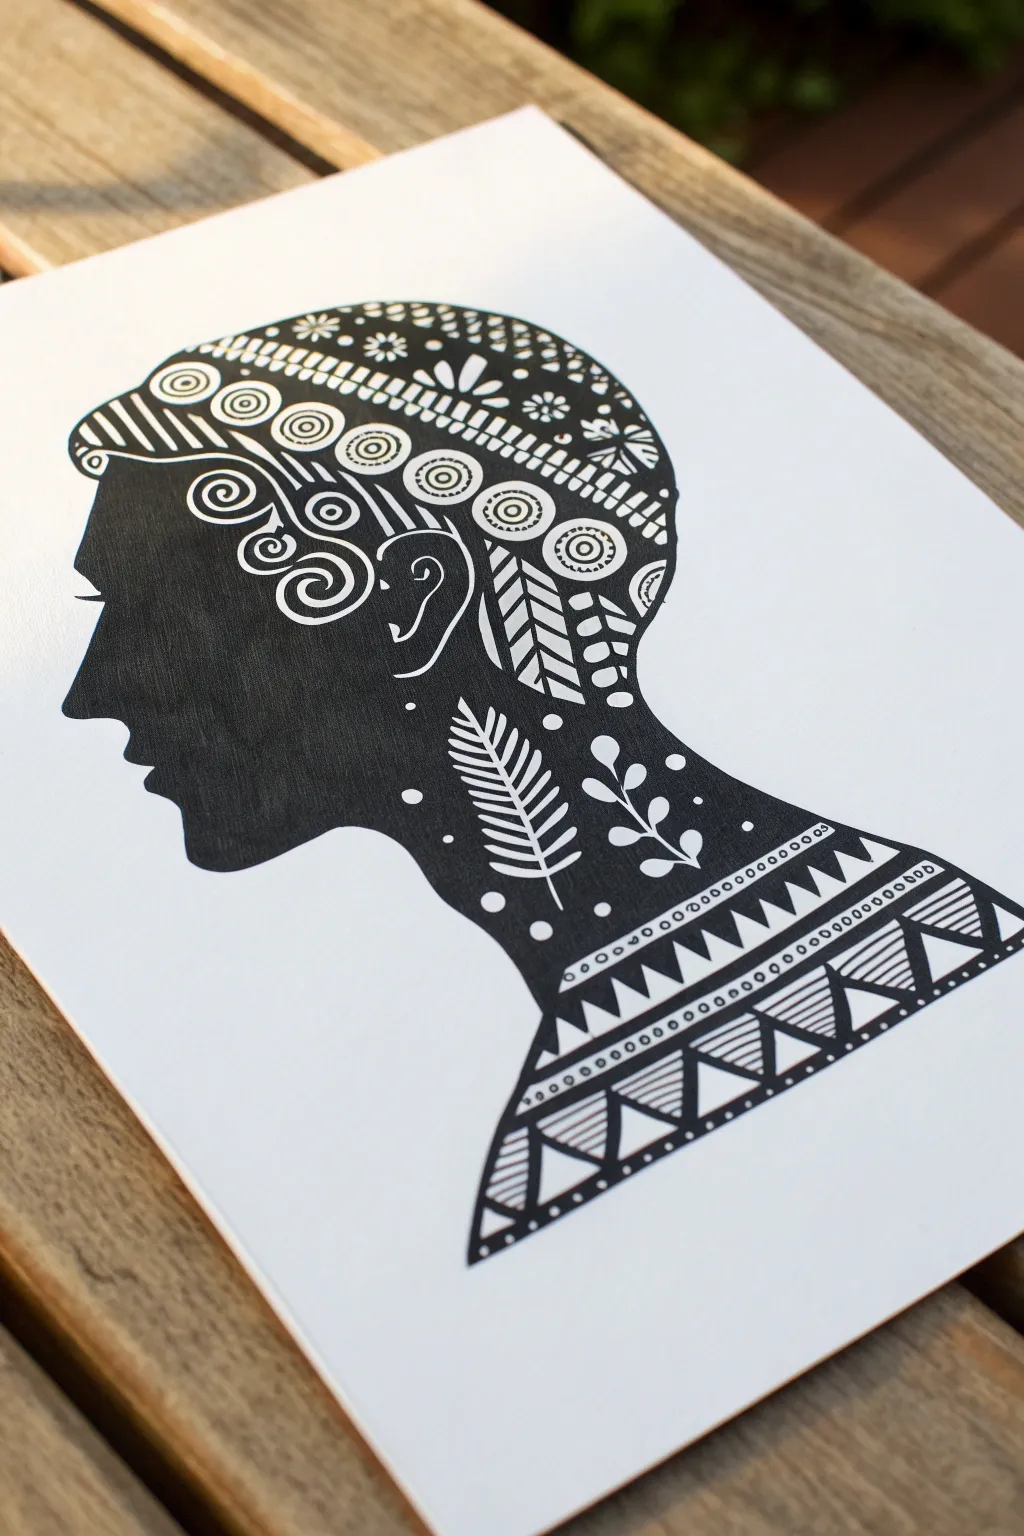
Transform a simple side profile into a striking piece of art by swapping traditional shading for bold, high-contrast patterns. This project combines the stark beauty of a black silhouette with intricate white doodling to create a modern graphic look.
Step-by-Step Guide
Materials
- Heavyweight white cardstock or Bristol paper
- Pencil and eraser
- Black India ink or permanent black markers (chisel tip)
- White gel pen (opaque, 0.8mm or 1.0mm)
- Fine-point black liner pen
- Reference photo of your side profile
- Light table or window (optional for tracing)
Step 1: Capturing the Silhouette
-
Prepare your photo:
Take a photo of your side profile against a plain, light background. Print this photo to the exact size you want your final drawing to be, or keep it digital if you plan to freehand the outline. -
Trace the outline:
If tracing, tape your reference photo to a window or light box, place your cardstock over it, and lightly trace the profile contour with a pencil. Focus on key features like the nose bridge, lips, and chin line. -
Refine the shape:
Remove the reference and clean up your pencil line. Extend the drawing down to include the neck and shoulders, creating a classic bust composition. -
Mark internal zones:
Very lightly sketch internal dividing lines where major patterns will go. For example, draw the curve of the hairline, the ear shape, and the neckline of the clothing to separate the head, neck, and garment areas.
Step 2: Creating the Solid Base
-
Outline in ink:
Go over your final pencil silhouette with a fine-point black liner. This establishes a crisp edge that prevents your filling ink from bleeding outside the shape. -
Fill the silhouette:
Using black India ink or a broad black marker, fill in the entire shape. Ensure the coverage is solid and opaque; you don’t want any streaks showing through. -
Double-check density:
Hold the paper up to the light to spot any thin or patchy areas. Add a second coat of ink if necessary to achieve a deep, true black. -
Let it cure:
Allow the black ink to dry completely. This is crucial—if the base is even slightly damp, your white pens will clog or turn gray.
Ink Flow Tip
If your white gel pen starts skipping over the black ink, wipe the tip on your thumb or a damp paper towel. Dried black ink particles can sometimes clog the rollerball mechanism.
Step 3: Drawing the Patterns
-
Test your white pen:
On a scrap piece of black paper or a dried ink swatch, test your white gel pen to ensure the ink flows smoothly and appears bright white. -
Map the headpiece:
Start at the top of the head. Draw concentric bands following the curve of the skull. Fill these bands with geometric motifs like small circles, dashes, and triangles. -
Add hair details:
Below the geometric bands, create the sensation of hair using stylized curls. Draw bold spirals near the temple and forehead to mimic rolled curls. -
Define the ear:
Instead of shading the ear, outline its inner cartilage structure with a single, clean white line. Keep it simple and graphical. -
Decorate the neck:
Move down to the neck area. Draw organic shapes like a large fern leaf or stylized branch. I find that keeping these organic shapes slightly separated creates a nice sense of negative space. -
Add filler elements:
Look for empty black spaces around the main neck motifs. Add small dots or tiny circles to balance the composition without overcrowding it. -
Design the clothing:
At the base, create a structured geometric pattern to represent the garment. Use a ruler if needed to draw straight horizontal bands across the shoulders. -
Fill clothing bands:
Populate these clothing bands with high-contrast shapes like zig-zags, triangles, and hatched lines. Alternating filled and open triangles creates a vibrant rhythm. -
Review and refine:
Step back and look at the overall balance. If any white lines look faint, carefully retrace them to increase opacity. Clean up any stray pencil marks with an eraser.
Level Up: Metallic Pop
Swap the white gel pen for gold or silver metallic markers for specific accents, like jewelry or the geometric crown, to add a distinct elegant shine to the piece.
Once the white ink sets, frame your artwork to highlight the striking contrast of your patterned silhouette
Collage-and-Drawing Self-Portrait With Cut Paper Shapes
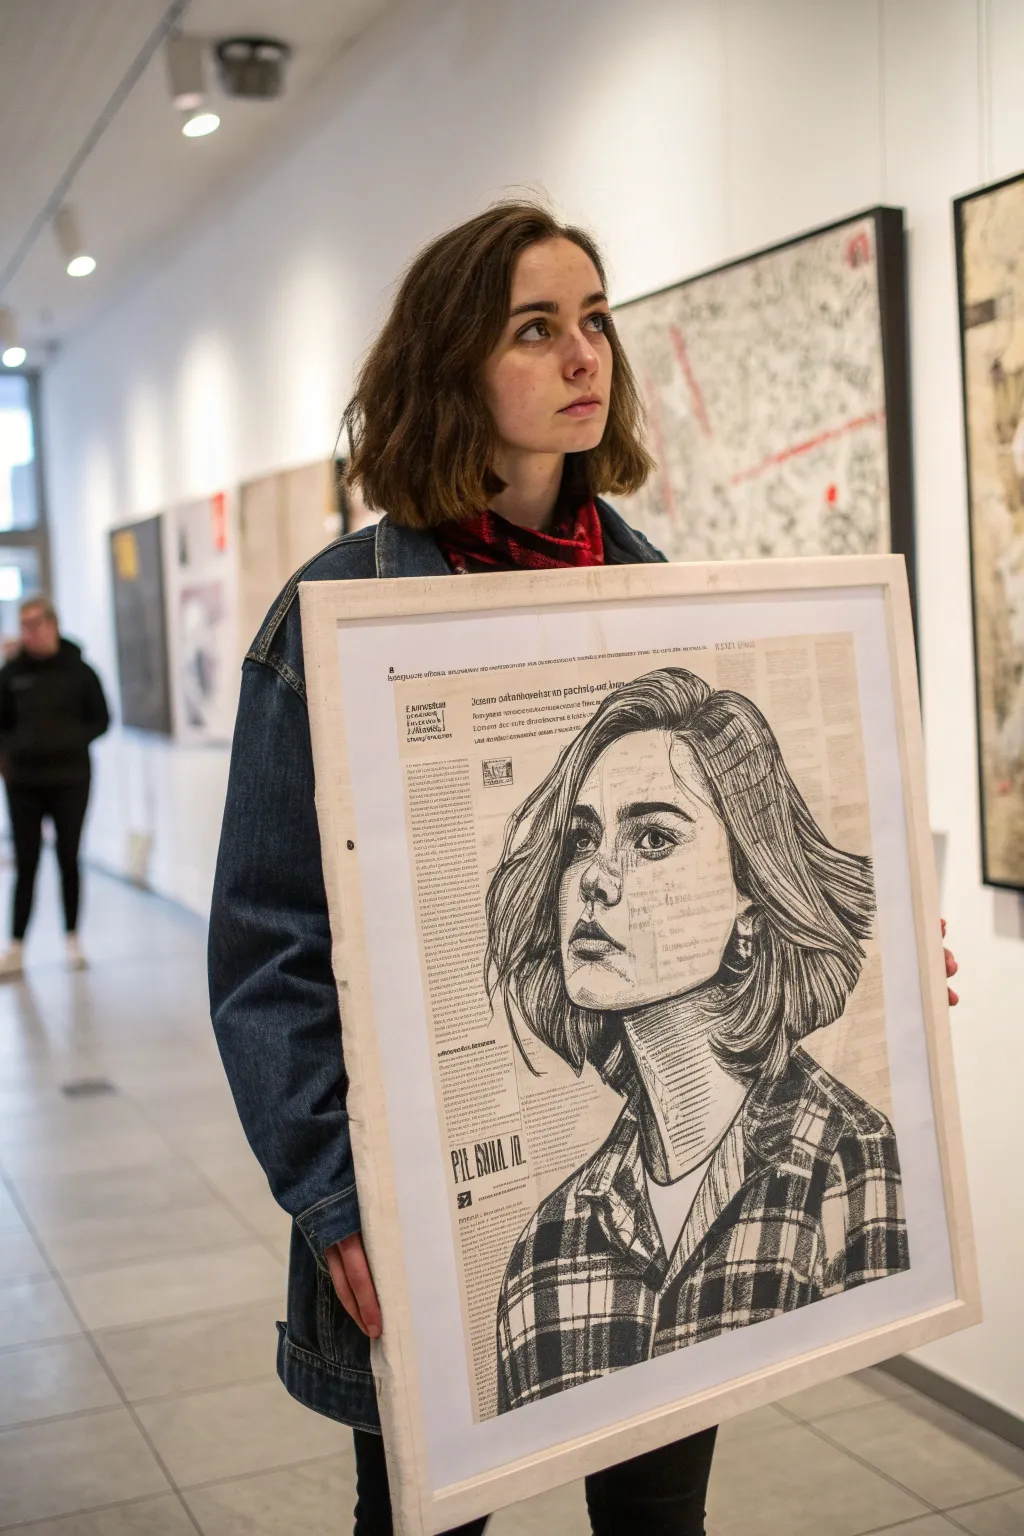
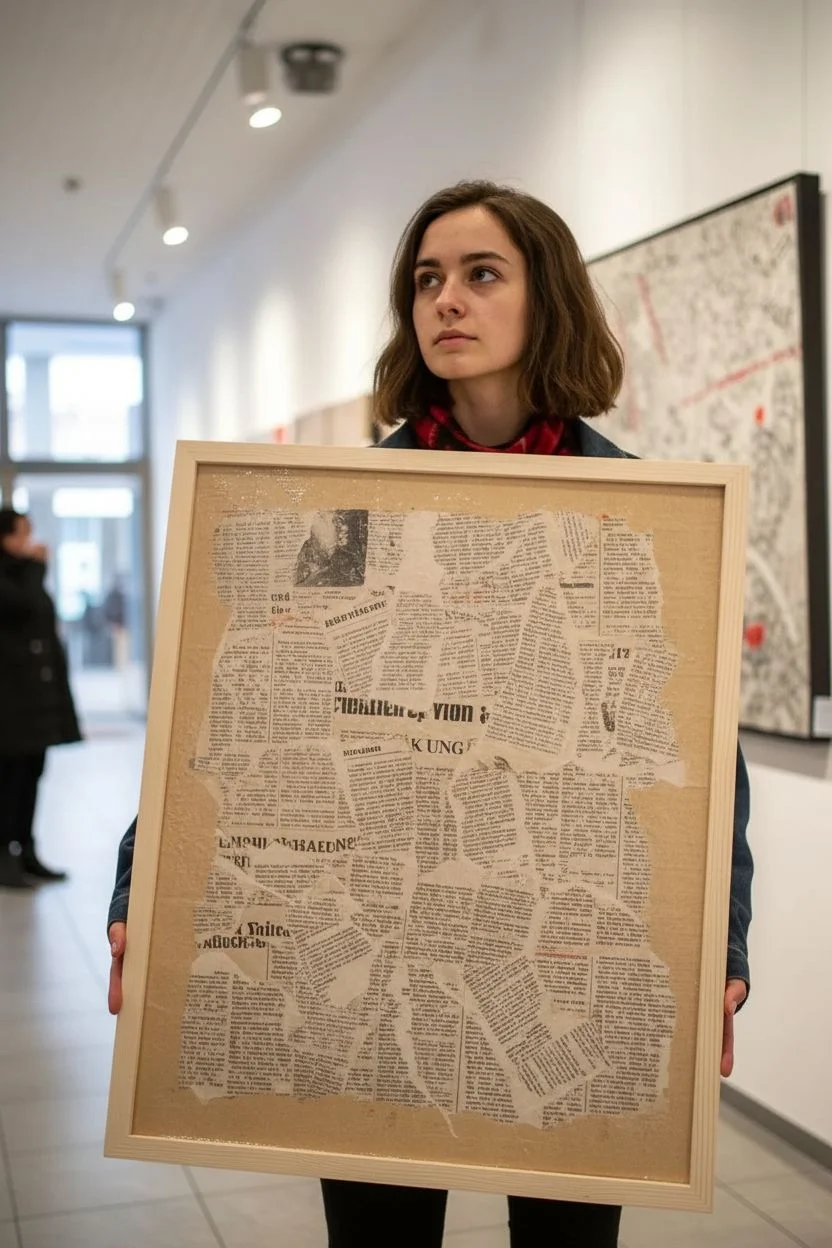
Transform everyday text into fine art by using repurposed book pages or newspaper as your drawing surface. This mixed-media technique layers bold, sketchy linework over a textual background, creating a striking self-portrait that feels both vintage and modern.
Detailed Instructions
Materials
- Heavyweight bristol board or canvas panel (for the base)
- Old newspapers, book pages, or text-heavy magazines
- Matte gel medium or decoupage glue
- Soft flat brush (for gluing)
- Graphite pencils (HB and 4B)
- Black drawing ink or high-quality black markers
- Fine liner pens (0.3mm and 0.5mm)
- Charcoal pencil (optional, for texture)
- Clear spray fixative
- Light colored wooden frame
Step 1: Preparing the Textual Background
-
Source your text:
Gather your vintage newspapers or book pages. Look for blocks of dense text without too many distracting images, as these will form the ‘skin’ of your canvas. -
Prepare the base:
Lay out your bristol board or canvas panel. This rigid backing is crucial because the glued paper needs support to prevent warping. -
Arrange the layout:
Dry-fit the paper pieces onto the board. I like to tear the edges slightly or overlay them haphazardly to create jagged, interesting seams rather than a perfect grid. -
Adhere the pages:
Apply a thin, even layer of matte gel medium to the back of each paper sheet. Smooth them onto the board, using an old credit card or brayer to push out air bubbles starting from the center. -
Seal the surface:
Once dry, brush a single coat of matte medium over the entire surface. This seals the paper so your ink won’t bleed uncontrollably later. -
Wait for curing:
Let the board dry completely, preferably overnight. It must be bone-dry and flat before you attempt to draw on it.
Step 2: Drafting the Portrait
-
Reference setup:
Take a photo of yourself in three-quarter view, looking slightly upward. High-contrast lighting helps define the facial planes needed for this graphic style. -
Rough sketch:
Using an HB pencil, lightly map out the proportions of your face directly onto the dried text background. Keep lines faint; erasing ink-soaked paper is difficult. -
Define feature placement:
Mark the eyes, nose, and mouth placement carefully. The text background can be distracting, so double-check your horizontal alignments.
Use Transparent Inks
Try using slightly diluted ink or semi-transparent markers for mid-tones. This lets the text beneath remain readable even through the shadowed areas.
Step 3: Inking and Detailing
-
Outline the contours:
Switch to your thicker black marker or a brush dipped in India ink. Trace the main outline of the face and hair with a confident, continuous line. -
Block in shadows:
Identify the darkest areas—under the chin, the pupils, and the deep shadows of the hair. Fill these in with solid black ink to anchor the drawing. -
Cross-hatching technique:
Use fine liner pens to create value on the face. Instead of blending, use hatching lines. Notice the neck area in the example uses horizontal hatching to suggest curvature. -
Hair texture:
Draw the hair using long, sweeping strokes. Don’t color every strand; draw the shapes of the hair clumps and leave areas of the text background showing through as highlights. -
Refine facial details:
Add subtle details around the eyes and lips with the finest pen (0.3mm). Keep the shading minimal on the cheeks to let the newspaper print act as the skin texture. -
Clothing patterns:
If your reference includes clothing, use bold, heavy strokes to differentiate the fabric texture from the skin. The plaid shirt in the example is created with thick, intersecting black bands. -
Final assessment:
Step back and look at the contrast. If the portrait feels flat, darken the outlines on the shadow side of the face to pop it forward.
Paper Buckling?
If the paper ripples after gluing, place a sheet of wax paper over it and weigh it down with heavy books overnight while it’s still slightly damp.
Step 4: Finishing Touches
-
Protect the work:
In a well-ventilated area, spray a coat of clear fixative over the drawing to prevent the ink from smudging or fading over time. -
Framing:
Mount your finished piece in a simple, light-colored wooden frame to complement the warm tones of the aged paper.
The juxtaposition of printed words and hand-drawn lines creates a truly narrative piece of art
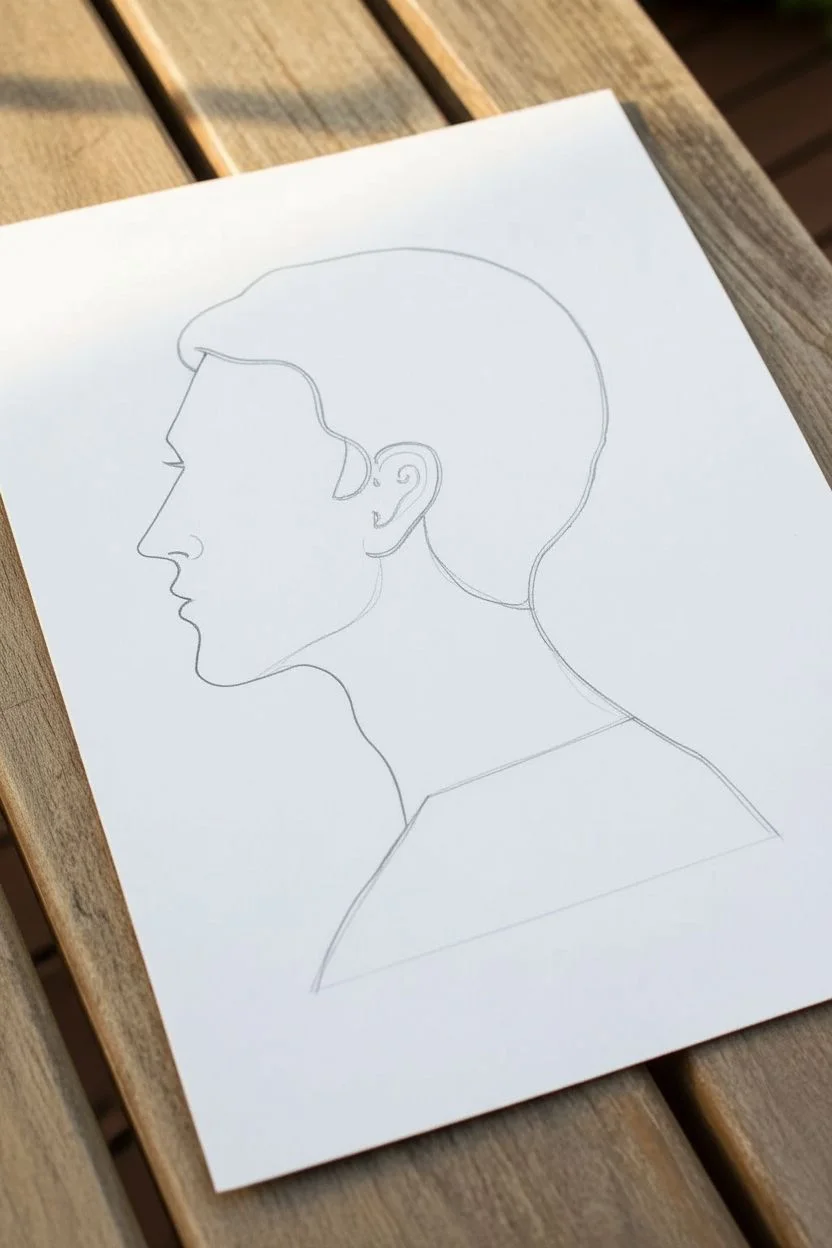
Hobby Props Self-Portrait With Your Everyday Objects
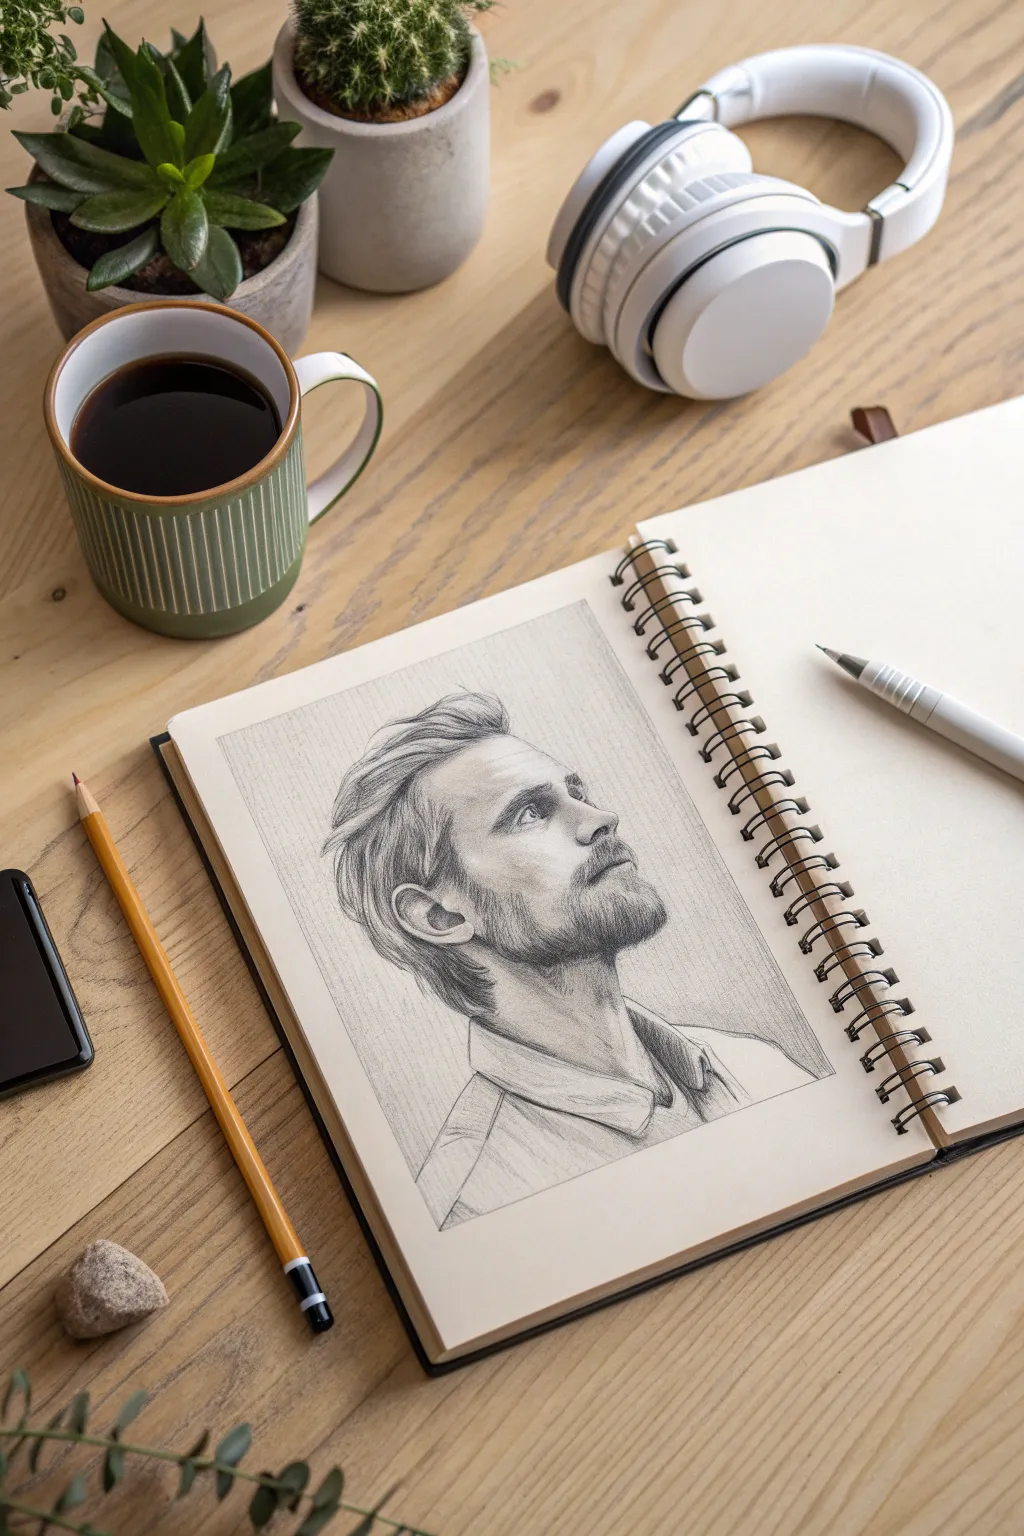
Capture a quiet, contemplative moment in this realistic pencil sketch self-portrait. This project focuses on rendering facial anatomy in profile while using simple shading techniques to create depth and emotion.
How-To Guide
Materials
- Spiral-bound sketchbook (medium textured paper)
- Graphite pencils (HB, 2B, 4B, and 6B)
- Mechanical pencil (for fine details)
- Kneaded eraser
- Blending stump or tortillon
- Reference photo of your profile
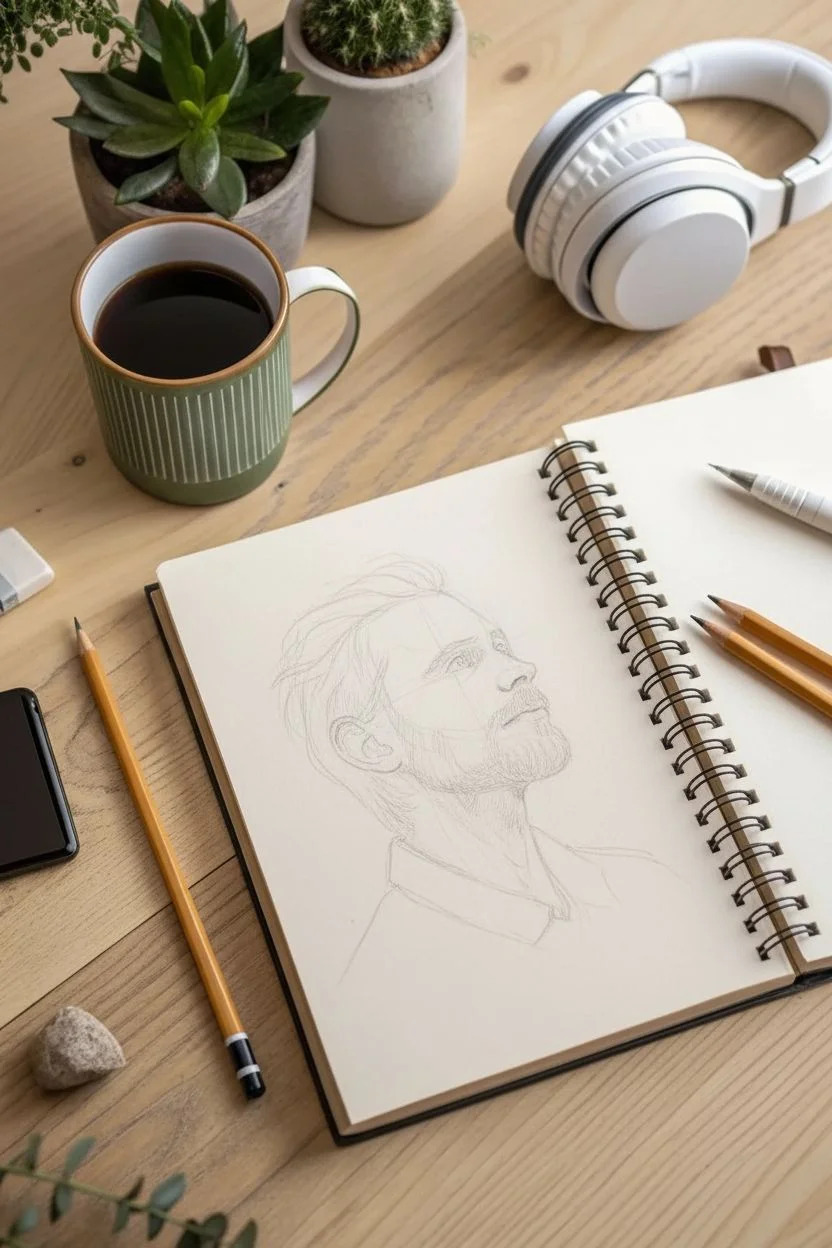
Step 1: Laying the Foundation
-
Establish the head shape:
Start with your HB pencil using very light pressure. Draw a rough oval shape to represent the cranium and a jawline extending down to form the chin. Don’t worry about details yet; just get the general mass on the paper. -
Map the facial features:
Draw faint guidelines to position the features. Since the subject is looking up, curve your eye line and nose line slightly upward. Mark the placement of the ear, which should sit lower than usual due to the upward tilt of the head. -
Refine the profile outline:
Carefully sketch the contour of the forehead, the bridge of the nose, and the lips. Pay attention to the negative space around the nose and chin to ensure the proportions feel authentic to your reference.
Step 2: Developing the Portrait
-
Draw the eye and brow:
Using a sharp 2B pencil, define the eye shape. Since it’s a profile view, the eye will look triangular. Shade the iris darkly, leaving a tiny speck created by the eraser for a highlight. Sketch the eyebrow hairs following their natural growth direction. -
Define the nose and mouth:
Darken the nostril and add the subtle curve of the nose wing. For the mouth, focus on the corner and the line between the lips rather than outlining the lips themselves. Keep the lines soft. -
construct the ear:
Ears can be tricky, so break it down into shapes. Draw the outer curve (helix) and the inner fleshy parts (antihelix and tragus). Use darker shading in the deepest crevices to create immediate depth. -
Add hair texture:
Switch to your mechanical pencil or a sharp HB. Instead of drawing individual strands, look for clumps of hair. Draw long, sweeping strokes that originate from the root and flow back, following the curvature of the skull. -
Indicate facial hair:
For the beard and mustache, use short, quick hatching strokes. Vary the direction slightly to make it look natural, concentrating more strokes along the jawline and chin for density.
Proportions Off?
If facial features feel misaligned, turn both your reference photo and your drawing upside down. This tricks your brain into seeing shapes instead of ‘a face,’ making errors easier to spot.
Step 3: Shading and Depth
-
Apply base shading:
With a 2B pencil held at a low angle, lightly shade the side of the face, the neck, and under the jaw. This established the light source coming from the front/top. -
Deepen the shadows:
Use a 4B pencil to push the darkest values. Focus on the area directly under the jawline, inside the ear, and the deep recesses of the hair. This contrast is what makes the drawing pop. -
Blend the skin tones:
I prefer using a blending stump here to smooth out the graphite on the cheek and neck, creating a soft skin texture. Be careful not to over-blend; you still want some structure visible. -
Refine the hair highlights:
Take your kneaded eraser and pinch it into a wedge. Lift out graphite from the tops of the hair clumps to create shine and volume. Reinforce the dark areas between these clumps with a 6B pencil. -
Sketch the clothing:
Keep the clothing loose and suggestive to keep the focus on the face. Sketch the collar and shoulder line simply. Add light hatching to indicate the fold of the collar and the shirt fabric. -
Final touches:
Review your drawing from a distance. Strengthen the outer contour line of the profile slightly to separate it from the background. Add any final stray hairs or subtle skin creases around the eye.
Layer Your Graphite
Start light! It is much harder to erase dark 6B graphite than it is to build up layers. Work from your hardest pencil (HB) to your softest (6B) slowly to achieve realistic gradients.
Now you have a captured a permanent moment of reflection in your sketchbook to look back on
Mask or Reveal Self-Portrait (Holding Your “Other Face”)

Create a thought-provoking diptych that explores the contrast between a polished outer self and a raw, hidden persona. This project uses two sketchbook pages to juxtapose a highly realistic tonal portrait with a surreal, mask-like line drawing to symbolize the complexity of identity.
Detailed Instructions
Materials
- Large spiral-bound sketchbook (A3 or similar size)
- Graphite pencils (HB, 2B, 4B, 6B)
- Charcoal sticks or pencils (soft and medium)
- Kneaded eraser
- Precision eraser pen
- Blending stumps (tortillons)
- Reference photo of yourself (looking upward/sideways)
- Fixative spray
Step 1: Conceptualizing and Layout
-
Choose your pose:
Take a reference photo of yourself looking slightly up and to the side. Ensure the lighting is dramatic, casting distinct shadows on one side of your face to create depth for the realistic portrait. -
Plan the diptych:
Open your spiral sketchbook to a fresh spread. The right page will hold the realistic portrait, acting as the ‘surface’ self, while the left page will feature the surreal, mask-like interpretation. -
Sketch the right-side outlines:
Using an HB pencil, lightly map out the proportions of your face on the right page. Focus on the tilt of the head and the placement of the eyes, nose, and mouth. -
Mirror the placement:
On the left page, lightly sketch where the corresponding head would be. This doesn’t need to be an exact mirror image but should balance the composition so the two faces feel like they are in conversation.
Smudge Patrol
Charcoal loves to travel. Place a sheet of glassine or tracing paper between the pages when working to protect the opposite drawing from accidental smudges.
Step 2: The Realistic Portrait (Right Page)
-
Lay down the darks:
Start with the background to establish your darkest values. Use a soft charcoal stick to fill in the negative space around the head, pressing firmly to create a deep, matte black. This pushes the portrait forward. -
Refine facial features:
Switch to 4B and 6B graphite pencils for the eyes and shadows. Pay close attention to the iris structure and the shadow cast by the eyelashes. -
Build skin tones:
Using a 2B pencil, lightly shade the mid-tones of the skin. I like to use a blending stump here to smooth out the graphite, creating that soft, photorealistic skin texture. -
Sculpt with light:
Use your kneaded eraser to lift out highlights on the nose bridge, cheekbones, and forehead. This subtraction technique is crucial for giving the face a three-dimensional form. -
Detail the hair:
Don’t draw every strand. instead, focus on the masses of hair. Use the charcoal for the deepest shadows in the hair and a sharp HB pencil for flyaway strands catching the light. -
Finalize the ‘Real’ face:
Deepen the shadows under the chin and neck to anchor the head. Ensure the contrast between the lit side of the face and the dark background is crisp.
Level Up: Mix Media
Try painting the background of the ‘mask’ side a stark, flat color like red or gold acrylic to create an even bolder visual separation between the two realities.
Step 3: The Surreal Mask (Left Page)
-
Establish the mask shape:
On the left page, draw a simplified, bald head shape. The outline should be clean and continuous, omitting hairline details to emphasize the ‘mask’ or ‘mannequin’ quality. -
Exaggerate the features:
Draw the eyes and mouth with exaggerated, theatrical lines. Think of the bold makeup on a mime or a classic theatre mask; make the eyelids heavy and the lips sharply defined. -
Shadow with cross-hatching:
Instead of smooth blending, use directional hatching or rougher shading with a 2B pencil to give this face a sculptural, stone-like texture. Keep the shading concentrated around the eye sockets and jawline. -
Enhance the eyes:
Darken the pupils and the exaggerated eyeliner on this mask face. The eyes should look piercing but slightly vacant, contrasting with the soulful expression on the right page. -
Connect the neck:
Extend a simple neck line down, but let it fade out or end abruptly. This reinforces the idea that this is a construct or a shell, rather than a living person.
Step 4: Finishing Touches
-
Review the relationship:
Step back and look at both pages together. Ensure the eye lines match up roughly, so it looks like the mask is looking at the real self, or vice versa. -
Clean the edges:
Use a precision eraser to clean up any smudges on the white paper surrounding the left drawing, keeping that side stark and clinical. -
Preserve your work:
Spray a light coat of fixative over both pages, especially the charcoal-heavy right side, to prevent the dark background from transferring to the cleanly drawn left page when the book closes.
You now have a powerful visual dialogue about identity right inside your sketchbook
Double-Exposure Self-Portrait With Nature or City Textures
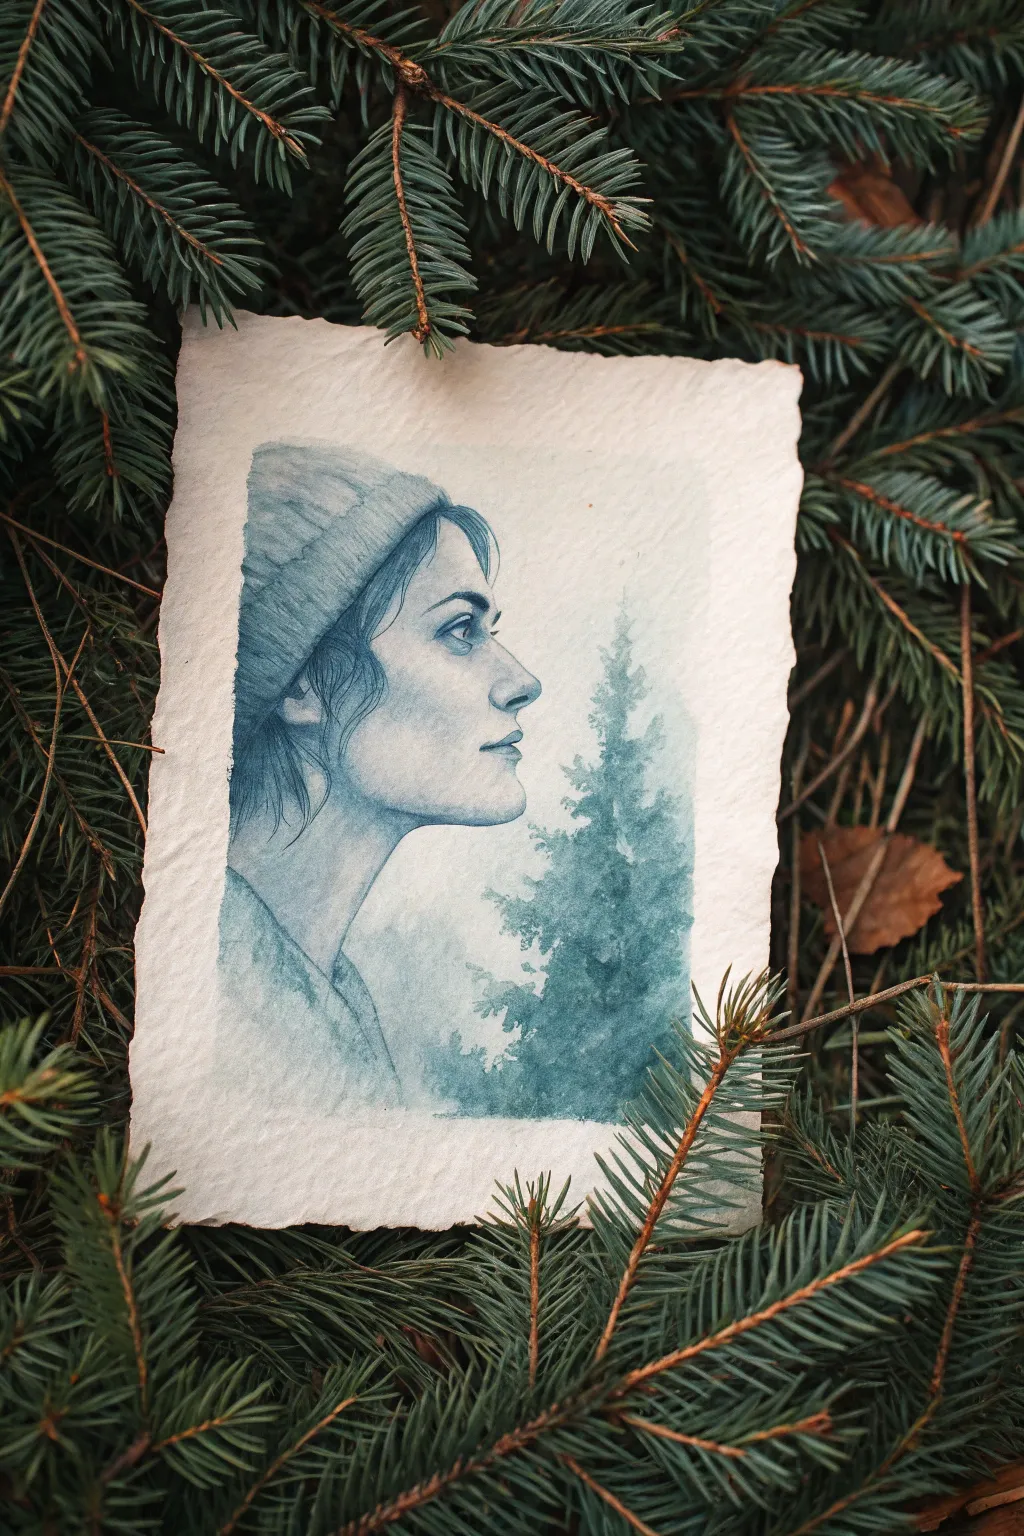
This ethereal self-portrait merges the sharp reality of a profile sketch with the moody atmosphere of a foggy forest. Using a wet-on-wet watercolor technique and a single pigment, you will create a seamless, dreamlike transition between human form and nature.
Step-by-Step
Materials
- Cold press watercolor paper (deckled edge preferred)
- H or HB graphite pencil for sketching
- Indigo or Prussian Blue watercolor paint
- Small round brush (size 2 or 4)
- Medium round brush (size 6 or 8)
- Mixing palette
- Jar of clean water
- Paper towel
- Kneaded eraser
Step 1: Drafting the Profile
-
Proportion Study:
Begin by lightly sketching the basic shapes of your profile on the center-left of your paper. Look straight ahead into a mirror or reference photo and mark the top of the head, the eyes, nose tip, and chin. -
Refining Features:
Flesh out the contour of the face with your HB pencil. Pay close attention to the silhouette of the nose and lips, keeping the lines very faint since watercolor is transparent. -
Adding Accessories:
Sketch the beanie hat sitting low on the forehead. Draw loose strands of hair escaping the hat and frame the ear, but leave the neck area open and unresolved at the bottom. -
Clean Up:
Use a kneaded eraser to lift any heavy graphite marks. You want a ‘ghost outline’ that is barely visible to guide your paint application without muddying the colors.
Don’t Overwork It
Watercolors dry lighter. Resist the urge to keep adding paint while the paper is wet, or you might create ‘mud’ or cauliflower blooms. Let layers dry.
Step 2: Painting the Portrait
-
Mixing Values:
Prepare three puddles of your blue paint: a watery, tea-like consistency for highlights; a milky, medium consistency for mid-tones; and a thick, creamy mixture for deep shadows. -
Initial Wash:
Using the medium brush, apply the lightest wash over the hat area and the shadow side of the face (under the chin, eye socket, and cheek hollow). Leave the forehead and nose tip pure white for now. -
Building Form:
While the first layer is still damp but not soaking, drop the medium-value paint into the deeper crevices: the folds of the beanie, the corner of the eye, and the jawline. -
Defining Details:
Switch to your small brush and the darkest paint mix. Carefully paint the pupil, the lash line, and the distinct line of the lips. Add texture to the hair strands with thin, sweeping strokes. -
Fading Out:
As you paint the neck and shoulder area, use clean water to soften the bottom edge, creating a gradient that fades into nothingness. This open space is where the forest will emerge.
Use Salt for Texture
While the tree area is still wet, sprinkle a few grains of table salt on the paint. As it dries, it creates beautiful starry, snowflake-like textures.
Step 3: Creating the Forest Exposure
-
Positioning the Tree:
Visualize where the tree ‘grows’ from the portrait. The main trunk should align roughly with the front of the neck or chest area, rising up toward the chin. -
Painting the Trunk:
With the small brush and medium paint, draw a faint vertical line for the tree trunk. Keep it shaky and organic rather than ruler-straight. -
Branch Structure:
Start tapping your brush to create pine boughs. I find it works best to start at the top of the tree with tiny dabs and let the branches get wider and heavier as you move down. -
Textural Tapping:
Use a stippling motion (tapping the brush tip) to create the impression of needles. Vary the pressure to make some branches look distant and misty, and others sharp and dark. -
Blending the Boundary:
Where the tree overlaps the neck and shoulder, saturate the branches with darker pigment. Let the foliage ‘eat’ into the silhouette of the person, blurring the line between skin and leaves. -
Atmospheric Mist:
Rinse your brush and use mostly water to paint faint, ghost-like trees in the background behind the main pine. This creates depth and that moody, foggy atmosphere.
Step 4: Final Touches
-
Deepening Shadows:
Once everything is dry to the touch, assess the contrast. Glaze a final dark layer over the hair and the deepest parts of the tree to anchor the image. -
Deckling the Edge:
If you are using plain paper, place a ruler along the edge. Tear the paper upwards against the ruler to create a rough, handmade deckled edge that mimics the organic subject matter.
Step back and admire how the stillness of the portrait quietens the wildness of the forest
Map or Constellation Self-Portrait of Where You’ve Been
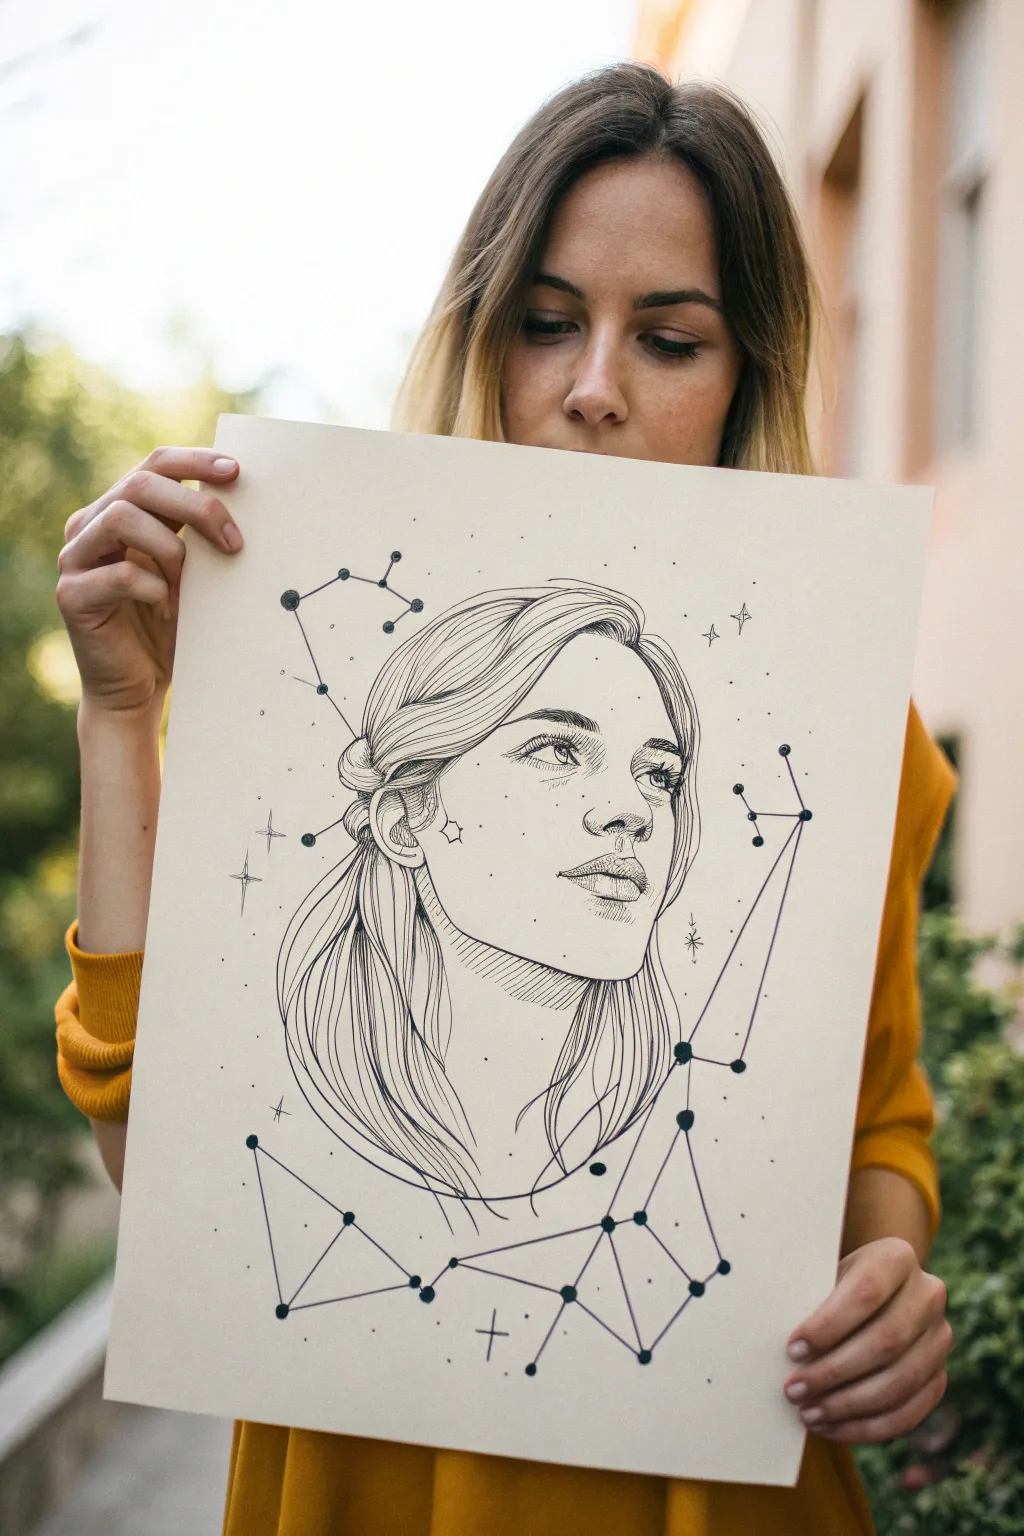
Blend the personal with the celestial in this striking fine-line illustration project. By combining a clean, minimalist self-portrait with geometric constellations, you’ll create a piece that feels both grounded and ethereal.
Step-by-Step Tutorial
Materials
- High-quality smooth bristol board or hot press watercolor paper (A3 or 11×14 inches recommended)
- H or HB pencil for initial sketching
- Kneaded eraser
- Fine liner pens (sizes 0.05, 0.1, 0.3, and 0.5mm)
- Ruler or straight edge
- Reference photo of yourself looking slightly upward
- Circle template (optional)
- Tracing paper (optional for transfer)
Step 1: Planning and Sketching
-
Analyze your reference:
Choose a photo where your head is slightly tilted up and to the side, as this creates a dreamy, contemplative mood. The light source should be clear to help with defining facial planes later. -
Map the composition:
Visualize where the portrait will sit on your paper. Center the face but leave generous negative space around the head for the constellation elements. Lightly mark the top, bottom, and center of the face with your HB pencil. -
Construct the face shape:
Using light, loose strokes, sketch the basic oval of the face. Mark the eye line, nose line, and mouth line. Ensure the jawline is defined but soft. -
Draft the features:
Lightly pencil in the eyes, nose, and lips. Since this is an illustrative style, focus on key overlapping lines—like the crease of the eyelid and the corner of the lips—rather than photo-realistic shading. -
Outline the hair:
Sketch the hair in large masses or shapes first, rather than individual strands. Notice how the hair tucks behind the ear or falls over the shoulder; capture that flow with sweeping, confident curves.
Wobbly Lines?
Don’t panic if a constellation line isn’t perfectly straight. Simply thicken the line slightly or add a small ‘star’ dot over the mistake to disguise the wobble as a design choice.
Step 2: Inking the Portrait
-
Define the eyes:
Switch to a 0.1mm fine liner. Carefully ink the upper lash line, making it slightly thicker than the bottom. Add the pupil and iris, leaving small white circles for catchlights to bring life to the gaze. -
Refine facial contours:
Use the 0.1mm pen to trace the nose and lips. Keep lines broken or lighter on the bridge of the nose and the center of the bottom lip to suggest highlights. -
Ink the structural lines:
Go over the jawline, chin, and neck with a slightly thicker 0.3mm pen. This weight hierarchy helps the face stand out against the delicate details inside. -
Execute hair texture:
Using a 0.05mm or 0.1mm pen, draw long, continuous strokes for the hair. Follow the growth pattern and curvature of the ‘clumps’ you sketched earlier. Don’t fill every space; leave areas of white to represent shine. -
Add minimal hatching:
With your finest 0.05mm pen, add extremely subtle hatching under the chin, beneath the nose, and inside the ear. Keep these lines directional and incredibly light to maintain the clean aesthetic.
Step 3: Adding the Constellations
-
Plot the stars:
Using a pencil, mark small dots around the portrait. You can create real constellations (like Cassiopeia or Orion) or invent geometric abstract shapes that frame the face nicely. -
Connect the dots:
Use a ruler and the 0.3mm pen to draw straight lines connecting your star points. I find it helpful to vary the length of these lines to create visual interest. -
Emphasize the major stars:
Go back to the intersections (the ‘stars’) and darken them into small solid circles. Make some slightly larger than others to simulate varying star magnitudes. -
Add decorative sparkle:
Draw tiny four-pointed stars or small crosses freely in the empty spaces near the cheekbones and hair. These don’t need to be connected to the grid; they act as decorative dust. -
Floating orbit lines:
If desired, add a few very faint curved lines or partial circles near the top of the head to mimic planetary orbits, keeping the line weight whisper-thin. -
Clean up:
Wait at least 15 minutes for the ink to cure completely. Then, gently erase all underlying pencil sketch marks with the kneaded eraser, dabbing rather than rubbing vigorously to protect the paper surface.
Pro Tip: Line Weight
Use your thickest pen (0.5mm) for the main constellation anchor points and the outer silhouette of the hair. Use the thinnest (0.05mm) for internal facial details to keep the face soft.
Now you have a celestial self-portrait that maps out your own personal universe
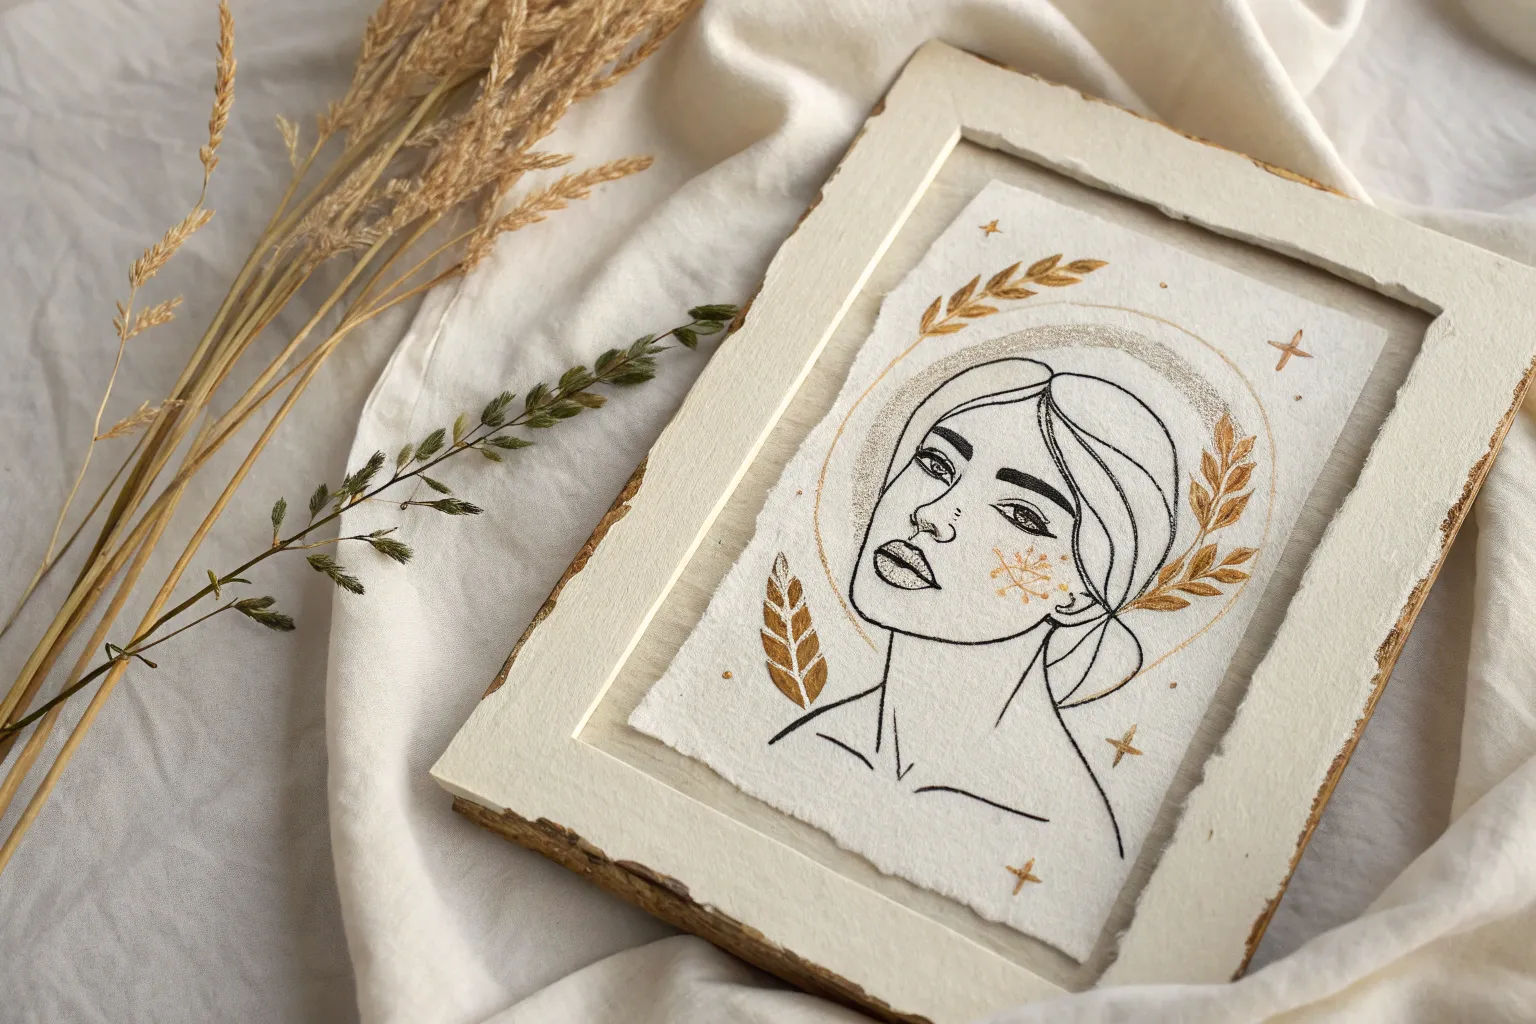
Surreal Metamorphosis Self-Portrait (Parts Turning Into Symbols)
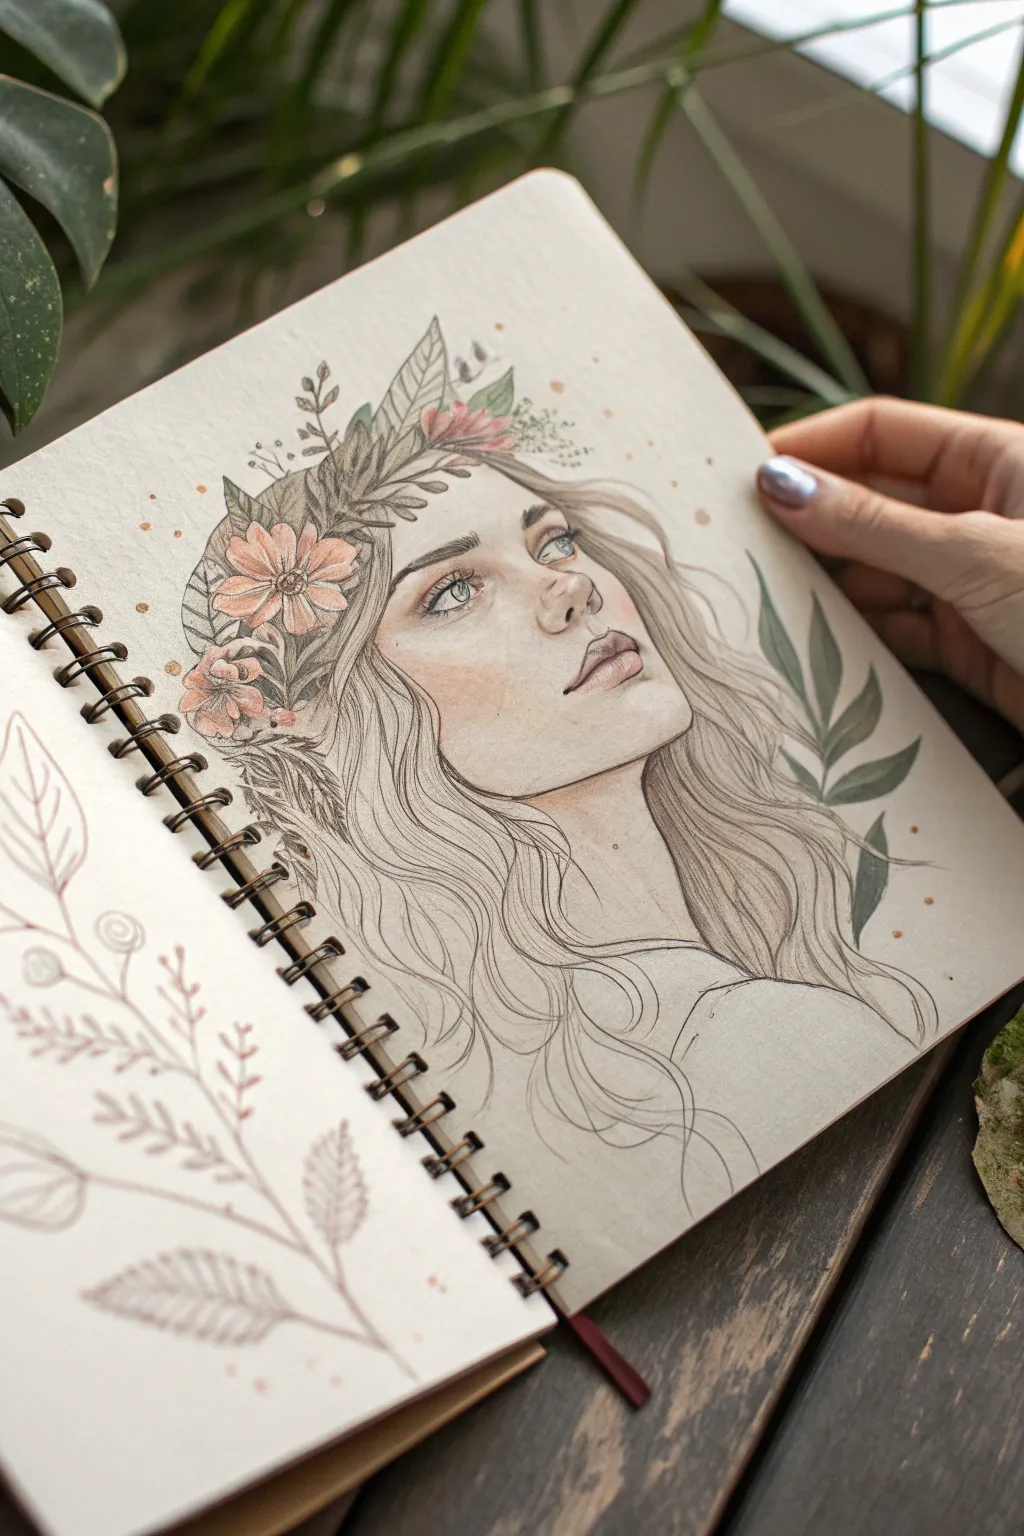
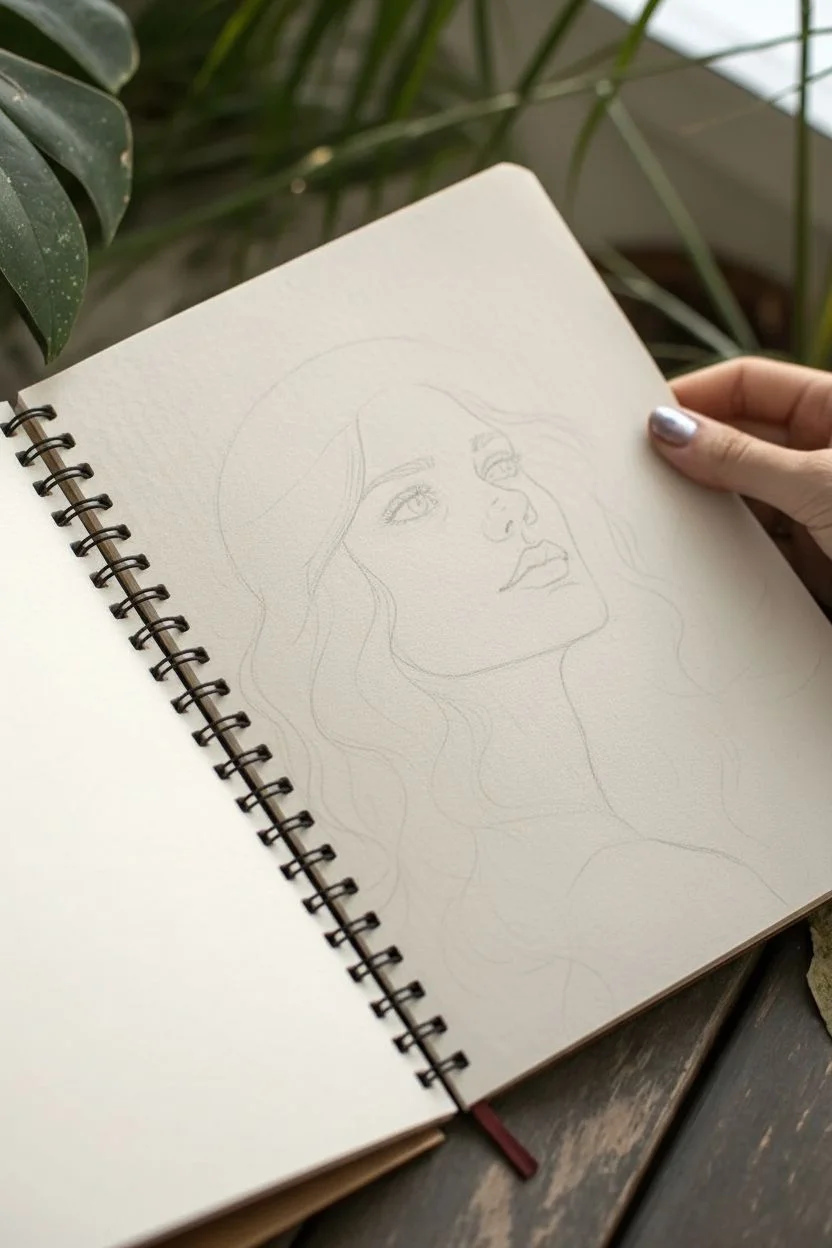
Capture the ethereal beauty of a metamorphosis self-portrait where human features gently blend into the natural world. This mixed-media sketch combines delicate graphite linework with soft touches of color to create a dreamlike woodland spirit.
Detailed Instructions
Materials
- Heavyweight sketchbook paper (mixed media or hot press watercolor paper)
- H and HB graphite pencils for sketching
- 2B or 4B pencil for shading
- Fine liner pens (sepia or brown, 0.1mm and 0.3mm)
- Colored pencils (muted pinks, greens, ochres)
- White gel pen (optional for highlights)
- Kneaded eraser
- Blending stump (tortillon)
Step 1: Planning the Composition
-
Light scaffolding:
Begin with a very faint H pencil to map out the basic oval of the face and the tilt of the head. Position the eyeline slightly higher than midway to allow room for the floral crown. -
Mapping the features:
Sketch the placement of the eyes, nose, and lips. The subject is looking upward and to the side, so ensure the iris placement reflects this gaze to create a dreamy, contemplative mood. -
Hair flow:
Block in the general shape of the hair. Instead of drawing individual strands immediately, focus on the large masses and how they frame the face, leaving open space at the top for the floral elements.
Clean Graphite
Place a scrap sheet of paper under your drawing hand while sketching. This prevents your palm from smudging the graphite or transferring oils to the pristine paper.
Step 2: Refining the Face
-
Defining the eyes:
Use an HB pencil to refine the almond shape of the eyes. Add creases to the eyelids and carefully draw the irises and pupils, leaving a small white circle in each for the catchlight. -
Nose and lips:
Strengthen the lines of the nostrils and the parting line of the lips. Keep the bridge of the nose subtle; often, just a suggestion of shadow is better than a hard line. -
Soft contouring:
Take a 2B pencil and lightly shade under the chin, beneath the nose, and in the hollows of the eyes. Use a blending stump to smooth these shadows out for a porcelain-skin effect. -
Hair strands:
Switch to a sharp HB or 2B pencil to draw long, flowing S-curves for the hair. Let the lines be loose and wavy, creating a sense of movement.
Metallic Touch
Use metallic gold watercolor or ink for the floating pollen dots or the centers of the flowers. It catches the light beautifully when the book is turned.
Step 3: The Floral Metamorphosis
-
Drafting the crown:
Lightly sketch the shapes of leaves and flower petals around the forehead. Visualize them not just sitting on the head, but growing from the hairline itself. -
Merging nature and human:
Draw leaves that curve seamlessly into hair strands. Some hair locks should transform into stems or leaves at their tips to emphasize the surreal ‘metamorphosis’ theme. -
Inking the line art:
Using a brown or sepia fine liner, carefully trace over your graphite lines. I find that using brown ink instead of black keeps the drawing feeling organic and earthy. Vary your line weight—thicker for shadows, thinner for delicate petals. -
Erasing foundations:
Once the ink is fully dry, gently erase the underlying graphite sketch with a kneaded eraser to clean up the page.
Step 4: Adding Color & Detail
-
Base skin tones:
Use a pale peach or ochre colored pencil to lightly graze the skin areas. Focus color on the cheeks, nose tip, and eyelids for a flushed look. -
Coloring the flora:
Fill in the leaves with muted sage and olive greens. For the flowers, use soft dusty pinks and terra-cotta tones. Keep the coloring light and sketchy rather than fully saturated. -
Adding depth to hair:
Add strokes of light brown or dark blonde colored pencil to the hair, specifically in the shadowed areas where strands overlap. -
Atmospheric elements:
Draw floating ‘spores’ or pollen dots around the head using an orange or gold pencil. This adds magic and balances the composition. -
Final highlights:
Use a white gel pen to accentuate the shine in the eyes and add tiny dewdrops to a few leaves or petals. -
Complementary foliage:
On the opposite page or empty side space, sketch a few standalone leaves or branches that mirror the crown’s design, tying the sketchbook spread together.
Now you have a poetic self-portrait that captures a magical connection with nature


Have a question or want to share your own experience? I'd love to hear from you in the comments below!