A self-portrait is the one painting subject you can always come back to—no scheduling a model, no waiting for the perfect moment. Here are my favorite self portrait painting ideas that range from classic and confidence-boosting to playful, weird, and wonderfully you.
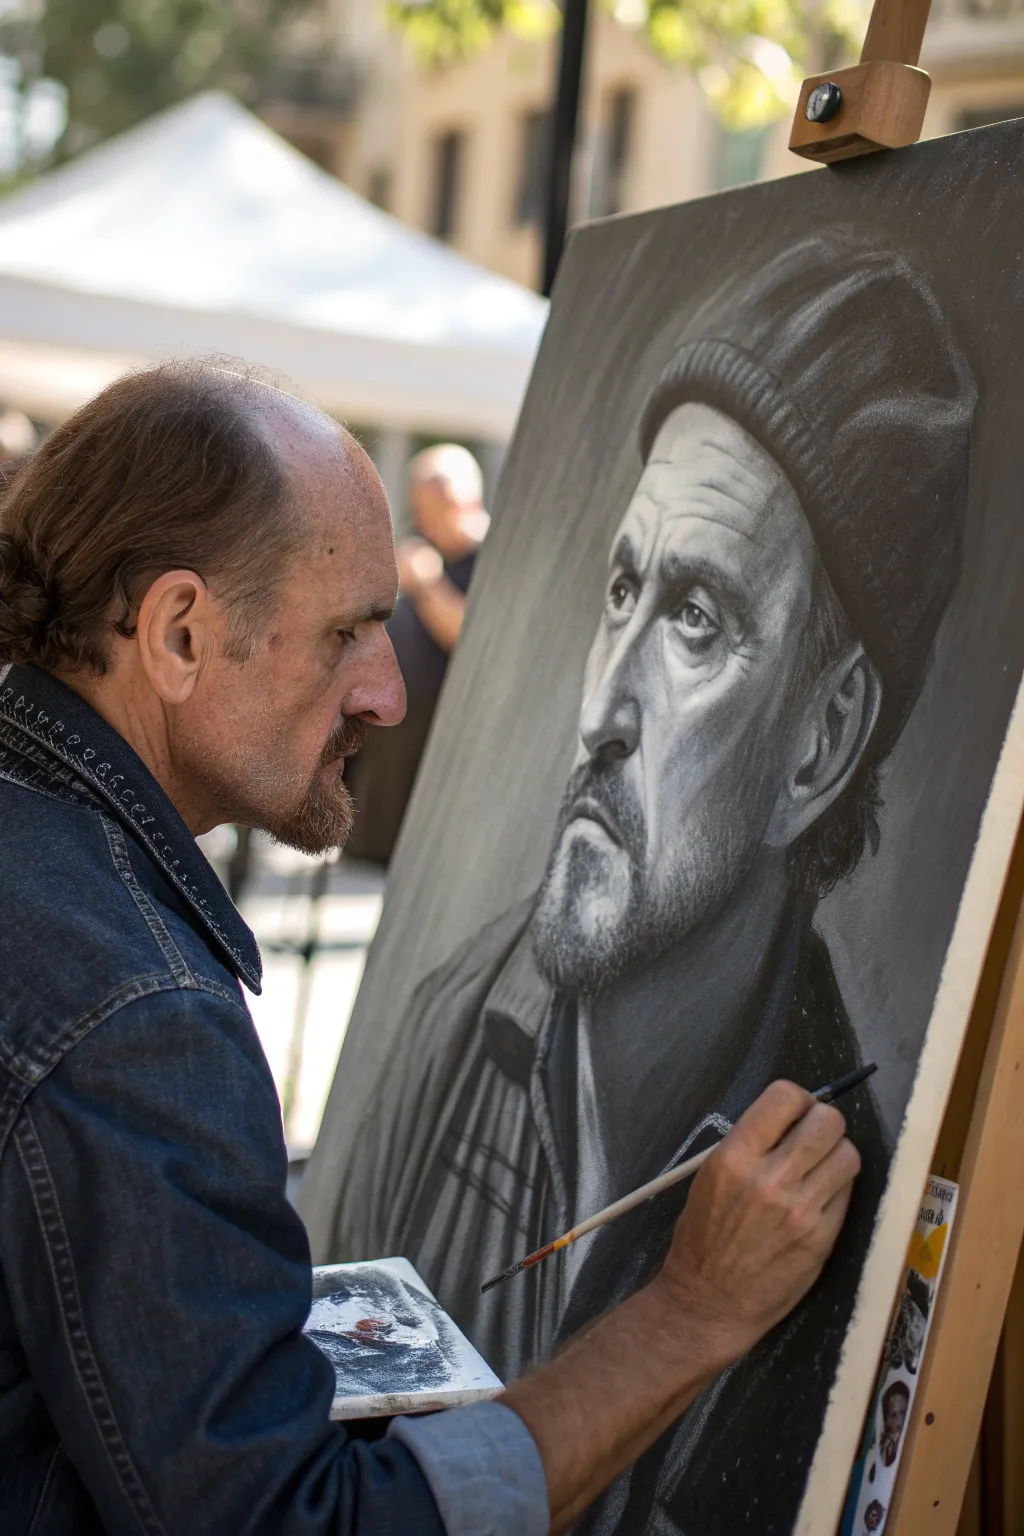
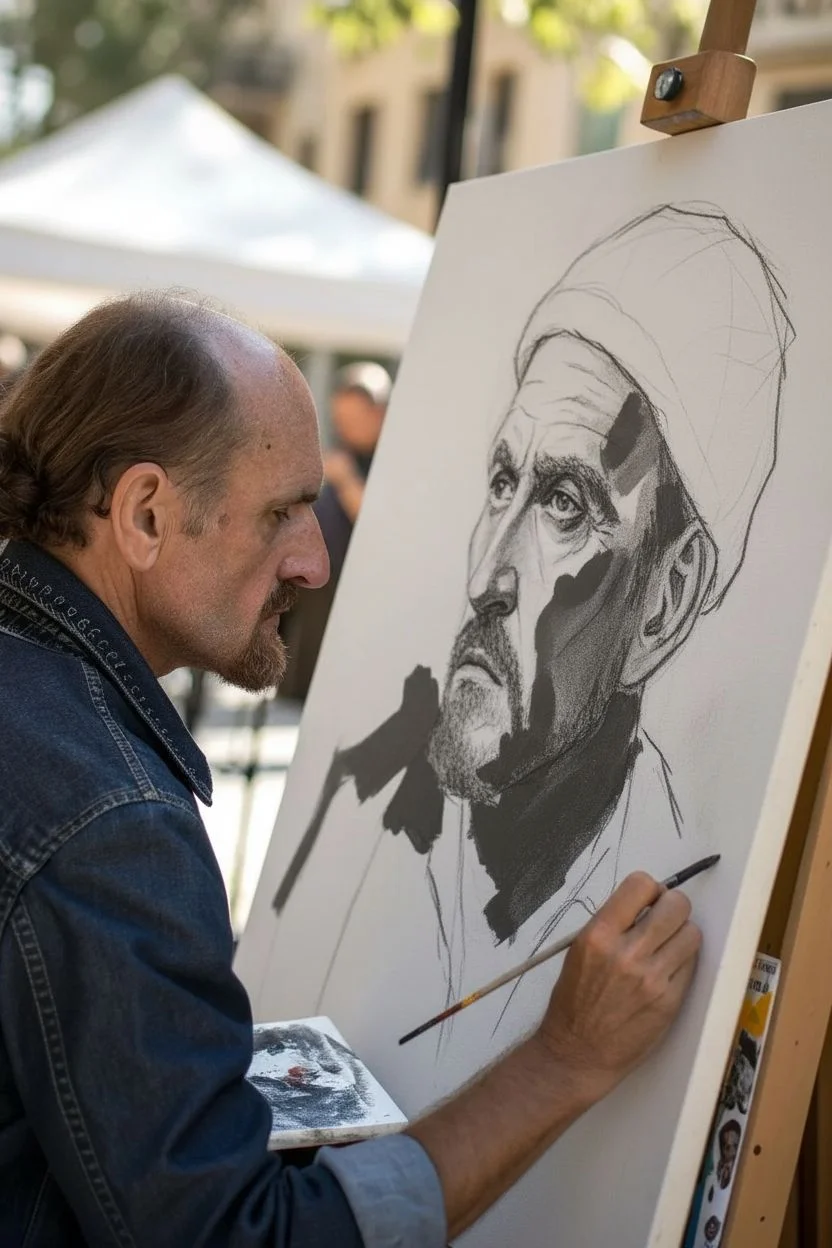
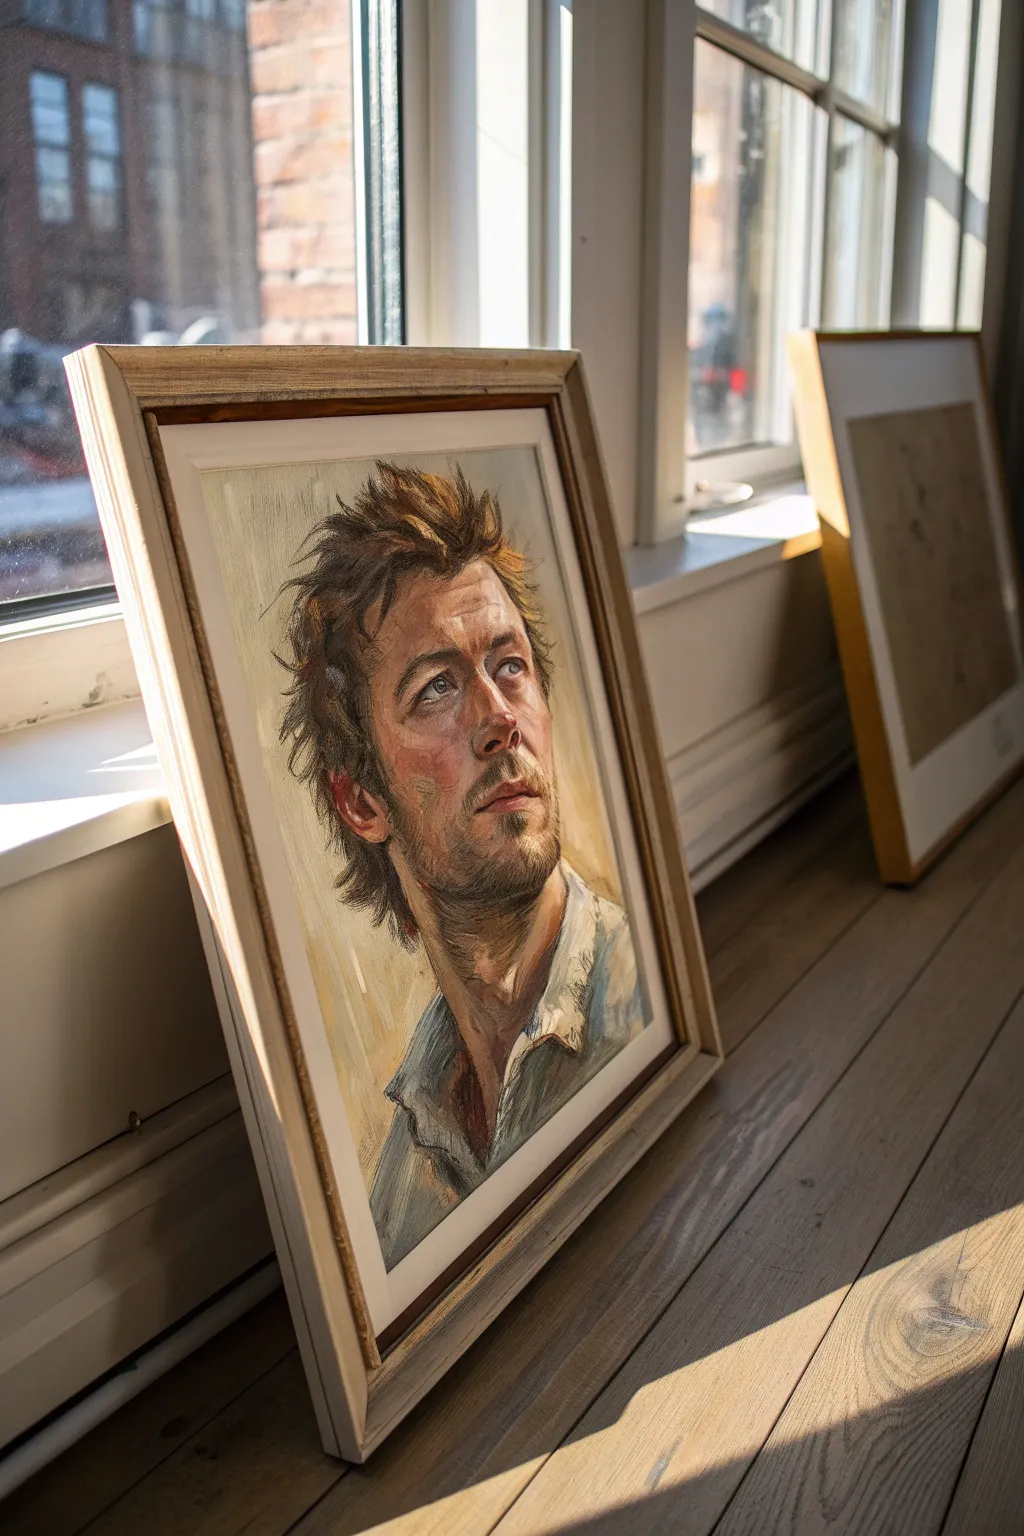
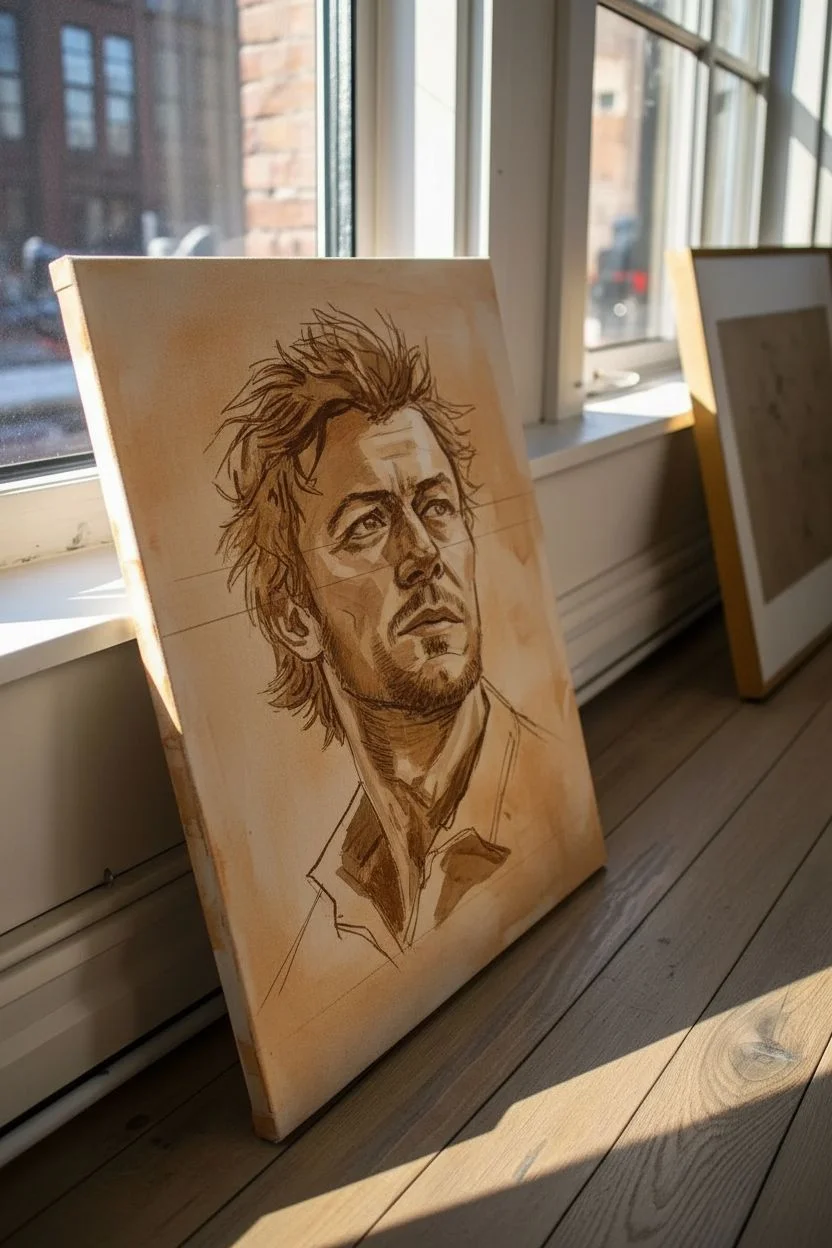
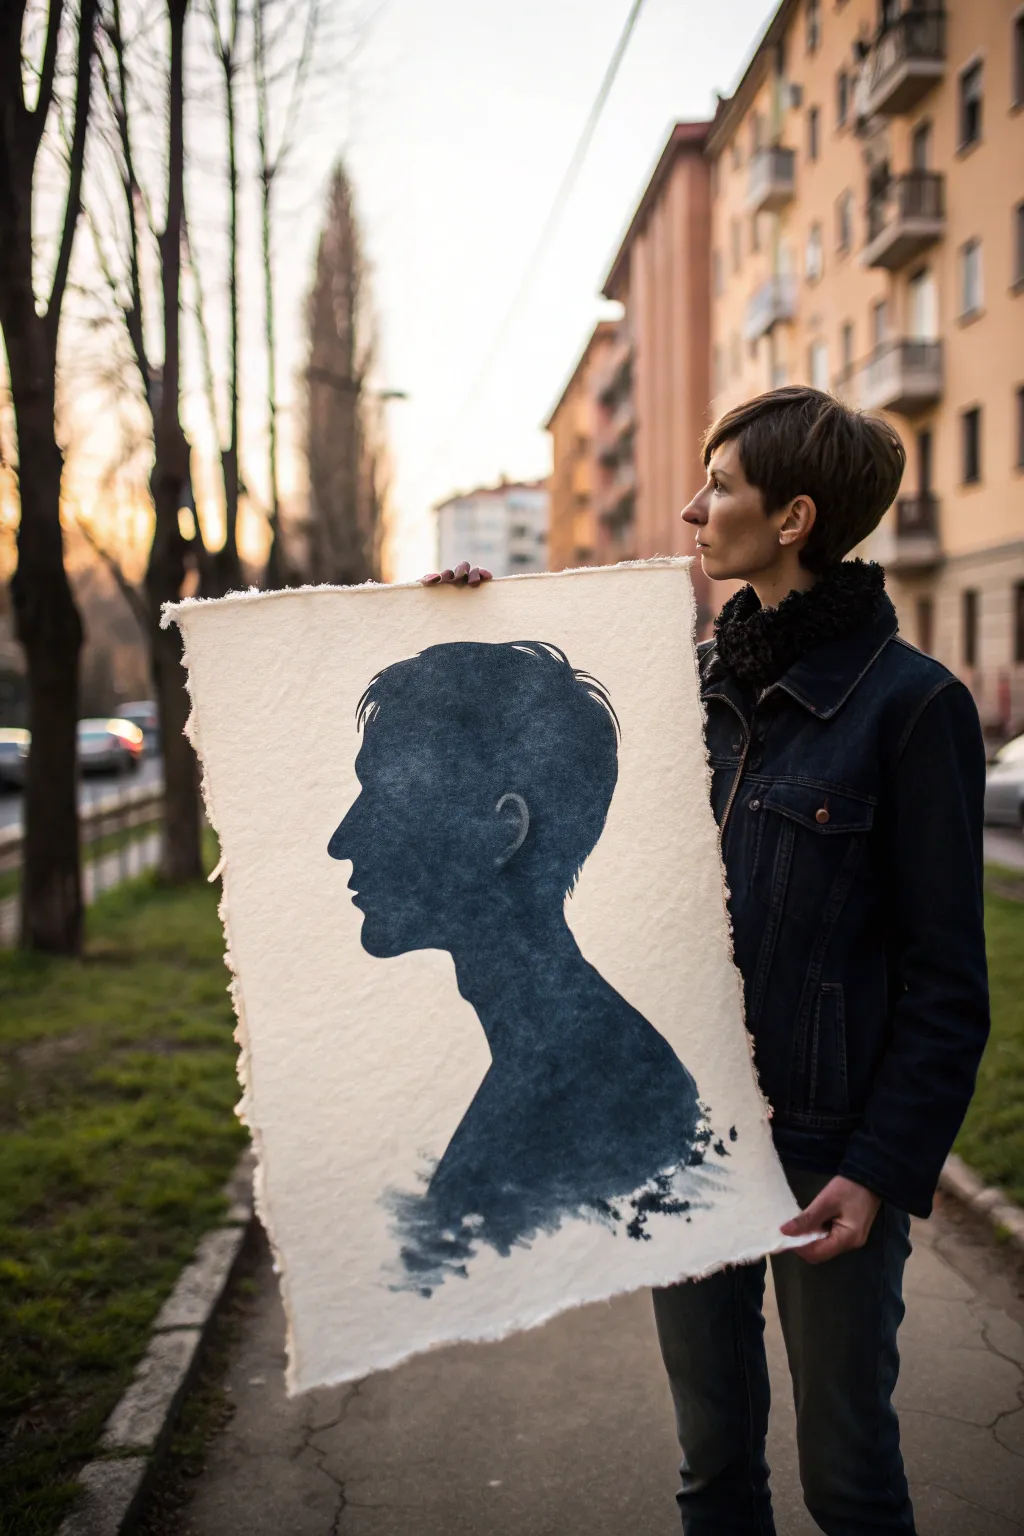
Self-Portrait With Dramatic Side Lighting
Master the art of light and shadow with this striking profile self-portrait. You will learn to use high-contrast lighting to sculpt facial features on canvas, creating a mood that is both intense and introspective.
Step-by-Step Guide
Materials
- Stretched canvas or canvas board (approx. 16×20 inches)
- Oil paints (Titanium White, Ivory Black, Burnt Umber, Yellow Ochre, Cadmium Red Medium, Alizarin Crimson, Ultramarine Blue)
- Brushes: Filberts (sizes 4, 8, 12) and a small round detail brush
- Palette and palette knife
- Odorless mineral spirits or turpentine
- Linseed oil or painting medium
- Digital camera or smartphone
- Graphite pencil (2B) or charcoal
- Clamp light or strong directional lamp
Step 1: Preparation & Drawing
-
Capture the reference:
Set up a strong light source directly to your side in a dim room. Take a profile photo where the light hits the forehead, nose, and cheekbone, leaving the back of the head and neck in deep shadow. -
Observe the values:
Open your photo on a screen or print it out. Convert it to black and white temporarily to clearly see the simplified map of light and dark shapes without color distractions. -
Prime the canvas:
Apply a thin wash of burnt umber mixed with plenty of mineral spirits to tone your canvas. This neutral mid-tone kills the white brightness and helps you judge values more accurately later. -
Draft the contours:
Using a small brush with thinned dark paint or charcoal, sketch the outline of your profile. Focus heavily on placing the ear, the bridge of the nose, and the eye socket correctly. -
Block in shadow shapes:
Identify the ‘terminator line’ where the light turns into shadow. Map out these large shadow masses on the face and fill them in loosely with a dark, thin mixture of burnt umber and ultramarine blue.
Squint to See Values
Periodically squint your eyes while looking at both your subject and your painting. This blurs details and helps you compare the big relationships of light and dark accurately.
Step 2: Painting the Structure
-
Mix your skin tones:
Prepare a gradient of flesh tones on your palette. I like to mix a light highlight (white + ochre), a mid-tone (white + ochre + cadmium red), and a darker shadow tone (umber + crimson + blue). -
Establish the darkest darks:
Paint the background behind the lit side of the face with a deep, rich dark color. This immediately creates the high contrast needed for the dramatic lighting effect. -
Apply the mid-tones:
Using a size 8 filbert brush, lay down usage of the mid-tone flesh color on the cheek, neck, and side of the forehead. Don’t smooth it out yet; keep the brushstrokes visible and directional. -
Introduce the warms:
The transition area between light and shadow often has a saturation bump. Glaze a small amount of cadmium red or alizarin crimson along the edge of the cheekbone and ear to simulate subsurface scattering. -
Paint the hair mass:
Block in the hair and beard as solid shapes rather than individual strands. Use a mix of umber and black, keeping edges soft where the hair recedes into the background shadow to create depth.
Warm vs. Cool Light
If you used a warm lamp for your reference photo, mix your highlights with yellow/orange. Counterbalance this by adding more cool blue tones into your shadow mixtures.
Step 3: Refining & Detailing
-
Sculpt the features:
Switch to a smaller filbert brush. Refine the shape of the nose and the planes of the brow. Pay special attention to the eye—remember the eyeball is a sphere, so shadow it accordingly. -
Add high highlights:
Mix a very light value using Titanium White and a touch of Yellow Ochre. Apply this thick impasto paint to the forehead, the bridge of the nose, and the top of the cheekbone where the light hits hardest. -
Soften the edges:
Use a clean, dry brush to very gently blend the transitions between your mid-tones and shadows. You want a ‘sfumato’ effect where the form turns slowly away from the light. -
Detail the beard:
Using your smallest round brush or a rigger, flick in a few specific hairs on the edge of the beard where it meets the light. Do not paint every hair; just suggest the texture on the illuminated edges. -
Refine the ear:
Ears are complex translucent shapes. Add touches of pink and red to the thinner parts of the cartilage where light passes through, while keeping the inner recesses dark. -
Adjust the background:
Revisit your background. If the paint has sunk in and become dull, apply another layer of your dark mix to ensure the profile pops forward with maximum contrast. -
Final assessment:
Step back five feet from your canvas. Look for any shapes that feel flat. Add a final glaze of medium and dark pigment to deepen the shadows on the unlit side of the face if necessary.
Allow your painting to dry fully before varnishing to protect those deep shadows and brilliant highlights


Monochrome Value Self-Portrait
Capture the raw emotion and depth of the human face with this striking monochrome study in light and shadow. By limiting your palette to just black and white, you’ll focus intensely on value structures to create a powerful, realistic likeness on a large scale.
How-To Guide
Materials
- Large stretched canvas (at least 24×36 inches)
- Black acrylic paint (Mars Black or Ivory Black)
- White acrylic paint (Titanium White)
- Assorted flat and filbert brushes (sizes 4, 8, 12, and a large 1-inch brush)
- Palette or disposable palette paper
- Charcoal vine stick or graphite pencil (4B)
- Hand-held mirror or reference photo
- Retarder medium (to extend drying time)
- Easel
- Mahl stick (optional, for steadying hand)
Step 1: Preparation and Mapping
-
Prepare the ground:
Begin by toning your white canvas with a very light wash of gray acrylic. Mix a tiny drop of black into white with plenty of water and cover the surface; this kills the harsh white and helps you judge values more accurately. -
Analyze your reference:
Set up a mirror or a high-contrast black and white photo of yourself. Look for the major shapes of shadow—the eye sockets, the shadow under the nose, and the hollows of the cheeks. -
Sketch the framework:
Using a vine charcoal stick or a soft graphite pencil, lightly sketch the contours of the head. Focus on placement and proportion rather than detail. Ensure the eyes are halfway down the head and align the ears correctly. -
Block in the darks:
Mix a dark gray (70% black, 30% white). Using your largest brush, paint in the biggest shadow shapes you identified earlier. Don’t worry about blending yet; just get the geography of the shadows down.
Values Looking Muddy?
If your grays look flat, you’re likely over-blending. Stop working wet-into-wet. Let the layer dry completely, then apply a fresh, distinct stroke of a lighter or darker value on top.
Step 2: Developing Form and Value
-
Create a value scale:
On your palette, mix five distinct piles of paint ranging from pure black to pure white, with three grays in between. This pre-mixed ‘ladder’ of values will speed up your painting process. -
Establish the mid-tones:
Switch to a medium-sized filbert brush. Apply the middle gray tone to the planes of the face that are turning away from the light but aren’t in deep shadow, such as the sides of the forehead and the bridge of the nose. -
Refine the beard and hair:
For the beard area, establish the dark base shape first. Don’t paint individual hairs yet. Treat the facial hair as a single, dark mass that defines the jawline. -
Sculpt the features:
Using a smaller brush, begin refining the eyes. Pay close attention to the upper eyelid crease and the pupil. Remember that the ‘white’ of the eye is rarely pure white; use a light gray to give it roundness. -
Model the skin:
Blend the edges where your darks meet your mid-tones. I like to use a dry, clean brush to softly feather these edges while the paint is still tacky, creating a smooth transition across the cheekbones. -
Deepen the contrast:
Go back in with pure black. reinforce the darkest points: the pupils, nostrils, the deep shadow under the chin, and the folds of the hat. This anchors the painting.
Squint to See
Periodically squint your eyes at both your subject and your painting. This blurs the details and forces you to see only the big shapes of light and dark, ensuring your overall structure is solid.
Step 3: Refining and Highlighting
-
Add texture to the hat:
Paint the hat using a scumbling technique. Load your brush with a lighter gray and drag it lightly over the dry dark base to simulate the fabric texture of the knit cap. -
Define the wrinkles:
Mix a thin, dark gray. With a small round brush, carefully paint the major forehead lines and crow’s feet. Immediately gently blend one side of the line into the skin tone so it looks like a fold, not a wire. -
Highlight the facial hair:
Now, take a small brush with light gray (not white yet) and flick in suggestions of individual hairs over the dark beard base, focusing on where the light catches the chin. -
Adding clothing structure:
Paint the jacket and shirt simply. Use broad, confident strokes to suggest the folds of the fabric. Keep the clothing looser than the face to ensure the viewer’s eye stays on the portrait. -
The final highlights:
Using pure Titanium White, add the magnificent specular highlights: the catchlight in the eyes, the tip of the nose, and the brightest point on the forehead. -
Step back and assess:
Walk ten feet away from your canvas. Look for any areas where the form feels flat. If needed, deepen a shadow or brighten a highlight to increase the three-dimensional illusion.
Sign your name in the corner and admire the timeless drama created by simple light and shadow.


Limited Palette Self-Portrait
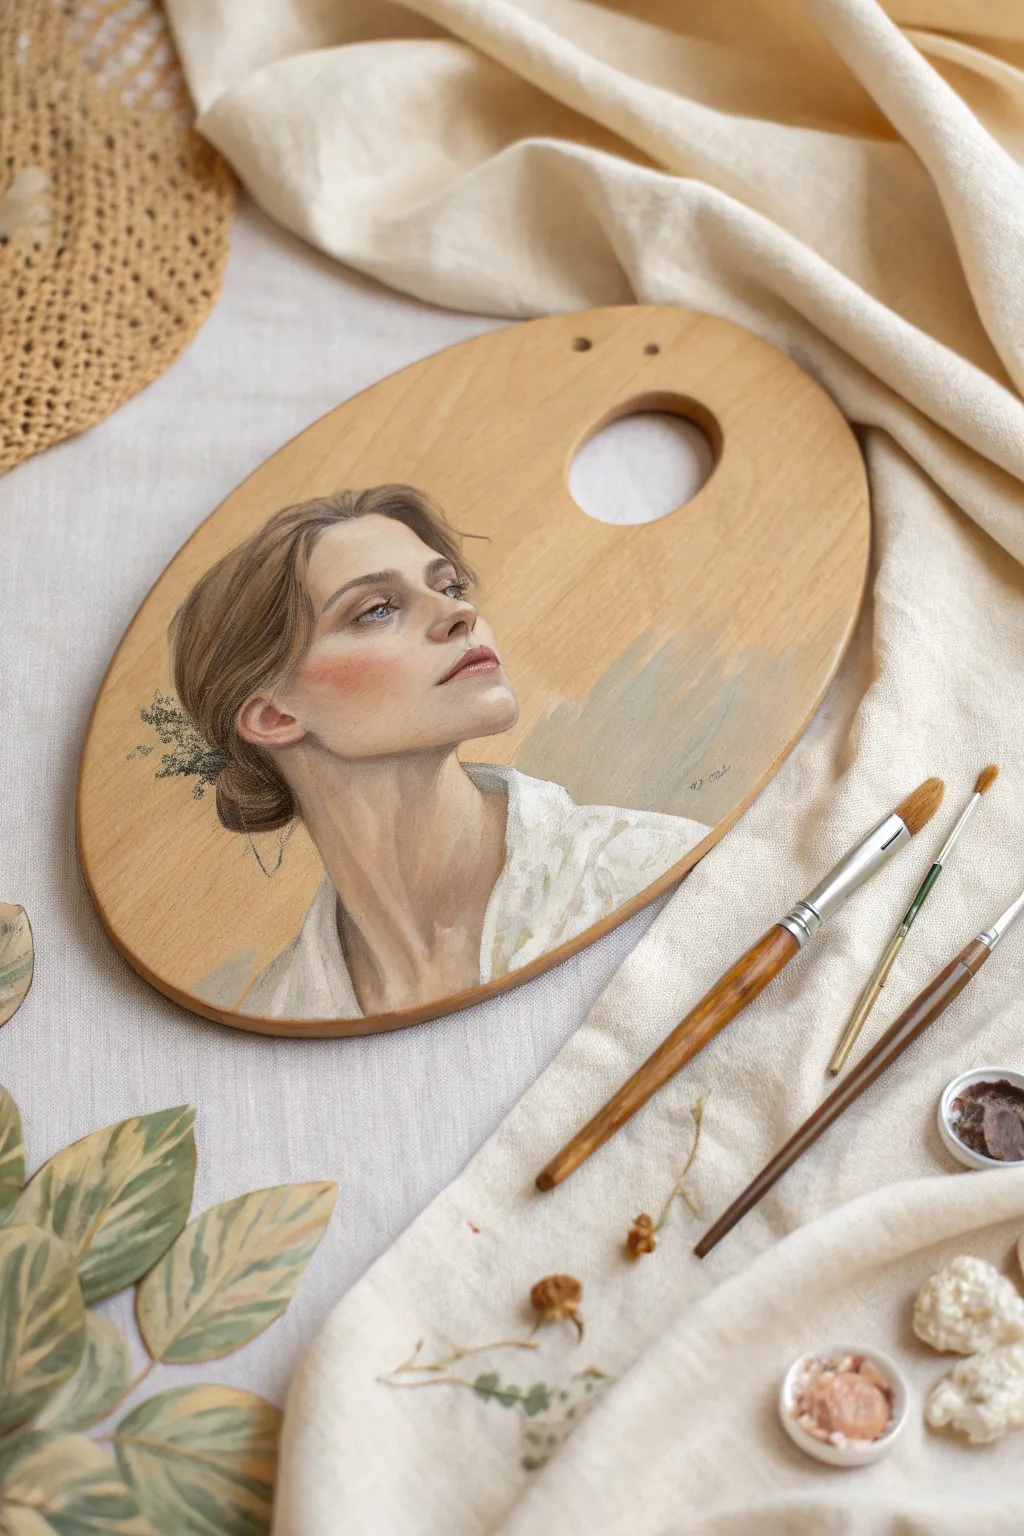
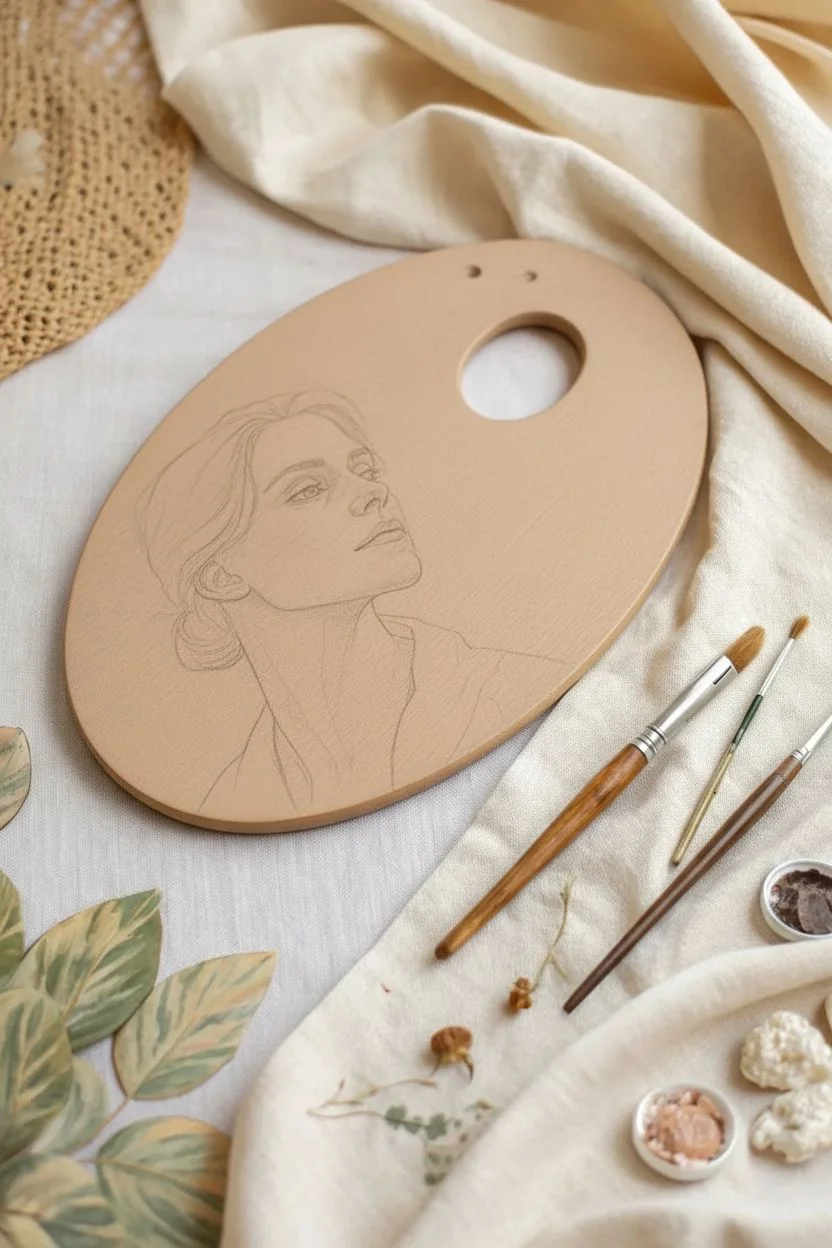
Transform a traditional painter’s tool into the canvas itself with this elegant self-portrait project. By utilizing the warm, natural grain of the wood as your mid-tone, you can create a soft, classical look that feels both timeless and innovative.
Step-by-Step Tutorial
Materials
- Oval wooden artist palette (smooth finish)
- Fine-grit sandpaper (220-grit)
- Clear gesso or matte medium
- Oil paints or heavy body acrylics (Titanium White, Burnt Umber, Yellow Ochre, Alizarin Crimson, Ultramarine Blue)
- Filbert brushes (sizes 4 and 8)
- Fine liner brush (size 1)
- Graphite transfer paper (optional)
- Mirror or reference photo
- Palette knife for mixing
- Medium for thinning (linseed oil for oils, glazing medium for acrylics)
- Varnish (satin or matte finish)
Step 1: Preparation & Sketching
-
Prepare the surface:
Begin by lightly sanding the wooden palette to ensure it is perfectly smooth. Wipe away any dust with a damp cloth or tack cloth. -
Seal the wood:
Apply two thin coats of clear gesso or matte medium. This step is crucial because it seals the wood fibers so paint doesn’t soak in, while still keeping that beautiful natural grain visible as your background tone. -
Plan composition:
Position your subject reference. The neck should curve elegantly along the bottom, and the face should angle upward toward the thumb hole, using the palette’s shape to frame the gaze. -
Transfer the sketch:
Lightly sketch the outline of the face, neck, and hair directly onto the dried clear gesso using a pencil. If you aren’t confident sketching freehand, you can trace your reference photo using graphite transfer paper, but keep the lines faint.
Paint Soaking In?
If your paint looks dull or sinks into the wood instantly, your clear gesso layer was too thin. Apply another layer of matte medium over the specific dry area before repainting.
Step 2: Painting the Portrait
-
Mix the flesh tones:
Prepare a base flesh tone using White, Yellow Ochre, and a touch of Burnt Umber. Create a shadow pile by adding more Umber and a hint of Alizarin Crimson, and a highlight pile with more White. -
Establish the shadows:
Using a size 4 filbert brush, gently block in the darkest areas under the chin, the eye sockets, and the side of the nose. Keep the paint thin so the wood warmth can influence the color. -
Paint the mid-tones:
Fill in the cheeks and forehead with your base skin tone. Blend the edges into the bare wood; you want the painting to fade softly into the palette surface rather than having a hard cutout edge. -
Add the highlights:
Apply the lightest skin tones to the bridge of the nose, the cheekbones, and the brow bone. This contrast helps the face pop forward against the neutral wood. -
Define the features:
Switch to a smaller brush to detail the eyes and lips. Use Alizarin Crimson mixed with Umber for the lips, keeping the edges soft. For the eyes, remember to paint the whites as a dull grey-cream, not pure white. -
Create the blush:
Mix a very translucent glaze of Alizarin Crimson. Gently dry-brush this onto the cheek area to create a flushed, romantic look without obscuring the skin painting underneath.
Step 3: Hair & Clothing
-
Block in hair shapes:
Using Burnt Umber and a little Blue to cool it down, paint the main masses of the hair. Don’t worry about individual strands yet; focus on the overall shape of the bun and swept-back style. -
Detail the hair:
With a fine liner brush and fluid lighter brown paint, add loose wisps escaping the bun and framing the ear. This movement makes the portrait feel alive. -
Paint the clothing:
For the shirt, use Titanium White with a rough, expressive stroke. I prefer to leave this area slightly unfinished and painterly, dragging the dry brush so the wood texture shows through the white paint. -
Add floral accents:
If desired, paint delicate sprigs of greenery or dried flowers tucked into the hair bun using a mix of Green and Umber. Keep these strokes minimal.
Level Up: Gold Leaf
Add a halo or decorative circle behind the head using gold leaf size and foil. The metallic shine contrasts beautifully with the matte wood and soft skin tones.
Step 4: Finishing Touches
-
Background abstracting:
Mix a muted grey-blue or sage green. Paint a loose, abstract swatch behind the back of the head, fading it out into nothingness. This acts as a cool-toned foil to the warm wood. -
Refine edges:
Check the edges where the skin meets the raw wood. If any lines look too sharp, use a clean, slightly damp brush to soften them. -
Final highlights:
Add the tiniest distinct dots of pure white to the highlight in the eye and the tip of the nose. -
Varnish:
Once the paint is fully cured (this takes significantly longer for oils than acrylics), apply a coat of satin varnish to protect the wood and unify the sheen of the painted areas.
Now you have a stunning, classical piece that celebrates both the subject and the tools of the trade


Loose Brushstroke Self-Portrait
Capture the raw emotion and structure of a face without getting bogged down in microscopic details. This project focuses on energetic, directional mark-making and naturalistic lighting to create a portrait that feels alive and immediate.
How-To Guide
Materials
- Canvas board or stretched canvas (approx. 16×20 inches)
- Oil paints (Titanium White, Yellow Ochre, Burnt Sienna, Alizarin Crimson, Ultramarine Blue, Burnt Umber)
- Hog bristle brushes (flats and filberts, sizes 4, 8, and 12)
- Palette knife for mixing
- Odorless mineral spirits or turpentine
- Linseed oil medium
- Wooden palette
- Rag or paper towels
Step 1: The Understructure
-
Tone the canvas:
Begin by covering your white canvas with a thin wash of Burnt Sienna and turpentine. Scrub it on loosely with a large brush or rag to kill the stark white. This warm mid-tone will peek through later and unify your color palette. -
Map the head shape:
Load a size 4 brush with thinned Burnt Umber. Sketch the basic oval of the head, paying attention to the tilt. The subject here is looking slightly up and to the right, so the chin line should be defined and higher than usual. -
Place the features:
Mark the horizontal lines for the eyes, nose base, and mouth. Don’t draw detailed eyes yet; just indicate the sockets with shadow shapes. Use straight, angular lines rather than curves to maintain that structural, loose feel. -
Block in major shadows:
Squint at your reference (or mirror) to merge details into big shapes. Mix a dark, warm shadow tone (Ultramarine Blue + Burnt Sienna) and paint the darkest areas: under the jawline, the eye sockets, and the shadow side of the hair.
Step 2: Building Form and Color
-
Mix skin mid-tones:
Prepare a few piles of flesh mid-tones using White, Yellow Ochre, and a touch of Cadmium Red or Burnt Sienna. Keep the mixtures slightly muted. I usually like to keep these piles distinct on the palette rather than blending them into one uniform color. -
Apply the first light planes:
Using a size 8 flat brush, lay down the planes of the face that are catching light—the forehead, the bridge of the nose, and the cheekbones. Use confident, single strokes. Do not blend or smooth them out yet. -
Define the nose and mouth:
Switch to a smaller filbert brush. Paint the structure of the nose, remembering it’s a 3D form, not an outline. Add the upper lip in a darker, cooler red and the lower lip in a lighter, warmer tone. -
Add warmth to the transition zones:
Where the light meets the shadow (the terminator line), create a transition tone. Mix Alizarin Crimson with a bit of Ochre to add ‘blood’ and warmth to the ears, the tip of the nose, and the cheeks. -
Refine the eyes:
Paint the whites of the eyes (they should be a dull grey-blue, never pure white). Add the iris color, keeping the edges soft. A single, crisp highlight on the pupil will suddenly bring the gaze to life.
Brush Economy
Count your strokes. Try to describe a cheekbone or a nose plane with one single, loaded brushstroke. If you mess up, scrape it off and try again rather than blending it into mud.
Step 3: Texture and Atmosphere
-
Scumble the beard stubble:
Mix a cool grey-brown tone. Using a dry brush with very little paint, scumble (drag lightly) over the jaw and chin area. This broken texture perfectly mimics stubble without needing to paint individual hairs. -
Construct the hair:
Treat the hair as large masses of volume first. Use your largest brush to sweep in the darks, then layer lighter brown tones on top. Use directional strokes that follow the messy, upward growth of the hair. -
Paint the shirt collar:
Block in the shirt collar with broad, angular strokes. Use cool greys and blues for the shadows in the fabric folds. Keep this area very loose so it doesn’t distract from the face. -
Work on the background:
Paint the background with a neutral, creamy off-white. Carefully ‘cut in’ around the head to shape the silhouette, but allow some edges of the hair to blur into the background for movement. -
Add final highlights:
Load a clean brush with thick Titanium White and a tiny touch of yellow. Apply the brightest highlights to the forehead, nose tip, and collarbone. -
Review and unify:
Step back five feet. If an area looks too detailed, scrape it down or paint over it with a broader stroke. The power of this style comes from the suggestion of detail, not the definition of it.
Cooler Shadows
To add depth to the skin, mix a little Viridian Green or extra Ultramarine into your jawline shadows. Cool shadows make the warm, illuminated skin tones pop.
Frame your piece in a simple wooden frame to complement the organic tones of the portrait.
BRUSH GUIDE
The Right Brush for Every Stroke
From clean lines to bold texture — master brush choice, stroke control, and essential techniques.
Explore the Full Guide
Bold Color-Blocked Self-Portrait
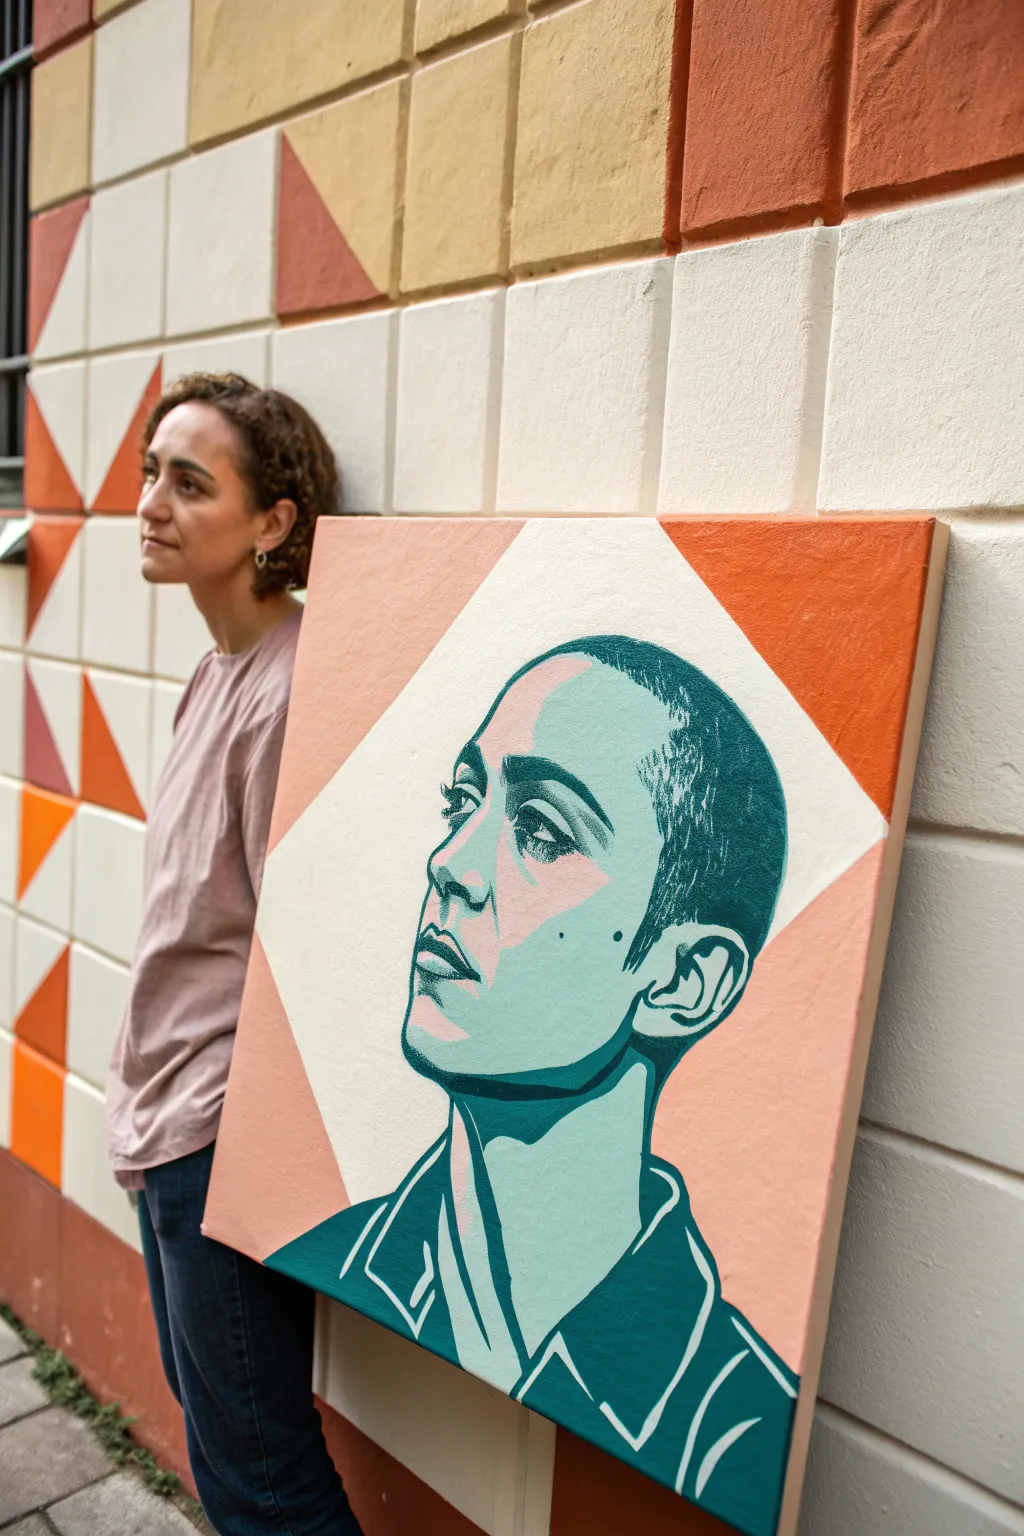
Transform a reference photo into a striking piece of modern art with this high-contrast, color-blocked technique. By simplifying shadows and highlights into distinct shapes and incorporating a geometric background, you’ll create a professional-looking self-portrait that pops.
Step-by-Step
Materials
- Large square canvas (approx. 24×24 or 30×30 inches)
- Acrylic paints: Teal/Turquoise, Deep Forest Green, Peach/Salmon, Cream/Off-White
- Digital photo editing software (Photoshop or free alternative like GIMP/Canva)
- Pencil for sketching
- Synthetic flat brushes (various sizes: 1 inch, 1/2 inch, and fine liner)
- Painting tape or masking tape
- Grid ruler or T-square
- Palette paper or mixing tray
- Projector (optional but recommended for accuracy)
Step 1: Planning and Prep
-
Choose your reference:
Take a photo of yourself in three-quarter view looking slightly upward. Strong directional lighting works best to create defined shadows for this style. -
Digital posterization:
Upload your photo to an editor. Convert it to grayscale and use a ‘posterize’ or ‘threshold’ filter to reduce the image to just 3-4 distinct values: black (deep shadow), dark gray (mid-tones), and white (highlights). -
Prepare the background geometry:
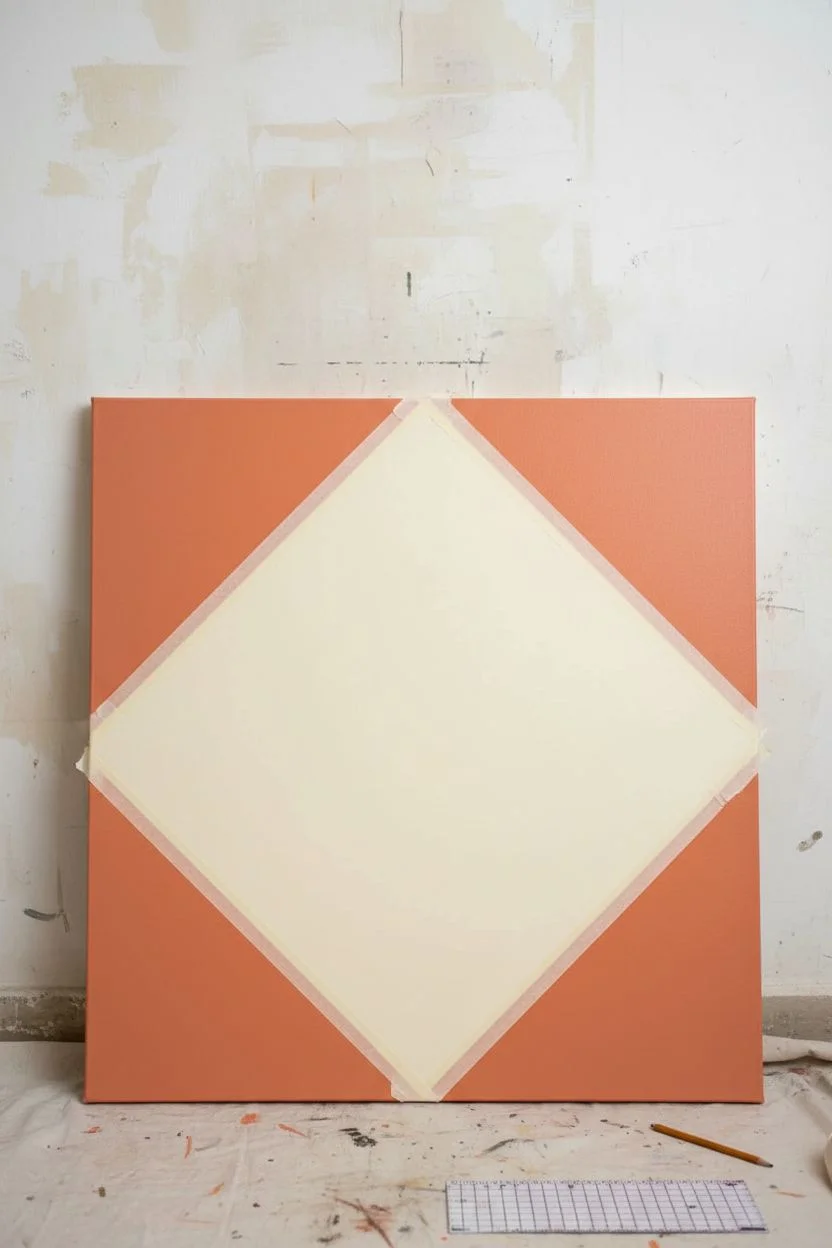
On your canvas, use a ruler to lightly draw a large diamond shape that touches the centers of the canvas edges. This creates triangular corners and a central focal area. -
Color blocking the background:
Tape off the lines of your diamond. Paint the four outer corners in a warm, rusty peach color. Leave the central diamond blank or paint it a soft cream color depending on your preference. -
Refining the background:
Once dry, verify your lines are crisp. You might need a second coat on the peach sections to ensure solid, opaque coverage without visible brushstrokes.
Uneven Coverage?
If your large color blocks look streaky, avoid adding water to the paint. Instead, use a flow improver medium to smooth the acrylic without losing opacity.
Step 2: Sketching the Portrait
-
Transfer the image:
If using a projector, project your simplified digital reference onto the dry canvas. The head should float centrally, overlapping the geometric shapes. -
Trace the key shapes:
Lightly trace the boundaries of your shadows and highlights with a pencil. Focus on the distinct shapes the shadows make around the eyes, nose, and jawline rather than trying to draw ‘features’. -
Simplify the hair:
Outline the hair as a solid mass or blocked shape. In this style, individual strands aren’t necessary; focus on the overall silhouette. -
Double-check proportions:
Step back and ensure the placement feels balanced within the diamond background before you commit to paint.
Step 3: Painting the Face
-
Mix your palette:
Prepare three main portrait colors: a ‘shadow’ tone (Deep Forest Green), a ‘mid-tone’ (Teal/Turquoise), and a ‘highlight’ tone (use the Cream/Off-White from the background or a very pale mint). -
Paint the darkest shadows:
Using a small flat brush, fill in the darkest areas first—typically under the jaw, the nostrils, and the deep recesses of the eyes—with the Deep Forest Green. -
Fill the mid-tones:
Apply the Teal/Turquoise to the main planes of the face that aren’t in direct light or deep shadow. I find it helpful to slightly overlap the green edges to ensure no canvas shows through. -
Add the highlights:
Paint the lightest areas (forehead, bridge of nose, cheekbones) with your pale cream or mint mixture, keeping the edges sharp. -
Detailing the eyes:
Use your finest liner brush to carefully paint the iris and pupil. Keep it simple—just two tones is often enough to suggest the gaze.
Shift the Palette
Try a monochrome version using only shades of blue, or a high-contrast pop art version with bright yellow shadows and purple highlights.
Step 4: Refining and Finishing
-
Clean up edges:
Go back with your background colors (peach and cream) to touch up any areas where the portrait paint strayed outside the intended silhouette. -
Add the collar:
Paint the clothing or collar details using the Deep Forest Green for outlines and folds, creating a graphic, sketched look. -
Second pass for opacity:
Acrylics can sometimes dry streaky. Apply a second coat to any large color blocks (like the teal cheek or forehead) to get that flat, print-like finish. -
Final assessment:
Step far back from the canvas. If any edges look wobbly, use the appropriate color to sharpen them up for a crisp, graphic design feel.
Hang your bold new self-portrait and enjoy the modern, graphic statement it makes in your space
Self-Portrait With a Simple Prop Story


Capture a quiet, reflective moment by painting yourself with a meaningful object, using a soft, painterly style that emphasizes mood over hyper-realism. This project balances loose brushwork with careful observation to create a narrative piece that feels both personal and artistic.
Detailed Instructions
Materials
- Canvas or canvas board (approx. 16×20 inches)
- Oil or acrylic paints (Titanium White, Yellow Ochre, Burnt Sienna, Cadmium Red, Ultramarine Blue, Burnt Umber)
- Assorted brushes (filberts size 4-8, round size 2, large flat for blocking)
- Palette and palette knife
- Reference photo of yourself holding a prop
- Easel
- Mediums (linseed oil for oils, matte medium for acrylics)
- Rag or paper towels
Step 1: Preparation and Sketching
-
Set up your reference:
Take a photo of yourself holding a simple prop, like a mug or book. Ensure the lighting is soft and directional, creating gentle shadows on one side of your face. Print this out or have it on a screen nearby. -
Tone the canvas:
Apply a thin wash of Burnt Sienna or Yellow Ochre diluted with solvent (or water for acrylics) over the entire canvas to kill the white. Wipe it back slightly with a rag to create a warm glow. -
Map the composition:
Using a small round brush and thinned Burnt Umber, loosely sketch the outlines of your head, shoulders, and hands. Focus on the triangle created between your face and the prop. -
Check proportions:
Step back to ensure the head size relates correctly to the hand holding the prop. Hands are often painted too small, so measure them against face features.
Loose but Accurate
Hold the brush by the end of the handle, not near the ferrule. This forces you to make broader, more expressive strokes and prevents you from ‘noodling’ on tiny details too early.
Step 2: Blocking in Color
-
Mix skin tones:
Prepare a base skin tone using White, Yellow Ochre, and a touch of Cadmium Red. Create a shadow version by adding Burnt Sienna and a tiny bit of Ultramarine Blue. -
Establish the shadows:
With a larger filbert brush, paint the shadow shapes on the face, neck, and behind the hair. Squint at your reference to see these shapes clearly without getting distracted by details. -
Block in the mid-tones:
Apply the main skin color to the illuminated parts of the face. Keep the edges between shadow and light relatively soft to maintain that painterly look. -
Background wash:
Scrub in a neutral, beige-grey background color around the figure. I find that painting the background early helps judge the skin values correctly. -
Defined the clothing:
Block in the shirt using broad strokes. If the shirt is white or light, use creams and light greys rather than pure white, reserving the brightest white only for highlights.
Muddy Skin Tones?
If skin looks gray or lifeless, you likely used too much blue or black in the shadow mix. Introduce warmth back into the shadows with Burnt Sienna or transparent Alizarin Crimson.
Step 3: Refining Features
-
Painting the eyes:
Use a smaller brush to suggest the eyes. Avoid outlining them strictly; instead, paint the shadow of the socket and the dark line of the upper lash. Place the iris carefully to direct the gaze. -
Building facial structure:
Add rosier tones to the cheeks, nose, and chin using a mix enriched with Cadmium Red. Blend the edges wet-into-wet if using oils to create smooth transitions. -
Hair texture:
Paint the hair as large masses of color first—darkest shadows, then mid-tones. Only add a few confident, lighter strokes at the end to suggest individual strands catching the light. -
The hand and prop:
Refine the hand holding the object. Pay attention to the negative space between fingers. If painting a mug, keep the color slightly muted so it doesn’t compete too much with the face.
Step 4: Finishing Touches
-
Adjust values:
Deepen the darkest darks (nostrils, corners of mouth, heavily shadowed hair) to add contrast and anchor the features. -
Add highlights:
Mix a thick, creamy highlight color (White with a tiny yellow tint) and dab it on the nose tip, forehead, and perhaps the rim of the prop. -
Abstract elements:
Look for areas in the background or clothing where you can add interesting, non-descriptive marks or strokes to enhance the ‘painterly’ aesthetic seen in the inspiration image. -
Final assessment:
Step away from the canvas for a few minutes. Return and make any final small adjustments to edges—softening some to make them recede and sharpening others to bring them forward.
Allow your painting to dry fully before varnishing to protect those beautiful, expressive brushstrokes

PENCIL GUIDE
Understanding Pencil Grades from H to B
From first sketch to finished drawing — learn pencil grades, line control, and shading techniques.
Explore the Full Guide
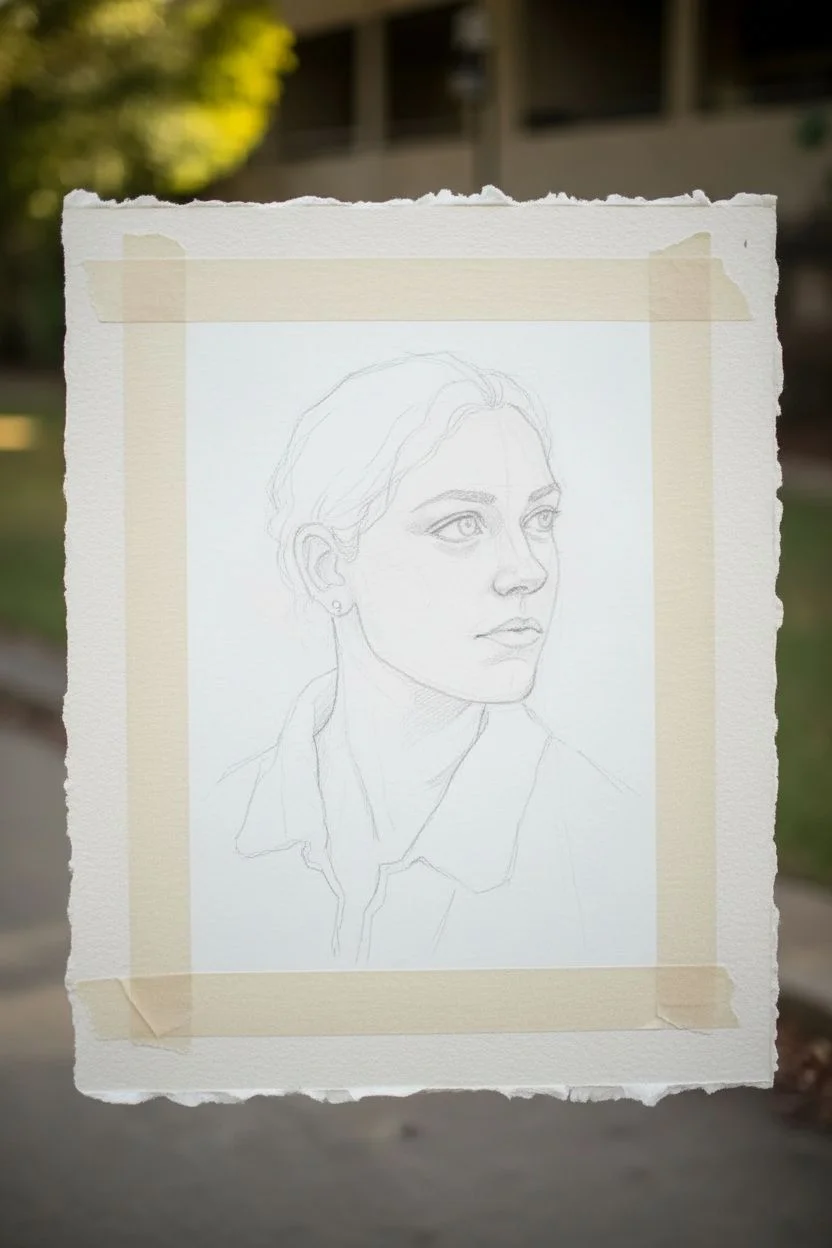
Self-Portrait With Hands in the Frame
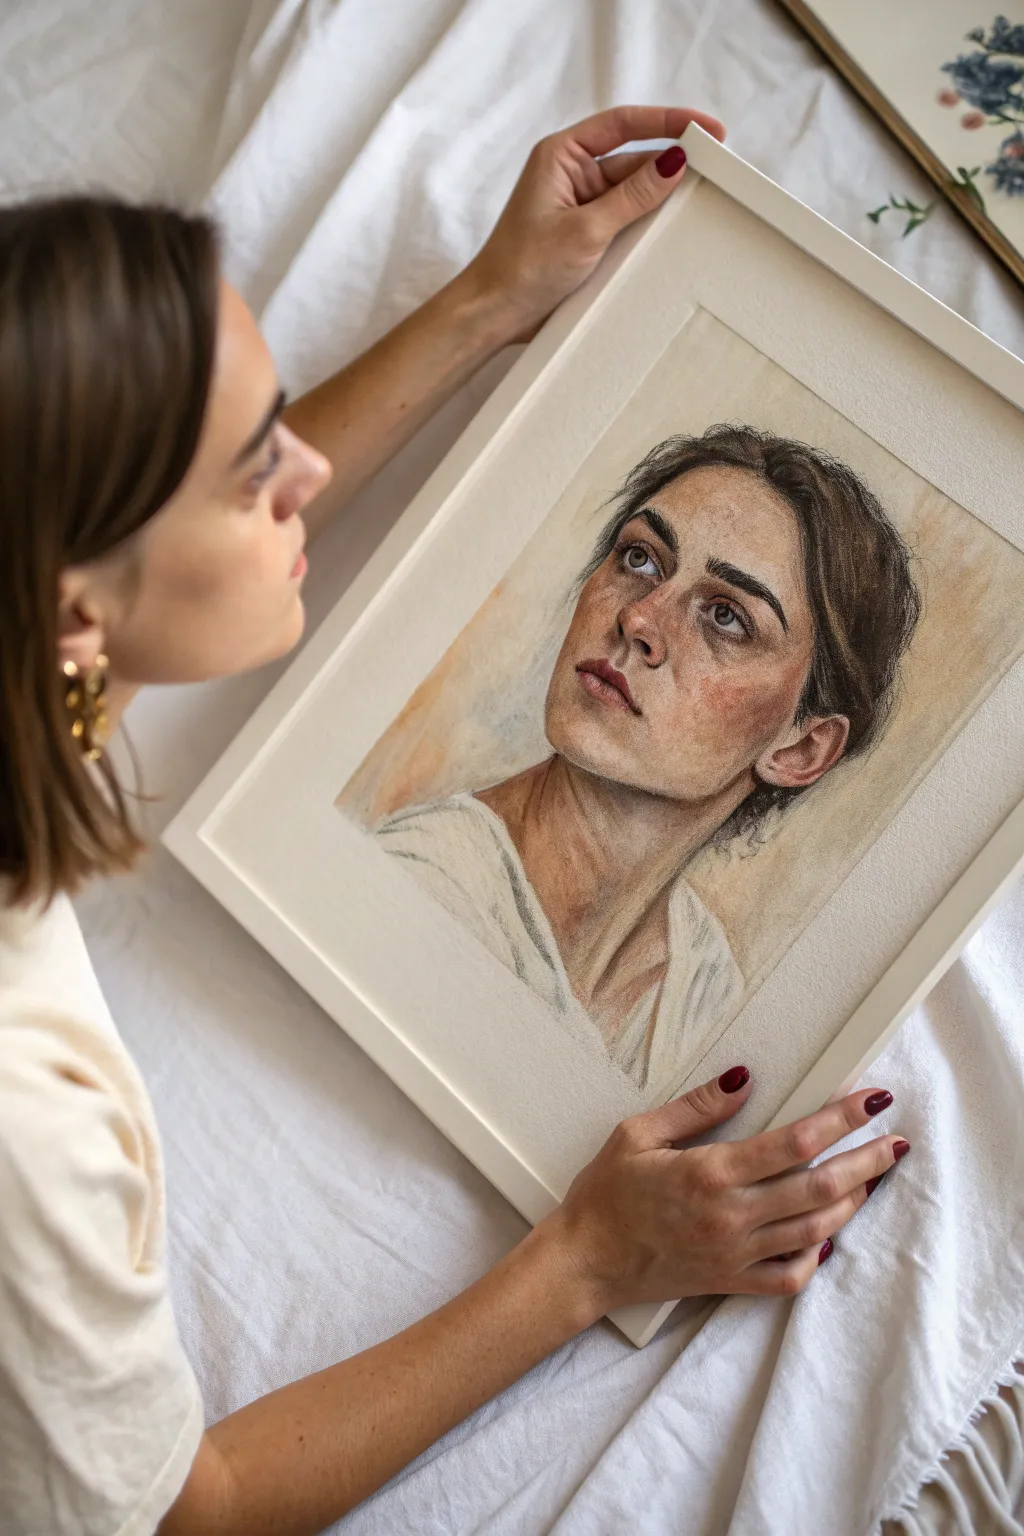
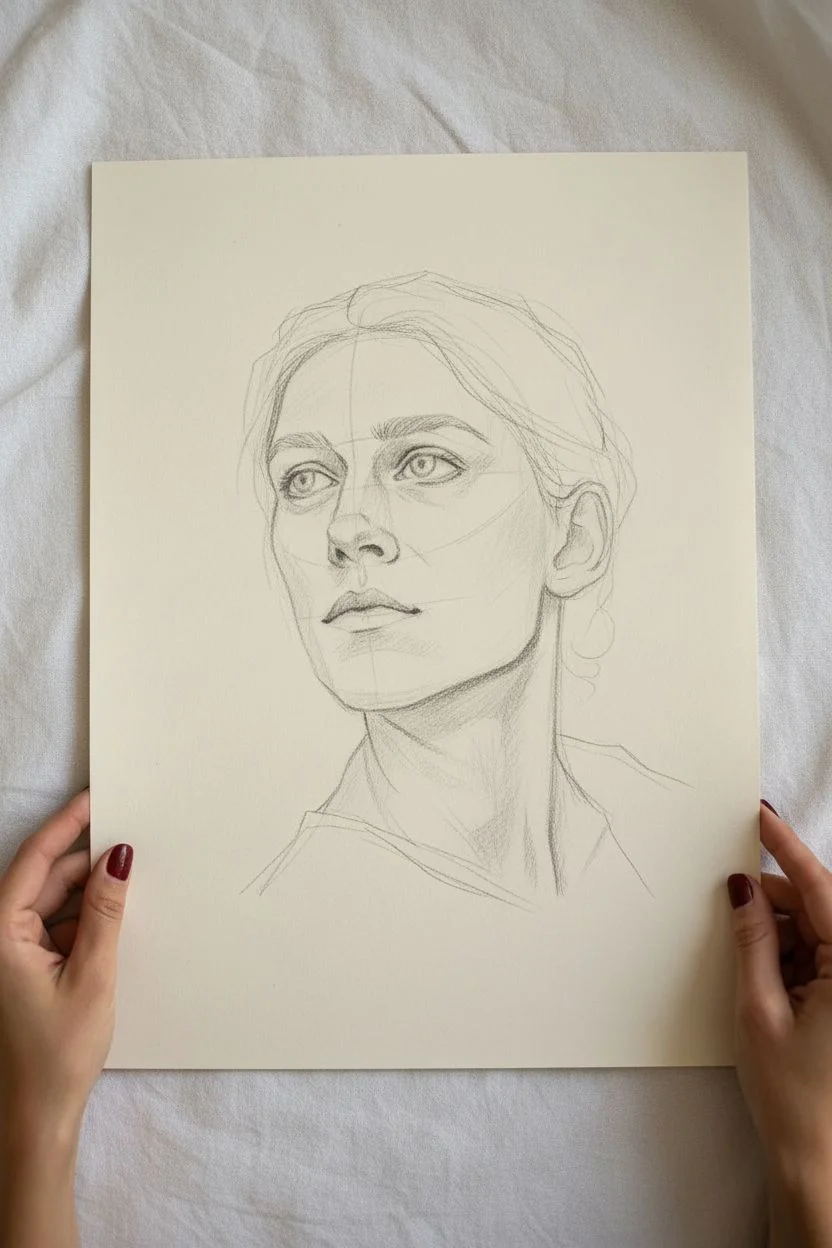
Capture a moment of quiet reflection with this expressive self-portrait study, focusing on the upward tilt of the head and the play of light on skin. Using a combination of charcoal and pastels creates a warm, textured finish that feels both classical and immediate.
Step-by-Step
Materials
- Toned sketching paper (cream or tan)
- Willow charcoal sticks
- Compressed charcoal pencil (soft/dark)
- White charcoal or white pastel pencil
- Sanguine or terra cotta pastel pencil
- Kneaded eraser
- Blending stump (tortillon)
- Workable fixative spray
- White or natural wood frame with mat
Step 1: Drafting the Composition
-
Establish the Head Angle:
Begin with a sharpened willow charcoal stick to lightly sketch an oval for the head. Crucially, tilt the axis diagonally to capture the upward gaze seen in the reference timelessly. Draw a centerline that curves up and to the left, following the nose’s direction. -
Map Facial Features:
Mark horizontal guidelines for the eyes, nose, and mouth. Because the head is tilted back, the distance between the nose and mouth will appear slightly elongated, while the forehead may seem foreshortened. Sketch the large shapes of the eyes looking upward. -
Refine the Contours:
Strengthen the jawline and neck muscles. The neck should show tension, twisting slightly to support the head’s position. Sketch the rough outline of the hair and the collar of the shirt to ground the portrait.
Value Check
Squint your eyes frequently while working. If the features disappear, your darks aren’t dark enough. Add compressed charcoal to the deepest crevices for instant pop.
Step 2: Developing Values and Form
-
Lay Down Core Shadows:
Using the side of your charcoal stick, gently block in the darkest areas: under the jawline, inside the eye sockets, and the shadowed side of the nose. Keep this layer light and airy for now. -
Blend Mid-Tones:
Smudge the charcoal gently with a blending stump or your finger to create soft grey mid-tones. This establishes the skin’s base texture without making it look too polished or plastic. -
Add Warmth with Sanguine:
Introduce the sanguine or terra cotta pencil. Apply this warm tone to the cheeks, tip of the nose, lips, and eyelids. I like to hatch this color loosely over the charcoal to create a vibrant, life-like skin tone. -
Define the Eyes:
Switch to the compressed charcoal pencil for sharp details. unexpected outlining the iris and pupil. Leave a tiny speck of white paper for the catchlight to bring the eyes to life. -
Sculpt the Nose and Mouth:
Darken the nostrils and the line between the lips. Use the sanguine pencil to fill the lips, layering a bit of charcoal on top for the darker corners of the mouth.
Step 3: Texture and Highlights
-
Detail the Hair:
Use broad strokes of willow charcoal for the hair mass. Don’t draw every strand; instead, look for clumps of shadow and light. Darken the area behind the ear to push the neck forward. -
Introduce Highlights:
Take your white charcoal or pastel pencil. Apply strong highlights to the bridge of the nose, the brow bone, the cheekbones, and the white of the eyes specifically where the light hits. -
Refine Skin Texture:
Add freckles or skin irregularities using light taps of the sanguine and charcoal pencils. This adds the realism seen in the project image. -
Sketch the Clothing:
Keep the clothing very loose and sketchy. Use simple gesture lines to suggest the folds of the fabric, leaving much of the paper untouched to prioritize the face.
Color Pop
Use a touch of muted blue pastel in the shadow beneath the chin. This cool tone contrasts beautifully against the warm sanguine cheeks and adds depth.
Step 4: Finishing Touches
-
Clean Up Edges:
Use the kneaded eraser to pick up stray smudge marks around the head, essentially ‘drawing’ negative space to sharpen the profile. -
Background Atmosphere:
Lightly scumble some ochre or warm pastel dust into the background behind the head. This separates the subject from the page without creating a solid background. -
Seal the Drawing:
Spray the artwork with a workable fixative in a well-ventilated area to prevent the charcoal from smearing. -
Frame the Work:
Once dry, mount the drawing behind a clean white mat and place it into a natural or white wood frame to complement the organic tones of the sketch.
Hang your finished self-portrait in a well-lit spot where the subtle textures can truly shine
Self-Portrait With Patterned Clothing
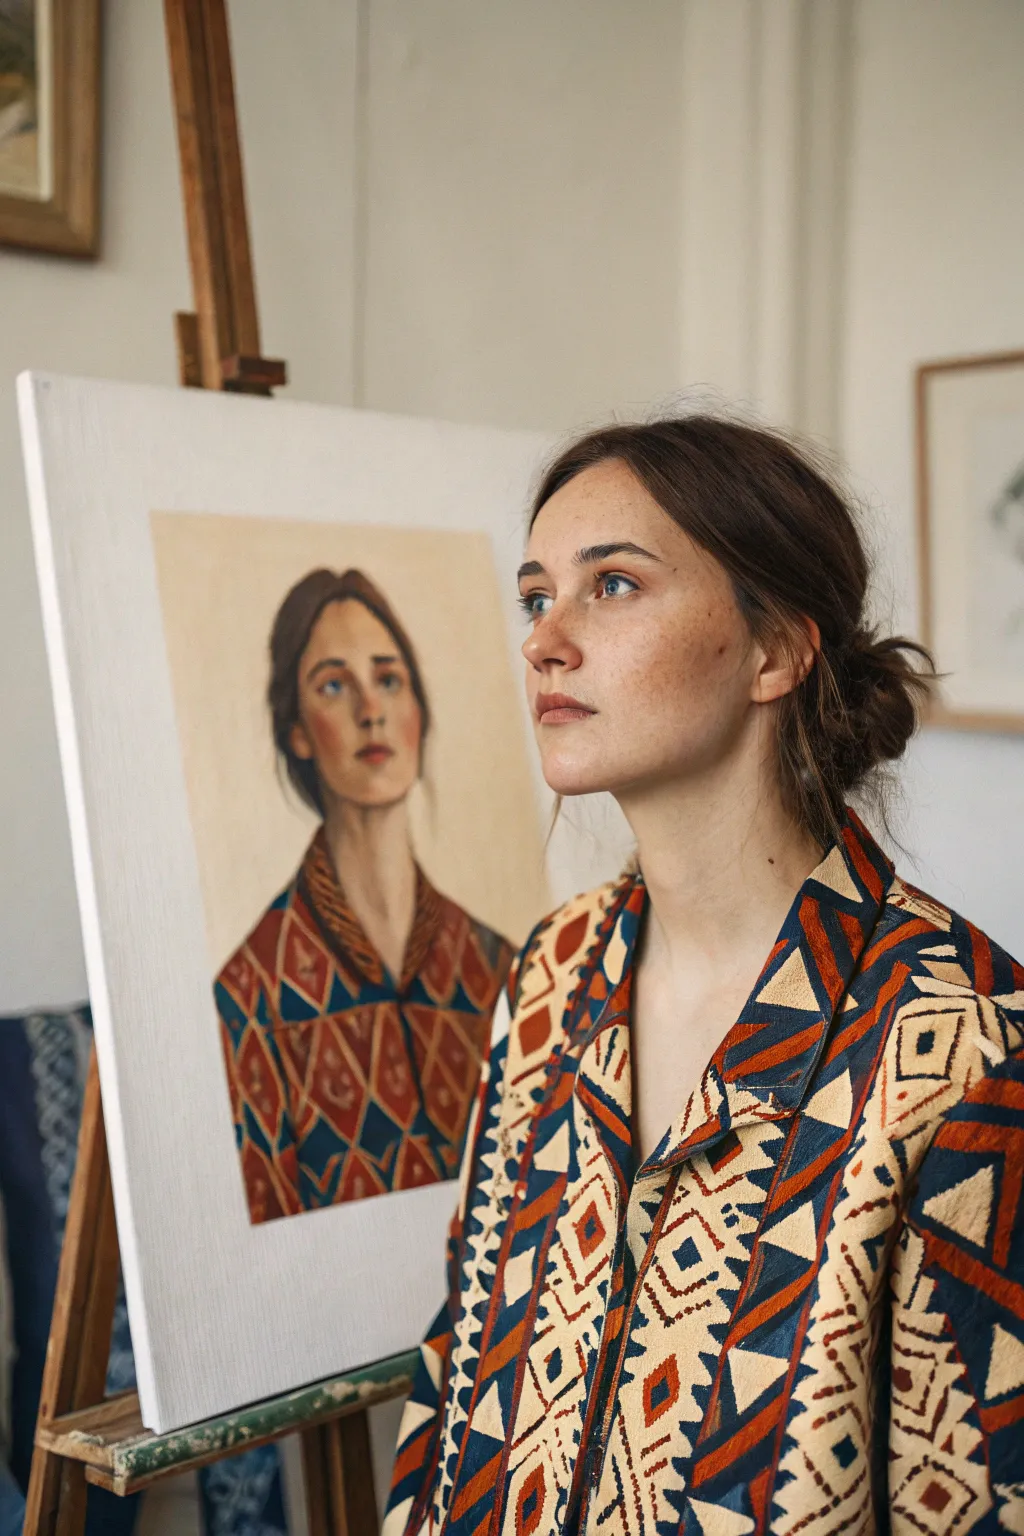
This project explores the fascinating relationship between a subject and what they wear, focusing on capturing intricate fabric patterns in oil. You’ll create a serene, classical self-portrait where the detailed geometry of your clothing balances soft facial features.
Step-by-Step Guide
Materials
- Primed stretched canvas (approx. 16×20 inches)
- Oil paints (Titanium White, Yellow Ochre, Burnt Sienna, Cadmium Red, Ultramarine Blue, Ivory Black)
- Oil painting medium (linseed oil or Liquin)
- Odorless mineral spirits
- Assorted hog hair brushes (filberts sizing 2-8)
- Fine synthetic liner brush (size 00 or 0)
- Glass or wood palette
- Palette knife
- Mahler stick (optional for steadying hand)
- Reference photo of yourself in patterned clothing
Step 1: Laying the Foundation
-
Prepare the canvas tone:
Begin by applying a thin wash of Yellow Ochre mixed with mineral spirits across the entire white canvas. This warm undertone will help unify the colors later and prevents white canvas from showing through. -
Sketch the major masses:
Using a small brush and thinned Burnt Sienna, sketch the basic oval of the head and the triangular shape of the shoulders. Focus on placement—ensure the head isn’t floating too high; anchor it with the neck and torso. -
Refine the features:
Within the head shape, mark the eye line, nose base, and lip line. Don’t get caught up in details yet; just map out the proportions to ensure your likeness will be accurate. -
Block in facial shadows:
Mix a shadow tone using Burnt Sienna and a touch of Ultramarine Blue. Paint the shadow shapes under the nose, the eye sockets, and the side of the face away from the light source. -
Block in the hair:
Using a mixture of Burnt Umber or Black, block in the general shape of the hair. Keep the edges soft where the hair meets the background to suggest volume rather than a cutout shape.
Pattern looking flat?
Check your edges. If pattern lines are too sharp everywhere, the fabric looks like a sticker. Blur the pattern slightly where the body curves away to create depth.
Step 2: Modeling the Face
-
Mixing skin tones:
Prepare a gradient of flesh tones on your palette. I usually mix a mid-tone with White, Yellow Ochre, and a tiny bit of Cadmium Red, then create lighter and darker variations from there. -
Developing the light side:
Apply the mid-tones to the lit side of the face. Paint in planes—think of the forehead, cheekbone, and chin as distinct surfaces catching the light. -
Integrating the features:
Refine the eyes, nose, and mouth. Remember that the whites of the eyes are rarely pure white; use a greyish-blue mix to make them sit back in the sockets. -
Softening transitions:
Using a clean, dry filbert brush, gently blend the edges between your shadow and light shapes. You want a soft transition, known as ‘sfumato,’ particularly around the cheeks and jawline.
Step 3: The Patterned Clothing
-
Map the garment structure:
Before painting the pattern, paint the underlying structure of the shirt or jacket. Define the lapels, the V-neck opening, and the way the fabric folds over the shoulders. -
Base color application:
Paint the local color of the fabric sections. In this reference, block in the darker blue/black triangular areas and the reddish-brown sections first, treating them like a puzzle. -
Establishing the geometry:
Once the base colors are tacky but not fully dry, use a smaller brush to sharpen the geometric lines. The pattern should follow the fold of the cloth; patterns curve around the volume of the body. -
Adding the lighter pattern details:
Mix a warm, creamy off-white. Using a fine liner brush or the edge of a small flat brush, paint the intricate zigzag and diamond patterns over the darker base layers. -
Pattern perspective:
Ensure the pattern gets smaller and more compressed as the fabric turns away from the viewer or folds into the armpit area. This compression sells the illusion of 3D form. -
Shadowing the pattern:
Glaze a thin, dark transparent layer over parts of the pattern that fall into shadow (like under the collar). The pattern shouldn’t be equally bright everywhere.
Texture Play
Use a palette knife to apply the paint for the clothing pattern. The thick impasto texture will contrast beautifully against the smooth brushwork of the face.
Step 4: Background and Final Touches
-
Painting the background:
Mix a neutral cream or beige tone similar to the reference. Paint the background carefully around the head, using this step to ‘cut in’ and refine the silhouette of the face and hair. -
Refining the hair:
Add a few highlights to the hair using a lighter brown mix, focusing on where the light hits the crown. Add a few stray ‘flyaway’ hairs for realism. -
Checking values:
Step back from your easel. Check the contrast between the clothing pattern and the face. The clothing is busy, so keep the face rendering somewhat soft to ensure it remains the focal point. -
Final highlights:
Add the brightest highlights: a dot in the eyes (the catchlight), the tip of the nose, and the bottom lip. This makes the portrait come alive.
This approach allows you to balance intricate design with soulful portraiture create a piece that feels both modern and timeless


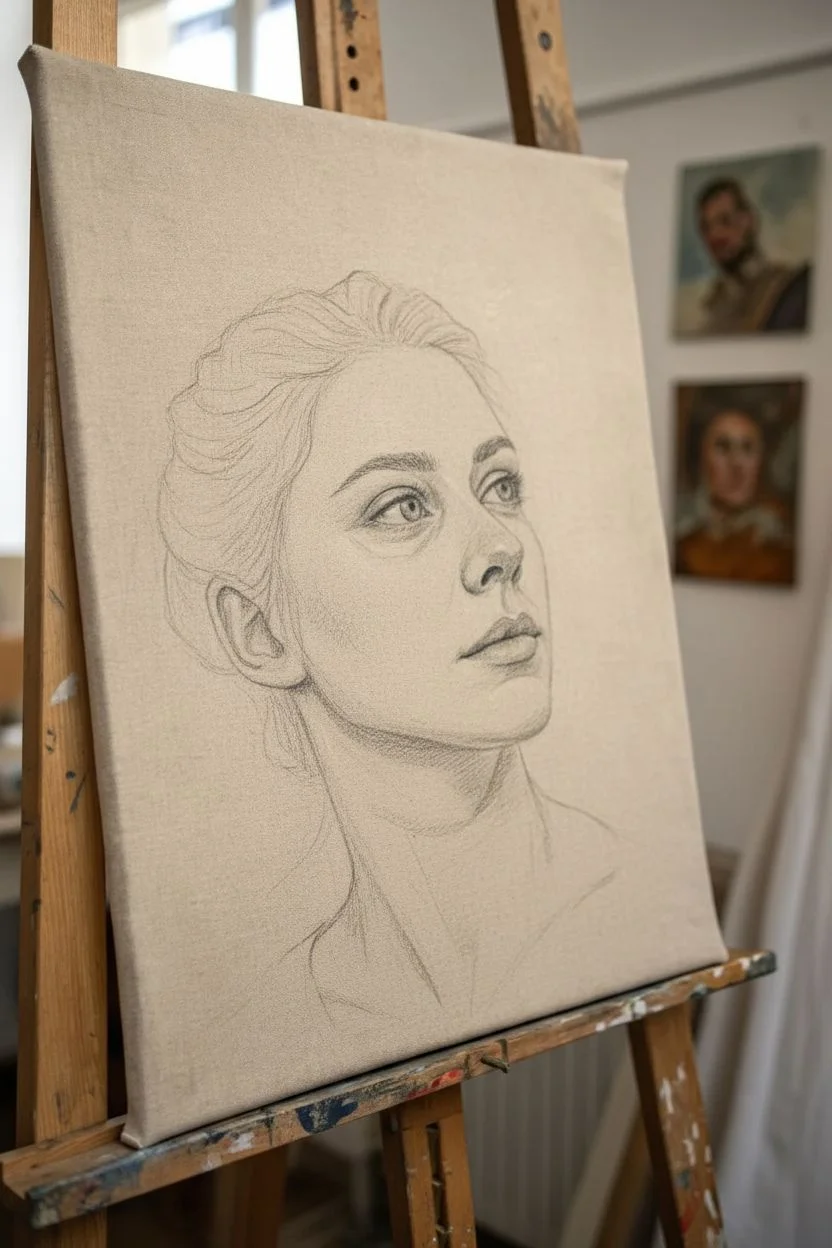
Self-Portrait With a Thought-Burst Background
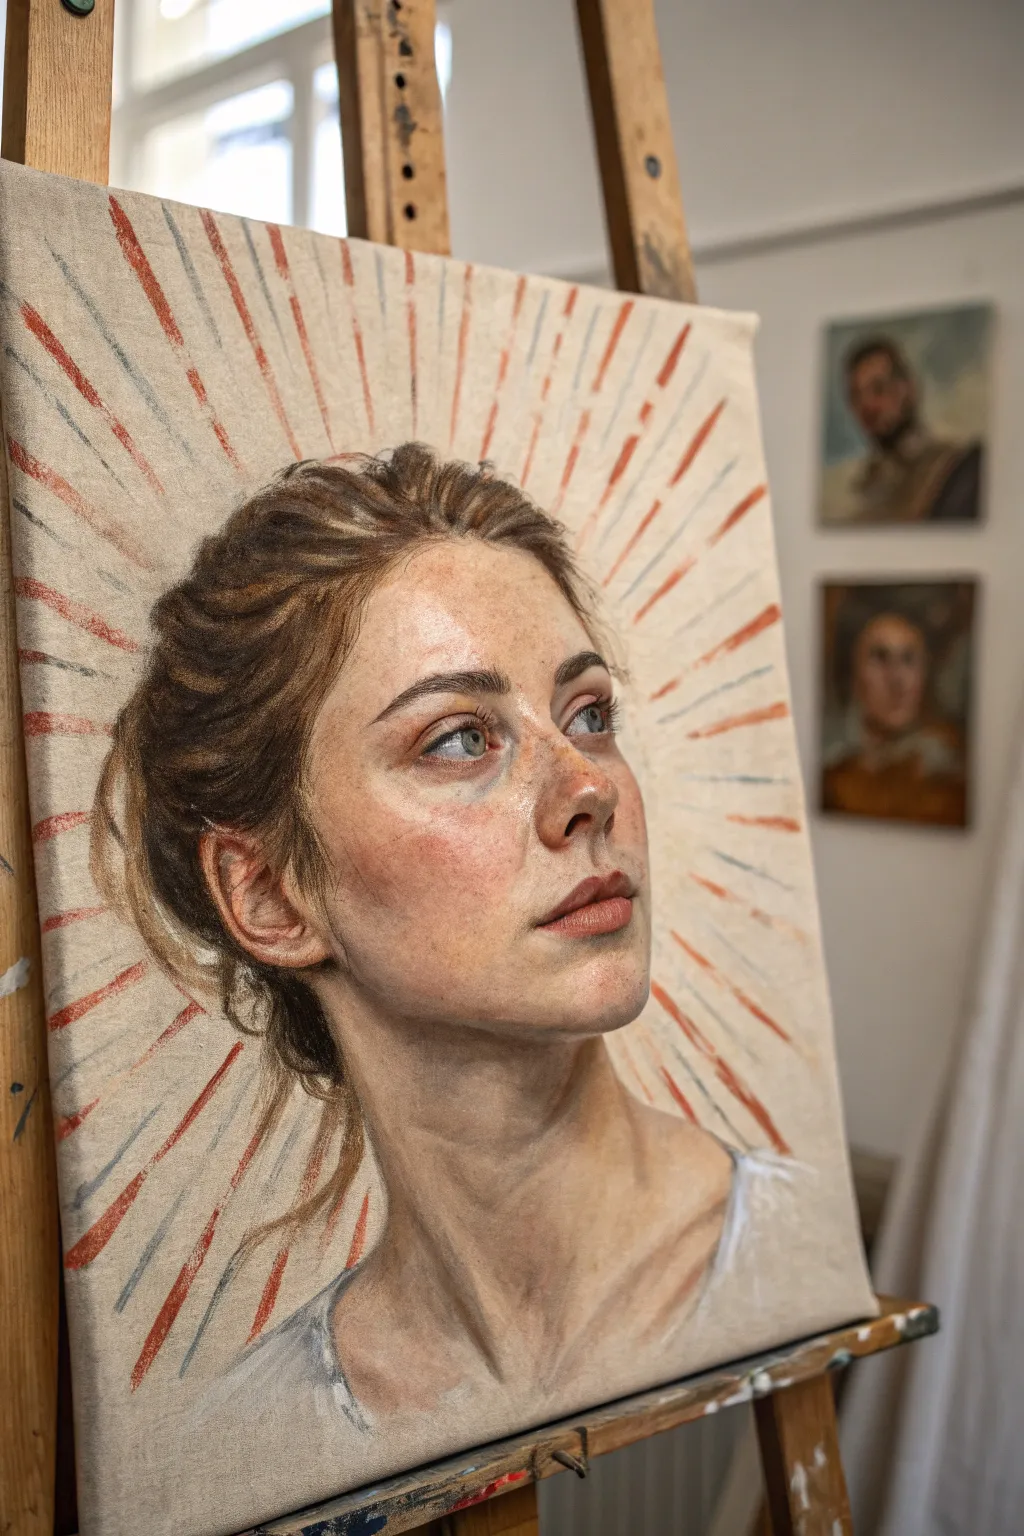
Capture the feeling of a fleeting idea or spiritual moment with this striking self-portrait concept. By combining a highly realistic facial study with a graphic, radiating background pattern, you create a powerful contrast that draws the eye directly to the subject’s gaze.
Detailed Instructions
Materials
- Stretched canvas (medium grain)
- Oil paints (Titanium White, Yellow Ochre, Burnt Sienna, Alizarin Crimson, Ultramarine Blue, Cadmium Red)
- Oil painting medium (linseed oil or Liquin)
- Odorless mineral spirits
- Assorted hog bristle brushes (filberts and flats)
- Fine detail synthetic brushes (rounds)
- Palette and palette knife
- Pencil or charcoal for sketching
- Mirror or high-quality reference photo
Step 1: Laying the Foundation
-
Prepare the canvas:
Start with a raw or lightly primed canvas to maintain that textured, organic look visible in the background. If using a pre-primed white canvas, you might want to apply a very thin wash of raw umber to kill the bright white, but keep it subtle. -
Sketch the composition:
Using a pencil or vine charcoal, lightly sketch the outline of the head, neck, and shoulders. Position the head slightly off-center to allow room for the ‘thought burst’ rays later. Pay close attention to the angle of the chin and the upward gaze. -
Block in shadows:
Mix a thin wash of Burnt Sienna and Ultramarine Blue to create a warm dark tone. Establish the darkest areas first: the pupils, nostrils, the shadow under the chin, and the deep creases of the hair. This anchors the drawing before you start with opaque color.
Step 2: Painting the Portrait
-
Mix skin tones:
Prepare a gradient of flesh tones on your palette. For this specific fair complexion, mix Titanium White with varying amounts of Yellow Ochre and a touch of Cadmium Red. Create cool transition tones by adding tiny amounts of Ultramarine Blue or green to your mid-tones. -
Apply base skin layers:
Start painting the face using a larger filbert brush. Lay down the mid-tones on the cheeks and forehead. Don’t worry about blending perfectly yet; focus on getting the color values right. -
Refine the features:
Switch to smaller brushes. Paint the eyes carefully, keeping the whites slightly greyed rather than pure white to add realism. For the irises, layer transparent blues or greens over the dark base you established earlier. -
Add warmth and flushed areas:
This portrait features distinct redness around the eyes, nose, and lips. Glaze a mixture of Alizarin Crimson and a little medium over these areas to create that ‘blood under the skin’ look. Soften the edges with a clean, dry brush. -
Detail the hair:
Avoid painting every single strand. Instead, paint the hair in mass shapes of dark brown and lighter auburn. Only add individual strands at the hairline and where the light hits the crown, lifting the brush at the end of the stroke for a tapered effect. -
Refine skin texture:
I like to use a small detailed round brush to stipple tiny freckles across the nose and cheeks using a watered-down Burnt Sienna. Keep them irregular and varied in opacity for a natural appearance. -
Paint the neck and shoulders:
Keep the brushwork on the neck and clothing looser than the face. Use broad, directional strokes for the neck muscles and a rough scrubbing motion for the suggestion of a shirt. This looseness helps direct focus back to the face.
Muddy Skin Tones?
If facial colors look dirty, you likely over-blended warm and cool tones. Let the muddy layer dry completely, then apply fresh, clean opaque paint on top without overworking.
Step 3: The Thought-Burst Background
-
Plan the rays:
Visualize a center point behind the head where the energy radiates from. Using a straightedge (or just freehand for a more organic feel), mark light guidelines radiating outward 360 degrees. -
Mix the ray colors:
You need two distinct colors for the rays: a warm, rusty red (Cadmium Red dull with a little Earth tone) and a cool, muted blue-grey. Keep the paint relatively dry and stiff. -
Paint the red rays:
Using a flat bristle brush, paint the red dashes. Apply them with a ‘scumbling’ technique—dragging the brush flat against the canvas grain so some of the underlying canvas texture shows through. These lines shouldn’t be solid; let them break and fade. -
Add the blue accents:
Intersperse the red rays with thinner, more subtle blue-grey dashes. These act as a visual cooler against the warmth of the face and the red rays, adding depth to the halo effect. -
The white halo:
Mix a thick, opaque Titanium White. Carefully paint around the immediate silhouette of the head, cutting into the background rays slightly. This ‘halo’ separates the darker hair from the busy background and enhances the glowing effect. -
Final highlights:
Add the brightest highlights last: a crisp dot of white in the eyes (the catchlight), the tip of the nose, and the wetness on the lower lip. This brings the portrait to life instantly.
Level Up: Gold Leaf
For a Byzantine icon feel, swap the red painted rays for genuine gold leaf. Apply sizing in radial strips and lay the leaf down for a shimmering, metaphysical background.
Step back and admire how the radiating lines amplify the quiet intensity of the expression you have captured
Self-Portrait With Symbolic Objects Around You
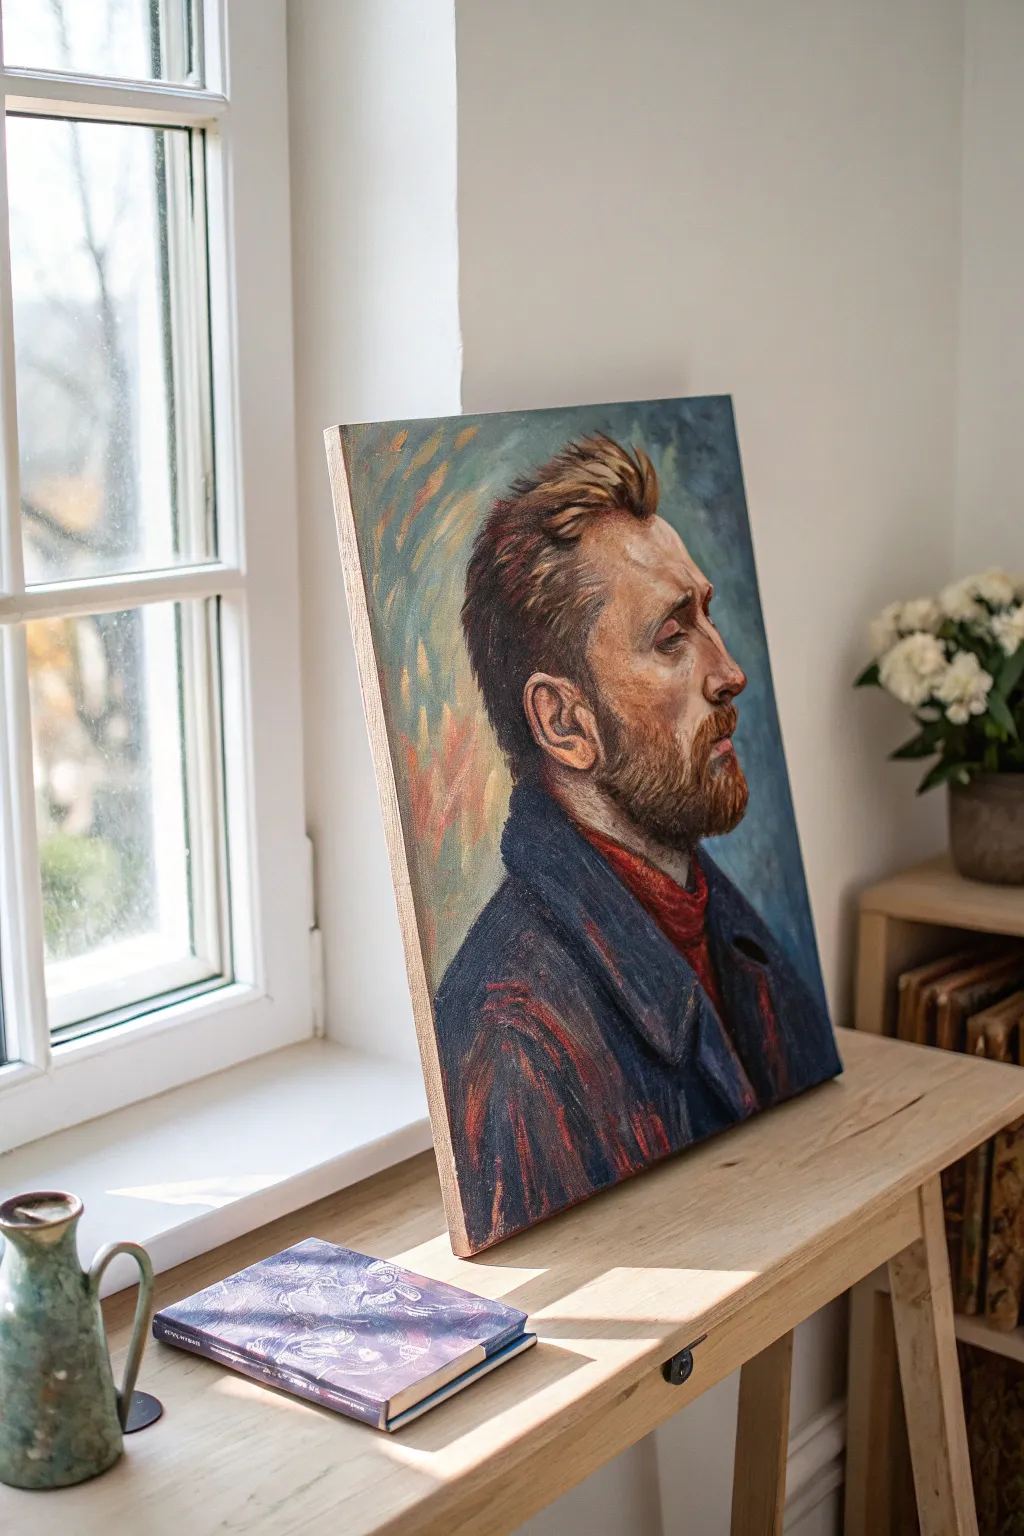
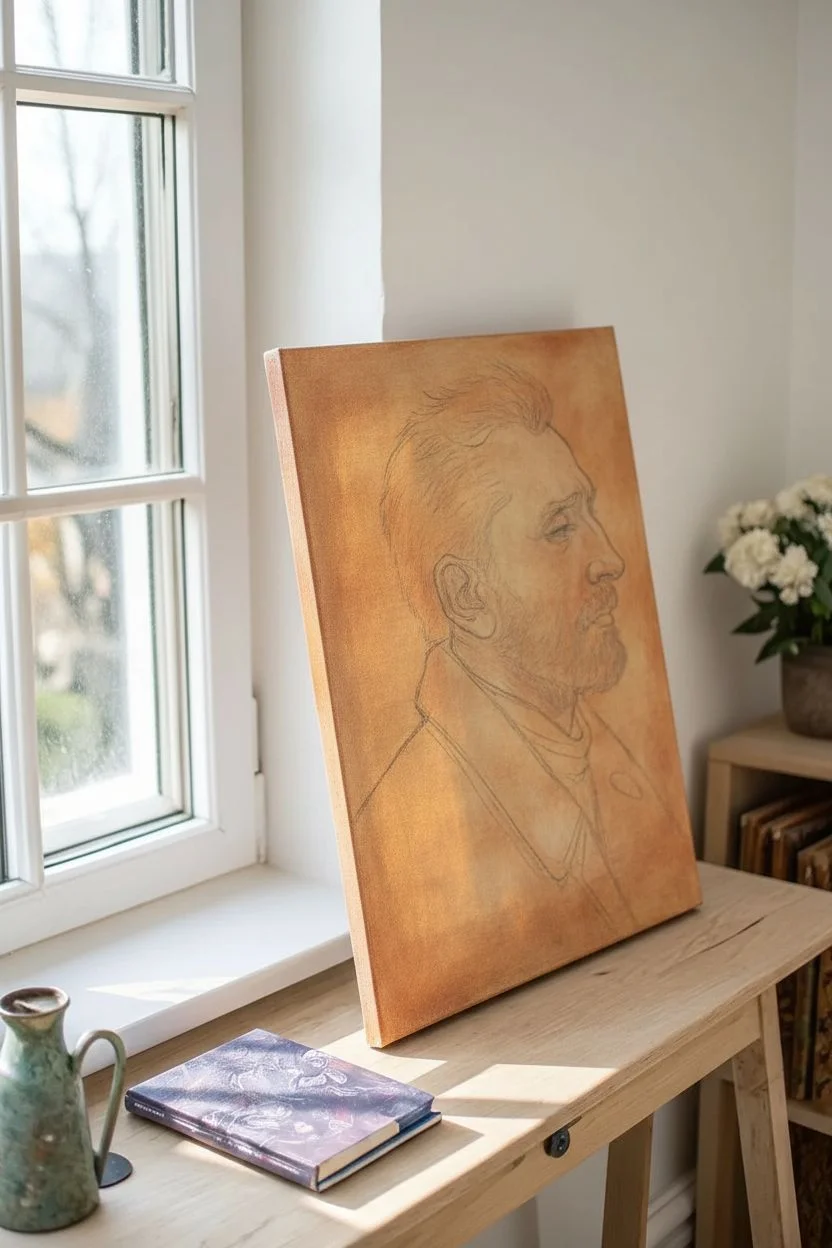
This project guides you through creating a striking, emotive profile portrait inspired by the thick brushwork and intense moods of Vincent van Gogh. You will learn to use visible strokes and a restricted, earthy palette to build a character-rich study that feels both classic and raw.
Step-by-Step Tutorial
Materials
- Stretched canvas or canvas board (approx. 16×20 inches)
- Acrylic or oil paints (Burnt Sienna, Yellow Ochre, Ultramarine Blue, Cadmium Red, Titanium White, Raw Umber, Alizarin Crimson)
- Assorted hog bristle brushes (filberts and flats, sizes 4-10)
- Small round brush for details
- Palette knife
- Palette for mixing
- Reference photo of a side profile (self or model)
- Graphite pencil for sketching
- Easel or table support
- Rags or paper towels
Step 1: Planning and Underpainting
-
Arrange your reference:
Set up a mirror or take a photo of your profile against a plain background. For this specific look, aim for a serious, contemplative expression with the head turned completely to the side. -
Sketch the outline:
Using a graphite pencil or a brush with thinned Raw Umber, lightly map out the composition on your canvas. Focus on the large shapes: the oval of the head, the slope of the shoulders, and the sharp angle of the jawline. -
Check proportions:
Pay close attention to the ear placement; it should sit roughly between the height of the eye and the nose base. Ensure the neck is thick enough to support the head realistically. -
Apply a toned ground:
Cover the entire canvas with a wash of diluted Burnt Sienna or Yellow Ochre. This warm undertone will peek through later layers, adding a glow typical of post-impressionist works.
Pro Tip: Directional Strokes
Follow form with your brushstrokes. Curves on the cheek, straight lines on the nose. This ‘sculpts’ the face with paint rather than just coloring it in.
Step 2: Blocking in Color
-
Mix your skin tones:
Prepare three main flesh values: a shadow tone (Burnt Sienna + touch of Blue), a mid-tone (Ochre + Sienna + White), and a highlight (White + touch of Ochre). Keep the mixtures slightly unblended on the palette. -
Paint the shadows:
Start applying the darkest areas of the face—the eye socket, under the nose, the jawline shadow, and the inner ear—using the shadow tone and a filbert brush. -
Develop the coat:
Mix Ultramarine Blue with a little Burnt Sienna to create a deep, rich navy. Block in the coat collar and shoulders with broad, directional strokes. -
Add the background base:
Choosing a contrasting cool tone, roughly fill in the background. A mix of White, Blue, and a hint of Green creates that atmospheric teal seen in the example.
Step 3: Layering and Texture
-
Build facial structure:
Apply your mid-tones to the cheek, forehead, and neck. Do not smooth the paint perfectly; let the brush marks follow the contours of the face to suggest bone structure. -
Create the beard texture:
Using a smaller flat brush, dab mixtures of Burnt Sienna, Ochre, and Raw Umber onto the jaw and chin. Use short, choppy strokes to mimic the direction of hair growth. -
Add the red accent:
Introduce the red collar or scarf near the neck. Use Alizarin Crimson mixed with a touch of Cadmium Red for a vibrant pop against the dark coat. -
Intensify the background:
Layer short, rhythmic strokes over your background base. Variate the color slightly by adding more Yellow or White to your teal mix, creating a vibrating ‘halo’ effect around the head. -
Refine the hair:
Paint the hair on the head using similar strokes to the beard but longer and more sweeping. Incorporate highlights of Yellow Ochre and White to show the light source hitting the strands.
Troubleshooting: Muddy Colors
If skin tones look gray or muddy, stop blending on the canvas. Place a stroke and leave it alone. Let the eye mix the colors optically.
Step 4: Refining Details
-
Detail the ear:
The ear is a complex shape; define the cartilage with small touches of your highlight mix and deepen the recesses with your darkest brown. It adds crucial realism to a profile. -
Highlight the face:
I like to place the brightest highlights last. carefully apply small dabs of Titanium White and Ochre to the bridge of the nose, the eyelid, and the top of the cheekbone. -
Texturize the clothing:
Add streaks of lighter blue and even touches of red into the dark coat. This ‘broken color’ technique makes the fabric look heavy and worn rather than flat. -
Evaluate the edges:
Look at where the profile meets the background. Soften some edges by pulling the background color slightly over the subject’s outline, so the figure feels settled in the space. -
Final touches:
Step back and assess the painting. Add any final ‘impasto’ (thick paint) marks to areas you want to emphasize, like the forehead or collar, to catch the light.
Allow your painting to dry completely before displaying it as a moody, soulful addition to your space
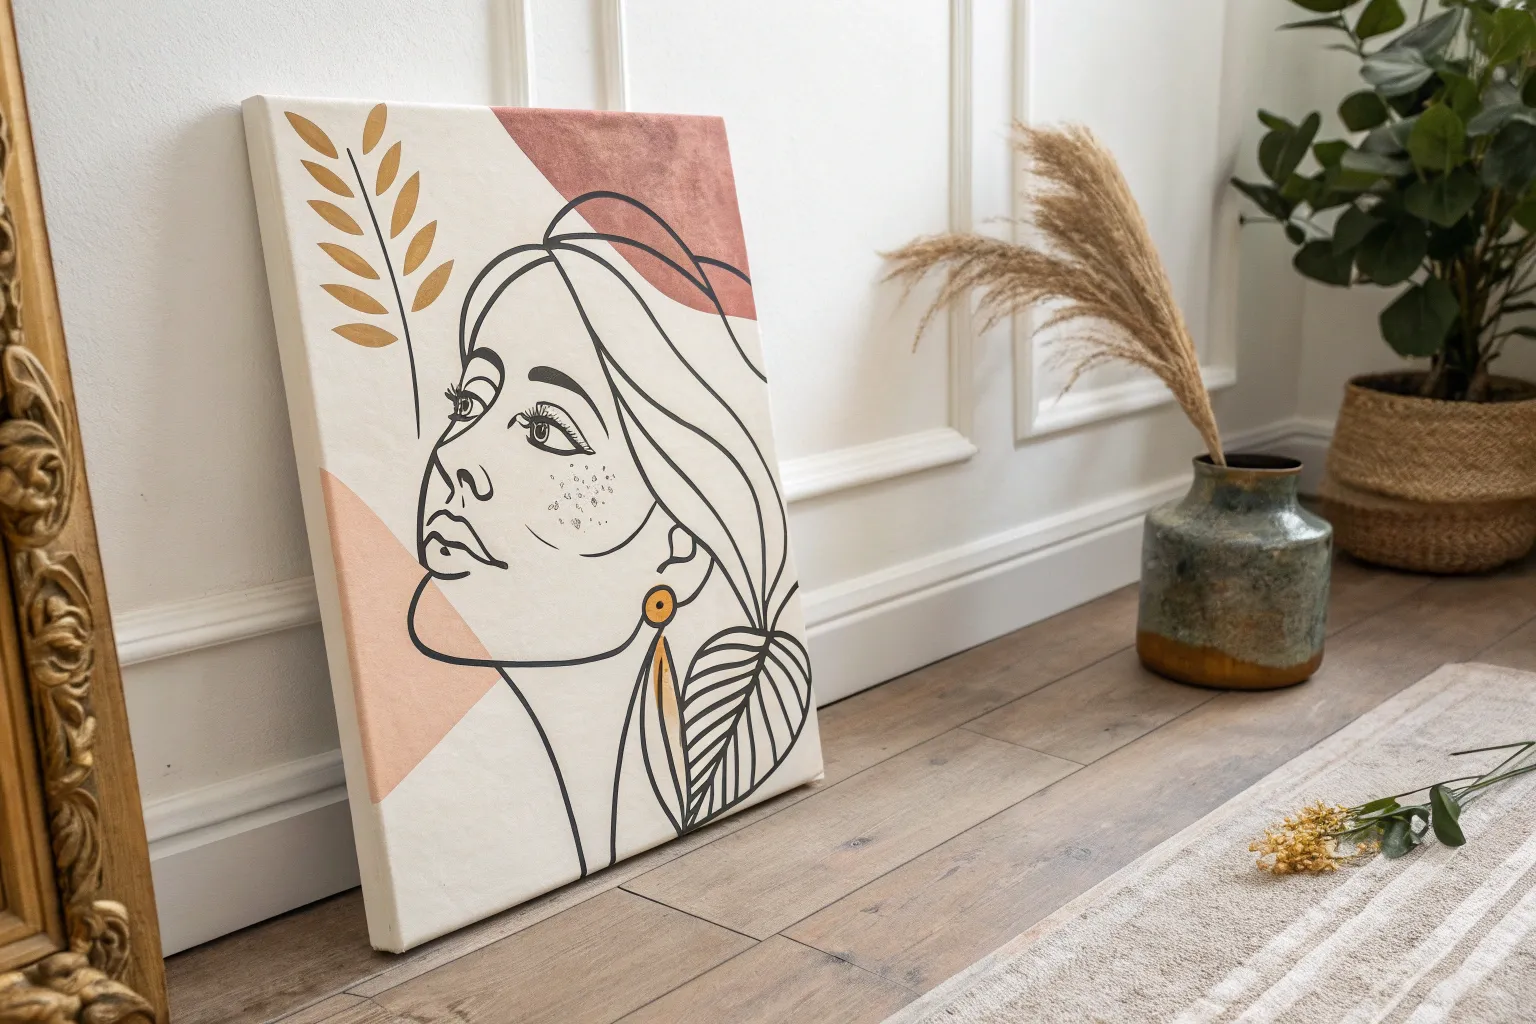
Nature-Crowned Self-Portrait
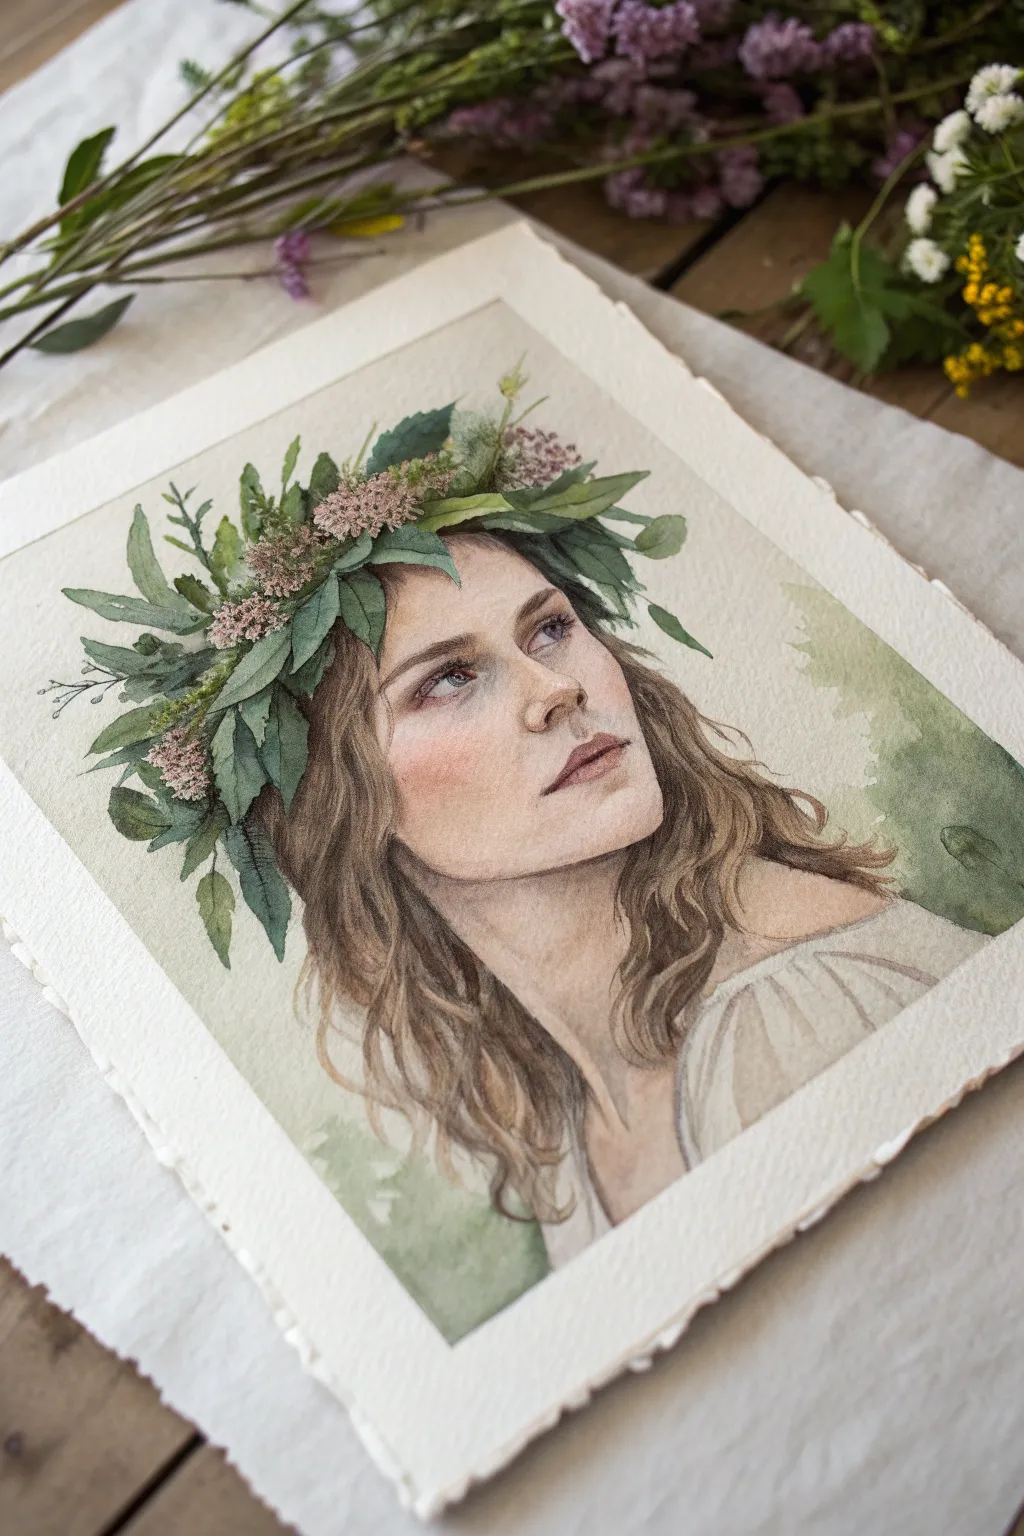
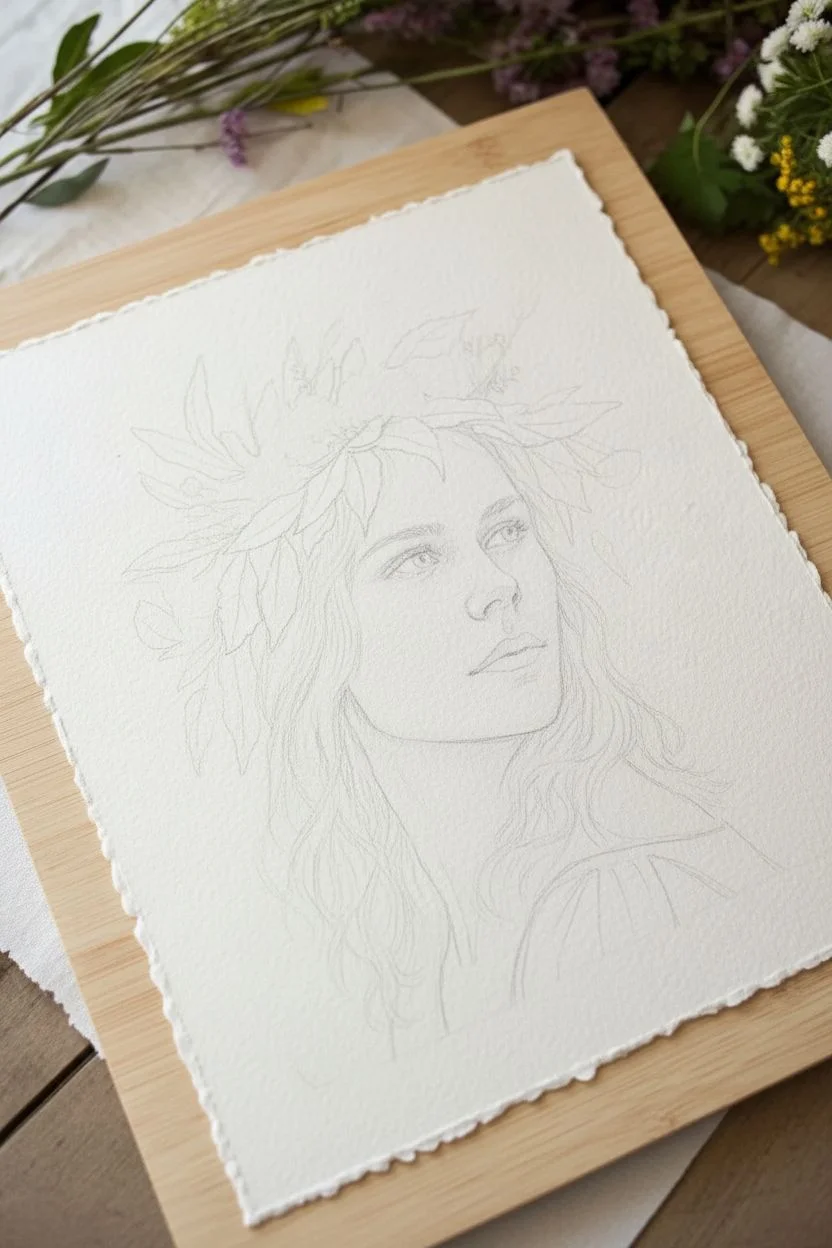
Embrace a connection to the earth with this delicate watercolor self-portrait featuring a lush, leafy crown. The soft washes and detailed botanical elements create a romantic, timeless feel perfect for capturing a serene moment.
How-To Guide
Materials
- Cold press watercolor paper (300 gsm or heavier)
- Pencil (HB or 2B) and kneaded eraser
- Watercolor paints (Sap Green, Hooker’s Green, Alizarin Crimson, Yellow Ochre, Burnt Umber, Ultramarine Blue, Burnt Sienna)
- Round brushes (sizes 2, 6, and 10)
- Masking tape or gummed tape
- Drawing board
- Reference photo of yourself wearing a wreath
Step 1: Drawing and Preparation
-
Prepare the paper:
Begin by securing your watercolor paper to a board. For that classic look seen in the example, you might choose paper with deckled edges and float-mount it later; if so, tape only the very corners or use a block. -
Establish the proportions:
Lightly sketch the oval of the face and the rough placement of the features using an HB pencil. Keep your lines very faint so they don’t show through the transparent watercolor layers later. -
Sketch the crown:
Draw the general shape of the wreath on the head. Don’t draw every single leaf yet; just map out the flow of the greenery and where the flower clusters sit. -
Refine the features:
Carefully draw the eyes, nose, and lips. Pay close attention to the tilt of the head and the upward gaze, as this creates the dreamy mood.
Keep it Fresh
Don’t overwork the greenery. Let the watercolor do the work by dropping two different green shades into a wet leaf shape and letting them bleed naturally.
Step 2: Painting the Skin Tones
-
Mix the base flesh tone:
Create a watery mix of Yellow Ochre and a touch of Alizarin Crimson. Test the color on a scrap piece of paper to ensure it isn’t too saturated. -
Apply the first wash:
Using a size 10 round brush, wash the color over the face and neck, avoiding the eyes and the white of the dress. Use the wet-on-dry technique for control. -
Build facial structure:
While the first layer is still slightly damp, drop in a slightly darker mix (add a tiny bit of Burnt Sienna or Umber) into specific shadow areas: under the eyebrow ridge, the side of the nose, and under the chin. -
Deepen the shadows:
Once the initial layers are dry, mix a cooler shadow tone using Alizarin Crimson and a touch of Ultramarine Blue. Glaze this under the jawline and mostly on the shadowed side of the face to create volume. -
Add the blush:
I like to dilute some Alizarin Crimson and gently glaze it onto the cheeks and the tip of the nose for that fresh, outdoor flush. Soften edges with a clean, damp brush.
Step 3: Hair and Eyes
-
Paint the eyes:
Use a size 2 brush for the eyes. Paint the iris with your chosen color, leaving a tiny white spot for the highlight. Use a dark brown mix for the lash line and pupils, keeping it crisp. -
Block in hair color:
Mix a base hair color (Burnt Umber and Yellow Ochre). Paint the hair in sections, following the wave pattern. Leave gaps for highlights where the light hits the curls. -
Add hair definition:
Once the base is dry, use a size 6 brush with a darker brown to paint individual strands and deeper shadows between the waves, particularly near the neck.
Metallic Magic
Once the painting is fully dry, use gold watercolor or ink to chase the veins of the leaves or outline the halo of the crown for an Art Nouveau touch.
Step 4: The Floral Crown
-
Base layer for leaves:
Mix a light Sap Green. Paint the leaf shapes, varying the pressure on your brush to get tapered tips. Let some leaves overlap the hair slightly. -
Add depth to greenery:
While some leaves are wet, drop in Hooker’s Green or a blue-green mix at the base of the leaves. Paint darker leaves behind the light ones to create density. -
Paint the flowers:
Use a stippling motion with a small brush and a mix of Alizarin Crimson and white gouache (or dilute watercolor) to create the texture of the small pink flower clusters. -
Refine botancial details:
Use your smallest brush to add thin stems and veins to the leaves using a dark green mix.
Step 5: Final Touches
-
Background wash:
Mix a very watery green wash. Loosely apply it behind the head and shoulders, letting it fade out to white at the edges for an atmospheric look. -
Clothing suggestions:
Paint the dress very simply with pale grey or tan shadows to indicate folds, keeping the focus on the face and crown. -
Final assessment:
Step back and check your values. Deepen the darkest shadows (nostrils, corners of mouth, deepest hair shadows) to make the portrait pop.
Allow your painting to dry completely before framing it to preserve the delicate textures of the paper
Broken Reflection Self-Portrait
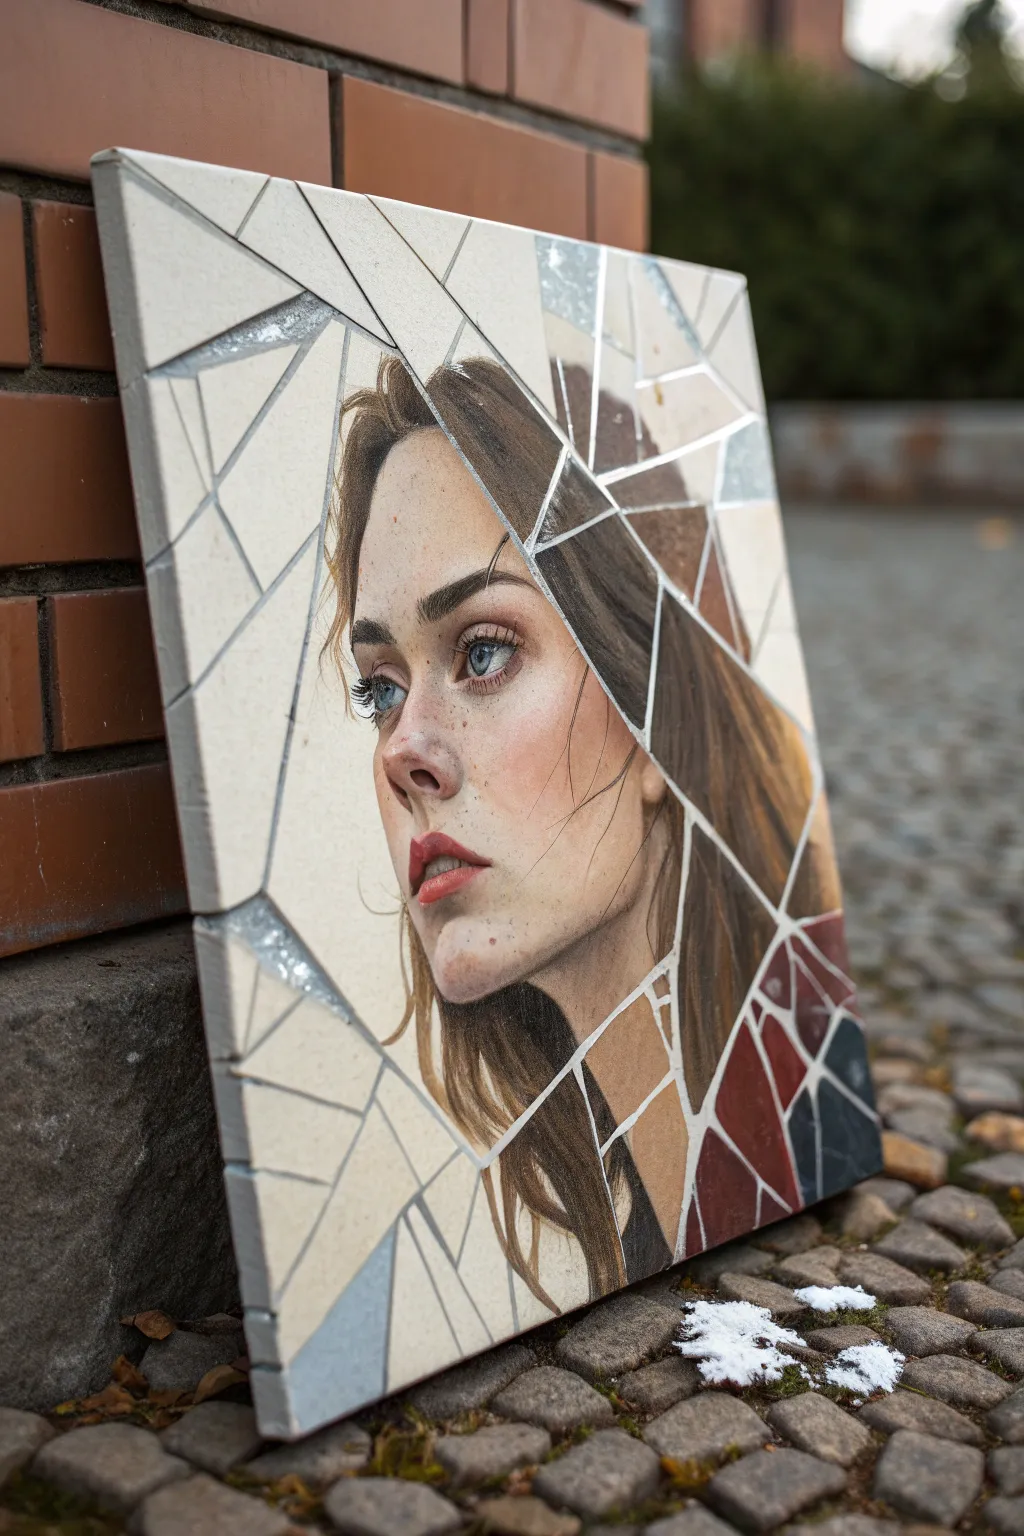

This striking self-portrait concept plays with the idea of a broken reflection, combining realistic portraiture with geometric abstraction. By painting distinct shards, you create a compelling visual metaphor that transforms a standard face study into a modern, edgy masterpiece.
Detailed Instructions
Materials
- Square canvas (stretched or canvas board)
- Acrylic paints (Skin tones, Burnt Umber, Ultramarine Blue, Titanium White, Red Oxide)
- Graphite pencils (HB and 2B)
- Ruler or straight edge
- Masking tape (low tack)
- Synthetic brushes (various sizes: flat, filbert, and a fine liner)
- Reference photo of your face looking slightly away/up
- Palette knife (optional for mixing)
- High-gloss varnish (optional)
Step 1: Planning and Sketching
-
Prepare the Concept:
Start by taking a reference photo of yourself. A three-quarter view looking slightly upward works beautifully for this composition, as it creates interesting angles that will interact with the ‘shards’ later. -
Map the Fractures:
Before drawing your face, use a ruler and a light pencil to draw a network of sharp, intersecting lines across the canvas. Imagine where a theoretical impact point might be and radiate angular lines outward, creating a mosaic of jagged shapes. -
Sketch the Portrait:
Lightly sketch your face onto the canvas, ignoring the fracture lines for a moment. Ensure the proportions are correct. Once the face is sketched, go back and bold the fracture lines that cut through the face, deciding which ‘shards’ will contain the image and which will be left as negative space or background.
Jagged Lines?
If your hand shakes while painting the thin white crack lines, use a ruler as a guide for your brush, or use an opaque white paint marker for cleaner, sharper lines.
Step 2: Blocking In Color
-
Isolate the Shards:
This is a crucial step for clean edges: Use masking tape to block off the ‘grout’ lines or the white spaces between the shards. If the lines are too thin for tape, simply paint very carefully up to your pencil lines, treating each shard as a mini-canvas. -
Base Tone Application:
Mix a mid-tone skin color. Apply this base layer to the face areas within the shards. Don’t worry about details yet; just get the general color blocked in to establish the silhouette. -
Negative Space:
Paint the background shards in neutral tones—pale creams, greys, or even metallic silver to mimic actual mirror backing. Keep these flat and smooth to contrast with the detailed face.
Add Metallic Flair
Use silver or gold leaf on a few of the non-portrait shards. This enhances the ‘mirror’ concept and catches the light beautifully from different angles.
Step 3: Detailing the Portrait
-
Building Shadows:
Mix Burnt Umber with a touch of Ultramarine Blue to create a deep, cool shadow tone. Paint the shadows under the jaw, around the eyes, and in the hair. I find it helpful to paint ‘through’ the cracks mentally, ensuring the shadow on one shard aligns logically with the shadow on the next. -
Adding Warmth:
Introduce warmer tones (pinks and reds) to the cheeks, nose, and lips. Use a small filbert brush to blend these soft transitions within the rigid boundaries of the jagged shapes. -
Refining the Eyes:
The eyes are the focal point. Use your smallest liner brush for the iris and eyelashes. Add a crisp highlight of pure Titanium White to the pupil to make the eyes look wet and alive. -
Painting the Hair:
Treat the hair as masses of color rather than individual strands initially. Lay down dark browns, then layer lighter chestnut tones on top. Only add fine strands at the very end for texture.
Step 4: The Shattered Effect
-
Defining the Edges:
Once the portrait paint is dry, carefully paint the gaps between the shards. A stark white or a pale cool grey works best to simulate the edge of broken glass or ceramic. -
Creating Depth:
To make the shards look three-dimensional, paint a tiny, thin cast shadow on one side of each ‘crack’ line (example: bottom and right edges) using a watered-down grey glaze. This lifts the shard off the surface visually. -
Displacement (Optional):
For a more realistic broken mirror effect, slightly misalign the image in a few shards. If a line of a jaw passes through a crack, paint it slightly higher or lower in the adjacent shard to simulate light refraction. -
Highlighting Edges:
On the opposite side of your cast shadows (top and left edges of the cracks), ensure the white line is crisp and bright. This acts as the highlight on the thick edge of the ‘glass’.
Step 5: Finishing Touches
-
Review and Correct:
Step back and look at the composition. If a specific shard looks too empty, consider adding a subtle reflection or color gradient to it. -
Final Varnish:
To truly sell the idea of glass, apply a coat of high-gloss varnish over the painted shards, but leave the ‘grout’ lines matte if possible. This difference in sheen adds incredible tactile reality.
Now you have a deeply symbolic piece that turns fragmentation into a beautiful whole
Ink Wash Silhouette Self-Portrait
Capture the essence of a profile with this striking ink wash technique on handmade paper. By combining deep indigo hues with the texture of frayed edges, you create a timeless and atmospheric self-portrait that feels both vintage and modern.
Step-by-Step
Materials
- Large sheet of thick, handmade watercolor paper (rough texture, deckle edge)
- Indigo or Payne’s Gray ink (or high-flow acrylic)
- Wide flat wash brush (1-2 inch)
- Medium round brush (for edges)
- Clean water container
- Pencil (HB or lighter)
- Bright light source (lamp or sunlight)
- Wall or large board for tracing
- Reference photo of your profile (optional)
- Masking tape
Step 1: Preparation & Outline
-
Prepare your paper:
Select a large sheet of heavy, textured paper. If your paper has clean cut edges, you can create a faux-deckle look by carefully tearing along the edges using a straight edge or wetting a line and pulling the paper apart gently to get that fibrous border. -
Set up the shadow projection:
Tape your paper securely to a wall. Position a bright lamp about 6-8 feet away from the wall, shining directly at the paper. Stand between the light and the paper so your profile casts a sharp shadow onto the sheet. -
Trace the silhouette:
Have a friend trace the outline of your shadow lightly with a pencil. If you are working alone, take a profile photo against a white wall, project specifically that image onto your paper using a digital projector, or print it large and use transfer paper. -
Refine the details:
Take the paper down and examine your pencil line. Lightly refine the hair strands, the curve of the ear, and the neck line. Don’t worry about being hyper-realistic; the beauty lies in the distinct shape. -
Plan the fade:
Mark a faint line near the bottom of the neck where you want the ink to fade out into the paper. This shouldn’t be a hard line, just a mental guide for where the wash will end.
Bleeding Lines?
If ink bleeds outside your crisp pencil line, wait for it to dry. Then, use white gouache or opaque watercolor to carefully ‘paint back’ the paper color and sharpen the edge.
Step 2: Inking the Silhouette
-
Mix your wash:
Pour some indigo ink into a shallow dish. I like to dilute it very slightly with water—just enough to help it flow but not enough to lose that deep, opaque darkness. -
Edge definition:
Using your medium round brush, carefully paint closely along the inside of your pencil line. Keep this edge crisp and clean, especially around the nose and lips, as these define the likeness. -
Fill the center:
Switch to your wide flat brush. While the edge paint is still wet (if possible), fill in the large central area of the head. Work relatively quickly to avoid harsh drying lines in the middle of the face. -
Create texture:
As you fill the shape, allow the brush to skip slightly over the rough tooth of the paper in some areas. This natural texture adds depth and visual interest to the dark mass. -
Detailing the ear:
For the ear detailing seen in the project, lift a tiny bit of pigment with a damp, clean brush or leave small islands of white paper unpainted to suggest the cartilage folds.
Step 3: The Fade Out
-
Start the gradient:
As you move down the neck toward the shoulders, stop reloading your brush with fresh ink. Let the pigment naturally run out. -
Wet the bottom edge:
Dip your damp brush into clean water and touch the bottom edge of the wet ink. Encourage the ink to bleed downward into the wet area. -
Feathering technique:
Use a dry bristle brush or a scrunched paper towel to dab at the very bottom edge of the wash. This creates that organic, cloudy, ‘broken’ edge effect rather than a straight cutoff. -
Add splash accents:
If you want a looser look, flick a tiny amount of watered-down ink near the bottom fade area to create splatter marks that integrate with the wash. -
Dry and press:
Allow the paper to dry completely flat. If the large amount of liquid caused buckling, place the dry artwork under a heavy board or stack of books for 24 hours to flatten it back out.
Pro Tip: Depth of Field
Apply a second layer of ink only to the back of the head and lower neck once dry. This subtle layering creates a 3D effect, making the face profile seem slightly lighter.
Now you have a deeply personal, stunningly moody piece of art ready to be framed or gifted
Negative Space Self-Portrait
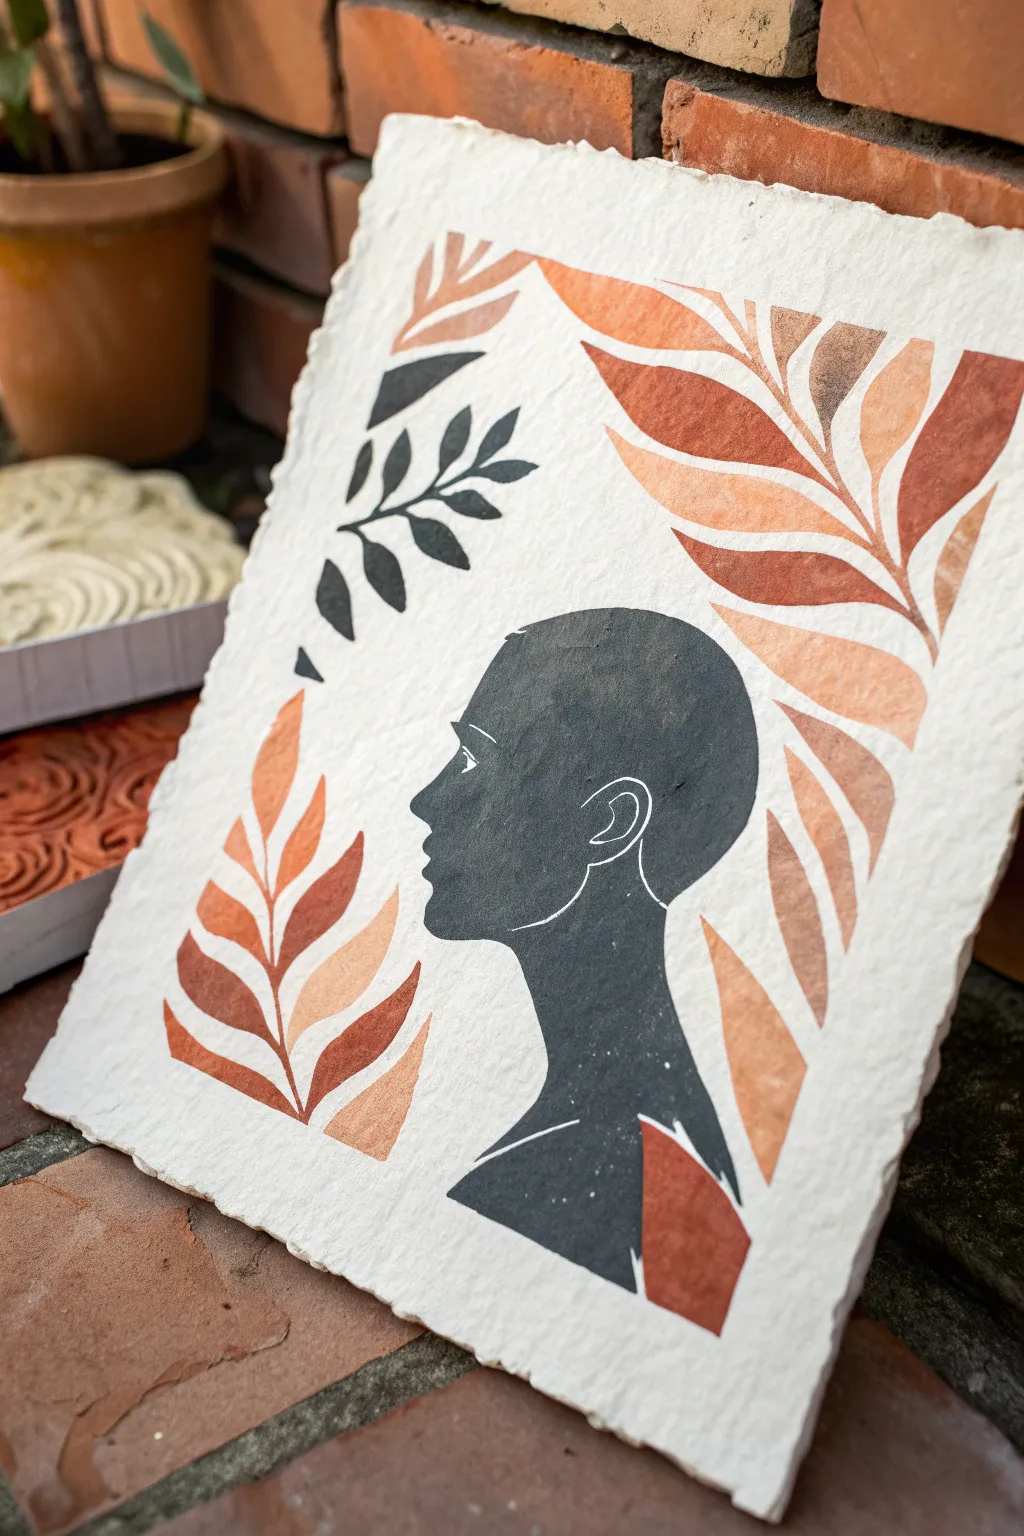
Recreate this striking piece by combining the bold simplicity of a silhouette with the organic warmth of leaf motifs. This mixed-media project uses block printing techniques on handmade paper to achieve an earthy, textured aesthetic.
Step-by-Step Guide
Materials
- Soft-cut lino block (4×6 inch or similar)
- Linocut carving tools (V-gouge and U-gouge)
- Heavyweight handmade paper with deckled edges
- Black block printing ink (water-soluble)
- Brayer (rubber roller)
- Acrylic paints (burnt sienna, terra cotta, dark brown)
- Stencil film or thin cardstock
- Craft knife and cutting mat
- Sponge daubers or stencil brushes
- Pencil and tracing paper
- Baren or wooden spoon
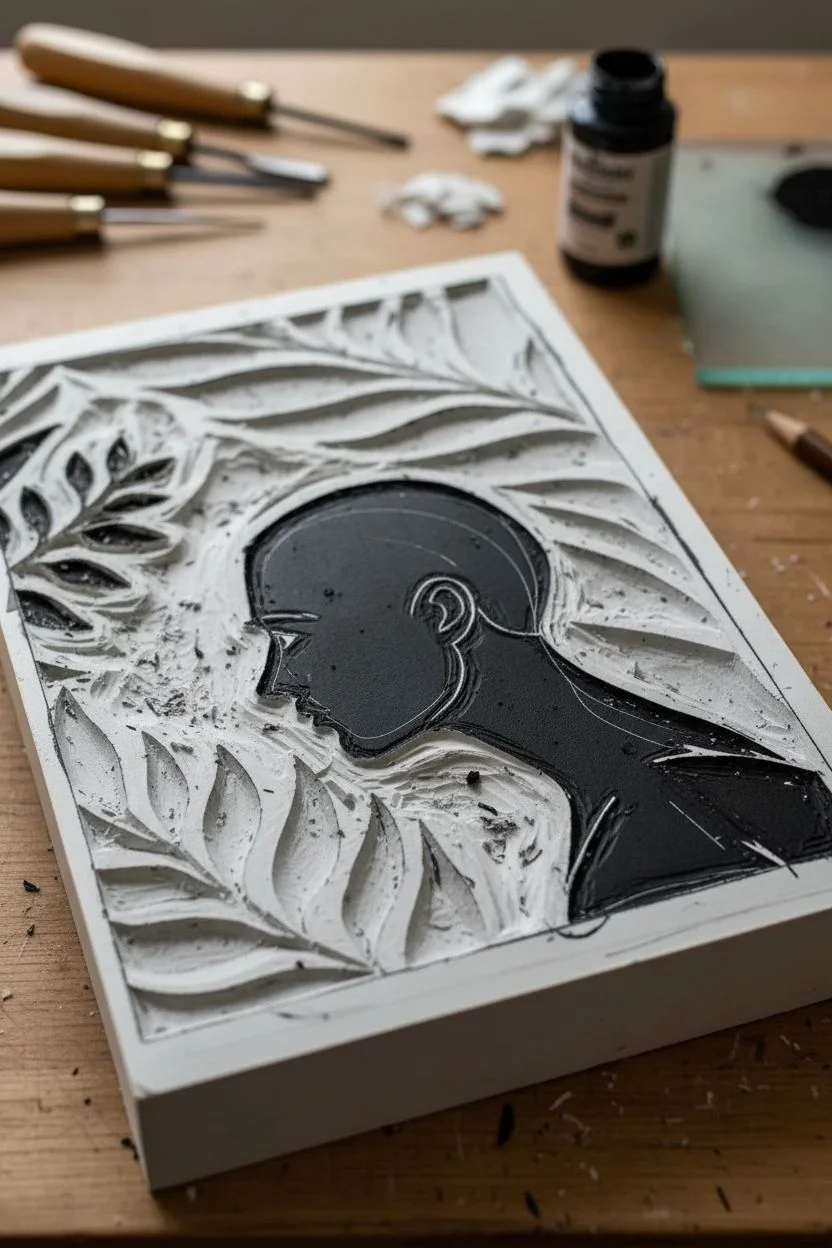
Step 1: Designing and Carving the Profile
-
Capture your profile:
Take a side-profile photo of yourself against a plain wall. Print it to size so the head is about 4-5 inches tall, fitting comfortably in the center of your paper. -
Transfer the image:
Trace the outline of your profile onto tracing paper. Flip the tracing paper over (graphite side down) onto your lino block and rub the back to transfer the image. Remember, the image on the block must be reversed so it prints correctly. -
Refine the lines:
Go over the transferred lines on the block with a permanent marker to make them clearly visible before carving. -
Carve the negative space:
Using a V-gouge tool, carefully carve away the material outlining your profile. You want the head itself to remain raised (uncarved) so it picks up the ink. -
Clear the background:
Switch to a wider U-gouge to remove the rest of the background material on the block. Be thorough, but don’t worry if a few chatter marks remain; they add character. -
Add fine details:
Use your smallest V-gouge to carve fine white lines for details like the eye, the curve of the ear, and the jawline definition inside the silhouette shape.
Registration Tip
Mark the corners of your paper lightly with pencil on your work surface before printing. This helps you center the block perfectly every time.
Step 2: Creating the Botanical Elements
-
Draft the stencils:
Sketch three or four large, flowing leaf shapes on cardstock or stencil film. Aim for variety in size and curvature to frame the face. -
Cut the stencils:
Place the film on a cutting mat and use a sharp craft knife to cut out the leaf shapes. Save the positive shape (the leaf itself) if you want to use it for masking later, but mostly you need the negative stencil. -
Plan the composition:
Lay your cut stencils over your handmade paper to dry-fit the arrangement. Position the leaves so they curve around where the head will be printed.
Add Metallic Flair
Mix a tiny amount of gold or bronze acrylic paint into your leaf color. It catches the light and adds a stunning, high-end finish to the artwork.
Step 3: Printing and Painting
-
Ink the profile:
Squeeze a small line of black block printing ink onto a palette or glass slab. Roll the brayer back and forth until it has a velvety, even coating of ink. -
Transfer ink to block:
Roll the inked brayer over your carved lino block. Apply a few thin layers rather than one thick gloop to prevent the ink from filling in your fine carved details. -
Print the centerpiece:
Center your block face-down onto the handmade paper. Apply firm, even pressure using a baren or the back of a wooden spoon, rubbing in circular motions particularly over the solid areas. -
Reveal the print:
Carefully peel one corner of the paper up to check coverage. If it looks patchy, lay it back down and rub more. Once satisfied, pull the block away and let the black ink dry completely. -
Mix leaf colors:
Prepare your acrylic paints. Mix burnt sienna with a touch of white for a soft terracotta, and keep some dark brown separate for contrast. -
Apply the first leaf:
Position a stencil near the corner of the paper. Load a sponge dauber with the terracotta mix, dab off excess paint on a paper towel, and gently pounce color through the stencil. -
Add color variation:
While the stencil is still in place, sponge a little dark brown near the base of the leaf stem or along one edge to create a gradient effect. -
Paint the remaining leaves:
Repeat the stenciling process around the other corners of the paper. I find rotating the stencil slightly for each impression keeps the design from looking too repetitive. -
Add floating leaves:
If you want the darker, solid leaves seen in the top left, freehand paint these with a small brush using the dark brown acrylic or cut a separate small stencil. -
Define the veins:
Once the paint is dry, use a very fine brush with white or light cream paint to add subtle vein lines down the center of the painted leaves. -
Final touches:
Inspect the black silhouette. If needed, touch up any significant missed spots with a small brush and black ink, but leave the texture for that authentic print look.
Display your finished print in a floating frame to show off the beautiful deckled edges of the paper
Mixed Media Collage Self-Portrait

Capture your likeness with soft, layered washes and expressive details in this traditional watercolor study. The finished piece features a beautiful, untouched paper border and deckled edges that give it a timeless, gallery-ready feel.
How-To Guide
Materials
- Heavyweight watercolor paper (300gsm, cold press or rough)
- Watercolor paints (pan or tube)
- Watercolor brushes (round sizes 2, 6, and 10)
- HB or 2B graphite pencil
- Kneaded eraser
- Masking tape
- Drawing board or stiff backing
- Clean water container
- Paper towels
Step 1: Preparation and Sketching
-
Prepare the substrate:
Begin by tearing your watercolor paper to size rather than cutting it. Use a ruler as a guide and rip the paper slowly to create uneven, deckled edges. This adds an organic, handmade quality to the final piece. -
Define the boundaries:
Using masking tape, tape off a rectangular border in the center of your paper. This preserves a clean, wide margin around the painting area, contrasting the painting against the textured paper edge. -
Initial block-in:
Lightly sketch the basic shapes of the head and shoulders using an HB pencil. Focus on the tilt of the head and the general proportions rather than tiny details at this stage. -
Refine features:
Map out the facial features—eyes, nose, mouth, and ear placement. Keep your lines faint so they won’t show through the transparent paint later. Use a kneaded eraser to lift off any excess graphite.
Water Control Woes?
If you get “cauliflower” blooms in your wash, you added water to drying paint. Let that layer dry completely, then gently glaze over it to smooth it out.
Step 2: First Washes and Skin Tones
-
Mix base skin tones:
Create a watery mix for the skin base using Yellow Ochre and a touch of Cadmium Red. The goal is a pale, warm peach tone. -
Apply the first wash:
Using a larger round brush (size 10), apply a wet wash over the face area, avoiding the whites of the eyes. Let the water carry the pigment naturally. -
Establish shadows:
While the paper is still slightly damp, drop in cooler shadow tones under the jawline, in the eye sockets, and under the nose. A mix of Ultramarine Blue and Burnt Sienna creates a perfect muted shadow grey. -
Add warmth:
While the surface is drying, glaze a slightly more saturated red/pink mix onto the cheeks, nose tip, and ears to simulate blood flow under the skin.
Step 3: Defining Features and Hair
-
Paint the eyes:
Switch to a smaller brush (size 2 or 6). Carefully paint the irises, leaving a tiny spot of white paper for the highlight. Darken the upper lash line to define the gaze. -
Sculpt the nose and mouth:
Deepen the shadows around the nostrils and the corners of the mouth. Use a soft, dusty pink for the lips, keeping the upper lip slightly darker than the lower lip. -
Block in hair shapes:
Mix a base color for the hair (Yellow Ochre, Burnt Umber, or similar). Paint the hair in large masses rather than individual strands, following the direction of growth. -
Layer hair details:
Once the base hair wash is dry, add darker streaks to represent shadows and separation between locks. Keep the hairline soft where it meets the forehead.
Add Subtle Texture
Sprinkle a tiny pinch of salt onto the wet background wash. As it dries, the salt absorbs pigment, creating a beautiful, starry texture.
Step 4: Clothing and Background
-
Suggest clothing texture:
Paint the collar and shoulders. For a denim look like the reference, use a diluted Indigo or Cobalt Blue. Use loose, scratchy strokes (dry brush technique) to suggest the fabric texture. -
Add background ambience:
Apply a very loose, abstract wash in the background area behind the head. Use muted, earthy tones that complement the skin but don’t compete with the face.
Step 5: Final Touches
-
Deepen contrast:
Look for the darkest points on the face—pupils, nostrils, corners of the mouth—and reinforce them with your darkest mixed pigment. -
Add white highlights:
If you lost any highlights, you can use a tiny amount of white gouache or a gel pen to bring back the shine in the eyes or on the tip of the nose. -
Reveal the border:
Wait until the painting is completely bone dry. Then, very slowly peel away the masking tape at a 45-degree angle to reveal the crisp edges.
Step back and admire how the crisp border frames your soft, expressive portrait
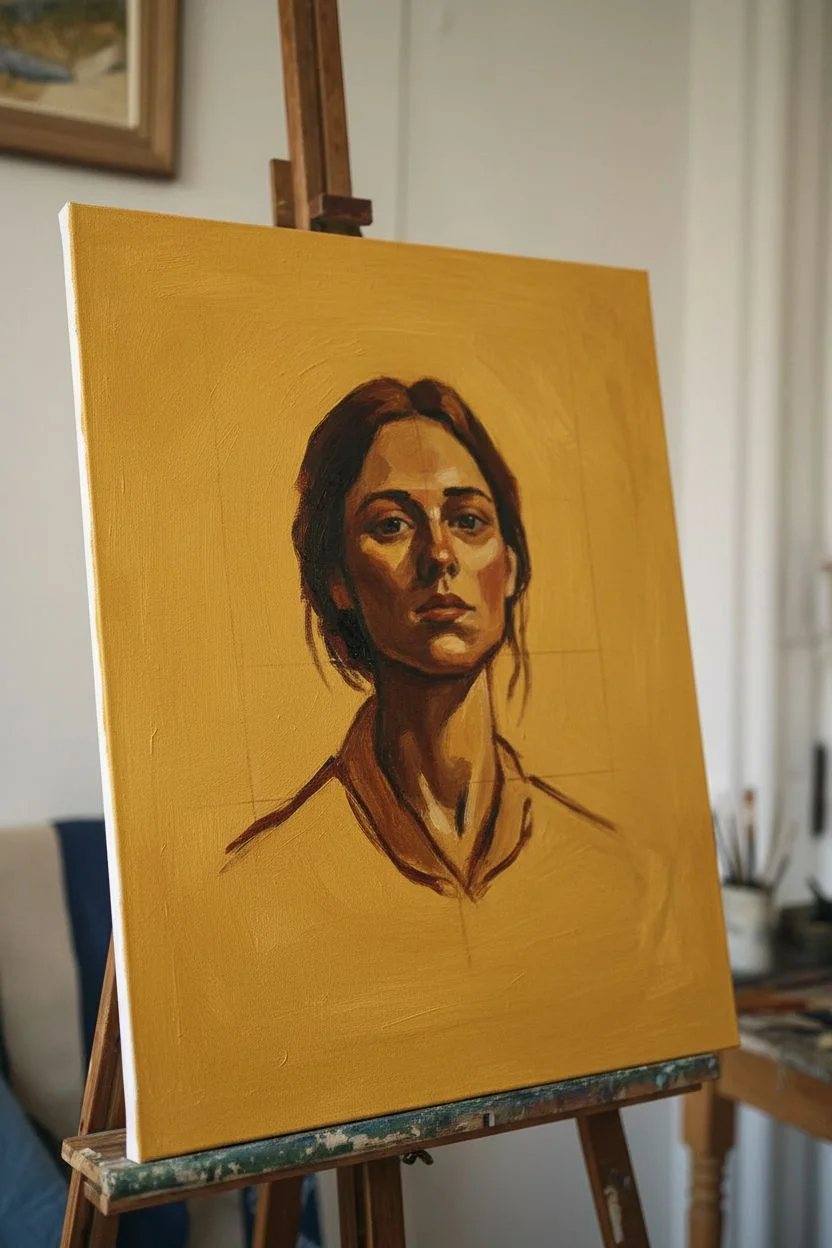
Self-Portrait With Two Moods Split Down the Middle
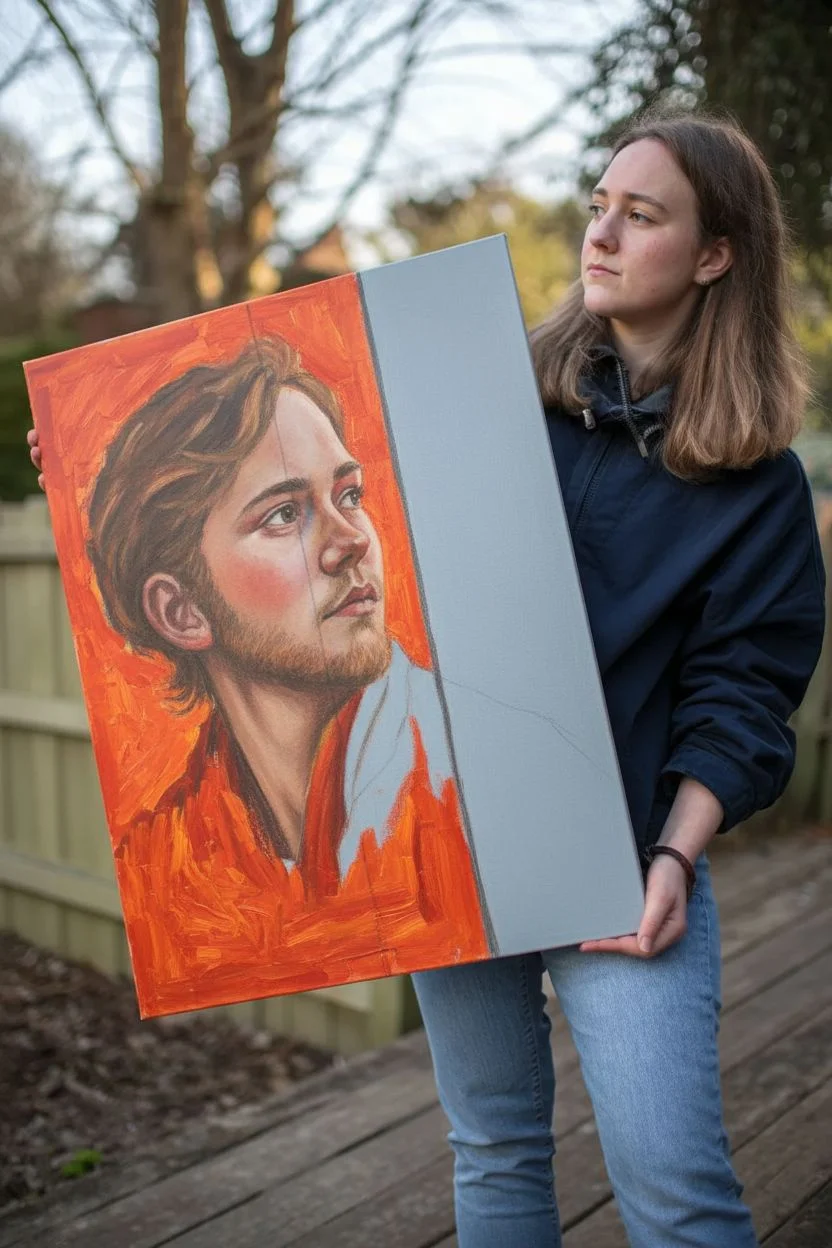
This striking portrait project explores duality by dividing the canvas into two distinct atmospheres. Using warm, fiery tones on one side and cool, muted hues on the other, you’ll create a narrative that speaks to contrasting emotions within a single subject.
Step-by-Step
Materials
- Large stretched canvas (approx. 18×24 inches or larger)
- Oil or acrylic paints (Titanium White, Burnt Sienna, Yellow Ochre, Cadmium Red, Ultramarine Blue, Ivory Black)
- Assorted synthetic brushes (filbert, round, and large flat shader)
- Palette knife
- Palette (wooden or disposable)
- Graphite pencil (HB or 2B)
- Easel
- Reference photo (lit from the side)
Step 1: Planning and Underpainting
-
Capture the reference:
Take a reference photo of your subject looking off to the side over their shoulder. Ensure the lighting is dramatic, highlighting the contours of the face, as this will help when defining the two zones later. -
Establish the divide:
Using a ruler and pencil, draw a definitive vertical line down your canvas. It doesn’t need to be perfectly centered; placing it slightly off-center (about 2/3 across) creates a more dynamic composition where the subject looks ‘into’ the larger space. -
Sketch the anatomy:
Lightly sketch the head and shoulders. Position the face so the split line runs vertically through it—perhaps cutting off the back of the head or just framing the face against a wall. Pay attention to the tilt of the chin and the angle of the jawline. -
Block in the warm background:
Mix a vibrant orange-red using Cadmium Red, Yellow Ochre, and a touch of Burnt Sienna. Paint the background on the left side (the ‘front’ of the face) with energetic, loose strokes to create a fiery atmosphere. -
Block in the cool background:
For the right side (behind the line), mix a neutral beige or soft grey-blue using Titanium White, a tiny dot of Ultramarine Blue, and Raw Umber. Apply this smoothly to suggest a flat wall or calm space.
Use a Mahl Stick
When painting the straight dividing line, steady your hand with a mahl stick (or a long ruler) rested against the easel edge, not the wet canvas.
Step 2: developing the Portrait
-
Base flesh tones:
Mix a mid-tone skin color. Apply this to the face, keeping the paint relatively thin. Don’t worry about details yet; just focus on distinguishing the skin from the background and clothing. -
Deepen the shadows:
Use Burnt Sienna and a touch of blue to create shadow tones. I like to define the eye sockets, the area under the nose, and the sharp shadow of the jawline early on to give the face structure. -
Emphasize the red flush:
On the cheek facing the warm background, glaze a brighter red-orange tone. This reflects the environment onto the skin, making the ‘warm’ mood feel cohesive and intense. -
Paint the hair foundation:
Block in the hair shape with a dark brown mix. Keep the edges soft where the hair meets the background on the left to suggest movement or light bleed. -
Add hair highlights:
Using a smaller filbert brush, flick in lighter strands of ochre and white where the light hits the waves of the hair. Keep the texture loose and painterly rather than drawing every single hair.
Shift the Season
Instead of warm/cool, try a seasonal split. Paint the left side with lush greens for summer and the right side with barren branches and greys for winter.
Step 3: Clothing and Refinement
-
Establish the clothing split:
Paint the scarf or collar on the left side in deep reds and maroons to match the warm theme. On the right side of the divide line, switch the clothing color to a cool, icy blue or grey. -
Define the dividing line:
Take a small brush with dark grey or black paint and carefully reinforce the vertical line that splits the composition. It should look like a physical barrier, perhaps a doorframe or wall edge. -
Refine facial features:
Go back into the eyes. Add the white reflection (catchlight) to make them look alive, and darken the lashes. Ensure the gaze is directed upward and outward. -
Highlight the skin:
Mix Titanium White with a tiny amount of yellow and red. Apply highlights to the forehead, bridge of the nose, and chin to bring these features forward. -
Add texture to the backgrounds:
Add visual interest to your backgrounds. Scumble some lighter yellow over the red side for a glowing effect, and smooth out the beige side to make it feel stark and solid. -
Final unifying touches:
Check your edges. Soften the hairline and the shadow on the neck. Sign your work in the bottom corner of the ‘cool’ side using a color from the ‘warm’ side to tie it all together.
Step back and appreciate how a simple line and color shift can tell a complex story about your subject
Abstract Map-of-Me Self-Portrait
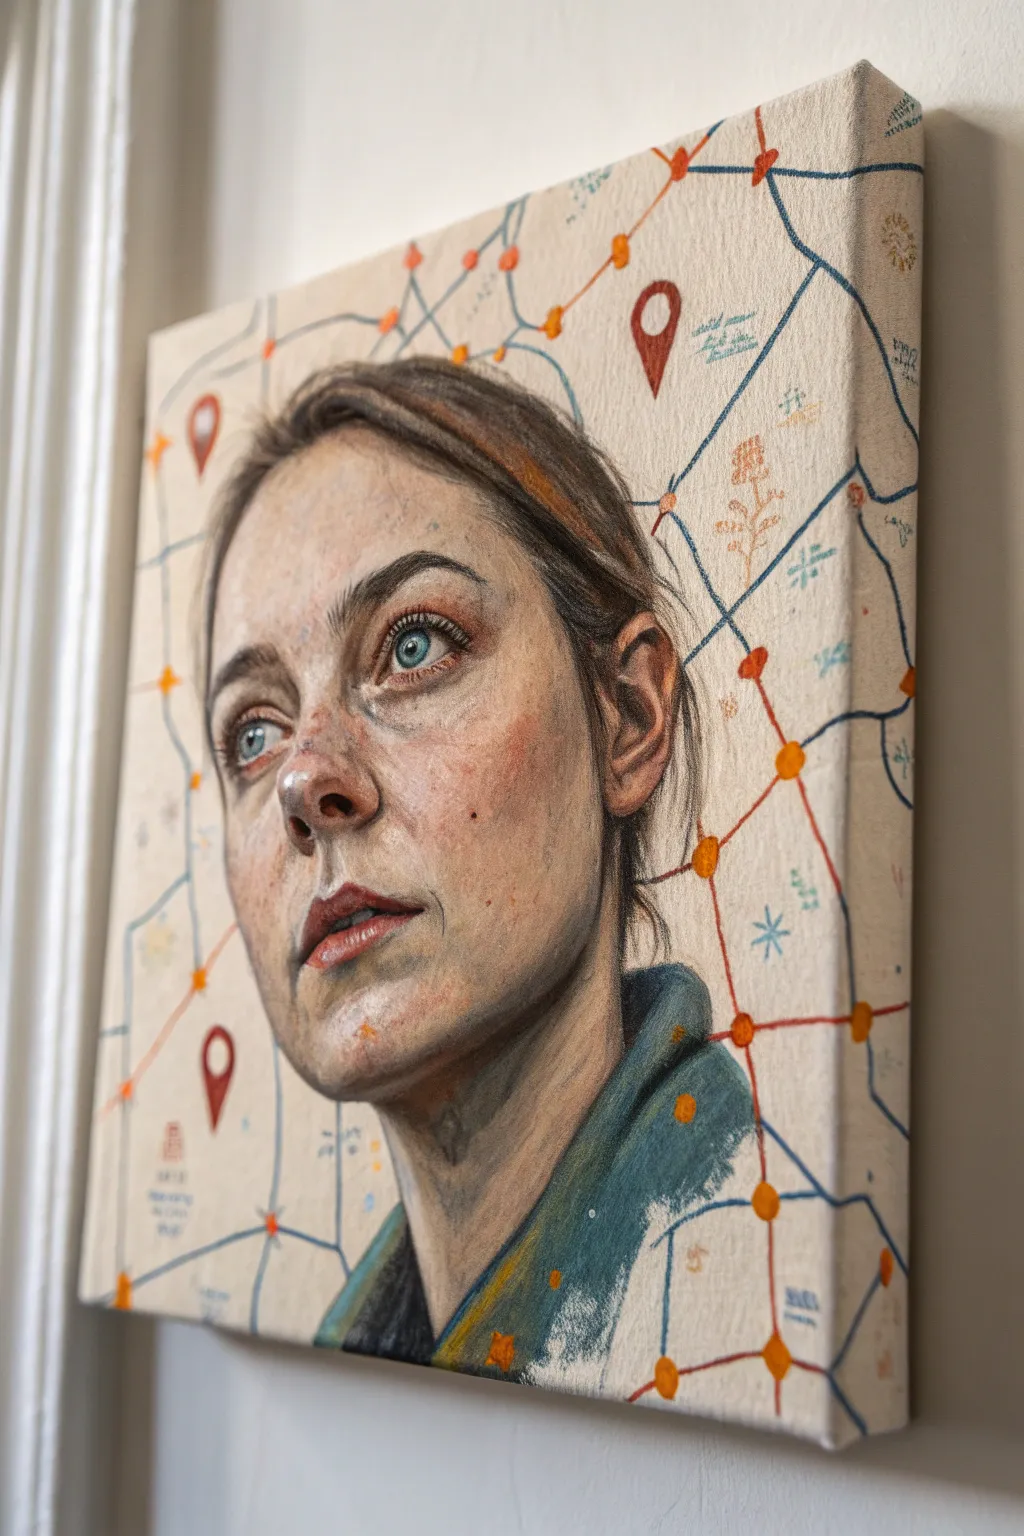
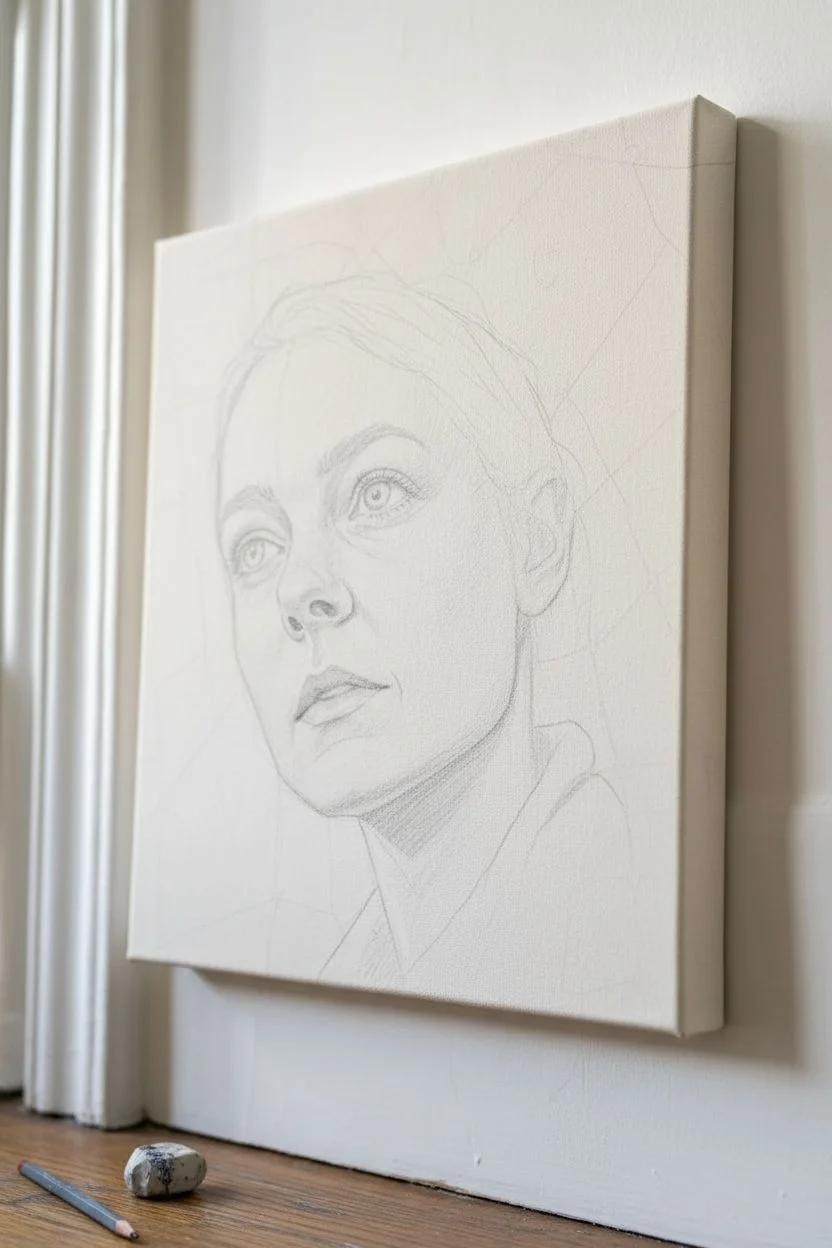
This intriguing mixed-media project combines a realistic self-portrait with cartographic elements to tell a personal story. By layering a detailed face over a stylized map background with location pins and connecting lines, you create a visual journey of where you’ve been and who you are.
How-To Guide
Materials
- Stretched canvas (square format recommended, e.g., 12×12 inches)
- Acrylic paints (skin tones, teal, orange, red, dark blue)
- Set of acrylic brushes (fine liner, small filbert, medium flat)
- Graphite pencils (HB and 2B)
- Kneaded eraser
- Posca paint pens or fine acrylic markers (orange, teal, red)
- Reference photo of your face (3/4 view recommended)
- Ruler
- Matte medium or clear gesso (optional)
Step 1: Planning and Sketching
-
Map out the background:
Begin by lightly drawing a network of lines across the canvas using your HB pencil. These will form your map. Don’t worry about geographical accuracy; think abstractly. Create intersecting paths that extend off the edges of the canvas. -
Draft the portrait:
Sketch your face in the center, slightly overlapping the map lines. A three-quarter view looking upward works beautifully to suggest looking toward the future. Keep the sketch loose but ensure the proportions of the eyes and nose are accurate. -
Refine the features:
Darken the key facial features—nostrils, pupils, and the line of the lips—with a 2B pencil. Lightly erase the map lines that cross directly through the main part of the face so they don’t interfere with the skin tones later.
Muddy Skin Tones?
If your skin colors look grey or muddy, let the layer dry completely. Then, glaze over it with a vivid, translucent orange or pink wash to bring the warmth back.
Step 2: Painting the Portrait
-
Block in skin interaction:
Mix a base skin tone using white, a touch of yellow ochre, and a tiny dot of red. Apply a thin wash over the face area. I like to keep this layer semi-transparent so the pencil guides remain visible. -
Add deep shadows:
Mix a darker shadow tone by adding burnt umber and a hint of blue to your skin mix. Paint the shadows under the chin, in the eye sockets, and along the jawline to establish a strong three-dimensional form. -
Highlight the high points:
Using a cleaner brush, apply lighter values (skin tone plus more white) to the bridge of the nose, the forehead, and the cheekbones. This creates the ‘glow’ seen in the reference. -
Detail the eyes:
Switch to a fine liner brush. Paint the irises carefully, leaving a small white spot for the catchlight. Use a diluted dark brown or black for the lash line, keeping the strokes delicate. -
Flush the cheeks:
Create a glaze with very diluted red or coral paint. Gently brush this onto the cheeks, nose tip, and forehead to give the skin a natural, flushed texture. Stippling with a dry brush helps blend this naturally.
Step 3: Creating the Map Layer
-
Trace the blue routes:
Using a teal or slate blue paint (or a paint pen for steady lines), trace over your initial pencil map lines. Vary the line weight slightly—some thick highways, some thin side streets. -
Add connecting nodes:
At the intersections of your blue lines, paint small orange dots or nodes. These represent stops along your journey. Ensure some of these lines and dots wrap around the side of the canvas for a finished look. -
Draw the location pins:
Select 2-3 significant spots in the background space and paint the classic teardrop-shaped location pin using deep red. Add a small white or black dot in the center of the pin head for realism. -
Incorporate symbols:
In the negative space around the head, use a fine brush or pen to draw tiny symbols: stars, small botanical sketches, or grid marks. Keep these subtle and sketch-like.
Personalize the Pins
Instead of generic pins, paint tiny icons inside the red markers that represent significant life events, or write specific dates next to the intersecting nodes.
Step 4: Final Integration
-
Paint the clothing:
Block in the shirt or collar with a solid color that complements the map lines, like the teal used in the background. Keep the clothing rendering looser than the face. -
Enhance texturing:
Use a dry brush with a tiny amount of white paint to scumble over the skin texture, adding pores and skin details. This adds that gritty, realistic feel. -
Bridge the layers:
To make the portrait feel part of the map, gently extend one or two faint map lines over the hair or the shadowy part of the neck. This integrates the subject into their environment. -
Final touches:
Check your contrast levels. Add the darkest darks to the pupils and nostrils one last time, and add a final bright white highlight to the tip of the nose and lips.
Hang your masterpiece where you can reflect on the journey you have traveled so far


Have a question or want to share your own experience? I'd love to hear from you in the comments below!