Whenever I feel stuck, I come back to a self-portrait—it’s the fastest way to practice skills and say something real at the same time. These self-portrait project ideas range from classic mirror studies to bold, story-filled experiments that let your identity show up on the page.
Classic Mirror Self-Portrait Study

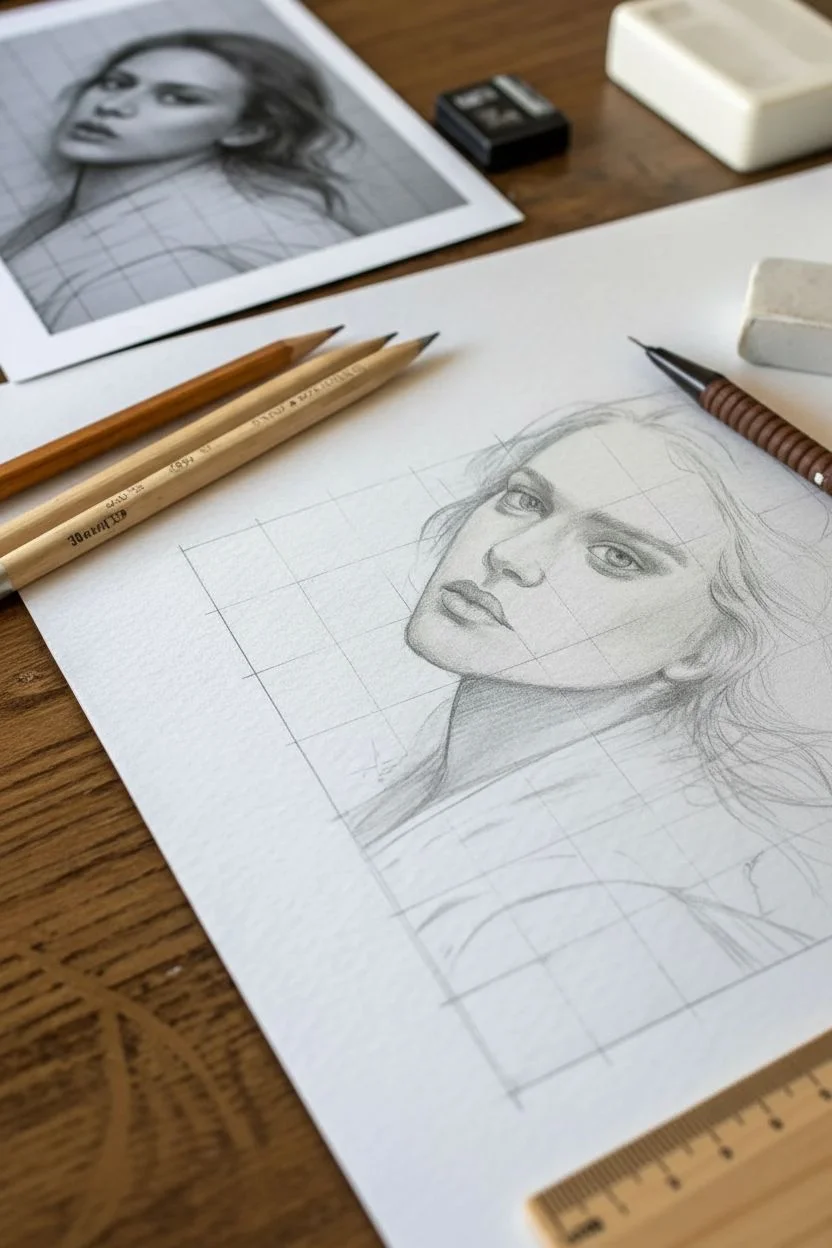
Master the art of proportion and realistic shading with this structured graphite pencil study. By breaking the reference image down into a manageable grid, you will create a stunningly accurate portrait that captures subtle expressions and delicate features.
How-To Guide
Materials
- High-quality drawing paper (smooth or medium tooth)
- Graphite pencils (H range for light lines, B range for shading)
- Mechanical pencil (0.5mm, HB lead)
- Ruler
- Kneaded eraser
- Reference photo of your face
- Blending stump (optional)
Step 1: Preparation and Grid Layout
-
Select your reference:
Choose a clear, well-lit photo of yourself. A 3/4 view often provides more interesting contours than a straight-on shot. Print this photo out. -
Draw the grid on the reference:
Using a ruler and a fine-tip pen, draw a square grid over your printed reference photo. One-inch or two-centimeter squares work well for this scale. -
Transfer the grid to drawing paper:
On your fresh sheet of drawing paper, lightly replicate the exact same grid using a 2H or 4H pencil. Keep these lines extremely faint so they can be erased later without damaging the paper tooth. -
Map key landmarks:
Identify where major features intersect the grid lines on your reference. Mark these intersection points lightly on your drawing paper to establish the placement of eyes, nose, lips, and chin.
Uneven Eyes?
If facial features look skewed, turn both your reference and your drawing upside down. This tricks your brain into seeing shapes and angles objectively rather than assuming what an eye ‘should’ look like.
Step 2: Drafting the Contours
-
Outline the face shape:
Using an HB pencil, sketch the outer contour of the face, constantly checking which grid square the line travels through to ensure accurate angles. -
Place the eyes:
Sketch the almond shapes of the eyes. Pay close attention to the distance between them and the tilt of the corners relative to your horizontal grid lines. -
Define the nose and mouth:
Lightly outline the bottom of the nose and the curves of the lips. Avoid drawing harsh lines for the nose bridge; instead, hint at it where the shadow will eventually fall. -
Sketch the hair flow:
Draw loose, sweeping lines to indicate the direction of the hair strands around the face and shoulders. Don’t worry about individual hairs yet; focus on the main masses. -
Refine the sketch:
Step back and compare your outline to the reference. Correct any proportions now before you begin shading. Once satisfied, gently erase the grid lines from inside the face area.
Add Texture
Place a sheet of textured paper underneath your drawing paper while shading small areas. Rubbing over it will transfer a subtle grain, perfect for mimicking skin pores or fabric without drawing every detail.
Step 3: Shading and Definition
-
Establish the darkest values:
Switch to a softer pencil, like a 2B or 4B. Darken the pupils, the lash line, and the corners of the mouth. Note that the nostrils are rarely pure black; keep them slightly softer. -
Shade the eyes:
Fill in the iris, leaving small white circles for the catchlights. Add a cast shadow from the upper eyelid onto the eyeball to create depth. -
Sculpt the nose:
Use light hatching to shade the side of the nose and underneath the tip. I prefer building this up slowly with an HB pencil to avoid making the nose look dirty. -
Render the lips:
Shade the upper lip slightly darker than the lower lip. Use vertical strokes to mimic the natural texture of lip skin, leaving a highlight on the fuller part of the bottom lip. -
Model the facial structure:
Apply broader shading to the cheekbones, jawline, and neck. Use the side of your pencil lead for a softer transition compared to the tip. -
Detail the hair:
Return to the hair with confident, long strokes using a 2B or mechanical pencil. Add darker values near the roots and neck where shadows are deepest, leaving paper white for shiny highlights. -
Refine shadows and edges:
Soft stick with the grid for the neck and shoulder placement. Deepen the shadow under the chin to push the neck back visually. -
Final touches:
Clean up the background by erasing any remaining grid lines or smudges outside the portrait. Reinforce the darkest accents one last time to increase contrast.
Now you have a timeless portrait study that captures your likeness with geometric precision


Three-Value Self-Portrait in Charcoal
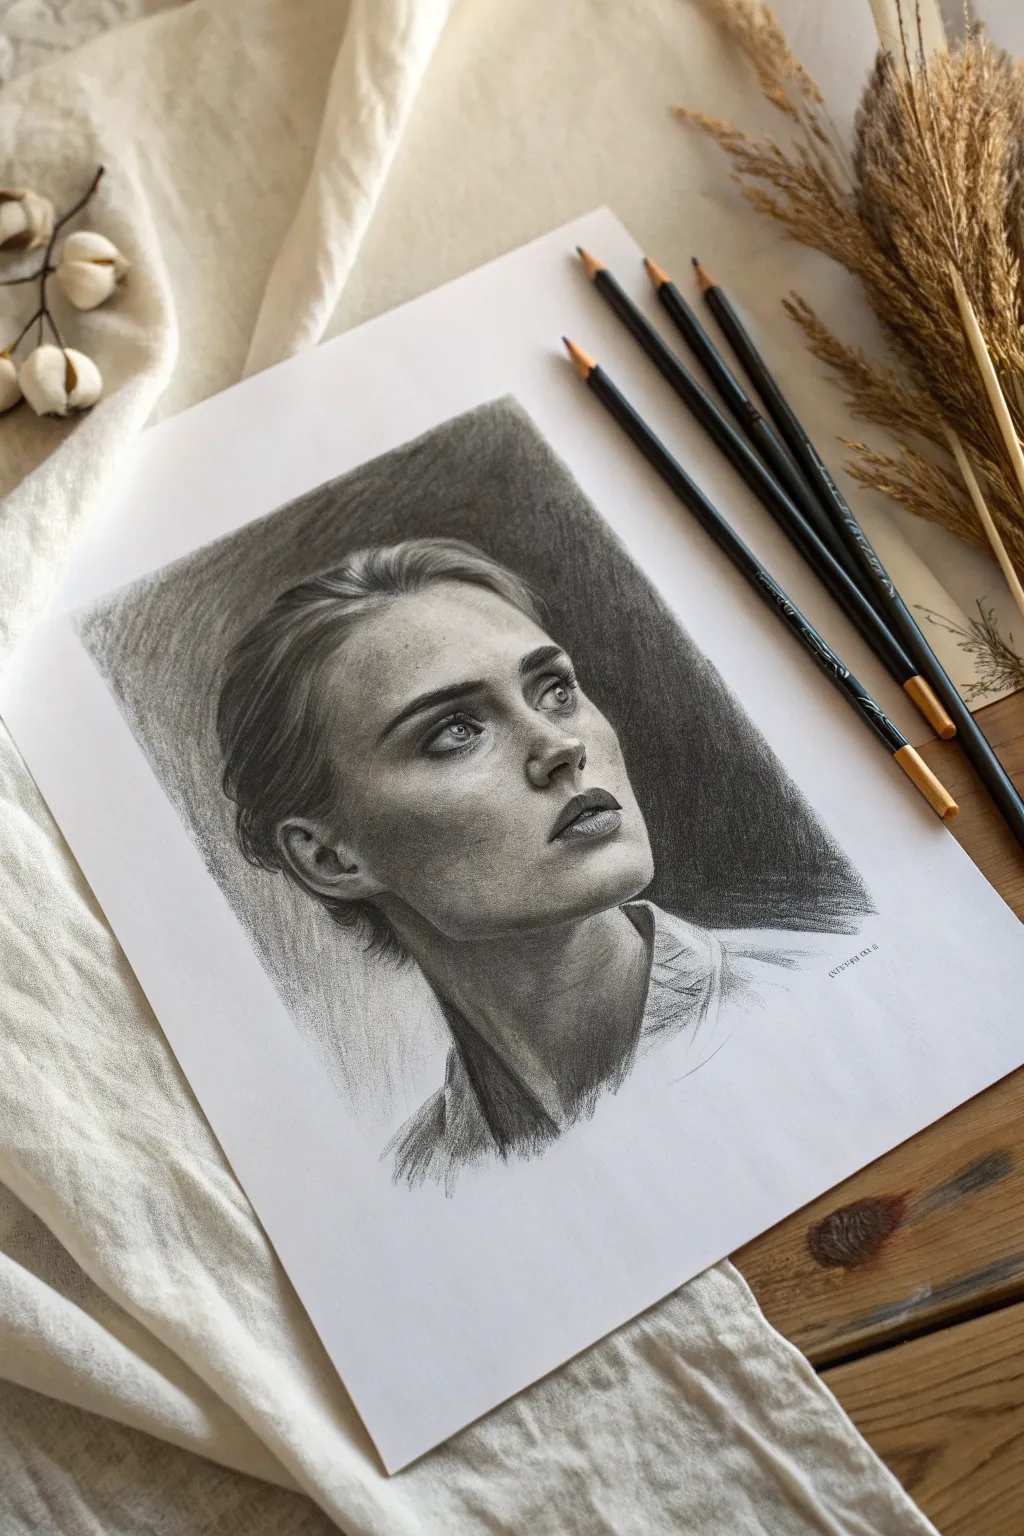
This arresting portrait study focuses on simplifying complex facial features into three distinct tonal values: highlight, mid-tone, and deep shadow. By limiting your palette to black, white, and grey, you’ll create a dramatic, sculptural effect that captures likeness and mood without getting lost in details.
Detailed Instructions
Materials
- Smooth bristol board or heavyweight drawing paper (A4 or similar)
- Hard charcoal pencil (HB or H) for initial sketching
- Medium charcoal pencil (2B or 4B) for mid-tones
- Soft charcoal pencil (6B or darker) for deep shadows
- Kneaded eraser
- Paper blending stump or tortillon
- Reference photo with strong lighting
- Workable fixative spray
Step 1: Preparation & Mapping
-
Select your reference:
Choose a reference photo of yourself that has strong, directional lighting. You want clear distinctions between light and dark areas. If your photo is in color, desaturate it digitally to see the black and white values clearly. -
Lightly sketch the envelope:
Using your hardest charcoal pencil (HB) with a very light hand, map out the general ‘envelope’ shape of the head. Don’t worry about features yet; just focus on the angle of the jaw, the curve of the skull, and the neck placement. -
Feature placement:
Mark horizontal guidelines for the eyes, nose base, and mouth. Lightly sketch the shapes of the features, ensuring the proportions are accurate before committing to any dark lines. -
Map the shadow shapes:
Look purely for the shapes of the shadows on your face. Outline where the light ends and the shadow begins. This ‘terminator line’ will be the most crucial boundary in your drawing.
Don’t Smudge Everything
Avoid over-blending with your finger, which transfers oils. Use a stump for smooth skin, but leave some raw charcoal marks in the hair and background for textural interest.
Step 2: Establishing Values
-
Lay in the dark background:
To make the face pop, start by shading the background behind the head. Use your softest pencil (6B) and broad strokes to create a dark, atmospheric value. This immediately establishes your darkest dark. -
Fill the deepest shadows:
Switching to a 4B pencil, fill in the shadow shapes you mapped earlier on the face—under the nose, the side of the neck, and deep eye sockets. Keep the pressure consistent for a flat, graphic look initially. -
Apply mid-tones:
Using the side of a medium charcoal pencil or a blending stump loaded with residual charcoal, gently shade the transitional areas. This connects your bright highlights and deep shadows. -
Developing the hair:
Treat the hair as a mass rather than individual strands. Block in the dark areas where the hair sweeps back or tucks behind the ear, leaving the paper white for the sheen on the top.
Add Drama with Erasure
Try ‘reductive drawing’ for the hair. Fill the area with charcoal dust, then use a mono-zero or electric eraser to carve out bright white strands against the dark mass.
Step 3: Refining & Texturing
-
Blend for smoothness:
Use a paper stump to gently soften the transitions on the cheeks and forehead. I find that using small circular motions helps blend the charcoal into the paper grain without making it look muddy. -
Sharpen the eyes:
Go back in with a freshly sharpened hard pencil to define the eyelids, iris, and pupil. These should be the sharpest, crispest lines in the drawing to draw the viewer’s focus. -
The nose and mouth:
Define the nostril with a deep black accent. For the lips, focus on the shadow beneath the bottom lip and the corners of the mouth rather than outlining the lips themselves. -
Lifting highlights:
Shape your kneaded eraser into a fine point. Dab—don’t rub—to lift out bright highlights on the tip of the nose, the tear duct, and the catchlight in the eye.
Step 4: Final Touches
-
Enhance texturing:
Add subtle texture to the skin by lightly stippling with a hard pencil in shadow areas, mimicking pores, or adding gentle hatch marks for eyebrows. -
Define hair strands:
Now you can add a few specific flyaway hairs or distinct strands using a sharp pencil edge. Don’t overdo it—just a few suggestions of direction are enough. -
Deepen contrast:
Step back and look at your drawing from a distance. If the blacks look dusty or grey, layer more soft charcoal over the background and deep shadows to increase the contrast. -
Clean edges:
Use a clean eraser to tidy up the white paper border around your drawing, ensuring a crisp presentation. -
Fixative:
Spray a light coat of workable fixative over the drawing in a well-ventilated area to prevent smudging.
Frame your portrait simply to let the dramatic lighting speak for itself


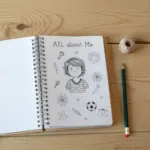

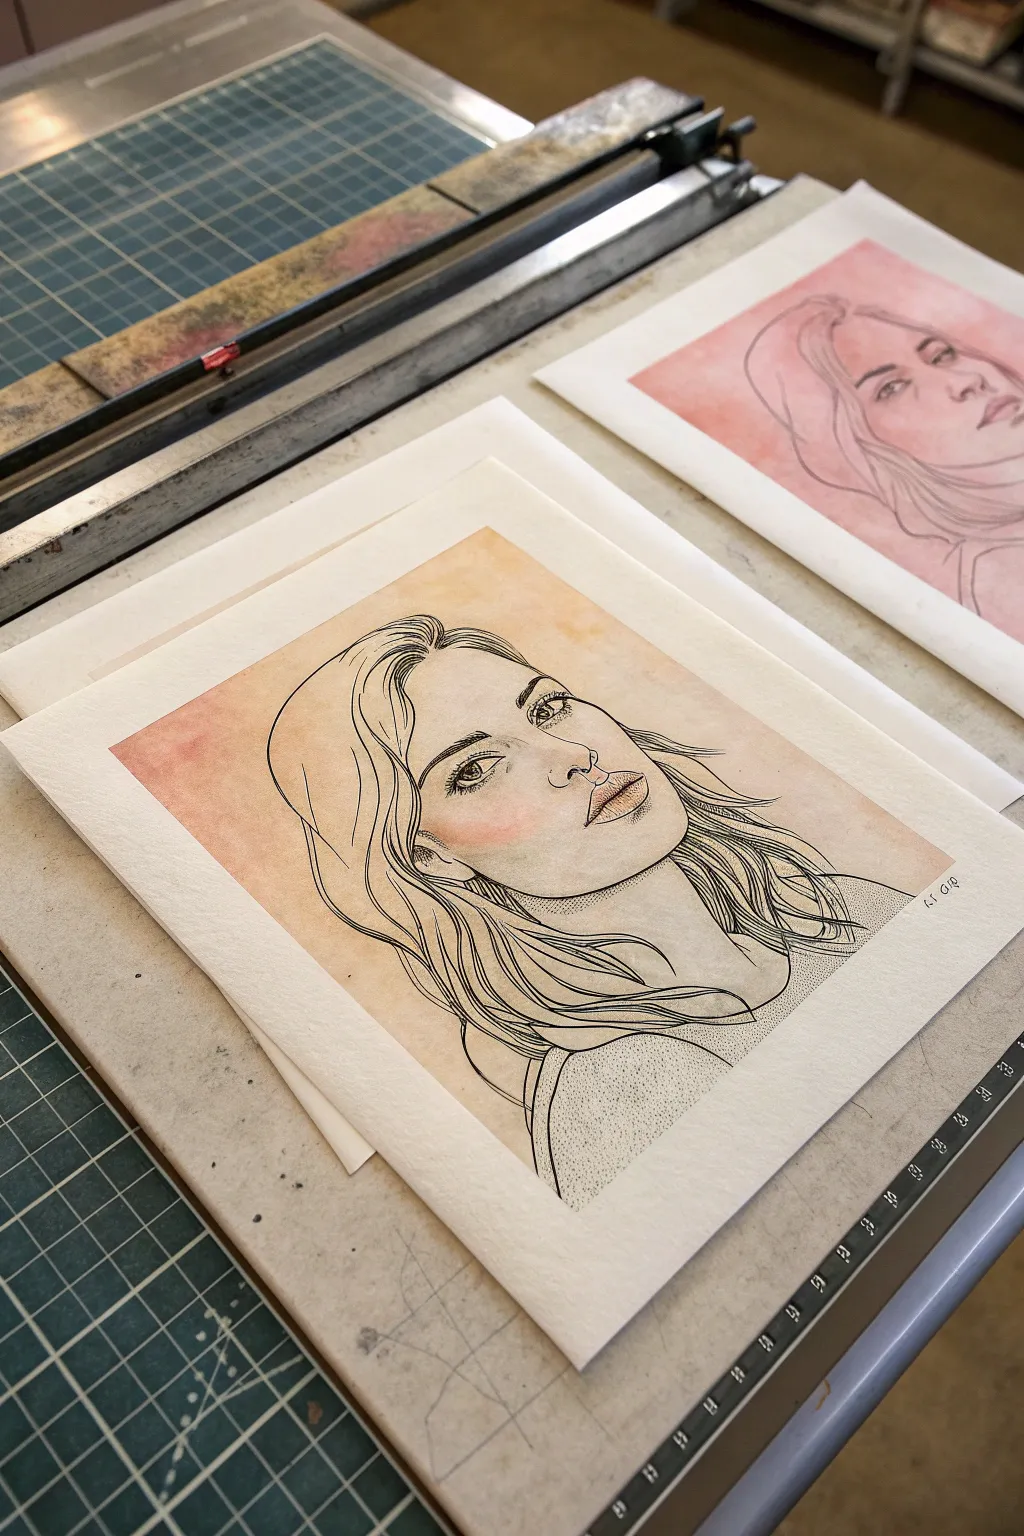
Limited Palette Painted Self-Portrait
This elegant self-portrait project teaches you how to capture likeness and mood using a restrained, earthy color palette. The soft watercolor washes combined with precise pencil details create a timeless, evocative look that feels both classic and modern.
How-To Guide
Materials
- Spiral-bound watercolor paper sketchbook (cold press, roughly 140lb/300gsm)
- Watercolor paints (emphasis on Yellow Ochre, Burnt Sienna, Burnt Umber, Alizarin Crimson, and French Ultramarine)
- Small round brush (size 2 or 4) for details
- Medium round brush (size 8 or 10) for washes
- Flat shader brush (optional, for background)
- HB or 2B graphite pencil
- Kneaded eraser
- Palette for mixing
- Cup of water and paper towels
Step 1: Sketching the Foundation
-
Establish the Head Shape:
Begin with a light pencil sketch. Draw a loose oval for the cranium and a jawline extending down. Position the head so there is negative space above and to the right, framing the upward gaze. -
Map the Features:
Using faint construction lines, mark the eye line, nose base, and mouth line. Since the face is tilted upward, these lines should curve slightly over the form of the face. -
Refine the Profile:
Carefully draw the contour of the nose, the curve of the lips, and the chin. Ensure the ear is placed low enough on the head to match the upward tilt perspective. -
Indicating Hair:
Sketch the hair mass loosely, focusing on the hairline and the bun at the back. Don’t draw individual strands yet; just block in the major shapes and volume.
Muddy Colors?
If your skin tones look dirty, you likely overmixed on the paper. Let layers dry completely between glazes, or mix fresh puddles on your palette rather than scrubbing the paper.
Step 2: Layering Skin Tones
-
Mix Your Base Tone:
Create a watery wash using Yellow Ochre and a tiny touch of Alizarin Crimson. I like to keep this very pale. -
Apply the First Wash:
Paint the entire face and neck area with this pale wash, avoiding the whites of the eyes and any high-key highlights on the nose or cheekbone. -
Building Shadows:
While the first layer is still slightly damp, mix Burnt Sienna with a little blue to create a warmer shadow tone. Drop this into the eye socket, under the nose, under the chin, and inside the ear. -
Adding the Blush:
Mix a stronger concentration of red earth tone or diluted Alizarin Crimson. Glaze this softly over the cheek, blending out the edges with clean water so there are no hard lines.
Step 3: Defining Features
-
Deepening Shadows:
Wait for the paper to dry completely. Mix a darker brown neutral tone. Use your small round brush to deepen the crease of the eyelid, the nostril, and the corner of the lips. -
Painting the Eye:
Carefully paint the iris, leaving a tiny spot of white paper for the catchlight. Use a dark brown-black mix for the pupil and upper lash line to give definition without harsh black outlines. -
Sculpting the Neck:
Apply a cool shadow wash (add more blue to your skin mix) along the front of the neck and under the jawline to create volume and separate the head from the neck.
Level Up: Golden Hour
Add a literal ‘glow’ by dropping pure, concentrated yellow watercolor into the top left corner of the wet background wash, suggesting sunlight hitting the face.
Step 4: Hair and Background
-
Base Hair Color:
Wash the hair area with a mix of Burnt Umber and Sepia. Let the brushstrokes follow the direction of hair growth, sweeping back towards the bun. -
Adding Texture:
Once the base is dry, use a drier brush with concentrated dark brown to simulate strands near the hairline and the messy texture of the bun. Leave some areas lighter to suggest shine. -
The White Shirt:
Instead of painting the shirt white, paint the shadows. Use a very pale, grayish-purple wash to paint the folds and collar edges, leaving the white of the paper as the highlight. -
Background Wash:
Mix a very watery, muted teal or slate blue. Paint a loose, uneven background around the profile, letting it fade out towards the page edges. This negative painting helps pop the skin tones forward.
This limited palette portrait captures a quiet moment of introspection and looks beautiful displayed right in your sketchbook


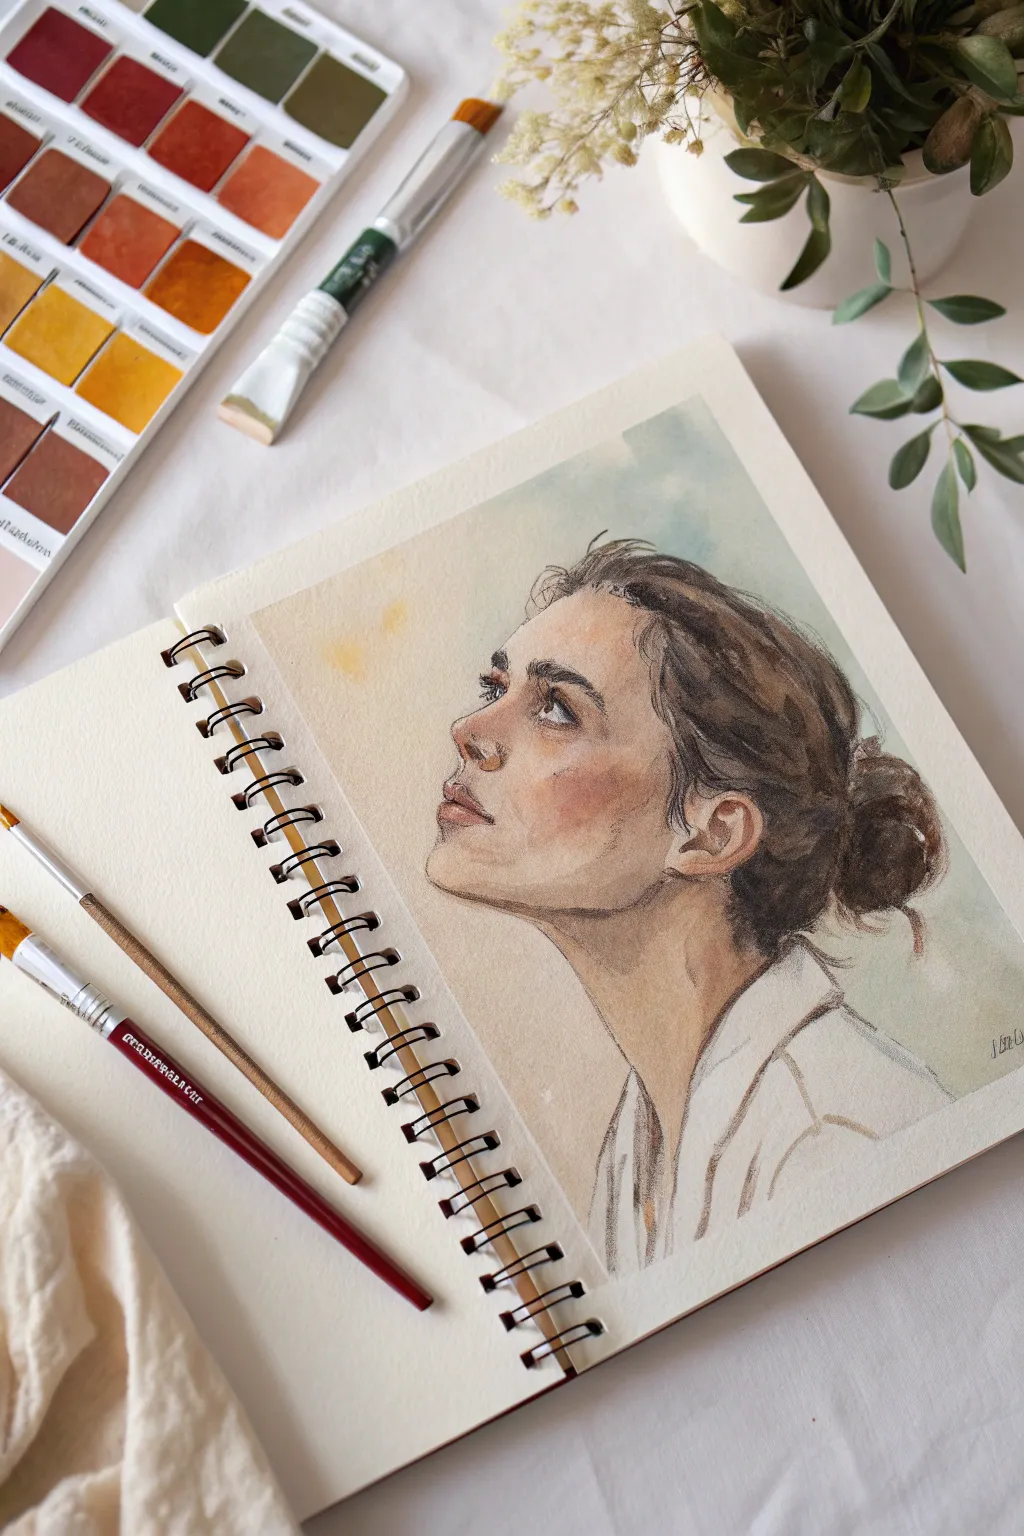
Skin Tone Mixing Map Self-Portrait
This study combines a traditional watercolor self-portrait with a scientific approach to color theory, creating a reference page that is both beautiful and functional. By painting your likeness and then deconstructing the palette into a tidy grid below, you’ll learn exactly how to mix your specific skin tones for future work.
Step-by-Step Guide
Materials
- Dotted grid spiral sketchbook (heavyweight paper suitable for watercolor)
- Watercolor pan set (professional grade preferred)
- Small round synthetic watercolor brush (approx. size 2 or 4)
- Detail brush (size 0/1)
- Pencil (HB or H)
- Fine liner waterproof pen (optional)
- Ruler
- Water jar and paper towels
Step 1: Planning the Layout
-
Define the grid area:
Start by deciding where your swatches will go. Use a ruler and pencil to lightly draw a 5×4 grid (20 squares total) on the bottom half of your sketchbook page. Leave a little breathing room between each square. -
Frame the portrait zone:
Directly above the grid, lightly sketch a rectangular frame where your self-portrait will live. This keeps the composition tidy and separates the ‘art’ from the ‘data’.
Fixing Muddy Colors
If your mixes look gray or dull, you may have over-mixed complementary colors. Clean your brush water and try mixing fresh on the paper rather than on the palette.
Step 2: Drafting the Portrait
-
Sketch the contours:
Lightly sketch your face within the upper rectangle. Focus on the angle of the head and the major planes of the face rather than tiny details like eyelashes just yet. -
Block in the background:
Paint a wash of a contrasting cool tone, like a muted teal or slate blue, around your sketched head. This negative space defines the silhouette and makes warm skin tones pop.
Make it a Series
Use the facing page to paint the same portrait again, but switch the lighting source or change the emotional expression, creating a new set of color formulas.
Step 3: Painting the Skin Tones
-
Base layer wash:
Mix a very dilute, pale tea-colored wash for the skin. Apply this over the face area, avoiding the eyes and lips, to establish the lightest value. -
Build the shadows:
While the base is drying, mix a slightly darker, cooler version of your skin tone (perhaps adding a touch of blue or violet to your brown). Apply this to the shadow side of the face, under the jawline, and in the eye sockets. -
Add warmth to cheeks:
Drop a small amount of diluted red or heavy rose tone onto the cheeks and nose while the paper is slightly damp to create a soft, natural flush. -
Refine features:
Once the skin is dry, use your smallest detail brush to paint the eyes and distinct red lips. Keep the hair strokes loose and expressive, letting the watercolor texture do the work.
Step 4: Creating the Swatch Grid
-
Identify your palette:
Look at the paints you used for your portrait. You likely used combinations of ochre, burnt sienna, umber, and perhaps a primary red or blue. -
Mix the lightest tones:
In the top row of your grid, paint the lightest variations. These are your ‘highlight’ colors—mostly water with just a hint of pigment. -
Gradual changes:
Moving down the rows, increase pigment density or introduce new mixing colors. I like to dedicate one column to ‘cool’ shadows (mixed with blue) and another to ‘warm’ tones (mixed with red). -
Fill the grid:
Continue painting square swatches until the grid is full. The bottom row should represent your darkest darks—the colors used for nostrils, deep shadows, or hair outlines.
Step 5: Labeling and Finishing
-
Let it dry completely:
Wait until every square is bone dry. Watercolor text will bleed if the paper holds any moisture. -
Add notations:
Using a very sharp pencil or a fine-tip pen, write tiny codes underneath each swatch (e.g., ‘BS + UB’ for Burnt Sienna and Ultramarine Blue). This creates a permanent recipe guide. -
Erase guidelines:
Gently erase the pencil grid lines around your swatches for a clean, floating look that emphasizes the colors themselves.
Now you have a personalized reference guide that turns the subtle complexity of skin tone mixing into repeatable formulas
BRUSH GUIDE
The Right Brush for Every Stroke
From clean lines to bold texture — master brush choice, stroke control, and essential techniques.
Explore the Full Guide
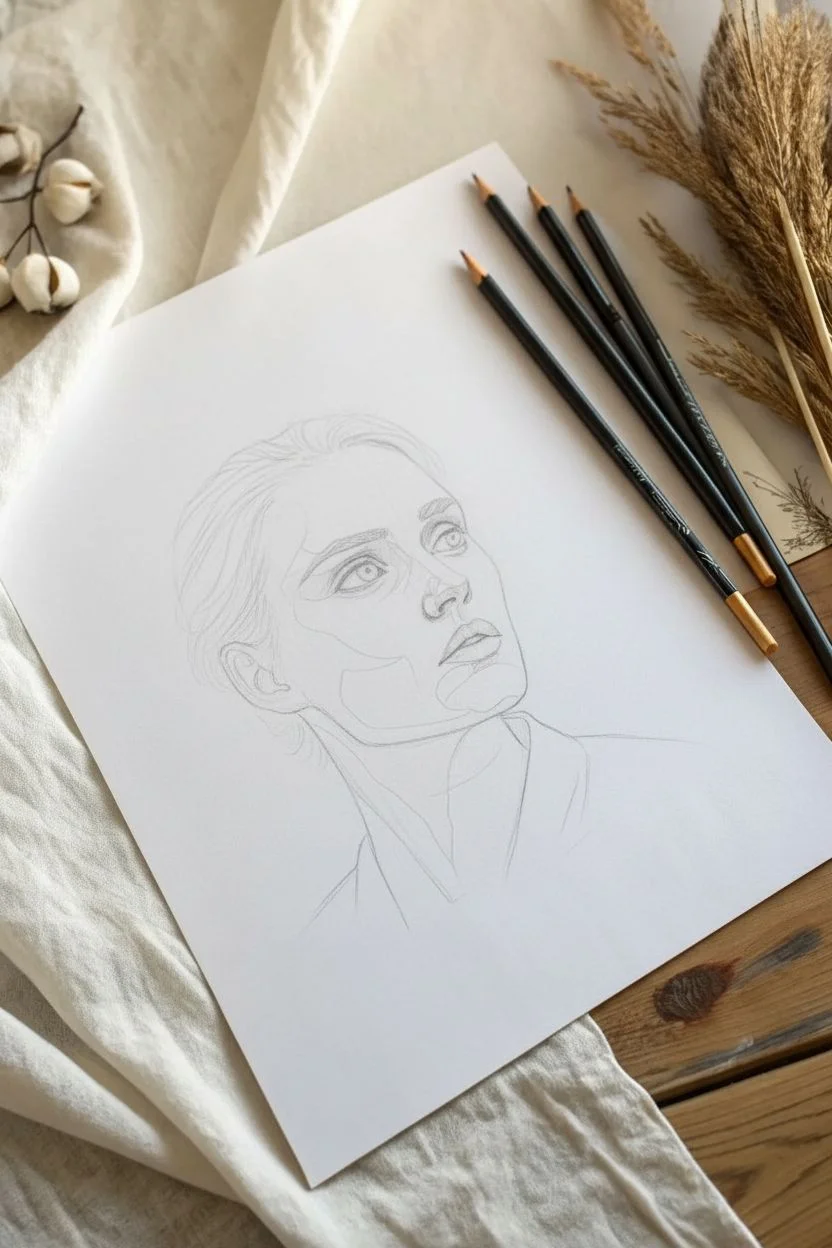
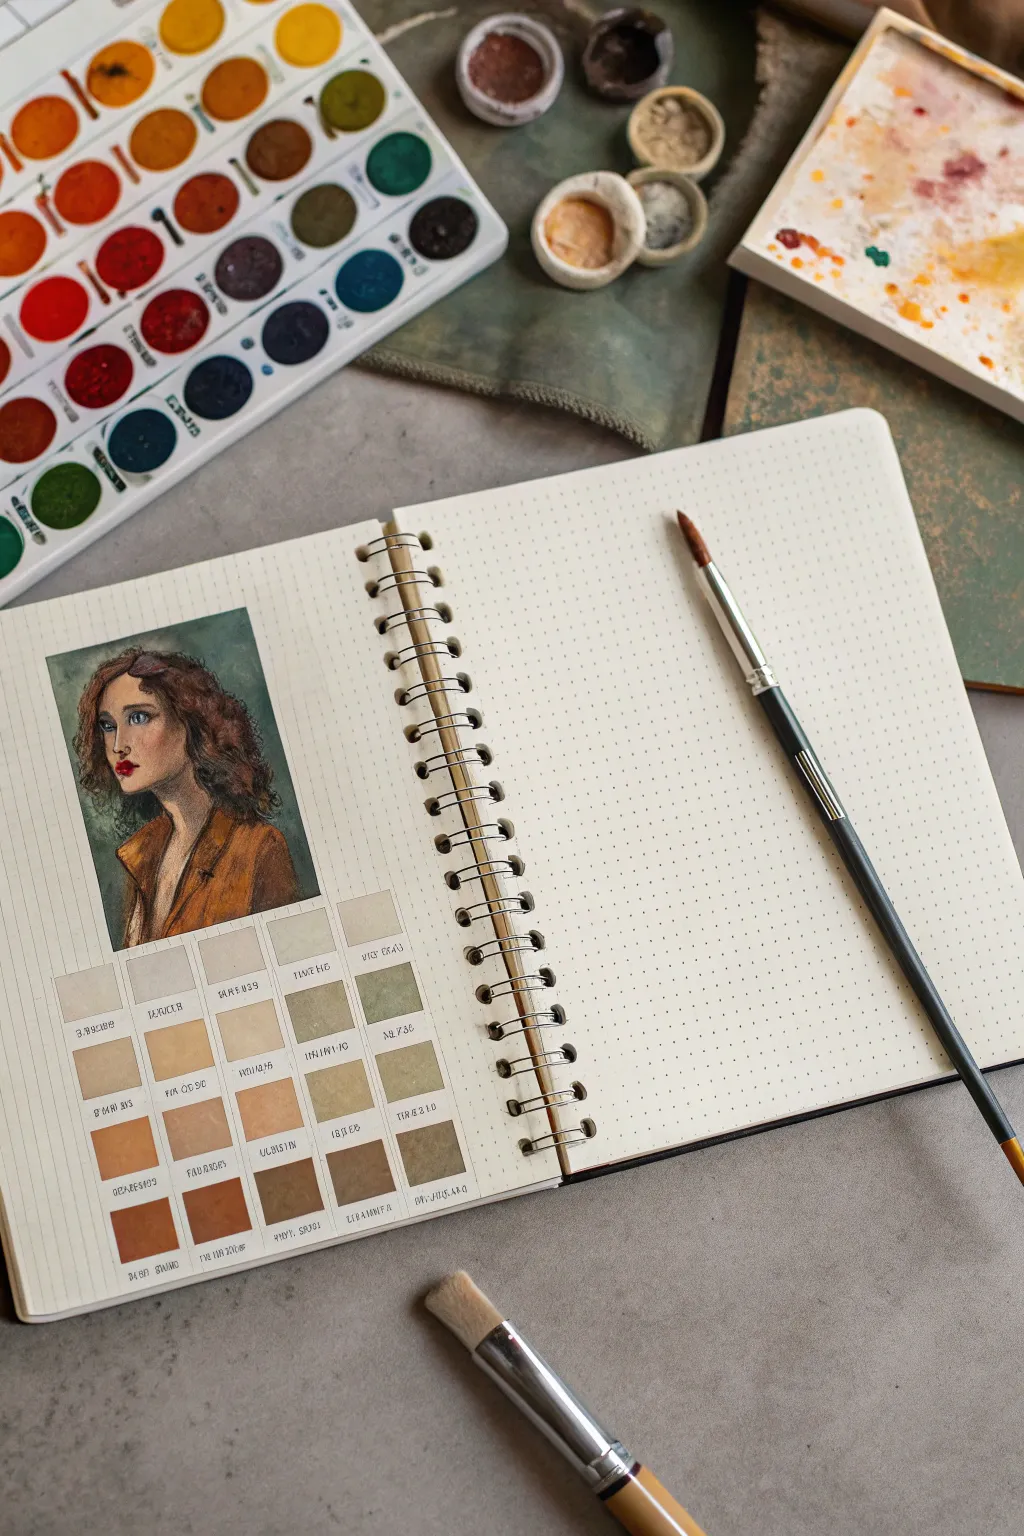
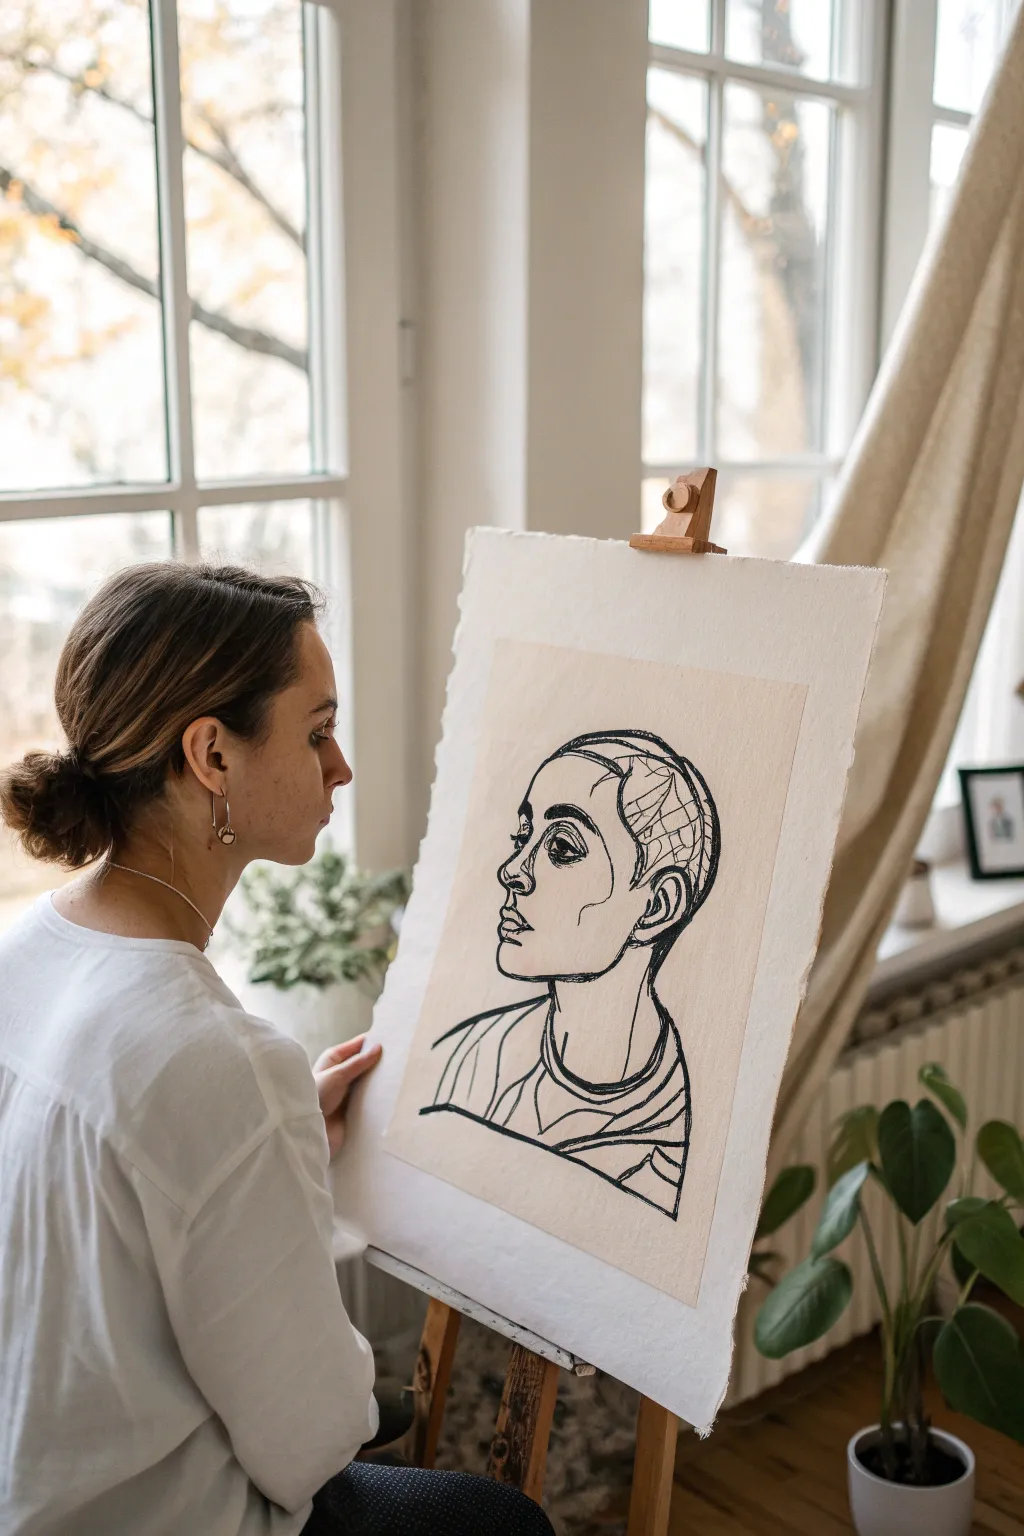
Continuous Line Self-Portrait Challenge
Capture the essence of a serene moment with this minimalist ink portrait. This project focuses on clean lines, subtle shading, and a stylized side profile that feels both modern and timeless.
Step-by-Step Tutorial
Materials
- Fine-point black drawing pen (0.5mm or similar)
- Plain sketchbook or drawing paper
- HB graphite pencil (for initial sketch)
- Soft eraser
- Comfortable workspace with good lighting
Step 1: Setting the Foundation
-
Establish the Head Angle:
Begin lightly with your pencil. Draw a faint oval tilted slightly upwards to represent the head. This isn’t a strict profile but a three-quarter view looking up and to the right. -
Map Facial Features:
Draw faint guidelines for the eyes, nose, and mouth. The eye line should be about halfway down the face. Mark the tip of the nose extending past the oval’s edge. -
Refine the Silhouette:
Still using pencil, gently sketch the jawline. It should curve smoothly from the ear area down to a gently pointed chin, then up towards the mouth line. -
Sketch the Hair Volume:
Outline the general shape of the hair. Focus on big shapes first: a swept-back front section and a low bun at the nape of the neck. Don’t worry about individual strands yet.
Step 2: Inking the Features
-
Start with the Eyes:
Switch to your black ink pen. Draw the eye closest to the viewer first. Outline the almond shape, thicken the upper lash line, and add a small circle for the iris. Leave a tiny white spec for a highlight. -
Brows and Nose:
Ink a thick, expressive eyebrow above the eye. Move down to the nose, drawing just the nostril shape and the outer curve of the tip, leaving the bridge implied or very faint. -
Define the Mouth:
Draw the lips with clean, separate strokes. The upper lip is usually a thinner, darker line, while the bottom lip is fuller. Leave a small gap in the lineart to suggest volume and light. -
Contour the Jaw:
Confidently trace your pencil jawline with a smooth ink stroke. Start from under the ear and flow down to the chin. -
Shoulder and Neck:
Extend a simple line down from the chin to form the neck. Add a curved horizontal line for the collar of the shirt and a simple sweeping line for the shoulder.
Wobbly Lines?
If your lines aren’t perfectly smooth, don’t restart. Go over the line again loosely to create a sketchy, artistic style intentionally.
Step 3: Detailing and Texture
-
Flowing Hair Strands:
Now, tackle the hair. Use long, sweeping pen strokes to mimic hair pulled back. Start from the hairline and curve them back towards the ear. Keep the lines spaced out to keep the look airy. -
Creating the Bun:
At the nape of the neck, draw circular, overlapping curves to form the bun. I like to bunch the lines tighter here to show the density of the gathered hair. -
Shading Under the Jaw:
Add shading beneath the jawline using hatch marks—short, parallel diagonal lines. This separates the head from the neck and adds dimension. -
Detailed Hair Shading:
Add darker, denser lines at the roots near the ear and at the base of the bun. This creates depth where the hair is tucked or shadowed. -
Freckles and Accents:
If you wish, tap your pen lightly across the nose and cheek area to create delicate freckles. -
Finishing Clothing:
Add a few quick, vertical lines on the shirt to suggest folds in the fabric. Keep these very minimal. -
Cleanup:
Let the ink dry completely for at least five minutes to avoid smudging. Then, gently erase all visible pencil guidelines.
Add a Wash
Dilute a drop of black ink or watercolor with water and paint very light grey shadows under the chin for a softer, 3D look.
Close your sketchbook knowing you’ve captured a moment of quiet grace on paper
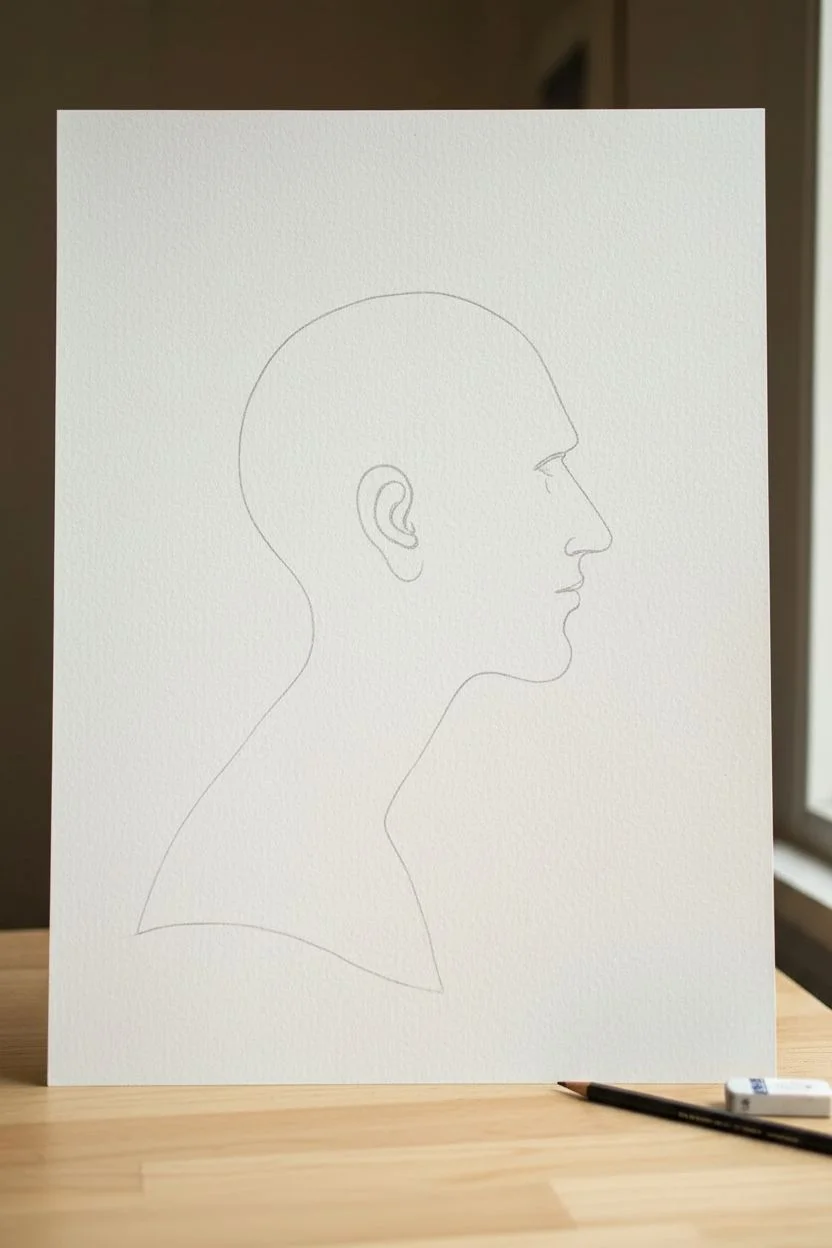
Blind Contour Self-Portrait With Ink Wash
Capture the essence of your profile with this minimalist and expressive technique. By utilizing varied line weights and a continuous contour approach, you will create a modern, graphic self-portrait that emphasizes form over perfection.
Detailed Instructions
Materials
- High-quality textured art paper (white, large sheet for backing)
- Cream or beige toned mixed media paper (smaller sheet for drawing)
- Black India ink or liquid acrylic ink
- Pointed round brush (size 4 or 6)
- Small flat brush (for broader strokes)
- Pencil (HB or H for faint guidelines)
- Mirror (wall-mounted or stand)
- Painter’s tape or acid-free glue
- Easel or drawing board
Step 1: Setting the Stage
-
Prepare your papers:
Begin by tearing the edges of your large white backing paper to create a soft, deckled look. Measure and cut your cream-toned paper to a size slightly smaller than the backing sheet, leaving a generous margin. -
Mount the drawing surface:
Center the cream paper onto the white textured sheet. You can use acid-free glue for a permanent bond or small loops of tape if you prefer to work flat and mount later. Secure the entire setup to your easel or drawing board. -
Position your mirror:
Set up your mirror so you have a clear, comfortable view of your profile. You want to be able to see your features without turning your head too much while drawing.
Loose is Better
Hold your brush further back on the handle, not near the bristles. This reduces control slightly, leading to looser, more expressive lines unique to this style.
Step 2: Establishing the Form
-
Observe your profile:
Spend a moment just looking. Trace the line of your forehead, nose, and chin with your eyes. Notice how the ear connects to the jawline and the curve of the neck. -
Lightly sketch guidelines:
Using an HB pencil, very faintly sketch the basic oval of the head and the placement of the ear and eye. Do not draw details; these are just faint anchors to keep your proportions in check. -
Load your brush:
Dip your round brush into the black ink. You want the brush fully saturated but not dripping. Test the flow on a scrap piece of paper to ensure smooth lines.
Ink Blotches?
Don’t panic if ink drips. Incorporate the mistake into the drawing by turning the drop into a shadow, a mole, or part of a pattern in the clothing.
Step 3: The Ink Drawing
-
Start the main contour:
Begin at the forehead. With a confident hand, draw the profile line down the bridge of the nose. Try not to lift the brush often; let the line wobble slightly for character. -
Define the features:
Continue the line under the nose and define the lips. Use slightly more pressure to thicken the line on the underside of the lip and chin, adding visual weight to shadow areas. -
Draw the eye:
Move inward to the eye. Use the tip of the brush for delicate lines around the eyelids and pupil. A single, bold stroke can define the eyebrow shape. -
Detail the ear:
The ear is a complex shape. Simplify it into a few curving lines that suggest the cartilage folds rather than drawing every anatomical detail. -
Suggest the hair:
Move to the hairline. Instead of drawing individual strands, use sweeping, curved motions to frame the face. You can use the flat brush here or press the round brush harder for thicker, graphic strokes. -
Connect the neck and shoulders:
Extend the line down from the ear and chin to form the neck. Add a few loose, sweeping lines to suggest the collarbone and clothing. Keep these lines simpler than the face to maintain focus on the portrait.
Step 4: Refining and Finishing
-
Assess line weight:
Step back and look at your drawing. Go back in with fresh ink and thicken key areas—like the back of the neck or the jawline—to add contrast and varied line quality. -
Add texture marks:
If parts of the drawing feel too empty, add subtle hatching or loose geometric marks, like the grid pattern seen in the hair area, to add visual interest without realism. -
Let it dry completely:
Ink can take longer to dry than expected, especially in thick areas. Wait at least 30 minutes before touching or moving the artwork to prevent smudging. -
Erase guidelines:
Once the ink is bone dry, gently erase any visible pencil marks. Be careful not to rub too hard over the ink lines.
Now you have a striking, modern portrait that captures your likeness in a bold new way

PENCIL GUIDE
Understanding Pencil Grades from H to B
From first sketch to finished drawing — learn pencil grades, line control, and shading techniques.
Explore the Full Guide
Cut-Paper Collage Self-Portrait Face
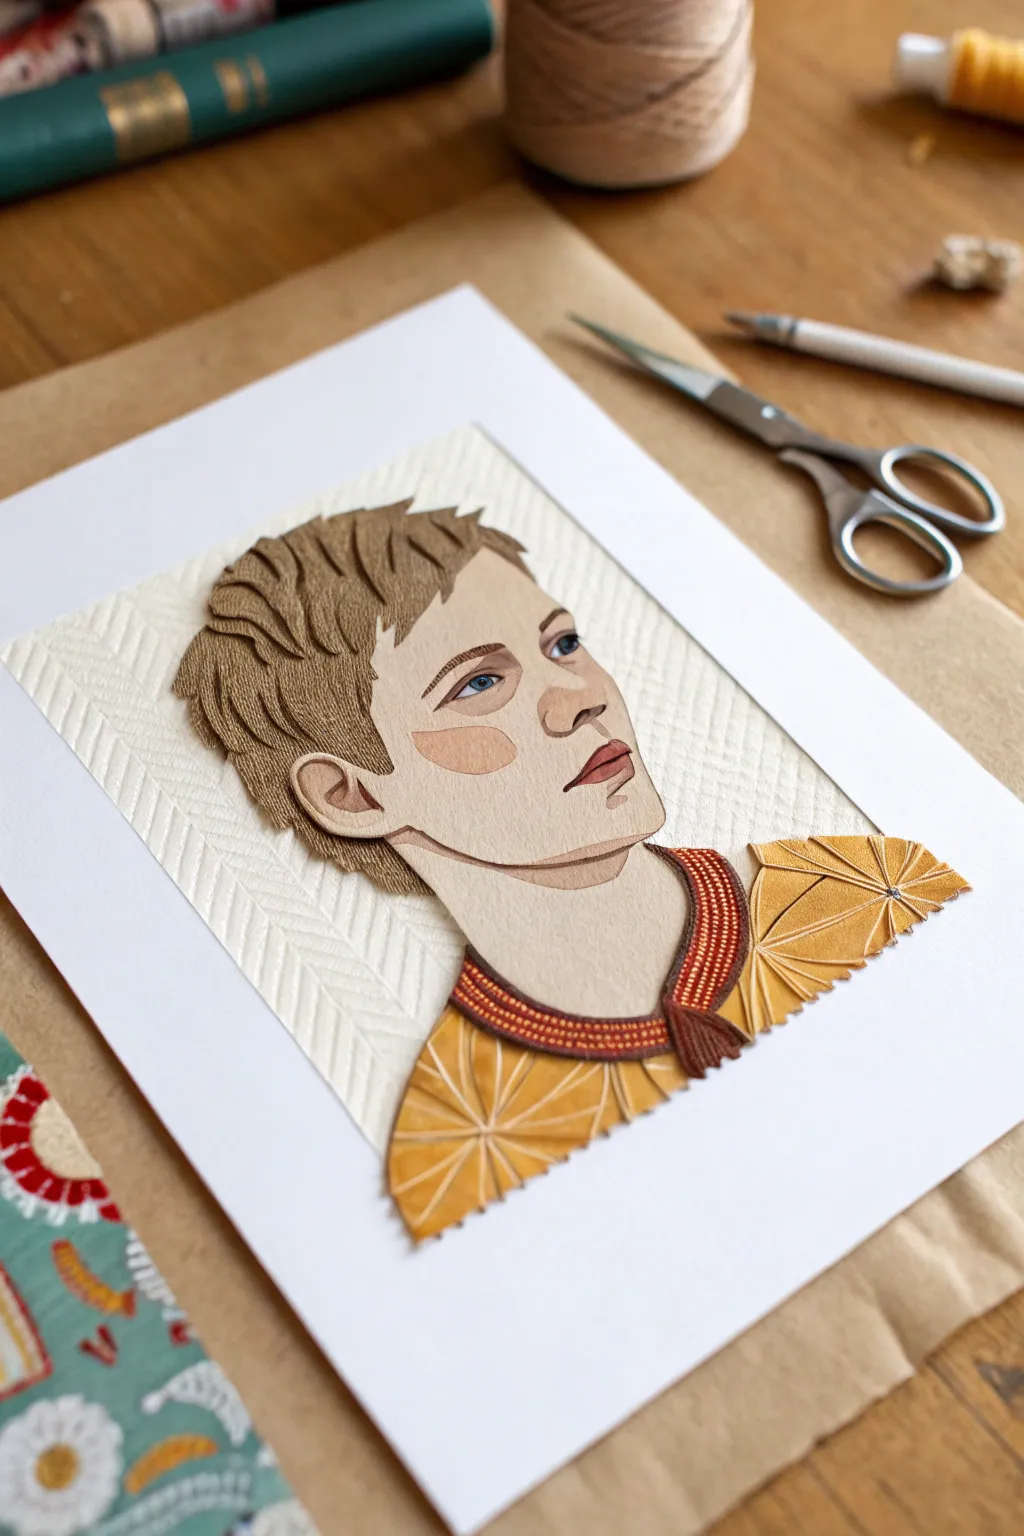
This stunning self-portrait technique uses layered paper to build dimension, turning a flat image into a sculptural relief. By combining varied textures like embossed paper and carefully cut cardstock, you’ll create a striking, partially 3D illustration that pops right off the page.
Step-by-Step
Materials
- Various colored cardstock (beige for skin, shades of brown/tan for hair, gold/mustard for shirt)
- Textured white paper (chevron or herringbone embossed pattern)
- Smooth white cardstock (for the base backing)
- Pencil and eraser
- Tracing paper
- Precision craft knife (X-Acto)
- Small sharp scissors (embroidery scissors work best)
- Cutting mat
- Glue stick and liquid craft glue with a fine tip applicator
- Fine-point markers or colored pencils (blue for eyes, pink for lips/cheeks)
- Optional: Bone folder for crisp creases
Step 1: Preparation & Base Layers
-
Sketch your reference:
Begin by sketching your self-portrait on a scrap piece of paper to get the scale right. Focus on simplifying your features into clean shapes—think of the face as a puzzle made of distinct blocks of color rather than a shaded drawing. -
Create the master template:
Once happy with the sketch, trace the outlines of every major shape (hair, face, neck, shirt segments) onto tracing paper. This will serve as your pattern for cutting the colored papers. -
Prepare the background window:
Take your main white backing cardstock and cut a rectangular window in the center where the portrait will sit. This creates a clean frame. -
Cut the textured backing:
Cut a piece of your chevron-embossed white paper slightly larger than the window opening. Glue this behind the window so the texture shows through the front.
Jagged Edges?
If your scissors leave rough edges on tight curves, switch to a fresh X-Acto blade. Rotate the paper, not the knife, for the smoothest possible cuts.
Step 2: Constructing the Face & Hair
-
Cut the skin base:
Using your beige cardstock, cut the main silhouette of the head and neck. Keep the edges clean and smooth using your craft knife. -
Add facial details:
Before gluing the face down, use colored pencils or fine markers to draw the eyes, eyebrows, and lips directly onto the beige paper. Add a soft pink shape cut from paper for the cheek blush and glue it in place. -
Cut hair segments:
This is the intricate part. Using tan or light brown paper, cut the hair in grouped sections rather than individual strands. For the texture shown in the image, you’ll want to make tiny, parallel cuts into the paper without cutting all the way through, or overlap small slivers to mimic flow. -
Layer the hair:
I find it helpful to start at the bottom of the hairline and work upward. Glue the base layer of hair flat, then add smaller, detailed clumps on top to create volume and shadow. -
Accentuate the ear:
Cut a C-shape for the ear from the beige paper and a smaller inner ear shape. Glue these over the hair/jawline intersection to create depth.
Level Up: Depth
Use thin foam adhesive squares instead of glue for specific layers, like the hair bangs or nose tip, to create dramatic shadows and real 3D depth.
Step 3: Clothing & Assembly
-
Design the collar:
Cut a curved collar shape from a rusty red or patterned paper. If you don’t have patterned paper, draw tiny dots or lines on plain paper with a gel pen before cutting. -
Construct the shirt segments:
Cut the yellow/mustard shirt pieces. To get that geometric, fan-like effect, score lines lightly with the back of your craft knife and gently fold them to create ridges before gluing them down. -
Assemble the figure:
Glue the neck behind the shirt collar, then attach the completed head to the neck. Ensure all layers are dry and secure. -
Mount onto background:
Apply glue to the back of your assembled paper figure. Carefully position it onto the textured white background inside your frame. -
Final trimming:
If the shirt or hair extends past the ‘window’ of your frame, gently tuck it under the white border or trim it flush for a neat finish. -
Clean up edges:
Use an eraser to gently remove any visible pencil marks on the face or clothing, being careful not to snag the delicate paper edges.
Step back and admire how simple paper shapes have come together to capture a likeness with personality and style
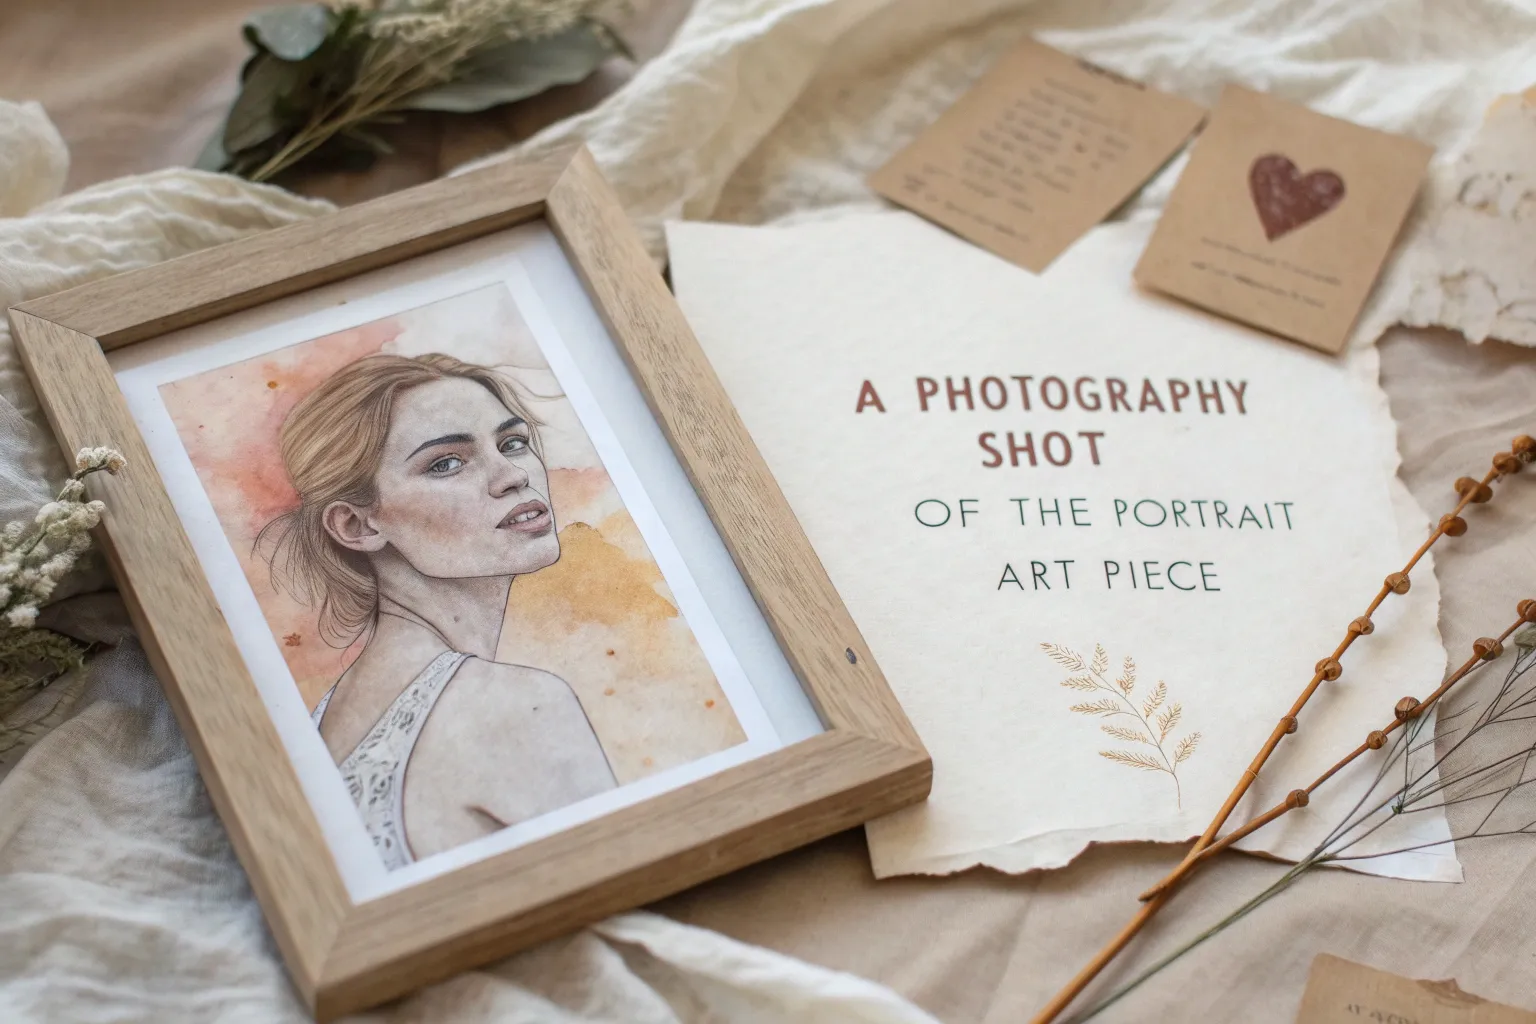
Text-and-Texture Identity Self-Portrait
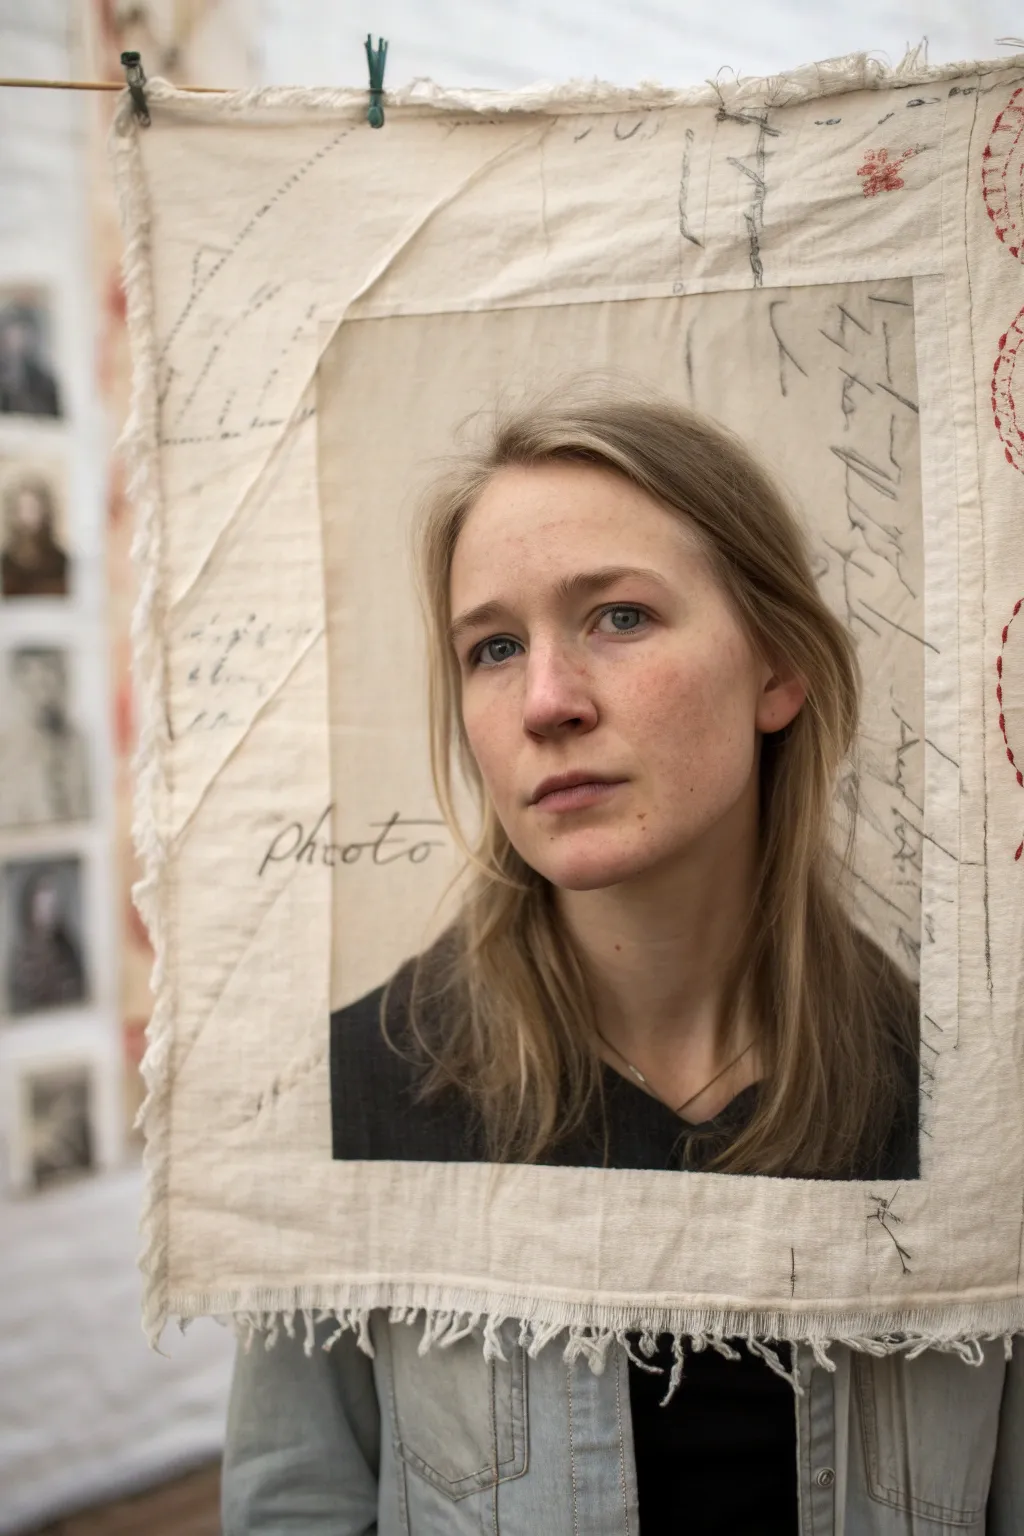
This evocative self-portrait project merges photography with textile art by framing your face within a suspended, handwritten canvas. The result is a layered, dimensional piece that explores identity through both your physical image and the written words surrounding it.
Step-by-Step Guide
Materials
- Unbleached muslin fabric or canvas (approx. 24×36 inches)
- Black fabric marker or fine-tip permanent marker
- Fabric scissors
- Pinking shears (optional)
- Clothespins (2)
- String or twine for suspension
- Pencil for sketching
- Red embroidery floss and needle (optional)
- DSLR camera or high-quality smartphone camera
- Fabric stiffener (optional)
Step 1: Fabric Preparation
-
Cut the Base Dimension:
Start by cutting a large rectangle of unbleached muslin. Aim for roughly 24 by 36 inches to give yourself ample negative space around the central frame. Don’t worry about perfect lines; a slightly organic edge adds character. -
Fray the Edges:
To achieve that raw, textural look seen in the example, pull horizontally running threads from the top and bottom edges of your fabric until you have a visible fringe about half an inch long. -
Mark the Frame:
Lightly sketch a rectangular window in the center of the fabric using a pencil. This opening should be large enough to frame your face and shoulders comfortably, roughly 10×12 inches. -
Create the Window:
Carefully cut out the inner rectangle. Instead of cutting straight lines, I prefer to drag the scissors slightly to create a jagged, imperfect edge, or leave small flaps of fabric attached for a deconstructed look. -
Texturize the Fabric:
Crumple the fabric tightly in your hands and then smooth it out. This creates natural wrinkles that catch the light and prevents the material from looking too stiff or manufactured.
Wrinkle Control
If the fabric hangs too limp, spray a light mist of spray starch or fabric stiffener on the back side. It helps it hold its shape without looking rigid.
Step 2: Adding the Narrative
-
Draft Your Text:
Plan out the text you want to include. This could be stream-of-consciousness journaling, favorite lyrics, or personal affirmations. Write it out on scratch paper first to check the flow. -
Apply Handwriting:
Using a fine-tip black fabric marker, begin transcribing your text onto the fabric borders. Vary the direction of the writing—have some lines running vertically and others horizontally to create visual rhythm. -
Incorporate Sketches:
Add loose, gestural sketches among the words. These can be abstract shapes, dashed lines, or simple symbols. Keep the lines quick and energetic rather than polished. -
Add Accent Details:
For a pop of color, use a red embroidery floss or a red marker to add small details, like the decorative loops seen on the right edge of the example piece. -
Write the Title:
If desired, write a focal word like ‘Photo’ or your name near the window cutout in a slightly larger, cursive script to anchor the composition.
Layered Identity
Try using semi-transparent vellum or sheer organza instead of muslin. This allows your features to be partially visible through the fabric itself, not just the hole.
Step 3: Display and Capture
-
Rig the Suspension:
Tie a length of string tight horizontally across your shooting space. It should be slightly above head height. -
Hang the Frame:
Use two clothespins to clip the top corners of your fabric vertically to the string. Ensure the fabric hangs relatively flat. -
Positioning:
Step behind the fabric and position your face within the window cutout. You should be close enough that your features are clear, but far enough back that shadows fall naturally on your face. -
Lighting Setup:
Use soft, natural window light hitting you from the front or slightly to the side. Ensure the fabric is well-lit so the handwriting is legible. -
Camera Focus:
Set your camera’s focus on your eyes, not the fabric. Use a wider aperture (low f-stop number) if you want the back of the room to blur out while keeping the fabric frame sharp. -
Capture the Shot:
Look directly into the lens with a neutral or contemplative expression. Take multiple shots, adjusting the angle of your head and the drape of the fabric slightly each time.
Review your photos and choose the one where your expression best creates a dialogue with the written words surrounding you


Inside/Outside Split Self-Portrait
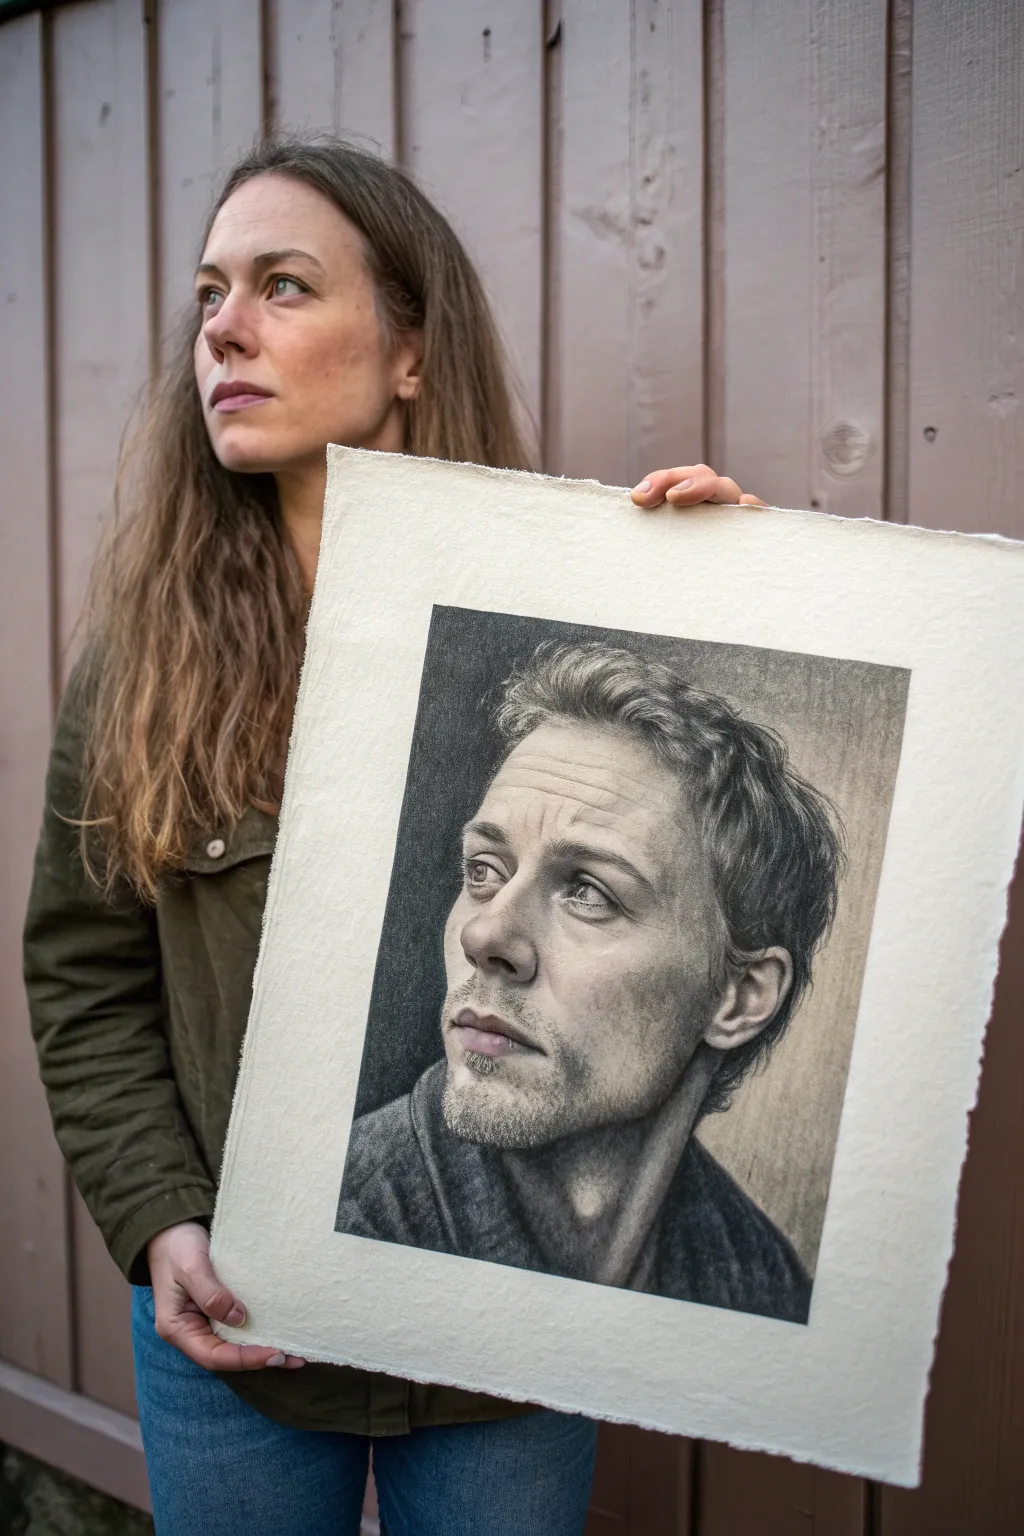
Capture the raw emotion and intricate details of a human face with this hyper-realistic pencil drawing project. Using high-quality paper and a range of graphite grades, you’ll create a striking portrait that balances photographic precision with artistic texture.
How-To Guide
Materials
- Heavyweight textured drawing paper (approx. 300gsm, deckle edge optional)
- Graphite pencils (HB, 2B, 4B, 6B, 8B)
- Charcoal stick or pencil (optional for deepest blacks)
- Kneaded eraser
- Precision stick eraser (e.g., Mono Zero)
- Blending stumps (tortillons) and tissues
- Fixative spray
- Reference photo
- Grid ruler or light table (optional for transfer)
Step 1: Preparation and Outline
-
Paper Selection:
Choose a heavyweight paper with a slight tooth. The texture is crucial here—it shouldn’t be too smooth, as you want the grain to hold the graphite and add character to the final piece. -
Reference Setup:
Select a high-contrast reference photo where the subject is looking slightly off-camera. The lighting should highlight facial structure, creating clear distinctions between the mid-tones and shadows. -
Light Sketching:
Using an HB pencil, map out the facial proportions. Keep your lines incredibly faint, just barely visible enough to guide you. Focus on the placement of the eyes, nose, and jawline without committing to hard edges. -
Refining Features:
Verify your proportions carefully. Pay close attention to the tilt of the head and the direction of the gaze, as these establish the mood. Erase any construction lines that are no longer needed.
Step 2: Building the Eyes and Skin
-
The Windows to the Soul:
Start with the eyes using a 2B pencil. Define the pupils and the iris texture, but leave pure white paper for the catchlights (reflections). These tiny white spots bring the drawing to life immediately. -
Establishing Skin Tone:
Lightly shade the skin areas using an HB or 2B pencil. Use the side of the lead rather than the tip to avoid harsh lines. Let the paper’s texture show through slightly; don’t burnish it completely smooth yet. -
Contouring the Face:
Switch to a 4B pencil to deepen the shadows around the eye sockets, under the nose, and beneath the lip. Use a blending stump to soften the transition from shadow to light, mimicking the curvature of the face. -
Adding Wrinkles and Pores:
For the forehead lines and skin texture, use a sharp HB pencil. Don’t draw straight lines; instead, use tiny, broken marks and slight shading differences to suggest skin folding naturally.
Keep it Clean
Place a sheet of scrap paper under your drawing hand at all times. This prevents oils from your skin transferring to the paper and stops you from smudging your hard work.
Step 3: Hair and Facial Elements
-
Stubble Texture:
Create the stubble using quick, short flicking motions with a 4B pencil. Vary the direction of the strokes to follow the natural growth pattern of facial hair along the jaw and chin. -
Mapping the Hair:
Outline the major clumps of hair rather than individual strands. Look at your reference photo to see how the hair groups together and where the highlights fall. -
Depths of the hair:
Fill in the darkest areas between the hair clumps using a 6B or 8B pencil. This negative space defines the lighter strands without you needing to draw every single hair. -
Mid-tones in Hair:
Using a 2B pencil, add texture to the hair clumps. Blend softly in the direction of hair growth to create volume, ensuring the transition from the dark roots to the highlighted tips is gradual.
Add Dimension
For ultra-realistic stubble, gently press an indenting tool or empty mechanical pencil into the paper before shading. The graphite will skip over the valleys, leaving white hairs.
Step 4: Background and Final Touches
-
Dark Background Application:
To make the portrait pop, fill in the background. Start with a 6B pencil or charcoal stick near the head and fade it out as you move toward the edges. -
Smoothing the Background:
Use a tissue or a large blending stump to smooth the background graphite. This creates a soft focus effect that contrasts beautifully with the sharp details of the face. -
Deepening Values:
Go back over the darkest points of the portrait—pupils, nostrils, corners of the mouth—with your 8B pencil to ensure contrast range is maximized. -
Highlight Retrieval:
I always use a precision stick eraser (like a Mono Zero) at this stage to lift out tiny highlights in the skin texture, the wetness of the eyes, and stray hairs catching the light. -
Final Fixative:
Once fully satisfied, spray the drawing with a workable fixative in a well-ventilated area to prevent the heavy graphite layers from smudging over time.
Step back and admire how a simple range of grey tones has transformed into a living, breathing expression
Silhouette Self-Portrait Filled With Doodles
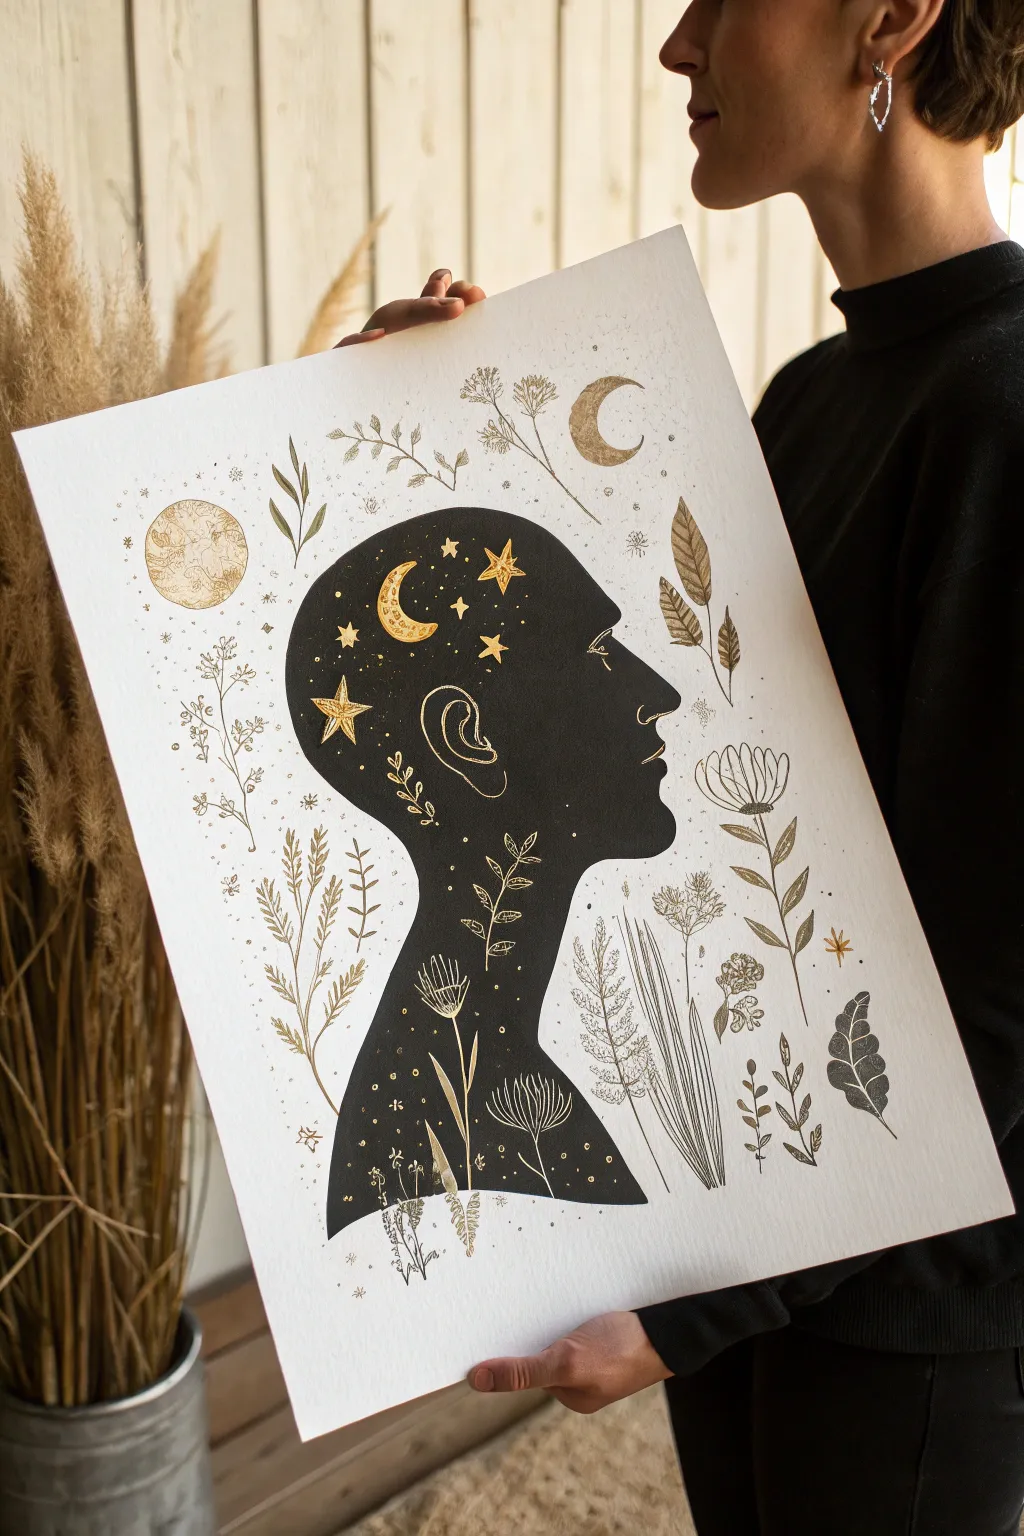
Capture your inner universe with this stunning silhouette project that blends personal identity with nature and the cosmos. By filling a stark black profile with delicate gold and fine-line botanical illustrations, you’ll create a piece of art that feels both grounding and ethereal.
Detailed Instructions
Materials
- High-quality watercolor or mixed media paper (heavyweight, textured)
- Black India ink or high-pigment black acrylic paint
- Metallic gold paint pen (fine tip) or gold gouache
- Fine liner pens (black, sizes 0.1 to 0.5)
- Graphite pencil (HB) and eraser
- Profile photo of yourself to trace
- Light box or sunny window (for tracing)
- Small round paintbrush (size 2 or 4)
- Masking tape
Step 1: Captured Shadow
-
Capture your profile:
Begin by taking a side-profile photo of yourself against a plain, light-colored wall. Ensure the lighting is crisp so your features are clearly defined. -
Size and print:
Scale the photo on your computer to fill the center of your page, leaving ample negative space around the edges. Print this out on standard printer paper. -
Establish the outline:
Tape your printed photo to a window or lightbox, then tape your high-quality art paper over it. Using a light hand with your pencil, trace the silhouette of your head, neck, and shoulders. -
Define the boundary:
Remove the papers from the light source. Go over your pencil line carefully to refine any bumps, smoothing out hair details into a sleek, manageable shape.
Clean Lines Tip
If your hand shakes while painting the silhouette’s edge, use masking fluid to block out the negative space first, or clean up wobbly edges with a white gel pen later.
Step 2: The Void
-
Outline in ink:
Using a slightly thicker black pen or a very steady brush with India ink, trace the final perimeter of your silhouette. -
Fill the interior:
Now, fill the entire silhouette with black India ink or fluid acrylics. Work slowly near the edges to keep them crisp. I like to use a larger brush for the center and a tiny detail brush for the nose and lips. -
Ensure opacity:
Let the first layer dry completely. If the black looks patchy or grey in areas, apply a second coat for that deep, velvety void effect. -
Wait for dryness:
Allow the silhouette to dry thoroughly—this is crucial. If the black ink is wet, your metallic details in the next phase will bleed.
Step 3: Celestial & Botanical Details
-
Sketch the inner world:
Once the black ink is bone-dry, lightly sketch placement ideas for your larger gold elements (like the moon and larger stars) using a pencil. Graphite will shine slightly against the matte black. -
Apply gold accents:
Using your gold paint pen or fine brush with gold gouache, draw a crescent moon near the forehead and scattered stars throughout the ‘mind’ area. -
Add floating flora:
Draw delicate gold botanical sprigs and leaves inside the silhouette, perhaps blooming upwards from the neck or shoulders. -
Highlight features:
Carefully draw a stylised ear and an eye outline in gold to bring the human element back into the shadow. -
Create external atmosphere:
Moving to the white paper outside the silhouette, switch to your fine black pens. Draw large, airy botanical stems that curve around the head shape. -
Introduce gold externally:
Intersperse gold details on the white background as well, such as a second moon or golden pollen dots floating among the black ink plants. -
Balance the composition:
Step back and look at the density. Add small clusters of dots (stippling) or tiny stars to fill empty gaps without overcrowding the piece. -
Erase guidelines:
Once you are absolutely certain all ink and paint is cured, gently erase any visible graphite lines.
Level Up: Texture
Instead of flat gold paint, use gold leaf size and real gold leaf foil for the crescent moon to create a texture that catches the light brilliantly.
Frame your new celestial portrait in a simple wood frame to let the intricate details speak for themselves
Fractured Color-Block Self-Portrait
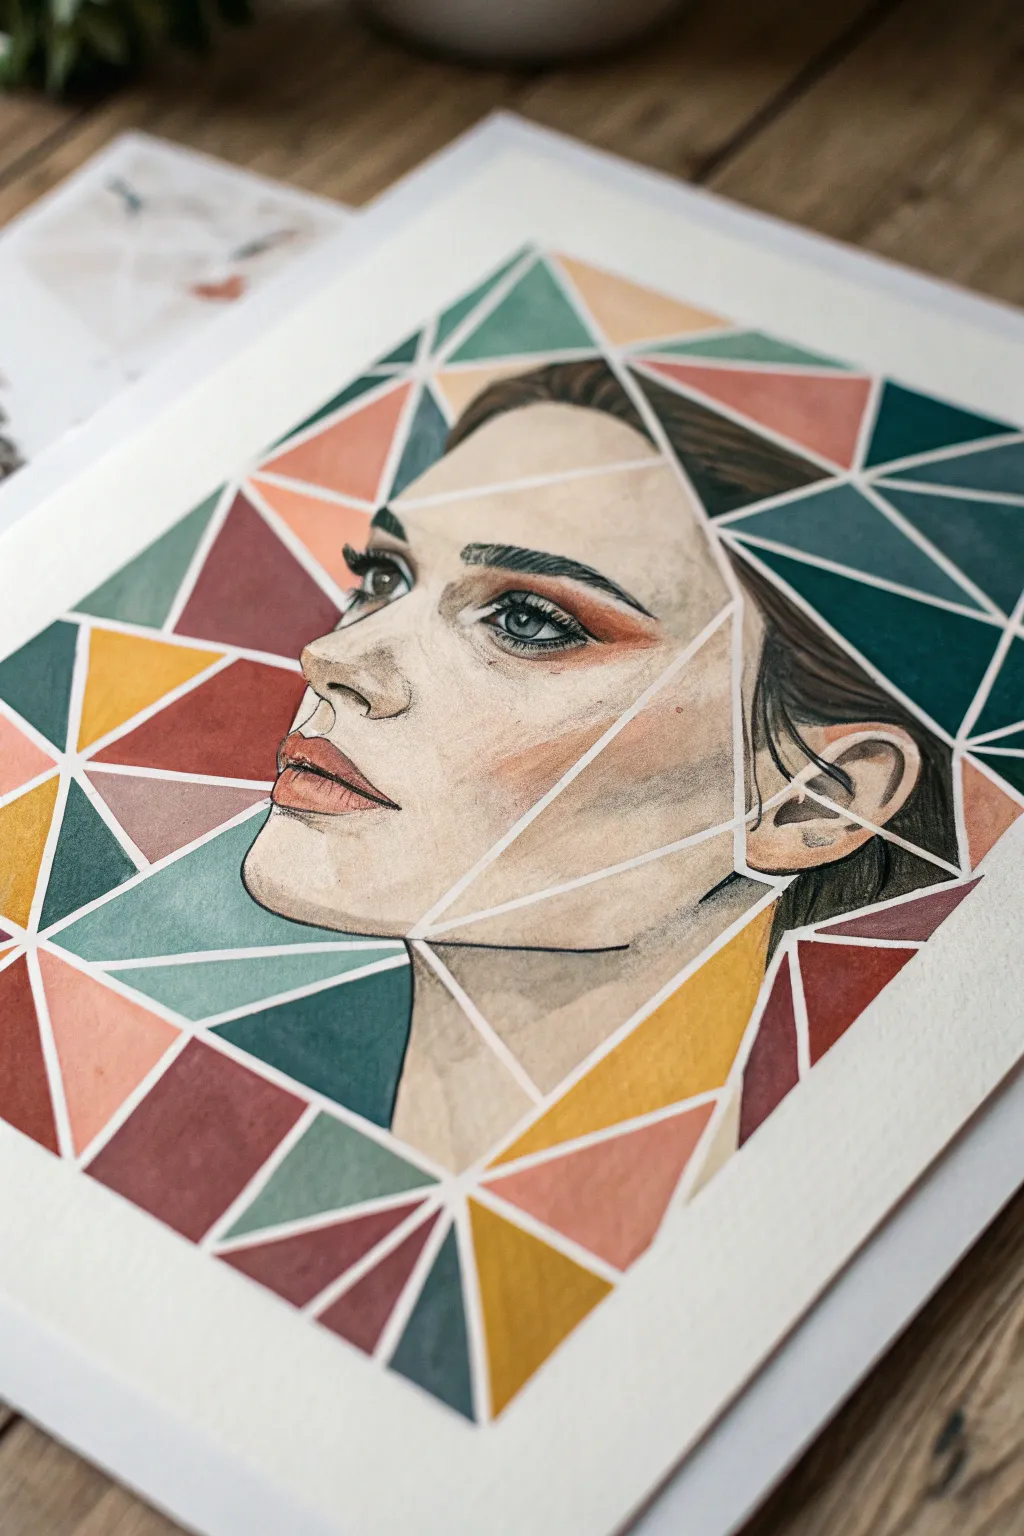
Transform a traditional portrait into a modern masterpiece by fracturing the composition into vibrant, geometric shards. This mixed-media approach balances realistic facial features with bold, flat color blocking for a striking contemporary look.
Detailed Instructions
Materials
- Heavyweight watercolor or mixed media paper (300gsm)
- Pencil (HB or 2B)
- Fine liner masking fluid pen or thin masking tape (1/8 inch)
- Watercolor paints or gouache
- Synthetic brushes (Pointed round size 2, Flat shader size 6)
- Eraser
- Reference photo of your profile
- Ruler
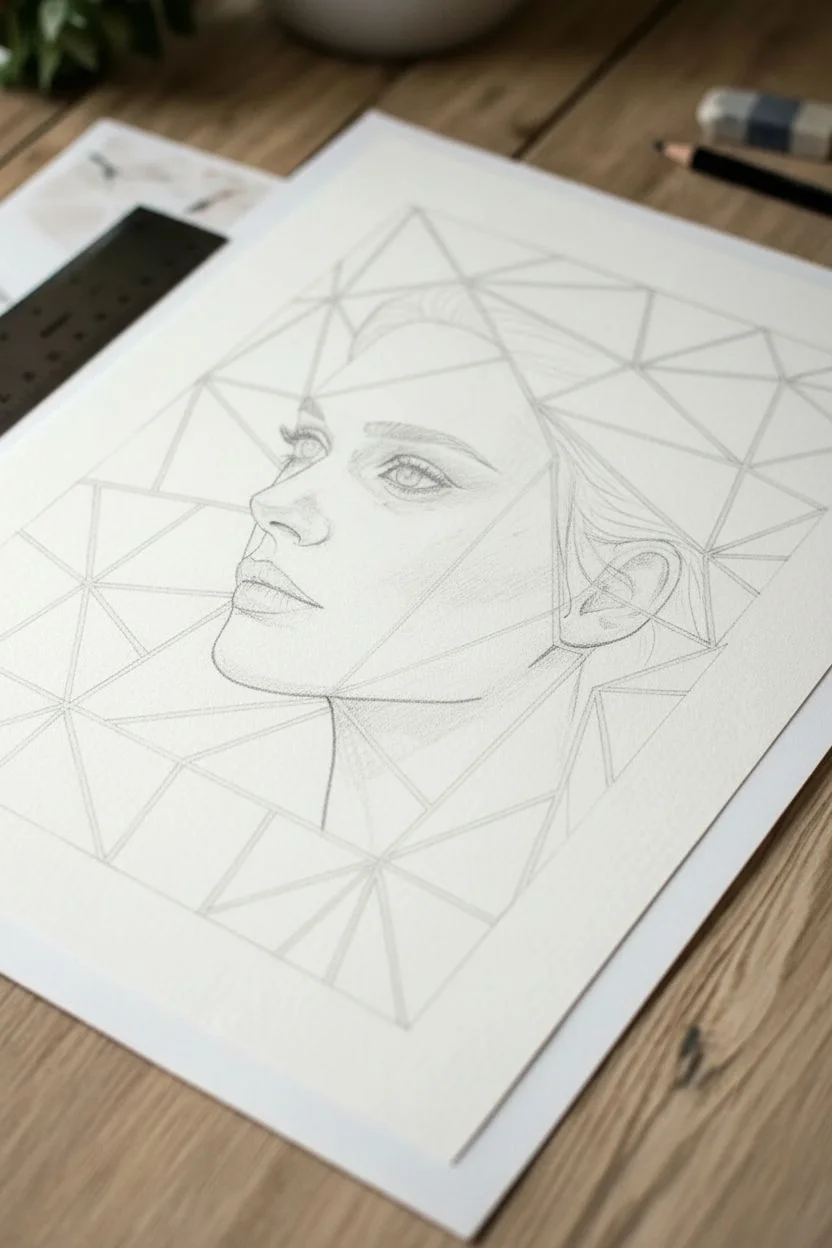
Step 1: Planning and Sketching
-
Select your reference:
Choose a side-profile photo of yourself. A profile view works exceptionally well for this style because the strong jawline and nose shape interact beautifully with the geometric angles we will add later. -
Sketch the portrait:
Lightly sketch the outline of your face, hair, and neck onto the paper. Focus on getting the proportions correct, but keep the lines faint as they will eventually be painted over or erased. -
Design the geometric web:
Using a ruler, draw straight lines across the entire page, cutting through both the background and the face itself. Create a network of triangles and trapezoids. -
Refine the composition:
Ensure no single shape is too tiny to paint. I like to make sure the lines intersect with key facial features—like the corner of the eye or the tip of the nose—to integrate the face into the design.
Bleeding Lines?
If paint bleeds under your tape, don’t panic. Wait for it to dry, then use a white gel pen or opaque white gouache to tidy up the lines and restore the crisp edges.
Step 2: Masking the Lines
-
Technique selection:
To achieve those crisp white lines between colors, you have two choices: careful negative painting or using a masking medium. For the sharpest result shown here, masking is best. -
Apply the mask:
Use a fine-tip masking fluid pen or very thin drafting tape to cover every pencil line you drew with the ruler. If using tape, press it down firmly to prevent paint bleeding underneath. -
Let it set:
Allow the masking fluid to dry completely until it is tacky and transparent. If you paint too soon, you risk ruining the brush and the barrier.
Add Metallic Foil
For a glamorous pop, leave 3-4 random shards unpainted. After removing the mask, apply size and gold leaf to these empty shapes for a shimmering mixed-media finish.
Step 3: Painting the Portrait
-
Base skin tones:
Mix a watery wash of your skin tone. Paint the shapes that fall within the face area. You don’t need to shade heavily yet; just establish the base color. -
Adding facial features:
Switch to your smaller size 2 brush. Carefully paint the eye, nostril, and lips. Even though a geometric line might cut through the eye, paint the feature realistically within that specific shard. -
Shadows and depth:
Deepen the skin tone with a bit of burnt umber or purple. Paint the shadows under the jaw, around the eye socket, and the side of the nose to give the face dimension against the flat background. -
Developing the hair:
Paint the hair sections. Instead of painting individual strands, treat the hair as blocks of dark value within the geometric shapes, adding just a few textural strokes near the edges.
Step 4: The Geometric Background
-
Choose your palette:
Select 4-5 distinctive colors for the background shards. The example uses a retro palette of teal, mustard yellow, terra cotta, and blush pink. -
Color blocking:
Begin filling in the background shapes. Use a flat shader brush to get clean coverage. Distribute the colors randomly so no two identical colors touch each other. -
Opacity control:
Aim for a flat, opaque look for these abstract shapes to contrast with the soft shading of the face. Gouache is perfect for this, but if you are using watercolor, use less water and more pigment. -
Filling the gaps:
Continue painting until every geometric ‘shard’ is filled. Don’t worry if you paint over the masking fluid; that is what it is there for. -
Dry thoroughly:
Walk away and let the piece dry completely. If the paper is cool to the touch, it’s still damp. Patience is crucial here to prevent tearing.
Step 5: The Reveal
-
Remove the mask:
Gently rub the masking fluid with your finger or a rubber cement pickup tool. If you used tape, peel it back slowly at a 45-degree angle. -
Clean up:
Revealing the stark white paper underneath is the most satisfying part. Use a clean, slightly damp brush to tidy up any tiny edges where paint might have snuck under the mask.
Step back and admire how the sharp white boundaries bring a cohesive energy to your fractured portrait composition
Layered Tracing-Paper Self-Portrait
Merge classic printmaking aesthetics with mixed-media layering in this sophisticated self-portrait project. By combining delicate line work with a soft, atmospheric color wash, you will achieve a timeless look that feels both illustrative and deeply personal.
Step-by-Step Guide
Materials
- Heavyweight printmaking paper (e.g., Rives BFK or Stonehenge)
- Plexiglass or zinc plate (for drypoint) OR tracing paper (for a faux-print effect)
- Etching needle (if doing drypoint) OR fine liner pens (0.1, 0.3, 0.5mm)
- Black printing ink (oil-based) OR India ink
- Tarlatan cloth (for wiping plates)
- Printing press (optional) OR baren/wooden spoon
- Watercolor paints or diluted acrylic inks (warm earth tones/peach)
- Soft watercolor brushes
- Spray bottle with water
- Masking tape
- Reference photo for your self-portrait
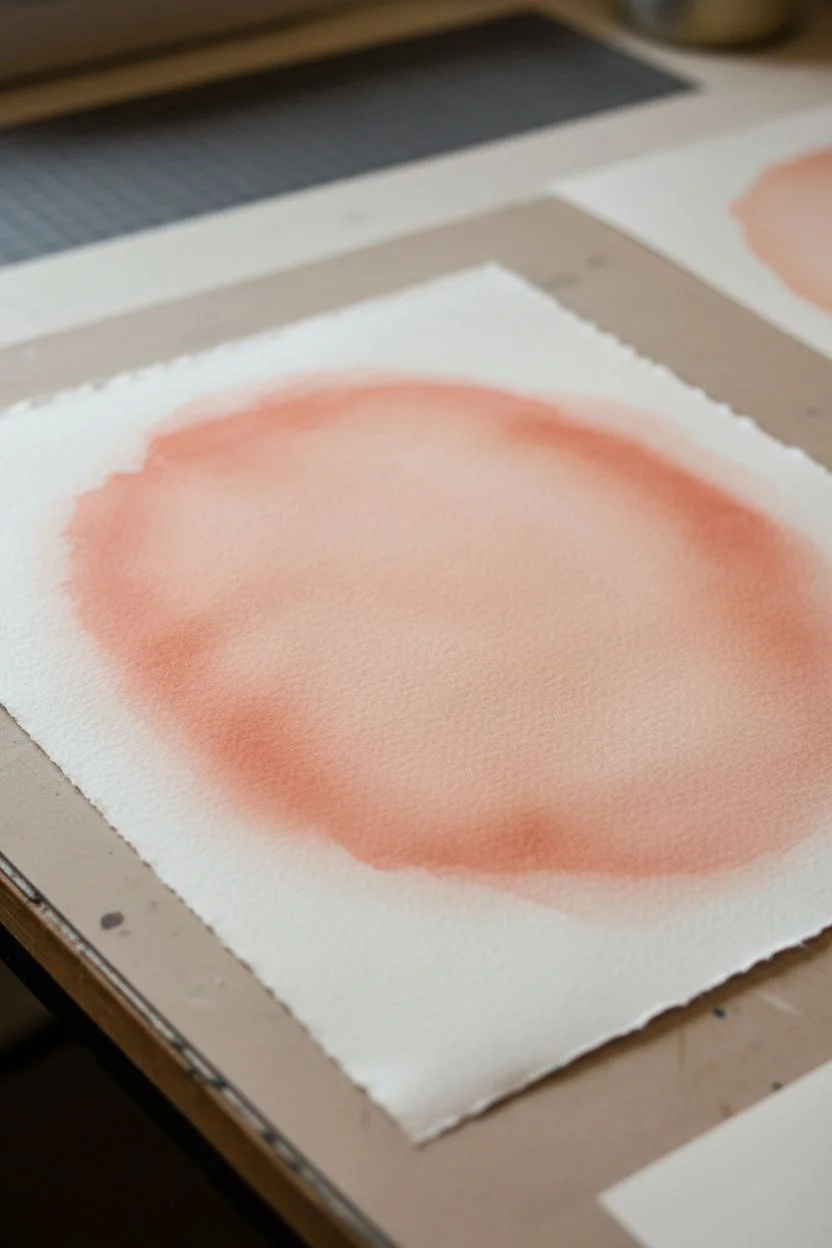
Step 1: Preparation & Base Color
-
Select your paper:
Choose a high-quality, heavyweight cotton rag paper. It needs to be sturdy enough to handle dampening and pressure without buckling. -
Soak the paper:
Fill a clean tray with water and submerge your paper for 15-20 minutes. This softens the fibers, allowing them to absorb ink better and mold to the plate. -
Prepare the color wash:
While the paper soaks, mix a watery wash of peach, terracotta, or warm pink watercolor. You want a very translucent ‘plate tone’ effect rather than opaque paint. -
Apply the tint:
Remove the paper from the bath and blot it between clean towels until it’s just damp. Lightly brush your color wash onto the center of the paper where the face will go, fading the edges out for a vignetted look. Let this dry completely if you are drawing directly, or keep it damp if printing with a press.
Plate Polishing Tip
Before printing, wipe the very highlights of the face (cheekbones, nose bridge) with a Q-tip or page from a phone book to make them bright white.
Step 2: Creating the Image Plate
-
Trace your reference:
Tape your reference photo behind your clear plexiglass plate. If you are doing a manual drawing method instead of printing, simply pencil your outline lightly onto the dried, tinted paper. -
Scribe the lines (Drypoint Method):
Using a sharp etching needle, scratch your portrait into the plexiglass. Press firmly to create a ‘burr’—a rough edge on the plastic that will hold the ink. Focus on the flow of hair and the contours of the face. -
Ink the plate:
Take a dollop of oil-based black etching ink and card it across the entire engraved plate using a scrap of mat board or a plastic card. Ensure ink is pushed deep into every scratched line. -
Wipe the plate:
Ball up a piece of tarlatan cloth. Wipe the surface of the plate in a circular motion to remove excess ink. You want the surface clean but the grooves full of black ink. I like to leave a tiny film of ink near the edges for atmosphere.
Collage Mash-up
Print the line work on transparent acetate or vellum instead, then overlay it onto a separate sheet of textured watercolor paper with a bold abstract painting.
Step 3: Printing & Finishing
-
Register the paper:
Place your inked plate face-up on the press bed. Carefully align your damp, tinted paper over the plate so the color wash aligns with the portrait engraving. -
Run through the press:
Cover with felts and run it through the etching press. If you don’t have a press, you can achieve a similar look by placing the paper over the plate and rubbing firmly and meticulously with a wooden spoon, though lines will be fainter. -
Simulated Alternative (No Press):
If skipping the press entirely: Take your dried, tinted paper and use fine liner pens to draw your portrait over the colored area. Vary your line weight—thicker for shadows, thinner for hair strands—to mimic the etched look. -
Add stippling details:
Whether you printed or drew the lines, inspect the shoulders and clothing area. Add texture using a stippling technique (tiny dots) to create a fabric-like density, contrasting with the smooth lines of the hair. -
Enhance the eyes:
Use a slightly darker ink or a second pass with a pen to deepen the pupils and the lash line. This focal point grounds the ethereal quality of the rest of the print. -
Flatten and dry:
Place the finished print between clean sheets of newsprint or tissue, weigh it down with a heavy board or books, and let it dry for 24 hours to ensure it is perfectly flat.
Once dry, verify your edition number or sign the corner to complete your studio-quality portrait
Alter-Ego Self-Portrait Series
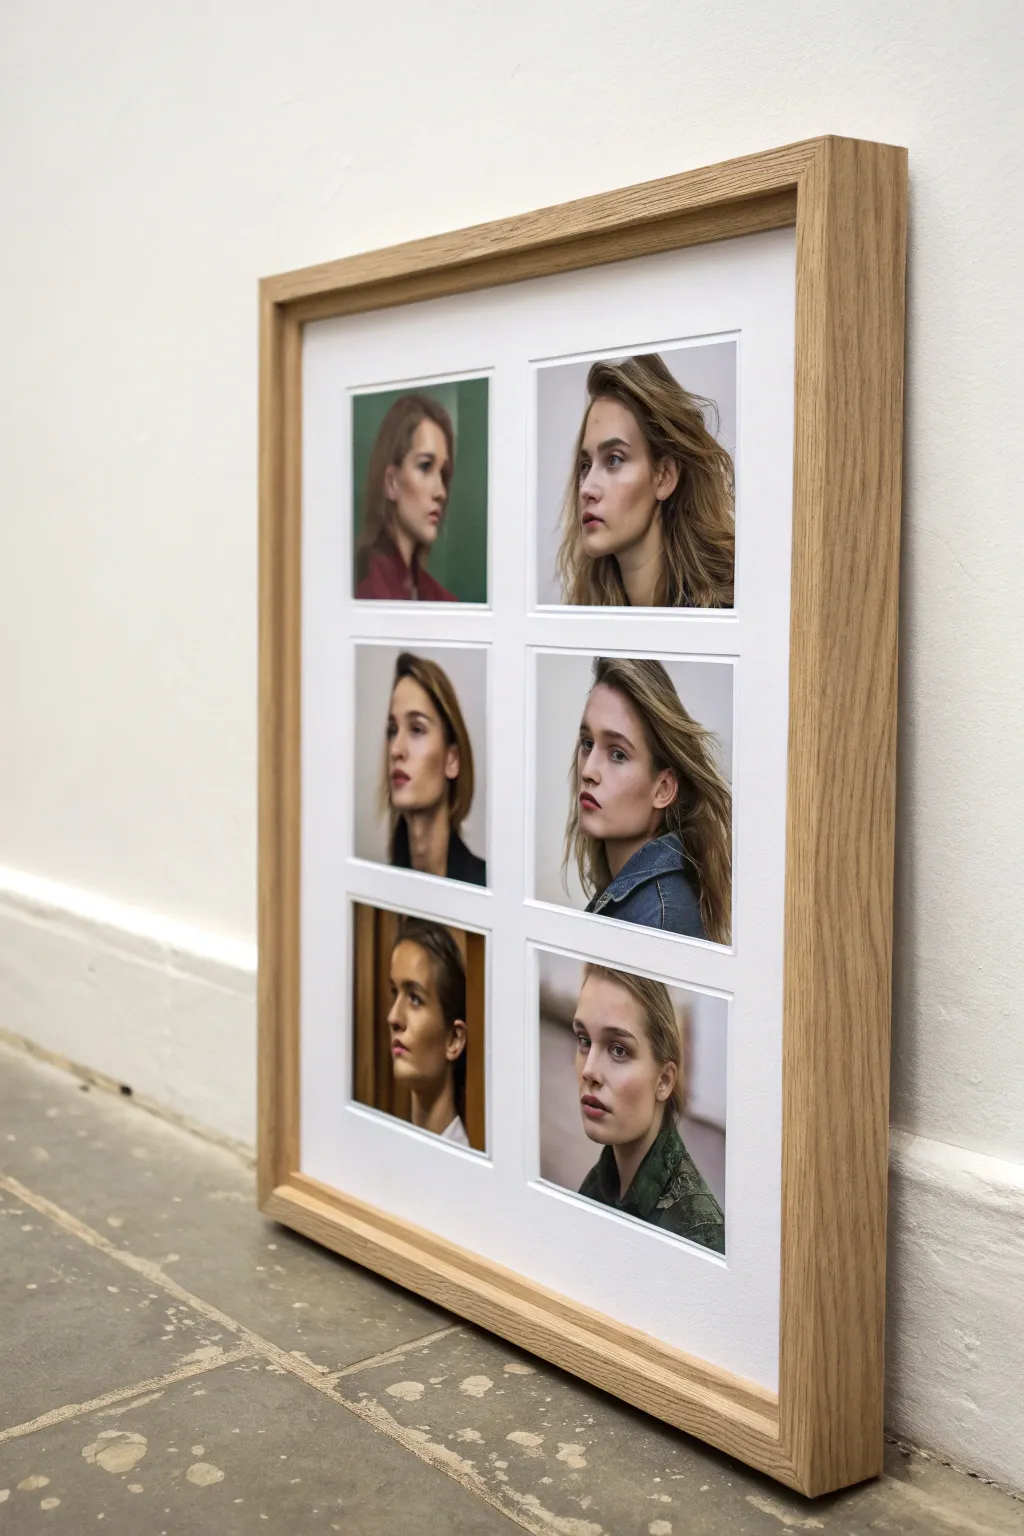
This compelling photography project explores the concept of the alter-ego through a structured yet intimate grid layout. By presenting two distinct aesthetic personas side-by-side, you create a narrative dialogue between different versions of the self within a single cohesive frame.
Step-by-Step Tutorial
Materials
- Digital camera or high-quality smartphone
- Tripod (essential for consistency)
- Neutral background (white wall or seamless paper)
- Two distinct outfits (defining the two personas)
- Photo editing software (Adobe Lightroom/Photoshop or similar)
- High-quality matte photo paper
- Large wooden frame (approx. A2 or 16×20 inches)
- Custom thick white picture mount with 6 apertures (2 columns, 3 rows)
- Double-sided archival tape
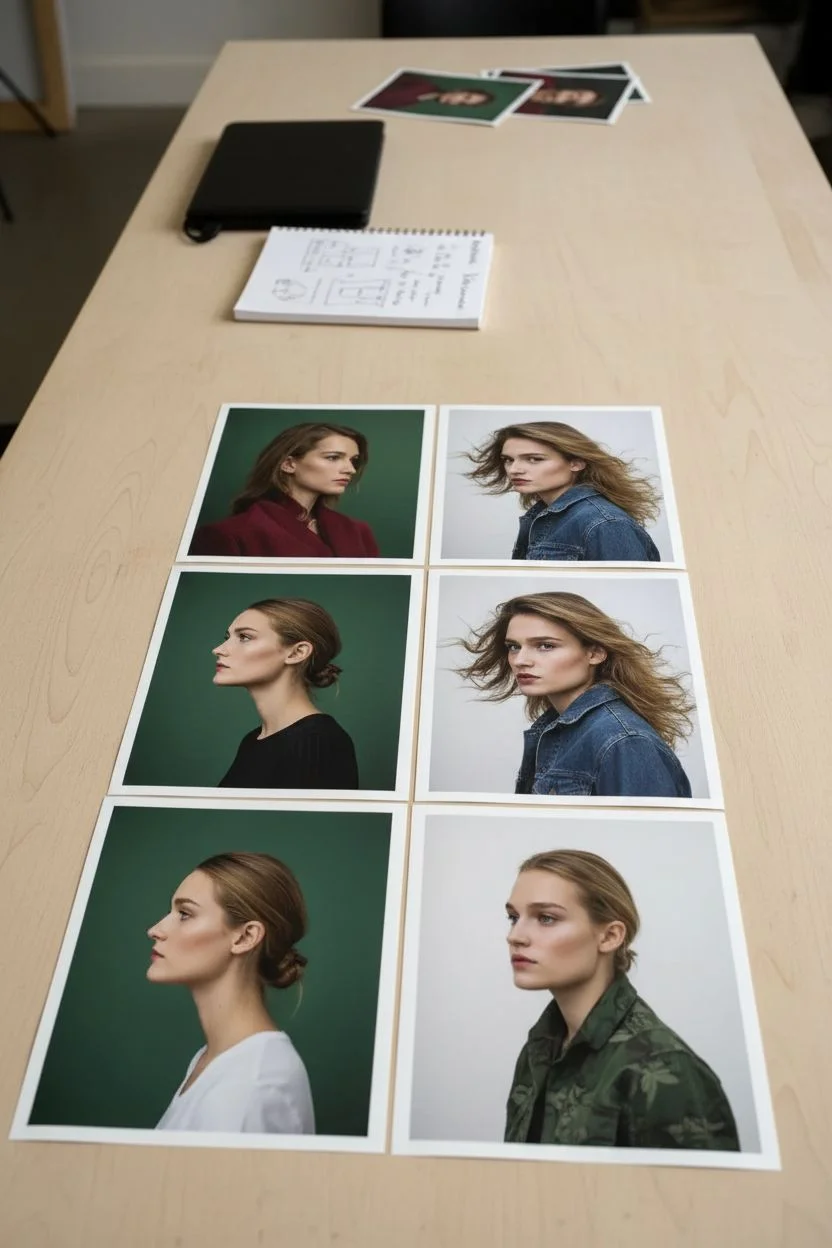
Step 1: Planning and Shooting
-
Concept Development:
Define your two personas before picking up the camera. In this example, the left column features a slightly softer, more introspective ‘observer’ persona, while the right column shows a sharper, wind-blown ‘active’ subject. Decide on the distinct styling for each column. -
Set Up the Studio:
Find a space with soft, directional natural light or set up a single softbox at a 45-degree angle. Position your tripod so the camera is at eye level. A plain, light-colored background is crucial to keep the focus entirely on the face. -
Shoot Column A (The Observer):
Dress in your first look. For this column, aim for a consistent profile or three-quarter view. Have the subject look ‘past’ the camera or toward the imaginary second subject. Keep expressions subtle and varied—chin up, chin down, neutral gaze. -
Shoot Column B (The Active Subject):
Change your styling significantly—looser hair, denim or textured clothing. Introduce movement by using a fan specifically for this set to create the windswept look seen in the right column. Capture direct eye contact or intense side-glances to contrast with the first set. -
Review and Select:
Import your photos. I usually rate them immediately to find pairs that ‘talk’ to each other. You need three solid images for the left column (Column A) and three for the right (Column B).
Pro Tip: Narrative Flow
Arrange the pairs so they interact. If the top left photo looks down, pick a top right photo that looks up or straight ahead to create a connected eyeline.
Step 2: Editing and Printing
-
Color Grading:
Apply a uniform color grade across all six images to unify them. Desaturate slightly for a raw, cinematic feel. Ensure skin tones match between the two columns even if the lighting changed slightly. -
Soft Focus Effect:
Notice how the left column in the reference has a slight blur? Replicate this in post-production by lowering the ‘Clarity’ or adding a very subtle Gaussian Blur to the Column A photos only to visually separate the personas. -
Cropping:
Crop all images to a consistent vertical aspect ratio (likely 4:5 or 2:3). Ensure the head size is relatively similar in all shots so the grid feels balanced. -
Test Printing:
Print a draft on regular paper first to check how the images sit next to each other. Check that the eyelines create an interesting visual path. -
Final Printing:
Print the final six images on high-quality matte archival paper. Glossy paper can cause glare once behind glass, so matte is best for this gallery style.
Troubleshooting: Slipping
If photos sag inside the mount over time, create a ‘T-hinge’ with your tape at the top of the print rather than taping all four sides, allowing the paper to breathe.
Step 3: Assembly and Framing
-
Prepare the workspace:
Clean a large table surface thoroughly. Lay the custom mount (mat board) face down. Make sure your hands are clean or wear cotton gloves to avoid fingerprints on the bright white board. -
Position the Images:
Place your photos face down over the apertures on the back of the mount. Align Column A (the softer focus images) on the left vertical row and Column B (the windswept images) on the right. -
Secure the Photos:
Use small strips of archival tape to hinge the top of each photo to the mount board. Check the front to ensure no white edges of the photo paper are showing and that the centering is perfect. -
Clean the Glass:
Clean the inside of the frame’s glass with glass cleaner and a microfiber cloth. Dust is the enemy here; hold it up to the light to catch any stray specks. -
Final Assembly:
Place the mount with attached photos into the frame, followed by the backing board. Flex the points or turnover clips to secure everything tightly.
Hang your finished piece at eye level to let viewers engage with the silent conversation between your two selves


Have a question or want to share your own experience? I'd love to hear from you in the comments below!