Shabby chic furniture is basically my favorite kind of “pretty imperfect”—soft color, timeworn layers, and just enough distressed finish to feel lived-in and loved. Here are my go-to shabby chic furniture ideas you can paint, refinish, or style in your own space without overthinking it.
Classic Distressed White Dresser
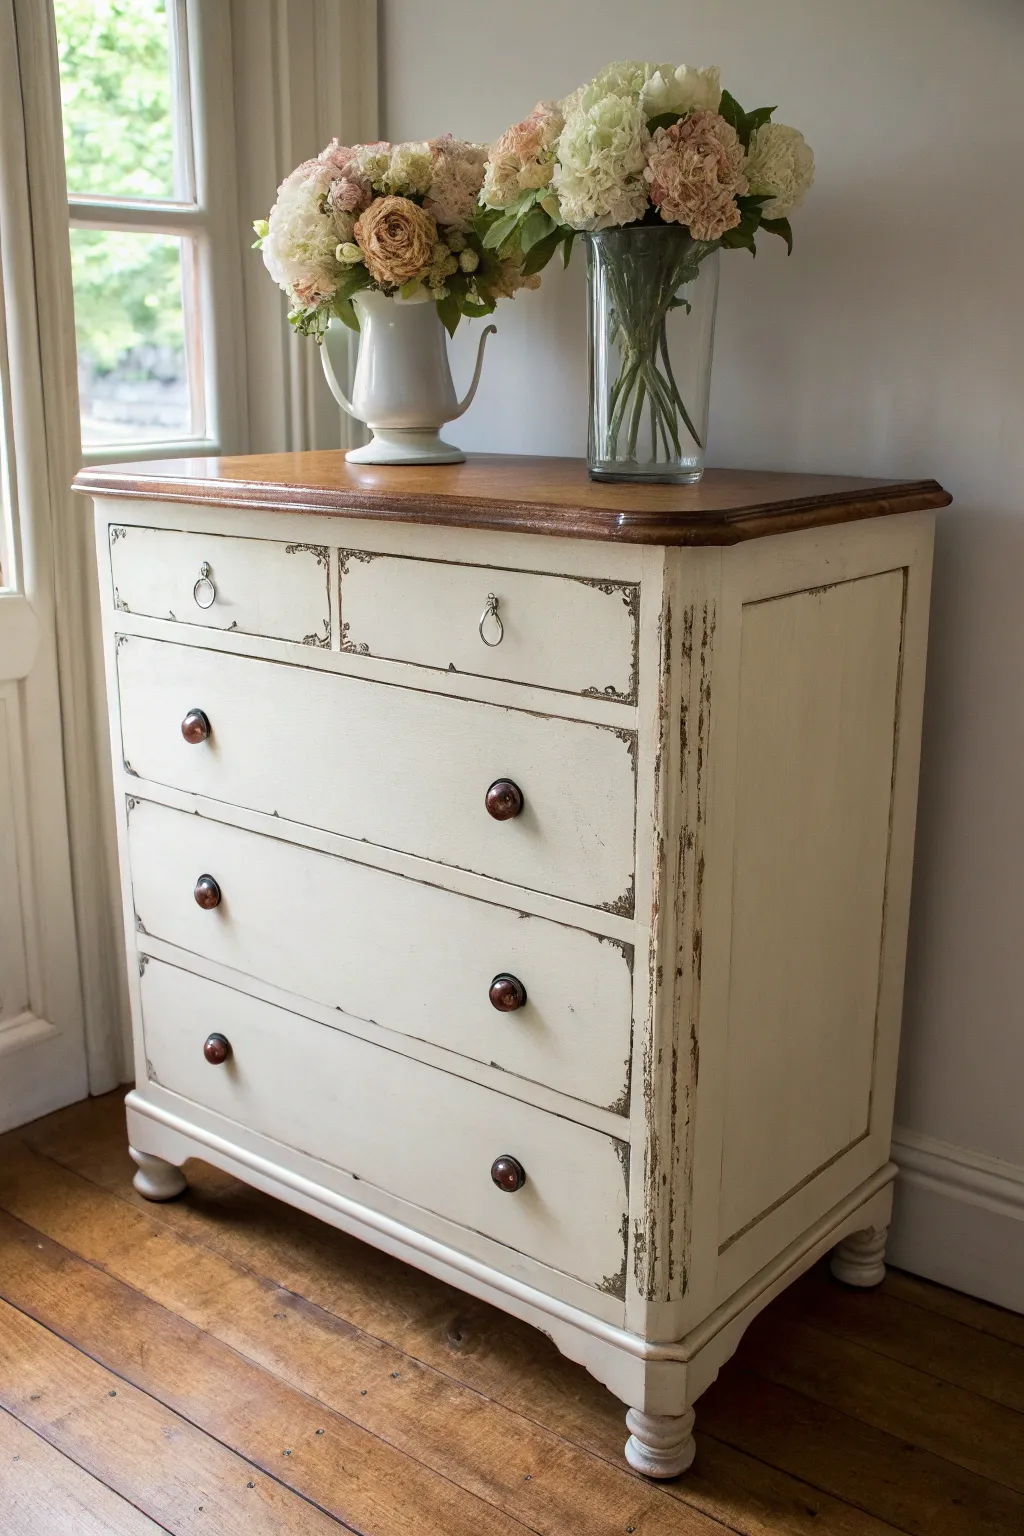
Bring rustic charm into your bedroom with this classic distressed dresser project that balances clean lines with aged imperfections. Learn how to preserve the warmth of natural wood on top while creating an authentic, time-worn finish on the body using chalk paint and strategic sanding.
Step-by-Step Guide
Materials
- Wooden dresser (preferably with good bones and solid wood top)
- Medium and fine grit sandpaper (120 and 220 grit)
- Orbital sander (optional but helpful)
- Painter’s tape
- Creamy white chalk paint
- Dark wood stain (Walnut or Espresso)
- Polyurethane topcoat (satin or matte)
- Clear furniture wax
- Dark antique wax
- Synthetic bristle paint brush
- Lint-free rags
- New hardware: Dark bronze knobs and ring pulls
- Screwdriver
Step 1: Preparation & Top Restoration
-
Remove Hardware:
Begin by removing all drawers from the dresser shell. Unscrew all existing knobs, handles, and pulls. Store the screws in a baggie if you plan to reuse them, though for this look, we will likely replace them. -
Clean Thoroughly:
Wipe down the entire piece with a degreasing cleaner (like TSP or a vinegar/water mix) to remove years of dust, oil, and furniture polish. Let it dry completely. -
Sand the Top:
Using an orbital sander or sanding block with 120-grit paper, sand the top surface of the dresser down to the bare wood. You want to remove all the old varnish and stain. -
Prep the Body:
Scuff sand the body and drawer fronts lightly with 220-grit sandpaper. You don’t need to strip it to bare wood here; just create enough ‘tooth’ for the paint to adhere. -
Wipe Away Dust:
Use a tack cloth or a damp lint-free rag to remove every speck of sanding dust from the drawers, body, and especially the raw wood top. -
Stain the Top:
Apply your chosen dark wood stain to the raw wood top using a rag or staining pad. Wipe with the grain. Apply one coat for a lighter look, or two for that rich contrast seen in the photo. Let it dry according to the can’s instructions. -
Seal the Top:
Once dry, apply two to three thin coats of satin polyurethane to the stained top to protect it from water rings and scratches, sanding lightly between coats.
Step 2: Painting & Distressing
-
Protect the Stain:
Run a line of painter’s tape along the underside edge of the newly stained top to protect it from accidental brush strokes while painting the body. -
First Coat of Paint:
Paint the dresser body and drawer fronts with a creamy white chalk paint. Don’t worry about perfect coverage yet; thin, even strokes are better than thick globs. Let this layer dry for about an hour. -
Second Coat:
Apply a second coat of chalk paint. This should provide solid opacity. If you missed any spots on the first round, catch them now. -
Distress the Edges:
Once the paint is fully dry, take a 120-grit sanding block to the edges. Focus on high-traffic areas: corners, drawer edges, and raised molding details where paint would naturally wear off over time. -
Heavy Distressing:
Referencing the photo, sand more aggressively on the vertical side pilasters. I like to sand until I see the substantial dark wood underneath, creating that distinct vertical worn patch. -
Detail Work:
For the drawer fronts, create small ‘chips’ in the paint near the corners and along the bottom edges. Irregularity is key here; make it look accidental rather than calculated.
Natural Wear Patterns
When sanding, close your eyes and run your hands over the furniture. Sand only where your hands or knees would naturally bump or rub the piece over 50 years to keep the distressing authentic.
Step 3: Finishing Touches
-
Wax Application:
Apply a coat of clear furniture wax over the painted sections using a wax brush or lint-free cloth. This seals the chalk paint and makes it durable. -
Antique Wax Accents:
To get that aged, dirty-in-a-good-way look, specifically brush dark antique wax into the grooves, corners, and over the distressed areas. Buff it back quickly so it doesn’t just look muddy, leaving shadows in the crevices. -
Buff to Sheen:
Wait for the wax to cure slightly (about 20 minutes) and then buff the entire painted surface with a clean cloth to achieve a soft, satin sheen. -
Install Hardware:
Attach the new hardware. Use small ring pulls for top, shallower drawers and darker, rounded knobs for the larger lower drawers to match the reference image exactly.
Add Drawer Liners
Elevate the interior by lining the drawers with a vintage floral or toile paper. It adds a secret pop of pattern that complements the shabby chic exterior whenever you grab a shirt.
Step back and admire how a simple can of paint and some sandpaper transformed a plain dresser into a piece full of history and character


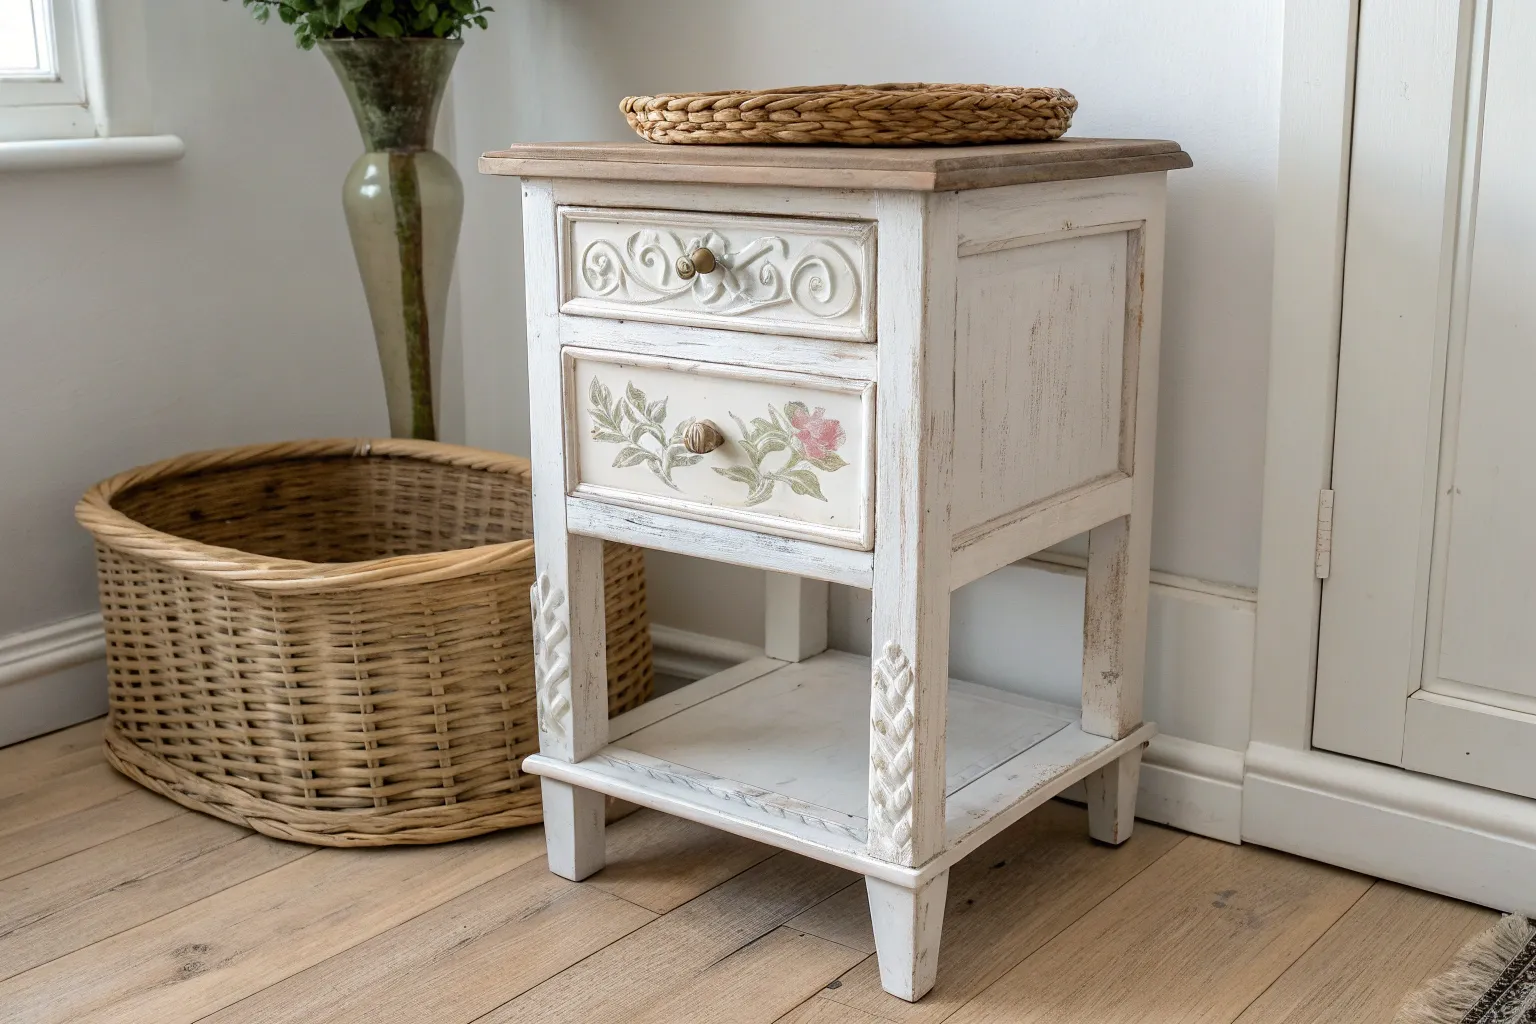
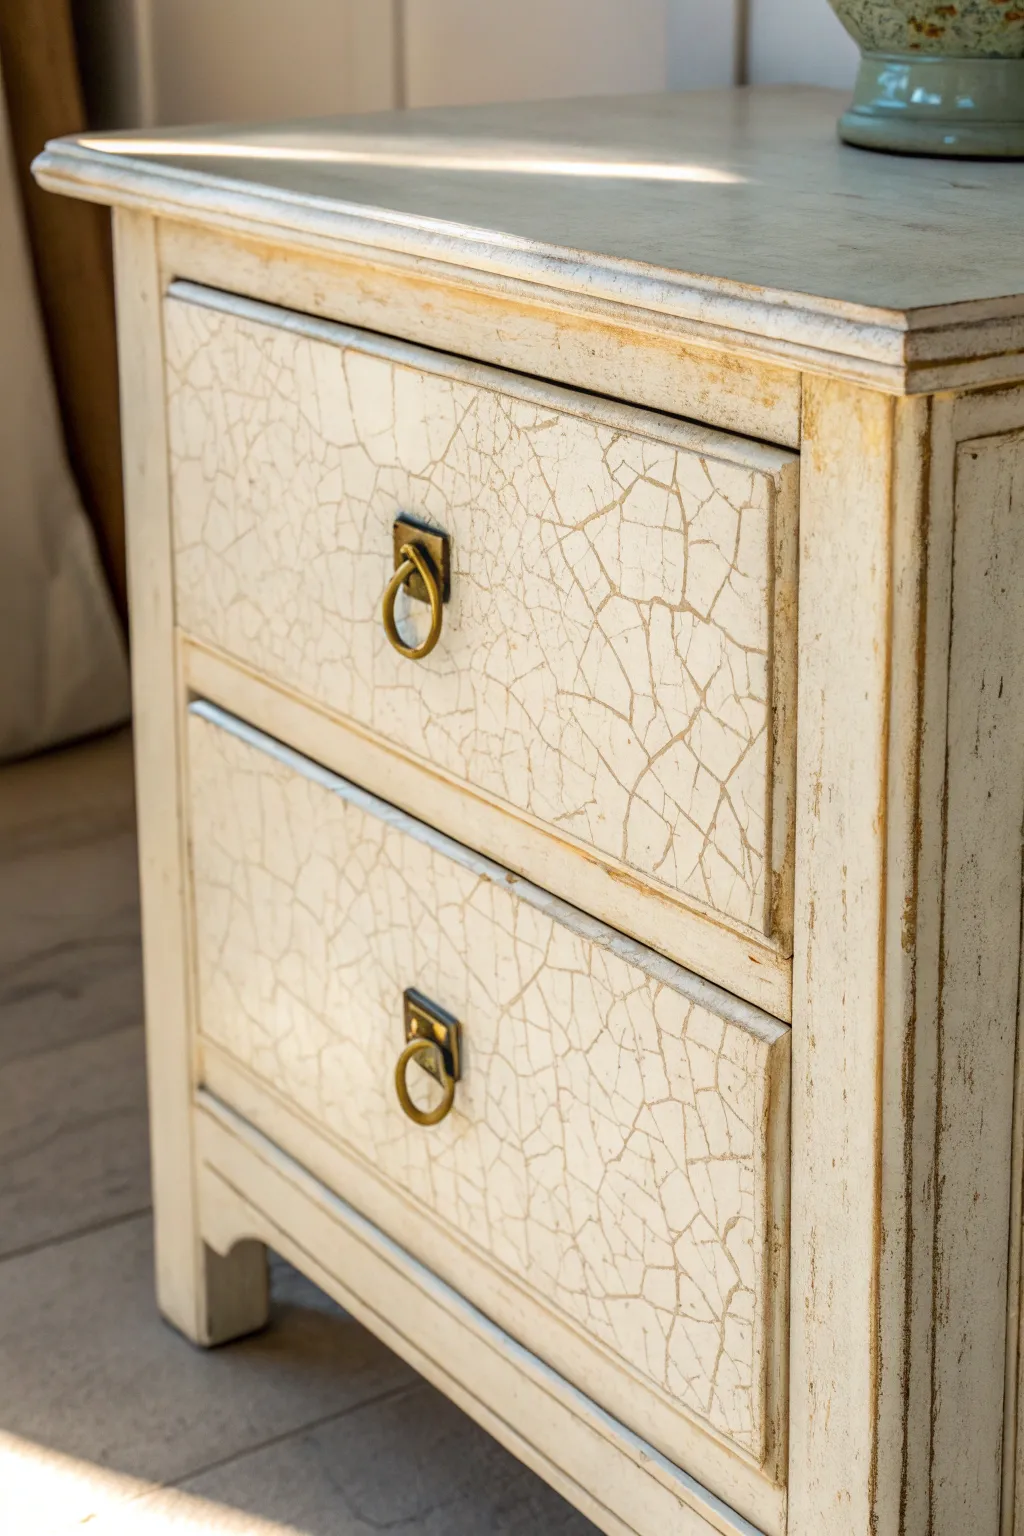
Chalky Painted Nightstand in Soft Pastels
Transform a dated wooden nightstand into a breezy, shabby chic statement piece with soft pastel chalk paint and intentional distressing. This project creates a lovely contrast between a weathered natural wood top and a chalky blue body, perfect for adding vintage charm to any bedroom.
Detailed Instructions
Materials
- Wooden nightstand (with ornate details/legs)
- Sandpaper (120, 220, and 320 grit)
- Electric orbital sander (optional but recommended for the top)
- Chalk mineral paint (soft Robin’s Egg Blue or Duck Egg Green)
- White lime wax or whitewash glaze
- Clear furniture wax
- Dark antique wax (optional for deeper crevices)
- Lint-free rags
- Detail artist brush
- Round chalk paint brush
- Drop cloth
- Screwdriver
Step 1: Prep and Strip
-
Remove Hardware:
Begin by removing all the drawers from the nightstand. Locate the screws holding the drop-ring pulls in place and unscrew them, setting the hardware aside in a labeled baggie so nothing gets lost. -
Clean the Surface:
Wipe down the entire piece with a mixture of warm water and a degreasing cleaner (like TSP) to remove years of furniture polish, oil, and dust. Let it dry completely. -
Sand the Top:
Since we want a natural top, use an orbital sander with 120-grit paper to remove the old finish from just the nightstand’s flat top surface. We want to expose the raw wood grain completely here. -
Refine the Top:
Switch to 220-grit sandpaper and run it over the top again to smooth out the grain and prepare it for the whitewash finish. -
Scuff Sand the Body:
For the painted areas (legs, sides, drawers), you don’t need to strip the paint. Just lightly scuff the surface with 220-grit paper to give the chalk paint something to grip.
Step 2: The Whitewashed Top
-
Apply Whitewash or Lime Wax:
To get that bleached wood look on the top, dip a lint-free rag into white lime wax or a thinned white glaze. Rub it firmly into the raw wood grain, working in the direction of the grain. -
Wipe Back:
Immediately wipe off the excess product with a clean cloth. You want the white pigment to settle into the wood pores while leaving the natural tan tones visible. Repeat if you want a frostier look. -
Seal:
Once dry, apply a coat of clear wax to seal the top and protect it from water rings.
Paint Bleed-Through?
If pink or yellow stains appear through your paint (common with mahogany), stop! Apply a coat of shellac-based primer directly over the stain, let dry, then repaint.
Step 3: Painting the Body
-
First Coat:
Stir your soft blue chalk paint thoroughly. Using a round chalk paint brush, apply the first coat to the body, drawers, and legs. Paint in all directions—chalk paint loves a messy texture. -
Dry Time:
Let this coat dry for about 30 to 60 minutes. Chalk paint dries quickly, but humidity can affect this. -
Second Coat:
Apply a second coat for full opacity. Pay special attention to the ornate carvings on the apron and legs, dabbing the bristles to get paint into the recessed details. -
Smooth Sanding:
Once the second coat is bone dry, take fine 320-grit sandpaper and very lightly stroke the flat surfaces. This knocks down brush strokes and makes the paint feel buttery smooth without removing the color.
Wet Distressing Pro Tip
Instead of sandpaper, use a damp kitchen sponge to remove paint from edges while it’s still slightly tacky. This creates a smoother, more authentic wear pattern.
Step 4: Distressing and Finishing
-
Edge Distressing:
Fold a piece of 120-grit sandpaper. Gently sand the edges of the drawer fronts, the corners of the legs, and the rim of the table top. Apply slightly more pressure on corners where natural wear would occur. -
Detail Texture:
On the ornate carved details at the bottom, use the sandpaper to rub away the high points of the design, revealing the wood or dark undercoat beneath. This highlights the sculpture of the furniture. -
Clean Up Dust:
Vacuum or wipe away all sanding dust thoroughly before sealing. -
Wax Application:
Dip a wax brush or clean rag into clear furniture wax. Massage it over all painted surfaces. I like to work in small sections to ensure even coverage. -
Buff to Shine:
Let the wax cure for about 15 minutes, then buff vigorously with a clean cotton cloth to create a soft, satin sheen. -
Reattach Hardware:
Clean your original hardware (or new antique brass pulls) and screw them back onto the drawer fronts.
Now you have a beautifully aged piece that brings a breath of fresh air to your room


Whitewashed Dining Table With Rubbed Edges
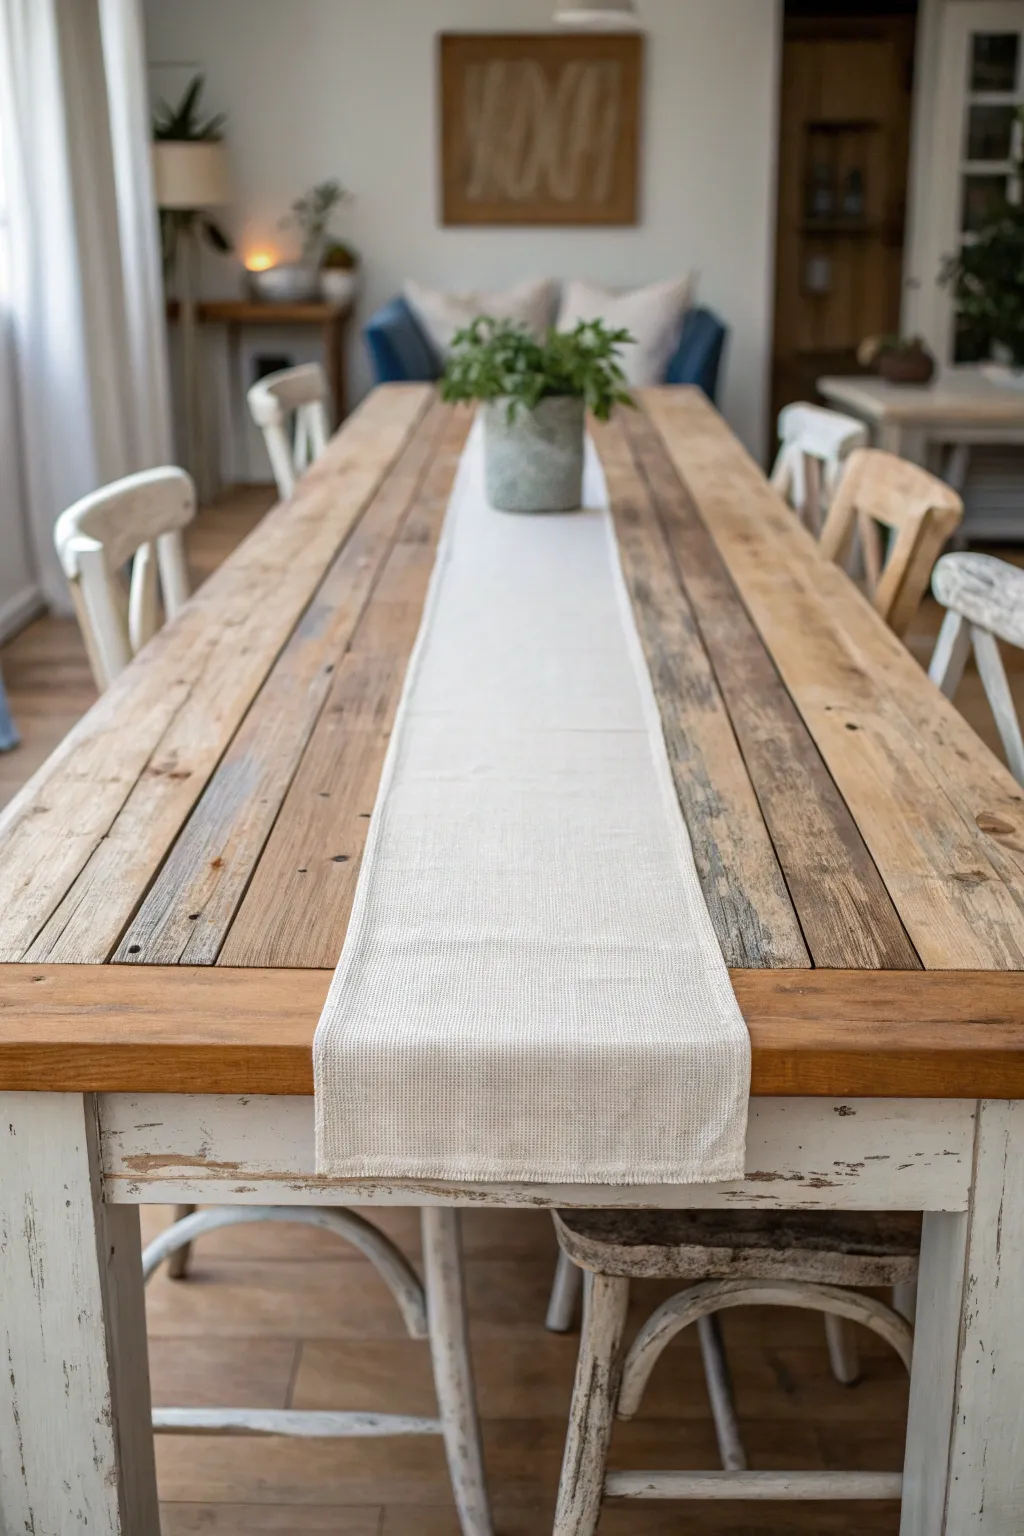
Transform a basic wooden table into a shabby chic centerpiece with this heavy distressing technique. By combining a raw, plank-style top with a heavily chipped white base, you’ll achieve that perfectly imperfect time-worn aesthetic.
Step-by-Step Tutorial
Materials
- Solid wood dining table (preferably with a plank top)
- Orbital sander
- Sandpaper (80, 120, and 220 grit)
- Chalk-style paint (Warm White or Cream)
- Dark wax or antique glaze
- Clear furniture wax
- Paintbrushes (one wide for coverage, one detail brush)
- Clean lint-free rags
- Scraper tool or putty knife
- Vaseline or candle wax (optional resist medium)
Step 1: Preparing the Tabletop
-
Strip the finish:
Begin by removing the existing finish from the tabletop using your orbital sander and 80-grit sandpaper. You want to expose the raw wood completely, moving with the grain to avoid swirl marks. -
Refine the surface:
Switch to 120-grit sandpaper to smooth out the roughness left by the stripping phase. The goal isn’t a factory-smooth finish, but rather a splinter-free surface that feels good to the touch. -
Accentuate the planks:
If your table has grooves between planks, use a folded piece of sandpaper or a scraper tool to clean out any old varnish from inside the cracks, ensuring the definition between boards remains sharp. -
Create distressing:
For added character, you can use chains, a hammer, or other heavy tools to physically dent and scratch the raw wood surface gently. This mimics decades of use. -
Seal the top:
Apply a clear furniture wax or a matte polyurethane to the raw wood top. I prefer working the wax in with a rag in circular motions, then buffing it off to protect the wood while keeping that dry, natural look.
Paint Won’t Chip?
If the paint is too stubborn to chip with a scraper, try using a heavier grit sandpaper (80 grit) or dampen the paint slightly with a wet sponge before scraping.
Step 2: Painting the Base
-
Clean the legs:
Wipe down the table legs and apron with a damp cloth to remove sanding dust. Let it dry completely before painting. -
Apply resist medium:
To make the distressing easier later, rub Vaseline or candle wax along the high points of the legs—corners, edges, and details where wear would naturally occur. -
First coat:
Apply a generous coat of warm white chalk-style paint to the legs and skirt. Don’t worry about perfect brush strokes; texture adds to the farmhouse look. -
Dry and repeat:
Allow the first coat to dry fully (about 1-2 hours). Apply a second coat if the original wood color is bleeding through too much, though slightly sheer coverage is acceptable for this style.
Step 3: Distressing and Finishing
-
Reveal the wood:
Once the paint is dry, use 120 or 220-grit sandpaper to sand over the areas where you applied the wax resist. The paint should flake off easily, revealing the dark wood underneath. -
Heavy chipping:
Use a metal scraper or putty knife to aggressively chip away paint on the flat surfaces of the legs. This creates the ‘chipped paint’ look seen in the image, rather than just smooth sanded wear. -
Soften edges:
Run a fine-grit sandpaper over the entire painted surface to smooth out any rough brush strokes and soften the transition between paint and raw wood. -
Apply dark wax:
Dip a brush lightly into dark antique wax and offload most of it onto a cardboard scrap. Lightly whisk this ‘dry brush’ over the textured areas and corners of the white paint to add grime and depth. -
Blend the patina:
immediately take a clean rag and buff the dark wax, feathering it so it settles only into the recesses and texture marks, avoiding a muddy look. -
Final protection:
Seal the painted base with a coat of clear wax. This locks in your chipping and antiquing work and provides a durable finish for everyday dining.
Add Grey Wash
To mimic the weathered wood tone on top, dilute grey paint with water (1:1 ratio) and brush it over the raw wood before waxing. Wipe back quickly for a subtle tint.
Gather your favorite chairs around your new table and enjoy the warmth it brings to your dining room


Vintage Chair Makeover With Linen Seat
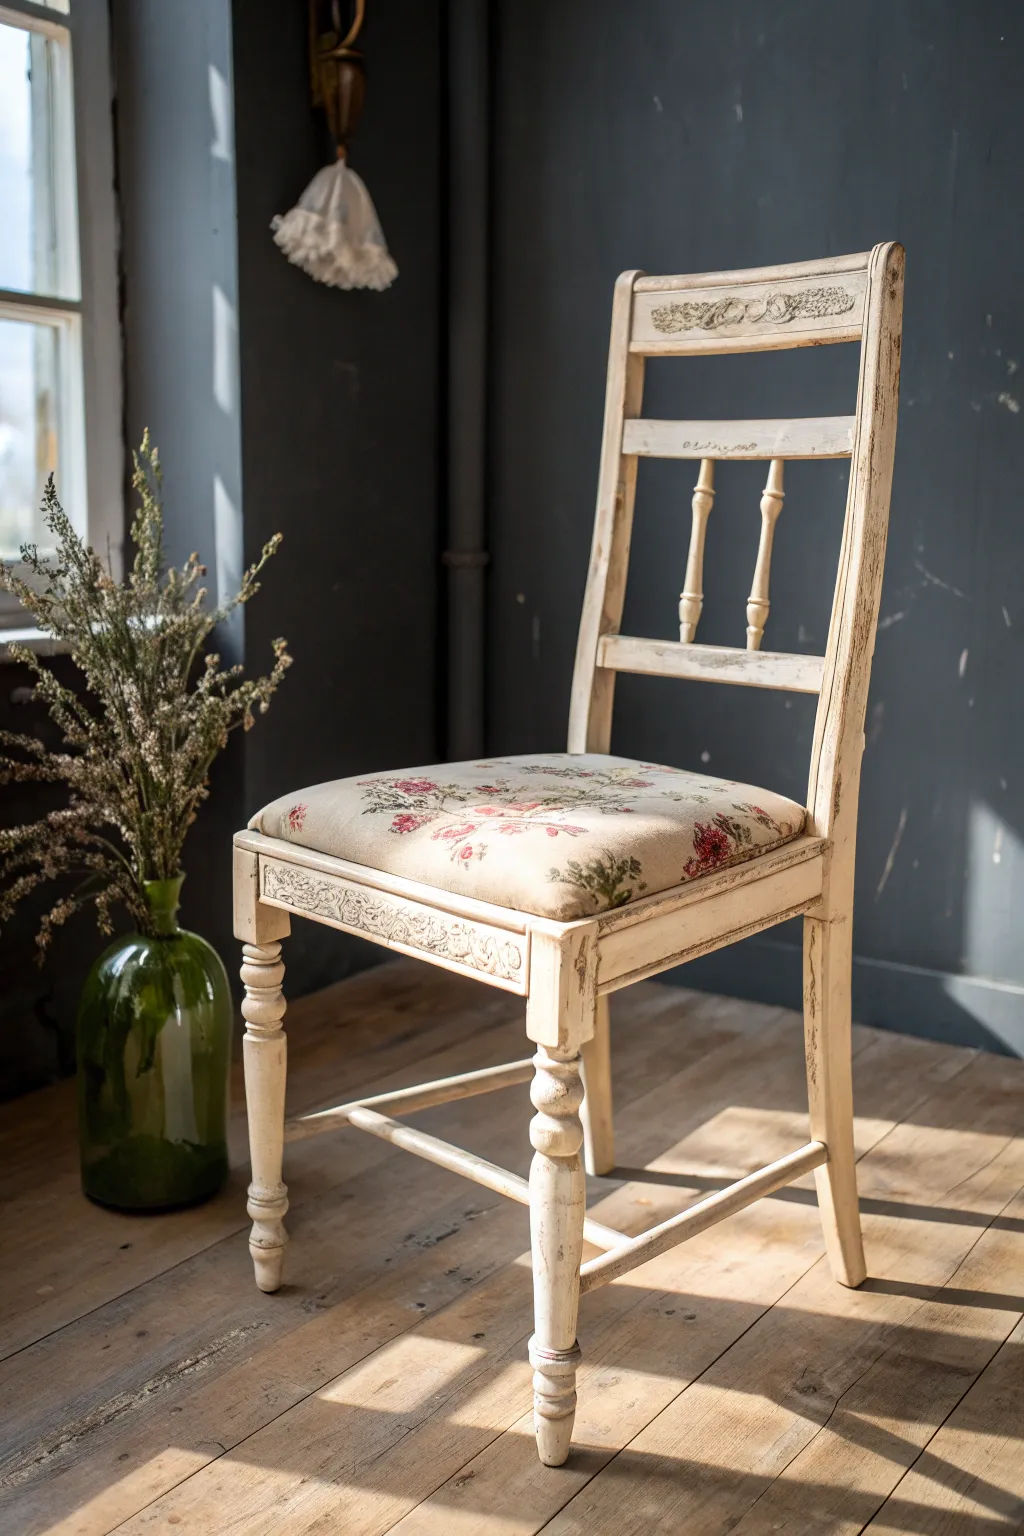
Transform a tired, dark wooden chair into a bright, romantic statement piece that perfectly embodies the shabby chic aesthetic. This project balances distressing techniques with soft floral linen upholstery to create a look that feels both historic and fresh.
How-To Guide
Materials
- Solid wood dining chair (spindle back preferred)
- Medium-grit sandpaper (100-120 grit)
- Fine-grit sandpaper (220 grit)
- Chalk paint (cream or off-white)
- Clear furniture wax
- Dark antique wax (optional for aging)
- Medium round paint brush
- Wax brush or lint-free rags
- Floral linen fabric
- High-density upholstery foam (2-inch)
- Batting
- Staple gun and staples
- Screwdriver
- Pliers
- Scissors
Step 1: Preparation and Base Coat
-
Remove the Seat:
Flip the chair upside down and locate the screws holding the seat in place. Use your screwdriver to carefully remove them, setting the hardware aside in a baggie so it doesn’t get lost. -
Clean the Frame:
Wipe down the entire wood frame with a degreasing cleaner to remove years of oils and dust. A clean surface ensures the chalk paint adheres properly without needing heavy priming. -
Scuff Sanding:
Take your medium-grit sandpaper and lightly scuff the glossy finish of the original wood. You aren’t trying to strip it bare, just giving the surface some ‘tooth’ for the paint to grab onto. -
First Coat Application:
Apply your first coat of cream chalk paint. Brush in the direction of the wood grain, working it into the crevices of the spindles and any carved details. Don’t worry if it looks streaky; chalk paint often needs two coats. -
Second Coat Coverage:
Once the first coat is fully dry (usually about an hour), apply a second coat for solid, opaque coverage. Let this layer dry completely, preferably overnight to let the paint cure slightly.
Waxing Wisdom
Always apply clear wax BEFORE dark wax. The clear layer acts as a barrier, allowing you to wipe off the dark wax if you apply too much. Without it, the dark stain penetrates instantly.
Step 2: Distressing and Sealing
-
Targeted Distressing:
Using the medium-grit sandpaper, gently sand areas where natural wear would occur: the edges of the legs, the tops of the spindles, the seat apron, and the raised carvings on the backrest. Reveal the dark wood underneath. -
Soften the Paint:
Switch to fine-grit sandpaper and run it lightly over the flat surfaces. This smooths out brush strokes and gives the paint a buttery, professional feel. -
Apply Clear Wax:
Dip your wax brush into clear furniture wax and massage it into the paint using circular motions. Work in small sections, wiping away excess with a clean rag as you go. -
Antique Detailing:
For that aged look seen in the photo, apply a tiny amount of dark antique wax into the grooves of the carvings and corners. I prefer to wipe it back almost immediately so it remains subtle and shadowy rather than dirty. -
Buff to Shine:
After the wax has dried for about 20 minutes, use a soft cloth to buff the entire frame vigorously. This creates a gentle sheen and hardens the protective finish.
Step 3: Upholstery Update
-
Strip Old Fabric:
Using pliers or a specialized staple remover, pull out all old staples from the seat base. Remove the old fabric and foam if it is crumbling. -
Cut New Foam:
Place the wooden seat base onto your new foam and trace the shape. Cut the foam out, leaving it flush with the edges of the wood. -
Add Batting Layer:
Wrap a layer of batting over the foam and seat base. Pull it taut to the underside of the wood and secure it with a few staples, trimming away the bulky excess. -
Position the Linen:
Lay your floral linen face down. Center the seat (foam side down) on top. Check the pattern placement to ensure your favorite flower cluster is right in the middle. -
Secure the Fabric:
Start stapling in the center of each side—front, back, left, right—pulling the fabric tight as you staple. This ‘compass point’ method prevents the fabric from skewing. -
Pleat the Corners:
At the rounded corners, pull the fabric gently and make small pleats so it lies flat without bunching. Staple these down securely. -
Final Assembly:
Place the newly upholstered seat back onto the chair frame. Reinsert the screws from underneath to lock it into place.
Level Up: Stenciled Charm
If your chair lacks carved details on the backrest, use a subtle damask stencil with a slightly darker shade of cream paint to mimic the look of relief carving before waxing.
Now you have a beautifully restored piece that brings a soft, poetic touch to any room in your home
BRUSH GUIDE
The Right Brush for Every Stroke
From clean lines to bold texture — master brush choice, stroke control, and essential techniques.
Explore the Full Guide
Curvy Sideboard With Aged Hardware
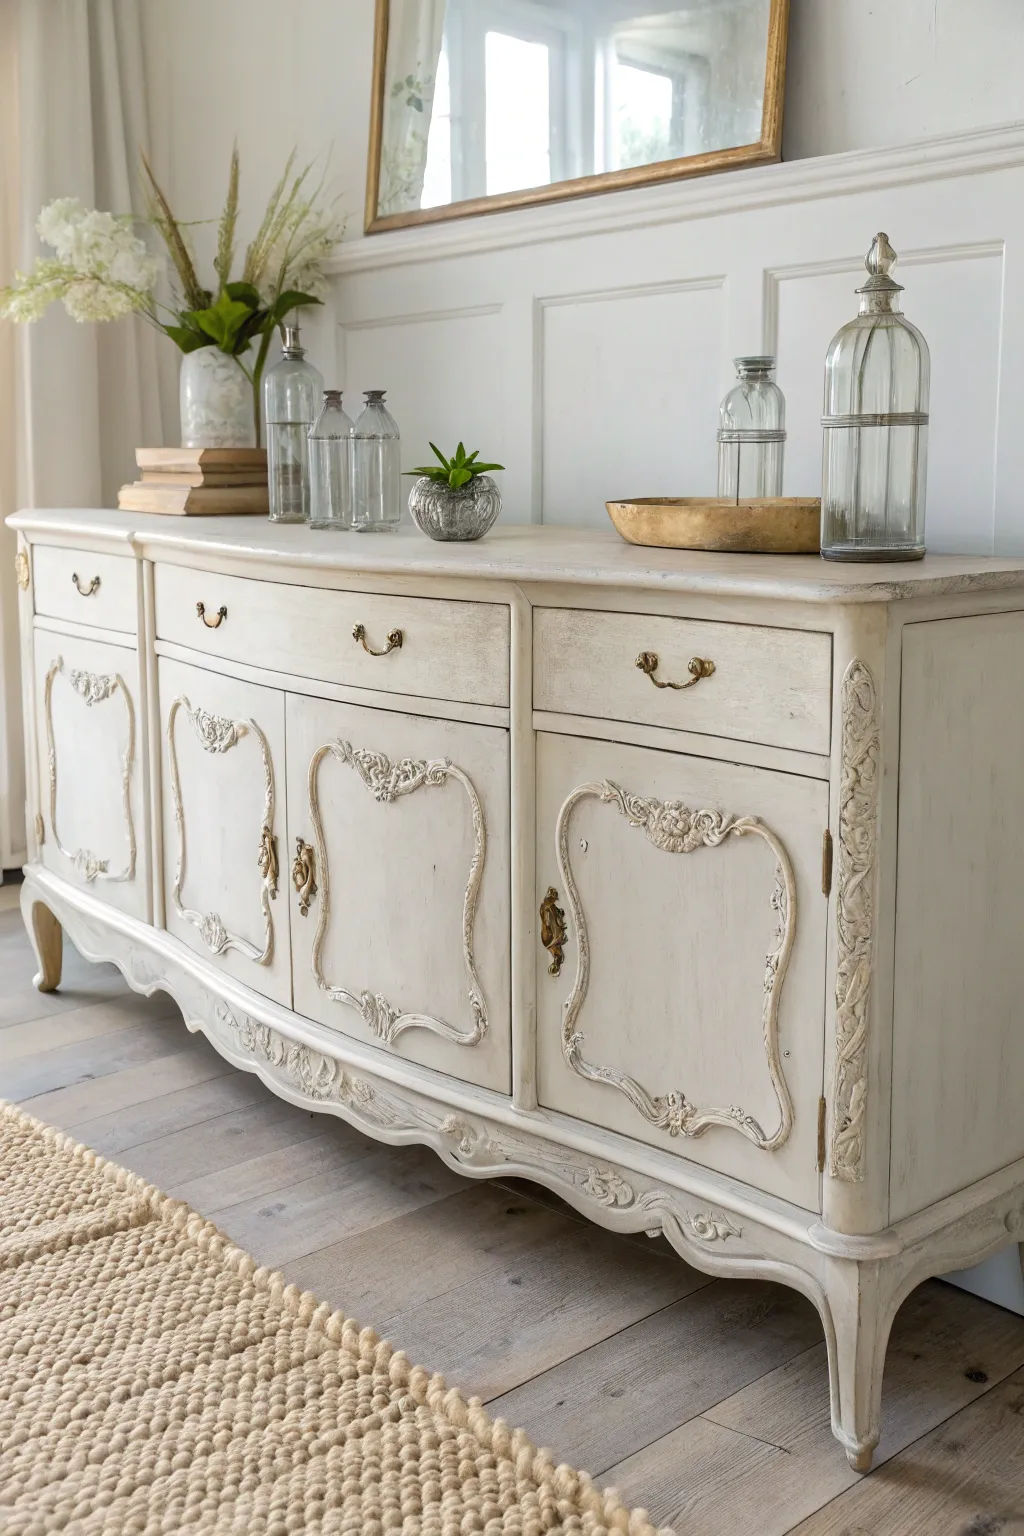
Bring classic elegance into your home by transforming an outdated buffet into a creamy, distressed masterpiece. This project focuses on highlighting ornate curves and aged hardware to achieve that perfectly imperfect vintage charm.
Step-by-Step Guide
Materials
- Ornate wooden sideboard or buffet
- Degreasing cleaner (like TSP substitute)
- Medium and fine grit sandpaper (120 and 220 grit)
- Chalk-style paint in creamy off-white
- Clear furniture wax
- Dark antique wax
- Round wax brush
- High-quality synthetic paint brush
- Lint-free cotton rags
- Gold Rub ‘n Buff or metallic wax
- Screwdriver for hardware removal
- Tack cloth
Step 1: Preparation & Cleaning
-
Remove hardware:
Begin by carefully removing all handles, knobs, and hinges with a screwdriver. Store them in a marked bag so none of the small screws get lost during the process. -
Deep clean:
Scrub the entire piece thoroughly with a degreasing cleaner to remove years of furniture polish, oil, and dust. This step is crucial for paint adhesion. -
Scuff sand:
Lightly sand the surfaces with 120-grit sandpaper to break the existing finish. You don’t need to strip it to bare wood, just create a ‘tooth’ for the paint to grab onto. -
Remove dust:
Wipe away all sanding residue with a tack cloth or a damp rag, ensuring the surface is completely dry before moving on.
Bleed-Through Blues?
If pink or yellow stains soak through your white paint (tannin bleed), stop immediately. Seal the spot with shellac-based primer, let dry, then repaint.
Step 2: Painting & Distressing
-
Apply the first coat:
Using your synthetic brush, apply a layer of creamy off-white chalk paint. Don’t worry about complete opacity yet; thin, even strokes work best here. -
Let it dry:
Allow the first coat to dry completely, usually about an hour depending on your local humidity. -
Apply the second coat:
Paint a second coat to achieve full coverage. Pay special attention to the ornate carvings, stippling the brush to get paint into the recessed details. -
Wet distress (optional):
If you prefer a natural worn look, take a damp rag while the paint is just barely tacky and gently wipe edges where wear would naturally occur. -
Dry distressing:
Once fully dry, use 220-grit sandpaper to gently distress high points, edges of drawers, and raised carvings to reveal the dark wood underneath. -
Smooth the surface:
Run a fine-grit sanding sponge lightly over the flat surfaces to knock down any heavy brush strokes and create a buttery smooth finish.
Step 3: Waxing & Detailing
-
Apply clear wax:
Using a dedicated wax brush, apply a thin coat of clear furniture wax over the entire piece to seal the paint. Work in small sections. -
Wipe excess:
Immediately wipe back any excess wax with a lint-free cotton rag. The surface should feel smooth, not sticky. -
Add antique depth:
Dip a small brush into dark antique wax and apply it sparingly into the crevices of the carvings and corners. I find less is more here—start light. -
Blend the darkness:
Use a rag with a little clear wax on it to erase and blend the dark wax, leaving it only in the deep grooves for a shadowed effect. -
Refresh hardware:
Clean the original hardware. If it looks too new, dab a tiny amount of gold metallic wax or Rub ‘n Buff to highlight the raised details. -
Reassemble:
Once the wax has cured (hardened slightly), reattach your hardware to the drawers and doors to complete the look.
Inside Matters
Line the drawers with vintage floral paper or fabric. It adds a secret pop of color and protects your stored items from raw wood interiors.
Step back and admire how a fresh coat of paint and some strategic aging have given this piece a whole new life
Slipcovered Armchair for Cozy Chic Comfort
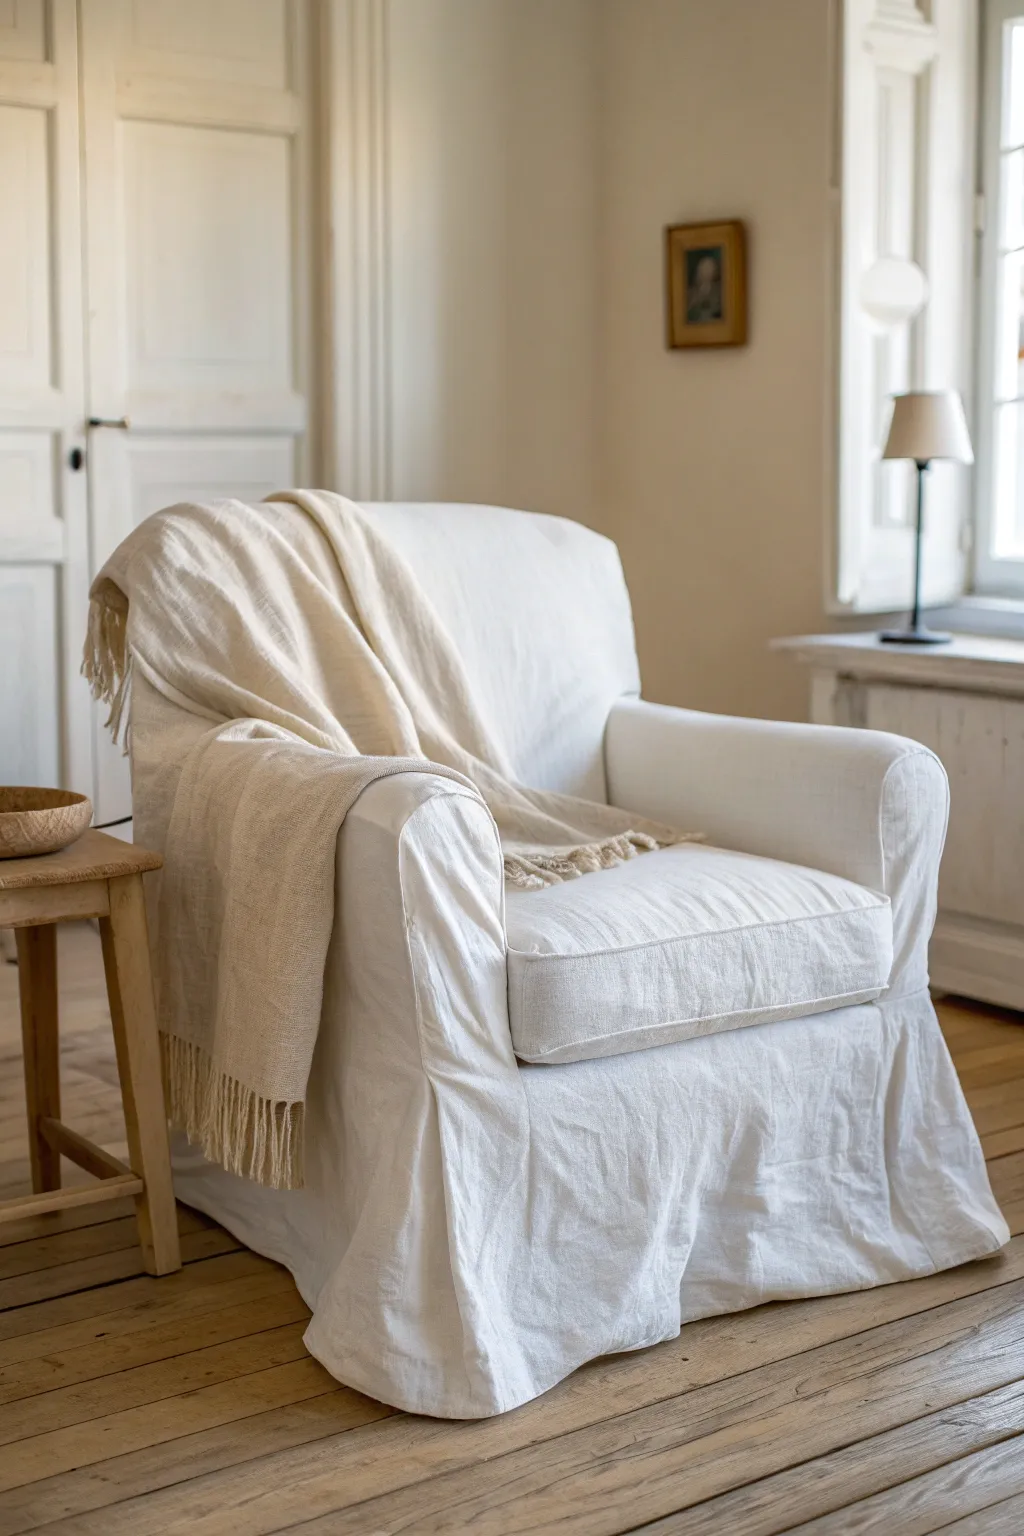
Transform a tired, dated armchair into a cloud of shabby chic comfort with this drop cloth style slipcover project. The soft, draped linen look instantly brightens a room and invites endless hours of cozy relaxation.
Step-by-Step
Materials
- A standard armchair with good bones
- Heavyweight washed linen or cotton drop cloth fabric (approx. 6-8 yards)
- Sewing machine with heavy-duty needle
- Fabric scissors or rotary cutter
- Straight pins and safety pins
- Tailor’s chalk or fabric marker
- Measuring tape
- Iron and ironing board
- Matching thread
Step 1: Preparation and Mapping
-
Measure your chair:
Before buying fabric, measure the chair’s height, width, and depth. Add generous allowances (at least 4-5 inches per seam) because the shabby chic look relies on a relaxed, non-tailored fit. -
Pre-wash the fabric:
This step is non-negotiable for that crinkled, lived-in look. Wash your linen or drop cloth on hot and dry it on high heat to pre-shrink it fully before you cut a single thread. -
Drape the main body:
Lay the fabric over the entire chair, starting from the back floor, up over the backrest, down the seat, and over the front to the floor. Smooth it roughly, ensuring enough fabric pools at the bottom for the skirt. -
Pin the basic shape:
Stand back and look at the drape. Start tucking the fabric deep into the crevices of the seat cushion area. I find using a wooden spoon helps push the fabric securely into the sides and back gap.
Pro Tip: The Tuck-In
Use pool noodles or PVC pipe scraps tucked deep into the crevices of the seat to hold the fabric in place and prevent untucking when you sit.
Step 2: Creating the Pattern
-
Cut the back piece:
Cut a separate piece for the back of the chair if your continuous drape isn’t wide enough. Pin it along the top edge of the chair, right sides meant to be facing out for now (pin fitting usually happens inside out, but for loose covers, pinning right-side-out helps visualize the drape). -
Trace the arms:
Drape separate pieces of fabric over each armrest. Let them hang long. Pin these pieces to the main body fabric along the inside and outside lines of the arm. -
Create the front T-shape:
If your chair has a T-cushion, cut the fabric at the front of the arms to allow the seat fabric to wrap around the front corners. This is often the trickiest part, so go slow. -
Pin fit the seams:
With all fabric pieces draped, pin along the natural seam lines of the chair. Don’t pull too tight; keep it slightly billowy. Pin vertically down the back corners and around the front curve of the armrests. -
Mark the sew lines:
Use your tailor’s chalk to trace exactly where your pins are. Mark any notches so you can match the pieces up later if they get separated.
Level Up: Tie Closures
Instead of sewing the back panel completely shut, install fabric ties or large wooden buttons down the spine for a romantic, vintage farmhouse detail.
Step 3: Sewing the Structure
-
Remove and trim:
Carefully unpin the fabric from the chair (but leave the pin lines intact or chalked). Trim the excess seam allowance to about 1 inch for durability. -
Stitch the main seams:
Sew along your chalk lines using a sturdy straight stitch. Backstitch at the start and end of every seam. Press these seams open with an iron to reduce bulk. -
Construct the seat deck:
If you are making a separate cushion cover (recommended), sew the main body slipcover so it covers the deck (the part under the cushion) completely. Usually, a simple rectangle box construction works here. -
Test fit the cover:
Put the cover back on the chair inside out first to check fit, then flip it right side out. It should slide on easily. If it’s too tight in the armpits of the chair, clip the curves slightly.
Step 4: The Skirt and Details
-
Measure the skirt drop:
Decide where you want the skirt to start. For the look in the image, the skirt starts low, just under the seat deck. Measure from that seam line to the floor. -
Create pleats or gathers:
Cut long strips for the skirt. To get that soft waterfall effect in the corners, calculate extra fabric length to create a simple kick pleat at each corner of the chair. -
Attach the skirt:
Pin the skirt strip to the main body of the slipcover. Sew the perimeter. Let the hem hit the floor for a ‘puddle’ effect or hem it slightly shorter for functionality. -
Sew the cushion cover:
Create a simple box envelope for the seat cushion using the same relaxed fit technique. Add a zipper at the back or use an envelope closure for easy removal. -
Layer with texture:
Once the slipcover is on, the final step involves styling. Drape a contrasting fringed throw blanket over one arm and place a raw wood side table nearby to echo the natural textures.
Enjoy curling up in your refreshed, airy sanctuary that feels as comfortable as it looks

PENCIL GUIDE
Understanding Pencil Grades from H to B
From first sketch to finished drawing — learn pencil grades, line control, and shading techniques.
Explore the Full Guide
Glass-Front Cabinet for Vintage Display

Transform a plain glass-front cabinet into a stunning shabby chic focal point with this layering and distressing technique. The finish features a soft, creamy off-white paint that reveals glimpses of dark wood beneath, creating that perfectly aged, time-worn farmhouse look.
Detailed Instructions
Materials
- Wooden glass-front cabinet (untreated or previously finished)
- Medium-grit sandpaper (120-150 grit)
- Fine-grit sandpaper (220 grit)
- Dark wood stain (Walnut or Espresso tone)
- Clean lint-free rags
- Paraffin wax block or beeswax puck
- Chalk-style paint in Cream or Antique White
- High-quality synthetic brush (2-inch)
- Clear matte furniture wax
- Wax brush or soft cloth
- Painter’s tape
- Screwdriver (for hardware removal)
- Tack cloth
Step 1: Preparation & Base Layer
-
Remove Hardware:
Begin by unscrewing and removing all handles, knobs, and hinges. Place them in a labeled bag so no small screws get lost during the painting process. -
Protect the Glass:
Carefully apply painter’s tape to the glass panes on both the inside and outside of the doors. Run the tape right up to the wood edge, pressing it down firmly with your fingernail to prevent paint bleed. -
Clean and Sand:
Wipe down the entire cabinet to remove dust and grease. Lightly sand the existing finish with medium-grit sandpaper to create a ‘tooth’ for the new layers to adhere to. Wipe away dust with a tack cloth. -
Stain the Base:
If your cabinet is light wood or raw, apply a coat of dark wood stain using a lint-free rag. Focus on edges, corners, and raised molding details where you plan to distress later. Allow the stain to dry completely according to the manufacturer’s instructions.
Paint Peeling Too Much?
If large chunks of paint peel off during sanding, you likely applied too much wax resist. Next time, use lighter pressure with the wax puck or sand more gently with a finer grit paper.
Step 2: Creating the Resist Effect
-
Wax Resist Method:
Take your paraffin wax block or beeswax puck and rub it vigorously over the areas you want to look distressed. Focus on high-traffic spots like corners, edges of the doors, the molding around the panels, and near the handles. -
Random Placement:
Apply the wax randomly on flat surfaces as well to simulate natural wear. The wax will prevent the paint from sticking in the next step, making the distressing process much easier and more authentic-looking.
Add Antique Depth
For a darker, grungier look, apply a dark antique wax into the crevices and corners after the clear wax layer. Wipe back the excess immediately to leave shadows.
Step 3: Painting & Distressing
-
First Coat of Paint:
Dip your synthetic brush into the cream chalk-style paint. Apply a smooth, even coat over the entire exterior of the cabinet, painting right over the waxed areas. Don’t worry if the coverage isn’t perfect yet. -
Dry and Repeat:
Let the first coat dry fully (usually about 1-2 hours). Apply a second coat for solid opacity. I like to brush in the direction of the wood grain for a natural finish. -
The Reveal:
Once the paint is completely dry, take medium-grit sandpaper again. Sand over the areas where you applied the wax block. The paint should flake off easily in those spots, revealing the dark stain underneath. -
Fine-Tune the Distress:
Continue sanding other areas lightly to blend the distressed spots. Use a lighter touch on flat protect panels and a heavier hand on corners. Wipe down the entire piece with a tack cloth to remove all sanding dust.
Step 4: Finishing Touches
-
Interior Treatment:
For the interior, you can choose to leave the natural wood (as shown in the image) for contrast or apply a light wash of the cream paint. If leaving it natural, simply clean and seal it with a coat of clear wax. -
Sealing the Paint:
Scoop a small amount of clear furniture wax onto a wax brush or soft cloth. Massage it into the painted surfaces using circular motions. This seals the chalk paint and adds a subtle, protective sheen. -
Buffing:
Wait about 15-20 minutes for the wax to absorb, then buff the surface vigorously with a clean, dry cloth. This hardens the finish and creates a velvety smooth texture. -
Reassemble:
Remove the painter’s tape from the glass. Clean any smudge marks with glass cleaner. Reattach the hinges, knobs, and latches to complete the look.
Step back and admire how the dark wood peeking through the cream paint gives your cabinet an authentic history and charm
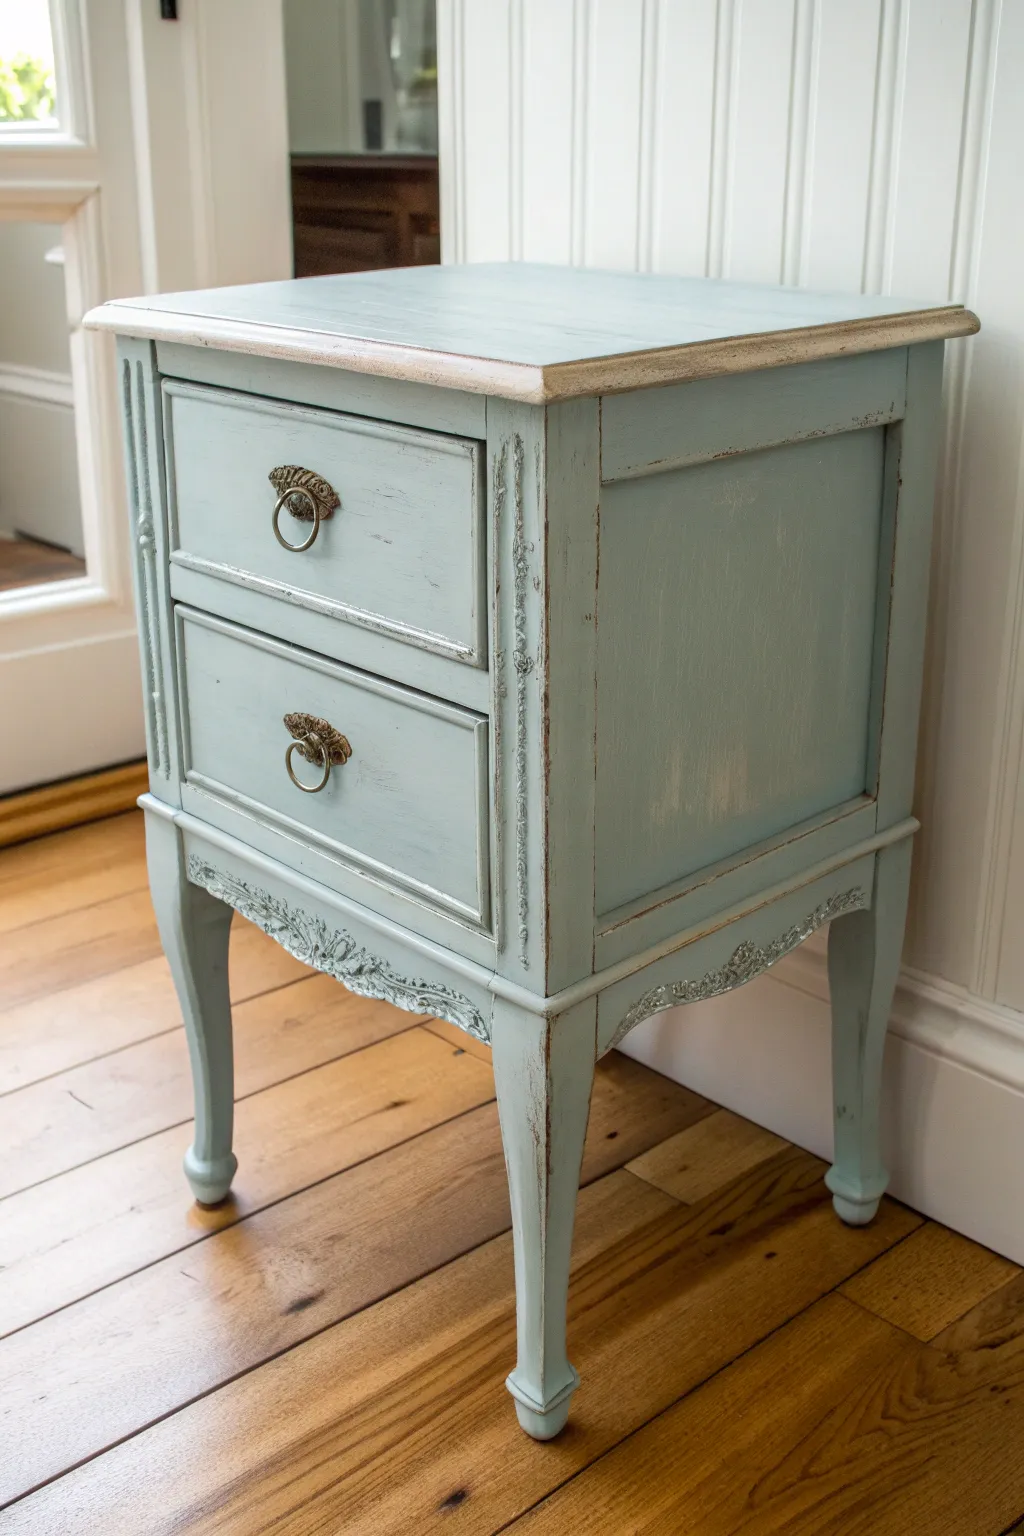
Coffee Table With Waxed, Timeworn Finish
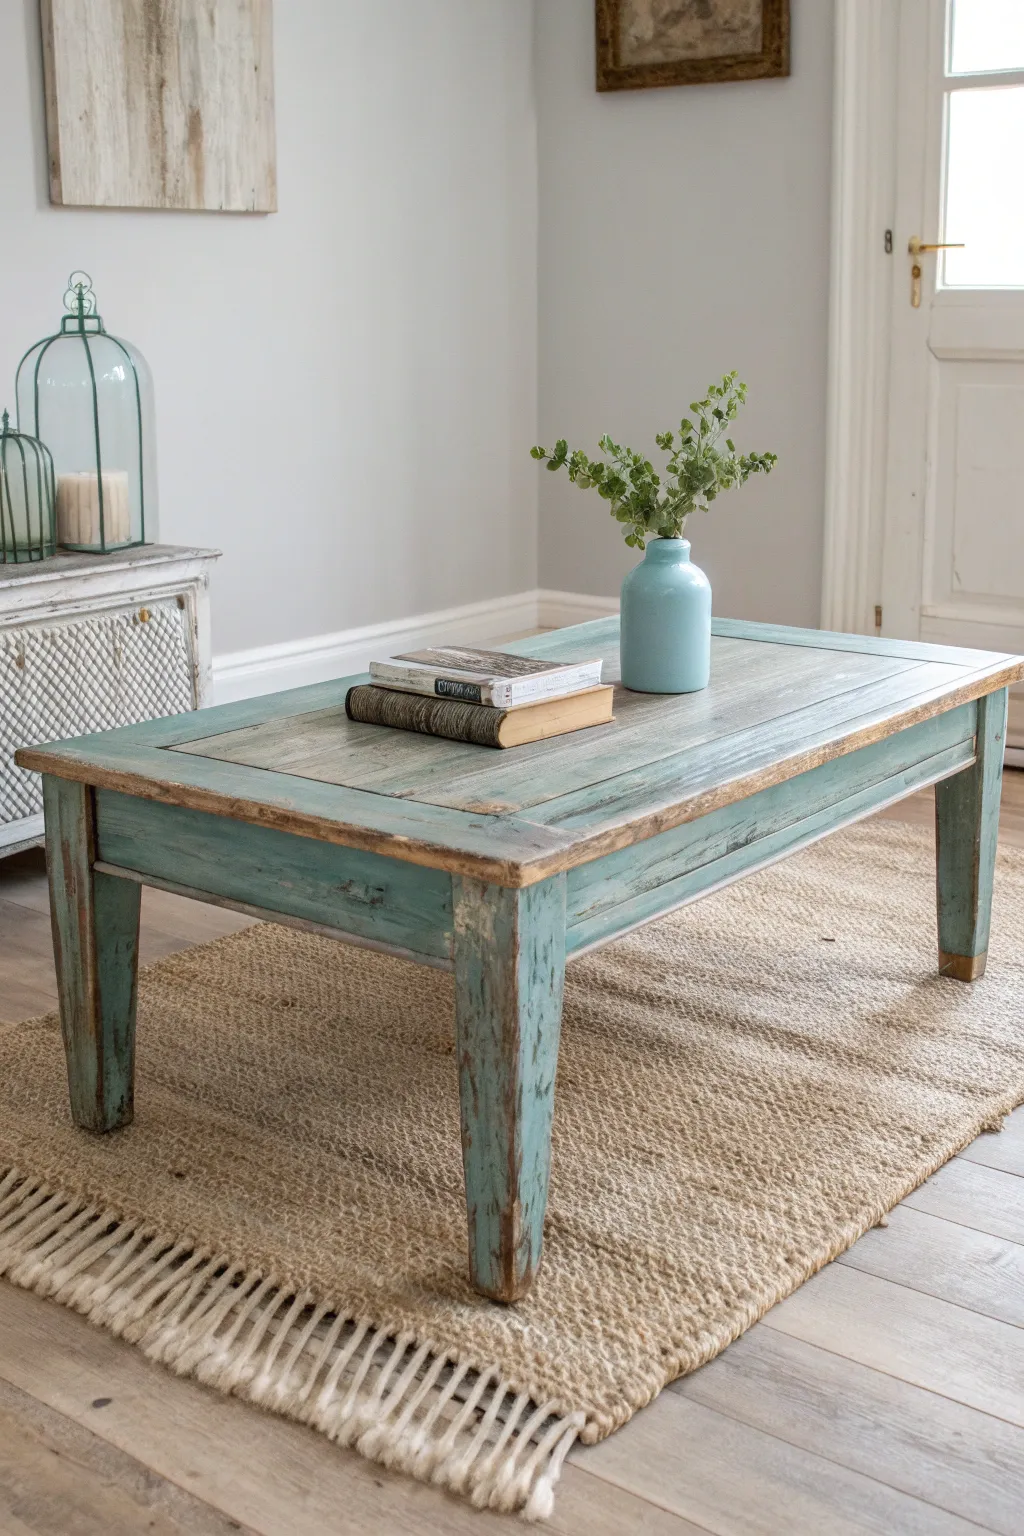
Transform a plain wooden table into a vintage-style centerpiece with this rustic, weathered paint technique. By layering milk paint and dark wax, you’ll achieve an authentic aged patina that looks like it has been loved for generations.
How-To Guide
Materials
- Wooden coffee table (unfinished or stripped)
- Light teal milk paint (or chalk paint)
- Medium-grit sandpaper (120 grit)
- Coarse-grit sandpaper (80 grit)
- Fine-grit sandpaper (220 grit)
- Clear furniture wax
- Dark antique wax
- Wax brush or lint-free cloths
- Paintbrush (synthetic bristle)
- Clean rags
- Tack cloth
- Putty knife or scraper
Step 1: Preparation and Base
-
Clean and prep:
Begin by thoroughly cleaning your wooden table to remove any oils or dirt. If the table has a previous glossy finish, sand it down lightly with 120-grit sandpaper to give the paint something to grip. -
Wipe down:
Use a tack cloth to remove every speck of sanding dust. A clean surface ensures your paint adheres properly but still allows for controlled distressing later. -
Mix the milk paint:
Prepare your teal milk paint according to the package instructions. Milk paint is ideal here because it naturally chips and flakes, adding to the shabby chic effect. If using chalk paint, stir it well. -
Apply the first coat:
Brush on a thin, even coat of paint over the entire table, including the legs and apron. Don’t worry about perfect coverage; a little translucency adds character. -
Let it dry:
Check the manufacturer’s drying time, usually about 30 minutes to an hour. I like to let this dry until it feels completely chalky to the touch before moving on. -
Apply second coat:
If you want a more solid colour before distressing, add a second coat now. Focus on the flat surfaces of the legs and apron, perhaps leaving the top slightly thinner if you want more wood showing through.
Too much paint removed?
If you sanded too aggressively, don’t panic. Dry brush a tiny amount of paint back over the bare spot, let it dry, and gently sand again with a finer grit.
Step 2: Distressing and Aging
-
Heavy distressing:
Once fully dry, take your coarse 80-grit sandpaper to the edges, corners, and high-traffic areas. Sand aggressively until you break through to the raw wood underneath. -
Scrape for texture:
For an authentic timeworn look, use a metal scraper or putty knife to gently chip away loose paint, especially if you used milk paint which may naturally flake. -
Soften the paint:
Switch to 120-grit sandpaper and lightly buff the flat surfaces. This smooths out brush strokes and fades the paint color slightly without removing it entirely. -
Focus on the top planks:
If your table has a planked top like our example, sand heavily along the seams between the planks to define them and expose the wood grain. -
Create wear patterns:
Imagine where feet would rest or hands would touch the table. Sand those specific spots on the legs and the rim of the table top to mimic decades of natural wear. -
Final smooth sanding:
Give the entire piece a quick, gentle pass with 220-grit sandpaper. This ensures the wood and paint feel buttery smooth to the touch, not scratchy. -
Clean up dust:
Vacuum the piece and wipe it down with a damp cloth to remove all sanding residue. It must be dust-free before waxing.
Waxing Pro Tip
Always apply clear wax BEFORE dark wax. The clear layer acts as a barrier, allowing you to move and control the dark wax so it doesn’t stain the paint permanently.
Step 3: Sealing and Patina
-
Apply clear wax:
Using a wax brush or lint-free cloth, massage a layer of clear furniture wax into the wood and paint. Work in small sections, rubbing it deep into the grain. -
Buff the clear wax:
Let the clear wax sit for about 10-15 minutes, then buff it briskly with a clean rag. This creates a protective seal and a slight sheen. -
Apply dark wax:
Dip your brush lightly into the dark antique wax. Apply it sparingly, focusing on corners, recessed areas, and deep scratches where dirt would naturally accumulate over time. -
Blend and remove:
Immediately wipe back the dark wax with a clean cloth. If it’s too dark, use a little clear wax on your rag to lift the pigment like an eraser. -
Final buffing:
Allow the waxes to cure for 24 hours (or as instructed), then give the entire table a vigorous final buffing to bring out a soft, satin glow.
Now you have a stunning, character-filled table ready to anchor your living room.


Two-Tone Painted Hutch With Warm Wood Top
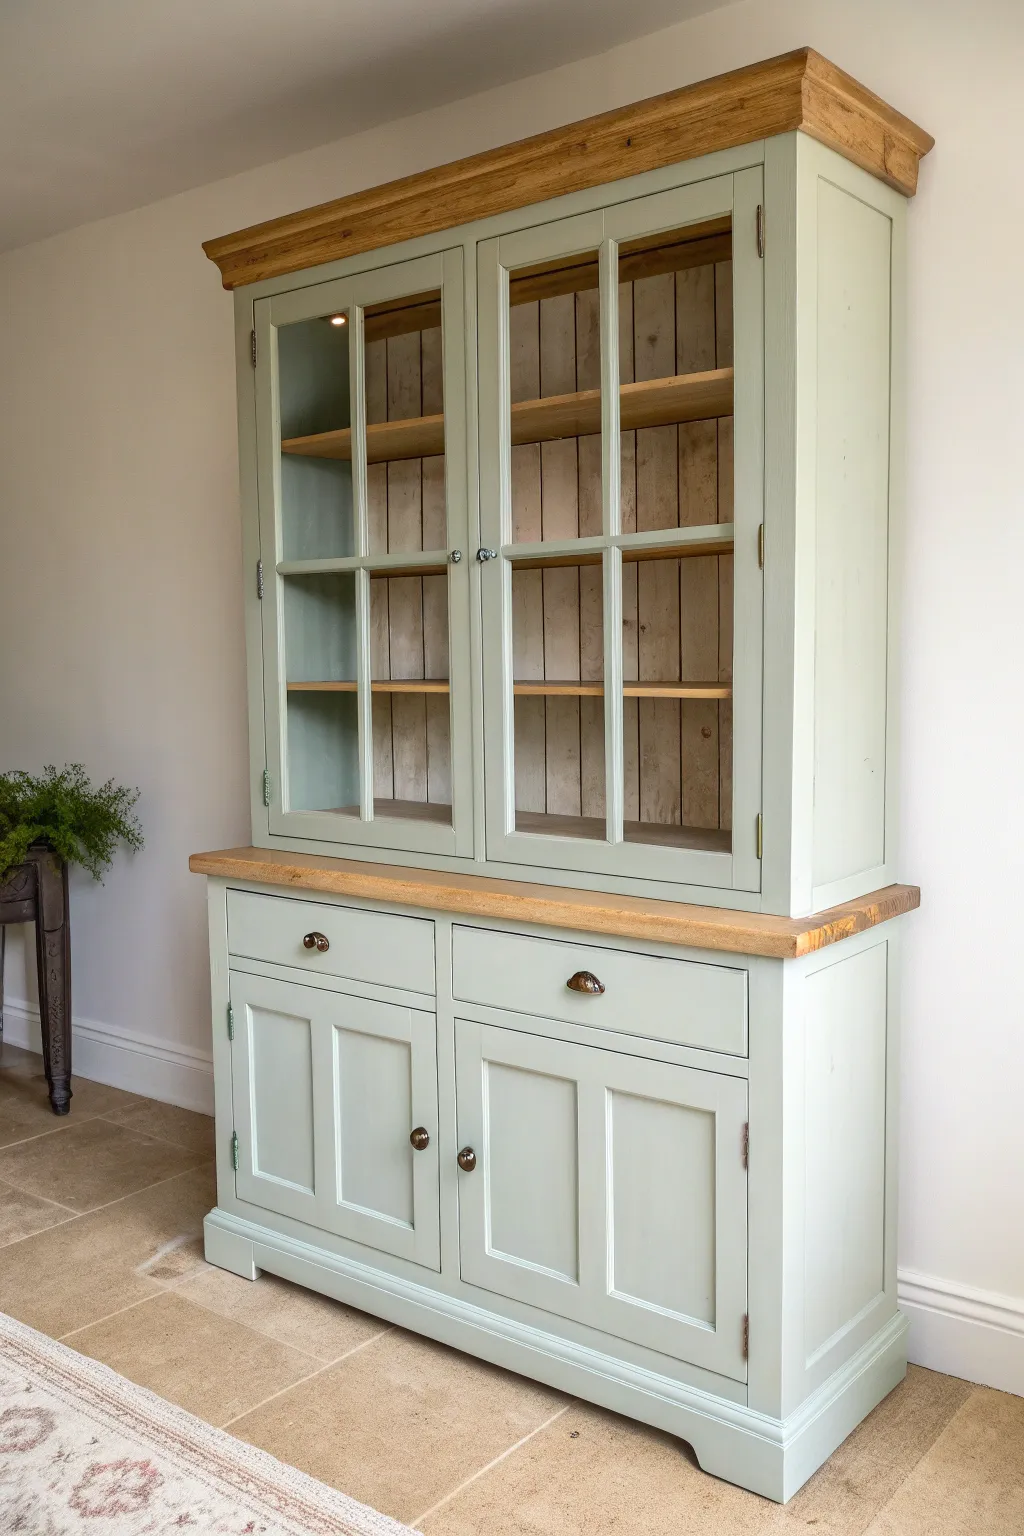
Transform a standard pine dresser into a stunning modern farmhouse centerpiece using this two-tone technique. The combination of calming sage green paint with warm, stripped oak details creates a sophisticated yet welcoming focal point for any dining room.
Step-by-Step Guide
Materials
- Solid wood hutch (top and bottom separated)
- Chemical varnish stripper (Citristip or similar)
- Plastic scraper and wire wool
- Orbital sander with 80, 120, and 220 grit pads
- Degreasing cleaner (TSP substitute)
- High-quality adhesion primer
- Eggshell or satin furniture paint in Sage Green (e.g., Farrow & Ball ‘Lichen’ or similar)
- Clear finishing wax or matte polyurethane
- Antique brass cup handles and knobs
- Wood stain (optional, Light Oak tone)
- Masking tape (painter’s tape)
- Small foam roller and tray
- Synthetic detailed angled brush
Step 1: Preparation & Stripping
-
Disassemble hardware:
Begin by removing all doors, drawers, and existing hardware. Store the screws in a labeled bag so you don’t lose them. If the glass panels are removable, take them out carefully; if not, tape them off thoroughly later. -
Strip the accent wood:
Apply a thick coat of chemical stripper to the top cornice and the countertop surface of the bottom buffet. Let it sit according to the manufacturer’s instructions until the old orange varnish bubbles up. -
Scrape and clean:
Use a plastic scraper to remove the sludge of old finish. I like to follow up with wire wool dipped in white spirit or mineral spirits to get into the grain and remove sticky residue. -
Sand the natural wood:
Using an orbital sander, sand the stripped surfaces starting with 80 grit to remove stubborn finish, moving to 120, and finishing with 220 for a smooth feel. Wipe away all dust. -
Scuff sand the body:
For the parts being painted, you don’t need to strip to bare wood. Just scuff sand the entire surface with 120-grit paper to give the primer something to grip.
Bleed-Through Blues?
If pink or yellow stains appear through your primer (common with old varnish), switch to a shellac-based blocker primer immediately to seal the tannins.
Step 2: Priming & Painting
-
Deep clean:
Wash the entire unit with a TSP substitute or intense degreaser. The surface must be free of grease, especially near handles, or the paint will eventually chip. -
Masking:
Apply painter’s tape along the edges where your natural wood meets the areas destined for paint. Take your time to get a crisp, straight line. -
Prime the surface:
Apply a coat of high-quality adhesion primer. Use a brush for corners and detailing, and a foam roller for flat areas to avoid brush marks. Let this cure for at least 4 hours. -
Light sanding:
Once the primer is dry, lightly run 220-grit sandpaper over it to smooth out any raised wood grain or dust nibs. Wipe clean with a tack cloth. -
First coat of colour:
Mix your sage green paint thoroughly. Apply the first coat using a synthetic brush for the panel grooves and a roller for the flat door fronts and sides. Don’t worry if it looks patchy; thin coats are better than thick ones. -
Paint interior backs (optional):
For the upper hutch, decide if you want the back panel painted. Leaving it as natural wood planks (as shown in the project image) adds lovely depth, but painting it creates a cohesive look. Ideally, leave it unpainted for that rustic vibe. -
Second coat:
After the recommended drying time, apply your second coat of green. This should provide full, opaque coverage. Remove the masking tape while the paint is still slightly tacky to prevent peeling the edge.
Add Interior warmth
Install small battery-operated puck lights inside the top of the upper cabinet to illuminate your display items and highlight the natural wood back panel.
Step 3: Finishing Touches
-
Seal the natural wood:
Apply a clear furniture wax or a matte water-based polyurethane to the stripped top and cornice. This protects the wood while keeping the colour natural and light. -
Protect the paint:
If you used a chalk paint, you must seal it with wax. If you used an eggshell or satin finish, it likely has a built-in topcoat, though a layer of clear wax can add extra durability to high-traffic drawer fronts. -
Reassemble doors:
Once everything is fully cured (give it 24 hours if possible), reattach the hinges and hang the doors. Adjust the hinges if the gaps look uneven. -
Install new hardware:
Drill new holes if your new cup pulls have different spacing than the old handles. Install the antique brass cup handles on the drawers and small matching knobs on the doors. -
Clean glass:
Remove any tape from the glass panels and clean them with glass cleaner to remove any paint splatters or dust.
Step back and admire how the fresh green paint revitalizes the piece while the natural wood keeps it grounded and warm
Painted Console Table for a Cottage Entry
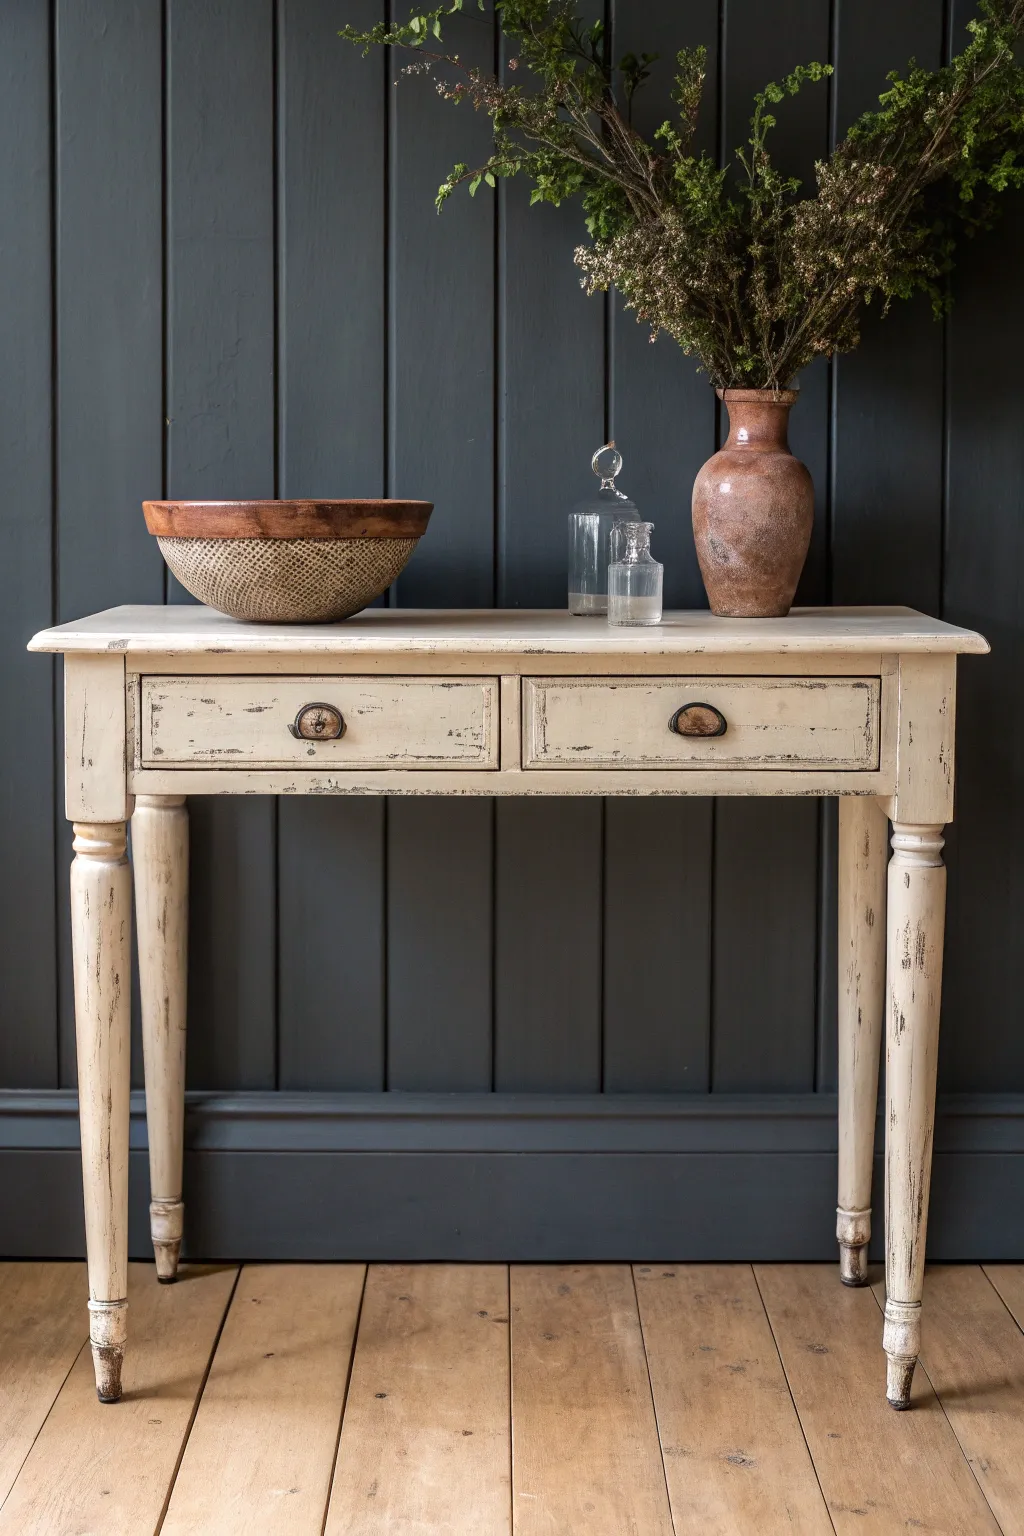
Transform a plain wooden console table into a charming cottage staple with a layered, distressed paint finish. This project creates an authentic aged look where dark wood peeks through creamy white paint, perfect for adding character to an entryway.
Detailed Instructions
Materials
- Unfinished or previously finished wooden console table (two drawers preferred)
- Medium grit sandpaper (120-150 grit)
- Fine grit sandpaper (220 grit)
- Tack cloths
- Dark wood stain (walnut or espresso)
- Foam brush or lint-free rag for staining
- Clear shellac or stain-blocking primer (optional)
- Creamy off-white chalk-style paint
- Medium-sized synthetic oval brush
- Dark wax or antiquing glaze
- Clear furniture wax
- Wax brush or lint-free buffing cloth
- Clean cotton rags
- Screwdriver for hardware removal
- Aged bronze cup pull hardware (if replacing)
Step 1: Preparation and Base Layer
-
Hardware Removal:
Begin by removing all drawers from the console. Use your screwdriver to take off the existing knobs or pulls and set them aside in a labeled bag if you plan to reuse them. -
Surface Cleaning:
Wipe down the entire piece with a mild degreaser and water to remove oils and dust. Let it dry completely before moving forward. -
Scuff Sanding:
Lightly scuff the entire surface with medium grit sandpaper. You aren’t trying to strip it to bare wood, just creating ‘tooth’ for the new finish to grab onto. -
Darken the Base:
Since the final look relies on dark wood showing through the distress marks, apply a coat of dark walnut or espresso stain if your starting piece is light wood. Wipe away excess and let it cure fully. -
Seal the Stain:
If you stained the piece or are working with mahogany that might bleed, apply a thin coat of clear shellac. This prevents the dark oils from turning your white paint pink or yellow later on. -
Wax Resist Method:
For natural-looking chipping, rub a small amount of clear wax or a wax puck along the edges, corners, and raised areas of the turned legs. These are the spots where paint would naturally wear off over time.
Step 2: Painting and Distressing
-
First Coat Application:
Stir your creamy off-white chalk paint thoroughly. Using a synthetic oval brush, apply the first coat comfortably. Don’t worry about perfect opacity here; thin, even strokes are key. -
Let it Dry:
Allow the first coat to dry for at least one hour, or until it is dry to the touch and no longer cool. -
Second Coat Application:
Apply a second coat of paint to achieve solid coverage. Pay attention to the turned legs, ensuring paint gets into the crevices without pooling. -
Wet Distressing:
Before the second coat is rock hard (about 30 minutes after painting), take a damp, lint-free rag and gently rub the areas where you applied the wax resist earlier. The paint should lift easily to reveal the dark base. -
Sandpaper Distressing:
Once the paint is fully dry, firmly use 220-grit sandpaper on the edges of the drawers and the ridges of the legs. I like to focus heavily on the sharp corners of the top surface to simulate years of use. -
Smooth the Surface:
Run a fine sanding sponge lightly over the flat surfaces to knock down any heavy brushstrokes, leaving a buttery smooth finish. -
Clean Up Dust:
Vacuum the piece thoroughly and wipe it down with a tack cloth to remove every speck of sanding dust.
Pro Tip: Authentic Wear
Focus your heaviest sanding and distressing near the drawer handles and the feet of the table. These are the high-traffic zones that naturally lose paint first!
Step 3: Finishing Touches
-
Clear Wax Application:
Apply a coat of clear furniture wax over the entire piece with a wax brush. Work in small sections, massaging the wax into the paint. -
Remove Excess Wax:
Immediately wipe back any excess wax with a clean cotton cloth. You want a thin, protective veil, not a sticky build-up. -
Adding Age:
Mix a tiny amount of dark wax or antiquing glaze with your clear wax. Brush this into the recessed grooves of the turned legs and drawer edges to add depth. -
Buff to Sheen:
Let the wax harden for about 20 minutes, then briskly buff the surface with a clean, soft cloth until you achieve a soft, satin sheen. -
Hardware Installation:
Reattach your hardware. Bronze cup pulls work exceptionally well with this aesthetic to ground the light paint color.
Level Up: Drawer Liners
Line the drawer interiors with vintage floral wallpaper or sheet music. It adds a secret pop of pattern that creates a delightful surprise when opening the drawers.
Place your favorite vase or stack of books on top and enjoy the warmth of your newly aged entryway piece.
Layered Sanding for Extra Chippy Edges
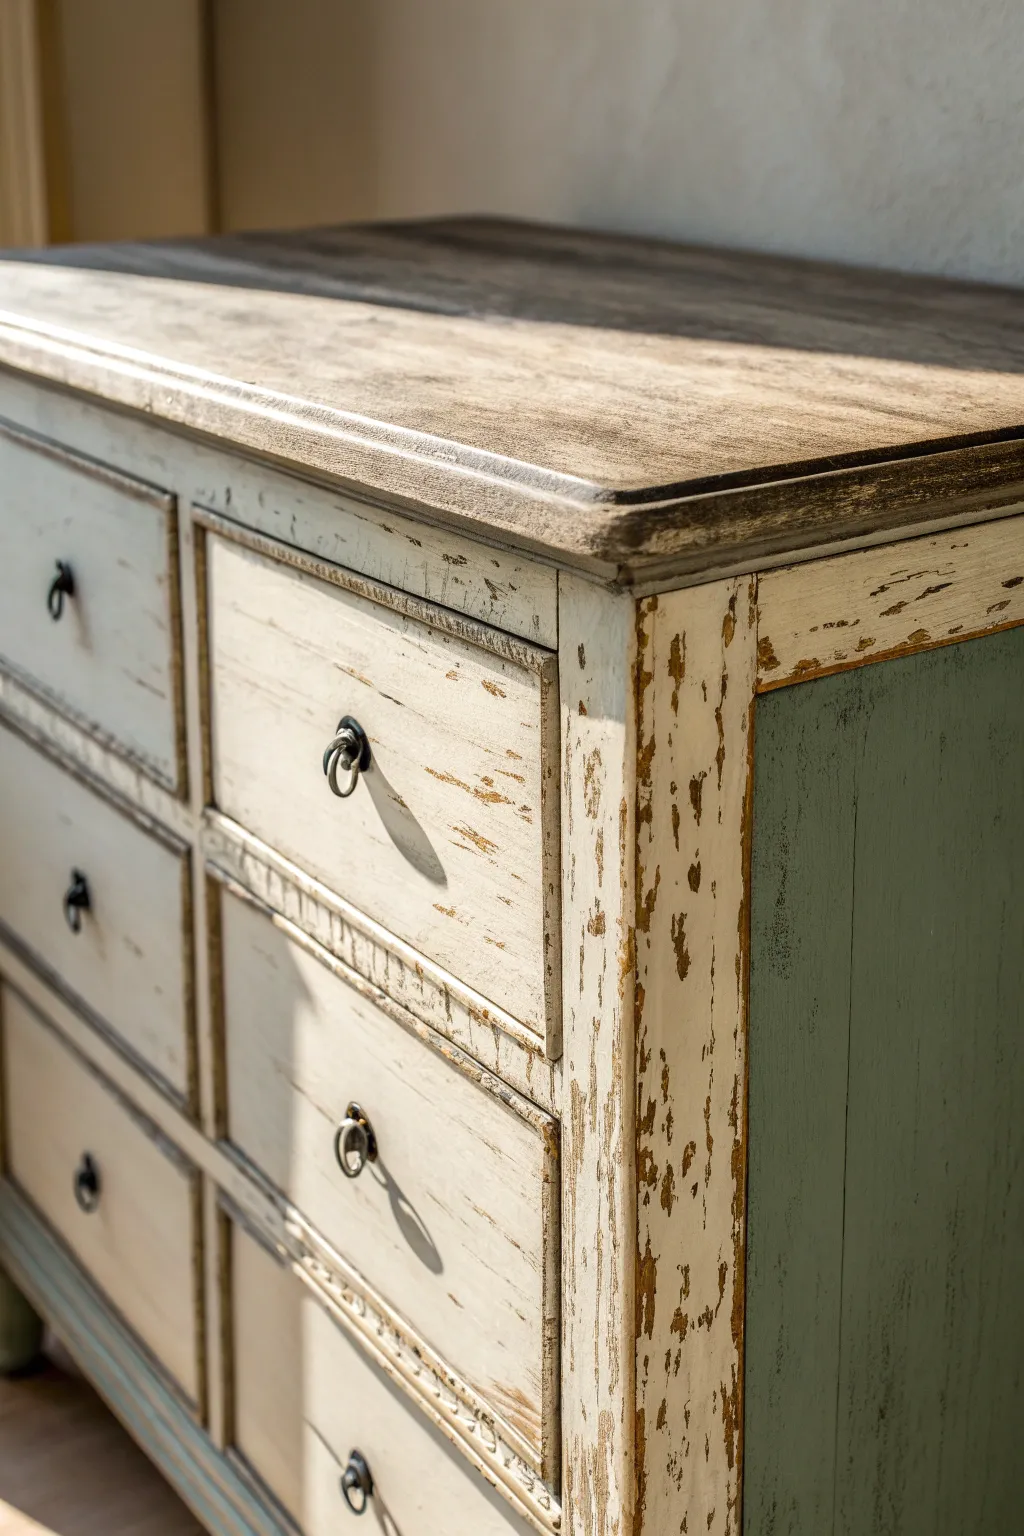
Transform an ordinary wooden dresser into a farmhouse masterpiece featuring heavily distressed layers and authentic peeling paint effects. This technique mimics decades of wear, revealing glimpses of raw wood and colorful undercoats beneath a soft, creamy white finish.
How-To Guide
Materials
- Solid wood dresser
- Medium-grit sandpaper (120-150 grit)
- Wire brush
- Dark wood stain (Espresso or Walnut)
- Teal or sage green chalk paint
- Creamy white chalk paint
- beeswax block or candle wax
- Paint scraper or plastic putty knife
- Clear matte polyurethane or wax sealant
- Lint-free rags
- Painter’s tape
- Ring pulls or antique hardware
Step 1: Refinishing the Top and Prep
-
Strip the Top:
Begin by removing all hardware. Use an electric sander or chemical stripper to remove the old finish completely from the top surface of the dresser, exposing the bare wood grain. -
Stain Application:
Apply a dark wood stain (like Espresso or Dark Walnut) to the raw wood top using a lint-free cloth. Wipe away excess stain immediately to prevent it from becoming too opaque. -
Seal the Top:
Once the stain is fully dry, apply two coats of a durable matte polyurethane to protect the surface, sanding lightly with fine-grit paper between coats for a smooth finish. -
Body Preparation:
Lightly scuff sand the rest of the dresser body and drawer fronts to help the base coats adhere. Wipe everything down with a tack cloth to remove dust.
Wax Resist Pro-Tip
Apply the wax heavily in uneven patches rather than straight lines. Nature wears furniture sporadically, unpredictable shapes look more authentic.
Step 2: Creating the Base Layer
-
Apply the Contrast Color:
Paint the side panels and select areas of the frame (where you want color to peek through) with your teal or sage green chalk paint. Let this dry completely. -
Stain the Edges:
Apply a thin layer of dark stain selectively along the sharp edges of the drawer fronts and frame corners. This ensures that when we distrust later, the revealed wood looks aged and dark, not brand new. -
The Wax Resist Method:
Take a block of beeswax or a simple candle and rub it heavily along the edges, corners, and random spots on the flat surfaces. This wax barrier will prevent the next layer of paint from sticking.
Color Pop Level-Up
Paint the inside of the drawers in the same teal or sage tone used on the side panel for a delightful surprise when opening them.
Step 3: The Chippy White Coat
-
Painting the Main Color:
Paint the entire body and drawer fronts (excluding the stained top) with a creamy white chalk paint. Don’t worry about perfect coverage; brush strokes add character here. -
Second Coat Application:
Apply a second coat of the white paint if needed for opacity, but maintain a slightly uneven texture. I find a round bristle brush helps create those natural-looking ridges. -
Wait for Tacky Dryness:
Allow the paint to dry until it is no longer wet but not fully cured—usually about 30 to 60 minutes depending on your humidity levels.
Step 4: Distressing and Finishing
-
Scraping the Paint:
Take a paint scraper or putty knife and firmly scrape along the areas where you applied the wax. The paint should chip and flake off easily, revealing the dark wood or teal base beneath. -
Heavy Edge Sanding:
Use 120-grit sandpaper to aggressively sand the corners and high points. This smoothes the ‘chippy’ edges so they aren’t sharp and exposes more wood for a time-worn look. -
Wire Brush Definition:
For extra texture, drag a wire brush gently with the grain on the flat drawer fronts. This creates minute scratches that mimic old, cracking varnish. -
Clean Up:
Vacuum the dresser thoroughly and wipe it down with a damp cloth to remove all sanding dust and paint flakes. -
Sealing the Paint:
Apply a clear furniture wax over the painted body. This seals the chalk paint and stops the ‘chipping’ process so the finish remains stable. -
Buffing:
Once the wax hazes over, buff it vigorously with a clean cotton rag to achieve a soft satin sheen. -
Hardware Installation:
Reattach your ring pull hardware. If the metal looks too new, you can dab a little dark wax on them to patina the finish before installing.
Step back and admire how a few layers of paint and strategic sanding can give a new piece a hundred years of history
Crackle Texture on Drawer Fronts
Transform a plain wooden nightstand into a vintage masterpiece with this stunning crackle glaze technique. The resulting texture mimics decades of aging paint, giving your furniture instant character and old-world charm.
Step-by-Step
Materials
- Wooden nightstand or small chest of drawers
- Medium grit sandpaper (120-150 grit)
- Painter’s tape
- Base coat paint (darker color like taupe or warm grey)
- Crackle medium (or liquid hide glue)
- Top coat paint (creamy white or antique white chalk paint)
- Small synthetic paintbrushes
- Clear sealing wax or polycrylic
- Antiquing wax (dark brown)
- Clean lint-free rags
- Screwdriver for hardware removal
- Brass drop-pull hardware (optional, for matching the look)
Step 1: Preparation & Base Coat
-
Remove Hardware:
Start by using a screwdriver to carefully remove all drawer pulls and knobs. Store them in a marked bag so you don’t lose the screws. -
Clean the Surface:
Wipe down the entire piece with a damp cloth and mild soap to remove any dust, oils, or grime. A clean surface is crucial for the crackle medium to adhere properly. -
Light Sanding:
Scuff sand the drawer fronts and frame lightly with 120-grit sandpaper. You aren’t trying to strip the wood bare, just giving the subsequent paint layers something to grip. -
Masking Areas:
If you want the crackle effect only on specific panels (like the inner drawer faces shown in the image), careful apply painter’s tape to mask off the surrounding borders. -
Apply the Base Color:
Paint the drawer fronts with your darker base color (taupe or warm grey). This is the color that will peek through the cracks later, so ensure solid coverage. -
Dry Completely:
Allow this base coat to dry thoroughly. If the base coat is wet when you apply the medium, the chemical reaction won’t work correctly.
Paint Dragging?
If your top paint drags or clumps, your crackle medium was too wet. Let the medium dry longer next time until it feels like the sticky side of scotch tape.
Step 2: The Crackle Effect
-
Apply Crackle Medium:
Brush a generous layer of crackle medium over the dark base coat. The thickness of this layer dictates the crack size—thicker medium equals larger cracks. -
Wait for Tacky State:
Let the medium dry until it is tacky but not wet. Consult the bottle instructions, but this usually takes about 1-2 hours depending on humidity. -
Apply Top Coat:
Using a clean brush, apply the creamy white top coat over the tacky medium. Work quickly and confidently in one direction. Do not back-brush or go over the same spot twice, or you will disturb the crackling process. -
Watch the Magic:
As the top coat dries, the cracks will begin to appear almost immediately. Leave the drawers horizontal and untouched while this dries completely, preferably overnight.
Step 3: Distressing & Finishing
-
Edge Distressing:
Once fully dry, take your sandpaper to the edges of the drawers and the main frame of the nightstand. Sand until the raw wood peeks through on corners and high points to mimic natural wear. -
Seal the Crackle:
Apply a coat of clear wax or clear polycrylic over the intricate crackle texture. This protects the finish before we add the antique grime look. -
Apply Dark Wax:
Work a small amount of dark antiquing wax into the cracks and distressed edges with a brush. I find working in small sections works best to control the darkness. -
Buff Back:
Immediately wipe away excess dark wax with a lint-free rag. The dark wax should remain settled in the cracks and corners, enhancing the aged appearance. -
Final Buffing:
Once the wax has cured (usually 24 hours), give the entire piece a final buff with a clean soft cloth to create a gentle sheen. -
Hardware Installation:
Reattach your hardware. For the exact look in the photo, use antique brass drop-pulls.
Crackle Control
Vary your brush strokes when applying the top coat. Cross-hatch strokes create a crazy-paving look, while straight strokes create linear, bark-like cracks.
Enjoy the rich history and charm your new nightstand brings to the room
Decoupage Botanical Prints Under a Soft Topcoat
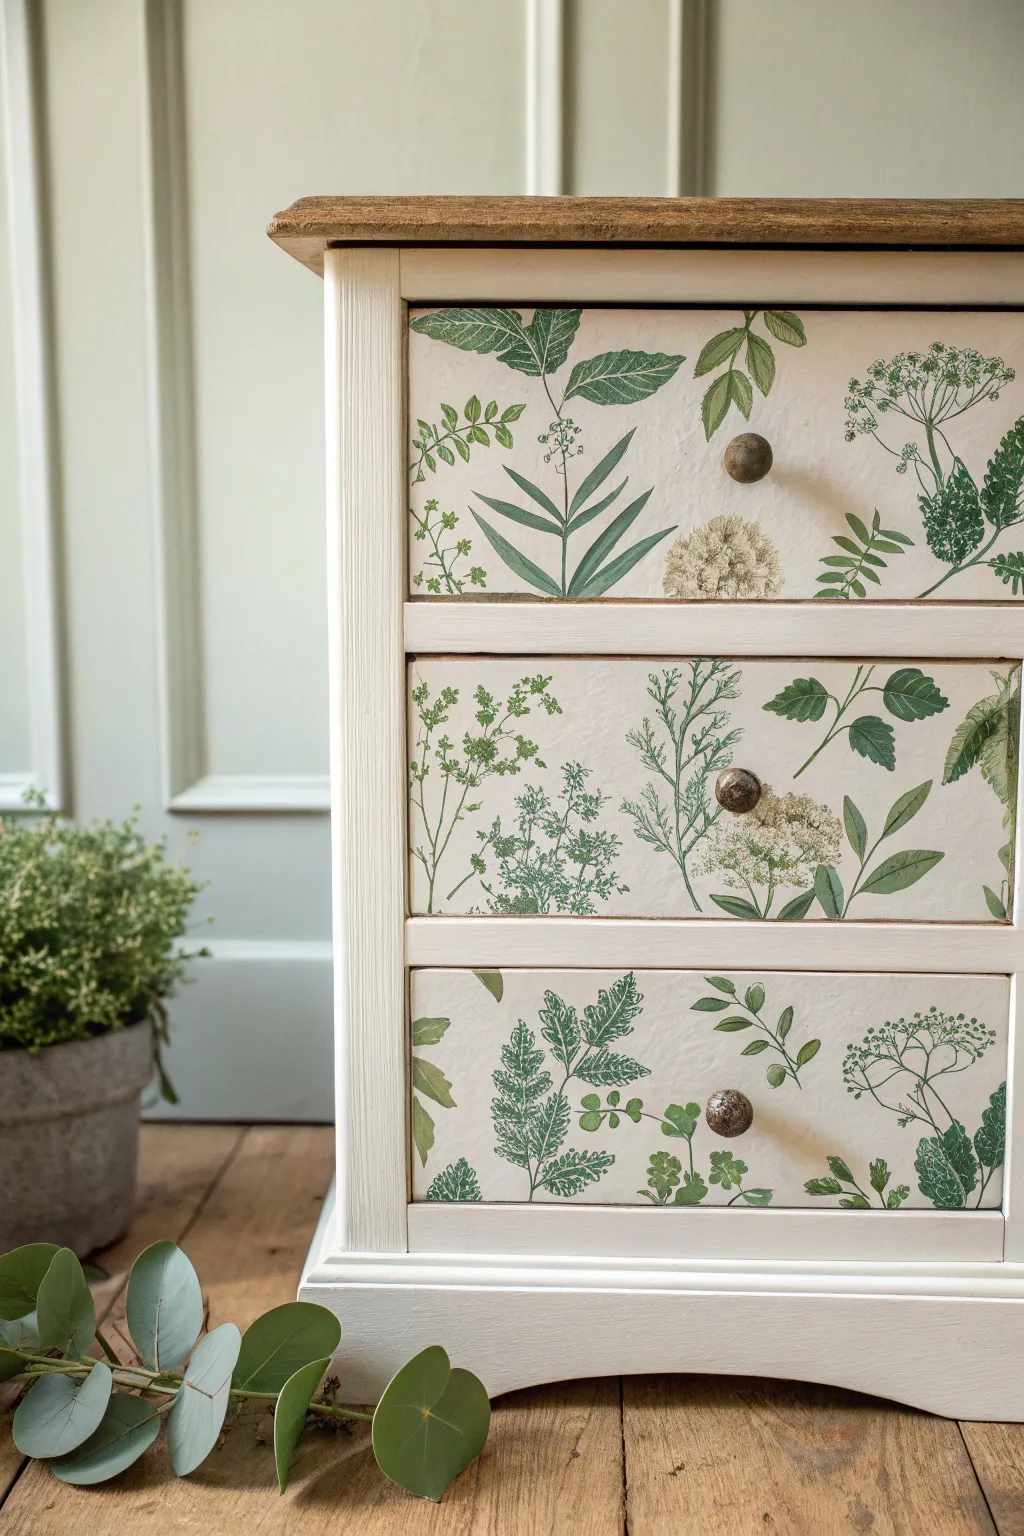
Transform a plain wooden dresser into a garden-inspired statement piece with this elegant decoupage project. Using botanical prints and soft paint tones creates a serene, nature-friendly look that perfectly complements the shabby chic aesthetic.
Detailed Instructions
Materials
- Small wooden chest of drawers or nightstand
- Sandpaper (120 and 220 grit)
- Cream or off-white chalk paint
- Paintbrushes (flat synthetic for paint, soft bristle for glue)
- Botanical prints (wrapping paper, specialized decoupage paper, or high-quality laser prints)
- Mod Podge or decoupage medium (matte finish)
- X-Acto knife or sharp craft scissors
- Clear matte polyurethane or wax for sealing
- Antique bronze or wooden knobs
- Clean lint-free cloths
- Wood stain (optional, for top)
Step 1: Preparation & Base Coat
-
Hardware Removal:
Begin by unscrewing and removing all existing drawer knobs and pulls. Store them safely if you plan to reuse them, though new hardware often elevates the look. -
Surface Cleaning:
Wipe down the entire piece with a mild degreaser or TSP substitute to remove oils and dirt. A clean surface is crucial for paint adhesion. -
Sanding:
Lightly sand the frame and the drawer fronts with 120-grit sandpaper to scuff up the glossy finish. You don’t need to strip it completely, just give the paint something to grip. -
Painting the Body:
Apply a coat of cream or off-white chalk paint to the frame, legs, and edges of the drawer fronts. I like to leave the top natural wood if it’s in good condition, or stain it darker for contrast. -
Second Coat:
Allow the first coat to dry fully (usually about an hour). Apply a second coat for full, opaque coverage. Let this dry overnight for best results.
Wrinkle-Free Finish
Iron your decoupage paper on a low, dry setting before applying glue. Relaxing the fibers beforehand helps the paper lay significantly flatter on the wood.
Step 2: Decoupage Application
-
Measuring the Drawers:
Measure the recessed panels of your drawer fronts precisely. If your drawers are flat, decide on the rectangular area you wish to cover. -
Cutting the Paper:
Cut your botanical papers to size. It’s helpful to cut them slightly larger than the drawer front, about 1/4 inch on all sides, to allow for perfect trimming later. -
Applying Decoupage Medium:
Brush a thin, even layer of Mod Podge or decoupage glue directly onto the face of the first drawer. Ensure you get all the way to the corners. -
Positioning the Paper:
Carefully lay your botanical paper onto the wet glue. Start from one edge and slowly smooth it down to avoid trapping large air pockets. -
Smoothing Out Bubbles:
Use a brayer roller or a clean credit card to smooth the paper from the center outwards. Work gently to push out air bubbles without tearing the delicate wet paper. -
Trimming Edges:
Once the paper is semi-dry but stable, use a sharp X-Acto knife to trim away the excess paper along the drawer edges for a crisp, professional line. -
Sealing the Paper:
Apply a top coat of decoupage medium over the paper to seal it. Don’t worry if it looks milky; it will dry clear.
Step 3: Finishing Touches
-
Re-opening Holes:
Once the paper is completely dry and hard, find the original knob holes by feel. Carefully poke through the paper from the outside using a sharp awl or screwdriver. -
Topcoat Application:
Protect the entire piece, including the painted frame, with a clear matte polyurethane or furniture wax. This ensures durability against daily use. -
Installing Hardware:
Screw in your chosen knobs. The antique rounded knobs shown in the example provide a perfect rustic contrast to the delicate green leaves. -
Final Cleanup:
Wipe away any residual dust or wax bits with a soft cloth before sliding the drawers back into the frame.
Aged Aesthetic
Mix a tiny drop of brown paint into your top-coat glue layer. This ‘glazes’ the white background of the paper, making it look like aged parchment instantly.
Step back and admire how a simple paper application has completely reinvented your furniture piece
Delicate Gilded Edges With Worn-Back Glam
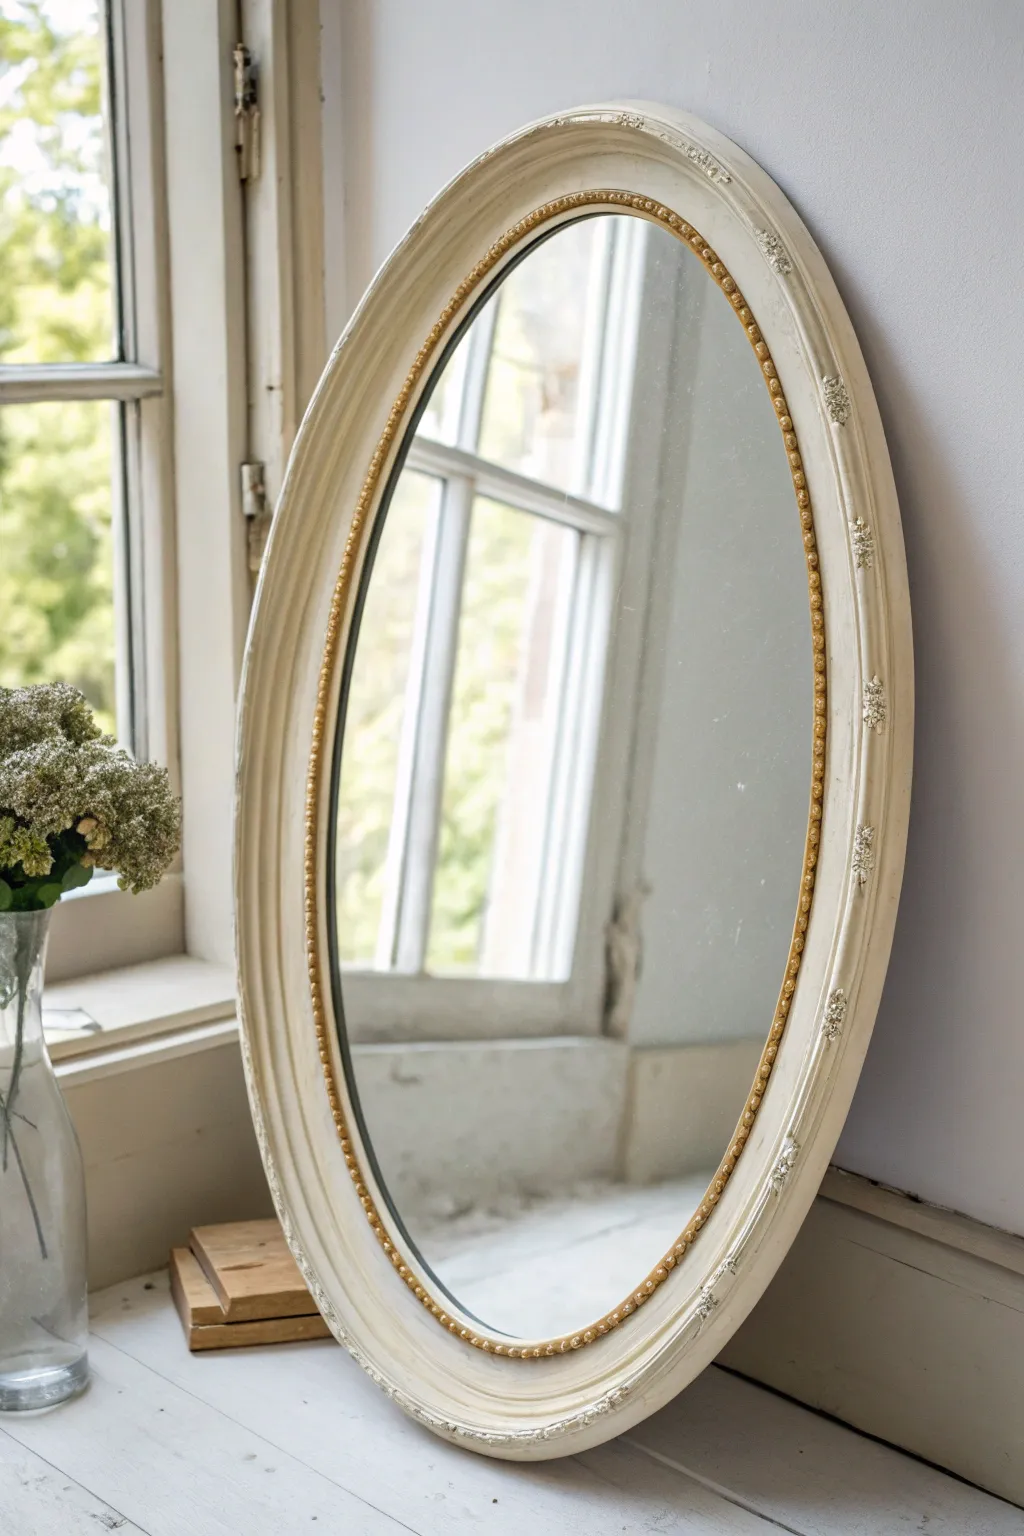
Transform a plain wooden framed mirror into a vintage French-country masterpiece with layers of chalky white paint and strategic gold accents. This project focuses on achieving that perfect balance between elegance and time-worn patina, highlighting the frame’s natural curves and beading.
How-To Guide
Materials
- Oval wooden mirror (thrifted is perfect)
- Creamy off-white chalk paint
- Gold gilding wax or metallic gold paint
- Clear furniture wax
- Dark antique wax (optional for aging)
- Medium-grit sandpaper (120-150 grit)
- Fine-grit sandpaper (220 grit)
- Small artist brushes
- Medium round paint brush
- Lint-free rags
- Painter’s tape
Step 1: Preparation & Base Coat
-
Clean surface:
Begin by thoroughly cleaning the mirror frame with a mixture of water and mild dish soap to remove years of dust or oil. Let it dry completely before moving on. -
Protect the glass:
Carefully apply painter’s tape around the inner edge of the mirror glass where it meets the frame. Slide the tape slightly under the rim if possible to ensure full coverage. -
Rough it up:
Lightly scuff the entire wooden frame with medium-grit sandpaper creates a ‘tooth’ for the paint to grab onto, especially if the original finish is glossy. -
First paint layer:
Apply your first coat of creamy off-white chalk paint using a medium round brush. Don’t worry about perfect coverage here; a little translucency adds to the aged effect. -
Dry and repeat:
Allow the first coat to dry for about 30-60 minutes. Apply a second coat for opacity, making sure to get the paint into any deep crevices or carvings.
Step 2: The Distressing Process
-
Smoothing:
Once the paint is fully cured (usually a few hours), take your fine-grit sandpaper and run it gently over the flat surfaces to smooth out brush strokes. -
Wet distressing technique:
I like to dampen a lint-free rag slightly and rub it over raised areas before sanding; this removes paint more naturally than sandpaper alone. -
Edge work:
Focus your sanding on the high points—the outer rim and any decorative flourishes. Sand until you reveal the original wood or base color underneath. -
Clean up dust:
Wipe the entire frame down with a clean, dry tack cloth or rag to remove all paint dust.
Wax On, Wax Off
If you apply too much dark wax or gold gilding, simply rub clear wax over it immediately. The clear wax acts as an eraser to lift the excess pigment.
Step 3: Gilding & Finishing
-
Highlight the beading:
Dip a small artist brush or your finger into the gold gilding wax. Gently run it along the inner beaded trim of the mirror. -
Create a worn look:
Apply the gold somewhat unevenly. You want it to look like old gold leaf that has worn away over decades, not a solid metallic stripe. -
Outer rim accents:
Smudge tiny amounts of gold wax on the distressing spots of the outer frame rim to catch the light. -
Seal with clear wax:
Use a wax brush or cloth to apply a thin layer of clear furniture wax over the entire painted surface to seal your work. -
Optional antique glazing:
For extra depth, mix a tiny dot of dark wax with your clear wax and apply it into the crevices of the beading, then wipe back immediately. -
Buff to shine:
Wait 15 minutes for the wax to harden slightly, then buff vigorously with a soft cloth to create a soft, satin sheen. -
Reveal:
Peel away the painter’s tape and clean any wayward smudges off the glass with vinegar and water.
Layered Luxury
Paint a dark grey or charcoal base coat before the cream layer. When you sand back, you’ll reveal grey instead of wood for a true Gustavian style.
Hang your new mirror near a window to let the natural light play off those subtle golden details
Rattan and Painted Wood Mix for Light Texture
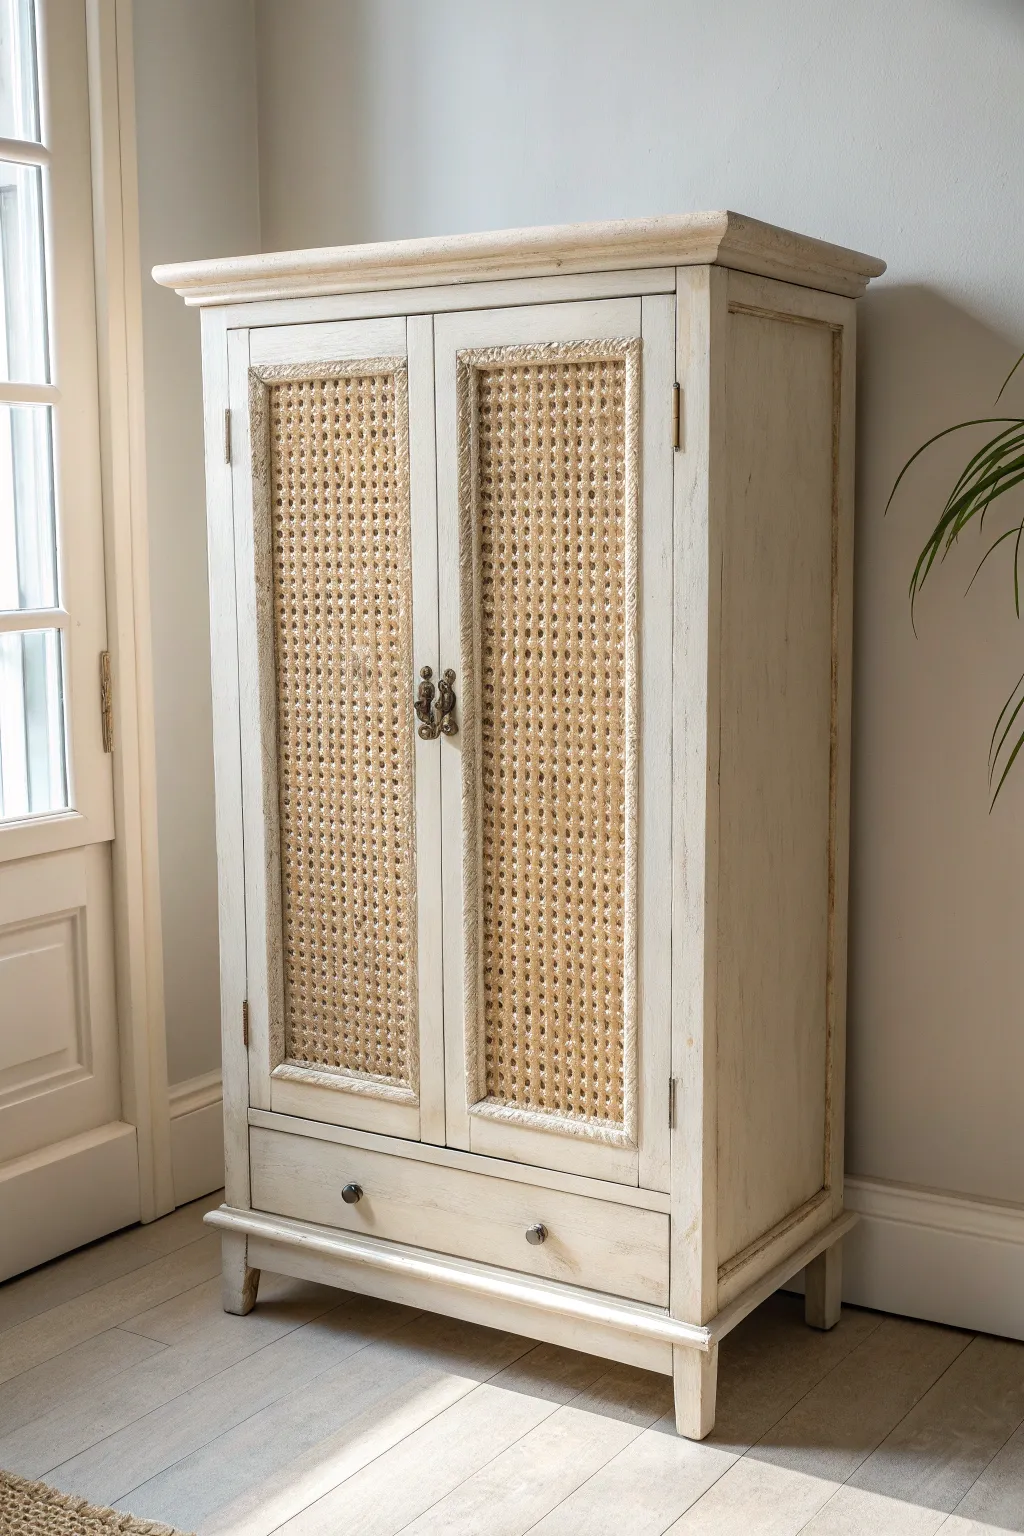
Transform a plain wooden wardrobe into a breezy, shabby chic statement piece by combining distressed chalk paint with natural rattan textures. This project balances airy coastal vibes with vintage charm, perfect for adding character to any bedroom or hallway.
Detailed Instructions
Materials
- Wooden wardrobe (with inset door panels)
- Cane webbing (rattan sheet material)
- Cream or off-white chalk paint
- Clear furniture wax
- Dark furniture wax (optional for aging)
- Wood glue
- Staple gun and staples
- Paintbrushes (medium synthetic)
- Sandpaper (120 and 220 grit)
- Scissors or utility knife
- Bowl of warm water
- Measuring tape
- Spline or flat trim (optional for finishing edges)
- Screwdriver
Step 1: Preparation & Disassembly
-
Remove Hardware:
Begin by unscrewing and removing all knobs, handles, and hinges. Place them in a labeled bag so you don’t lose any tiny screws. -
Remove Door Panels:
If your wardrobe doors have removable solid wood panels, carefully pry off the retaining molding on the back and pop the panels out. If they are solid doors without removable panels, you will need to cut out the center rectangle using a jigsaw, leaving a sturdy frame border. -
Clean and Sand:
Wipe down the entire piece to remove dust and grease. Lightly scuff-sand the entire surface with 120-grit sandpaper to help the paint adhere, then wipe clean again.
Loose Webbing?
If the cane dries and isn’t taut, re-wet it with a sponge while it’s attached. Let it dry naturally again, and it should shrink tight.
Step 2: Applying the Rattan
-
Soak the Cane:
Cut your cane webbing slightly larger than the opening of your door frames. Soak these pieces in warm water for about 30 minutes; this makes the fibers pliable and prevents snapping. -
Blot Dry:
Remove the cane from the water and blot off excess moisture with a towel. It should be damp but not dripping. -
Positioning:
Lay a door frame face down on a flat surface. Position the damp cane webbing over the opening on the back side, ensuring the weave pattern is straight and aligned with the frame edges. -
Stapling:
Staple the webbing to the wood frame. Start from the center of one side, pull it taut to the opposite side, and staple there. I prefer to work from the centers outward to the corners to keep tight tension. -
Trimming Excess:
Once the cane is securely stapled all around, use a sharp utility knife or heavy-duty scissors to trim the excess material flush with the staples. Let the cane dry completely; it will tighten as it dries, creating a perfect drum-skin effect.
Add a Color Wash
Mix 50% water with gray paint and brush over the dry rattan for a weathered, driftwood look before sealing.
Step 3: Painting & Distressing
-
First Coat:
Apply a generous coat of cream chalk paint to the wardrobe frame, door frames, and drawer front. Don’t worry about perfect coverage; brush strokes add to the texture. -
Second Coat:
Once dry, apply a second coat if needed for better opacity. Allow this to dry completely, preferably overnight. -
Distressing the Edges:
Take your 220-grit sandpaper and gently sand areas where natural wear would occur—corners, raised edges, and around the feet. Sand until the raw wood peeks through the white paint. -
Detail Sanding:
For a truly authentic look, lightly scuff flat surfaces randomly to simulate years of cleaning and use.
Step 4: Finishing Touches
-
Waxing:
Apply a layer of clear furniture wax with a lint-free cloth to seal the paint. Buff it to a soft sheen. -
Optional Aging:
If you want more depth, lightly apply dark wax into the crevices and corners, then wipe back the excess immediately for an antique patina. -
Reassembly:
Screw the hinges back onto the doors and frame. Reattach the knobs to the doors and the drawer pulls. -
Front Trim (Optional):
If the stapled edge of the rattan is visible from the inside or looks messy, glue a small strip of flat wood trim or spline over the staples on the back for a clean finish.
Step back and admire how the natural texture of the cane breathes new life into your beautifully aged furniture piece
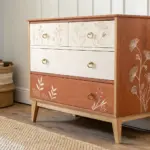
Hand-Painted Mini Mural on an Armoire Door
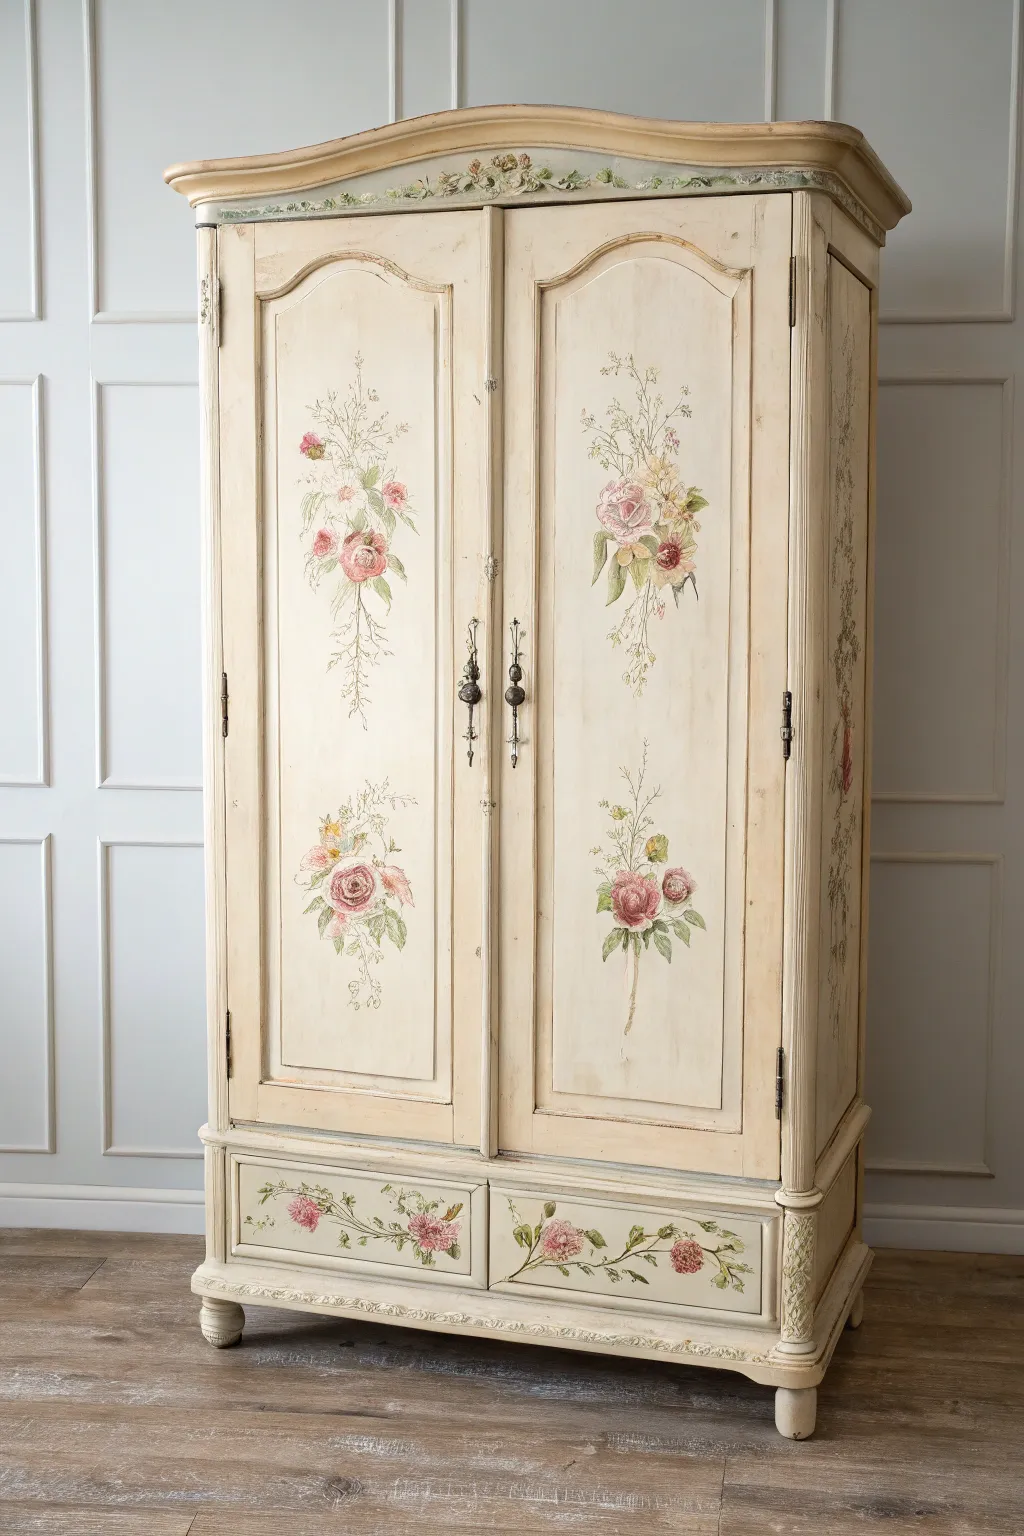
Transform a plain wooden wardrobe into a romantic shabby chic centerpiece with delicate floral motifs and a distressed finish. This project creates an heirloom-quality piece featuring cascading bouquets of roses and soft greenery against a creamy, aged background.
How-To Guide
Materials
- Wooden armoire or wardrobe
- Sandpaper (120 and 220 grit)
- White or cream chalk paint (base coat)
- Clear wax and dark antique wax
- Acrylic craft paints (Sage Green, Olive Green, Dusty Rose, Burgundy, Cream, Pale Pink, Mustard Yellow)
- Set of artist brushes (liner brush, small round brush, medium flat brush, filbert brush)
- Pencil and eraser
- Transfer paper (optional)
- Small sea sponge
- Lint-free cloths
- Painter’s tape
Step 1: Preparation & Base Coat
-
Prep the surface:
Remove all hardware, including handles and hinges if possible. Clean the entire piece thoroughly with a degreaser to remove oils and dirt. Lightly scuff-sand the existing finish with 120-grit sandpaper to help the paint adhere. -
Apply the base color:
Paint the entire armoire with your cream chalk paint. Use a large brush and paint in the direction of the wood grain. Don’t worry about perfect opacity on the first coat; chalk paint builds up nicely. -
Add a second coat:
After the first coat is dry (usually 1-2 hours), apply a second coat for full coverage. Let this dry completely overnight to ensure a hard surface for your detailed painting.
Natural Fade Trick
Mix a tiny drop of your wall color into the leaf green paint. This ‘grays down’ the green so it harmonizes perfectly with the background instead of popping too brightly.
Step 2: Layout & Composition
-
Mark the center lines:
Lightly mark a vertical center line on each door panel with a pencil. This helps ensure your floral bouquets hang straight and centered. -
Sketch the upper bouquets:
Sketch a teardrop-shaped floral arrangement on the upper half of each door panel. Focus on a large central bloom with trailing stems falling downwards. Keep the sketch faint so it’s easily covered by paint. -
Sketch the lower motifs:
Draw smaller, slightly simpler floral clusters on the lower half of the door panels. These should balance the larger upper designs without competing with them. -
Plan the drawer details:
For the bottom drawers, sketch a horizontal vine pattern that connects across the drawer fronts, featuring small rosebuds and leaves interspersed along the vine. -
Outline the cornice:
Lightly draw a scrolling vine pattern along the very top curved cornice of the armoire to frame the piece.
Crackled Finish
For extra age, apply a crackle medium between your base coat and top coat in select areas. The paint will separate as it dries, mimicking centuries-old chipped varnish.
Step 3: Painting the Florals
-
Block in the main blooms:
Using a filbert brush, mix Dusty Rose and Cream to create a soft pink base for the main roses. Paint rough circles or ovals as placeholders for the flowers on the doors. -
Add depth to the roses:
While the base pink is still tacky, swirl in touches of Burgundy for the darker centers and Pale Pink for the highlights on the petal edges. Use a ‘C’ stroke motion to mimic unfolding petals. -
Paint secondary flowers:
For the smaller flowers in the bouquet, dab Mustard Yellow or Cream paint with a small round brush. stipple the centers to give them texture. -
Create the greenery:
Mix Sage Green and Olive Green. Use a liner brush to paint fine, trailing stems extending downward from the main bouquets. I like to keep a loose wrist here so the vines look natural and organic. -
Add leaves:
Paint small almond-shaped leaves along the stems using a small round brush. Vary the green shades—use lighter green at the tips of the vines and darker green near the flower bases for dimension. -
Detail the drawer vines:
Paint the horizontal vines on the drawer fronts using the same green mixes. Add small rosebuds by pressing a round brush loaded with pink and white paint gently onto the surface. -
Paint the cornice scrollwork:
Using a steady hand and a liner brush, paint the scroll design on the top moulding in a muted Sage Green. This acts as a crown for your artwork.
Step 4: Distressing & Finishing
-
Distress the edges:
Once all paint is fully dry, take 220-grit sandpaper and gently sand the edges of the doors, drawers, and raised mouldings. Reveal the wood underneath in areas that would naturally wear over time. -
Soften the painting:
Very lightly sand over your painted floral designs. This knocks back the brightness and makes them look hand-painted decades ago rather than yesterday. -
Apply clear wax:
Brush a layer of clear furniture wax over the entire piece to seal the chalk paint. Buff it gently with a lint-free cloth. -
Add antique character:
Apply dark antique wax sparingly into the crevices of the mouldings and corners of the door panels. Wipe away excess immediately, leaving just enough to create a shadowed, aged effect. -
Reinstall hardware:
Attach your decorative handles and hinges back onto the armoire to complete the transformation.
Step back and admire how your brushwork has turned a simple storage piece into a romantic focal point for the room


Have a question or want to share your own experience? I'd love to hear from you in the comments below!