Shoes are basically tiny moving canvases, and painting them is one of my favorite ways to turn everyday wear into wearable art. These shoe art ideas go from easy, feel-good patterns to more detailed illustrations that play nicely with seams, panels, and that clean rubber edge.
Classic Tie-Dye Swirls on Canvas Shoes
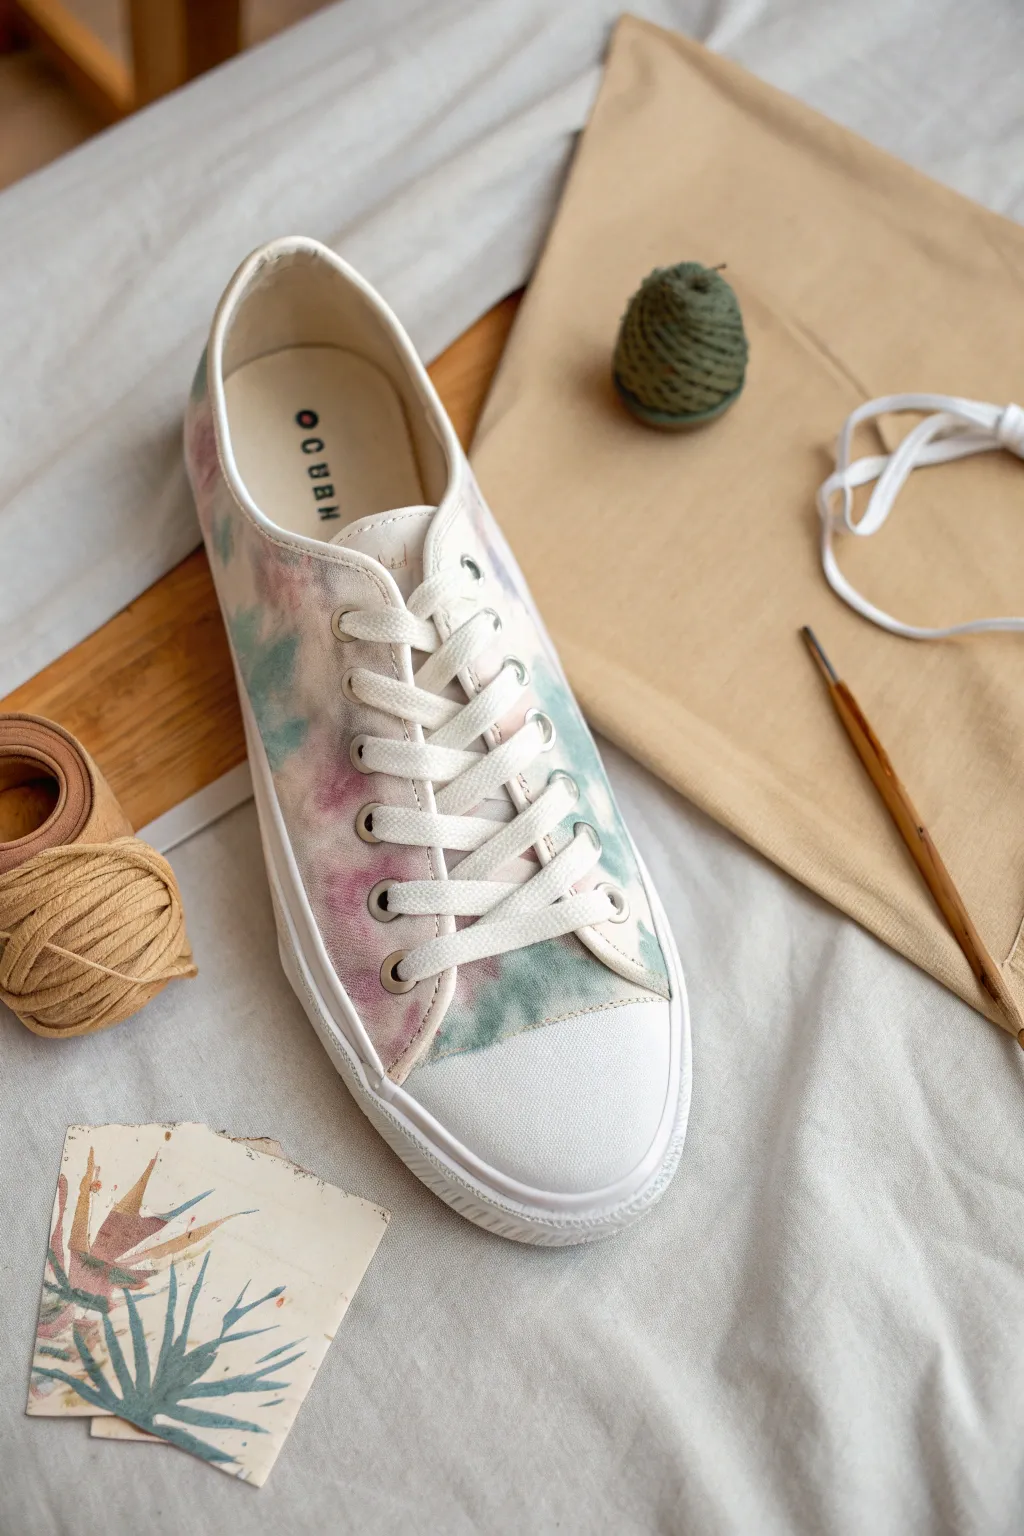
Transform a simple pair of white canvas sneakers into a dreamy, watercolor-inspired masterpiece with this subtle tie-dye technique. The soft blend of muted pinks, teals, and sage greens creates a sophisticated, cloud-like effect that feels both artistic and wearable.
How-To Guide
Materials
- White canvas sneakers
- Fabric dye (dusty pink, teal, sage green)
- Small paintbrushes (round and flat tips)
- Water spray bottle
- Painters tape or masking tape
- Paper towels
- Small mixing cups or palette
- Water cup
Step 1: Preparation
-
Remove Laces:
Begin by completely unlacing the sneakers. This ensures the tongue gets fully dyed and prevents the laces from getting unintended color spots. -
Tape Off Soles:
Carefully apply painter’s tape to the rubber soles and the toe cap. Press the edges down firmly with your fingernail to create a tight seal so no dye bleeds onto the white rubber. -
Dampen the Canvas:
Using a spray bottle filled with clean water, lightly mist the canvas surface of the shoe. You want it damp but not soaking wet; this helps the dye spread softly for that watercolor look. -
Mix Your Dyes:
Prepare your fabric dyes in small cups. I like to dilute them slightly more than the package instructions say to keep the colors pastel and soft. Aim for a consistency similar to watercolor paint.
Pro Tip: Bleed Control
To prevent muddy colors, let the first color dry for just 5 minutes before adding a contrasting color next to it. It keeps the distinct hues visible.
Step 2: Applying the Color
-
Start with Pink:
Dip a round brush into the dusty pink dye. Apply random, organic splotches onto the canvas, leaving plenty of white space between them. -
Blend the Edges:
Immediately after placing a pink spot, dip a clean brush in water and gently feather the edges of the dye so it bleeds outward slightly. -
Add Teal Accents:
Wash your brush well, then pick up the teal dye. Apply this color in the white spaces next to the pink, allowing them to touch and merge slightly in some areas. -
Introduce Sage Green:
Finally, add touches of sage green to any remaining large white gaps. This earth tone grounds the palette and creates a beautiful transition between the pink and teal. -
Check the Tongue:
Don’t forget to pull the tongue out and apply the same mottled pattern there, as it will peek through the laces. -
Review and Refine:
Step back and look at the overall pattern. If some areas look too starkly white, use a very watery wash of your lightest color to tint them barely visible.
Step 3: Finishing Up
-
Air Dry:
Allow the sneakers to air dry completely in a well-ventilated area, away from direct sunlight which might fade the wet dye unevenly. -
Heat Set:
Once dry, use a hairdryer on a high heat setting for a few minutes over the canvas. This helps set the dye so it becomes permanent. -
Remove Tape:
Slowly peel away the painter’s tape from the soles. If any dye leaked under, quickly wipe it with a damp magic eraser or a bit of rubbing alcohol. -
Re-Lace:
Lace your fresh white laces back into the shoes. The crisp white of the laces will make your pastel design pop even more.
Level Up: Embroidered Details
Once the shoes are dry, stitch small white stars or dashed lines over the darker dye patches using embroidery floss for added texture.
Step into your new custom kicks and enjoy the subtle splash of color on your feet


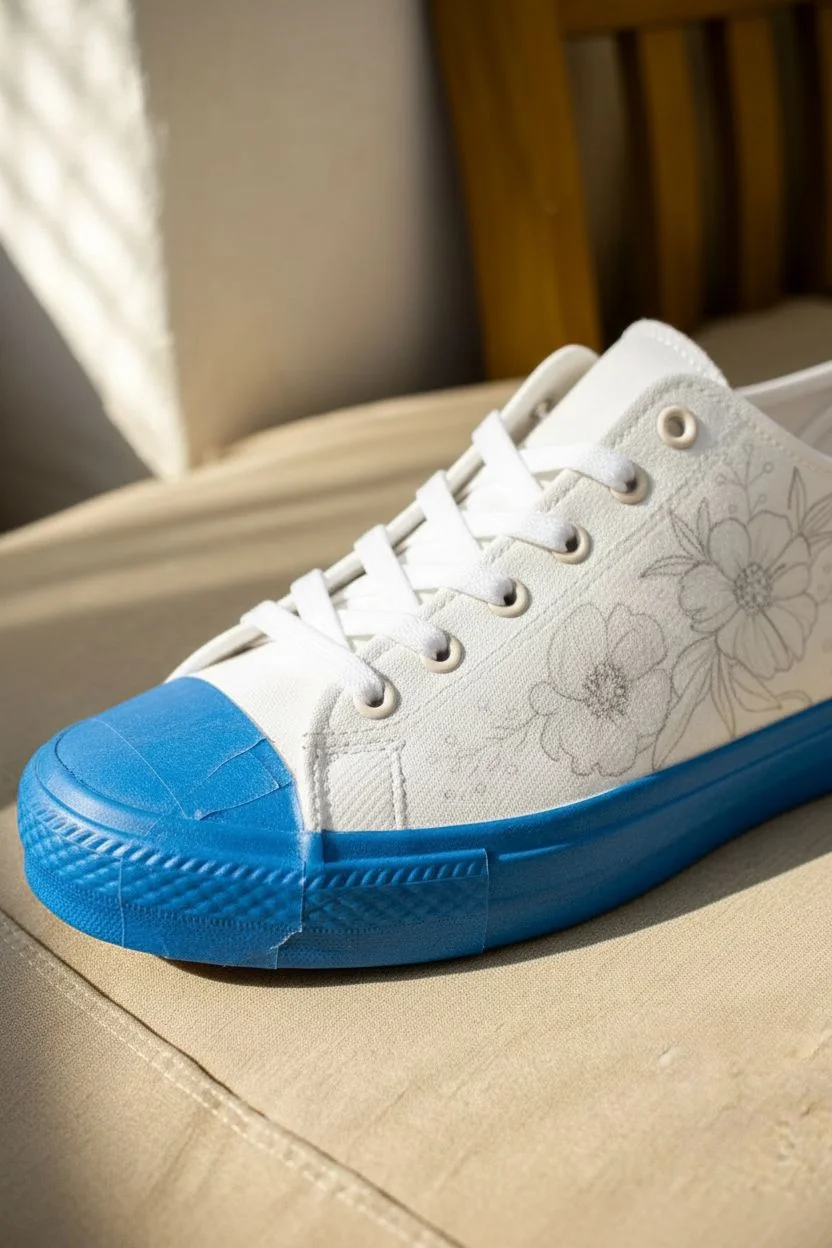
Paint Splatter With a Clean Sole Line
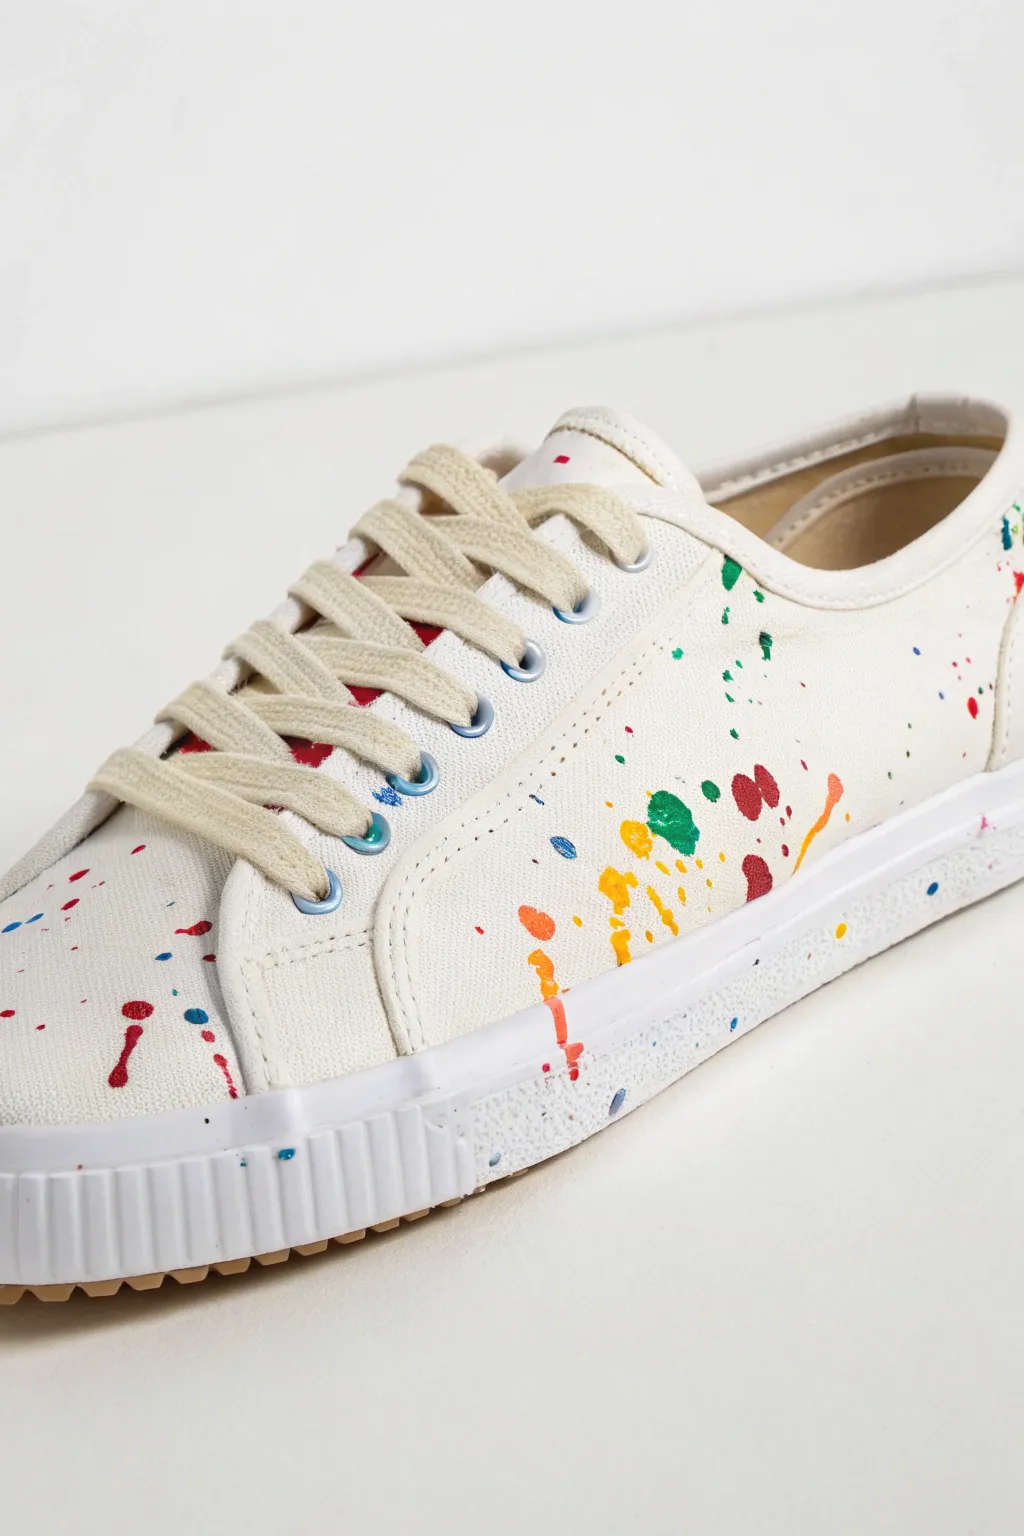
Transform plain white canvas sneakers into a vibrant, artistic statement with this controlled splatter technique. By masking off the key areas, you’ll achieve a professional-looking finish where the chaos of colorful paint stops perfectly at the sole’s edge.
Step-by-Step Guide
Materials
- White canvas sneakers
- Fabric medium
- Acrylic paints (various bright colors)
- Painter’s tape or masking tape (approx. 1 inch width)
- Small plastic cups or palette
- Stiff-bristled paintbrushes or old toothbrushes
- Newspaper or drop cloth
- Plastic bags or paper towels (for stuffing)
- Water
Step 1: Preparation
-
Clean and prep:
Start with clean, dry sneakers. If they are brand new, wipe them down with a slightly damp cloth to remove any factory sizing or dust that might repel paint. -
Remove laces:
Take out the shoelaces completely. This prevents them from getting gummy with paint and allows you to reach the tongue area easily. -
Stuff the shoes:
Stuff the insides of the shoes tightly with balled-up newspaper or plastic bags. This pads out the canvas to make a firm surface and protects the interior lining from accidental drips. -
Protect the sole:
Carefully apply painter’s tape around the entire rubber sidewall of the sole. Press the edge of the tape firmly against where the rubber meets the canvas to ensure a sharp, clean line later. -
Mask eyelets (optional):
If you want the metal eyelets to remain paint-free, place tiny squares of tape over them, though painting over them creates a more rugged look.
Step 2: Mixing and Splattering
-
Prepare the paint mix:
In your small cups, mix acrylic paint with fabric medium according to the bottle’s ratio (usually 1:1 or 2:1). The medium makes the paint flexible so it won’t crack when you walk. -
Adjust consistency:
I like to add just a few drops of water to the mixture to make it slightly runnier. It needs to be fluid enough to fly off the brush, but not so watery that it bleeds instantly into the fabric. -
Set up your workspace:
Lay down a generous amount of newspaper or a drop cloth. This process is messy by design, and paint will fly beyond the shoes. -
Start with the first color:
Dip a stiff brush or toothbrush into your first color. Using your thumb, flick the bristles back to spray the paint onto the canvas. Alternatively, load a brush and tap the handle against a stick for larger droplets. -
Rotate and repeat:
Move the shoe around as you splatter to ensure coverage on the heel, toe box, and tongue. Don’t saturate it; leave plenty of white space. -
Layering colors:
Allow the first color to set for about 5-10 minutes before moving to the next. This prevents the wet dots from mixing into a muddy brown on the canvas. -
Add visual interest:
Vary your technique. Use a toothbrush for fine mist and a loaded paintbrush for big, juicy globs. Try ‘throwing’ the paint from a distance for directional streaks. -
Check the density:
Step back and look at both shoes together. They shouldn’t be identical, but they should look like extended family—balanced in color density and intensity.
Paint Bleeding?
If paint bleeds under the tape, it’s likely too watery or the tape wasn’t pressed down hard enough. Use a razor blade to gently scrape dried paint off the rubber sole.
Step 3: Finishing Touches
-
Initial dry time:
Let the shoes sit undisturbed for at least 24 hours. Acrylic paint needs time to bond properly with the fibers. -
The reveal:
Slowly peel off the painter’s tape from the soles. This is the most satisfying part—revealing that crisp, white rubber edge against the chaotic splatter. -
Clean up edges:
If any paint bled under the tape onto the rubber, dip a cotton swab in rubbing alcohol or acetone and gently wipe it away immediately. -
Heat set:
To make the design permanent and washable, blast the shoes with a hairdryer on high heat for a few minutes, or tumble them in the dryer (inside a pillowcase) if the shoe construction permits. -
Re-lace:
Once fully cured and cooled, lace them back up. You can use the original white laces for contrast or swap them for a color that matches one of your paint splatters.
Level Up: Neon Pop
Use a base coat of glow-in-the-dark medium mixed with neon acrylics. Your splatters will look bright in the day and light up under UV or low light at night.
Enjoy walking in your custom art pieces, knowing there isn’t another pair exactly like them in the world


Bold Geometric Color Blocks With Tape
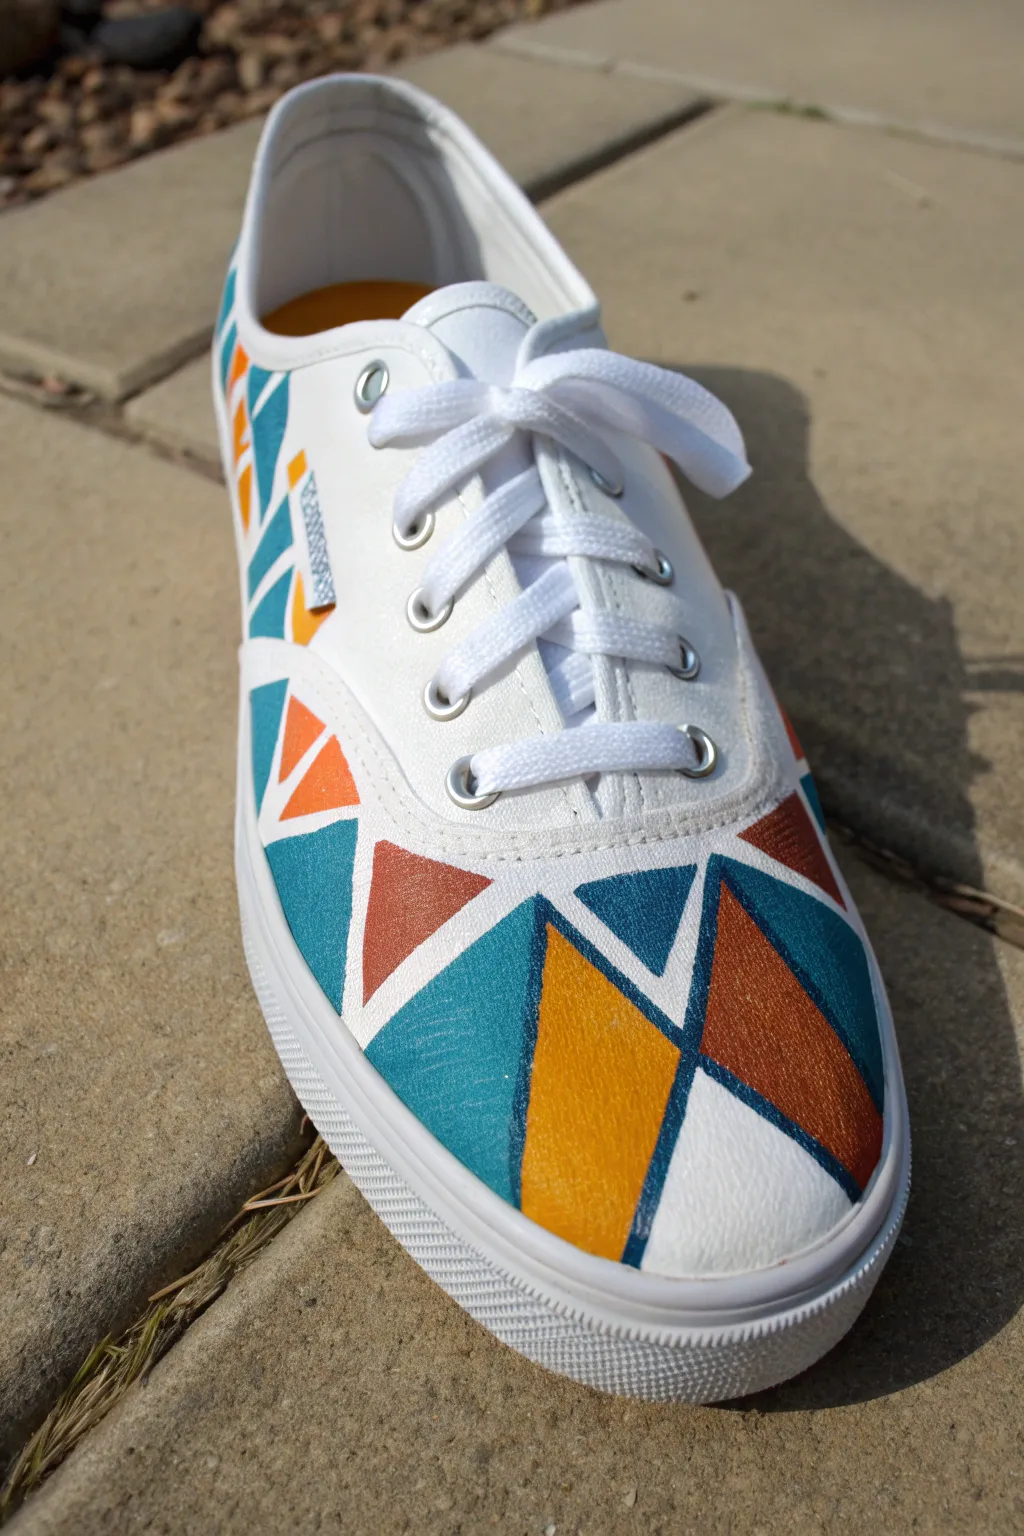
Transform a plain pair of white canvas sneakers into a bold statement piece with this easy-to-follow geometric design. Using clean lines and a vibrant mid-century modern color palette, these shoes feature sharp, interlocking triangles that look professionally crafted but are surprisingly simple to achieve at home.
Step-by-Step Tutorial
Materials
- White canvas sneakers (Vans Authentic style or similar)
- Painter’s tape or masking tape (various widths)
- Acrylic leather paint or fabric paint (Teal, Orange, Rust Brown, Mustard Yellow)
- Fabric painting medium (if using standard acrylics)
- Small flat synthetic brushes
- Small craft knife or scissors
- Waterproofing sealant or finisher (matte or glossy)
- Hair dryer (optional for faster drying)
Step 1: Preparation & Masking
-
Clean surface:
Ensure your canvas shoes are brand new or thoroughly cleaned and dried. Remove the laces completely and set them aside to keep them pristine. -
Stuff the shoe:
Pack the toe box firmly with newspaper, plastic bags, or a shoe tree. This is crucial as it creates a solid, hard surface to press against when you’re applying tape and painting. -
Apply base tape layer:
Cut strips of painter’s tape and lay them across the toe of the shoe in random, crisscrossing directions. Don’t worry about the pattern yet; just aim to create distinct shapes. -
Create triangles:
Overlap your tape strips specifically to form triangles and irregular polygons. The specific white lines visible in the example are created by the tape itself, so the width of your tape determines the thickness of the white borders. -
Refine the edges:
Use a craft knife or sharp scissors to trim excess tape near the rubber midsole. You want the tape to end cleanly where the canvas meets the rubber sole so paint doesn’t bleed downward. -
Seal the tape:
Press down firmly on all tape edges with your fingernail or a spoon handle. I guarantee this extra minute of burnishing makes the difference between crisp lines and fuzzy bleeding.
Crisp Line Secret
Paint a thin layer of white over the tape edges first. This seals the tape, meaning any bleed is white-on-white, leaving your colored layers perfectly sharp.
Step 2: Painting
-
Plan your palette:
Pour small amounts of your teal, orange, rust, and mustard paints onto a palette. If you are using standard acrylics, mix them 1:1 with a fabric medium to prevent cracking later. -
Start with Teal:
Select a random distribution of shapes on the toe box for your first color, teal. Using a small flat brush, paint inside the masked areas, brushing away from the tape edges toward the center of the shape to minimize bleeding. -
Apply Orange accents:
Clean your brush and move on to the bright orange. Fill in shapes adjacent to the teal ones, ensuring you don’t paint two shapes of the same color right next to each other if they touch. -
Add Rust tones:
Paint select sections with the deeper rust-brown color. This darker shade adds depth and grounds the brighter colors. -
Finish with Mustard:
Fill the remaining masked shapes with the mustard yellow paint. Check for any missed spots or uneven coverage across all colors. -
Apply second coat:
Let the first layer dry to the touch (about 15-20 minutes). Apply a second thin coat to all colors to ensure the canvas texture is fully covered and the colors are opaque.
Bleeding Blues?
If paint seeps under the tape, don’t panic. Wait for it to dry fully, then use a white paint pen or a fine brush with white gesso to clean up the borders
Step 3: Revealing & Sealing
-
Remove tape:
Wait until the paint is dry to the touch but not fully cured. Carefully peel off the tape strips at a 45-degree angle. This is the most satisfying part, revealing those perfect white lines. -
Touch ups:
Inspect the lines. If any paint bled under the tape, use a tiny detailed brush and a bit of white paint (or white acrylic marker) to tidy up the edges. -
Full dry:
Allow the shoes to dry completely for at least 24 hours. Don’t rush this step. -
Apply sealant:
Brush on a clear waterproofing finisher or acrylic sealer over the painted areas. This protects your artwork from dirt and water damage. -
Re-lace:
Once the sealant is fully dry, grab those clean white laces you set aside and lace up your new custom kicks.
Step out in style knowing you have a completely unique pair of shoes that are sure to turn heads


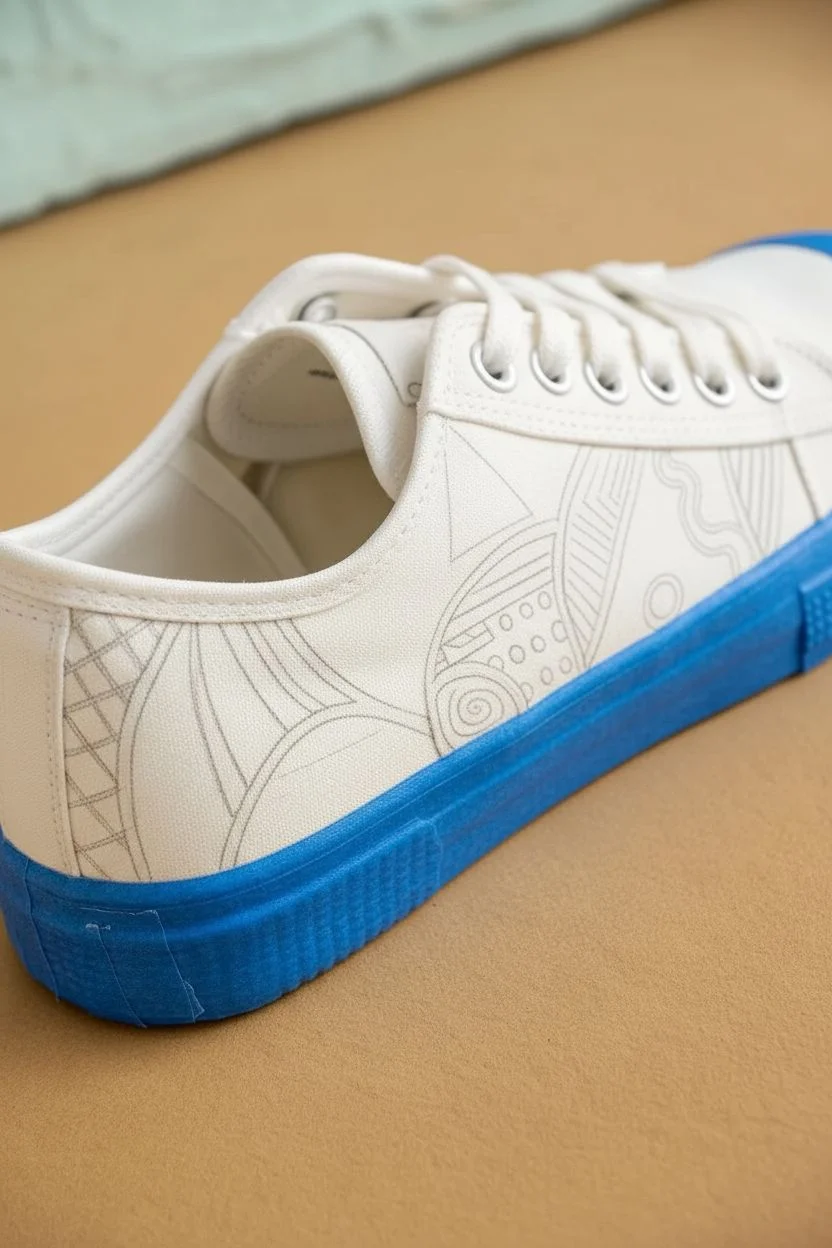
Black-and-White Mandala Line Art
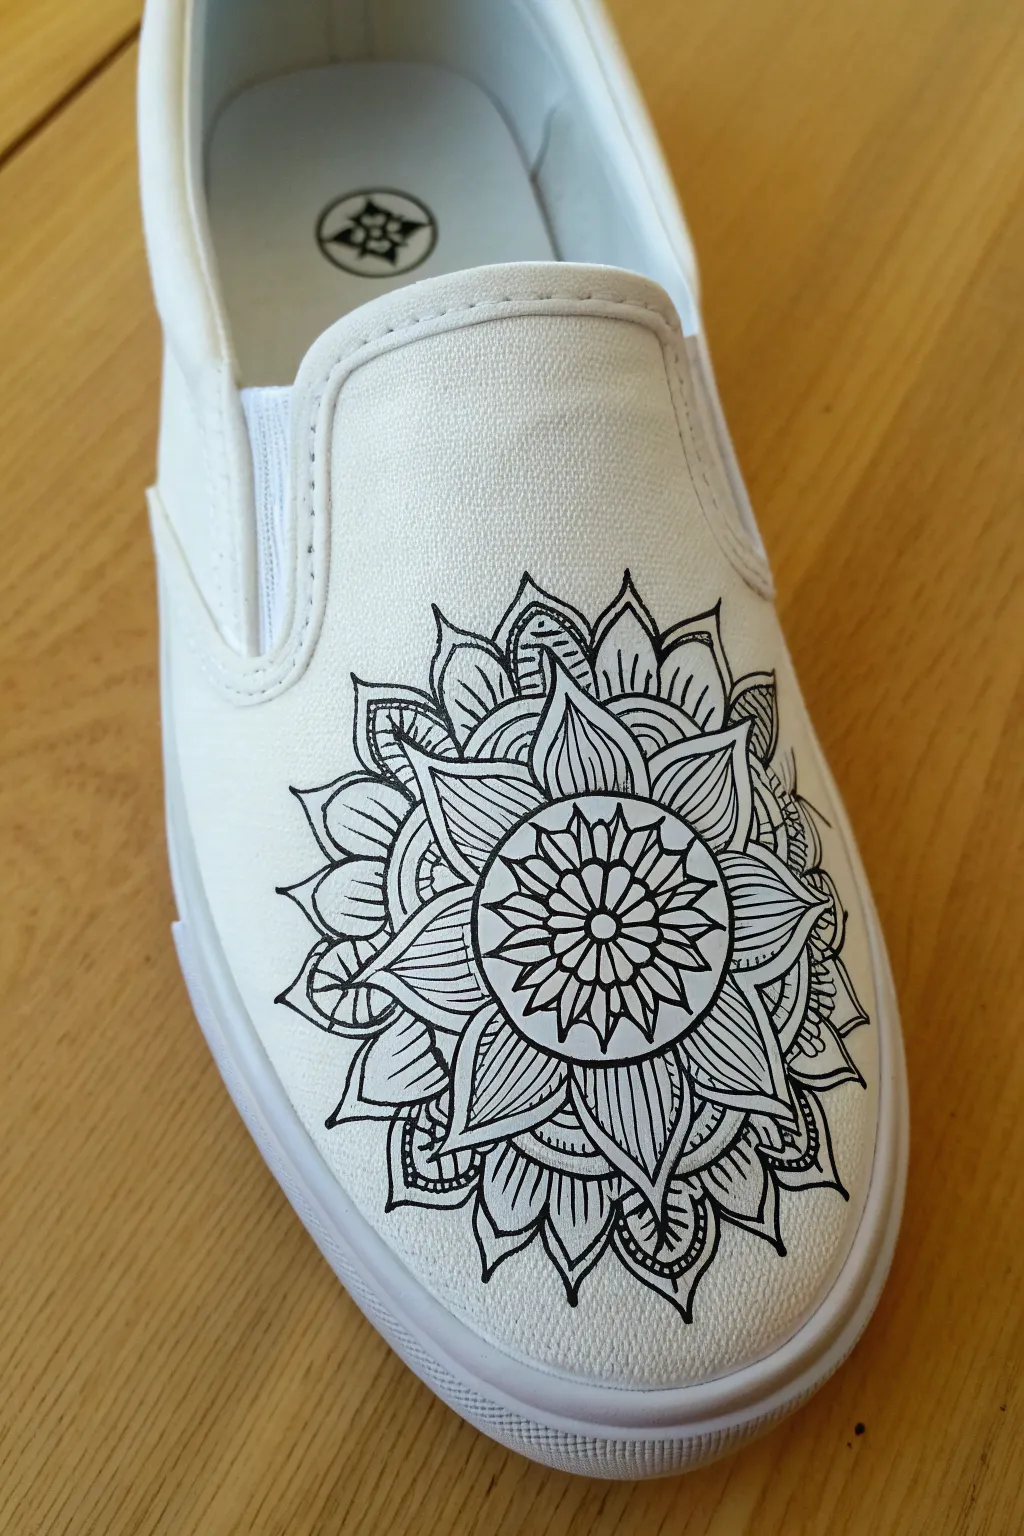

Transform plain white canvas shoes into a bohemian masterpiece with this intricate black-and-white mandala design. The high-contrast line art creates a striking focal point on the toe box, turning simple footwear into wearable art.
Step-by-Step Guide
Materials
- White canvas slip-on shoes (cleaned and dried)
- Fine-point fabric marker or waterproof pigment liner (black)
- Ultra-fine point fabric marker (black, for details)
- Pencil (HB or lighter)
- Eraser (white polymer works best)
- Ruler or flexible measuring tape
- Paper towels or cloth
- Waterproofing fabric spray (optional but recommended)
Step 1: Preparation & Mapping
-
Prepare the canvas:
Ensure your slip-on shoes are completely clean and dry. If they are brand new, you might want to wipe them down with a slightly damp cloth to remove any factory sizing, but let them dry thoroughly before starting. -
Stuff the toe:
Pack the toe box tightly with paper towels or old socks. This provides a firm surface to draw on, preventing the fabric from collapsing under your pen pressure. -
Mark the center point:
Using your pencil, conduct a light visual measurement to find the absolute center of the toe box. Make a tiny dot here; this will be the anchor for your entire radial design. -
Draft the guide circles:
Lightly sketch three concentric circles radiating from your center point. These don’t need to be mathematically perfect, but they will help you keep your petal layers even as you work outward.
Step 2: Drawing the Core Mandala
-
Draw the central flower:
Switch to your fine-point marker. Directly over your center dot, draw a small circle, then add eight small, pointed petals around it to form the flower’s core. -
Add the second petal layer:
Draw a slightly larger set of petals in the gaps between the first set. These should be wider and have a clear outline. -
Establish the first border:
Draw a circle that encloses your current flower. Then, draw a second circle just outside that one to create a thin band. I find this helps separate the center from the expanding complex layers. -
Create the main structural petals:
Sketch large, leaf-like arched petals radiating from the banded circle. Aim for about 8-10 large petals that extend towards your outer guide lines. -
Inner detailing:
Inside each of these large petals, draw a smaller, parallel petal shape. This ‘double-line’ effect adds instant depth to the design. -
Fill the negative space:
Between the large petals, draw small triangular peaks or tiny petals that peek out from behind. This makes the mandala look layered and full.
Steady Hand Trick
Rest your drawing hand’s pinky finger on the rubber sole of the shoe while you sketch. This acts as an anchor, giving you much more control over curves.
Step 3: Adding Complexity & Shading
-
Draw the outer flourish:
Add a final layer of pointed, flame-like shapes around the entire perimeter. Allow these to curve naturally with the shape of the shoe, extending towards the sole and the elastic vents. -
Detail the center core:
Using your ultra-fine marker, draw tiny lines radiating from the center of the very first flower. This hatching technique creates a shadow effect. -
Stripe the middle petals:
Go back to the second layer of petals and draw vertical stripes or veins inside them. Keep the lines close together for a dark, textured look. -
Add petal veins:
For the largest structural petals, draw a single central line in each, then add angled veins branching off it, similar to a leaf. -
Deepen the contrast:
Identify areas where petals overlap. Use your marker to color in the tiny triangular gaps between shapes with solid black ink. This high contrast makes the white linework pop. -
Decorative dots:
Add stippling (tiny dots) along the base of the outer petals to imply shading without using solid blocks of ink.
Color Pop
Once the black ink is dry, use watered-down acrylics or fabric dye markers to add a soft watercolor wash to just the center flower petals.
Step 4: Finishing Touches
-
Erase guidelines:
Wait at least 30 minutes to ensure the ink is totally dry. Gently erase any visible pencil guide circles. Be careful not to scrub too hard on the canvas texture. -
Heat set the ink:
Blast the design with a hair dryer on high heat for a few minutes. This helps set the pigment into the fibers. -
Protect your work:
Apply a light coat of waterproofing fabric spray to the shoes. This will prevent dirt from instantly ruining your crisp white background.
Enjoy walking in your custom art pieces, knowing each step displays a unique design you drew by hand
BRUSH GUIDE
The Right Brush for Every Stroke
From clean lines to bold texture — master brush choice, stroke control, and essential techniques.
Explore the Full Guide
Mini Doodles and Icon Patterns
Transform a plain pair of canvas kicks into a personalized sketchbook with this simple yet striking icon pattern. The monochromatic black ink on cream fabric creates a versatile look that feels both playful and polished.
Step-by-Step
Materials
- Cream or off-white canvas high-top sneakers
- Fine-point permanent fabric marker (black)
- Extra-fine point fabric marker (black) for details
- Pencil (HB or lighter)
- Eraser
- Piece of scrap paper
- Waterproofing shoe spray (optional but recommended)
Step 1: Planning Your Designs
-
Brainstorm icons:
Before touching the shoes, look at the reference image to identify the key motifs: lightning bolts, five-pointed stars, outlined hearts, detailed flowers, snowflakes, and tiny sparkles. -
Practice on paper:
Grab your scrap paper and sketch out these specific tiny icons. Practice drawing them at a very small scale, about half an inch to an inch tall. -
Refine the style:
Notice the specific style in the photo—some hearts have interior patterns like dashed lines, while flowers have distinct stem leaves. Practice these specific details to match the aesthetic.
Step 2: Sketching the Layout
-
Prep the surface:
Remove the shoelaces from the sneakers. This allows you to draw closer to the eyelets without obstruction and gives you a completely flat canvas. -
Stuff the toe:
Stuff the inside of the shoe tightly with an old shirt or rags. This provides a firm surface to push against while you draw, preventing the fabric from buckling. -
Pencil placement:
Using a light hand, sketch the rough placement of your largest icons first using a pencil. I like to start with the flowers and larger hearts to anchor the design. -
Space it out:
Leave generous empty space between your main pencil sketches. The design breathes better if it isn’t too cluttered, and you need room for the smaller filler stars. -
Vary orientation:
As you sketch, rotate the icons slightly. Notice how the lightning bolt is angled and the stems curve in different directions to create movement.
Fixing Bleeds
If ink bleeds into the fabric grain, don’t panic. Turn the mistake into a solid filled shape (like a solid star or heart) or thicken the outline of the doodle intentionally.
Step 3: Inking the Design
-
Outline main shapes:
Take your standard fine-point permanent fabric marker. Begin tracing your pencil lines for the main outlines of the hearts, flowers, and stars. -
Steady hand technique:
Pull the fabric taut with your non-dominant hand as you draw. This prevents the marker tip from snagging on the canvas weave and ensures crisp lines. -
Add floral details:
For the tulips and roses shown in the image, draw the main bloom first, then add the stem and distinct leaf shapes. Keep the lines connected and fluid. -
Detail the hearts:
Using your extra-fine point marker, go back into the hearts. Draw the little dashed lines or “confetti” patterns inside select hearts, just like the reference. -
Inking the stars:
Draw the solid black stars scattered throughout. Fill these in completely with the marker to add visual weight and contrast to the line drawings. -
Create the snowflakes:
Near the toe cap or heel, draw a simple cross, then add diagonal lines through the center. Add tiny hash marks at the ends of each line to create the snowflake effect.
Use a Stencil
For perfectly uniform shapes, cut small stencils out of cardstock for the stars and hearts. Trace the stencil first, then ink it for consistent sizing across the shoe.
Step 4: Finishing Touches
-
Fill the gaps:
Look for any large empty spaces between your main drawings. Add tiny doodles here, like small four-pointed sparkles, mini lightning bolts, or tiny hollow hearts. -
Check near the eyelets:
Extend the pattern right up to the stitching near the lace holes. Don’t be afraid to let a drawing get partially cut off by a seam; it makes the pattern look continuous. -
Erase guidelines:
Once the ink is completely dry (give it at least 20 minutes), gently erase any visible pencil lines. Be careful not to smudge the canvas. -
Protect your work:
In a well-ventilated area, spray the shoes with a fabric waterproofing spray. This prevents your beautiful doodles from bleeding if you get caught in the rain. -
Re-lace:
Once the sealant is dry, lace your sneakers back up. Using crisp white laces keeps the focus on your fresh artwork.
Now you have a totally unique pair of shoes that puts your personal creativity on display with every step
Animal Print Accents on Panels
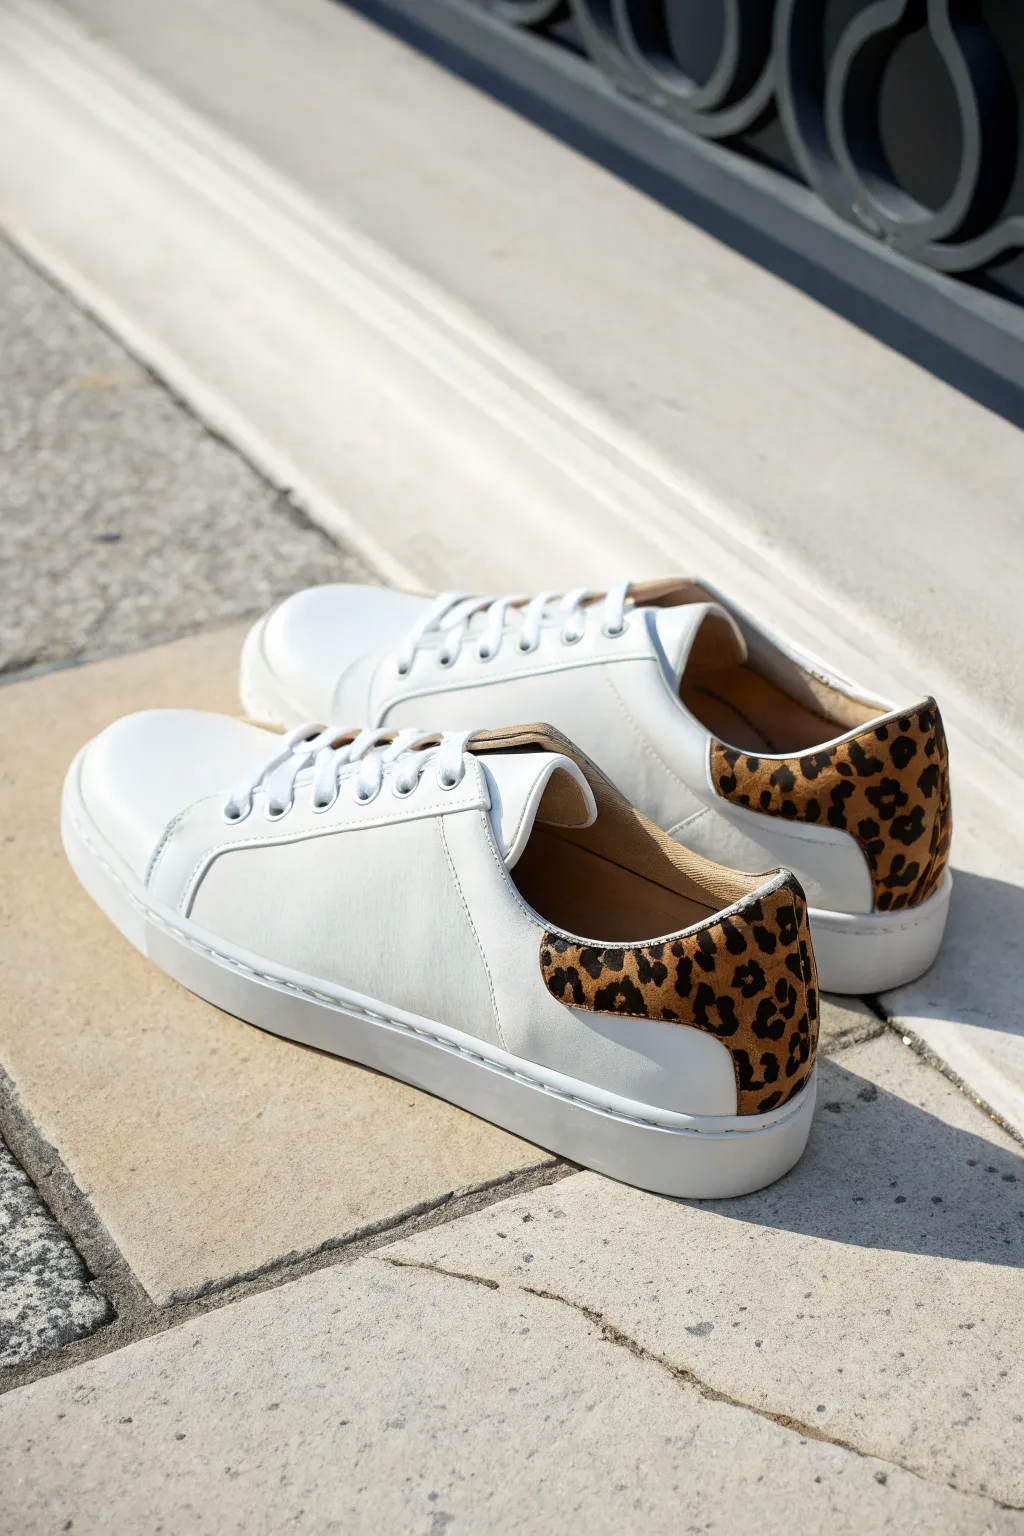
Elevate a pair of basic white trainers into a boutique-worthy statement piece with this custom leopard print heel detail. By focusing the wild pattern solely on the back panels, you create a sophisticated yet playful accent that looks professionally manufactured.
Step-by-Step Tutorial
Materials
- Pair of clean white leather or faux-leather sneakers
- Angelus leather preparer and deglazer (or acetone)
- Cotton pads or rounds
- Painter’s tape or masking tape
- Flat shader brush (size 4 or 6)
- Fine liner brush (size 0 or 00)
- Angelus leather paint: Beige/Tan (base)
- Angelus leather paint: Dark Brown
- Angelus leather paint: Black
- Matte or Satin acrylic finisher
Step 1: Preparation
-
Clean surface:
Begin by thoroughly cleaning the heel panel area of the sneakers. Even brand new shoes have a factory finish that resists paint, so wiping them down is crucial. -
Deglaze the heel:
Apply the leather preparer and deglazer to a cotton pad. Rub the heel tab area firmly to remove the glossy protective coating until the surface feels slightly tacky or matte. -
Tape edges:
Carefully apply painter’s tape around the edges of the heel panel to protect the stitching and the white leather areas you want to keep pristine. Press the tape edges down firmly with your fingernail.
Clean Lines Hack
Before painting your beige base, paint a thin layer of white over the tape edge first. This seals the tape, so any bleeds are white-on-white and invisible.
Step 2: Base Color Application
-
First coat:
Dip your flat shader brush into the beige or tan leather paint. Apply a thin, even layer across the entire taped-off heel area. Don’t worry if it looks streaky at first. -
Dry and repeat:
Allow the first layer to dry for about 15-20 minutes. Apply a second thin coat of beige to ensure solid, opaque coverage without any white showing through. -
Smoothing:
Inspect the surface for any brush strokes. If needed, a third very thin coat can be added for a perfectly smooth canvas.
Step 3: Painting the Leopard Pattern
-
Mixing the mid-tone:
While the base dries completely, prepare your palette. You’ll need the dark brown paint ready for the inner spots of the leopard rosettes. -
Creating spots:
Using a smaller brush, dab irregular, organic shapes of dark brown onto the beige background. Scatter them randomly, leaving plenty of space between them for the black outlines. -
Varying sizes:
Make some spots larger and some barely like dots. I like to keep the shapes wobbly rather than perfect circles to mimic natural fur patterns. -
Outlining preparation:
Let the brown spots dry to the touch before switching to your fine liner brush and black paint. -
Painting rosettes:
Paint black structural lines around the brown spots. Do not circle them completely; instead, paint two or three brackets or ‘C’ shapes around each brown spot. -
Adding variety:
Vary the thickness of your black lines. Press down slightly harder at the start of the stroke and lift off gently to taper the ends. -
Filler spots:
Fill the empty beige spaces between the large rosettes with small, solid black irregular dots or dashes. This density is what makes the print look lush and realistic.
Textured Touch
For a luxe feel, mix a tiny amount of suede additive into your beige base coat. It minimizes brush strokes and gives the heel a soft, velvety texture.
Step 4: Finishing Touches
-
Drying time:
Allow the painted design to cure for at least 24 hours. This ensures the bond between the paint and leather is strong. -
Remove tape:
Carefully peel away the masking tape. Pull it away at a 45-degree angle to ensure a crisp, clean line between the artwork and the white shoe. -
Clean up:
If any paint seeped under the tape, quick cleanup with a toothpick or a Q-tip dipped in a tiny bit of deglazer can fix it immediately. -
Seal the deal:
Apply a thin layer of matte or satin acrylic finisher over the painted heel. This protects your artwork from scuffs, water, and cracking.
Step out in style knowing your custom kicks are completely one of a kind

PENCIL GUIDE
Understanding Pencil Grades from H to B
From first sketch to finished drawing — learn pencil grades, line control, and shading techniques.
Explore the Full Guide
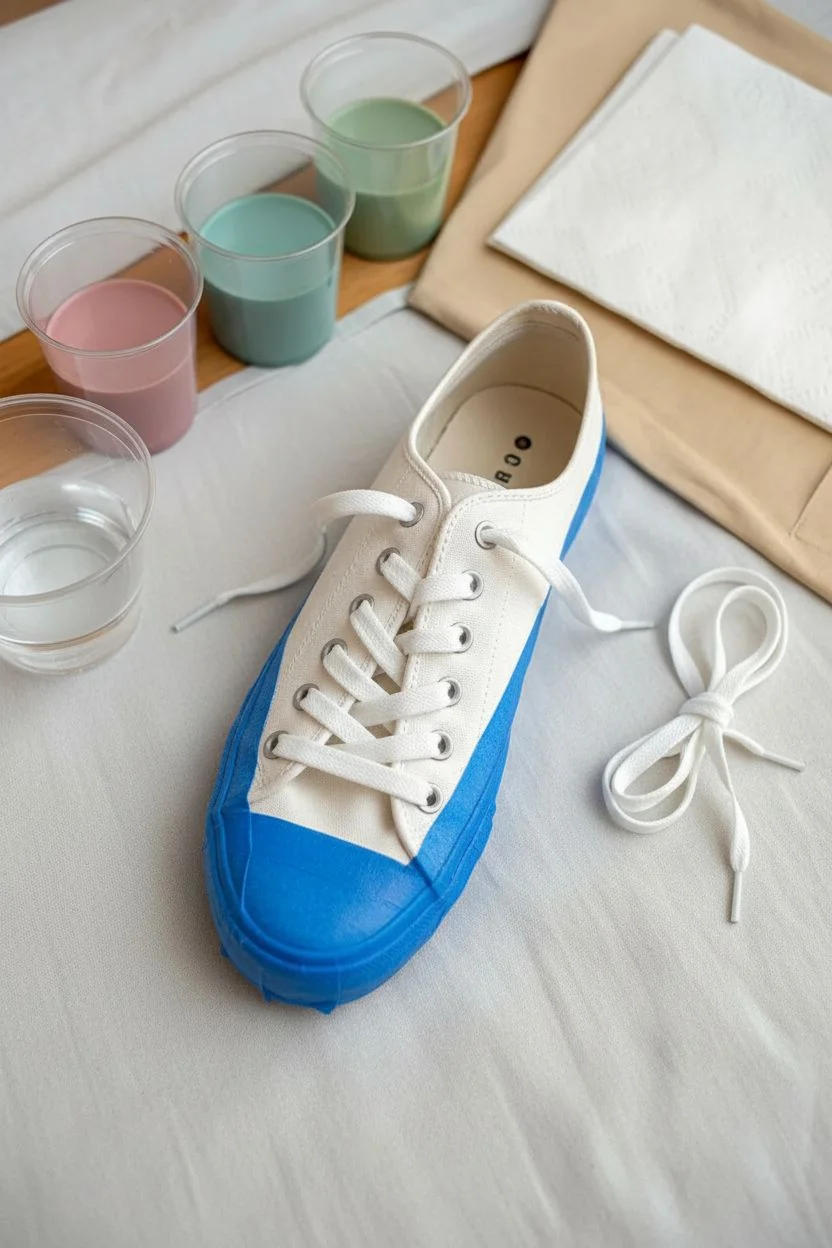
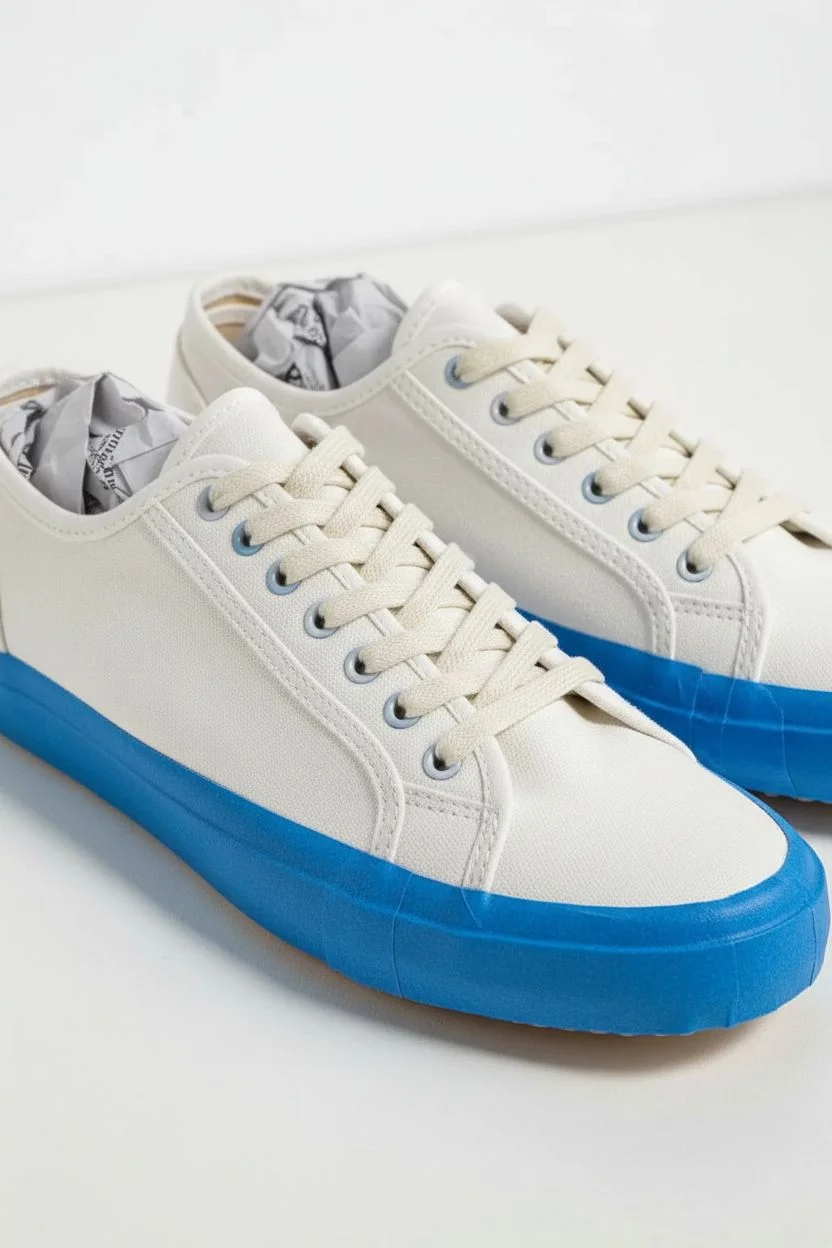
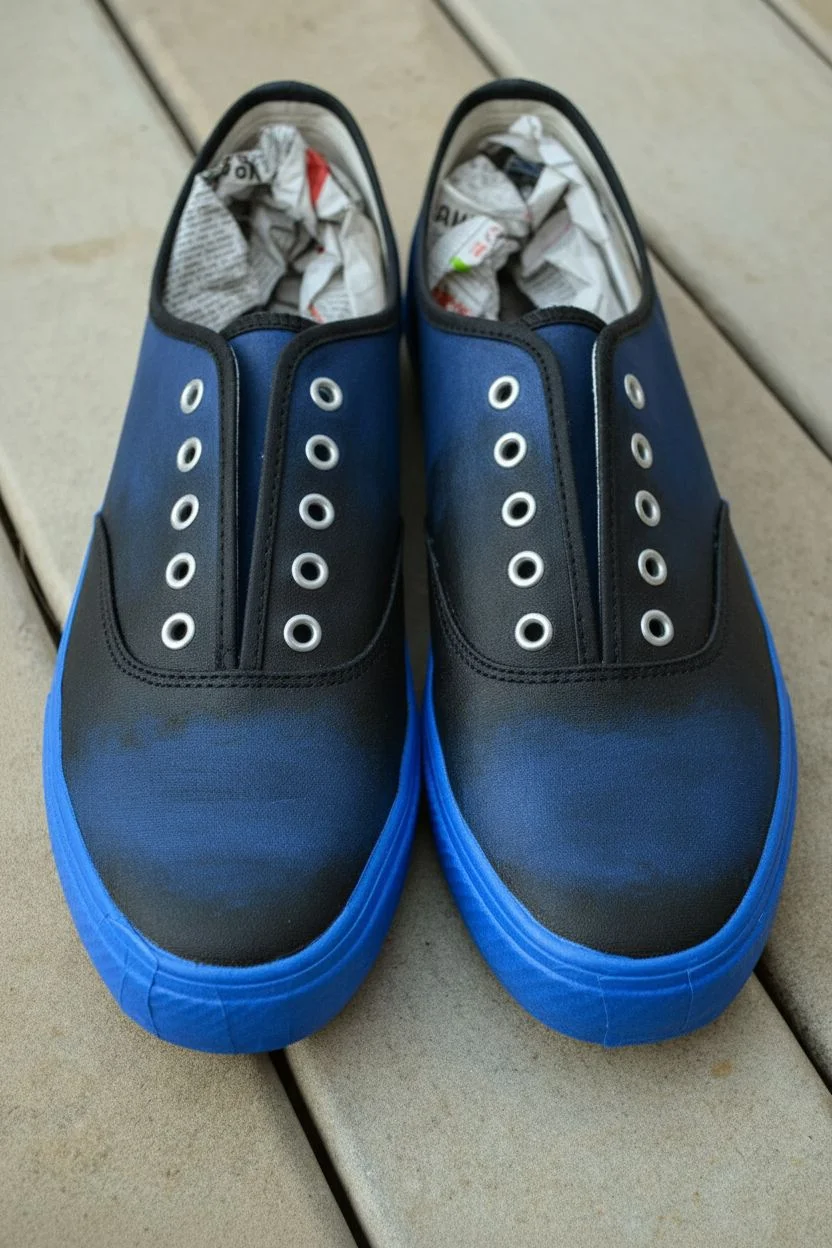
Smooth Ombre Fade From Toe to Heel
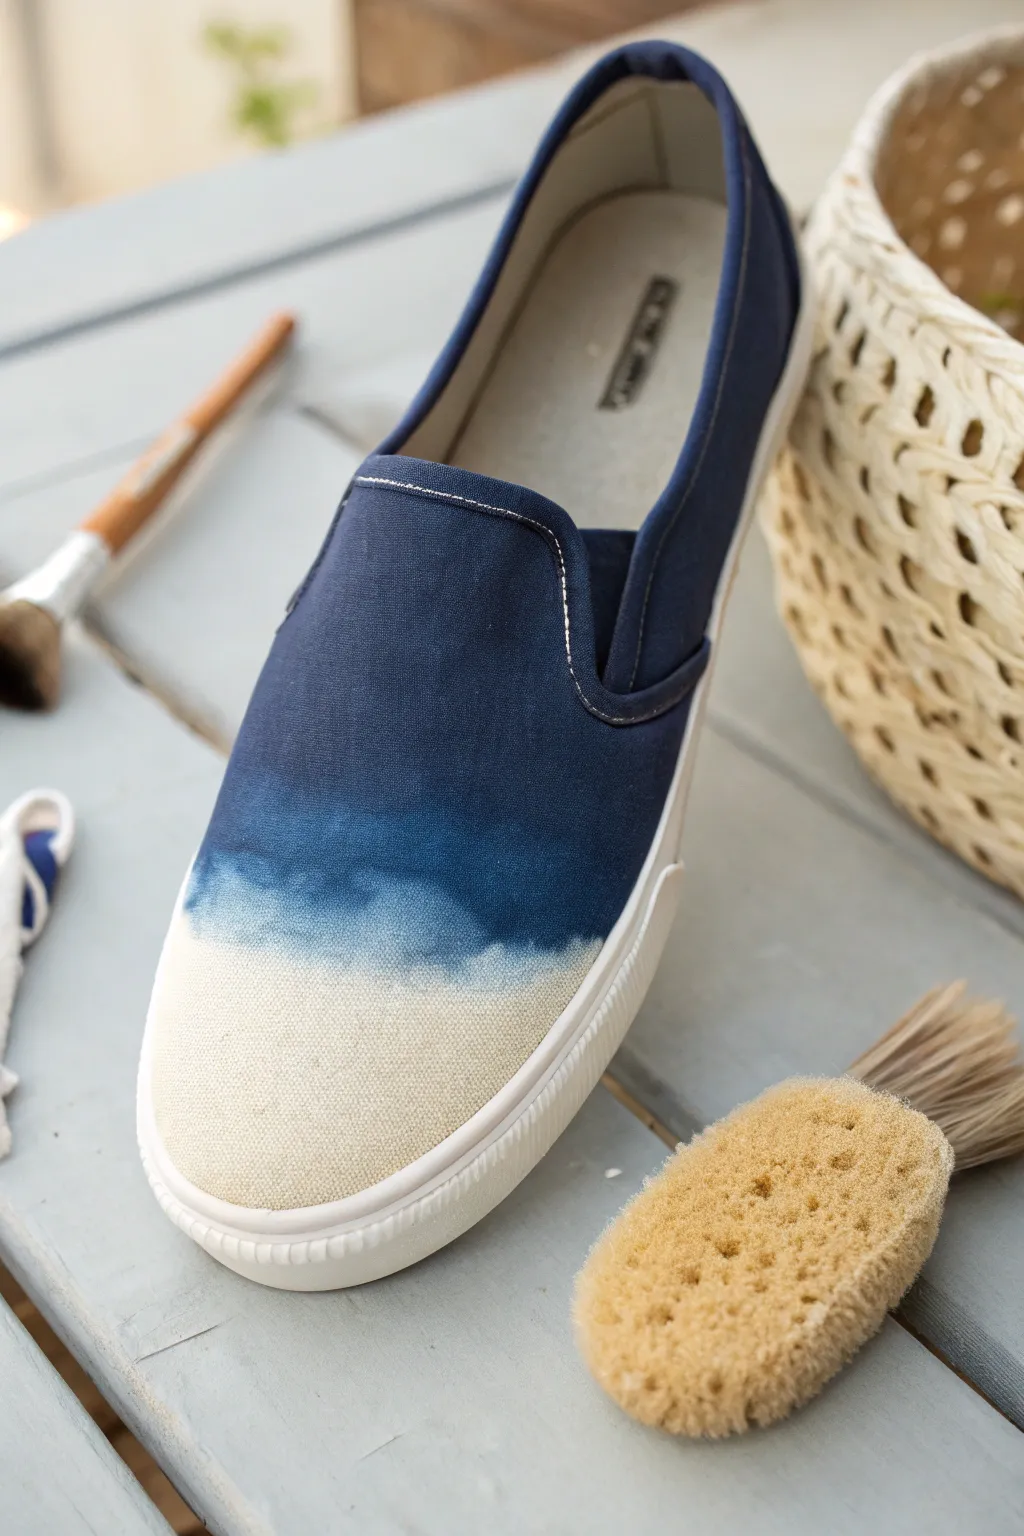
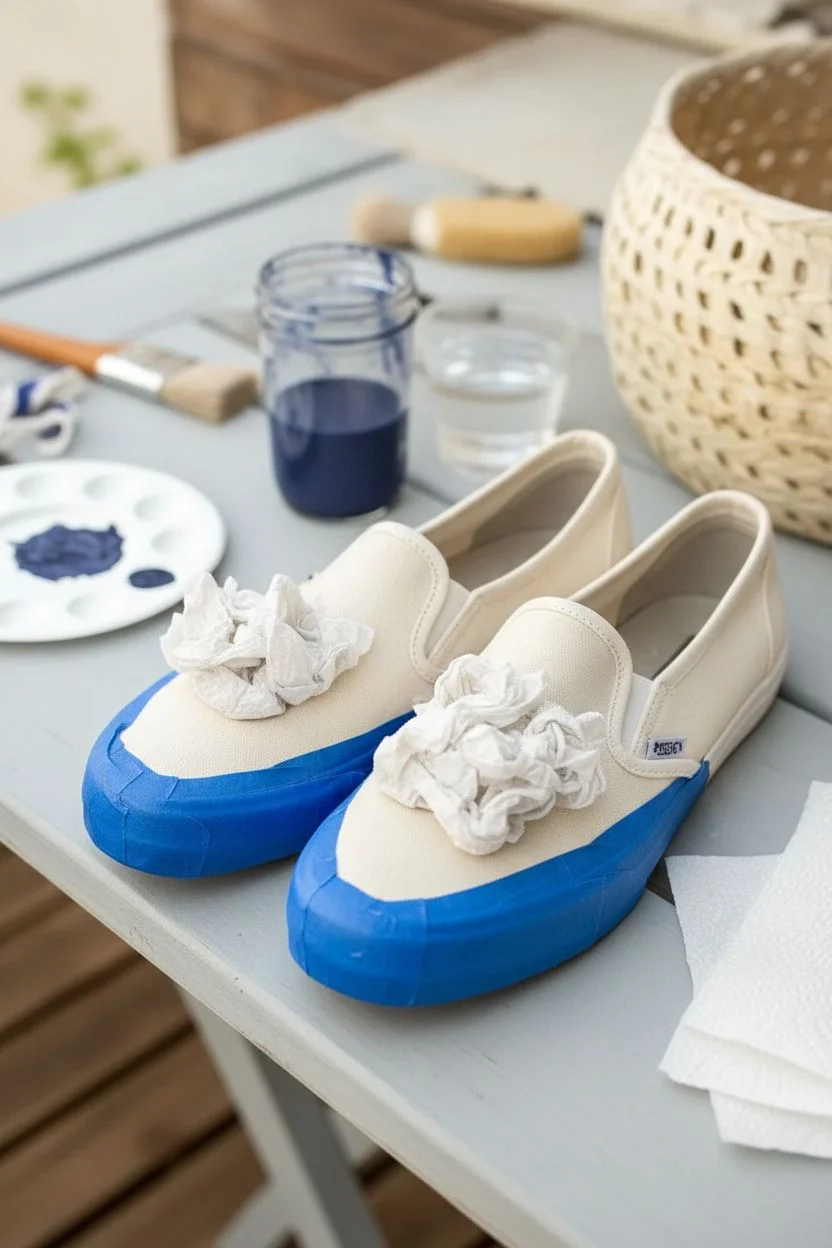
Transform plain canvas shoes into a seaside-inspired accessory with this serene gradient technique. The design features a rich indigo that seamlessly fades into natural canvas, evoking the look of ocean waves crashing onto a sandy beach.
Detailed Instructions
Materials
- Canvas slip-on shoes (white or off-white)
- Fabric medium
- Navy blue fabric paint or acrylic paint
- White fabric paint (optional, for blending)
- Wide flat paintbrush
- Small cup of water
- Natural sea sponge or synthetic sponge
- Painter’s tape or masking tape
- Paper towels
- Palette or paper plate
Step 1: Preparation
-
Clean surface:
Ensure your shoes are brand new or freshly cleaned and completely dry. Any dirt or oil on the canvas will prevent the ombré from blending smoothly. -
Protect the soles:
Carefully apply painter’s tape around the entire rubber sole of both shoes. Press down firmly on the edges to prevent any dye or paint from seeping underneath onto the white rubber. -
Stuff the toes:
Stuff the inside of the shoes tightly with paper towels or newspaper. This provides a firm surface to paint against and prevents wet paint from soaking through to the inner lining. -
Prepare the paint mix:
Mix your navy blue paint with a generous amount of fabric medium according to the bottle’s instructions. This ensures the paint stays flexible on the canvas and doesn’t crack as you walk.
Wet The Canvas First
For the smoothest possible gradient, lightly mist the entire shoe with water before painting. The damp fibers encourage the paint to bleed and blend naturally.
Step 2: Applying the Gradient
-
Paint the heel:
Dip your wide brush into the navy mixture and begin painting at the heel and the top opening of the shoe. Apply a solid, opaque coat here, as this will be the darkest point of your design. -
Extend the color:
Continue painting forward toward the toe, covering about two-thirds of the shoe’s length. Don’t worry about fading just yet; simply get the color onto the fabric. -
Create a wash:
Dip your brush into the water cup to dilute the remaining paint on your bristles. Apply this watered-down version starting where your solid blue ends, moving slightly further toward the toe. -
Begin the blend:
Take a damp sponge and gently dab at the transition line where the dark blue meets the lighter wash. This stippling motion breaks up any hard lines. -
Wet the toe area:
Use a clean, damp brush to moisten the unpainted canvas at the toe. I find that wetting the destination fabric helps the paint travel naturally without leaving harsh stop marks. -
Feather the edge:
Using your sponge or a clean brush, drag small amounts of the blue pigment from the mid-section into the wet toe area. You want this to look like a wispy mist, not a solid color. -
Refining the fade:
If the transition looks too abrupt, mix a tiny drop of white paint with water. Glaze this over the transition area to milk out the blue and create a frostier, softer look. -
Check the symmetry:
Place the shoes side-by-side to ensure the fade starts and ends at roughly the same point on both feet. Adjust with a bit more watered-down paint if necessary.
Add Texture
Sprinkle coarse salt over the wet transition area while the paint is drying. Brush it off later to create a mottled, foamy sea-spray texture.
Step 3: Finishing Touches
-
Remove tape:
Carefully peel off the painter’s tape while the paint is still slightly tacky. If you wait until it’s bone dry, you risk peeling up jagged chunks of paint with the tape. -
Clean up edges:
If any paint bled onto the rubber sole despite your taping, wipe it away immediately with a damp rag or a cotton swab dipped in rubbing alcohol. -
Air cure:
Let the shoes sit in a well-ventilated area for at least 24 hours. Avoid direct sunlight, which can sometimes bleach the color unevenly while it’s wet. -
Heat set:
Once fully dry, use a hair dryer on the hottest setting for a few minutes over the painted areas. This helps bond the fabric medium and paint permanently to the fibers.
Wear your new custom kicks with pride knowing you have a totally unique piece of wearable art
Galaxy Night Sky With Star Details
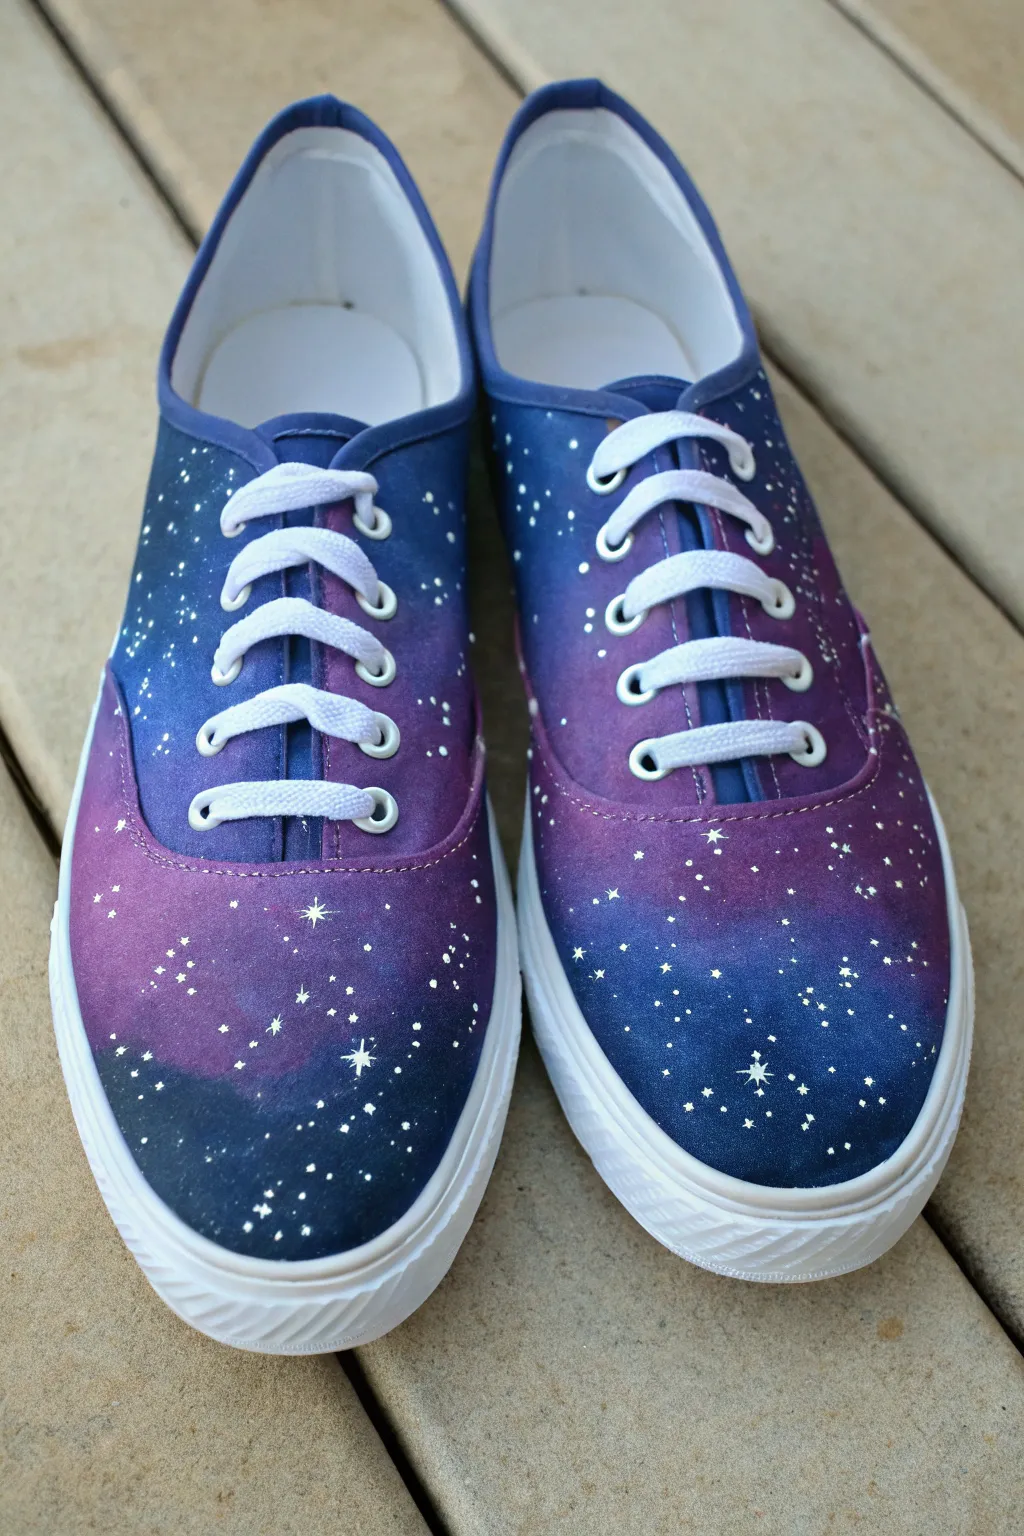
Transform ordinary white sneakers into a stunning wearable nebula with this galaxy print tutorial. Using blurred gradients of deep space purple and midnight blue, punctuated by delicate white stars, you’ll create shoes that are truly out of this world.
Step-by-Step Guide
Materials
- White canvas sneakers (Vans or similar style)
- Acrylic fabric paint (Navy Blue, Deep Purple, Violet, Black, Titanium White)
- Fabric medium (optional, if using regular acrylics)
- Small painting sponges or makeup sponge wedges
- Small bristle brush (for spattering)
- Fine-point detail brush (for large stars)
- Painter’s tape or masking tape
- Paper towels
- Water cup
- Newspaper or drop cloth
Step 1: Preparation and Base Layer
-
Prep the canvas:
Remove the shoelaces completely from both shoes. Stuff the insides of the shoes with newspaper or plastic bags to keep the fabric taut and prevent paint from bleeding through to the inside lining. -
Protect the soles:
Carefully apply painter’s tape around the rubber soles of the shoes. Press the edges down firmly to ensure a clean line where the canvas meets the rubber; this saves a lot of cleanup time later. -
Start with the darkest blues:
Squeeze some navy blue and black paint onto your palette. Using a slightly damp sponge, dab the navy blue onto large sections of the shoe, focusing on the toe box and the heel area first. -
Add depth with black:
While the blue is still tacky, lightly dab black paint into the corners and edges of the blue sections. Blur them together with the sponge to create a deep, midnight sky effect.
Step 2: Creating the Galaxy Gradient
-
Introduce the purple:
Take a fresh sponge wedge and load it with deep purple paint. Dab this color right next to and slightly overlapping the navy blue areas on the toe and sides. -
Blend the transition:
To get that seamless nebula look, use a clean side of your sponge to tap gently where the blue and purple meet. You want a soft gradient, not a harsh distinct line. -
Add lighter highlights:
Mix a little white into your violet or purple paint to create a lighter shade. sponge this sparingly into the center of the purple patches to make the galaxy look like it’s glowing from within. -
Fill the gaps:
Continue working around the shoe, alternating between blue and purple patches. Make sure every bit of the original white canvas is covered. I find it helpful to look at the shoes from a distance to ensure the color balance feels right. -
Refine the tongue:
Don’t forget the tongue of the shoe! Pull it forward and verify that you paint down the sides, blending your galaxy colors so no white shows when the shoes are laced up. -
Let it dry:
Allow the base coat to dry completely. Since you used thin sponge layers, this should take about 20-30 minutes.
Sponge Success
Don’t wipe or drag the sponge across the fabric. Use a strict up-and-down dabbing motion. This pushes the paint into the heavy canvas weave for better coverage.
Step 3: Painting the Stars
-
Prepare the star paint:
Dilute a small amount of white acrylic paint with a few drops of water. The consistency should be like thin ink or heavy cream so it splatters easily. -
Create the distant stars:
Dip a stiff bristle brush or an old toothbrush into the thinned white paint. Using your index finger, flick the bristles to spray a fine mist of white dots across the shoes. Test on paper first to control the spray. -
Vary the density:
Aim for variety—concentrate more splatter in the lighter purple ‘nebula’ areas and keep the darker black/blue areas a bit sparser for realistic depth. -
Paint larger stars:
Using a very fine detail brush and undiluted white paint, hand-paint specific larger stars. Just a simple dot is enough for medium stars. -
Add the hero stars:
Choose 3-5 spots on each shoe (like the toe box) to paint a ‘cross’ shape star. Paint a vertical line and a horizontal line crossing it, tapering the ends to sharp points for that classic twinkle effect. -
Final touches:
Once the paint is fully dry (wait at least 24 hours), peel off the masking tape. -
Re-lace:
Lace the bright white shoelaces back into the shoes. The contrast between the fresh white laces and the deep galaxy colors makes the design pop.
Too Much Paint?
If you accidentally create a blob while splattering stars, don’t panic. Let it dry completely, paint over it with a dark blue or purple patch, and try again.
Step into your new cosmic shoes and enjoy walking on starlight


Monochrome Sketch-Style Illustrations
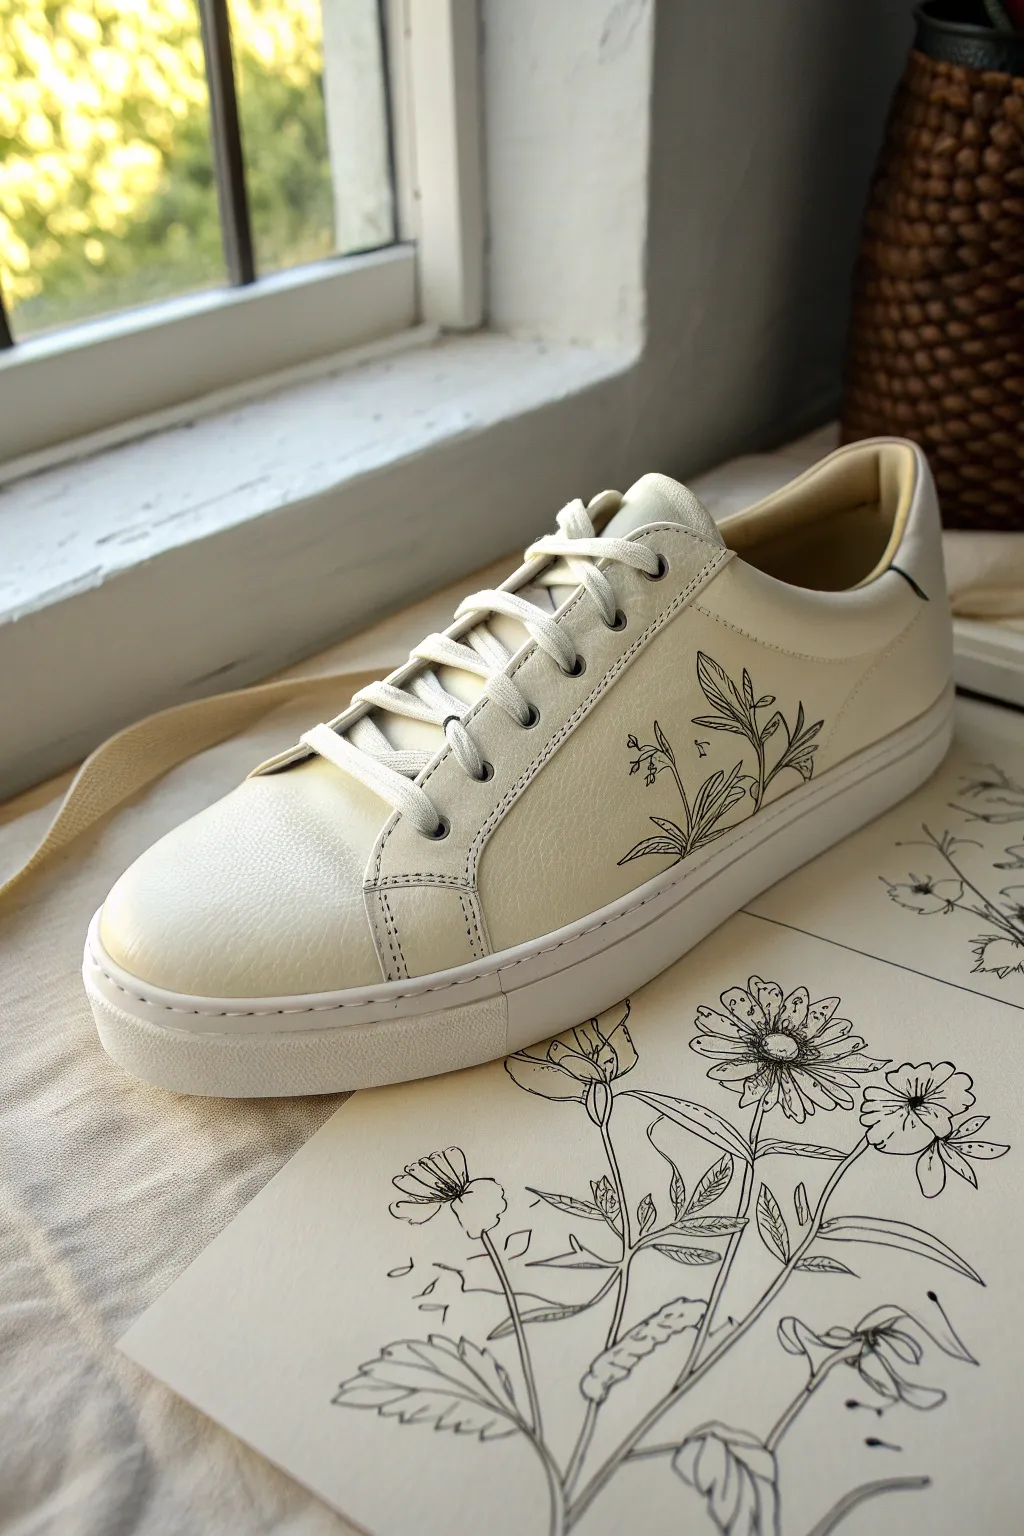
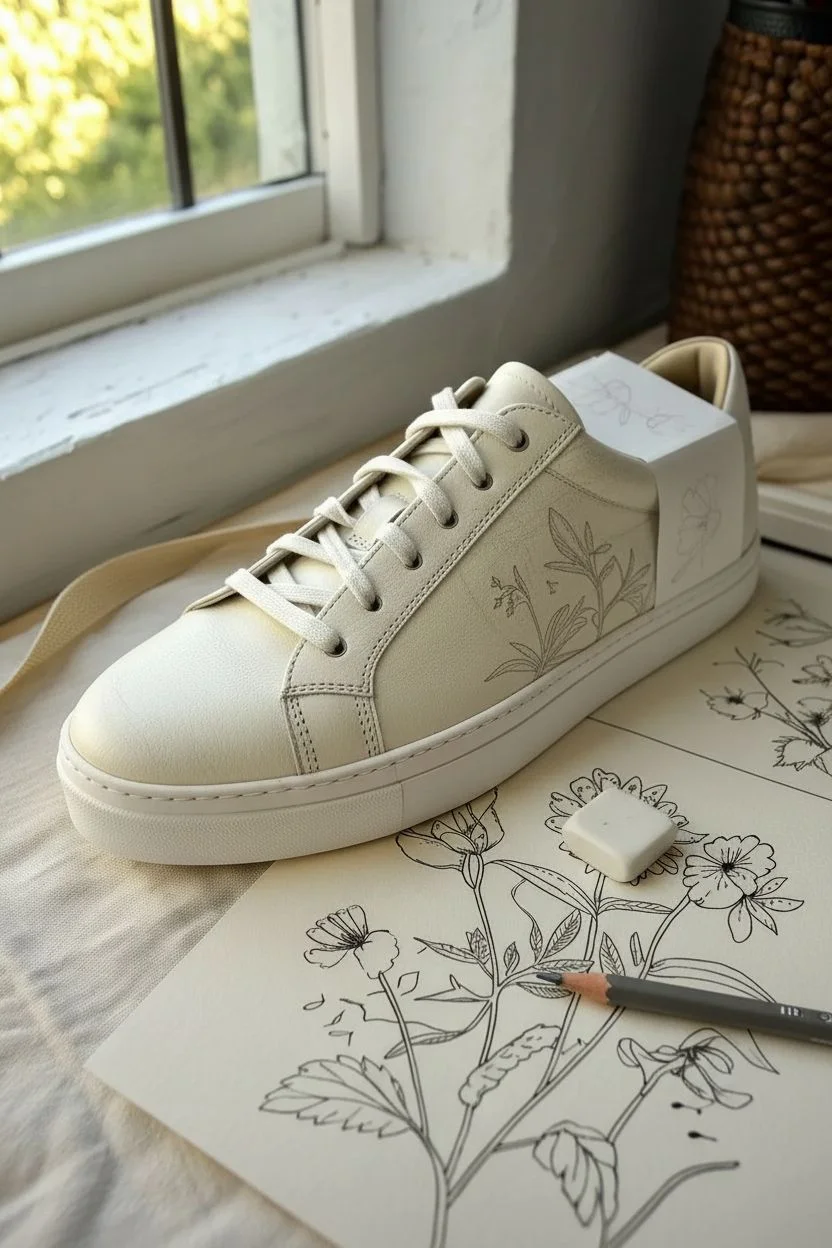
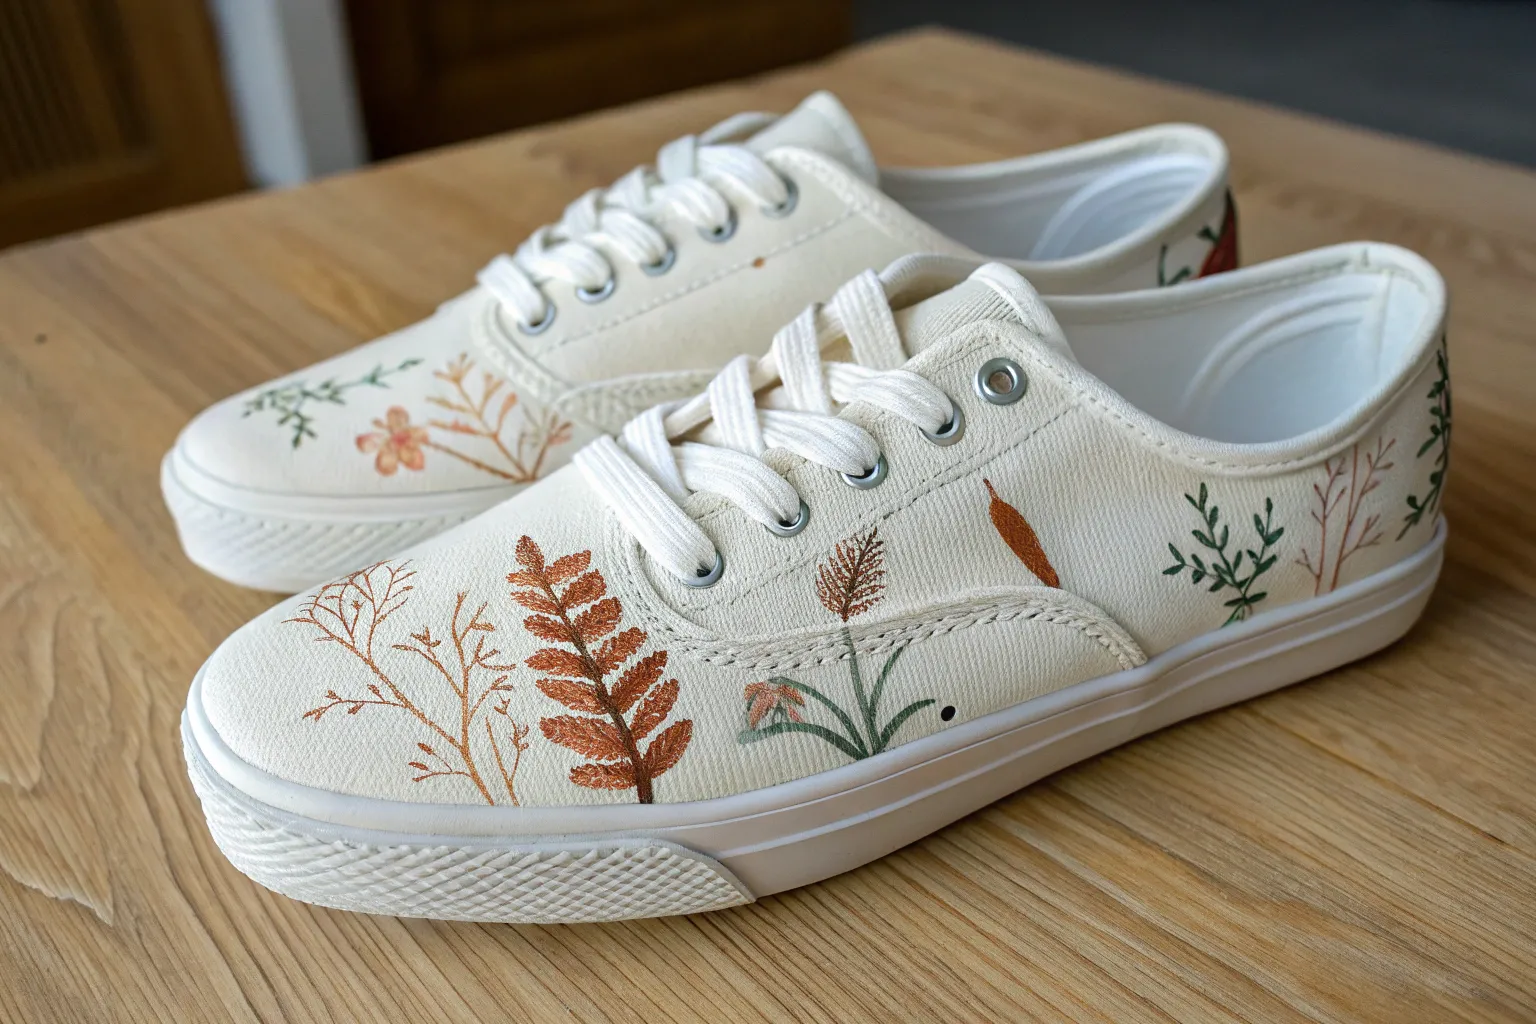
Transform a plain pair of cream leather sneakers into a wearable sketchbook with this elegant, monochrome customization. Using fine-line techniques, you’ll replicate the look of a vintage botanical drawing directly onto the shoe’s surface for a subtle yet artistic statement.
Step-by-Step Tutorial
Materials
- Cream or off-white leather sneakers (clean and dry)
- Black Angelus leather paint or high-quality waterproof ink (e.g., Copic marker refill)
- Fine liner brush (size 000 or 0000) or extra-fine tip paint marker designed for leather
- Pencil (HB or lighter)
- Tracing paper
- Painter’s tape or masking tape
- Leather preparer and degalazer (or acetone)
- Cotton rounds or balls
- Acrylic finisher (matte)
- Small mixing palette
Step 1: Preparation & Drafting
-
Clean the surface:
Before anything touches the shoe, remove the factory finish. Apply a small amount of leather preparer and degalazer to a cotton round and gently rub the area where you plan to draw. This ensures the ink bonds permanently rather than sitting on top of the wax coating. -
Select your botanicals:
Sketch a few loose botanical ideas on a separate piece of paper first. For this project, a leafy stem with small buds works perfectly because it follows the natural curve of the shoe’s side panel. -
Create a guide:
Draw your final design onto a small piece of tracing paper that fits the side of the shoe. Flip the tracing paper over and retrace your lines heavily with a soft pencil on the back. -
Transfer the design:
Tape the tracing paper onto the shoe, pencil-side down. Firmly trace over your original drawing lines with a hard pencil or stylus to transfer a faint graphite guide onto the leather. -
Lighten the guidelines:
If the transferred pencil lines are too dark or smudge-prone, lightly dab them with a kneadable eraser until they are just barely visible guideposts.
Uneven Lines?
If your brush lines are getting thick or shaky, the paint might be too thick. Thin it with a drop of water or flow improver to get that ink-like consistency.
Step 2: Inking the Outline
-
Prepare your tool:
Load your fine liner brush (0000) with a small amount of black leather paint. If you are using a paint marker, pump the tip on a scrap piece of paper to ensure the flow is consistent but not blobbing. -
Start with the main stem:
Begin at the bottom of the design near the sole. Use a steady hand to pull the brush upward, creating the primary stem that curves slightly toward the heel. -
Add primary leaves:
Draw the outlines of the larger leaves branching off the main stem. Keep your lines very thin and crisp; the beauty of this style relies on delicate linework rather than heavy strokes. -
Draw the connecting branches:
Add the thinner, secondary stems that connect the smaller leaves and buds to the main stalk. These lines should taper off naturally as they extend outward. -
Detail the buds:
Sketch the small, unbloomed flower buds at the tips of the stems. Use tiny, broken lines or dots to give them a slightly texture appearance without filling them in solid.
Level Up: Vintage Aging
Mix a tiny drop of brown paint into your matte finisher and glaze over the drawing for an ‘aged paper’ look.
Step 3: Shading & Refining
-
Hatching technique:
Instead of painting solid shadows, use hatching (parallel lines). Add tiny, closely spaced lines at the base of the leaves where they meet the stem to create depth. -
Veining the leaves:
Draw a central vein down each leaf. From there, add very light, swift strokes for the secondary veins. I like to lift my brush at the end of these strokes so they fade out naturally. -
Deepen contrast:
Look for areas where stems overlap or leaves tuck behind one another. Add a touch more black ink in these crevices to separate the elements visually. -
Check balance:
Step back and look at the shoe from a distance. If the design feels too sparse in any area, add a few tiny floating leaves or distinct pollen dots to balance the composition. -
Clean up errors:
If you made any small slips, dip a toothpick in water (if the paint is wet) or a tiny bit of acetone (if dry) to carefully scrape or dissolve the mistake away.
Step 4: Finishing Touches
-
Let it cure:
Allow the paint to dry completely. While it might feel dry to the touch in minutes, give it at least 24 hours to fully cure before sealing. -
Apply the sealer:
Dip a soft, flat brush into matte acrylic finisher. Apply a thin, even coat over the entire drawing and the surrounding leather area. -
Feather the edges:
While the finisher is wet, feather the edges outward so you don’t end up with a visible rectangle of clear coat around your artwork. -
Final dry:
Let the sealer dry for another few hours before wearing the shoes. This protects your delicate linework from scuffs and moisture.
Lace up your new custom kicks and enjoy walking in your own personal art gallery.
Wrap-Around Vines Using Seams as Borders
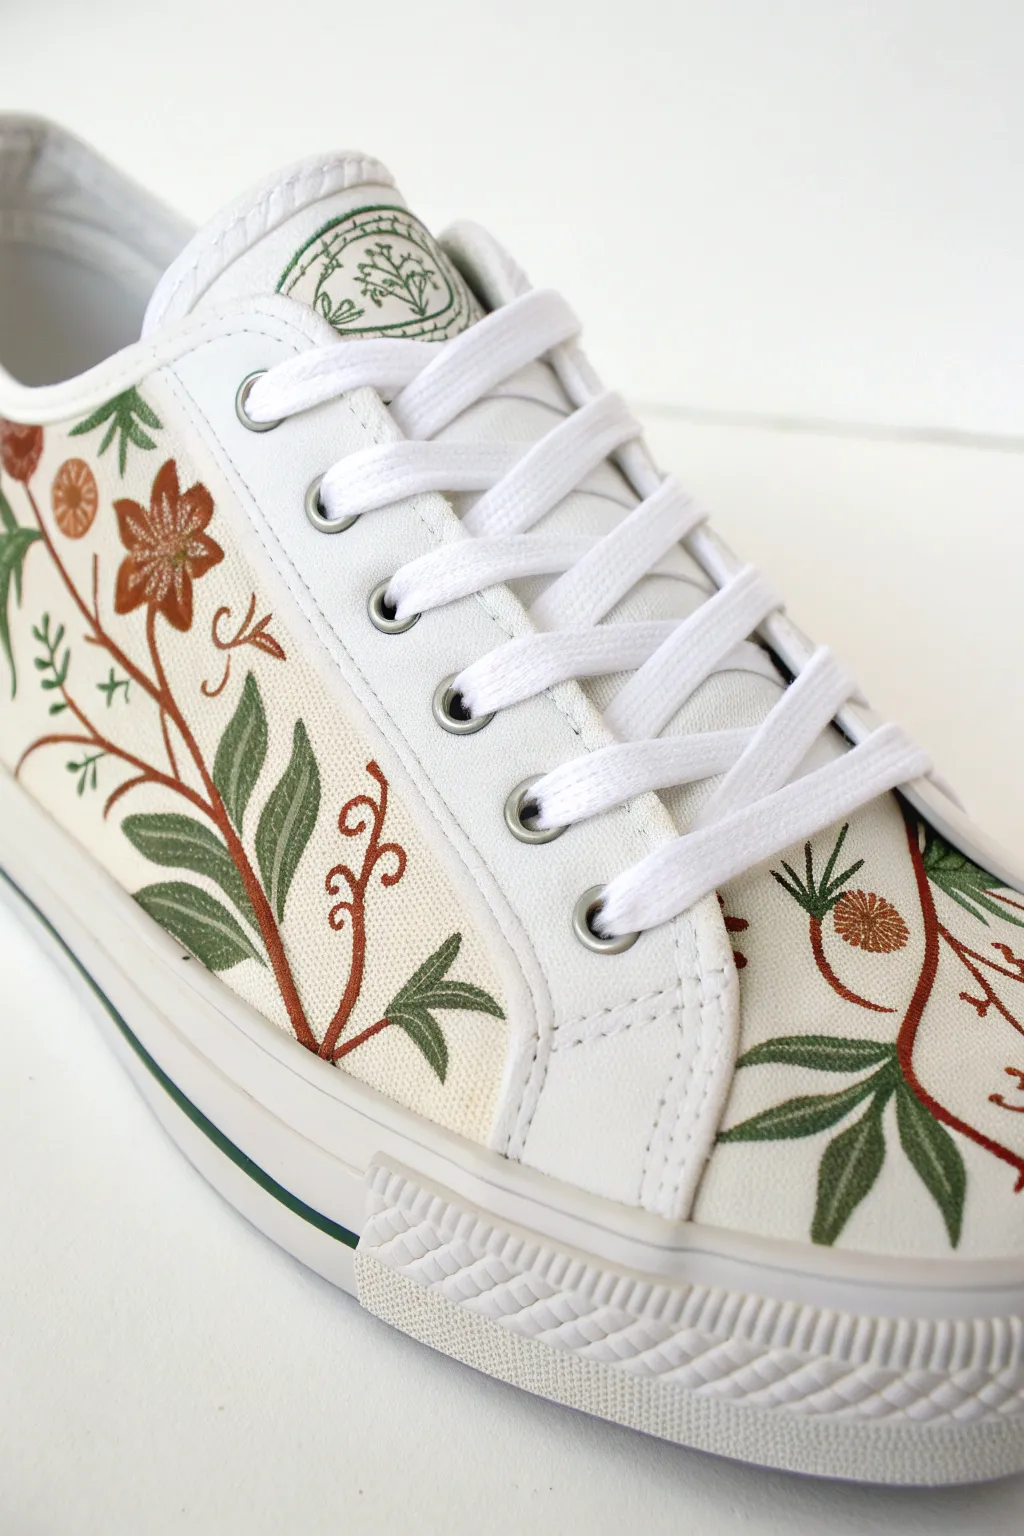
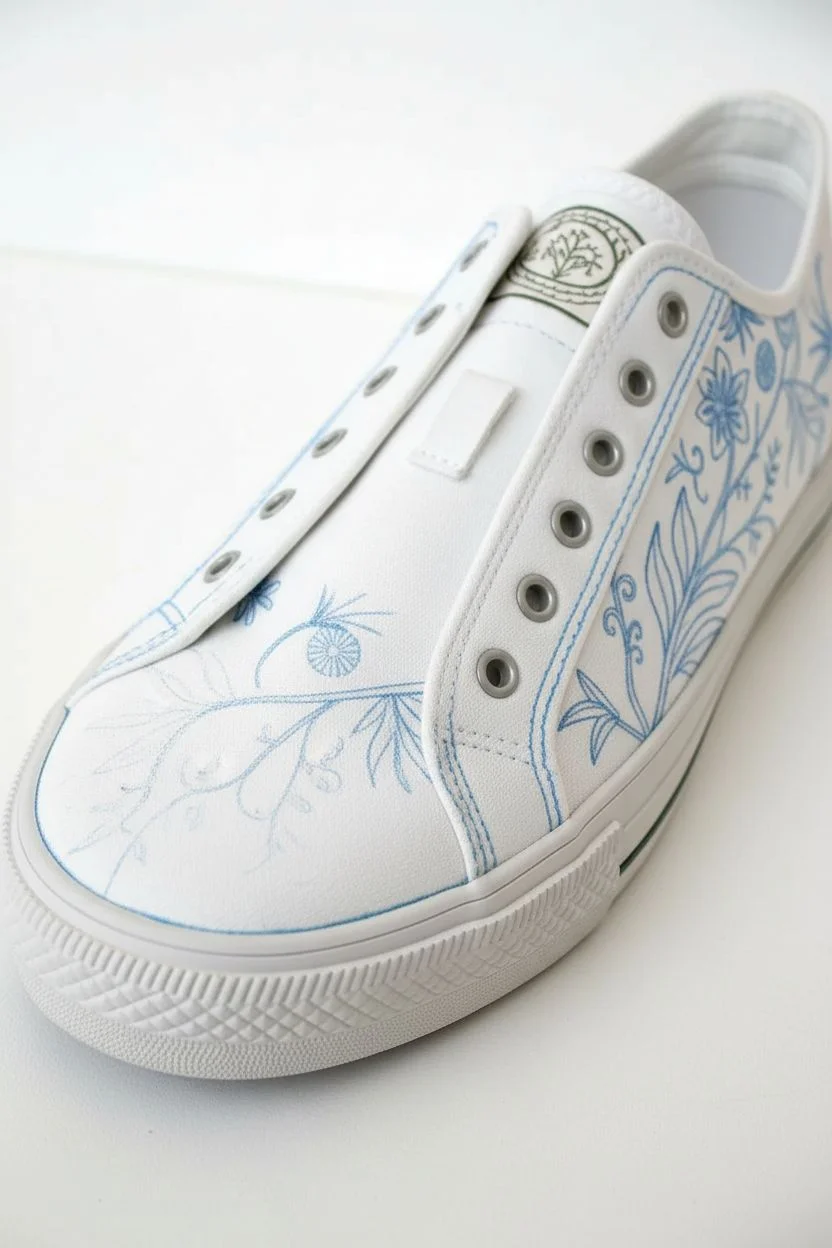
Transform a plain pair of white canvas sneakers into a botanical masterpiece with this detailed embroidery project. The design uses the shoe’s existing seams as natural borders, filling the panels with organic, flowing vines and delicate rust-colored blooms.
Step-by-Step
Materials
- White canvas sneakers (low-top style)
- Embroidery floss (Dark Moss Green, Sage Green, Rust/Terracotta, Cream)
- Embroidery needles (sizes 5-9)
- Water-soluble fabric marker or transfer pen
- Small embroidery hoop (optional, but tricky on shoes)
- Thimble
- Small sharp scissors
- Needle threader
Step 1: Preparation & Sketching
-
Prepare the shoes:
Remove the laces entirely from the sneakers to give yourself clear access to the tongue and side panels. Stuff the toe box tightly with clean rags or paper towels to create a firm surface to work against. -
Map the boundaries:
Using your water-soluble marker, lightly trace just inside the stitching lines of the side panels. These are your ‘do not cross’ lines, ensuring the vines look like they are growing within the structure of the shoe. -
Sketch the main stems:
Draw the primary vine stems first. Start from the bottom near the sole and draw a winding line that curves upward toward the eyelets. Repeat this on the front toe panel if desired. Keep the lines flowy and organic. -
Add leaves and florals:
Along your stem lines, sketch in leaf placements. Alternate large leaves with smaller sprigs. Add circular markers where you want your rust-colored flowers to be, placing them at the ends of smaller branching stems.
Step 2: Stitching the Vines
-
Outline the stems:
Thread your needle with 3 strands of the Dark Moss Green floss. Use a stem stitch or a backstitch to go over your main vine lines. Keep your stitches small (about 3mm) to navigate the curves smoothly without jagged edges. -
Stitch the leaf outlines:
Using the same dark green, stitch the central vein of each leaf and the outer perimeter. For a more delicate look on the smaller sprigs, a simple single straight stitch can act as the stem. -
Fill the leaves (Satin Stitch):
Switch to the Sage Green floss (2 strands). Using a satin stitch, fill in the leaves. Start from the center vein and stitch outward to the edge, angling your stitches slightly toward the leaf tip to mimic natural veins. -
Add texture to leaves:
To create the two-tone effect seen in the image, go back over the bottom half of select leaves with single strands of the Dark Moss Green, adding a few straight stitches over the satin stitch for depth. -
Create curly tendrils:
Using a single strand of rust-colored floss, stitch delicate, curly embellishments coming off the main vine. Use a whipped backstitch here for a smooth, rope-like appearance that stands out against the cream canvas.
Needle Won’t Push Through?
Canvas is tough! If the needle gets stuck, wiggle it side-to-side while pushing. Using a rubber thimble or a small pair of pliers to pull the needle through can save your fingers.
Step 3: Stitching the Flowers
-
Create the flower base:
For the star-shaped flowers, use the Rust/Terracotta floss (3 strands). Stitch five straight stitches radiating from a center point to form the base petals. -
Fling the petals:
Fill in the petals using a satin stitch, working from the center outward. I find that keeping the tension slightly looser here helps the flowers look puffier and more dimensional. -
Add flower centers:
With Cream or a lighter beige thread, add a French knot in the absolute center of each flower. Wrap the thread twice around the needle before pulling through for a tight, neat knot. -
Stitch the buds:
For the small round buds, use a satin stitch in a circle shape with the Rust thread. Then, use the Dark Moss Green to create a small ‘V’ shape at the base of the bud to connect it to the stem.
Add Some Sparkle
For a magical touch, incorporate a single strand of metallic gold thread into the center vein of the leaves or use small gold seed beads for the flower centers.
Step 4: Finishing Touches
-
Inspect and refine:
Look over the shoe for any gaps in the satin stitching. If canvas is showing through a leaf, add a single thread stitch to cover it. -
Remove markings:
Dip a Q-tip in water or use a damp cloth to dab away any visible blue marker lines. Do not soak the shoe; just spot-clean the ink. -
Secure the inside:
Check the inside of the shoe. If you have long tails or large knots, apply a tiny dot of fabric glue to them and press them flat so they don’t rub against your foot while walking. -
Re-lace:
Once everything is dry, re-lace your sneakers. Crisp white laces look great, or swap them for green to match the foliage.
Now step out and enjoy your completely unique, nature-inspired footwear
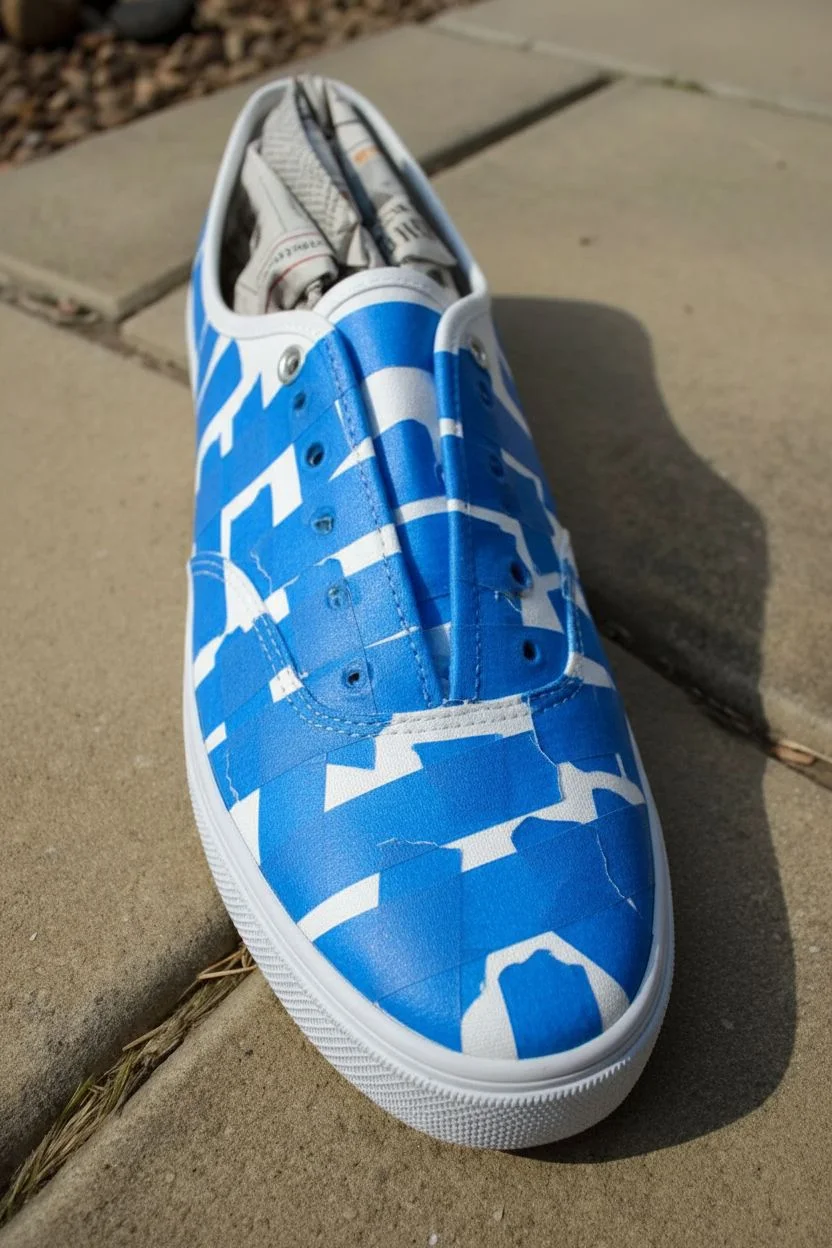
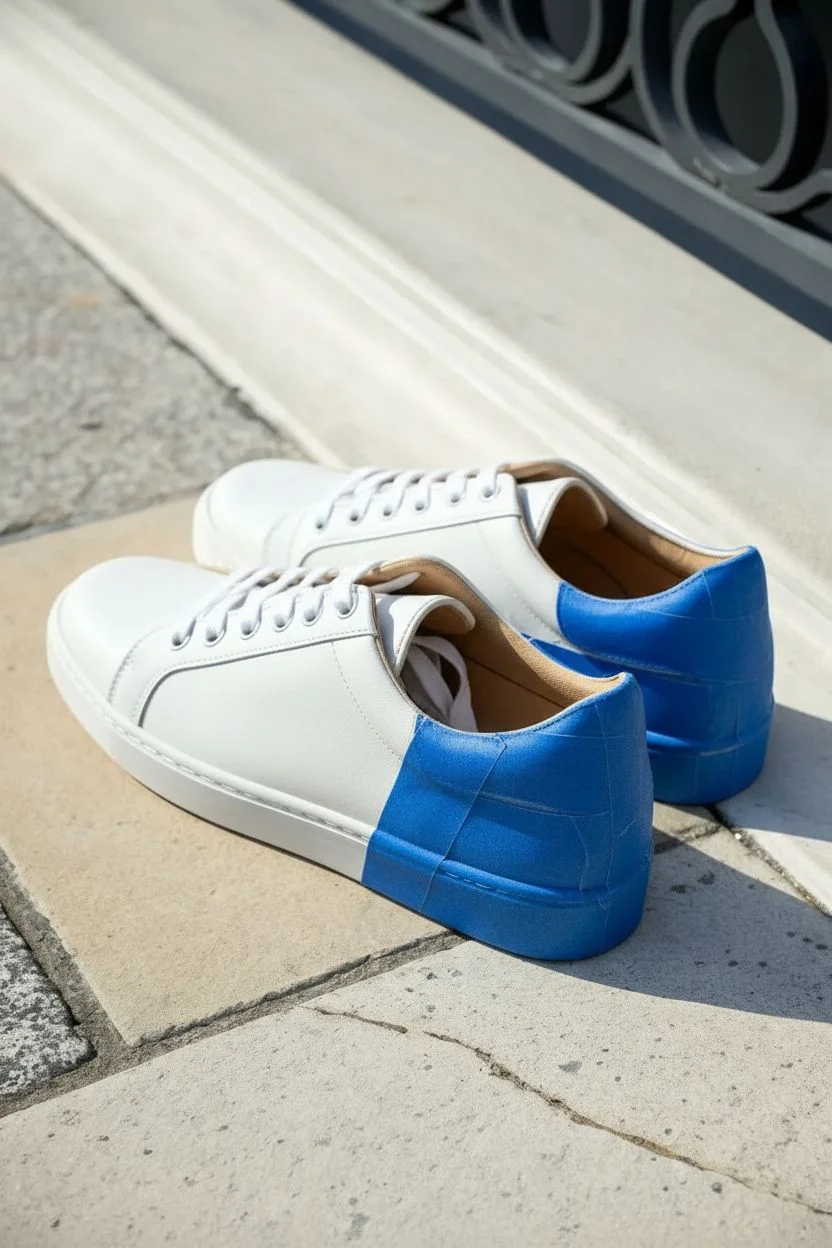
Matching Pair vs. Storytelling Pair Designs
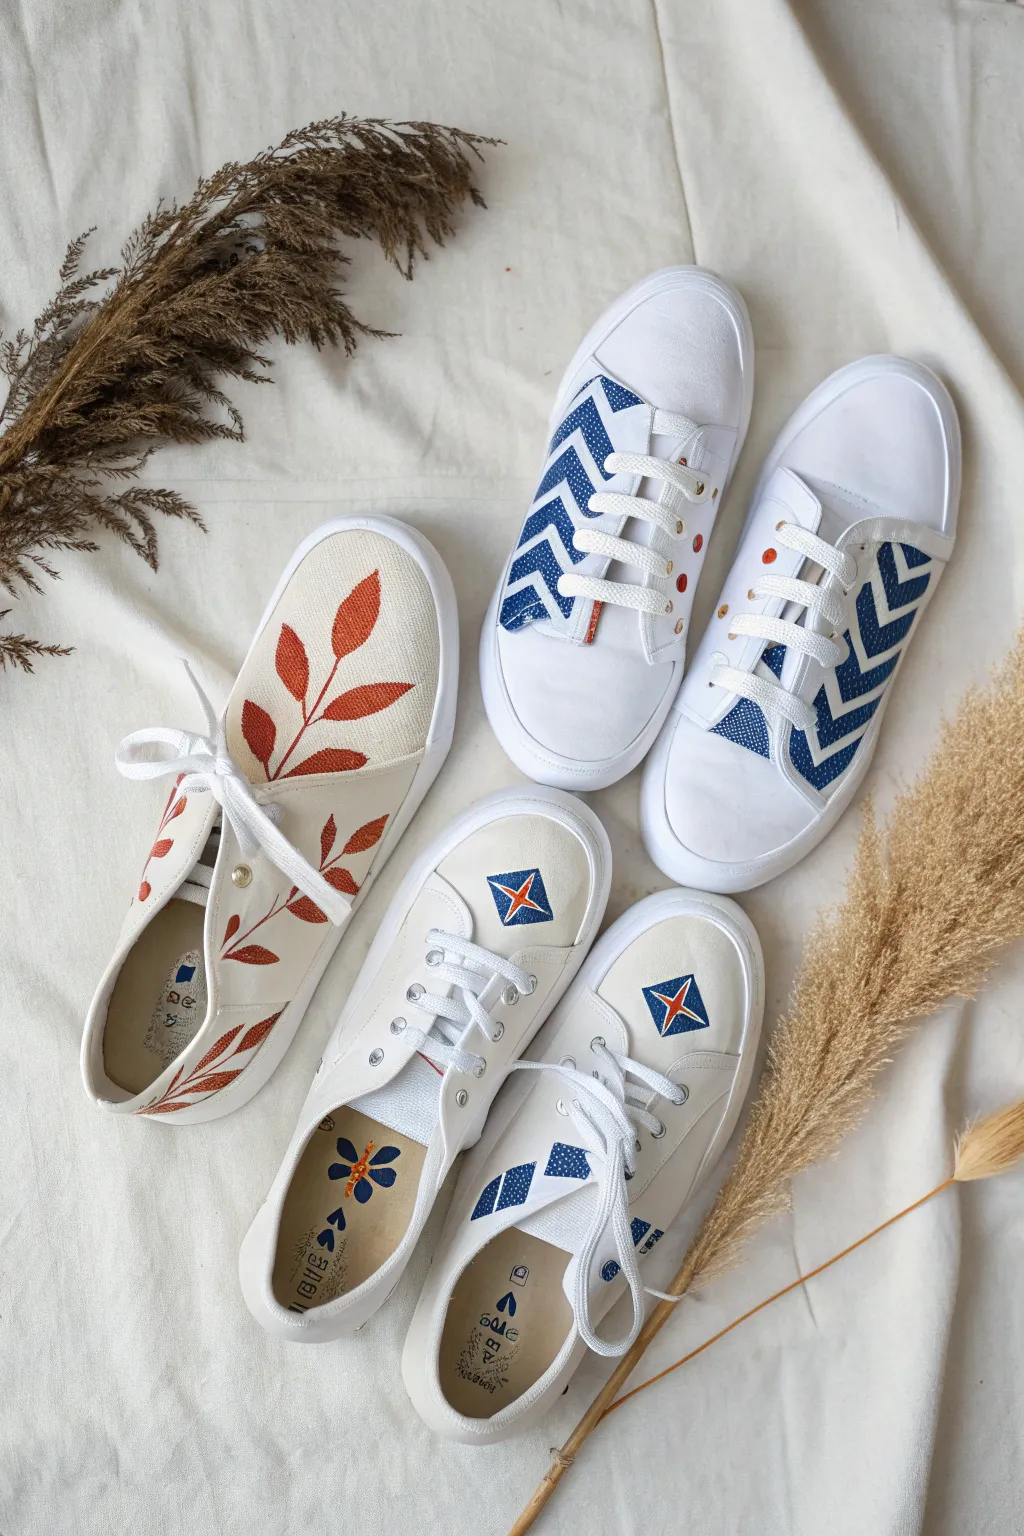
Transform plain white plimsolls into wearable art with these two distinct design approaches: a bold, geometric chevron pattern and a delicate, organic leaf motif. This project playfully explores how visual storytelling can differ between pairs, offering options for both modern structure and nature-inspired flow.
Detailed Instructions
Materials
- Two pairs of white canvas shoes (slip-ons or lace-ups)
- Fabric medium
- Acrylic paints (Navy Blue, Burnished Orange/Rust, White)
- Small flat shader brush (size 4 or 6)
- Fine liner brush (size 0 or 00)
- Low-tack masking tape or painter’s tape
- Pencil
- Eraser
- Palette or small mixing dish
- Water cup and paper towels
- Hairdryer (optional, for faster drying)
- Fabric sealant spray (optional)
Step 1: Preparation & Planning
-
Prepare the canvas surface:
Before starting, remove any laces from the shoes. Clean the canvas surface with a slightly damp cloth to remove dust or sizing chemicals, then let them air dry completely to ensure the paint adheres properly. -
Mix your base medium:
For durable, flexible designs, it’s crucial to mix your acrylic paints with a fabric medium. Follow the bottle ratio instructions (usually 1:1 or 2:1 paint to medium). This prevents cracking as the shoe flexes while walking. -
Stuff the shoes:
Stuff the toe boxes of your shoes tightly with newspaper or plastic bags. This creates a firm, even surface for painting and prevents the canvas from denting while you work.
Step 2: Design 1: Geometric Chevrons
-
Sketch the guides:
Using a pencil, lightly mark the center line of the tongue area on the first pair. Sketch a series of V-shapes (chevrons) stacked vertically. Aim for three to four distinct chevron rows. -
Apply masking tape:
To get those crisp lines seen in the blue pair, apply pieces of low-tack tape along the outside edges of your pencil marks. Press down firmly on the tape edges to prevent paint bleed. -
Paint the first chevron layer:
Load your flat brush with the navy blue mixture. Paint the alternate chevron stripes. Apply the paint in thin, even layers. I usually refer to the ‘less is more’ rule here; two thin coats are better than one thick, gloopy one. -
Add texture details:
While the blue paint is wet, use a clean, dry brush or a toothpick to gently stipple or scratch tiny patterns into the paint if you want a textured look, or simply paint solid for a bold graphic effect. -
Paint the accent details:
For the contrasting element, paint the small rectangular tab at the base of the lacing area using the rust orange color. This small pop of warmth balances the cool blue tones. -
Remove tape and refine:
Once the paint is tacky but not fully dry, carefully peel away the tape at a 45-degree angle. Use your fine liner brush and white paint to touch up any areas where the blue might have bled.
Bleeding Edges?
If paint bleeds under your tape, don’t panic. Wait for it to dry completely, then use a tiny brush with white acrylic (or the original shoe color) to paint over the mistake like creative correction design.
Step 3: Design 2: Organic Leaves & Stars
-
Outline the vine:
On the second pair, use your pencil to draw a flowing, curved line starting from the outer heel and wrapping toward the toe box. This will be the main stem for your leaf design. -
Sketch the leaves:
Draw almond-shaped leaves branching off the main stem. Vary the sizes—larger leaves near the center, smaller ones near the tips. Keep the arrangement asymmetrical for a more natural look. -
Base coat the leaves:
Using the fine liner brush, fill in the leaves with the rust/burnished orange paint mixture. Use smooth strokes from the base of the leaf to the tip to mimic the vein structure. -
Add the star motif:
On the other shoe of this pair (or near the heel), sketch a small diamond shape. Paint the background navy blue. Let it dry, then use the liner brush to paint a thin, orange four-point star in the center. -
Create the secondary motif:
To coordinate with the first pair, replicate the diamond/star emblem on the heel or side of the chevron shoes as well, creating a unifying ‘logo’ across your collection. -
Paint inner details:
For a hidden surprise, paint a small blue flower or geometric shape on the inner sole heel area. It’s a fun detail that only the wearer knows about.
Mix It Up
Make the design standout by swapping standard laces for satin ribbons or velvet cords in a matching navy or rust color. It instantly elevates the look from casual sneaker to custom boutique footwear.
Step 4: Finishing Touches
-
Heat set the design:
Allow all paint to cure for at least 24 hours. To make the design permanent and washable, blast the painted areas with a hairdryer on high heat for a few minutes, or iron (without steam) using a pressing cloth. -
Optional sealing:
If you plan to wear these outdoors frequently, give the canvas a light misting of fabric protector spray to help repel dirt and water. -
Re-lace specifically:
When re-lacing the chevron pair, try a straight-bar lacing style. This keeps the laces horizontal and minimizes visual clutter, letting your geometric pattern shine through clearly.
You now have custom footwear that perfectly balances structured geometry with organic beauty, ready to walk your own path
Side-Panel Mini Landscapes
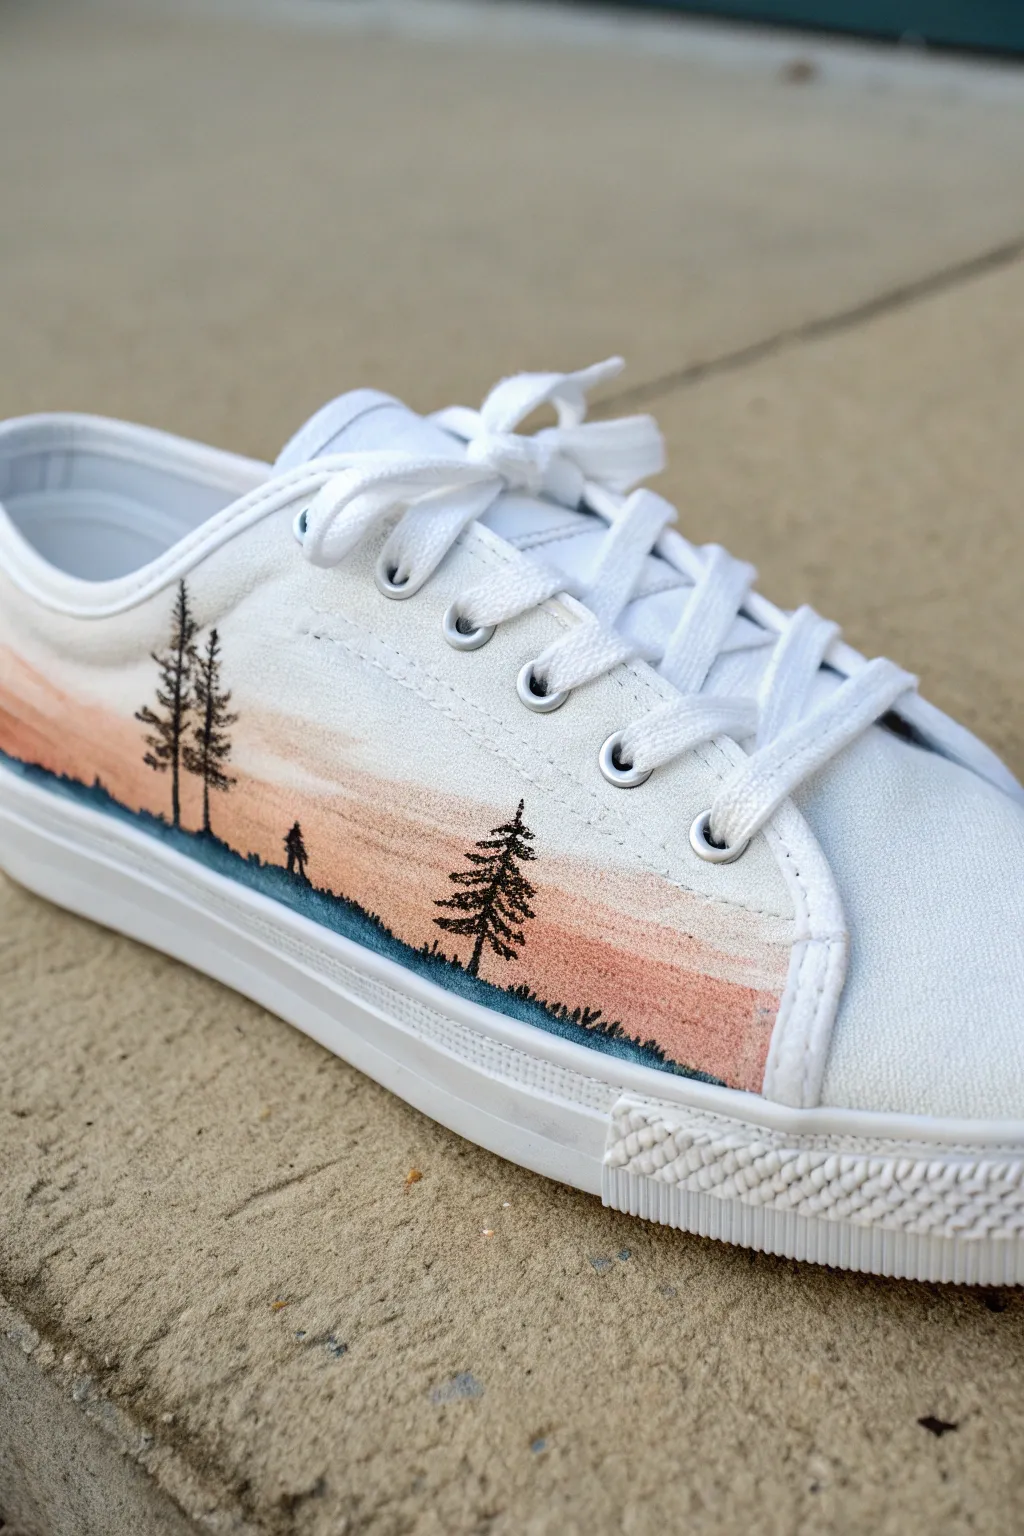
Transform a plain pair of white shoes into a wearable canvas featuring a serene, misty mountain sunset. The gradient sky and crisp silhouette trees create a stunning contrast that looks deceptively professional but is achievable with patient layering.
How-To Guide
Materials
- White canvas sneakers (clean and dry)
- Acrylic paints or textile paints (peach, soft orange, light blue, white, black)
- Fabric painting medium (if using standard acrylics)
- Small flat brush (size 4 or 6)
- Fine detail liner brush (size 0 or 00)
- Painter’s tape or masking tape
- Water cup and palette
- Pencil (optional)
Step 1: Preparing the Canvas
-
Clean surface:
Ensure your sneakers are completely clean and dry. If they are brand new, wipe the canvas down with a slightly damp cloth to remove any factory sizing or dust. -
Tape the boundaries:
Use painter’s tape to mask off the rubber sole immediately below the side panel where you will be painting. This ensures a crisp bottom edge and protects the white rubber. -
Protect the laces:
Remove the shoelaces completely so you have unobstructed access to the side panels and eyelet area.
Uneven Blending?
If your sky gradient looks streak, dip your brush in a tiny bit of water and minimal paint to rework the transition while it’s still damp.
Step 2: Painting the Sky Gradient
-
Mix the peach tone:
Mix a soft peach color using white, a tiny dot of orange, and a hint of yellow. If using standard acrylics, mix in your fabric medium now according to the bottle instructions. -
Apply the base peach:
Using the flat brush, paint a horizontal band of the peach color starting about one inch above the sole. Feather the top edge upward so it’s not a hard line. -
Blend the upper sky:
While the peach is still slightly wet, use a very clean, slightly damp brush to fade the peach color out into the white of the shoe as you move upward toward the laces. The goal is a soft, misty fade-out. -
Add warmth:
Mix a slightly deeper, warmer orange tone. Glaze this gently over just the bottom half of your peach section to intensify the sunset feeling near the horizon line. -
Create the horizon line:
Mix a muted dark blue or teal color. Paint a thin, uneven strip along the very bottom of your painted area, right against the tape, to serve as the distant ground or water. -
Smooth the transition:
I like to use a dry brush to gently blend the boundary between the dark blue ground and the peach sky, creating a soft, misty look rather than a sharp separation. -
Let it dry:
Allow these background layers to dry completely before attempting the trees. This usually takes about 15-20 minutes depending on humidity.
Step 3: Adding the Silhouettes
-
Practice your trees:
Before touching the shoe, practice painting tiny evergreen trees on a scrap piece of paper using your detail liner brush. -
Load the liner brush:
Load your fine liner brush with black paint mixed with a tiny drop of water to make it flow smoothly like ink. -
Paint the tree trunks:
Draw faint vertical lines where you want your trees to stand. Vary the heights—make some taller and some shorter for a natural look. -
Add the branches:
Starting from the top of a trunk, use tiny, flicking motions to create branches. Keep the top very narrow and widen the tree as you move down. -
Refine the texture:
Dab the brush tip gently to create the look of dense pine needles rather than straight lines. Allow some sky to peek through the branches. -
Ground the trees:
Thicken the horizon line slightly in black where the trees meet the ground, blending the tree bases into the dark blue strip you painted earlier. -
Add distant details:
Add tiny suggested bumps or very small trees in the background used lighter pressure to create depth.
Tree Tech
Don’t overthink the branches! Quick, jagged, imperfect dabbing motions create much more realistic pine needles than careful, slow strokes.
Step 4: Finishing Touches
-
Remove tape:
Carefully peel off the painter’s tape while the paint is dry to the touch but not fully cured to ensure a clean edge. -
Cleanup:
If any paint seeped onto the rubber sole, use a cotton swab dipped in rubbing alcohol or acetone to wipe it away immediately. -
Heat set:
Once fully dry (usually 24 hours), use a hairdryer on high heat for a few minutes over the artwork to help set the paint into the fabric fibers.
Lace them back up and enjoy showing off your custom miniature landscapes
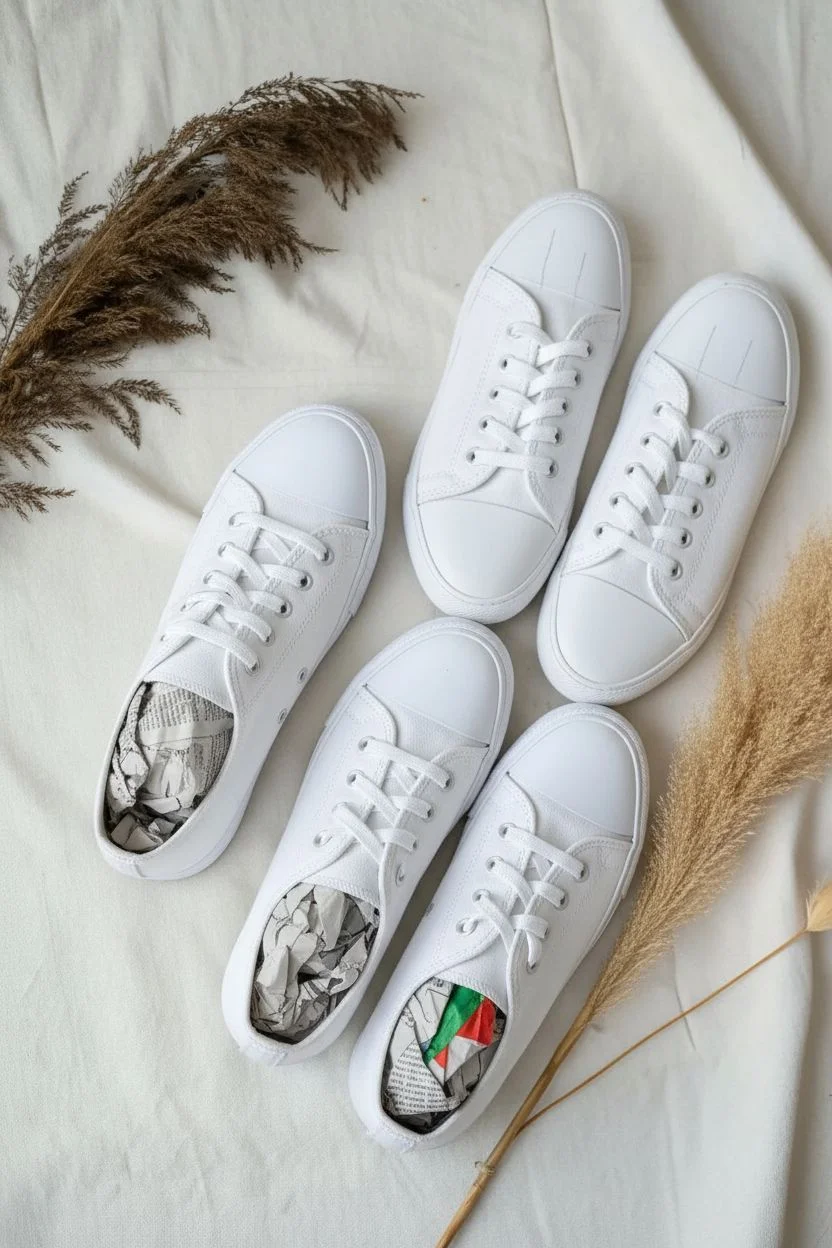
Candy-Wrapper-Inspired Graphics and Type
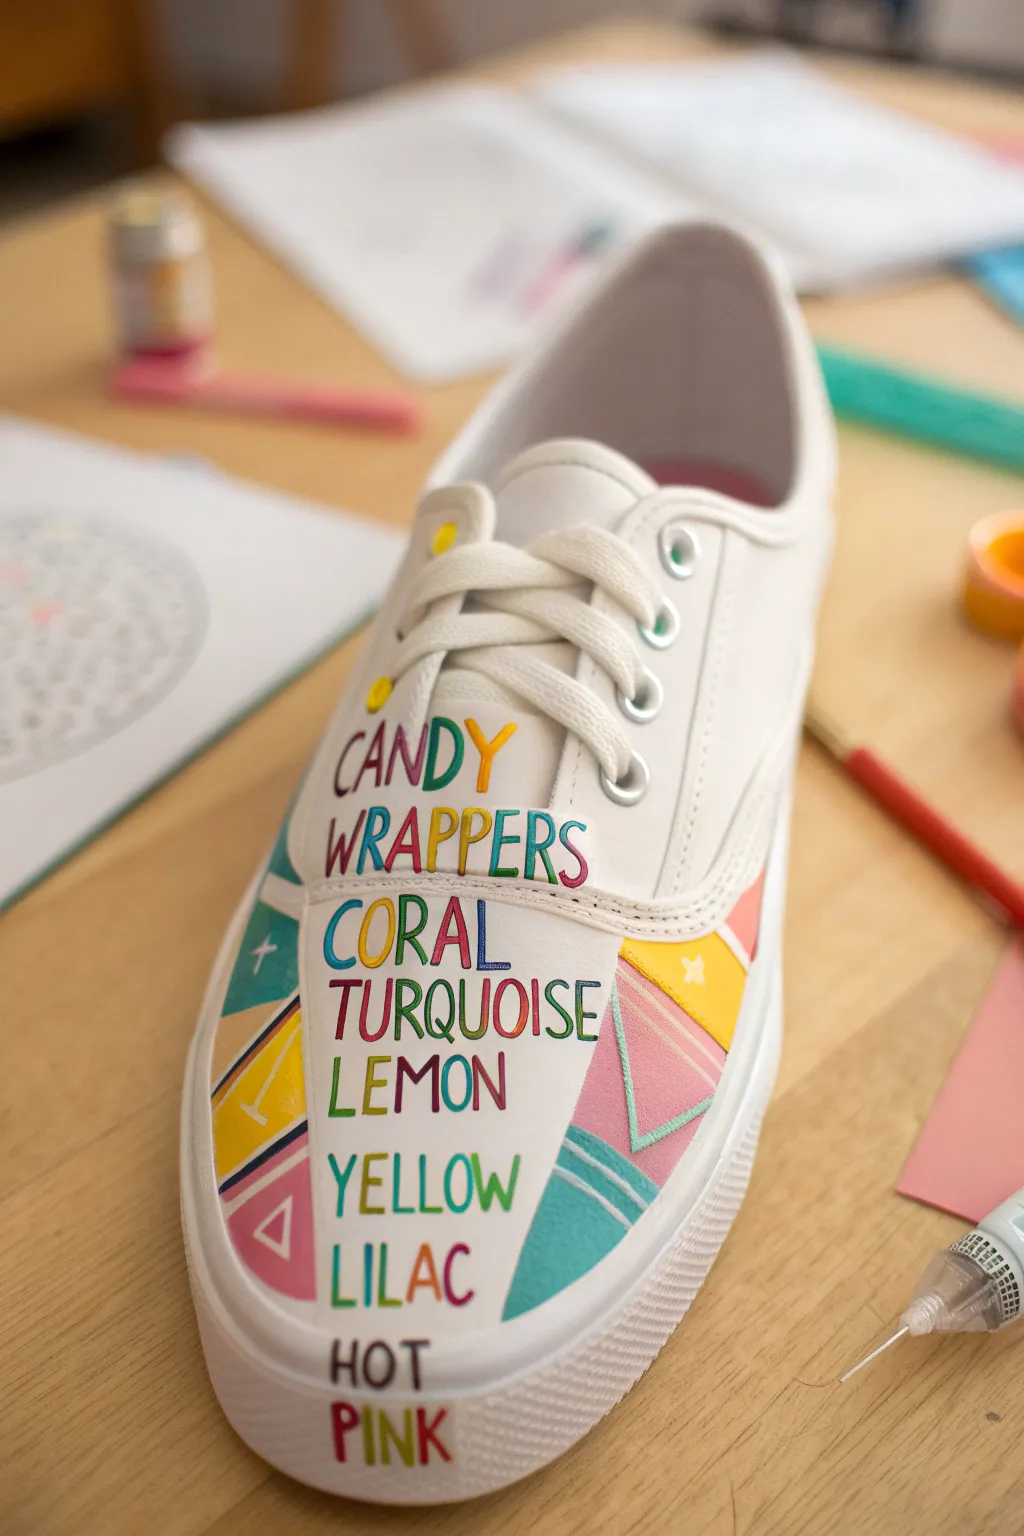
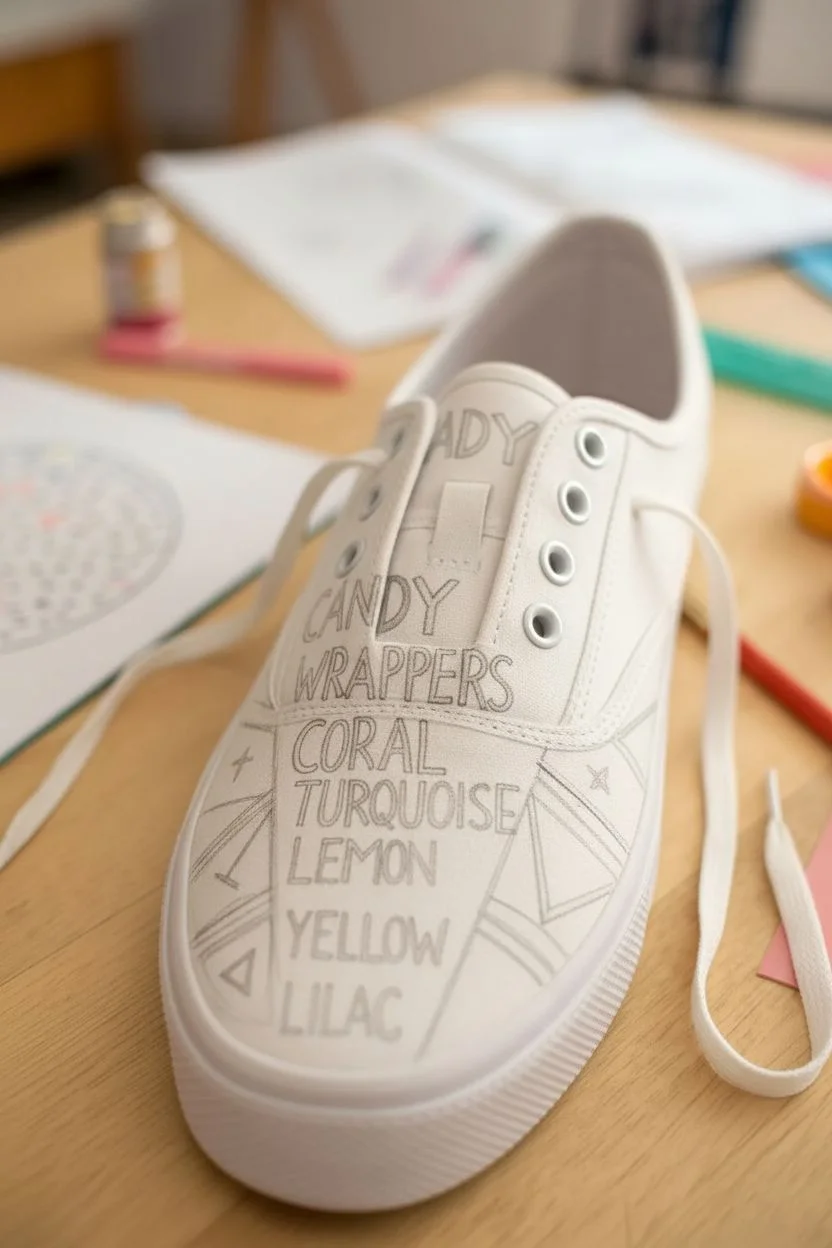
Transform plain white canvas shoes into a vibrant, nostalgic statement piece using bold typography and confectionery-inspired geometry. This design mimics the playful lettering and pastel color palettes often found on vintage sweet packaging, creating a look that’s quirky, colorful, and completely unique.
Detailed Instructions
Materials
- White canvas sneakers
- Fabric paints (white, turquoise, hot pink, lemon yellow, lilac)
- Fine-point fabric markers (various colors)
- Extra-fine detail paintbrush (size 0 or 00)
- Small flat angled brush
- Pencil and eraser
- Painter’s tape or masking tape
- Ruler
- Black fine-liner pen (permanent/waterproof)
- Waterproofing spray or fabric sealant
Step 1: Planning and Mapping
-
Clean and Prep:
Start by removing the laces from your shoes. Ensure the canvas surface is clean and dry; if the shoes are new, give them a quick wipe with a damp cloth to remove any factory sizing, then let them air dry completely. -
Sketch the Text:
Using a light pencil, lightly sketch your centralized text down the tongue and bridge of the shoe. Aim for a centered, stacked layout. I like to write the words ‘CANDY WRAPPERS’, ‘CORAL’, ‘TURQUOISE’, ‘LEMON’, ‘YELLOW’, ‘LILAC’, and ‘HOT PINK’ in varying heights to create a dynamic typographic column. -
Refine Lettering:
Go back over your pencil sketch and thicken the lines to create simple, sans-serif block letters. Keep the spacing tight but legible. -
Map Out Geometry:
On the sides of the toe box (flanking the text), sketch geometric shapes. Draw triangles, semicircles, and angled bands. Use a ruler to ensure your straight lines are crisp, creating sections that look like unfolded wrapper corners.
Step 2: Painting the Text
-
Base Color for Letters:
Using your fine-point fabric markers or a very small detail brush with fabric paint, carefully fill in each letter. Alternate colors for a playful effect—make the ‘C’ pink, the ‘A’ yellow, etc. Don’t worry about perfect opacity yet; a second coat can fix unevenness. -
Outline for Definition:
Once the letter fill color is dry (give it about 20 minutes), outline the letters if needed with a slightly darker shade of the same color or a very thin black liner to make them pop against the white background. -
Adding Highlights:
For that shiny ‘foil wrapper’ look, use a tiny dot of white paint on the upper right corner of thicker letters to create a subtle highlight.
Bleeding Lines?
If paint bleeds under the tape, don’t panic. Wait for it to dry completely, then use a white opaque fabric paint or a white Posca pen to touch up the edges and cover the mistake.
Step 3: Geometric Color Blocking
-
Tape Off Areas:
To get sharp edges on your geometric shapes, use small pieces of painter’s tape to mask off the areas you aren’t painting yet. This is crucial for crisp lines between the teal and pink sections. -
Paint First Shapes:
Fill in the unmasked geometric shapes with your fabric paints. Apply the lemon yellow triangles and turquoise semicircles first. Use the flat angled brush to get right up to the tape edge. -
Dry and Peel:
Wait until the paint is dry to the touch before peeling off the tape. Peeling too early can drag wet paint across the clean white canvas. -
Paint Adjacent Shapes:
Tape off the dried sections you just painted, then fill in the remaining areas with lilac and hot pink. Ensure the colors touch perfectly without bleeding. -
Add Decorative Details:
Once all block colors are solid and dry, use a fine liner or detail brush to add small patterns on top of the shapes. Draw thin white borders, small crosses, or triangles inside the larger shapes to mimic printed wrapper patterns.
Add Some Texture
Mix a tiny amount of fabric medium with glitter dust and overlay it on specific shapes (like the pink triangles) to give the shoe a sugary, crystallized texture.
Step 4: Finishing Touches
-
Clean Up:
Check for any pencil marks that are still visible around your paint. Gently erase them, being careful not to rub the painted areas. -
Seal the Work:
Apply a coat of fabric sealant or spray with a waterproofing shoe protector. This will keep your bright candy colors from fading and protect the text from water damage. -
Re-lace:
Once the sealant is fully cured (check bottle instructions, usually 24 hours), lace the shoes back up. White laces keep the look fresh, or try a pastel color to match the design.
Step out in style knowing your footwear is now a walking piece of typographic art
Comic-Inspired Halftone Dots and Pop Shapes

Transform a plain pair of white canvas sneakers into a wearable masterpiece featuring comic-inspired shapes and bold, abstract patterns. This project uses vibrant acrylics and strong black outlines to create a dynamic, eye-catching design that feels like a walking piece of modern art.
Step-by-Step
Materials
- White canvas sneakers
- Pencil and eraser
- Acrylic leather or fabric paints (red, yellow, teal, navy, peach, white)
- Black fabric marker or fine-tip black paint pen (0.7mm)
- Fine detail brushes (sizes 0 and 00)
- Flat shader brush (size 2 or 4)
- Painter’s tape
- Acrylic finisher or matte sealer
- Heat gun or hairdryer (optional)
Step 1: Preparation & Sketching
-
Prepare the canvas:
Remove the shoelaces completely to ensure you don’t get paint on them and to open up the painting surface. If the shoes are new, give them a quick wipe with a slightly damp cloth to remove any factory dust. -
Masking up:
Apply painter’s tape carefully around the rubber sole edge where it meets the canvas. This prevents stray paint marks on the crisp white rubber. -
Sketching the heel design:
Starting at the back heel, lightly sketch a large, swooping intersected shape. Draw a grid pattern in a triangular section on the outer left edge, and a large curved red section next to it. -
Sketching the side panel:
Move to the side of the shoe. Draw a combination of overlapping geometric shapes—circles, semi-circles, and soft triangles. Include a wave-like line cutting through a large red area and a section for polka dots. -
Refining the tongue:
Don’t forget the tongue area beneath the laces; sketch a few continuing shapes there so the design peeks through when laced up.
Step 2: Color Application
-
Painting the vibrant red:
Using a flat shader brush, fill in the large curved section on the heel and the main background area on the side panel with bright red paint. Apply thin, even layers. -
Adding yellow accents:
Paint the grid section on the heel and the semi-circle on the side panel with a sunny yellow. Yellow often requires two or three coats to be fully opaque on canvas. -
Introducing teal contrasting:
Use your teal or light blue paint for the smaller circle details and the segmented semi-circle near the bottom of the side design. -
Filling the peach tones:
Fill in the remaining segment on the heel with a soft peach or flesh-tone color to balance the primary brightness. -
Painting the navy details:
Identify the dark, curved geometric shape separating the yellow and red sections on the side. Carefully fill this in with deep navy blue or dark teal. -
Drying time:
Allow all base colors to dry completely. I usually give it about 20 minutes, or you can use a hairdryer on a low cool setting to speed this up.
Paint Flexibility Tip
Mix a fabric medium or ‘2-Soft’ additive into your acrylics. This prevents the paint from cracking when the shoe flexes as you walk.
Step 3: Detailing & Outlining
-
Creating the grid pattern:
Once the yellow heel paint is dry, use your black paint pen or detail brush to draw the diagonal grid lines over the yellow section. -
Applying pop-art dots:
Dip the handle end of a paintbrush into pink or light red paint and dot it over the yellow section on the side panel to create consistent polka dots. -
Drawing the squiggle:
Paint a light blue wavy line (squiggle) floating over the large red area on the side. This adds that classic comic-book energy. -
The crucial black outlines:
This step brings it all together. Using a steady hand and your fine-tip black paint pen, trace over all your pencil lines. Outline every shape, color block, and pattern edge with a bold, consistent black line. -
Adding interior details:
Add the smaller black lines inside shapes, such as the stripes inside the navy blue section and the spiral swirl inside the small teal circle. -
Sealing the deal:
Once the black ink is fully dry (wait at least an hour), apply a thin coat of matte acrylic finisher over the painted areas to waterproof and protect your artwork. -
Final touches:
Remove the painter’s tape carefully. If any paint bled onto the rubber, scratch it off gently with a fingernail or use a touch of acetone on a Q-tip.
Style Upgrade
Swap the standard white laces for bright red or yellow ones to match the dominant colors in your new custom design.
Lace up your freshly painted kicks and enjoy wearing a truly unique piece of pop art
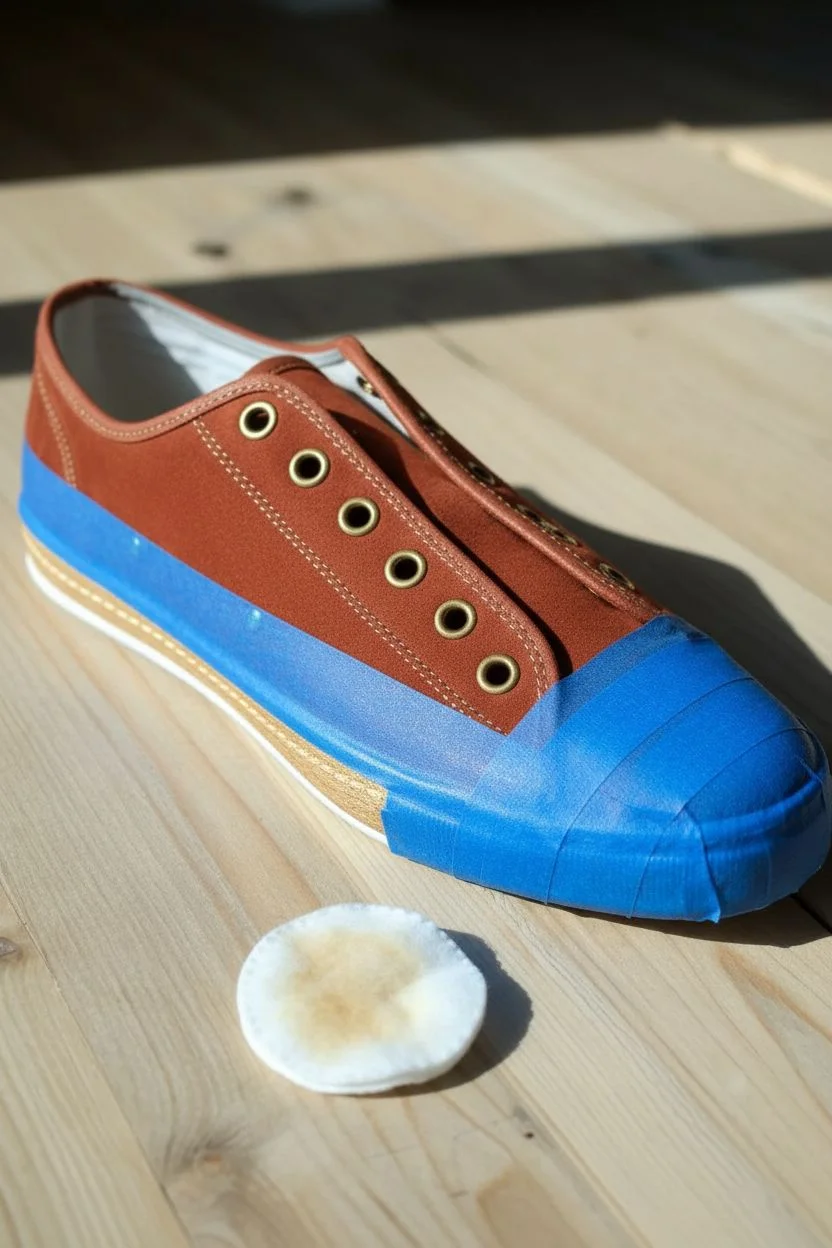
Metallic-Look Highlights and Faux Shine
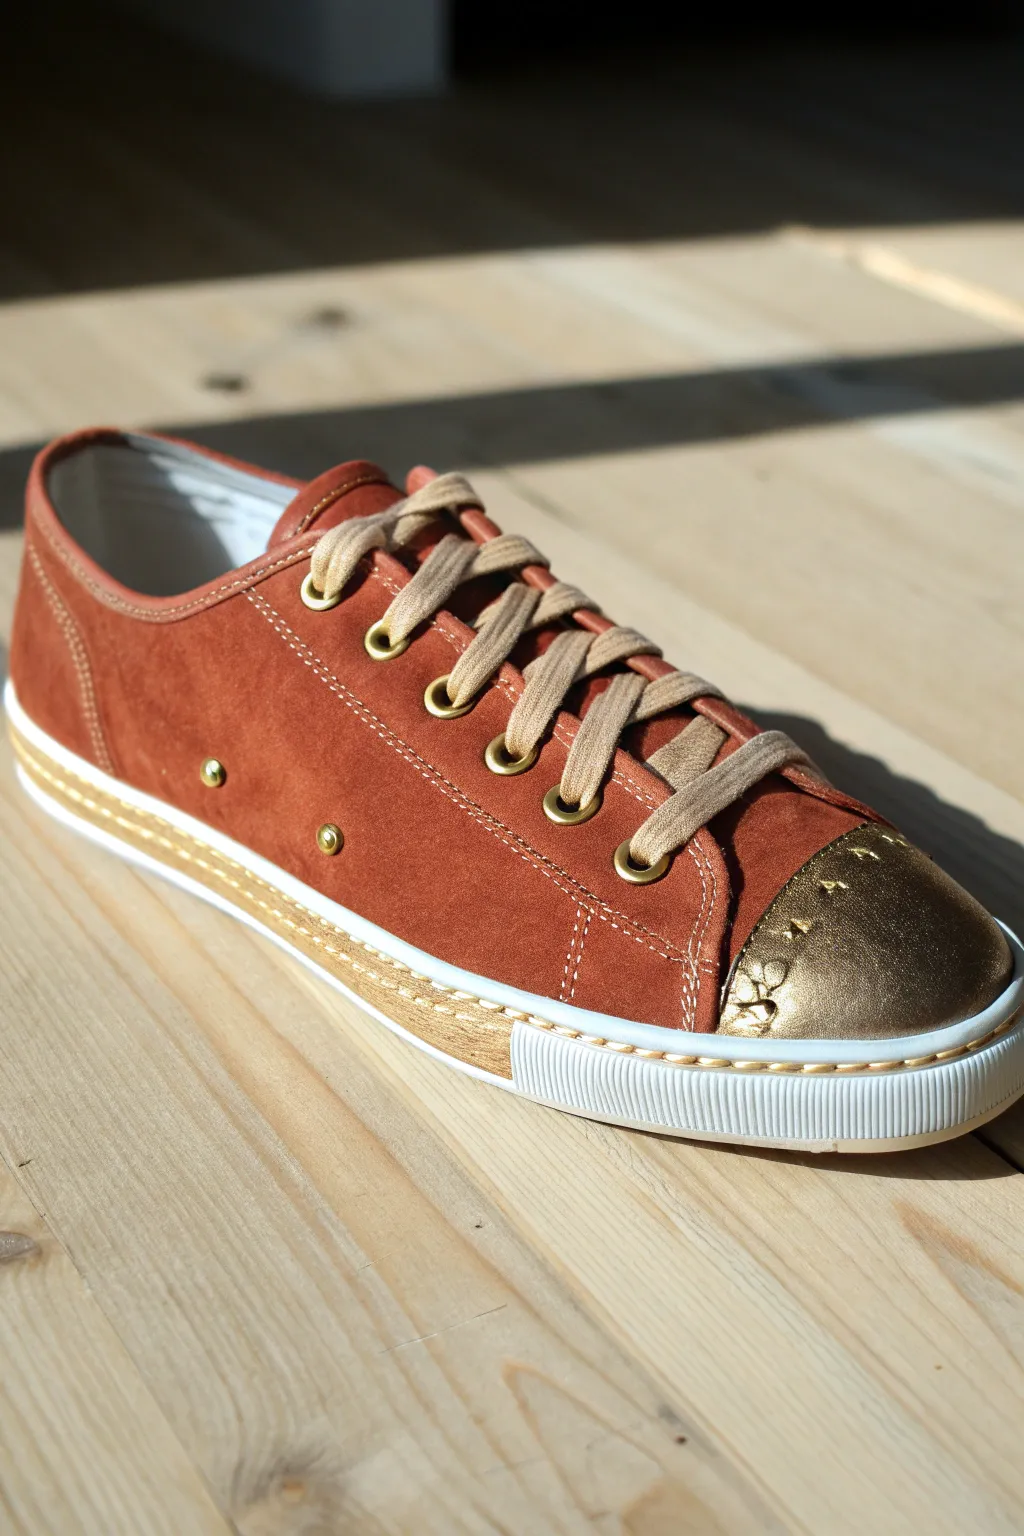
Transform a standard pair of suede sneakers into a luxury statement piece by adding metallic gold accents to the toe cap and sole stitching. This project mimics the high-end look of designer footwear using specialized leather paints for a durable, flexible finish that catches the sunlight beautifully.
Step-by-Step Guide
Materials
- Pair of rust/terracotta suede sneakers (clean and dry)
- Angelus leather preparer and deglazer (or acetone)
- Cotton pads or balls
- Painter’s tape (blue or green)
- Angelus leather acrylic paint (metallic gold)
- Angelus 2-Hard additive (for plastic/rubber adhesion)
- Flat shader brush (size 4 or 6)
- Fine detail brush (size 0 or 1)
- Acrylic finisher (matte or satin)
- Small mixing cup
- Gold screw-back studs (optional, for side detailing)
- Leather hole punch (optional)
Step 1: Preparation & Masking
-
Clean the surface:
Before anything else, remove the laces completely to keep them safe from stray paint drops. -
Mark the toe cap area:
Visualize exactly where you want the gold toe cap to end. Most sneakers have a natural seam or stitching line across the toe box; use this as your guide. -
Tape the suede:
Apply painter’s tape carefully along that seam on the suede side. Press the edge of the tape down firmly with your fingernail to prevent paint from bleeding onto the delicate suede texture. -
Protect the sole:
Run another strip of tape along the white rubber sole immediately below the toe cap area, ensuring you don’t tape over the welt (the stitched strip connecting the shoe to the sole) if you plan to paint that too. -
Prep the surface:
Dip a cotton pad in leather preparer or acetone. Scrub the toe cap area vigorously to remove the factory finish. This feels counterintuitive, but it’s essential for paint adhesion.
Smooth Operator Tip
For the smoothest metallic finish, use a very soft synthetic brush. Stiff bristles leave brush marks in metallic paints which are hard to fix later.
Step 2: Painting the Gold Accents
-
Mix the paint:
Pour a small amount of metallic gold leather paint into your mixing cup. Since the toe cap is likely a harder material, mix in the 2-Hard additive according to the bottle’s ratio (usually 50/50 or 75/25) to help it bond to plastic or rubberized surfaces. -
Apply the base layer:
Using the flat shader brush, apply a thin, even coat of the gold mixture to the toe cap. Don’t worry if it looks streaky or translucent at first; thin layers are key to preventing cracks. -
Let it dry:
Allow the first coat to dry completely, which typically takes about 15-20 minutes depending on humidity. -
Build the opacity:
Apply a second and third coat, changing the direction of your brush strokes slightly each time to smooth out the metallic finish. I usually find three coats is the sweet spot for a solid gold look. -
Paint the welt:
Switch to your fine detail brush. Carefully paint the textured strip (welt) that runs along the side of the shoe, just above the white sole. This mimics the stitched leather look seen in the photo. -
Detail the texture:
If your shoe has a textured pattern on the toe (like the floral tooling in the image), use the fine brush to ensure the gold paint gets into the deep crevices of the design.
Step 3: Finishing Touches
-
Seal the paint:
Once the gold paint is fully cured (give it a few hours), apply a clear acrylic finisher over the painted areas to protect against scuffs and water. -
Remove the tape:
Ideally while the sealer is still slightly tacky, slowly peel back the painter’s tape at a sharp angle to reveal crisp, clean lines. -
Add side studs (optional):
To recreate the metallic studs on the side, mark two spots on the suede quarter panel. Punch a small hole using a leather punch and screw in the gold studs. -
Clean up:
Check for any small gold smudges on the white rubber sole and gently scrape them off with a toothpick or wipe with a tiny bit of acetone. -
Re-lace:
Once everything is dry (wait 24 hours before wearing), re-lace the sneakers with coordinating beige or tan laces to complement the warm suede.
Level Up: Pattern Play
Before painting the toe cap gold, use a leather embossing tool to stamp a subtle floral or geometric pattern into the leather for extra texture.
Step out in style with your customized sneakers that perfectly balance rustic texture with brilliant shine
Textured Details With Stippling and Thick Paint
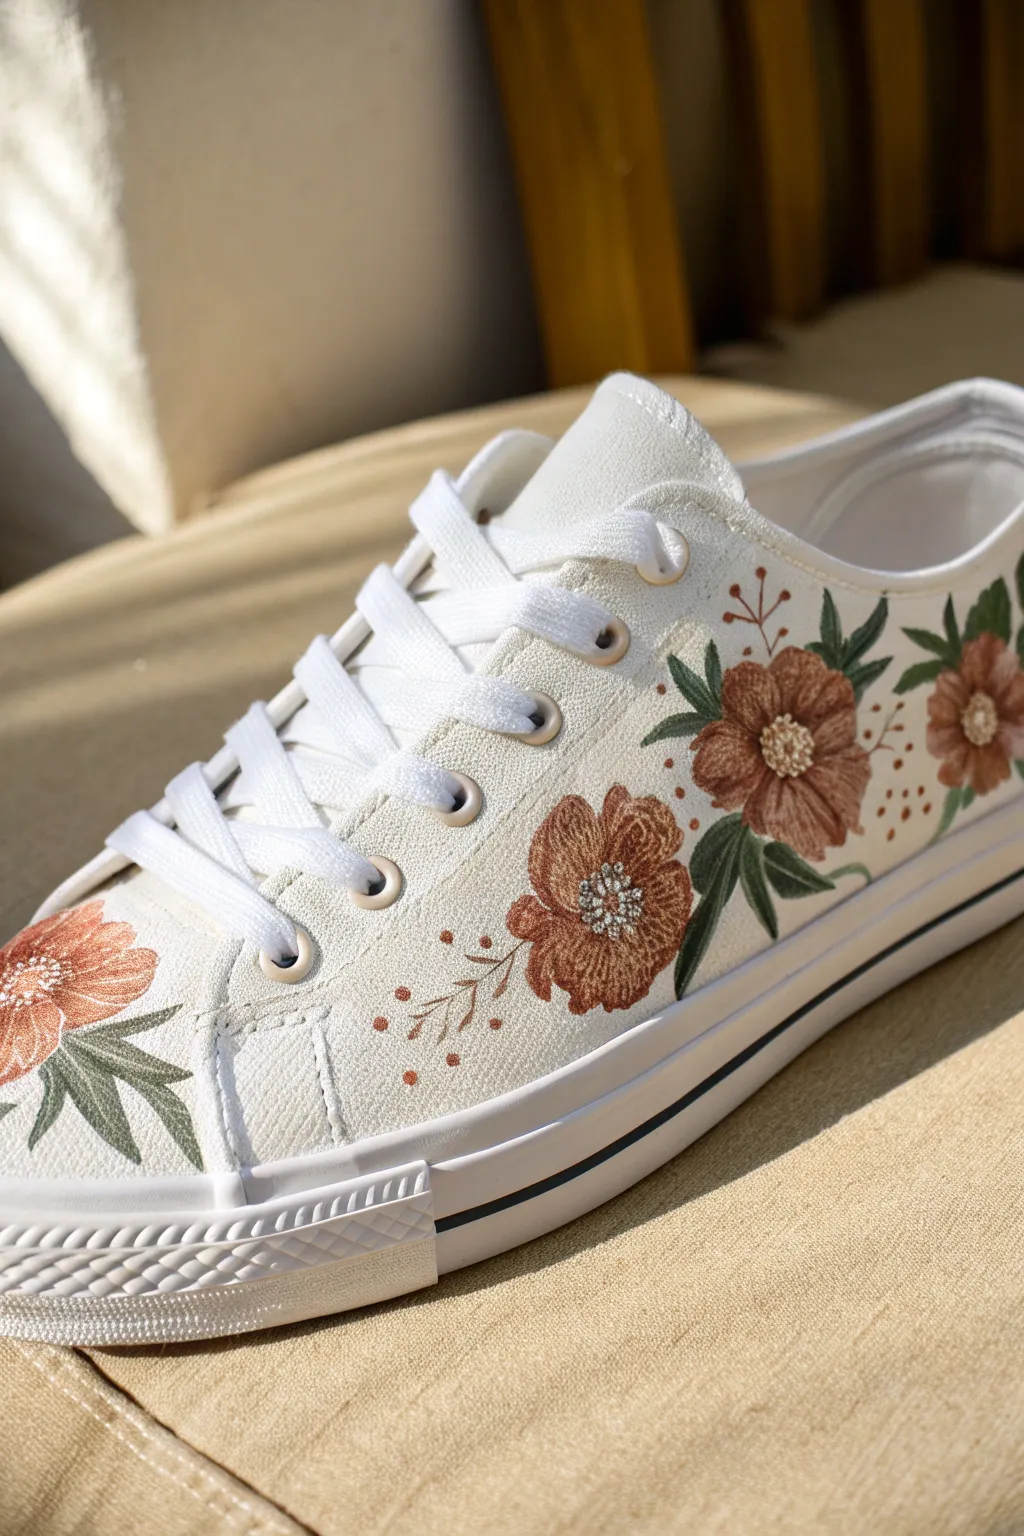
Transform ordinary white canvas sneakers into a botanical masterpiece with a muted, autumnal color palette and rich textural details. This project uses clever layering techniques to mimic the look of embroidered fabric without a single needle.
Step-by-Step Tutorial
Materials
- A pair of clean, white canvas sneakers
- Acrylic paints (burnt sienna, rust orange, olive green, dark green, cream/off-white, metallic gold)
- Fabric painting medium (to mix with acrylics)
- Small round detail brushes (sizes 0, 1, and 2)
- Fine-tip stylus or toothpick for stippling
- Waterproof fabric sealant spray
- Painter’s tape
- Pencil
Step 1: Preparation & Layout
-
Prep the canvas:
Begin by removing the laces from your shoes to create a clear workspace. If the shoes aren’t brand new, clean them thoroughly with a damp cloth and let them air dry completely. -
Protect the rubber:
Use small strips of painter’s tape to cover the rubber soles and the toe cap. This ensures your crisp white rubber stays paint-free while you work near the edges. -
Sketch the composition:
Lightly sketch your floral design directly onto the canvas using a pencil. Aim for three main oversized blooms on the outer side of the shoe, spacing them irregularly for a natural, organic look. Add sweeping lines for stems and leaves.
Fixing Blotchy Paint
If the canvas texture shows through too much on the first coat, don’t overload the brush. Apply multiple thin layers, letting each dry fully, rather than one thick gloop.
Step 2: Creating the Base Layer
-
Mix your mediums:
Mix your acrylic paints with the fabric medium according to the bottle’s instructions (usually 1:1 or 2 parts paint to 1 part medium). This makes the paint flexible so it won’t crack when you walk. -
Block in the flowers:
Using a size 2 brush and your burnt sienna or rust orange color, paint the base shape of the flowers. Don’t worry about shading yet; just get solid coverage within your pencil lines. -
Paint the foliage:
Switch to your olive green paint and fill in the leaf shapes. Use a confident stroke, starting at the stem and listing the brush as you reach the leaf tip to create a tapered point. -
Initial drying phase:
Allow these base colors to dry touch-dry, which typically takes about 15-20 minutes depending on humidity. You want a stable surface for the detail work.
Step 3: Adding Texture & Detail
-
Layering the petals:
Mix a slightly lighter version of your flower color by adding a touch of cream. Using a smaller size 1 brush, paint individual petal strokes on top of the base layer, working from the center outward to create depth. -
Deepening the greens:
Take your dark green paint and a fine detail brush (size 0). Paint delicate veins on the leaves and add shadows where the leaves meet the stems to give them dimension. -
Creating the flower centers:
Mix a lighter tan or cream color. In the center of each flower, paint a small circular area. This will be the base for our textured stippling. -
The stippling technique:
Here is where the texture comes alive. Dip a fine-tip stylus or a toothpick into thick, un-thinned white or cream paint. Dab tiny dots densely in the flower centers to mimic pollen or French knot embroidery. -
Adding metallic accents:
If you want a bit of sparkle, add a few tiny dots of metallic gold paint interspersed within the stippled centers. It catches the light beautifully when you walk.
3D Paint Effect
For true texture you can feel, use ‘Puffy Paint’ or dimensional fabric paint for the center stippling dots. It rises as it dries, perfectly mimicking embroidery knots.
Step 4: Final Flourishes
-
Delicate filler details:
Using your thinnest brush and diluted rust paint, create wispy, vine-like sprigs coming off the main bouquet. Add tiny dots at the ends of these sprigs to suggest buds. -
Clean up edges:
Once the paint is dry, carefully peel away the painter’s tape. If any paint seeped through, wipe it immediately with a damp Q-tip or a magic eraser sponge. -
Seal the deal:
Allow the shoes to cure for at least 24 hours. Then, in a well-ventilated area, spray the painted sections with a waterproof fabric sealant to protect your art from rain and dirt. -
Re-lace and wear:
Lace your sneakers back up. I prefer crisp white laces to keep the focus on the artwork, but a matching cream lace can look lovely too.
Enjoy strolling in your custom floral kicks, knowing you’re walking on unique art
Glow-in-the-Dark Constellations and Moon Phases
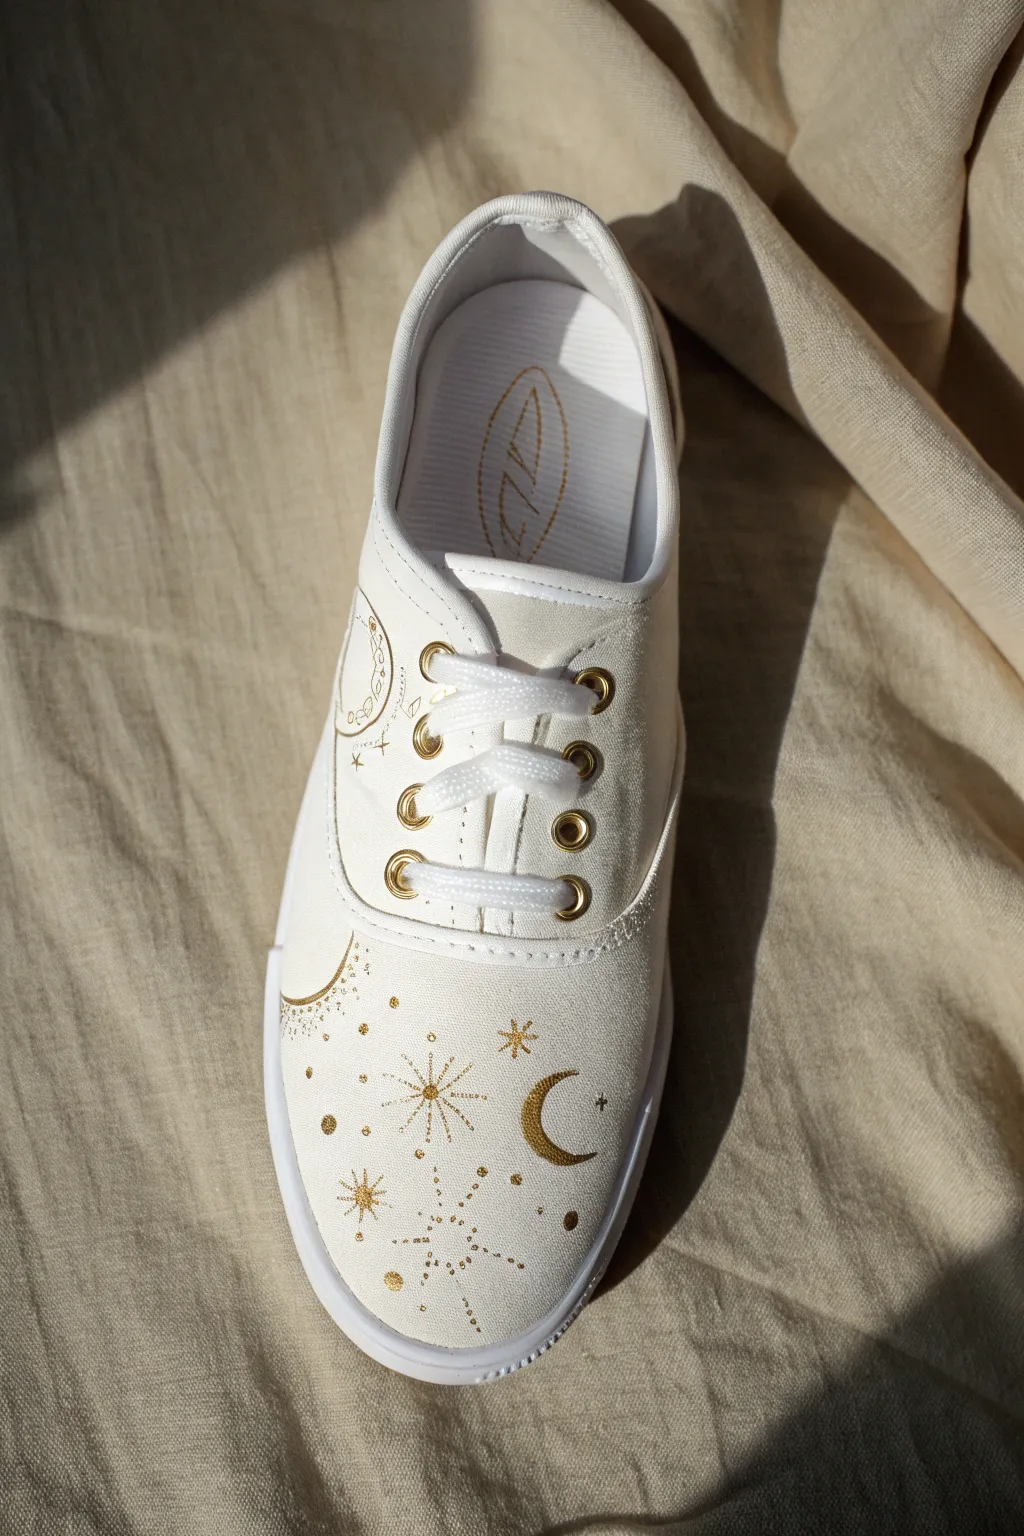
Transform a simple pair of white canvas sneakers into a dreamy night sky with this delicate celestial design. Using metallic gold paint and hidden glow-in-the-dark accents, these shoes capture the magic of the cosmos right at your feet.
Detailed Instructions
Materials
- White canvas sneakers (like Keds or Vans)
- Metallic gold fabric paint or acrylic paint with fabric medium
- Glow-in-the-dark fabric paint (neutral/clear drying)
- Fine detail paintbrushes (size 000 and 00)
- Pencil or air-erasable fabric marker
- Gold grommets/eyelets (optional, if replacing existing ones)
- Gold aglets or metallic laces (optional)
- Clear acrylic sealer spray (matte or satin)
- Painter’s tape or masking tape
- Small mixing palette
Step 1: Preparation
-
Clean the canvas:
Even if the shoes are new, give the canvas a quick wipe with a damp cloth to remove any factory dust or sizing that might repel paint. Let them dry completely. -
Remove laces:
Take out the shoelaces to ensure you have full access to the tongue and eyelet area without obstruction. -
Tape off soles:
carefully apply painter’s tape along the rubber sole line. Press down firmly on the edge to prevent any gold paint from bleeding onto the white rubber. -
Plan the layout:
Using a pencil or air-erasable marker, lightly sketch your celestial design. Focus on the toe area for the main elements like crescents and larger stars, then plan scattered smaller elements trailing up the sides.
Paint consistency check
If your metallic paint is too thick, don’t add water, which breaks down acrylic bonds. Use a fabric medium to thin it for smoother lines.
Step 2: Painting the Gold Elements
-
Outline the crescent moon:
Start with the focal point: the large crescent moon on the outer toe box. Use your finest brush (size 000) loaded with metallic gold paint to verify the outline is crisp before filling it in. -
Create starbursts:
Paint the eight-pointed stars next. Start with a simple cross (+), then add a diagonal cross (x) over it. Extend the vertical and horizontal lines slightly longer than the diagonal ones for a classic twinkle effect. -
Add solid circles:
Dip the handle end of your paintbrush into the gold paint to create perfect dots. Vary the pressure to create different sizes of planets or distant stars around your main elements. -
Detail the constellations:
Connect tiny dots with very thin lines to form constellations. You can create real ones like Cassiopeia or the Big Dipper, or invent your own whimsical shapes. -
Refine the edges:
Go back over your main shapes. I find that a second thin coat on the crescent moon really helps the metallic pigment pop and look solid rather than streaky. -
Create stardust texture:
Using the very tip of your smallest brush, add clusters of distinct, tiny dots. These should look like trails of stardust weaving between the larger celestial bodies.
Sharper star points
For ultra-sharp starburst points, place a tiny piece of tape as a stencil for the lines, or use a toothpick instead of a brush for the tips.
Step 3: Adding the Glow & Finishing
-
Apply the glow layer:
Once the gold is fully dry to the touch, take your glow-in-the-dark paint. Carefully paint *over* selected gold stars or add invisible glow dots in the negative white space for a surprise effect when the lights go out. -
Wait for curing:
Allow the paint to cure according to the bottle instructions. This usually takes at least 24 hours. Do not rush this step, or the paint may crack. -
Erase guidelines:
If you can still see any pencil or marker lines, gently erase them or wipe them away with a damp Q-tip, being careful not to rub the painted areas vigorously. -
Seal the artwork:
Take the shoes outside or to a well-ventilated area. Spray a light, even coat of clear acrylic sealer over the painted sections to waterproof your design and protect the metallic sheen. -
Re-lace:
Once the sealer is dry, remove the tape from the soles and re-lace your shoes. Fresh white laces keep the look crisp, or switch to satin ribbon for a softer vibe.
Enjoy walking on starlight with your custom celestial sneakers
Mixed-Media Collage With Fabric Patches and Paint
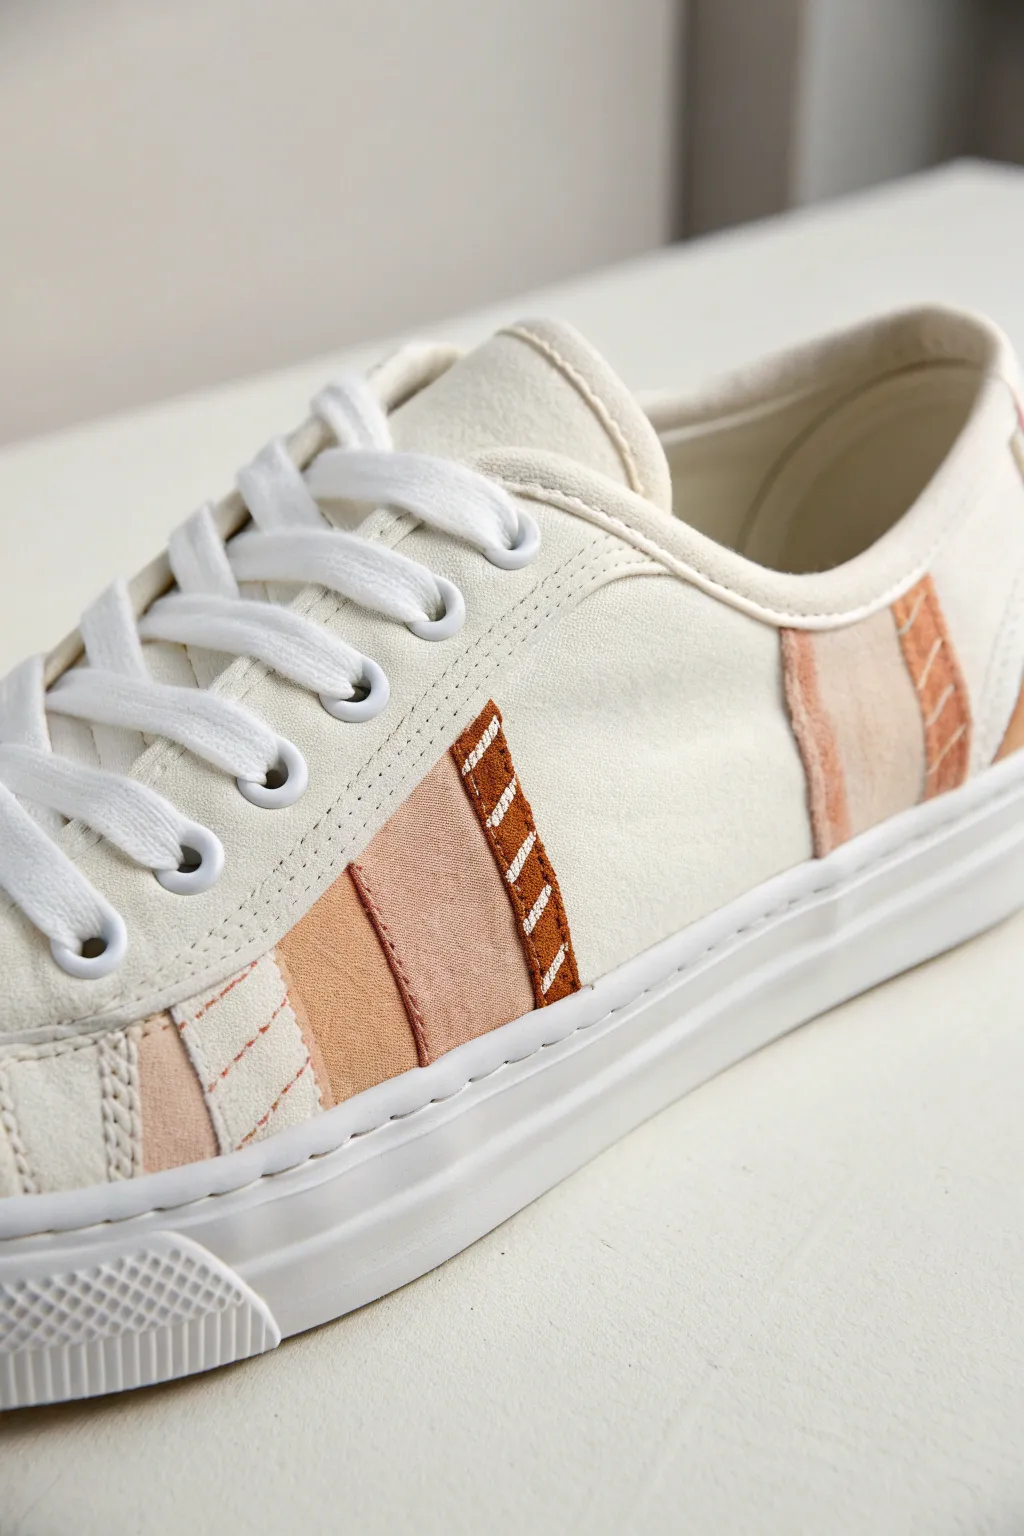
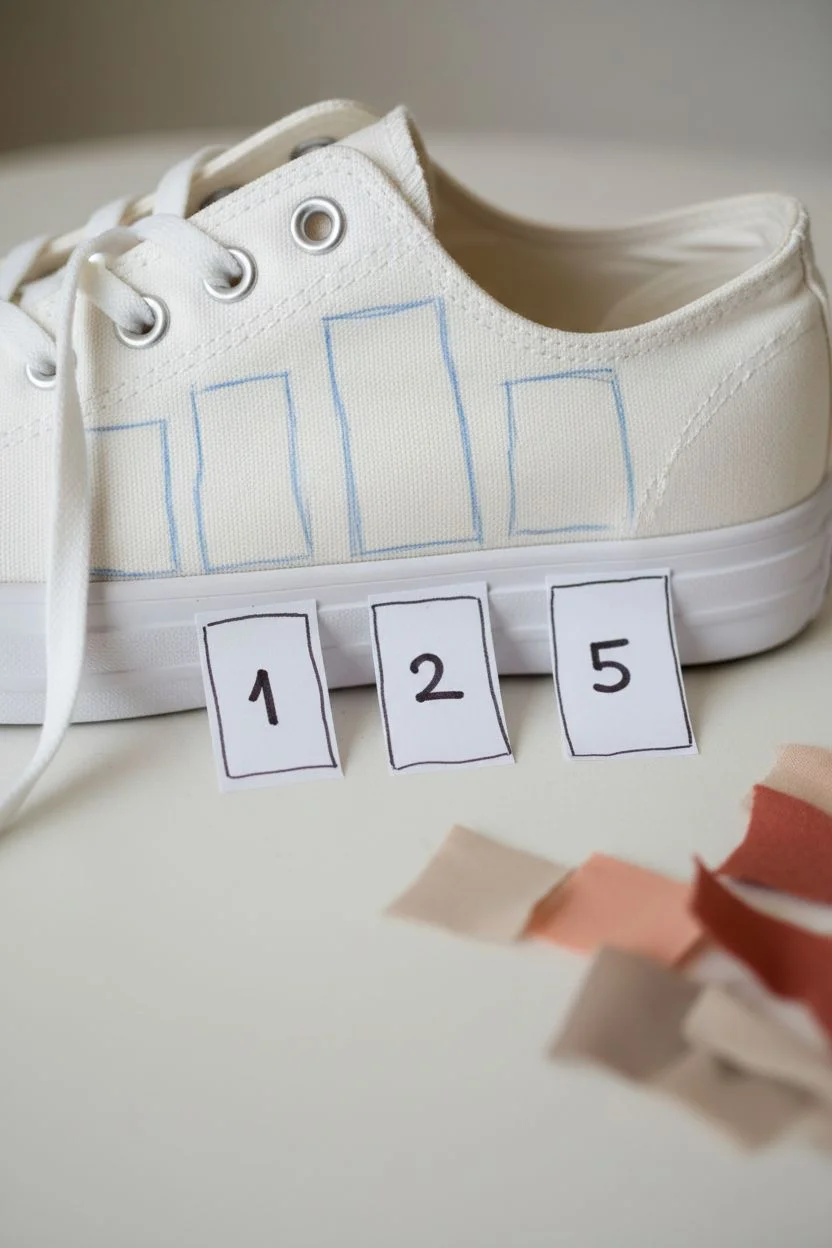
Transform a simple pair of white canvas sneakers into a textured, earthy-toned masterpiece using mixed-media techniques. This project combines applied fabric scraps with strategic fabric painting to create a cohesive, vintage-inspired patchwork design that wraps beautifully around the shoe’s profile.
How-To Guide
Materials
- White canvas sneakers (low-top)
- Fabric scraps (cotton or linen in beige, peach, and rust tones)
- Fabric paint (soft pink, terracotta, white)
- Fabric glue (high-strength, washable)
- Embroidery floss or thick thread (white)
- Embroidery needle
- Fabric stiffener (optional)
- Small flat paintbrush
- Fine liner brush
- Fabric scissors
- Tailor’s chalk or disappearing ink pen
- Masking tape
Step 1: Planning and Preparation
-
Prep the canvas:
Begin by removing the laces from your sneakers to ensure you have an unobstructed workspace. If intended to be worn, wipe the canvas down with a damp cloth to remove any surface dust or sizing. -
Map out the design:
Using tailor’s chalk, lightly sketch four to five vertical rectangular sections along the side of the shoe. These should start near the midsole and extend upward toward the laces or ankle collar. -
Create a template:
Cut small pieces of paper to match the shapes of your chalk outlines. Number them so you remember which fabric or paint color goes where.
Sticky Situation
Dealing with fabric fraying too much? Apply a tiny bead of clear nail polish or Fray Check along the edges of your cut fabric strips before gluing them down to lock the threads in place.
Step 2: Applying the Textile Patches
-
Select your fabrics:
Choose two fabric scraps with distinct textures—perhaps a darker rust cotton and a lighter beige linen. I find that varying the weave adds a lot of visual interest. -
Cut the fabric strips:
Using your paper templates, cut your fabric pieces. For a raw, deconstructed look like the reference photo, allow the edges to fray very slightly, or cut them perfectly straight for a cleaner finish. -
Prepare the fabric edges:
If your fabric is too flimsy, dab a tiny amount of fabric stiffener on the back. For the darker rust strip, consider fraying the sides intentionally to expose the weave. -
Glue the first patch:
Apply a thin, even layer of high-strength fabric glue to the back of your rust-colored strip. Press it firmly onto one of your pre-marked sections, smoothing out any air bubbles. -
Secure the second textile:
Repeat the gluing process with a beige or peach fabric scrap in a different section, perhaps near the heel. Ensure the edges lie flat against the canvas.
Needle Knowledge
Shoe canvas is tough. Use a sharp chenille needle or a leather needle. If it’s too hard to push through, pre-poke your stitch holes with a thumb tack before sewing.
Step 3: Painting the Faux Patches
-
Masking tape application:
For the sections that will be painted instead of glued, apply masking tape along the vertical lines to ensure crisp, sharp edges. -
Mix your colors:
Mix a soft peach or terracotta shade of fabric paint. It should complement the actual fabric pieces you’ve already glued down. -
Paint the blocks:
Use a small flat brush to paint the designated open sections. Apply thin coats, letting the paint soak into the canvas weave. -
Remove tape:
Peel off the masking tape while the paint is still slightly tacky to avoid pulling up dried flakes. Let this dry completely before moving on.
Step 4: Adding Embroidered Details
-
Simulate stitching:
To marry the painted sections with the fabric sections, stick simple lines of white fabric paint over the darker fabric patches to mimic stitch marks. -
Real stitching prep:
Thread an embroidery needle with white floss. You will be adding real stitches to the lighter fabric patches for texture. -
Execute the stitching:
Sew simple diagonal or vertical running stitches through the glued fabric patch and the shoe canvas. Use a thimble, as pushing through canvas can be tough. -
Detailing the painted zones:
On the painted peach sections, distinct red ‘stitch’ lines are visible in the reference. Use a fine liner brush and rust-colored paint to draw faint, dashed diagonal lines to simulate thread. -
Final texture check:
Inspect your work. If any fabric edges are lifting, apply a tiny dot of glue. Ensure painted ‘stitches’ look consistent with the real thread.
Step 5: Finishing Touches
-
Heat set the paint:
Once all paint and glue are dry, use a hairdryer on high heat (or an iron with a protective cloth) to heat-set the fabric paint, making it more durable. -
Clean up:
Erase any visible chalk lines with a damp cotton swab. -
Re-lace:
Re-lace your sneakers, perhaps opting for a fresh white pair to match the clean canvas, and display your work.
Now step out in style with your unique, mixed-media sneakers that blur the line between fashion and collage art

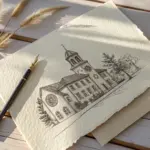


Have a question or want to share your own experience? I'd love to hear from you in the comments below!