I’m obsessed with how silhouette rock painting turns a tiny stone into a whole scene with just high-contrast shapes and a juicy blended gradient sky. Here are my go-to silhouette rock painting ideas, starting with the classic sunset looks and drifting into moodier, more unexpected scenes.
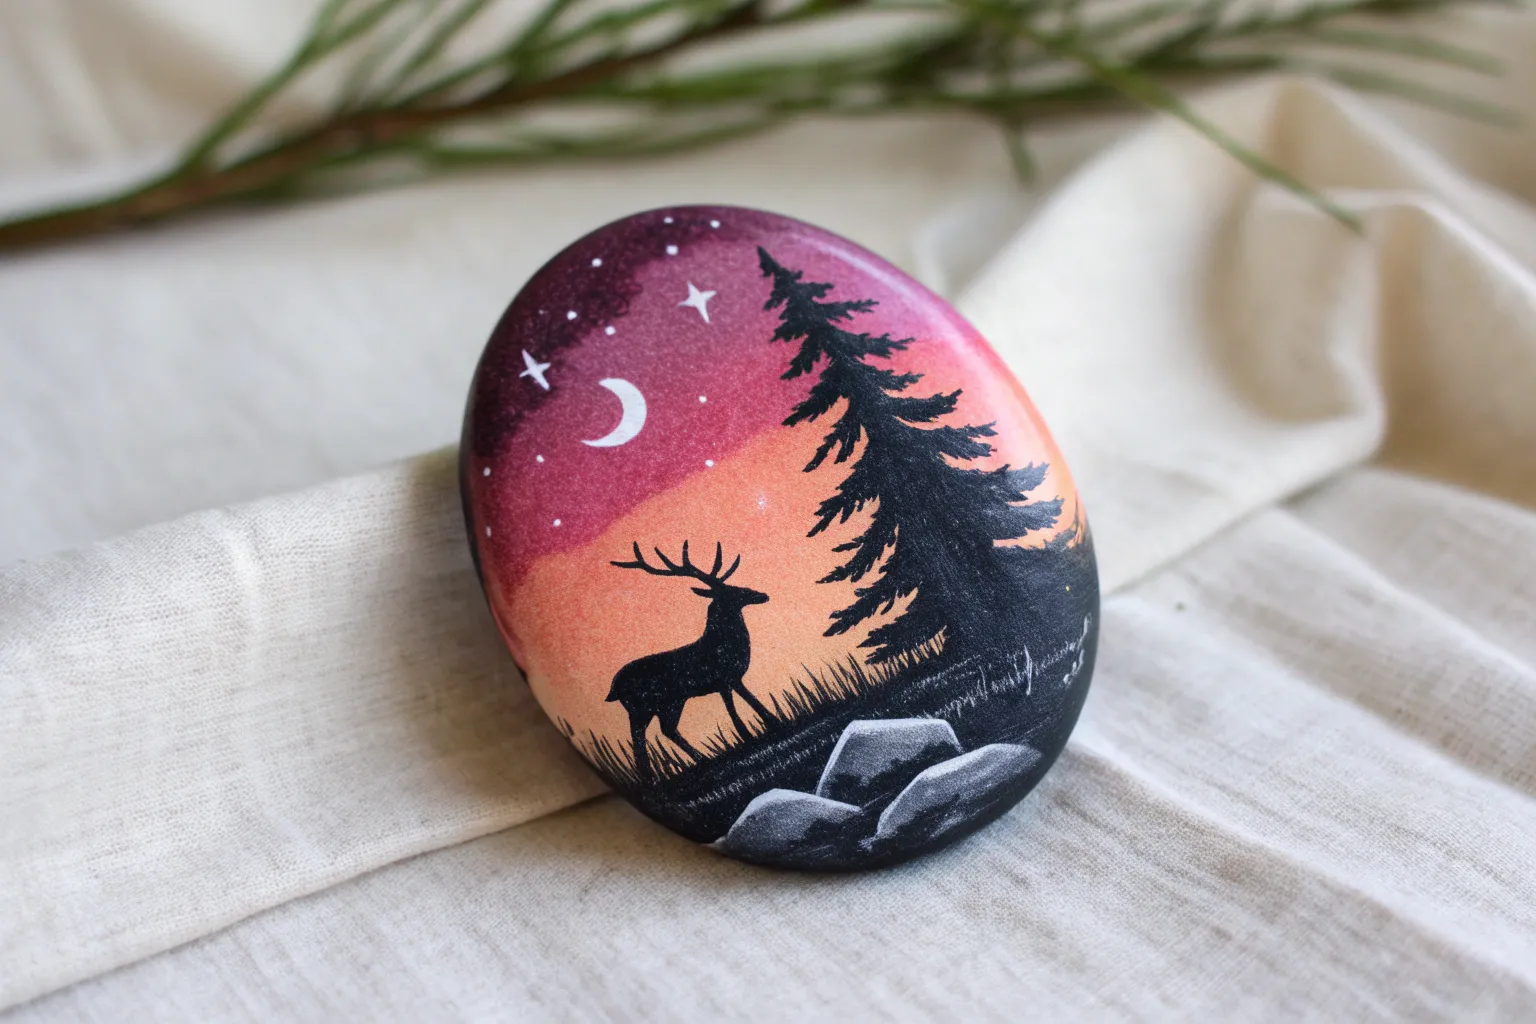
Sunset Tree Line
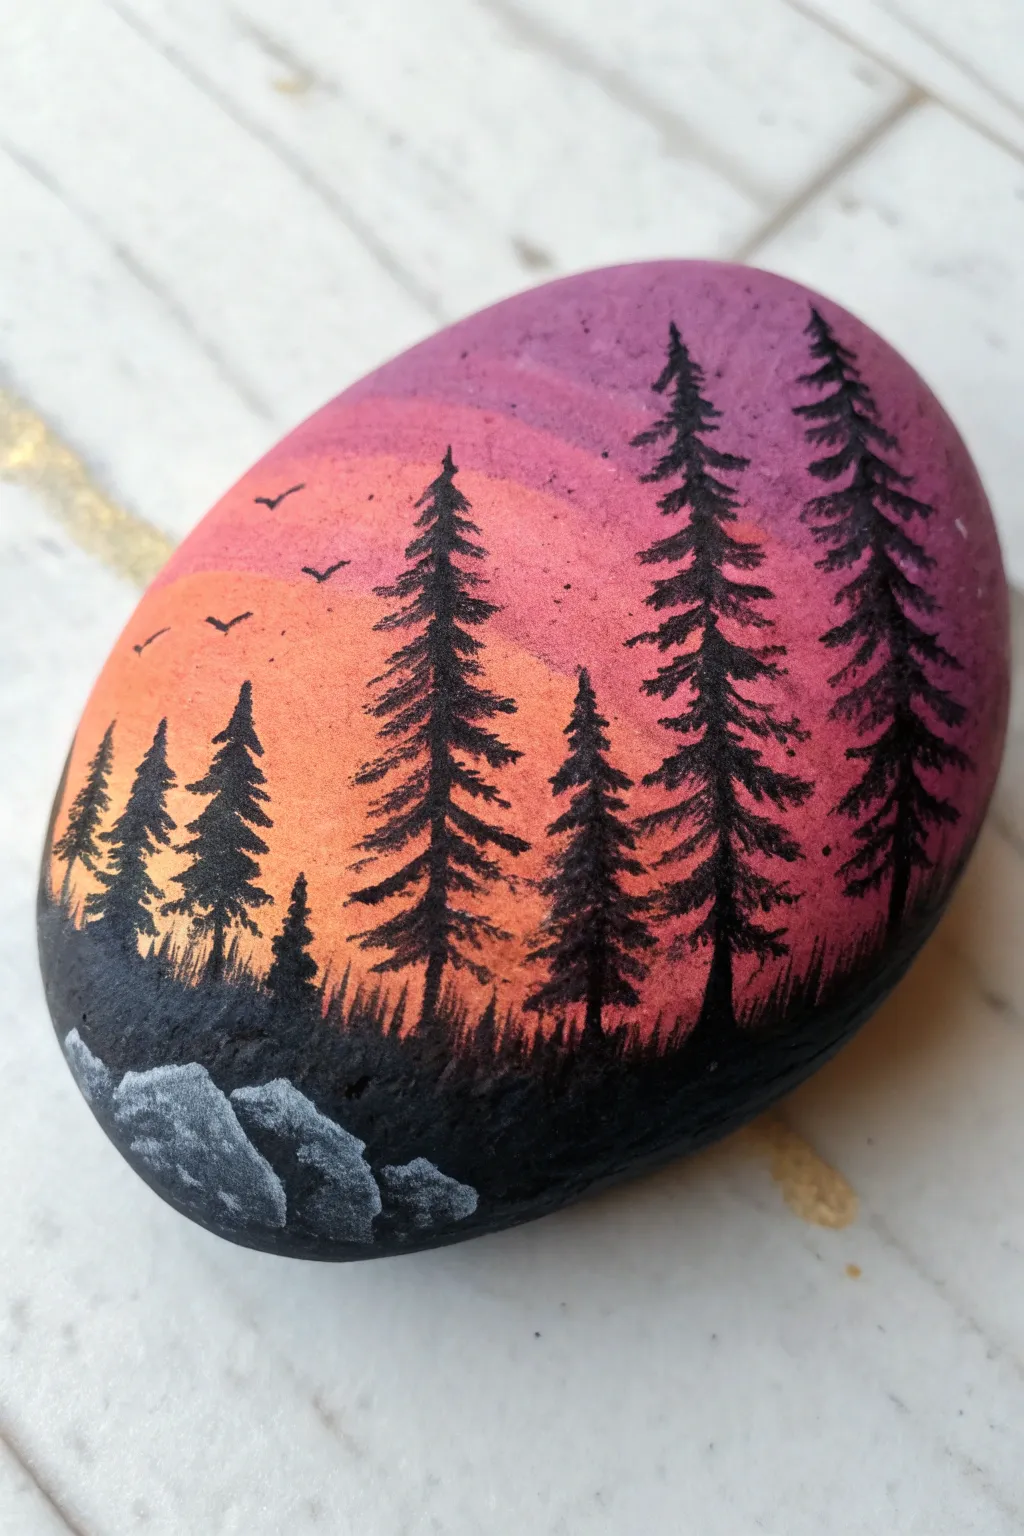
Transform a simple stone into a breathtaking woodland scene with this evocative silhouette painting. The project captures the serene transition from dusk to night, featuring craggy pine trees set against a vibrant purple and orange gradient sky.
Detailed Instructions
Materials
- Smooth, oval river rock (clean and dry)
- Acrylic paints: Violet/Purple, Magenta, Orange, Yellow, Black, White, Grey
- Paintbrushes: Flat brush (for blending), Liner brush (size 0 or 00), Round brush (size 2)
- Palette or paper plate
- Cup of water
- Paper towels
- Acrylic clear sealer (spray or brush-on)
Step 1: The Sunset Sky Gradient
-
Base Prep:
Ensure your rock is perfectly clean and dry. If the rock is very dark, you might want to paint a thin coat of white first to make the sunset colors pop, though this is optional. -
Colors at the Top:
Load your flat brush with violet paint. Start painting the top third of the rock, following the natural curve of the stone. -
Mid-Tone Transition:
Without fully rinsing your brush, dip into magenta. Paint the middle section, slightly overlapping with the wet violet edge to encourage blending. -
Warm Low Tones:
Wipe your brush lightly, then pick up orange. Paint below the magenta, again overlapping the wet edge. Finally, add a touch of yellow at the very bottom horizon line for the brightest glow. -
Smoothing the Blend:
While the paint is still damp, use a clean, slightly moist brush to run horizontal strokes back and forth over the transition lines. This creates that seamless ombre effect. -
Drying Time:
Let the gradient sky dry completely. This step is crucial; if the sky is wet, your sharp black trees will bleed into blurry blobs.
Muddy Sky Fix
If blending colors creates brown mud, let it dry completely. Then repaint the gradient layers, rinsing your brush thoroughly between conflicting colors like purple and yellow.
Step 2: Painting the Silhouettes
-
Establishing the Ground:
Using a round brush and black acrylic, paint a solid, curved line across the bottom fourth of the rock to create the forest floor. Fill it in completely solid black. -
Tree Trunks:
Switch to your finest liner brush. Paint thin, vertical lines rising from the black ground. Vary their heights—place tall ones on the right and shorter ones on the left to create depth. -
Creating Foliage Texture:
Starting near the top of a trunk, create the pine branches. Use a gentle stippling or tapping motion with the liner brush tip. Start narrow at the jagged top and widen the branches as you move down. -
Refining the Pines:
Don’t make the trees perfectly symmetrical; nature is messy. Let some branches droop slightly. I like to keep the paint slightly thick here so the texture stands out against the smooth sky. -
Adding Smaller Trees:
Fill the gaps between your main trees with much smaller, simpler tree shapes. These distant trees create the illusion of a dense forest receding into the background. -
Stippling the Grass:
Where the tree trunks meet the ground, use the tip of your brush to tap tiny vertical grass blades. This softens the hard line of the horizon.
Starry Night Option
Before painting the trees, flick an old toothbrush with thinned white paint over the darker purple sections to create a field of distant stars.
Step 3: Foreground Details & Finish
-
Adding Birds:
With the very tip of your liner brush and black paint, add tiny ‘V’ or ‘M’ shapes in the orange section of the sky to represent birds in flight. -
Rock Formation Base:
In the bottom left corner, paint a few mounds overlapping the black ground. These will be your foreground boulders. -
Highlighting the Rocks:
Mix a light grey (or use white sparingly). Dry brush the tops of these mounds to give them rocky texture and dimension, leaving the bottoms black for shadow. -
Final Inspection:
Check for any bald spots in your black silhouettes and touch them up. Ensure the birds look crisp. -
Sealing:
Once the entire painting is bone dry—wait at least an hour—apply a clear acrylic sealer. This protects the paint from chipping and gives the colors a permanent ‘wet’ look.
Display your finished stone on a desk or windowsill to enjoy a permanent sunset view


Mountain Ridge Horizon
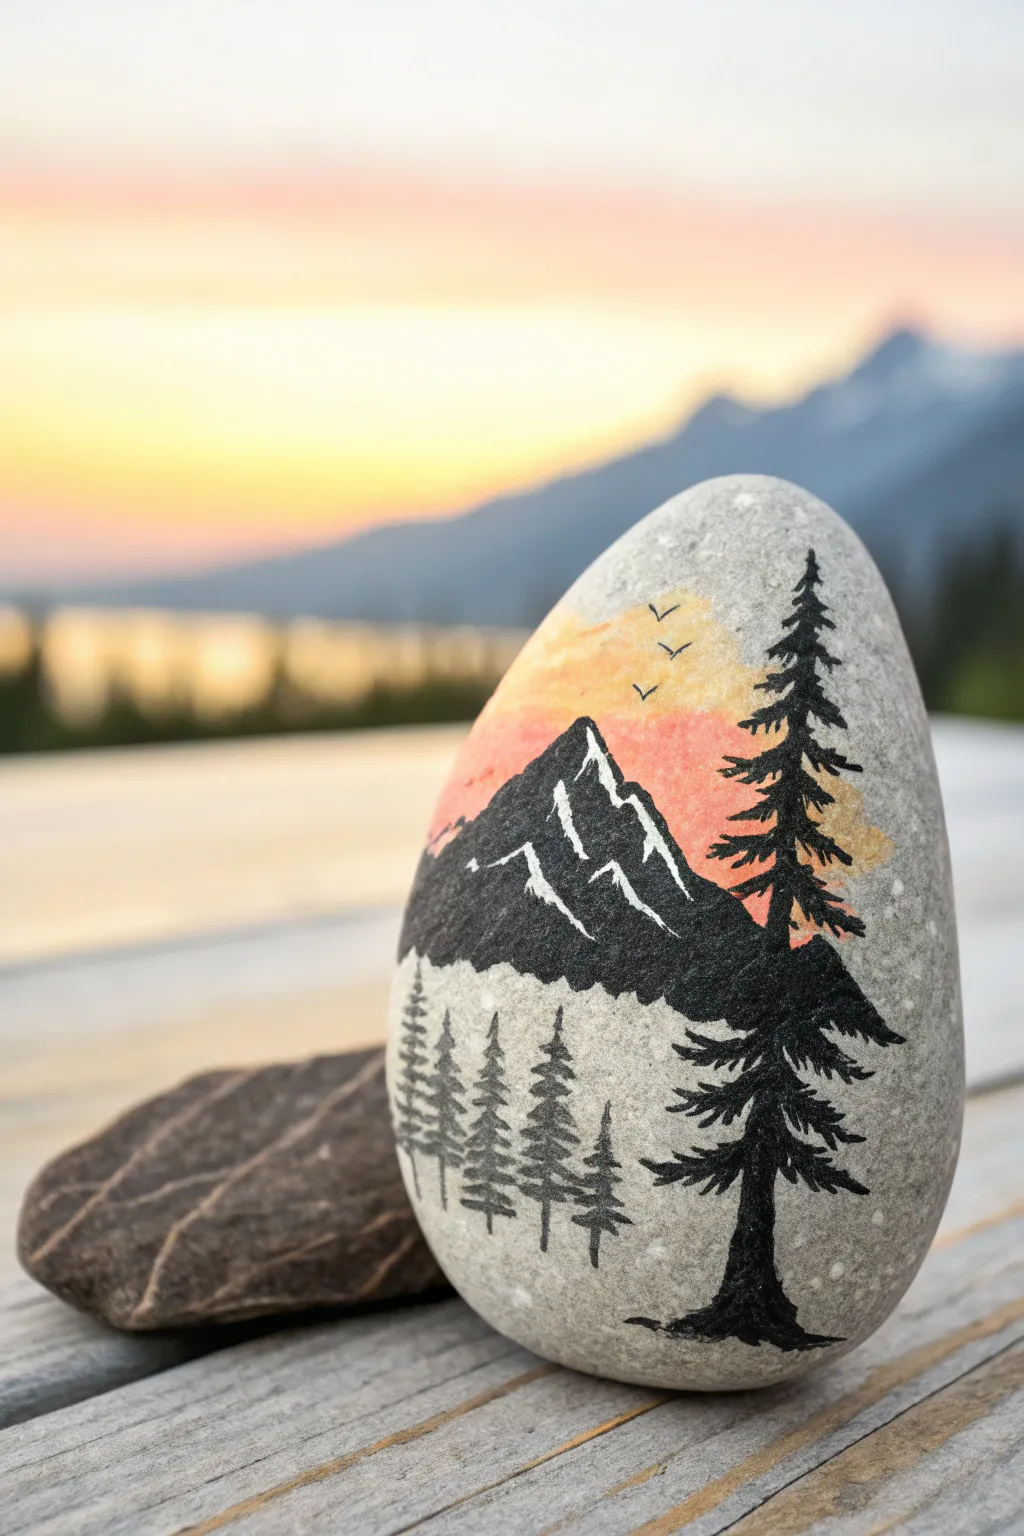
Capture the serenity of twilight on a stone canvas with this beautiful silhouette landscape. Featuring rugged peaks, towering pines, and a warm sunset gradient, this project turns a simple river rock into a miniature window to the wilderness.
Step-by-Step Guide
Materials
- Smooth, oblong river rock (light grey or white base)
- Acrylic paints (Titanium White, Mars Black, Cadmium Orange, Primary Yellow)
- Small flat brush (size 4 or 6)
- Fine liner brush (size 0 or 00)
- Water cup and paper towels
- Pencil (optional for sketching)
- Spray sealer or varnish (matte finish)
Step 1: Setting the Sky
-
Clean your canvas:
Begin by washing your rock with soap and water to remove any dust or oils. Let it dry completely so the paint adheres properly. -
Mix the sunset wash:
On your palette, mix a very small amount of Primary Yellow with a tiny drop of water to make it translucent. We want the natural stone texture to show through slightly. -
Apply the upper sky:
Using your flat brush, paint the upper third of the rock with the yellow wash. Keep the edges soft and feathery; don’t create a hard line. -
Add the orange glow:
While the yellow is still slightly damp, mix a dilute wash of Cadmium Orange. Apply this just below the yellow area, blending them gently where they meet to create a soft transition. -
Let it cure:
Allow the sky portion to dry completely. Since these are thin washes, this should only take about 5-10 minutes.
Natural Stone Texture
Don’t basecoat the whole rock white first. Leaving the grey stone visible creates a natural earthy tone that grounds the bright sunset colors.
Step 2: Painting the Mountains
-
Outline the peaks:
Switch to your liner brush and Mars Black paint. Outline the shape of a jagged mountain range across the middle of the rock, overlapping the bottom edge of your sunset sky. -
Fill the silhouette:
Fill in the mountain shape with solid black. Extend the black paint down slightly, but leave the bottom third of the rock unpainted for the foreground trees. -
Add snow caps:
Once the black mountain is dry to the touch, take your fine liner brush with Titanium White. Paint jagged, zig-zag lines down the right side of the mountain peaks to suggest snow catching the light. -
Refine the snow:
Add smaller dabs of white on the left sides of the peaks, but keep the majority of the snow on one side to mimic a consistent light source.
Step 3: Adding the Forest
-
Anchor the main tree:
Using the liner brush and black paint, draw a clean vertical line on the right side of the rock. This will be the trunk of your large foreground pine. -
Build the branches:
Starting from the top of the trunk, paint small, downward-sloping lines. As you move down the trunk, make the branches wider and slightly thicker. -
Create texture:
Use quick, flicking motions with the very tip of the brush to create the look of pine needles on the ends of the branches. -
Paint the small forest:
On the left side of the rock, paint three or four smaller vertical lines. Add tiny horizontal dashes across these lines to create distant, smaller pine trees. -
Vary sizes:
I prefer to make these smaller trees different heights to keep the composition looking natural and organic.
Metallic Glint
Mix a tiny amount of metallic gold paint into your yellow sunset wash to make the sky shimmer when the rock catches the light.
Step 4: Final Details
-
Paint the birds:
With the finest point of your liner brush and black paint, add three tiny ‘V’ shapes in the yellow part of the sky to represent birds in flight. -
Check opacity:
Look over your black silhouettes. If the stone is showing through too much, apply a second thin coat of black to make the shadows solid. -
Seal the artwork:
Once the paint is fully dry (give it at least an hour), spray the rock with a matte sealer to protect your landscape from chipping.
Place your finished mountain scene on a windowsill or desk to enjoy a permanent sunset view


Ocean Sunset and Palms
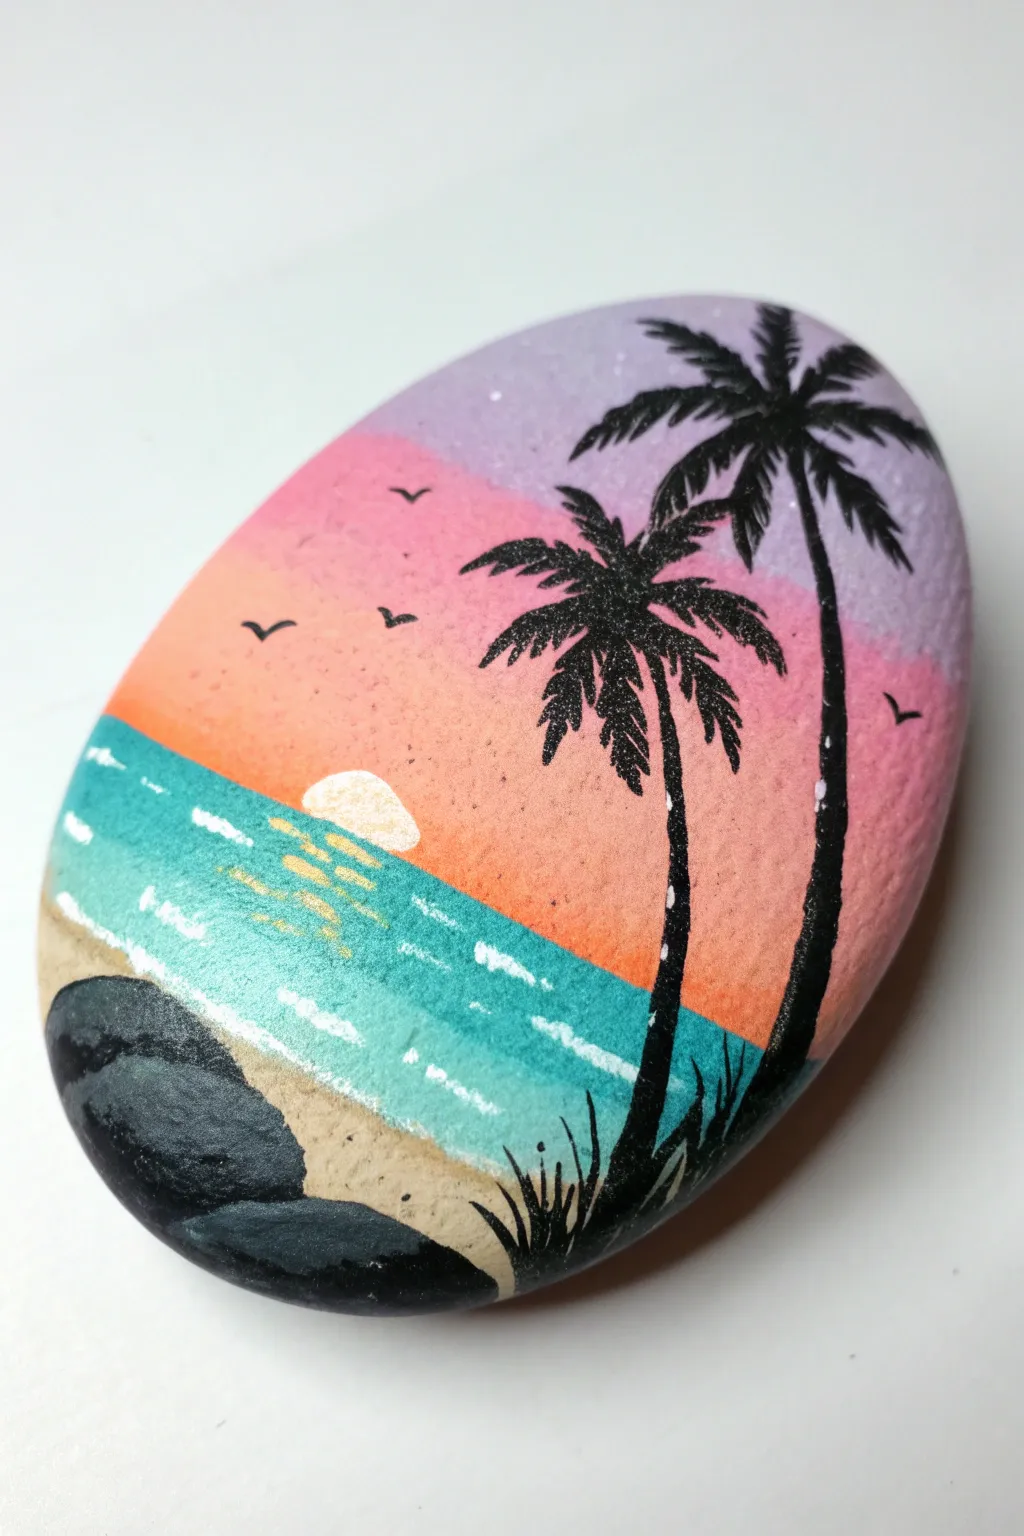
Capture the warmth of a summer evening with this vibrant ocean scene painted on a smooth stone. The brilliant gradient sky transitions perfectly into turquoise waters, framed by striking black palm tree silhouettes.
Step-by-Step Tutorial
Materials
- Smooth, oval-shaped river rock
- Acrylic paints (purple, pink, bright orange, teal/turquoise, white, beige, black, dark grey)
- Flat paintbrushes (medium and small)
- Fine liner brush or detail brush
- Posca paint pens (black and white) – optional but recommended
- Water cup and paper towels
- Clear spray sealant or varnish
Step 1: Creating the Background Gradient
-
Prepare the Surface:
Begin by washing your rock with soap and water to remove any dirt or oils. Let it dry completely before starting. -
Base Coat:
Paint a layer of white acrylic over the entire front surface of the rock. This primes the stone and ensures your sunset colors will pop vividly rather than soaking into the porous grey stone. -
Purple Sky:
Starting at the very top of the rock, paint a horizontal band of light purple. Keep the paint somewhat wet to allow for blending in the next step. -
Pink Transition:
Immediately below the purple, paint a band of bright pink. While both colors are still wet, use your brush to gently brush back and forth where they meet to create a soft, seamless blend. -
Orange Horizon:
Add a strip of bright orange below the pink, blending the seam again just like before. Extend this orange section down to just below the middle of the rock. -
Turquoise Ocean:
Below the orange horizon line, paint a band of turquoise or teal blue. Create a clean, straight line where the orange sky meets the blue water. -
Sandy Shore:
Fill the remaining bottom portion of the rock with a soft beige color for the beach. Let this entire background layer dry completely before moving on.
Blending Struggle?
If acrylics dry too fast to blend, use a ‘retarder’ medium or simply keep your brush slightly damp (not dripping) to keep the paint workable longer.
Step 2: Adding Details and Silhouettes
-
Sun Reflection:
Mix a tiny bit of white with yellow or use pale yellow paint. Create a small semi-circle sun peeking over the horizon line in the orange section, situated to the left side. -
Ocean Shimmer:
Using a very fine brush and the same pale yellow, paint small, dashed horizontal lines on the blue water directly below the sun to create a sparkling reflection. -
Waves:
With pure white paint and a liner brush (or white paint pen), draw thin, wavy lines across the turquoise area to represent wave crests. -
Shoreline Foam:
Dab white paint gently along the edge where the blue water meets the beige sand to create the look of sea foam washing up on the beach. -
Painting the Large Rock:
On the bottom left corner, paint a rounded, organic shape in dark grey or black to represent a large boulder sitting on the sand. -
Rock Highlights:
Mix a little white into your black paint to make a dark grey. Add subtle highlights to the top of the boulder to give it dimension and 3D form. -
Palm Tree Trunks:
Using black paint and a liner brush, paint two long, slightly curved lines on the right side of the rock. Make the trunks thicker at the base and thinner near the top. -
Palm Fronds:
At the top of each trunk, paint 5-7 curved lines radiating outward. Then, verify the paint is not too blobs, and flick small, quick strokes off each curved line to create the feathery palm leaves. -
Grass Detail:
At the base of the palm trees and around the boulder, flick your brush upward with black paint to create tufts of grass silhouette. -
Birds in Flight:
Add tiny ‘v’ shapes in the sky using black paint or a fine pen to represent distant birds flying near the sunset.
Pro Tip: Sharp Lines
For the ultra-fine palm leaves, dilute your black acrylic paint slightly with a drop of water. Inky consistency flows better for sharp, thin lines.
Step 3: Final Touches
-
Highlight the Trunk:
I like to add just a few tiny dots or dashes of white on the right side of the palm trunks to simulate light catching the bark. -
Sealing:
Once the artwork is 100% dry, take the rock to a well-ventilated area and spray it with a clear acrylic sealer to protect your painting from chipping and UV fading.
Place your finished tropical masterpiece on a desk or shelf to bring a little beach relaxation to your daily life


Desert Cactus Dusk
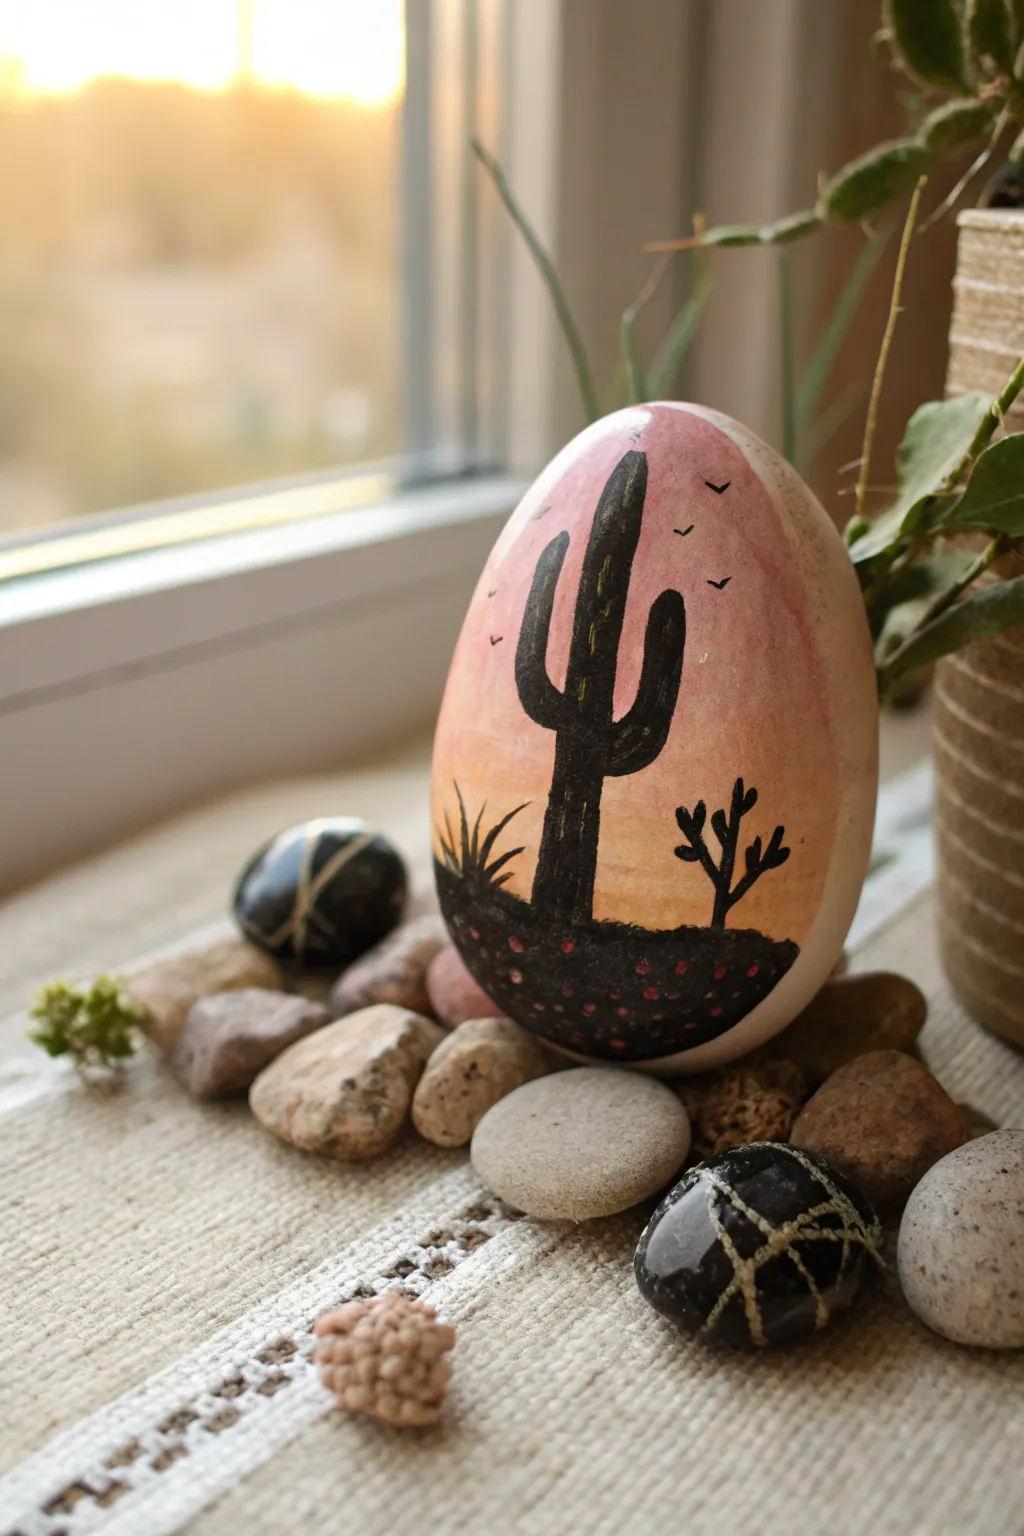
Capture the serene beauty of the American Southwest with this simple yet striking rock painting project. Using a smooth, egg-shaped stone, you’ll blend warm sunset hues to create the perfect backdrop for a bold cactus silhouette.
Detailed Instructions
Materials
- Smooth, egg-shaped river rock or gardening stone
- Acrylic paints: Titanium White, Rose Pink (or gentle magenta), Warm Yellow, Black
- Paintbrush: medium flat brush for blending
- Paintbrush: fine liner brush (size 0 or 00) for details
- Water cup and paper towels
- Palette or paper plate
- Pencil (optional)
- Spray varnish or clear acrylic sealer (matte or satin finish)
Step 1: Preparing the Canvas
-
Clean surface:
Begin by washing your stone thoroughly with soap and water to remove any dirt or oils. Let it dry completely in the sun or use a hairdryer to speed things up. -
Base coat:
Mix a small amount of Titanium White with a tiny drop of Rose Pink to create a very pale blush color. Paint the entire front face of the rock with this mixture to prime the surface and ensure your sunset colors pop.
Paint Lifting?
If blending the sky pulls up the base coat, let the white primer layer cure longer. Acrylics need to be fully dry before layering wet-on-wet blends.
Step 2: Painting the Sunset Gradient
-
Top section:
Load your medium flat brush with the Rose Pink paint. Apply this to the top third of the painted area, curving the strokes slightly to follow the shape of the rock. -
Middle transition:
Without cleaning your brush, pick up a little Titanium White and blend it into the bottom edge of the pink, pulling the color downward to create a softer, lighter pink in the middle section. -
Lower horizon:
Rinse your brush. Pick up your Warm Yellow and paint the bottom third of the background area. While the yellow is still wet, gently blend it upward into the pale pink section to create a soft, peachy transition where the colors meet. -
Refine the blend:
If the transition lines look too harsh, use a slightly damp, clean brush to gently feather the boundary between the yellow and pink layers until it looks like a smooth ombre sky. -
Let it dry:
Allow the background gradient to dry completely before moving on to the silhouette. This is crucial so the black paint doesn’t bleed into the wet sky.
Starry Night
For a night version, swap the pink/yellow sky for dark blue/purple. Once dry, flick an old toothbrush with white paint to create a starry galaxy background.
Step 3: Creating the Silhouette
-
Ground line:
Using black acrylic paint and your fine liner brush, paint a curved horizon line near the bottom of the rock, covering the lower edge of your yellow sky. -
Fill the earth:
Fill in the area below your horizon line with solid black paint to create the dark desert floor. -
Main cactus trunk:
Switch back to your liner brush. Paint a vertical line rising from the ground on the left-center side for the main trunk of the saguaro cactus, tapering it slightly rounded at the top. -
Cactus arms:
Add the characteristic arms of the saguaro. Paint one arm branching out to the left and curving upward, and a slightly higher arm branching to the right and curving up. Keep the edges smooth. -
Right-side vegetation:
On the right side of the ground, paint a smaller, spindly desert shrub or ocotillo silhouette using quick, thin upward strokes that branch out. -
Left-side details:
Add a small, spiky agave or yucca plant on the far left side of the ground using short, sharp flicking motions with the tip of your liner brush. -
Adding life:
Dip just the very tip of your liner brush into black paint and add three or four tiny ‘v’ shapes in the upper pink sky to represent distant birds.
Step 4: Final Touches
-
Texture details:
Once the black ground is dry, you can add subtle texture. Mix a dark grey or use a tiny dot of red mixed with black, and add tiny stippled dots along the bottom black area to suggest pebbles or sand texture. -
Highlighting (Optional):
If you want to give the cactus depth, mix a very dark grey and add extremely faint vertical lines on the cactus body, though solid black works perfectly for a true silhouette look. -
Sealing:
Once the entire painting is bone dry—I usually wait overnight to be safe—spray the rock with a clear matte or satin sealer to protect your artwork from chipping and fading.
Place your finished desert stone on a sunny windowsill or nestled among your house plants for a warm, artistic touch
BRUSH GUIDE
The Right Brush for Every Stroke
From clean lines to bold texture — master brush choice, stroke control, and essential techniques.
Explore the Full Guide
Birds Flying Across the Sun
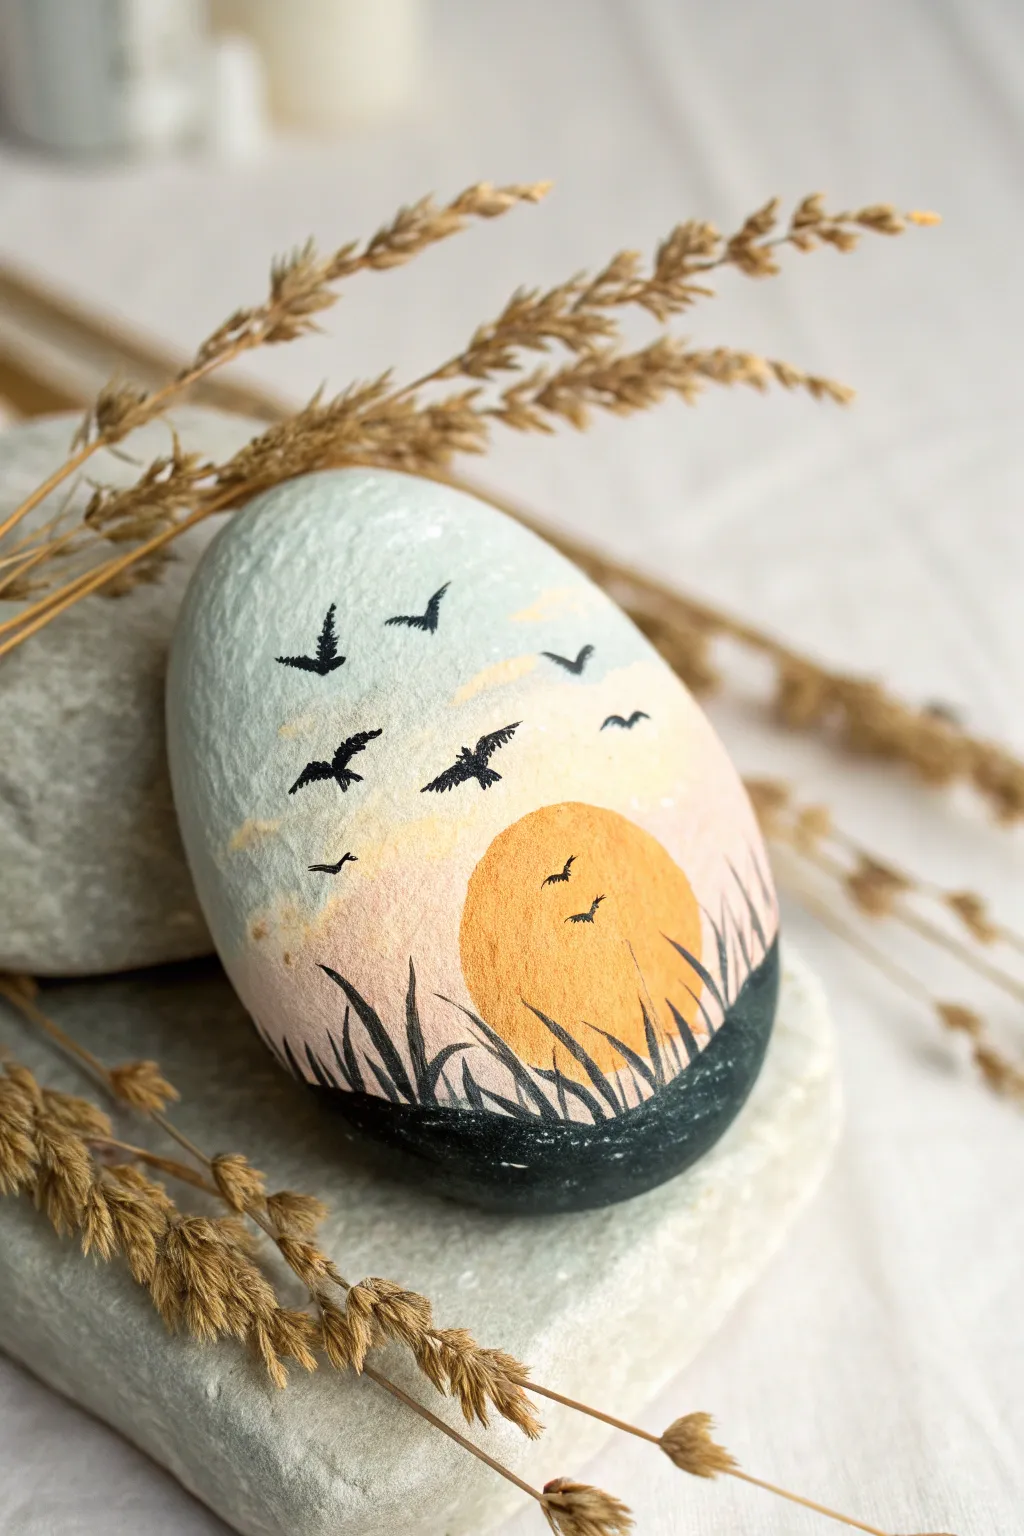
Capture the serene transition of day into night with this elegant painted stone project. Featuring a soft gradient sky, a glowing sun, and a flock of silhouette birds, this piece brings a warm, natural touch to any desk or garden shelf.
How-To Guide
Materials
- Smooth, oval-shaped river rock (cleaned and dried)
- Acrylic paints (light blue, white, pale yellow, peach/coral, golden yellow, black)
- Flat shader brush (size 6 or 8)
- Small round brush (size 2)
- Fine liner brush (size 0 or 00)
- Chalk or pencil (optional)
- Spray varnish or sealant (satin or matte)
Step 1: Preparing the Sky Gradient
-
Base coat:
Start by painting the entire face of the stone with a coat of white acrylic paint. This primer layer ensures your sky colors will look bright and opaque rather than muddy against the gray stone. -
Top sky color:
Using your flat brush, apply a soft, light blue paint to the top third of the stone. Curve the stroke slightly downward at the edges to mimic the shape of the rock. -
Middle transition:
While the blue is still slightly wet, mix a tiny amount of white with pale yellow. Paint the middle band of the stone, gently blending upward into the blue to create a soft, hazy transition. -
Horizon glow:
For the bottom third (before the dark ground), apply a peach or coral color. Blend this upward into the pale yellow section. I like to keep this stroke horizontal to suggest the horizon line. -
Dry time:
Allow the gradient background to dry completely. It must be dry to the touch so the crisp details added later won’t smear into the sky.
Gradient Pro Tip
Work quickly while blending the sky colors. If the paint dries too fast, dip your brush in a tiny bit of water or glazing medium to keep the acrylics workable for smoother blending.
Step 2: Painting the Sun
-
Outline the sun:
If you aren’t confident with freehand circles, lightly trace a circle shape in the lower-middle section using a pencil or piece of chalk. It should sit low in the sky, ready to set. -
Fill the sun:
Use a round brush loaded with golden yellow paint to fill in the circle. Make the edges as neat as possible. -
Texture:
To give the sun that warm, glowing texture seen in the photo, dab a tiny bit of darker orange or peach onto the wet yellow paint and stipple it gently. This adds depth so the sun isn’t just a flat yellow sticker.
Level Up: Cloud Texture
Before painting the birds, use a dry sponge to very lightly dab thin white clouds across the blue and yellow sections for a wispy, atmospheric effect.
Step 3: Adding Silhouettes
-
Ground foundation:
Using black paint and a medium brush, paint a curved hill at the very bottom of the rock. This anchors your scene. -
Tall grass blades:
Switch to your fine liner brush. With black paint, flick quick, upward strokes starting from the black ground. Vary the lengths and curves; some should sweep left, some right, to look like natural wind-blown grass. -
Overlap effect:
Ensure some of the grass blades overlap the bottom of the sun. This crucial step pushes the sun into the background and creates a sense of distance. -
Bird formation:
With the finest liner brush, paint small ‘V’ creates in the sky. To make them look like birds, thicken the center of the ‘V’ slightly (the body) and make the wings taper to sharp points. -
Size variation:
Paint the birds in different sizes. Larger ones should be higher up to appear closer, while smaller specks near the horizon create perspective. -
Sun birds:
Paint two small bird silhouettes directly over the yellow sun. The strong contrast here is the focal point of the artwork. -
Final check:
Look over your composition. If the sky looks too empty, add one or two more tiny birds, but avoid overcrowding the scene.
Step 4: Sealing
-
Protect the art:
Once the black paint is fully cured (give it at least an hour), spray the stone with a clear varnish. A matte finish looks natural, while gloss gives it a ‘wet look’ sheen.
Now you have a peaceful sunset captured in stone that will never fade
Birds on a Wire
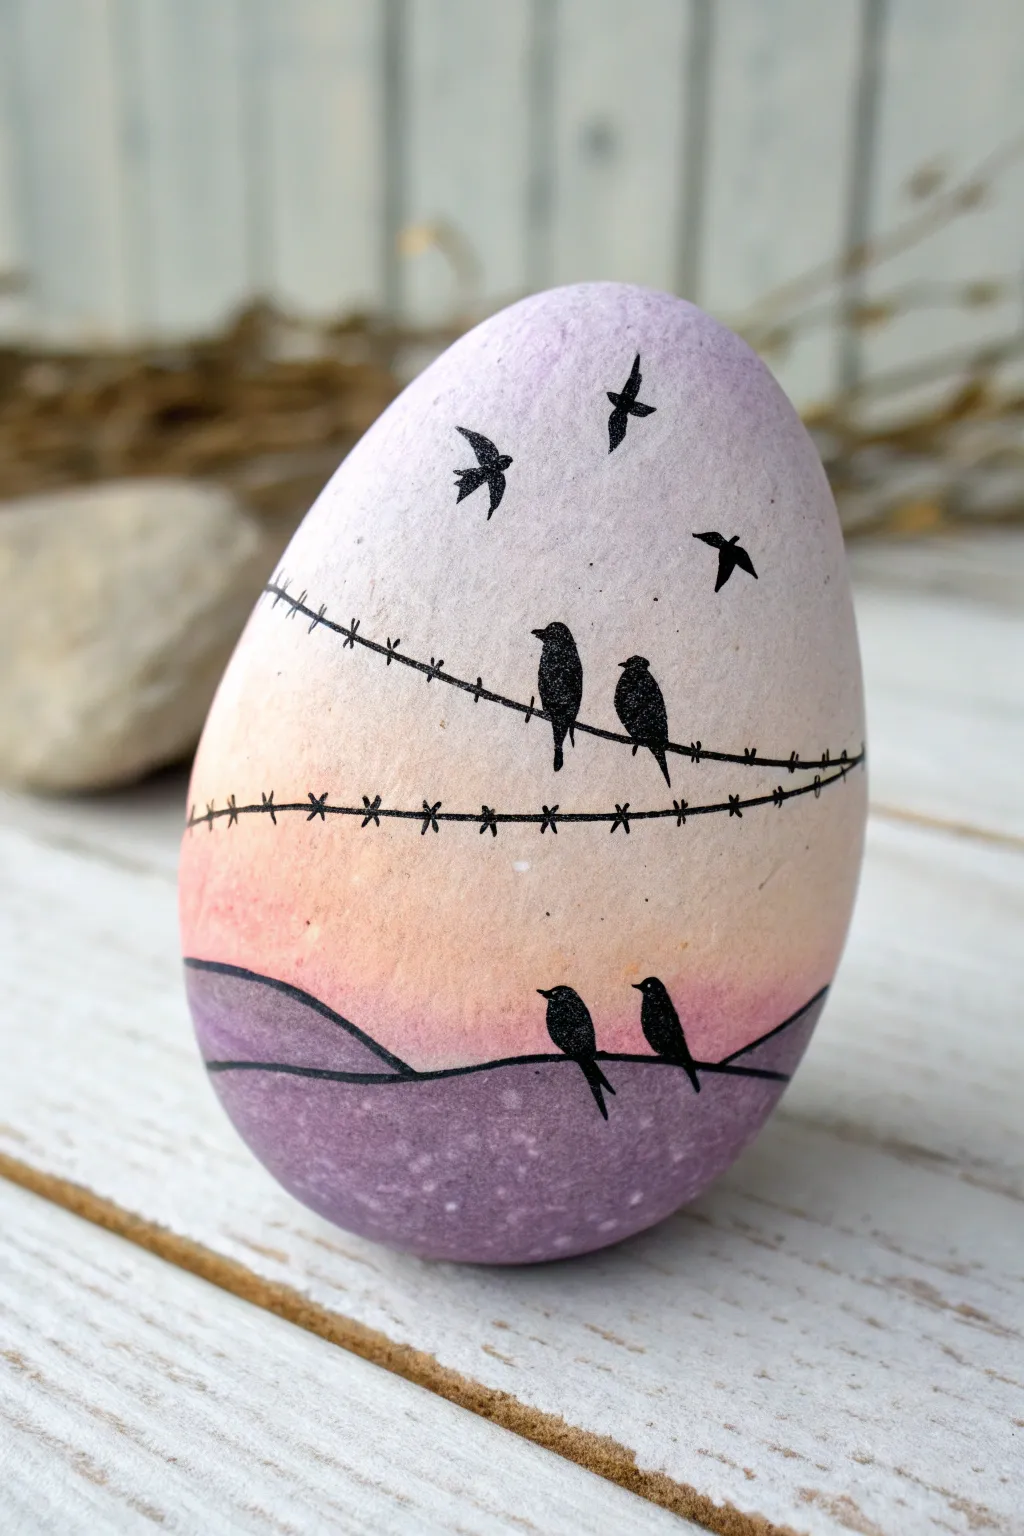
Transform a simple egg-shaped stone into a serene landscape featuring delicate bird silhouettes against a pastel sunset. This project captures the quiet beauty of dusk with soft blended gradients and crisp, high-contrast black details.
Step-by-Step
Materials
- Smooth, egg-shaped rock or wooden egg
- White acrylic paint or gesso (for priming)
- Acrylic paints: Lavender/Light Purple, Peach/Light Orange, White
- Makeup sponge or small sponge dabber
- Extra-fine tip black paint pen (0.5mm or 0.7mm)
- Water and paper towels
- Matte finish spray sealant
Step 1: Preparing the Canvas
-
Clean and Dry:
Begin by thoroughly washing your rock with soap and water to remove any dirt or oils. Let it dry completely before starting. -
Prime the Surface:
Apply a coat of white acrylic paint or gesso over the entire surface. This bright white base ensures your pastel sunset colors will pop rather than looking muddy. -
Second Coat:
If the stone’s natural color still peeks through after the first coat dries, apply a second layer of white and allow it to dry fully.
Step 2: Creating the Sunset Gradient
-
Top Color Application:
Squeeze a small amount of lavender paint onto your palette. Using a makeup sponge, dab this color onto the top third of the egg, fading it out as you move downward. -
Bottom Color Application:
Clean your sponge or use a fresh side. Dab the same lavender color onto the bottom quarter of the rock to create the ground base, leaving the middle section empty for now. -
Middle Glow:
Take your peach or light orange paint on a clean sponge section. Dab this into the middle band of the egg, overlapping slightly with the purple areas above and below. -
Blending the Horizon:
While the paint is still slightly tacky, use the sponge to gently tap the areas where the peach meets the lavender. This creates a soft, seamless transition typical of a sunset sky. -
Softening the Look:
If the colors feel too intense, lightly dab a tiny amount of white paint over the transition zones to mute them and create a hazy atmosphere. Let this background layer dry completely.
Ink Smudge Rescue
If you smudge the black ink while it’s wet, wait for it to dry completely, then dab a tiny bit of the background paint color over the mistake to cover it like correction fluid.
Step 3: Painting the Silhouette Details
-
The Ground Line:
Using your fine-tipped black paint pen, draw a wavy, uneven line across the bottom section where the purple ground meets the peach sky to establish the rolling hills. -
Wired Lines:
Draw two distinct horizontal lines across the middle section. These should dip slightly in the center to mimic the natural sag of telephone wires. -
Adding Barbs:
Transform the plain lines into barbed wire by drawing tiny ‘X’ marks along the wires at regular intervals. Keep them small and precise. -
Perching Birds:
Draw two birds sitting on the upper wire. Start with a small oval for the body and a smaller circle for the head, then fill them in with solid black. -
Ground Birds:
Add two more birds perched on the rolling hill line at the bottom. I like to pose them facing slightly different directions to add interest. -
Adding Beaks and Tails:
With the very tip of your pen, add tiny triangular beaks and elongated tail feathers to all the birds. A light touch is crucial here. -
Sky Details:
In the upper lavender section, draw three or four flying birds. Simple ‘V’ shapes or slightly more detailed curved wings work perfectly to suggest movement. -
Stars and Speckles:
For a magical touch, use an old toothbrush or a stiff brush to gently spatter minute white dots over the purple ground area, simulating dew or distant textures.
Metallic Magic
For a magical twist, use metallic gold or silver paint for the barbed wire lines instead of black. It catches the light beautifully and adds elegance.
Step 4: Finishing Touches
-
Review and Refine:
Check your silhouettes for any gaps in the black ink. Go over the birds one last time to ensure they are opaque and solid black. -
Sealing:
Once the black ink is 100% dry (give it at least an hour), spray the entire rock with a matte sealant to protect your artwork from scratches and fading.
Display your peaceful sunset creation on a small stand or nestled in a decorative nest to enjoy the view

PENCIL GUIDE
Understanding Pencil Grades from H to B
From first sketch to finished drawing — learn pencil grades, line control, and shading techniques.
Explore the Full Guide
Cat on a Moonlit Branch
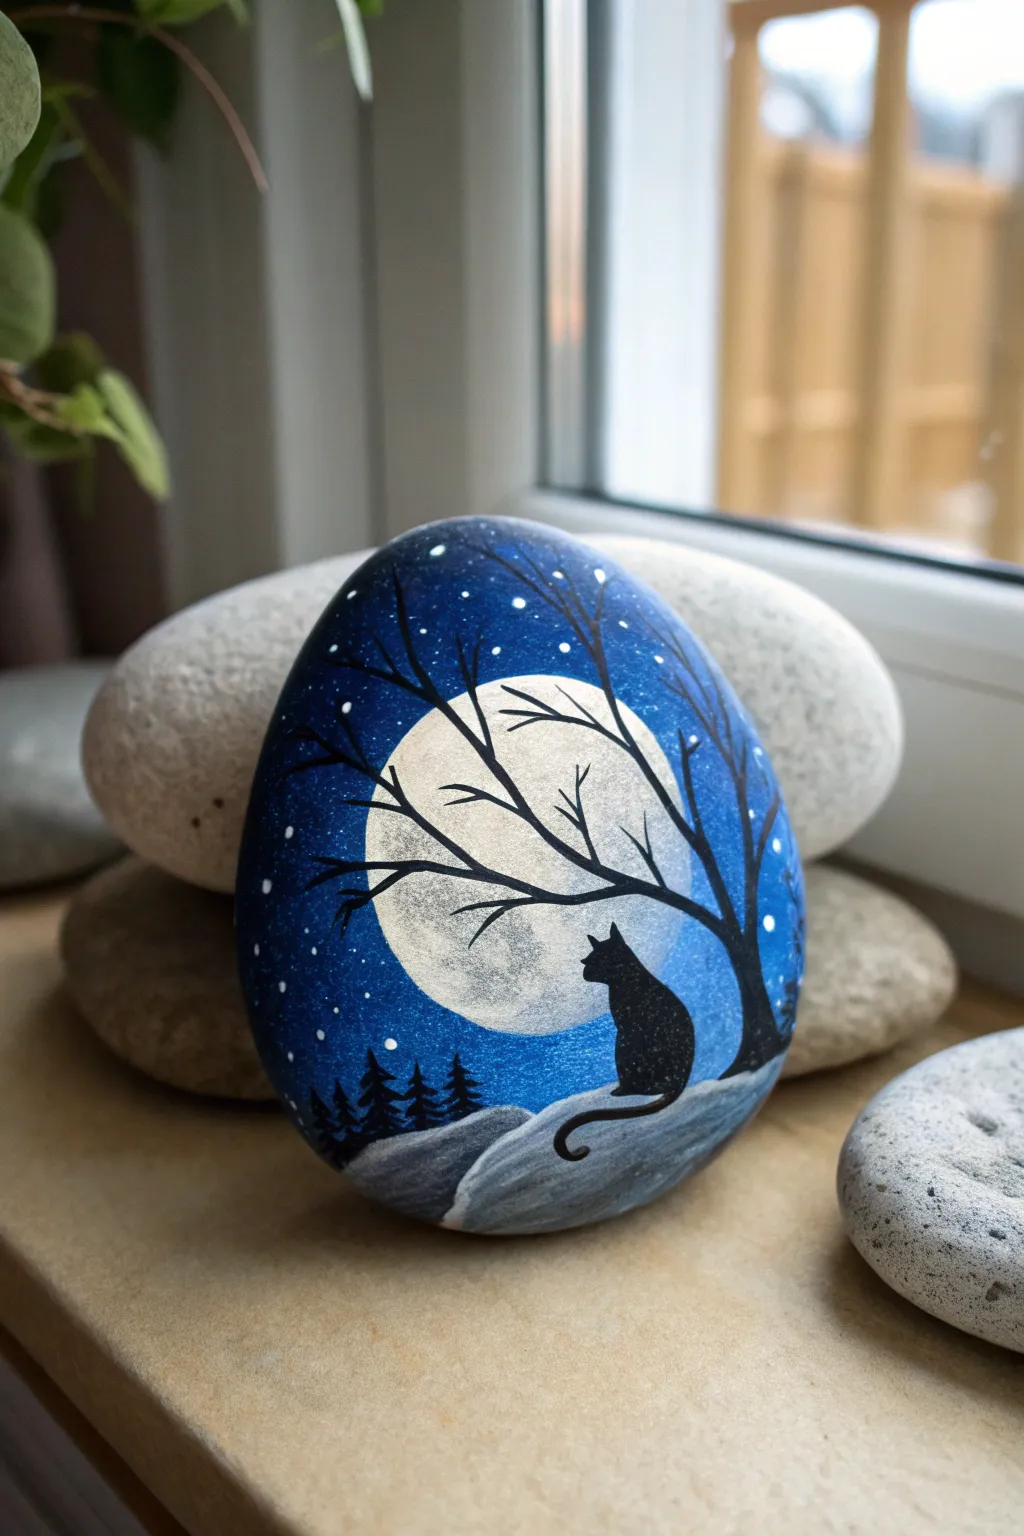
Transform a smooth river rock into a serene nocturnal scene featuring a curious black cat gazing at a luminous full moon. This painting captures the quiet magic of a winter night with crisp silhouettes and a dreamy, starry sky.
Step-by-Step Tutorial
Materials
- Smooth, oval-shaped river rock (cleaned and dried)
- Acrylic paints (dark blue, medium blue, white, black)
- Small flat brush
- Fine detail liner brush (size 0 or 00)
- Pencil (optional)
- Palette for mixing
- Spray sealant or varnish (matte or glossy)
Step 1: Setting the Night Sky
-
Prepare the stone:
Begin by ensuring your stone is completely free of dust and dirt. A quick wash with soapy water and thorough drying allows the paint to adhere properly without lifting later on. -
Create the gradient base:
Squeeze out dark blue, medium blue, and white acrylic paint. Start at the top of the rock with the darkest blue, painting horizontal strokes. -
Blend downward:
As you move toward the middle of the rock, mix in the medium blue. Blend the colors while wet on the stone to create a smooth transition from deep midnight to a lighter evening sky. -
Lighten the bottom:
Near the bottom third of the rock, blend white into your blue to create a pale horizon line where the snowy ground will eventually go. Let this base coat dry completely.
Moon Too Blobby?
If your circle isn’t perfect, wait for the white to dry. Then, use the dark blue sky color to carefully ‘cut in’ and reshape the edges of the moon back into a circle.
Step 2: The Luminous Moon
-
Outline the moon:
Once the sky is dry, use a small flat brush loaded with white paint to create a large circle in the center. I find it helpful to dot the center and expand outward to keep it round. -
Paint the first moon layer:
Fill in the circle with white paint. Don’t worry if the blue shows through slightly; you will add more layers. -
Add texture:
Mix a tiny drop of grey or light blue into your white. Dab this onto parts of the moon while the white is still tacky to create subtle crater textures. -
Dry and refine:
Allow the moon to dry, then add a final thin coat of bright white around the edges to make it pop against the dark blue sky.
Step 3: Snowy Ground and Trees
-
Paint the snowy bank:
At the very bottom, paint an undulating white shape for the snowy ground. Add a touch of grey to the bottom edge for shadow and dimension. -
Add distant pines:
Use your fine liner brush and black paint to create tiny triangular shapes on the left side of the horizon line. These are distant pine trees, so keep them small and jagged. -
Start the main tree:
On the right side, paint a thick black trunk rising up. Curve it slightly as it grows to give it character. -
Branch out:
Extend thin, bare branches from the trunk, reaching across the moon. Let the branches become thinner at the tips, like delicate veins against the light.
Level Up: Glowing Eyes
Make the cat come alive by adding two microscopic dots of yellow or green for eyes. Ensure the black silhouette is 100% dry before attempting this detail.
Step 4: The Cat Silhouette
-
Sketch the cat:
If you are nervous, lightly sketch the cat shape with a pencil on top of the dry snowy ground first. The cat should be sitting, facing left toward the trees. -
Fill the body:
Using black paint, fill in the teardrop shape of the cat’s body. Ensure the paint is opaque enough to block out the white snow beneath it. -
Add the head and ears:
Paint a smaller circle on top for the head and add two tiny triangles for ears. Refine the neck connection so it looks natural. -
Paint the tail:
Sweep a curved line extending from the base of the cat, curling slightly at the end for a relaxed pose.
Step 5: Final Magical Touches
-
Create stars:
Dip the tip of a toothpick or your smallest brush into white paint. Gently dot stars into the dark blue areas of the sky. -
Add snow to branches:
Carefully add thin lines of white along the tops of the black branches and distant trees to mimic settled snow. -
Seal the artwork:
Once absolutely dry (give it a few hours), spray the entire rock with a clear varnish to protect your painting from chipping and moisture.
Place this miniature masterpiece on your windowsill to enjoy a peaceful winter night scene all year long
Howling Wolf and Full Moon
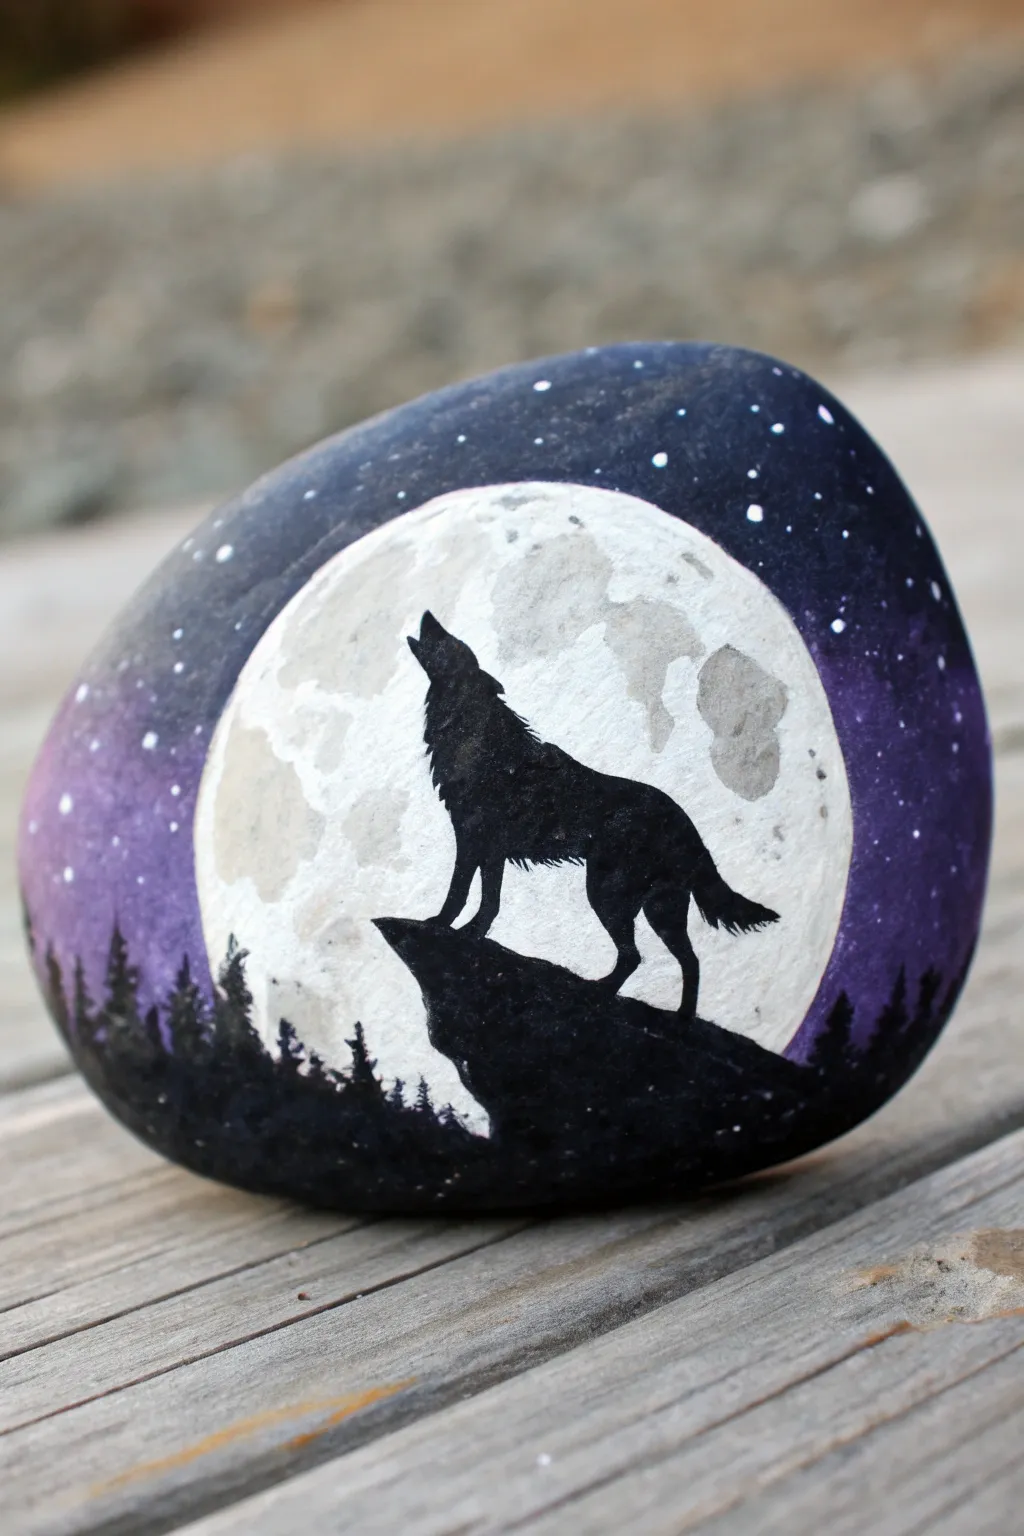
Capture the mystic energy of the wilderness with this striking silhouette rock painting. Using a blend of deep purples and stark blacks, you’ll create a dramatic contrast between a glowing full moon and a lone wolf calling to the night sky.
Step-by-Step Guide
Materials
- Smooth, rounded river rock (palm-sized or larger)
- Acrylic paints: Black, White, Deep Violet, Light Purple (Lavender)
- Flat shader brush (size 6 or 8)
- Small round brush (size 1 or 2)
- Detail liner brush (size 0 or 00)
- Pencil (for sketching)
- Clear acrylic sealer (spray or brush-on)
- Palette or paper plate
- Cup of water and paper towels
Step 1: Setting the Night Scene
-
Clean and Prep:
Begin by washing your rock with soap and water to remove any dirt or oils. Let it dry completely before you start painting to ensure the acrylics adhere properly. -
Base Coat:
Using your larger flat brush, paint the entire front surface of the rock black. This dark base adds depth to the night sky, even though we will layer purple over it later. -
First Drying Phase:
Allow the black base coat to dry fully. If the rock texture is porous, you might need a second coat to get a solid, opaque background. -
Establish the Moon:
Once the black is dry, use a pencil to lightly sketch a large circle slightly off-center on the rock. This will be your full moon. -
Paint the Moon Base:
Fill in the circle with white acrylic paint. You may need two to three coats to get a bright, solid white against the black background. Let each layer dry in between. -
Create the Night Sky Gradient:
While the moon dries, take your deep violet paint. Use a flat brush to paint around the outer edges of the rock, fading it inward toward the moon but leaving a gap of black. -
Soft Blending:
Mix a little white with your violet to make a lighter purple. Blend this color from the violet edge inwards, getting closer to the moon to create a glowing atmospheric effect. -
Starry Details:
Load a toothbrush or stiff brush with watered-down white paint and flick it gently to create tiny stars in the purple and black areas. Alternatively, use your smallest dotting tool or toothpick for precise star placement.
Moon Glow Tip
For a brighter moon, wait for the textured grey layer to dry, then dry-brush a tiny bit of pure white back over the center. This makes the moon appear spherical and glowing.
Step 2: Adding the Moon Texture
-
Grey Tone Mixing:
Mix a very small amount of black into your white paint to create a light grey. We want this to be subtle, barely darker than the moon itself. -
Spunge or Dab Texture:
Using a small, dry brush or a piece of sponge, lightly dab grey patches onto the white moon. Focus on the edges and random spots in the center to mimic craters. Don’t overdo it; keep it subtle.
Make It Magical
Add a touch of glow-in-the-dark acrylic paint over the white moon area. In daylight, it looks standard, but at night, your wolf will truly be howling at a glowing moon.
Step 3: Painting the Silhouette
-
Sketch the Outline:
Once the moon and sky are totally dry, use your pencil to lightly sketch the outline of the rocky cliff at the bottom and the wolf silhouette. I find it helps to start with the rock shapes first. -
Fill the Cliff:
Using black paint and a round brush, fill in the rocky outcrop at the bottom. Make the edges jagged to look like natural stone. -
Wolf Body:
Switch to your small detail brush. Carefully outline the wolf’s body first, starting with the legs planting firmly on the rock. Fill in the body with solid black. -
Refining the Head:
Paint the head tilted upward. Use the very tip of your detail brush to shape the snout and the ears. A sharp snout is key to the howling look. -
Creating Fur Texture:
Along the neck and tail of the silhouette, use tiny flicking motions with your liner brush to create the appearance of ruffled fur. Smooth lines look unnatural, so rough edges are better here. -
Forest Horizon:
along the very bottom edge of the rock, paint tiny vertical lines and triangles to suggest distant pine trees. This grounds the image and adds scale. -
Final Touches:
Check for any light spots in your black silhouette and touch them up. Ensure the contrast between the black wolf and white moon is crisp. -
Seal the Rock:
Allow the entire painting to cure for at least 24 hours. Apply a clear acrylic sealer to protect your artwork from chipping and give it a professional shine.
Place your finished rock in a garden or on a shelf where its dramatic silhouette can be admired


Deer in Meadow Grass
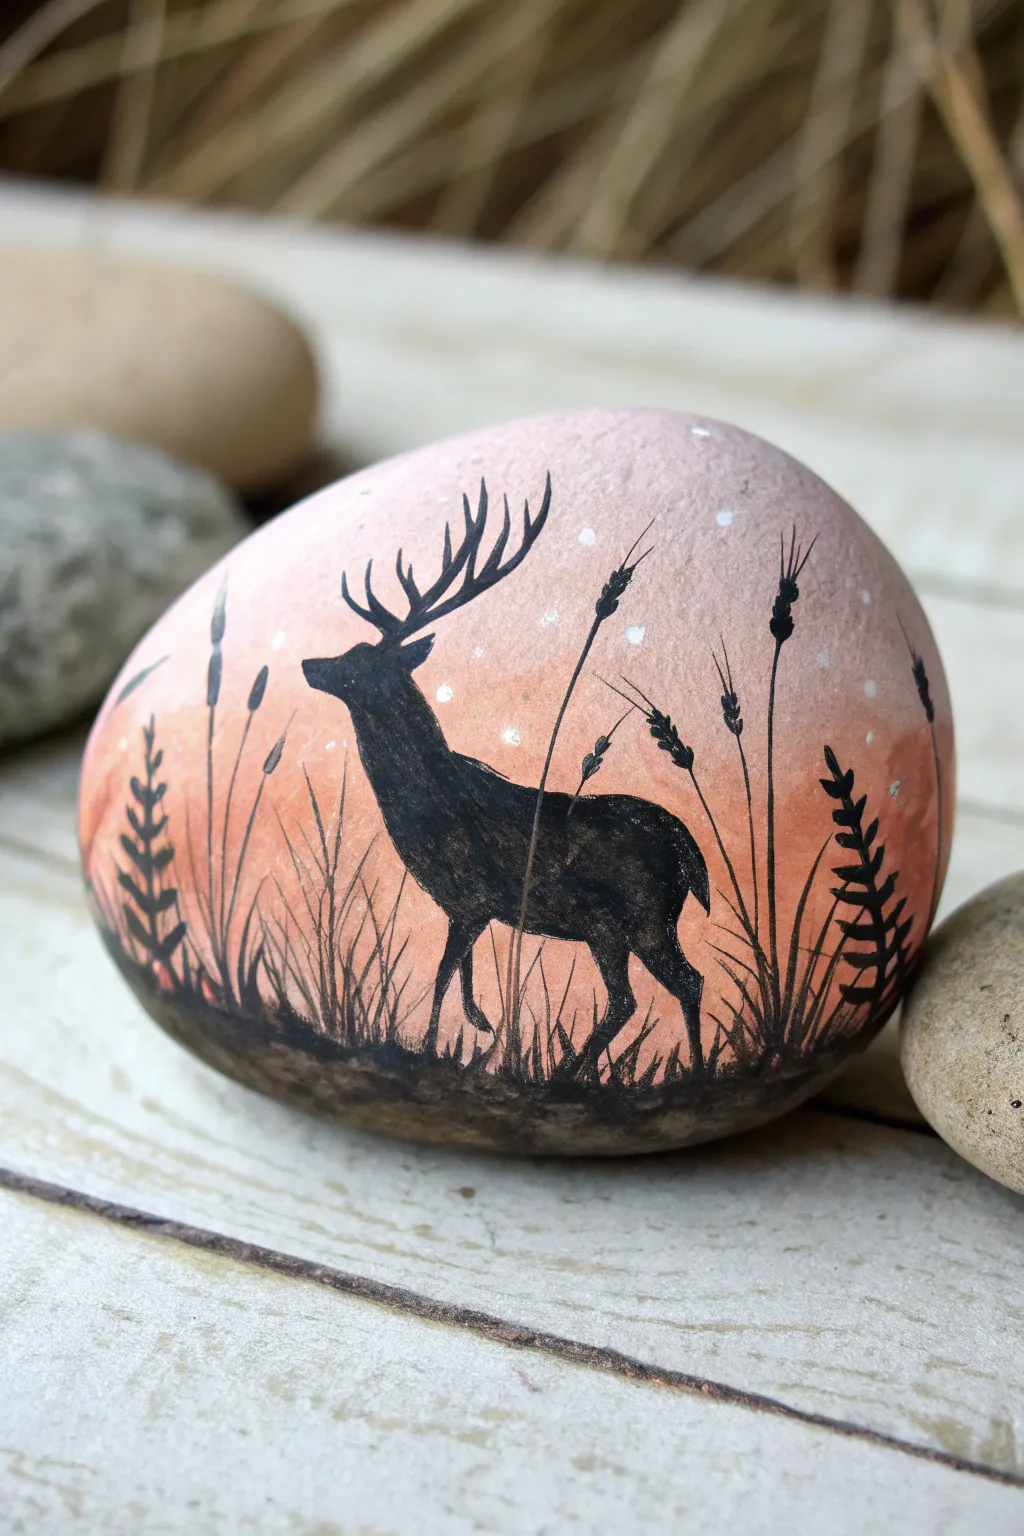
Capture the serene beauty of a foggy sunrise with this painted stone, featuring a majestic stag silhouette against a soft peach and pink gradient. It’s a wonderful beginner project for practicing blending and fine line work on a natural canvas.
Detailed Instructions
Materials
- Smooth, rounded river rock (cleaned and dried)
- Acrylic paints: Titanium White, Peach or Light Orange, Dusty Pink, Black
- Sponges or makeup wedges for blending
- Small flat paintbrush
- Fine liner brush (size 0 or 00)
- Black fine-tip acrylic paint pen (optional but helpful)
- Sealer (spray varnish or brush-on mod podge)
Step 1: Creating the Atmospheric Background
-
Prime the surface:
Start by giving your rock a coat of Titanium White acrylic paint. This creates a bright base that will make your gradient colors pop rather than sinking into the stone’s natural gray tones. -
Prepare your palette:
Squeeze out a dollop of Peach (or Light Orange), Dusty Pink, and White onto your palette. You want these colors ready to go because acrylics dry fast. -
Sponge the base color:
Using a sponge or makeup wedge, dab the Peach paint along the bottom third of the rock. Don’t worry about complete coverage yet; we are building layers. -
Add the middle tone:
Pick up some Dusty Pink on a fresh part of the sponge. Dab this across the middle section of the rock, slightly overlapping with the peach edge below to start the blending process. -
Blend the top:
Use Titanium White for the top third of the stone. While the pink layer is still slightly wet, dab the white down into it to create a seamless, foggy transition. -
Smooth the gradient:
Go back over the transition lines with a lightly dampened clean sponge to soften any harsh stripes. I find tapping lightly up and down blurs the lines best. -
Let it cure:
Allow this background layer to dry completely. If the colors look too sheer, repeat the sponging process for a more opaque, vibrant look.
Step 2: Painting the Silhouette
-
Draft the deer:
Lightly sketch the outline of the deer with a pencil. Focus on the main shapes: the curve of the chest, the long neck, and the angle of the head. -
Fill the body shape:
Using black acrylic paint and a small round brush, fill in the body of the deer. Keep the paint flowing smoothly; adding a tiny drop of water can help it glide over the stone’s texture. -
Detail the antlers:
Switch to your finest liner brush or a black paint pen. Carefully draw the main beams of the antlers extending up and back, then add the tines branching off. -
Refine the legs:
Paint the slim legs. Notice how the back leg has a distinct bend at the hock. Keep the feet somewhat loose as they will be hidden by grass later. -
Ground the scene:
Paint a solid black uneven strip along the very bottom of the rock to serve as the ground. This anchors your deer so it doesn’t look like it’s floating.
Paint looking blotchy?
If your black silhouette looks streaky, don’t keep brushing wet paint. Let the first coat dry fully, then apply a second thin coat for solid coverage.
Step 3: Adding Meadow Details
-
Paint tall grass blades:
Using the liner brush, flick thin, upward strokes from the bottom black strip. Vary the lengths and angles—some should cross over the deer’s legs to place him ‘in’ the scene. -
Add seed heads:
On a few of the taller grass stalks, add small, textured seed heads. You can do this by stippling tiny dots or small dashes near the tips of the stalks. -
Create fern leaves:
On the sides, paint one or two fern-like plants. Draw a central stem first, then add small, angled leaves going up both sides of the stem. -
Add distant specs:
Dip the tip of a toothpick or a stylus into white paint. Add a few tiny, scattered dots in the upper pink area to represent faint stars or pollen drifting in the air. -
Seal the artwork:
Once everything is bone dry (give it at least an hour), apply a coat of spray sealer to protect your detailed work from chipping.
Metallic Magic
Mix a tiny drop of gold paint into your black for the deer’s body. It won’t change the color much but adds a subtle shimmer in the sunlight.
Place your finished piece in a garden corner or on a windowsill to enjoy a permanent peaceful sunrise.
Bear Family at Golden Hour
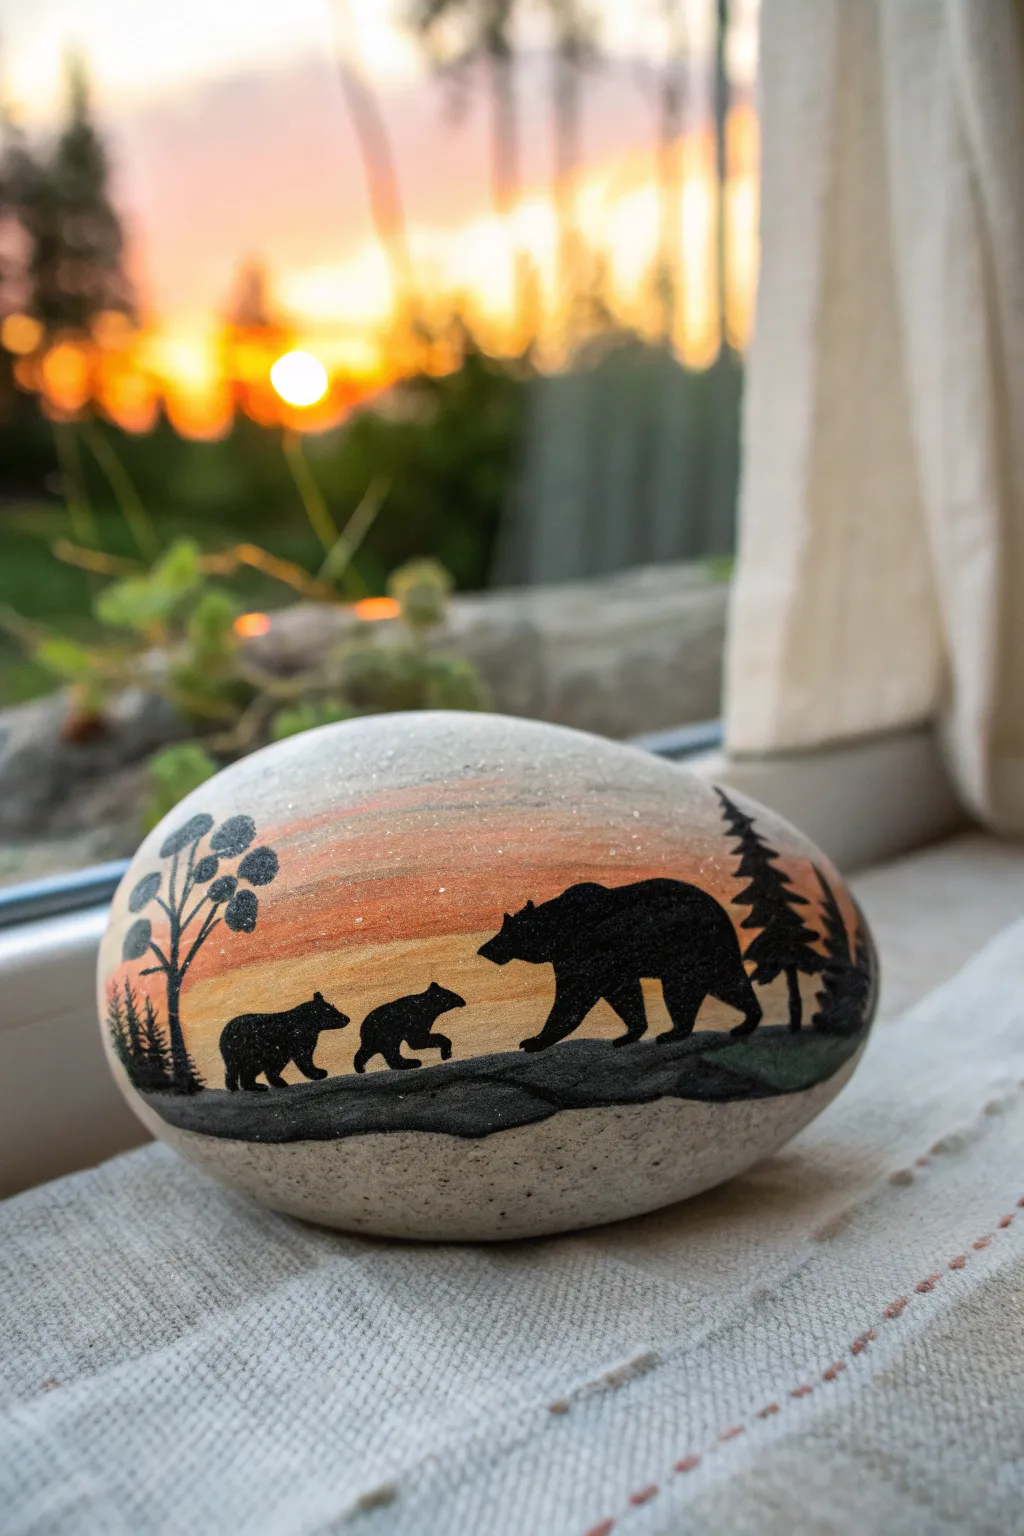
Capture the warmth of a setting sun with this heartwarming silhouette painting on a smooth stone. The design features a mother bear leading her two cubs across a landscape against a glowing orange and yellow sky.
How-To Guide
Materials
- Smooth oval river rock (about 4-5 inches wide)
- Acrylic paints (White, Pale Yellow, Golden Yellow, Orange, Burnt Sienna, Black)
- Flat brush (medium)
- Small round detail brush (size 0 or 00)
- Pencil for sketching
- Water cup and palette
- Matte or satin spray sealant
Step 1: Painting the Sky
-
Clean the stone:
Begin by washing your stone with warm soapy water to remove any dirt or oils. Let it dry completely before starting to ensure the paint adheres properly. -
First layer: The horizon:
Squeeze out some pale yellow acrylic paint. Using your flat brush, paint a horizontal band across the middle of the rock. This will be the brightest part of the sunset just above the ground. -
Adding warmth:
While the yellow is still slightly wet, mix in a bit of golden yellow and paint the band directly above the pale yellow. Blend the edges gently where the colors meet to create a soft transition. -
The orange glow:
Move further up the rock with your orange paint. Apply a band above the golden yellow passing, using light horizontal strokes to blend downward into the lighter color. -
Upper sky tones:
For the top curve of the stone, use a mix of white and a tiny dot of Burnt Sienna to create a very pale, dusty pinkish-beige. Blend this into the top edge of the orange band. -
Smoothing the gradient:
Clean your brush and leave it slightly damp. Run it lightly back and forth over the color transitions to smooth out any harsh lines, creating that seamless ‘golden hour’ glow. -
Drying time:
Allow the background sky to dry completely. It should feel dry to the touch before you attempt to sketch or paint the black silhouettes.
Pro Tip: Blending
If paints dry too fast while blending the sunset, mix a drop of water or acrylic retarder into your colors. This keeps them wet longer for smoother gradients.
Step 2: Creating the Silhouettes
-
Sketch the layout:
Lightly use a pencil to outline the bumpy ground line across the bottom third of the rock. Then, sketch the rough shapes of the mother bear, the two cubs, and the tree placements. -
Paint the ground:
Load your medium brush with black acrylic paint. Fill in the entire bottom section below your ground line, ensuring it’s opaque and solid. -
Outline the mother bear:
Switch to your small round detail brush. Carefully outline the mother bear on the right side, focusing on the hump of her back and her snout. -
Fill the large bear:
Fill in the mother bear’s shape with solid black. Make sure her legs are distinct against the lighter background where they don’t overlap. -
Paint the first cub:
Paint the middle cub following the mother. Give this one a walking pose with legs slightly apart to show movement. -
Paint the trailing cub:
Paint the final, smallest cub on the left. Rounded ears help distinguish them as young bears. -
Add the pine trees:
On the far right edge, paint a vertical black line for a tree trunk. Use the tip of your small brush to tap horizontal, jagged branches getting wider as you go down. -
Add the deciduous tree:
On the far left, create a spindly tree trunk. Add small, rounded blobs of black at the ends of the branches to represent leaf clusters in silhouette. -
Add small details:
Use the very tip of your finest brush to add tiny tufts of grass along the ground line or a few extra pine saplings on the far edges. -
Seal the artwork:
Once the paint is completely dry (wait at least an hour), finish with a coat of spray sealant to protect your work from chipping.
Level Up: Starry Night
Once the sky is dry, use an old toothbrush to flick tiny specks of white paint near the top of the rock. This creates a transition from sunset to a starry night sky.
Place your finished rock on a windowsill where it can catch the real light of the setting sun
Rooftops and Streetlamp Glow
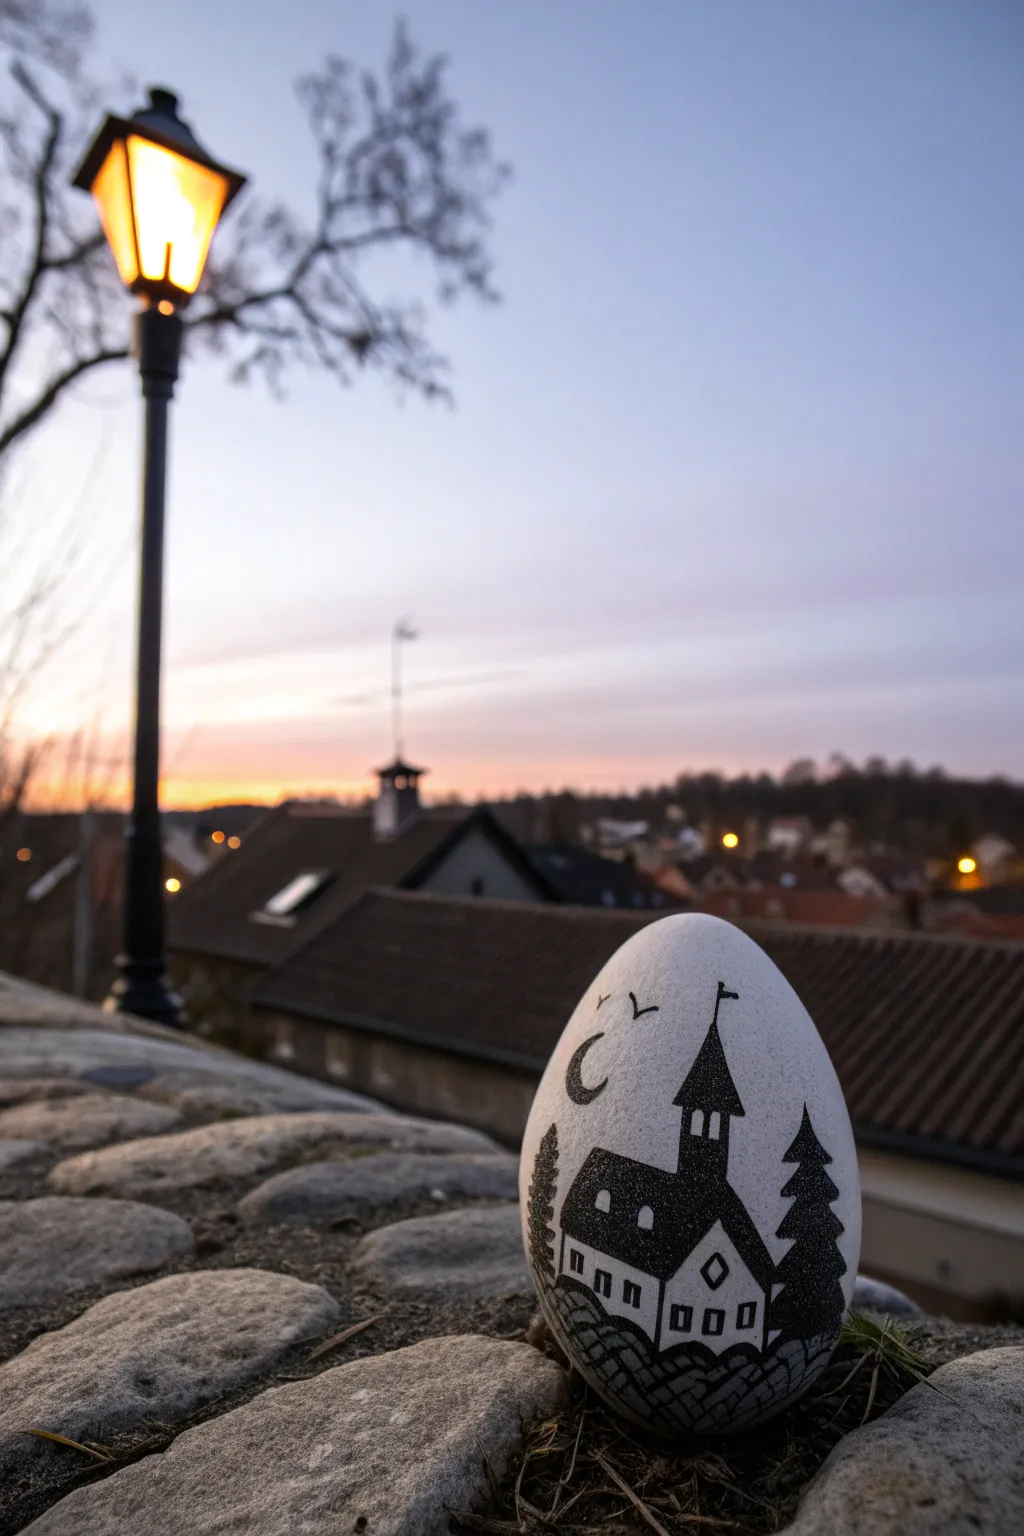
Capture the serene beauty of a quiet village at night with this striking monochromatic rock painting. By playing with negative space and sharp black lines on a clean white background, you can create a charming architectural scene that glows with simplicity.
Step-by-Step Guide
Materials
- Smooth, egg-shaped river rock
- White acrylic paint (matte finish)
- Wide flat paintbrush
- Extra-fine tip black permanent marker (0.5mm or smaller)
- Medium tip black permanent marker
- Pencil and eraser
- Spray sealant (matte or satin)
- Paper towel and water cup
Step 1: Preparing the Canvas
-
Clean the stone:
Begin by scrubbing your rock with warm soapy water to remove any dirt or oils that might repel the paint. Let it dry completely in the sun or use a hair dryer to speed things up. -
Base coat application:
Using your wide flat brush, apply a smooth layer of white acrylic paint over the entire surface of the rock. -
Second coat:
Once the first layer is dry, apply a second coat. You want an opaque, solid white finish that hides the natural stone color entirely. Let this dry fully—I usually give it at least an hour so the marker nibs don’t dig into soft paint.
Marker Mastery
If your marker tip gets clogged with white acrylic dust, scribble on a piece of scrap paper to clear it out, or wipe the tip gently on a damp paper towel.
Step 2: Sketching the Scene
-
Establish the ground line:
With a pencil, lightly sketch a curved horizon line near the bottom third of the egg. This curve should mimic the natural shape of the rock. -
Drafting the main building:
Sketch the outline of the church or house in the center. Start with a rectangle for the main body and add a steep, triangular roof. -
Adding architectural details:
Draw a smaller annex attached to the side of the main building. Add a tall, pointed steeple rising from the center. -
Positioning the trees:
Lightly mark the placement of two pine trees flanking the building—one on the left and a taller one on the right. -
Sky elements:
Sketch a crescent moon and two small flying bird silhouettes in the upper left area of the rock.
Ink Smearing?
Permanent marker can bleed when sealed. To prevent this, apply a very thin layer of Mod Podge or white glue over the drawing before using spray varnish.
Step 3: Inking the Silhouette
-
Outlining the structures:
Using the medium tip black marker, trace over your pencil lines for the building’s main shape. Keep your hand steady to ensure crisp, straight edges. -
Windows and doors:
Draw small squares for windows and a rectangle for the door with the fine tip marker. Leave the insides of these shapes white; do not color them in. -
Filling the building:
Color in the walls and roof of the building with the medium marker. Be careful to work around the windows and door you just drew, preserving the white background. -
Steeple details:
Use the fine tip marker to draw the steeple. Create small arched windows near the top (leaving them white) and add a tiny flag or cross at the very peak. -
Creating the trees:
Switch back to the medium marker for the trees. Start with a central vertical line, then use small, jagged horizontal strokes to create the texture of pine needles, getting wider as you move down. -
Ground texture:
Below the building, draw a pattern of interconnected semi-circles or irregular stones to suggest a cobblestone path or rocky ground. Fill in the spaces between the stones with black ink, leaving the stone tops white. -
Sky features:
Carefully ink the crescent moon and the V-shapes for the birds. If you want a textured moon, use small dots (stippling) instead of a solid fill.
Step 4: Finishing Touches
-
Clean up:
Once the ink is 100% dry, gently erase any visible pencil marks. Be gentle so you don’t smudge the marker or scratch the paint. -
Sealing the art:
Take the rock outside and apply a light coat of spray sealant. Hold the can about 12 inches away to prevent the ink from running. Let it dry, then apply a second coat for durability.
Place your finished piece near a window or lamp to let the silhouette stand out against real light
Castle Under a Starry Sky
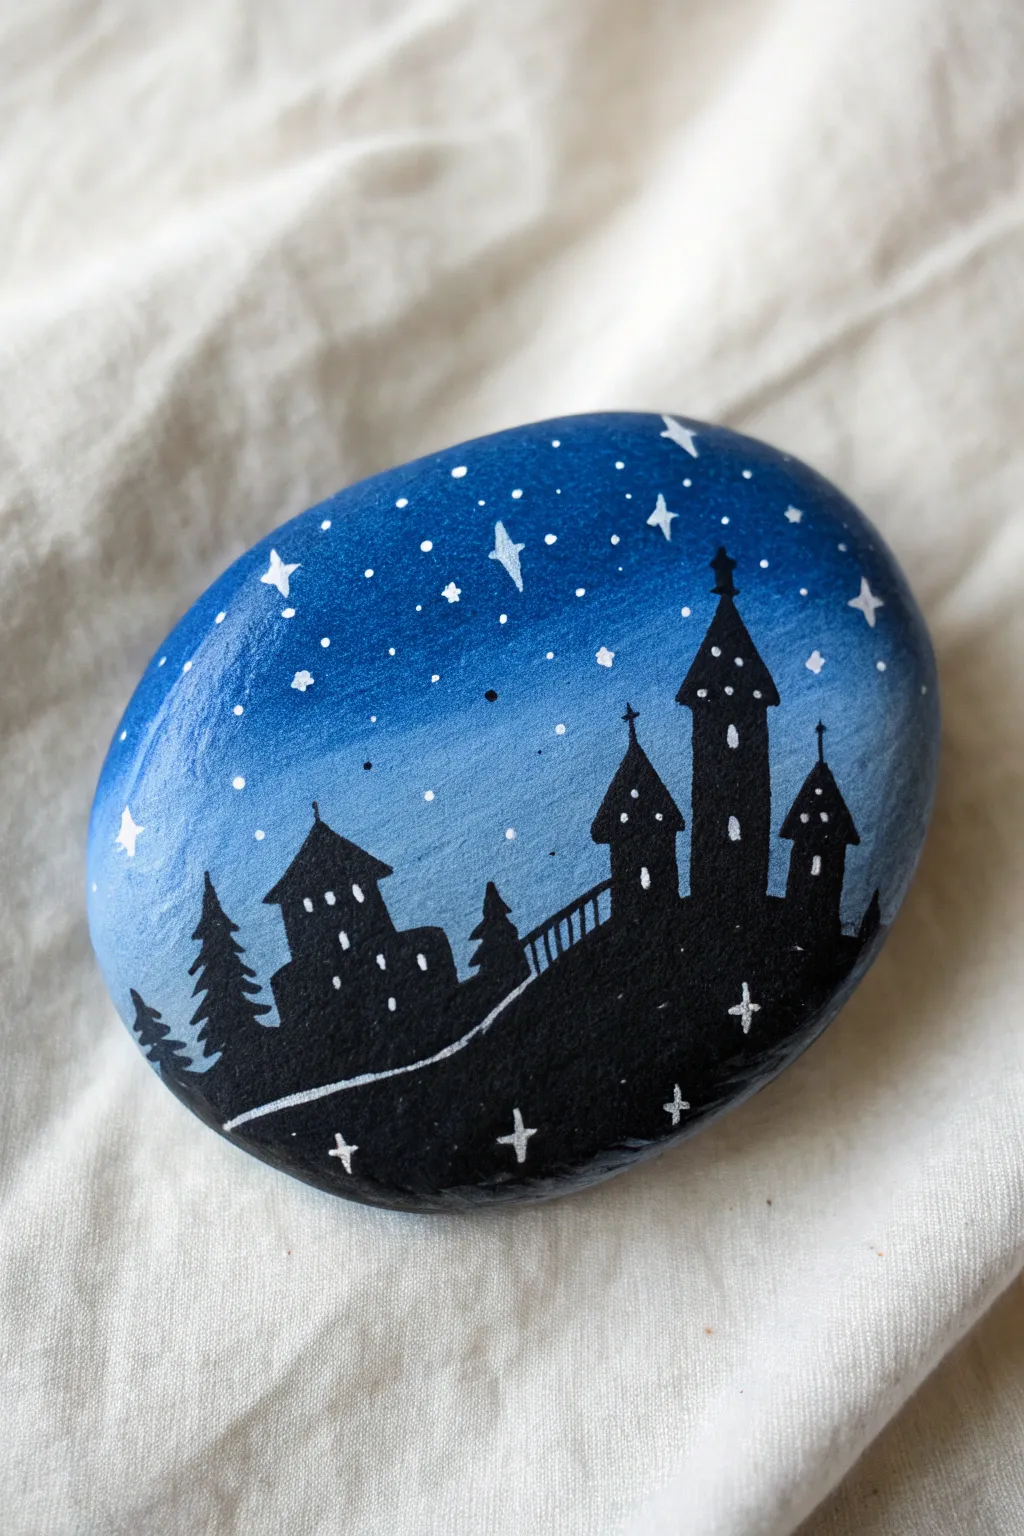
Transform a simple stone into a magical kingdom at night with this celestial silhouette scene. The gradient blue background creates the perfect moody atmosphere for sharp black towers and twinkling white stars.
Step-by-Step Tutorial
Materials
- Smooth, rounded river rock
- Acrylic paints (dark blue, medium blue, light blue, white, black)
- Flat shader brush (size 6 or 8)
- Small round detail brush (size 0 or 00)
- Fine-point black acrylic paint pen (optional but helpful)
- White gel pen or fine-point POSCA pen
- Water cup and paper towels
- Spray sealer or varnish (gloss or matte)
Step 1: Preparing the Night Sky
-
Clean surface:
Begin by washing your rock with warm, soapy water to remove any dirt or grease. Let it dry completely before starting. -
Base layer:
Using your flat brush, paint the entire rock surface with a medium blue shade. This acts as a primer and ensures your gradient will look smooth later. -
Top gradient:
While the base is still slightly tacky or dry, apply dark blue paint to the very top third of the rock. -
Blending down:
Load your brush with the medium blue and paint the middle section, overlapping slightly with the dark blue above. Use horizontal strokes to blend the two colors where they meet. -
Lightest horizon:
Mix a little white into your light blue paint to create a pale horizon color. Paint the bottom third of the rock with this shade, blending it seamlessly into the medium blue section above. I like to keep working the paint while wet for the smoothest transition. -
Dry completely:
Let the ombre background dry fully. The surface must be non-tacky before you add the silhouette, or the black paint will muddy the sky.
Starry Night Trick
To make the tiny stars look random and natural without tedious dotting, dip an old toothbrush in watered-down white paint and flick the bristles over the rock.
Step 2: Painting the Silhouette
-
Outline the hill:
Using black acrylic paint and a small round brush, draw a curved, sloping line across the bottom third of the rock to establish the ground. -
Fill the ground:
Fill in everything below that line with solid black paint. Apply two coats if necessary to ensure it’s fully opaque. -
Main tower structure:
On the right side of the hill, paint the tallest tower first. Draw a vertical rectangle that tapers slightly, topped with a triangular roof. Add a tiny cross or finial at the very tip. -
Adding side towers:
Paint a shorter, slightly thinner tower to the right of the main one, and another medium-sized tower to the left. Give them similar pointed roofs. -
Connecting bridge:
Draw a thin diagonal line connecting the base of the castle structure to the lower left area. Add tiny vertical lines to create a railing or bridge effect. -
Left-side building:
On the lower left slope, paint a smaller, stout building with a pointed roof. This balances the composition. -
Pine trees:
In the remaining gaps on the far left and between buildings, paint simple jagged shapes to represent pine trees. Use the very tip of your brush to make the branches look sharp. -
Windows:
Once the black paint is 100% dry, use your white gel pen or a tiny brush with white paint to add small rectangular or arched windows to the towers and buildings.
Wobbly Lines?
If painting straight tower walls is difficult with a brush, switch to a fine-tip black acrylic paint pen. It gives you control like a marker but covers like paint.
Step 3: Celestial Details
-
Adding large stars:
Using the white pen or fine brush, draw a few four-pointed stars in the darker blue section of the sky. Vary their sizes for interest. -
Scattered stardust:
Dot the sky with tiny white specks to create distant stars. Concentrate more dots near the top and fewer near the horizon. -
Ground sparkles:
Add three or four four-pointed stars on the black ground area to represent reflections or magical glimmers. -
Highlighting the hill:
Draw a thin, white line along the top curve of the black hill. This separates the ground from the sky and adds a crisp highlight. -
Sealing:
Allow the rock to cure overnight, then apply a spray varnish to protect your miniature landscape from scratches and weather.
Place your finished castle rock on a shelf or in the garden to add a touch of nighttime magic to your day
Aurora Borealis Forest
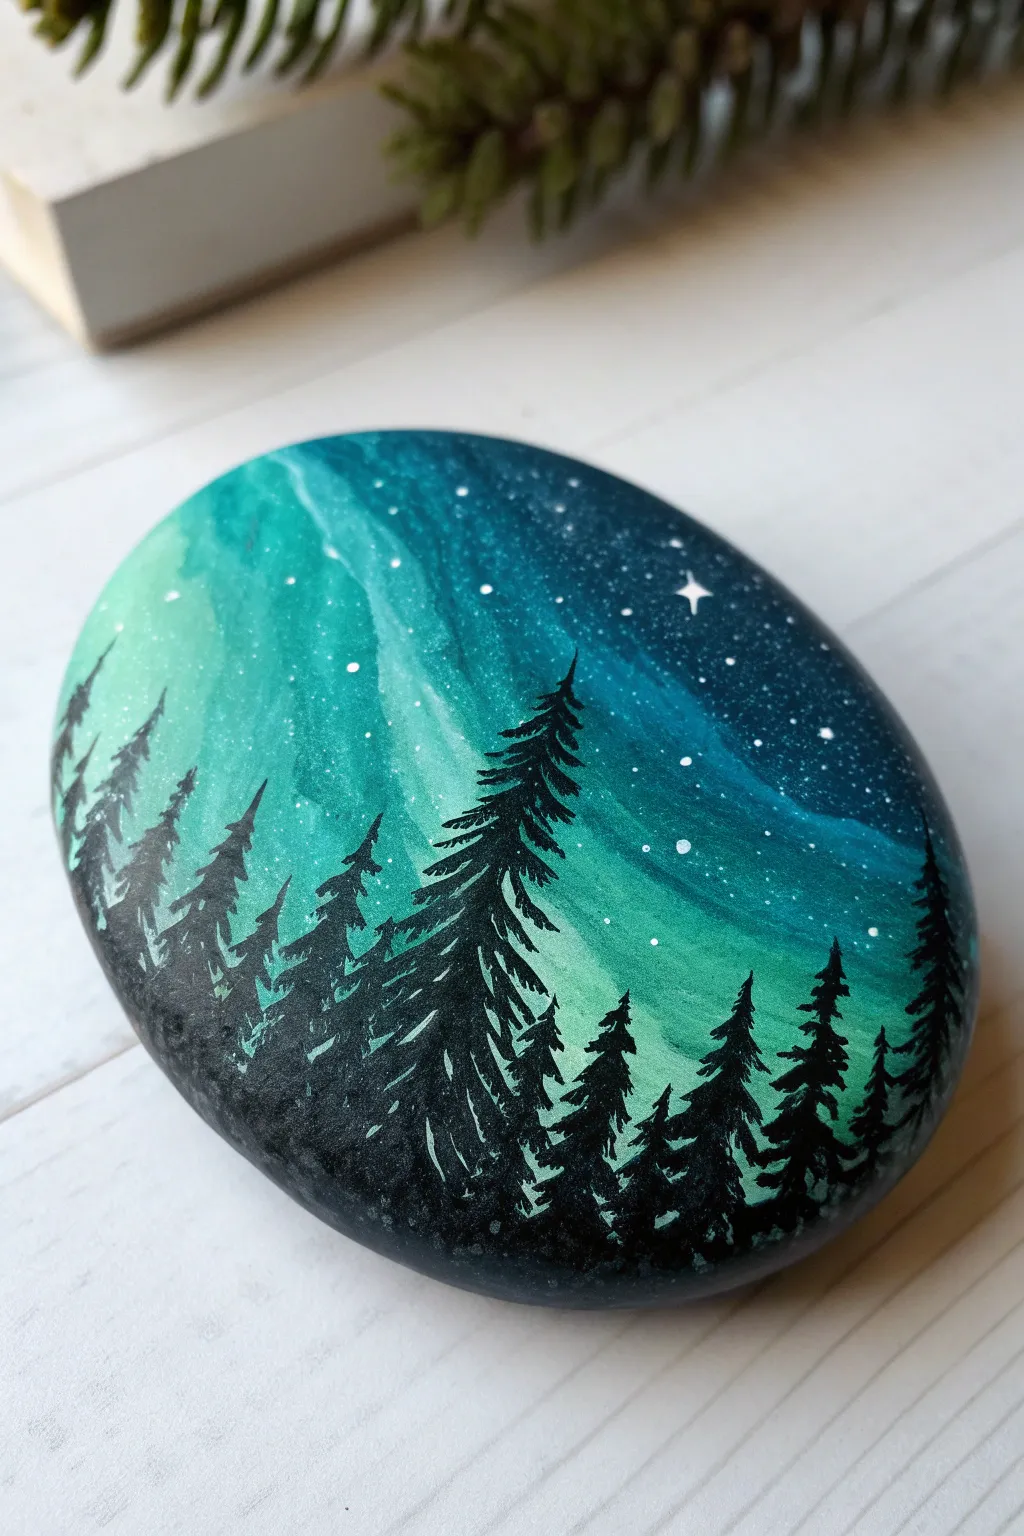
Capture the magic of the northern night sky in the palm of your hand with this stunning rock painting project. The swirling teals and greens of the aurora borealis create a mesmerizing backdrop for a stark, beautiful silhouette of pine trees.
Step-by-Step
Materials
- Smooth, oval river rock (clean and dry)
- Black acrylic paint (or gesso)
- Teal or turquoise acrylic paint
- Light green or mint acrylic paint
- White acrylic paint
- Flat shader brush (medium)
- Small round detail brush (size 0 or 00)
- Fine liner brush
- Old toothbrush (optional for stars)
- Palette or paper plate
- Cup of water
- Paper towels
- Clear sealant (spray or brush-on)
Step 1: Setting the Stage
-
Clean your canvas:
Before putting brush to stone, ensure your rock is scrubbed clean of any dirt or oils with soap and water. Let it dry completely in the sun or with a hairdryer to ensure the paint adheres properly. -
Base coat application:
Using your flat shader brush, cover the entire top surface of the rock with black acrylic paint. I usually apply two thin coats rather than one thick one to avoid streaks, letting the first coat dry fully before adding the second. -
Establish the horizon:
Visualize where your tree line will be. Keep the bottom third of the rock solid black for now, as this will ground your forest later. The painting action will focus on the upper two-thirds.
Step 2: Painting the Aurora
-
Mix your transition shades:
On your palette, prepare your teal and light green paints. You may want to mix a mid-tone by combining a little teal with the green to help with blending later. -
Layout the teal sky:
Start with the teal paint on your flat brush. Paint a diagonal swath across the upper right portion of the rock, fading it out as you move toward the left side. Don’t worry about perfect coverage; a little transparency adds depth. -
Introduce the light:
While the teal is still slightly tacky, pick up your light green or mint paint. Apply this creatively starting from the left side, sweeping it in upward, curvy strokes to mimic the dancing lights of the aurora. -
Blend the colors:
Clean your brush slightly but leave it damp. Gently work the area where the green meets the teal. Use soft, feathery strokes to blur the hard lines, creating that ethereal, glowing effect characteristic of the northern lights. -
Deepen the night:
Add a touch of black back into the very top right edge of the rock to deepen the night sky, blending it slightly into the teal. This creates high contrast which makes the aurora pop. -
Adding the Milky Way texture:
For a flowing texture, add very watered-down white or extremely light mint paint in thin, wavy lines through the lightest parts of the green, then quickly smudge them with a clean, dry brush to soften.
Pro Tip: Wet Blending
Keep a spray bottle of water handy. A tiny mist keeps acrylics wet longer, making those smooth aurora color gradients much easier to achieve without drying lines.
Step 3: Stars & Forests
-
Create the stars:
Load a toothbrush or a stiff bristled brush with watered-down white paint. Test it on a paper towel first, then gently flick the bristles to spray tiny specks over the teal and black sky areas. -
Add a focal star:
Using your finest detail brush or a toothpick, paint a larger four-pointed star or cross shape in the darker sky area for a bright focal point. -
Start the tree line:
Switch to black paint and your liner brush. Paint a vertical line for the trunk of your tallest tree first, positioning it slightly off-center for a balanced composition. -
Build the branches:
Starting from the top of the trunk, use tiny, quick dabbing motions to create branches. Keep the strokes very narrow at the top and gradually widen them as you move down the trunk. -
Create variation:
Paint neighboring trees of different heights. Ensure some trees overlap others to create a sense of density and depth in your forest. -
Fill the foreground:
Once all your tree silhouettes are painted, fill in the bottom area of the rock completely with black to connect all the trunks into a solid shadowy ground. -
Final drying time:
Let the rock sit undisturbed for at least an hour. The thick black paint of the trees might take longer to dry than the background layers. -
Seal your artwork:
To protect your painting from chipping or fading, apply a coat of clear sealant. A glossy spray sealer works beautifully here to make the sky look wet and vibrant.
Level Up: GLOW UP
Mix glow-in-the-dark medium into your light green paint. In daylight, it looks standard, but lights out will reveal a true glowing aurora!
Now you have a piece of the silent, glowing north to keep on your desk or give to a friend
Lake Reflection Silhouette
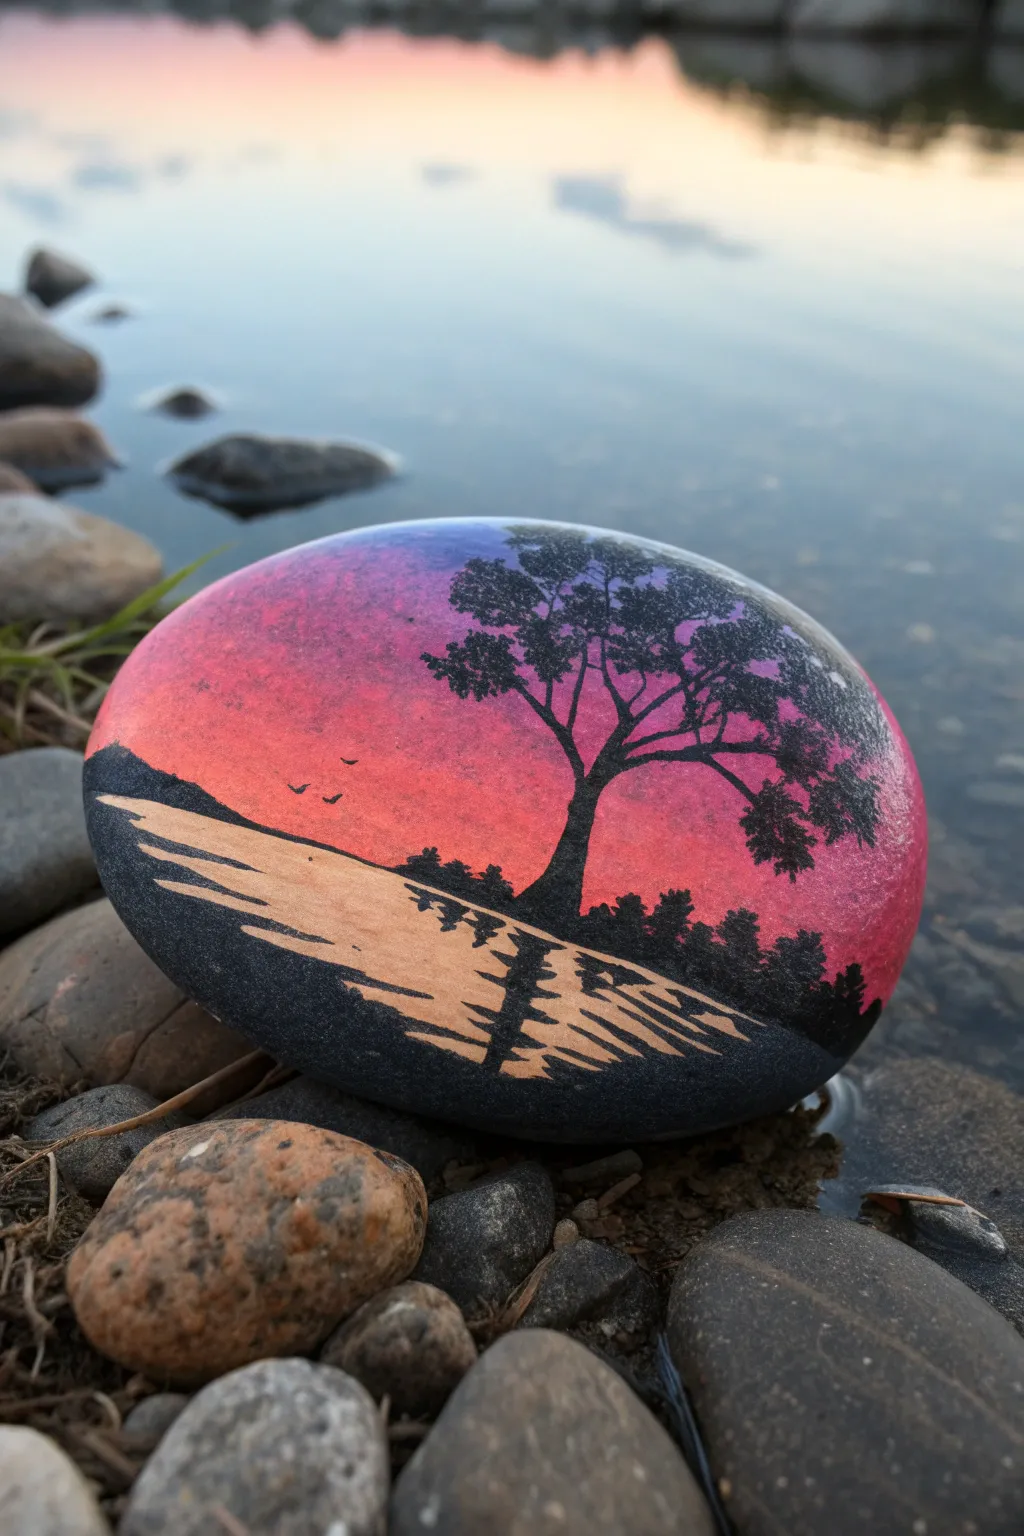
Capture the serene beauty of twilight on a smooth river rock with this striking silhouette project. By blending vibrant sunset hues and adding a stark black tree outline, you’ll create a miniature landscape that fits in the palm of your hand.
Detailed Instructions
Materials
- Smooth, oval river rock (approx. 4-5 inches)
- Acrylic paints: Ultramarine Blue, Deep Violet, Magenta, Orange, Yellow, Black, Titanium White
- Paintbrushes: Flat shader brush (small/medium), fine liner brush (00/000 size)
- Pencil (optional)
- Palette or paper plate
- Water cup and paper towels
- Spray sealer (matte or gloss)
Step 1: Painting the Sunset Gradient
-
Clean the surface:
Begin by washing your rock with soap and water to remove any dirt or oils. Let it dry completely before starting. -
Start with the sky:
Using a flat brush, apply a band of deep violet mixed with a touch of ultramarine blue at the very top edge of the rock. -
Move to magenta:
While the violet is still wet, paint a band of magenta directly below it. Gently blend the two colors where they meet using back-and-forth strokes. -
Add the warmth:
Switch to orange paint, applying a band below the magenta. Blend the transition area carefully to avoid muddy colors. -
Create the horizon line:
Paint the lowest section of the sky with yellow, blending it into the orange above. Keep this horizon line roughly one-third from the bottom of the rock. -
Base coat the water:
For the water section at the bottom, mix a very pale orange/peach tone using white and a tiny dot of orange. Paint the entire bottom area with this base color. -
Let it dry:
Allow the background gradient to dry completely. I prefer to wait at least 30 minutes here so the black paint doesn’t smear into the wet sunset colors.
Gradient Blending Tip
If acrylics dry too fast while blending the sky, keep your brush slightly damp or mix in a drop of acrylic retarder to extend working time.
Step 2: Creating the Silhouettes
-
Paint the shoreline:
Using black paint, define the shoreline. Create a sloping bank on the left side and a flatter bank on the right where the tree will stand. -
Create water ripples:
With the black paint, add horizontal tapered lines across the peach water area. Keep these lines irregular and thinner as they move toward the horizon to simulate ripples. -
Establish the tree trunk:
Using your fine liner brush and black paint, draw the main trunk of the tree on the right side. Make the base wider and tackle it lightly as you move upward. -
Branching out:
Extend main branches from the trunk. Remember that trees are organic, so allow the lines to twist and turn slightly rather than being perfectly straight. -
Adding foliage:
To create the leaves, use the tip of a small brush or a stiff stippling brush. Tap small clusters of black dots at the ends of the branches to suggest dense leaf clumps. -
The distant treeline:
Paint small, uneven bumps along the horizon line to represent distant trees or bushes. keep these much smaller than your main foreground tree. -
Reflecting the tree:
Paint a distorted, zig-zagging reflection of the main tree trunk in the water directly below the tree. Keep the strokes horizontal and separated to look like water.
Fixing Wobbly Lines
If a black line gets too thick or messy, wait for it to dry completely, then paint over the mistake with the background sunset color to ‘erase’ it.
Step 3: Final Details
-
Add bird silhouettes:
With the finest liner brush, paint two or three tiny ‘V’ shapes in the orange section of the sky to represent birds flying in the distance. -
Check for opacity:
If the black paint looks streaky or gray in places (especially the large tree trunk), add a second coat of black once the first is dry. -
Seal the artwork:
Once the rock is fully dry (give it a few hours), spray it with a clear acrylic sealer to protect the paint from chipping and to make the colors pop.
Place your finished stone in a garden or on a desk to enjoy a permanent sunset view
Scratch-Back Stars Inside a Silhouette
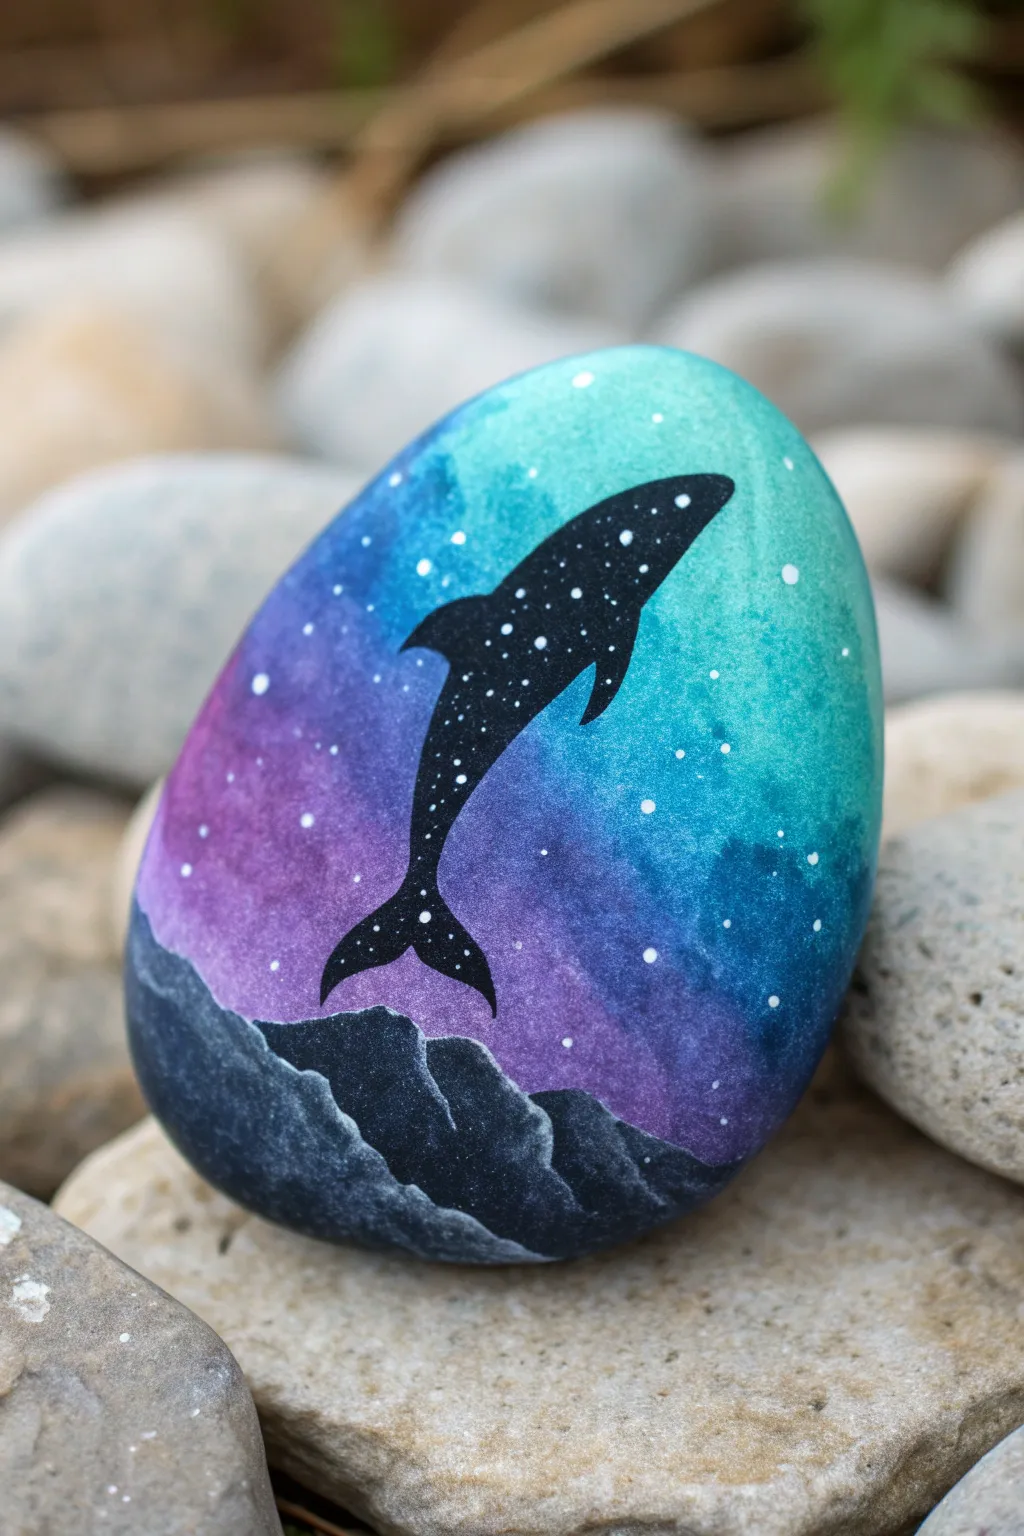
This celestial-inspired rock painting uses a galaxy gradient to create a dreamy backdrop for a leaping whale silhouette. The clever use of white speckles creates a starry night effect that brings the entire scene to life.
How-To Guide
Materials
- Smooth, rounded river rock
- Acrylic paints (teal, bright blue, purple, black, white)
- Small makeup sponge or detail sponge
- Fine liner brush (size 00 or 000)
- Small flat brush
- Water cup and paper towels
- Acrylic spray sealer (glossy)
Step 1: Creating the Galaxy Gradient
-
Base cleaning:
Begin by washing your stone thoroughly with warm soapy water to remove any dirt or oils, then let it dry completely. -
Prime the surface:
Paint a thin layer of white acrylic paint over the entire top surface of the rock. This acts as a primer and helps the bright gradient colors pop later. -
Top gradient color:
Load a small sponge with teal paint. Dab it onto the top right third of the rock, keeping the edges soft. -
Middle gradient color:
Clean the sponge or use a fresh corner, then pick up bright blue paint. Sponge this into the middle right section, slightly blending it into the teal. -
Lower gradient color:
Using the purple paint, sponge the left and lower-left portions of the rock to complete the background transition. -
Blend the seams:
While the paint is still tacky, gently dab over the areas where the colors meet to create a smooth, cloud-like transition between the teal, blue, and purple. -
Background stars:
Using the handle end of a paintbrush or a dotting tool, dip into white paint and place random dots across the colored background to represent distant stars.
Sponge Technique Tip
Dampen your sponge slightly before picking up paint. This helps the acrylics blend more smoothly on the rock’s surface without drying too fast.
Step 2: Painting the Silhouette
-
Outline the mountains:
With black paint and a fine liner brush, draw an uneven, wavy line across the bottom third of the rock to establish the horizon or mountain range. -
Fill the bottom:
Fill in everything below that wavy line with solid black paint. This grounds the composition. -
Sketch the whale:
Using a very light touch with the liner brush (or a pencil first), outline the shape of the whale diagonally across the center, looking like it’s leaping upwards. -
Refine the shape:
Focus on the curve of the body, the dorsal fin on top, and the distinct fluke (tail) at the bottom. -
Fill the silhouette:
Carefully fill in the whale shape with solid black paint. You may need two coats to ensure it is completely opaque against the colorful background. -
Mountain highlights:
Mix a tiny amount of white into your black paint to make a dark grey. Use the fine brush to add thin, jagged lines along the top ridges of the black mountains for texture.
Step 3: Final Details
-
Adding inner stars:
Once the black whale is totally dry, use your finest brush or a toothpick to add tiny white dots *inside* the whale’s black body. -
Varying star sizes:
Make some dots slightly larger than others to create depth, concentrating a few clusters near the head and tail. -
Extra atmosphere:
Add a few more tiny white specks to the mountain area or water line if you want the scene to look extra sparkly. -
Final cure:
Allow the entire rock to dry for at least 24 hours before handling too much. -
Sealing:
Apply a coat of glossy spray sealer. This protects the paint from chipping and makes the galaxy colors look wet and vibrant.
Fixing Wobbly Lines
If your contour lines get messy, wait for the black paint to dry, then use a tiny bit of the background color to carefully paint over the mistake.
Place your finished cosmic whale in a sunny spot or gift it to a stargazer in your life


Have a question or want to share your own experience? I'd love to hear from you in the comments below!