Silk painting has this magical way of making color look like it’s glowing from within, and it never stops feeling a little bit like alchemy. Here are my favorite silk painting ideas—from classic gutta resist florals to playful texture tricks that’ll make you want to start a whole new piece immediately.
Single Peony With Gutta Outlines
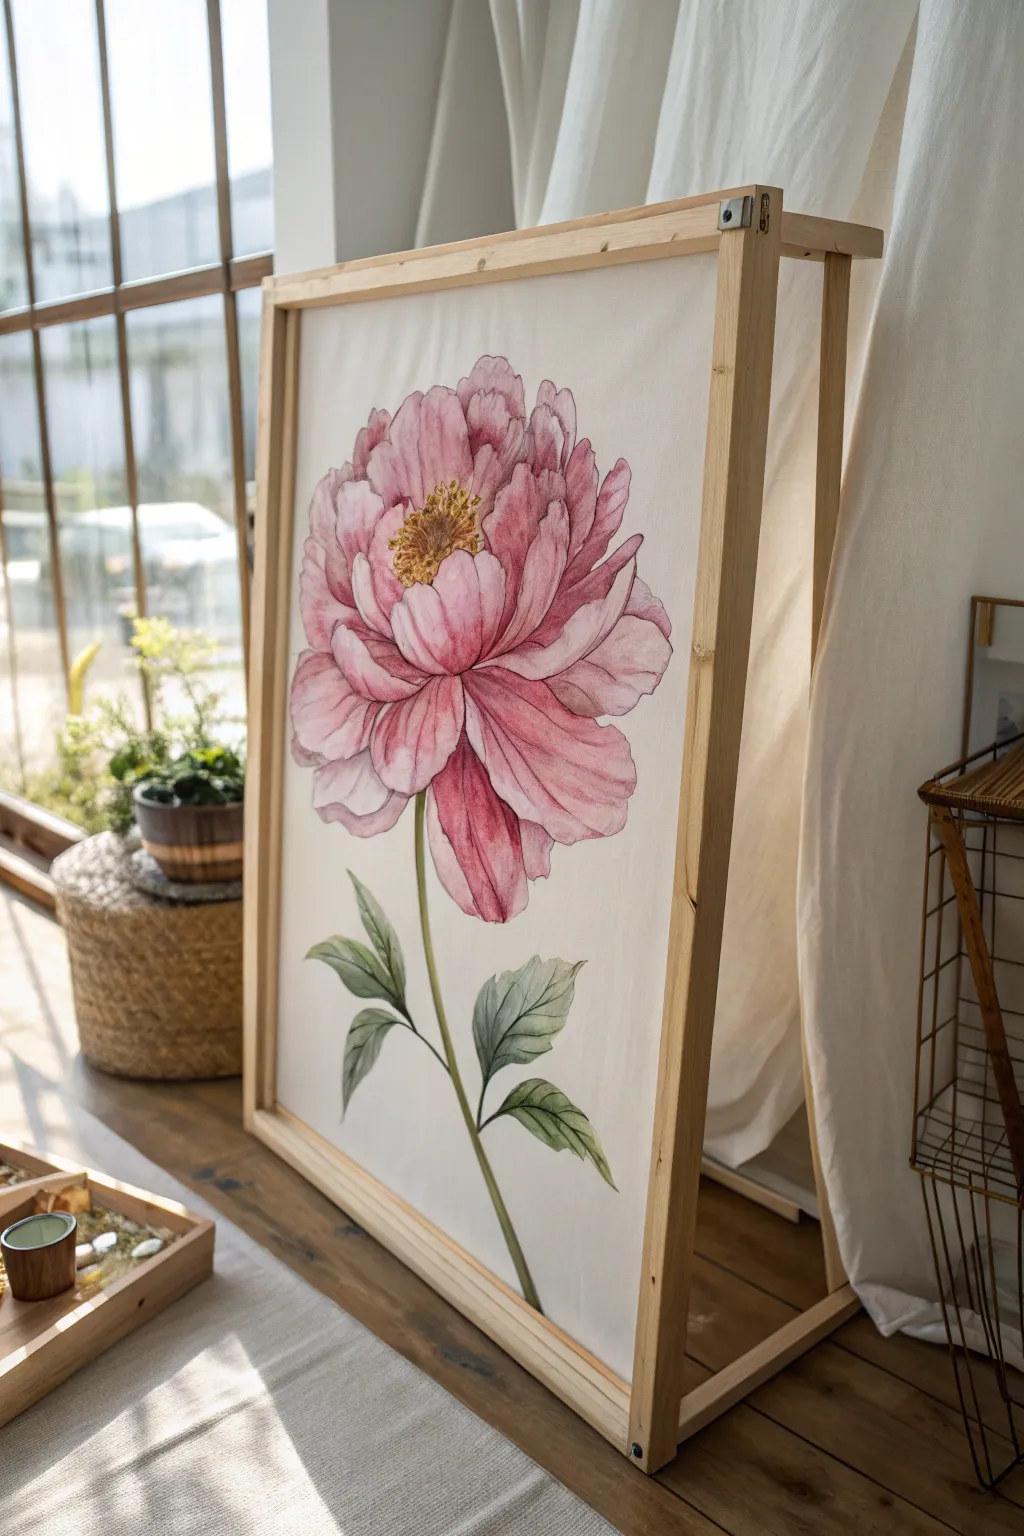
This project transforms a large panel of silk into a breathtaking room divider or framed statement piece featuring a single, oversized peony bloom. By using clear gutta resist, you’ll capture the delicate, vein-like details of the petals while allowing the soft watercolor-style dyes to bleed beautifully within the boundaries.
Step-by-Step
Materials
- Large wooden silk stretching frame (approx. 24″ x 36″ or larger)
- White silk habotai or crepe de chine (sized to frame)
- Silk pins or claw hooks for stretching
- Clear gutta resist or water-based resist in an applicator bottle
- Fine-point metal applicator tip
- Silk dyes or paints (Pink, Magenta, Deep Green, Yellow Ochre)
- Soft watercolor brushes (various sizes: #8 round, #12 flat)
- Water jar and paper towels
- Auto-fade fabric marker or soft pencil
- Reference photo of a peony
Step 1: Preparation & Drawing
-
Stretch the silk:
Begin by stretching your silk tightly onto the wooden frame. Secure the fabric using silk pins or claw hooks spaced every few inches. The fabric should be taut like a drum skin to ensure clean lines later. -
Draft the layout:
Lightly sketch the large peony design directly onto the silk using an auto-fade marker or a very soft pencil. Start with the central cluster of stamens, then draw the petals radiating outward in layers, followed by the long stem and leaves at the bottom. -
Check composition:
Take a step back to view the scale. The flower head should dominate the upper two-thirds of the panel for maximum impact, with the leaves balancing the visual weight near the bottom. -
Apply the resist:
Fill your applicator bottle with clear gutta resist and attach the fine-point tip. Carefully trace over your pencil lines. Hold the bottle at a consistent angle and move steadily to create smooth, unbroken lines. -
Double-check lines:
Inspect your lines closely. Every shape must be completely enclosed; any gap in the gutta line will allow the dye to escape and bleed into unwanted areas. Let the resist dry completely until it is hard to the touch.
Breach Containment
If dye breaches a line while painting, stop immediately! Dry the spot with a hair dryer, re-apply gutta over the gap, let it dry, and then carefully dab away the error with clean water and a cotton bud.
Step 2: Painting the Flower
-
Wet the petals:
Working one petal section at a time, lightly dampen the silk within the gutta lines using clean water. This helps the dye flow evenly and creates soft gradients. -
Apply base pink:
Dilute your pink dye to a very pale wash. Apply this base color to the outer edges of a petal, letting it flow toward the center but leaving some areas almost white for highlights. -
Add depth with magenta:
While the silk is still damp, drop concentrated magenta dye into the base of the petals (where they meet the center) and along the shadowed edges. Watch the color bloom and blend naturally. -
Create distinct separation:
Focus on defining the layers. Ensure the petals underneath appear darker than the ones on top by using stronger pigment saturation in the shadowed areas. -
Paint the center:
For the flower center, use small dots of yellow ochre mixed with a tiny bit of brown. Apply the dye carefully so it stays crisp within the tiny stamen shapes.
Step 3: Stem & Leaves
-
Paint the leaves:
Mix a natural green shade using your deep green and a touch of the ochre or pink to harmonize the colors. Paint the leaves using the wet-on-wet technique, keeping the tips lighter and the base darker. -
Detail the veins:
I like to wait until the base green is semi-dry, then use a finer brush with undiluted green dye to add subtle shadowing along the leaf veins for texture. -
Complete the stem:
Using a steady hand, paint the long stem. You can run a line of darker green down one side of the stem to give it a cylindrical, 3D appearance. -
Air dry:
Allow the entire painting to dry completely on the frame. Do not touch or move it while wet to prevent back-runs or watermarks.
Salt Texture Trick
While the petal dye is still wet, sprinkle a few grains of coarse salt onto the darker areas. As it dries, the salt pulls the pigment, creating beautiful starburst patterns that mimic natural floral texture.
Step 4: Finishing
-
Set the dye:
Read the instructions for your specific dye type. Most silk dyes require heat setting with an iron or steaming to make the color permanent and wash-fast. -
Remove resist (optional):
If you used a water-based resist, you can rinse the silk in warm water to dissolve the lines, leaving white borders. If using clear gutta, the lines generally remain as a part of the texture unless dry-cleaned. -
Mount the artwork:
Once set and pressed, re-mount the silk onto a clean wooden display frame or screen divider structure, pulling it tight and stapling it to the back or side for a professional finish.
Now you have a stunning, large-scale botanical piece that captures the light and adds elegance to any room


Botanical Leaf Study in Greens
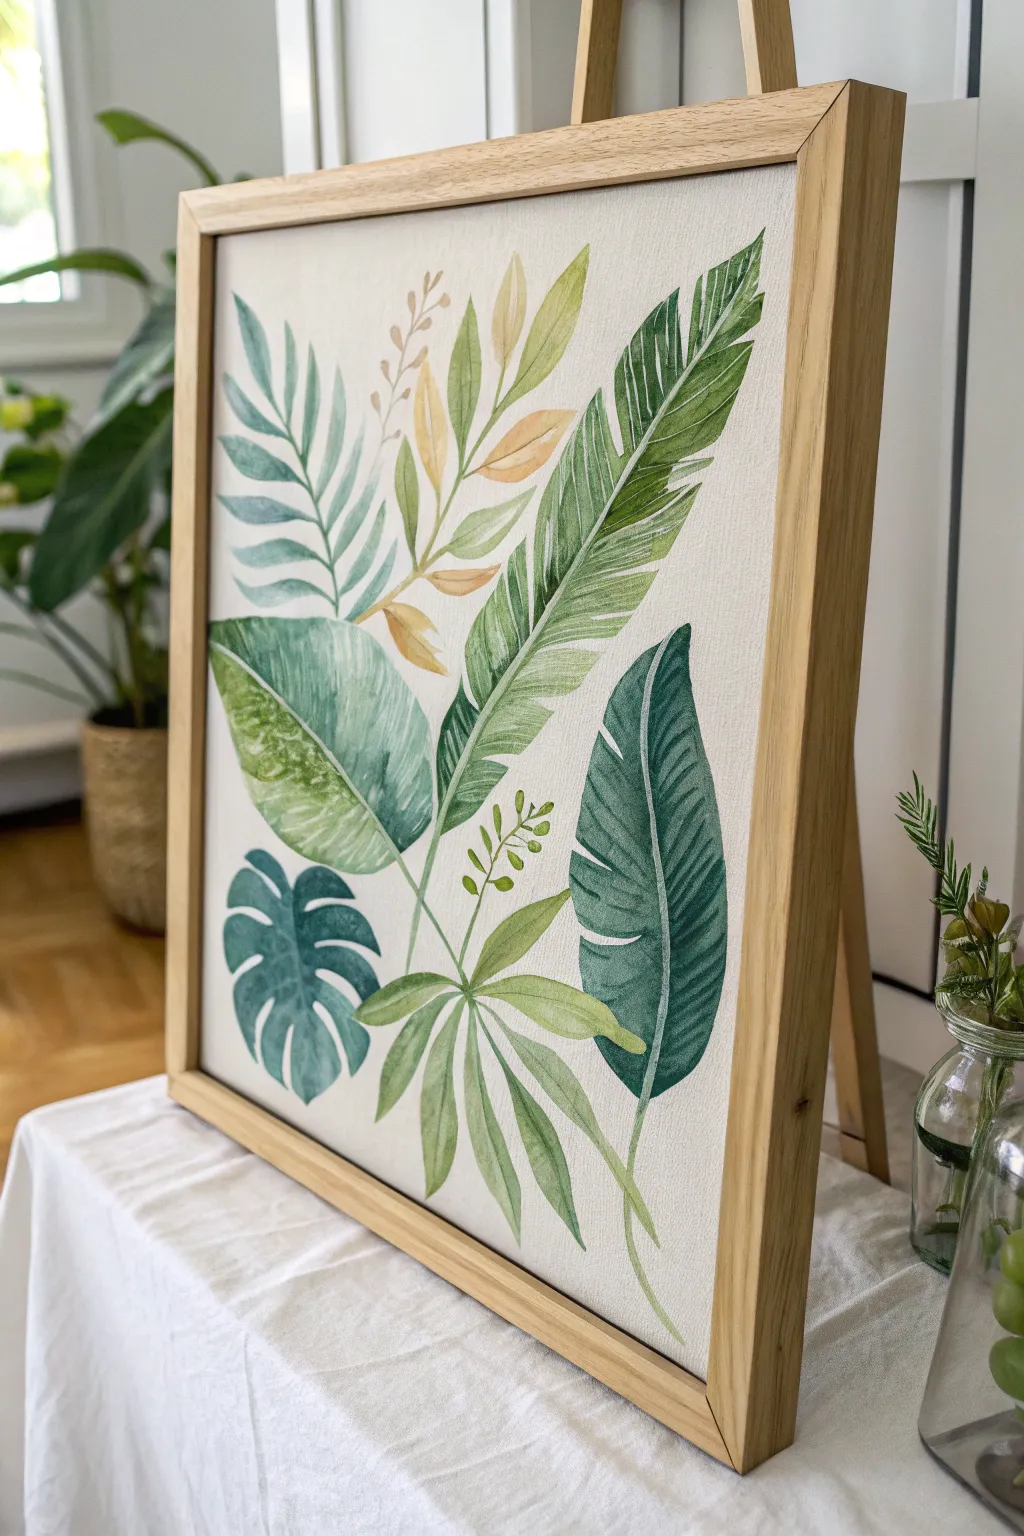
Capture the calm of a greenhouse with this elegant study of tropical foliage. Using silk painting techniques on a stretched frame creates a luminous, soft watercolor effect where shades of sage, emerald, and muted gold blend effortlessly.
Step-by-Step Guide
Materials
- Pre-stretched silk canvas or heavy silk habotai on a stretcher frame (approx 16×20 inches)
- Silk paints or dyes (Iron-fix or steam-fix depending on preference)
- Colors: Olive Green, Emerald Green, Sap Green, Teal, Muted Yellow/Gold, Brown
- Gutta or water-based resist (Clear or similar light neutral tone)
- Recall/fading medium or water for diluting
- Soft synthetic watercolor brushes (Round #4, #8, and a small liner brush)
- Palette for mixing
- Paper towels
- Pencil and sketchbook paper for drafting
- Wooden floating frame (Natural oak finish recommended)
Step 1: Drafting and Composition
-
Sketch the Layout:
Begin by sketching your leaf arrangement on a separate piece of paper the same size as your canvas. Aim for a balanced composition with a mix of large broad leaves (like the Monstera) at the bottom and tall, slender fronds reaching upward. -
Transfer to Silk:
Place your sketch under the silk if it’s transparent enough, or lightly sketch directly onto the silk fabric using a very soft pencil or a specialized fading fabric marker. Keep lines faint so they disappear later. -
Apply the Resist (Optional):
For crisp white veins like those seen on the dark teal leaf, carefully apply a thin line of clear gutta/resist. Let this dry completely. For the softer, more watercolor-style leaves, you can skip the resist to allow edges to bleed slightly.
Water Control
To prevent dye from bleeding uncontrollably on silk, work with your brush ‘thirsty’—blot it on a paper towel after loading paint before touching the fabric.
Step 2: Painting the Foliage
-
Prepare Your Palette:
Mix several puddles of green. Create a watery, pale sage by diluting olive green; a deep, rich forest green by mixing emerald with a touch of brown; and a cool teal shade. -
Start with the Large Broad Leaf:
Begin with the large, broad leaf in the middle left. Wet the area slightly with clean water, then drop in pale sap green. While wet, add darker green strokes along the veins to create a soft, diffused gradient. -
Paint the Monstera:
Move to the bottom left corner for the Monstera leaf. Use a blue-leaning teal green here. Paint the segments carefully, leaving tiny slivers of white silk dry to suggest veins if you didn’t use resist. -
Create the Tall Palm Frond:
For the tall, serrated palm leaf on the right, use a ‘wet-on-dry’ technique for sharper edges. Use your #4 round brush to pull stripes of olive and sap green from the center spine outward, mimicking the natural striation of the leaf. -
Add the Muted Gold Accents:
Paint the delicate, smaller branch in the center using a muted yellow-gold dye. Keep this wash very sheer to contrast with the heavier greens. I find this creates a lovely visual break in the composition. -
Detailing the Dark Leaf:
Paint the dark, pointed oval leaf on the bottom right using your darkest emerald-teal mix. If you applied resist for the vein earlier, simply paint over it; the dye will slide off the reserved line. -
Layering the Palmate Leaf:
For the five-pointed leaf at the bottom center, use a mid-tone grass green. Paint each leaflet individually, letting the color pool slightly at the tips for natural variation. -
Ferns and Fillers:
Fill in the upper left with the airy fern-like sprays. Use a very watery blue-green mix associated with the Monstera to tie the color palette together, keeping strokes loose and gestural.
Step 3: Finishing Touches
-
Refining Veins:
Once the base layers are dry, use your smallest liner brush with a slightly darker, concentrated dye to add fine detail lines and central veins to the lighter leaves. -
Adding Texture:
If some leaves look too flat, dampen them slightly and drop in a concentrated spot of color or a tiny pinch of salt (brush off when dry) to create an organic, mottled texture. -
Setting the Dye:
Follow the instructions for your specific silk paints. This usually involves ironing on the reverse side for several minutes or steam-fixing to make the colors permanent and vibrant. -
Framing:
Place your finished piece into a light oak floating frame. Secure it from the back so the artwork has a small gap between the canvas edge and the frame, enhancing the modern botanical look.
Add Metallic Sheen
Mix a tiny amount of gold gutta or gold fabric pearlescent medium into the yellow leaves for a subtle shimmer that catches the light beautifully when hung.
Hang your new botanical artwork in a bright room to enjoy the translucent beauty of the silk


Magnolia Branch With Soft Shadowing
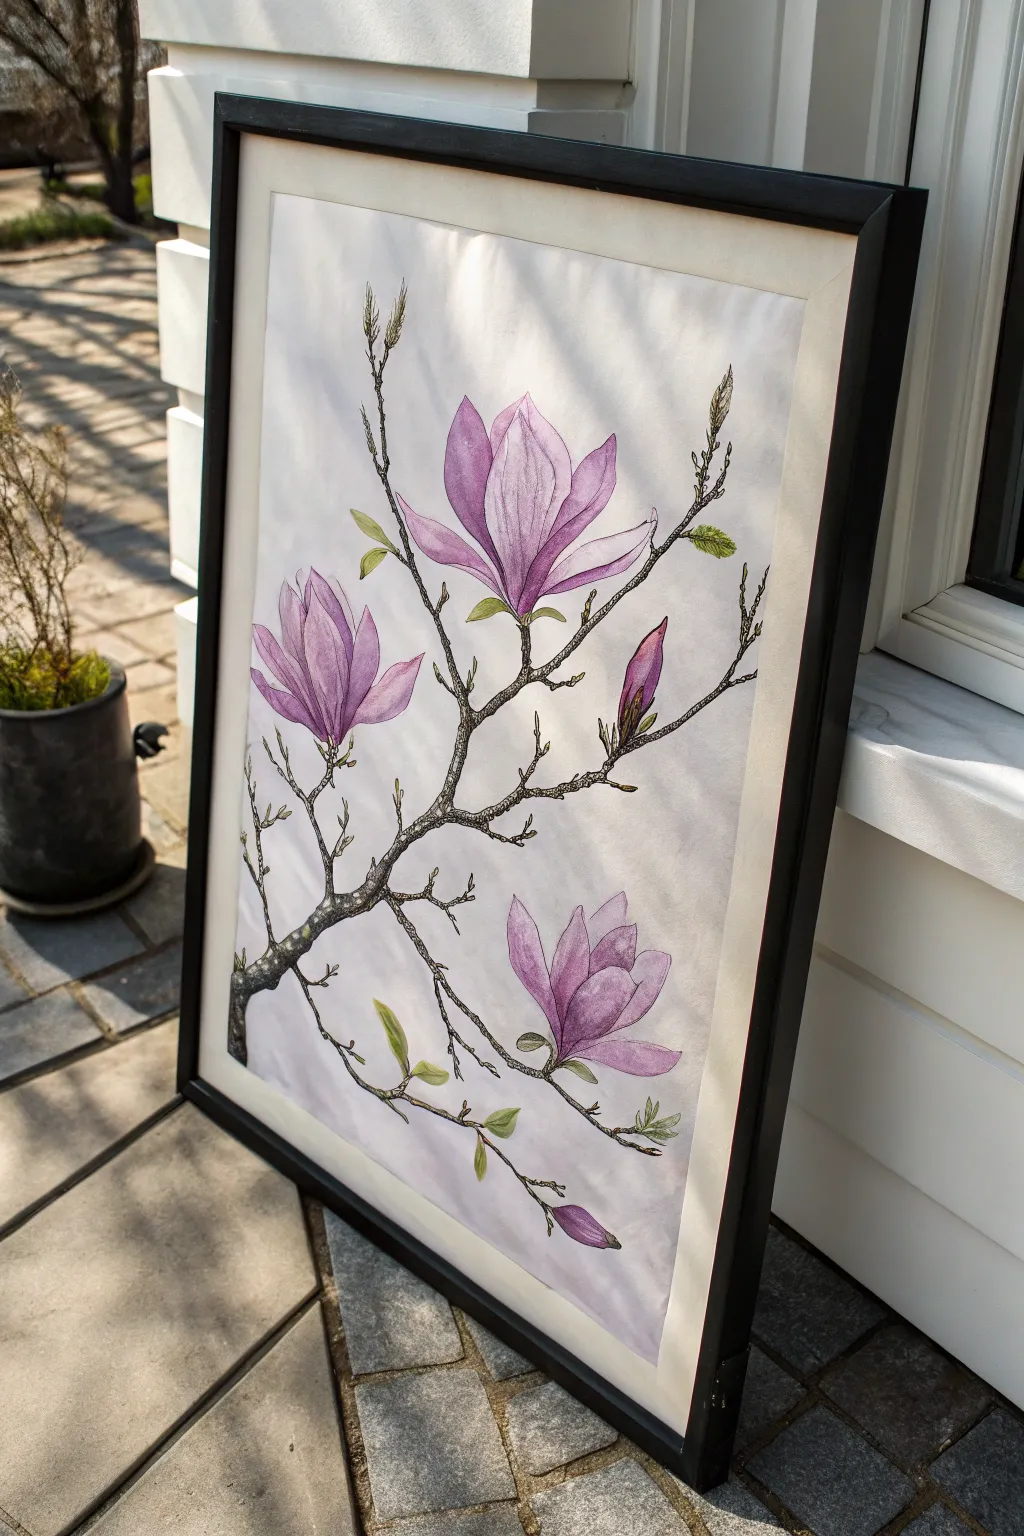
Capture the delicate beauty of spring with this elegant silk painting project featuring magnolia blooms. Combining fluid silk dyes for the petals with precise gutta lines for the branches creates a stunning contrast that looks beautiful in any frame.
Detailed Instructions
Materials
- Silk hoop or stretcher frame
- White silk habotai (8mm or 10mm weight)
- Black water-based gutta or silk outliner
- Gutta applicator bottle with fine metal tip
- Silk paints/dyes (Magenta, Violet, Sap Green, Burnt Umber, Sepia)
- Soft watercolor brushes (Round #4 and #8)
- Water-soluble fabric marker
- Palette for mixing
- Reference photo of magnolias
Step 1: Preparation and Sketching
-
Stretch the Silk:
Begin by stretching your silk habotai tightly across your frame or hoop. It should be taut like a drum skin to ensure smooth lines later. -
Draft the Composition:
Using a water-soluble fabric marker, lightly sketch the main branch structure diagonally across the silk. Place three main blooms: a large open one near the top center, a side-facing one on the left, and a lower bloom on the bottom right. -
Refine the Details:
Sketch in the smaller details, like the unopened buds and small leaflets. Keep your lines light, as the gutta will cover them, but you want a clear guide.
Broken Barriers?
If dye breaches a gutta line, quickly stop the flow with a hair dryer. Once dry, re-apply a thicker gutta line over the breach to seal it.
Step 2: Outlining with Gutta
-
Prepare the Applicator:
Fill your applicator bottle with black gutta and attach a fine metal tip. Test the flow on a scrap piece of silk or paper towel to ensure clean lines. -
Outline the Blooms:
Start by outlining the flower petals. Use confident, sweeping strokes to create the organic curves of the magnolia. Ensure every shape is fully closed so the dye won’t leak later. -
Draw the Branches:
Outline the woody branches. For a natural texture, make these lines slightly jagged or uneven, mimicking bark. -
Add Texture Details:
Draw small stippled dots or hatching lines inside the branch outlines to suggest moss and rough bark texture. This adds depth before you even start painting. -
Dry Completely:
Allow the gutta lines to dry completely. This usually takes about an hour, but check your specific brand instructions.
Add Sparkle
Mix a tiny pinch of pearl ex powder into your petal wash. It gives the silk a subtle shimmer that catches the light beautifully when framed.
Step 3: Painting the Blooms
-
Mix Petal Colors:
Dilute your violet and magenta silk dyes with water or a specialized diluent to create a very pale, transparent wash. -
Wet-on-Dry Application:
Dip your #8 round brush into the pale wash and touch it to the center of a petal. Let the dye flow towards the gutta lines, stopping just short of the edge. -
Add Depth:
While the first layer is still slightly damp, add a concentrated drop of undiluted violet at the base of the petals. I find this creates a lovely natural gradient as it bleeds outward. -
Highlighting:
Leave the very tips of some petals white or extremely pale to represent sunlight catching the edges.
Step 4: Painting Branches and Background
-
Color the Wood:
Mix Sepia with a touch of Burnt Umber. Paint the branches carefully, allowing the color to settle darker near the ‘knots’ of the wood. -
Add Greenery:
Use Sap Green for the small leaves and the casings of the buds. Blend a little brown into the green near the stems for a seamless transition. -
Create Soft Shadows:
This is the trickiest part: Mix a very watery grey-purple wash. Paint a soft ‘shadow’ shape on the silk background just underneath and to the right of the main branches to give a 3D effect. -
Setting the Dye:
Once the painting is fully dry (24 hours is best), fix the dyes according to the manufacturer’s instructions. This usually involves steam fixing or ironing on the reverse side. -
Final Wash:
Rinse the silk in cool water to remove the soluble marker lines and excess dye, then lay flat to dry before framing.
Now mount your dried silk in a simple black frame to let the vibrant blooms take center stage


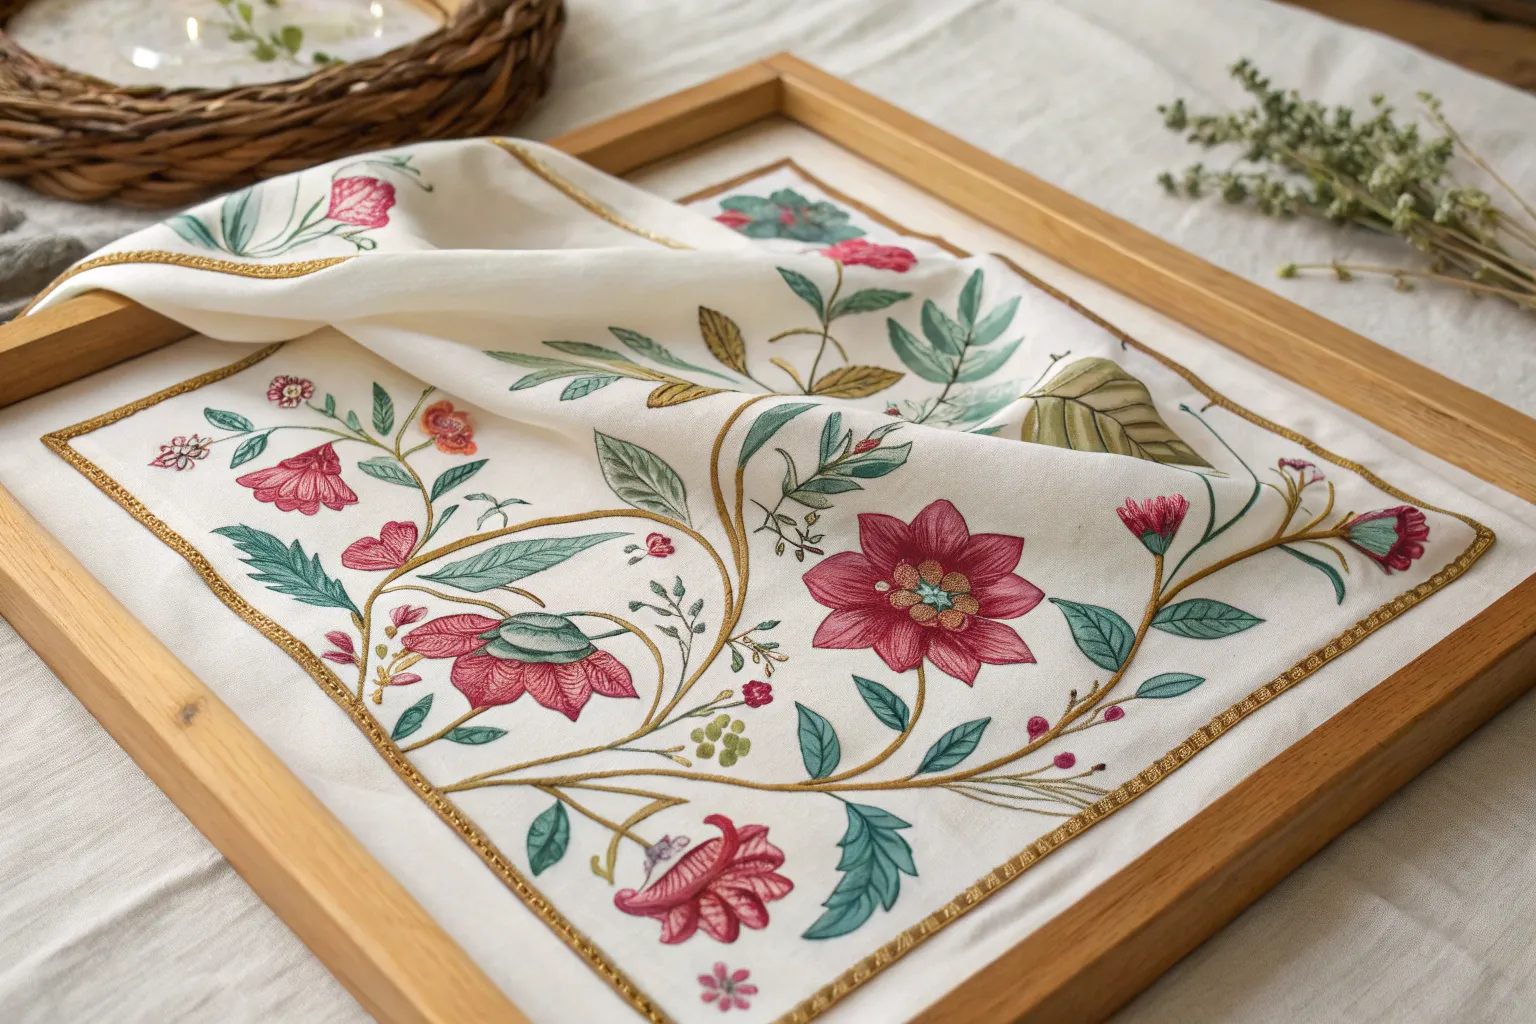
Simple Rose With Ombré Petals
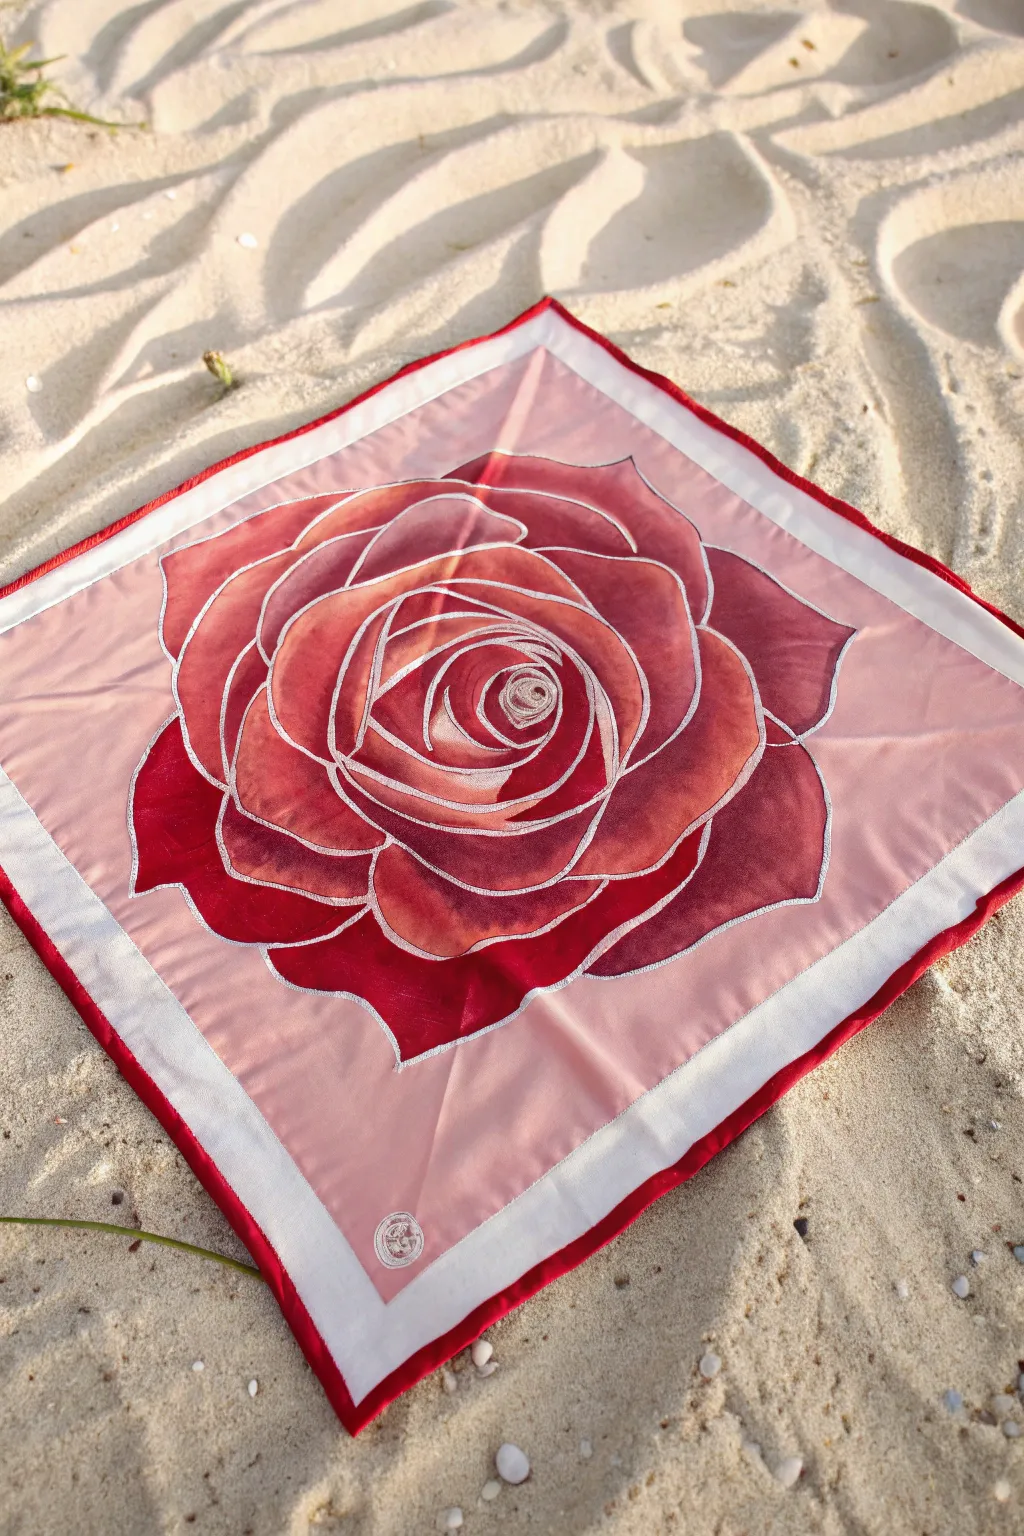
This elegant square scarf features a stylized, blooming rose as its centerpiece, utilizing gradient shading to create depth within each petal. The combination of rich reds, soft pinks, and distinct silver resist lines creates a stunning, wearable piece of art that looks deceptively complex.
How-To Guide
Materials
- Square silk scarf blank (approx. 55x55cm, Habotai 8 or Ponge 5)
- Silk painting frame and claws/pins
- Silver water-based gutta or resist outliner
- Silk paints (iron-fix or steam-fix): Deep Red, Magenta, Pale Pink, White (for mixing)
- Soft watercolor brushes (Sizes 4 and 8)
- Water jar and paper towels
- Auto-fade fabric marker or soft pencil
- Rose pattern template (printed to size)
- Iron (for fixing)
Step 1: Preparation and Outlining
-
Prepare the silk:
Begin by washing your silk scarf blank to remove any factory sizing or oils. Iron it flat while slightly damp to ensure a perfectly smooth surface. -
Stretch the silk:
Attach the silk to your frame using claw pins or three-prong tacks. Pull it taut until it sounds like a drum when tapped; sagging silk will cause paint to pool unevenly. -
Transfer the design:
Place your rose template underneath the stretched silk. Trace the primary lines of the rose petals and the inner square border lightly using an auto-fade marker or a very soft pencil. -
Apply the resist:
Using the silver gutta outliner, carefully trace over your pencil lines. Keep consistent pressure on the bottle to ensure the line penetrates the fabric completely, creating a ‘dam’ for the dye. -
Check for gaps:
Once the outline is complete, hold the frame up to the light to check for breaks in your silver lines. Seal any gaps to prevent dye from bleeding into unwanted areas. -
Allow to dry:
Let the gutta dry completely. This usually takes about 1-2 hours depending on humidity, but you can speed it up carefully with a hair dryer on a cool setting.
Gutta Bottle Control
Keep a paper towel in your non-dominant hand. Wipe the gutta nozzle tip every few inches to prevent blobs from ruining your fine silver lines.
Step 2: Painting the Rose
-
Mix your palette:
Prepare three concentrations of your red dye: a dark, concentrated red; a medium magenta-red; and a very watery pale pink. I find test strips of scrap silk essential here to check the shades. -
Start the center petals:
Wet the center petal slightly with clear water (wet-on-wet technique). Apply the darkest red at the very bottom crease of the petal. -
Blend the gradient:
Immediately dip your brush into the medium tone and drag the dark colour upwards. Finish the tip of the petal with the palest pink or water, creating a smooth ombré effect. -
Work outward:
Move to the surrounding petals one by one. Avoid painting adjacent wet petals simultaneously if possible, as this prevents accidental bleeding if a resist line fails. -
Deepen the shadows:
For the outer, larger petals, use the darkest red more generously at the base to create the illusion of curvature and depth. -
Refine the edges:
Ensure the paint touches the silver resist line exactly but doesn’t pool against it, which can cause ‘back-runs’ or watermarks.
Add Salty Texture
While the background pale pink is still wet, sprinkle a few grains of coarse silk salt in the corners. This creates a beautiful starburst texture.
Step 3: Background and Finishing
-
Paint the background:
Mix a very large wash of the palest pink (almost white). Apply this quickly and evenly to the background area between the rose and the square border to avoid hard drying lines. -
Leave the border white:
Keep the area outside the inner silver square unpainted. This white reserve creates a frame that helps the red rose pop visually. -
Paint the hem:
Using a small brush and your dark red dye, carefully paint the extreme outer edge (the rolled hem) of the scarf. This creates a finished, professional red border. -
Fix the dye:
Once the scarf is bone dry (wait 24 hours for best results), fix the paints according to the manufacturer’s instructions—usually by ironing on the reverse side for 3-5 minutes. -
Final rinse:
Gently rinse the scarf in lukewarm water to remove excess dye and the resist (if it’s a water-soluble gutta), then iron damp to restore the silk’s sheen.
Wrap yourself in this floral masterpiece and enjoy the delicate drape of your hand-painted silk


Have a question or want to share your own experience? I'd love to hear from you in the comments below!