There is something incredibly satisfying about breaking away from traditional rectangular canvases to explore the fluid, organic beauty of painting within a round format. Whether you choose mini stretched canvases, rustic wood slices, or simply mask off a sketchbook page, these circular designs offer a fresh perspective that instantly frames your art in a captivating way.
Gradient Sunset Silhouette
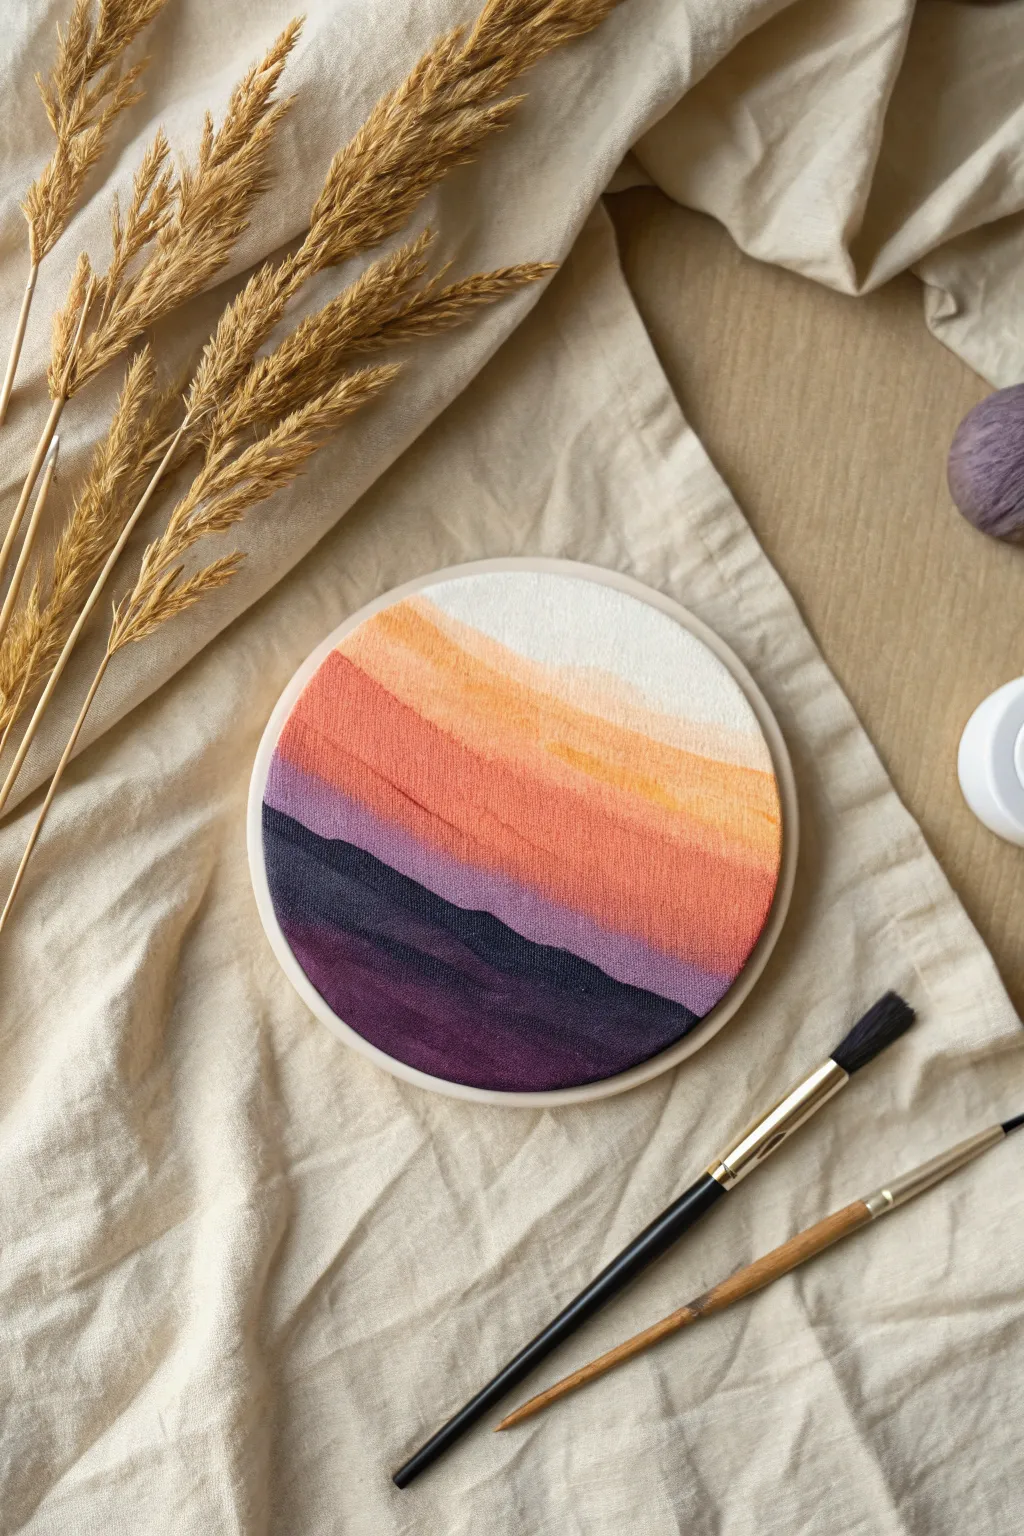
Capture the serene beauty of a fading sunset with this textured fabric painting project. Using simple color blending on a stretched fabric canvas creates a soft, modern aesthetic perfect for wall decor.
Detailed Instructions
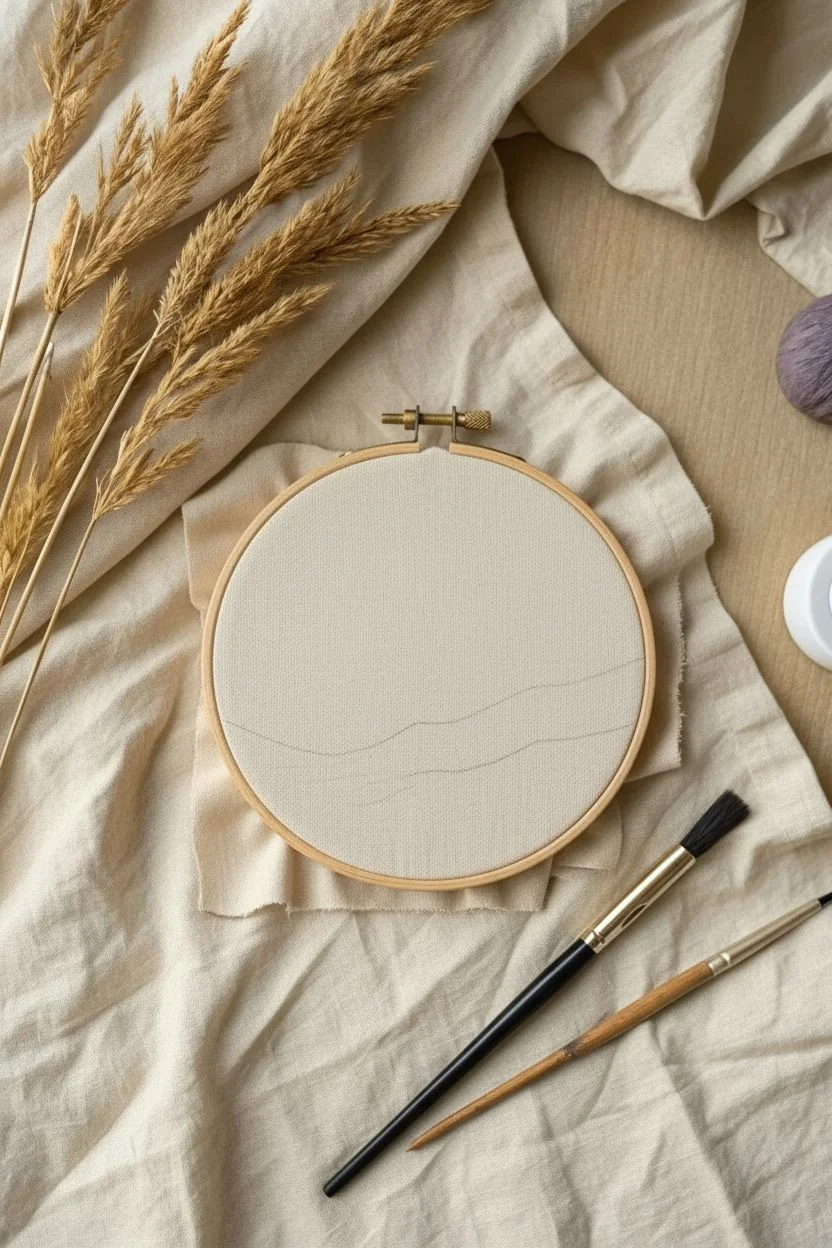
Materials
- Wooden embroidery hoop (approx. 6 inches)
- Light-colored cotton or linen fabric
- Acrylic paints (Titanium White, Orange, Red, Violet, Black)
- Textile medium (or water for dilution)
- Flat synthetic brushes (various sizes)
- Small round brush
- Palette for mixing
- Pencil
- Fabric scissors
Step 1: Preparation
-
Secure the fabric:
Loosen the screw on your embroidery hoop, separate the rings, and place your fabric over the inner ring. Press the outer ring down and tighten the screw while pulling the fabric taut like a drum. -
Trim excess:
Once the fabric is extremely tight and secure, you can trim the excess fabric from the back, or leave it until the end if you prefer a larger margin for error. -
Sketch the horizon:
Using a pencil very lightly, draw create three or four wavy horizontal lines across the bottom half of the circle to map out where your mountain layers will go. -
Prepare the palette:
Squeeze out your white, orange, red, violet, and a dot of black onto the palette. If using textile medium, mix a drop into each color to improve flow.
Smooth Blends
Add a tiny drop of water or retarder to your brush when blending the sky. Acrylics dry fast, and a little moisture keeps the gradient workable longer.
Step 2: Painting the Sky
-
Start with white:
Load a clean flat brush with white paint mixed with a tiny touch of orange to create a warm cream. Paint the top segment of the circle using horizontal strokes. -
Mix the peach layer:
Add a little more orange to your white mixture to create a soft peach tone. Apply this directly below the cream section. -
Blend the transition:
While the paint is still wet, gently brush over the line where the cream and peach meet to create a seamless, soft gradient. -
intenisfy the orange:
Mix a vibrant coral color using orange and a small touch of red. Paint the next band down, making it the most colorful part of the sky. -
Final sky blend:
Work the coral color upwards slightly into the peach layer. I like to keep my brush slightly damp here to help the acrylics merge smoothly on the fabric texture.
Level Up: Texture
Once the paint is fully dry, use embroidery floss to stitch French knots in the sky for stars, or outline the mountain ridges with a simple backstitch for definition.
Step 3: Painting the Landscape
-
Mix the first mountain color:
Create a dusty mauve by mixing violet with a little white and red. It should be darker than the sky but lighter than the foreground. -
Paint the distant range:
Using the edge of your flat brush or a round brush, carefully paint the first mountain shape, overlapping the bottom of your coral sky just slightly to cover the pencil line. -
Darken the mixture:
Add more violet and a tiny dot of black to your mauve mix to create a deep purple. Paint the next mountain layer below the first one. -
Create the foreground shadow:
Mix your darkest color using violet and black (and a touch of blue if you have it) to make a deep indigo-black tone. -
Fill the bottom:
Paint the final, lowest section of the hoop with this dark shade. This anchors the image and creates strong contrast with the bright sky. -
Refine the edges:
Use a small round brush to neaten the tops of the mountain ridges, ensuring crisp, undulating lines. -
Touch up painting:
Check for any white spots of fabric showing through the weave. Dab a little extra paint into these textured areas for solid coverage. -
Dry and Display:
Allow the hoop to dry completely overnight. The fabric will tighten up again as the paint dries.
Hang your finished hoop on the wall or prop it on a shelf for an instant splash of serene color.


Tropical Palm Tree Vibe
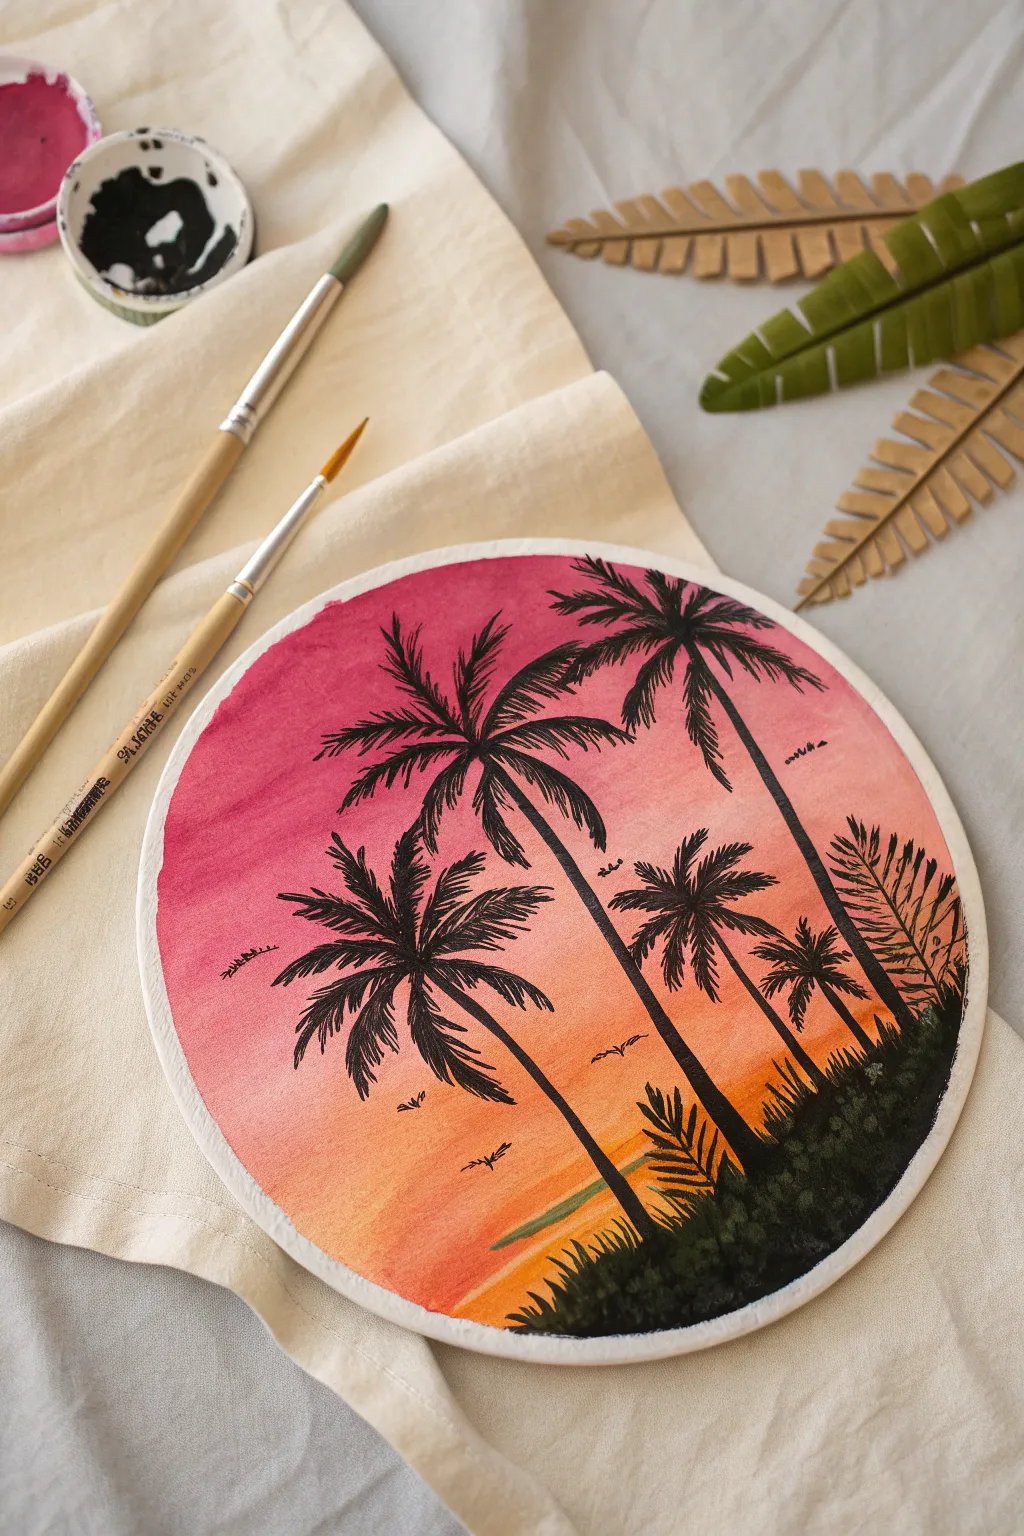
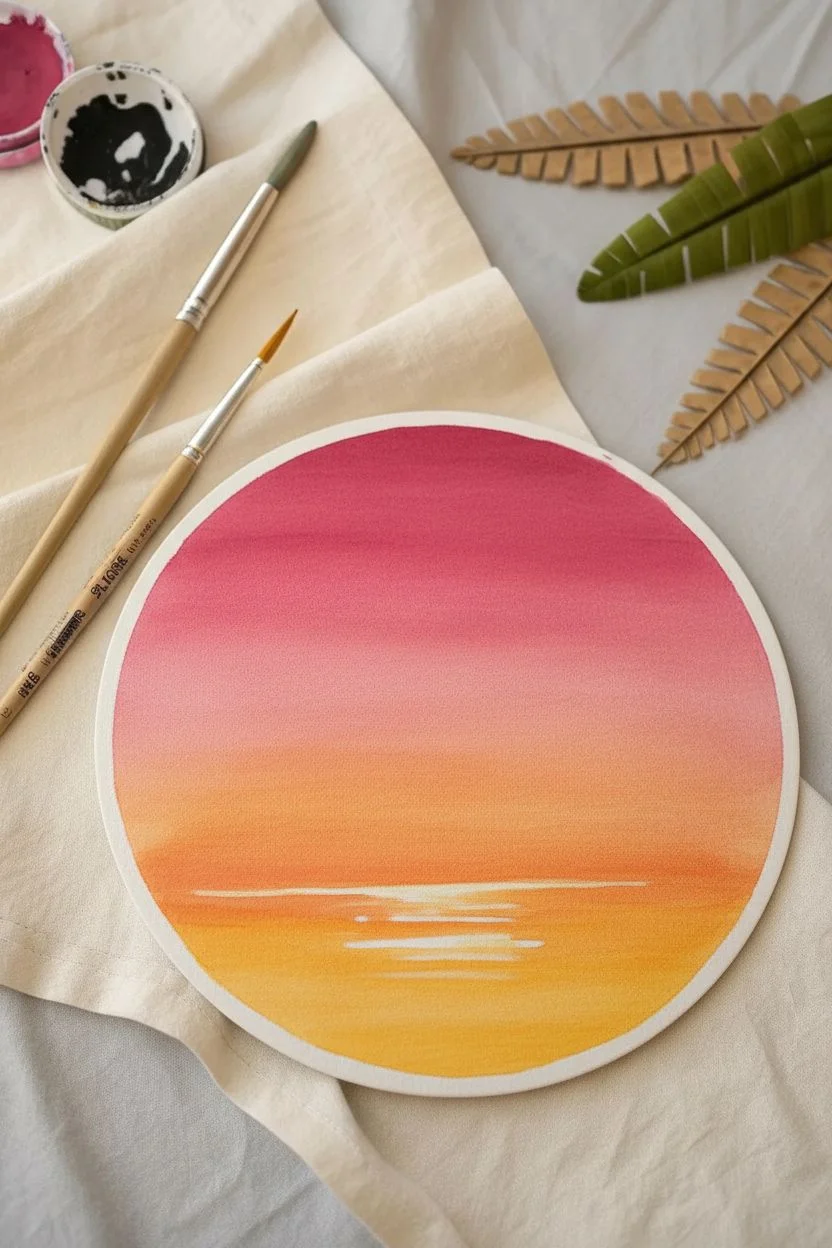
Capture the warmth of a tropical evening in this vibrant circular painting. Using a stunning gradient of berry pinks to golden yellows as a backdrop, you will create a high-contrast scene featuring silhouetted palms and calm waters.
Step-by-Step Guide
Materials
- Round canvas panel or watercolor paper
- Acrylic paints (Magenta, Orange, Yellow, Black, White)
- Flat shader brush (medium size)
- Fine liner or detail brush
- Cup of water and paper towels
- Palette or mixing plate
Step 1: Painting the Gradient Sky
-
Start with Magenta:
Load your flat brush with magenta or deep pink paint. Cover the top third of your circle using smooth, horizontal strokes. -
Introduce Orange:
Without cleaning your brush thoroughly, pick up some bright orange paint. Apply this to the middle section of the circle, slightly overlapping the bottom edge of the pink. -
Blend the Transition:
While both colors are still wet, gently brush back and forth over the overlap line to create a seamless fade between the pink and orange. -
Add the Horizon:
Mix yellow with a tiny touch of orange. Paint the remaining bottom third of the circle, filling it all the way to the bottom edge. -
Soft Yellow Blend:
Blend the top of this yellow section into the orange mid-section just like you did before. The goal is a smooth ombre effect from dark top to light bottom. -
Create Water Reflections:
While the yellow paint is wet, mix a faint amount of white into your yellow. Paint a few horizontal streaks in the very center of the bottom section to suggest light hitting the water. -
Dry Completely:
Let the background dry fully. The surface must be non-tacky before moving to the next phase to prevent the black lines from bleeding.
Pro Tip: Smooth Blending
If your acrylics dry too fast while blending the sky, keep a spray bottle handy. A very fine mist of water over the canvas will reactivate the paint just enough to smooth out brushstrokes.
Step 2: Creating the Silhouettes
-
Outline the Trunks:
Switch to your fine liner brush and black acrylic paint. Draw the tall palm trunks first, curving them slightly inward as if bending in a breeze. -
Add Trunk Texture:
Thicken the trunks slightly at the base and taper them as you go up. A slightly shaky hand here actually helps create natural-looking bark texture. -
Start the Fronds:
To paint the palm leaves, start at the very top of a trunk. Use a flicking motion to pull curved lines outward from the center point. -
Foliage Detail:
Add smaller flick marks coming off each main palm curve to represent the individual leaves. I like to make the lower fronds droop down heavily while the top ones stand up perky. -
Vary the Trees:
Repeat this process for the other trees. Ensure your trees are different heights and some are leaning more than others to keep the composition dynamic. -
Background Palms:
Add a few shorter, smaller palm trees in the background. Make these slightly less detailed to push them visually into the distance.
Step 3: Foreground & Details
-
Ground Coverage:
Use the black paint to fill in the bottom edge of the circle. Use a dabbing motion to create an irregular, bushy texture representing island foliage. -
Grassy Spikes:
From the bushy black bottom, pull quick, short strokes upward to mimic tall grasses and wild plants growing on the shore. -
Distant Birds:
Using the very tip of your detail brush, paint small ‘V’ shapes in the orange section of the sky to represent birds flying in the distance. -
Water Ripples:
Mix a tiny drop of water into your black paint to make it fluid. Paint extremely thin, broken horizontal lines across the yellow water area to create shadow ripples. -
Final Contrast Check:
Look over the painting. If the black looks patchy in areas once dried, apply a second coat to the silhouette shapes to ensure they are solid and opaque.
Level Up: Metallic Shimmer
Once the painting is finished, use a metallic gold paint pen or thin brush to trace the edges of the sun reflections on the water. It gives the piece a luxurious glow when the light hits it.
Now you have a peaceful tropical escape that fits perfectly on your wall


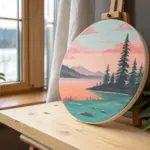
Misty Pine Tree Skyline
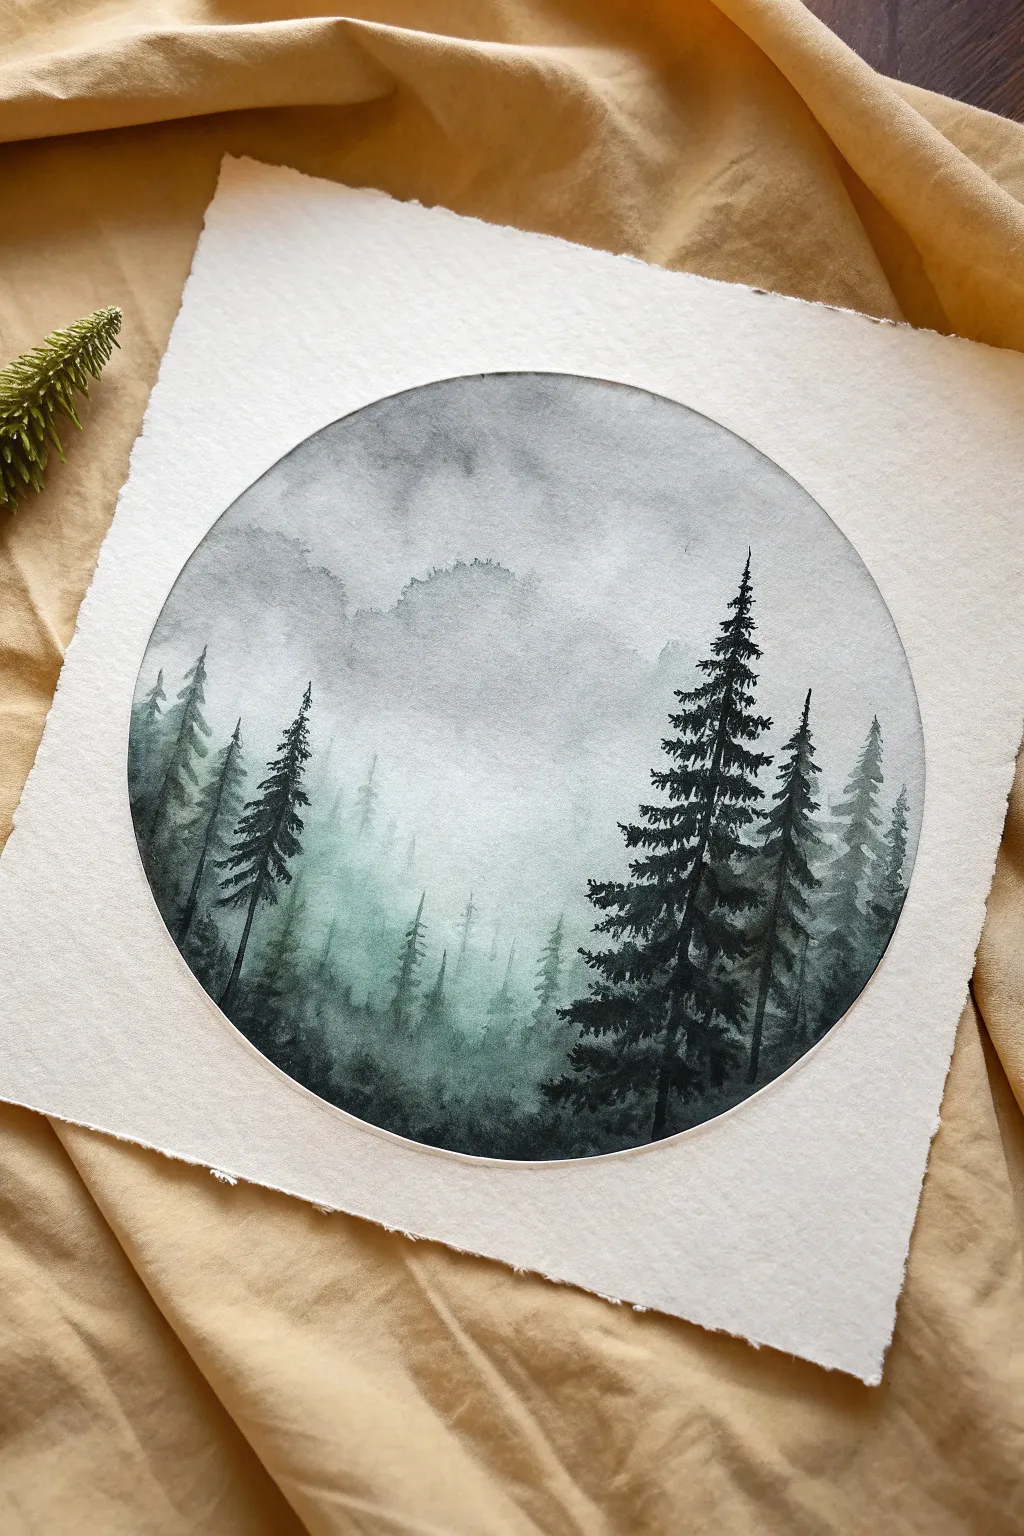
Capture the serene mystery of a foggy evergreen forest contained within a crisp geometric shape. This project plays with the contrast between soft, flowing watercolors and sharp, defining edges to create a stunning atmospheric window.
Step-by-Step Tutorial
Materials
- Cold press watercolor paper (300gsm)
- Pencil and compass (or circular object to trace)
- Watercolor paints (Payne’s Grey, Indigo, Sap Green, Lamp Black)
- Round brushes (Size 8 for washes, Size 2 for details)
- Two jars of water
- Paper towels
- White eraser
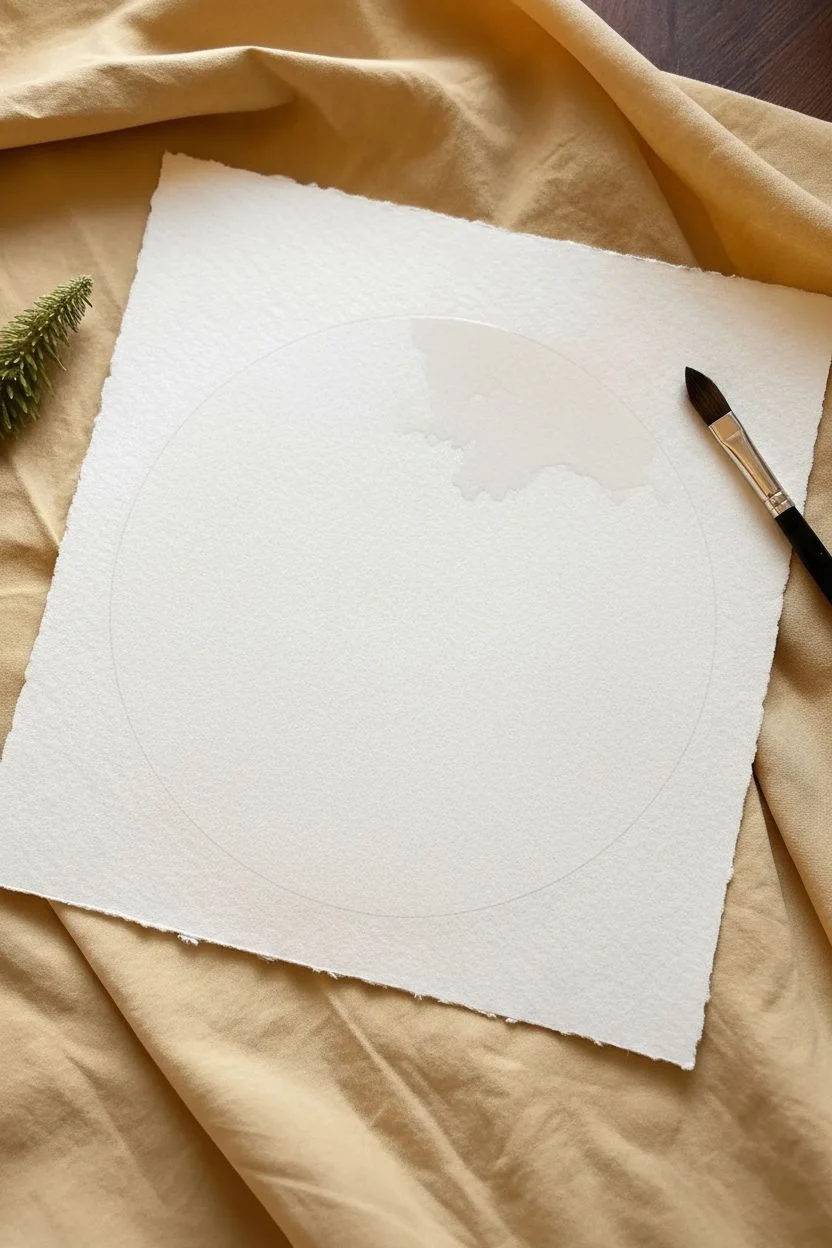
Step 1: Setting the Scene
-
Prepare the paper:
Cut your watercolor paper into a square. For the deckled edge look shown in the photo, you can carefully tear the paper against a ruler properly or buy pre-cut deckled paper. -
Draw the boundary:
Use a compass or trace a bowl to draw a light, perfect circle in the center of your page. Keep the pencil line very faint so it won’t show through the lighter sky later. -
The initial wash:
Dip your Size 8 brush in clean water and wet the top two-thirds of the inside of the circle. Try to stay exactly within the pencil lines to maintain that sharp shape.
Step 2: Creating the Atmosphere
-
Cloudy formations:
Dilute a small amount of Payne’s Grey so it is very watery. Touch the wet paper gently to let the grey bloom into soft cloud shapes. -
Lifting the mist:
Rinse your brush and dry it slightly on a paper towel. Use this ‘thirsty brush’ to lift up some pigment in the center sky area to create white, rolling fog banks. -
Distant hills:
While the paper is still slightly damp (but not puddling), mix a faint grey-green. Paint a soft, uneven horizon line about halfway down clearly indicating the first layer of distant mountains. -
Ghost trees:
Using the same faint mix, dab tiny vertical lines onto the distant hill layer. Because the paper is damp, these will blur slightly, creating the illusion of trees far in the fog. -
The crucial pause:
Let this atmospheric layer dry completely. The paper must be bone dry before stepping forward, or your sharp trees will bleed into the mist.
Pro Tip: Two Water Jars
Keep two water jars: one for rinsing dirty brushes and one for clean water. Use the clean water when wetting the sky to ensure your misty white areas stay bright and don’t turn muddy grey.
Step 3: Painting the Forest
-
Mixing deep greens:
Create a rich, dark color by mixing Sap Green with Indigo and a touch of Lamp Black. You want a high pigment-to-water ratio for bold opacity. -
Left side trees:
Start with the mid-sized trees on the left. Paint a thin vertical line for the trunk using the Size 2 brush. -
Adding texture:
Using the tip of your brush, work from the top of the trunk down, tapping horizontal zig-zag motions that get wider towards the base to mimic pine branches. -
Varying the height:
Add 2-3 more trees on the left side, ensuring they are different heights and widths to make the forest look natural and organic. -
The giant foreground tree:
On the right side, paint your largest, darkest tree. This tree should extend higher than the others, reaching up into the lighter sky area for high contrast. -
Detailing the giant:
Be very deliberate with these branches. Leave small gaps between the foliage layers so the background mist peeks through the needles. -
Grounding the scene:
Mix your darkest possible black-green. Fill in the bottom curve of the circle, blending the base of all your trees into this deep shadow. -
Softening the bottom:
I like to add a tiny amount of water to the bottom edge just inside the circle line to ensure the darkness is smooth and not scratchy. -
Final touches:
Add tiny, sharp tips to the tops of the trees and a few stray branches sticking out on the sides using your finest brush point. -
Cleanup:
Allow the painting to dry overnight. Once absolutely dry, gently erase any visible pencil marks from the circle’s perimeter.
Troubleshooting: Hard Edges
If your background clouds dry with hard, rigid lines, your paper wasn’t wet enough. Gently scrub the edge with a clean, damp brush (not dripping) to reactivate the paint and soften the transition.
Step back and admire how a simple circle frame transforms a forest scene into a modern masterpiece.


Starry Galaxy Splatter
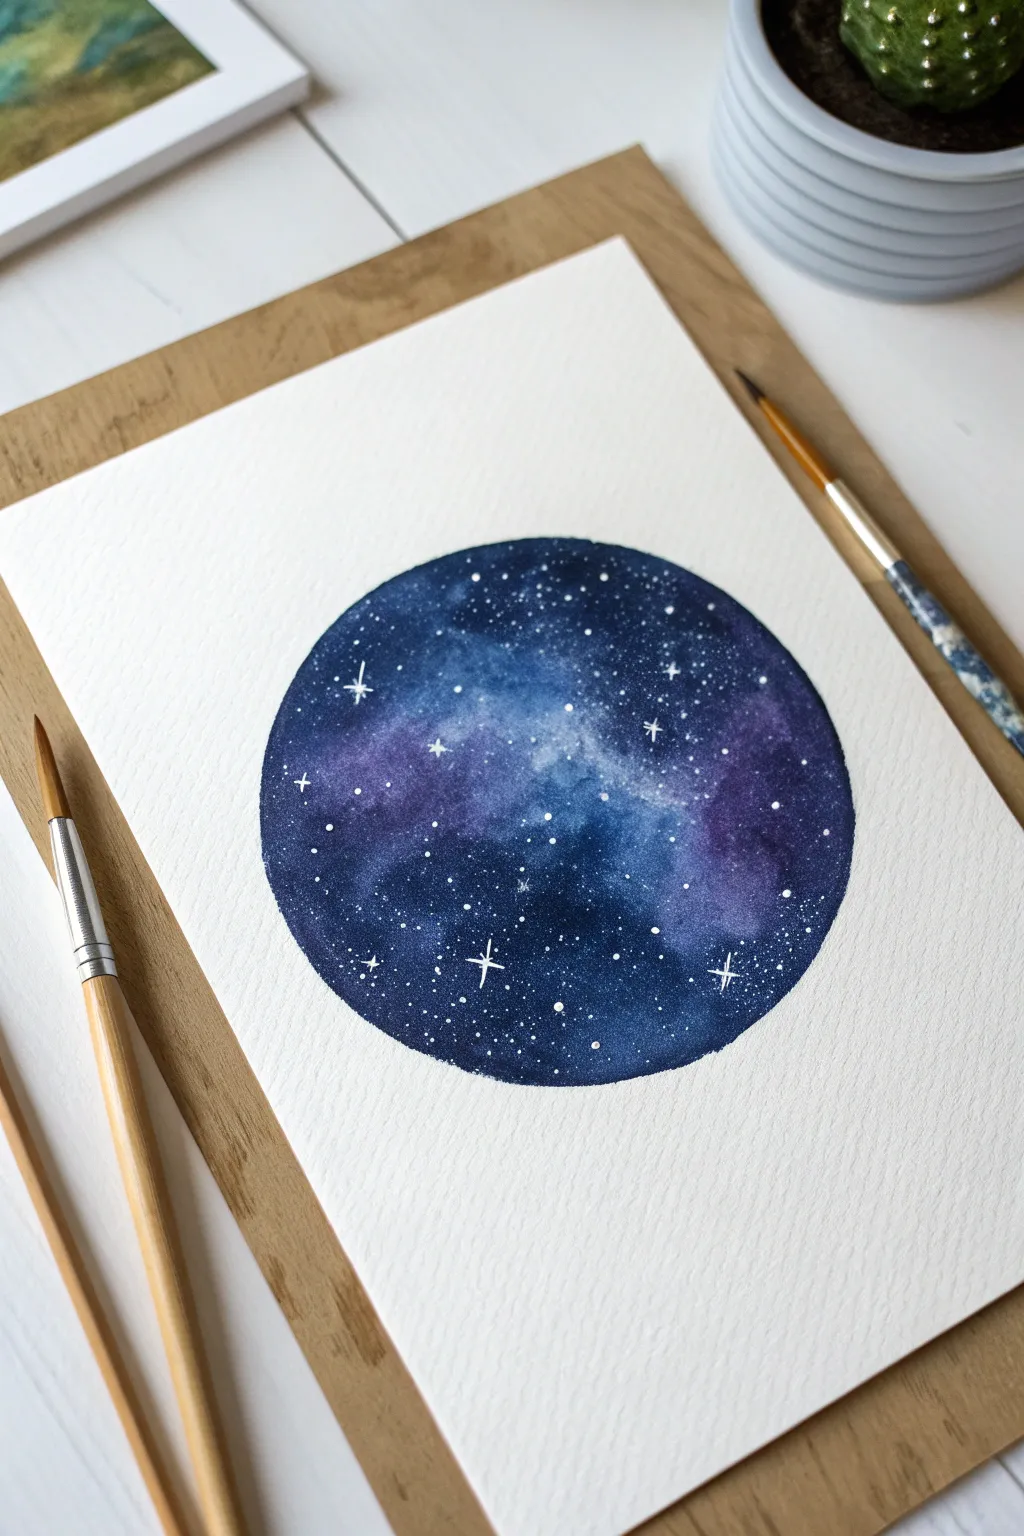

Capture the infinite beauty of the cosmos within a perfect geometric shape using simple watercolor techniques. This project focuses on wet-on-wet blending to create a dreamy, deep-space nebula effect dotted with bright stars.
Step-by-Step Guide
Materials
- Cold press watercolor paper (300gsm)
- Watercolor paints (Indigo, Violet, Prussian Blue, Black)
- White gouache or bleed-proof white ink
- Round watercolor brush (size 6 or 8)
- Fine detail brush (size 0 or 1)
- Circular object to trace (like a masking tape roll)
- HB Pencil
- Two jars of water
- Paper towels
Step 1: Preparation & Base Layer
-
Outline the shape:
Place your circular object in the center of the paper and lightly trace around it with an HB pencil. Keep the line faint so it won’t show through the finished painting. -
Prepare your palette:
Before wetting the paper, activate your paints. Create juicy puddles of violet, indigo, and blue on your palette so they are ready to drop in immediately. -
Wet the paper:
Dip your clean size 6 brush into water and fill the inside of the circle. Create an even sheen of water, ensuring you carefully paint right up to the pencil line without going over. -
Check the sheen:
Tilt your head to look at the paper in the light. It should glisten evenly but not have large pools of standing water. If it’s too wet, dab the excess with a thirsty brush. -
Drop in the lightest color:
Load your brush with the violet or lighter purple mix. Gently touch the tip to the wet paper in random, cloud-like patches, leaving white space in between. -
Add mid-tones:
While the paper is still wet, drop Prussian Blue or a standard dark blue around the purple areas. Allow the colors to touch and bleed into one another naturally.
Water Control Pro Tip
If the paper dries too fast while painting, don’t add water directly to the center. Instead, re-wet the area by adding very watery paint to avoid creating ‘cauliflower’ back-runs.
Step 2: Deepening the Galaxy
-
Introduce deep shadows:
Mix a concentrated indigo or varying amounts of black. Drop this dark pigment along the outer edges of the circle and into the gaps between the colored clouds to create depth. -
Soften the transitions:
I like to rinse my brush and dry it slightly, then use the damp bristles to gently nudge colors together if hard lines start forming. Let the water do most of the work. -
Lift color for highlights:
To create a glowing nebula effect, use a clean, damp brush or a twisted corner of a paper towel to lift a tiny amount of pigment from the center of the purple areas. -
Refine the edge:
Use the tip of your brush to carefully neaten the circle’s edge with the dark indigo paint, ensuring the rim looks crisp and round. -
Let the layers settle:
Allow the painting to sit undisturbed for a moment. Watch how the granulation of the paint creates natural rocky or starry textures as it settles into the paper fibers. -
Dry completely:
This is the most crucial step. Let the painting dry 100% until the paper is warm to the touch. You can use a hairdryer on a low setting to speed this up.
Step 3: Stars & Details
-
Prepare the stars:
Squeeze a small amount of white gouache onto your palette. Mix it with a tiny drop of water until it has the consistency of heavy cream. -
Splatter technique:
Load a medium brush with the white mix. Hold it over the painting and tap the handle firmly against another brush or your finger to spray fine mist droplets resembling distant stars. -
Control the splatter:
Focus the density of the splatter on the darker areas of the galaxy to create high contrast. -
Paint prominent stars:
Switch to your fine detail brush (size 0). dip it in the thick white gouache and manually dot a few larger stars in open spaces. -
Add sparkles:
Select 3 locations for ‘twinkling’ stars. Paint a small cross shape with a longer vertical line and a shorter horizontal line intersecting through a central white dot.
Level Up: Silhouette
Once the galaxy is dry, use opaque black gouache or ink to paint a tiny silhouette of a pine tree forest or mountain range along the bottom curve of the circle.
Once the white stars are dry, you have a portable window into deep space ready to display
BRUSH GUIDE
The Right Brush for Every Stroke
From clean lines to bold texture — master brush choice, stroke control, and essential techniques.
Explore the Full Guide
Reflective Water Horizon
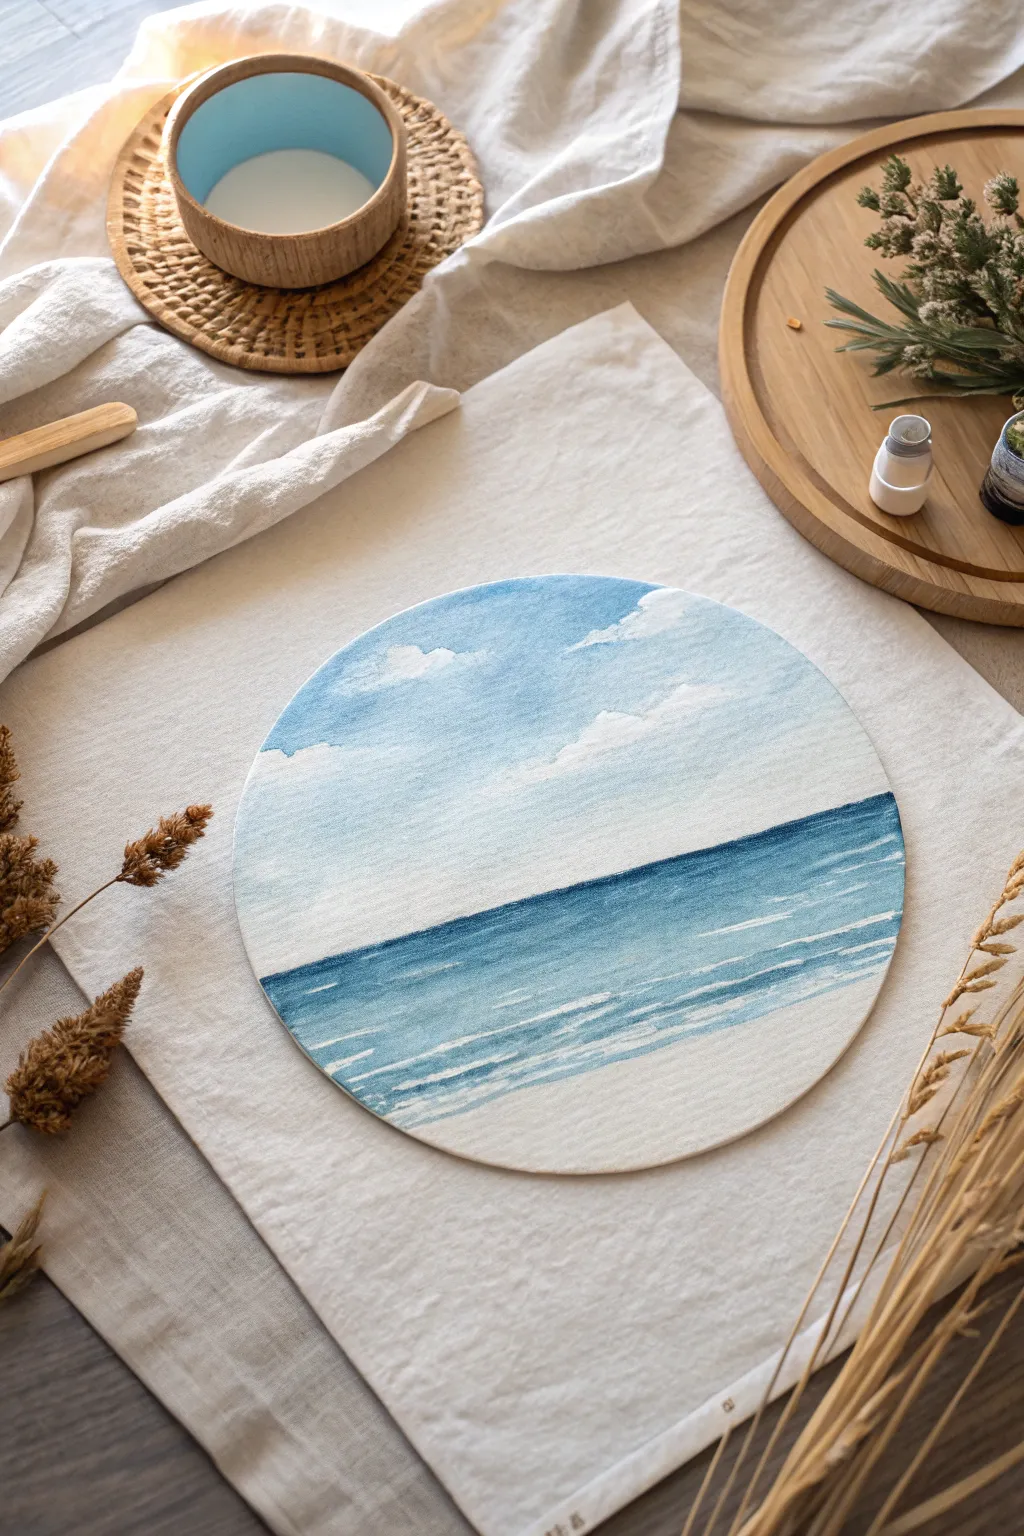
Capture the serenity of a quiet beach day with this circular seascape painting. The round canvas format acts like a porthole, focusing the eye on the soft gradients of the sky and the rhythmic, calming lines of the ocean waves.
Step-by-Step Tutorial
Materials
- Round canvas panel (8 to 10 inches)
- Acrylic paints (Titanium White, Phthalo Blue, Ultramarine Blue)
- Flat synthetic brush (3/4 inch)
- Round brush (size 6)
- Fine detail liner brush
- Palette and water cup
- Paper towels
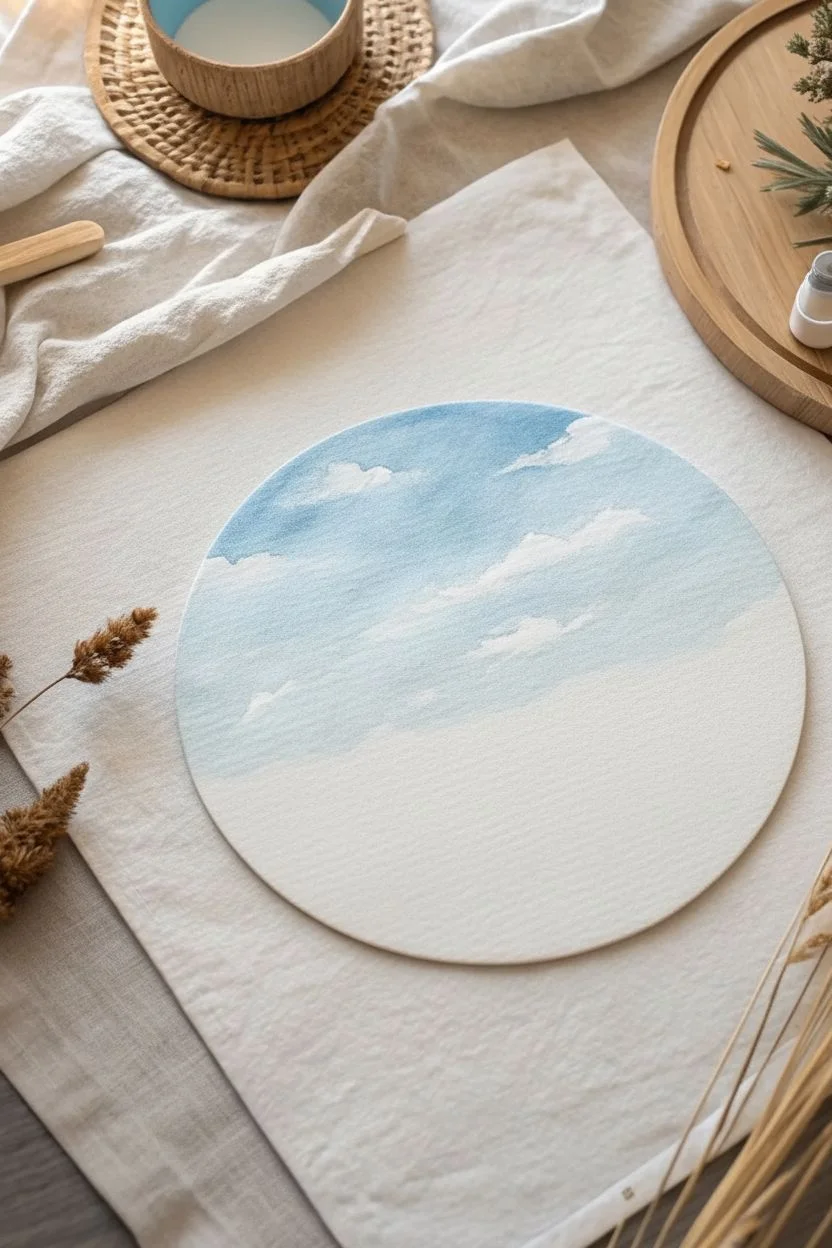
Step 1: Sky & Clouds
-
Mix sky base:
Combine a large amount of Titanium White with a tiny speck of Phthalo Blue to create a very pale, airy sky color. -
Paint the gradient:
Starting at the top edge of the circle, apply the blue mix using horizontal strokes. As you move down, mix in more white to fade the color to nearly white by the time you reach the bottom third of the canvas. -
Add cloud forms:
While the sky is still slightly tacky but not soaking wet, load a round brush with pure Titanium White. -
Shape the clouds:
Dab irregular, fluffy shapes into the upper blue section. Keep the tops of the clouds distinct but soften the bottom edges with a clean, slightly damp brush so they melt into the atmosphere. -
Layering clouds:
Paint a few smaller, wispy cloud streaks lower down in the sky for depth. -
Dry completely:
Allow the entire sky section to dry completely. This is crucial for getting a crisp horizon line in the next phase.
Step 2: The Deep Blue Sea
-
Mix horizon color:
Create a deep ocean blue by mixing Ultramarine Blue with a touch of Phthalo Blue. I like to add the tiniest drop of black or brown if it looks too vibrant, but pure blue works well for a tropical look. -
Establish the horizon:
Using the flat brush turned on its chisel edge, paint a straight, horizontal line across the canvas about one-third of the way up from the bottom. -
Fill the deep water:
Paint a solid band of this dark blue just below the horizon line, making it about an inch wide. -
Transition lighter:
Without cleaning your brush thoroughly, pick up some Titanium White and blend it into the bottom edge of the dark blue band to start lightening the water. -
Fade to shore:
Continue painting downward, adding significantly more white to your mix until the bottom area is a very pale, creamy off-white representing the shallow sandy shore. -
Let it set:
Allow this base layer of the ocean to dry to the touch before adding details.
Streaky Blending?
If your sky or water gradients look rough, the acrylics are drying too fast. Mist the canvas lightly with water or mix a drop of gel retarder into your paint to extend working time.
Step 3: Waves & Texture
-
Prepare detailed white:
Thin down a small amount of Titanium White with a few drops of water until it has an ink-like consistency. -
Distant ripples:
Using your fine liner brush, paint very thin, broken horizontal lines in the darker blue water area to suggest distant ripples catching the light. -
Mid-ocean waves:
As you move towards the lighter water, paint slightly thicker, more jagged horizontal lines to represent rolling wave crests. -
Foreground foam:
For the bottommost area, use a round brush with less water to scumble (lightly scrub) white paint in irregular patches, mimicking sea foam washing up on sand. -
Highlighting:
Add a final pass of solid, bright white highlights to the tops of the largest waves for extra pop. -
Final check:
Step back and ensure your horizon line looks straight, touching up the edge with dark blue if needed.
Level Up: 3D Foam
Mix a pinch of baking soda into the white paint used for the foreground sea foam. This creates a gritty, raised texture that mimics the look of bubbly sand and real ocean froth.
Display your peaceful porthole view on a mini easel or propagate a calming vibe by hanging it in your workspace.
The Seasonal Quartet Series
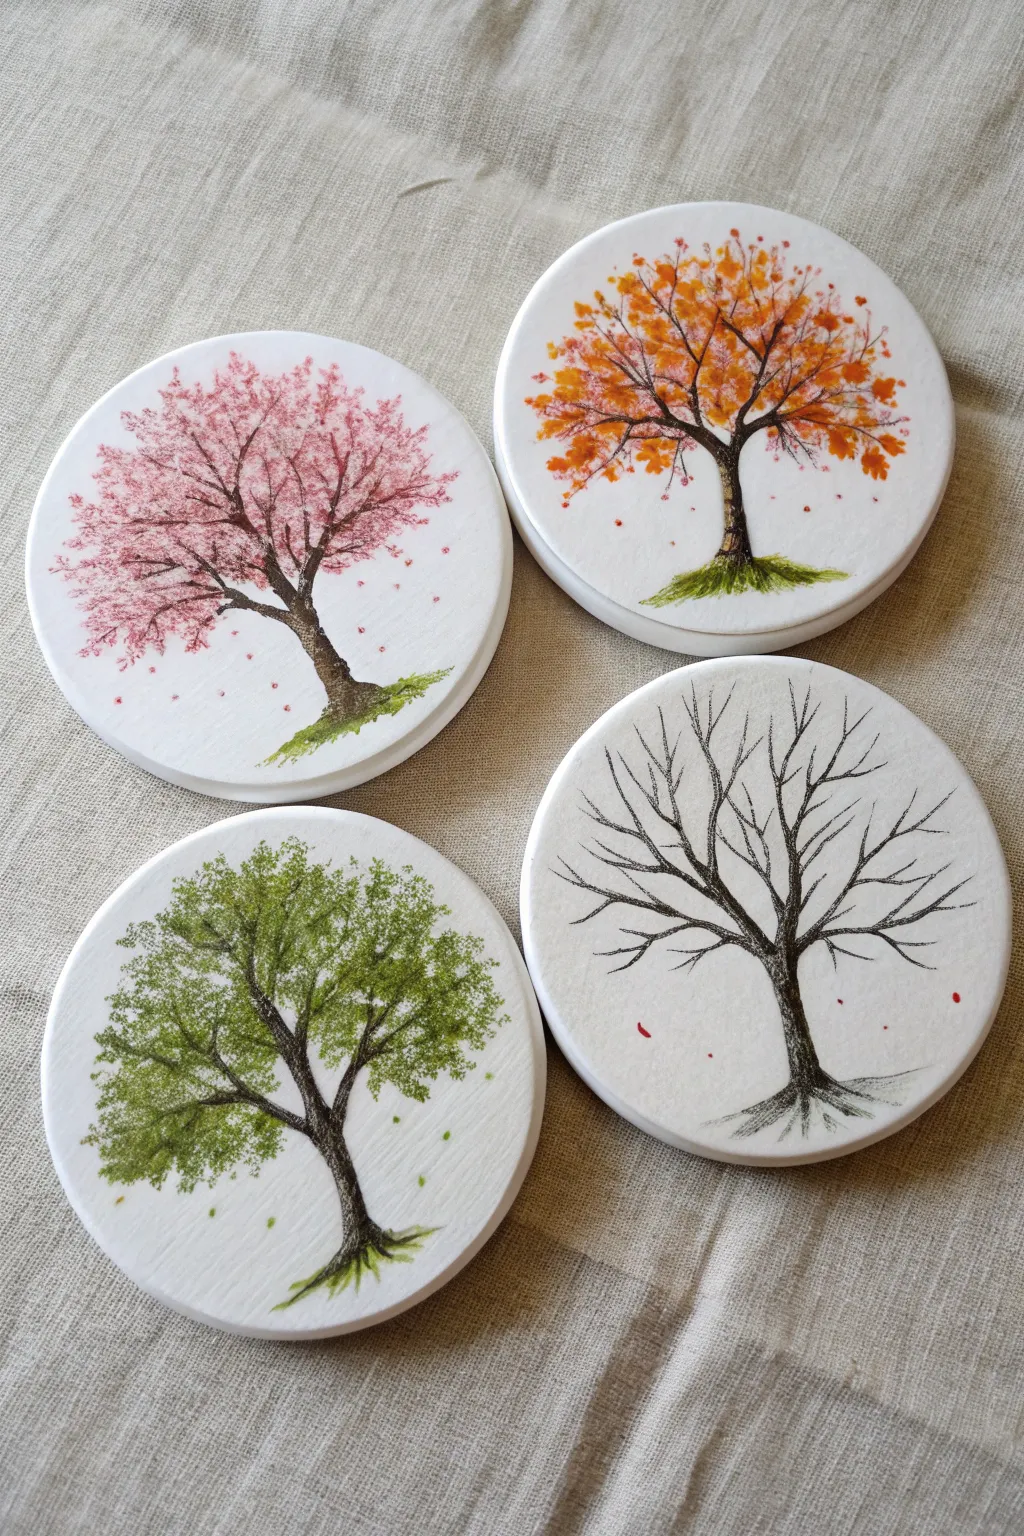
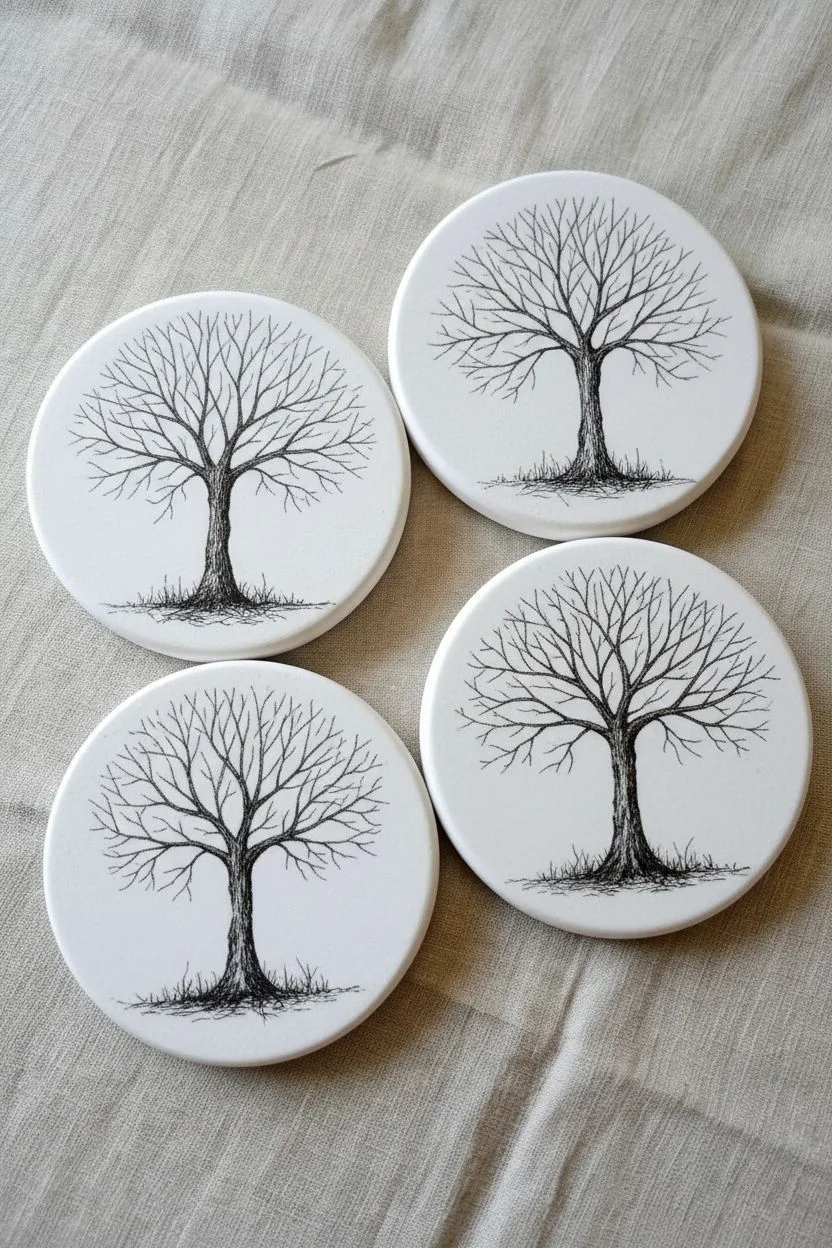
Capture the graceful cycle of nature by painting four distinct seasons of the same tree on round ceramic coasters or mini canvases. This project combines precise ink line work with loose, stippled watercolor effects to create a cohesive and meditative gallery set.
Step-by-Step
Materials
- 4 Round ceramic bisque coasters or round watercolor paper blocks (approx. 4 inches)
- Waterproof archival fine liner pens (Black, sizes 01, 03, and 05)
- Watercolor paints (Sap Green, Olive Green, Alizarin Crimson, Cadmium Orange, Burnt Sienna)
- Small round detail brush (size 2)
- Paper towels
- Pencil and eraser
- Clear spray varnish (matte or satin finish)
Step 1: Sketching the Skeleton
-
Establish the ground:
On all four discs, lightly use your pencil to draw a faint horizon line near the bottom third of the circle to maintain consistency across the set. -
Draft the trunks:
Sketch a central tree trunk on each coaster using pencil, ensuring they are roughly the same height and width, with a Y-shape branching out towards the top. -
Ink the main trunk:
Using the 05 (thickest) pen, go over your pencil lines for the trunk, making the base slightly wider and using short, vertical strokes to simulate rough bark texture. -
Branch out:
Switch to the 03 pen to draw the primary branches extending from the trunk, tapering them as they reach outward. -
Add fine twigs:
With your 01 (finest) pen, add delicate, fractal-like twigs to the ends of the branches; intricate branching is crucial for the Winter coaster to look complete. -
Ground the trees:
Use the 01 pen to sketch small, scribbly grass textures and roots at the base where the tree meets the ground. -
Clean up:
Allow the ink to dry completely, then gently erase all visible pencil marks.
Step 2: Changing Seasons
-
Spring blossoms (Pink):
For the first coaster, mix a watery crimson or pink; use the tip of your brush to ‘stipple’ (dot) clusters of flowers, keeping them dense near the branches and sparse at the edges. -
Falling petals:
Add a few stray pink dots floating in the air and settling on the ground to simulate falling cherry blossoms. -
Summer canopy (Green):
On the second coaster, stipple varying shades of green (mix olive and sap green) to create a full, lush canopy, leaving small gaps so the sky peeks through. -
Autumn foliage (Orange):
I like to work wet-on-dry here; dab bold orange, red, and yellow paints on the third coaster, allowing the colors to naturally blend on the paper for a fiery look. -
Winter dormancy (Bare):
Leave the branches of the fourth coaster bare, but add a very faint wash of grey shadow on the ground to suggest cold earth or snow. -
Grounding shadows:
Paint a small wash of green at the base of the Spring and Summer trees, and a brownish-yellow wash for the Autumn tree. -
Details and movement:
Go back to the Autumn tree and add several ‘falling’ leaves in the air using tiny dabs of orange paint, creating a sense of wind.
Ink Smearing?
If your black lines bleed when adding watercolor, your pen isn’t fully waterproof. Test pens on scrap paper first, or heat set the ink with a hair dryer before painting.
Step 3: Finishing and Sealing
-
Deepen contrast:
Once the paint is dry, use the 005 pen to re-emphasize any trunk lines that got covered by the foliage paint, bringing the structure back to the foreground. -
Scattered highlights:
For the Summer tree, add a few yellow dots on the upper edges of the green leaf clusters to mimic sunlight hitting the canopy. -
Final cure:
Let the artwork dry for at least 24 hours to ensure all moisture has evaporated from the porous surface. -
Protect the art:
Spray a thin, even coat of matte varnish over the coasters to seal the watercolor and prevent smudging during use.
Metallic Magic
Use a metallic gold watercolor pan or a gold gel pen to add tiny, shimmering accents to the Autumn leaves or the center of the Spring blossoms.
Arrange your finished quartet in a row to enjoy a year’s worth of nature’s beauty at a single glance.

PENCIL GUIDE
Understanding Pencil Grades from H to B
From first sketch to finished drawing — learn pencil grades, line control, and shading techniques.
Explore the Full Guide
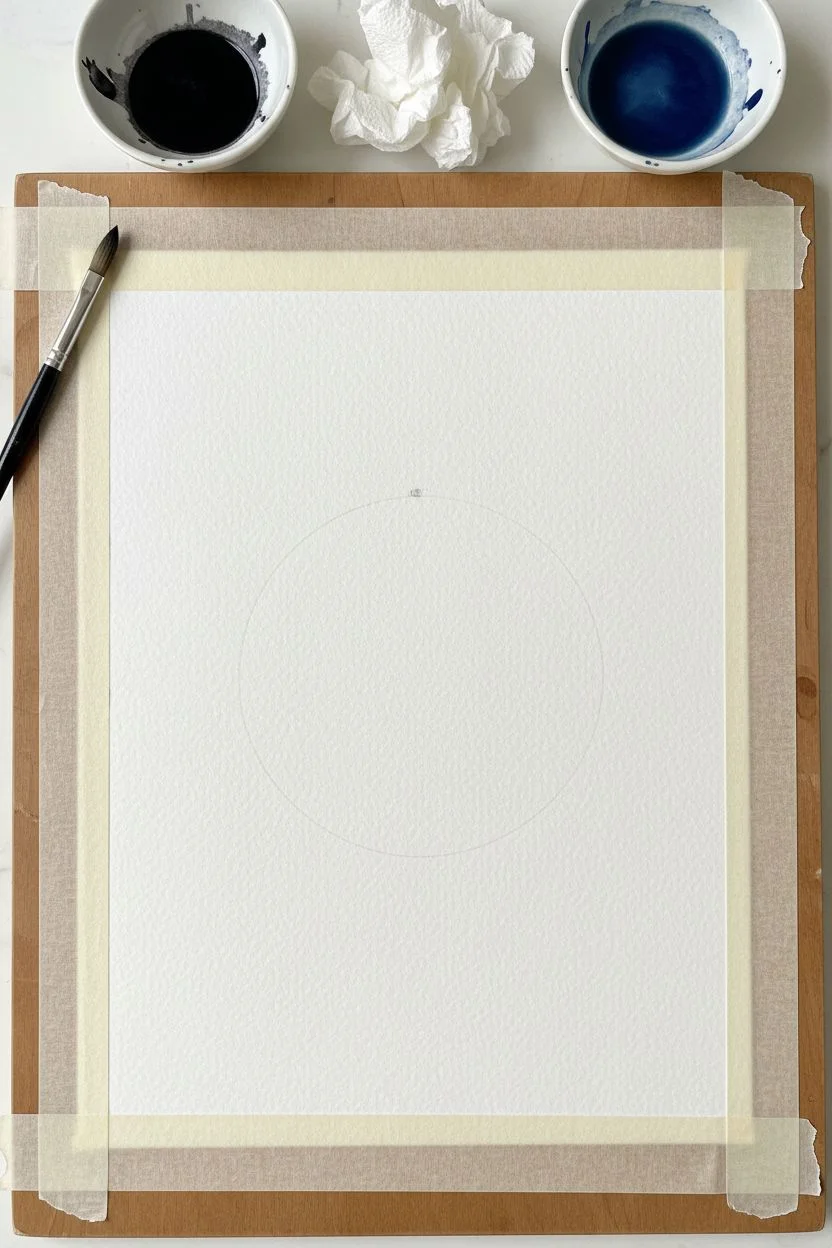
Hanging String Lights Frame
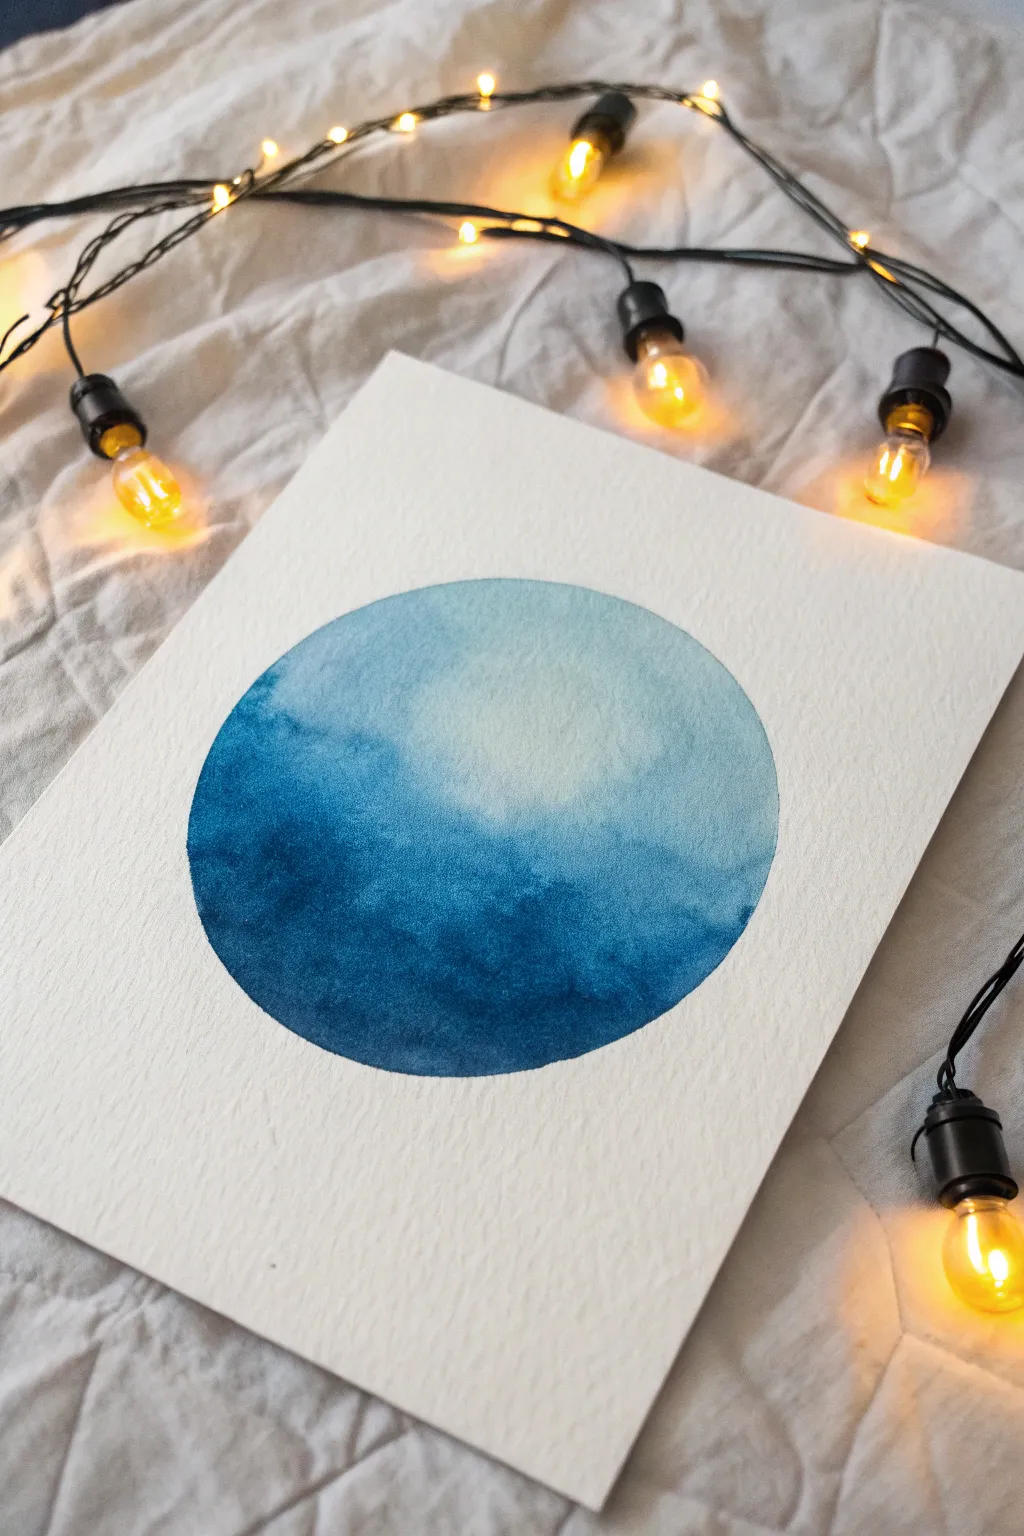
Capture the serene atmosphere of a moonlit night contained within a simple geometric shape. This project uses wet-on-wet watercolor techniques to create a beautiful, misty gradient that looks professional yet is surprisingly beginner-friendly.
Detailed Instructions
Materials
- Cold-press watercolor paper (300gsm)
- Indigo and Ultramarine watercolor paints
- Round watercolor brush (size 8 or 10)
- Circular object for tracing (like a bowl)
- Pencil and eraser
- Masking tape and hardboard
- Two jars of water
- Paper towel
Step 1: Preparation and Outline
-
Secure the paper:
Tape your watercolor paper down to a hardboard or table on all four sides. This prevents the paper from buckling when it gets wet. -
Trace the shape:
Place your circular object in the center of the paper. -
Draw the outline:
Lightly trace around the object with a pencil. Keep the line faint so it won’t be visible through the lighter paint at the top. -
Mix colors:
Prepare a puddle of Indigo paint mixed with a little water to make it inky and dark. -
Secondary color:
Prepare a second puddle of Ultramarine blue that is more diluted and watery.
Two-Jar Method
Keep two jars of water handy: one for rinsing your dirty brush and a constantly clean one for wetting the paper. This ensures the top of your moon stays pristine white and doesn’t get muddy.
Step 2: Wet-on-Wet Application
-
Wet the circle:
Load your brush with clean water and paint inside the circle outline. -
Check the sheen:
Tilt your head to check the light reflection; the paper should be glistening evenly but not have standing pools of water. -
Refine edges:
Use the tip of your brush to ensure the water goes exactly to the pencil line, creating a crisp barrier. -
Drop the darks:
Load your brush with the concentrated Indigo mix. -
Apply base color:
Touch the brush to the bottom curve of the wet circle. Watch the paint explode and bloom upwards naturally. -
Deepen the bottom:
Dab more Indigo along the bottom edge to create the deepest shadow, mimicking the night sky or ocean depth.
Celestial Sparkle
While the paint is still damp (not soaking wet), sprinkle a tiny pinch of table salt into the dark blue area. As it dries, the salt absorbs moisture and creates star-like crater textures.
Step 3: Gradient and Texture
-
Add mid-tones:
Rinse your brush slightly and pick up the diluted Ultramarine blue. -
Blend upwards:
Dab this lighter blue into the middle of the circle, letting it touch the Indigo so they mix on the paper. -
Fade to white:
Clean your brush thoroughly and dry it slightly on a paper towel so it’s damp, not dripping. -
Soften the top:
Gently nudge the edge of the blue paint upwards, fading it out before it reaches the very top of the circle. Leave the top area white or very pale blue. -
Create blooms:
I like to drop a tiny bead of clean water into the drying blue paint near the center. This pushes the pigment away and creates those cloudy ‘cauliflower’ textures seen in the photo. -
Tilt for variation:
Pick up the board and tilt it slightly to encourage the paint to flow, but keep the darks generally at the bottom. -
Let it dry:
Lay the board flat and let it dry completely. Don’t touch it while it’s damp, or you might smudge the texture. -
Final cleanup:
Once bone dry, gently erase any visible pencil marks around the edges.
Now you have a stunning, atmospheric moon painting ready to frame and light up your space.
Tape-Masked Sketchbook Circles


Transform a plain black sketchbook into a portal to the beach with this high-contrast scenic painting. By masking off a perfect circle, you create a polished “porthole” effect that makes the opaque acrylic colors pop vividly against the dark background.
Step-by-Step Guide
Materials
- Black sketchbook or heavy black cardstock
- Wide masking tape or painter’s tape
- Hobby knife (X-Acto)
- Compass or circular object for tracing
- Acrylic gouache paints (coral, teal, ochre, white, purple)
- Small flat shader brush
- Fine liner brush
- Palette and water
Step 1: The Masking Setup
-
Apply the tape base:
Cover the center of your sketchbook cover with strips of masking tape, overlapping the edges slightly to ensure there are absolutely no gaps. -
Trace the shape:
Use a drawing compass or trace around a jar lid to draw a circle directly onto the layer of masking tape. -
Cut the stencil:
Carefully trace the pencil line with a hobby knife, applying just enough pressure to slice through the tape without scoring the sketchbook cover beneath. -
Expose the canvas:
Peel away the tape from the *inside* of the circle to reveal the clean black painting surface. -
Seal the edges:
Run your fingernail or a spoon handle firmly along the cut edge of the remaining tape to prevent paint from seeping underneath.
Bleeding Edges?
If a little paint seeped under the tape, don’t worry. Once the paint is dry, carefuly tidy up the fuzzy edge using a black permanent marker or a tiny amount of black paint.
Step 2: Painting the Scene
-
Block in the sky:
Mix a vibrant coral-red shade and paint the top third of the circle, applying the paint thickly enough to completely hide the black paper. -
Create the horizon:
While the red is still slightly wet, blend a lighter orange strip just below it to create a soft, glowing horizon line. -
Paint the sun:
Using a pale tangerine or peach color, paint a semi-circle resting on the horizon line to represent the setting sun. -
Add cloud details:
Add a few horizontal, jagged strokes of peach or light orange across the red sky area to mimic drifting clouds. -
Form the mountains:
Mix a dark slate or purple-grey hue and paint jagged mountain shapes on the right side, slightly overlapping the sun. -
Fill the ocean:
Load your brush with deep teal or turquoise paint and fill the middle section, cutting a straight line below the sun and mountains. -
Lay the sand:
Switch to a golden yellow ochre to paint the beach at the bottom, creating a diagonal shoreline where it meets the water.
Step 3: Highlights and Reveal
-
Add sea foam:
I prefer to wait until the teal is touch-dry, then use a fine liner brush and pure white paint to sketch irregular lines where the water meets the sand. -
Detail the water:
Paint small, broken horizontal dashes of white and lighter teal across the water’s surface to create the suggestion of ripples and waves. -
Dry completely:
Allow the painting to dry fully; if you peel the tape while the paint is wet, you risk smudging the crisp border. -
The final reveal:
Slowly peel off the outer masking tape at a 45-degree angle to reveal the sharp, perfect circle.
Pro Tip: Opacity is Key
For this project, use ‘Acrylic Gouache’ instead of standard acrylics. Its matte, ultra-opaque finish covers black paper instantly without requiring multiple layers.
Enjoy your customized sketchbook cover that invites you to create every time you look at it.


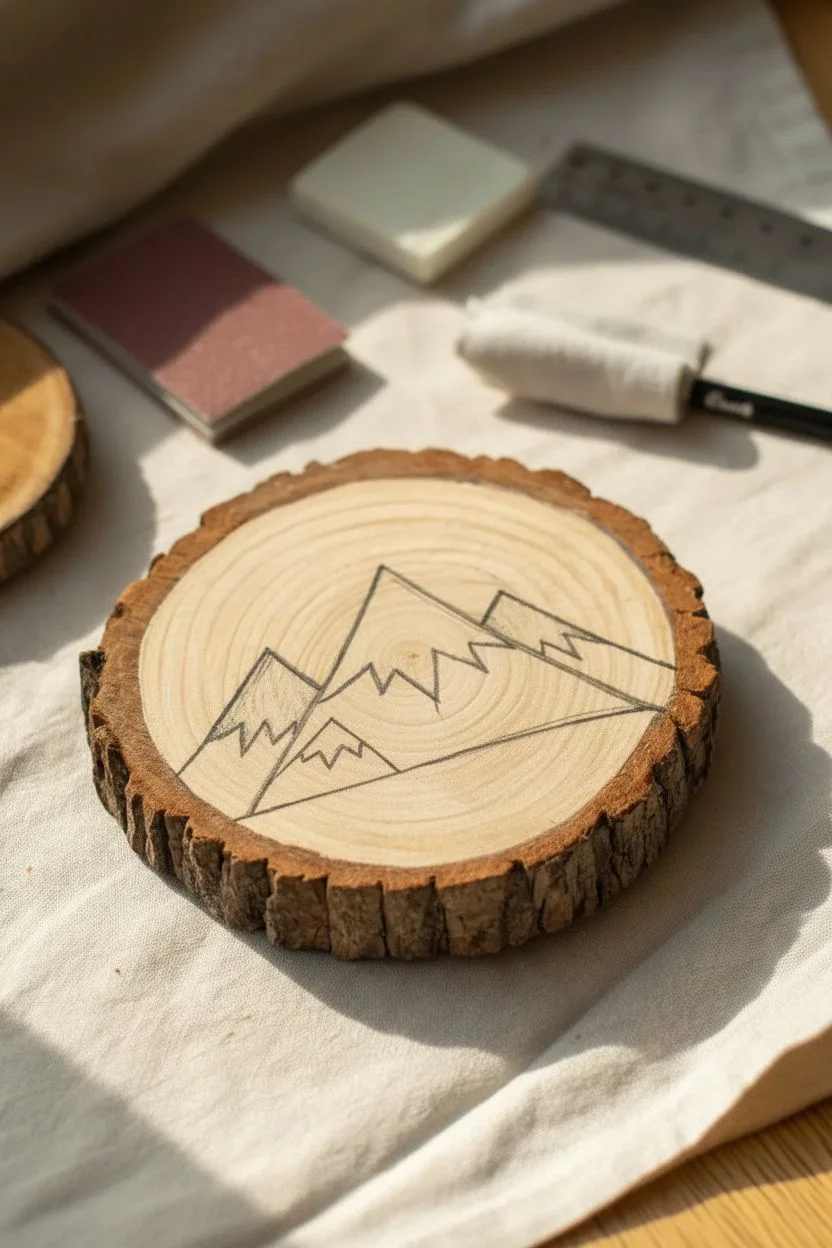
Rustic Wood Slice Coasters
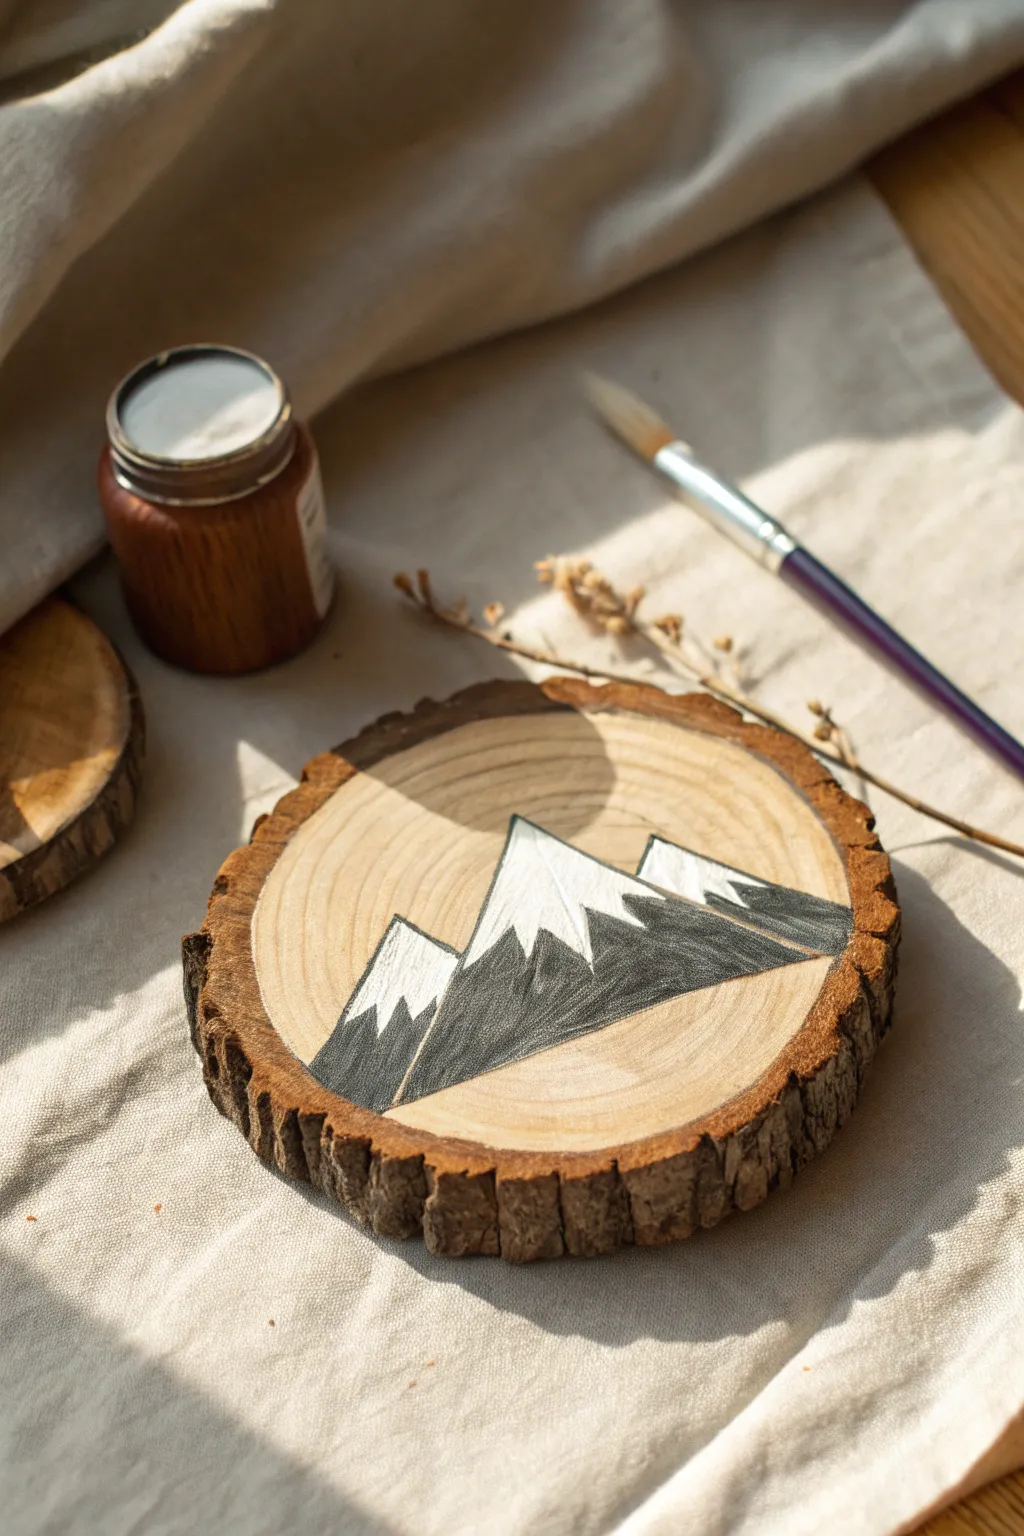
Bring the serenity of the alpine wilderness to your coffee table with this rustic yet modern coaster project. By combining the raw texture of natural wood with crisp geometric peaks, you’ll create a functional piece of art that strikes a perfect balance between organic and graphic.
How-To Guide
Materials
- Wood slice coaster (approx. 4-inch diameter)
- Fine-grit sandpaper
- Pencil and eraser
- Acrylic paint or opaque ink (White and Charcoal/Black)
- Small flat brush
- Fine detail brush
- Ruler (optional)
- Clear waterproof varnish or sealant
Step 1: Preparation and Sketching
-
Sand the surface:
Begin by sanding the top face of your wood slice with fine-grit sandpaper until it feels smooth to the touch. This prevents the paint from skipping over rough fibers. -
Clean the dust:
Use a barely damp cloth or a dry microfiber towel to wipe away all sanding dust. The surface needs to be completely clean for crisp lines. -
Establish the center peak:
Using your pencil, draw a large triangle in the center of the wood slice. Make sure the base of the triangle sits slightly below the midline of the circle. -
Add flanking peaks:
Draw two smaller triangles on either side of the main peak. Position them slightly lower so they appear to be in the foreground, overlapping the central mountain slightly. -
Define the snowline:
Sketch a jagged, irregular line across the top third of each triangle. This zigzag pattern will separate the snowy caps from the rocky bases.
Bleeding edges?
If paint bleeds into the wood grain, try painting a thin layer of clear matte medium over your pencil sketch first. This seals the fibers and creates a barrier for sharp lines.
Step 2: Painting the Mountains
-
Outline the bases:
Dip your fine detail brush into the charcoal or black paint.Carefully trace the outer lines of the mountain bases, stopping where the snowline begins. -
Fill the dark areas:
Switch to a small flat brush to fill in the bottom sections of the mountains. I like to use diagonal brush strokes here to mimic the texture of slate or rock. -
Refine the edges:
Ensure the bottom edge of your mountain range is straight and sharp. You can use a ruler to guide your hand if you feel unsteady. -
Allow base to dry:
Let the black paint dry completely. Since wood is porous, this should be quick, but ensure it’s dry to the touch to avoid smudging white paint into the black. -
Paint the center snowcap:
Load your clean brush with white acrylic paint. Fill in the tip of the central mountain, carefully following the jagged pencil line you drew earlier. -
Paint remaining snowcaps:
Fill in the white tips of the two smaller side mountains. Make sure the white points are opaque; you may need a second coat if the wood grain shows through too much. -
Sharpen the contrast:
Use your finest brush to touch up the meeting point between the black and white paint, ensuring the ‘peaks’ of the snow line are sharp and crisp.
Step 3: Finishing Touches
-
Erase guidelines:
Once the paint is 100% dry, gently run your eraser over the design to remove any visible pencil marks around the edges. -
Apply first coat of sealer:
Apply a thin layer of waterproof varnish over the entire face of the coaster. This locks in the design and protects the wood from moisture. -
Apply final coat:
After the first coat is tacky or dry, add a second layer of varnish to ensure a durable finish that can handle hot mugs. -
Let it cure:
Allow the coaster to cure for the time recommended on your varnish bottle before placing any drinks on it.
Crisp Lines Pro Tip
For perfectly straight outer lines on your triangles, apply strips of washi tape or painter’s tape to the wood before painting. Peel it off while the paint is still wet.
Place your warm mug on your new creation and enjoy the cozy cabin vibes you’ve just created
Minimalist Moon Phase
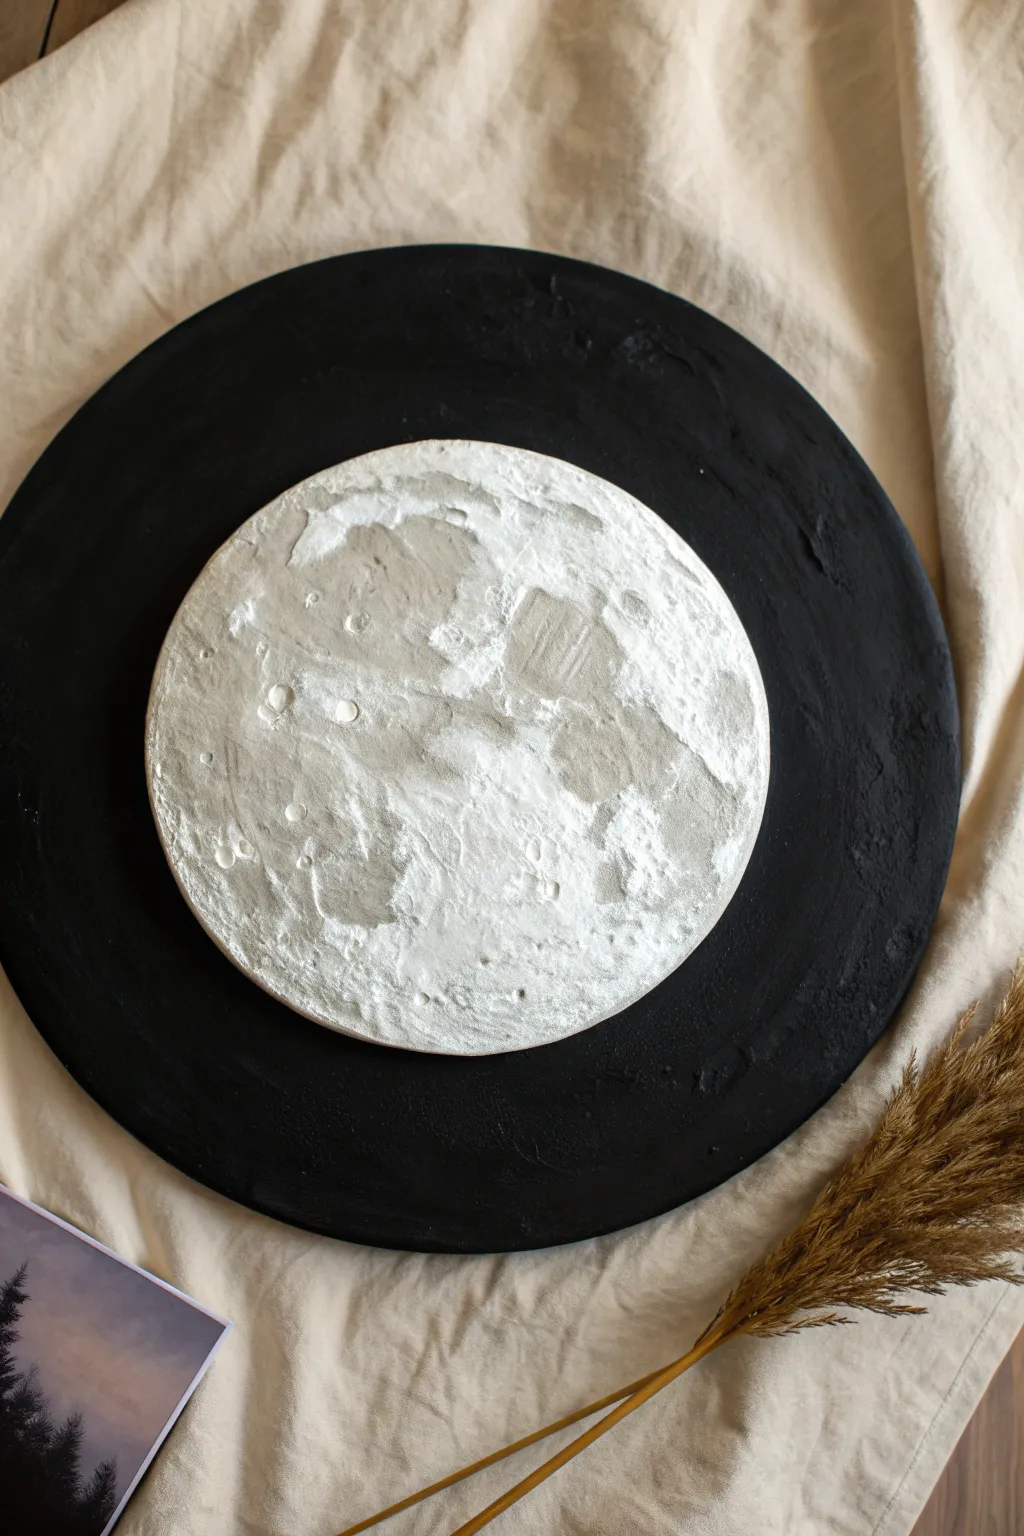
Capture the stark beauty of a full moon against the void of space with this high-contrast textured art piece. Using modeling paste to create realistic craters and ridges, you will build a touchable lunar surface mounted on a sleek, matte black background.
Step-by-Step Tutorial
Materials
- Large round wooden board (base)
- Smaller round cardboard or wood cutout (moon)
- Modeling paste or thick heavy body gel
- Matte black acrylic paint
- Titanium white acrylic paint
- Neutral grey acrylic paint
- Palette knives (variety of sizes)
- Small sea sponge
- Strong craft glue
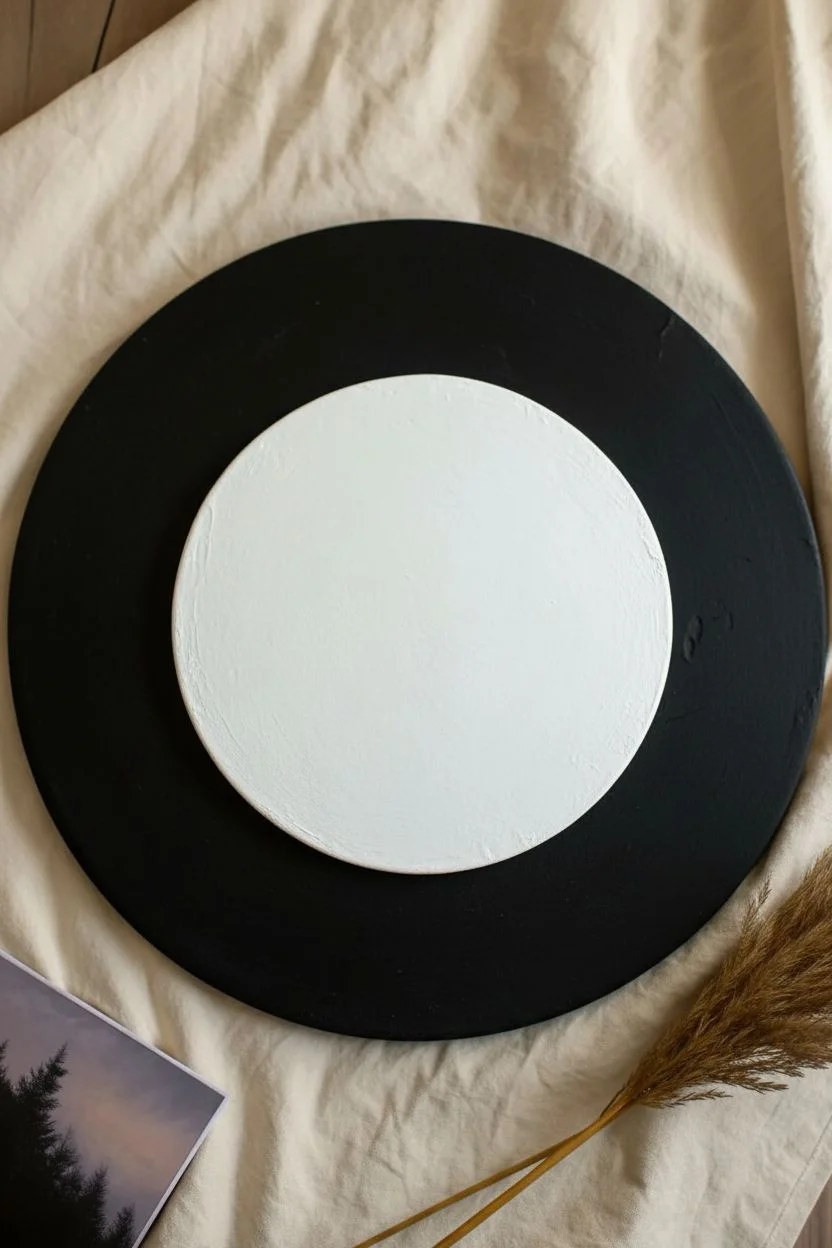
Step 1: Preparing the Void
-
Prepare the base:
Start by sanding your large wooden round to ensure a completely smooth surface, removing any splinters or rough patches. -
Apply the darkness:
Paint the entire large wooden round with matte black acrylic paint. You want this to be flat and light-absorbing. -
Second coat:
Once the first layer is dry to the touch, apply a second coat of black to ensure full opacity with no wood grain showing through. -
Prime the moon:
Take your smaller circle cutout and apply a thin layer of white acrylic paint or gesso to seal the surface before texturing.
Cracked Craters?
If the thick paste cracks while drying, don’t panic! Mix a little paste with white paint and fill the fissures, or leave them as natural-looking geological fault lines.
Step 2: Sculpting the Surface
-
Apply texture paste:
Using a palette knife, scoop a generous amount of modeling paste onto the smaller white circle. -
Spread the surface:
Spread the paste across the entire circle like frosting. I like to keep the layer about 3-5mm thick to allow for deep carving. -
Create the Lowlands:
Use the flat side of your knife to smooth out large, irregular patches. These smooth areas represent the lunar ‘seas’ or maria. -
Form the Highlands:
In the areas between the smooth patches, dab the palette knife up and down to pull the paste into rough, jagged peaks. -
Carve craters:
Use the tip of a brush handle or a small circular object to press craters into the wet paste, pushing the edges up slightly to form rims. -
Refine the edges:
Run your finger or a clean knife around the very edge of the circle to clean up any overhanging paste for a crisp silhouette. -
Allow to cure:
Let the texture paste dry completely. This is crucial—thick paste may take 12-24 hours depending on humidity.
Level Up: Cosmic Glow
Mix glow-in-the-dark powder into your final white highlight layer. The moon will charge during the day and softly luminesce when the lights go out.
Step 3: Painting and Assembly
-
Base color:
Once hardened, paint the entire textured moon with a mix of white and a tiny drop of grey for a bright off-white base. -
Add depth:
Mix a darker grey wash (paint thinned with water). Apply this into the craters and rough textured areas. -
Wipe back:
Immediately use a paper towel or sponge to gently wipe the dark grey off the raised peaks, leaving the shadow only in the crevices. -
Highlighting:
Dip a dry sponge into pure titanium white paint. Blot excess paint off on a paper towel until the sponge is almost dry. -
Dry styling:
Gently drag the sponge over the highest ridges and crater rims to catch the texture, making the bright white pop against the grey lowlands. -
Final assembly:
Apply a strong craft glue to the back of your finished moon and center it carefully onto the large black background. -
Press and set:
Place a heavy book on top of the moon (protecting the texture with a soft cloth) for an hour to ensure a secure bond.
Hang your lunar masterpiece on a wall where light hits it from the side to maximize those dramatic shadows
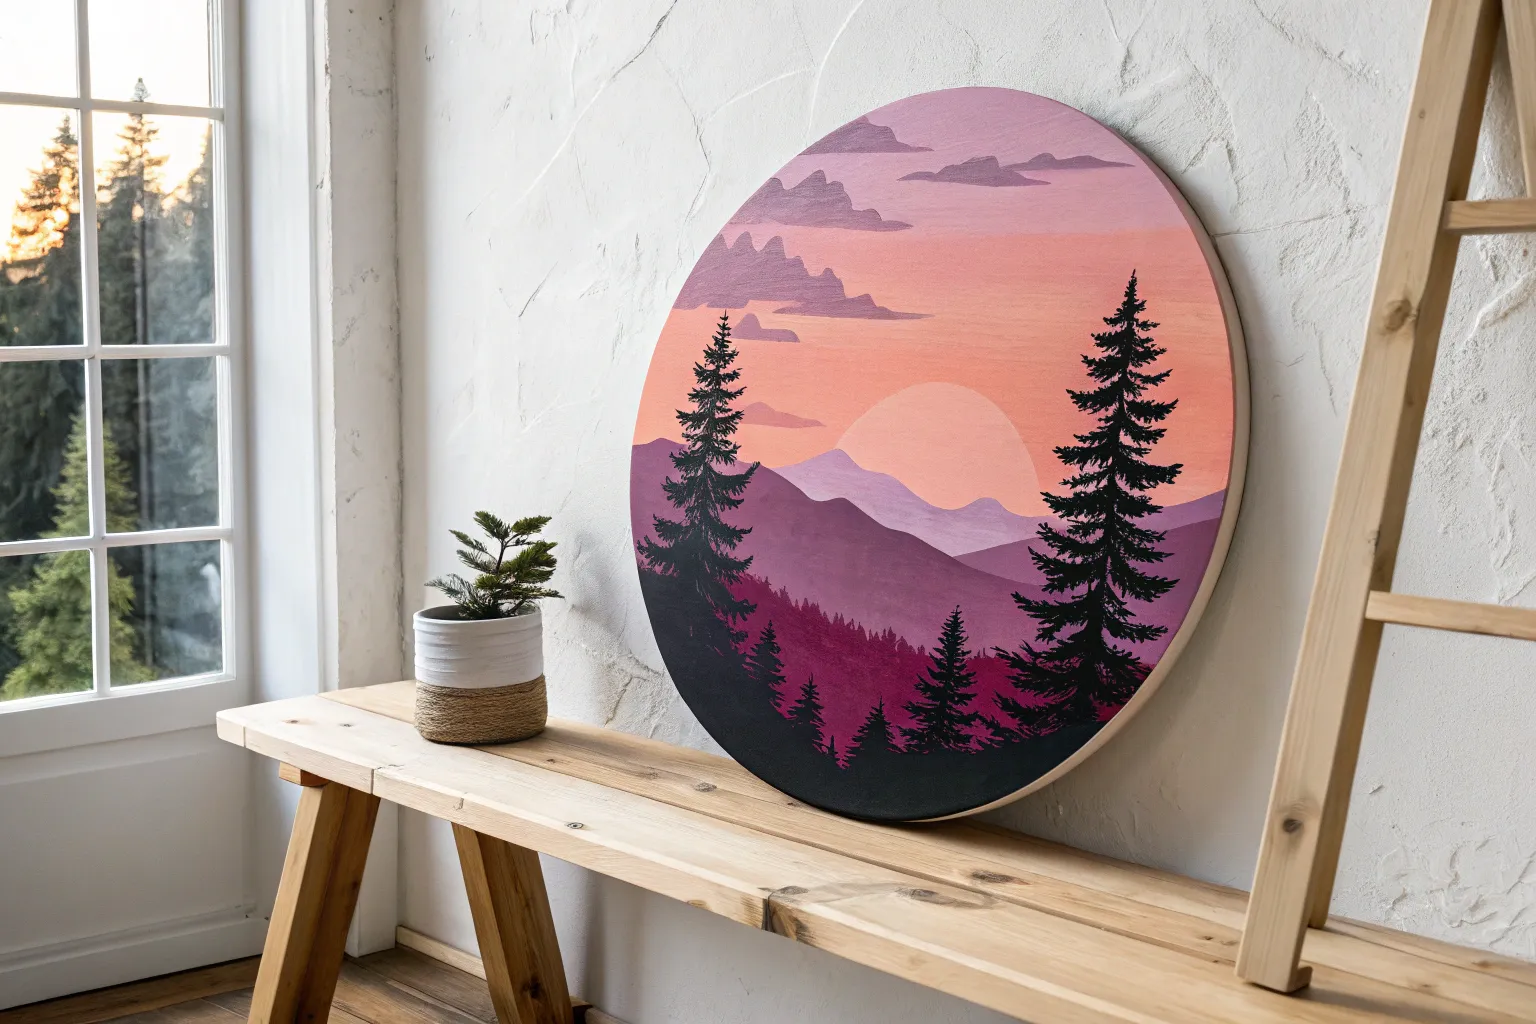
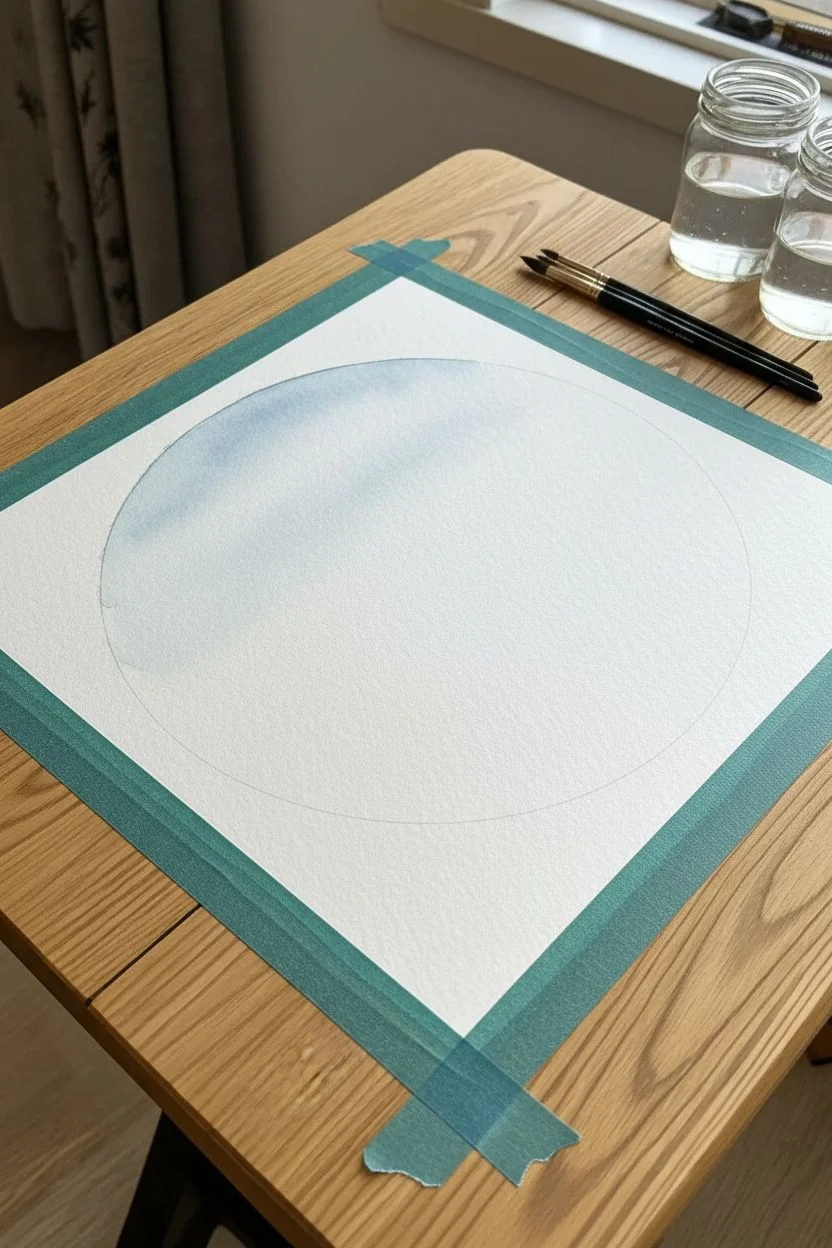
Layered Mountain Depth
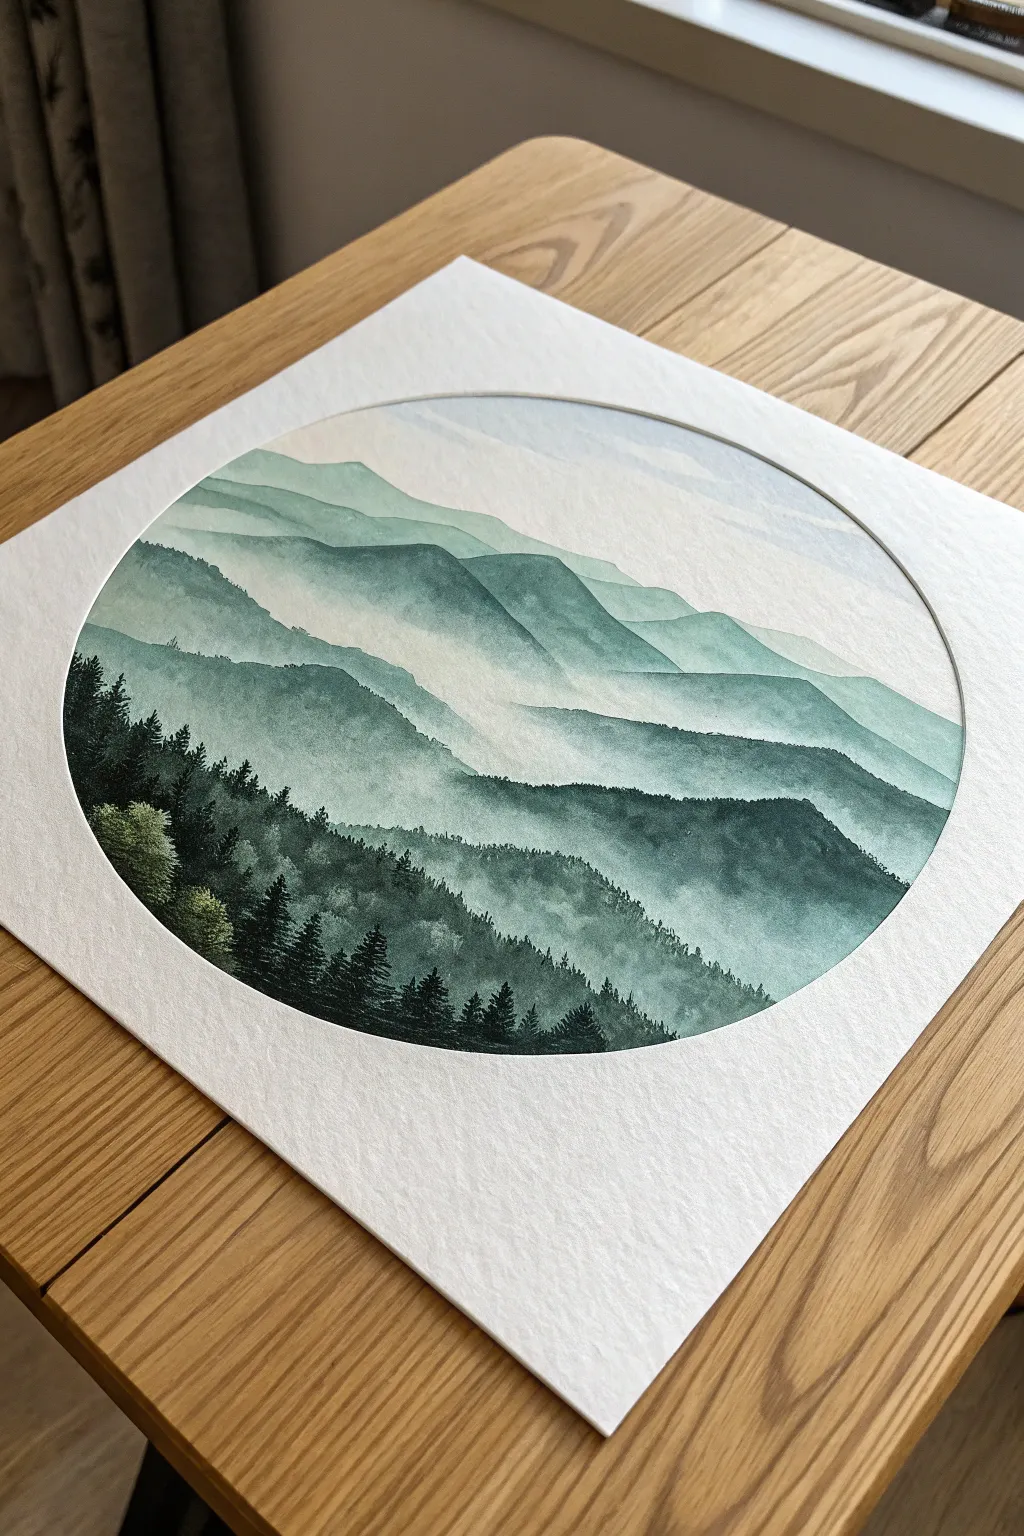
Capture the moody elegance of a misty mountain range contained within a crisp geometric circle. This project relies on water control and layering to create a stunning sense of depth, moving from pale, distant peaks to a rich, detailed forest foreground.
How-To Guide
Materials
- Cold press watercolor paper (300gsm or heavier)
- Watercolor paints (Indigo, Payne’s Gray, Phthalo Green, Sap Green)
- Round brushes (flats sizes 8 and 4, detail/rigger size 0)
- Compass or a 6-inch bowl to trace
- HB Pencil and kneaded eraser
- Masking tape
- Two jars of water
- Paper towels
Step 1: Preparation and Sky
-
Secure the paper:
Tape your square sheet of watercolor paper firmly to your work surface using masking tape on all four edges to prevent buckling. -
Define the boundary:
Use a compass or trace around a medium-sized bowl to draw a perfect circle in the center of the paper. Keep the pencil line very faint so it won’t show through later. -
Mix the sky tone:
Create a wash composed mostly of water with just a whisper of Indigo. The goal is a color that is barely there. -
Paint the sky:
Wet the upper quarter of the circle inside the line with clean water, then drop in your pale sky mix, letting it fade to white as you move downward.
Pro Tip: The Two-Jar Method
Keep two jars of water: one for rinsing dirty brushes and one strictly for clean water. Use the clean water jar when softening the mountain edges to ensure your ‘mist’ stays pure white and doesn’t get muddy.
Step 2: The Distant Ranges
-
First mountain layer:
Mix a slightly stronger version of your sky color, perhaps adding a touch of Phthalo Green. Paint a jagged, organic ridge line just below where the sky fades. -
Create the mist:
Immediately rinse your brush and use clean water to soften the bottom edge of this mountain shape, dragging the pigment down until it disappears into the white of the paper. This creates the ‘fog’ effect. -
Dry time:
Wait for this layer to be completely bone dry. Use a hairdryer on a low setting if you are impatient. -
Second mountain layer:
Mix a darker value using more cooler green and blue. Paint a second ridge line overlapping the first one, varying the peaks and valleys so they don’t look identical to the row above. -
Fade out again:
Repeat the mist technique: use a damp, clean brush to blur the bottom edge of this new shape into nothingness.
Step 3: Building the Middle Ground
-
Darkening the palette:
For the third layer, introduce some Payne’s Gray to your green mix for a moodier, stormier teal. I like to make this layer significantly wider than the previous ones. -
Paint the mid-range:
Apply this paint across the middle of the circle, creating a distinct ridge line. The paint should be opaque at the top edge but still fade out at the bottom using water. -
Adding texture:
While the paint is still damp on this distinct ridge, drop in tiny dots of concentrated pigment along the top edge to suggest distant tree textures. -
Let it settle:
Allow this layer to dry completely. The separation between layers depends entirely on the paper being dry before the next shape is painted.
Level Up: Golden Hour
Instead of a monochromatic blue-green palette, try starting your sky with a very pale pink or peach wash to simulate sunrise, transitioning into purple mountains before hitting the dark green foreground.
Step 4: The Foreground Forest
-
Mix the deepest darks:
Create a creamy, thick mixture of Payne’s Gray and Sap Green. It should look nearly black. -
Base of the forest:
Paint the final hill shape at the bottom of the circle. This layer does not need to fade out; fill it solidly to the bottom curve of the pencil line. -
Pine details:
Switch to your size 0 or rigger brush. Along the top ridge of this dark shape, flick tiny vertical lines upward to create tree trunks. -
Foliage texture:
Using the tip of the small brush, stipple tiny horizontal dashes across those trunks to form dense pine branches. Vary the heights to make the forest look natural. -
Left-side variation:
On the left side of the circle, paint a slightly lighter green tree cluster in front of the dark mass to add 3D interest, as seen in the reference. -
Clean up:
Once the painting is 100% dry, gently erase any visible pencil marks from the circle’s perimeter to leave a sharp, crisp edge.
Now you have a serene little world captured on paper that draws the viewer deep into the distance.
Birds on a Wire Silhouette
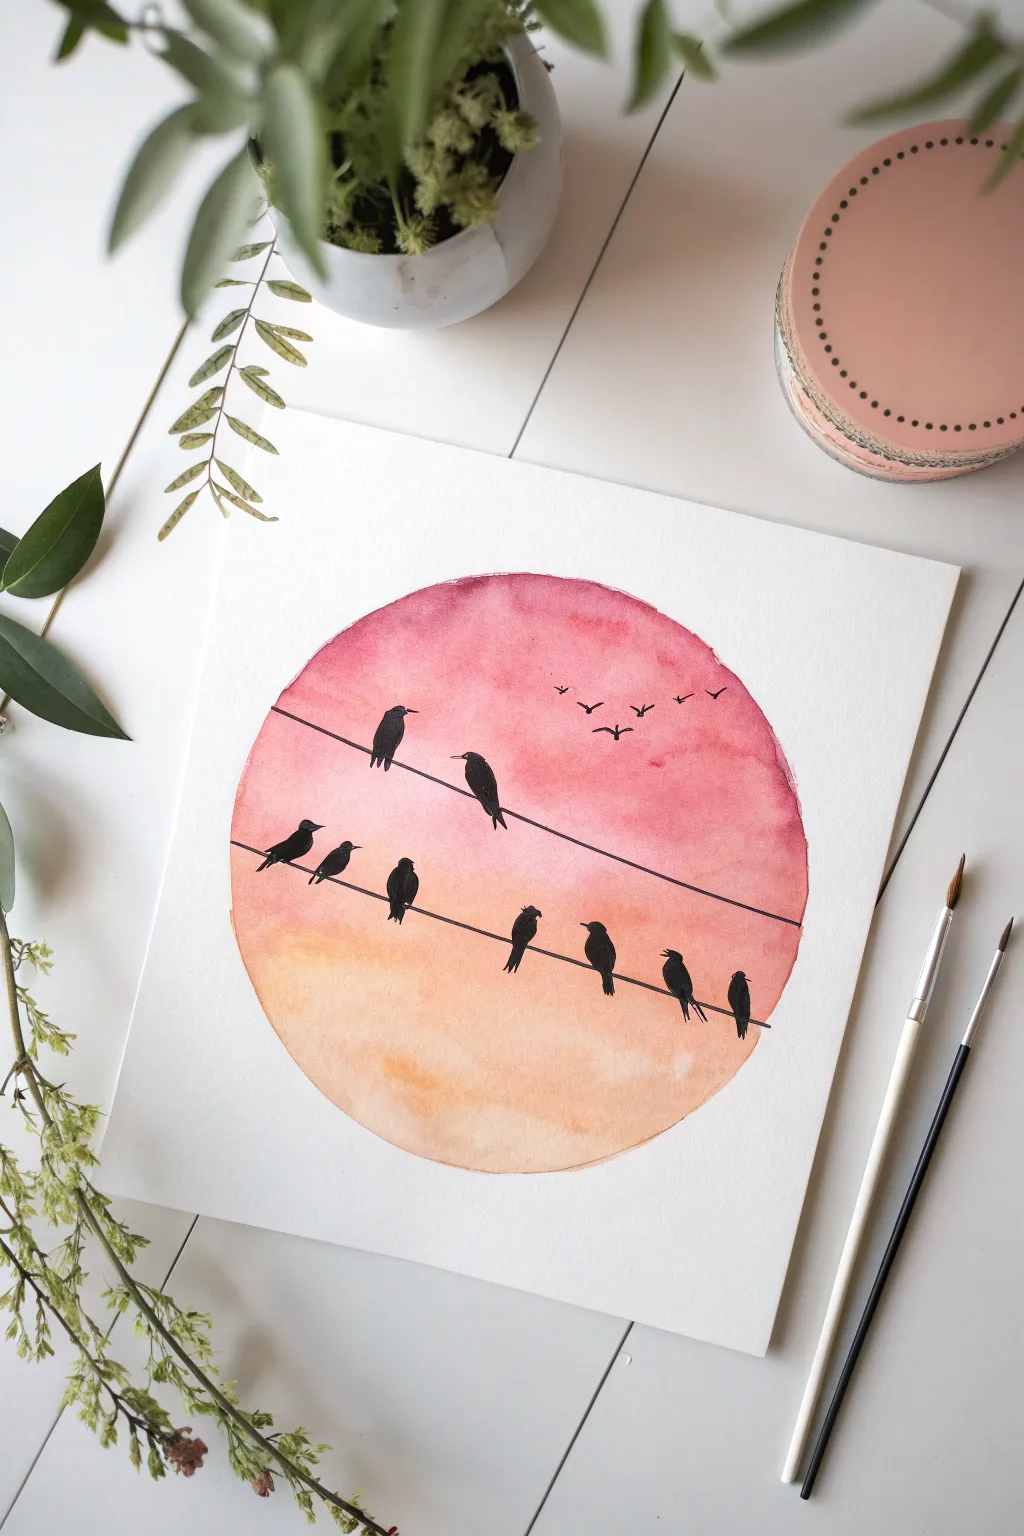
Capture the peaceful transition of day into night with this vibrant watercolor circle painting. By combining a wet-on-wet gradient background with crisp black silhouettes, you create a scene that feels both vast and intimate.
Detailed Instructions
Materials
- Cold press watercolor paper (300gsm)
- Watercolor paints (Alizarin Crimson, Cadmium Orange, Yellow Ochre)
- Black India ink or black gouache
- Round brush (size 6 or 8)
- Detail brush (size 0 or 1)
- Black waterproof fine liner pen (0.5mm)
- Compass or round object to trace
- Pencil and eraser
- Ruler
- Masking tape
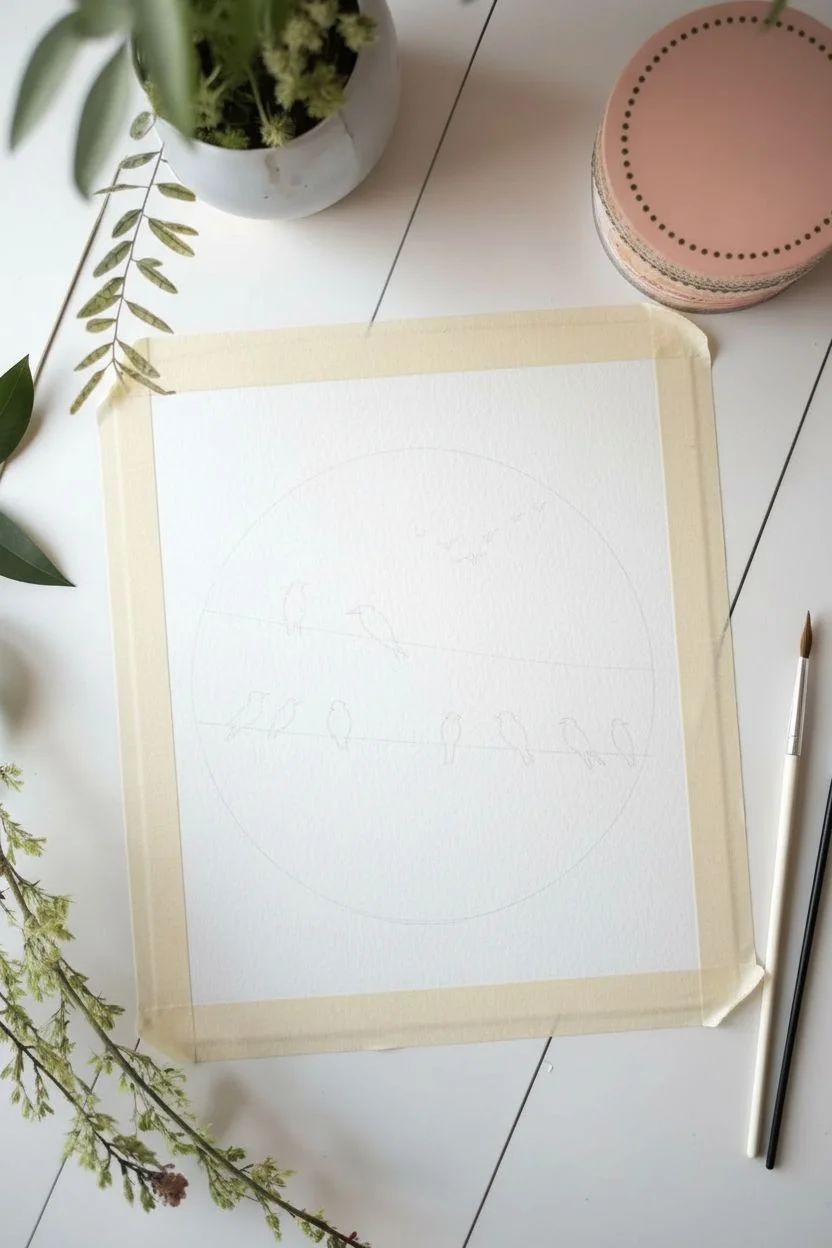
Step 1: Setting the Scene
-
Secure the paper:
Tape your watercolor paper down to a hard board on all four sides. This prevents the paper from buckling when we add the water for the background. -
Outline the shape:
Use a compass or trace a circular object (like a bowl) to create a perfect circle in the center of your paper. Keep the pencil line very light so it doesn’t show through later. -
Plan the composition:
Lightly sketch two diagonal parallel lines where your wires will go. Mark small ovals where you want your birds to sit to ensure the spacing looks balanced before painting.
Bleeding Edges?
If paint escapes the circle outline while wet, quickly dab it with a clean paper towel. For perfect containment next time, apply masking fluid to the paper outside the circle before painting.
Step 2: The Sunset Gradient
-
Wet the paper:
Dip your clean size 8 brush into water and carefully paint the inside of the circle. The paper should be glisten with a sheen, but not have standing puddles. -
Apply the top color:
Load your brush with a reddish-pink hue, like Alizarin Crimson. Paint the top third of the circle, following the curve of the rim carefully. -
Add the middle tones:
Rinse your brush slightly and pick up a vibrant orange. Paint the middle section, allowing it to touch the wet red paint so they bleed and blend naturally. -
Finish the gradient:
Complete the bottom third with a very watered-down yellow ochre or pale orange wash. I like to tilt the board slightly to help the colors merge downwards. -
Clean the edges:
If any paint pooled at the edges of the circle, lift it gently with a dry clean brush. Leave this to dry completely—the paper must be bone dry before the next phase.
True Black Depth
Black watercolor often dries greyish. For the sharpest silhouettes, use India Ink or black Gouache. These are opaque and matte, providing the high contrast needed against the sunset.
Step 3: Adding the Wires
-
Draw the wires:
Once the background feels cool and dry to the touch, place your ruler along your sketched pencil lines. Use the black fine liner to draw two crisp, straight lines across the circle. -
Thicken the lines:
Go over the lines a second time if needed to ensure they are solid black and distinct against the colorful background.
Step 4: Painting the Silhouettes
-
Outline the top birds:
Switch to your tiny detail brush and black ink (or gouache). Paint the outline of the bodies for the two birds on the top wire, using the wire as a guide for their feet. -
Fill in the upper shapes:
Fill in the outlines with solid black. Be careful not to let the brush stray outside the lines, as silhouette work relies on sharp edges. -
Add upper details:
With the very tip of the brush, add tiny beaks pointing in different directions and small tail feathers extending below the wire. -
Paint the lower flock:
Repeat the process for the five birds on the bottom wire. Vary their sizes slightly—make some look forward and others sideways to create interaction. -
Refine the postures:
Add the small details to the bottom group, ensuring the tail feathers taper to a point for a realistic silhouette look. -
Add the flight details:
Using the fine liner pen or the very tip of your detail brush, make small ‘v’ or ‘m’ shapes in the upper right sky to represent distant birds in flight. -
Final clean up:
Wait for all ink to dry, then gently erase any visible pencil marks from your initial circle sketch to leave a crisp floating edge.
Step back and admire how the simple black shapes make the colors of your sunset glow even brighter
Window View Perspective
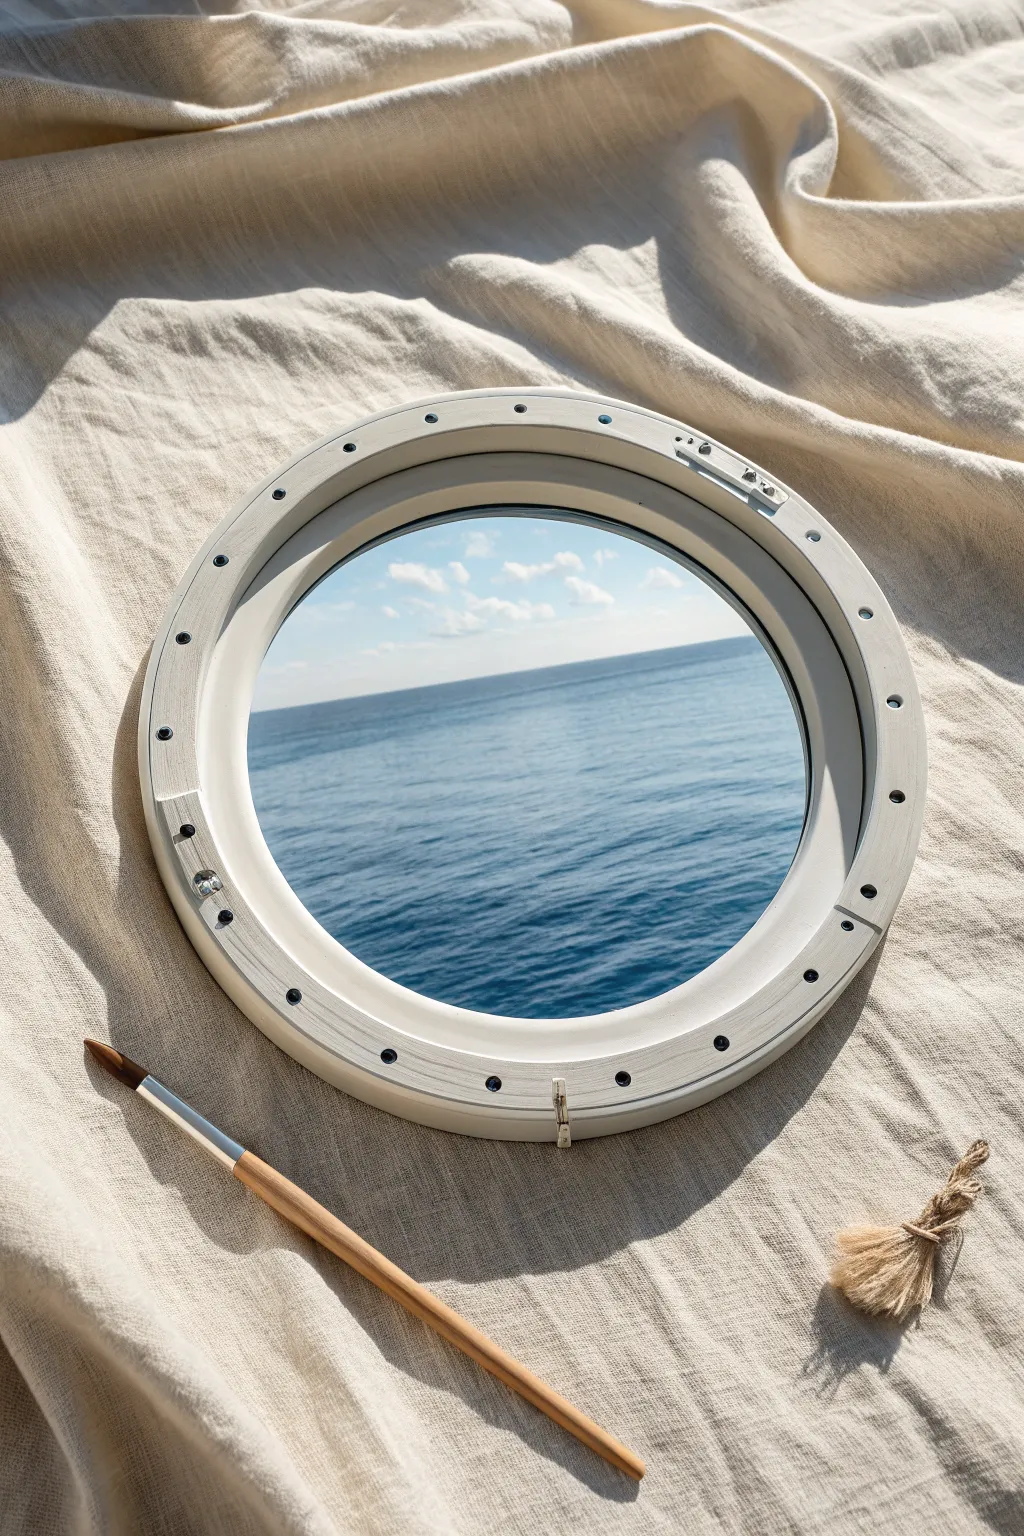
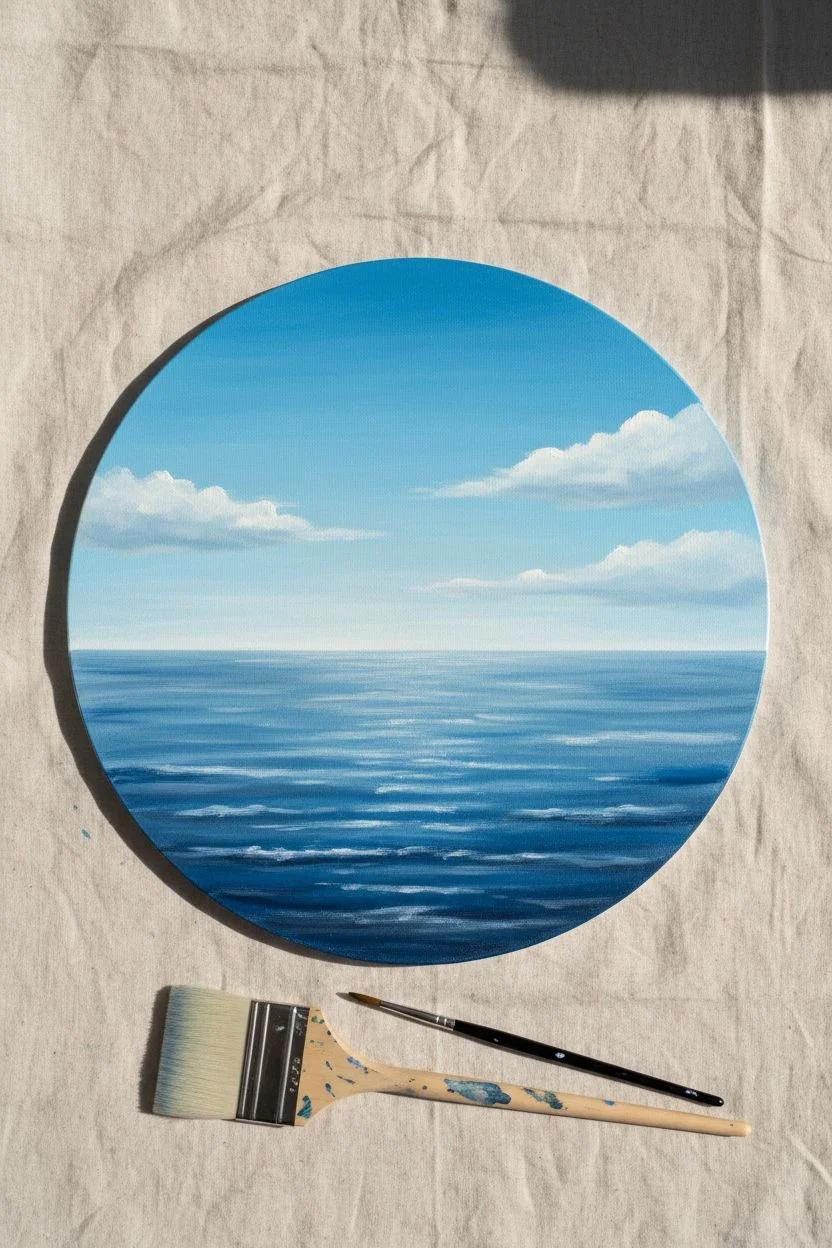
Transform a simple round surface into a captivating window to the sea with this trompe-l’oeil style project. By combining a realistic ocean painting with a dimensional frame, you will create a charming nautical vignette that looks like a view from a ship’s cabin.
Step-by-Step Guide
Materials
- Round canvas panel or round wood plaque (approx. 12 inches)
- Foam core board or thick mat board
- Heavy body acrylic paints (Ultramarine Blue, Phthalo Blue, Titanium White, Warm Grey, Silver)
- Wide flat synthetic brush
- Small round detail brush
- Craft knife and cutting mat
- Strong craft glue
- Split peas or small flat gems (for rivets)
- Ruler and pencil
Step 1: Painting the Ocean View
-
Establish the horizon:
Draw a light horizontal guide line across your round canvas, positioning it slightly below the center marks to give the sky more dominance. -
Sky gradient base:
Mix Titanium White with a tiny dot of Phthalo Blue. Start at the horizon line and paint upwards, gradually adding more blue as you reach the top curve to create a fading gradient. -
Adding cloud textures:
While the sky is still tacky, use a dry, scruffy brush with pure white paint to dab in soft, horizontal cloud shapes, softening the bottom edges with your finger. -
Deep water base:
For the ocean, mix Ultramarine Blue with a touch of grey. Apply this dark mixture starting at the bottom of the circle, brushing horizontally. -
Lighter water tones:
As you move painting up toward the horizon, gradually mix white into your blue to create distance, ensuring the value is lightest right where the water meets the sky. -
Creating movement:
Use a small flat brush to add thin, horizontal streaks of white and light blue across the water surface to mimic gentle waves catching the sunlight.
Step 2: Constructing the Frame
-
Designing the ring:
On your foam core board, trace the circumference of your canvas. Then, use a compass or bowl to draw a smaller inner circle, creating a ring about 1.5 inches wide. -
Cutting the main frame:
Carefully cut out this ring using a sharp craft knife. I find it helps to change the blade frequently here to avoid tearing the foam. -
Adding the inner lip:
Cut a second, thinner strip of cardstock or foam board to glue along the inner edge of your main ring, creating the stepped bevel seen in real portholes. -
Base coating the frame:
Paint the entire foam ring and the inner lip with a Warm Grey or creamy off-white color. You may need two coats to hide the foam texture. -
Simulating hardware:
Glue small split peas or flat-backed gems evenly spaced around the ring to represent the heavy bolts of a ship window. -
Painting the hardware:
Once the glue is dry, paint the ‘bolts’ carefully with a dark grey or black to make them stand out against the light frame.
Straight Horizons
Place a strip of painters tape across the canvas at your horizon line. Paint the sky, let it dry, then peel the tape to paint the sea for a razor-sharp edge.
Step 3: Assembly and Detailing
-
Adding the hinge mechanism:
Cut small rectangles from scrap cardboard to fashion the hinge and latch mechanism shown on the right side of the frame. -
Metallic accents:
Paint the cardboard hinge pieces with metallic silver paint and glue them onto the frame rim. -
Weathering effects:
Mix a watery wash of brown and grey paint. Lightly brush this into the crevices around the rivets and inner rim to simulate age and salt accumulation. -
Highlighting edges:
Use dry delicate strokes of pure white on the top edges of the rivets and the upper curve of the frame to suggest sunlight hitting the object. -
Final assembly:
Apply strong craft glue to the back of your finished porthole frame and press it firmly onto your dried seascape canvas. -
The shadow line:
Paint a very thin, dark grey line on the canvas right underneath the inner edge of the frame to enhance the 3D illusion of the window sitting above the view.
Glass Effect
Before gluing on the frame, pour a layer of clear self-leveling resin over the painted ocean view. Once cured, it mimics the look of real heavy glass.
Hang your finished piece in a well-lit spot to let the painted highlights shine and enjoy your permanent view of the ocean
Negative Space Botanicals
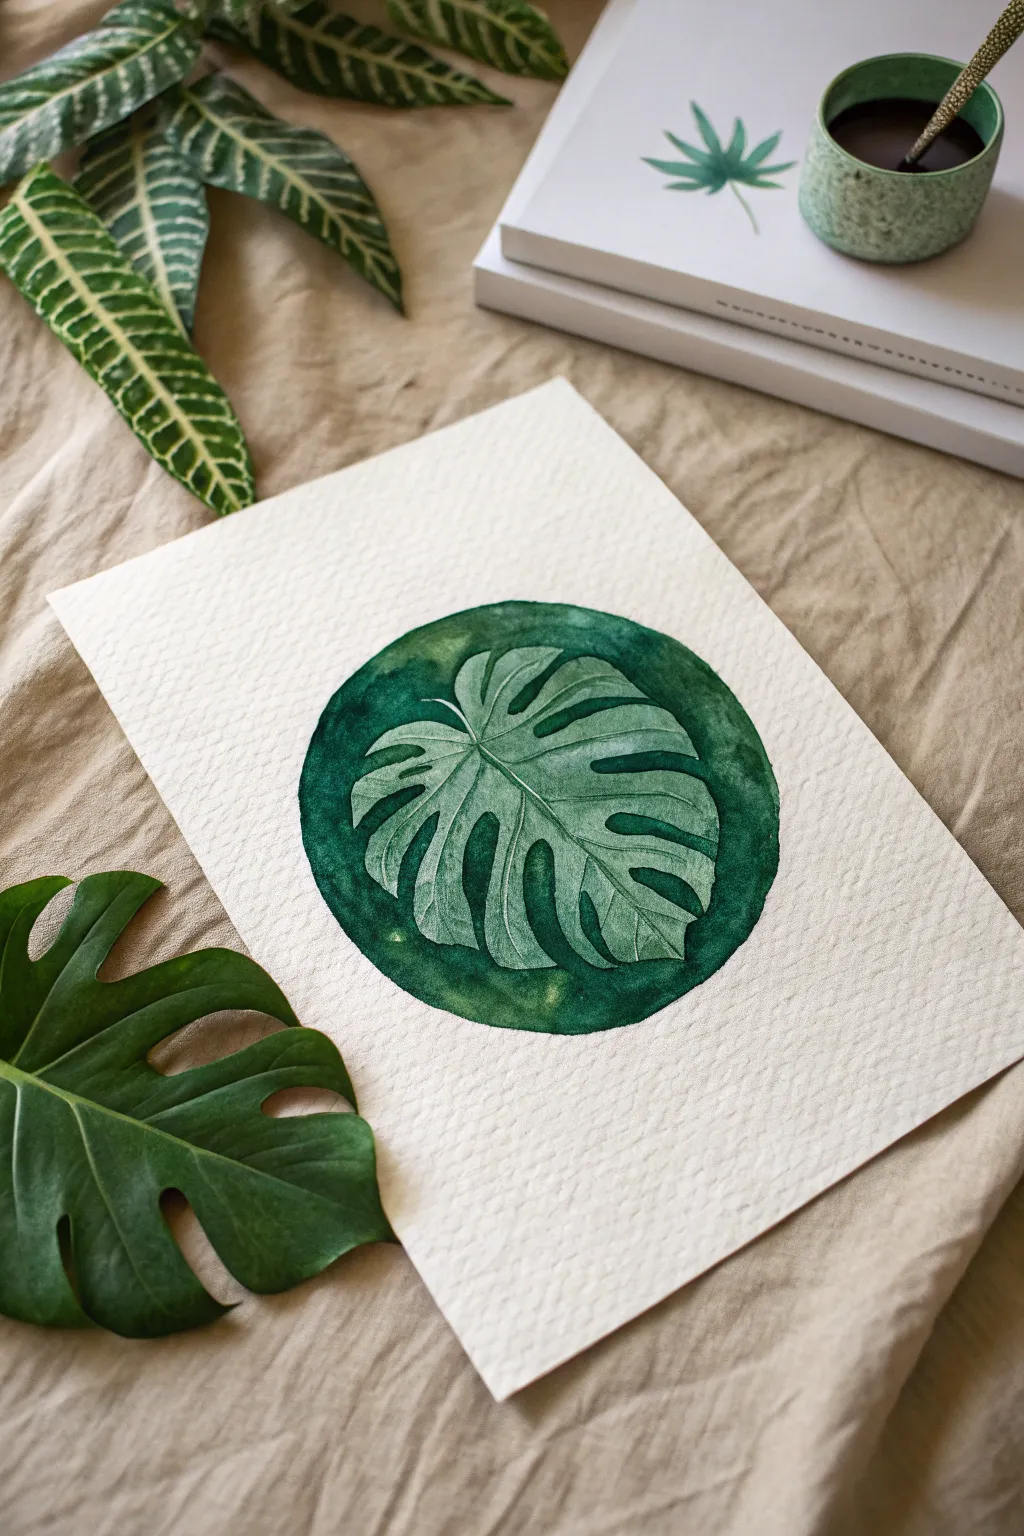
This project balances a delicate botanical study with a bold geometric element to create a modern focal point. You will use negative painting techniques to make a pale Monstera leaf pop against a deep, moody green circle.
How-To Guide
Materials
- Cold-press watercolor paper (300gsm)
- Watercolor paints (Sap Green, Hooker’s Green, Indigo/Payne’s Grey)
- Round brushes (flats can work, but rounds size 2 and 6 are best)
- H or HB Pencil and eraser
- Compass or small bowl (approx. 4-5 inches)
- Masking tape
- Palette for mixing
- Two jars of water
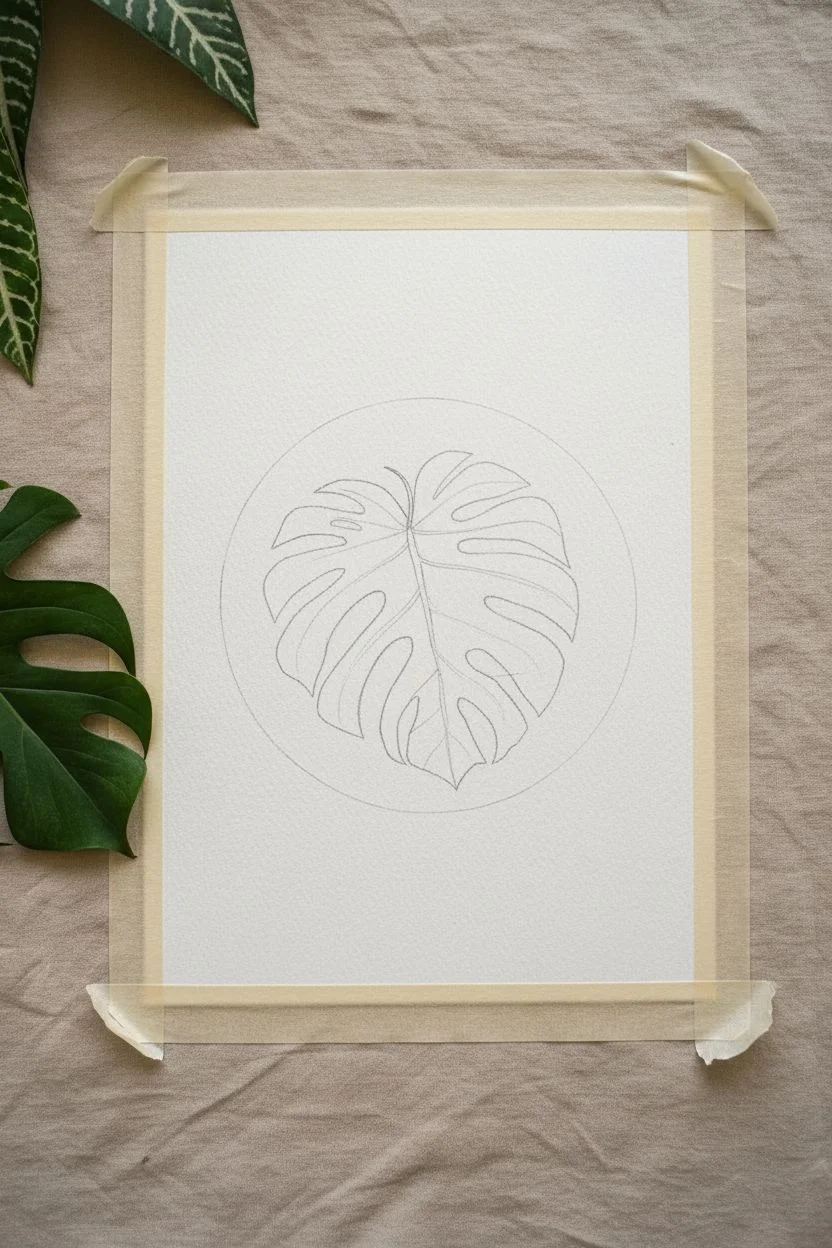
Step 1: Sketching the Composition
-
Prepare the surface:
Tape your watercolor paper down to a board or table on all four sides to prevent buckling when the paper gets wet. -
Define the boundary:
Place your bowl or compass in the center of the paper and lightly trace a perfect circle. -
Map the stem:
Draw a curved line through the center of the circle to act as the main vein and stem of the leaf. -
Outline the leaf:
Sketch a large heart shape around the stem, ensuring the edges of the leaf almost touch the boundary of the circle. -
Add character:
Draw the signature Monstera splits (fenestrations) into the sides of the leaf, erasing the outer contour lines where the deep notches dip inward. -
Clean up:
Gently roll a kneaded eraser over your sketch to lift distinct graphite marks, leaving just a faint guide for painting.
Step 2: Painting the Leaf
-
Mix the base wash:
Dilute a Sap Green with plenty of water until it is a very pale, transparent tea consistency. -
Apply the first layer:
Fill in the entire leaf shape with this pale wash, keeping the edges neat but worrying less about the background area. -
Let it set:
Allow this base layer to dry completely; the paper should feel room temperature to the touch, not cool. -
Detail the veins:
Mix a slightly stronger, darker green and switch to your size 2 brush. -
Paint the structure:
Carefully paint thin lines over your initial stem sketch and add curved veins branching out toward the leaf edges. -
Add subtle depth:
I like to soften one side of each painted vein with a clean, damp brush to give the veins a clearer sense of dimension. -
Dry completely:
It is crucial to let the leaf dry 100% before moving on, otherwise the dark background will bleed into your work.
Bleeding Edges?
If dark paint seeps into the leaf, wait for it to dry, then use a stiff, damp brush to gently scrub and lift the unwanted color. Blot with a paper towel immediately.
Step 3: The Negative Background
-
Mix the deep green:
Combine Hooker’s Green with a touch of Indigo or Payne’s Grey to create a dark, saturated forest green. Aim for a milky consistency, not too watery. -
Start the edge:
Using the size 6 brush, carefully paint along the pencil line of the leaf’s edge to establish the boundary. -
Fill the voids:
Paint the background space inside the circle, including the areas between the leaf splits. -
Maintain a wet edge:
Work somewhat quickly to keep the paint wet as you move across the circle helping to avoid drying lines or streaks. -
Refine the circle:
Use the tip of your brush to carefully trace the perfect circular outer edge, keeping the paint inside the line. -
Drop in pigment:
While the background is still wet, you can drop in tiny amounts of pure Indigo in random spots for a textured, organic look. -
Final dry:
Let the painting dry undisturbed for at least 30 minutes before removing the tape.
Level Up: Salt Texture
While the dark background wash is still wet, sprinkle a pinch of table salt over it. Once dry, brush the salt off to reveal a starry, speckled texture.
Peel off your tape to reveal a crisp, gallery-worthy botanical illustration.
Abstract Alcohol Ink swirl
Capture the elegance of geode art with this vibrant, circular fluid painting. By manipulating rich turquoise, deep violet, and metallic gold inks with air, you will create a mesmerizing abstract piece that mimics the look of polished stone.
Step-by-Step Tutorial
Materials
- Round synthetic paper or primed circular art board (12-inch diameter)
- Alcohol Inks: Turquoise/Teal, Navy Blue, Magenta/Plum
- Metallic Gold Alcohol Ink Mixative
- Isopropyl Alcohol (91% or 99%) in a squeeze bottle
- Hairdryer with a ‘cool’ setting
- Gloves and respirator mask
- Liquid gold leaf or gold acrylic paint
- Paintbrush (small)
- Varnish/Sealer spray (specifically for alcohol ink)
Step 1: Setting the Stage
-
Safety First:
Begin by putting on your gloves and ensuring your workspace is well-ventilated, as alcohol inks have strong fumes. -
Surface Prep:
Wipe down your round art board or synthetic paper with a little isopropyl alcohol to remove any oils or dust, ensuring a clean canvas. -
Wetting the Canvas:
Squeeze a generous pool of isopropyl alcohol onto the upper left quadrant of your circle, creating a wet base for the ink to travel on.
Muddy Colors?
If the blue and magenta mix into an ugly brown, let the blue layer dry completely before adding the magenta. The separation keeps the hues distinct.
Step 2: Creating the Ocean Tides
-
Teal Application:
Drop 3-4 drops of Turquoise ink directly into the alcohol pool. -
Moving with Air:
Using your hairdryer on the lowest speed and cool setting, gently push the turquoise ink outward to create wispy, soft edges. -
Deepening the Blue:
Add a few drops of Navy Blue near the center of the turquoise area to create depth and shadow. -
Blending Tones:
Add a splash more clear alcohol and use the air to blend the Navy into the Turquoise, guiding the fluid toward the center of the board in a diagonal wave pattern.
Glass-Like Finish
To perfectly match the photo’s depth, pour a clear coat of art resin over the piece once the sealer is fully dry.
Step 3: Adding the Berry Contrast
-
Magenta Foundation:
Now, flood the lower right quadrant of the circle with fresh isopropyl alcohol. -
Dropping Color:
Apply your Magenta or Plum ink into this new wet area, keeping it slightly separated from the blue section initially. -
Creating the Meeting Point:
I like to gently blow the magenta ink toward the blue wave using the hairdryer to create a distinct ‘ridge’ where the two colors meet without turning muddy. -
Softening Edges:
Use the hairdryer to feather the outer edges of the magenta section so the color fades softly toward the rim.
Step 4: The Golden Veins
-
Shake the Metallic:
Shake your Gold Mixative bottle vigorously until the ball bearing rattles freely to ensure the metal particles are suspended. -
Applying Gold Accents:
Place tiny drops of gold ink along the dark ridges where the blue and magenta sections meet. -
Dispersing the Gold:
Immediately use the hairdryer to blow these gold droplets; they will ride the currents of the nearly-dry ink, creating lightning-like veins. -
Refining Details:
Add a tiny bit of clear alcohol to any clumped gold areas and blow it out again to thin the lines.
Step 5: Finishing Touches
-
Drying:
Allow the piece to sit undisturbed for at least 24 hours to ensure all alcohol has fully evaporated. -
Sealing:
Spray the artwork with a specialized varnish/sealer to protect the inks from fading and smudging. -
The Golden Rim:
Dip a small brush into liquid gold leaf or metallic acrylic paint and carefully paint the outer edge of the round board to create a framed, tray-like appearance.
Display your beautiful abstract circle on a stand or use it as a stunning tray centerpiece.
Metallic Gold Accents
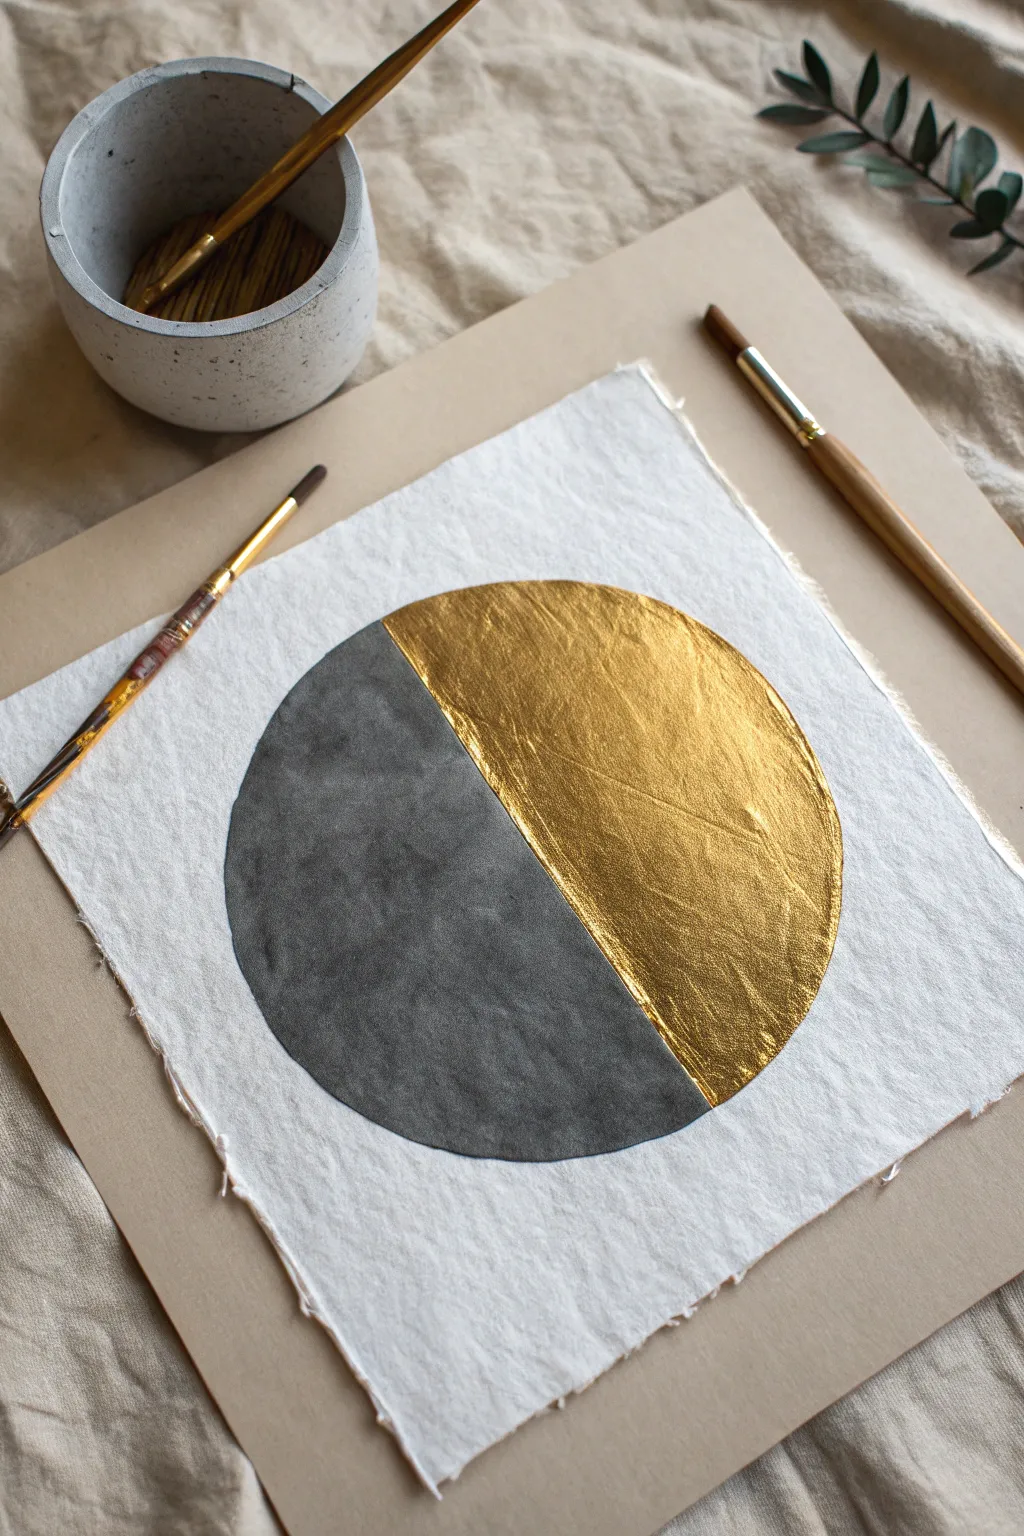
Contrast is the star of this project, blending modern minimalist geometry with the organic luxury of handmade textures. By pairing matte charcoal gouache with shimmering gold leaf on crude deckle-edge paper, you will create a stunning piece of wall art that feels both ancient and contemporary.
Step-by-Step Tutorial
Materials
- Handmade cotton rag paper (deckle edge)
- Charcoal grey gouache or opaque watercolor
- Gold leaf sheets (imitation or real)
- Water-based metal leaf adhesive (gilding size)
- Round synthetic brush (size 4 or 6)
- Flat shader brush (for adhesive)
- Soft, dry mop brush (for removing excess leaf)
- Pencil
- Compass or round bowl (for tracing)
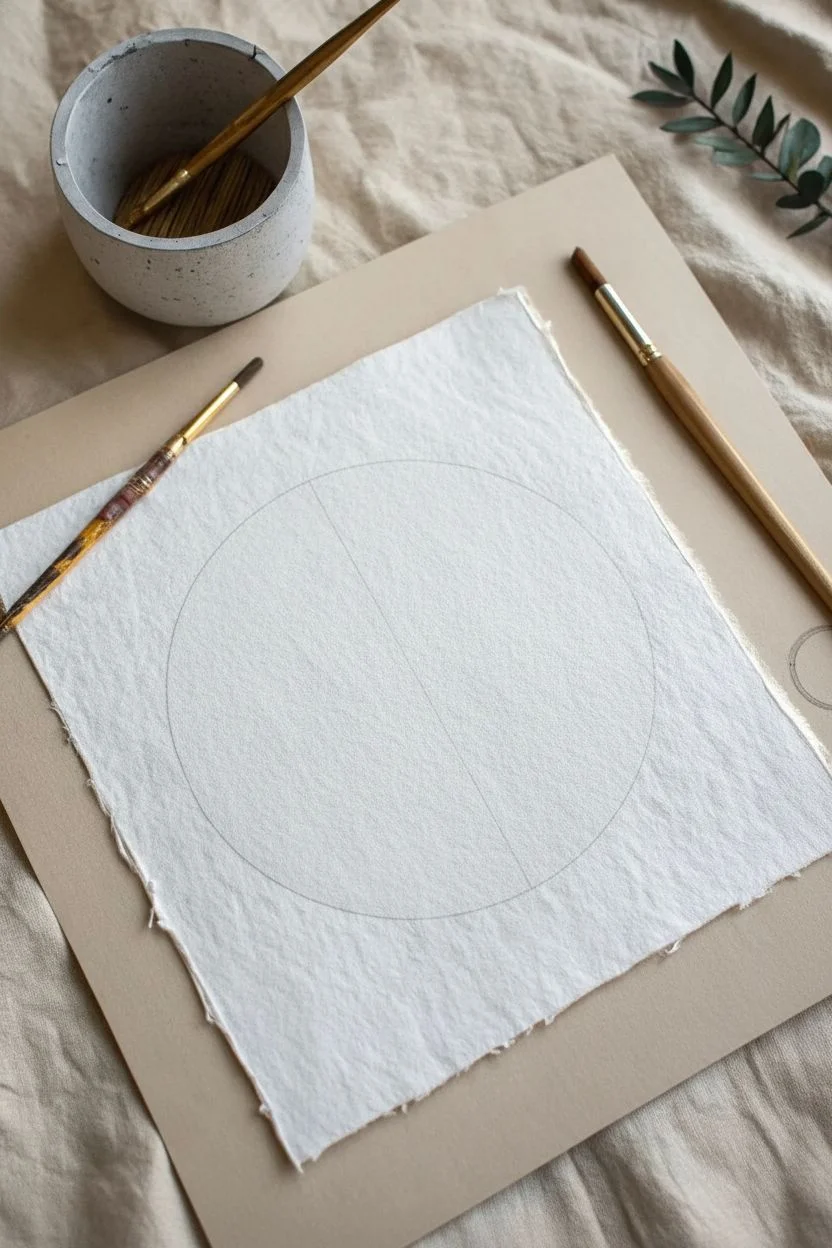
Step 1: Drafting the Design
-
Prepare the surface:
Lay your handmade paper on a flat, clean surface. If the paper is very textured, you might want to tape the corners lightly to keep it steady. -
Trace the shape:
Place a compass or a small bowl in the center of the paper and lightly trace a perfect circle using a pencil. -
Divide the circle:
Draw a straight vertical line through the circle to divide it into two equal semi-circles. Press lightly so the graphite doesn’t show through later.
Pro Tip: Texture Mastery
When working with rough cotton paper, dab the adhesive brush vertically (stippling) rather than dragging it. This ensures the glue creates a solid bond in the deep ‘valleys’ of the paper grain.
Step 2: The Matte Half
-
Mix the paint:
Dilute charcoal gouache with a small amount of water. You want a creamy consistency that is opaque but flows smoothly off the brush. -
Outline the curve:
Using a round brush, carefully paint along the inner edge of the left semi-circle’s curved perimeter. -
Define the center:
Paint a sharp straight line down the center divider. This edge needs to be crisp, as it contrasts directly with the gold. -
Fill the section:
Fill in the rest of the left semi-circle with the grey paint. I like to work quickly here to avoid drying lines within the paint. -
Let it dry:
Allow the paint to dry completely. It must be bone-dry before you introduce the sticky adhesive nearby.
Troubleshooting: Flaking Gold
If the gold leaf lifts off when you brush it, you likely applied the leaf while the glue was still too wet. The adhesive must be tacky (sticky but dry to the touch) for the metal to grip properly.
Step 3: The Metallic Half
-
Apply adhesive:
Using a clean flat brush, apply a thin, even layer of gilding size (adhesive) to the unpainted right semi-circle. -
Mind the gap:
Be extremely precise at the center line. The glue should touch the grey paint edge exactly, without overlapping onto it. -
Wait for tack:
Let the adhesive sit for about 15 to 20 minutes (check your bottle’s instructions). It should turn clear and feel tacky, not wet. -
Place the leaf:
Gently lift a sheet of gold leaf and lay it over the adhesive area. Don’t worry if it wrinkles; that adds to the texture. -
Secure the bond:
Use a dry, soft brush to pat the gold leaf down firmly. Ensure it gets into the deep texture of the handmade paper.
Step 4: Finishing Touches
-
Dust off excess:
Once the gold is set, use a fluffy brush to gently sweep away the loose flakes of leaf that aren’t stuck to the glue. -
Clean the edges:
Use a specialized eraser or a very clean damp brush to tidy up any stray specks around the circle’s perimeter. -
Refine the divide:
If the central line looks ragged, use a fine detail brush and a tiny bit of grey paint to sharpen the boundary between gold and charcoal.
Frame this piece in a float mount to show off those beautiful decal edges and let the gold catch the light.
Underwater Jellyfish Glow
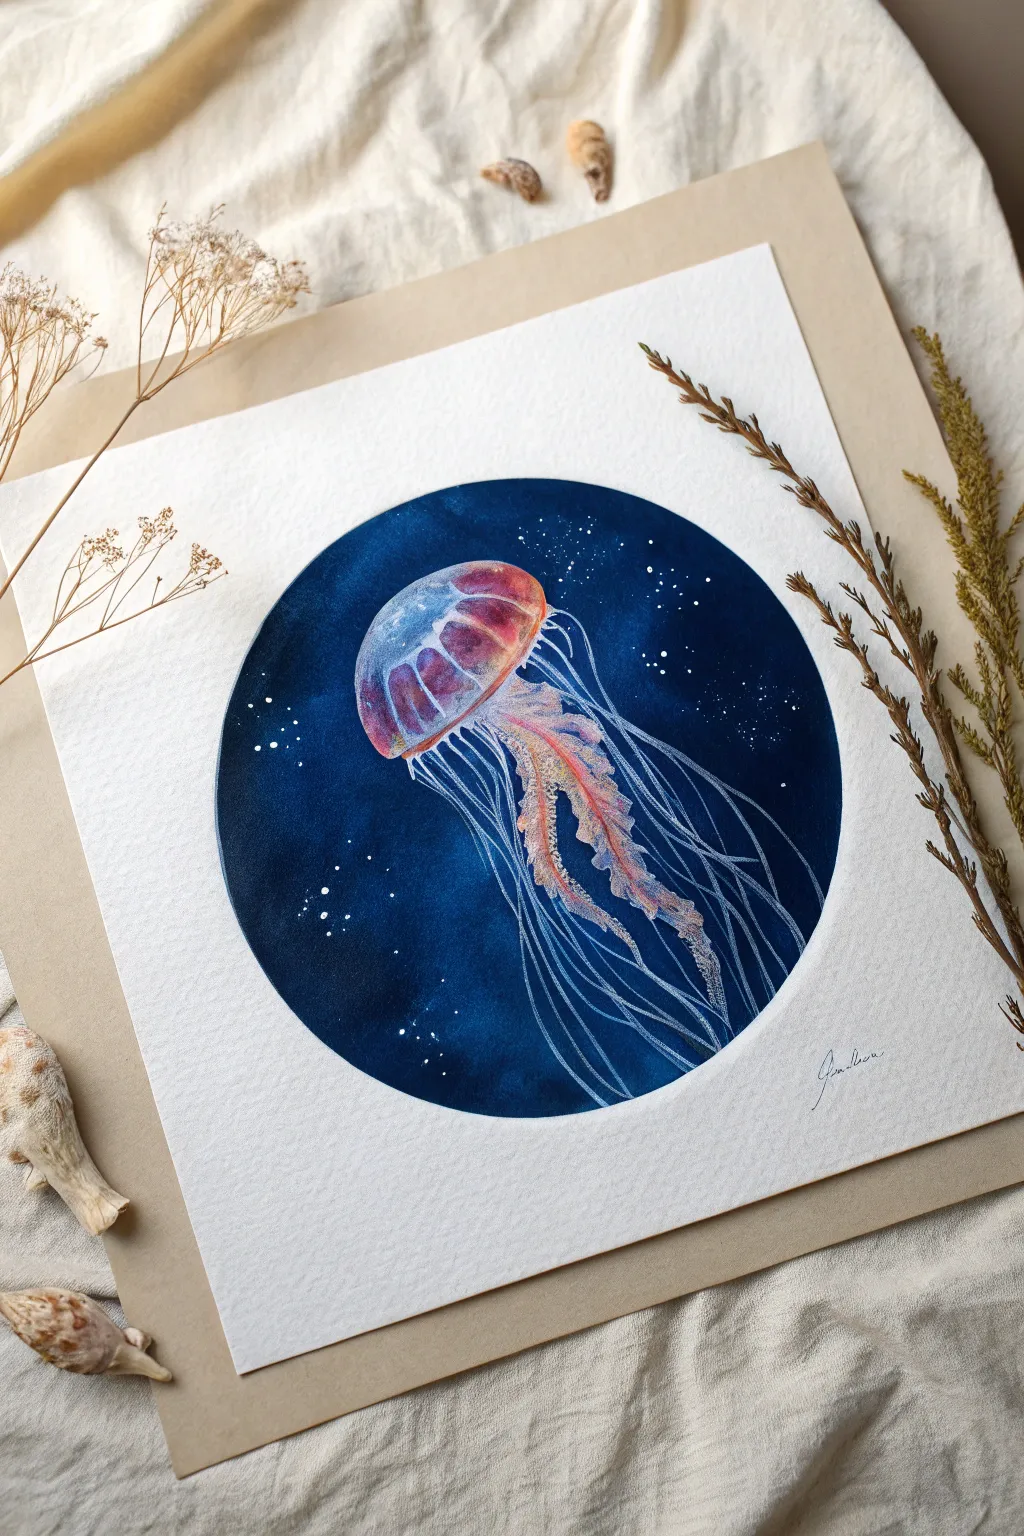
Capture the ethereal glow of deep-sea life with this high-contrast circle painting. By placing vibrant, translucent colors against a stark indigo background, you will create a luminous effect that makes the jellyfish appear to float right off the paper.
Step-by-Step
Materials
- Cold press watercolor paper (300gsm)
- Watercolors: Indigo (or Payne’s Grey), Magenta, Cyan/Turquoise, Burnt Sienna
- Opaque White Paint (Gouache or Bleed-proof White)
- Round brushes (size 4 and 6)
- Fine liner or rigger brush (size 0 or 00)
- Compass or small bowl (for tracing)
- Pencil and eraser
- Palette for mixing
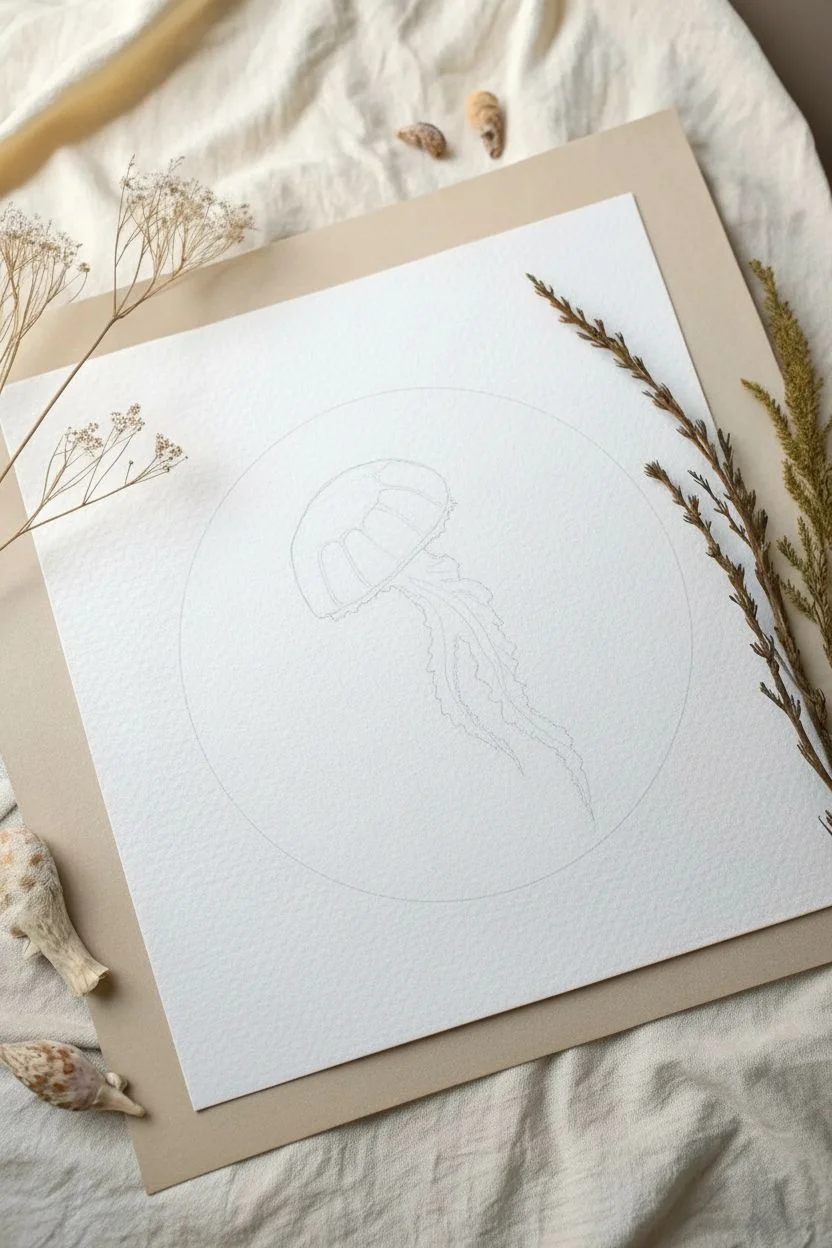
Step 1: Drafting the Composition
-
Trace the boundary:
Start by lightly tracing a perfect circle in the center of your paper using a compass or by tracing around a small bowl. -
Sketch the subject:
Inside the circle, lightly sketch the dome shape of the jellyfish bell near the upper third. Draw wavy guidelines for the oral arms (the thicker central tentacles) flowing downward, but don’t worry about drawing every single thin tentacle yet.
Use a Rigger Brush
For the long, continuous tentacles, try using a ‘rigger’ or ‘script liner’ brush. These have very long bristles that hold more paint, allowing you to drag long lines without stopping to reload.
Step 2: The Deep Blue Abyss
-
Prepare the dark wash:
Mix a heavy amount of Indigo or Prussian Blue. You want a very saturated, dark consistency to represent the deep ocean. -
Paint the negative space:
Carefully paint the background inside the circle, working around your pencil sketch of the jellyfish. The goal is to leave the jellyfish shape pure white for now. -
Add depth:
While the blue paint is still wet, drop in hints of black or purple near the edges of the circle to create a vignette effect. -
Create space dust:
I like to splatter a tiny bit of clean water onto the drying blue paint to create subtle ‘blooms’ that look like distant water particles. Allow the background to dry completely before moving on.
Step 3: Painting the Jellyfish
-
Base layer of the bell:
Wet the inside of the jellyfish bell with clean water. Drop in a pale wash of Cyan at the top and Magenta near the rim. -
Blend the gradients:
Let the blue and pink merge naturally on the wet paper to create a soft violet transition. This establishes the translucent look. -
Define the ribs:
Once the bell is damp but not soaking, use a thicker purple mixture to paint curved vertical lines down the bell to suggest the ribbed structure. -
The oral arms:
Mix a light peach color using Magenta and a touch of Burnt Sienna. Paint the ruffled, thicker tentacles hanging from the center of the bell using a dabbing motion to create texture. -
Add shadows:
While the peach arms are technically still wet, drop in a slightly darker terracotta color into the crevices of the ruffles to give them 3D volume.
Level Up: Metallic Shimmer
Mix a tiny amount of iridescent medium or pearlescent watercolor into your purple mix for the bell. It will make the jellyfish shimmer like real bioluminescence when the light hits.
Step 4: The Bioluminescent Glow
-
Prepare the opaque white:
Squeeze out some white gouache or bleed-proof white ink. It needs to be creamy, not too watery, to stand out against the dark blue. -
Paint the fine tentacles:
Using your finest liner brush, paint long, flowing white lines extending from the bottom of the bell. Let these lines cross over each other and flow naturally. -
Vary line opacity:
For a realistic depth effect, paint some tentacles with watered-down white (so they look further away) and others with solid opaque white (for the foreground). -
Highlight the bell:
Add thin white highlights to the top of the bell dome and the edges of the ruffled peach arms to make them look wet and shiny. -
Final atmosphere:
Dip a stiffer brush in white paint and tap it against your finger to splatter tiny white stars or bubbles across the dark blue background, concentrating them around the jellyfish.
Step back and admire how your luminous creature glows against the deep sea backdrop.


Have a question or want to share your own experience? I'd love to hear from you in the comments below!