
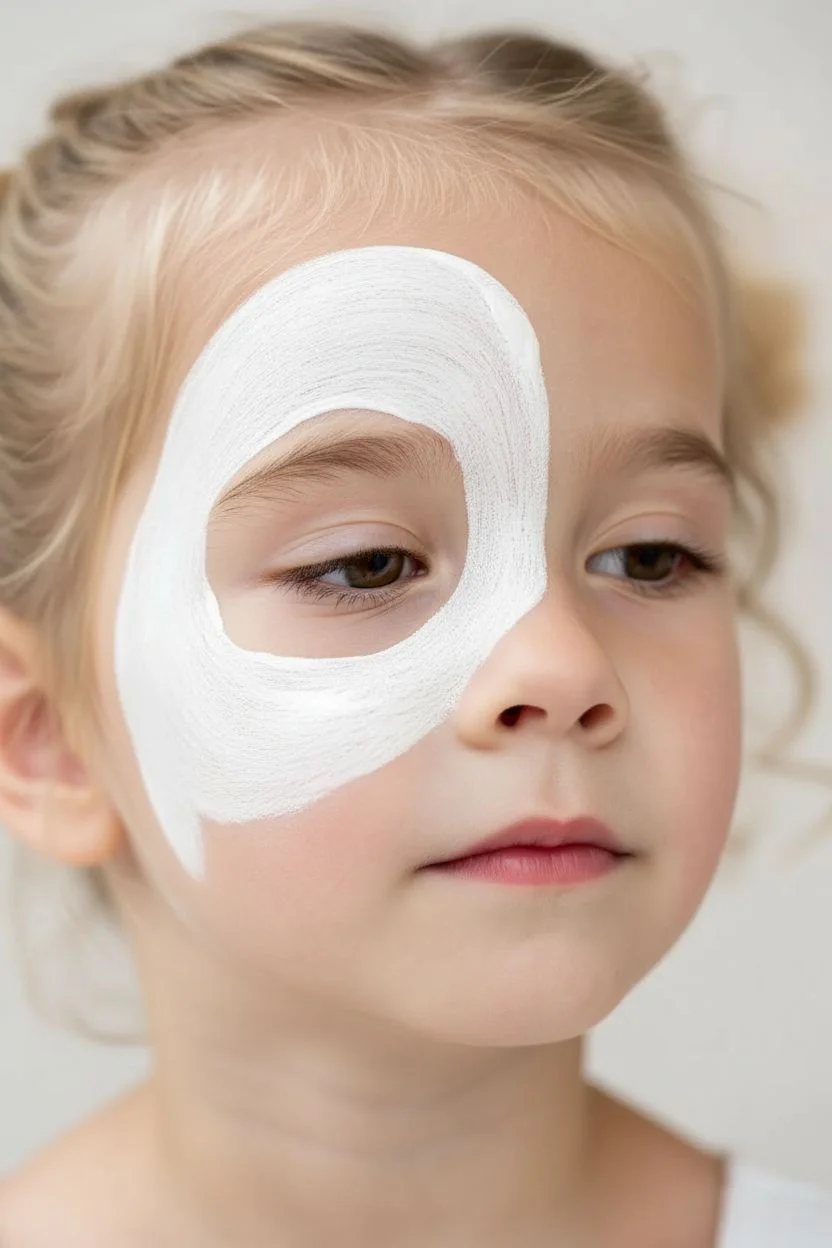
There is something truly magical about watching a child’s face light up when they see their colorful transformation in the mirror for the first time. You don’t need a professional kit to get started; these beginner-friendly designs focus on simple strokes and cheek art that anyone can master in minutes.
The Classic Butterfly Mask
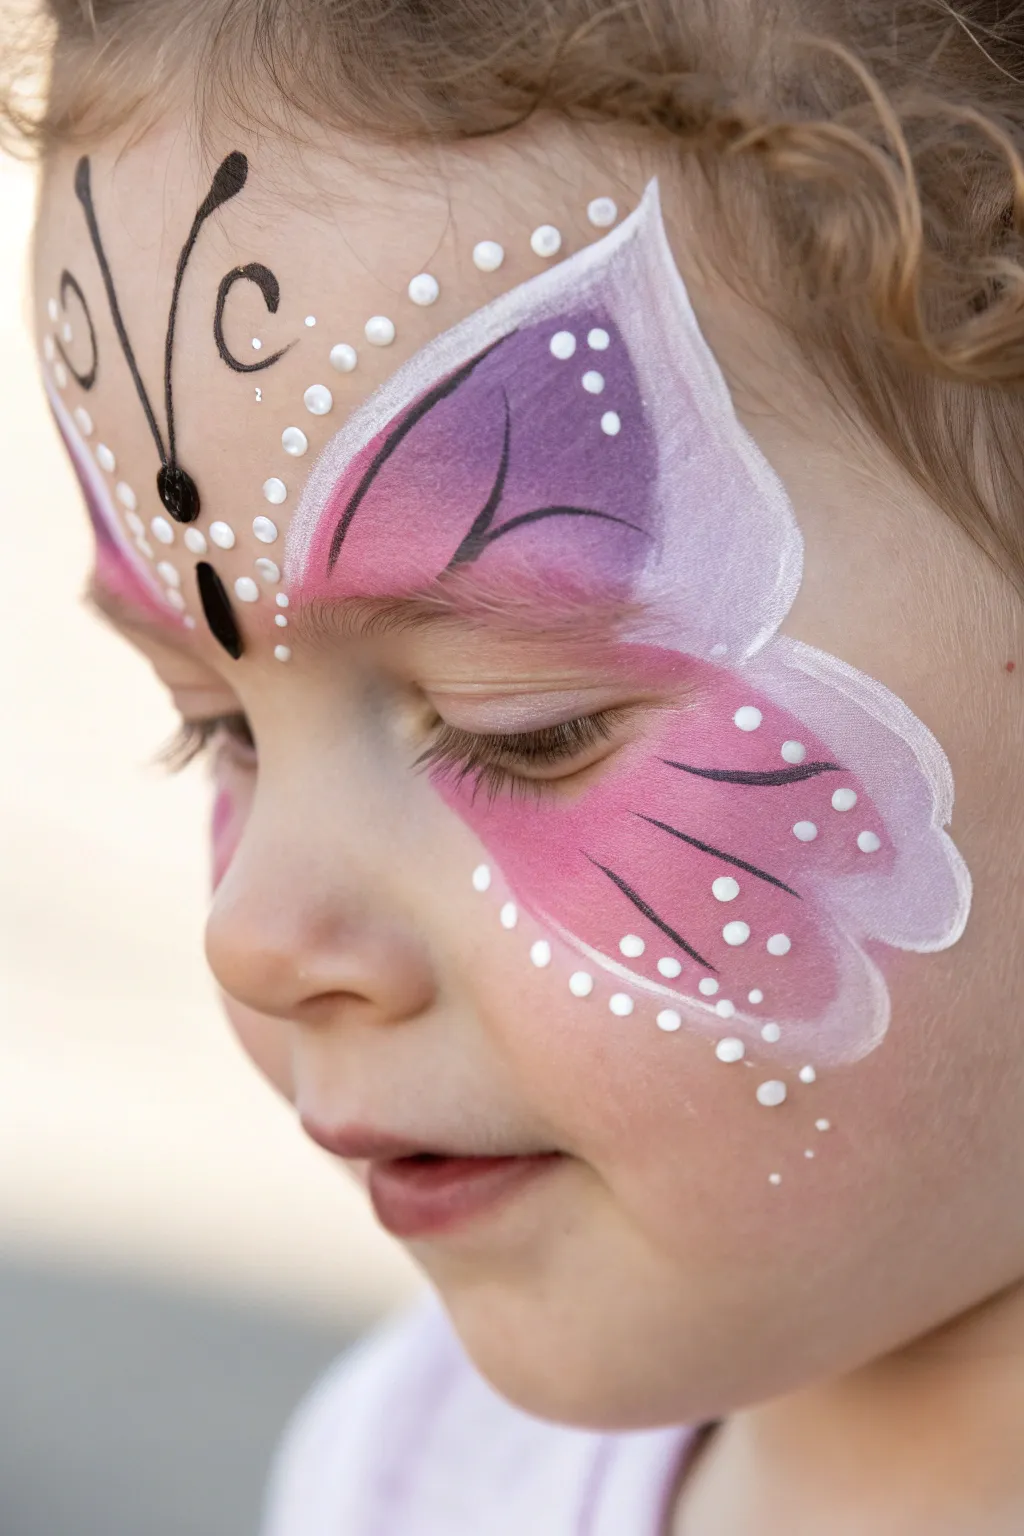
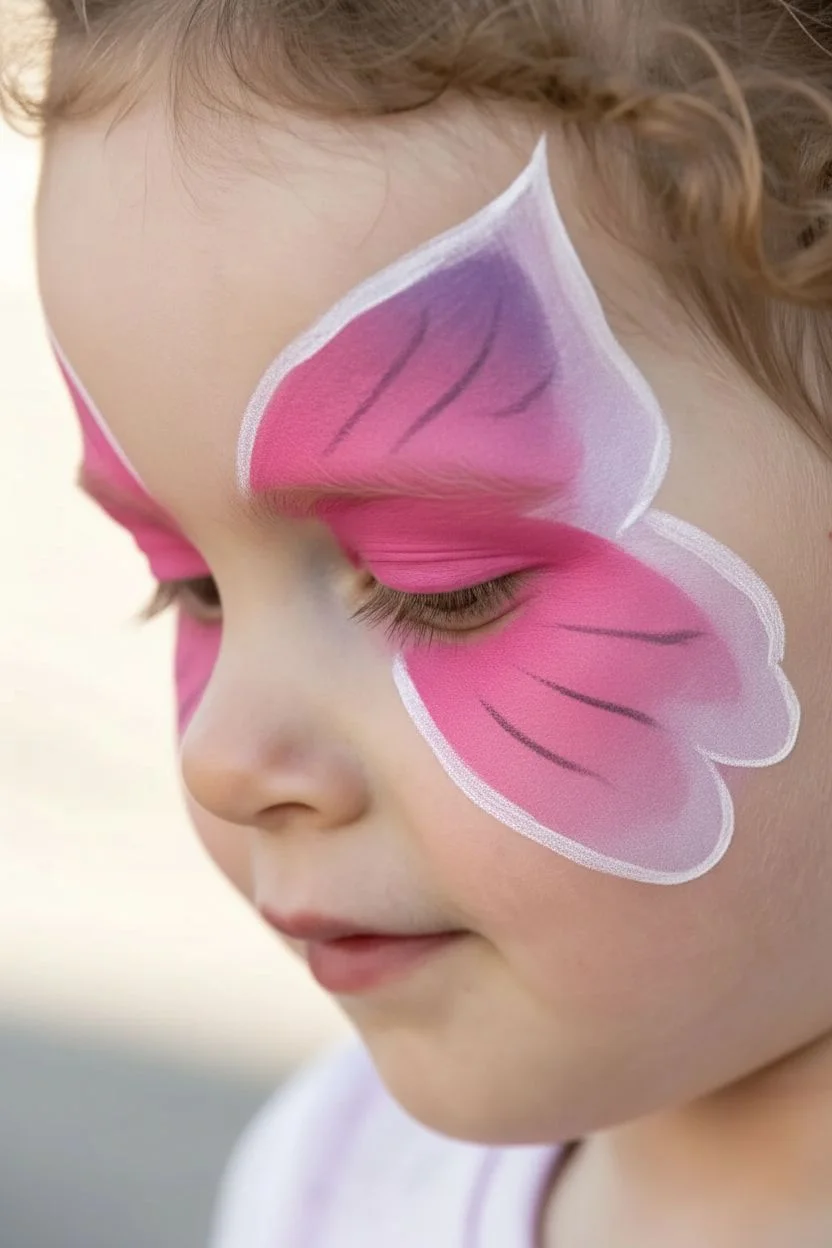
This delicate design combines soft pinks and purples with crisp linework to transform a fave into a magical creature. It focuses on symmetrical wings and dotted accents for a whimsical, professional-looking finish.
Step-by-Step Guide
Materials
- High-density face paint sponge (cut in half)
- Face paint cakes: Bright pink, Lavender/Purple, White, Black
- Round brush (size 4) for outlining
- Fine liner brush (size 1 or 2) for details
- Cup of clean water
- Spray bottle (optional)
Step 1: Creating the Wing Base
-
Load the sponge:
Mist your sponge lightly with water. Rub the rounded edge into the bright pink face paint until it is creamy and well-loaded. -
Apply the top inner wing:
Gently pat the pink paint onto the eyelid and the area just above the eyebrow, stopping midway across the forehead. -
Add the purple gradient:
Load a fresh edge of the sponge with lavender or purple paint. Patty this onto the temple area, blending it slightly into the pink edge to create a soft fade. -
Form the lower wings:
Reload the sponge with pink and dab a rounded shape onto the cheekbones, angling it upwards towards the outer corner of the eye to meet the purple section. -
Symmetry check:
Repeat these steps on the other side of the face, trying to keep the height and width as even as possible.
Clean Lines Pro-Tip
For sharp teardrop shapes and outlines, always keep your paint creamy, not watery. If it drips, it’s too thin. Consistency should be like soft butter.
Step 2: White Framework
-
Prepare white paint:
Wet your size 4 round brush and work it into the white paint until you get a consistency like melted styling gel. -
Outline the top:
Starting between the eyebrows, sweep a curved line up over the purple section, pressing down to make it thick and lifting to taper off at the temple. -
Define the lower wing:
Paint a scalloped (wavy) line along the bottom edge of the pink cheek section, curving upward to connect with the top wing. -
Feather the edges:
I like to use the side of the brush to drag a little white paint inward from the outline, creating a soft, feathery look. -
Add decorative dots:
Using the tip of the round brush, press a series of white dots descending in size alongside the nose bridge, following the inner curve of the wing.
Troubleshooting Edges
If your sponge application looks patchy or streaky, the sponge was likely too wet. Squeeze it out thoroughly in a paper towel and reload with fresh paint.
Step 3: Line Work and Details
-
Create the body:
Switch to your fine liner brush (size 1 or 2) and load it with black paint. Paint a small oval on the bridge of the nose for the body, and a smaller circle above it for the head. -
Draw the antennae:
From the head, pull two long, thin lines curving upward onto the forehead. Curl the ends into delicate spirals. -
Add wing veins:
Paint thin, sweeping curved lines inside the purple sections of the upper wings and the pink sections of the lower wings to mimic veins. -
Highlight the black:
Once the black paint is dry, use a tiny amount of white on your finest brush to add minuscule highlights to the body and antennae loops. -
Final accents:
Add a few extra white dots near the outer corners of the eyes and on the purple wing tips to make the design pop.
You’ll see their eyes light up when they catch their reflection in the mirror


Quick Side-Swipe Tiger
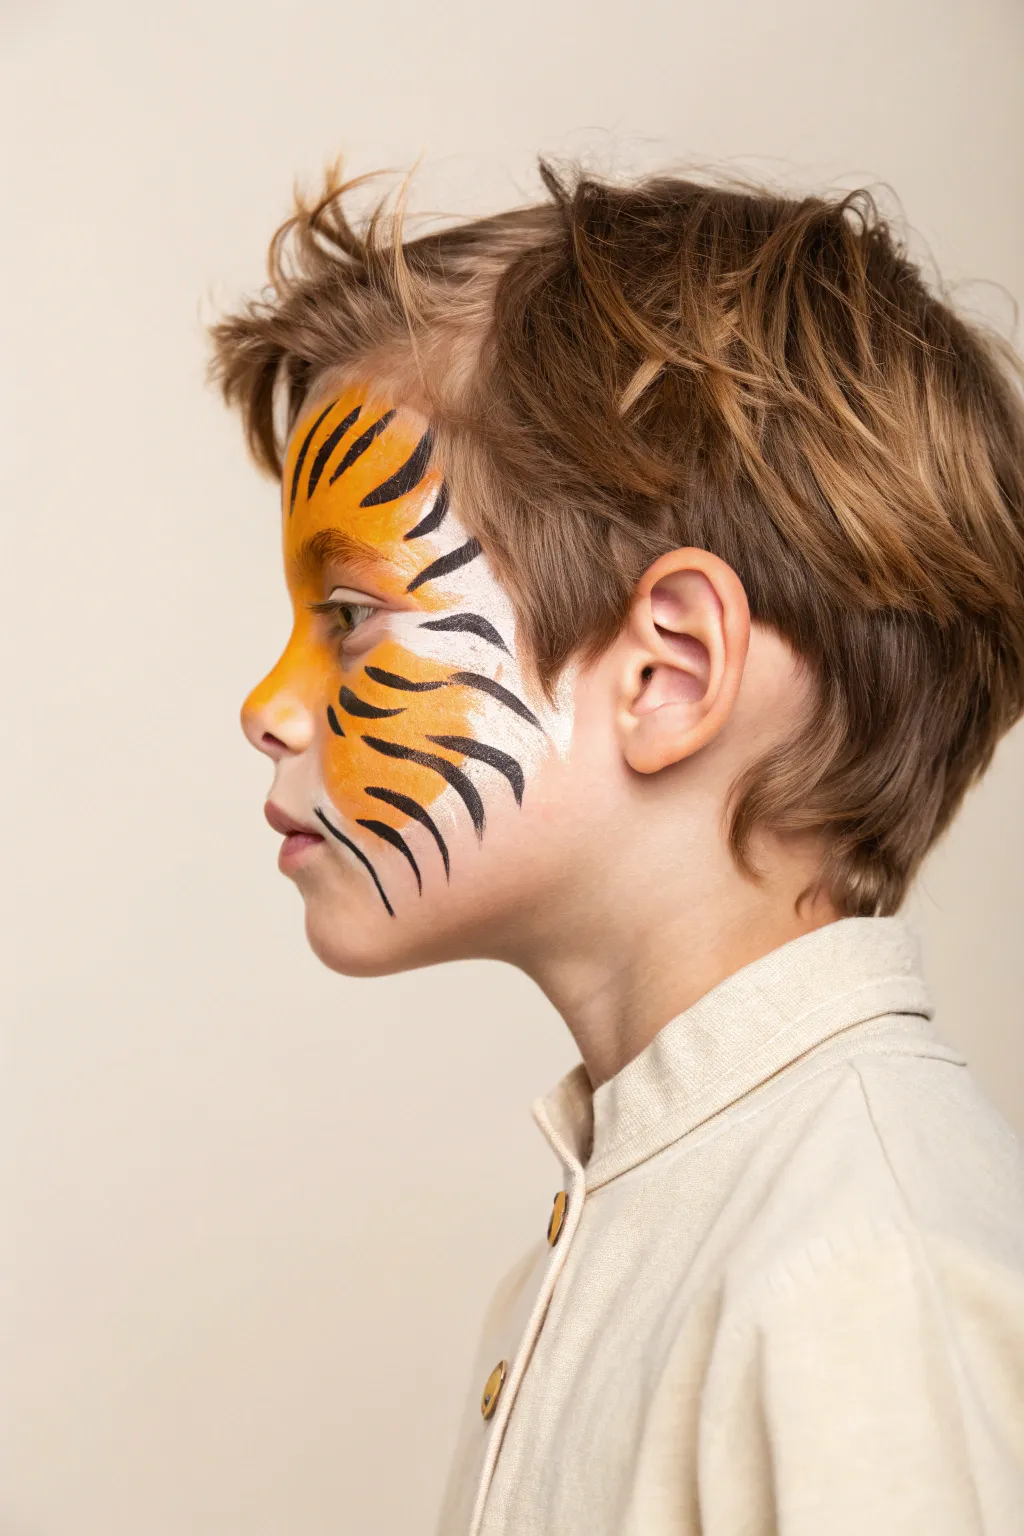
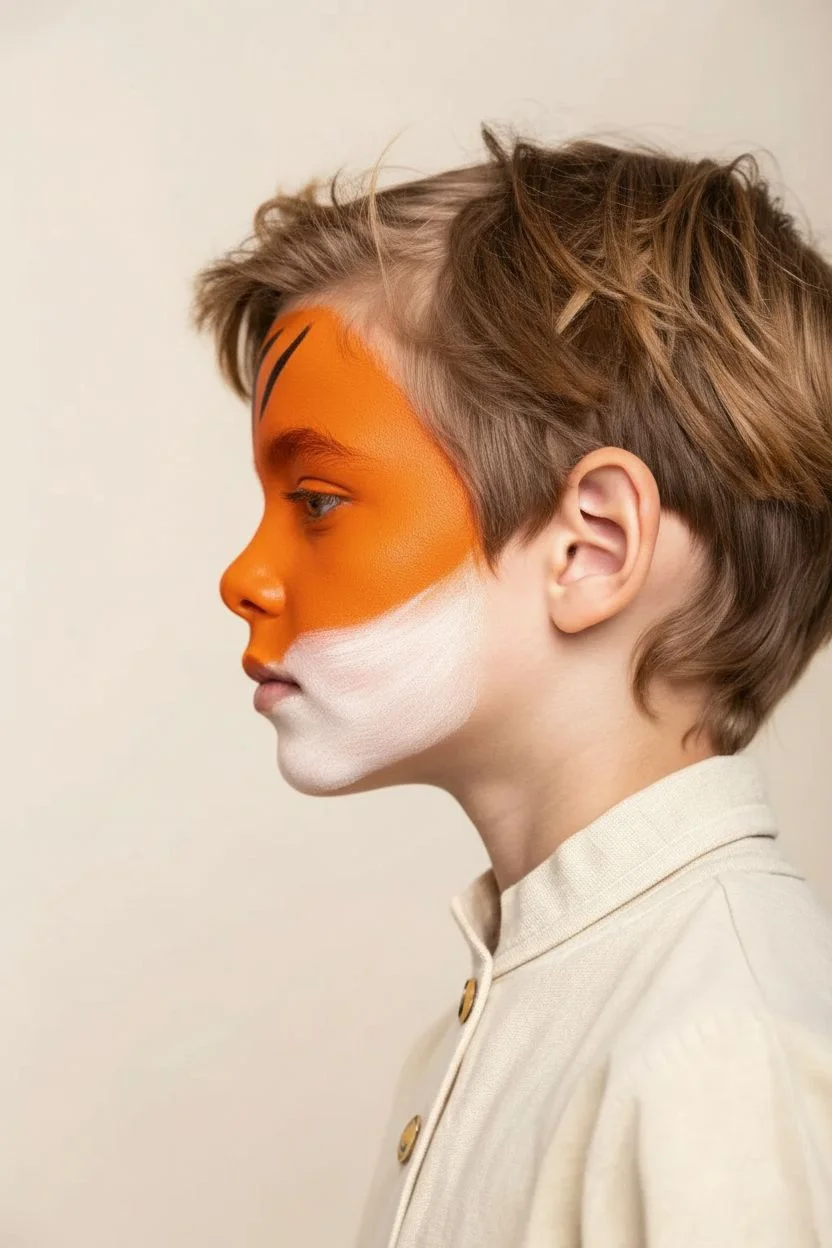
This dynamic side-swipe design captures the fierce energy of a tiger without covering the entire face, making it perfect for active kids. It focuses on high-contrast stripes and a vibrant orange gradient that sweeps dramatically across one side.
Detailed Instructions
Materials
- Bright orange face paint
- White face paint
- Black face paint
- High-density face painting sponge
- Round brush (size 3 or 4)
- Water container
- Spray bottle with water
Step 1: Laying the Base
-
Activate the orange:
Lightly mist your orange face paint with water until the surface is creamy. -
Load the sponge:
Rub one end of a damp high-density sponge firmly into the orange paint to pick up a solid load of color. -
Apply to eyelid:
Ask your model to close their eyes gently, then pat the orange color directly over the eyelid. -
Extend upwards:
Dab the sponge upward from the eye onto the forehead, fading the pressure as you go higher to create a soft edge. -
Sweep down the cheek:
Continue patting the orange down along the cheekbone, stopping halfway down the cheek. -
Paint the nose:
Using the corner of the sponge or a small brush, paint the very tip of the nose completely orange. -
Load white paint:
Flip your sponge to a clean side or grab a fresh one, and load it with white face paint. -
Highlight the eye:
Press the white paint underneath the eye, blending it backwards towards the ear. -
Blend the transition:
Softly dab where the white and orange meet on the cheekbone to create a seamless, furry gradient.
Sponge Sculpting
Cut a round sponge in half to create a semi-circle. The flat edge is excellent for defining straight lines, while the rounded side fits perfectly into the eye socket for smooth base application.
Step 2: Striping & Definition
-
Prepare the brush:
Wet your round brush and swirl it into the black paint until it has an inky, smooth consistency. -
Forehead stripes:
Start at the top orange edge on the forehead. Press the brush down to make a thick head, then lift purely while dragging to create a sharp, thin tail pointing toward the eye. -
Temple details:
Paint two or three curved stripes at the temple, sweeping them outward towards the hairline. -
Eye definition:
Carefully paint a thin black line immediately under the lower lash line if the child is comfortable with it. -
Cheek stripes:
I like to rest my pinky finger on the chin for stability here. Paint tiger stripes on the cheek, curving them downward following the face’s natural contour. -
Vary the lines:
Ensure your stripes vary in length and thickness to mimic natural fur patterns rather than rigid geometry. -
Nose outline:
Use the very tip of your brush to outline the bottom curves of the orange nose tip. -
Add whiskers:
Paint three very fine, short lines or dots near the corner of the mouth to suggest whisker roots. -
Muzzle accents:
Add a few quick, thin flicks of black into the white area under the eye to enhance the texture. -
Final check:
Step back and check if any stripes need sharpening at the tips to ensure a consistent fierce look.
Glitter Glam
While the orange paint is still tacky, tap a finger dipped in cosmetic-grade gold glitter over the eyelid and forehead area to give the tiger design a magical, shimmering finish.
You’ve now unleashed a wild tiger design that looks professional but takes only minutes to apply.


Minimalist Superhero Mask
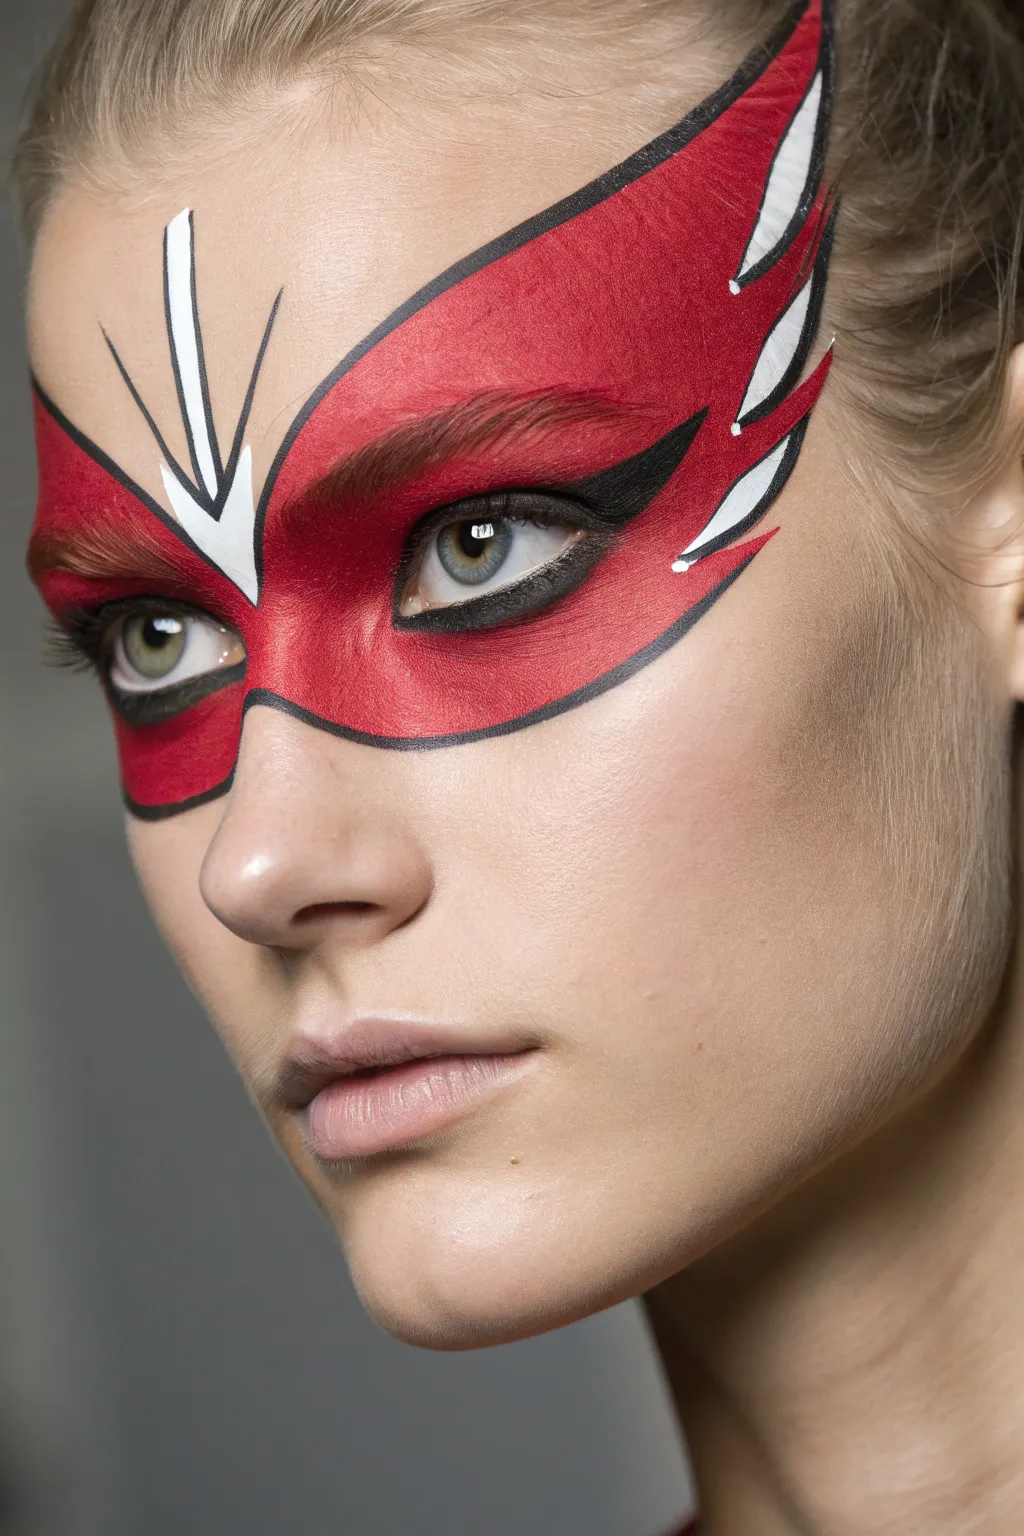
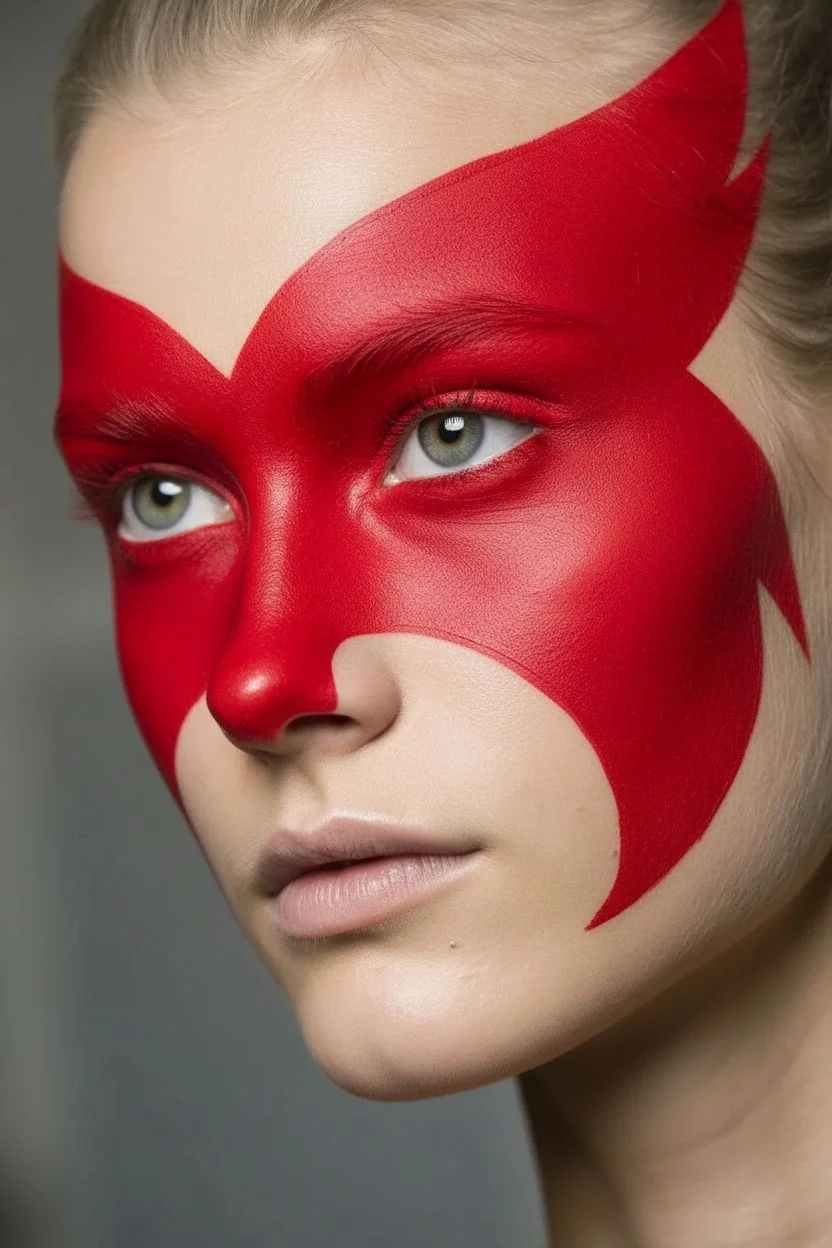
This striking design combines bold comic book outlines with an aerodynamic shape to create a sleek superhero identity. It frames the eyes beautifully with high-contrast colors, perfect for a minimalist yet powerful costume.
Step-by-Step Guide
Materials
- High-density face paint (Red, White, Black)
- Medium flat brush (size 6)
- Fine liner brush (size 1)
- Small round brush (size 2)
- Cup of water
- Cotton swabs
- Setting spray (optional)
Step 1: Shaping the Red Base
-
Map the center:
Start with a clean, dry face. Load your flat brush with red face paint and mark the center point on the bridge of the nose. -
Draw the lower curve:
Sweep the brush from the nose bridge outwards under the eye, following the natural curve of the cheekbone up towards the temple. -
Create the upper wing:
Paint a line starting just above the inner eyebrow, arching upwards and outwards to meet the lower line at a sharp point near the hairline. -
Fill the shape:
Fill in the entire outlined area with red paint, covering the eyebrows and eyelids completely. -
Build opacity:
If the red looks streaky, let the first layer dry for a minute and apply a second coat for a vibrant, solid finish. -
Mirror the design:
Repeat these steps on the other side of the face, aiming for symmetrical wings.
Sharp Line Pro-Tip
To get razor-sharp points on your outline, roll the tip of your liner brush into the paint until it forms a needle-like point, rather than just dipping it.
Step 2: Adding White Accents
-
Create the center logic:
Switch to a small round brush loaded with opaque white paint. Draw a ‘V’ shape starting from the middle of the forehead down to the nose bridge, creating a stylized arrowhead. -
Fill the center:
Carefully fill the ‘V’ shape with white paint, ensuring the red underneath doesn’t mix in. -
Paint side feathers:
On the outer temples, paint two or three stylized diagonal teardrop shapes that look like wing feathers, curving slightly upward. -
Dry time:
I usually wait about 60 seconds here to ensure the white is totally dry before adding black outlines to prevent smudging.
Step 3: Graphic Black Lines
-
Outline the center:
Using a fine liner brush and black paint, carefully outline the white ‘V’ on the forehead with a thin, precise line. -
Add the central shaft:
Draw a straight, vertical black line directly down the center of the white ‘V’ to resemble a sleek arrow or quill. -
Define side feathers:
Outline the white feather shapes at the temples with the liner brush to make them pop against the red. -
Trace the perimeter:
Use the liner brush to outline the entire border of the red mask with a smooth, continuous black line. -
Connect the points:
Ensure the outline is sharpest at the outer wing tips and the inner corners near the nose. -
Upper lash line:
Paint a thick black line along the upper lash line, winging it out slightly to follow the upward sweep of the mask. -
Lower lash line:
Line under the lower lashes with black paint, connecting it to the upper wing for a dramatic, defined eye shape.
Level Up: Metallic Pop
Swap the matte red base for a metallic crimson face paint, or dab a little sheer gold glitter gel over the white feather accents for a dazzling finish.
Step back and admire your clean, graphic superhero transformation, perfect for saving the day or just the party


One-Stroke Rainbow Arch
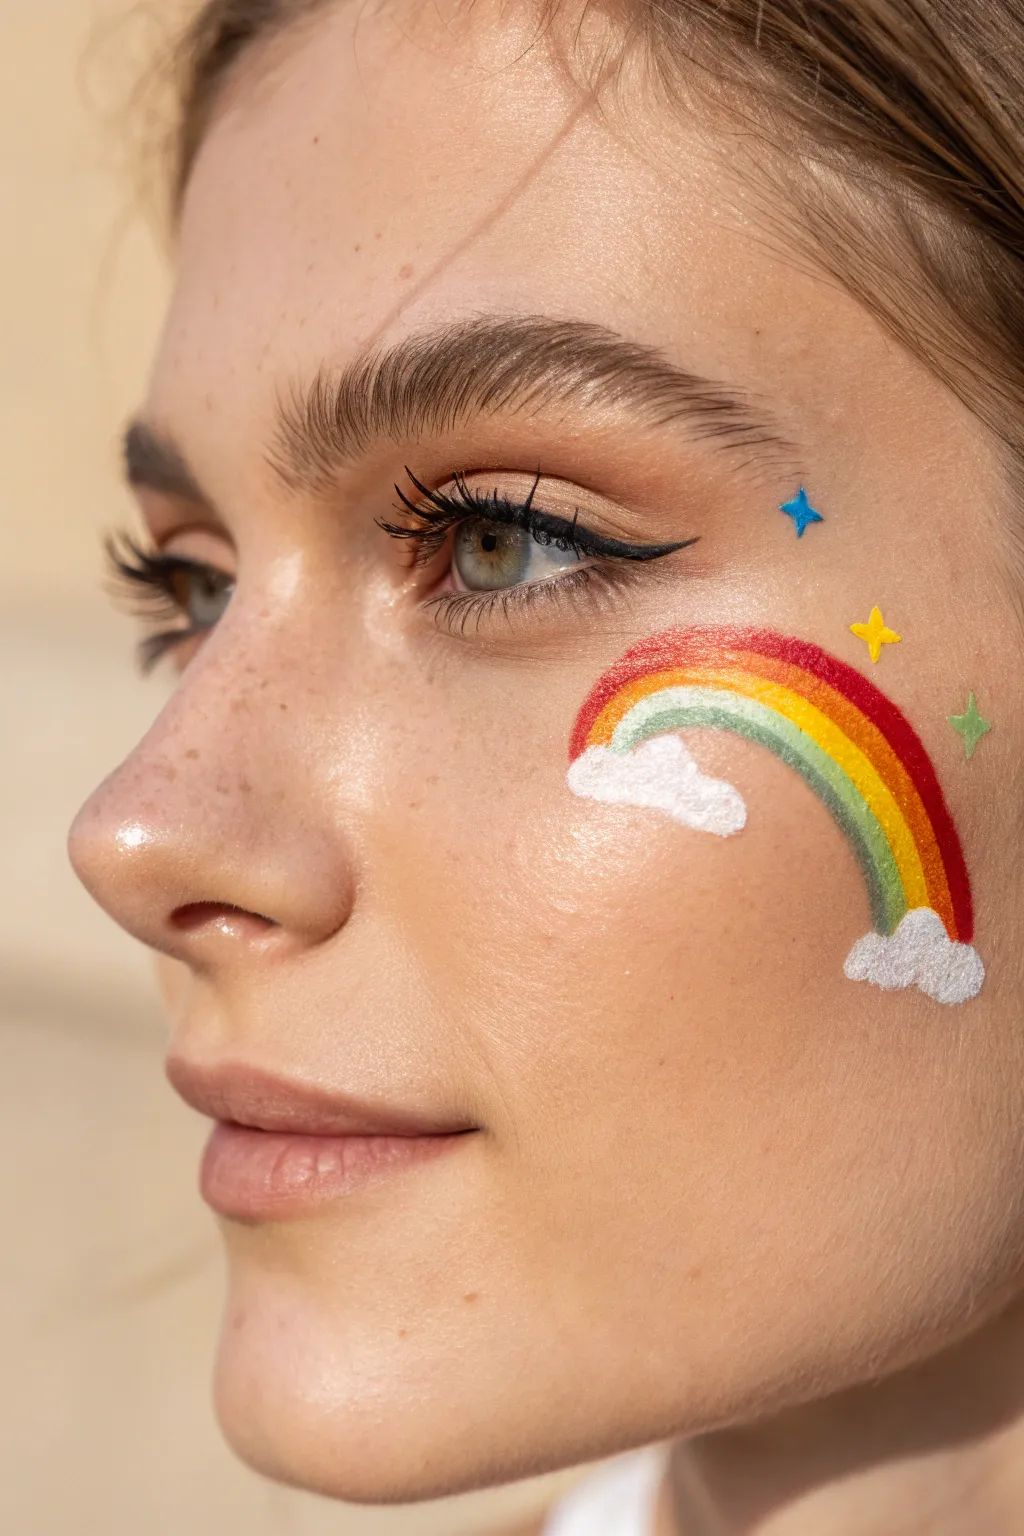

Brighten up any look with this classic festival favorite that sweeps elegantly across the cheekbone. Using a split cake makes the gradient effortless, while fluffy clouds and scattered stars add a dreamy finish.
How-To Guide
Materials
- Rainbow split cake face paint
- White face paint
- Blue, yellow, and green face paint
- 3/4 inch or 1 inch flat brush
- #3 or #4 round brush
- Water container
- Spray bottle (mister)
- Cosmetic glitter (optional)
Step 1: The Gradient Arch
-
Activate the paint:
Start by lightly misting your rainbow split cake with water to activate the surface without creating puddles. -
Load the brush:
Take your flat rectangular brush and drag it back and forth over the cake, pressing firmly until the bristles are fully saturated with all the colors. -
Check consistency:
Test on the back of your hand first; you are looking for a creamy, opaque consistency that doesn’t drip. -
Position the brush:
Place the brush on the apple of the cheek, ensuring the red strip is at the top facing the eye and the violet is at the bottom. -
Anchor your hand:
Stabilize your painting hand by resting your pinky finger gently against the chin or jawline. -
Execute the stroke:
In one smooth, continuous motion, glide the brush up over the cheekbone and curve it downwards toward the hairline. -
Lift off:
Pull the brush away gently at the end of the arch; don’t worry about rough ends as they will be covered by clouds. -
Touch up:
If the coverage looks streaky, wait for it to dry briefly and carefully repeat the stroke directly over the first layer.
Step 2: Cloudy Ends
-
Switch to white:
Rinse your brushes thoroughly or switch to a fresh round brush loaded with creamy white face paint. -
Form the inner cloud:
At the front end of the rainbow near the nose, press the brush tip down to create three or four rounded, scalloped bumps. -
Fill the shape:
Fill in the body of the cloud, ensuring the white paint slightly overlaps the rough starting edge of the rainbow. -
Form the outer cloud:
Move to the tail of the rainbow near the ear and repeat the scalloped dabbing motion to create a matching fluffy cloud. -
Add dimension:
I like to dab a second layer of white in the center of the clouds to make them look extra puffy and dimensional.
Muddy Colors?
If the rainbow stripes bleed into a brown mess, your brush is too wet. Squeeze out excess water on a towel and reload.
Step 3: Celestial Accents
-
Paint the blue star:
Clean your round brush and pick up a bright blue color, then paint a small four-point star near the outer corner of the eye. -
Paint the yellow star:
Rinse and switch to a bright yellow pigment, painting a second star floating just below the rainbow arch. -
Paint the green star:
Finish with a green star positioned slightly further back near the temple area to balance the composition. -
Refine edges:
Use the very tip of your round brush to sharpen the points of your stars for a crisp look. -
Let it set:
Allow the design to dry completely for a minute before touching your face or applying any setting spray.
Add Some Shimmer
While the white paint is still tacky, tap some translucent cosmetic glitter onto the clouds for a magical texture.
You are now ready to show off your vibrant, sky-inspired masterpiece at your next event
BRUSH GUIDE
The Right Brush for Every Stroke
From clean lines to bold texture — master brush choice, stroke control, and essential techniques.
Explore the Full Guide
Simple Whiskers Kitty
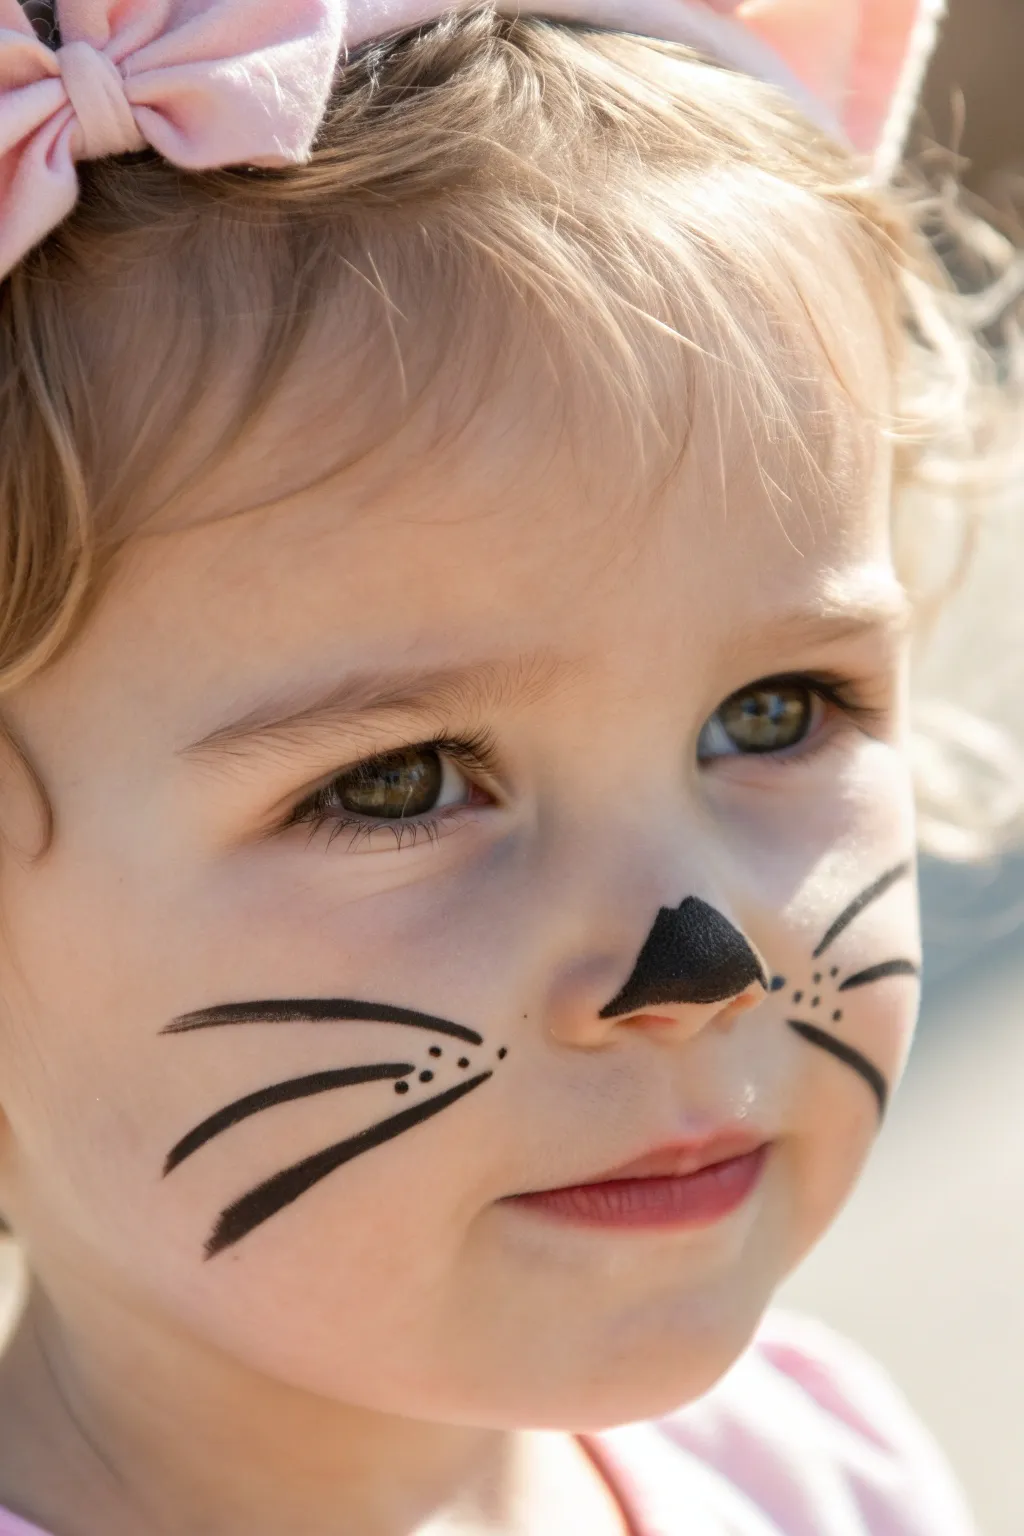
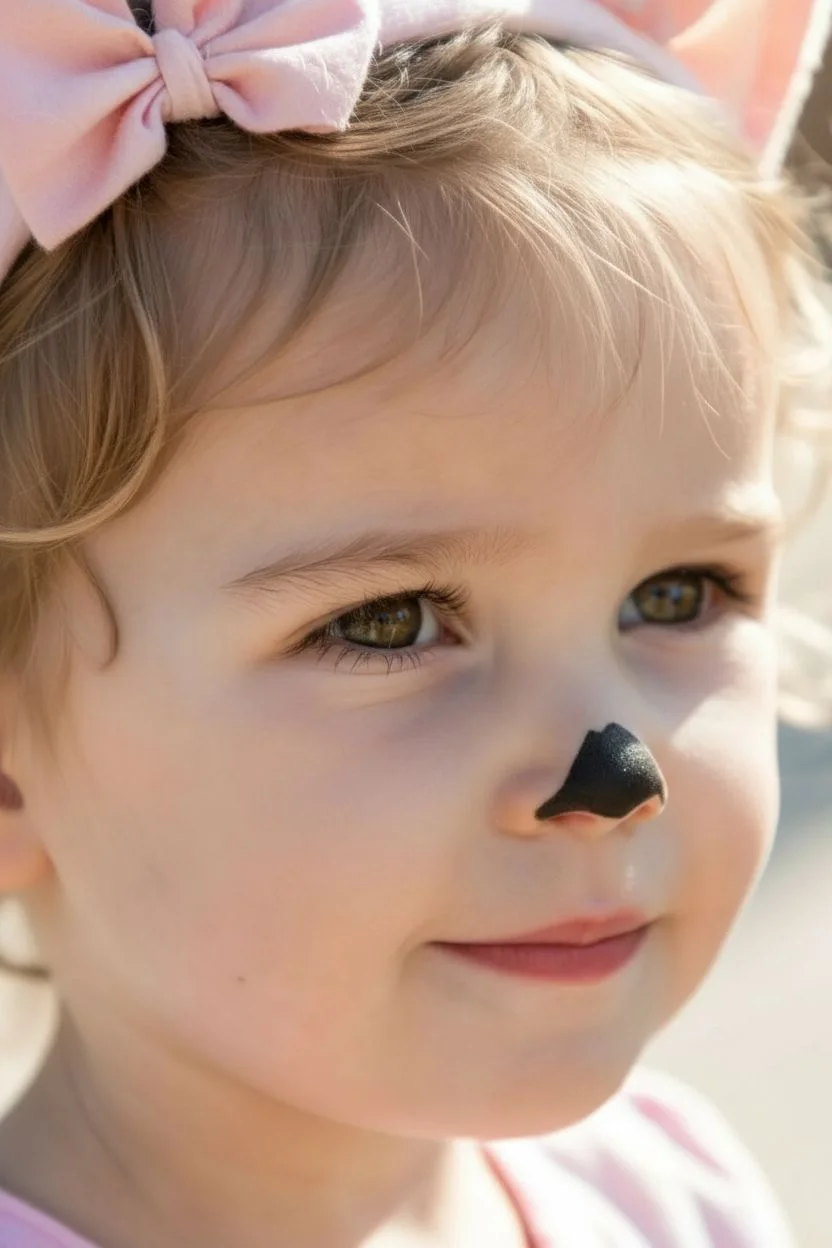
Transform your little one into an adorable kitty in minutes with this minimal face paint design. This look focuses on clean black linework for the nose and whiskers, making it perfect for energetic kids who can’t sit still for full-face coverage.
Step-by-Step Guide
Materials
- Black water-activated face paint (e.g., Snazaroo or TAG)
- Round brush (size 4 or 6)
- Fine liner brush (size 2)
- Cup of clean water
- Baby wipes or damp cloth
- Pink cat ear headband
Step 1: Preparation & Nose
-
Clean the canvas:
Gently wipe the child’s face with a damp cloth to remove any oils or food residue, ensuring the paint sticks evenly. -
Secure the hair:
Place the pink cat ear headband on the child’s head now to keep stray curls away from the painting area. -
Load the brush:
Dip your size 4 round brush into water, then swirl it into the black face paint cake until you achieve a creamy, ink-like consistency. -
Define the nose base:
Start at the very tip of the child’s nose and draw a horizontal line to mark the bottom of the kitten nose pad. -
Shape the triangle:
From the ends of your bottom line, draw two lines angling upward to meet in the center, forming a soft triangle shape. -
Fill it in:
Use the belly of the brush to fill in the triangle completely with solid black paint. -
Refine the edges:
Smooth out the top point of the triangle so it isn’t too sharp; a slightly rounded top looks softer and cuter. -
Dry check:
Give the nose a moment to dry so it doesn’t smudge while you work on the cheeks.
Anchor Your Hand
To stop your hand from shaking, rest your pinky finger gently on the child’s chin or cheek (away from wet paint) while you draw fine lines.
Step 2: Whiskers & Details
-
Switch brushes:
Change to your finer size 2 brush or liner brush to ensure crisp, sharp lines for the whiskers. -
Reload paint:
Load this smaller brush with black paint, ensuring the paint is fluid enough to glide without dragging. -
Position the first whisker:
Start the first whisker on the fleshy part of the cheek, aligned roughly with the bottom of the nose. -
Execute the stroke:
Press the brush down firmly to start the line thick, then lift as you pull outward to create a sharp, tapered point. -
Add the middle whisker:
Repeat the press-and-flick motion just below the first line, angling it slightly more downward. -
Paint the bottom whisker:
Add the third whisker below the middle one, curving it down towards the jawline for a fanned-out look. -
Mirror the design:
Move to the opposite cheek and paint three matching whiskers, trying to keep them symmetrical with the first side. -
Add muzzle dots:
Using the very tip of your fine brush, gently dab three small dots between the nose and the whiskers on the left cheek. -
Finish the details:
Add three corresponding freckle dots to the right cheek to complete the muzzle area.
Fixing Smudges
If a whisker goes wonky or too thick, don’t panic. Wrap a baby wipe tightly around your finger to act as an eraser and wipe away the mistake before trying again.
Now your little kitten is ready to prowl and play with their picture-perfect face paint.
Spotted Puppy Eye
Transform little ones into adorable pups with this classic spotted design that focuses on a single eye patch for a cute, asymmetrical look. This design leaves plenty of breathing room on the face while still making a big impact with high contrast spots and a sweet puppy nose.
Step-by-Step
Materials
- White water-activated face paint
- Black water-activated face paint
- Red or pink face paint (or lipstick)
- High-density face painting sponge
- Round brush (size 4)
- Fine detail brush (size 1 or 2)
- Cup of water
- Towel or paper towel
Step 1: Creating the White Patch
-
Prepare your sponge:
Dip the tip of your high-density sponge into the water, squeezing out any excess so it is damp but not dripping. -
Load the white paint:
Rub the damp sponge in a circular motion over your white face paint cake until you have a creamy implementation that looks opaque. -
Outline the top curve:
Starting above the right eyebrow, gently press the sponge to create a curved arch that goes high on the forehead. -
Form the cheek curve:
Bring the sponge down around the outer corner of the eye and sweep it inwards across the cheekbone, stopping near the side of the nose. -
Fill in the shape:
Use a dabbing or stippling motion to fill the entire area around the right eye with white paint, ensuring an even, solid coverage without streaks. -
Cover the eyelid:
Have the child close their eyes gently so you can carefully pat the white paint over the eyelid to complete the patch. -
Let it set:
I like to wait just a moment for the white base to dry to the touch so the black spots won’t bleed into it later.
Sponge Smarts
Cut a round sponge in half to create a ‘teardrop’ point. This allows you to get the white paint into the inner corner of the eye easily without accidentally poking the eye or smudging.
Step 2: Adding Spots and Details
-
Load the black paint:
Wet your size 4 round brush and load it with black paint until it has an ink-like consistency. -
Paint the nose:
Draw an inverted triangle or soft heart shape on the tip of the nose, filling it in completely with black. -
Create the large cheek spot:
Press the belly of your round brush down firmly onto the white patch on the cheek to create a large, slightly irregular circular spot. -
Add forehead spots:
Paint two or three medium-sized oval spots on the upper white section above the eyebrow, varying the pressure to change their sizes. -
Detail with tiny spots:
Using just the very tip of your brush, add a few tiny dots or ‘freckles’ on the white patch near the nose bridge. -
Balance the other side:
On the left cheek (the side without the white patch), paint two small, floating black dots to balance the design. -
Simulate texture:
For a natural fur look, try slightly wiggling your brush as you lift it off the skin so the spots aren’t perfectly round geometric circles.
Puppy Perks
Make the design sparkle by quickly puffing cosmetic-grade iridescent glitter onto the white paint while it is still damp, or adding a stick-on gem to the center of the nose.
Step 3: Finishing Touches
-
Clean your tools:
Rinse your brush thoroughly or grab a fresh small brush for the final color. -
Prepare the lip color:
Load a small brush with red or soft pink face paint, or use a lipstick applicator. -
Apply the lipstick:
Carefully paint the lips, keeping the edges clean. A berry-toned red works beautifully to contrast with the black and white. -
Check your work:
Step back and look for any thin areas in the white paint; you can lightly dab a bit more white over them if needed, being careful around the black spots.
Snap a photo of your adorable new puppy and get ready for some playful barking

PENCIL GUIDE
Understanding Pencil Grades from H to B
From first sketch to finished drawing — learn pencil grades, line control, and shading techniques.
Explore the Full Guide
Daisy Chain Cheek Art
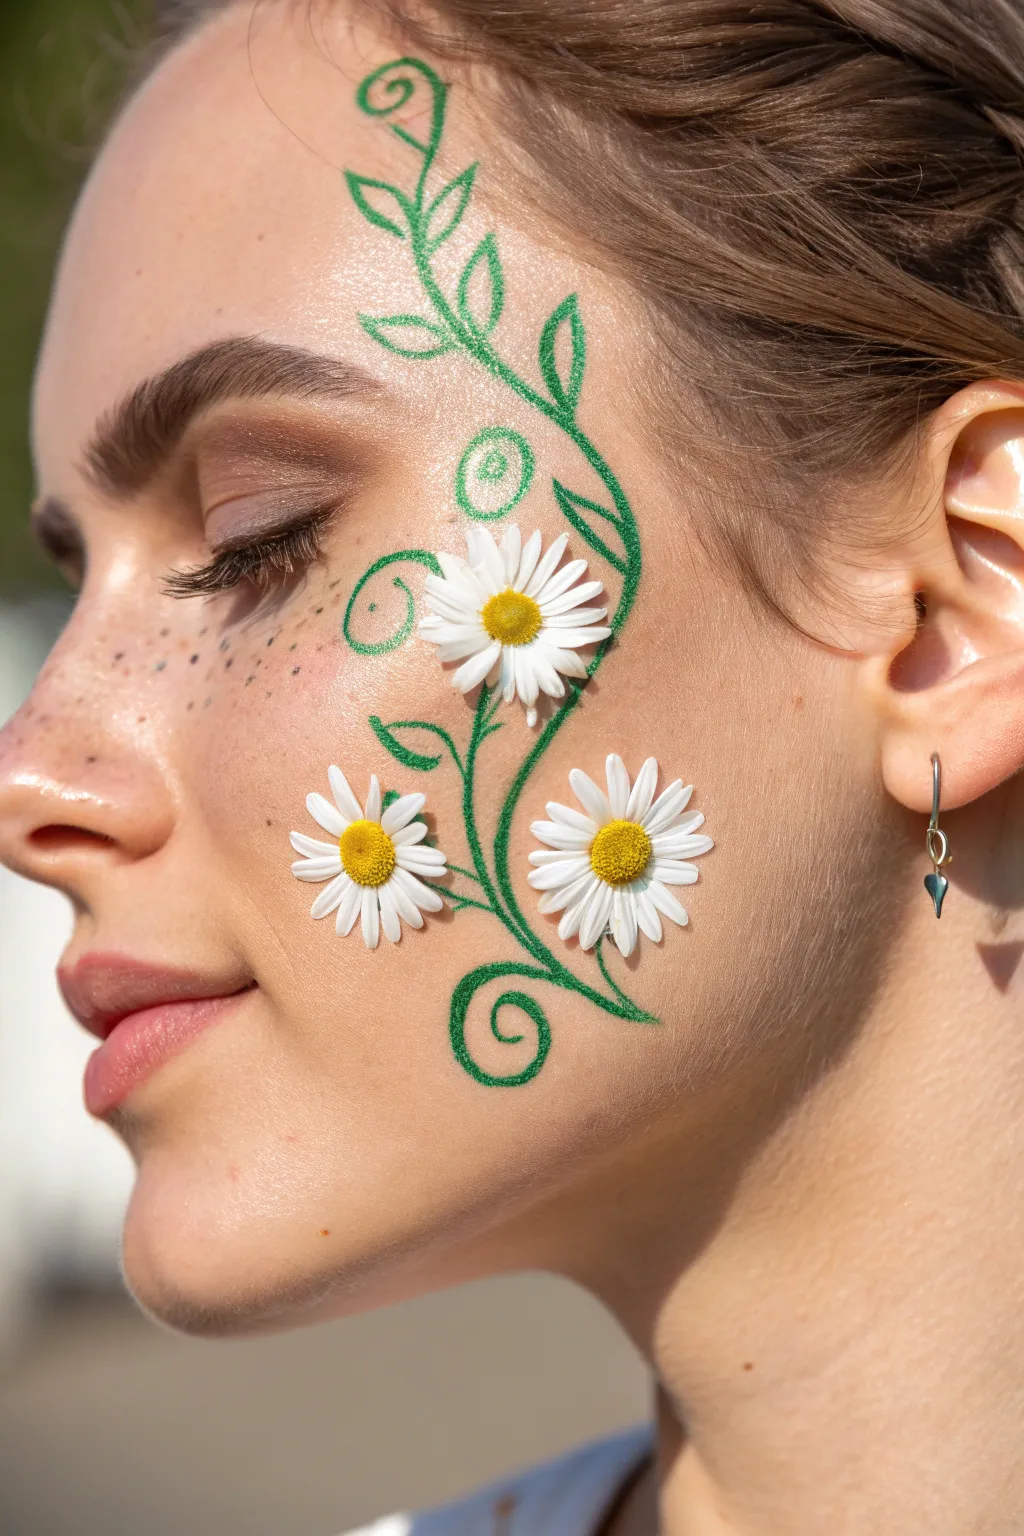
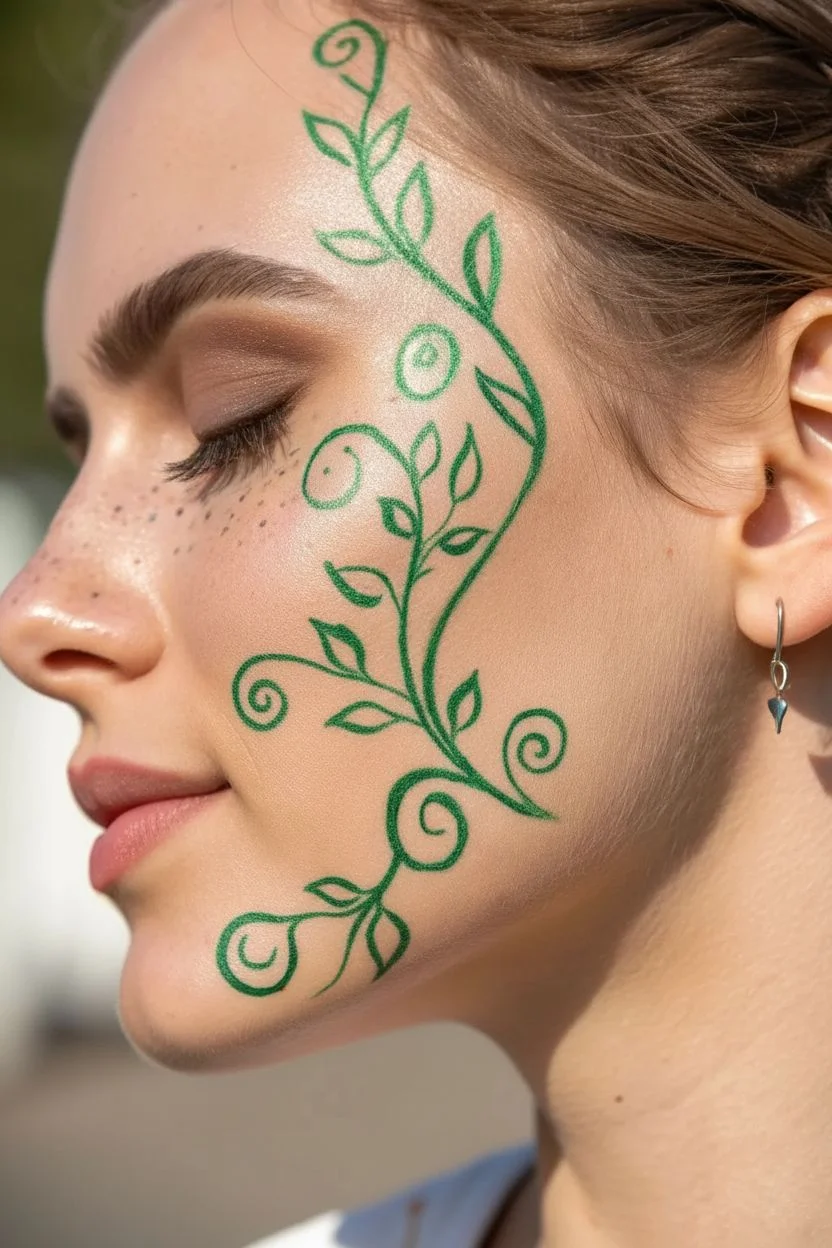
Capture the essence of a sunny garden with this delicate floral face paint design. Featuring sweeping green vines and bright white daisies, this look flows elegantly from the jawline to the temple for a fresh, nature-inspired style.
Step-by-Step Guide
Materials
- Green face paint
- White face paint
- Yellow face paint
- Face paint brush (round, size #2)
- Face paint brush (round, size #4)
- Cup of water
- Brown face paint (optional for freckles)
Step 1: Setting the Scene & Vines
-
Prep the canvas:
Start with a clean, dry face. If you want the sun-kissed base shown in the photo, lightly splatter diluted brown face paint across the nose and cheeks using a toothbrush or stiff brush to create faux freckles. -
Load the green:
Dip your #2 round brush into water and work it into the green face paint until you have a creamy implementation. -
Draw the main stem:
Starting near the jawline, paint a long, curving line that sweeps up across the cheek towards the temple, creating a graceful ‘S’ shape. -
Add spirals:
At the top end of your line near the temple, curl the stroke tightly inward to form a spiral. Repeat this at the bottom end near the jaw. -
Create branches:
Paint two or three smaller offshoot lines branching out from the main vine, curling them gently to fill the cheek area. -
Paint the leaves:
Using the same brush, press the body of the bristles down onto the skin and lift sharply to create teardrop-shaped leaves along the vines. -
Let it set:
Allow the green paint to dry for a minute so the colors remain distinct when you add the flowers.
Petal Perfection
To get that sharp inner point on your petals, reduce pressure on the brush as you drag it inward, lifting it off the skin right at the center.
Step 2: Blooming Daisies
-
Switch to white:
Rinse your brush well or switch to a clean #4 round brush. Load it generously with white face paint. -
Position the blooms:
Visualize three spots for your flowers: one near the jaw, one in the center of the cheek, and one higher up near the eye. -
Form the petals:
Starting with the top flower, press the brush down to create the rounded outer edge of a petal, then flick the stroke inward toward the center. -
Complete the circle:
Rotate your angle and continue adding petals around the center point until you have a full daisy shape. -
Layer the flowers:
Paint the middle daisy next. It’s okay if a petal or two overlaps the green vine; this adds depth to the artwork. -
Finish the trio:
Paint the final daisy at the bottom near the jawline, keeping the petals thin and delicate. -
Touch up:
If the green shows through the white paint too much, wait for it to dry and dab a second layer of white on the petals.
Step 3: Centers & Highlights
-
Prepare the yellow:
Clean your smaller brush and load it with bright yellow face paint. -
Add pollen centers:
Dab a solid circle of yellow into the center of each white daisy. -
Texture the centers:
I like to gently stipple the yellow paint with the brush tip while it’s wet to give it a fuzzy, realistic pollen texture. -
Optional outlining:
If you want more definition, you can use a very fine brush with a darker green to thinly outline one side of the leaves. -
Final check:
Look for any gaps in the petals or stem and fill them in with a tiny amount of paint for a polished finish.
Morning Dew
Add tiny white dots to the green leaves and vines using the tip of a small brush to simulate glistening dewdrops.
Now you have a beautiful, blooming floral design that celebrates the warmth of the season.
Hammerhead Shark Attack
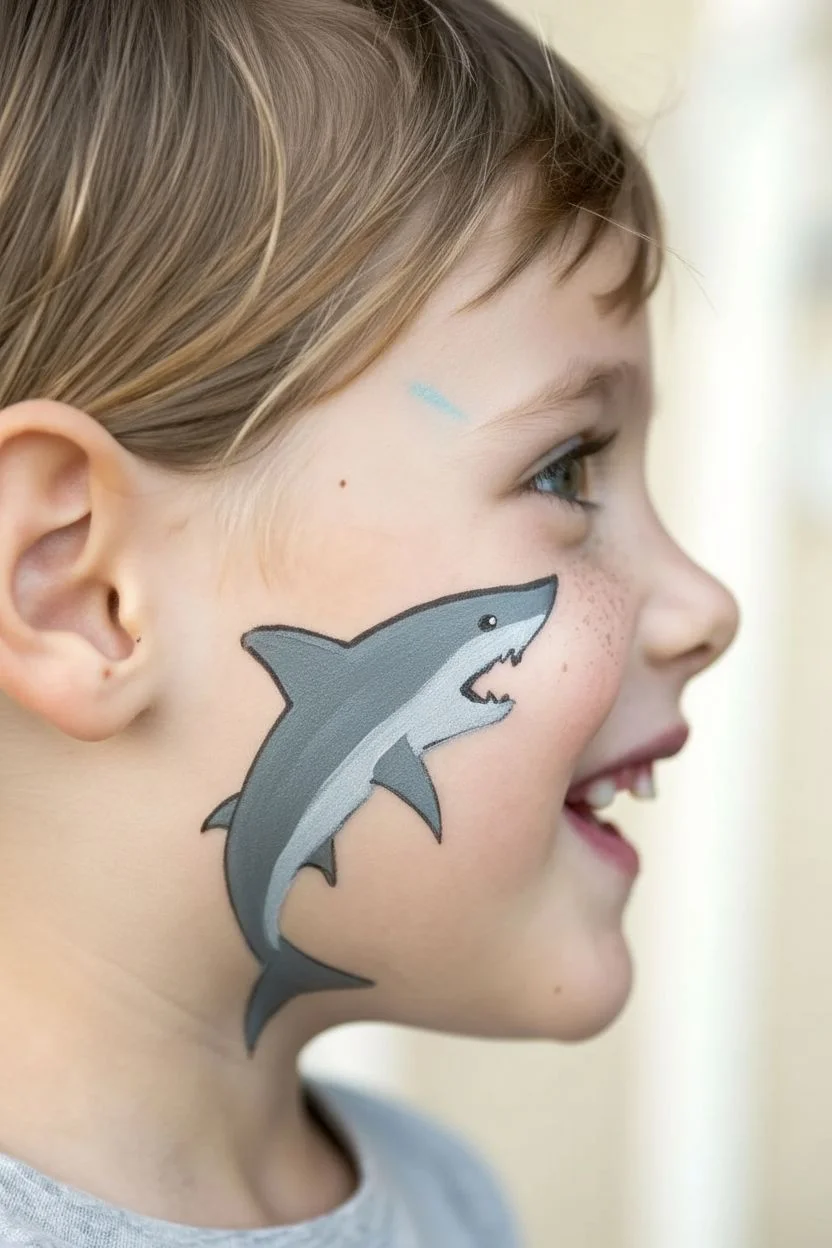
Transform a cheek into a deep-sea scene with this classic shark design. It captures the energy of a shark swimming upwards with bright highlights and sharp details, making it a favorite request at any painting booth or party.
Step-by-Step
Materials
- Grey face paint
- White face paint
- Black face paint
- Round brush (size 4)
- Fine liner brush (size 1)
- Water cup
- Paper towel or sponge
Step 1: Shaping the Shark
-
Load the brush:
Dip your size 4 round brush into water and work it into the grey face paint until you have a creamy consistency. -
Outline the body:
Start near the corner of the mouth. Draw a curved line swimming upwards toward the temple to form the shark’s back. -
Form the belly:
Draw the lower curve of the body, creating a pointed nose at the top and leaving the tail area open for now. -
Fill the grey:
Fill in the top half of the body shape with the grey paint, leaving the belly area slightly empty or very sheer. -
Add dorsal fin:
Paint a triangular fin on top of the shark’s back, curving it slightly backward. -
Add pectoral fins:
Paint the side fins on the lower part of the body; one should look like it is coming from the other side of the shark. -
Create the tail:
Paint the classic crescent moon shape at the bottom of the body to form the tail fin.
Smear Prevention
If the black line bleeds into the grey, the base layer was too wet. Ensure the grey paint has lost its wet sheen and is dry to the touch before starting your outline work.
Step 2: Highlights and Teeth
-
Switch to white:
Clean your brush thoroughly or switch to a fresh round brush loaded with white face paint. -
Highlight the belly:
Fill in the belly area with white, blending it slightly where it meets the grey to create a rounded effect. -
Create the mouth:
Paint the open mouth shape near the nose, leaving a gap of unpainted skin in the center. -
Paint teeth:
Use the tip of the brush to dab small triangles along the top and bottom of the mouth opening for sharp teeth. -
Add body shine:
Run a smooth line of white along the upper edge of the shark’s back to make it look wet and shiny. -
Tip the fins:
Add small dashes of white highlight to the tips of the tail and the dorsal fin.
Step 3: Outlining and Details
-
Prepare black paint:
Load a fine liner brush with black paint. I usually aim for an inky, thin consistency here for the sharpest lines. -
Outline the nose:
Start at the nose and trace a thin black line along the top of the body. -
Define the fins:
Carefully outline the dorsal fin, pectoral fins, and the tail, tapering your brush pressure at the tips. -
Outline the mouth:
Trace around the open mouth shape, being careful not to obscure the small white teeth you painted earlier. -
Add the eye:
Paint a small black dot near the front of the face for the eye. -
Draw gills:
Paint three short, curved vertical lines behind the head to represent the gills. -
Final sparkle:
Dip the back end of your brush handle into white paint and add a tiny dot inside the black eye for a lifelike glint.
Pro Tip: Sharp Fins
To get those razor-sharp points on the fins, press down at the start of the stroke and lift the brush gradually while dragging it out until only a single bristle touches the skin.
Now this fierce little shark is ready to explore the party


Scary Green Dinosaur

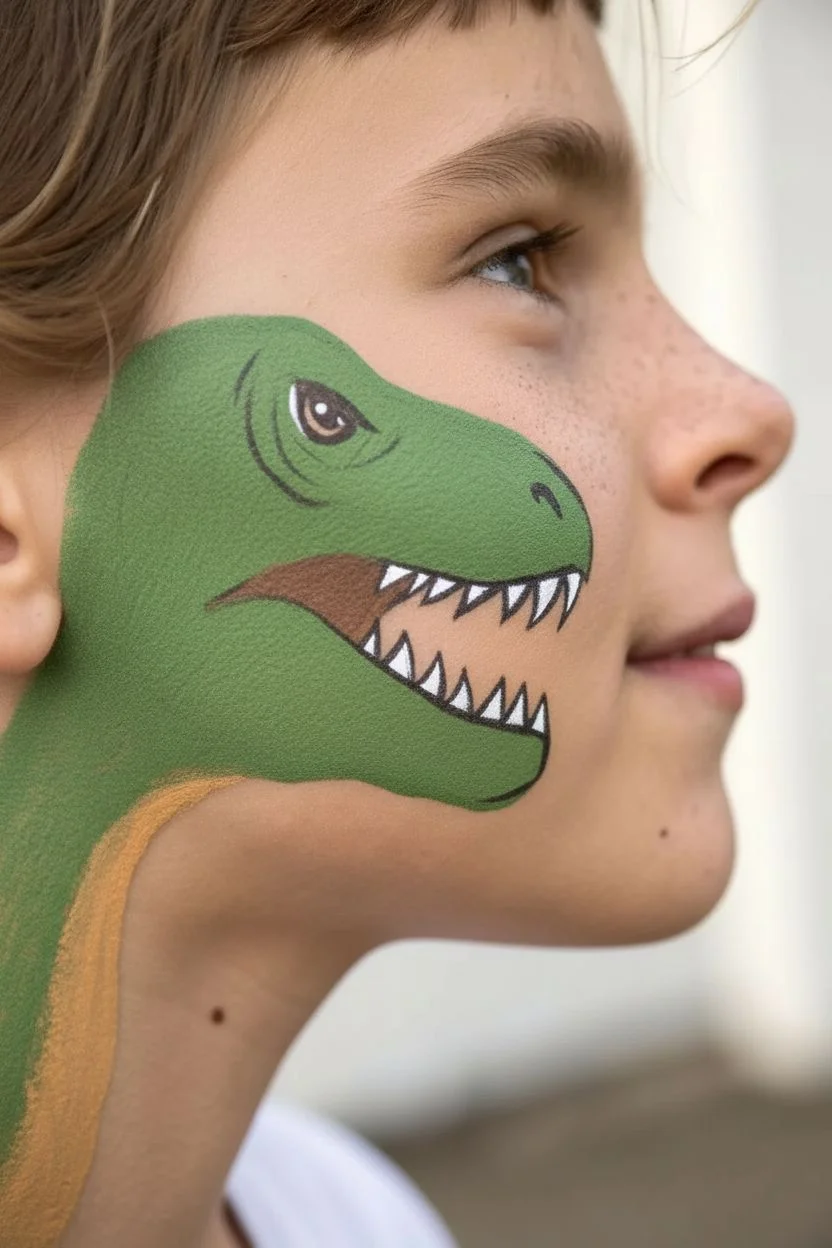
Transform a cheek into a prehistoric scene with this cool dinosaur profile that extends down the neck. It combines a classic reptile green with sharp teeth and unique geometric white accents for a tribal touch.
How-To Guide
Materials
- Face paint (grass green, ochre or light brown, white, black)
- High-density face paint sponge
- Round brush (size 4)
- Fine liner brush (size 1 or 0)
- Cup of water
- Wet wipes for cleanup
Step 1: Laying the Foundation
-
Load the sponge:
Dampen your sponge slightly and load it with a generous amount of grass green face paint. -
Shape the head:
Dab the sponge onto the cheek to form a rounded rectangular shape for the dinosaur’s head, positioning the snout towards the mouth. -
Extend the neck:
Continue sponging the green paint down the side of the jawline and onto the neck to create the dinosaur’s throat. -
Add the underbelly:
Switch to a round brush loaded with ochre or light brown paint. -
Paint the throat patch:
Paint a curved strip along the bottom edge of the green neck section to represent the lighter underbelly scales. -
Let it set:
Allow these base colors to dry for about a minute so they finish matte.
Smudge Prevention
If your black outlines are bleeding into the green, your base layer is still too wet. Wait until the green loses its shine before applying the black lines.
Step 2: Teeth and Tribal Accents
-
Prepare white paint:
Clean your round brush thoroughly and load it with bright white paint, ensuring a creamy consistency. -
Create the eye:
Paint a small, almond-shaped white spot on the upper back part of the green head for the eye. -
Paint the teeth:
On the snout area, paint a zigzag line to form sharp, triangular teeth, leaving a gap in the green for the mouth opening. -
Start the geometric pattern:
Moving to the child’s forehead skin above the dinosaur, paint a row of small white triangles pointing upward. -
Extend the pattern:
Continue painting a second row of slightly larger white triangles above the first row, moving toward the hairline. -
Add decorative dots:
I like to add a few small white dots trailing behind the dinosaur’s jaw to balance the design.
Step 3: Defining the Beast
-
Load the liner:
Switch to your fine liner brush and load it with black paint. Roll the tip to get a sharp point. -
Outline the head:
Carefully outline the top of the green head and the snout with a thin, continuous black line. -
Define the mouth:
Outline the white teeth, using the black to create the separation between the upper and lower jaw. -
Detail the eye and nose:
Paint a small black pupil inside the white eye and add a comma shape near the snout tip for a nostril. -
Outline the neck:
Outline the green neck section and the brown underbelly patch. -
Add scale texture:
Draw crisscross diamond patterns over the brown underbelly area to create a heavy scale texture. -
Final skin interaction:
Add a few curved “C” shaped lines inside the green area to look like wrinkles and skin folds.
Level Up: Texture
Before outlining, hold a mesh stencil (or fishnet stocking piece) over the green paint and sponge on a darker green to create instant, realistic reptile scales.
Now you have a ferocious pint-sized predator ready to roam the party
Glittery Princess Tiara
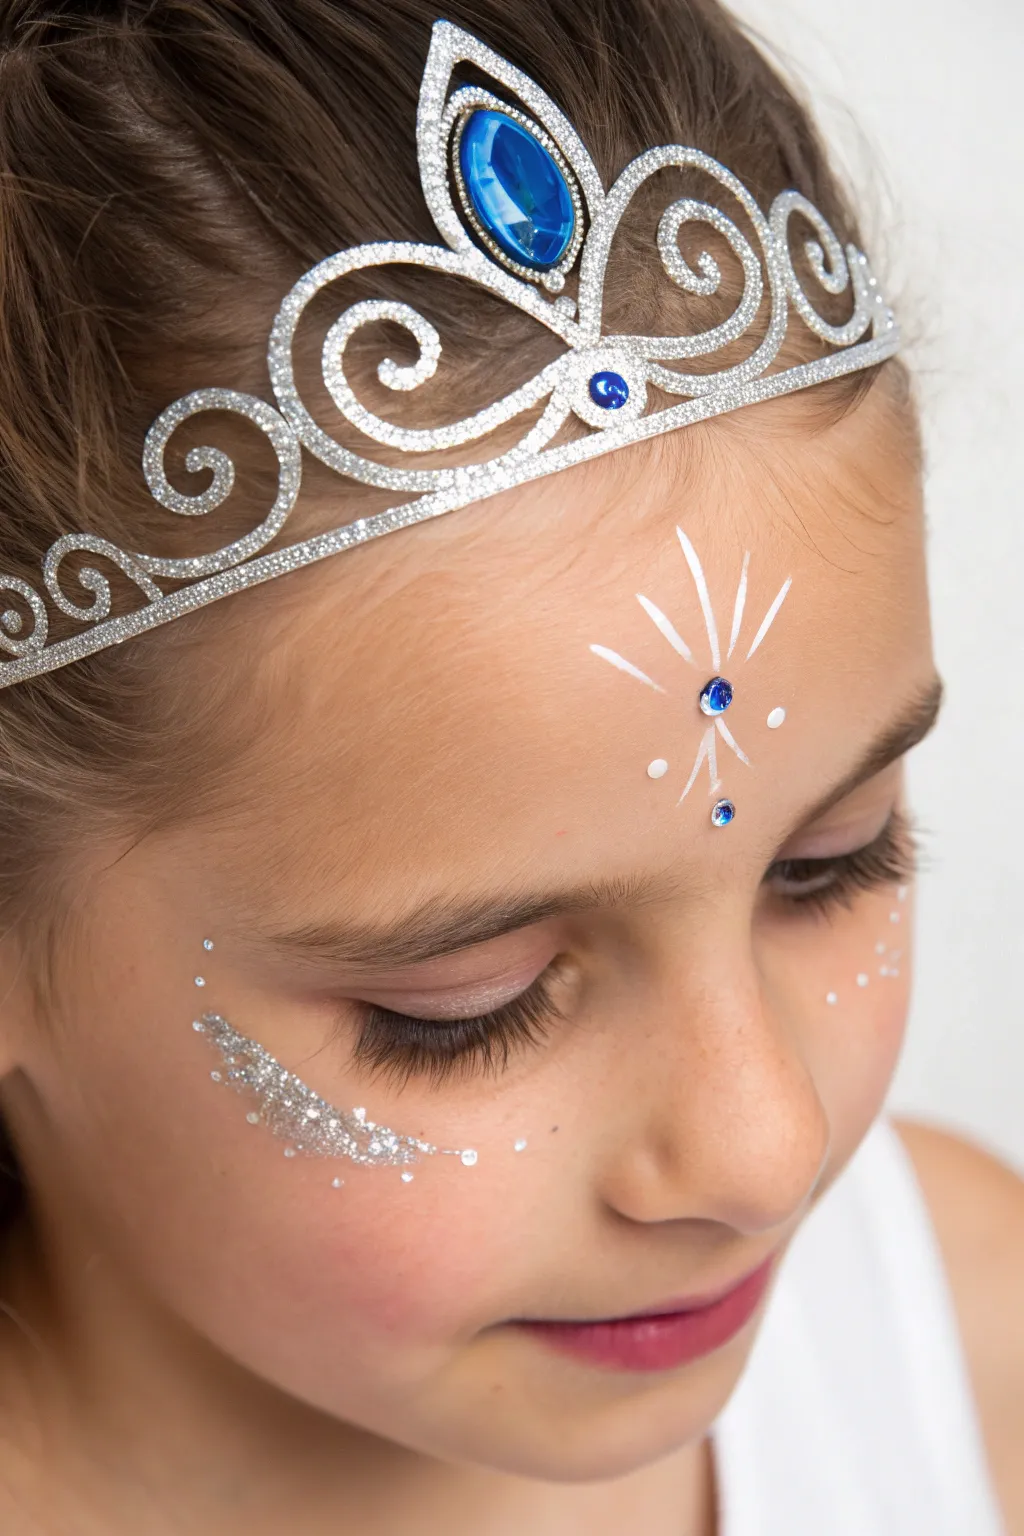
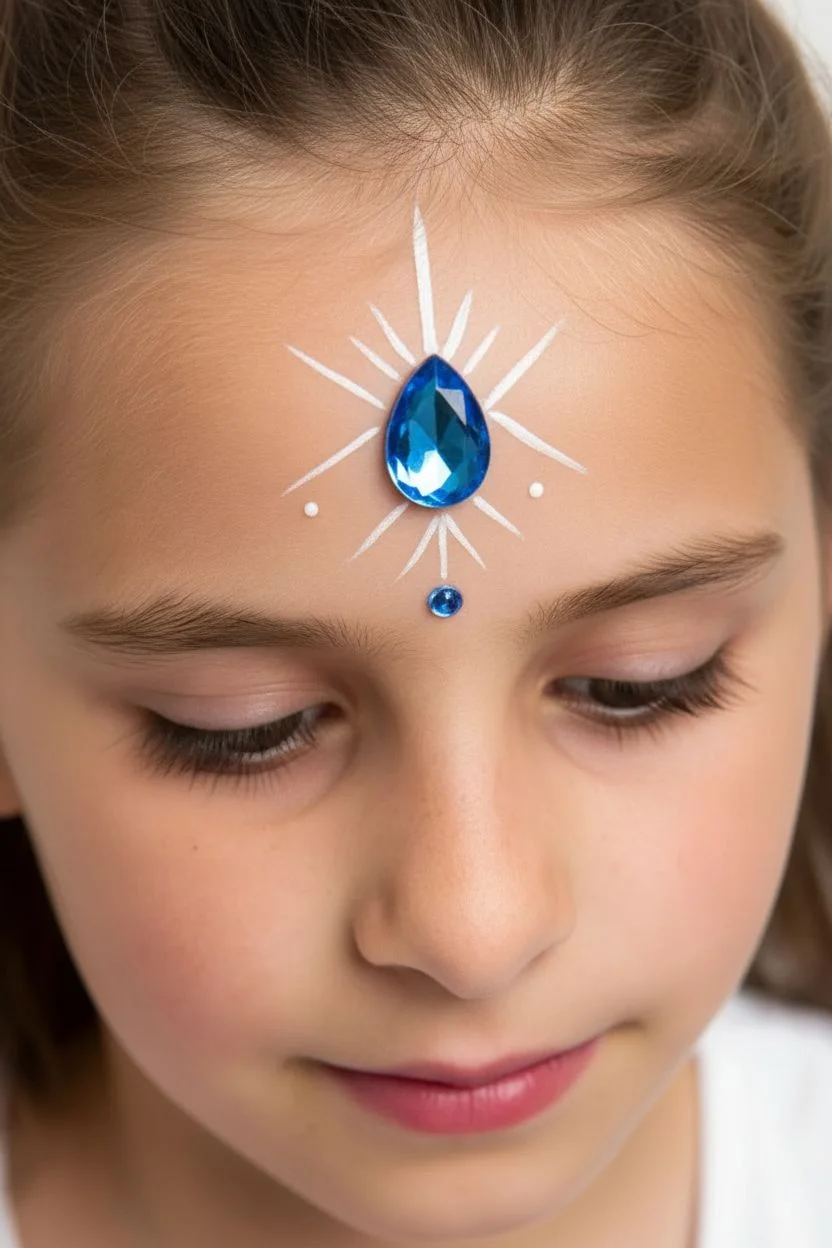
Transform into royalty with this delicate, jeweled face paint design that complements a silver tiara perfectly. This look combines elegant linework with cosmetic gems and glitter for a magical, frozen style suitable for any costume party.
Step-by-Step Guide
Materials
- White face paint
- Fine round brush (size 1 or 2)
- Skin-safe cosmetic adhesive (spirit gum or eyelash glue)
- Large blue flat-back rhinestone
- Small blue flat-back rhinestone
- Cosmetic silver glitter (chunky and fine mix)
- Glitter gel or aloe vera gel
- Silver toy tiara
Step 1: The Centerpiece
-
Prep the canvas:
Start with a clean, dry face to ensure the adhesive and paint stick properly throughout the day. -
Position the main gem:
Apply a small dot of skin-safe adhesive to the back of the large blue rhinestone. -
Place the jewel:
Press the gem firmly onto the center of the forehead, just slightly above the eyebrow line. -
Load your brush:
Dip your fine round brush into water and work it into the white face paint until you have a creamy consistency. -
Paint the central ray:
Starting near the top of the blue gem, paint a single straight line flicking upward toward the hairline. -
Add side rays:
Paint two shorter diagonal lines on each side of the central ray, radiating outward like a sunburst. -
Create the tail:
Paint two thin, curved lines extending downward from the bottom of the main gem, creating a small inverted point. -
Add the accent gem:
Using a tiny dab of glue, attach the smaller blue rhinestone at the very tip of the bottom painted lines. -
Dot details:
Add two small white dots on either side of the lower paint strokes to balance the design.
Stay Stickier
If using spirit gum for the gems, wait 30 seconds for it to become tacky before pressing the jewel onto the skin for a secure hold.
Step 2: Glitter & Glow
-
Prep the cheeks:
Dab a small amount of glitter gel or aloe vera gel onto the high points of the cheekbones. -
Apply silver glitter:
Gently pat cosmetic silver glitter over the gel using your finger or a sponge applicator. -
Feather the edges:
I like to tap lightly around the edges of the glitter patch so it fades naturally into the skin rather than having a harsh line. -
Add cheek highlights:
Clean your round brush and reload it with fresh white paint. -
Paint tiny stars:
Add a few tiny white dots or micro-stars near the outer corners of the eyes, mingling with the glitter. -
Check symmetry:
Step back and ensure the forehead design looks balanced, adding a touch more white paint to the stroke tips if needed. -
Crown the princess:
Carefully place the silver tiara on the head, positioning it so the painted design sits just below the crown’s center point.
Winter Magic
Swap the plain white paint for a metallic pearlescent blue to give the design an extra frosty, ice-queen shimmer.
Your dazzling royal look is complete and ready to sparkle at the ball
Sweet Birthday Cupcake
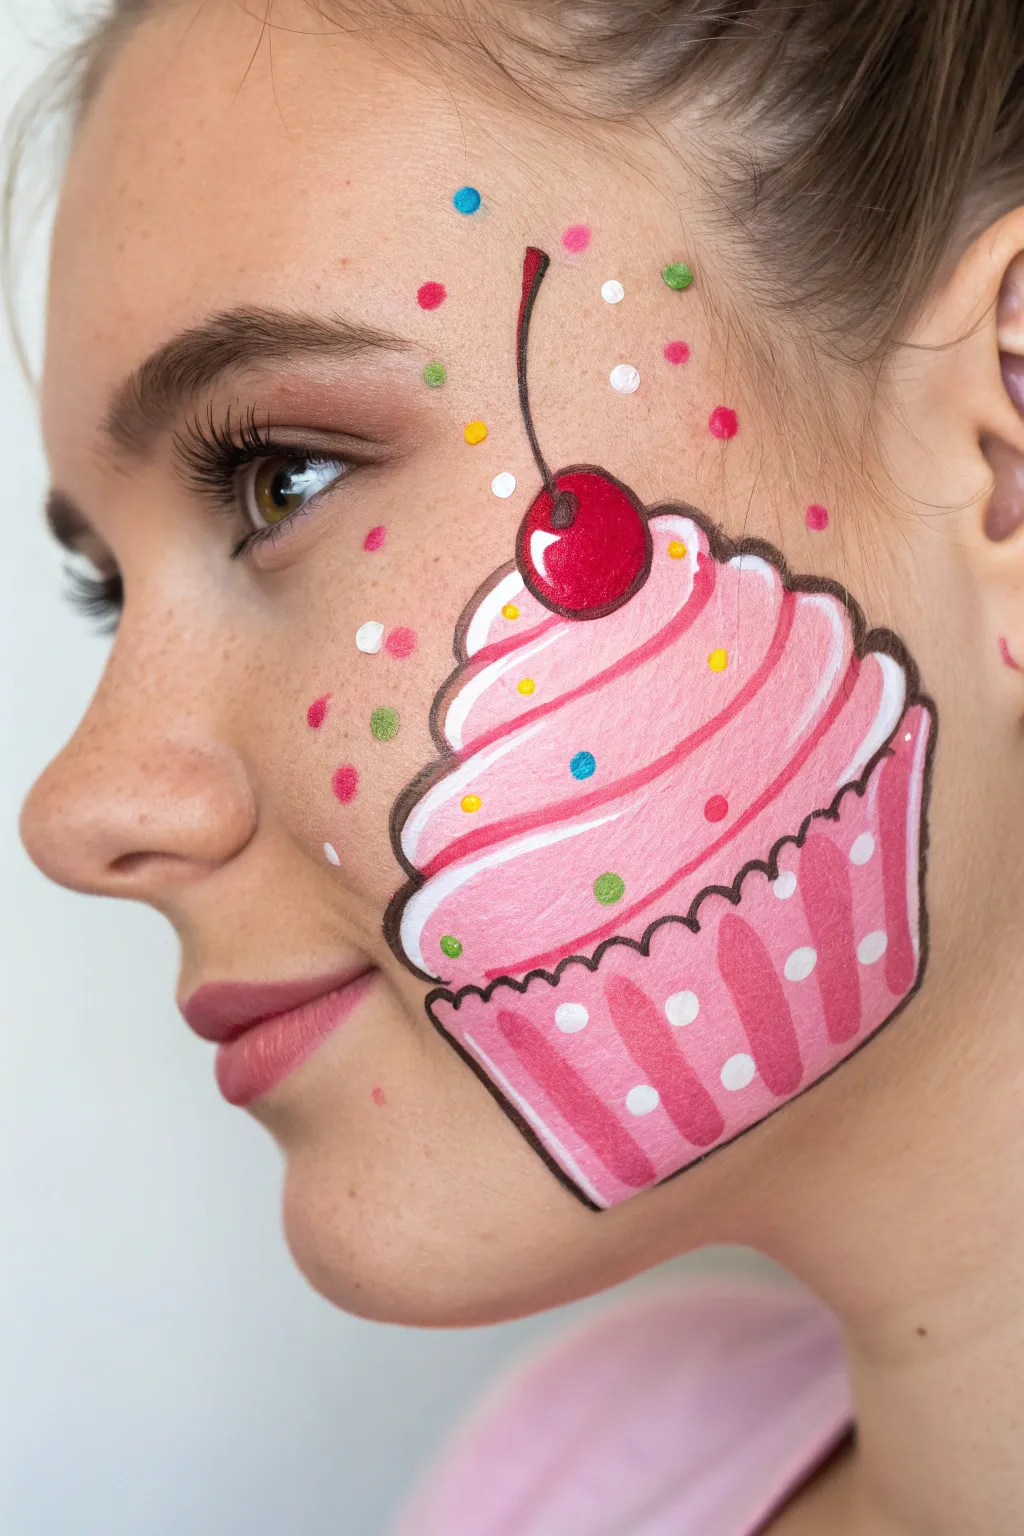
Transform a cheek into a sugary masterpiece with this delightful pink cupcake design perfect for birthday celebrations. Featuring swirling frosting, a striped liner, and a classic cherry on top, it creates a cheerful and festive look.
How-To Guide
Materials
- High-quality face paint palette (Light pink, hot pink, red, white, black, yellow, teal, lime green)
- Medium round brush (size 4 or 6)
- Fine liner brush (size 1)
- Cup of water
- Spray bottle (optional for activating paints)
Step 1: Baking the Base
-
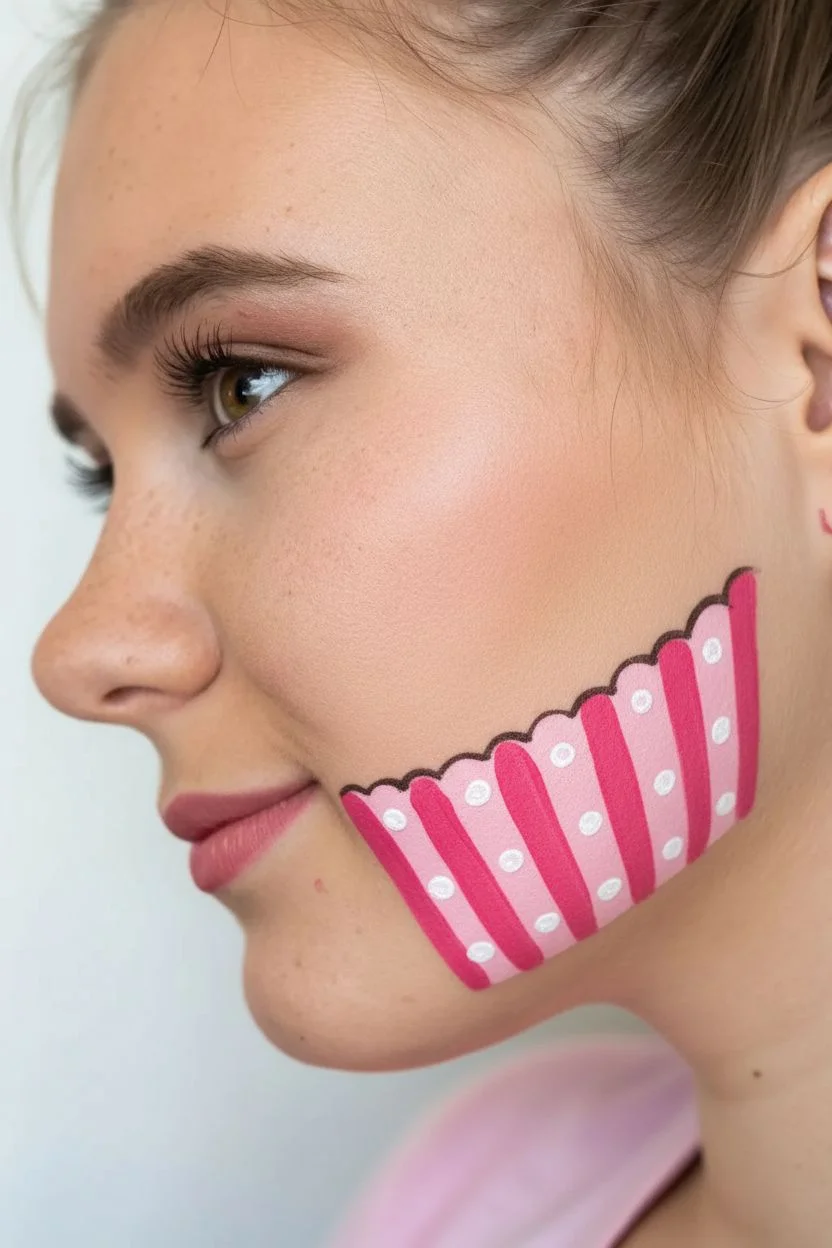
Create the liner shape:
Visualize the placement on the apple of the cheek. Using your medium round brush and light pink paint, draw a trapezoid shape slightly wider at the top to form the cupcake liner. -
Fill the liner:
Fill in the trapezoid completely with the light pink paint, ensuring solid, opaque coverage. -
Paint the stripes:
Switch to hot pink paint on a smaller round brush. Paint vertical stripes over the light pink base. Curve the outer stripes slightly inward to give the cup a rounded, 3D appearance. -
Add polka dots:
Once the pink stripes are dry, use the handle of your brush or a small detail brush to stamp clean white dots down the center of each hot pink stripe.
Step 2: Frosting and Cherry
-
First frosting layer:
Reload your brush with light pink. Paint a wide, scalloped shape directly on top of the liner, slightly overhanging the edges. -
Build the swirl:
Paint a second, slightly smaller layer of pink frosting above the first one, curving it like a soft serve swirl. -
Top off the swirl:
Add a small final dollop of pink at the very top to complete the frosting mound. -
Highlight the frosting:
Using white paint and a thin brush, paint curved lines between the pink layers to separate the swirls and add volume. -
Place the cherry:
Dip your round brush into bright red paint. Paint a perfect circle resting on top of the frosting swirl. -
Cherry reflection:
Add a small, curved white comma shape on the upper side of the cherry to make it look shiny and round.
Inky Lines Tip
For crisp outlines, ensure your black paint is the texture of ink—not too thick, not too watery. Roll your liner brush into a sharp point on the palette before touching the skin.
Step 3: Outlines and Confetti
-
Outline the wrapper:
Load a fine liner brush with black paint until it has an inky consistency. Carefully outline the cupcake liner, including the bottom and sides. -
Scallop the edge:
continue the black outline across the top of the liner where it meets the frosting, using small bumps to create a scalloped paper effect. -
Define the frosting:
Outline the outer edges of the pink frosting swirls. Keep your hand steady to maintain a smooth line weight. -
Outline the cherry:
Draw a thin black outline around the red cherry circle. -
Draw the stem:
Starting from the center of the cherry, pull a long, curved black line upward onto the temple to act as the stem. -
Paint frosting sprinkles:
Using various colors like yellow, teal, and lime green, dab small dots onto the pink frosting area. -
Add floating confetti:
I like to extend the party vibes by painting extra multicolor dots floating around the cupcake, moving up towards the eyebrow. -
Final white touches:
Add a few tiny white dots among the floating confetti for extra sparkle and balance.
Glitter Upgrade
Apply a safe cosmetic glitter gel over the cherry or the frosting while the paint is still slightly damp to make the design sparkle beautifully in the light.
Now you have a sweet treat that looks good enough to eat—enjoy showing off your artwork.
Pirate Eye Patch and Stubble
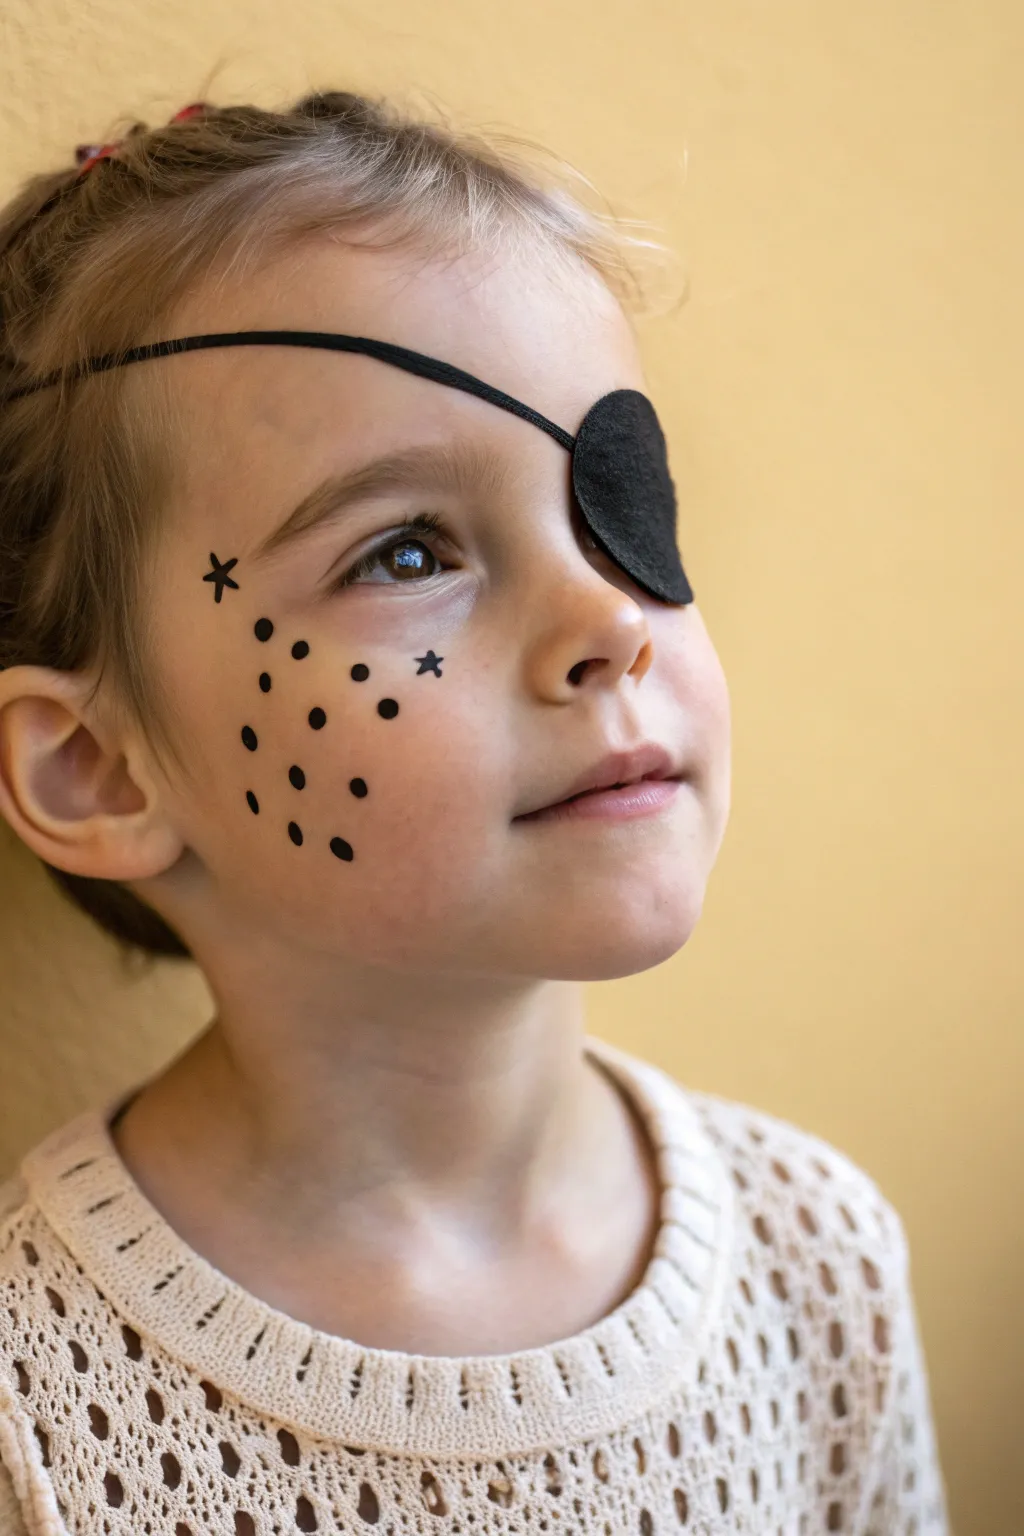
This whimsical take on a pirate look combines a classic eye patch with stylized, celestial cheek art. Instead of rough, messy stubble, we use crisp black stars and scattered dots for a cleaner, playful design that is perfect for young buccaneers.
Step-by-Step
Materials
- Black face paint (water-activated)
- Round brush (size 1 or 2)
- Small cup of water
- Paper towel
- Black felt eye patch with elastic band
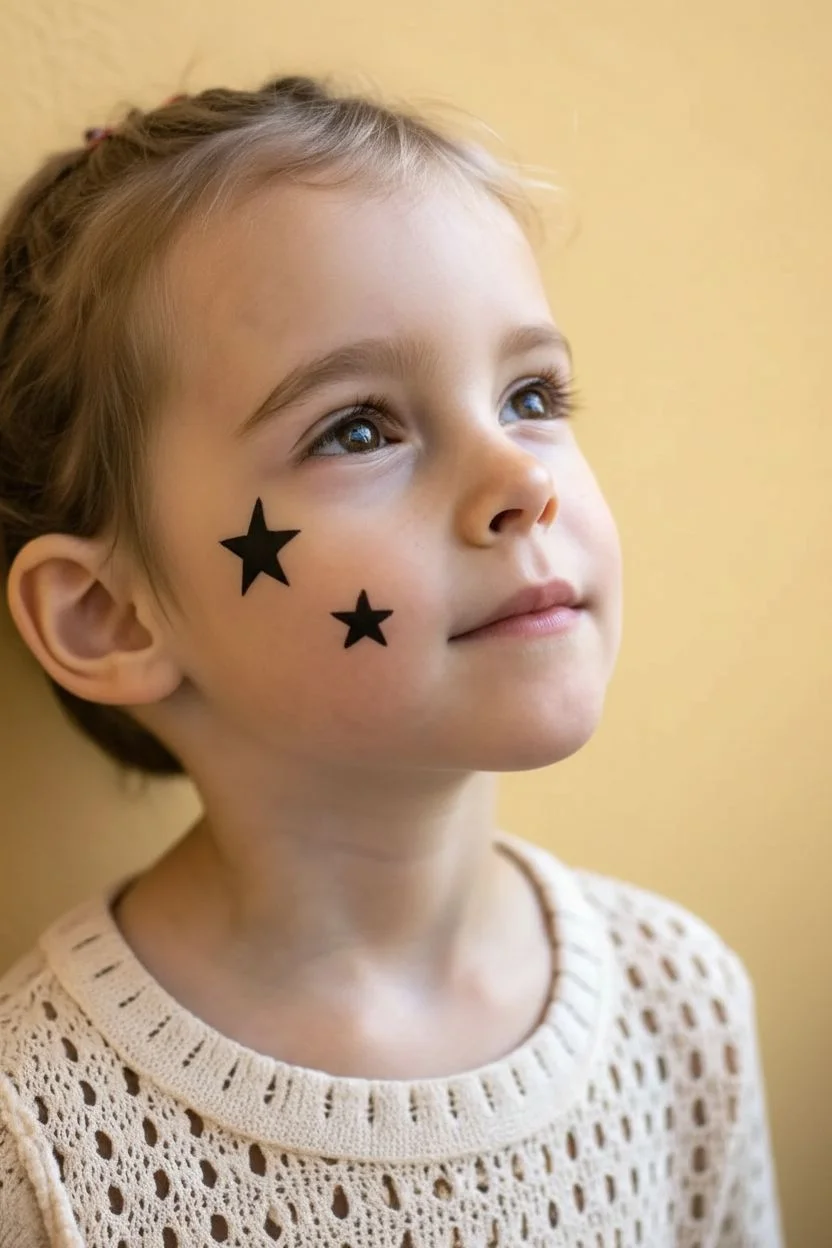
Step 1: Painting the Stars
-
Prepare your paint:
Dip your round brush into the water and swirl it into the black face paint until you have a creamy, ink-like consistency that doesn’t drip. -
Position the first star:
Visualize the placement for the first star high on the cheekbone, slightly towards the outer corner of the right eye. -
Outline the top point:
Using the very tip of your brush, draw a small inverted ‘V’ shape to create the top point of your five-pointed star. -
Add the side arms:
Extend lines outward from the base of your ‘V’ to create the two horizontal arms of the star. -
Connect the bottom:
Draw the two diagonal bottom legs, bringing them together to close the shape. -
Fill it in:
Gently fill in the center of the outline with black paint, being careful to keep the points sharp. -
Create the second star:
Locate a spot slightly lower and more central on the cheek for the second star. Repeat the outlining and filling process, perhaps making this one slightly smaller for variety.
Anchor Your Hand
To get steady stars and round dots, rest your pinky finger gently on the child’s chin or cheekbone while you paint. This acts as a stabilizer for shake-free lines.
Step 2: Adding the Stylized Stubble
-
Reload the brush:
Give your brush a fresh swirl in the paint to ensure your next marks are dark and opaque. -
Test the consistency:
I like to dab a quick dot on my hand or a paper towel to ensure the paint isn’t too watery, which keeps the dots perfectly round. -
Start near the ear:
Begin placing your dots near the hairline or tragus of the ear to anchor the pattern. -
Master the dot technique:
Press the tip of the round brush straight down onto the skin and lift it directly up to create a clean circle. -
Scatter the middle dots:
Add dots moving inward toward the nose, arranging them in the space between and around your painted stars. -
Vary the spacing:
Place the dots randomly rather than in a stiff grid; some should be closer together, others further apart. -
Extend the pattern down:
Continue adding a few dots lower down the cheek towards the jawline to simulate the spread of freckles or stubble. -
Check the balance:
Step back and look at the whole cheek. Add one or two final dots to fill any large empty spaces, aiming for about 12-15 dots total.
Step 3: Applying the Accessory
-
Prepare the patch:
Take your black felt eye patch and gently stretch the elastic band to check its tension. -
Position the patch:
Place the patch over the child’s left eye (the side without the paint), angling it so the strap goes diagonally up over the forehead. -
Secure the strap:
Slide the elastic band over the head, resting it comfortably above the right ear so it doesn’t slide down. -
Final adjustment:
Ensure the patch isn’t pressing uncomfortably on the eyelashes and that the diagonal angle complements the artwork on the other cheek.
Make It Sparkle
For a magical twist, apply a tiny dab of cosmetic glitter gel to the center of each black star once the paint is fully dry to catch the light.
Now you have a dashing, modern pirate ready to set sail for adventure!
Mermaid Scale Texture
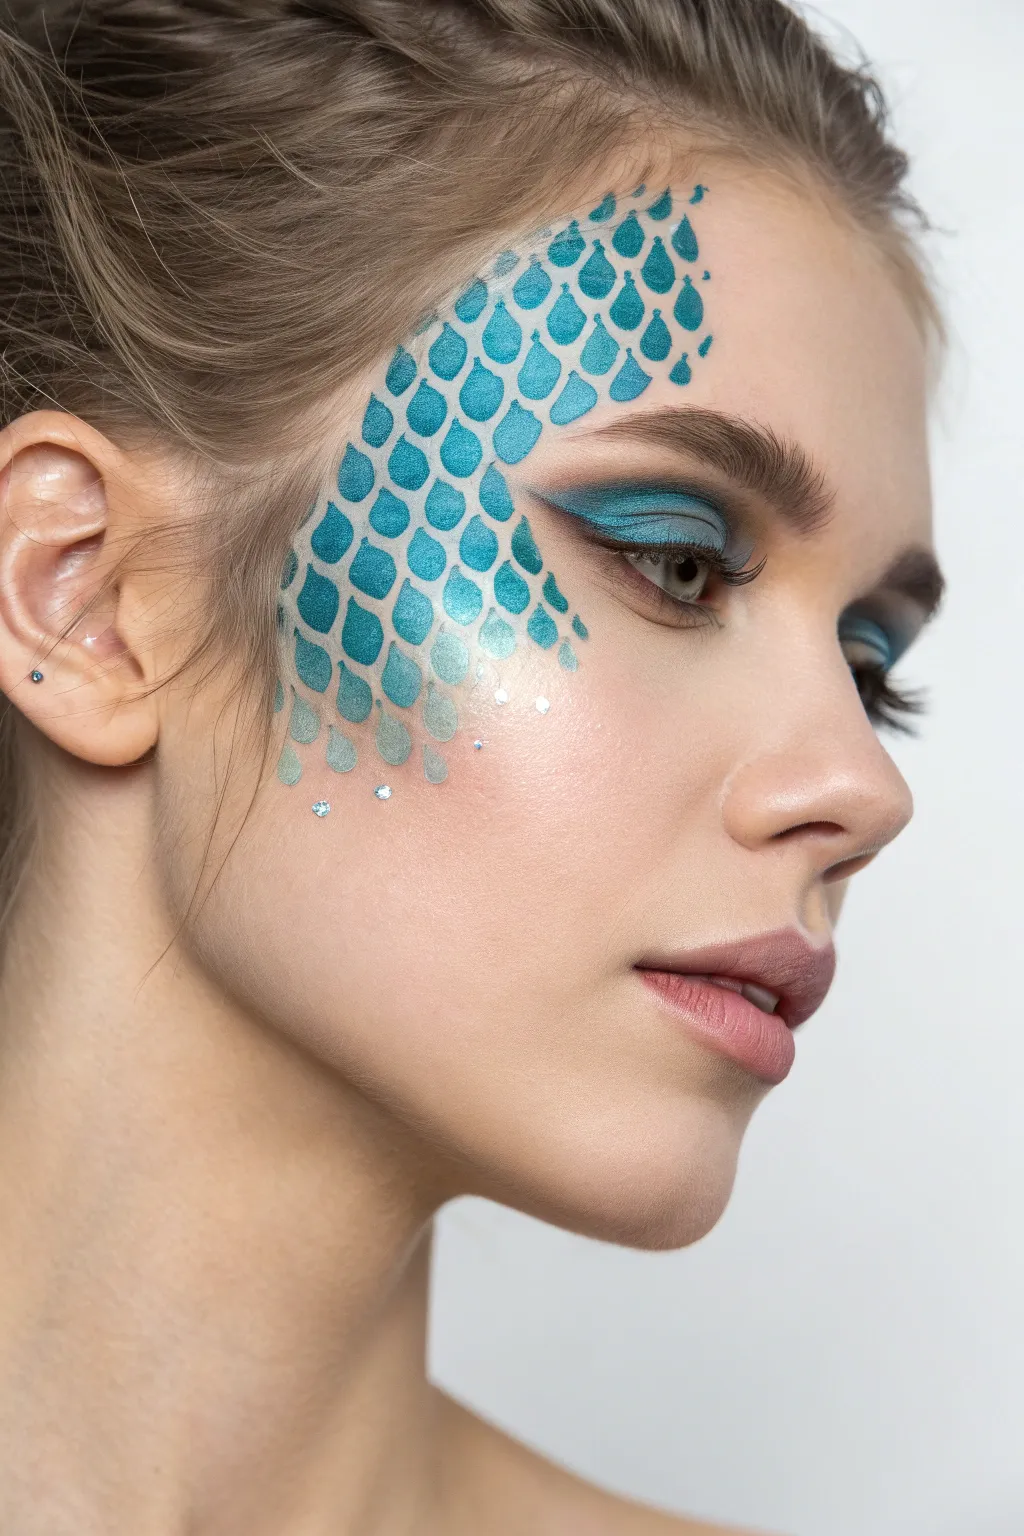
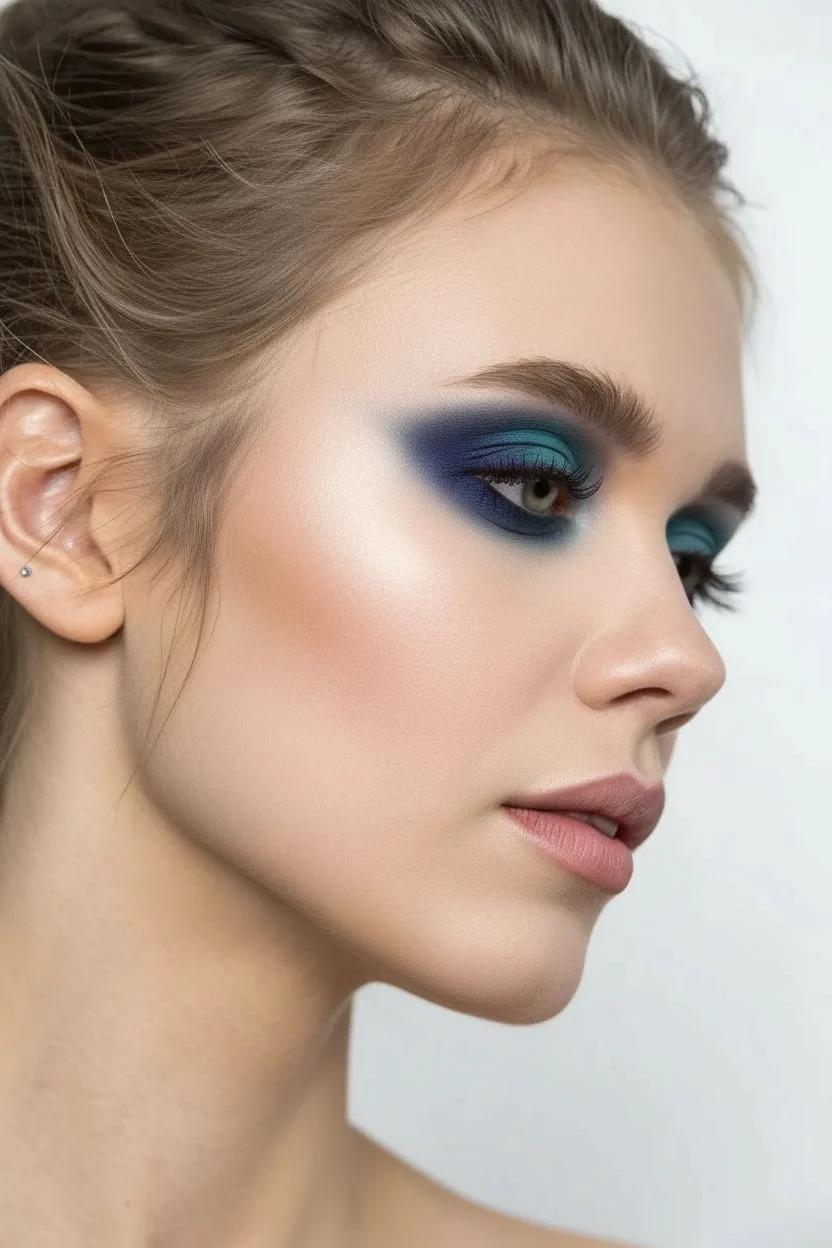
Achieve an ethereal underwater look using a clever stenciling technique that creates perfect, gradient scales every time. This design pairs dramatic teal eyes with metallic textures for a costume-ready style that looks far more complex than it actually is.
How-To Guide
Materials
- Metallic teal face paint
- Pearly white or silver face paint
- High-density makeup sponge (cut in half)
- Mermaid scale stencil (positive pattern with teardrop holes)
- Matte teal eyeshadow
- Navy blue eyeshadow
- Fluffy blending brush
- Black mascara
- Small rhinestones/gems
- Eyelash glue
Step 1: Ocean Eyes Base
-
Prep the canvas:
Start with clean, moisturized skin and apply your preferred foundation or concealer to create an even base. -
Define the brows:
Brush your eyebrows upward and fill them in lightly with a natural tone to frame the eye area. -
Apply teal shadow:
Load a fluffy brush with matte teal eyeshadow and sweep it generously into the crease of your eyelid. -
Deepen the look:
Using a smaller brush, press navy blue shadow into the outer corner of the eye to add dimension. -
Blend outward:
Blend the eyeshadow upward and outward toward the temple; this creates a seamless transition where the scales will eventually sit. -
Lash definition:
Apply two coats of black mascara to both the upper and lower lashes to open up the eyes.
Sponge Safety
Squeeze your sponge thoroughly before loading paint. If it is too wet, the water will bleed underneath the stencil plastic and ruin the sharp outlines of your scales.
Step 2: Stenciling the Scales
-
Activate the paint:
Mist your high-density sponge lightly with water until it is damp but not dripping. -
Load the gradients:
Rub one end of the sponge into the metallic teal paint and the other end into the pearly white paint. -
Position the stencil:
Place your scale stencil firmly against the temple, angling it where you want the main cluster of scales to be. -
Apply the pattern:
Dab the loaded sponge over the stencil using a straight up-and-down motion. -
Watch the placement:
Ensure the teal side of the sponge hits the top (hairline side) of the scales and the white hits the bottom tips for a 3D effect. -
Lift and reveal:
Carefully lift the stencil straight off the skin to avoid smudging the crisp edges of the teardrops. -
Extend the design:
Clean the back of the stencil quickly, re-align it slightly higher on the forehead, and repeat the dabbing process. -
Fade the edges:
I like to use much lighter pressure on the sponge as I move down the cheekbone to make the scales look translucent. -
Add scattered scales:
Use the corner of the stencil to add just one or two isolated scales at the very bottom of the design for a dispersing effect.
Step 3: Finishing Details
-
Let it set:
Allow the face paint to dry completely for about 60 seconds. -
Prepare the gems:
Dot a tiny amount of eyelash glue onto the back of three or four small rhinestones. -
Apply highlights:
Place the gems below the scale pattern on the cheekbone to mimic water droplets catching the light. -
Balance the lips:
Finish with a soft, neutral pink lipstick or gloss to ensure the focus remains on the eyes and temple.
Glimmer Upgrade
While the paint is still slightly tacky on the skin, softly pat a sheer iridescent loose glitter over the scales to make them sparkle like real fish scales.
You now have a mesmerizing aquatic look perfect for festivals or parties, achieved with just a simple sponge technique.
Friendly Winter Snowman
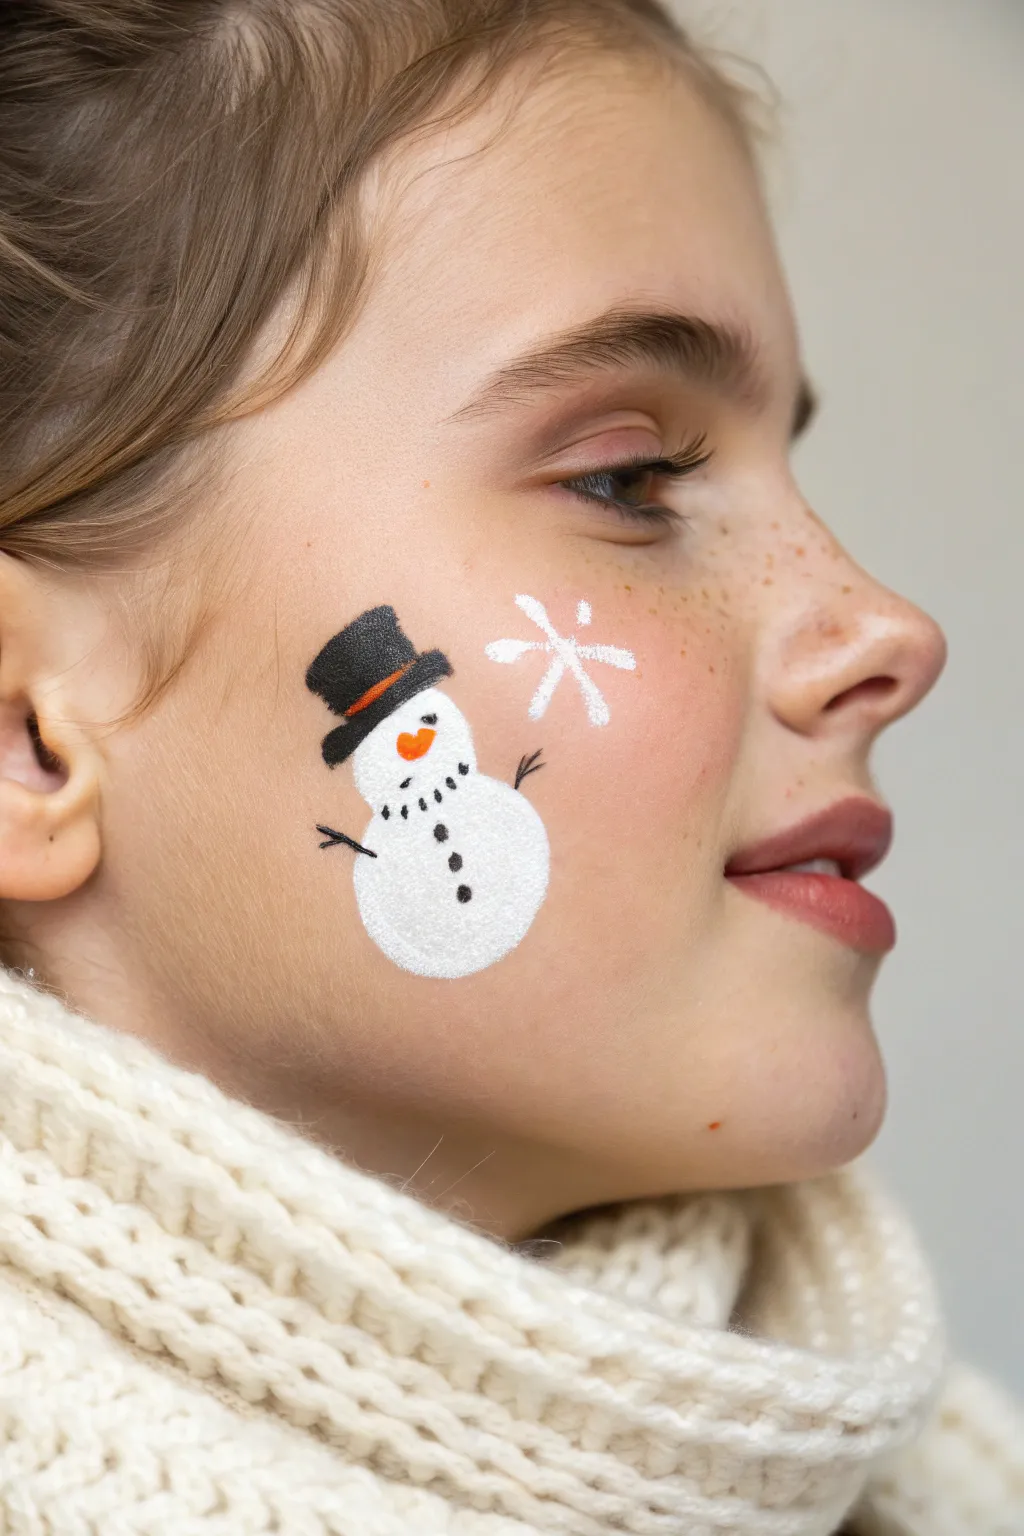
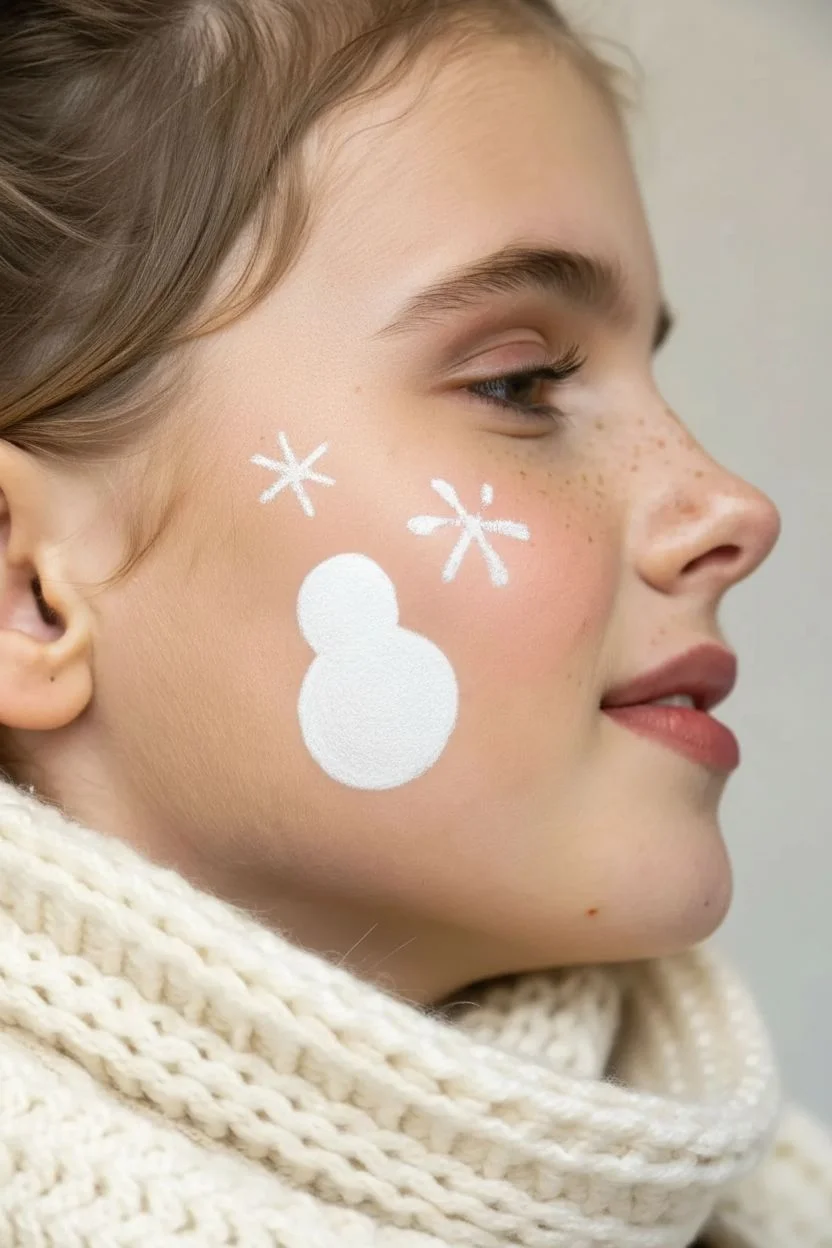
Capture the magic of a snow day with this sweet and simple face painting design featuring a cheerful snowman and a crisp snowflake. It fits perfectly on the cheek and uses minimal colors, making it ideal for quick holiday looks.
Step-by-Step
Materials
- Water-activated face paint (White, Black, Bright Orange)
- Medium round brush (size 4)
- Fine liner brush (size 1)
- Cup of water for rinsing
- Cosmetic glitter (optional)
Step 1: Snowy Shapes
-
Activate white paint:
Dip your medium round brush into water and swirl it into the white face paint until you get a creamy, opaque consistency. -
Paint the body:
On the apple of the cheek, paint a solid white circle to form the base of the snowman. -
Add the head:
Paint a slightly smaller circle directly on top of the body, merging them slightly where they touch. -
Smooth the texture:
Go over the white circles gently to ensure the coverage is solid and smooth without visible brushstrokes. -
Position the snowflake:
Move your brush up towards the temple area, near the outer corner of the eye. -
Snowflake strokes:
Using the tip of the brush, paint a simple cross, then add diagonal intersecting lines to form a star-shaped snowflake.
Clear Colors
If your white looks streaky or transparent, let the first layer dry completely before gently dabbing on a second coat.
Step 2: Hat and Carrot
-
Paint the brim:
Switch to a fine liner brush loaded with black paint and draw a small rectangular line on top of the snowman’s head, slightly tilted. -
Top the hat:
Draw a square block sitting on the brim to finish the shape of the top hat. -
Prepare orange:
Rinse your brush thoroughly and load it with bright orange paint. -
Add the nose:
In the center of the face circle, paint a small, horizontal teardrop or triangle shape for the carrot nose. -
Decorate the hat:
Carefully paint a thin orange line across the black hat, just above the brim, to create a decorative ribbon.
Step 3: Bringing It to Life
-
Load black liner:
Clean your brush and reload it with black paint, ensuring the consistency is inky for sharp lines. -
Dot the eyes:
Place two tiny dots above the carrot nose for the snowman’s see-through eyes. -
Create a smile:
Paint a curved row of tiny dots below the nose to form a traditional coal smile. -
Add buttons:
I like to place three distinct dots vertically down the center of the body circle for buttons. -
Draw arms:
Using the very tip of the liner brush, draw thin lines extending outward from both sides of the body for stick arms. -
Add fingers:
Paint tiny ticks at the ends of the stick arms to represent twigs or fingers. -
Final check:
Let the design dry for a moment, checking for any spots that might need a tiny touch-up.
Sparkle Up
Press cosmetic-grade iridescent glitter onto the wet white paint before it dries for a frosty, magical finish.
Now you have a festive winter friend ready to celebrate the season
Slithering Green Snake
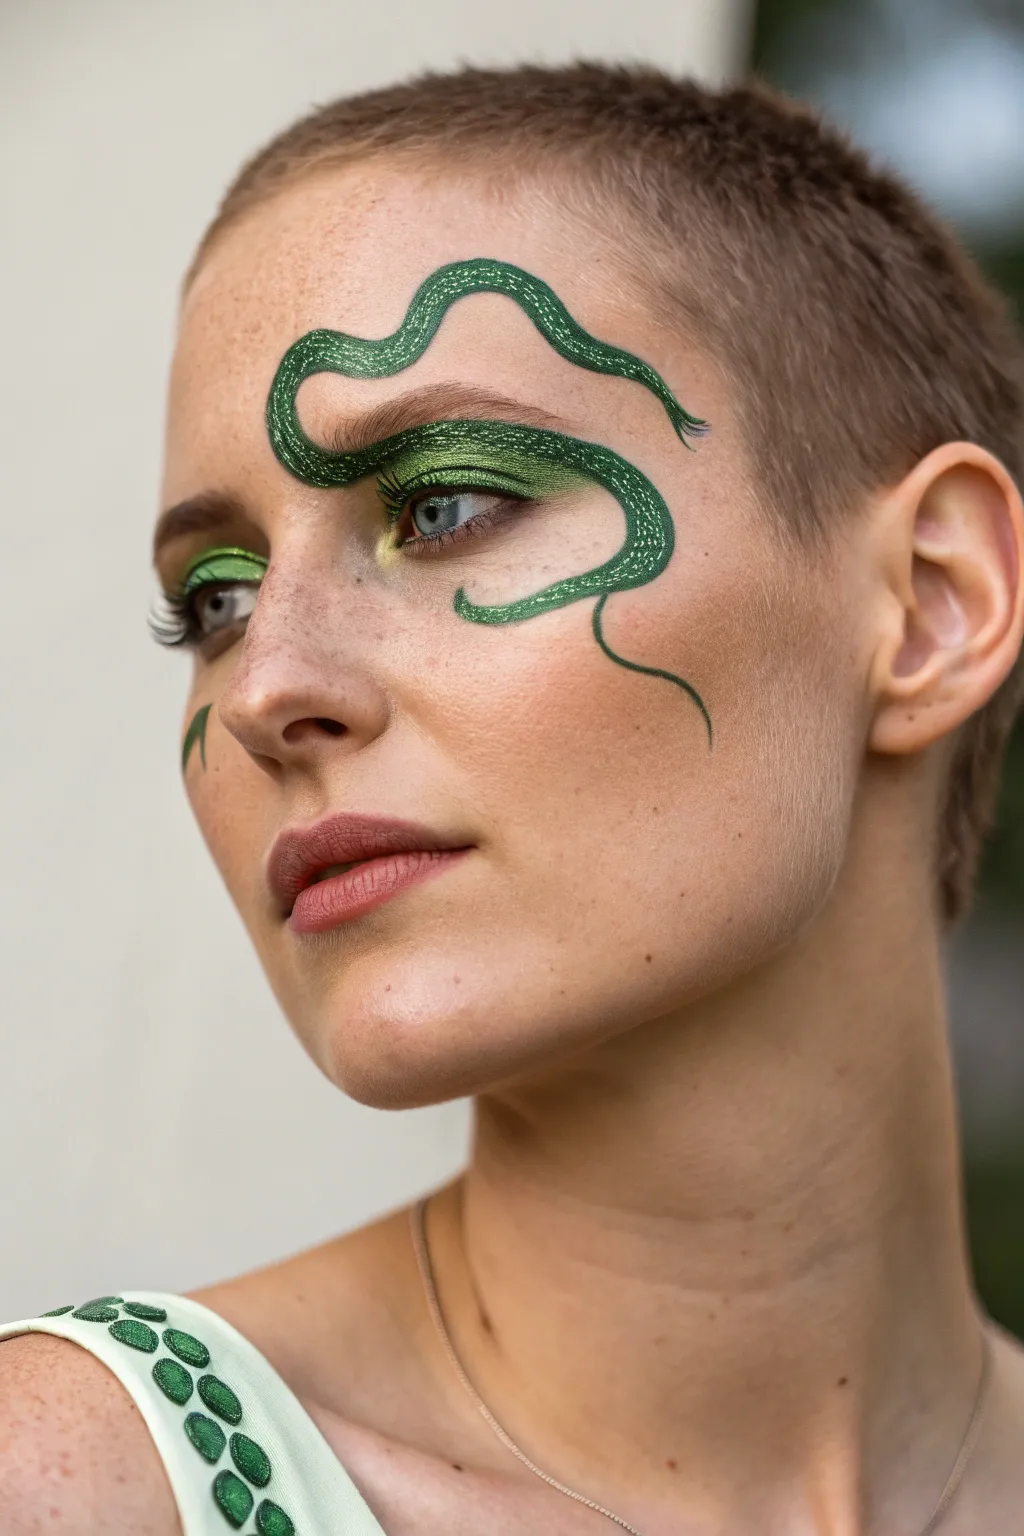
Transform your look with this elegant, high-fashion snake design that curves artistically around the eye. Combining metallic sheen with intricate linework creates a mesmerizing effect perfect for costume parties or festivals.
Detailed Instructions
Materials
- Water-activated face paint (dark green)
- Metallic green face paint or powder
- Fine liner brush (size 1)
- Small round brush
- Green eyeshadow (matte and shimmer)
- Gold or yellow eyeshadow
- Cosmetic glitter or glitter gel (green)
- Mascara
- Neutral rose lipstick
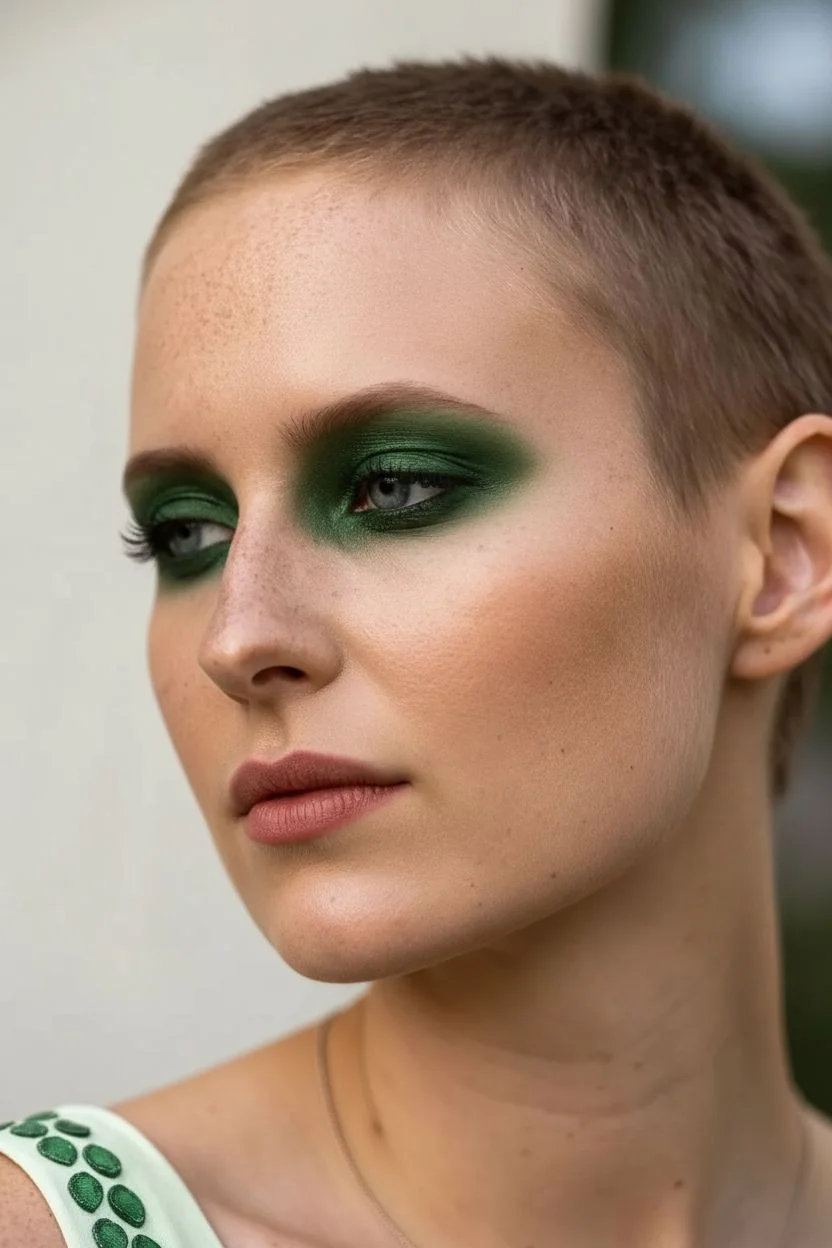
Step 1: Base & Eyeshadow
-
Prep the canvas:
Start with a clean, moisturized face. If you prefer a base, apply a sheer foundation or tinted moisturizer to keep skin looking natural and fresh. -
Apply base color:
Using a shadow brush, pack a matte forest green eyeshadow onto both eyelids, focusing on the mobile lid area. -
Blend the crease:
Soften the edges of the green shadow with a blending brush, pulling the color slightly upward towards the brow bone. -
Add dimension:
Pat a shimmery lighter green shadow onto the center of the eyelids to create a spotlight effect. -
Highlight corners:
Apply a touch of gold or bright yellow eyeshadow to the inner corners of the eyes to open them up.
Banish Shakey Lines
Struggling with smooth curves? Rest your pinky finger gently on your cheek to anchor your hand. This provides stability for precise linework.
Step 2: Painting the Serpent
-
Load the brush:
Activate your dark green face paint with a little water until it has an inky consistency. Load your fine liner brush. -
Start the curve:
Begin the design high on the forehead, slightly off-center. Draw a wavy line that dips down towards the bridge of the nose. -
Loop the brow:
Continue the line by curving it up and arching it over the natural eyebrow shape on the left side. -
Wrap the eye:
Bring the line down around the outer corner of the eye, hugging the socket shape closely. -
Under eye sweep:
Curve the line underneath the eye, moving inwards towards the nose. -
Create the tail:
Finish the shape by drawing a loose ‘S’ curve that trails down the cheek, tapering off into a fine point. -
Thicken the body:
Go back over your initial guide line, thickening it to create the width of the snake’s body. I like to keep the tail and starting point slightly thinner.
Step 3: Texture & Details
-
Fill with metallic:
Switch to a small round brush and fill the inside of the snake shape with metallic green paint. -
Add scale texture:
Before the paint fully dries, dab green cosmetic glitter or textured glitter gel along the center of the snake body for a sparkling, scaly effect. -
Define edges:
Use your fine liner brush and the dark green paint to re-outline the shape, ensuring the edges are crisp and stand out against the skin. -
Balance the face:
On the opposite cheek (the right side), paint a small, simple curved stroke or leaf shape to balance the heavier design.
Pro Tip: Liquid Gold
Mix metallic pigment with a mixing seal liquid instead of water. This creates a waterproof, molten metal finish that won’t crack when dry.
Step 4: Finishing Touches
-
Lash definition:
Apply two coats of black mascara to both top and bottom lashes to define the eyes against the green makeup. -
Lip color:
Finish the look with a neutral rose or nude lipstick, patting it in with a finger for a soft, stained finish. -
Set the look:
Lightly mist your face with a setting spray to ensure your artwork stays smudge-free all day.
Wear your serpentine creation with confidence and let your eyes mesmerize everyone you meet
Space and Galaxy Mask
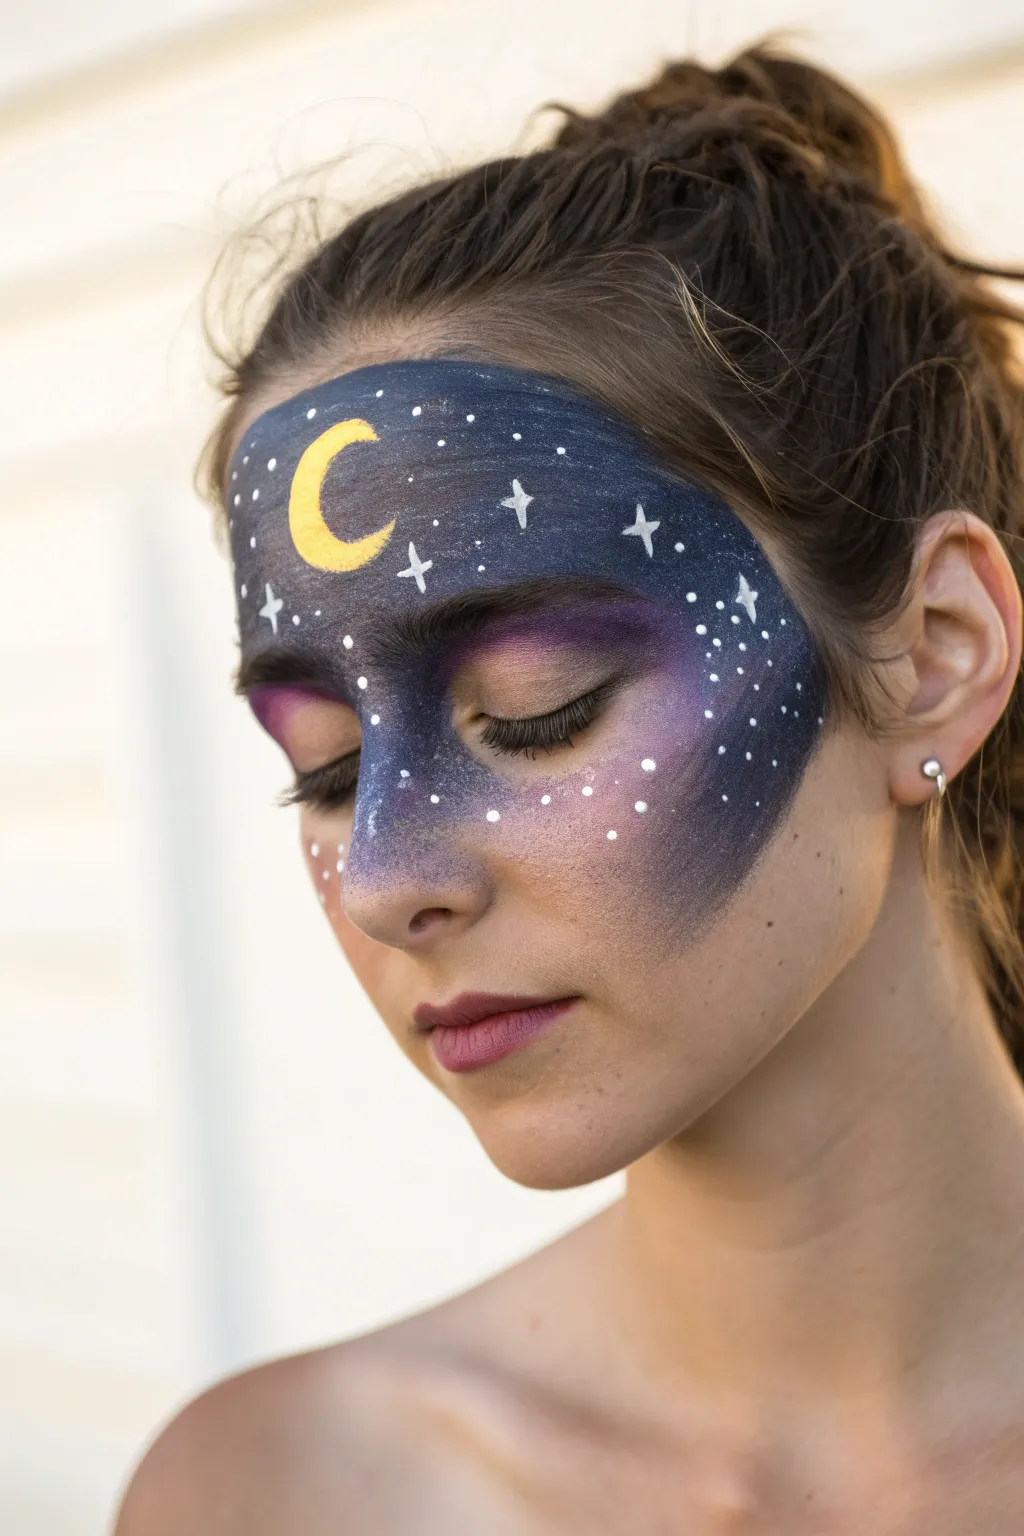
Transform your look into a celestial masterpiece with this enchanting galaxy mask design. Featuring deep cosmic blues, a glowing crescent moon, and a scattering of starlight, this face ‘mask’ is perfect for festivals or costume parties.
How-To Guide
Materials
- Dark blue face paint
- Purple face paint
- Bright yellow face paint
- Opaque white face paint
- High-density makeup sponges
- Thin round detail brush (size 1 or 2)
- Cup of water
- Spray bottle (optional)
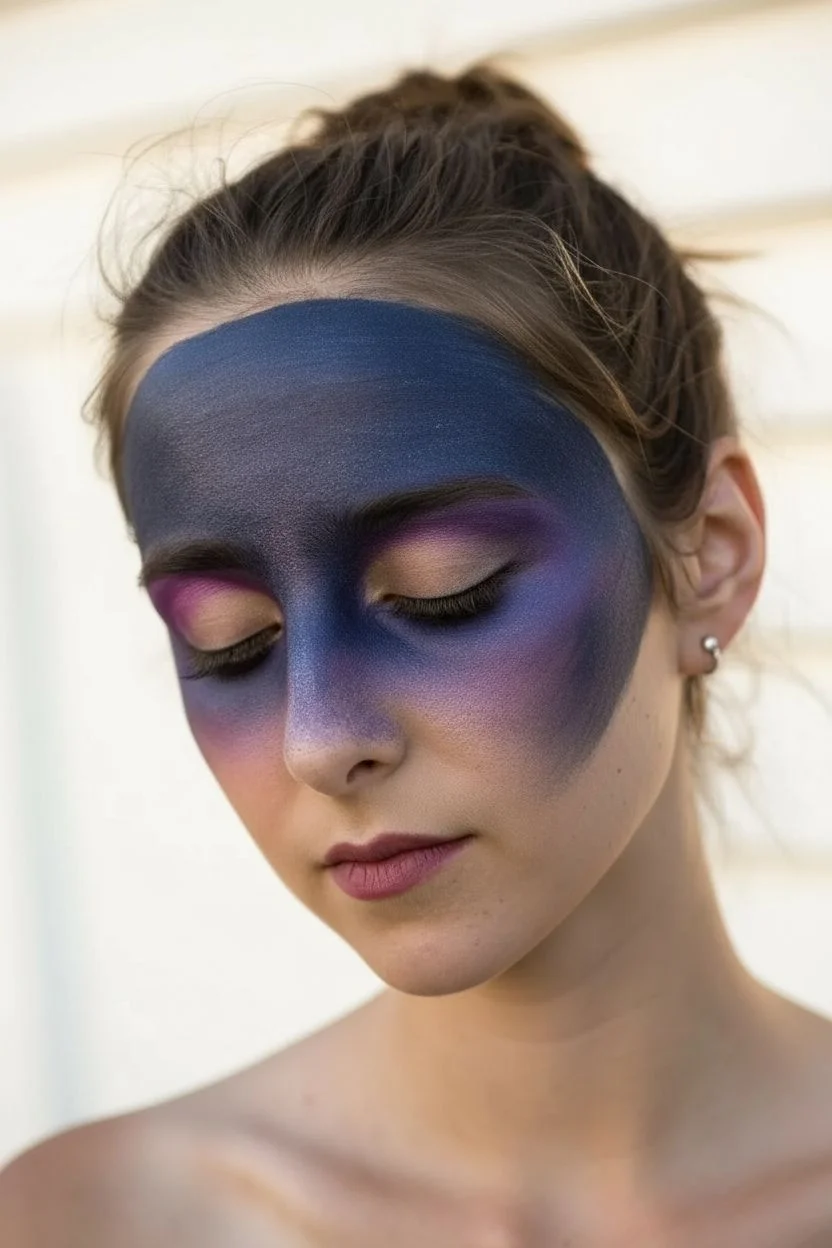
Step 1: Creating the Galactic Base
-
Load the blue sponge:
Dampen a makeup sponge slightly and load it generously with dark blue face paint. -
Define the forehead:
Pat the blue paint firmly across the forehead to create the upper section of the mask shape. -
Frame the face:
Bring the blue paint down along the temples, curving it towards the top of the cheekbones. -
Apply purple tones:
Switch to a clean section of the sponge (or use a fresh one) and load it with purple paint. -
Cover the eyes:
Gently pat the purple paint over the eyelids and the area directly underneath the eyes. -
Connect the mask:
Continue patting purple across the bridge of the nose to connect the two sides seamlessly. -
Blend the gradient:
Where the blue meets the purple on the forehead and temples, dab lightly to blend them into a soft gradient. -
Fade expectations:
Allow the sponge to run slightly dry on the outer edges (cheeks and nose) to create a soft, faded border rather than a hard line. -
Dry check:
Let this base layer dry for a minute or two until it is dry to the touch.
Muddy Colors?
If your moon turns green, the blue base wasn’t dry enough. Wait for the background to fully set before applying lighter detailed colors on top.
Step 2: Painting the Celestial Details
-
Mix the yellow:
Load a thin round brush with bright yellow paint until the consistency is creamy and smooth. -
Shape the moon:
On one side of the forehead, carefully paint a ‘C’ shape to form the crescent moon. -
Fill opacity:
Fill in the moon shape; I like to add a second coat here to ensure the yellow pops against the dark blue. -
Prepare white paint:
Rinse your brush thoroughly and load it with opaque white face paint. -
Draw large stars:
Paint a few four-pointed stars (cross shapes) scattered across the forehead and temples. -
Refine star shape:
Make the vertical line of the stars slightly longer than the horizontal line for a twinkling effect. -
Add constelations:
Use the tip of the brush to place medium-sized white dots in clusters near the outer corners of the eyes. -
Create space dust:
Scatter tiny white dots over the purple nose bridge area and across the cheeks. -
Add distant stars:
Fill any remaining empty dark spaces on the forehead with very small, delicate white specks. -
Final touches:
Check your symmetry and add any extra dots needed to balance the galaxy look.
Cosmic Sparkle
While the purple paint is still slightly damp, gently puff some cosmetic-grade iridescent glitter onto the eyelids for a shimmering nebula effect.
You now have a mystical night sky mask that is ready to shine at any event
Metallic Robot Gears
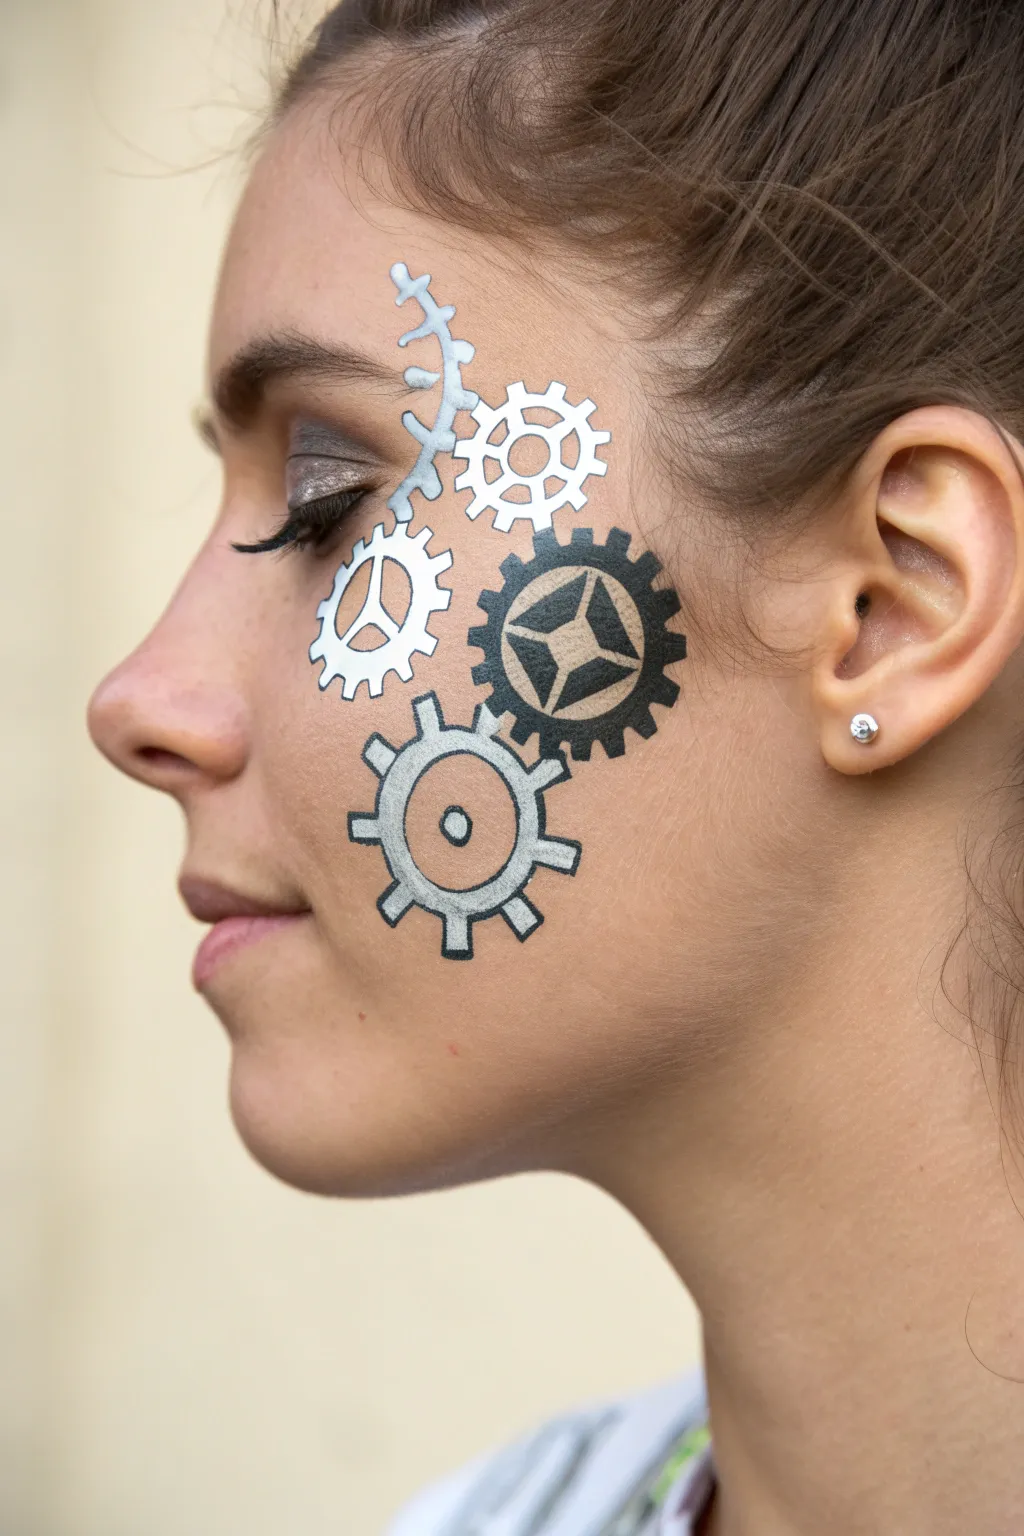

Transform into a clockwork masterpiece with this precise and industrial face paint design. By combining metallic sheens with crisp black outlines, you’ll create a dimensional robotic look that appears to sit right on top of the skin.
Detailed Instructions
Materials
- Metallic Silver Face Paint
- White Face Paint
- Black Face Paint
- Charcoal or Dark Grey Face Paint
- Champagne or Gold Face Paint
- Round Brush (size 4)
- Fine Liner Brush (size 0 or 1)
- Cup of Water
- Cotton Buds (for cleanup)
Step 1: Laying the Base Shapes
-
Start the top gear:
Load a size 4 round brush with metallic silver paint. Near the temple, paint a medium-sized ring with a hollow center. -
Add first cogs:
Using the same silver paint, add small square teeth around the outer edge of this first ring to form the cog shape. -
Create the white gear:
Rinse your brush and load it with white face paint. Paint a smaller gear shape slightly below and forward (towards the nose) of the first gear. Make the teeth on this one slightly triangular. -
Paint the dark gear:
Switch to charcoal or dark grey paint. Create a solid circle slightly behind the white gear, closer to the ear. Add chunky, square teeth to the rim. -
Form the large bottom gear:
Reload your brush with metallic silver. Paint the largest circle on the lower cheek/jaw area. Add large, prominent square teeth around the entire circumference. -
Draw the chain track:
Using your silver paint, draw a curved line extending from the top temple gear upward toward the hairline. Add small cross-hatch strokes to mimic a chain or track.
Step 2: Adding Interior Details
-
Detail the top gear:
With a clean brush and white paint, create thin spokes inside the top silver gear, connecting the center to the rim. -
Detail the white gear:
Inside the white gear, paint three pie-slice shapes leaving a Mercedes-style three-pointed star in the negative space (or paint the star directly with silver). -
Detail the dark gear:
I like to use a champagne or soft gold color here for contrast. Paint a four-pointed geometric diamond shape inside the dark grey gear. -
Detail the bottom gear:
Using silver paint, add a smaller inner ring inside the large jaw gear, and place a simple dot in the very center.
Fixing Shaky Lines
If your black outlines smudge or get wobbly, wait for them to dry completely. Then, use a damp cotton bud or a concealer brush to gently erase or sharpen the edge.
Step 3: The Outline Definition
-
Prepare the liner:
Switch to a size 0 or 1 liner brush and load it with an inky, creamy black paint. Make sure the paint consistency is thin enough to flow smoothly. -
Outline the track:
Carefully outline the silver track at the top, defining the individual links or vertebrae shapes. -
Define the top gear:
Outline the outer teeth and inner rim of the top temple gear. Keep your hand steady to create sharp, mechanical lines. -
Define the white gear:
Outline the perimeter of the white gear and trace the inner three-spoke design to make the white pop. -
Define the dark gear:
Outline the teeth of the dark grey gear. Also, firmly outline the inner gold geometric shape to sharpen its angles. -
Define the large gear:
Trace the large silver bottom gear, paying close attention to the corners of the square teeth. -
Inner circles:
Outline the inner ring and the central dot of the bottom gear to finish the mechanical look. -
Final touches:
Check for any gaps in your outlines. If needed, thicken the lines where the gears overlap to create a sense of depth. -
Optional eye makeup:
If desired, blend a little silver or grey eyeshadow on the eyelid to compliment the face paint without overpowering it.
Make It 3D
To add realistic shine, place a tiny dot of pure white paint on the upper right corner of every gear and internal shape. This creates a ‘specular highlight’ effect.
Enjoy showing off your intricate mechanical transformation at your next costume party or event
Pop Art Comic Style
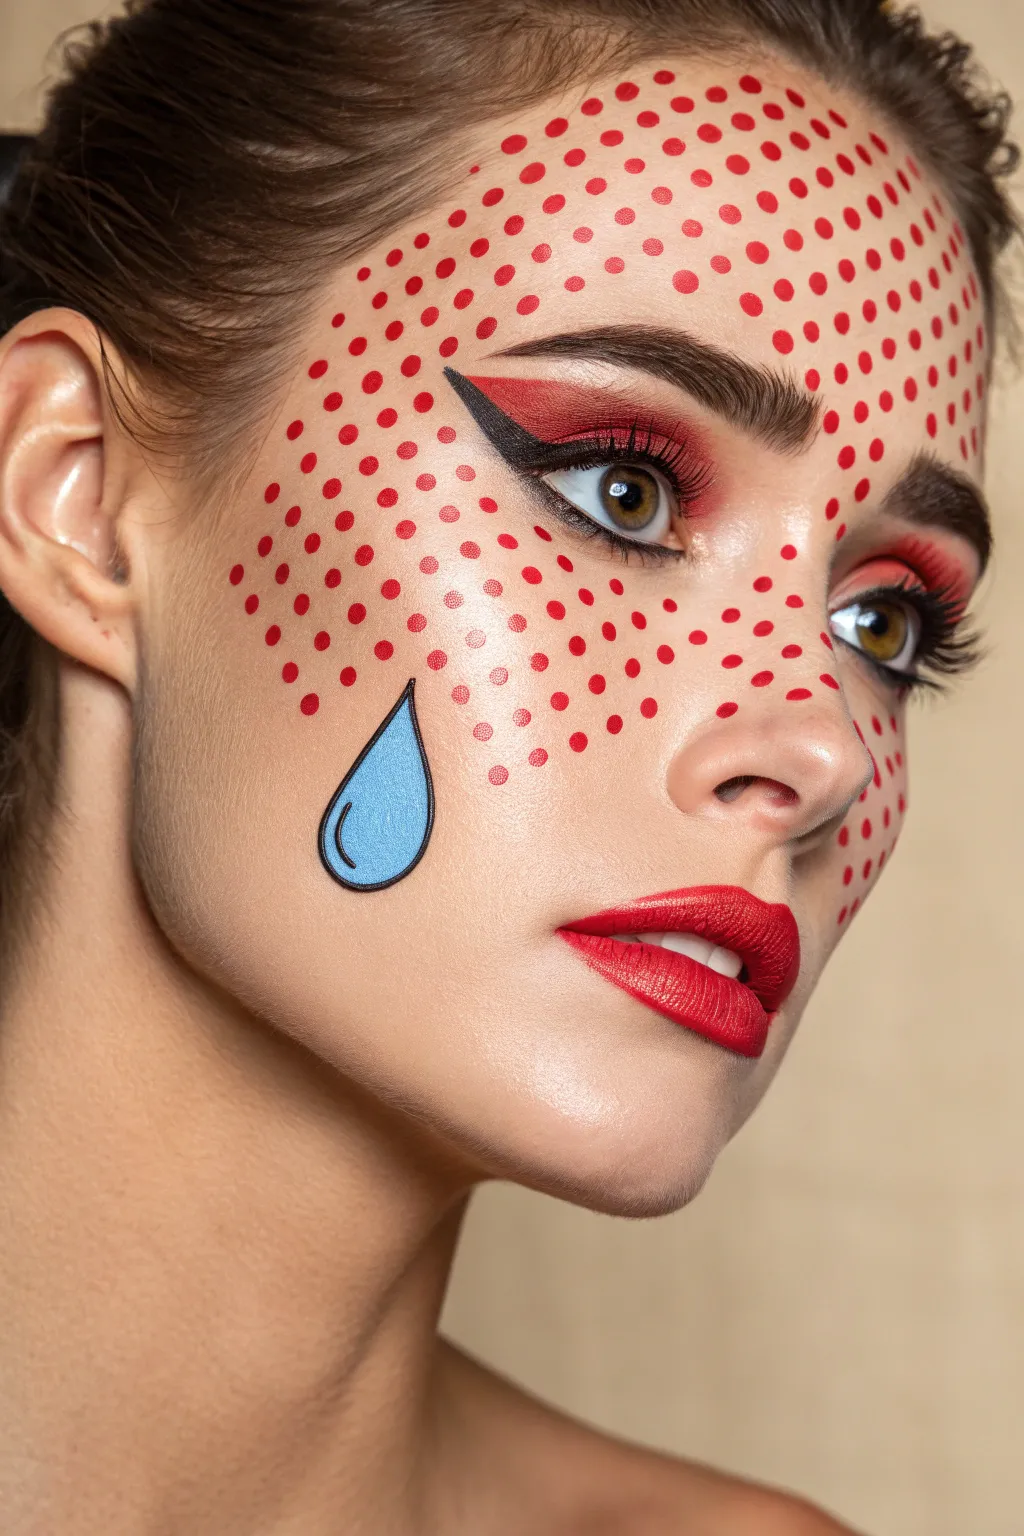
Transform yourself into a living comic book character with this striking pop art look. By combining precise graphic lines with classic Ben-Day dots, you’ll create a dramatic, 2D-illustration effect that looks stunning in photos.
Step-by-Step Guide
Materials
- Full coverage matte foundation
- Water-activated face paints (Red, Black, Light Blue, White)
- Fine liner brush (size 0 or 00)
- Round makeup brush handle or dotting tool
- Matte red lipstick
- Red eyeshadow
- Black liquid eyeliner
- Mascara and brow pomade
- Setting spray
Step 1: Flawless Base & Eyes
-
Prep the canvas:
Start with a clean, moisturized face and apply a high-coverage matte foundation. A uniform, shine-free complexion is essential to mimic the flat paper of a comic book. -
Define the brows:
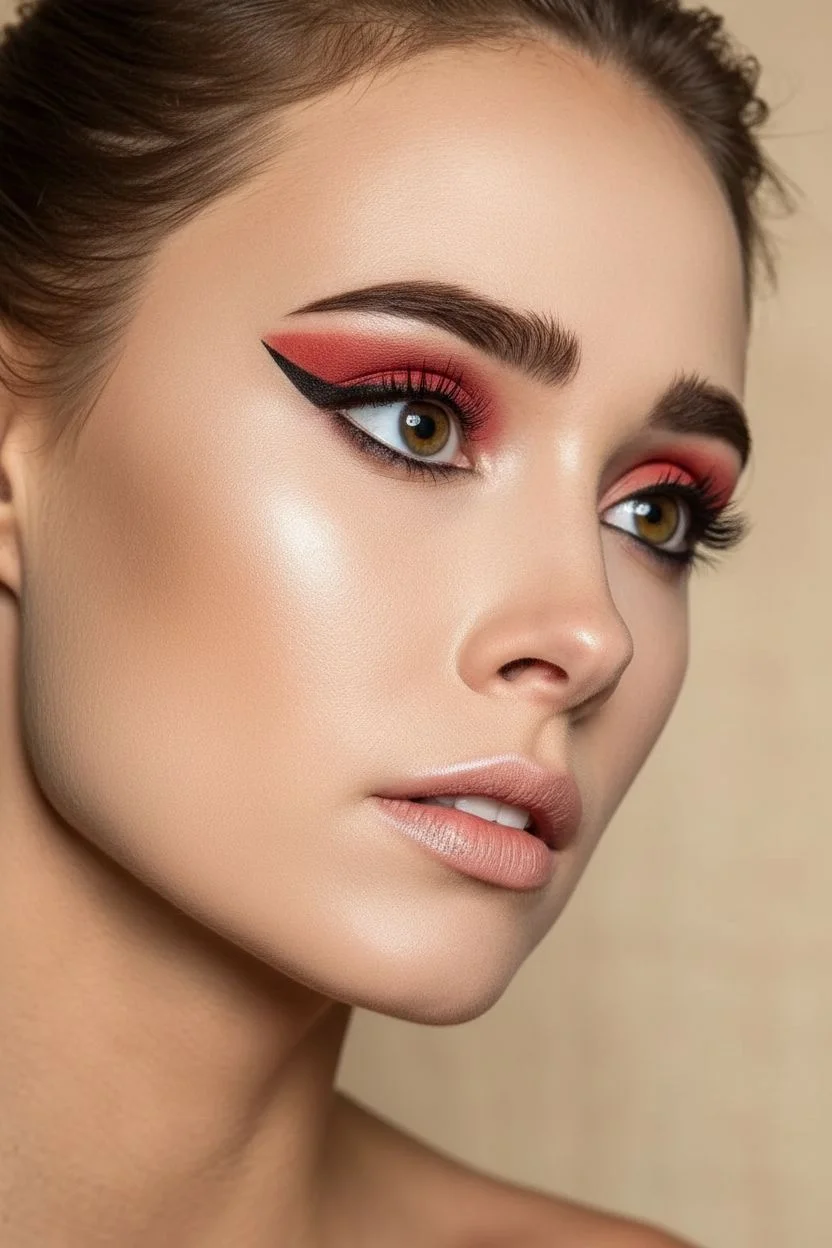
Fill in your eyebrows using a dark brow pomade or pencil. Aim for a sharply defined, arched shape that looks slightly more dramatic and structured than your everyday brow. -
Apply crease shadow:
Sweep a vibrant red or cranberry eyeshadow into the crease of your eyelid, blending it upwards slightly. Keep the mobile lid relatively clean or nude to create contrast. -
Create the winged liner:
Using a black liquid eyeliner, draw a thick, dramatic cat-eye wing. Start thin at the inner corner and thicken the line as you extend it outward toward the tail of your brow. -
Lash application:
Apply two coats of volumizing black mascara to both top and bottom lashes to open up the eyes. Ensure the lashes are separated and distinct.
Stamp Master
If you don’t have a dotting tool, the back end of a makeup brush works perfectly. Dip, press, and twist slightly to create crisp circles.
Step 2: The Ben-Day Dots
-
Prepare the red paint:
Activate your red face paint with a small amount of water until it reaches a creamy, ink-like consistency that won’t drip. -
Testing the size:
Find a brush with a round handle end deeply suited for the dot size you want. Dip the handle into the paint and test a dot on the back of your hand to ensure it’s circular. -
Start the forehead pattern:
Begin stamping dots across your forehead. Start in the center and work outward to maintain a symmetrical grid pattern, keeping the spacing between dots uniform. -
Cheek application:
Continue the dot pattern down the right side of your face (the viewer’s left), covering the temple, cheekbone, and side of the nose. I find it helpful to look straight in the mirror to keep the rows straight. -
Check consistency:
Reload your tool with paint frequently. If the dots start to look faded or uneven, wipe the tool clean and redip it into the fresh paint. -
Clean up edges:
Once the red dots are dry, use a Q-tip dipped in micellar water to carefully clean up any smudges or dots that lost their round shape.
Step 3: Graphic Details & Lips
-
Outline the teardrop:
Using a fine liner brush and black contour paint, carefully draw a teardrop shape just below the eye on the dotted side of your face. -
Fill with color:
Fill the inside of the teardrop outline with opaque light blue face paint. Apply layers if necessary to get a solid block of color. -
Add the tear highlight:
Take a tiny amount of white paint and draw a curved ‘comma’ shape inside the blue drop to represent a light reflection. -
Apply lipstick:
Coat your lips with a saturated, matte red lipstick. Use a lip liner first if you need help maintaining a crisp edge. -
Create lip dimension:
Using the white paint, carefuly paint a small section of the teeth if shown, or add a small white highlight on the lower lip to simulate a glossy reflection. -
Set the look:
Mist your face lightly with a setting spray to lock the face paint and foundation in place without smudging your distinct lines.
Level Up
Add a white pencil to your lower waterline to extend the whites of your eyes, making them appear larger and more doll-like for the final look.
Now you are ready to jump off the page and party with your bold, graphic new look


Have a question or want to share your own experience? I'd love to hear from you in the comments below!