
Sometimes you just need simple face paint ideas that look adorable without taking forever or requiring fancy skills. These designs are my go-to choices when I’m painting fast at a party but still want that “wow, you did that?” moment.
Classic Butterfly Eye Mask
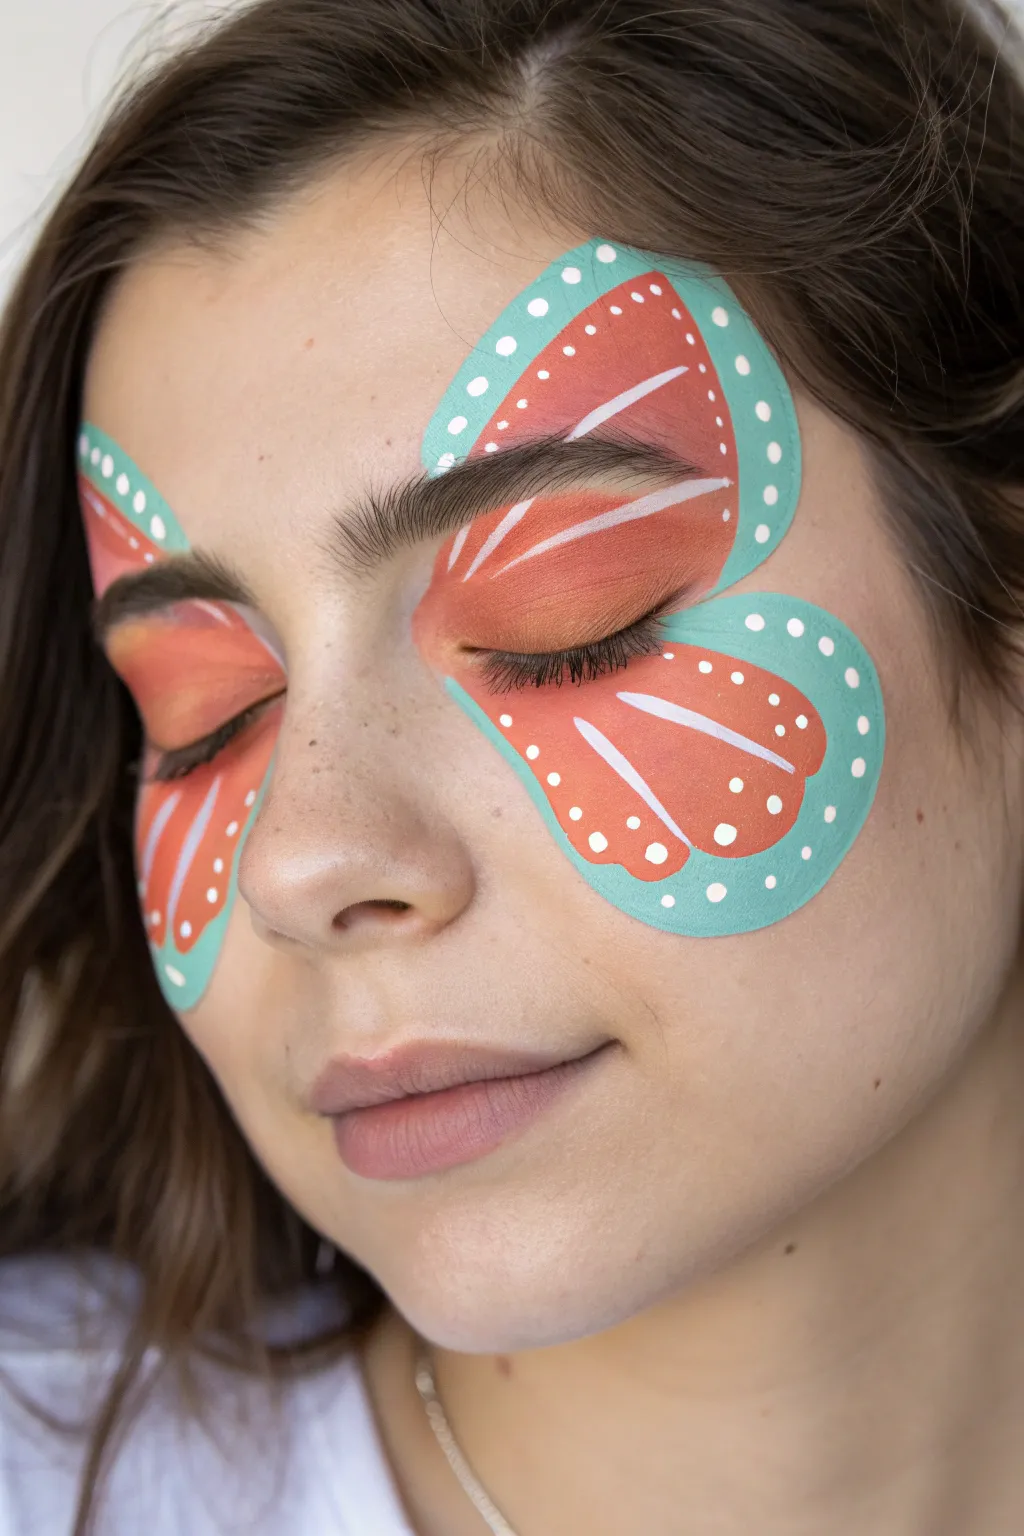
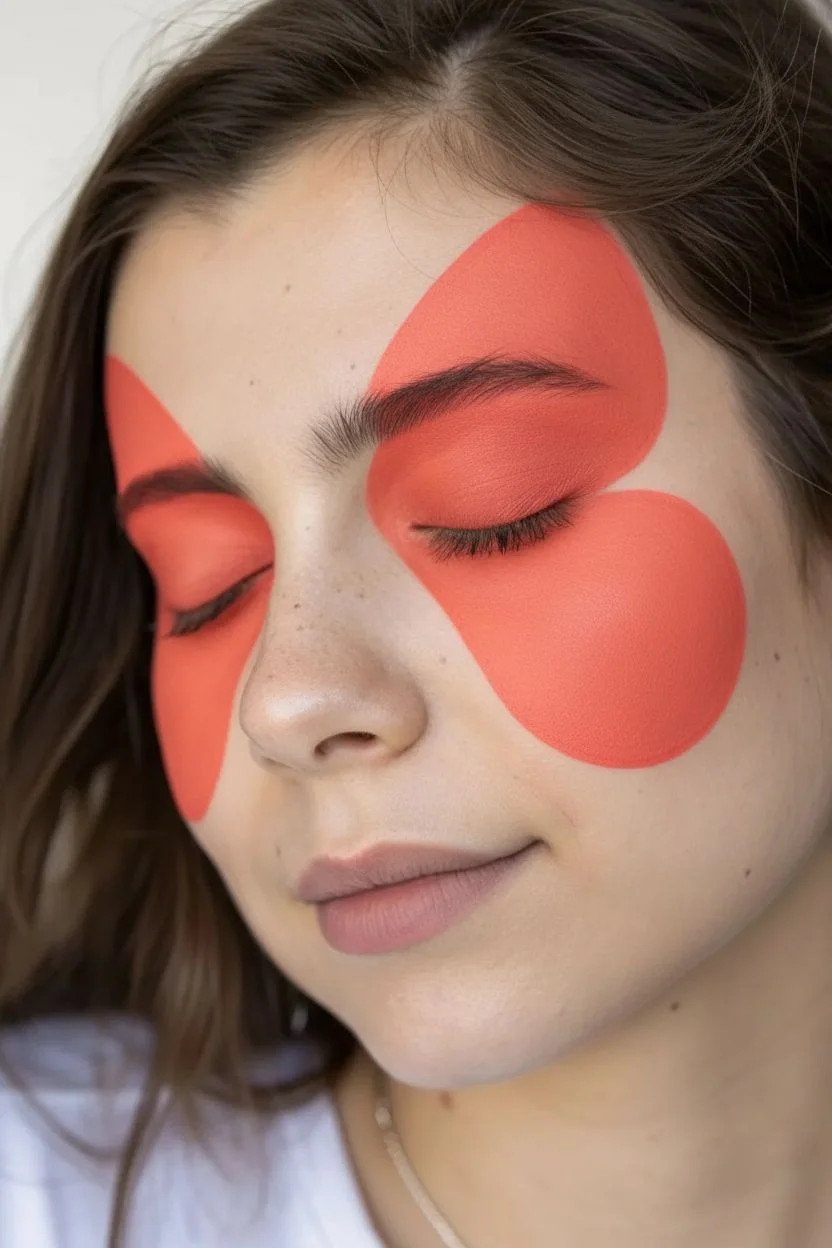
Transform a simple face paint session into something ethereal with this delicate butterfly wing design. Featuring soft coral wings and a dreamy mint border detailed with white accents, this look is perfect for a whimsical costume or a fun festival style.
Step-by-Step Tutorial
Materials
- Face paint pallet (must include coral/orange, mint/teal, and white)
- Flat brush (medium size)
- Round liner brush (fine tip)
- Small blending sponge or eyeshadow applicator (optional)
- Cup of water
- Paper towels
Step 1: Painting the Upper Wing
-
Map the shape:
Visualize a teardrop shape that starts above the inner corner of the eyebrow and sweeps up towards the temple. Using your medium flat brush and the coral paint, lightly sketch this outline. -
Fill the color:
Load your brush fully with coral paint. Fill in the shape you just mapped, ensuring the color is opaque and vibrant. Extend the paint down to the eyelid crease, blending it softly so it looks part of the wing. -
Soften the edges:
While the paint is slightly damp, I like to gently tap the edges near the eyelid to create a seamless transition into the skin.
Fixing Smudges
If colors bleed into each other, wait for them to dry completely. Then, use a damp Q-tip to lift the mistake before reapplying the correct color.
Step 2: Creating the Lower Wing
-
Outline the bottom section:
Starting from the outer corner of the eye, draw a rounded petal shape that curves down onto the cheekbone. This should mirror the top wing but slightly smaller. -
Fill and connect:
Fill this lower wing with the same coral shade. Ensure the paint connects near the outer corner of the eye so the upper and lower wings feel united, but leave a small gap for natural eye movement if needed. -
Add the second eye (optional):
Repeat a smaller version of this process on the bridge of the nose and inner corner of the other eye if you want the symmetrical butterfly look shown in the reference.
Add Some Sparkle
Before the paint dries, press cosmetic-grade biodegradable glitter onto the white veins or the mint border for a magical, shimmering effect.
Step 3: Adding the Mint Border
-
Mix your teal:
Clean your flat brush thoroughly. Load it with a creamy mint green or teal paint. If your green is too dark, mix in a little white to soften it. -
Line the upper wing:
With a steady hand, paint a thick, even border along the outer top curve of the coral wing. The line should be consistent in width, hugging the coral shape perfectly. -
Line the lower wing:
Continue this border around the bottom curve of the lower wing on the cheek. Make sure the teal touches the coral without overlapping it too much to keep the colors distinct. -
Define the inner corner:
Add a small swoop of mint green on the inner side of the wing (near the nose bridge) to frame the inside of the design.
Step 4: Detailing with White
-
Prep the liner brush:
Switch to your fine liner brush. Load it with highly pigmented white face paint. The consistency should be inky but not drippy. -
Draw the veins:
Starting from the corner of the eye (the center of the wing), drag long, thin lines outward across the coral paint. Press slightly harder at the start and lift off at the end for wispy, tapered lines. -
Dot the border:
Using the very tip of the brush or the back end of the handle, stamp small white dots along the mint green border. Space them evenly for a polished pattern. -
Add inner accents:
Place a few tiny white dots on the coral section itself, specifically near the bottom edge of the lower wing, to add texture and depth. -
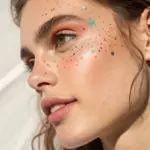
Create scattered freckles:
To finish the ethereal vibe, flick a few tiny specs of brown or warm orange paint across the nose bridge to mimic freckles.
Give the paint a moment to set and you are ready to flutter away with your beautiful new look


Quick Kitty Nose And Whiskers
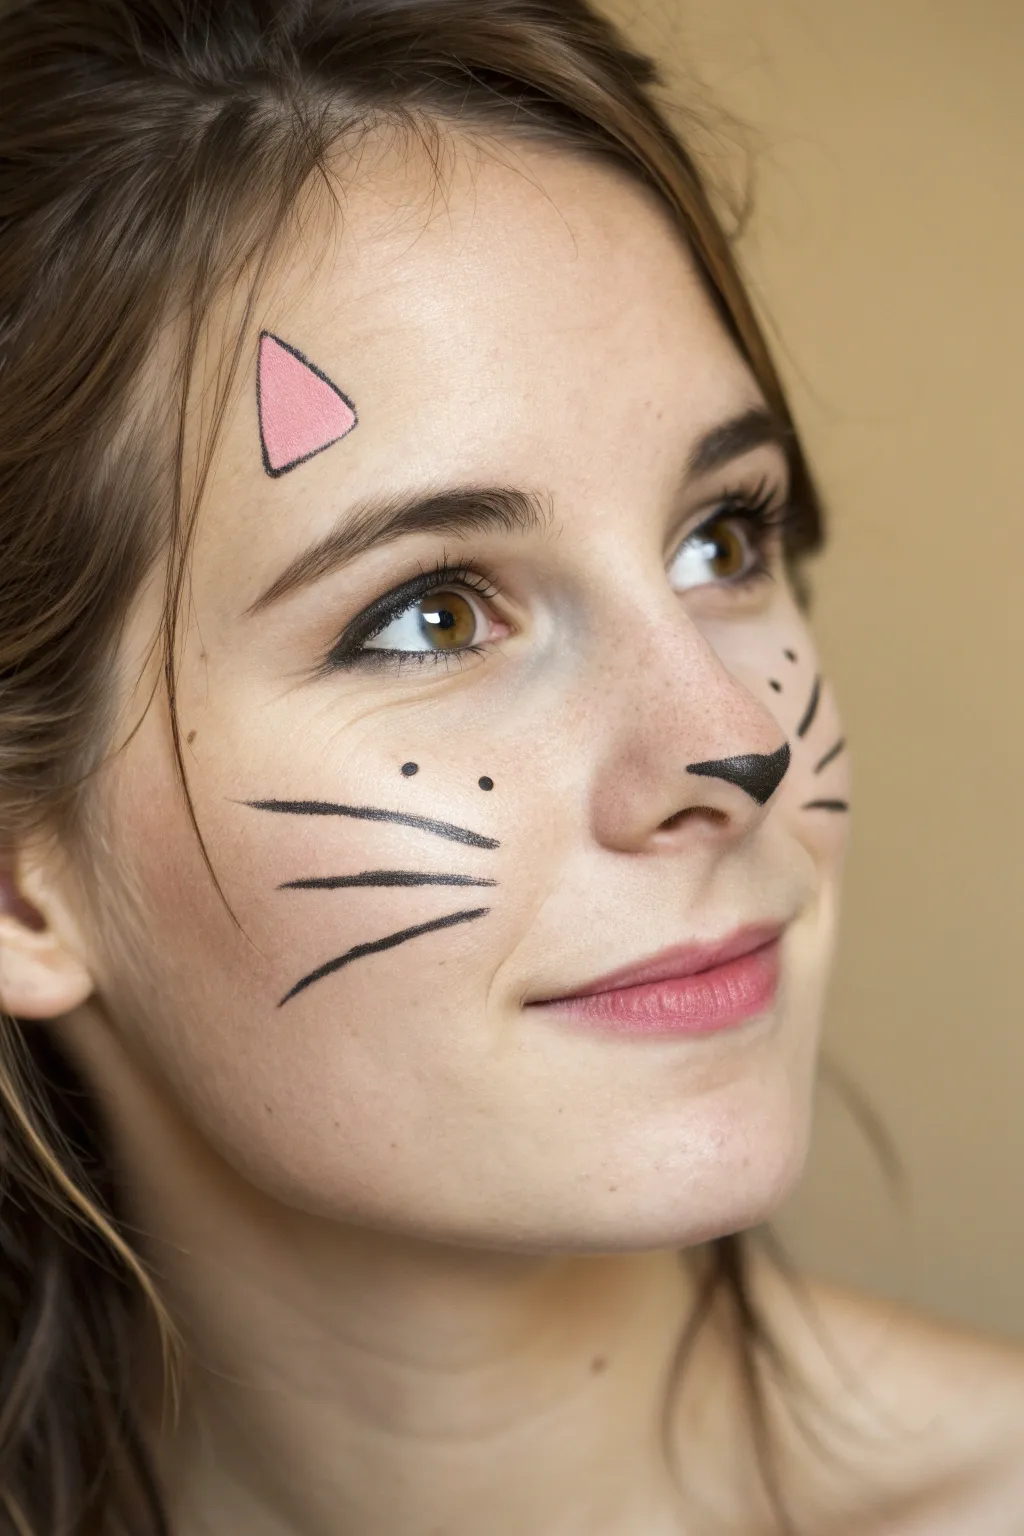
Transform into a feline friend with this ultra-fast and adorable cat face paint design. Featuring defined whiskers, a cute triangular nose, and playful ears right on your forehead, this minimal look is perfect for last-minute costumes or simple dress-up fun.
Step-by-Step
Materials
- Black face paint (water-activated or cream)
- Pink face paint (soft rose or carnation pink)
- Black liquid eyeliner (optional, for eye definition)
- Fine detail brush (size 0 or 1)
- Small flat brush (size 2 or 4)
- Cup of water and paper towels
Step 1: Prepping the Base
-
Cleanse the skin:
Start with a clean canvas by wiping the face with a gentle cleanser or micellar water to remove any oils. This ensures the face paint adheres smoothly and lasts longer specially on the t-zone. -
Optional base makeup:
If desired, apply a light layer of your regular foundation or concealer to even out skin tone, though this look works perfectly great on bare skin too.
Wrist Flick Technique
For perky whiskers, press the brush head down slightly at the start of the stroke, then lift it gradually while dragging outward to creates a perfect tapered end.
Step 2: The Kitty Features
-
Outline the nose:
Load your fine detail brush with black face paint. Drawing on the very tip of the actual nose, outline a small, inverted triangle shape. Keep the bottom edge relatively straight or slightly curved upward. -
Fill the nose:
Using the same brush, carefully fill in the triangle you just outlined with solid black. Ensure the coverage is opaque. -
Add nose details:
Extend tiny, subtle lines from the upper corners of the nose paint slightly outwards to blend it naturally into the nostril shape.
Step 3: Whiskers and Dots
-
Place muzzle dots:
On the upper lip area, just below the nose on either side, gently stamp two or three small black dots using the tip of your round brush. -
Plan your whiskers:
Visualize three lines radiating from the cheek area. You want them to start about an inch away from the nose to keep the face looking open. -
Paint the left whiskers:
Starting from the inner cheek moving outward, paint three distinct black lines. Press down firmly at the start and flick your wrist at the end to create a tapered, sharp point. -
Mirror the right side:
Repeat the process on the right cheek. Try to keep the angle and length symmetrical to the left side, though slight variations add character. -
Add secondary whiskers:
Paint two smaller floating whiskers further back on the cheekbones, closer to the ear, for added dimension.
Glitter Glam
While the pink paint on the forehead ear is wet, dab a little cosmetic glitter over it. Or, add a highlight dot of white paint to the black nose tip for a ‘wet nose’ look.
Step 4: The Forehead Ear
-
Outline the ear shape:
Choose a spot on the forehead, just above the eyebrow arch. Using black paint and the fine brush, draw a simple triangular outline to represent a cat ear. -
Add pink center:
Switch to a clean flat brush loaded with pink paint. carefully fill the inside of the triangle, leaving the black outline visible and sharp. -
Define the ear:
Once the pink is a bit tacky or dry, you can re-trace the black outline if any pink smudged over it, ensuring crisp edges.
Step 5: Finishing Touches
-
Winged liner:
Enhance the cat-eye effect by applying black eyeliner to the upper lash line. Extend the line outward and upward at the outer corner for a classic flick. -
Lower lash definition:
Add a very thin line of black under the lower lashes, connecting it to the outer wing to frame the eye completely. -
Mascara time:
Finish the eyes with a generous coat of black mascara on both top and bottom lashes to make the eyes pop against the simple face paint. -
Final check:
Step back and check for symmetry. Use a damp cotton swab to clean up any smudges or sharpen the tips of the whiskers.
Now you are ready to prowl with your sleek and simple feline look


Easy Puppy Face With Floppy Spots
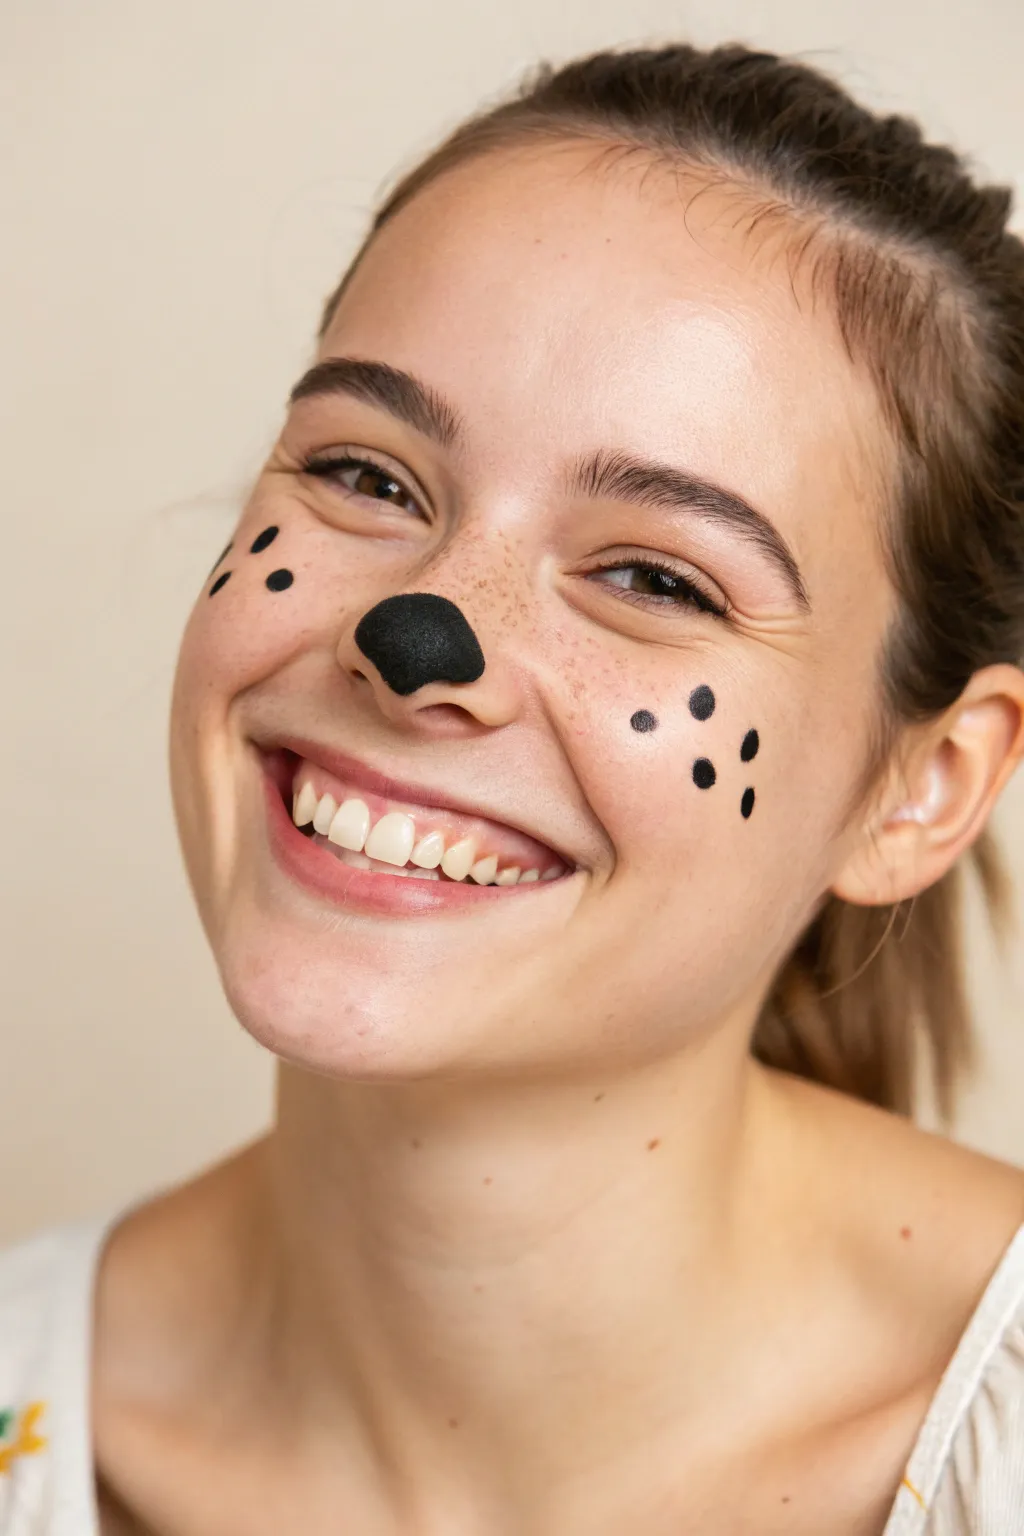
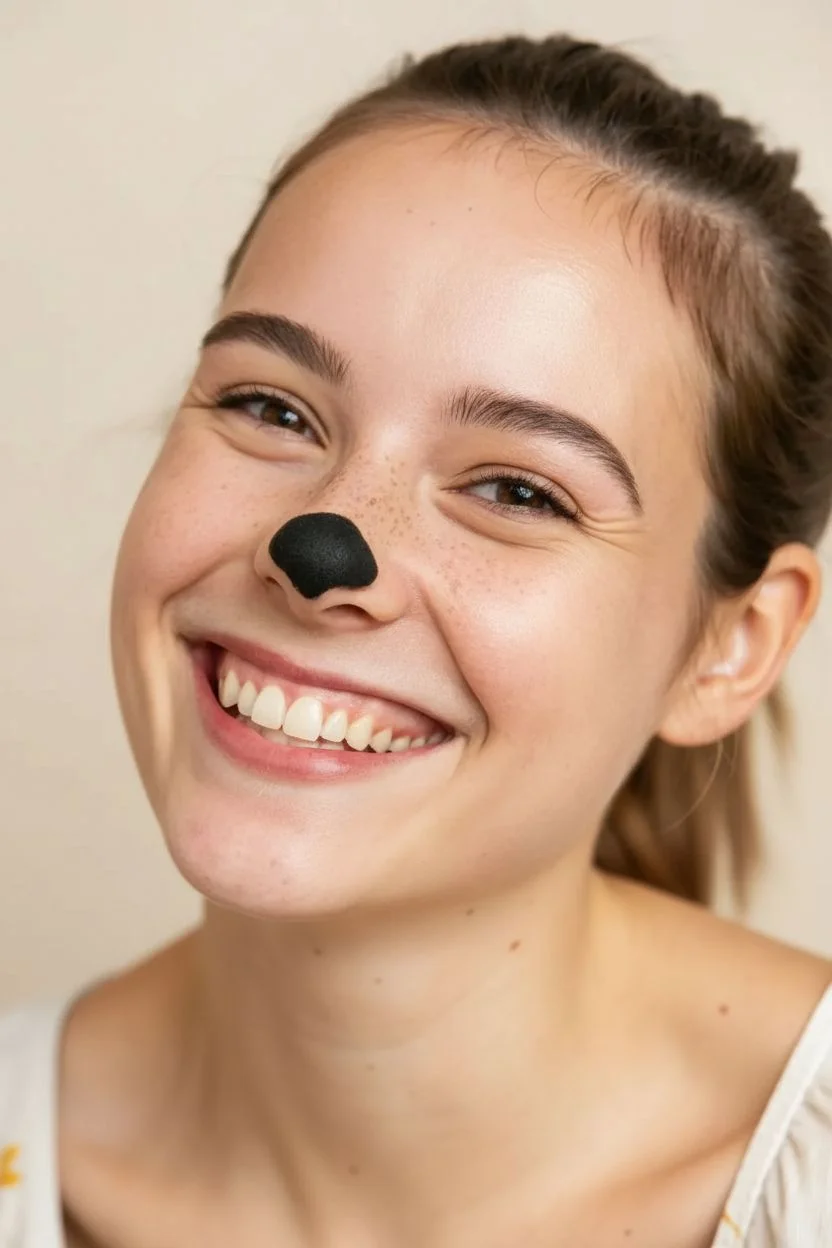
Transform into an adorable pup with this minimal yet charming face paint design featuring playful spots and a cute button nose. It is a quick, mess-free look that works perfectly for last-minute costumes or just for fun.
How-To Guide
Materials
- Black face paint (water-activated or cream)
- Small round brush (size 2 or 4)
- Medium round brush (size 6 or 8)
- Cup of water
- Paper towel or cloth
- Makeup setting spray (optional)
- Mirror
Step 1: Painting the Nose
-
Clean the canvas:
Start with a clean, dry face. Use a gentle wipe to remove any oils or existing makeup from the nose and cheek areas so the paint adheres smoothly. -
Load the medium brush:
Dip your medium round brush into water and swirl it into the black face paint until you have a creamy, ink-like consistency. -
Outline the nose shape:
Begin at the bottom center of the nose tip. Carefully draw a curved line upwards to define the top edge of the puppy nose, stopping just below the bridge. -
Define the nostrils:
Extend the outline down around the sides of the nostrils, following the natural curve of the nose to create a rounded, button shape. -
Fill it in:
Using the same brush, fill in the outlined area with solid black paint. Use gentle dabbing motions to ensure full coverage without streaks. -
Check the edges:
Smooth out the perimeter of the nose shape. If the lines look a bit jagged, I prefer to use the very tip of the brush to refine the curve.
Fixing Smudges
If you accidentally smear a dot, wait for it to dry completely. Then, use a damp Q-tip to wipe away the mistake before repainting.
Step 2: Adding the Spots
-
Switch brushes:
Rinse your medium brush and switch to the smaller round brush (size 2 or 4) for better control over the dots. -
Prepare the paint:
Reload the small brush with black paint. You want the consistency to be fluid enough to make clean circles but not so wet that it drips. -
Plan the placement:
Visualize where you want the spots. Look at the left cheek first; aim for high on the cheekbone. -
Paint the first cheek spots:
Press the tip of the brush gently onto the left cheek to create three distinct dots in a loose triangle formation. -
Vary the sizes:
Try applying slightly different pressure for each dot. Press harder for a larger spot and lighter for a petite one to add character. -
Move to the right cheek:
Shift your focus to the right cheek. Plan for a scattering of about five spots here to create an asymmetrical, playful look. -
Create the top cluster:
Paint two or three dots higher up on the cheekbone, similar to the left side. -
Add lower spots:
Place two more dots slightly lower down the cheek. Spacing them out irregularly makes the design feel organic and natural. -
Clean up edges:
Inspect your dots. If any aren’t quite round enough, carefully touch up the edges with the very tip of your small brush.
Step 3: Finishing Touches
-
Let it dry:
Allow the paint to set for about 3-5 minutes. Avoid scrunching your nose or touching the spots during this time. -
Optional setting spray:
If you need the look to last all day, lightly mist a makeup setting spray over the face from arm’s length.
Pro Tip: Freckles
For extra cuteness, use a brown eyeliner pencil to add tiny, subtle freckles across the bridge of the nose between the black spots.
Enjoy your simple and sweet puppy transformation


Simple Tiger Stripes And Muzzle
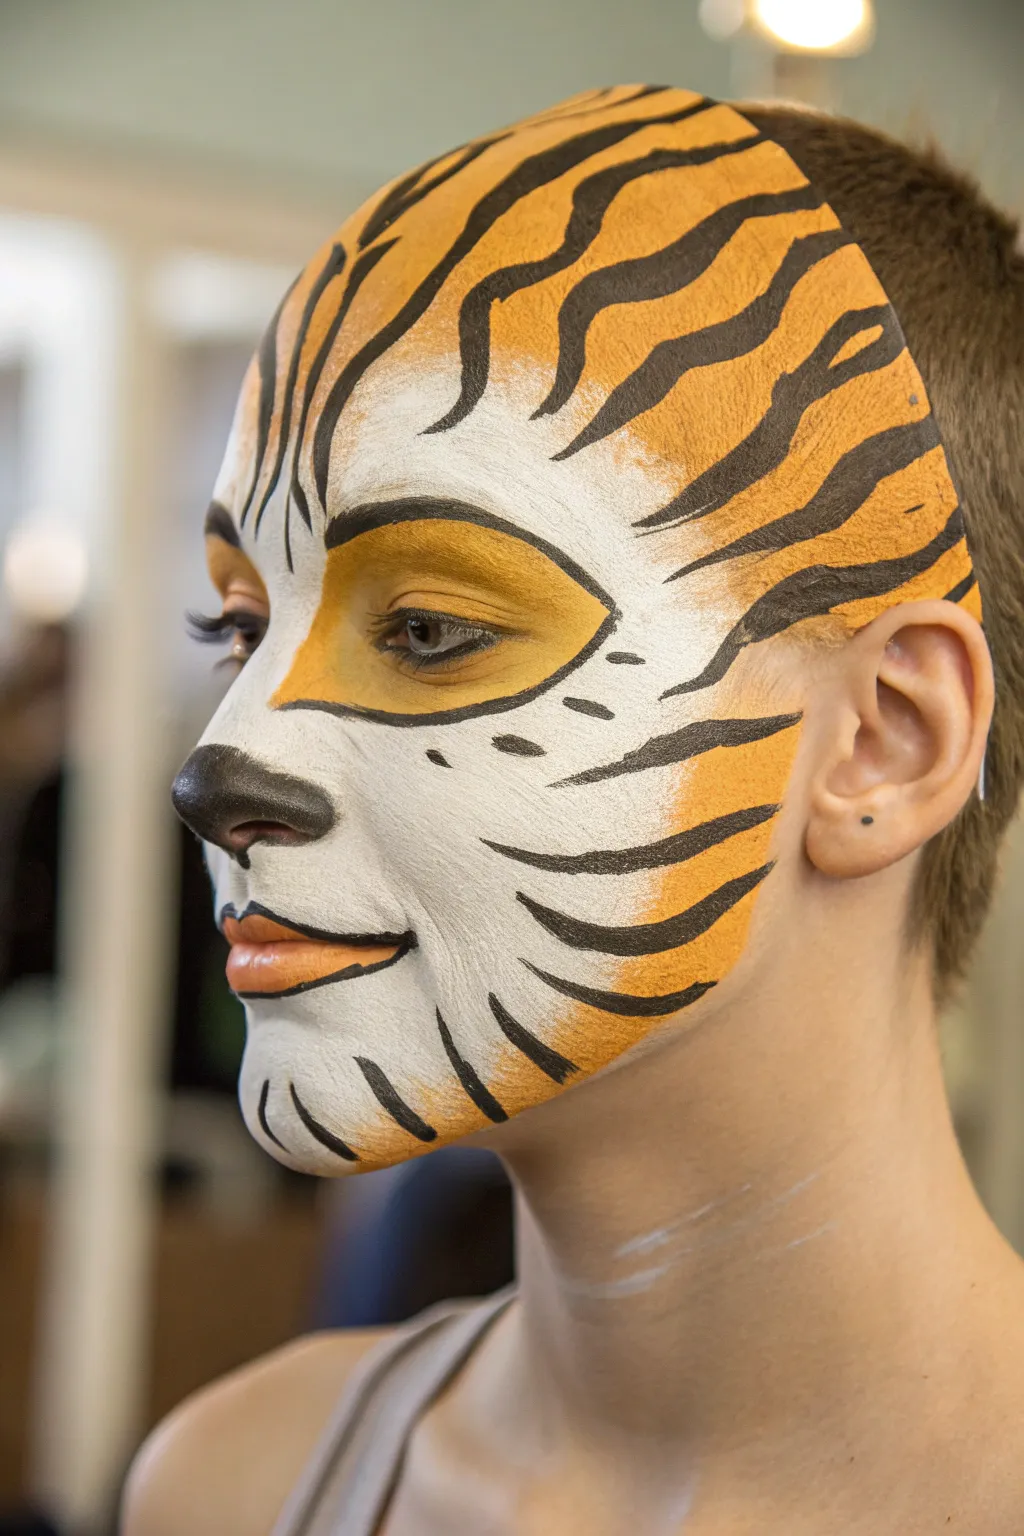
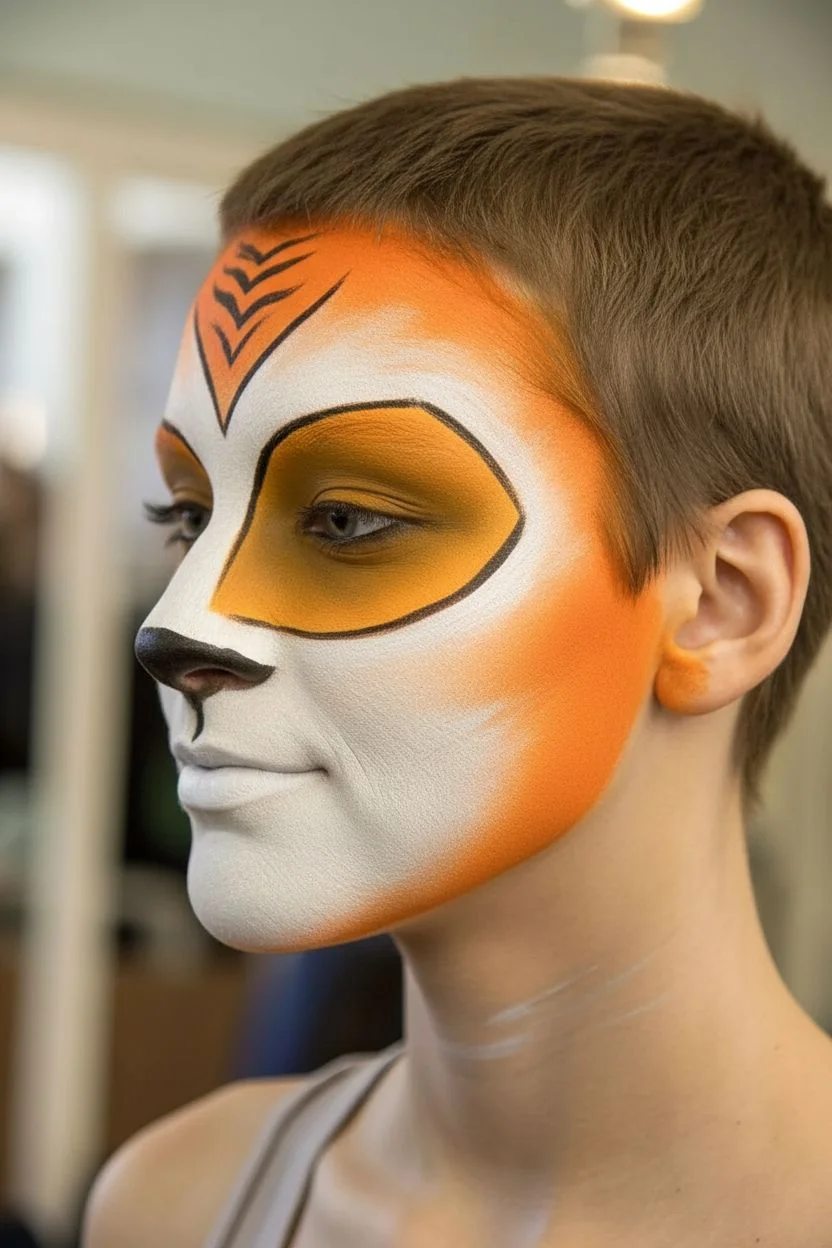
Unleash your wild side with this classic yet striking tiger face paint design, featuring bold stripes and a defined muzzle. This look focuses on high contrast between the bright orange, crisp white, and sharp black details to create a captivating feline expression.
Detailed Instructions
Materials
- High-quality face paint (orange, white, black, yellow-ochre)
- Wide flat brush (for base layers)
- Medium round brush (for blending)
- Fine liner brush (for stripes and details)
- Makeup sponge
- Cup of water
- Paper towels
Step 1: Setting the Base
-
Map the White Highlights:
Start with a clean, dry face. Load a sponge or wide flat brush with white face paint. Pat this color generously onto the muzzle area (around the mouth and chin), the tip of the nose, and flare it upwards between the eyebrows onto the center of the forehead. Extend the white slightly onto the cheek beneath the eye. -
Apply the Orange Base:
Using a fresh sponge or clean brush, pick up your bright orange face paint. Fill in the rest of the forehead, the temples, and the cheeks, blending gently where the orange meets the white. You want a soft gradient rather than a hard line here. -
Add Depth with Yellow-Ochre:
To give the tiger look some dimension, use a medium round brush to apply a yellow-ochre or darker golden shade right around the eyes and along the bridge of the nose, blending it into the surrounding white and orange.
Control Your Brush
For the sharpest “tiger strip” points, press the brush down to start the line thick, then lift gently as you drag to taper it off perfectly.
Step 2: Defining Features
-
Paint the Nose:
Switch to black face paint and a medium round brush. Paint the tip of the nose black, creating a distinct animalistic nose shape. Bring the black color slightly down the center of the philtrum (the groove above the lip) to connect with the lip line. -
Line the Eyes:
Carefully outline the eyes. I like to extend the inner corner downwards slightly to mimic a cat’s tear duct shape, giving the eyes that piercing feline quality. -
Create the Muzzle:
Paint the upper lip black, extending the corners slightly upwards into a subtle smile. Then, paint the lower lip with an orange or ochre tone to differentiate it from the black upper lip.
Step 3: Stripes and Details
-
Forehead Stripes:
Using a fine liner brush loaded with inky black paint, start creating your stripes. On the forehead, paint wavy lines that start thick at the hairline and taper into sharp points as they move toward the center. -
Cheek Stripes:
Move to the orange sections of the cheeks. Paint horizontal stripes that curve slightly downward, mimicking the contours of a tiger’s fur. Ensure the lines vary in thickness for a natural look. -
Muzzle Whiskers and Dots:
On the white muzzle area, use the very tip of your liner brush to add small black dots on either side of the nose. Add a few very short, delicate strokes near the dots to suggest whisker follicles. -
Chin Detail:
Add a few small, curved stripes on the chin area to frame the jawline, keeping the strokes light and feathery. -
Refine the Whiskers:
If you want visual whiskers without gluing anything on, paint very thin, long sweeping lines originating from the muzzle dots out towards the cheeks. -
Highlighting Fur Texture:
Rinse your fine brush thoroughly and load it with white paint. Add tiny, hair-like strokes along the edges of the orange and black sections, especially on the forehead, to create the illusion of fur texture. -
Final White Accents:
Add a small highlight of white on the black nose tip to make it look wet and shiny. -
Clean Up Edges:
Use a slightly damp Q-tip or a clean brush with a tiny bit of concealer to sharpen any stripe edges that might have gotten messy. -
Set the Look:
If you need the paint to last a long time, lightly dust the face with translucent setting powder, being careful not to smudge your black lines.
Glitter Glam
Add some gold or copper cosmetic glitter over the orange sections or along the eyelids while the paint is still tacky for a magical jungle shimmer.
Now you are ready to roar with a face paint design that captures the true spirit of the jungle
BRUSH GUIDE
The Right Brush for Every Stroke
From clean lines to bold texture — master brush choice, stroke control, and essential techniques.
Explore the Full Guide
Sweet Bunny Nose And Teeth
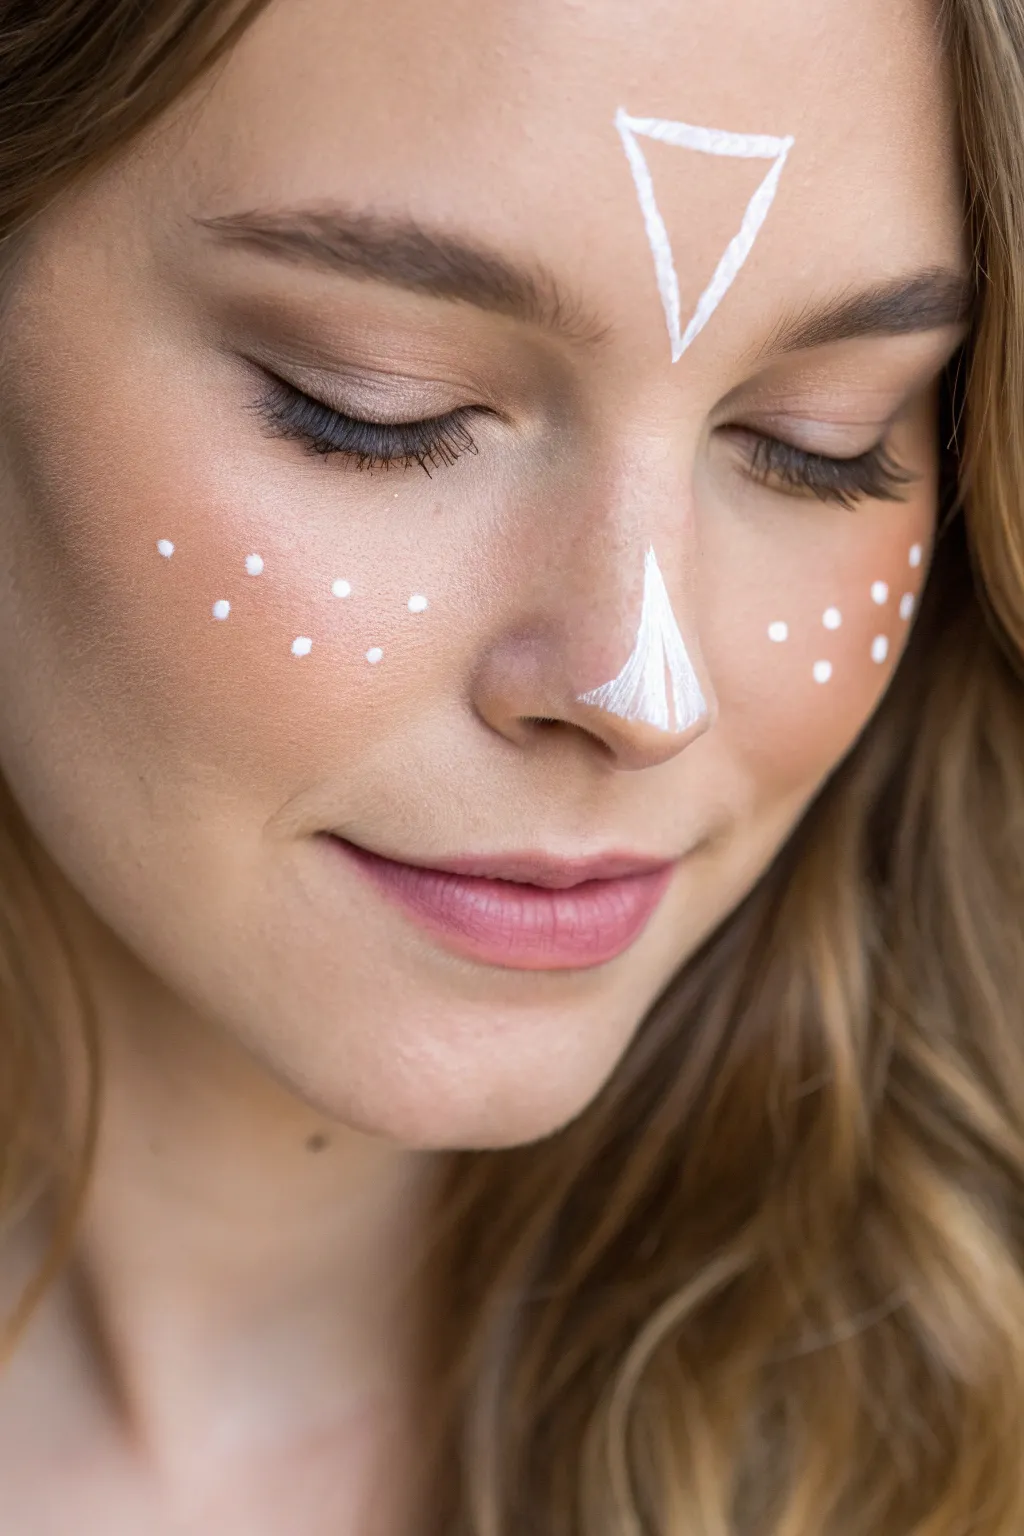
This minimalist, nature-inspired look combines delicate geometric shapes with soft faux freckles for an ethereal vibe. It’s an incredibly simple design that relies on crisp white linework to create a striking, gentle fawn or festival appearance.
Step-by-Step Tutorial
Materials
- White face paint (water-activated or cream)
- Small round brush (size 1 or 2)
- Medium round brush (size 4)
- Makeup sponge
- Setting spray (optional)
- Small cup of water
- Paper towel
Step 1: Preparation & Base
-
Clean and Prep:
Start with a clean, dry face. If the subject has oily skin, a quick wipe with a gentle toner can help the paint adhere better. -
Activate the Paint:
Dip your medium round brush into water and swirl it into your white face paint until you have a creamy consistency, similar to melted ice cream. -
Test Consistency:
Test the paint on the back of your hand. It should be opaque but fluid enough to make smooth lines without dragging.
Step 2: Forehead Geometry
-
Map the Triangle:
Using the medium brush, visualize an inverted triangle in the center of the forehead. The top edge should be parallel to the eyebrows. -
Draw the Top Line:
Paint a straight horizontal line across the center of the forehead, roughly two inches long. -
Create the V-Shape:
Starting from the left end of your top line, draw a diagonal line angling downward toward the center point between the eyebrows. -
Close the Triangle:
Repeat the diagonal line from the right side to meet at the bottom point. Keep the lines slightly sketchy or organic rather than perfectly rigid for a softer look. -
Refine the Edges:
Go over the lines once more if needed to ensure the white is bright and solid, but leave the inside of the triangle empty.
Clean Lines Tip
If your hand is shaky, rest your pinky finger gently on the model’s cheek or forehead to stabilize your hand while painting the geometric lines.
Step 3: Nose Detail
-
Start the Nose Tip:
Reload your brush. On the very tip of the nose, paint a small vertical line starting from the bottom and flicking upward. -
Widen the Base:
Add strokes on either side of that central line, following the natural curve of the nostrils, to create a triangular shape that covers the nose tip. -
Create the Peak:
Extend the top center of the nose paint upward into a sharp point, creating a tall, narrow triangle shape that bridges onto the bridge of the nose. -
Feather the Edges:
I like to use light, upward flicking motions here to give the nose paint a slightly textured, fur-like appearance near the bottom.
Add Sparkle
Before the white paint dries completely, tap a tiny amount of cosmetic glitter onto the nose triangle or the largest cheek dots for a magical finish.
Step 4: Cheek Accents
-
Switch Brushes:
Change to your smaller round brush (size 1 or 2) for finer control over the dots. -
Place Key Dots:
Start on the left cheekbone. Place three main dots in a loose triangle formation high on the cheek. -
Fill the Pattern:
Add smaller dots scattered around the main three, extending slightly toward the nose and out toward the ear. -
Mirror the Design:
Repeat the dot pattern on the right cheek, trying to keep the overall placement symmetrical, though the exact dot count doesn’t need to match perfectly. -
Vary the Sizes:
Press harder for some dots and lighter for others to create a variety of circle sizes, which looks more natural and playful. -
Final Check:
Step back and check for symmetry. If any white areas look translucent, carefully dab a second layer of paint on top once the first is dry. -
Set the Look:
Lightly mist with a setting spray to keep the design smudge-proof throughout the day.
Enjoy your fresh and whimsical look inspired by the forest
One-Cheek Bumblebee
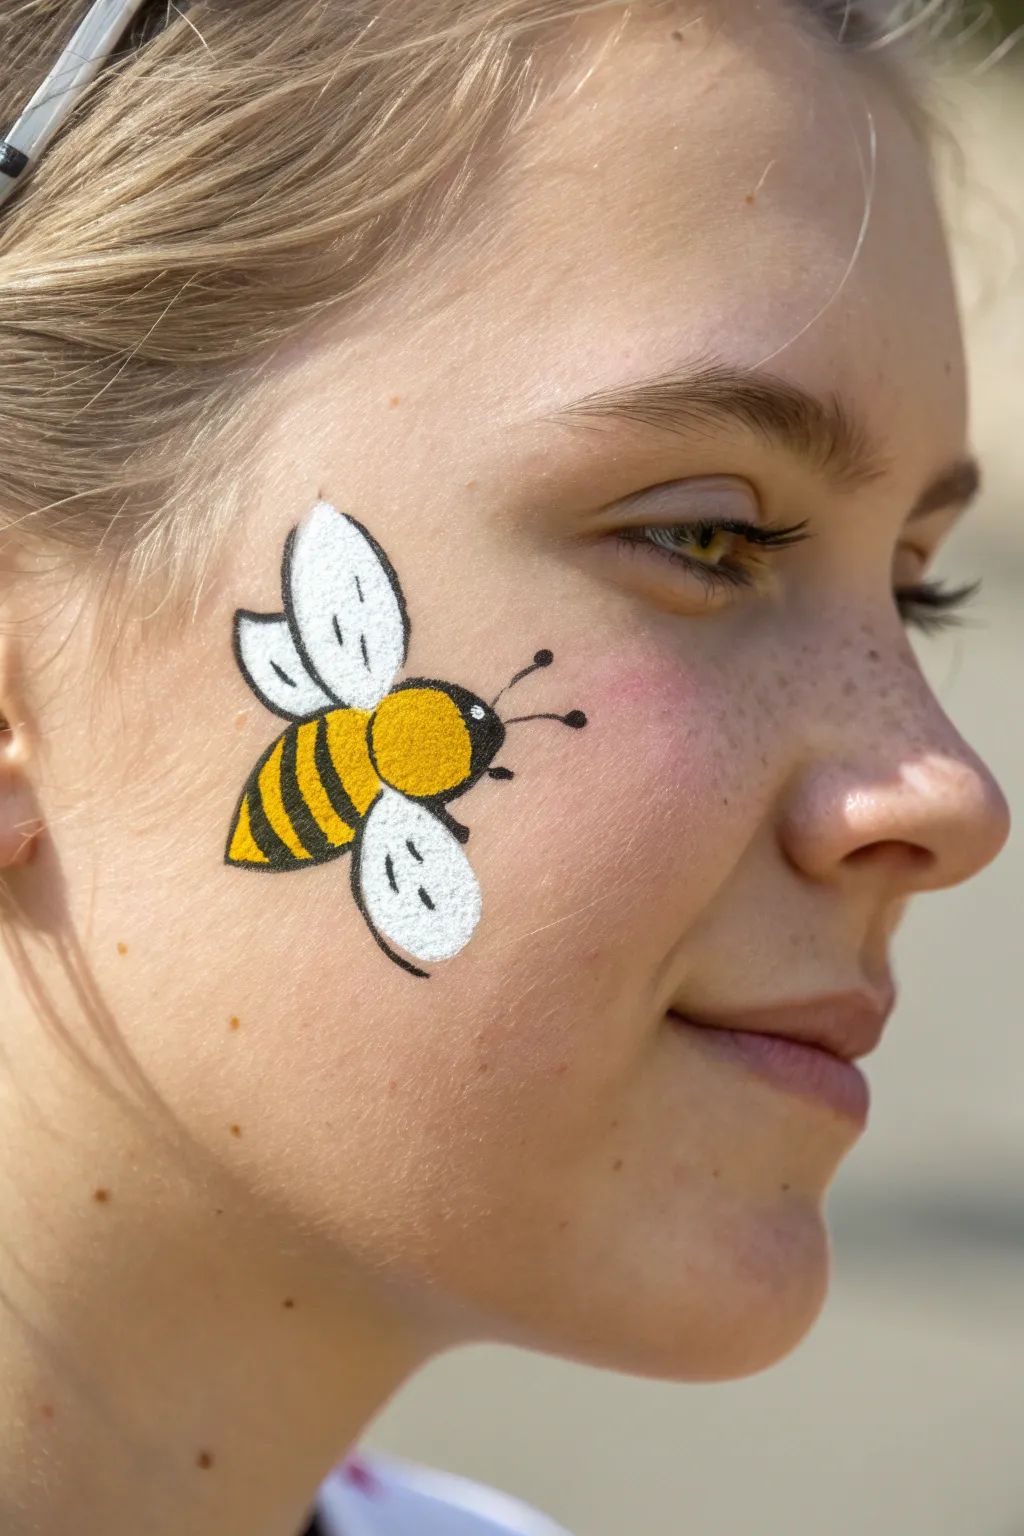
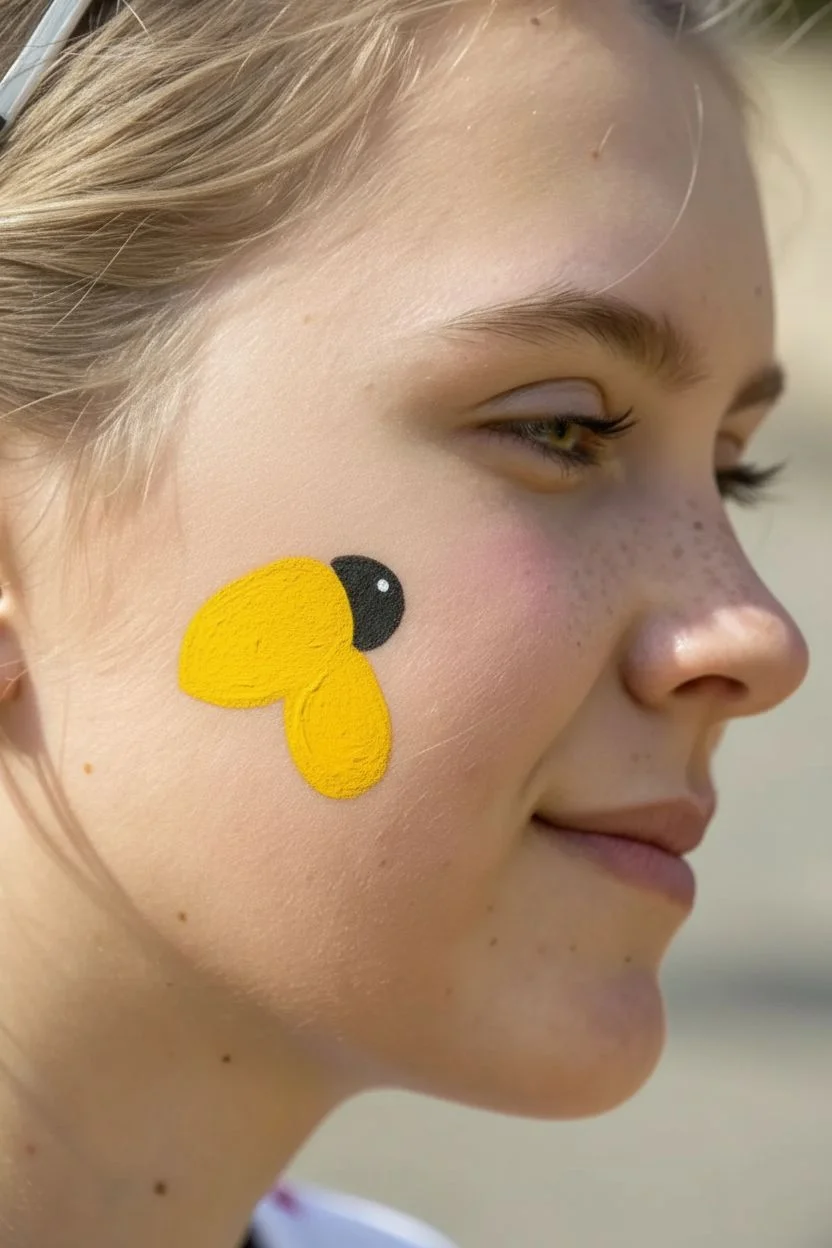
This charming, single-cheek design features a fluffy-looking bumblebee buzzing towards the nose, perfect for a quick yet impactful face paint look. The bright yellow rings and crisp white wings create a lovely contrast that pops beautifully on the skin.
Step-by-Step Guide
Materials
- High-density face paint (Bright Yellow)
- High-density face paint (Pure White)
- High-density face paint (Black)
- Round synthetic brush (size 4 or 6)
- Fine liner brush (size 1)
- Small cup of water
- Paper towels
Step 1: Painting the Body
-
Start the body:
Begin with your round brush (size 4 or 6) loaded with bright yellow paint. Position the bee’s body on the fleshy part of the cheek, angled diagonally upwards toward the bridge of the nose. -
Create the segments:
Paint a solid, rounded oval shape for the thorax (the section closest to the head) and a separate, slightly longer rounded shape for the abdomen. -
Fill the color:
Ensure the yellow is opaque and vibrant. You might need a second coat if the skin tone shows through too much. -
Add the head:
Clean your brush thoroughly. Pick up black paint and create a small, half-circle shape at the front of the yellow thorax to form the bee’s head.
Step 2: Adding the Wings
-
Outline the top wing:
With a clean round brush loaded with white paint, draw a large, teardrop-shaped wing emerging from the top of the thorax. -
Add the second top wing:
Paint a slightly smaller white teardrop shape just behind the first one, slightly overlapping or tucking behind it to show perspective. -
Paint the bottom wing:
Create a third white wing shape extending downwards from the lower part of the body. This one should look slightly more rounded. -
Fill in the white:
Fill all three wing shapes with solid white. I like to dab the brush gently here to create a slightly feathery texture rather than smooth strokes.
Smudged Lines?
If your black outlines are bleeding into the yellow, the base layer is too wet. Wait fully for the yellow to dry, or use a drier consistency for the black liner.
Step 3: Stripes and Details
-
Switch to fine liner:
Load your size 1 liner brush with a creamy consistency of black paint. It should flow easily like ink. -
Paint the stripes:
Carefully paint curved black stripes over the yellow abdominal section. Make them slightly thicker in the middle and tapered at the ends to emphasize the roundness of the bee. -
Outline the body:
Use the very tip of your liner brush to outline the entire yellow body and the black head. Keep the line thin and deliberate. -
Outline the wings:
Outline the white wings with a thin black line. Don’t worry if the line breaks slightly; it adds to the organic look. -
Add wing details:
Inside the white wing areas, add two or three tiny, disjointed dash marks to suggest veins or texture. -
Create the stinger:
Flick a tiny, sharp black triangle at the very end of the abdomen to create the stinger. -
Paint the legs:
Add two small, curved black lines extending from the bottom of the body for legs. -
Finish with antennae:
Draw two thin, curved lines coming from the black head. Press down slightly at the end of each stroke to create a small dot at the tip of each antenna. -
Add a highlight:
Finally, place a singular, tiny white dot on the black head section to give it a shiny, 3D appearance.
Make It Sparkle
While the white wing paint is still slightly tacky, tap a tiny bit of cosmetic-grade iridescent glitter onto the wings for a magical, shimmering flight effect.
Now you have a cute little pollinator ready to brighten up the day

PENCIL GUIDE
Understanding Pencil Grades from H to B
From first sketch to finished drawing — learn pencil grades, line control, and shading techniques.
Explore the Full Guide
Ladybug Cheek Dot With Tiny Hearts
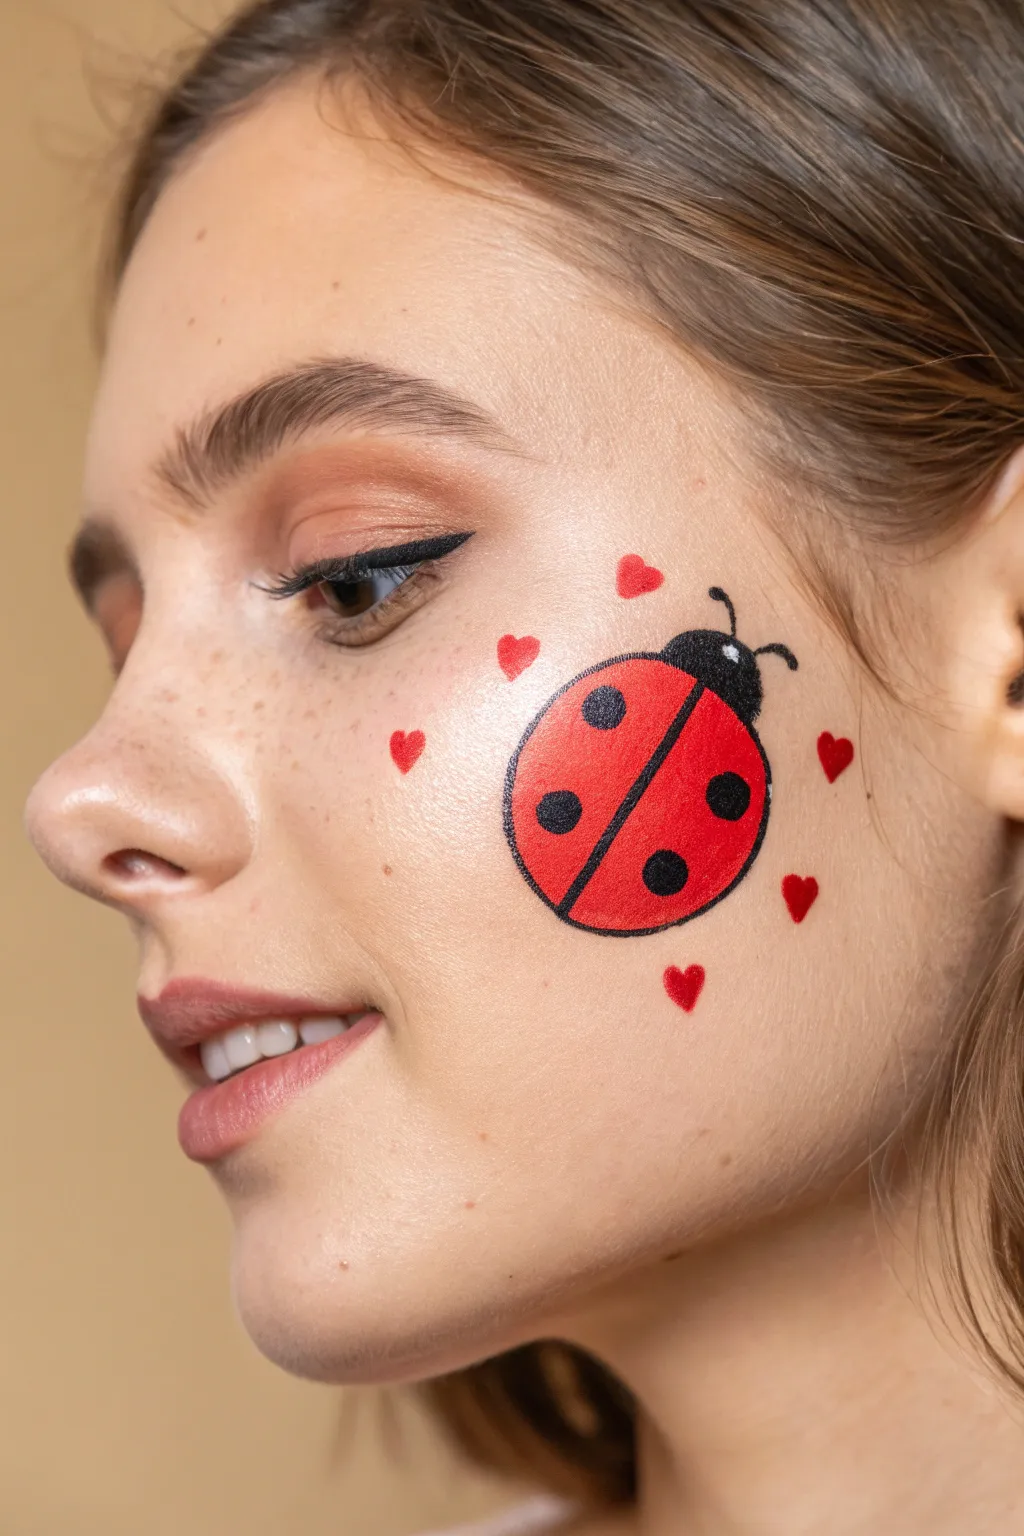
Transform one cheek into a charming garden scene with this simple yet classic ladybug design. Surrounded by tiny red hearts, this bright and bold motif stands out beautifully against natural skin, making for an adorable, quick face paint idea.
Detailed Instructions
Materials
- Red face paint (high opacity)
- Black face paint (strong pigment)
- White face paint
- Medium round brush
- Fine liner brush or detail brush
- Q-tips or correction tools
- Water container
- Sponge (optional for blush base)
Step 1: Painting the Body
-
Map the shape:
Visualize a large, tilted oval on the apple of the cheek. Load your medium round brush with bright red face paint. -
Fill the oval:
Paint the solid red oval shape. Keep the edges as smooth and rounded as possible, tilting the top slightly inward toward the nose. -
Let it set:
Wait about 30-60 seconds for the red paint to dry completely. This is crucial so the black details we add later don’t smear into a muddy grey.
Step 2: Adding the Details
-
Outline the body:
Using a fine liner brush loaded with black face paint, carefully trace resulting the outline of the red oval. Keep your hand steady for a crisp, confident line. -
Create the head:
At the top of the oval (the end closest to the eye), paint a solid black semi-circle that overlaps slightly onto the red body. This forms the ladybug’s head. -
Draw the center line:
With the detail brush, draw a straight black line down the center of the red oval, starting from the head and ending at the bottom tip. This divides the wings. -
Add the spots:
Dip your round brush or a large dotting tool into black paint. Press gently to create large, distinct black polka dots on the red wings. Aim for about two to three dots on each side of the dividing line. -
Paint thin antennae:
Switch back to your finest liner brush. From the top of the black head, pull two short, curved lines outward. Add tiny dots at the very ends for a cute, cartoonish style.
Don’t Rush the Dry
Red paint is notorious for bleeding into other colors. Ensure your red base is completely dry to the touch before laying down any black lines on top of it.
Step 3: Sweet Surroundings
-
Scatter the hearts:
Clean your detail brush thoroughly and reload it with the red paint. Paint small, simple hearts floating around the ladybug. Place two or three near the nose side and a few more trailing off toward the ear. -
Balance the placement:
Vary the angle of the hearts slightly so they look like they are fluttering, rather than stamped in a rigid grid. -
Highlight the wing:
Check that the black head is dry. Take a tiny amount of white paint on a clean detail brush and add a small curved slash or dot on the black head to make it look shiny. -
Catch light on the body:
I prefer to add just a barely-there white highlight on the red part of the wing (near the top left) to give the shell a glossy, 3D appearance. -
Final clean up:
Inspect the edges of your ladybug. If any lines are wobbly, use a damp Q-tip to carefully sharpen the outer boundary before the paint sets fully.
Glitter Upgrade
While the red paint is still slightly tacky, tap a cosmetic-grade red glitter over the ‘wings’ for a sparkly finish that catches the light beautifully.
Now you have a cheerful little garden companion ready for any party or event
Rainbow Swipe With Cloud Puffs
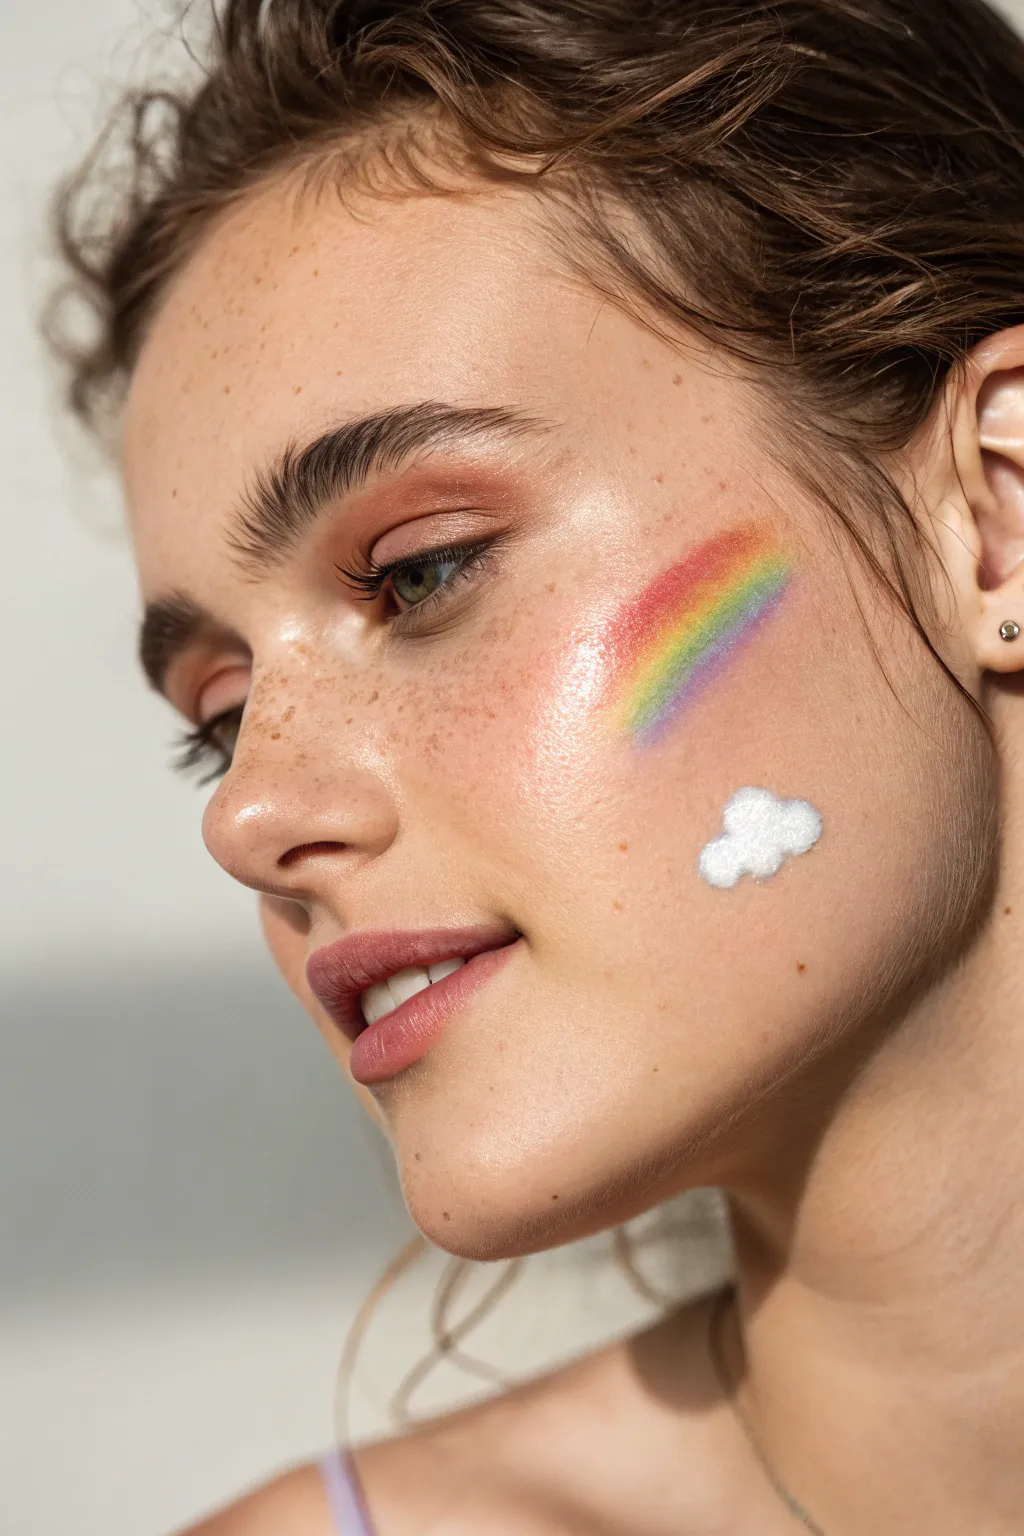
Embrace a whimsical yet minimalist vibe with this dreamy sky-inspired face paint design. A soft gradient of rainbow hues glides across the cheekbone, perfectly complemented by a fluffy little cloud for a look that’s both artistic and wearable.
Step-by-Step Guide
Materials
- Face primer or moisturizer
- Light coverage foundation or BB cream (optional)
- Creamy concealer (optional)
- Warm-toned blush (liquid or powder)
- Cream face paints (Red, Orange, Yellow, Green, Blue, Purple)
- Small flat synthetic brush
- Small rounded detail brush
- White or metallic pearlescent face paint
- Makeup sponge
- Clear brow gel (optional)
- Setting spray
Step 1: Base Preparation
-
Prime and prep:
Start with a clean, moisturized face to ensure the paint glides on smoothly. Apply a light layer of primer if you want extra longevity. -
Even out the complexion:
If desired, apply a sheer layer of foundation or BB cream. The goal is a fresh-faced, natural ‘no-makeup’ look, so let your freckles show through if you have them. -
Add warmth:
Using a contour shade or bronzer, lightly sculpt the hollows of your cheeks to give the rainbow some dimension to sit on top of. -
Flush the cheeks:
Apply a warm, peachy blush to the apples of your cheeks. Blend it upwards toward the temples to create a sun-kissed base for your artwork. -
Groom the brows:
Brush your eyebrows upward with a spoolie or clear gel for that fluffy, natural aesthetic seen in the inspiration photo.
One-Stroke Magic
For the fastest rainbow, use a flat 1/2-inch brush and a ‘split cake’ face paint that has all rainbow colors in one block. One swipe does it all.
Step 2: Painting the Rainbow
-
Load the brush:
For the rainbow, use a small flat synthetic brush. You can either load all colors side-by-side on one brush (one-stroke technique) or paint them individually. -
Paint the red stripe:
Start at the top of the cheekbone, near the outer corner of the eye. Paint a short, diagonal stroke of red cream paint moving downward towards the center of the cheek. -
Layer the warm tones:
Immediately below the red, add a stripe of orange, followed by yellow. Keep the lines tight against each other to mimic a real prism effect. -
Add the cool tones:
Continue the gradient by adding green, blue, and finally purple. I like to keep the pressure light at the tail end of the swipe so it fades out softly. -
Blend the edges:
Take a clean, slightly damp brush or your fingertip and very gently tap the edges of the rainbow swipe. You want it to look slightly diffused into the skin, not like a sticker. -
Highlight the placement:
Ensure the rainbow sits right on the high point of the cheekbone where light naturally hits.
Step 3: Adding the Cloud & Finish
-
Position the cloud:
Locate a spot lower on the cheek, closer to the jawline and slightly forward from the rainbow. This creates a balanced composition. -
Create the cloud shape:
Using a small rounded detail brush and white pearl paint, dab three or four connecting luminous dots to form a fluffy cloud shape. -
Texture the cloud:
Don’t make the cloud flat white; dab a second layer of bright white focused in the center of the ‘fluffs’ to give it 3D volume. -
Add subtle sparkle:
If your white paint isn’t metallic, tap a tiny bit of pearlescent highlighter over the cloud while it’s still tacky for a magical glow. -
Enhance the eyes:
Apply a wash of warm terracotta eyeshadow to the lids to tie into the rainbow’s warm tones, as shown in the look. -
Define the lashes:
Apply a coat of mascara to the upper lashes to open up the eyes. -
Set the look:
Mist your face with a setting spray to lock the cream paints in place and prevent smudging throughout the day.
Go Glittery
Make it a festival look by pressing loose cosmetic glitter onto the rainbow stripe while the paint is still wet. Use chunky glitter for extra texture.
Now you have a piece of wearable sky art that brightens up any casual outfit


Sparkly Starburst Around One Eye
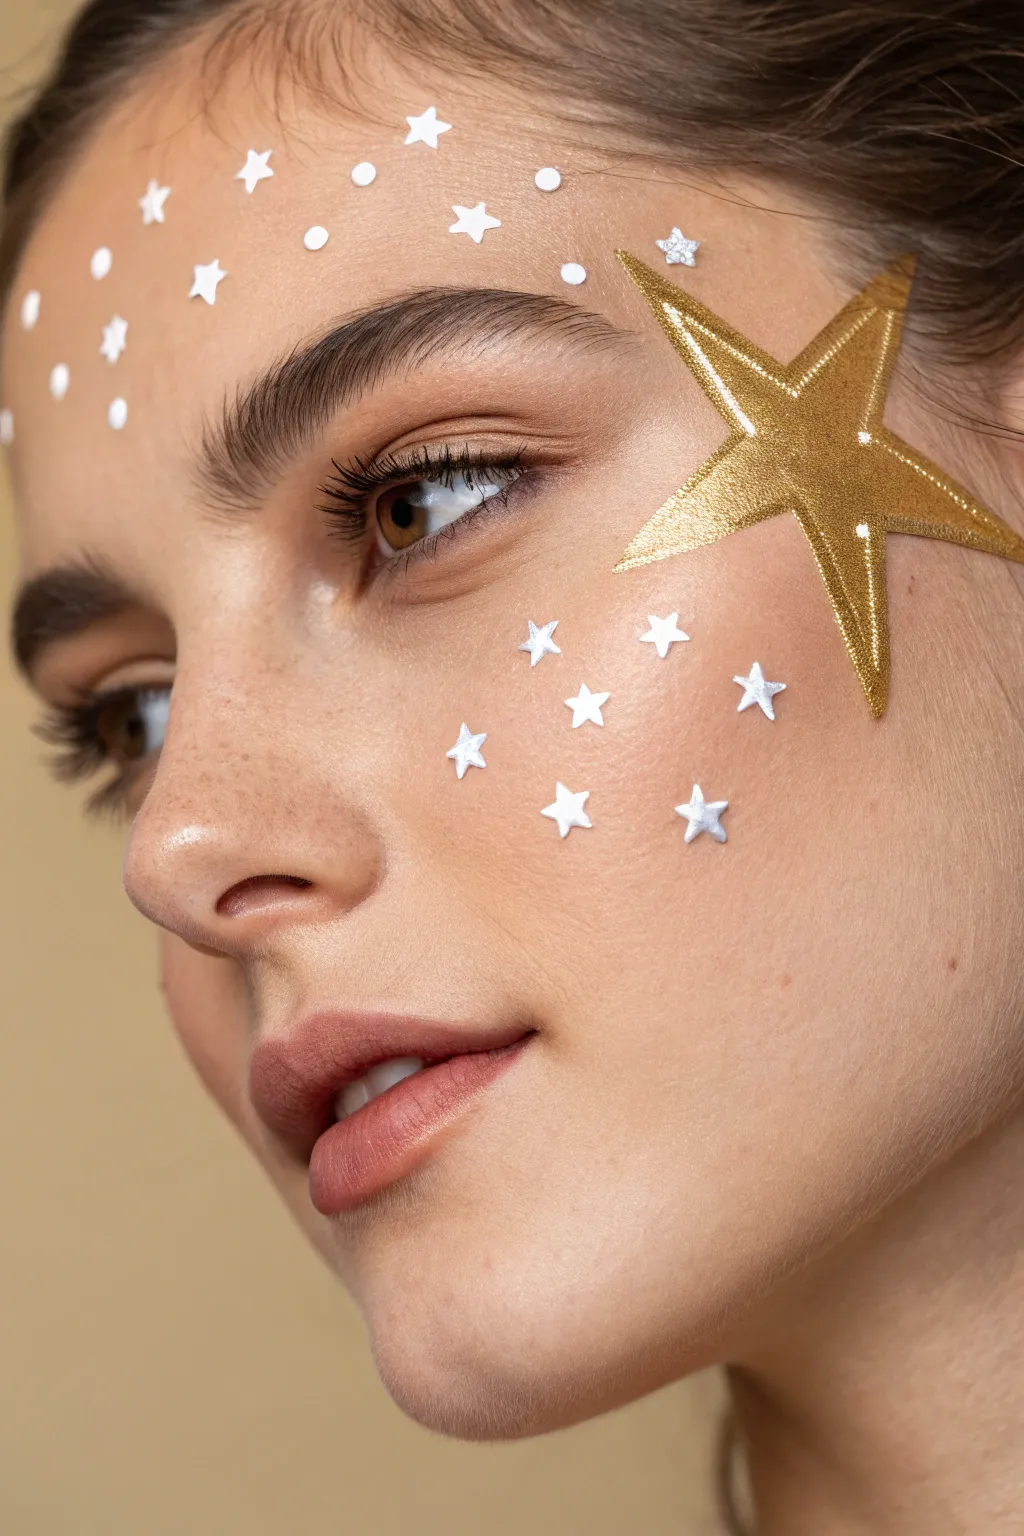
Achieve an ethereal, starry-eyed look with this simple yet striking design that combines a bold statement piece with delicate details. The mix of a large gold star decal and scattered white confetti creates a playful constellation across the forehead and cheek.
How-To Guide
Materials
- Large metallic gold star sticker or face decal (approx. 2 inches)
- Small white star-shaped confetti or face gems
- Small white round confetti dots (or white face paint)
- Cosmetic grade adhesive (lash glue or spirit gum)
- Tweezers
- Setting spray
- Nude lip color (matte finish)
- Grooming brow gel
- Lightweight foundation or tinted moisturizer
Step 1: Base Preparation
-
Cleanse and moisturize:
Start with a totally fresh, clean face. Apply your regular moisturizer and let it sink in completely so adhesives will stick properly. -
Apply light coverage:
Using a sponge or brush, apply a lightweight foundation or tinted moisturizer. You want the skin to look like skin, so keep the coverage sheer and freckles visible if you have them. -
Groom the brows:
Brush eyebrow hairs upward using a clear brow gel to create a fluffy, natural frame for the eyes. -
Add subtle lip color:
Pat a nude, matte lipstick onto your lips with your finger for a ‘your lips but better’ flush.
Sticker Lifting?
If the points of the large star keep lifting, use a tiny dot of eyelash glue on a toothpick to secure the very tip back down.
Step 2: Applying the Main Star
-
Position the gold star:
Take your large gold metallic star decal. Before gluing, hover it over the outer corner of your eye to find the perfect placement. It should sit high on the cheekbone, angling up toward the hairline. -
Apply adhesive:
Apply a thin, even layer of cosmetic adhesive to the back of the star. Allow it to become tacky for about 30 seconds. -
Secure the star:
Press the star firmly onto the skin. One point should aim down toward the jaw, and another should extend over the temple area. -
Smooth the edges:
Gently run your finger over the points of the star to ensure they are lying completely flat against the skin without lifting.
DIY Star Sticker
No gold star decal? Cut your own shape out of gold metallic washi tape or skin-safe metallic temporary tattoo paper.
Step 3: Creating the Constellation
-
Prepare the scatter stars:
Pour out a small amount of white star confetti onto a clean surface so they are easy to grab. -
Dot the glue:
Using the tip of your adhesive tube or a small brush, place three tiny dots of glue in a triangle formation on the cheek, just below the gold star. -
Place cheek stars:
Use tweezers to pick up the white stars and place them onto the glue dots. I find looking slightly away from the mirror helps gauge the spacing better. -
Add forehead stars:
Repeat the process on the forehead, placing 3-4 white stars scattered above the eyebrow and toward the center of the forehead. -
Incorporate round dots:
To add dimension, take your small white round confetti. Place a few dots interspersed among the forehead stars. -
Add temple details:
Place one small silver or white star right near the top point of the gold star for continuity. -
Check for balance:
Step back and check the distribution. The smaller elements should look random and floating, like a galaxy, rather than a rigid pattern. -
Variation: Painting dots:
If you don’t have round confetti, dip a toothpick or the back of a thin brush into white face paint and gently stamp small dots onto the skin instead.
Step 4: Finishing Touches
-
Set the look:
Close your eyes and mist the face lightly with a setting spray. This helps lock the makeup in place and takes down any powderiness. -
Final press:
Once the spray is dry, do one final gentle press on the gold star to ensure the edges remain secure for the duration of your event.
Now you are ready to shine with a celestial look that is both simple and captivating
Simple Flower Cheek Cluster
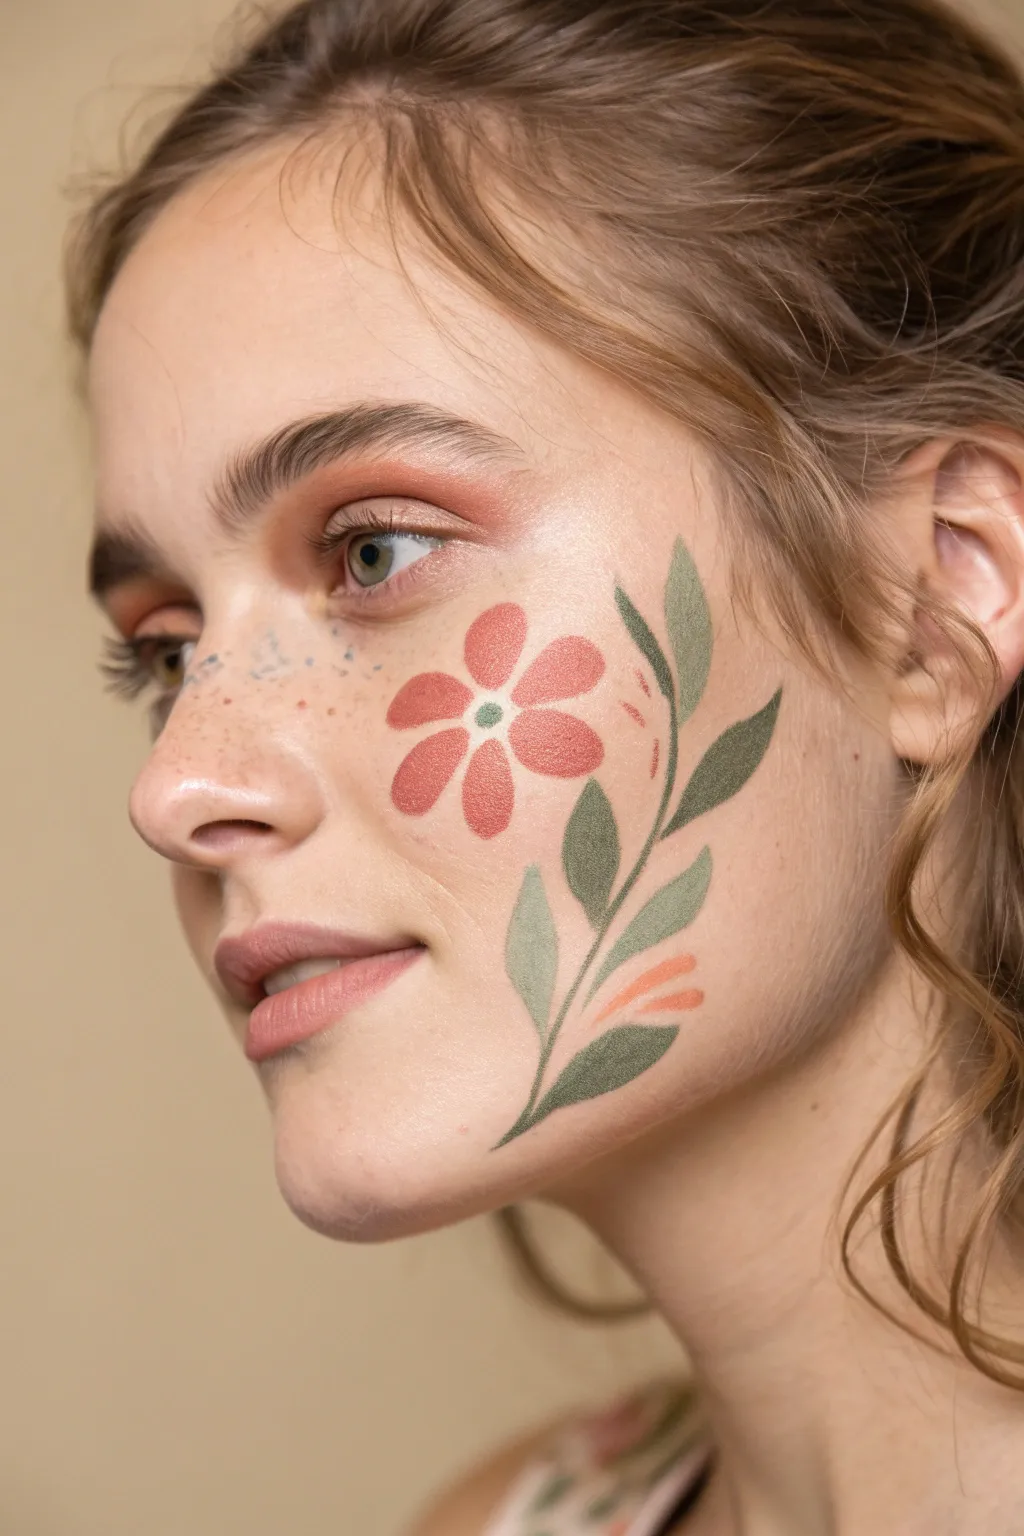
Embrace a touch of nature with this sweet, illustrative floral design that sits beautifully on the cheekbone. The look combines a soft, matte flower with leafy accents for a romantic, cottage-core aesthetic that is perfect for festivals or photoshoots.
Detailed Instructions
Materials
- Matte cream face paint (salmon pink)
- Matte cream face paint (sage green)
- Matte cream face paint (forest green)
- Small round detail brush (size 1 or 2)
- Fine liner brush (size 00)
- Flat angled brush (optional)
- Setting spray
- Translucent setting powder
- Faux freckle tint or brown face paint
Step 1: Base Preparation
-
Prep the skin:
Start with clean, moisturized skin. Apply a light layer of foundation or concealer if desired to create an even canvas, but keep the texture natural and dewy. -
Apply warm blush:
Using a fluffy brush, sweep a warm terracotta or peach blush across the cheeks and slightly over the nose bridge to create a sun-kissed base for your artwork. -
Create faux freckles:
Use a freckle tint or a very fine brush with diluted brown face paint to dot random freckles across the nose and upper cheeks. Tap them with your finger to soften the edges so they look lived-in.
Smudge Control
If your hand shakes and smears a line, wait for the paint to dry completely. Flaking it off with a dry spoolie is cleaner than wiping wet paint.
Step 2: Painting the Flower
-
Map the center:
Visualize where the main flower will sit—right on the apple of the cheek is ideal. Place a very tiny dot with your salmon pink paint to mark the center point. -
Paint the first petal:
Load your small round brush with the salmon pink face paint. Press the brush down gently near your center mark and pull outward to create a rounded petal shape. -
Complete the flower head:
Continue painting four or five more petals around the invisible center point. Aim for a simple daisy shape with rounded, not pointed, tips. -
Refine the edges:
Go back over the petals to ensure the color is opaque and the edges are smooth. If the paint is streaky, let the first layer dry for a moment before adding a second thin coat. -
Add the flower center:
Clean your brush or switch to a new one. Dip the tip into the sage green paint and press a small, perfect circle right in the middle of your pink petals. -
Add floating accents:
Using the pink paint again, add two small, detached teardrop shapes floating just below the main flower cluster to suggest falling petals or buds.
Adding Sparkle
For a magical twist, press tiny clear rhinestones onto the center of the flower or scattered like dew drops on the leaves using eyelash glue.
Step 3: Adding the Foliage
-
Draw the main stem:
Switch to your fine liner brush loaded with forest green paint. Draw a thin, curved line starting from the bottom jawline up toward the flower, curving it gently with the contour of your face. -
Paint the lower leaves:
Using the flat angled brush or the round brush, paint elongated leaf shapes attaching to the bottom of the stem. Use the darker forest green here for depth. -
Mix your greens:
For a more illustrative look, I like to switch between the sage and forest green shades. Paint the upper leaves near the flower in the lighter sage tone. -
Create leaf variety:
Ensure some leaves curve upwards and others gently droop. Varying the size keeps the design from looking too stiff or patterned. -
Add fine details:
Use the very tip of your liner brush to add tiny, hair-thin stems connecting any floating leaves to the main branch. -
Layer in texture:
If you have a slightly lighter green, add tiny highlights to the tips of the darker leaves to give them dimension without losing the flat illustrative style.
Step 4: Finishing Touches
-
Clean up edges:
Dip a small angled brush in a tiny bit of concealer to sharpen any petal or leaf edges that smudge or look uneven. -
Set the paint:
Once the paint is fully dry to the touch, lightly dust translucent powder over the design to prevent it from transferring. -
Final seal:
Mist the entire face with a setting spray to lock the design in for all-day wear.
Now you have a poetic piece of face art ready for a sunny day out
Mini Pirate Mustache And Scar
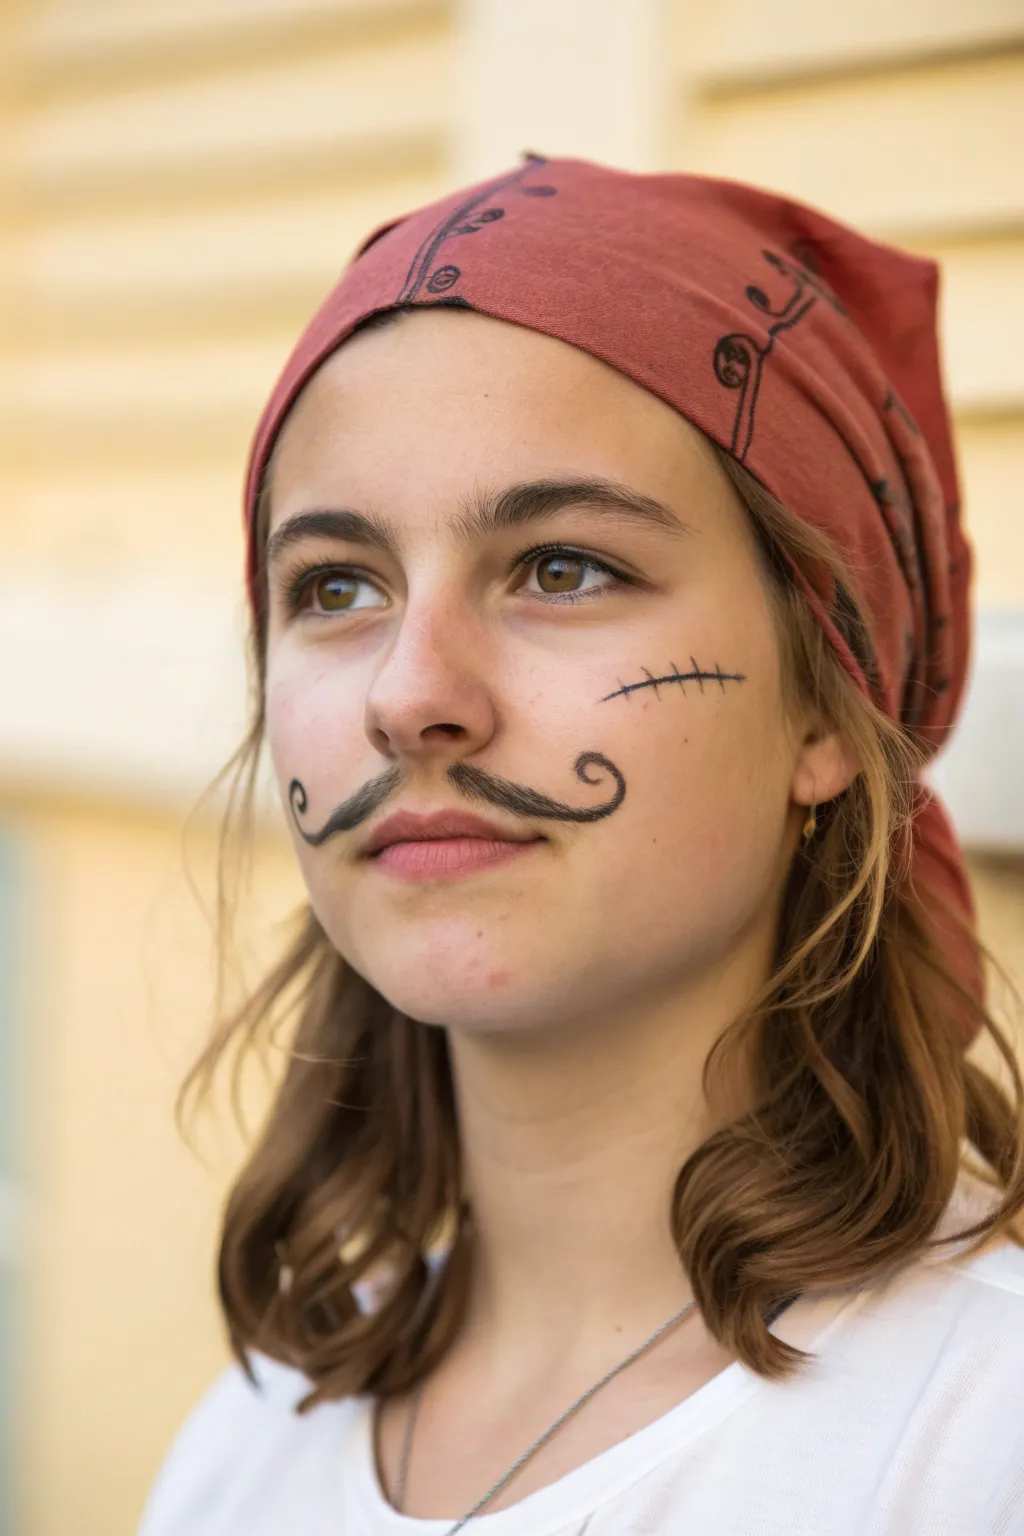
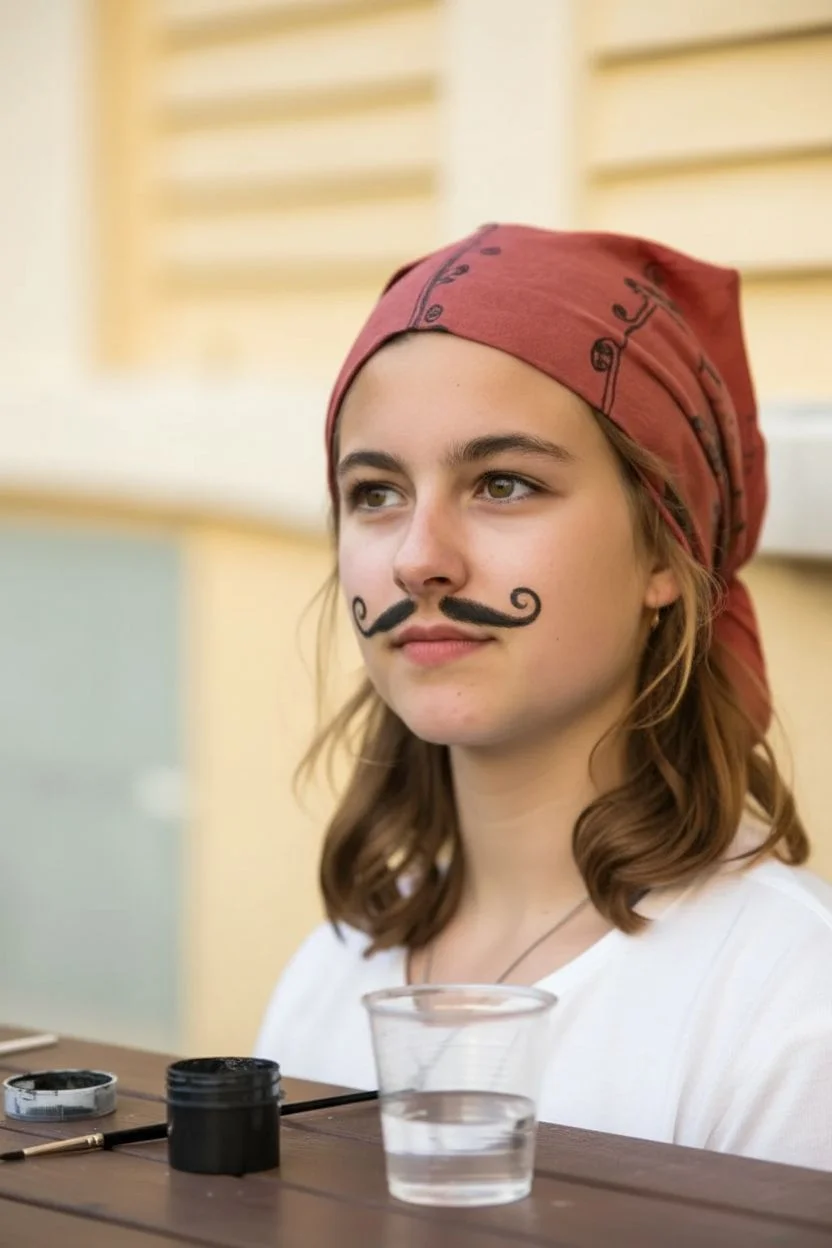
Transform into a pint-sized pirate in minutes with this minimal yet effective face paint design. Featuring a classic curled mustache and a rugged stitched scar, this look captures the adventurous spirit of the high seas without covering the entire face.
Step-by-Step Guide
Materials
- Black face paint (water-activated or cream)
- Fine round brush (size 1 or 2)
- Red bandanna
- Small cup of water
- Makeup remover wipes (for cleanup)
Step 1: Painting the Mustache
-
Load your brush:
Dip your fine round brush into water and swirl it into your black face paint until you have an inky, smooth consistency like liquid eyeliner. -
Find the center:
Start directly under the nose, right in the philtrum (the little groove above the lip). Place the tip of your brush there to anchor your design. -
Draw the left side:
Stroke outwards from the center towards the left cheek. Keep the line fairly thin at first; you can always thicken it later. -
Curl the end:
As you move past the corner of the mouth, curve the line upward into a tight spiral or loop to give it that classic handlebar look. -
Draw the right side:
Return to the center point and repeat the process on the right side, trying to mirror the angle and length of the first stroke. -
Match the curls:
Finish the right side with a matching spiral curl. Don’t worry if they aren’t perfectly symmetrical; pirates are a rough-and-tumble bunch. -
Thicken the mustache:
Go back over the main horizontal lines of the mustache to add a bit of weight and thickness, tapering it slightly as it reaches the curls. -
Refine the edges:
Use the very tip of your brush to sharpen the points of your curls or smooth out any shaky sections.
Uneven Handlebars?
If one curl ends up much larger than the other, simply thicken the smaller one to match. A thicker mustache just looks more villainous, which works perfectly here.
Step 2: Adding the Battle Scar
-
Position the scar:
Choose a spot high on the cheekbone, separate from the mustache area. I like placing it on the left side to balance the face. -
Draw the main scratch:
Using the same black paint, draw a single, slightly diagonal line about an inch and a half long. Lift your brush at the end to taper the line. -
Add stitches:
Paint short, vertical hash marks perpendicular to the main scar line. Aim for 5 to 7 stitches depending on the length of your scar. -
Vary the pressure:
Keep the stitch marks uneven in length and pressure to make the scar look old and jagged rather than surgical.
Step 3: Finishing Touches
-
Check for smudges:
Look over your work and clean up any accidental drips with a damp cotton swab or the corner of a wipe. -
Wait to dry:
Ask your pirate to keep their face relatively still for about a minute to let the black lines set completely. -
Prepare the headwear:
Take your red bandanna and fold it into a triangle. -
Tie the bandanna:
Place the long folded edge across the forehead, just above the eyebrows, covering the hairline. -
Secure the knot:
Bring the ends around to the back of the head and tie them securely over the third corner of the fabric. -
Adjust placement:
Tuck in any stray hairs and adjust the bandanna so it sits comfortably and frames the painted design well.
Use Liquid Liner
For ultra-crisp lines if you don’t have face paint, a felt-tip liquid eyeliner works brilliantly. It offers great control for those tiny curls and stays put for hours.
Now you are ready to set sail and hunt for buried treasure
Pumpkin Cheek With A Jack-O’-Lantern Face
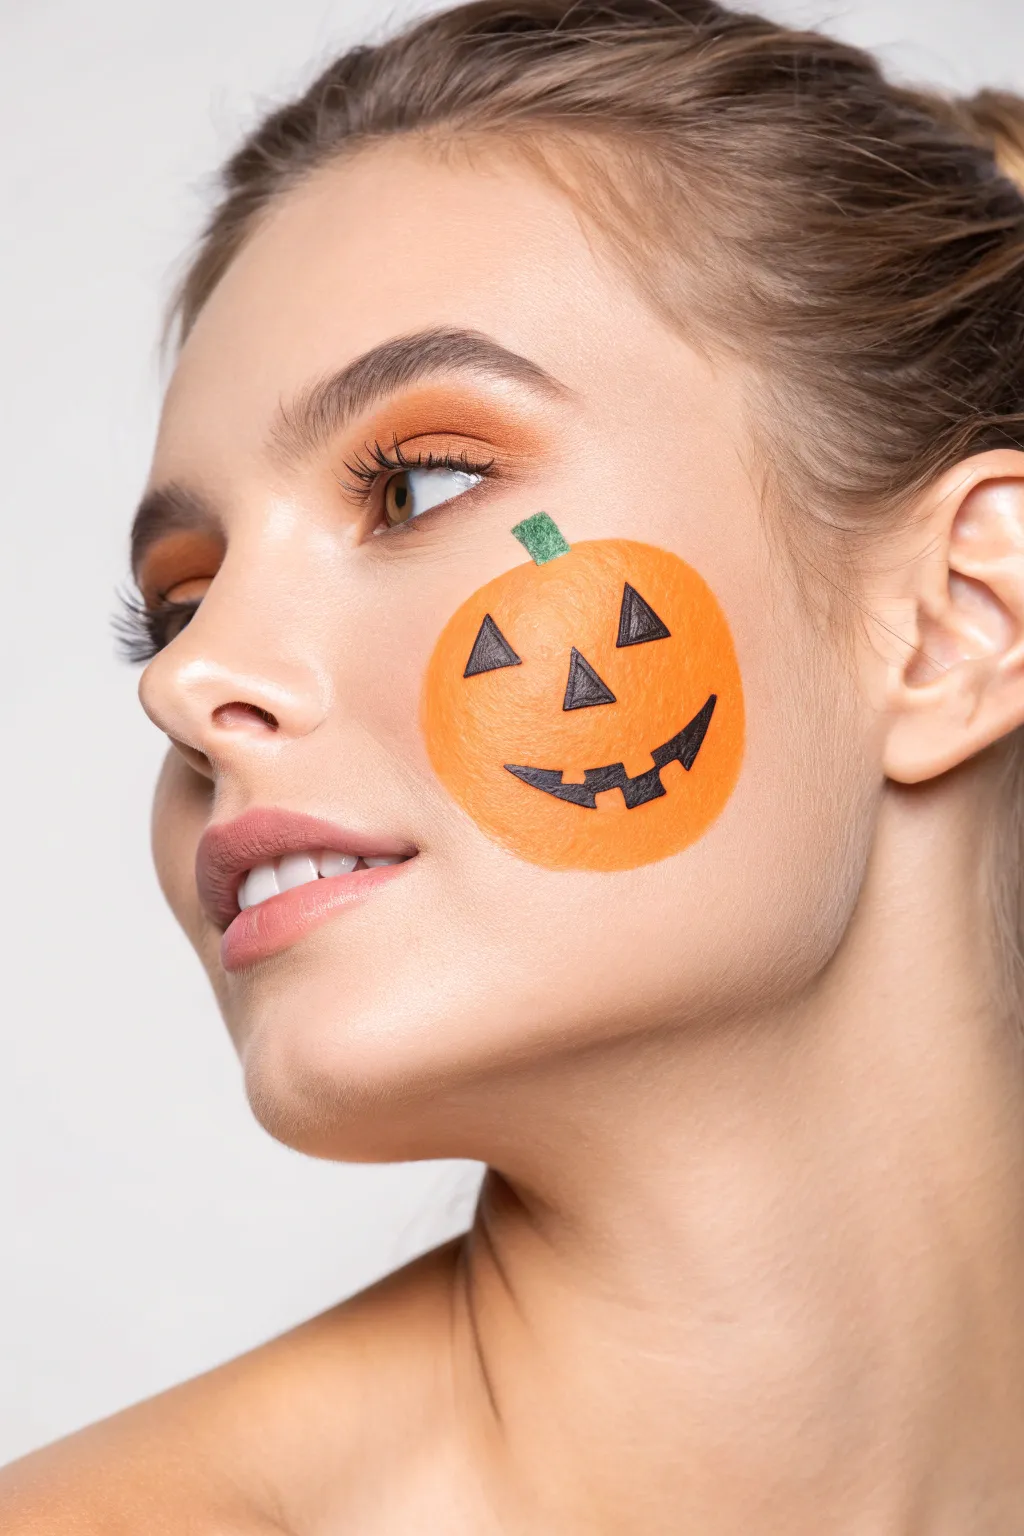
This minimalist yet festive design creates a vibrant pumpkin patch right on your cheek, perfect for a subtle Halloween look. By pairing a bright orange base with crisp black details, you’ll achieve a cheerful accent that complements warm-toned eye makeup beautifully.
How-To Guide
Materials
- Bright orange face paint (water-activated or cream)
- Black face paint or black liquid eyeliner
- Green face paint
- Round synthetic brush (specifically #4 or #6)
- Fine detail brush (liner brush or #0)
- Small flat brush
- Makeup sponge (optional, for the base)
- Orange eyeshadow (matte)
- Fluffy blending brush
Step 1: Setting the Scene
-
Prep the eyelid:
Before starting the face paint, create a cohesive look by applying a wash of matte orange eyeshadow across the eyelid and into the crease using a fluffy blending brush. -
Lower lash line:
Sweep a small amount of that same orange shadow under the lower lash line to balance the warmth of the pumpkin you are about to create.
Step 2: The Pumpkin Base
-
Load the orange:
Wet your medium round brush (#4 or #6) and swirl it into the bright orange face paint until you have a creamy, opaque consistency. -
Outline the shape:
On the apple of the cheek, draw a circle roughly 2 inches in diameter. It doesn’t need to be perfectly geometric; a slightly organic, squat shape looks more like a real pumpkin. -
Fill in the circle:
Fill the outline completely with the orange paint. You can use the same brush or switch to a small sponge to dab the color on for a smoother, texture-free finish. -
Check opacity:
If the skin shows through, let the first layer dry for about thirty seconds before patting on a second thin coat to ensure vibrant coverage. -
Add the stem:
Using a small flat brush and green paint, add a small rectangle or trapezoid shape right at the top center of your orange circle.
Uneven Coverage?
If the orange looks streaky, don’t drag the brush. Instead, use a tapping or stippling motion to deposit more pigment without lifting the layer underneath.
Step 3: Carving the Features
-
Switch brushes:
Clean your workstation and pick up your fine detail liner brush. Load it with black face paint, aiming for an ink-like consistency that flows easily. -
Right eye triangle:
Paint a small, solid black triangle on the upper right side of the pumpkin face. Keep the edges sharp. -
Left eye triangle:
Paint a matching black triangle on the left side. Try to keep them level with each other, though a little asymmetry adds character. -
The nose:
Make a slightly smaller triangle in the center, just below the eyes. -
Start the smile:
Draw a thin, curved line for the mouth base, extending almost as wide as the eyes. -
Create the teeth:
Add small square notches protruding up from the bottom lip line and down from the top lip line to simulate missing teeth. -
Thicken the grin:
Go back over the mouth lines to thicken them slightly, filling in the shape so it reads as a solid black cutout. -
Refine edges:
I usually take a moment here to tidy up any fuzzy black edges with the very tip of the liner brush for a crisp ‘carved’ appearance.
Pro Outline Tip
For a cartoon style, outline the entire orange pumpkin shape with a very thin black line. This makes the design pop against the skin tone, especially for photos.
Enjoy showing off your festive new accessory at your next autumn gathering
Spider And Web Corner Accent
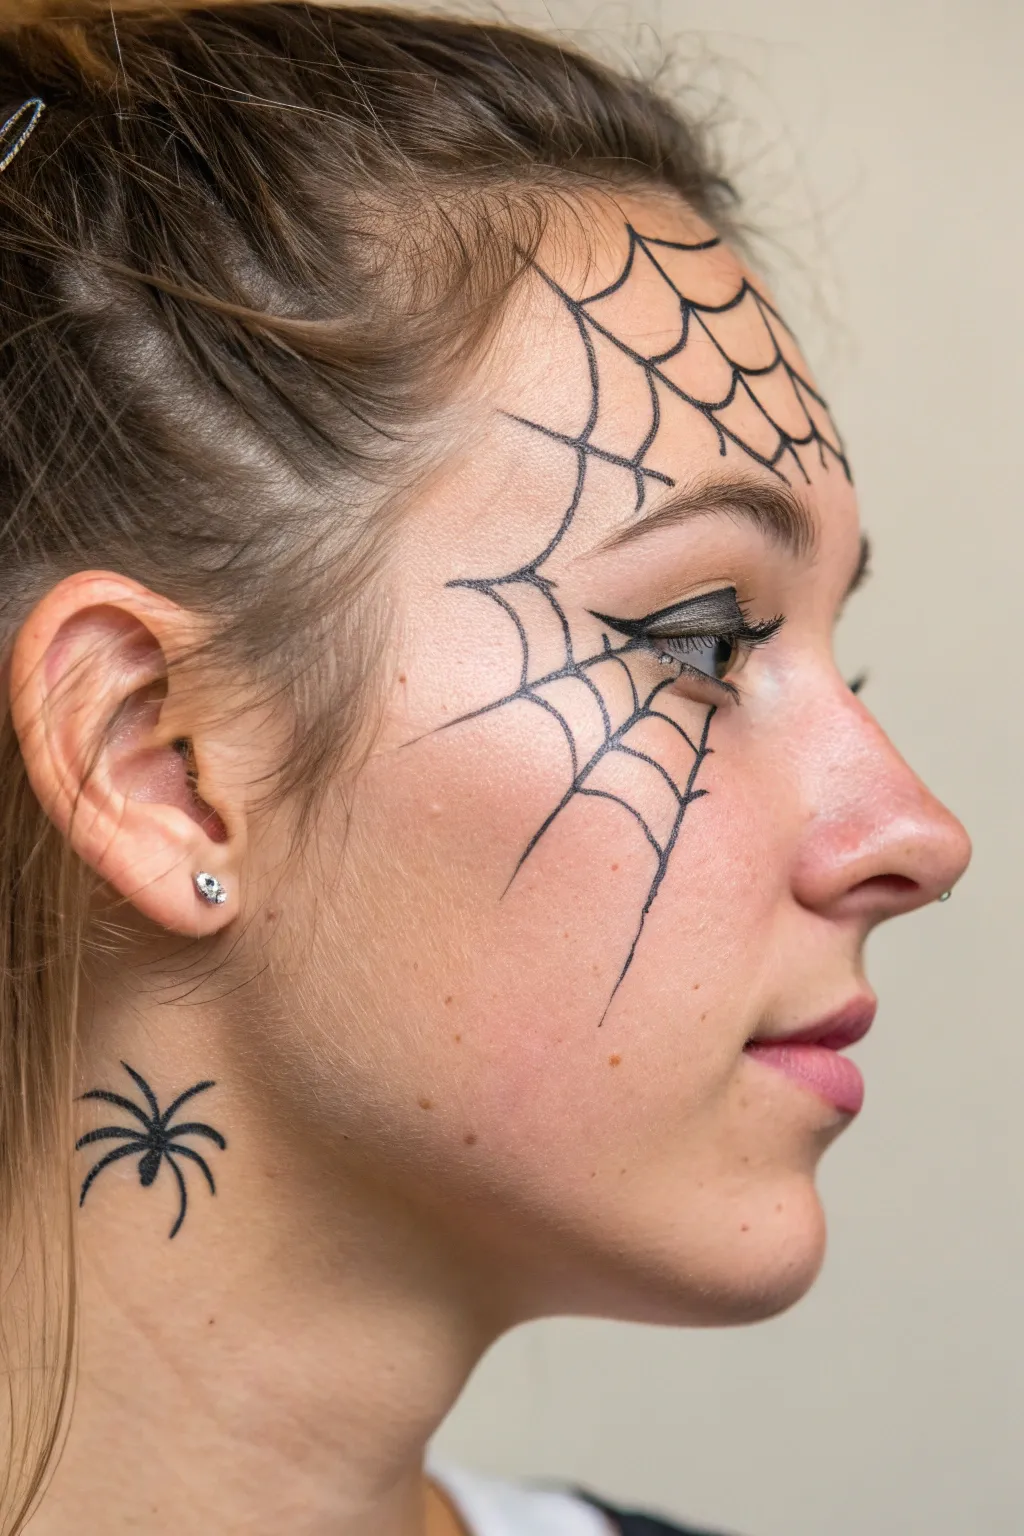
This minimalist yet striking face paint design combines sweeping eyeliner with a delicate spiderweb that fans out across the temple and forehead. It balances Halloween vibes with an elegant makeup look, featuring a subtle little spider creeping up the neck as a playful detail.
Step-by-Step
Materials
- Black liquid eyeliner (fine felt tip or brush tip)
- Black face paint or gel liner
- Fine liner brush (size 0 or 00)
- Black eyeshadow
- Small angled brush
- Pointed cotton swabs (for cleanup)
- Makeup remover or micellar water
Step 1: The Base Eye Makeup
-
Prime the canvas:
Start with a clean, dry face. If you have foundation or powder on, make sure the eye area is set so the liner doesn’t skip. -
Define the lash line:
Using your black liquid eyeliner, draw a classic winged liner along your upper lash line. Start thin at the inner corner and thicken it as you move outward. -
Extend the wing:
Extend the wing out past the corner of the eye, keeping it sharp. This wing will actually serve as one of the anchor lines for your web, so make sure the angle points towards your temple. -
Add smoky depth:
Take a small angled brush and a touch of black eyeshadow. Smudge it slightly into the lower lash line for definition without making it too heavy.
Use A Pinky Rest
To keep your hand steady while drawing fine lines on the cheek, rest your pinky finger gently on the chin or nose. This acts as a stabilizer for cleaner strokes.
Step 2: Weaving the Web
-
Map the anchor lines:
Using the fine liner brush or liquid eyeliner pen, draw the main radial lines of the web. Start from the outer corner of the eye, where your wing ended. -
Draw the upward radials:
Sweep one long line curving up towards the hairline on the forehead. Draw a second line slightly lower, angling towards the temple. -
Draw the downward radials:
Create two or three lines extending downward onto the cheekbone area. Keep your hand steady and let the lines taper off naturally at the ends. -
Start the inner webbing:
Begin connecting the radial lines with curved ‘scalloped’ strokes. Start close to the eye, connecting the lines with U-shaped curves that dip inwards towards the eye corner. -
Build the second row:
Move about half an inch outward and draw a second row of connecting curves parallel to the first set. I find it easiest to work from the top forehead line down to the cheek. -
Complete the outer webbing:
Add a third, and partially fourth row of webbing curves as you move further out. Make sure the curves get slightly wider as the web expands outward.
Add Some sparkle
For a glam twist, place tiny self-adhesive rhinestones at the intersection points of the web or use a silver glitter liner to trace over the black web lines.
Step 3: The Tiny Spider
-
Position the body:
Choose a spot on the neck, just below the ear. Use the tip of your eyeliner or brush to draw two small connected sections: a smaller circle for the head and a slightly larger oval for the abdomen. -
Fill in the shape:
Color in the spider’s body completely black so it looks solid and opaque. -
Legs on the left:
Draw four bent legs coming from the left side of the body. The front two should curve forward, and the back two should curve backward. -
Legs on the right:
Repeat on the right side with four matching bent legs. Keep the lines very thin and sharp at the tips for a realistic spindly look. -
Final touches:
Check your lines. If any web connections look shaky, lightly retrace them to crisp up the black. Use a pointed cotton swab dipped in remover to clean up any smudges.
This sophisticated web design adds just the right amount of edge to your look without covering your whole face
Friendly Monster Eyes On Forehead
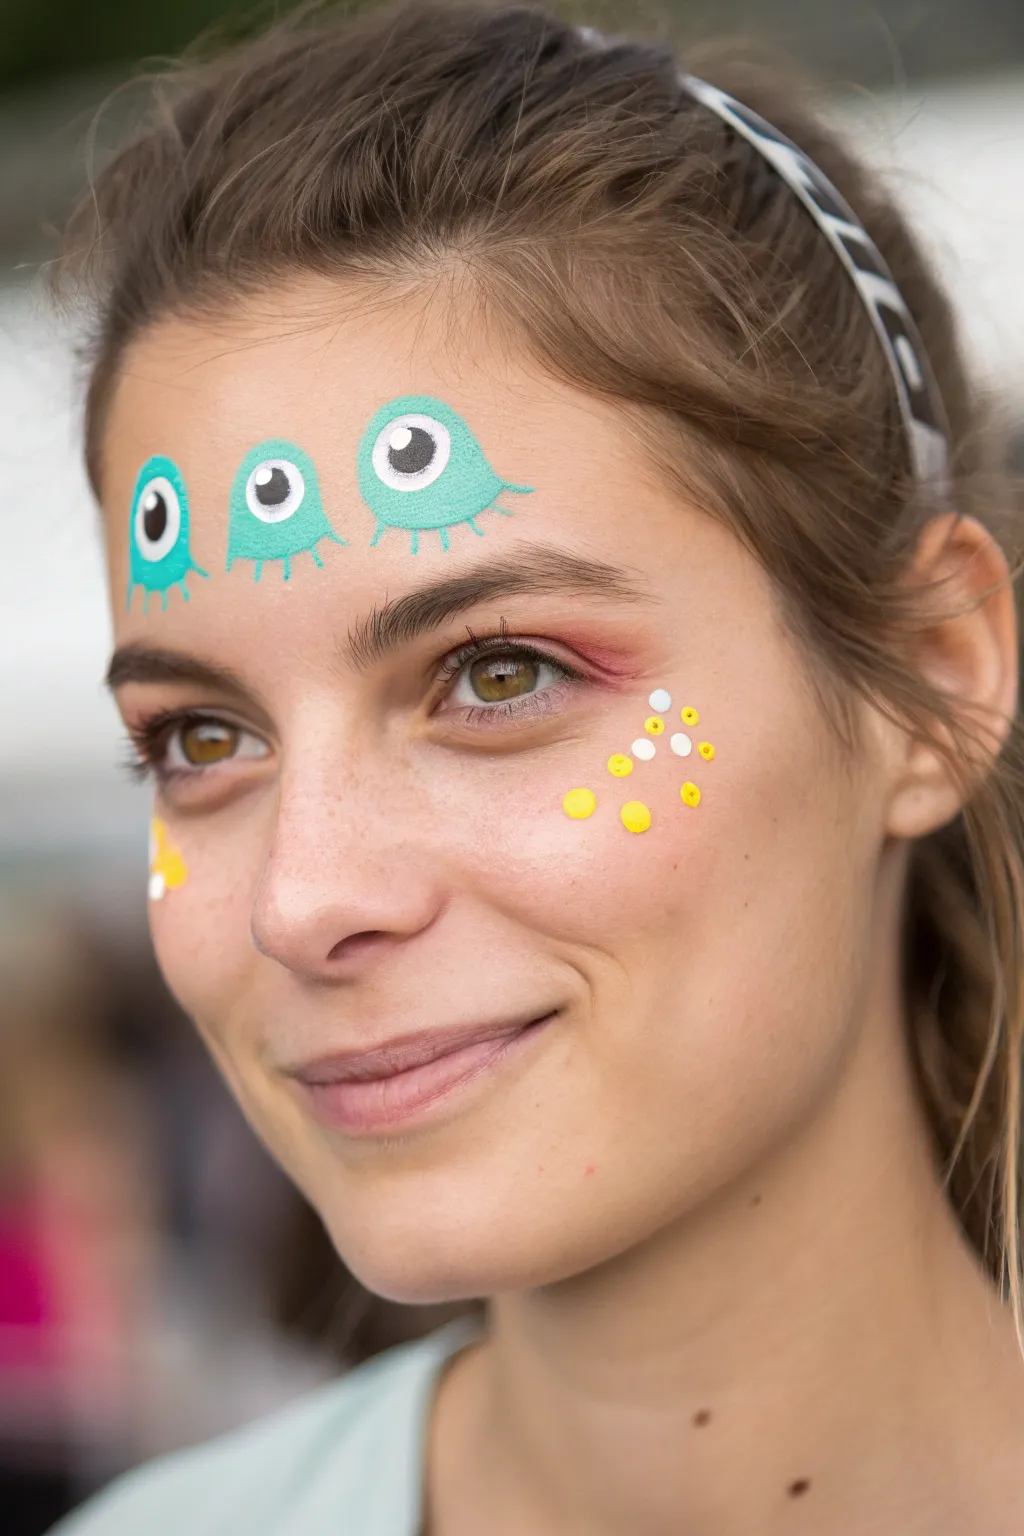
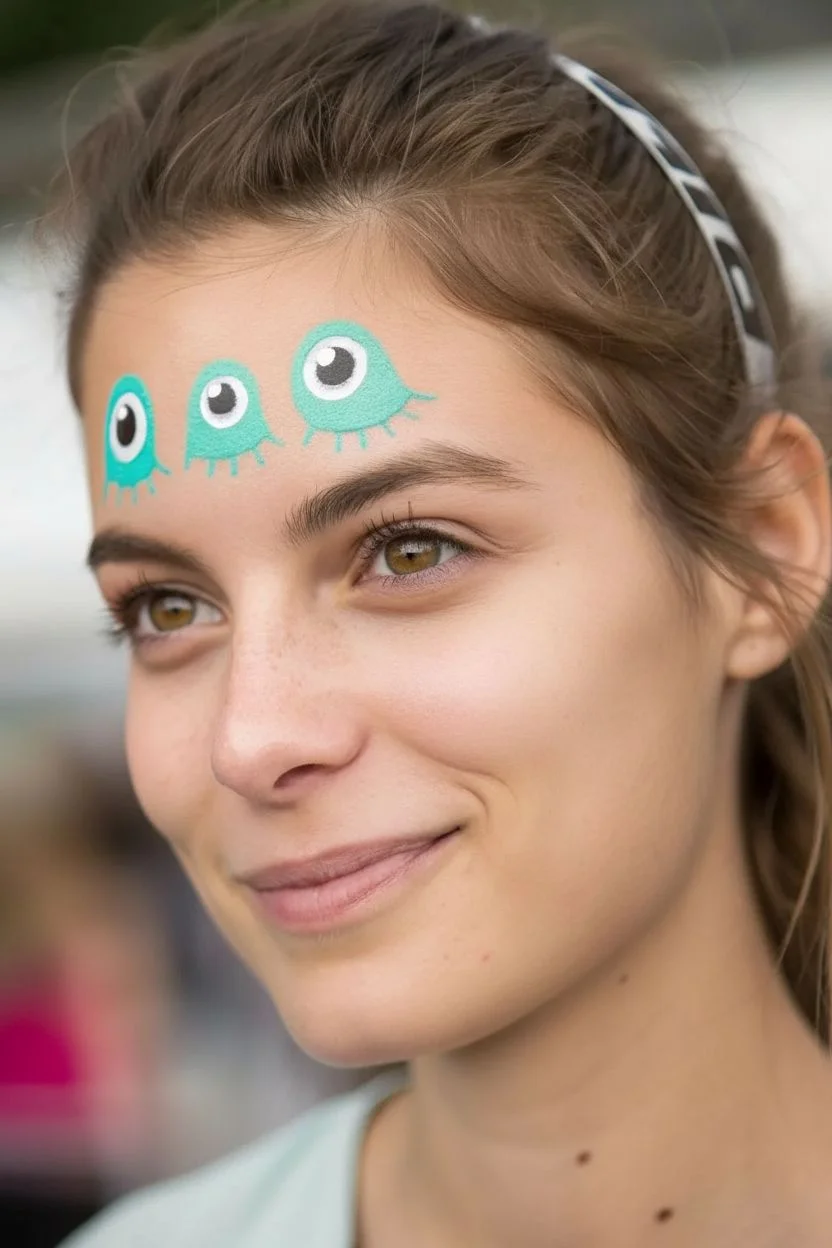
Transform your forehead into a playfully spooky creature with this simple yet striking design. Featuring three googly-eyed monster heads and a sprinkle of stardust on the cheeks, this look is perfect for a quick and friendly Halloween costume.
Step-by-Step Guide
Materials
- Teal or aqua face paint
- White face paint
- Black face paint
- Yellow face paint
- Pink powder eyeshadow or blush
- Medium round brush (size 4 or 6)
- Small round detail brush (size 1 or 2)
- Fluffy eyeshadow blending brush
- Sponge or applicator for eyeshadow
- Cup of water
- Paper towels
Step 1: Painting the Monster Eyes
-
Load your brush:
Start by wetting your medium round brush and swirling it into the teal or aqua face paint until you have a creamy consistency that isn’t too drippy. -
Create the center head:
Position your brush in the center of the forehead, just above the eyebrows. Paint a filled-in oval shape, slightly wider at the bottom like a gumdrop. -
Add the side heads:
Paint two more identical gumdrop shapes on either side of the center one. Angle them slightly outward to follow the curve of the forehead naturally. -
Paint the legs:
Using the very tip of the same brush (or switching to a smaller round brush), pull three or four tiny, short lines downward from the bottom flat edge of each blob to create little monster feet. -
Add the horns:
With a light touch, add two tiny lines sticking out from the upper sides of the side monsters’ heads for little ears or horns. -
Paint the whites of the eyes:
Rinse your medium brush thoroughly. Load it with white face paint and press a large, solid circle into the upper center of each teal shape. These are the eyeballs. -
Let it dry:
Wait a moment for the teal and white layers to dry completely so the black details won’t smear or turn gray. -
Add the pupils:
Using your small detail brush and black paint, add the pupils inside the white circles. I like to make the center pupil look straight ahead, while the side pupils look slightly outward for a goofy effect. -
Outline the eyes:
Carefully outline just the white circles with a very thin line of black paint to make them pop against the teal.
Step 2: Eyeshadow and Star Dust
-
Apply eyeshadow base:
Take a fluffy brush and your pink eyeshadow or blush. Sweep a soft wash of color over the eyelids, extending it slightly outward toward the temples. -
Deepen the crease:
Add a little more pigment just to the outer corners and crease of the eye to create a nice gradient effect contrasting with the bright face paint. -
Start the cheek dots:
Clean your small round brush or grab a fresh one. Load it with bright yellow face paint. -
Cluster the yellow dots:
Dab a cluster of small yellow dots on the upper cheekbone area. Vary the pressure to make some dots slightly larger than others. -
Add white accents:
Rinse the brush and load it with white paint. Interperse a few tiny white dots among the yellow ones to add sparkle and dimension. -
Add final details:
If you want extra flair, place one or two yellow dots near the outer corner of the opposite eye to balance the look.
Smudged edges?
If your monster shapes look messy, wait for the paint to fully dry, then use a slightly damp Q-tip to gently erase and reshape the edges cleaner
Level Up: Glitter
For a magical touch, press chunky cosmetic grade glitter over the yellow cheek dots while the paint is still tacky to catch the light
Now you have a trio of friendly alien buddies to accompany you wherever you go
Galaxy Cheek Wash With Tiny Constellations
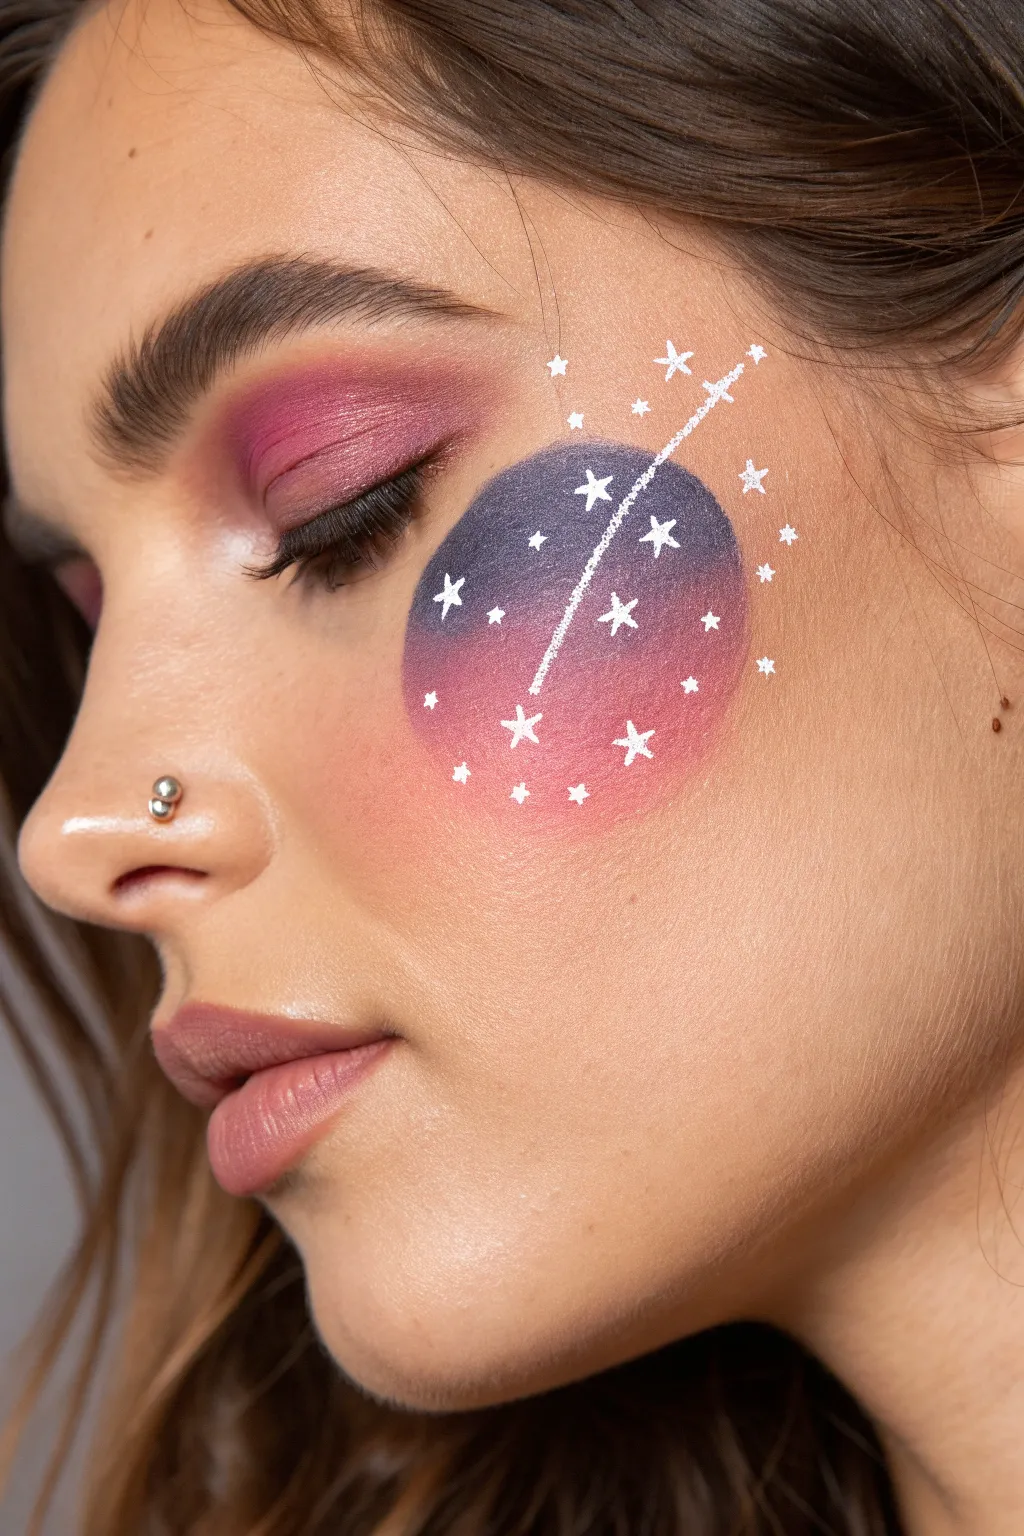
Capture the magic of the night sky with this ethereal galaxy cheek design. Soft gradients of berry and nebula blue form the backdrop for crisp white stars, creating a celestial look that’s perfect for festivals or creative photoshoots.
Step-by-Step Tutorial
Materials
- Matte eyeshadow in berry/magenta
- Matte eyeshadow in deep indigo/navy blue
- Fluffy blending brush
- Small dense shader brush
- White liquid eyeliner or white face paint
- Fine liner brush (if using face paint)
- Setting spray
- Mascara
- Brow gel
Step 1: Setting the Scene: Eye Makeup
-
Prime the eyelid:
Start with a clean, prepped eyelid. Apply a thin layer of eyeshadow primer or concealer to ensure your colors pop and stay vibrant throughout the day. -
Apply the berry base:
Using a fluffy blending brush, sweep the berry-toned matte eyeshadow across the entire eyelid, extending it slightly above the crease for a soft, diffused wash of color. -
Deepen the outer corner:
Take a smaller brush with a touch of the darker indigo shadow and gently blend it into the outer ‘V’ of the eye to add dimension without overpowering the pink tones. -
Define the lashes:
Apply a coat or two of black mascara to both upper and lower lashes to frame the eye. Keep the brows groomed natural with a clear brow gel.
Star Power Tip
If you struggle painting stars, use a white gel pen instead of liquid liner. It offers way more control and is easier to correct if you slip up.
Step 2: Creating the Nebula
-
Establish the shape:
Visualize a circle on the apple of your cheek. This will be the canvas for your galaxy. It doesn’t need to be perfectly round; a slightly organic shape works well. -
Lay down the pink gradient:
Load your fluffy brush with the berry eyeshadow. Stipple and swirl the color onto the bottom half of your imaginary circle, fading it out gently into the skin at the bottom edge. -
Add the deep space blue:
Switch to the deep indigo eyeshadow. Apply this to the top half of the circle, carefully blending it down to meet the pink. -
Blend the transition:
Where the blue and pink meet in the middle, use clean blending motions to create a seamless purple transition. You want a gradient, not a hard line. -
Intensify the core:
Go back in with a denser brush to pack a bit more blue into the upper center of the circle, ensuring the ‘night sky’ looks deep and rich. -
Clean up edges:
If the edges became too messy, use a clean brush or a sponge with a tiny bit of foundation to tidy the perimeter, though keeping it soft looks best.
Level Up: Cosmic Shimmer
Tap a tiny amount of iridescent glitter or loose highlighter over the darkest blue section before painting the stars to give the nebula a real 3D glow.
Step 3: Painting the Stars
-
Start the constellation line:
Dip your fine liner brush into white face paint or use a white liquid liner. Draw a thin, slightly broken line diagonally across the nebula circle, extending it out towards the temple. -
Texture the line:
I find that making the main constellation line look slightly ‘sketched’ or dashed rather than solid adds a lovely artistic texture. -
add major stars:
Paint classic five-point stars along the line and scattered within the dark blue section. Vary the sizes—some large, some medium—to create depth. -
Sprinkle minor stars:
Fill in the gaps with smaller four-point stars or simple crosses. Position these in the pinker areas and around the perimeter of the circle. -
Dot the background:
Use the very tip of your brush to place tiny white dots throughout the galaxy and slightly outside the colored area to represent distant stars. -
Highlight the connection points:
Place slightly larger dots at the intersections or ends of your main constellation line to emphasize the star map effect. -
Set the look:
Once the white paint is fully dry, mist your face with setting spray from a distance to lock everything in place without smudging your hard work.
Now you’re ready to shine brighter than the night sky with your custom galaxy art
Negative-Space Graphic Line Art Face Accent
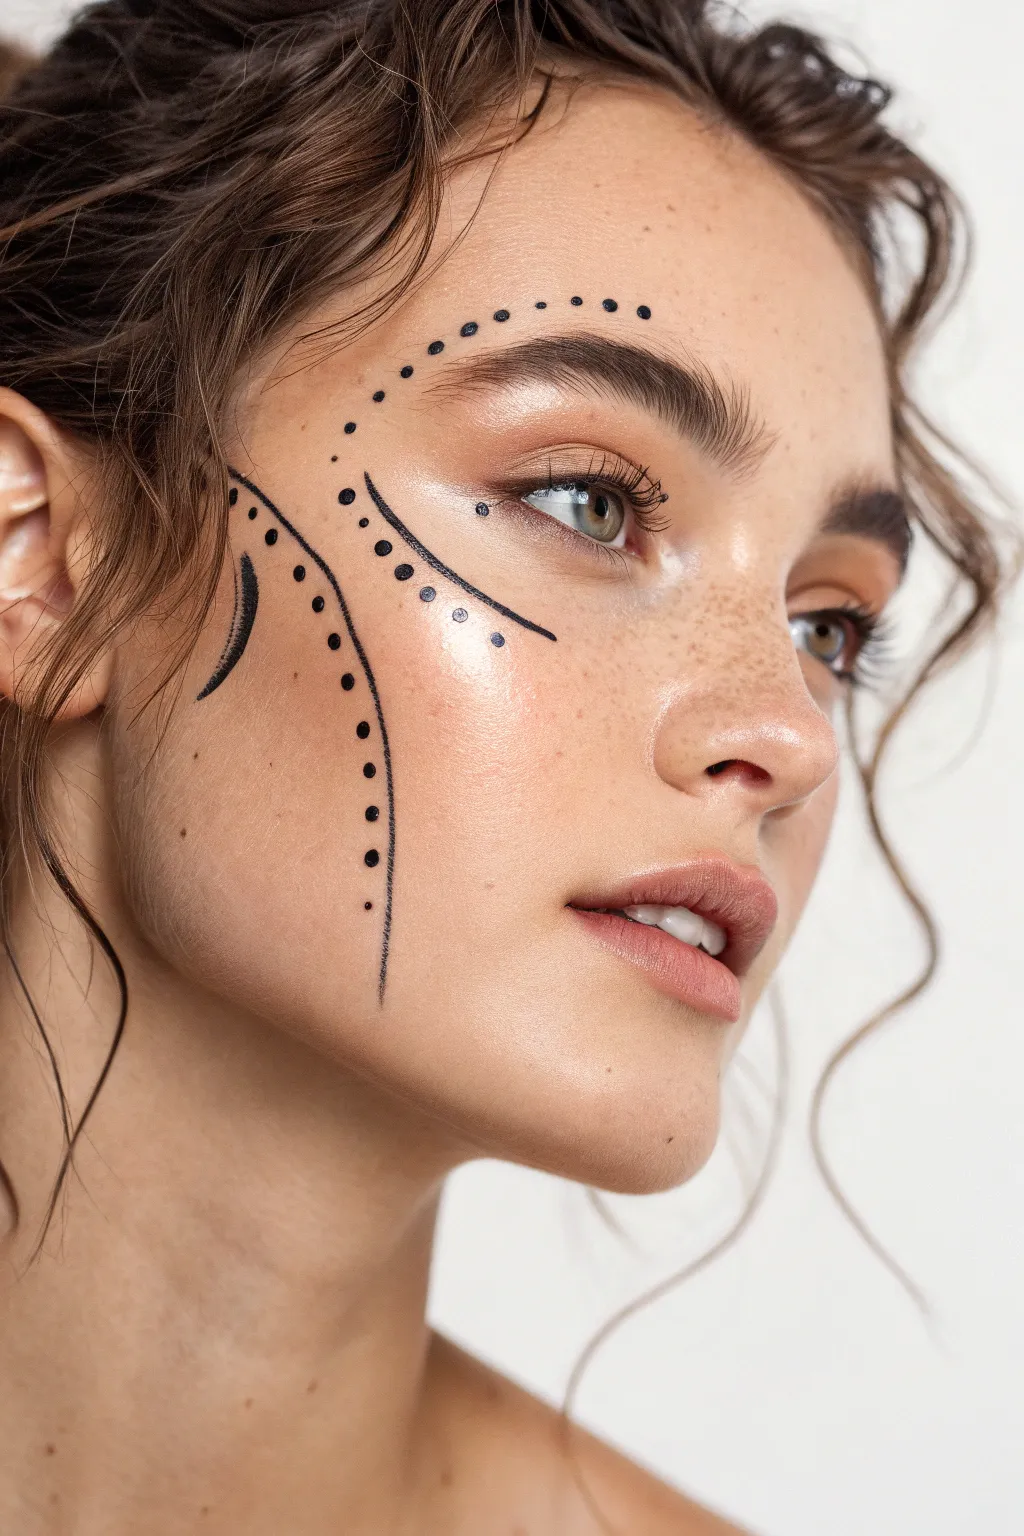
This striking look combines precise black linework with delicate dotwork to create a modern, tribal-inspired face accent that beautifully frames the cheekbone. The negative space design plays with natural facial contours, highlighting bone structure without overwhelming the features.
Detailed Instructions
Materials
- Fine-tipped black liquid liner or gel liner with a thin brush
- Pointed cotton swabs (for cleanup)
- Micellar water or makeup remover
- Setting spray
- Highlighter (liquid or powder)
- Small detail brush
Step 1: Base Preparation
-
Cleanse and moisturize:
Start with a clean, freshly moisturized face to ensure your liner glides on smoothly without skipping. -
Apply natural makeup:
Create a fresh, natural base. The model wears light foundation or skin tint, allowing freckles to show through, with brushed-up brows. -
Highlight the canvas:
Apply a luminous highlighter to the high point of your cheekbone. This glow will serve as the backdrop for the graphic lines, making the black ink pop.
Clean Up Mistakes
Line too thick? Dip a small angled brush in concealer and trace along the edge of the black liner. It acts like an eraser and sharpens the line instantly.
Step 2: Creating the Main Structure
-
Map the primary curve:
Starting near the top of the ear, draw a long, sweeping curve that descends down the cheek and tapers off just below the jawline. -
Refine the line weight:
Go back over your first curve. The line should be slightly thicker at the top and gradually thin out to a whisper-sharp point at the bottom. -
Draw the secondary curve:
Just under the eye, draw a shorter, opposing curve that swoops downward and outward, pointing towards the middle of your cheek. -
Add the ear contour:
Place a smaller, comma-shaped stroke right in front of the tragus (the nub of cartilage in front of your ear canal), curving slightly inwards.
Stamp, Don’t Draw
For perfect, round dots, don’t try to draw circles. Use the back end of a small brush or a toothpick dipped in liquid liner and simply stamp it onto the skin.
Step 3: Detailing with Dots and Dashes
-
Start the brow arch:
Create an arch of dots above the eyebrow. Begin with larger dots closer to the temple and graduate to tiny micro-dots as you move toward the forehead center. -
Dot the main curve:
Follow the inside edge of your long cheek curve with a line of dots. Start with medium-sized dots near the ear and space them out as you move down. -
Add inner details:
Inside the area framed by the eye curve and the main cheek line, add a few scattered dots of varying sizes to create depth. -
Create the lower flourish:
At the very bottom of the jawline curve, add two or three tiny dots extending past the line’s end to soften the finish. -
Balance the ear accent:
Add three distinct dots above the small swoosh near the ear to connect the design elements visually.
Step 4: Finishing Touches
-
Sharpen edges:
Dip a pointed cotton swab in a little micellar water and carefully drag it along the edges of your black lines to sharpen them if they look fuzzy. -
Intensify the high points:
I like to tap a tiny bit more highlighter right in the center of the design, between the two main curves, to maximize that ‘wet skin’ look. -
Check symmetry (optional):
If you are doing this on both sides, step back from the mirror now to check that the curves sit at roughly the same height on your cheekbones. -
Set the look:
Close your eyes and mist your face with a setting spray to lock the liner in place and prevent smudging throughout the day. -
Final drying time:
Keep your face relatively still for about 60 seconds to let the setting spray and liner dry completely.
Now you have a fierce, geometric accent that elevates a simple makeup look into wearable art


Have a question or want to share your own experience? I'd love to hear from you in the comments below!