Skeleton hands are one of my favorite subjects because you get instant drama, storytelling, and structure all in one drawing. Here are my go-to skeleton hand drawing ideas—from classic studies to more playful, unexpected concepts you can make your own.
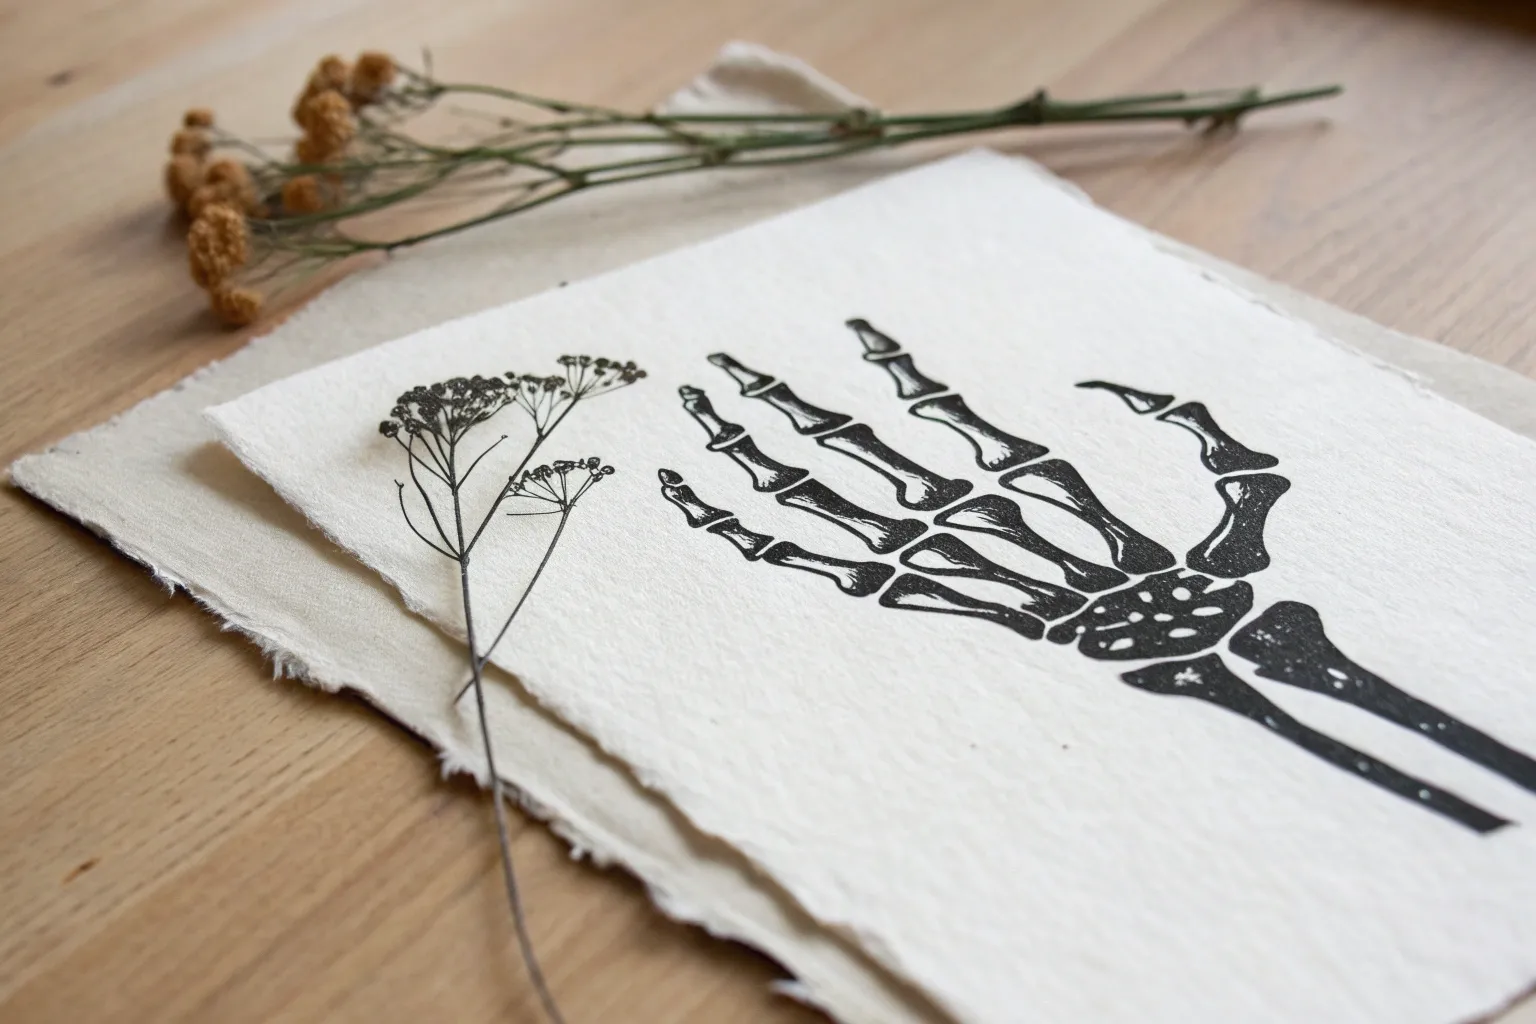
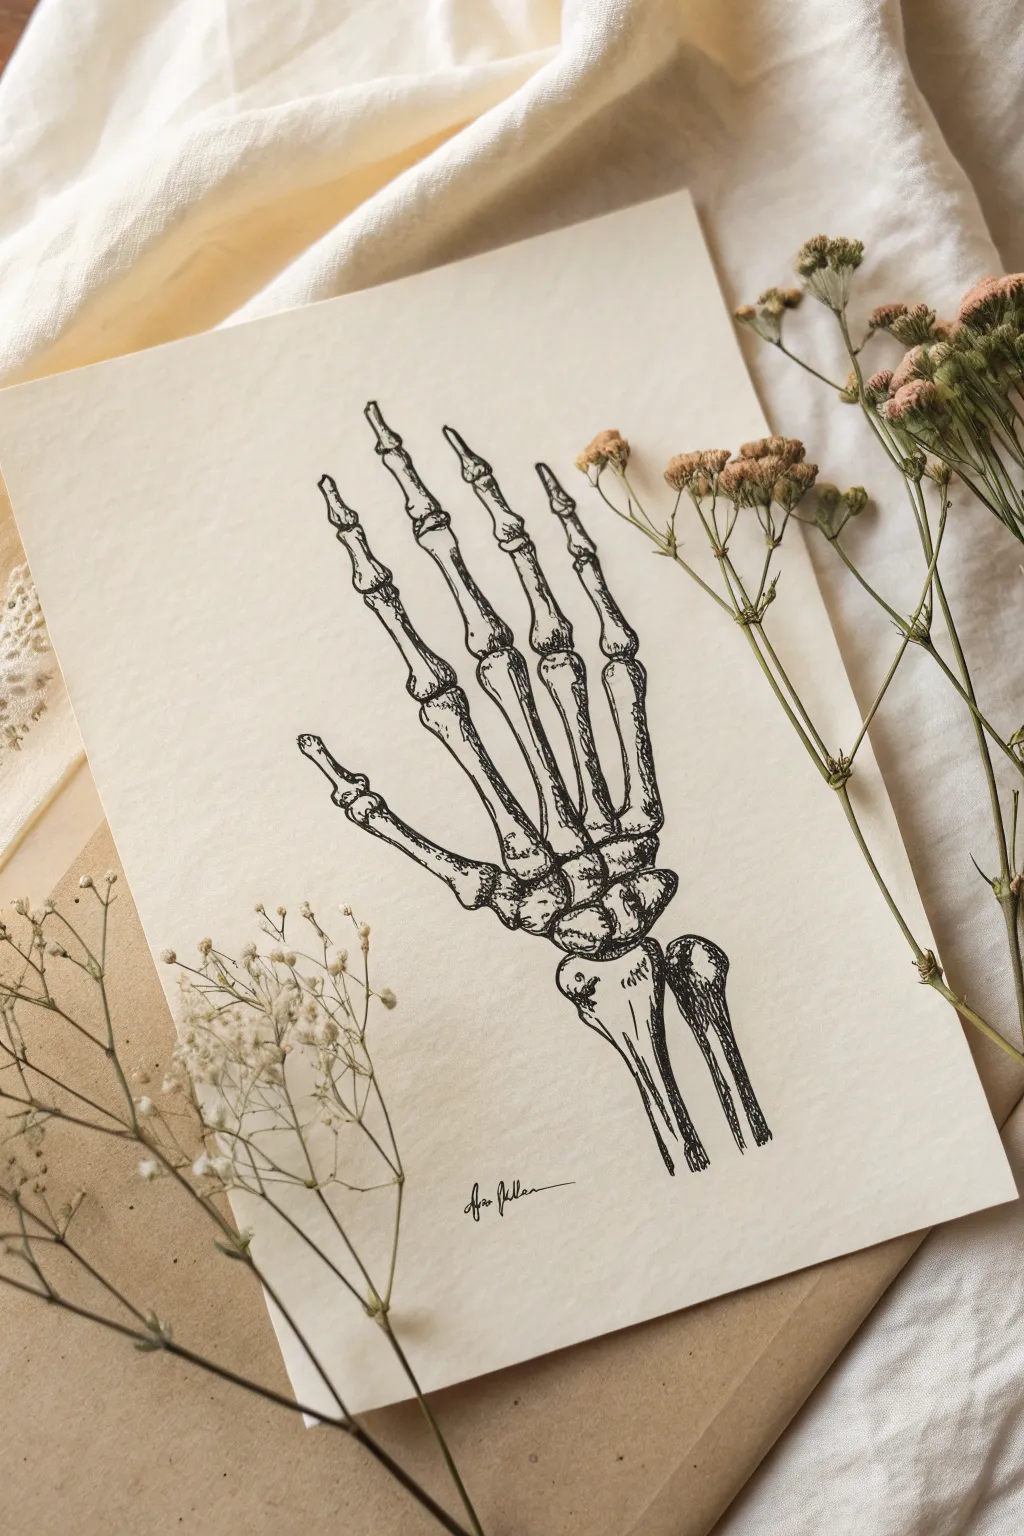
Classic Open-Palm Skeleton Hand Study
Master the intricate mechanics of human anatomy with this detailed skeletal hand study. Using precise linework and targeted shading, you will render the smooth, bone-like textures and complex joints that give the hand its structure.
Step-by-Step Guide
Materials
- Sketchbook with smooth or medium-tooth paper
- HB graphite pencil (for initial sketching)
- 2B or 4B graphite pencil (for shading)
- Fine-point mechanical pencil (optional, for details)
- Kneaded eraser
- Blending stump or tortillon (optional)
Step 1: Constructing the Framework
-
Establish the wrist:
Begin at the bottom of the page by lightly sketching the outline of the two forearm bones (radius and ulna). The radius (thumb side) should be slightly wider at the connection point. -
Sketch the carpals:
Above the wrist bones, draw a clustered group of varying rounded shapes to represent the carpal bones. Think of this as a compacted, pebble-like foundation for the fingers. -
Map the metacarpals:
Extend five long, cylinder-like shapes upward from the carpal cluster. These are the metacarpals (palm bones). Fan them out slightly, with the thumb bone positioned lower and angled outward to the right. -
Indicate the knuckles:
At the top of each metacarpal, sketch small, bulbous shapes to mark the main knuckles. This establishes the base of the fingers. -
Draft the phalanges:
Draw the finger bones extending from the knuckles. Remember that the thumb has two segments (proximal and distal), while the other four fingers have three distinct segments each. -
Refine the bone joints:
Go back over the connection points between the finger segments. Widen the ends of the bones slightly where they meet to mimic actual skeletal joints, creating that ‘knobby’ silhouette.
Bone Texture Tip
Don’t shade overly smoothly. Use slightly rough, directional hatching strokes to mimic the porous, fibrous texture typical of dry bone surfaces.
Step 2: Refining Contours
-
Define the outer edges:
Switching to a slightly sharper pencil, trace over your framework with a confident, continuous line. Give the bones a slightly organic, undulating contour rather than perfectly straight lines. -
Detail the carpals:
Clarify the shapes of the wrist bones. Instead of random circles, try to nest them together tightly like puzzle pieces, particularly the scaphoid and lunate bones at the base. -
Add texture lines:
Sketch faint vertical striations or slight grain lines running along the length of the longer bones. This hints at the bone structure before we apply heavy shading. -
Clean up the sketch:
Use your kneaded eraser to gently lift away the initial construction lines and any smudge marks, leaving only your refined outcome.
Step 3: Shading and Form
-
Establish a light source:
Assume the light is coming from the top left. This means the right side of each bone and the underside of the joints will be your darkest areas. -
Shade the fingers:
Start applying graphite to the right side of the phalanges. Use a curved hatching motion to follow the cylindrical roundness of the bone. -
Deepen the joints:
Press harder with your pencil in the crevices between the knuckles. Darker shadows here separate the segments and create depth. -
Shadow the metacarpals:
Apply a gradient shadow to the palm bones (metacarpals). I find it helpful to leave a thin strip of white space on the far left edge of each bone to act as a rim highlight. -
Sculpt the wrist:
Shade the carpal cluster heavily where the bones overlap. Deep shadows in the gaps between these small bones are crucial for making them look like separate, solid objects. -
Render the forearm:
Add broad strokes of shading to the radius and ulna at the bottom. The interior space between these two bones should be dark to show the void. -
Final polish:
Go over the entire drawing one last time to punch up the contrast. Re-darken the deepest outlines and clean up any highlight edges with a sharp eraser edge.
Aged Parchment Look
To give your drawing an antique medical study vibe, lightly wash the paper with diluted coffee or tea and let it dry completely before starting your sketch.
Now you have a striking skeletal study that captures both anatomical precision and artistic depth


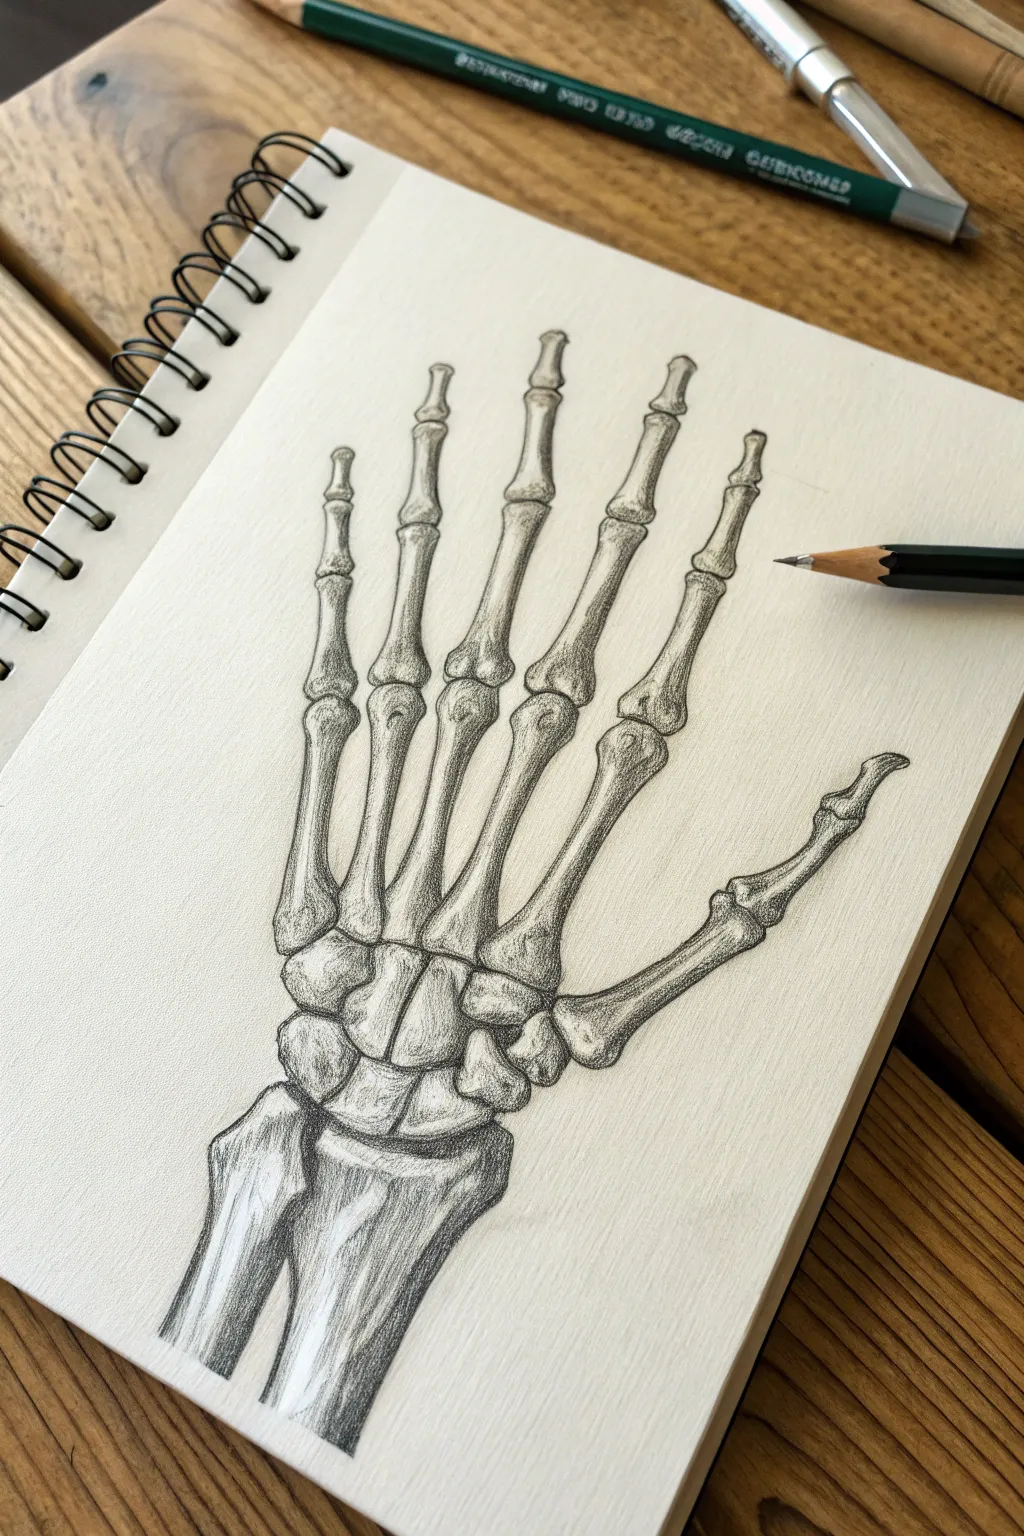
Reaching Skeleton Hand in Foreshortening
Master the intricate beauty of human anatomy with this detailed skeletal hand study. Using clean ink lines and careful hatching, you’ll capture the delicate structure of the phalanges, metacarpals, and wrist bones in a striking black-and-white composition.
Step-by-Step Guide
Materials
- Spiral-bound sketchbook (smooth or mixed media paper)
- HB or 2B graphite pencil
- Fine liner pen (0.3mm or 0.5mm, black)
- Fine liner pen (0.1mm, black for detailing)
- Kneaded eraser
Step 1: Constructing the Framework
-
Lay out the wrist block:
Begin lightly in pencil near the bottom third of your page. Draw a cluster of small, irregular oval shapes to represent the carpal bones of the wrist. Keep them loosely grouped together, acting as the anchor for the hand. -
Map the metacarpals:
Extending upward from the wrist cluster, sketch five long, thin lines to mark the direction of the metacarpal bones (the palm bones). Notice that they fan out slightly, like rays of sunlight. -
Indicate the finger joints:
Along each finger line, make small horizontal tick marks to indicate where the knuckles and joints will sit. The middle finger is the longest, while the thumb sits lower and branches off to the right at a wider angle. -
Sketch the phalanges:
Flesh out the finger bones by drawing cylinders around your guide lines. Remember that finger bones are widest at the joints (knuckles) and taper in the middle sections. -
Add the arm bones:
Draw the radius and ulna extending downward from the wrist. The ulna (on the pinky side) has a prominent knobby end near the wrist, while the radius is broader.
Clean Lines Only
Smudged ink ruins bone studies. Always place a scrap piece of paper under your drawing hand to protect the paper from oils and prevent wet ink from smearing.
Step 2: Inking the Outline
-
Tracing the primary shapes:
Switch to your 0.3mm or 0.5mm pen. Carefully trace over your pencil sketch, but don’t just draw straight lines. Use slightly wobbly, organic strokes to mimic the texture of bone. -
Define the carpals:
Ink the cluster of wrist bones individually. They should look like small, fitted stones. Ensure gaps remain between them to suggest cartilage without drawing it explicitly. -
Detail the knuckles:
At each joint, widen your line work to create the bulbous heads of the bones. I like to add tiny, broken lines on the surface of the joints to suggest contour and roundness. -
Refine the thumb mechanism:
Pay special attention to the base of the thumb (trapezium bone). Give it a distinct saddle shape where it meets the first metacarpal to show flexibility.
Scientific Labels
Enhance the anatomical textbook vibe by adding delicate calligraphic labels (e.g., ‘Carpals’, ‘Phalanges’) with leader lines pointing to specific bones.
Step 3: Shading and Texture
-
Erase pencil guides:
Once the main ink outlines are completely dry, gently run your kneaded eraser over the entire drawing to lift the graphite, leaving only the crisp black ink. -
Start linear hatching:
Using the finer 0.1mm pen, begin adding shadow. Use parallel diagonal lines (hatching) along the sides of the cylindrical bones to create a sense of roundness. -
Darken the recesses:
Identify the spaces between the fingers and the deep gaps in the wrist cluster. Apply cross-hatching (overlapping lines) here to push these areas into deep shadow. -
Texture the radius and ulna:
Add long, sweeping vertical hatch lines along the arm bones. This emphasizes their length and differentiates them from the stubby carpal bones. -
Highlight the ridges:
Leave the center of each bone white to represent the high point catching the light. Add tiny stippling dots near the joints for a porous bone texture. -
Final contour check:
Go back over the outer edges with your thicker pen (0.5mm) to create a stronger silhouette, making the skeleton pop against the white paper.
Now you have a striking anatomical study that blends scientific accuracy with artistic flair


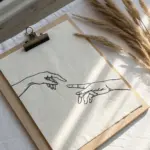
Two Skeleton Hands Forming a Heart
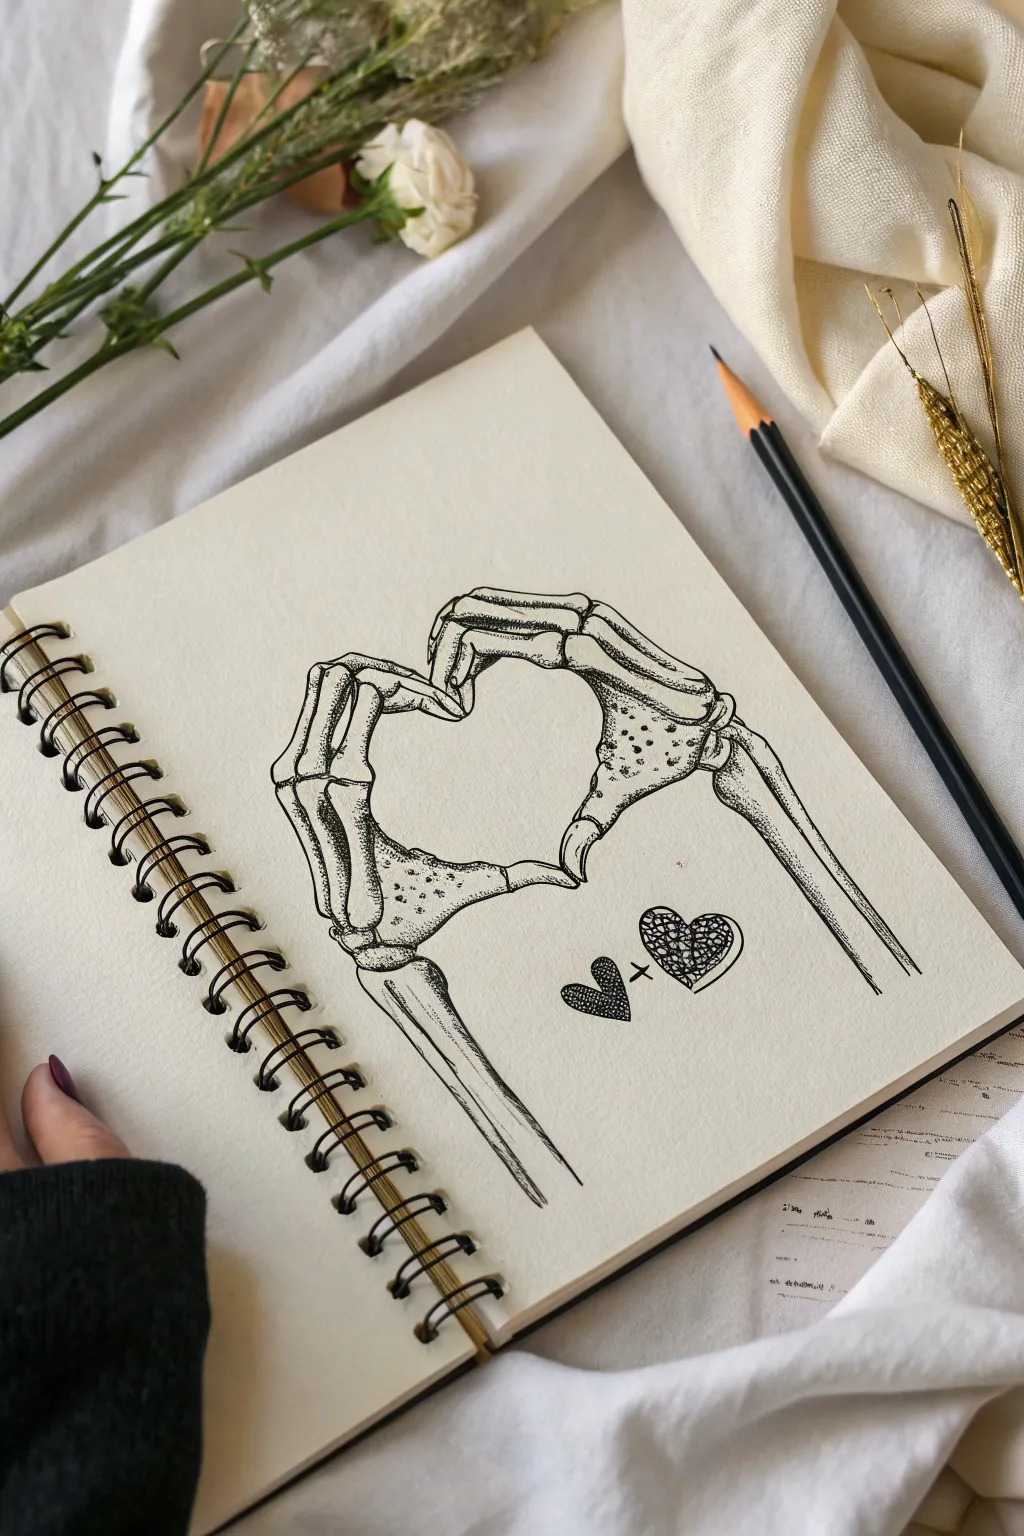
Capture a spooky yet romantic sentiment with this detailed ink drawing of two skeletal hands forming a heart shape. The stark black lines against cream paper create a striking contrast, using stippling techniques to add realistic bone texture and depth.
Detailed Instructions
Materials
- Sketchbook with cream or off-white paper (smooth texture preferred)
- HB pencil for initial sketching
- Kneaded eraser
- Fine liner pen (size 0.1mm or 0.05mm for details)
- Fine liner pen (size 0.3mm or 0.5mm for main outlines)
- Ruler (optional for arm alignment)
Step 1: Laying the Skeletal Foundation
-
Establish the heart shape:
Start by very lightly sketching a simple heart shape in the center of your page with your HB pencil. This invisible guide will ensure the fingertips meet perfectly later. -
Map out the wrists:
Draw two parallel lines extending from the bottom corners of your page towards the heart shape. These will become the radius and ulna bones of each arm. Angle them slightly inward. -
Block in the palm area:
At the end of your arm lines, sketch rough trapezoid shapes to represent the cluster of carpal and metacarpal bones. The left hand’s palm should face right, and the right hand’s palm should face left. -
Sketch the finger segments:
Using simple lines and small circles for joints, map out the fingers. The thumb and index fingers create the top curve of the heart, while the remaining fingers curl inward or tuck away. -
Refine the bone structures:
Flesh out your stick figures. Draw the individual phalanges (finger bones), widening them at the joints (knuckles) and narrowing them in the middle of each segment. -
Detail the wrist bones:
Define the carpal area more clearly. Instead of one solid block, sketch slight bumps and curves to suggest the multiple small bones that make up the wrist complex.
Step 2: Inking the Outlines
-
Outline the fingers:
Switch to your 0.3mm fine liner. carefully trace over your pencil lines for the fingers. Use slightly broken lines at the joints to suggest separation between bones. -
Define the arms:
Ink the long bones of the arms. I like to keep these lines fairly straight but with slight wobbles to mimic organic bone texture rather than perfect geometric lines. -
Connect the heart:
Pay special attention to where the fingertips touch. Ensure the index fingers and thumbs creates a smooth, continuous heart silhouette at the top. -
Ink the decorative elements:
Draw the small heart symbol and the ‘plus’ sign below the hands. For the second broken heart, outline the jagged crack down the middle. -
Erase pencil guides:
Once the ink is completely dry—give it a few minutes—gently erase all underlying pencil sketches with your kneaded eraser to reveal a clean line drawing.
Stippling Patience
Don’t rush the dots! Fast, aggressive tapping damages pen nibs and makes ‘tails’ instead of round dots. Hold the pen vertical and move rhythmically.
Step 3: Shading and Texturing
-
Start stippling the wrists:
Using your 0.1mm fine liner, begin adding small dots (stippling) to the wrist and palm bones. Concentrate the dots heavily on the underside and edges to create shadow. -
Add depth to finger joints:
Add tiny clusters of dots or very fine hatching lines around the knuckles and where finger bones overlap. This separates the segments visually. -
Contour the arm bones:
Draw long, thin vertical lines along the radius and ulna bones. These hatch marks should follow the length of the bone to emphasize its cylindrical shape. -
Shade the dark heart:
Fill in the small solid heart on the left using a tight cross-hatching pattern or solid black ink for a bold look. -
texture the broken heart:
For the heart on the right, fill the inside with a ‘cobweb’ or lace-like texture using squiggly, intersecting lines, keeping the outline crisp. -
Final contrast check:
Look at the overall drawing. If the bones look too flat, add more stippling to the darkest shadowed areas to increase the contrast and pop the form.
Floral Infusion
Intertwine vines or small roses through the finger bones to soften the macabre theme and add a splash of color to the monochrome ink.
Now you have a beautifully anatomical piece of art that wears its heart on its skeletal sleeve


Skeleton Hand Holding a Butterfly
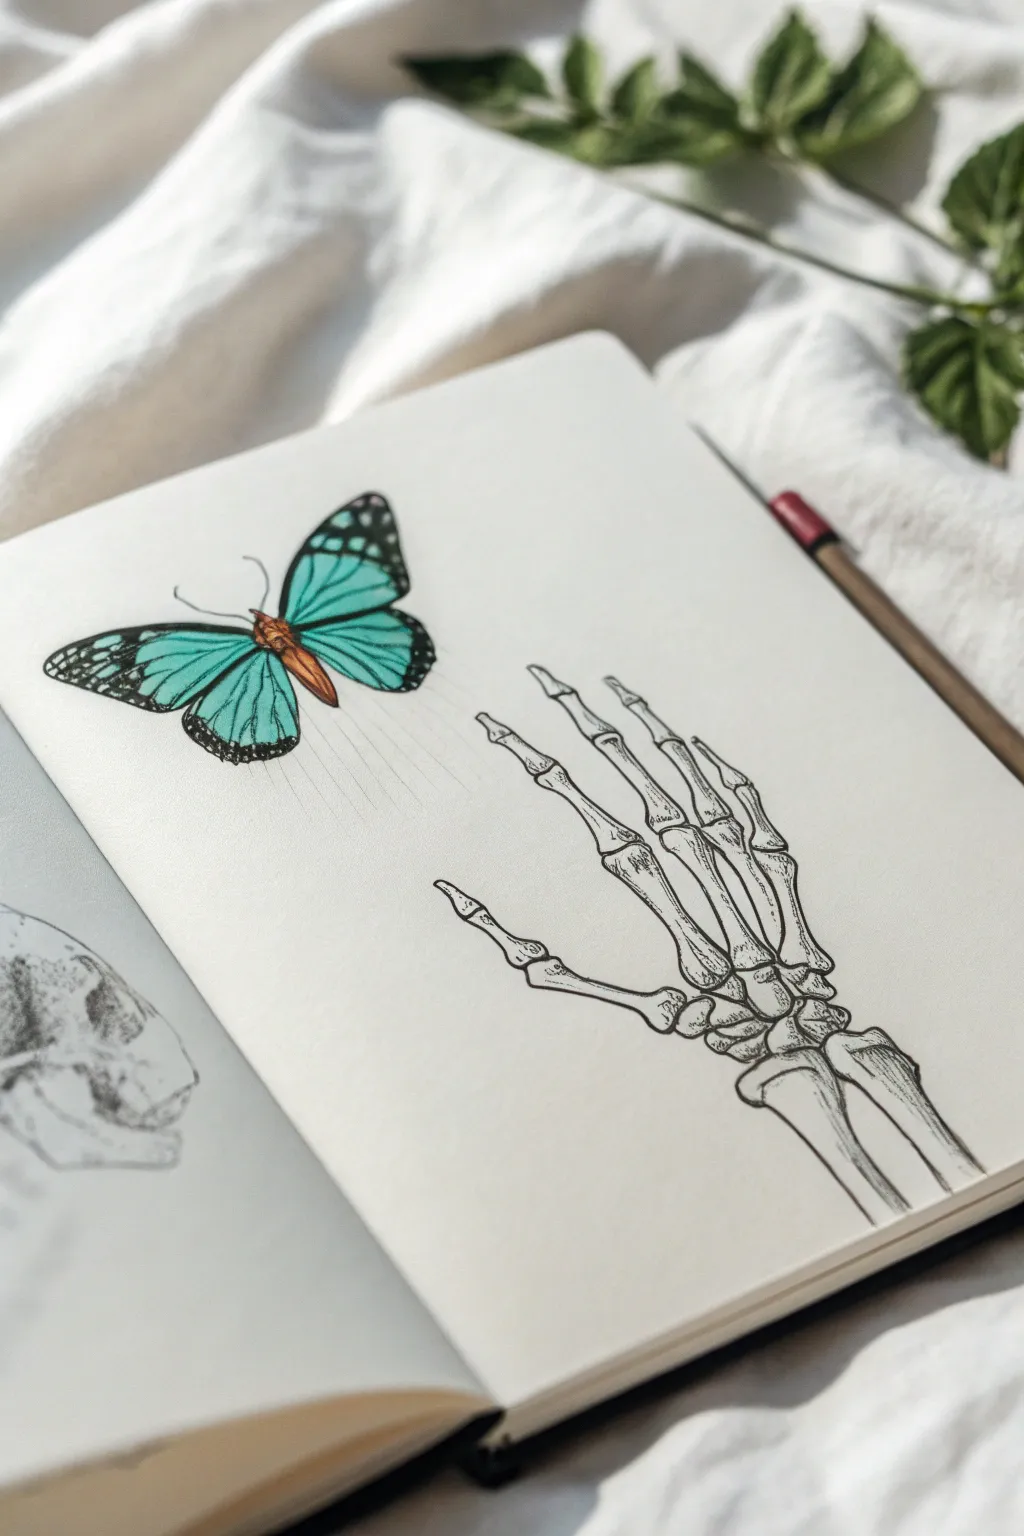
This striking sketchbook piece contrasts the delicate, vibrant life of a blue butterfly against the stark, monochromatic detail of a skeletal hand. The composition captures a moment of gentle interaction between two opposing symbols, rendered beautifully with fineliners and colored pencils.
Step-by-Step Tutorial
Materials
- Sketchbook with smooth or lightly textured paper
- HB graphite pencil
- Kneaded eraser
- Fine liner pens (0.1mm, 0.3mm, 0.5mm)
- Colored pencils (Teal/Turquoise, Black, Orange/Brown, White)
- Ruler (optional for guidelines)
Step 1: Conceptual Sketching
-
Map out the composition:
Begin by lightly marking the position of the two main elements. Place an oval shape for the butterfly in the upper left quadrant and a rough block shape for the palm and wrist of the skeleton hand in the lower right. Ensure there is a diagonal flow connecting them. -
Sketch the skeleton hand structure:
Using your HB pencil, lightly draft the bones. Start with the carpals (wrist bones) and metacarpals (hand bones). Treat the finger bones (phalanges) as small cylinders connected by knuckle joints. The hand should be open, reaching upwards. -
Refine the bone shapes:
Go back over your skeleton sketch to add the characteristic widening at the ends of the bones where joints meet. Sketch the thumb extending to the left and the fingers fanning out gently. -
Draft the butterfly:
Draw the central body of the butterfly angled towards the hand. Sketch the upper and lower wings on both sides, making the wings on the left slightly larger to suggest a three-quarter view. -
Connect the elements:
Draw very faint, straight guidelines radiating from the butterfly towards the fingertips. This indicates the motion or connection between the two subjects.
Smudge Alert
Rest your hand on a scrap piece of paper while drawing. This prevents oils from your skin transferring to the paper and stops you from accidentally smudging the graphite or fresh ink.
Step 2: Inking the Skeleton
-
Outline the bones:
Switch to a 0.3mm fineliner. Carefully trace the outline of your skeleton sketch. Keep your lines slightly broken or organic rather than perfectly smooth to mimic the texture of bone. -
Add bone texture:
Use a 0.1mm pen to add internal details. Draw small scratches, cracks, and pitting on the surface of the bones, particularly near the joints and knuckles. -
Shade with stippling:
Create depth by adding stippling (tiny dots) or fine hatching on the underside of the bones where shadows would naturally fall. Focus on the areas between the fingers and the wrist bones. -
Deepen the shadows:
I prefer to switch to a 0.5mm pen for the darkest crevices between the bones to make the structure pop. This high contrast adds a realistic, 3D quality to the hand.
Step 3: Bringing the Butterfly to Life
-
Color the wings base:
Take your teal or turquoise colored pencil. Fill in the wing sections solidly, leaving the veins and edges empty for now. Press firmly to get a vibrant, opaque color. -
Add the wing veins:
Using a sharp black colored pencil or a 0.5mm pen, draw the thick black veins that separate the colored panels of the wings. Thicken the outer edges of the wings significantly. -
Detail the wing patterns:
Inside the thick black borders of the wings, use a white gel pen or very sharp white pencil to add tiny white dots, characteristic of Monarch or similar butterflies. If using black pencil for the borders, layer it heavily for a velvet-like finish. -
Color the body:
Use an orange or rust-brown pencil for the butterfly’s thorax and abdomen. Add a touch of dark brown on the underside for shadow. -
Finalize the butterfly outline:
Use your 0.1mm pen to draw the delicate antennae and legs. Ensure these lines are very fine to contrast with the bold wing colors.
Golden Touch
Use gold leaf or metallic gold paint for the butterfly’s body instead of orange. This adds a surreal, precious quality to the piece that catches the light beautifully.
Step 4: Final Touches
-
Enhance the guidelines:
Revisit the faint pencil lines connecting the butterfly to the skeleton hand. You can leave them as graphite for a subtle look or trace them very lightly with the 0.1mm pen for a more graphic style. -
Clean up:
Once the ink is completely dry, gently erase all remaining pencil sketch lines with your kneaded eraser. Be careful not to smudge the colored pencil areas. -
Review contrast:
Check the balance between the two elements. If the skeleton looks too light compared to the vibrant butterfly, add a bit more hatching to the shadowed areas of the bones.
Now you have a beautifully contrasted artwork symbolizing the delicate balance of nature

PENCIL GUIDE
Understanding Pencil Grades from H to B
From first sketch to finished drawing — learn pencil grades, line control, and shading techniques.
Explore the Full Guide
Skeleton Hand Holding a Rose Stem
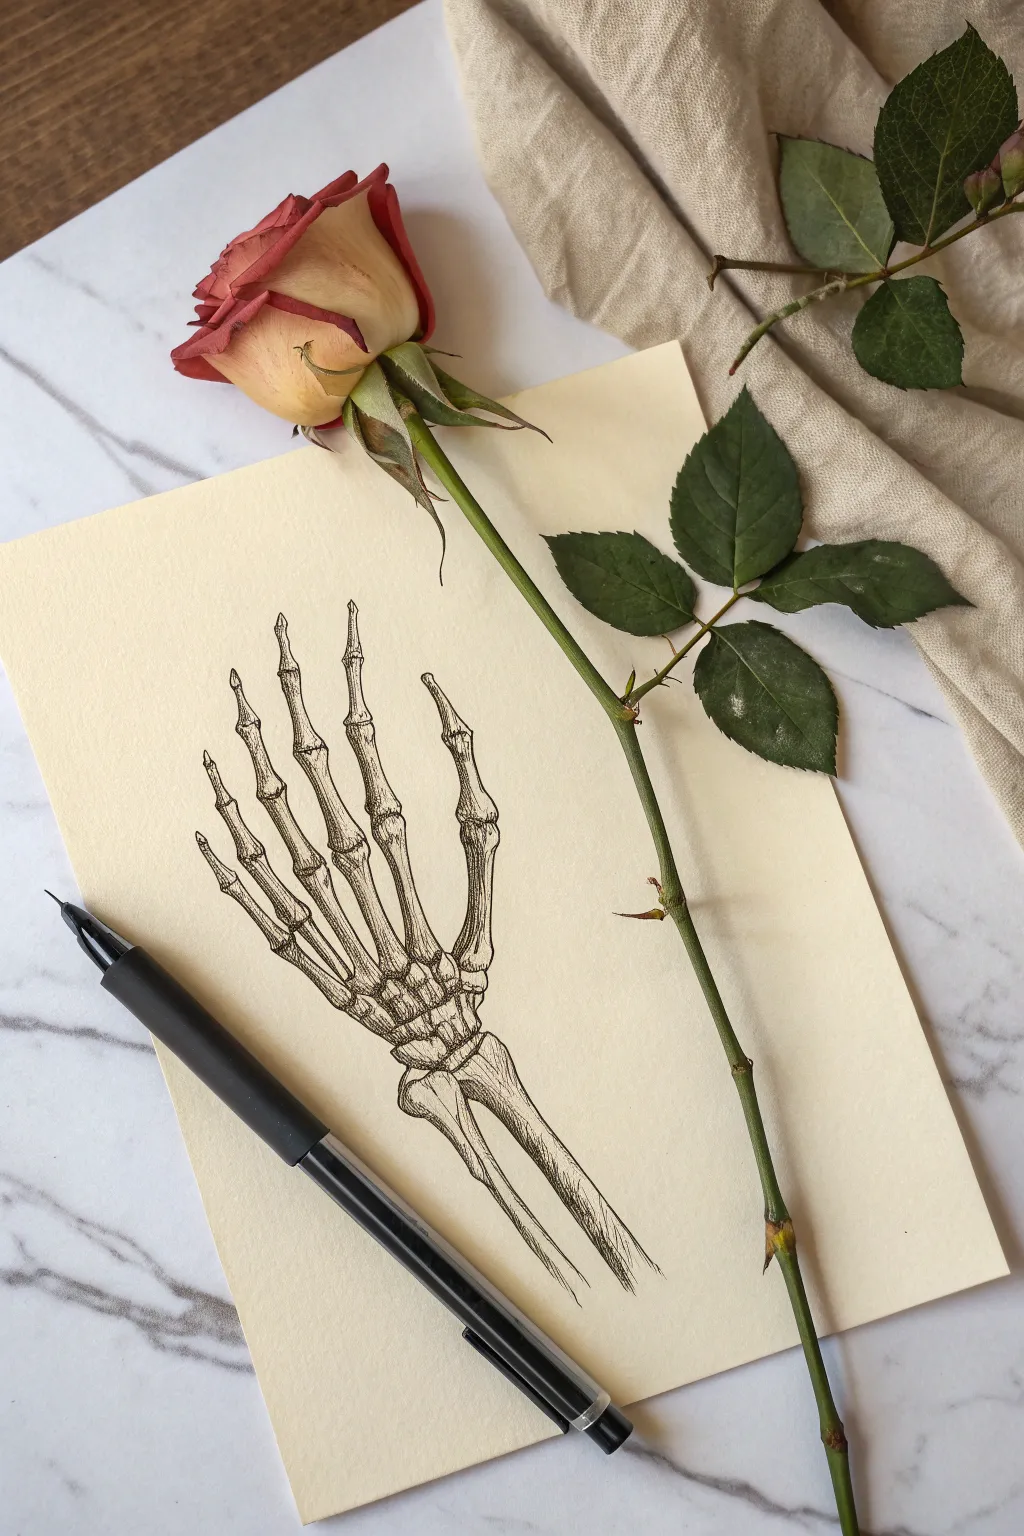
This elegant pen-and-ink study captures the delicate structure of a skeletal hand and forearm. Using simple black fineliners on warm-toned paper, you’ll create a piece that feels vintage and scientific, perfect for pairing with botanical elements.
Step-by-Step Guide
Materials
- Cream or off-white drawing paper (smooth bristol or mixed media)
- HB or 2H graphite pencil
- Kneaded eraser
- Black fineliner pen (0.05 mm for details)
- Black fineliner pen (0.1 mm or 0.3 mm for outlines)
- Ruler (optional for alignment)
- Reference image of skeleton hand anatomy
Step 1: Anatomical Sketching
-
Establish the wrist:
Begin lightly with your pencil near the bottom third of the page. Sketch the clustered carpals—the small, pebble-like bones that form the base of the wrist. Keep these shapes rough and blocky for now. -
Draw the metacarpals:
From the wrist cluster, extend five long lines upward to represent the metacarpals (the bones inside the palm). Note that the thumb’s metacarpal sits lower and wider than the four fingers. -
Map the finger joints:
Along each finger line, mark the locations of the knuckles. The fingers should fan out slightly, with the middle finger being the longest. Remember that the thumb has two segments, while the other fingers have three. -
Flesh out the bone shapes:
Go over your guide lines and draw the actual contours of the phalanges. Instead of straight cylinders, widen the ends where the joints meet to create that knobby, skeletal look. I find it helps to think of them as long hourglass shapes. -
Add the forearm bones:
Extend two long bones (the radius and ulna) downward from the wrist cluster. These should taper off the bottom of the page, acting as the foundation.
Bone Texture Tip
Don’t make your lines perfectly straight. Slight wobbles in your hatching lines mimic the porous, organic surface of real dry bone.
Step 2: Inking the Outlines
-
Trace the main contours:
Switch to your medium-sized fineliner (0.1 mm or 0.3 mm). Carefully ink over your pencil lines, defining the outer edges of each bone. Use a slightly shaky or broken line occasionally to give the bones an organic, aged feel. -
Define the joint separation:
Ensure there is a tiny gap between the bones at the joints. Do not connect them with a solid line; this negative space implies the cartilage and joint capsule. -
Erase pencil guides:
Wait a few minutes for the ink to dry completely to avoid smudging. Gently lift away all graphite lines with your kneaded eraser until only the clean ink remains.
Vintage Effect
Stain your paper with tea or diluted coffee and let it dry before drawing. This creates an authentic parchment look for your anatomy study.
Step 3: Texturing and Shading
-
Start linear hatching:
Using your finest pen (0.05 mm), begin adding texture. Draw long, thin vertical lines running down the length of the metacarpals and phalanges to mimic the grain of the bone. -
Shade the sides:
Add density to your hatching on the sides of the bones to create roundness. Imagine the light source is coming from above, leaving the center of the bones brighter. -
Detail the knuckles:
Use short, curved hatch marks around the widened ends of the bones. This emphasizes the bulbous shape of the joints and adds depth to the connection points. -
Darken the recesses:
In the tight spaces between the fingers and the complex carpal bones of the wrist, layer cross-hatching to create deep shadows. This contrast makes the white of the bones pop forward. -
Define the forearm:
Apply heavier vertical hatching to the radius and ulna at the bottom. Since they are at the base of the drawing, darker shading here helps ‘ground’ the illustration. -
Final touches:
Review the drawing for areas that look too flat. Add tiny stippling dots near the darkest shadows for extra texture and definition.
Once inked, your anatomical study is ready to be displayed on its own or used as a striking base for real floral photography
Skeleton Hand With a Ring Detail
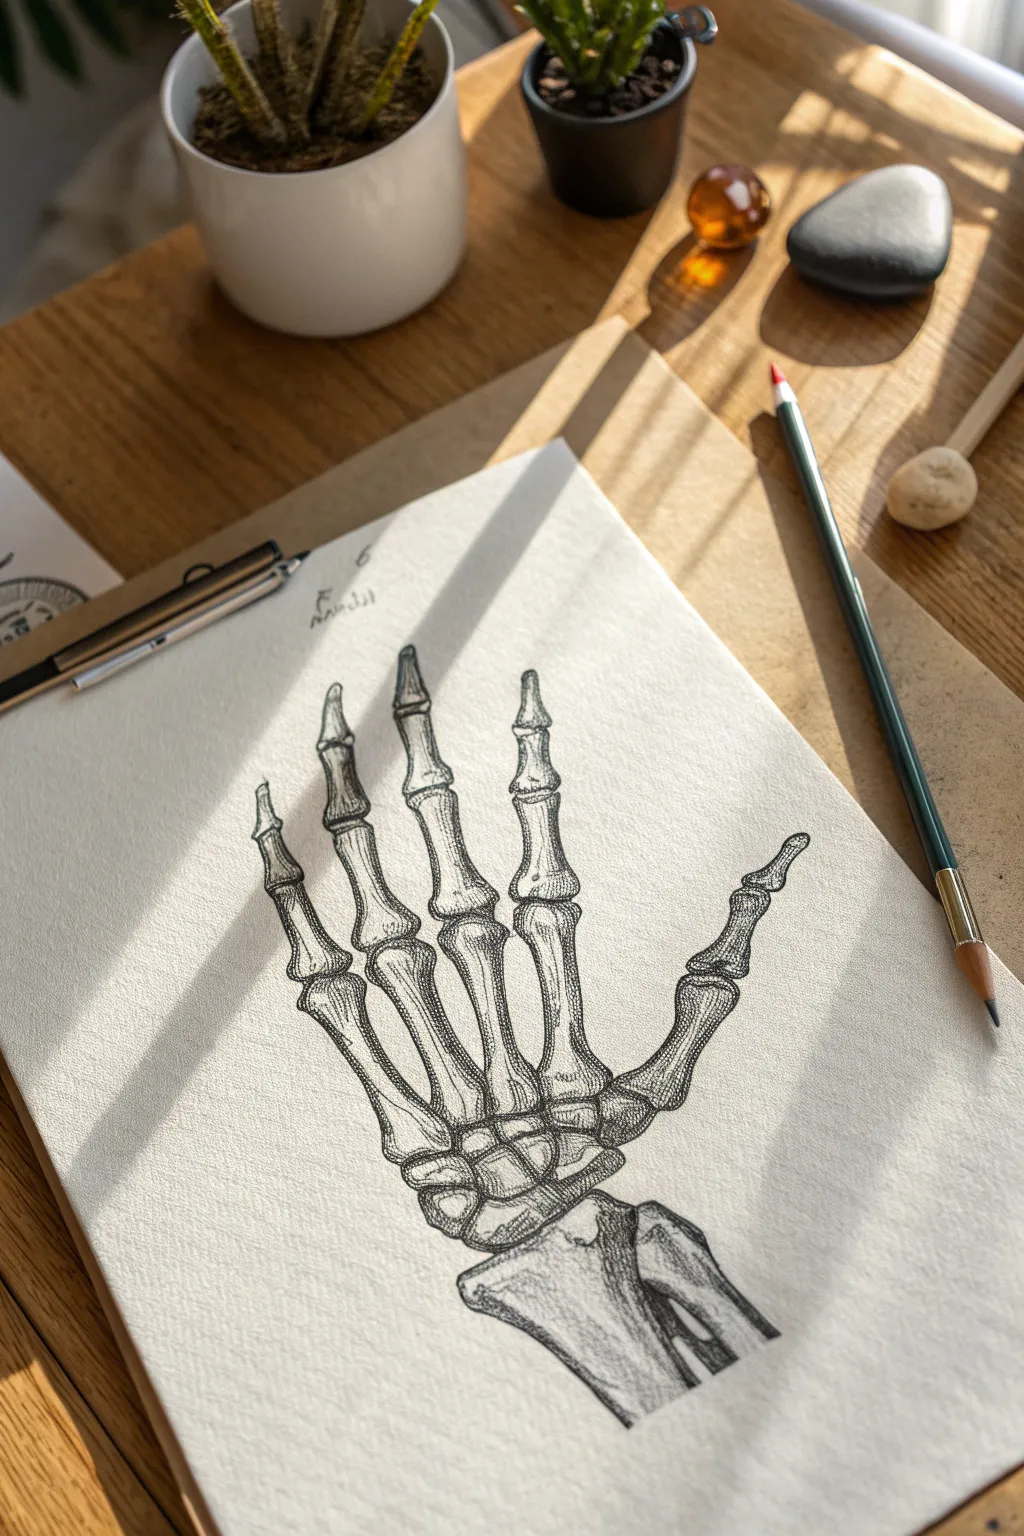
Capture the intricate anatomy of the human hand with this striking graphite skeleton study. Using careful shading and line work, you’ll create a piece with realistic depth and a classic, anatomical illustration feel on textured paper.
Step-by-Step Tutorial
Materials
- Textured drawing paper (heavyweight, cold press or mixed media)
- Graphite pencils (HB, 2B, 4B)
- Mechanical pencil (0.5mm, HB lead)
- Kneaded eraser
- Precision vinyl eraser
- Blending stump (tortillon)
- Workable fixative (optional)
Step 1: Anatomical Structure
-
Measure the proportions:
Begin by lightly marking the top and bottom boundaries of the hand on your paper using an HB pencil. Divide the space into two main sections: the carpal/metacarpal block (the palm area) and the phalanges (the fingers). The fingers should take up slightly more vertical space than the palm section to elongate the skeletal look. -
Block in the wrist and palm:
Sketch a simplified, boxy shape comprising the small carpal bones at the wrist base. Above this, draw five radiating lines to represent the metacarpals, keeping the thumb’s metacarpal distinct and angled outward to the right. -
Map the finger joints:
Along the radiating lines, mark small circles where the knuckles and joints will be. Remember the thumb has two joints past the wrist, while the other fingers have three. Pay attention to the natural arch created by the fingertips; the middle finger should be the highest point. -
Flesh out the bone shapes:
Refine your stick figure lines into cylindrical bone shapes. The metacarpals (palm bones) should be thicker at the ends and narrower in the middle. Give the finger bones a slight ‘hourglass’ contour, widening at the joints.
Use That Texture
Don’t blend everything smooth! Allow the paper’s grain to show through your shading. The white speckles left behind mimic the natural porous texture of dried bone perfectly.
Step 2: Defining the Forms
-
Outline the contours:
Switch to your mechanical pencil for cleaner lines. Go over your rough sketch, defining the specific bumps and grooves of the joints. The ends of the bones aren’t perfectly round; give them slight indentations where they articulate with each other. -
Add the ulna and radius:
At the very bottom, sketch the tops of the two arm bones (ulna and radius). The one on the thumb side (radius) should be larger and flatter, while the ulna creates a styloid process (a bony protrusion) on the pinky side. -
Erase guidelines:
Using a kneaded eraser, gently lift away the initial structural lines and stick figures, leaving only your faint but clean contour drawing. Rolling the eraser over the page rather than scrubbing helps preserve the paper’s tooth.
Step 3: Shading and Texture
-
Establish the light source:
Decide on a light source coming from the top left. This means the right side of each bone and the underside of the joints will be in shadow. Lightly hatch these shadow areas with a 2B pencil. -
Apply core shadows:
Darken the right edges of the finger bones and the deep crevices between the wrist bones. Use firm pressure but avoid flattening the paper grain completely just yet. -
Model the rounded forms:
To make the bones look cylindrical, use curved hatching lines that wrap around the form. Start dark at the edge and lift your pressure as you move toward the center of the bone. -
Stipple the texture:
Bone isn’t perfectly smooth. Take your mechanical pencil and add tiny dots or stippling on the ends of the bones near the joints. This implies the porous texture of the spongy bone found at articulations. -
Deepen the crevices:
Switch to a 4B pencil for the darkest darks. Apply this deep graphite into the tight gaps where bones overlap, specifically in the carpal (wrist) cluster and directly under the knuckles. -
Create distinct highlights:
Ensure the left side of the bones remains the white of the paper. If you’ve accidentally smudged graphite there, use the vinyl eraser to cut a sharp, clean highlight back into the form.
Make It Gothic
Add a solitary gold or silver ring to the ring finger. Use a metallic colored pencil or even a touch of gold leaf for a striking pop of contrast against the monochrome bone.
Step 4: Final Details
-
Refine the thumb:
The thumb often requires extra attention; ensure the saddle joint at the base looks disconnected enough to suggest mobility. Shade heavily underneath the metacarpal to pop it forward. -
Cross-hatching for density:
On the darkest shadow sides (the right edges), add a layer of diagonal cross-hatching. This builds believable density without looking like a solid black block. -
Clean up edges:
Go around the entire perimeter of the skeleton with the precision eraser to remove any smudges or halo effects. A crisp outer edge is essential for that scientific illustration look. -
Add subtle cast shadows:
Optionally, add a very faint, soft shadow underneath the lower wrist area to ground the drawing, creating the illusion that the hand is resting on a surface.
Step back and admire the stark, elegant contrast of your finished anatomical study
BRUSH GUIDE
The Right Brush for Every Stroke
From clean lines to bold texture — master brush choice, stroke control, and essential techniques.
Explore the Full Guide
Skeleton Hand Line Art With Bold Contours
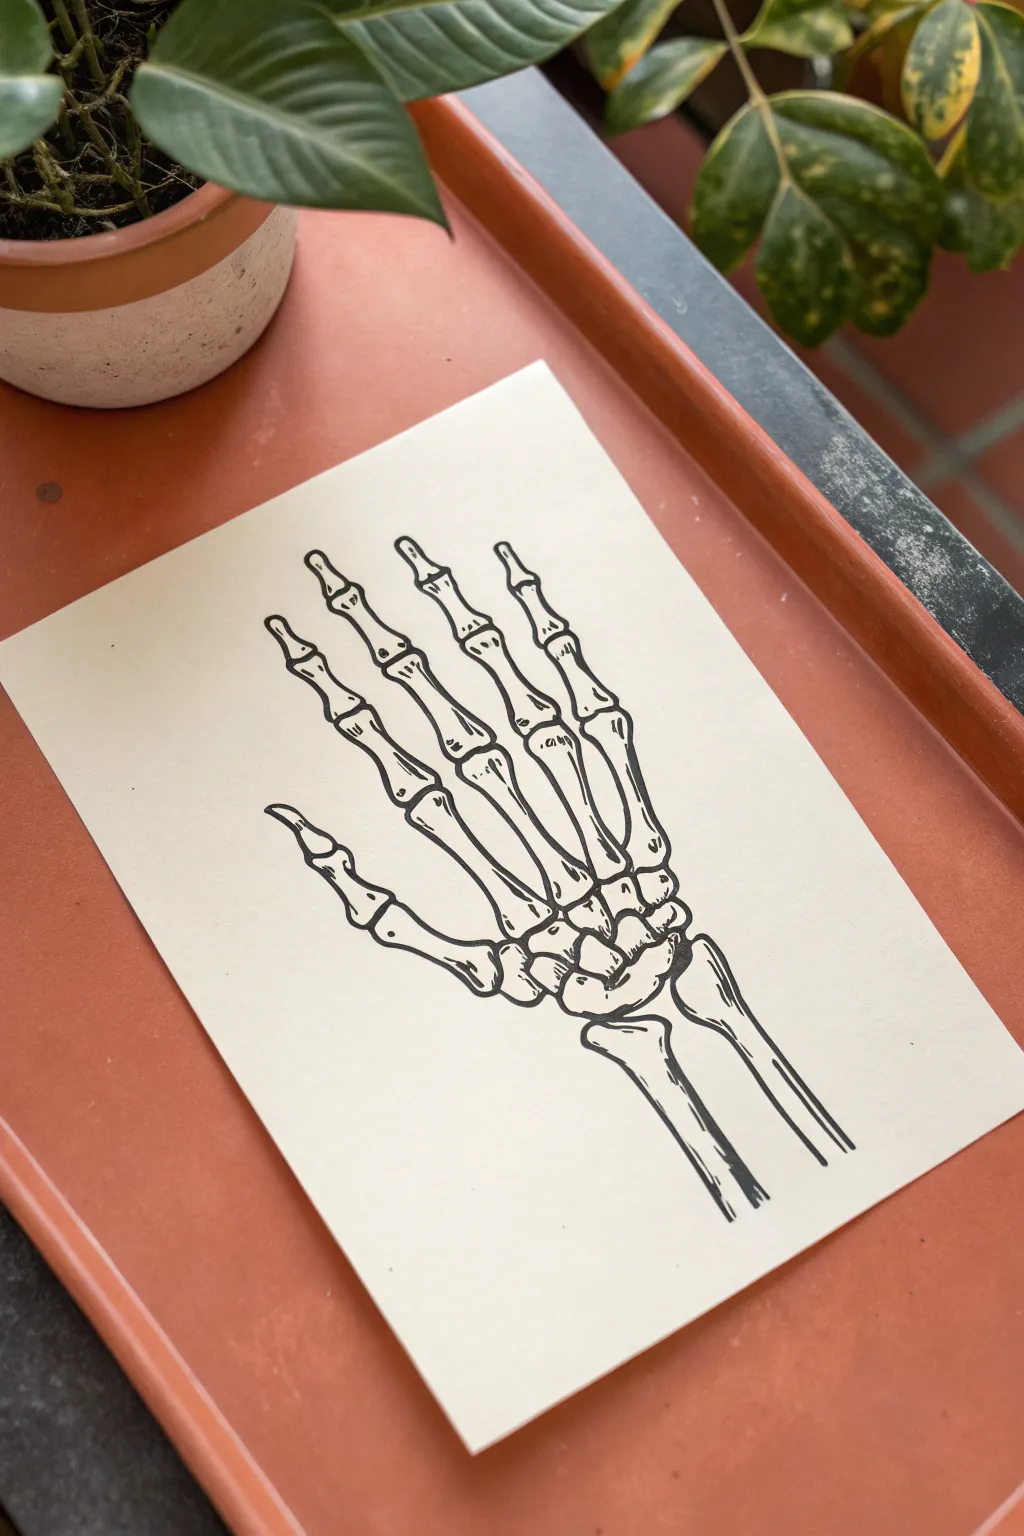
This striking illustration relies on confident, clean lines to create a stylized skeletal hand that pops off the page. The high-contrast black ink against cream paper gives it a classic, almost scientific diagram feel, perfect for spooky decor or art portfolios.
Step-by-Step Guide
Materials
- Smooth cream or off-white cardstock (A5 size)
- HB Pencil
- Kneadable eraser
- Fine liner pen (01 or 03 nib)
- Medium liner pen (05 or 08 nib) or brush pen
- Ruler (optional for alignment)
Step 1: Planning the Structure
-
Establish the wrist:
Begin by lightly sketching the two bones of the forearm (radius and ulna) at the bottom right. Draw them as two parallel, slightly widening shapes that terminate just before the center of the page. -
Map the palm area:
Sketch a rough trapezoid shape above the wrist bones to represent the carpal (wrist) and metacarpal (palm) area. This forms the foundation where the fingers will attach. -
Indicate finger placement:
Draw five light lines radiating from the palm trapezoid to determine the length and direction of each finger. Keep the thumb distinct and slightly separated from the other four digits. -
Block in the joints:
Along your finger lines, mark small horizontal dashes where the knuckles (joints) will be. Remember the thumb has two joints, while the other fingers generally show three distinct sections.
Steady Hand Trick
Pull the pen toward your body rather than pushing it away when drawing long curves. This motion uses your elbow pivot and creates smoother, less shaky lines.
Step 2: Refining the Forms
-
Draw the finger bones:
Flesh out the phalanxes (finger bones) by drawing ‘dog-bone’ shapes around your guide lines. The ends of each bone should flare out slightly to meet the next joint. -
Shape the carpals:
Refine the cluster of small bones at the base of the palm. Instead of drawing every single carpal perfectly, focus on creating a cluster of pebble-like shapes that interlock between the wrist and the long palm bones. -
Detail the thumb:
Give specific attention to the thumb, ensuring the metacarpal connects lower on the wrist cluster than the other fingers to allow for that opposable angle. -
Add contour details:
Lightly sketch small contour lines at the ends of the bones. These curved lines near the joints help suggest the cylindrical, 3D shape of the bone rather than a flat cutout.
Vintage Vibe
Tea-stain your paper before drawing and let it dry completely. The tan, mottled background makes the black ink skeleton look like an antique medical diagram.
Step 3: Inking and Definition
-
Start the main outline:
Switch to your medium liner pen (like an 05). Trace the outer perimeter of the entire skeleton hand first. Keep this line smooth and continuous where possible for that ‘sticker’ look. -
Define the individual bones:
Using the same pen, carefully ink the spaces between the bones. Make sure to leave small gaps between knuckles to show they are separate pieces just touching, not fused together. -
Switch to a finer point:
Pick up your 01 or 03 fine liner for the interior details. Add the subtle curves and ridges inside the bone outlines. -
Add texture marks:
Draw tiny, controlled hatch marks or stippling near the ends of the bones to suggest shadows and curvature. I find keeping these marks minimal maintains the clean aesthetic. -
Clean up the drawing:
Wait at least 5-10 minutes for the ink to fully bond with the paper fibers. Gently erase all pencil guidelines using the kneadable eraser to avoid smudging. -
Thicken shadow areas:
Go back over the ‘shadow side’ of the bones (usually the right or bottom edges) with your thicker pen to add weight and dimension to the drawing.
Now you have a bold skeleton drawing ready to be framed or used as a unique seasonal decoration
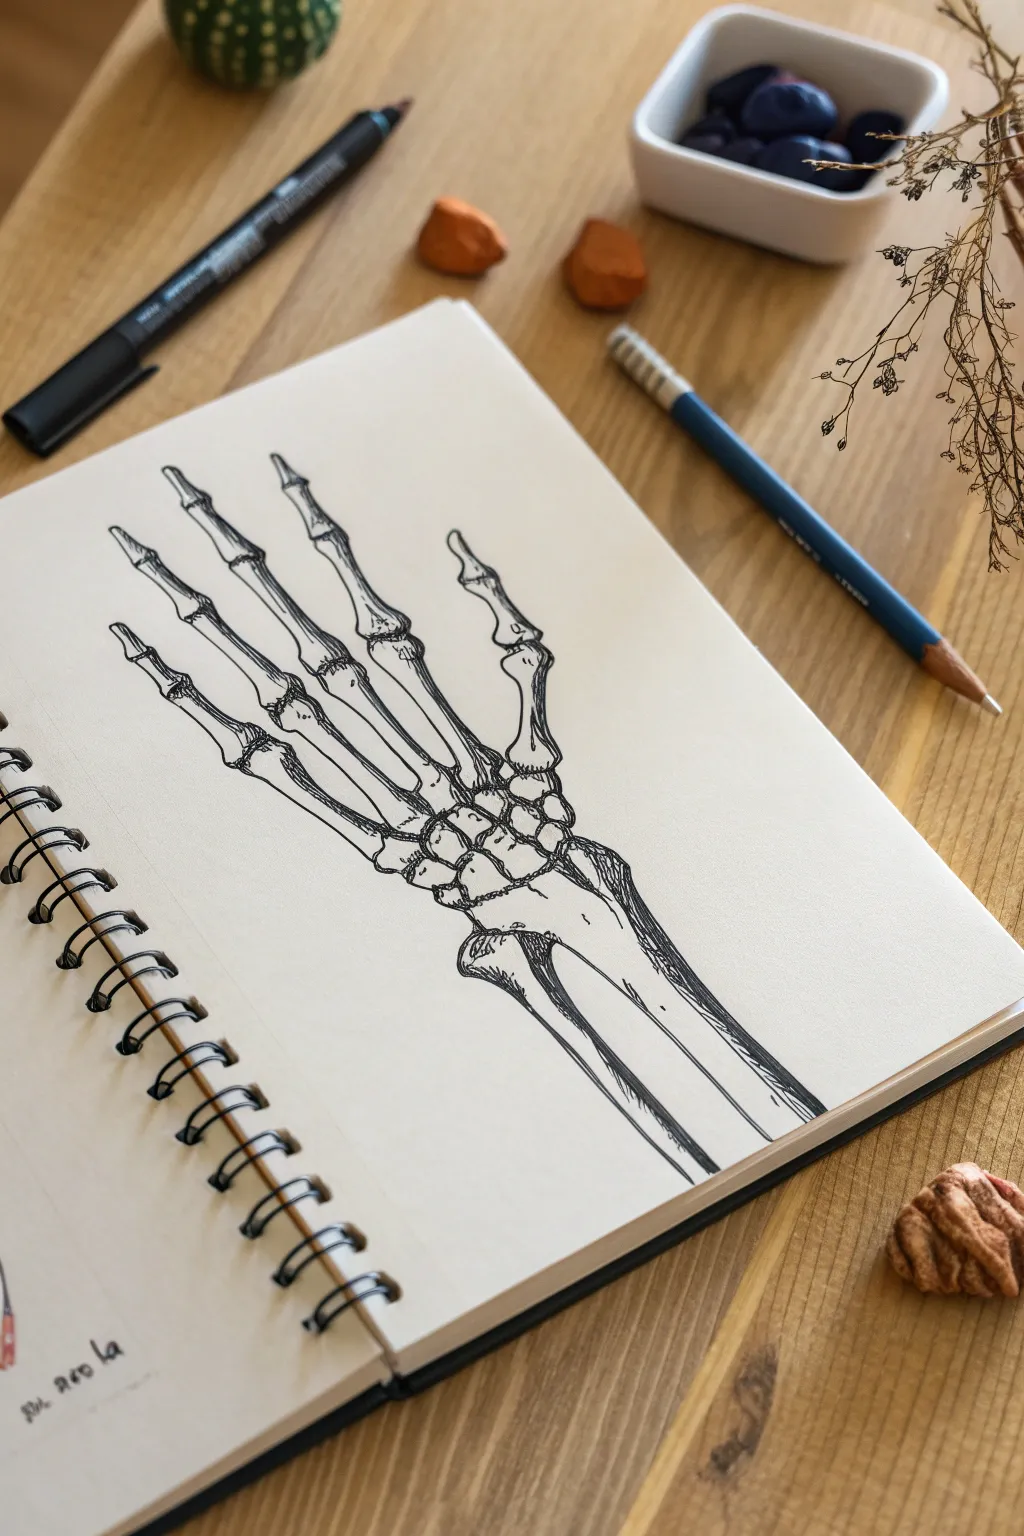
Cross-Hatching Skeleton Hand Shading Practice

Master the art of anatomical illustration with this detailed skeleton hand study, executed in crisp black ink. You’ll learn how to build form using cross-hatching techniques and capture the intricate connections of phalanges and carpals.
Step-by-Step
Materials
- Sketchbook with quality, heavyweight drawing paper
- HB or 2B graphite pencil
- Kneaded eraser
- Fine liner pens (sizes 005, 01, and 03)
- Anatomy reference photo (of hand bones)
Step 1: Structural Layout
-
Establish the Wrist Base:
Begin lightly with your pencil. Near the bottom center of the page, block in the two forearm bones (radius and ulna). The radius (on the thumb side) should be slightly wider at the top where it meets the wrist. -
Map the Carpals:
Draw a clustered, oval-like shape sitting directly on top of the radius and ulna. This represents the carpal bones. Don’t worry about individual bones yet; just capture the mass. -
Sketch the Metacarpals:
Extending from the carpal cluster, draw five long, straight lines to represent the core direction of the metacarpals (the bones inside the palm). Note that they fan out slightly, like sun rays. -
Add Finger Joints:
Mark the positions of the knuckles along your directional lines. Remember, the thumb has two joints, while the other fingers have three. Mark these with small circles. -
Flesh Out the Bone Shapes:
Using your guidelines, draw the actual outlines of the bones. Make them slightly concave in the middle and wider at the joints (condyles). Ensure the tips of the fingers (distal phalanges) taper to a rounded point.
Uneven ink flow?
If your pen skips over graphite, erase the pencil lines more thoroughly. Oil from your hand can also resist ink, so keep a scrap paper under your drawing hand.
Step 2: Inking the Outlines
-
Refine the Pencil Sketch:
Before picking up the pen, use your kneaded eraser to lift off excess graphite until only faint ghost lines remain. This prevents the ink from smudging later. -
Outline the Forearm:
Start with the 03 fine liner for strong outer edges. Outline the radius and ulna at the bottom, using slightly broken lines to suggest rough texture rather than a smooth pipe. -
Define the Wrist Cluster:
Switch to the 01 pen for the carpal bones. Draw these as puzzle-like pieces fitting together, using small, curved gaps to separate them. -
Ink the Fingers:
Carefully trace your finger outlines. At the joints where bones meet, leave very tiny gaps or use thinner lines to prevent the drawing from looking stiff or fused together. -
Erase Remaining Graphite:
Wait at least five minutes for the ink to fully cure. Once dry, thoroughly erase all remaining pencil marks to leave a clean, crisp base.
Add an artistic twist
Surround the skeleton hand with organic elements like vines or flowers intertwining through the fingers to create a contrast between life and structure.
Step 3: Shading and Texture
-
Establish Light Source:
Decide where your light is coming from (in the reference, it’s roughly top-left). This means shadows will fall on the right and bottom sides of the bones. -
Initial Hatching:
Using the 005 pen, start adding single diagonal hatch marks on the shadowed side of each bone segment. Keep your strokes light and uniform. -
Cross-Hatching for Depth:
Go back over the darkest areas (like under the joints and between the wrist bones) with a second layer of lines running perpendicular to the first. This creates the cross-hatching effect. -
Contouring the Bones:
Add curved hatch lines that wrap around the cylindrical parts of the phalanges. This visual trick helps the bones look 3D and rounded rather than flat. -
Deepening Recesses:
Use the 01 pen to darken the deepest crevices between the carpal bones. Deep shadows here make the structure feel solid and tightly packed. -
Texture the Surfaces:
Bones have imperfections. Add tiny stippling dots or small wiggly lines near the ends of the bones to simulate porous texture and wear. -
Final Contrast Check:
Take a step back. If the drawing feels too flat, add a third layer of hatching to the absolute darkest points, such as the space between the radius and ulna.
Now you have a striking anatomical study that serves as a perfect reference for future figure drawings


Skeleton Hand With Glowing X-Ray Effect
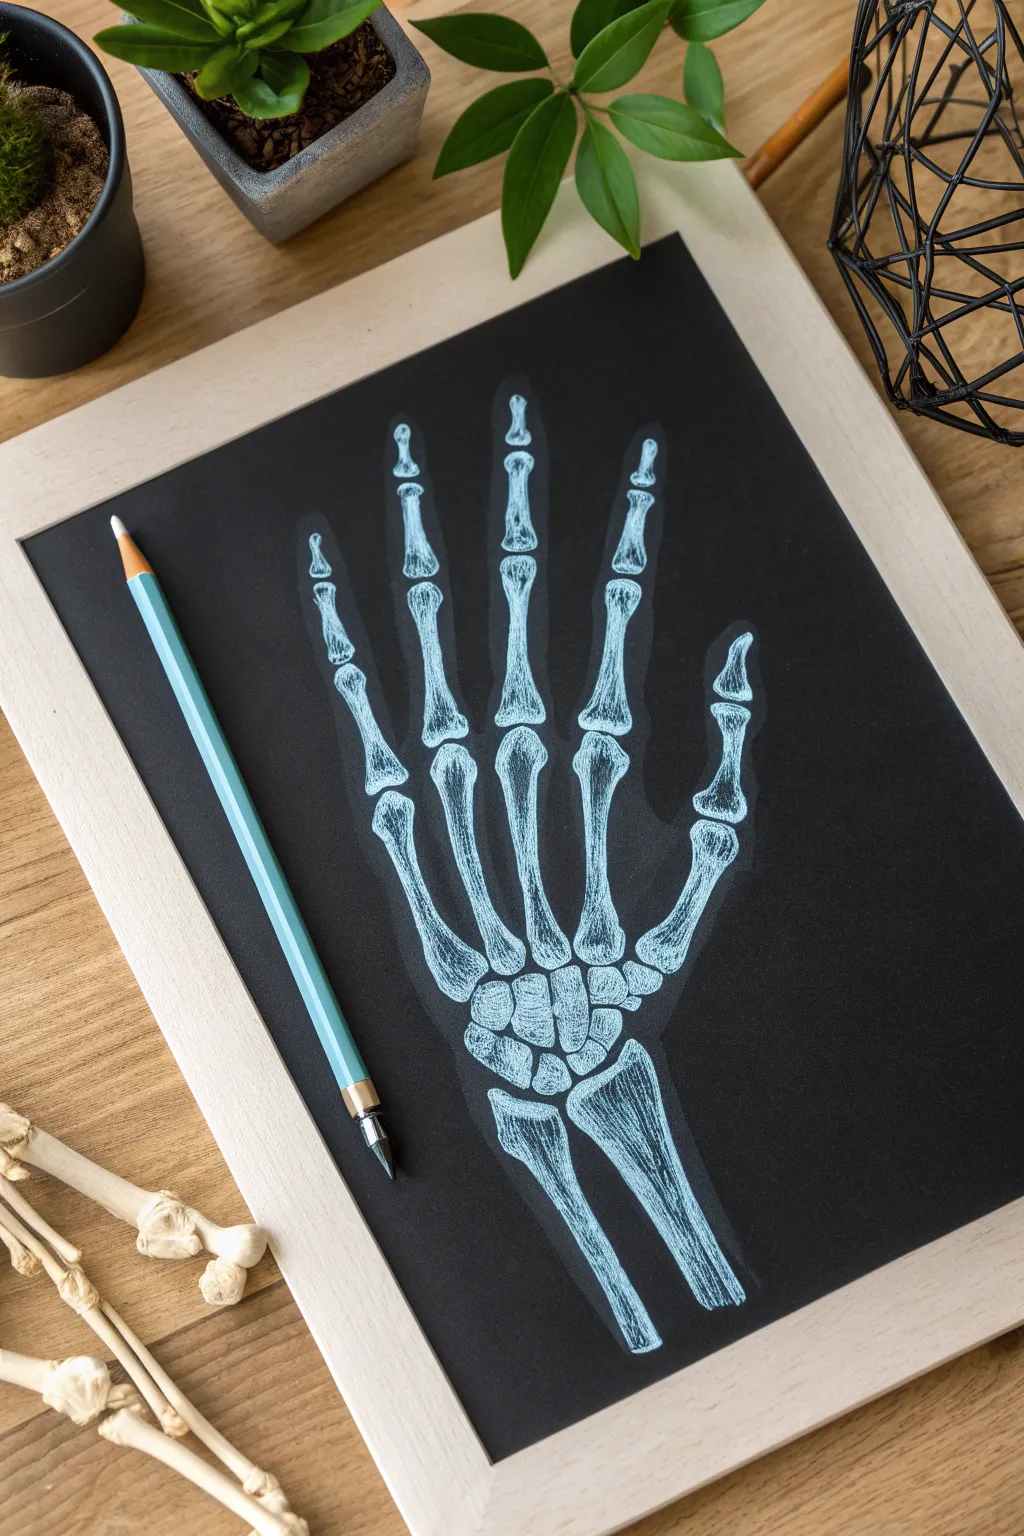
Capture the eerie glow of an X-ray using nothing but a dark canvas and colored pencils. This project creates a striking illusion of transparency and bone structure that jumps right off the black paper.
Step-by-Step Guide
Materials
- Black cardstock or art paper (A4 or similar size)
- White charcoal pencil or pastel pencil
- Light blue colored pencil (pastel or wax-based)
- Eraser (kneaded eraser works best)
- Reference image of a hand skeleton
- Simple wooden frame (optional for display)
Step 1: Basic Structure
-
Establish the wrist:
Begin at the bottom center of your black paper using the white charcoal pencil. Lightly sketch the two long arm bones (radius and ulna) coming up from the bottom edge, keeping the pressure very faint so mistakes are easily erasable. -
Form the carpals:
Above the arm bones, draw a cluster of small, pebble-like shapes to represent the carpal bones of the wrist. They should fit together loosely like a puzzle but don’t worry about anatomical perfection just yet. -
Draft the metacarpals:
Extend five longer, slender lines upwards from the wrist cluster. These represent the localized bones inside the palm of the hand. Space them out slightly to suggest a relaxed, open hand pose. -
Add the finger joints:
At the end of each palm bone, sketch the phalanges (finger bones). Remember that the thumb has two segments, while the other four fingers have three segments each. Keep these shapes blocky and simple for now.
Chalky Mess?
If your charcoal or pastel is smudging onto the black paper where you don’t want it, place a piece of scrap paper under your drawing hand to act as a shield.
Step 2: Refining the Form
-
Shape the bones:
Go back over your stick-figure sketch and flesh out the bones. Widen the ends of each segment to create the ‘knobby’ look of joints, narrowing the shafts in the middle. -
Clean up outlines:
Once you are happy with the proportions, use your eraser to lift away any messy construction lines, leaving only the clear outline of the skeleton hand. -
Establish the white base:
Firmly trace the final outline with your white pencil. Start shading the edges of the bones in white, leaving the absolute centers of the bones slightly darker (the black paper showing through) to create volume. -
Texture the bones:
Add small, vertical hatching lines along the shafts of the bones using the white pencil. This mimic the fibrous texture of bone and adds directional flow to the drawing.
Anatomy Hack
Struggling with proportions? Take a photo of your own hand against a dark surface, print it out, and trace the general shape of the fingers first.
Step 3: The X-Ray Glow
-
Introduce the blue tint:
Switch to your light blue colored pencil. Gently glaze over the white lines you’ve already drawn. I find that layering the blue over the white creates that specific cool, medical imaging look. -
Highlight the joints:
Press harder with the blue pencil at the very tops and bottoms of the bone segments (the joints). These areas are denser on an X-ray and should appear brighter. -
Create the ‘flesh’ ghost:
This is the secret to the X-ray effect: very lightly sketch a faint outline of the skin around the bones using the side of your blue pencil. It should be barely visible, like a ghostly aura surrounding the fingers.
Step 4: Final Details
-
Deepen the shading:
Look at where the bones overlap or touch. Keep these areas dark or use a black pencil to clean up the gaps, ensuring the bones look separated. -
Intensify highlights:
Go back in with the white charcoal pencil one last time. Add sharp, bright highlights on the most prominent parts of the bones to make them pop against the black background. -
Refine the marrow:
Add tiny, scribbled textures inside the larger wrist bones to suggest the spongy interior structure. It adds a nice level of realism to the illustration. -
Smudge for glow:
Use your finger or a blending stump to very slightly smudge the outer edges of the white bone drawing. This softens the lines and enhances the glowing effect.
Frame your spooky masterpiece to add a touch of scientific curiosity to your wall decor
Surreal Skeleton Hand With Vines and Blooms
Master the delicate art of scientific illustration with this clean, striking drawing of skeletal anatomy. Using fine liners on textured paper, you’ll build up form and shadow to create a piece that feels both vintage and edgy.
Step-by-Step
Materials
- Heavyweight cream or off-white drawing paper (smooth or light texture)
- HB or 2H graphite pencil for sketching
- Kneaded eraser
- Fine liner pens (sizes 0.05, 0.1, and 0.3mm)
- Reference image of hand skeletal anatomy
- Ruler (optional for alignment)
Step 1: Structural Sketching
-
Map the palm area:
Begin lightly with your pencil. Draw a loose, slightly rectangular shape near the bottom center of your page to represent the carpal bones (wrist) and metacarpals (palm area). Keep this shape angled slightly to the left. -
Mark the finger joints:
Visualize where the knuckles will be. Draw five lines radiating from the wrist/palm block. These are your guides for the fingers. Make the middle finger the longest and the thumb much shorter and set lower on the side. -
Segment the phalanges:
Along those finger lines, make small tick marks to indicate where the joints bend. Remember, the thumb has two segments (phalanges), while the other fingers have three. This ensures your proportions are accurate before you commit to ink. -
Draw the bone outlines:
Sketch the ‘dog bone’ shapes over your guide lines. The ends of each bone should be wider and bulbous (the condyles), narrowing into a thinner shaft in the middle. Leave small gaps between the segments to represent cartilage space. -
Refine the wrist anatomy:
Break that initial wrist block into smaller, pebble-like shapes for the carpals. Don’t worry about perfect anatomical naming, but capture the cluster of small bones that connects the long hand bones to the arm. -
Add the arm bones:
Draw the ends of the radius and ulna coming down from the wrist. The radius (thumb side) should be larger and flatter at the top, while the ulna (pinky side) has that distinct styloid process sticking out.
Wobbly Lines?
If your lines aren’t perfectly straight, don’t panic. Bone is organic! Embrace the shakes; they actually add realistic texture and age to the skeletal structure.
Step 2: Inking the Outline
-
Initial line work:
Switch to your 0.1mm fine liner. Trace over your pencil sketch with a steady hand. Instead of a single continuous line, use slightly broken or varied pressure lines to give the bones a natural, organic texture rather than a cartoonish look. -
Define the joints:
Pay special attention to where bones meet. Use slightly heavier lines or double passes on the undersides of the joints to suggest weight and shadow immediately. -
Detail the ulna and radius:
Ink the arm bones at the bottom. Add a few small, jagged lines or cracks near the ends to mimic the texture of dried bone or anatomical specimens. -
Erase pencil guides:
Wait until the ink is completely dry—I usually give it at least five minutes to be safe. Then, gently roll your kneaded eraser over the drawing to lift all graphite without damaging the paper surface.
Step 3: Shading and Texturing
-
Establish light source:
Decide on a light source (in this reference, it’s coming from the top left). This means your deepest shadows will be on the right side and bottom of each bone segment. -
Stippling the joints:
Using the 0.05mm pen, add tiny dots (stippling) to the rounded ends of the bones. Concentrate the dots heavily on the shadowed side and disperse them as they move toward the light. -
Linear hatching:
On the long shafts of the proper metacarpals and phalanges, use fine, vertical hatching lines. These lines should follow the length of the bone to emphasize its cylindrical shape. -
Deepen the shadows:
Switch to the 0.3mm pen for the darkest areas. Add solid black or dense cross-hatching in the deep crevices between the wrist bones and where the fingers overlap or touch. -
Enhance bone texture:
Add small, wandering scratchy lines and microscopic divots (called foramina) on the bone surfaces using the 0.05mm pen. This makes the skeleton look realistic and weathered rather than polished. -
Final contrast check:
Step back and look at the whole piece. If the drawing looks flat, go back in with the 0.3mm pen and thicken the outline on the shadow side only (the right side) to pop the hand off the page. -
Sign your work:
Add your signature in a loose, cursive script near the wrist area, keeping it small so it balances the composition without distracting from the anatomy.
Make it Gothic
Use a diluted black watercolor wash or tea stain over the finished ink drawing to give the paper an aged, parchment-like appearance.
Frame your anatomical study in a simple black frame or pin it up for some darkly academic decor.


Have a question or want to share your own experience? I'd love to hear from you in the comments below!