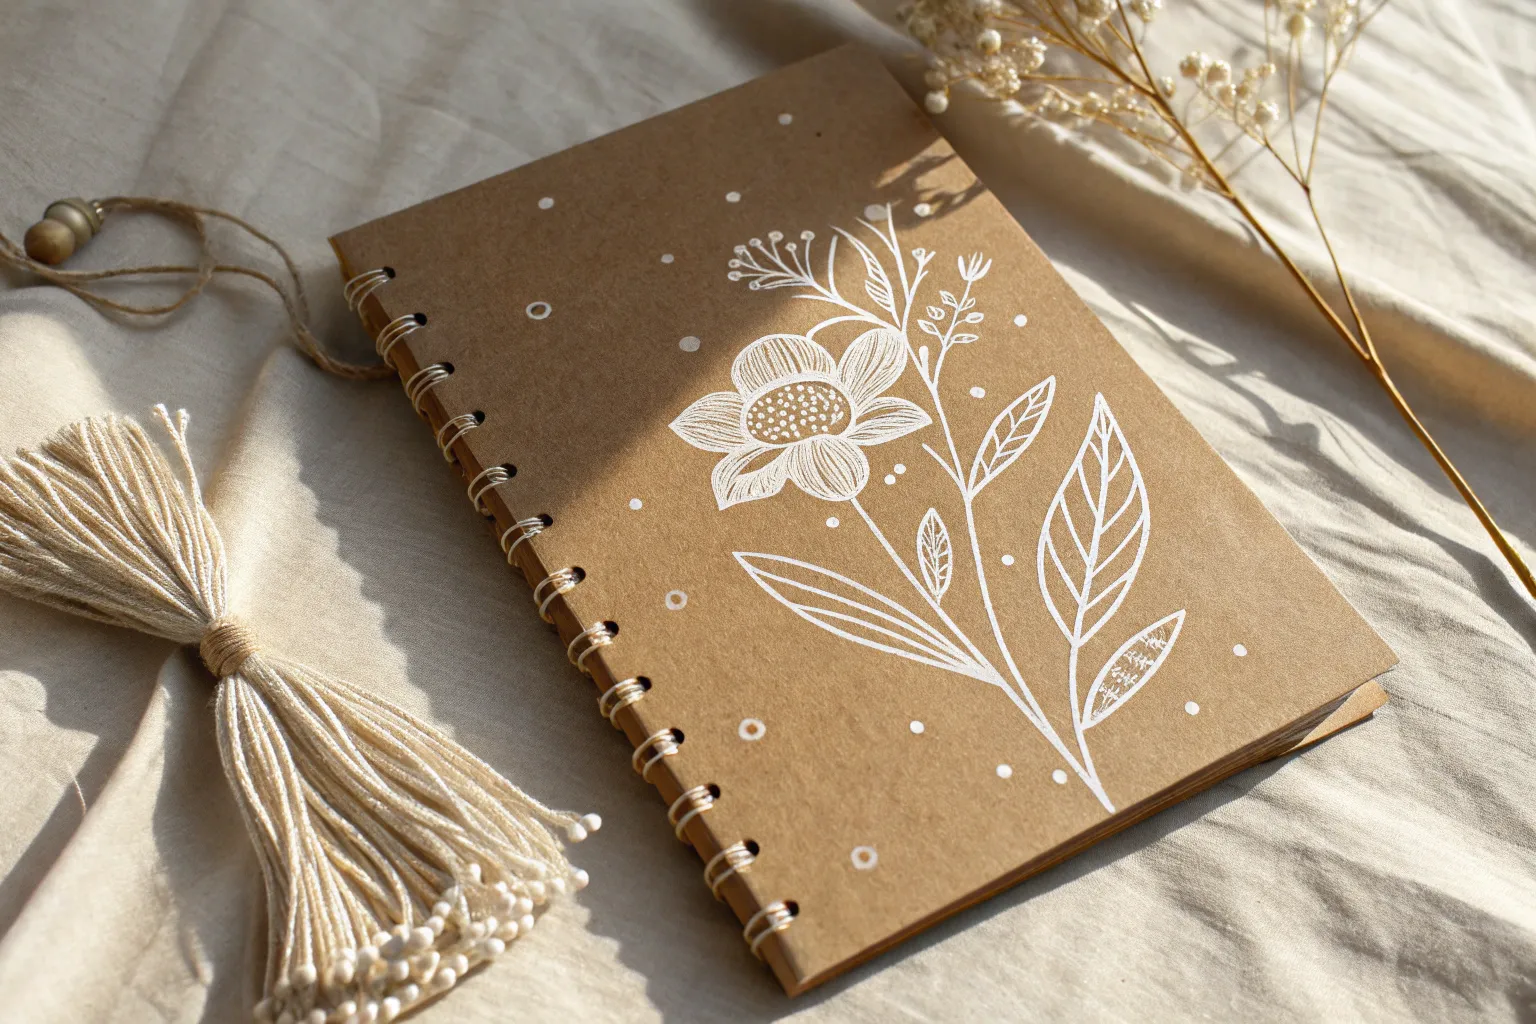
I treat every sketchbook cover like a tiny piece of art that sets the mood before I even turn the first page. Here are my favorite sketchbook cover ideas—starting with the classics you can do today and drifting into the more unexpected, artsy experiments.
Bold Hand-Lettered Title
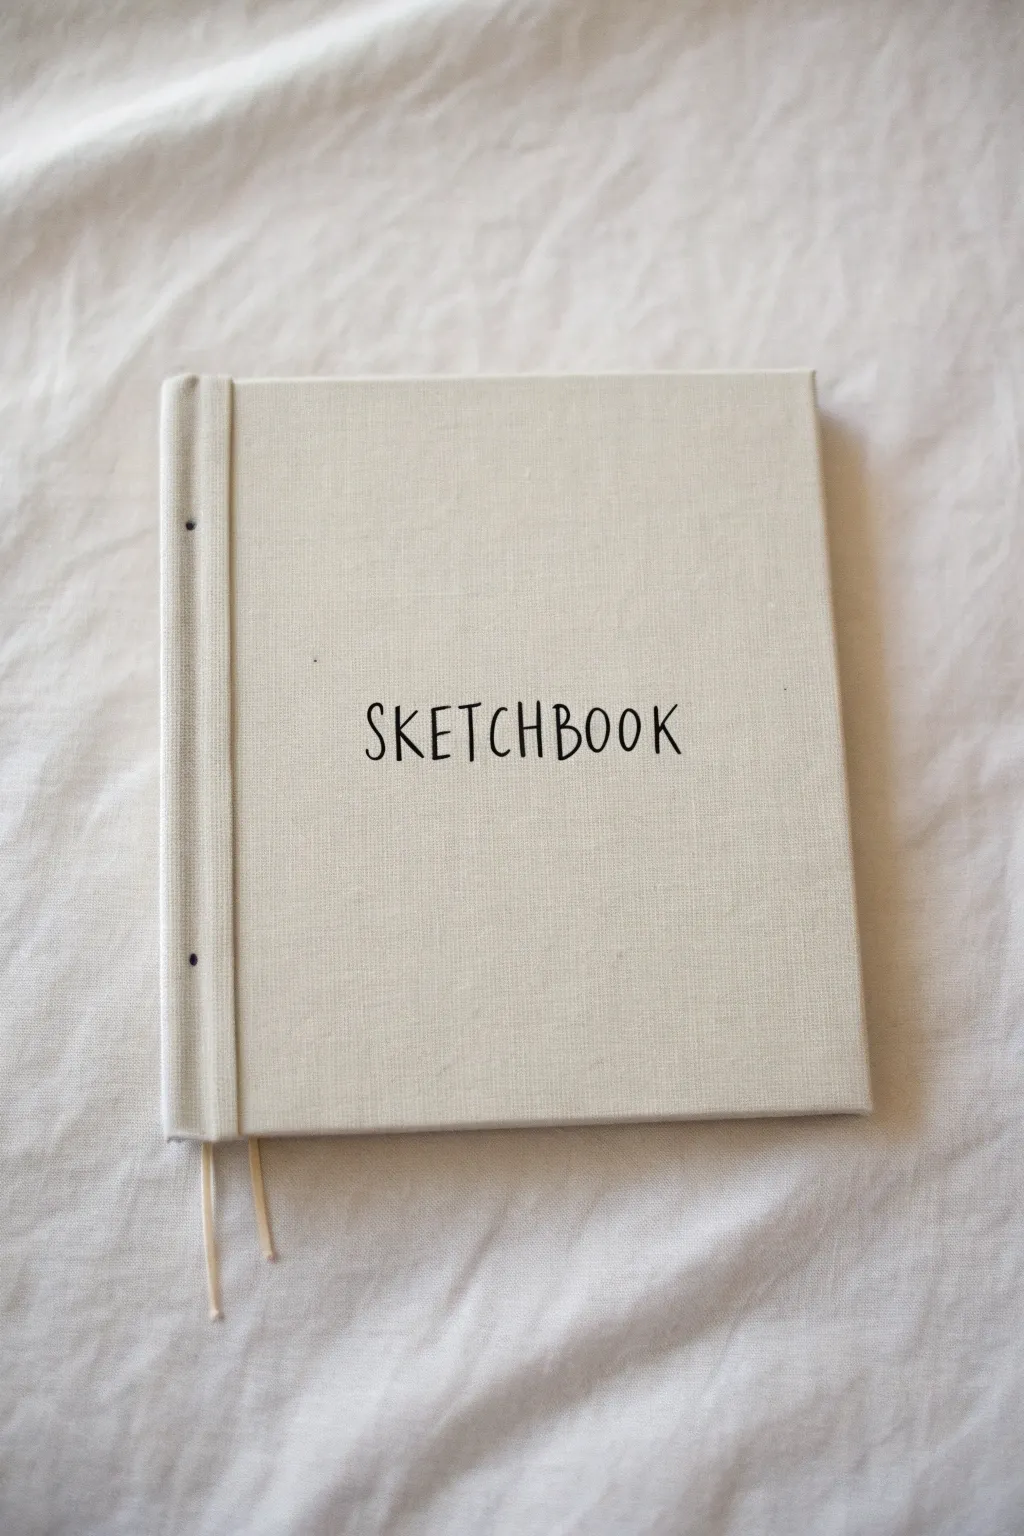
Sometimes the most striking covers are the simplest, letting the texture of the material shine through. This project transforms a plain linen-bound sketchbook into a personalized art journal using nothing but careful hand-lettering and a steady hand.
Step-by-Step Tutorial
Materials
- Hardcover sketchbook with linen or fabric cover
- Fabric marker or fine-tip permanent marker (black)
- HB pencil
- Ruler
- Kneaded eraser
- Scrap paper for practice
Step 1: Planning and Layout
-
Practice your font:
Before touching the fabric, grab a piece of scrap paper. Practice writing the word ‘SKETCHBOOK’ in a tall, narrow sans-serif style. Notice the quirks in the reference image: the ‘S’ is slightly top-heavy, and the ‘O’s are narrow ovals. Aim for a handwritten, organic feel rather than perfect machine uniformity. -
Find the center:
Use your ruler to measure the width and height of your sketchbook cover. Lightly mark the exact center point with your pencil. This will overlap with the middle of your word. -
Establish a baseline:
Decide where you want the text to sit vertically. Place your ruler horizontally across the cover at your desired height. Very lightly sketch a baseline across the center area to keep your letters aligned. -
Map out letter spacing:
Count the letters in ‘SKETCHBOOK’ (10 letters). The gap between ‘H’ and ‘B’ is roughly the midpoint. Starting from your center mark, measure outwards to the left and right to ensure the word will be centered. You can make small tick marks for where each letter should start and end.
Step 2: Penciling the Design
-
Sketch the central letters:
Start sketching the letters ‘H’ and ‘B’ on either side of your center point. Press very lightly with your pencil; distinct graphite marks can be hard to erase from textured linen fabric. -
Work outwards:
Continue sketching the remaining letters, working your way out to the ‘S’ on the left and the ‘K’ on the right. Keep checking the balance to ensure the word doesn’t drift off-center. -
Refine the shapes:
Go back over your pencil sketch to firm up the lines you like. Pay attention to the crossbars on the ‘E’ and ‘H’—keeping them slightly higher than the vertical center can give the font a vintage, hand-drawn character. -
Check for fabric pull:
Examine the fabric surface. If your pencil caught on the weave and created any skips, lightly fill those in now so you have a solid guide for ink.
Bleeding Lines?
If ink bleeds into the fabric weave, stop immediately. Switch to a fine-point gel pen or a pigment liner, which sits on top of the fibers rather than soaking in.
Step 3: Inking the Title
-
Test your marker:
On a hidden spot of the sketchbook (like the inside back folded edge) or a similar scrap fabric, test your black marker. You want to see if the ink bleeds into the linen fibers. If it spreads too much, switch to a finer tip. -
Start in the middle:
Just like the sketching phase, I prefer to start inking from the middle letters ‘H’ and ‘B’. This prevents you from smearing wet ink with your hand as you move across the cover. -
Commit to the lines:
Draw each letter with slow, deliberate strokes. Fabric has a texture that can bump your pen tip, so go slowly to maintain a smooth line. Don’t worry about ‘sketching’ the line; try to make single, confident strokes. -
Double-pass for density:
If the first line looks a bit gray or skipped over the fabric weave, go over the letter strokes a second time. This deepens the black and makes the title pop against the natural linen. -
Let it dry completely:
Give the ink plenty of time to set. Fabric markers can stay wet longer than you expect, and you don’t want to smudge it during cleanup.
Add Some Color
For a subtle pop, shadow the black letters with a grey fabric marker, or stitch over your inked lines with embroidery floss for a tactile 3D effect.
Step 4: Finishing Touches
-
Erase pencil marks:
Once the ink is bone dry, gently press a kneaded eraser onto the fabric to lift away the graphite guidelines. Avoid rubbing vigorously, which can pill the fabric; a dabbing or rolling motion works best. -
Heat set (optional):
If your specific fabric marker requires it, run a warm iron over the cover (using a pressing cloth between the iron and the sketchbook) to make the design permanent.
Now you have a sketchbook that is distinctly yours, ready to be filled with your creative journey


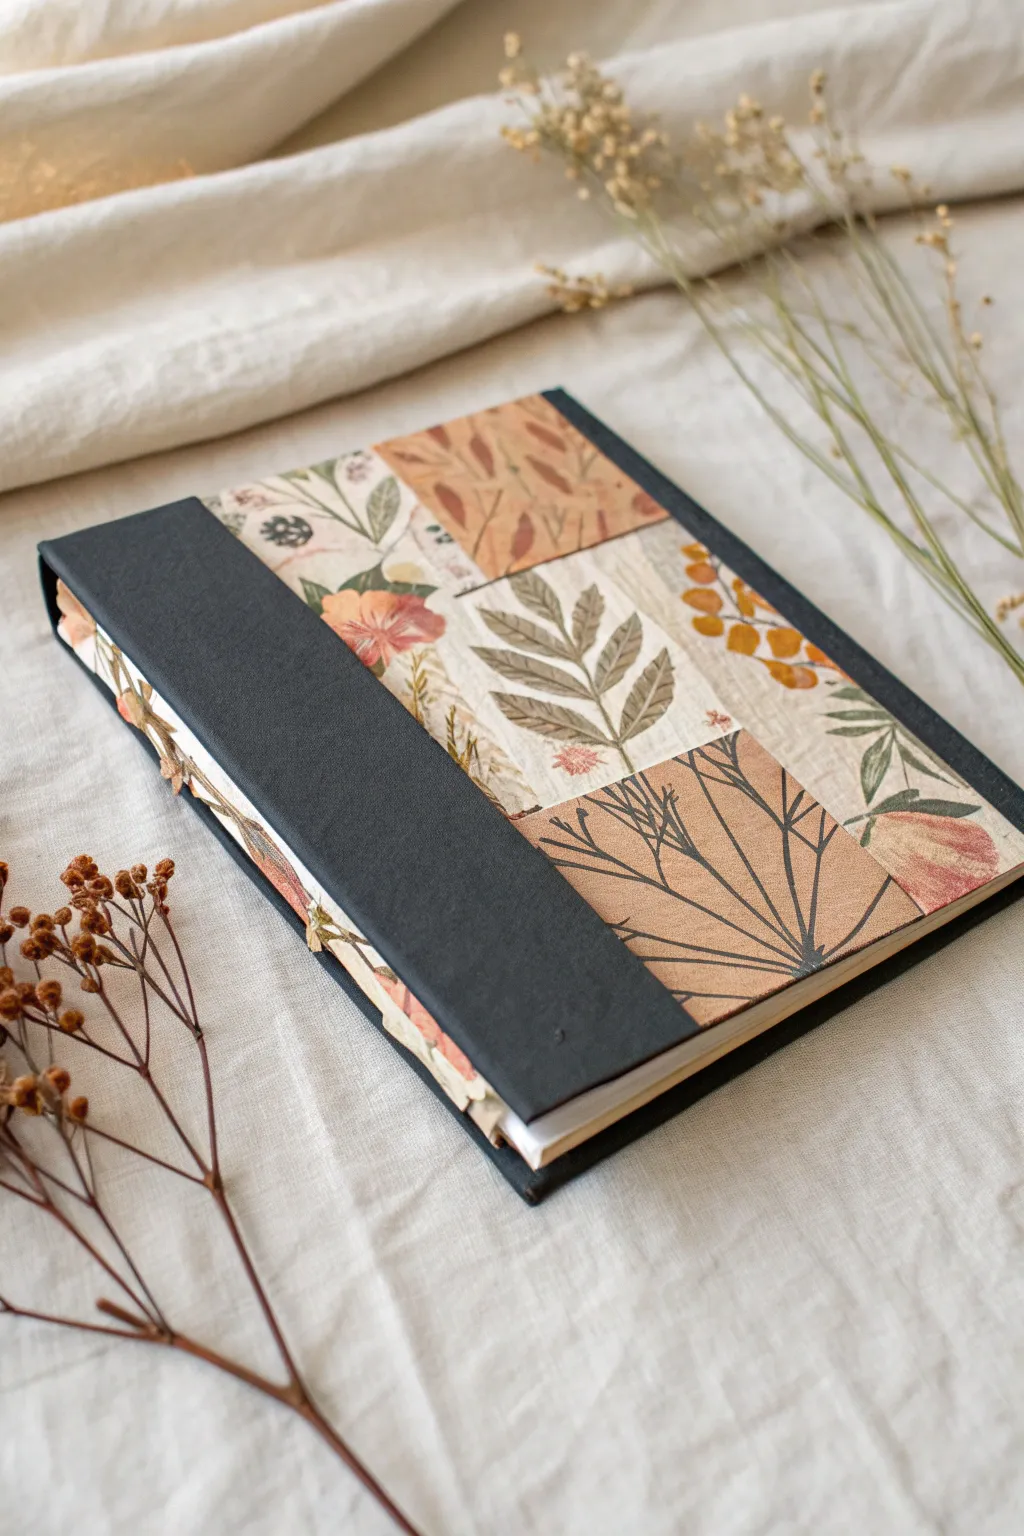
Simple Collage Patchwork
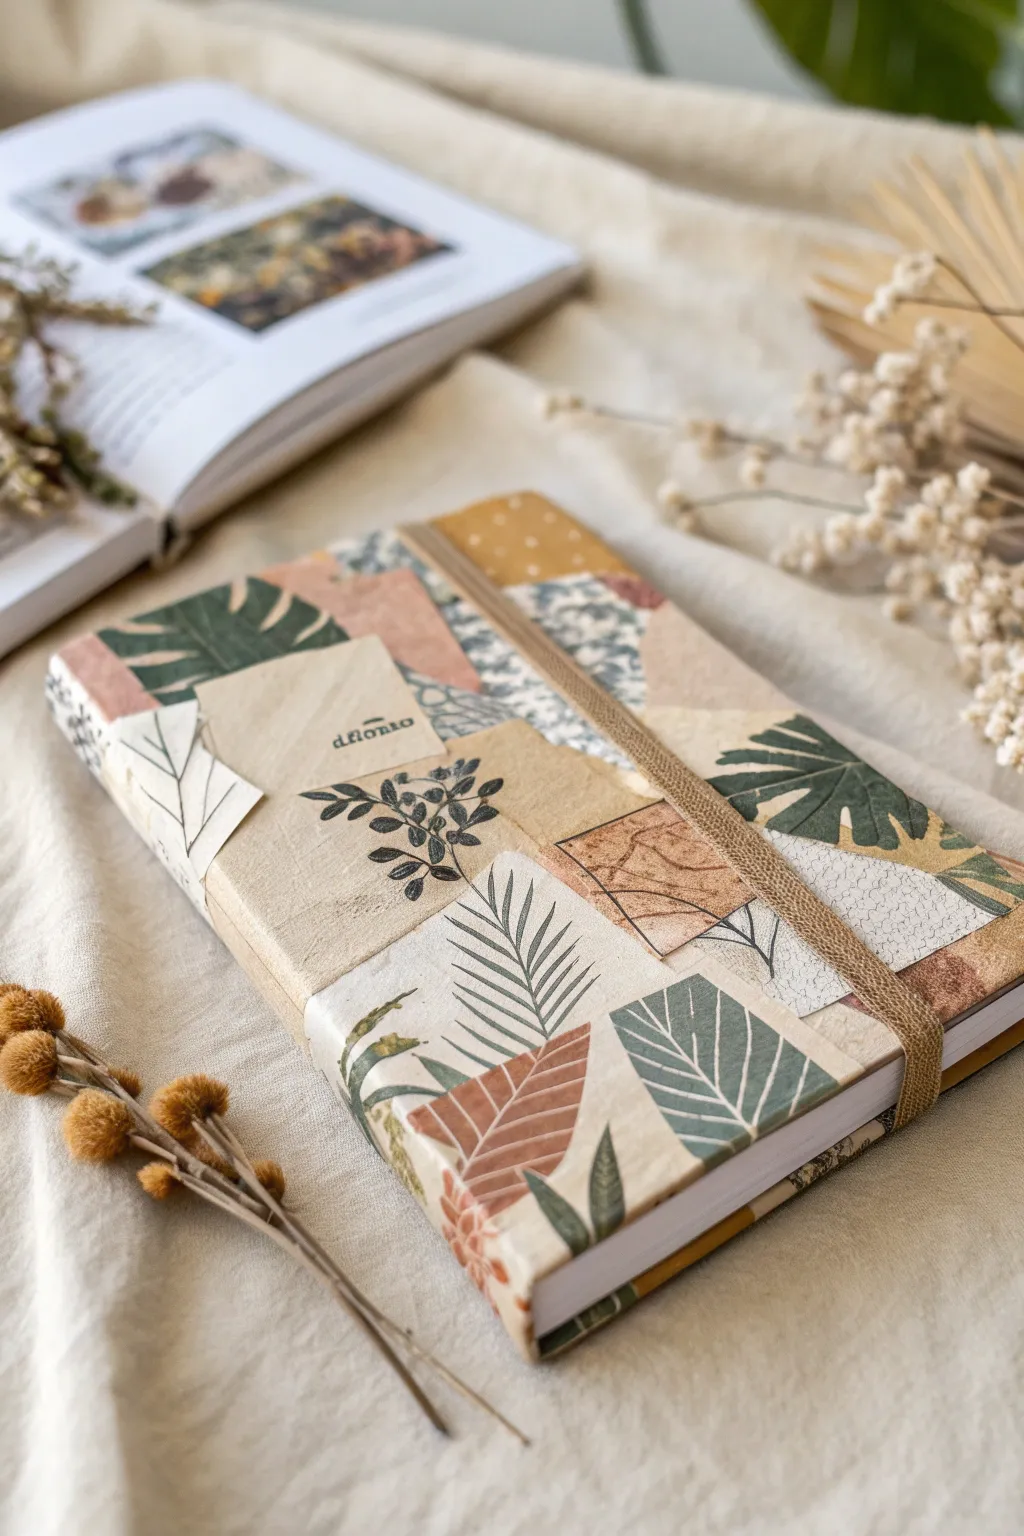
Transform a plain sketchbook into an earthy, textured art piece with this simple collage technique. By layering scraps of botanical papers in a patchwork style, you create a cohesive yet eclectic cover that feels both vintage and modern.
Step-by-Step
Materials
- Hardbound sketchbook or journal
- Assorted patterned craft papers (botanical prints, nature textures)
- Plain kraft paper or beige cardstock
- Mod Podge or decoupage glue
- Flat paintbrush (1-inch width)
- Scissors
- Fine-grit sandpaper (optional)
- Black ink pen or fine liner
- Clear matte varnish or sealant spray
- Wide elastic band (beige or tan)
- Ruler
Step 1: Preparation & Layout
-
Clean the surface:
Before you begin, wipe down the cover of your sketchbook with a slightly damp cloth to remove any dust or oils. Let it dry completely to ensure the glue adheres properly. -
Select your palette:
Gather your patterned papers. Look for a mix of large leafy prints, subtle textures like dots or woven patterns, and solid earthy tones. Aim for a color scheme of sage greens, rusty terracottas, and creamy beiges. -
Cut base shapes:
Start cutting your papers into various geometric shapes. Don’t worry about perfect squares; irregular quadrilaterals and trapezoids add to the organic patchwork look. Keep pieces ranging from 2 to 4 inches in size. -
Dry fit the arrangement:
Lay the cut pieces onto the book cover without glue first. Experiment with the composition by rotating pieces and overlapping edges. I like to take a quick photo on my phone once I find a layout I love, just for reference.
Wrinkle Rescue
If paper bubbles appear while gluing, pop them gently with a fine pin and smooth the air out with your finger immediately before the glue sets hard.
Step 2: Adhering the Collage
-
Apply the base layer:
Pour a small amount of decoupage glue into a dish. Using your flat brush, apply a thin, even layer of glue to the back of your first paper piece. -
Position and smooth:
Place the paper onto the cover, starting near a corner or edge. Use your fingers or a clean credit card to smooth it down, pushing air bubbles out towards the edges. -
Build the patchwork:
Continue gluing pieces one by one, slightly overlapping the edges of previous pieces. This overlapping is crucial—it prevents the original cover from peeking through and creates that glued-patchwork texture. -
Wrap the edges:
For pieces that extend beyond the cover’s edge, wrap the excess paper around to the inside cover for a clean finish. Glue them down firmly on the inside. -
Seal the surface:
Once the entire front cover is covered and the glue is dry to the touch, apply a top coat of decoupage glue over the entire collage. Brush in consistent strokes to seal the papers together.
Unify the Palette
To make disparate paper scraps look cohesive, brush a very diluted wash of coffee or tea over the finished collage before sealing to give it an aged tone.
Step 3: Adding Details & Finishing
-
Create a focal point:
Cut a smaller, rectangular piece of light beige or cream paper. This will serve as a label area. -
Add hand-drawn elements:
On this label piece or on plain sections of the collage, use your black fine liner to draw simple botanical sprigs or leaves. This integrates the different papers and adds a personal touch. -
Attach the label:
Glue your drawn label piece onto the cover, perhaps slightly off-center or overlapping two different background patterns for visual interest. -
Sand for texture (optional):
If you want a more weathered, vintage look, very lightly scuff the edges of the book and the paper overlaps with fine-grit sandpaper. This softens the crisp paper edges. -
Final seal:
Apply a final coat of matte varnish or clear sealant spray. This protects your handiwork from moisture and daily wear and tear. -
Let it cure:
Allow the book to dry completely, preferably overnight. Leave it open or prop it up so the covers don’t stick to anything. -
Add the closure:
Measure a length of wide beige elastic that fits snugly around the height of the book. Sew the ends together to form a loop and slide it onto the back cover to keep your sketchbook closed.
Your sketchbook is now protected by a custom cover that inspires creativity before you even open the first page


Black-and-White Doodle Pattern
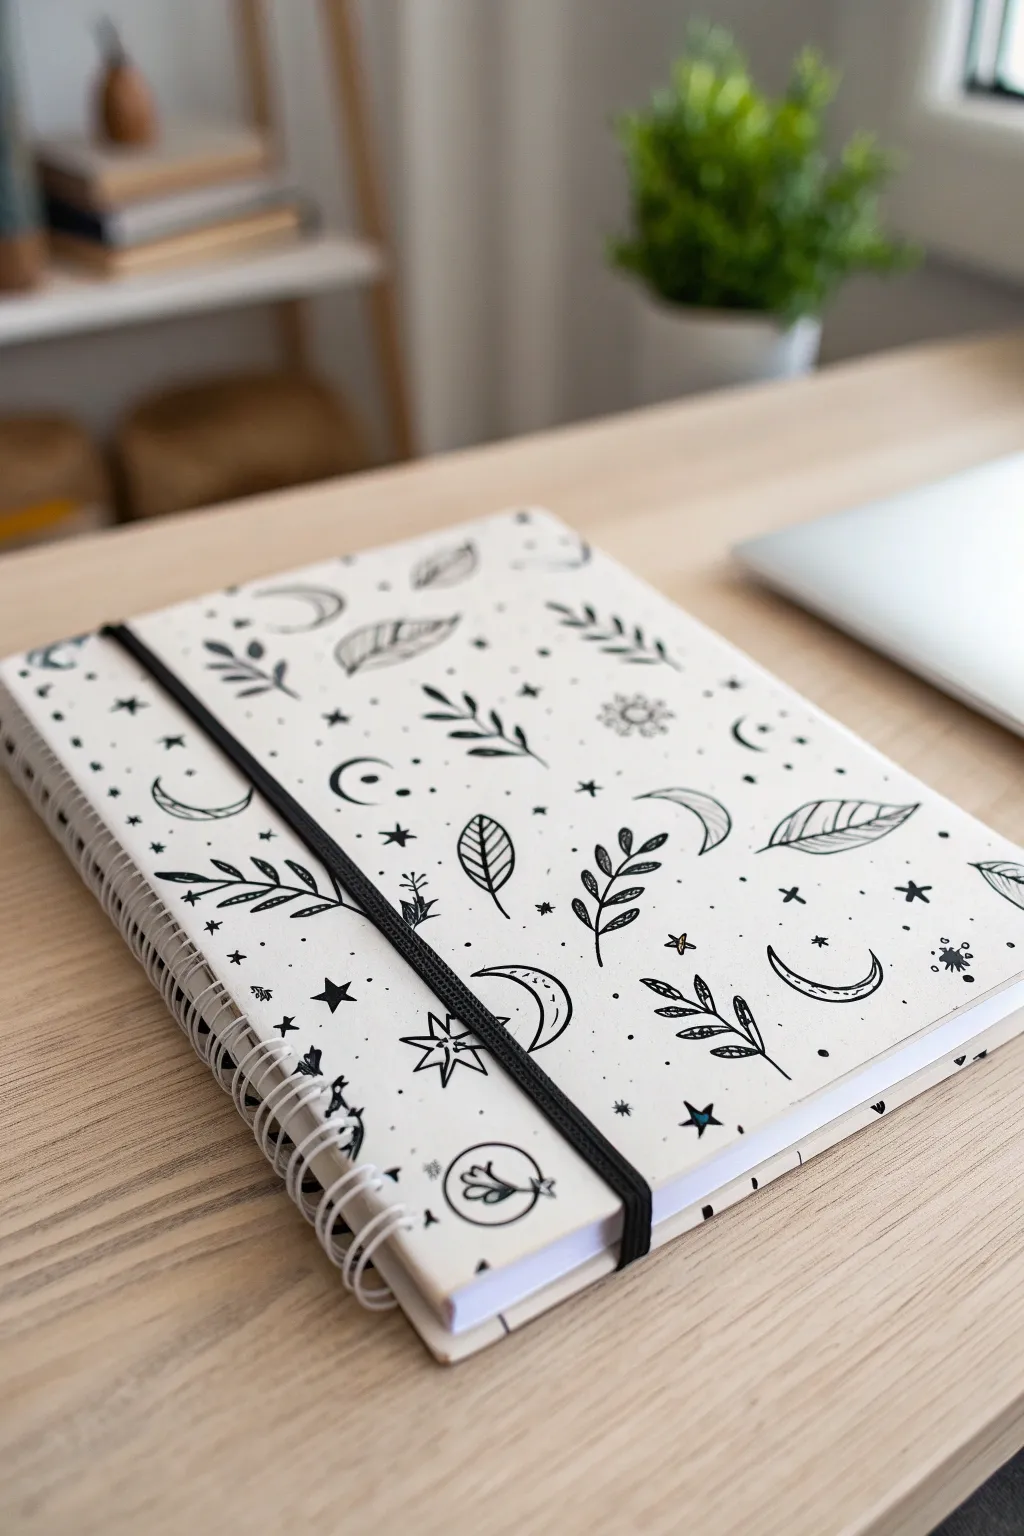
Transform a plain sketchbook into a dreamy, custom art piece with this simple yet striking black-and-white pattern. Combining delicate leaves with celestial moons and stars creates a balanced, whimsical aesthetic that looks professionally printed but is entirely hand-drawn.
Step-by-Step Guide
Materials
- Spiral-bound sketchbook with a plain white or kraft cover (hardcover preferred)
- Fine-liner pens (black, archival ink, varying sizes like 0.3mm, 0.5mm, 0.8mm)
- Pencil (HB or 2B)
- Eraser (kneaded or high-quality vinyl)
- Ruler (optional, for spacing)
- Scrap paper for practice
Step 1: Planning and Layout
-
Assess your canvas:
Start by examining your sketchbook cover. If the surface is glossy, lightly scuff it with fine sandpaper to help the ink adhere; if it’s matte paper or cardstock, you are ready to begin immediately. -
Practice your motifs:
On a piece of scrap paper, doodle the key elements: crescent moons (both waxing and waning), simple pointed leaves, fern-like sprigs, five-pointed stars, and small asterisks. Get comfortable with the shapes before touching the final cover. -
Establish the flow:
Visualize a random but balanced distribution. You don’t want all the moons in one corner. Lightly pencil in a few ‘anchor’ shapes—the larger moons and biggest leaves—spaced evenly across the cover to guide your doodle density.
Doodle Flow Tip
Rotate your sketchbook physically as you draw. This prevents your hand from smudging wet ink and naturally encourages you to draw elements at different angles.
Step 2: Drawing the Primary Elements
-
Ink the crescent moons:
Using a 0.5mm or 0.8mm pen, draw your crescent moons first. Vary their orientation so some face left, some right, and some tilt slightly. Keep the lines smooth and confident. -
Add detail to moons:
For added texture, add a double line inside some of the moons or small stippling dots near the inner curve to suggest shading. -
Draw the botanical sprigs:
Switch to a slightly thinner pen (like a 0.3mm or 0.5mm) for the plants. Draw a central stem line first, sketching it with a gentle curve rather than a straight stick. -
Flesh out the leaves:
Add small, teardrop-shaped leaves along the stems. For variety, make some leaves solid black, keep some open with a center vein, and stripe others with diagonal hatching. -
Incorporate single leaves:
Fill some of the larger gaps with floating, standalone leaves. These should be larger than the ones on the sprigs. Draw a leaf outline, add a center vein, and then draw diagonal veins extending to the edges.
Fixing Mistakes
Did a line go crooked? Turn it into a new leaf or thicken the outline to hide the wobble. Since this is an organic pattern, slight irregularities usually blend right in.
Step 3: Filling the Negative Space
-
Draw the stars:
Using your medium-sized pen, scatter five-pointed stars into the medium-sized gaps. You can draw these as outlines or fill them in solid black for contrast. -
Add burst accents:
Create small ‘starbursts’ or asterisks using crossing lines. These mimic distant twinkling stars and add energy to the static pattern. -
Sprinkle the dots:
Look for the smallest awkward empty spaces between your main drawings. Use your thickest pen tip to tap single dots into these areas. This ‘confetti’ technique unifies the whole design. -
Review and refine:
Step back and look at the cover as a whole. If a specific area looks too empty, add a small circle or a tiny floating leaf to balance the visual weight.
Step 4: Finishing Touches
-
Let the ink cure:
Allow the drawing to sit untouched for at least 15 to 20 minutes. I prefer to wait a bit longer just to be safe, especially if the cover material is slightly coated. -
Erase guidelines:
Gently erase any pencil marks you made during the planning phase. Be extremely careful near the spiral binding so you don’t snag the paper. -
Re-install the band:
If your sketchbook has an elastic closure band, bring it back around to the front. The black band will perfectly complement your new monochromatic design.
Now you have a personalized sketchbook that inspires creativity before you even open the first page


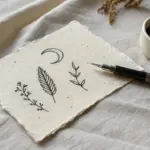

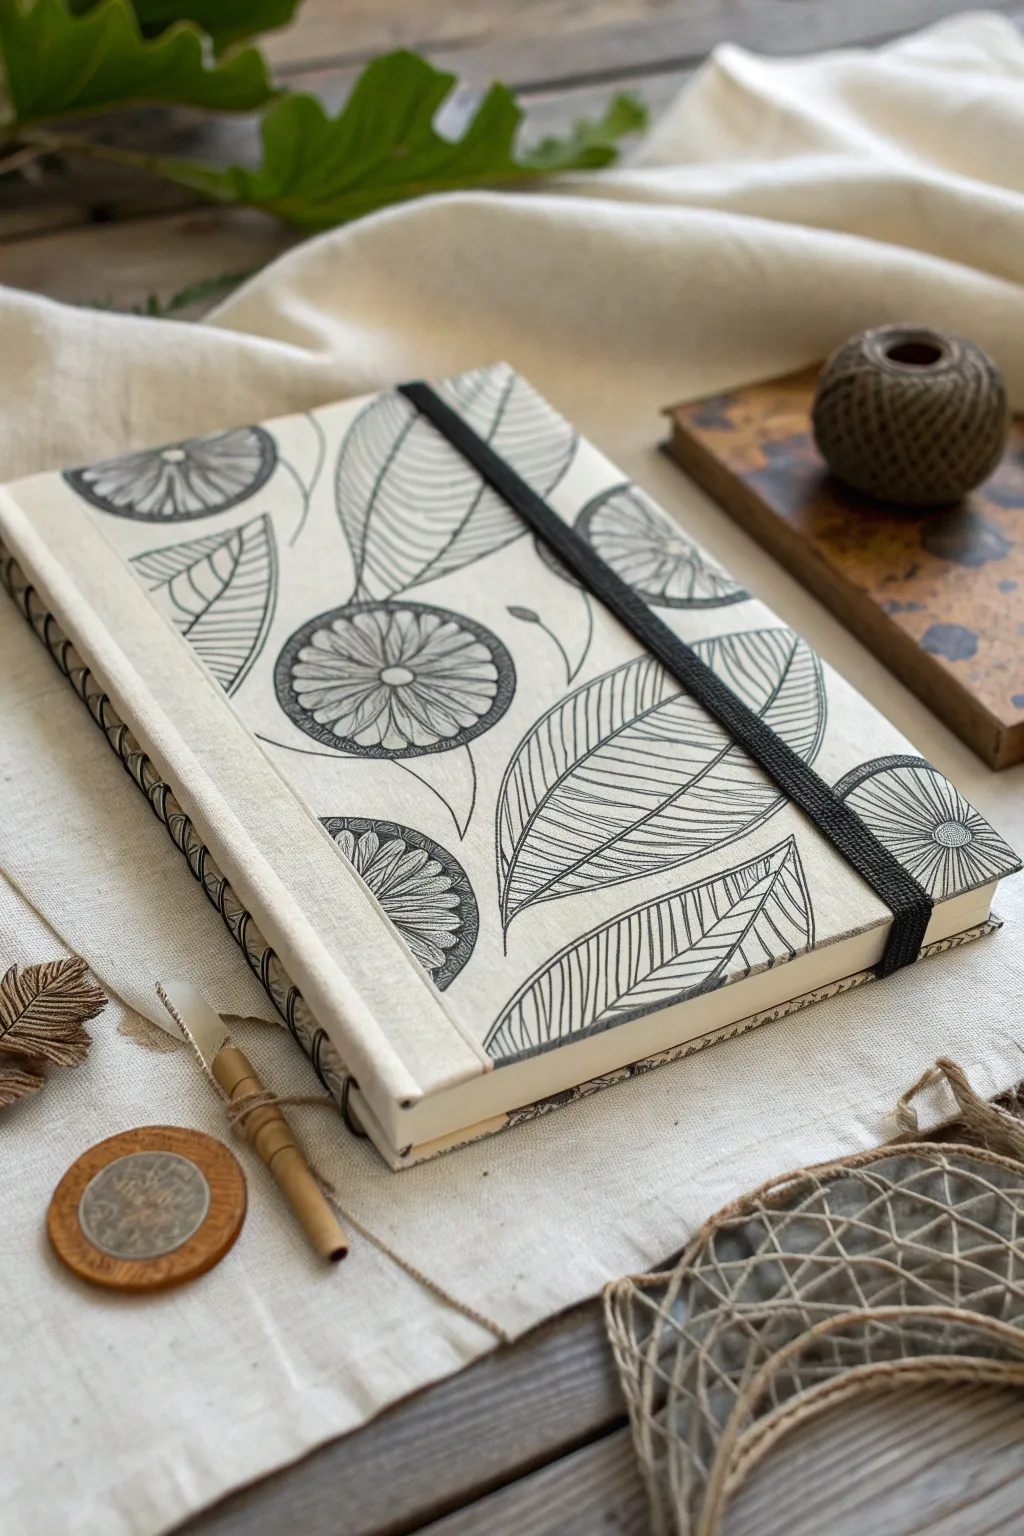
Botanical Line Drawing
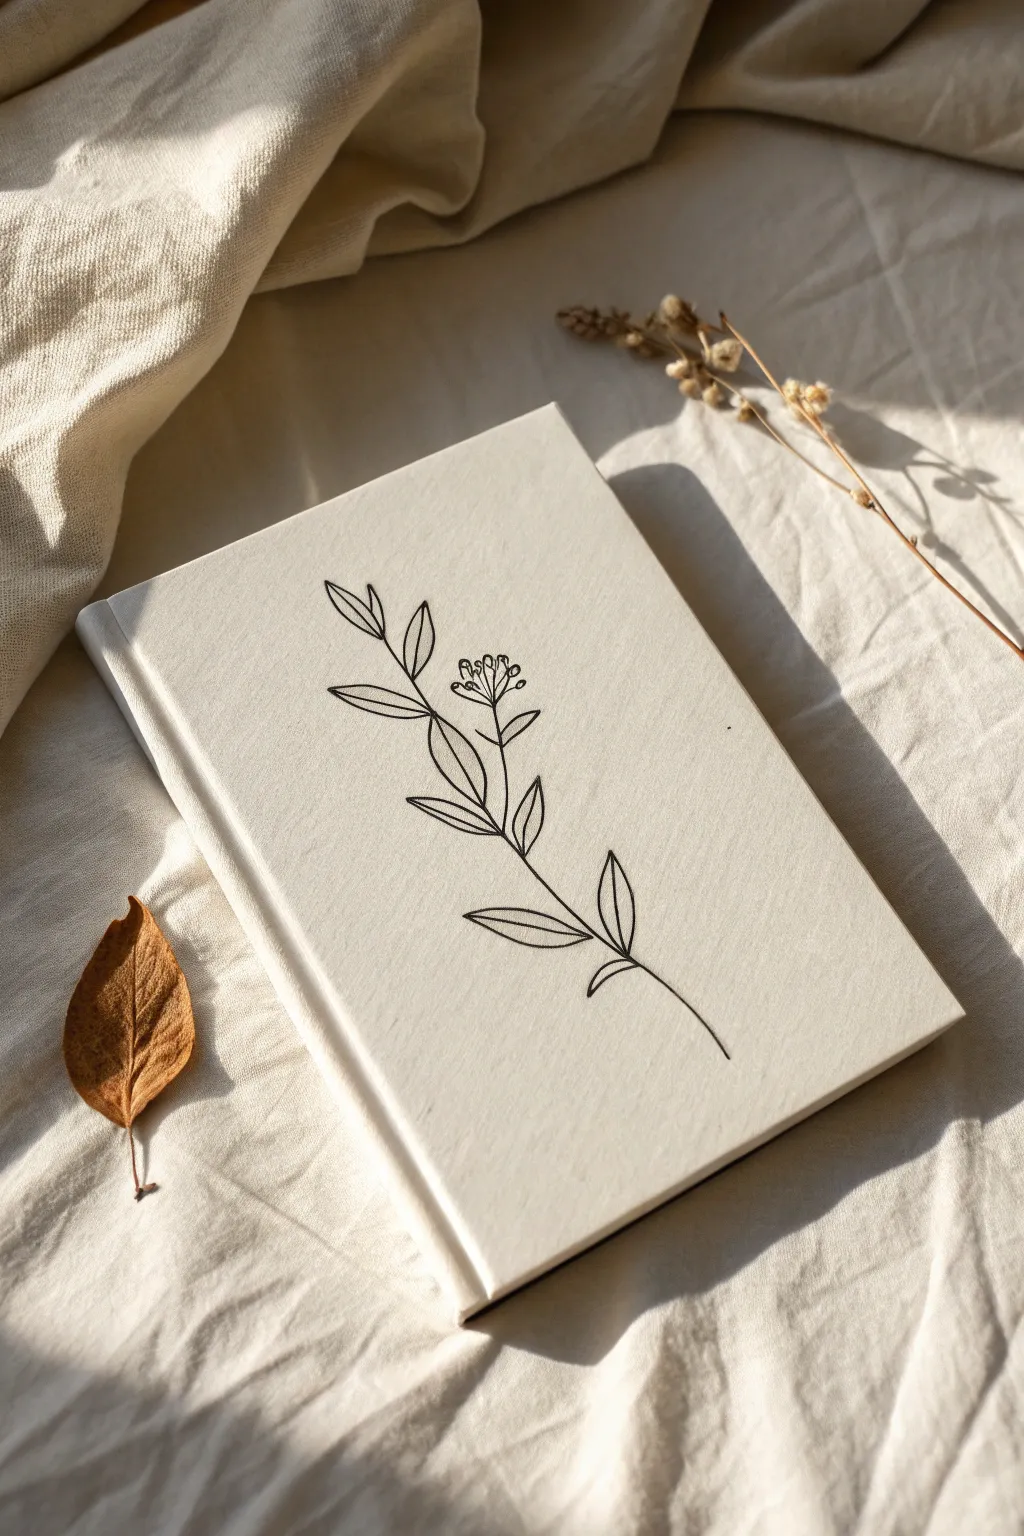
Simple yet striking, this cover design uses delicate line work to transform a plain sketchbook into a personalized art journal. The stark contrast of black ink on a creamy canvas fabric creates a modern aesthetic that feels both organic and refined.
Step-by-Step
Materials
- Hardcover sketchbook with a fabric or canvas cover (cream or off-white)
- Pencil (HB or 2H)
- White vinyl eraser
- Fine liner pen (size 05 or 08), waterproof and archival ink (black)
- Ruler (optional)
- Tracing paper (optional)
Step 1: Planning and Sketching
-
Surface Prep:
Begin by ensuring your sketchbook cover is clean and free of lint. If it’s a fabric cover like the one shown, lightly brush your hand over it to smooth down any raised fibers that might catch your pen tip. -
Find the Center:
Visually locate the center of the cover. You don’t need to measure perfectly, but identifying the middle vertical axis helps balance the stem. The design should flow slightly diagonally, starting from the bottom right quadrant and reaching toward the top left. -
Draft the Primary Stem:
Using your pencil with very light pressure, draw a single, slightly curved line for the main stem. It shouldn’t be perfectly straight; a gentle ‘S’ curve gives it a natural feeling. Start about 2 inches from the bottom right corner. -
Map Out Leaf Positions:
Along the main stem, lightly mark small ticks where the leaves will attach. Alternate sides as you move up the stem to create a balanced structure. -
Sketch the Lower Leaves:
Draft the bottom leaves first. Draw elongated almond shapes. Keep the points sharp and the curves smooth. Notice how the lowest leaf points almost horizontally to the right. -
Add Middle Foliage:
Moving up, sketch the middle pairs of leaves. These should angle upward more aggressively than the bottom ones. I like to keep the sketched lines faint so they are easier to erase later. -
Detail the Top Cluster:
Near the top of the stem, sketch a small cluster where the flowers will be. Instead of large leaves, draw shorter, thinner branchlets radiating outward. -
Draft the Buds:
At the ends of those top branchlets, draw tiny circles or ovals to represent the buds or seed pods.
Fabric Texture Trick
If the fabric grain is coarse, draw your lines slightly slower. This allows the ink to saturate the valleys of the weave, preventing jagged, skipped lines.
Step 2: Inking the Design
-
Test Your Pen:
Before touching the cover, test your fine liner on a scrap piece of paper or the back inside cover of the sketchbook. You want to ensure the ink flow is consistent and dark. -
Ink the Main Stem:
Starting from the bottom, carefully trace over your pencil line for the stem. Use a confident, steady speed. Too slow can cause shaky lines; too fast reduces control. -
Outline the Leaves:
Trace the leaf shapes. For the central vein of each leaf, draw a line that stops just short of the leaf’s tip. This gap keeps the drawing feeling airy and light. -
Connect Leaves to Stem:
Ensure there is a solid connection between the leaf base and the main stem. A tiny, almost triangular thickening at the joint adds realism. -
Ink the Floral Top:
Trace the fine branchlets at the top. Use a lighter touch here if possible. Outline the small circular buds clearly. -
Add Texture Details:
Inside the buds, add tiny dots or a small crescent line to give them dimension. -
Check Line Weight:
Look over the drawing. If any main lines look too thin or broken, carefully go over them a second time to thicken the stroke slightly, enhancing the graphic look.
Step 3: Finishing Touches
-
Let it Dry:
This is crucial. Cloth covers absorb ink differently than paper. Wait at least 15-20 minutes to ensure the ink is completely set and won’t smudge. -
Erase Pencil Marks:
Gently erase the visible pencil sketch. Hold the book cover taut with one hand while erasing with the other to prevent the fabric from bunching up. -
Brush Away Debris:
Sweep away the eraser dust with a soft brush or your hand. -
Protect the Art:
Optionally, spray a light coat of fixative if you are worried about the ink rubbing off over time, though archival ink usually holds up well on its own.
Add a Pop of Color
Once the black ink is fully dry, use a gold paint pen to fill in just the tiny circular buds at the top for an elegant metallic accent.
Now you have a custom sketchbook that is as inspiring on the outside as the pages are on the inside
BRUSH GUIDE
The Right Brush for Every Stroke
From clean lines to bold texture — master brush choice, stroke control, and essential techniques.
Explore the Full Guide
Bold Geometric Blocks
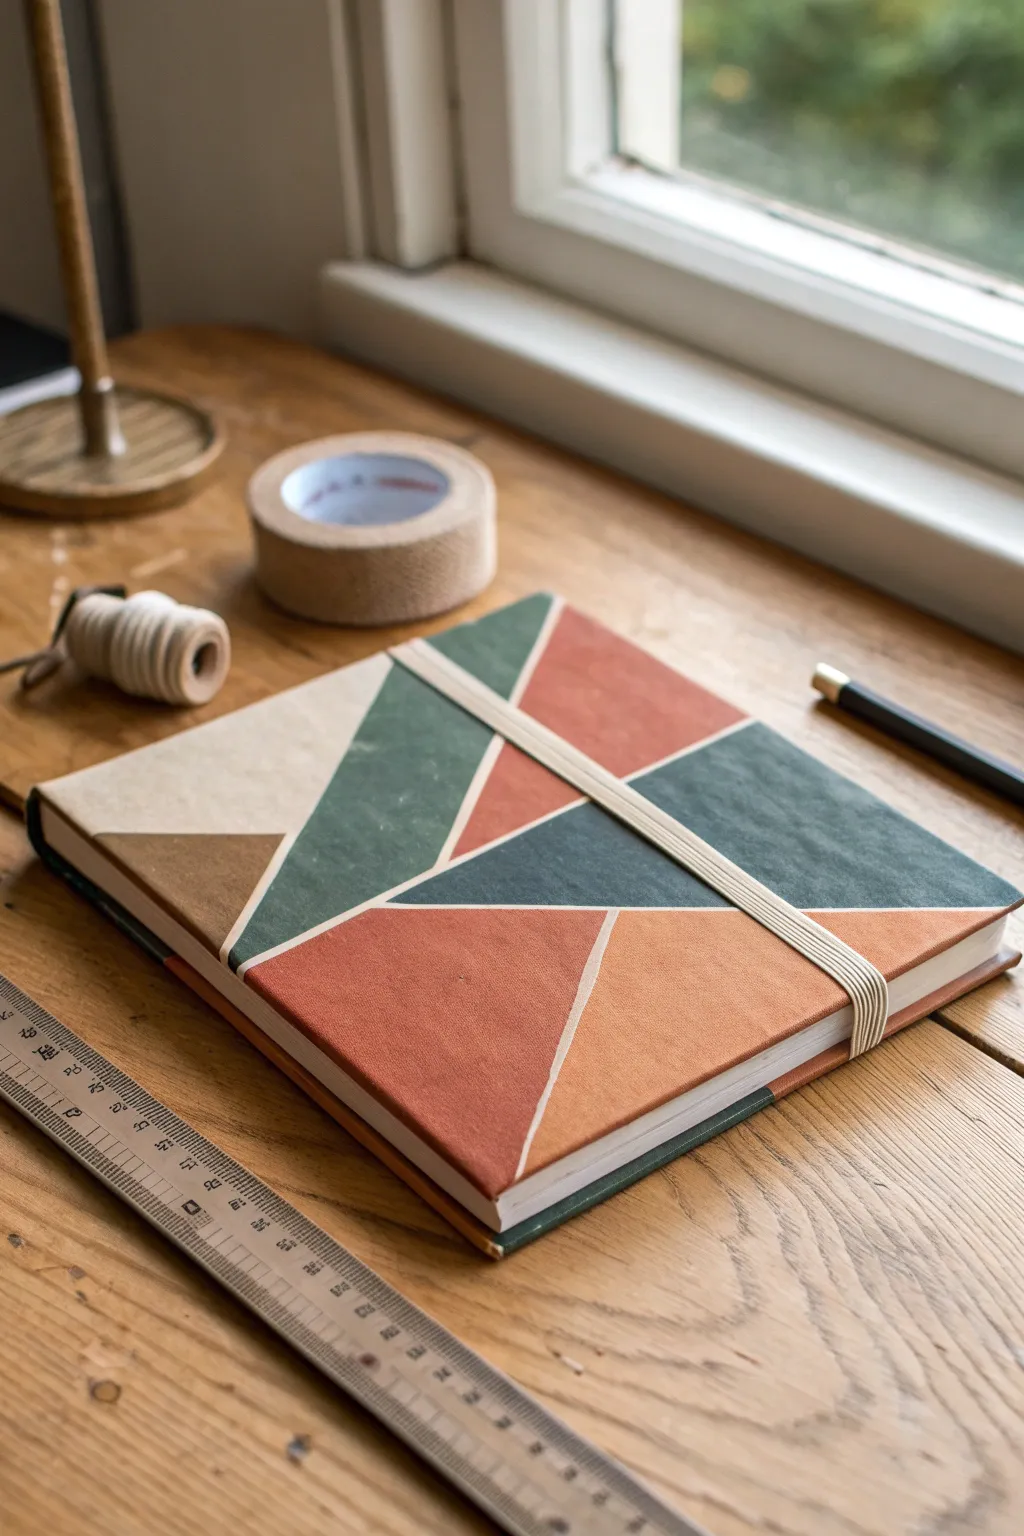
Transform a plain sketchbook into a piece of modern art with this bold geometric cover design. Using a palette of muted terracotta, deep teal, and cream, you’ll create a striking patchwork pattern that feels both structured and organic.
Detailed Instructions
Materials
- Hardcover sketchbook (A5 or similar size)
- Heavyweight decorative paper or book cloth (Terracotta, Teal, Olive Green, Cream, Tan)
- PVA glue or bookbinding glue
- Flat paintbrush (1-inch width)
- Bone folder
- Metal ruler
- Craft knife or scalpel
- Self-healing cutting mat
- Pencil and eraser
- Flat elastic band (cream or beige, 10-15mm wide)
- Heavy-duty double-sided tape or fabric glue
- Wax paper
Step 1: Planning and Cutting
-
Measure the cover:
Begin by measuring the front cover of your sketchbook accurately. Add an extra 2cm to the top, bottom, and right edge (the fore-edge) to account for the wrap-around later. -
Sketch the layout:
On a scrap piece of paper cut to your cover’s size, sketch out your geometric design. Create intersecting diagonal lines to form large, mismatched triangles and quadrilaterals. -
Create templates:
Once happy with your design, number the shapes on your sketch. Trace each shape onto cardstock to create reusable templates for cutting your paper or book cloth. -
Select your palette:
Assign colors to your numbered shapes. Aim for high contrast between adjacent shapes—place the dark teal next to the cream, and the terracotta next to the tan for visual impact. -
Cut the shapes:
Using your templates, trace the shapes onto the back of your colored papers or book cloth. Carefully cut them out using a metal ruler and craft knife for perfectly straight edges.
Use Fabric over Paper
For a truly durable, tactile finish, use bookbinding cloth or stiffened cotton fabric instead of paper. It handles wear better and adds a lovely texture.
Step 2: Assembling the Mosaic
-
Prepare the workspace:
Lay a sheet of wax paper over your workspace to catch any glue drips. Place your cut shapes in their correct arrangement to double-check the fit before gluing. -
Glue the first shape:
Start with a central shape rather than an edge piece. Apply a thin, even layer of PVA glue to the back of the shape using your flat brush, extending all the way to the edges. -
Position and smooth:
Place the shape onto the book cover. Use a bone folder to gently smooth it down from the center outward, eliminating air bubbles and ensuring good adhesion. -
Leave a gap:
This is crucial for the mosaic look: leave a tiny, consistent gap (about 1mm) between the paper shapes. This reveals the ‘grout’ line, which is visually pleasing. -
Continue assembling:
Working outward from your first piece, glue down the remaining shapes. Pay close attention to the alignment of your diagonal lines across different colors. -
Handle the edges:
For the pieces bordering the edges of the book, ensure the material hangs over the side by the 2cm margin we planned earlier.
Step 3: Finishing Touches
-
Wrap the edges:
Open the sketchbook cover. Apply glue to the overhanging material strips. Pull them taut around the edge of the board and smooth them down onto the inside cover. -
Miter the corners:
Where the material overlaps at the corners, carefully trim the excess at a 45-degree angle so the folds lay flat without bulk. I prefer to leave just a tiny bit of material to pinch over the board tip. -
Install the elastic band:
Measure a length of elastic that is slightly shorter than the height of your book so it stretches taut. Glue the ends of the elastic to the inside back cover, about 3cm from the top and bottom edges. -
Secure the elastic:
Use a piece of strong tape or a scrap of book cloth glued over the raw ends of the elastic to ensure they never pull loose. -
Add endpapers:
To hide the wrapped edges and elastic ends, cut a large sheet of coordinating thick paper. Glue this ‘endpaper’ to the inside of the front and back covers. -
Press and dry:
Close the sketchbook. Place a sheet of wax paper between the cover and the first page to prevent sticking. Weight the book down with heavy objects and let it dry overnight.
Gaps Too Wide?
If your gaps between shapes became uneven, use a fine tip paint pen (gold or white) to trace over the ‘grout lines’ after gluing to unify the design.
Now you have a stunning, personalized sketchbook that invites you to open it up and create every day
Minimal Single-Icon Cover
Embrace simplicity with this striking single-icon design that transforms a plain notebook into a mystical journal. The high-contrast black ink against a natural cream cover creates a clean, intentional aesthetic perfect for dream journaling or sketching.
Step-by-Step Tutorial
Materials
- Hardcover sketchbook (cream, kraft, or beige)
- Pencil (HB or H)
- Eraser
- Ruler
- Black permeant marker or fineliner (0.5mm and 1.0mm)
- Black brush pen (optional, for filling)
- Compass or circle template (optional)
- Tracing paper (optional)
Step 1: Planning and Sketching
-
Find the center:
Begin by laying your sketchbook flat on a hard surface. Use your ruler to measure the width and height of the cover to determine the exact center point, marking it very lightly with your pencil. -
Draft the eye shape:
Sketch a simple almond shape centered on your mark. Keep the curves gentle; the top arch should be slightly more pronounced than the bottom curve. -
Draw the iris:
Inside the almond shape, draw a perfect circle for the iris. It should be large enough that the top and bottom edges are just hidden by the eyelids, or touching them. -
Add the pupil:
Draw a smaller circle directly in the center of the iris for the pupil. Leave a tiny, white circular highlight near the top left or right of the pupil to give the eye life. -
Create the eyelid crease:
Sketch a curved line above the eye, mirroring the shape of the upper lid. This line should be shorter than the eye itself, floating just a few millimeters above it. -
Mark the lashes:
Lightly mark short, radiating lines around the entire eye. I like to make the top lashes slightly longer than the bottom ones, spacing them evenly like rays of sunlight.
Step 2: Inking and Refining
-
Outline the main shape:
Switch to your thicker marker or 1.0mm fineliner. Carefully trace the main almond outline of the eye, using confident, continuous strokes to avoid shaky lines. -
Define the crease:
Ink the floating crease line above the eye with the same pen thickness to maintain visual balance. -
Ink the lashes:
Go over your lash marks. Instead of just straight lines, try to taper them slightly so they are thicker near the eye and thinner at the tips, or use a single bold stroke for a graphic look. -
Outline the iris and pupil:
Switch to a finer pen (0.5mm) to outline the circle of the iris and the pupil. This helps keep the curves growing crisp. -
Fill the pupil:
Use your black marker or brush pen to fill in the pupil completely solid black. Be very careful to preserve the small white highlight circle you sketched earlier; do not color over it. -
Thicken the lash line:
To give the design more weight, go back over the upper almond curve to thicken it slightly, mimicking eyeliner. -
Fill the iris details:
If you want a solid graphic look like the photo, leave the iris (the space between pupil and eyelid) white/unfilled, or add very subtle shading.
Stamp It
Not confident in your drawing skills? Carve this simple design into a rubber eraser or linoleum block first, then use an archival ink pad to stamp it perfectly.
Step 3: Finishing Touches
-
Let the ink set:
Allow the ink to dry completely for at least 15 minutes. Some cover materials absorb ink slowly, and smudging at this stage is heartbreaking. -
Erase pencil guides:
Gently erase your initial pencil sketch marks and the centering crosshairs using a soft eraser. -
Final inspection:
Check the density of your black fill. If the cover texture is showing through the ink, carefully apply a second layer to make the black truly opaque.
Bleeding Ink?
If your markers bleed into the cover fibers, stop immediately. Switch to a black acrylic paint pen or a gel pen, which sit on top of the paper rather than soaking in.
Your sketchbook now has a watchful guardian on its cover, ready to protect your ideas

PENCIL GUIDE
Understanding Pencil Grades from H to B
From first sketch to finished drawing — learn pencil grades, line control, and shading techniques.
Explore the Full Guide
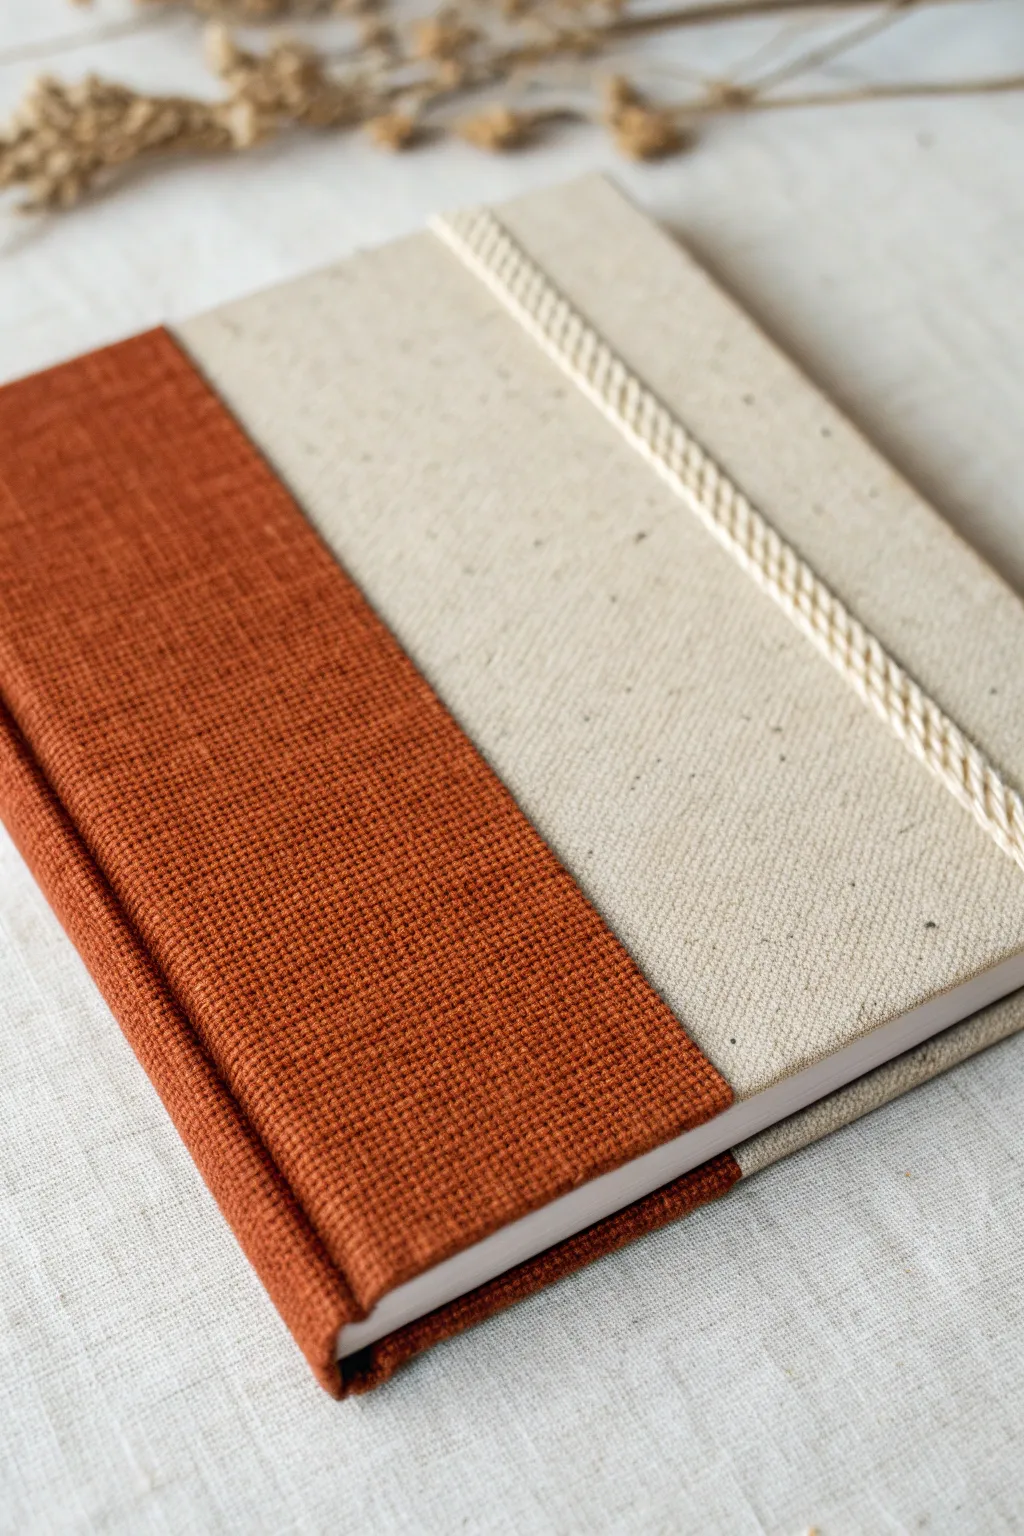
Paper-Wrapped Color Block Cover
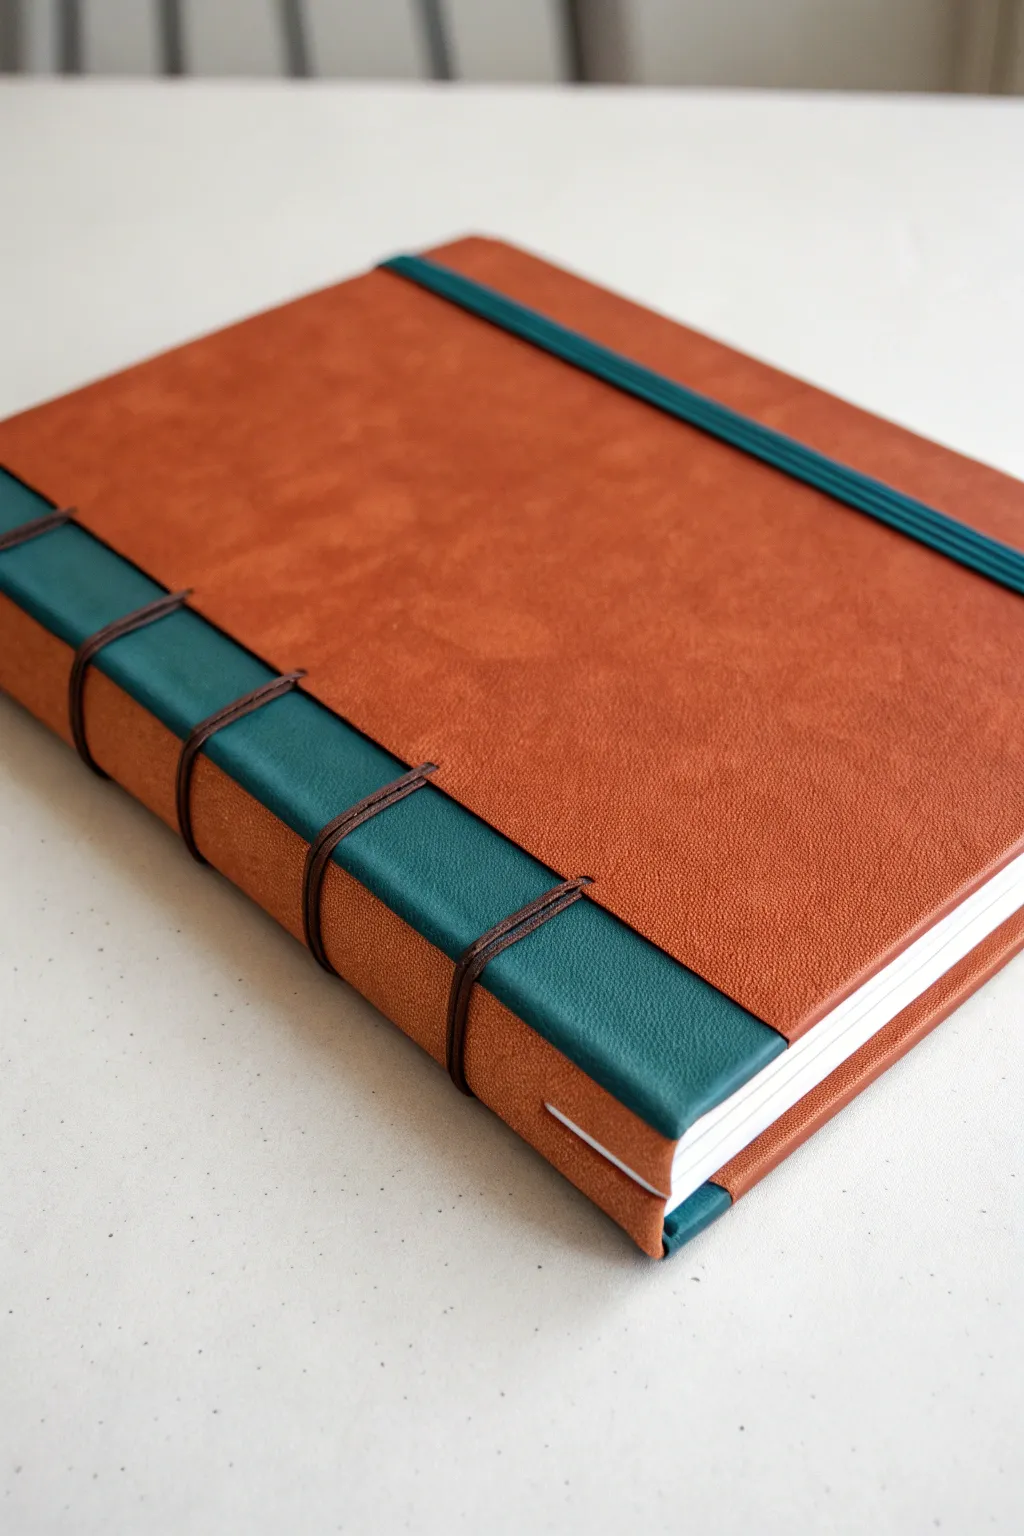
Elevate a standard sketchbook with a sophisticated two-tone cover that mimics the look of high-end library bindings. This project combines faux leather textures in warm terracotta and cool teal, accented with exposed stitching for a durable and stylish finish.
Step-by-Step Guide
Materials
- Hardcover sketchbook (A5 or similar size)
- Terracotta faux leather fabric or bookbinding cloth
- Teal faux leather fabric
- PVA glue or bookbinding glue
- Flat paintbrush or foam brush
- Bone folder
- Waxed thread (dark brown)
- Curved upholstery needle
- Awl or heavy-duty needle
- Scissors and rotary cutter
- Ruler
- Binder clips
- Teal elastic band (optional, for closure)
Step 1: Preparing the Sections
-
Measure the Spine:
Start by measuring the spine width of your sketchbook plus 1.5 inches onto both the front and back covers. This total width will be for your teal spine accent piece. -
Cut the Teal Panel:
Cut a strip of teal faux leather to your measured width. Ensure the height matches the sketchbook’s height plus an extra inch on top and bottom for folding over. -
Measure the Main Panels:
Measure the remaining width of the front and back covers. Cut two pieces of terracotta adhesive faux leather or cloth, adding an extra inch on the outer edges and top/bottom for wrapping.
Step 2: Applying the Cover Material
-
Apply Glue to Spine:
Brush a thin, even layer of PVA glue onto the spine of the book and the 1.5-inch strip on the front and back covers where the teal material will sit. -
Attach Teal Strip:
Center the teal strip over the spine. Press firmly along the spine edges with a bone folder to create sharp, defined creases. Smooth out the material onto the front and back covers. -
Wrap Spine Edges:
Open the book covers slightly. Fold the excess teal material at the top and bottom of the spine into the hollow space between the book block and the spine cover, securing with a dot of glue. -
Position Terracotta Panels:
Align the terracotta pieces so they perfectly abut the teal strip. I like to dry-fit this first to ensure the seam is straight before gluing. -
Gluing the Main Panels:
Apply glue to the front cover board. Carefully press the terracotta material down, smoothing from the center outward to eliminate air bubbles. -
Create Neat Corners:
Cut the corners of the terracotta fabric at a 45-degree angle, leaving about a cardboard’s thickness away from the corner tip. -
Fold and Finish Edges:
Apply glue to the fabric margins and fold them tightly over the edges of the cover board to the inside. Use the bone folder to flatten everything securely.
Clean Seams
To get a perfectly flush seam between colors, overlap the two fabrics slightly while gluing, then double-cut through both layers with a sharp blade and peel away the excess waste.
Step 3: Adding the Stitching Detail
-
Mark Sewing Stations:
Using a ruler, mark five pairs of holes along the seam where the teal and terracotta fabrics meet. Space them evenly down the spine length. -
Punching Holes:
Carefully puncture through the cover material and board with an awl at your marked spots. Be gentle to avoid tearing the faux leather. -
Prepare the Thread:
Cut a long length of dark brown waxed thread. Thread your curved needle, leaving a short tail. -
Create the Spine Loops:
Starting from the inside of the cover, bring the needle out through the first hole in the terracotta section. Cross over the spine and go down into the corresponding hole on the back cover. -
Doubling Back:
Bring the needle back up through the adjacent hole (on the teal side) and cross back over the spine to the front. Repeat this for all five stations to create the horizontal bands. -
Tie Off:
Once all horizontal bands are sewn, tie the thread ends securely on the inside of the cover. A dab of glue on the knot will keep it permanent. -
Optional Elastic:
If adding a closure, glue the ends of a teal elastic band to the back cover board before pasting down your endpapers to hide the attachment points.
Decorate the Spine
Before gluing the spine leather down, slide a thin piece of sturdy cardstock under the leather on the spine area only. This creates a raised band effect when rubbed with a bone folder.
Once the adhesive cures fully, you will have a durable, custom-bound journal ready for your next adventure
Year-and-Volume Label Design

Embrace the elegance of simplicity with this clean, archival-style sketchbook cover. This project creates a professional-looking journal featuring crisp typography and a classic border on light grey book cloth.
Detailed Instructions
Materials
- Hardbound sketchbook with a plain fabric or canvas cover (light grey or off-white)
- Black Heat Transfer Vinyl (HTV) sheet
- Electronic cutting machine (Cricut or Silhouette)
- Weeding tool
- Iron or heat press
- Teflon sheet or parchment paper
- Ruler
- Computer with design software
Step 1: Digital Design Preparation
-
Set canvas size:
Measure the front cover of your sketchbook precisely. In your design software, create a workspace that matches these dimensions so you can visualize the scale perfectly. -
Create the border:
Draw a rectangle that allows for a generous margin—about 1.5 to 2 inches—from the edge of the book. Create a second, slightly smaller rectangle inside the first to form a double-line border effect. -
Select your typeface:
Choose a classic, serif font for a timeless look. Type out the year ‘2026’ in a large point size to serve as the focal point. -
Add the volume details:
Using a smaller size of the same font (or a clean sans-serif for contrast), type ‘VOL. 01’ and place it visually centered near the bottom of the inner rectangle. -
Finalize alignment:
Use the ‘Align Center’ tools in your software to ensure the year, the volume text, and the rectangular border are perfectly stacked vertically. -
Mirror the image:
Before sending the design to cut, select the entire artwork and flip it horizontally (mirror it). This is crucial for HTV projects so the text reads correctly once applied.
Clean Peel Pro Tip
For thin serif fonts and fine lines, peeling the carrier sheet slowly at a 45-degree angle helps prevent the delicate vinyl edges from lifting.
Step 2: Cutting and Weeding
-
Load the mat:
Place your black HTV sheet onto the cutting mat with the shiny carrier sheet side facing down. -
Cut the design:
Adjust your machine settings for standard iron-on vinyl and run the cut. -
Weed the excess:
Use a weeding hook to carefully remove the negative space vinyl. I find it helpful to start with the delicate inner parts of the numbers and letters first. -
Clear the border:
Slowly peel away the large outer area of vinyl, leaving only your double border and text attached to the clear carrier sheet.
Step 3: Application
-
Prep the surface:
Run a lint roller over the fabric cover to remove any dust or fibers that might interfere with adhesion. -
Position the design:
Place the weeded design (sticky side down) onto the book cover. Use a ruler to measure from the edges to ensure it is perfectly centered. -
Protect the fabric:
Lay a Teflon sheet or piece of parchment paper over the entire design to protect the book cloth from scorching. -
Apply heat:
Using an iron set to the ‘Cotton’ setting (no steam) or a heat press, apply firm, even pressure for 10-15 seconds. Don’t slide the iron; press straight down. -
Let it cool:
Wait for the carrier sheet to be cool to the touch before attempting to remove it. This ensures the vinyl has fully set into the fabric weave. -
The reveal:
Gently peel back the clear carrier sheet at a sharp angle. If any vinyl lifts, lay the sheet back down and re-press for another 5-10 seconds.
Level Up: Texture
Instead of standard smooth HTV, use ‘flocked’ HTV for a fuzzy, felt-like texture that feels luxurious and mimics high-end velvet printing.
You now have a beautifully customized chronicle for the year ahead


Painted Gradient Background
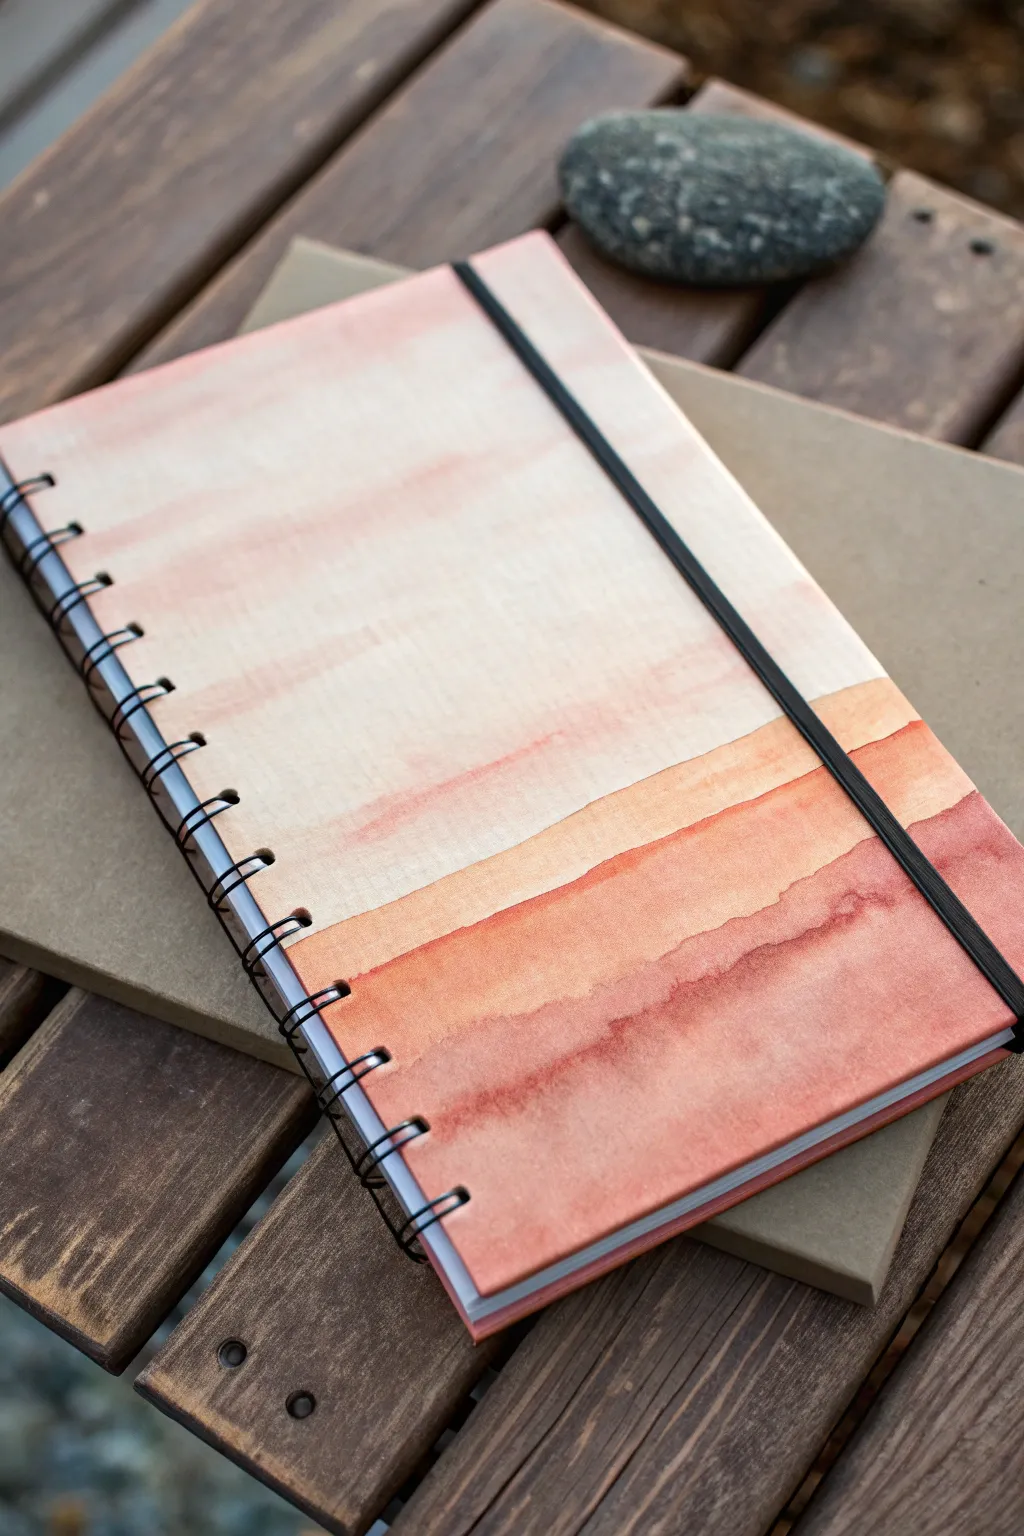
Capture the serene beauty of a desert sunset with this warm, gradient cover design. Using simple watercolor washes, you’ll build layers of terracotta, peach, and cream to create a landscape-inspired abstract piece.
Step-by-Step Guide
Materials
- Hardcover sketchbook or heavy mixed-media paper
- Watercolor paints (terracotta, burnt sienna, yellow ochre, white)
- Wide flat brush (1-inch)
- Medium round brush
- Cup of water
- Paper towels
- Painter’s tape (optional)
- Matte spray sealant
Step 1: Preparing the Base
-
Surface Prep:
If you are painting directly onto a sketchbook cover, ensure the surface is paper-based and absorbent. If it’s glossy, lightly sand it first. Alternatively, cut a piece of watercolor paper to the exact size of your cover. -
Tape the Spines:
Protect the wire spiral binding by carefully running a strip of painter’s tape along the edge where the paper meets the wire. This keeps your metal clean from stray brushstrokes. -
Base Wash:
Mix a very dilute wash of white with a tiny drop of yellow ochre or peach. Using your wide flat brush, dampen the entire cover surface with clean water first, then apply this pale cream color across the top two-thirds of the cover.
Step 2: Layering the Gradient
-
First Horizon Line:
While the top is still slightly damp but not soaking, mix a light peach tone. Paint a horizontal band across the middle of the cover, allowing the top edge to bleed softly upwards into the cream base. -
Define the Edge:
Load your brush with slightly more pigment and create a distinct lower edge for this peach section. A slightly wavy, natural line mimics distant hills better than a ruler-straight one. -
Deepening the Tones:
Mix a terracotta shade using burnt sienna and a touch of red. Apply this below the peach band. I like to keep the brush fairly wet here so the pigment pools naturally, creating those lovely watercolor textures. -
Creating Separation:
To simulate distinct hills, let the previous layer dry for about 5-10 minutes. If you paint while it’s too wet, everything will merge into one blob. Once tacky, paint the next band of darker orange underneath.
Bleeding Lines?
If your color bands are merging too much into muddy blobs, your paper is too wet. Let the surface dry completely before adding the next distinct ‘horizon’ line layer.
Step 3: Adding Depth and Detail
-
The Darkest Bands:
For the bottom third, use your most saturated burnt sienna or rusty red. Paint irregular horizontal stripes that slope gently, creating the look of rolling dunes or layered rock formations. -
Bleed and Bloom:
While the bottom layer is wet, drop in tiny amounts of clean water or darker pigment in random spots. This creates ‘blooms’—those cauliflower-like textures that give watercolor its character. -
Softening Transitions:
If a line looks too harsh, use a damp, clean round brush to gently run along the edge, softening the transition between the distinct color bands. -
Final Dark Anchors:
Ensure the very bottom edge of the cover has the deepest color weight to ground the composition. You might need a second coat here once the first is dry.
Natural Edges Pro Tip
Tilt the sketchbook slightly while the paint is wet to encourage gravity to pool the pigment at the bottom of each color band, creating a naturally darker edge.
Step 4: Finishing and Sealing
-
Complete Drying:
Let the artwork dry completely flat. If the paper buckles, you can place a heavy book on it (protected by wax paper) once it is bone dry to flatten it out. -
Remove Tape:
Carefully peel away the painter’s tape near the spiral binding at a 45-degree angle to ensure a crisp edge. -
Sealing the Art:
Watercolors can reactivate if they get wet. To make your sketchbook durable, take it outside and spray a light, even coat of matte fixative or sealant over the cover. -
Assembly (If needed):
If you painted on separate paper, use a strong spray adhesive or double-sided tape to mount the artwork onto the sketchbook cover, trimming any overhang with a craft knife.
Now you have a custom sketchbook that inspires creativity before you even open the page
Tape-Resist Pattern Play
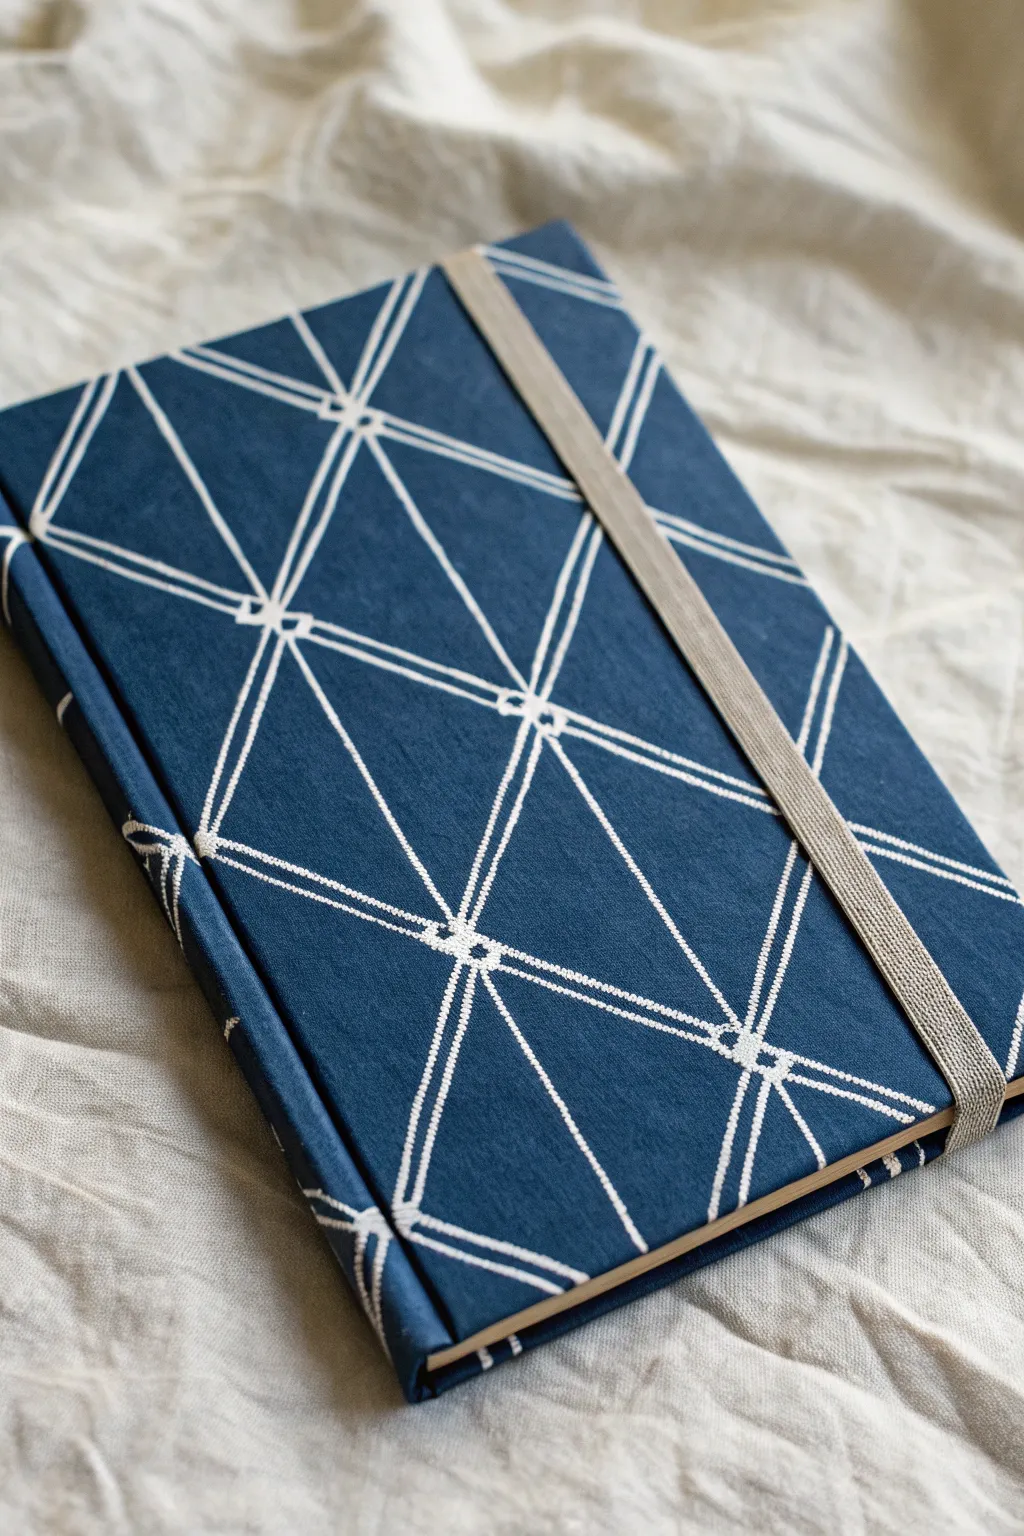
Transform a plain sketchbook into a piece of modern art with this crisp, high-contrast cover design. By using simple masking tape on fabric, you achieve striking geometric white lines against a deep, rich indigo blue background.
Detailed Instructions
Materials
- Hardcover sketchbook (A5 or similar size)
- White or light canvas fabric (enough to wrap the cover)
- Fabric shears or sharp scissors
- Thin painter’s masking tape (1/8 inch or 3mm width)
- Fabric paint (dark indigo or navy blue)
- Wide foam brush or soft bristle brush
- Ruler or straight edge
- Fabric glue or PVA glue
- Craft knife
- Elastic ribbon (beige or grey, optional closure)
- Bone folder (optional)
- Heavy books (for pressing)
Step 1: Preparation & Masking
-
Measure the fabric:
Lay your open sketchbook onto the white canvas fabric. Measure and cut the fabric so there is a 1-inch (2.5 cm) overhang on all four sides of the open book. -
Secure the fabric:
If you want to work on a flat surface, tape the corners of your fabric piece to your work table. This keeps it from shifting while you apply the design. -
Begin the primary triangles:
Start creating your geometric pattern with the thin masking tape. Lay down long diagonal strips first to create large triangles. Press the tape down firmly with your fingernail or a bone folder to prevent paint seepage. -
Add intersecting lines:
Cross your initial diagonals with opposing diagonal lines. Use your ruler to ensure the spacing feels somewhat consistent, though a hand-drawn look adds charm. -
Create detailed connections:
Where the lines intersect, you can add small horizontal or vertical pieces of tape to create the ‘knotted’ or complex joint look seen in the photo. -
Final seal check:
Run your finger over every single piece of tape one last time. The key to crisp lines is ensuring there are absolutely no air gaps.
Clean Lines Secret
Before painting blue, paint a thin layer of clear acrylic medium or white paint over the tape edges. This seals the tape, so any bleed is invisible.
Step 2: Painting & Revealing
-
Prepare the paint:
Pour your indigo fabric paint onto a palette or paper plate. Ensure it isn’t too watery; a slightly thicker paint works better for tape resist to avoid bleeding. -
Apply the base coat:
Using the foam brush, dab the paint onto the fabric. I prefer a dabbing motion near the tape edges rather than brushing across them, as this pushes less paint under the mask. -
Cover completely:
Continue painting until the entire fabric surface is an even, solid blue. Don’t worry about painting over the tape lines; cover them entirely. -
Let it dry:
Allow the paint to dry completely. This usually takes about 1-2 hours depending on your paint brand. It must be dry to the touch. -
The reveal:
Carefully peel away the masking tape. Pull the tape slowly at a 45-degree angle to reveal the stark white fabric lines beneath.
Step 3: Assembly
-
Position the book:
Apply a thin layer of fabric glue to the front cover of your sketchbook. Center the front cover onto your painted fabric (which should be face down) and press firmly. -
Glue the spine and back:
Apply glue to the spine and back cover, then wrap the rest of the fabric around. Smooth out any air bubbles with a bone folder. -
Miter the corners:
At each corner of the book, snip the excess fabric at a 45-degree angle, stopping just short of the cardboard corner. This reduces bulk when folding. -
Fold the edges:
Apply glue to the inside edges of the book covers. Fold the top, bottom, and side fabric flaps tightly over the edge and press them down onto the inside cover. -
Cover the inside:
To hide the raw fabric edges inside, glue a sheet of decorative paper or cardstock over the inside front and back covers (this is called the endpaper). -
Add the elastic band:
If adding a closure, measure a loop of elastic ribbon that fits snugly around the book. Glue or stitch the ends together, then slide it over the back cover before gluing your endpaper down to hide the attachment point. -
Final press:
Place the finished book under a stack of heavy books overnight to ensure the glue sets perfectly flat.
Add Texture
Instead of plain canvas, use a white linen fabric with a visible weave. The paint will settle differently, giving the cover an authentic, vintage textile feel.
Now you have a fully customized, professional-looking sketchbook ready to be filled with your next great ideas
Sticker-and-Ephemera Cluster
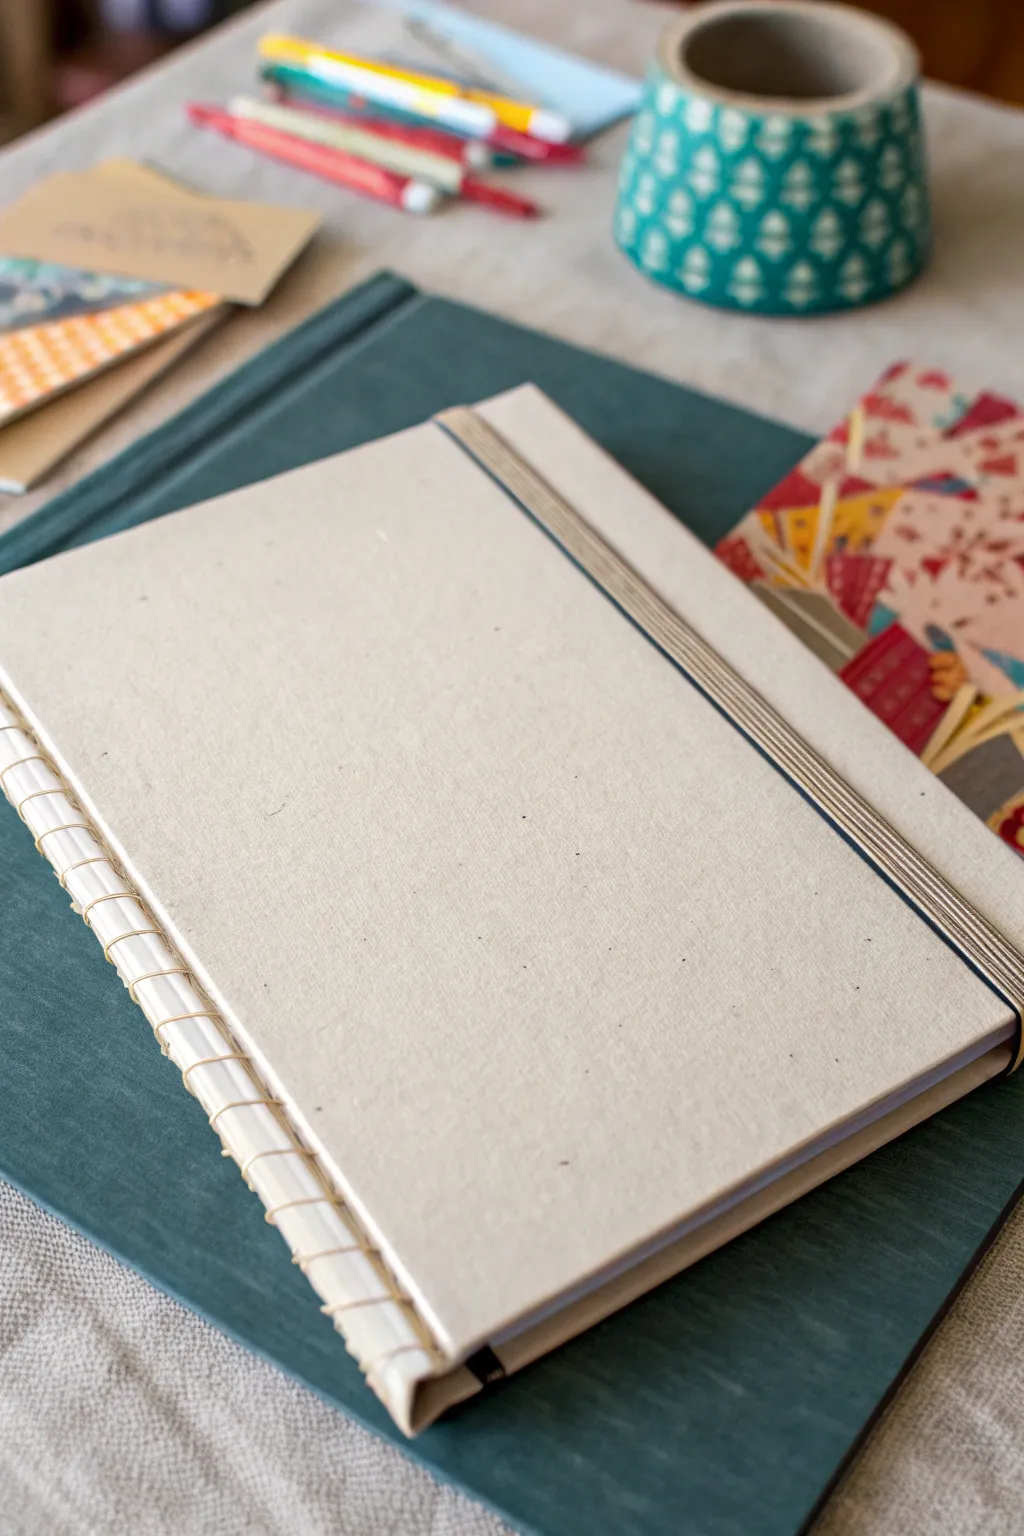
Embrace the elegance of raw materials with this handmade sketchbook featuring an exposed Coptic stitch binding. The natural cream cover contrasts beautifully with the intricate spine detail, creating a book that lays perfectly flat for all your creative endeavors.
How-To Guide
Materials
- Book board (2 pieces, approx. A5 size)
- Natural cream book cloth or heavy canvas
- PVA glue or bookbinding glue
- Waxed linen thread (white or cream)
- Curved bookbinding needle
- Awl or heavy-duty hole punch
- Bone folder
- Text block paper (30-40 sheets of sketch paper)
- Flat elastic band (grey or taupe)
- Ruler and pencil
- Scissors or craft knife
- Heavy books or weights for pressing
Step 1: Preparing the Covers
-
Measure and cut board:
Cut your two pieces of book board to your desired size, ensuring they are identical. They should be slightly larger (about 1/8 inch on top, bottom, and fore-edge) than your folded paper signatures. -
Cut the cover fabric:
Lay your book board onto the cream book cloth. Cut the fabric so there is a 1-inch margin of excess material on all four sides of the board. -
Apply adhesive:
Spread a thin, even layer of PVA glue across the face of one book board using a brush or glue roller. I find working from the center outward helps prevent pooling at the edges. -
Mount the board:
Center the glued board onto the back of your fabric piece. Press down firmly and smooth it out with a bone folder to eliminate air bubbles. -
Miter the corners:
Trim the corners of the fabric at a 45-degree angle, leaving about a board’s thickness of fabric away from the actual corner of the board to ensure full coverage when folded. -
Turn in the edges:
Apply glue to the fabric margins. Fold the top and bottom edges over tightly onto the board, smoothing them down. Repeat with the side edges, tucking in the little corner nubs neatly. -
Attach the elastic closure:
On the back cover board (inside face), measure about an inch from the fore-edge. Cut a slit or glue the ends of your flat elastic band here so the loop wraps around the front. -
Line the covers:
Cut two pieces of decorative paper or cardstock slightly smaller than your board. Glue these to the inside of each cover to hide the raw fabric edges and the elastic attachment points.
Step 2: Creating the Text Block
-
Fold signatures:
Group your sketch paper into stacks of 4-6 sheets. Fold each stack in half meticulously to create ‘signatures’. You will need about 6-8 signatures for a good thickness. -
Press the signatures:
Stack all folded signatures and place them under a heavy weight for a few hours. This makes the sewing process much smoother. -
Mark sewing stations:
Create a template using a scrap strip of paper the same height as your spine. Mark 4-6 equidistant points for sewing holes. Transfer these marks to the spine fold of every signature and the edge of your covers. -
Punch holes:
Using an awl, pierce through the fold of each signature at your marked stations. Also, pierce holes into your cover boards about 1/2 inch in from the spine edge to match the station alignment.
Needle Knowledge
A curved upholstery needle makes looping around the spine stitches much easier than a straight needle, especially as the book gets thicker.
Step 3: Binding the Book
-
Start the Coptic stitch:
Thread your curved needle with a generous length of waxed thread. Begin by anchoring the thread to the inside of the first signature. -
Attach the first cover:
Sew from the first signature hole out to the corresponding hole in the front cover. Loop around the edge of the cover and go back into the same signature hole. Repeat for all stations on the first signature. -
Add the second signature:
Place the second signature on top. Sew out from the first hole, loop under the stitch connecting the cover and first signature (this creates the chain look), and re-enter the second signature. -
Continue the chain:
Repeat this looping process (‘kettle stitch’) at every station, adding new signatures one by one. Keep your tension tight but consistent so the spine stays straight. -
Attach the back cover:
Once the final signature is sewn, attach the back cover using a similar looping method as the front, anchoring it securely to the last signature. -
Secure and trim:
Tie off the thread securely on the inside of the final signature. Trim the excess thread close to the knot.
Make it Personal
Before gluing the fabric to the cover, embroider a small icon or monogram onto the corner for a truly custom textile finish.
Now you have a durable, lay-flat sketchbook ready to be filled with your next great ideas
Silhouette Portrait Fill
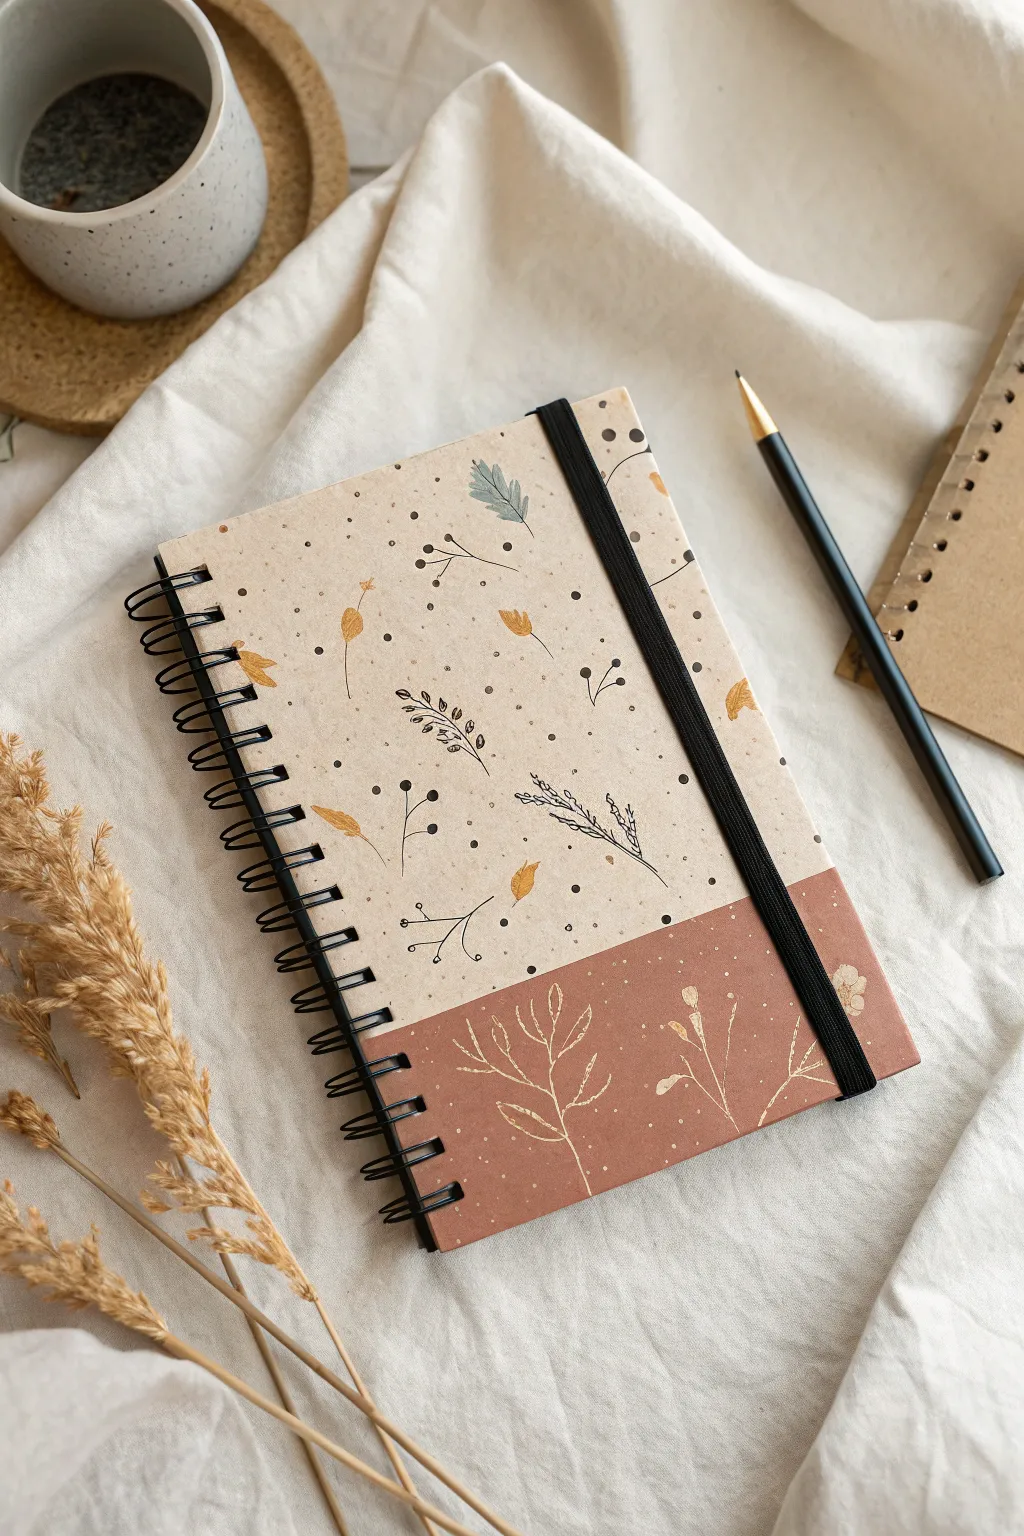
Transform a plain sketchbook into an earthy, nature-inspired journal using simple mixed media techniques. This two-tone design combines warm terracotta hues with delicate ink illustrations for a cover that feels both organic and refined.
Detailed Instructions
Materials
- Hardcover spiral-bound sketchbook or notebook (kraft or plain)
- Acrylic paint (Cream/Beige and Terracotta/Rusty Brown)
- Wide flat paintbrush
- Painter’s tape or masking tape
- Fine-liner pen (Black, waterproof, 0.3mm or 0.5mm)
- White or Gold gel pen (for the bottom section)
- Colored pencils or thin markers (Mustard Yellow, Sage Green)
- Ruler
- Pencil and eraser
- Matte varnish or sealant (optional)
Step 1: Creating the Base Layers
-
Mask the dividing line:
Measure about two-thirds down from the top of your sketchbook cover. Place a strip of painter’s tape horizontally across the entire width of the cover to create a crisp separation between the sections. Press the edges of the tape down firmly to prevent paint bleed. -
Paint the bottom section:
Using your wide flat brush, apply the terracotta or rusty brown acrylic paint to the bottom third of the cover (below the tape line). Apply smooth, even vertical strokes. -
Review coverage:
Let the first coat dry for about 10-15 minutes. If you can still see the original cover texture too clearly, apply a second thin coat and let it dry completely. -
Paint the top section:
Once the bottom is dry, carefully peel off the tape. Now, apply the cream or beige acrylic paint to the top two-thirds. Be extremely careful when painting near the terracotta edge; use a smaller brush for this border if needed, or re-mask the dry brown area if you have a steady hand. -
Final drying time:
Allow the entire cover to dry fully. The surface needs to be completely moisture-free before you start drawing, or the ink might bleed.
Bleeding Lines?
If your fine-liner bleeds into the paint, the acrylic isn’t fully cured. Wait another hour or use a hairdryer on cool to speed it up.
Step 2: Adding the Illustrations
-
Sketch the layout:
Lightly sketch your botanical placement using a pencil. Aim for a scattered, random pattern of twigs, leaves, and berries rather than a rigid grid. Keep the designs simple and airy. -
Ink the top section:
Take your black fine-liner pen and trace over your pencil sketches in the beige section. Draw thin stems with small oval leaves, fern-like fronds, and tiny berry clusters. Vary the pressure to create organic, tapering lines. -
Add color accents:
Select a few specific leaves on the beige section to fill with color. Use mustard yellow for small seed pods or single leaves, and sage green for a feature leaf here and there. Leave most of the line art uncolored for a minimalist look. -
Detail the bottom section:
Switch to your white or gold gel pen for the terracotta section. Draw larger, sweeping leaf stems that reach upwards. Since this background is dark, the metallic or white ink will pop beautifully. -
Add stippling texture:
Return to the beige section with your black pen. Add clusters of tiny dots (stippling) around the stems to fill empty negative space. I find this creates a nice sense of movement and texture without cluttering the design. -
Add light accents:
Using the white or white gel pen, add tiny decorative dots to the terracotta section as well, mirroring the texture of the top half. -
Erase guidelines:
Wait at least 30 minutes to ensure all ink is bone-dry. Gently erase any visible pencil marks with a soft eraser.
Go Digital
Scan your finished cover design before sealing it to create custom digital wallpapers or printable wrapping paper patterns for friends.
Step 3: Finishing Touches
-
Clean the binding:
If any paint got onto the metal spiral binding, carefully scrape it off with a fingernail or a damp Q-tip before it cures completely. -
Protect your work:
To ensure your cover lasts, apply a thin layer of matte varnish or clear sealant over the painted artwork. This prevents the acrylic from scratching and the ink from smearing during daily use.
Now you have a personalized sketchbook that invites you to open it and create every single day
Open-Mind Cutout Collage
This elegant sketchbook cover brings the outdoors in with a warm, earthy patchwork of botanical illustrations. The design juxtaposes a clean, dark book cloth spine against a textured collage of leaf and seed pod imagery, creating a timeless and sophisticated look for your artistic musings.
Step-by-Step Guide
Materials
- Hardcover sketchbook (approx. A5 size) or heavy book board
- PVA glue or bookbinding glue
- Patterned papers with botanical motifs (earth tones, cream backgrounds)
- Black book cloth or heavy linen fabric
- Bone folder
- Craft knife or scalpel
- Metal ruler
- Cutting mat
- Flat glue brush (1 inch)
- Small scissors
- Heavy books or weights
Step 1: Planning the Layout
-
Select your papers:
Gather a variety of patterned papers featuring botanical prints. Look for a mix of scales—some large leaves, some delicate seed heads—and varied background tones like cream, beige, and soft rust. -
Cut the patchwork squares:
Cut your botanical papers into rectangles and squares of varying sizes. They don’t need to be uniform; creating an organic, puzzled look adds character. -
Dry fit the arrangement:
Lay your sketchbook flat and arrange the paper pieces on the front cover area (excluding the spine). Shuffle them until you find a composition where colors and shapes balance nicely. -
Take a reference photo:
Once you are happy with the layout, snap a quick photo with your phone so you remember exactly where each piece goes.
Wrinkle Rescue
If your paper bubbles after gluing, use a clean needle to poke a tiny hole in the center of the bubble, then press the air out with your bone folder.
Step 2: Creating the Collage Cover
-
Apply the base glue:
Using a flat brush, apply a thin, even layer of PVA glue to the back of your first paper piece. Start with a central piece to anchor the design. -
Position and smooth:
Place the paper onto the sketchbook cover board. Use your bone folder to gently smooth it down from the center outward, eliminating any air bubbles. -
Continue the patchwork:
Working outward from the center, glue down the remaining paper pieces, butting the edges tightly against each other so no base board shows through. -
Trim the edges:
Once the entire front cover area is filled, flip the cover over. Use your craft knife and ruler to trim any paper overhanging the top, bottom, and right edges flush with the board. -
Press flat:
Place a sheet of wax paper over the collage and weigh it down with a heavy book for about 20 minutes to ensure everything dries perfectly flat.
Clean Edges
For a truly seamless transition between the black spine and collage, lay a piece of masking tape along the collage edge before gluing the spine cloth.
Step 3: Binding the Spine
-
Measure the spine cloth:
Cut a strip of black book cloth. It should be tall enough to cover the book’s height plus 1 inch overlap top and bottom, and wide enough to cover the spine plus about 2 inches on the front and back covers. -
Glue the spine area:
Apply a generous layer of bookbinding glue to the spine of the book and the adjacent 2-inch strip on the front and back covers. -
Attach the cloth:
Center the black cloth over the spine. Press it firmly onto the spine first, ensuring it adheres well to the contour. -
Smooth the front overlap:
Smooth the cloth onto the front cover, covering the raw edge of your paper collage. Use the bone folder to create a crisp, straight line where the cloth meets the paper. -
Smooth the back overlap:
Repeat the smoothing process on the back cover. I like to double-check that the cloth is pulled taut so there are no wrinkles. -
Turn in the edges:
Open the book cover. At the top and bottom of the spine, cut a small slit in the cloth where the hinge is. -
Fold and glue:
Apply glue to the overhanging cloth at the top and bottom. Fold these flaps tightly over the edge of the board to the inside of the cover. -
Finish interior corners:
Use your bone folder to crisply tuck and smooth the turned-in cloth so the corners are sharp and professional. -
Final press:
Close the book, place it between two clean sheets of paper, and put it under heavy weights overnight to cure the glue completely.
Now you have a durable, nature-inspired journal ready to be filled with your sketches and ideas
Textured Mixed-Media Surface
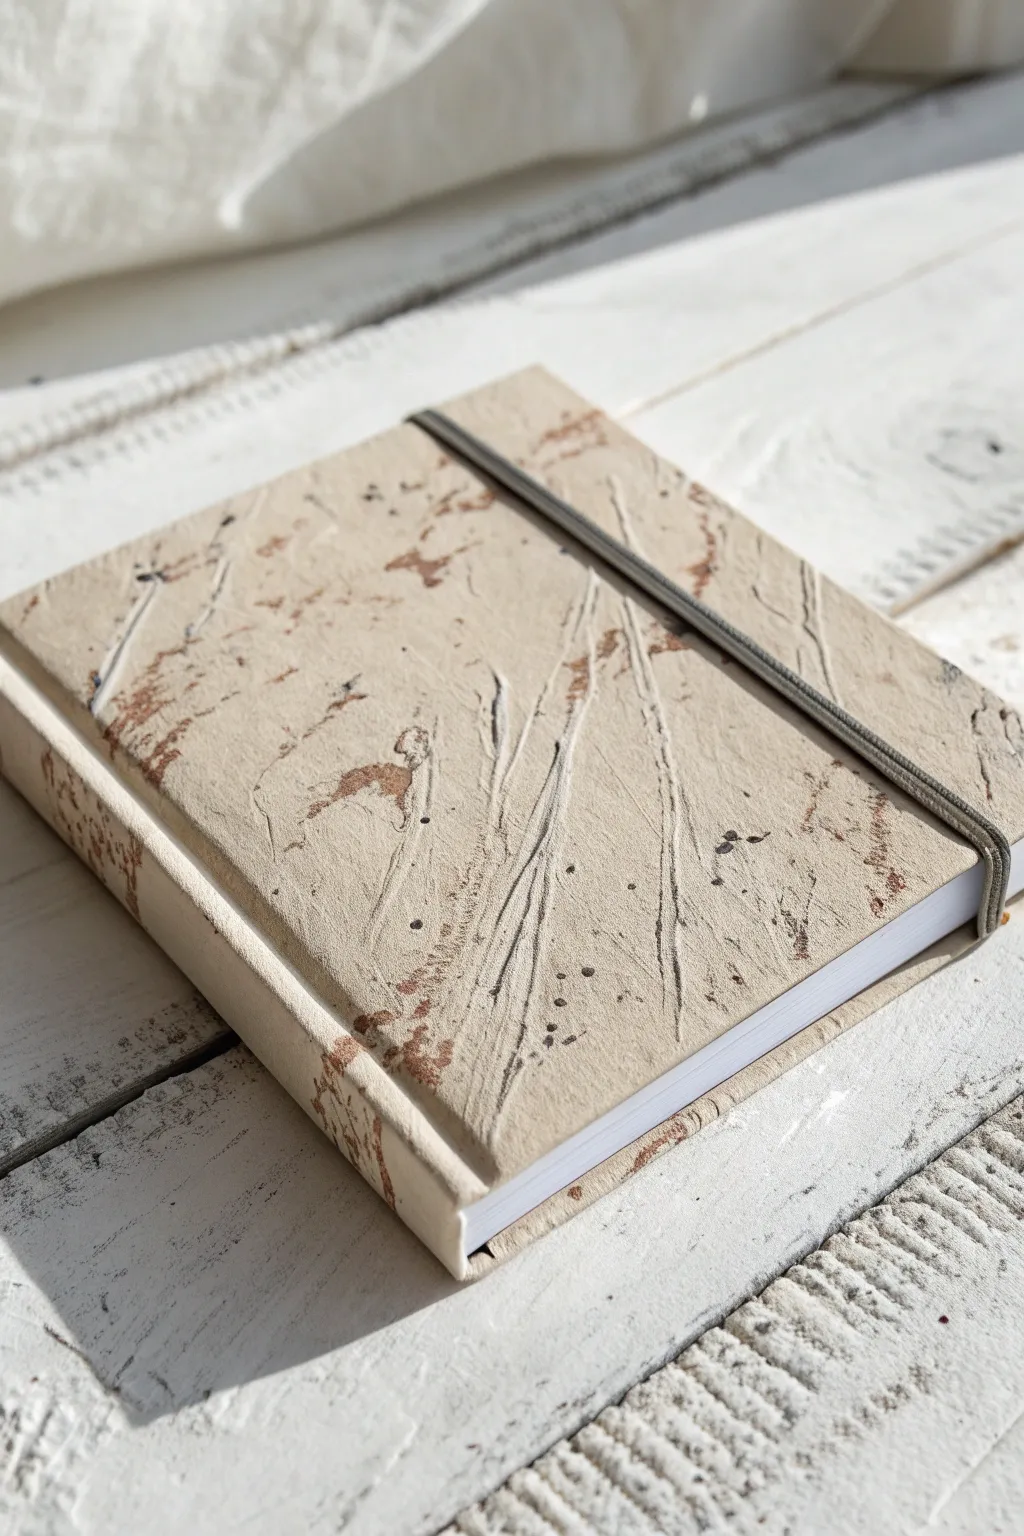
Transform a plain sketchbook into a tactile, earthy artifact with this mixed-media cover project. Using simple relief techniques and acrylic washes, you’ll create a finish that mimics the look of weathered stone or ancient pottery.
How-To Guide
Materials
- Hardbound sketchbook to be altered
- Gesso (white or clear)
- Heavy body acrylic medium or modeling paste
- Cotton twine or heavy thread
- Acrylic paints: Raw Umber, Burnt Sienna, Titan Buff (or Unbleached Titanium)
- Small spray bottle with water
- Wide flat synthetic brush
- Small round detail brush
- Stiff bristle toothbrush
- Palette knife
- Matte varnish spray
Step 1: Preparation and Relief Base
-
Protect the block:
Before starting, carefully tape off the text block edges (the pages) of your sketchbook with painter’s tape to prevent any medium from seeping onto the paper. -
Prime the surface:
Apply a coat of gesso to the front, spine, and back covers. This ensures your heavier mediums will adhere properly to the bookbinding material. -
Create the lines:
Cut lengths of cotton twine. Dip them into gesso or fluid matte medium until soaked, then arrange them randomly across the cover to create organic, raised lines. Let the ends trail off the edges or cross over the spine. -
Dry the string:
Allow the string arrangement to dry completely until hard. If the strings pop up, press them back down with a little extra medium. -
Build up texture:
Use a palette knife to apply a thin, uneven layer of modeling paste or heavy acrylic medium over the entire cover, burying the strings slightly but letting their ridges protrude. -
Add surface noise:
While the paste is wet, stipple it lightly with a stiff brush or crumbled plastic wrap to create a pitted, stone-like texture. Let this layer dry overnight.
Sticky Situation
If your pages stick to the cover after varnishing, slide a sheet of wax paper between the cover and the first page, then close the book under a heavy weight overnight.
Step 2: Color and Weathering
-
Base coat application:
Paint the entire textured surface with Titan Buff or Unbleached Titanium. Ensure you get the paint into all the little crevices around the strings. -
Create the wash:
Mix a small amount of Raw Umber acrylic paint with water to create a thin, transparent wash. It should be the consistency of ink. -
Apply the first wash:
Brush the brown wash loosely over the cover. Work quickly so the acrylic doesn’t set before the next step. -
Wipe back:
Immediately use a soft cotton rag or paper towel to gently wipe away the wet wash from the high points of the texture, leaving the darker color settled only in the recessed areas and around the strings. -
Add warmth:
Repeat the wash process, this time using a very dilute Burnt Sienna in specific patches to add warmth and simulate rust or iron deposits in rock. -
Dry thoroughly:
Let the washes dry completely. The surface should look chalky and matte.
Step 3: Finishing Details
-
Prepare splatter:
Dilute a mix of Raw Umber and a touch of black acrylic on your palette until it is very fluid. -
Apply speckles:
Dip an old toothbrush into the dark paint mix. Hold it over the cover and flick the bristles with your thumb to spray fine speckles across the surface. I prefer to concentrate heavier speckles near the corners. -
Control the splatter:
If any distinct large drops land where you don’t want them, quickly dab them with a clean corner of a paper towel to disperse them. -
Highlight ridges:
Using a dry brush technique with pure Titan Buff, lightly graze the tops of the string ridges and texture peaks to make them pop against the darker wash. -
Clean up:
Remove the protective tape from the page block carefully. -
Seal the work:
Finish with two light coats of matte spray varnish to protect the surface from dirt and moisture without adding unwanted shine.
Go Botanical
Press dried leaves or skeleton leaves into the wet modeling paste layer instead of (or alongside) the string for a fossilized forest floor effect.
Enjoy the rugged, tactile feel of your new sketchbook every time you sit down to create.
Fabric Panel With Simple Stitching
This project transforms a standard sketchbook or text block into a tactile, earthy treasure using a classic quarter-binding technique. By combining a textured rust-colored spine with smooth oatmeal linen, you create a sophisticated two-tone look that feels wonderful in the hand.
Step-by-Step Tutorial
Materials
- Hardcover sketchbook text block (or a rebinding candidate)
- Rust-colored woven fabric (linen or cotton blend)
- Oatmeal or speckled beige fabric (canvas or heavy cotton)
- Bookbinding board (2mm grayboard or chipboard)
- PVA glue or archival bookbinding glue
- Braided decorative cord or rope (cream color)
- Bone folder
- Brush for glue application
- Scissors and rotary cutter
- Ruler
- Heavy books or book press
- Waxed paper
Step 1: Preparation & Cutting
-
Measure your text block:
First, measure the height, width, and spine thickness of your chosen text block. Adds 3mm (1/8 inch) to the height and width measurements for the cover boards to create the overhang (‘squares’). -
Cut the boards:
Cut two pieces of bookbinding board to your new dimensions. Cut a third strip for the spine that matches the height of the boards but is exactly the width of the text block’s spine. -
Determine fabric ratios:
Decide on the split point for your quarter binding. For the look in the photo, the rust fabric should cover the spine and extend about 2-3 inches onto the front and back covers. -
Cut the rust fabric:
Cut the rust fabric strip. It needs to be tall enough to wrap around the top and bottom of the boards (add 1.5 inches total to height) and wide enough to cover the spine, the hinges, and the overlap onto the boards. -
Cut the oatmeal fabric:
Cut two pieces of the oatmeal fabric for the main cover panels. Ensure these overlap slightly with where the rust fabric will end and wrap around the fore-edge, top, and bottom.
Crisp Corners Tip
When wrapping corners, pinch the fabric at the very tip of the board with your thumbnail before folding the sides in. This tucks the excess material for a sharp point.
Step 2: Assembling the Casement
-
Position the boards:
Lay your fabric pieces face down on your work surface. Arrange the grayboards and spine strip on top to check the spacing. Leave a gap of about 5-6mm between the spine strip and the cover boards to allow the book to open freely. -
Glue the spine fabric:
Apply a thin, even layer of PVA glue to the rust fabric strip. Place the spine board in the exact center, then position the two cover boards on either side, maintaining that crucial 6mm hinge gap. -
Smooth the spine:
Flip the assembly over and use your bone folder to smooth the rust fabric down, paying special attention to the ‘gutters’ or hinge gaps. I like to gently press the fabric into these grooves to ensure a sharp definition. -
Attach the oatmeal panels:
Apply glue to one oatmeal fabric piece. Adhere it to the remaining exposed area of the cover board, overlapping the edge of the rust fabric by about a half-inch for a clean transition. -
Create a folded edge:
To get the clean seam seen in the photo where the fabrics meet, you can fold the edge of the rust fabric under before gluing it down over the oatmeal, or simply butt them closely if the material is too thick. -
Repeat for back cover:
Repeat the previous step for the back cover board, ensuring the seam lines up perfectly with the front cover for symmetry.
Step 3: Wrapping & Finishing
-
Miter the corners:
Trim the fabric corners at a 45-degree angle, leaving about one board-thickness of fabric away from the corner tip to ensure full coverage when folded. -
Turn in the edges:
Apply glue to the top and bottom fabric overhangs. Fold them tightly over the board edges. Use the bone folder to smooth them down and tuck in the little corner points. -
Finish sides:
Glue and fold the side edges in the same manner. Your case is now fully wrapped. -
Attach the closure cord:
Before casing in the text block, cut a length of braided cord. Glue the ends of the cord to the *inside* of the back cover board, about 1 inch from the edge, so the loop stretches vertically around the book. -
Case in the text block:
Apply glue generously to the outer endpaper of your text block. Carefully position the block inside your new cover, ensuring the margins are even. -
Press and dry:
Place sheets of waxed paper between the covers and the text block to prevent moisture from rippling pages. Close the book and place it under heavy weight or in a press. -
Final cure:
Leave the sketchbook to dry for at least 12 hours—patience here prevents warping later.
Add a Pocket
Before gluing the back endpaper down, create a simple paper accordion pocket and glue it to the inside back cover for storing loose notes and swatch cards.
Now you have a durable, custom-bound sketchbook ready for your next creative adventure
Found-Texture Rubbing Print Cover
Transform a plain sketchbook into a work of natural art using the simple, nostalgic technique of relief rubbing. This project captures the delicate veins of leaves and the segments of citrus slices in striking black ink, creating a sophisticated monochromatic pattern on linen fabric.
Step-by-Step Guide
Materials
- Hardcover sketchbook (A5 or similar size)
- Natural unbleached linen or heavy cotton fabric (enough to cover the book plus 2-inch margins)
- Black block printing ink or heavy-body acrylic paint
- Soft rubber brayer (roller)
- Fresh, sturdy leaves with prominent veins (e.g., peace lily, rubber plant)
- Dried citrus slices (orange or lemon) – must be fully hard and dry
- PVA glue or bookbinding adhesive
- Paintbrush (for glue)
- Scissors
- Heavy books or a book press
- Black flat elastic band (optional, for closure)
- Bone folder (optional)
- Scrap paper or newsprint
Step 1: Preparing the Printing Surface
-
Measure and Cut Fabric:
Lay your sketchbook open flat on the fabric. Measure and cut a piece that extends at least 1.5 to 2 inches beyond the book edges on all sides to ensure enough wrap-around material. -
Iron the Fabric:
Press the fabric thoroughly with an iron to remove all creases. A smooth surface is critical for getting a crisp impression from your rubbings. -
Gather Textures:
Select your botanical items. For the leaves, choose ones with thick, raised veins on the underside. For the citrus, ensure the slices are completely dehydrated and hard, as moisture will ruin the ink transfer.
Clean Lines Pro-Tip
For sharper prints, place a thin foam mat underneath your fabric while stamping. The slight ‘give’ helps the fabric press into the texture of the leaves and fruit.
Step 2: Creating the Botanical Prints
-
Ink the Brayer:
Squeeze a small amount of block printing ink onto a palette or glass slab. Roll the brayer back and forth until it is evenly coated with a thin layer of ink, creating a ‘hissing’ sound. -
Ink the Leaf:
Place a leaf vein-side up on a scrap piece of paper. Roll the inked brayer over the leaf, ensuring the raised veins catch the ink well. Be careful not to clog the recessed areas. -
Position the Leaf:
Carefully pick up the inked leaf by the stem and place it ink-side down onto your fabric. I like to plan a diagonal composition beforehand to create a sense of movement. -
Press and Rub:
Place a clean sheet of scrap paper over the leaf. Use your hand or a clean brayer to press firmly, rubbing over the entire leaf surface to transfer the ink to the fabric. -
Reveal the Print:
Gently peel the paper and leaf away to reveal the impression. Repeat this process with more leaves, re-inking each time, creating a flowing pattern across the fabric. -
Ink the Citrus Slices:
Apply ink to the flat surface of a dried citrus slice using the brayer. You want the segments and rind to catch the ink. -
Stamp the Citrus:
Press the inked citrus slice onto the fabric in the empty spaces between leaves. Press straight down firmly without wiggling to avoid smudging the radial lines. -
Dry Completely:
Allow the printed fabric to dry completely. Block printing ink can take longer than acrylics, so give it several hours or overnight to be safe.
Step 3: Binding the Sketchbook
-
Apply Adhesive to Cover:
Open your sketchbook. Apply a thin, even layer of bookbinding glue to the front cover of the cardboard hard shell. -
Adhere the Front Fabric:
Center the book on the non-printed side of your fabric. Press the front cover down firmly. Smooth out any air bubbles with a bone folder or clean cloth. -
Wrap the Spine:
Apply glue to the book’s spine and roll the book onto it, pulling the fabric taut. Then, apply glue to the back cover and press it down onto the remaining fabric. -
Create Mitered Corners:
At each corner of the open book, trim the excess fabric at a 45-degree angle not quite touching the corner of the cardboard, leaving about 2-3mm of fabric. -
Glue the Turn-Ins:
Apply glue to the overhanging fabric margins. Fold the top and bottom edges over into the inside cover first, pulling tight. Then fold in the side edges. -
Install Elastic Closure:
If using an elastic band, cut a strip slightly shorter than the height of the book. Glue the ends of the elastic on the inside back cover, about an inch from the edge, before covering with endpapers. -
Cover with Endpapers:
Cut two sheets of heavy paper slightly smaller than the open book dimensions. Glue these inside the front and back covers to hide the raw fabric edges and elastic ends. -
Final Press:
Close the book and place it under heavy weights or in a book press. Leave it for at least 24 hours to ensure the glue cures flat and the cover doesn’t warp.
Level Up: Embroidered Details
Once the ink is fully dry, use black embroidery floss to stitch over the main veins of the leaves or outline the citrus rinds to add tactile dimension.
Your sketchbook is now protected by a beautiful, tactile piece of nature that invites you to fill its pages.


Have a question or want to share your own experience? I'd love to hear from you in the comments below!