Skull art doesn’t have to feel dark or intimidating—there are so many ways to make it decorative, playful, and full of personality. Here are my favorite skull art ideas you can try in your sketchbook, on paper crafts, or as small painted decor pieces.
Classic Sugar Skull Pattern Fill
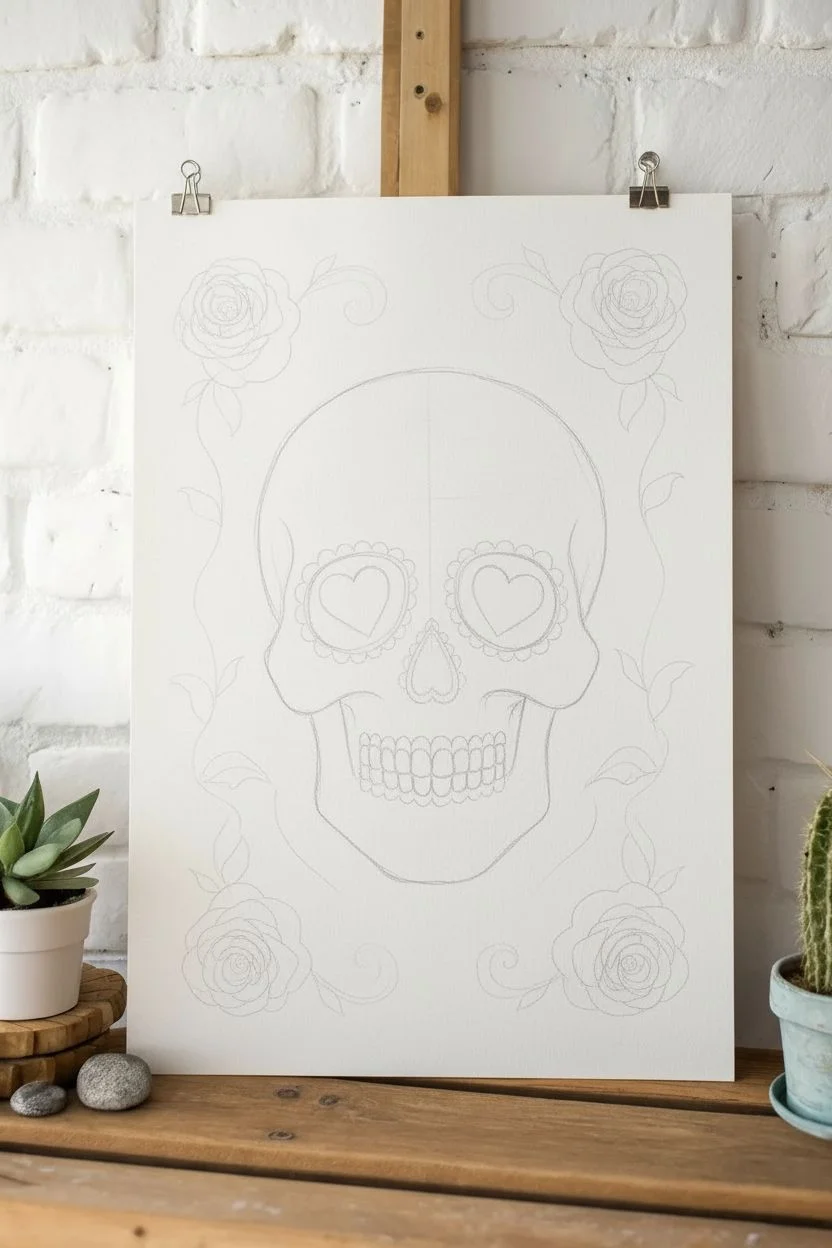
This project features a beautifully balanced sugar skull illustration that combines bold black outlines with soft pastel fills and striking gold accents. The design focuses on symmetry and classic Mexican folk art motifs like marigolds and scrolling vines, perfect for celebrating Day of the Dead or simply enjoying vibrant skull art.
Step-by-Step Guide
Materials
- Heavyweight mixed media paper or watercolor paper
- HB pencil and eraser
- Fine liner pens (0.3mm and 0.8mm black, waterproof)
- Black brush pen or broad marker for filling
- Colored pencils or alcohol markers (teal, pink, orange)
- Gold metallic paint pen or gel pen
- White gel pen (optional for highlights)
Step 1: Sketching the Skeleton
-
Outline the cranium:
Begin by lightly sketching a large, rounded inverted egg shape for the main skull. Flatten the bottom section slightly where the jaw will attach. -
Shape the cheekbones:
Refine the outline by indenting the sides just below the midpoint to create prominent cheekbones, curving back out for the jawline. -
Place prominent features:
Draw two large circles for the eye sockets. Between and slightly below them, sketch an upside-down heart shape for the nose cavity. -
Draft the jaw:
Extend the jawline downwards, keeping it relatively squared off but with rounded corners. Sketch a horizontal line for the mouth separation.
Uneven Eyes?
Symmetry is hard! Draw a vertical centerline lightly in pencil first. Use a ruler to mark the top and bottom of the eye sockets to keep them level.
Step 2: Designing the Motifs
-
Add eye socket details:
Draw scalloped edges around the outside of your eye circles. Inside each socket, draw a simple five-petaled flower centered in the dark space. -
Create the forehead centerpiece:
Above the eyes, sketch a central floral motif. Start with a tulip-like flower in the center, flanked by scrolling vines and leaves that curve outward toward the temples. -
Add side patterns:
On the temples and cheeks, add small circles and teardrop shapes to fill the empty space without overcrowding it. -
Detail the chin:
Sketch two distinct flowers on the chin area—a larger one on the right and a smaller bud on the left to create asymmetrical interest. -
Draft the teeth:
along the mouth line, sketch top and bottom rows of teeth. Keep them slightly elongated and rounded at the roots.
Step 3: Inking and Filling
-
The main outline:
Using your thicker 0.8mm fine liner, trace the entire outer perimeter of the skull. This heavy line weight separates the subject from the background. -
Inking details:
Switch to the 0.3mm pen for the internal details like the flowers, leaves, and teeth. Keep your hand steady and confident. -
Fills the voids:
Use a black brush pen or marker to fill in the nose cavity and the background of the eye sockets, being careful to paint around the flower petals inside. -
Erase pencil marks:
Wait until the ink is completely dry—I usually give it an extra five minutes just to be safe—then erase all your pencil guides.
Make it Sparkle
Glue tiny flat-backed rhinestones or sequins into the center of the eye flowers or along the forehead scrolls for a 3D mixed-media texture.
Step 4: Adding Color
-
Teal accents:
Color the large leaves on the forehead and the flowers on the chin with a soft teal pencil or marker. Apply shading at the base of the leaves for depth. -
Pink pops:
Fill the central flower petals in the eyes and on the forehead with a vibrant pink. Add pink touches to the cheek ornaments as well. -
Golden touches:
Isolate the scalloped edges around the eyes and color them with orange or yellow first. We will embellish this later. -
Teeth shading:
Lightly shade the gum line area just above the teeth with a very faint grey or blue to give the mouth dimension; don’t leave the teeth stark white.
Step 5: Final Embellishments
-
Metallic shine:
Take your gold paint pen and go over the scalloped frames of the eyes. Add small gold dots in the center of the forehead flowers. -
External flourishes:
Add tiny decorative dots along the jawline and detailed stippling inside the flower centers using your finest black pen. -
Final check:
Look for any uneven coloring or shaky lines and touch them up carefully to complete the polished look.
Display your finished calavera art near some succulents or candles for a festive seasonal atmosphere


Flower Eyes for Instant Charm
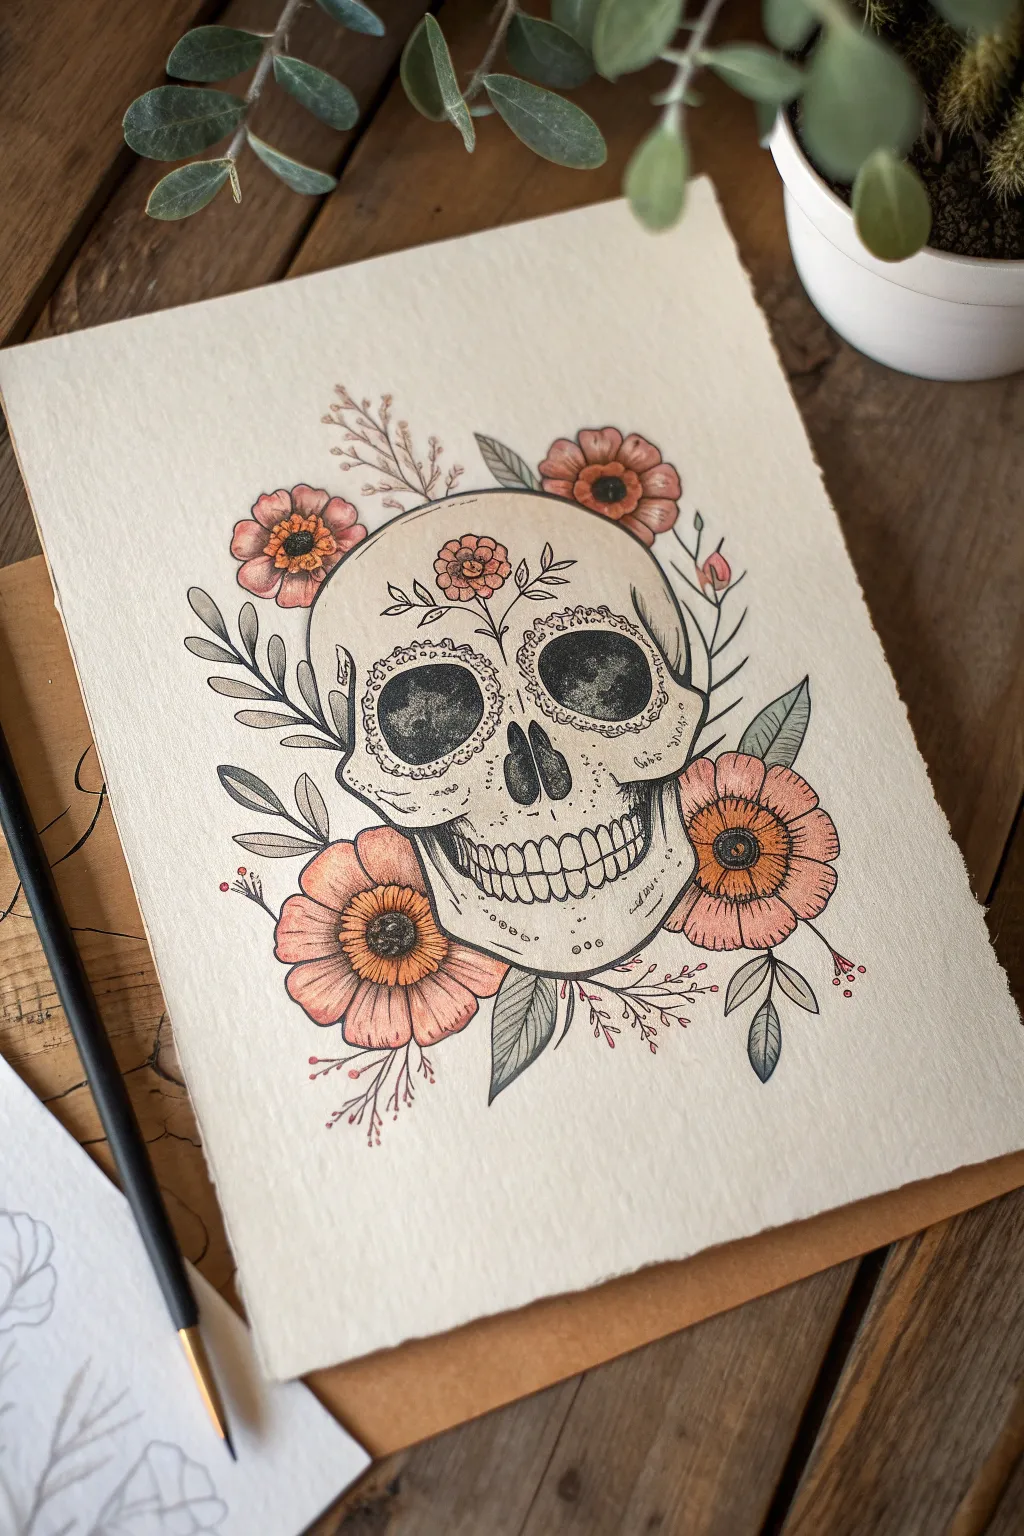
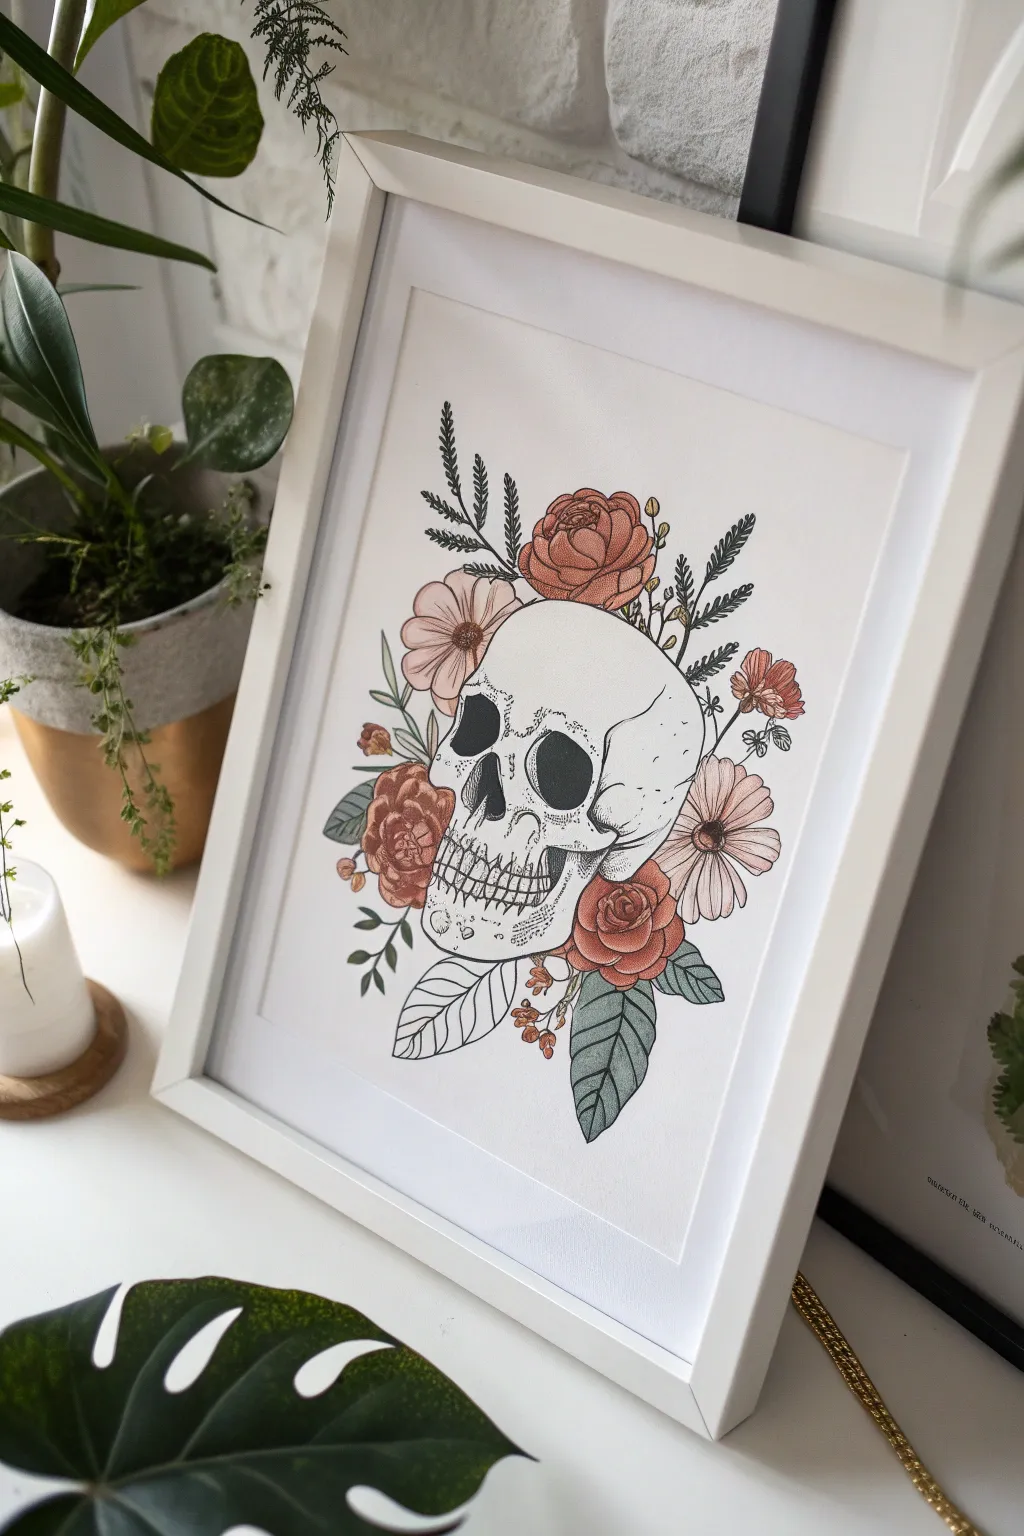
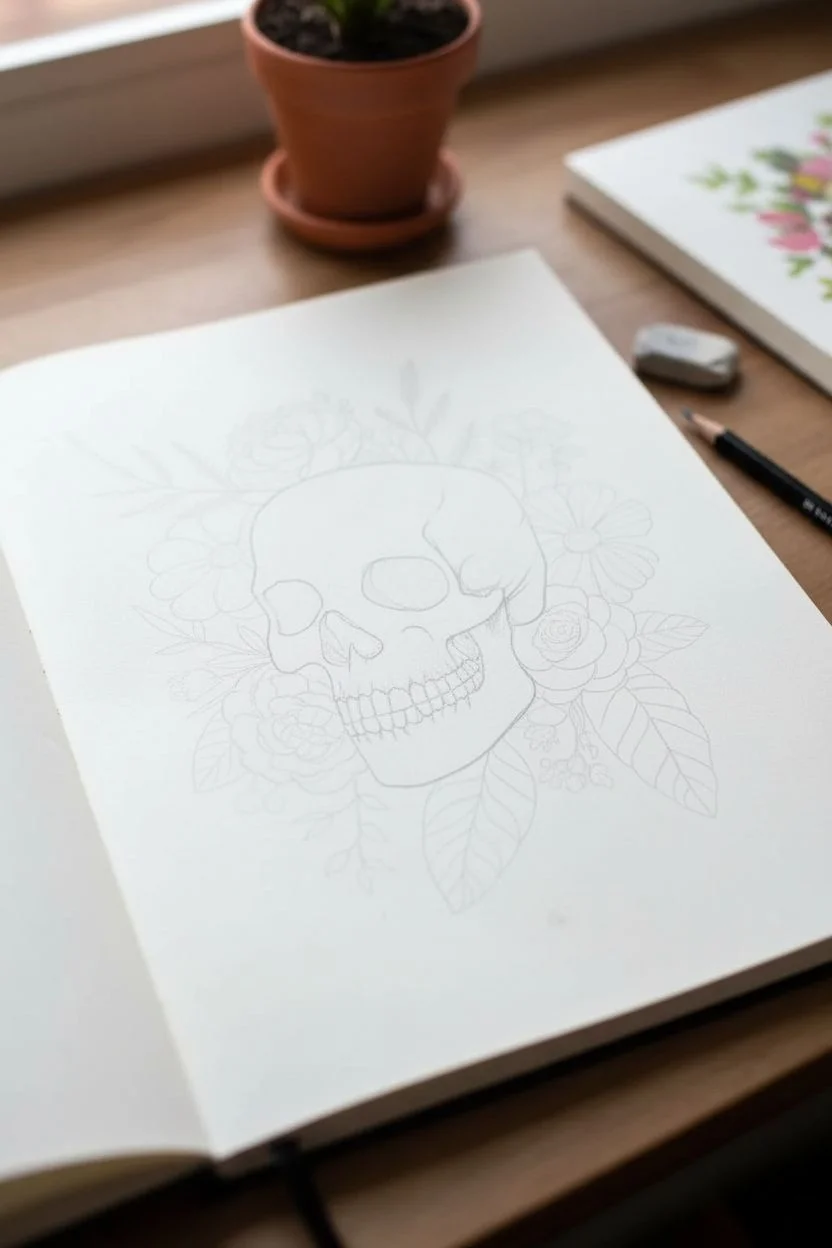
This project blends the potentially darker imagery of a skull with soft, vibrant botanicals for a striking contrast. You’ll create a stylized skull with large, expressive eye sockets, framing it with wildflowers and poppies in warm coral and peach tones.
Step-by-Step
Materials
- Hot press watercolor paper (smooth texture is key for the ink lines)
- Pencil (HB or H for light sketching)
- Kneaded eraser
- Fine liner pens (sizes 005, 01, and 03, waterproof/archival black ink)
- Watercolor paints (Peach, Coral, Sap Green, Burnt Umber, Yellow Ochre)
- Round watercolor brushes (Size 2 and 4)
- White gel pen (optional for highlights)
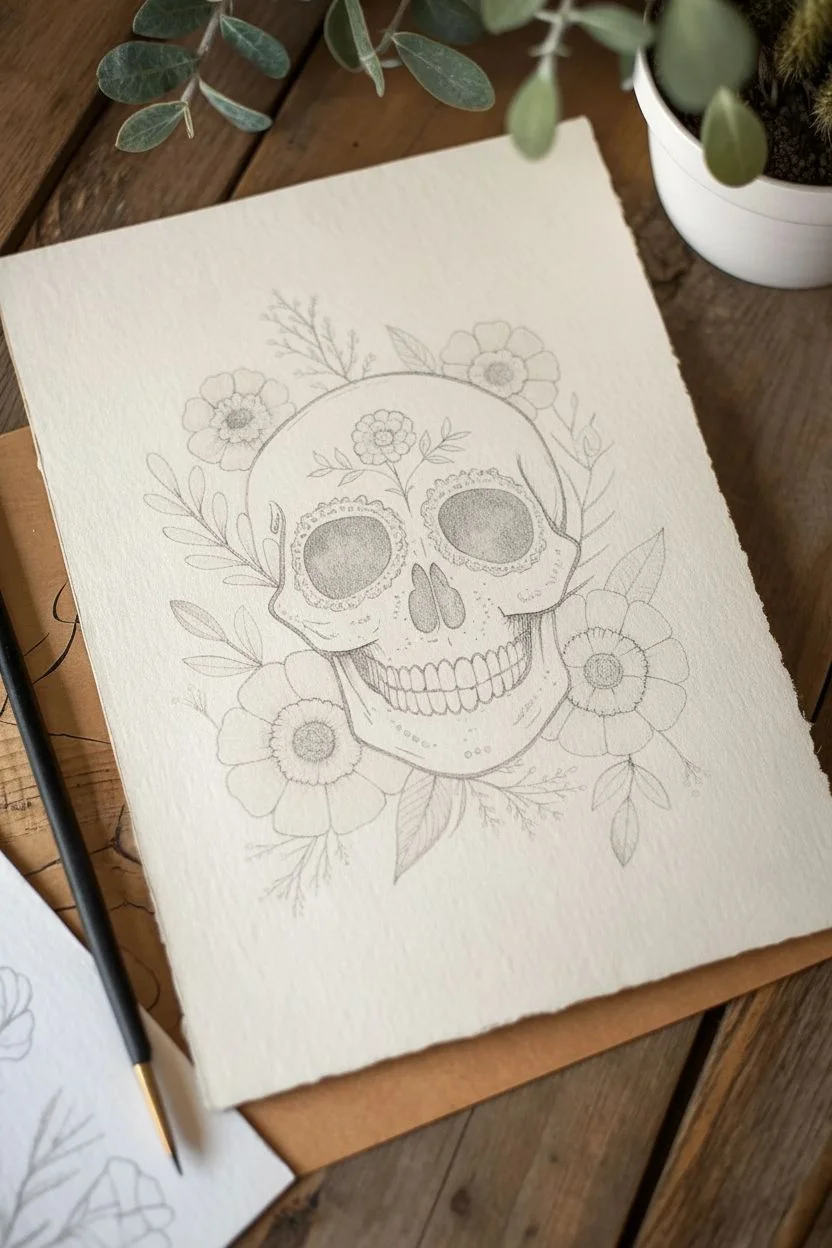
Step 1: Sketching the Composition
-
Establish placement:
Begin by finding the center of your paper. Lightly sketch a large, rounded vertical oval shape for the cranium. Leave equal space on all sides for the floral border you’ll add later. -
Define the skull features:
Divide the oval horizontally roughly in the middle for the eye line. Draw two large, slightly irregular circles for the eye sockets. Below them, sketch an upside-down heart shape for the nasal cavity. -
Sketch the jaw and teeth:
Draw the cheekbones curving outward below the eyes, then taper the jawline inward. Sketch a horizontal curve for the mouth line and lightly block in rectangular shapes for the upper and lower teeth. Don’t worry about perfection; a little irregularity adds character. -
Add floral elements:
Sketch four main flowers around the skull: one at the top left, one top right, and two larger ones flanking the jawline. Add leaves tucking behind the skull and sprigs of smaller buds extending outward to balance the composition.
Keep it Clean
Wait at least 15 minutes before erasing pencil lines after inking. Smudged wet ink can ruin the crisp illustrative look instantly.
Step 2: Inking the outlines
-
Outline the skull:
Using your 03 pen, trace over your skull pencil lines. Use broken or slightly wavering lines in some areas, especially around the cracks and sutures, to create an aged bone texture. -
Detail the eyes and nose:
Switch to a 01 pen for the eye sockets. Draw a decorative scalloped border inside the rim of the sockets for that ‘sugar skull’ feel. Fill the nasal cavity deep black, but leave the eye sockets merely outlined for now. -
Ink the botanicals:
Outline your petals and leaves with the 01 pen. For the flower centers, use stippling (small dots) to create texture. Add central veins to the leaves. -
Add fine details:
With the 005 pen, add tiny cracks to the skull forehead and gentle shading lines (hatching) under the cheekbones and around the teeth roots. Gently erase all pencil marks once the ink is totally dry.
Step 3: Adding Watercolor
-
Base wash for the skull:
Dilute a tiny amount of Yellow Ochre and Burnt Umber with lots of water to make a creamy ‘bone’ color. Wash this over the entire skull, keeping it very pale. -
Shadowing the bone:
While the base is damp, drop slightly more concentrated beige paint into the shadowy areas: under the cheekbones, the temples, and where the flowers cast shadows on the bone. -
Painting the eyes:
Mix a dark grey or watered-down black watercolor. Paint the inside of the eye sockets, leaving the decorative scalloped edge unpainted (or pale bone color). I like to let the paint pool slightly at the bottom of the sockets for depth. -
Coloring the petals:
Use a mix of Coral and Peach for the flower petals. Start with a light wash, then drop darker pigment near the center of the flowers while the paper is still wet to create a soft gradient. -
Greenery and centers:
Paint the leaves with Sap Green, desaturated slightly with a touch of red or brown to look more natural. Paint the centers of fresh flowers with a dark Yellow Ochre or brown.
Vintage Vibe
For an aged look, spatter diluted brown watercolor or tea lightly over the background paper using an old toothbrush before you start drawing.
Step 4: Final Touches
-
Deepen the contrast:
Once the first layer of floral color is dry, go back with a smaller brush and add a second, darker layer of coral to the separation lines between petals to add dimension. -
Texturize the eyes:
If the eye sockets look too flat, use your stippling technique with the black pen over the dried grey paint to add gritty texture. -
Highlights:
Use a white gel pen to add tiny dots to the center of the dark eye sockets or on the curve of the skull if you want to increase the contrast.
Frame your finished piece in a simple wood frame to let the delicate linework stand out


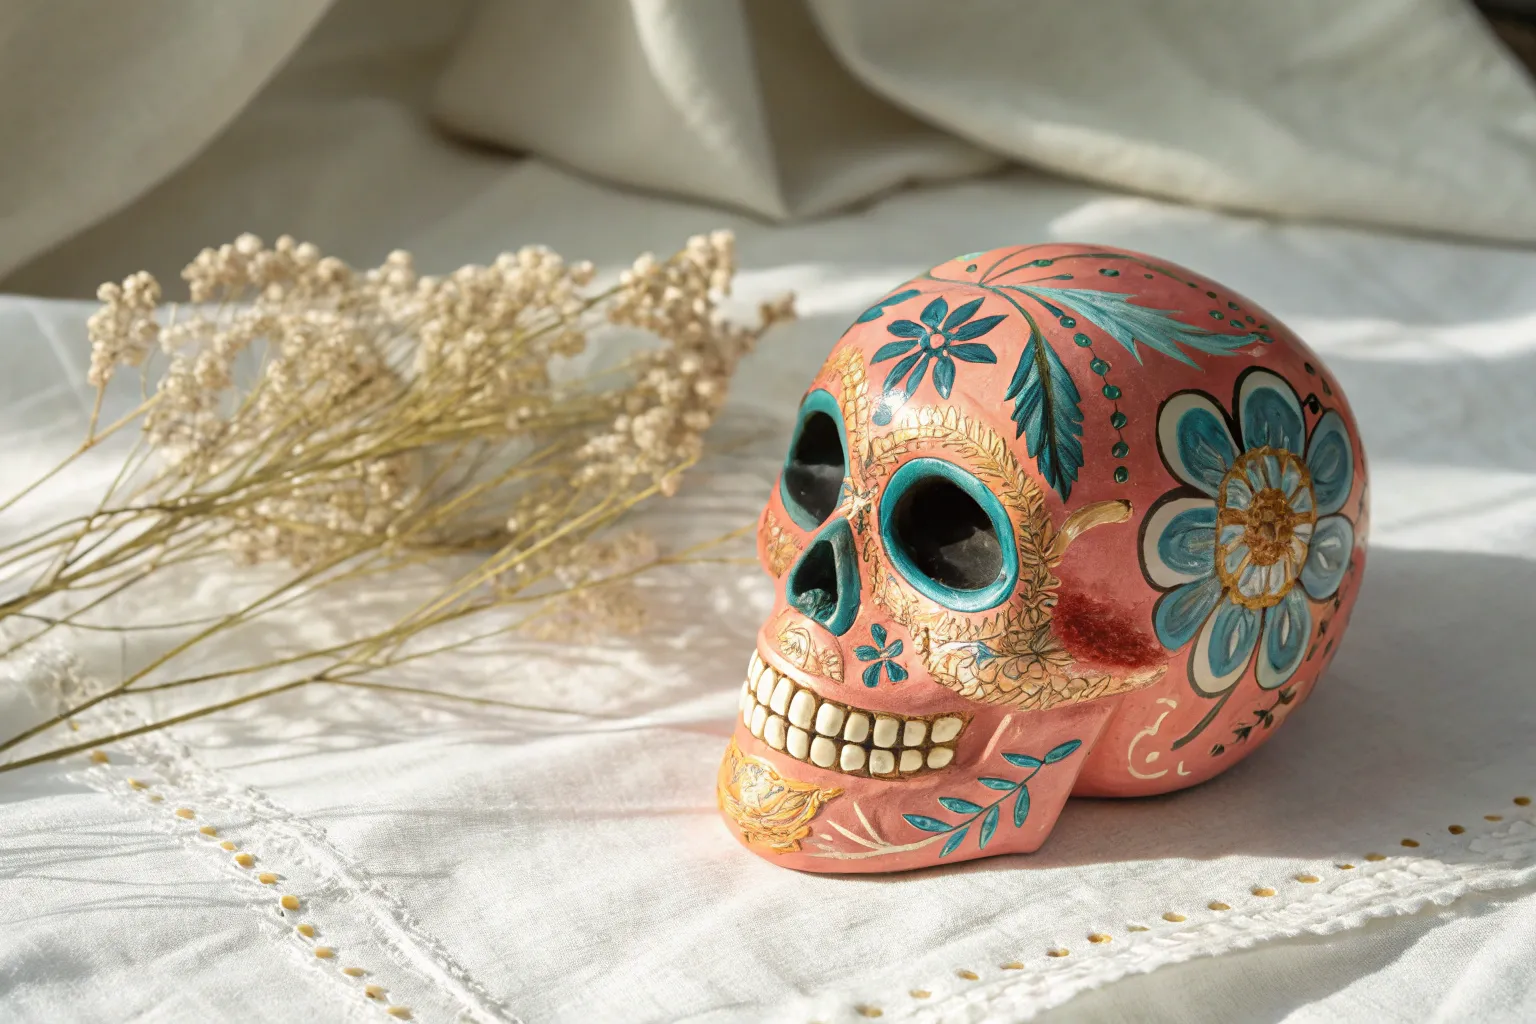
Marigold Crown and Leafy Garland
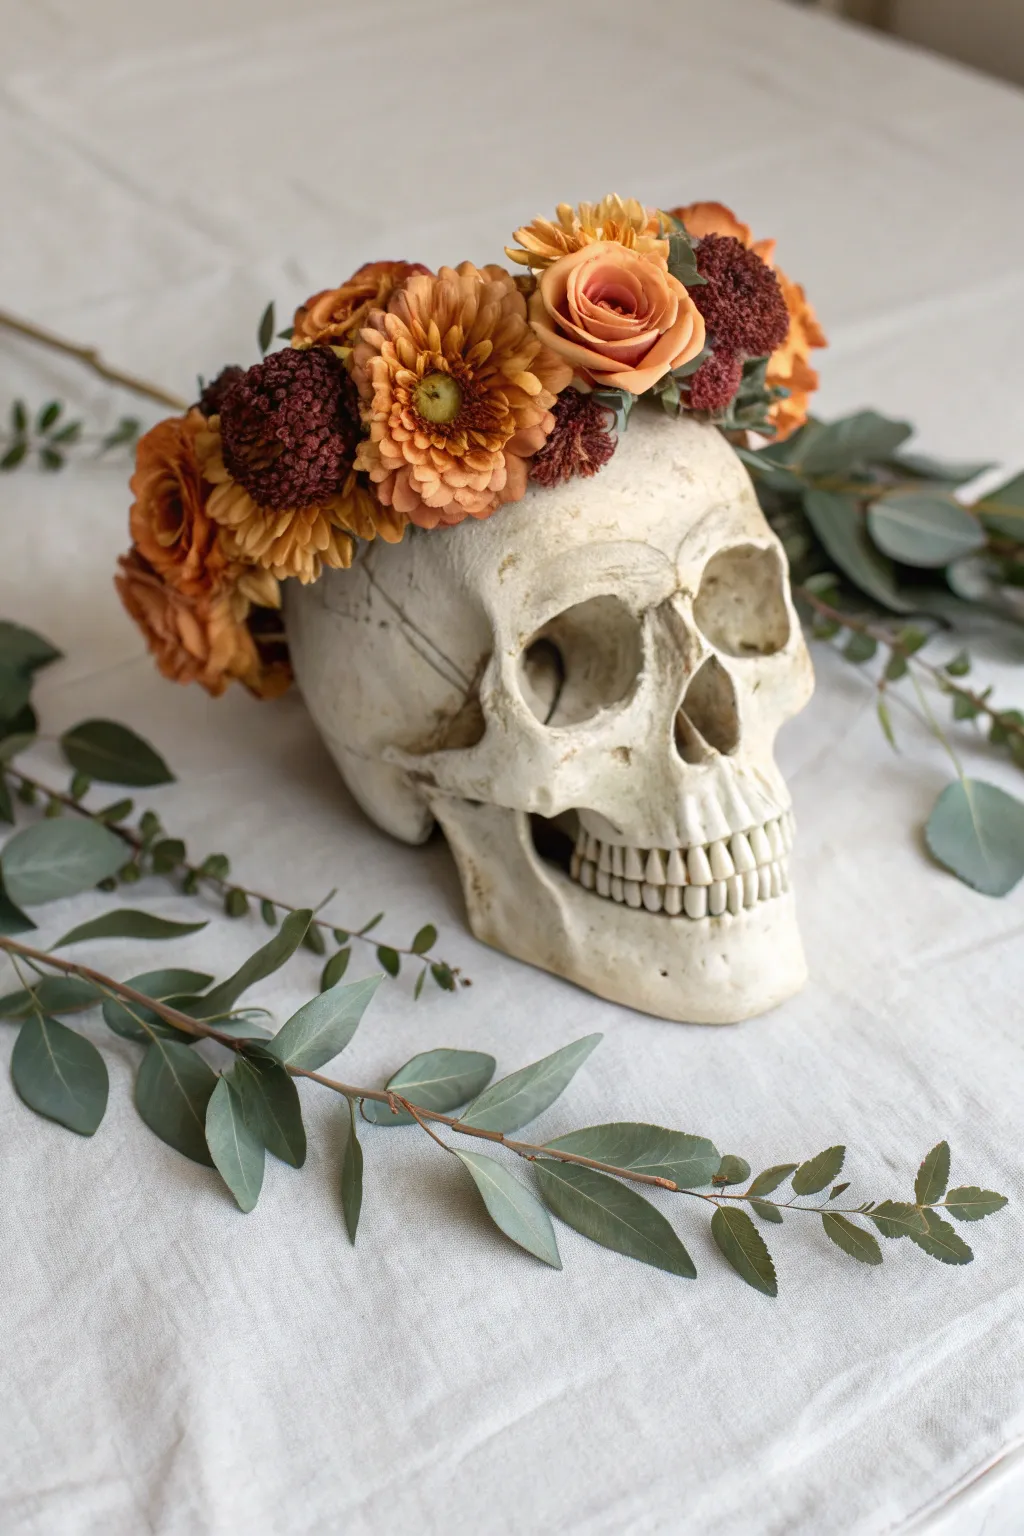
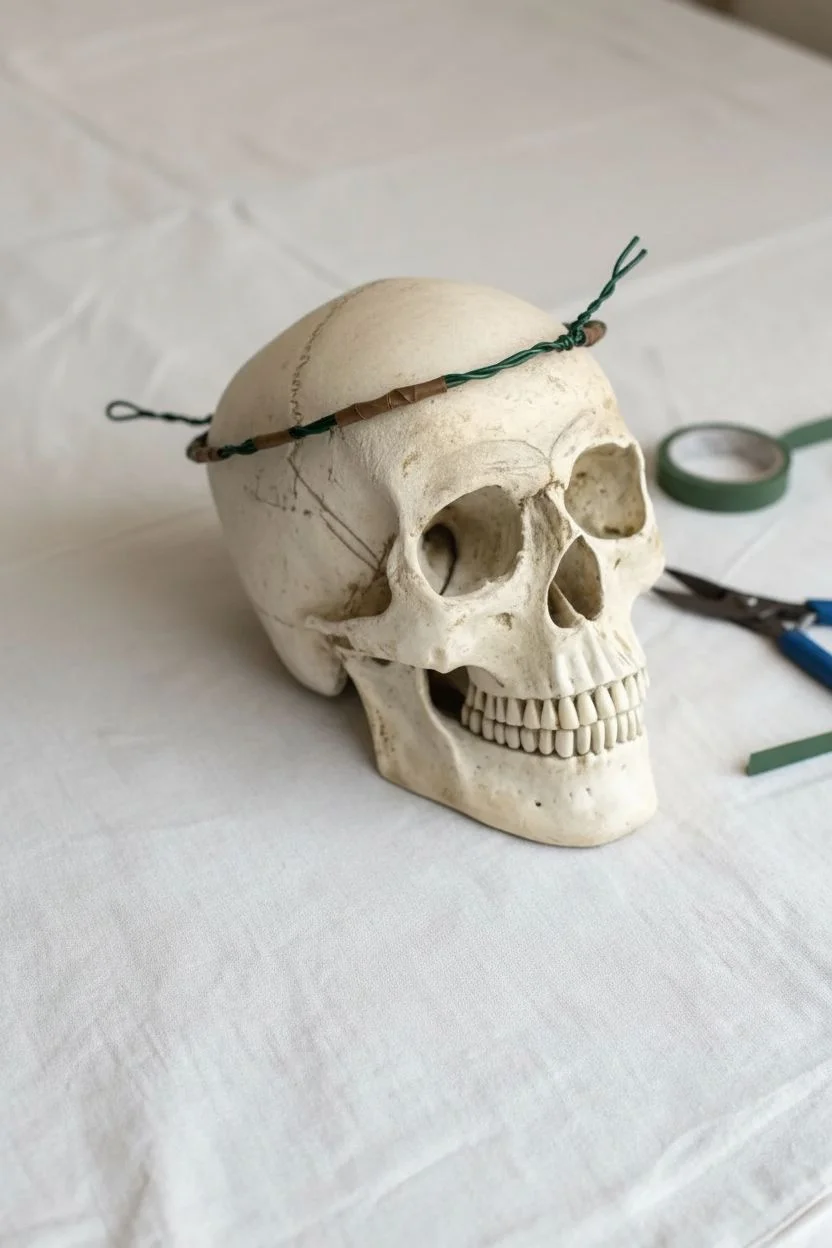
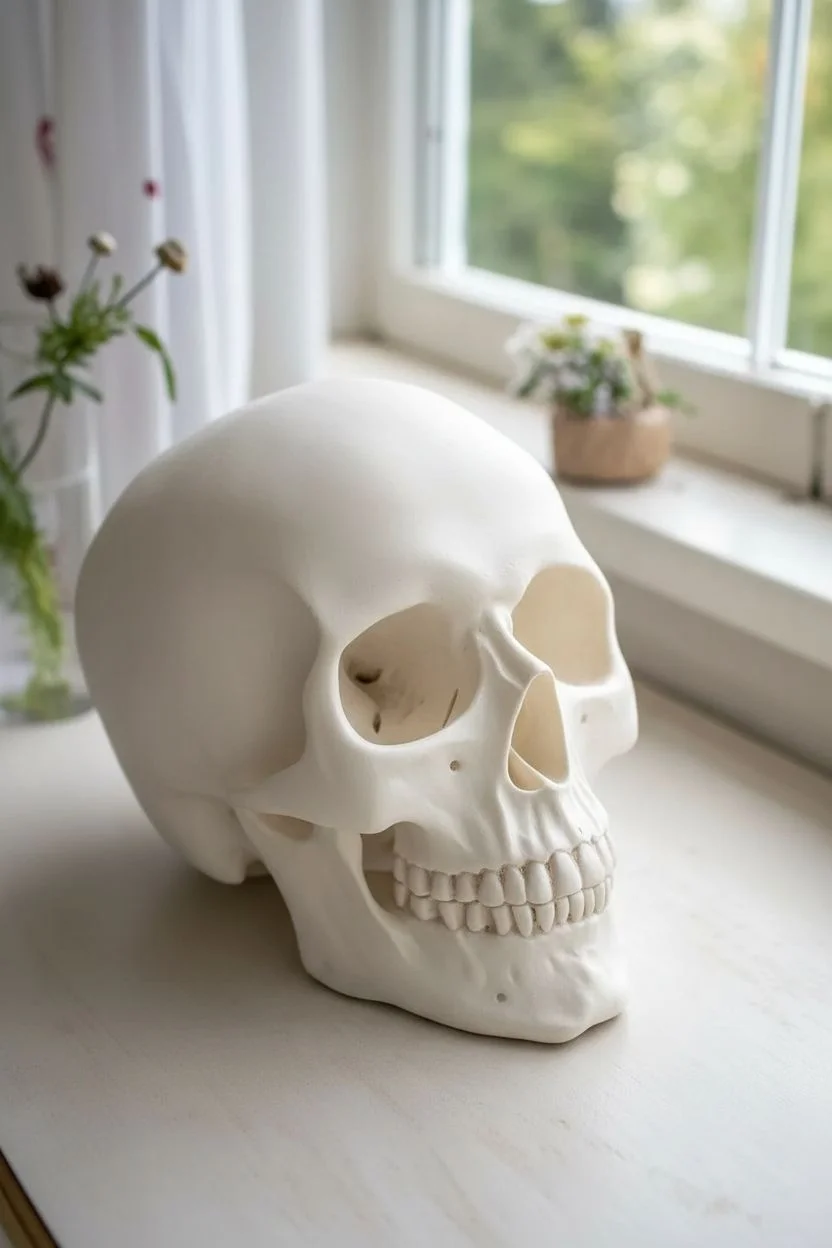
Bring a touch of sophisticated spookiness to your decor with this elegant skull arrangement adorned in warm, earthy tones. The combination of a realistic bone-finish skull with vibrant rust and burgundy florals creates a stunning contrast perfect for Halloween or Día de los Muertos.
Step-by-Step Tutorial
Materials
- Realistic resin or plastic human skull (lifesize)
- Artificial floral stems: Burnt orange roses
- Artificial floral stems: Rust-colored chrysanthemums or marigolds
- Artificial floral stems: Burgundy pincushion flowers or pom-pom mums
- Artificial greenery: Silver dollar eucalyptus and seeded eucalyptus
- Floral wire (22 or 24 gauge)
- Floral tape (brown or green)
- Wire cutters
- Hot glue gun and glue sticks
Step 1: Preparing the Base
-
Clean the skull surface:
Begin by wiping down your resin skull with a dry cloth to remove any dust or oils. This ensures that any adhesive used later will bond securely to the ‘bone’ surface. -
Measure the circumference:
Take a length of floral wire and wrap it loosely around the crown of the skull where you want the flowers to sit. It should rest just above the brow ridges and ear openings. -
Form the wire frame:
Cut the wire with about two inches of overlap. Twist the ends together securely to create a simple circlet. Check the fit again; it shouldn’t be too tight, as you need room to add stems. -
Wrap the wire:
Wrap the entire length of your wire circle with floral tape. This adds friction so stems don’t slide around and covers the sharp wire ends.
Step 2: Arranging the Florals
-
Prepare the flower heads:
Using your wire cutters, snip the flower heads off their main stems, leaving about 1.5 to 2 inches of stem attached to each bloom. You’ll need roughly 3-4 roses, 3-4 mums, and 3-4 burgundy accents. -
Snip greenery sprigs:
Cut small sprigs of eucalyptus, about 3 inches long. I find that mixing both the leafy silver dollar variety and the detailed seeded variety adds nice texture. -
Attach the focal flowers:
Select your largest blooms—the burnt orange roses—and tape their short stems onto the wire frame using floral tape. Space them out slightly unevenly for a more organic look. -
Add secondary blooms:
In the gaps between roses, tape in the rust-colored chrysanthemums. Position them so they face slightly outward and upward, rather than just straight up. -
Insert accent flowers:
Tuck the deep burgundy pincushion flowers in clusters of two or three between the larger blooms. These darker tones add depth and richness to the palette. -
Secure with glue:
Once the main flowers are taped, apply a small dot of hot glue to the underside of the flowers where they touch the wire frame to lock them permanently in place. -
Fill with greenery:
Hot glue small sprigs of eucalyptus behind the flowers and in any visible gaps. This hides the mechanics of the wire and softens the transition between the crown and the skull.
Pro Tip: Antique Wash
If your skull looks too ‘plastic clean,’ dilute brown acrylic paint with water (1:5 ratio) and brush it over the surface, wiping it off immediately. The dark pigment will stay in the cracks for an aged look.
Step 3: Final Styling
-
Place the crown:
Gently set your finished floral crown onto the skull. Adjust the angle so it sits jauntily or regally, depending on the vibe you want. -
Secure the crown (optional):
If this is a permanent display, you can place a dab of hot glue at the contact points on the skull’s temples to prevent slipping. -
Prepare the display surface:
Lay down a textured white linen or cotton cloth on your display table. Wrinkle it intentionally to create shadows and a relaxed, ancient aesthetic. -
Position the skull:
Place the skull in the center of the fabric. I like to angle it slightly to the side, rather than facing perfectly forward, to make it look like a portrait. -
Add trailing greenery:
Take full-length stems of eucalyptus and weave them around the base of the skull. Let one long branch trail off to the left foreground to draw the eye into the composition. -
Overlap the foliage:
Layer a second stem on the right side, ensuring the leaves curl naturally. Allow some leaves to lightly touch the jawbone of the skull to integrate the prop with the setting.
Level Up: LED Glow
Tuck a small, battery-operated warm white fairy light string inside the cranium cavity. The soft glow will spill out through the eye sockets and illuminate the flowers from underneath for night viewing.
Step back and admire your elegantly eerie centerpiece, ready to serve as a conversation starter


Forehead Mandala Focal Point
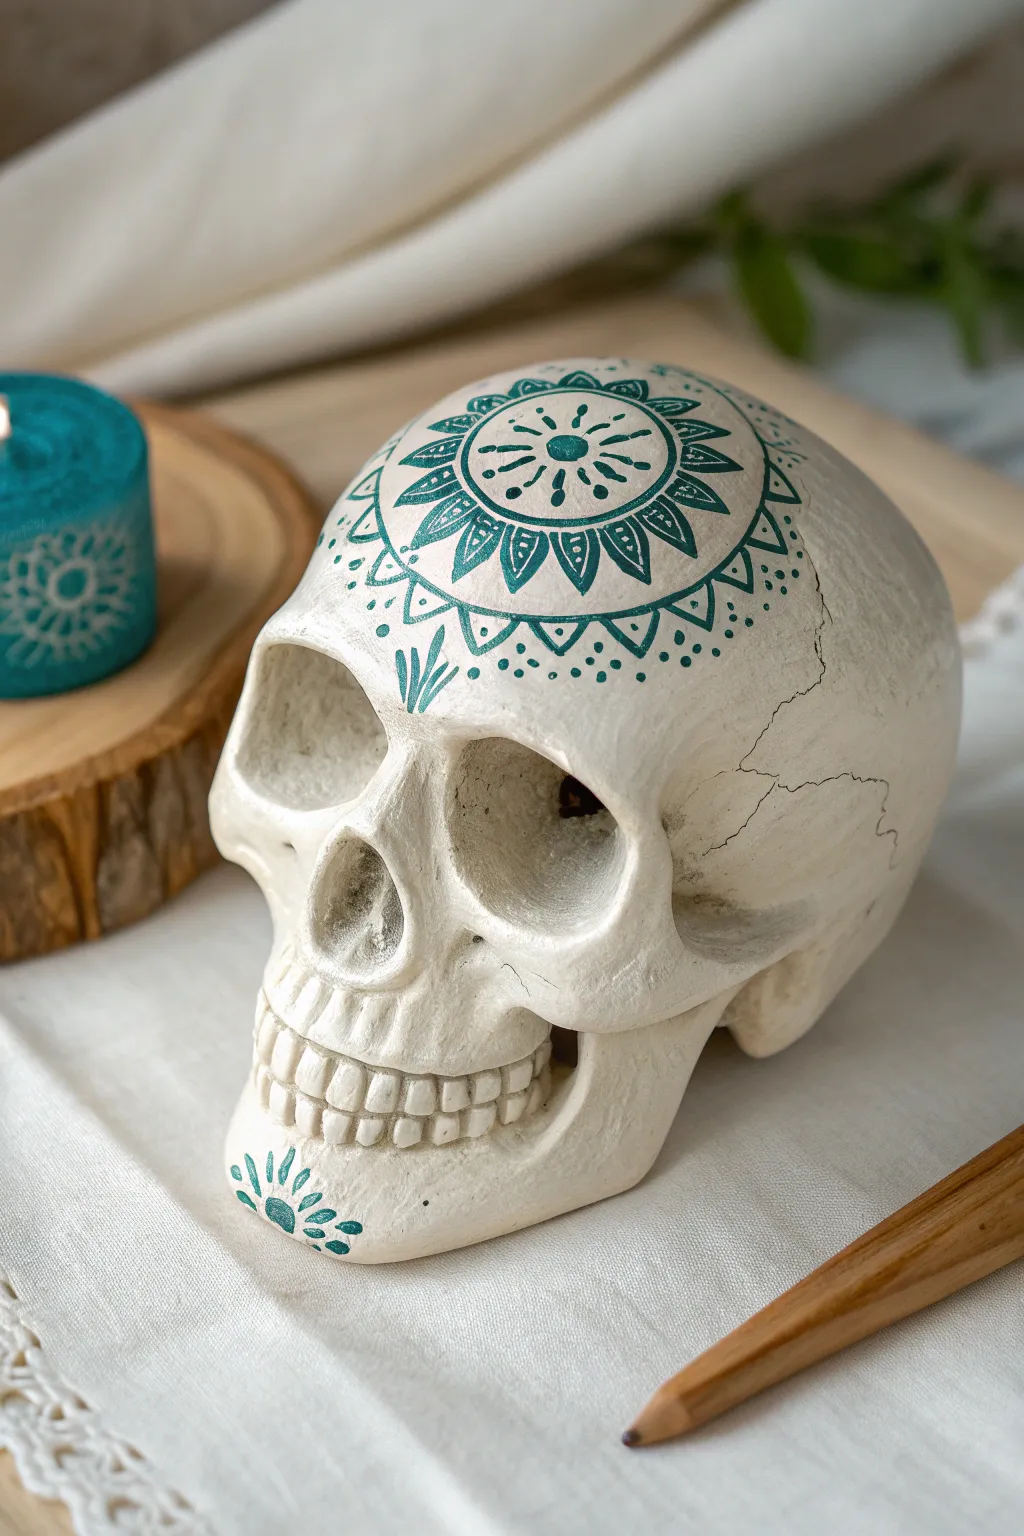
Transform a plain decorative skull into a bohemian centerpiece featuring a striking geometric mandala on the forehead. The contrast of the deep teal paint against the bone-white surface creates a sophisticated, modern look perfect for shelves or altars.
How-To Guide
Materials
- White or cream resin/plaster skull
- Teal acrylic paint (matte finish)
- Fine detail paintbrush (size 00 or 000)
- Small round paintbrush (size 1)
- Pencil (HB or lighter)
- Compass (optional but recommended)
- Small ruler
- Eraser
- Matte clear sealant spray
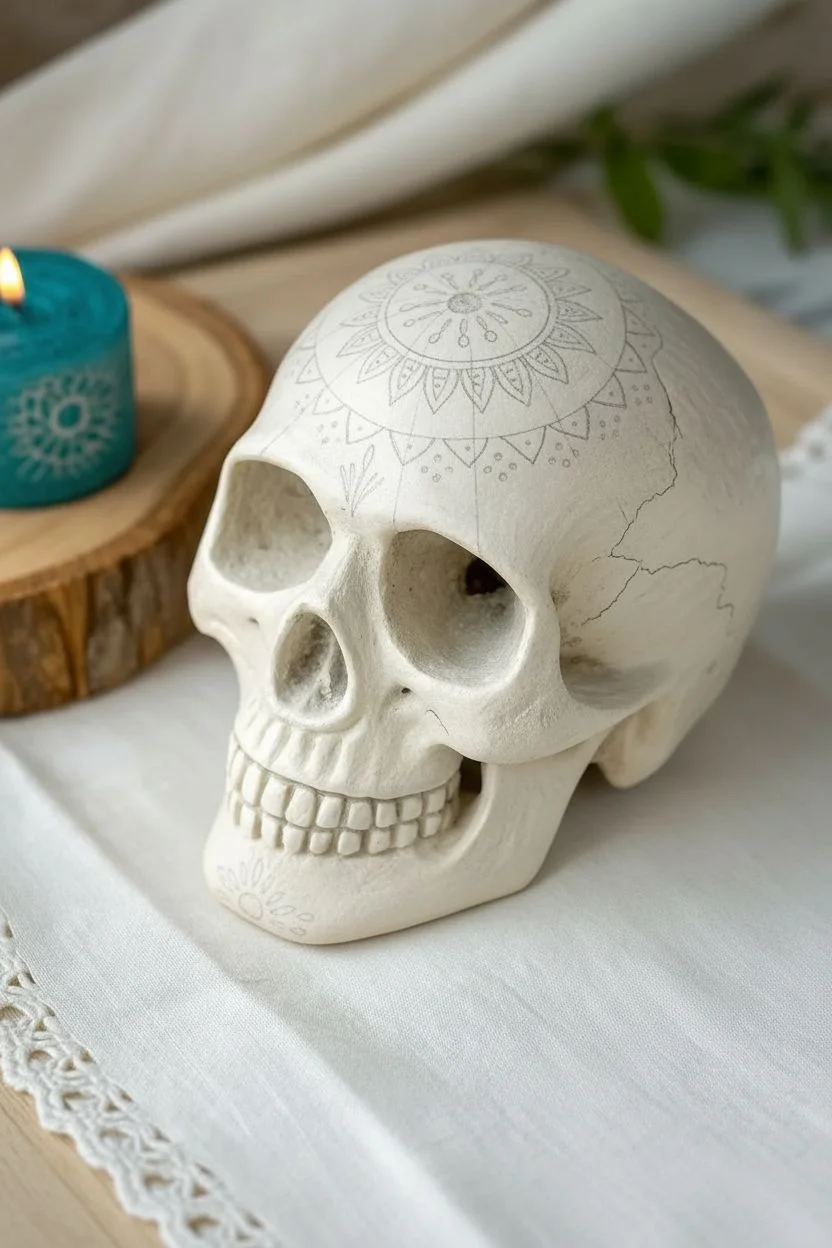
Step 1: Preparation and Mapping
-
Clean surface:
Begin by wiping down your resin or plaster skull with a slightly damp cloth to remove any dust or oils. Let it dry completely before starting. -
Find the center:
Determine the exact center of the forehead area. Mark this spot lightly with your pencil; this will be the anchor point for your entire mandala. -
Draft the circles:
Using a compass gently resting on the curved surface (or freehanding if you are confident), sketch three concentric circles radiating from your center dot. The outermost circle should reach the brows. -
Divide the space:
Lightly draw lines dissecting the circles like a pie chart to help space your petals evenly. Aim for 12 or 16 equal sections for a symmetrical design.
Steady Hand Trick
Rest your pinky finger against the skull’s surface while you paint intricate lines. This anchors your hand and prevents shaking on the curved surface.
Step 2: Painting the Mandala
-
Center dot:
Load your small round brush with teal acrylic paint. Create a solid, confident circle right over your center mark. -
Inner rays:
Using the fine detail brush, paint small lines radiating outward from the center dot, stopping at your first pencil circle guideline. Add tiny dots at the end of each ray. -
First petal layer:
Paint a ring of small, filled semi-circles or petals around the rays. Keep the paint opaque; you may need a second coat if the white shows through. -
Primary ring:
Paint a thick, consistent line over your middle pencil circle guideline. This creates a strong border for the inner design. -
Main petals:
Draw the outlines of larger, pointed petals extending from the thick ring out to your final pencil circle. I define the tips first to ensure they are evenly spaced. -
Fill the petals:
Inside each large petal, paint a smaller, solid tear-drop shape. This negative space creates a beautiful lacy effect. -
Detail work:
Add thin lines inside the negative space of the petals, connecting the solid tear-drop to the outer petal rim. -
Outer framing:
Paint a final thin ring around the tips of your large petals to encase the design. -
Decorative triangles:
On the outside of this final ring, paint small, open triangles in the spaces between the petal tips. -
Dot accents:
Dip the non-brush end of your paintbrush into the paint. Dot the center of every outer triangle for a uniform, stamped look. -
Side flourishes:
Add three simple, grass-like strokes on the temples, just below the main mandala, to help the design flow down the skull.
Go Golden
After sealing, trace just the center of the mandala or select petal tips with liquid gold leaf or a metallic gold pen for a luxurious, gilded finish.
Step 3: Finishing Touches
-
Chin detail:
Mimic the forehead design on the chin. Paint a semi-circle rising from the bottom edge, adding small rays and petals similar to the center of your main mandala. -
Clean up:
Once the paint is 100% dry, very gently erase any visible pencil guidelines. Be careful not to rub the acrylic paint. -
Antique cracking (Optional):
If your skull didn’t come with cracks, you can sketch faint jagged lines on the side with a sharp pencil to simulate hairline fractures. -
Seal:
Mist the entire skull with a matte clear sealant. This protects your paint and evens out the finish between the raw skull material and the acrylic.
Place your finished piece near a candle or on a stack of books to enjoy the meditative vibes of your new artwork
BRUSH GUIDE
The Right Brush for Every Stroke
From clean lines to bold texture — master brush choice, stroke control, and essential techniques.
Explore the Full Guide
Stitched Mouth Stylization
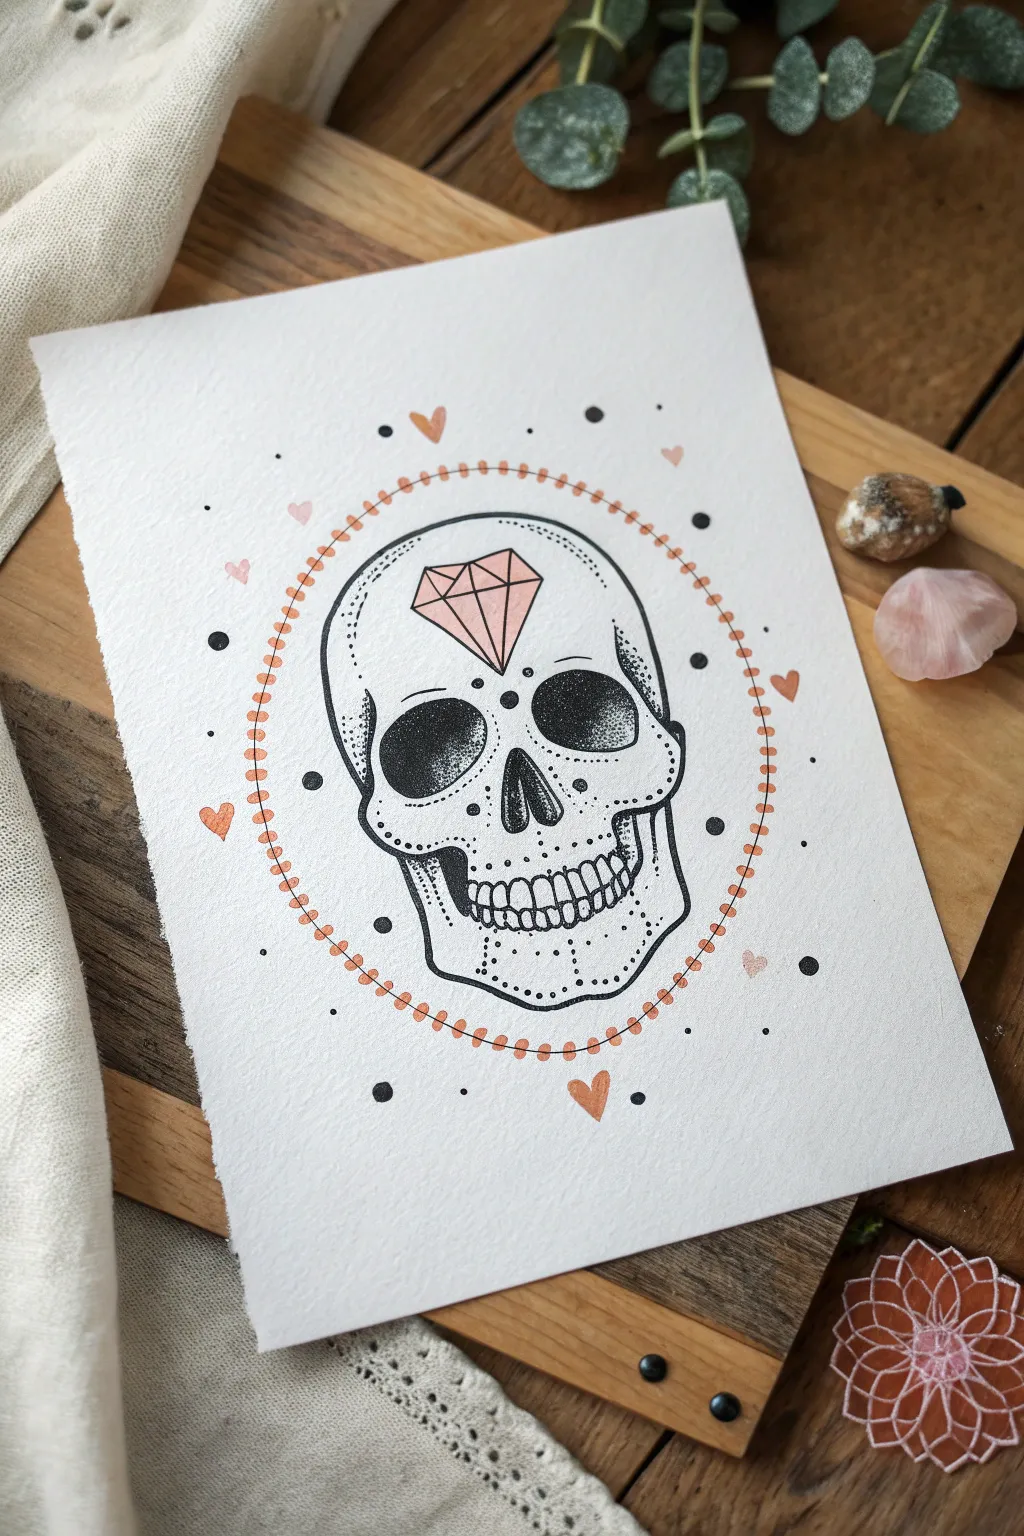
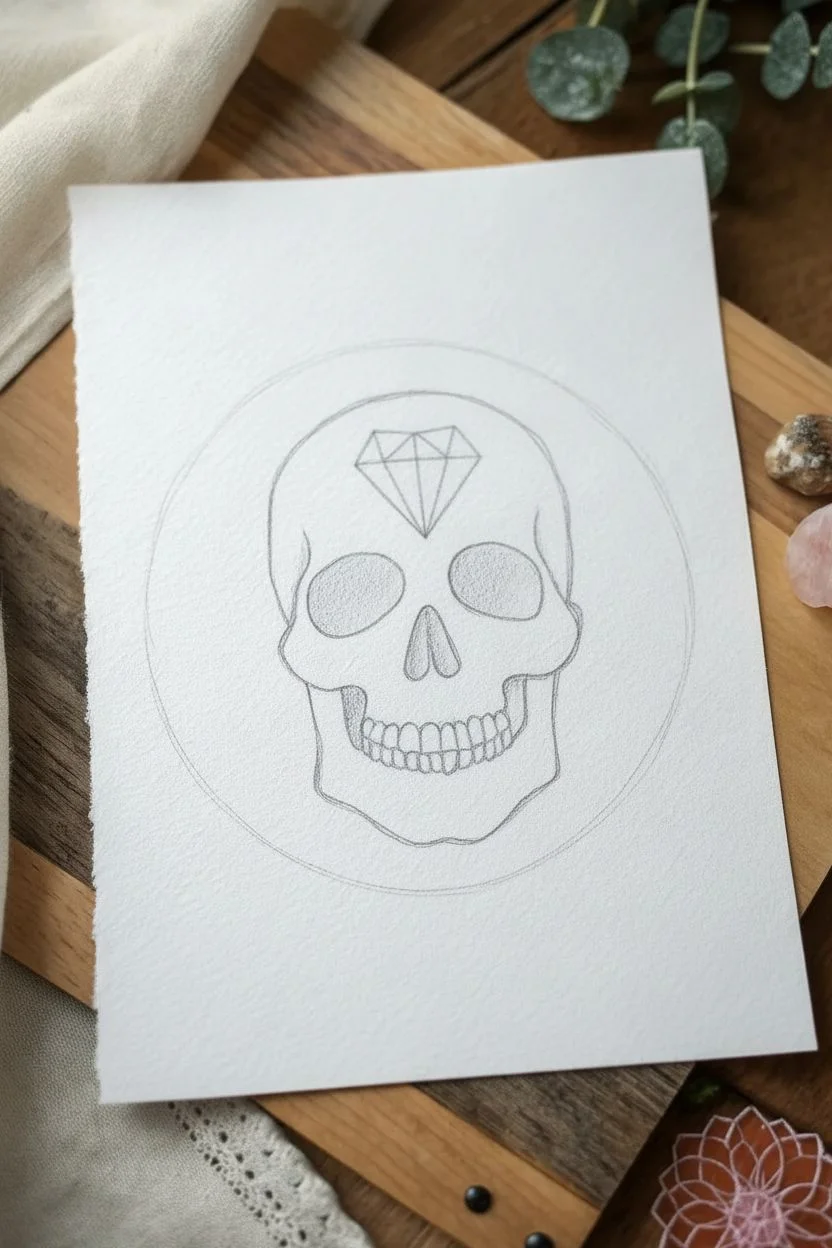
This project combines delicate stippling techniques with bold linework to create a stylized skull that feels both edgy and soft. Using simple fine-liners and a touch of rose gold or soft pink, you’ll render a skull featuring a distinctive diamond forehead emblem and a charming dotted halo border.
Detailed Instructions
Materials
- Heavyweight textured art paper (watercolor or mixed media paper, cold press)
- Black archival fine-liner pens (sizes 005, 01, and 05)
- Rose gold or coral pink paint pen (or watercolor)
- Pencil (HB or 2H)
- Soft eraser
- Compass or circular object (for guiding the border)
Step 1: Sketching the Framework
-
Pencil Outline:
Begin by lightly sketching the skull shape in pencil. Focus on the large cranial dome and the narrower jawline. Draw large, slightly irregular circles for the eye sockets and an inverted heart shape for the nose cavity. -
Adding Features:
Sketch the prominent cheekbones jutting out below the eye sockets. Draw the upper and lower teeth, keeping them relatively uniform but with slight size variations to look natural. -
Placing the Diamond:
Position a diamond shape directly in the center of the forehead. Draw the top horizontal line first, then angles downwards to a point. Divide the top section with geometric facets. -
Mapping the Halo:
Use a compass or trace a circular object to lightly draw a large oval or circle surrounding the skull to guide your future border placement.
Uneven Stippling?
If your dots look inconsistent or messy, slow down and hold the pen perfectly vertical. Use a wrist motion rather than moving your whole arm for better control.
Step 2: Inking the Skull
-
Major Outlines:
Switch to your 05 fine-liner. Ink the outer contour of the skull, the jaw, and the main curves of the cheekbones. Use confident, smooth strokes. -
Facial Features:
Outline the eye sockets and nose cavity. For the teeth, switch to a finer 01 pen to keep the details crisp without them bleeding together. -
Stippling the Shadows:
This is where the magic happens. Using a 005 or 01 pen, fill the eye sockets and nose cavity with stippling (tiny dots). Pack the dots densely near the center and edges for deep black, getting sparser toward any highlighted areas. -
Adding Texture:
Add light stippling around the temples, under the cheekbones, and on the chin to suggest depth and roundness. I find that going slow here prevents the dots from turning into dashes. -
Stitched Mouth Detail:
Rather than a literal stitched thread, this style uses vertical lines extending from the teeth roots and tips, plus small dots along the jawline, mimicking the perforation of a seam.
Add Metallic Flare
Use gold leaf adhesive on the diamond facets instead of pink marker. Once tacky, apply gold leaf for a shimmering 3D effect that catches the light.
Step 3: Adding Color & Details
-
Coloring the Diamond:
Once your black ink is fully dry, color in the diamond shape with your rose gold or coral pink marker. Apply it evenly to avoid streaks. -
Diamond Outline:
After the color dries, outline the diamond and its internal facets with the 05 black pen for a bold, illustrative look. -
The Dotted Halo:
Following your pencil guide, create the border using the pink marker. Draw small, vertical dashes or ovals spaced evenly apart to form the ring. -
Connecting the Dots:
Using a very fine black pen, draw a single line passing through the center of all your pink border dashes, connecting them into a beaded chain.
Step 4: Final Flourishes
-
Scattered Hearts:
Draw several small hearts using the pink marker around different areas of the background—near the border and closer to the skull. -
Confetti Dots:
Add variety by placing solid black dots and smaller ink speckles randomly around the composition to balance the negative space. -
Cleanup:
Wait at least 15 minutes to ensure all ink is completely set. Gently erase any visible pencil guidelines, being careful near the stippled areas.
Now you have a striking piece of skull art that balances dark themes with delicate execution
Black Background With Neon Pop
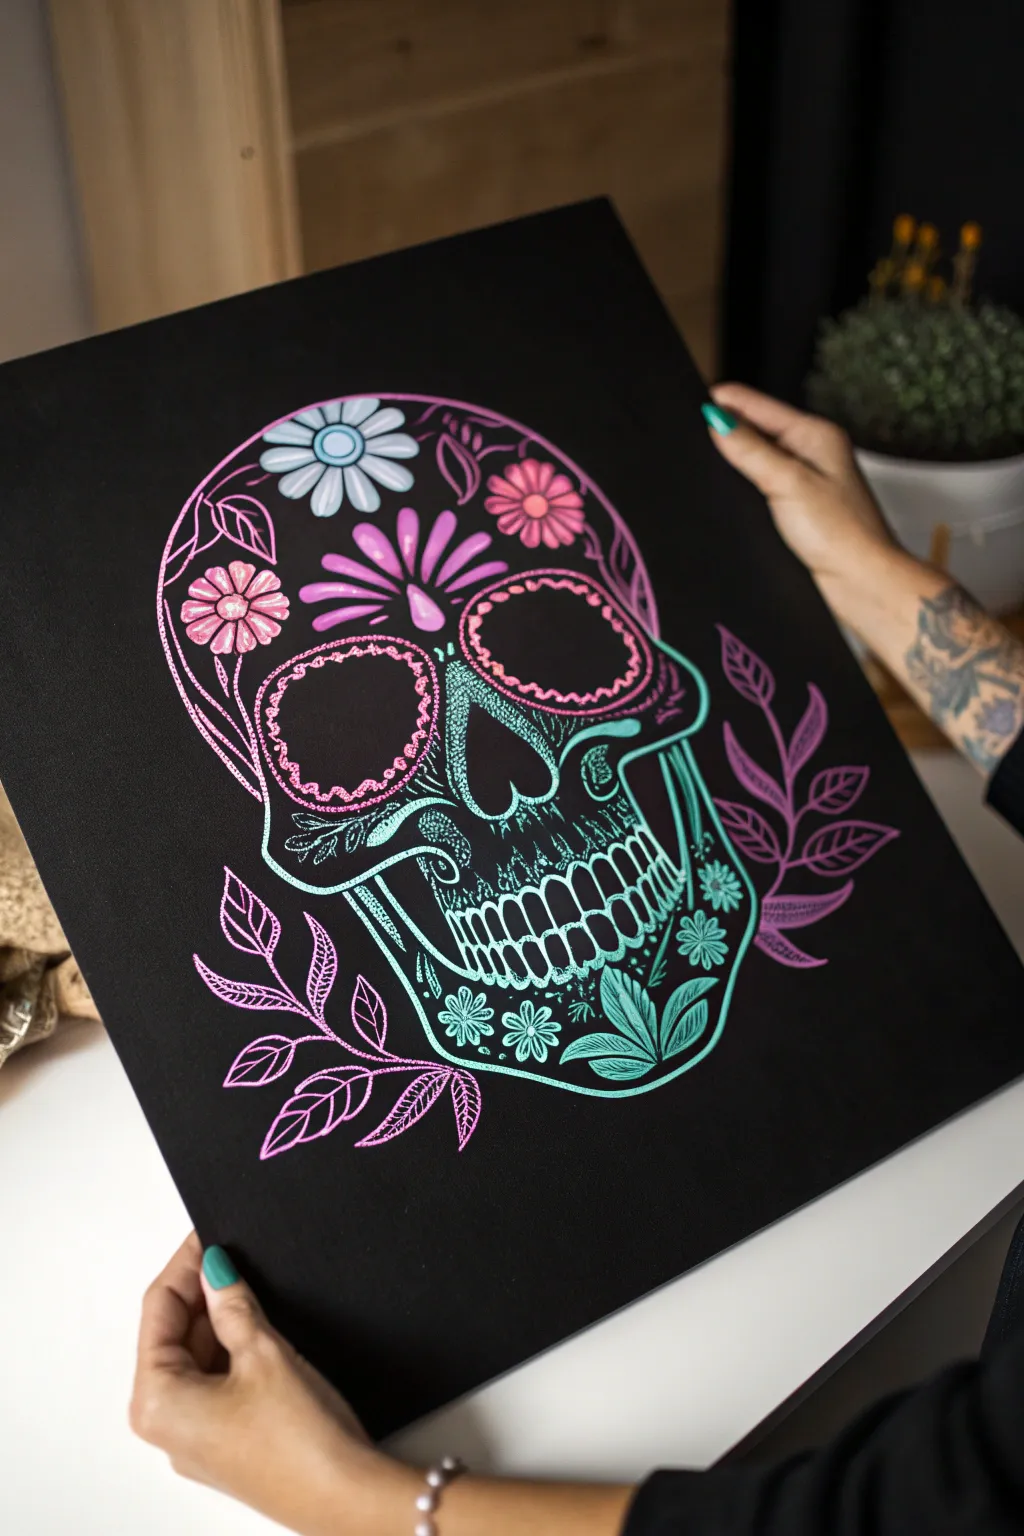
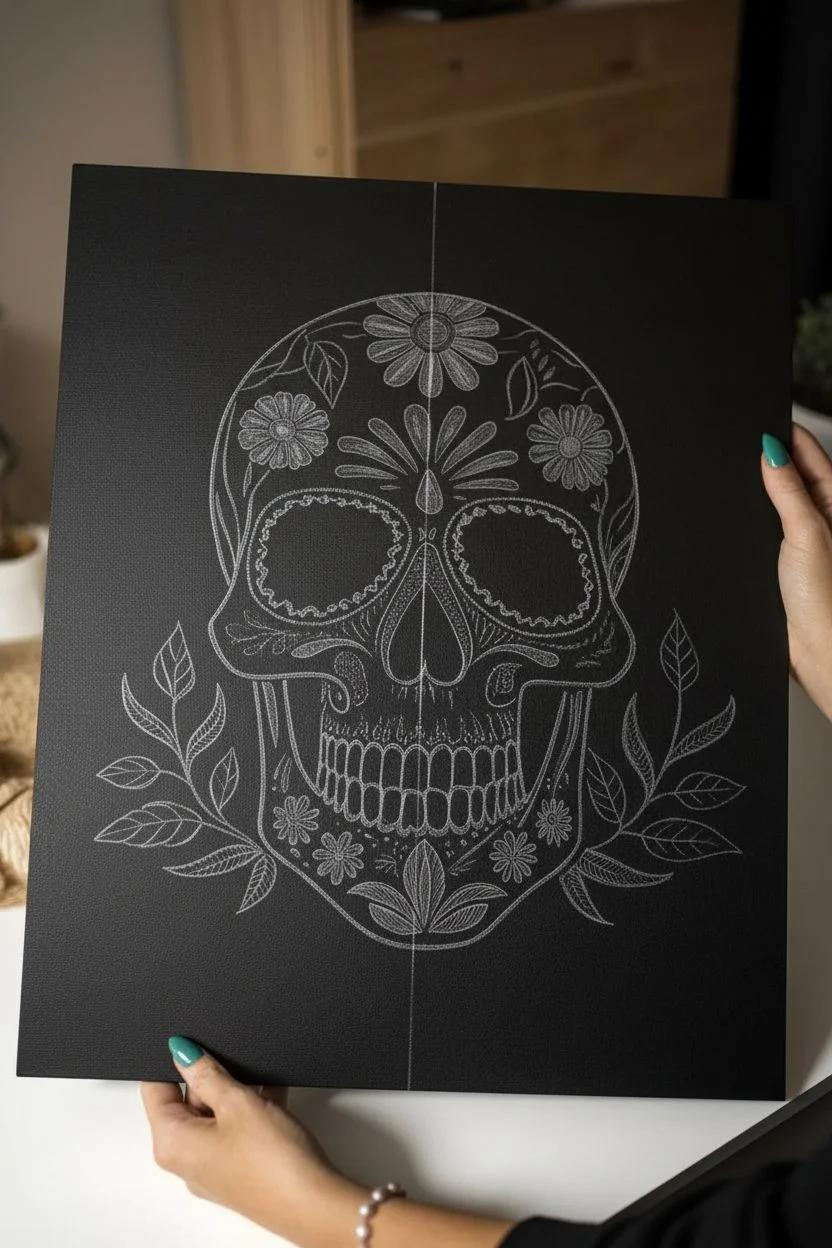
Embrace the contrast of light and dark with this striking sugar skull design, where vibrant neon hues pop against a deep matte black canvas. This project uses opaque markers to create clean, luminous lines that feel both modern and traditionally inspired.
Step-by-Step
Materials
- Black canvas board or heavy black cardstock (11×14 inches recommended)
- White colored pencil or chalk pencil (for sketching)
- Neon pink opaque paint marker (fine tip)
- Neon teal/cyan opaque paint marker (fine tip)
- White or metallic silver paint marker (fine tip)
- Eraser (kneaded eraser works best on canvas)
- Ruler
- Reference image of a sugar skull
Step 1: Laying the Groundwork
-
Prepare your surface:
Ensure your black canvas or cardstock is completely clean and dust-free. Wipe it gently with a dry microfiber cloth to remove any lint that might snag your marker tips. -
Sketch the outline:
Using a white colored pencil or chalk stick, lightly sketch natural oval shape for the cranium. Keep the pressure extremely light so you can erase mistakes easily without burnishing the black surface. -
Establish symmetry:
A faint vertical line down the center of your oval helps keep features balanced. Mark horizontal guidelines for where the eyes, nose cavity, and mouth will sit to ensure proportion. -
Refine the skull shape:
Sketch the distinct contours of the skull, narrowing at the cheekbones and squaring off slightly at the jaw. I usually do this slowly to get that classic anatomical silhouette before adding decorative elements. -
Map the features:
Draw large, hollow circles for the eye sockets and an upside-down heart shape for the nasal cavity. Sketch the grimacing teeth structure along the jawline, keeping the teeth simple rectangular shapes for now.
Step 2: Adding Decorative Flourishes
-
Draft the floral crown:
Lightly sketch a large central flower on the forehead, flanked by smaller blossoms and leaves wrapping around the top curve of the skull. These organic shapes soften the harsh lines of the bone. -
Detail the eyes:
Inside the eye sockets, sketch a scalloped border or small petal shapes to frame the emptiness, giving it that classic sugar skull vibe. -
Add flanking leaves:
Draw two large, leafy branches curving upwards on either side of the skull’s jaw. These shouldn’t touch the skull but frame it nicely in the lower corners.
Ink Flow Problems?
If neon markers streak or look transparent on black, don’t press harder. Let the first layer dry fully, then apply a second coat for true opacity.
Step 3: Inking in Neon
-
Start with the focal point:
Shake your pink paint marker well. Begin inking the central flower on the forehead. Use smooth, confident strokes to outline the petals, ensuring the ink flows opaquely. -
Define the pink accents:
Continue with the pink marker to outline the scalloped details around the eye sockets and the leafy branches in the lower corners. The brightness of the pink sets the tone for the piece. -
Introduce the teal:
Switch to your neon teal marker. Outline the main shape of the skull, including the jawline and cheekbones. The cool tone contrasts beautifully with the warm pink. -
Fill the teeth details:
Carefully outline each tooth with the teal marker. Add small vertical lines at the roots of the teeth to simulate definition and depth within the jaw. -
Detail the nose and chin:
Outline the nasal cavity in teal. Add additional teal decorative swirls on the chin and cheeks to balance the color distribution across the face. -
Create the two-tone flower:
Return to the forehead flower. If you outlined petals in pink, use the teal marker to add small inner details or centers to the flowers, creating a vibrant two-tone effect. -
Add leafy greens:
Use the teal marker to color the leaves sprouting from the jawline on the skull itself (not the floating branches). Add veins inside these leaves for texture.
Pro Tip: Pencil Prep
Use a white charcoal pencil instead of standard graphite. It shows up clearly on black and dusts off easily without smudging your final ink lines.
Step 4: Final Touches
-
Add white highlights:
Using a white or silver marker, add tiny dots or ‘stippling’ inside the pink eye socket rings. This mimics the look of glitter or beadwork often found on real sugar skulls. -
Clean up lines:
Check for any uneven lines. Go over any marker strokes that look a bit translucent to ensure solid, bold color coverage against the black background. -
Erase guidelines:
Wait at least 30 minutes for the paint markers to cure completely. Then, gently erase any visible white pencil lines with your kneaded eraser to leave only the glowing neon art.
Hang your vibrant masterpiece in a spot with good lighting to really let those neon colors shine.

PENCIL GUIDE
Understanding Pencil Grades from H to B
From first sketch to finished drawing — learn pencil grades, line control, and shading techniques.
Explore the Full Guide
Pastel Sugar Skull for a Soft Look
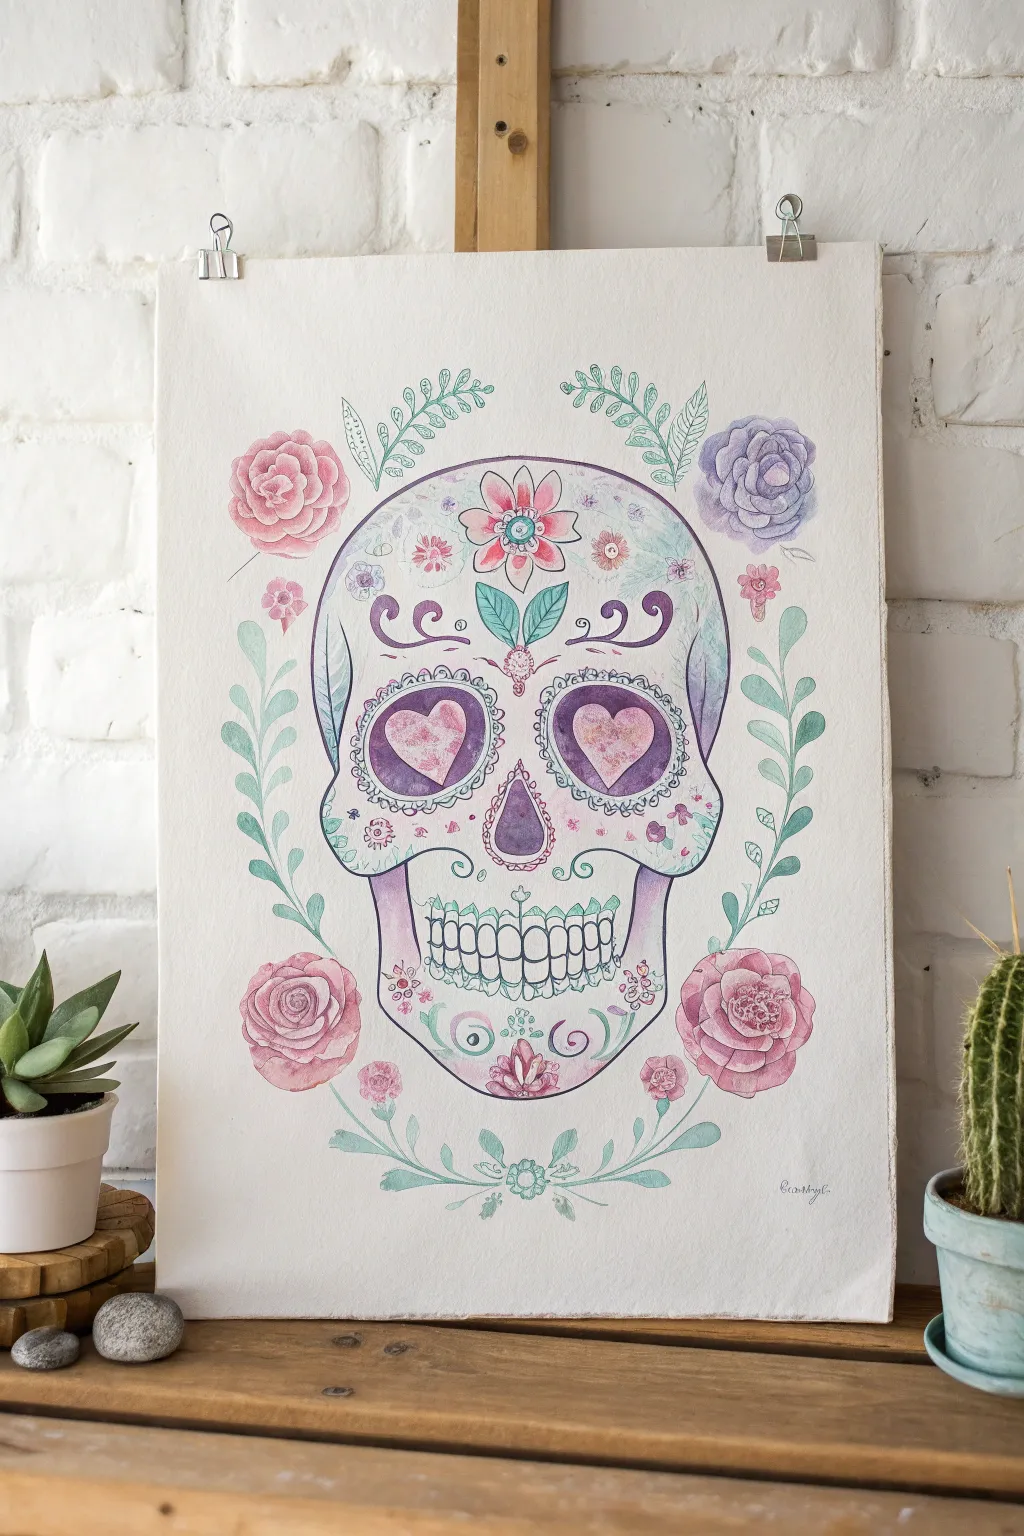
Embrace a softer side of skeletal art with this delicate sugar skull painting that trades spooky for sweet. Using gentle pastel washes and intricate floral details, you’ll create a piece that feels airy, romantic, and beautifully hand-crafted.
Step-by-Step Guide
Materials
- Cold press watercolor paper (A3 or 11×14 inches recommended)
- HB pencil for sketching
- Kneaded eraser
- Waterproof fine-liner pens (black, 0.1mm and 0.3mm)
- Watercolor paint set (pastels: soft pinks, lavender, mint green, teal)
- Small round brushes (size 2 and 4)
- White gel pen
- Clean water jar and paper towels
Step 1: Sketching the Bones
-
Outline the Cranium:
Start by lightly sketching the main shape of the skull in the center of your paper. Draw a large, rounded dome for the top and taper it down towards the jawline. Don’t worry about perfect symmetry; a slightly hand-drawn look adds charm. -
Define Facial Features:
Map out two large, upside-down heart shapes for the eye sockets. In the center, below the eyes, sketch an inverted heart or spade shape for the nose cavity. -
Draw the Mouth and Jaw:
Sketch the cheekbones curving inward. Below them, draw the upper and lower jaw, outlining a row of teeth. Keep the teeth simple and slightly rounded rather than sharp. -
Draft the Florals:
Lightly pencil in four large roses around the corners of the skull—two at the top, two at the bottom. Connect them with flowing leafy vines that frame the skull’s sides.
Wet-on-Wet Technique
Pre-wet the paper with clean water before dropping in pastel colors. This creates those soft, blooming edges seen in the cheeks and eye sockets.
Step 2: Adding the Fineline Detail
-
Ink the Main Outline:
Using your 0.3mm waterproof pen, carefully trace over your pencil lines for the skull shape and the main roses. Use a confident, steady hand, but remember, slight wobbles add character. -
Decorate the Forehead:
Switch to the finer 0.1mm pen. Draw a central flower on the forehead, flanked by two leafy sprigs. Add swirling filigree lines above the eyebrows. -
Detail the Eyes and Cheeks:
Inside the eye sockets, draw smaller hearts. Add a scalloped lace border around the outer edge of the eye sockets. On the cheeks, draw small floral motifs or simple swirls. -
Refine the Chin and Jaw:
Add a small lotus-like flower on the chin. Draw tiny decorative dots and smaller flowers along the jawline to fill empty spaces. -
Erase Guidelines:
Once the ink is completely dry (test a small spot first!), gently erase all your pencil marks with the kneaded eraser to leave a clean black-and-white design.
Metallic Magic
Swap the grey shadows for a diluted metallic silver or pearlescent watercolor to make the skull shimmer subtly in the light.
Step 3: Watercolor Washes
-
Paint the Eye Sockets:
Load your brush with a watery purple wash. Paint the outer area of the eye sockets, leaving the inner hearts white for now. While wet, drop in a tiny bit of darker purple at the edges for depth. -
tint the Inner Hearts:
Paint the hearts inside the eyes with a soft, diluted pink. I allow this to bleed slightly into the surrounding purple if it’s still damp for a dreamy effect. -
Color the Roses:
Use a mix of pale pink and dusty rose for the four corner flowers. Paint the petals loosely, leaving small white highlights to represent light hitting the bloom. -
Wash the Leaves:
Using a mint green or soft teal, fill in the leafy vines and the leaves on the forehead. Keep the paint inconsistent—darker in some spots, lighter in others—to mimic watercolor texture. -
Create the Bone Shadow:
Mix a very diluted wash of purple and blue. Gently paint along the outer edges of the skull and under the cheekbones to give the skull dimension without making it look gray or dirty. -
Nose and Mouth Details:
Fill the nose cavity with a deeper purple. For the teeth, apply a barely-there wash of teal or blue just at the roots, fading to white at the tips.
Step 4: Final Touches
-
Add Speckles:
Once the main paint is dry, take a wet brush with pink or teal paint and gently tap it against your finger to splatter tiny droplets around the skull for texture. -
Highlight with White:
Use a white gel pen to add tiny dots to the center of the eyes, on the nose, and stamen details in the center of the flowers. -
Sign and Frame:
Add your signature near the bottom right vine. To display it like the photo, suspend the paper using metal bulldog clips attached to a wooden board or easel.
Now you have a stunning piece of pastel art that perfectly balances edge and elegance
Minimal Line Art Skull With Florals
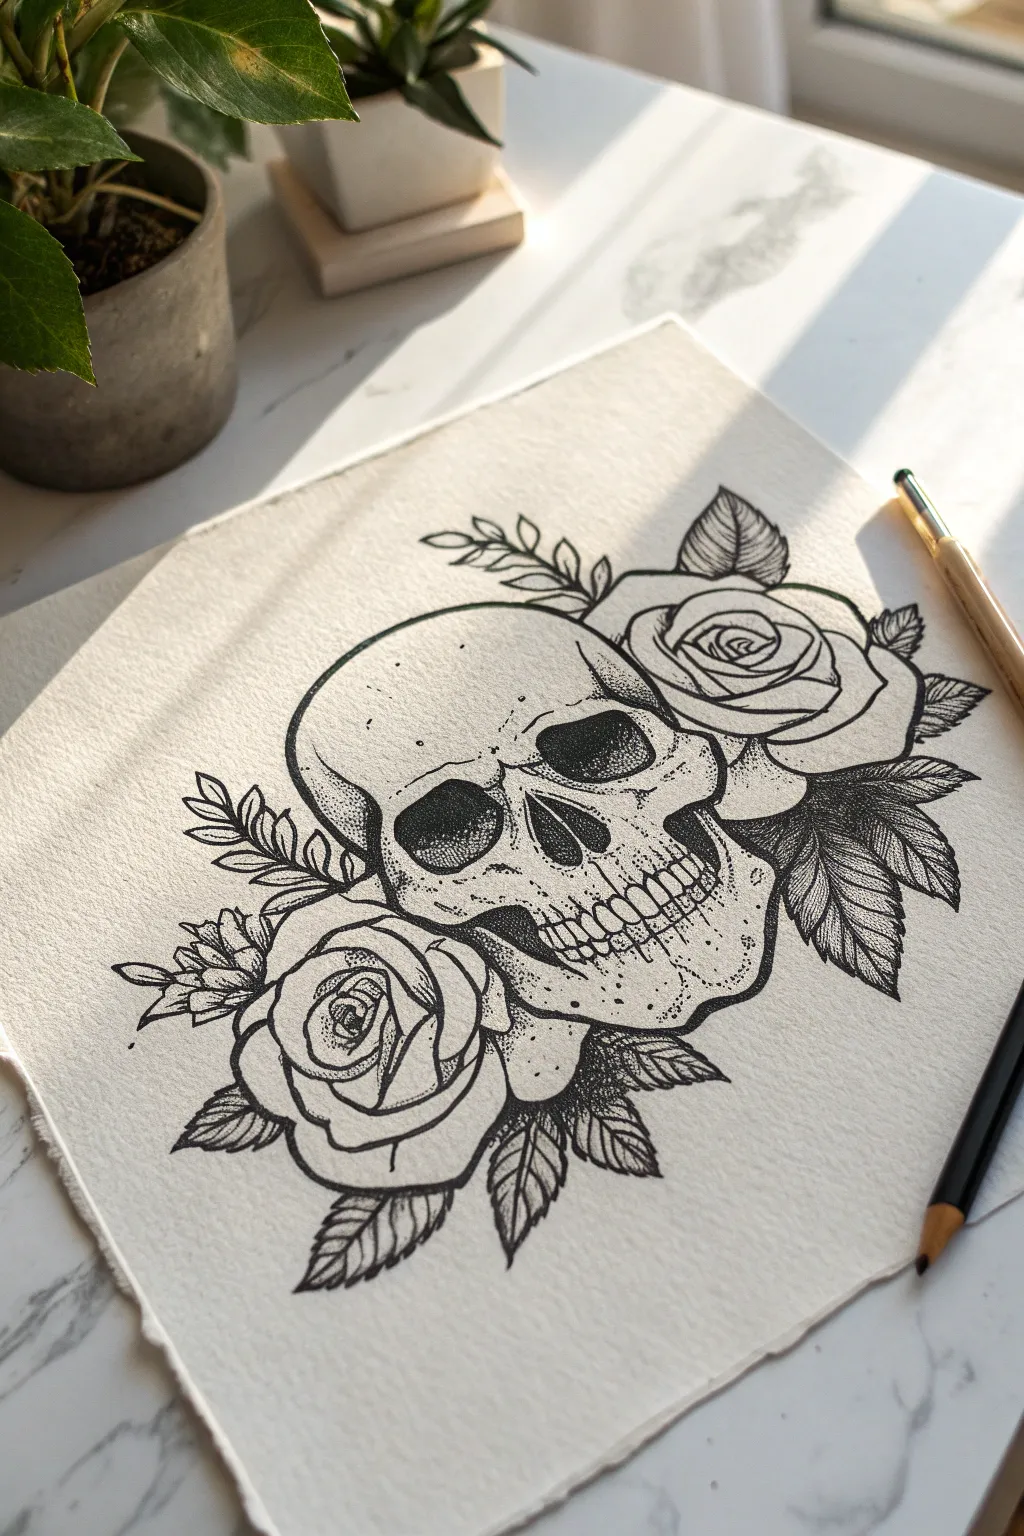
This elegant illustration balances the edginess of a skull with the softness of wild botanicals, rendered in a muted, earthy color palette. The combination of fine black ink detailing and stippling creates a sophisticated, tattoo-inspired aesthetic perfect for modern wall art.
Step-by-Step
Materials
- Hot press watercolor paper or smooth Bristol board (A4 size)
- Fine liner pens (sizes 0.1, 0.3, and 0.5)
- Pencil (HB or 2H for sketching)
- Kneadable eraser
- Watercolor paints or alcohol markers (terracotta, sage green, blush pink)
- Small round paintbrushes (size 2 and 4)
- White or light wood frame with matting
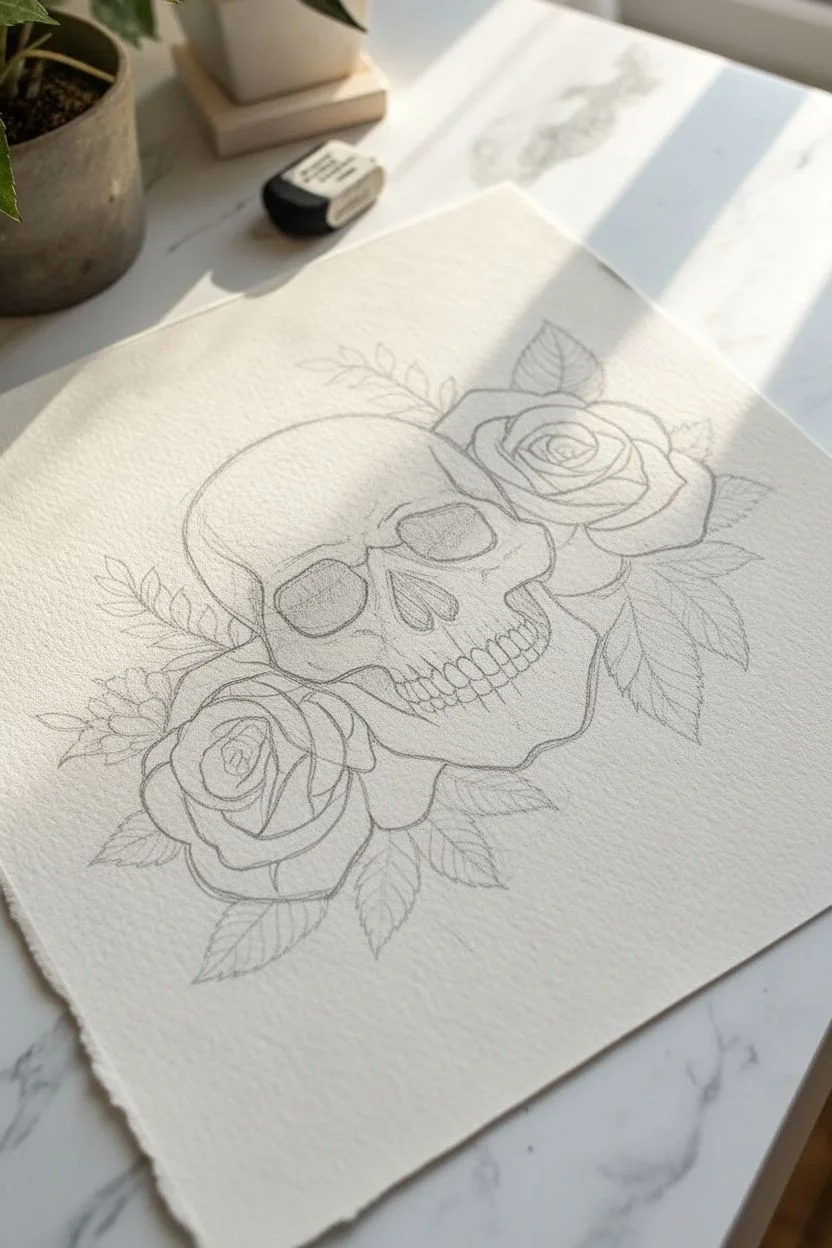
Step 1: Sketching the Composition
-
Map out the skull shape:
Begin by lightly sketching the central skull shape on your paper using an HB pencil. Focus on the large cranium dome first, then taper down for the cheekbones and jawline. -
Define facial features:
Sketch the large, dark eye sockets, the inverted heart shape of the nasal cavity, and the teeth. Don’t worry about perfect anatomy; a stylized look works well here. -
Add floral placements:
Loosely draw circles where your main flowers will go—one large rose on the top right, another at the bottom right, and a cluster on the left cheek. -
Sketch foliage details:
Fill the gaps with sprigs of ferns, leaves, and small filler flowers extending outward from the skull to create a balanced, oval-shaped composition.
Step 2: Inking the Outlines
-
Trace the main lines:
Using a 0.3 fine liner, carefully go over your pencil lines. Keep your hand steady but allow for slight variations in line weight to give it an organic feel. -
Refine the teeth:
Switch to a 0.1 pen for the teeth details. Instead of drawing individual chiclets, focus on the gum line and the separation between the top and bottom jaw. -
Add cracks and texture:
Draw the squiggly suture lines on the skull’s cranium and faint cracks above the eye sockets to add age and character. -
Detail the botanicals:
Ink the flowers, adding multiple layers of petals to the roses and simple, clean lines for the daisy-like blooms and leaves. -
Clean up the sketch:
Once the ink is fully dry—give it a few minutes to be safe—gently erase all underlying pencil marks with a kneadable eraser.
Smudged Ink?
If ink smears while erasing, you erased too soon. Fix it by turning the smudge into a deliberate shadow with stippling or by covering it with an extra leaf.
Step 3: Shading and texture
-
Fill the hollows:
Use a 0.5 pen to color the eye sockets and nasal cavity solid black, leaving tiny specks of white for depth if desired. -
Apply stippling:
This is the crucial step for that tattoo-style look. Use your 0.1 pen to create gradients of tiny dots (stippling) around the temples, under the cheekbones, and at the base of the petals. -
Enhance the shadows:
Add extra density to your stippling where flowers overlap the skull or cast shadows, creating a 3D effect without solid lines.
Make It Pop
For deeper contrast, go back in with a white gel pen over the black eye sockets or colored petals to add tiny highlights and bring the drawing to life.
Step 4: Adding Color
-
Prepare the palette:
Mix a muted terracotta red, a dusty blush pink, and a desaturated sage green. If using watercolors, test the opacity on a scrap piece of paper first. -
Paint the roses:
Apply the terracotta color to the roses. I like to keep the wash fairly flat but slightly darker toward the center of the bloom. -
Color the filler flowers:
Use the blush pink for the daisy-like flowers on the left side, keeping the application light and delicate. -
Fill in the greenery:
Paint the leaves with your sage green. For the ferns, use the very tip of your brush to stay within the fine lines. -
Optional accent foliage:
Leave some leaves simply outlined in black ink without color to maintain a minimalist, illustrative feel. -
Framing:
Once completely dry, place your artwork behind a clean white mat and frame it to highlight the contrast between the ink and the paper.
Now hang your beautifully eerie masterpiece and enjoy the unique blend of nature and anatomy on your wall


Geometric Skull With Symmetry
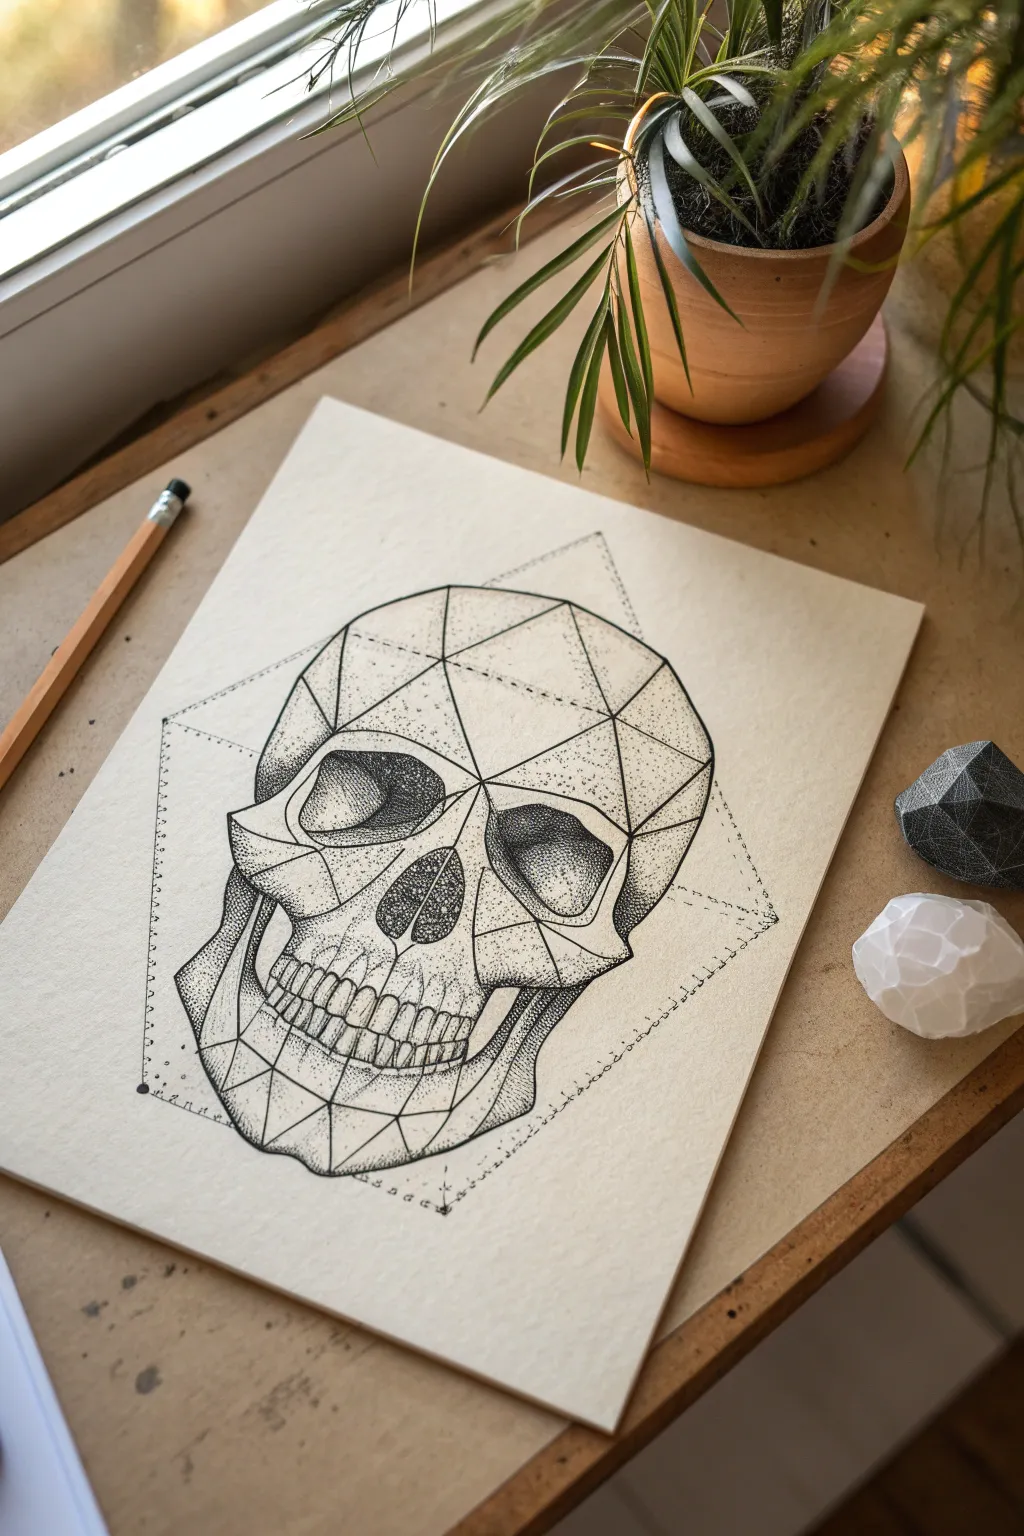
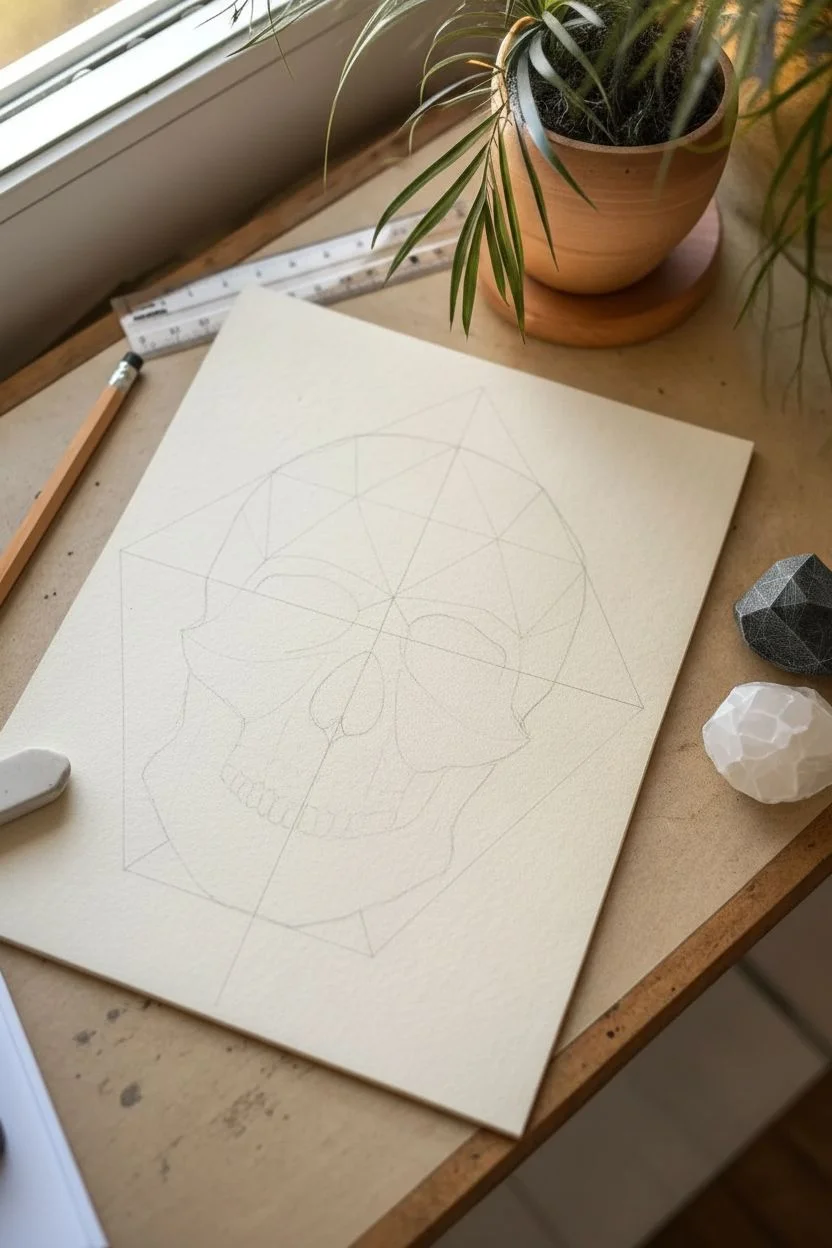
This striking artwork merges the organic form of a human skull with the sharp precision of geometric design. By using stippling techniques on a faceted grid, you’ll create a modern, low-poly aesthetic that feels both architectural and anatomical.
Detailed Instructions
Materials
- High-quality heavyweight drawing paper or cardstock (cream or off-white)
- HB graphite pencil
- Eraser (kneaded eraser preferred)
- Ruler or straight edge
- Fine liner pens (0.1mm, 0.3mm, and 0.5mm)
- Compass or circle template (optional)
Step 1: Planning the Geometric Framework
-
Establish the outer boundary:
Begin by lightly sketching a large, inverted egg shape in the center of your paper with an HB pencil. This will serve as the general boundary for the skull. -
Define the facial centerline:
Draw a vertical line straight down the middle of your egg shape. This axis is crucial for maintaining symmetry as you build the geometric facets. -
Map key anatomical landmarks:
Mark horizontal lines to indicate where the eye sockets, nasal cavity, and teeth will sit. Keep these loose; they are just guides for the next step. -
Draw the geometric frame:
Around your skull shape, lightly sketch a large diamond or kite shape enclosing the drawing area. This external frame adds to the sacred geometry vibe visible in the final piece.
Stippling Patience
Don’t rush dotwork! Keep your pen vertical and use a rhythmic tapping motion. Slanted quick jabs create dashes, not dots.
Step 2: Drafting the Facets
-
Outline the eye and nose polygons:
Instead of circles for eye sockets, draw angular pentagons or hexagons. For the nose, create an upside-down heart shape using straight lines only. -
Create the cranial facets:
Starting from the forehead, use your ruler to draw triangles and quadrilaterals that connect to build the dome of the skull. Think of it like a 3D wireframe mesh. -
Structure the cheekbones and jaw:
Extend lines from the eye sockets down to the jawline. Create sharp, angular planes for the cheekbones (zygomatic arches) and a squared-off jaw. -
Sketch the teeth blocks:
Rather than individual rounded teeth, sketch a band of rectangular blocks for the upper and lower teeth. Keep them simple and grid-like for now. -
Finalize the pencil web:
Review your entire pencil sketch. Ensure every section of the skull is comprised of connected geometric shapes—triangles, diamonds, and trapezoids.
Step 3: Inking and Shading
-
Outline the main structure:
Switch to a 0.5mm fine liner. Carefully trace over your pencil lines that define the main facets of the skull. Use a ruler if your hand isn’t steady, but a slightly organic line has character too. -
Solidify the darkest voids:
Use stippling (dots) to fill in the eye sockets and nasal cavity. Start with a 0.3mm pen, packing dots densely near the edges and loosening them slightly toward the center for depth. -
Shade the facets:
I find it best to work one facet at a time. Use a 0.1mm pen to add gradients of dots. Place dots closer together where shadows would naturally fall (usually at the bottom or sides of a shape). -
Detail the teeth:
Refine the teeth outlines with your finest pen. Add light stippling near the gum line to curve them visually into the jaw. -
Add the external dotted frame:
Go back to the large diamond frame you sketched earlier. Instead of a solid line, ink this using spaced-out dots or dashed lines for a delicate, blueprint effect. -
Erase pencil guidelines:
Once the ink is completely dry—give it at least 15 minutes to be safe—gently erase all underlying pencil marks. -
Enhance contrast:
Look at the overall piece. If the skull looks too flat, go back into the shadowed facets with your 0.1mm pen and add another layer of dots to deepen the blacks.
Smudge Prevention
Place a scrap piece of paper under your drawing hand. This prevents skin oils from transferring and keeps you from smearing wet ink.
Step back and admire how simple lines and dots have constructed a complex, three-dimensional form
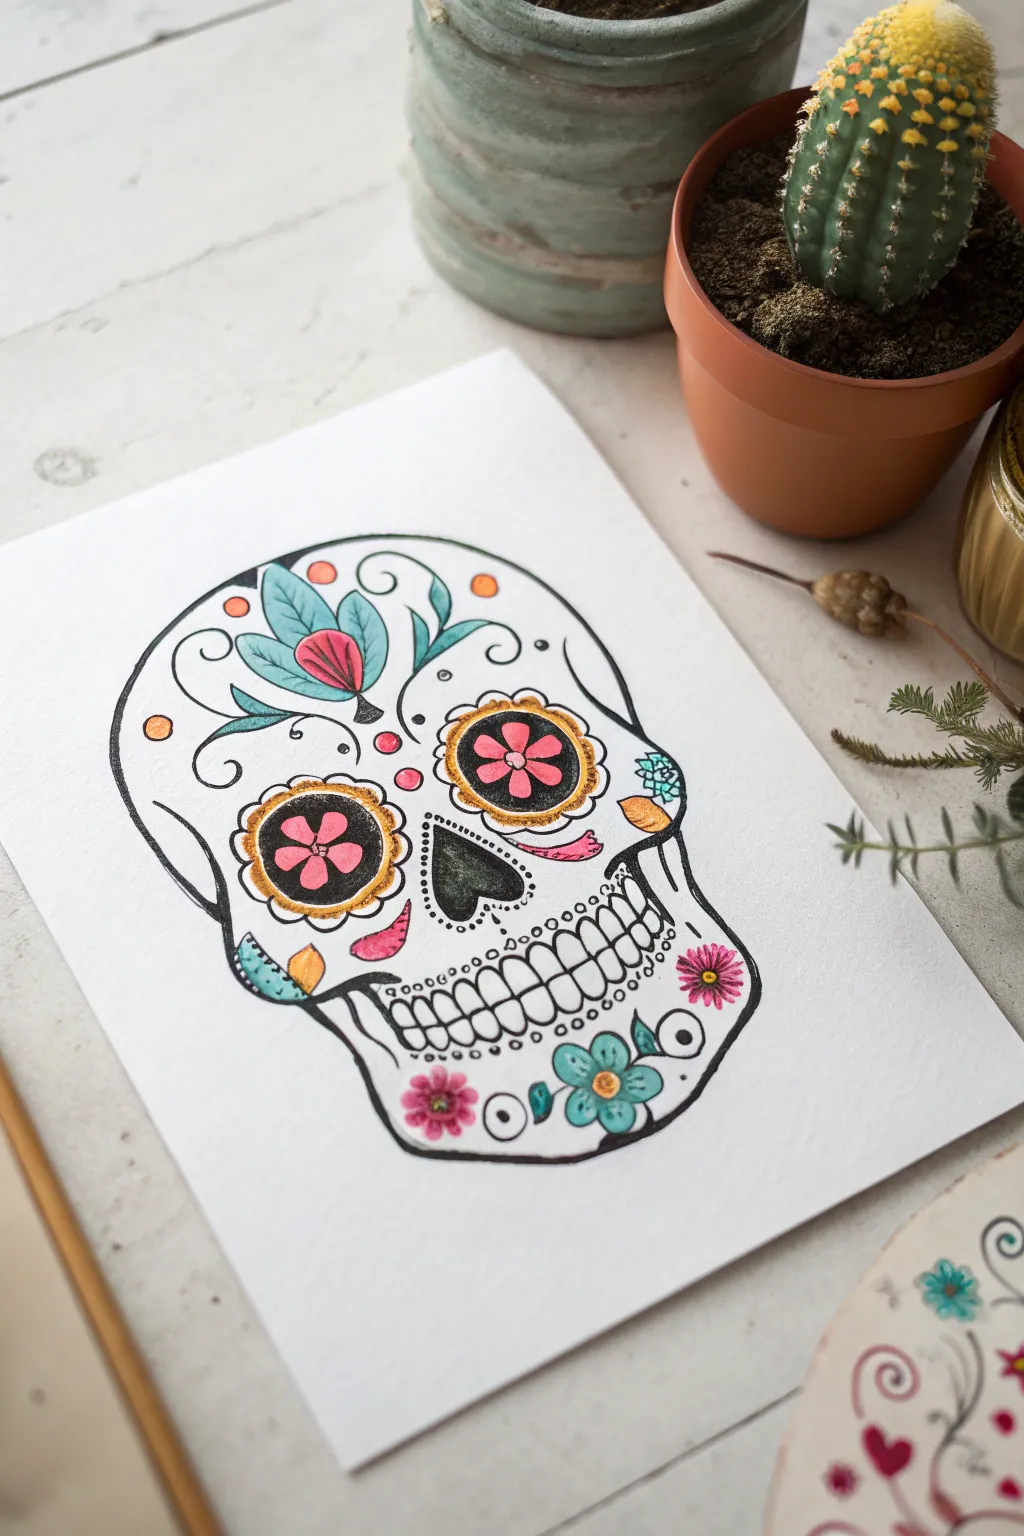
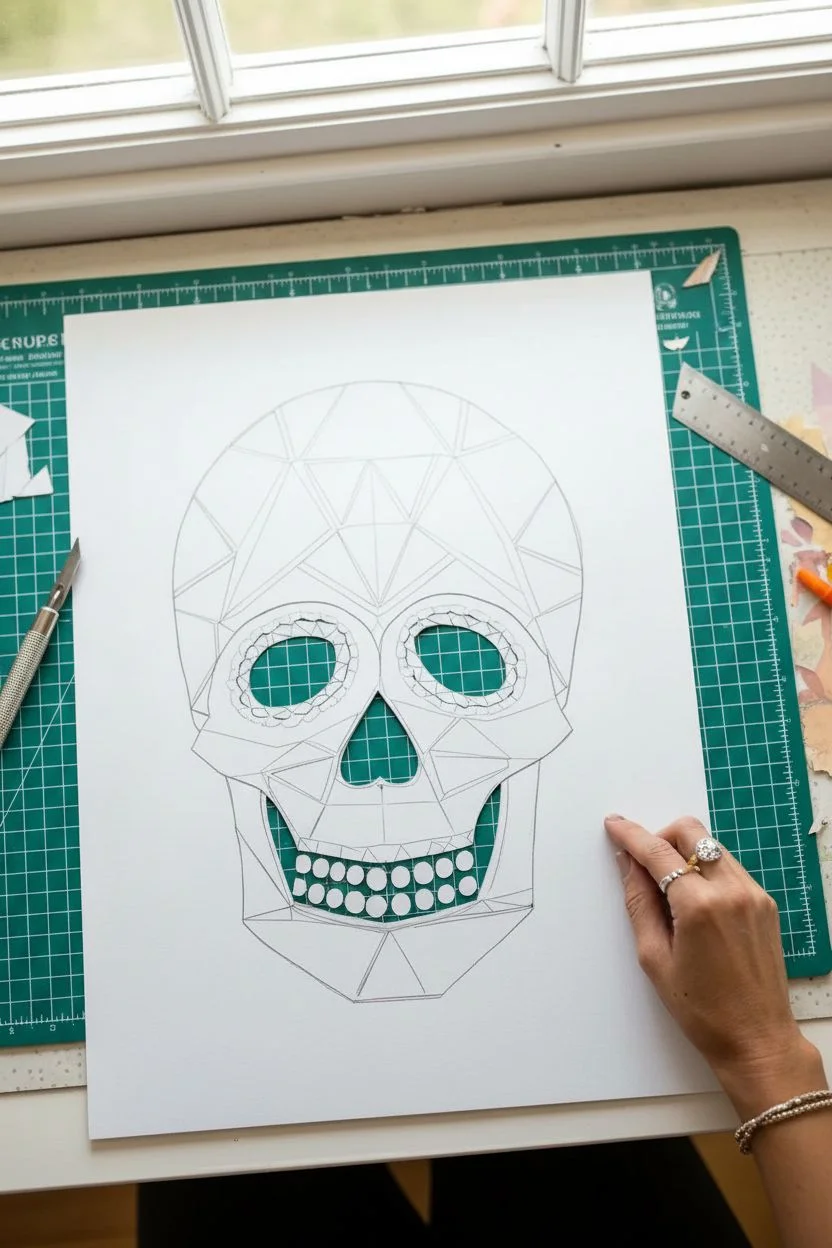
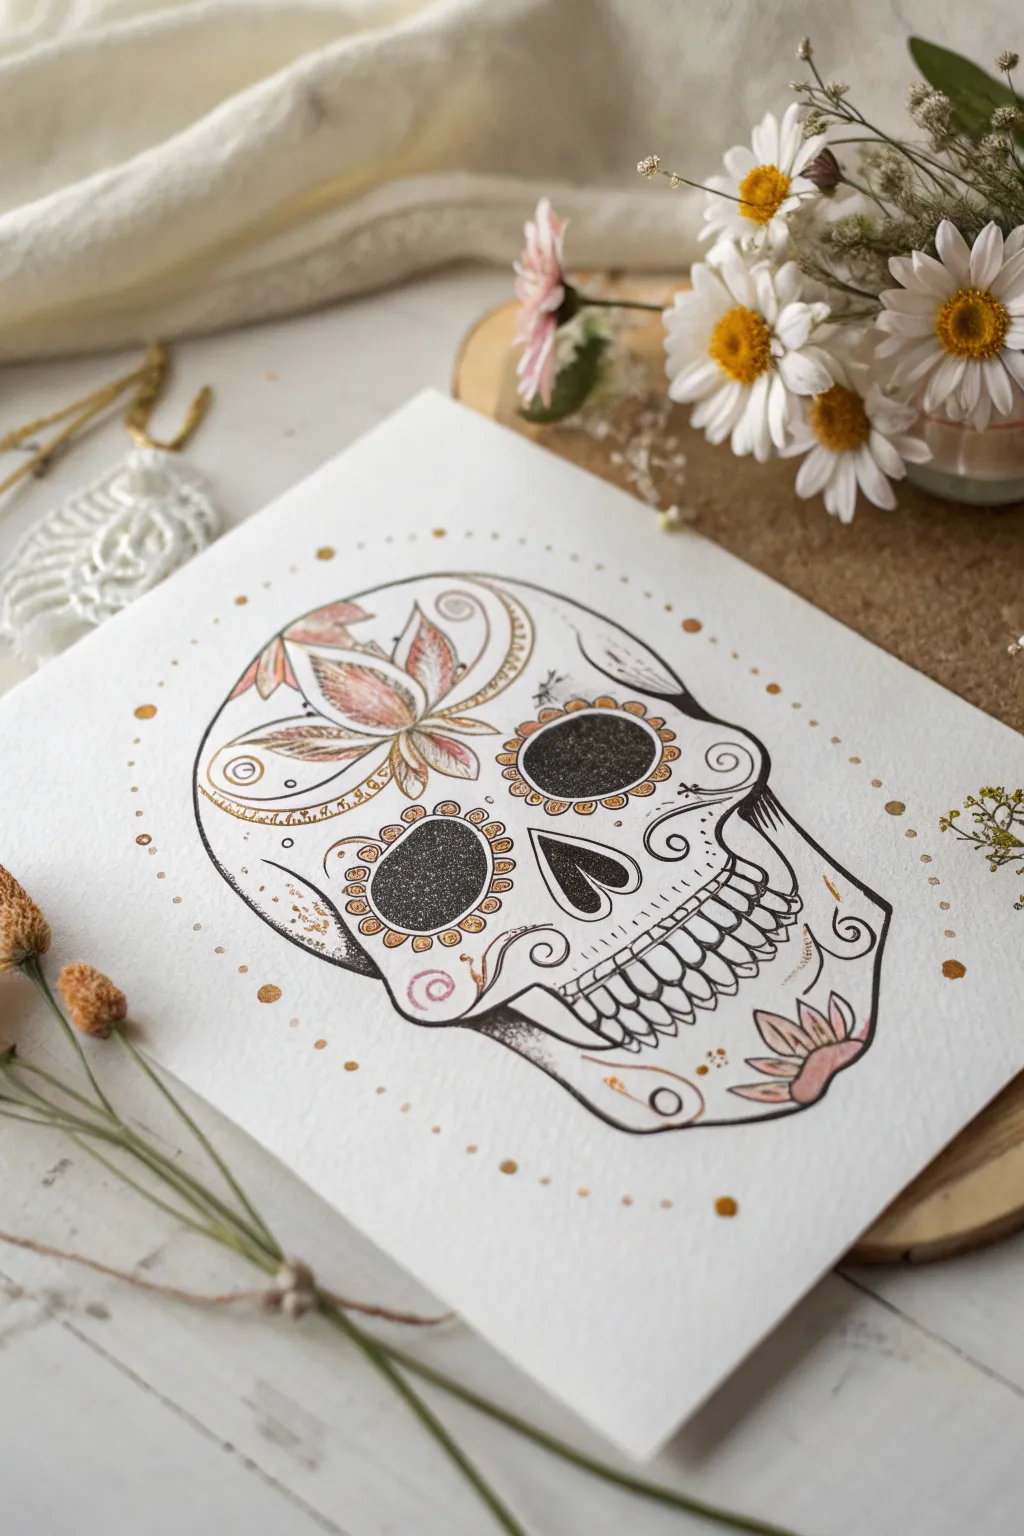
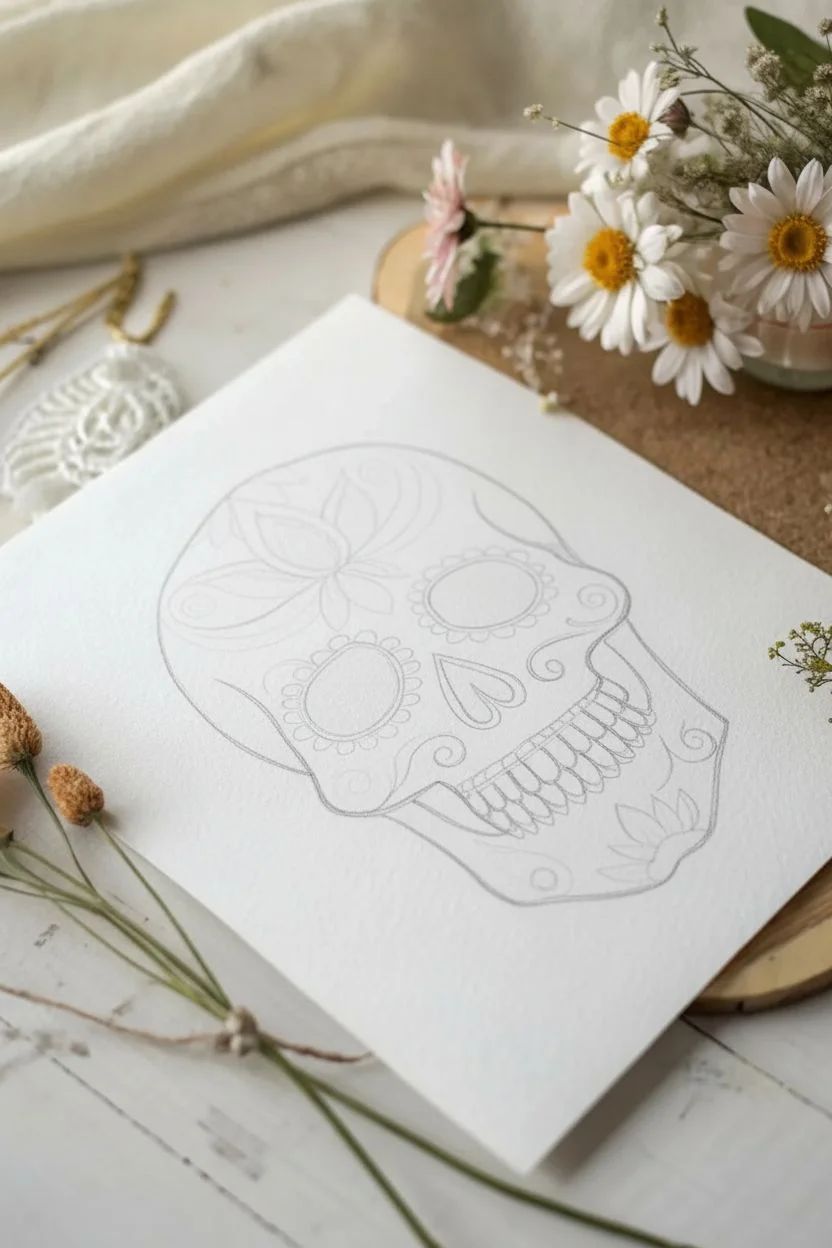
Skull Coloring Page You Design Yourself
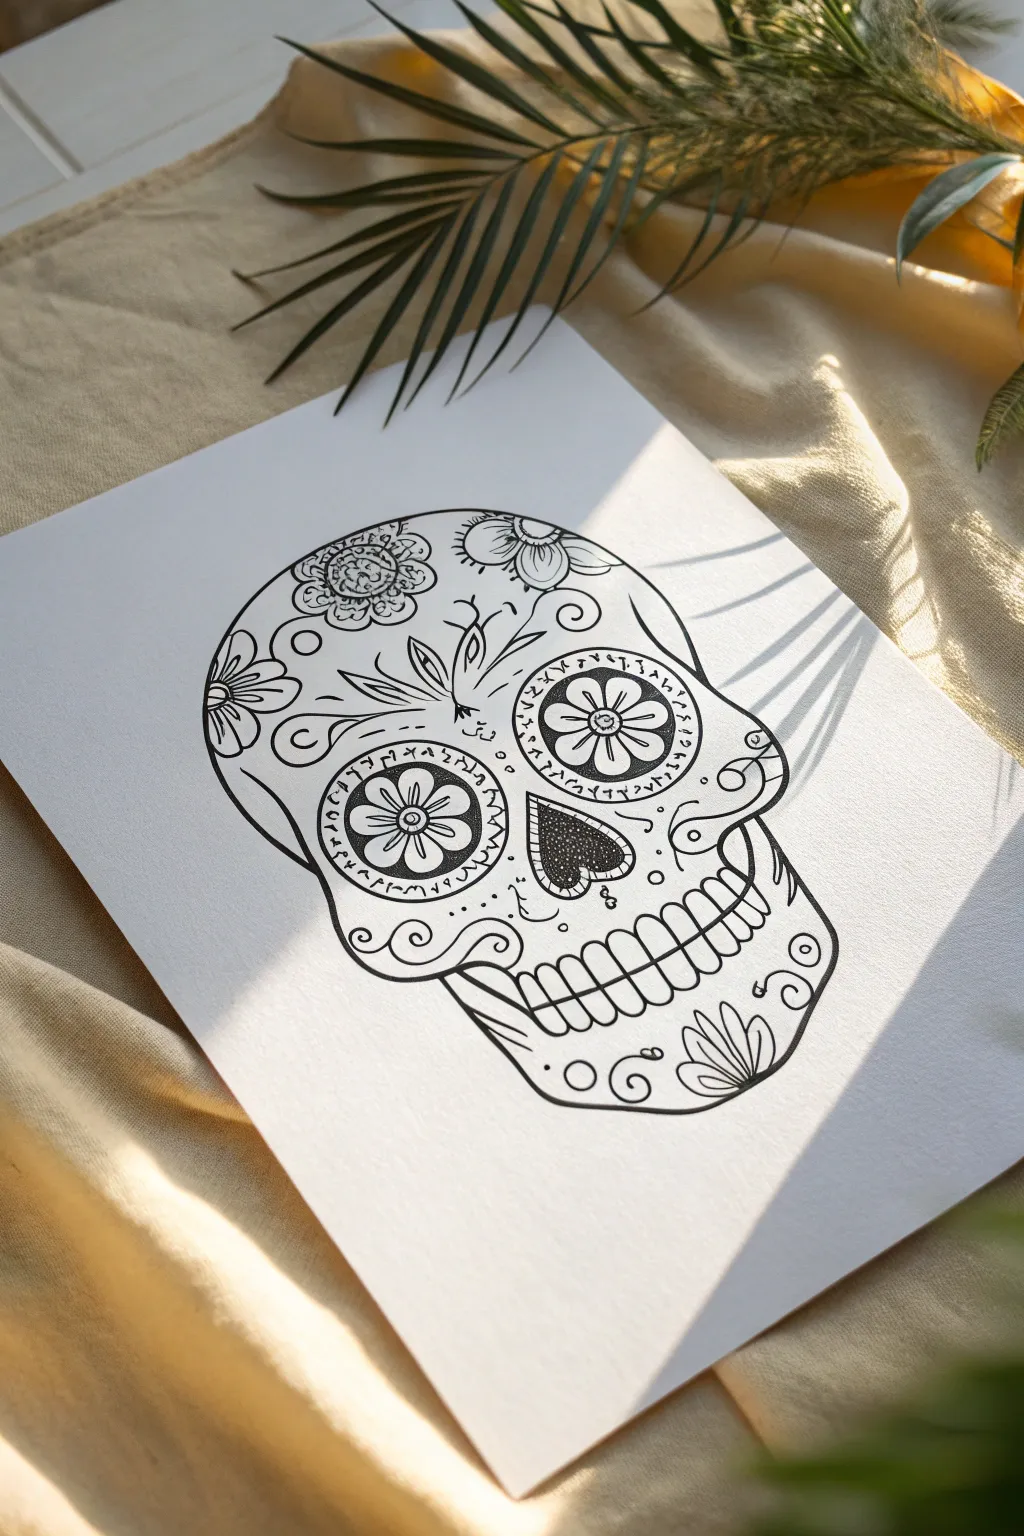
Embrace the intricate beauty of Día de los Muertos with this crisp, hand-drawn sugar skull design. Using fine liners on sturdy paper, you will create a detailed calavera filled with floral motifs and geometric patterns, perfect for framing or coloring later.
How-To Guide
Materials
- High-quality white cardstock or mixed media paper (A4 size)
- Pencil (HB or H for light sketching)
- Eraser (kneaded eraser preferred)
- Fine liner pen (0.5mm or 0.8mm for bold outlines)
- Ultra-fine liner pen (0.1mm or 0.2mm for details)
- Ruler (optional, for symmetry checks)
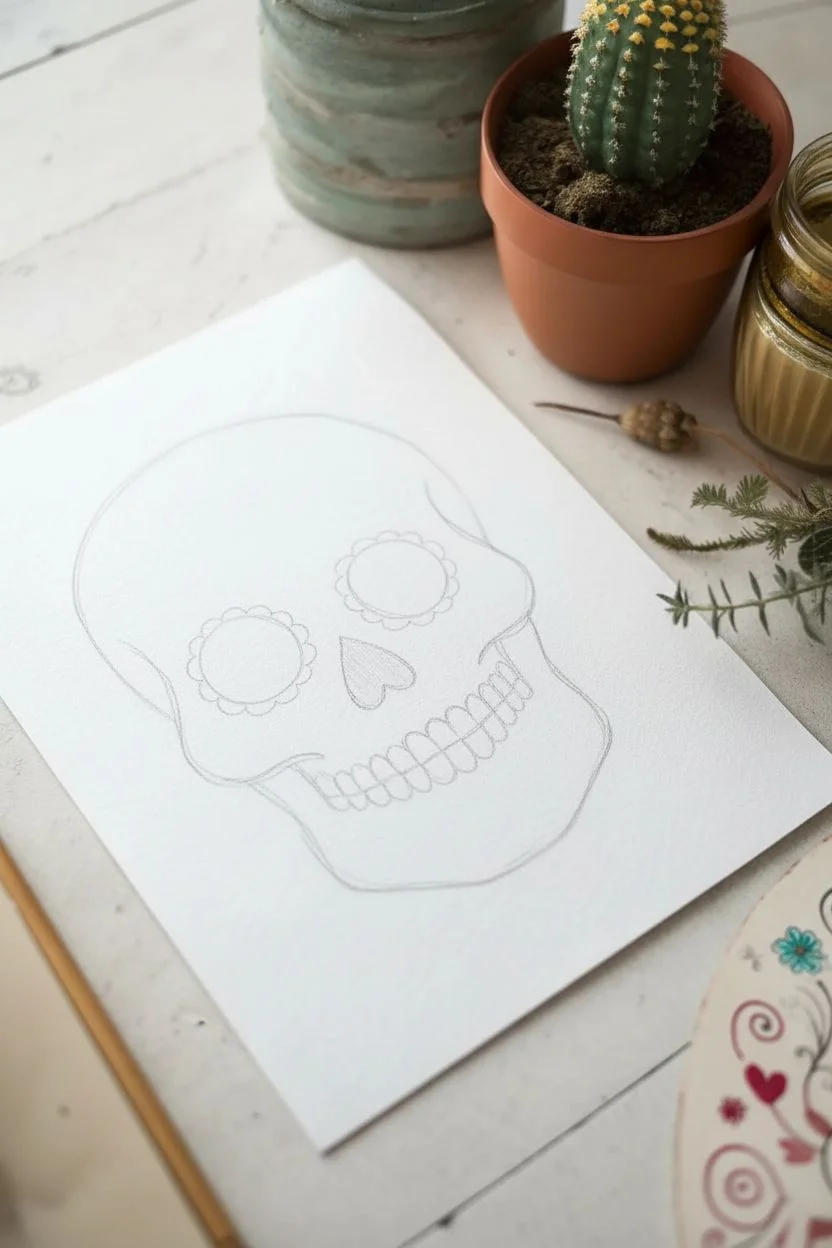
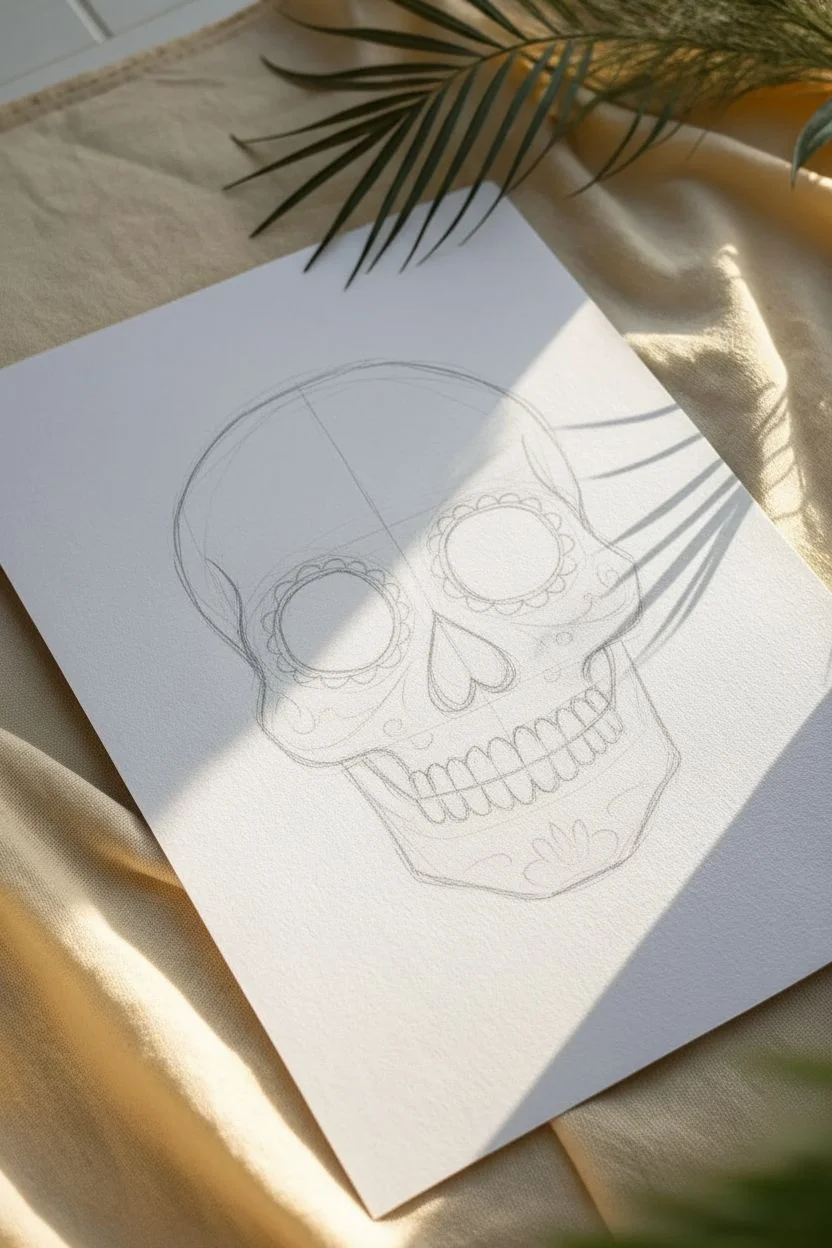
Step 1: Basic Sketching
-
Outline the cranium:
Start by lightly sketching a large, inverted egg shape with your pencil. The top should be round and full for the cranium, tapering down slightly towards where the cheekbones will be. -
Define the jaw:
Draw the jawline extending from the bottom of your egg shape. Give it a slightly squared-off bottom edge rather than a sharp point, creating a realistic mandible shape. -
Map facial features:
Lightly mark a vertical center line to help with symmetry. Sketch large, circular eye sockets on either side of this line, positioned roughly in the middle of the head. -
Add the nose cavity:
Draw an upside-down heart shape for the nose cavity in the center, just below the eye sockets. -
Sketch the mouth area:
Identify the mouth area below the nose. Sketch a wide, horizontal band where the teeth will go, spanning almost the width of the jaw.
Step 2: Inking the Structure
-
Ink the outer contour:
Using your thicker fine liner (0.5mm), trace the final outer shape of the skull. Smooth out your pencil lines to create a clean, continuous silhouette. -
Define the orbital sockets:
Go over the large eye circles with the thicker pen. Don’t worry if they aren’t perfect circles; a slightly organic shape adds character. -
Ink the nose:
Trace the inverted heart nose shape. I like to fill the inside of the nose with a stippling technique or solid black to give it depth immediately. -
Draw the teeth:
Switch to a slightly thinner pen if desired. Draw individual teeth within your mouth band. Start with the two front teeth on the top and bottom and work your way outwards to keep them centered.
Pro Tip: Line Weight
Make the skull’s outer outline twice as thick as the interior details. This visual hierarchy helps the skull shape stand out clearly.
Step 3: Adding Decorative Details
-
Create flower eyes:
Inside the eye sockets, draw a smaller circle in the center. Around this center, draw flower petals radiating outward to fill the socket, creating a marigold look. -
Add forehead florals:
Sketch two large flower blooms on the forehead. Make them distinct—perhaps a sunflower on one side and a rosette on the other for variety. -
Detail the eye rims:
Using your finest pen (0.1mm), draw small decorative circles or dots around the outer rim of the eye sockets. You can add tiny rune-like dashes or scallops for texture. -
Embellish the cheeks:
Draw swirls or paisley shapes on the cheekbones. Connect these swirls to the corners of the mouth to integrate the design. -
Add chin designs:
At the very bottom on the chin, draw a small floral motif or a fan shape to balance the heavy design on the forehead. -
Fill empty spaces:
Look for empty areas on the cranium. Add small teardrops, leaves, or tiny circles to fill gaps without overcrowding the design.
Level Up: Gold Leaf
Apply liquid gold leaf or metallic gold pen to the flower centers or tooth outlines for a stunning, luxurious contrast against the black ink.
Step 4: Final Touches
-
Refine the lines:
Go back over any main structural lines that need more weight. A varied line weight (thicker on the outside, thinner inside) makes the drawing pop. -
Erase pencil sketch:
Wait at least 10 minutes to ensure the ink is completely dry. Gently erase all visible pencil lines with your kneaded eraser. -
Survey and clean up:
Check for any gaps in your black lines and close them up. This ensures that if you color it later, the colors won’t bleed between sections.
Now you have a stunning, custom-designed sugar skull ready to display or color with your favorite markers
Paper Cut-Out Skull Collage
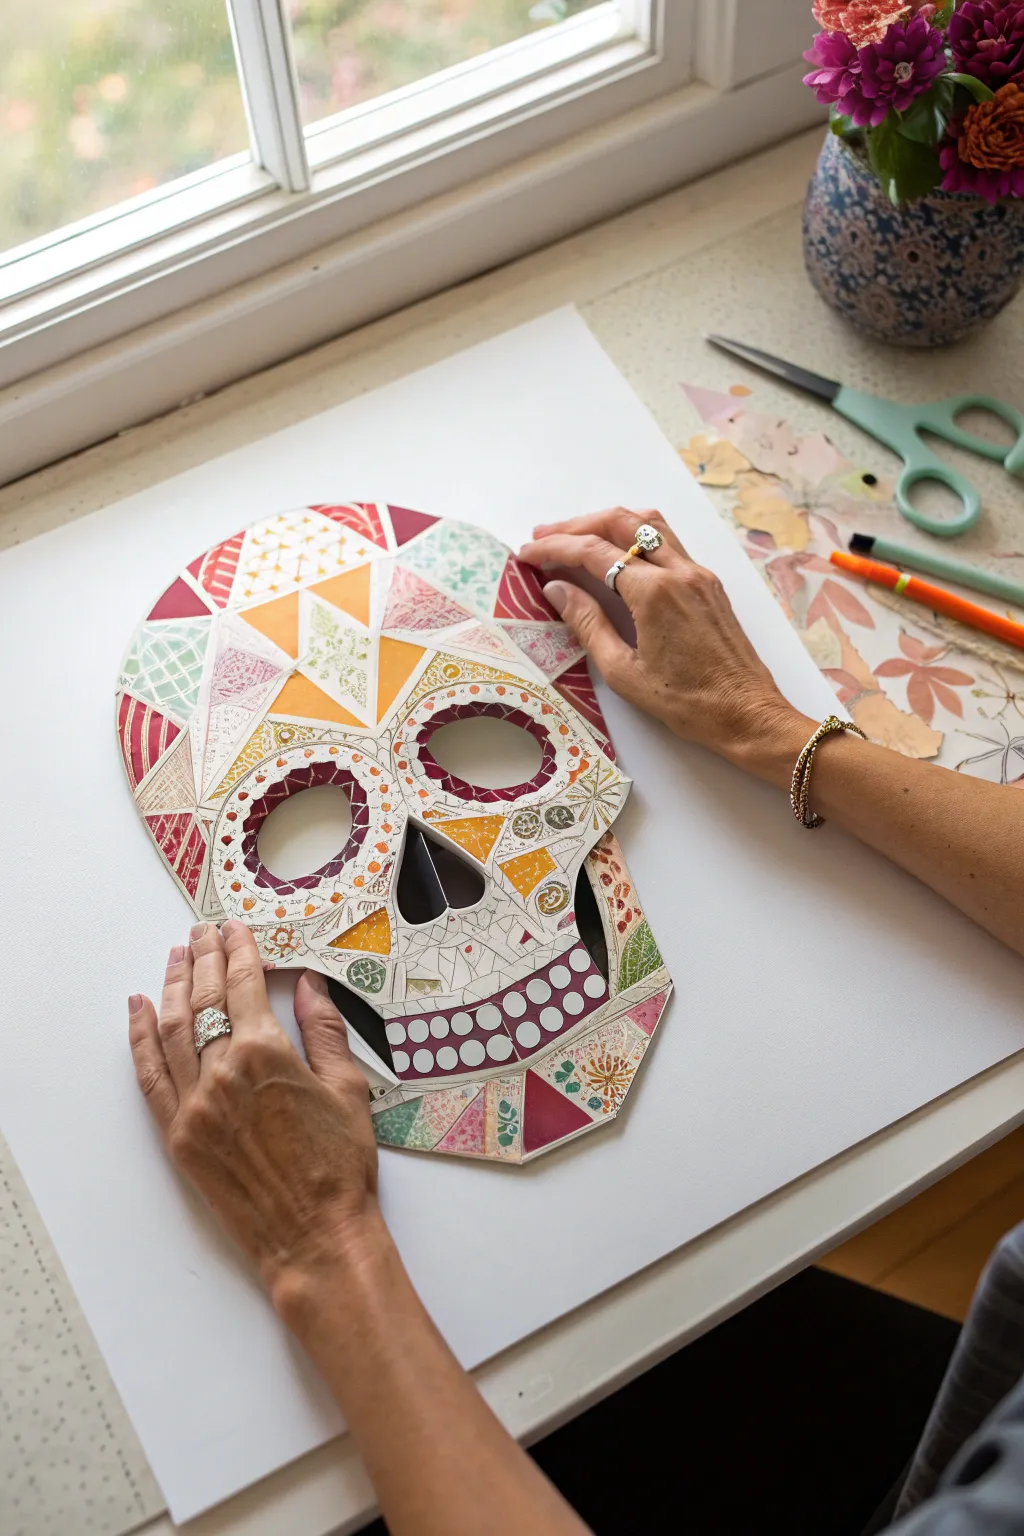
Celebrate Dia de los Muertos or simply add a touch of edgy decor with this vibrant paper collage skull. Using kaleidoscopic patterned papers and careful cutting, you’ll build a textured, multi-layered mask that balances intricate details with bold geometric shapes.
Detailed Instructions
Materials
- White cardstock or heavy watercolor paper (11×14 inches)
- Assorted patterned scrapbook paper (florals, geometrics, solids)
- Solid color cardstock (burgundy or deep red)
- Pencil and eraser
- Craft knife (X-Acto style) with fresh blades
- Small, sharp pair of scissors
- Glue stick or archival craft glue
- Cutting mat
- Ruler
- Optional: Bone folder for crisp creases
Step 1: Designing the Base
-
Draft the skull outline:
Start by lightly sketching a large skull shape on your heavy white cardstock. Aim for a symmetrical design, but don’t worry about perfection; character is key. Include the jawline, cheekbones, and the rounded cranium. -
Map out the features:
Draw large, expressive eye sockets, an upside-down heart shape for the nose cavity, and a grid-like structure for the teeth area. Sketch faint lines across the forehead and cheeks to divide the skull into geometric sections—triangles and polygons—that will guide your paper placement later. -
Cut the master shape:
Using your scissors, cut out the entire skull silhouette from the white cardstock. This will be your sturdy base to build upon. -
Excavate the features:
Place the skull on a cutting mat. carefully use your craft knife to cut out the eye sockets, the nose cavity, and the negative spaces between the teeth. Take your time on the curves to keep the edges clean.
Sticky Situation?
If your paper ripples from wet glue, switch to double-sided tape or a dry adhesive runner. If ripples already happened, place the collage under a heavy book overnight.
Step 2: Selecting and Cutting Patterns
-
Curate your palette:
Sort through your patterned papers. I like to group them by color family—warm oranges, deep reds, and soft greens—to ensure the final collage feels cohesive. -
Trace the segments:
Using your initial pencil map as a guide, lay a sheet of tracing paper over your skull base and trace the individual geometric shapes you drew earlier. Alternatively, simply eyeball the shapes if you prefer a more organic, improvised look. -
Cut the paper tiles:
Transfer these shapes onto your various patterned papers. Cut them out precisely. Mix and match textures; place a floral pattern next to a geometric grid for visual interest. -
Create the eye surrounds:
For the eye sockets, cut larger rings or curved segments from a contrasting paper. In the example, a deep burgundy creates a striking frame for the eyes. -
Detail the teeth:
Cut small rectangles or rounded squares from white or cream paper for individual teeth, or create a single strip of paper with a teeth pattern drawn or printed on it.
Make it 3D
Use foam adhesive squares for specific elements like the eye rings or cheek triangles. This lifts them off the base slightly, creating cool shadows and depth.
Step 3: Assembling the Collage
-
Dry fit the pieces:
Before gluing anything down, arrange your cut paper tiles onto the cardboard skull base. This is the puzzle phase—shift pieces around until you’re happy with the balance of color and pattern. -
Glue the center outward:
Start adhering the paper pieces beginning at the center of the face (nose and eyes) and working your way out to the edges. Use a glue stick for a smooth, non-wrinkled finish. -
Trim the overhang:
Some paper pieces might hang over the edge of your base skull. Flip the project over and use your scissors to trim any excess paper flush with the white cardstock backing. -
Layering for depth:
Don’t be afraid to overlap pieces slightly. Adding a second layer of smaller triangles on top of larger ones can create a fantastic dimensional effect. -
Define the mouth:
Glue the teeth pieces into the mouth area. Consider backing the mouth area with a dark piece of cardstock from behind if you want the teeth to really pop against a dark void.
Step 4: Refining and Finishing
-
Smooth the edges:
Run a bone folder or the back of a spoon over the glued areas to ensure everything is firmly attached and to press out any air bubbles. -
Add drawn details:
If some areas feel too plain, use a fine-tip pen to draw small doodles, dots, or stitches directly onto the paper pieces giving it that ‘sugar skull’ intricacy. -
Final clean up:
Check the eye and nose holes again. If glue or paper has obscured the crisp edges, use your craft knife to gently trim the interior cuts one last time.
Hang your colorful creation on a door or frame it in a shadow box to enjoy the festive spirit year-round
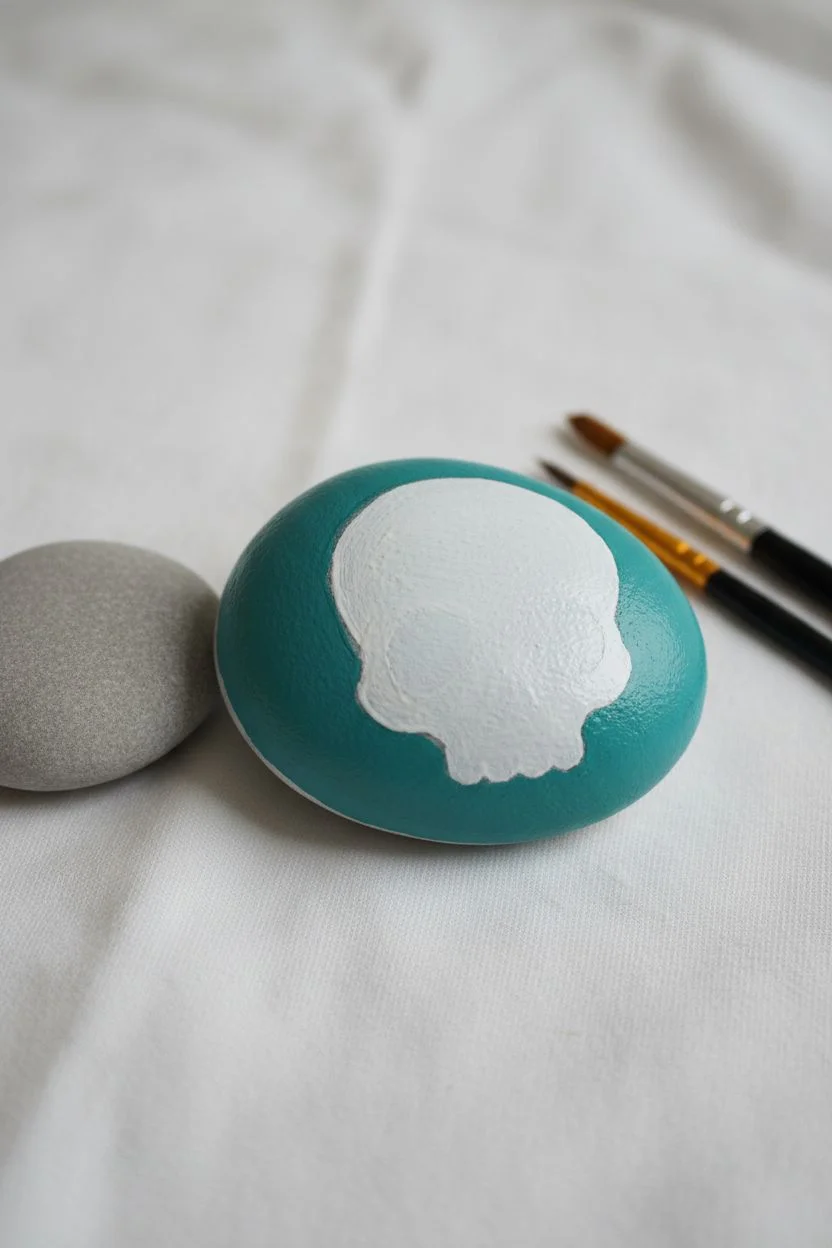
Rock-Painted Mini Sugar Skull
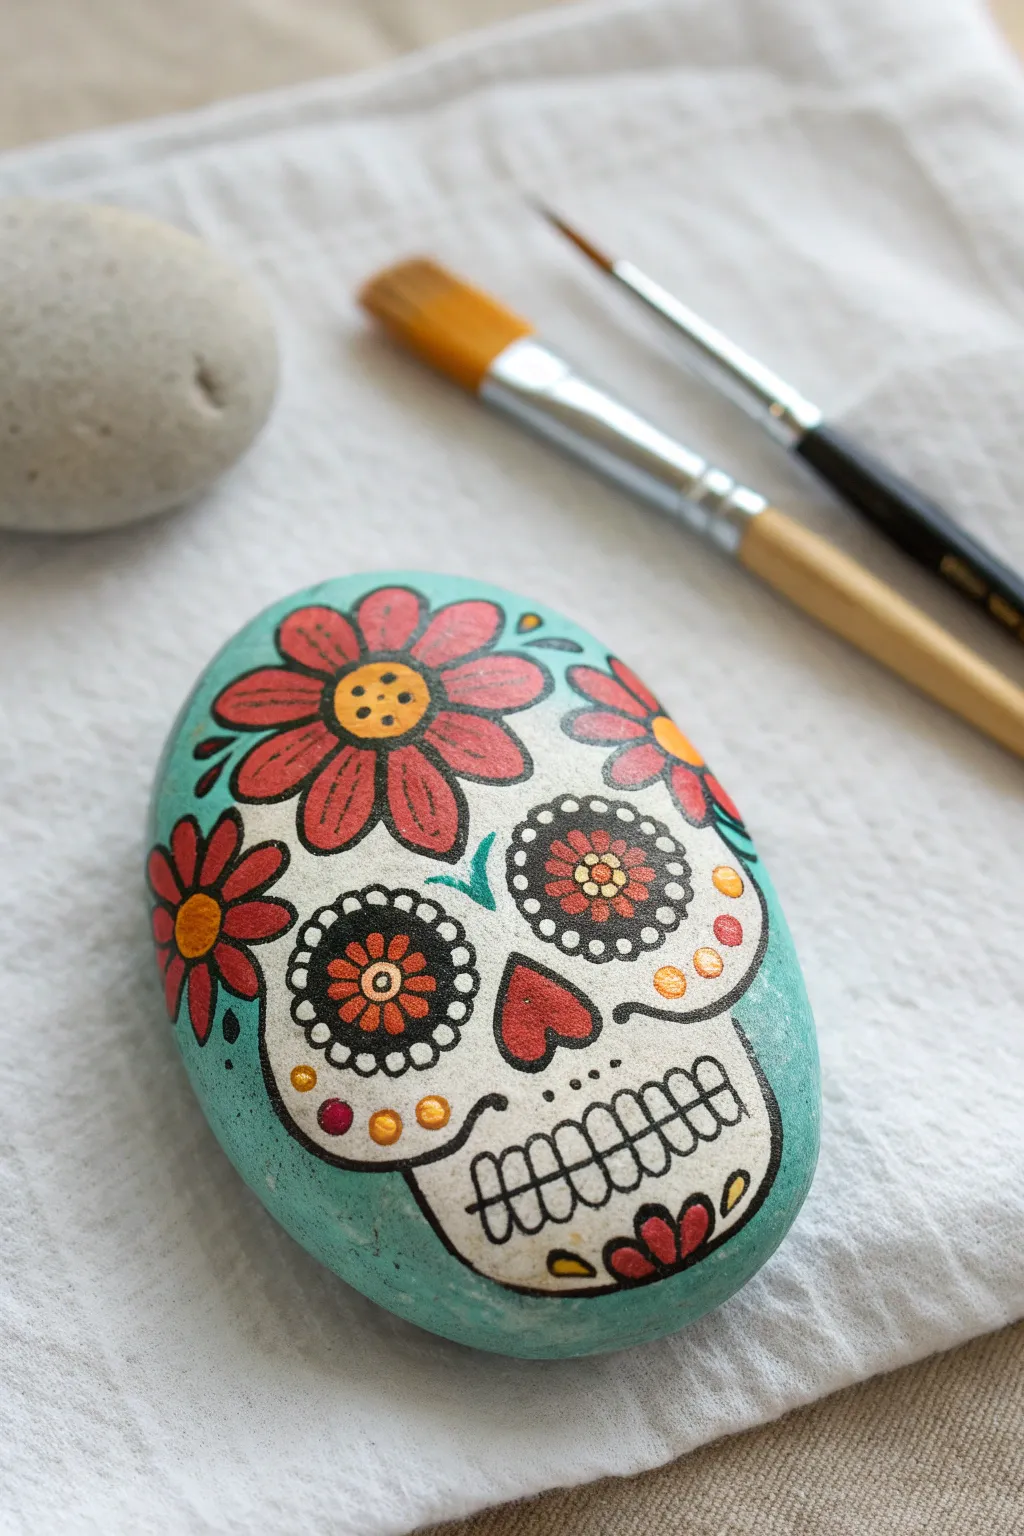
Transform a simple river stone into a vibrant piece of folk art with this detailed sugar skull design. Featuring a distinct teal background and bold floral accents, this project is perfect for celebrating Día de los Muertos or adding a pop of color to your garden.
Step-by-Step
Materials
- Smooth oval river rock (palm-sized)
- Acrylic craft paints (Teal, White, Red, Black, Gold, Orange)
- Small flat paintbrush
- Fine detail liner brush (size 00 or 0)
- Pencil and eraser
- Dotting tool or toothpick
- Spray sealer or varnish (matte or glossy)
Step 1: Base Painting
-
Clean surface:
Begin by washing your rock with soap and water to remove any dirt or grease, then dry it thoroughly. -
Teal background:
Using a flat brush, coat the entire top surface of the rock with teal acrylic paint. You may need two to three coats for full opacity; let each layer dry completely before adding the next. -
Skull silhouette:
Once the teal is dry, use a pencil to lightly sketch the outline of the skull in the center. It should look like a rounded pear shape with a flatter bottom for the jaw. -
Fill the skull:
Paint inside your pencil outline with white acrylic paint. This creates the bright base for the face. Apply a second coat if the teal shows through.
Smooth Lines
Add a tiny drop of water to your black outlining paint. Ink-like consistency flows much better than thick paint, giving you crisp, confident lines without clumps.
Step 2: Floral Details
-
Top flower placement:
Paint a small orange circle near the top left of the skull (this is the flower center). Paint red petals radiating out from it, extending slightly off the white skull onto the teal background. -
Smaller flowers:
Add a partial red flower on the left side and another one on the upper right side, mirroring the style of the main bloom. -
Nose cavity:
Paint an upside-down heart shape in red right in the middle of the face for the nose cavity. -
Chin embellishment:
Add a tiny three-petal red flower shape or heart design at the very bottom chin area.
Glow in the Dark
Swap the standard white paint for glow-in-the-dark acrylic on the skull base. By day needed it looks normal, but at night your spooky creation will softly illuminate.
Step 3: Creating the Eyes
-
Eye sockets:
Paint two large circles using black paint where the eyes should go. Try to keep them symmetrical. -
Scalloped edges:
For that traditional sugar skull look, use a detail brush to paint small white scallops or dots around the outer rim of the black eye sockets. -
Inner flowers:
Inside the black eye sockets, paint smaller six-petal flowers. Use red for the petals and a dip of orange for the center.
Step 4: Fine Lining & Finishing
-
Outline the skull:
Using your finest liner brush and slightly thinned black paint, carefully outline the entire white skull shape to separate it from the teal background. -
Outline the flowers:
Outline the red petals of the large head flowers in black, adding center details like small dots or lines. -
Mouth stitching:
Paint a horizontal black line near the bottom of the skull for the mouth. Cross it with short vertical lines to create the stitched teeth look. -
Cheek details:
Use a dotting tool or the back of a paintbrush to add decorative dots on the cheeks. Use gold paint for a metallic shimmer on the cheekbones. -
Final leaf accents:
Paint tiny teal teardrop shapes or leaves interspersed around the floral crown on the forehead to tie the background color back in. -
Seal the work:
Allow the rock to cure overnight. Once fully dry, spray with a clear varnish to protect your artwork from weathering.
Place your finished stone on a windowsill or gift it to a friend as a charming handmade keepsake
Skull With Butterfly and Flower Accents
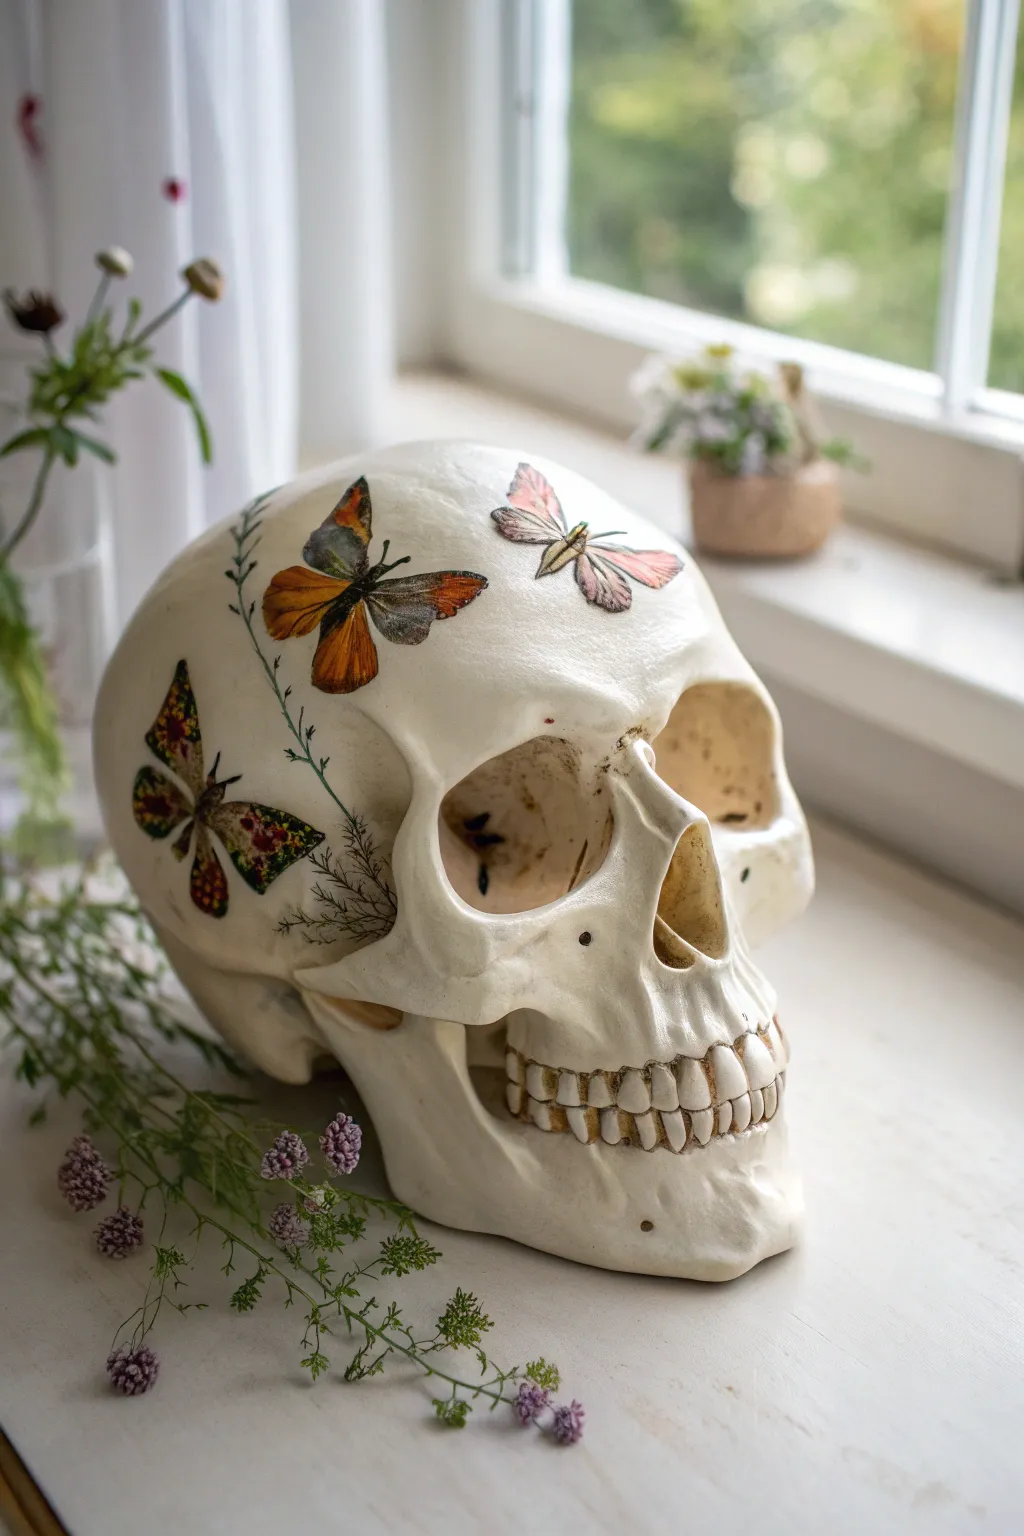
Transform a plain anatomical model into a piece of whimsical nature-inspired decor with this delicate butterfly skull project. The juxtaposition of the aged bone texture with vibrant, colorful wings creates a stunning focal point for any shelf or cabinet of curiosities.
Step-by-Step Guide
Materials
- Realistic resin or plaster skull model (matte finish)
- Butterfly decoupage paper, napkins, or stickers
- Small pressed flowers or greenery stickers (optional)
- Mod Podge (Matte)
- Small precision scissors
- Soft flat paintbrush (1/2 inch)
- Pair of tweezers
- Rubbing alcohol
- Cotton pads
- Acrylic paint (thinned brown or raw umber) for aging (optional)
- Matte clear sealant spray
Step 1: Preparation & Cleaning
-
Clean the surface:
Begin by thoroughly wiping down your resin skull with a cotton pad moistened with rubbing alcohol. This removes any manufacturing oils or dust that might prevent the adhesive from sticking properly. -
Assess the finish:
If your skull is too glossy or plastic-looking, lightly sand it with fine-grit sandpaper to give it a bone-like tooth. Wipe away the dust afterward. -
Plan your layout:
Before cutting anything, visualize where you want your main focal points. I find it helpful to place the largest butterfly on the forehead or temple area first to anchor the design.
Wrinkle Rescue
If a stubborn wrinkle forms on a curved area, use a craft knife to make a tiny slit in the bubble. Overlap the cut edges slightly and press flat with medium.
Step 2: Preparing the Motifs
-
Select your images:
Choose a variety of butterfly sizes and colors from your decoupage paper or napkins. You want a mix of large specimen butterflies and smaller, dainty moths. -
Fussy cut the designs:
Using your small precision scissors, carefully cut out each butterfly. Get as close to the edge of the design as possible so you don’t have a visible white border. -
Separate the layers:
If you are using paper napkins, this is crucial: peel away the white backing layers until you are left with only the single, ultra-thin printed ply. This transparency helps it look painted on. -
Prepare the greenery:
Cut out thin strips or individual sprigs of your greenery or floral stickers/paper to serve as connecting elements between the butterflies.
Step 3: Application
-
Apply base medium:
Dip your soft brush into the Matte Mod Podge and apply a thin, even layer to the specific spot on the skull where your first butterfly will go. Don’t cover the whole skull at once. -
Place the main butterfly:
Gently pick up your largest cutout, perhaps using tweezers for precision, and lay it onto the wet medium. Start from the center of the image and smooth outwards. -
Smooth out wrinkles:
Use your finger or the dry handle of your paintbrush to very gently press down the wings. The skull is curved, so you may need to firmly press the paper to mold it to the bone contours. -
Seal the image:
Immediately brush a thin layer of Mod Podge over the top of the butterfly. Use light strokes to avoid tearing the wet paper. -
Add connecting vines:
Apply the thin greenery stems. I like to position these so they look like they are ‘growing’ up the side of the skull, leading the eye toward the butterflies. -
Layer smaller insects:
Add the smaller moths and butterflies around the main focal point. Try placing one near the eye socket or cheekbone for an artistic, asymmetrical look.
Pro Tip: seamless look
When using thicker paper, gently sand the edges of the cutout with high-grit sandpaper after the glue dries to feather the edge into the skull surface.
Step 4: Finishing Touches
-
Check for lifting edges:
Once the first coat is tacky, inspect your work. If any wing tips are lifting off the curved surface, add a tiny dot of glue and press down with your finger until it holds. -
Clean up excess glue:
If you have large globs of Mod Podge surrounding the images, use a damp finger to wipe the excess away so the finish remains smooth. -
Optional aging wash:
To make the skull look less pristine and more like an old specimen, water down brown acrylic paint significantly. Brush it into the deep crevices (sockets, teeth gaps) and immediately wipe the high points clean with a paper towel. -
Final drying time:
Allow the skull to sit undisturbed for at least 2 hours to ensure the decoupage medium is completely hardened. -
Protective coat:
Take the skull outside or to a ventilated area and mist it with a matte clear sealant spray. This unifies the sheen of the paper and the skull.
Place your finished nature-inspired skull near a window or among plants to highlight the organic feel of the design
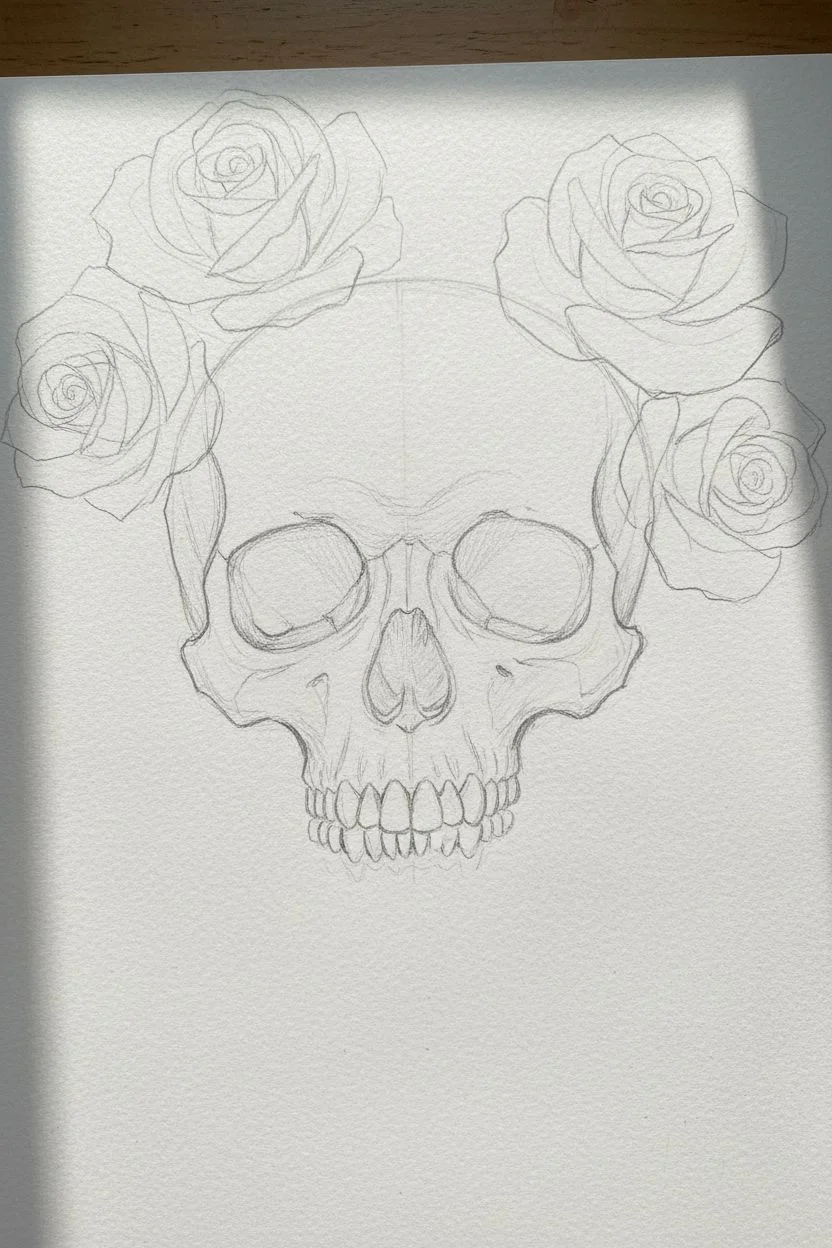
Skull and Roses With Bold Outlines
Master the art of high-contrast illustration with this striking combination of organic floral shapes and the rigid structure of a human skull. This project focuses on using varied line weights and meticulous stippling to create texture and depth on textured watercolor paper.
Step-by-Step
Materials
- Heavyweight textured paper (cold press watercolor or mixed media, approx. 300gsm)
- HB Graphite pencil
- Kneadable eraser
- Fine liner pens (sizes 005, 01, 03, and 05) – waterproof ink preferred
- ruler (optional for centering)
- Reference photo of a skull in slight 3/4 profile
Step 1: Conceptual Sketching
-
Center the composition:
Begin by finding the visual center of your paper. Using your HB pencil very lightly, draw a loose oval shape for the cranium of the skull, slightly angled to the right. This ensures your main subject isn’t drifting off the page. -
Draft the skull structure:
Refine the basic oval into the skull shape. Add the brow ridge, the hollows for the eyes (orbits), the nasal cavity, and the zygomatic arch (cheekbone). Keep the jawline slightly squared but organic. -
Position the roses:
Sketch two large circles to represent the roses—one tucked behind the upper right of the skull and one below the lower left jaw. These should act as diagonal anchors for your composition. -
Detail the rose petals:
Inside your rose circles, draft the petals spiraling outward from a tight center. Keep the outer petals large and loosely folding back to create volume. -
Add foliage:
Draw leaves extending outwards from beneath the roses. Use serrated edges for the rose leaves and include a few smaller, fern-like sprigs on the left side for variety. -
Refine pencil lines:
Go over your sketch to finalize the shapes, erasing any confusing construction lines. Pay special attention to the teeth; sketch them lightly as simple rounded rectangles first, following the curve of the jaw.
Step 2: Inking the Outlines
-
Bold outer contour:
Switch to your thickest pen (05 or 08). Trace the outermost perimeter of the entire design—the skull, the main rose shapes, and the leaves. This heavy line weight separates the subject from the background. -
Secondary lines:
Using a slightly thinner pen (03), ink the major internal shapes. This includes the individual petals of the roses, the eye sockets, the nose hole, and the separation between the upper and lower jaw. -
Leaf detailing:
With an 01 pen, draw the central veins of the leaves. Add the serrated edges carefully, ensuring the points are sharp and crisp. -
Clean up:
Once the ink is completely dry (give it a few minutes to avoid smudges), gently erase all remaining graphite pencil marks with your kneadable eraser.
Stippling Patience
Don’t rush the dots! Fast, hard tapping ruins pen nibs and creates ‘tails’ on your dots. maintain a vertical pen angle and a steady, rhythmic tap.
Step 3: Shading and Stippling
-
Deep blacks:
Use your 05 pen to fill in the darkest areas completely solid. This includes the nasal cavity and the deepest parts of the eye sockets. Leave small white gaps for texture if you prefer a less graphic look. -
Beginning the stipple:
Switch to your finest pen (005). Start stippling (creating tiny dots) around the edges of the eye sockets and the temples. The dots should be dense near the shadow edge and disperse as they move into the light. -
Shading the skull:
Apply stippling to the curve of the cranium and the cheekbones. I find it helpful to bunch dots closer together at the bottom of the skull to suggest weight and shadow. -
Defining the teeth:
Use very sparse stippling on the teeth, focusing only on the gum line and the separation between each tooth. Too much detail here can make the teeth look decayed. -
Rose petal depth:
Add shading to the roses using a mix of stippling and short, curved hatching lines. Place the darkest shadows deep inside the spiral center and underneath where the petals overlap. -
Leaf texture:
For the leaves, create a darker value. Use dense stippling or cross-hatching to make the leaves significantly darker than the skull. This contrast pushes the white skull forward visually. -
Final assessment:
Step back and look at the overall contrast. If the skull looks too flat, add another layer of dots to the shadowy side (the left side in this composition) to increase the three-dimensional effect.
Gold Leaf Accent
For a luxe finish, apply gold leaf to the teeth or the center of the roses. Use a sizing pen for precise glue application before laying the foil.
Now you have a bold, tattoo-style illustration that balances gritty texture with elegant linework
Tiny Skull Icons in a Pattern Grid
This project creates a piece of custom fabric featuring a repeating grid of sugar skull motifs and floral accents. The result is a charming, slightly rustic textile with a hand-printed aesthetic, perfect for crafting into placemats, table runners, or tote bags.
Step-by-Step
Materials
- Light beige or off-white cotton canvas or calico fabric
- Linoleum carving block (soft cut variety)
- Linoleum cutter tool with V-gouge and U-gouge blades
- Fabric ink or block printing ink (black and terracotta red)
- Small foam rollers (brayers) or sponges
- Glass or acrylic sheet (for rolling ink)
- Pencil and eraser
- Ruler or quilter’s grid
- Scrap paper for testing
- Iron (for heat setting)
- Small paintbrush (optional, for touch-ups)
Step 1: Designing and Carving the Stamps
-
Draft the Skull Design:
Begin by sketching a small sugar skull (calavera) on paper, roughly 1.5 inches tall. Keep the details bold and simple: large eye sockets, a triangular nose, and a straightforward jawline with teeth. -
Transfer to Linoleum:
Use a soft pencil to darken the back of your sketch, then place it pencil-side down on your linoleum block. Trace over the lines firmly to transfer a carbon copy onto the soft block surface. -
Draft the Flower Accents:
Create two small flower designs on the block as well: one simple five-petal daisy and one slightly more elaborate six-petal bloom. These should be smaller than the skull to serve as filler. -
Carve the Outlines:
Using a V-gouge blade on your cutter, carefully crave away the linoleum around your pencil lines. Remember, whatever you carve away will be white (unprinted), and the raised surface will hold the ink. -
Add Details:
Switch to a smaller blade to carve the tiny details inside the skull, like the ‘dots’ around the eyes or the forehead decoration. Keep your hand steady and always cut away from your body. -
Cut Out the Stamps:
Once the designs are fully carved, use a craft knife to cut the shapes out of the main block so you have individual stamps: one skull and two types of flowers.
Patchy Printing?
If your stamp prints look uneven or speckled, your fabric might be too textured. Place a slightly padded surface (like a mousepad or folded towel) underneath the fabric while stamping to improve contact.
Step 2: Planning the Layout
-
Prepare the Fabric:
Wash, dry, and iron your cotton fabric to remove any sizing chemicals. This ensures the ink absorbs evenly into the fibers. -
Mark a Grid:
The pattern thrives on regularity. Use a ruler and a very light pencil mark to create a diagonal grid or simply mark small dots every 3-4 inches to guide where your main skull motifs will go. -
Test Print:
Before hitting the fabric, do a test print on scrap paper. I find this crucial for checking if I’ve carved deep enough; if you see unwanted ink lines, carve them away now.
Step 3: Printing the Pattern
-
Ink the Skull Stamp:
Squeeze a small amount of black fabric ink onto your glass sheet. Roll the brayer over it until the roller sounds ‘sticky,’ then roll an even coat onto your skull stamp. -
Stamp the Skulls:
Press the skull stamp firmly onto your fabric at your marked intervals. Apply even pressure without wiggling the stamp to ensure crisp lines. Repeat this across the entire fabric, reapplying ink for every single impression. -
Switch to Red Ink:
Clean your workstation and prepare the terracotta red ink. Ink up your flower stamps using a clean roller. -
Fill the Gaps:
Stamp the red flowers in the spaces between the skulls. Alternate between the simple daisy and the detailed flower to create visual interest. -
Add Small Dots:
To mimic the image’s texture, dip the end of a paintbrush handle or a small dowel into black ink. Dot these periodically around the skulls and flowers to fill empty white space. -
Set the Ink:
Allow the fabric to dry for at least 24 hours. Once dry, heat set the ink according to the manufacturer’s instructions, usually by ironing the reverse side of the fabric for several minutes.
Level Up: Ombré Effect
When rolling your ink, place a dab of red next to a dab of orange. Roll them together to create a gradient on your brayer. Your flower stamps will now print with a beautiful, sunset-like transition.
Now you have a custom, spooky-chic fabric ready to be sewn into your next favorite accessory
Watercolor Drip Skull With Ink Details
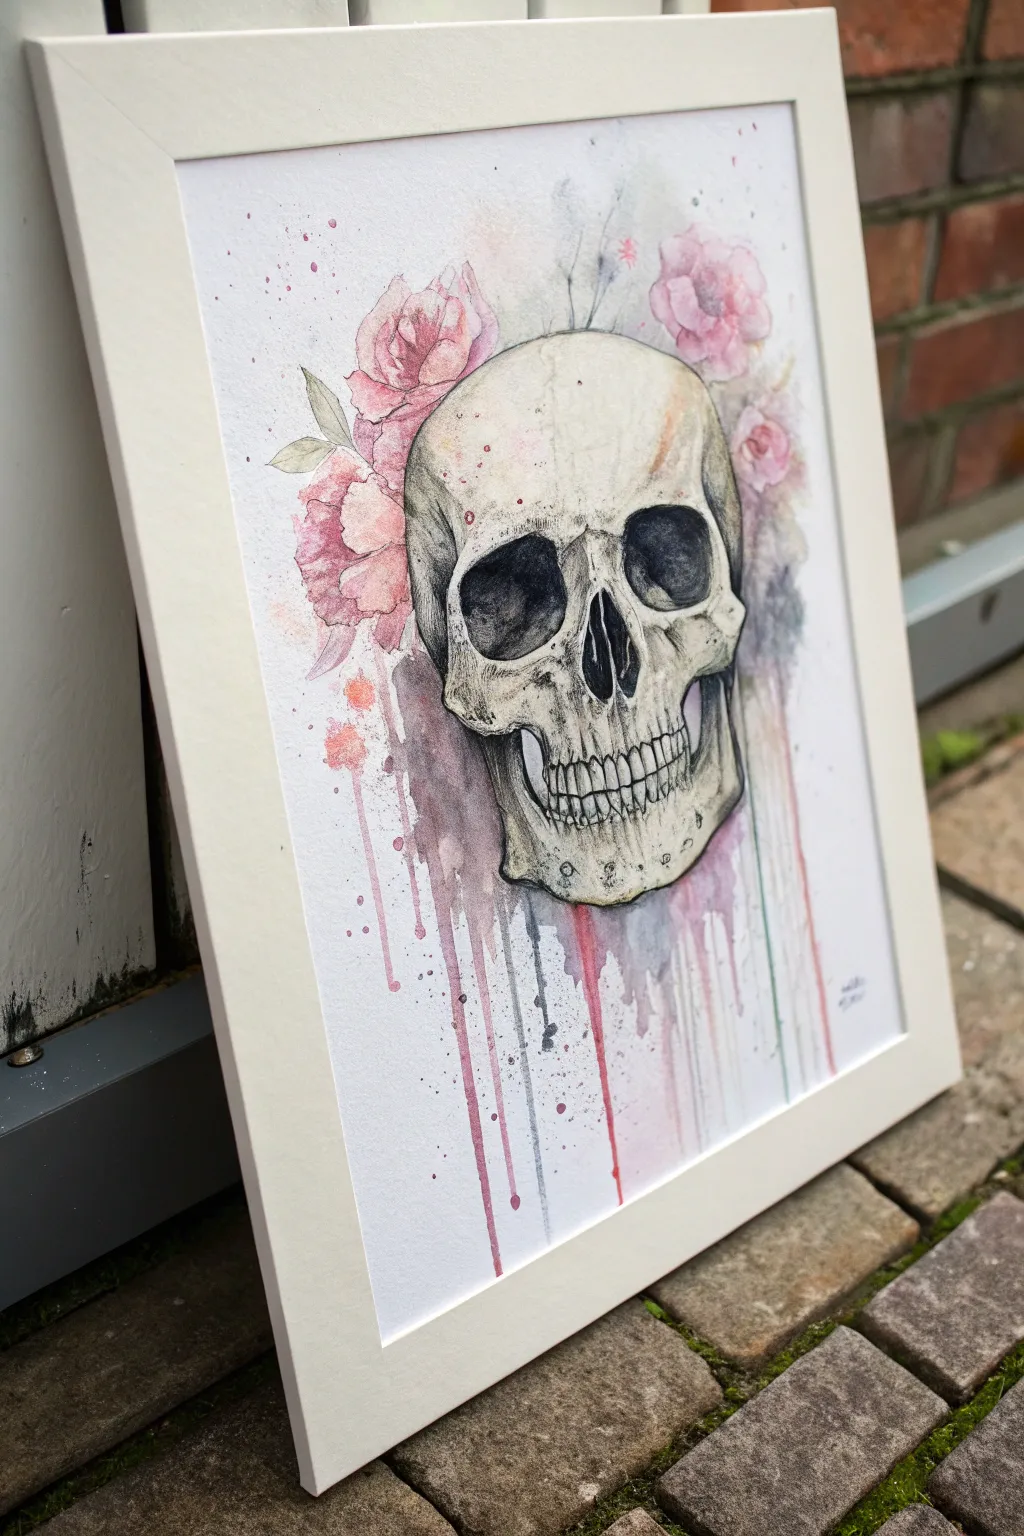
Contrast the stark, anatomical precision of a skull with the soft, flowing romance of watercolor florals in this striking piece. Heavy ink lines define the bone structure, while messy, purposeful drips create a dreamy, ethereal movement that bleeds down the page.
Step-by-Step Guide
Materials
- Cold press watercolor paper (300gsm)
- Waterproof fineliner pens (0.1, 0.3, and 0.5mm)
- Watercolor paint set (pinks, reds, purples, blues, yellow ochre)
- Round watercolor brushes (size 4 and 8)
- Pencil and eraser
- Paper towel
- Jar of water
Step 1: Sketching the Bones
-
Light Outline:
Begin with a very faint pencil sketch of the skull in the center of your paper. Focus on the main shapes: the rounded cranium, the hollow eye sockets, the nasal cavity, and the jawline. -
Map the Flowers:
Lightly sketch large rose shapes clustering around the top left and upper right of the skull. Keep these shapes loose and organic, as they will be defined mostly by paint later. -
Refine the Teeth:
Sketch the teeth carefully. They don’t need to be perfect rectangles; add slight curves and gaps to make them look aged and realistic.
Step 2: Inking the Details
-
Structural Lines:
Using a 0.5mm waterproof pen, trace over your main skull outline. Use broken or jittery lines occasionally to suggest cracks or rough bone texture rather than a single smooth cartoon line. -
Deep Shadows:
Fill in the eye sockets and nasal cavity with solid black ink. I prefer to use a cross-hatching technique near the edges of these voids to soften the transition from black to bone. -
Fine Textures:
Switch to a 0.1mm pen to add subtle cracking, porous textures, and the finer details between the teeth. Add stippling (small dots) around the jaw and cheekbones to suggest shadowing. -
Erase Guide Lines:
Once the ink is completely dry—give it a few minutes to be safe—gently erase all your pencil marks so the paper is clean.
Bleeding Control
If ink smears when painting, switch to a permanent marker or ensure your pen is explicitly labeled ‘waterproof’ or ‘archival.’ Let ink cure for 15+ mins before wetting.
Step 3: Watercolor Washes
-
Base Bone Tone:
Mix a very watery wash of yellow ochre with a tiny touch of brown. Paint the skull loosely, leaving plenty of white paper showing on the forehead and cheekbones for highlights. -
Floral Blooms:
While the skull dries, wet the brush and dip into a soft pink. Paint the roses using C-shaped strokes, starting with concentrated color in the center and using water to fade the petals outward. -
Adding Depth:
Drop touches of purple or darker red into the wet floral paint while it is still damp. This allows the colors to bleed naturally into one another, creating soft shadows.
Gravity Painting
Don’t force the drips! Let gravity do the work. Vary the amount of water in your brush to get different drip thicknesses—more water equals longer, thinner runs.
Step 4: The Drip Effect
-
Creating the Runs:
Load your size 8 brush with plenty of water and a mix of purple and pink pigment. Apply this wet mixture underneath the flowers and the jawline. -
Gravity Assist:
Tilt your paper upright so the excess fluid runs down the page. If the drips are stubborn, gently touch the bottom of a paint puddle with a wet brush to guide the path downwards. -
Splatter Accents:
Load a brush with concentrated pink or red paint. Tap the handle against your finger over the artwork to create organic splatters around the flowers and drips. -
Final Contrast:
Once the first layers are dry, add a slightly darker, cool-toned wash (watered-down grey or blue) behind the skull on the left side to make the bone color pop forward.
Frame your spooky yet elegant masterpiece once it is fully dry to preserve the delicate watercolor texture
Metallic Accents and Glitter Highlights
This delicate illustration merges the edginess of a skull with the softness of floral motifs and metallic detailing. By combining precise ink lines with pops of pink and shimmering gold, you’ll create a piece that feels both rustic and refined.
Detailed Instructions
Materials
- Cold press watercolor paper (A4 or 8×10)
- Black fineliner pens (sizes 0.1 and 0.5)
- Metallic gold paint marker or heavy body acrylic paint
- Soft pink watercolor pencil or pastel pencil
- Small round paintbrush
- Pencil (HB)
- Kneaded eraser
- Gold glitter gel pen (optional for extra sparkle)
Step 1: Sketching the Structure
-
Outline the cranium:
Begin lightly with your HB pencil. Draw a large, rounded dome shape for the top of the skull, slightly wider at the top than the bottom. -
Define the cheekbones:
Curve the lines inward below the dome to create the cheekbone indentations, then flare them out slightly before tapering down to the jaw. -
Map facial features:
Lightly sketch two large, circular eye sockets. Below them, draw an upside-down heart shape for the nose cavity. Sketch a straight horizontal line for the mouth, adding vertical guidelines for teeth positioning. -
Add floral details:
Inside the forehead area, sketch a central floral motif—think of a lotus or blooming flower with petals radiating upward. Sketch flower petals inside the eye sockets or around their edges.
Dot Precision
For the perfectly round gold dots in the halo, use a distinct tool like a dotting tool or a toothpick rather than a brush tip, which can splay.
Step 2: Inking the Design
-
Main outlines:
Switch to your 0.5 black fineliner. Carefully trace the outer perimeter of the skull. Use a varies line weight here; press slightly harder on the underside of curves to simulate shadow. -
Eyes and nose:
Ink the eye sockets and the nose cavity. For the nose, fill the shape in completely with black ink, leaving a tiny sliver of white if you want a highlight effect, though solid black works well for contrast. -
Teeth definition:
Using the 0.1 fineliner for finer detail, draw the teeth. Start with the center two teeth on top and bottom and work your way outward, ensuring they get slightly smaller towards the molars. -
Decorative elements:
Ink the floral design on the forehead and the petals around the eyes. Add swirls on the cheeks and chin. I find that keeping these lines thinner (0.1 pen) helps them look more delicate against the bold skull outline.
Vintage Patina
Lightly brush strong brewed coffee or tea over the paper before drawing. Once dry, it gives the paper an aged, parchment-like texture that suits the style.
Step 3: Adding Color and Texture
-
Soft pink shading:
Take your pink watercolor pencil or pastel. lightly shade the inside of the forehead petals and the floral elements near the jaw. Don’t press hard; you want a dusty, vintage pink look. -
Creating dimension:
Use the stippling technique (tiny dots) with your 0.1 fineliner to add shading. Focus these dots at the base of the petals, under the cheekbones, and around the edges of the skull to give it a rounded 3D form. -
Darkening the eyes:
Fill the eye sockets. You can use solid black, but for a textured look like the example, use dense stippling or cross-hatching in the center, fading slightly towards the flower petal rims.
Step 4: The Golden Touch
-
Gold flower centers:
Using your gold paint marker or a small brush with metallic acrylics, fill in the small circles bordering the eye sockets. -
Metallic highlights:
Add thin gold lines inside the pink forehead petals and along the swirls on the cheeks. This overlay of gold on top of ink creates a beautiful mixed-media depth. -
The halo effect:
Dip the back end of a paintbrush into your gold paint (or use the marker) to create a halo of dots surrounding the entire skull. Space them irregularly for an organic, majestic feel. -
Final clean up:
Once the ink and paint are fully dry, gently erase any visible pencil lines with your kneaded eraser to leave a crisp, clean illustration.
Frame this piece in a simple wood frame to let the gold accents truly shine in the light
Skull Mask Design for Craft Decor
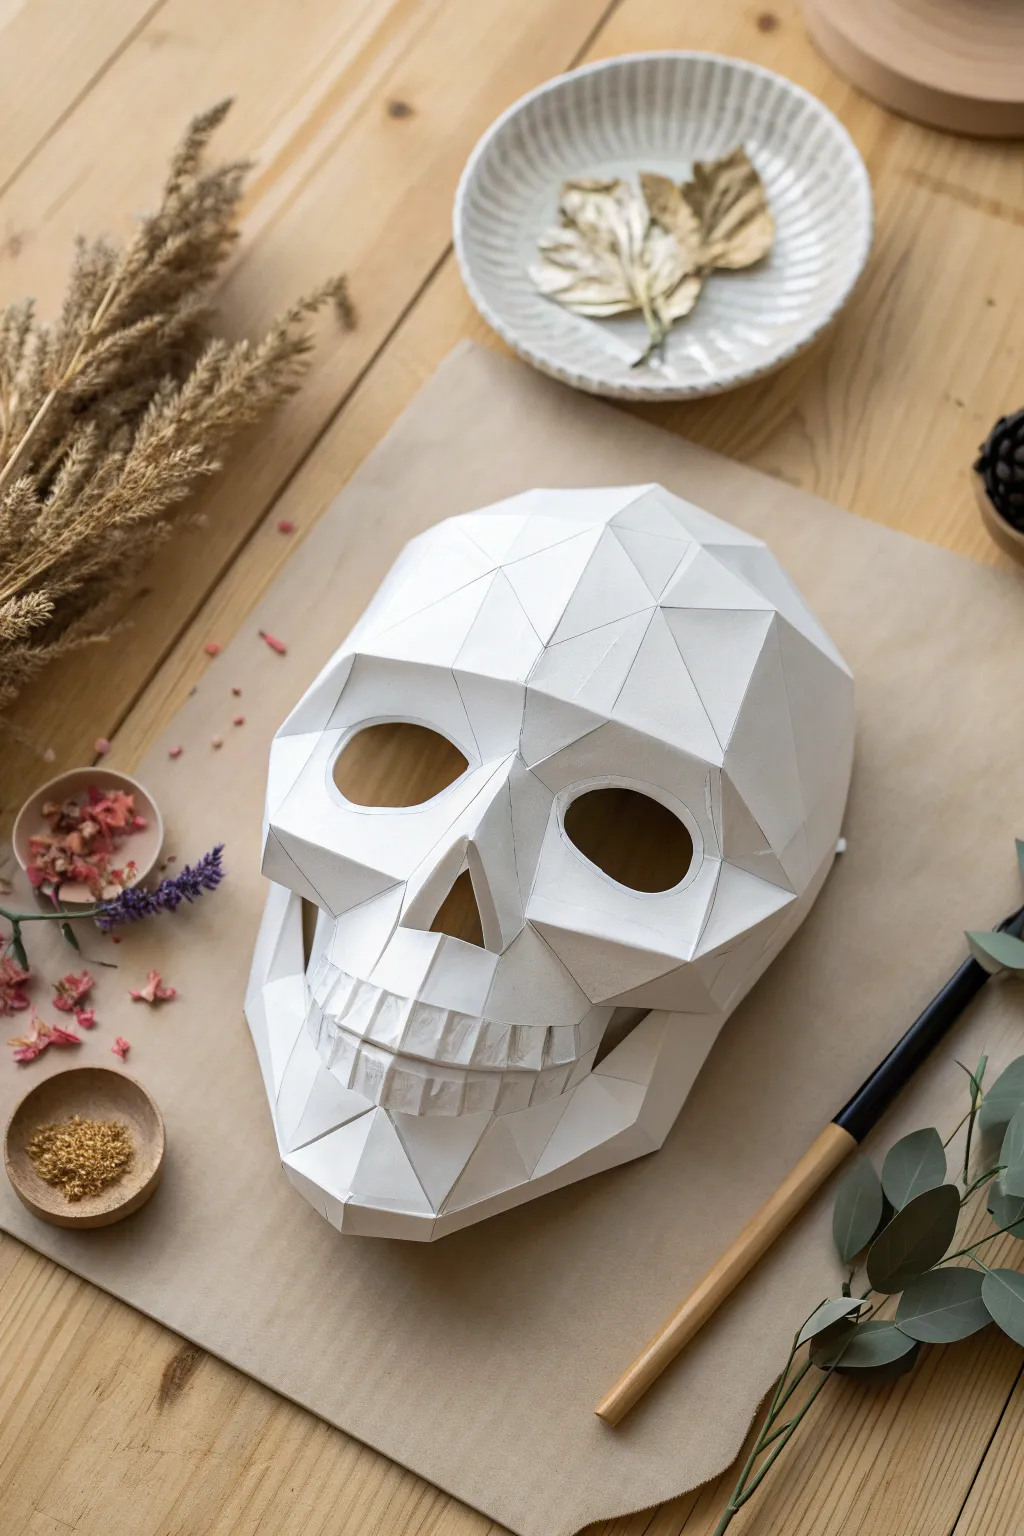
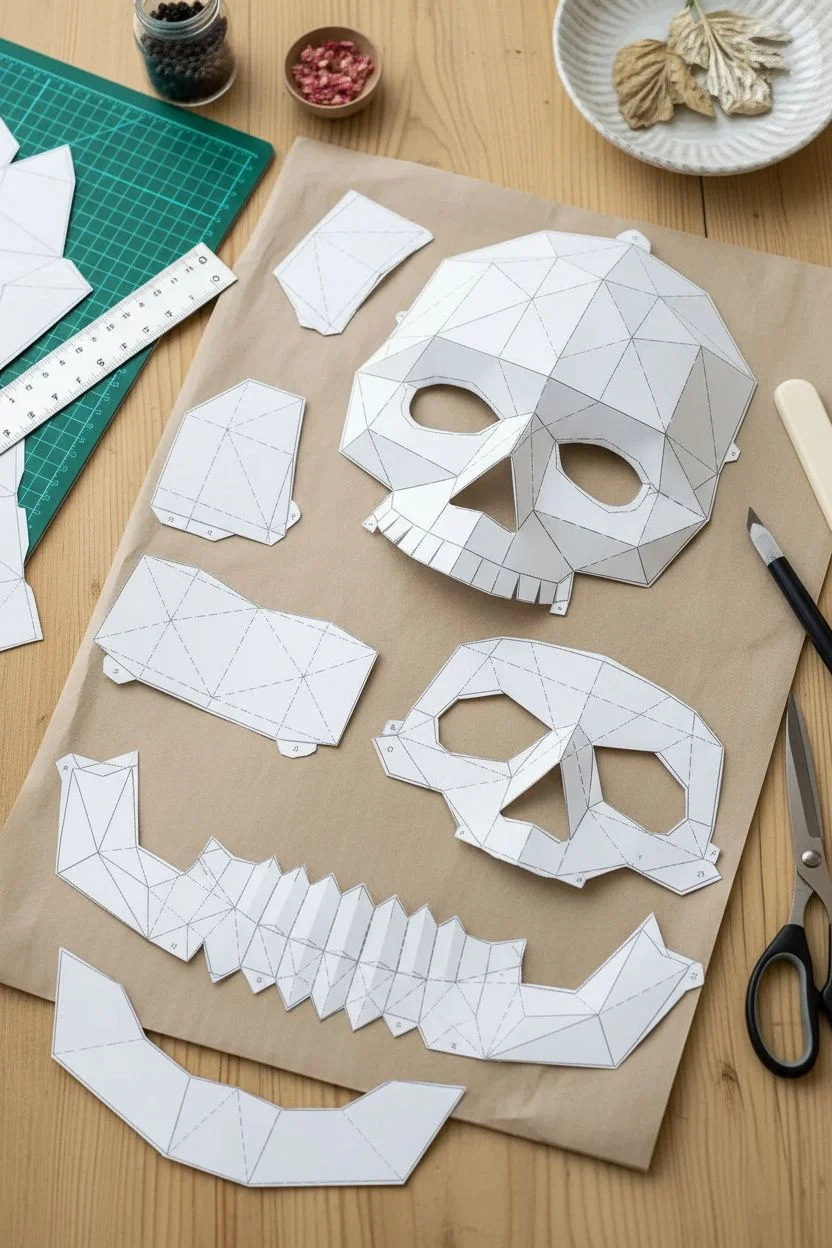
Embrace the beauty of modern low-poly aesthetics with this striking geometric skull mask. Crafted from crisp white cardstock, its faceted design creates dramatic light and shadow play, making it a perfect piece for stylish wall decor or a sophisticated costume prop.
Step-by-Step Guide
Materials
- Heavyweight white cardstock (180-250 gsm)
- Printable PDF skull pattern (low-poly style)
- Craft knife or precision scalpel works best
- Self-healing cutting mat
- Metal ruler
- Bone folder or dried-out ballpoint pen
- White PVA glue or tacky craft glue
- Small paintbrush (for glue application)
- Double-sided tape (optional for tabs)
- Elastic ribbon (if wearing)
- Scissors
Step 1: Preparation & Cutting
-
Source your pattern:
Find a low-poly skull template online or design your own using 3D modeling software. Print the pattern pages directly onto your heavyweight cardstock. Make sure your printer settings are set to ‘Actual Size’ to avoid mismatched edges later. -
Score the fold lines:
Before cutting anything out, score all the internal fold lines. Place your ruler along the dashed lines and run a bone folder or a dried-out ballpoint pen over them firmly. This creates a groove that ensures sharp, professional-looking creases. -
Identify fold types:
Pay close attention to key guidelines on your pattern: usually dashed lines indicate ‘valley’ folds (folding inward) and dot-dash lines indicate ‘mountain’ folds (folding outward). -
Cut out the components:
Using your craft knife for precision and scissors for general shapes, cut along all the solid outline borders of the pattern pieces. Take your time around tight corners, especially near the teeth and eye sockets. -
Organize your pieces:
Group the cut-out pieces by section—jaw, face, cranium. Most patterns number the matching tabs; keeping them in numerical order now will save you a headache during assembly.
Glue Drying Too Slow?
Use a hairdryer on a low, cool setting to speed up tacking time between tabs. Don’t use hot air, as it might warp the paper or make the glue brittle.
Step 2: Shaping & Assembly
-
Pre-fold all edges:
Go through every piece and physically fold along the score lines you made earlier. Establishing these creases now makes the 3D form come together naturally when you start gluing. -
Start with the eyes:
Begin assembly at the most detailed point: the eye sockets. Apply a thin layer of glue to the tabs using a small brush. I find that starting here anchors the face’s structure and prevents warping. -
Construct the nose bridge:
Connect the pieces that form the nose and bridge, attaching them to the eye sections. Hold each tab in place for 10-15 seconds until the glue tacks so the tension of the paper doesn’t pop it open. -
Build the jagged teeth:
Carefully assemble the teeth strip. This is often the fiddliest part due to small tabs. Use tweezers if your fingers feel too large for the tiny geometric details of the jawline. -
Form the cranium:
Start piecing together the larger, flatter panels that make up the top and back of the skull. These larger polygons come together quickly but require patience to ensure the curve remains smooth. -
Connect face to cranium:
Join the detailed face mask to the larger head dome. work from the center of the forehead outwards toward the ears to keep the symmetry aligned. -
Attach the lower jaw:
Glue the prepared jaw section to the upper skull. Check the alignment of the cheekbones as you do this to ensure the skull doesn’t look twisted.
Step 3: Finishing Touches
-
Reinforce the inside:
For extra durability, you can apply strips of tape or an extra layer of glue over the tab connections on the *inside* of the mask where they won’t be seen. -
Smooth the seams:
Run your bone folder gently over the exterior fold lines one last time to crisp up the geometry and ensure the low-poly effect looks intentional and sharp. -
Add rigging (optional):
If you plan to wear this, punch small holes on the side tabs near the temples and thread elastic ribbon through, securing it with knots on the inside.
Level Up: Stone Texture
Spray paint the finished mask with a textured ‘granite’ spray, then lightly dry-brush with white acrylic to highlight the edges for an ancient statue look.
Place your completed geometric skull on a shelf or hang it to admire the modern shadows it casts
Surreal Skull Made of Blossoms Only
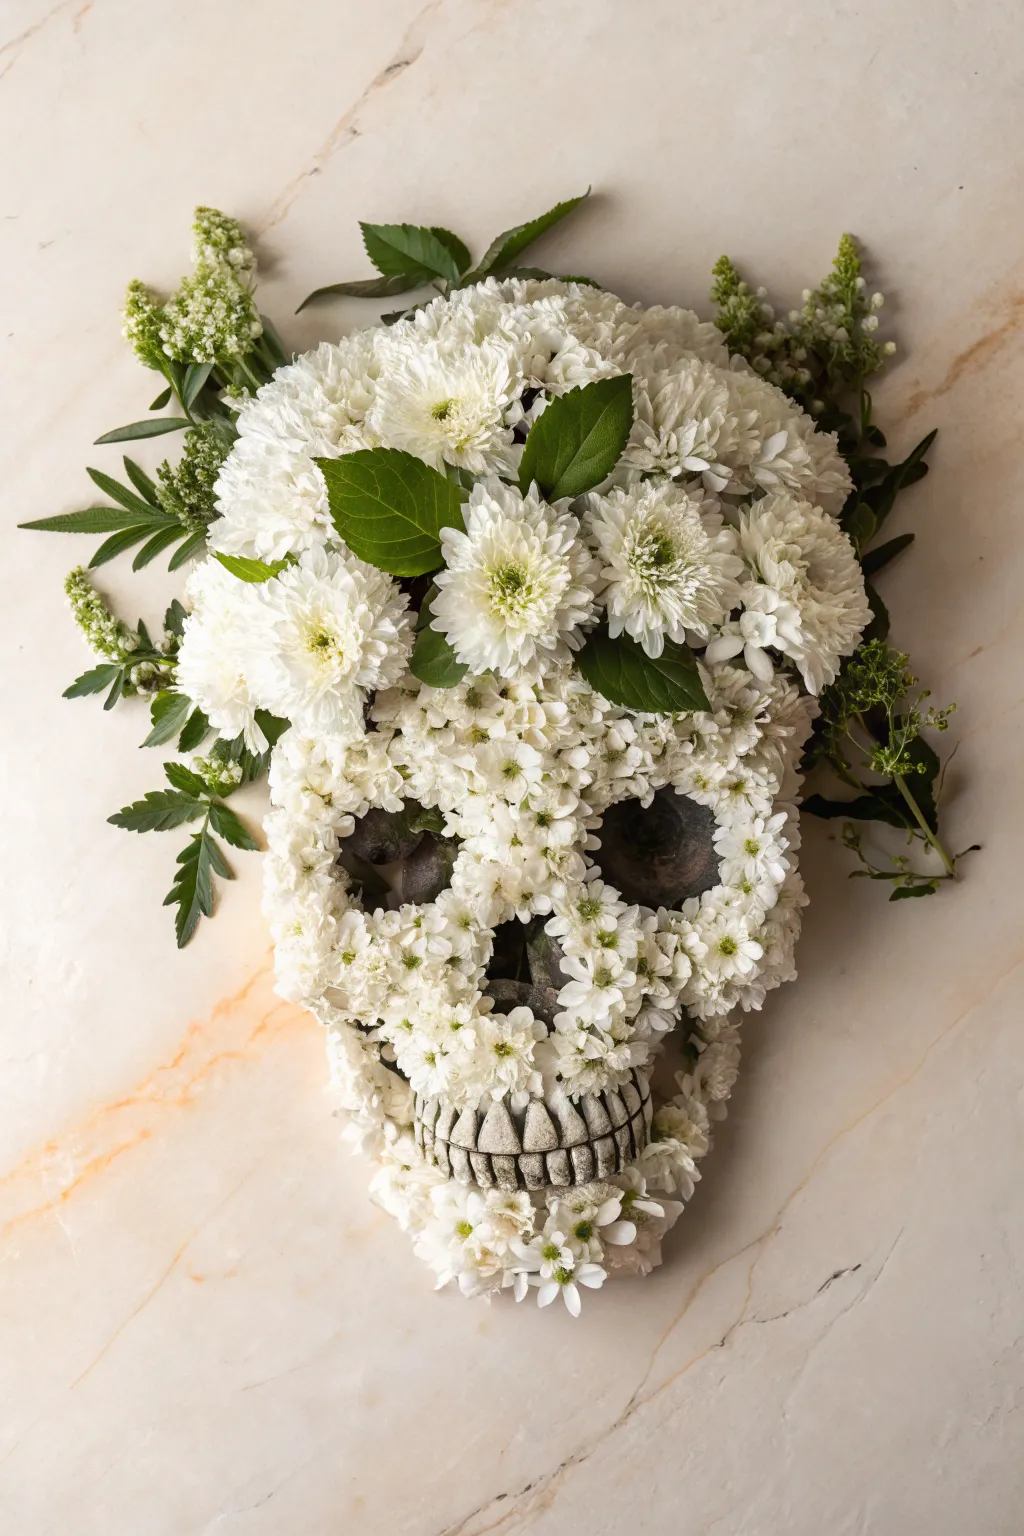
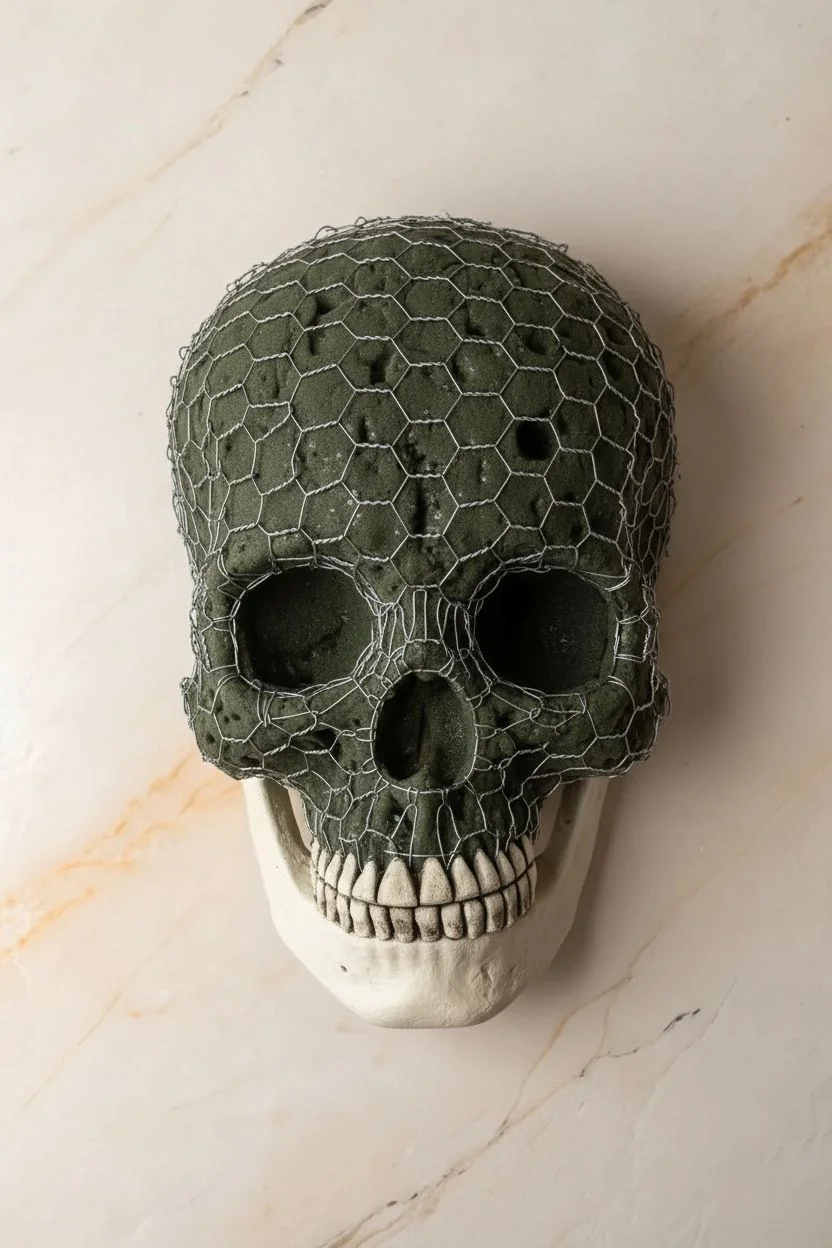
This striking project blends the macabre with the delicate, creating a full-scale skull sculpture composed almost entirely of fresh white blooms. The result is a surreal, textural centerpiece that juxtaposes life and death in a beautiful, organic form.
Step-by-Step Tutorial
Materials
- Plastic or foam anatomical skull model (life-size)
- Floral foam bricks (wet type)
- Chicken wire or green floral netting
- Wire cutters
- Floral shears
- Hot glue gun and glue sticks
- White spray paint (matte)
- Gray and black acrylic paint (for weathering)
- Small paintbrush
- Fresh white chrysanthemums (large blooms)
- Fresh white pom-pom mums (medium)
- Fresh baby’s breath or waxflower (small filler)
- Green foliage (fern tips or salal leaves)
- Floral tape
- Water tray or shallow dish
Step 1: Base Preparation
-
Prep the skull:
Begin with a sturdy plastic or foam skull. If it’s a hollow plastic Halloween skull, you need to create a base for the flowers to drink from. Carefully cut away the top and face sections of the plastic skull, leaving only the jaw, teeth area, and the back structure to act as a frame. -
Soak the foam:
Submerge your floral foam bricks in water until they stop bubbling. Do not force them down; let them absorb water naturally to ensure there are no dry pockets inside. -
Sculpt the foam:
Cut the wet floral foam into blocks and stack them onto your skull armature to recreate the cranium shape. You can use floral tape to bind the blocks together slightly, but the main structure will come next. -
Secure with wire:
Wrap the foam structure snugly with chicken wire. This is crucial as it prevents the heavy wet foam from crumbling and gives you a strong grid to insert stems into. Twist the wire ends at the back to secure it. -
Expose the teeth:
Make sure the teeth area of your original skull (or the plastic form) remains uncovered by foam. If your base skull had poor teeth, you can sculpt new ones from polymer clay, paint them, and glue them to the bottom of the foam structure.
Step 2: Painting and detailing
-
Weather the teeth:
The teeth are the only non-floral visible part, so they need to look realistic. Paint the teeth with a base of off-white or bone color. -
Add depth:
Mix a watery wash of black and gray acrylic paint. brush this into the crevices between the teeth and wipe away the excess on the surface with a paper towel. This highlights the separation and gives an aged, stone-like look. -
Seal the area:
I like to give the painted teeth a quick coat of matte clear spray sealer to protect the paint job from the moisture of the flowers.
Extended Freshness
Keep the floral foam moist by misting the skull daily. For longer display life, place the sculpture in a fridge at night to slow wilting.
Step 3: Floral Arrangement
-
Cut the stems:
Trim your flower stems at a sharp 45-degree angle, leaving about 1.5 to 2 inches of stem. The sharp angle helps them pierce the foam easier and drink water better. -
Start with the eyes:
The eye sockets are negative space. To define them, do not place flowers in the socket areas. Instead, line the rim of the ‘sockets’ with smaller white blooms to create a clear border. -
Place focal flowers:
Take your largest chrysanthemums and place them near the top of the forehead or the ‘temples.’ These larger blooms establish the curvature of the skull. -
Fill the cranium:
Work your way back from the forehead using the medium-sized pom-pom mums. Insert them firmly into the foam through the chicken wire. Pack them tightly enough that no foam or wire is visible between the petals. -
Contour the cheeks:
Use slightly smaller flowers as you move down beneath the eye sockets towards the jawline. The change in flower size helps mimic the tapering bone structure of a real skull. -
Add greenery accents:
Intersperse a few green leaves around the larger mums on the forehead and temples. Don’t overdo it; these should look like accents, not a bouquet. -
Detail with filler:
Use the smallest flowers (waxflower or bits of baby’s breath) to fill tiny gaps, especially around the nasal cavity area and the edges of the teeth. -
Define the nose:
Like the eyes, leave a triangular void for the nose. If the foam is visible black inside the holes, you can paint that section of foam black before inserting flowers, or push dark moss into the cavity for depth. -
Final inspection:
Rotate the skull and look for any bald spots or visible mechanics. delicately fluff the petals to interlock them and create a seamless surface.
Gothic Gradient
Use dark red roses at the base of the skull fading into lighter pinks and whites at the top for a dramatic ombré effect.
Place your finished floral skull on a marble surface or a vintage silver tray to complete the elegant, haunting aesthetic


Have a question or want to share your own experience? I'd love to hear from you in the comments below!