If you’re craving that instantly iconic skull face paint look, you’ve got so many ways to make it yours—simple, spooky, glam, or wildly artistic. Here are my go-to skull face painting ideas I’d pull out in the studio when you want something that looks strong in photos and feels doable at the mirror.
Classic Full-Face Skull
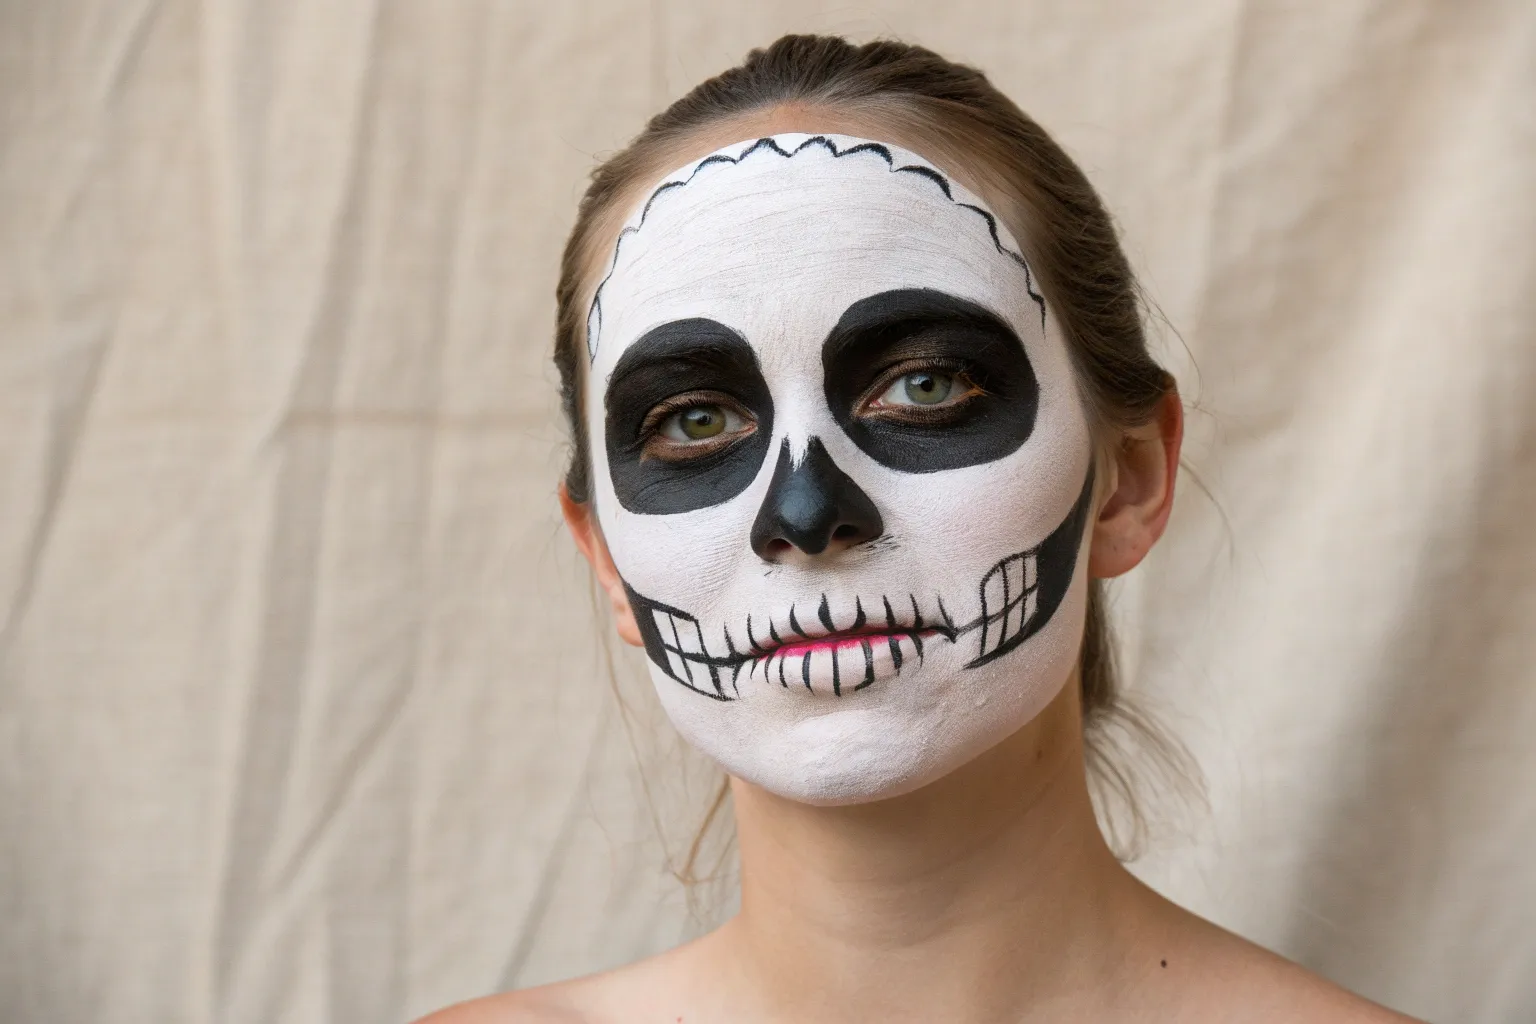
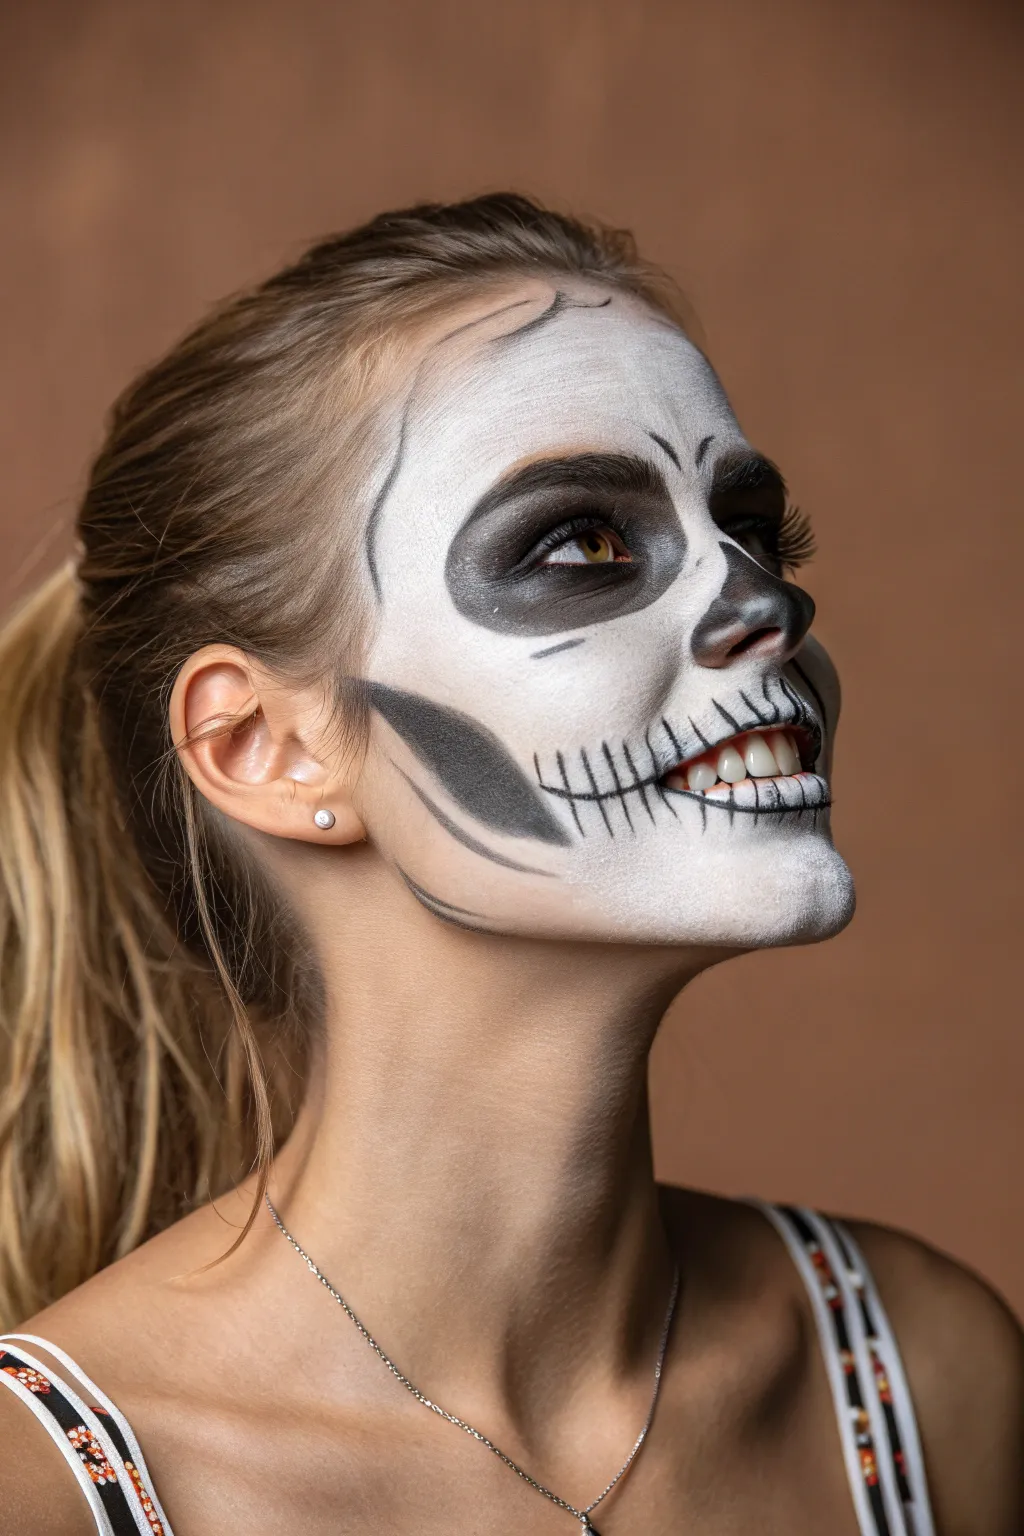
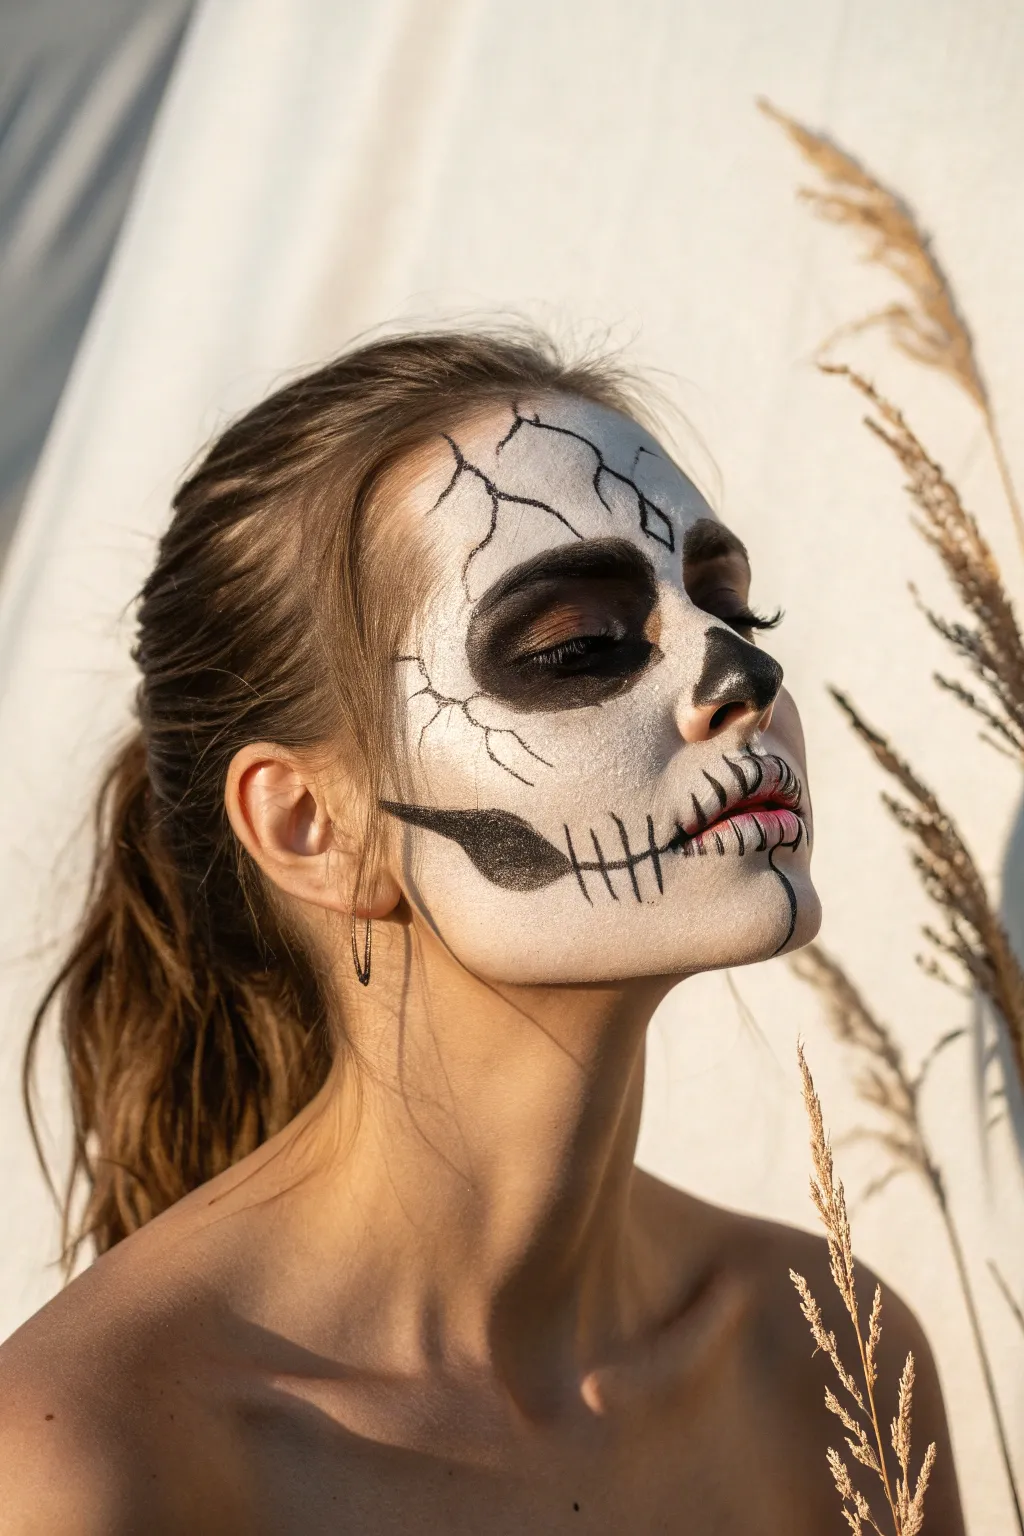
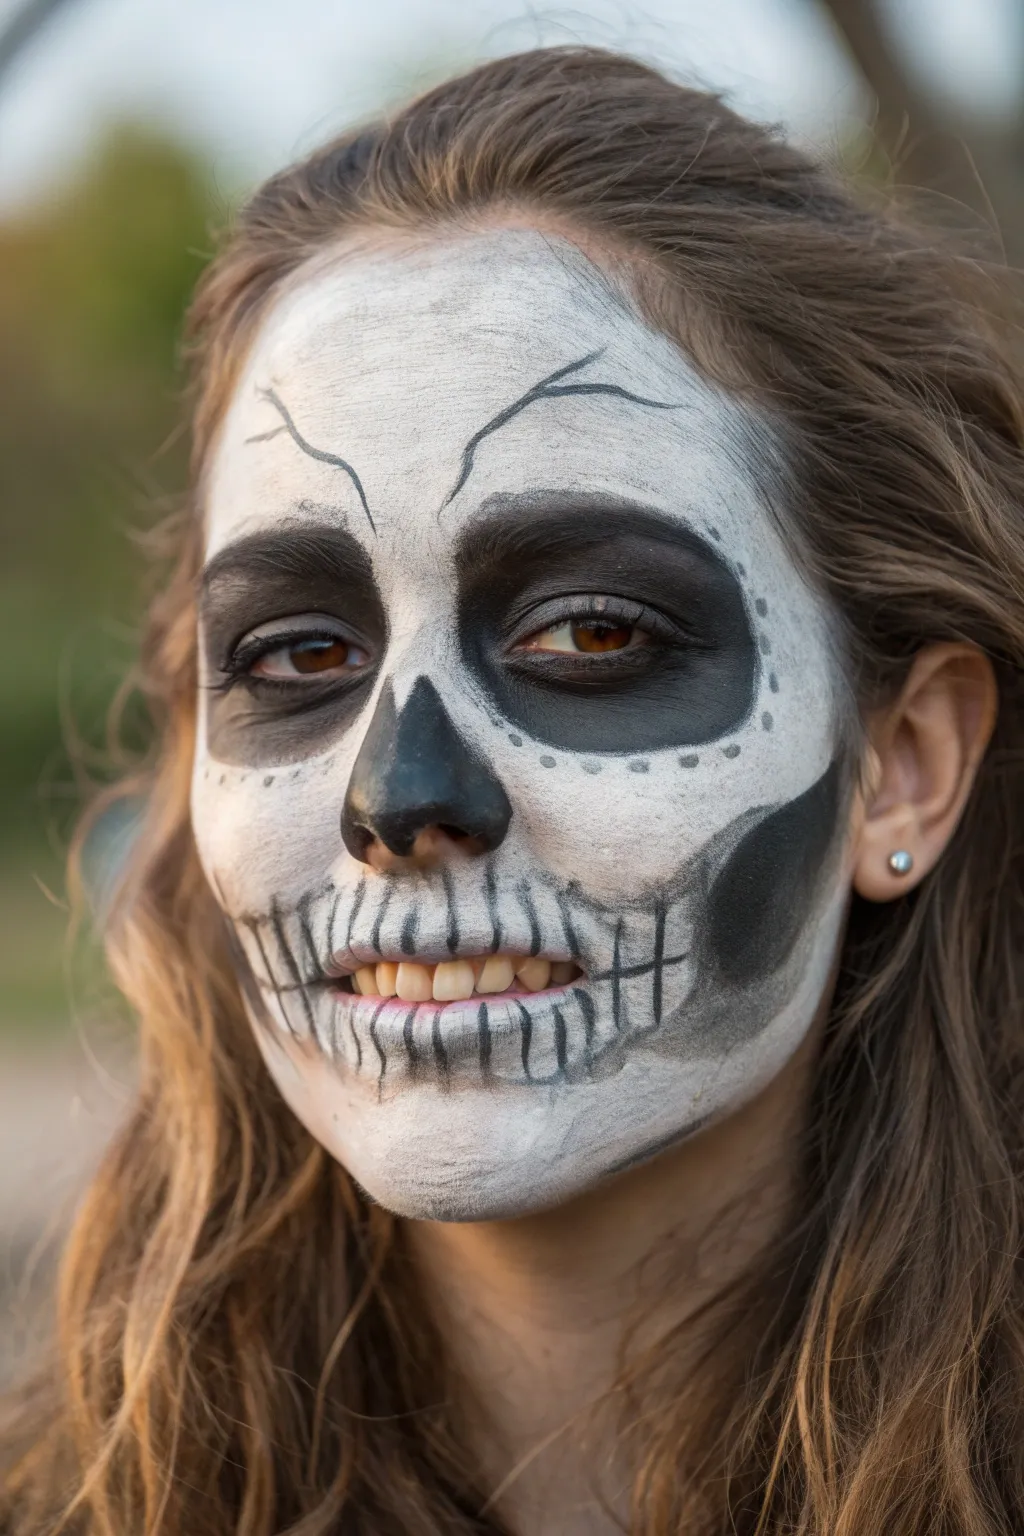
Achieve a striking balance between spooky and sophisticated with this partial skull design that emphasizes bone structure while leaving one side slightly more faded for an artistic touch. This look relies on stark contrast and soft shading to create a realistic, hollowed-out skull effect that feels both classic and contemporary.
Step-by-Step
Materials
- White cream face paint or theatrical greasepaint base
- Translucent setting powder (colorless)
- Black cream face paint or gel eyeliner
- Dark brown or grey eyeshadow (matte)
- Black eyeshadow (matte)
- Synthetic foundation brush or makeup sponge
- Medium fluffy blending brush
- Small angled brush
- Fine detail brush or eyeliner brush
- Setting spray
Step 1: Base application
-
Clean and prep:
Start with a freshly washed and moisturized face. Apply a thin layer of primer if you have one, as this helps the heavy white pigment sit smoothly without sinking into pores. -
Outline the shape:
Visualize mask-like coverage. Using a nude or white eyeliner pencil, lightly trace where you want the white paint to stop. For this look, aim for a jagged, uneven edge near the hairline and jaw to simulate cracked bone. -
Apply white base:
Load a damp sponge or synthetic brush with your white face paint. Pat the color onto the skin rather than dragging it to ensure full opacity. Cover the forehead, nose, cheeks, and chin, leaving the eye socket area bare for now. -
Feather the edges:
Where the white paint meets your natural skin tone near the hairline and neck, use a clean, dry sponge to softly fade the edges. You don’t want a harsh line here; a wispy, crumbling effect looks more organic. -
Set the base:
Before moving to dark colors, generously press translucent setting powder over the white paint using a powder puff. I find this critical because it prevents the black detail work from turning grey and muddy later.
Step 2: Creating depth and contrast
-
Map the eye sockets:
Load a medium fluffy brush with grey or brown eyeshadow. Sweep it into the orbital bone area—your eyebrows and under-eye circles—to map out the hollow shape before committing to black. -
Darken the eyes:
Switch to black cream paint or gel eyeliner. Fill in the entire eye socket area, extending slightly above your natural eyebrow and below the lower lash line for that sunken skeletal look. -
Softening the socket edges:
Take a clean blending brush with a little black eyeshadow and buff the edges of your black eye circles. You want a smoky transition into the white base, not a sharp circle. -
Sculpting the nose:
Using a small angled brush and black paint, draw an inverted ‘V’ or ‘M’ shape on the tip of your nose. Fill it in completely black. This mimics the nasal cavity where the cartilage would be missing on a skull. -
Define the cheekbones:
Suck in your cheeks to find the hollow. Use grey eyeshadow to create a sharp contour line under the cheekbone, blending downward to create the illusion of a hollow jaw. -
Deepen the hollows:
Intensify the deepest part of that cheek contour with black eyeshadow, keeping the darkest point near the ear and fading it as it moves toward the mouth.
Don’t Sweat It
If you struggle with cream paints creasing, use an eyeshadow primer on your eyelids and under-eye area before applying any black paint. It grips the pigment significantly better.
Step 3: Detailed bone work
-
Map the teeth line:
With a fine detail brush and watered-down black paint or grey shadow, draw a horizontal line extending from the corners of your mouth toward your ears. Keep this line faint initially. -
Vertical teeth marks:
Paint short vertical lines across your lips and the extended smile line. Make the lines on the actual lips slightly thicker and taper them as they move outward. -
Detailing the teeth:
At the top and bottom of each vertical line, add tiny ‘Y’ or ‘V’ splits to suggest roots. This small detail instantly makes the teeth look more realistic and less like a stitched mouth. -
Temple shading:
Add a touch of shading to the temples using your grey eyeshadow. Focus on the indentation near the hairline to give the skull a more three-dimensional, curved appearance. -
Cracks and texture:
Using your finest liner brush and black paint, draw very thin, trembling lines radiating from the eye sockets or nose cavity to resemble hairline fractures in the bone. -
Final highlights:
If your white base has dulled, tap a pure white eyeshadow or matte highlight on the highest points—the brow bone, the bridge of the nose, and the chin—to make them pop. -
Lock it in:
Close your eyes and mist the entire face with a strong setting spray. This seals the layers and ensures your haunting look survives the night without smudging.
Glam It Up
Add self-adhesive rhinestones along the edge of the large eye socket circles or use a metallic silver pigment for the teeth highlights to transform this into a chic ‘Sugar Skull’ variation.
Now you have a chillingly realistic skull visage ready to turn heads at your next costume event


Easy Kids Skull in Five Minutes
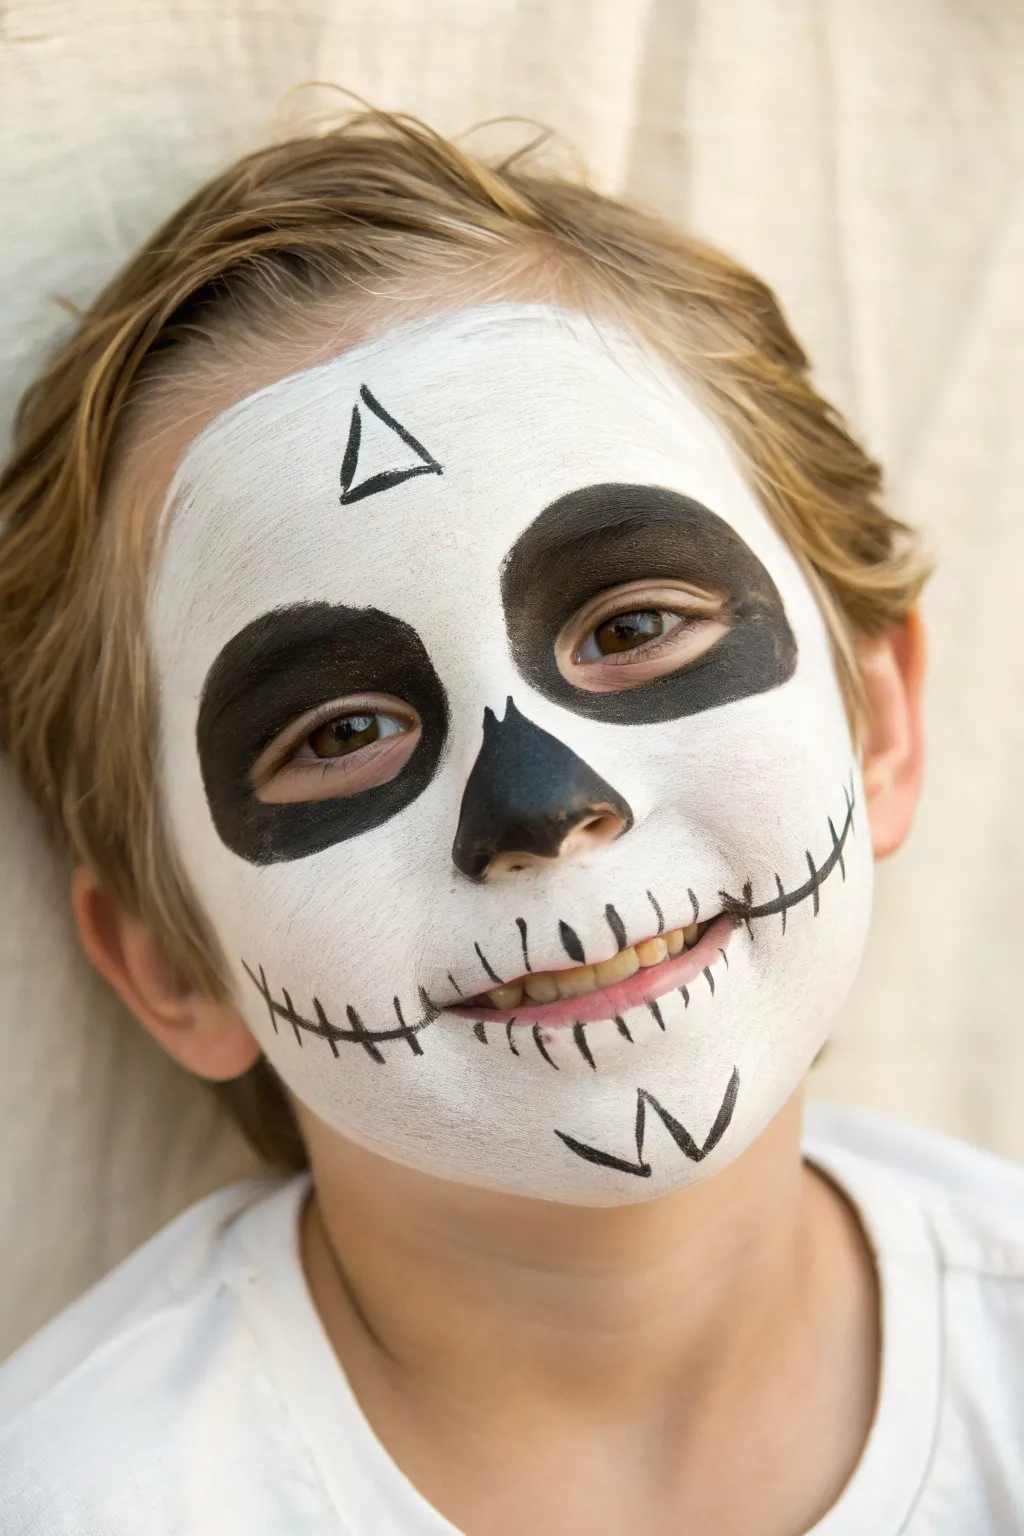
This quick and approachable skull design is perfect for last-minute costumes or kids who can’t sit still for long. It features bold black accents over a clean white base, creating a look that is spooky but sweet.
Detailed Instructions
Materials
- White face paint (water-activated cake or cream based)
- Black face paint (water-activated cake or cream based)
- Small face painting sponge
- Medium round brush
- Fine liner brush
- Small cup of water
- Paper towels
Step 1: Creating the Base
-
Prepare the Sponge:
Dampen your face painting sponge slightly and load it generously with the white face paint. You want a creamy consistency that isn’t too drippy. -
Map the Base Layer:
Begin dabbing the white paint all over the face. Start from the center of the nose and work outward toward the hairline and jawline. -
Create Even Coverage:
Continue sponging until the entire face is covered in an opaque white layer. Leave the immediate eye area slightly bare if the child is sensitive, as we will cover this with black later. -
Smooth the Edges:
Blend the paint out toward the ears and below the chin, creating a soft edge rather than a hard line. Allow this base layer to dry for about 60 seconds before moving on.
Keep it Creamy
If your black paint looks streaky or gray, your brush is too wet. Blot it on a paper towel and reload with more pigment to get that deep, solid black color.
Step 2: Eyes and Nose
-
Load the Black Paint:
Using a medium round brush, create a creamy paste with your black face paint. It needs to be thick enough to be opaque in one stroke. -
Outline the Eye Sockets:
Draw large circles around each eye, extending well above the eyebrow and below the lower lid to create that classic hollow socket look. -
Fill the Sockets:
Fill in the circles completely with black paint. Be gentle around the delicate eye area; I often ask the child to close their eyes gently while I work near the lashes. -
Shape the Nose Cavity:
Paint the nose black. Instead of just a circle, bring the paint up slightly onto the bridge of the nose in a triangle shape. -
Add Detail to the Nose:
At the very top of the nose triangle, add two tiny upward points to mimic the nasal bone structure.
Bone Shading
Use a dry brush with a tiny bit of grey eyeshadow to lightly shade under the cheekbones and around the temples for a more 3D, realistic skull effect.
Step 3: Mouth and Details
-
Switch Brushes:
Clean your medium brush and switch to a fine liner brush loaded with black paint for the delicate line work. -
Draw the Mouth Line:
Extend a thin black line from the corners of the mouth outward toward the cheeks, curving slightly upward at the ends. -
Create the Vertical Teeth:
Paint small vertical lines across the extended mouth line and directly over the lips. Space them out evenly to represent teeth. -
Add Cracks:
Extend the main horizontal mouth line slightly further into jagged points on the cheeks to suggest cracks in the bone. -
Forehead Decoration:
In the center of the forehead, paint a small black triangle. This simple geometric shape adds balance to the design without being too scary. -
Add Chin Detail:
Paint a ‘W’ or jagged zigzag shape on the chin. This helps define the bottom jaw bone. -
Refine Edges:
Check your black circles and lines for any unevenness. Use the fine brush to sharpen the edges of the eye sockets if needed. -
Final Check:
Step back and ensure the design looks symmetrical. Fill in any patches in the white base that might have been rubbed off during the process.
Now you have a spooky, classic skeleton look complete in just a few minutes


Half-Skull Mask (Talk-and-Snack Friendly)

This striking half-skull design offers the best of both worlds: a spooky, dramatic costume look on one side and a glamorous, snack-ready face on the other. It’s perfect for parties where you want to look the part without sacrificing comfort or conversation.
Step-by-Step
Materials
- White face paint (water-activated or cream)
- Black face paint (water-activated or cream)
- Black eyeshadow (matte)
- Eyeliner pencil (black)
- Flat foundation brush or sponge
- Small round brush (size 2 or 4)
- Fine liner brush (size 0 or 00)
- Setting powder (translucent)
- Your regular makeup kit (foundation, blush, mascara)
Step 1: The Glam Side
-
Prep and Prime:
Start with a clean, moisturized face. Apply your regular primer to ensure a smooth canvas for both the makeup and the paint. -
Apply Beauty Makeup:
On the side of your face you intend to keep ‘human’ (the model’s right side), apply your normal foundation, concealer, and contour. Do a full eye makeup look with mascara and liner to contrast sharply with the skull side. -
Define the Boundary:
Using a black eyeliner pencil, lightly sketch a vertical line down the center of your face, starting at the hairline, going down the nose, and over the lips to the chin. This creates your definitive ‘do not cross’ border.
Step 2: The Bone Base
-
Fill in White:
Load a flat brush or sponge with white face paint. Fill in the entire skull side of your face, going right up to the pencil line you just drew. Don’t worry about being perfectly opaque yet; two thin layers are better than one thick, crackly one. -
Preserve the Eye:
Leave a roughly circular area around your eye socket bare for now; painting too close to the waterline with heavy white paint can cause tearing. -
Set the White:
Once the white base is tacky or dry, gently pat translucent setting powder over it using a fluffy brush or powder puff. This prevents the black details from smudging into gray mud later.
Uneven White Base?
If your white paint looks streaky, use a damp beauty sponge to stipple (tap repeatedly) over the wet paint. This texture evens out coverage better than dragging a brush.
Step 3: Sculpting the Skull
-
Mapping the Eye Socket:
Using black face paint and a round brush, outline a large, somewhat squared-off circle around your eye, covering the eyebrow completely. It should dip down towards the cheekbone for a skeletal look. -
Fill the Hollows:
Fill inside the eye socket shape with solid black paint. I find it helpful to close my eye gently to get full coverage on the lid without wrinkling. -
The Nose Cavity:
Paint half of the nose tip black. Follow the natural curve of your nostril, extending the black shape slightly upward into a teardrop or inverted ‘U’ shape on the bridge of the nose. -
Hollow Cheek:
Locate the hollow of your cheekbone by sucking in your cheek. Paint a black, curved shape here that tapers toward the ear to simulate the missing jaw bone connection. -
Soften with Shadow:
Take a small fluffy brush and some matte black eyeshadow. Gently buff the edges of your black paint shapes (eye socket and cheek hollow) to create a smoky, recessed 3D effect rather than a harsh sticker-like edge.
Pro Tip: Lip Longevity
Use a long-wear matte liquid lipstick for the colorful half of your mouth. It won’t bleed into the white skull paint the way a creamy satin lipstick or gloss might.
Step 4: Fine Details
-
Sketch the Teeth:
Switch to your fine liner brush and black paint. Draw a horizontal line extending from the corner of your mouth toward your ear. Then, draw short vertical lines across your lips and that extension line to create the teeth. -
Shape the Teeth:
At the top and bottom of each vertical ‘tooth’ line, add tiny triangles or small ‘Y’ shapes to imply roots and gum recession. -
Add Cracks:
Using the very tip of your fine liner brush, draw squiggly, branching cracks on the forehead and cheekbone. Keep your hand loose and vary the pressure—press harder for the start of the crack and lift off to a whisper for the end. -
Refine the Middle:
Go back to the center line on your face. You can leave it as a straight hard line, or add a subtle black shadow along the edge of the white paint to make it look like the skin is peeling away. -
Final Setting:
Give the black painted areas a very light dusting of translucent powder or a spritz of setting spray to lock the look in for the night.
Now you are ready to haunt the party while still enjoying the snacks


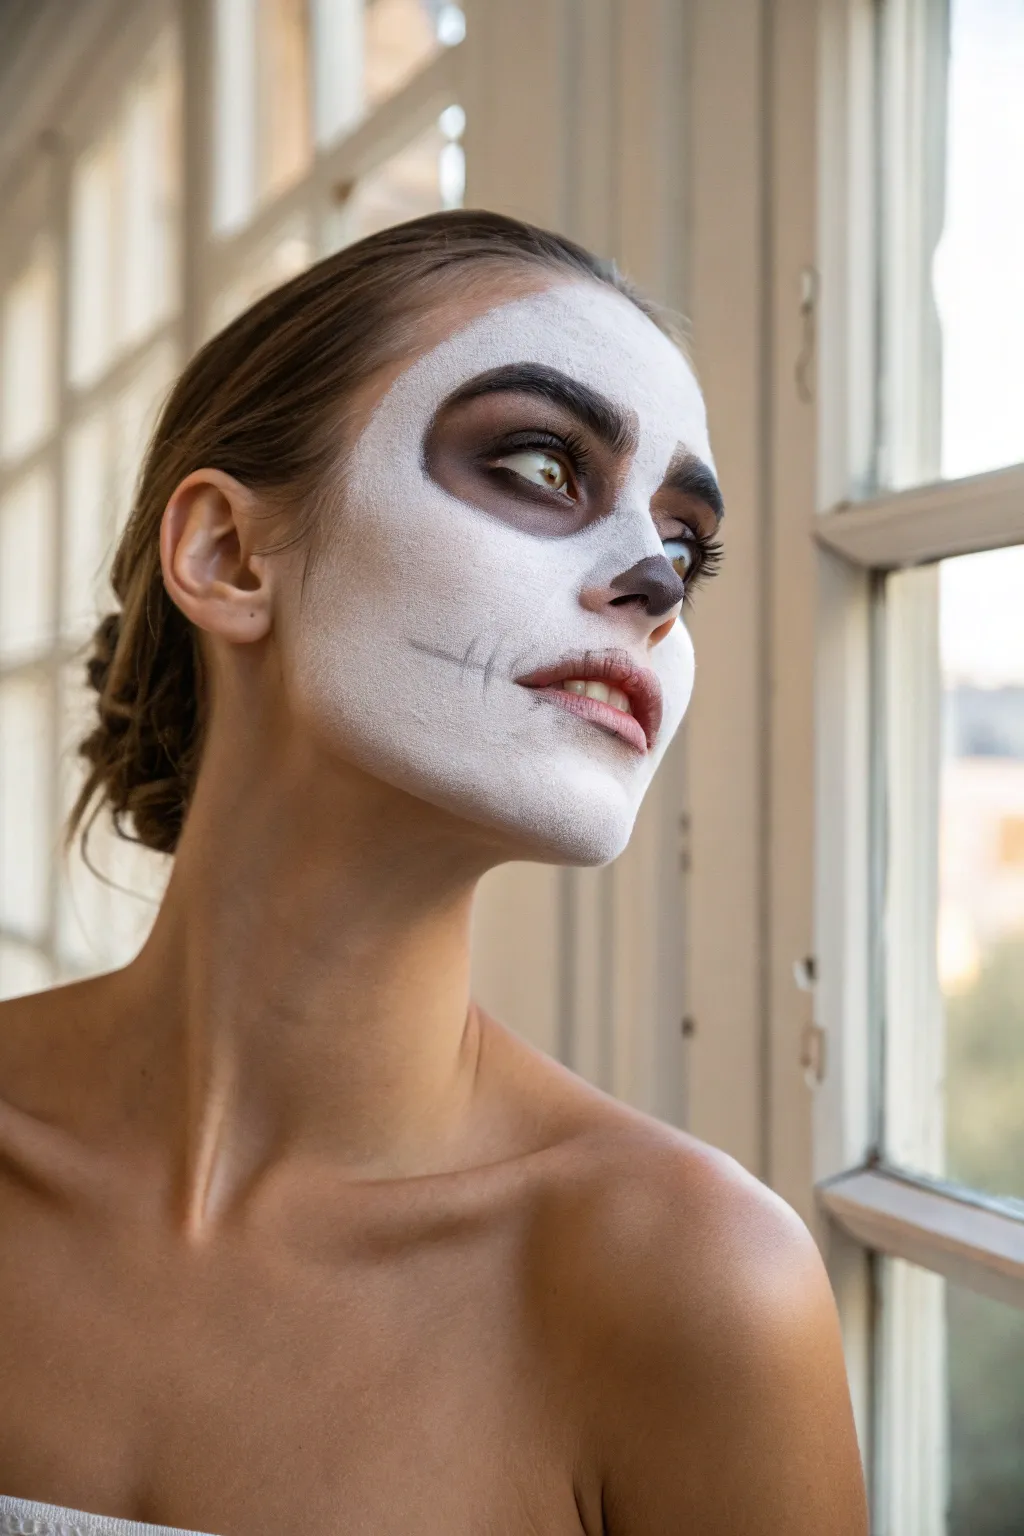
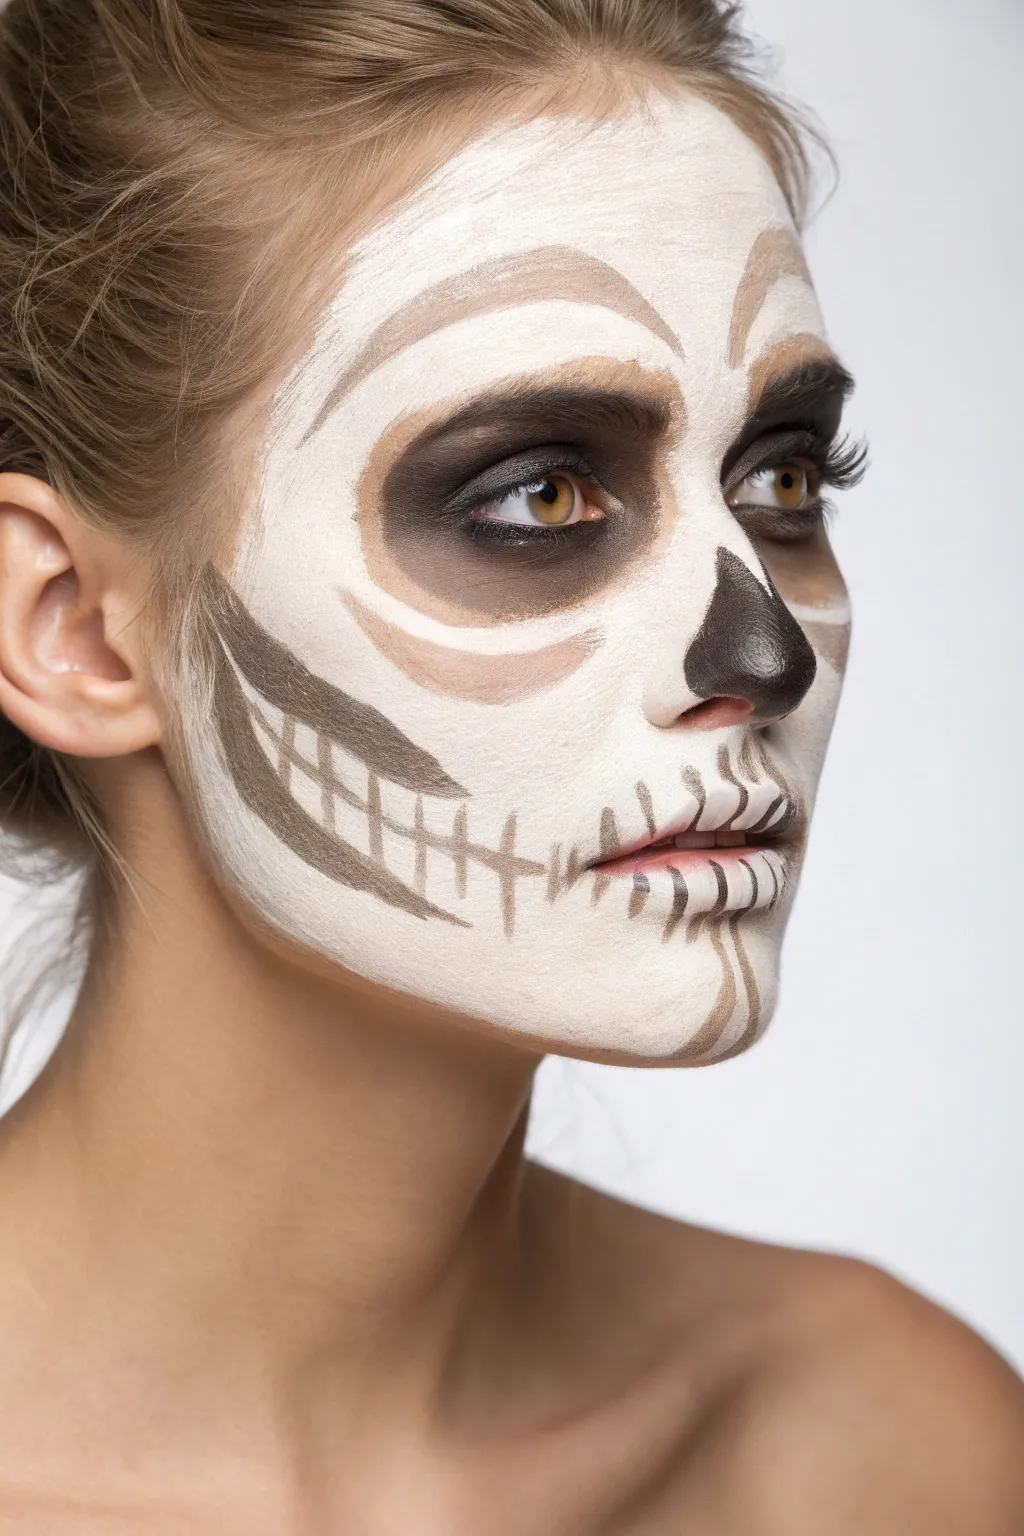
Smoky Shaded Skull for Real Bone Depth
Achieve a hauntingly realistic skeletal look with this tutorial that focuses on soft shading rather than harsh lines. By blending blacks and grays into a white base, you’ll create the illusion of genuine bone depth and hollow sockets.
Step-by-Step Tutorial
Materials
- Water-activated face paint (White)
- Water-activated face paint (Black)
- Black eyeshadow or setting powder
- Flat foundation brush or sponge
- Medium round brush
- Small detail brush
- Fluffy blending brush
- Setting spray
Step 1: Base Preparation
-
Clean and Prep:
Start with a clean, dry face. Pull your hair back tightly into a ponytail to keep it away from your workspace and mimic the sleek look of the model. -
Apply White Base:
Using a damp sponge or flat brush, apply an even layer of white face paint. Cover the entire face, bringing it down slightly past the jawline to obscure the natural skin tone. -
Smooth Coverage:
Dab over the white paint with your sponge to remove any brush strokes, ensuring a smooth, matte canvas. -
Set the Base:
Let the white paint dry completely. You can lightly dust it with translucent powder to prevent smudging during the shading process.
Patchy Base?
If the white looks streaky, don’t keep layering wet paint. Let it dry fully, then sponge on a second thin layer. Patting, not swiping, creates the smoothest coverage.
Step 2: Creating the orbital sockets
-
Outline the Eyes:
Load a medium round brush with black face paint. Draw a large circle around each eye, extending up over the eyebrow and down to the top of the cheekbone. -
Fill the Sockets:
Fill in the circles with black paint. Don’t worry about perfect opacity yet; the goal is to establish the dark hollows. -
Soften the Edges:
Before the black paint dries fully, take a clean, fluffy blending brush and gently smudge the outer edges. This creates a smoky transition into the white base. -
Deepen the Center:
Apply a second layer of black closer to the lash line and center of the eyelid to create intense depth where the socket would be deepest. -
Set with Shadow:
Press black eyeshadow over the painted sockets. This sets the cream/liquid paint and enhances the blurry, smoky texture.
Step 3: Nose and Contouring
-
Paint the Nose:
Using a small brush and black paint, draw an inverted V-shape on the tip of your nose. Fill it in, leaving the bridge of the nose white. -
Extend the Nasal Cavity:
Drag the black paint slightly upwards along the sides of the nose bridge, fading it out to simulate the nasal bone structure. -
Map the Hollows:
Visualize a line from the corner of your mouth to your ear. Use black paint to draw a thick line precisely underneath your cheekbone. -
Blend the Hollows:
Using your blending brush, pull the black paint downwards from that line. Keep the top edge sharp against the cheekbone but fade the bottom edge into the jaw. -
Temple Shading:
Add a touch of black or grey shadow to the temples and blend it softly into the hairline to narrow the forehead.
Glam It Up
Add false eyelashes to the upper lids inside the black sockets. The contrast between identifying beauty features and the skull makeup creates a striking, spooky effect.
Step 4: Teeth and Jawline
-
Extend the Smile:
Draw thin black lines extending from the corners of your mouth outwards toward the ear lobes, creating a wide, skeletal grin. -
Mark the Teeth:
Using a fine detail brush, paint vertical lines across your lips and the extended smile line. Space them evenly to represent individual teeth. -
Shape the Teeth:
At the top and bottom of each vertical line, add tiny ‘Y’ shapes or triangles to suggest roots and separation between the teeth. -
Internal Shading:
I like to take a very faint grey eyeshadow and shade the inner center of the lips slightly, giving the teeth a more recessed, 3D appearance. -
Jawline Definition:
Paint a faint, smoky black line along the very edge of your jawbone, separating the face from the neck. -
Final Touches:
Add small cracks or fissures on the forehead or chin using the finest tip of your brush for extra detail. Mist the entire face with setting spray to lock the look in place.
Enjoy your haunting new look and the impressive depth you’ve created with simple shading.
BRUSH GUIDE
The Right Brush for Every Stroke
From clean lines to bold texture — master brush choice, stroke control, and essential techniques.
Explore the Full Guide
Hollow Cheekbones Spotlight Skull
This striking skull design focuses on dramatic shading and structured bone features rather than spooky gore. With its soft, smoky eye sockets and sharply defined cheek hollows, it creates a sophisticated and wearable skeleton look perfect for any costume party.
How-To Guide
Materials
- White cream makeup or water-activated face paint
- Black cream makeup or face paint
- Dark brown eyeshadow or contour powder
- Makeup sponges (wedges or rounds)
- Medium flat synthetic brush
- Small detail brush
- Fluffy blending brush
Step 1: Setting the Base
-
Prep the canvas:
Start with clean, dry skin. Pull your hair back completely to expose the hairline and ears. -
Apply the white base:
Using a slightly damp makeup sponge, pick up your white face paint. Stipple it over the entire face, avoiding the immediate eye area and the tip of the nose. -
Refine the edges:
Feather the white paint towards the hairline and jawline so it fades naturally rather than stopping abruptly. You want opaque coverage in the center, softening as it moves outward.
Soft Focus Finish
Use a damp sponge to lightly press translucent powder over the finished white areas. It sets the paint and dulls the shine for a real bone texture.
Step 2: Sculpting the Eyes and Nose
-
Define the eye sockets:
With a flat brush, apply black paint to the eyelid and underneath the eye. Don’t worry about being neat yet; just get the color down. -
Blend the sockets:
Use a fluffy blending brush and your dark brown shadow to buff out the edges of the black paint. Extend this smoky effect up towards the eyebrow and down onto the cheekbone to create a sunken, hollow look. -
Highlight the brow bone:
Paint a curved white shape directly above the eyebrow, mimicking a skeletal brow ridge. This negative space helps define the angry, angular look of the skull. -
Paint the nose cavity:
Using a small detail brush loaded with black paint, draw an inverted ‘V’ shape on the tip of the nose. Fill it in completely. -
Add nose dimension:
Dab a tiny amount of white paint on the very top center of the black nose shape to create a highlight, making the nose look more three-dimensional.
Add Glamour
Apply false eyelashes or a heavy coat of mascara to the upper lashes. The contrast between glam lashes and the skull face is stunning.
Step 3: Carving the Cheekbones
-
Draft the hollows:
Locate the natural hollow under your cheekbone. Using a medium flat brush and dark grey or thinned black paint, draw a long, sweeping stroke from the ear towards the corner of the mouth. -
Deepen the shadow:
Go back into the deepest part of that hollow (near the ear) with pure black paint to intensify the depth. -
Feather the edges:
I like to use a clean, dry brush to drag the bottom edge of this cheek shadow downwards. This creates a gradient that simulates a sharp bone ridge above and a hollow beneath.
Step 4: Teeth and Jawline
-
Draw the mouth line:
Extend a thin horizontal line from the corners of your mouth outward across your cheeks, following the natural curve of your jaw. -
Sketch the teeth:
Using your finest detail brush and thinned lack/brown paint, draw vertical lines across your lips and the extended mouth line. -
Shape the roots:
Instead of straight lines, curve the top and bottom of each vertical ‘tooth’ line slightly inward to suggest roots. -
Shade the teeth:
Lightly smudge brown eyeshadow at the base of these vertical lines to age the teeth and make them look embedded in the jaw. -
Final jaw definition:
Paint two vertical curved lines on the chin to suggest the separation of the mandible bone, shading the outer edges with your brown powder.
You’ve now created a hauntingly beautiful illusion that balances elegance with the macabre.
Teeth-Forward Grin Skull
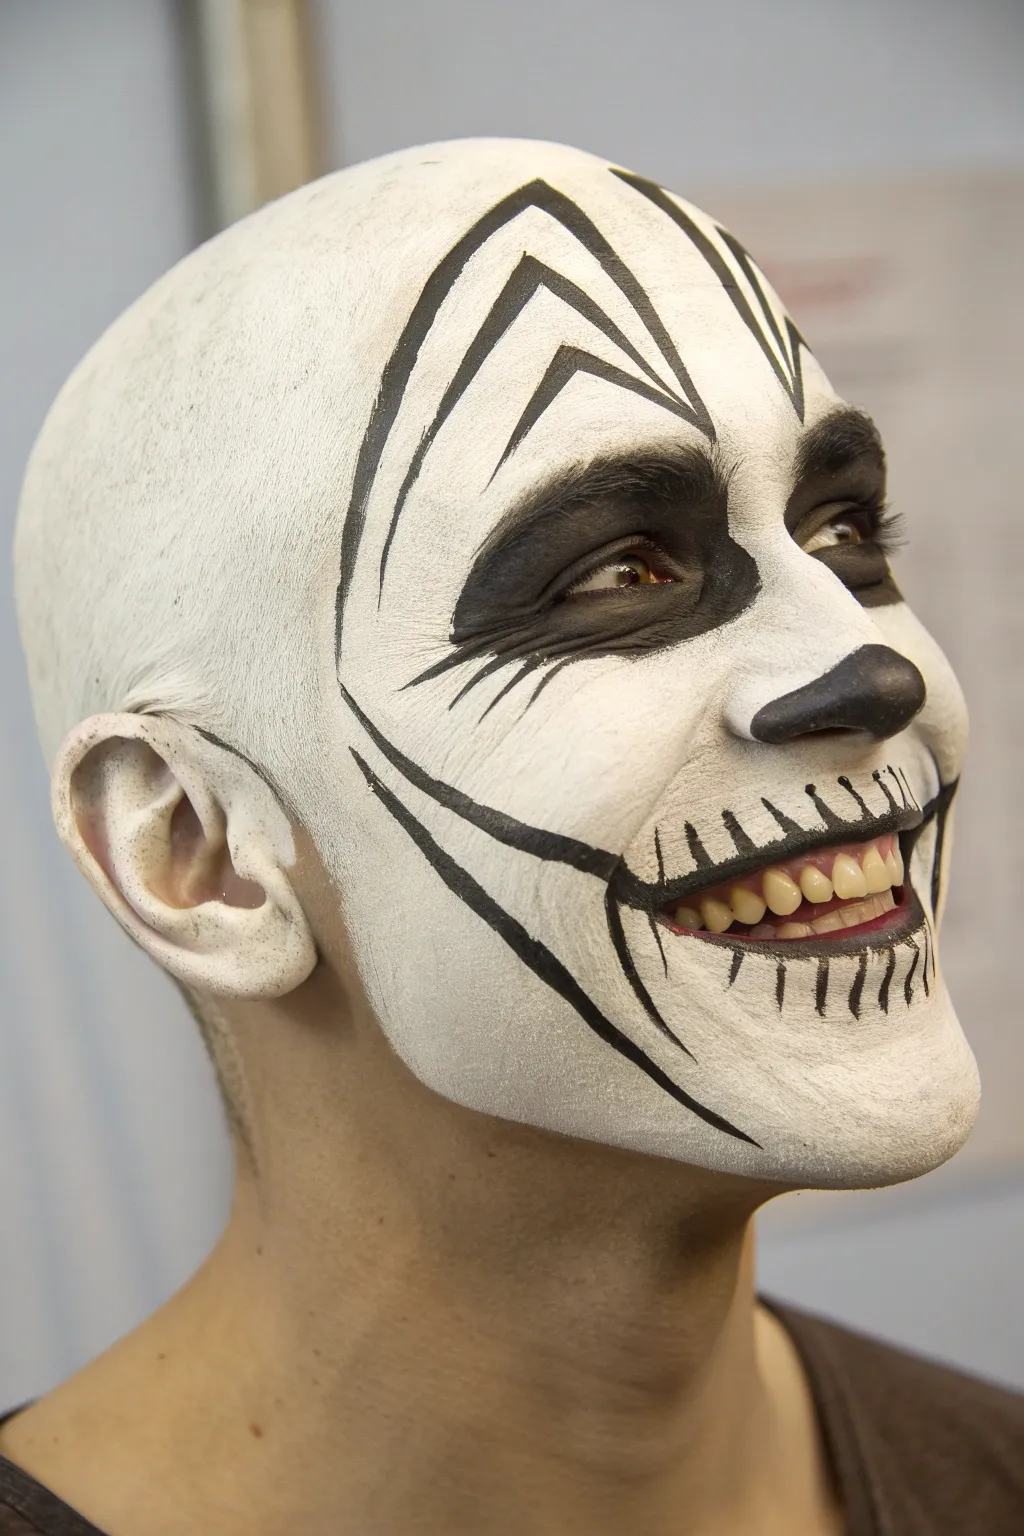
Transform yourself into a walking skeleton with this striking full-coverage skull makeup. This design features bold geometric lines and an exaggerated, toothy grin that extends past the mouth for a truly unnerving effect.
Detailed Instructions
Materials
- White face paint or cream makeup (high opacity)
- Black face paint or cream makeup
- Large sponge or foundation brush
- Medium round brush
- Fine detail brush
- Translucent setting powder
- Powder puff
- Bald cap (optional, if you have hair)
Step 1: Base Preparation
-
Prepare the canvas:
Start with clean, dry skin. If the model has hair, apply a bald cap securely, blending the edges with liquid latex or spirit gum before painting. -
Apply the white base:
Using a slightly damp sponge, load up your white face paint. Begin stippling the paint over the entire face, ears, and head. Stippling (dabbing) rather than stroking prevents streaks. -
Build opacity:
Let the first layer dry for a moment, then go back over any patchy areas. You want a solid, bone-white finish that covers the natural skin tone completely. -
Don’t forget the ears:
Make sure to sponge white paint onto the ears, getting into all the crevices. This helps the face paint look like a complete mask rather than just makeup.
Keep It Crisp
Use water-activated paints rather than grease paint for lines. They dry matte and smudge far less, keeping those geometric details sharp all night.
Step 2: Defining the Eyes and Nose
-
Outline the eye sockets:
Switch to a medium round brush loaded with black paint. Draw large, rounded shapes around the eyes. They should extend slightly above the eyebrows and dip down onto the upper cheek. -
Fill the sockets:
Fill in these shapes completely with black paint. Keep the model’s eyes closed to get close to the lash line safely. -
Create the nose cavity:
Paint the bottom half of the nose black. Instead of a simple triangle, draw an inverted ‘U’ shape or two teardrop shapes on the nostrils to simulate the nasal cavity. -
Add eye details:
Using a finer brush, flick a few short, sharp lines radiating outward from the outer corners of the eye sockets to suggest cracks or stress fractures.
Step 3: Sculpting the Head and Cheekbones
-
Draw the forehead markings:
On the forehead, paint two large, arching black lines that swoop upwards from the brow bone towards the top of the head. -
Add geometric flair:
Inside these arches, I like to create a sharp, angular chevron pattern. Draw inverted V-shapes that follow the curve of the main arch to add a stylized, graphic look to the skull plates. -
Define the jawline:
Starting from the ear, draw a thick black line that curves down underneath the cheekbone and towards the corner of the mouth. This defines the separate jaw bone. -
Sharpen the cheekbone:
Above that jaw line, add a second stroke that emphasizes the hollow of the cheek, creating a sharp division between the upper and lower jaw area.
Hollow Effects
Blend a tiny bit of grey eyeshadow around the edges of the black eye sockets and nose. This softens the transition and adds 3D depth to the hollows.
Step 4: The Signature Grin
-
Extend the mouth:
Paint a black line extending from the corners of the lips outward towards the jaw hinge. Curve it slightly upwards at the end to create that permanent grin. -
Outline the lips:
Trace the natural lip line with black paint, connecting it seamlessly to your extended grin lines. -
Draft the teeth:
Using a fine detail brush, paint short vertical lines crossing the lips. Space them out evenly to represent the gaps between teeth. -
Shape the roots:
At the top and bottom of each vertical line, add small ‘Y’ shapes or slight curves to suggest the roots of the teeth extending into the the gums. -
Shadow the jaw:
Add a few vertical hash marks on the chin area below the teeth to simulate the texture and curvature of the chin bone.
Step 5: Finishing Touches
-
Refine lines:
Go back with your fine brush and sharpen any black edges that look fuzzy. The contrast between the black and white needs to be crisp. -
Set the makeup:
Load a powder puff with translucent setting powder. Gently press—do not wipe—the powder over the white areas first, then carefully over the black to lock everything in place.
Now you are ready to haunt the night with your impressively detailed skeletal visage

PENCIL GUIDE
Understanding Pencil Grades from H to B
From first sketch to finished drawing — learn pencil grades, line control, and shading techniques.
Explore the Full Guide
Cracked Skull Face Paint
This striking design combines the eerie elegance of a skull with the delicate imperfections of cracked porcelain. By focusing on stark contrast and fine detail work, you’ll create a hauntingly beautiful illusion perfect for Halloween or photoshoots.
Step-by-Step Guide
Materials
- White cream makeup or face paint (highly pigmented)
- Black cream makeup or face paint
- Translucent setting powder
- Flat foundation brush or sponge
- Small blending brush
- Fine liner brush
- Black eyeliner pencil (optional)
- Black eyeshadow
Step 1: Base Preparation
-
Clean and Prep:
Start with a clean, dry face. Tie your hair back securely to keep it away from the paint. Apply a light layer of moisturizer if your skin is dry, but let it absorb fully before painting. -
Apply White Base:
Using a flat foundation brush or a damp sponge, apply white face paint evenly across your entire face. Don’t worry about the ears or neck; the contrast with your natural skin tone is part of the look. -
Build Opacity:
Dab the sponge over areas that look streaky to build up an opaque, bone-white finish. I find that pressing the product into the skin rather than dragging it creates a smoother result. -
Set the Base:
With a large fluffy brush or powder puff, gently pat translucent setting powder over the white paint. This step is crucial to prevent the black details from smudging later.
Fix Smudges Instantly
If black paint smears onto the white base, wait for it to dry completely, then gently flake it off with a dry cotton swab or cover it with fresh white paint.
Step 2: Sculpting the Features
-
Outline Eye Sockets:
Use a small brush and black paint to lightly outline large, rounded circles around your eyes. Go above your eyebrows and down onto the upper cheekbones for a hollowed-out skull effect. -
Fill the Sockets:
Fill in these circles completely with black cream makeup. Be gentle around the delicate eye area. -
Set and Blend:
Pack black eyeshadow over the black cream paint to set it and deepen the color. Use a fluffy blending brush to soften the outer edges slightly so they aren’t too harsh. -
Nose Cavity:
Paint the bottom half of your nose black, creating an upside-down ‘M’ or heart shape. Extend the black paint slightly into the nostril openings to hide any skin color. -
Hollow Cheeks:
Starting near the ear, paint a thick black line tapering towards the corner of the mouth, following the underside of your natural cheekbone. This creates the illusion of the hollow cheek cavity.
Step 3: Intricate Cracking Details
-
Mouth Guidelines:
For the teeth, draw a thin horizontal line extending from the corners of your lips outwards towards the cheek hollows. -
Draw the Teeth:
Using a fine liner brush and black paint, draw vertical lines across your lips and the extended line. Make the center ones longer and the outer ones shorter. -
Refine Teeth Shape:
Connect the tops and bottoms of these vertical lines with small, curved arches to simulate the gum line and individual teeth roots. -
Forehead Cracks:
With your thinnest liner brush (or liquid eyeliner), draw jagged lines starting from your hairline and moving downward. Think of how lightning branches out—keep lines shaky and irregular. -
Connect the Web:
Add smaller fissures branching off the main cracks. Connect some lines to create isolated shapes that look like broken pottery shards. -
Temporal Fractures:
Add a few cracks radiating near the temples or eyes, but keep the cheeks relatively clear to let the cheekbone contour stand out. -
Chin Detail:
Draw a wavy, vertical crack running from your bottom lip down the center of your chin. -
Final Contrast Check:
Step back and look in the mirror. If any black lines look grey or faded, carefully go over them again with liquid liner or black paint for maximum impact.
Add Dimension
Use a grey eyeshadow to lightly shade along one side of the larger cracks. This creates a shadow effect that makes the cracks look deep and three-dimensional.
Now you are ready to turn heads with this hauntingly detailed transformation
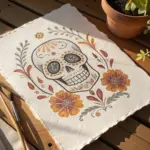
Festive Floral Skull (Day-of-the-Dead Inspired)

Capture the spirit of Dia de los Muertos with this elegant sugar skull design that balances traditional elements with soft, festive colors. Featuring warm marigold tones, deep burgundies, and delicate vine work, this look is both intricate and surprisingly approachable for face painting beginners.
How-To Guide
Materials
- White face paint (water-activated or cream)
- Black face paint (detail/liner)
- Burnt orange or terracotta face paint
- Mustard yellow or gold face paint
- Deep maroon or burgundy face paint
- Teal or turquoise face paint
- Makeup sponge (high density)
- Round brushes (sizes #2, #4, and #6)
- Fine liner brush (size #0 or #1)
- Setting powder (translucent)
- Pencil eyeliner (optional for sketching)
- False eyelashes (optional)
Step 1: Setting the Canvas
-
Prep the skin:
Start with a clean, dry face. Tie hair back securely to keep it away from the forehead and cheeks. -
Apply the white base:
Dampen your high-density sponge and load it with white face paint. Use a stippling (dabbing) motion to create an even, opaque layer over the entire face, avoiding the immediate eye area. -
Refine the edges:
Gently fade the white paint as it nears the hairline and jawline for a softer look, rather than a hard mask line. Let this base dry completely before moving on.
Step 2: The Eyes & Nose
-
Fill the eye sockets:
Using a #6 round brush, fill the entire eyelid and undereye area with deep maroon paint. Create a large circle that extends up to the eyebrow and down to the top of the cheekbone. -
Create the scalloped border:
Switch to a #4 brush loaded with mustard yellow. Paint gentle semi-circles (scallops) all around the outer edge of the maroon circle. -
Add dimension:
While the yellow is still slightly damp, take a small amount of burnt orange on a #2 brush and blend it into the inner edge of the yellow scallops to create a subtle ombre effect. -
Paint the nose cavity:
Load a #4 brush with black paint. Paint a teardrop or spade shape on the tip of the nose, extending slightly up the bridge. Keep the edges sharp. -
Highlight the nose:
Before the black completely dries, dab the sponge lightly or use a dry brush to lift a tiny bit of pigment from the center, creating a highlight that gives the nose depth.
Clean Lines Secret
Rest your pinky finger on the model’s face (use a powder puff to prevent smudging) while painting. It acts as an anchor for steady, precise linework.
Step 3: Detailed Vine Work
-
Forehead floral center:
In the center of the forehead, paint a geometric flower using three burnt orange petals fanning upwards. Outline these petals finely with burnt orange for definition. -
Add teal accents to forehead:
Paint two teal leaves flanking the orange flower petals. Use a confident stroke, pressing down and lifting up to create the leaf shape. -
Cheek swirls:
Using a thin liner brush and brown or dark orange paint mixed with a touch of black, paint a large, elegant swirl starting from the ear and curving toward the mouth. -
Leaf details:
Along the main cheek vine, add small teal and red leaves. Allow them to follow the curve naturally. -
Chin embellishment:
Mirror the forehead design on the chin with a smaller, three-petal orange flower and a single teal leaf extending to the side.
Patchy White Base?
If the white looks streaky, don’t drag the sponge. Wait for the first layer to dry fully, then stipple (tap) a second thin layer directly over the patchy spots.
Step 4: The Mouth & Final Touches
-
Draw the mouth line:
With your fine liner brush and black paint, extend the corners of the mouth outward toward the jawline in a thin, continuous line. -
Stitch the lips:
Paint vertical tick marks across the lips and the extended line. I find it helps to start in the center and work outward to keep the spacing symmetrical. -
Add detail dots:
Using the back end of a small brush dipped in maroon, place three vertical dots between the eyebrows and single dots in the center of the cheek swirls. -
Define the scallops:
If needed, take your fine liner brush with a very diluted brown or orange and outline the yellow eye scallops to make them pop. -
Set the look:
Lightly dust translucent powder over the T-zone to prevent shine and lock the face paint in place.
Pair this striking makeup with a crown of marigolds to complete your transformation


Glam Skull With Liner-Sharp Details

This striking look merges the classic haunting appeal of a skull with high-fashion precision, featuring crisp lines and a stark black-and-white palette. The design focuses on sharp contrasts and delicate dot work to create a glamorous yet eerie skeletal illusion.
Step-by-Step Tutorial
Materials
- Full coverage white face paint (cream or water-activated)
- Black face paint or cream liner
- Setting powder (translucent)
- Black eyeliner pencil (soft kool-style)
- Liquid eyeliner pen (precision tip)
- Flat foundation brush
- Small angled brush
- Fine detail brush (size 0 or 00)
- Makeup sponge
- Micellar water (for cleanup)
Step 1: Base and Structure
-
Prep the canvas:
Start with a clean, dry face. Tie your hair back tightly to keep it away from the paint. If you have dark eyebrows, you might want to glue them down flattened with a gluestick, though simply painting over them works for this thick coverage style. -
Apply the white base:
Using a damp sponge or flat foundation brush, apply the white face paint all over your face. Stop at the jawline—keep the neck bare for that ‘mask’ effect. Build up opacity with a second layer if needed. -
Set the base:
Lightly dust translucent setting powder over the white paint using a fluffy brush. This is crucial to prevent the black details from smudging into the white later. -
Outline the eye sockets:
With a black eyeliner pencil, lightly sketch large circles around your eyes. Extend them up over your eyebrows and well below the under-eye area to mimic the hollowing of a skull. -
Fill the eyes:
Fill in these circles with black face paint using a flat brush. Be gentle around the delicate eye area and ensure you get close to the lash line. -
Contour the hollows:
Draw a sweeping, curved shape on each cheek, starting from the ear and curving down towards the jawline, mimicking where the cheekbone would hollow out. Fill this shape in with solid black.
Step 2: Fine Details and Linework
-
Create the nose cavity:
Paint the tip of your nose black. Instead of a simple triangle, create an inverted ‘M’ shape at the top bridge and two small curves near the nostrils to simulate the nasal cavity bones. -
Draft the mouth:
Extend the line of your mouth outwards toward the ears on both sides using a fine liner brush and black paint. Keep the line thin and crisp. -
Draw the teeth:
paint vertical lines across your lips and the extended mouth line. Make the center lines slightly longer and the outer lines shorter as they recede along the cheek. -
Connect the roots:
At the top and bottom of each vertical tooth line, draw faint, Y-shaped forks that fade into the white skin, giving the appearance of tooth roots. -
Lower lip shading:
Add tiny horizontal shading lines inside the lip ‘teeth’ to give them roundness and dimension. -
Add forehead ornamentation:
Using your liquid eyeliner or fine brush, paint two elongated, inverted triangular shapes in the center of the forehead, resembling a stylized spider or foliate design. -
Detail the chin:
Mirror the forehead design on the chin with a small, floral-like black shape. Keep the strokes sweeping and elegant.
Sharpen Your Edges
If your black lines look shaky, dip a small angled brush in concealer or white paint to “erase” and sharpen the edges from the outside in.
Step 3: The Dotted Finish
-
Petal outlines:
Around the black eye sockets, use your liquid liner or smallest brush to paint tiny U-shapes or scallops. This acts as a guide for the dots. -
Apply the dot work:
Place a single black dot inside each scallop you just painted. Try to keep the spacing consistent. I like to reload my brush every 3-4 dots to keep them round. -
Cheek accents:
Add a row of graduated dots following the curve of the black cheek contour, getting smaller as they move toward the mouth. -
Final touches:
Clean up any edges with a cotton swab dipped in micellar water, and re-apply white paint if you accidentally smudged any boundaries.
Add Subtle Texture
For a grittier look, use a dry sponge with a tiny bit of grey eyeshadow to lightly dab texture around the temples and jawline for artificial weathering.
Take a moment to admire your precision work in the mirror before heading out.
Lace-Pattern Skull Overlay
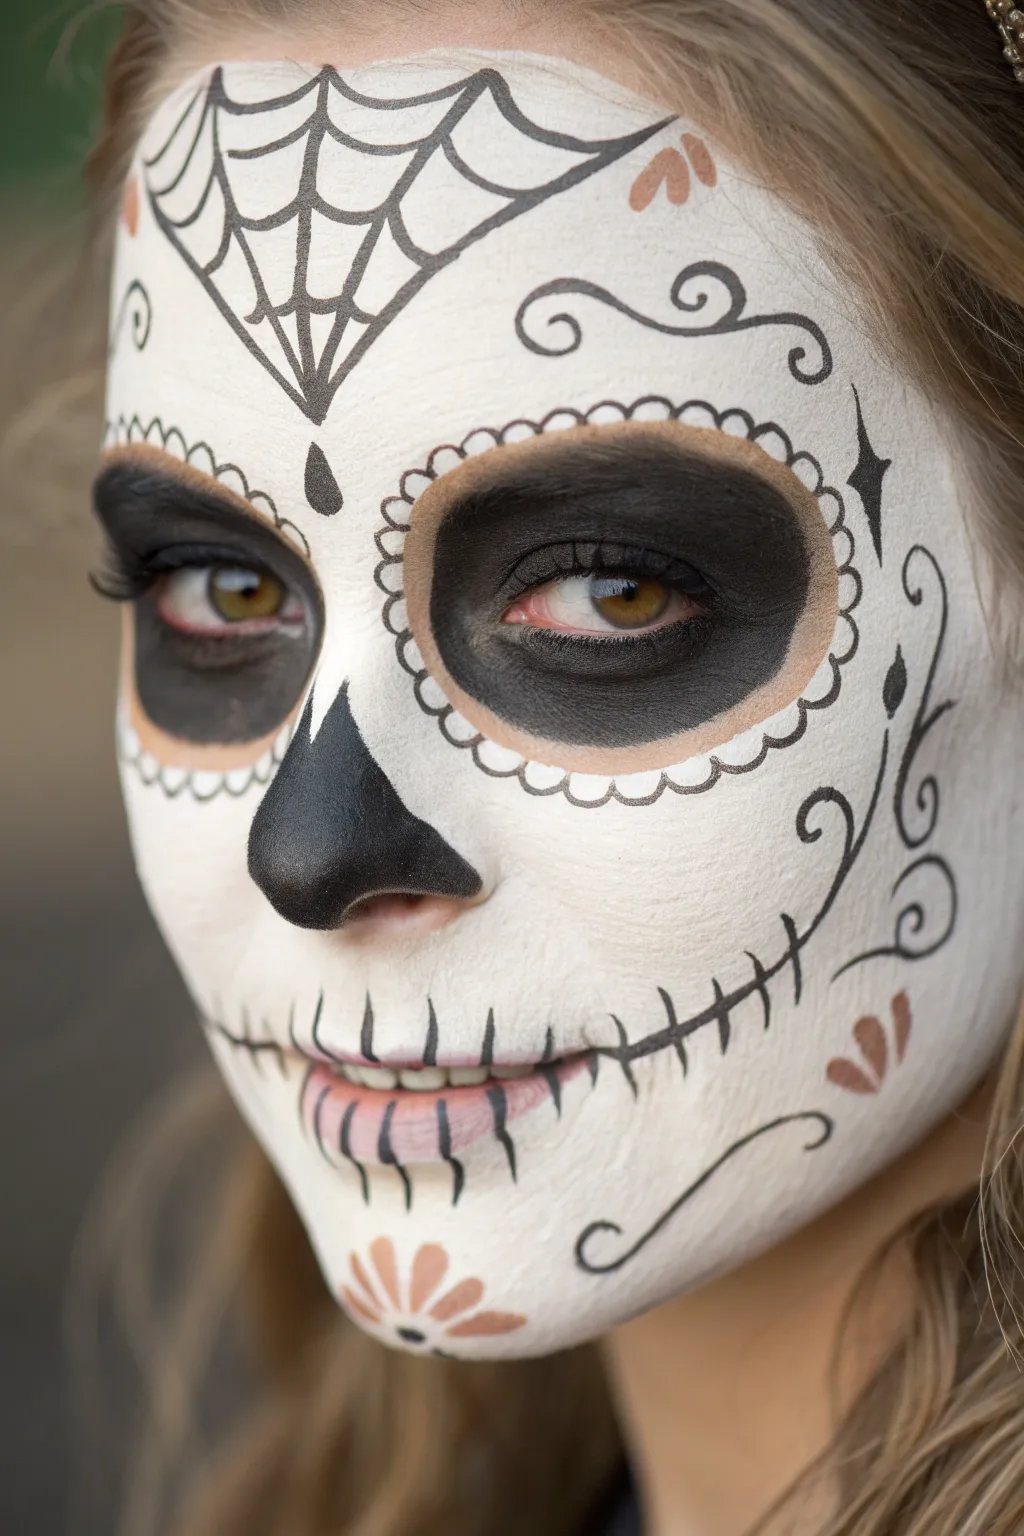
Transform yourself with this elegant yet spooky sugar skull design that balances stark black details against a smooth, porcelain-white base. The delicate scalloped edges around the eyes mimic intricate lace, giving this classic Day of the Dead look a refined and detailed finish.
Step-by-Step Guide
Materials
- High-quality white face paint (water-activated or cream)
- Black face paint (strong pigment, water-activated)
- Muted coral or terracotta face paint (for accents)
- Dense makeup sponge or beauty blender
- Fine detail brush (size 0 or 1)
- Small round brush (size 2 or 3)
- Translucent setting powder
- Large fluffy powder brush
Step 1: Creating the Porcelain Canvas
-
Clean and prep:
Start with a freshly washed and dried face. If you have oily skin, a light astringent wipe can help the paint adhere better. -
Apply the white base:
Load a slightly damp sponge with white face paint. Stipple (dab repeatedly) the white over the entire face, avoiding the immediate eye area and the tip of the nose. This dabbing motion creates a smoother, streak-free finish than swiping. -
Build opacity:
Let the first layer dry for a minute or two. Apply a second layer of white to ensure full coverage, making sure the skin tone underneath is completely hidden. -
Set the base:
Once the white is dry to the touch, gently pat a layer of translucent setting powder over the face using a fluffy brush. This prevents smudging when you add the black details later.
Step 2: The Lace Eyes and Nose
-
Block out the eyes:
Using the small round brush and black paint, outline large circles around the eyes, covering the eyebrows and extending below the under-eye area. Fill these circles in completely with black. -
Refine the edges:
If the black looks patchy, wait for it to dry and add a second coat. Keep the edges relatively clean, but they don’t need to be razor-sharp yet. -
Paint the nose cavity:
Outline the tip of the nose in an inverted ‘V’ or subtle spade shape. Fill completely with black paint to simulate a nasal cavity. -
Outline the scallops:
Switch to your fine detail brush. Carefully paint small ‘U’ shapes around the perimeter of the black eye circles. I like to anchor my pinky on the cheek for stability here. -
Connect the lace pattern:
Inside each ‘U’ loop (the scalloped edge), paint a smaller, thinner black line that hugs the border of the main eye socket, connecting the scallops to create that delicate lace effect.
Clean Lines Hack
For the crispest lines on the lace details, dilute your black paint slightly until it has an ink-like consistency, and use a liner brush with long bristles.
Step 3: Webs, Stitches, and Swirls
-
Center the web:
On the forehead, paint a central vertical line roughly two inches long starting from the hairline. Add two curved lines branching out from the top center to the sides. -
Connect the web:
Draw concave curved lines connecting your main web strands to create the spiderweb mesh. -
Draw the main mouth line:
Paint a thin black line extending from the corners of the mouth outward towards the jawline, slightly curving up at the ends. -
Stitch the lips:
Paint vertical lines across the lips and the extended mouth line. Make the lines shorter near the center of the lips and longer as you move outward. -
Add forehead swirls:
Using the fine brush, paint symmetrical decorative swirls above the eyebrows, curving outwards. -
Cheek details:
Paint a larger, elegant swirl starting from the ear area and curving down toward the jawline on each cheek. -
Add floral accents:
Using the terracotta or muted coral paint and a small round brush, press small teardrop shapes near the forehead web and chin to create subtle flower petals. -
Final touches:
Add tiny black teardrops or dots inside the forehead web or near the lace eye patterns for extra texture and detail.
Fixing Smudges
If you accidentally smudge black onto the white base, don’t wipe it! Let it dry completely, then dab a tiny bit of white paint over it like correction fluid.
Now you have a stunning, intricate sugar skull design ready for any celebration
Dripping Ink Skull
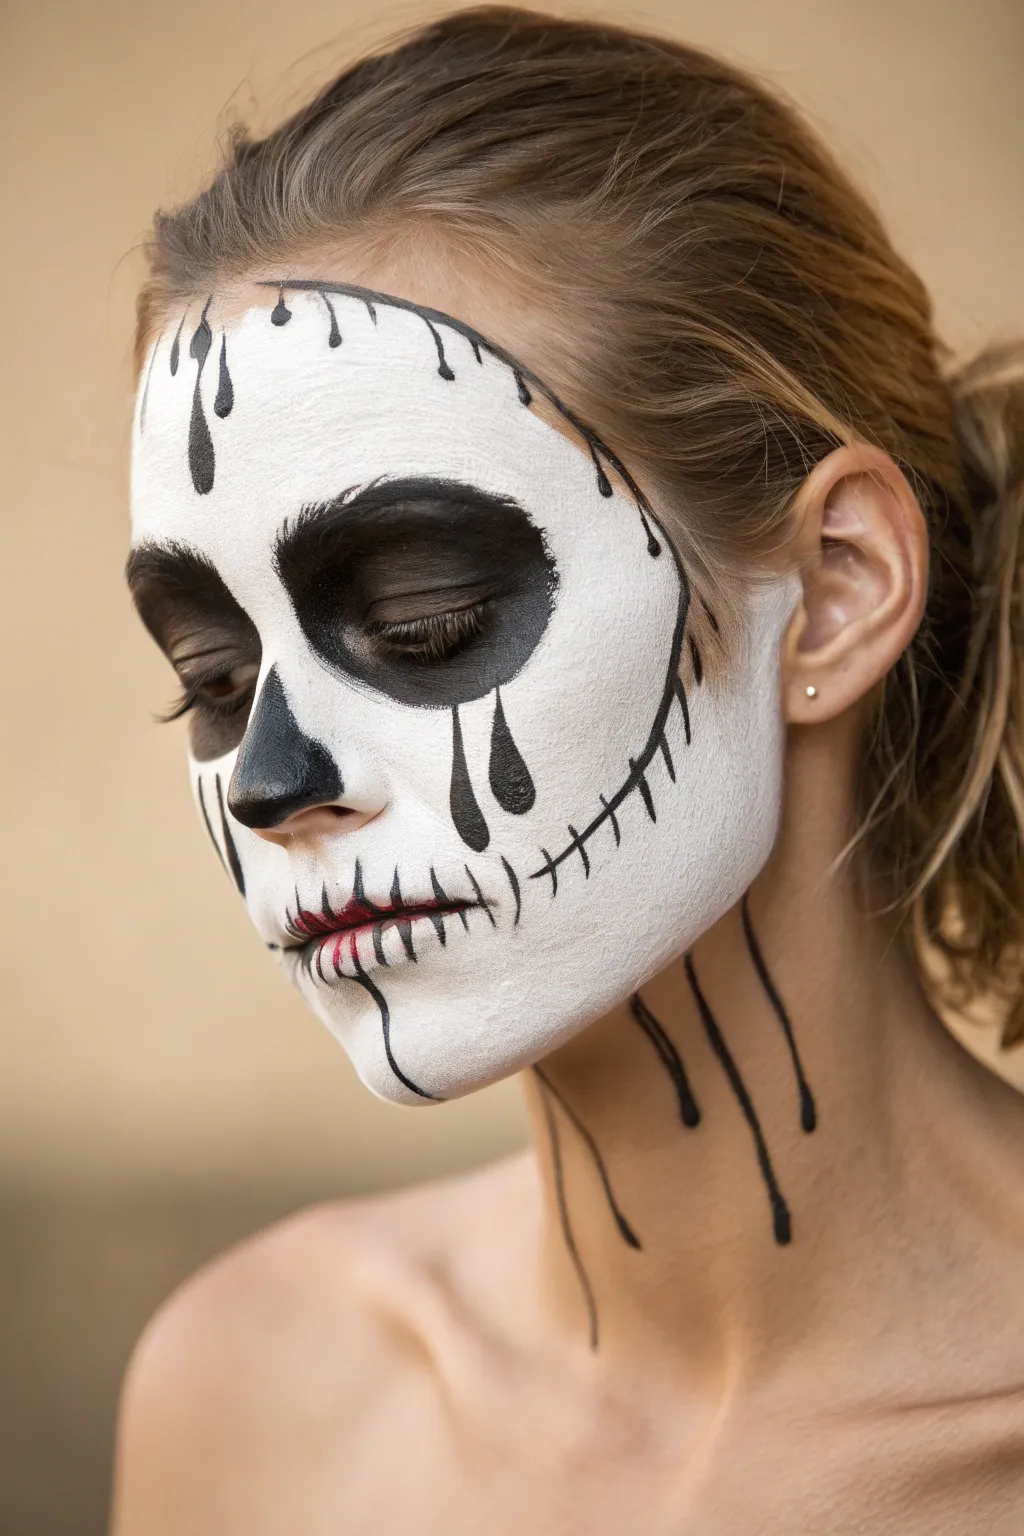
This hauntingly beautiful skull design moves beyond the traditional sharp lines of skeletal makeup, incorporating an artistic, dripping ink effect. By blending classic calavera elements with fluid, downward strokes, you create a melancholic character that looks like a living illustration.
Detailed Instructions
Materials
- High-quality white face paint (water-activated or cream)
- Black face paint (strong pigment)
- Red lipstick or red cream face paint
- Flat foundation brush or makeup sponge
- Medium round brush
- Fine detail brush (liner brush)
- Translucent setting powder
- Powder puff or large fluffy brush
- Black eyeshadow (matte)
- Micellar water and cotton buds (for cleanup)
Step 1: Creating the Canvas
-
Prep the skin:
Begin with a clean, dry face. Tie your hair back securely to keep it out of the paint. If you have very dry skin, apply a light, non-greasy moisturizer and let it soak in completely before starting. -
Apply the white base:
Using a damp sponge or flat foundation brush, apply the white face paint all over your face. Start from the center and work outward towards the hairline and jawline. -
Build opacity:
Don’t try to get solid coverage in one go, or it might crack. Apply a second thin layer once the first is semi-dry to achieve a smooth, porcelain-like finish. -
Set the base:
Gently press translucent setting powder over the white paint using a puff. This is crucial to prevent the black details from smudging into the white later.
Step 2: Defining the Skull Structures
-
Outline the eye sockets:
With a medium round brush and black paint, draw large circles around your eyes. Follow the natural curve of your eyebrow bone and dip down onto the upper cheekbone. -
Fill the eyes:
Fill in the circles completely with black. Be gentle around the delicate eyelid area. For a softer look, I sometimes pat black eyeshadow over the wet paint to set it and create a deeper matte finish. -
Sculpt the nose:
Paint the tip of your nose black. Instead of a solid triangle, draw two upside-down teardrop shapes that mirror the nasal cavity, leaving a tiny sliver of skin or white paint in the center if you want extra detail. -
Draft the jawline:
Using a thinner brush, draw a curved line starting from your earlobe down towards your chin on both sides to simulate the separated jawbone of a skull.
Smudge Control
If black paint falls onto the white cheek area, wait for it to fully dry. Then, gently scratch it off with a clean spoolie brush or q-tip before touching up with white.
Step 3: The Mouth and Ink Details
-
Paint the inner lips:
Apply red lipstick or red paint to the very center of your lips. It doesn’t need to be perfect; a stained effect works well here. -
Extend the smile:
With your fine liner brush and black paint, draw a horizontal line extending from the corners of your mouth out towards your cheeks. -
Stitch the mouth:
Draw short, vertical vertical lines across the mouth slit and your actual lips. Make the lines vary slightly in length and angle to look organic rather than mechanical. -
Create forehead drips:
At the top of your forehead/hairline, press your loaded round brush down and drag it upward or downward to create teardrop shapes that look like dripping ink. -
Add the weeping eyes:
Paint two or three drips coming directly from the bottom of the black eye sockets, running down the cheek. Make the heads of the drips rounded and the tails tapered. -
Detail the neck:
Extend the ‘ink’ theme to your neck. Paint long, vertical lines of varying thickness running from the jawline down the neck, ending in droplet shapes. -
Refine edges:
Go back with your finest brush and sharpen the points of the drips or fix any jagged edges on the eye sockets.
Level Up: Texture
Mix a tiny amount of water into your black paint to make it runny. Tilt your head back and let gravity create real, spontaneous drips on the neck area for authenticity.
Now you are ready to haunt the night with this elegant and sorrowful masterpiece
Neon Pop Skull on a Dark Base
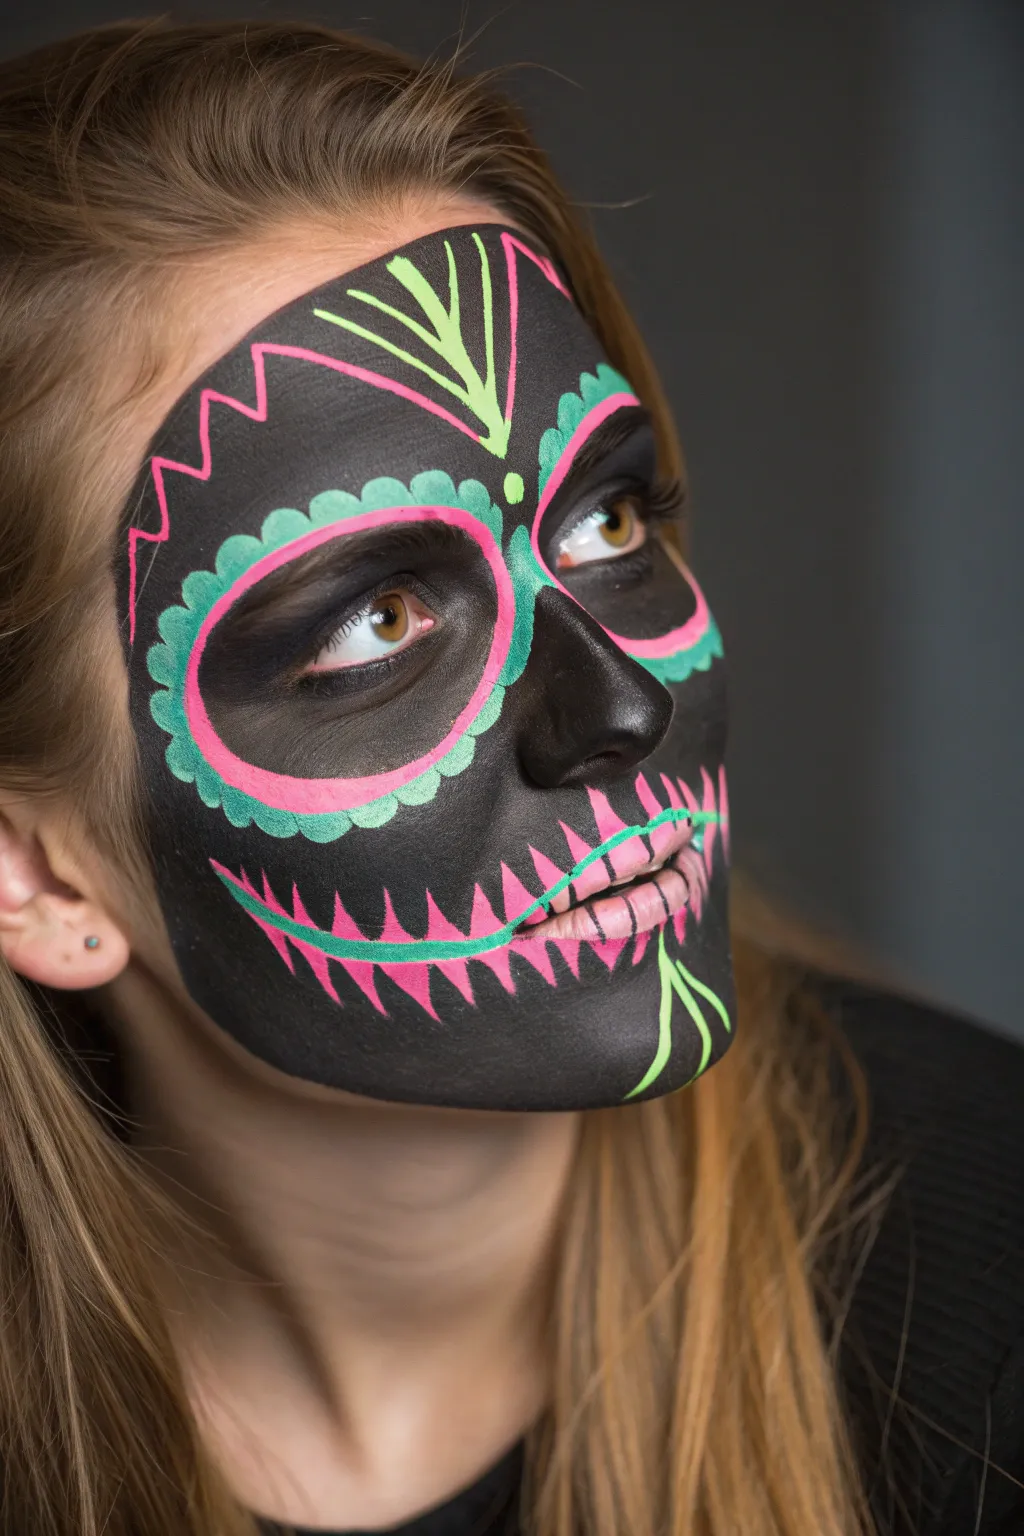
Stand out with this vibrant take on a calavera design that sets glowing neon pinks and greens against a stark matte black background. The high contrast makes the colors practically vibrate, creating a striking look perfect for Halloween or Día de los Muertos celebrations.
Step-by-Step Tutorial
Materials
- Matte black water-activated face paint
- Neon pink face paint (UV reactive serves well)
- Neon lime green face paint
- Flat foundation brush or synthetic sponge
- Medium round brush (size 4 or 6)
- Fine liner brush (size 1 or 2)
- Small eyeshadow blending brush
- cup of water
- Paper towels
Step 1: Laying the Foundation
-
Prep the skin:
Begin with a clean, dry face. Tie back any loose hair to keep it away from the paint. If the skin is oily, a quick swipe of toner helps the paint adhere better. -
Outline the eye sockets:
Load a medium round brush with black paint. Draw large circles around your eyes, extending up to the eyebrows and down to the top of the cheekbones. Leave the inside of these circles bare for now. -
Establish the nose:
Using the same black paint, outline the nose shape. Create a ‘V’ shape on the tip of the nose, extending the wings up towards the bridge, leaving a small triangle of skin visible on the very tip if you prefer, or fill it all in later. -
Fill the dark base:
Switch to your flat foundation brush or a damp sponge. Load it heavily with the matte black paint. Fill in the entire face around your eye and nose outlines, covering the forehead, cheeks, chin, and jawline. Keep the coverage opaque and even. -
Refine the edges:
Use the medium brush to tidy up the edges near the hairline and jaw. You don’t need to paint the ears or neck, but a clean line along the jaw makes the skull shape pop. -
Darken the sockets:
Now, fill in the skin inside your eye socket outlines with a lighter wash of black, or use a black eyeshadow for a softer look around the sensitive eye area. Blend it right up to the lash line.
Step 2: Adding the Neon Details
-
Pink socket outlines:
Clean your medium round brush thoroughly. Load it with creamy neon pink paint. Carefully trace the outer edge of your black eye sockets. The line should be consistent in thickness. -
Green scalloped edges:
Switch to the neon green paint. Using the tip of the round brush, paint small scallops or ‘petals’ bordering the outside of the pink eye rings. Press down and lift up quickly to create a teardrop or petal shape. -
Forehead decoration:
Starting from the center of the forehead above the bridge of the nose, use the green paint to draw a vertical teardrop shape pointing down. Add two fanned lines extending upward and outward from this point. -
Pink forehead accents:
Using the fine liner brush and pink paint, add accents to the forehead design. Draw a zigzag line on the left temple and mirror it on the right if desired, or frame the green center piece with thin pink angled lines. -
Create the nose definition:
If you haven’t filled in the nose fully, do so now with black. Ensure the black paint on the nose is solid and dark, sharp against the colorful cheeks.
Clean lines tip
Mix your neon paints to a creamy consistency, like melted ice cream. If the paint is too watery, the vibrant colors won’t show up opaque against the black background.
Step 3: The Skeletal Mouth
-
Draw the mouth line:
Locate the corners of your real mouth. Extend a thin black line outward from these corners toward your earlobes to create a wider skeletal grin. -
Pink teeth base:
Load your fine liner brush with neon pink. Paint triangular ‘teeth’ along your upper and lower lips. The triangles should point outward—roots on the lips, points extending into the black skin. -
Green highlighting:
Clean the liner brush and pick up neon green. Add a thin line of green running horizontally through the center of the lips, separating the upper and lower teeth. This creates a striking division. -
Refining the teeth:
I find it helpful to go back with the green liner and add tiny highlights or outlines to a few of the pink teeth triangles to make them look sharper and more dimensional. -
Chin embellishment:
Finish the design with a chin element. Using the green paint on a round brush, paint three curved lines swooping downward from the center of the lower lip, resembling a stylized goatee or root structure.
Glow Up
Dust translucent setting powder over the black areas before adding neon lines. This prevents the neon colors from smudging into the black and turning muddy.
Pair this striking neon skull with a dark outfit to make those fluorescent colors truly shine in the night
Burnt-and-Ash Skull
Achieve a hauntingly textured skeletal look with this technique, which mimics the finish of bleached bone and charcoal ash. The style relies on rough brushwork and soft shading rather than precise lines, giving it an organic, weathered appearance perfect for Halloween.
Step-by-Step Tutorial
Materials
- White cream face paint (water-based or grease)
- Black cream face paint or gel liner
- Grey matte eyeshadow or contour powder
- Synthetic foundation brush
- Small detail brush (round or liner)
- Fluffy eyeshadow blending brush
- Makeup sponge
- Translucent setting powder
Step 1: Base & Structure
-
Prepare the canvas:
Start with clean, dry skin. Tie back any loose hair to keep the forehead and jawline completely accessible. -
Apply the white base:
Using a foundation brush or damp sponge, apply a layer of white face paint over the entire face, avoiding only the immediate eye socket area and the tip of the nose. -
Creating texture:
The goal isn’t a porcelain doll finish, but rough bone. Dab the sponge over the paint before it dries to create a slightly patchy, textured surface. Don’t worry if skin color peeks through slightly; it adds realism. -
Set the base:
Dust translucent setting powder heavily over the white paint. This is crucial—it prevents the black details from smearing into a grey mess later. -
Map the eye sockets:
Visualize large circles around your eyes, following the natural ridge of your brow bone and dipping down to the cheekbone. Lightly sketch this shape with a brush that has very little black paint on it.
Dry Brush Secret
For the grey shading, wipe 90% of the paint off your brush first. Use a ‘dry brush’ scrubbing motion to get that dusty, ash-covered texture.
Step 2: Shadows & Sockets
-
Fill the eyes:
Using your black face paint and a medium brush, fill in the large circles around the eyes completely. Keep the paint opaque. -
Soften the edges:
Before the black paint sets, take a clean, fluffy brush and gently buff the outer edges of the black circles so they fade into grey rather than stopping abruptly. -
Paint the nose cavity:
Draw an upside-down ‘V’ or spade shape on the tip of the nose with black paint. Extend the points slightly up the bridge of the nose. -
Hollow the cheeks:
Dip a fluffy brush into grey eyeshadow or use a tiny amount of black paint wiped almost dry. Start at the ear and sweep a thick, soft shadow under the cheekbone, curving down toward the jaw. -
Temple shading:
Add a wide, soft shadow on the temples, blending it back into the hairline to simulate the depression in the skull.
Step 3: Fissures & Teeth
-
Forehead cracks:
With a fine liner brush and black paint, draw thin, trembling lines radiating from the center of the forehead or temples. I find that twisting the brush slightly as you pull creates inconsistent, realistic cracks. -
Detailing the eye sockets:
Add small dots or short dashes just underneath the black eye circles to mimic porous bone texture. -
Outline the mouth:
Extend a horizontal line from the corners of your mouth out toward your ears, stopping about halfway across the cheek. -
Draw the teeth lines:
Paint vertical lines across the lips and the horizontal extension line. Make the lines in the center shorter and the ones toward the back longer. -
Shape the roots:
At the top and bottom of each vertical tooth line, fork the paintbrush slightly to create ‘roots’ that disappear into the white skin. -
Final shading pass:
Take your grey powder again and dab it lightly over the teeth lines to make them look dirty and aged rather than crisp.
Add Dimension
Dab a tiny bit of white highlight in the center of the black nose tip and the center of the eyelids to make the hollows look deeper and more 3D.
Now you are ready to haunt the night with this wonderfully weathered skull look
Ice-Crystal Skull With Frosted Edges
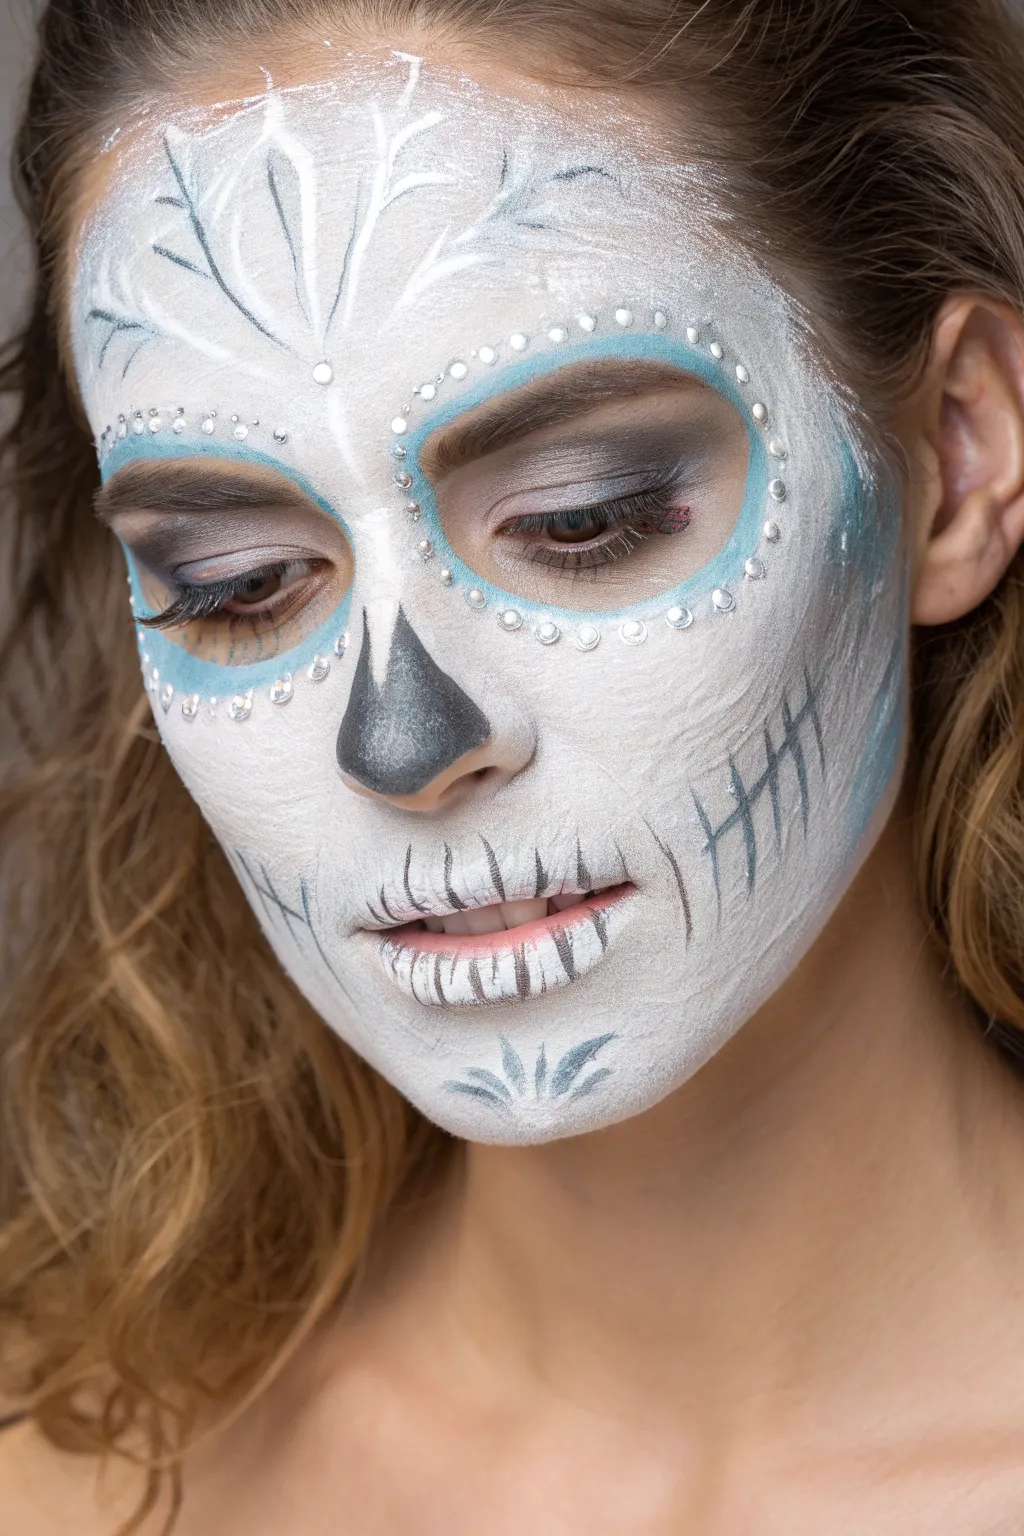
Channel a chillingly beautiful winter spirit with this icy take on the traditional sugar skull. By combining a stark white base with soft blue contours, metallic silver stitching, and sparkling gem accents, you will create a look that is both eerie and elegant.
Step-by-Step
Materials
- White face paint (water-activated or cream)
- Light blue face paint
- Dark grey or black eyeshadow/powder
- Silver metallic face paint or liner
- Small adhesive face gems or rhinestones (clear/silver)
- Skin-safe cosmetic adhesive (spirit gum or lash glue)
- Makeup sponge applicator
- Fluffy blending brush
- Fine detail brush
- Angled shading brush
- Setting spray
Step 1: Base and Eyes
-
Prime the canvas:
Begin with a clean, dry face. Load a makeup sponge with opaque white face paint and stipple it over the entire face, avoiding the immediate eye area. Build the coverage in thin layers until you have a solid, chalky white base that hides the skin tone underneath. -
Highlight the eyes:
Using a clean sponge or a medium brush, apply a ring of light blue paint around both orbital sockets. This shape doesn’t need to be perfectly round; a slightly squared or oval shape mimics a skull socket well. Blend the outer edges slightly into the white base for a frosty transition. -
Deepen the sockets:
Inside the blue ring, specifically on the eyelids and under the lash line, apply a dark grey or charcoal eyeshadow. Use a fluffy brush to smudge this color outward, creating a bruised, hollowed-out skull effect that contrasts with the bright blue rim. -
Apply the gems:
Dab tiny dots of skin-safe adhesive along the border where the blue paint meets the white base. Carefully place small clear rhinestones or gems onto these dots, encircling both eyes to frame the sockets with icy sparkle.
Patchy White Paint?
If your white base looks streaky, switch to a stippling motion (rapid tapping) rather than dragging the sponge. Let each layer dry fully before adding the next.
Step 2: Nose and Mouth
-
Sculpt the nose:
Use a medium brush loaded with dark grey or black paint to draw an inverted ‘V’ shape on the tip of the nose. Fill it in completely, bringing the color partially up the bridge. Soften the edges slightly so it looks sunken rather than painted on. -
Whiten the lips:
Paint the lips entirely white to match the face base. Let this dry completely before moving to the next step to prevent smudging. -
Draw the teeth:
Switch to a fine detail brush and black or dark grey paint. Draw thin vertical lines across the lips to represent teeth. Extend these lines slightly past the lip line onto the skin above and below. -
Add stitched details:
Extend a horizontal line from the corners of the mouth outward toward the jawline. Cross this line with small vertical hatch marks to create the classic ‘stitched smile’ look, varying the length of the stitches for a more organic feel.
Add Real Frost
Before the white base paint fully dries, lightly dust cosmetic-grade iridescent white glitter over the high points of the face for a shimmering, genuine frost effect.
Step 3: Forehead and Details
-
Frost the hairline:
Using a sponge with a very small amount of light blue paint, lightly dab around the temples and hairline. This adds a subtle frozen contour that frames the face. -
Create the centerpiece:
On the center of the forehead, use a fine liner brush and grey paint mixed with a little water to paint a sprawling, organic fern or ice-crystal shape. Keep the lines delicate and wispy. -
Add dimension:
Trace next to your grey forehead lines with white paint to act as a highlight, making the design look like raised frost. -
Shade the cheekbones:
Take an angled brush with grey eyeshadow or contour powder. Sweep it under the cheekbones to create a hollow, skeletal structure. Blend this downwards to keep the look soft and ethereal. -
Detail the chin:
Paint a small, stylized icy leaf pattern on the center of the chin using the grey paint. I find mirroring the forehead design here balances the composition beautifully. -
Final texture:
Using a very dry brush or a stipple sponge, lightly tap grey texture over the white base on the forehead and cheeks. This breaks up the solid white and gives the skin a weathered, frozen texture. -
Spray to set:
Close your eyes tight and mist the entire face with a setting spray to lock the design in place and prevent the white from transferring.
Now you are ready to haunt the winter night with this stunning skeletal visage
Split-Face Skull vs. Portrait (Before-and-After Style)
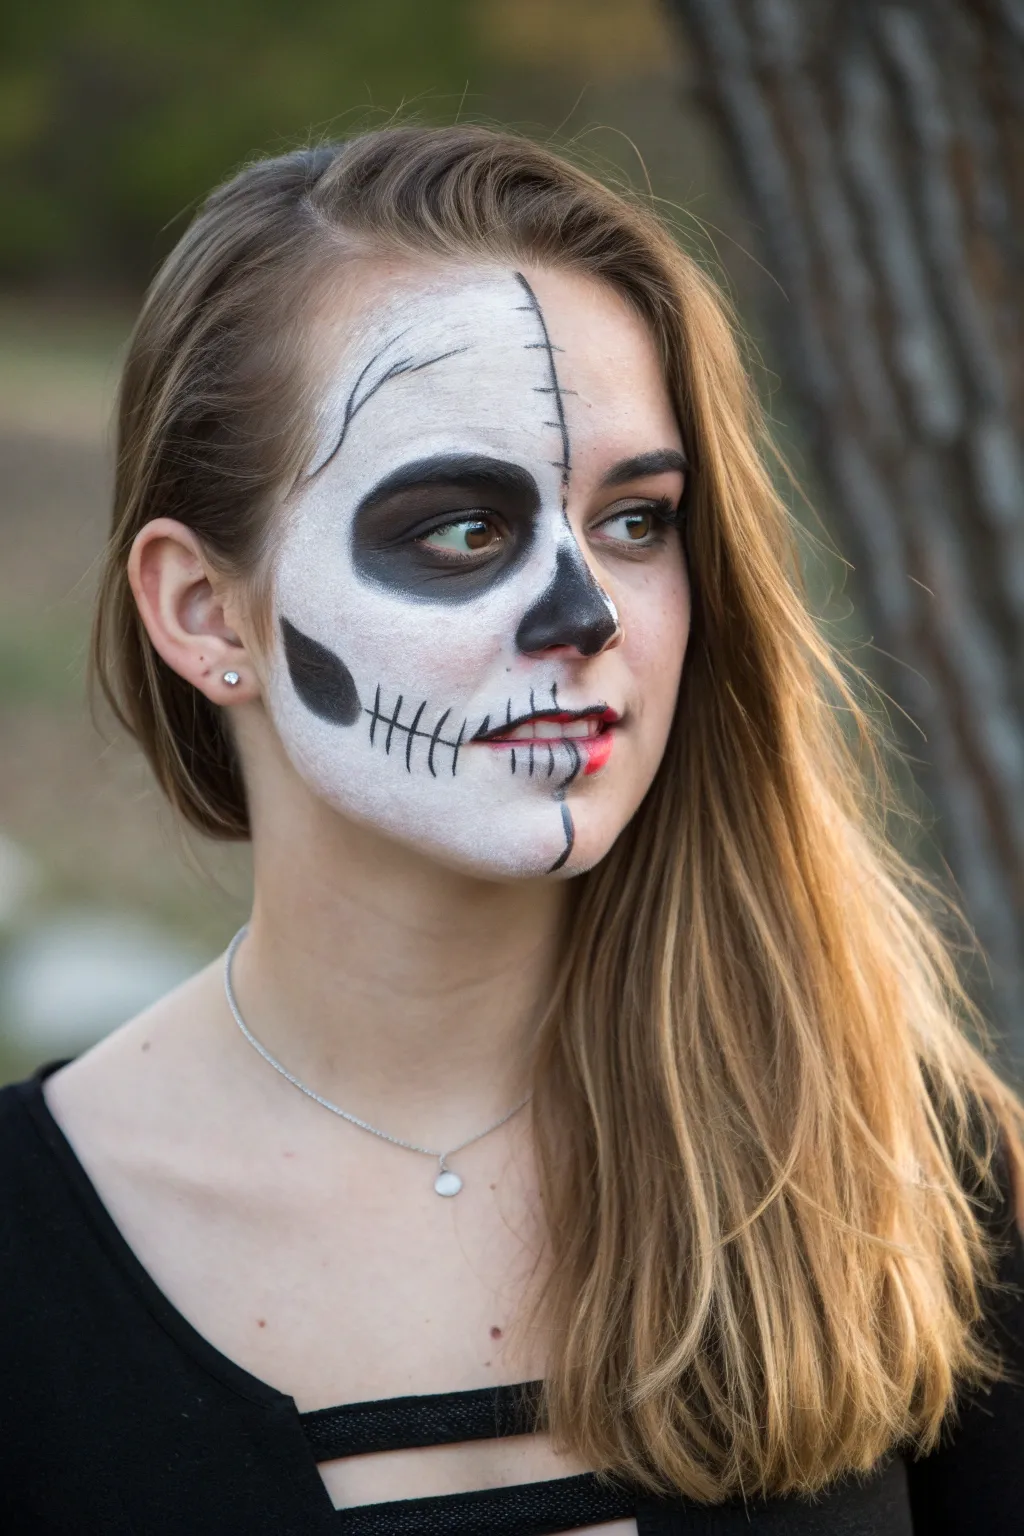
This striking makeup look juxtaposes a naturally beautiful portrait with a stark, skeletal alter ego by bisecting the face down the center. It creates a haunting visual conversation between life and death, perfect for those who want a costume that is both glamorous and macabre.
Detailed Instructions
Materials
- White cream face paint or theatrical greasepaint
- Black cream face paint or gel eyeliner
- Translucent setting powder
- Flat foundation brush
- Small angled brush or detailing brush
- Fluffy blending brush
- Makeup sponge
- Black eyeshadow
- Standard beauty makeup (foundation, mascara, etc.) for the ‘alive’ side
Step 1: Setting the Dividing Line
-
Clean and prep:
Begin with a clean, dry face. Tie your hair back to keep stray strands out of the paint. Apply a light layer of moisturizer if your skin is dry, but let it absorb fully before starting. -
Apply beauty makeup:
Before touching the face paint, apply your standard daily makeup to the *left* side of your face (the side that will remain human). This includes foundation, brow filler, mascara, and a touch of neutral lipstick. -
Draw the boundary:
Using a small brush and a tiny amount of black paint or a nude liner pencil, lightly trace a vertical line down the exact center of your forehead, nose, lips, and chin. This guide ensures your symmetry remains sharp.
Patchy White Paint?
If your white base looks streaky, don’t drag the brush. Instead, use a damp sponge and ‘stipple’ (repeatedly tap) the paint onto the skin to build smooth, opaque coverage.
Step 2: Creating the Bone Base
-
Apply white base:
Dip your flat foundation brush or makeup sponge into the white cream paint. Apply an opaque layer to the *right* side of your face, covering the skin from the hairline to the jawline. -
Smooth the texture:
Pat the white paint with a sponge to remove brush strokes. I like to be careful near the eye area, ensuring the white goes right up to the lower lash line but leaving the eyelid bare for now. -
Set the white:
Gently press translucent setting powder over the white paint using a fluffy brush or powder puff. This step is crucial to prevent the black details from smearing into a gray mess later.
Step 3: Sculpting the Skull Features
-
Outline the eye socket:
Using a medium brush and black paint, draw a large circle around your right eye. Follow the natural curve of your eyebrow bone at the top and the cheekbone at the bottom. -
Fill the socket:
Fill in the entire circle with black paint. For a smokier, more realistic look, I often pat black eyeshadow over the wet paint to set it and soften the edges slightly. -
Create the nose cavity:
Paint the right half of your nose black. Draw a line following the curve of the nostril up towards the bridge, creating a tear-drop or pear seed shape that stops at the midline of your nose. -
Carve the cheekbone:
Locate the hollow of your cheek. Using the black paint, draw a bold, teardrop-shaped hollow starting near the ear and tapering toward the corner of the mouth, simulating the missing flesh under the zygomatic arch. -
Define the temple:
Add a thin, curved black line or distinct cracks near the temple area to simulate cranial sutures or fractures.
Level Up: 3D Cracks
Use a fine-tip liquid eyeliner to add tiny, branching hairline fractures radiating from the black eye socket or temple lines to make the bone look aged and brittle.
Step 4: Teeth and Final Details
-
Extend the mouth:
Draw a thin horizontal black line extending from the corner of your mouth outward across the white cheek, following the natural seam of your lips. -
Mark the teeth:
Along this mouth line and over your actual lips on the white side, draw short vertical lines to represent teeth. Make them longer near the center and shorter as they move outward. -
Add sutures to the divide:
Return to the center line dividing the two faces. Using a fine detail brush and black paint, add small horizontal ‘stitches’ or hatch marks across the boundary on the forehead and chin for a sewn-together effect. -
Shade the teeth:
For extra dimension, use a tiny bit of grey eyeshadow or diluted black paint to add small triangles at the root of the drawn teeth lines, making them look rooted in the jaw.
You have successfully merged elegance and horror into a single, show-stopping look


Have a question or want to share your own experience? I'd love to hear from you in the comments below!