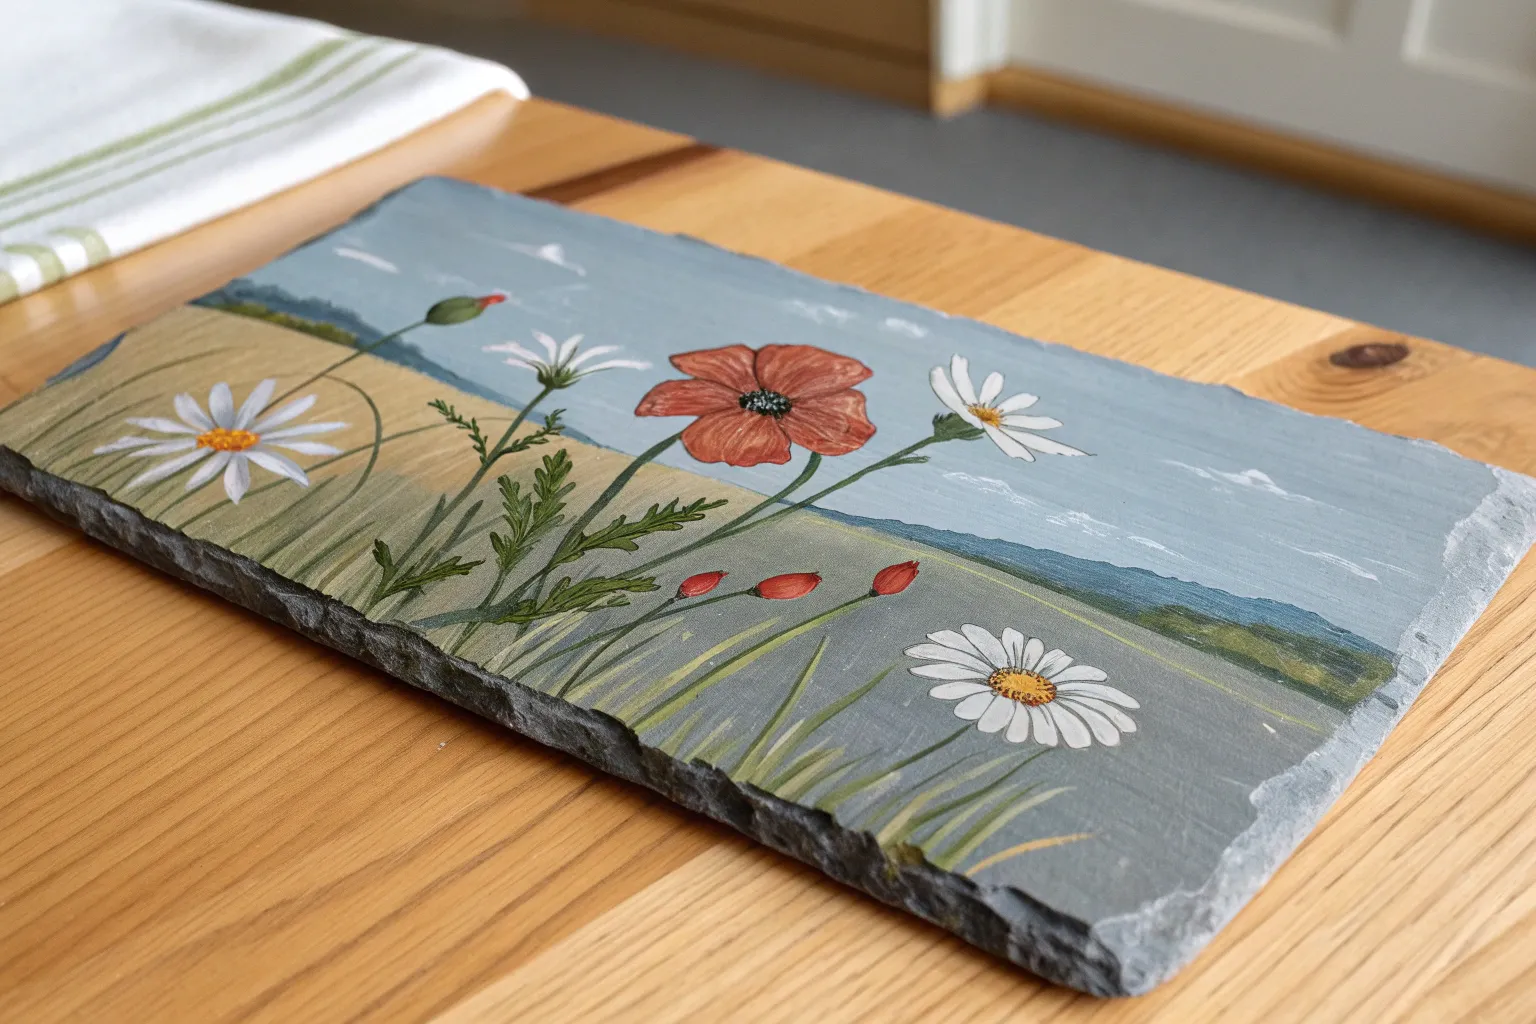
If you’ve got a little piece of slate and the itch to make something cute, you’re in the right mindset for easy slate painting. I love slate because that moody dark surface makes bright colors and crisp lines pop fast, so your slate painting looks impressive without a ton of fuss.
Bold Sunflower on Slate
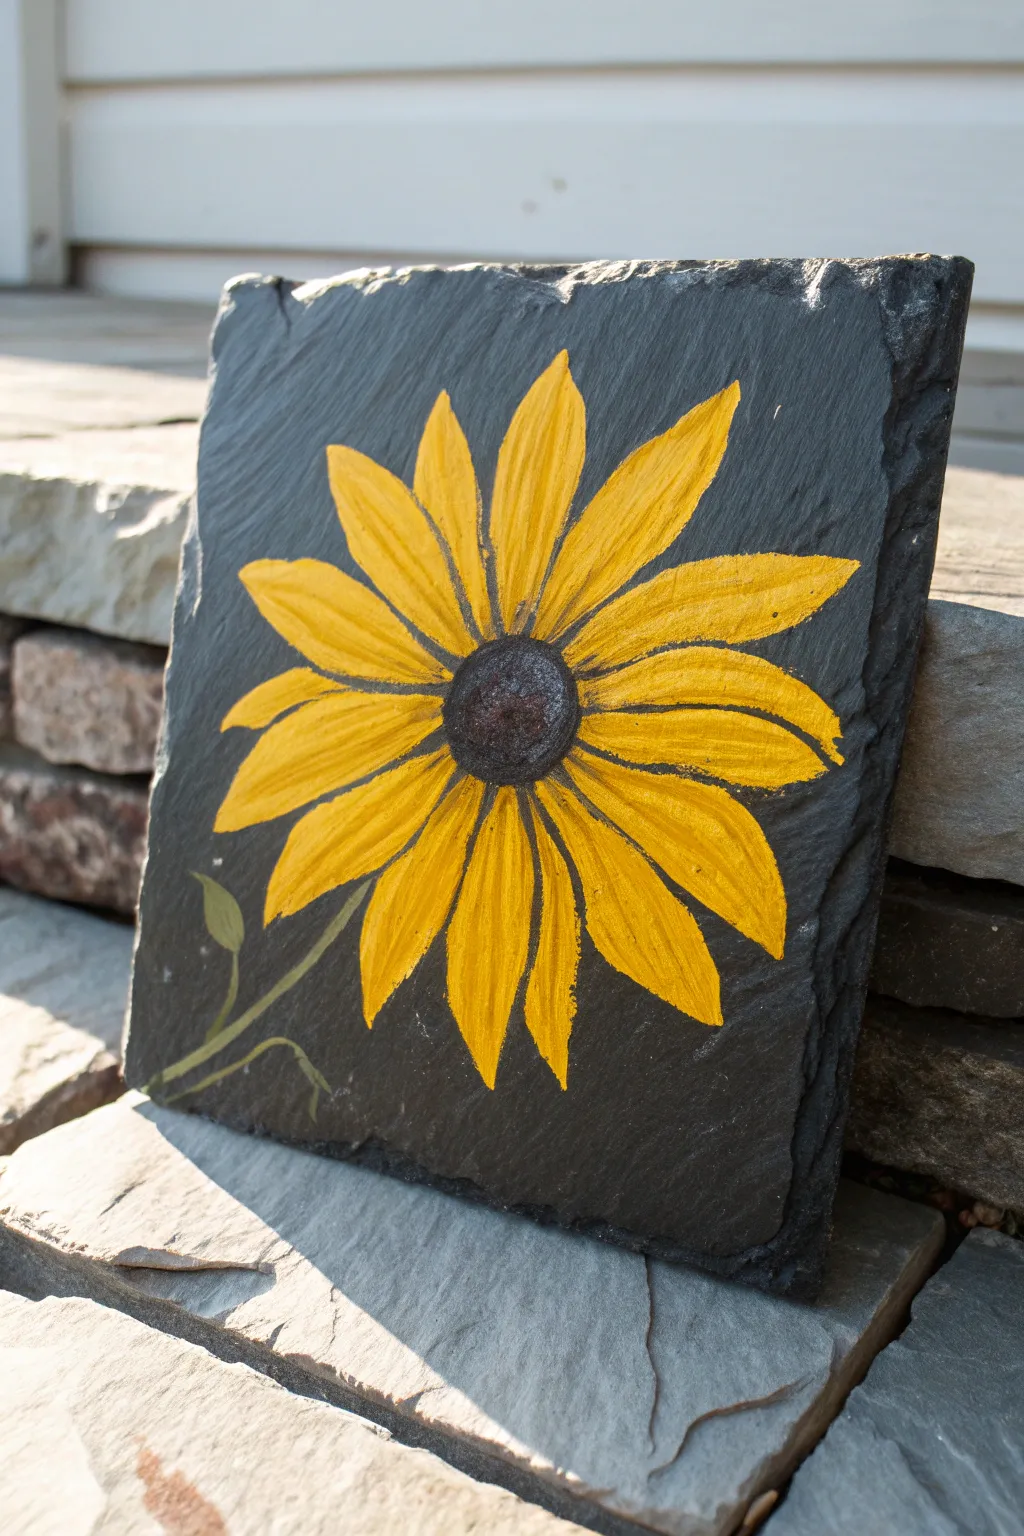
Bring a burst of sunshine to your garden or porch with this striking sunflower painted on a natural slate tile. The dark, textured background of the stone makes the vibrant yellows pop beautifully, creating a perfect piece of rustic decor.
Detailed Instructions
Materials
- Square slate tile (approx. 8×8 or 10×10 inches)
- White chalk or watercolor pencil (for sketching)
- Acrylic craft paints: Bright Yellow, Golden Yellow/Ochre, Dark Brown, Black, Olive Green
- Medium flat brush (size 6-8)
- Small round brush (size 2-4)
- Water cup and paper towels
- Clear outdoor acrylic sealer (matte or satin finish)
Step 1: Preparation and Sketching
-
Clean the surface:
Begin by wiping down your slate tile with a damp cloth to remove any stone dust or debris. Let it dry completely before starting. -
Mark the center:
Using your white chalk or a pale watercolor pencil, lightly draw a circle slightly below the exact center of the slate. This will be the sunflower’s head. -
Sketch petal guides:
Draw simple lines radiating outward from the center circle to plan where your petals will go. This ensures your flower looks balanced and fills the space nicely. -
Outline the stem:
Sketch a curved line coming from the bottom left of the flower head towards the bottom left corner of the slate for the stem, adding a small leaf shape on the left side.
Paint Soaking In?
Slate is porous! If your first yellow layer looks dull or disappears, don’t panic. Paint a base layer of white first, let it dry, then paint the yellow on top for maximum brightness.
Step 2: Painting the Petals
-
Base coat the petals:
Load your medium flat brush with Bright Yellow paint. Paint the individual petal shapes over your sketched guidelines. Don’t worry if the slate texture shows through a bit; we want good coverage but a rustic feel. -
Let the first layer dry:
Acrylics dry darker on dark surfaces, so allow this first yellow layer to dry to the touch for about 10–15 minutes. -
Apply a second coat:
Go over the petals again with the Bright Yellow to make the color opaque and vibrant against the dark grey stone. -
Add dimension:
While the yellow is still slightly wet, pick up a tiny bit of Golden Yellow or Ochre on the edge of your brush. Stroke this down the center or one side of each petal to create shadow and depth. -
Highlight the tips:
Using a clean brush, create sharp, pointed tips on the petals to define their shape clearly.
Natural Texture
Use the slate’s natural ridges to your advantage. Let the brush skip slightly over the deepest crevices to enhance the rustic, weathered look of the artwork.
Step 3: Painting the Center
-
block in the center:
Mix a little Black into your Dark Brown to create a deep espresso color. Use your round brush to fill in the center circle completely. -
Texture the seeds:
Once the dark center is tacky but not fully dry, use the very tip of your brush to stipple (tap repeatedly) lighter brown or dark grey dots in the center to mimic seeds. -
Define the inner ring:
I like to add a subtle ring of darker stippling right where the petals meet the center to make the yellow petals appear to be sitting on top of the seeds.
Step 4: Stem and Finishing Details
-
Paint the stem:
Switch to your small round brush and Olive Green paint. Trace over your stem line with a fluid stroke. -
Fill the leaf:
Paint the small leaf shape attached to the stem. You can add a tiny touch of yellow to the green to highlight the top edge of the leaf. -
Outline for contrast:
If your petals blend too much into the stone, take a very fine detail brush with slightly watered-down black paint and add very thin, broken outlines between overlapping petals. -
Clean up stray marks:
Use a damp Q-tip or a wet brush to gently erase any visible chalk lines that weren’t covered by paint. -
Seal the artwork:
Once the paint is fully cured (give it at least an hour), spray or brush on your clear outdoor sealer to protect the artwork from the elements.
Now you have a durable and cheerful piece of garden art ready to lean against a planter or hang on a wall


Easy Dandelion Puff on Slate
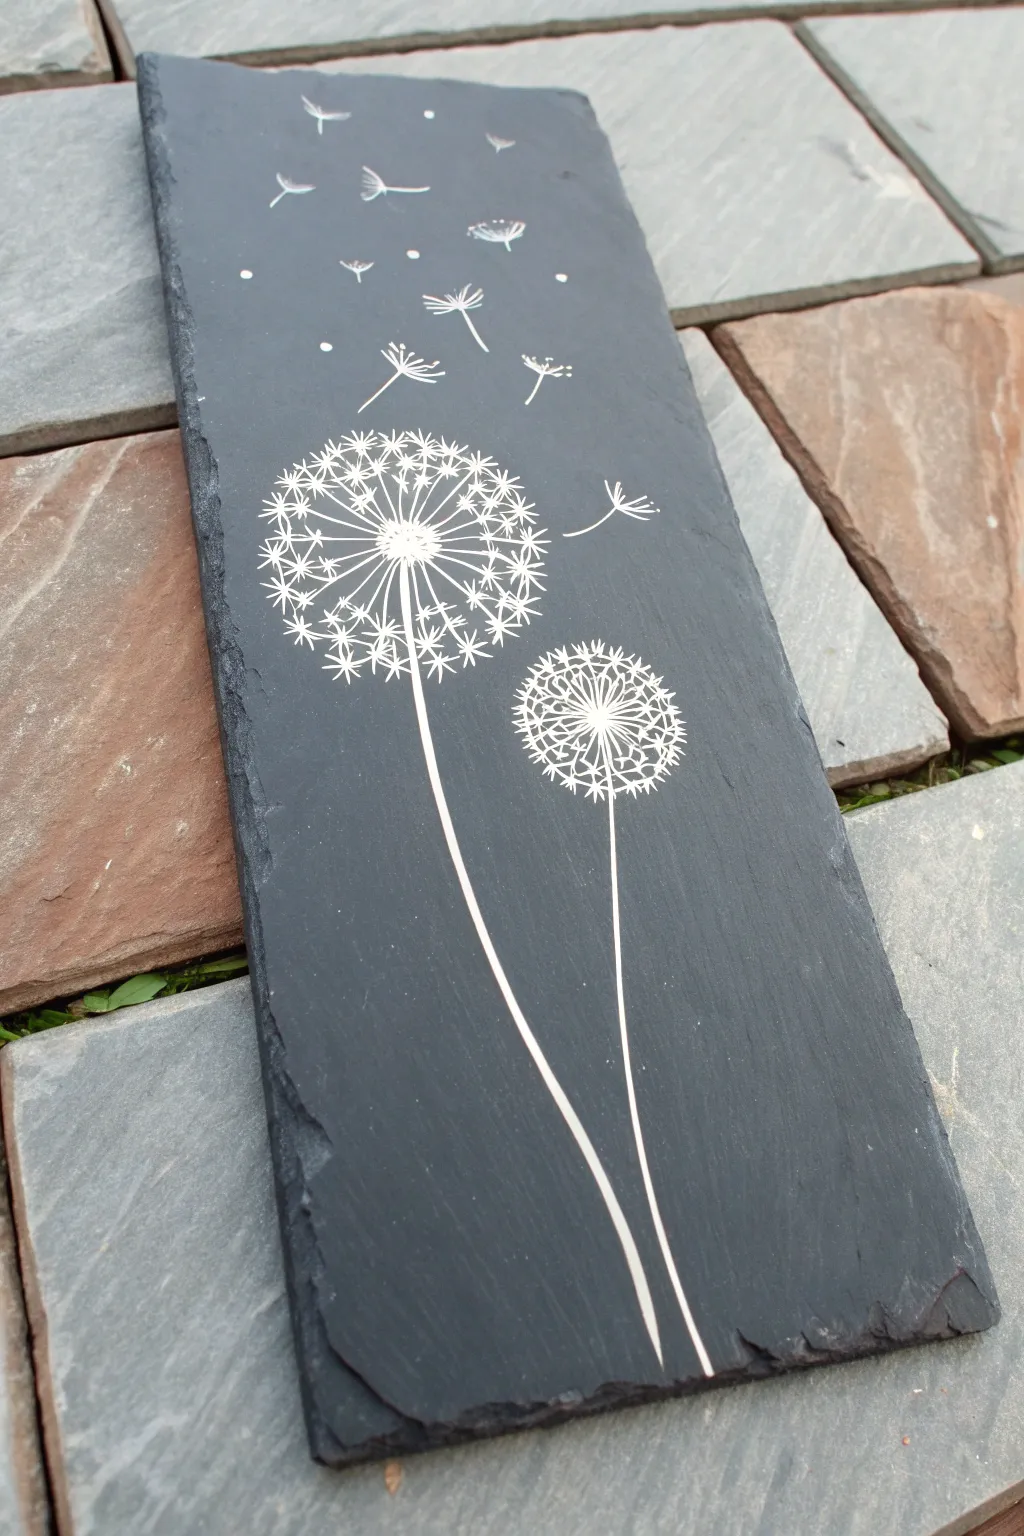
Transform a rough-edged slate tile into a piece of minimalist art with this delicate dandelion design. The stark contrast between the dark stone and the crisp white lines creates a modern yet rustic feel perfect for garden or home decor.
Step-by-Step
Materials
- Rectangular slate tile (approx. 4×10 inches or similar)
- White acrylic paint or specialized stone paint
- Fine liner brush (size 00 or 000)
- White paint pen (extra fine tip) – optional but recommended
- Pencil and eraser
- Ruler
- Clear acrylic sealer spray (matte or satin)
- Paper plate or palette
- Cup of water and paper towels
Step 1: Preparation and Sketching
-
Clean the Slate:
Begin by thoroughly washing your slate tile with warm soapy water to remove any dust or loose grit. Scrub gently with a brush if needed, but be careful of sharp edges. Let it dry completely before starting. -
Plan Composition:
Visualize where your two dandelions will sit. The larger one should be positioned slightly higher and to the left, while the smaller one sits lower and to the right. Leave plenty of negative space at the top for the flying seeds. -
Draw Stem Guides:
Using a light pencil, sketch two curved lines for the stems. They should start near the bottom right center and curve gently upwards and outwards towards the planned flower heads. I find starting the stroke from the bottom helps get a natural curve. -
Mark Heads:
Lightly sketch a circle at the top of each stem to mark the outer boundary of your dandelion puffs. These don’t need to be perfect; they are just guides to keep your painting symmetrical.
Step 2: Painting the Structure
-
Paint Stems:
Load your fine liner brush or shake your paint pen well. Carefully trace over your pencil lines for the stems. Use one continuous, confident stroke if possible to avoid shakiness. The line should be slightly thicker at the bottom and taper as it reaches the head. -
Create Center Points:
Paint a small, somewhat irregular white dot at the very top of each stem. This is the seed head center where all the fluff will radiate from. -
Basic Spokes:
From that center dot, paint thin, straight lines radiating outward like the spokes of a wheel. These should reach about halfway to your outer circle guide. Keep these lines very fine. -
Second Layer Spokes:
Paint a second set of spokes that extend all the way to your outer pencil guide. Intersperse them between the shorter spokes to create density.
Paint Pen Sputtering?
If using a paint pen and it blots, press the tip onto a spare piece of cardboard to release excess pressure before returning to the slate surface.
Step 3: Adding the Fluff Details
-
Paint Seed Terminal Ends:
At the very end of each long spoke, paint a tiny ‘V’ shape or a small three-pronged fork shape facing outward. This mimics the parachute structure of the seed. -
Inner Fluff:
Go back to the shorter inner spokes and add smaller ‘V’ shapes or tiny asterisks just past their ends. This creates the illusion of a spherical, 3D shape rather than a flat circle. -
Add Dots for Texture:
Using the very tip of your brush or pen, stipple tiny white dots randomly within the dandelion head area, concentrating them slightly more near the center to suggest density. -
Repeat for Second Dandelion:
Follow the same steps for the smaller, lower dandelion. Make the spokes slightly shorter and denser to differentiate it from the larger bloom.
Sharper Lines
For ultra-crisp seed details, dilute your white acrylic paint slightly with water (ink consistency) so it flows smoothly off a liner brush without dragging.
Step 4: Flying Seeds and Finishing
-
Drifting Seeds:
Above the main flowers, paint individual seeds floating away. Draw a tiny curved line for the stem, and a small ‘V’ or umbrella shape at the top. Angle them as if they are being carried by a breeze towards the top left. -
Distant Specs:
Add a few simple white dots higher up in the ‘sky’ area to represent seeds that are further away or just caught in the light. -
Refining Lines:
Check your work. If any lines look too faint against the dark slate, gently go over them a second time once the first layer is dry to brighten the white pop. -
Clean Up:
Once the paint is fully dry, use a soft eraser to gently remove any visible pencil guidelines. Be careful not to rub partially dry paint. -
Seal the Artwork:
Take your slate outside or to a well-ventilated area. Spray a thin, even coat of clear acrylic sealer over the entire surface to protect the paint from chipping and weather damage.
Hang your new slate artwork in a sunny spot and enjoy the perpetual summer vibes it brings to your space


Minimal Mountain Outline on Slate
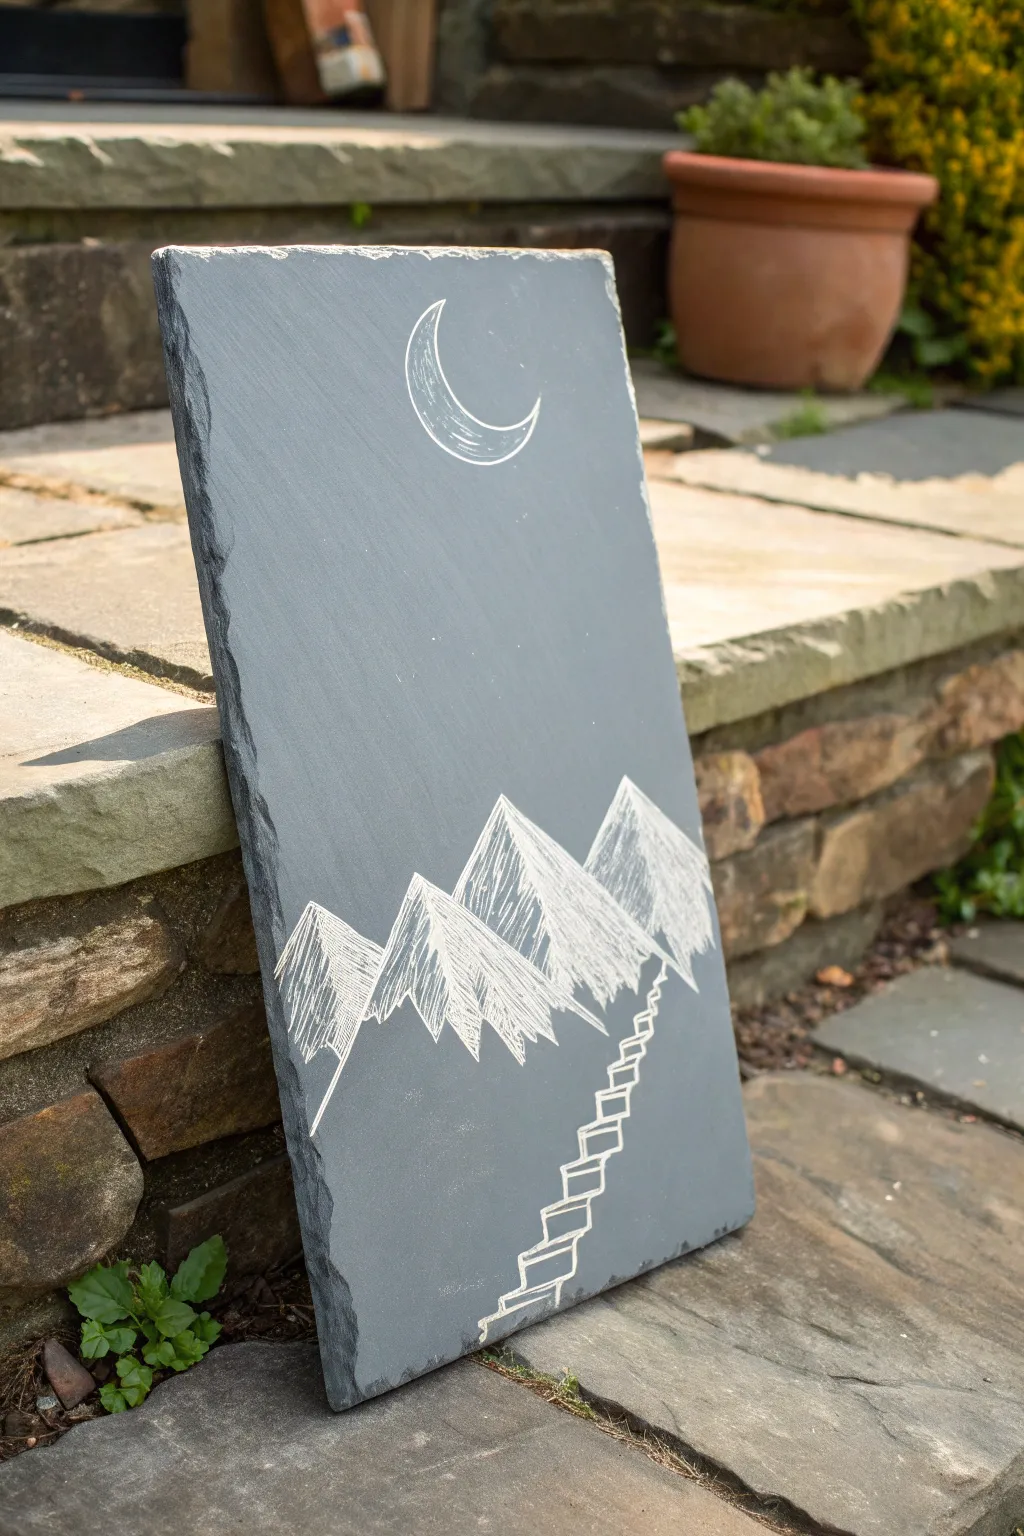
Transform a simple rectangle of dark slate into a dreamlike landscape using minimalist white lines. This project captures the stark beauty of jagged mountain peaks and a glowing crescent moon, connected by a whimsical stairway climbing into the scene.
Step-by-Step Guide
Materials
- Rectangular slate tile (approx. 8×12 inches)
- White acrylic paint pen (fine tip, 0.7mm – 1mm)
- White acrylic paint pen (medium tip, 2mm-3mm)
- Pency or soapstone (for sketching)
- Damp cloth or sponge
- Ruler or straight edge
- Clear matte sealant spray
Step 1: Preparation and Sketching
-
Clean the slate surface:
Begin by wiping down your slate tile with a damp cloth to remove any dust, grit, or oils. Let it dry completely so your markers will adhere properly. -
Plan the composition:
Visualize the placement of your elements: the moon will sit in the upper center, the mountains will span the middle section, and the stairs will rise from the bottom right. -
Outline the mountains:
Using a pencil or a piece of sharpened soapstone, lightly sketch three main triangular peaks. Make the central peak slightly taller, with flanking peaks on either side. -
Sketch the moon:
Near the top center of the slate, lightly draw a crescent moon shape. Keep the curve smooth and facing towards the left. -
Draft the stairway:
Lightly sketch a winding path of stairs starting from the bottom right edge and leading up toward the base of the rightmost mountain peak.
Uneven Ink Flow?
Slate texture can clog paint pens. If ink stops flowing, press the nib on a scrap piece of paper or cardboard to pump new paint into the tip, then resume.
Step 2: Drawing the Elements
-
Inking the moon:
Take your fine-tip white acrylic pen and trace over your moon sketch. Outline the crescent shape first, ensuring clean, continuous curves. -
Detailing the moon:
Add inner texture to the moon by drawing a few thin, parallel curved lines inside the crescent shape to give it a slightly illustrative feel. -
Inking the mountain outlines:
Switch to your medium-tip pen if you want bolder lines, or stick with the fine tip for precision. Trace the jagged outlines of your mountain peaks. -
Hatching the shadows:
To create dimension, decide which side of the mountains is in shadow (let’s say the left side). Use rapid, diagonal hatching lines to fill in the left faces of the peaks. -
Cross-hatching for depth:
Go back over the darker areas of the mountains with lines running in the opposite direction. This cross-hatching adds density to the shadows. -
Defining the lit slopes:
On the right-hand slopes of the mountains, use fewer, lighter lines or leave them mostly bare to represent light hitting the stone.
Step 3: The Stairway and Finishing Touches
-
Drawing the stair risers:
Using the fine-tip pen, draw the vertical lines (the risers) of each step first. Try to keep them parallel to the sides of the slate. -
Connecting the treads:
Connect the tops of the risers with horizontal lines to form the treads. Extend these lines slightly backward to give the stairs perspective. -
Refining the path:
Ensure the stairway naturally disappears into the mountain range. You may need to add a few small rocks or lines at the base of the mountain where the stairs meet the peak. -
Cleaning up sketches:
Once the white ink is fully dry (wait at least 15 minutes), gently wipe away any visible pencil or soapstone guidelines with a slightly damp cloth. -
Adding texture:
If I feel the sky looks too empty, I sometimes add a few tiny dots around the moon to represent distant stars, though keeping it minimal is also impactful. -
Sealing the artwork:
Take the slate to a well-ventilated area. Apply a light coat of clear matte sealant spray to protect your drawing from scratches and moisture. -
Final drying time:
Allow the sealant to cure according to the manufacturer’s instructions before displaying your new slate art.
Add a Celestial Glow
Dilute a drop of white acrylic paint with water. Use an old brush to flick tiny droplets across the sky area for a starry galaxy effect.
Place your finished slate on a mantel or in the garden to add a touch of mystical charm to your space


Sunset Gradient With Tree Silhouette on Slate
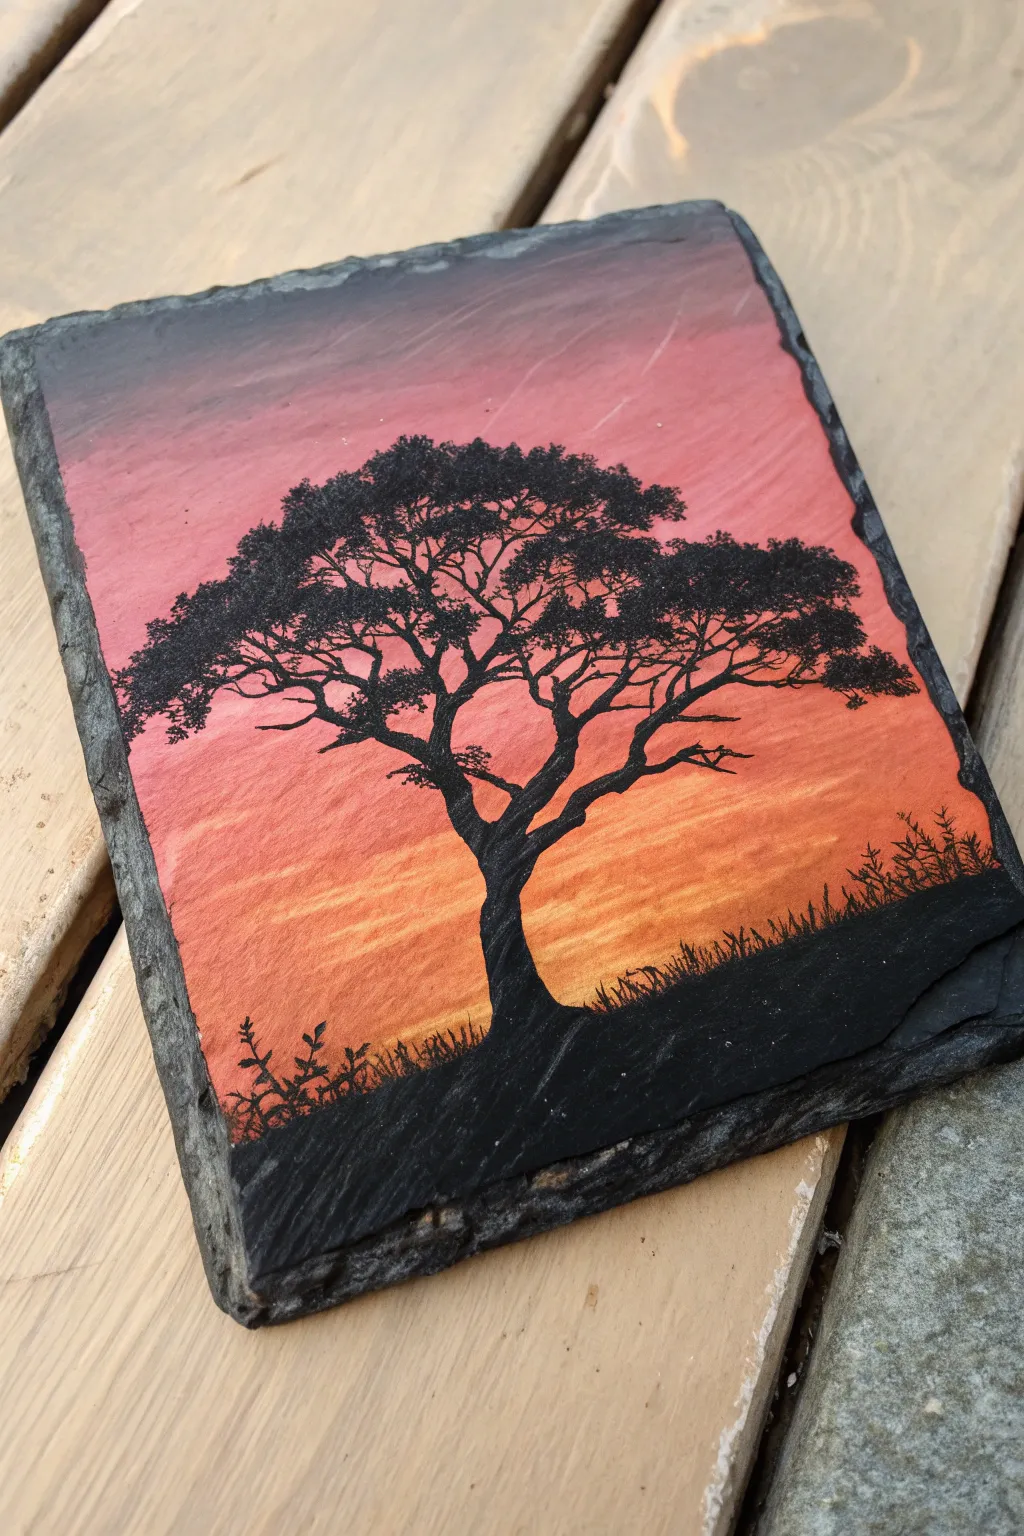
Capture the warmth of an African savannah sunset on rustic stone with this striking slate painting project. The rich gradient sky provides a stunning backdrop for the crisp, stark silhouette of an acacia-style tree.
How-To Guide
Materials
- Rectangular slate coaster or plaque
- Acrylic paints (Mars Black, Titanium White, Cadmium Red, Cadmium Orange, Cadmium Yellow)
- Flat shader brush (medium size)
- Small round detail brush (size 0 or 00)
- Small piece of sponge or makeup wedge
- Water cup and palette
- Paper towels
- Mod Podge or clear acrylic sealer (matte or gloss)
Step 1: Creating the Sunset Gradient
-
Clean surface:
Begin by wiping down your slate piece with a damp cloth to remove any stone dust or oils. Let it dry completely before applying any paint. -
Base coat:
Apply a thin layer of Titanium White paint across the entire surface of the slate. This acts as a primer and ensures your sunset colors will pop against the dark stone. -
Top section:
Mix a small amount of black into your red paint to create a deep maroon. Paint the top quarter of the slate with this dark shade using your flat brush. -
Middle transition:
Moving downward, paint a band of pure red, slightly blending it up into the maroon section while the paint is still wet. -
Lower sky:
Add a band of orange below the red, followed by yellow at the very bottom. Work quickly so the acrylics don’t dry before you can blend them. -
Create the gradient:
Using a slightly damp sponge or clean brush, gently swipe back and forth horizontally where the colors meet. This softens the lines between maroon, red, orange, and yellow to create a smooth transition. -
Add texture:
To mimic the wispy clouds seen in the original, use a nearly dry brush with a tiny amount of watered-down white or light orange. Lightly streak it horizontally across the orange and yellow sections. -
Dry time:
Allow the background gradient to dry completely. If the slate feels cool to the touch, it likely needs more time.
Gradient Not Blending?
If acrylics are drying too fast to blend, mist the slate lightly with water or mix a slowing medium into your paints.
Step 2: Painting the Silhouette
-
Ground the scene:
Using black paint and a medium brush, create the ground layer at the bottom. Paint a solid black hill that slopes gently upwards from left to right. -
Trunk structure:
Switch to your small detail brush. Paint the main trunk of the tree starting from the ground mound, making it thicker at the base and twisting slightly as it goes up. -
Main branches:
Extend two or three primary branches out from the trunk. Keep the lines somewhat jagged and organic rather than perfectly straight. -
Secondary branches:
From the main branches, paint thinner offshoot branches that reach outward and upward, creating a wide canopy shape typical of acacia trees. -
The foliage:
I prefer to use an old, frayed brush for this part. Dip the tip stright into black paint and dab—don’t stroke—onto the ends of the branches to create clusters of leaves. -
Refining the canopy:
Continue dabbing small clusters of leaves along the top of the canopy, ensuring some sky peeks through so the tree doesn’t look like a solid blob. -
Adding grass:
Using your finest detail brush or just the very tip of a round brush, flick tiny upward strokes along the black ground line to simulate grass and small shrubs. -
Final leaf details:
Add a few tiny stray leaf dots floating near the main clusters to make the foliage look more natural and airy. -
Sealing:
Once the black paint is fully cured (give it at least an hour), apply a coat of clear acrylic sealer or Mod Podge to protect the artwork and enhance the slate’s natural texture.
Sharper Silhouettes
For ultra-crisp tree branches, try using a black fine-tip permanent marker or paint pen over the dried background instead of a brush.
Place your finished slate art on a display stand or use it as a striking coaster to bring a bit of nature’s drama indoors
BRUSH GUIDE
The Right Brush for Every Stroke
From clean lines to bold texture — master brush choice, stroke control, and essential techniques.
Explore the Full Guide
Bird on a Branch Slate Painting
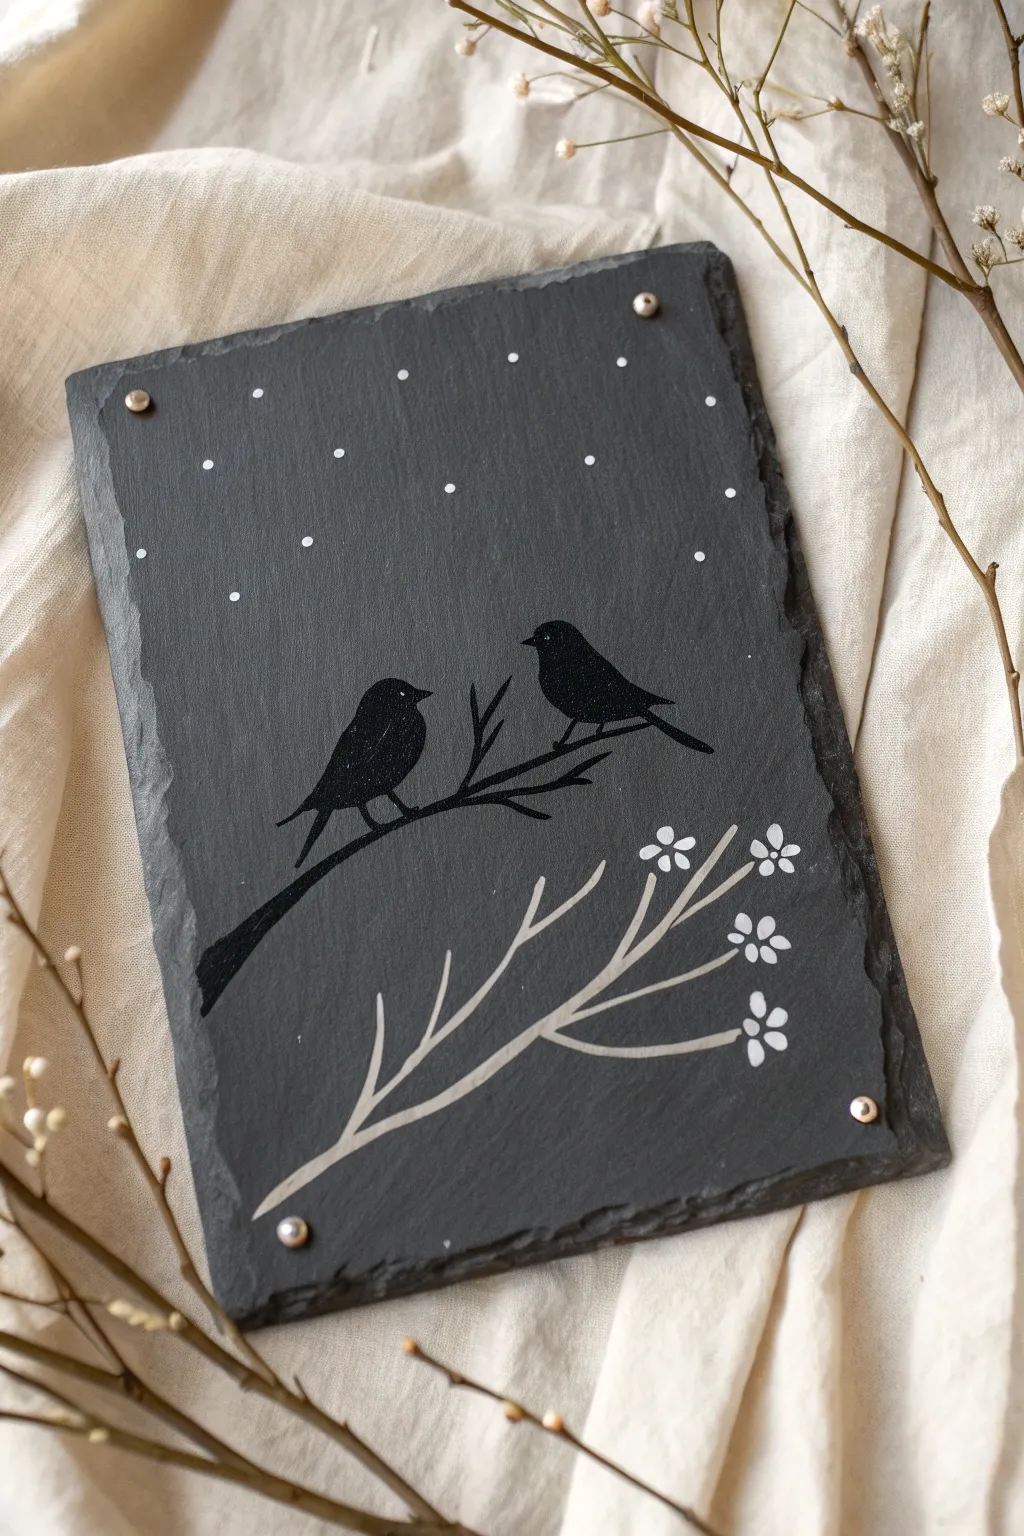
This charming project uses the natural texture of slate to create a moody, contrasting backdrop for a pair of sweet silhouetted birds. The design relies on simple shapes and minimal colors, making it a perfect beginner-friendly piece that still looks strikingly professional.
Step-by-Step Tutorial
Materials
- Rectangular slate piece (approx. 5×7 or 8×10 inches)
- Black acrylic paint
- White or light grey acrylic paint
- Fine tip liner brush (size 0 or 00)
- Small round brush (size 2)
- Dotting tool or toothpick
- Chalk or slate pencil (for sketching)
- Water cup and paper towels
- Matte spray sealant (optional)
- Small adhesive decorative gems or beads (optional, for corners)
Step 1: Preparation and Sketching
-
Prepare the slate:
Start by wiping your slate piece down with a damp cloth to remove any dust or loose gritty bits. Let it dry completely before you begin. -
Plan the composition:
Visualize the placement of your main branch. It should sweep in from the left side, curving slightly upwards towards the middle. -
Sketch the main branch:
Using a piece of chalk or a slate pencil, lightly draw the main black branch line. Keep the line fairly thin and organic. -
Outline the birds:
Sketch two small oval shapes sitting on the branch facing each other. Add a smaller circle on top of each oval for the heads to get basic proportions right. -
Add the lower branch:
Below the main black branch, lightly sketch a second, separate branch structure that curves upward from the bottom left. This will be painted in a lighter color later.
Oops, Smudged It?
If you smudge paint on slate, don’t panic. Let it dry completely, then gently scratch it off with a craft knife or toothpick. It usually flakes right off the non-porous stone.
Step 2: Painting the Silhouettes
-
Mix your paint:
Put a small amount of black acrylic paint on your palette. If the paint feels too thick, add a drop of water to improve the flow for fine lines. -
Paint the main branch:
Using your fine liner brush, paint over your chalk mark for the main branch. Vary the pressure slightly—press harder at the base and lift off towards the tip for a tapered look. -
Fill the bird bodies:
Switch to the small round brush to fill in the bodies of the birds with solid black. Be careful to stay inside your sketched lines. -
Refine the shapes:
Use the liner brush to crisp up the edges of the birds. Carefully add the small details: tiny triangular beaks facing each other and thin tail feathers extending downwards. -
Add branch details:
Paint small twigs branching off the main black line. I like to add a few specifically around the birds’ feet to ground them on the perch.
Add a Winter Shimmer
Mix a tiny pinch of silver glitter or mica powder into your white paint for the snow dots. It catches the light beautifully and adds a frosty, magical feel.
Step 3: Adding Light and Details
-
Paint the lower branch:
Clean your liner brush thoroughly. Load it with light grey or off-white paint and trace the lower branch structure you sketched earlier. -
Create flower petals:
Dip the very tip of your round brush or a large dotting tool into white paint. At the ends of the grey twigs, press gently to create 4-5 small petal shapes clustered together. -
Detail the eyes:
Dip a toothpick or a very fine needle tool into white paint. Add a tiny dot on each black bird head to create the eyes. -
Create the snowy sky:
Using a dotting tool or the back end of a paintbrush handle, dip it into white paint. Stamp random dots primarily in the upper half of the slate to mimic falling snow or stars. -
Vary dot sizes:
For a more natural look, use different tools (like a toothpick vs. a brush handle) to make some snow dots smaller and some larger. -
Clean up sketches:
Once the paint is fully dry to the touch, use a slightly damp Q-tip or a soft cloth to gently wipe away any visible chalk guidelines. -
Add corner accents (optional):
Glue small metallic gems or beads to the four corners of the slate for a finished, framed appearance.
Now you have a delightful piece of slate art ready to display on a shelf or gift to a nature lover
Simple House Number Slate Sign
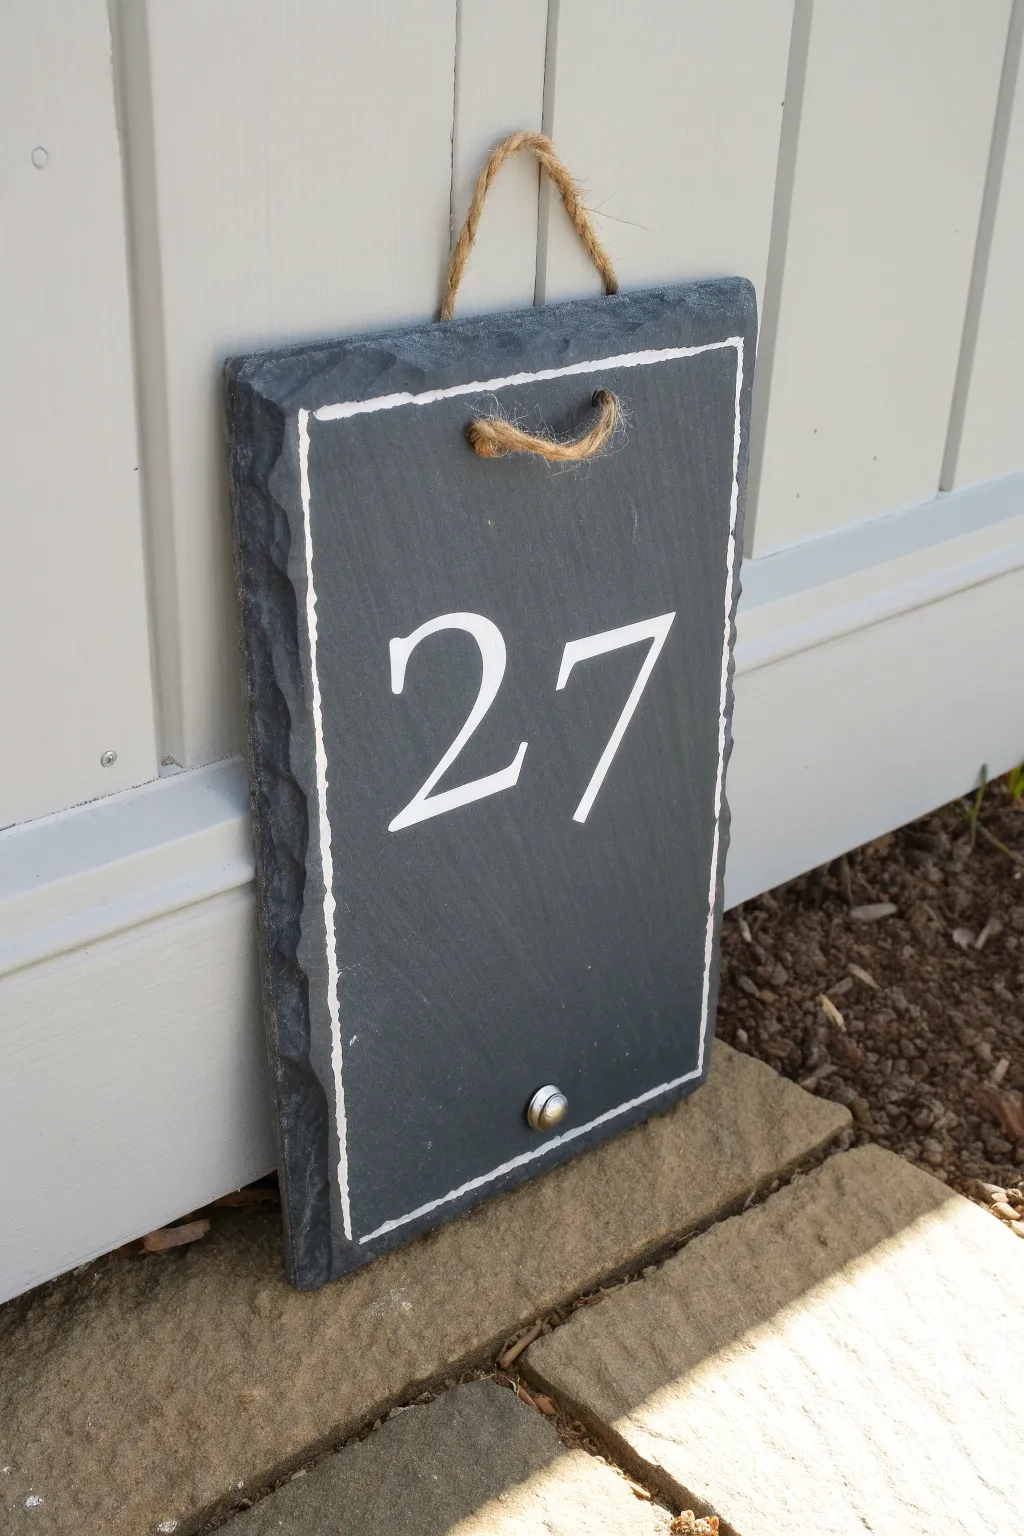
Create a welcoming entrance to your home with this clean and classic slate house number sign. The natural texture of the stone combined with crisp white lettering offers a timeless look that suits almost any exterior style.
Step-by-Step
Materials
- Rectangular slate plaque (approx. 8×12 inches) with pre-drilled holes
- White outdoor acrylic paint or enamel craft paint
- Fine detail paintbrush (size 0 or 1)
- Flat shader paintbrush (small, size 4)
- Ruler or tape measure
- Chalk or a white charcoal pencil
- Masking tape or painter’s tape
- Paper towels
- Jute twine or rope (medium thickness)
- Scissors
- A printed template of your house numbers (optional but recommended)
- Clear outdoor spray sealer (matte or satin finish)
- Small metal decorative stud or bolt (optional)
Step 1: Preparation & Layout
-
Clean the surface:
Begin by thoroughly cleaning your slate piece with warm soapy water to remove any dust or rock residue. Rinse it well and let it dry completely before starting; slate is porous and needs to be bone dry for paint adhesion. -
Measure the border:
Using your ruler, measure about 0.5 inches in from the edge of the slate on all four sides. Make small tick marks with your chalk or charcoal pencil to serve as guides for your border. -
Sketch the border line:
Lightly connect your tick marks to draw a rectangular border around the face of the slate. Don’t worry about using a ruler for the actual line drawing—freehanding this part gives it that charming, rustic character seen in the photo. -
Position the numbers:
Find the vertical and horizontal center of the slate inside your border box. If you printed a template, cut out your numbers and tape them gently to the slate to check the spacing. -
Transfer the outline:
Trace around your paper template using the chalk pencil. If you feel confident, you can sketch the numbers directly onto the slate freehand. Aim for a classic serif font to match the elegant style.
Fixing Wobbly Lines
If your hand shakes on the rough surface, use a paint marker instead of a brush for the outline. It offers more control over the bumpy slate texture.
Step 2: Painting the Design
-
Load the detail brush:
Shake your white outdoor acrylic paint well. Dip your fine detail brush into the paint, ensuring you don’t overload it, as slate surfaces can cause thick blobs to run into the crevices. -
Outline the numbers:
Carefully paint the outline of your numbers first, tracing over your chalk lines. Keep your hand steady and use smooth strokes. -
Fill the numbers:
Switch to your small flat shader brush to fill in the body of the numbers. Apply a thin, even coat. You will likely see the dark stone through the first layer, but don’t panic—this is normal. -
Apply a second coat:
Let the first coat dry for about 15-20 minutes. Apply a second coat of white paint to make the numbers opaque and crisp. I typically find that three thin coats work better than two thick ones on this texture. -
Paint the border:
Go back to your fine detail brush. Paint over your chalk border line. Allow the brush to skip slightly over the rough texture of the slate; this creates that intentional ‘imperfect’ rustic line. -
Clean up edges:
If any paint went where it shouldn’t, use a damp Q-tip immediately to wipe it away. If it has dried, you can gently scrape it off with a craft knife once fully hard.
Level Up: Shadow Effect
Add a drop of black to your white paint to make grey. Paint a thin line along the right side of your numbers to create a subtle 3D shadow effect.
Step 3: Finishing Touches
-
Allow to cure:
Let the paint dry completely, preferably overnight, to ensure it hardens enough to withstand weather conditions. -
Seal the slate:
Take the sign to a well-ventilated area and spray a light, even coat of clear outdoor sealer over the entire front surface. This protects the white paint from rain and UV fading. -
Prepare the hanger:
Cut a length of jute twine or rope, approximately 12-14 inches long (or adjusted to your preferred hanging height). -
Thread the rope:
Push the ends of the rope through the pre-drilled holes at the top of the slate, feeding them from the front to the back so the knot is hidden, or knotting them in front for a decorative touch. -
Secure the knots:
Tie a sturdy knot at each end of the rope on the chosen side. Pull tight to ensure they won’t slip through the holes. -
Add decorative hardware:
If your slate has a bottom hole or you want to mimic the look, glue a small silver stud or bolt head to the bottom center using heavy-duty outdoor adhesive for that industrial detail.
Hang your new custom sign by the front door and enjoy the instant curb appeal upgrade

PENCIL GUIDE
Understanding Pencil Grades from H to B
From first sketch to finished drawing — learn pencil grades, line control, and shading techniques.
Explore the Full Guide
Quick Garden Label Slate Plaque
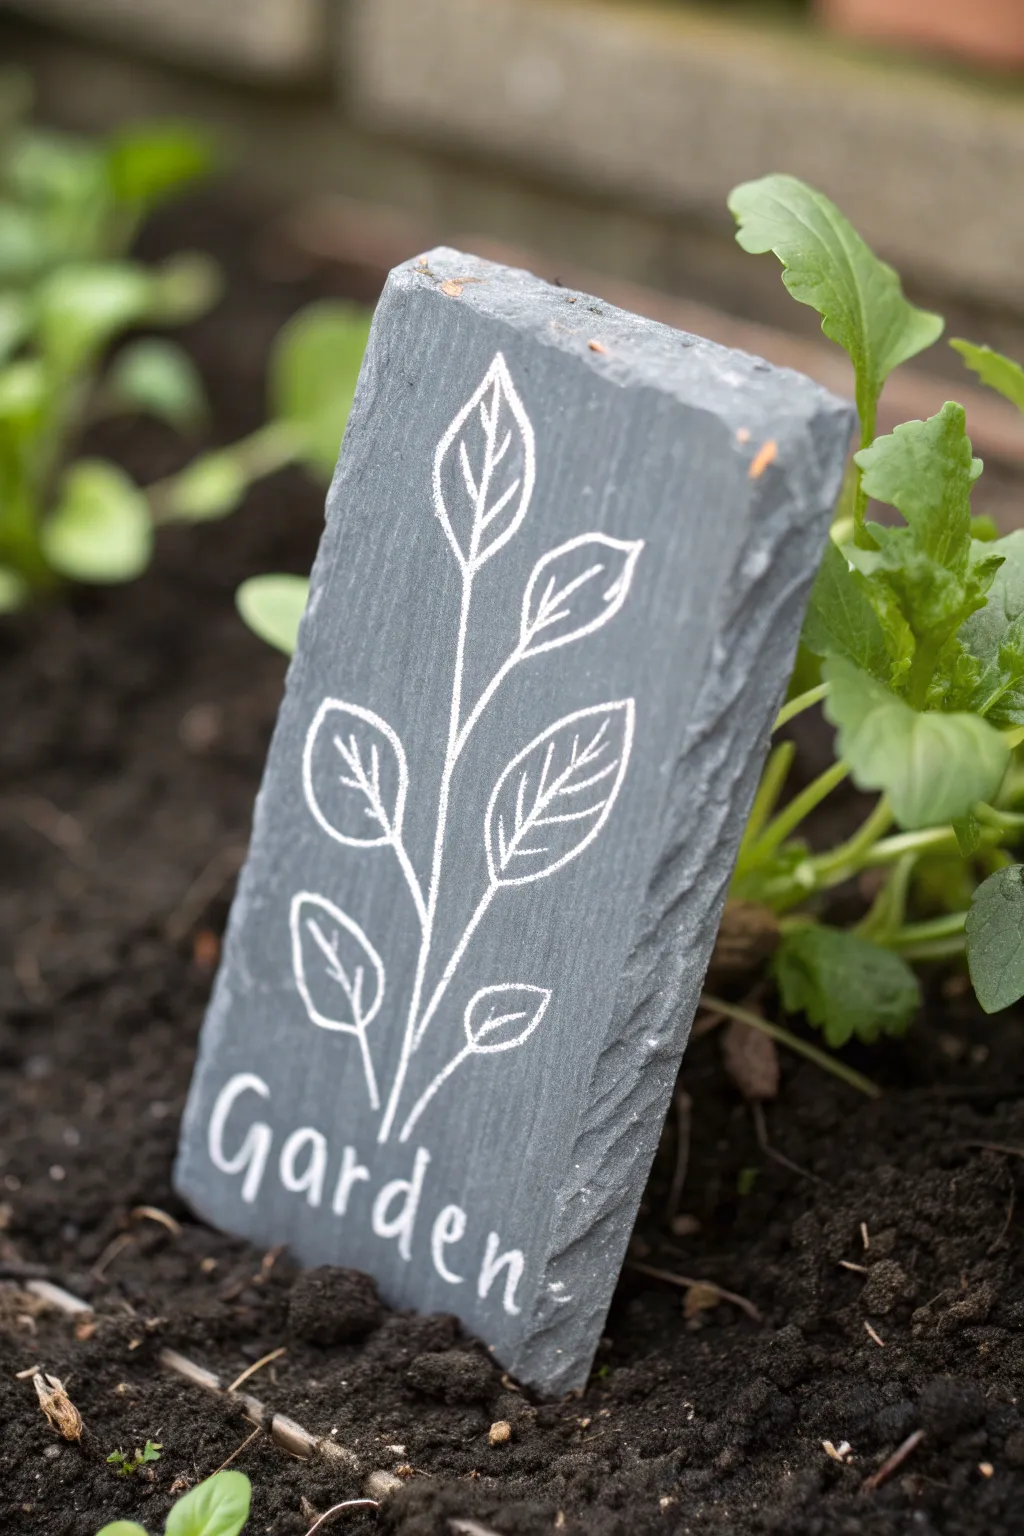
Transform a simple piece of slate into a charming garden accent with this rustic yet modern label. The crisp white design against the dark, textured stone creates an elegant contrast that looks beautiful nestled among your greens.
Step-by-Step Tutorial
Materials
- Rectangular slate marker (or repurposed slate tile)
- White liquid chalk marker (fine tip) or white acrylic paint pen
- Pencil
- Ruler
- Paper towel or damp cloth
- Clear matte spray sealer (outdoor rated)
Step 1: Preparation & Sketching
-
Clean the surface:
Begin by wiping down your slate piece with a damp cloth to remove any stone dust or dirt. Let it dry completely so your marker adheres properly. -
Plan the layout:
Mentally divide your slate vertically. You’ll want about two-thirds of the space for the botanical illustration and the bottom third reserved for the text. -
Lightly sketch the design:
Using a soft pencil, very faintly sketch your design directly onto the slate. The graphite will shine slightly against the matte stone, acting as a guide without being permanent. -
Draft the text:
lightly write the word ‘Garden’ (or your specific plant name) near the bottom edge. Aim for a loose, handwritten style rather than perfect block letters.
Step 2: Drawing the Stem
-
Prime your pen:
Shake your white paint pen or chalk marker well and depress the nib on a scrap piece of paper until the ink flows smoothly. -
Draw the main stem:
Starting just above your text, draw a single, slightly curved vertical line reaching up towards the top center of the slate. This is the backbone of your plant. -
Add side branches:
Draw small, upward-curving lines branching off the main stem. Stagger them, so they don’t sit perfectly opposite each other, creating a more natural look.
Stone Smoothness Tip
Work on the smoothest side of the slate. If your piece is very ridged, use a medium-tip marker instead of fine to prevent the nib from snagging.
Step 3: Adding Detail
-
Outline the top leaf:
At the very tip of your main stem, draw a pointed oval shape for the topmost leaf. Keep the lines confident and fluid. -
Add side leaves:
Create similar pointed oval shapes at the end of each side branch. Vary their sizes slightly, making lower leaves a bit larger than the upper ones. -
Draw leaf veins:
Inside each leaf outline, draw a central vein line. I usually stop this line just short of the leaf tip to keep it delicate. -
Add detail veins:
Add tiny diagonal lines branching from the central leaf veins. Two or three pairs per leaf are enough to suggest texture without cluttering the design.
Color Pop Upgrade
After the white lines dry, lightly fill in the leaves with a sheer wash of diluted green acrylic paint for a subtle, watercolor-like tint.
Step 4: Lettering & Finishing
-
Trace the text:
Go over your penciled word ‘Garden’ with the white marker. Use steady pressure to ensure the lines are opaque and bright. -
Thicken the downstrokes:
To give the lettering a bit of weight, re-trace the downward strokes of each letter just slightly to thicken them. -
Let it dry:
Allow the paint or chalk ink to dry completely. This usually takes about 15-20 minutes depending on the thickness of your application. -
Clean up sketch lines:
If any pencil marks are still visible, gently erase them or wipe them away with a barely damp cotton swab, being careful not to smudge your white lines. -
Seal the slate:
Take the slate outside and apply a light coat of clear matte spray sealer. This is crucial for protecting your artwork from rain and soil moisture.
Place your new marker in the soil and enjoy the custom touch it adds to your garden bed
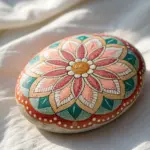
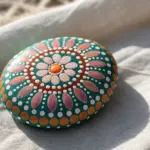
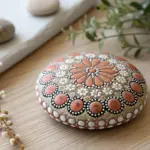
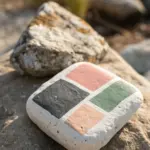
Easy Dot Mandala on Slate
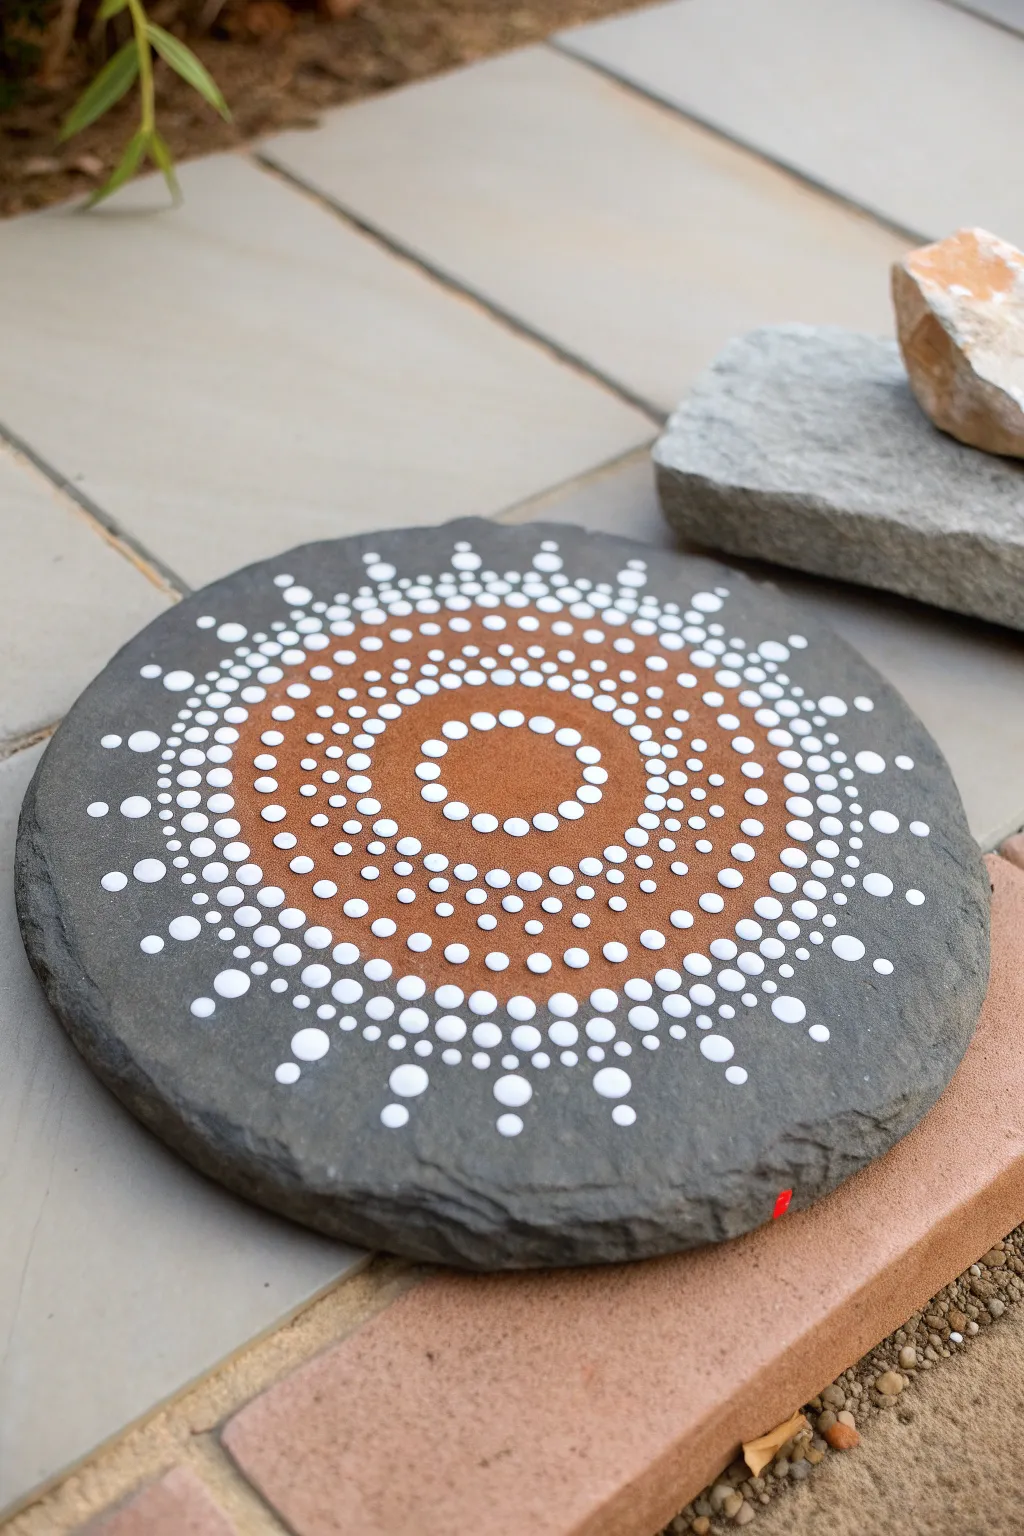
Transform a simple round slate piece into a radiant piece of garden art with this warm and inviting mandala design. Using just rich terracotta and crisp white, you’ll build up layers of dots that mimic a stylized sunburst pattern.
Step-by-Step
Materials
- Round slate stone (approx. 8-10 inches diameter)
- White multisurface acrylic paint
- Terracotta or warm burnt orange multisurface acrylic paint
- Dotting tool set (various sizes from pinhead to eraser size)
- Palette or small plate
- Damp cloth or paper towel
- Clear spray varnish (optional, for outdoor use)
Step 1: Base and Center
-
Clean the surface:
Before starting, wipe your slate clean with a damp cloth to remove any dust or grit. Let it dry completely so the paint adheres properly to the stone’s texture. -
Paint the central disc:
Locate the center of your slate. Using a medium paintbrush or a sponge dauber, paint a solid circle of terracotta paint about 2.5 to 3 inches wide. You may need two coats for full opacity. -
Create the central ring:
Once the terracotta base is dry, take a medium-sized dotting tool and white paint. Create a ring of evenly spaced dots inside the terracotta circle, leaving about half an inch of space from the very center. -
Add inner details:
Switch to a slightly smaller tool. Place a second ring of smaller white dots just inside the previous ring, filling the space closer to the center point.
Uneven Spacing?
For uneven gaps, use ‘walking dots’ (tiny dots that decrease in size) to fill awkward spaces gracefully without breaking the pattern flow.
Step 2: Building the Pattern
-
Border the terracotta:
Using your medium tool again, dot a ring of white directly on the outer edge of your terracotta circle. These dots should sit right on the boundary line where the orange meets the grey slate. -
Start the radiating rows:
Load a slightly larger tool with white paint. Place a dot directly above every other dot from your border ring. This begins the expansion outward. -
Fill the gaps:
In the spaces between those larger outer dots, use a smaller tool to add tiny white accent dots. This creates a dense, lace-like appearance. -
Create the orange layer:
Now, switch back to your terracotta paint. Using a medium tool, place a ring of orange dots just outside the white ones you just created. Try to nest them in the V-shapes formed by the previous white row. -
Expand further:
Continue with another ring of terracotta dots, slightly larger than the previous row, moving outward toward the slate’s edge. -
Return to white:
Clean your tools. Switch back to white paint and add a ring of medium dots outside the last orange row. At this point, I like to step back and check that the circle looks relatively even. -
Intricate spacing:
Add a second row of white dots immediately after the first. Keep these fairly close together.
Step 3: Finishing Flourishes
-
The outer spikes:
To create the starburst effect, choose a large dotting tool. Place large white dots spaced widely apart around the perimeter of your current pattern. -
Tapering the spikes:
Using progressively smaller tools, walk a line of 2-3 smaller dots outward from each large dot toward the edge of the stone. -
Add floating accents:
In the wide gaps between the large outer spikes, place a single floating dot or a tiny trio of micro-dots to balance the negative space. -
Final cure:
Allow the stone to dry undisturbed for at least 24 hours. Because dotting creates thick mounds of paint, the center may stay wet longer than the surface appears. -
Seal the stone:
If this is going in the garden, apply two coats of a clear, non-yellowing spray varnish to protect the design from rain and sun.
Dimension Boost
Once the base dots are 100% dry, add a tiny ‘top dot’ of a lighter shade (like light orange on terracotta) to the center of larger dots for a 3D effect.
Place your finished slate in a sunny spot in the yard to let the contrast really shine


Starry Night Constellations on Slate
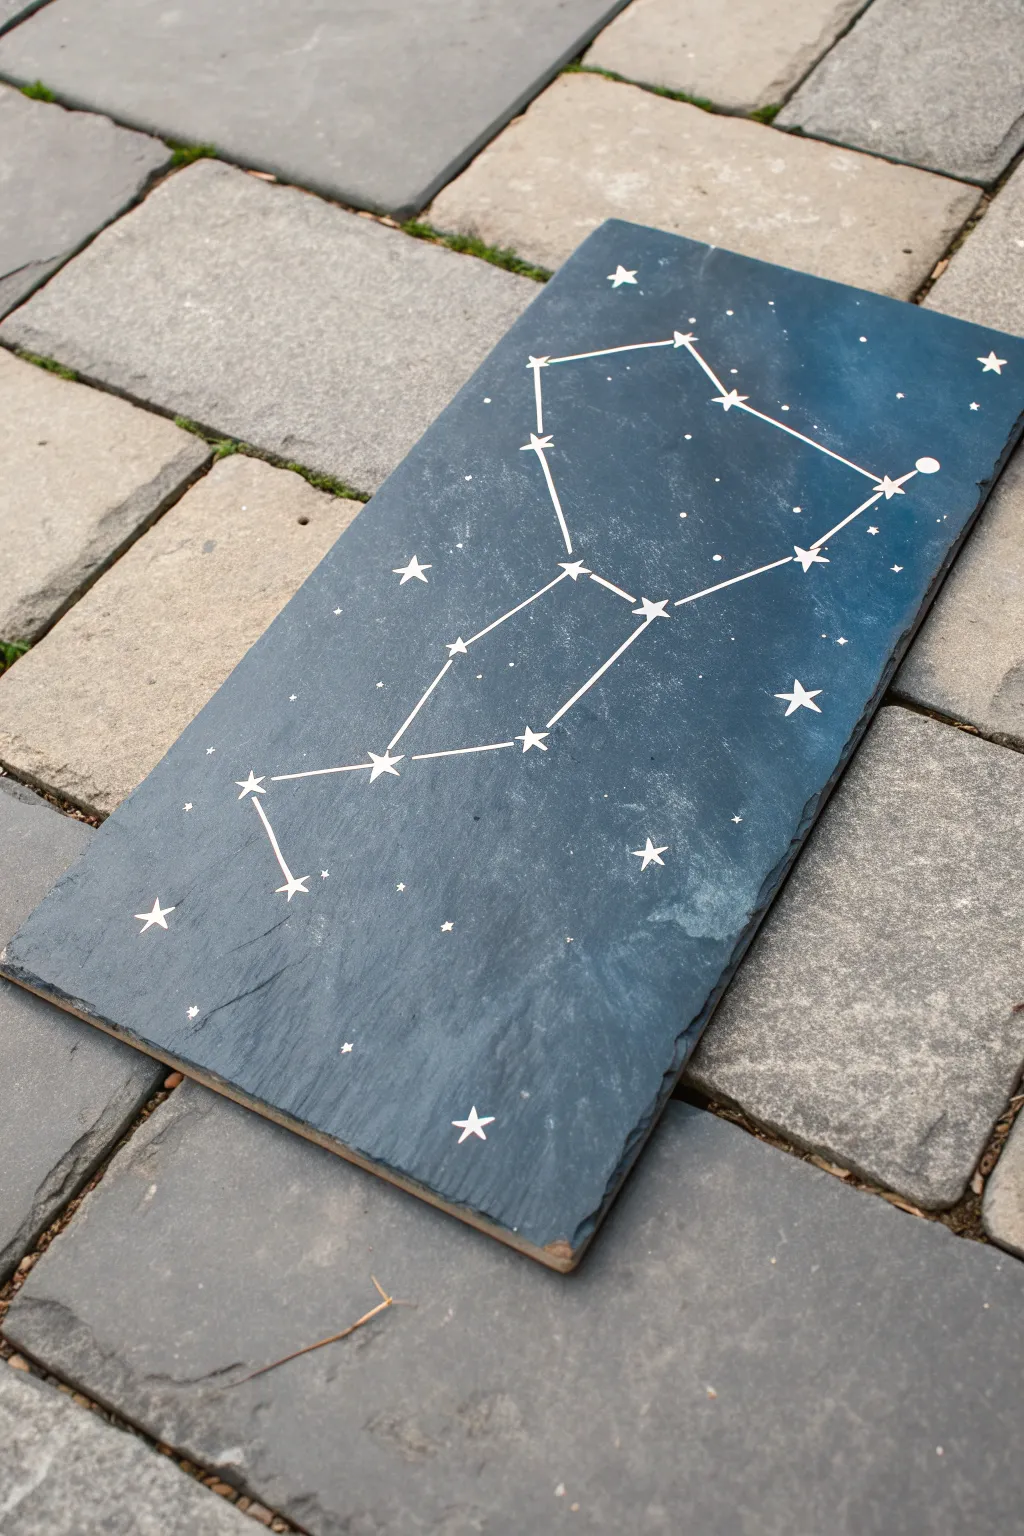
Transform a plain garden slate into a stunning piece of celestial décor with this straightforward painting project. By layering deep blues and adding precise metallic details, you can capture the magic of the night sky in a durable, weather-resistant format.
Step-by-Step Tutorial
Materials
- Rectangular slate tile (approx. 6×12 inches)
- Acrylic paints: Navy blue, black, titan white
- Metallic silver paint pen (fine tip)
- White or silver acrylic paint (for stars)
- Sponge dabber or small sea sponge
- Fine detail paintbrush (size 0 or 00)
- Ruler
- Pencil or white chalk pencil
- Clear outdoor sealant spray (matte or satin finish)
- Water cup and palette
Step 1: Preparing the Night Sky
-
Clean the slate surface:
Begin by thoroughly washing your slate tile with warm soapy water to remove any dust or quarry residue. Let it dry completely, as trapped moisture can cause the paint to peel later. -
Mix the base color:
On your palette, mix a generous amount of navy blue acrylic paint with a small touch of black. You want a very deep, midnight blue rather than a pure black, which adds richness to the final look. -
Sponge on the background:
Dip your sponge dabber into the midnight blue mixture. Apply the paint to the slate using a dabbing motion rather than brushing; this helps the paint get into the textured crevices of the stone. -
Add atmospheric depth:
While the base coat is still slightly wet, dab a tiny amount of pure black onto the corners and edges of the slate to create a vignette effect. -
Create a lighter nebula:
Mix a little white into your original navy blue to create a lighter denim shade. Lightly sponge this across the center of the slate diagonally to simulate the Milky Way’s glow, blending the edges softly into the darker background. -
Allow to cure:
Let this background layer dry completely. Slate is porous, so I usually give this at least 30 to 45 minutes to ensure the surface is ready for fine details.
Step 2: Charting the Stars
-
Splatters for distant stars:
Thin down a small amount of white acrylic paint with water until it has an inky consistency. Dip a toothbrush or stiff brush into it and flick the bristles with your thumb to create a spray of tiny, random white specks across the slate. -
Plan your constellation:
Using a reference image of your chosen constellation (the example shows Gemini), lightly mark the positions of the main stars using a white chalk pencil or a very light graphite pencil. -
Draw the main stars:
Using your fine detail brush and white or silver paint, paint five-pointed stars over your plotted marks. Make the ‘alpha’ and ‘beta’ stars (the brightest ones) slightly larger than the others. -
Add the connecting lines:
Once the star shapes are dry, take your silver paint pen and use a ruler to draw straight lines connecting the stars. Stop the line right at the edge of each star drawing rather than running through it. -
Highlight the stars:
Add a tiny dot of pure white paint to the very center of your larger stars to make them appear to glow against the dark background. -
fill in extra stars:
Look at the empty spaces around your main constellation. Hand-paint a few medium-sized four-pointed stars and scattered dots to fill out the composition without overcrowding it. -
Refine the edges:
If any blue paint got onto the chipped edges of the slate where you want the natural stone showing, wipe it away carefully with a damp cloth or paint over it with a grey that matches the raw stone.
Uneven Lines?
If the slate texture makes your ruler slip, try using a softer felt-tip paint marker instead of a hard nib. The softer tip conforms better to the bumps for a straighter line.
Step 3: Finishing Touches
-
Apply sealant:
Once all paint is perfectly dry (wait at least 24 hours just to be safe), take the slate to a well-ventilated area. Apply a light, even coat of clear outdoor sealant spray to weatherproof your artwork. -
Second coat:
After the first coat of sealer is dry to the touch, apply a second coat to ensure maximum durability, especially if you plan to keep this piece in the garden.
Tip: Glowing Effect
Before painting the white stars, dab a tiny, hazy circle of watered-down white paint where each star will go. This creates a realistic glowing aura behind the constellation.
Now you have a permanent piece of the cosmos captured on stone, ready to display on a patio table or garden wall
Ombre Ocean Wave Stripe on Slate
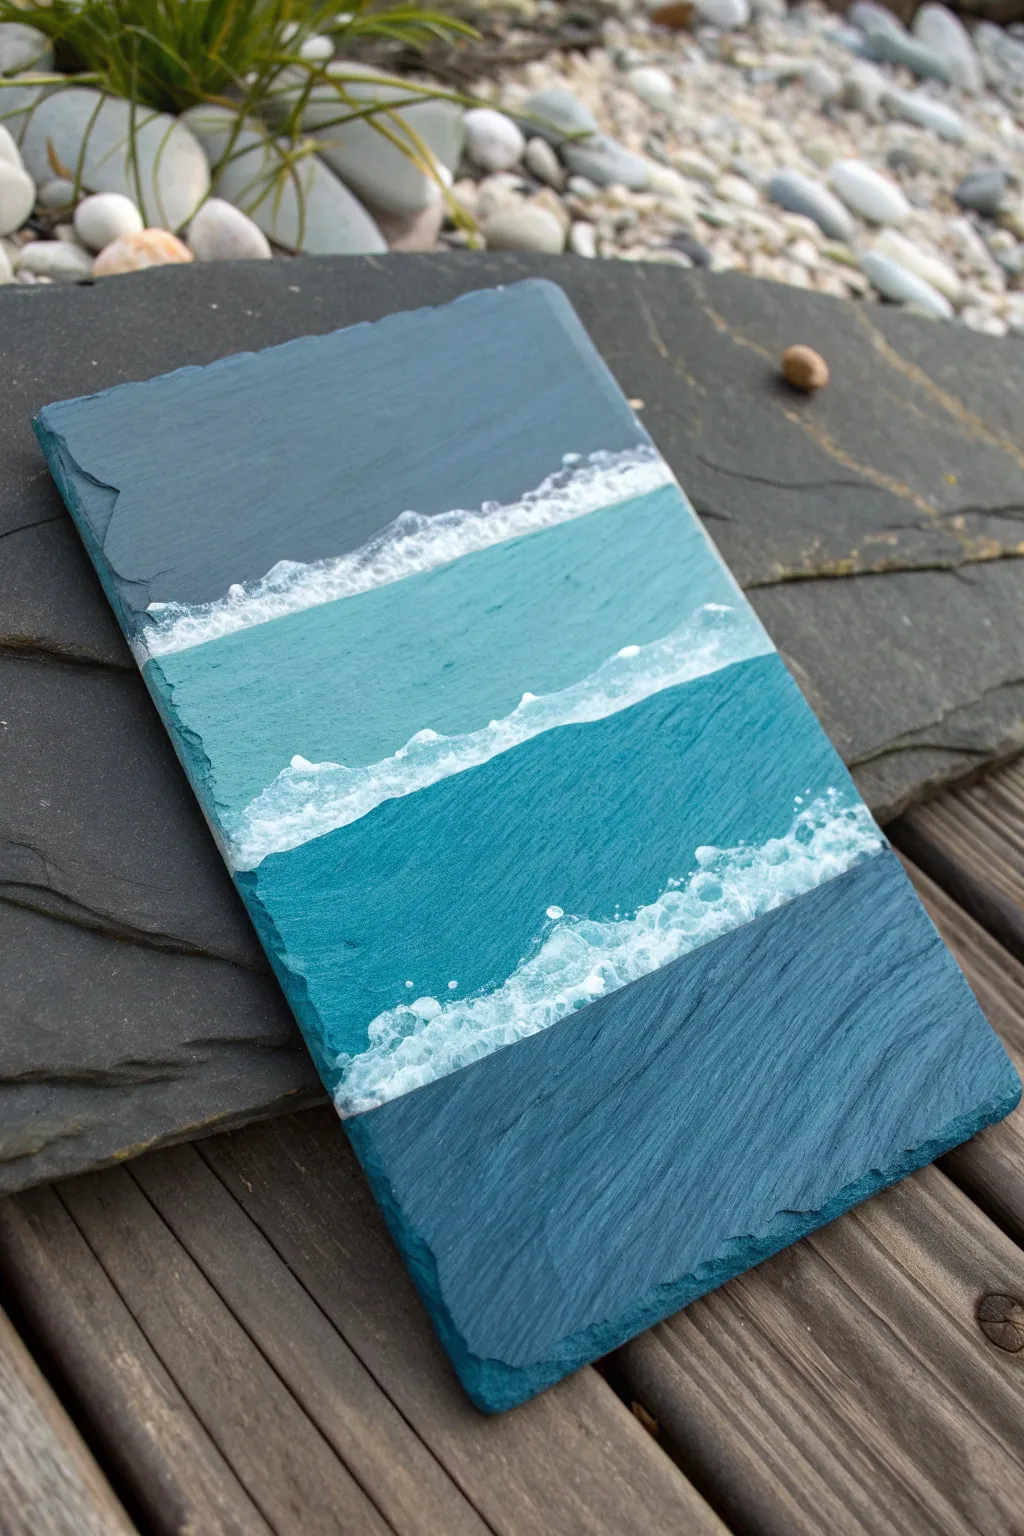
Capture the rhythm of the tide with this layered ocean slate painting. By alternating bold bands of teal and navy with textured white foam, you can turn a simple piece of roofing slate or a coaster into a striking piece of coastal decor.
How-To Guide
Materials
- Rectangular slate piece (clean and dry)
- Acrylic paints: Navy Blue, Teal/Turquoise, Deep Cyan, Titanium White
- Flat shader brushes (medium width)
- Small liner brush or detail brush
- Palette or paper plate
- Paper towels
- Water cup
- Old toothbrush (optional for splatter)
- Masking tape (for clean edges, optional)
Step 1: Base Layers
-
Prepare the Surface:
Begin by wiping down your slate with a damp cloth to remove any dust or loose rock fragments. Let it dry completely. If your slate is very rough, you don’t need to sand it; the texture actually adds character to the waves. -
Mix the Top Color:
On your palette, mix a small amount of Navy Blue with a touch of grey or black to create a moody, deep storm-blue shade. This will be the uppermost section of the ocean. -
Paint the Top Band:
Using a flat shader brush, paint a wide stripe across the top third of the slate. I like to keep the bottom edge of this stripe slightly uneven to mimic the organic flow of water, rather than a perfect straight line. -
Apply the Middle Tone:
Clean your brush. For the middle section, use a pure Teal or Turquoise color mixed with a tiny bit of white to soften it. Paint a second band below the dark blue one, leaving a very small gap or just barely touching the previous color. -
Create the Lower Band:
Mix a Deep Cyan or a darker Teal for the third stripe. Paint this band below the lighter teal stripe. The goal is to create a visual gradient, though they don’t need to blend seamlessly since the foam will separate them. -
Paint the Bottom Section:
For the final, bottom-most section, return to a dark Navy Blue, perhaps slightly brighter than the very top layer to suggest depth near the viewer. Paint this section all the way to the bottom edge of the slate. -
Let it Dry:
Allow these four solid block colors to dry completely. The slate is porous, so acrylics usually dry quickly, but give it at least 10-15 minutes to prevent the white foam from turning muddy later.
Muddy Foam Fix
If your white foam turns light blue, your base layers weren’t dry enough. Stop, let it dry completely, then layer fresh titanium white on top to restore the brightness.
Step 2: Adding the Foam
-
Prepare the Texture:
Load a small detail brush or a stippling brush with undiluted Titanium White paint. You want the paint to be thick, not watery, to create texture. -
Start the First Wave:
Focus on the line where the top dark blue meets the lighter teal. Dab the white paint along this seam using a tapping motion. Don’t paint a straight line; instead, stipple irregular dots to look like crashing foam. -
Build the Crest:
Add more concentration of white dots at the ‘top’ of the foam line (masking the dark blue edge) and let the dots fade out sparsely as they move down into the lighter teal section. -
Adding Sea Spray:
For a realistic effect, use the very tip of a liner brush to place tiny, stray white dots slightly above the main foam line on the dark blue. This simulates spray flying off the wave. -
Second Wave Line:
Repeat the process on the seam between the light teal band and the darker cyan band below it. Make this line slightly thicker or more jagged to show movement. -
Detailing the Middle Wave:
Drag the brush very lightly downwards from the white foam into the cyan band. This ‘dry brush’ technique creates the illusion of transparency where water is rolling over itself. -
The Final Wave:
Create the last foam line between the cyan band and the bottom navy section. I prefer making this the boldest, most turbulent line, as if it is the closest wave to the viewer. -
Enhancing Texture:
Once the first layer of white is dry, go back over the brightest parts of the foam with a second layer of thick white paint. This makes the foam pop against the drying darker colors. -
Tiny Bubble Details:
Use the back end of your paintbrush handle dipped in white paint to stamp a few larger distinct bubbles within the foamy areas for variation.
Step 3: Finishing Touches
-
Check the Edges:
Look at the jagged sides of the slate (the ‘chipped’ edges). You can choose to wrap your blue colors over the edge or leave the ragged natural stone visible for contrast. -
Seal (Optional):
If you plan to use this as a coaster, apply a clear acrylic sealer or spray varnish once the painting is fully cured to protect it from moisture.
Texture Pro Tip
Mix a pinch of baking soda into your white acrylic paint before applying the foam. This creates a gritty, 3D texture that looks and feels like real frothy sea bubbles.
Place your finished slate piece on a wooden table or shelf to bring a serene seaside atmosphere to your room
Metallic-Look Accents on Slate
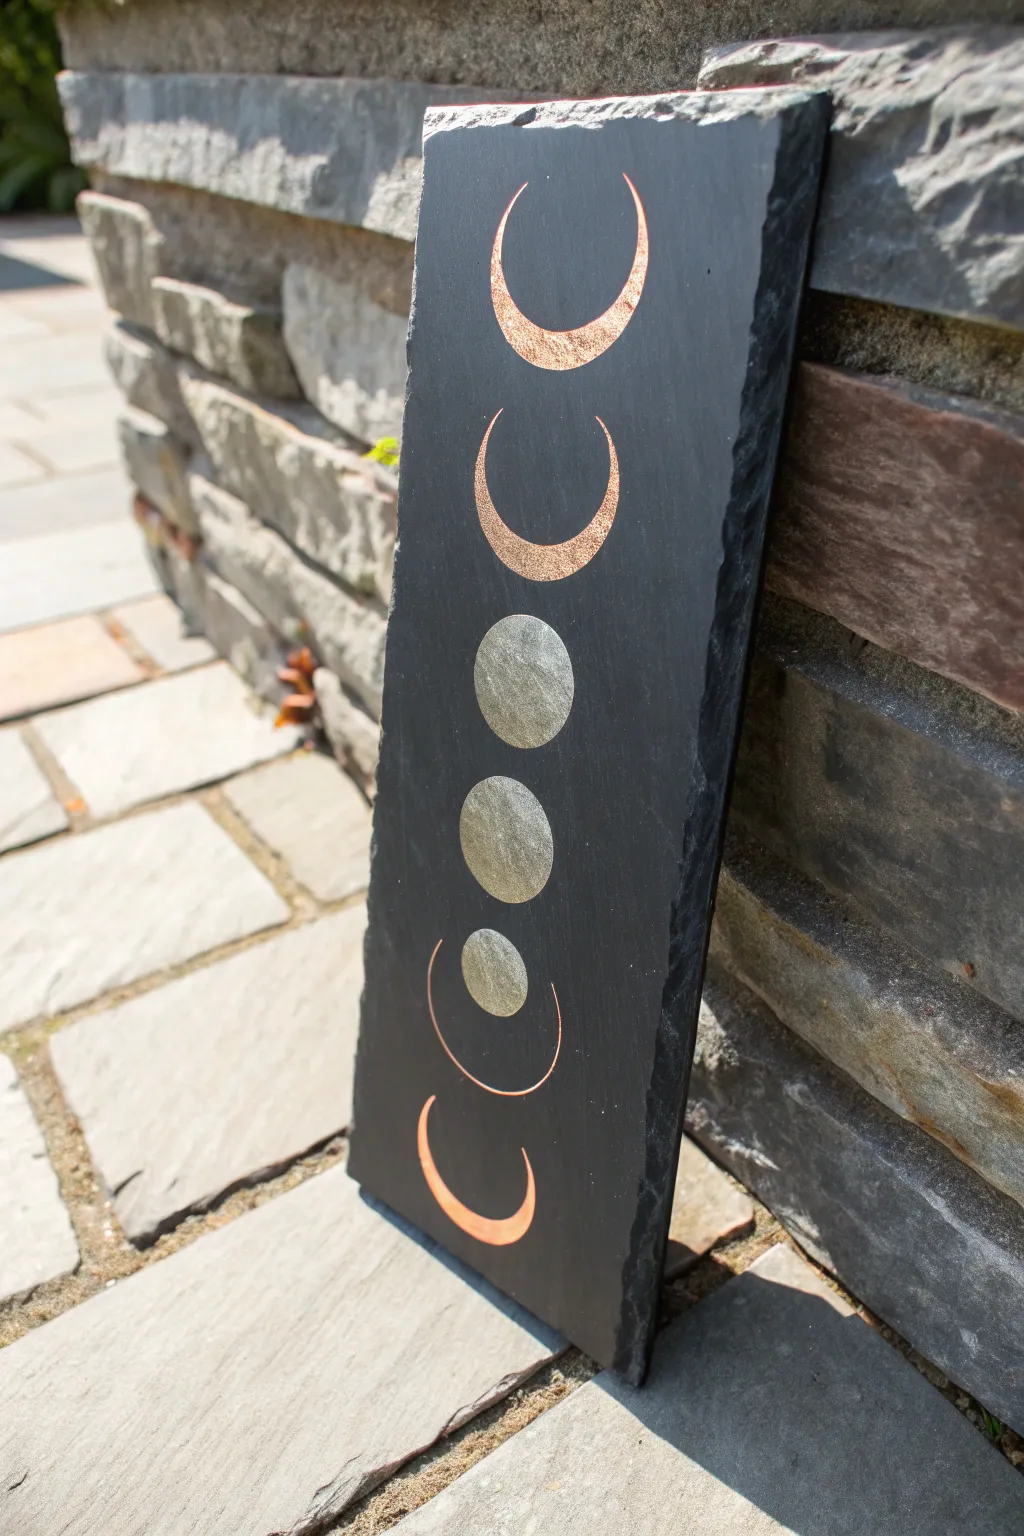
Transform a simple slate tile into a stunning piece of celestial décor using lustrous metallic finishes. This vertical moon phase design contrasts beautifully against the dark, natural texture of the stone, creating an elegant accent for any garden or home.
Step-by-Step Tutorial
Materials
- Rectangular slate tile (approx. 6″ x 12″ or similar dimensions)
- Metallic acrylic paints (Copper/Rose Gold and Silver)
- White chalk or a white charcoal pencil
- Round stencils or diverse circle templates (bottle caps, jars, etc.)
- Medium flat synthetic brush
- Small round detail brush
- Ruler
- Painter’s tape (optional)
- Clear spray sealant (outdoor variety)
Step 1: Planning and Sketching
-
Clean the surface:
Begin by wiping down your slate tile with a damp cloth to remove any stone dust or oils. Let it dry completely before starting. -
Establish the centerline:
Use a ruler to lightly mark a vertical centerline down the middle of the slate with your white chalk or charcoal pencil. This guide will ensure your moons stay perfectly aligned. -
Mark positions:
Decide on the placement of your seven moon phases. Mark the center point for the main full moon right in the middle, then evenly space three points above and three points below for the remaining phases. -
Trace the circles:
Select a circle stencil or household object that fits the width of your slate comfortably. Center it over your markings and trace seven identical circles lightly with chalk. -
Define the phases:
Now, sketch the shadow lines inside your circles to create the phases. The center circle remains full. For the ones directly above and below, draw a curved line to create gibbous shapes. For the top and bottom pairs, draw deeper curves to create crescents.
Paint looking dull?
Slate is very porous and ‘drinks’ paint. If your metallics look flat, apply a base coat of white acrylic first where the moons will be. This makes the metallic topcoat pop instantly.
Step 2: Applying the Metallics
-
Paint the full moon:
Dip your flat brush into the silver metallic paint. Fill in the center circle completely. You might notice the slate’s texture absorbs the first layer, so apply a generous coat. -
Paint the silver gibbous moons:
Moving to the circles immediately above and below the center, paint the larger moon shapes in silver as well. Use the small round brush to keep the curved edges crisp. -
Paint the copper crescents:
Switch to your copper or rose gold metallic paint. Carefully fill in the remaining four crescent shapes at the top and bottom of the slate using your detail brush for the sharp tips. -
Let the first coat dry:
Allow the paint to dry for about 20-30 minutes. Slate is porous, so the first coat often looks a bit dull once absorbed. -
Apply a second coat:
Go over all shapes with a second layer of paint. I like to dab the paint on slightly thicker this time rather than brushing it out, which enhances the metallic texture. -
Add texture details:
While the silver paint is still slightly wet on the center moon, you can dab a tiny amount of grey or diluted black paint with a sponge to mimic lunar craters, though a solid metallic look is also beautiful.
Step 3: Finishing Touches
-
Clean up the outlines:
Once the paint is fully dry, take a damp q-tip or a soft cloth and wipe away any visible chalk guidelines or stray sketch marks. -
Sharpen edges:
If any paint bled into the rough texture of the slate, use a small stiff brush dipped in black paint (or just water if the paint is fresh) to clean up the edges of your moons. -
Seal the artwork:
Take the slate to a well-ventilated area. Spray it with an even coat of clear outdoor sealant. This creates a barrier against moisture and prevents the metallic paint from tarnishing over time. -
Final cure:
Let the sealant cure for at least 24 hours before placing your slate art outside in the garden or on a porch.
Add dimensional shine
For a truly reflective finish, apply gold and silver leaf adhesive and use real metal leaf sheets instead of paint. The texture of the slate makes crinkled metal leaf look incredible.
Place your finished slate piece in a spot where the sunlight can catch those metallic phases throughout the day


Have a question or want to share your own experience? I'd love to hear from you in the comments below!