A small bathroom is basically a tiny canvas, and color is the fastest way to make it feel bigger, calmer, cozier, or just more you. Here are my favorite small bathroom color ideas—from classic light-boosters to bold, artsy choices that turn tight quarters into a statement.
Crisp Warm White Walls
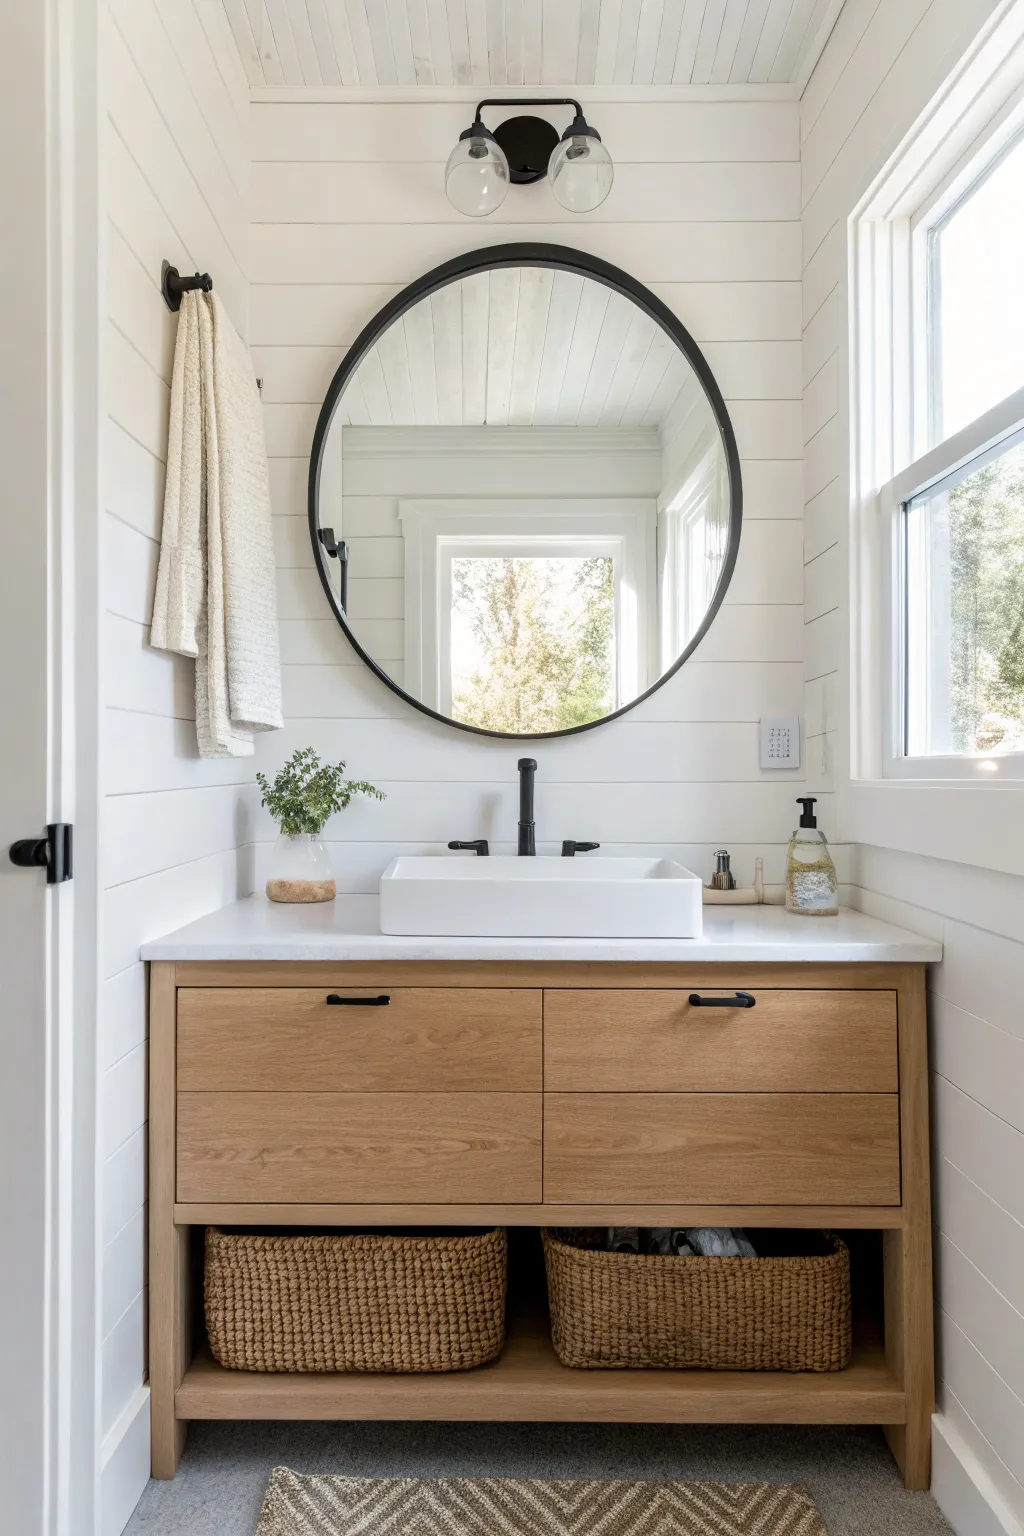
Transform a small bathroom space by embracing the clean lines and airy feel of crisp warm white walls paired with natural wood tones. This project recreates a modern farmhouse vanity nook that feels spacious and serene.
Step-by-Step
Materials
- Shiplap boards (primed or raw pine)
- Warm white paint (eggshell or satin finish)
- White trim paint (semi-gloss)
- Light wood vanity with open bottom shelf
- Rectangular white vessel sink
- Matte black faucet
- Round black framed mirror (approx. 30-36 inch)
- Matte black vanity light fixture (2-light)
- Black towel hook
- Woven storage baskets (rectangular)
- Neutral textured hand towel
- Construction adhesive
- Brad nailer and 1.5-inch brad nails
- Jigsaw or miter saw
- Caulk and caulking gun
- Drill and wall anchors
- Level
Step 1: Wall Preparation & Shiplap Installation
-
Prep the canvas:
Begin by removing any existing mirrors, light fixtures, or towel bars. Patch any significant holes, though the shiplap will cover most minor imperfections. Ensure the walls are clean and dry. -
Mark your studs:
Use a stud finder to locate and mark the wall studs with a pencil. You’ll want to nail into these for a secure hold. -
Measure and cut:
Measure the width of your wall carefully. Cut your shiplap boards to length using a miter saw. If you have outlets or plumbing to work around, use a jigsaw to create the necessary cutouts. -
Install the first board:
Start at the very top of the wall (or the ceiling line). Level this first board perfectly, as it will determine the alignment for the rest of the wall. Apply construction adhesive to the back and nail it into the studs. -
Continue the install:
Work your way down the wall, slotting the tongue and groove boards together firmly. Check your level every few rows to ensure the lines remain straight horizontal. -
Finish the edges:
Install corner trim or scribe molding where the shiplap meets adjacent walls or corners to hide any cut ends for a polished look. -
Caulk and fill:
Fill all nail holes with wood filler and let dry. Sand them smooth. Run a bead of caulk along the corners and ceiling line to seal gaps.
Uneven Gaps?
If your shiplap gaps look uneven, use a nickel as a spacer between boards during installation to ensure consistent spacing throughout the entire wall.
Step 2: Painting & Vanity Setup
-
Apply the warm white paint:
Roll on your chosen crisp warm white paint. I find that two coats usually give that rich, opaque finish. Use a brush to get into the grooves between boards thoroughly. -
Install the vanity:
Once the paint is fully dry, position your wood vanity. Ensure it sits level on the floor; use shims if necessary. Secure the vanity to the wall studs through the back rail. -
Mount the vessel sink:
Apply a bead of clear silicone adhesive to the bottom of the white vessel sink and position it centered on the vanity countertop. Let it cure according to manufacturer instructions. -
Install the faucet:
Mount the matte black faucet into the pre-drilled hole behind the vessel sink. Connect the water supply lines and the drain assembly below, ensuring all seals are tight.
Step 3: Finishing Details
-
Hang the mirror:
Center your round black mirror over the sink. Measure up from the vanity so it sits at eye level but leaves space for the faucet below. Use heavy-duty wall anchors if you can’t hit a stud. -
Install lighting:
Mount the matte black vanity light centered above the mirror. The black finish ties in perfectly with the mirror frame. -
Add functional hardware:
Install the black towel hook to the left of the mirror. It should break up the visual line of the shiplap without feeling cluttered. -
Style with texture:
Slide the two large woven baskets onto the open bottom shelf of the vanity. These add essential warmth and hide clutter. -
Final touches:
Hang a textured neutral hand towel on the hook and place a small glass vase with greenery on the countertop to bring life to the crisp white space.
Elevate Your Style
Swap standard drawer pulls for sleek matte black finger pulls or knobs to perfectly match the faucet and mirror frame for a cohesive designer look.
Step back and enjoy the bright, clean atmosphere of your newly refreshed modern farmhouse bathroom


Soft Greige for Gentle Depth
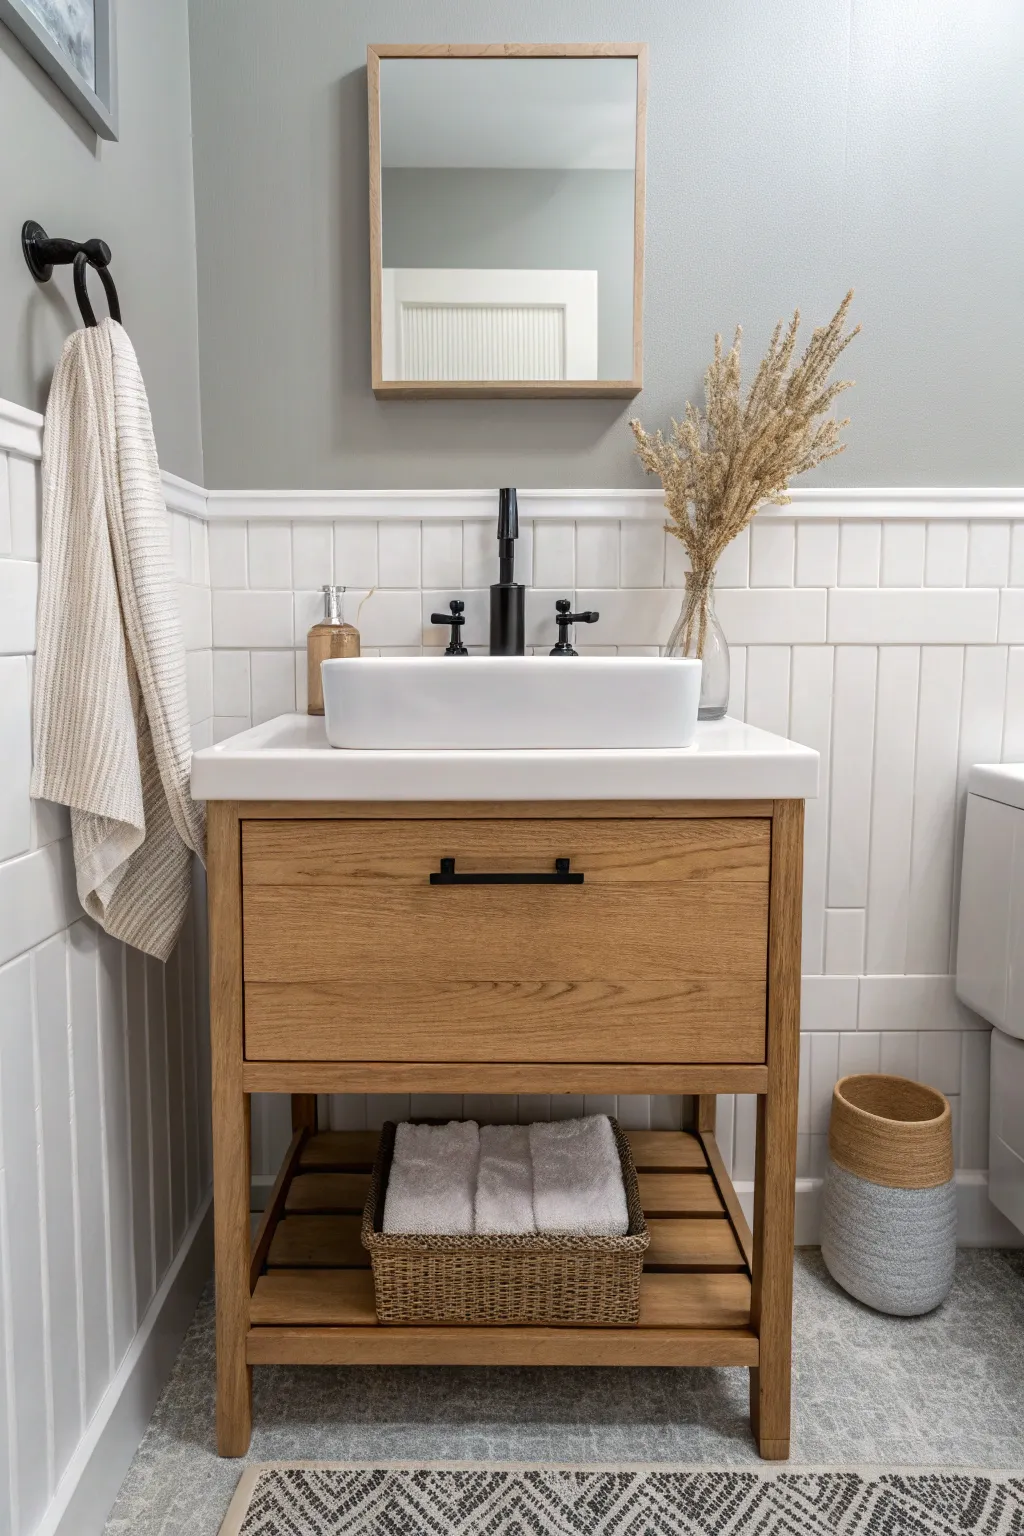
Transform a small bathroom space by combining the warmth of natural wood with the subtle elegance of soft greige walls. This project creates a spa-like retreat featuring crisp white subway tile wainscoting and modern matte black fixtures for a high-contrast finish.
Step-by-Step Guide
Materials
- Light Oak single-sink vanity with shelf
- Square white vessel sink
- Matte black widespread faucet
- Soft greige interior paint (satin finish)
- White semi-gloss paint (for trim/wainscoting)
- White beadboard or subway tile panels
- Chair rail molding
- Matte black towel hook
- Framed light wood mirror
- Woven storage basket
- Textured bath towel
- Dried pampas grass or wheat stems
- Clear glass vase
- Drill and mounting hardware
- Paint rollers, brushes, and painter’s tape
- Silicone caulk and gun
Step 1: Prepping the Canvas
-
Clear and clean:
Remove all existing fixtures, mirrors, and unnecessary hardware from the bathroom walls. Clean the surfaces thoroughly with a degreaser to ensure good paint adhesion. -
Patch and prime:
Fill any old nail holes or imperfections with spackle. Once dry, sand smooth and apply a coat of primer to the upper half of the walls if you are changing colors drastically. -
Define the wainscoting line:
Measure about 40 to 48 inches up from the floor to determine the height of your wainscoting. Use a level and a pencil to mark this line around the entire perimeter of the focused area.
Color Match Tip
Test your greige paint on different walls. The lighting changes throughout the day, and greige can lean purple or green depending on the sun.
Step 2: Installing Wainscoting & Painting
-
Install the beadboard or tile:
Apply your white beadboard panels or subway tile vertically up to your marked line. Use constructive adhesive and nails for wood panels, or thin-set mortar for tiles. -
Add the chair rail:
Cap the top of your wainscoting with a decorative chair rail molding. This creates a finished visual break between the white lower section and the colored upper section. -
Paint the upper walls:
Apply two coats of your chosen ‘soft greige’ paint to the upper walls. I like to cut in around the ceiling and corners first before rolling the main sections for a smooth finish. -
Detail the trim:
Paint the wainscoting and chair rail in a crisp, bright white semi-gloss. This contrast is the secret to making the greige pop.
Luxe Upgrade
Swap the standard vanity hardware for matte black pulls that match your faucet to create a cohesive, custom-designed look.
Step 3: Setting the Vanity Area
-
Position the vanity:
Place the light oak vanity cabinet into position. Ensure it sits level on the floor; use shims under the legs if the floor is uneven. -
Install the countertop and sink:
Secure the white countertop to the vanity base. Place the square vessel sink over the pre-cut drain hole. Apply a bead of clear silicone under the sink’s rim to seal it to the counter. -
Mount the faucet:
Install the matte black faucet and handles into the pre-drilled holes behind the vessel sink. Connect the water supply lines underneath and check for leaks. -
Hang the mirror:
Center the light wood framed mirror above the sink. Aim for eye level, ensuring the wood tone complements the vanity below. -
Install the hardware:
Mount the matte black towel hook to the left of the vanity at a height that allows a long towel to hang freely without bunching on the wainscoting ledge.
Step 4: Styling the Space
-
Add organic textures:
Place a woven basket on the vanity’s lower shelf. Fill it with neatly folded white towels to add softness and practical storage. -
Arrange counter decor:
Set a clear glass vase with dried pampas grass or wheat stems on the right side of the sink. This brings height and a natural element that echoes the greige walls. -
Place soap and textiles:
Add an amber glass soap dispenser near the faucet. Hang a textured, cream-colored bath towel on the black hook to tie all the neutral tones together. -
Layer the floor:
Finish by placing a geometric or textured runner rug in front of the vanity for underfoot comfort and visual interest.
Step back and admire your fresh, serene bathroom sanctuary


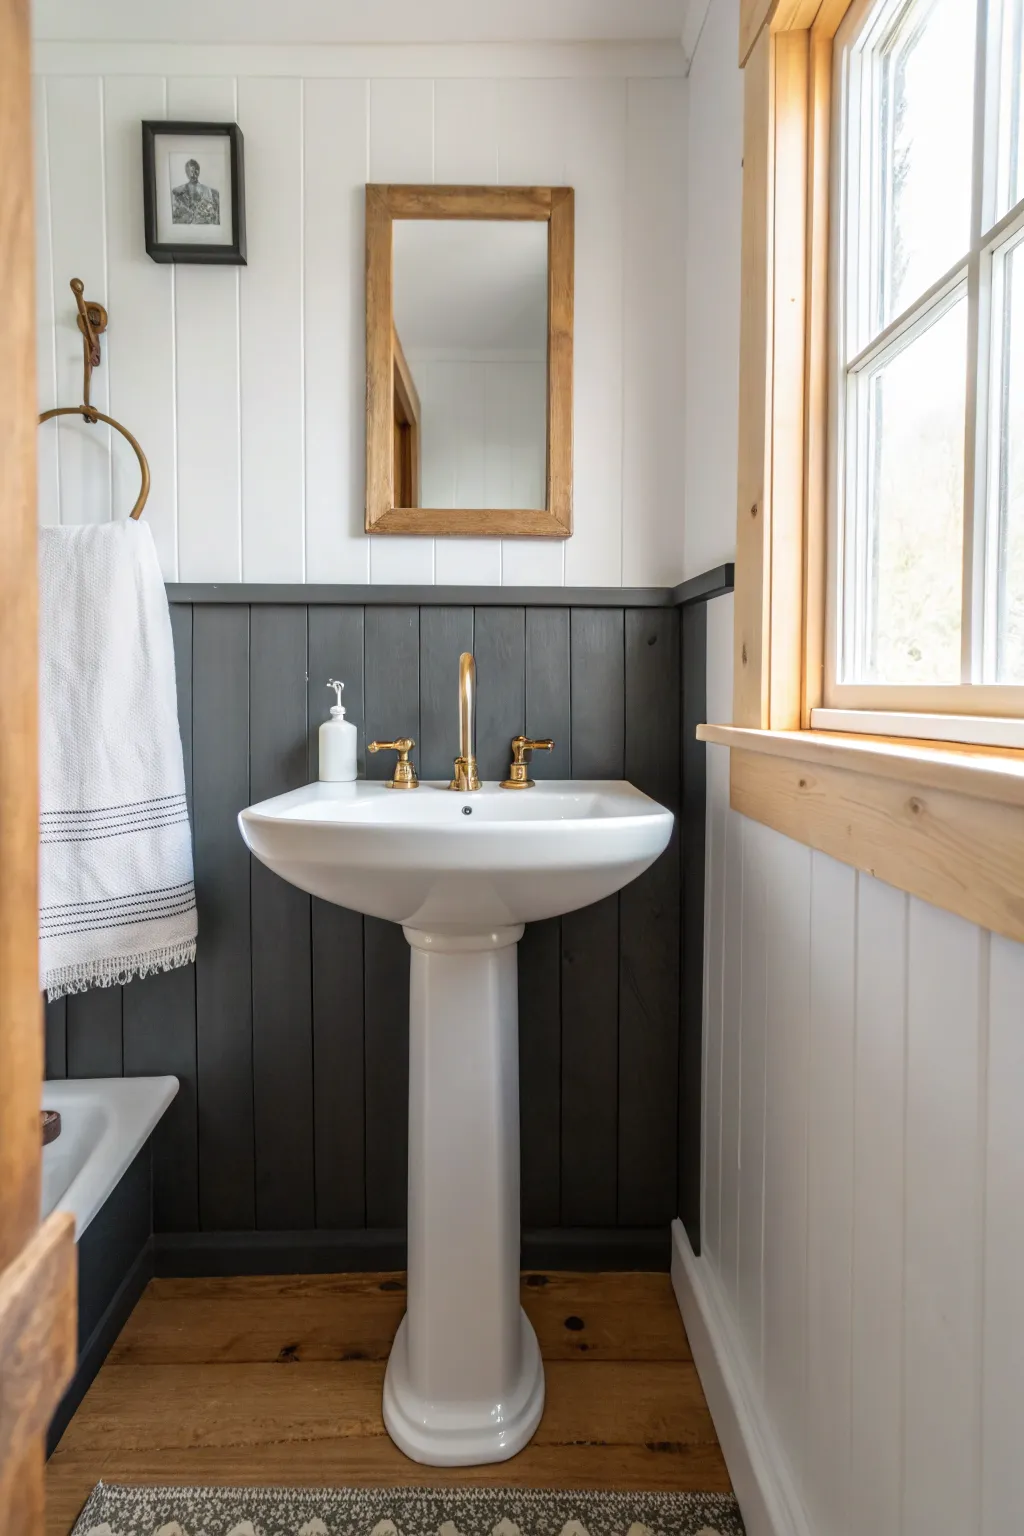
Pale Gray With Bright White Trim
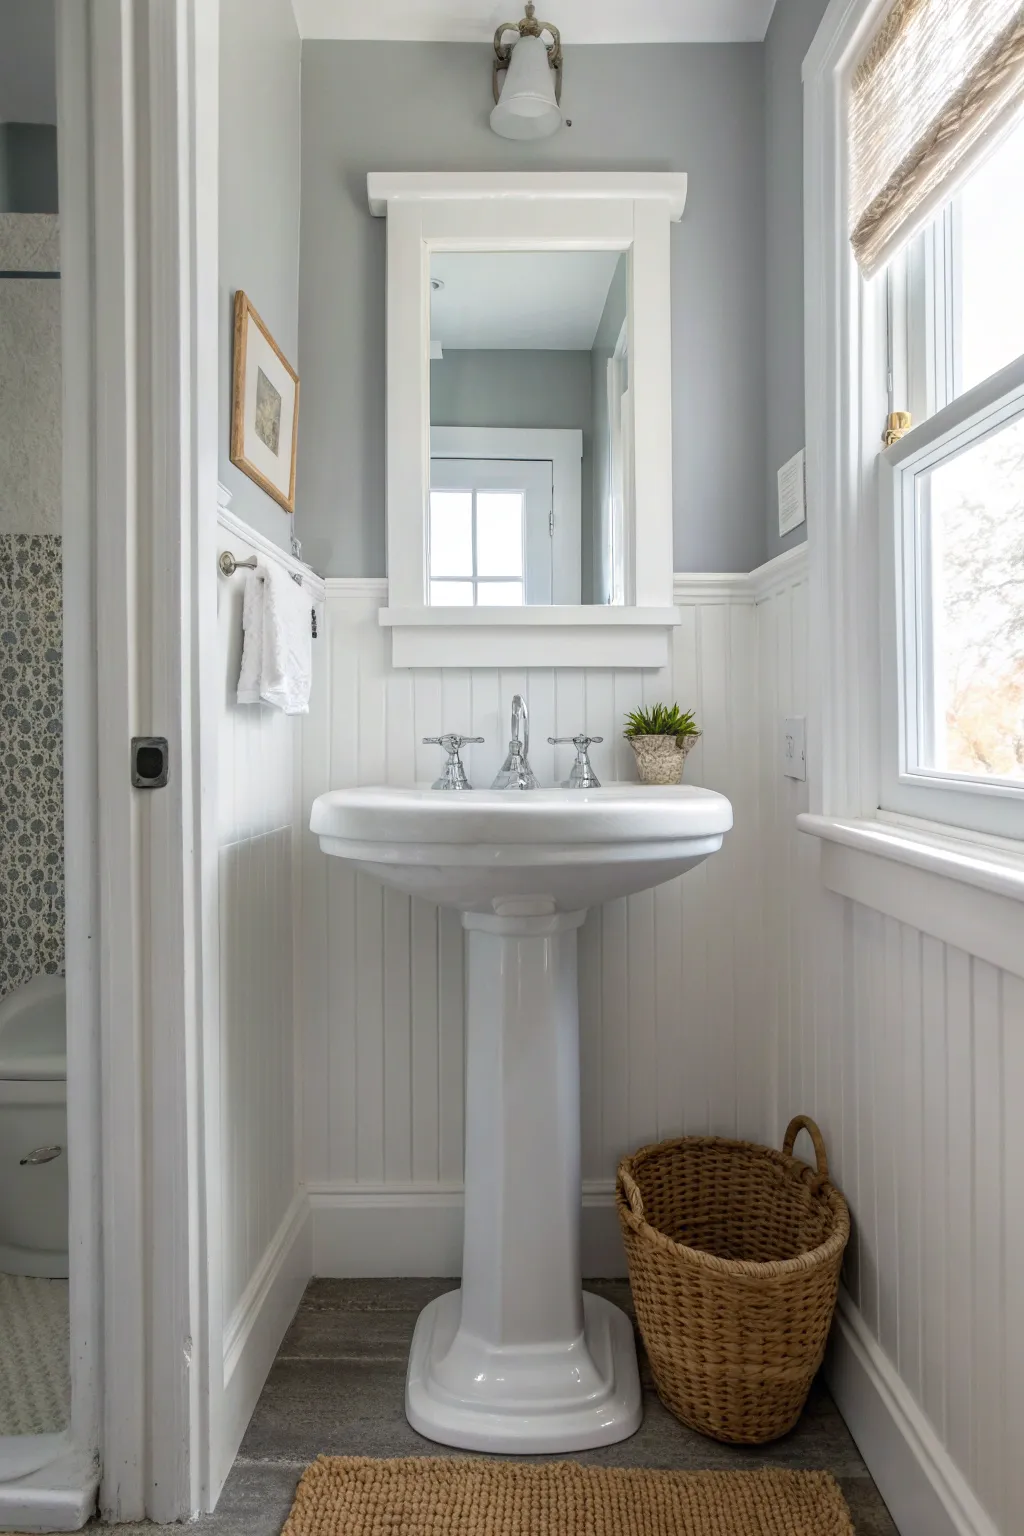
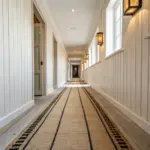
Transform a small powder room into a bright, airy retreat using classic wainscoting and a crisp two-tone palette. This project combines beadboard paneling with pale gray walls to create a timeless look that feels much larger than its actual footprint.
Step-by-Step
Materials
- Pre-primed beadboard paneling sheets
- Top cap molding
- Baseboard molding
- Circular saw
- Jigsaw
- Stud finder
- Construction adhesive (Liquid Nails)
- Brad nailer with 1-1/2 inch nails
- Painters tape
- White semi-gloss paint
- Pale gray satin paint (e.g., Benjamin Moore Stonington Gray)
- caulk gun and paintable caulk
- Spackle
- Fine-grit sandpaper
- Level
Step 1: Preparation and Wall Painting
-
Clear the space:
Remove existing fixtures if possible, such as the pedestal sink and toilet, to make installation easier. If removing them isn’t an option, you’ll need to measure and cut carefully around them later. -
Prep the walls:
Remove any old baseboards and patch significant holes. Lightly sand the upper portion of the walls to ensure good paint adhesion. -
Paint the upper walls:
Apply two coats of pale gray satin paint to the upper half of the room. It’s much easier to paint down past your intended wainscoting line now than to cut in perfectly later. Let this dry completely.
Smooth Seams
Where two large beadboard sheets meet on a flat wall, sand the vertical seam lightly before painting. This hides the join and makes the paneling look like one continuous piece.
Step 2: Installing the Beadboard
-
Determine the height:
Decide on the height of your wainscoting. A common standard is about 32-36 inches, or roughly one-third of the wall height. Mark a level line around the entire room at this height. -
Locate studs:
Use a stud finder to mark the location of all wall studs just above your level line so you can see them while you work. -
Cut the panels:
Measure the length of your first wall. Cut your beadboard sheet to fit horizontally. If you need to cut around plumbing pipes or outlets, measure their exact position and use a jigsaw to cut the openings. -
Apply adhesive:
Apply a wavy line of construction adhesive to the back of the panel. This helps secure the board flat against the wall and reduces the number of nails needed. -
Install the first panel:
Press the panel against the wall, ensuring the top edge aligns with your level line. Use a brad nailer to secure the panel into the studs you marked earlier. -
Continue around the room:
Measure, cut, and install subsequent panels. Butt the edges tightly together. I find that checking level frequently prevents a slanted look as you wrap around corners.
Step 3: Adding Trim and Finishing Touches
-
Install baseboards:
Measure and cut baseboard molding for the bottom edge. Miter the corners at 45 degrees for a clean join. Nail these into the studs through the beadboard. -
Install the top cap:
Cut the top cap molding to length, miter the corners, and place it visually on top of the beadboard edge. Secure it with brad nails, angling them slightly to catch the wall behind. -
Fill the gaps:
Use spackle to fill all nail holes. Once dry, sand them flush. Run a bead of paintable caulk along all seams, corners, and where the molding meets the wall for a seamless professional finish. -
Paint the woodwork:
Tape off the gray wall just above the top cap. Apply two coats of bright white semi-gloss paint to the beadboard, baseboards, and top cap. The glossier finish resists moisture and is easier to clean. -
Reinstall fixtures:
Once the paint has cured (give it at least 24 hours), reinstall your sink, toilet, and any towel bars or accessories.
Add a Picture Rail
For extra charm, add a shallow ledge or picture rail just above the top cap molding. It’s the perfect spot to lean small framed prints or rest vintage apothecary bottles.
Step back and admire how the crisp white lines brighten the space and make the gray walls feel serene and sophisticated


Misty Sky Blue to Open the Space
Transform a small, cramped bathroom into an airy sanctuary with this misty blue color scheme. The soft, diffuse light reflecting off the pale blue walls creates an illusion of openness, making the space feel significantly larger and more serene.
Step-by-Step Tutorial
Materials
- High-quality blue painter tape
- Drop cloths or plastic sheeting
- Spackle and putty knife
- Fine-grit sanding block
- Screwdriver (for removing hardware)
- Mild detergent or TSP substitute
- Primer (preferably moisture-resistant for bathrooms)
- Interior paint in ‘Misty Sky Blue’ (eggshell or satin finish)
- White trim paint (semi-gloss)
- 2-inch angled sash brush
- 9-inch roller frame and microfiber roller covers (3/8 inch nap)
- Paint tray and liners
- Extension pole for roller
Step 1: Prep and Protect
-
Clear the Room:
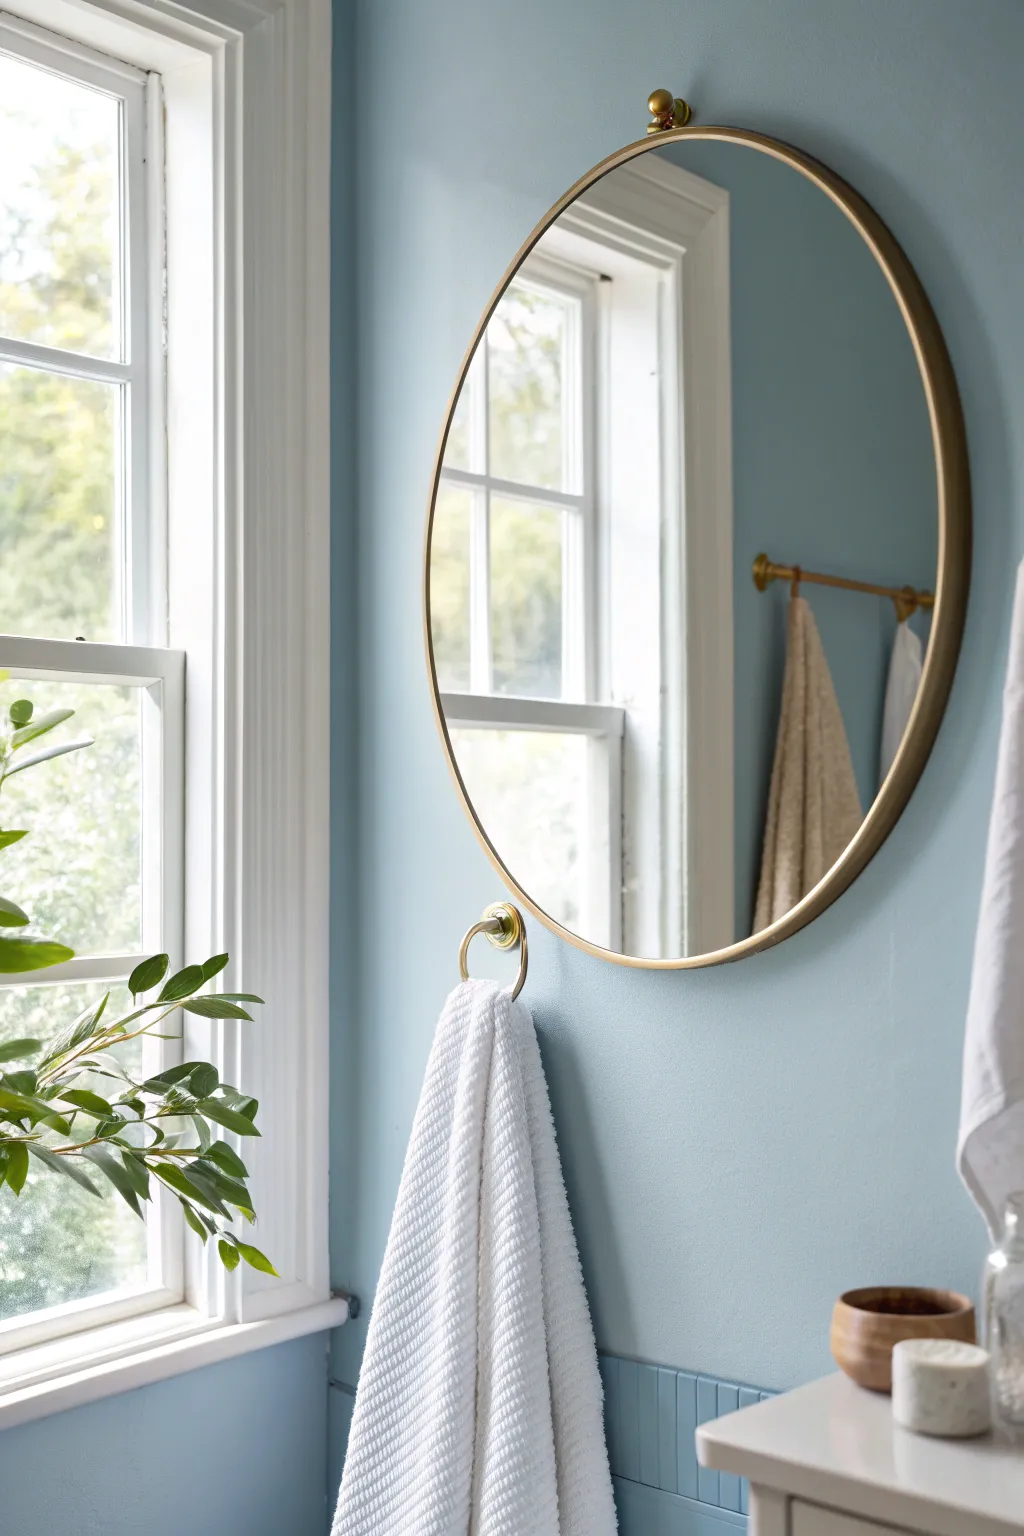
Remove everything movable from the bathroom. This means towels, toiletries, the shower curtain, and even removable wall fixtures like the round brass mirror and towel ring shown in the photo. It’s easier to paint without obstacles. -
Remove Hardware:
Use your screwdriver to take off outlet covers and switch plates. If you can, unscrew the towel ring mount and the hook for the mirror, placing screws in a labeled baggie so they don’t get lost. -
Clean Surfaces:
Bathroom walls often have invisible soapy residue or hairspray buildup. Wipe down the walls and trim with a mild detergent or TSP substitute to ensure the paint adheres perfectly. -
Patch and Sand:
Inspect the walls for nail holes or dings. Fill them with spackle, let dry, and sand smooth with your fine-grit block. Wipe away the dust with a damp cloth. -
Tape It Off:
Apply painter’s tape meticulously along the edges of the window frame, the ceiling line, and the baseboards. Press the tape edge down firmly with a putty knife to prevent bleed-through. -
Lay Down Cloths:
Cover the floor and any fixtures you couldn’t remove, like the vanity or toilet, with drop cloths. Tape the cloths down so they don’t slide around while you work.
Step 2: Priming the Space
-
Why Prime?:
Since bathrooms are high-humidity zones, I always recommend a moisture-resistant primer. It prevents mildew and provides a uniform base for that beautiful misty blue tone. -
Cut In the Primer:
Using your angled sash brush, apply a strip of primer roughly 2-3 inches wide around all edges—ceiling, corners, windows, and trim. This technique is called ‘cutting in’. -
Roll the Walls:
While the cut-in line is still wet, use the roller to apply primer to the large wall sections. Use a ‘W’ or ‘M’ pattern to distribute paint evenly, then smooth it out with vertical strokes. -
Let it Dry:
Allow the primer to dry completely according to the manufacturer’s instructions before moving on to the color.
Pro Tip: Moisture Barrier
Use a kitchen and bath specific paint formula. It contains mildewcides and a tighter resin structure to repel moisture and humidity better than standard interior paint.
Step 3: Applying the Misty Blue
-
First Coat Cutting In:
Open your ‘Misty Sky Blue’ paint. Just like with the primer, start by using the angled brush to cut in around the perimeter of one wall at a time to maintain a wet edge. -
Rolling the First Coat:
Load your roller and apply the first coat of blue. Don’t press too hard; let the roller do the work. The goal is even coverage, not opacity on the first pass. -
Wait and Assess:
Let this first coat dry for at least 4 hours. It might look patchy right now, but resist the urge to touch it up while it’s drying. -
Second Coat Magic:
Apply the second coat in the same manner—cutting in followed by rolling. This is where the true depth of the blue color will emerge, giving you that soft, sky-like finish. -
Remove Tape:
The trick to crisp lines is removing the tape while the final coat is still slightly tacky, not bone dry. Pull it off slowly at a 45-degree angle away from the painted edge.
Level Up: Beadboard Accent
Install wainscoting or beadboard on the lower third of the wall and paint it the same blue for a monochromatic texture, or bright white for classic contrast.
Step 4: Finishing Touches
-
Clean Up:
Fold up your drop cloths carefully to keep dust off your fresh walls. Wash your brushes and roller frame immediately with warm soapy water. -
Reinstall Hardware:
Once the walls have cured (ideally 24 hours), screw your towel ring, mirror hook, and outlet covers back into place. -
Style the Space:
For the look in the photo, hang a crisp white textured towel and place the round brass mirror back on its hook. The contrast between the brass and the new blue walls is stunning.
Enjoy the fresh, spa-like atmosphere of your newly painted bathroom retreat
BRUSH GUIDE
The Right Brush for Every Stroke
From clean lines to bold texture — master brush choice, stroke control, and essential techniques.
Explore the Full Guide
Seafoam and White Spa Pairing
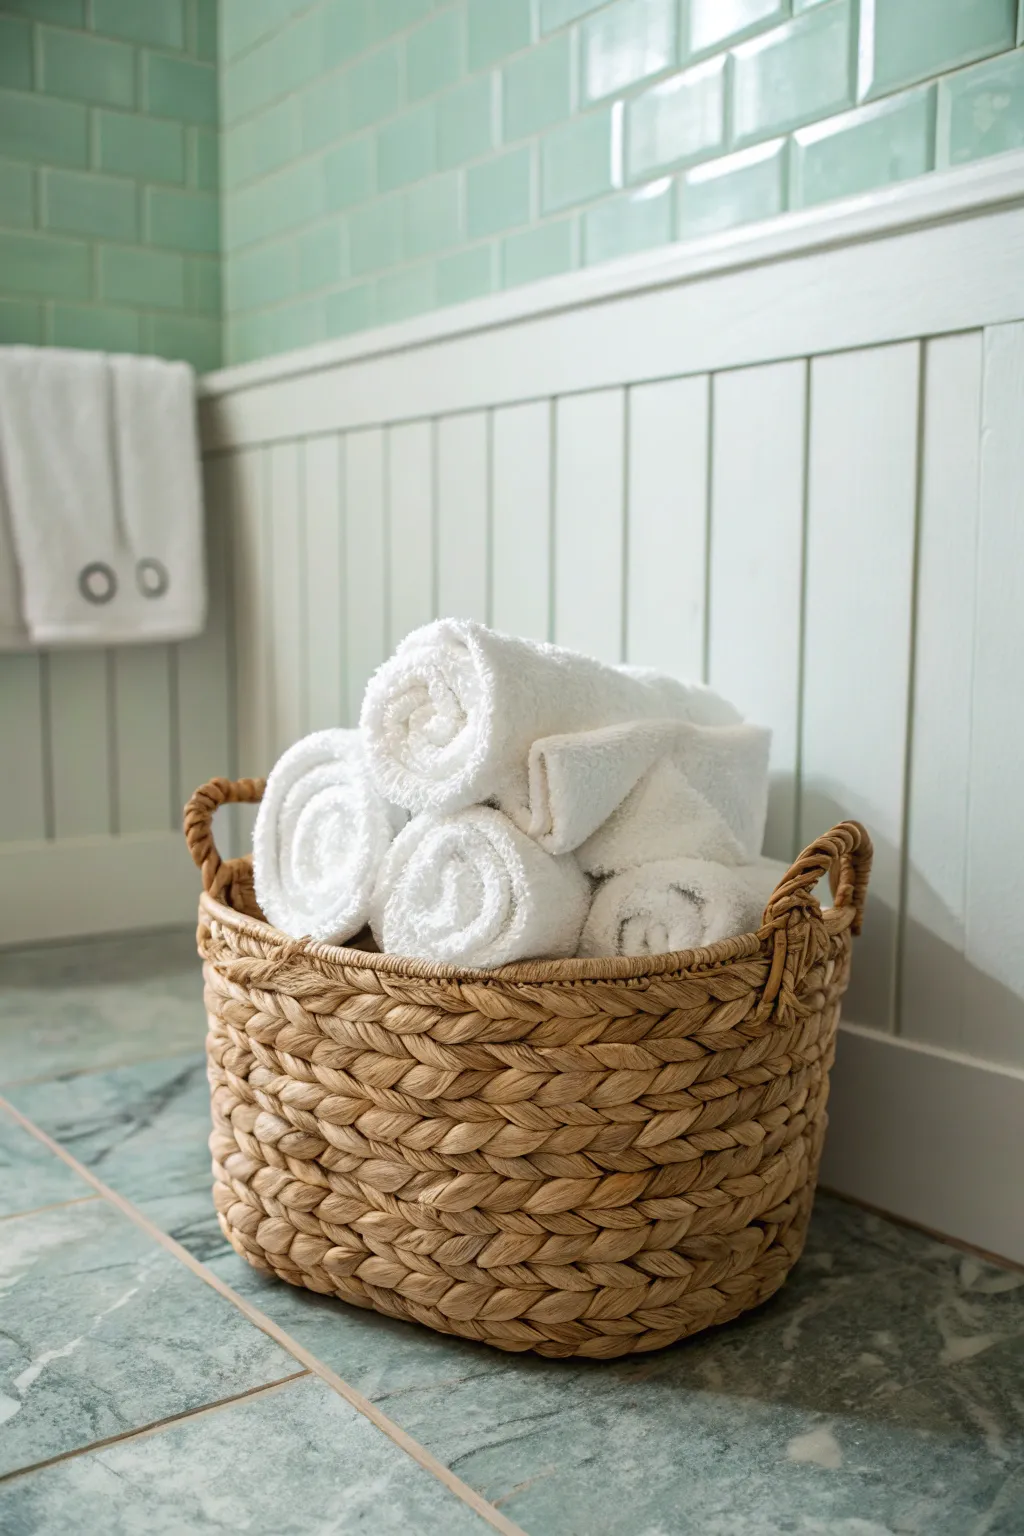
Bring the serene feeling of a coastal spa into your home by recreating this textured towel basket display. This styling project combines the crispness of white cotton with natural woven textures to perfectly complement a seafoam and white bathroom palette.
How-To Guide
Materials
- Large oval woven basket (hyacinth or seagrass)
- 4-6 plush white bath towels
- 2-3 plush white hand towels
- Optional: Fabric stiffener or spray starch (for styling)
- Optional: Small foam block or filler towels (for height)
Step 1: Preparation
-
Basket Selection:
Choose a basket made from chunky natural fibers like water hyacinth or thick seagrass. Look for an oval shape with sturdy, integrated handles on the sides, aiming for a medium golden-brown tone to warm up the cool bathroom colors. -
Towel Prep:
Ensure all towels are freshly laundered and completely dry. Using a high-heat dry cycle helps fluff up the loops for that luxurious spa look. I find that skipping fabric softener actually keeps them fluffier and more absorbent. -
Base Layer:
If your basket is very deep, place a folded ‘sacrifice’ towel or a small foam block at the very bottom. This acts as a riser so your beautifully rolled towels sit visible at the rim rather than sinking out of sight.
Floppy Rolls?
If towels unroll, use a large rubber band to secure them while arranging. Hide the band at the bottom or back of the basket once placed.
Step 2: Mastering the Spa Roll
-
Lay Flat:
Lay your first bath towel out flat on a clean surface, smoothing out any major wrinkles. -
Fold in Half:
Fold the towel in half lengthwise (hot dog style). Align the edges carefully so the roll looks neat later. -
Create the Start:
Start at one narrow end and begin rolling the towel tightly. Keep the edges aligned as you go. For a tighter, neater spiral, tuck the first inch in firmly before continuing the roll. -
Secure the Roll:
Once fully rolled, you can tuck the loose flap into the roll itself if you want it to hold independently, or simply place it seam-side down in the basket. -
Repeat the Process:
Repeat this rolling technique for three to four bath towels. Aim for consistent tightness so all rolls are roughly the same diameter. -
Hand Towel Variation:
For the smaller hand towels, fold them differently to add visual variation. Fold them in thirds lengthwise before rolling, or simply fold them loosely to drape over the structural rolls.
Scent Infusion
Tuck a small sachet of dried lavender or a dryer sheet deep inside the bottom of the basket for a subtle, fresh scent release.
Step 3: Arrangement & Styling
-
Position the Anchors:
Place three rolled bath towels horizontally into the basket. Stack them in a pyramid formation—two on the bottom layer, one resting centrally on top. -
End-Facing Technique:
Orient the rolls so the attractive spiral end faces outward toward the viewer. This is the ‘face’ of the arrangement. -
Fill the Gaps:
Take a fourth rolled towel and slot it vertically or diagonally into any side gaps to ensure the basket looks bountiful and full. -
The Casual Drape:
Take one hand towel and fold it loosely. Drape it over the top right edge of the basket, allowing part of it to spill over the rim slightly. This breaks the rigidity of the rolls. -
Top Layer Texture:
Nestle a second folded hand towel near the back, peeking out from behind the main pyramid. -
Final Fluff:
Gently gently tug at the loops of the visible towel ends to make them look softer. If a roll looks too tight or compressed, loosen it slightly. -
Positioning:
Place the finished basket on the floor against the beadboard wall, angling it slightly so the contents welcome you as you enter the room.
Enjoy the instant visual softness and practical luxury this display adds to your daily routine
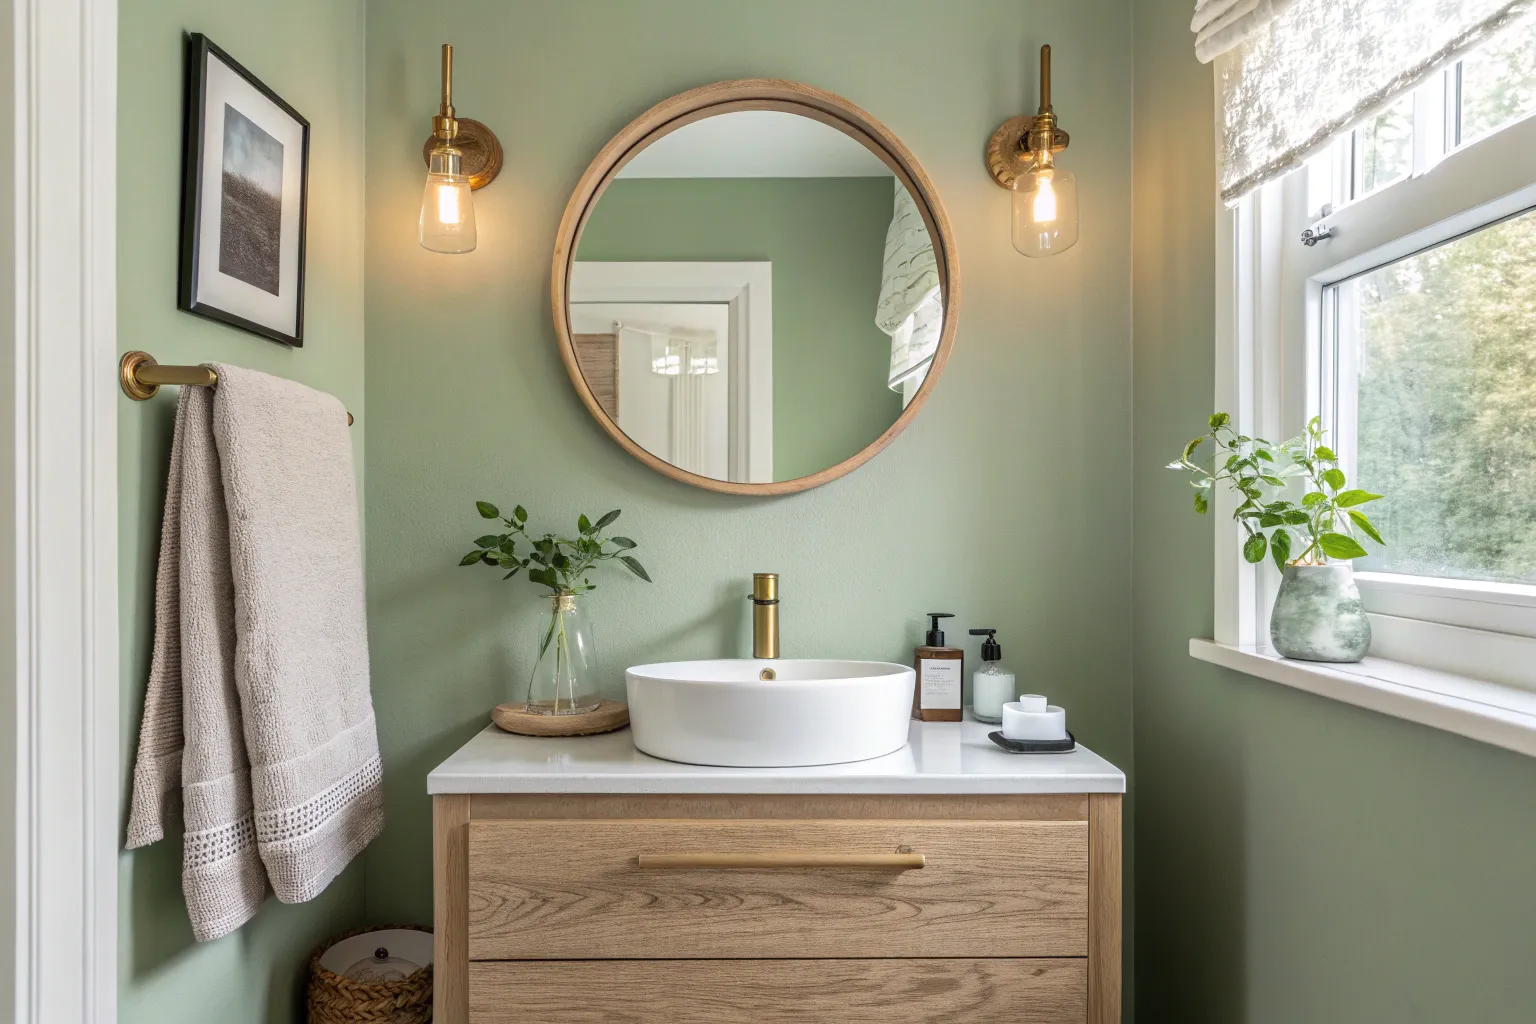
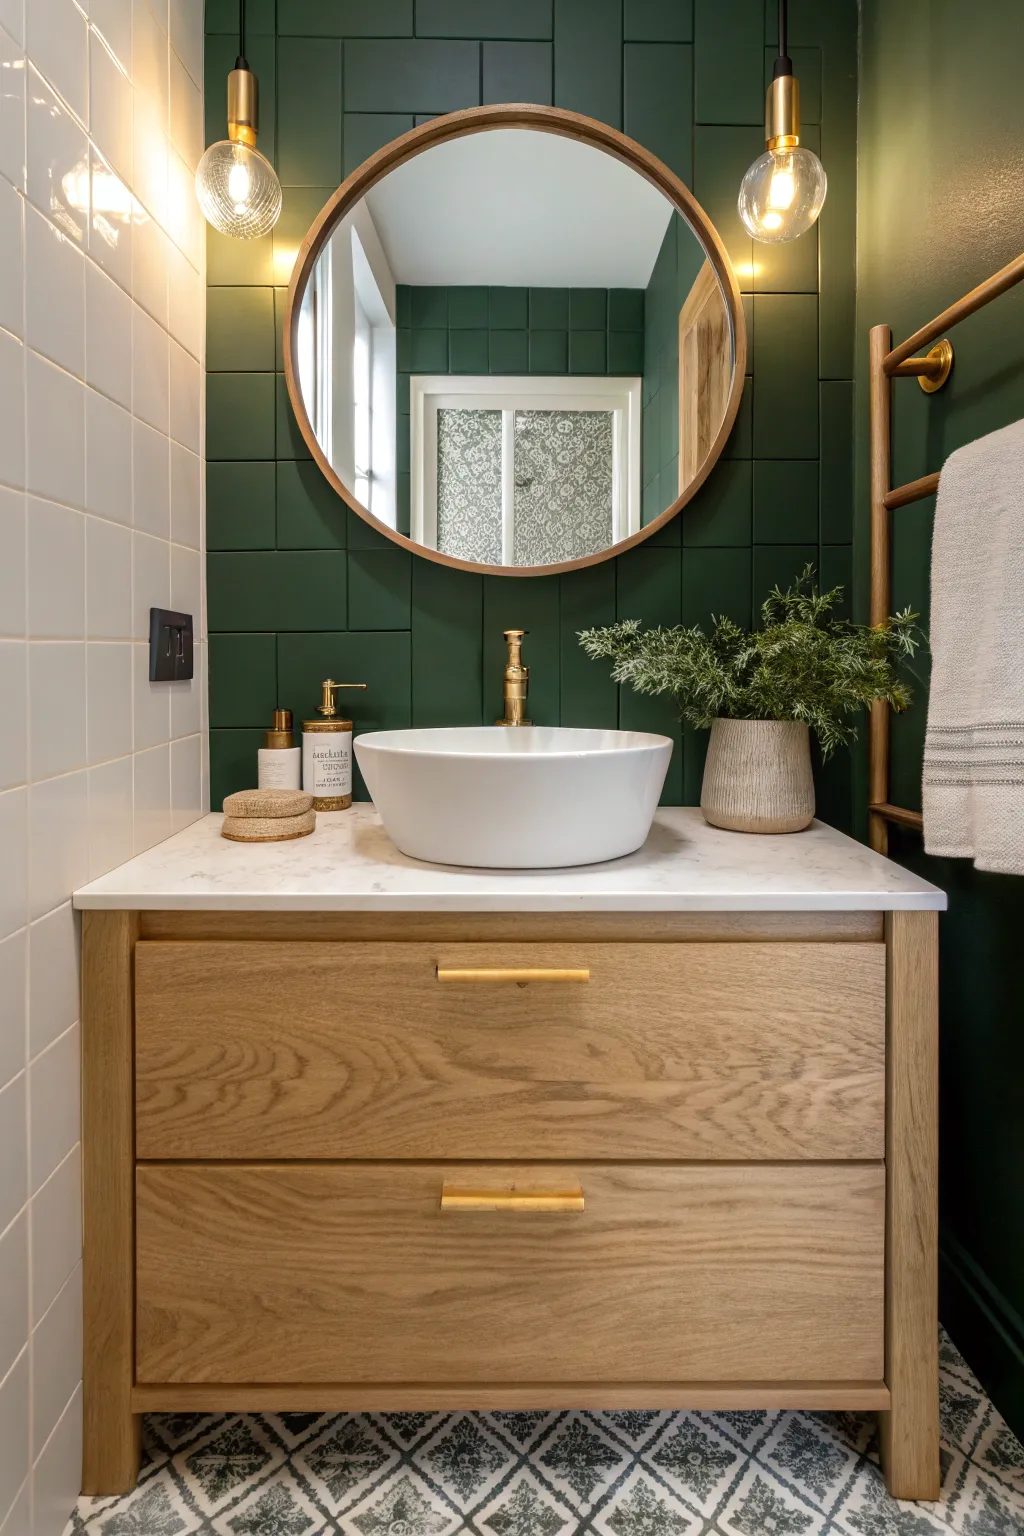
Soft Sage Green for Natural Calm
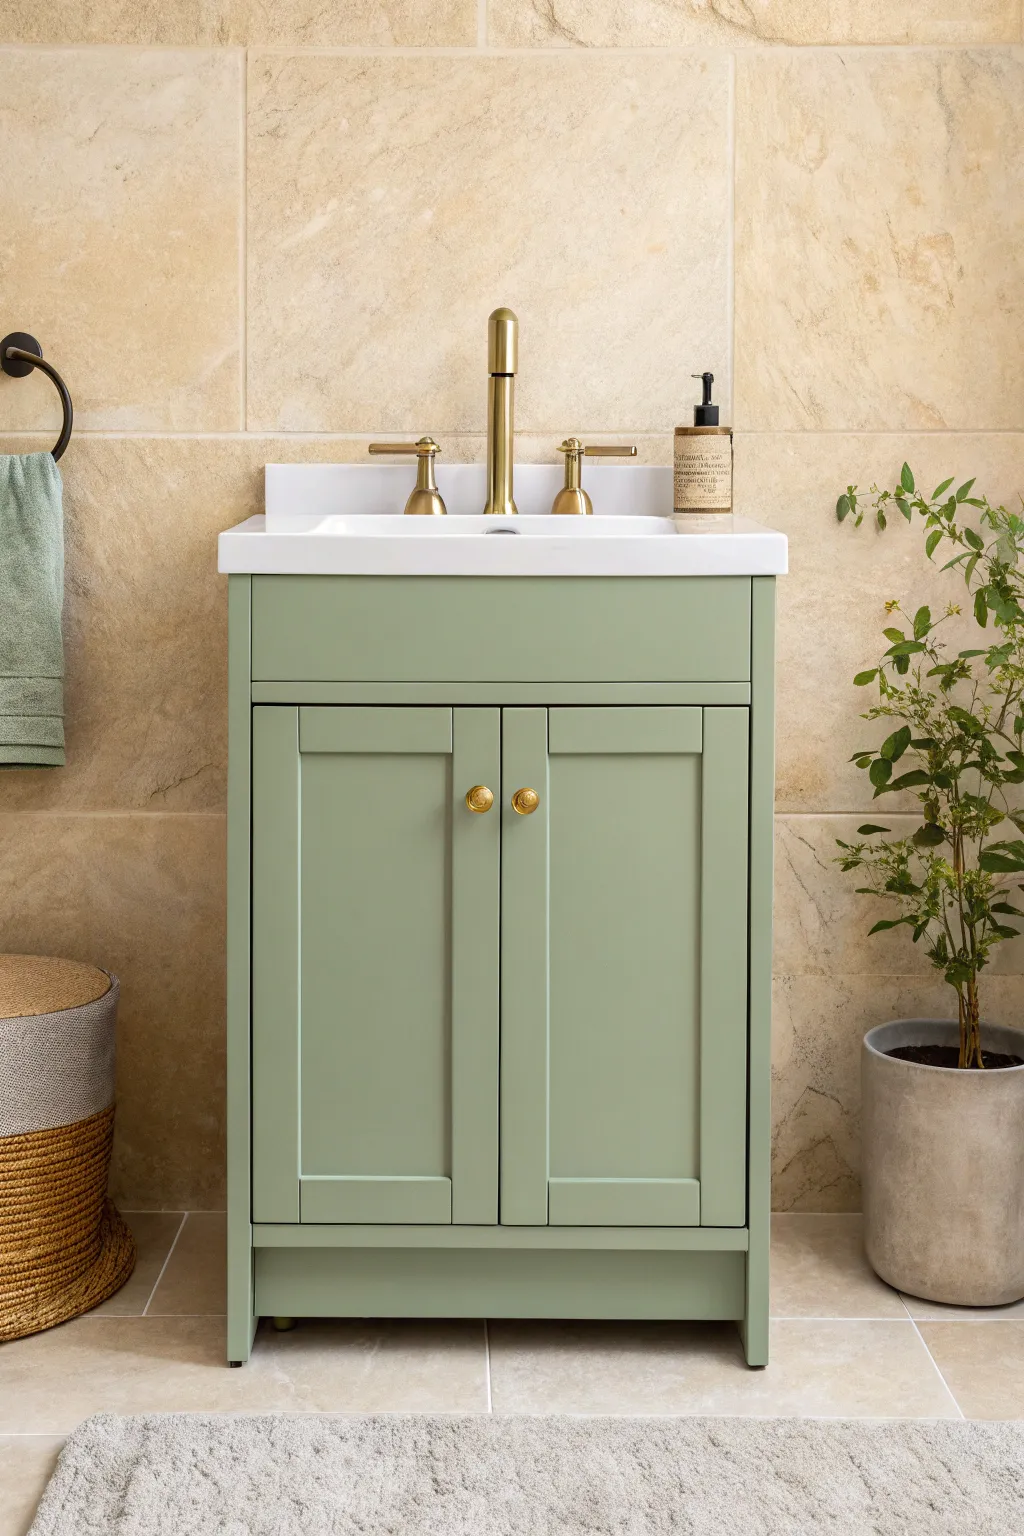
Transform a standard bathroom vanity into a calming focal point with this soft sage green finish. The gentle, earthy tone pairs beautifully with warm gold hardware and natural textures, creating a spa-like retreat in even the smallest powder room.
Step-by-Step Tutorial
Materials
- Bathroom vanity cabinet (wood or laminate)
- High-quality cabinet enamel paint (Sage Green)
- Bonding primer (specifically for cabinets)
- Degreasing cleaner (like TSP substitute)
- Sanding sponge (medium and fine grit)
- Tack cloth
- Painter’s tape
- Mini foam roller and tray
- 2-inch angled sash brush
- Gold cabinet knobs
- Gold faucet set
- Drop cloths
- Screwdriver or drill
Step 1: Preparation & Disassembly
-
Clear and clean:
Begin by removing all items from inside and on top of the vanity. If the sink top is removable, take it off carefully; otherwise, you’ll need to work around it. -
Remove hardware:
Use a screwdriver to take off the cabinet doors and drawer fronts. Remove all existing knobs, hinges, and the faucet if you plan to replace it. -
Label everything:
Place hardware in labeled bags. I find it helpful to mark the back of each door and hinge with a piece of tape indicating its original location (e.g., ‘Left Door’ or ‘Top Hinge’) to make reassembly seamless. -
Deep clean:
Scrub all surfaces of the cabinet box, doors, and drawers with a degreasing cleaner. Bathroom vanities often accumulate unseen hairspray or soap residue that can repel paint. -
Scuff sand:
Once dry, lightly sand all surfaces with a medium-grit sanding sponge. You aren’t trying to strip the finish, just roughening it up to give the primer something to grip. -
Dust removal:
Vacuum up the sanding dust, then wipe everything down thoroughly with a tack cloth to ensure a perfectly smooth base. -
Protect surroundings:
Apply painter’s tape along the floor edges and walls where they meet the vanity. If the sink top is still in place, tape off the edge where the cabinet meets the porcelain.
Floetrol for Flow
Add a paint conditioner like Floetrol to your latex enamel. It slows drying time, allowing brush and roller marks to level out for a glass-smooth, factory-like finish.
Step 2: Priming & Painting
-
Apply primer:
Roll a thin coat of bonding primer onto the flat surfaces of the doors and cabinet box. Use the angled brush to get into the corners and recessed panels. -
Smooth the primer:
Allow the primer to dry fully according to the can’s instructions. Once dry, very lightly sand with fine-grit paper to knock down any brush strokes, then wipe with the tack cloth again. -
First coat of sage:
Stir your sage green cabinet enamel thoroughly. Start by painting the backs of the doors first; this allows you to practice your technique on a hidden surface. -
Brushing the details:
On the front of the doors, use your angled brush to paint the recessed panels and corners first. Feather out the edges so you don’t leave ridge lines. -
Rolling the flats:
Immediately follow up with the mini foam roller on the flat stiles, rails, and side panels. Rolling while the brushed areas are still wet helps blend the texture for a sprayed-on look. -
Dry and assess:
Let this first coat dry completely. Don’t rush this step, as tacky paint can pull up when you apply the next layer. -
Second coat:
Apply the second coat using the same method: brush the details, then roll the flat surfaces. This top coat typically provides the true depth of the sage color.
Step 3: Reassembly & styling
-
Cure time:
Allow the paint to cure for at least 24 to 48 hours before reattaching any hardware. The paint needs to harden to resist chipping. -
Install the faucet:
While waiting for the doors to cure, install the new gold faucet into the sink top according to the manufacturer’s instructions. -
Reattach doors:
Carefully screw the hinges back onto the cabinet frame and reattach the doors. Use your labels to ensure they go back in the correct spots. -
Add gold hardware:
Install the new gold knobs. If your new hardware uses different hole spacing than the old, fill the old holes before painting and drill new ones during the prep phase. -
Final touches:
Remove the painter’s tape slowly at a 45-degree angle. Place your accessories, like the amber soap dispenser and greenery, to complete the natural, calming aesthetic.
Sticky Doors?
If doors stick to the frame after reassembly, stick small clear felt bumpers on the corners of the doors. This creates a tiny gap that prevents paint-on-paint contact.
Enjoy the peaceful atmosphere your newly refreshed sage vanity brings to your daily routine

PENCIL GUIDE
Understanding Pencil Grades from H to B
From first sketch to finished drawing — learn pencil grades, line control, and shading techniques.
Explore the Full Guide
Blush Pink to Warm Up a Small Bath
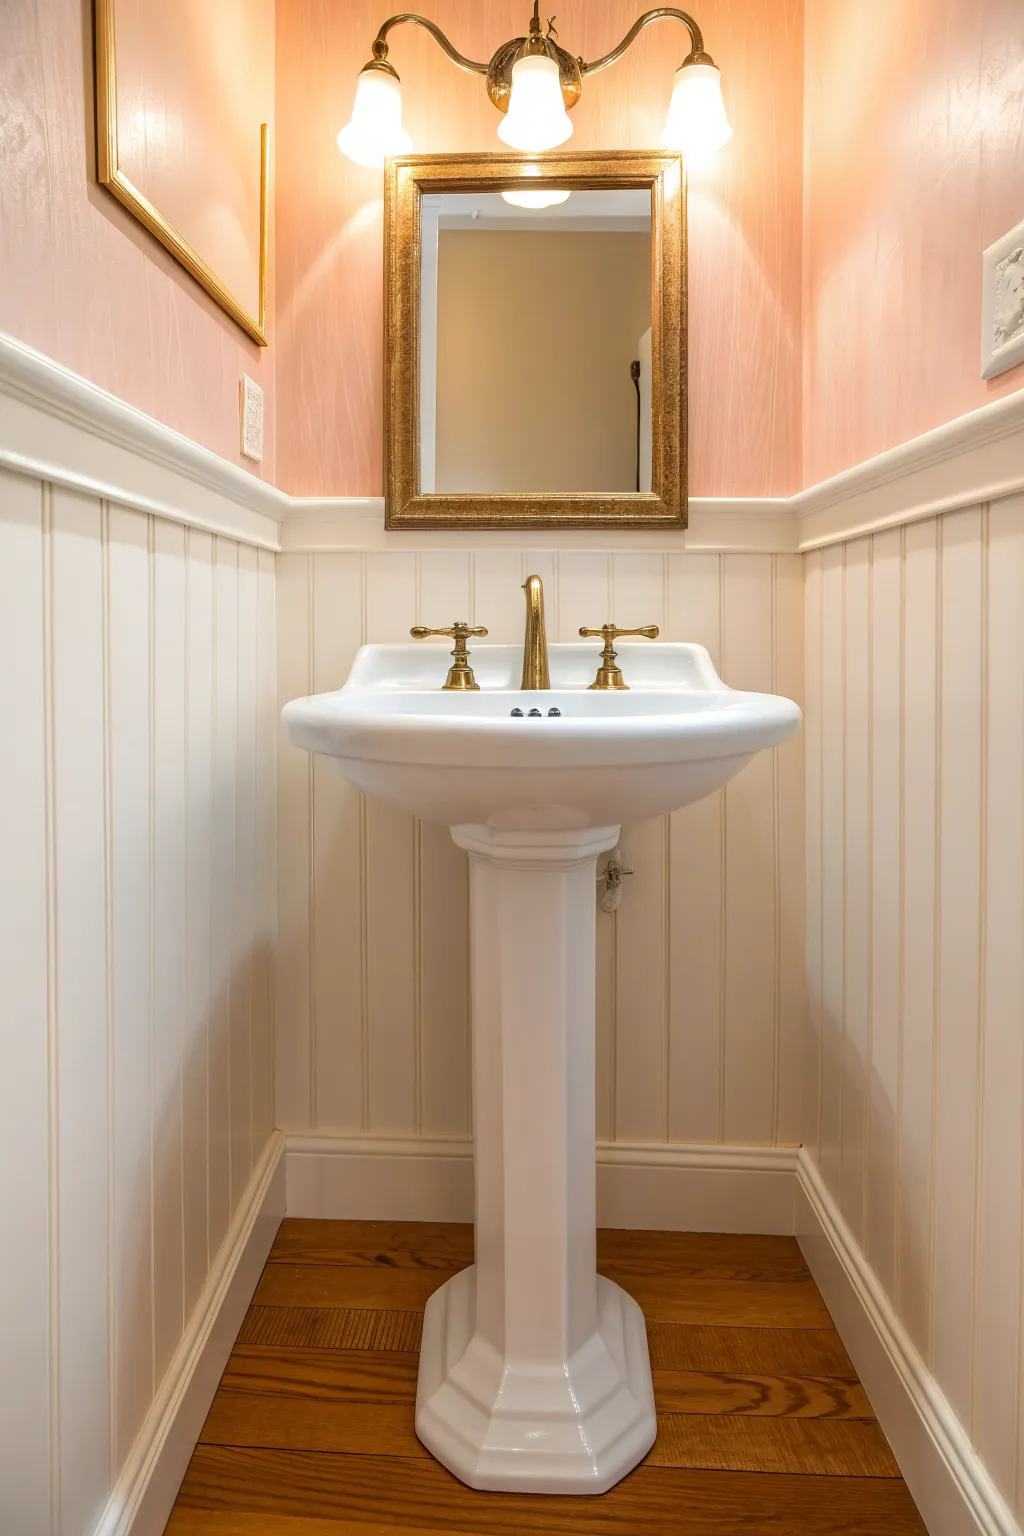
Transform a tiny powder room into a glowing jewel box using soft peach-pink paint and crisp white wainscoting. This project balances warm, feminine tones with classic architectural details to make a small space feel both cozy and expansive.
Step-by-Step
Materials
- Interior paint: ‘Blush Pink’ or ‘Peach Parfait’ (Eggshell finish)
- Interior paint: ‘Bright White’ (Semi-gloss finish)
- Beadboard paneling sheets
- Chair rail molding
- Baseboard molding
- Construction adhesive
- Pedestal sink kit (classic white porcelain)
- Widespread brass faucet set
- Gold-framed rectangular mirror
- Three-light brass vanity fixture
- Brad nailer and 1-1/2 inch nails
- Caulk gun and paintable caulk
- Spackle or wood filler
- Painter’s tape
- Paint rollers, trays, and brushes
- Level and measuring tape
- Jigsaw (to cut outlet holes)
Step 1: Wainscoting & Wall Prep
-
Measure and mark:
Begin by determining the height for your wainscoting. A standard height is about 32-36 inches from the floor, but in small rooms, going slightly higher can add drama. Mark a level line around the entire perimeter of the room. -
Cut the beadboard:
Measure the width of your walls carefully. Cut your beadboard sheets to fit below your marked level line. Remember to measure and cut out rectangles for any electrical outlets or plumbing pipes using a jigsaw before installation. -
Install the panels:
Apply construction adhesive to the back of your beadboard sheets in a zigzag pattern. Press the panel firmly against the wall, ensuring it aligns with your level line. Secure it further using a brad nailer, placing nails into the grooves where they are less visible. -
Add the trim:
Measure and cut your baseboard molding and chair rail molding. Miter the corners at a 45-degree angle for a seamless join. Attach the baseboards at the floor and the chair rail directly on top of the beadboard edge to cap it off neatly. -
Caulk and fill:
Fill all nail holes with spackle and let dry. Run a bead of caulk along the top of the chair rail, the corners where panels meet, and along the baseboards to close any gaps. Smooth the caulk with a wet finger for a professional finish.
Gaps in Corners?
If your corner joints aren’t perfect, use a flexible, paintable caulk. Run a generous bead into the corner, wet your finger, and smooth it into a curve. Once painted, the gap disappears entirely.
Step 2: Painting & Finishes
-
Prime the wood:
If your beadboard isn’t pre-primed, apply a coat of high-quality primer to the wood and trim. This ensures the white paint will look crisp and adhere properly. -
Paint the wainscoting:
Using a semi-gloss ‘Bright White’ paint, cover the beadboard, chair rail, and baseboards. I recommend two coats here; the semi-gloss finish is not only classic but durable and easy to clean in a bathroom environment. -
Apply the blush wall color:
Tape off the top of your chair rail to protect it. Paint the upper portion of the walls with your chosen blush pink color. Use a roller for the main areas and an angled sash brush to cut in carefully around the ceiling and corners. -
Second coat:
Apply a second coat of the pink paint once the first is dry to ensure a rich, even color that doesn’t show roller marks.
Step 3: Fixture Installation
-
Install the vanity light:
Ensure the power is off at the breaker. Mount the brass three-light fixture centered on the wall above where the sink will go. The upward-facing shades help bounce light off the ceiling, making the room feel taller. -
Set the pedestal sink:
Position the pedestal base and sink basin. Connect the plumbing lines and secure the basin to the wall according to the manufacturer’s instructions. Standard pedestal sinks are perfect for tight spaces as they reduce visual clutter. -
Mount the faucet:
Install the widespread brass faucet onto the sink basin. The brass tone is crucial here—it warms up the white porcelain and complements the pink walls beautifully. -
Hang the mirror:
Center your gold-framed rectangular mirror directly beneath the light fixture and above the sink. Ensure it is hung securely, likely using wall anchors if you aren’t drilling into a stud. -
Final touches:
Install the switch plate covers and give the room a final clean. Step back and check for any paint touch-ups needed around the fixtures.
Texture Play
Swap standard flat pink paint for a subtle faux-finish glaze or a textured wallpaper in the same blush tone. This adds depth and makes the small wall space feel more luxurious and custom designed.
Enjoy the warm and welcoming glow of your newly refreshed powder room
Creamy Beige With Soft Glow
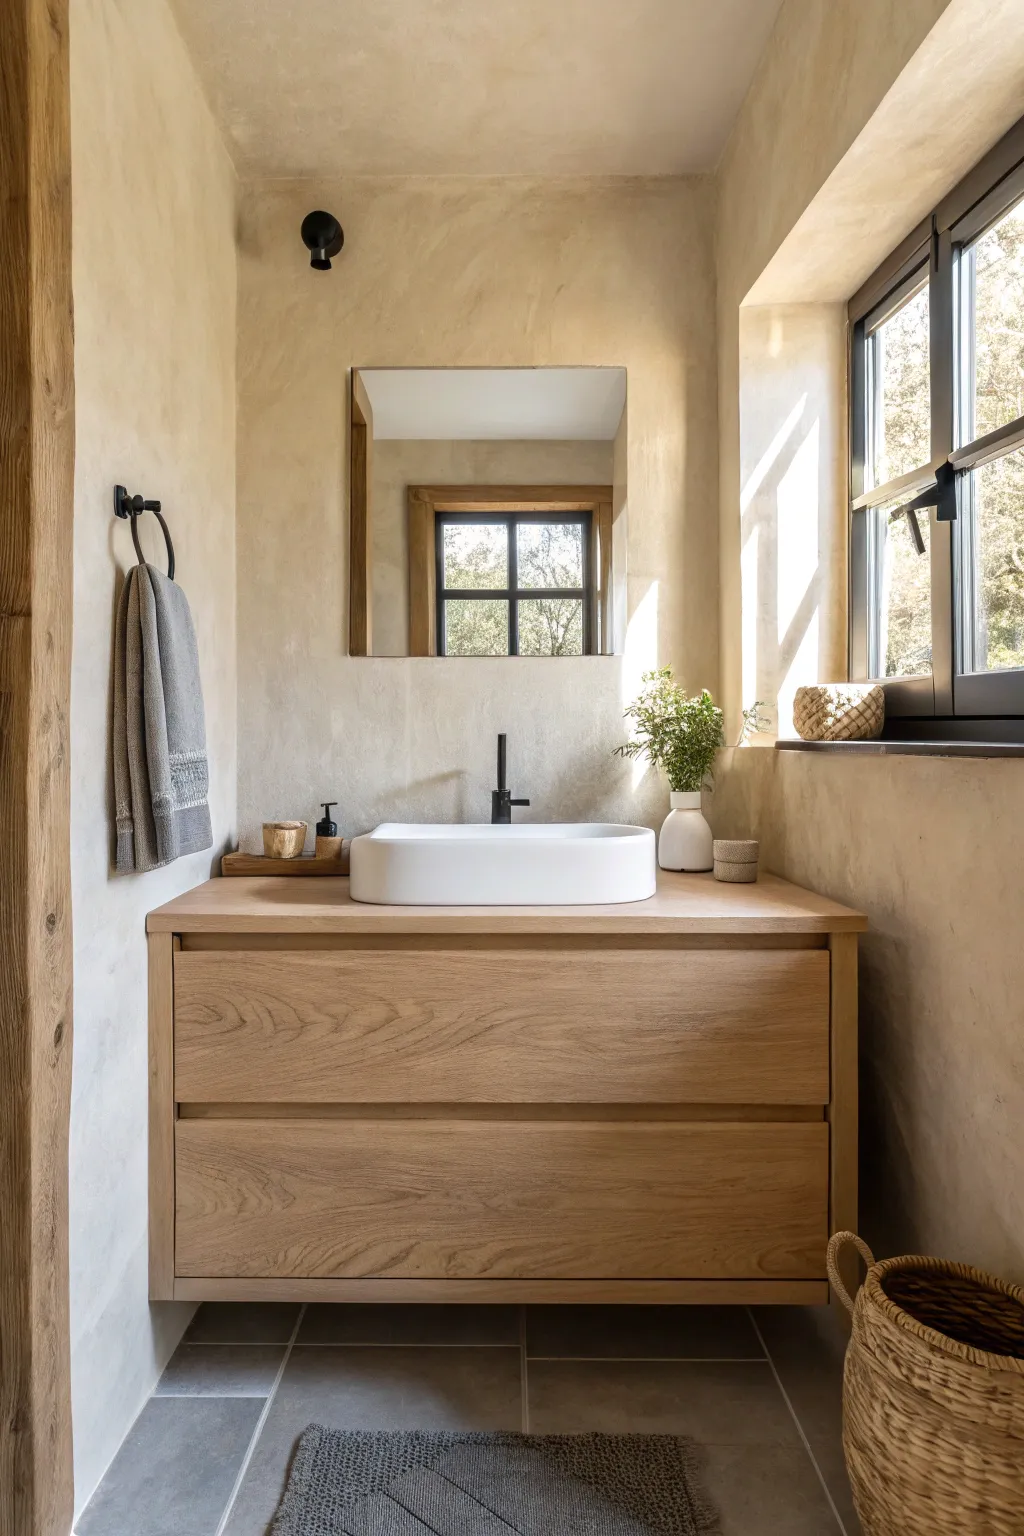
Step away from stark whites and embrace the calming warmth of creamy beige with a textured finish that mimics the depth of ancient plaster. This project transforms a flat, boring bathroom into a soothing, spa-like retreat through the clever application of lime wash paint and natural wood tones.
How-To Guide
Materials
- High-quality lime wash paint (creamy beige/sand tone)
- Wide lime wash block brush (natural bristle)
- Painter’s tape
- Drop cloths
- Sanding sponge (fine grit)
- Primer designed for lime wash
- Matte clear topcoat (optional, for water resistance)
- Floating wood vanity (or wood veneer sheets to resurface)
- Vessel sink (white ceramic)
- Wall-mounted matte black faucet
- Square mirror
- Black industrial sconce light
- Grey floor tiles (ceramic or vinyl peel-and-stick)
- Assorted woven baskets and towels
Step 1: Preparation & Priming
-
Clear and clean:
Remove all existing fixtures from the room, including the mirror, vanity, and lighting. Thoroughly clean the walls with a mild detergent and water to remove any soap scum or grease. -
Smooth the surface:
Inspect the walls for holes or imperfections. Fill them with spackling paste and lightly sand smooth once dry, ensuring a completely flat canvas. -
Mask the edges:
Apply painter’s tape carefully around the ceiling line, floor trim (if keeping), and window frames. Lay drop cloths to protect the flooring. -
Apply the specialized primer:
Roll on a coat of primer specifically formulated for lime wash paint. This gritty primer is crucial—it gives the mineral paint something to grip onto. Let this dry completely while you take a coffee break.
Step 2: Creating the Lime Wash Texture
-
Mix the wash:
Stir your lime wash paint thoroughly. The pigments settle heavily, so keep a stir stick handy to remix every 10-15 minutes during application. -
Cut in the edges:
Use a smaller brush to dab paint into the corners and edges. Don’t paint a straight line; feather it out immediately so it blends with the main wall sections. -
The cloud technique:
Dip your wide block brush into the lime wash. Apply the paint using random, X-shaped strokes or a crisscross motion. This technique creates that signature ‘cloudy’ movement and depth. -
Maintain a wet edge:
Work in manageable sections (about 3×3 feet). It’s important to keep a wet edge to avoid harsh lap lines, so try to complete one entire wall at a time without stopping. -
Apply the second coat:
Allow the first coat to dry until it is light-colored and chalky. Apply a second coat using the same crisscross motion to build richness and opacity. -
Seal the splash zones:
Since this is a bathroom, apply a matte, breathable sealer over the areas near the sink and water sources to protect the finish from moisture stains.
Uneven Texture?
If brush strokes look too uniform, go back over wet paint with a dry brush in swirling motions to soften the hard edges and create more random clouding.
Step 3: Vanity Installation & Details
-
Install the vanity:
Mount your floating wood vanity. If recreating the look on a budget, you can apply oak veneer sheets to an existing flat-front cabinet to mimic the warm wood grain shown. -
Plumbing fixtures:
Install the white vessel sink centered on the vanity. I find it easiest to attach the countertop faucet hardware before finalizing the plumbing underneath. -
Mount the mirror:
Hang a simple, frameless or thin-frame square mirror directly above the sink. Ensure it reflects the window light to maximize the airy feel. -
Add lighting:
Install a matte black sconce high on the wall to the left or above the mirror area for a modern, industrial touch. -
Flooring touch-up:
Lay down large-format grey tiles. If you can’t retile, luxury vinyl tiles in a slate grey finish are an excellent, renter-friendly alternative.
Warm Glow
Choose a soft white (2700K) bulb for your sconce. Cooler bulbs will make the beige lime wash look grey or muddy at night.
Step 4: Styling the Sanctuary
-
Window treatment:
Leave the window unadorned if privacy allows to let natural light highlight the wall texture, or add a simple roller shade if needed. -
Add greenery:
Place a white ceramic vase with fresh greenery or dried eucalyptus on the vanity to bring a vibrant, organic element to the neutral palette. -
Textural accessories:
Introduce warmth with woven textures. A seagrass basket on the floor and a wooden tray for soaps tie the natural wood tones together. -
Hang textiles:
Finish by hanging a textured, grey waffle-knit towel on a matte black ring to complement the floor and faucet.
Enjoy the peaceful ambiance of your newly created spa-inspired bathroom retreat.


Light Taupe for Cozy Neutral Energy
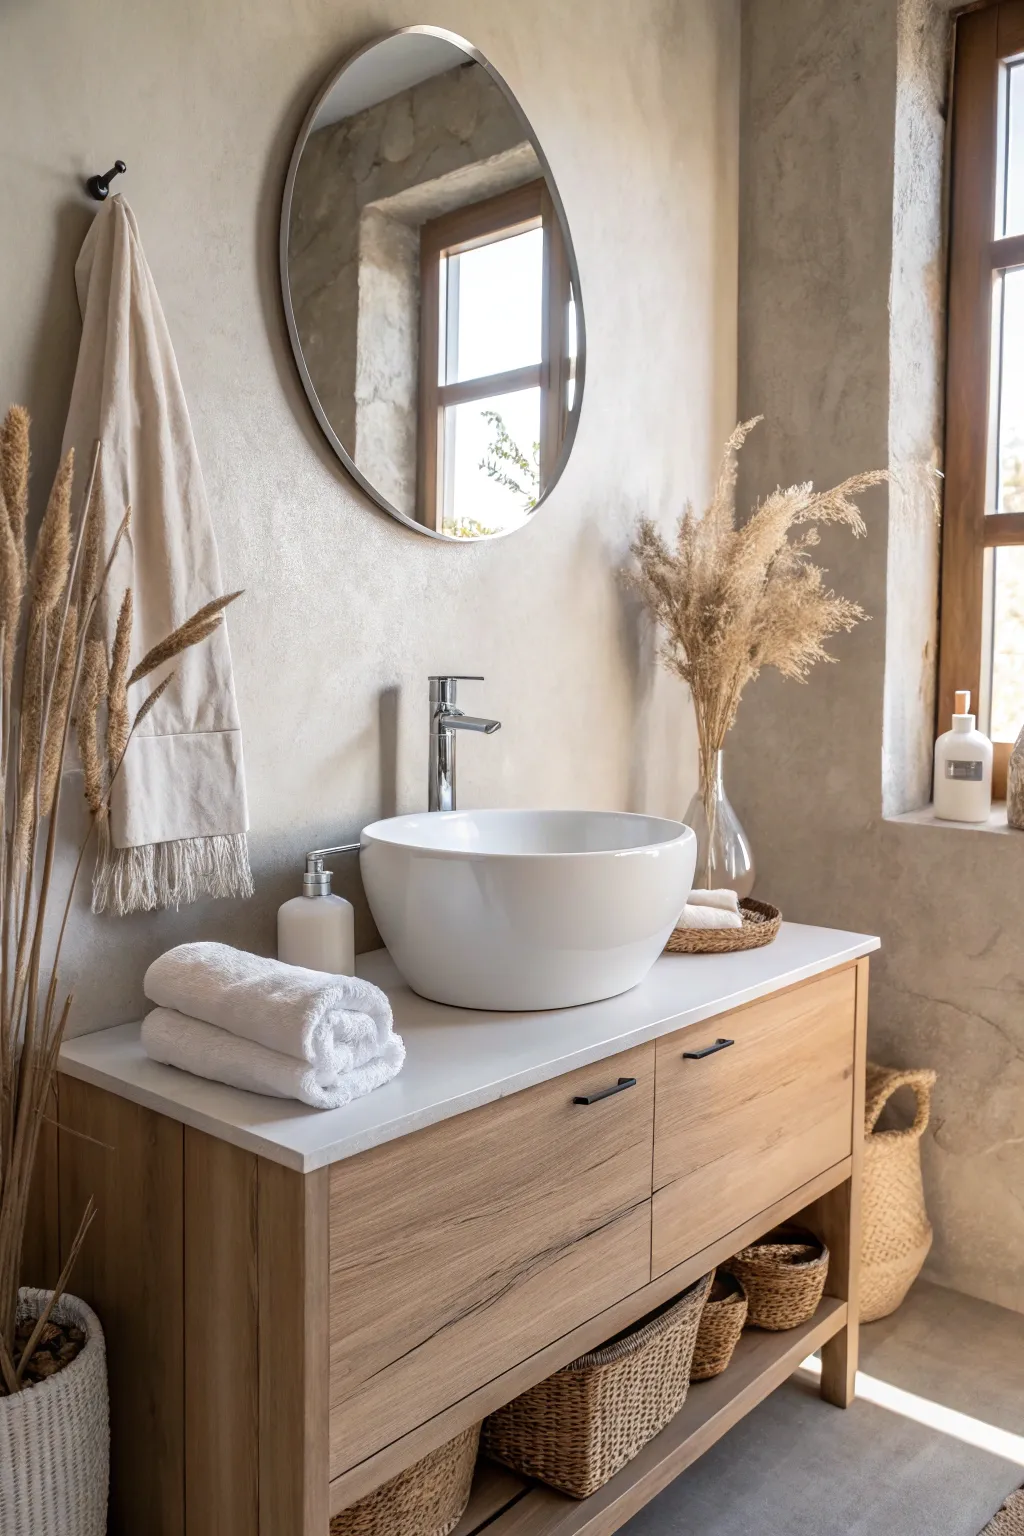
Transform your bathroom into a serene sanctuary with this layered, neutral design focused on texture and organic warmth. This project creates a spa-like atmosphere using calming hues of taupe, natural wood elements, and soft woven accents.
Step-by-Step Guide
Materials
- Light taupe wall paint (matte or eggshell finish)
- Wooden vanity cabinet (light oak finish)
- White vessel sink (round ceramic)
- Quartz countertop (white or light grey)
- Round mirror with thin silver or brushed nickel frame
- Modern tall faucet (chrome finish)
- Dried pampas grass (tall stems)
- Clear glass vase (bottle neck style)
- Woven storage baskets (various sizes)
- Beige hand towel with fringe
- Wall hook (black matte metal)
- White liquid soap dispenser
- White rolled towels
- Small woven tray
Step 1: Setting the Neutral Canvas
-
Prep the Walls:
Begin by removing all existing hardware, outlet covers, and the old mirror. Patch any holes with spackle and sand smooth once dry to ensure a flawless finish for your paint application. -
Apply the Taupe Base:
Paint the walls with a high-quality light taupe paint. I recommend using a roller for the main sections to achieve that soft, almost plaster-like texture seen in the image, cutting in the edges carefully with a brush. -
Install the Vanity:
Position your light oak wooden vanity. Ensure it is perfectly level before securing it to the wall studs. This wood tone is crucial for providing the earthy warmth that balances the cool white ceramics. -
Secure the Countertop:
Apply silicone adhesive to the top edge of the vanity cabinet and carefully lower the quartz countertop into place. Let it cure according to the manufacturer’s instructions. -
Mount the Vessel Sink:
Center the round white vessel sink over the drain hole. Apply a bead of clear silicone seal around the bottom edge of the sink where it meets the counter to prevent water seepage.
Color Consistency
Keep the color palette strict: taupe, white, and wood. Introducing bright colors will break the serene ‘wabi-sabi’ aesthetic.
Step 2: Installing Fixtures and Hardware
-
Install the Tall Faucet:
Mount the tall chrome faucet behind the vessel sink. Ensure the water stream hits the center of the bowl to avoid splashing. Tighten connections underneath and test for leaks immediately. -
Hang the Mirror:
Identify the center line above the sink. Hang the round silver-framed mirror so the center is at eye level (usually about 60-65 inches from the floor). Use heavy-duty wall anchors if you aren’t drilling into a stud. -
Add the Towel Hook:
To the left of the mirror, install a simple black matte hook. Position it high enough so your long fringed towel hangs freely without touching the counter, adding a touch of asymmetry to the layout.
Texture Play
Mix smooth ceramic with rough wicker. Combine sleek metal with fluffy dried grass. This contrast is the secret to cozy minimalism.
Step 3: Styling with Organic Textures
-
Arrange Lower Storage:
In the open bottom shelf of the vanity (or on the floor beneath if floating), place matched woven baskets. Fill one with extra supplies and perhaps leave one empty for texture. The weave brings necessary roughness to the smooth surfaces. -
Create the Floral Arrangement:
Take your tall dried pampas grass stems and arrange them in the clear glass vase. Fluff the plumes gently. Place this arrangement in the corner of the vanity or on a window ledge if available to draw the eye up. -
Prepare the Hand Towel:
Drape the beige fringed hand towel casually over the wall hook. Don’t fold it perfectly; a loose drape enhances the relaxed, effortless vibe we are aiming for. -
Style the Countertop:
Group your white soap dispenser near the sink. Roll two fluffy white towels tightly and stack them neatly on the counter. Beside them, place a small woven tray with washcloths or small toiletries. -
Add Floor Accents:
If you have corner space, place a large, tall woven basket with dried reeds or extra towels. This grounds the design and connects the floor to the vanity area. -
Final Polish:
Wipe down the mirror, faucet, and sink one last time to remove fingerprints. Step back to check the visual balance—the mirror should reflect the light and open up the space beautifully.
Enjoy the calming atmosphere of your newly styled, spa-inspired bathroom retreat
White Walls With a Deep Navy Vanity
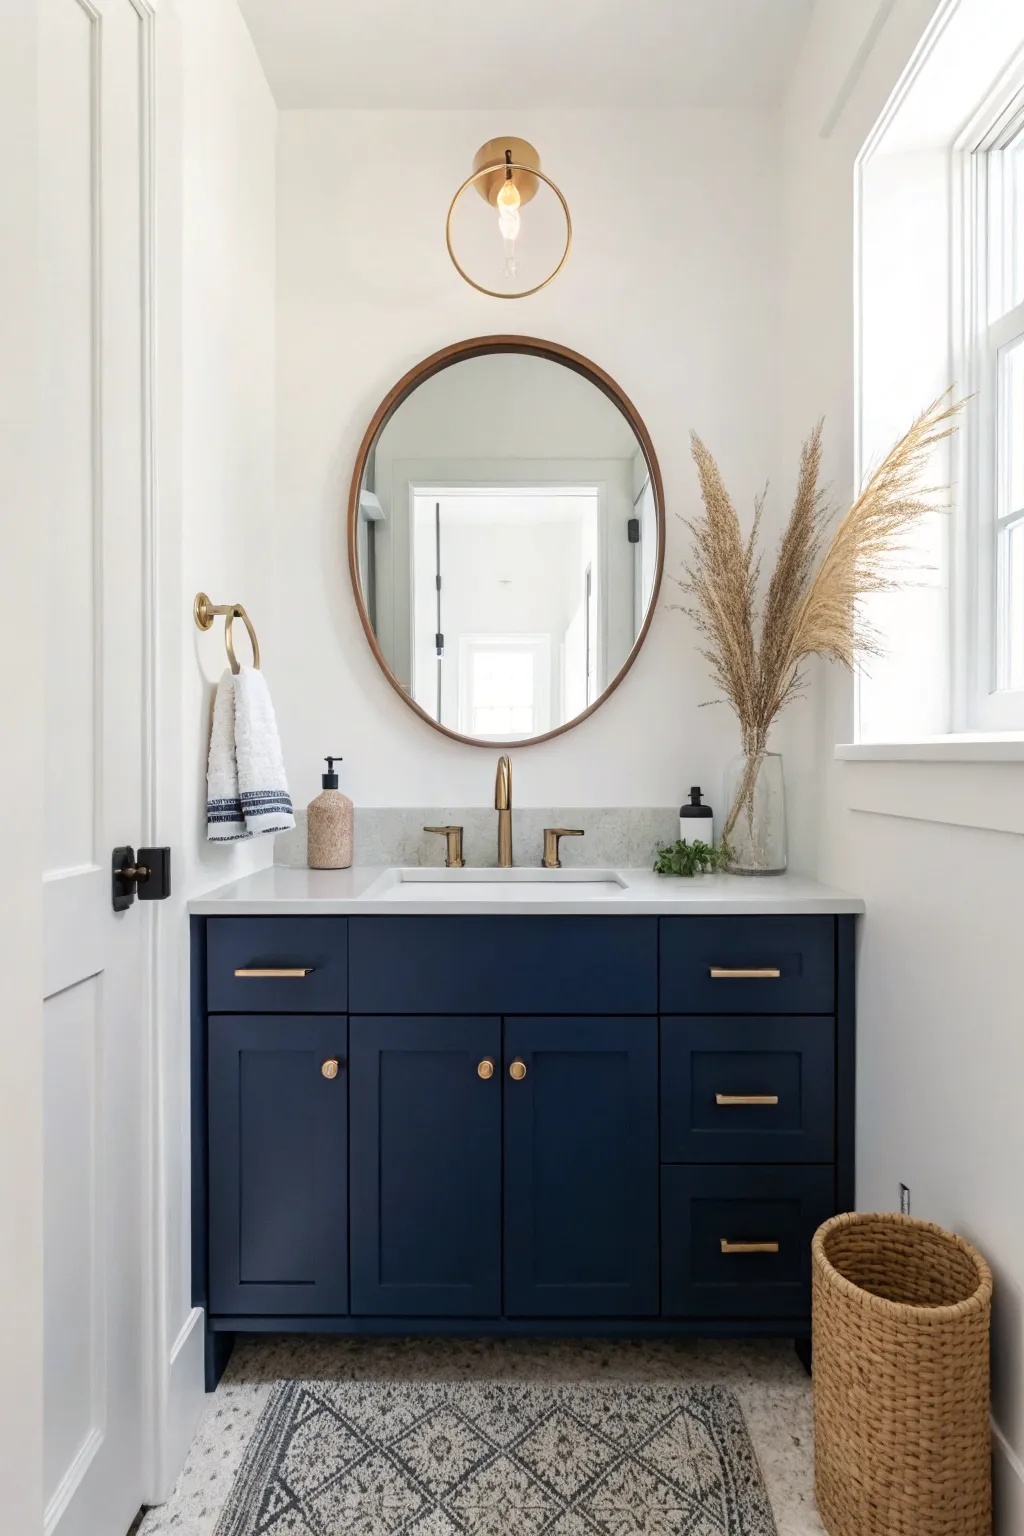
Transform a standard bathroom vanity area into a sophisticated coastal retreat by pairing deep navy cabinetry with bright white walls and warm brass accents. This refreshing upgrade balances modern clean lines with organic textures for a spa-like atmosphere.
How-To Guide
Materials
- Deep navy blue cabinet paint (satin or semi-gloss finish)
- High-quality white wall paint (eggshell or satin finish)
- Brass cabinet hardware (pulls and knobs)
- Round mirror with wood or brass frame
- Brass finish faucet
- Pendant light fixture with brass accents
- Sandpaper (120 and 220 grit)
- Painter’s tape
- Drop cloths
- Primer (bonding primer for cabinets)
- Paint rollers (foam for cabinets, nap for walls)
- Angled sash brushes
- Screwdriver or chill for hardware removal
- Clear glass vase and dried pampas grass
- Woven waste basket
- patterned rug
Step 1: Prep & Prime
-
Clear the space:
Remove all items from the vanity countertop and drawers. Take down the existing mirror, light fixture, and towel ring if you are replacing them. -
Remove hardware:
Using a screwdriver, carefully remove all existing cabinet doors, drawers, pulls, and knobs. Label each door and drawer with its corresponding opening using painter’s tape to ensure an easy reinstallation later. -
Clean surfaces:
Thoroughly clean the cabinet surfaces with a degreaser or TSP substitute to remove oils and grime. This is crucial for paint adhesion. -
Sand the cabinets:
Lightly scuff the cabinet frames, doors, and drawer fronts with 120-grit sandpaper to remove the glossy finish. Wipe away all dust with a tack cloth or damp rag. -
Protect the area:
Apply painter’s tape along the walls where they meet the vanity, floor, and ceiling. Lay down drop cloths to protect your flooring. -
Apply primer:
Roll or brush a coat of high-quality bonding primer onto the cabinet boxes, doors, and drawer fronts. Let it dry completely according to the manufacturer’s instructions.
Sticky Drawers?
If drawers stick after painting, run a plain candle or beeswax along the wooden glides. The wax acts as a lubricant and prevents paint friction.
Step 2: Painting
-
Paint the walls:
While the cabinet primer is drying, paint the walls with a crisp white paint. Use an angled brush for cutting in around corners and trim, then use a roller for the main wall surfaces. Two coats are usually best for a solid, bright finish. -
Sand primer:
once the primer on the cabinets is fully dry, lightly sand it with 220-grit sandpaper to smooth out any brush strokes or texture. Wipe off the dust. -
Paint the vanity:
Apply the first coat of deep navy paint to the cabinet frames, doors, and drawers. Use a foam roller for the flat surfaces to get a smooth, factory-like finish, and a brush for corners and details. -
Apply second coat:
Allow the first coat to dry fully. I find waiting overnight is safest. Apply a second coat of navy paint for full, rich coverage. Let this cure for at least 24-48 hours before reattaching any hardware.
Step 3: Fixtures & Finishes
-
Install faucet:
Install the new brass faucet according to the manufacturer’s instructions while the vanity paint is curing, being careful not to scratch the new paint. -
Mount lighting:
Install the new brass pendant light fixture above the vanity area. Ensure the power is off at the breaker before doing any electrical work. -
Reassemble cabinetry:
Once the paint is fully cured, reattach the cabinet doors and slide the drawers back in. Install the new brass pulls and knobs. -
Hang mirror and accessories:
Center and hang the round mirror above the sink. Install the towel ring on the side wall. -
Style the space:
Place a tall glass vase with dried pampas grass on the counter to add height and texture. Add a soap dispenser, a patterned rug on the floor, and a woven basket to complete the look.
Customize It
Swap the woven basket for a dipped ceramic planter or use live eucalyptus instead of pampas grass for a fresh, spa-scented vibe.
Step back and admire how this bold contrast brings a fresh new energy to your bathroom space
Airy Walls With a Charcoal Accent
Transform a plain bathroom into a high-contrast sanctuary by combining crisp white walls with moody charcoal wainscoting. This project balances airy brightness with grounding dark tones, accented by natural pine, to create a sophisticated yet rustic look.
Detailed Instructions
Materials
- Tongue-and-groove pine planks (v-groove profile)
- Construction adhesive
- Finish nails (1.5 inch and 2 inch)
- Brad nailer or hammer
- Wood trim (chair rail or cap molding)
- Charcoal paint (satin or semi-gloss finish)
- White paint (eggshell or satin finish)
- Clear wood finish (polyurethane or wax)
- Natural pine mirror frame
- Natural pine window casing boards
- Paintbrushes (high-quality angled sash brush)
- Foam roller and tray
- Painter’s tape
- Fine-grit sandpaper (220 grit)
- Caulk and caulk gun
- Wood filler
- Pedestal sink (for reference)
Step 1: Preparation & Wall Layout
-
Clear and clean:
Remove everything from the walls, including existing mirrors, towel racks, and outlet covers. If you are keeping the sink in place, carefully tape off the edges where it meets the wall to protect the porcelain. -
Determine wainscoting height:
Measure up from the floor to decide your transition line. A good rule of thumb for this look is about 40 to 48 inches high, or roughly one-third to one-half up the wall. Mark a level line around the perimeter of the room. -
Paint the upper wall:
Before installing any wood, paint the upper portion of the wall with your crisp white paint. I prefer doing this now so you don’t have to cut in carefully around the new wood later. Apply two coats for solid coverage.
Paint Persistence
Dark charcoal paint shows dust easily. Use a satin finish rather than matte; it’s much easier to wipe down and won’t show water splashes as clearly.
Step 2: Installing the Wainscoting
-
Cut planks to size:
Measure the distance from the floor to your level line. Cut your tongue-and-groove planks to this length. Double-check measurements frequently, as floors can be uneven. -
Start the installation:
Apply construction adhesive to the back of your first plank in a zig-zag pattern. Place it in the corner, ensuring it is perfectly plumb (vertically level). Use a level to check this before nailing. -
Secure the planks:
Nail through the tongue of the plank into the wall studs using 2-inch finish nails. If you can’t hit a stud, angle the nails in separate directions (cross-nailing) to lock it into the drywall. -
Continue the run:
Slide the next plank’s groove onto the previous tongue. Tap it gently with a rubber mallet or a scrap block of wood to ensure a tight seam, then nail it in place. Repeat this process around the room. -
Cut around obstacles:
When you encounter plumbing pipes or outlets, measure carefully and use a jigsaw to notch out the planks. Since the sink covers the pipe area, these cuts don’t have to be perfect, but outlet cuts should be precise.
Vintage Vibe
Swap standard hardware for unlacquered brass or antique gold fixtures. Over time, they will develop a patina that looks incredible against the charcoal.
Step 3: Trim & Finishing Details
-
Install the cap molding:
Once all vertical planks are installed, cut your chair rail or cap molding to fit the top edge of the wainscoting. Miter the corners at 45 degrees for a clean join. -
Nail the trim:
Secure the cap molding with finish nails, driving them into the tops of the vertical planks and the wall studs behind them. This hides the cut ends of your planks. -
Fill and sand:
Use wood filler to cover all nail holes on the wainscoting. Once dry, sand the filler smooth and lightly scuff the face of the wood planks with 220-grit sandpaper to prepare them for paint. -
Caulk the seams:
Apply a thin bead of printable caulk along the top of the chair rail where it meets the wall, inside the corners, and along the baseboards. Smooth it with a damp finger for a seamless look.
Step 4: Painting & Styling
-
Prime the wood:
If your pine is bare, apply a stain-blocking primer to prevent knots from bleeding through your dark paint later. Let this dry completely according to the can’s instructions. -
Paint the grooves:
Using an angled sash brush, paint the vertical grooves (the ‘v’ shape) of the paneling first with your charcoal paint. A roller often misses these deep crevices. -
Roll the flat surfaces:
While the groove paint is still wet, use a small foam roller to apply the charcoal paint to the flat faces of the planks. This ensures a smooth, brush-stroke-free finish. -
Apply second coat:
Allow the first coat to dry, then apply a second coat for full opacity. Dark colors often need that second pass to look rich and velvety. -
Install wood accents:
Install your natural pine window casings and hang the wood-framed mirror. Keep these in their natural wood tone, perhaps sealed with a clear matte polyurethane, to contrast against the dark charcoal. -
Final touch-ups:
Remove any painter’s tape carefully. Reinstall your switch plates, gold towel ring, and hang a textured white towel to complete the airy yet grounded aesthetic.
Enjoy the dramatic depth this split-wall design brings to your refreshed bathroom space
Moody Navy for a Jewel-Box Effect

Transform a small powder room into a sophisticated jewel box with deep navy walls and rich gold accents. This tutorial guides you through installing custom molding, painting dramatic walls, and styling a luxurious vanity space.
Step-by-Step Guide
Materials
- Deep navy blue paint (e.g., Hale Navy or similar)
- White ceiling paint
- Primer suitable for dark colors
- Pre-primed wood trim/molding strips (1×2 or similar)
- Wood glue or liquid nails
- Spackle or wood filler
- Caulk and finish nails
- Gold/Brass oval vintage-style mirror
- Gold globe wall sconces
- Vessel sink (white ceramic)
- Brushed gold vessel faucet
- Marble or faux-marble vanity top
- Dark walnut wood vanity cabinet
- Gold vase and greenery for styling
- Painter’s tape
- Drop cloths
- Level and measuring tape
- Miter saw (optional, for precise cuts)
- Nail gun or hammer
Step 1: Wall Prep and Paneling
-
Clear and clean:
Remove all existing fixtures, mirrors, and outlet covers from the walls. Clean the surfaces thoroughly with TSP or a degreaser to ensure the paint adheres perfectly later. -
Map out the grid:
Using a pencil and a level, draw your desired grid pattern directly onto the walls. For this look, aim for large rectangular boxes that extend almost to the ceiling, creating a sense of height in the small space. -
Cut the molding:
Measure your vertical stiles first. Cut your 1×2 trim pieces to length. I find it helpful to label each piece on the back with painter’s tape corresponding to its position on the wall. -
Install vertical boards:
Apply a bead of construction adhesive to the back of the vertical trim pieces. Press them onto your pencil lines, check for level one last time, and secure them with a nail gun. -
Add horizontal rails:
Measure the distance between your vertical stiles individually—walls are rarely perfectly straight. Cut your horizontal rails to fit snugly between the verticals and install them using glue and nails. -
Fill and seamless finish:
Fill all nail holes with spackle and run a bead of paintable caulk along every seam where the wood meets the wall. This step is crucial for making the paneling look like it was original to the house.
Paint Sheen Secret
For dark bathrooms, use a satin or eggshell finish. Flat paint shows scuffs too easily, while semi-gloss can create distracting glare.
Step 2: Painting the Drama
-
Prime for darkness:
Apply a coat of high-quality water-based primer over the walls and the new wood trim. Since you are going for a very dark color, consider using a tinted grey primer to help coverage. -
Cut in the edges:
Using an angled sash brush, carefully cut in your deep navy paint around the ceiling line, corners, and inside the molding squares. Be generous with the paint here so you don’t have to rework it later. -
Roll the surfaces:
Use a small foam roller for the flat faces of the trim to get a smooth finish, then switch to a standard nap roller for the wall sections inside the panels. Maintain a wet edge to avoid lap marks. -
Apply second coat:
Let the first coat dry completely according to the can’s instructions. Apply a second coat to ensure the color is rich, opaque, and velvety. In some lights, a third coat might be necessary for true depth. -
Paint the ceiling:
Keep the ceiling a stark, crisp white to contrast the dark walls. If you haven’t painted it yet, do this now, being careful not to drip on your fresh navy walls (or mask them off first).
Level Up: Ceiling Detail
Add crown molding painted the same navy as the walls. It draws the eye up and makes the ‘box’ feel even more cohesive and custom-built.
Step 3: Vanity Installation and Styling
-
Install the vanity:
Place your dark wood vanity cabinet into position. Ensure it is perfectly level before securing it to the wall studs. This prevents rocking and ensures the plumbing lines up correctly. -
Set the countertop:
Apply silicone adhesive to the top rim of the cabinet and carefully lower your marble top into place. Let this cure for the time recommended on the adhesive package. -
Mount the faucet and sink:
Install the gold vessel faucet into the pre-drilled hole. Place the vessel sink over the drain hole, sealing it with a ring of silicone underneath, and connect the plumbing trap below. -
Hang light fixtures:
Install the gold sconces on either side relative to where the mirror will go. Install warm-toned Edison bulbs to enhance the cozy, moody atmosphere. -
Position the mirror:
hang the gold oval mirror between the sconces. Ensure it is centered over the faucet and sits at comfortable eye level. The gold frame should pop beautifully against the navy background. -
Final styling touches:
Place a gold vase with fresh greenery or dried eucalyptus on the corner of the vanity. Add plush navy towel to the towel ring to complete the monochromatic, high-end look.
Step back and enjoy the incredible depth and luxury of your new jewel-box powder room
Forest Green That Feels Intentional
Transform a bland powder room into a moody, modern sanctuary using deep forest green tiles and warm wood accents. This renovation project focuses on high-impact changes like vertical tile installation and statement lighting to create a space that feels intentionally designed and cozy.
Step-by-Step Tutorial
Materials
- Forest green square ceramic tiles
- Dark green grout
- Tile adhesive (thin-set mortar)
- Notched trowel
- Tile spacers (1/16 or 1/8 inch)
- Tile cutter or wet saw
- Light wood vanity with drawers
- White vessel sink
- Tall gold vessel faucet
- Round wood-framed mirror
- Two gold pendant light fixtures
- Patterned floor tiles (geometric black/white)
- Gold/brass drawer pulls
- Silicone caulk
Step 1: Demo & Prep
-
Clear the space:
Remove the old vanity, mirror, lighting, and any existing wall treatments. Ensure the water supply is turned off before disconnecting plumbing fixtures. -
Prepare the walls:
Repair any drywall damage from demolition. For the tiled area, ensure the surface is flat and clean; apply a primer if recommended for your adhesive. -
Dry lay the floor:
Before committing to the floor pattern, I like to lay out the geometric tiles dry to plan cuts and ensure the pattern is centered nicely in the room. -
Install flooring:
Install your patterned floor tiles using mortar and grout according to manufacturer instructions. Let the floor cure fully before bringing in the heavy vanity.
Grout Color Choice
Using a grout color that matches the tile (green on green) makes the wall feel like a seamless texture rather than a busy grid.
Step 2: Tiling the Feature Wall
-
Plan the layout:
Mark a vertical centerline on the wall behind the vanity. Plan your vertical stack bond layout to avoid sliver cuts at the edges or ceiling. -
Spread adhesive:
Starting at the bottom (or a ledger board if tiling above the floor), spread a small section of thin-set mortar using a notched trowel. Create even ridges. -
Set the tiles:
Press the forest green square tiles firmly into the mortar. Use spacers to maintain consistent gaps. For this look, a straight vertical stack creates a clean, modern grid. -
Check for level:
Frequently check your work with a level, both horizontally and vertically, to keep the grid perfectly straight. -
Let it set:
Allow the adhesive to dry for at least 24 hours before moving on to grouting. -
Grout with green:
Mix dark green grout to match or slightly complement the tile. Apply it with a rubber float, pressing it deep into the joints. -
Clean the haze:
Wipe away excess grout with a damp sponge. Rinse the sponge frequently. Once dry, buff off any remaining haze with a microfiber cloth.
Step 3: Vanity & Plumbing
-
Install the vanity:
Place the light wood vanity in position against your newly tiled wall. Secure it to the wall studs to ensure stability. -
Mount the faucet:
Install the tall gold vessel faucet onto the countertop before placing the sink, as it’s often easier to tighten the connections now. -
Secure the sink:
Apply a bead of silicone to the bottom of the white vessel sink and position it centrally over the drain hole. Let it cure. -
Connect plumbing:
Reconnect the P-trap and water supply lines. Turn on the water to test for leaks immediately.
Elevate the Look
Install a heated towel rack on the adjacent wall if you have space; warm towels add a serious touch of luxury to a small room.
Step 4: Finishing Touches
-
Hang the mirror:
Center the round wood-framed mirror above the sink. Ensure it hangs high enough to clear the faucet but low enough to be functional. -
Install lighting:
Wire and hang the two gold pendant lights on either side of the mirror. Adjust the cable length so the bulbs sit evenly, roughly at eye level or slightly above. -
Hardware update:
Attach the sleek gold drawer pulls to the vanity drawers, matching the faucet and lighting finish. -
Accessorize:
Place a potted fern or greenery on the counter to echo the wall color, and add amber glass accessories for a cohesive look.
Enjoy the calm and sophisticated atmosphere of your newly renovated green bathroom space
Black Lower Walls, Light Upper Walls
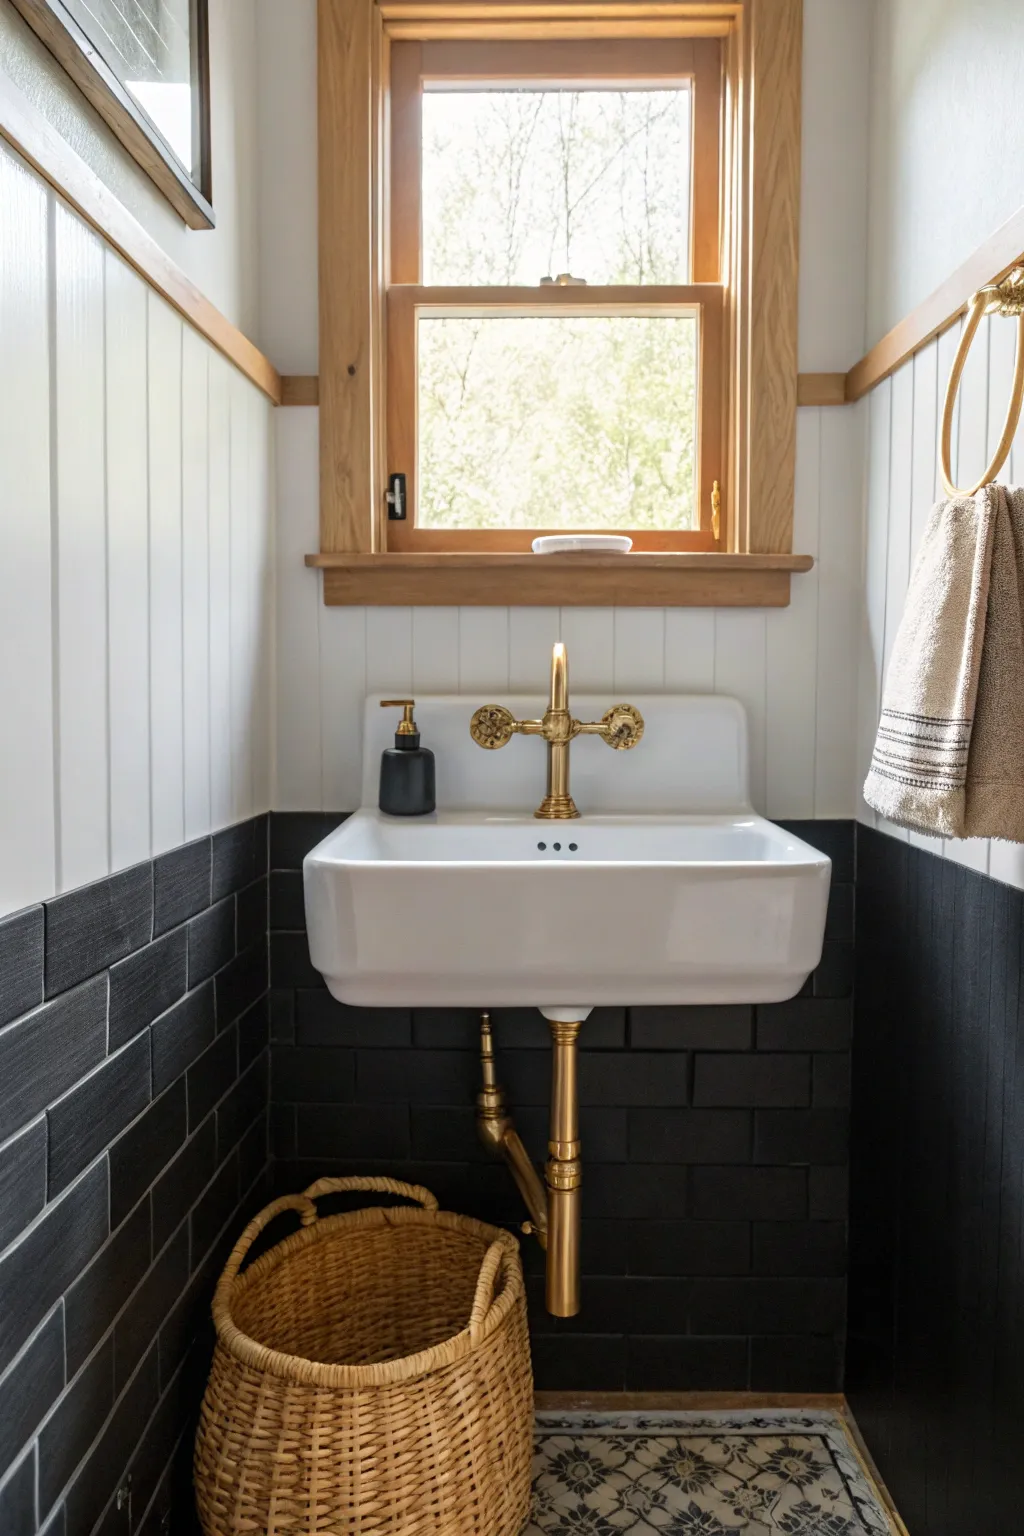
This striking bathroom makeover balances depth and brightness by pairing moody black subway tile wainscoting with crisp white vertical planking. The result is a sophisticated, textural space that feels both grounded and airy, anchored by warm wood and brass accents.
Detailed Instructions
Materials
- Matte black subway tiles
- Dark grout (charcoal or black)
- Vertical shiplap or beadboard paneling
- Satin white paint
- Wood trim (natural finish)
- Wall-mounted utility sink
- Brass bridge faucet
- Exposed brass plumbing kit (P-trap and lines)
- Tile adhesive and notched trowel
- Grout float and sponge
- Construction adhesive and finish nails
- Caulk gun and paintable caulk
- Painter’s tape
- Woven basket (for styling)
Step 1: Setting the Dark Foundation
-
Establish the height:
Determine the height of your wainscoting line. For this look, aim for just under the halfway point of the wall, ensuring it aligns nicely with your sink placement. Snap a level chalk line around the room as your guide. -
Apply tile adhesive:
Using a notched trowel, spread tile adhesive on the lower section of the wall. Work in small sections so the adhesive doesn’t dry out before you place the tiles. -
Install black subway tiles:
Press the matte black subway tiles into the adhesive, using spacers to maintain even gaps. A running bond pattern (brick style) creates that classic subway look. -
Prepare for grout:
Once the adhesive has fully cured (check manufacturer times), remove the spacers. Clean any excess adhesive from the tile faces or joints. -
Apply dark grout:
Mix your charcoal or black grout. Using a rubber grout float, press the grout firmly into the joints at a 45-degree angle. I find using a darker grout helps hide future stains and creates a seamless, modern wall of color. -
Clean the tile face:
Wipe away excess grout with a damp sponge. Rinse your sponge frequently. You’ll likely need to do a second pass once a haze forms to get the matte black finish perfectly clean.
Sticky Situation?
If grout haze won’t wipe off the matte tiles, use a specialized grout haze remover solution. Avoid abrasive scrubbers that could scratch the matte finish.
Step 2: Installing the Light Upper Walls
-
Install vertical shiplap:
Above your new tile line, install vertical shiplap or beadboard paneling. Use construction adhesive on the back and secure with finish nails into the studs. -
Add the transition trim:
Install a simple wood trim piece or chair rail directly over the junction where the tile meets the wood paneling. This hides the raw tile edge and creates a polished transition. -
Caulk gaps:
Run a bead of paintable caulk along the seams of the wood paneling, corners, and where the trim meets the wall to ensure a seamless look before painting. -
Paint the upper section:
Apply a high-quality satin white paint to the shiplap and the upper walls. The satin sheen is durable for bathrooms but soft enough to reflect light gently without being too glossy.
Step 3: Window and Trim Detailing
-
Frame the window:
Install natural wood casing around the window. Match the stain or finish to your transition trim for cohesion. A clear matte sealer will protect the wood from humidity. -
Install the windowsill:
Add a slightly deeper wooden sill at the bottom of the window frame. This provides a small shelf for decor items like a soap dish.
Add Vintage Charm
Swap the standard P-trap for a specialized decorative bottle trap in unfinished brass. It will patina over time, adding authentic old-world character.
Step 4: Installing Fixtures and Finishing Touches
-
Mount the sink:
Install the wall-mounted utility sink. Ensure you have proper blocking in the wall behind the paneling to support the weight of the cast iron or ceramic basin. -
Install the faucet:
Attach the brass bridge-style faucet. The bridge design adds a vintage industrial feel that pairs perfectly with the utility sink. -
Connect exposed plumbing:
Connect the exposed brass supply lines and P-trap. Since this plumbing is visible, ensure all connections are neat and the brass finish is polished free of fingerprints. -
Install accessories:
Mount a brass towel ring to the right of the window, aligning roughly with the top of the window sash. -
Final styling:
Place a large woven basket on the floor beneath the sink to add texture and warmth. Add a ceramic soap dispenser and a soft hand towel to complete the space.
Step back and admire the bold contrast you have created in your refreshed bathroom space
Burgundy for a Cozy Statement Bath
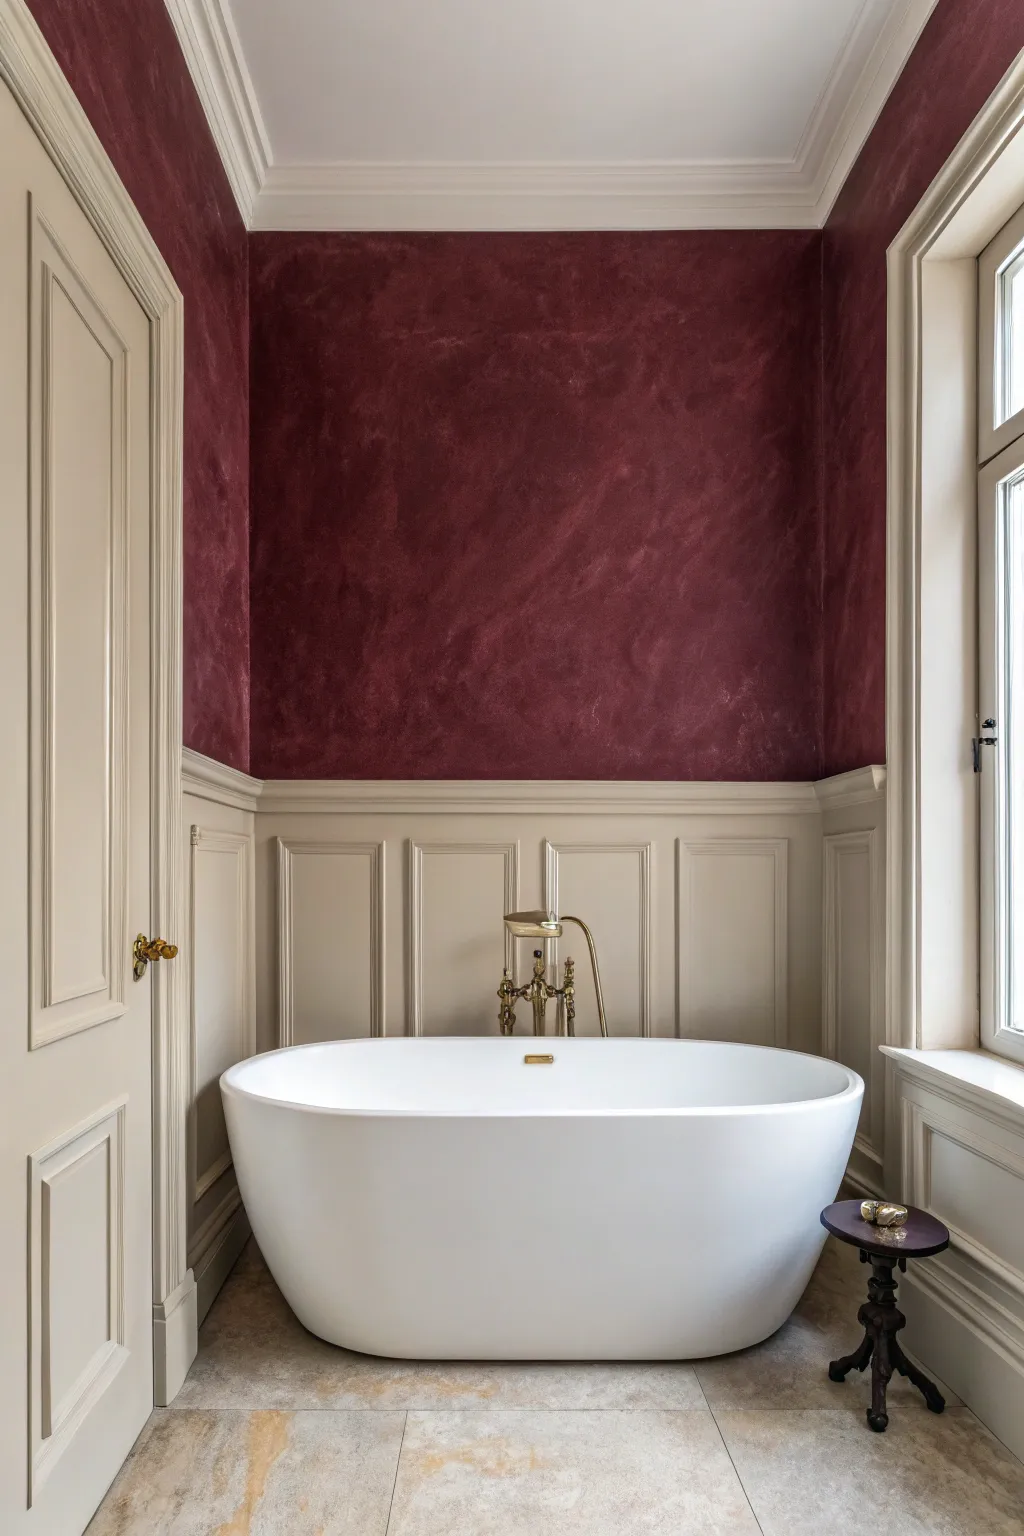
Transform a plain bathroom into a luxurious sanctuary by combining classic wainscoting with a rich, textured wall treatment. The deep burgundy limewash adds marvelous depth and warmth above the creamy, elegant paneling.
How-To Guide
Materials
- Picture frame molding trim
- Chair rail molding
- Baseboard molding
- Construction adhesive (e.g., Liquid Nails)
- Painter’s caulk and caulk gun
- Wood filler
- Sandpaper (medium and fine grit)
- Primer (high-quality interior)
- Interior paint (Satin finish, Cream/Beige)
- Limewash paint (Burgundy/Deep Red)
- Large block brush (for limewash)
- Rollers and trays
- Level and measuring tape
- Miter saw
Step 1: Installing the Wainscoting
-
Measure and Mark:
Begin by determining the height of your wainscoting. A standard height is often around 30 to 40 inches, but align it with window sills if possible, as seen in the photo. Use a laser level or long spirit level to mark a horizontal line around the entire room where the chair rail will sit. -
Plan Your Boxes:
Sketch out the layout for your ‘picture frame’ molding boxes on the wall. To keep things symmetrical, measure the total wall width and divide by your desired number of boxes, ensuring the spacing between boxes (stiles) is uniform—usually about 3 to 4 inches wide. -
Install Baseboards:
If your existing baseboards are small or damaged, remove them and install new, taller baseboard molding first. Secure these with construction adhesive and finishing nails. -
Cut the Picture Frames:
Using your miter saw, cut the molding strips for your rectangular boxes. Each corner needs to be cut at a 45-degree angle so they fit together perfectly to form 90-degree corners. -
Attach the Frames:
Apply a bead of construction adhesive to the back of each molding piece. Press them onto the wall according to your pencil marks, then secure them with a few finishing nails while the glue sets. I find a spacer block is helpful here to ensure consistent gaps between boxes. -
Add the Chair Rail:
Install the chair rail molding along the top horizontal line you marked earlier. This cap piece separates the paneling visually from the upper wall and hides the top edge of your wainscoting zone.
Cloud Master
For more ‘movement’ in the limewash, don’t overload your brush. A drier brush creates more texture, while a loaded brush makes the color more solid and uniform.
Step 2: Prep and Paint the Paneling
-
Fill and Caulk:
Fill all nail holes with wood filler and let dry. Run a bead of painter’s caulk along every edge where molding meets the wall and inside the mitered corners for a seamless look. -
Sand Smooth:
Once dry, sand the wood filler flush and lightly scuff the new trim to ensure paint adhesion. Wipe away all dust with a tack cloth. -
Prime the Lower Walls:
Apply a coat of high-quality primer over the entire lower section—covering the drywall, the new molding, and baseboards. This unifies the texture between the drywall and the wood trim. -
Apply the Base Color:
Paint the wainscoting section with a creamy beige satin paint. Use a brush for the corners and molding profiles first, then follow up with a small foam roller on the flat sections to minimize brush strokes. Two coats usually give the best finish.
Step 3: Creating the Textured Burgundy Wall
-
Protect the Trim:
Once the paneling paint is fully cured (give it at least 24 hours), apply painter’s tape along the top edge of the chair rail to protect your fresh work. -
Prime for Limewash:
Limewash works best on a specific mineral-based primer, often sold by the limewash manufacturer. Roll this special primer onto the upper walls and let it dry completely. -
First Limewash Coat:
Stir your burgundy limewash thoroughly. Using a large block brush, apply the paint in random, crisscross X-strokes. Do not paint in straight lines; the chaotic brushwork is exactly what creates that cloudy, suede-like texture. -
Maintain a Wet Edge:
Work across the wall in manageable sections, always keeping a wet edge to blend the strokes seamlessly. Avoid stopping in the middle of a wall. -
Second Limewash Coat:
Allow the first coat to dry until it is lighter and chalky to the touch. Apply a second coat using the same X-stroke technique. This layers the pigment and enhances the movement and depth of the color. -
Final Reveal:
Remove the painter’s tape carefully while the final coat is still slightly tacky to prevent peeling. Step back and check for any spots that need a tiny touch-up.
Level Up: Aged Patina
Dilute a bit of darker limewash (or a brown glaze) and lightly feather it into the corners and edges of the ceiling for an ‘olde world’ vintage charm.
Now step into your newly transformed space and enjoy the rich, sophisticated atmosphere you have created
Teal Color Drenching for Depth
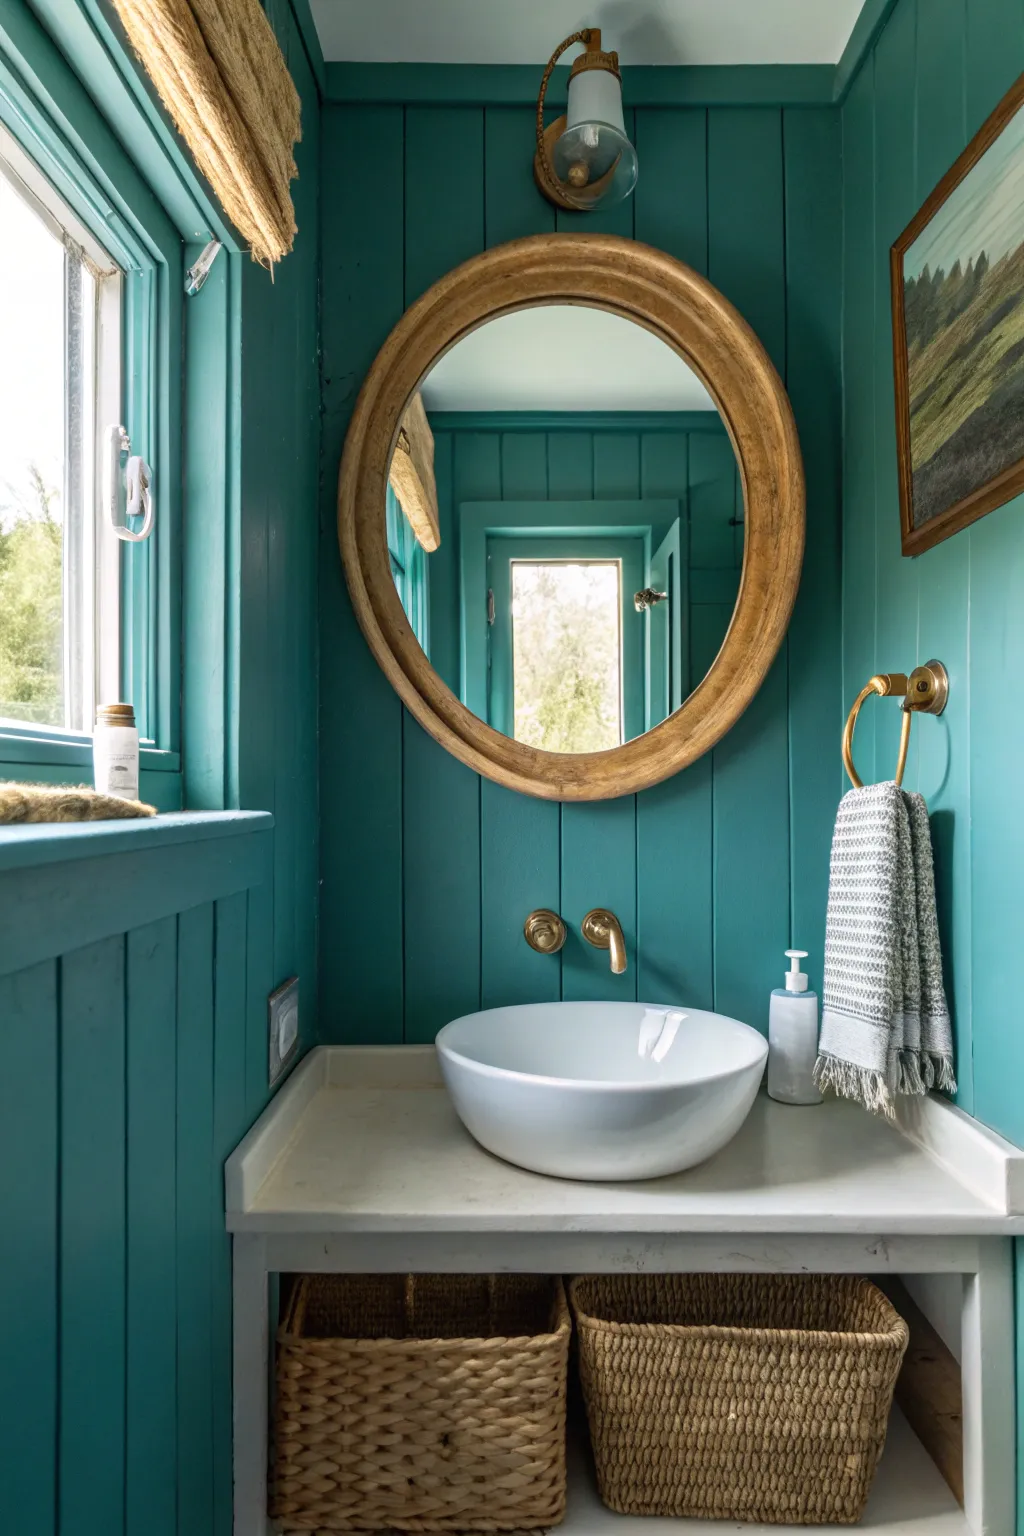
Transform a small powder room into a moody, jewel-toned sanctuary using the technique of color drenching. This project focuses on applying a rich teal shade across vertical shiplap walls and trim to create an immersive and cozy atmosphere.
Step-by-Step Tutorial
Materials
- High-quality interior paint (Satin or Semi-Gloss finish) in a rich teal color
- Primer suitable for wood paneling
- Painter’s tape
- Drop cloths
- Sanding block (120-grit)
- Microfiber tack cloths
- Angled sash brush (2.5 inch)
- 4-inch foam roller for smooth surfaces
- Paint tray and liners
- Screwdriver (for removing hardware)
- Caulk gun and paintable caulk
- Woven storage baskets (optional)
- Gold finish hardware (sconce, faucet, towel ring – optional for styling)
Step 1: Preparation and Priming
-
Clear and clean:
Begin by removing all items from the room, including the mirror, wall art, towel racks, and window treatments. Unscrew switch plates and outlet covers. -
Remove hardware:
Turn off the water supply and carefully remove the faucet and existing light fixtures if you plan to replace them or paint behind them thoroughly. -
Surface prep:
Lightly sand the vertical shiplap paneling and window trim with a 120-grit block to degloss the previous finish. This ensures the new paint adheres perfectly. -
Clean the dust:
Wipe down all walls, trim, and baseboards with a tack cloth or a damp rag to remove every speck of sanding dust. -
Caulk gaps:
Inspect the shiplap grooves and corners. If you see cracks or gaps, run a thin bead of paintable caulk along them and smooth it with a wet finger for a seamless look. -
Tape carefully:
The key to a professional finish is careful taping. Apply painter’s tape to the window glass, the ceiling line (unless you are painting the ceiling too, which enhances the drenching effect), and floor edges. -
Prime the walls:
Apply a coat of high-quality primer. Use a brush to get into the vertical grooves of the paneling first, then roll the flat surfaces. Let this dry completely according to the can’s instructions.
Step 2: Painting the Teal Base
-
Cut in edges:
Open your teal paint. Using the angled sash brush, cut in around the ceiling line, corners, floorboards, and window frame. -
Paint the grooves:
Before rolling, use your brush to paint inside the vertical shiplap grooves. Painting the grooves first prevents drips from settling in the gaps later. -
Roll the first coat:
Use a 4-inch foam roller to apply paint to the flat panels. Work in small sections, maintaining a wet edge to avoid lap marks. -
Dry and assess:
Allow the first coat to dry fully—usually 4 to 6 hours. Don’t panic if it looks patchy; dark colors often require multiple coats for true depth. -
Apply second coat:
Repeat the cutting-in and rolling process for a second coat. I find that deeply saturated teals sometimes even need a third light coat to achieve that velvety, solid richness. -
Paint the trim:
Paint the window casing and baseboards in the exact same teal shade. This lack of contrast is what defines the ‘color drenching’ look.
Uneven Coverage?
If the teal looks streaky after drying, you likely over-rolled the paint. Apply a final coat using a light hand, ensuring the roller is fully loaded with paint, and don’t press too hard.
Step 3: Finishing Touches
-
Remove tape:
Score the edge of the painter’s tape with a utility knife before pulling it off while the paint is still slightly tacky to ensure crisp lines. -
Reinstall fixtures:
Once the paint has cured (ideally 24 hours), reinstall your light sconce and faucet. Gold or unlacquered brass hardware pops beautifully against this specific teal. -
Hang the mirror:
Mount a round wooden mirror. The warmth of the wood tone serves as a necessary contrast to the cool wall color. -
Style and organize:
Place large woven baskets on the open lower shelf of the vanity for texture and storage, matching the natural tones of the mirror.
Warm It Up
Add a woven roman shade to the window in a natural fiber like jute or bamboo. This repeats the warm texture from the mirror and baskets, balancing the cool teal walls.
Step back and enjoy the dramatic, cozy depth your new color-drenched bathroom provides
Painted Ceiling Pop in a Tiny Room
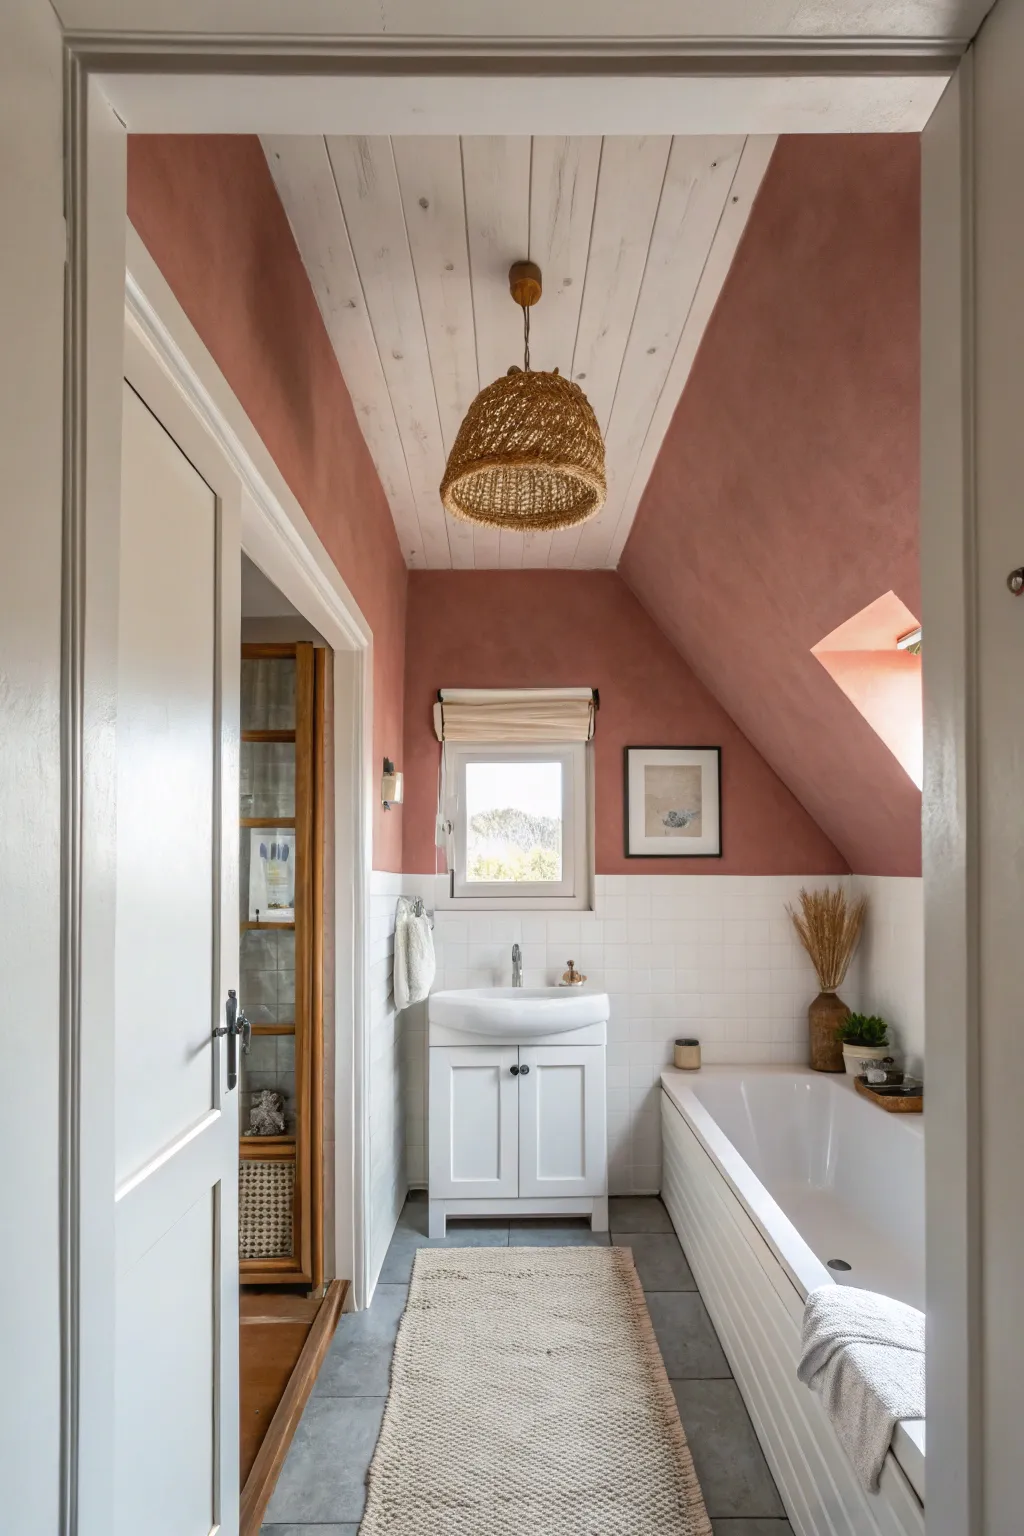
Transform a compact bathroom into a warm retreat by combining earthy terracotta tones with crisp white textures. This project balances the rustic charm of tongue-and-groove paneling with a modern color-block effect for a space that feels both grounded and airy.
How-To Guide
Materials
- Matte interior paint (terracotta/dusty rose shade)
- Satin or semi-gloss interior paint (bright white)
- Tongue-and-groove wooden planks (primed pine or MDF)
- Construction adhesive (e.g., Liquid Nails)
- Finish nails or brad nailer
- Wood filler
- Sandpaper (120 and 220 grit)
- Painter’s tape
- Drop cloths
- Paint rollers (medium nap) and tray
- Angled sash brush (2-inch)
- Caulk and caulking gun
- Ladder
- Tape measure
- Jigsaw or handsaw (for cutting planks)
Step 1: Ceiling Preparation & Installation
-
Measure and Cut:
Begin by measuring the width of your bathroom ceiling accurately. Cut your tongue-and-groove planks to length, accounting for any light fixtures or odd angles like the sloped roof section shown. -
Apply Adhesive:
Apply a zigzag of construction adhesive to the back of your first plank. This provides extra hold alongside the nails. -
Secure the First Plank:
Position the first plank against the wall, ensuring the groove side faces out. Nail it into the ceiling joists using a brad nailer or finish nails. -
Continue Installation:
For the subsequent rows, slot the tongue of the new board into the groove of the previous one. Tap gently with a rubber mallet if needed to ensure a tight fit, then nail into place. -
Work Around Fixtures:
When you reach the pendant light location, carefully measure and use a jigsaw to cut a circular hole in the specific plank before installing it. -
Fill and Sand:
Once the ceiling is fully clad, fill all nail holes and any noticeable gaps with wood filler. Let it dry completely, then sand smooth with 120-grit sandpaper.
Paint Finish Pro Tip
For bathroom ceilings, use a mildew-resistant satin paint. It reflects light to brighten the room but is durable enough to withstand humidity and easy to wipe clean.
Step 2: Painting the Ceiling
-
Prime the Wood:
If your planks weren’t pre-primed, apply a coat of high-quality wood primer. This prevents tannins from bleeding through the white paint later. -
Cut In Edges:
Using your angled brush and bright white satin paint, ‘cut in’ around the perimeter where the ceiling meets the walls and around the light fixture base. -
Roll the Finish:
Use a roller to paint the main surface of the timber ceiling. Follow the direction of the wood grain for the smoothest finish. Apply two coats for full opacity.
Texture Trouble?
If the terracotta paint looks patchy after rolling, your roller nap might be too short. Switch to a 3/8-inch or 1/2-inch nap to hold more paint and cover textured walls evenly.
Step 3: Wall Painting & Finishing
-
Tape Off Areas:
Apply painter’s tape along the top edge of your white subway tiles (or wainscoting) and along the newly painted ceiling edge to ensure crisp lines. -
Cut In the Color:
Dip your angled brush into the terracotta paint. Carefully paint along the taped ceiling line, the tile edge, and corners. I always take my time here—a steady hand makes the final look much sharper. -
Roll the Walls:
Using a roller, fill in the wall space with the terracotta paint. The matte finish helps hide imperfections in older plaster. Allow the first coat to dry for at least 4 hours. -
Second Coat:
Apply a second coat of the terracotta color to achieve that deep, rich saturation seen in the photo. Don’t rush the drying time between coats. -
Caulk Edges:
For a professional seal, run a thin bead of printable caulk where the ceiling meets the wall if there are any small gaps, then touch up with paint once dry. -
Remove Tape:
Peel off the painter’s tape while the paint is still slightly tacky to prevent peeling. Pull the tape away from the fresh paint at a 45-degree angle. -
Install Fixtures:
Reinstall or hang your wicker pendant light and any wall sconces. The warm light will really make that terracotta color glow.
Step back and enjoy the warm, enveloping atmosphere you’ve created in your new sanctuary
Two-Tone Wainscoting to Add Height
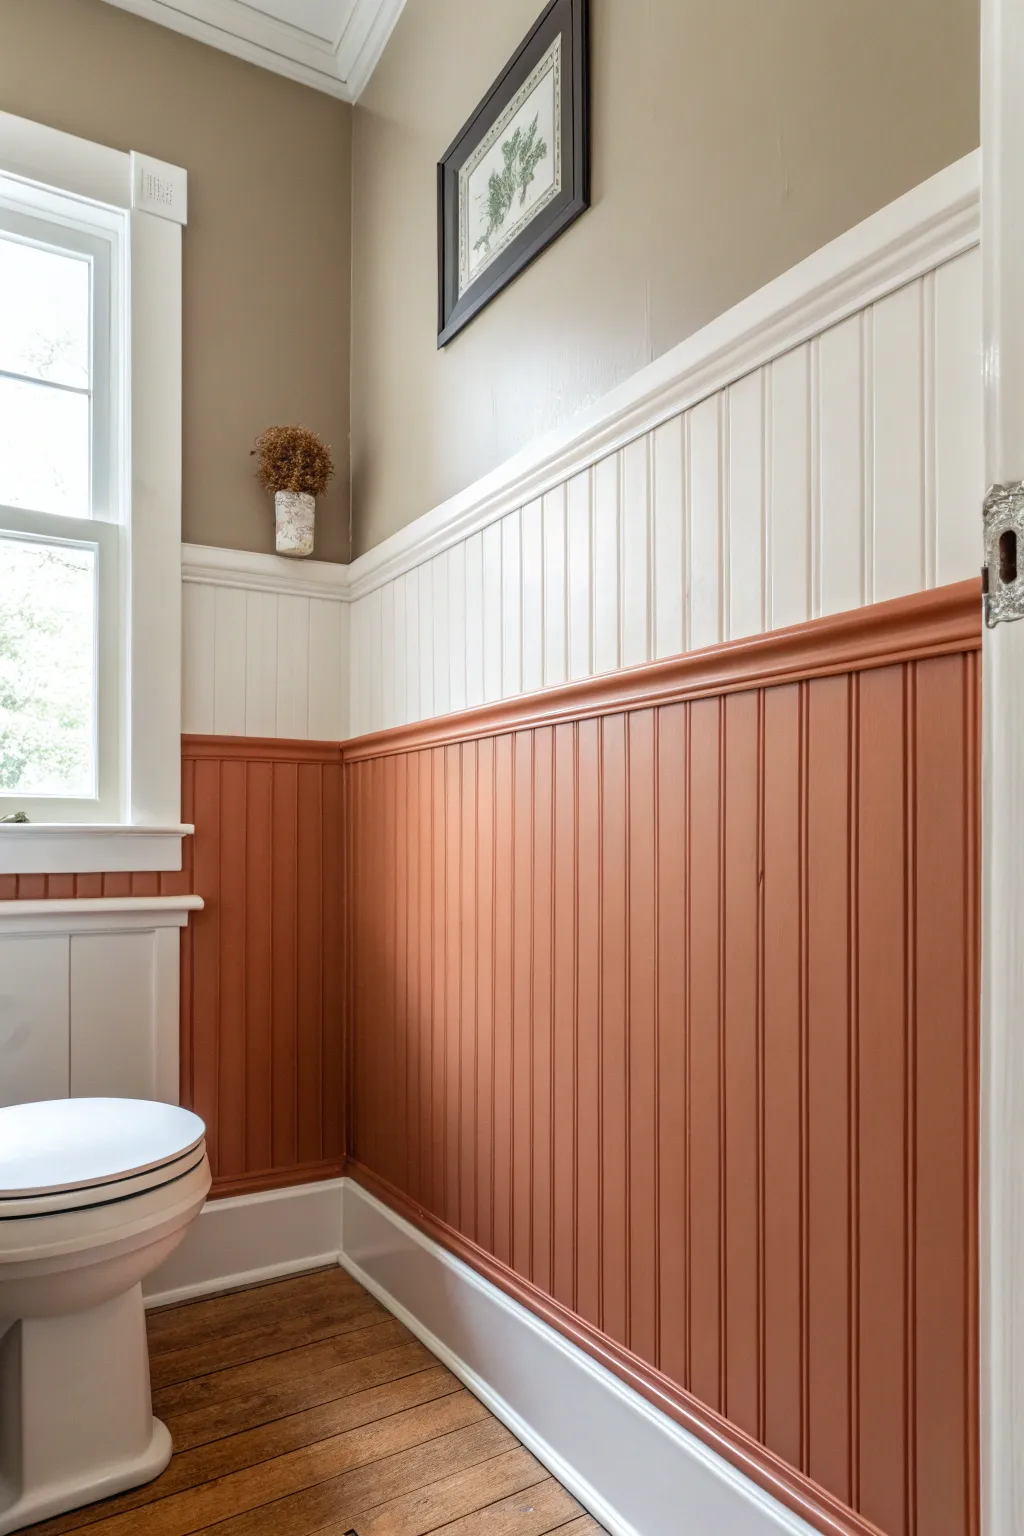
Elevate a small bathroom with this clever visual trick that draws the eye upward and adds rich warmth. By combining classic beadboard texture with a bold terracotta lower half and crisp white upper trim, you create a sophisticated, custom look.
Step-by-Step
Materials
- Beadboard paneling sheets or planks
- Baseboard molding
- Chair rail molding
- Cap molding (optional, for top edge)
- Construction adhesive (Liquid Nails)
- Brad nailer and brad nails
- High-quality wood filler
- Caulk and caulk gun
- Fine-grit sandpaper (220-grit)
- Painter’s tape
- Primer (oil-based if covering knots)
- Interior semi-gloss paint: Terracotta/Burnt Orange
- Interior semi-gloss paint: White
- Interior eggshell or satin paint: Beige/Taupe (for upper wall)
- Paint rollers (foam for smooth finish)
- Angled sash brush (2-inch)
- Level and measuring tape
- Circular saw or jigsaw
Step 1: Preparation & Wall Layout
-
Determine the Height:
Decide on the height of your wainscoting. For this two-tone effect, a ‘three-quarters’ height looks dramatic, but the image shows a traditional chair-rail height around 32-36 inches. Mark a level line around the room at your chosen top edge. -
Prep the Walls:
Remove existing baseboards carefully if you plan to reuse them, though new molding usually provides a crisper finish. Patch any major holes and scuff-sand glossy surfaces to help the adhesive grip. -
Measure and Cut Beadboard:
Measure the horizontal distance for your first wall. Cut your beadboard sheets to height and width using a circular saw. Remember to cut roughly 1/4 inch short of the floor to allow for expansion; the baseboard will cover this gap.
Uneven Gaps?
If corners aren’t perfectly 90 degrees, gaps hinder the look. Coping your inside corners with a coping saw instead of simple miter cuts ensures a tight fit even on wonky walls.
Step 2: Installation
-
Apply Adhesive:
Apply a zigzag pattern of heavy-duty construction adhesive to the back of your first beadboard panel. I find this creates a much more solid feel than nailing alone. -
Secure the Panels:
Press the panel firmly against the wall, ensuring the top edge aligns with your level line. Secure it with a brad nailer, placing nails into the grooves of the beadboard where they are easier to hide. -
Install Baseboards:
Measure and cut your baseboard molding to fit the length of the wall. Nail this directly over the bottom edge of the beadboard, covering that expansion gap we left earlier. -
Add Chair Rail:
Install the chair rail molding directly on top of the beadboard. If you want the specific ‘ledge’ look from the photo, you might stack a small decorative molding underneath a flat 1×2 board.
Pro Tip: Seamless Seams
When joining two sheets of beadboard on a long wall, cut the edge at a 45-degree bevel (scarf joint). This overlap disguises the seam much better than simply butting two flat edges together.
Step 3: Finishing & Painting
-
Fill and Sand:
Fill all nail holes with wood filler and let dry. Using a caulking gun, run a thin bead of finish caulk along all seams—where the board meets the chair rail, baseboard, and corner joints. Once dry, lightly sand everything smooth. -
Prime the Surface:
Apply a coat of primer to the entire wainscoting installation. Do not skip this step, especially on the raw cut edges or if you are painting over a pre-finished coating. -
Paint the Upper Wall:
Before tackling the wood, paint the upper drywall section in your beige or taupe color. It’s easier to cut in the top line of the molding later than to protect the molding now. -
Paint the Upper Trim White:
Paint the window casing, upper chair rail, and potentially the top section of the beadboard in white. The image shows a unique detail where the white extends slightly down onto the beadboard before the color change, though standard practice is usually painting the whole rail. -
Tape for Two-Tone:
This is the critical step for the specific look in the photo. Apply painter’s tape horizontally across the beadboard, or directly under the chair rail molding if you prefer the color transition to happen at the trim line. Press the tape edge firmly. -
Apply the Terracotta:
Using an angled brush, cut in the terracotta paint along the corners and baseboards. Then, use a foam roller to apply the color to the main beadboard surface. The foam roller helps get paint into the grooves without heavy brush marks. -
Second Coat and Peel:
Apply a second coat of the terracotta paint for full opacity. While the paint is still slightly tacky (not fully wet, but not dry), carefully peel back the painter’s tape at a 45-degree angle to reveal a crisp line. -
Final Touch-Ups:
Inspect your lines. If any paint bled under the tape, use a small artist’s brush to correct it with the opposing color once the first layer is completely dry.
Step back and admire how this simple addition of color and texture completely transforms the architectural character of the room
Color-Matched Trim for a Seamless Wrap
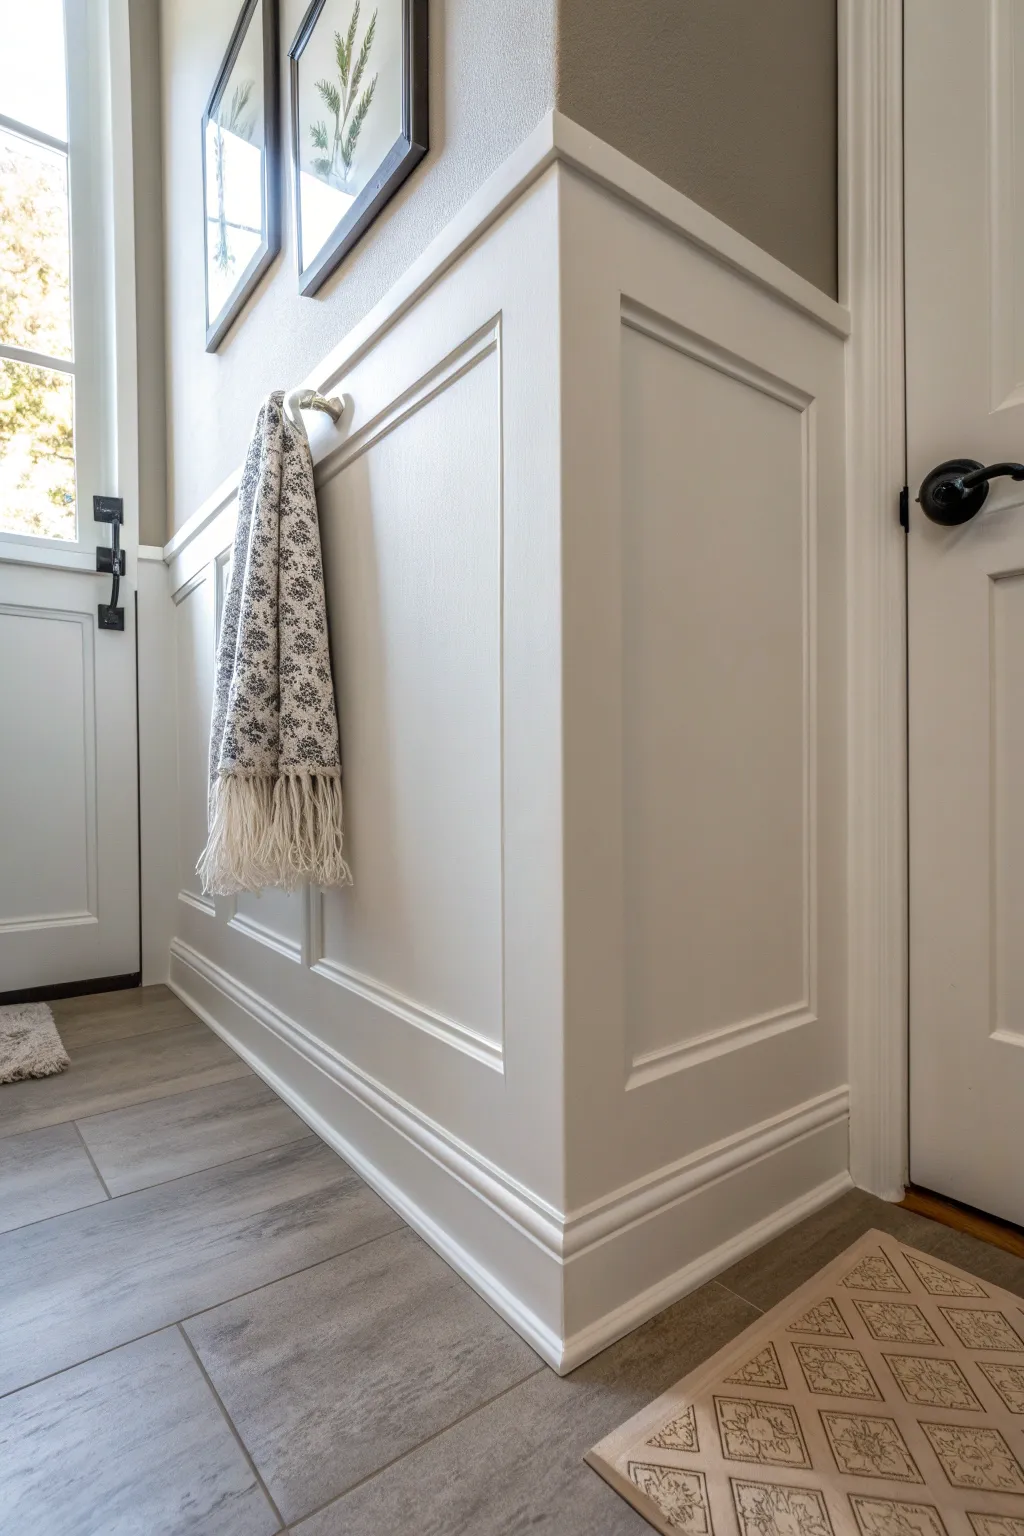
Transform a plain hallway or bathroom wall into a feature of architectural elegance using this wrap-around wainscoting technique. By painting the trim, panels, and baseboards in the same creamy white, you create a seamless, built-in look that adds depth and sophistication to small spaces.
How-To Guide
Materials
- 1×4 MDF or Poplar boards (for stiles and rails)
- Base cap molding
- Panel molding (small decorative trim)
- Chair rail molding
- Construction adhesive
- Brad nailer and 1 1/2 inch nails
- Wood filler
- Caulk and caulk gun
- Sandpaper (120 and 220 grit)
- Primer
- Interior semi-gloss or satin paint (Creamy White)
- Paint rollers and angled sash brush
- Level and measuring tape
- Miter saw
Step 1: Planning and Layout
-
Measure and Mark:
Begin by determining the desired height of your wainscoting. A standard height is often around 36 to 42 inches, or roughly one-third of the wall height. Use a level to mark a horizontal line around the room at this height. -
Calculate Spacing:
Measure the total length of your walls to determine the spacing for your vertical battens (stiles). Aim for equal spacing between 24 to 30 inches apart to create balanced rectangular panels. -
Check for Obstructions:
Identify electrical outlets or switches. You may need to adjust your spacing slightly to avoid awkward cuts around these fixtures.
Uneven Walls?
If your walls aren’t perfectly flat, the boards might not sit flush. Don’t force them; use shims behind the loose areas to bring them forward, then hide the gaps with caulk later.
Step 2: Installing the Framework
-
Install Top Rail and Baseboard:
Install the horizontal top rail (1×4 board) first, aligning its top edge with your level line. Secure it with construction adhesive and brad nails into the studs. Install your baseboard at the floor level. -
Cut Vertical Stiles:
Measure the distance between the top rail and the baseboard for each vertical stile location. Cut your 1×4 boards to length. -
Attach Stiles:
Apply adhesive to the back of each stile and nail them into place according to your layout marks. Use a level to ensure each piece is perfectly plumb before nailing. -
Corner Consideration:
For outside corners like the one shown in the photo, butt the two corner boards together. I prefer to sand the joint flush later for a seamless look rather than attempting a difficult 45-degree miter along the entire length.
Secret to Seamless Joints
When joining rails on long walls, cut the ends at a 45-degree angle (scarf joint) rather than butt-jointing them. This overlap prevents cracks from appearing as the wood expands.
Step 3: Adding Detail and Trim
-
Install Interior Panel Molding:
To create the raised panel look, cut picture frame molding or small base cap molding to fit inside each rectangular box formed by the stiles and rails. -
Miter the Inner Trim:
Cut the ends of this inner molding at 45-degree angles. Use a scrap piece of wood as a spacer block to ensure the molding is positioned consistently away from the edges of the stiles. -
Add Chair Rail:
Install a decorative chair rail cap on top of the upper horizontal 1×4 rail. Since this sits on top, it adds a polished ledge and hides the raw edge of the MDF. -
Detailed Base Shoe:
If your flooring is uneven or if you want extra detail, add a quarter-round or shoe molding at the very bottom of the baseboard.
Step 4: Finishing and Painting
-
Fill Nail Holes:
Go over every board and fill all nail holes with high-quality wood filler. Overfill slightly, as the filler will shrink when drying. -
Caulk Seams:
Apply a thin bead of paintable caulk to every seam where wood meets wood or wood meets wall. This step is crucial for achieving that seamless, solid-piece appearance. -
Sand Smooth:
Once dry, sand the wood filler flat and lightly scuff the rest of the wood with 220-grit sandpaper to prepare it for paint. Wipe away all dust with a tack cloth. -
Prime the Surface:
Apply a coat of primer to the entire wainscoting area. If you are painting over raw wood or MDF, a second coat of primer might be necessary to seal the pores. -
Apply Topcoat:
Using a high-quality sash brush for the corners and molding profiles, and a small foam roller for the flat panels, apply your choice of creamy white paint. Semi-gloss is ideal for durability and easy cleaning. -
Second Coat:
Allow the first coat to dry fully according to the manufacturer’s instructions. Lightly sand any imperfections, wipe clean, and apply a second coat for a flawless finish.
Step back and admire how the uniform color creates a calm, high-end architectural feature that expands the feel of the room
Sun-Washed Butter Yellow for Instant Cheer
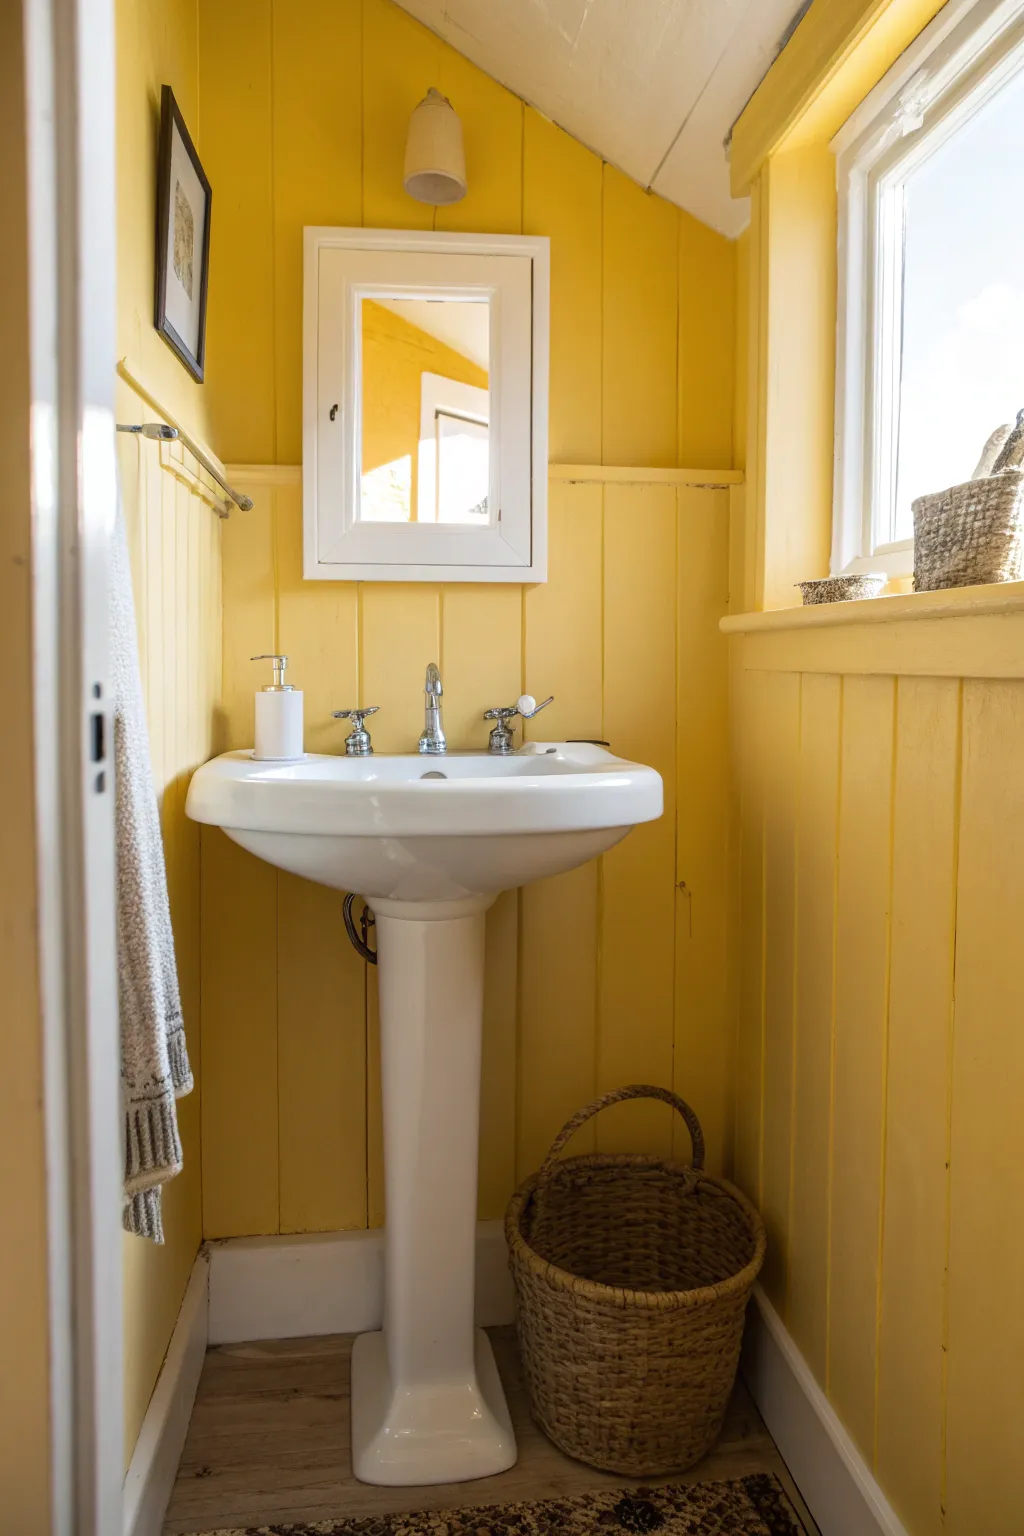
Transform a small, possibly overlooked washroom into a beacon of warmth with a monochromatic butter-yellow palette inspired by vintage cottage aesthetics. This project focuses on achieving that cohesive, sun-washed look through paint, careful fixture selection, and texture layering.
Step-by-Step
Materials
- Butter yellow interior satin paint
- High-adhesion primer
- White gloss trim paint
- Pedestal sink (vintage style)
- Chrome widespread faucet set
- Rectangular mirror with white frame
- Woven basket
- Towel bar (chrome)
- Small pendant light fixture
- Paint rollers and extension pole
- Angled sash brushes
- Painter’s tape
- Drop cloths
- Sandpaper (120 and 220 grit)
- Screwdriver and wrench set
Step 1: Preparation & Cleaning
-
Clear and clean:
Remove all existing fixtures, including the sink, mirror, towel bars, and lighting if possible. Scrub the walls thoroughly with TSP or a degreaser to ensure the paint adheres perfectly to the paneling. -
Surface repair:
Inspect the wooden paneling for any cracks or nail holes. Fill these imperfections with wood filler, let dry, and sand flush for a seamless finish. -
Protect surfaces:
Layout drop cloths to protect the flooring. Use painter’s tape carefully along the floor trim and around the window pane to ensure crisp lines later.
Step 2: Painting the Envelope
-
Priming the paneling:
Apply a coat of high-adhesion primer to the wooden paneling. This is crucial if the wood was previously varnished. Allow it to cure fully before proceeding. -
Cutting in:
Using an angled sash brush, cut in your butter yellow paint along the corners, ceiling line, and grooves of the paneling. I find that doing the grooves first prevents unsightly drips later. -
Rolling the walls:
Roll the main flat surfaces with the yellow paint. Apply two to three thin, even coats rather than one thick one to avoid gummy texture, letting each coat dry for at least 4 hours. -
Painting the ceiling:
Don’t stop at the walls—carry the color or a slightly lighter shade up to the sloped ceiling for an enveloping, cozy effect similar to the photo. -
Detailed trim work:
Paint the window casing and the baseboards in a crisp, clean white gloss. This contrast makes the yellow pop and adds a necessary visual break.
Pro Tip
If you have knotty pine paneling, use a shellac-based primer first. It prevents the wood knots from bleeding sap and staining your beautiful yellow paint later.
Step 3: Fixture Installation
-
Sink assembly:
Install the faucet hardware onto the pedestal sink basin before mounting it to the wall. This saves awkward reaching later. -
Mounting the sink:
Secure the pedestal sink base and basin to the wall and floor according to manufacturer instructions, ensuring the plumbing connections are tight and leak-free. -
Mirror placement:
Center your white-framed rectangular mirror directly above the sink. Ensure it is hung securely, especially if the frame is heavy wood. -
Lighting update:
Install a small, unobtrusive pendant light or sconce high on the wall or ceiling slope to cast a warm glow downwards. -
Adding hardware:
Install the chrome towel bar to the left of the sink at a comfortable reaching height, ensuring it is level.
Level Up
Install a vintage-style glass shelf with chrome brackets above the sink but below the mirror for practical storage that enhances the period look.
Step 4: Styling the Space
-
Adding texture:
Place a large, round woven basket on the floor. This natural texture grounds the bright colors and provides functional storage for towels or trash. -
Window dressing:
Keep the window treatment minimal or non-existent to maximize natural light. If privacy is needed, a simple white roller shade works best. -
Final touches:
Add a crisp white soap dispenser and hang a neutral, textured towel. A small piece of framed art on the side wall breaks up the vertical lines of the paneling.
Step back and bask in the glow of your cheerful, sun-drenched bathroom renovation


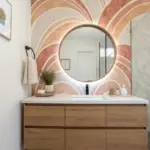
Have a question or want to share your own experience? I'd love to hear from you in the comments below!