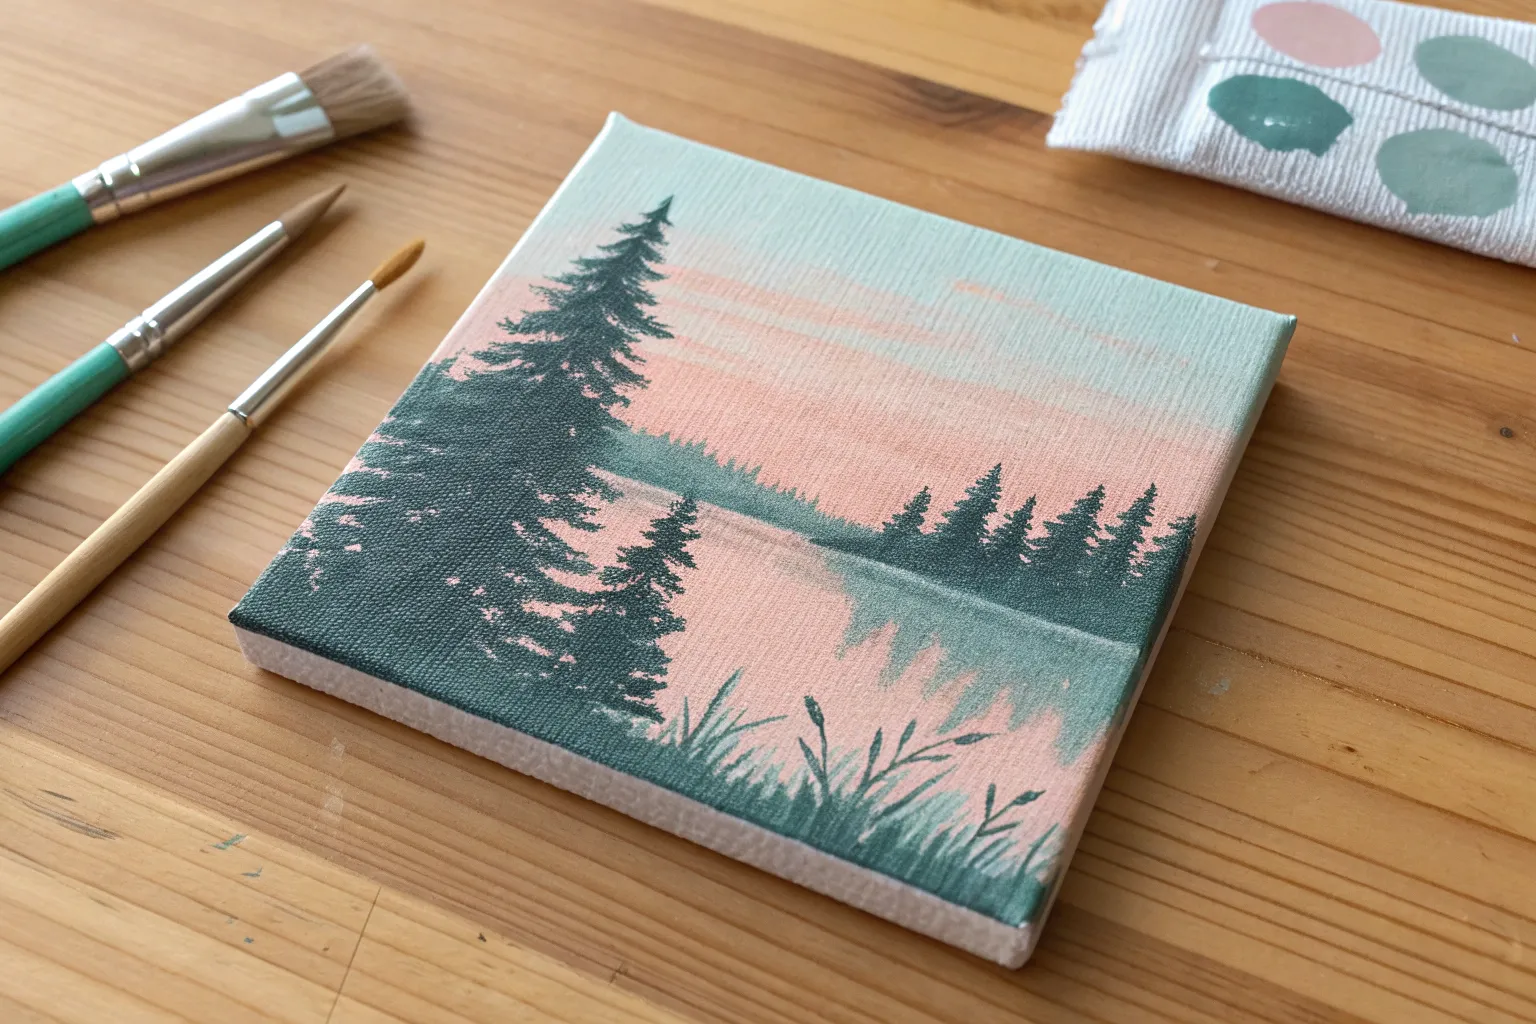
If you’re craving that “I actually finished a painting!” feeling, small canvas projects are my favorite way to get there fast without the pressure. Here are beginner-friendly painting ideas that look polished on a tiny surface, even if you’re still getting comfortable with brushes and blending.
Simple Sunset Gradient With Tree Silhouette
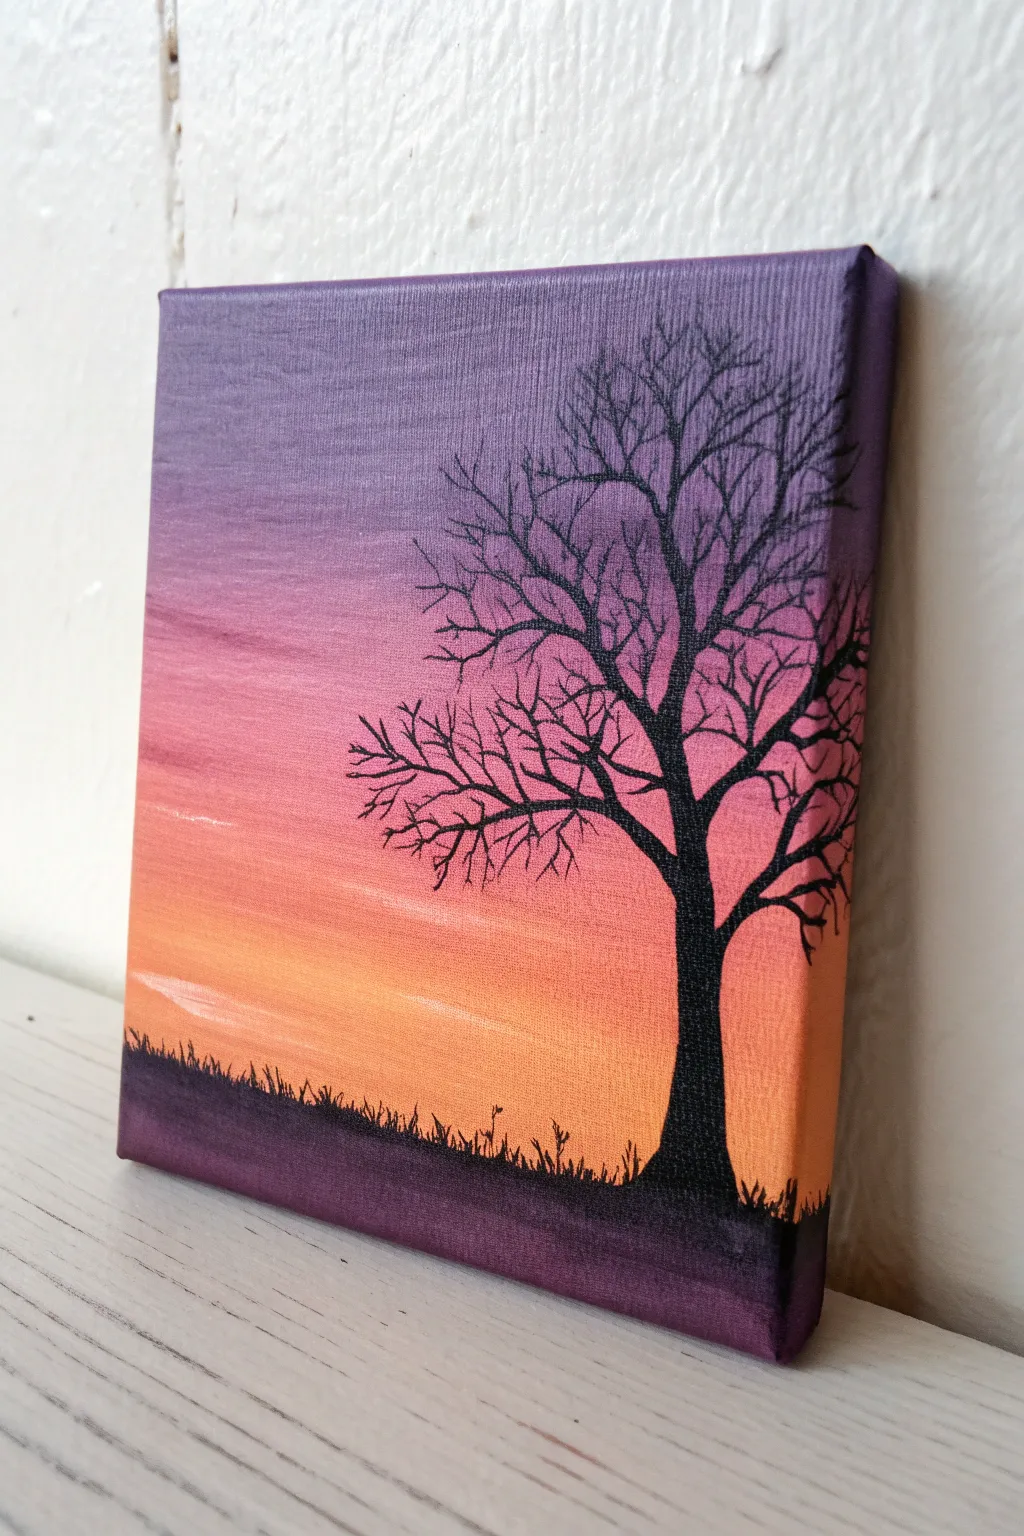
Capture the serene beauty of dusk with this simple yet striking acrylic painting. The blend of purple, pink, and orange creates a vibrant backdrop for the crisp, detailed silhouette of a winter tree.
Step-by-Step Tutorial
Materials
- Small square canvas (e.g., 6×6 or 8×8 inches)
- Acrylic paints: Purple/Violet, Magenta, Orange, Yellow, Black, White
- Flat shader brush (approx. 1 inch width)
- Fine detail liner brush (size 0 or 00)
- Cup of water
- Paper towels
- Palette or paper plate
Step 1: Painting the Gradient Sky
-
Prepare your palette:
Squeeze out a generous amount of your sky colors: purple, magenta, orange, and a touch of white. Keep black aside for later. -
Start with purple:
Using a slightly damp flat brush, load up the purple paint. Apply it horizontally across the top quarter of the canvas, ensuring you paint around the edges for a finished look. -
Blend in the pink:
Without cleaning your brush, pick up some magenta. Paint just below the purple strip, overlapping the wet edge slightly. Use long, horizontal strokes to blend the two colors where they meet. -
Add the orange layer:
Wipe your brush on a paper towel to remove excess dark pigment, then pick up orange paint. Apply this below the pink, again blending the seam while the paint is still wet to create a smooth transition. -
Brighten the horizon:
Mix a little white into your orange or use a yellow-orange hue for the lowest part of the sky. Paint this band right down to where the ground will be, creating a glowing horizon effect. -
Soften the transitions:
I like to take a clean, slightly damp brush and run it lightly back and forth over the transition lines to ensure there are no harsh stripes. -
Let it dry completely:
Wait for the background to fully cure. This is crucial; if it’s wet, the black silhouette will smudge into the sky.
Muddy colors?
If your gradient paints are mixing into a brown mess, let each layer dry slightly more before blending, or wipe your brush clean more frequently between color shifts.
Step 2: Adding the Silhouette
-
Paint the ground:
Switch to black acrylic. Paint a solid uneven strip across the very bottom of the canvas to represent the ground. You can make it slightly higher on the right side where the tree will stand. -
Outline the trunk:
Using a smaller brush, paint a vertical line for the tree trunk on the right third of the canvas. Make the base wider and taper it as you go up. -
Create the main branches:
Extend 3 to 4 main branches from the top of the trunk. Remember that trees grow outward and upward looking for light, so keep angles somewhat V-shaped. -
Switch to the liner brush:
For realistic twigs, use your thinnest liner brush. Thin your black paint slightly with a drop of water so it flows like ink. -
Detail the branches:
Paint smaller twigs extending from the main branches. Use a very light hand—barely touching the canvas—to get hairline strokes. -
Add complexity:
Continue adding tiny twig offshoots. The tips should be extremely fine. Crossing some branches over each other adds depth and realism. -
Stipple the grass:
Using the tip of your small brush or an old fan brush, tap tiny vertical uneven lines along the top edge of the black ground to mimic grass blades. -
Review and refine:
Step back to look at the overall balance. If a spot looks too empty, add a small twig. Once happy, let the black paint dry completely.
Level Up: Starry Night
Once the sky is dry but before painting the tree, dip an old toothbrush in watered-down white paint and flick it for a subtle starry effect.
Hang this colorful piece on a small wall or prop it on a shelf to enjoy your personal sunset anytime


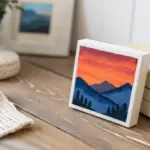
Tiny Mountain Layers in Mist
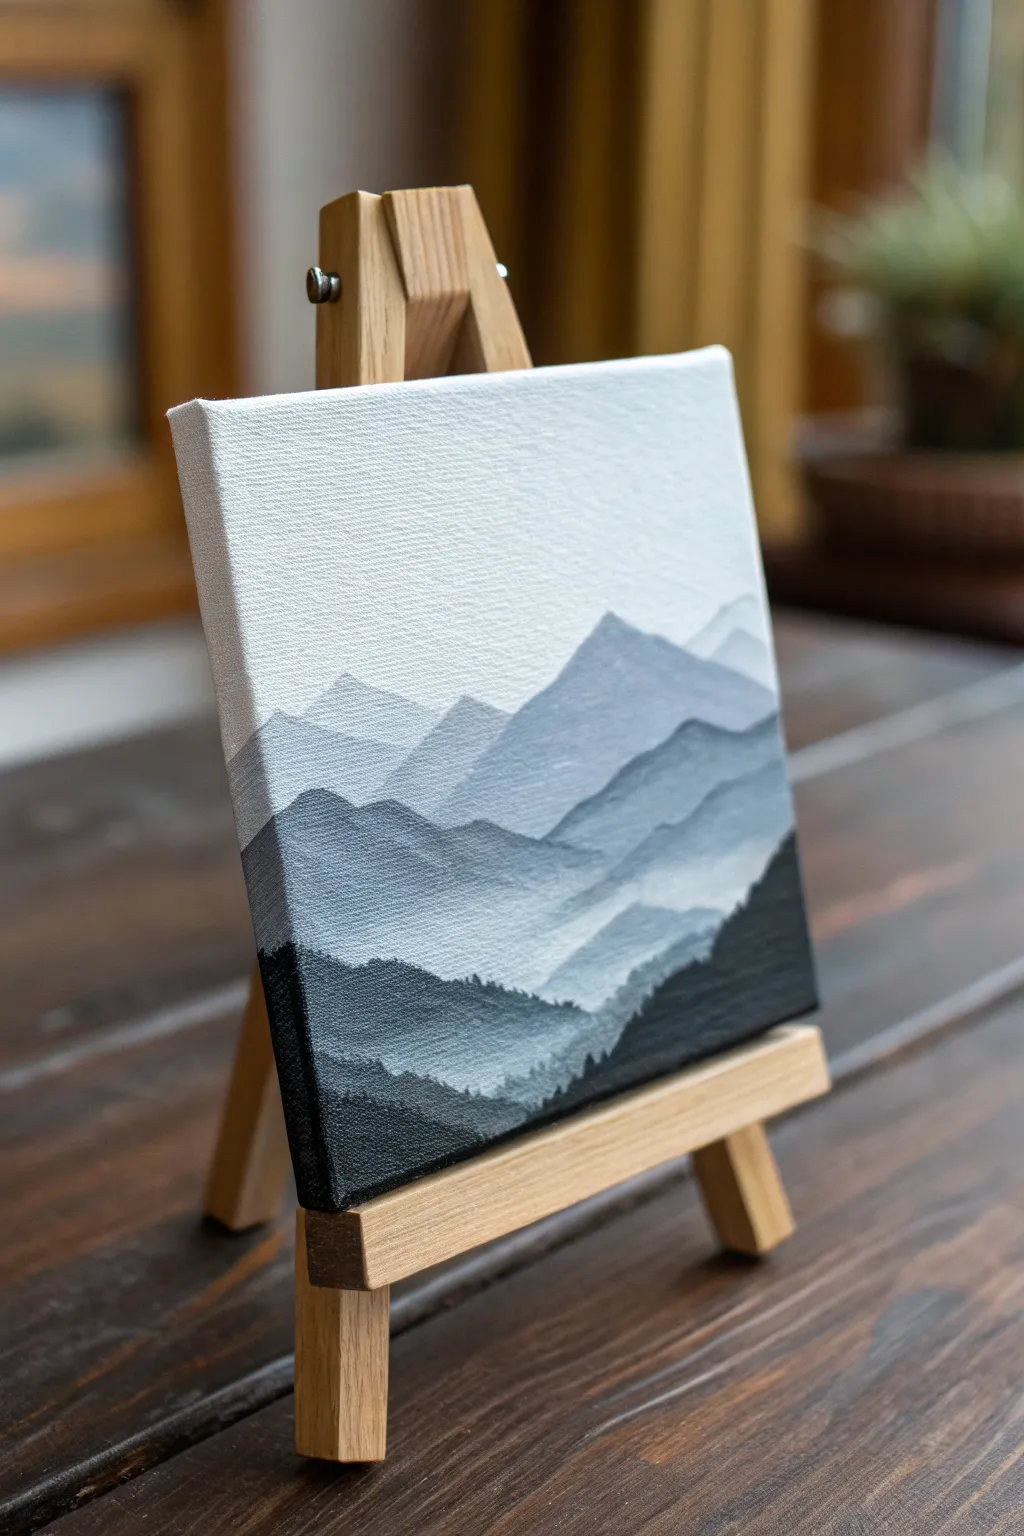
Create a serene, atmospheric landscape using nothing but black and white paint mixed into varying shades of gray. The beauty of this piece lies in its gradient layers, where distant peaks fade into the background while the foreground stands bold and dark.
How-To Guide
Materials
- Small square canvas (e.g., 4×4 or 6×6 inches)
- Black acrylic paint
- Titanium white acrylic paint
- Flat brush (size 6 or 8)
- Small round detail brush (size 1 or 2)
- Palette or mixing plate
- Cup of water
- Paper towels
- Mini wooden easel (optional, for display)
Step 1: Preparation and Background
-
Set up your palette:
Squeeze out a generous amount of white paint and a smaller amount of black paint onto your palette. It helps to keep them separated initially so you can pull small amounts to mix as needed. -
Mix the sky color:
Take a large amount of white and add the tiniest speck of black. You want a very pale, almost-white gray. It should be just slightly darker than the pure canvas white. -
Paint the sky:
Using your flat brush, cover the top third of the canvas with this pale gray mix. Ensure your brush strokes are horizontal and smooth to create a calm atmosphere. -
Continue down the canvas:
Paint the middle section of the canvas with just pure white or the very pale gray, blending it slightly towards the horizon area. Let this layer dry completely before starting the mountains.
Gradient Mastery
Prepare 5 distinct puddles of gray on your palette before you start painting—ranging light to dark. This ensures consistent color steps.
Step 2: Farthest Mountain Ranges
-
Mix the lightest mountain shade:
Add a tiny bit more black to your sky mixture. This gray should be visibly distinct from the sky but still very light and airy, representing the most distant peak. -
Paint the first peak:
Using the edge of your flat brush or the round brush, paint a mountain shape about one-third down from the top. Keep the silhouette simple—just a gentle rise and fall. -
Fill the shape:
Fill in the mountain shape down to where you want the next layer to start. When filling, you can let the paint get slightly lighter towards the bottom of this shape to mimic mist. -
Create the second layer:
Mix a slightly darker gray. Paint a second mountain range slightly overlapping the first one, but positioned a bit lower. Notice how the staggered heights create depth. -
Define the edges:
ensure the top edge of this new mountain is crisp against the lighter layer behind it. This sharp contrast is what makes the layers pop.
Muddy Colors?
If your grays look streaky or uneven, ensure you mix the black and white thoroughly on the palette, not on the canvas itself.
Step 3: Mid-Ground and Foreground
-
Deepen the gray:
Add more black to your mix for a medium-gray tone. Paint a third layer of mountains, making this shape larger and closer to the viewer. -
Add texture variation:
Instead of a perfectly smooth line, tap your brush slightly along the ridge of this layer to suggest rougher terrain or distant trees. -
Mix charcoal gray:
Create a dark, charcoal gray—almost black, but not quite. This is for the second-to-last layer. -
Paint the near foothills:
Apply this dark gray across the bottom third of the canvas. Make the slopes steeper or more jagged here to show more detail as the landscape gets closer. -
Paint the edge detail:
Don’t forget to wrap your painting around the sides of the canvas! Continue the gray lines over the thick edges of the canvas for a professional, finished look.
Step 4: The Final Contrast
-
Prepare pure black:
Load your brush with pure black paint. You want this to be opaque and strong. -
Paint the foreground silhouette:
Paint the final meaningful shape at the very bottom right or left corner, creating a large, looming slope. -
Add tree details:
Switch to your smallest round brush. Along the ridge of this black foreground layer, dab tiny vertical strokes to suggest the tops of pine trees. -
Refine the mist:
I like to take a clean, slightly damp brush and very gently feather the bottom of the gray layers if they look too blocked-in, softening the transition between ranges. -
Final check:
Look for any white canvas showing through the dark distinct layers and touch them up. Let the painting dry completely before placing it on the easel.
Place your finished canvas on the mini easel to enjoy your personal slice of mountain serenity


Calm Ocean Horizon With Soft Waves
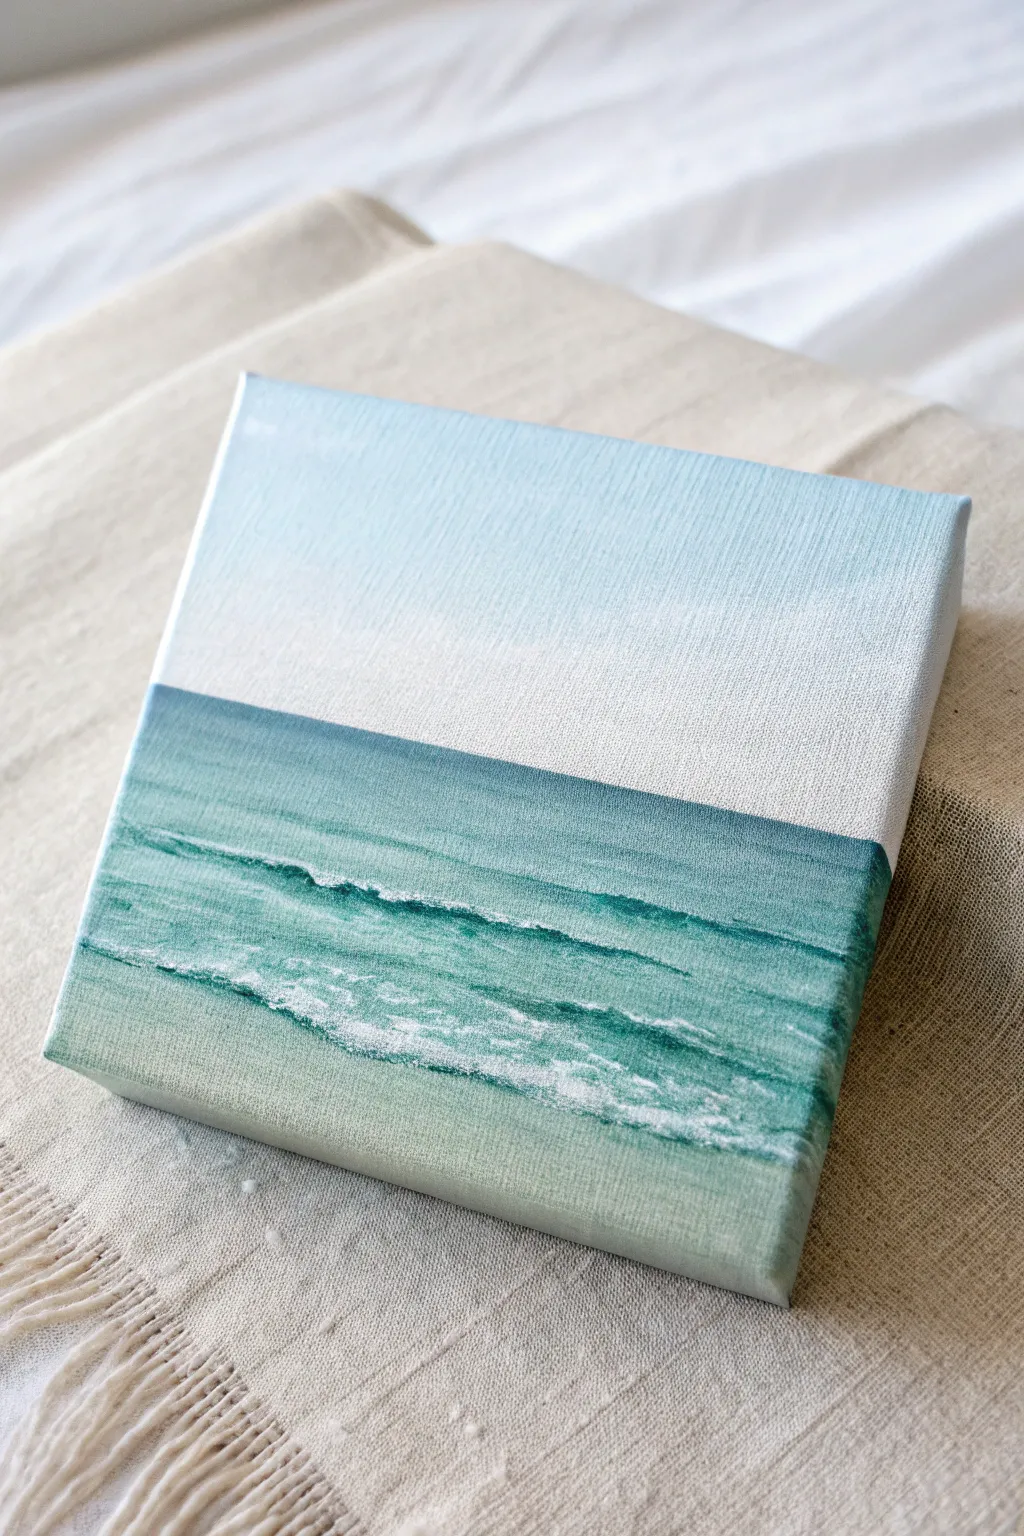
Capture the peaceful essence of a beach day with this minimalist canvas painting. Featuring a soft gradient sky and gentle, rolling waves, this project relies on blending and simple layering to create a calming oceanic scene.
Step-by-Step
Materials
- Small square canvas (e.g., 6×6 or 8×8 inches)
- Acrylic paints: Titanium White, Phthalo Blue (Green Shade), Teal, and a touch of Sap Green
- Flat synthetic brushes (1-inch for blending, smaller size 4 for details)
- Small round brush (size 0 or linear) for foam details
- Palette for mixing
- Cup of water and paper towels
Step 1: Sky and Base Layers
-
Prime the canvas:
Even if your canvas is pre-primed, apply a thin, smooth coat of Titanium White over the entire surface, including the edges. This helps the subsequent layers blend more seamlessly. -
Mix the sky color:
On your palette, mix a large amount of Titanium White with a tiny dot of Phthalo Blue. You want a color that is almost white with just a whisper of cool blue. -
Paint the upper sky:
Using your 1-inch flat brush, paint the top third of the canvas with your sky mixture. Use long, horizontal strokes to ensure a smooth finish without choppy brush marks. -
Create the gradient:
Dip your brush directly into pure Titanium White without cleaning it. Paint the middle third of the canvas, overlapping slightly with the pale blue section above to create a soft, hazy transition. -
Establish the horizon line:
Determine where your ocean will begin—roughly a little below the halfway mark. Use a ruler or painter’s tape if you need a guide, or freehand a straight horizontal line using a mix of Teal and Titanium White. -
Paint the edges:
Don’t forget to wrap your sky colors around the top and side edges of the canvas. This gallery-wrapped look gives the finished piece a professional polish without needing a frame.
Straight Horizon Hack
Use a piece of low-tack painter’s tape to mark the horizon line. Paint the sky, let it dry, remove the tape, and you’ll have a perfect crisp edge to start your ocean against.
Step 2: Ocean Depth and Color
-
Mix the deep ocean hue:
Combine Teal not with white, but with a small touch of Phthalo Blue and a pinhead amount of Sap Green. This creates that rich, tropical turquoise found in deeper waters. -
Paint the horizon strip:
Change to a smaller flat brush (size 4). Carefully paint a strip of this darker turquoise right against your sky horizon line. Keep the edge crisp. -
Lighten the water:
As you move down the canvas, gradually mix more Titanium White into your turquoise puddle. Paint the middle section of the water, blending it upwards into the darker strip while the paint is still wet. -
Create the sandy shallows:
For the very bottom section, mix a very pale version of your green-teal color (mostly white). Add a tiny dot of raw sienna or yellow oxide if you want a hint of sand showing through, though the reference image keeps it cool and sandy-green. -
Blend the water gradient:
Use a clean, slightly damp flat brush to sweep horizontally across the transition zones in the water. Smooth out the shift from deep turquoise to pale shallow water. -
Wrap the ocean edges:
Extend your water gradient around the sides and bottom edge of the canvas, matching the lines on the front face exactly.
Add Sparkle
Mix a tiny amount of iridescent medium or silver paint into your final white highlights. When the light hits the canvas, the waves will look like they are sun-kissed.
Step 3: Waves and Foam Details
-
Dry completely:
Let the base layer dry fully. Acrylics dry darker, so this is a good moment to check if your gradient looks smooth. -
Mix the foam color:
You need a color that isn’t stark white but stands out. Mix Titanium White with a tiny speck of your lightest water color. -
Paint the main wave line:
Using your smallest round brush, paint a thin, slightly wavy horizontal line across the lower third of the canvas. It shouldn’t be perfectly straight; let it undulate naturally. -
Add secondary ripples:
Paint 1-2 fainter, thinner lines further back towards the horizon. These represent smaller swells in the distance. -
Create sea foam texture:
Load a small, stiff brush with pure Titanium White. Blot most of the paint off on a paper towel until the brush is ‘dry.’ lightly tap or stipple along the top edge of your main wave line to create a fizzy, foamy texture. -
Add shore wash:
At the very bottom, scumble (scrub lightly) some white dry-brush texture to mimic the water rushing up onto the sand. -
Final highlights:
I like to add a few purposeful dots or tiny dashes of pure white on the crest of the biggest wave catch the ‘light’ and add dimension.
Step back and breathe in the calm atmosphere of your coastal creation


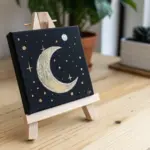
Starry Night Sky With Paint Splatter
Capture the magic of a clear evening with this simple yet stunning starry sky painting. Using a smooth gradient technique and playful splatter application, you will create a dreamy, deep-space atmosphere perfect for any small wall space.
Detailed Instructions
Materials
- Small square canvas (e.g., 6×6 or 8×8)
- Acrylic paint: Dark Navy or Prussian Blue
- Acrylic paint: Ultramarine Blue
- Acrylic paint: Teal or Turquoise
- Acrylic paint: Titanium White
- Flat shader brush (medium size)
- Detail liner brush (size 0 or 00)
- Old toothbrush or stiff bristle fan brush
- Cup of water
- Paper towels
- Palette or paper plate
Step 1: Creating the Ombré Gradient
-
Prepare the darkest shade:
Squeeze out your Dark Navy or Prussian Blue onto the palette. If you want a truly deep space look, you can mix in a tiny, pin-head amount of black, but pure navy usually keeps the colors more vibrant. -
Paint the top section:
Using your flat brush, paint the top third of the canvas with the darkest blue. Ensure you carry the paint over the edges of the canvas for a professional, finished look. -
Introduce the mid-tone:
Without washing your brush completely, pick up some Ultramarine Blue. Apply this to the middle section of the canvas, slightly overlapping with the dark navy above. -
Blend the transition:
While both paint sections are still wet, use long, horizontal strokes to blend the dark navy into the ultramarine. Go back and forth until the line between them disappears and becomes a smoky transition. -
Apply the lightest tone:
Wipe your brush on a paper towel to remove most of the dark pigment. Pick up your Teal or Turquoise paint mixed with a little bit of Titanium White to create a soft, glowing horizon color. -
Complete the gradient:
Paint the bottom third of the canvas with this light teal mix. Blend it upward into the mid-tone blue using the same horizontal sweeping motion until you have a smooth fade from dark to light. -
Let it dry completely:
Allow the background gradient to dry fully. This is crucial because if the background is wet, your stars will blend into the blue rather than sitting crisp white on top.
Mess-Free Splatter
To prevent white dots from getting all over your table, place your canvas inside a large, deep cardboard box before flicking the toothbrush.
Step 2: Adding the Stars
-
Prepare the splatter paint:
Mix a small amount of Titanium White with water on your palette. You want a consistency similar to heavy cream or melted ice cream—thin enough to fly off bristles, but thick enough to be opaque. -
Test the consistency:
Dip your old toothbrush or stiff brush into the thinned white paint. Test the splatter on a piece of scrap paper or cardboard first to make sure you aren’t getting huge blobs. -
Create the heavy star field:
Hold the brush near the top (darkest) part of the canvas. Run your thumb across the bristles to flick tiny droplets of paint onto the surface. Focus the density of stars at the top, letting them fade out as you move lower. -
Add deeper stars:
Reload your brush and do a second pass, focusing on clustering stars in the upper corners to create depth and the illusion of a galaxy. -
Paint the hero stars:
Switch to your fine detail liner brush and pure, un-thinned Titanium White paint. Select 3 or 4 spots in the upper half of the painting to place larger, featured stars. -
Shape the larger cross-stars:
To make the cross-shaped stars seen in the example, paint a small vertical line, then cross it with a horizontal line. Lightly taper the ends of the lines so they look like points of light. -
Add varied dots:
Using the handle end of a paintbrush, dip it in white paint and gently dot a few medium-sized planet-like circles among the tiny splatters. This adds variety to the star sizes. -
Paint a subtle horizon mist:
If you want the bottom to look extra dreamy, create a very sheer wash of white (mostly water) and glaze it over the very bottom edge of the teal section once dry.
Level Up: Silhouette
Once dry, use black paint to add a simple silhouette along the bottom edge, like a row of pine trees or a mountain range, for a landscape view.
Allow the white drops to dry completely before displaying your personal window into the cosmos
BRUSH GUIDE
The Right Brush for Every Stroke
From clean lines to bold texture — master brush choice, stroke control, and essential techniques.
Explore the Full Guide
Crescent Moon Over Dreamy Clouds
Capture the magic of twilight with this ethereal moon and cloud painting. Using a soft gradient background and fluffy white clouds, this piece brings a calming, dreamy vibe to any small space.
Step-by-Step Guide
Materials
- Small stretched canvas (e.g., 4×4 or 6×6 inch)
- Acrylic paints: Titanium White, Violet/Purple, Magenta (or Deep Pink), Yellow Ochre (or Gold)
- Flat shader brush (medium size)
- Small round detail brush
- Palette or paper plate
- Cup of water and paper towels
Step 1: Creating the Ombré Sky
-
Mix your base purple:
Start by squeezing out your violet paint and mixing in a generous amount of Titanium White. You want a soft, lavender shade rather than a deep, dark purple. -
Paint the top third:
Using your flat shader brush, apply this lavender mix to the top third of the canvas. Don’t forget to paint the top and side edges of the canvas as you go for a polished, gallery-wrapped look. -
Mix the transition pink:
Without cleaning your brush thoroughly, pick up some magenta and mix it into your lavender pile, adding a touch more white if needed. This should create a soft mauve-pink color. -
Apply the middle section:
Paint the middle third of the canvas with this pinkish hue. While the paint is still wet, gently stroke upward into the lavender section to blend the line where the two colors meet. -
Create the bottom peach tone:
Clean your brush. Mix magenta with a tiny dot of yellow ochre and plenty of white to create a warm, peachy-pink sunset color. -
Finish the gradient:
Fill the bottom third of the canvas with this peach tone. Use horizontal strokes to blend it seamlessly into the pink section above. -
Let it dry:
Allow the background gradient to dry completely before moving on. This usually takes about 10-15 minutes for thin acrylic layers.
Starry Splatter
For a natural star field, load an old toothbrush with watered-down white paint. Flick the bristles with your thumb to create a mist of tiny stars instantly.
Step 2: Painting Fluffy Clouds
-
Prepare cloud highlights:
Load a clean, round brush with pure Titanium White. You don’t need to add much water; a thicker consistency helps create texture. -
Shape the upper cloud edges:
Starting near the bottom right, dab the brush to create the rounded, fluffy tops of the clouds. Use a tapping motion rather than smooth strokes to mimic the billowing shape. -
Fill the cloud body:
Once the top edge is defined, drag the white paint downward slightly, letting it fade out. It doesn’t need to be solid white at the bottom; transparency adds depth. -
Add lower cloud layers:
Repeat this process on the bottom left side, creating a second bank of clouds. Vary the size of the ‘humps’ so they look natural and organic. -
Tint the shadows:
Mix a tiny amount of your background lavender into the white. Gently glaze the bottom edges of your clouds with this shadow color to make them look 3D. -
Add final bright spots:
I like to go back with pure white one last time on the very tops of the clouds to make them pop against the sunset background.
Step 3: Celestial Details
-
Outline the crescent:
Using your smallest detail brush and the yellow ochre (mixed with a little white for opacity), carefully paint a ‘C’ shape in the upper right quadrant. -
Fill the moon:
Fill in the crescent shape. Make the center of the crescent thicker and taper the points to sharp, delicate ends. -
Highlight the moon:
Add a swipe of pure white or very pale yellow to the inner curve of the moon to make it look like it’s glowing. -
Paint the stars:
Dip the tip of your detail brush into thinned white paint. Dot random stars around the purple section of the sky. -
Create twinkle stars:
Select two or three larger stars and carefully drag lines outward—vertical and horizontal—to create a cross shape, making them ‘twinkle’. -
Final touches:
Check the edges of your canvas to ensure your design wraps around neatly, and verify that your cloud highlights are bright enough once dried.
Add Some Shimmer
Once the painting is fully dry, paint over the moon and the tops of the clouds with a layer of clear glitter glaze or metallic pearl paint for extra magic.
Step back and admire your peaceful, pastel creation.
One Big Daisy Close-Up

Capture the warmth of a sunlit afternoon with this charming close-up of a single daisy on a mini canvas. The soft, buttery background makes the crisp white petals pop, creating a cozy piece of decor perfect for a windowsill.
Step-by-Step Tutorial
Materials
- Small square canvas (approx. 4×4 or 5×5 inches, thick profile)
- Acrylic paints: Titanium White, Yellow Ochre, Burnt Sienna, Cadmium Yellow, Sap Green, Olive Green
- Flat brush (medium)
- Small round detail brush
- Filbert brush (small)
- Palette
- Cup of water and paper towels
Step 1: Setting the Scene
-
Mix the background color:
Start by mixing a warm, neutral beige. Combine a large amount of Titanium White with a touch of Yellow Ochre and a tiny speck of Burnt Sienna to tone it down. -
Apply the base coat:
Using your flat brush, cover the entire canvas surface with your beige mix. Don’t forget to paint the thick sides of the canvas for a finished, professional look. -
Add a sunlit gradient:
While the beige is still slightly wet, mix a little more Yellow Ochre into your existing pile. Gently blend this warmer tone into the top right corner and diffuse it diagonally downwards to simulate sunlight hitting the canvas. -
Let it dry completely:
Wait for the background to be fully touch-dry before moving on to the flower, as you want the white petals to be crisp and clean.
Fixing Mistakes
If your petal edges look messy against the background, wait for them to dry, then use a small brush with your background beige color to ‘cut back’ into the petal shape and tidy the edges.
Step 2: Painting the Petals
-
Sketch the placement:
Lightly sketch the oval shape for the flower center. Position it slightly off-center to the right for a dynamic composition. -
Block in the first petals:
Load your filbert brush with pure Titanium White. Start painting the petals radiating outward from your sketched center. Use the natural curve of the brush to create the rounded tips of the petals. -
Layering for opacity:
Acrylic white can be translucent. If the background shows through, let the first layer of petals dry and apply a second coat for solid, bright coverage. -
Add shadow depth:
Mix a tiny amount of grey or dilute your beige background color. Paint very thin, subtle lines between the petals where they overlap to create separation and depth. -
Paint the bud:
Near the bottom right, paint a small, closed oval shape in white to represent a flower bud waiting to bloom.
Step 3: The Center & Stems
-
Base the center:
Fill the oval center of the main flower with a mix of Cadmium Yellow and Yellow Ochre. -
Stipple texture:
Switch to your smallest round brush. Dip it into Burnt Sienna and gently stipple (dot) the bottom left edge of the yellow center to create a shadow side. -
Add highlights:
Clean your brush and pick up pure Cadmium Yellow or even a mix with a little white. Stipple the top right of the center to make it look domed and sunlit. -
Paint the main stem:
Mix Sap Green with a little Olive Green. With a steady hand or your small round brush, draw a thin line extending from the flower down to the bottom edge. -
Detail the bud:
Using the same green mix, paint the sepal (the green cup) holding the white bud, and draw a short stem connecting it to the bottom of the canvas. -
Final highlights:
Add tiny streaks of white or pale yellow to the green stems to show where the light hits them.
Level Up
Try using thick heavy body acrylics or modeling paste for the flower petals. This impasto technique will give the daisy actual 3D texture that stands off the canvas surface.
Place your finished mini-masterpiece on a shelf where it can catch the light and brighten your day

PENCIL GUIDE
Understanding Pencil Grades from H to B
From first sketch to finished drawing — learn pencil grades, line control, and shading techniques.
Explore the Full Guide
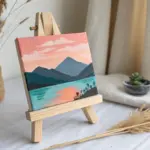
Flowery Hills With Dabbed Wildflowers
Capture the peaceful serenity of a meadow at dawn with this soft, layered landscape painting. Using gentle gradients and muted earth tones, this beginner-friendly project creates a calming sense of depth perfect for any small space.
Step-by-Step
Materials
- Small square canvas (e.g., 6×6 or 8×8 inches)
- Acrylic paints: Titanium White, Burnt Sienna, Yellow Ochre, Sap Green, Olive Green, Crimson Red, Unbleached Titanium (beige)
- Flat shader brushes (medium and small)
- Small round detail brush
- Palette for mixing
- Cup of water and paper towels
- Pencil for sketching (optional)
Step 1: Sky and Sun
-
Prepare the sky gradient:
Begin by mixing a very large amount of Titanium White with a tiny dot of Crimson Red to create a barely-there blush pink. Paint the top two-thirds of the canvas with this shade. -
Blend downwards:
While the pink is still wet, mix Titanium White with a touch of Yellow Ochre to make a pale cream. Blend this into the lower part of the sky area, creating a soft transition for the horizon. -
Paint the sun:
Mix a slightly stronger pale yellow using White and Yellow Ochre. Using a clean brush, paint a semi-circle rising from the center of what will become your horizon line. Soften the edges slightly so it glows rather than looking like a sticker. -
Add soft clouds:
Using a dry brush technique and a slightly darker pink mix, gently scumble in a few horizontal cloud streaks across the upper sky. Keep them wispy and translucent.
Smooth Gradients
To get that seamless fade in the sky, use a tiny bit of water or slow-drying medium. Work quickly while the paint is wet to blur the line between pink and yellow.
Step 2: Layering the Background Hills
-
Mix the furthest hill color:
Create a dusty mauve by mixing Burnt Sienna, White, and a tiny touch of Crimson. You want this to look muted and far away. -
Paint the back range:
Paint a rolling hill shape that overlaps the bottom of the sun slightly. This establishes your horizon line. Fill in the shape solid. -
Create the middle ground color:
Mix Burnt Sienna with a little less White and a touch of Yellow Ochre to create a warm terracotta earth tone. -
Paint the middle hills:
Paint a second layer of hills below the mauve ones. Make the curves different from the first layer to create visual interest. -
Add distant vegetation:
Using a small round brush and a dark olive green, dab tiny, uneven blobs along the ridge of the terracotta hill to represent distant trees or shrubs.
Step 3: Foreground and Details
-
Mix foreground greens:
Prepare two shades of green: a pale, dusty sage (Sap Green + White) and a warmer olive green (Olive Green + Yellow Ochre). -
Paint the left slope:
Use the pale sage green to paint a large sloping hill coming in from the left side, sweeping down towards the center bottom. -
Paint the right slope:
Use the warmer olive green to paint the hill coming from the right. Let your brushstrokes follow the curve of the land to suggest grassy texture. -
Sketch the path:
Using your Unbleached Titanium (or a mix of White and Yellow Ochre), paint a winding path starting narrow at the middle hills and widening as it reaches the bottom right corner. -
Refine the path edges:
I find it helpful to go back with the green paint to tidy up the edges of the path, making it look like the grass is growing over the dirt slightly. -
Add mid-ground trees:
Mix a deep, dark green. Paint small, rounded tree shapes along the ridge where the green hills meet the terracotta hills. -
Paint the path center:
Add a lighter strip or faint directional strokes down the center of your beige path to mimic tire tracks or foot traffic wear. -
Add texture to the grass:
Using a dry brush with a slightly lighter green, whisk gentle strokes over the foreground hills. This simulates the movement of wind through grass. -
Final touches:
Step back and assess your layers. If the sun has faded too much behind the hills, gently brighten the top curve with fresh pale yellow.
Add Wildflowers
Once the green hills are dry, use the handle end of a paintbrush dipped in white or yellow to dot tiny wildflowers in the immediate foreground for extra detail.
Place your finished canvas on a miniature easel to enjoy your own slice of peaceful countryside
Bright Fruit Slice on Solid Background
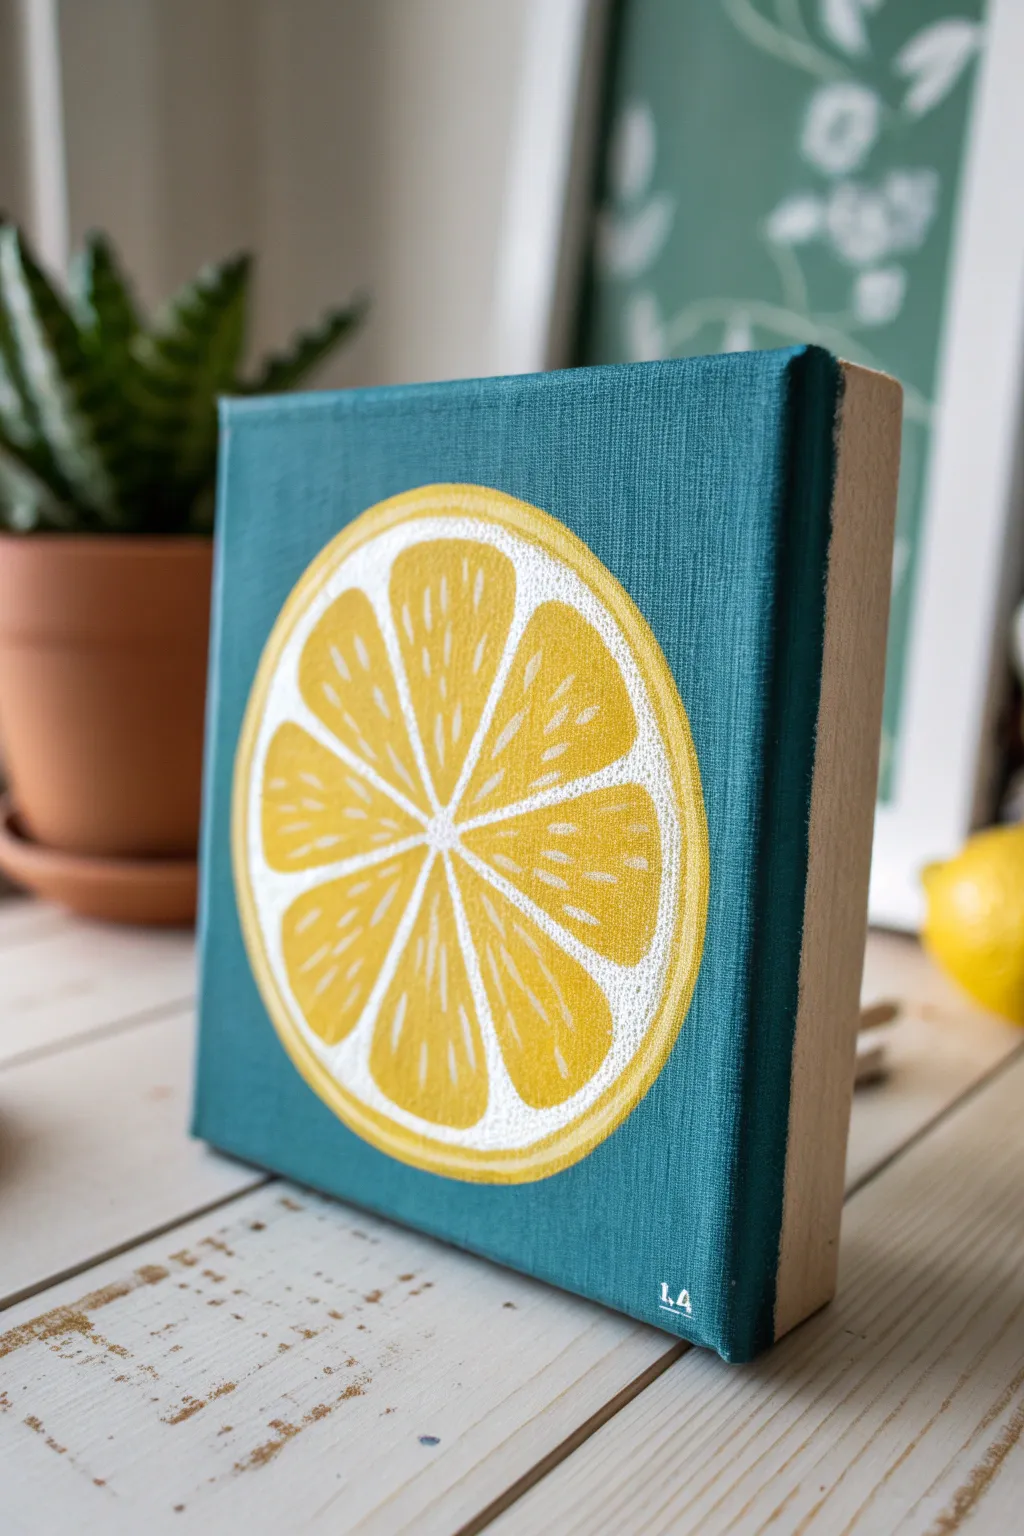
Brighten up any corner of your home with this graphic and refreshing lemon slice painting. The contrast between the vibrant yellow fruit and the deep teal background creates a modern, pop-art aesthetic that is surprisingly simple to achieve.
How-To Guide
Materials
- Small square deep-edge canvas (approx. 6×6 inches)
- Acrylic paints: Deep teal/petrol blue, cadmium yellow medium, titanium white
- Flat shader brush (size 6 or 8)
- Small round detail brush (size 1 or 2)
- Pencil
- Compass or a circular object for tracing
- Clean water jar
- Paper towels
- Palette or paper plate
Step 1: Preparing the Base
-
Prime the background:
Begin by squeezing out a generous amount of deep teal acrylic paint. Using your flat shader brush, cover the entire front surface of the canvas. Ensure your brushstrokes are long and smooth to minimize texture. -
Paint the edges:
Don’t forget the sides! Continue the teal paint around all four deep edges of the canvas for a polished, gallery-wrapped look. I like to do this while the front is still wet to ensure the color matches perfectly. -
Let it dry completely:
Allow the background coat to dry fully. This is crucial because you don’t want the yellow you’ll add later to mix with the teal and turn green. Use a hairdryer on a cool setting if you’re impatient.
Uneven Circles?
If your hand is shaky, don’t paint the outer circle freehand. Cut a circle from paper, place it on the canvas, and essentially stencil around it for a crisp edge.
Step 2: Sketching the Design
-
Draw the outer circle:
Once the teal is dry to the touch, use a compass or trace a circular object (like a large mug or bowl) to lightly draw a perfect circle in the center of the canvas with a pencil. -
Mark the inner circle:
Sketch a slightly smaller circle inside the first one, leaving about a quarter-inch gap. This gap will become the heavy white pith of the lemon. -
Divide into segments:
Find the center point of your circle. Lightly draw straight lines radiating outward to divide the circle into eight even pie slices. -
Round the corners:
Inside each triangular ‘pie slice,’ sketch the lemon segment shape. Round off the corners so they don’t touch the center point or the rind circle, looking like soft teardrops or petals.
Pro Tip: Opacity
Yellow is naturally translucent. Always paint a layer of white underneath yellow areas when working on a dark background to make the final color bright and solid.
Step 3: Color Blocking
-
Base coat the white areas:
Using a clean round brush and titanium white, fill in the entire large circle shape first. Painting white under the yellow ensures the yellow pops against the dark teal background. -
Refine the edges:
While using the white, clean up the outer edge of your circle to make it nice and crisp. Let this white layer dry completely. -
Paint the yellow rind:
Mix a tiny bit of white into your yellow to make it opaque. Paint the outermost ring of the circle yellow, leaving the thick white ring just inside it untouched. -
Fill the segments:
Switch to your yellow mixture and fill in the eight segment shapes you sketched earlier. Leave the white underpainting showing between the segments to act as the membrane lines.
Step 4: Adding Details
-
Deepen the yellow:
Once the first yellow coat is dry, add a second coat of pure cadmium yellow (without white mixed in) to the segments and outer rind for vibrancy. -
Add juice vesicles:
Load your smallest detail brush with white paint. Inside each yellow segment, paint tiny, fleeing dashed lines or small seeds. These represent the texture of the juicy fruit flesh. -
Vary the marks:
Keep these white marks random—some short dots, some slightly longer dashes—pointing roughly toward the center of the fruit. -
Highlight the rind:
Add a very thin, subtle white highlight line on one side of the yellow rind to suggest light hitting the curve of the fruit. -
Final touch-ups:
Check your teal background. If any yellow or white strayed outside the circle, use your teal paint and flat brush to carefully tidy up the edges. -
Sign your work:
Use your smallest brush or a white paint pen to add your initials in the bottom corner.
Step back and admire your fresh, fruity artwork which is now ready to add a splash of color to your shelf


Cute Bear Face With Simple Shapes
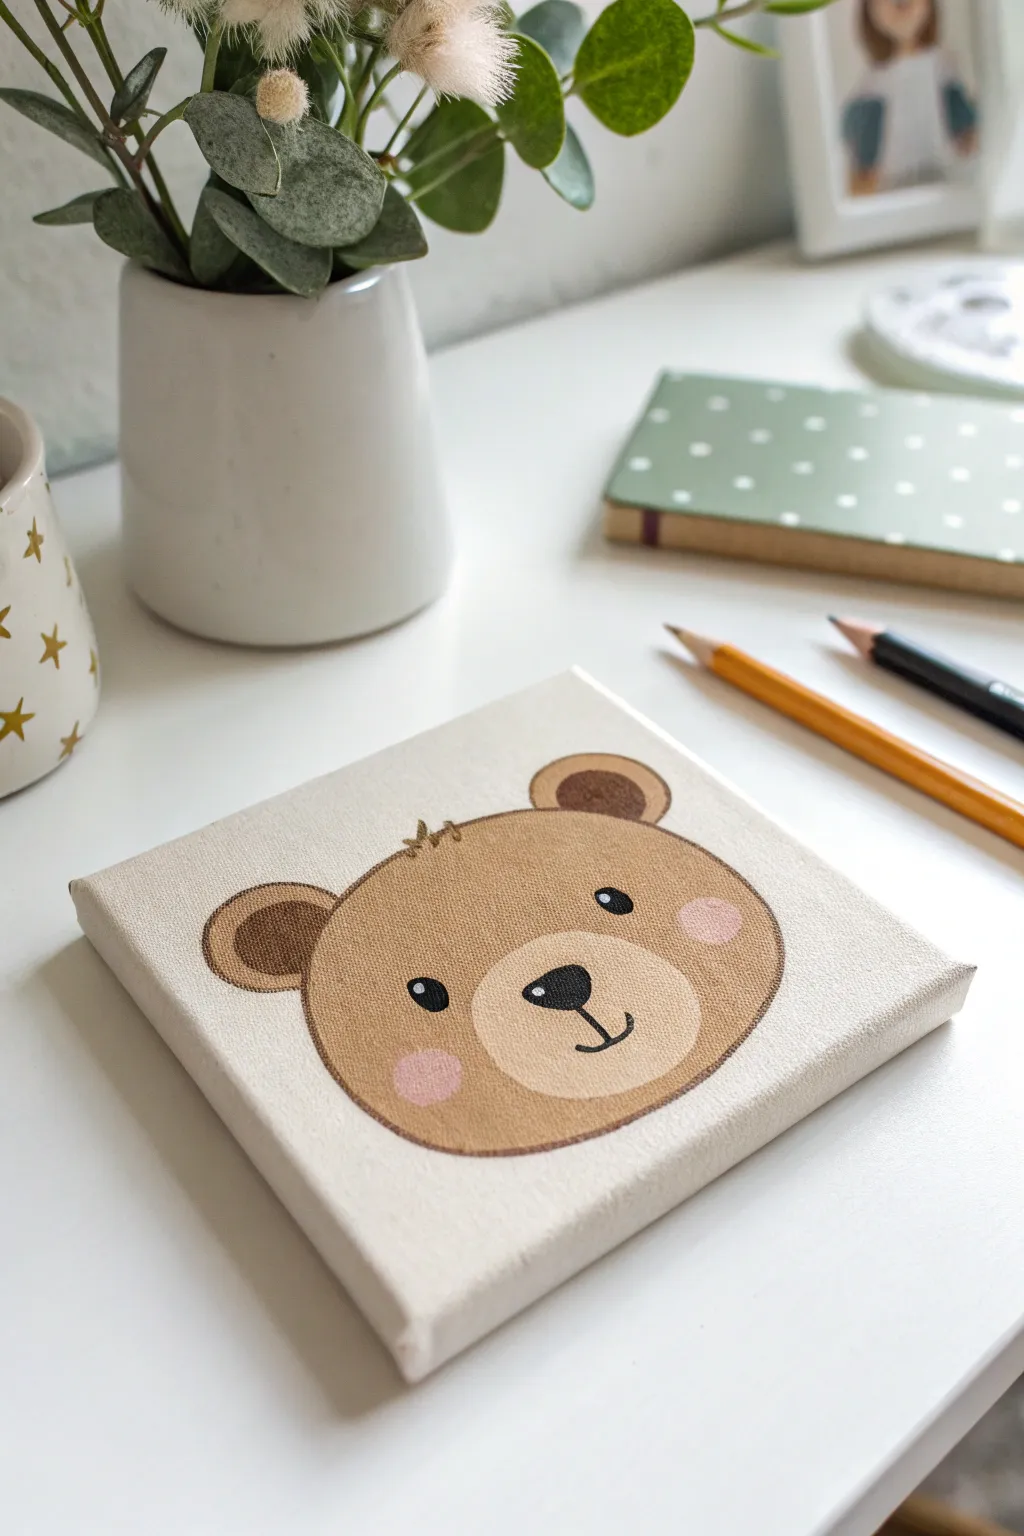
This adorable bear face is the perfect project for mastering simple shapes and clean lines on a small canvas. With its warm, earthy tones and sweet expression, this piece makes a charming addition to a nursery shelf or a thoughtful handmade gift.
How-To Guide
Materials
- Small square stretched canvas (4×4 or 6×6 inches)
- HB pencil and eraser
- Acrylic paints: warm brown, light beige/tan, dark chocolate brown, soft pink, black, and white
- Flat shader brush (small size)
- Round detail brush (size 1 or 0)
- Small liner brush (optional for fine details)
- Palette or paper plate
- Cup of water and paper towels
Step 1: Sketching the Shapes
-
Center Your Canvas:
Begin by finding the approximate center of your canvas. You don’t need to measure perfectly, but having a visual anchor helps keep the face symmetrical. -
Draw the Main Head:
Using your pencil lightly, sketch a large, wide oval shape for the bear’s head. The bottom creates the chin while the top curves gently for the forehead. Leave plenty of white space around the edges. -
Add the Ears:
Sketch two half-circles on the top corners of the head. Inside each ear, draw a slightly smaller half-circle to mark where the darker inner ear color will go. -
Outline the Snout:
In the lower middle section of the face, draw a smaller, wider oval for the snout area. This should sit quite low on the face to give the bear a cute, chubby look. -
Place Facial Features:
Lightly mark two small circles for eyes just above the snout line. Add a small, inverted triangle shape for the nose inside the snout area.
Smooth Surface Trick
Before painting, apply a coat of white gesso and sand it lightly once dry. This fills the canvas weave texture, making it much easier to paint sharp, clean lines for the face.
Step 2: Painting the Base Layers
-
Fill the Main Face:
Mix your warm brown paint. Using a flat shader brush, carefully fill in the main head shape, painting around the snout oval and the ears. I like to keep my brush strokes horizontal for a smooth finish. -
Paint the Snout:
Switch to a clean brush and use your light beige or tan color to fill in the snout oval. Ensure the edges meet the brown fur neatly without overlapping too messily. -
Color the Inner Ears:
Use a dark chocolate brown to fill in the inner semi-circles of the ears. This contrast adds nice depth to the simple character. -
Complete the Outer Ears:
Use the original warm brown mix to paint the outer rim of the ears, blending it seamlessly where it meets the main head shape. -
Let it Dry:
Allow these base layers to dry completely. Acrylics dry fast, but give it about 10-15 minutes so your details don’t smudge into the wet paint.
Make it a Set
Don’t stop at a bear! Use the same head shape but change the ears to triangles for a cat or long ovals for a bunny to create a matching woodland trio.
Step 3: Adding Details
-
Paint the Nose:
Using a small round brush and black paint, fill in the triangle nose shape. Round off the corners slightly so it looks soft rather than sharp. -
Create the Eyes:
Paint the two eye circles with solid black. If you struggle with circles, you can use the back end of a paintbrush handle dipped in paint as a stamp. -
Add the Mouth:
Mix a tiny amount of water into your black paint to help it flow. Use a thin liner brush to draw a straight line down from the nose, curving into a gentle anchor shape for the smile. -
Rosy Cheeks:
Mix a soft pink color using red and lots of white. Paint two soft circular spots on either side of the snout for blushing cheeks. -
The Distinctive Outline:
Once the face is dry, use a detail brush and dark chocolate brown to outline the entire head and ear shape. This thin line gives the painting that clean, illustrative sticker-like quality. -
Add Hair Tuft:
While outlining the top of the head, add three tiny, quick strokes sticking up from the center to create a playful tuft of fur. -
Eye Sparkles:
Dip the very tip of a clean detail brush or toothpick into white paint. Add a tiny white dot to the upper right corner of each black eye and the nose for a lively sparkle.
Step back and admire your little forest friend, ready to brighten up any small corner of a room
Little Frog Peeking From a Pond
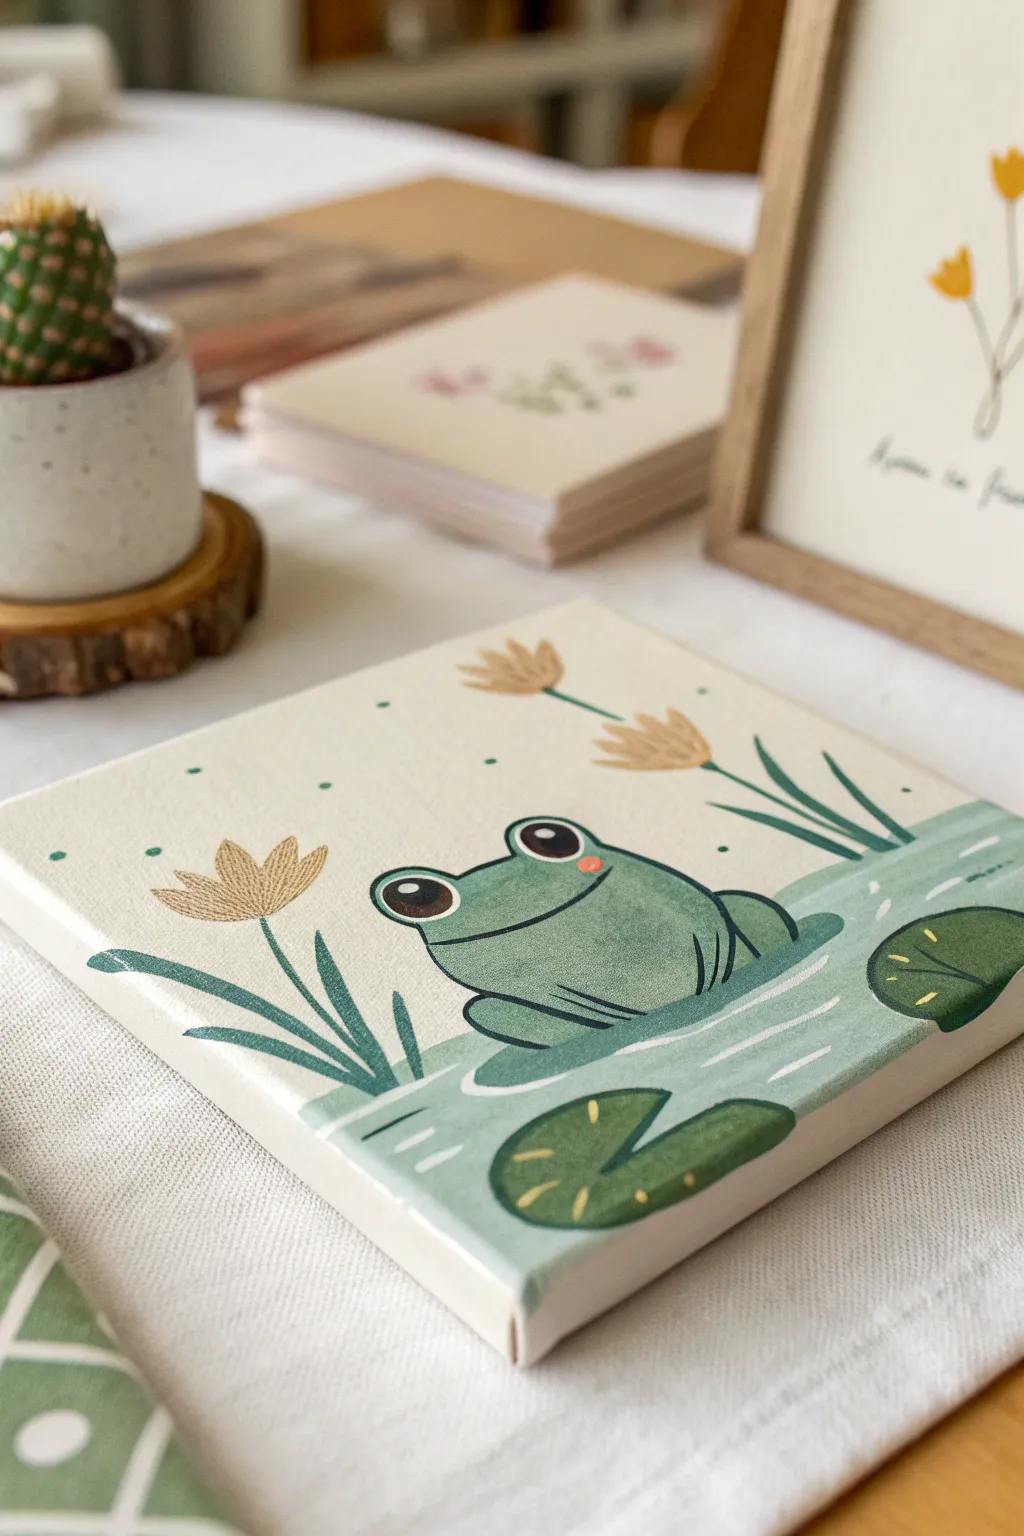
This charming little canvas features a cheerful frog nestled among lily pads, painted in soft, illustrative tones. Its gentle sage greens and creamy background make it a delightful addition to a desk or bookshelf.
Detailed Instructions
Materials
- Small square wrapped canvas (approx. 6×6 inches)
- Acrylic paints (Cream/Off-white, Sage Green, Olive Green, Deep Green, Chocolate Brown, Mustard Yellow, Soft Pink, White)
- Flat brush (medium)
- Round brush (small)
- Detail liner brush
- Pencil and eraser
- Palette
- Water cup and paper towels
Step 1: Setting the Scene
-
Prime the Background:
Mix a generous amount of cream or off-white acrylic paint. Using a flat brush, cover the entire canvas surface, ensuring smooth, even strokes. Don’t forget to paint the sides of the canvas for a finished look. Let this base layer dry completely. -
Light Sketching:
Using a pencil, very lightly sketch the composition. Start with a large oval shape for the frog’s body in the lower center. Add two half-circles on top for the eyes. -
Adding Nature Elements:
Sketch a horizontal wavy line across the bottom third to mark the water level. Draw a few oval lily pads floating on the water. Finally, sketch three tall, thin stems rising on the left and right sides for the flowers.
Step 2: Blocking in Color
-
Painting the Water:
Mix a pale, watery teal-green using white, a touch of sage, and a tiny bit of blue. Fill in the water area at the bottom, carefully painting around the frog and lily pads. -
The Frog’s Body:
Paint the frog’s body with a solid coat of sage green. You may need two coats to get opaque coverage over the background. -
Lily Pads:
Use a slightly darker green, like olive, to fill in the oval lily pads. This subtle contrast helps distinguish them from the water while keeping the palette cohesive. -
Flower Shapes:
For the three flower heads, mix a mustard yellow with a little brown to get a muted gold tone. Paint the tulip-like shapes at the top of your sketched stems. -
Stems and Leaves:
Switch to your small round brush and use a deep green to paint the thin stems connecting to the flowers and the long, grass-like leaves shooting up from the water on the left.
Smooth Operator
To get those super clean, illustrative outlines, thin your black paint slightly with a drop of water. It should flow like ink.
Step 3: Defining the Character
-
Outlining the Frog:
Once the green base is totally dry, use a detail liner brush and dark charcoal or black paint to outline the frog’s body. Keep the line weight relatively consistent for that illustrative look. -
Facial Features:
Paint two large chocolate brown circles inside the eye bumps. Add a wide, curved line for the smile. -
Eye Details:
When the brown eyes are dry, add a small white highlight dot to the upper right of each pupil. Then, use your liner brush to carefully outline the eyes in black. -
Rosy Cheeks:
Mix a soft pink color. Using the tip of your finger or a round brush, a dab a small, soft circle on the frog’s cheek, just below the eye.
Make it 3D
For a fun twist, use puffy paint or embroidery floss glued onto the canvas for the flower stems to add actual tactile texture.
Step 4: Isolating Details
-
Flower Textures:
Take your liner brush and a diluted brown paint. Add fine vertical lines inside the flower heads to suggest petals or texture. -
Lily Pad Lines:
Using a light yellow or cream paint, add tiny dashed lines or veins radiating from the center of the lily pads to give them definition. -
Water Ripples:
With pure white paint and a liner brush, add short, horizontal dashes in the water area. Place these around the frog and lily pads to suggest movement and ripples. -
Background Dots:
Dip the back end of your paintbrush handle into sage green paint. Dot the background sky area randomly to create a whimsical, patterned effect. -
Final Polish:
Check for any pencil marks that are still visible and gently erase them. If the black outlines look faded in spots, go over them one last time to make the illustration pop.
Place your little amphibian friend on a mini easel to bring a smile to any corner of your room
Three Simple Planets Floating in Space
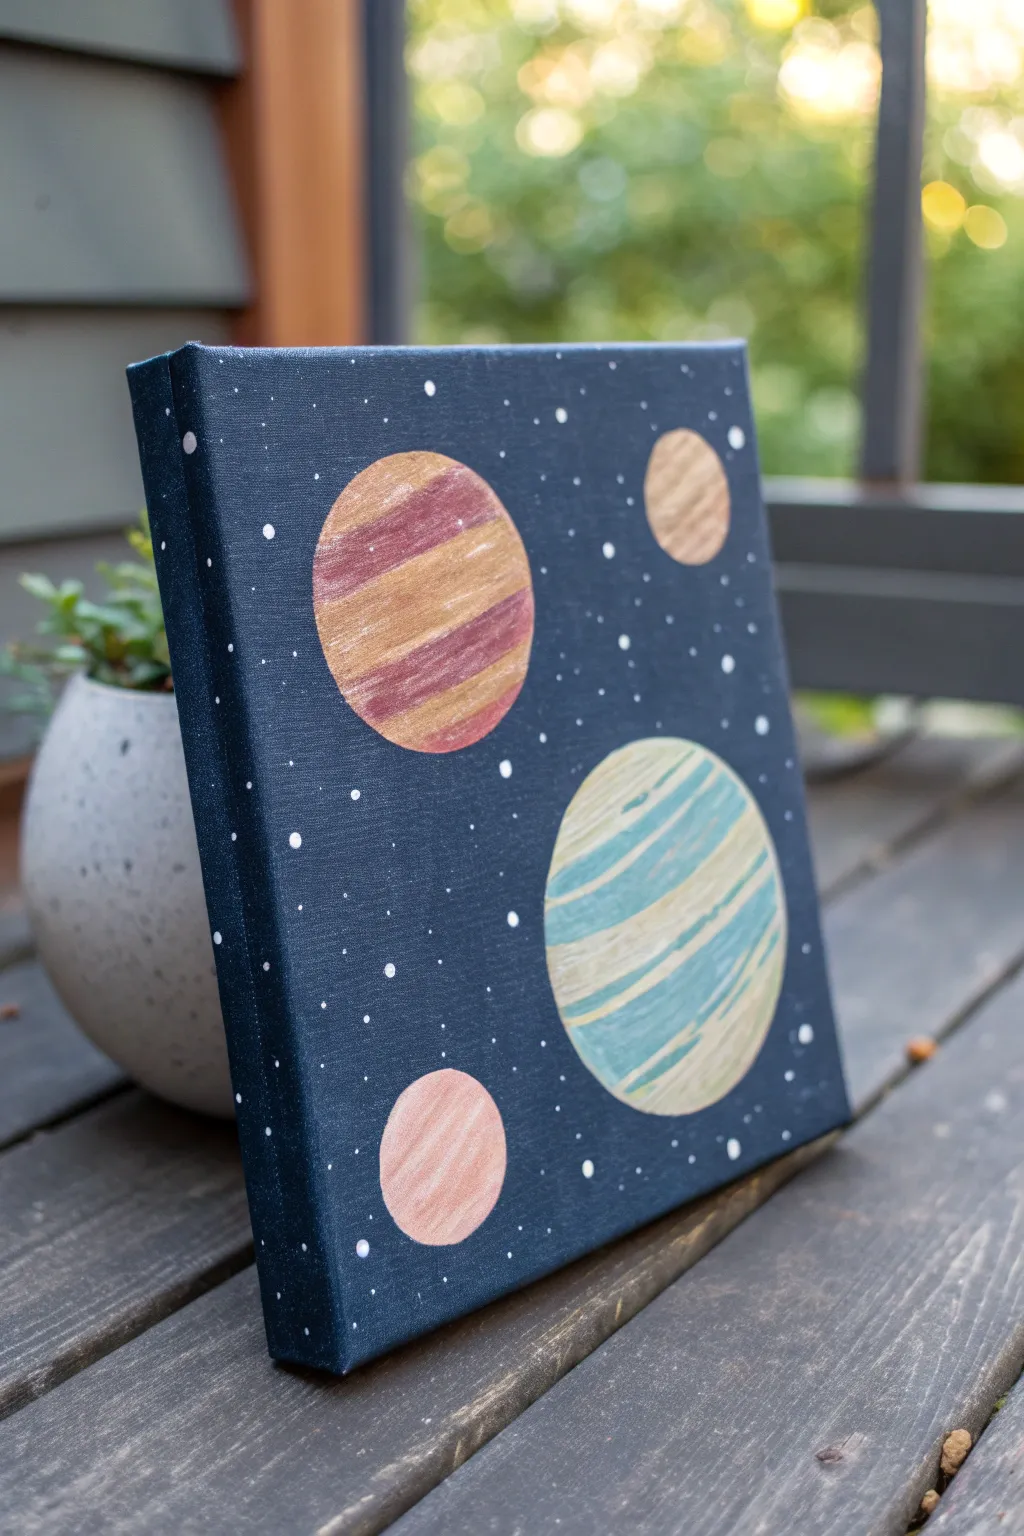
Create a minimal yet striking galaxy scene featuring four stylized planets against a deep, starry backdrop. This project uses metallic or shimmering paints to give the planetary stripes a unique, textural glow that catches the light.
How-To Guide
Materials
- Small square stretched canvas (e.g., 8×8 or 10×10 inches)
- Acrylic paint: Deep Navy or Black, White
- Metallic Acrylic paint: Gold, Bronze, Copper
- Pastel Acrylic paint: Light Pink, Light Blue, Cream
- Flat paintbrush (medium)
- Detail round paintbrush (small)
- Pencil
- Circle templates (cups, lids, or a stencil)
- Palette or paper plate
- Water cup and paper towels
Step 1: Prepping the Galaxy
-
Paint the background:
Using your medium flat brush, cover the entire front and sides of the canvas with your deep navy blue or black paint. Ensure the weave of the canvas is fully filled for a solid, dark void. -
Dry completely:
Allow the background layer to dry fully. If the canvas still shows white spots through the paint, apply a second coat for opacity. -
Trace the planets:
Gather four circular objects of varying sizes to serve as templates. Arrange them on the dry canvas to find a balanced composition—perhaps one large planet, one medium, and two smaller ones. -
Outline circles:
Lightly trace around your chosen objects with a pencil. Don’t press too hard; you just need a faint guide to paint inside.
Fixing Wobbly Circles
If your planet edges look uneven, wait for the paint to dry. Then, use the background navy color to carefully ‘cut in’ and reshape the circle from the outside.
Step 2: Painting the Planets
-
Base coat the large planet:
Select your largest circle. I like to start by filling this shape with a base color that matches one of its stripes, like a rusty red or deep bronze. -
Add metallic stripes:
While the base is drying or just after, load a flat brush with metallic gold. Paint thick, slightly curved bands across the circle to create a spherical illusion. -
Refine the edges:
Use your small detail brush to neaten the outer edge of the circle so it looks crisp against the dark background. -
Create the blue planet:
Move to the medium-sized circle. Paint alternating curved stripes of light pastel blue and cream or soft metallic silver. Curve your brush strokes downward to mimic the roundness of a planet. -
Paint the small planets:
For the smaller circles, choose distinct color palettes. One can be a solid soft pink with faint darker swirls, and another can be a simple metallic gold or copper. -
Add texture:
If you want a more painterly look, don’t over-blend the stripes. Let the brushstrokes remain visible to give the planets a textured, gas-giant appearance. -
Check opacity:
Some lighter colors or metallics might be transparent on the dark background. Apply a second layer to the planets if the navy blue is showing through.
Pro Tip: Spherical stripes
Always curve your stripes slightly relative to the circle’s edge—like parentheses—rather than painting straight lines. This makes the circle look like a 3D sphere.
Step 3: Stars and Details
-
Prepare star paint:
Mix a small amount of white paint with a drop of water on your palette to make it roughly the consistency of heavy cream. -
Paint larger stars:
Dip the handle end (the non-brush end) of a paintbrush into the white paint. Dot it gently onto the background to create perfectly round, larger stars. -
Add tiny distant stars:
Switch to your smallest detail brush. Dip the tip in the thinned white paint and lightly touch the canvas in the empty spaces to create tiny pinprick stars. -
Avoid the planets:
Be careful not to dot stars on top of your planets. The stars should appear behind them. -
Final touches:
Inspect your planet edges one last time. If any star dots accidentally overlapped a planet, touch up the planet’s edge with the appropriate color.
Hang your new miniature galaxy on the wall and enjoy the interstellar view
Bold Geometric Color Blocks
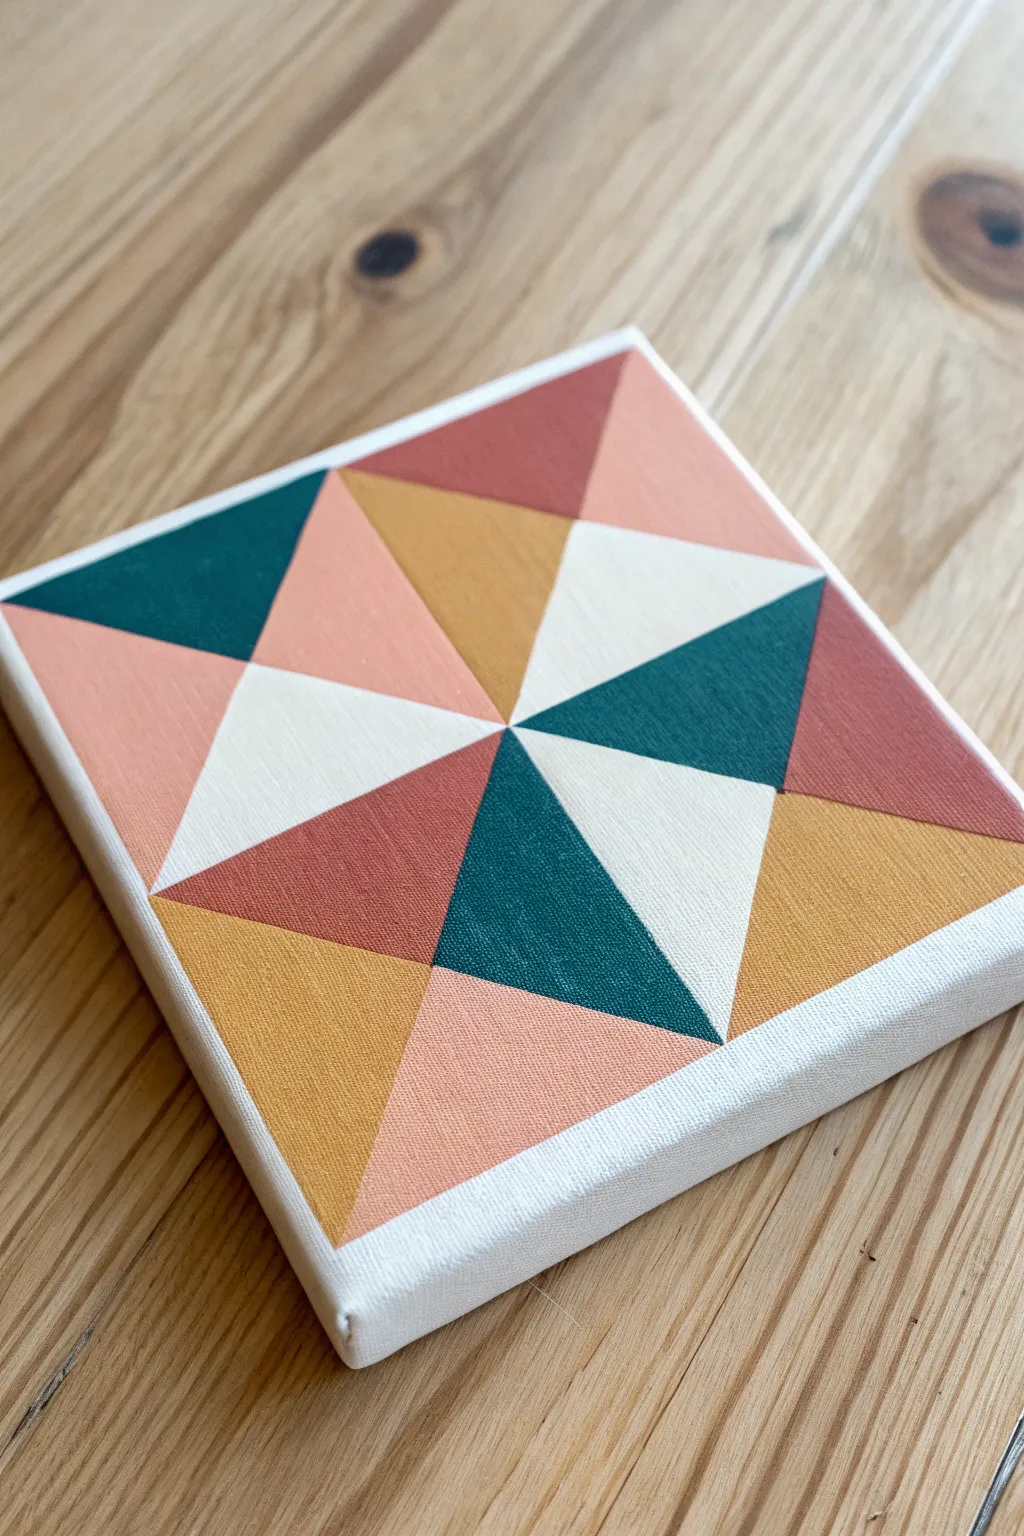
This striking geometric design relies on bold color blocking and crisp lines to create a modern, quilt-like pattern on a small canvas. The warm palette of terracotta, mustard, and blush contrasts beautifully with deep teal and cream whites, making it a perfect accent piece for a shelf or desk.
Step-by-Step
Materials
- Small square canvas (e.g., 6×6 or 8×8 inches)
- Painter’s tape or drafting tape (optional but helpful for straight lines)
- Acrylic paints: Terracotta/Rust, Mustard Yellow, Blush Pink, Deep Teal/Emerald, Cream/Off-White
- Ruler and pencil
- Flat shader brush (small to medium width for straight edges)
- Small round brush (for touch-ups)
- Palette or paper plate
- Cup of water and paper towels
Step 1: Drafting the Design
-
Grid Setup:
Begin by finding the exact center of your square canvas. Use a ruler to lightly draw a vertical line and a horizontal line crossing through the center, dividing the canvas into four equal quadrants. -
Diagonal guides:
Next, draw diagonal lines from corner to corner, creating an ‘X’ across the entire canvas. You should now have eight triangular sections radiating from the center point. -
Creating the secondary triangles:
Within each of the four main square quadrants, draw a diagonal line connecting the midpoints of the outer edges. This step subdivides the larger shapes into the smaller triangles seen in the design. -
Check your pattern:
Step back and verify your pencil lines. You should see a pattern composed of 16 small triangles arranged in a pinwheel-like formation.
Crisp Line Hack
Before painting your color, brush a thin layer of matte medium or white paint over the tape edge. This seals the gap so your colored paint won’t bleed underneath.
Step 2: Planning Your Colors
-
Map the palette:
Before painting, lightly mark which color goes where with a tiny pencil initial (e.g., ‘T’ for Teal, ‘M’ for Mustard). Reference the photo closely: notice how the colors rotate around the center point. -
The color rotation:
Observe the pattern: The four central triangles meeting at the middle point alternate between Blush Pink and Terracotta. The ‘blades’ radiating out alternate between Cream and Teal.
Rotate the Pattern
Make a set of four canvases with this identical pattern. Display them in a grid on your wall, rotating each one 90 degrees to create a massive, complex kaleidoscope effect.
Step 3: Painting the Sections
-
Tape off the first set:
To get super sharp lines, apply painter’s tape along the edges of non-adjacent triangles. Press the tape edges down firmly with your fingernail to prevent bleed-under. -
Painting darks first:
Start with the Deep Teal sections. Load your flat brush evenly and paint from the tape inward toward the center of the triangle to avoid pushing paint under the tape edge. -
Apply the warm tones:
While the tape is still set for the first batch of non-touching shapes, paint the Rust/Terracotta sections. Look specifically for the triangles on the outer perimeter. -
Remove tape and dry:
Carefully peel back the tape while the paint is still slightly tacky to avoid ripping a dry skin of paint. Let these sections dry completely before moving on. -
Tape the second set:
Once the first shapes are dry to the touch, apply new tape over the painted lines to expose the remaining unpainted triangles. -
Painting the lights:
Fill in the Cream/Off-White triangles. Depending on your paint opacity, these might need two thin coats to cover the canvas texture fully. -
Filling the remaining shapes:
Paint the Mustard Yellow sections on the outer edges and the Blush Pink sections near the center. I find that keeping a paper towel handy to wipe the brush between drastic color changes keeps the hues pure. -
Final reveal:
Remove all the tape carefully. If you taped correctly, you should have crisp intersections between your colors.
Step 4: Cleanup and Finishing
-
Freehand touch-ups:
Small ridges or gaps might appear where tape lines met. Use a very small round brush with a tiny amount of water to smooth out these ridges or fill in tiny white specs. -
Clean edges:
Decide how you want to handle the sides of the canvas. You can wrap the pattern around the edge, paint the sides solid white, or leave them raw for a minimalist look. -
Refining the center:
The center point where all lines meet is the focal point. Ensure these points are sharp; you can use the corner of a flat brush to ‘stamp’ the final sharp tip of the triangle if needed. -
Let it cure:
Allow the entire piece to dry overnight before displaying it to ensure the paint hardens well.
Now you have a charming, quilt-inspired piece of art that looks professionally designed and vibrant
Easy Dot Mandala Center Design
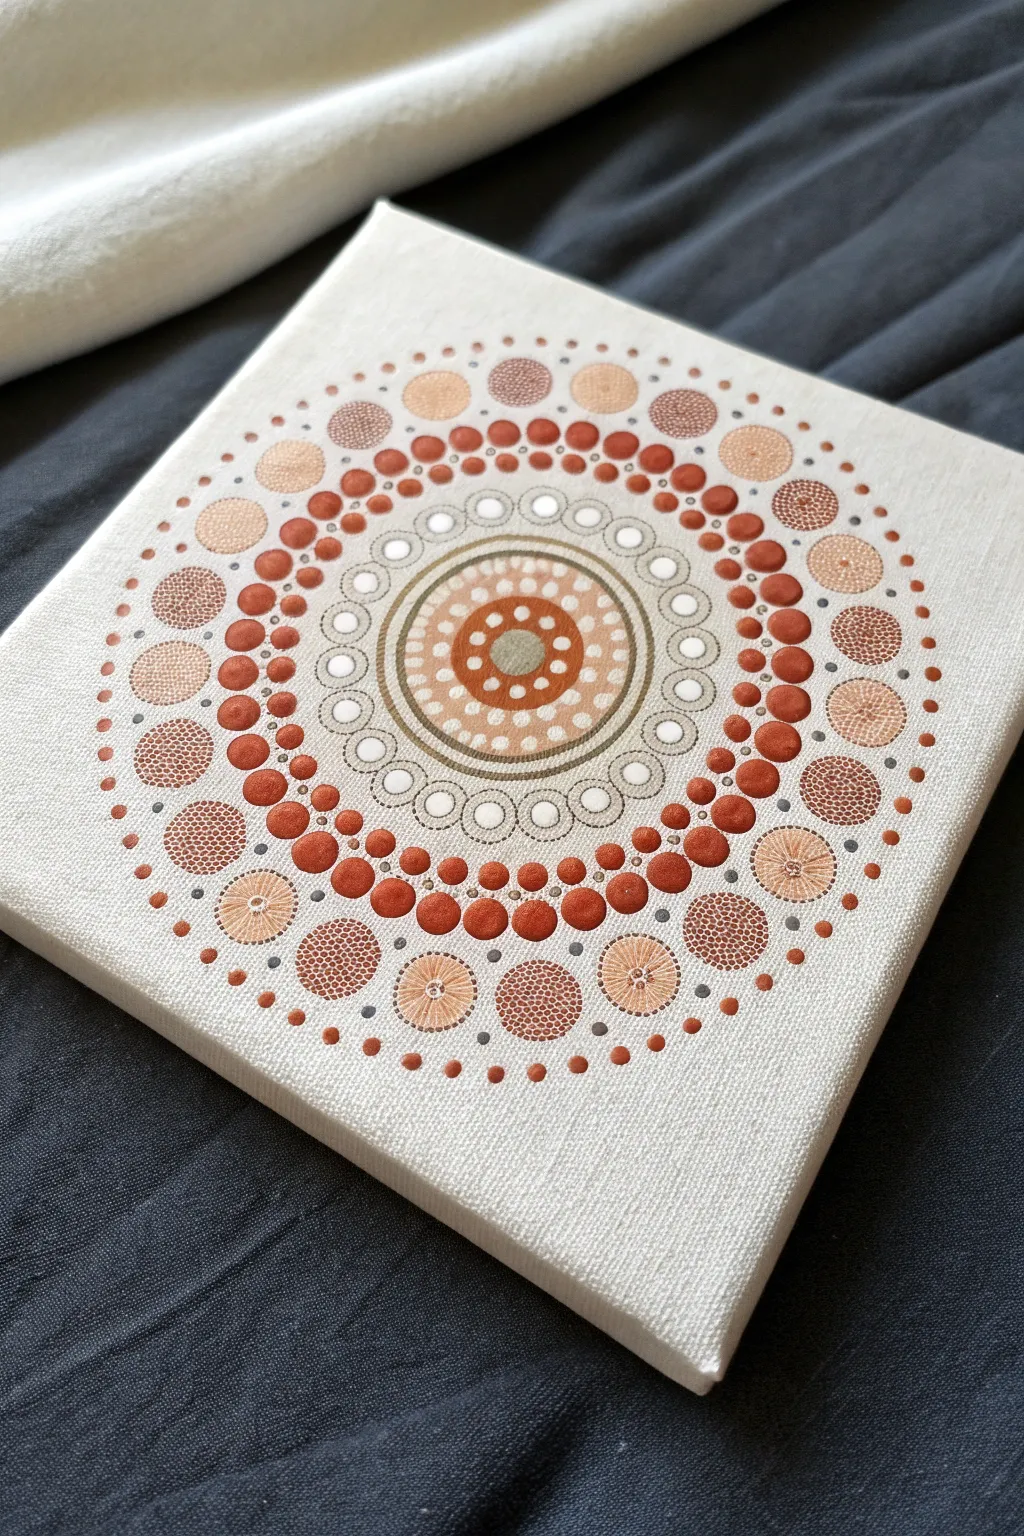
Create a soothing and symmetrical masterpiece using simple dotting techniques in warm, earthy tones. This small canvas project features radiating rings of terra cotta, peach, and sage dots that build up from a central focal point.
Step-by-Step Tutorial
Materials
- Small square canvas (e.g., 6×6 or 8×8 inch)
- Acrylic paints (White, Burnt Sienna, Terra Cotta, Peach/Light Flesh, Sage Green)
- Dotting tool set (various sizes) or household alternatives (brush ends, toothpicks, Q-tips)
- Ruler and pencil
- Compass (optional but recommended)
- Palette or small plate for mixing paints
- Damp cloth or paper towel
Step 1: Preparation and Grid
-
Base Coat:
Begin by painting your entire canvas with two coats of white or cream acrylic paint to ensure a smooth, opaque background; let it dry completely between coats. -
Finding the Center:
Use a ruler to lightly draw diagonal lines from corner to corner in pencil. Where they intersect is your exact center point. -
Drawing Guidelines:
Using a compass, lightly draw concentric circles radiating from the center point. Space them about 1/4 to 1/2 inch apart to serve as guides for your dot rings. -
Marking Segments:
To help with symmetry, you can also lightly draw horizontal and vertical lines through the center, dividing the canvas into pie-like segments.
Paint Consistency Pro-Tip
For perfectly round dots, your paint should be the consistency of heavy cream. If it stands in stiff peaks, thin it with a drop of pouring medium or water.
Step 2: The Center Focal Point
-
Central Dot:
Mix a soft sage green. Using your largest dotting tool, place a single large dot directly on the center mark. -
First Ring:
Switch to a medium tool and white paint. Place small white dots closely around the central sage dot, keeping them evenly spaced. -
Second Ring:
Using a terra cotta or deep orange shade and a slightly larger tool, create a ring of dots around the white ones. Try to place these dots in the gaps between the previous ring’s dots (brick-laying pattern). -
Adding Details:
Once the terra cotta dots are dry, use a very fine tool or toothpick to place a tiny white dot in the center of each terra cotta dot. This top-dot technique adds instant depth. -
Third Ring Border:
Create a solid ring using a sage green or light grey mix. Instead of individual dots, paint a thin, continuous circular line that encases the center design.
Step 3: Building the Mandala
-
Inner White Ring:
Just outside your painted green line, place a ring of medium-sized white dots. Space them slightly apart. -
Walking the Dots:
For the next layer, place a large white dot between the previous ones. Then, using smaller and smaller tools, ‘walk’ tiny white dots down the sides of the larger dot to create a lace-like effect. -
Large Terra Cotta Ring:
Using your largest tool and burnt sienna paint, create a ring of bold, prominent dots further out. These act as anchors for the outer design. -
Filling the Gaps:
In the spaces between the large sienna dots, place smaller peach-colored dots closer to the center, creating a transition zone. -
Gradient Effect:
I like to mix a little white into my burnt sienna to create a lighter shade. Use this mix to add a ring of medium dots just outside the dark sienna ring.
Fixing Wonky Dots
If a dot isn’t perfectly round or smears, don’t wipe it! Let it dry completely, then paint over it with your background color before re-dotting.
Step 4: Outer Details and Finishing
-
Textured Outer Circles:
For the largest outer circles (alternating peach and brown), dip a large tool in paint and impress it firmly. While wet, use a pin to swirl or stipple the paint inside the dot for a textured look. -
Tiny Accents:
Use your smallest tool (or a needle) to place tiny grey or sage ‘floating dots’ in the negative spaces between the larger outer circles. -
Top Dots:
Go back over your largest dried dots (the peach and sienna ones) and add smaller, lighter-colored dots on top. Repeat with an even smaller white dot on top of that once dry for a 3D effect. -
Erase Guidelines:
Allow the painting to dry for at least 24 hours. Once fully cured, gently erase any visible pencil lines with a soft white eraser. -
Sealing:
Protect your work with a coat of spray varnish (matte or gloss depending on preference) to prevent the dots from being scratched.
Enjoy the meditative process of watching your pattern grow outward, dot by dot
Abstract Swirls With Two-Color Blending
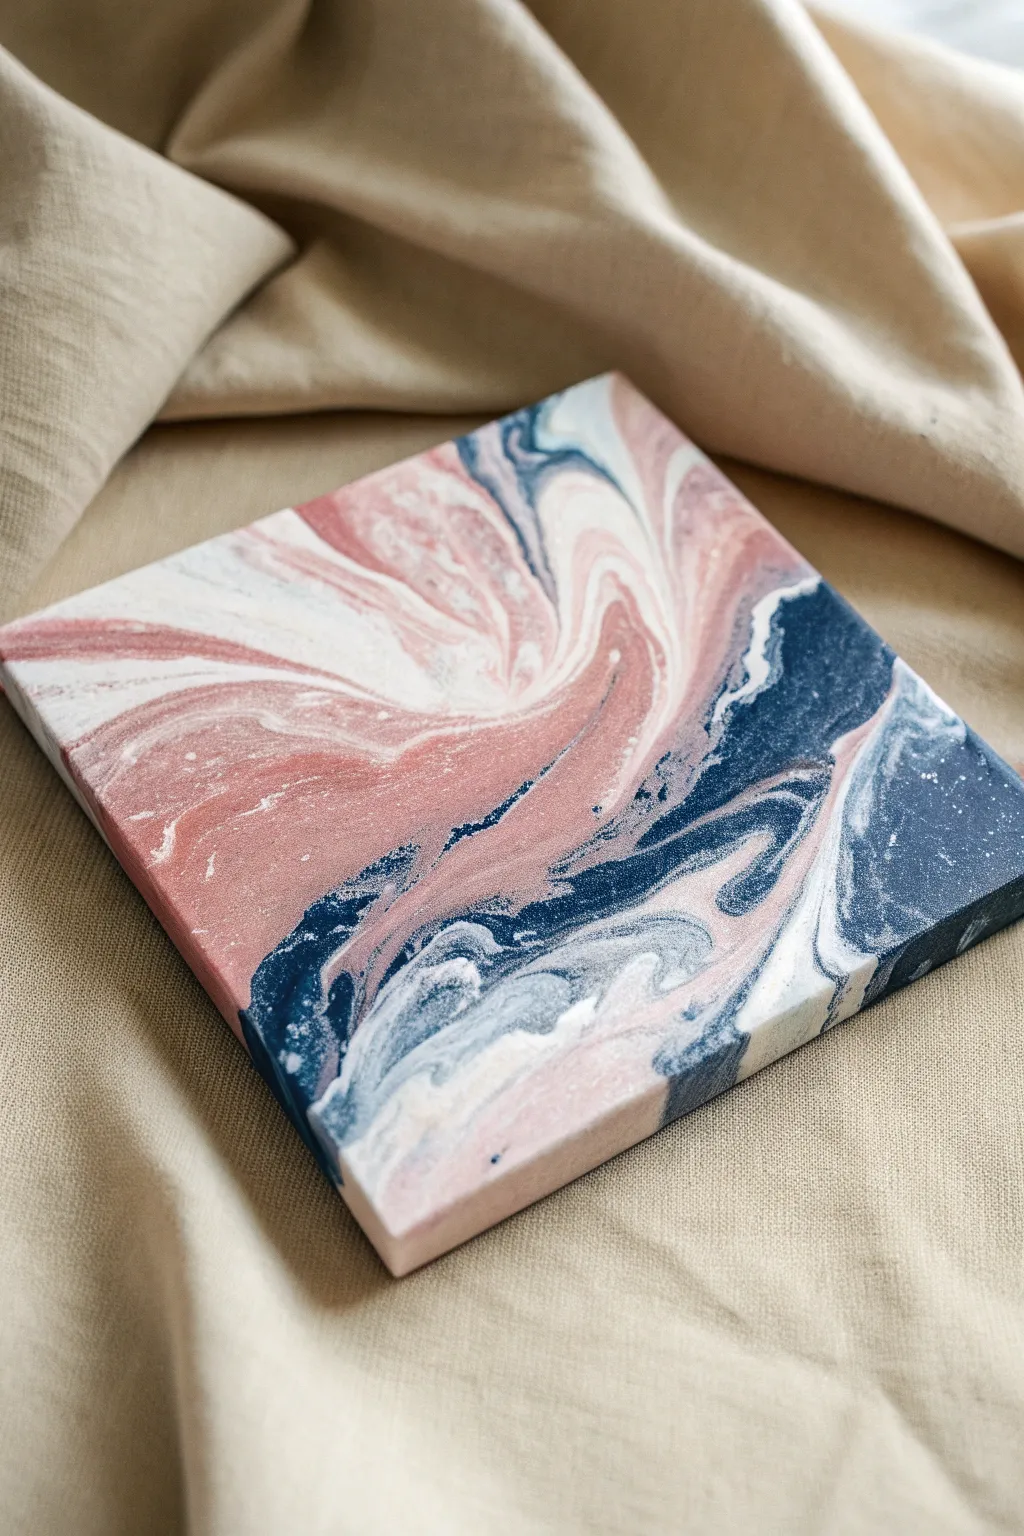
Achieve the look of polished agate with this mesmerizing fluid art project that blends dusty pink, deep navy, and crisp white. This technique uses acrylic pouring to create organic swirls and cells, resulting in a sophisticated, marble-like finish on a small canvas.
Detailed Instructions
Materials
- Small square canvas (e.g., 6×6 or 8×8 inch)
- Acrylic paints (Dusty pink/mauve, Navy blue, Titanium white)
- Pouring medium (e.g., Liquitex or Floetrol)
- Plastic cups (one for each color, plus one for the dirty pour)
- Craft sticks for stirring
- Water (optional, for thinning)
- Drop cloth or plastic sheet
- Gloves
- Push pins (4 large ones for elevating the canvas)
Step 1: Preparation
-
Set the Stage:
Protect your workspace thoroughly with a drop cloth or plastic sheet, as fluid art can get messy. Ensure your surface is perfectly level so the paint doesn’t slide off prematurely. -
Prep the Canvas:
Insert four large push pins into the back corners of your canvas frame. This elevates the canvas off the table, allowing the paint to drip freely over the edges without sticking to your work surface. -
Mix the Paints:
In separate plastic cups, mix each paint color with your chosen pouring medium. A standard ratio is usually 1 part paint to 2 parts medium, but check your product’s label for specifics. -
Check Consistency:
Stir well until smooth. The consistency should resemble warm honey—fluid enough to flow off the stick in a continuous stream, but not watery. Add a few drops of water if the mixture feels too thick.
Step 2: The Pour
-
Layer the Dirty Cup:
Take a clean, empty cup. Start layering your colors one by one. I like to begin with white to create separation between the darker hues. -
Build the Layers:
Pour some navy blue gently into the cup, followed by the dusty pink. Repeat this layering process until the cup is about half to two-thirds full, depending on your canvas size. -
Do Not Mix:
Resist the urge to stir the paint inside this ‘dirty cup.’ You want the distinctive layers to remain intact so they interact on the canvas. -
The Flip Cup Technique:
Place your canvas face-down on top of the cup. firmly holding the cup against the canvas surface, flip the whole assembly over quickly so the cup is now upside down on the canvas. -
Release the Paint:
Wait a moment for the paint to settle, then gently lift the cup straight up. The paint will puddle outward in a mixture of swirls.
Muddy Colors?
If your pink and blue are turning purple/gray, you likely over-tilted or mixed paints too thin. Keep movements slow and stop tilting once covered.
Step 3: Tilting and Finishing
-
Tilt to Cover:
Gently tilt the canvas in a circular motion. Watch as the paint flows toward the corners. The goal is to stretch the paint slowly without losing the beautiful bands of color. -
Guide the Swirls:
Manipulate the flow to create the composition you want. If you see a particularly nice swirl of pink against the navy, tilt the canvas to expand that area. -
Check the Edges:
Ensure the paint runs over the sides of the canvas fully. Use your gloved finger to touch up any bare spots on the corners or sides with the drips on your table. -
Remove Air Bubbles:
Look closely for tiny trapped air bubbles. If you see them, you can pop them lightly with a toothpick or a quick pass of a culinary torch. -
Drying Time:
Place the canvas in a dust-free area to dry. Fluid art takes much longer to dry than standard acrylics—often 24 to 48 hours is needed for the surface to cure completely.
Add Sparkle
For a geode effect, while the paint is still very wet, sprinkle fine glitter into the ‘veins’ where colors meet, or add crushed glass bits for texture.
Once fully cured, this glossy, marble-effect piece will add a modern touch to any small wall space or shelf
Crisp Stripes Using Masking Tape
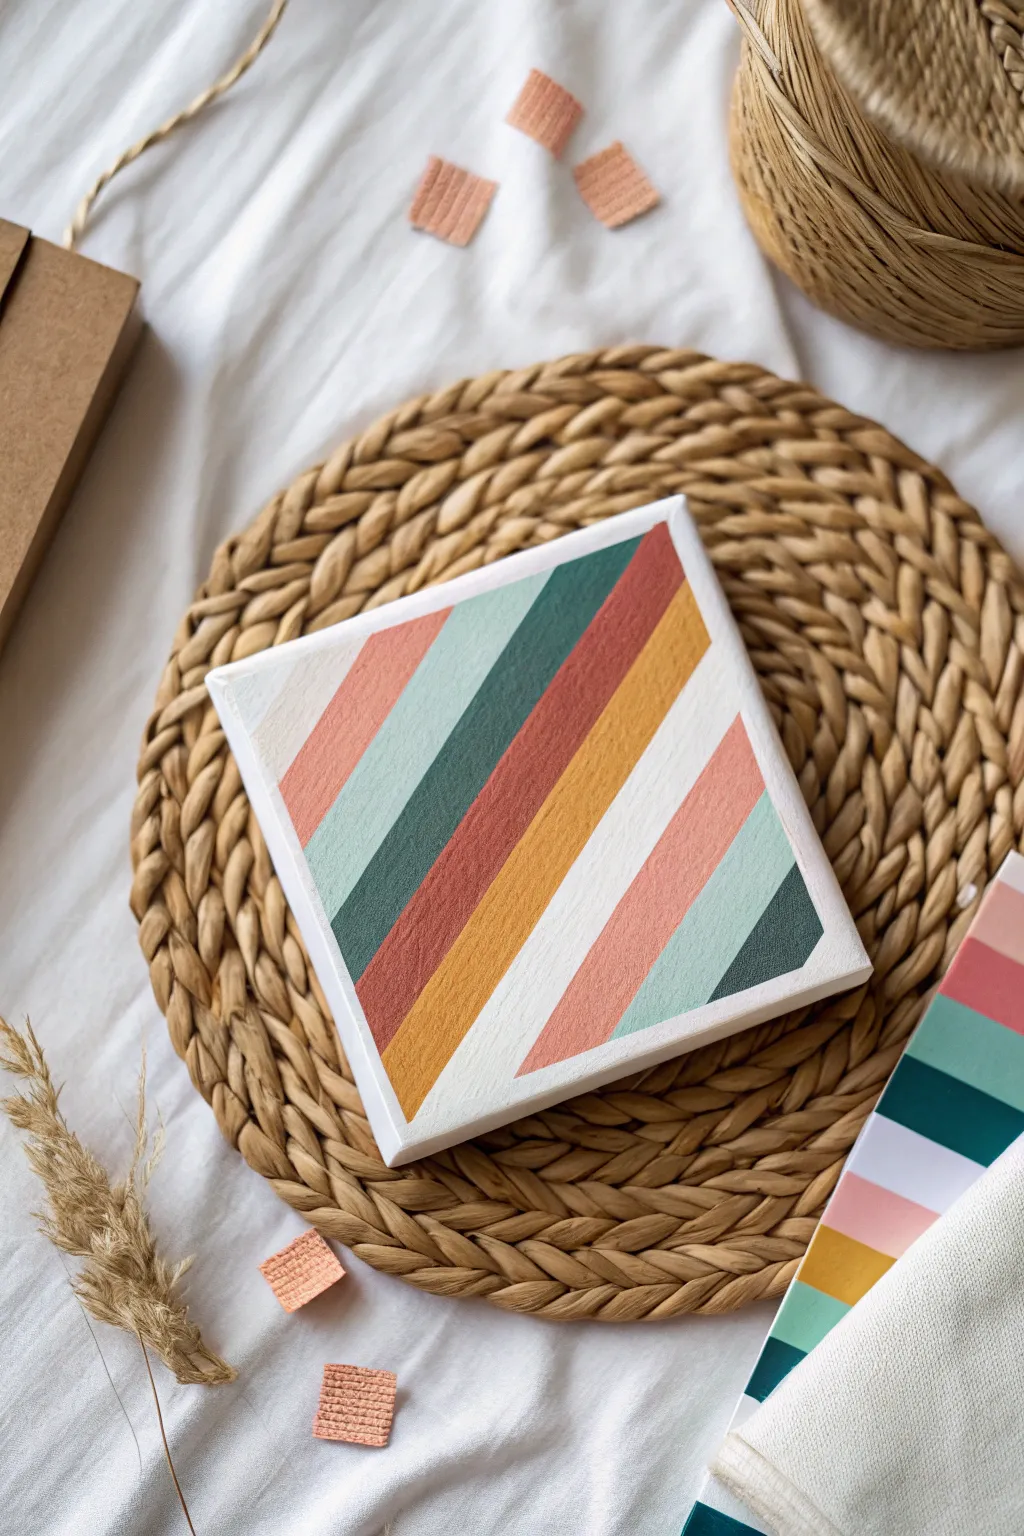
Achieve crisp, gallery-worthy lines with this simple yet striking geometric design. Featuring a warm, earthy color palette of terracotta, sage, and deep greens, this project is perfect for adding a modern bohemian touch to small spaces.
Step-by-Step Tutorial
Materials
- Small square canvas (e.g., 6×6 or 8×8 inches)
- Acrylic paints (White, Terracotta/Peach, Sage Green, Deep Forest Green, Dark Rust/Burnt Sienna, Mustard Yellow)
- Painter’s tape or masking tape (approx. 0.5 to 1 inch width)
- Flat paint brushes (various sizes)
- Palette or paper plate
- Ruler
- Pencil
- Clear matte medium or white paint (optional, for sealing tape)
Step 1: Preparation & Base Coat
-
Prime the Surface:
Even if your canvas is pre-primed, applying a fresh coat of white acrylic paint ensures a smooth, bright foundation. Cover the entire face and edges of the canvas. -
Let it Dry:
Allow the white base coat to dry completely. It must be bone dry before any tape touches it to prevent peeling later. -
Plan Your Pattern:
Visualize the diagonal flow. The design features stripes of varying widths. You can lightly sketch diagonal guide lines with a pencil and ruler if you want precise measurements, or eyeball it for a more organic feel.
Step 2: Taping Strategy
-
Apply the First Tape Strips:
Place strips of painter’s tape diagonally across the canvas. Remember, the areas *under* the tape will remain white (or serve as boundaries between colors). -
Wrap the Edges:
Ensure the tape extends over the sides of the canvas and wrap it around to the back. This creates a professional ‘gallery wrap’ look where the pattern continues seamlessly over the edges. -
Seal the Edges:
Press down firmly along the edges of the tape with your fingernail or a credit card to eliminate air bubbles. -
The Anti-Bleed Hack:
I like to elevate my lines by painting a thin layer of the *base color* (white) or a clear matte medium over the edge of the tape. This seals the gap so any paint that bleeds underneath matches the background.
Clean Line Secret
Use a clear matte medium to seal the tape edges before painting colors. It dries invisible and blocks colored paint from creeping underneath.
Step 3: Painting the Stripes
-
Mix Your Palette:
Prepare your colors: terracotta, sage, deep forest green, dark rust, and mustard yellow. If your paints are too bright, mix in a tiny dot of brown or black to mute them into earthy tones. -
Paint Section A:
Start with the top left corner section. Apply a coat of light peach or terracotta, brushing away from the tape edge to minimize paint forcing its way underneath. -
Paint Section B:
Move to the next exposed stripe area. Fill this with your sage green or muted teal. Use a flat brush that fits the width of the stripe comfortably. -
Paint Section C:
Apply the deep forest green to the adjacent stripe. Ensure full coverage, especially if the canvas has a heavy texture. -
Continue the Gradient:
Fill the remaining sections with dark rust, mustard yellow, and finishing with the lighter pink/peach tone near the bottom right corner. -
Double Check Edges:
Inspect the sides of the canvas. Make sure you have painted the corresponding colors down the edges to match the face. -
Wait for Touch-Dry:
Let the paint dry until it creates a skin but isn’t fully cured. This usually takes about 10-15 minutes depending on paint thickness.
Texture Twist
Mix a little baking soda or modeling paste into your acrylics for a tactile, plaster-like finish that adds depth to the simple stripes.
Step 4: The Reveal
-
Remove Tape Carefully:
Slowly peel the tape away at a sharp 45-degree angle. Pulling while the paint is still slightly tacky helps prevent the dry paint film from cracking or lifting. -
Touch Ups:
If any paint bled through, don’t panic. Use a very small detail brush and some white paint to tidy up the lines once everything is fully dry. -
Final Varnish:
Once the entire piece is cured (usually 24 hours), apply a satin or matte varnish to protect the colors and give the sheen a uniform finish.
Hang your new geometric mini-masterpiece on the wall or display it on a shelf for a pop of modern color
Mini Canvas Triptych From Day to Night
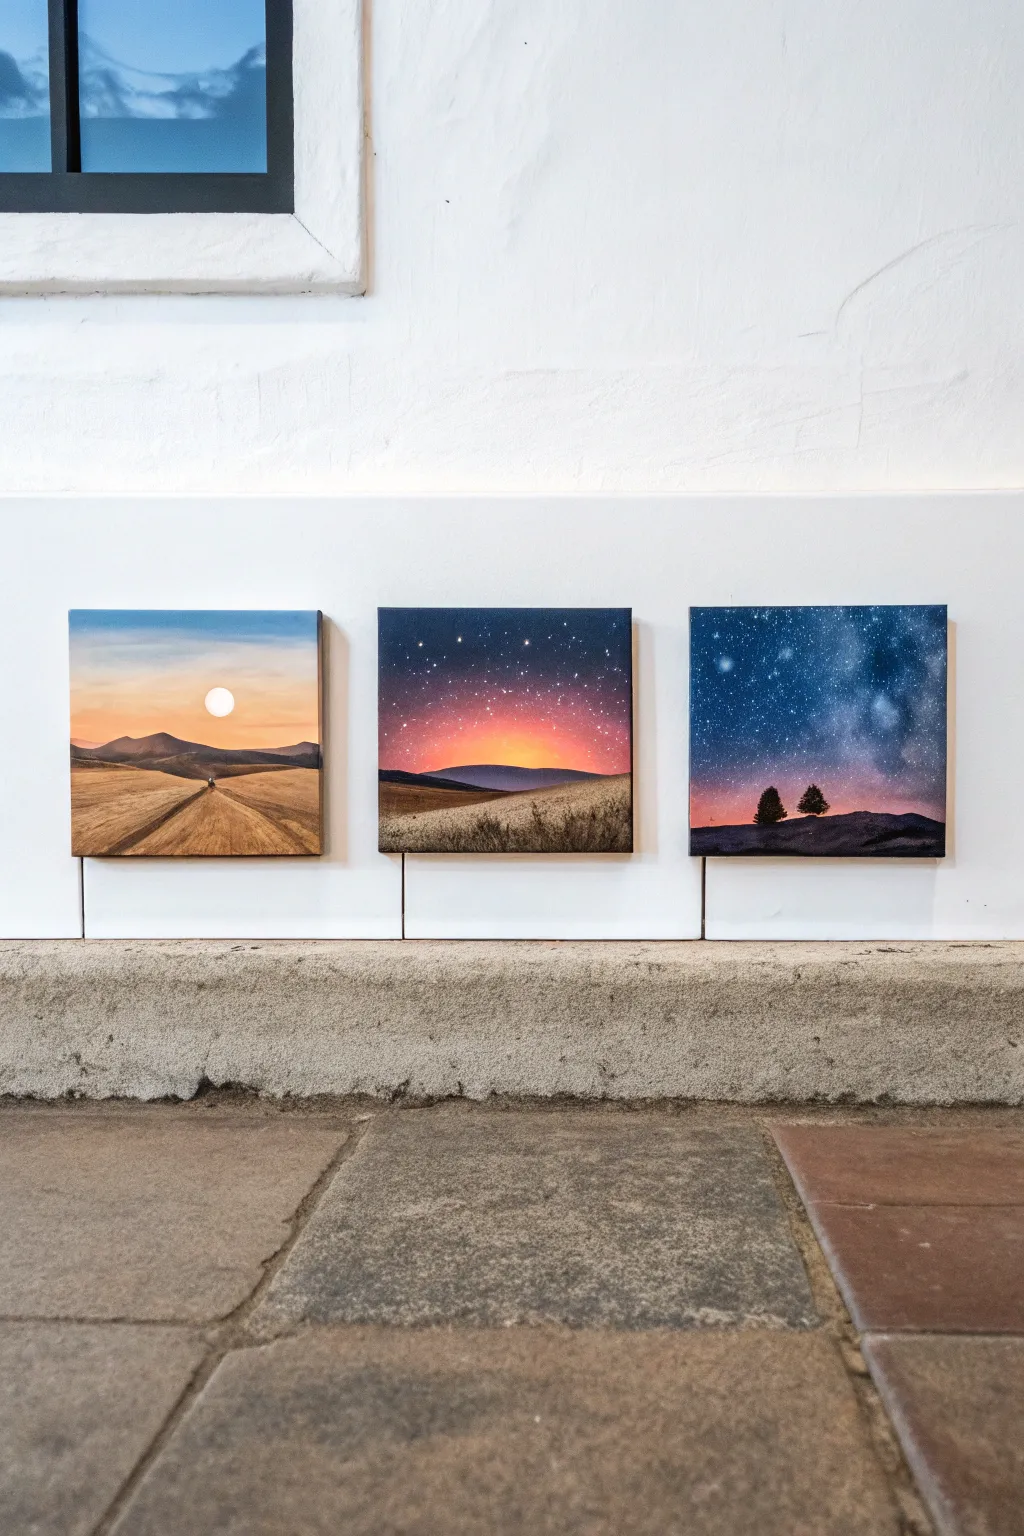
Capture the passing of time with this stunning three-part series on mini canvases. You will paint a continuous landscape that transitions from a golden sunset road to a vibrant twilight, ending in a deep starry night.
Step-by-Step Guide
Materials
- 3 mini square canvases (approx. 4×4 or 6×6 inches)
- Acrylic paints (Titanium White, Mars Black, Burnt Sienna, Yellow Ochre, Cadmium Orange, Alizarin Crimson, Ultramarine Blue, Phthalo Blue)
- Set of synthetic brushes (flat shader, small angled brush, fine liner)
- Palette for mixing
- Cup of water and paper towels
- Old toothbrush (for stars)
- Pencil for sketching
- Low-tack masking tape (optional)
Step 1: Preparation & Sketching
-
Align the canvases:
Place your three canvases side-by-side on your workspace in a horizontal row, leaving a tiny gap between them to simulate how they will hang. -
Establish the horizon line:
Using a pencil, lightly draw a continuous horizon line across all three canvases. Aim for the lower third of the canvas to leave plenty of room for the sky. -
Sketch the terrain:
Sketch rolling hills in the background. On the first canvas (left), draw a road vanishing into the distance. On the second (middle), draw gentle fields. On the third (right), outline two small silhouetted trees.
Uneven Gradients?
If your sky transitions look choppy, the paint is drying too fast. Use a retarder medium or keep your brush slightly damp to blend colors longer.
Step 2: Canvas 1: Golden Hour Road
-
Paint the sky gradient:
Start with a light blue mixed with white at the very top. Blend downwards into a soft peach, and finally a warm yellow near the horizon line while the paint is still wet for a smooth transition. -
Add the sun:
Using pure Titanium White, paint a small, crisp circle resting just above the distant mountains. -
Block in the hills:
Mix Burnt Sienna with a touch of blue to create a muted brown for the distant mountains. Fill in the shapes below the horizon line. -
Create the fields:
Use Yellow Ochre mixed with white to paint the grassy fields. Use horizontal brushstrokes to suggest flatness. -
Detail the road:
Paint the road using a darker mix of Burnt Sienna. I find that starting broad at the bottom and tapering to a fine point at the horizon adds instant depth.
Add Metallic Pop
Once fully dry, glaze a tiny bit of metallic gold over the sun in the first panel or silver over the Milky Way in the third for a magical shimmer.
Step 3: Canvas 2: Vibrant Twilight
-
Create a deep sky:
Start the top of this canvas with a mix of Ultramarine Blue and a tiny bit of black. As you move down, blend in Alizarin Crimson to create a rich purple mid-tone. -
Paint the sunset glow:
At the horizon line, blend a vibrant Cadmium Orange into the purple above. You want a strong ‘fire’ effect where the sun has just dipped below the hills. -
Add first stars:
Once the sky is dry, use a fine liner brush to dot a few tiny white stars in the upper blue section. Keep them sparse. -
Darken the landscape:
Paint the rolling hills in the foreground. Use a darker brown than the first canvas, perhaps mixing in some purple, to show that light is fading. -
Texture the grass:
Use an old, dry brush with some lighter tan paint to dab gently on the foreground, simulating dry textured grass caught in the last light.
Step 4: Canvas 3: Starry Night
-
Paint the galaxy sky:
Cover the sky area with a mix of Phthalo Blue, Ultramarine, and Black. While wet, dab in some pure blue and purple clouds to create a nebula effect. -
Create the Milky Way:
Take a dry brush with a tiny amount of white paint and softly scumble a diagonal hazy line through the dark sky. It should be barely visible and smoky. -
Splatter the stars:
Dilute some white paint with water until it’s inky. Dip an old toothbrush in it and flick the bristles with your thumb to spray tiny stars across the sky. -
Paint the silhouettes:
Mix a solid black. Paint the foreground ground completely dark. -
Add the trees:
Using your smallest detail brush and the black paint, carefully fill in the two small trees. Use a dabbing motion for the leaves to give them a natural, bushy texture.
Now hang these up in order and enjoy your own personal window into a perfect evening transformation

Have a question or want to share your own experience? I'd love to hear from you in the comments below!