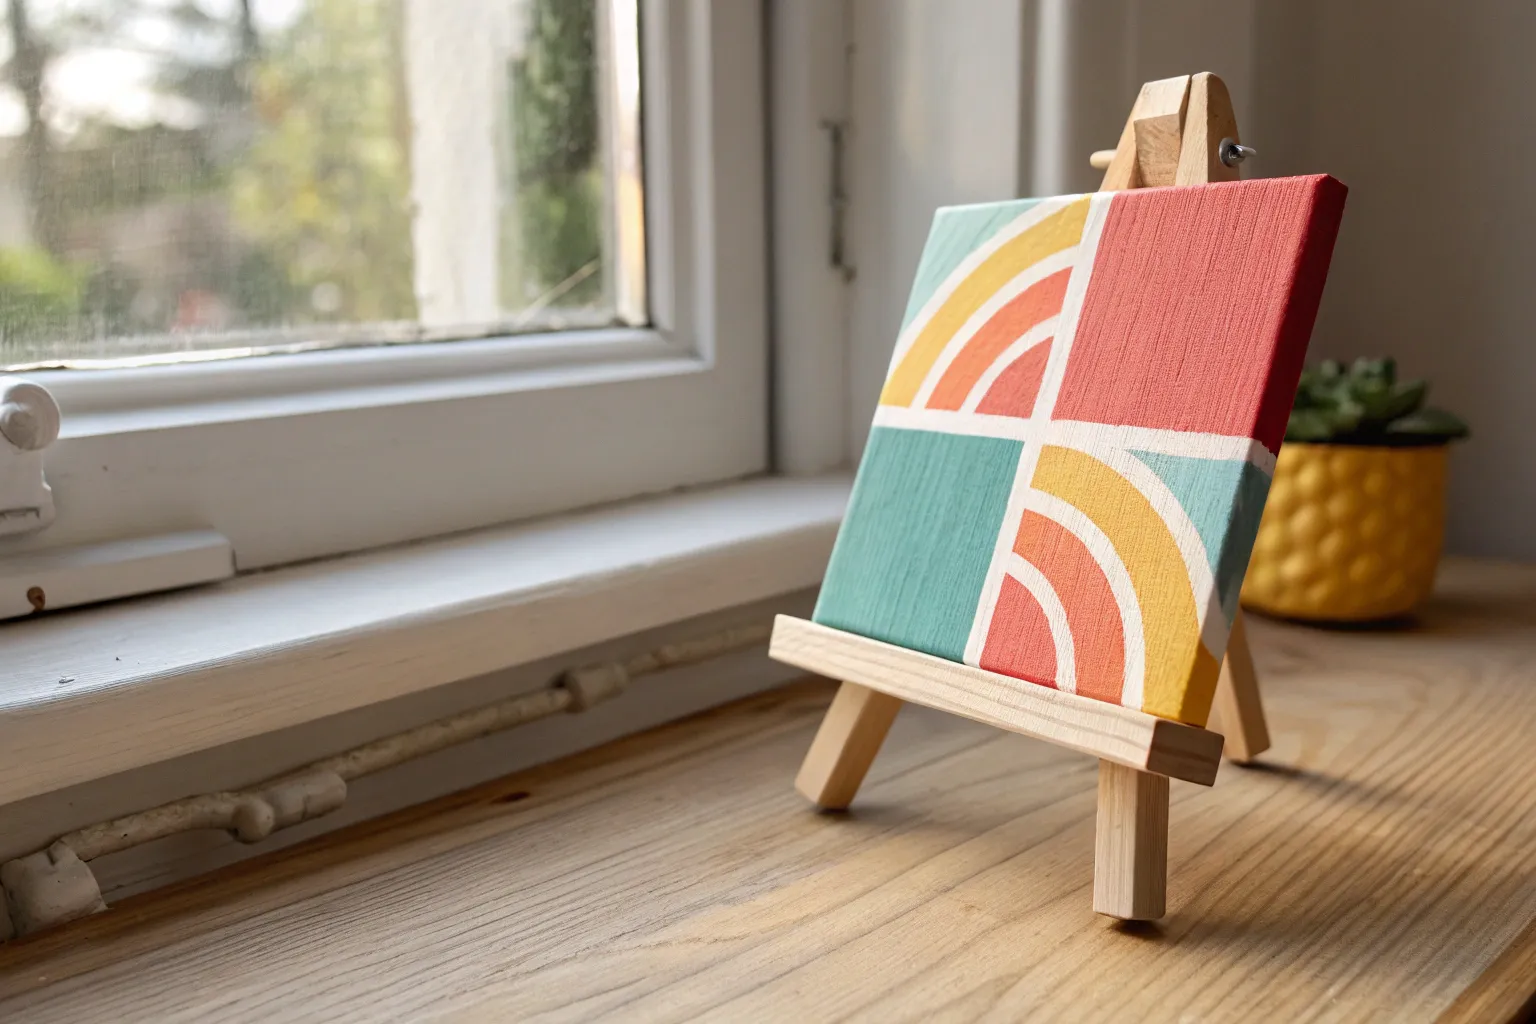
Whenever I’m craving a quick win in the studio, I reach for a mini canvas and paint something bold, simple, and satisfying. These small painting ideas are all about strong shapes, clean compositions, and just enough detail to make them feel finished without feeling fussy.
Sunset Gradient Sky
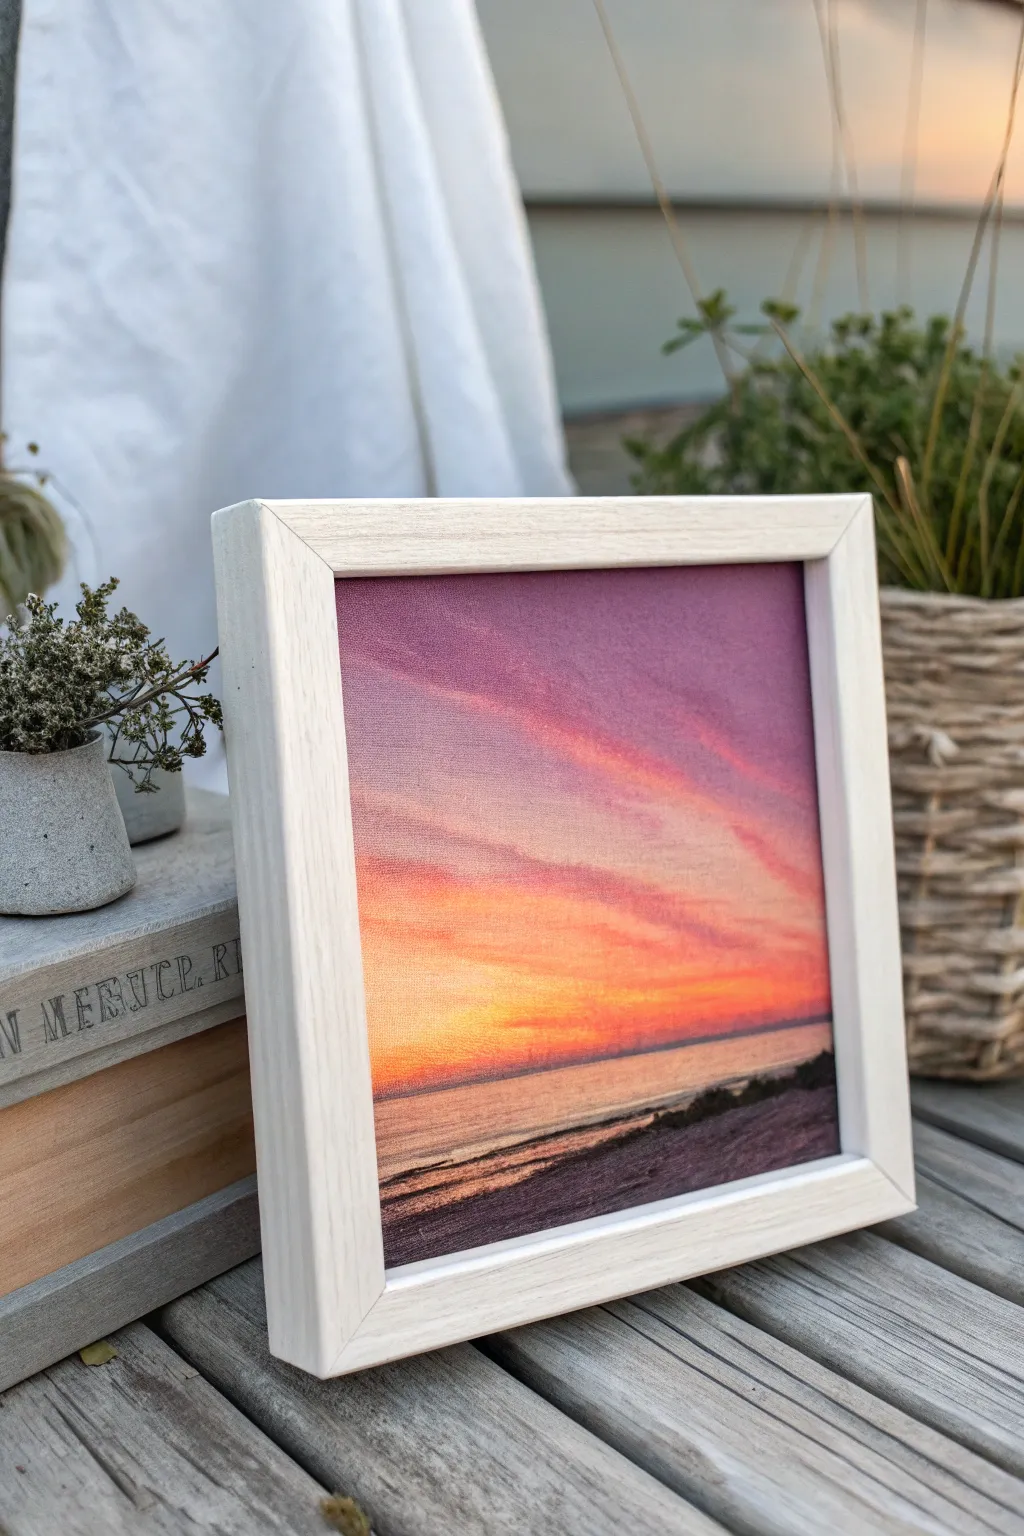
Capture the fleeting beauty of twilight with this stunning gradient sky painting. By blending rich indigos into warm oranges, you’ll create a glowing backdrop for a simple, tranquil seascape that fits perfectly in a small frame.
Step-by-Step Guide
Materials
- Small square canvas or canvas board (approx. 6×6 inches)
- Acrylic paints: Dioxazine Purple, Quinacridone Magenta, Cadmium Orange, Cadmium Yellow Light, Titanium White, Burnt Umber
- Flat shader brushes (medium and small sizes)
- Soft round brush or filbert brush for clouds
- Palette knife or mixing plate
- Cup of water and paper towels
- White wooden frame (optional)
Step 1: Creating the Sky Gradient
-
Prime the sky:
Begin by painting the top third of your canvas with a solid coat of Dioxazine Purple. Keep the paint relatively wet to help with blending later. -
Mix the transition color:
On your palette, mix a beautiful deep violet by combining Dioxazine Purple with a little Quinacridone Magenta. Apply this right below your purple band. -
Blend the upper sky:
Using a clean, slightly damp flat brush, gently stroke back and forth horizontally where the purple and violet meet. Use long, smooth strokes to create a seamless fade. -
Add the warm mid-tones:
Paint a horizontal strip of pure Quinacridone Magenta below the violet section. Rinse your brush, then add a strip of Cadmium Orange directly below that. -
Create the horizon glow:
Mix Cadmium Yellow Light with a tiny touch of Titanium White to make it opaque and bright. Paint this band at the very bottom of the sky area, just above where your water line will be. -
Complete the gradient:
Clean your brush thoroughly. Starting from the yellow strip, blend upward into the orange, and then blend the orange upward into the magenta. I find that working light-to-dark here keeps the yellow pure. -
Enhance the clouds:
While the sky is still slightly tacky, mix a soft lavender-pink using White, Magenta, and a speck of Purple. Use a filbert brush to gently streak in diagonal cloud formations across the upper purple/pink sections. -
Soften the clouds:
Wipe your brush off and barely touch the edges of your cloud streaks to soften them, making them look wispy and wind-swept.
Seamless Blending Trick
Keep a spray bottle of water nearby. A very fine mist over the canvas keeps acrylics wet longer, allowing you more time to work those perfect gradient transitions.
Step 2: Painting the Sea and Foreground
-
Establish the horizon line:
Mix a muted purple-grey for the distant water. Use a ruler or painter’s tape if needed to ensure a perfectly straight horizon line across the canvas. -
Paint the water base:
Fill the water area with horizontal strokes. Near the horizon, use the purple-grey mix; as you move closer to the bottom, mix in some orange and pink reflections to mirror the sky. -
Add water highlights:
Use a small detail brush with your pale yellow mix to paint thin, broken horizontal lines on the water surface, concentrating these highlights in the center where the sun’s reflection would be. -
Darken the shoreline:
Mix Burnt Umber with Dioxazine Purple to create a very dark, near-black shade. Paint the bottom-right corner area to form the sandy beach or shoreline. -
Texture the sand:
Dab your brush slightly to give the ‘sand’ some texture rather than painting it perfectly smooth. Let the top edge of this dark area be irregular. -
Create the wet sand reflection:
Right where the dark sand meets the water, glaze a thin layer of the dark purple mix horizontally to suggest wet sand reflecting the dark ground. -
Final adjustments:
Check your transitions. If the horizon line feels too sharp, you can glaze a very thin wash of the atmospheric colors over it once dry to push it back into the distance.
Muddy Colors?
If your orange and purple mix creates brown mud, let the purple layer dry completely before painting orange near it. Only blend neighbors on the color wheel while wet.
Once dry, pop your miniature masterpiece into a simple white frame to really make those sunset colors sing


Moon and Dreamy Clouds
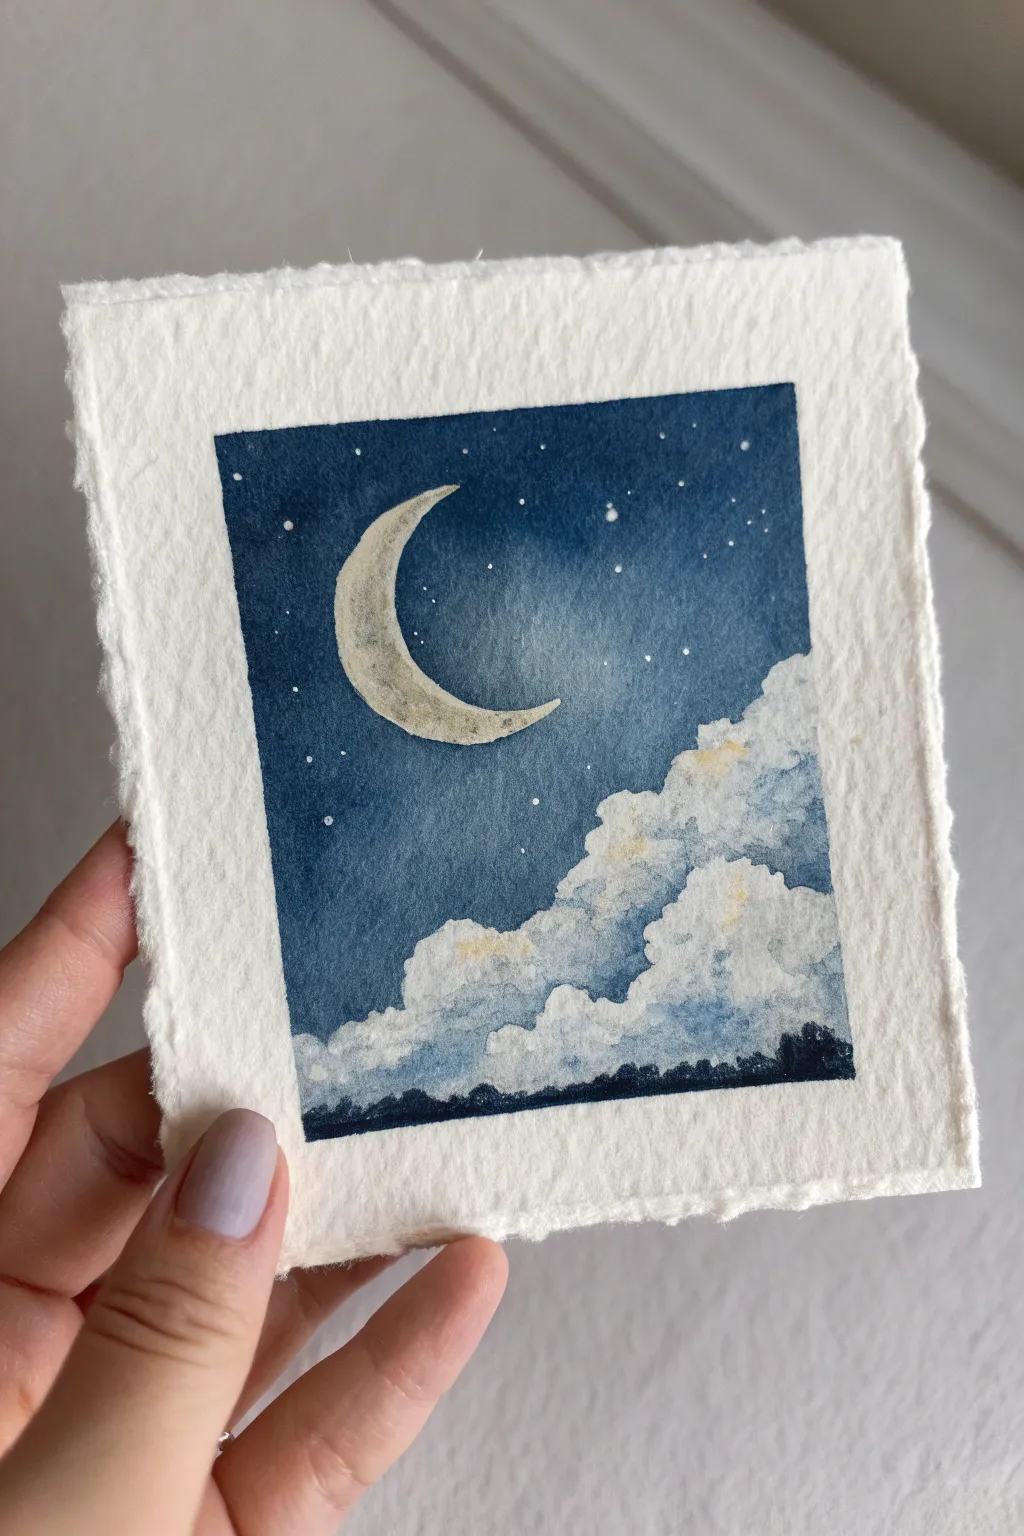
Capture the serenity of a moonlit night in this delicate miniature painting. Using wet-on-wet techniques and careful lifting, you’ll create a glowing crescent moon resting above soft, billowing clouds on textured paper.
Detailed Instructions
Materials
- Small sheet of cold press watercolor paper (approx. 4×4 inches)
- Masking tape
- Watercolor paints: Indigo, Payne’s Gray, Yellow Ochre, Ultramarine Blue
- White gouache or white gel pen
- Round brushes (size 2 and size 6)
- Masking fluid (optional)
- Clean water jars
- Paper towels
Step 1: Preparation and Sketching
-
Prepare your paper:
Tear your large watercolor sheet down to size by hand rather than cutting it. This creates the charming, soft deckled edges seen in the example. -
Tape the borders:
Place masking tape on all four sides of the paper to create a crisp white border. Press the edges of the tape down firmly to prevent paint from bleeding underneath. -
Sketch the moon:
Lightly sketch a crescent moon shape in the upper left quadrant using a hard pencil (like 2H) so the lines remain faint. -
Mask the moon (optional):
Apply a thin layer of masking fluid over the moon shape if you want to paint freely without worrying about preserving the white paper. Allow it to dry completely.
Step 2: Painting the Night Sky
-
Wet the sky area:
Using your larger clean brush, apply clear water to the sky area, stopping just above where you want your clouds to begin. Avoid the moon shape if you didn’t use masking fluid. -
Apply the first wash:
Drop in a wash of diluted Indigo or Ultramarine Blue while the paper is wet. Let the color flow, keeping it lighter near the moon to suggest a glow. -
Deepen the night:
While the paper is still damp, charge in a darker concentrated mix of Indigo and Payne’s Gray at the top corners and edges to create depth. -
Create a gradient:
Use a clean, slightly damp brush to blend the blue downwards, fading it out as it approaches the cloud line. This soft edge will help blend the clouds later. -
Dry the layer:
Allow this sky layer to dry completely before moving on. The paper should be flat and cool to the touch.
Pro Tip: Glowing Moon
To make the moon really shine, gently lift a little color from the dark sky directly around the moon’s edge using a damp brush. This creates a halo effect.
Step 3: Creating the Clouds
-
Paint the cloud shadows:
Mix a very watery grey-blue using Ultramarine and a touch of Payne’s Gray. Paint the bottom shadowed areas of the clouds first. -
Soften the edges:
Immediately rinse your brush and use clean water to soften the upper edges of those grey shapes, pulling them upward into puffy, rounded forms. -
Add warmth:
While the cloud area is still wet, drop tiny hints of very diluted Yellow Ochre into the tops of the clouds to represent reflected moonlight. This warmth contrasts beautifully with the blue sky. -
Layering the clouds:
Build up the cloud volume by adding slightly darker blue-grey glazes to the bottom/middle sections once the first layer is just starting to dry. -
Define the horizon:
Mix a thick, dark concentration of Indigo and Payne’s Gray (almost black). Paint a jagged, uneven treeline along the very bottom of the clouds to ground the composition.
Level Up: Metallic Magic
Swap the yellow ochre on the moon or the final stars for metallic gold watercolor paint. It adds a magical shimmer that catches the light.
Step 4: The Moon and Stars
-
Reveal the moon:
If you used masking fluid, gently rub it away now. If you painted around it, ensure the area is clean. -
Texture the moon:
Paint the moon with a very pale wash of Yellow Ochre. While wet, drop in tiny specs of light grey to create craters and texture. -
Add the stars:
Using white gouache or a white gel pen, dot random stars into the dark blue sky. Vary the sizes, making a few slightly larger to act as ‘focus’ stars. -
Splatter stars:
For a more natural galaxy look, load a toothbrush or stiff brush with white gouache and flick tiny droplets over the sky area. Cover the moon with a scrap of paper first to keep it clean. -
Peel the tape:
Once the painting is bone dry, slowly peel the masking tape away at a 45-degree angle to reveal your crisp, clean borders.
Frame this tiny masterpiece or give it as a soulful handmade card


Ocean Horizon Mini Seascape
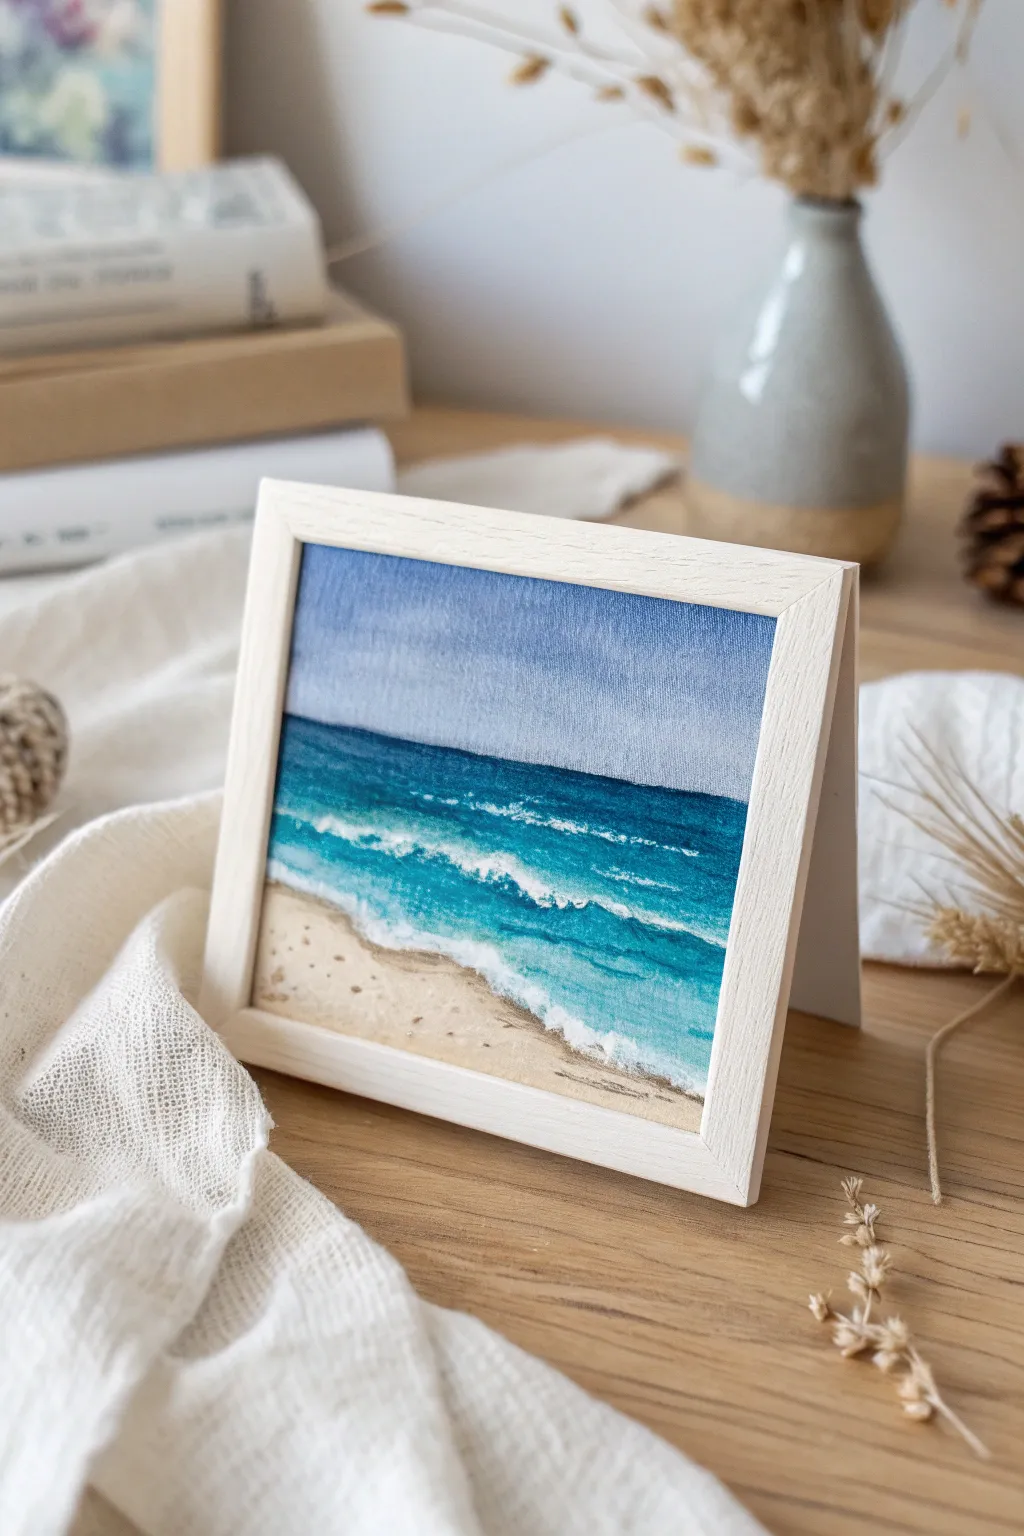
Capture the serene beauty of gentle waves meeting the sand in this miniature format. This petite seascape balances vibrant turquoise waters with a soft, faded horizon to create a calming window to the ocean.
Step-by-Step Guide
Materials
- Small canvas panel or watercolor paper (approx. 4×4 or 4×6 inches)
- Light wood picture frame (open back or without glass)
- Acrylic paints: Titanium White, Ultramarine Blue, Phthalo Turquoise, Burnt Umber, Yellow Ochre
- Flat shader brush (size 6)
- Small round detail brush (size 0 or 1)
- Palette knife (optional for texture)
- Mixing palette
- Water cup and paper towels
Step 1: Setting the scene
-
Define the horizon:
Begin by lightly sketching a horizontal line about two-thirds of the way up your canvas. This will separate your sky from the ocean. -
Mix the sky color:
On your palette, mix a large amount of Titanium White with a very small touch of Ultramarine Blue and a speck of Phthalo Turquoise. Aim for a pale, airy blue. -
Paint the sky:
Use your flat brush to apply the sky color from the top edge down to the horizon line. Paint in horizontal strokes, adding a bit more white as you get closer to the horizon to create atmospheric perspective. -
Deep ocean base:
Mix Phthalo Turquoise with a little Ultramarine Blue for the deepest ocean color. Paint a distinct, straight strip right below the horizon line. The horizon edge should be sharp against the paler sky.
Straight Horizon Hack
Use a strip of masking tape across the canvas to mark your horizon line. Paint the sky, let it dry, then peel the tape for a perfectly crisp edge.
Step 2: Creating the waves
-
Transition to teal:
Add a little Titanium White to your deep blue mix to create a vibrant teal. Paint the middle section of the water, blending it slightly into the darker blue ‘deep water’ line above it while the paint is still tacky. -
Light turquoise shallows:
Mix more white into your teal to create a bright turquoise. Apply this to the lower third of the water area, keeping your brushstrokes horizontal and slightly choppy to suggest movement. -
Sand base color:
Clean your brush thoroughly. Mix Titanium White with a small amount of Yellow Ochre and a tiny dot of Burnt Umber. Paint the bottom section of the canvas for the sandy beach. -
Wet sand effect:
Where the sand meets the water, mix a slightly darker version of your sand color (add a tiny bit more Burnt Umber). Apply a thin, uneven line here to mimic wet sand soaking up the water.
Make it Sparkle
Mix a tiny pinch of iridescent medium or fine glitter into your white paint for the wave crests. It adds a subtle shimmer that catches the light.
Step 3: Adding texture and details
-
Drafting wave crests:
Load your small round brush or the edge of a clean flat brush with pure Titanium White. Gently dab horizontal lines where the different blue zones meet to suggest breaking waves. -
Building foam texture:
I prefer to use a slightly drier brush here. Stipple thick white paint along the shoreline where the water meets the sand. -
Foam trails:
Drag small amounts of the white foam color backwards into the turquoise water to show the foam retreating or churning. -
Sea spray highlights:
Add tiny dots and dashes of pure white on the crests of the darker waves further out to sea for extra sparkle. -
Sand texture:
Mix a diluted, watery brown using Burnt Umber. Load an old toothbrush or stiff brush and flick tiny specks onto the sand area to create the look of pebbles and grain. -
Final framing:
Allow the painting to dry intimately before placing it into the light wood frame. No glass is needed, as the texture is part of the charm.
Place this little piece on a desk or shelf for a permanent view of the shore


Single Bloom Close-Up
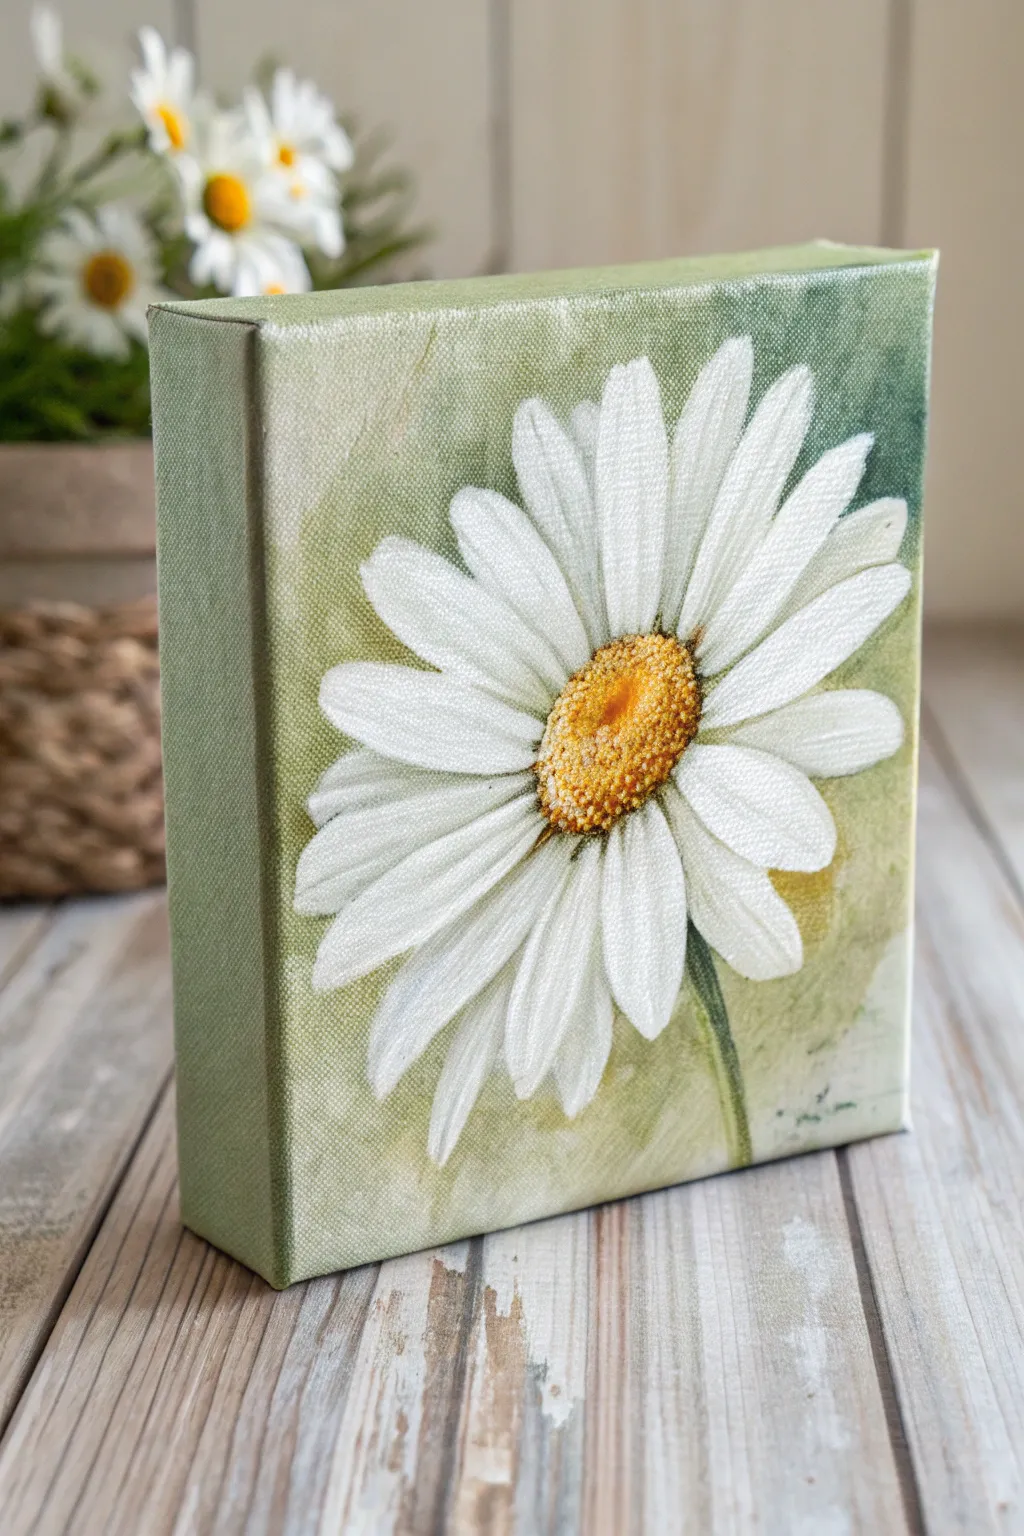
Capture the delicate simplicity of a single white daisy with this charming, close-up study on a small canvas. The soft green background and focused composition make this an ideal project for practicing petal layering and texture without getting overwhelmed by a complex scene.
How-To Guide
Materials
- Small square canvas (e.g., 6×6 inch)
- Acrylic paints: Titanium White, Sap Green, Yellow Ochre, Cadmium Yellow, Burnt Umber or Raw Sienna
- Brush set: Flat brush (medium), round brush (small), and a fine liner brush
- Palette
- Cup of water and paper towels
- Pencil for sketching
Step 1: Preparing the Background
-
Mix the Base Tone:
Start by mixing a soft, muted green. Combine Sap Green with a generous amount of Titanium White and a tiny touch of Yellow Ochre to warm it up. You want a natural, leafy hue rather than a bright artificial green. -
Apply the First Wash:
Use your flat brush to cover the entire canvas with this pale green mixture. Use criss-cross strokes to create a slightly uneven, textured look rather than a flat wall of color. -
Deepen the Corners:
While the paint is still slightly wet, mix a slightly darker version of your green by adding less white. Gently blend this into the corners and edges of the canvas to create a subtle vignette effect, drawing the eye toward the center. -
Don’t Forget the Edges:
Carry your green paint over the sides of the canvas. This gallery-wrap style gives the finished piece a professional look without needing a frame.
Muddy Petals?
If your white petals are turning green, your background wasn’t fully dry. Stop, let it dry completely, then apply another layer of white to cover the streaks.
Step 2: Drafting the Flower
-
Dry and Sketch:
Ensure the background is completely dry to the touch. Lightly sketch the center oval of the daisy, placing it just slightly off-center for a dynamic composition. -
Map the Petals:
Draw faint lines radiating outward from the center to guide your petal placement. Don’t worry about perfect symmetry; natural flowers have variations.
Pro Tip: Stroke Direction
Always pull your brush strokes toward the flower’s center. This naturally creates the taper needed for petals and deposits the most texture at the outer tips.
Step 3: Painting the Daisy
-
Block in the Center:
Mix Cadmium Yellow with a spot of Yellow Ochre. Fill in the center oval shapes using a small round brush. Stipple the paint (tap the brush tip up and down) to create a fuzzy, pollen-like texture. -
First Layer of Petals:
Load a round brush with pure Titanium White. Paint the first layer of petals, starting from the outside edge and pulling the stroke in toward the yellow center. These petals should be slightly translucent, allowing a hint of the green background to peek through, which acts as a shadow. -
Add Petal Depth:
Mix a tiny amount of grey (white with a pinprick of black or burnt umber) and paint a few petals that appear ‘behind’ the main ones. These darker values create depth and prevent the flower from looking flat. -
Refine the White Petals:
Once the first white layer is tacky, apply a second coat of thick Titanium White to the most prominent petals. Press firmly at the start of the stroke and lift as you near the center to get a tapered shape.
Step 4: Adding Details & Definition
-
Texture the Center:
Go back to the yellow center. Mix Burnt Umber with your yellow to create a golden-brown shade. Use the very tip of your brush to tap small dots along the bottom edge of the center oval, simulating shadow and depth. -
Highlight the Pollen:
Add tiny dots of pure yellow or even white to the top ridge of the center area where the light hits the pollen. -
Define Petal Separation:
Using a very diluted grey or a dirty brush water wash, carefully outline the edges where overlapping petals meet. This separates them visually. -
Paint the Stem:
Mix a darker green using Sap Green and a touch of Burnt Umber. With your liner brush, paint a thin, slightly curved stem extending from beneath the petals down to the bottom edge. -
Final Highlights:
I like to add one last pass of pure white highlights on the tips of the petals that are catching the most light. This makes the flower pop against the soft background.
Allow your painting to dry fully before hanging it up or gifting it to a friend who loves nature
BRUSH GUIDE
The Right Brush for Every Stroke
From clean lines to bold texture — master brush choice, stroke control, and essential techniques.
Explore the Full Guide
Fruit Slice Pop Study
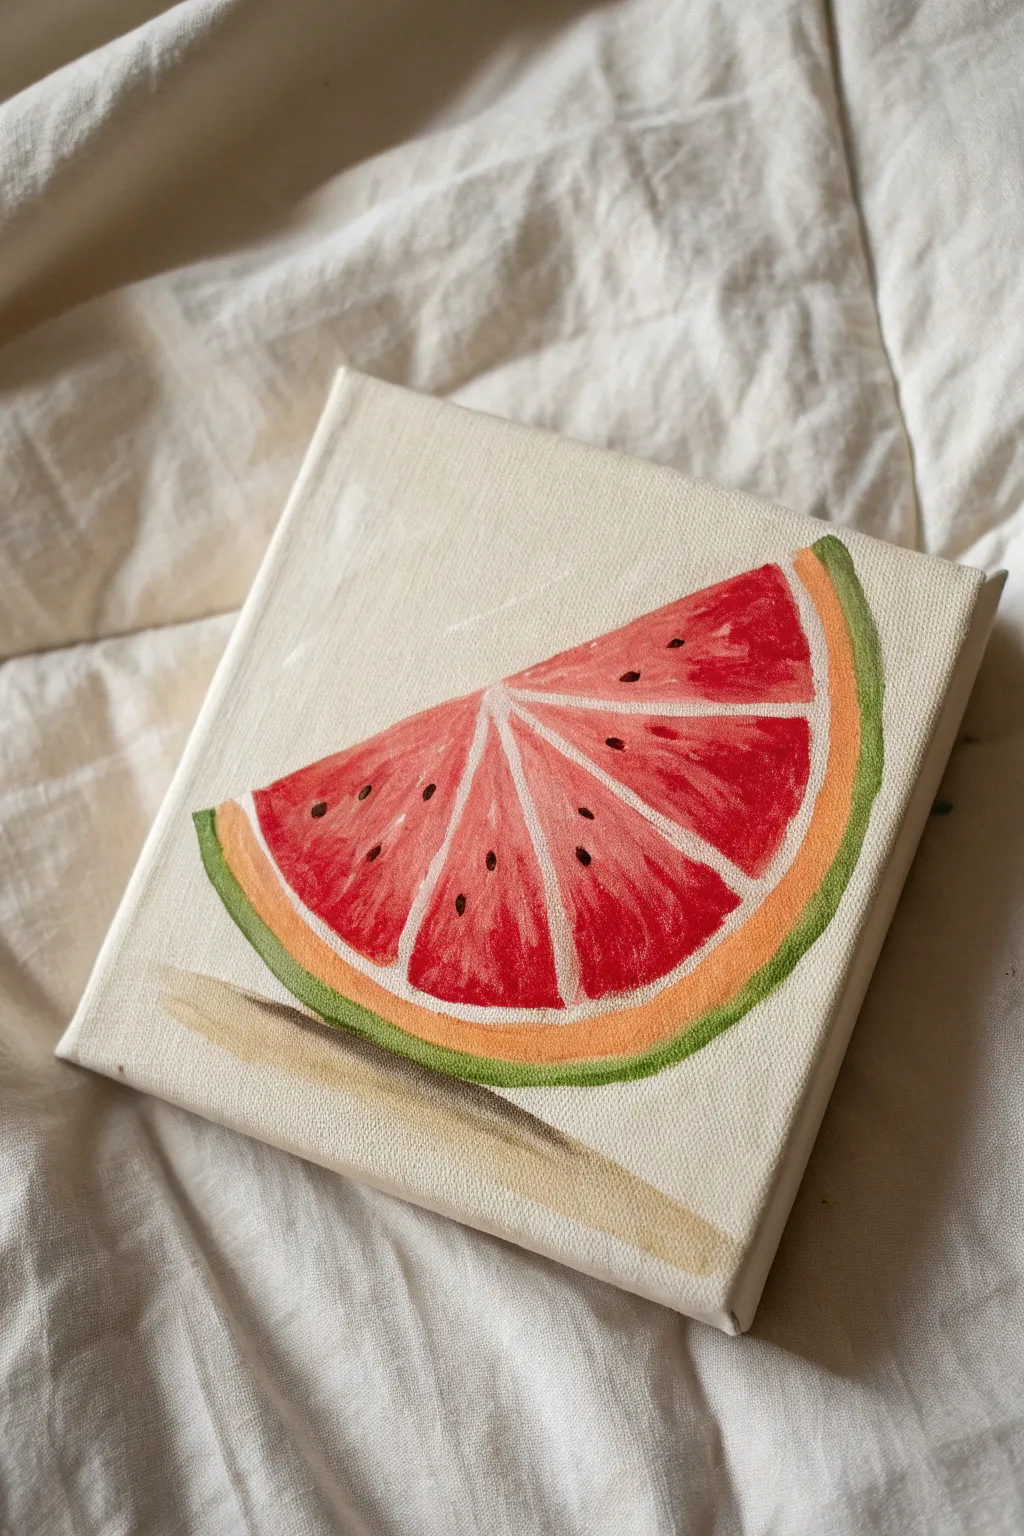
Capture the refreshing essence of summer with this vibrant acrylic study of a watermelon wedge. The stark white background makes the reds and greens pop, creating a bold, graphic statement piece perfect for a kitchen shelf.
Step-by-Step Tutorial
Materials
- Small square canvas (approx. 6×6 inch)
- Acrylic paints (Titanium White, Cadmium Red, Alizarin Crimson, Sap Green, Cadmium Yellow, Mars Black, Burnt Umber)
- Flat shader brush (size 6)
- Round detail brush (size 2)
- Small liner brush (size 0 or 00)
- Pencil for sketching
- Palette
- Water cup and paper towel
Step 1: Sketching and Blocking In
-
Map out the wedge:
Begin by lightly sketching a wide triangle shape that curves at the bottom. Position it slightly off-center to leave room for the shadow later. -
Define the layers:
Inside the curved bottom edge, draw two parallel lines following the curve. The outer band will be the green rind, the middle band will be the yellowish-white pith, and the large triangular area will be the red flesh. -
Segment the flesh:
Draw faint lines radiating from the top point of the triangle down towards the rind, dividing the red area into four or five sections. Not straight lines—give them a slight curve. -
Base coat the flesh:
Mix Cadmium Red with a touch of White to create a bright, solid pinkish-red. Fill in the main triangular sections, leaving small gaps of white canvas between the segments for now. -
Paint the rind:
Using Sap Green mixed with a tiny bit of Yellow, paint the outermost curved band. Keep the stroke smooth and consistent along the bottom edge. -
Create the transition layer:
Mix Titanium White with a small amount of Yellow and a speck of Red to create a creamy, pale peach or light orange tone. Paint the band between the red flesh and green rind.
Fixing Wobbly Lines
If your white separation lines look shaky, don’t panic. Wait for them to dry, then use the red paint to carefully ‘cut back’ into the white line to thin and straighten it out.
Step 2: Building Depth and Texture
-
Deepen the reds:
Mix Alizarin Crimson with your original red mix to create a darker value. Paint this into the center of each fruit segment, blending outward so the edges remain slightly lighter. -
Add juicy highlights:
Using a smaller brush and a mix of mostly White with a hint of Red, add streaks near the top of the wedge and along the edges of the segments to make the fruit look wet. -
Refine the segment lines:
Take pure Titanium White on your liner brush. Carefully paint thin, distinct lines between the red segments, connecting them to the pale pith layer at the bottom. This structure is key to the look. -
Detail the rind:
If the transition between the orange pith and green rind looks too harsh, lightly blend them with a clean damp brush while the paint is tacky, or glaze a thin layer of yellow-green over the seam.
Step 3: Seeds and Shadows
-
Place the seeds:
Dip a fine round brush into Mars Black. Paint small teardrop shapes scattered within the red flesh. Focus them near the center of the wedge rather than the very edges. -
Seed highlights:
Once the black seeds are fully dry, add a tiny dot of white to the top corner of each seed to make them look glossy. -
Mix the shadow color:
Create a transparent wash using Burnt Umber heavily diluted with water (or glazing medium). It should be very faint. -
Cast the shadow:
Paint a horizontal sweep underneath the melon slice. I find it helpful to start directly under the rind and pull the brush outwards to the right, letting the paint fade out. -
Final touches:
Check your white dividing lines. If any red got smudged on them, re-apply a crisp white line to ensure that fresh, segmented look remains sharp.
Make It Pop
For a more illustrative style, outline the entire wedge in a very thin, diluted black or dark brown line. It gives the piece a cool, sticker-like quality.
Now you have a sweet slice of summer art ready to brighten up any corner of your home
Tiny Cactus in a Pot
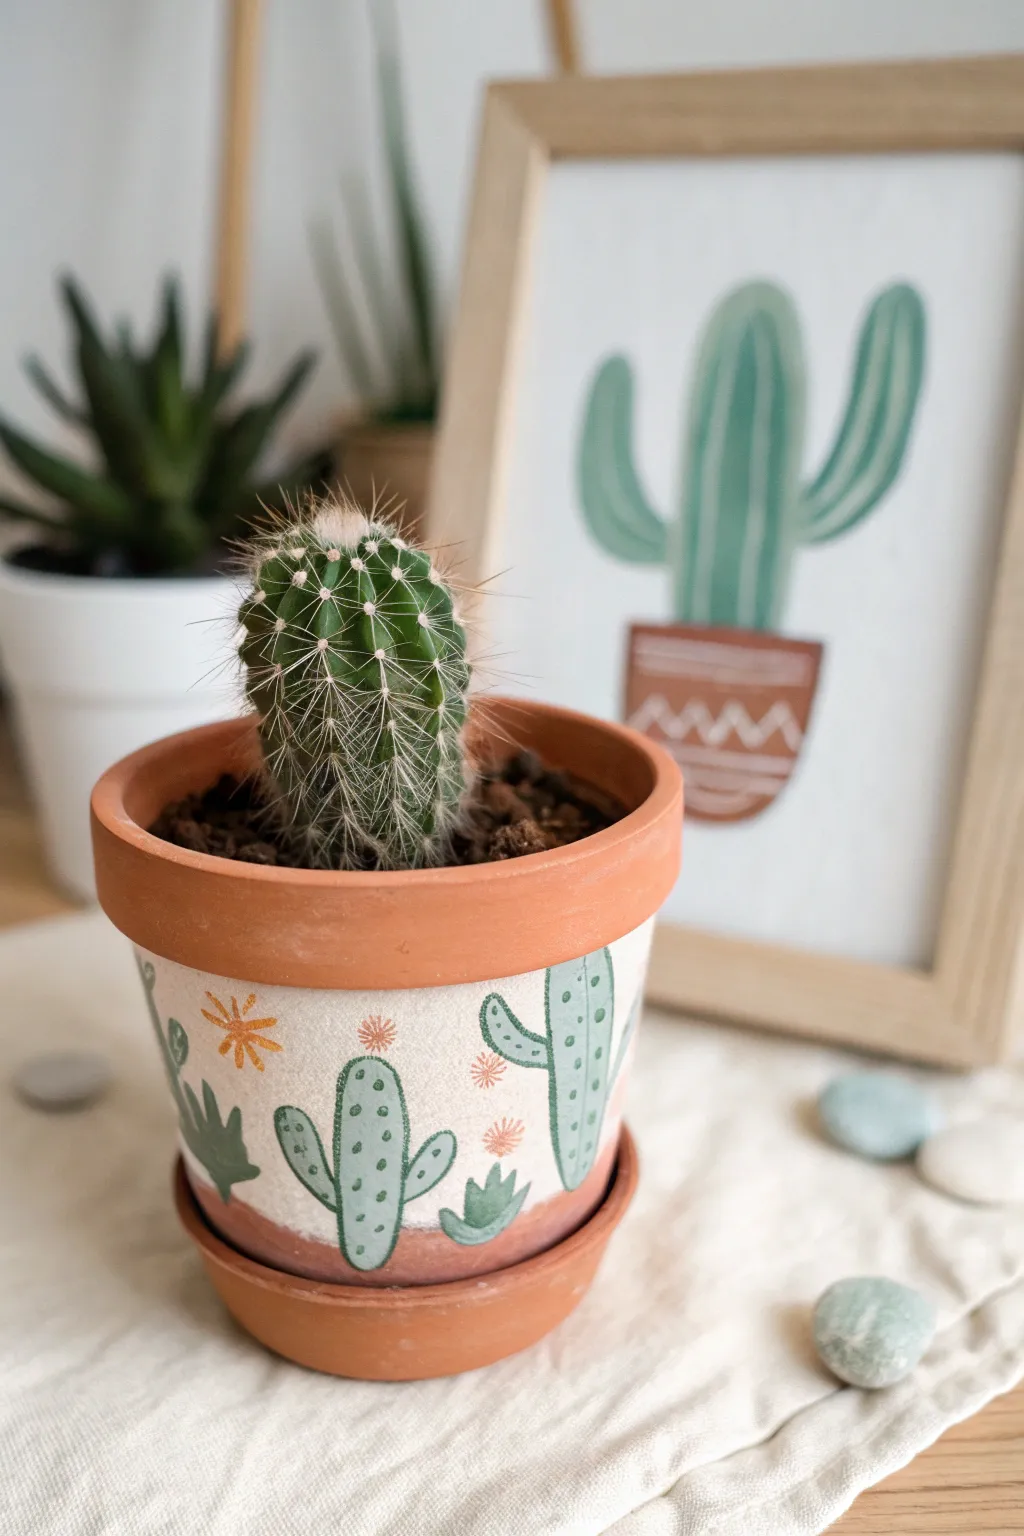
Transform a plain terracotta pot into a charming home for your succulents with this hand-painted cactus design. The earthy tones and whimsical illustrations create a warm, artisanal look perfect for brightening up any desk or windowsill.
Step-by-Step
Materials
- Small terracotta pot (3-4 inch diameter) with matching saucer
- White acrylic paint (matte finish)
- Sage green acrylic paint
- Dark forest green acrylic paint
- Terracotta or burnt orange acrylic paint
- Small flat brush (size 4 or 6)
- Fine liner brush (size 0 or 00)
- Pencil
- Matte spray sealer or varnish
- Small cactus and potting soil
Step 1: Preparing the Canvas
-
Clean the surface:
Before starting, wipe down your terracotta pot with a damp cloth to remove any dust or loose clay particles. Let it dry completely so the paint adheres properly. -
base coat application:
Using your flat brush, paint a wide band of white acrylic around the middle of the pot. leave the top rim and the bottom half-inch of the pot unpainted to keep that natural terracotta contrast. -
Second coat:
Terracotta is porous and soaks up paint quickly. Apply a second coat of white once the first is dry to ensure an opaque, solid background for your design. -
Sketching the design:
Take a pencil and very lightly sketch your cactus shapes onto the white band. Draw a mix of tall saguaro shapes and smaller, rounder succulent shapes. Spacing them out evenly helps the pattern flow.
Clean Lines Hack
Use painter’s tape or masking tape to mark off the top rim and bottom section before painting the white band. This guarantees perfectly straight, crisp edges every time.
Step 2: Painting the Cacti
-
Fill the shapes:
Load your flat brush with sage green paint. Carefully fill in the larger cactus outlines you sketched. I find it easier to do the edges first and then fill the center. -
Add variety:
For the smaller, spiky plants near the bottom, mix a tiny bit of the forest green into your sage green to create a slightly deeper shade. Paint these shorter plants between the larger cacti. -
Let it dry:
Allow the green shapes to dry completely. This is crucial because wet paint will smear when you add the fine details in the next steps. -
Painting the borders:
Once dry, use your fine liner brush and the dark forest green paint to outline the cactus shapes. keep your hand steady and use light pressure for a thin, delicate line. -
Add the spines:
Using the same dark green and liner brush, add small dots or tiny dashes inside the cactus bodies to represent spines or texture.
Step 3: Adding Blooms and Details
-
Creating flowers:
Dip your fine brush into the terracotta or burnt orange paint. Paint small starburst shapes or simple asterisks floating above or near the tops of the cacti to look like desert blooms. -
Filling the gaps:
If there are large white spaces left, add a few more small orange starbursts to balance the composition. -
Refining the rim:
Check the edges where the white paint meets the natural clay. If it looks messy, you can use a clean, damp brush to tidy up the line or add a thin painted stripe of orange for a finished border. -
Clean the saucer:
Ensure the matching saucer is clean. You can leave it natural or paint the rim white to match the pot, though the example keeps it natural for harmony.
Make It 3D
For a textured effect, mix a pinch of baking soda into your green paint. It creates a slightly gritty, puffed texture that mimics the surface of a real cactus.
Step 4: Finishing Up
-
Sealing the work:
Take the pot outside or to a well-ventilated area. Spray the painted section with a matte clear acrylic sealer. This protects your artwork from water damage when you water the plant. -
Final dry:
Let the sealer cure for at least 24 hours before introducing any moisture or soil. -
Planting:
Fill the bottom of the pot with a little soil, place your small cactus inside, and gently pack soil around the roots. -
Top dressing:
Finish by placing small stones or pebbles on top of the soil for a polished look. -
Display:
Place the pot on its saucer and find a sunny spot for your new creation.
Now you have a custom, desert-inspired planter that brings a touch of nature to your indoor space

PENCIL GUIDE
Understanding Pencil Grades from H to B
From first sketch to finished drawing — learn pencil grades, line control, and shading techniques.
Explore the Full Guide
Minimal Mountain Peaks
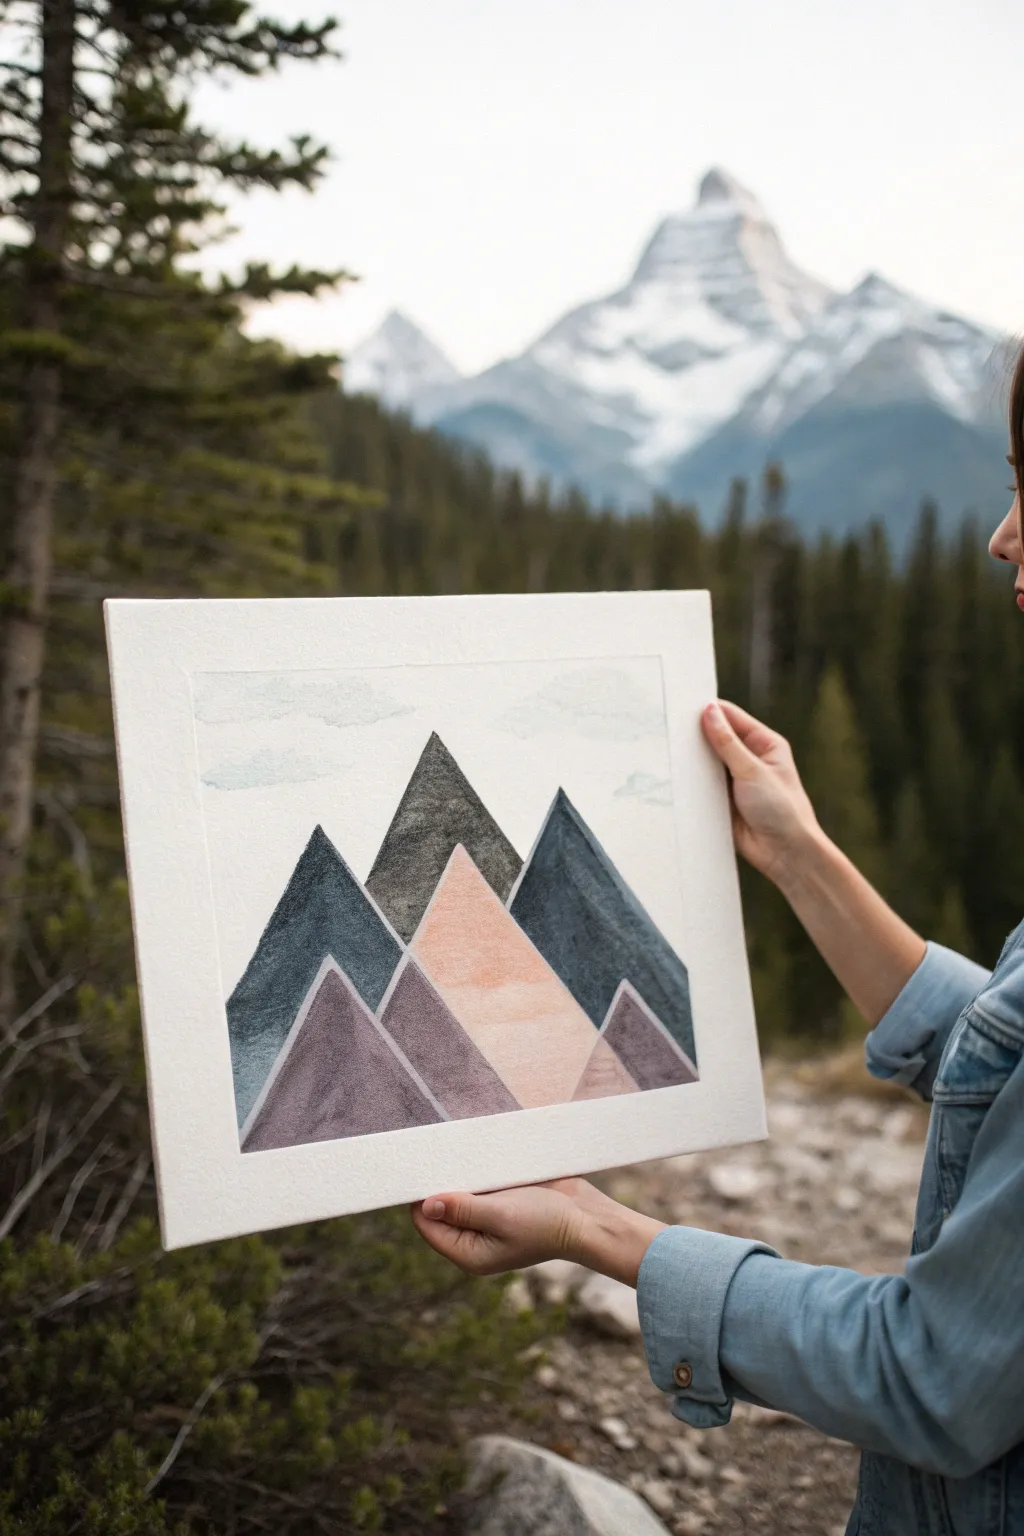
Capture the serenity of the mountains with this minimalist, geometric watercolor painting. Using clean lines and soft overlapping shapes, you will create a modern landscape that balances structure with organic textures.
Detailed Instructions
Materials
- Cold press watercolor paper (140 lb or higher)
- Painter’s tape or masking tape
- Watercolor paints (Payne’s Grey, Indigo, Burnt Sienna, Alizarin Crimson)
- Flat brush (1/2 inch)
- Round brush (size 6 or 8)
- Ruler
- Pencil (HB or lighter)
- Eraser
- Cup of water and paper towels
- White gel pen (optional for touch-ups)
Step 1: Preparation & Drawing
-
Tape the edges:
Begin by securing your watercolor paper to a flat surface using painter’s tape. Create a border of about 1 inch on all sides to frame your artwork cleanly once finished. -
Mark the center:
Using your ruler, lightly find the horizontal center of your paper. This will help position the tallest central peak. -
Draft the central peak:
Draw a large triangle in the center, ensuring the tip is sharp and high, but leaving plenty of room at the top for the sky. The base should be wide and stable. -
Add secondary peaks:
Sketch two slightly smaller triangles flanking the central one. These should overlap the main peak slightly or sit just behind it to create depth. -
Draw foreground shapes:
Create the lowest layer of mountains by drawing smaller triangles in the foreground. One prominent pinkish triangle should sit front and center, overlapping the bases of the taller mountains behind it. -
Refine the lines:
Go over your pencil lines with the ruler to ensure they are perfectly straight. Lighten them with an eraser so they are barely visible but still guide your painting.
Crisp Edges Hack
For ultra-sharp geometric lines, apply thin masking tape along the pencil lines of the mountains before painting. Remove only after paint is dry.
Step 2: Painting the Layers
-
Mix the darkest grey:
In your palette, mix a strong concentration of Payne’s Grey with a touch of Indigo. This dark, moody charcoal color is for the tallest central peak. -
Paint the central peak:
Carefully fill in the top triangle with your flat brush. Use the edge of the brush to keep the sides crisp. Let the texture of the paper show through slightly for that granite feel. -
Mix the blue-grey tones:
Water down your Indigo paint significantly to create a soft, slate blue. You want this to be lighter than the central peak to suggest atmospheric perspective. -
Fill the side peaks:
Paint the two flanking triangles with this slate blue mix. Be careful where they touch the central peak; leave a hair-thin line of white paper between shapes if you want distinct separation. -
Create the blush tone:
Mix a very watery wash of Burnt Sienna with a tiny dot of Alizarin Crimson. Test on a scrap piece of paper; you are aiming for a dusty rose or soft blush color. -
Paint the focal triangle:
Fill the large central foreground triangle with your blush mix. This warm tone contrasts beautifully with the cool greys behind it. -
Paint the lowest peaks:
For the remaining small foreground shapes, mix a muddy purple using the leftovers of your blush mix and a touch of the slate blue. Fill in the bottom triangles.
Step 3: Finishing Touches
-
Add cloud details:
With a clean brush and very diluted light grey water, dab gently in the sky area. Blot immediately with a paper towel to lift the pigment, creating soft, barely-there cloud shapes. -
Define the edges:
Once the paint is fully dry, you might notice some edges are soft. If you want a sharper look, very lightly outline the triangles with the white gel pen to accentuate the separation between layers. -
Dry thoroughly:
Let the entire piece dry completely. If the paper feels cold to the touch, it is still damp deep down, so give it extra time. -
Reveal the painting:
Slowly peel away the painter’s tape at a 45-degree angle. This reveals the crisp white border that gives the piece its professional, matted look.
Metallic Upgrade
Mix a small amount of gold watercolor or metallic ink into the blush pink triangle to make the foreground shimmer when the light hits it.
Now you have a serene mountain geometric study ready to frame or display on a shelf
Mini Planets and Stars
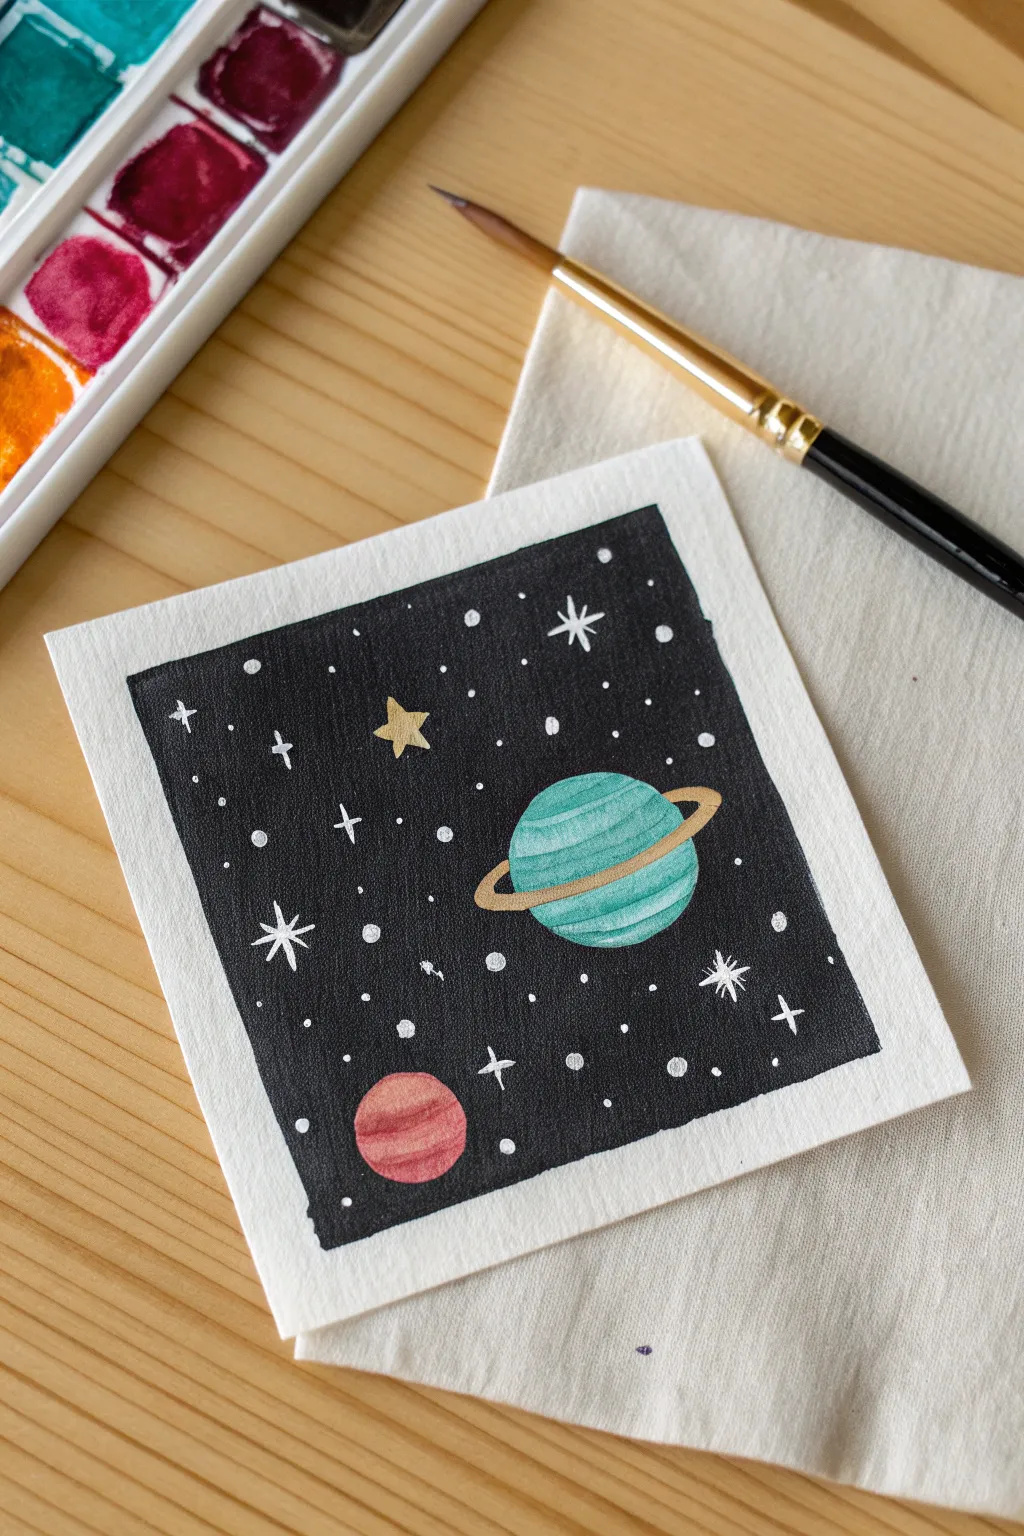
This charming miniature painting captures the vastness of space in a bite-sized square, featuring a teal ringed planet and a coral companion floating against a deep black void. It’s a perfect beginner-friendly project that uses contrast and simple shapes to create a striking celestial scene.
Step-by-Step Guide
Materials
- Square watercolor paper (approx. 4×4 inches)
- Black gouache paint (or highly pigmented black watercolor/ink)
- Watercolor paints (teal, coral/red, gold/ochre)
- White gel pen or fine white paint marker
- Gold metallic paint or marker
- Small round paintbrush (size 0 or 2)
- Fine detail brush (size 000)
- Pencil and eraser
- Masking tape or washi tape
- Palette for mixing
Step 1: Preparation and Sketching
-
Tape the border:
Cut your watercolor paper to a small square size. Carefully apply masking tape or washi tape around all four edges to create a clean, crisp border (about 1/4 inch wide). Press down firmly to prevent paint bleeding. -
Draft the layout:
Using a pencil, lightly sketch the outlines of your planets. Place a larger circle slightly to the right for the main planet, and draw an angled oval around it for the rings. Add a smaller circle in the bottom left corner for the secondary planet. -
Map the stars:
Lightly mark where you want your largest star (the five-pointed gold one) to be, just to ensure you don’t paint over that spot later. Keep the sketch very faint so graphite doesn’t smudge into the light colors.
Step 2: Painting the Planets
-
Base coat the ringed planet:
Mix a watery teal watercolor. Fill in the main circle of the larger planet. It doesn’t need to be perfectly flat; letting the water pool slightly creates natural texture. Avoid the area where the rings cross in front of the planet. -
Add planet texture:
While the teal is still slightly damp, add horizontal strokes of a slightly darker or more saturated teal to simulate atmospheric bands. Let this dry completely. -
Paint the rings:
Using a gold or ochre metallic paint, carefully fill in the rings. Make sure the ring passes ‘behind’ the top of the planet and ‘in front’ of the bottom section. -
Paint the second planet:
Mix a soft coral or dusty red watercolor. Fill in the smaller circle in the bottom left. Similar to the first planet, add subtle horizontal bands of darker red for texture while the paint is wet. -
Paint the gold star:
Use your gold paint or a metallic marker to fill in the five-pointed star shape you marked earlier. I find a fine liner brush works best for these sharp points.
Bleeding Edges?
If paint bleeds under the tape, wait for it to dry fully. Then, mix a thick white gouache (consistency of toothpaste) and carefully paint over the mistake to restore the border
Step 3: The Deep Space Background
-
Outline carefully:
Switch to your black gouache or concentrated black watercolor. Using your smallest brush, carefully outline the planets, the rings, and the gold star. Precision is key here to keep the shapes clean. -
Fill the void:
Switch to a slightly larger brush and fill in the rest of the background with solid black. Ensure the paint is opaque enough to hide the paper texture but not so thick it cracks. -
Check for gaps:
Look closely at the edges where the black meets the planets. If there are tiny white gaps, carefully touch them up with the tip of your detail brush. Let the black background dry completely—this is crucial before the next step.
Starry Splatters
For a more organic look, cover your colored planets with scrap paper and flick white paint off a stiff toothbrush onto the black background for tiny, random nebula stars
Step 4: Stardust Details
-
Add distant stars:
Using a white gel pen or a fine brush with white gouache, dot the background with tiny specks. Vary the pressure to create different sizes of stars. -
Draw larger glimmers:
Select a few spots to draw larger, four-pointed or eight-pointed starbursts. Draw a simple cross first, then add smaller diagonal lines for the extra glimmer. -
Highlight the rings:
Add a very thin white line on the front-facing part of the planet’s ring to give it dimension and make it look like it’s catching the light. -
Highlight the planets:
Add tiny white accent marks or curved lines on the upper left or right sides of the teal and coral planets to suggest a light source. -
The reveal:
Once everything is bone dry, slowly peel away the masking tape at a 45-degree angle to reveal your crisp white border.
Frame your tiny masterpiece or paste it into a journal to admire your own slice of the galaxy


Whale Tail Silhouette
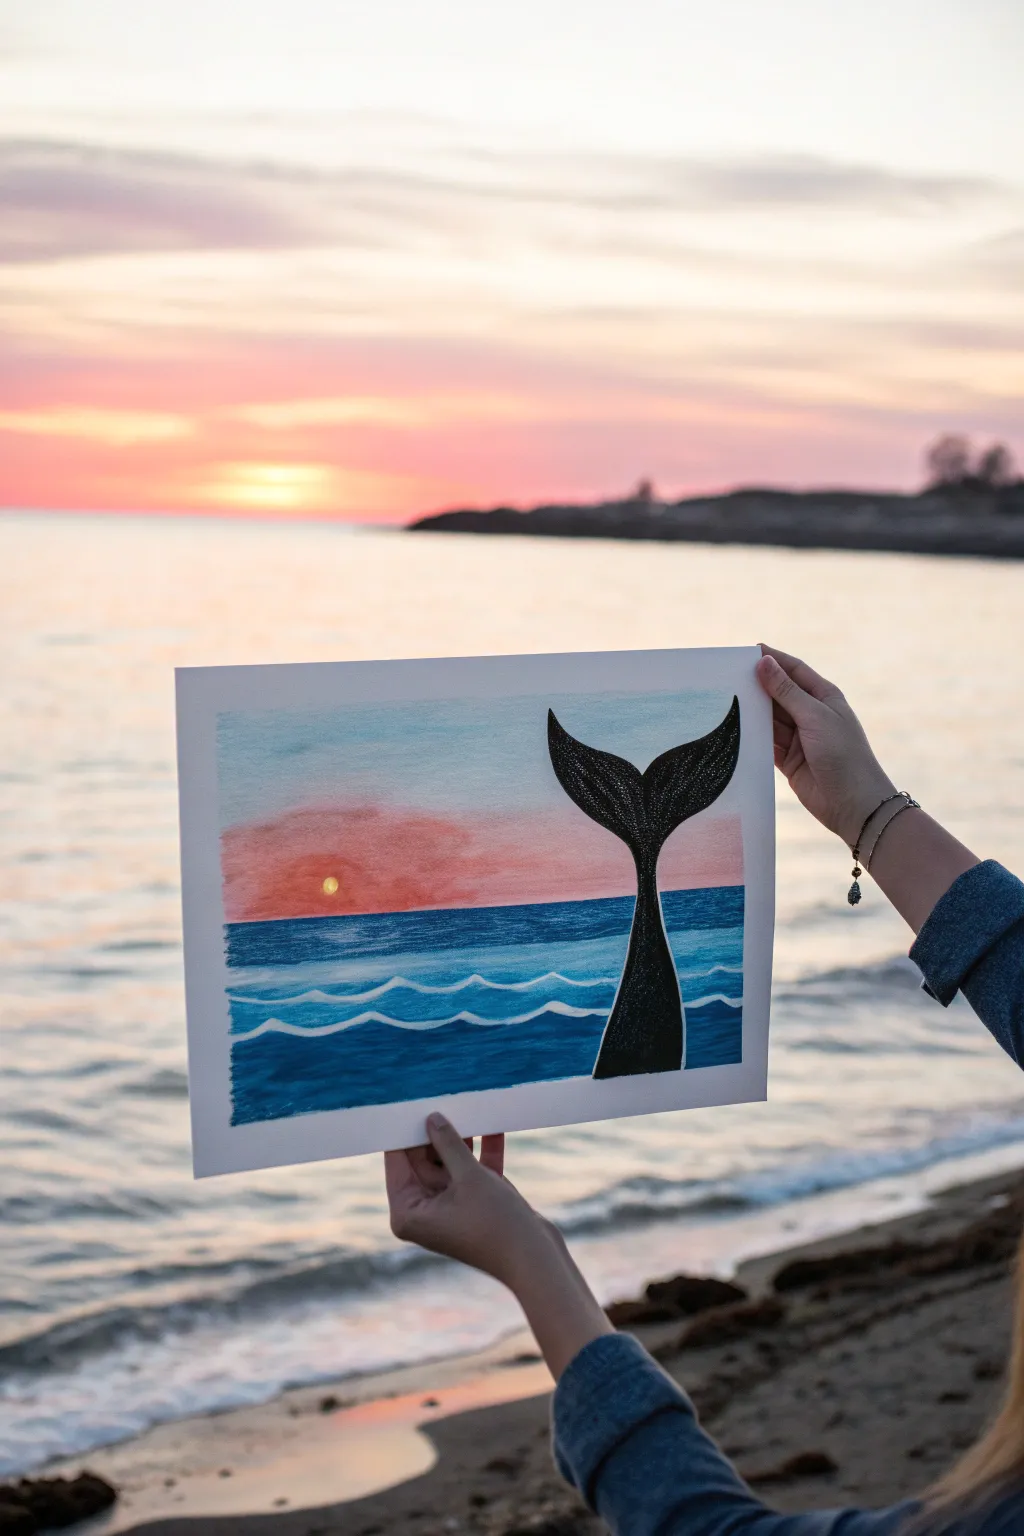
Capture the magic of an evening ocean with this vibrant pastel drawing. Featuring a striking black whale tail silhouette against a gradient sunset and rolling waves, this project is perfect for beginners looking to practice blending and contrast.
Detailed Instructions
Materials
- Heavyweight textured paper (watercolor or pastel paper recommended)
- Oil pastels or soft pastels (Pink, Orange, Light Blue, Dark Blue, White, Black, Yellow)
- Masking tape
- Pencil and eraser
- Paper towel or blending stump (tortillon)
Step 1: Setting the Scene
-
Prep your surface:
Tape down all four edges of your paper to a flat surface using masking tape. This secures the page and creates a satisfying crisp white border when you’re finished. -
Sketch the horizon:
Lightly draw a straight horizontal line across the paper, positioning it slightly below the vertical center. This separates your sky from the ocean. -
Outline the tail:
Sketch the outline of the whale tail emerging from the water on the right side. Start with a narrow stalk that fans out broadly at the top, curving elegantly at the tips.
Smudge Patrol
Black pastel smears easily. Keep a spare sheet of paper under your hand while working on the tail to protect the sky area.
Step 2: Creating the Sky
-
Apply the warm tones:
Start just above the horizon line with a bright pink or salmon-colored pastel. Color a thick band horizontally, pressing firmly to get good coverage. -
Blend upwards:
Above the pink, add a layer of soft light blue or periwinkle. Don’t worry about perfect lines; let the colors touch and overlap slightly. -
Smooth the gradient:
Use your finger or a paper towel to rub the transition between the pink and blue sky. I like to use small circular motions here to mix the pigments directly on the paper for a dreamy, soft look. -
Add the sun:
Place a small, firm dot of yellow pastel in the pink area on the left side to represent the setting sun. Gently soften the edges just a tiny bit so it glows.
Level Up: Reflection
Add a faint, blurry reflection of the sun and the whale tail in the water using vertical strokes of pink and grey.
Step 3: Painting the Ocean
-
Deepen the horizon:
Take a medium or dark blue and color a straight band directly below the horizon line. This creates depth and distance in the water. -
Layer water colors:
Fill the rest of the ocean area with a lighter blue shade, leaving some rough texture or white gaps where you plan to put waves. -
Draw the waves:
Using a white pastel, draw thick, wavy lines horizontally across the blue water. Make scallops or ‘U’ shapes to imitate foamy crests. -
Blend for movement:
Lightly smudge the blue areas around the white waves. You want to keep the white lines fairly crisp, but soften the blue underneath them to look like moving water.
Step 4: The Silhouette & Details
-
Block in the tail:
Fill in your sketched whale tail outline completely with black pastel. Press hard to ensure it is opaque and stands out boldly against the colorful background. -
Refine the edges:
Go over the outline of the tail one more time to make the curves sharp and clean, correcting any smudges that happened during coloring. -
Add texture to the tail:
For a subtle realistic touch, use a white pencil or the edge of a white pastel to add tiny, faint scratches or texture marks on the black tail, suggesting wet skin reflecting light. -
Highlight the water:
Add a few extra strokes of white right at the base of the tail where it meets the water to show the splash and disturbance. -
Reveal the border:
Slowly and carefully peel away the masking tape. Pull the tape away from the center of the drawing to prevent tearing the paper surface.
Frame your mini masterpiece or hold it up against the real horizon for a perfect photo opportunity
Cute Animal Face Close-Up
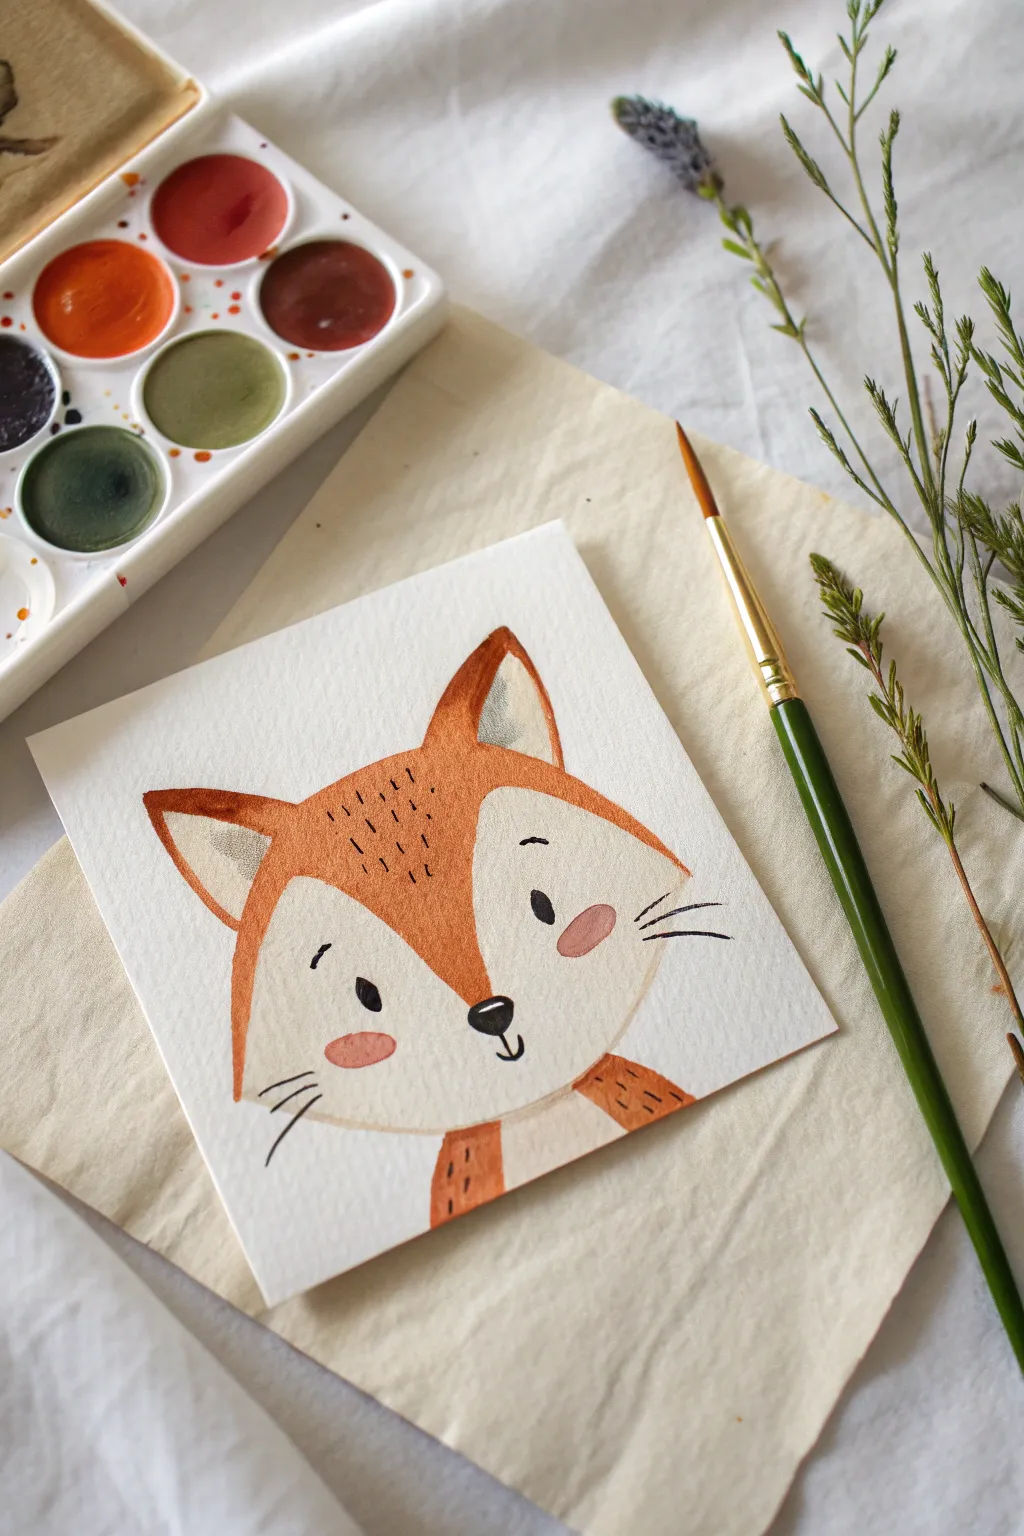
This charming project focuses on capturing the sweet expression of a fox using simple shapes and warm, earthy watercolor tones. The clean white background keeps the focus entirely on the character’s friendly face, making it a perfect quick study for beginners.
Step-by-Step Tutorial
Materials
- Small square watercolor paper (approx. 4×4 or 5×5 inches)
- Watercolor paints (burnt orange/sienna, raw umber, black, blush pink)
- Round watercolor brushes (size 4 or 6 for fills, sizes 0 or 1 for details)
- Pencil and kneaded eraser
- Jar of clean water
- Paper towel or rag
Step 1: Sketching the Outline
-
Establish the head shape:
Begin by lightly sketching a wide, soft U-shape for the bottom half of the fox’s head. Keep your pencil pressure very light so the graphite doesn’t show through the paint later. -
Add the ears:
Draw two large, triangular ears on top of the head. Curve the outer lines slightly outwards to make them look fluffy rather than geometric. -
Define the face mask:
Sketch the ‘mask’ line that separates the orange fur from the white muzzle. Start from the bottom center of the chin and curve upwards towards the ears, creating a heart-like dip in the middle of the forehead. -
Mark features and body:
Lightly mark placements for the eyes, nose, and cheeks. Add a small suggestion of the body and shoulders at the very bottom edge of the paper.
Keep it clean
Rest your hand on a piece of scrap paper while painting the details. This prevents natural oils or wet paint from smudging your pristine white background.
Step 2: Applying the Base Colors
-
Mix your orange:
Create a warm, foxy orange by mixing burnt sienna with a touch of bright orange or yellow ochre. You want a color that feels earthy but vibrant. -
Paint the main fur:
Using your medium round brush, fill in the top section of the head and the outer ears with your orange mix. Leave the inner ear triangles and the bottom face area unpainted. -
Paint the shoulders:
Use the same orange mixture to paint the small shoulder sections visible at the bottom of the page. -
Soften the edges:
If you want a softer look, you can run a clean, damp brush along the inner edge where the orange meets the white face area before the paint dries completely. -
Let it dry completely:
Wait until the orange paint is bone dry. This is crucial to prevent colors from bleeding into the sensitive white areas.
Step 3: Adding Details and Features
-
Paint the inner ears:
Mix a very diluted, watery grey or pale blue-grey. Gently fill in the triangular spaces inside the ears, leaving a tiny gap of white paper between this grey and the orange outline for contrast. -
Add rosy cheeks:
Dilute a red or pink pigment until it is very soft. Paint two small ovals on the white muzzle area, just below where the eyes will go. -
Paint the nose:
Using a smaller brush and concentrated black or dark brown paint, fill in the rounded triangular nose. I find it helps to leave a tiny speck of white unpainted for a highlight. -
Draw the mouth:
With the very tip of your smallest brush (or a fine liner pen if you prefer), draw a simple anchor shape descending from the nose to form the mouth. -
Paint the eyes:
Carefully paint two solid black ovals for eyes, tilting them slightly inward to create a kind expression. Add small eyebrows floating above them in the orange section.
Make it a set
Paint a raccoon and a bear on separate squares using the same simple face-forward composition to create an adorable woodland nursery trio.
Step 4: Final Textures
-
Add fur texture:
Reload your small brush with a slightly darker, more concentrated orange-brown. Paint tiny, short vertical dashes on the forehead and shoulders to suggest fur texture. -
Whiskers:
Using a fine liner brush and black paint with an inky consistency, flick three quick lines outward from each cheek for whiskers. Commit to the stroke quickly for the smoothest line. -
Final touches:
Assess your painting. If the nose needs to be darker, add a second layer of black. Erase any visible pencil lines once the paper is 100% dry.
Now you have a sweet woodland friend ready to be framed or gifted as a greeting card
Butterfly Wing Color Study
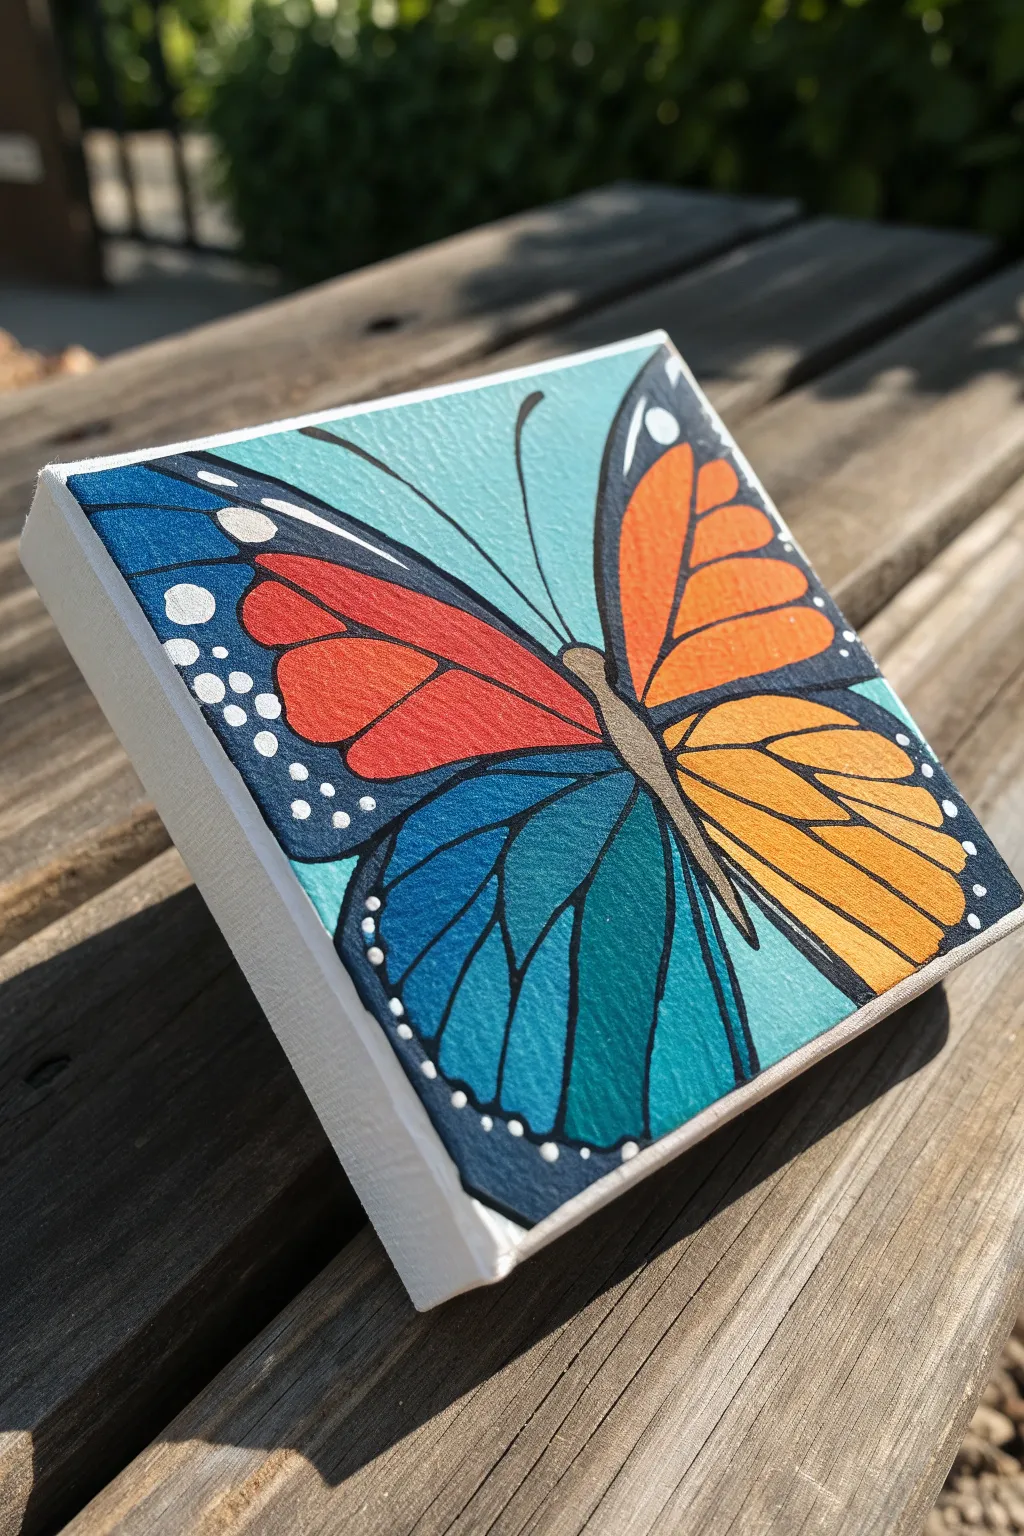
This vibrant small canvas project explores color theory through the simple, symmetrical beauty of a butterfly. By dividing the wings into varying color zones, you create a striking, stained-glass effect that pops against a bright aqua background.
How-To Guide
Materials
- Small square gallery-wrapped canvas (e.g., 4×4 or 6×6 inches)
- Acrylic paints: Titanium White, Mars Black, Cadmium Red, Cadmium Orange, Cadmium Yellow, Cobalt Blue, Teal/Turquoise
- Pencil and eraser
- Round synthetic brushes (sizes 0 or 1 for details, size 4 for filling)
- Palette or paper plate
- Water cup and paper towels
- Ruler (optional)
Step 1: Sketching the Layout
-
Center the Body:
Begin by lightly sketching the butterfly’s body diagonally across the canvas. Draw a slender oval shape starting from the lower right quadrant and angling up toward the top left. -
Outline the Wings:
From the body, sketch four main wing sections. Two large upper wings should stretch almost to the corners, and two smaller lower wings should fan out below them. Don’t worry about perfect symmetry; a natural look works best. -
Sketch Wing Veins:
Inside each wing section, draw the ‘cells’ or segments that will hold the color. Think of these like stained glass lead lines—curved shapes that radiate outward from the body to the wing edges.
Steady Hand Trick
To get crisp black lines, rest your pinky finger on a dry part of the canvas (or the table) to stabilize your hand while painting the delicate veins.
Step 2: Applying Base Colors
-
Paint the Background:
Mix Titanium White with a small amount of Teal to create a soft, light aqua. Using your size 4 brush, carefully paint the negative space around the butterfly wings. I find it helpful to paint the canvas edges now too for a finished look. -
Undercoat the Wings:
For the upper left wing, paint the inner segments a bold red and the outer rim a deep blue. Don’t worry about the black lines yet; just block in the color shapes. -
Right Wing Colors:
On the upper right wing, use straight Cadmium Orange for the inner segments. For the lower right wing, mix yellow and orange for a lighter, golden amber tone. -
Lower Left Teal:
Paint the segments of the lower left wing with a mix of Teal and Cobalt Blue to create a rich peacock color. -
Let it Dry:
Allow all color blocks to dry completely. Acrylics dry darker, so apply a second coat if the canvas texture is still showing through or the colors look streaky.
Metallic Magic
Swap the white dots for metallic gold or silver paint. This small change adds a shimmering, jewelry-like quality to the wing borders.
Step 3: Refining and Detailing
-
Define the Body:
Mix a warm grey or light brown using a tiny dot of black into your orange or brown paint. Fill in the body shape you sketched earlier. -
Start the Linework:
Switch to your smallest liner brush (size 0) and slightly watered-down Mars Black paint. Outline the main shape of the wings where they meet the background. -
Fill the Borders:
Thicken the black borders on the outer edges of the wings. This heavy black outline acts as a frame and will hold the white dots later. -
Draw the Veins:
Carefully trace over your pencil lines inside the wings with the black paint. Keep these lines thinner than the outer border. Moving from the body outward helps keep your hand steady. -
Add Antennae:
With a quick, confident flick of the wrist, paint two thin, curved black lines extending from the head area into the aqua background.
Step 4: Final Highlights
-
Prepare the Dots:
Squeeze out a fresh dollop of Titanium White. You want this paint thick and opaque. -
Dot the Edges:
Using the tip of a toothpick or the handle end of a small paintbrush, dip into the white paint and gently stamp dots along the thick black outer borders of the wings. -
Vary the Sizes:
Create visual interest by making some dots larger (near the wing tips) and others tiny (as the border thins out). -
Clean Up:
Check for any smudges or areas where the background color needs a touch-up. Once fully dry, erase any visible pencil marks that weren’t covered by paint.
Display your colorful mini-masterpiece on a small easel or grouped with other insect studies for a nature-inspired wall
Mandala Dot Mini
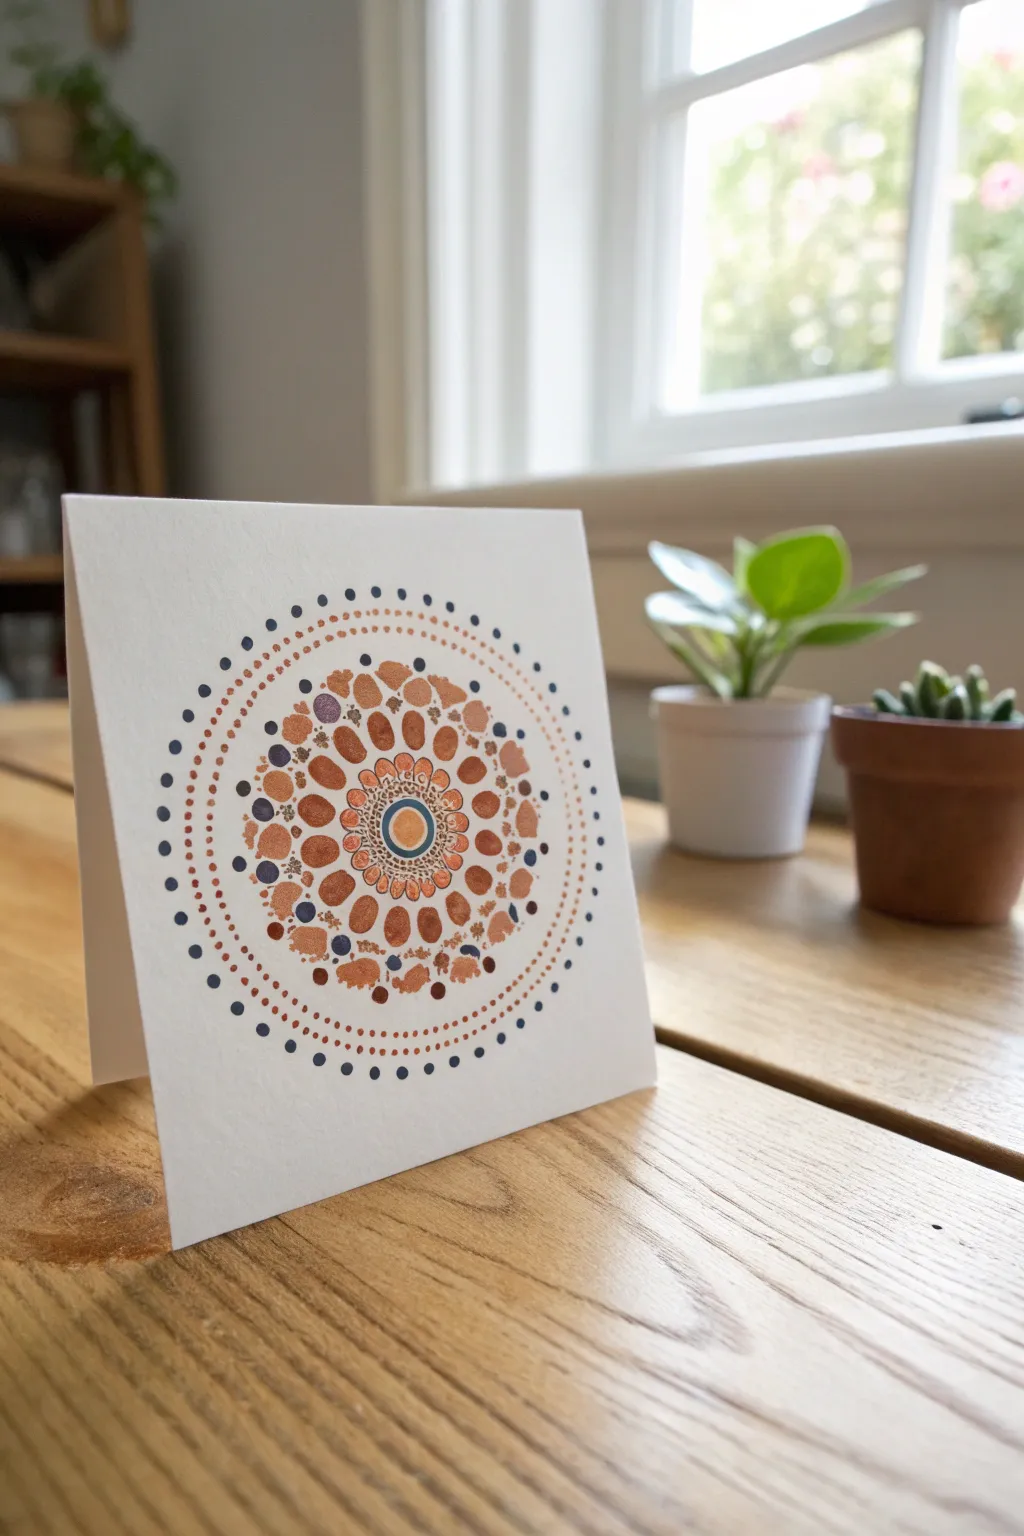
Create a soothing and symmetrical work of art using simple dotting techniques in warm, earthy tones. This mini mandala project transforms a blank greeting card into a detailed, mesmerizing focal point perfect for gift-giving or display.
Step-by-Step Tutorial
Materials
- Square white cardstock greeting card (approx. 5×5 or 6×6 inches)
- Acrylic paints (terracotta, copper metallic, burnt sienna, dark navy blue, white)
- Dotting tools (various sizes) or household substitutes (pencil erasers, brush ends, toothpicks)
- Palette or paper plate
- Compass
- Pencil
- Eraser
Step 1: Preparation & Guide Lines
-
Find the center:
Lay your square card flat on a stable surface. Use a ruler to lightly mark the exact center point with a pencil. -
Draw concentric circles:
Using a compass, place the point on your center mark. Draw four light concentric circles outward. The smallest should differ by about 1/4 inch, expanding to fill the central area of the card. -
Mark radial lines:
Lightly sketch 8 or 16 dividing lines radiating from the center like a pizza. This grid will help you keep your dots evenly spaced and symmetrical. -
Prepare your palette:
Squeeze small amounts of terracotta, burnt sienna, copper, dark navy, and white onto your palette. It helps to have them ready to mix slightly as you go.
Paint Consistency
For perfect round dots, your paint should be the consistency of heavy cream. If it forms peaks that don’t settle, thin it with a drop of pouring medium or water.
Step 2: The Central Motif
-
Start the center:
Using a medium-sized dotting tool, place a single, perfect copper dot directly on your center pencil mark. -
Surround the center:
Switch to a smaller tool. Dip it in the dark navy paint and create a tight ring of small dots around the central copper dot. -
Add a solid ring:
Paint a thin, solid line circle around the navy dots using a fine liner brush and navy paint to contain the center design. -
Create the first petal layer:
Using terracotta paint and a medium tool, place dots on your first guide circle. Gently drag the paint inward slightly with a toothpick to create teardrop or oval shapes pointing toward the center.
Step 3: Expanding the Pattern
-
Second petal layer:
On the next guide circle, use burnt sienna to create larger oval dots. Place these in the windows between the previous layer’s teardrops (offset pattern). -
Enhance with metallics:
Use your copper paint to add small accent dots between the burnt sienna ovals. The metallic shine adds lovely dimension when the light hits it. -
Add detail dots:
Dip a very fine tool or toothpick into white or cream paint. Carefully place tiny ‘top dots’ onto the larger dried terracotta ovals to add depth. -
Expand outward:
Continue creating rings of dots, alternating between your earthy browns and occasional navy accents. I find that varying the dot size creates the most visual interest here. -
Incorporate mixed sizes:
In the outer section of the main design, mix medium copper dots with clusters of tiny navy dots to create a textured, mosaic look.
Gilded Edges
Once the mandala is dry, use a metallic gold or copper paint pen to carefully line the edges of the card itself for a polished, high-end framed look.
Step 4: The Outer Details
-
Start the border:
Move to your outermost pencil guide circle. Using your smallest tool, dot a continuous ring of tiny terracotta dots. -
Add contrast ring:
Just outside the terracotta ring, add a final ring of slightly larger dark navy dots. Space them evenly, perhaps every 2-3 millimeters. -
Clean up:
Allow the paint to dry completely. This usually takes 1-2 hours for thicker dots. Once fully hard, gently erase any visible pencil guidelines.
Enjoy the meditative process of watching your intricate pattern grow from the center outward
Geometric Color Blocks
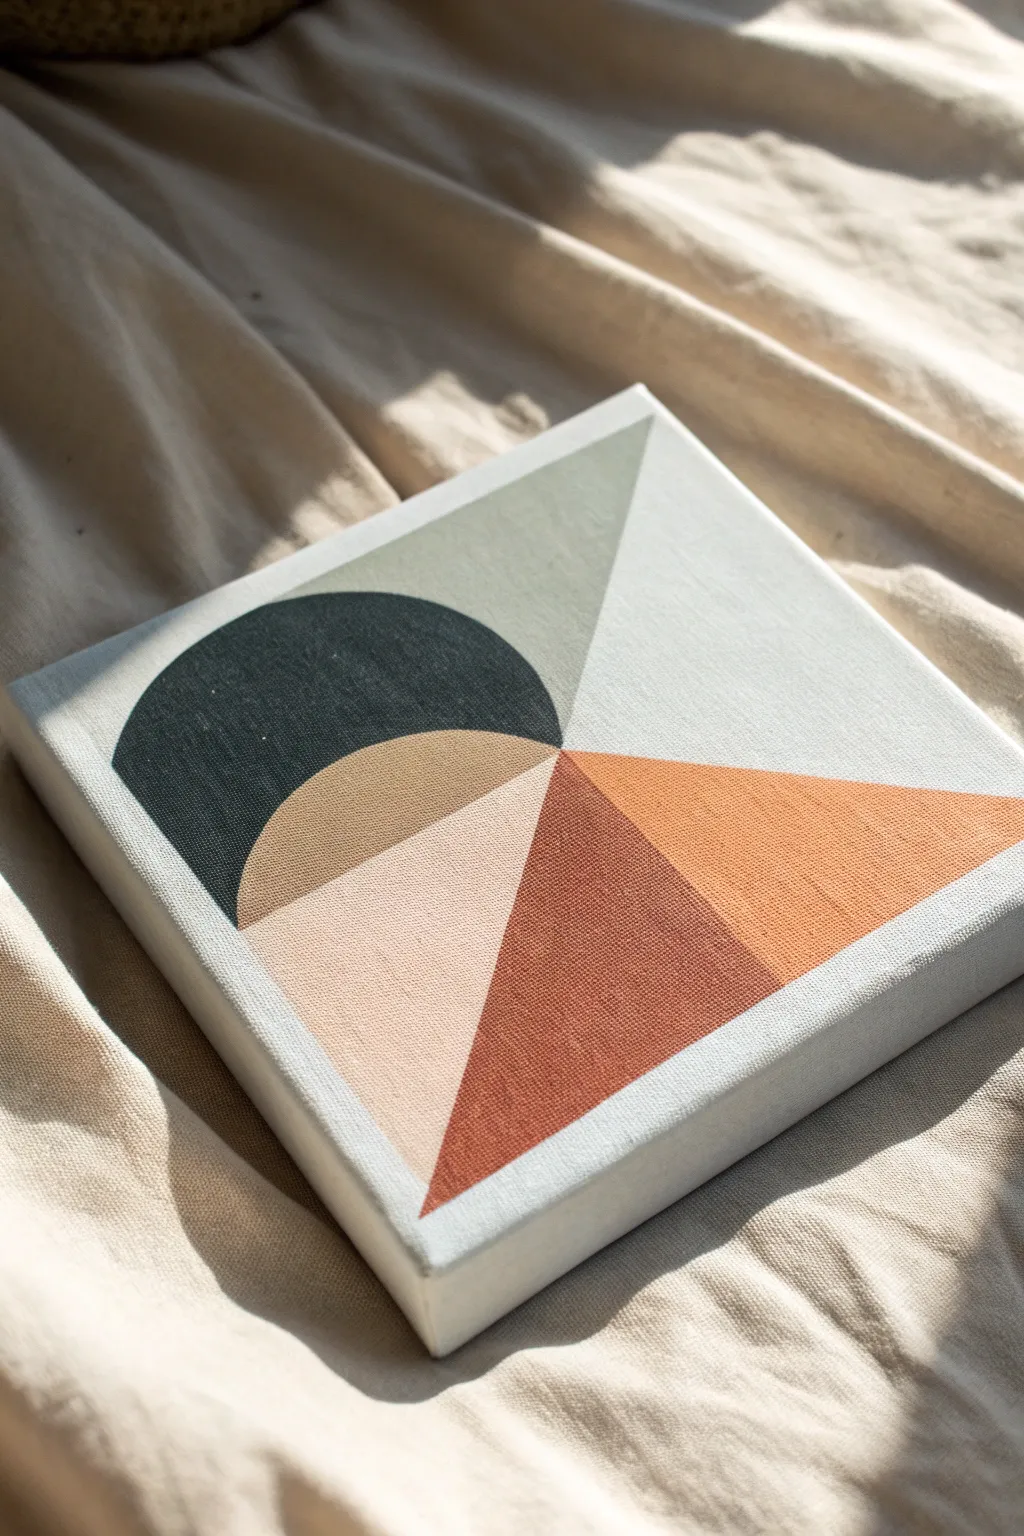
This minimal geometric canvas blends warm desert tones with cool sage and deep teal for a perfectly balanced modern art piece. The crisp lines and intersecting shapes create a sophisticated look that is deceptively simple to achieve with the right taping technique.
Detailed Instructions
Materials
- Small square stretched canvas (approximately 6×6 or 8×8 inches)
- Acrylic paints: Dark teal/forest green, sage green, rust red, burnt orange, tan/ochre, pale peach, and titanium white
- Painter’s tape or drafting tape (low tack)
- Flat synthetic brushes (various sizes)
- Pencil
- Ruler
- Compass or round object for tracing
- Palette or paper plate
- Cup of water and paper towels
Step 1: Planning & Sketching
-
Prime the surface:
Begin by ensuring your canvas is clean. If it isn’t pre-primed, apply a coat of white gesso and let it dry completely to create a smooth surface for your geometric shapes. -
Mark the center point:
Using your ruler, lightly measure and mark the exact center point of the canvas with a pencil. This will be the anchor for all your intersecting lines. -
Draft the diagonal lines:
From the center point, draw straight lines extending to the edges to form the triangular sections. Note that the lines don’t just go to the corners; create angles that divide the space into unequal wedges for visual interest. -
Sketch the circle segments:
Use a compass planted near the left side of your center point to draw a large semi-circle that spans across two of your drafted wedges. It should look like a setting sun intercepted by the geometric rays.
Step 2: Painting the Base Shapes
-
Tape the first section:
Identify the top right triangular section (the sage green area). Apply painter’s tape along the pencil lines that define this shape. Press the edges of the tape down firmly with your fingernail to prevent bleed-through. -
Mix and apply sage green:
Mix a muted sage green using green, a touch of yellow, and white. Paint this section thoroughly. I prefer to brush away from the tape edge initially to further seal it. -
Tape the bottom right triangle:
Wait for the sage section to be dry to the touch. Remove the old tape and mask off the large bottom-right triangle that will be orange. -
Apply the rusty orange:
Paint this section with a warm, medium orange hue. Ensure the coverage is solid, as orange can sometimes be semi-transparent. -
Define the rust red triangle:
Once the orange is dry and tape is removed, mask off the central bottom triangle. Paint this with a deep rust red or terracotta color. This anchors the bottom of the composition.
Seal the Tape Edge
Before applying colored paint, brush a tiny amount of white paint (or clear matte medium) over the tape edge. This seals any gaps so your color lines remain razor-sharp.
Step 3: Curve Details & Finishing
-
Taping the curves:
This is the trickiest part. To mask the curved sections for the dark teal and tan areas, you can cut small pieces of tape to follow the arc or carefully freehand the edge with a steady hand and a small brush. -
Paint the dark teal arc:
Fill the large semi-circle segment on the left with a deep forest green or dark teal. This high-contrast color provides the focal weight of the painting. -
Paint the tan intersection:
Where the circle overlaps with the lower wedge, paints this small section a warm tan or ochre color. This creates a transparency effect where shapes seem to overlap. -
Fill the final wedge:
Paint the remaining wedge section (below the teal arc) with a very pale peach or blush pink color. -
Touch up lines:
After all paint is completely dry, remove any remaining tape. Inspect your white lines (the unpainted canvas space between shapes). If paint bled over, use a tiny brush and titanium white paint to clean up and sharpen the boundaries. -
Clean up edges:
Don’t forget the sides of the canvas! Decide whether to wrap the colors around the edges for a gallery finish or paint the sides a solid white for a crisp border.
Add Metallic Accents
For a luxe twist, swap the tan or rust-colored wedge for metallic gold leaf or gold paint. It catches the light beautifuly against the matte colors.
Hang your new geometric masterpiece in a spot that gets nice natural light to show off those crisp edges
Abstract Brushstroke Sampler
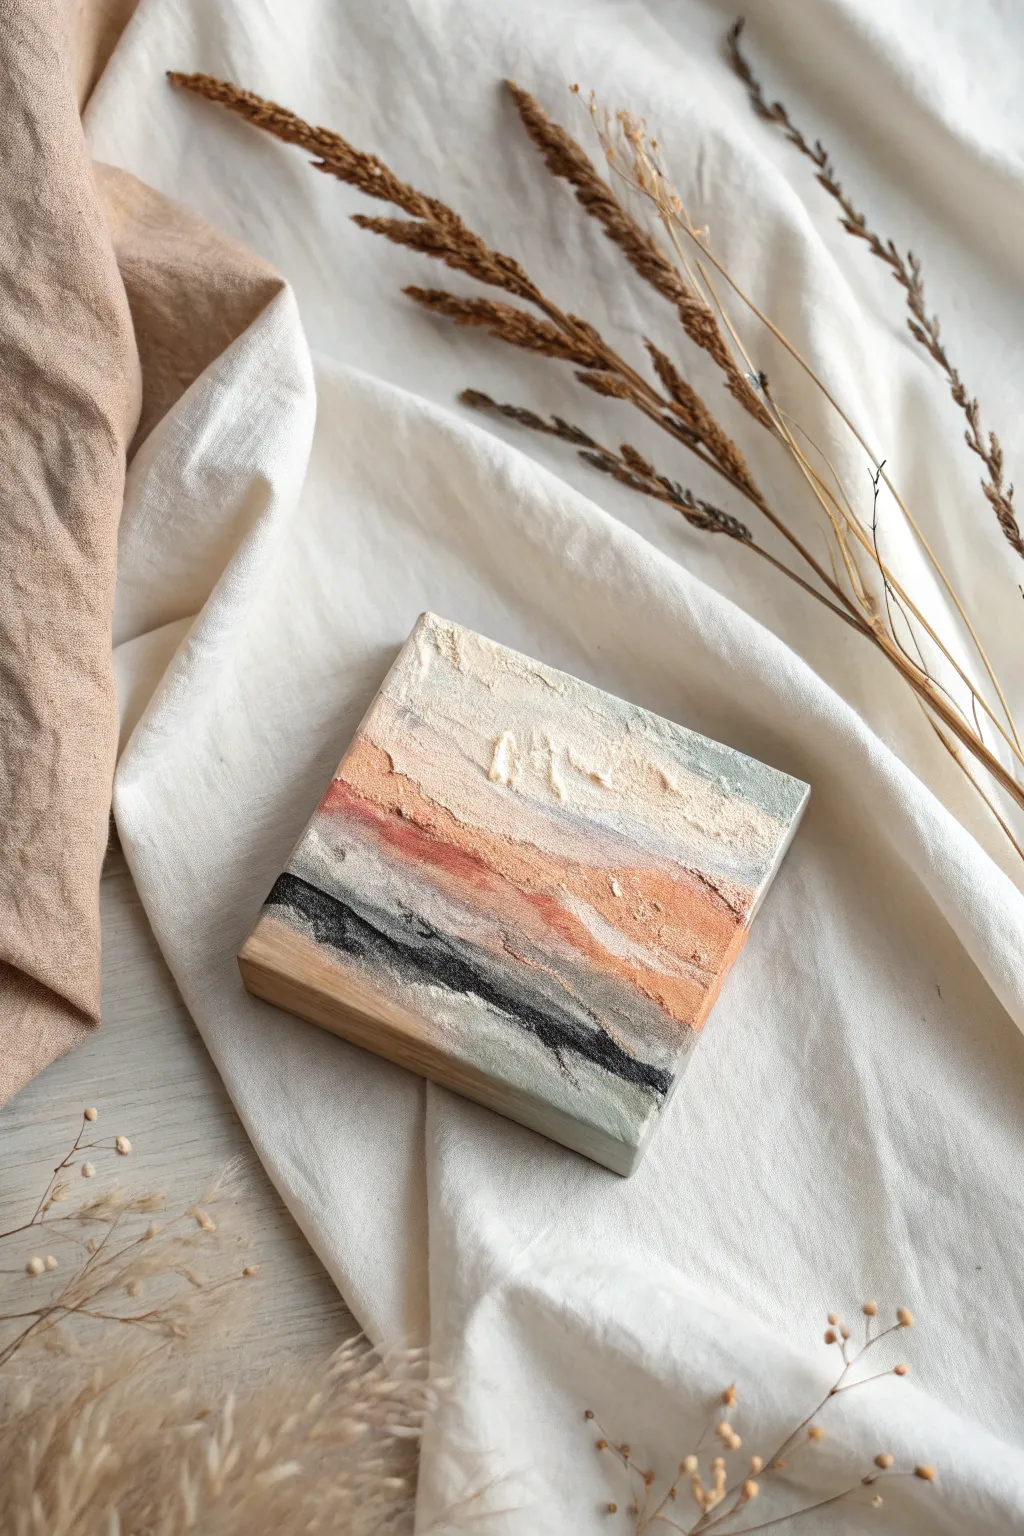
Embrace the calming effect of layered textures and earth tones with this miniature abstract landscape. Using modeling paste and a limited palette, you’ll create a tactile piece that captures the essence of a dusty sunset horizon on a chunky wood block.
Step-by-Step Guide
Materials
- Small square wood block (approx. 4×4 inches, 1-inch depth) or deep edge canvas
- Acrylic modeling paste or heavy texture gel
- Palette knife (trowel shape preferred)
- Acrylic paints: Titanium White, Unbleached Titanium (cream), Terracotta/Burnt Sienna, Paynes Grey, Lamp Black, Sage Green
- Gesso (clear or white)
- Sandpaper (fine grit)
- Matte varnish spray
Step 1: Preparation & Base Texture
-
Prep the surface:
Begin by lightly sanding your wood block to ensure a smooth starting surface. Wipe away any dust with a damp cloth. -
Prime the wood:
Apply a thin coat of gesso to the front face and sides of the wood block. Let this dry completely to prevent the wood from absorbing too much paint later. -
Apply modeling paste:
Scoop out a generous amount of modeling paste with your palette knife. Spread it across the top third of the block. -
Create texture:
Don’t smooth it out perfectly; instead, use the flat side of the knife to tap and pull the paste upward to create ridges and peaks. This roughness will catch the light beautifully. -
Dry layer one:
Allow this initial texture layer to dry for at least 30 minutes until it forms a skin. The inside can still be soft, but the surface should be touch-dry.
Knife Angle Tip
Keep your palette knife at a low, 30-degree angle to the surface when smoothing, and a steep 80-degree angle when you want to scrape or create sharp ridges.
Step 2: Layering Colors
-
Mix the sky tone:
Mix Titanium White with a tiny dot of Unbleached Titanium to create a warm, creamy off-white. -
Paint the upper section:
Using the palette knife, scrape this cream color over the dried texture at the top. Let the knife skip over the ‘valleys’ of the texture so some of the white paste underneath might peek through. -
Mix the horizon color:
Create a soft peach by mixing a small amount of Terracotta with plenty of White. You want a very desaturated, dusty look. -
Apply the middle band:
Apply this peach mixture just below the cream section. Use horizontal sweeping motions with the knife to blend the transition slightly where the two colors meet. -
Add depth:
Dip the very edge of your knife into the pure Terracotta paint. Drag it horizontally through the wet peach section to create a thin, darker organic line that suggests a distant landscape. -
Create the lower transition:
Mix a light Sage Green with White and a touch of Paynes Grey. Apply this below the peach/terracotta band, again using the knife to create horizontal texture.
Gold Leaf Accent
For a luxe touch, press tiny flakes of gold leaf into the tacky paint right at the transition line between the peach and black sections before it dries.
Step 3: Grounding & Details
-
The dark accent:
Squeeze out a bit of Lamp Black and mix it with the modeling paste directly on your palette to create a thick, dark grey sludge. -
Apply the dark band:
Apply this dark mixture near the bottom third of the painting. Press firmly with the knife to create a distinct, jagged separation between the earth and sky tones. -
Soften the bottom:
Below the black line, blend the remaining Sage Green mix with more white to create a very pale, misty grey-green at the very bottom edge. -
Scumbling effect:
Once the paint is tacky but not fully dry, lightly drag a clean, dry knife with a tiny bit of white paint horizontally across the dark section. This ‘scumbling’ technique highlights the texture. -
Side treatment:
Decide if you want to continue the painting onto the sides or leave them raw wood. I personally love the raw wood look as it frames the abstract art nicely. -
Final cure:
Because the modeling paste is thick, set the block aside in a warm, dry place for at least 24 hours to ensure it cures all the way through. -
Seal:
Finish with a light mist of matte varnish to protect the surface without adding unwanted gloss.
Place your finished textural block on a shelf or desk where the side-lighting can really show off those ridges you created
Cozy Candle Glow Still Life
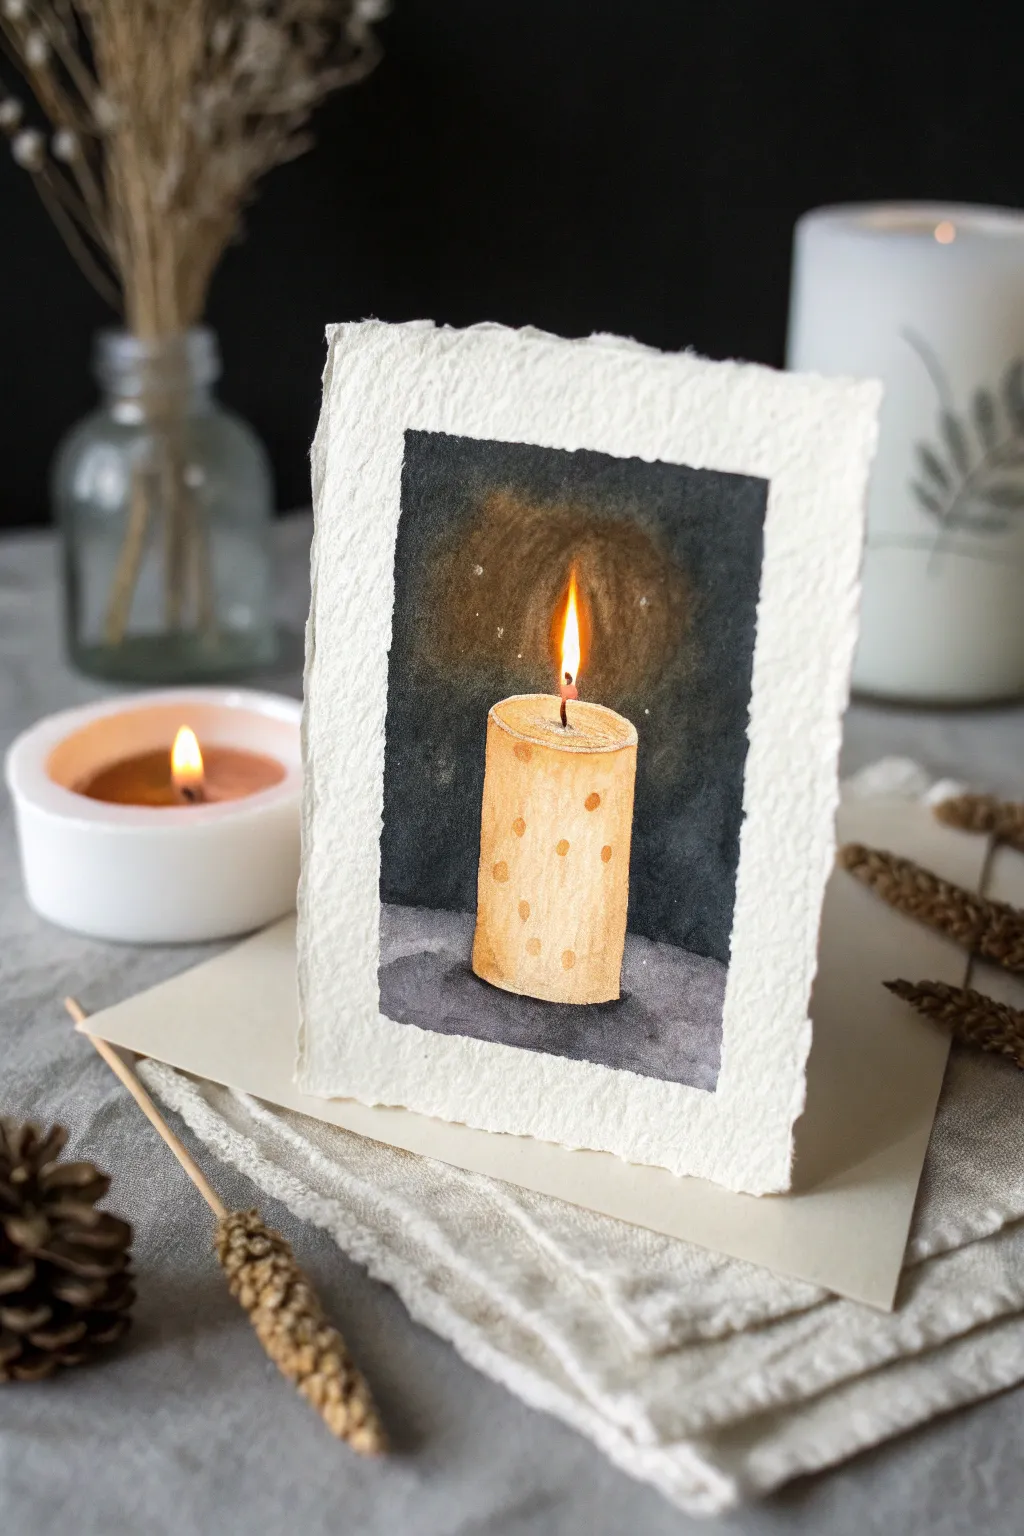
This project captures the warm, comforting essence of a flickering candle using watercolors on beautifully textured paper. The high contrast between the luminous flame and the dark background makes the light seem to truly glow from within the page.
Step-by-Step Tutorial
Materials
- Cold press watercolor paper (300 gsm or heavier), roughly 5×7 inches with deckled edges
- Watercolor paints: Yellow Ochre, Cadmium Yellow, Burnt Sienna, Burnt Umber, Payne’s Grey, and Indigo
- Small round brush (size 2 or 4)
- Medium round brush (size 6 or 8)
- Masking fluid (optional)
- Clean water and paper towels
- Cream or off-white cardstock for mounting
- Pencil and kneadable eraser
Step 1: Sketching and Masking
-
Outline the candle:
Begin by lightly sketching a cylindrical shape in the lower center of your watercolor paper. Draw a slightly flattened oval for the top surface and vertical lines for the sides. -
Add the wick and flame:
Sketch a small, thin wick rising from the center of the oval. Draw a teardrop flame shape around it, making sure it’s tall and elegant rather than short and squat. -
Sketch the details:
Lightly mark small, random circles on the candle body to represent wax texture or embedded elements. Define a horizon line behind the candle to separate the table surface from the background. -
Protect the highlights:
If you are using masking fluid, apply a tiny dot to the very center of the flame and the rim of the candle top. If not, be very mindful to leave these areas pure white as you paint.
Softening Edges
To get that seamless glow, wet the paper around the flame with clean water *before* applying the dark background paint. The dark paint will bleed softly into the wet area.
Step 2: Painting the Light
-
Paint the flame core:
Using your small brush, wet the flame area with clean water. Drop in a concentrated Cadmium Yellow at the base of the flame, letting it bleed upward into a pale yellow tip. -
Create the aura:
While the flame is damp, take a very diluted wash of Yellow Ochre and paint a circle around the flame on the background, softening the edges with water so it fades into nothing. -
Base coat of the candle:
Mix a light wash of Yellow Ochre and a touch of Burnt Sienna. Fill in the body of the candle, working around the small circles you sketched earlier. -
Add warmth to the top:
Paint the top oval of the candle with a slightly lighter version of your candle body mix to show that light is hitting it directly.
Step 3: Building Contrast
-
Start the background:
It’s time for the darks. Mix a rich, dark color using Indigo and Burnt Umber. Do not use plain black, as it can look flat. -
Paint around the glow:
Carefully paint the background, starting from the outer edges and working inward. As you approach the yellow ‘aura’ you painted earlier, dilute your dark mix with water to create a soft, smoky transition. -
Deepen the darks:
While the background is still slightly damp, drop in more pigment (Indigo or Payne’s Grey) into the corners and edges furthest from the light to create a vignette effect. -
Paint the table surface:
For the surface beneath the candle, use a diluted wash of Payne’s Grey. Keep it lighter than the wall behind it to create depth. -
Cast shadow:
While the table wash is wet, add a concentrated stroke of shadow directly under the candle base, blending it outward slightly.
Add Metallic Touches
Use gold watercolor or metallic ink for the small dots on the candle body. It will catch the light beautifully and enhance the feeling of warmth.
Step 4: Refining Details
-
Texture the candle:
Once the candle body is dry, mix a slightly darker ochre tone. Dab this color onto the small circular spots you left blank, giving the candle a mottled, rustic texture. -
Shadow the cylinder:
Add a vertical shadow on the left and right sides of the candle cylinder using a translucent brown glaze to make the form look round. -
Define the wick:
Using the very tip of your smallest brush and a thick mix of Burnt Umber and Indigo, paint the burnt black wick. I usually add a tiny dot of red at the tip where it meets the flame. -
Final glow adjustment:
If the glow needs more intensity, you can gently scrub the area around the flame with a damp brush to lift pigment, or add tiny dots of white gouache for magical dust motes.
Step 5: Finishing Touches
-
Remove masking:
If you used masking fluid, rub it away gently once the paper is completely bone dry. Soften any hard edges with a damp brush. -
Deckle the edges:
To match the reference, tear the edges of your watercolor paper against a ruler to create a rough, deckled look. -
Mount the artwork:
Apply double-sided tape or glue to the back of your painting and center it on a piece of cream cardstock or a folded greeting card base.
Now you have a cozy, hand-painted card ready to bring warmth to someone’s home.
Tiny Window Scene
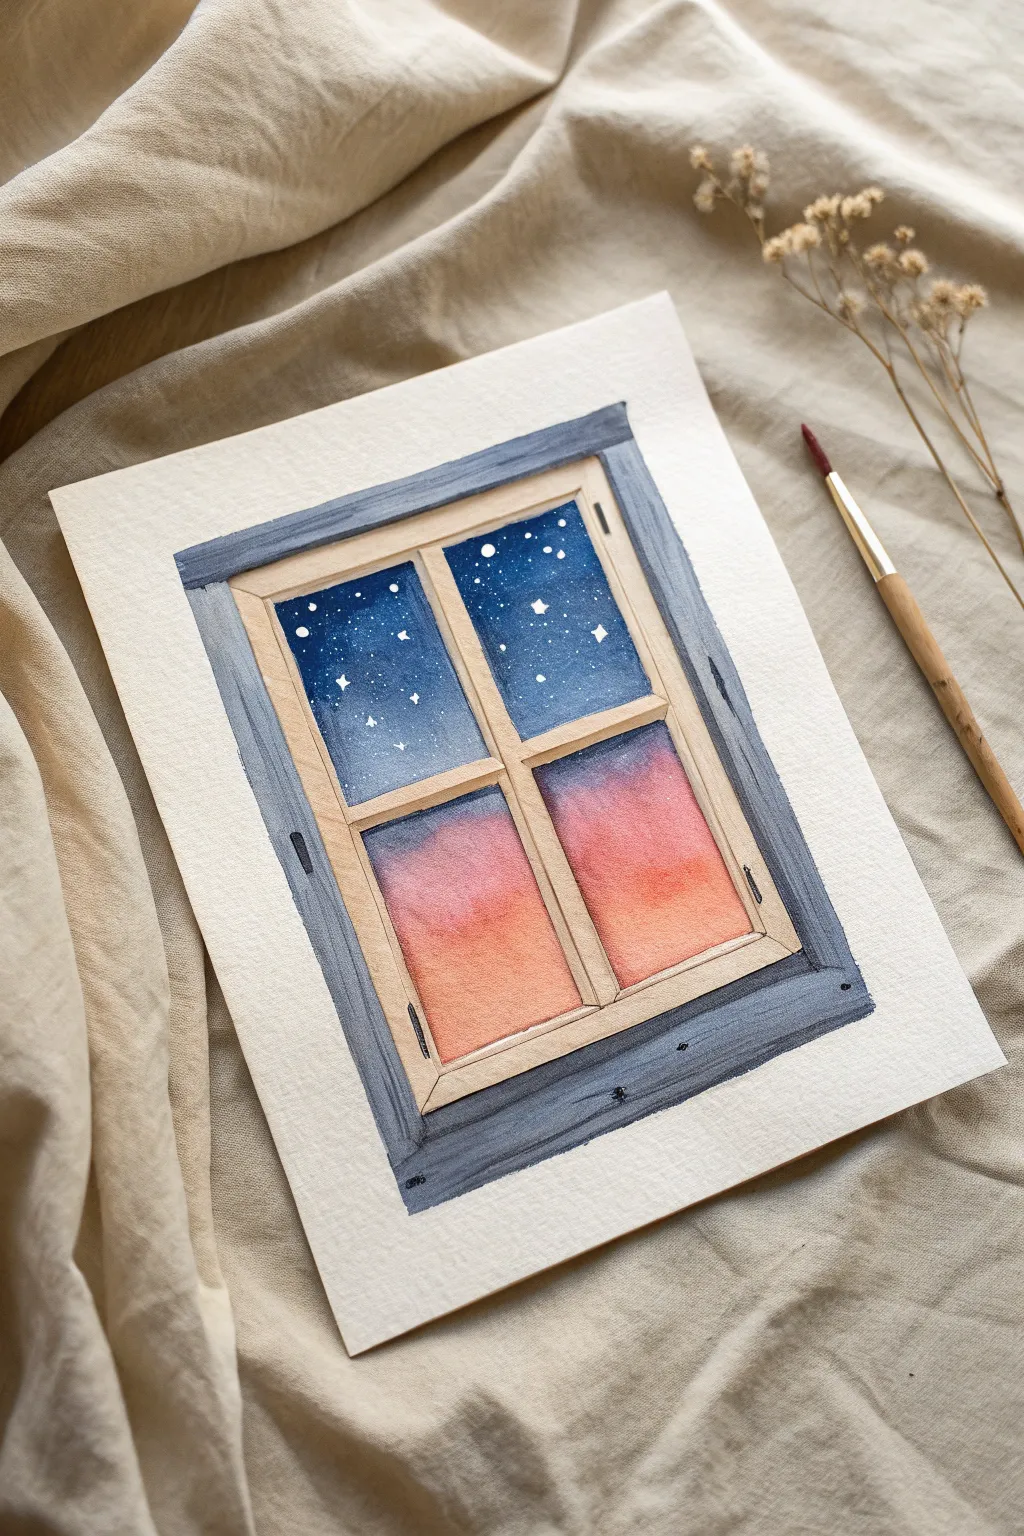
This charming watercolor piece captures the transition between day and night through a rustic window pane. Featuring a dreamy gradient sky blending into a starry deep blue, it uses simple masking techniques to achieve crisp, clean lines.
Detailed Instructions
Materials
- Cold press watercolor paper (approx. 5×7 inches)
- Watercolor paints (Indigo, Prussian Blue, Alizarin Crimson, Orange, Burnt Sienna, Payne’s Grey)
- White gouache or white gel pen
- Washi tape or masking tape (low tack)
- Synthetic round brushes (size 2 and size 6)
- Pencil and eraser
- Ruler
- Two jars of water
- Paper towels
Step 1: Sketching & Preparation
-
Define the perimeter:
Begin by lightly drawing a large rectangle in the center of your paper using a ruler. This will be the outer edge of your window frame. -
Draw the inner frame:
Sketch a smaller rectangle inside the first one, leaving about a half-inch gap for the thick outer casing. Then, divide this inner rectangle into four equal panes by drawing a cross shape. -
Add dimension:
To give the window depth, draw thin diagonal lines from the corners of the window panes inward, creating bevels that suggest the thickness of the wood.
Clean Lines Secret
Use ‘liquid frisket’ or masking fluid on the wood frame areas before painting the sky. It lets you paint freely without worrying about messy edges.
Step 2: Painting the Sky
-
Top panes: Deep blue:
Start with the top two window panes. Mix a rich Indigo with a touch of Prussian Blue. Apply this to the top half of each upper pane, fading it slightly with clean water as you move downward to create a soft gradient. -
Top panes: Starry transition:
While the paint is still damp, drop in small hints of lighter blue near the bottom of these top panes to suggest the fading light, but keep the overall tone dark. -
Bottom panes: Sunset glow:
For the bottom two panes, start at the top edge with a purplish mix (Alizarin Crimson + Blue). Blend this down into a warm Alizarin Crimson. -
Bottom panes: Horizon line:
Finish the bottom of the lower panes with a vibrant Orange, blending it seamlessly into the crimson above. This creates that magical ‘golden hour’ glow. -
Let it dry:
Ensure the sky sections are completely bone-dry before moving on to the frame to prevent bleeding.
Step 3: The Inner Frame
-
Base wood tone:
Mix a watery wash of Burnt Sienna with a tiny dot of Orange. Carefully paint the cross-bars and the inner trim of the window. -
Shadows and details:
Once the base beige layer is dry, use a slightly darker brown mix to paint thin shadow lines on the right side and bottom of each wooden slat. This establishes the light source.
Muddy Gradients?
If your sunset colors turn brown where they meet, let each color strip dry slightly before blending, or ensure your brush is very clean between transitions.
Step 4: The Outer Casing
-
Rustic grey wash:
Mix Payne’s Grey with a lot of water to get a cool, steel-blue grey. Paint the wide outer frame surrounding the window. -
Wood grain texture:
Using your smallest brush (size 2) and a more concentrated (less watery) Payne’s Grey, paint thin, wavy lines along the length of the outer frame to simulate rough wood grain. -
Adding hardware:
Use the tip of your brush to dab small dark rectangles or dots on the frame to look like hinges or nails.
Step 5: Final Touches
-
Stars:
Using opaque white gouache or a white gel pen, dot tiny stars into the dark blue sections of the top panes. Vary the size slightly to make them look more natural. -
Highlights:
Add a few tiny white lines to the edges of the inner wood frame where the light would hit. -
Clean up:
If you used any tape, peel it away gently. Erase any remaining visible pencil lines around the exterior.
Frame your mini masterpiece or gift it to someone who loves stargazing
Mini Series: Four Seasons Set
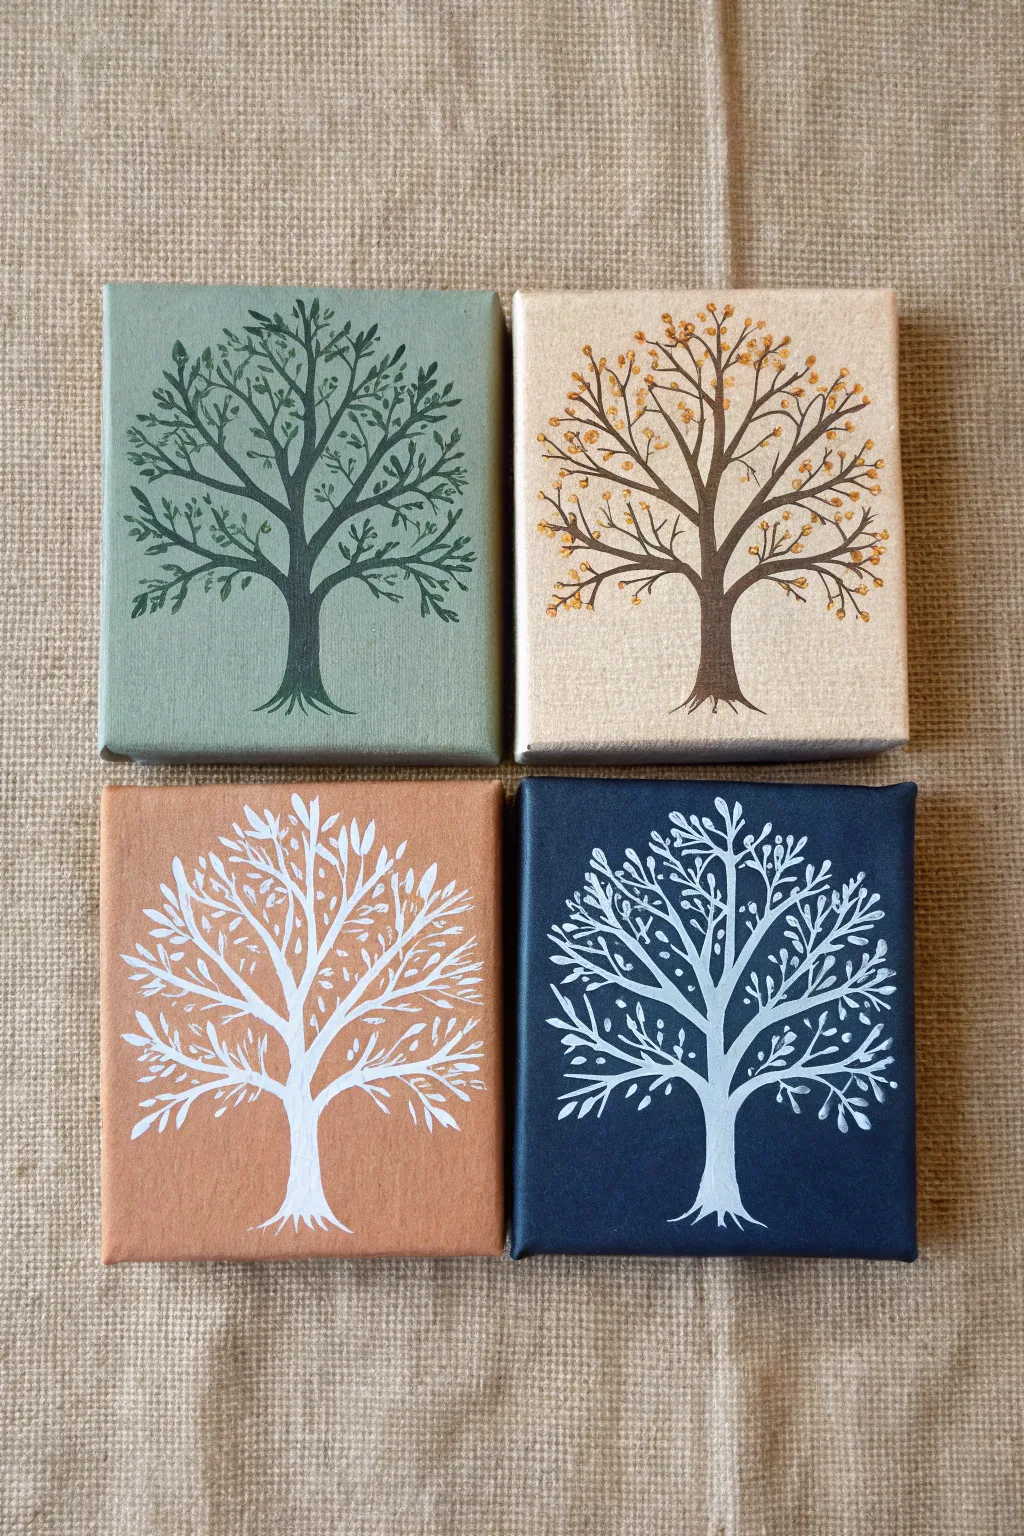
Celebrate the changing year with this charming set of four miniature canvases, each depicting a stylized tree against a seasonal backdrop. The cohesive yet distinct color palettes make this quartet a perfect gallery wall element for small spaces.
Step-by-Step Guide
Materials
- 4 mini square canvases (approx. 4×4 inches)
- Acrylic paints: Sage Green, Terracotta/Burnt Orange, Navy Blue, Titanium White, Dark Brown, Forest Green, Metallic Gold (optional)
- Small flat brush (for backgrounds)
- Fine liner brush (size 0 or 00)
- Palette or paper plate
- Cup of water and paper towels
- Pencil (optional)
Step 1: Setting the Scene
-
Prep the canvases:
Lay out your four mini canvases on a protected work surface. Ensure they are free of dust or lint before starting. -
Paint the Summer background:
For the first canvas (top left), mix a soft sage green using Forest Green and White. Apply an even coat over the entire surface, painting the sides for a finished look. -
Paint the Autumn background:
For the second canvas (top right), leave the canvas raw if it’s a beige tone, or paint it a warm, creamy beige to mimic unbleached linen. -
Paint the Spring/Earth background:
For the third canvas (bottom left), apply a solid coat of Terracotta or warm muted orange paint. -
Paint the Winter background:
For the final canvas (bottom right), paint the entire surface with a deep Navy Blue. Let all backgrounds dry completely before proceeding.
Jittery hands?
Work with your wrist resting on the table for stability. If painting fine lines is hard, use a waterproof fine-tip paint marker instead of a brush for the trees.
Step 2: Creating the Silhouettes
-
Outline the trunk:
Starting with the sage green canvas, use your fine liner brush and dark Forest Green paint. Draw a central vertical line for the trunk, widening it slightly at the base to form roots. -
Branch structure:
Extend two main branches outward from the top of the trunk in a ‘V’ shape. Then, add smaller sub-branches radiating outwards from these main lines. -
Adding foliage details:
For this summer tree, use short, dabbing brushstrokes along the branches to suggest leaves rather than painting individual leaf shapes. Keep the silhouette dark green. -
The Autumn tree:
Switch to your metallic gold or light orange paint for the leaves on the beige canvas. First, paint the trunk in dark brown using the same structure as before. -
Autumn details:
Once the brown trunk is dry, use the very tip of your brush to dot small speckles of orange or gold along the branch tips to represent falling leaves or berries. -
The White Silhouettes:
For the bottom two canvases (Orange and Navy), the trees will be stark white. Ensure your Titanium White paint is opaque; you might need a drop of water to improve flow. -
Painting the white trunks:
On both colored backgrounds, paint the central trunk and root base in white. I find it helpful to paint these simultaneously so the style remains consistent. -
Creating the canopy:
Draw the main branches reaching outward. For the white trees, make the branches slightly more intricate and visible, as they represent the bare bones of the tree or frost-covered limbs. -
Refining the lines:
Go back over your white lines if the background color shows through. A seccond coat on the trunk makes the white pop brilliantly against the navy and orange. -
Final leaf accents:
On the white trees, add tiny, almond-shaped strokes at the ends of the branches to suggest buds or frost, keeping everything in pure white.
Add some sparkle
For the winter (navy) tree, mix a tiny pinch of silver glitter into your white paint or use pearlescent white for a glistening frost effect.
Step 3: Finishing Touches
-
Check for consistency:
Line up all four paintings. Check that the tree trunks are roughly the same height and width to maintain the ‘set’ appearance. -
Clean up edges:
If any tree branches went over the edge unintentionally, use your background color to tidy up the sides of the canvas. -
Varnish (optional):
Once fully dry (give it at least 24 hours), you can apply a matte varnish to protect the paint and unify the sheen across all four pieces.
Arranging these four distinct yet harmonious pieces in a square grid will instantly create a sophisticated focal point in your room
Texture-Forward Mini Impasto
Embrace the tactile beauty of heavy texture with this delightful mini canvas project that makes flowers literally pop off the surface. Using thickened acrylics or modeling paste, you’ll sculpt a dimensional meadow scene that feels just as lovely to touch as it is to look at.
Detailed Instructions
Materials
- Small square canvas (e.g., 6×6 or 8×8 inches)
- White modeling paste or molding paste
- Acrylic paints (Titanium White, Sap Green, Dark Green, Peach/Salmon, Pale Yellow)
- Palette knives (one pointy trowel shape, one narrow rounded tip)
- Small round synthetic brush (size 1 or 2)
- Piping bag with small round tip (optional, for stems)
- Palette or wax paper for mixing
Step 1: Setting the Scene
-
Prepare the gradient background:
Start by squeezing out Titanium White, Peach, a pale Sap Green, and a Dark Green onto your palette. You want to create a vertical gradient on the canvas. -
Blend the sky:
Using a wide flat brush or a large palette knife, apply the Peach and White mix to the top third of the canvas. Use horizontal strokes for a smooth look, but don’t worry about perfection; texture is part of the charm. -
Transition to meadow:
Mix Titanium White with a tiny dot of Sap Green to get a very pale mint. Apply this to the middle section, blending it slightly upwards into the wet peach paint to create a soft transition. -
Anchor with deep greens:
Fill the bottom third with a mix of Sap Green and Dark Green. Use upward, sweeping strokes here to mimic the direction of growing grass. Let this base layer dry completely—this is crucial so your 3D work doesn’t sink or get muddy.
Cracking Issues?
If your thick paste cracks while drying, it usually means the layer was too thick all at once. Apply in two thinner stages next time, or mix a gel medium into the paste to increase flexibility.
Step 2: Sculpting the stems & grass
-
Mix your sculpting medium:
Mix a dollop of modeling paste with your Dark Green acrylic paint. Currently, I find a ratio of about 70% paste to 30% paint keeps the peaks stiff enough for grass blades. -
Apply vertical grass texture:
Using the edge of your palette knife, scrape lines of the green paste mixture upward from the bottom edge. Vary the pressure to make some thick and some thin, creating a grassy bed. -
Pipe or roll the stems:
For the prominent flower stems, you can either roll a thin ‘snake’ of paste with a knife and lay it down, or use a piping bag with a fine tip to draw raised green lines. Create three main stems for your focal flowers and several shorter ones. -
Add delicate leaves:
With the tip of a small palette knife, press small blobs of green paste against the stems and pull outward quickly to form pointy, textured leaves.
Step 3: Creating the 3D Blooms
-
Mix the peach petal paste:
Clean your palette knife thoroughly. Mix a fresh batch of modeling paste with the Peach paint. You want a consistent, frosting-like texture. -
Sculpt the main peach flower:
Locate the top of your tallest stem on the left. Using the rounded tip of a palette knife, scoop a small amount of peach paste and press it down, pulling inward toward the center to form a petal. Repeat this in a circle. -
Refine the peach petals:
Use the knife edge to gently press a central vein into each petal while the paste is still wet. This adds realistic detail. -
Create the white daisy:
Mix white paint with modeling paste. On the right-hand stem, apply longer, slender teardrop shapes radiating from a center point. Overlap them slightly to give the flower volume. -
Add flower centers:
Mix a small amount of reddish-brown and use a piping bag or the tip of a handle to deposit a textured dot in the center of both the peach and white flowers. -
Sculpt the buds:
Using the leftover peach paste, add small, tight oval shapes to the tips of the shorter stems on the left side to represent closed buds.
Clean Knife, Sharp Petals
Wipe your palette knife completely clean after every single petal stroke. Dried bits of acrylic on the knife will drag through your fresh paste and ruin the smooth, sculpted surface.
Step 4: Delicate Details
-
Add tiny filler flowers:
Dip a toothpick or very fine brush handle into plain white modeling paste. Dot small clusters of white around the base of the stems to create the look of baby’s breath or wild chamomile. -
Falling petals:
Place one or two tiny white or peach petals near the bottom of the canvas, as if they have drifted down from the blooms above. -
Final texture check:
Look at the composition from the side. If any petals look flat, add a tiny bit more paste on top to build height before it dries. -
The long dry:
Set the canvas in a safe, dust-free place. Because of the thick impasto layers, this will need at least 24 hours to fully cure and harden.
This little relief sculpture captures the essence of a spring garden that you can keep year-round.

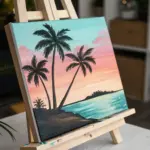
Have a question or want to share your own experience? I'd love to hear from you in the comments below!