When I’m craving something festive without committing to a huge project, small pumpkins are my go-to—they’re quick, cute, and super forgiving. Below are my favorite small pumpkin ideas that lean into their tiny size with simple shapes, bold paint, and clever little groupings.
Classic Mini Jack-o’-Lantern Faces
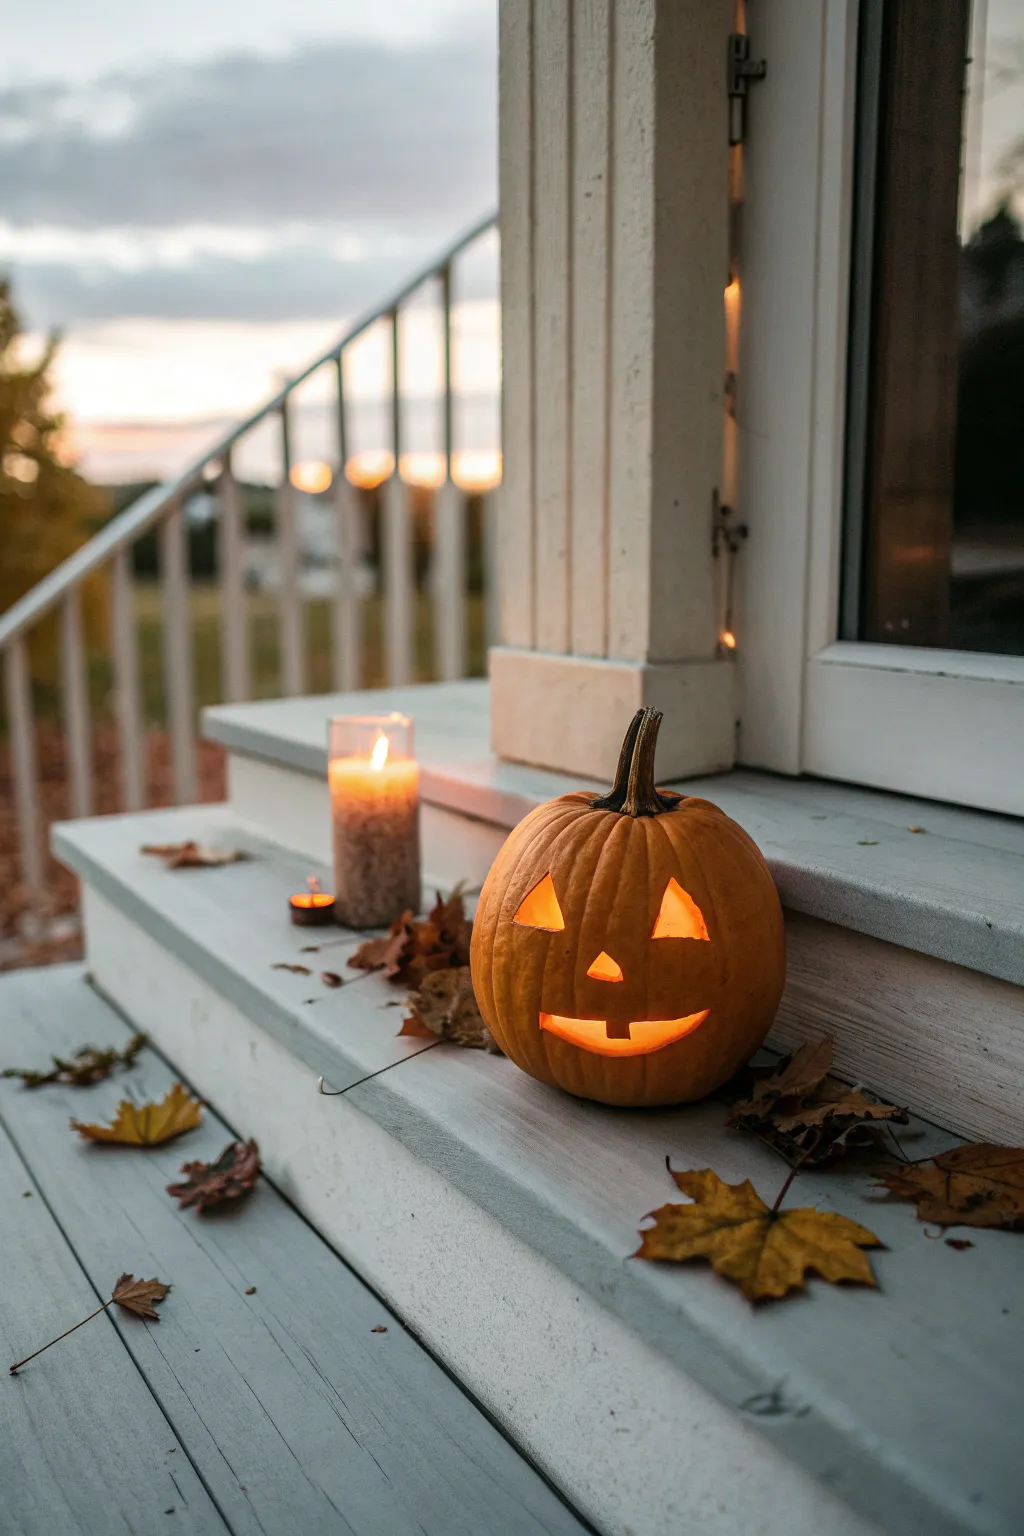
Capture the nostalgic essence of Halloween with this simple yet expressive mini pumpkin carving. Its classic triangular eyes and single-toothed smile create a warm, inviting glow perfect for greeting guests on your front steps.
Step-by-Step Guide
Materials
- Small to medium round orange pumpkin (preferably with a sturdy stem)
- Small serrated pumpkin carving saw or a sharp paring knife
- Large metal spoon or pumpkin scraper
- Water-soluble marker or pencil
- Tea light candle or battery-operated LED light
- Bowl for seeds and pulp
- Towel or newspaper for workspace protection
Step 1: Preparation & Cleaning
-
Select your canvas:
Choose a pumpkin that sits flat without wobbling. A slightly taller shape works nicely for this particular face design. -
Clean the surface:
Wipe down the exterior of the pumpkin with a damp cloth to remove any dirt or field debris, then dry it completely so your marker lines won’t smudge. -
Draw the lid:
Using your marker, draw a circle around the stem about 2 inches in diameter. I like to add a small notch or triangle shape in the back of this circle; this acts as a key so you always know how the lid fits back on. -
Cut the lid:
Insert your serrated saw or knife at a 45-degree angle inward toward the center of the pumpkin. This angle prevents the lid from falling inside once the pumpkin shrinks slightly. -
Remove the top:
Gently pry the lid off by the stem. If it sticks, run your knife around the cut one more time to ensure all fibers are severed. -
Scoop the interior:
Use the metal spoon to scrape out the seeds and stringy pulp. Scrape the inner wall where you plan to carve the face until it is about 1 inch thick, which makes cutting features much easier.
Tooth Trouble?
If the tooth accidentally breaks off while carving, don’t panic. Use a sturdy toothpick to pin it back into the bottom gum line of the mouth.
Step 2: Designing the Face
-
Draft the eyes:
On the smoothest side of the pumpkin, draw two equilateral triangles for eyes. Place them about midway up the pumpkin’s height, spacing them roughly an inch apart. -
Add the nose:
Draw a smaller triangle centered below the eyes for the nose. Position it slightly lower than you might think to leave room for the expressive eyes. -
Sketch the mouth:
Draw a wide, shallow U-shape for the smile. Add a straight line across the top to close the mouth shape. -
Create the tooth:
On the bottom lip of your mouth outline, draw a small square rising up into the mouth cavity. This single tooth gives the pumpkin its charming character.
Spooky Spice
Sprinkle cinnamon or pumpkin pie spice on the inside of the lid. When the candle warms it up, your porch will smell like autumn baking.
Step 3: Carving & Finishing
-
Cut the eyes:
Using your small saw, cut along the lines of the eye triangles. Use a gentle up-and-down sawing motion rather than forcing the blade. -
Pop out the pieces:
Once an eye is fully cut, push the loose piece gently from the inside out to avoid breaking the delicate pumpkin wall. -
Carve the nose:
Carefully saw out the small nose triangle. Since this shape is small, go slowly to maintain sharp corners. -
Cut the mouth outline:
Saw along the top straight edge of the mouth first. Then, cut the curved bottom line, stopping when you reach the vertical lines of the tooth. -
Detail the tooth:
Carefully cut around the square tooth shape. This is the most delicate part, so take your time to ensure the tooth remains attached to the pumpkin bottom. -
Clean up edges:
Remove the large mouth piece. Use a small knife to trim away any ragged pumpkin flesh or dangling strings inside the cutouts for a cleaner look. -
Erase guidelines:
Wipe away any remaining marker lines with a damp cloth or a little rubbing alcohol. -
Preserve the cut edges:
Rub a tiny bit of petroleum jelly on the cut surfaces of the eyes, nose, and mouth. This helps seal in moisture and keeps the pumpkin looking fresh longer. -
Lighting up:
Place your tea light or LED candle inside. If using a real flame, ensure it sits flat and consider leaving the lid slightly askew or cutting a small chimney hole in the back for ventilation.
Set your finished jack-o’-lantern on the step alongside some fallen leaves to welcome the season.


Minimal Dot-Eye Smiley Minis
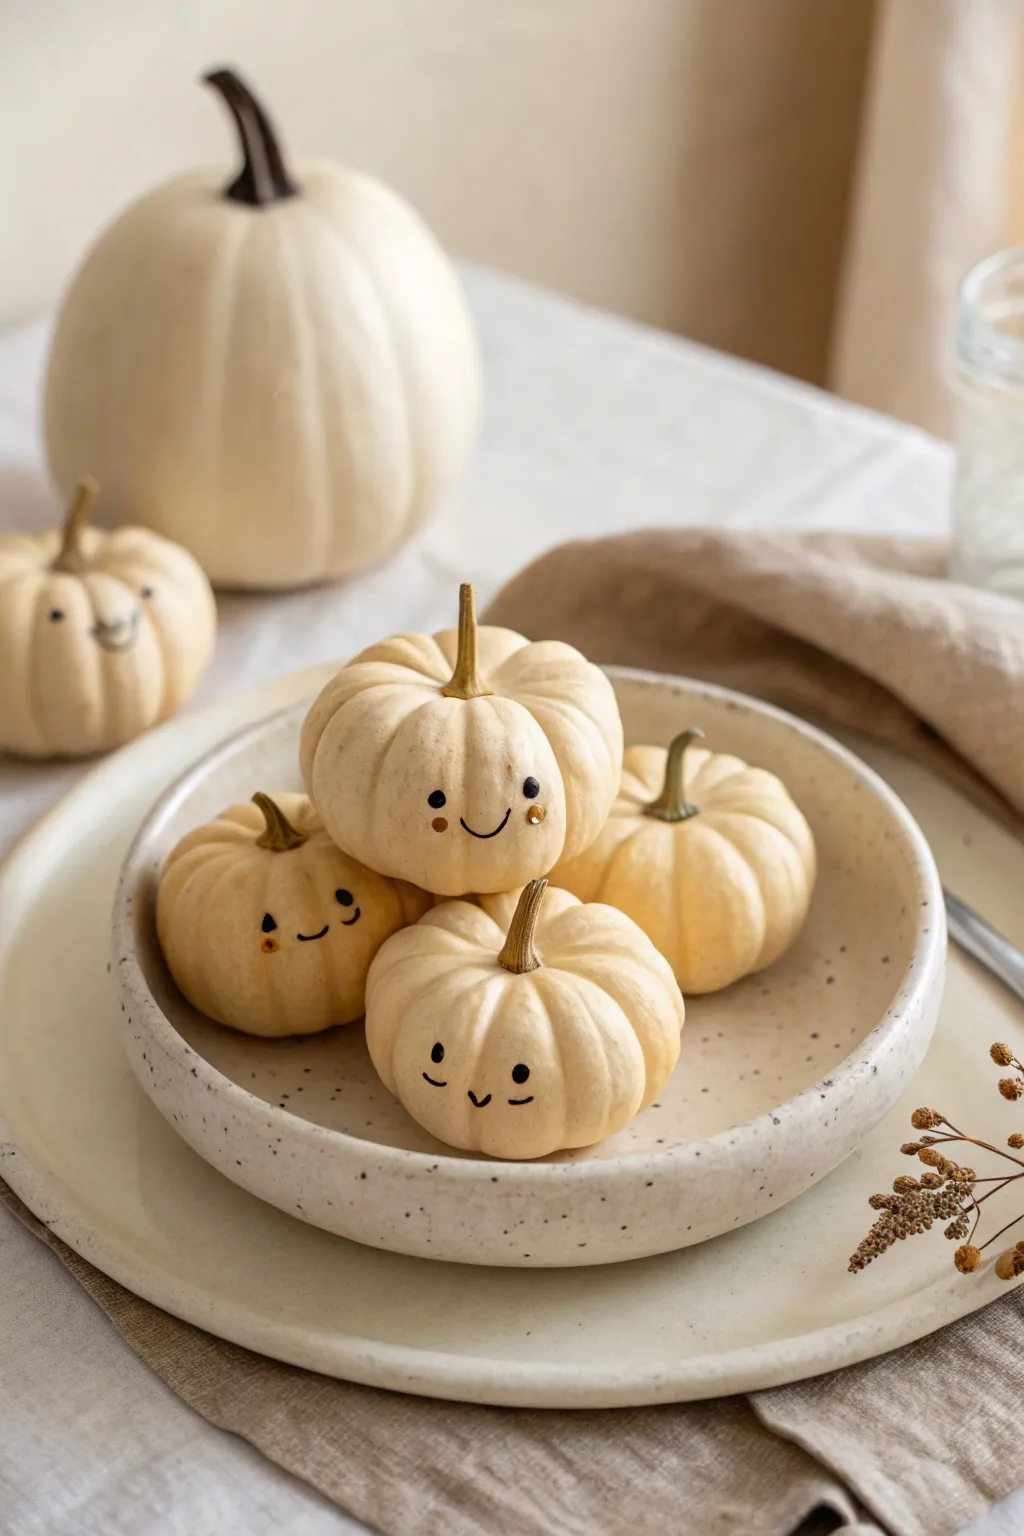
These charming miniature pumpkins are the epitome of sweet, understated autumn decor. By adding tiny, minimalist faces to creamy white pumpkins, you create an adorable centerpiece that feels both modern and whimsical.
Detailed Instructions
Materials
- Small white pumpkins (real ‘Baby Boo’ variety or faux)
- Fine-point black permanent marker or posca paint pen
- Soft cloth or paper towel
- Rubbing alcohol
- Pencil (optional for sketching)
- White eraser (optional)
- Matte clear sealant spray (optional)
Step 1: Preparation
-
Clean the surface:
Begin by gently wiping down each pumpkin with a soft cloth. If you are using real pumpkins, they often have a bit of dirt or farm residue. -
Degrease for adhesion:
Moisten a part of your cloth with a little rubbing alcohol and swipe over the smoothest side of the pumpkin. This removes natural oils and ensures your marker ink won’t bead up or smudge. -
Select the face side:
Turn the pumpkin around in your hands to find the ‘face.’ You’re looking for the smoothest, most unblemished section of the rind, ideally one that sits relatively flat when the pumpkin is resting. -
Dry generally:
Let the alcohol evaporate completely before you attempt to draw. This usually takes just a few seconds, but drawing on a damp surface will cause the ink to bleed.
Ink Beading Up?
If the marker ink separates on the surface, the pumpkin skin is too waxy. Wipe it clean and lightly buff the spot with fine sandpaper before drawing again.
Step 2: Drafting the Design
-
Visualize the placement:
Ideally, these faces look best when placed slightly lower than the center line of the pumpkin. This gives them a cute, ‘chubby’ appearance. -
Lightly sketch positions:
If you are nervous about freehanding with permanent ink, use a pencil to make two very faint dots for eyes. Keep them widely spaced apart for that specific ‘kawaii’ look seen in the photo. -
Mark the mouth:
Sketch a tiny, shallow ‘U’ shape exactly centered between the eye dots, but slightly lower down. The mouth should be significantly smaller than the width between the eyes. -
Check the expression:
I prefer to step back and look at the pumpkin from a distance here. The pencil is faint, but you can tell if the expression feels balanced before committing.
Eye Symmetry Trick
Cut a tiny strip of paper with two holes punched in it. Use this as a stencil to mark your eye placement perfectly spaced every time.
Step 3: Inking the Features
-
Draw the first eye:
Using your black permanent marker or paint pen, create the first eye. Instead of just tapping a dot, gently press and make a tiny circular motion to create a solid, bold circle about 2-3mm wide. -
Draw the second eye:
Repeat the process for the second eye. Try to match the size of the first dot exactly. Variations in size can make the expression look surprised rather than sweet. -
Create the smile:
Draw the smile with a single, confident stroke. Start from the left, curve down gently, and flick up slightly at the end. -
Add cheek details:
For the pumpkin that has cheeks, add two tiny dots just outside and slightly below the main smile curve. This adds a blushing effect. -
Create variation:
For a different expression shown in the group, try drawing the eyes as tiny upside-down ‘U’ shapes instead of dots to create a ‘happy squint’ look. -
Let the ink set:
Do not touch the faces for at least 5-10 minutes. Even permanent marker can smear on the waxy surface of a pumpkin skin if not given ample time to dry.
Step 4: Finishing Touches
-
Clean up stray marks:
If any pencil lines are still visible around your ink, wait until the ink is fully bone-dry, then deeply gently erase the graphite with a white eraser. -
Seal (Optional):
If these will be handled frequently or used outside, give the face area a very light misting of matte clear sealant spray to lock the design in place. -
Arrangement:
Nestle your finished pumpkins into a shallow bowl or specked ceramic plate. Tucking them closely together emphasizes their personality as a little group.
Now you have a handful of delightful personalities ready to brighten up any corner of your home


Tiny Toothy Grins
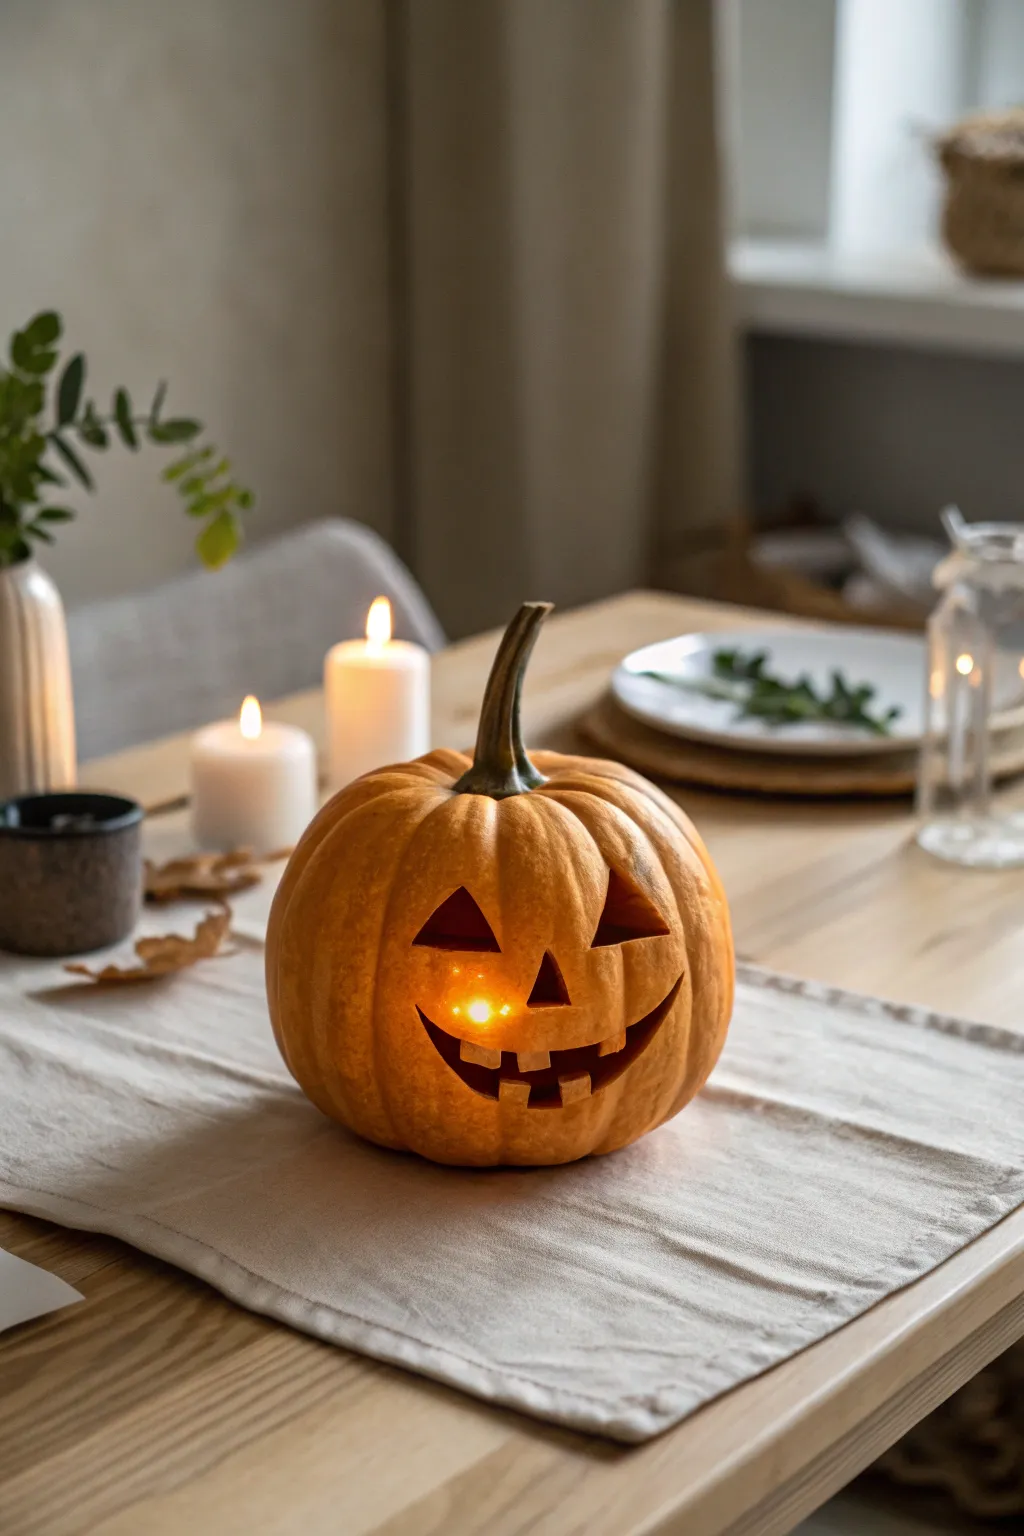
Capture the essence of traditional Halloween charm with this perfectly proportioned small pumpkin carving. This design features classic triangular eyes and a wonderfully jagged, toothy grin that glows warmly from within, making it an ideal centerpiece for a cozy autumn table.
Step-by-Step Tutorial
Materials
- One small to medium round orange pumpkin (approx. 6-8 inches diameter)
- Pumpkin carving kit (or a sharp serrated paring knife)
- Large metal spoon or pumpkin scraper
- Water-soluble marker or pencil
- Bowl for seeds/pulp
- LED votive candle or tea light
- Paper towel or rag
Step 1: Preparation and Cleaning
-
Select the face side:
Examine your pumpkin to find the smoothest side. Look for a surface without deep blemishes or bumps that might interfere with your carving tools. -
Wipe it down:
Clean the exterior with a damp rag to remove any dirt or field dust. Drying it thoroughly ensures your marker won’t smudge during the design phase. -
Cut the lid:
Using a serrated knife, cut a circle around the stem. Angle your knife inward at about 45 degrees toward the center; this creates a ledge so the lid won’t fall inside later. -
Remove the top:
Gently pry the lid off by the stem. Trim any hanging pulp from the bottom of the lid to keep it clean. -
Scoop the interior:
Use a large metal spoon or scraper to remove the seeds and stringy pulp. I prefer to scrape the inner wall of the ‘face side’ a bit thinner (about 3/4 inch thick) to make carving easier and the light brighter.
Broken Tooth Fix
If a tooth snaps off during carving, don’t panic. Use a sturdy toothpick broken in half to pin the piece back into place from the inside. It will be invisible from the outside.
Step 2: Drafting the Design
-
Mark the eyes first:
Using a water-soluble marker, draw two equilateral triangles for eyes about one-third of the way down the pumpkin face. Space them slightly apart for a friendly look. -
Add the nose:
Draw a smaller triangle right in the center, slightly below the eyes. This one usually looks best if it’s slightly narrower than the eye triangles. -
Sketch the smile curve:
Draw a wide, U-shaped curve starting below the nose. Extend the corners up toward the outer edges of the eyes to ensure a happy expression. -
Detail the teeth:
Along your smile curve, sketch out square or rectangular teeth. For this specific ‘toothy grin’ look, draw two prominent top teeth and three bottom teeth in the gaps.
Cinnamon Scent Hack
Make your glowing pumpkin smell like autumn pie by sprinkling cinnamon or pumpkin spice on the underside of the lid. The warmth of the light releases the scent gently.
Step 3: Carving the Features
-
Carve the eyes:
Begin with the eyes. Insert your small serrated saw or knife perpendicular to the pumpkin skin. Use a gentle sawing motion to cut along your lines. -
Pop out the pieces:
Once an eye shape is fully cut, push the piece gently from the inside out to remove it cleanly without tearing the skin. -
Carve the nose:
Cut the nose triangle next. This is often the smallest piece, so go slowly to avoid over-cutting the corners. -
Start the mouth outline:
For the mouth, don’t try to cut the whole thing at once. Start by cutting the upper line of the smile, carefully tracing around the top teeth. -
Finish the jawline:
Cut the bottom line of the smile, navigating around the bottom teeth marks. Take your time comfortably sawing through the curves. -
Define the teeth:
Go back and make the vertical cuts to separate the teeth shapes. This requires finesse, as the pumpkin flesh between teeth can be fragile. -
Remove oral sections:
Remove the pumpkin pieces in the ‘gap’ areas of the mouth. You might need to wiggle them slightly or push from the inside to release them.
Step 4: Finishing Touches
-
Clean the edges:
Check your cutouts for any hanging bits of pumpkin flesh or jagged skin edges. Trim these away carefully for a sharp, clean silhouette. -
Wipe away marks:
Take a damp paper towel and wipe off any remaining marker lines from the face surface. -
Light it up:
Place an LED votive or tea light inside the pumpkin. Using an LED is great because it prevents the pumpkin from shriveling too quickly from heat.
Place your newly carved creation on the table and enjoy the warm, welcoming glow it brings to the room


Painted Ghost Mini Pumpkins
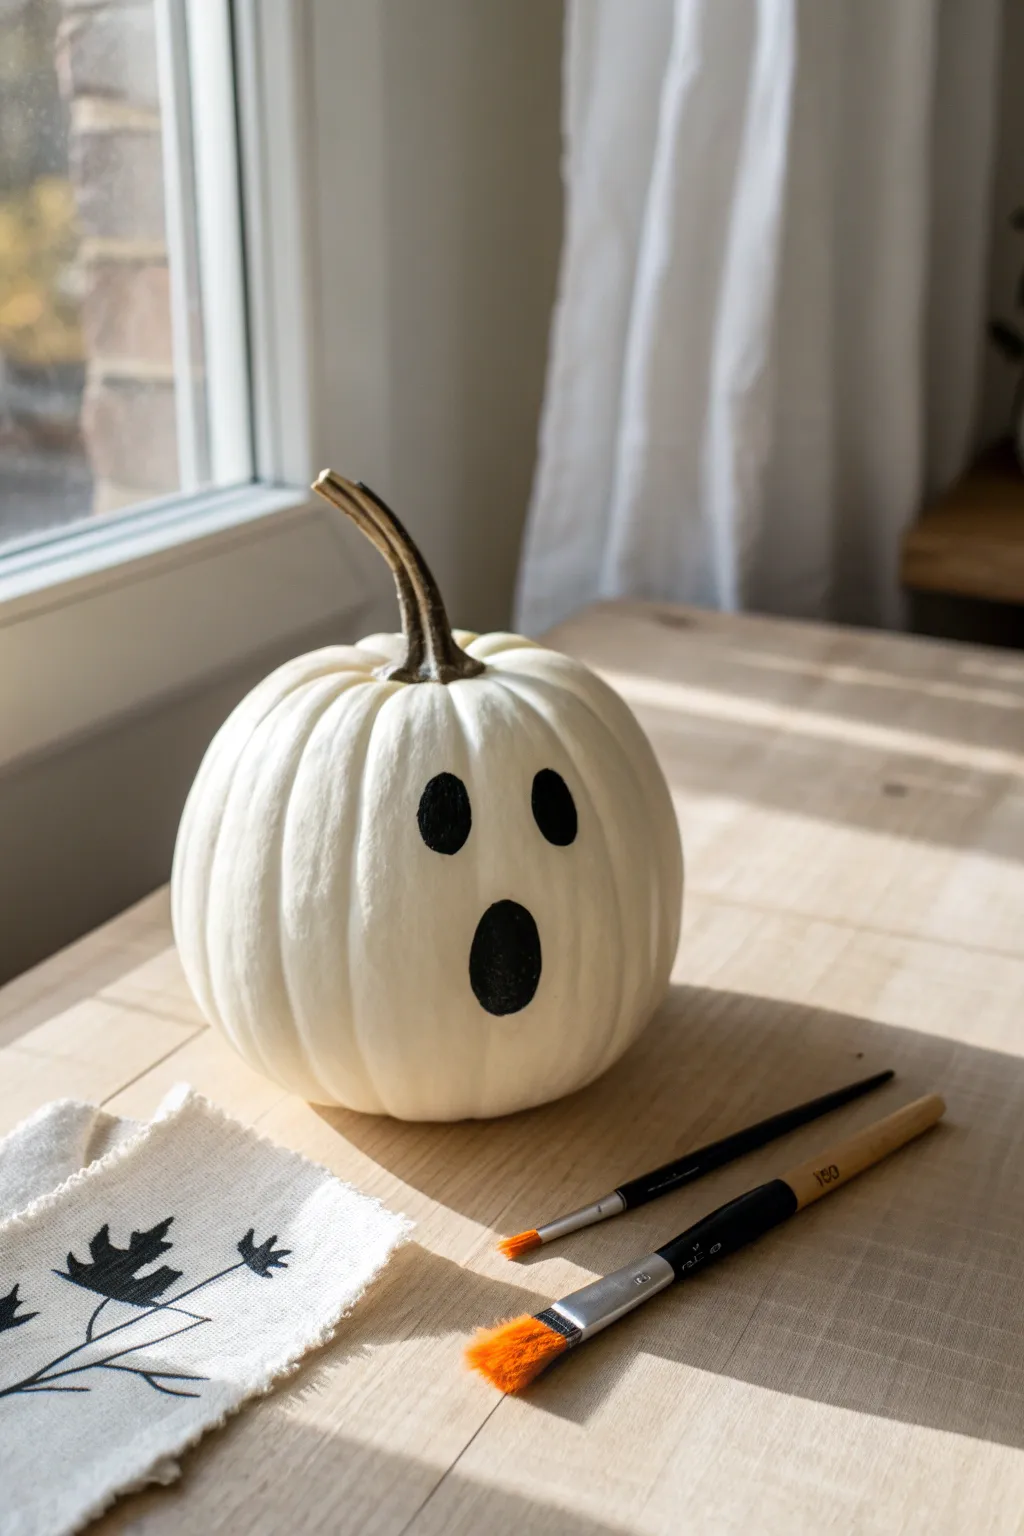
Turn a naturally white pumpkin into a charmingly spooky ghost with just a few dabs of paint. This minimalist project embraces the pumpkin’s natural shape to create a classic Halloween decoration that is both cute and slightly eerie.
Step-by-Step
Materials
- Small white pumpkin (Casper or Lumina variety)
- Black acrylic paint
- Small round paintbrush
- Medium flat paintbrush
- Microfiber cloth or paper towel
- Pencil (optional)
- Small palette or plate
Step 1: Preparation & Planning
-
Clean surface:
Begin by thoroughly wiping down your white pumpkin with a damp cloth. You want to remove any dirt or field dust that might prevent the paint from sticking smoothly. -
Dry completely:
Allow the pumpkin to air dry completely. Acrylic paint adheres best to a bone-dry surface, so patience here ensures a longer-lasting design. -
Choose the face side:
Rotate your pumpkin to find the ‘front.’ Look for a relatively smooth section without deep blemishes where the eyes and mouth will sit nicely. -
Plan placement:
Visualize three points: two eyes generally aligned horizontally, and an oval mouth centered below them to create that shocked ghost expression. -
Light sketch:
If you’re nervous about freehanding, use a pencil to very lightly sketch the ovals for the eyes and the larger oval for the mouth. Keep the lines faint so they don’t show through later.
Uneven Paint?
If the black paint looks streaky or gray after drying, the pumpkin skin might be too slick. Allow the first coat to dry fully, then dab a second coat on top for a solid, jet-black finish.
Step 2: Painting the Ghost
-
Load the brush:
Squeeze a small amount of black acrylic paint onto your palette. Dip your small round brush in, ensuring the bristles are coated but not dripping. -
Outline the left eye:
Start with the left eye. Paint a small, vertical oval shape. I find it helpful to start in the center and spiral outward until the oval reaches the desired size. -
Outline the right eye:
Move to the right eye, painting a matching oval. Try to keep it roughly the same size as the first one, but remember that slight asymmetry adds character. -
Fill the eyes:
Use the brush to carefully fill in both eye ovals with solid black paint. Smooth out any brushstrokes so the finish looks matte and even. -
Draft the mouth:
Dip your brush again and start the mouth. This oval should be significantly larger and taller than the eyes to create the gaping ‘Woooo!’ expression. -
Widen the shape:
Elongate the mouth shape vertically. A taller oval emphasizes the spooky, shocked look more than a wide circle would. -
Fill the mouth:
Fill in the mouth completely with black paint. Be careful near the edges to keep the lines crisp against the white pumpkin skin. -
Check for gaps:
Look closely at your black shapes. If the pumpkin’s natural texture is showing through, apply a second thin coat of black paint for full opacity. -
Clean edges:
If any edges look wobbling or uneven, use the very tip of your small brush to gently smooth the perimeter of your ovals. -
Protect the stem:
Ensure no black paint accidentally smudged onto the stem or other parts of the pumpkin. A quick wipe with a damp Q-tip can fix any stray marks while wet. -
Final drying:
Set the pumpkin in a safe spot to dry untouched for at least an hour. The thick black paint needs time to set fully so it doesn’t smear when moved.
Add Dimension
Mix a tiny drop of white into your black paint to create a dark grey. Add a minuscule highlight dot to the eyes to give your ghost a bit more life and direction.
Place your little ghost pumpkin on a windowsill or table for an instant touch of Halloween spirit
BRUSH GUIDE
The Right Brush for Every Stroke
From clean lines to bold texture — master brush choice, stroke control, and essential techniques.
Explore the Full Guide
Spiderweb Linework Wrap
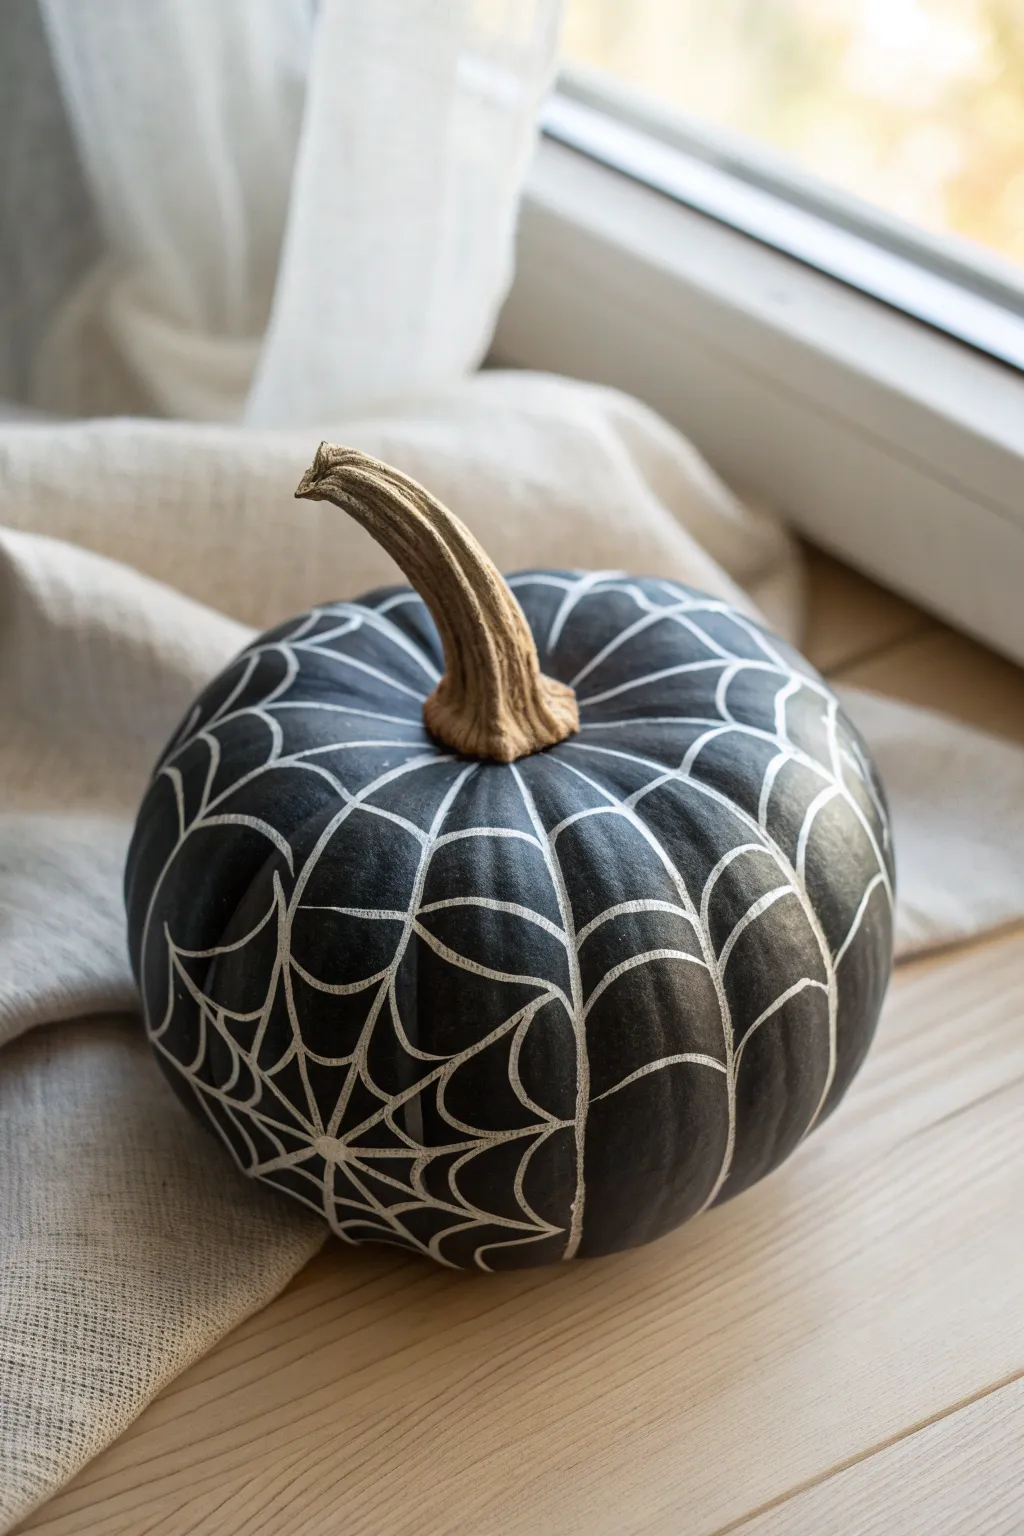
Transform a simple pumpkin into a sleek Halloween decoration with this high-contrast spiderweb design. The matte black finish paired with delicate white linework creates a sophisticated yet spooky look perfect for a windowsill display.
Step-by-Step Tutorial
Materials
- Small to medium pumpkin (real or faux)
- Matte black spray paint or acrylic craft paint
- White paint pen (fine tip) or white gel pen
- Clean cloth
- Painter’s tape or masking tape
- Pencil (optional)
- Newsprint or drop cloth
Step 1: Base Preparation
-
Clean the Surface:
Begin by thoroughly washing and drying your pumpkin to remove any dirt or oily residue. A clean surface ensures the paint adheres properly and doesn’t flake off later. -
Protect the Stem:
Carefully wrap the stem entirely with painter’s tape or masking tape. We want to keep the natural brown texture of the stem to contrast with the dark pumpkin body. -
Prime the Area:
Set up a well-ventilated workspace covered with newsprint or a drop cloth to protect your surrounding surfaces from overspray. -
Apply Base Coat:
Spray the pumpkin with matte black paint, holding the can about 8-10 inches away. Use smooth, sweeping motions to apply a light first coat. If you are using brush-on acrylics, apply a thin, even layer with a wide brush. -
Build Coverage:
Allow the first coat to dry until tacky, then apply a second coat to ensure complete opacity. Check for any orange spots peeking through near the bottom. -
Let it Cure:
Allow the black paint to dry completely. This is crucial—if the paint is even slightly wet, your white pen will clog or drag through the surface.
Step 2: Web Construction
-
Remove Tape:
Gently peel away the tape from the stem once the paint is fully dry to reveal the natural wood contrast. -
Establish Anchors:
Using your white paint pen, draw vertical lines originating from the base of the stem down to the bottom of the pumpkin. Follow the natural ribs or grooves of the pumpkin for organic placement. -
Space the Ribs:
Continue drawing these vertical ‘anchor’ lines around the entire circumference. I find spacing them about 1.5 to 2 inches apart works best for a balanced web. -
Start the Webbing:
Near the top of the pumpkin, draw a small, curved line connecting two vertical anchor lines. The curve should dip downward slightly, like a draped string. -
Create the Top Ring:
Continue connecting the vertical lines with these downward curves all the way around the top section of the pumpkin to create your first ‘ring’ of webbing. -
Add Middle Sections:
Move lower down the pumpkin and repeat the process, drawing larger curved lines connecting the vertical ribs. Ensure the curves dip consistently to mimic gravity. -
Vary the Pattern:
As you move toward the bottom, you can make the web sections larger. Don’t worry about perfect symmetry; natural spiderwebs are rarely perfect. -
Check Line Opacity:
If the black paint is showing through your white lines, go back over pivotal intersections or faint lines a second time to brighten them up. -
Detail the Bottom:
Extend the pattern all the way to the base of the pumpkin so the design doesn’t abruptly stop when viewed from the side. -
Clean Up:
Inspect the web for any gaps where lines should meet but don’t quite touch. extending these connection points makes the structure look solid.
Ink Not Flowing?
If your paint pen drags or stops flowing, press the tip onto a scrap piece of paper or cardboard a few times to re-saturate the nib before returning to the pumpkin.
Pro Tip: Steady Hand
Rest your pinky finger on a dry section of the pumpkin while drawing. This acts as a pivot point and stabilizer, giving you much cleaner, smoother curved lines.
This refined black-and-white pumpkin is now ready to add a touch of elegant noir to your seasonal decor
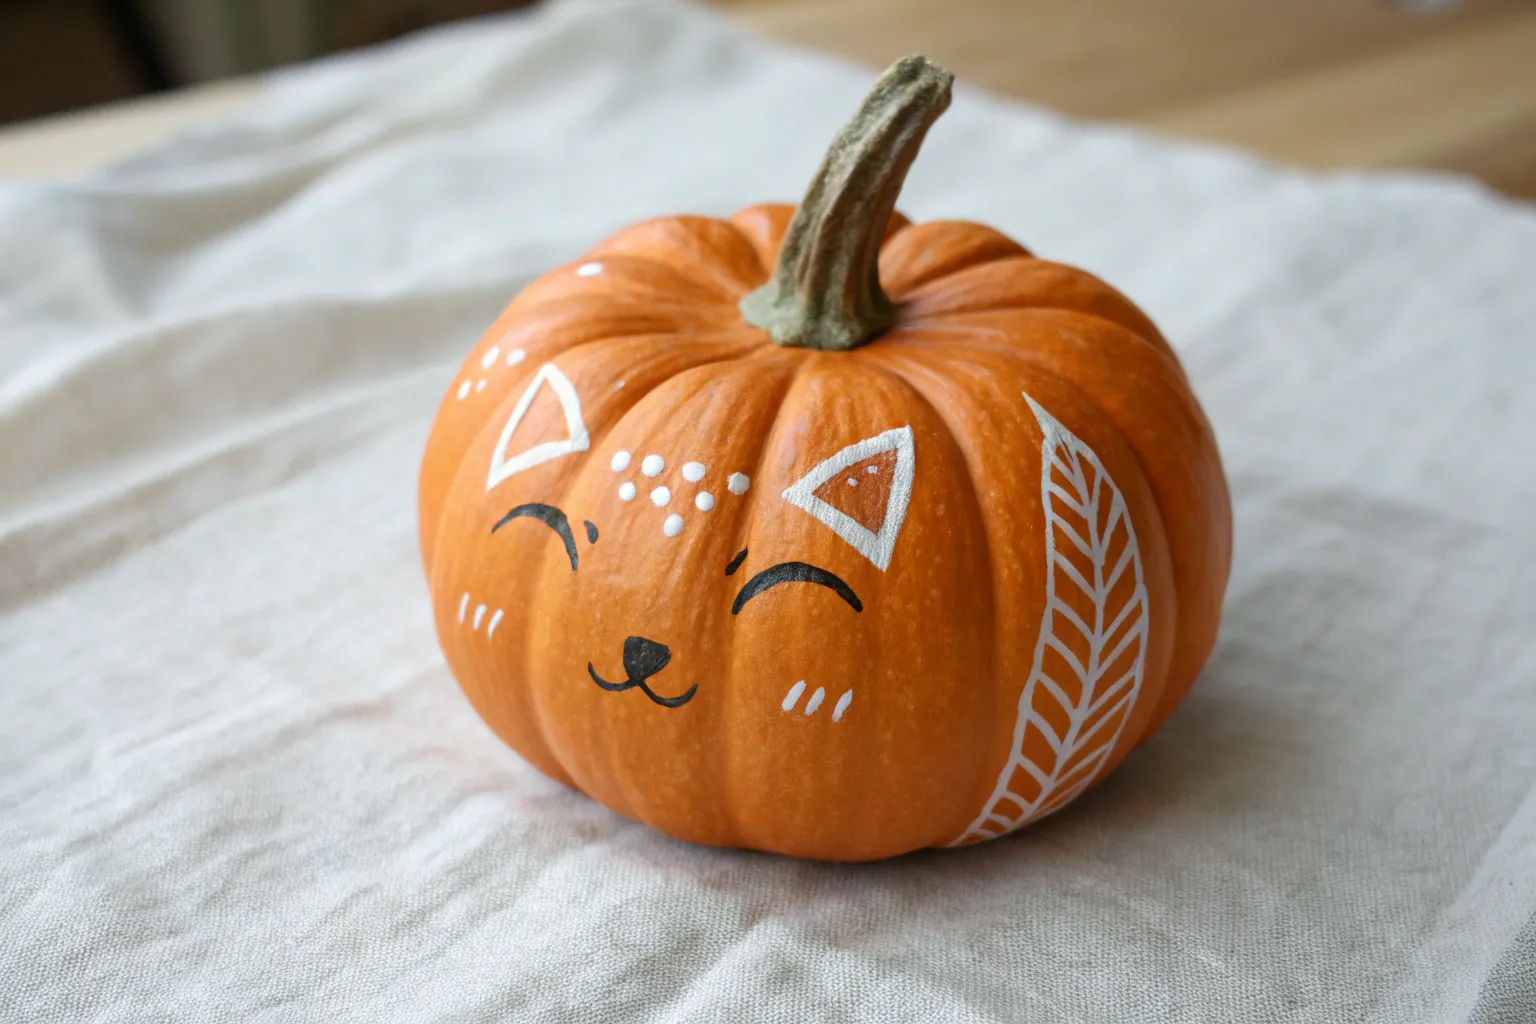
Mini Pumpkin Cat Characters
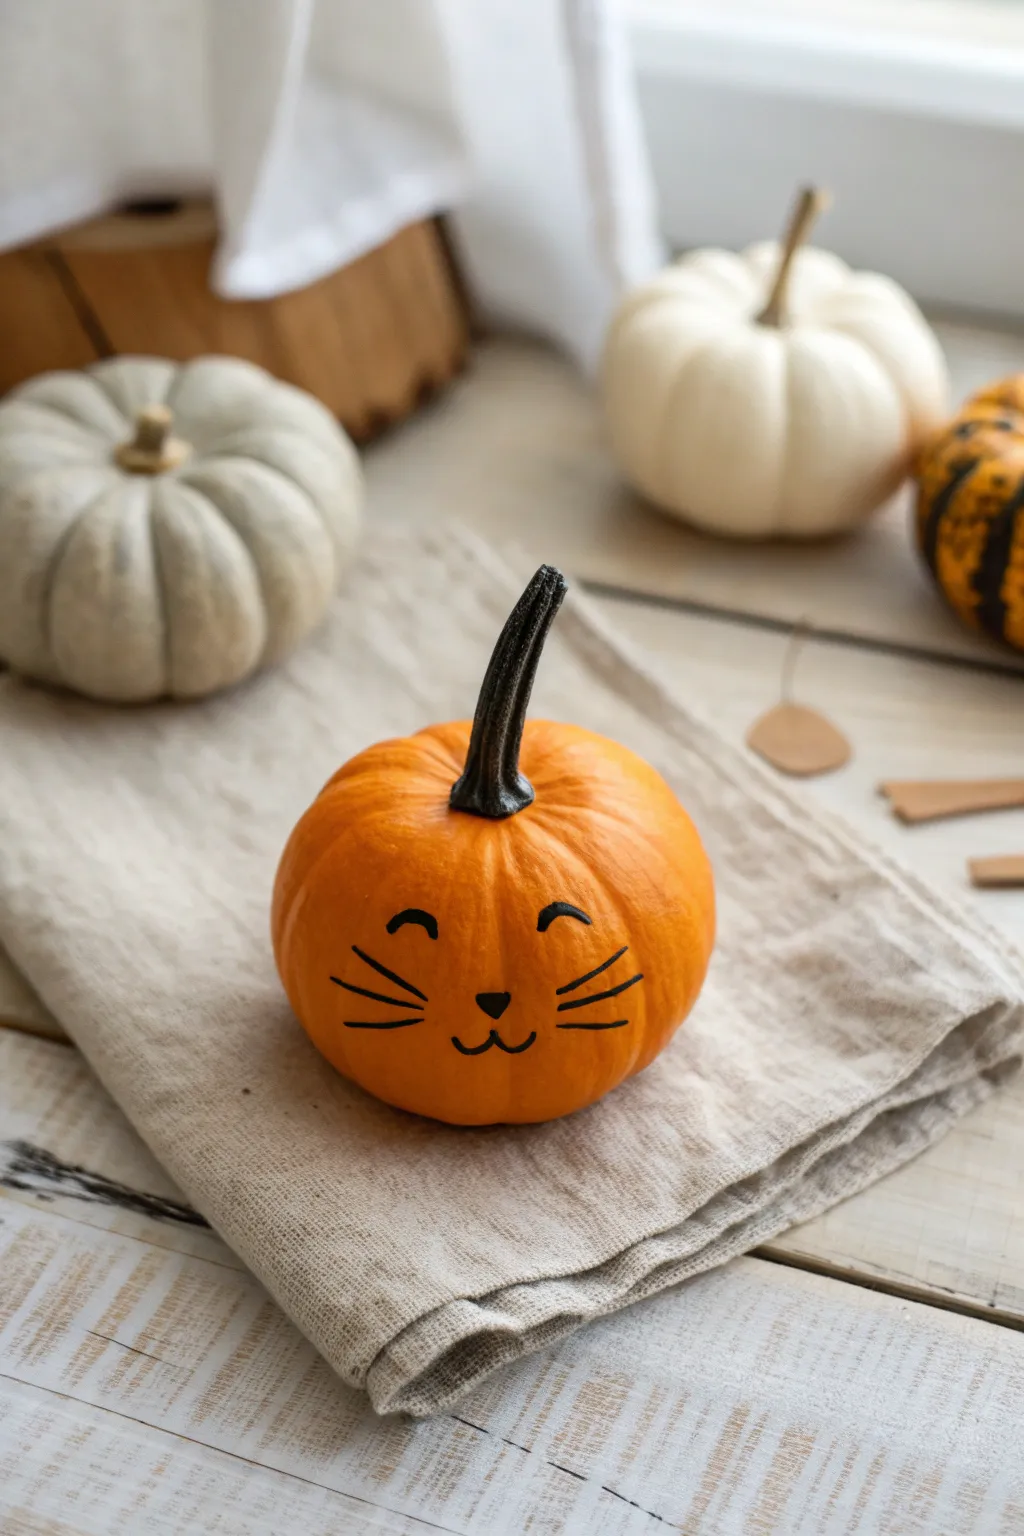
Transform a humble mini orange pumpkin into a charming feline friend with just a few strokes of a marker. This minimalist, no-carve project is perfect for quick seasonal decor and safely avoids any knife work, resulting in an adorable character with a sweet, smiling expression.
Step-by-Step
Materials
- Small orange pumpkin (clean and dry)
- Black permanent marker (fine or medium tip)
- Black acrylic paint (optional, for the stem)
- Small paintbrush (optional)
- Pencil (optional, for sketching)
- Damp cloth or paper towel
Step 1: Preparation and Sketching
-
Clean the Surface:
Begin by wiping down your pumpkin with a damp cloth to remove any dirt or residue. A clean, dry surface is essential for the ink to adhere smoothly without skipping. -
Identify the Face:
Rotate the pumpkin to find its best side. Look for a relatively smooth patch without deep blemishes or bumps that might interfere with your drawing surface. -
Lightly Pencil Guidelines:
If you’re nervous about freehanding, use a pencil to very lightly sketch where the eyes, nose, and mouth will go. Keep the pressure light so you don’t indent the pumpkin skin.
Ink Choosing Tip
Use an oil-based paint marker instead of a standard Sharpie for deeper opacity. Standard markers can sometimes look purple or translucent on orange skins.
Step 2: Drawing the Features
-
Start with the Nose:
Using your black permanent marker, draw a small, inverted triangle in the center of the pumpkin’s face area. -
Fill the Nose:
Color in the triangle completely. To soften the look, round off the corners of the triangle slightly so it looks more organic and cute. -
Create the Mouth Anchors:
From the bottom point of the nose triangle, draw a tiny vertical line downwards, just a few millimeters long. -
Draw the Mouth Curves:
From the bottom of that anchor line, draw two small curves sweeping outward and upward, like a flattened ‘w’ shape, to create a happy smile. -
Position the Eyes:
Visualize where the eyes should sit; they should be spaced fairly wide apart above the nose for that kawaii aesthetic. -
Draw the Eye Arches:
Draw two curved arches for closed, smiling eyes. I like to make these slightly thicker in the middle and tapered at the ends for a more expressive look. -
Check for Symmetry:
Take a step back and look at your cat face. If the eyes look uneven, you can thicken the line on the smaller one slightly to balance them out.
Fixing Mistakes
Did your hand slip? Don’t panic. A cotton swab dipped in rubbing alcohol can usually erase permanent marker from the waxy pumpkin skin before it sets.
Step 3: Adding Details and Finishing
-
Add Whiskers (Left):
On the left cheek area, draw three straight lines radiating outward from the space between the nose and the eye. -
Add Whiskers (Right):
Repeat on the right side, trying to match the angle and length of the left whiskers. Quick, confident strokes usually result in straighter lines than slow ones. -
Darken the Stem Base:
The pumpkin in the image features a very dark, black stem. Use your marker or a bit of black acrylic paint to color the stem fully black. -
Refine the Stem Connection:
Ensure the black color on the stem goes all the way down to where it meets the orange skin, creating a stark contrast. -
Let it Set:
Allow the ink (and paint if used) to dry completely for about 10 minutes to prevent accidental smudging when you move it. -
Clean Up Guidelines:
If you can still see any pencil marks from your initial sketch, gently erase them now that the ink is dry.
Place your new pumpkin kitty on a soft linen napkin or a windowsill to enjoy its cheerful company all autumn long

PENCIL GUIDE
Understanding Pencil Grades from H to B
From first sketch to finished drawing — learn pencil grades, line control, and shading techniques.
Explore the Full Guide
Constellation Dot Patterns
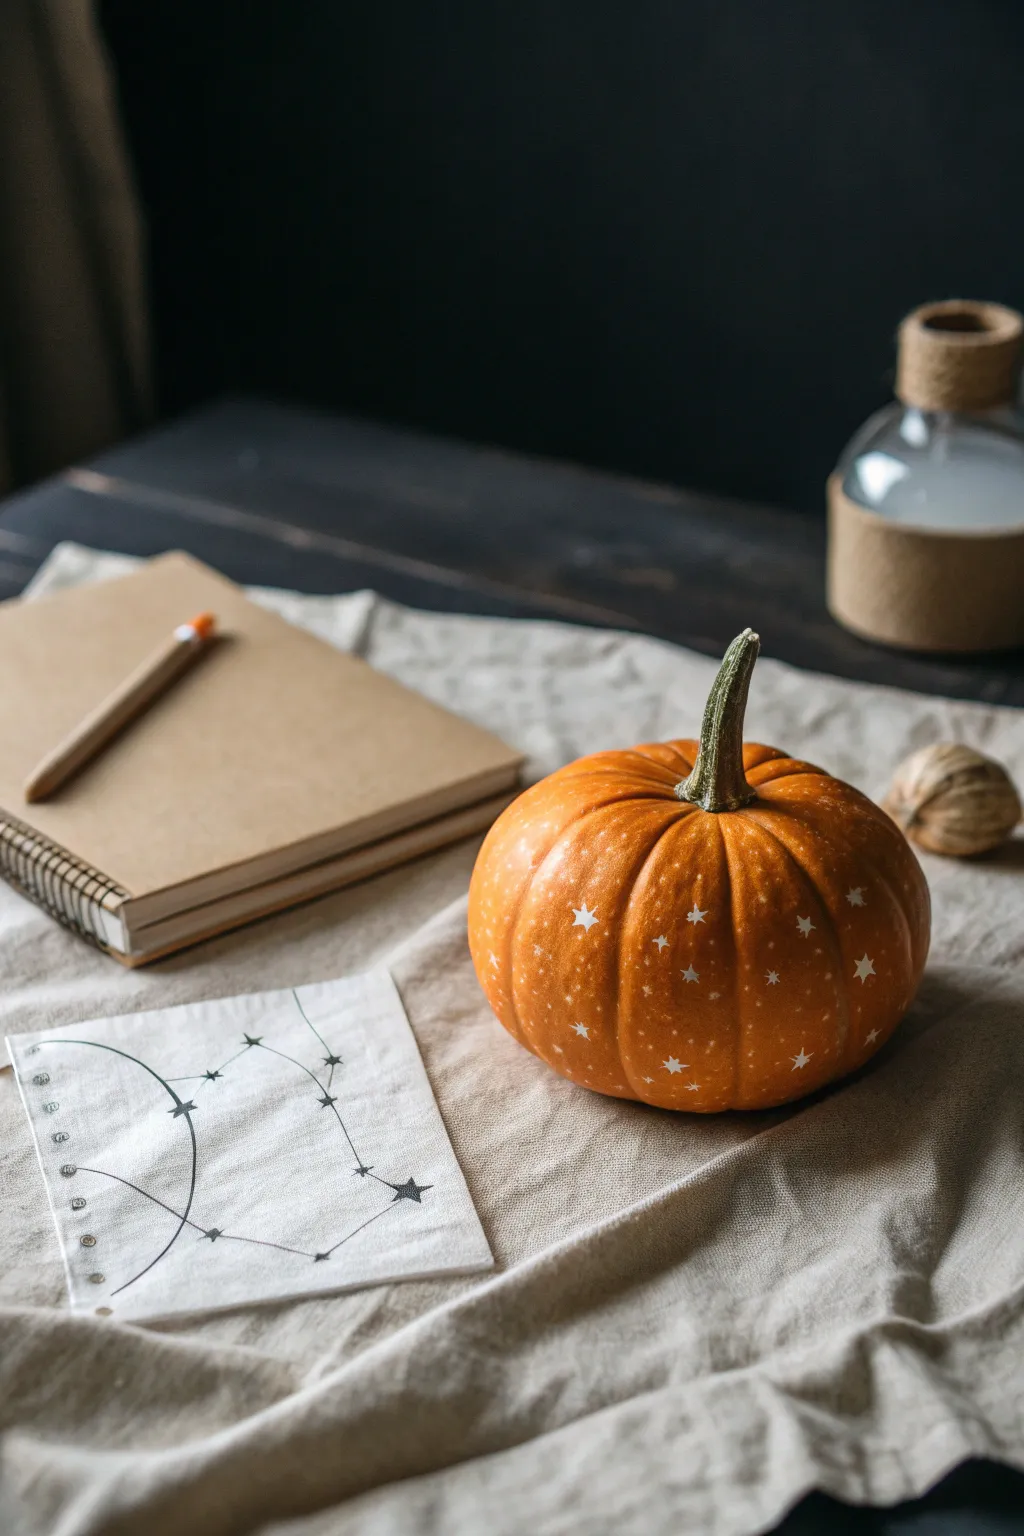
Bring the magic of the night sky into your home with this minimalist and elegant pumpkin design. By painting delicate silver or white starbursts onto an orange gourd, you create a sophisticated decoration that feels both whimsical and celestial.
How-To Guide
Materials
- Small to medium round pumpkin (real or faux)
- White or metallic silver acrylic paint pen (fine tip)
- Alternatively: Thin round paintbrush and white acrylic paint
- Paper napkin or tracing paper
- Pencil
- Damp cloth or paper towel
- Clear matte sealer spray (optional)
Step 1: Preparation & Planning
-
Clean surface:
Begin by wiping down your pumpkin with a damp cloth to remove any dirt, dust, or oils from the skin. -
Dry thoroughly:
Allow the pumpkin to air dry completely, as moisture will prevent the paint or marker ink from adhering properly. -
Sketch concept:
Before marking the pumpkin, take a piece of scrap paper or a napkin to sketch out a few star shapes to practice. -
Test the marker:
Use the bottom of the pumpkin to test your paint pen flow; pump the nib on paper first to ensure the ink is running smoothly but not pooling.
Smudged Ink?
If a star smears, turn it into a ‘shooting star’ by extending the smudge into a tail, or wipe it off immediately with a wet cotton swab.
Step 2: Painting the Stars
-
Start the center:
Choose a spot roughly in the middle of a pumpkin rib to place your first star. -
Draw the cross:
Draw a small vertical line, then cross it with a horizontal line of the same length to create a basic plus sign. -
Add diagonals:
Draw two shorter diagonal lines intersecting the center point, creating an eight-point starburst shape. -
Vary the sizes:
Move a few inches away and create a second star, perhaps making this one slightly smaller or larger for visual interest. -
Spacing creates rhythm:
Continue adding stars around the pumpkin, keeping a loose, random distance between them so it doesn’t look like a grid. -
Follow the ribs:
I find it helpful to look at the natural vertical ribs of the pumpkin and place stars in a staggering pattern across them. -
Fill the gaps:
Step back and assess the distribution; add tiny four-point stars (just a simple cross) in areas that look too empty. -
Check the bottom:
Don’t forget to add a few stars near the base of the pumpkin so the design feels continuous from all angles. -
Refine the points:
Go back over your earlier stars and carefully extend the tips with a quick flick of the pen to make them look sharper. -
Let it set:
Allow the paint to dry undisturbed for at least 15 to 20 minutes to prevent accidental smearing.
Step 3: Optional Constellation Detail
-
Mark constellation points:
If you want to add a specific constellation like the one on the napkin in the photo, lightly mark dot positions with a pencil first. -
Connect the dots:
Use your paint pen to draw very thin, straight lines connecting specific stars to form the constellation shape. -
Clean up errors:
If you make a mistake, quickly wipe it away with a damp Q-tip while the paint is still wet. -
Final dry:
Let the entire project cure for an hour before handling. -
Seal the design:
For longevity, especially if using a real pumpkin outdoors, lightly mist with a clear matte sealer spray.
Level Up: Glow Time
Use glow-in-the-dark puffy paint instead of white acrylic. By day it looks white, but at night your constellations will actually glow green.
Place your celestial creation on a linen cloth or rustic table to enjoy the subtle starlight atmosphere
Tiny Hole-Punched Lanterns
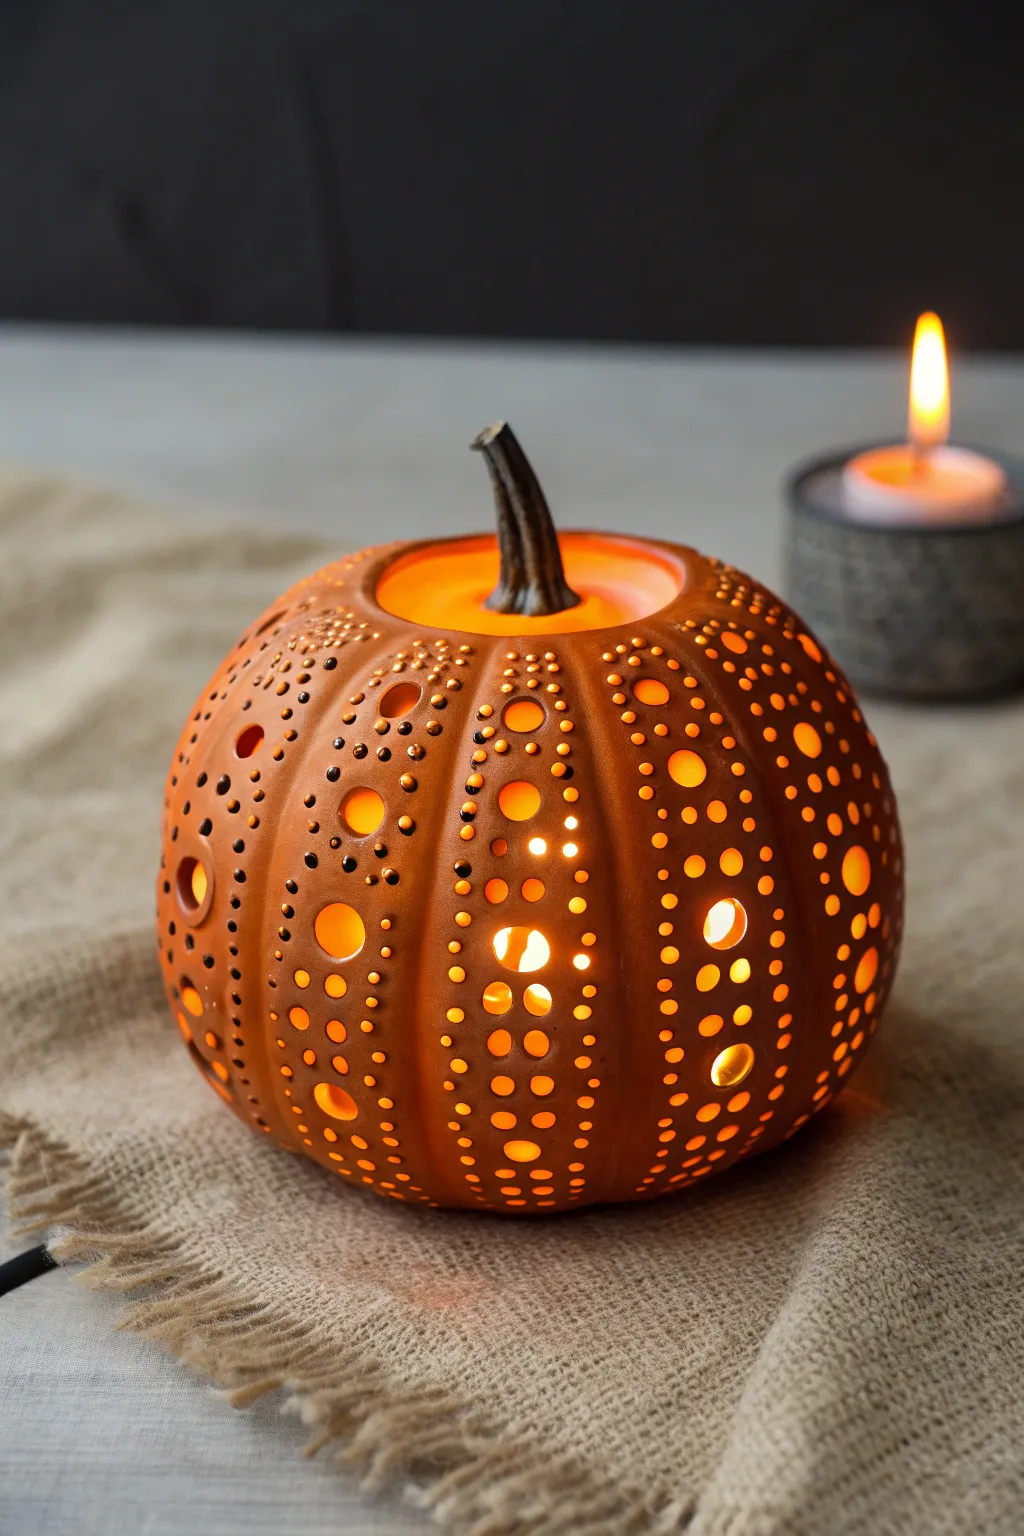
Transform a simple faux pumpkin into a radiant lantern using nothing more than a drill and a steady hand. This project creates a stunning play of light through intricate patterns of dots and circles, casting a warm, speckled glow perfect for cozy evenings.
Detailed Instructions
Materials
- Small foam or hollow faux pumpkin (orange)
- Power drill
- Drill bits (various sizes: roughly 1/8″, 1/4″, and 1/2″)
- Masking tape or painter’s tape
- Fine-grit sandpaper
- Pencil or white chalk marker
- Dark brown or black acrylic paint (optional)
- Small paintbrush
- Paper towel or rag
- Battery-operated tea light or LED puck light
Step 1: Planning the Pattern
-
Prepare the surface:
Wipe down your faux pumpkin with a slightly damp cloth to remove any dust or manufacturing residues. Ensure it is completely dry before proceeding. -
Mark vertical guides:
Using the pumpkin’s natural ridges as a guide, lightly trace vertical lines with a pencil or chalk marker down the center of each ridge. These will serve as the spine for your dot patterns. -
Sketch the design:
Plan out where your largest holes will go. I like to mark three large circles evenly spaced down the center of every other ridge to create a balanced focal point. -
Add detail markers:
Fill in the spaces around your large circle marks with smaller dots. Create rows of tiny dots running parallel to the vertical ridges to frame the design.
Clean Cuts Every Time
If the drill leaves messy, hanging bits of foam, run the drill in reverse while pulling it out of the hole. This often shears off the excess debris cleanly.
Step 2: Drilling the Design
-
Safety check:
Place the pumpkin on a stable surface. You might want to cradle it in a towel to keep it from rolling while you work. -
Start with the smallest bit:
Insert your smallest drill bit (around 1/8 inch) into the drill. Begin drilling the tiny framing holes that run along the outer edges of the ridges. -
Drill with gentle pressure:
Apply light, steady pressure to puncture the foam shell without cracking it. Let the drill do the work rather than forcing it through. -
Create the medium accents:
Switch to a medium-sized bit (about 1/4 inch). Drill the secondary accent holes that sit between your large focal points and the tiny running borders. -
Drill the large focal points:
Finally, swap in your largest bit (1/2 inch or slightly larger spade bit). Carefully drill the main circles you marked earlier in the center of the ridges. -
Clean the holes:
You will likely have shreds of foam clinging to the holes. Use a piece of rolled-up high-grit sandpaper to gently smooth the inside edges of the larger holes. -
Remove debris:
Use a dry stiff-bristled brush or a blast of compressed air to remove all loose foam particles from the inside and outside of the pumpkin.
Avoid Cracking
Don’t press too hard! Let the drill speed do the cutting. If you push, the foam might crack or cave in throughout the delicate sections.
Step 3: Finishing Touches
-
Erase guidelines:
Gently wipe away any remaining pencil or chalk marks with a damp cloth. -
Add definition (optional):
To make the holes pop even when unlit, dip a small brush in watered-down dark brown paint. -
Paint the inner rims:
Carefully paint just the inside rim of the cuts. This mimics the look of a thicker, more ceramic-like material and adds depth. -
Wipe excess paint:
If any paint gets on the orange surface, immediately wipe it away with a paper towel so the dark color remains only inside the drilled holes. -
Prepare the light source:
If your pumpkin doesn’t have an opening at the bottom, carefully cut a circular hole in the base large enough to fit your LED light. -
Insert the light:
Place your battery-operated tea light inside. I prefer warm white LEDs to mimic the color of real candlelight.
Place your glowing creation on a mantle or tablescape and enjoy the intricate shadows it casts.


Pressed-Flower Collage Minis
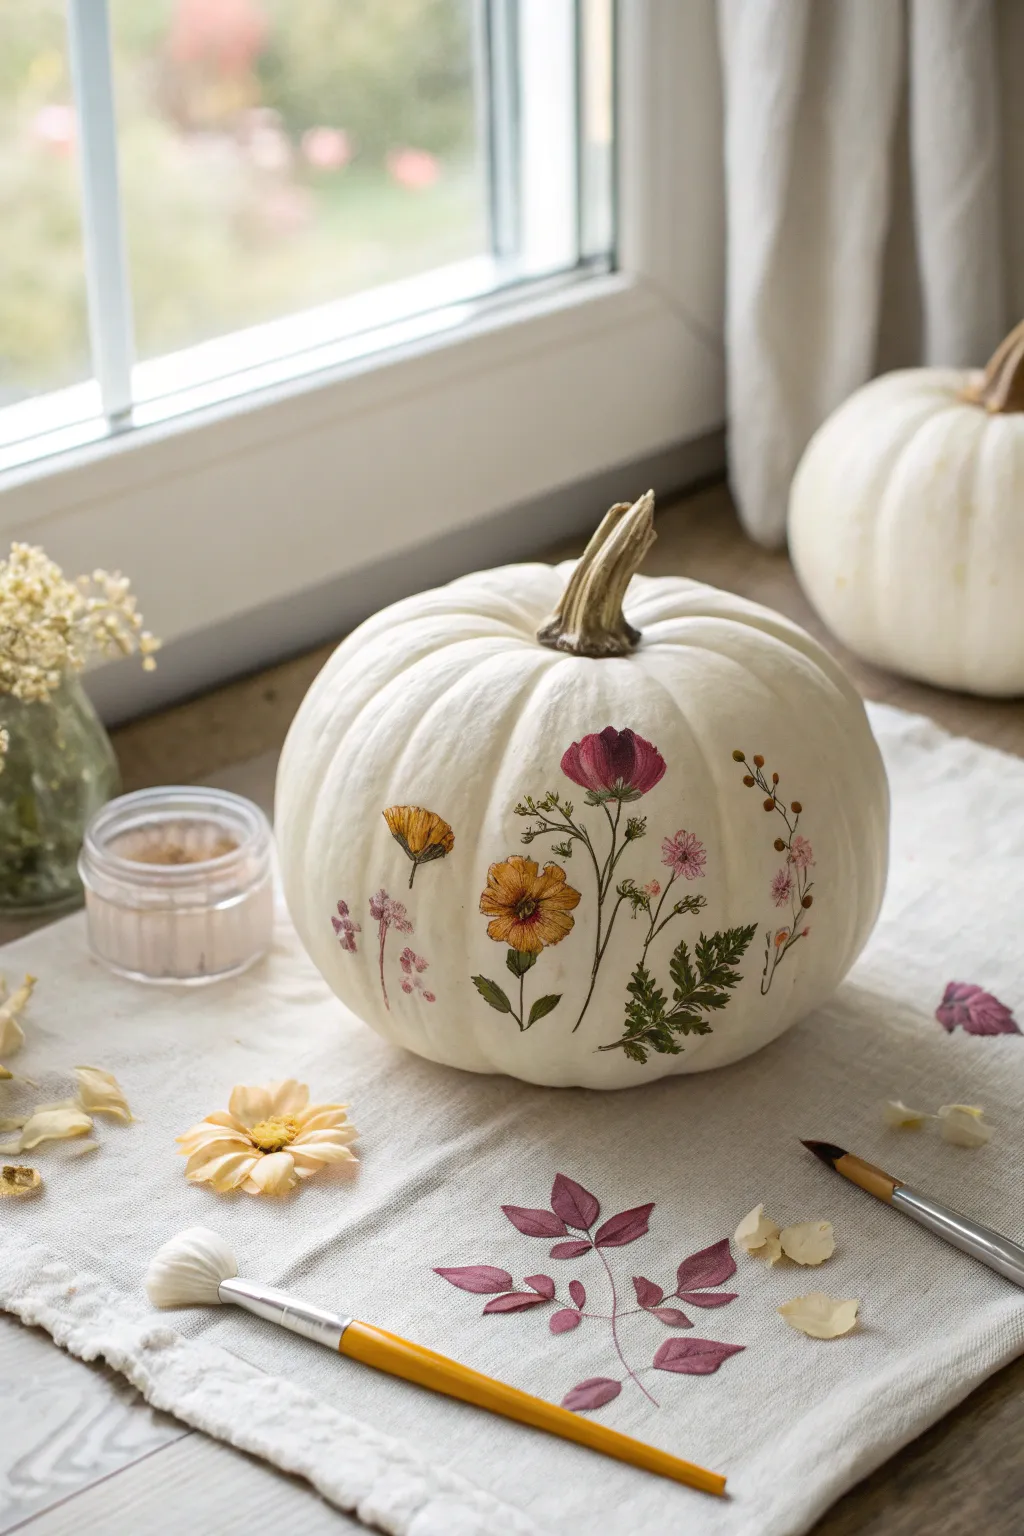
Bring the delicate beauty of a cottage garden indoors with this elegant pressed-flower pumpkin. Combining the rustic charm of dried botanicals with the smooth canvas of a white gourd creates a sophisticated autumnal centerpiece that feels both natural and artistic.
Step-by-Step
Materials
- Small white pumpkin (real or faux)
- Assorted pressed dried flowers (cosmos, ferns, chamomile, etc.)
- Mod Podge (matte finish)
- Soft flat paintbrush (approx. 1 inch)
- Fine-point tweezers
- Wax paper or palette
- Paper towels
- Clear matte acrylic sealer spray (optional)
Step 1: Preparation and Planning
-
Clean the Surface:
Begin by thoroughly wiping down your pumpkin with a slightly damp paper towel to remove any dirt or oils. If using a real pumpkin, ensure it is completely dry before proceeding. -
Select Your Botanicals:
Lay out your collection of pressed flowers on a flat surface. Look for a mix of larger focal flowers (like the reddish cosmos and yellow daisy) and dainty filler stems (like ferns and seeded grasses) to create a balanced composition. -
Dry Run Arrangement:
Before reaching for any glue, arrange your flowers on the table in a layout that mimics how you want them on the pumpkin. This trial run helps visualize spacing without committing to the adhesive. -
Prepare the Adhesive:
Pour a small amount of matte Mod Podge onto a piece of wax paper or a small dish. Having it easily accessible prevents the glue from drying out in the bottle while you work.
Wrinkle Rescue
If a petal bubbles or wrinkles while gluing, wait for the glue to get tacky, then gently roll over it with a specialized brayer or the back of a spoon to smooth it out.
Step 2: Applying the Flora
-
Base Application:
Choose the placement for your first flower—usually a large focal bloom works best as an anchor. Apply a thin, even layer of Mod Podge directly onto the pumpkin surface at that specific spot using your flat brush. -
Place the Bloom:
Using your tweezers, gently lift the pressed flower and position it over the wet adhesive. -
Secure the Center:
Lightly press down on the center of the flower with your finger or the dry handle end of your brush to tack it into place. -
Smooth the Petals:
Dip your brush lightly into the Mod Podge again and gently sweep over the top of the flower. Work from the center outward to the tips of the petals to avoid folding them back or tearing delicate edges. -
Add Greenery:
Select a piece of greenery, like the fern leaf shown in the image. Apply adhesive to the pumpkin next to your focal flower, overlapping the stems slightly if desired for a natural, bouquet-like look. -
Layering Technique:
When overlapping elements, I often let the bottom layer dry for just a minute or two so it doesn’t slide around when applying the top flower. -
Addressing Curves:
Because the pumpkin is round, stiffer stems might resist laying flat. Hold these down with the handle of your brush for 30 seconds until the glue becomes tacky enough to hold them. -
Fill the Gaps:
Continue adding smaller sprigs, like the tiny purple wildflowers or yellow buds, to fill in open spaces. Aim for an organic scatter rather than a rigid pattern.
Pressing Pro Tip
Make your own flat flowers by placing fresh blooms between parchment paper inside a heavy book for 7-10 days. Thinner flowers like pansies dry faster and flatter.
Step 3: Sealing and Finishing
-
Check Edges:
Inspect each flower to ensure all petal edges are securely glued down. If any are lifting, use a toothpick with a dab of glue to slide underneath and press them back down. -
Full Seal Coat:
Once your design is complete, apply a final thin coat of Mod Podge over the entire decorated area. Use long, smooth strokes to minimize brush marks. -
Drying Time:
Allow the pumpkin to sit undisturbed in a dry area for at least 1-2 hours until the adhesive is completely clear and dry to the touch. -
Clean Up Haze:
If you notice the glue has dried with a glossy sheen that clashes with the pumpkin’s skin, you can gently wipe surrounding bare areas with a slightly damp cloth to remove excess spread. -
Final Protection (Optional):
For extra durability, especially if the pumpkin will be displayed in a humid area, create a final seal by misting the project with a clear matte acrylic spray.
Display your botanical masterpiece on a linen runner or near a window to let the natural light highlight the floral details
Mini Pumpkin Flower Vases
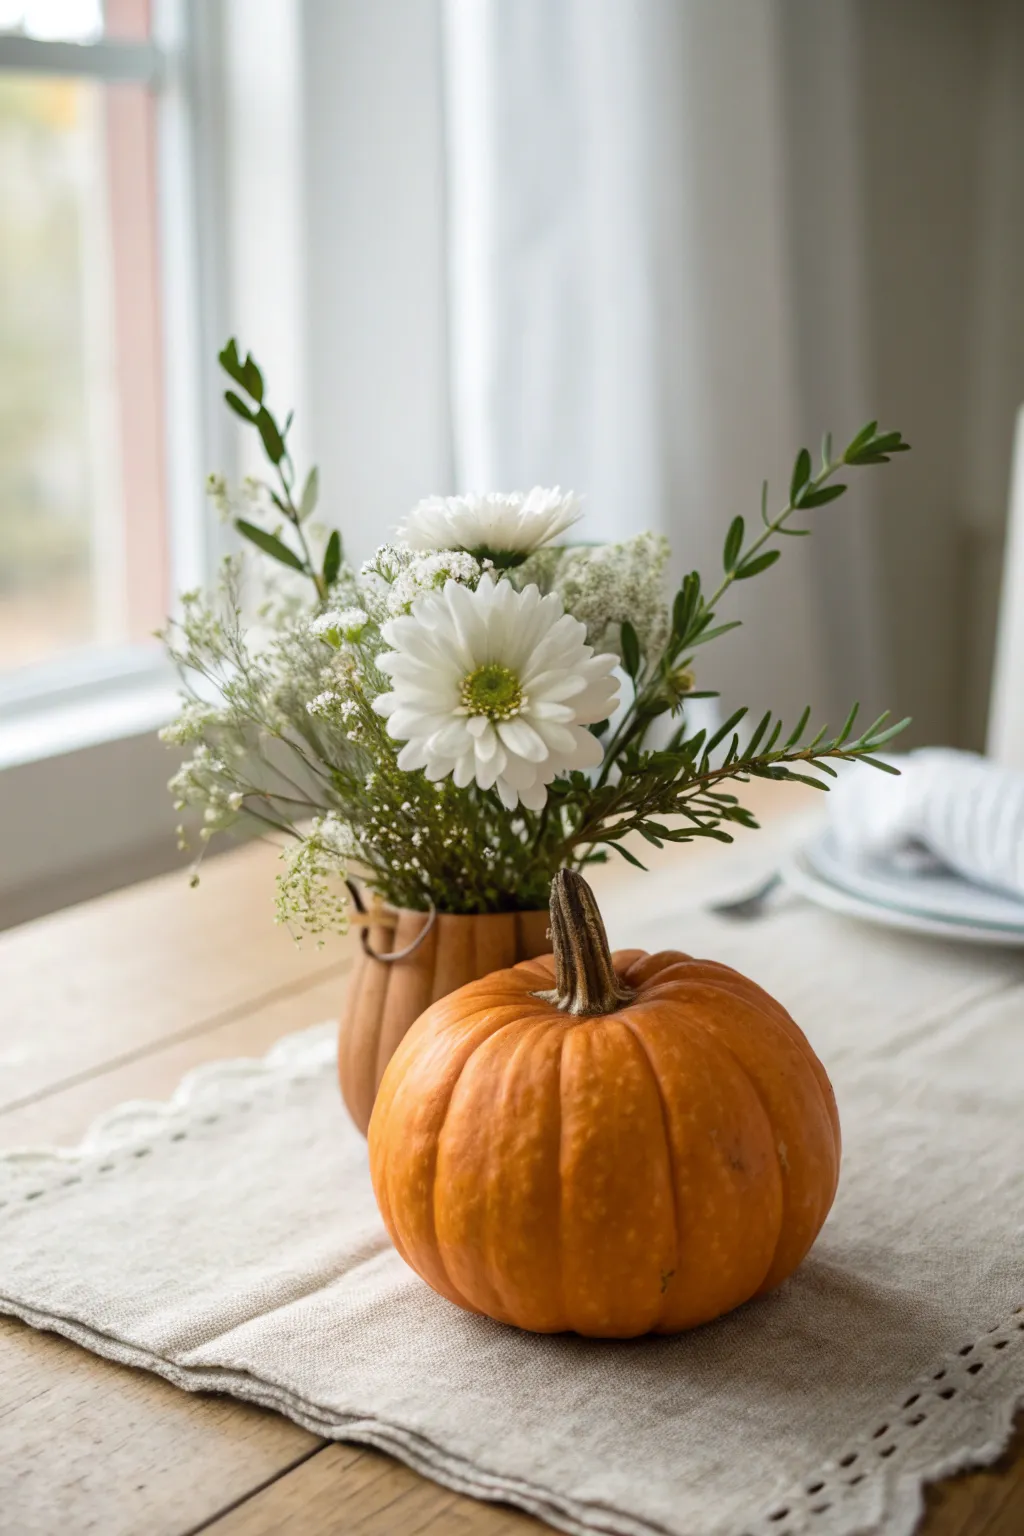
This charming project transforms a humble mini pumpkin into a delicate vessel for fresh blooms, creating a quintessential autumnal display. The contrast between the vibrant orange pumpkin and the crisp white daisies makes for a cozy, rustic accent perfect for any fall table setting.
How-To Guide
Materials
- Small sugar pumpkin or large mini pumpkin (about 4-5 inches wide)
- Sharp serrated knife
- Metal spoon or melon baller
- Small plastic cup, shot glass, or floral foam (to fit inside pumpkin)
- Water
- White gerbera daisies or similar white mums
- Baby’s breath (gypsophila)
- Greenery sprigs (eucalyptus or rosemary work well)
- Floral shears or scissors
- Paper towels
Step 1: Pumpkin Preparation
-
Clean surface:
Begin by wiping down the exterior of your pumpkin with a damp cloth to remove any dirt or debris. Dry it thoroughly with a paper towel. -
Mark the cut:
Use a pencil or tip of a knife to lightly score a circle around the stem, ensuring the opening will be wide enough to fit your chosen water vessel (plastic cup or glass). -
Remove the top:
Carefully insert your serrated knife along the guide line. Cut at a slight inward angle so the lid won’t fall in if you decide to replace it later, although for this vase, the top is discarded. -
Scoop the interior:
Using a metal spoon, scrape out the seeds and fibrous pulp. I like to be thorough here and scrape the inner walls until they are smooth and clean, which helps the pumpkin last longer. -
Fit the liner:
Test fit your small plastic cup or glass inside the hollowed pumpkin. It should sit flush with or slightly below the rim. If it sits too high, scrape a bit more from the bottom of the pumpkin interior. -
Add water:
Fill your liner cup about three-quarters full with cool water before placing it permanently inside the pumpkin to avoid spills.
Freshness Tip
To extend the life of your pumpkin vase, rub a thin layer of petroleum jelly on the cut raw edges. This seals in moisture and slows down shriveling.
Step 2: Floral Arrangement
-
Cut focal flowers:
Take your white daisies or mums and trim the stems so the flower heads will sit just an inch or two above the pumpkin rim. Cut stems at a 45-degree angle for better water absorption. -
Position the main blooms:
Place the two or three main white flowers into the center of your water vessel. They should be the star of the show but leave room for accents. -
Add height with greenery:
Select a few sprigs of greenery that are taller than your flowers. Place these towards the back or sides to create an asymmetrical, organic shape similar to the reference photo. -
Fill with texture:
Cut small clusters of baby’s breath. Tuck these in around the main white flowers to fill gaps and add a soft, airy texture. -
Final adjustments:
Step back and look at the arrangement. Adjust the angles of the greenery so they flare out naturally, mimicking wild growth. -
Companion styling:
For the full look shown in the image, place a second, uncarved mini pumpkin in the foreground. This adds depth and reinforces the harvest theme.
Dry Variation
Swap fresh flowers for dried wheat stalks, bunny tails, and preserved eucalyptus. You can skip the water liner entirely for a long-lasting display.
Place your finished arrangement on a linen runner near a window to catch the gentle autumn light
Color-Blocked Modern Minis
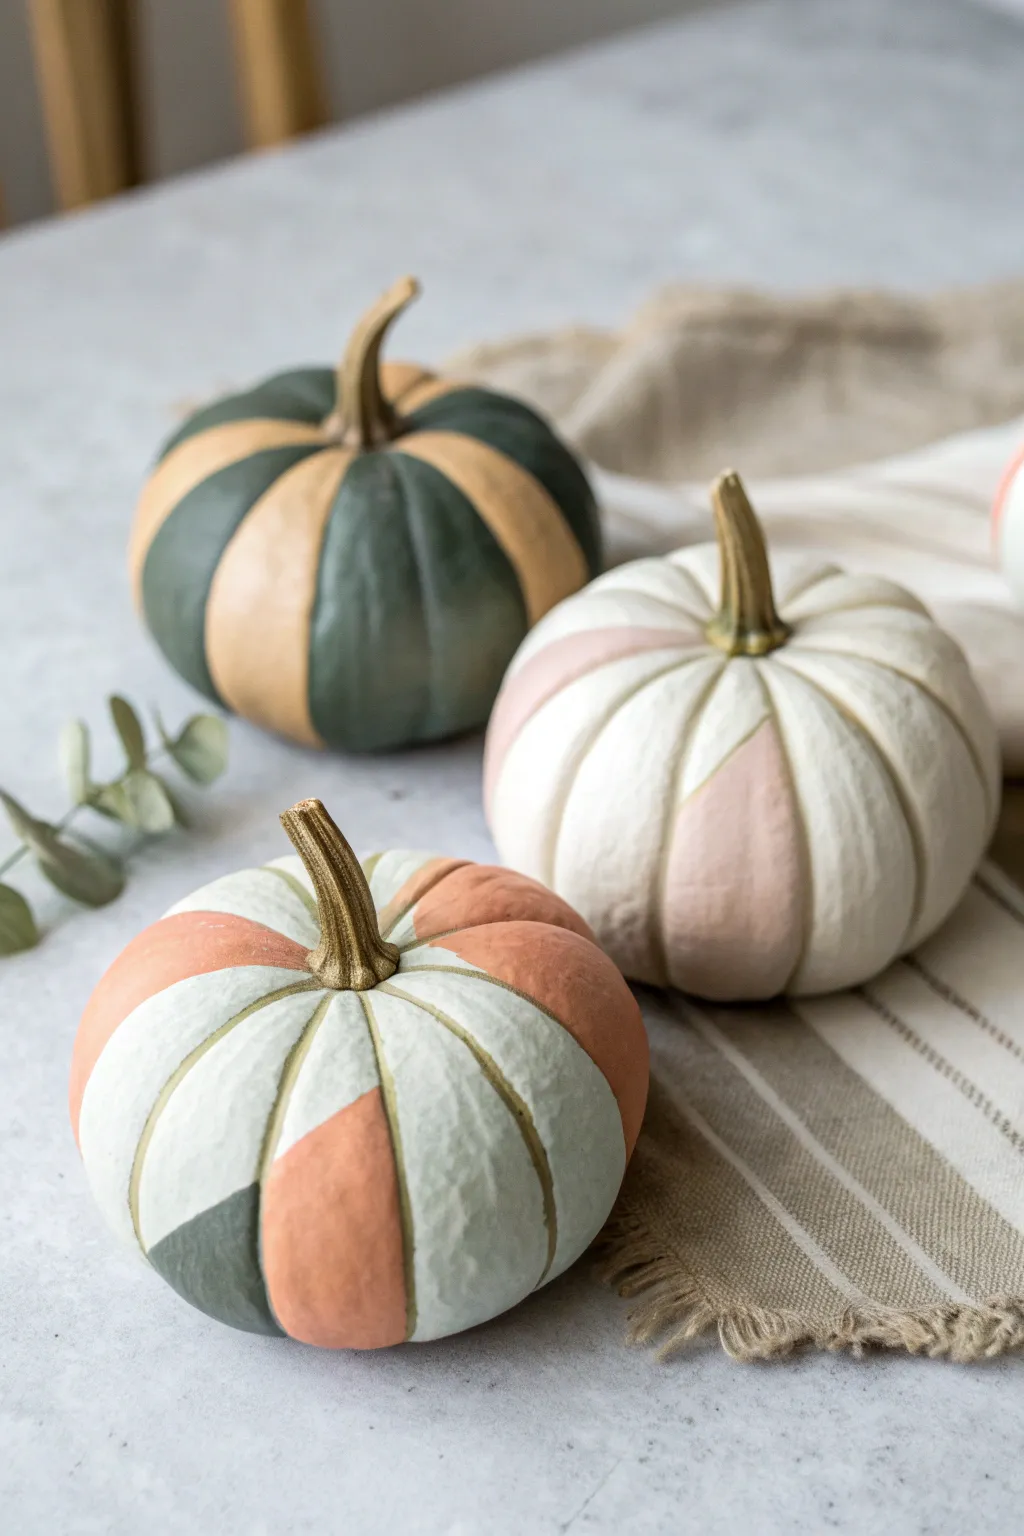
Transform ordinary mini pumpkins into modern décor pieces using a creative color-blocking technique. By combining muted earth tones like sage, terracotta, and cream with crisp geometric lines, you’ll achieve a sophisticated matte finish that instantly elevates your autumnal table setting.
Step-by-Step
Materials
- 3 small craft pumpkins (white or cream base preferred)
- Acrylic craft paints (matte finish): sage green, terracotta, light beige, dusty pink, cream
- Gold metallic paint
- Painter’s tape or masking tape (approx. 1/2 inch width)
- Small flat paintbrush
- Small round detail brush
- Palette or paper plate
- Paper towels
- Cup of water
Step 1: Preparation & Base Coat
-
Clean surface:
Begin by wiping down your pumpkins with a slightly damp paper towel to remove any dust or oils. This ensures the paint adheres smoothly. -
Prime the base:
If your pumpkins aren’t already white, apply a base coat of cream or white paint over the entire surface. Let this dry completely before moving forward. -
Plan your patterns:
Look at the natural ridges of the pumpkin. Visualize how you want to divide the sections. You can opt for simple vertical stripes like the back pumpkin, or diagonal geometric blocks like the front one.
Burnish for Perfection
After applying tape, run the back of your fingernail or a credit card firmly over the tape edges. This ‘burnishing’ creates a tight seal against the textured pumpkin skin.
Step 2: Creating the Design
-
Tape vertical sections:
For a striped look (like the green and tan pumpkin), apply tape vertically, following the pumpkin’s natural grooves. Press the edges down firmly to prevent bleed-through. -
Tape geometric angles:
For the color-blocked design (front pumpkin), apply pieces of tape at angles across the face of the pumpkin to create triangular or trapezoidal sections. -
Mix your palette:
Squeeze out small amounts of sage green, terracotta, and beige onto your palette. I like to mix a tiny drop of white into the terracotta to soften it slightly. -
Paint the first color:
Select your darkest color first, such as the sage green. Using the flat brush, fill in the specific taped-off sections intended for this shade. Apply thin, even strokes. -
Allow to dry:
Let this first color dry to the touch, usually about 15-20 minutes depending on paint thickness. -
Add secondary colors:
Move on to your next shade, like the beige or terracotta. Paint the adjacent sections. Be careful near the taped edges; painting away from the tape edge helps keep lines crisp. -
Remove tape carefully:
Once the paint is tacky but not fully hardened, slowly peel back the tape. Pulling at a 45-degree angle usually gives the cleanest line. -
Let dry fully:
Allow the initial blocked sections to cure completely for at least an hour before adding any crossing lines or adjacent colors that touch.
Paint Peeling Off?
If paint lifts when removing tape, you likely waited too long and the paint bonded to the tape. Next time, peel while the paint is still slightly damp.
Step 3: Refinement & Details
-
Touch up edges:
Use your small round detail brush to fix any uneven lines or spots where paint might have bled under the tape. Use the cream base color to clean up the negative space. -
Freehand details:
For organic shapes (like the pink swoop on the white pumpkin), lightly sketch the curve with a pencil first, then carefully fill it in using the round brush. -
Paint the stems:
Dip your detail brush into the gold metallic paint. Carefully coat the entire stem, working the metallic pigment into the crevices for a high-end look. -
Add subtle definition:
If you want to emphasize the segments, use a very diluted wash of grey or brown paint in the deepest crevices of the pumpkin’s ribs, though keeping it clean creates a more modern look. -
Final inspection:
Check the pumpkins from all angles. Apply a second coat to any color blocks that look streaky or transparent. -
Seal the paint (optional):
If these will be handled often, apply a clear matte spray sealer. Otherwise, the matte acrylic finish is perfect as is.
Arranging these muted beauties together creates a gentle, modern autumn display
Ombre Dip-Dyed Mini Pumpkins
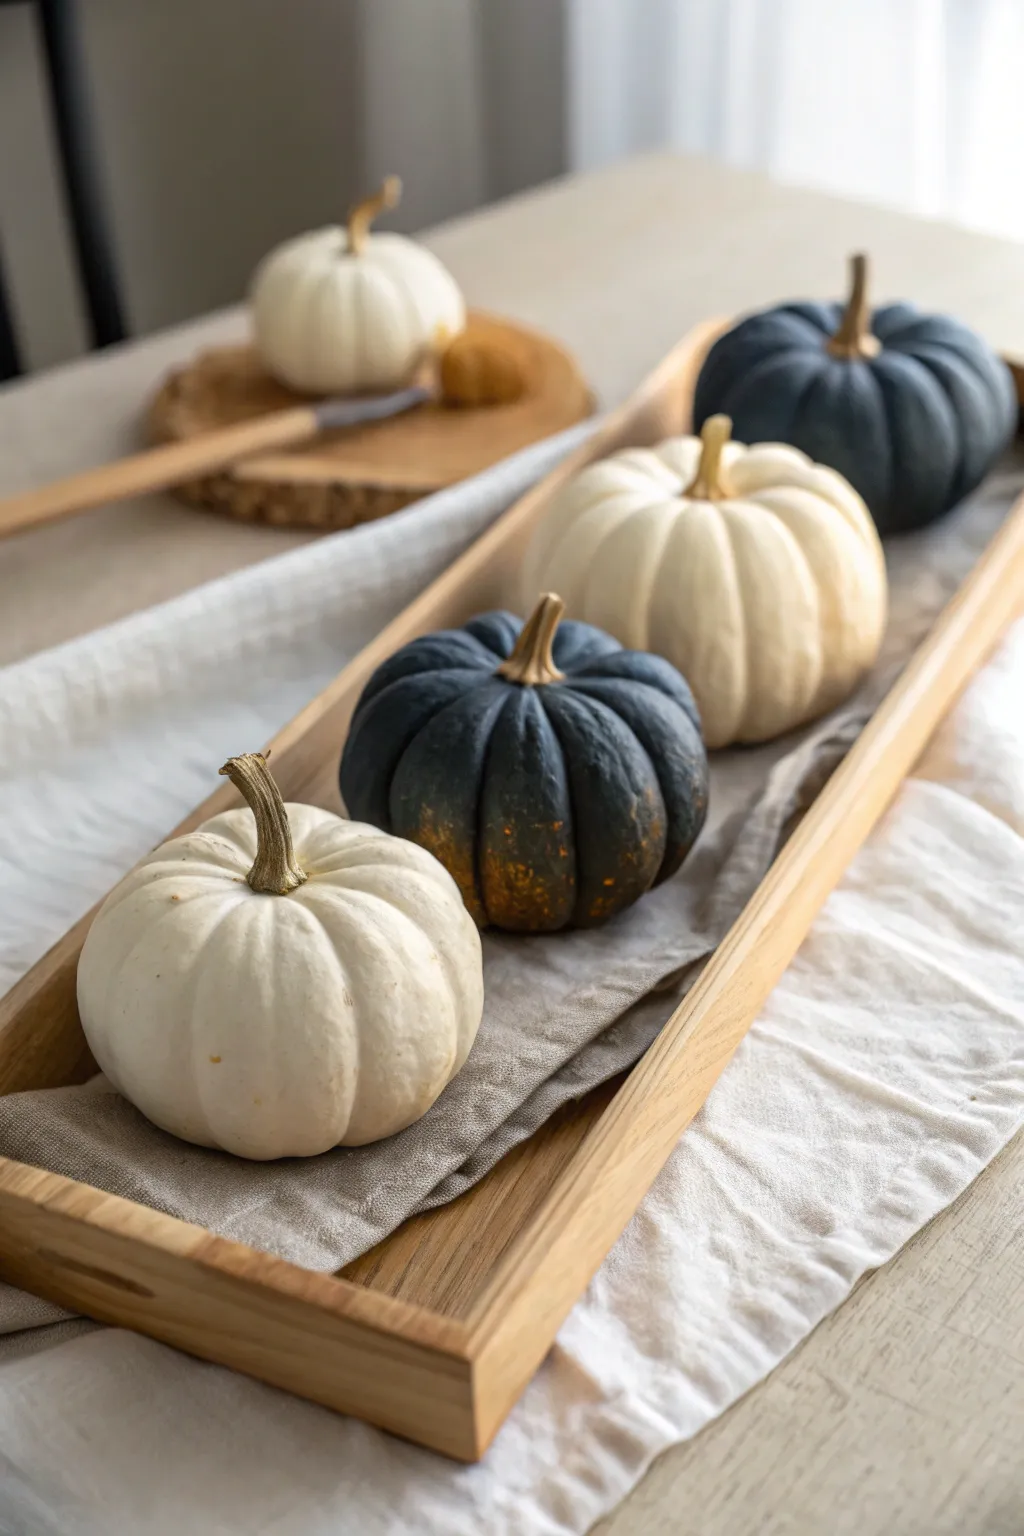
Bring sophisticated contrast to your autumn decor with this remarkably simple dip-dye project. By using deep indigos or charcoal tones against natural white pumpkins, you create a striking, modern look perfect for a centerpiece tray.
Step-by-Step Tutorial
Materials
- 4-5 white mini pumpkins (real or realistic faux)
- Deep indigo, navy, or charcoal liquid dye (fabric or craft dye)
- Two disposable bowls or plastic containers (deep enough to submerge half a pumpkin)
- Latex or nitrile gloves
- Paper towels
- Wax paper or a drying rack
- Water
- Stirring stick
- Clear matte sealant spray (optional)
Step 1: Preparation
-
Clean surface:
Begin by thoroughly cleaning your pumpkins. If using real ones, wipe them down with a damp cloth to remove any dirt or field dust. For faux pumpkins, ensure there’s no manufacturing residue. -
Dry completely:
Allow the pumpkins to dry totally before proceeding. Any moisture on the skin will repel the dye and create uneven splotches. -
Set up workspace:
Cover your work area with plastic or old newspapers. Put on your gloves to avoid staining your hands, as the concentrated dye is quite potent.
Stem Success
Keep stems natural! Wrap the stem tightly in painter’s tape before dipping. The contrast between the tan stem and dark skin looks much more high-end.
Step 2: Dye Bath Mixing
-
Mix concentrated bath:
In the first bowl, pour a mixture of hot water and a generous amount of dye. The ratio should be roughly 1 part dye to 2 parts water for the darkest, almost black result shown in the dark pumpkins. -
Mix lighter bath:
In the second bowl, create a more diluted solution—about 1 part dye to 10 parts water. This will be used if you want a subtle transition or a lighter gray variations, though the image focuses on high contrast. -
Test the color:
Dip a paper towel strip into your dark bath to verify the tone. If it looks too transparent, add more dye until it reads as a solid, deep color.
Step 3: Dipping Process
-
The full dip:
For the solid dark pumpkins, hold the pumpkin by the stem and submerge it completely into the concentrated dye bath. You may need to hold it under for 10-15 seconds to let the color bite into the skin. -
Check coverage:
Lift the pumpkin out. If the color looks streaky, dip it again. I find that rotating it slightly while submerged helps the liquid reach every crevice near the stem. -
Creating the ombre effect:
For a subtle ombre look on the dark pumpkins (where the bottom is slightly darker/warmer), dip the bottom third of the pumpkin into the concentrated bath again and hold it there for an extra 30 seconds. -
Natural pumpkins:
Leave two or three pumpkins completely undyed to serve as the high-contrast elements. Simply clean these and set them aside. -
Drip management:
As you pull the dyed pumpkins out, hold them over the bowl for a moment to let excess liquid drip off. Use a paper towel to gently dab—not rub—the very bottom to prevent a pool of dye from forming.
Metallic Touch
After the dye dries, dry-brush a tiny amount of antique gold paint onto the ridges of the dark pumpkins to catch the light and add dimension.
Step 4: Finishing
-
Initial drying:
Place the wet pumpkins on wax paper or a wire rack. Do not place them on paper towels or cardboard, as these will absorb the dye from the bottom and leave marks. -
Touch-ups:
Once they are tacky to the touch, inspect them. If you see any light spots in the crevices, use a small paintbrush dipped in the concentrated dye to spot-fill those areas. -
Full cure:
Let the pumpkins dry for at least 24 hours. Real pumpkin skin is porous but slow-drying. -
Seal the color:
To prevent the dye from rubbing off on your furniture later, give the dark pumpkins a light coat of clear matte sealant spray. -
Arrangement:
Once fully dry, arrange them on a long wooden tray, alternating between natural white and deep charcoal for that elegant rhythmic pattern seen in the example.
Enjoy the sleek, contemporary vibe these custom-colored pumpkins add to your seasonal table setting
Metallic Highlights and Shimmer Details
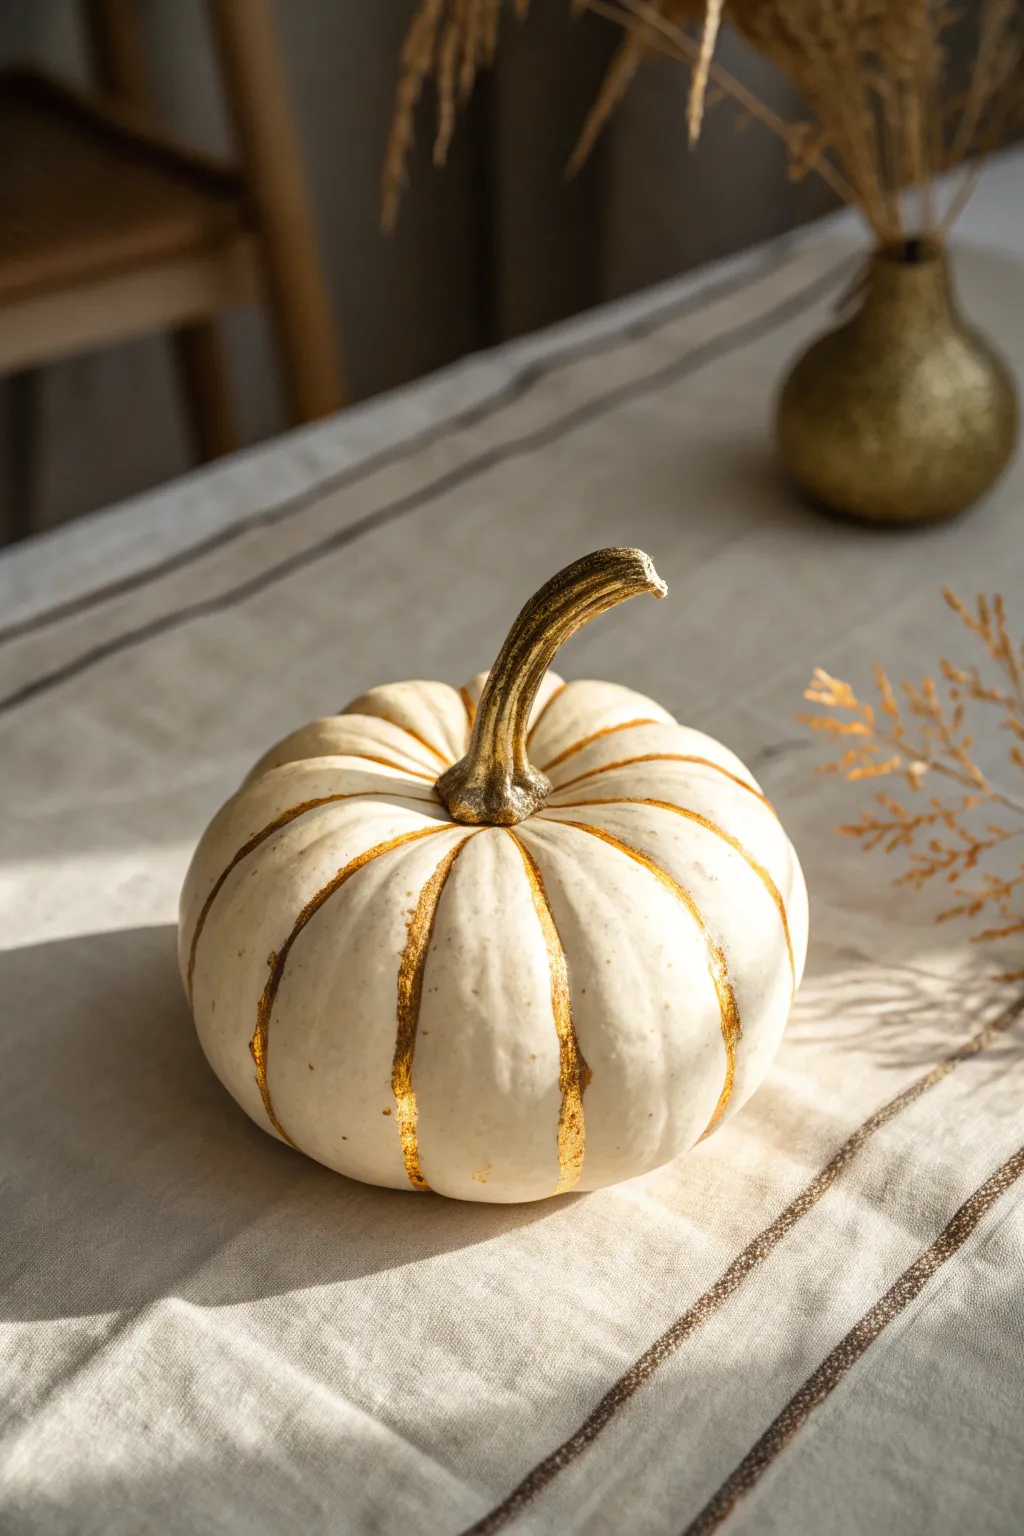
Transform a simple white pumpkin into an elegant centerpiece by highlighting its natural contours with shimmering gold. This project uses metallic leafing paint to fill the deep crevices and coat the stem, creating a striking contrast against the smooth ivory skin.
Step-by-Step Guide
Materials
- Small white pumpkin (real or high-quality faux)
- Liquid gold leaf or gold gilding paint
- Small, soft paintbrush (round size 2 or 4)
- Medium flat paintbrush (size 6 or 8)
- Damp cloth or paper towel
- Rubbing alcohol
- Palette or small disposable cup
- Newspaper or drop cloth
Step 1: Preparation and Cleaning
-
Surface Prep:
Begin by thoroughly wiping down your pumpkin with a damp cloth to remove any dirt or dust. -
Degreasing:
If using a real pumpkin, wipe the skin with a little rubbing alcohol on a paper towel to remove natural oils, which helps the paint adhere better. -
Dry Time:
Allow the pumpkin to air dry completely for about 10 minutes before applying any metallic products. -
Paint Setup:
Shake your liquid gold leaf or gilding paint bottle vigorously to ensure the metallic particles are evenly distributed. -
Loading the Palette:
Pour a small amount of the gold paint into your palette or cup; liquid leaf dries fast, so only pour what you can use in a few minutes.
Clean Lines
If you smear gold outside the groove, quickly wipe it away with a Q-tip dipped in rubbing alcohol before it sets.
Step 2: Gilding the Crevices
-
Initial Application:
Using the small round brush, dip the tip into the gold paint and carefully place it at the top of one of the pumpkin’s vertical grooves. -
Dragging the Color:
Slowly drag the brush down the natural channel of the pumpkin, allowing the brush hairs to splay slightly to fill the deeper part of the groove. -
Feathering Edges:
For a more organic look, don’t worry about perfect straight lines; let the paint naturally follow the bumps and dips of the crevice. -
Building Opacity:
If the gold looks translucent, wait a moment for the first stroke to tack up, then apply a second layer over the same groove for a solid metallic finish. -
Working Around:
Rotate the pumpkin and repeat this process for every major vertical groove, reloading your brush frequently to maintain a fluid stroke. -
Checking the Base:
When you reach the bottom of the pumpkin, taper the gold line off gently rather than creating a hard stop. -
Drying Phase:
Let the painted grooves dry for at least 30 minutes. Be careful not to smudge the wet lines while handling the pumpkin for the next step.
Add Dimension
After the gold dries, lightly dry-brush a tiny amount of bronze paint over the stem to give it an antique, weathered look.
Step 3: Stem and Finishing Touches
-
Switching Brushes:
Switch to your medium flat brush to cover the larger surface area of the stem efficiently. -
Base of Stem:
Start painting at the very base of the stem where it meets the pumpkin, carefully overlapping the tops of your groove lines to connect the design. -
Painting Upward:
Brush the gold paint upward along the stem, working into all the textured nooks and crannies of the dry stem material. -
Stem Tip:
Coat the cut end of the stem thoroughly; I like to dab the paint here to ensure full coverage on the rough surface. -
Touch-ups:
Inspect the transition area where the stem meets the skin and use the small brush to refine any gaps. -
Final Cure:
Place the pumpkin on a clean surface and allow the liquid gold leaf to cure fully according to the manufacturer’s instructions, usually about an hour.
Place your gilded creation on a linen runner or wooden tray to add a sophisticated sparkle to your autumn decor
Hand-Lettered Word Minis
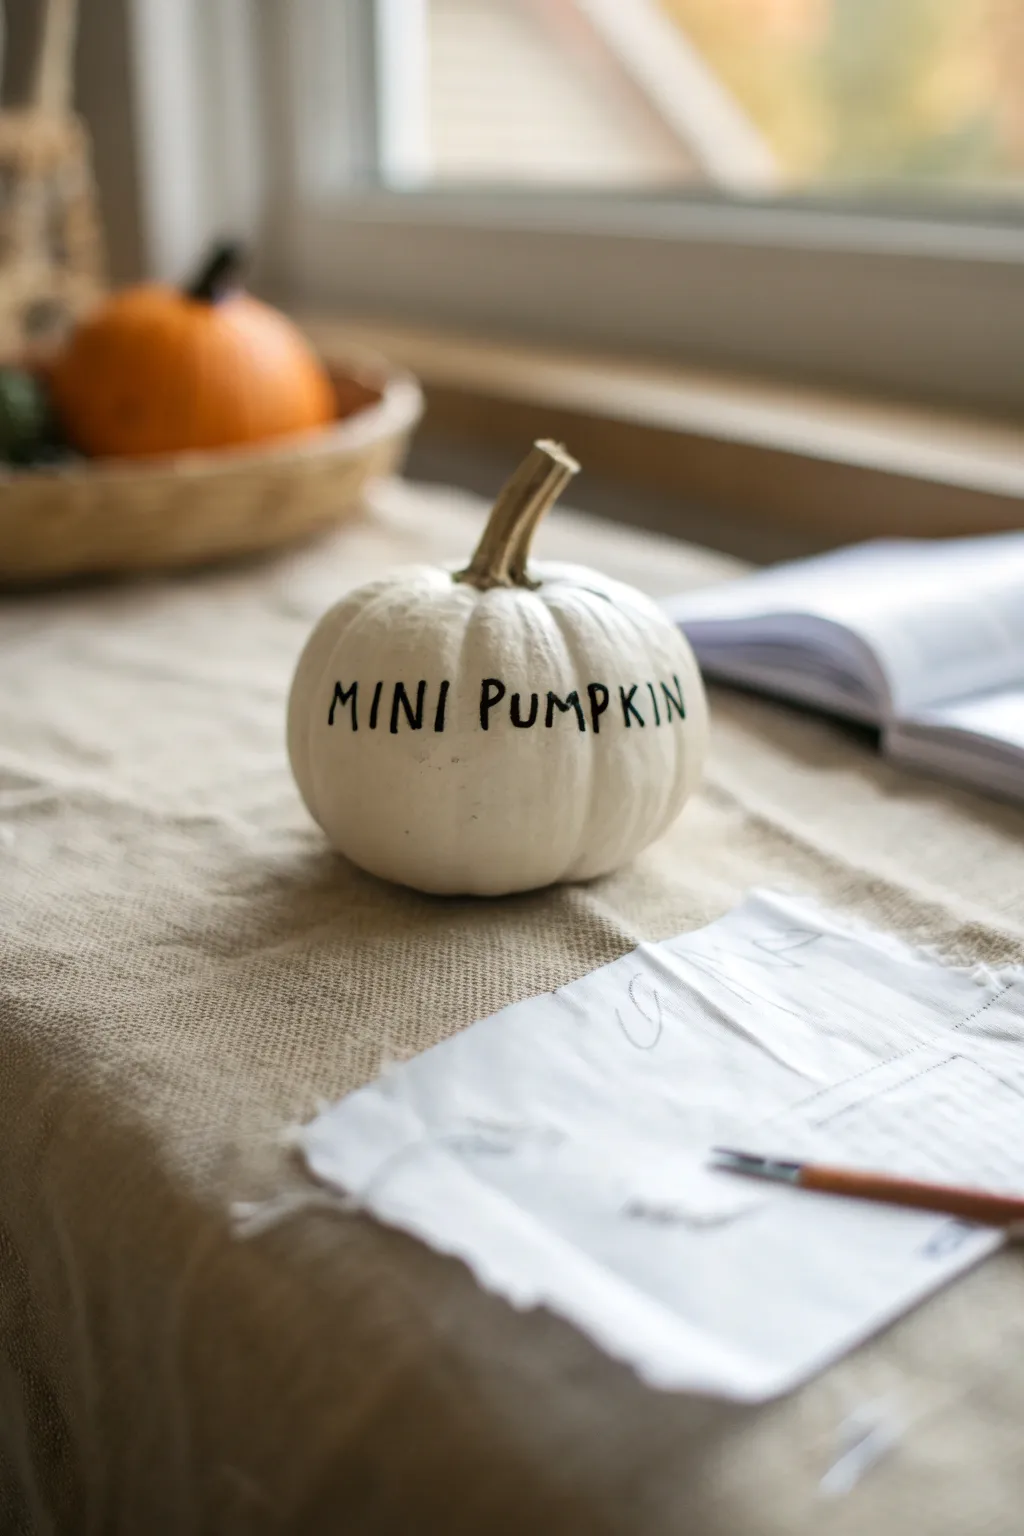
Transform a simple seasonal gourd into a personalized piece of decor with clear, crisp lettering. This project combines the rustic charm of a white mini pumpkin with the modern feel of minimalist typography.
Step-by-Step Tutorial
Materials
- Small white ‘Baby Boo’ pumpkin (real or high-quality faux)
- Mild dish soap and water
- Soft cloth or paper towel
- Rubbing alcohol
- Pencil (HB or H)
- Scrap paper for practice
- Black oil-based paint marker (fine point) or permanent marker
- Kneaded eraser (optional)
- Clear matte sealant spray (optional for longevity)
Step 1: Preparation & Cleaning
-
Selection:
Choose a pumpkin with a relatively smooth face. While no pumpkin is perfectly round, look for one side that is less bumpy for easier writing. -
Wash the surface:
Gently wash your pumpkin with mild dish soap and cool water to remove any field dirt or grime. -
Dry thoroughly:
Wipe it completely dry with a soft cloth. Any moisture left on the skin will prevent the marker or paint from adhering properly. -
Degrease:
Wipe the intended writing area with a cotton ball soaked in a little rubbing alcohol. This removes natural oils from the pumpkin skin that can cause ink to skip.
Use That Natural Curve
Follow the pumpkin’s equator when writing. If the text curves slightly upward at the ends like a smile, it often looks more natural than a ruled straight line.
Step 2: Planning & Sketching
-
Choose your phrase:
Decide on your text. ‘MINI PUMPKIN’ is classic, but names or festive words work well too. Keep it short so the letters can be legible. -
Paper draft:
Grab your scrap paper and pencil. Sketch out the lettering style you want to use. I find it helpful to draw a rough oval on the paper first to simulate the pumpkin’s shape. -
Refine the font:
Practice a simple, sans-serif print like the one in the photo. Focus on consistent height and spacing between the letters. -
Test spacing on the pumpkin:
Using a very light touch with your pencil, sketch the center letter of your phrase on the pumpkin first. This ensures the text is centered. -
Complete the pencil sketch:
Fill in the remaining letters lightly to the left and right of the center. Don’t press hard, or you might dent the delicate skin. -
Check alignment:
Step back and look at the pumpkin from a distance. The natural ribs of the pumpkin can make straight lines look curved, so adjust your sketch slightly if needed.
Step 3: Inking the Letters
-
Prepare the marker:
If using a paint pen, shake it well and press the tip on scrap paper until the ink flows smoothly and consistently. -
Start the outlines:
Begin tracing over your pencil lines. Use steady, deliberate strokes rather than short, sketchy ones to keep the lines clean. -
Thicken the strokes:
Go over your initial lines a second time to add a tiny bit of weight to the letters. A slightly bolder line stands out better against the textured white skin. -
Mind the ribs:
Be extra careful when crossing over the vertical ribs of the pumpkin. The pen tip might jump, so slow down significantly in these valleys. -
Fill small gaps:
Inspect the letters for any spots where the ink looks thin or where the pumpkin texture shows through, and touch them up gently. -
Let it dry:
Allow the ink to dry completely. Oil-based markers may take 10-15 minutes to fully set on the waxy surface. -
Remove specific pencil marks:
Once you are certain the ink is dry, very gently use a kneaded eraser to lift any visible pencil lines. Avoid scrubbing, which might smear the ink.
Ink Smearing?
If you smudge wet ink, quickly dampen a Q-tip with rubbing alcohol and gently wipe the error away. Wait for the alcohol to dry before re-drawing.
Place your finished mini pumpkin on a windowsill or styling tray for a subtle autumn touch
Pattern Play: Stripes, Dots, and Gingham
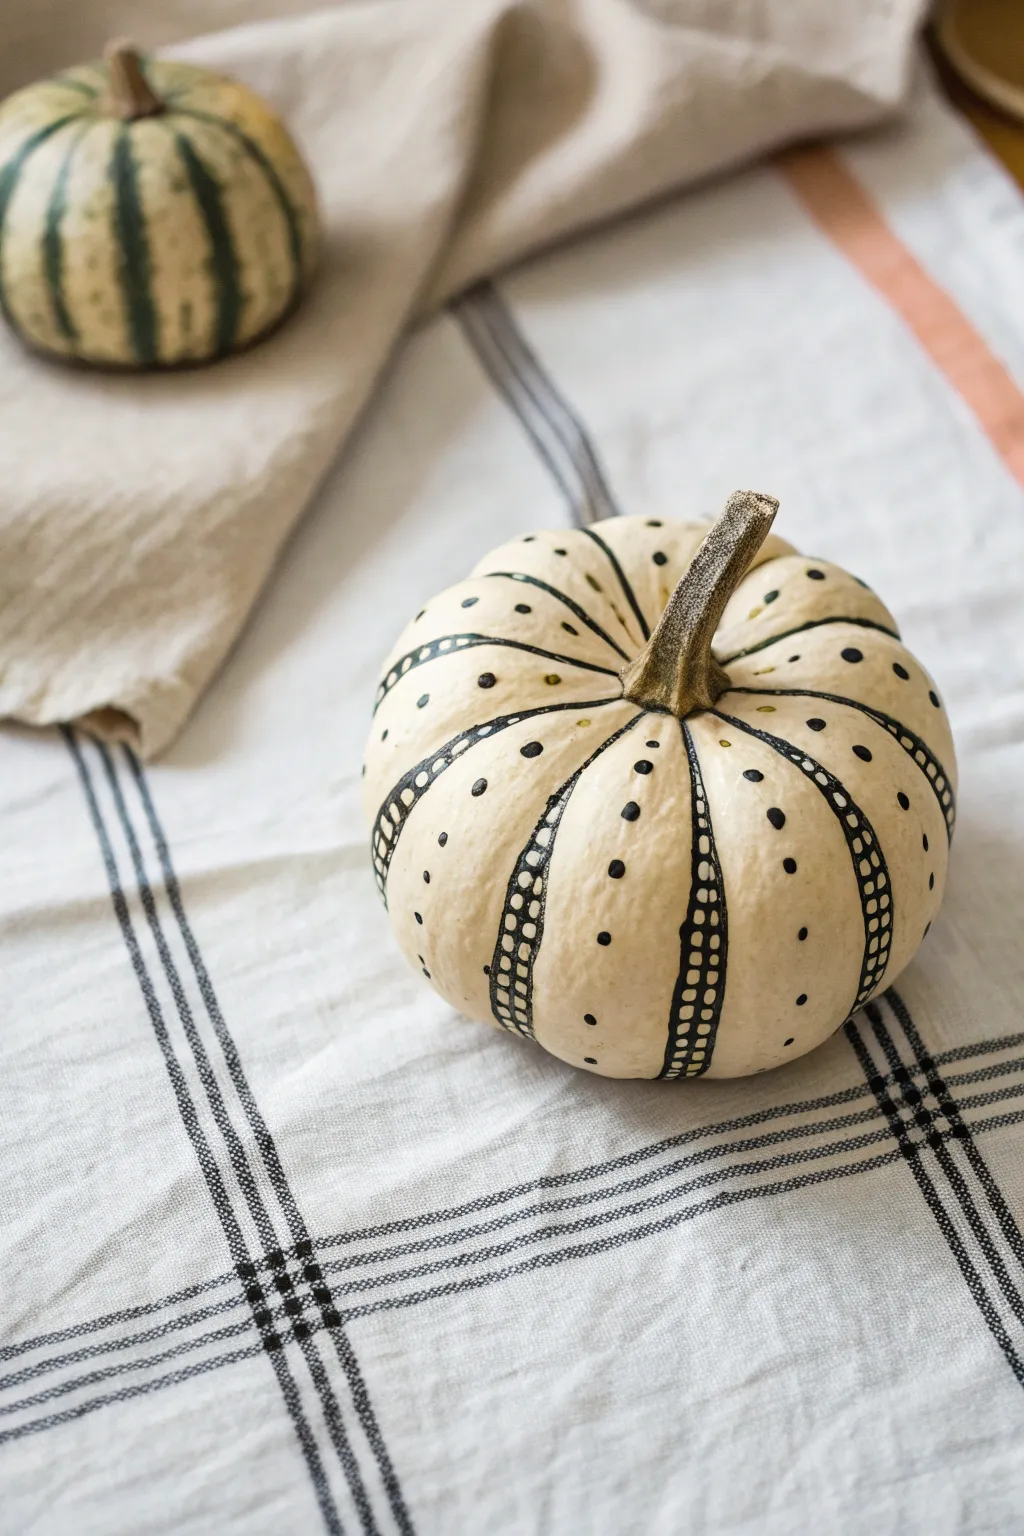
Transform a simple white mini-pumpkin into a chic piece of decor with nothing more than a steady hand and some black ink. This no-carve project features a mix of bold stripes, delicate cross-hatching, and playful dots that mimic the charm of modern textiles.
Step-by-Step Guide
Materials
- White miniature pumpkin (real or faux)
- Black permanent marker or paint pen (fine tip)
- Black permanent marker or paint pen (medium tip)
- Damp cloth or paper towel
- Pencil (optional, for sketching)
Step 1: Preparation
-
Clean surface:
Begin by wiping down your pumpkin with a damp cloth to remove any dirt, dust, or natural oils. This ensures the ink adheres properly without skipping. -
Dry thoroughly:
Let the pumpkin air dry completely before attempting to draw. Any moisture will cause the marker ink to bleed or wipe away. -
Mapping the ribs:
Observe the natural ribs of your pumpkin. These indentations will serve as your guides for where to place the different pattern sections.
Smudge Prevention
Work from the top down, and if you are right-handed, rotate the pumpkin counter-clockwise as you work to keep your palm off fresh ink.
Step 2: Drawing the Linear Patterns
-
Select primary ribs:
Choose alternating ribs to feature the bold striped design. You don’t need to do every single one; skipping every other rib creates breathing room in the design. -
Draw parallel lines:
Using your fine-tip marker, draw two parallel lines running vertically down a selected rib, starting from the stem base and ending at the bottom. -
Connect the ladder:
Inside these parallel lines, draw small horizontal hash marks all the way down, creating a ladder or zipper-like effect along the stripe. -
Thicken the borders:
Go back over the two long vertical border lines with the medium-tip marker to give them more weight and definition against the lighter inner hash marks. -
Repeat the stripes:
Continue this process on the other chosen ribs, rotating the pumpkin carefully as you work to avoid smudging wet ink with your hand.
Step 3: Adding Geometric Details
-
Identify open spaces:
Look at the remaining blank ribs between your newly drawn ladder stripes. These areas will host the dotted patterns. -
Center dot colums:
On one of the blank ribs, draw a single vertical column of dots right down the center, spacing them evenly apart. -
Side dot accents:
On a different blank section, try drawing two columns of dots side-by-side for variety. -
Varying dot sizes:
I prefer to press a little harder on the center dots to make them slightly larger than any secondary accent dots. -
Add dividing lines:
Between some sections, draw a single, simple thin line to act as a separator between a dotted section and a striped section.
Wobbly Lines?
Don’t stress about perfection. If a line goes astray, thicken it slightly or turn the mistake into a new geometric shape.
Step 4: Finishing Touches
-
Check the stem base:
Refine the area where your lines meet the stem. Add small curved lines or extra dots to ensure the pattern looks intentional where it terminates. -
Inspect for gaps:
Look over the entire pumpkin for any faint lines or skipped areas and touch them up with the fine-tip marker. -
Let it cure:
Allow the finished pumpkin to sit untouched for at least 15 minutes to let the permanent marker fully set.
Place your patterned pumpkin on a neutral linen runner to let the high-contrast design really pop
Stacked Mini Pumpkin Totems
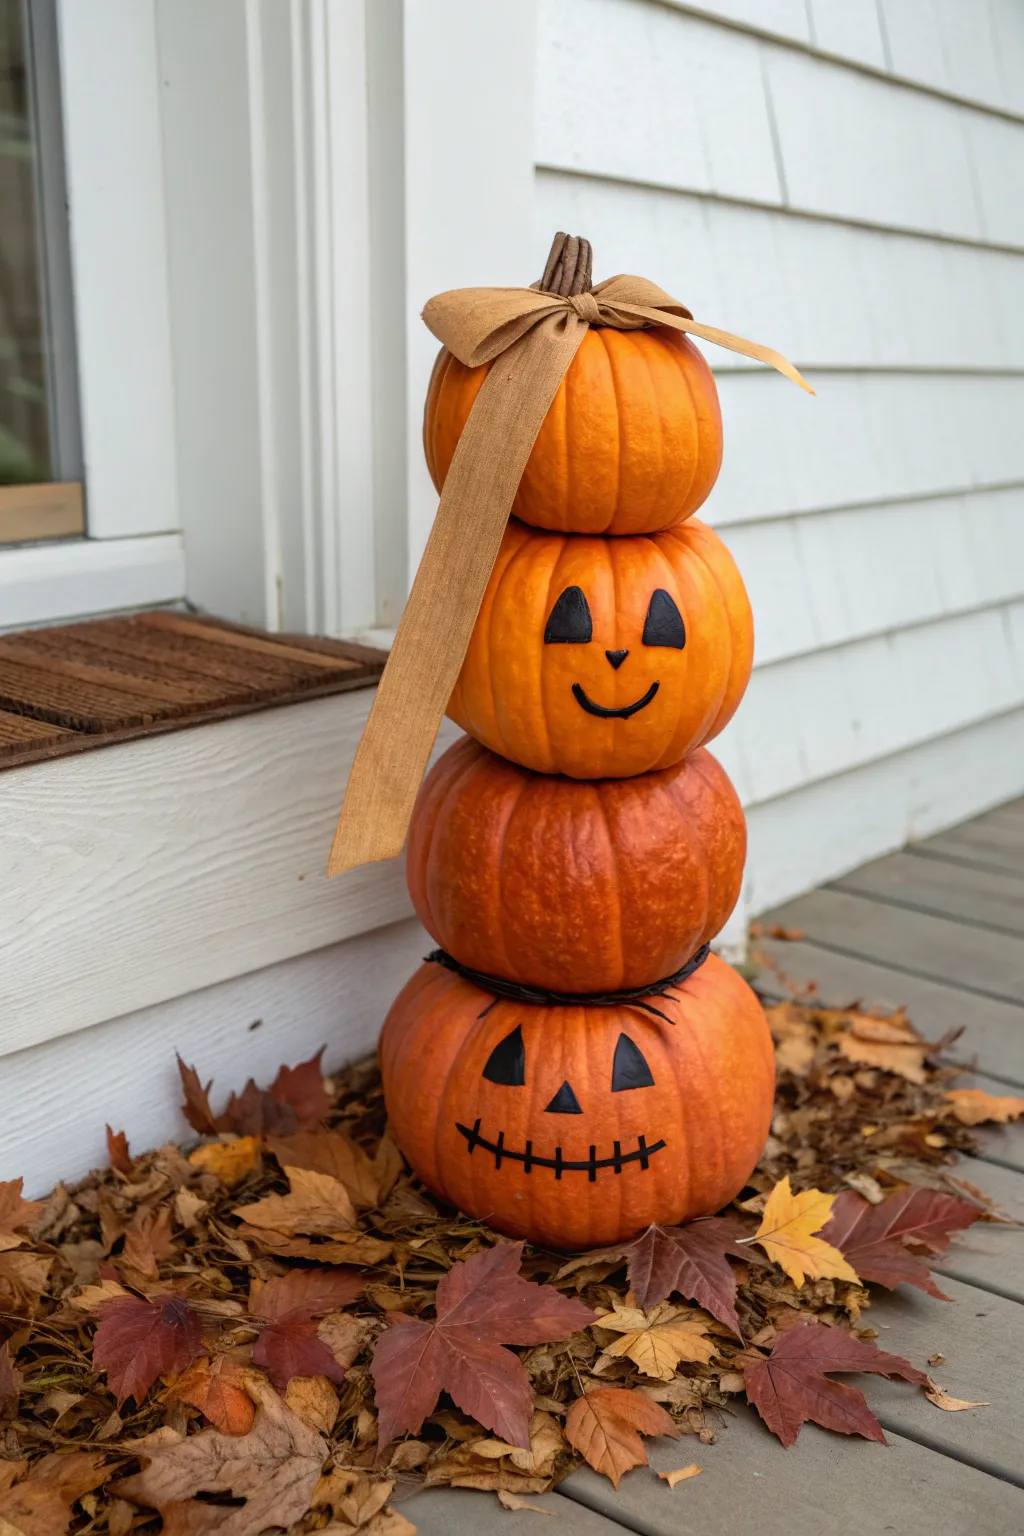
Welcome autumn to your doorstep with this charming totem of stacked mini pumpkins. Featuring alternating smiling faces and a rustic burlap bow, this easy project adds a playful and festive vertical element to your seasonal porch decor.
Detailed Instructions
Materials
- 4 faux or real mini pumpkins (roughly similar sizes)
- Black acrylic paint
- Small flat paintbrush
- Fine-tip detail brush
- Hot glue gun and glue sticks
- Burlap ribbon (approx. 1.5 inches wide)
- Wooden dowel or strong stick (optional, for stability)
- Pencil for sketching
- Dried autumn leaves (for styling)
Step 1: Painting the Faces
-
Select your pumpkins:
Choose four pumpkins that stack well together. Look for flatter bottoms and tops to ensure stability. Decide which will be your ‘face’ pumpkins—in this design, the bottom and the second-from-top pumpkins get the personality. -
Design the bottom face:
On your base pumpkin, use a pencil to lightly sketch a classic jack-o’-lantern face. The lower face features triangle eyes, a small triangle nose, and a wide, stitched smile. -
Design the second face:
Take the pumpkin intended for the third slot up (second from the top). Sketch a simpler, sweeter face here: triangle eyes, a tiny nose, and a simple curved smile. -
Fill in the eyes:
Using your small flat brush and black acrylic paint, carefully fill in the triangle shapes for the eyes on both pumpkins. Use the straight edge of the brush to get crisp lines. -
Add the noses:
Paint the small triangle noses. For the upper pumpkin, this is just a tiny dab of paint to create a small upward-pointing triangle. -
Paint the bottom smile:
Switch to your fine-tip detail brush. Carefully paint the wide mouth line on the bottom pumpkin. -
Add stitched details:
Still using the fine brush, add vertical hatch marks across the mouth line to create that classic ‘stitched’ scarecrow look. -
Paint the top smile:
On the upper face pumpkin, paint a smooth, simple curve for the smile. I like to thicken the middle of the line slightly to make the expression friendlier. -
Let it dry:
Set these painted pumpkins aside to dry completely before you attempt to stack them, so you don’t smudge your artwork.
Step 2: Assembly and Finishing
-
Prepare the base:
Place your large, stitched-smile pumpkin at the bottom. If you are using faux pumpkins and want extra security, you can push a wooden dowel through the center, but hot glue usually suffices. -
Stack the second tier:
Apply a generous ring of hot glue around the stem area of the base pumpkin. Place a plain, unpainted pumpkin on top, pressing down firmly until the glue sets. -
Add the third tier:
Apply hot glue to the top of the plain pumpkin. Place your smaller, sweet-faced pumpkin on top, ensuring the face is aligned with the bottom one. -
Top it off:
Glue the final, unpainted pumpkin to the very top of the stack. -
Tie the bow:
Cut a length of burlap ribbon. Tie a simple shoelace bow, leaving long tails that will drape down the side of the stack. -
Attach the bow:
Place a dab of hot glue right at the base of the stem on the top pumpkin. Press the knot of your burlap bow into the glue. -
Arrange the ribbon tails:
Gently drape the ribbon tails down the left side of the pumpkins. You can use a tiny dot of glue on the side of the pumpkins to keep the ribbon in that perfect cascading position if it’s windy. -
Style the scene:
Place your finished totem on your porch or entryway. Arrange a bed of dried autumn leaves around the base to ground the arrangement and hide the bottom edge.
Stem Removal Trick
If stacking real pumpkins is wobbly, gently snap off the stems of the bottom three pumpkins to create flatter surfaces for gluing.
Weatherproofing
If keeping this outside, seal the painted faces with a clear matte spray sealer to prevent the rain from running the paint.
Enjoy the smiles your new pumpkin family brings to visitors all season long
Mini Pumpkin Critters and Crawlers
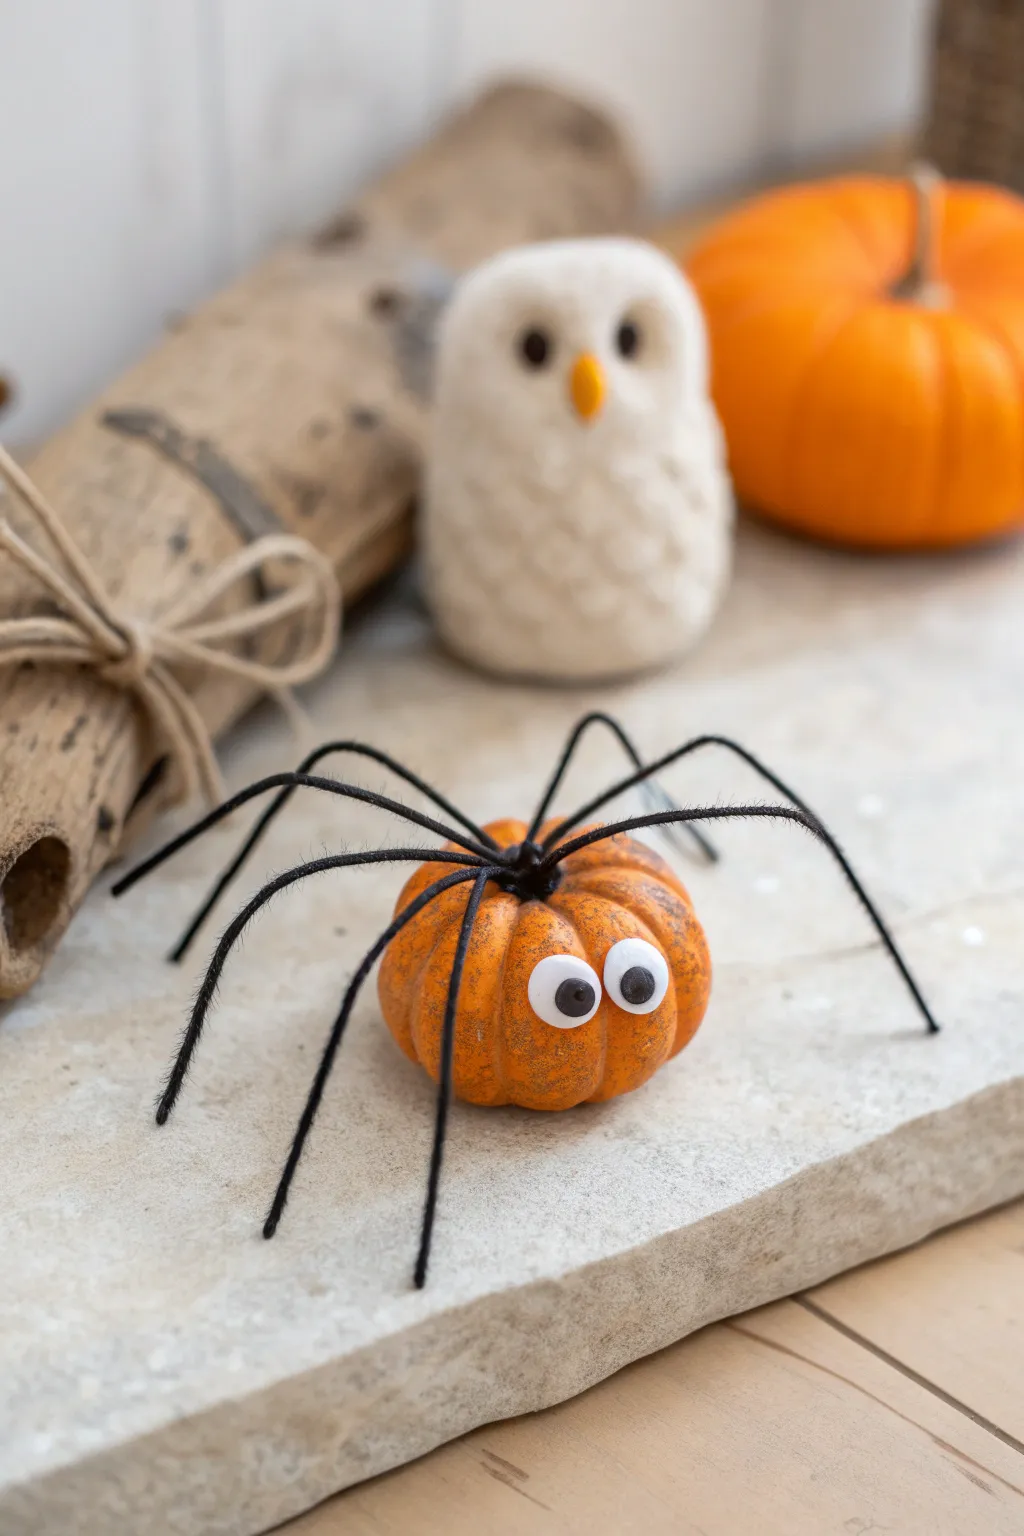
Transform a tiny pumpkin into a friendly, crawling arachnid for your Halloween decor. This simple craft combines the charm of autumn gourds with just a touch of spooky whimsy, perfect for shelves or table settings.
How-To Guide
Materials
- Small artificial mini pumpkin (orange)
- Black chenille stems (pipe cleaners)
- Googly eyes (medium size)
- Hot glue gun and glue sticks
- Scissors
- Wire cutters (optional, but helpful for pipe cleaners)
- Pencil or awl (for marking)
Step 1: Preparing the Body
-
Clean and prep:
Start by ensuring your mini pumpkin is clean and dry. If you are using a plastic pumpkin, wipe it down with a cloth to remove any dust or oils that might prevent the glue from sticking. -
Remove the stem:
Carefully twist or pull off the existing plastic stem from the top of the pumpkin. If it’s glued tightly, you might need to use pliers or carefully cut it flush with the pumpkin surface. -
Plan the leg placement:
Looking at the top of the pumpkin where the stem used to be, visualize where the legs will attach. You’ll want them clustered near the center divot so they arch outward naturally.
Leg Stability Fix
If the legs are too floppy to hold the pumpkin’s weight, twist two pipe cleaners together for each leg to double the thickness and strength.
Step 2: Creating the Legs
-
Cut the pipe cleaners:
Take four black chenille stems. Using scissors or wire cutters, cut each stem in half so you end up with eight equal-length pieces. These will become your spider legs. -
Bundle the legs:
Gather four of your cut pipe cleaner pieces together in a small bundle. Twist one end of the bundle tightly together for about half an inch. Repeat this with the remaining four pieces to create two sets of legs. -
Join the bundles:
Twist the two bundled ends together to form a single central point with eight legs radiating outward. This creates a solid anchor point that is easier to glue than individual stems. -
Attach the legs:
Apply a generous dollop of hot glue directly into the center indentation on top of the pumpkin. -
Secure the joint:
Press the twisted center of your pipe cleaner assembly firmly into the hot glue. Hold it in place for 30-60 seconds until the glue cools and hardens completely.
Hair & Fang Upgrade
Add a tuft of black faux fur on top for hair, or glue tiny white pointed felt triangles under the eyes for spooky little fangs.
Step 3: Shaping and Details
-
Initial bending:
Once dry, fan the legs out so there are four on the left and four on the right. Bend each leg sharply upwards right at the base so they stand tall initially. -
Creating the knee:
About halfway down the length of each pipe cleaner, create a sharp downward bend. This forms the ‘knee’ joint and gives the spider its characteristic creeping stance. -
Adjusting the feet:
Bend the very tip of each leg slightly outward so the spider has small ‘feet’ to balance on. Adjust heights until the pumpkin body sits slightly suspended or just barely touches the surface. -
Adding the eyes:
Select two medium-sized googly eyes. Decide on the ‘front’ of your pumpkin, ideally a smooth side without major blemishes. -
Spacing the expression:
Test the placement before gluing. Put the eyes close together for a cute look, or further apart for something goofier. I personally love placing them touching each other for that classic cartoon spider vibe. -
Gluing the face:
Apply a small dot of hot glue to the back of each eye and press them onto the upper half of the pumpkin face. -
Final adjustments:
Give your spider a final check. Tweak the leg angles so they look symmetrical and ensure the spider stands stable without tipping over.
Set your new crawling creation on a mantel or windowsill to keep watch over the season


Have a question or want to share your own experience? I'd love to hear from you in the comments below!