If you’ve got a handful of small pumpkins and some paint, you’ve basically got a tiny gallery waiting to happen. I love mini projects like this because you can try a bunch of pumpkin painting ideas in one sitting without feeling overwhelmed.
Classic Solid Mini Pumpkin Colors
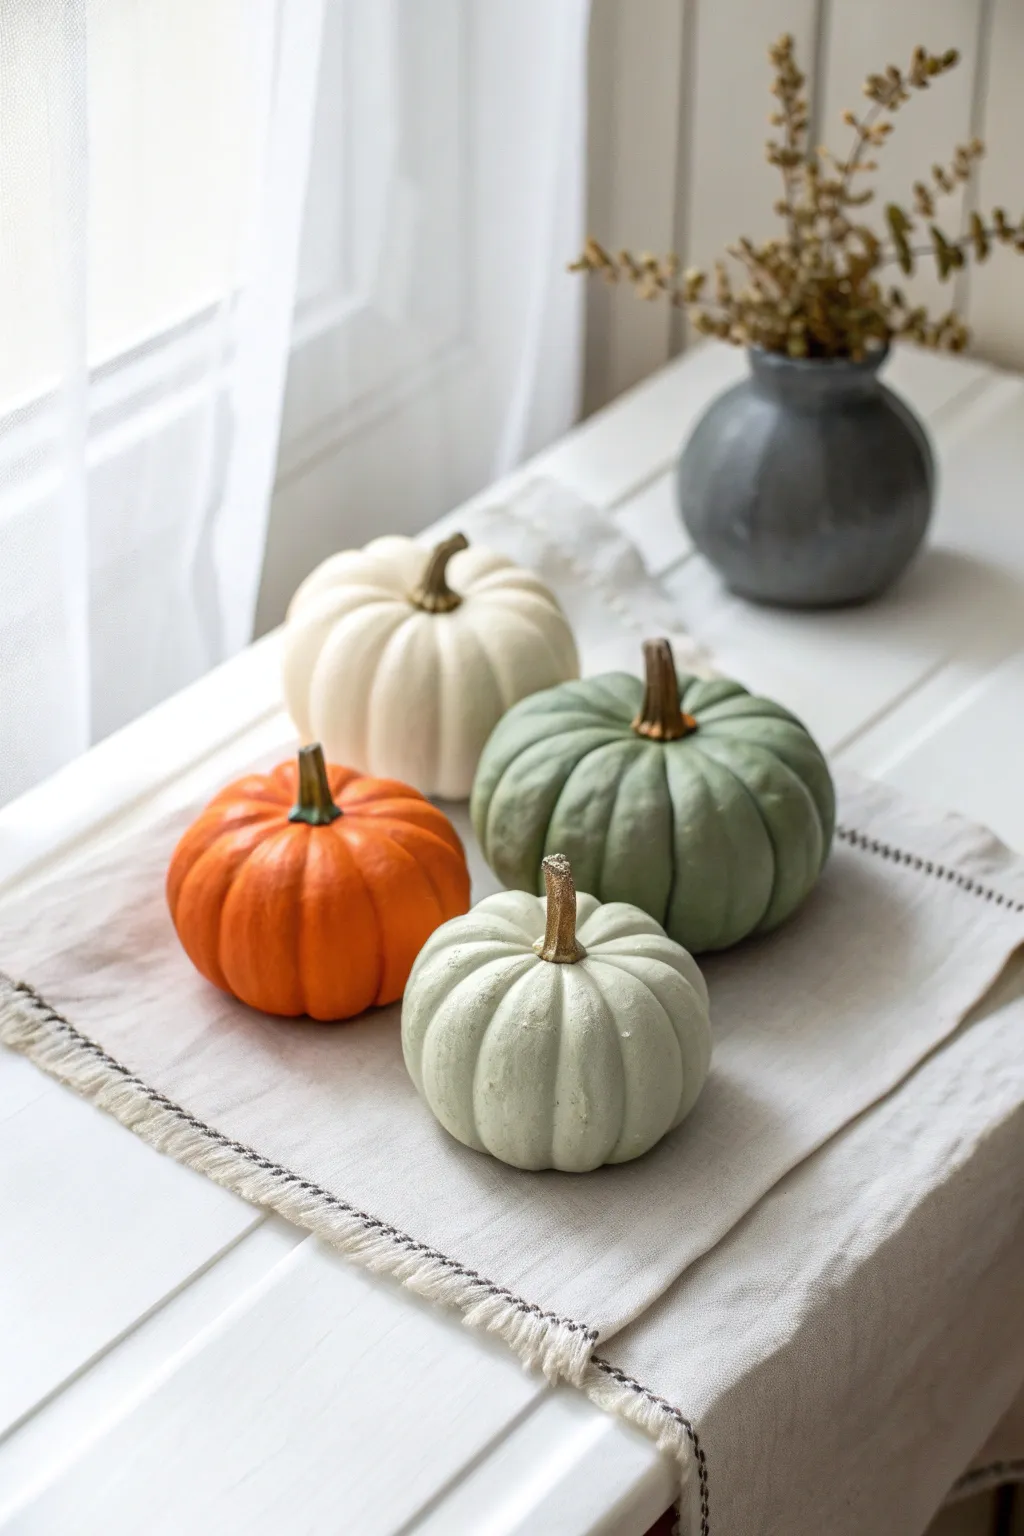
Achieve a sophisticated autumn look by transforming ordinary mini pumpkins with a curated palette of matte cream, muted orange, and soft sage green. The elegant finish is elevated by hand-painted metallic gold stems, creating a modern centerpiece perfect for any windowsill or table setting.
Step-by-Step Guide
Materials
- 4 mini pumpkins (real or faux)
- Matte chalk paint or acrylic craft paint (Colors: Cream/Off-White, Sage Green, Muted Orange, Pale Seafoam)
- Metallic gold or antique bronze acrylic paint
- Soft synthetic flat brush (1/2 inch)
- Small round detail brush (size 2 or 4)
- Painter’s tape (optional)
- Mild dish soap and water
- Paper towels
- Wax paper or drying rack
Step 1: Preparation & Cleaning
-
Clean the surface:
Begin by thoroughly wiping down your mini pumpkins with a damp cloth dipped in mild soapy water. This removes any dirt, oils, or waxy residue that might prevent the paint from adhering properly. -
Dry completely:
Use a paper towel to dry each pumpkin completely, paying special attention to the deep crevices and the area around the stem. Wet surfaces will cause the paint to streak. -
Mask the stem (optional):
If you are worried about getting body color on the stem, carefully wrap a small piece of painter’s tape around the base of the stem. I tend to skip this and just paint carefully, but taping ensures a sharp line.
Step 2: Base Coat Application
-
Mix the cream tone:
Pour a small amount of cream or off-white chalk paint onto your palette. If using standard acrylics, you might mix in a tiny drop of brown to warm it up so it isn’t stark white. -
Paint the first pumpkin:
Holding the pumpkin by the stem, use your flat brush to apply the cream paint in vertical strokes, following the pumpkin’s natural ribs from top to bottom. -
Apply the sage green:
On a fresh palette area, prepare your sage green. Paint the largest pumpkin in this shade, ensuring you push the bristles into the grooves for full coverage. -
Paint the accent colors:
Coat the remaining two pumpkins—one in muted orange and the smallest in the pale seafoam color. Keep your layers thin to preserve the texture of the pumpkin skin. -
Let dry and flip:
Set the pumpkins on wax paper to dry for about 20-30 minutes. Once the tops are dry to the touch, gently turn them over to paint the very bottom base so no raw pumpkin shows. -
Second coat:
Chalk paint often covers well in one coat, but apply a second thin layer if you see any streakiness or the original orange showing through. Let this cure fully for an hour.
Paint Peeling?
If paint scrapes off easily, the pumpkin skin was likely too waxy. Lightly sand the surface with fine-grit sandpaper before repainting to give the paint something to grip.
Step 3: The Metallic Stem Detail
-
Prepare the gold paint:
Shake your metallic gold or antique bronze paint well to distribute the shimmer pigments evenly before pouring a dime-sized amount. -
Switch brushes:
Pick up your small round detail brush. This smaller tip gives you control around the uneven base of the stem. -
Paint the stem base:
Carefully outline where the stem meets the pumpkin body. It’s okay if it isn’t a perfect circle; following the organic shape looks more natural. -
Fill in the stem:
Paint upward to cover the rest of the stem. Dab the paint into the cut top of the stem to seal it and give it a finished, high-end look. -
Check for gaps:
Rotate the pumpkin to ensure you haven’t missed any spots on the back side of the stem. The metallic sheen should be solid and opaque.
Level Up: Velvet Texture
Mix a teaspoon of baking soda into your acrylic paint before applying. This creates a textured, faux-terracotta finish that looks incredibly high-end and rustic.
Step 4: Finishing Touches
-
Final drying time:
Allow the metallic stems to dry completely, which usually takes about 30 minutes. Avoid touching them while tacky to prevent fingerprints. -
Inspect the finish:
Look over your pumpkins for any drips or missed spots in the grooves. A quick touch-up now ensures they look flawless from every angle. -
Arrange your display:
Once fully cured, arrange them together on a linen runner or cloth to highlight the complementary matte colors and gleaming stems.
Group your newly painted pumpkins near a window where the natural light can catch the subtle shimmer of the gold stems


Black-and-White Pumpkin Stripes
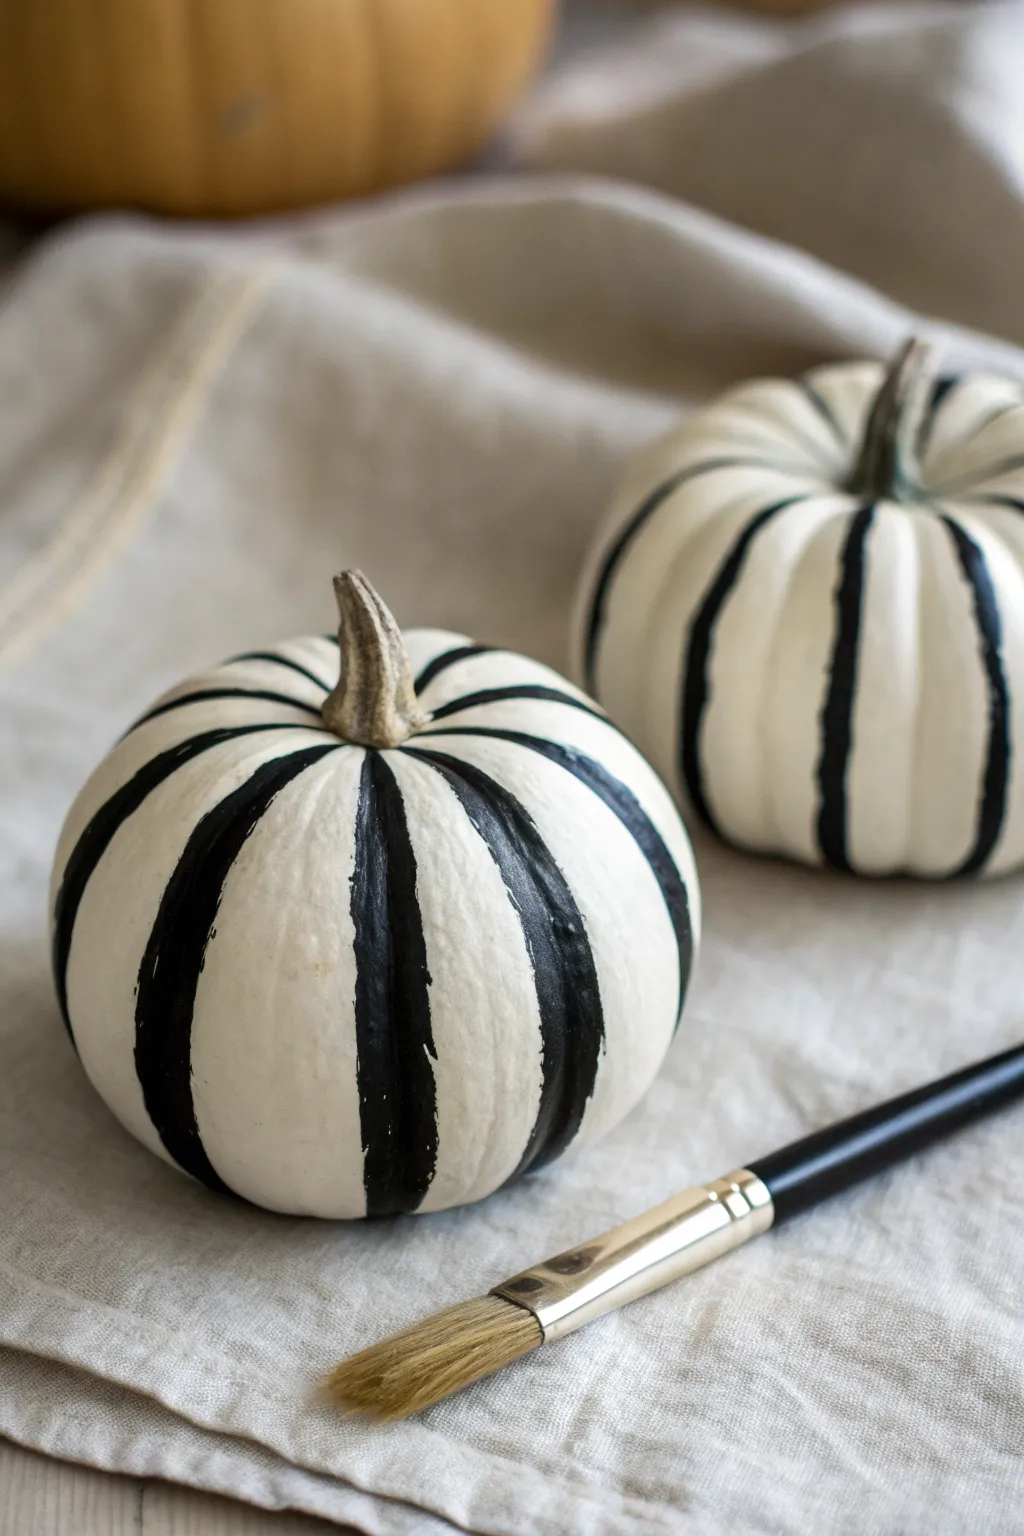
Transform ordinary mini pumpkins into sleek sophisticated decor with this striking high-contrast design. The bold black stripes against a crisp white background create a modern look that feels fresh and elegant on any autumn mantel.
Detailed Instructions
Materials
- Small white pumpkins (real or faux)
- White acrylic craft paint (matte or satin finish)
- Black acrylic craft paint
- Medium flat paintbrush (approx. 1/2 inch)
- Small round paintbrush for touch-ups
- Paper towels or a rag
- Cup of water
- Palette or paper plate
Step 1: Preparation & Base Coat
-
Clean surface:
Begin by thoroughly wiping down your pumpkins to remove any dirt or waxy residue. If you are using real pumpkins, dry them completely with a paper towel to ensure the paint adheres properly. -
Remove stems mixing:
If your pumpkins are faux and the stems are removable, pop them out now. If they are real or fixed, simply carefully tape around the base of the stem with painter’s tape if you’re worried about accidental smudges. -
Painting the base:
Even if your pumpkin is already white, apply a coat of white acrylic paint. This creates a uniform, clean canvas and covers any natural yellowish imperfections. -
Drying time:
Allow the first coat of white paint to dry completely. This usually takes about 15-20 minutes, depending on the thickness of the paint. -
Second coat:
Apply a second coat of white paint for a truly opaque, professional finish. I find this step crucial for getting that crisp contrast later. -
Final cure:
Let the white base coat cure fully. It must be bone dry before you introduce the black paint to avoid blending.
Groove Guide
Use the pumpkin’s natural ribs as a stencil. Rest the side of your brush or pinky finger against a dry section for stability as you pull the brush down the indentations.
Step 2: Adding the Stripes
-
Planning the lines:
Observe the natural ridges and grooves of the pumpkin. These vertical indentations will serve as your guides for where the stripes should go. -
Loading the brush:
Load your medium flat brush with black acrylic paint. You want enough paint for opaque coverage but not so much that it drips. -
Starting the stroke:
Start at the top of the pumpkin, right near the base of the stem. Place your brush inside one of the natural grooves. -
Pulling down:
With a steady hand, pull the brush straight down following the pumpkin’s groove all the way to the bottom. Don’t worry if the edges look a little organic or rough; that adds to the hand-painted charm. -
Rotating carefully:
Rotate the pumpkin slightly to access the next groove, being careful not to touch the wet black paint. -
Continuing the pattern:
Repeat the painting process for every other groove, or every groove, depending on how dense you want your stripes. -
Checking opacity:
Go back over your first few stripes. If the black looks streaky or gray, carefully layer a second coat over the existing black lines once the first layer is tacky. -
Touching up:
Use a small round brush and a bit of white paint to clean up any accidental splashes or wobbly edges where the black strayed too far. -
Handle with care:
Let the black stripes dry undisturbed for at least an hour. The thicker paint in the grooves may take longer to set.
Metallic Twist
Swap the black paint for gold leaf or metallic copper paint to create a glamorous, high-shine version perfect for a formal Thanksgiving table setting.
Group these striking monochromatic pumpkins together on a linen runner for an effortlessly chic fall centerpiece


Polka Dot Mini Pumpkin Charm
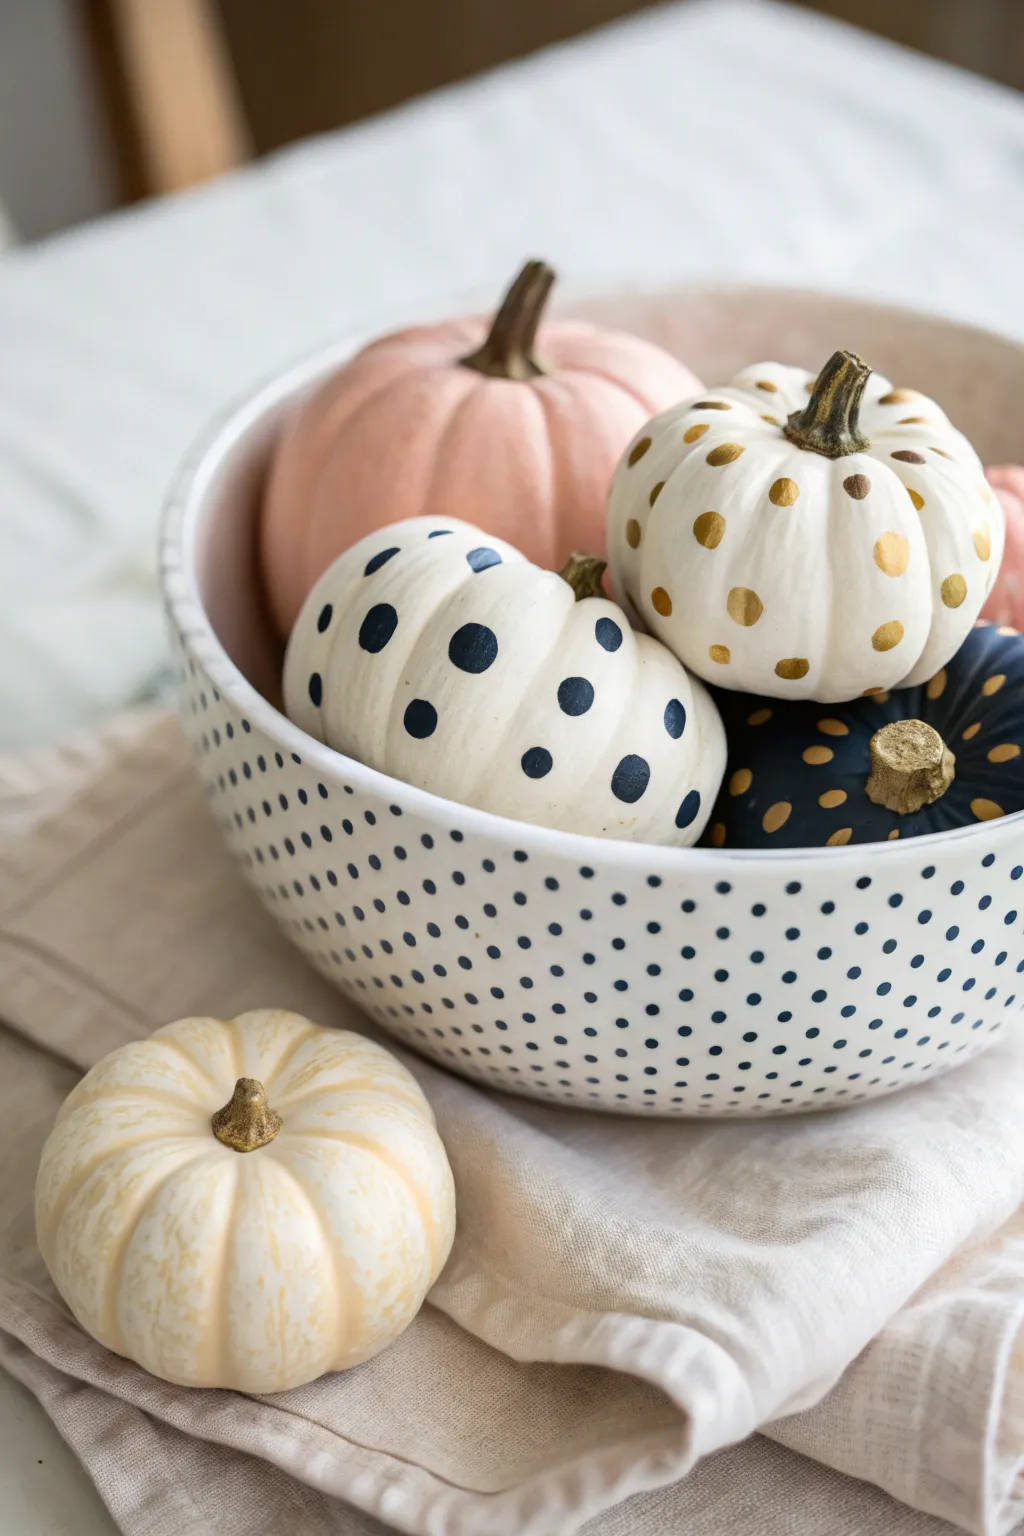
Transform ordinary mini pumpkins into a chic autumn centerpiece with a simple yet striking polka dot motif. By combining matte base coats with metallic gold and deep navy accents, you’ll create a sophisticated collection that feels modern and playful.
How-To Guide
Materials
- Small white mini pumpkins (real or faux)
- Matte acrylic craft paint: white, navy blue, and blush pink
- Metallic gold acrylic paint
- Small, round foam pouncers (various sizes)
- Fine-grit sandpaper (optional)
- Painter’s tape (optional)
- Paper plate or palette
- Synthetic soft bristle brush (medium width)
- Clear matte sealer spray
Step 1: Preparation and Base Coating
-
Clean the surfaces:
Begin by wiping down your pumpkins with a damp cloth to remove any dirt or residue. If using real pumpkins, ensure they are completely dry before proceeding. -
Mask the stems:
Carefully wrap a small piece of painter’s tape around the stems to protect them from stray paint marks; maintaining the natural brown stem adds a lovely contrast. -
Prime the surface:
If your pumpkins are orange or have blemishes, apply a thin coat of white primer. For white faux pumpkins, you can skip straight to the colored base coats. -
Paint the white pumpkin:
Using your soft bristle brush, apply an even coat of matte white acrylic paint to one pumpkin. Brush vertically from top to bottom to follow the pumpkins’ natural ribs. -
Apply the navy base:
For the dark pumpkin, coat the entire surface with deep navy blue acrylic paint. I like to do two thin coats here rather than one thick one to avoid visible brushstrokes. -
Create the pink pumpkin:
Paint a third pumpkin with a soft blush pink shade. This solid-colored gourd acts as a calming anchor for the patterned ones in the final arrangement. -
Paint the stems (optional):
For a glamorous touch shown on the navy pumpkin, paint the stem with metallic gold paint. Use a tiny detail brush to get into the crevices of the stem base. -
Allow to dry:
Let all base coats dry completely for at least one hour. The paint must be fully set before adding dots to prevent smearing.
Pro Tip: Perfect Circles
Don’t press too hard with the foam pouncer. A light, straight-down touch prevents paint from squishing out the sides, keeping your dot edges sharp.
Step 2: Adding the Polka Dots
-
Prepare your palette:
Squeeze a dime-sized amount of navy blue paint and metallic gold paint onto your paper plate, keeping them well separated. -
Load the pouncer:
Take a small round foam pouncer and dip it straight down into the navy paint. Dab it once on a clean part of the plate to offload excess paint and ensure a crisp circle. -
Apply navy dots:
Press the foam pouncer gently onto the white painted pumpkin. Apply dots in randomized rows, spacing them out evenly around the circumference. -
Switch to gold:
Using a fresh pouncer, dip into the metallic gold paint. Apply these gold dots to a second white pumpkin for a bright, festive look. -
Dot the navy pumpkin:
On the dry navy blue pumpkin, apply gold polka dots. The metallic paint may require a slightly heavier load on the pouncer to show up opaque against the dark background. -
Check for gaps:
Rotate each pumpkin to look for bare spots. Add partial dots near the top and bottom recesses to create the illusion that the pattern continues underneath. -
Touch up edges:
If any dots look uneven or smudged, use a tiny detailed brush with the base color to carefully clean up the edges once the dots are dry. -
Remove tape:
Once all paint is dry to the touch, gently peel away the painter’s tape from the stems. -
Seal the work:
Take the pumpkins to a well-ventilated area and apply a light mist of clear matte sealer. This protects the paint from scratching and unifies the sheen.
Troubleshooting: Uneven Dots
If the pumpkin ribs distort your dots, use the end of a round paintbrush handle instead of a foam pouncer. It fits into the grooves better.
Arrange your finished pumpkins in a coordinating bowl to enjoy a custom piece of autumn decor that will last all season


Gingham Checks on Small Pumpkins
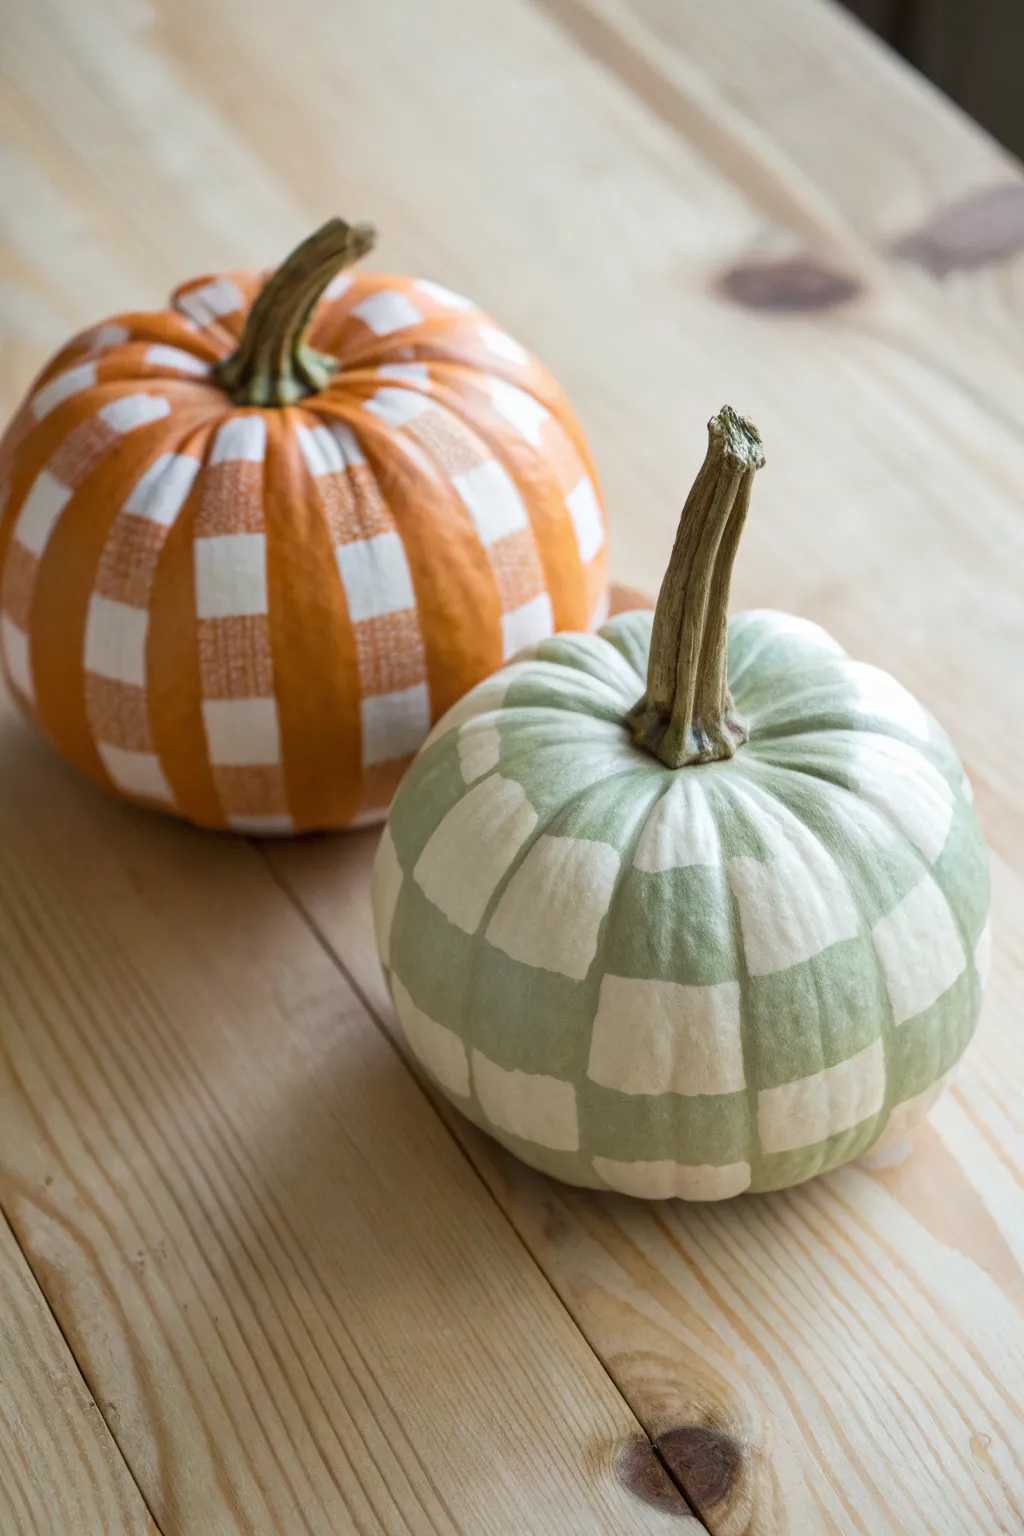
Transform ordinary real or faux pumpkins into charming rustic décor with this deceptively simple painting technique. By layering translucent white paint over the pumpkin’s natural color, you can create a cozy, fabric-like gingham effect that looks perfect for farmhouse autumn styling.
Step-by-Step
Materials
- Small pumpkins (real or faux, in orange and muted green)
- White acrylic craft paint
- Flat shader paintbrush (square tip, about 1/2 to 3/4 inch wide)
- Glazing medium or water (for thinning paint)
- Paper plate or palette
- Wipeable cloth or paper towels
- Masking tape (optional, intended for guidelines)
- Clear matte sealer (optional)
Step 1: Preparation and Planning
-
Clean the surface:
Before you begin, wipe down your pumpkins with a damp cloth to remove any dirt, dust, or oils. If you are using real pumpkins, ensure they are completely dry before applying any paint. -
Mix your glaze:
The key to the gingham look is transparency. Mix your white acrylic paint with a glazing medium or a small amount of water. You want a consistency that isn’t solid opaque white but a milky, semi-sheer wash. -
Test the opacity:
I like to test the paint mixture on the bottom of the pumpkin first. One stroke should allow the pumpkin’s original color to show through slightly. If it’s too solid, add more medium; if it’s too invisible, add more paint.
Master the Texture
Use a dry brush technique. Don’t overload the brush with paint; a slightly ‘scratchy’ application mimics the weave of woven fabric better than solid lines.
Step 2: Painting Vertical Lines
-
Start at the stem:
Using your flat shader brush, start painting vertical stripes from the base of the stem down to the bottom of the pumpkin. Follow the natural ribs of the pumpkin as a guide. -
Spacing the stripes:
Paint a stripe, then leave a gap of roughly the same width as your brush, then paint the next stripe. Try to keep the spacing consistent around the entire circumference. -
Smoothing the strokes:
Try to make each vertical line in one or two long, continuous strokes to minimize brush marks. If you need to stop, lift the brush gently to feather the edge. -
Let it dry completely:
This is crucial: allow the vertical stripes to dry fully before moving on. If the paint is wet, the next step will smudge the lines rather than layering over them.
Step 3: Creating the Check Pattern
-
Begin horizontal bands:
Once dry, start painting horizontal bands around the pumpkin. Start near the top (but slightly below the stem) and encircle the pumpkin. -
Maintain consistent width:
Use the flat edge of your brush to keep the horizontal stripe the same width as your vertical ones. This creates the square ‘check’ shape. -
Observe the overlap:
As you paint horizontally over the dried vertical stripes, notice how the intersection becomes a brighter, erratic white. This double layer creates the ‘gingham’ effect naturally. -
Continue down the pumpkin:
Leave a gap equal to the stripe width below your first horizontal band, then paint the next ring. Repeat this until you reach the bottom. -
Navigating the curve:
Because pumpkins are round, your horizontal lines might curve slightly. Don’t stress about geometric perfection; following the pumpkin’s natural curve adds to the organic, fabric look.
Mix Up the Palette
Try a reverse gingham! Use a white pumpkin as your base and paint the checks in soft sage green, navy blue, or muted terracotta for a colorful twist.
Step 4: Refining and Sealing
-
Touch up intersections:
If some of the overlapping squares (where vertical meets horizontal) aren’t bright enough, dab a tiny bit more of your milky paint mixture specifically on those squares to highlight the check pattern. -
Clean up edges:
If any lines went too far astray, you can use a damp Q-tip to gently wipe away excess paint before it fully cures. -
Dry time:
Allow the entire pumpkin to dry for at least an hour. Acrylics dry fast, but thicker intersections might take a moment longer. -
Protect your work:
If these pumpkins will be displayed outside or handled frequently, apply a coat of clear matte sealer spray to lock in the design without adding unnatural shine.
Now you have a set of cozy, patterned pumpkins ready to warm up your table or mantelpiece
BRUSH GUIDE
The Right Brush for Every Stroke
From clean lines to bold texture — master brush choice, stroke control, and essential techniques.
Explore the Full Guide
Checkerboard Mini Pumpkin Pattern
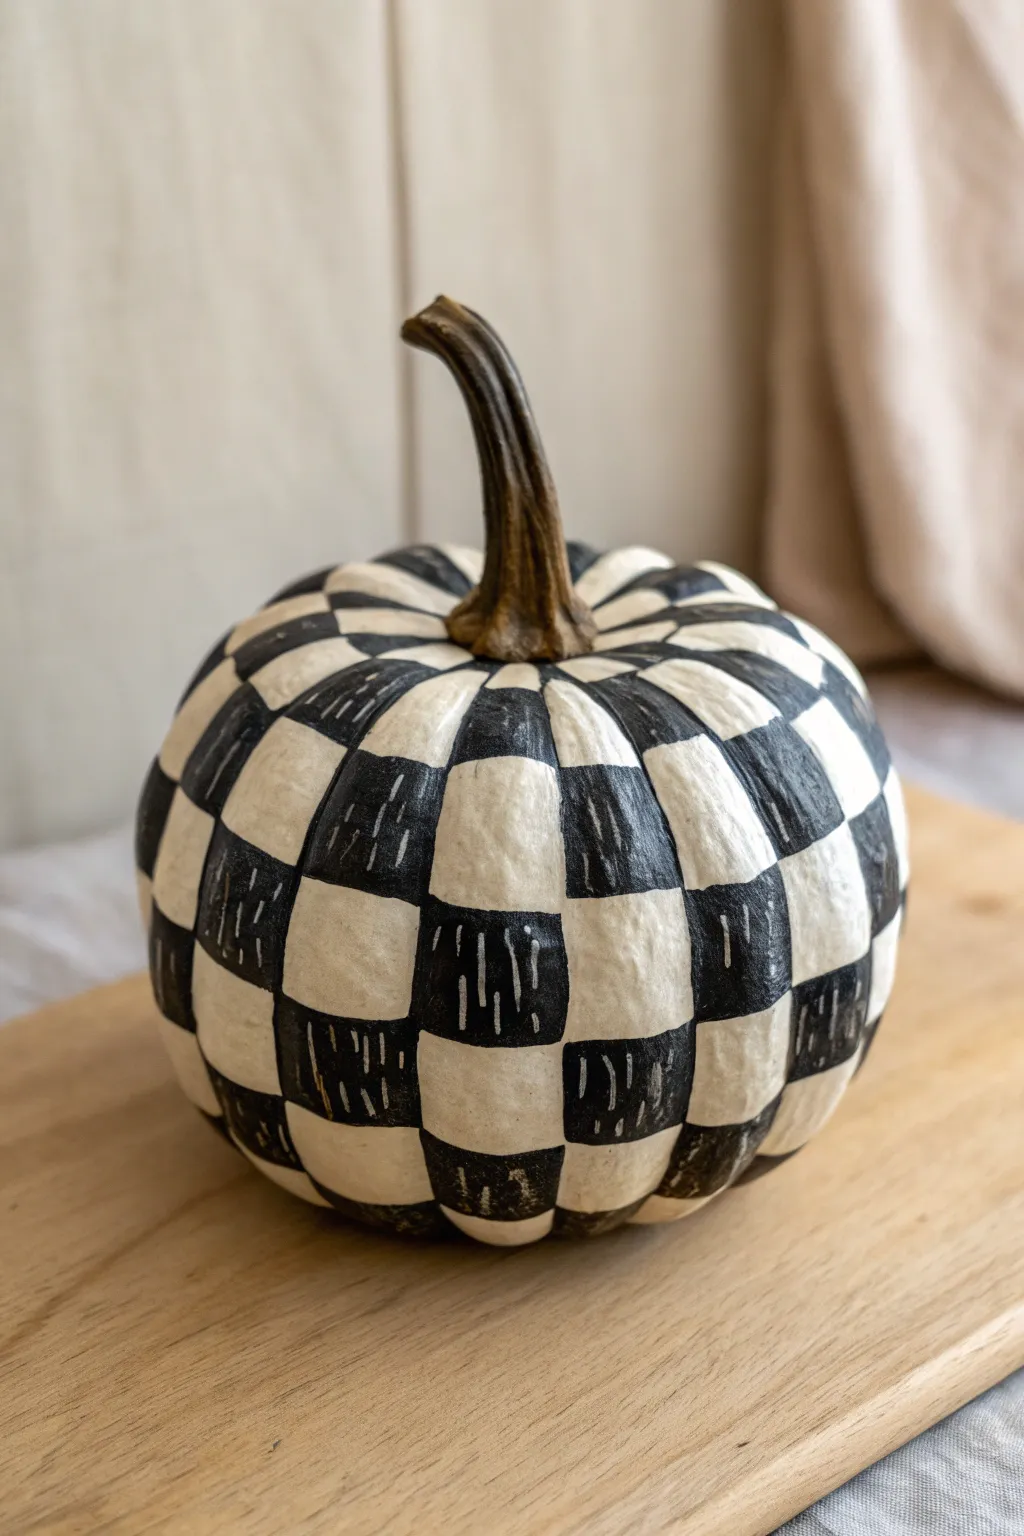
Transform a simple mini pumpkin into a piece of modern farmhouse decor with this striking black and white checkerboard design. The scratched texture on the black squares adds a delightful, hand-carved block print effect that elevates the finish beyond simple painting.
How-To Guide
Materials
- Small white pumpkin (real or faux)
- Black acrylic craft paint
- Small flat shader brush (size 4 or 6)
- Very fine liner brush or detail brush (size 0 or 00)
- Pencil
- Matte finish sealer (spray or brush-on)
- Paper towel
- Palette or paper plate
Step 1: Base Prep & Mapping
-
Clean the surface:
Start by wiping down your pumpkin with a damp cloth to remove any dirt or oils. If you are using a real pumpkin, ensure it is completely dry before proceeding. -
Paint the base white:
Even if your pumpkin is already white, give it a coat of white acrylic paint. This creates a uniform canvas and helps the pencil marks show up clearly later. Let this base coat dry completely. -
Define the vertical ribs:
Using the pumpkin’s natural ribs as a guide, lightly trace vertical lines with a pencil from the stem down to the base. Real pumpkins aren’t perfect, so don’t worry if the sections vary slightly in width. -
Mark horizontal rings:
Starting near the top stem, draw horizontal rings around the pumpkin to create a grid. Space them roughly equal to the width of your vertical sections to create squares. Continue these rings all the way to the bottom. -
Mark the checkerboard:
To avoid painting the wrong square later, lightly mark an ‘X’ inside every other square on your grid with your pencil. This simple step saves so much frustration during the painting phase.
Grid Guide
Use the pumpkin’s natural ribs for vertical lines, but don’t force perfection. Wobbly lines enhance the organic, folk-art feel of the final piece.
Step 2: Painting the Grid
-
Load your flat brush:
Squeeze a dollop of black acrylic paint onto your palette. Load your small flat shader brush, but don’t overfill it near the ferrule (the metal part). -
Outline the first square:
Choose a marked square near the top. Carefully use the edge of your brush to outline the square’s boundaries first. -
Fill the center:
Once outlined, fill in the center of the square with solid black paint. Try to smooth out any heavy ridges of paint for a flat finish. -
Work in sections:
Paint the remaining ‘X’ marked squares, working your way around and down the pumpkin. I find it easiest to paint all the squares in one horizontal row before moving down to the next ring to avoid smudging wet paint. -
Refine the edges:
After the first coat is tacky, check for any uneven edges. Use the corner of your flat brush to crisp up the corners where the black and white squares meet. -
Second coat check:
If the black paint looks streaky or translucent in spots, apply a second thin coat to make it opaque. Let the black squares dry completely before moving to the detailing phase.
Step 3: Adding Texture & Finish
-
Switch to the liner brush:
Clean your workstation and pick up your fine liner brush. You can use standard white paint here, or mix a tiny drop of beige into white for a softer, creamier look. -
Practice the scratch marks:
Before touching the pumpkin, test your strokes on paper. You want short, vertical, slightly irregular hash marks that mimic a woodcut or scratchboard texture. -
Apply texture to black squares:
Paint groupings of 3 to 5 vertical hash marks inside each black square. Vary the placement—some near the left edge, some center, some right—to keep the pattern organic. -
Layering the marks:
Don’t aim for perfection. If your brush runs a little dry, that broken line effect actually adds to the rustic aesthetic. -
Touch up the white squares:
Inspect your white squares. If any black paint strayed over the lines, use a clean brush and white paint to tidy them up now. -
Seal the artwork:
Once all paint is bone dry (give it at least an hour), apply a matte sealer. A spray sealer is best to avoid smearing the delicate hash marks.
Metallic Twist
Swap the white detail paint for metallic gold or copper. The subtle shimmer against the matte black creates a chic, sophisticated look for evening decor.
Place your finished pumpkin on a shelf or mantel to enjoy the cozy, handcrafted vibe it brings to your space
Pastel Ombre Pumpkin Fade
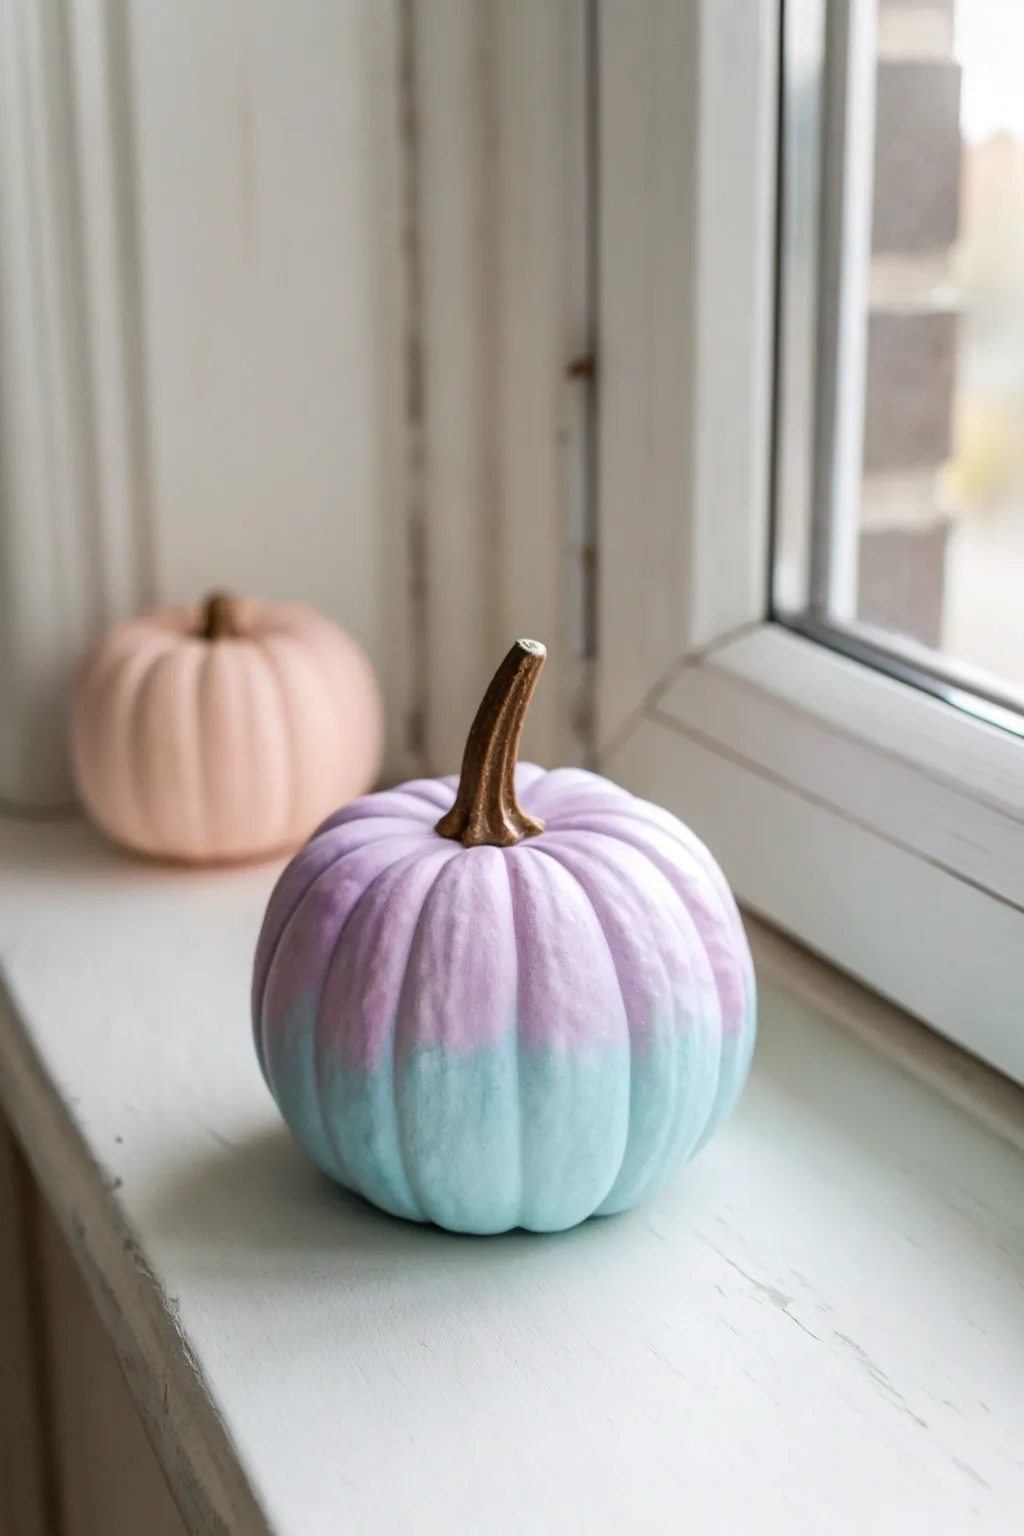
Transform a mini pumpkin into a piece of soft, dreamy decor with this subtle gradient technique. By blending lavender and mint paint directly on the surface, you’ll create a seamless ombre effect that looks elegant on any windowsill.
Detailed Instructions
Materials
- Small white pumpkin (real or faux)
- Pastel lavender acrylic paint
- Pastel mint or teal acrylic paint
- Medium soft-bristle paintbrush
- Small sponge dabber or makeup sponge
- Painter’s tape (optional, for protecting the stem)
- Matte finish sealant spray
- Paper plate or palette
- Paper towels
Step 1: Preparation
-
Clean the surface:
Wipe down your pumpkin carefully to remove any dirt or dust. If using a real pumpkin, ensure it is completely dry before starting; for faux pumpkins, a quick wipe with a damp cloth usually suffices. -
Protect the stem:
If you want to keep the stem’s natural brown color, carefully wrap a small piece of painter’s tape around the base of the stem. I prefer to carefully paint around it freehand, but tape guarantees a sharp edge.
Step 2: Base Colors
-
Lay out the palette:
Squeeze a roughly quarter-sized amount of pastel lavender paint onto one side of your paper plate and an equal amount of mint paint on the other side. -
Paint the top half:
Dip your soft brush into the lavender paint. Start painting from the base of the stem, working your way down the sides of the pumpkin. -
Establish the horizon line:
Stop painting the lavender when you reach completely around the pumpkin’s equator, covering roughly the top 50% of the surface. -
Clean your brush:
Rinse your brush thoroughly in water and dry it well on a paper towel, or switch to a clean second brush. -
Paint the bottom half:
Load your brush with the mint paint and start painting from the very bottom center of the pumpkin, working your way upward. -
Meet the middle:
Bring the mint paint up until it just barely touches the edge of the wet lavender paint. Don’t worry about blending perfectly just yet; simply get the color coverage down.
Seamless Blending
Work while the paint is wet! Acrylics dry fast, so paint both halves quickly. If it dries before you blend, mix a drop of ‘slow-dry medium’ into your paint.
Step 3: Creating the Ombre Fade
-
Prepare the blending tool:
Take your slightly damp sponge dabber or makeup sponge. It shouldn’t be dripping wet, just barely moist to help move the acrylics. -
Tap the transition line:
Gently tap the sponge exactly where the two colors meet. The goal isn’t to drag the paint, but to stipple it, blurring the harsh line. -
Feather upward:
Lightly tap the sponge slightly upward into the purple section to pull a tiny bit of blue up, creating a softer transition. -
Feather downward:
Now do the reverse: tap slightly downward into the mint section to bring a hint of purple down. This back-and-forth motion creates that signature misty fade. -
Check for consistency:
Rotate the pumpkin and inspect the belt around the middle. If the paint has started to dry too much, add a tiny dot of fresh paint to your sponge to re-wet the area and continue blending. -
Let it dry completely:
Once you are happy with the gradient, let the pumpkin sit undisturbed for at least 30 minutes until the paint is fully dry to the touch.
Gold Dust
For a magical twist, dip an old toothbrush in gold paint and flick the bristles to splatter tiny speckles over the finished ombre for a starry effect.
Step 4: Finishing Touches
-
Inspect coverage:
Check for any streaks where the original pumpkin color shows through. If needed, apply a thin second coat to the top and bottom sections, being careful near your blended middle area. -
Seal the artwork:
Take the pumpkin to a well-ventilated area and apply a light coat of matte sealant spray. This protects the finish and unifies the sheen of the two paint colors. -
Reveal the stem:
If you used masking tape, gently peel it away now. If any paint strayed onto the stem, you can scrape it off gently with a fingernail or touch it up with a bit of brown paint.
Place your creation next to a window to let the natural light highlight the soft color transition

PENCIL GUIDE
Understanding Pencil Grades from H to B
From first sketch to finished drawing — learn pencil grades, line control, and shading techniques.
Explore the Full Guide
Color-Dipped Small Pumpkin Look
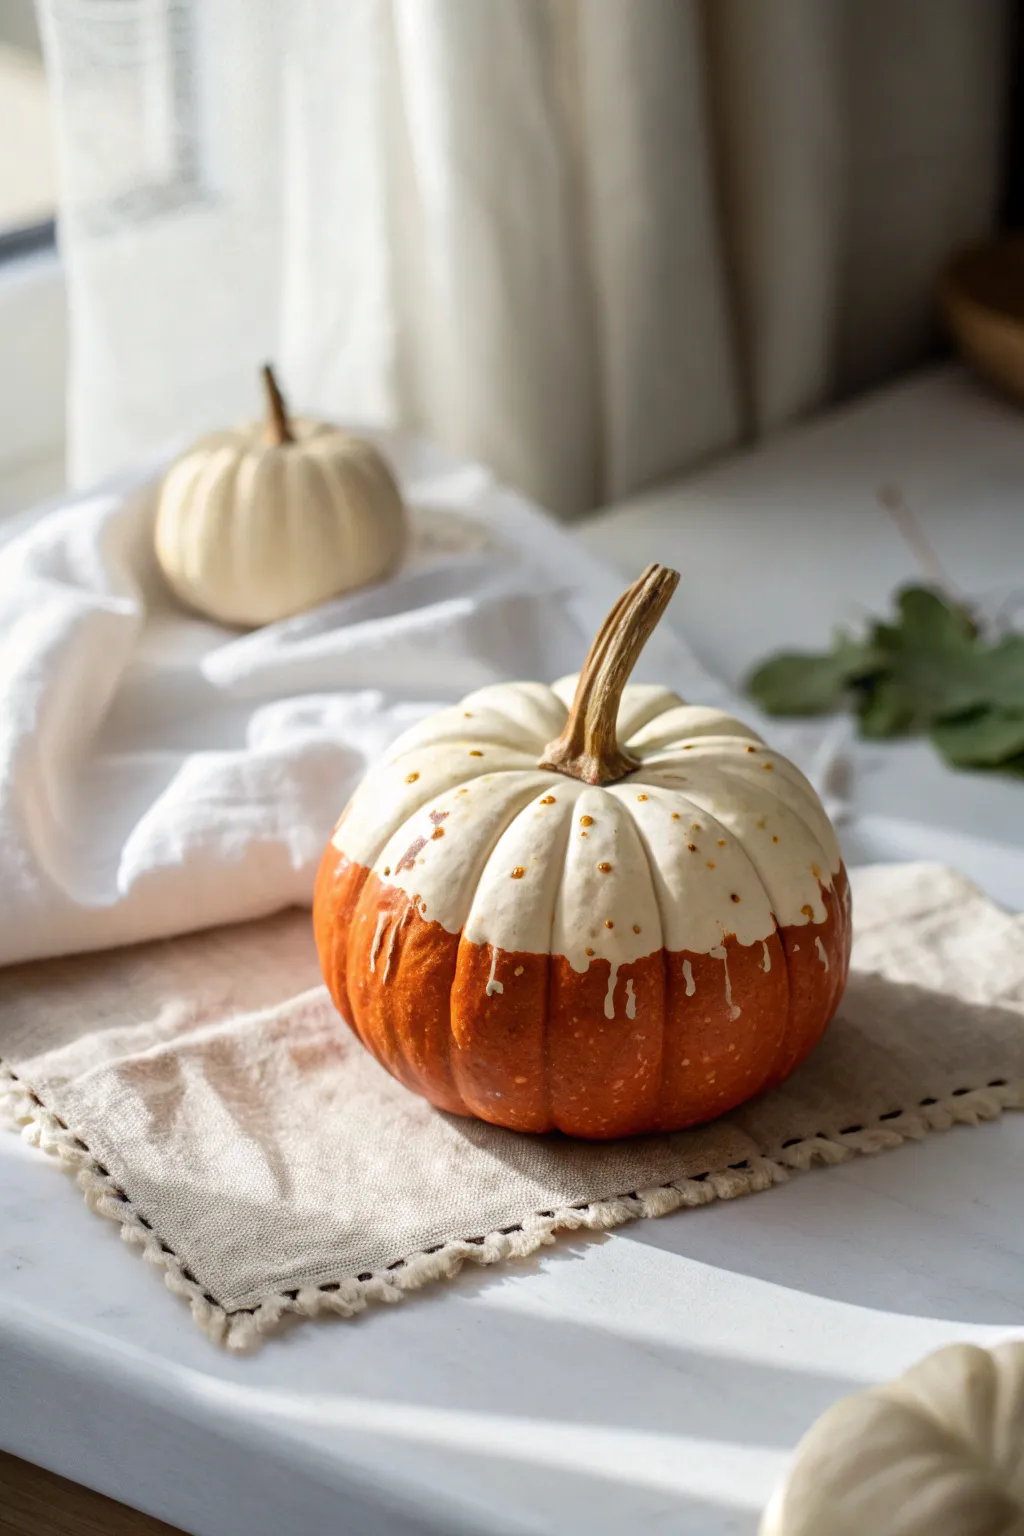
Achieve a chic, high-contrast look by giving a classic orange pumpkin a creamy white makeover on just the top half. This drip-effect style mimics the satisfying look of dipped fondue or candle wax, creating a cozy autumnal accent.
Step-by-Step Tutorial
Materials
- Small orange pumpkin (real or high-quality faux)
- Creamy white acrylic craft paint (satin or gloss finish)
- Small cup or bowl (wider than the pumpkin stem)
- Rubbing alcohol
- Cotton balls
- Parchment paper or wax paper
- Small round paintbrush (size 2-4)
- Painter’s tape (optional)
- Disposable spoon
Step 1: Cleaning & Preparation
-
Clean the surface:
Begin by thoroughly wiping down your pumpkin with rubbing alcohol on a cotton ball. This removes natural oils or store dust, ensuring the paint adheres properly. -
Protect the stem:
Since you want the stem to remain natural brown for a rustic touch, carefully wrap it with a small piece of painter’s tape. If you have a steady hand, you can skip this, but I like to tape it off just to be safe. -
Set up your workspace:
Lay down a sheet of parchment or wax paper on your table. This is crucial because the paint will drip off the pumpkin, and you don’t want it sticking to your tablecloth.
Paint sliding off?
If the paint slides off too fast without sticking, your pumpkin surface is too slick. Lightly buff the pumpkin skin with fine-grit sandpaper before painting to give it ‘tooth’.
Step 2: Applying the ‘Dip’
-
Prepare the paint:
Pour a generous amount of creamy white acrylic paint into your small cup. If the paint is very thick, mix in a tiny drop of water to help it flow, but don’t make it too runny. -
The initial pour:
Instead of literally dipping the pumpkin (which can be messy upside down), hold the pumpkin upright. Use a spoon to pour a large dollop of paint right around the base of the stem. -
Spread the paint:
Gently nudge the puddle of paint outward from the center using the back of your spoon. Guide it over the ‘shoulders’ of the pumpkin. -
Encourage the drips:
Continue adding paint and pushing it toward the indentations (the ribs) of the pumpkin. The paint naturally wants to travel down these grooves. -
Control the flow:
Watch as the paint begins to trickle down the sides. You want it to stop roughly halfway down the pumpkin. -
Refine the edge:
If the drips aren’t uneven enough for your liking, use your small round paintbrush to manually drag some paint further down certain grooves to create that organic, melting look. -
Check the coverage:
Inspect the top area near the stem to ensure the orange skin is completely hidden. Add a second layer on top immediately if the orange is showing through too much.
Step 3: Detailing & Drying
-
Add speckles (optional):
Looking at the inspiration, there are faint speckles. To replicate this, dip an old toothbrush or stiff brush in gold or brown thinned paint and very lightly flick tiny specks onto the white cap while wet. -
Create defined drips:
For the specific look in the photo where drips end in rounded points, you can dip your brush into a heavy glob of paint and touch it to the end of an existing drip, letting gravity pull a ‘bead’ of paint downward. -
Let it sit:
Place the pumpkin carefully on the parchment paper. Resist the urge to touch it. -
Check for pooling:
After about 10 minutes, check the bottom of the drips. If they are running too far down, gently wipe the excess with a clean brush or paper towel. -
Remove tape:
While the paint is tacky but not fully dry, carefully peel away the painter’s tape from the stem to reveal the clean edge. -
Full cure time:
Because the paint application is thick, let this project dry for at least 24 hours in a cool, dry place to prevent the outer skin from cracking. -
Final touch:
Once fully dry, you can display it immediately. No sealant is usually needed unless you plan to put it outdoors.
Add Metallic Flair
Mix a small amount of gold mica powder directly into your white paint before pouring. This gives the dripped section a subtle, shimmering glow perfect for elegant tablescapes.
Now you have a charming, two-toned pumpkin that adds a modern twist to traditional fall decor
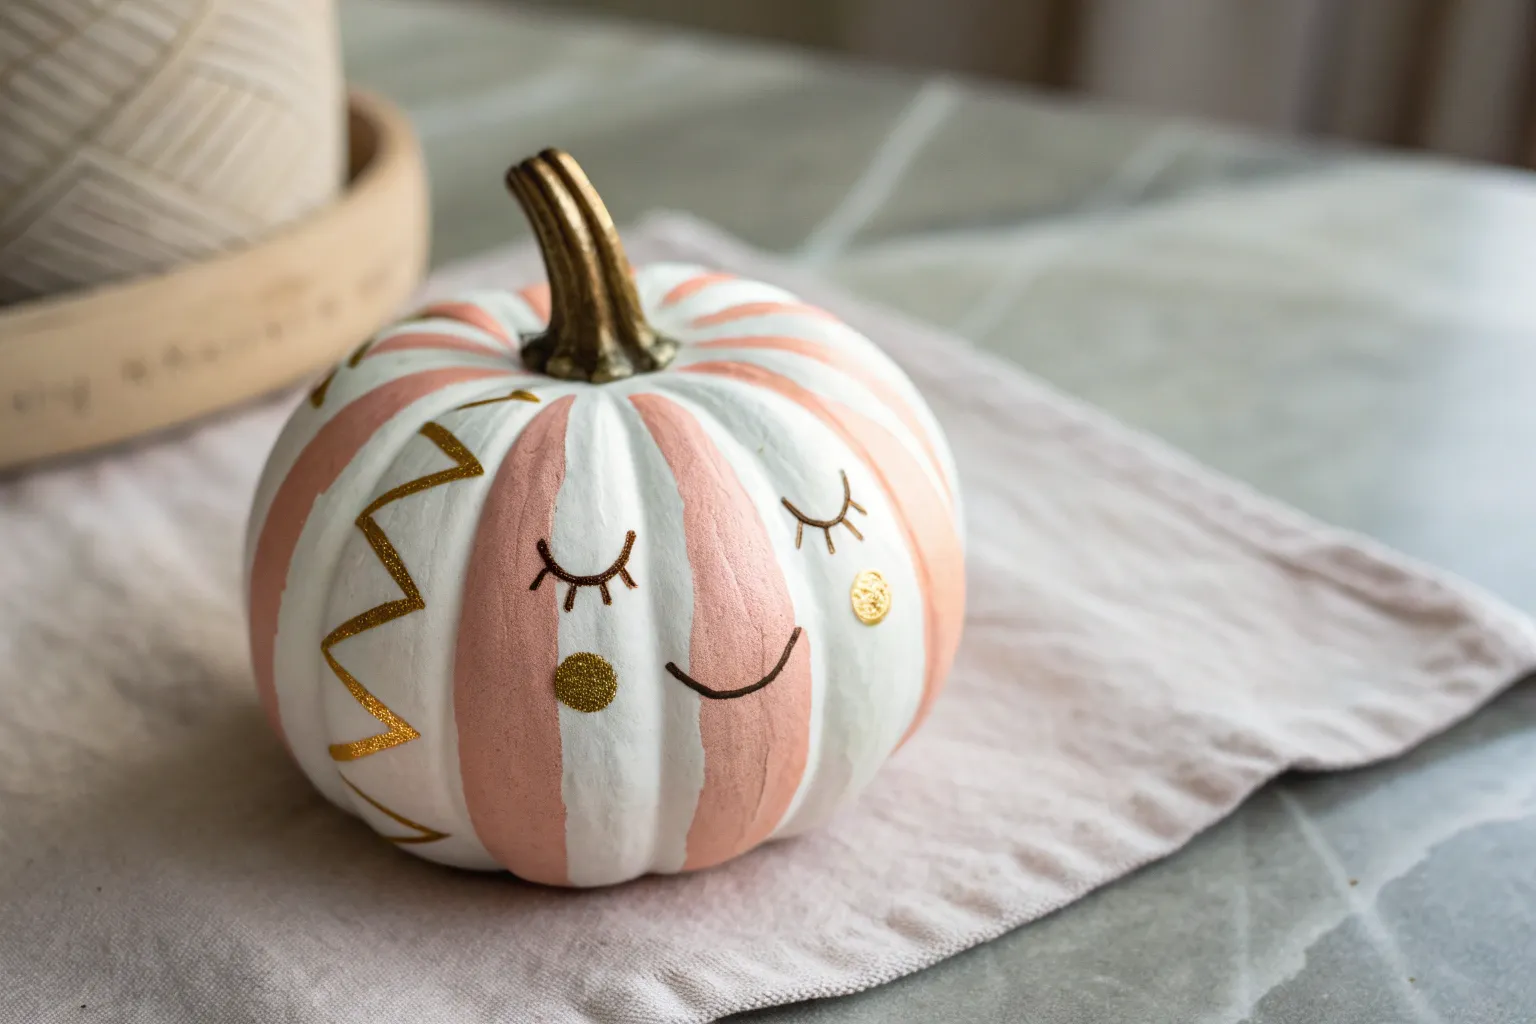
Simple Cute Pumpkin Faces
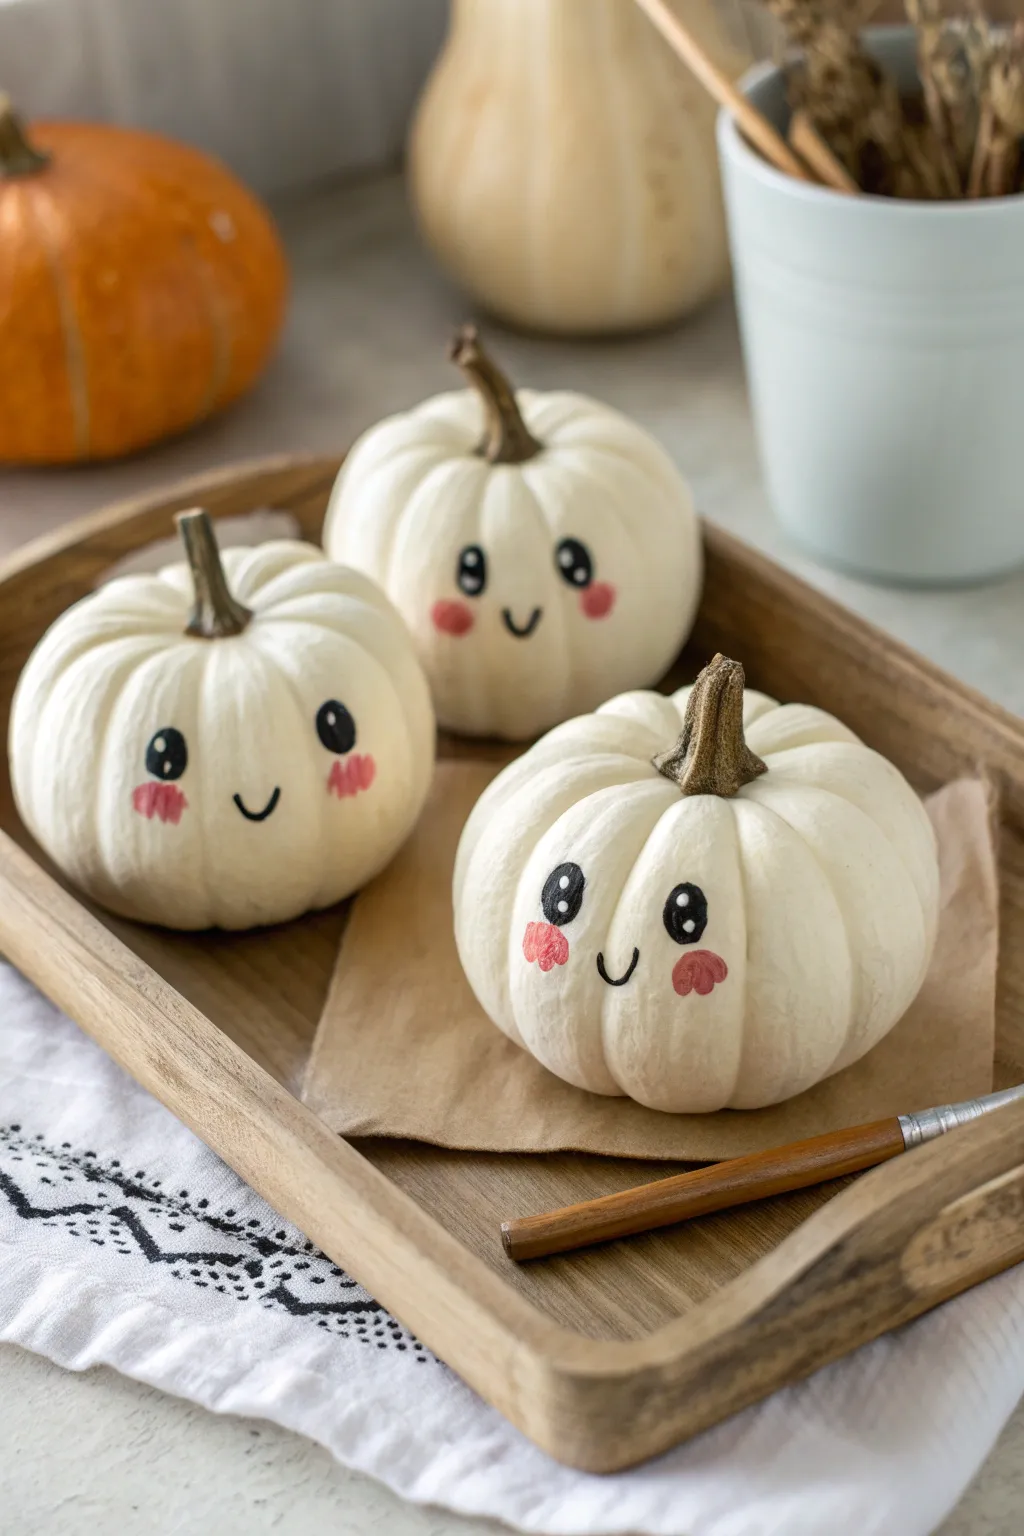
Transform basic mini pumpkins into adorable personalities with just a few strokes of paint and a steady hand. These cheerful little faces feature sparkling eyes, rosy cheeks, and simple smiles that create an instantly charming autumn display.
Step-by-Step Guide
Materials
- Small white pumpkins (real or faux)
- Black acrylic paint
- Pink or coral acrylic paint
- White acrylic paint
- Fine detail paintbrush (size 0 or 00)
- Small round paintbrush (size 2)
- Damp paper towel or rag
- Palette or small dish
- Pencil (optional)
Step 1: Preparation
-
Clean the surface:
Before you begin, wipe down your pumpkins with a damp cloth to remove any dirt or dust. If you are using real pumpkins, make sure they are completely dry before painting so the acrylic adheres properly. -
Plan the face:
Look at the natural shape of the pumpkin. Find the smoothest side without too many deep ridges to serve as the ‘face.’ You can lightly sketch the eye and mouth placement with a pencil if you’re worried about symmetry, though freehanding often adds character.
Fixing Smudges
If you make a mistake with the black paint, don’t wipe it! Let it dry completely, then paint over the error with white acrylic that matches the pumpkin skin.
Step 2: Painting the Features
-
Load the detail brush:
Squeeze a small amount of black acrylic paint onto your palette. Dip your fine detail brush (size 0 or 00) into the paint, ensuring the tip is coated but not dripping. -
Outline the left eye:
Start by painting a small oval or circle for the left eye. Position it slightly lower on the pumpkin’s side to give it that cute, ‘chibi’ proportion. -
Outline the right eye:
Paint the matching right eye, trying to keep it level with the first one. Leave a generous amount of space between the eyes to make room for the mouth and cheeks. -
Fill the eyes:
Carefully fill in both black ovals until they are solid and opaque. Depending on your paint quality, you might need a second coat after the first dries to get a true deep black. -
Paint the smile:
Using the very tip of your fine brush, paint a small, U-shaped mouth right in the center between the eyes. Keep the line thin and delicate for the sweetest expression. -
Let the black dry:
Allow the black features to dry completely for about 10-15 minutes. It is crucial the black is dry before adding cheeks or highlights to avoid smudging.
Step 3: Adding Cheekiness
-
Prepare pink paint:
Mix a soft coral or bright pink shade. I find that a slightly warmer pink looks best against the creamy white pumpkin skin. -
Paint cheek circles:
Switch to your slightly larger round brush (size 2). Dip it in the pink paint and dab two small circles or ovals just below the outer corners of the eyes. -
Create variation:
For variety, you can paint distinct vertical stroke marks for blushing cheeks instead of solid circles, as seen on the pumpkin on the left. -
Dry the cheeks:
Let the pink paint dry fully. This usually takes just a few minutes since the layers are thin.
Pro Tip: Eye Placement
To make faces look scientifically ‘cuter’ (kawaii style), place the eyes slightly wider apart and lower down on the pumpkin’s vertical axis.
Step 4: The Sparkle Finish
-
Prepare white highlights:
Clean your fine detail brush thoroughly or grab a fresh one. Dip just the very tip into white acrylic paint. -
Add primary reflection:
Place a small white dot in the upper right or left corner of the black eye oval. Ensure you put the dot in the same position on both eyes so the pumpkin looks focused. -
Add secondary reflection:
For extra cuteness, add a second, tinier dot near the bottom of the eye, opposite the first highlight. This creates a sparkling anime-eye effect. -
Final check:
Look over your trio. If any edges look rough, you can tidy them up with a tiny bit of white paint (matching the pumpkin skin) once everything else is dry.
Set your trio on a wooden tray or mantelpiece for a minimalist harvest decoration that is sure to make guests smile


Ghost Face Mini Pumpkins

Transform ordinary white mini pumpkins into a charming little ghost family with just a few simple strokes. The high contrast of black paint on natural white rind creates a minimalist, modern Halloween look that is equal parts spooky and adorable.
How-To Guide
Materials
- Fresh white mini pumpkins (Baby Boos or similar)
- Black acrylic paint
- Small round paint brush (size 2 or 4)
- Very fine detail brush (size 0 or 00)
- Damp cloth or paper towel
- Mild dish soap
- Clear matte sealant spray (optional)
- Pencil (optional for sketching)
Step 1: Preparation
-
Clean the surface:
Before you start painting, your pumpkins need to be squeaky clean. Mix a drop of mild dish soap with water and gently wipe down the surface of each pumpkin to remove any dirt or field residue. -
Dry thoroughly:
Pat the pumpkins dry with a clean towel and let them sit for at least 15 minutes to air dry completely. Acrylic paint won’t stick well if the rind holds any moisture. -
Select your best side:
Examine each pumpkin. Look for the smoothest, whitest side to serve as the ‘face’ canvas. I usually try to find a side where the natural ribs of the pumpkin won’t distort the painted features too much. -
Plan your expressions:
Decide on the personalities for your ghost squad. The image shows variety: a classic jack-o’-lantern grin with stitches, a wide-mouthed surprised ghost, and a happy ghost with a simple smile. Lightly sketch these with a pencil if you want a guide.
Oops! Smudged paint?
Don’t panic! While the paint is wet, quickly wipe it away with a damp Q-tip. If it stains, let it dry, paint over the smudge with white acrylic, then try again.
Step 2: Painting the Faces
-
Load the brush:
Dip your small round brush into the black acrylic paint. You want the paint to be fluid but opaque; if it’s too thick, add a tiny drop of water to improve the flow. -
Paint the eyes: The Happy Ghost:
For the pumpkin closest to the front left, paint two vertical ovals for eyes. They don’t need to be perfect circles; slightly elongated ovals give a friendlier, cartoonish look. -
Add the nose and mouth:
Using the very tip of the brush, dab a small dot for a nose. Beneath that, paint a gentle upward curve. Thicken the middle of the curve slightly to create an open smiling mouth. -
Paint the eyes: The Surprised Ghost:
For the middle painted pumpkin, paint two slightly larger ovals for eyes. Position them a bit higher up on the pumpkin’s curve. -
Create the open mouth:
Paint a wide, crescent-moon shape for the mouth representing a friendly grin. Ensure the bottom edge is rounded and smooth. -
Start the Stitch-Face Ghost:
For the pumpkin on the right, switch to your finest detail brush. Paint two teardrop shapes for eyes, pointing slightly inward toward the nose area. -
Detail the nose:
Add two tiny vertical dashes for nostrils. Keep them very small and close together. -
Draft the stitched mouth:
Using the detail brush, paint a thin, long smile line that curves up significantly at the cheeks. Keep a steady hand to maintain a consistent line width. -
Add the stitches:
Paint short, vertical hatch marks across the smile line. Space them evenly, starting from the center and working your way out to the edges of the smile.
Glow Up Idea
Make them glow in the dark! Use glow-in-the-dark paint for the whites of the eyes or apply a clear glow topcoat over the entire pumpkin for a spooky night effect.
Step 3: Finishing Touches
-
Check for opacity:
Once the first layer of black is dry to the touch (about 10-15 minutes), check if the white rind is showing through. Apply a second coat to the eyes and mouths if needed for a solid, deep black. -
Clean up edges:
If any lines look wobbly, you can carefully scratch away excess dry paint with a toothpick or a fingernail to sharpen the shapes. -
Seal (Optional):
If these will curb outdoors or be handled frequently, spray them lightly with a clear matte sealant to protect the paint from chipping.
Arranging your new ghost family together creates an instant centerpiece ready for the season
Friendly Frankenstein Mini Pumpkin

Transform a mini pumpkin into an adorable little monster with a soft pastel twist. This friendly Frankenstein-inspired design features a lovely mint green base and classic stitched details that are perfect for a not-so-spooky Halloween display.
Step-by-Step
Materials
- Small artificial or real pumpkin
- Mint green acrylic paint (satin finish)
- Black acrylic paint
- White acrylic paint
- Medium flat paintbrush
- Small round detail brush (size 0 or 1)
- Fine-point black paint pen (optional)
- Sealant spray (glossy or matte)
- Paper plate or palette
- Water cup and paper towels
Step 1: Base Coat Application
-
Clean surface:
Begin by wiping down your pumpkin with a damp cloth to remove any dust or oils. If you are using a real pumpkin, ensure it is completely dry before starting. -
Initial green layer:
Using a medium flat paintbrush, apply a generous coat of mint green acrylic paint over the entire surface of the pumpkin. Don’t worry about complete opacity just yet. -
Painting the stem:
Carefully paint around the base of the stem. For this specific look, leave the stem dark brown or black for contrast. If your pumpkin’s stem is light, paint it black now. -
Drying time:
Allow the first coat to dry completely. This usually takes about 15-20 minutes, depending on the thickness of your paint. -
Second coat:
Apply a second coat of mint green paint to achieve a solid, opaque finish. Brush in the direction of the pumpkin’s natural ribs for a smooth look. -
Inspect coverage:
Check for any streaks or bare spots. If necessary, I find a third thin coat creates the perfect flawless pastel finish.
Paint Slipping?
If acrylic paint beads up on a faux pumpkin’s plastic surface, lightly sand the pumpkin with fine-grit sandpaper first to give the paint some tooth to grip onto.
Step 2: Creating the Face
-
Drafting the features:
Once the green base is bone dry, lightly sketch the facial features with a pencil. Draw two large ovals for eyes, a small triangle for the nose, and a wide curved line for the mouth. -
Painting the eyes:
Dip your small round detail brush into black acrylic paint. Carefully fill in the oval eye shapes, keeping the edges as smooth as possible. -
Outline alternative:
If you struggle with unsteady hands during detailed work, outline the eyes with a fine-point black paint pen first, then fill them in with the brush. -
Triangle nose:
Paint the small triangle nose in the center of the face, slightly below the eyes. Ensure the paint is solid black. -
The smile line:
Using the very tip of your detail brush or a paint pen, draw a long, thin curved line for the mouth. Let the line follow the natural curve of the pumpkin. -
Adding stitches:
Paint short vertical hash marks across the smile line to create the classic ‘stitched’ Frankenstein look. Space them somewhat evenly, but imperfections add character. -
Eye highlights:
Dip the back end of your paintbrush handle into white paint. Dot a small highlight into the upper right corner of the left eye. -
Second highlight:
Repeat the process for the right eye, placing the white dot in the same relative position (upper right) to make him look focused and friendly.
Add Texture
Mix a tiny amount of baking soda into your mint green paint before applying. This creates a matte, ceramic-like texture that makes the pumpkin look like expensive pottery.
Step 3: Finishing Touches
-
Cleanup:
Check your lines. If you made any smudges, use a clean damp brush to wipe them away quickly or touch up with the mint green paint once the black is dry. -
Sealing:
Once the face is completely dry (wait at least an hour), spray the entire pumpkin with a clear sealant to protect the paint and give it a lasting sheen.
Enjoy your charming little monster pumpkin displayed alongside other pastel fall decor
Sweet Vampire Mini Pumpkin
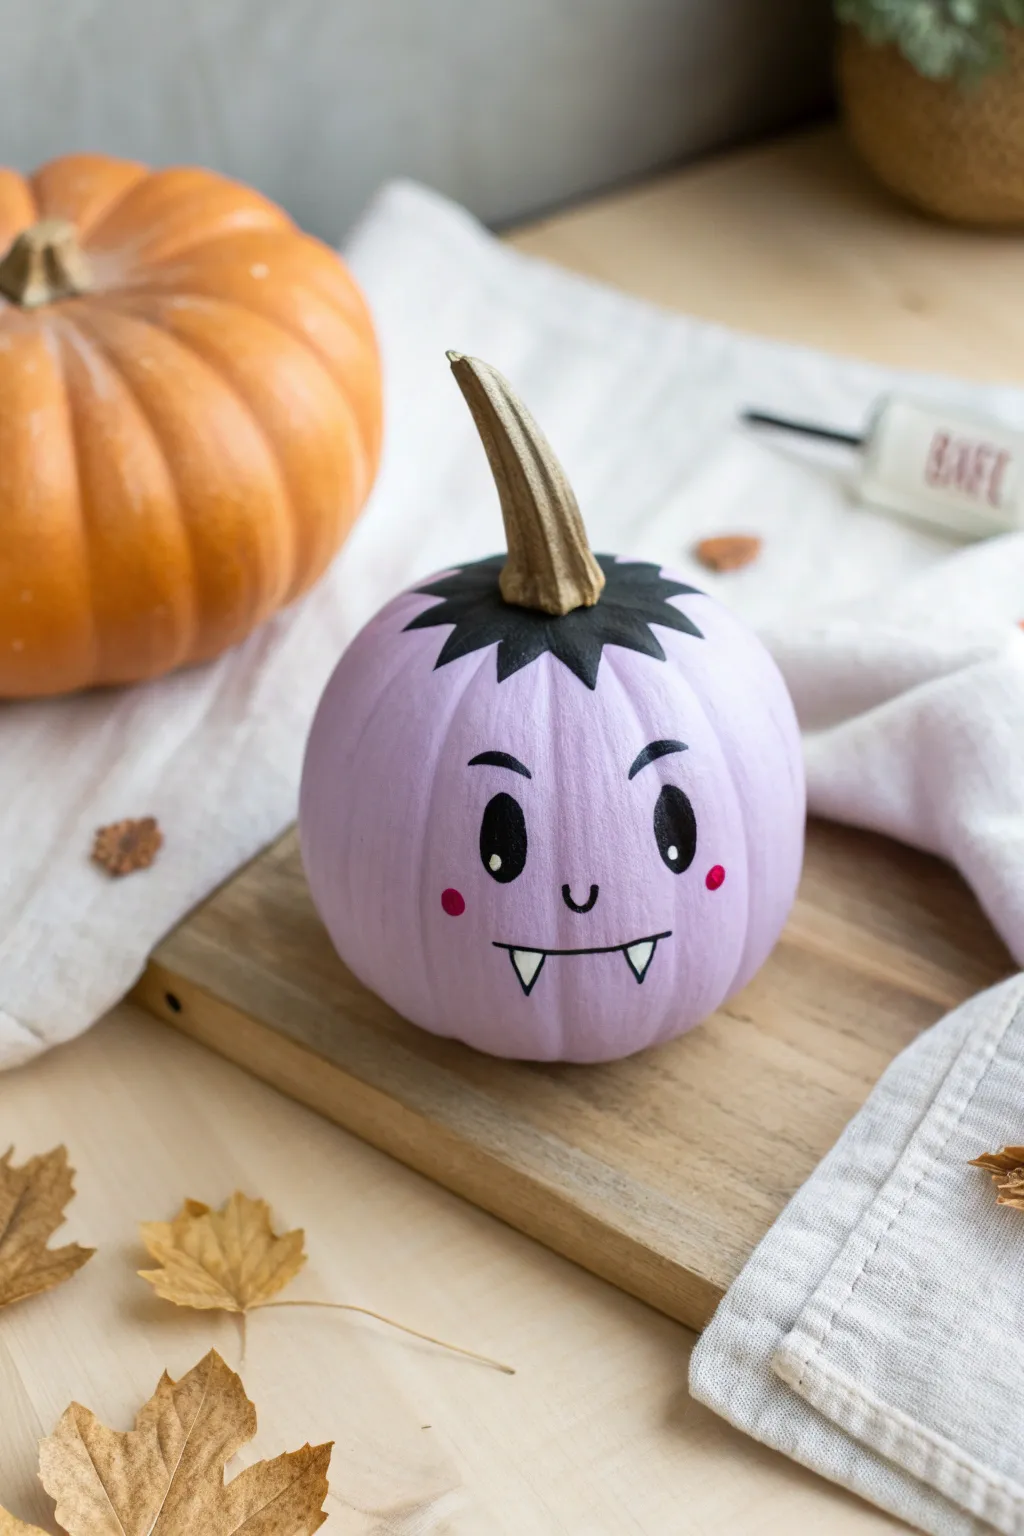
Transform a mini pumpkin into an adorable little bloodsucker with this simple painting project. The soft lavender base puts a cute, pastel twist on the classic vampire look, featuring charming fangs and blushing cheeks.
Step-by-Step Guide
Materials
- Small white or orange pumpkin (real or faux)
- Light lavender acrylic paint
- Black acrylic paint
- White acrylic paint
- Bright pink acrylic paint
- Medium flat paintbrush
- Small round detail brush
- Paint palette or plate
- Cup of water and paper towels
- Pencil (optional)
Step 1: Base Coat
-
Clean the surface:
Whatever pumpkin you choose, wipe it down with a damp cloth to remove dust or dirt. If you are using a real pumpkin, make sure it is completely dry before you start painting. -
Mix your purple:
Squeeze out your light lavender acrylic paint. If the shade feels too dark, I like to mix in a tiny drop of white to get that soft, pastel marshmallow look shown in the photo. -
Apply first coat:
Using the medium flat brush, cover the entire body of the pumpkin in lavender paint. Use long, vertical strokes following the pumpkin’s natural ribs for a smooth finish. -
Avoid the stem:
Paint carefully around the base of the stem, but try to keep the stem itself natural and unpainted for contrast. -
Let it dry:
Allow the first coat to dry completely. This usually takes about 20 minutes, depending on how thick your paint application was. -
Second coat:
Apply a second layer of lavender paint to ensure full opacity, especially if painting over an orange pumpkin. Let this dry thoroughly before moving to details.
Pro Tip: Highlight Placement
Make sure you place the white eye reflection dots on the same side of both eyes (e.g., top right). This makes the vampire look focused rather than cross-eyed.
Step 2: Vampire Hair
-
Outline the widow’s peak:
Using your small round brush and black paint, start at the base of the stem. Paint a zigzag line encircling the stem to create the vampire’s signature widow’s peak hairline. -
Fill in the hair:
Using the dark black paint, fill in the area between your zigzag line and the stem. Connect the paint right up to the stem so no purple shows through. -
Create sharp points:
Go back over the tips of the zigzag with the very tip of your small brush to make sure the hair points are sharp and defined.
Troubleshooting: Sheer Purple
If your purple paint looks streaky over an orange pumpkin, don’t keep brushing wet paint. Let it dry fully, then sponge the next layer on for better coverage.
Step 3: Face Details
-
Map the face:
If you are nervous about freehanding, lightly sketch the eyes and mouth placement with a pencil directly on the dry purple paint. -
Paint the eye shapes:
Dip the round brush in black paint and create two tall, oval shapes for the eyes. Space them fairly far apart to increase the cuteness factor. -
Add eyebrows:
Paint two small, angled dashes above the eyes for eyebrows. Tilt them slightly inward to give him a mischievous expression. -
The mouth:
Paint a thin, wide ‘U’ shape for the mouth centered between and below the eyes. -
Fangs:
Using white paint and your clean detail brush, carefull paint two small triangular fangs hanging down from the black mouth line. Outline them thinly in black if they blend too much with the lavender. -
Eye highlights:
Dip the back end of your paintbrush handle into white paint. Dot a highlight into the upper right corner of each black eye oval to bring the character to life. -
Cheeky blush:
Dip the handle end of a brush into the pink paint. Dot two small circles outside the mouth area to create rosy cheeks. -
Final dry:
Set the pumpkin aside in a safe spot and let all the detailed facial features dry completely before displaying.
Group this little guy with other pastel pumpkins for a unique and colorful Halloween display
Witch Hat Small Pumpkin Character
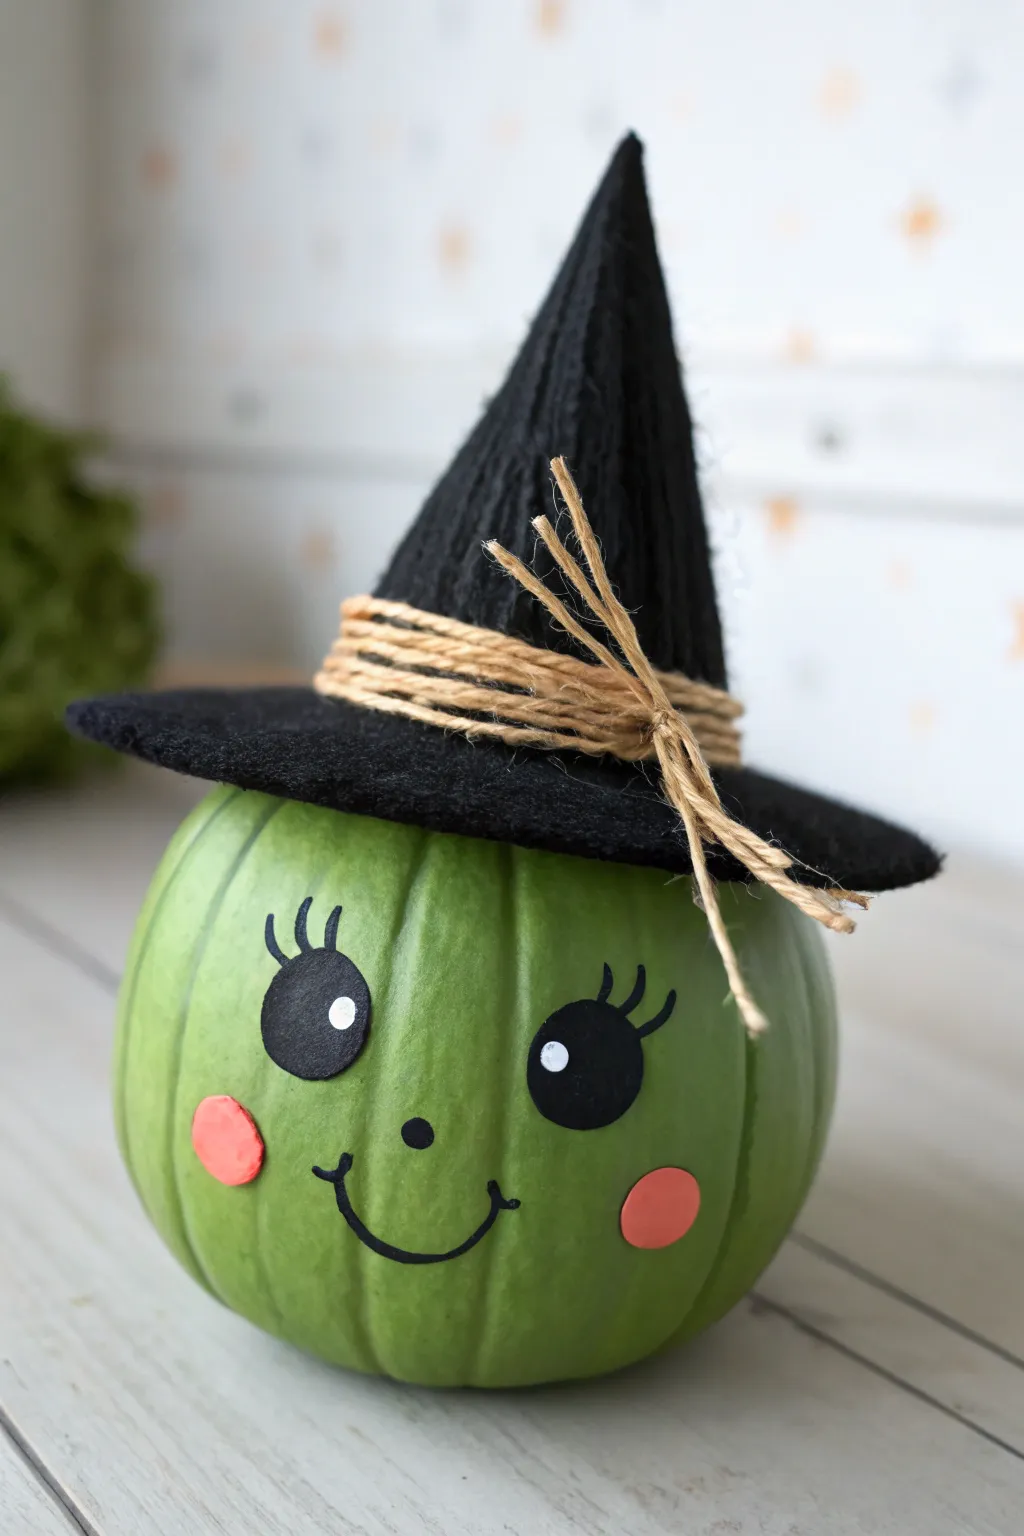
Transform a simple small pumpkin into this adorable green witch character with just a coat of paint and some felt accents. The combination of the quirky black felt hat and the bright, friendly face makes this a charming, non-scary decoration perfect for kids.
Detailed Instructions
Materials
- Small pumpkin (real or faux)
- Acrylic paint: Apple Green, Black, White, Soft Pink
- Paintbrushes: medium flat brush, fine liner brush
- Black stiff felt sheet
- Jute twine
- Hot glue gun and glue sticks
- Scissors
- Pencil
- Compass or round object for tracing
Step 1: Painting the Base
-
Prep the surface:
Wipe down your pumpkin with a damp cloth to remove any dirt or oils. If you are using a real pumpkin, ensure the stem area is clean and dry. -
Apply the green coat:
Using a medium flat brush, paint the entire surface of the pumpkin with apple green acrylic paint. You don’t need to paint the stem since it will be covered. -
Layer for opacity:
Let the first coat dry completely for about 15-20 minutes. Apply a second coat to ensure the natural orange or white color of the pumpkin is fully concealed. Allow this to dry fully before moving on.
Stiff Felt Matters
Use “stiff” felt specifically (often found in the kids’ craft aisle) rather than soft felt. It holds the cone shape upright without needing cardboard support inside.
Step 2: Creating the Hat
-
Cut the hat brim:
On your black stiff felt, use a compass or a small bowl to trace a circle slightly larger than the top of your pumpkin (approx. 4-5 inches wide). Cut this circle out. -
Cut the center hole:
Cut a smaller hole in the center of your felt brim just large enough to fit over the pumpkin’s stem, creating the base of the hat. -
Shape the cone:
Cut a separate semi-circle or quarter-circle shape from the felt. Roll this piece into a tall cone shape. Test the size to make sure the base of the cone fits well onto your brim circle. -
Secure the cone:
Run a thin line of hot glue along the straight edge of your rolled cone and press it closed. Hold it for a few seconds until the glue sets. -
Assemble the hat:
Place the cone onto the center of the brim circle. Use hot glue to attach the bottom edge of the cone to the brim. -
Add texture:
I like to gently crumple the top of the felt cone just slightly before the glue fully hardens to give it that charming, crooked witch hat look. -
Wrap perfectly with jute:
Squeeze a dab of hot glue at the base of the cone. Take your jute twine and wrap it around the base 4-5 times, layering it neatly. -
Tie the bow:
Cut the twine and tie the loose ends into a rough, rustic knot or bow at the front. Trim the excess tails to your desired length.
Glitter Glam
Brush a layer of Mod Podge and fine green glitter over the pumpkin skin before adding the face for a shimmering, magical witch effect.
Step 3: Adding the Face
-
Create the eyes:
Cut two small ovals from the leftover black felt. These will be the eyes. Using felt instead of paint adds a nice dimensional texture matching the hat. -
Add eye details:
Dip the handle end of a paintbrush into white paint and dot a ‘sparkle’ into the upper right corner of each black felt oval. -
Paint the cheeks:
Using pink paint, paint two small circles on the pumpkin cheeks. Alternatively, you can cut these from pink paper or felt and glue them on for a cleaner edge. -
Attach the features:
Once the paint on the pumpkin is dry, hot glue the felt eyes onto the upper third of the pumpkin. -
Draw the lashes:
With a fine liner brush (or a black permanent marker), carefully draw three curved eyelashes extending from the top outer corner of each eye. -
Paint the smile:
Using the liner brush and black paint, paint a simple, small ‘u’ shape for the mouth between the cheeks. -
Finish small details:
Add a tiny black dot for the nose and add small ‘bracket’ lines at the ends of the smile to give it personality. -
Final assembly:
Place the finished hat on top of the pumpkin. You can secure it with a dab of hot glue if you want it permanently attached, or leave it loose.
Place your cute green witch on a mantle or windowsill to greet guests with a smile
One-Eyed Monster Mini Pumpkin
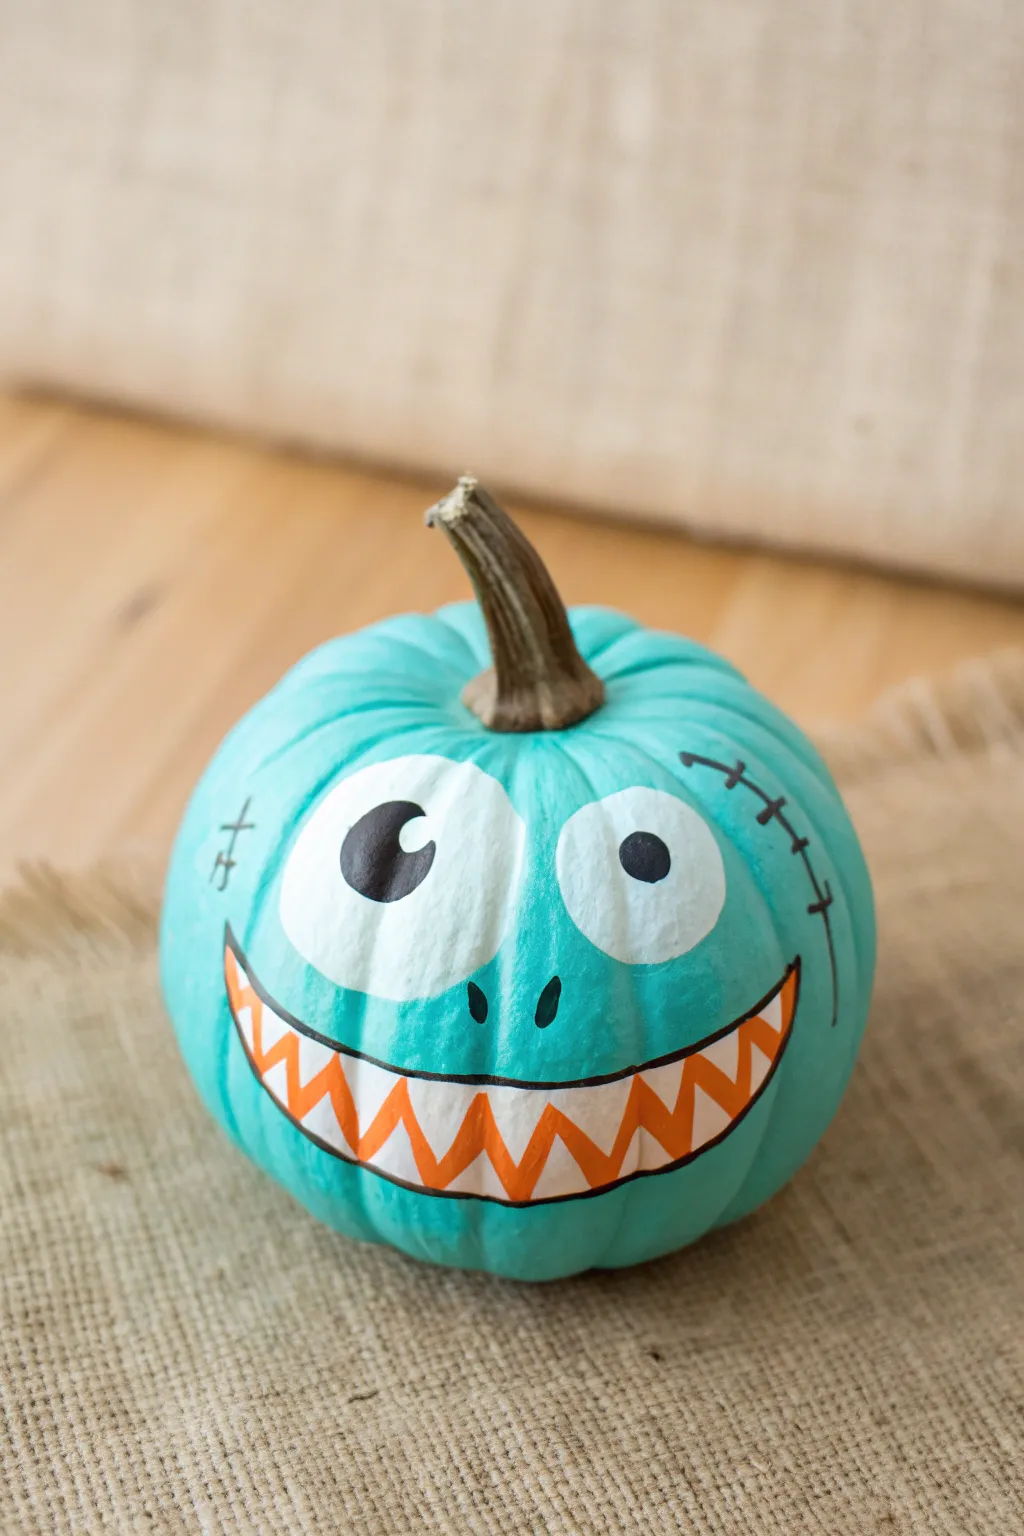
Transform a tiny pumpkin into a goofy grinning monster with just a splash of teal paint and some clever details. This playful project uses bright zingy teal as a base, contrasting sharply with orange monster teeth for a look that’s more silly than spooky.
How-To Guide
Materials
- Small pumpkin (real or faux)
- Teal acrylic craft paint
- White acrylic craft paint
- Orange acrylic craft paint
- Black acrylic craft paint or black paint pen
- Medium flat paintbrush
- Small round detail brush
- Fine-point paintbrush or liner brush
- Pencil
- Water cup and paper towels
Step 1: Base Coat
-
Clean surface:
Begin by wiping down your pumpkin with a damp cloth to remove any dirt or oils, ensuring the paint adheres properly. Dry it completely before starting. -
Apply base color:
Using the medium flat brush, paint the entire surface of the pumpkin with the teal acrylic paint. Be careful to paint around the stem, leaving it natural. -
Wait and repeat:
Let the first coat dry for about 15-20 minutes. If the orange of the pumpkin is still showing through, apply a second coat of teal for a solid, opaque finish. -
Full dry time:
Allow the base coat to dry completely. This is crucial so your pencil sketching doesn’t scratch the wet paint.
Paint Pen Magic
For the black outlines and stitches, swap the brush for a fine-tip black Posca marker or paint pen. It offers much better control over fine lines on curved surfaces.
Step 2: Sketching the Face
-
Plan the eyes:
Lightly sketch two large circles near the top half of the pumpkin with a pencil. To achieve the goofy look, draw the left circle significantly larger than the right one. -
Draw the mouth:
Sketch a wide, U-shaped smile below the eyes. Make the curve deep enough to accommodate some big teeth. -
Add teeth details:
Inside the mouth shape, draw a zigzag line horizontally across the middle to create sharp, triangular teeth pointing up and down.
Step 3: Painting Features
-
Fill the eyes:
Use a small round brush and white paint to fill in the eye circles you sketched. You might need two layers of white to cover the teal background completely. -
Base the mouth:
While the eyes dry, paint the entire interior of the mouth shape with white paint first. This will make the orange teeth pop later. -
Paint the teeth:
Once the white mouth base is dry, carefully paint the triangular teeth using orange paint and a fine detail brush. Leave small white gaps between the orange triangles to represent the gums or separation. -
Add pupils:
Paint a large black circle inside the left eye (looking slightly up and right) and a smaller black circle in the right eye to enhance the crazy expression. -
Highlight the eyes:
Dip the non-brush end of your paintbrush handle into white paint and dot a tiny highlight onto the black pupil of the larger eye for a ‘shiny’ look.
Glow Up
Mix a little glow-in-the-dark medium into your white paint for the eyes and teeth. When the lights go out, your little teal monster will stare back at you.
Step 4: Outlining and Scars
-
Outline the mouth:
Using a fine liner brush and black paint (or a black paint pen for easier control), outline the entire smile. Keep your hand steady to get a crisp edge. -
Define the teeth:
Trace the zigzag line between the teeth with your thin black line to separate the top and bottom rows clearly. -
Nostrils:
Dab two small, tear-drop shaped nostrils in black right between the eyes and the mouth. -
Big scar:
On the upper right side of the face, paint a curved black line. Cross it with several small perpendicular dashes to look like stitches. -
Little scar:
Add a smaller stitched mark on the far left side, roughly parallel to the eye, using just two or three small cross-hatches. -
Final touches:
Check your black lines for consistency and touch up any orange or teal areas if needed.
Set your goofy teal monster on a shelf or windowsill to bring a smile to anyone who walks by
Terrazzo Speckled Mini Pumpkin
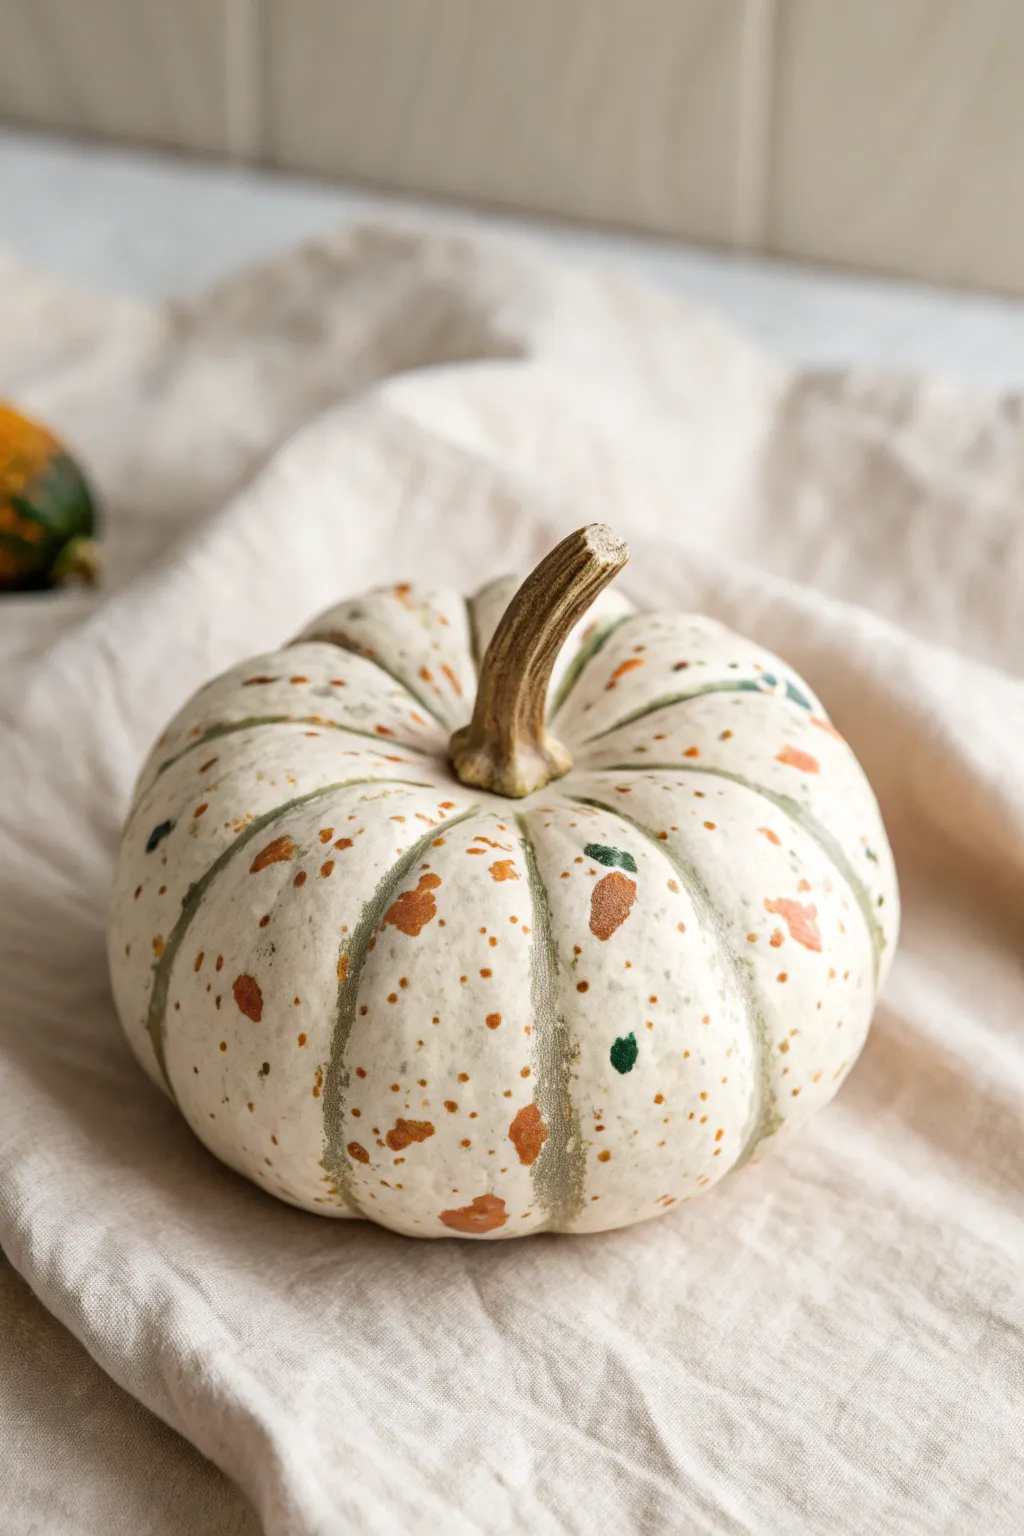
Bring a touch of modern art to your fall decor with this chic terrazzo-inspired design. By layering simple brushstrokes of terracotta, sage, and rust over a creamy base, you can transform an ordinary gourd into a speckled masterpiece.
Step-by-Step
Materials
- Small pumpkin (real or faux)
- White or cream acrylic paint (matte finish)
- Terracotta orange acrylic paint
- Sage green acrylic paint
- Dark rust or brown acrylic paint
- Small flat paintbrush
- Fine detail paintbrush (size 0 or 1)
- Paint palette or paper plate
- Paper towels
- Clear matte sealer spray (optional)
Step 1: Base Preparation
-
Clean surface:
Before you begin, wipe down your pumpkin with a slightly damp paper towel to remove any dirt or oils that might prevent the paint from sticking. -
Dry thoroughly:
Ensure the pumpkin is completely dry. If you are using a real pumpkin, avoid soaking the stem area. -
Apply base coat:
Using your larger brush, cover the entire pumpkin with a creamy white acrylic paint. This creates a uniform canvas for your speckles. -
Paint the bottom:
Don’t forget to paint the underside, but wait until the top is dry to flip it over so you don’t smudge your work. -
Second coat:
Once the first layer is dry to the touch, apply a second coat of cream paint if the original pumpkin color is still peeking through. Let this dry completely.
Brush Technique
Don’t overthink the shapes! Instead of painting perfect circles, press the flat side of the brush down once and lift to create organic, stone-like marks.
Step 2: Creating the Terrazzo Pattern
-
Mix first color:
Pour a small amount of terracotta orange paint onto your palette. I like to add a tiny drop of water to improve the flow, but keep it thick enough to be opaque. -
Paint large shapes:
Using the small flat brush, paint irregular, geometric shapes scattered randomly across the pumpkin surface. Think of small shards of tile—some triangular, some square-ish. -
Rotate and inspect:
Turn the pumpkin as you work to ensure the orange shapes are evenly distributed, leaving plenty of negative space for other colors. -
Add sage accents:
Switch to your sage green paint. Using the same technique, add green geometric shapes in the gaps between the orange ones. These can be slightly smaller than the orange blotches. -
Overlap carefully:
Allow the shapes to sit close to each other without touching wet paint. If you want a layered look, wait for the orange to dry before painting a green shape near it. -
Dark speckles:
Dip your fine detail brush into the dark rust or brown paint. Create tiny flecks and dots around the larger shapes to mimic the grit found in real terrazzo stone. -
Vary dot size:
Make some dots pin-prick small and others slightly larger and irregular. This randomness is key to a realistic stone effect. -
Fill empty spots:
Step back and look for any large white voids. Fill these with very small flecks of your terracotta or sage paint using the fine brush.
Step 3: Finishing Touches
-
Green stripes:
To mimic the natural ribs of the pumpkin shown in the inspiration, mix a very diluted wash of sage paint with water. -
Trace the ribs:
Lightly drag your brush along the natural crevices of the pumpkin with this watery mix. This adds subtle depth and definition underneath your speckles. -
Paint the stem:
Use a mix of brown and a touch of gold or cream to paint the stem, giving it a dried, realistic timber look. -
Let it cure:
Allow the pumpkin to sit undisturbed for at least an hour to ensure all thick paint blobs are fully hardened. -
Seal (Optional):
If this pumpkin will be displayed outdoors or handled frequently, lightly mist it with a clear matte sealer spray to protect your design.
Metallic Pop
Mix gold leaf flakes or gold paint into your speckle pattern for a glamorous, high-end twist that catches the light wonderfully.
Place your finished terrazzo pumpkin on a linen napkin or mantel for a sophisticated seasonal display
Marbled Pastel Small Pumpkin Swirls
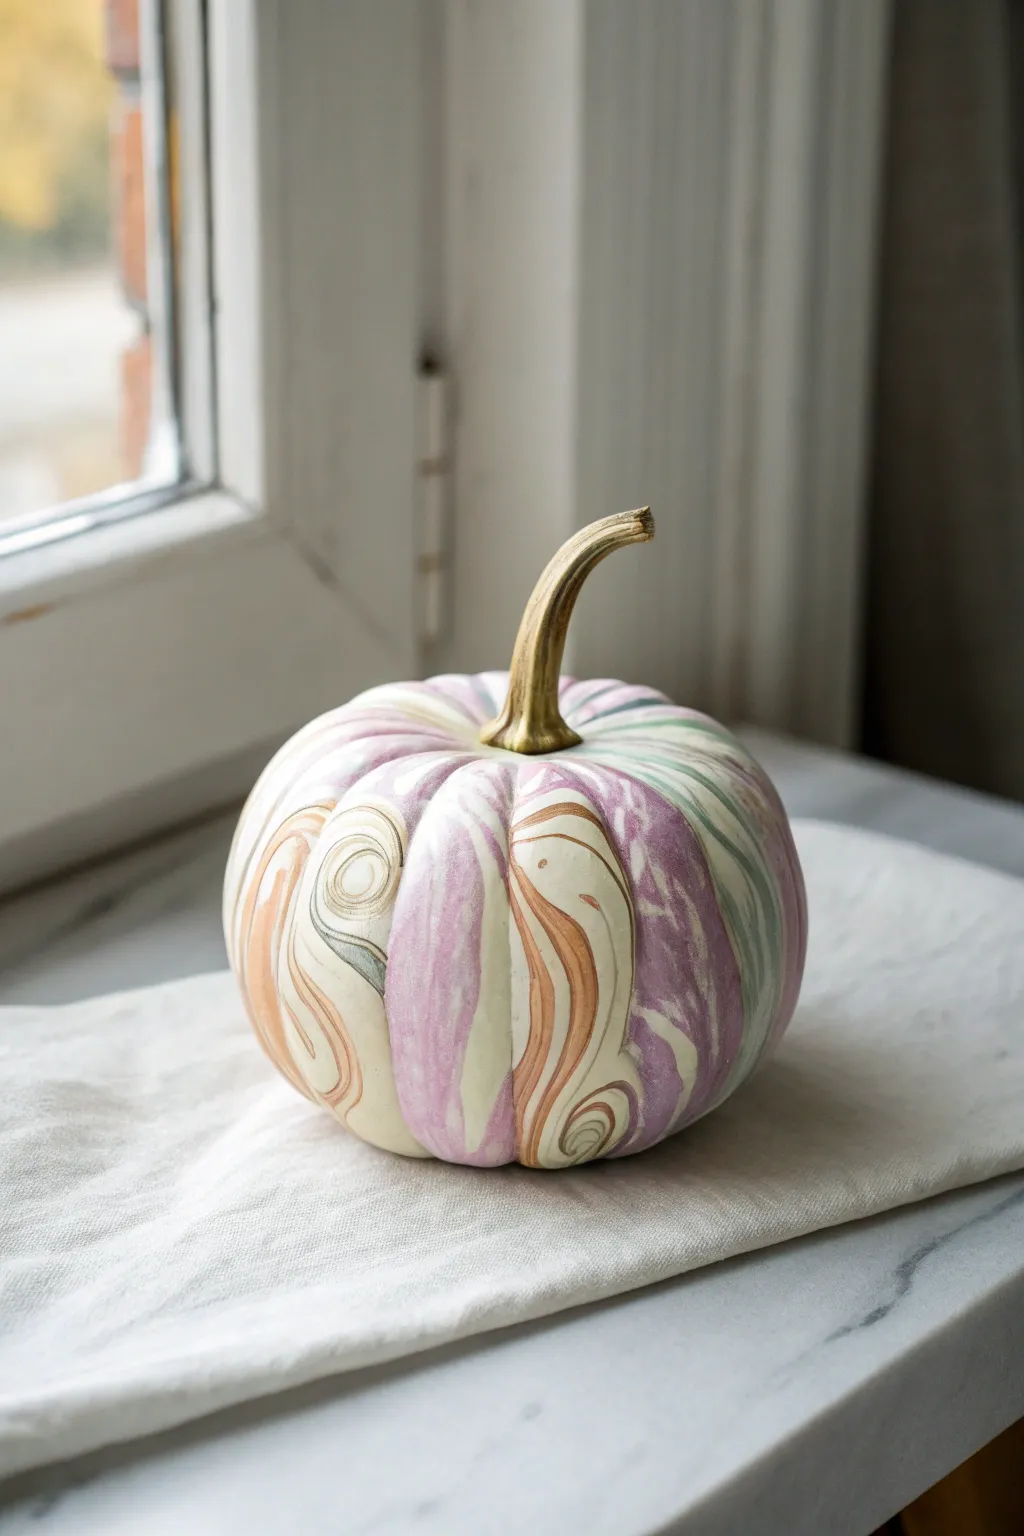
Transform a simple pumpkin into a sophisticated piece of art using a surprisingly easy hydro-dipping technique. The result is a glossy, high-end ceramic look with delicate swirls of lavender, sage, and peach dancing across a creamy base.
How-To Guide
Materials
- Small white faux pumpkin (or real pumpkin painted white)
- Deep disposable container (plastic bin or bucket)
- Room temperature water
- Nail polish (lilac, sage green, metallic gold/copper, peach)
- Toothpicks or wooden skewers
- Painter’s tape
- Rubber gloves
- Clear spray sealant (glossy finish)
- Gold acrylic paint (optional, for stem)
Step 1: Preparation
-
Clean the surface:
Wipe down your pumpkin with a damp cloth to remove any dust or oils. If you are using a real pumpkin that isn’t naturally white, give it two coats of white acrylic paint first and let it dry completely. -
Protect the stem:
Carefully wrap the entire stem in painter’s tape. You want to keep this area clean during the dipping process so we can paint it gold later for a chic finish. -
Set up your station:
Find a well-ventilated area, preferably outdoors or near an open window, as nail polish fumes can be strong. Lay down newspaper or a drop cloth to catch any splashes. -
Fill the vessel:
Fill your disposable container with room temperature water. The water level needs to be deep enough to submerge the pumpkin entirely but leave about 2 inches from the rim to prevent overflow.
Troubleshooting: Clumpy Polish?
If the polish sinks or clumps immediately, your water is too cold or hot. It must be room temperature! Also, work faster—polish forms a skin within 30 seconds.
Step 2: Creating the Marble
-
Pour the first color:
Unscrew all your nail polish caps before starting, as speed is key. Pour a generous amount of your first color (e.g., lilac) onto the water’s surface. Hold the bottle close to the water so the drops spread out rather than sinking. -
Layer additional shades:
Quickly add drops of sage green, peach, and metallic gold inside or around the previous color circles. Aim for randomness rather than a perfect target shape. -
Swirl the pattern:
Takes a toothpick or skewer and gently run it through the floating polish. I prefer to drag lines from the outside in to create petal-like shapes, or lightly swirl for a classic marble look. Don’t over-mix or the film will start to dry and clump. -
Check consistency:
The polish should look like a thin, colorful skin floating on the water. If it looks thick or tacky, stick a paper towel in to clear the surface and try again—speed is your friend here.
Step 3: The Dip
-
Submerge the pumpkin:
Wearing rubber gloves, hold the pumpkin by the taped stem (or the bottom if secure). Push it slowly and steadily straight down into the water, right through the center of your swirl pattern. -
Clear the surface:
While the pumpkin is fully underwater, use your free hand or a piece of cardboard to sweep away the remaining polish floating on the surface. This prevents a double-layer of mess when you pull the pumpkin back up. -
Retrieve and inspect:
Lift the pumpkin out of the water. Gently shake off excess water droplets, but be careful not to touch the wet paint. The marble design should now be adhered to the pumpkin skin. -
Dry thoroughly:
Set the pumpkin on a non-stick surface, like wax paper, to dry. Let it sit undisturbed for at least 1-2 hours until the polish is completely hardened and no longer tacky.
Pro Tip: Color Pop
To make pastel colors truly vibrant against the orange of a real pumpkin, always prime the surface with a matte white spray paint first.
Step 4: Finishing Touches
-
Paint the stem:
Remove the painter’s tape from the stem. Using a small brush, apply a coat of metallic gold acrylic paint to the stem. This coordinates perfectly with the copper/gold swirls in the marbling. -
Seal the design:
Take the pumpkin back to your ventilated area. Spray a light, even coat of clear glossy sealant over the entire pumpkin. This protects the finish and gives it that ceramic glazed appearance. -
Final cure:
Allow the sealant to cure according to the can’s instructions, usually about 24 hours, before placing your new décor piece on display.
Place your elegant marbled creation near a window to catch the light and watch the metallic swirls shimmer
Splatter Paint Mini Pumpkin Drama

Embrace a chic, modern aesthetic with this high-contrast pumpkin design that balances structure with spontaneity. The crisp white base, intentional black striping, and playful splatter effect create a sophisticated piece of autumn decor perfect for a minimalist table setting.
Step-by-Step
Materials
- Small white pumpkin (real or faux)
- White acrylic craft paint (matte or satin)
- Black acrylic craft paint
- Medium flat synthetic brush
- Small round detail brush (size 2 or 4)
- Old toothbrush or stiff bristle brush
- Painter’s tape or scrap paper (for masking)
- Paper plate or palette
- Cup of water and paper towels
- Matte spray sealer (optional)
- Drop cloth or cardboard (essential for splattering)
Step 1: Base Coat Preparation
-
Clean surface:
Begin by wiping down your pumpkin with a damp cloth to remove any dirt or oils. If using a real pumpkin, ensure it is completely dry before painting. -
Protect the stem:
Wrap the stem carefully with painter’s tape to keep it natural. I find this creates a much cleaner look than trying to paint around it later. -
Apply white base:
Using your medium flat brush, apply a coat of white acrylic paint over the entire surface of the pumpkin. Even if the pumpkin is already white, a painted base ensures the texture is uniform and helps the subsequent layers adhere better. -
Let it dry:
Allow the first coat to dry completely. This usually takes about 15-20 minutes depending on the thickness of the paint. -
Second coat:
Apply a second coat of white paint if the natural color is showing through or if you want a more opaque finish. Let this layer cure fully before moving on to the black details.
Splatter Control Trick
For bigger, distinct spots rather than a mist, dip a regular round brush in fluid paint and firmly tap the handle against a second brush handle over your pumpkin.
Step 2: Defining the Ribs
-
Load detail brush:
Squeeze a small amount of black acrylic paint onto your palette. Load your small round detail brush with paint, ensuring the bristles are coated but not dripping. -
Trace natural grooves:
Identify the natural vertical indentations (ribs) of the pumpkin. Starting from the top near the stem, gently drag your brush down along these grooves toward the base. -
Vary the line width:
Don’t worry about making straight, perfect lines. Allow the brush to follow the pumpkin’s organic shape. Pressing slightly harder in some areas will create thicker line segments, adding character. -
Complete the circumference:
Continue painting lines down every major vertical groove around the entire pumpkin. Leave the raised sections between the grooves pure white. -
Smooth the termination points:
Feather the lines out slightly as they reach the very bottom of the pumpkin so they don’t end abruptly. -
Dry the stripes:
Allow the black stripes to dry completely to the touch. This is crucial so the splatter step doesn’t smear your lines.
Step 3: The Splatter Effect
-
Prepare workspace:
Move your pumpkin to a protected area, such as a large cardboard box or a drop cloth. Splatter paint travels further than you expect. -
Dilute paint:
Mix a small amount of water into your black paint on the palette. You want a consistency similar to heavy cream or fluid ink. -
Load the splatter tool:
Dip an old toothbrush or a stiff bristle brush into the watered-down black paint. -
Test splatter:
Before hitting the pumpkin, do a quick test spray on a piece of scrap paper to check the droplet size. Adjust the paint thickness if needed. -
Flick the paint:
Hold the brush near the pumpkin and use your thumb to flick the bristles, sending a spray of black droplets onto the surface. -
Rotate and repeat:
Rotate the pumpkin slowly, applying splatters to all sides. Aim for a mix of tiny speckles and larger, more dramatic drops. -
Control the density:
Be mindful not to overdo it; you still want plenty of white space visible to maintain that crisp, high-contrast look.
Oops! Too Much Black?
If a splatter lands too heavy or smears, wait for it to dry completely. Then, use a small brush and your white base paint to essentially ‘erase’ or shape the blob.
Step 4: Final Touches
-
Remove tape:
Once all paint is dry, carefully peel the painter’s tape off the stem. -
Seal (optional):
If you plan to display this pumpkin outdoors or want extra durability, lightly mist the entire piece with a matte spray sealer.
Place your finished artwork on a wooden tray or mantel to enjoy the modern farmhouse vibe you have created


Have a question or want to share your own experience? I'd love to hear from you in the comments below!