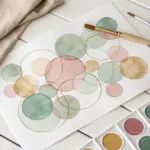
When I want a quick creative reset, I grab a small scrap of watercolor paper and paint something simple enough to actually finish in one sitting. These small watercolor painting ideas are all about big satisfaction on a tiny surface—no pressure, just paint and play.
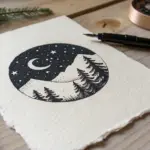
Mini Sunset Gradient with Simple Silhouettes
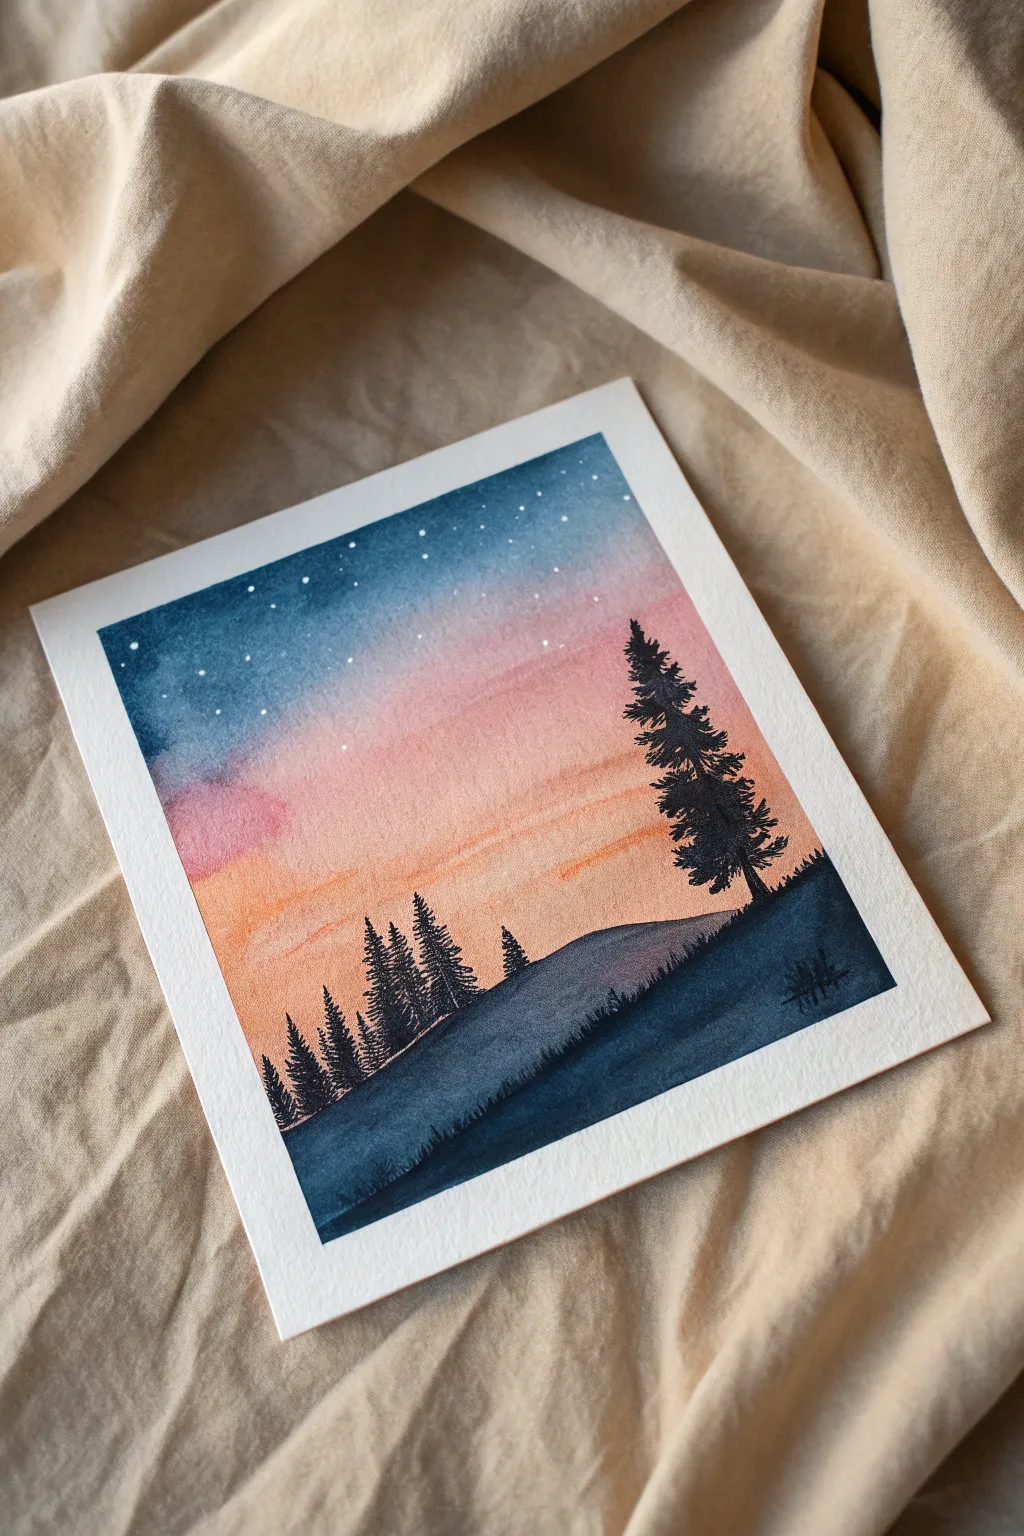

Capture the magic of twilight with this stunning miniature watercolor landscape. You’ll create a seamless gradient sky transitioning from deep indigo to warm peach, framing a delicate silhouette of pine trees.
Step-by-Step
Materials
- Cold press watercolor paper (cut to 4×4 or 5×5 inches)
- Masking tape (low tack)
- Watercolor paints: Indigo (or Prussian Blue), Alizarin Crimson (or Pink), Cadmium Orange
- Flat wash brush (medium size)
- Round detail brush (size 0 or 1)
- White gel pen or white gouache
- Two jars of water
- Paper towels
- Painter’s board or hard surface
Step 1: Setting the Stage
-
Tape the borders:
Begin by taping down all four edges of your small paper square onto your board. Press the tape edges firmly to ensure clean, crisp white borders later. -
Prepare the wash:
Pre-wet your paints in your palette to get them creamy. You will need a good amount of Indigo, Crimson, and Orange ready to go so you aren’t mixing while the paper dries.
Muddy Gradients?
If your sky colors turn brown where they meet, you likely overworked the blend. Next time, lay the colors down quickly and let the wet paper do the mixing for you.
Step 2: Painting the Gradient Sky
-
Wet-on-wet base:
Using your flat brush and clean water, apply an even coat of water across the entire paper surface. It should glisten but not have puddles. -
Apply the dark sky:
Load your brush with the dark Indigo. Start at the very top edge and paint horizontally, bringing the color down about one-third of the way. Let the water naturally dilute it slightly as you move down. -
Transition to pink:
Clean your brush quickly and pick up the Crimson/Pink. Blend this right into the bottom edge of the blue while it is still wet, moving downwards to the middle section. -
Add the horizon glow:
Rinse again and pick up the Orange. Blend this into the bottom of the pink and carry it all the way down to the tape. -
Smooth the blend:
With a clean, damp brush, you can strictly lightly sweep horizontally across the transition zones if lines look too harsh, but don’t overwork it. Let gravity help the colors merge. -
Let it dry completely:
This is crucial: allow the paper to dry 100%. The paper must be bone dry, or the silhouette layer will bleed into the sky.
Step 3: Adding the Stars
-
Create the stars:
Once the sky is dry, take your white gel pen or a fine brush with white gouache. Dot tiny points of light primarily in the dark blue section. -
Vary the brightness:
Make some dots slightly larger than others for a natural celestial look, fading them out as they reach the pink section.
Crisp Tape Lines
To prevent paint bleeding under the tape, run a bone folder or the back of your fingernail firmly along the tape edge before you start painting.
Step 4: Creating the Silhouettes
-
Mix shadow color:
Mix a very concentrated Indigo with a tiny touch of black or dark brown to create a near-black silhouette color. It should be opaque, not watery. -
Paint the first hill:
Starting near the bottom right, paint a sloping hill shape that dips down towards the left. Fill it in solid dark blue-black. -
Paint the second hill:
Create a second, steep hill shape in the foreground on the bottom left, overlapping the first one slightly to create depth. I find darker pigment here helps push this hill forward. -
Start the main tree:
Switch to your smallest detail brush. On the right side, draw a thin vertical line for the trunk of the tallest pine tree. -
Detail the pine branches:
Using a light tapping or stippling motion, paint horizontal, jagged branches extending from the trunk. Start very narrow at the top and get wider at the base. -
Add background trees:
On the left hill, paint a cluster of smaller pine trees. Keep these simpler and less detailed than the main tree to suggest distance. -
Add ground texture:
Use the tip of your brush to flick tiny vertical grass strokes along the ridge of the foreground hill.
Step 5: Finishing Touches
-
The final reveal:
Wait until the black paint is completely dry. Slowly and carefully peel the tape away at a 45-degree angle not to tear the paper. -
Sign your work:
Add your signature or initials in the bottom corner of the dark silhouette.
Now you have a serene little window into a mountain twilight to display or gift


Tiny Mountain Layers in Atmospheric Washes
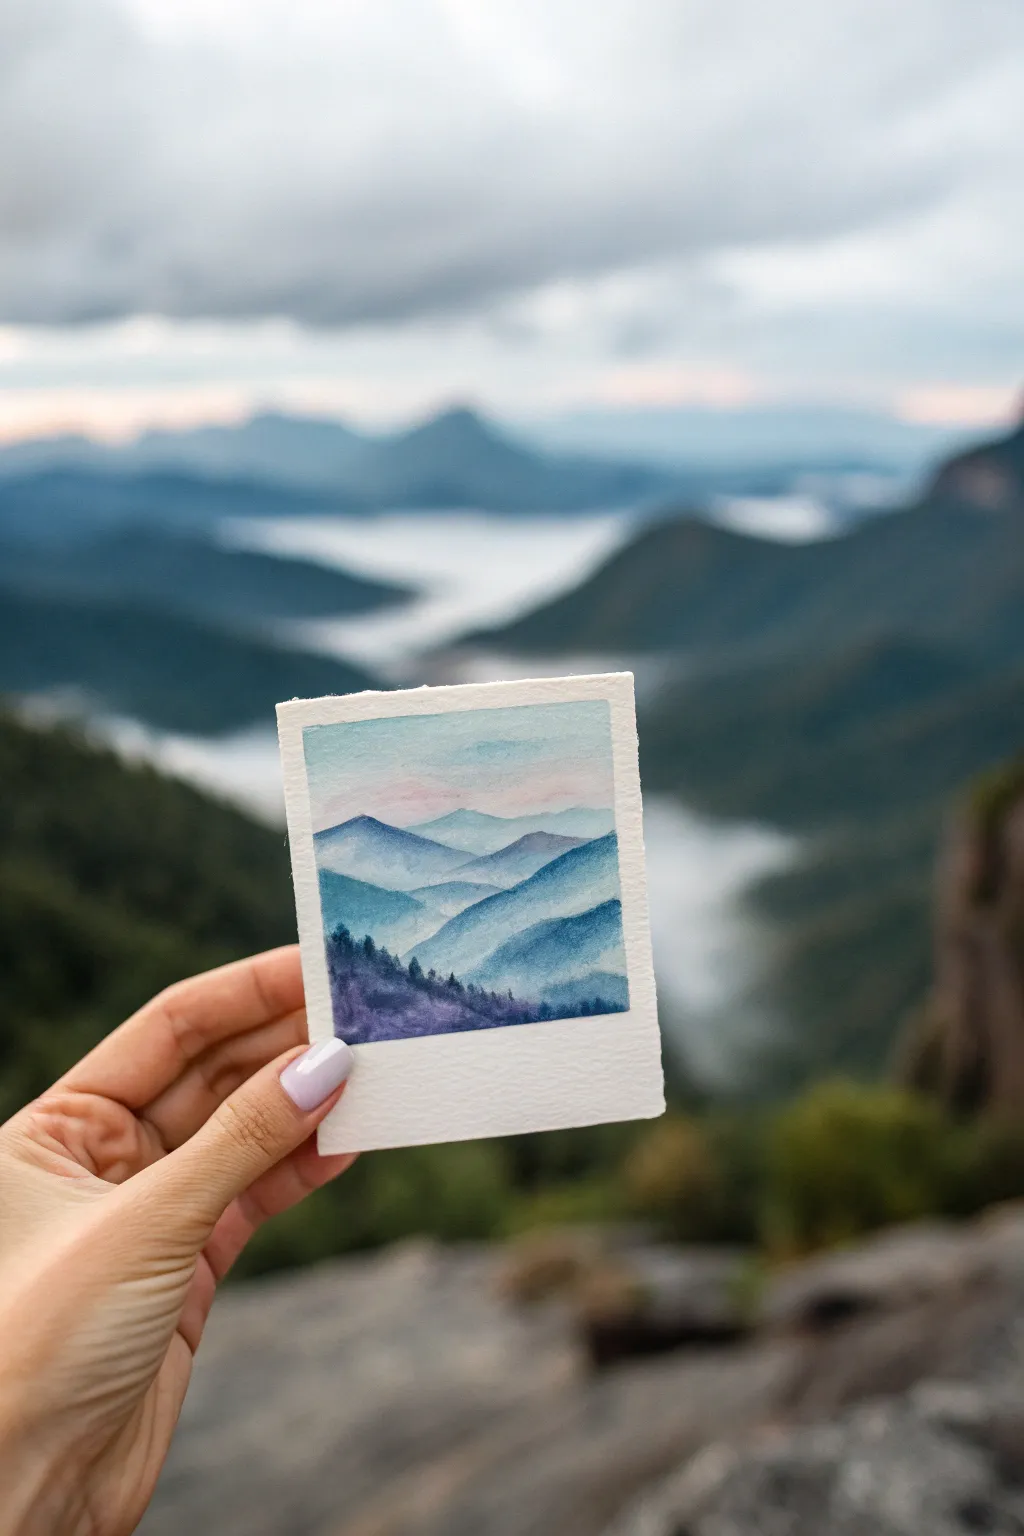
Capture the serene beauty of distant peaks with this miniature watercolor landscape that fits right in the palm of your hand. Using atmospheric perspective and simple wet-on-wet techniques, you’ll build depth layer by layer to create a dreamy, misty horizon.
Detailed Instructions
Materials
- Heavyweight watercolor paper (300gsm cold press recommended)
- Masking tape or painter’s tape
- Small round brushes (size 0 and 2)
- Watercolor paints (Indigo, Prussian Blue, Ultramarine, Alizarin Crimson)
- Two jars of water
- Paper towel
- Small mixing palette
- White gel pen (optional for stars)
Step 1: Preparation & Sky
-
Cut and tape:
Cut a small rectangle of watercolor paper, approximately 2.5 x 3.5 inches. Tape down all four edges onto a hard board, leaving a generous white border to mimic a Polaroid frame. -
Pre-wet the sky:
Using clean water and your size 2 brush, gently wet the top third of the painting area. The paper should glisten but not have standing puddles. -
Drop in the clouds:
Mix a very dilute wash of Alizarin Crimson (a pale pink) and a touch of Ultramarine Blue. Touched the wet paper lightly to let the colors bloom and create a soft, sunset sky. -
Soften the edges:
While the sky is still damp, lift out a few areas with a thirsty brush or corner of a paper towel to suggest white cloud shapes.
Fixing Hard Lines
If your ‘misty’ fade dried with a hard edge, gently scrub it with a damp brush to reactivate the paint and smooth it out.
Step 2: Painting the Ridges
-
Mix the furthest range:
Create a tea-consistency mix of Ultramarine Blue. It should be very pale, as distant objects appear lighter. -
Paint the first peaks:
Once the sky is bone dry, paint the silhouette of the furthest mountain range horizontally across the paper using the pale blue mix. -
Fade the bottom:
Immediately rinse your brush, dry it slightly, and run it along the bottom edge of this mountain shape to fade the color into nothingness. -
Mix the mid-ground color:
Add a little Prussian Blue to your existing mix to create a slightly darker, cool blue tone. -
Layer the second range:
Ensure the first layer is dry. Paint a second mountain ridge slightly lower than the first, varying the peak shapes so they don’t look uniform. -
Create the mist:
I like to use a clean, damp brush to pull the pigment downwards from this second ridge, creating a misty valley effect.
Step 3: Foreground & Details
-
Darken the mix:
For the closer mountains, mix Indigo with a touch of purple. This layer needs to be darker and more pigmented (milk consistency). -
Paint the third layer:
Paint the third ridge, making the peaks sharper and more defined. The darker color brings this layer forward visually. -
Prepare the foreground color:
Mix a concentrated dark blue-black using Indigo and a tiny bit of brown or black. This should be creamy and intense. -
Paint the closest hill:
Paint the final landmass at the very bottom left corner, swooping upwards slightly. -
Add tree texture:
While the foreground shape is wet, dab the top edge with the tip of your size 0 brush to create tiny, jagged tree silhouettes. -
Refine the trees:
Switch to your smallest brush and paint tiny vertical lines along the ridge of the closest dark mountain to suggest individual pine trees.
Add Some Magic
For a night scene, swap the pink sky for deep indigo and use a white gel pen to dot tiny stars in the drying sky.
Step 4: Finishing Touches
-
Let it dry completely:
Wait until the entire paper is cool to the touch and perfectly dry. Patience here prevents smudging. -
The reveal:
Carefully peel away the masking tape at a 45-degree angle, away from the painting area, to reveal crisp white borders.
Now you have a serene little window into the wild that you can keep in your sketchbook or gift to a friend


Single Leaf Miniature with Simple Veins
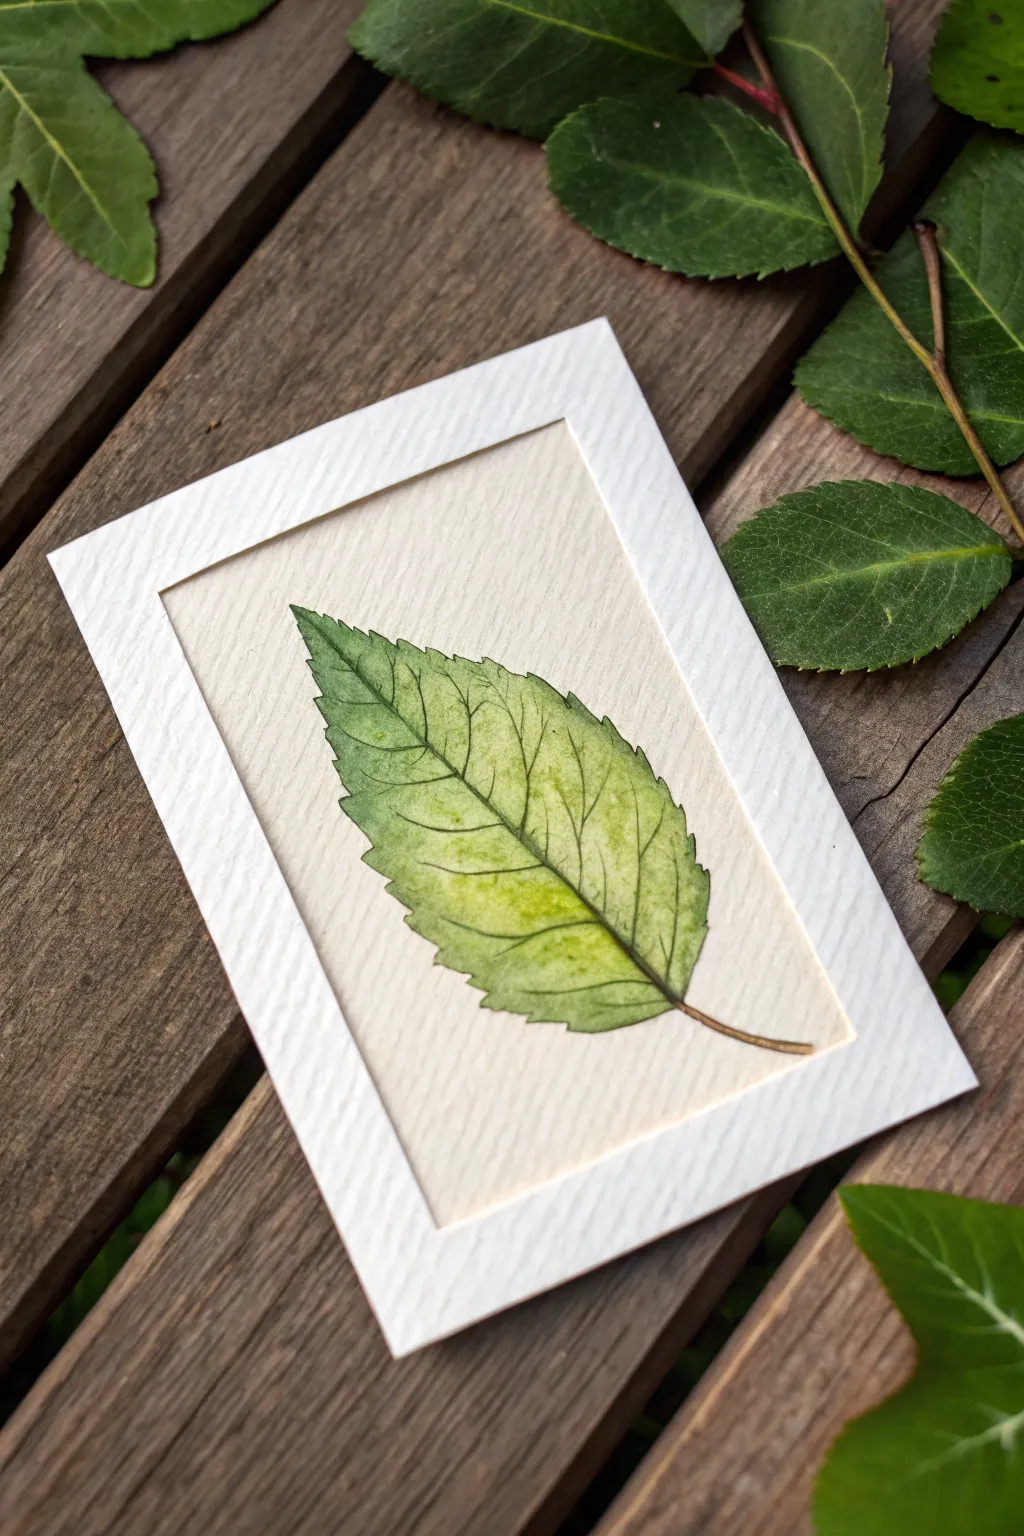
Capture the delicate beauty of a single leaf in this miniature watercolor project. You’ll focus on layering translucent greens and defining intricate veins to create a realistic, botanical illustration mounted on textured cardstock.
Detailed Instructions
Materials
- Cold press watercolor paper (with visible texture)
- White textured cardstock (for the mount)
- Watercolor paints (Sap Green, Lemon Yellow, Burnt Umber, Payne’s Gray)
- Small round brushes (Size 0 and Size 2)
- Pencil (HB or H)
- Kneadable eraser
- Paper towels
- Craft knife and ruler (or pre-cut aperture card)
- Double-sided tape or glue stick
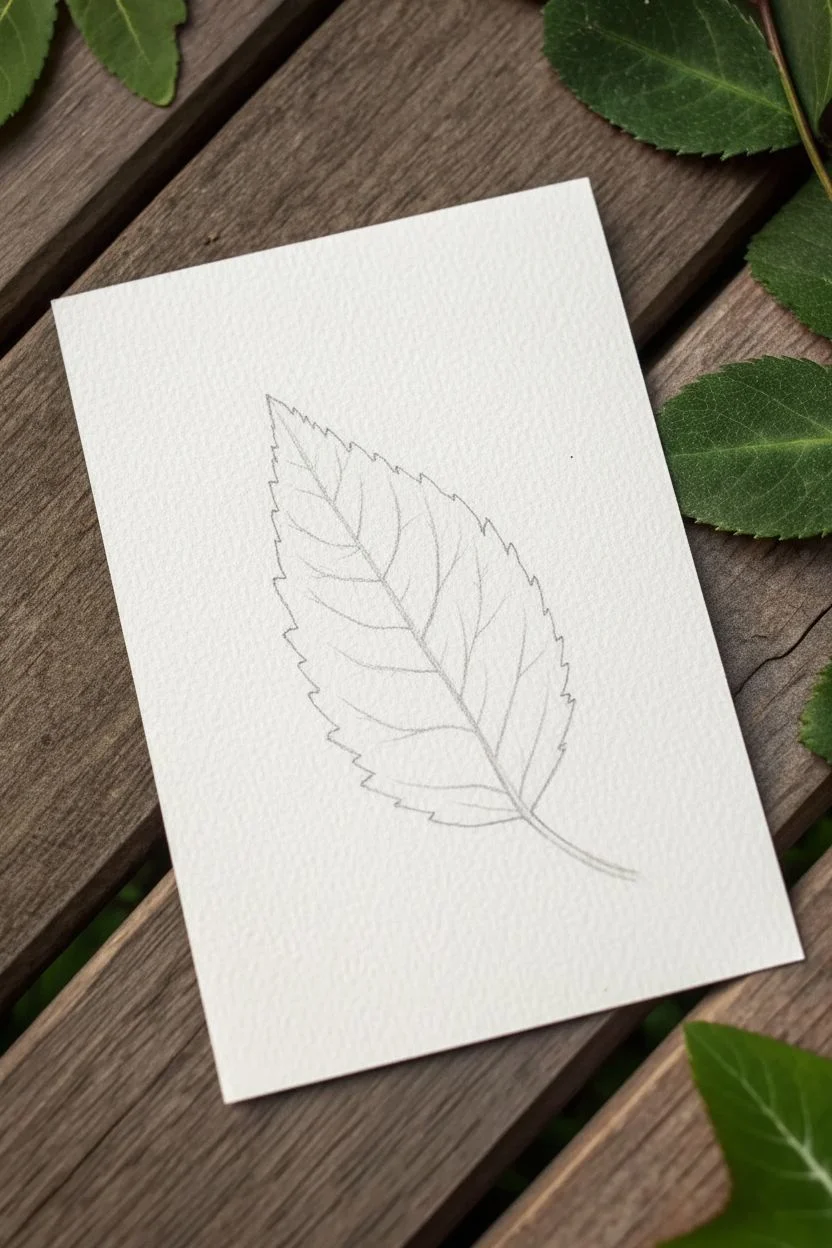
Step 1: Sketching and Preparation
-
Paper Selection:
Begin by selecting a watercolor paper with a distinct grain or texture, as seen in the reference. A heavy cold-press or a laid paper works beautifully to add character to the washes. -
Cut to Size:
Trim your watercolor paper to a small rectangle, slightly larger than the final window size you intend to display it in—roughly 3×4 inches is a manageable size for this miniature. -
Outline the Shape:
Using a sharp HB pencil, lightly draw the central vein (midrib) of a rose or beech leaf, giving it a gentle curve. Sketch the serrated outer edges of the leaf, ensuring the shape tapers to a point. -
Refine the Edges:
Go back over your outline and add the specific jagged teeth along the leaf margin. Keep these pencil lines extremely faint so they disappear under the paint later. -
Map Main Veins:
Lightly sketch the primary lateral veins branching out from the center line. You don’t need every tiny vein, just the main architectural structure.
Pro Tip: Texture Trick
To replicate the paper texture in the image, hold your brush at a low angle and drag it lightly. This ‘dry brush’ technique skips over the paper valleys.
Step 2: Painting the Base Layers
-
First Wash:
Mix a very watery, pale yellow-green using Lemon Yellow and a touch of Sap Green. Apply this wash over the entire leaf shape, keeping it wet and even. -
Lifting Highlights:
While the first wash is still damp, use a clean, thirsty brush to lift out a little color along the central vein and in the center of the larger leaf sections to suggest light hitting the surface. -
Drying Time:
Allow this base layer to dry completely. The paper must be bone dry before adding detail to prevent the veins from bleeding. -
Second Layer Glazing:
Mix a slightly stronger Sap Green. paint into the spaces *between* the veins, leaving the sketched vein lines the color of the lighter first wash. This is negative painting. -
Softening Edges:
If the edges of your green shadows look too harsh, quickly run a damp brush along them to soften the transition into the lighter areas.
Level Up: Dew Drops
Add realism by lifting a tiny circle of paint with a damp brush, then adding a dark crescent shadow underneath to create a realistic water droplet.
Step 3: Detailing and Veins
-
Deepening Shadows:
Mix a darker green by adding a tiny dot of Payne’s Gray to your Sap Green. Use your Size 0 brush to deepen the color right next to the veins and near the central midrib. -
Defining the Serrated Edge:
Use this darker mix to carefully paint the very tips of the serrated edges, giving the leaf a crisp, sharp outline. -
Painting the Stem:
Mix Burnt Umber with a little green to get a brownish-olive tone. Paint the stem base thin and fine, blending it gently into the bottom of the leaf. -
Fine Vein Lines:
I like to take my finest brush and add extremely thin, dark lines right alongside the main veins to make them pop. Keep these lines broken and organic, not solid strokes. -
Final Wash (Optional):
If the contrast feels too high, you can run a very watery glaze of yellow over the whole leaf once it’s dry to unify the colors.
Step 4: Mounting the Miniature
-
Prepare the Passpartout:
Cut a piece of textured white cardstock larger than your painting. Cut a rectangular window in the center that frames your leaf perfectly, leaving plenty of white space. -
Create the Frame Effect:
To mimic the reference, ensure the white cardstock has a subtle embossed texture or use a textured paper. You can lightly score a border around the window for added depth. -
Align the Art:
Place your painting face up on the table and position the window card over it. adjust until the leaf is centered with a pleasing amount of negative space. -
Secure the Painting:
Flip the assembly over carefully. Use double-sided tape or artists’ tape to secure the watercolor paper to the back of the window card.
Display your botanical miniature on a small easel or frame it to bring a permanent touch of nature indoors


Tiny Citrus Slice for Easy Color Layering
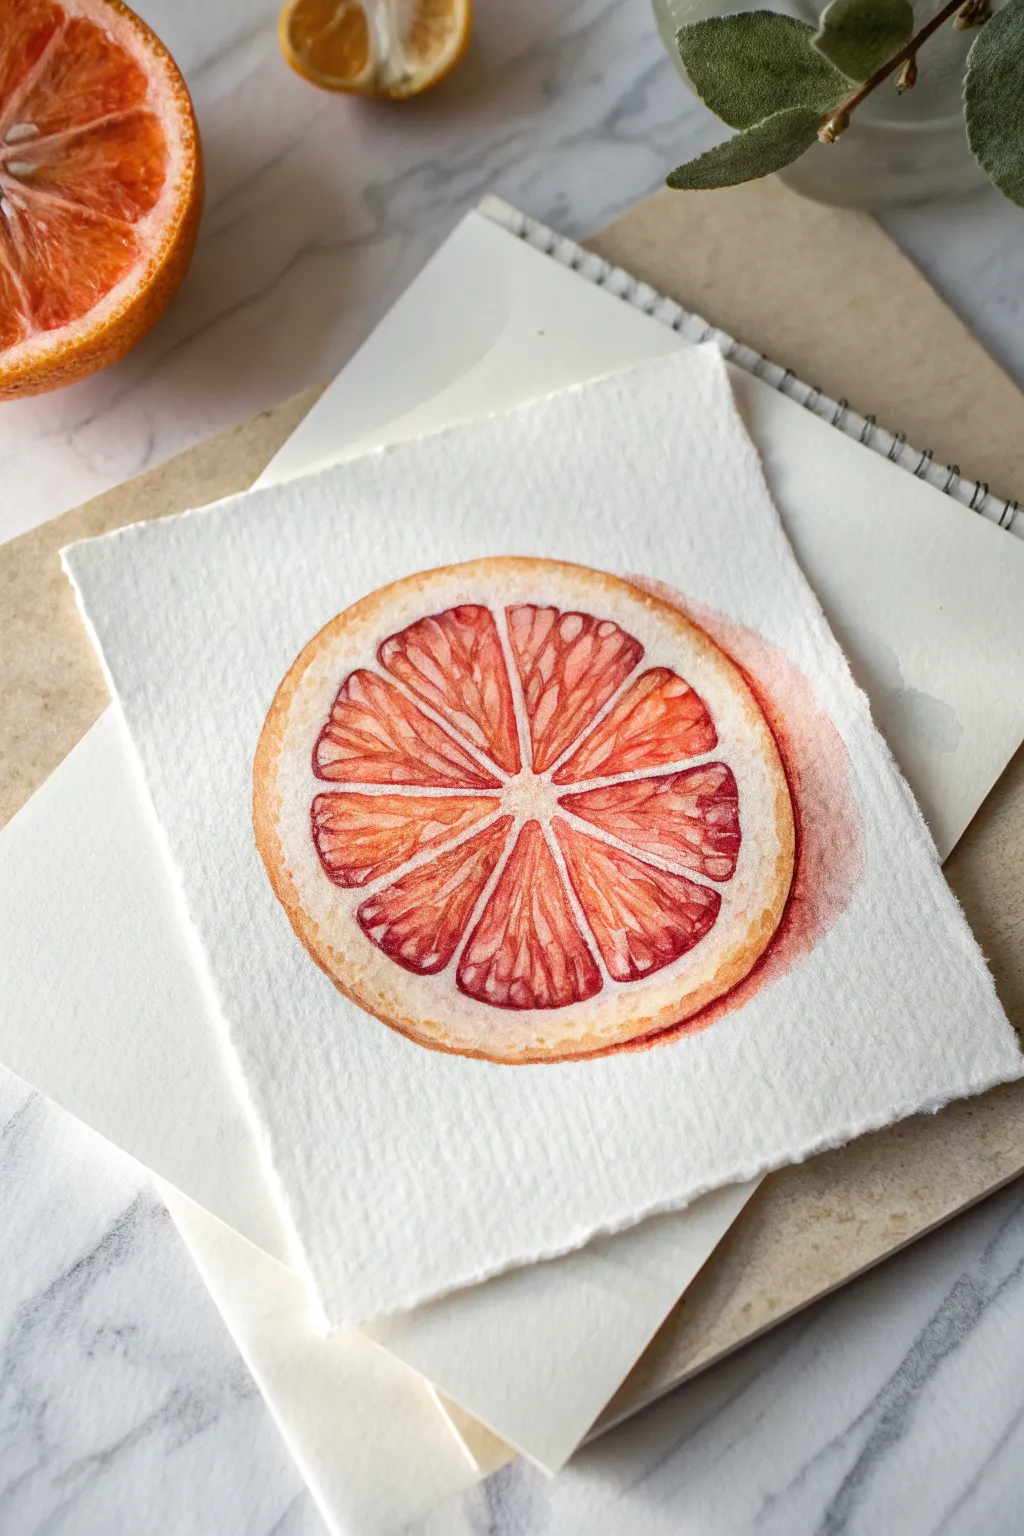
This refreshing watercolor study captures the translucent beauty of a blood orange slice, focusing on its vibrant red-orange gradients and white pitch. It’s a perfect exercise for practicing wet-on-dry layering and controlled color bleeding within small segments.
Step-by-Step Guide
Materials
- Cold press watercolor paper (deckle edge optional)
- Small round watercolor brush (size 2 or 4)
- Watercolor paints: Cadmium Orange, Alizarin Crimson, Burnt Sienna
- Pencil (HB or H)
- Kneaded eraser
- Two jars of water
- Paper towel
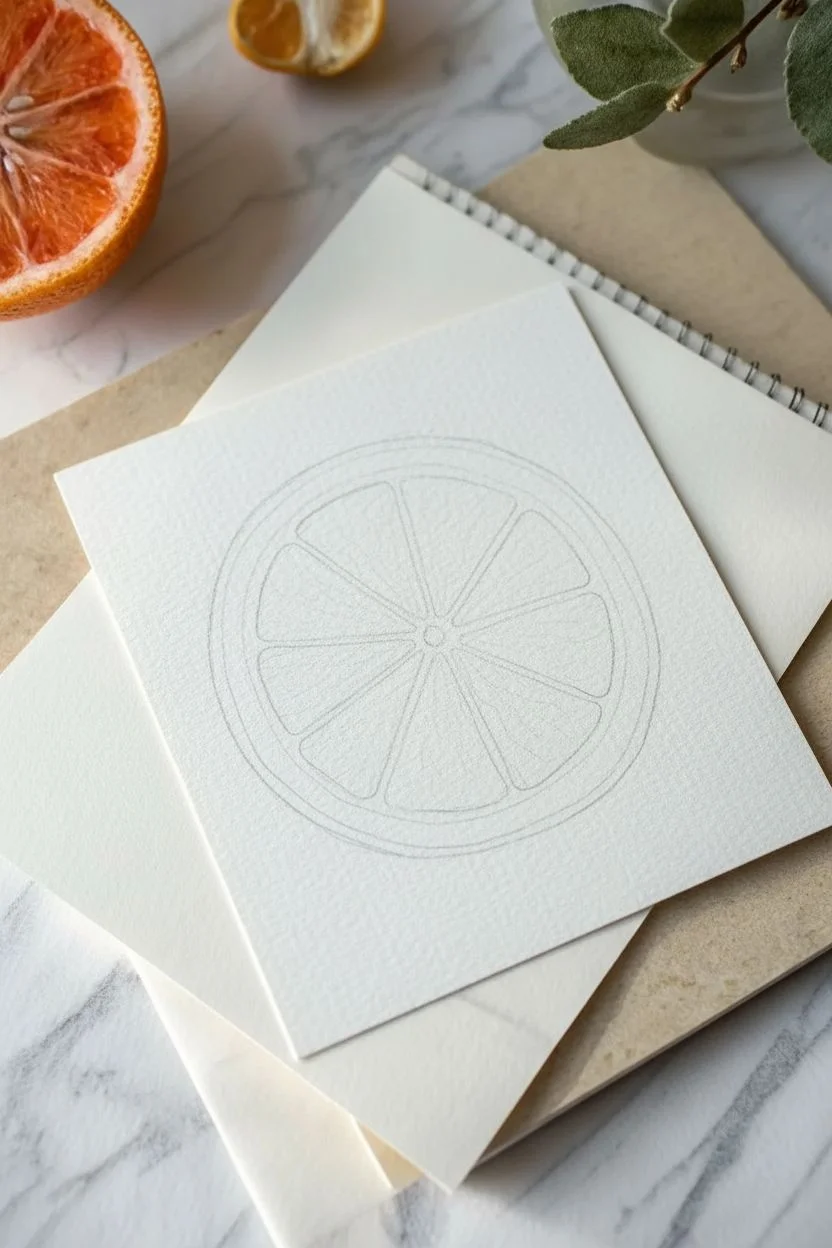
Step 1: Sketching the Structure
-
Outline the circle:
Begin by lightly sketching a perfect circle on your paper. You might want to use a small lid or tape roll as a template to ensure it’s symmetrical. -
Define the rind:
Draw an inner circle about 1/8th of an inch inside the first one to establish the thickness of the rind. -
Mark the center:
Place a tiny dot in the exact center of your circle to guide your segment placement. -
Draft the segments:
Draw the triangular fruit segments radiating from the center. Keep the white lines (the pith) between the segments fairly thick and organic; they shouldn’t look like rigid spokes on a wheel. -
Soften the lines:
Roll your kneaded eraser gently over the entire sketch. You want the graphite to be barely visible so it disappears under the light washes.
Bleeding Colors?
If your segment colors are running into the white pith lines, your paper is too wet or you didn’t wait for adjacent segments to dry. Use a hairdryer on low heat between sections.
Step 2: Painting the Fruit Segments
-
Mix your base orange:
Create a watery mix of Cadmium Orange on your palette. It should be transparent and light. -
First wash:
Paint every other fruit segment with this light orange wash. Working on non-touching segments prevents the wet paint from bleeding together. Let these dry, then paint the remaining segments. -
Mix the blood orange red:
While the first layer dries completely, mix a deeper, richer red using Alizarin Crimson with a touch of the orange. -
Deepening the color:
Working one segment at a time, wet the segment slightly with clean water, then drop the red mixture into the outer wide edge of the wedge. Let it naturally bleed toward the center but stop before it reaches the tip. -
Adding texture detail:
Once the previous layer is damp but not soaking, use the very tip of your brush with a concentrated mix of Alizarin Crimson and a tiny bit of Burnt Sienna to paint thin, veiny lines inside the segments. These mimic the juice sacs. -
Refining edges:
Darken the outer corners of each segment where they meet the rind. This creates a sense of depth and separation from the white pith.
Add Sparkle
For a hyper-realistic juicy look, add tiny dots of white gouache or a white gel pen over the darkest red parts of the segments to create highlight reflections.
Step 3: The Rind and Shadows
-
Base rind color:
Clean your brush and pick up a very dilute, clean yellow-orange mix. Paint the outer ring (the skin), keeping the touch incredibly light. -
Texturing the skin:
While the rind wash is still wet, drop in tiny points of slightly darker orange to suggest the porous texture of citrus skin. -
Painting the shadow:
Mix a diluted purple-red using Alizarin Crimson and a touch of blue or brown. Paint a crescent moon shape along the right side of the orange slice on the paper background. -
Softening the shadow:
Immediately rinse your brush, dry it slightly on a towel, and run the damp bristles along the outer edge of the shadow to fade it softly into the white paper. -
White pith clean-up:
If any paint accidentally crossed into the white dividing lines, you can use a clean, stiff damp brush to gently lift the pigment away. -
Final touches:
Assess the vibrancy. If the center looks too pale, add a very delicate glaze of yellow-orange to the inner tips of the segments.
Once dry, this vibrant slice will look fresh enough to squeeze
BRUSH GUIDE
The Right Brush for Every Stroke
From clean lines to bold texture — master brush choice, stroke control, and essential techniques.
Explore the Full Guide
Mini Mushrooms with Earthy Tones and Spots
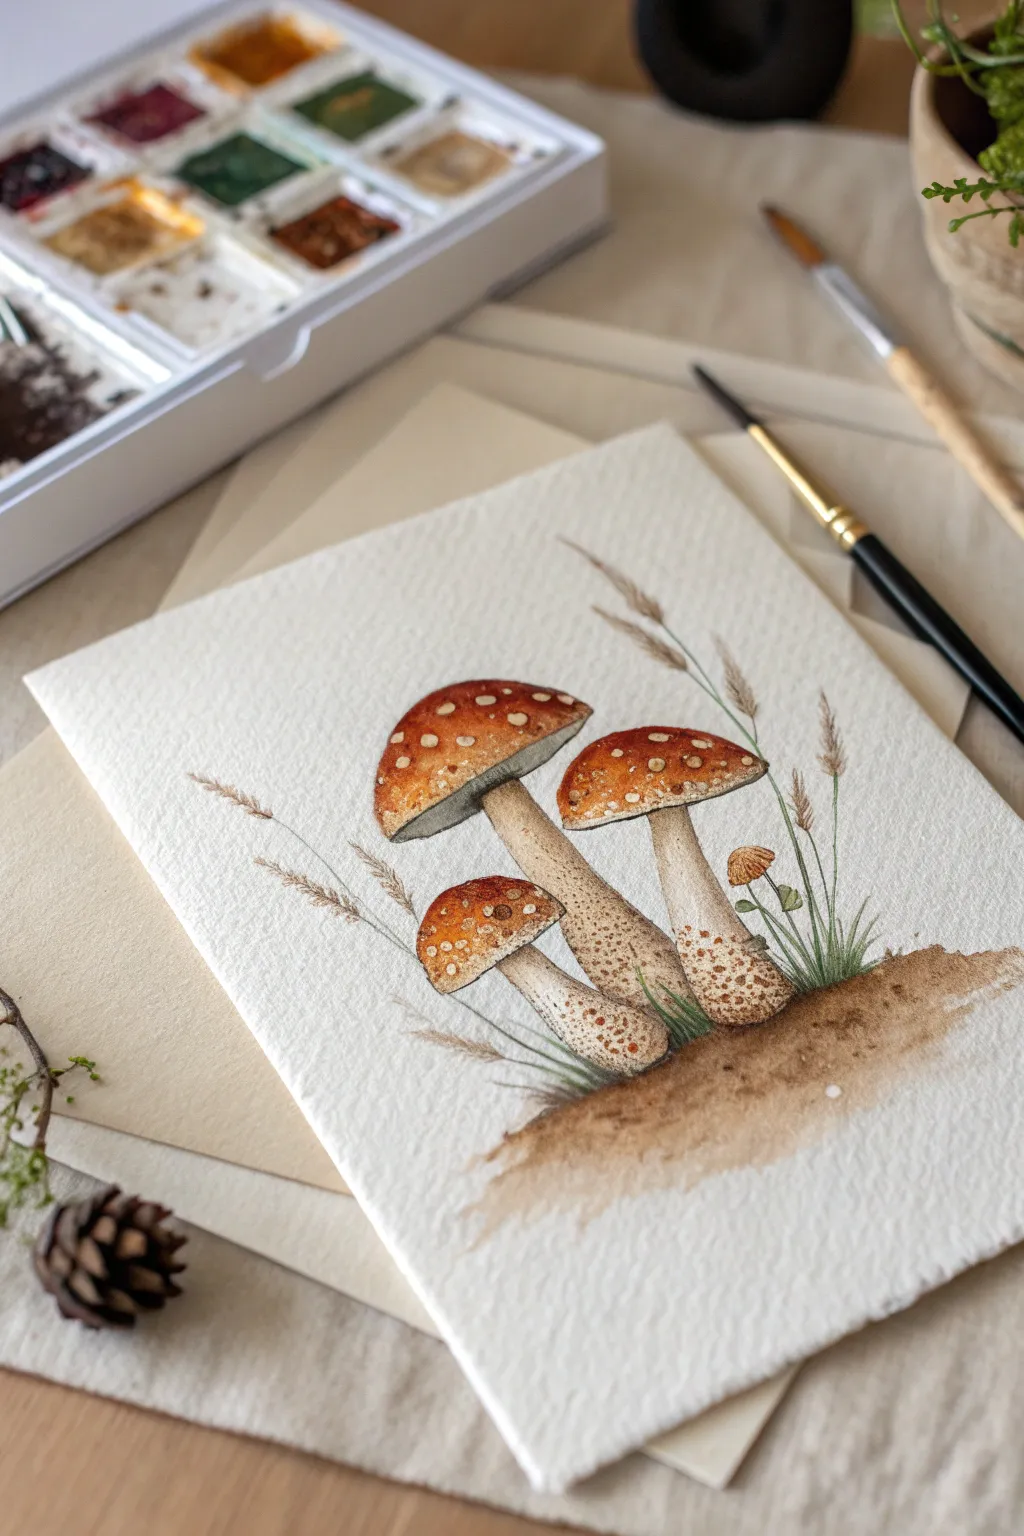
Capture the charm of the forest floor with this detailed watercolor study of fly agaric mushrooms. Using warm earthy tones and careful layering, you’ll create a textured, realistic scene complete with delicate grasses and speckled stems.
Detailed Instructions
Materials
- Cold press watercolor paper (300 gsm)
- Pencil (HB or similar)
- Kneaded eraser
- Watercolors: Burnt Sienna, Yellow Ochre, Alizarin Crimson, Burnt Umber, Sap Green, Sepia
- Round brushes (sizes 2, 4, and 0 for details)
- White gouache or white gel pen
- Masking fluid (optional)
- Clean water and paper towels
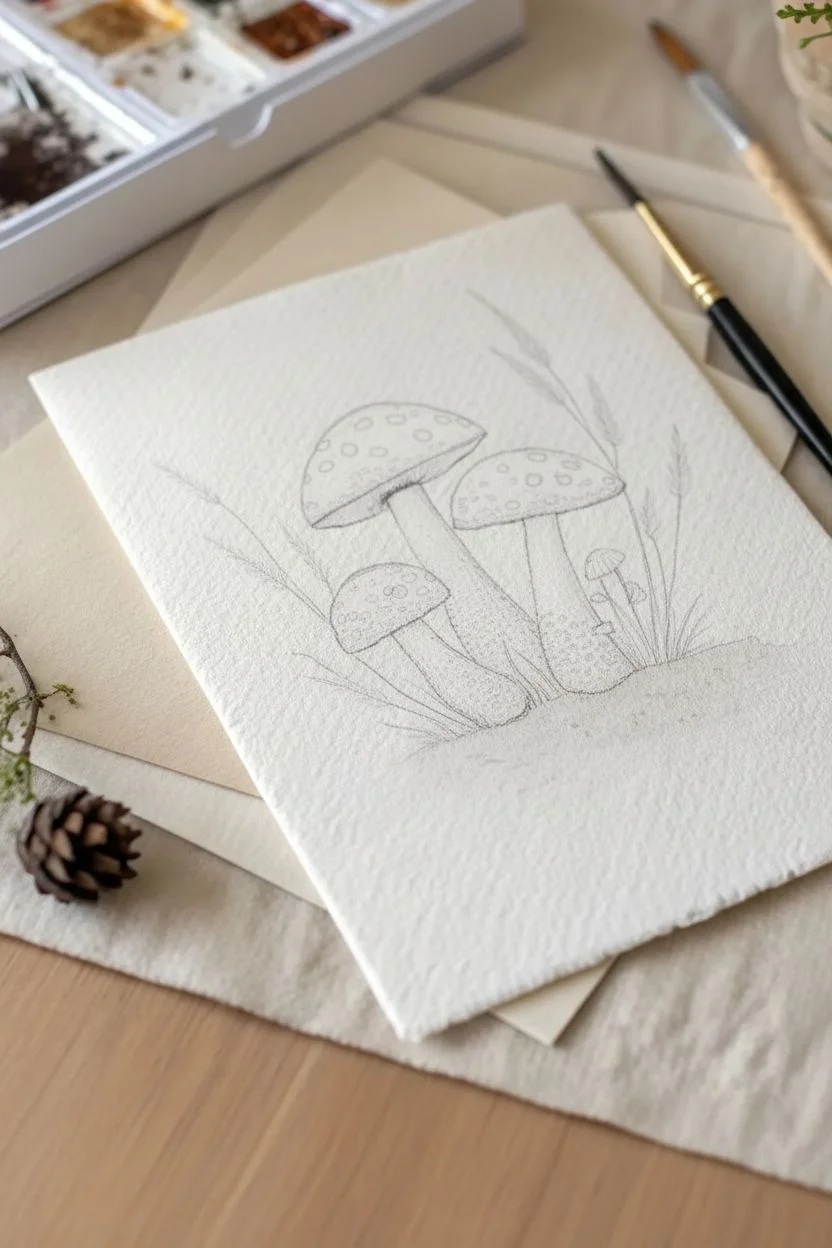
Step 1: Sketching the Composition
-
Outline the caps:
Begin by lightly sketching three mushroom caps. Place the largest one on the left, tilting slightly down. Draw a second, slightly smaller cap to its right, and a small, round button cap nestled low between them. -
Define the stems:
Draw thick, sturdy stems for the two larger mushrooms. The left stem should curve slightly outward, while the right stem stands straighter. Make the bases bulbous where they meet the ground. -
Add nature details:
Sketch a tiny, fourth mushroom popping up on the far right. Lightly pencil in a few tall, thin lines for the grass and wheat-like stalks behind the group, and mark a rough horizon line for the dirt mound. -
Clean up:
Use your kneaded eraser to lift any heavy graphite lines, leaving ghost lines that are just visible enough to guide your painting.
Step 2: Painting the Caps
-
First wash:
Mix a warm orange using Yellow Ochre and a touch of Alizarin Crimson. Paint the main caps, leaving small random circles unpainted to serve as the white spots. If you have masking fluid, you can dot it on first. -
Deepening the color:
While the paint is still damp, drop concentrated Burnt Sienna and Alizarin Crimson into the top centers of the caps to create a rounded, 3D effect. The edges should remain slightly lighter. -
Shadows under the rim:
Once the red wash is dry, mix a diluted Sepia or dark grey. Paint a thin shadow line underneath the rim of the caps to separate them from the gills and stems. -
The small mushrooms:
Paint the smallest mushroom cap with a lighter wash of your orange mix, keeping it paler than the big ones to show variety.
Keep it clean
Wait for the red cap paint to be 100% dry before painting the background stems. Red pigment bleeds easily and can muddy your delicate sky or grass area instantly.
Step 3: Stems and Texture
-
Base stem color:
Use a very watery mix of Yellow Ochre and Burnt Umber to paint the stems. Keep the center of the stems almost white to act as a highlight. -
Adding texture:
Mix a slightly thicker Burnt Umber. Using the tip of a size 0 brush, stipple tiny dots and broken lines onto the lower parts of the stems to create a rough, earthy texture. -
Painting the gills:
Underneath the large caps, paint fine, dark lines radiating from the stem to the rim using Sepia. This suggests the shadowed gills hidden beneath. -
Refining the unpainted spots:
If your reserved white spots on the caps look too harsh, soften their edges with a clean, damp brush. You can also tint a few of them slightly yellow or brown for realism.
Autumn vibe
Swap the green grass for burnt orange and yellow blades to turn this into a late autumn scene. You can also splatter diluted brown paint for a dirty effect.
Step 4: Ground and Grasses
-
Earthy foundation:
Wet the paper area at the base of the mushrooms. Drop in varied mixes of Burnt Umber and Sepia, letting the colors bleed naturally to form the dirt mound. -
Softening the edge:
Pull the bottom edge of the dirt paint downward with plain water to create a soft, jagged fade-out, rather than a hard line. -
Drawing grass blades:
Load a size 0 or liner brush with Sap Green mixed with a little brown. Paint think flicks of grass growing up from the dirt, clustering them near the stems. -
Wheat stalks:
Use a diluted faint brown to paint the tall, thin stalks in the background. Add tiny tick marks at the tops to simulate the seeds of wild dried grass.
Step 5: Final Details
-
Highlighting:
If you lost any white spots during painting, use white gouache or a gel pen to bring them back. Add a few tiny white dots to the textured dirt area for sparkle. -
Deepening contrast:
Add a final layer of dark Sepia right where the stems meet the dirt to anchor the mushrooms to the ground.
Now your little forest floor scene is complete and ready to be framed or gifted
Small Bird Silhouette on a Minimal Branch

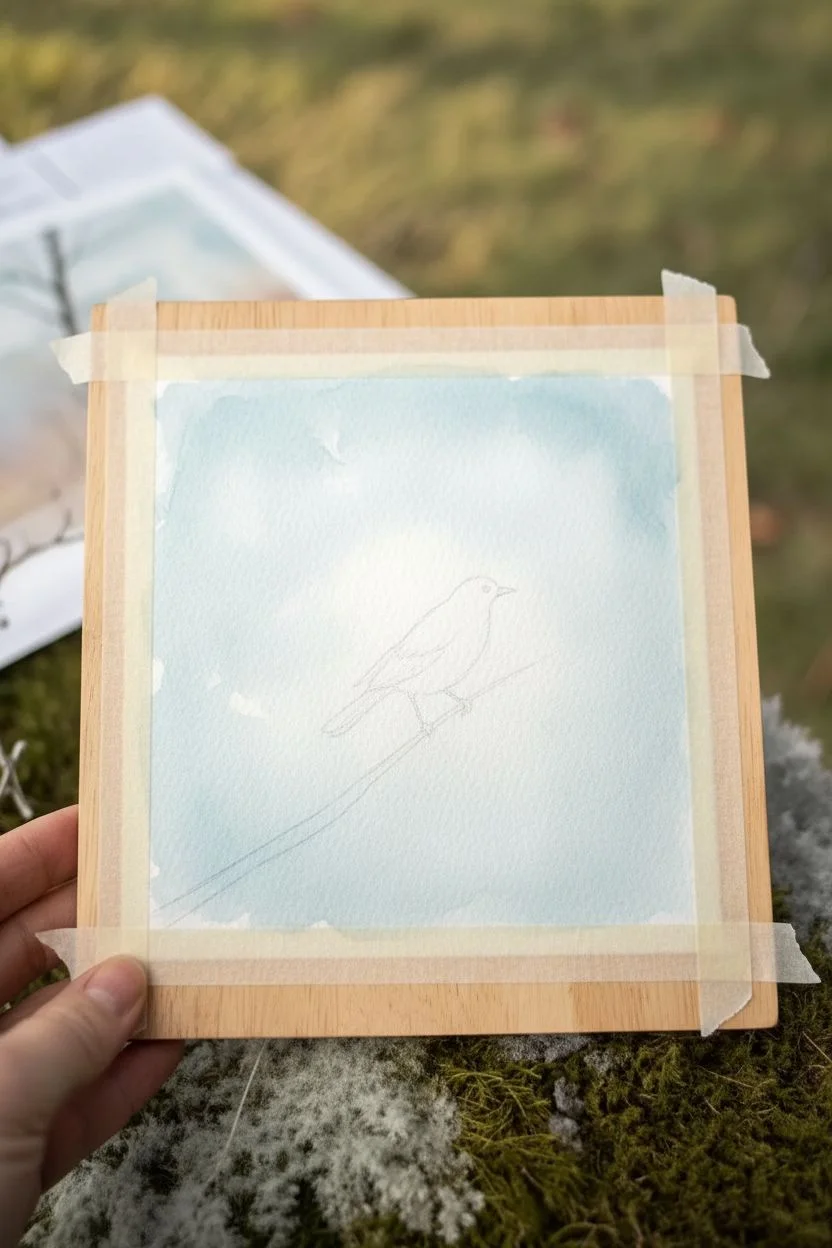
Capture the quiet stillness of winter with this delicate watercolor study. Featuring a stark silhouette against a soft, misty background, this piece is perfect for practicing atmospheric depth and fine brush control.
Step-by-Step Guide
Materials
- Cold press watercolor paper (cut to a square format)
- Masking tape
- Watercolor paints: Indigo, Payne’s Grey, Cerulean Blue, Burnt Umber, Lamp Black
- Round brushes: Size 6 for washes, Size 0 or 00 for details
- Clean water jars
- Paper towels
- Pencil (HB or H)
Step 1: Setting the Scene
-
Tape and Prep:
Begin by taping down all four edges of your square watercolor paper to a board. This creates the crisp white border seen in the example and prevents buckling. -
Light Sketching:
Using a hard pencil (H or HB), very faintly sketch the main diagonal branch rising from the bottom left. Then, sketch the outline of the bird perched on the branch. Keep the lines barely visible so they won’t show through the sky later. -
Wet-on-Wet Sky:
Pre-wet the entire sky area with clean water using your larger brush, carefully painting *around* the bird’s body. The paper should be glistering but not swimming. -
Washing the Blue:
Load your brush with a watery mix of Cerulean Blue. Drop color into the upper corners and sides, letting it bleed inward. Leave the center behind the bird much lighter, almost white, to create an airy, backlit effect. -
Adding Texture:
While the sky is still damp, you can dab a clean, dry tissue to lift tiny clouds or irregularities if the blue becomes too uniform. Let this layer dry completely before moving on.
Pro Tip: Better Branches
When painting thin twigs, hold your paintbrush near the very end of the handle. This looseness creates shaky, organic lines that look more like real nature than stiff, straight lines.
Step 2: The Distant Forest
-
Mixing Muted Greens:
Create a ‘ghost tree’ color by mixing Indigo with a touch of Burnt Umber and plenty of water. You want a pale, cool grey-green tone. -
Painting the Treeline:
Along the bottom quarter of the paper, paint vertical, jagged shapes to suggest distant pine trees. Use the tip of your brush to make uneven peaks. -
Softening the Edges:
Immediately rinse your brush and run damp, clean bristles along the bottom edge of these trees to fade them into the white paper below, creating a misty fog effect. -
Layering Depth:
Once the initial treeline is semi-dry, add varying heights of faint distinct trees using slightly more pigment to suggest layers of forest.
Step 3: The Main Subject
-
Branch Base Coat:
Mix a dark grey-brown using Burnt Umber and Payne’s Grey. With a liner brush or size 0 round, paint the main branch, varying the pressure to make the line thicker in some spots and thinner in others. -
Adding Twigs:
Extend smaller, delicate twigs branching off the main stem. Keep these lines shaky and organic rather than perfectly straight. -
First Bird Layer:
Fill in the bird’s silhouette with a medium-strength wash of Payne’s Grey. Avoid solid black immediately; we want to build dimension. -
Darkening the Body:
While the first layer is still slightly damp, drop in a thicker, darker mix of Lamp Black and Indigo near the bottom of the bird (the belly) and under the wing to create shadow. -
Defining the Wing:
Wait for the body to dry. Then, using a thicker, deeper black mix, paint the distinct shape of the folded wing and tail feathers over the dry base layer. -
The Fine Details:
Switch to your smallest brush (00). Paint the beak carefully with a sharp point. Add the tiny feet gripping the branch. -
The Eye:
With the tip of your brush, leave a microscopic white speck of paper unpainted for the eye, or if you covered it, touch it with a dot of white gouache or gel pen later. Outline the eye with pure black. -
Final Contrast:
Assess the branch. If it looks too flat, run a very thin line of pure black along the bottom edge of the wood to act as a shadow.
Level Up: Snow Texture
For a true winter feel, splatter a tiny amount of diluted white gouache or acrylic ink over the finished painting (masking the bird first) to simulate falling snow.
Once fully dry, peel off the tape to reveal those pristine white borders that give your painting a polished, professional finish

PENCIL GUIDE
Understanding Pencil Grades from H to B
From first sketch to finished drawing — learn pencil grades, line control, and shading techniques.
Explore the Full Guide
Mini Mug Painting with Steam Swirl Washes
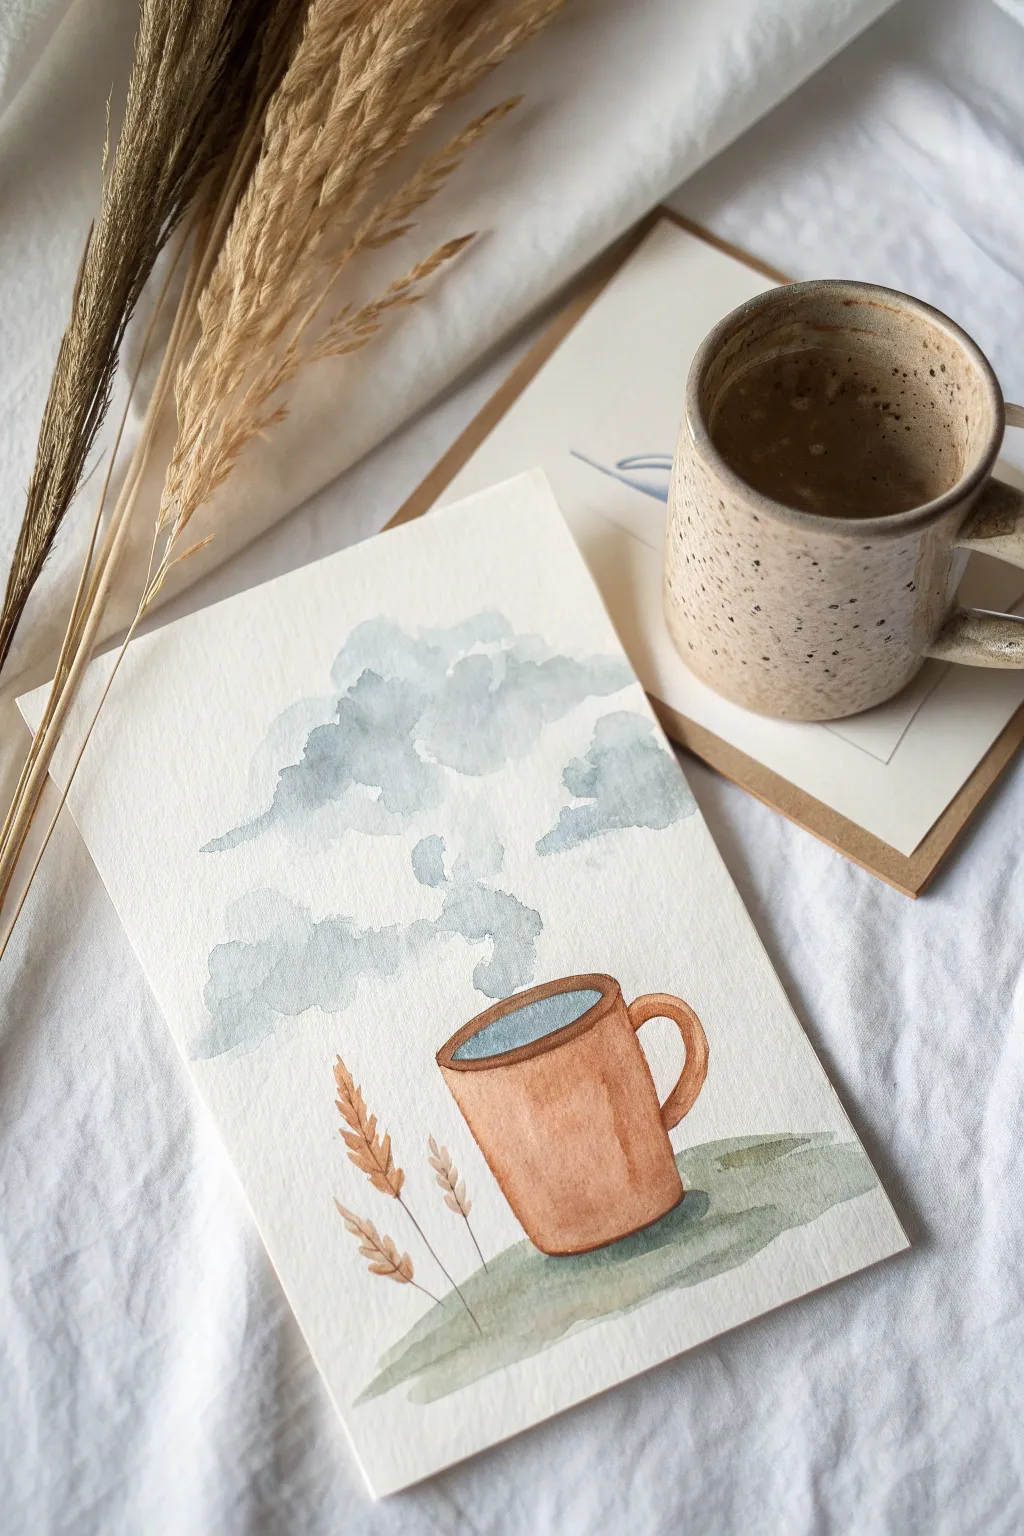
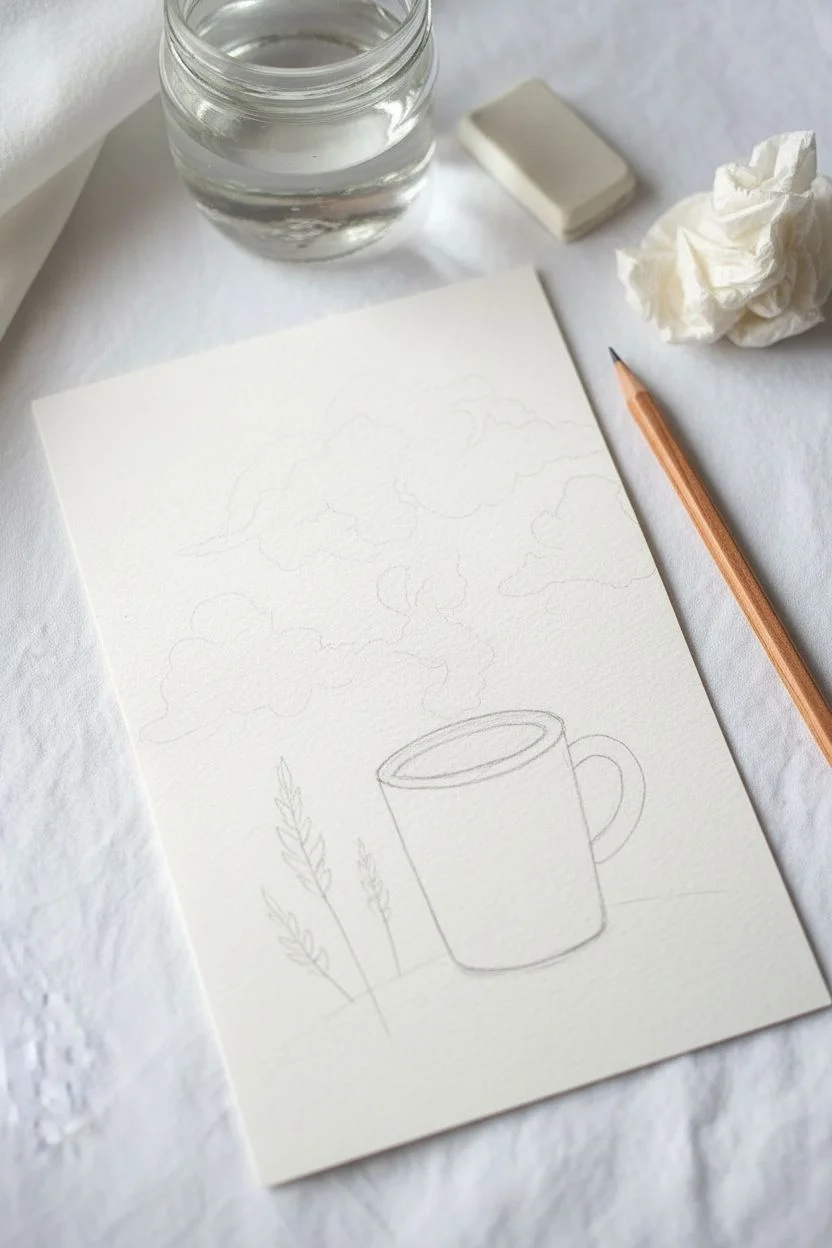
Capture the warmth of a morning brew with this gentle watercolor illustration. By blending organic steam shapes with a structured mug, you’ll create a comforting scene that feels both whimsical and grounded.
Step-by-Step
Materials
- Cold press watercolor paper (approx. 5×7 inches)
- Watercolor paints (Burnt Sienna, Ultramarine Blue, Paynes Gray, Yellow Ochre)
- Round watercolor brush (size 4 or 6)
- Small detail brush (size 0 or 2)
- Pencil (HB) and kneaded eraser
- Jar of clean water
- Paper towel
Step 1: Sketching the Elements
-
Outline the mug:
Start near the bottom third of your paper. Lightly sketch a simple cylinder shape for the mug, tapering slightly at the bottom. Draw an oval for the rim opening and add a curved handle on the right side. -
Add the wheat stalks:
To the left of the mug, draw three thin, straight lines rising up from the ground line. Sketch small, teardrop shapes along the top of these lines to represent the wheat kernels. -
Draft the steam:
Very faintly sketch organic, cloud-like shapes rising from the mug. Keep these lines extremely light as you want the paint to define the edges later, not the pencil.
Don’t Overwork Clouds
For the steam, lay the paint down and leave it alone. Touching wet paint too much destroys the natural ‘bloom’ texture that makes watercolor clouds look pillowy.
Step 2: Painting the Mug & Wheat
-
Wash the mug body:
Mix a warm Burnt Sienna with a touch of water. Fill in the body of the mug, keeping the color fairly even but allowing a little more pigment on the right side for shadow. -
Paint the handle:
Using the same brown mixture, carefully fill in the handle loop, leaving a tiny sliver of white paper where it meets the mug to define the separation. -
Fill the coffee liquid:
For the liquid inside the rim, mix a darker, cool grey-blue. This provides a nice contrast to the warm brown cup and suggests reflection. -
Detail the rim:
Once the body of the mug is slightly damp but not wet, outline the rim with a concentrated mix of Burnt Sienna to give the ceramic some thickness. -
Paint the wheat stalks:
Mix a Yellow Ochre with a tiny bit of brown. Using the tip of your small brush, paint the stems and the individual kernels on the wheat stalks.
Try a Pattern
Once the mug is dry, use white gouache or a gel pen to add tiny speckles, stripes, or a heart to the mug for a customized ceramic look.
Step 3: Creating the Atmosphere
-
Mix the steam color:
Prepare a watery wash of Paynes Gray mixed with a hint of Ultramarine Blue. It should be very pale and transparent. -
First steam layer:
Apply the pale blue-grey wash to the cloud shapes you sketched earlier. Use plenty of water to keep the edges soft and uneven. -
Add cloud definition:
While the first layer is still wet, drop in slightly darker pigment near the bottom edges of the clouds to create volume and fluffiness. -
Connect to the mug:
Ensure the lowest section of steam visually connects to the liquid in the mug, using a very jagged, wavy line to simulate rising heat. -
Ground the scene:
Mix a muted green-grey wash. Paint a loose, horizontal patch beneath the mug and wheat to ground the objects so they aren’t floating.
Step 4: Final Touches
-
Deepen shadows:
Wait for the mug to be fully dry. Add a second glaze of brown to the right side of the cup and under the handle to suggest a light source coming from the left. -
Refine the wheat:
Use your smallest brush and a darker brown to add tiny tick marks or ‘hairs’ extending from the wheat kernels for texture. -
Clean up:
Once strictly dry, gently erase any visible pencil lines, particularly around the fluffy steam clouds.
Now let your gentle painting dry completely before framing it or sending it as a card
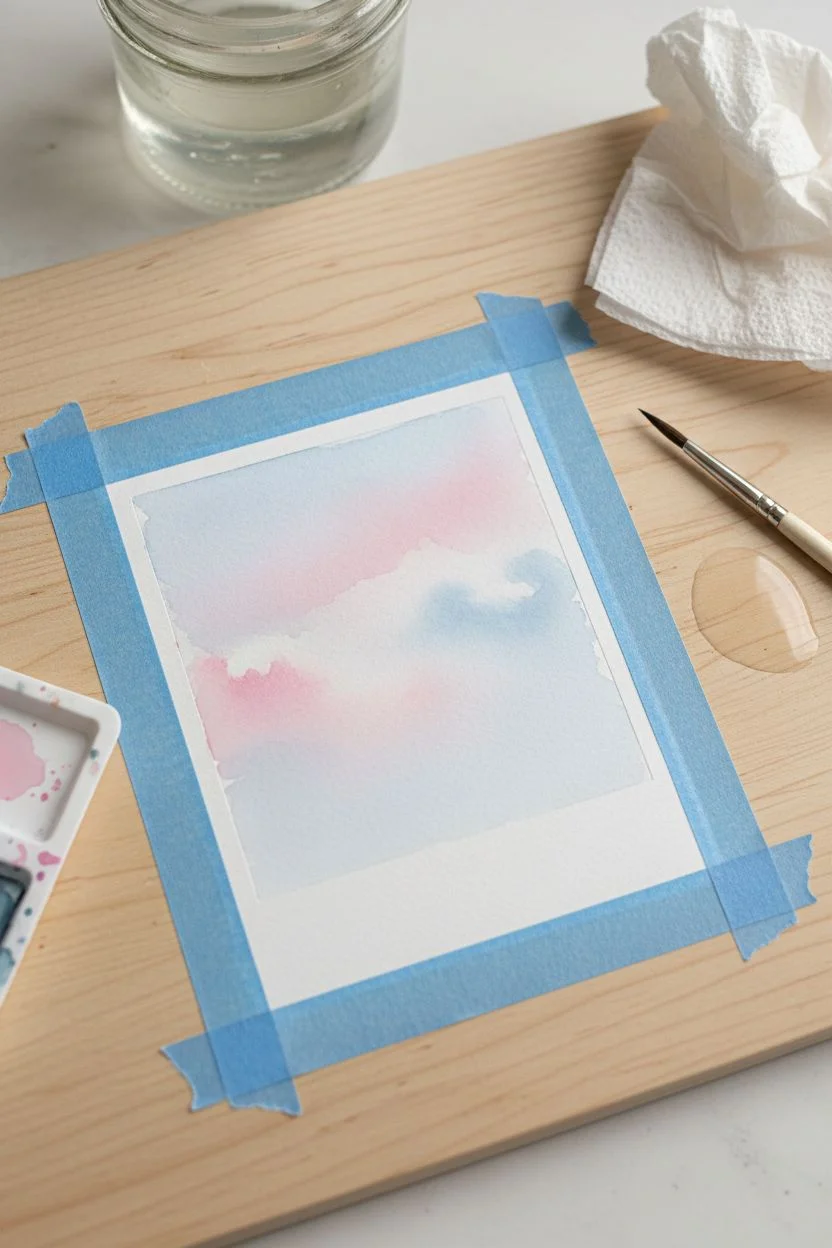
Tape-Resist Mini Paintings with Crisp White Borders
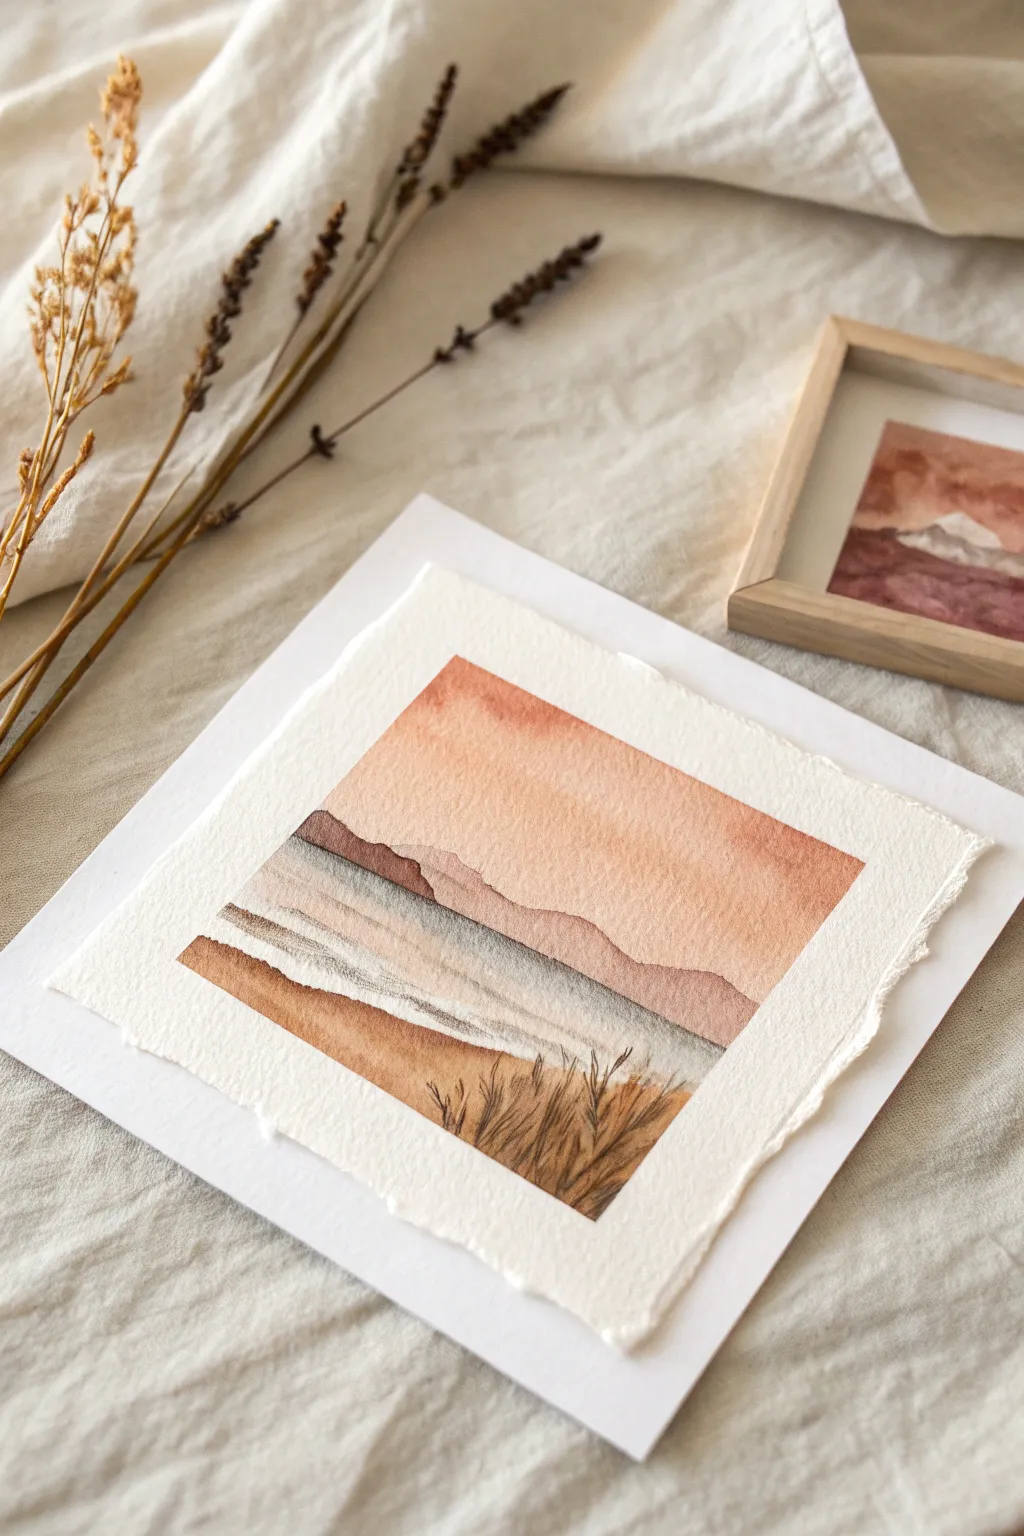
Capture the serene beauty of a hazy morning with this delicate watercolor landscape featuring soft peach skies and textured foreground grasses. The torn paper edges add an organic, tactile charm that perfectly complements the rustic color palette.
Step-by-Step
Materials
- Cold press watercolor paper (300 gsm)
- Larger white backing card or mat board
- Watercolor paints (Burnt Sienna, Yellow Ochre, Paynes Grey, Alizarin Crimson)
- Small round brush (size 2)
- Medium round brush (size 6)
- Masking tape or painter’s tape
- Ruler
- Jar of clean water
- Paper towels
- Pencil
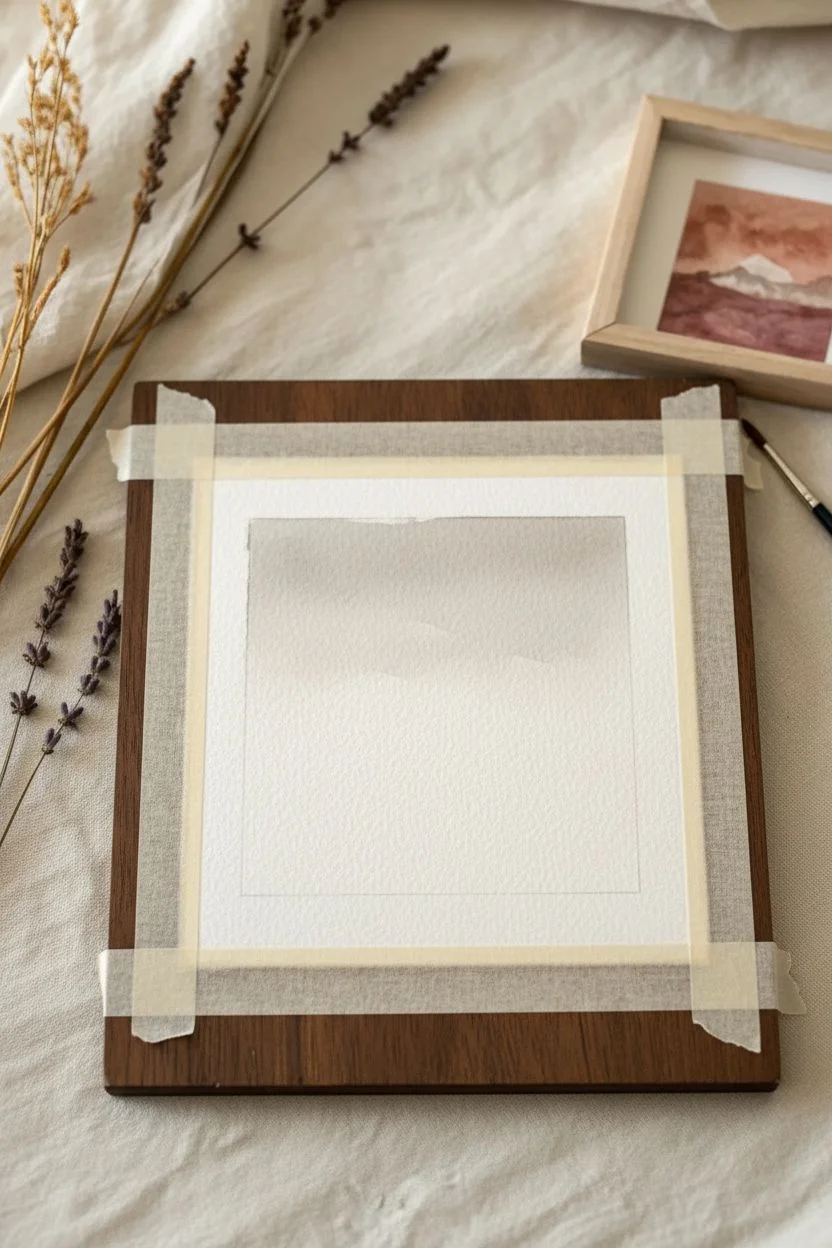
Step 1: Preparing the Surface
-
Measure and mask:
Cut a square piece of watercolor paper, roughly 5×5 inches. Tape it down to a hard board on all four sides to keep it flat, but leave a generous margin of paper exposed. -
Create the rough border:
Using a ruler and pencil, lightly draw a smaller square in the center of your paper. This will be your painting area. Do not paint past these lines for now. -
Pre-wet the sky:
With your medium brush and clean water, gently wet the top half of your square, stopping just above where you want the horizon line to be.
Tear like a Pro
For a softer, fuzzier torn edge, dampen the paper slightly along the fold line with a wet brush before tearing it against the ruler.
Step 2: Painting the Sky and Mountains
-
Wash in the sky:
Mix a very watery wash of Burnt Sienna with a touch of Alizarin Crimson to get a soft peach tone. Apply this to the wet sky area, letting the color fade slightly as it moves downward. -
First mountain range:
While the sky is still slightly damp but not soaking, mix a slightly stronger version of your peach color. Paint a distant, soft mountain ridge across the horizon. -
Second mountain layer:
Once the first layer is dry, mix Burnt Sienna with a tiny bit of Paynes Grey for a muted reddish-brown. Paint a second, more defined mountain range slightly lower than the first. -
Adding atmospheric depth:
To create the misty effect at the base of the mountains, quickly rinse your brush and run clean water along the bottom edge of the wet paint, letting it bleed downward into the white paper.
Level Up: Shadow Play
When mounting, use foam adhesive squares instead of flat tape. This lifts the painting off the backing, casting a real shadow.
Step 3: Creating the Water and Foreground
-
Paint the water:
I like to use a very dilute mix of Paynes Grey for this. Paint horizontal strokes below the mountains, leaving some white paper gaps to suggest reflection or light hitting the water. -
Define the shoreline:
Mix a concentrated Burnt Sienna. Paint a solid strip at the bottom of the water area to represent the wet sand or soil where the water meets the land. -
Foreground earth:
Fill the remaining bottom section with a warm wash of Yellow Ochre mixed with Burnt Sienna. Let the paint settle and dry completely before adding texture. -
Adding texture details:
Using the tip of your small size 2 brush and a darker brown mix, add tiny dots or quick horizontal dashes in the foreground to suggest dirt and debris.
Step 4: Finishing Touches and Assembly
-
Painting the grasses:
Load your small brush with a dark, concentrated brown (Burnt Sienna + Paynes Grey). With a flicking motion starting from the bottom up, paint thin grass stalks in the right corner. -
Varying the grass:
Ensure your grass blades vary in height and slightly in direction to look natural. Add a few smaller tufts on the left side for balance. -
Tearing the edges:
Once the painting is 100% dry, remove the tape. Place a ruler along the pencil lines you drew in step 2. Carefully tear the paper upwards against the ruler to create the jagged ‘deckle’ edge. -
Mounting the art:
Apply double-sided tape or glue to the back of your torn painting and center it on the larger white backing card.
Step back and admire how the torn edges give your misty landscape a wonderful vintage feel, ready for a frame


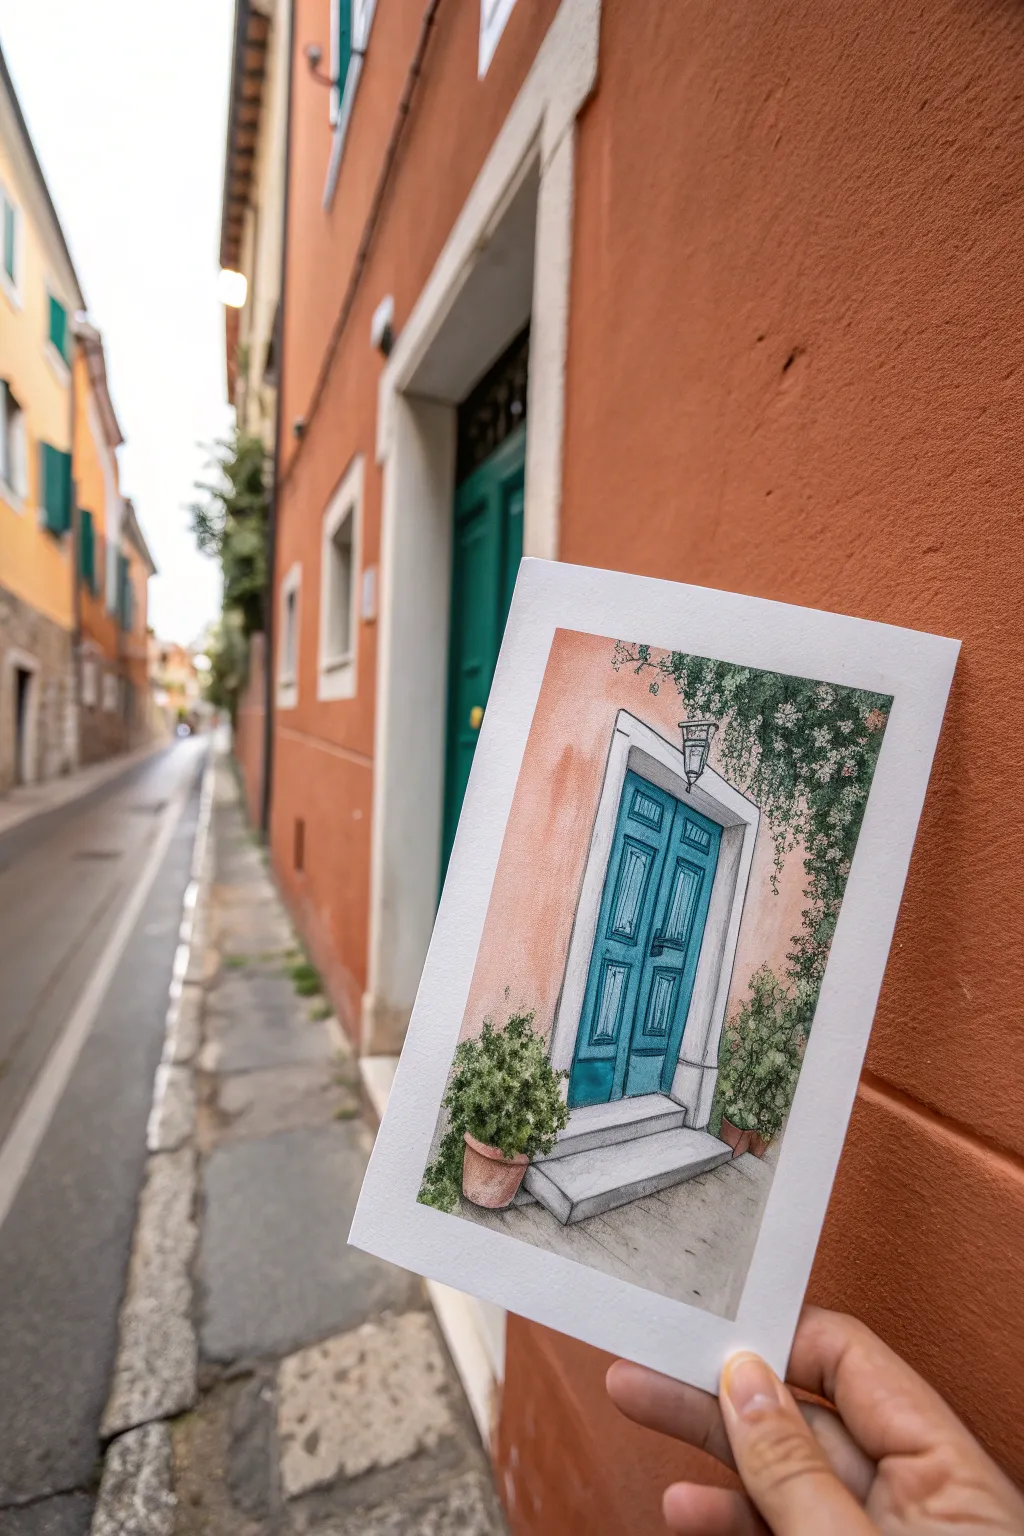
Ink-and-Wash Tiny Street Corner Sketch

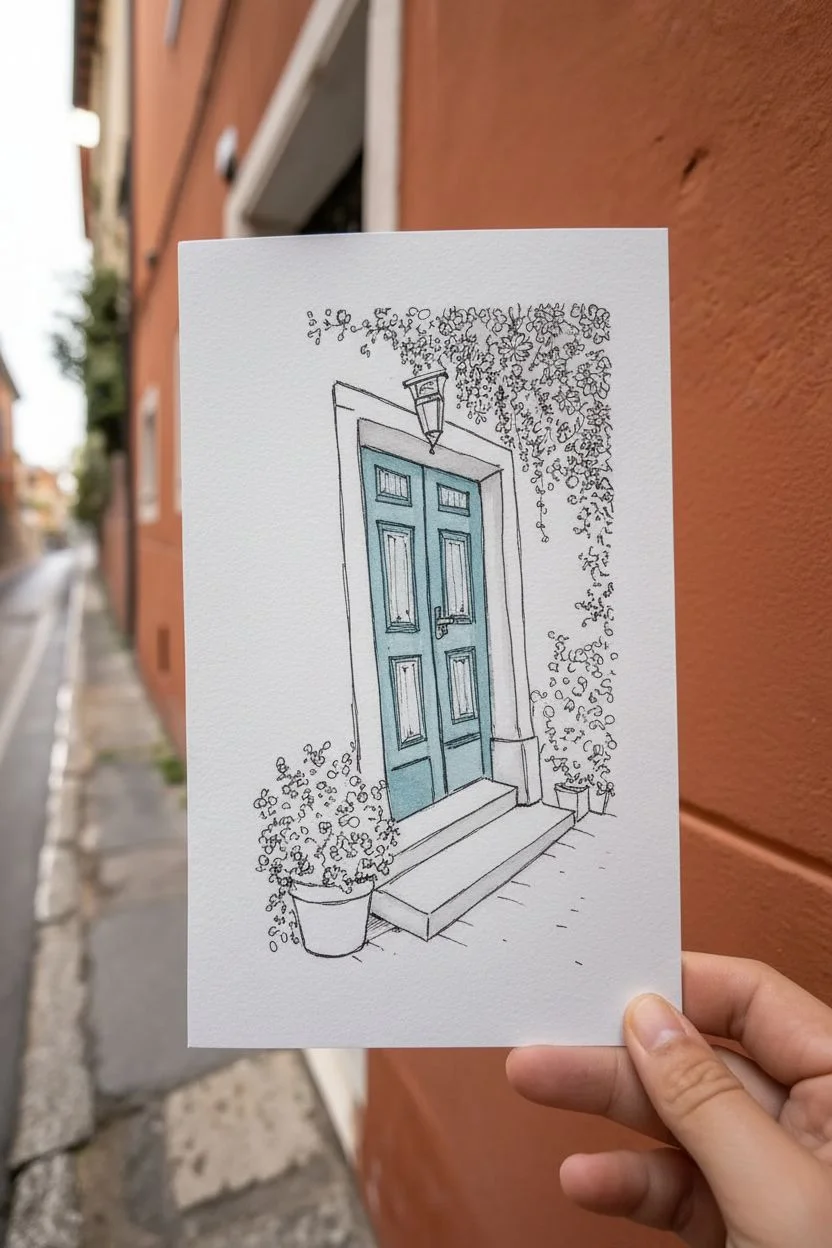
Capture the charm of a quiet European side street with this delicate ink-and-wash study. By combining loose, waterproof fineliner sketch work with soft washes of watercolor, you’ll recreate the inviting texture of a weathered door and lush greenery.
How-To Guide
Materials
- Cold press watercolor paper (postcard size, approx. 4×6 inches)
- Waterproof fineliner pens (sizes 0.1 and 0.3, black)
- Watercolor paints (Terracotta/Burnt Sienna, Phthalo Blue, Sap Green, Burnt Umber)
- Small round watercolor brush (size 4 or 6)
- Pencil and eraser
- Water cup and paper towel
Step 1: Pencil & Ink Framework
-
Light scaffolding:
Begin with a very faint pencil sketch to place the main elements. Draw a slightly skewed rectangle for the door frame to mimic a realistic perspective, rather than a perfect geometric shape. -
Detailing the door:
Sketch the inner panels of the double doors. Notice how the doors in the reference painting are tall and narrow; split the rectangle down the middle and add simple recessed panel shapes on each side. -
Adding surroundings:
Lightly outline the thick white stone trim around the door and sketch rough, fluffy shapes to indicate where the potted plants and hanging vines will go. -
Inking the structure:
Switch to your 0.3 waterproof fineliner. Go over the door frame and door panels. Don’t use a ruler; a slightly wobbly hand adds character to old architecture. -
Inking the foliage:
Use the fine 0.1 pen for the greenery. Instead of drawing individual leaves, use quick, scribbly loops and dotted textures to suggest the mass of the bush on the left and the vines hanging from the top right. -
Texture and hardware:
Add the lantern above the door and the door handle with the 0.1 pen. Add a few vertical lines on the ground to suggest pavement cracks. Once the ink is totally dry, erase your pencil lines.
Ink Smearing?
If your black lines bleed when you add watercolor, your pen isn’t fully waterproof or dry. Wait at least 10 minutes after drawing before painting, or double-check your pen label.
Step 2: Watercolor Washes
-
The terracotta wall:
Mix a watery wash of Terracotta or Burnt Sienna. Paint the wall area around the door frame, leaving the frame itself unpainted white. Let the color be uneven to look like aged stucco. -
Painting the door:
Mix a vibrant teal using Phthalo Blue and a tiny touch of green. Paint the door panels, but try to leave tiny slivers of white paper showing on the edges of the panels to act as highlights. -
First layer of greens:
Dilute Sap Green and dab it loosely over your ink scribbles for the plants. Let the paint bleed slightly outside the lines for a loose, artistic feel. -
Grounding the scene:
Use a very watery grey (mix blue and brown) to paint the steps and the sidewalk. Keep this extremely pale so it doesn’t compete with the colorful door. -
Adding shadow depth:
Once the first door layer is dry, mix a slightly darker, more concentrated teal. I like to paint just the recessed parts of the door panels to create dimension. -
Deepening the foliage:
Mix a darker green by adding a touch of blue to your Sap Green. Dab this into the center and bottom of the potted bushes to create volume and shadow. -
Pot details:
Paint the flower pots with a concentrated Burnt Sienna. Make the left side of the pots slightly darker to imply a light source coming from the right. -
Final shadows:
Mix a translucent grey-purple. Glaze a thin shadow under the white door frame and along the left side of the steps to ground the architecture.
Level Up: Texture
Splatter tiny speckles of brown paint onto the terracotta wall area while it’s dry. This creates a weathered masonry look without needing to draw individual bricks.
Now you have a charming little architectural vignette that feels like a travel memory captured in a sketchbook


Have a question or want to share your own experience? I'd love to hear from you in the comments below!