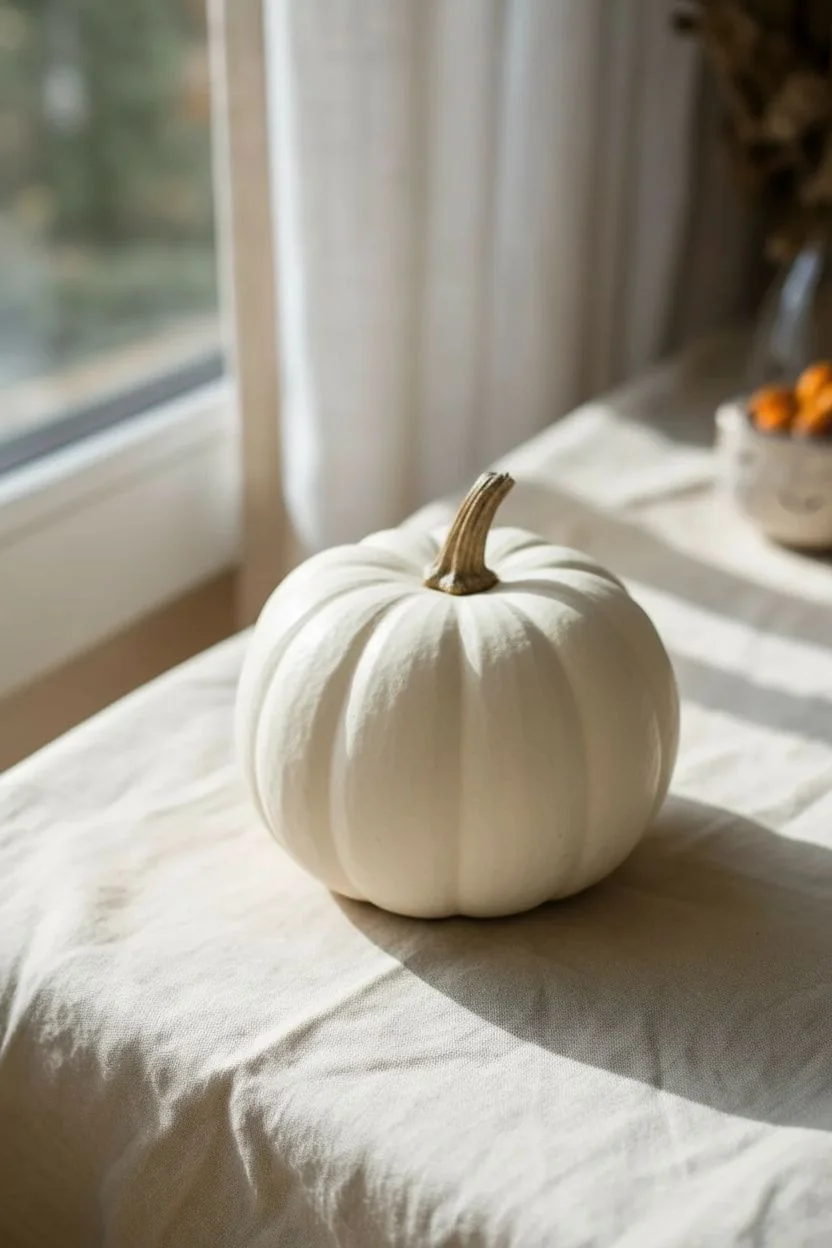
Small white pumpkins are basically my favorite tiny canvases—zero carving mess, tons of style. I love how that white base lets every mark pop, from crisp black linework to soft, moody washes.
Classic Ghost Faces on Small White Pumpkins

Transform ordinary mini pumpkins into a charming gang of spectral friends with just a bit of paint and creativity. These classic ghost faces rely on simple shapes to convey distinct personalities, making for an adorable, minimalist Halloween display.
Detailed Instructions
Materials
- 3 small white pumpkins (real or faux)
- Black acrylic paint (matte finish recommended)
- Small round paintbrush (size 2 or 4)
- Pencil (H or HB)
- Eraser
- Palette or small plate
- Paper towels
- Cup of water
- Clean cloth
- Matte spray sealer (optional)
Step 1: Preparation
-
Clean the Pumpkins:
Before you begin, wipe down each pumpkin with a clean, slightly damp cloth to remove any dust, dirt, or oils. If you are using real pumpkins, make sure they are completely dry before proceeding. -
Inspect the Surface:
Turn the pumpkins around to find the best ‘face’ side. Look for the smoothest section with the fewest bumps or ridges, which will make painting clean lines much easier.
Uneven Coverage?
If the black paint looks streaky or gray after the first coat, don’t keep brushing wet paint. Let it dry completely, then apply a second thin layer for solid opacity.
Step 2: Sketching the Expressions
-
Plan the Faces:
Visualize the three expressions shown in the reference: the ‘Smiling Ghost,’ the ‘Shocked Ghost,’ and the ‘Wailing Ghost.’ Notice how the eyes are generally elongated ovals rather than perfect circles. -
Sketch the Smiling Ghost:
On your first pumpkin, lightly use your pencil to draw two vertical oval eyes. Below them, sketch a wide ‘U’ shape for the mouth. Add small ticks at the corners of the mouth for a classic jack-o’-lantern smile. -
Sketch the Shocked Ghost:
For the middle pumpkin, draw two oval eyes slightly higher up. Below them, draw a small, perfect circle for the mouth to create that ‘O’ expression of surprise. -
Sketch the Wailing Ghost:
On the third pumpkin, draw oval eyes similar to the others. For the mouth, create a very tall, elongated oval that stretches vertically, mimicking a long ghostly moan. -
Check Symmetry:
Step back and look at your sketches. Adjust the pencil lines gently if needed, ensuring the features are centered relative to the stem.
Step 3: Painting
-
Load the Brush:
Squeeze a dime-sized amount of black acrylic paint onto your palette. Dip your small round brush in, ensuring the bristles are coated but not dripping. -
Outline the Eyes:
Starting with the first pumpkin, carefully use the tip of your brush to trace the pencil outline of the eyes. Keep your hand steady by resting your pinky finger on the pumpkin’s surface. -
Fill in the Eyes:
Once outlined, fill in the center of the eyes with solid black paint. Use smooth strokes to avoid texture buildup. -
Paint the Mouth Outline:
Move down to the mouth area. Trace your pencil sketch carefully. For the smiling ghost, pay extra attention to the sharp corners of the smile. -
Fill the Mouth:
Fill the mouth shape with black paint. Take your time here to ensure the coverage is opaque; you don’t want the white pumpkin skin showing through. -
Repeat for Remaining Pumpkins:
Move on to the ‘Shocked’ and ‘Wailing’ pumpkins, repeating the outlining and filling process. I find it easiest to paint all the eyes first, then go back and do all the mouths to keep consistency. -
Clean Up Edges:
Look closely at your edges. If any lines look shaky, carefully smooth them out with a tiny amount of fresh paint on your brush tip.
Use A Marker
Struggling with brush control? Swap the paint and brush for a black oil-based paint pen. It offers the precision of a marker with the permanence of paint.
Step 4: Finishing Touches
-
Let it Dry:
Allow the paint to dry completely. Acrylics usually dry to the touch within 20-30 minutes, but let them sit for an hour to be safe. -
Erase Pencil Marks:
Once totally dry, gently use your eraser to remove any visible pencil lines that weren’t covered by the paint. -
Seal (Optional):
If these will appear outdoors or be handled frequently, give them a light coat of matte spray sealer to protect the paint faces from chipping.
Now you have a trio of spooky friends ready to haunt your mantel or entryway with style


Black Polka Dots on Small White Pumpkins
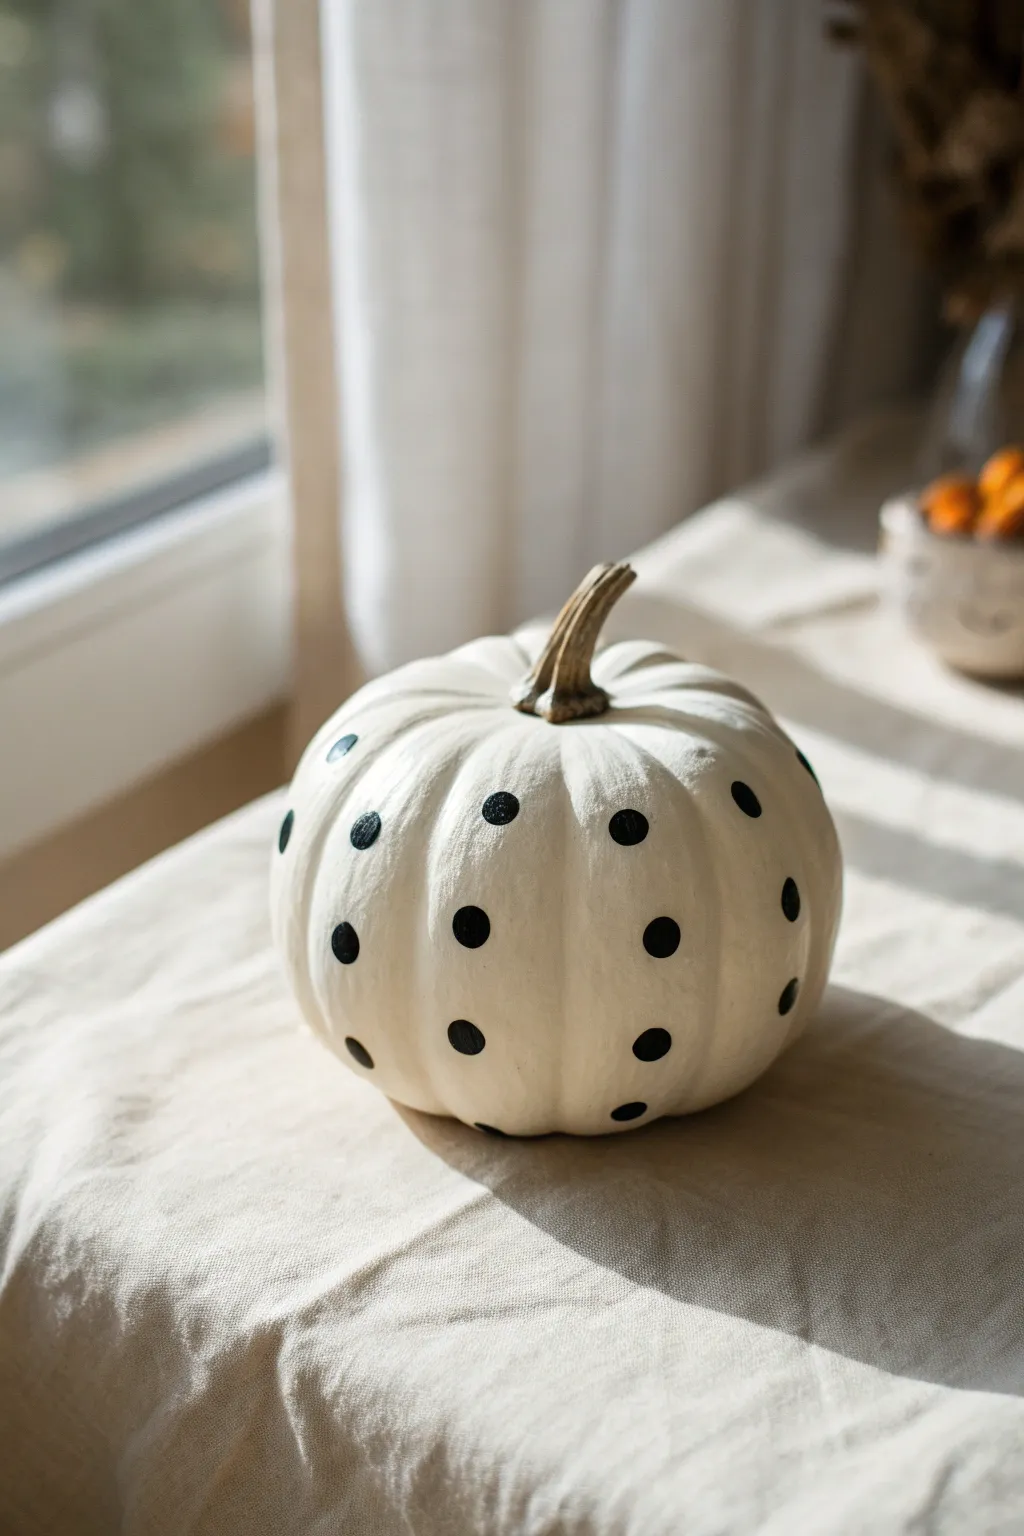
For a minimalist Halloween decoration that fits seamlessly into modern home decor, try this simple yet striking polka dot design. Using black paint on a stark white pumpkin creates a crisp, high-contrast look that is both playful and elegant.
Step-by-Step
Materials
- Small white pumpkin (real or faux)
- Black acrylic paint
- Round foam pouncers (small size)
- Palette or paper plate
- Damp paper towel
- Dry cloth or microfiber towel
- Matte sealer spray (optional)
- Small detail brush (for touch-ups)
Step 1: Preparation
-
Clean surface:
Begin by wiping down your white pumpkin with a slightly damp cloth to remove any dirt or oils. -
Dry thoroughly:
Use a dry microfiber towel to ensure the surface is completely moisture-free so the paint adheres properly. -
Stem check:
If you are using a real pumpkin, check that the stem is secure and dry; for faux pumpkins, ensure the surface is free of manufacturing dust. -
Prepare paint:
Squeeze a small amount of black acrylic paint onto your palette or paper plate.
Clean Circle Trick
Twist the foam pouncer slightly as you lift it off the pumpkin surface. This twisting motion helps break the suction and leaves a crisper paint edge.
Step 2: Planning the Pattern
-
Visualize placement:
Look at the natural ridges and valleys of your pumpkin to decide on spacing. -
Random vs. Grid:
Decide if you want a perfect grid or a more scattered, random look like the example image. -
Test spacing:
I like to dry-fit the look by hovering the foam pouncer over the pumpkin surface to see how the spacing feels.
Step 3: Applying the Dots
-
Load the pouncer:
Dip your round foam pouncer straight down into the black paint. -
Remove excess:
Dab the pouncer off slightly on a clean part of the palette to ensure you don’t have a giant glob of paint, which causes dripping. -
First press:
Choose a spot on the upper slope of the pumpkin and press the pouncer straight down firmly. -
Lift straight up:
Lift the tool straight back up to create a clean, round circle without smearing edges. -
Repeat process:
Reload paint and continue adding dots, spacing them out by roughly two inches. -
Work in sections:
Paint one side of the pumpkin first, allowing you to hold the unpainted side to rotate it. -
Stagger the rows:
Place the next row of dots in the spaces between the dots above, creating a diamond or staggered effect rather than straight lines. -
Handle curves:
When painting over deep ridges, you may need to rock the pouncer very gently to ensure the paint reaches the bottom of the groove.
Go Glam
Instead of matte black paint, use gold metallic paint or apply adhesive size and gold leaf on the dots for a chic, high-end look.
Step 4: Finishing Touches
-
Fill gaps:
Check near the bottom and top stem area for any large empty spaces that need an extra dot. -
Retouch edges:
If any circles look uneven, use a small detail brush dipped in black paint to carefully round them out. -
Dry completely:
Let the pumpkin sit undisturbed for at least an hour until the black paint is fully dry to the touch. -
Clean up:
Wash your foam pouncers immediately with warm soapy water so they can be reused. -
Seal (Optional):
If this pumpkin will be outside on a porch, lightly mist it with a matte sealer spray to protect the dots from moisture.
Now you have a stylish, spotted pumpkin ready to brighten up your festive display


Bold Stripes on Small White Pumpkins
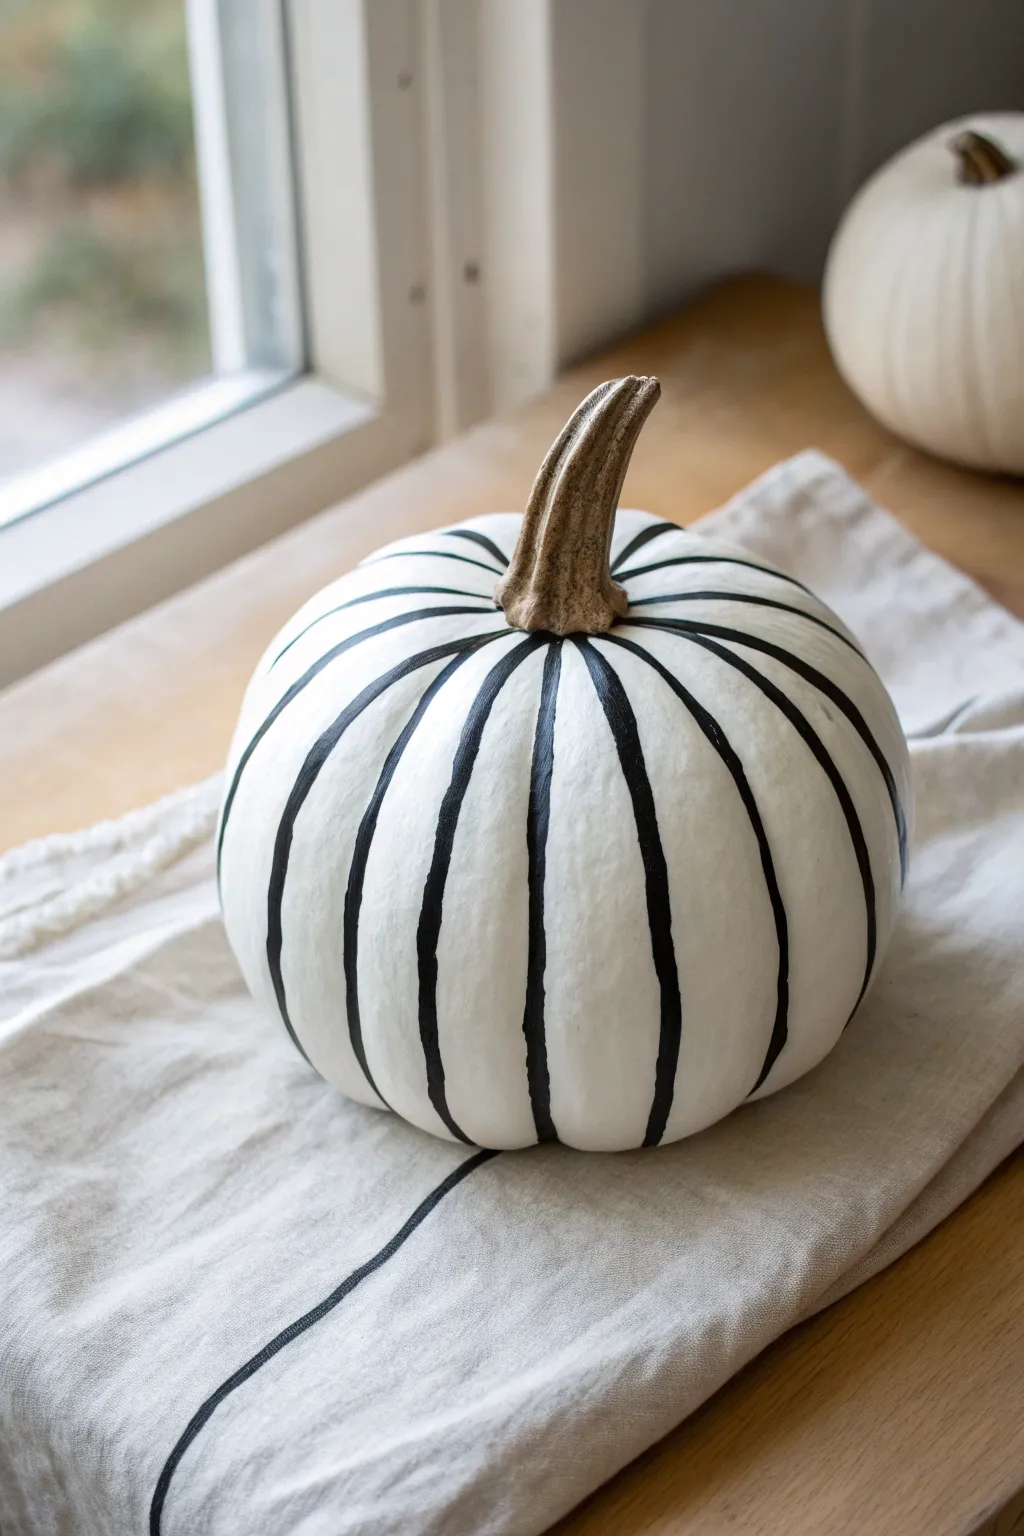
Transform a plain white pumpkin into a striking piece of modern decor with this simple yet impactful painting technique. The bold contrast of black stripes following the natural curves creates a sophisticated look perfect for a monochrome fall aesthetic.
Step-by-Step Tutorial
Materials
- Small white pumpkin (real or faux)
- Black acrylic paint (matte finish recommended)
- Round detail brushes (sizes 2 and 4 are ideal)
- Damp paper towel or rag
- Clean working surface
- Small cup of water
- Painter’s tape (optional)
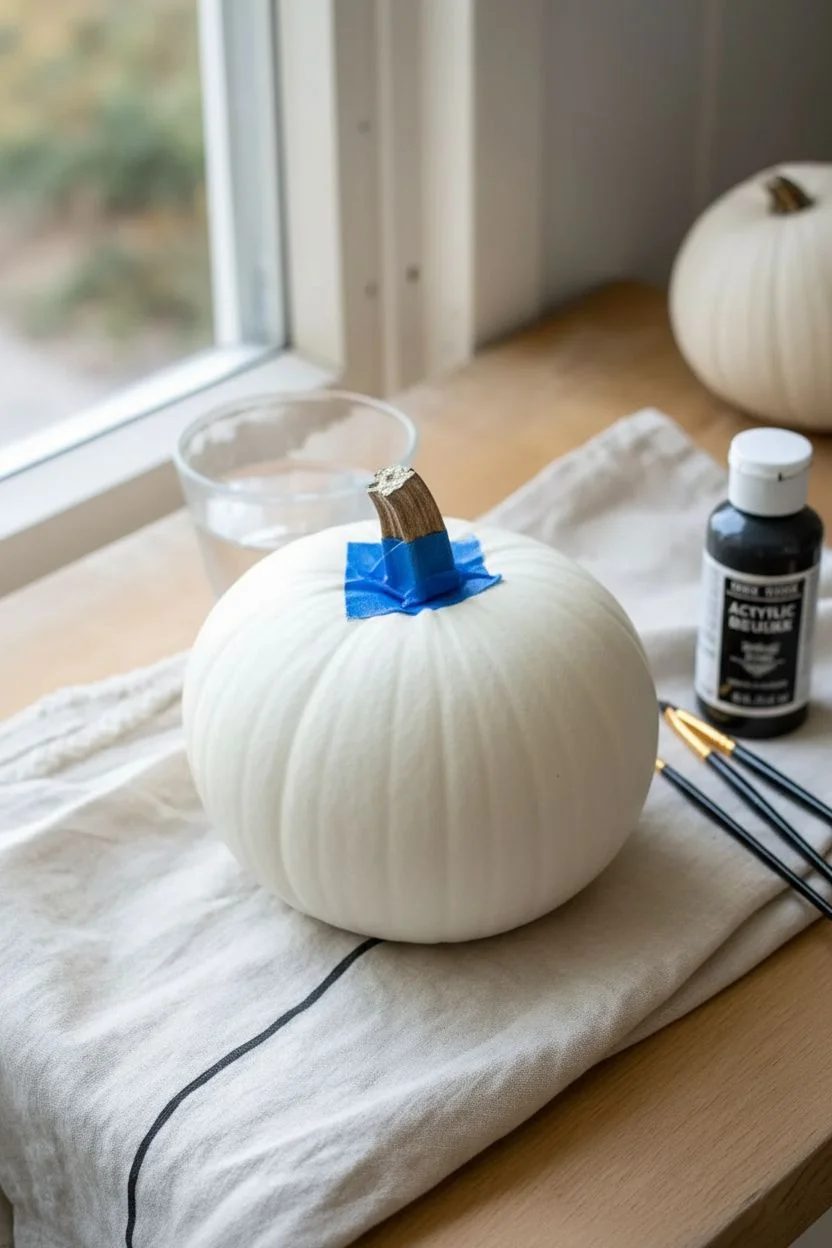
Step 1: Preparation
-
Clean surface:
Begin by wiping down your pumpkin thoroughly with a damp cloth to remove any dust, dirt, or natural oils. -
Dry completely:
Before you open any paint, ensure the pumpkin surface is bone dry to prevent the paint from lifting or bubbling later. -
Remove stem protection:
If you are worried about getting paint on the stem, wrap a small piece of painter’s tape around the very base of the stem where it meets the pumpkin skin.
Step 2: Mapping the Lines
-
Identify ridges:
Examine your pumpkin to find its natural vertical ridges; these indentations will serve as your guide for the stripes. -
Plan your start:
Choose a prominent ridge to begin with. I find it helpful to start on the ‘back’ or less perfect side to get used to the brush movement. -
Load the brush:
Dip your medium-sized round brush (size 4) into the black acrylic paint, ensuring the bristles are coated but not dripping.
Wobbly Hand Fix
Lines looking shaky? Rest your pinky finger on a dry part of the pumpkin to stabilize your hand while pulling the brush down.
Step 3: Painting the Stripes
-
Start at the top:
Place the tip of your brush right at the base of the stem, centering it within the chosen natural groove. -
Pull downward:
With steady, even pressure, pull the brush downward along the groove towards the bottom of the pumpkin. -
Follow the curve:
Let your hand naturally follow the curvature of the pumpkin; don’t fight the bumps, just glide over them. -
Complete the line:
Continue the stroke all the way to the underside of the pumpkin so the line disappears cleanly underneath. -
Refine edges:
If the line looks a bit ragged, use the smaller detail brush (size 2) to carefully smooth out the edges while the paint is still wet. -
Work in opposites:
Instead of painting the next line immediately adjacent, rotate the pumpkin 180 degrees and paint the opposite side to keep your hand from smudging wet paint.
Paint Pen Alternative
For sharper lines with less mess, swap the brush for a broad-tip black oil-based paint marker. It offers more control.
Step 4: Filling In and Finishing
-
Fill remaining gaps:
Work your way around the rest of the pumpkin, filling in the remaining grooves using that same opposing pattern to avoid accidents. -
Check consistency:
Step back and look at the line weights. If some stripes look too thin compared to others, carefully widen them with the larger brush. -
Touch up top:
Check the area near the stem again. Use the finest tip of your brush to ensure the black paint meets the stem cleanly without getting on it. -
First coat drying:
Allow the first layer of black paint to dry for about 15 to 20 minutes. -
Second coat application:
If your black paint looks slightly translucent or streaky, apply a second coat exactly over the first lines for a solid, opaque finish. -
Final dry:
Let the pumpkin sit for at least an hour until the paint is fully cured and hard to the touch.
Place your sleek striped pumpkin on a sunny windowsill or table runner to enjoy its bold, graphic appeal


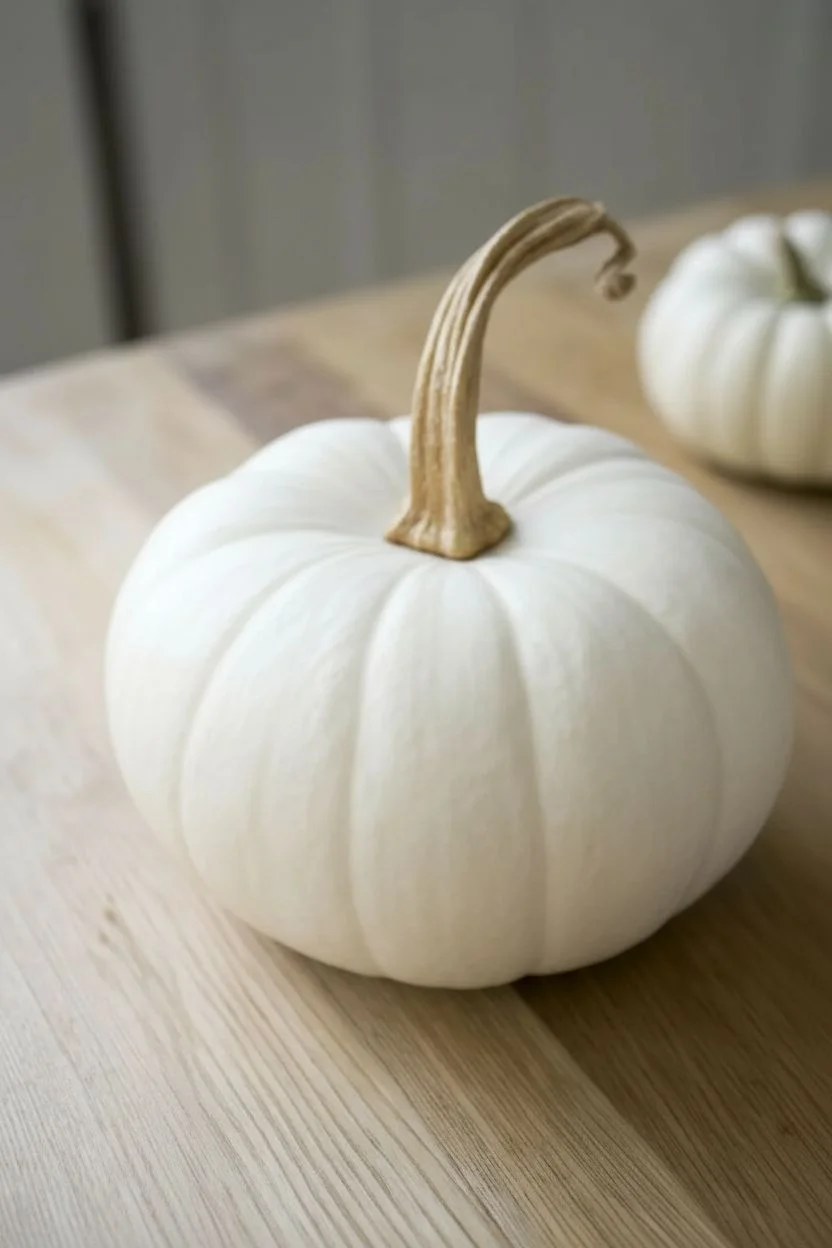
Hand-Lettered Names on Small White Pumpkins

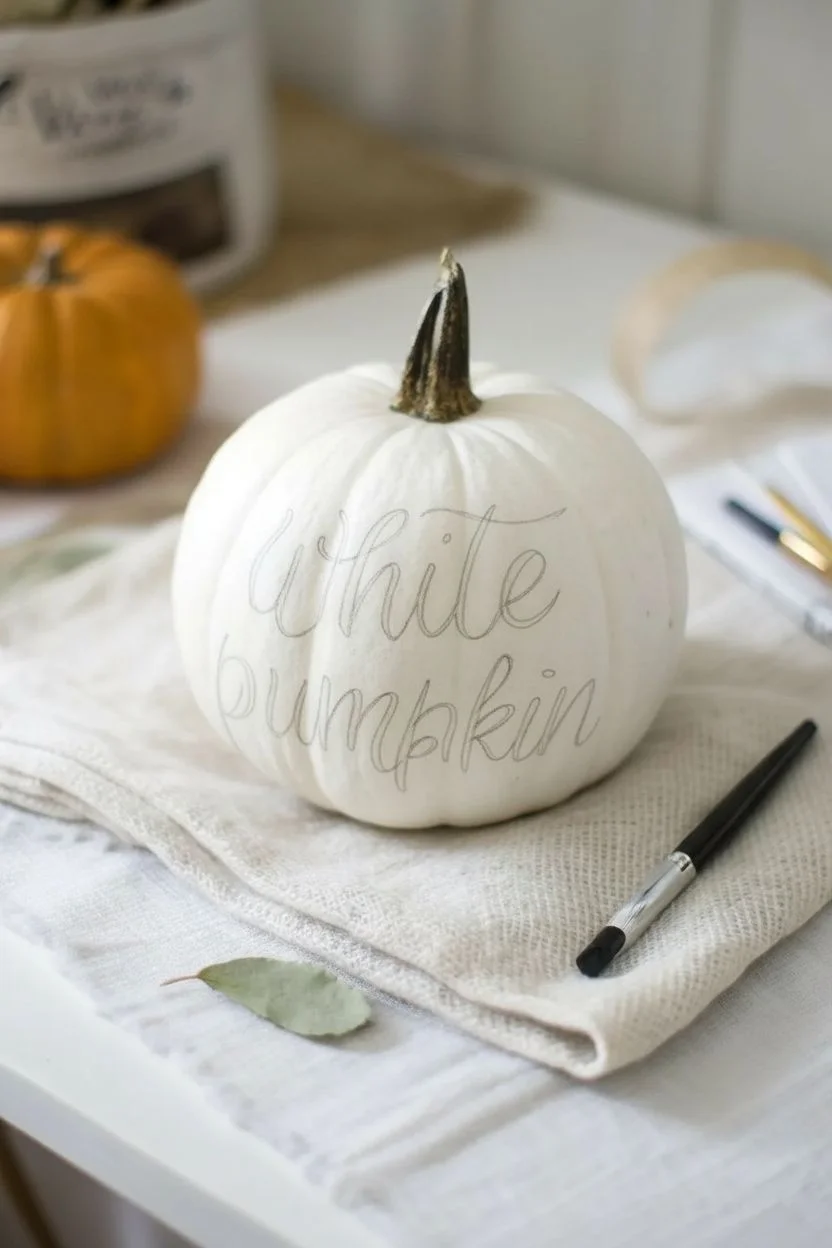
Embrace the charm of the harvest season with this beautifully simple painted pumpkin project. The crisp white background paired with elegant, flowing black script creates a modern farmhouse look that fits perfectly on any fall table setting.
How-To Guide
Materials
- Small white pumpkin (real or faux)
- Black acrylic paint
- Fine liner brush (size 0 or 00)
- Pencil (HB or lighter)
- Kneaded eraser
- Paper plate or palette
- Cup of water
- Paper towels
- Clear matte sealer spray (optional)
Step 1: Preparation & Planning
-
Clean and Dry:
Begin by thoroughly wiping down your pumpkin surface. If it’s a real pumpkin, use a slightly damp cloth to remove any dirt or residue, then dry it completely with a paper towel. For faux pumpkins, a quick dusting is usually sufficient. -
Check the Surface:
Examine the pumpkin’s ribs. Decide which ‘face’ of the pumpkin offers the smoothest area for your lettering. The natural curves are lovely, but excessive bumps can make straight lines tricky. -
Draft the Phrase:
Before touching the pumpkin, practice writing your chosen phrase—in this case, ‘White pumpkin’—on a piece of scrap paper. Experiment with looping the ‘W’ and extending the tails of the ‘p’ and ‘n’ to see what style you prefer. -
Sketch the Outline:
Using a light pencil, gently sketch your words onto the pumpkin surface. Don’t press too hard, as you don’t want to carve into the skin. Focus on centering the two words, stacking ‘White’ above ‘pumpkin’. -
Refine the Spacing:
Step back and look at your pencil marks. Ensure the spacing between letters is even and that the words follow the natural curvature of the pumpkin rather than fighting against it. Adjust with your eraser if needed.
Paint Slipping?
If the paint beads up on a glossy faux pumpkin skin, lightly buff the surface with fine-grit sandpaper first to give the paint something to grip onto.
Step 2: Painting the Script
-
Prepare the Paint:
Squeeze a small amount of black acrylic paint onto your palette. I like to add a tiny drop of water to the paint to make it fluid towards an ink-like consistency, which helps the brush glide over the textured skin. -
Load the Brush:
Dip your fine liner brush into the thinned paint. Twirl the tip against the palette edge to sharpen it into a fine point. You want the brush fully loaded but not dripping. -
Start the Downstrokes:
Begin painting the first letter. Use light pressure for the thin ‘upstrokes’ of the cursive letters. When you move the brush downward for the thicker parts of the letter, apply slightly more pressure to widen the line. -
Paint ‘White’:
Carefully trace over your pencil lines for the word ‘White’. Focus on making the ‘W’ prominent and graceful. If the paint skips over a bump, simply go back and fill in the gap gently. -
Paint ‘pumpkin’:
Move on to the second word. Pay special attention to the descender on the ‘p’—let it dip down elegantly. Keep your hand steady by resting your pinky finger on a dry part of the pumpkin. -
Refine the Edges:
Once the basic letters are blocked in, look closely at your edges. Use the very tip of your brush to smooth out any ragged lines or to make the thin connectors between letters more delicate. -
Thicken Lines Faux-Calligraphy Style:
If you struggle with brush pressure variation, simply paint the letters as single lines first. Then, go back and manually paint a second line next to every downstroke to thicken it, filling in the space between.
Step 3: Finishing Touches
-
Let it Dry:
Allow the paint to air dry completely. Acrylics dry fast, but give it at least 20-30 minutes so you don’t accidentally smudge your hard work while handling it. -
Erase Guidelines:
Once the paint is bone dry to the touch, take your kneaded eraser and gently dab or rub away any visible pencil marks remaining around the letters. -
Seal (Optional):
If you plan to keep this pumpkin outside or want to preserve it longer, lightly mist it with a clear matte sealer spray in a well-ventilated area.
Make it Metallic
Swap the black paint for a gold leafing pen or metallic gold liquid acrylic to add a glamorous, festive shine that catches the candlelight.
Place your lovely new creation on a stack of linen napkins or nestled among fall leaves for a perfect seasonal display
BRUSH GUIDE
The Right Brush for Every Stroke
From clean lines to bold texture — master brush choice, stroke control, and essential techniques.
Explore the Full Guide
Minimalist Spiderweb Corners on Small White Pumpkins
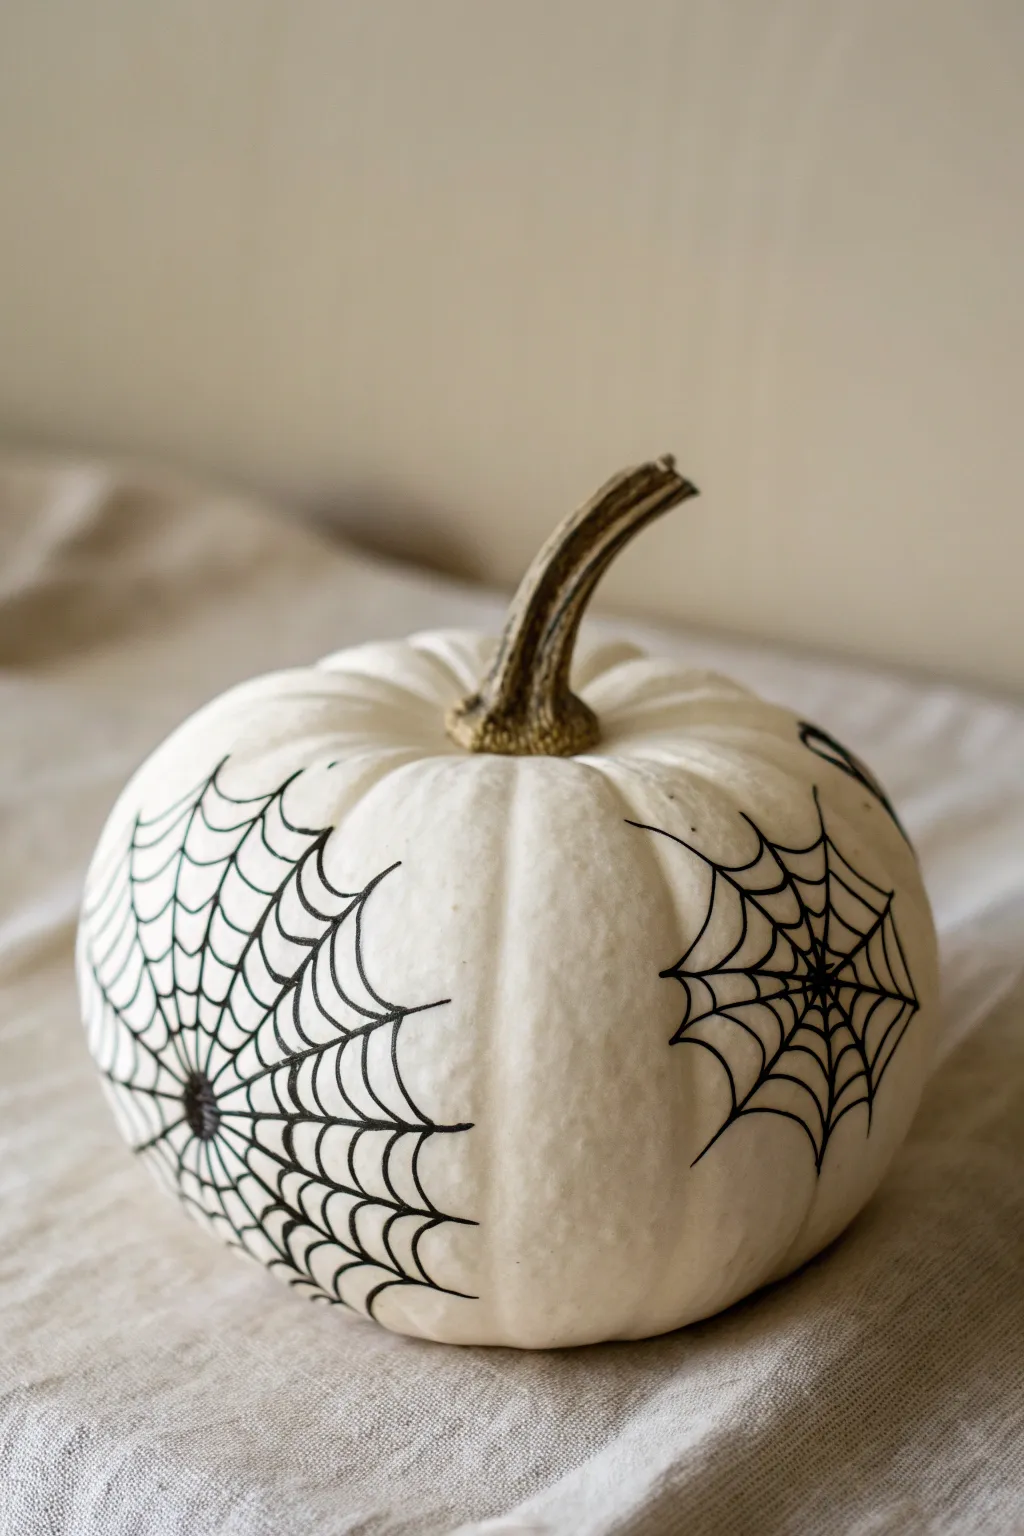
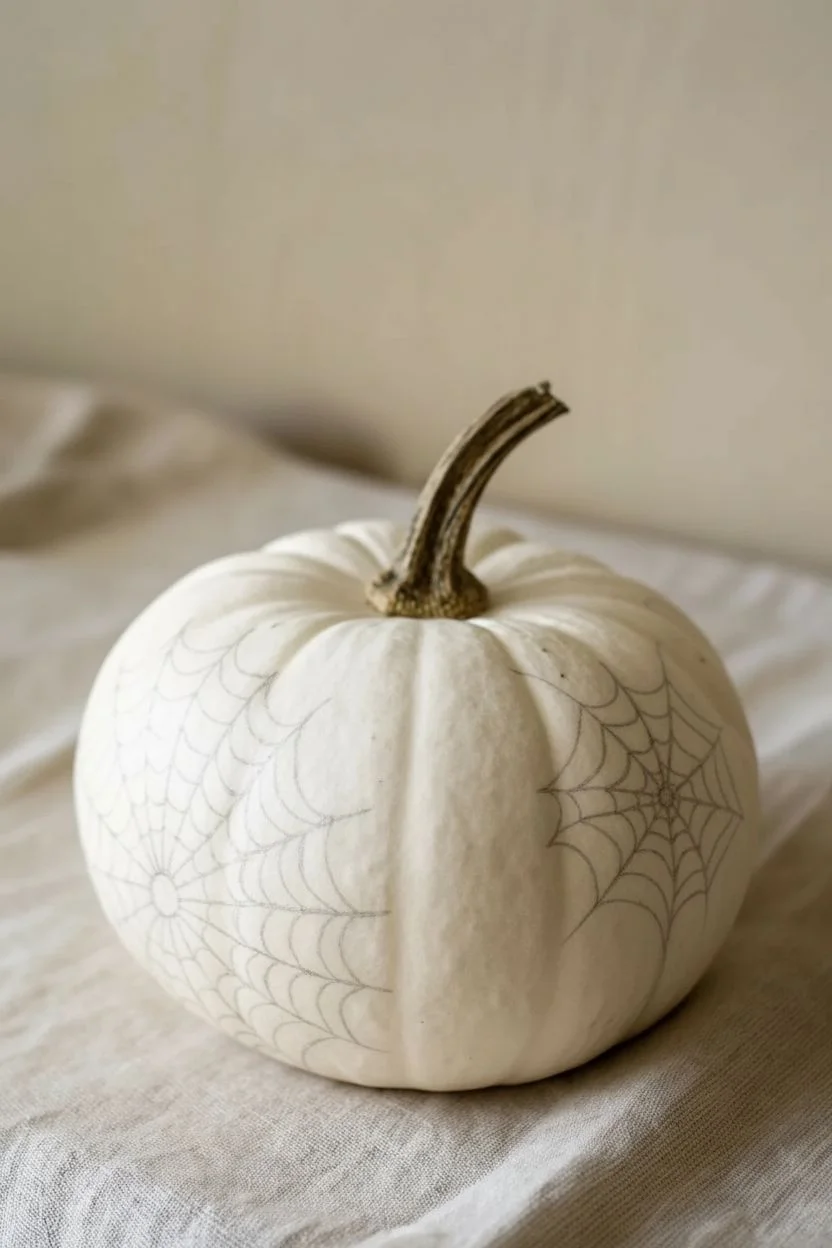
Transform a simple white pumpkin into a sophisticated Halloween decoration with nothing more than a steady hand and some black ink. This design features crisp, high-contrast spiderwebs that wrap beautifully around the pumpkin’s natural curves, creating a look that is both spooky and distinctively modern.
Step-by-Step
Materials
- Small white pumpkin (real or faux)
- Black fine-point permanent marker
- Black ultra-fine point permanent marker
- Pencil (optional)
- Eraser (optional)
- Damp cloth
Step 1: Preparation & Planning
-
Clean surface:
Begin by wiping down your pumpkin with a damp cloth to remove any dust, dirt, or oils that might resist the marker ink. Allow it to dry completely before starting. -
Choose placement:
Examine your pumpkin to find the best spots for your webs. For this specific look, you want to place the webs off-center, rather than directly on the ‘face,’ creating an asymmetrical, artistic layout. -
Sketch lightly (optional):
If you are nervous about committing to ink immediately, lightly sketch your primary anchor lines with a pencil. Keep the pressure very soft so you don’t dent the pumpkin skin.
Step 2: Drawing the Web Structure
-
Start the center point:
Pick a spot low on the side or toward the bottom curve of the pumpkin for your first web center. Draw a small, solid black dot about the size of a peppercorn using the fine-point marker. -
Draw radial lines:
From that center dot, draw straight lines radiating outward like sun rays. Make these lines fairly long, extending about 3 to 4 inches up the side of the pumpkin. -
Follow the curve:
As you draw these radial lines, try to let them naturally follow the vertical ribs of the pumpkin where possible, which helps integrate the design with the organic shape. -
Add spacing variety:
Ensure your radial lines aren’t perfectly evenly spaced. Varying the distance between them slightly makes the web look more natural and less geometric. -
Create the second web:
Find a second location on the opposite side or slightly higher up for another web. Draw your center dot and radiating lines here as well, perhaps making this web slightly smaller for visual interest.
Smudge Prevention
Pumpkins have a slick surface, so permanent marker takes longer to dry than on paper. Work from left to right (if right-handed) to avoid smearing your fresh lines.
Step 3: Adding the Webbing
-
Switch markers:
I prefer to switch to the ultra-fine point marker for the connecting web lines. This creates a nice variation in line weight that makes the drawing look more professional. -
Start near the center:
Begin close to the center dot of your first web. Draw a curved line connecting two adjacent radial lines. The curve should dip inward toward the center point, creating a ‘U’ shape. -
Continue the inner ring:
Work your way around the center point, connecting all the radial lines with these small concave curves until you have completed the first inner ring. -
Draw the second ring:
Move about half an inch further out along the radial lines. Draw a second ring of connecting curves, keeping them roughly parallel to the first set. -
Expand outward:
Continue adding concentric rings of webbing, spacing them further apart as you move away from the center. The gaps between the rings should get progressively wider. -
Vary the endpoints:
Don’t feel the need to close every single outer ring. Letting some of the jagged edges trail off into open space gives the design an ethereal, floating quality. -
Repeat for the second web:
Return to your second web structure and repeat the webbing process, connecting the radial lines with inward-curving strokes.
Adding Some glitz
Trace over the thinner interior web lines with a fine-tip silver or gold metallic paint pen to give the spiderweb a subtle, dew-covered shimmer in the light.
Step 4: Finishing Touches
-
Thicken main lines:
Go back over the initial radial lines with your thicker fine-point marker. This reinforcement makes the ‘skeleton’ of the web pop against the delicate cross-lines. -
Clean up sketch lines:
If you used pencil earlier, wait at least 5 minutes to ensure the ink is totally dry, then very gently erase any visible graphite marks. -
Check for gaps:
Inspect your lines for any ink that might have skipped over the pumpkin’s texture. Carefully fill in any small gaps to ensure solid black lines.
Place your stylishly spooky pumpkin on a mantel or side table to show off your handiwork
Simple Bat Silhouettes on Small White Pumpkins
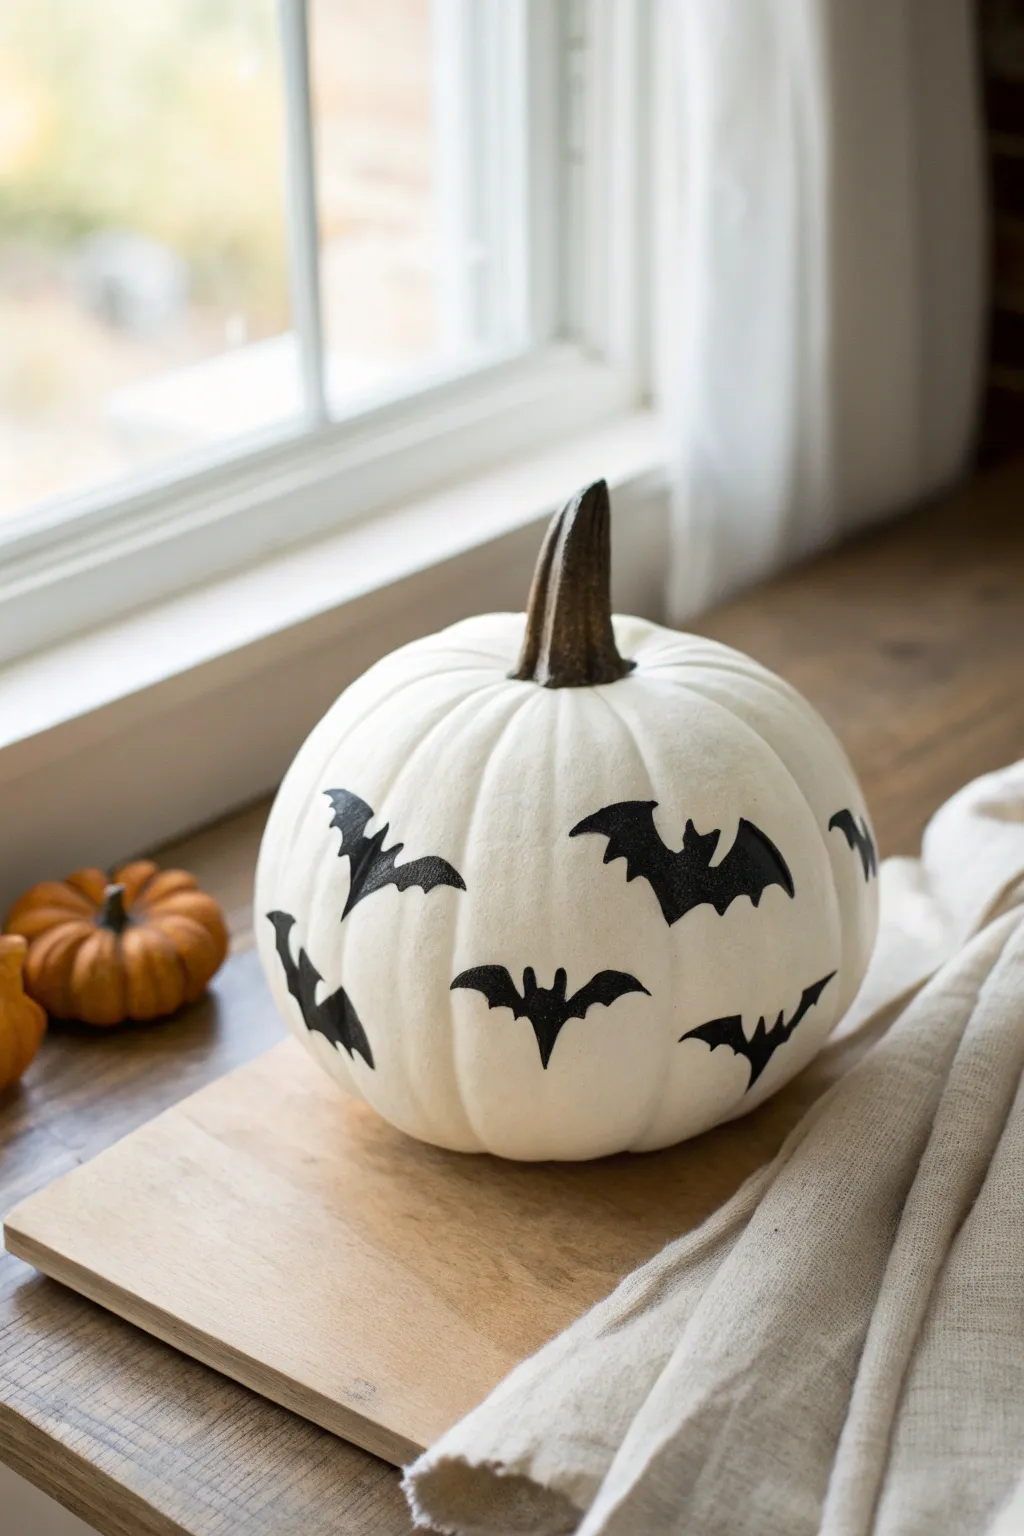
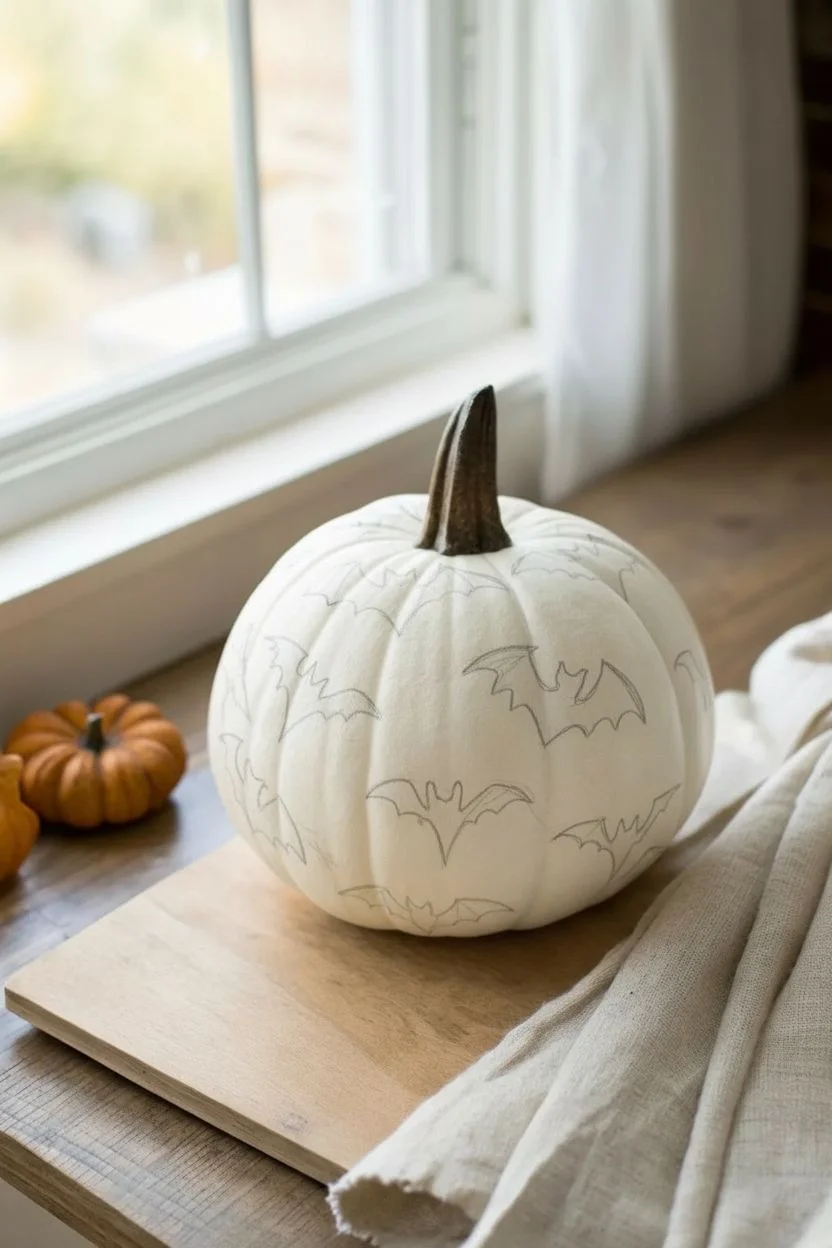
Transform a simple white pumpkin into a spooky-chic centerpiece with these striking black bat silhouettes. The contrast of the matte black figures against the pristine white surface creates a look that is both modern and suitably eerie for the Halloween season.
How-To Guide
Materials
- Small to medium white pumpkin (faux or real)
- Black acrylic craft paint (matte finish)
- Small angled shader brush (approx. size 4 or 6)
- Fine liner brush (size 0 or 00)
- Pencil for sketching
- Paper towels
- Water cup
- Optional: Cardstock and scissors for a stencil
Step 1: Preparation & Planning
-
Surface Cleaning:
Before you begin, wipe down your pumpkin with a damp cloth to remove any dust or oils. If you are using a real pumpkin, ensure it is completely dry. -
Deciding Placement:
Visualize where you want your bats to fly. A random, scattered pattern often looks more natural and dynamic than perfect rows. -
Creating a Template:
Draw a small, simple bat shape on a piece of scrap paper or cardstock to get the size right. The bats in the image are roughly 2-3 inches wide. -
Sketching:
Hold your template against the pumpkin surface. Lightly trace the outline with a pencil. Repeat this around the pumpkin, rotating the angle of some bats to simulate flight. -
Varying Sizes:
Consider sketching a few smaller bats near the top or bottom to create depth, making it look like a swarm is moving across the surface.
Smudged Paint?
If you smear wet black paint on the white skin, don’t panic. Use a damp Q-tip to lift the mistake immediately. If a stain remains, dab a tiny bit of white paint over it once dry.
Step 2: Painting the Silhouettes
-
Loading the Brush:
Squeeze a small amount of matte black acrylic paint onto your palette. Dip your angled shader brush in, ensuring the bristles are coated but not dripping. -
Outlining:
Using the sharp edge of your angled brush (or switching to the fine liner brush if you prefer precision), carefully paint the outline of your first bat over your pencil marks. -
Filling the Center:
Once the outline is crisp, fill in the body of the bat. Use smooth strokes to avoid ridges in the paint. -
Refining Wing Tips:
Switch to your fine liner brush to sharpen the points of the wings and the tiny ears. These sharp details are what make the silhouette readable. -
Painting the Scallops:
Pay close attention to the scalloped bottom edge of the wings. I find that using a pulling motion from the wing tip inward helps keep these curves smooth. -
Reviewing Opacity:
Let the first bat dry for a minute or two. If the white pumpkin shows through the black paint, apply a second thin coat for solid coverage.
Make It 3D
Cut duplicate bat shapes out of black cardstock. Fold them slightly in the center and glue them directly over your painted bats for a fun, fluttering 3D effect.
Step 3: Finishing Touches
-
Rotate and Repeat:
Move on to the next penciled outline. Be careful not to smudge your wet work—rotate the pumpkin by gripping the stem. -
Checking Angles:
As you work around the curve, ensure your bats aren’t distorted. Paint them ‘flat’ relative to the viewer’s eye, even on the round surface. -
Cleanup:
If you accidentally make a stray mark, quickly wipe it away with a damp paper towel or cotton swab before it sets. -
Final Inspection:
Step back and look at the overall composition. Add a tiny bat or two in any large empty spaces if the design feels unbalanced. -
Drying:
Allow the pumpkin to sit undisturbed for at least an hour to ensure the acrylic paint cures completely. -
Optional Sealing:
If this pumpkin will be placed outdoors, you might want to brush a layer of matte clear sealer over the painted areas to protect against moisture.
Now your tastefully spooky pumpkin is ready to perch on a windowsill or join a festive autumn vignette.

PENCIL GUIDE
Understanding Pencil Grades from H to B
From first sketch to finished drawing — learn pencil grades, line control, and shading techniques.
Explore the Full Guide
Clean Geometric Lines on Small White Pumpkins
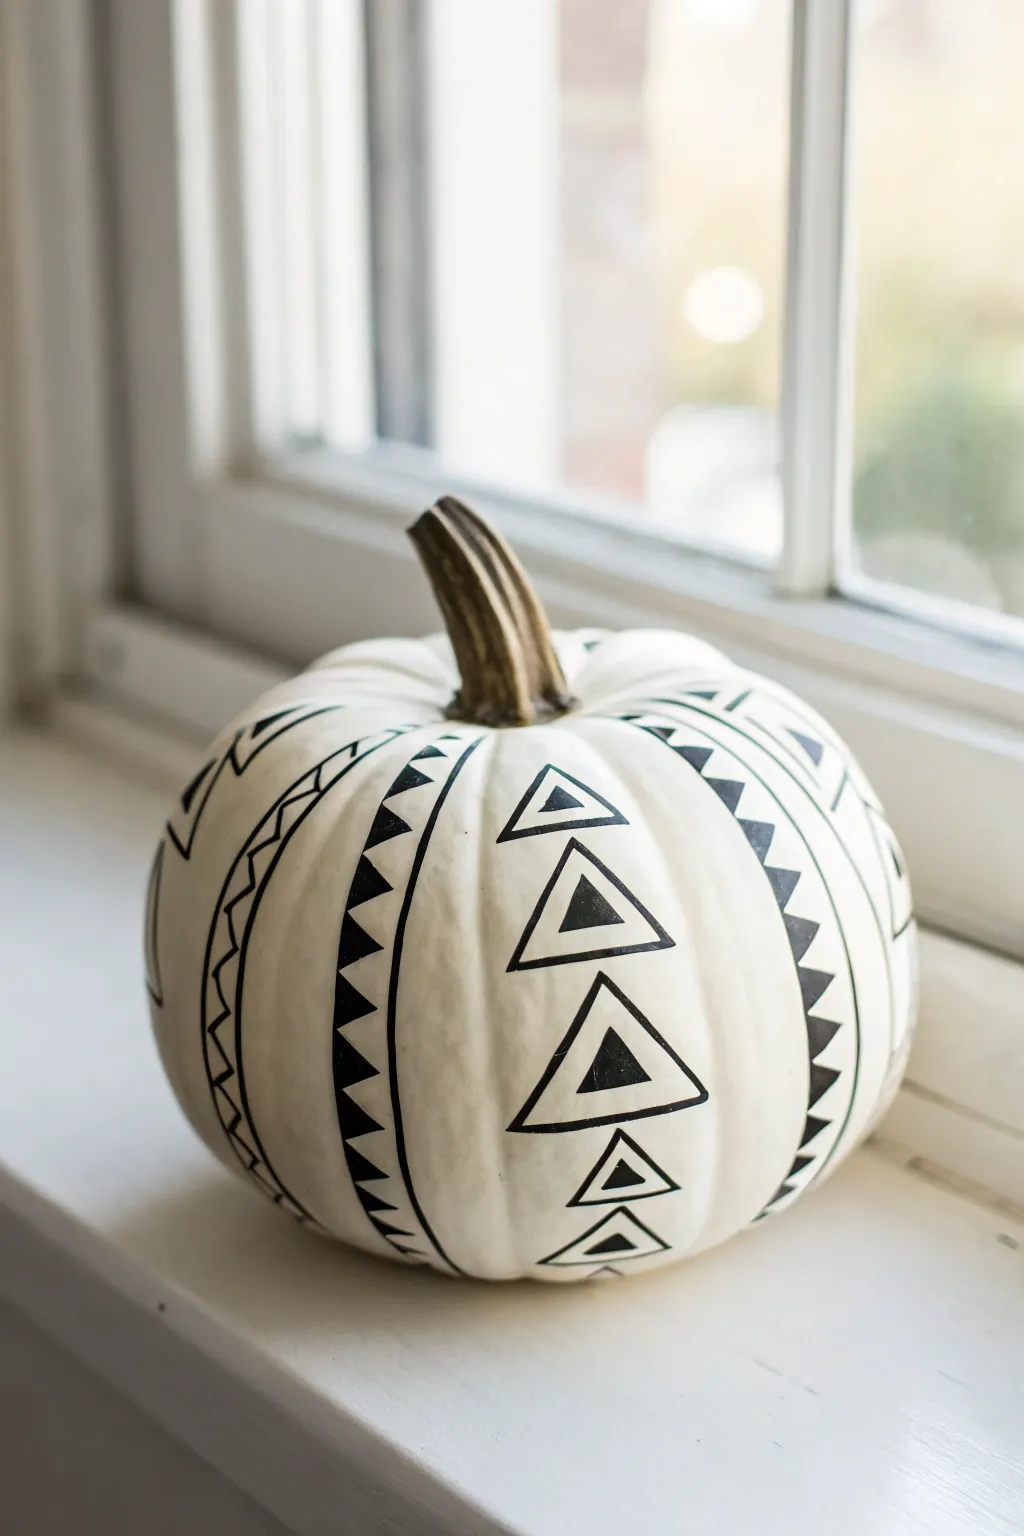
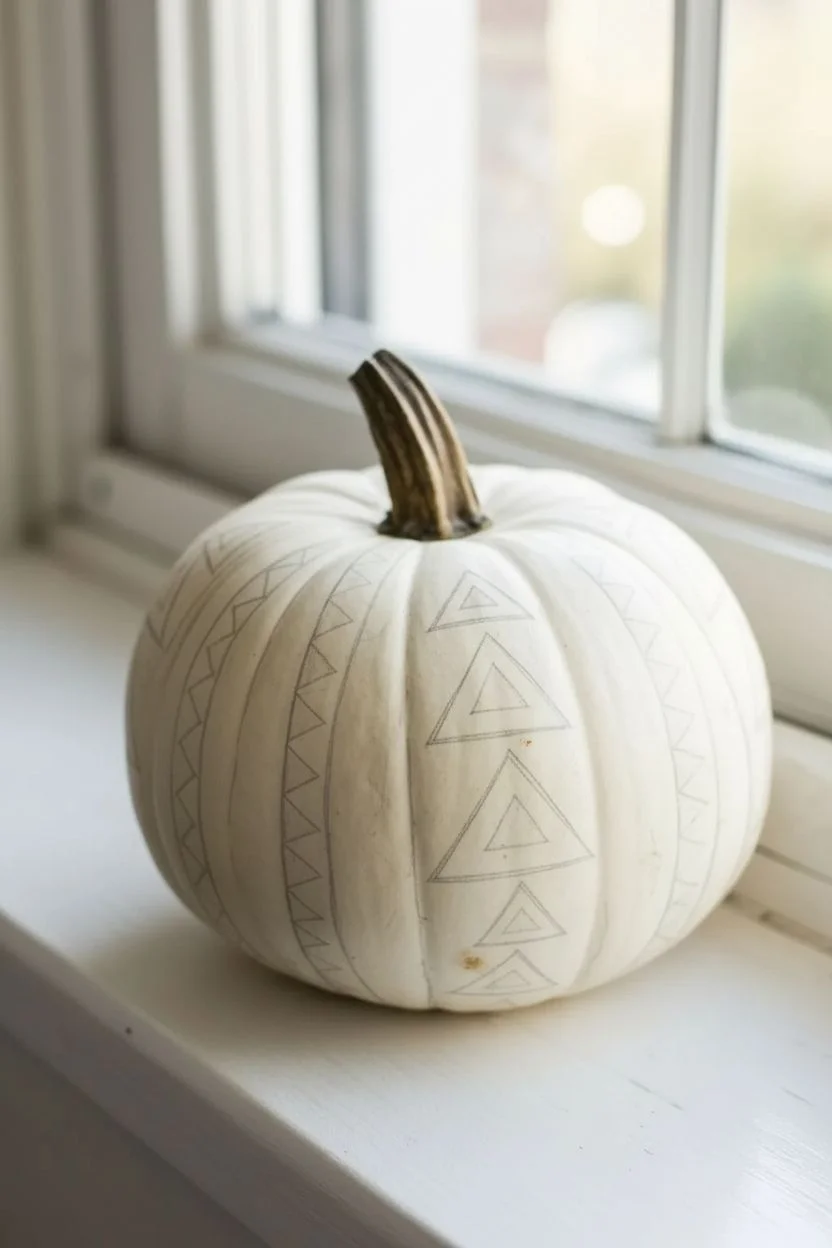
Transform a simple white pumpkin into a striking piece of modern fall decor with bold, high-contrast geometric patterns. This design relies on alternating vertical bands of triangles, zig-zags, and nested shapes to create a clean, contemporary look.
Step-by-Step Guide
Materials
- Small white pumpkin (real or faux)
- Black paint pen (fine tip)
- Black paint pen (medium or bold tip)
- Pencil
- Eraser
- Soft measuring tape (optional)
- Damp paper towel
Step 1: Planning and Sketching
-
Clean surface:
Begin by wiping down your pumpkin with a damp towel to remove any dust or dirt. If using a real pumpkin, ensure it is completely dry before starting. -
Map the ribs:
Observe the natural ribs and valleys of your pumpkin. These vertical indentations are perfect natural guidelines for your pattern columns. -
Initial sketching:
Using a pencil, lightly sketch your alternating designs into the vertical sections. I prefer to sketch just the main shapes first to ensure spacing looks even before committing to ink. -
Define the triangle row:
Plan one vertical column to be a stacked row of medium-sized triangles pointing upward. Leave a small gap between each one. -
Define the zig-zag row:
In the adjacent vertical section, sketch a zig-zag line running from stem to base. Add a second parallel zig-zag line just below it. -
Define the nested triangles:
For the wider sections of the pumpkin, plan a column of large, outlined triangles. Inside each large triangle, sketch a smaller solid triangle to create a nested effect. -
Repeat the patterns:
Continue alternating these three core designs—solid stacks, zig-zags, and nested shapes—around the entire circumference of the pumpkin.
Smudge Fixer
If you accidentally smudge wet ink, quickly wipe it with a damp Q-tip. If it stains, paint over the mistake with a tiny bit of white acrylic paint.
Step 2: Inking the Design
-
Outline the major shapes:
Take your fine-tip black paint pen and carefully trace over your pencil lines for the large outlined triangles. Keep your hand steady and rest your pinky on the pumpkin for balance. -
Fill the nested centers:
Switch to the medium-tip pen to fill in the small solid triangles that sit inside the larger outlines. -
Create the solid column:
Move to the column of stacked triangles. Outline each triangle first, then use the medium tip to fill them in completely with solid black ink. -
Draw the zig-zags:
Using the fine-tip pen again, trace your parallel zig-zag lines. Use confident, single strokes for each segment to keep the lines crisp rather than shaky. -
Add detail to zig-zags:
Connect the points of your parallel zig-zag lines with short straight lines if you want a ‘ladder’ effect, or leave them as double lines as shown in some variations. -
Create saw-tooth accents:
In narrower grooves, draw a single vertical line, and add small solid triangles attached to the side of it, creating a saw-tooth or bunting pattern running down the pumpkin. -
Check for consistency:
Rotate the pumpkin and look for any spots where the black ink looks thin or streaky. Go over these areas a second time for a truly opaque, deep black. -
Dry and protect:
Allow the paint pen ink to dry completely, which usually takes about 15-20 minutes. Be careful not to smudge wet sections as you work around the sphere. -
Clean up:
Once you are 100% sure the ink is dry, gently erase any visible pencil marks with a soft eraser.
Level Up: Gold Accents
For a glamorous twist, use a metallic gold paint pen for the ‘nested’ inner triangles or every other vertical patterned stripe.
Place your finished geometric masterpiece on a windowsill or mantle for an instant modern update to your seasonal decor
Paint Splatter Accents on Small White Pumpkins
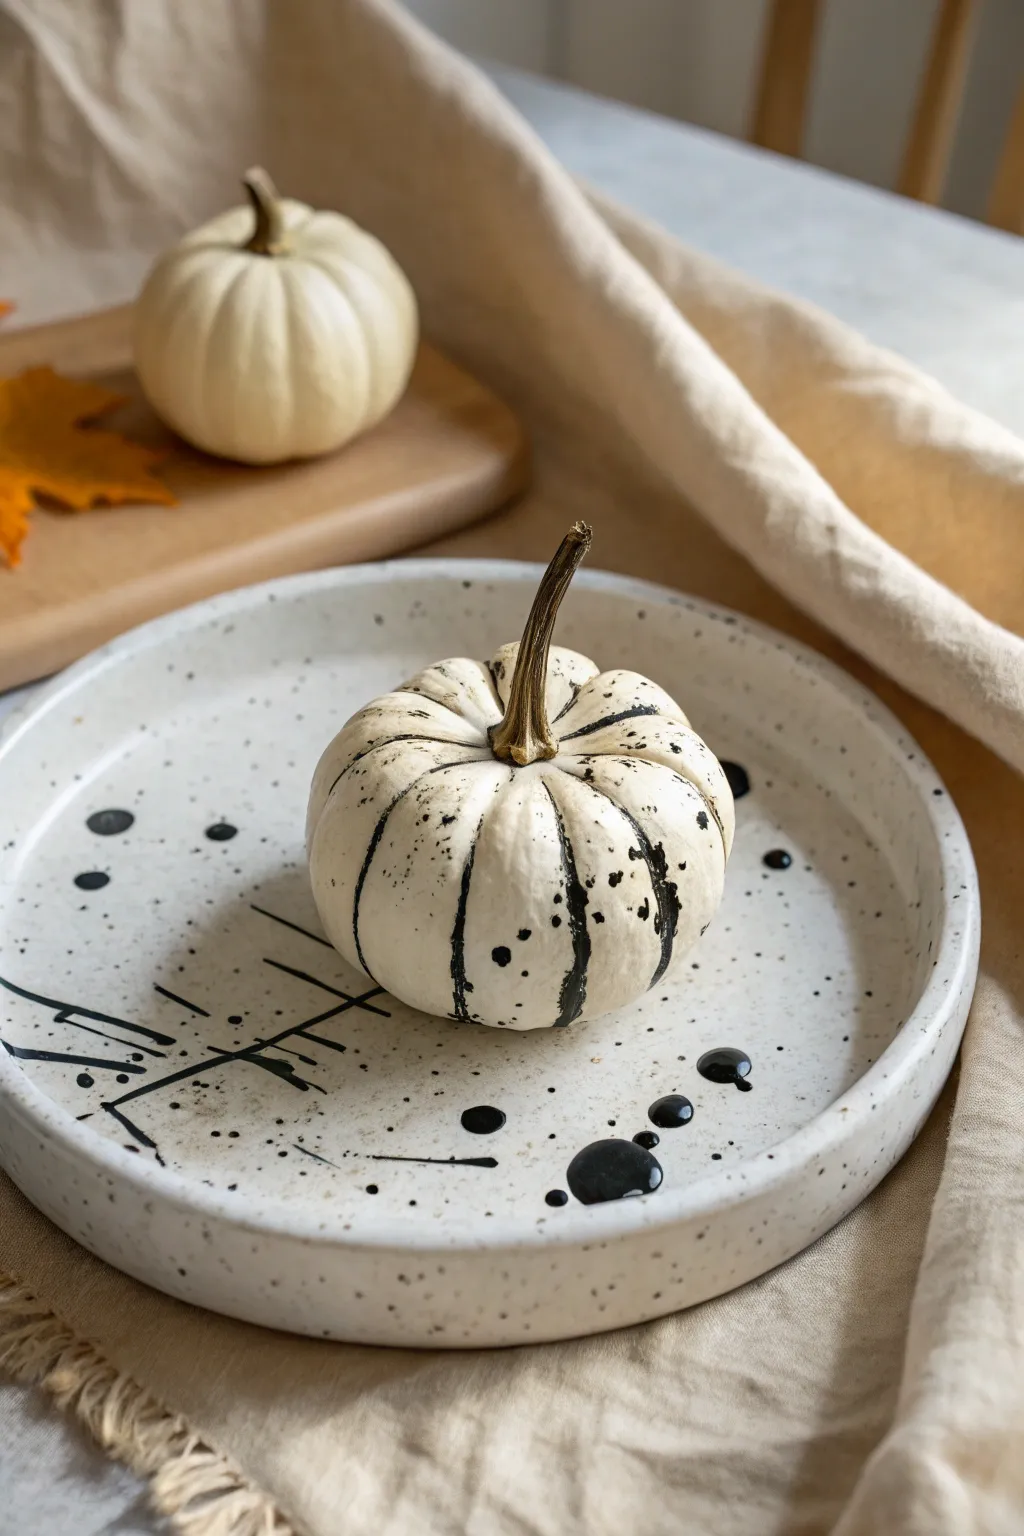
Transform a simple white pumpkin into a piece of modern art with nothing but black paint and a few flicks of the wrist. This striking, high-contrast design marries the rustic charm of autumn with a gallery-worthy abstract aesthetic.
Step-by-Step Tutorial
Materials
- Small white pumpkin (real or faux)
- Black acrylic paint or India ink
- Small round paintbrush (size 2 or 4)
- Old toothbrush (optional but recommended for fine specks)
- Cup of water
- Paper towels
- Cardboard or protective drop cloth
- Clear matte sealer spray (optional)
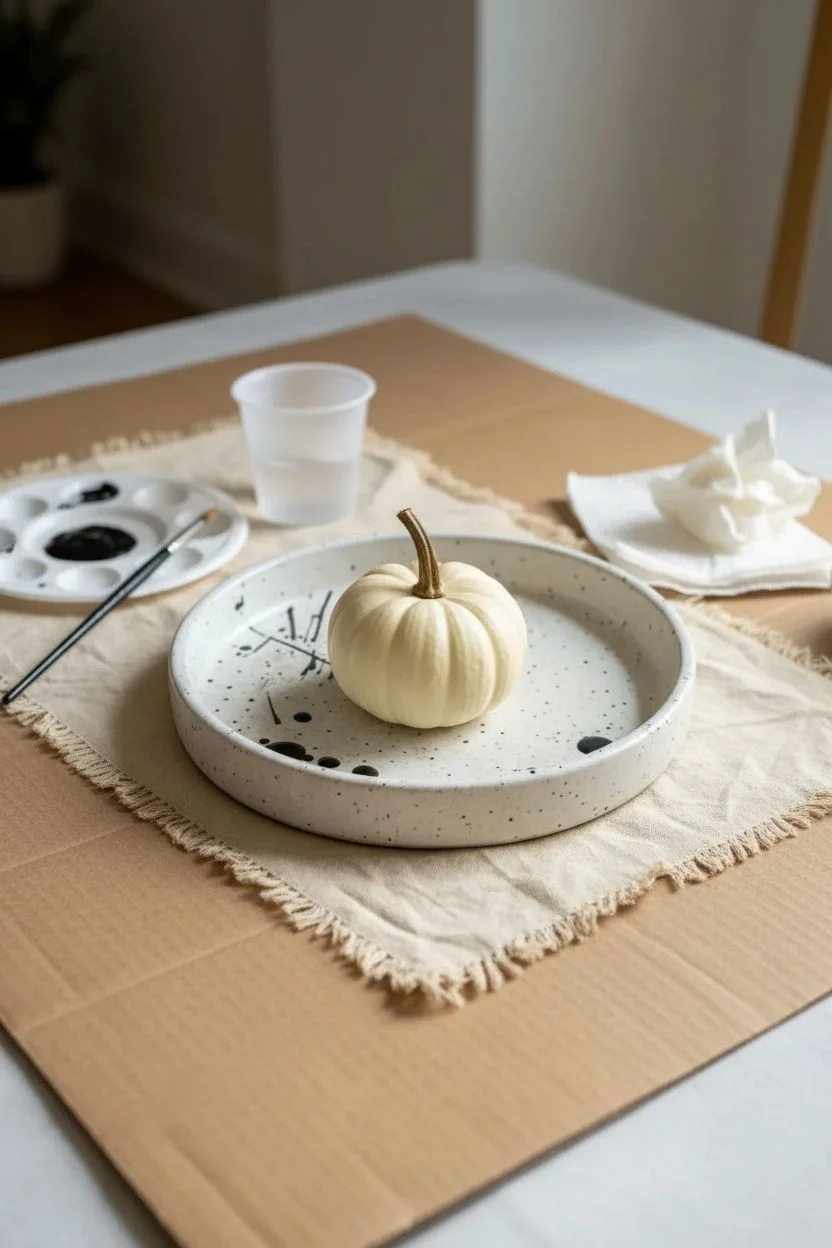
Step 1: Preparation & Base
-
Clean surface:
Begin by wiping down your pumpkin with a slightly damp paper towel to remove any dirt or oils. If you are using a real pumpkin, ensure the stem is completely dry and intact. -
Protect workspace:
This project gets messy by design. Lay down a generous amount of cardboard or a drop cloth to protect your table from wandering paint droplets. -
Paint consistency:
Squeeze a dollop of black acrylic paint onto a palette or disposable plate. Add small drops of water and mix until the paint reaches the consistency of heavy cream; ink users can skip this thinning step.
Step 2: Creating the Drips
-
Load the brush:
Dip your round brush into the thinned black paint or ink, ensuring it is heavily loaded but not dripping uncontrollably just yet. -
Position the drip:
Choose a groove near the top of the pumpkin, close to the stem base. Touch the tip of your loaded brush here and press gently to release a pool of paint. -
Encourage gravity:
Let the pool of paint naturally slide down the groove. If it stops too soon, you can reload your brush and add more paint to the starting point, pushing the droplet further down. -
Varied lengths:
Repeat this dripping process on 3-5 different grooves around the pumpkin. Aim for asymmetry—let one drip go halfway down, while another stops near the top. -
Stem detail:
While the brush is still wet, carefully paint a very thin line outlining the base of the stem where it connects to the pumpkin skin, grounding the design.
Control the Chaos
Practice your flicking technique on a scrap piece of paper first. Varying the distance changes the dot size significantly.
Step 3: Adding the Splatter
-
Brush flicking technique:
Dip your brush again. Hold it about 6 inches away from the pumpkin surface. Tap the handle of the brush firmly against your other hand or a finger to send larger droplets flying onto the pumpkin. -
Target specific areas:
Focus these larger splatters near the drip lines you created earlier to make the design feel cohesive rather than random. -
Toothbrush method:
For the fine, misty specks seen in the inspiration image, switch to an old toothbrush. Dip the bristles slightly into the paint. -
Fine misting:
Hold the toothbrush bristles facing the pumpkin. Run your thumb along the bristles, pulling them back and releasing them to spray a fine mist of black dots. -
Check density:
Step back and assess your work. I find it helpful to squint at the pumpkin to see if the balance of white space and black ink feels right. -
Correcting mistakes:
If a splatter lands somewhere you hate, quickly dab it away with a damp Q-tip before it dries. Or, embrace the unpredictability.
Metallic Twist
Swap the black paint for liquid gold leaf or metallic copper paint to give your pumpkin a glamorous, high-end fall look.
Step 4: Finishing Touches
-
Plate matching (optional):
If you wish to create the matching tray shown in the photo, repeat the splatter steps on a plain ceramic saucer (ensure the paint is food safe if you plan to use it for serving). -
Drying time:
Allow the pumpkin to sit undisturbed for at least an hour. The thicker drip lines will take longer to dry than the fine mist. -
Sealing:
Once fully dry, you can lightly mist the pumpkin with a clear matte sealer to prevent the paint from chipping, especially if you plan to keep it outdoors.
Now you have a striking, minimalist decoration that proves Halloween decor can be sophisticated


Metallic Stem Highlights on Small White Pumpkins
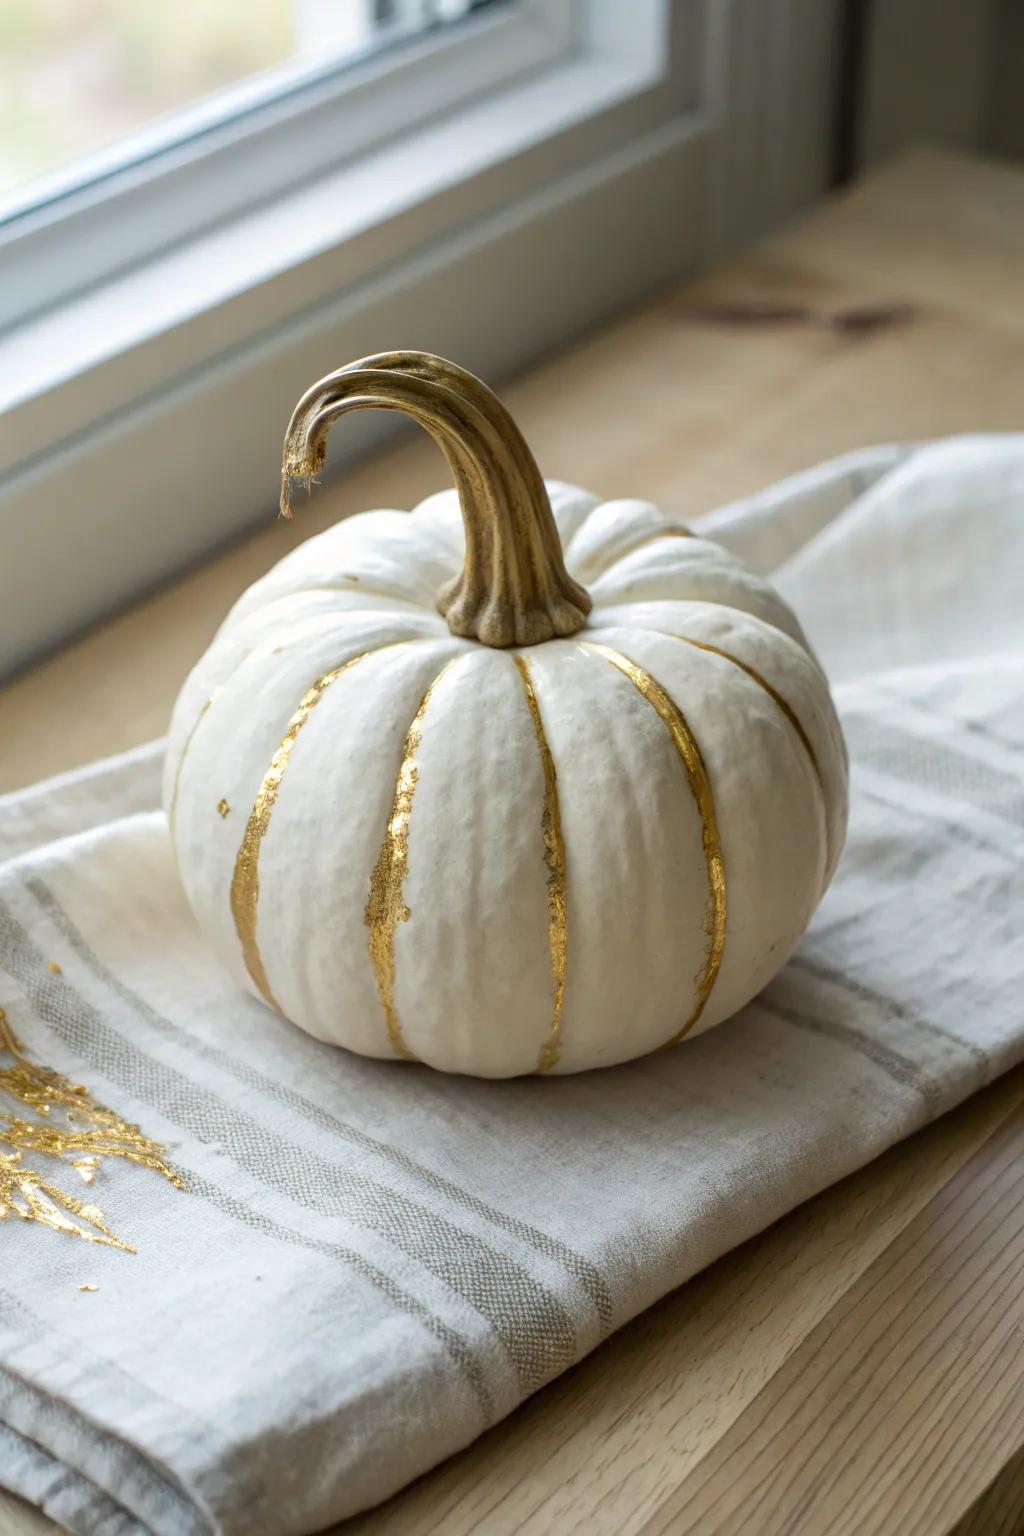
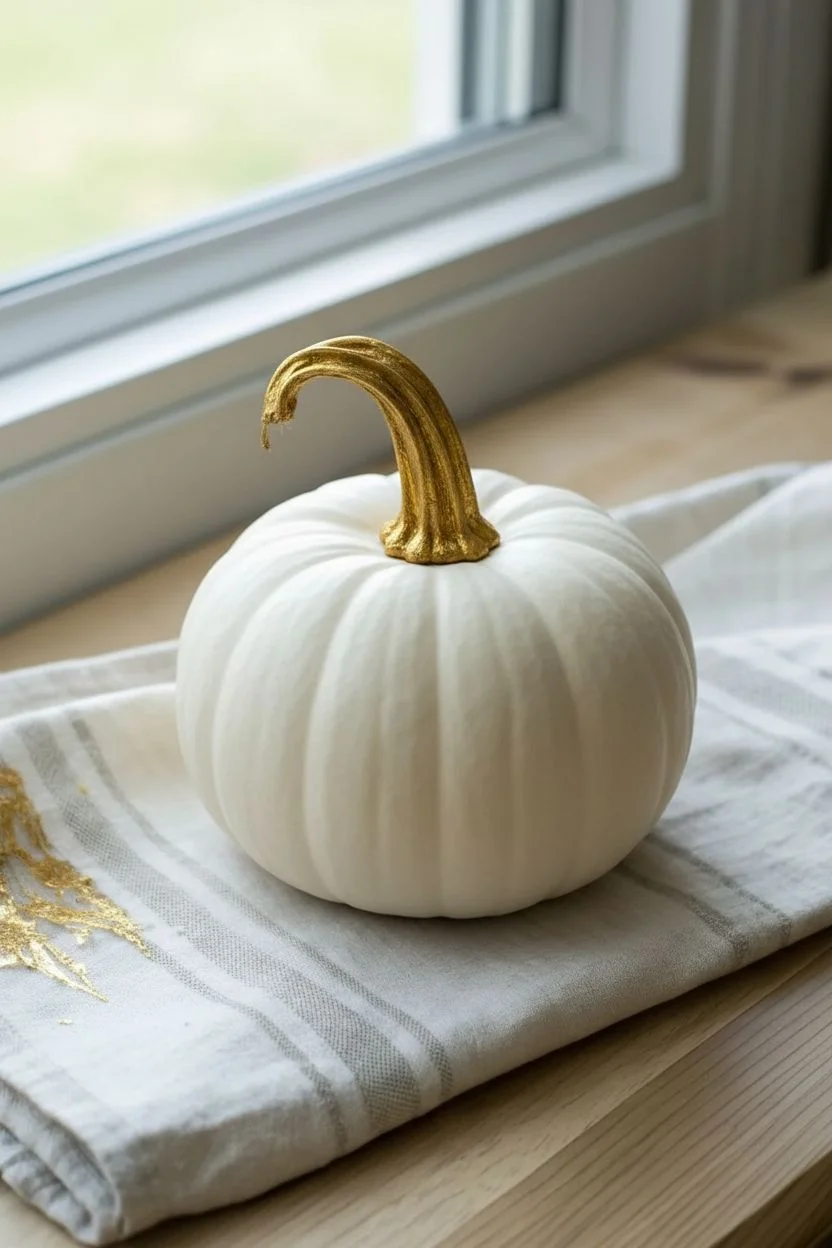
Elevate a simple white pumpkin into a piece of metallic elegance by highlighting its natural contours with gold leaf. This project focuses on accentuating the pumpkin’s ribs and stem for a sophisticated, understated autumn decoration.
Step-by-Step
Materials
- Small white ‘Baby Boo’ pumpkin
- Gold leaf sheets
- Metal leaf adhesive sizing
- Small soft paintbrush (for sizing)
- Clean, dry soft bristled brush (for burnishing)
- Liquid gold paint or gilding wax (for the stem)
- Fine detail paintbrush
- Damp cloth or tweezers
Step 1: Preparation & Stem
-
Clean surface:
Begin by gently wiping down your pumpkin with a damp cloth to remove any dirt or oils. The pumpkin needs to be completely clean and dry for the adhesive to stick properly. -
Dry thoroughly:
Ensure the pumpkin is bone dry before proceeding; any lingering moisture will prevent the sizing from tacking up correctly. -
Base coat the stem:
Using a fine detail brush, paint the entire stem with liquid gold paint. You can also use gilding wax here if you prefer a thicker, more textured finish. -
Refine the edges:
Carefully trace around the base of the stem where it meets the pumpkin flesh to create a crisp line. Don’t worry if it’s not perfect, as the gold leaf ribs will eventually meet this area. -
Dry stem:
Allow the painted stem to dry completely according to the manufacturer’s instructions before you start working on the body of the pumpkin to avoid smudging.
Step 2: Golden Ribs
-
Identify the grooves:
Locate the natural vertical indentations or ‘ribs’ running down the side of your pumpkin. -
Apply sizing:
Using a small soft paintbrush, paint a thin, uneven line of metal leaf adhesive sizing specifically into these grooves. I like to keep the line slightly jagged to mimic a natural vein. -
Wait for tackiness:
Let the adhesive sit for about 15-30 minutes (check your bottle’s specific instructions) until the milky white glue turns clear and feels sticky or ‘tacky’ to the touch. -
Apply gold leaf:
Gently pick up a sheet of gold leaf. You may want to cut it into thin strips beforehand to make it easier to handle for these narrow areas. -
Press into place:
Lay the gold leaf strip over the tacky adhesive in the groove. Use your fingers or a dry brush to press it down firmly. -
Cover all adhesive:
Repeat this process for every rib line you painted with adhesive, ensuring all sticky areas are covered with leaf. -
Burnish the leaf:
Once all the leaf is applied, take a clean, dry, soft-bristled brush and gently brush over the gold areas in a circular motion. -
Remove excess:
Continue brushing more vigorously to flake away the excess gold leaf that isn’t stuck to the adhesive. This ‘dusting off’ reveals the clean, metallic lines underneath. -
Clean up stray flakes:
Use a stiff brush or even a piece of masking tape to lift away stubborn little specks of gold leaf that have landed on the white parts of the pumpkin where you don’t want them. -
Inspect the lines:
Look closely at your gold lines. If you missed spots, you can dab a tiny bit more sizing, wait for it to tack, and apply small scraps of gold leaf to patch the gaps.
Sticky Situation?
If the gold leaf lifts off completely when brushing, your adhesive size wasn’t tacky enough yet or had dried out too much. Timing is key.
Step 3: Finishing Touches
-
Seal (Optional):
If you plan to handle the pumpkin frequently, apply a very light coat of spray sealer to protect the delicate gold leaf. -
Final polish:
Give the pumpkin a final wipedown with a soft cloth to remove any remaining gold dust and make the white skin shine.
Static Trick
Rub your paintbrush quickly on your own hair or a wool sweater to create static electricity; this helps pick up delicate gold leaf sheets easily.
Place your gilded pumpkin on a neutral linen cloth to let the metallic accents truly shine
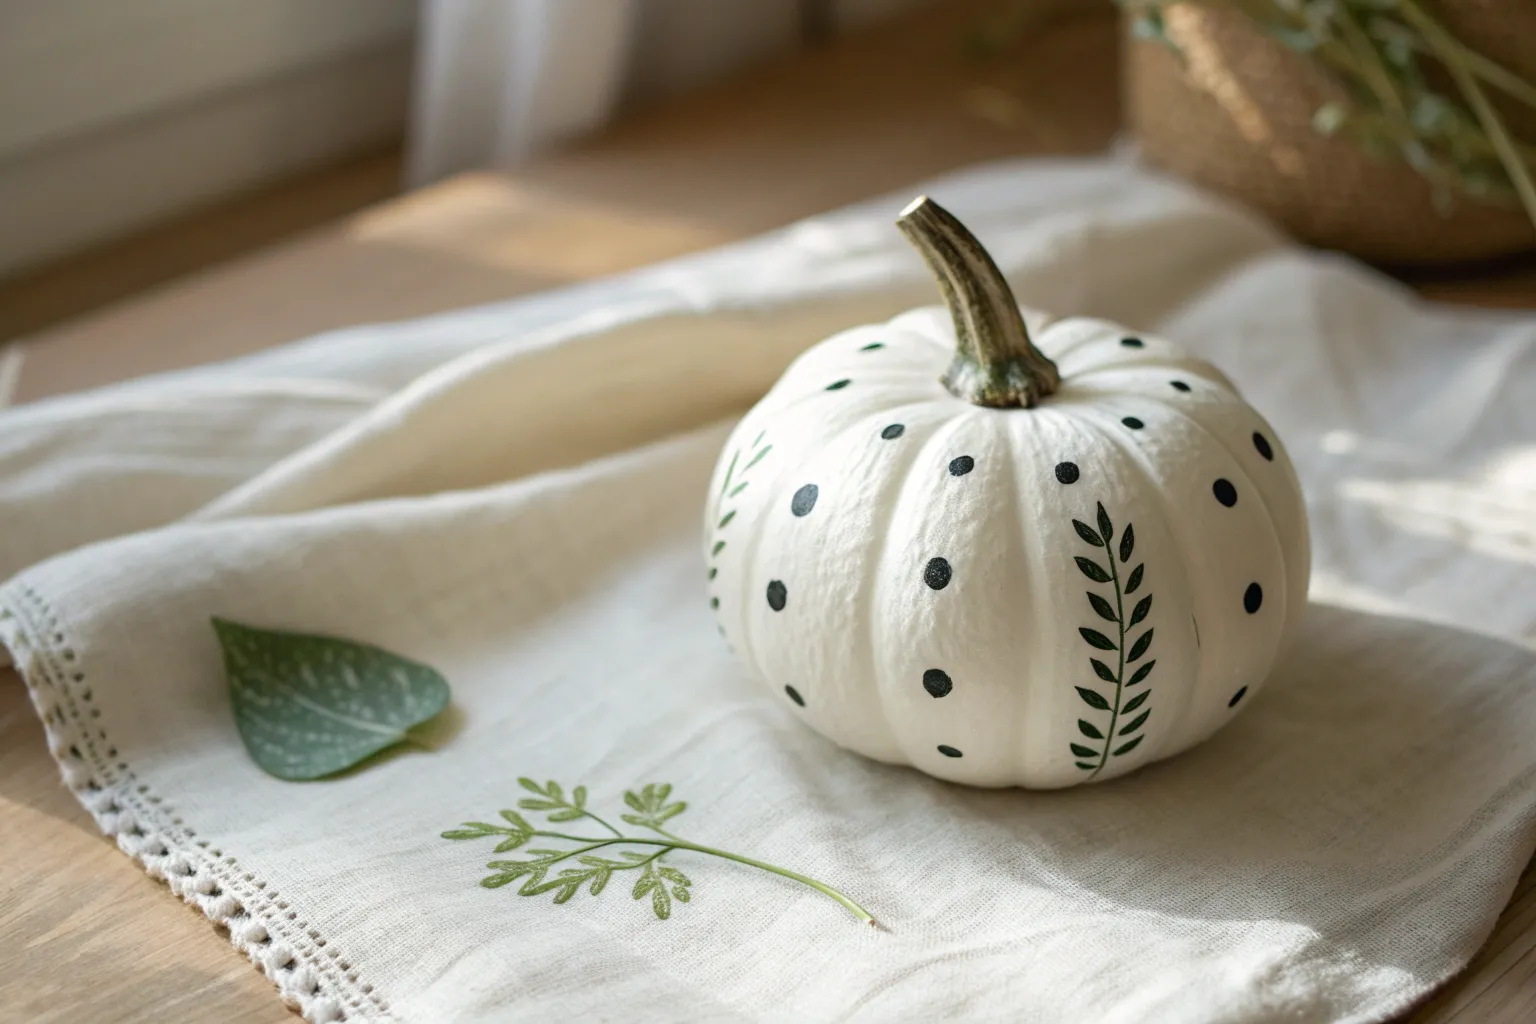
Delicate Vine Wraps on Small White Pumpkins
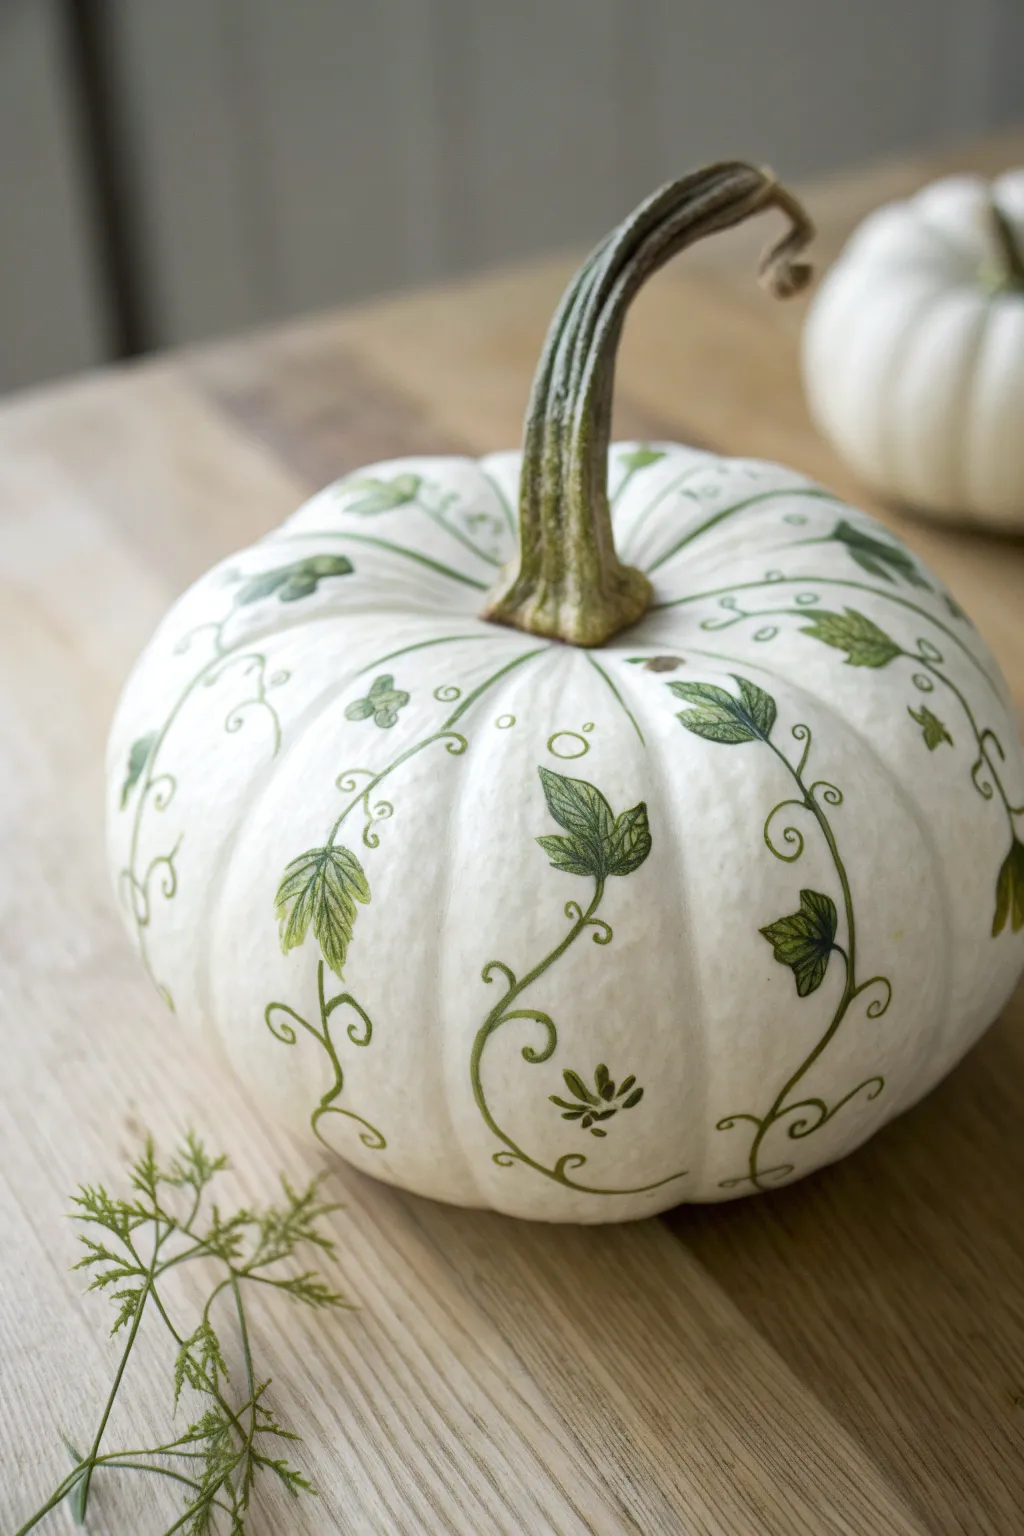
Transform a smooth white pumpkin into a piece of fine art with this delicate, nature-inspired design. The graceful green vines and detailed leaves follow the pumpkin’s natural curves, creating an elegant centerpiece perfect for a refined autumn table.
How-To Guide
Materials
- Small white pumpkin (real or faux)
- Fine tip permanent marker or acrylic paint pen (dark green or olive)
- Fine tip permanent marker or acrylic paint pen (lighter leaf green)
- Pencil (HB or H for light sketching)
- Soft eraser
- Paper towel or rag
- Optional: Clear matte sealant spray
Step 1: Preparation & Planning
-
Clean surface:
Begin by wiping down your pumpkin thoroughly. If using a real pumpkin, wash it gently with mild soap and water to remove any oils or dirt that might resist the ink. Dry it completely with a paper towel. -
Analyze the ribs:
Look at the natural vertical ribs of your pumpkin. These indentations act as perfect guidelines. You want your vines to drape naturally between these ribs, so mentally map out where the main stems will flow.
Oops, Smudged Ink?
If you accidentally smear wet ink, dampen a Q-tip with a tiny bit of rubbing alcohol and gently dab the mistake away. Let it dry completely before drawing over the spot again.
Step 2: Sketching the Design
-
Draft the main vines:
Using your pencil very lightly, draw thin, sweeping S-curves starting from the base of the stem and winding down toward the bottom of the pumpkin. Don’t worry about perfection; you want a fluid, organic look. -
Add secondary tendrils:
Sketch smaller, tighter curls branching off the main vines. These should look like the tiny grabbing tendrils on a real vine plant, curling into little loops and spirals. -
Place the leaves:
Lightly outline triangular or heart-shaped leaves along the vines. Vary their placement—some near the stem, some in the middle, and some trailing near the bottom. I like to alternate sides to keep the design balanced.
Gilded Edges
For a glamorous twist, use a metallic gold paint pen to re-trace just the very tips of the leaves or adds tiny gold dots along the curly tendrils for a bit of sparkle.
Step 3: Inking the Vines
-
Trace the stems:
Take your darker green fine-tip marker or paint pen. Carefully trace over your pencil lines for the main vines and the curly tendrils. Keep your hand steady but allow the line width to vary slightly for a natural feel. -
Refine the curls:
Go back over the delicate spirals. If using a paint pen, ensure the ink flows smoothly so the loops don’t look broken. Add tiny little circles or dots near the vines to mimic spores or tiny buds. -
Outline the leaves:
Use the darker green pen to outline the leaf shapes you sketched earlier. Give the edges a slight jagged or serrated texture rather than a perfectly smooth line to make them look more realistic.
Step 4: Adding Detail & Color
-
Draw leaf veins:
Inside each leaf outline, draw a central vein line from the stem to the tip. Then, add smaller veins branching out to the sides. Use a very light touch here; these lines should be thinner than the outline. -
Fill with color:
Switch to your lighter green marker or paint pen. Gently color inside the leaves. You don’t need opaque coverage; a slightly sketched, translucent look adds to the vintage botanical illustration style. -
Layering distinct tones:
Once the light green is dry, use the darker green pen again to add shading right at the base of the leaf where it meets the vine. This creates depth and makes the leaves look like they are growing off the stem. -
Add decorative elements:
Look for empty spaces on the pumpkin surface. Draw small, three-petaled flower shapes or extra little loops to fill gaps without overcrowding the design.
Step 5: Finishing Touches
-
Erase guidelines:
Wait at least 15 to 20 minutes to ensure every bit of ink is completely dry. Then, gently erase any visible pencil marks. Be careful not to scrub too hard over the drawn areas. -
Check for gaps:
Rotate the pumpkin and look at it from all angles. If a vine looks like it ends abruptly, extend it with a final curl or a small leaf. -
Seal the work:
If you plan to keep this pumpkin outside or for next year (if it’s faux), spray a light coat of matte clear sealant over the entire surface to protect your artwork.
Now you have a stunning, hand-illustrated pumpkin that looks like it came straight from a vintage storybook
Leaf Silhouettes on Small White Pumpkins
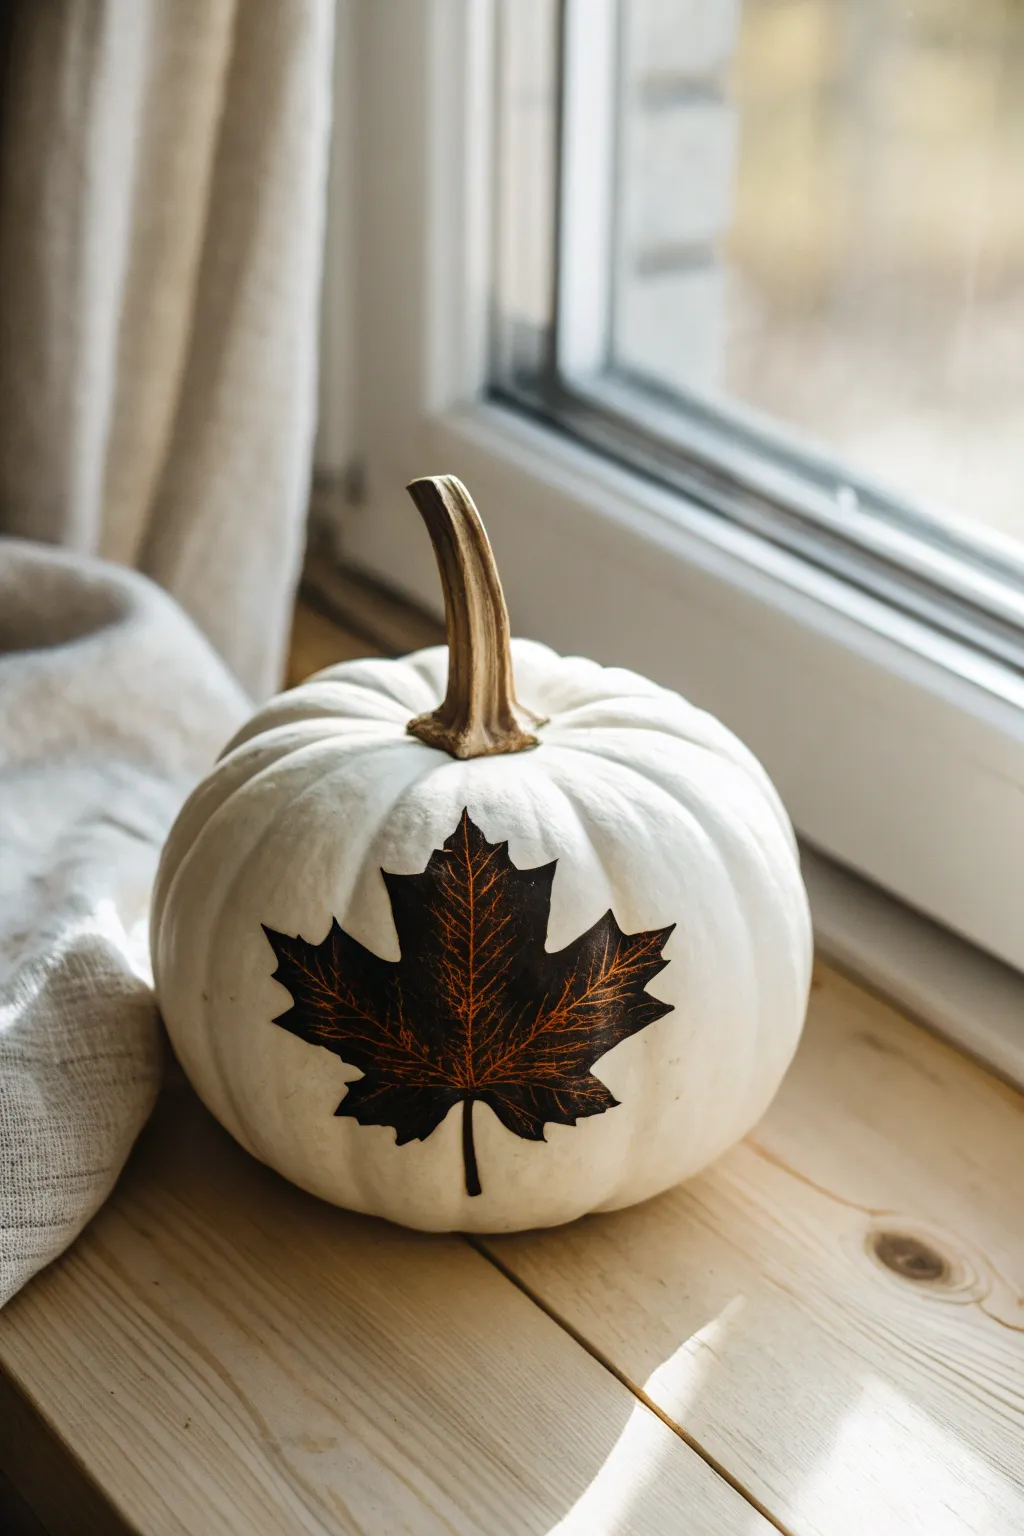
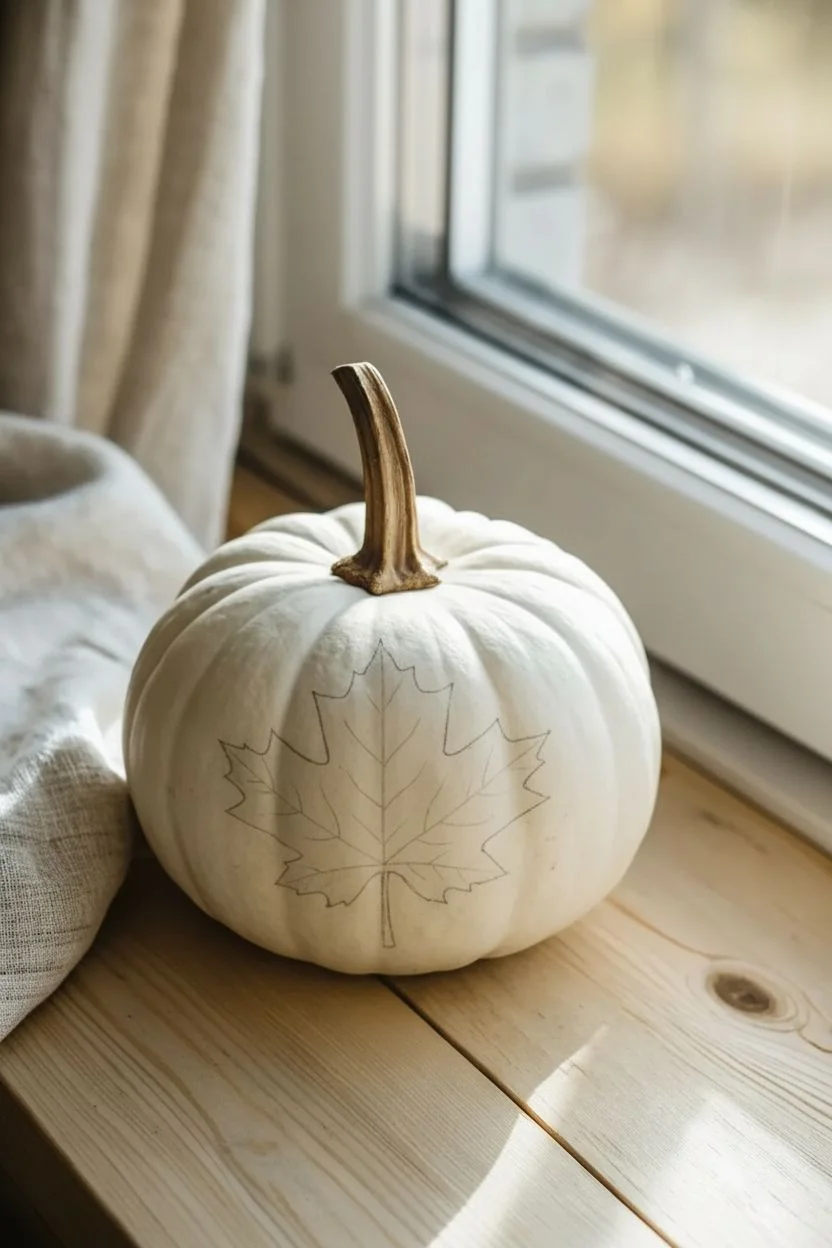
Embrace the crisp elegance of autumn with this minimalist design featuring a striking dark leaf silhouette against a pristine white pumpkin. The delicate gold-toned veining adds a sophisticated touch, making this piece perfect for a modern windowsill display.
Step-by-Step Tutorial
Materials
- Small white pumpkin (real or faux)
- Maple leaf template or stencil
- Pencil
- Black acrylic craft paint
- Small flat paintbrush
- Fine liner brush (size 0 or 00)
- Metallic copper or gold acrylic paint
- Matte finish spray sealant (optional)
- Paper towel
- Water cup
Step 1: Preparation & Outline
-
Clean the surface:
Before starting, wipe your pumpkin down with a damp cloth to remove any dust or dirt. Let it dry completely to ensure the paint adheres smoothly. -
Position the leaf:
Hold your maple leaf template against the pumpkin’s curve. I find placing it slightly lower than the center gives it a grounded look. -
Trace the shape:
Using a pencil, lightly trace the outline of the leaf directly onto the pumpkin skin. Don’t press too hard to avoid indenting real pumpkins. -
Refine the edges:
Remove the template and inspect your pencil lines. If any areas are faint or shaky, gently sketch over them to create a clear guide for painting.
Step 2: Creating the Silhouette
-
Outline with paint:
Dip your fine liner brush into black acrylic paint. Carefully trace over your pencil lines, creating a crisp border for your leaf. -
Fill in the shape:
Switch to the small flat brush to fill in the body of the leaf. Work from the center outward toward your outlined edges. -
Smooth the coverage:
Apply the black paint in even strokes to avoid heavy ridges. If the white pumpkin shows through, let the first coat dry for 5-10 minutes and apply a second coat. -
Sharpen the points:
Use the liner brush again to make the tips of the leaf sharp and defined. Crisp points are key to a realistic silhouette. -
Paint the stem:
Extended a thin line downward from the base of the leaf to create the stem. Keep this line slightly thicker at the top and tapering off at the bottom. -
Let it cure:
Allow the black silhouette to dry completely. This usually takes about 20-30 minutes, or you can use a hairdryer on a cool setting to speed it up.
Clean Lines
If you paint outside the lines, wait for the mistake to dry, then gently scrape it off with a damp toothpick or Q-tip. It’s cleaner than wiping wet paint.
Step 3: Adding the Veins
-
Plan the structure:
Visualize the central vein running from the stem to the top point, with secondary veins branching to the side lobes. -
Load the liner brush:
Thoroughly clean your fine liner brush and load it with metallic copper or gold paint. Thin the paint slightly with water if it feels too thick for fine lines. -
Paint the main vein:
Start steps away from the stem base and draw a thin line straight up the center of the leaf, stopping just before the tip. -
Add side branches:
From the center vein, paint lines extending outward into the other main lobes of the leaf. -
Create fine details:
Add tiny, delicate spider-webbing veins branching off the main lines. Here I prefer to use a very light touch, barely grazing the pumpkin surface. -
Final dry:
Let the metallic paint dry completely. The contrast between the matte black and shimmering copper will really pop once dry. -
Seal (Optional):
If you plan to keep this outdoors, give it a light coat of matte spray sealant to protect your work from moisture.
Level Up: Texture
Mix a tiny pinch of baking soda into your black paint before applying. This creates a matte, velvety texture that contrasts beautifully with the smooth copper veins.
Now you have a chic, modern pumpkin decoration that brings a hint of nature indoors
Blue-and-White Porcelain-Inspired Florals on Small White Pumpkins
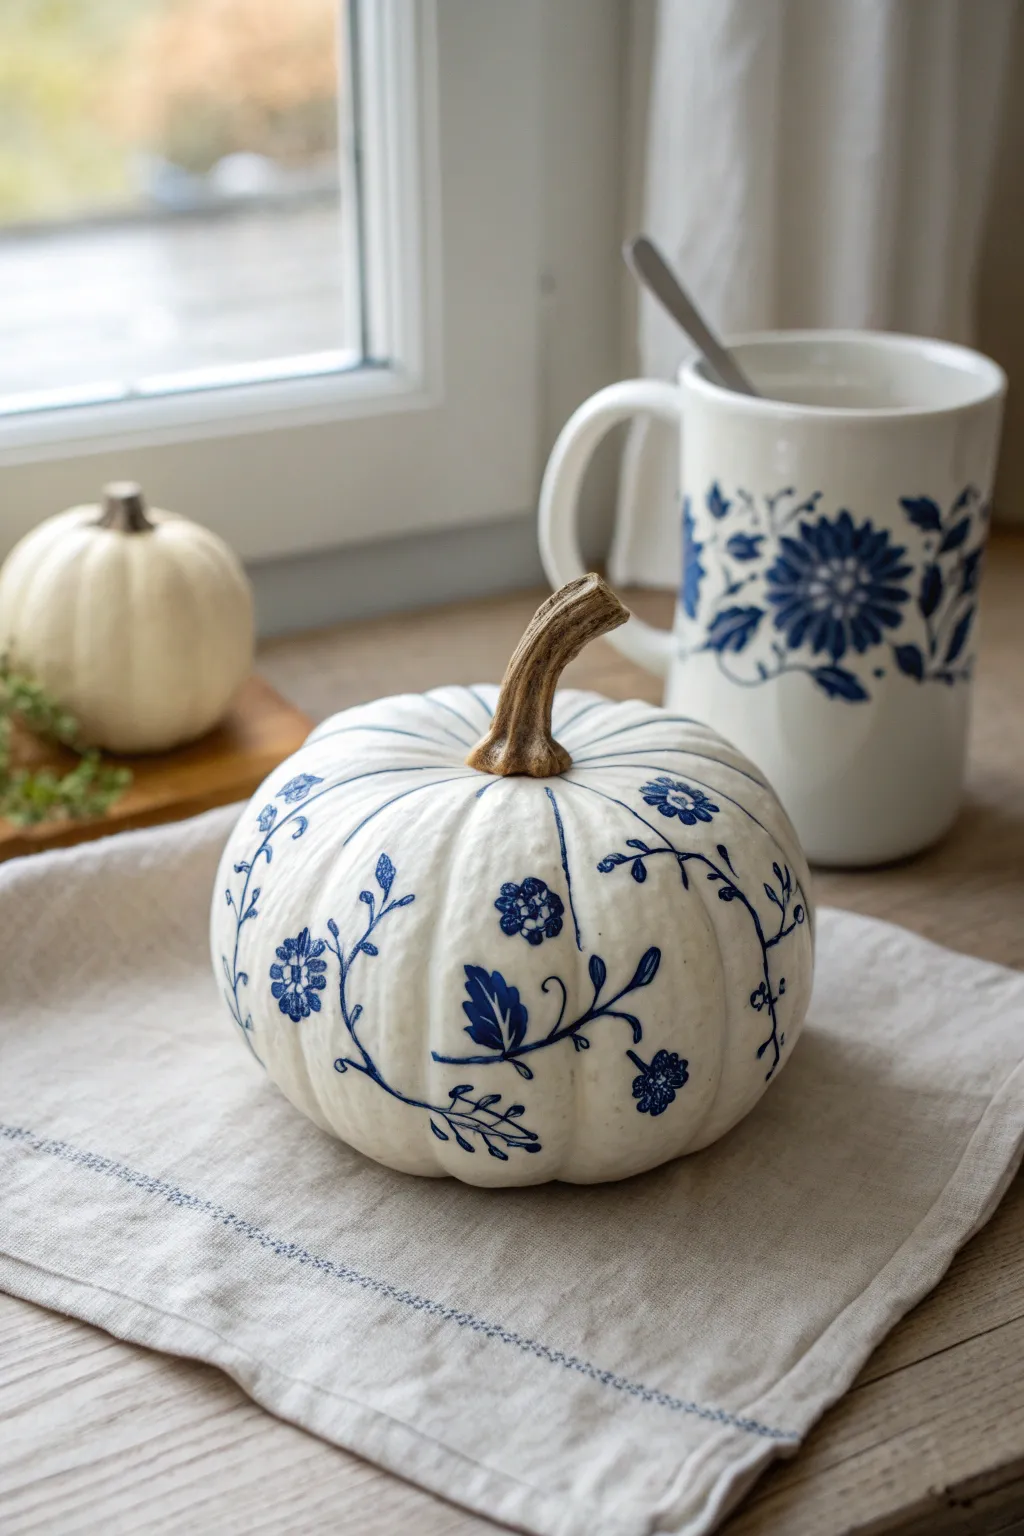
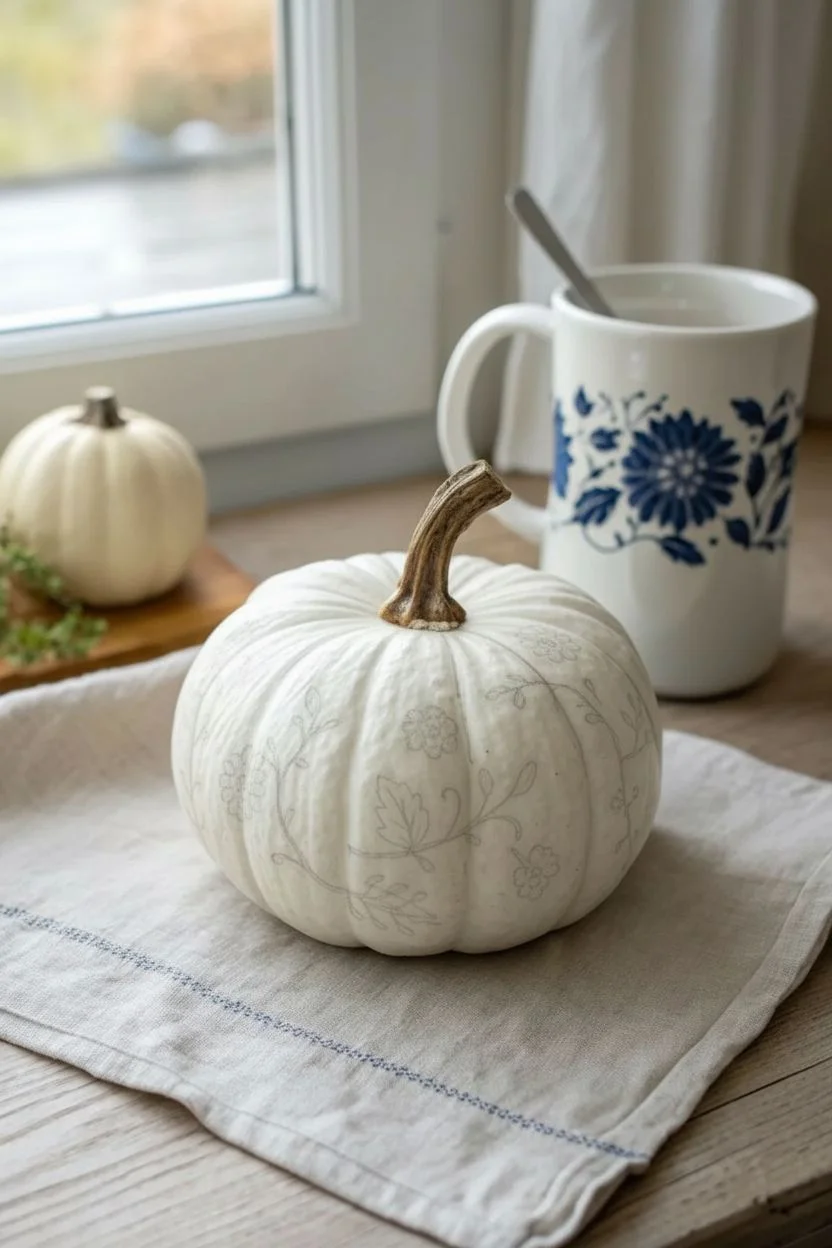
Transform a humble white pumpkin into a piece of faux-ceramic art with this elegant blue-and-white porcelain design. The striking contrast of deep cobalt ink against the creamy pumpkin skin mimics the timeless beauty of Delftware pottery, making it a sophisticated addition to your autumn decor.
Step-by-Step Guide
Materials
- Small white pumpkin (real or faux)
- Fine-point permanent marker (Cobalt blue)
- Medium-point permanent marker or paint pen (Navy blue)
- Pencil (light H grade)
- Eraser
- Paper towels
- Rubbing alcohol
- Reference images of porcelain patterns
Step 1: Preparation & Planning
-
Clean surface:
Begin by wiping down your pumpkin with a paper towel dampened with rubbing alcohol. This removes natural oils or manufacturing residue, ensuring your ink adheres crisp and clean. -
Wait to dry:
Allow the surface to dry completely for about 5 minutes. If playing with a real pumpkin, ensure the stem handles are sturdy and the skin is unblemished. -
Sketch the vines:
Using a very light touch with your pencil, sketch a meandering vine line that wraps horizontally around the pumpkin’s midsection. Let the line curve naturally with the pumpkin’s ribs. -
Plot the blooms:
Mark small circles along the vine where you want your main flowers to sit. Space them irregularly to keep the organic, hand-painted pottery look.
Glazing Illusion
Use two shades of blue markers. A lighter blue for outlines and a deep navy for filling creates a convincing ‘glazed ceramic’ depth.
Step 2: Drafting the Design
-
Outline the vines:
Switch to your medium-point blue pen. Trace over your main vine pencil lines with a confident, smooth stroke. Don’t worry if it’s not perfectly steady; slight variations look like authentic brushwork. -
Draw flower centers:
At your marked flower spots, draw tiny circles or heavy dots to serve as the pollen centers. -
Add petals:
Using the fine-point marker, draw five or six simple, rounded petals radiating from each center. Keep the shapes open and airy. -
Create leaf stems:
Draw shorter, thinner lines branching off the main vine. Curve them outward to fill empty spaces between the ribs. -
detail the leaves:
Add small, almond-shaped leaves to these branch stems. I like to alternate the leaves on either side of the stem for a balanced flow.
Inky Accidents
Smudged the ink? Dip a Q-tip in rubbing alcohol and gently dab the error. It acts like a magic eraser on the pumpkin skin.
Step 3: Refining & Shading
-
Fill the leaves:
Using the medium marker, color in half of each leaf, or add thick hatched lines. This heavy blue weight mimics the traditional glazing technique. -
Inner petal details:
Switch back to the fine-point tip. Inside each petal, make three tiny flicks starting from the center and moving outward. This adds depth and simulates embroidery-style stitching. -
Add stamens:
Draw tiny dots hovering just above the center of the flowers to create delicate stamens. -
Connect the design:
Look for large gaps in your pattern. Add whimsical curlicues or loose tendrils with the fine tip to visually connect the floral elements. -
Thicken main lines:
Go back to your main vine. In certain curves—specifically the ‘downward’ slopes of the vine—thicken the line slightly to mimic calligraphy weight. -
Clean up:
Once the ink is fully dry (give it at least 20 minutes to prevent smudging), gently erase any visible pencil marks. -
Optional sealing:
If you plan to keep this outside or for many years, spray with a matte clear coat. Apply in very light mists to avoid making the ink run.
Display your new porcelain-inspired pumpkin near a window to let the natural light highlight the intricate blue details
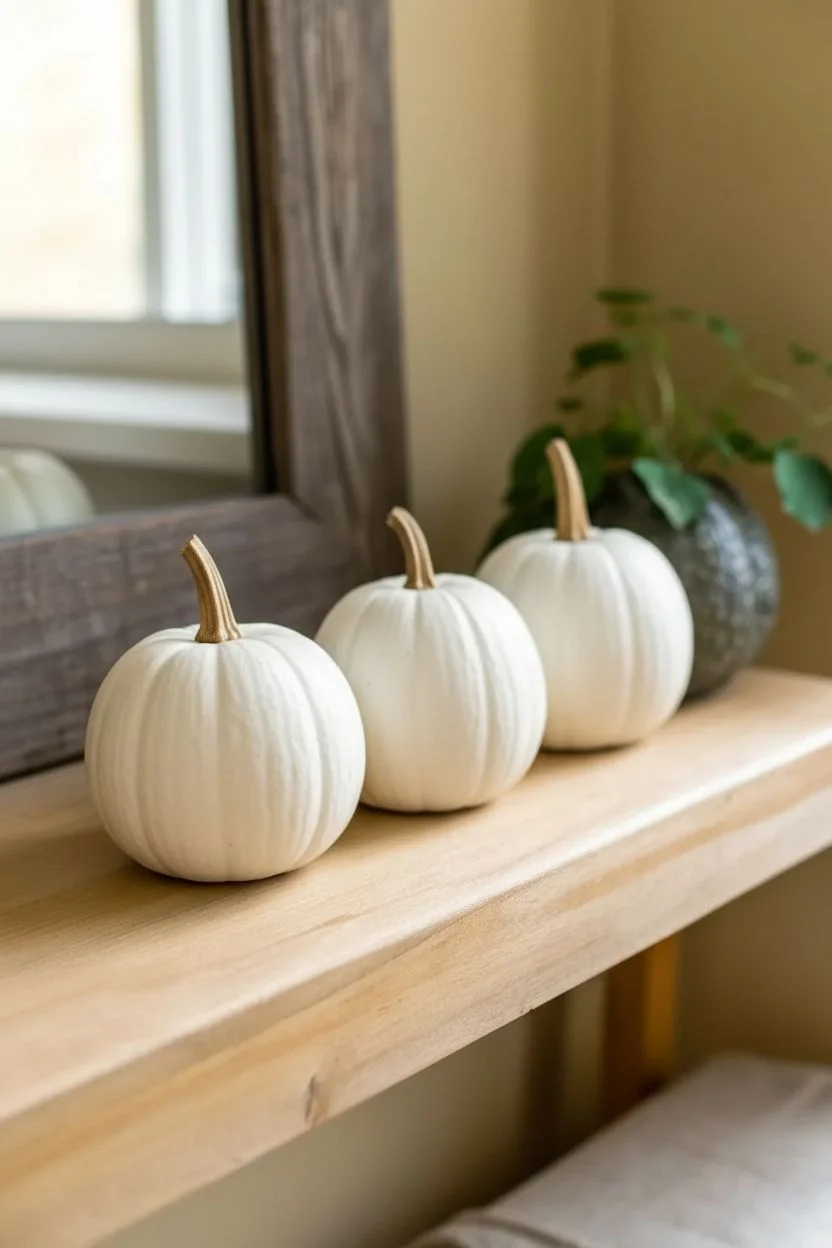
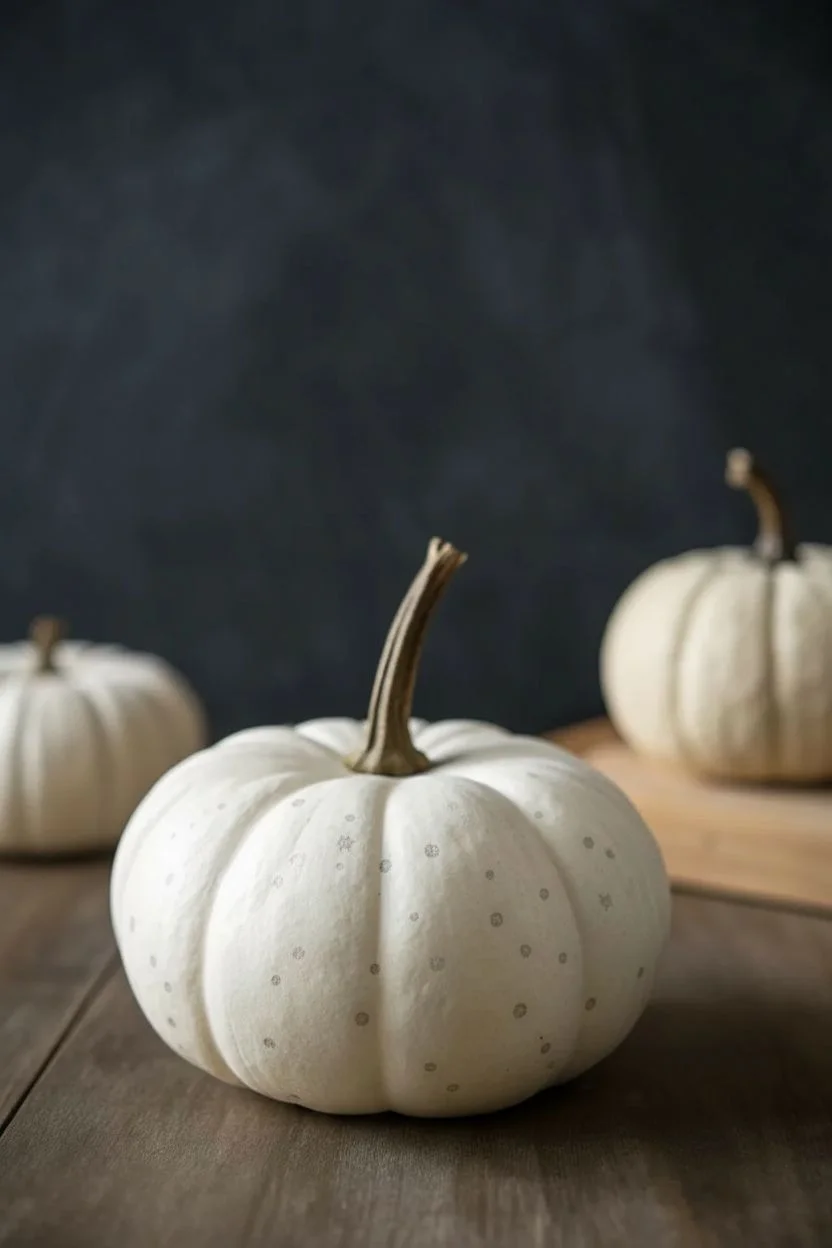
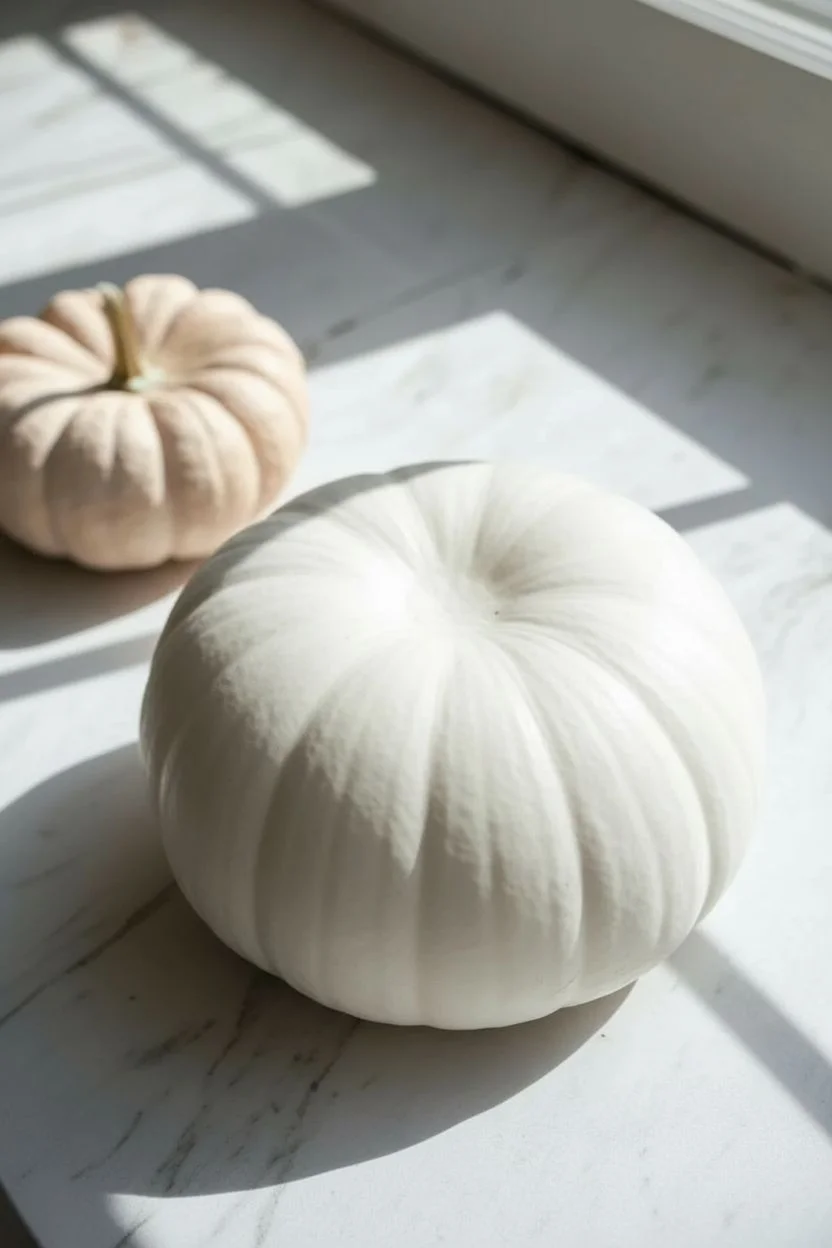
Soft Ombre Washes on Small White Pumpkins
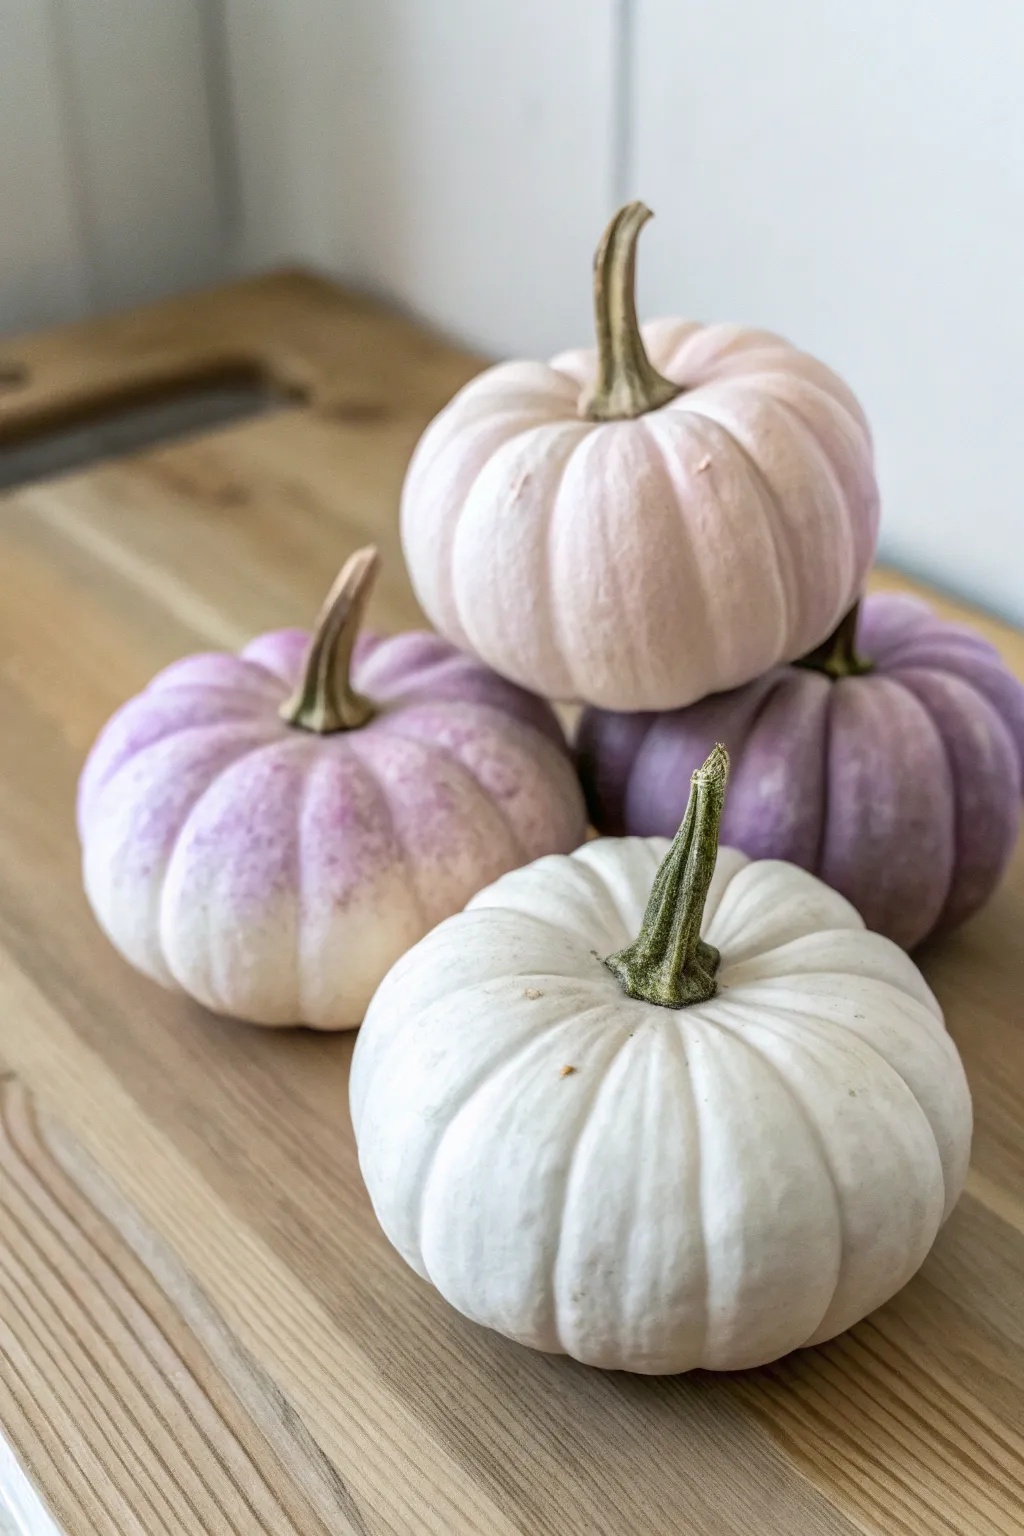

These delicate pumpkins feature soft, ethereal washes of color that mimic the natural blushing effect found on heirloom varieties. By layering sheer paint over a white base, you can achieve a sophisticated, matte ombre finish that looks effortlessly chic.
Step-by-Step
Materials
- Small white pumpkins (real or faux)
- Acrylic paint (purple, magenta, white)
- Water
- Small mixing cups or palette
- Soft synthetic paintbrushes (medium round and large flat shader)
- Paper towels
- Matte clear spray sealant (optional)
- Painter’s tape (optional to protect stems)
Step 1: Preparation
-
Clean the Pumpkins:
Before you begin, wipe down your small white pumpkins with a damp cloth to remove any dust or dirt. If you are using real pumpkins, dry them thoroughly. For faux pumpkins, ensure the surface is clean and smooth. -
Protect the Stems:
If you want to keep the stems completely natural, carefully wrap them with painter’s tape. Alternatively, you can just be very mindful with your brushwork near the top.
Fixing Blotchy Paint
If the wash dries with hard water lines, lightly dampen the area with a wet sponge and gently rub to reactivate and smooth the edge.
Step 2: Mixing the Washes
-
Create a Pale Blush Wash:
In your first mixing cup, combine a tiny drop of magenta paint with a generous amount of white paint. Add water gradually until you have a consistency similar to skim milk. You want a very sheer, tinted water rather than opaque paint. -
Mix a Lilac Wash:
In a second cup, mix purple paint with white paint to create a soft lavender base. Again, water this down significantly until it flows easily and is translucent. Test the opacity on a paper towel; it should bleed like watercolor. -
Prepare a Deeper Purple Wash:
For the darkest pumpkin, mix a deeper purple shade using less white paint. Dilute this mixture as well, but keep it slightly more saturated than the previous two for a richer final color.
Add Metallic Specks
Flick a toothbrush dipped in diluted gold paint over the dry pumpkins for a subtle, magical speckled effect.
Step 3: Creating the Blush Ombré
-
Apply the Base Layer:
Take your blush wash and a medium round soft brush. Start painting from the top near the stem, pulling the color downwards into the grooves of the pumpkin. -
Feather the Edges:
As you move about halfway down the pumpkin, dip your brush in clean water and blend the paint downwards so it fades seamlessly into the white bottom. The goal is to avoid hard lines. -
Check Coverage:
Let this first sheer layer dry for about 5 minutes. If the color is too faint, apply a second wash focused closer to the stem to deepen the ‘blush’ effect while keeping the bottom pale.
Step 4: Painting the Lilac Pumpkin
-
Start the Gradient:
Using the lilac wash, begin applying color at the very top of the pumpkin, dabbing darker pigment right around the base of the stem. -
Drag the Color:
Use a damp flat shader brush to drag that pigment down the ribs of the pumpkin. The natural grooves are great channels for the watery paint to settle in, creating depth. -
Soften the Transition:
Before the paint dries, wipe your brush clean and use just water to feather the purple edge around the equator of the pumpkin, letting it vanish into the white underside.
Step 5: Building the Deep Purple Pumpkin
-
Saturate the Top:
For the darker purple pumpkin, apply your deepest wash liberally around the top half. Because this color is stronger, work quickly to ensure smooth blending. -
Layering for Texture:
While still damp, you can dab a tiny bit of un-diluted paint into the deepest crevices near the stem. This mimics the natural variegation of real produce. -
Final Fade:
Blend the bottom edge out with a wet brush. Leave less white space at the bottom of this pumpkin compared to the others to distinguish it as the darker accent piece.
Step 6: Finishing Touches
-
Dry Time:
Allow all the pumpkins to dry completely for at least 30 minutes. The washes will look lighter once they are fully dry. -
Assessment:
Look at your set. If you painted one pumpkin purely white, ensure it’s clean; you might want to add a tiny wash of cream or off-white if your faux pumpkin looks too plastic-bright. -
Seal (Optional):
If you plan to keep these for next year, a light mist of matte spray sealant will protect the delicate washes without adding unwanted shine. -
Stem Touch-up:
Remove any tape. If you accidentally got paint on the stems, use a damp Q-tip to wipe it off, or paint over the stem with a brownish-green acrylic for a fresh look. -
Final Arrangement:
Stack or cluster your pumpkins to highlight the beautiful gradient of colors you’ve created.
Display your charming pastel pumpkin patch on a mantle or centerpiece for a soft autumnal touch
Constellation Dots on Small White Pumpkins
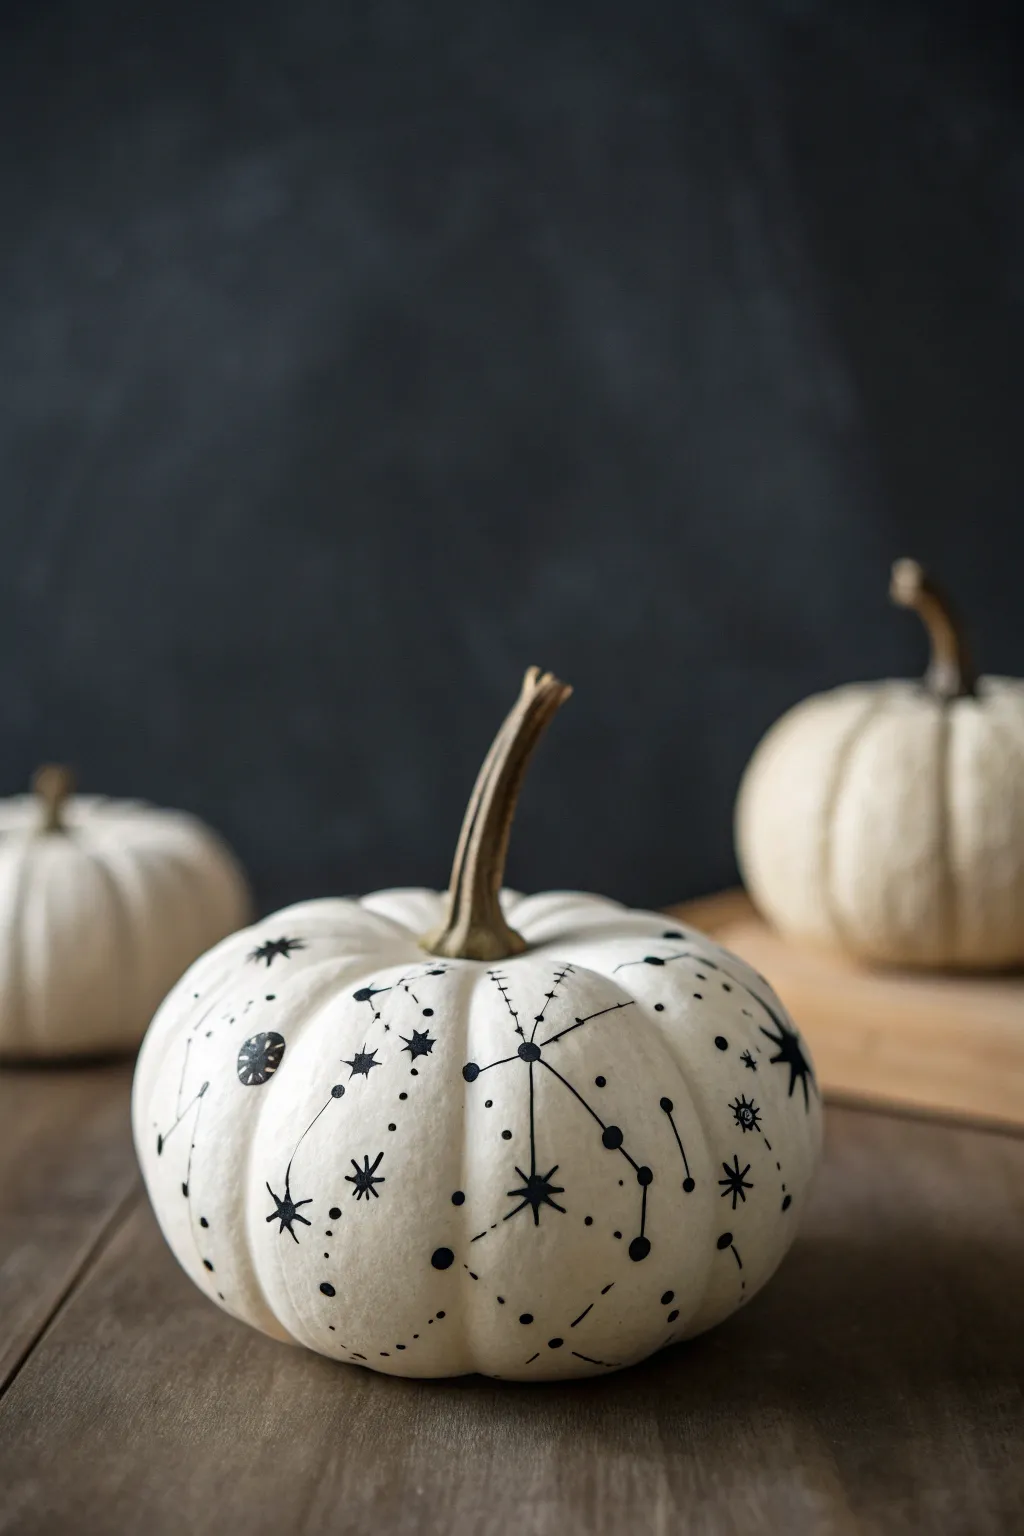
Transform a simple white gourd into a dreamy piece of autumnal decor with this minimalist celestial design. Using fine black lines to create stars and constellations, this project offers a sophisticated and mystical take on traditional pumpkin painting.
How-To Guide
Materials
- Small white pumpkin (real or faux)
- Black fine-tip paint pen (oil or acrylic based)
- Black medium-tip paint pen
- Pencil with eraser
- Damp cloth or baby wipes
- Matte spray sealer (optional)
Step 1: Preparation and Planning
-
Clean surface:
Begin by wiping down your pumpkin thoroughly with a damp cloth to remove any dirt or waxy residue. A clean surface is crucial for the paint to adhere properly. -
Dry completely:
Allow the pumpkin to dry fully. If using a real pumpkin, inspect it for any soft spots or nicks that you might want to avoid or cover with your design. -
Plan key points:
Using a pencil, very lightly mark where you want your main constellations to go. You don’t need to draw the whole design, just place small dots to guide your spacing.
Smudge Fixer
If you accidentally smear a wet dot, quickly wipe it away with a damp Q-tip or baby wipe before it sets. If it stains, cover the spot with a larger starburst design
Step 2: Drawing the Constellations
-
Create anchor dots:
Take your medium-tip black paint pen and create the main ‘stars’ of your constellations. Press down to make solid, round dots varying slightly in size for visual interest. -
Connect the stars:
Switch to the fine-tip pen. Draw thin, straight lines connecting your anchor dots to form the constellation shapes. A steady hand is helpful here, but small wobbles add character. -
Add varied dot sizes:
Go back with the medium-tip pen and add larger, standalone dots in empty spaces. These act as planets or brighter stars to balance the composition. -
Draw starbursts:
Using the fine-tip pen, draw 5-point or 8-point stars scattered around the pumpkin. I like to make the vertical and horizontal lines slightly longer than the diagonal ones for a classic twinkle effect. -
Incorporate unique shapes:
Add a few unique celestial symbols, such as a small circle with rays coming out (like a sun) or a tiny crescent moon, to break up the pattern of dots.
Step 3: Adding Detail and Depth
-
Create Milky Way dust:
Using the very tip of your fine pen, gently stipple clusters of tiny micro-dots. Group these around the larger constellations to suggest distant galaxies or stardust. -
Check spacing:
Rotate the pumpkin and look for any large, awkward white spaces. Fill these gaps with a single small starburst or a duo of medium dots. -
Follow the ribs:
Let the natural ribs of the pumpkin guide your flow. Sometimes placing a line of dots running vertically down a rib accentuates the pumpkin’s shape nicely. -
Refine lines:
Inspect your connecting lines. If any look too faint, retrace them carefully with the fine-tip pen to ensure they are bold and black. -
Clean up:
If you see any visible pencil marks from your planning phase, gently erase them once you are absolutely certain the paint is 100% dry.
Gilded Galaxy
tracing some of the connecting lines with a gold metallic paint pen or adding tiny gold highlight dots inside the larger black circles for an elegant shimmer
Step 4: Finishing Touches
-
Dry time:
Let the pumpkin sit undisturbed for at least an hour. Paint pens can be deceptively wet and smear easily if handled too soon. -
Seal:
For longevity, especially if placing outdoors, apply a light coat of matte spray sealer. This protects the design from moisture and rubbing off. -
Stem detail:
Leave the stem natural for contrast, or if it looks messy, give it a quick dry-brush with a little dark brown or gold paint to neaten it up.
Place your finished cosmic pumpkin on a mantel or centerpiece to enjoy your handiwork all season long
Cute Monster Faces on Small White Pumpkins

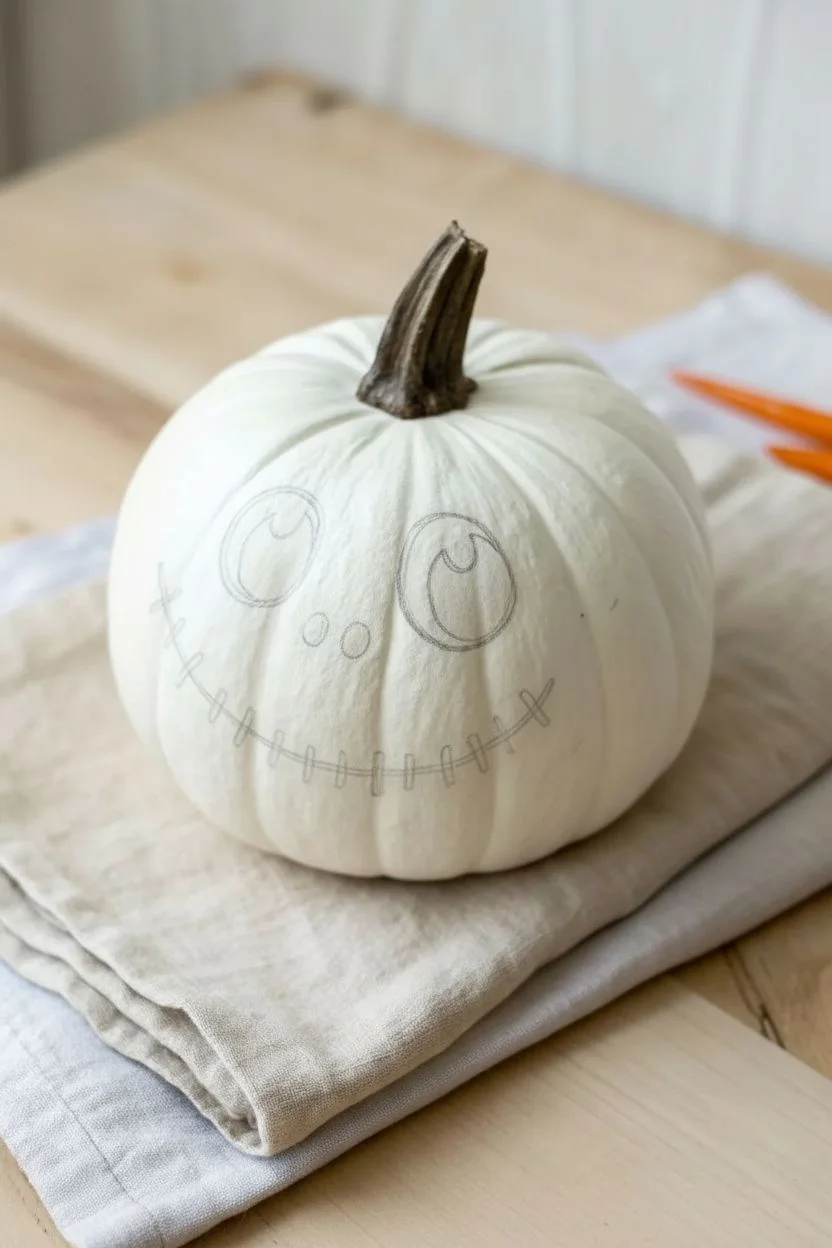
Bring a touch of whimsical spookiness to your Halloween decor with this adorable stitched-face pumpkin. The classic white background makes the simple black painted features pop, creating a high-contrast look that is both cute and slightly eerie.
Step-by-Step Guide
Materials
- Small white pumpkin (real or artificial)
- Black acrylic paint
- Small round paintbrush (size 2 or 4)
- Very fine liner brush (size 0 or 00)
- Pencil (for sketching)
- Eraser
- Paper towel
- Cup of water
Step 1: Preparation & Sketching
-
Clean the surface:
Before you begin, make sure your pumpkin is free of dirt or dust. Wipe it down gently with a damp paper towel and let it dry completely. If you are using a real pumpkin, ensure the stem is firmly attached. -
Sketch the eyes:
Using a pencil, lightly draw two large ovals for the eyes. Position them slightly higher on the pumpkin’s face, spacing them evenly apart. I find drawing them at a slight inward tilt makes the expression look a bit friendlier. -
Sketch the nose:
Draw two small, vertical ovals or dots right in the center of the face, just below the eyes. These will be the nostrils. -
Outline the mouth:
Sketch a long, wide U-shape for the smile. Start wide on the cheeks and let it dip down low. Don’t worry about the stitch marks just yet; focus on getting the main curve symmetrical. -
Check symmetry:
Step back and look at your pencil marks. This is the time to make adjustments with your eraser if one eye is larger than the other or if the smile is crooked.
Wobbly Lines?
If you struggle with shaky hands on the curved pumpkin surface, use a black permanent marker or paint pen instead of a brush for the fine stitching details.
Step 2: Painting the Features
-
Outline the eyes:
Load your small round paintbrush with black acrylic paint. Carefully trace the pencil outline of the left eye. Keep your hand steady and use the tip of the brush for a clean edge. -
Fill the eyes:
Once the outline is secure, fill in the entire oval with black paint. Apply a second coat if the first one looks streaky or translucent, ensuring a solid, matte black finish. -
Repeat for the right eye:
Move to the right eye and repeat the outlining and filling process. Try to match the opacity of the first eye so they look uniform. -
Add the highlights:
This is the crucial step for ‘cuteness.’ While the black paint is still wet, you can leave a small negative space unpainted (showing the white pumpkin skin) in the upper right corner of each eye. Alternatively, wait for the black to fully dry and dot white paint on top. The unpainted negative space method creates the crispest look. -
Paint the nostrils:
Using the very tip of your round brush or switching to the fine liner brush, fill in the two small nostril dots. Make them distinct but not overpowering.
Glow Up
Use glow-in-the-dark paint for the white eye highlights and over the teeth stitches. The face will look normal in light but reveal a ghostly grin in the dark.
Step 3: Stitching the Smile
-
Trace the main smile line:
Switch to your fine liner brush for the mouth. Load it with black paint and carefully trace the main curved line of the smile. Use long, smooth strokes rather than short, choppy ones to keep the line fluid. -
Thicken the smile ends:
Slightly thicken the very ends of the smile line (the corners of the mouth) to give them visual weight, or add tiny perpendicular caps like the letter ‘T’ as shown on the left side. -
Start the stitches:
Begin adding the vertical stitch marks. Start from the center of the mouth and work your way outward to ensure they are spaced evenly. I like to make the center stitch perfectly vertical. -
Continue stitching:
Add stitches every half-inch or so along the smile line. As the smile curves up the cheeks, angle your stitch marks slightly so they remain perpendicular to the curve of the mouth. -
Refine the lines:
Go back over any stitch marks that look too thin. You want them to look deliberate and bold, similar to the thickness of the main smile line. -
Clean up edges:
If you made any smudges, wait for the black paint to dry completely. Then, use a small amount of white paint (or white correction fluid if the color matches) to touch up the mistakes. -
Final dry:
Let the pumpkin sit undisturbed for at least an hour to ensure the thick black paint is fully cured and won’t smear if touched.
Set this character on a shelf or mantle and enjoy the friendly grin every time you pass by
Whimsical Animal Portraits on Small White Pumpkins
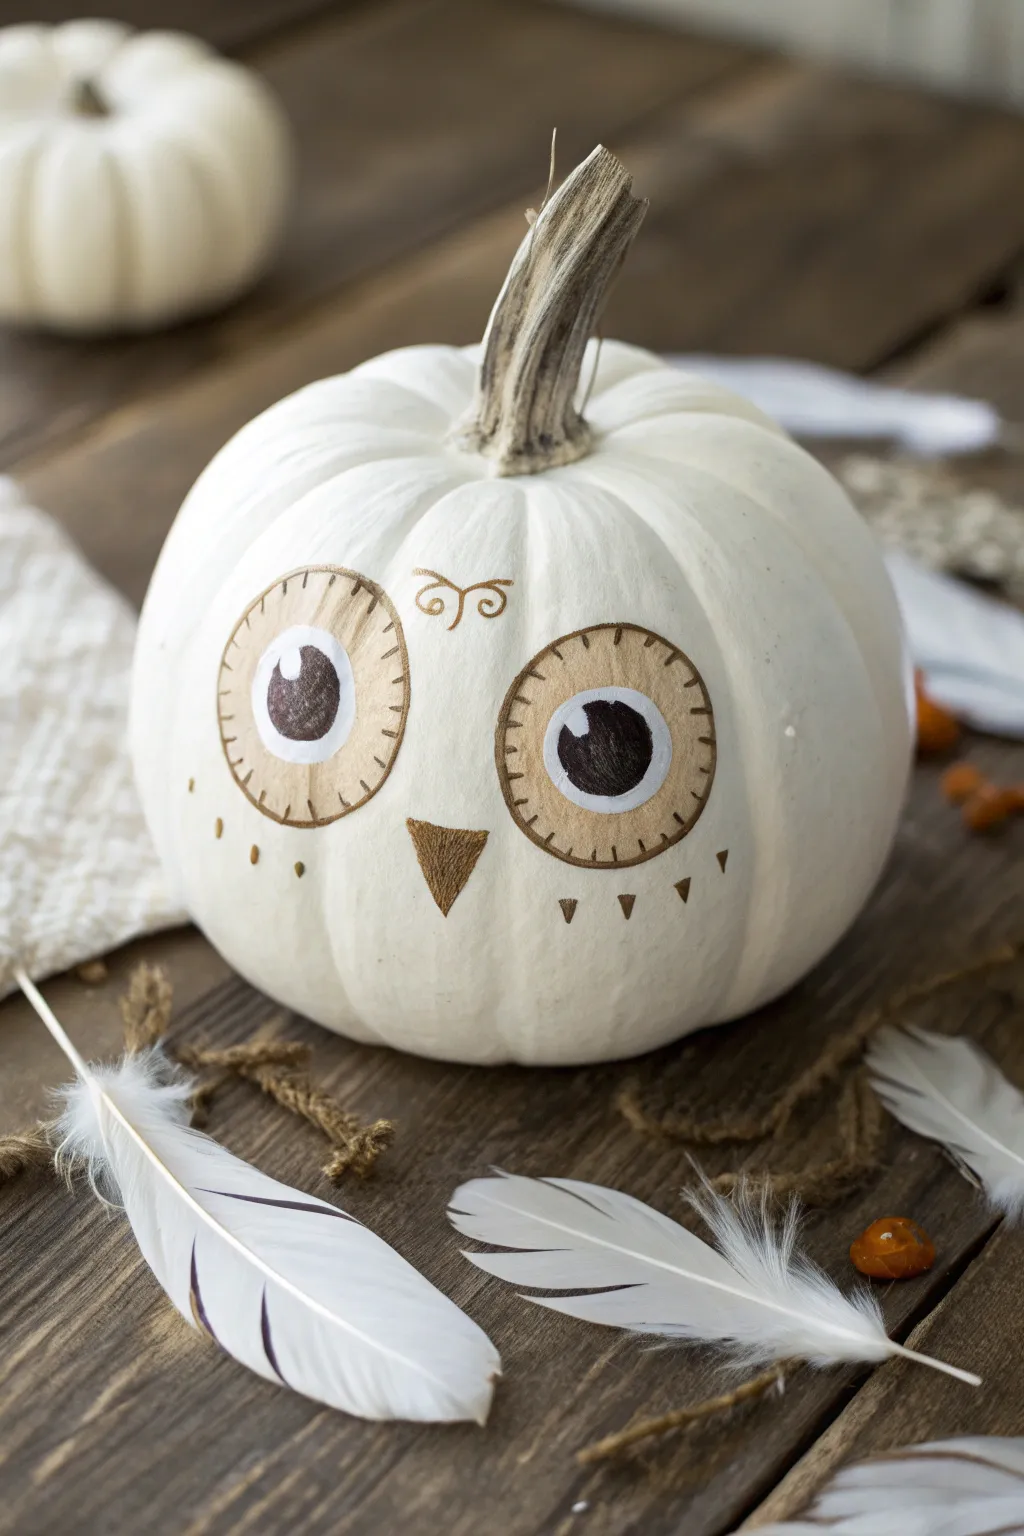
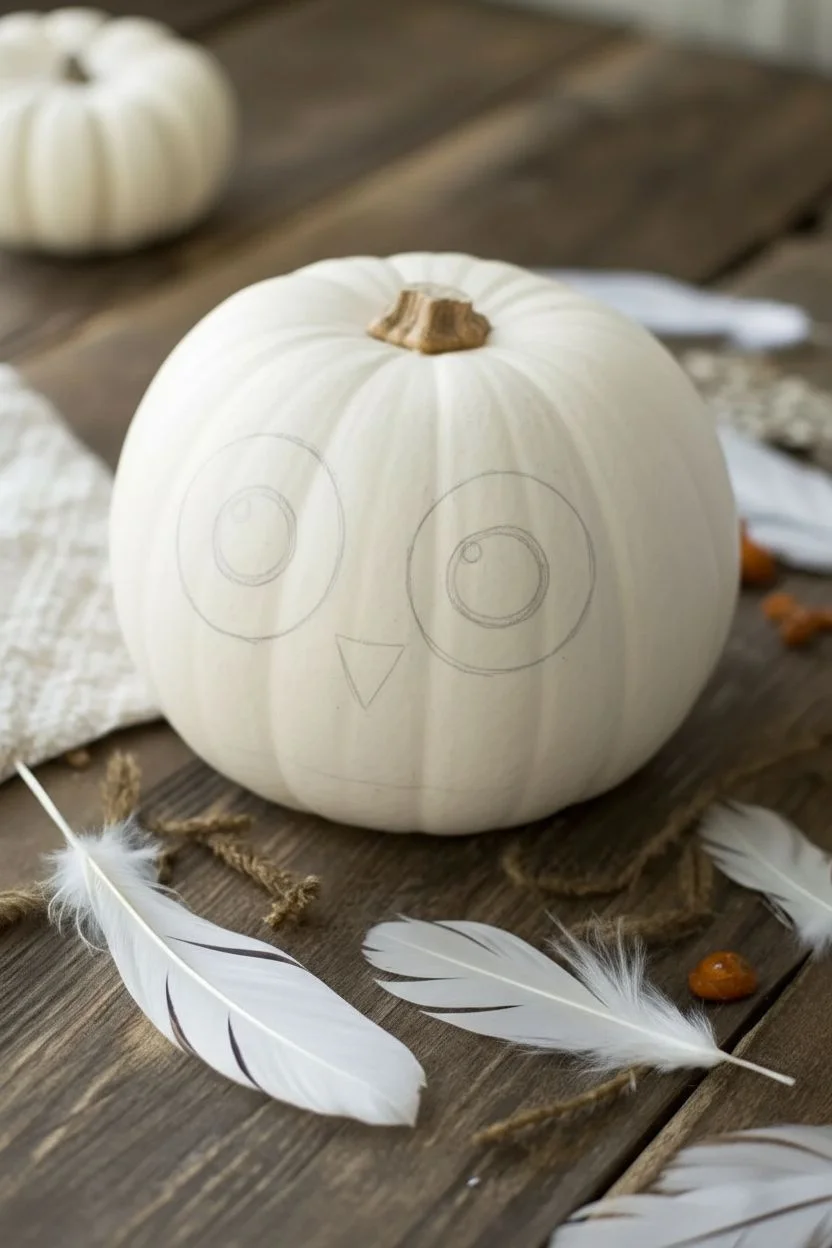
Transform a simple white pumpkin into a charming woodland creature with minimal supplies and maximum personality. This owl design uses earthy browns and gold tones to create a wide-eyed, whimsical look that pairs perfectly with rustic fall decor.
Detailed Instructions
Materials
- Small white pumpkin (real or faux)
- Brown permanent marker or acrylic paint pen (fine tip)
- Gold or light brown paint pen
- White paint pen or small brush with white acrylic paint
- Pencil for sketching
- Eraser
- Paper towel or rag
Step 1: Preparation & Sketching
-
Clean surface:
Begin by wiping down your pumpkin with a damp cloth to remove any dust or dirt. If using a real pumpkin, ensure it is completely dry before starting. For faux pumpkins, a quick wipe with rubbing alcohol helps the marker adhere better. -
Position the face:
Establish where the ‘front’ of your pumpkin is. Look for a flatter side that sits nicely without rolling. The stem usually curves slightly; having it curve slightly backward or to the side often looks best. -
Sketch the eyes:
Using a pencil very lightly, draw two large circles for the eyes. These should be quite big relative to the pumpkin size to achieve that cute, cartoonish owl look. Place them midway down the pumpkin’s height. -
Outline interior details:
Inside the large circles, sketch a smaller circle slightly off-center for the pupils. Add a small highlight circle inside the pupil area now so you don’t accidentally fill it in later. -
Add the beak:
Draw a small, downward-pointing triangle right between the eyes, positioning the top edge of the triangle in line with the bottom third of the eye circles.
Step 2: Painting the Features
-
Fill the pupils:
Using your dark brown marker or paint pen, carefully fill in the pupil circles. Remember to leave that tiny white highlight circle completely unpainted for a spark of life. -
Create the iris:
Switch to a gold or light tan paint pen. Fill in the ring around the dark pupil. I find that doing this in small, circular strokes helps blend the color smoothly without streaking. -
Outline the eyes:
Take your fine-tipped brown marker and trace the outer edge of the large eye circles. Go over the line twice if you want a bolder definition. -
Add eye details:
Draw small, straight hash marks all around the iris, radiating outward like distinct eyelashes or feather details. This gives the eyes that stitched, textured appearance. -
Paint the beak:
Fill in the triangle beak with the gold or tan marker. Once dry, outline it with the dark brown fine tip to make it pop against the white skin.
Use the Pumpkin’s Shape
Work with the natural ribs of the pumpkin. Center the beak on a convex ridge and let the large eyes sit in the slightly concave valleys for natural dimension.
Step 3: Decorative Accents
-
Forehead flourishes:
Directly above the beak, in the center of the forehead, draw a small decorative swirl design using the gold or tan marker. It should look like two small spirals meeting in the middle. -
Add chest feathers:
Below the eyes and beak, create a row of small, inverted triangles or ‘V’ shapes. These represent the texture of chest feathers without needing to paint the whole pumpkin. -
Side feather details:
Add a few small dots or dashes to the left and right of the eyes to suggest cheek feathers or contouring. -
Clean up sketch lines:
Once you are absolutely certain all ink and paint is dry—give it a good 10 to 15 minutes—gently erase any visible pencil marks. -
Refining the white:
If your white highlights in the eyes got smudged, use a tiny dot of white acrylic paint or a white pen to make them crisp and bright again.
Smudged Ink?
If you smudge marker on a real pumpkin skin, a cotton swab dipped in rubbing alcohol acts as a magic eraser. Just dab gently so you don’t spread the stain.
Place your finished owl among some feathers and twigs for a complete woodland vignette
Neutral Terrazzo Speckles on Small White Pumpkins
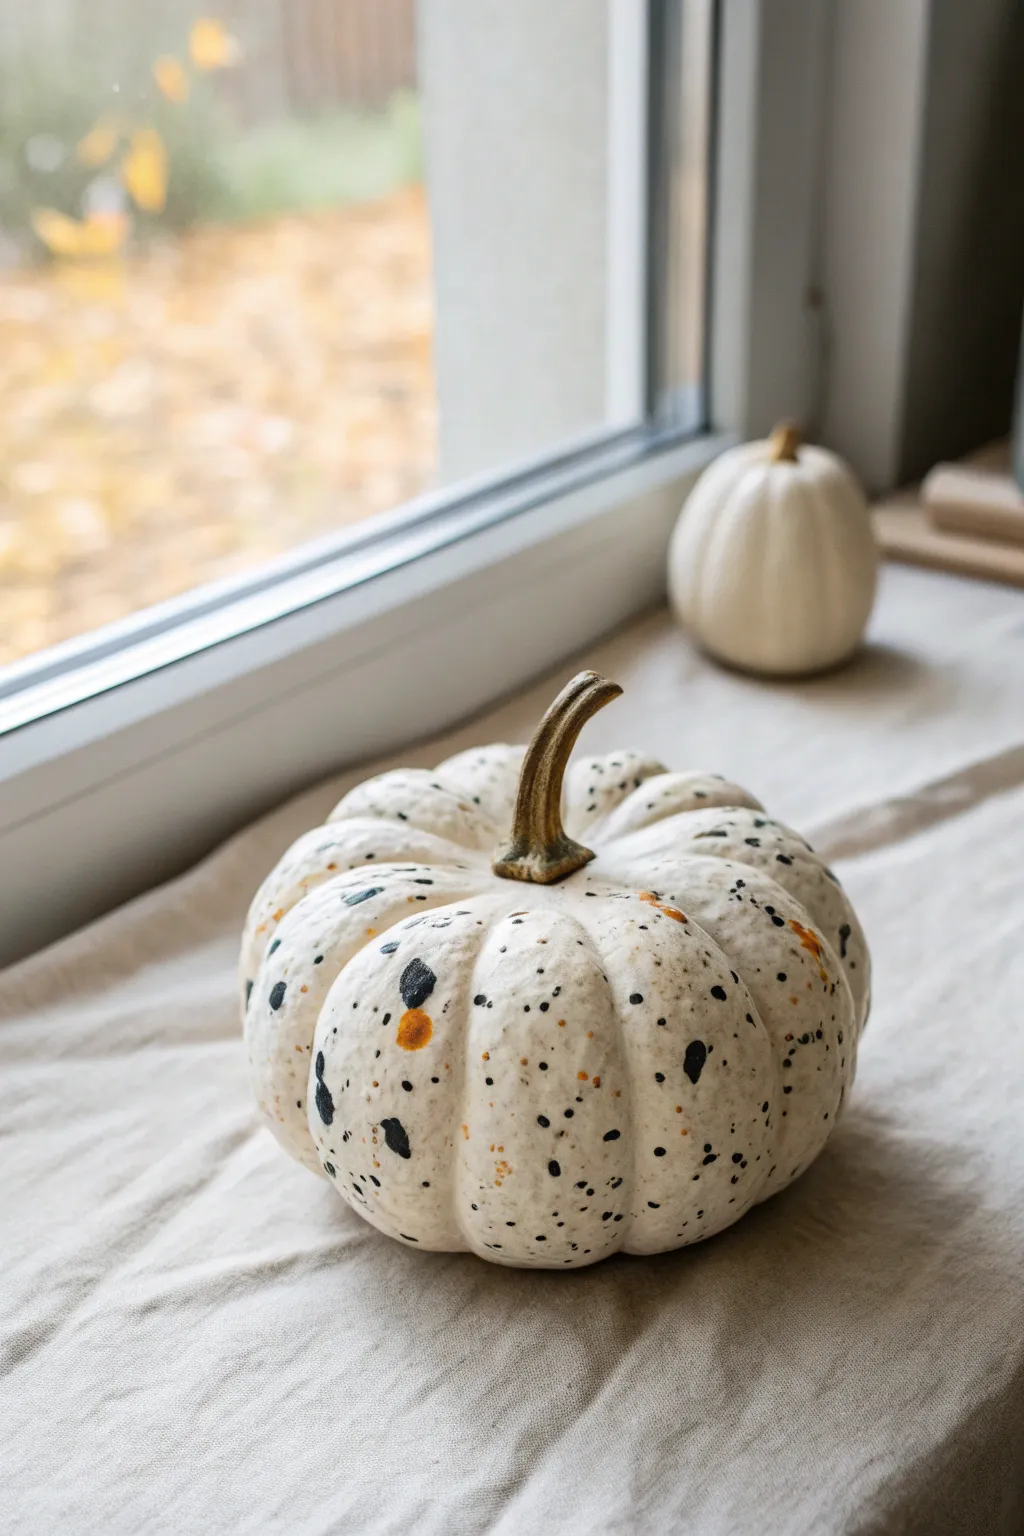
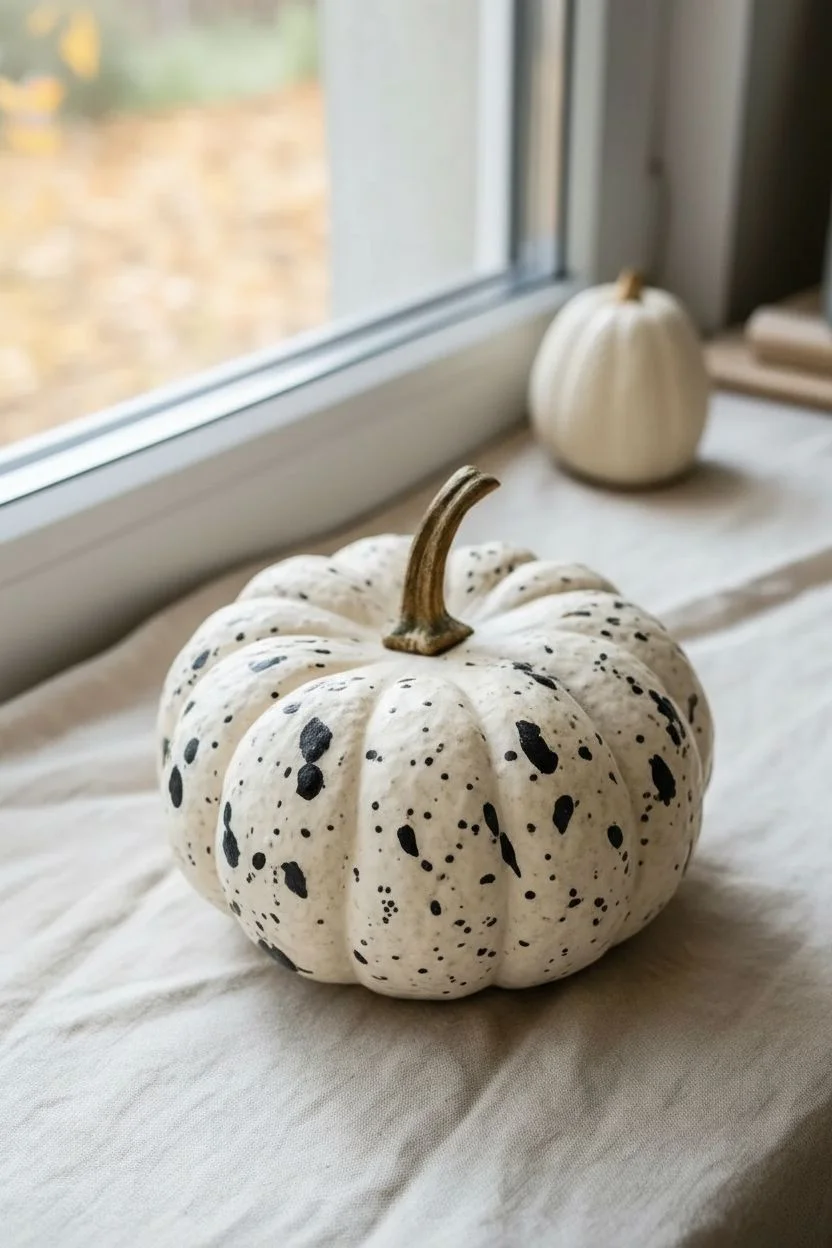
Transform a plain white pumpkin into a piece of modern, minimalist decor with this easy speckled design. The abstract terrazzo-inspired pattern combines stark black flecks with warm rust accents for a sophisticated autumnal look.
Step-by-Step
Materials
- Small white pumpkin (real or faux)
- Black acrylic paint
- Rust or burnt orange acrylic paint
- Small round paintbrush (size 0 or 1)
- Fine detail paintbrush or toothpick
- Cup of water
- Paper palette or plate
- Paper towels
- Matte sealant spray (optional)
Step 1: Preparation
-
Clean the surface:
Before you begin painting, ensure your pumpkin is completely clean. Wipe it down with a damp cloth to remove any dust or dirt, then dry it thoroughly with a paper towel. If using a real pumpkin, make sure the surface is not waxy or slick. -
Prepare your palette:
Squeeze a small dime-sized amount of black acrylic paint onto your palette. Do the same for the rust or burnt orange color, keeping them separated so they don’t mix accidentally.
Step 2: Painting the Black Speckles
-
Start with medium shapes:
Load your small round brush with black paint. We aren’t looking for perfect circles here; create small, irregular blobs spaced randomly around the pumpkin’s ribs. -
Vary the edges:
As you paint these larger shapes, press the brush down slightly and wiggle it to create uneven, organic edges that mimic chipped stone. -
Add detail dots:
Switch to your fine detail brush or a toothpick. Dip it into the black paint and add tiny pinprick dots in the empty spaces between your larger blobs. -
Cluster the dots:
To make the pattern feel natural, try clustering two or three tiny dots near some of the larger shapes rather than spacing them all perfectly evenly. -
Rotate and evaluate:
Turn the pumpkin slowly as you work to ensure you aren’t leaving any large bald spots. The coverage should feel random but balanced. -
Let the black dry:
Allow the black paint to dry completely. Since the dots are small, this should only take about 10 to 15 minutes.
Natural Texture
For a truer terrazzo look, dilute the black paint slightly with water. This makes the speckles partially translucent, mimicking the varied density found in real stone or concrete.
Step 3: Adding the Color Accents
-
Introduce the warmth:
Now, pick up your rust or burnt orange paint with a clean small brush. You want fewer of these spots than the black ones—think of them as highlights. -
Place larger color spots:
Look for wider gaps in your black pattern and fill a few of them with slightly larger, irregular shapes of the rust color. -
Create tiny accents:
Use the very tip of your brush or toothpick to add minuscule speckles of orange near the black clusters. This adds depth to the terrazzo illusion. -
Check the crevices:
Make sure to bring the pattern all the way down into the grooves of the pumpkin ribs so the design doesn’t disappear when viewed from different angles. -
Review the stem area:
I always check near the stem to ensure the pattern flows naturally up to the top, adding a few tiny specks right at the base of the stem if needed. -
Final drying time:
Let the rust paint dry completely. Avoid touching the painted areas until the sheen of the wet paint has disappeared.
Metallic Twist
Swap the rust-colored paint for gold leaf paint or liquid gilding to give your pumpkin a glamorous, high-end shine that catches the light beautifully.
Step 4: Finishing Touches
-
Clean up stray marks:
If you accidentally smudged a spot, you can usually gently scratch it off a faux pumpkin with a fingernail or use a damp Q-tip for a real one. -
Seal the work (optional):
To protect your design, especially if the pumpkin will be moved often, spray a light coat of matte sealant over the entire surface in a well-ventilated area.
Place your stylish new pumpkin on a windowsill or mantle to enjoy the modern autumn vibes
Textured Dot Mandalas on Small White Pumpkins
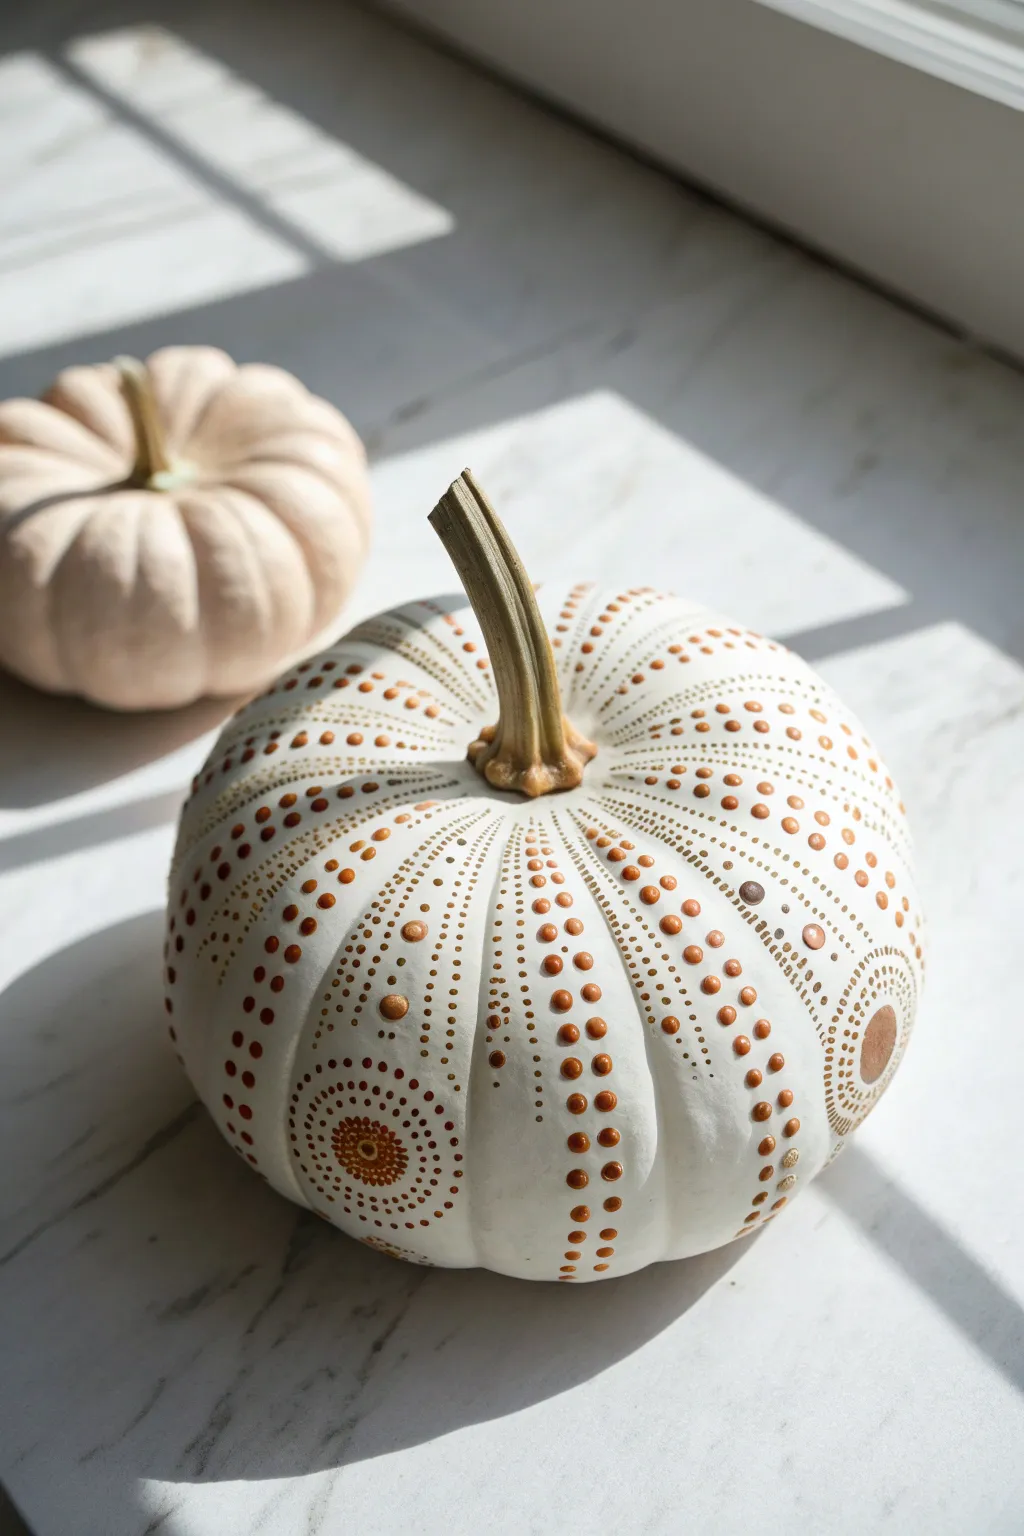
Transform a simple white pumpkin into an elegant autumn centerpiece with the meditative art of dot painting. This project uses raised metallic paints to create intricate, radiating patterns that mimic the natural curves of the gourd for a sophisticated, textural finish.
Step-by-Step Guide
Materials
- Small white pumpkin (real or faux)
- Dimensional fabric paint or puff paint (Gold, Copper, Bronze)
- Rubbing alcohol and cotton pad (for cleaning)
- Pencil (optional for guidelines)
- Paper towel
- Small painting palette or scrap paper (for testing flow)
Step 1: Preparation & Planning
-
Clean surface:
Begin by wiping the entire surface of your white pumpkin with rubbing alcohol on a cotton pad. This removes natural oils or manufacturing residue, ensuring your dimensional paint adheres perfectly. -
Dry thoroughly:
Allow the pumpkin to air dry completely for a few minutes before you start painting. -
Test paint flow:
Take your bottle of dimensional paint and squeeze a few test dots onto a scrap piece of paper. You want to ensure there is no air bubble at the tip that could cause a splatter on your actual project. -
Visualize sections:
Look at the natural ribs of the pumpkin. These vertical indentations will serve as the natural guidelines for your radiating lines. You don’t need to draw them, just identify the ‘valleys’ and ‘ridges’.
Pro Tip: Steady Hands
Rest your painting elbow firmly on the table and use your pinky finger as a bridge on a dry section of the pumpkin. This tripod grip stabilizes shakes for perfect circles.
Step 2: Creating the Radiating Lines
-
Start at the stem:
Choose one of the pumpkin’s ribs. Place your paint tip very close to the base of the stem. Gently squeeze to form a tiny dot right where the stem meets the skin. -
Create the first line:
Moving downwards along the ridge of the pumpkin, create a line of dots. Keep these initial dots extremely small and close together to create a delicate, fine line effect. -
Dotted gradation:
As you move further down the rib away from the stem, slightly increase the space between dots or the size of the dots themselves to create a sense of expansion. -
Repeat around the top:
Repeat this process for every rib around the pumpkin, creating starburst-like lines that radiate outward from the stem down the sides. -
Vary dot sizes:
For visual interest, create secondary lines in the ‘valleys’ between ribs. Use significantly smaller, pin-prick sized dots here to contrast with the bolder dots on the ridges.
Level Up: Ombré Effect
Use three shades of metallic paint (champagne, pure gold, bronze). Start lightest near the stem and transition to darker bronze dots near the base for a gradient look.
Step 3: Adding Medallion Details
-
Locate focal points:
Choose 3-4 random spots on the wider, lower part of the pumpkin’s curve to place your larger medallion designs. These break up the vertical symmetry. -
Center dot:
Squeeze a larger, generous amount of paint to create a raised central dot about the size of a peppercorn. Let it settle slightly. -
First ring:
Carefully place a ring of tiny dots immediately surrounding the central dot. Keep your hand steady and rest your pinky finger on a dry part of the pumpkin for stability. -
Expand the pattern:
Add a second and third ring of dots, gradually increasing their size. I like to alternate between metallic shades here—perhaps using copper for the center and gold for the outer rings—to add depth. -
Connect designs:
Between the vertical lines and medallions, fill empty negative spaces with trailing lines of graduating dots. Start with a medium dot and follow it with three or four progressively smaller ones.
Step 4: Finishing Touches
-
Check for peaks:
Dimensional paint often leaves little sharp ‘peaks’ when you pull the nozzle away. If you see any, gently tap the bottom of the pumpkin on the table to help the paint settle into round domes. -
Clean up errors:
If a dot smudges or runs, use a damp Q-tip immediately to wipe it away cleanly, then dry the spot before reapplying. -
Final drying:
This step is crucial: set the pumpkin in a safe, dust-free place to dry undisturbed for at least 24 hours. The thick dots need time to cure completely hard.
Once fully cured, your gilded pumpkin is ready to bring a touch of sophisticated shimmer to your seasonal decor
Faux Marble Veins on Small White Pumpkins


Transform a simple white pumpkin into a sophisticated piece of decor with this faux marble technique. By carefully layering fine lines and soft washes, you can achieve the elegant, organic look of Carrara marble on a seasonal gourd.
Step-by-Step Tutorial
Materials
- Small white pumpkin (real or faux)
- Black acrylic paint
- White acrylic paint (for blending)
- Glazing medium or water
- Fine liner brush (size 0 or 00)
- Small round brush (size 2)
- Feather or sea sponge (optional)
- Paper plate or palette
- Paper towels
- Clear matte sealer spray
Step 1: Preparation & Base
-
Clean surface:
Begin by wiping down your pumpkin with a slightly damp paper towel to remove any dirt or oils. If you are using a real pumpkin, ensure it is completely dry before starting. -
Prime the stem:
Protect the stem with painter’s tape if you want to keep its natural color, or leave it exposed if you plan to paint around it carefully. -
Prepare the paint mix:
On your palette, mix a small drop of black acrylic paint with a generous amount of glazing medium or water. You want a very watery, translucent grey consistency, almost like ink.
Veins look too straight?
Roll the brush between your fingers as you drag it. This naturally rotates the bristles and creates unpredictable, jagged lines that look much more organic.
Step 2: Creating the Major Veins
-
Load the liner brush:
Dip your fine liner brush into the watered-down grey mixture. Remove excess liquid on the edge of the palette so it doesn’t drip. -
Identify natural lines:
Look for the natural vertical ribs of the pumpkin. These recessed areas are perfect guides for your primary veins. -
Draw the main vein:
Starting near the stem, drag your brush down one of the pumpkin’s ribs with a shaky, unsteady hand. A jittery motion creates a more realistic, organic nature than a perfect straight line. -
Vary the pressure:
As you pull the line down, press slightly harder in some spots and lift off in others to vary the line thickness. -
Soften the line:
Immediately after painting a segment, take a slightly damp round brush or your finger and gently blot parts of the line to blur it into the white background. This mimics the ‘buried’ look of real marble veins. -
Repeat vertically:
Continue this process for the major vertical crevices around the pumpkin, keeping the lines faint and irregular.
Add a Luxe Touch
Once the black veins are dry, trace along a few select edges with metallic gold leaf paint. This adds a trendy ‘kintsugi’ vibe to your marble design.
Step 3: Adding Detail & Depth
-
Mix a darker shade:
Add a tiny bit more black to your grey wash so it is slightly more opaque and darker than the previous layer. -
Branch out:
Using the tip of the liner brush, create smaller veins that branch off from your main vertical lines. These should move diagonally across the pumpkin’s ‘face’ rather than just strictly up and down. -
Create lightning shapes:
Paint these secondary veins in jagged, lightning-bolt shapes. Let them intersect and fade out randomly. -
Feathering technique:
I sometimes use a feather or a small piece of sea sponge to lightly dab grey wash in random open areas, creating the cloudy ‘smoke’ effect seen in natural stone. -
Intensify specific spots:
Go back with pure, undiluted black paint on the very tip of your smallest brush. Accentuate the intersections where two veins meet to create depth. -
Dry styling:
Allow the paint to dry completely for about 20 minutes. The acrylics will darken slightly as they dry. -
Protection:
Once fully dry, take the pumpkin outside and spray it with a clear matte sealer to protect the design and give it a finished stone-like sheen.
Place your marble masterpiece on a dark surface to really make the white pop and enjoy your elegant autumn accent
Glow Accents and Starbursts on Small White Pumpkins
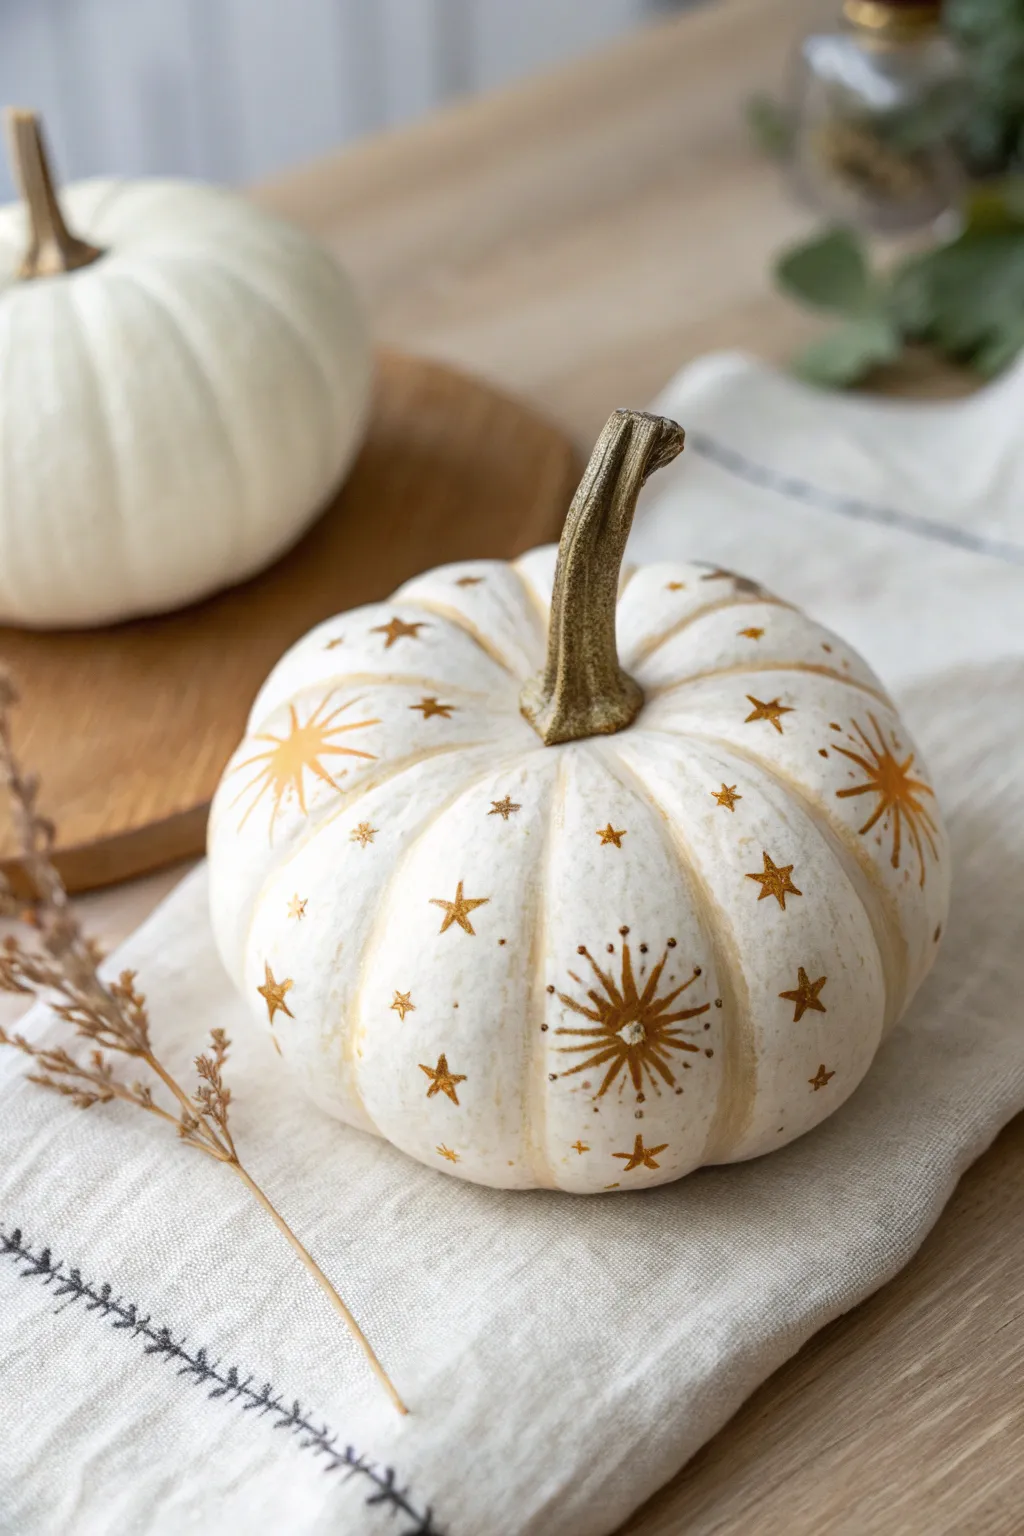
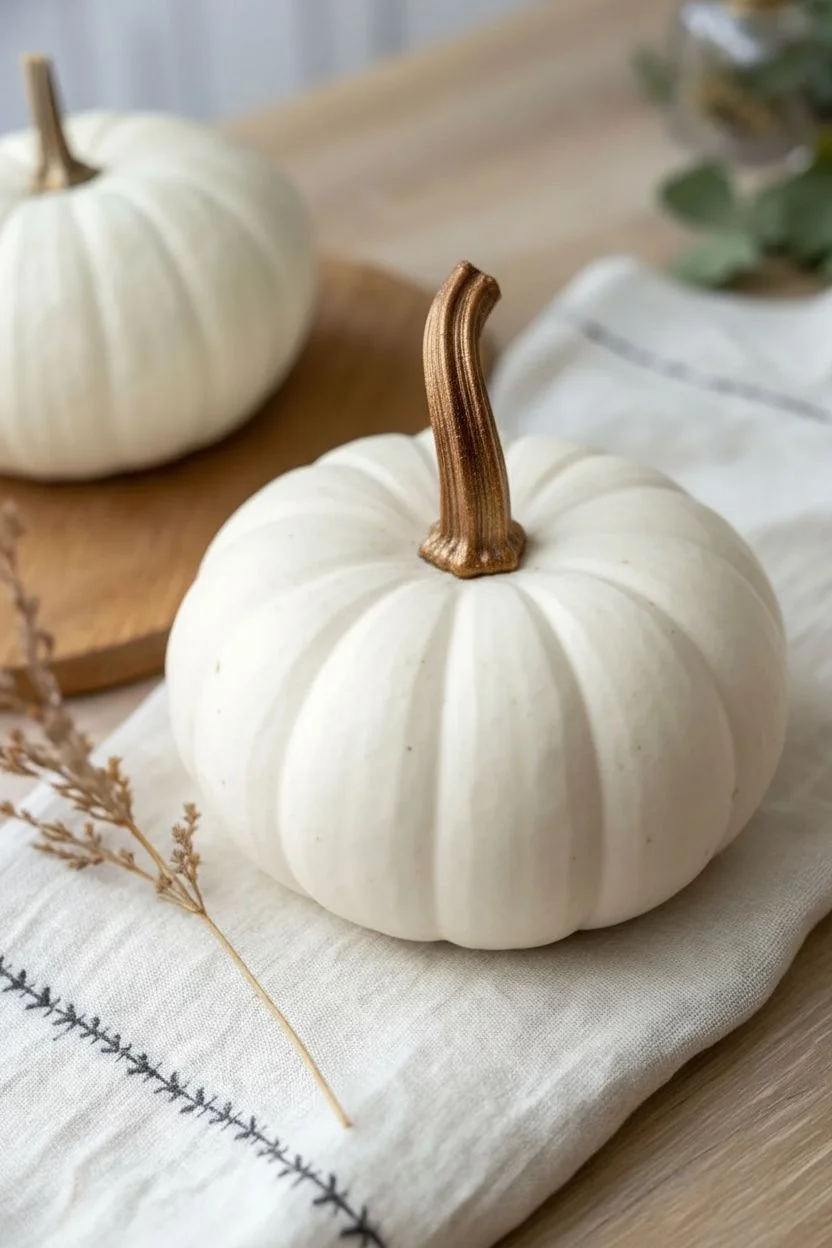
Transform a simple white gourd into a mystical autumn centerpiece with delicate metallic accents. This design combines radiating starbursts and scattered stars to give your pumpkin a magical, hand-drawn aesthetic that catches the light beautifully.
Detailed Instructions
Materials
- Small white pumpkin (real or faux)
- Metallic gold paint pen (medium or fine tip)
- Metallic bronze or antique gold acrylic paint
- Small flat paintbrush
- Paper towel or rag
- Pencil (optional)
- Clear matte sealant spray (optional)
Step 1: Preparation & Stem
-
Clean the surface:
Before starting, wipe down your white pumpkin with a damp cloth to remove any dirt or oils that might prevent the paint from adhering properly. Pat it completely dry. -
Prepare the stem color:
Squeeze a small amount of metallic bronze or antique gold acrylic paint onto a palette or paper plate. This darker metallic shade adds a sophisticated contrast to the lighter gold details. -
Paint the stem base:
Using your small flat paintbrush, carefully apply the bronze paint to the entire stem. Start at the very base where the stem meets the pumpkin skin, working your way up. -
Finish the stem:
Coat the top of the cut stem and ensure all crevices are covered. I find that a second coat after the first one dries adds a richer, more solid metallic look. -
Let it cure:
Allow the stem to dry completely—usually about 15 to 20 minutes—before handling the pumpkin to draw the designs.
Step 2: Designing the Starbursts
-
Prime your pen:
Shake your gold paint pen well and press the tip on a scrap piece of paper until the ink flows smoothly and consistently. -
Position the main motifs:
Plan where your large starbursts will go. Aim for 3-5 large bursts spaced unevenly around the pumpkin’s midsection, placing them on the smoother parts of the ribs for easier drawing. -
Draw the center dot:
Create the heart of your first starburst by pressing the paint pen down to make a distinct, solid gold dot. -
Add primary rays:
Draw four long rays extending from the center dot: up, down, left, and right. These should be your longest lines, tapering slightly at the ends. -
Fill in secondary rays:
Between each primary ray, draw shorter lines radiating outward. Vary the lengths slightly to create a dynamic, shimmering effect rather than a perfect geometric shape. -
Add detail dots:
To enhance the ‘glow’ effect, place tiny dots at the very tips of some of the longer rays. This small detail makes the starburst feel like it’s sparkling.
Steady Hand Trick
For crisper lines on the curved surface, rest your pinky finger on the pumpkin itself to stabilize your drawing hand while you move the pen.
Step 3: Adding Scattered Stars
-
Draw five-pointed stars:
In the empty spaces between your large starbursts, draw classic five-pointed stars. Keep these roughly the same size, about half an inch wide. -
Fill the stars:
Color in your five-pointed stars completely with the gold pen so they appear solid rather than outlined. -
Create variation:
Turn the pumpkin as you work and add smaller, four-pointed sparkles (just a simple cross shape) in tighter areas near the top and bottom. -
Review spacing:
Step back and look at the overall pattern. If there are large white gaps, fill them with tiny singular dots to suggest distant stardust. -
Dry and seal:
Let the paint pen ink dry for at least an hour. If you plan to keep this outside, a light coat of clear matte sealant spray will protect your beautiful work from the elements.
Cosmic Contrast
Before adding gold, dry-brush a tiny bit of pale pink or lavender paint behind where the starbursts will go for a subtle, ethereal background glow.
Place your celestial pumpkin on a mantle or tablescape to enjoy its subtle shimmer all season long


Have a question or want to share your own experience? I'd love to hear from you in the comments below!