
Snow is one of my favorite things to draw because it’s basically a magic trick: you “draw” it by drawing everything around it. Here are a bunch of snow drawing ideas that feel cozy and doable, whether you’re sketching in pencil or building a full winter scene.
Classic Snowy Cabin With Smoke
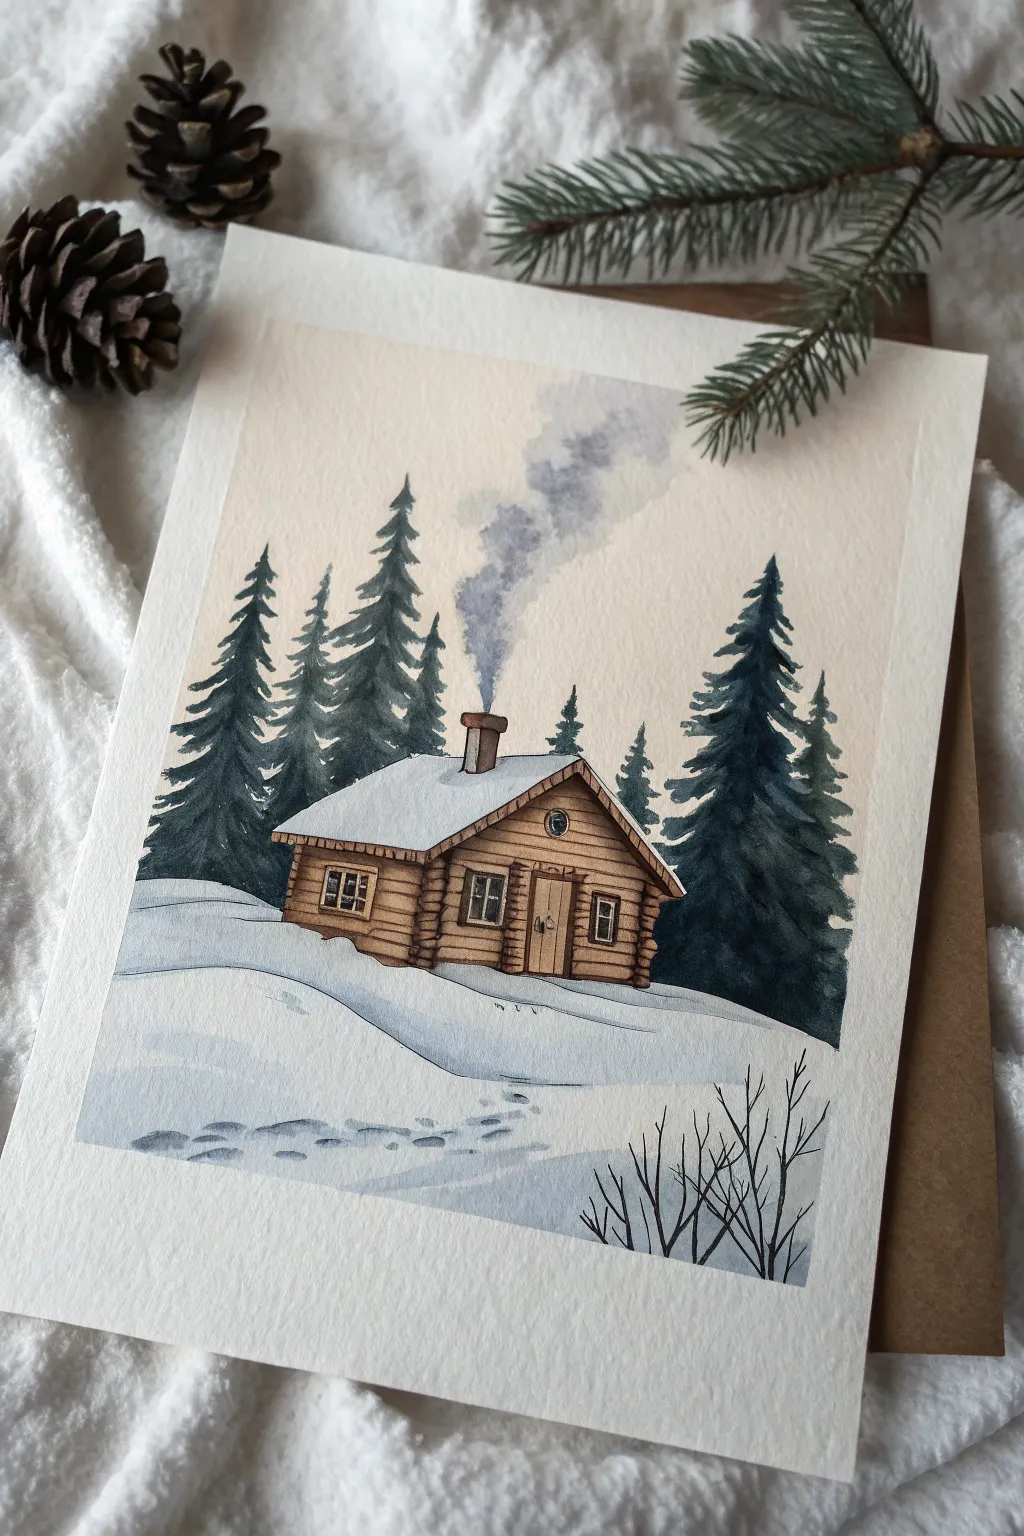
Capture the cozy silence of winter with this charming watercolor illustration featuring a rustic log cabin nestled among deep green pines. This project focuses on building depth through layers and using negative space to create soft, pillowy snow banks.
Detailed Instructions
Materials
- Cold press watercolor paper (300 gsm)
- Watercolor paints (Burnt Sienna, Sepia, Payne’s Grey, Indigo, Prussian Blue)
- Pencil (HB) and kneaded eraser
- Round brushes (sizes 2, 6, and 8)
- Fine liner pen (brown or sepia, 0.1mm)
- White gouache or white gel pen
- Masking tape
- Jar of water and paper towels
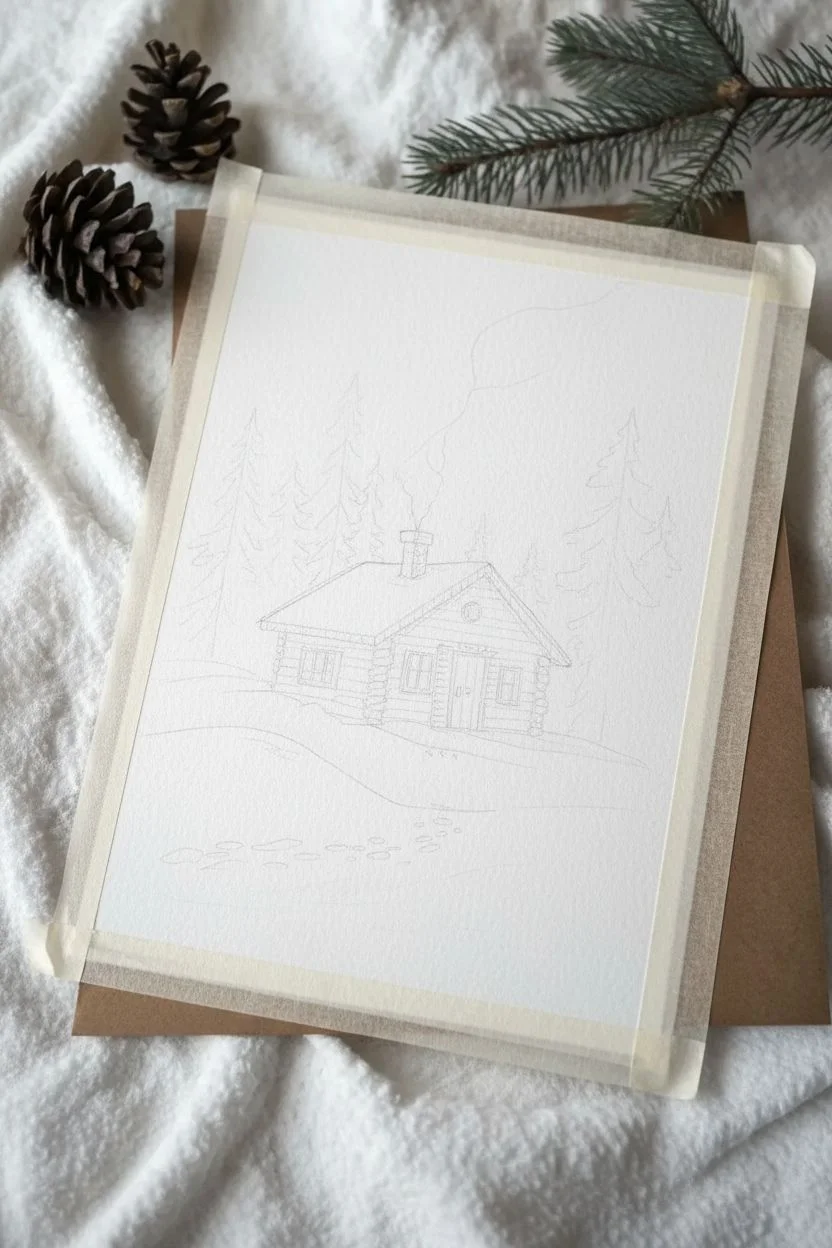
Step 1: Sketching and Preparation
-
Paper Setup:
Begin by taping down all four edges of your watercolor paper to a board. This creates the crisp white border seen in the final piece and prevents the paper from buckling when wet. -
Layout Sketch:
Using an HB pencil, lightly sketch the horizon line about one-third of the way up the page. Draw the basic rectangular shape of the house in the center, ensuring the perspective lines of the roof and walls angle slightly downward towards a vanishing point. -
Detailing the Cabin:
Refine your cabin sketch by adding the timber logs, the door, three windows, and the chimney. Keep your lines faint so they don’t show through the transparent paint later. -
Planning the Landscape:
Lightly outline where the pine trees will stand behind the cabin—vary their heights for interest. Also, mark the sweeping curves of the snow banks in the foreground to guide your painting.
Snow Texture Trick
Before painting the snow shadows, sprinkle a few grains of table salt onto wet washes. It creates a crystallized ice texture perfect for winter scenes.
Step 2: Painting the Elements
-
Cabin Base Layer:
Mix a watery wash of Burnt Sienna. Paint the entire wooden structure of the cabin, carefully avoiding the roof (which stays white for snow) and the window panes. Let this dry completely. -
Adding Wood Texture:
Once dry, use a size 2 brush with a thicker mix of Burnt Sienna and a touch of Sepia to paint individual horizontal logs. Leave tiny slivers of the lighter base layer showing between the logs to create dimension. -
Shadows and Trim:
Use a mix of Sepia and Payne’s Grey to paint the darker trim around the windows and door. Add a cast shadow under the eaves of the roof to make the snow look thick and heavy. -
Chimney Detail:
Paint the chimney with a reddish-brown mix. While it’s still slightly damp, drop in a tiny bit of darker brown on the shadowed side for volume. -
The Smoke:
Wet the area above the chimney with clean water. Drop in a very dilute mix of Payne’s Grey and let it bloom upward and outward naturally to create soft, diffusing smoke.
Step 3: Trees and Landscape
-
Mixing Green:
Create a deep, cold green by mixing Indigo with a little Burnt Sienna or Hooker’s Green. You want a color that feels like a twilight forest. -
Painting Pine Trees:
Start from the top of a tree with a size 6 brush. Use a zig-zag motion, pressing harder as you move down to create wider branches. Leave gaps in the foliage so the sky or background shows through occasionally. -
Tree Depth:
While the trees are still damp, drop clearer Indigo into the bottoms and centers of the trees to adding core shadows. I find this gives them that dense, three-dimensional look. -
Snow Shadows:
Mix a very watery, pale blue-grey (Payne’s Grey is perfect here). Paint the shadows on the snowy ground, following the curves you sketched earlier. Keep the top surfaces of the snow drifts pure white paper. -
Foreground Details:
Paint the footprints leading to the house using small dabs of the shadow color. Make the footprints larger in the foreground and smaller as they get closer to the cabin. -
Dry Branches:
Using your finest brush or a liner pen, add the delicate, bare shrub branches in the bottom right corner. Use quick, confident flicks of the wrist for natural-looking growth.
Starry Night Upgrade
Paint the sky a deep navy blue behind the smoke. Once dry, splatter white gouache or acrylic ink over the sky to create a magical falling snow effect.
Step 4: Final Touches
-
Refining the Cabin:
Use a brown fine liner pen to outline the logs, windows, and door frames if you want a sharper illustrative style. Add small ticks on the roof to suggest texture. -
Window Glow:
If you want the cabin to look inhabited, add a light wash of yellow ochre or weak orange to the window panes. -
Softening Edges:
Check the snow shadows. If any edges are too harsh, soften them with a clean, damp brush to maintain that powdery snow feel. -
The Reveal:
Wait until the paper is bone dry—touch it with the back of your hand to be sure. Peel the masking tape away slowly at a 45-degree angle to reveal your crisp white frame.
Now you have a serene winter hideaway that looks perfect framed on a wall or sent as a holiday card


Snowman With Scarf and Hat
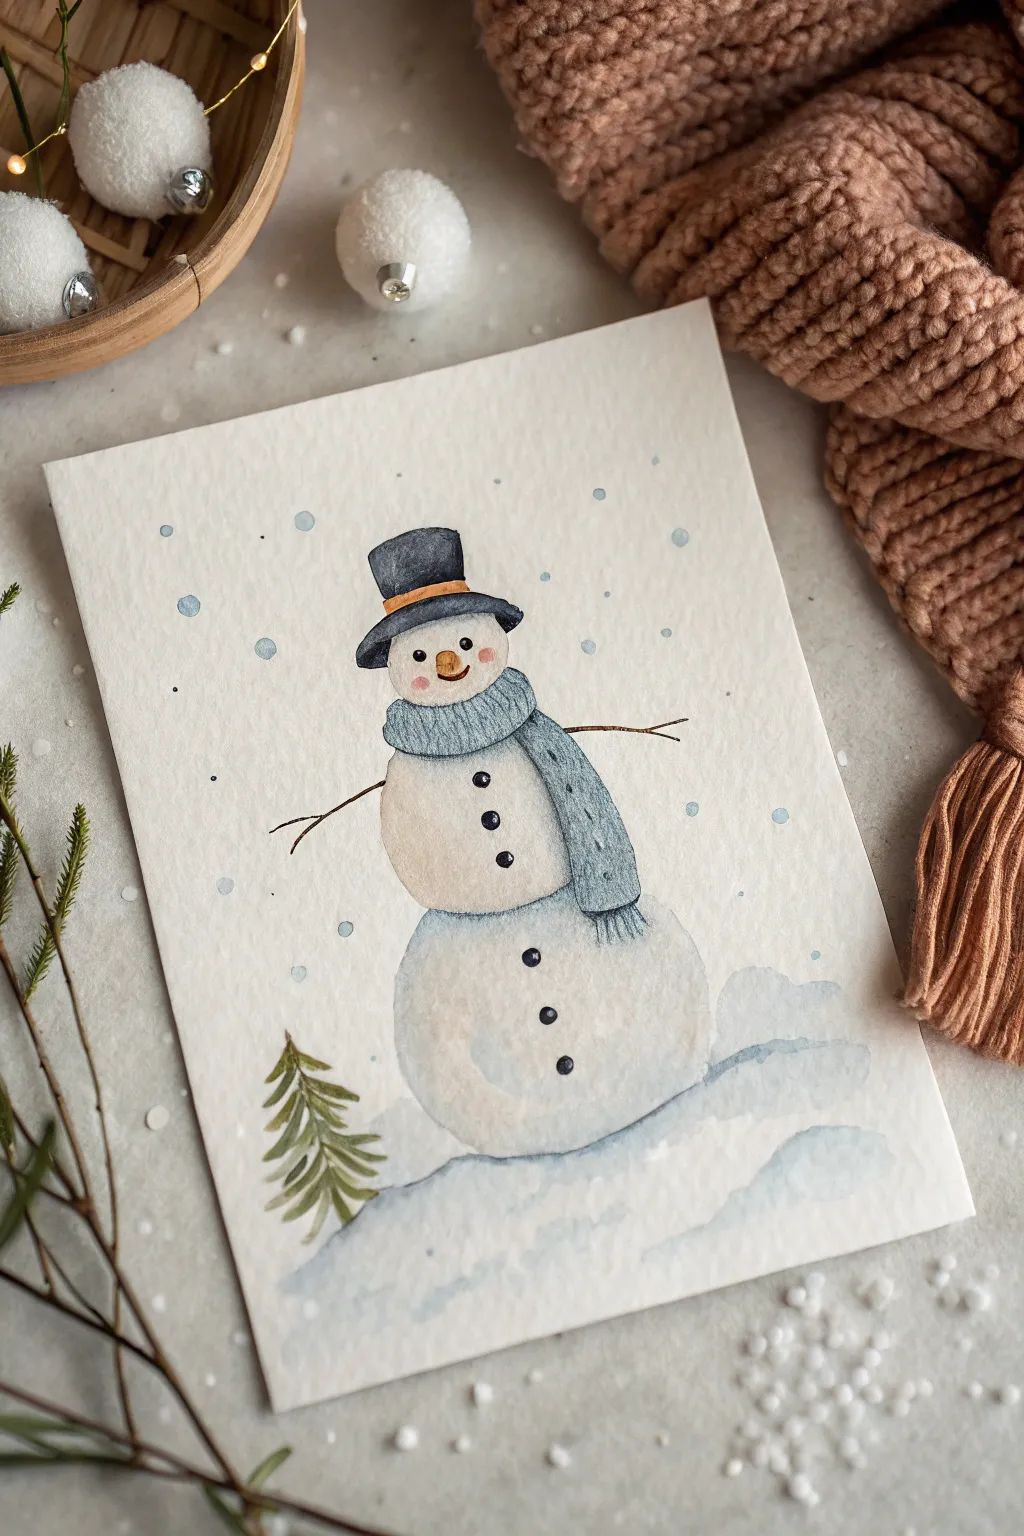
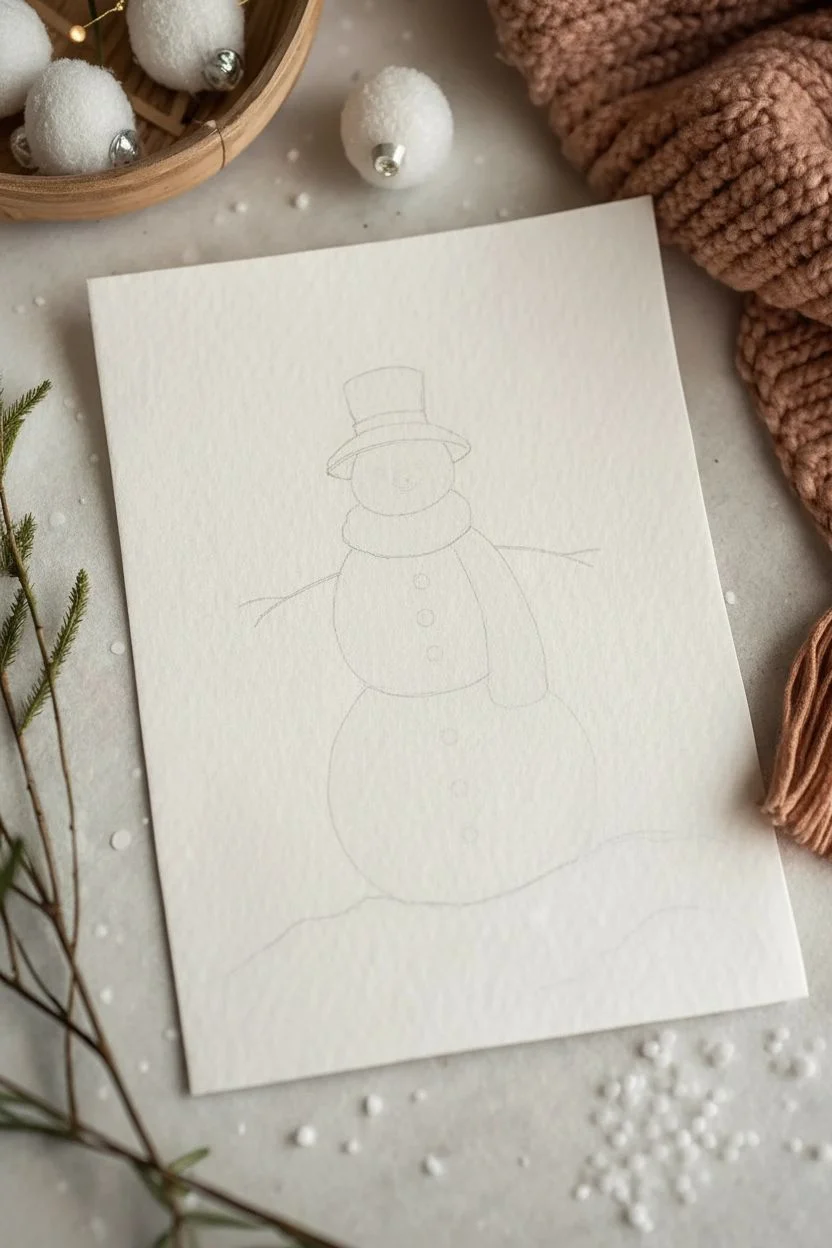
Capture the charm of winter with this gentle watercolor illustration featuring a classic snowman bundled up in a knit scarf. The soft washes and delicate details create a heartwarming holiday card or a perfect addition to your seasonal sketchbook.
Step-by-Step Guide
Materials
- Cold press watercolor paper (300 gsm)
- Pencil (HB or H)
- Kneaded eraser
- Watercolor paints (Payne’s Grey, Cerulean Blue, Burnt Sienna, Orange, Sap Green)
- Round watercolor brushes (size 2 and size 6)
- Fine liner pen (black or dark grey, waterproof)
- White gouache or white gel pen
- Jar of water & paper towels
Step 1: Sketching the Outline
-
Basic shapes:
Begin by lightly sketching three stacked circles for the snowman’s body. Make the bottom circle the largest and the top head circle the smallest, slightly overlapping them to connect the form. -
Adding accessories:
Sketch a top hat on the head, tilting it slightly for personality. Draw a wide, chunky scarf wrapped around the neck area, erasing the lines of the circles underneath where the scarf covers them. -
Details and surroundings:
Add stick arms extending outward. Sketch a small evergreen tree to the bottom left and lightly mark a wavy horizon line for the snowbank. Keep your pencil lines very faint so they don’t show through the paint later.
Step 2: Painting the Snowman
-
First wash:
Mix a very dilute wash of watered-down Payne’s Grey or a soft blue-grey. Apply this to the shadowed sides of the snowballs (usually the bottom and right sides) to give them volume, fading into white towards the light source. -
Painting the nose:
Using a small size 2 brush, paint the carrot nose with bright orange. Let the orange bleed just slightly into the damp paper for a soft look, or wait for it to dry for a crisp edge. -
The hat:
Paint the hat using a concentrated Payne’s Grey or black. Leave a tiny sliver of white paper unpainted on the top edge to act as a highlight. Once dry, paint the band with a warm orange-brown hue. -
The scarf base:
Fill in the scarf shape with a medium wash of Cerulean Blue or a muted teal. While it’s still slightly damp, drop in a slightly darker version of the same color in the folds to create depth. -
Scarf texture:
Once the scarf is completely dry, mix a darker, thicker shade of blue. Use the tip of your smallest brush to paint tiny vertical lines or ‘knit’ patterns and fringe at the ends.
Muddy Colors?
If colors are bleeding into each other, you’re painting wet-on-wet too quickly. Let adjacent sections (like the scarf and neck) dry completely before painting next to them.
Step 3: Background and Details
-
Snowy ground:
Wet the area at the bottom of the paper for the ground. Drop in watery blue-grey paint to create soft, undulating snowdrifts. I find that lifting a little pigment with a dry brush helps create soft highlights on the drifts. -
Evergreen tree:
Paint the small pine tree using Sap Green mixed with a touch of brown. use short, downward strokes to mimic pine needles, keeping the shape loose and organic. -
Coal buttons and eyes:
Using your darkest black or grey paint (not too watery), dot in the eyes, the smile, and the buttons down the snowman’s chest. -
Stick arms:
Paint thin, delicate lines for the stick arms using a brown mix. Ensure your hand is steady and use the very tip of the brush. -
Falling snow:
Mix a light blue-grey color. Creates random dots of varying sizes all around the sky area to represent falling snow. -
Final highlights:
If you want extra sparkle, add tiny dots of white gouache or white gel pen to the rounded parts of the snowflakes or the highlight on the hat to make it pop.
Add Sparkle
Sprinkle a pinch of salt onto the wet background wash before it dries. The salt absorbs pigment, creating beautiful, crystalline ice-like textures in the sky.
Once dry, this cheerful winter friend is ready to be framed or sent as a holiday greeting


Falling Snow Over a Streetlight
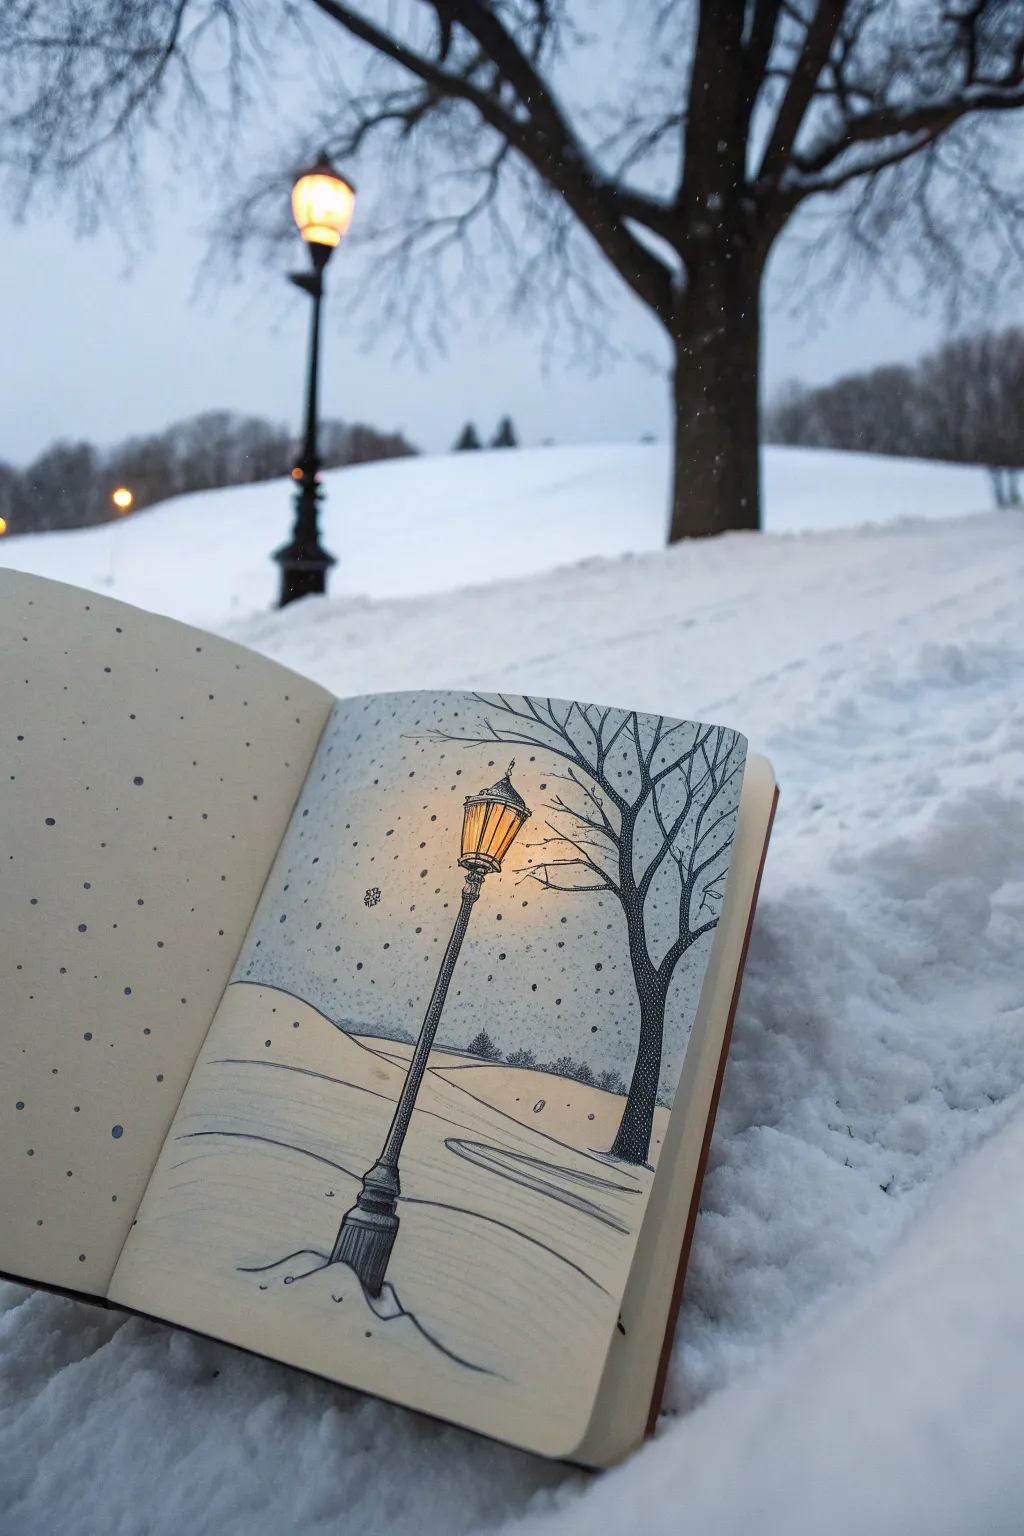
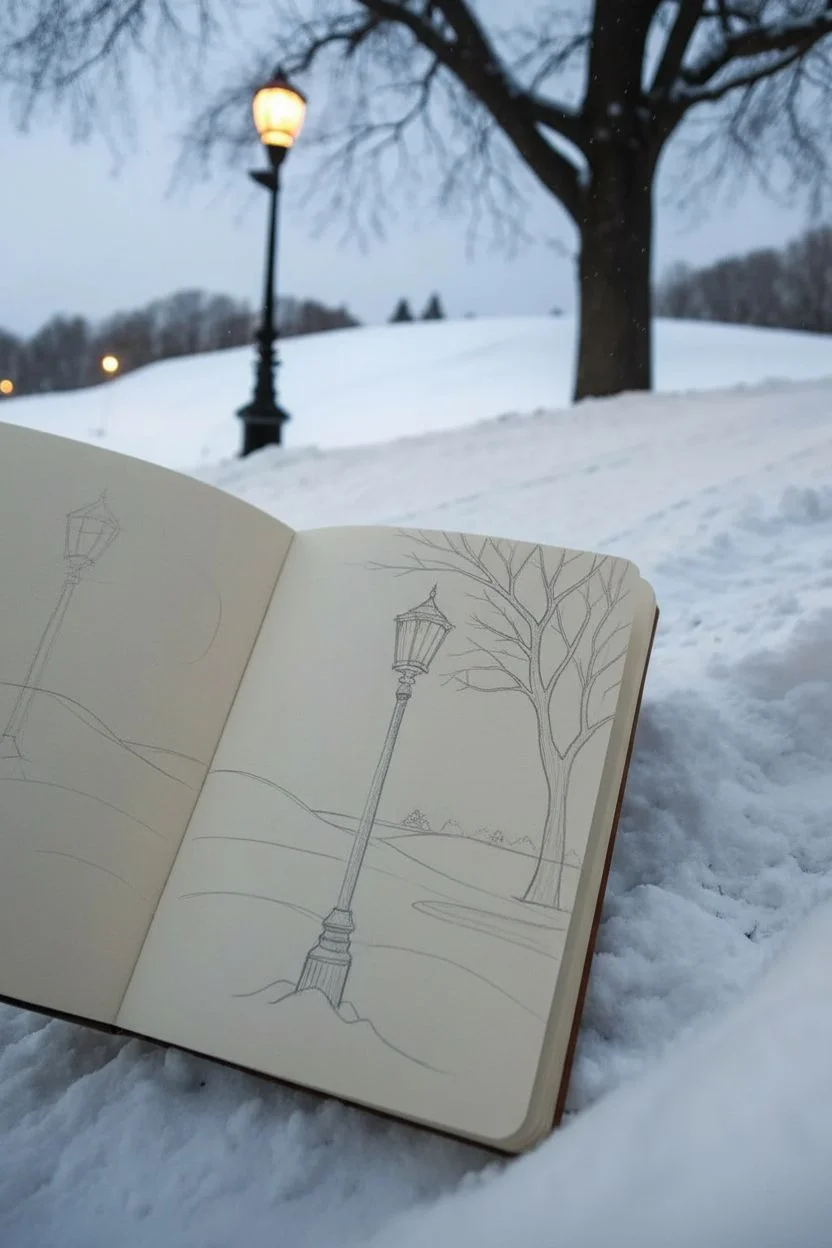
Capture the stillness of a winter evening with this mixed-media sketch that blends pen illustration with glowing light effects. This project focuses on drawing a scene directly from observation, using warm tones to make a street lamp pop against a cool, snowy background.
Step-by-Step Tutorial
Materials
- Sketchbook (heavyweight paper preferred)
- Fine liner pens (0.1, 0.3, and 0.5 sizes, black)
- Brush pen (black, for trees)
- Alcohol-based markers (yellows, oranges, light greys)
- White gel pen or acrylic paint pen
- Pencil (HB or 2B)
- Eraser
Step 1: Planning the Composition
-
Block in the shapes:
Start with a very light pencil sketch. Draw a sloping horizon line about one-third of the way up the page to represent the snowbank. Position a vertical line for the lamp post in the left-center of the page. -
Sketch the terrain:
Add gentle, curving lines across the snowy ground to imply rolling hills or subtle drifts. These lines shouldn’t be straight; let them mimic the soft contours of snow. -
Outline the tree:
On the right side, lightly sketch the skeleton of a large tree. Ensure the branches reach upwards and curve naturally, intersecting with the space where the lamp light will be.
Uneven Glow?
If your marker light source looks streaky, blend the edges with a colorless blender immediately while the ink is still wet to soften the transition.
Step 2: Inking the Structures
-
Detail the lamp:
Using a 0.3 fine liner, ink the lamp post. Pay attention to the decorative base and the panes of glass at the top. Use straight, deliberate strokes for the metalwork. -
Create the tree silhouette:
Switch to a thicker pen or a brush pen for the tree trunk and main branches. Fill them in solid black to create a stark contrast against the pale background. Keep the tips of the branches fine and delicate. -
Ground the objects:
Add small mounds of snow at the base of the lamp post and tree trunk using your 0.1 pen. This grounds the objects so they don’t look like they are floating. -
Define the hills:
Ink the horizon lines with a broken, sketchy line weight. You don’t want a heavy outline for snow—just enough to show where the slope changes.
Step 3: Adding Light and Atmosphere
-
Color the light:
Use a bright yellow marker to fill in the glass panes of the lamp. Extend this color slightly outside the lamp housing to create a glow. -
Warm the surroundings:
Layer a soft orange marker over the yellow in the center of the lamp for intensity. I like to lightly feather the yellow color onto the nearby tree branches that are being hit by the light. -
Shadow the snow:
Use a very light cool grey marker to add shadows on the ground. Follow the curve of your pencil drift lines. The shadows should be on the side of the drifts facing away from the lamp light. -
Cast shadows:
Draw long, elongated shadows stretching away from the base of the lamp post and the tree using a slightly darker grey marker or hatched ink lines.
Level Up: Texture
Use stippling (lots of tiny dots) with your finest pen to create texture on the snowy ground instead of solid lines for a softer, powdery look.
Step 4: The Details
-
Erase pencil lines:
Once the ink is totally dry, gently erase your initial pencil guides to clean up the page. -
Falling snow:
Take a 0.5 pen or a dark grey marker and add small dots across the sky area and crossing over the tree branches. Vary the size to show depth—larger dots are closer. -
Add white highlights:
Use a white gel pen to add bright white dots directly over the dark tree trunk and the lamp post. This creates the effect of fresh snow flakes passing in front of the dark objects. -
Final glow touch-up:
If the glow feels too contained, use a very light yellow pencil or pastel to gently buff a soft halo around the lamp head, fading into the paper’s white.
Now you have a cozy, illuminated winter scene captured right on the page


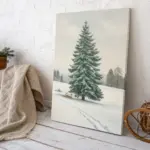
Snowflakes Close-Up Study
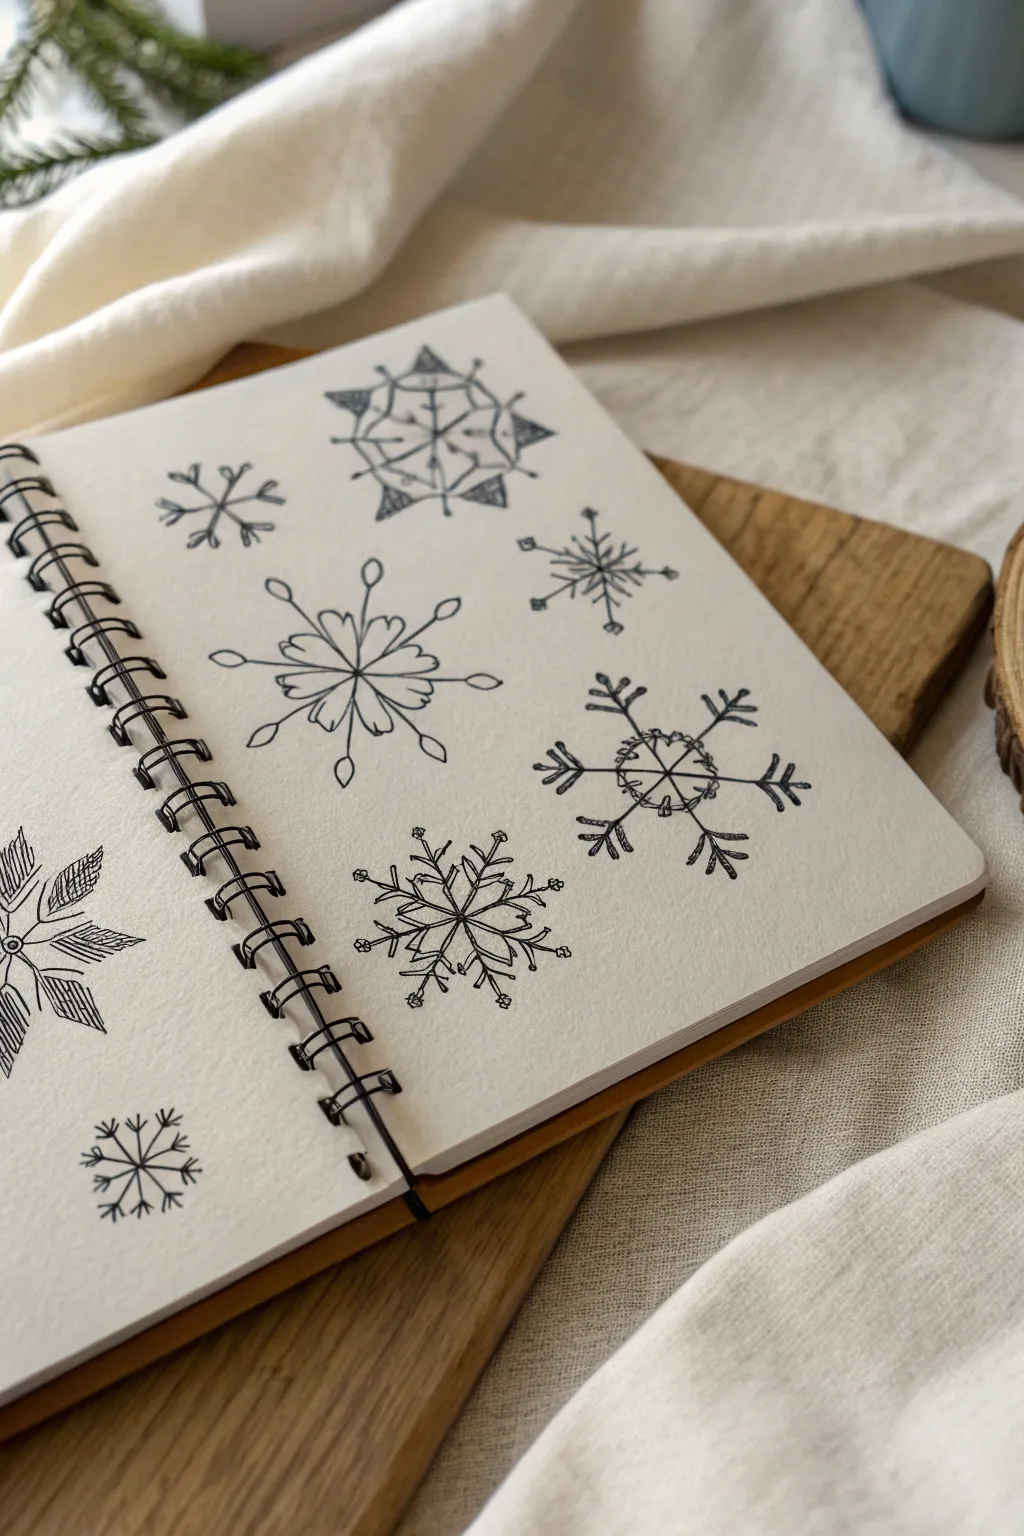
This study focuses on capturing the infinite variety of snowflakes through clean line work and playful geometric patterns. Using just a fine liner and sketchbook, you’ll create a page filled with crystallized shapes that range from simple stars to complex, fern-like structures.
Step-by-Step
Materials
- Spiral-bound sketchbook (heavyweight paper preferred)
- Pencil (HB or H for light sketching)
- Eraser
- Fine liner pen (black, 0.3mm or 0.5mm)
- Ruler (optional, for guidelines)
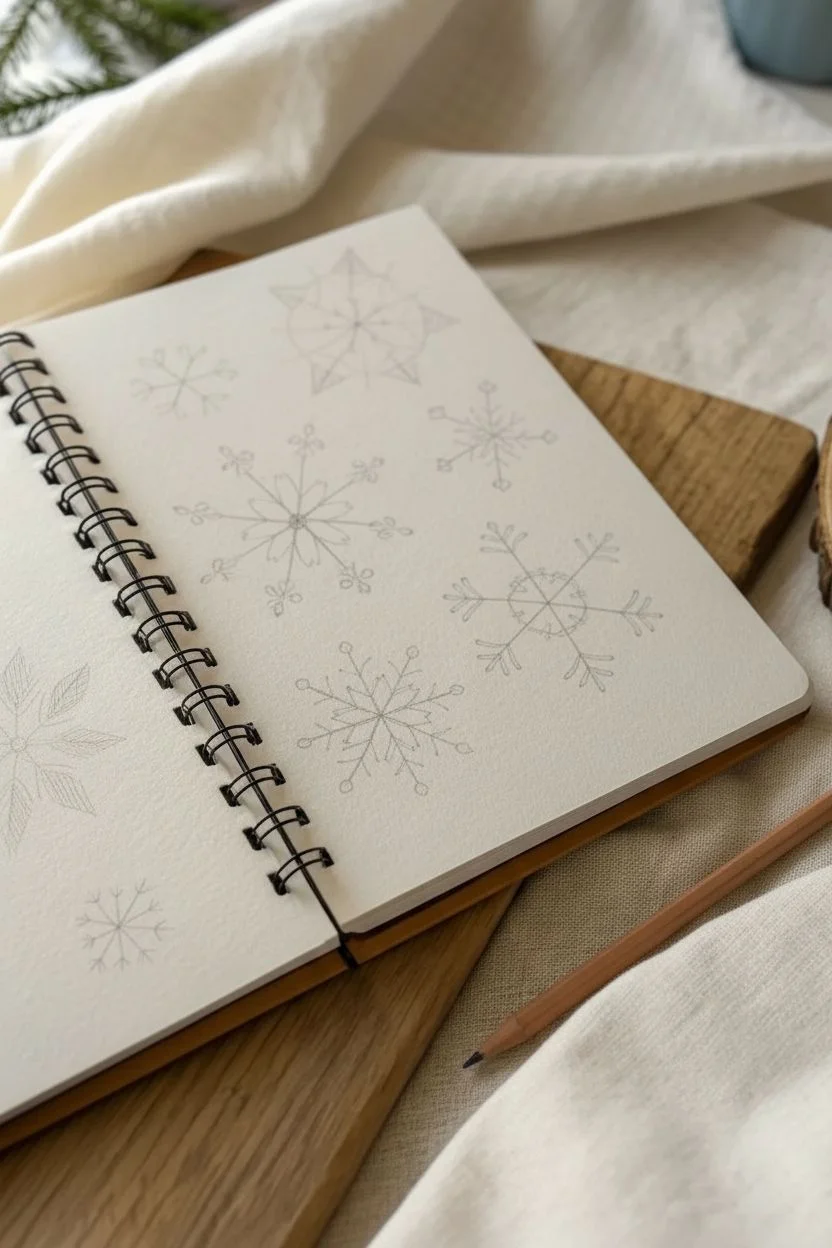
Step 1: Setting the Structure
-
Plan your layout:
Visualize where your snowflakes will sit on the page. Aim for a scattered, staggered arrangement rather than a perfect grid to keep the composition organic. You can lightly mark the center point for about 6-8 snowflakes to ensure they are spaced evenly. -
Establish the axes:
For each snowflake, lightly sketch a central ‘cross’ or ‘star’ shape. Most real snowflakes have six points, so draw three intersecting lines (like an asterisk). However, for artistic variety like in the photo, you can also mix in some four-point or eight-point bases. -
Add radial guides:
Extend these lines outward to define the overall size of each flake. Keep your pencil pressure very light, as these lines will eventually be erased or covered.
Wobbly Lines?
Don’t stress about perfect straightness. Natural snowflakes have imperfections. If a line goes astray, thicken it slightly or add a small ‘crystal’ bump to hide the wobble.
Step 2: Developing the Key Designs
-
Draw the ‘Classic Star’ center:
Starting with the top-right snowflake design, draw a small hexagon or star shape in the very center. From each point of the star, extend a straight line outward. -
Add the crystal points:
Connect the tips of your radiating lines with V-shapes pointing outward, creating a sharp, crystallized edge. Add inner triangles to give the star depth. -
Create the ‘Heart-Petal’ flake:
Move to the large central snowflake. Instead of sharp spikes, draw rounded, heart-like lobes or petals radiating from the center point. This gives a softer, more floral appearance to the ice crystal. -
Detail the ‘Heart-Petal’ stems:
Extend a thin line from the tip of each petal, finishing it with a small, open circle or teardrop shape for a whimsical touch. -
Draft the ‘Fern’ structure:
For the bottom-right snowflake, draw six long, stick-like arms. Along each arm, add small V-shaped branches pointing outward, resembling the needles of a pine tree or fern frond. -
Connect the ‘Fern’ center:
Draw widely spaced, curved webbing near the center to connect the six main arms, creating a spiderweb-like core. -
Sketch the ‘Feathered’ flake:
On the bottom-left design (partially cut off in the view), create thick, blocky arms. Fill the interior of these arms with fine diagonal hatching lines to simulate a textured, icy surface.
Step 3: Inking and Refining
-
Trace over main lines:
Switch to your black fine liner. Confidently trace over your pencil sketches. I prefer to rotate the sketchbook as I work to keep my hand comfortable and the lines steady. -
Emphasize line weight:
To make the designs pop, go back over the central structural lines to make them slightly thicker than the decorative details like the little feathers or outer dots. -
Add tiny details:
Look for empty spaces on your branches. Add tiny dots, small perpendicular dashes, or little diamonds to mimic the way ice accumulates. -
Draw the filler flakes:
Fill the smaller gaps between your main subjects with simple, tiny asterisks or basic six-point stars. These don’t need much detail; they just help balance the white space. -
Erase pencil guides:
Wait until the ink is completely dry—give it a full minute or two to avoid smudges. Then, gently erase all the underlying pencil marks to reveal the crisp black design. -
Clean up edges:
Inspect your lines. If any connections look too thin or didn’t quite meet, touch them up carefully with the pen to ensure the snowflakes look solid and interconnected.
Adding Dimension
Use a light grey marker or watered-down ink to add a faint shadow along one side of the thickest snowflake arms, giving them a subtle 3D lift off the page.
Now you have a stunning reference page of winter patterns ready to spark future holiday card designs
BRUSH GUIDE
The Right Brush for Every Stroke
From clean lines to bold texture — master brush choice, stroke control, and essential techniques.
Explore the Full Guide
Snow-Covered Rooftops in a Village
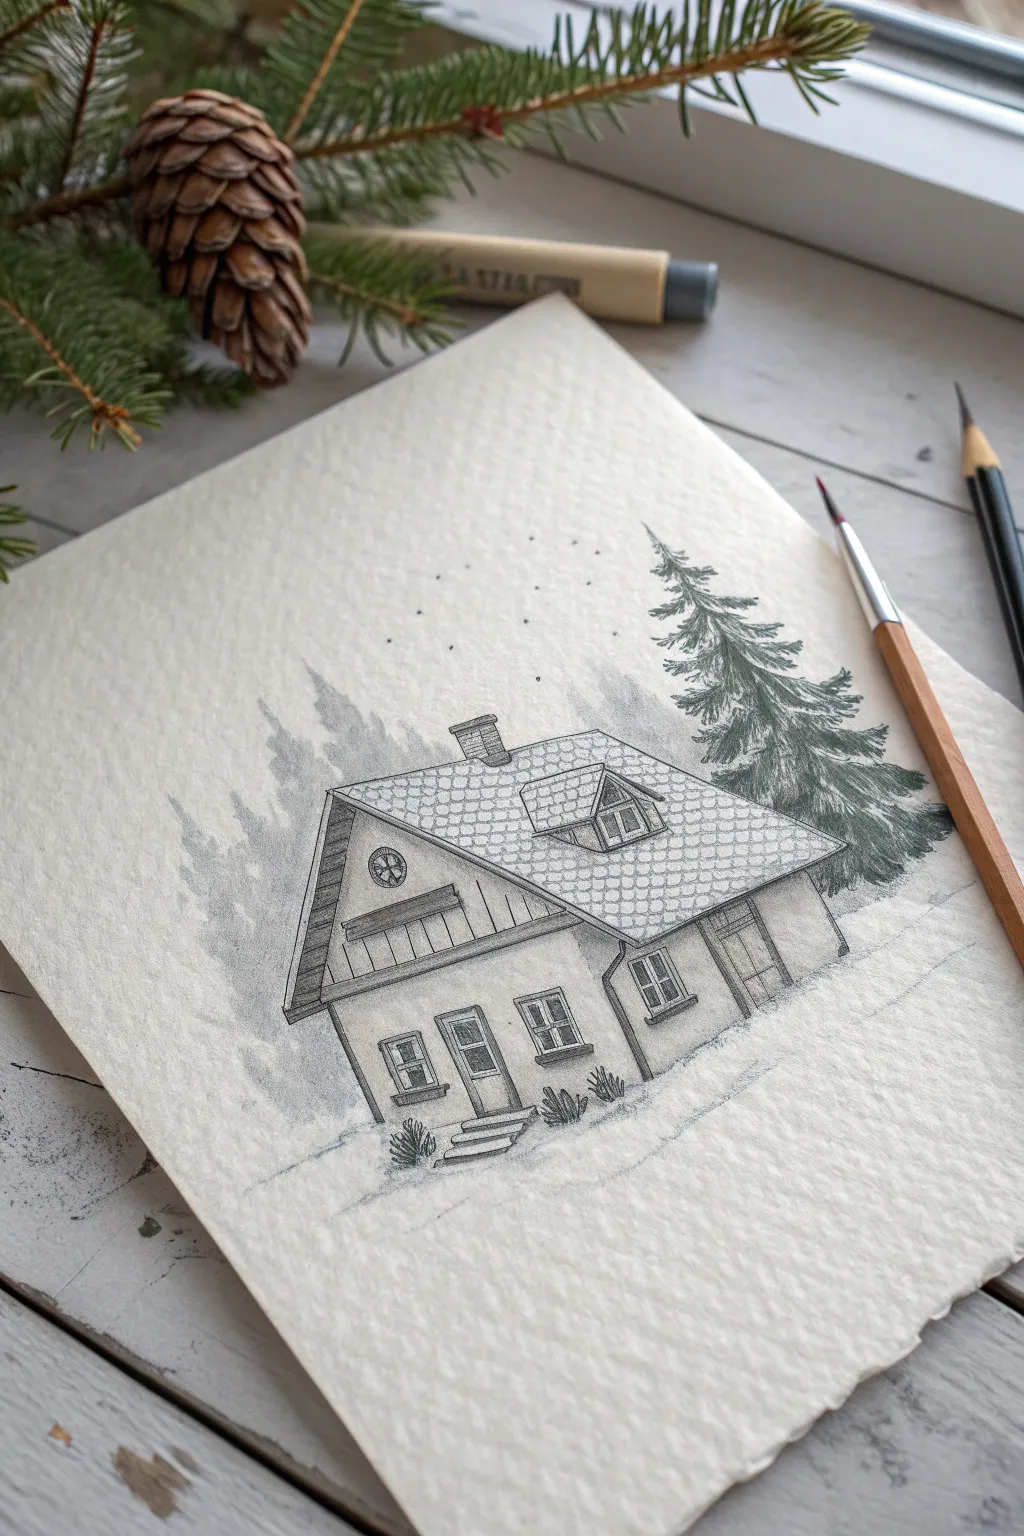
Capture the serene beauty of a snow-day hideaway with this detailed architectural sketch. Using fine liners and shading techniques, you will create a charming cabin nestled among misty pines on textured paper.
Detailed Instructions
Materials
- Textured watercolor paper or mixed media paper (cold press)
- HB or 2B graphite pencil
- Fine liner pens (sizes 0.1, 0.3, and 0.5)
- Small paintbrush or blending stump
- Soft eraser
- Ruler (optional)
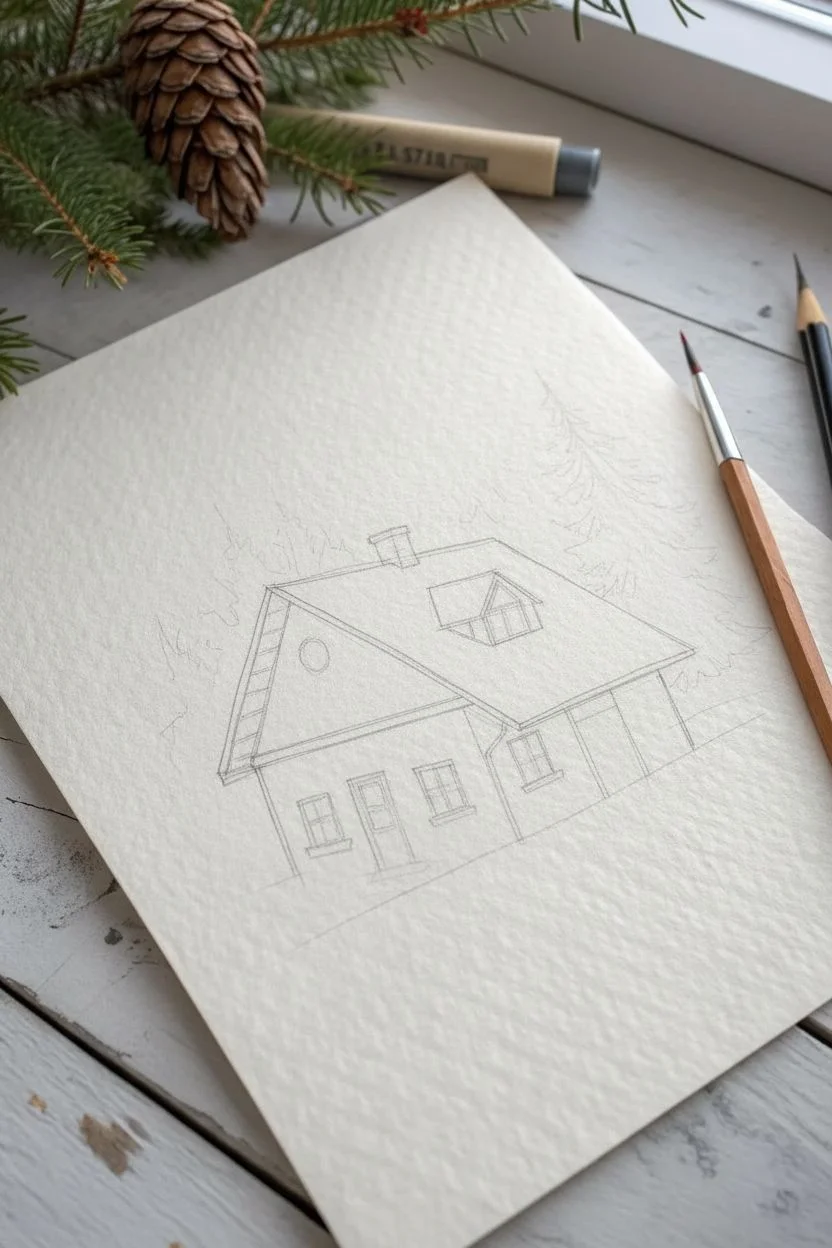
Step 1: Laying the Foundation
-
Establish the horizon:
Begin by lightly drawing a faint horizon line about one-third up from the bottom of your page to ground the house. -
Block in the main structure:
Sketch a simple rectangular box for the main body of the house. Add a protruding section on the right side for the extension. -
Add the rooflines:
Draw the large, sloping triangular roof over the main box. Extend the eaves slightly past the walls to create an overhang. -
Place the architectural features:
Lightly outline the chimney on the roof ridge, the dormer window sticking out of the main roof, and the positions for the door and ground-floor windows. -
Sketch the surrounding landscape:
Faintly sketch the jagged outline of a large pine tree to the right of the house and suggestion of faint tree shapes in the background.
Keep it Clean
Place a scrap piece of paper under your drawing hand. This prevents natural oils or graphite from smudging onto the white snowy areas of your textured paper.
Step 2: Inking the Details
-
Outline the main house:
Switch to a 0.3 fine liner. Carefully go over your pencil lines for the walls and roof edges. Use straight, deliberate strokes. -
Detail the roof tiles:
Draw a grid of small, interconnected scallops or curved rectangles across the entire roof surface to simulate shingles covered in a thin layer of snow. -
Feature the dormer window:
Ink the dormer window structure, ensuring the perspective matches the main roof. Add the window panes with a finer 0.1 pen. -
Define windows and doors:
Ink the window frames and the front door. Add small horizontal lines under the windowsills to suggest depth and shadow. -
Texture the wood siding:
On the upper triangle of the house gable, use vertical lines to indicate wood planks. Leave the bottom stucco section mostly blank for contrast.
Step 3: Adding Atmosphere and Depth
-
Render the pine tree:
Using a 0.5 pen or darker pencil, draw the pine tree foliage with short, scribbly strokes. Keep the texture loose and darker towards the bottom branches. -
Create background mist:
With a soft pencil held at a low angle, shade very lightly behind the house to suggest distant trees. Smudge this gently with your finger or a blending stump for a misty look. -
Shade the house:
Apply light shading under the eaves and on the right side of the house to establish a light source coming from the left. -
Ground the structure:
Add small tufts of grass poking through the snow near the foundation and create soft shadow lines on the ground to show snowdrifts. -
Add falling snow:
In the sky area above the roof, add tiny, random stippling dots with your finest pen to mimic light snowfall. -
Final touches:
Erase any remaining pencil guidelines. If needed, darken the windows slightly to show they are reflecting the dark outdoors.
White Gel Pen Magic
After inking, use a white gel pen to add highlights on the dark pine tree branches or to clean up roof lines, making the snow look freshly fallen and crisp.
Now you have a tranquil winter scene ready to frame or give as a holiday card


Have a question or want to share your own experience? I'd love to hear from you in the comments below!