There is incredible energy and passion in the beautiful game that translates perfectly onto a fresh canvas or a sheet of watercolor paper. Whether you are looking to capture the intensity of a match or the quiet details of worn equipment, these artistic concepts will help spark your next creative masterpiece.
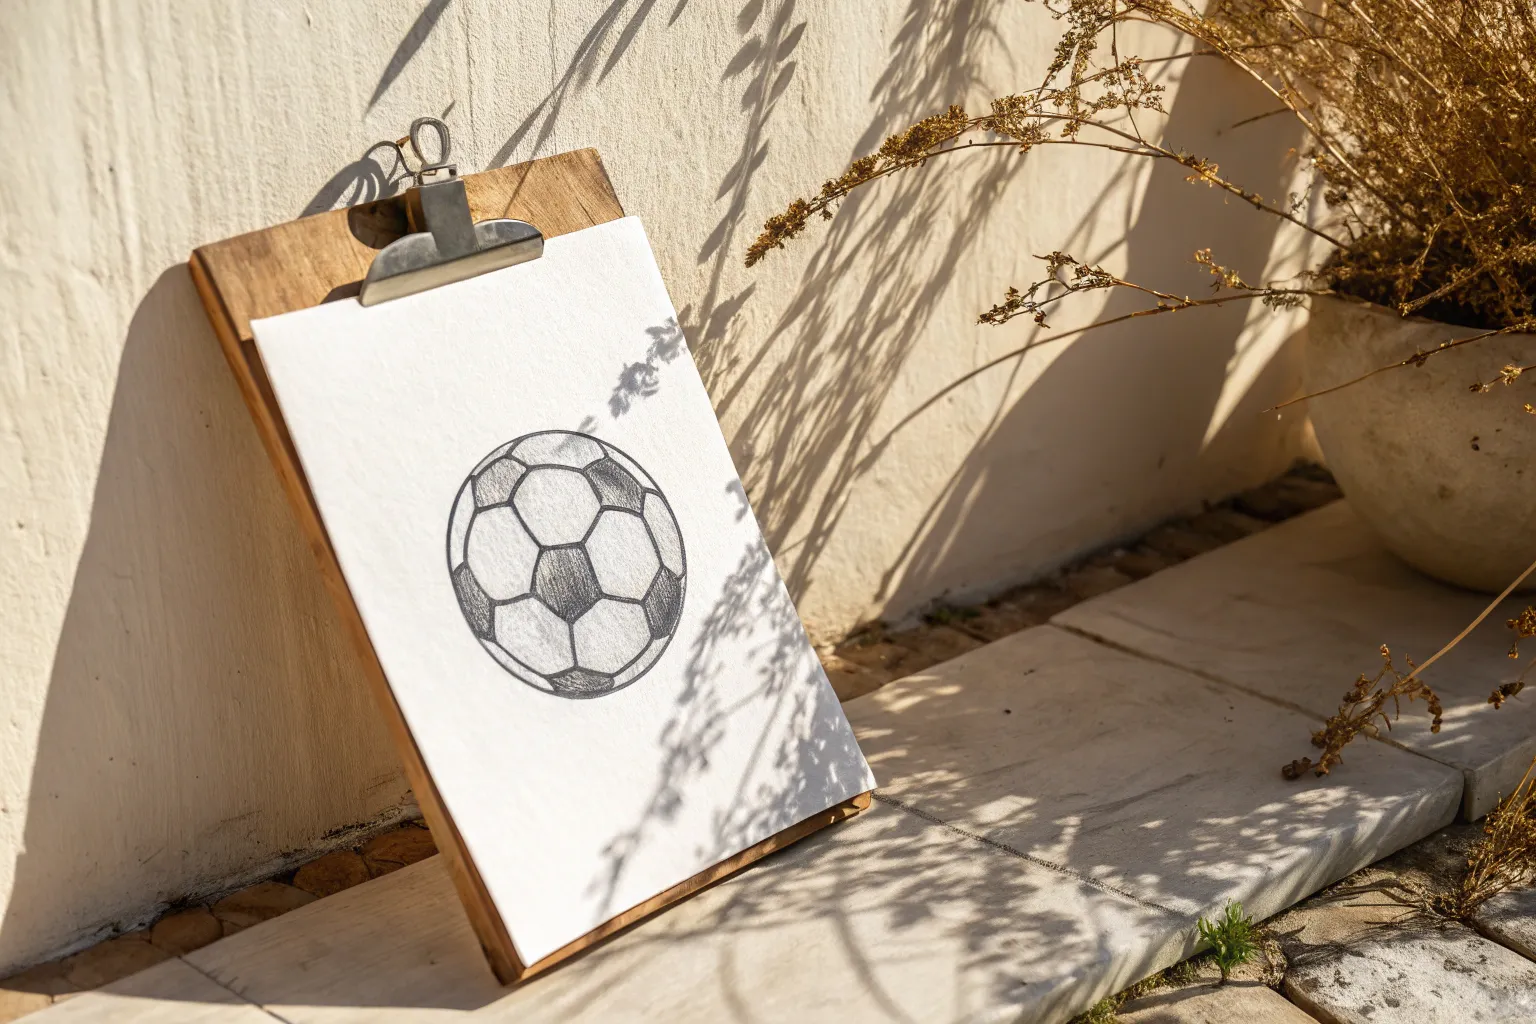
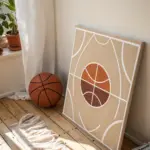
Classic Black and White Ball
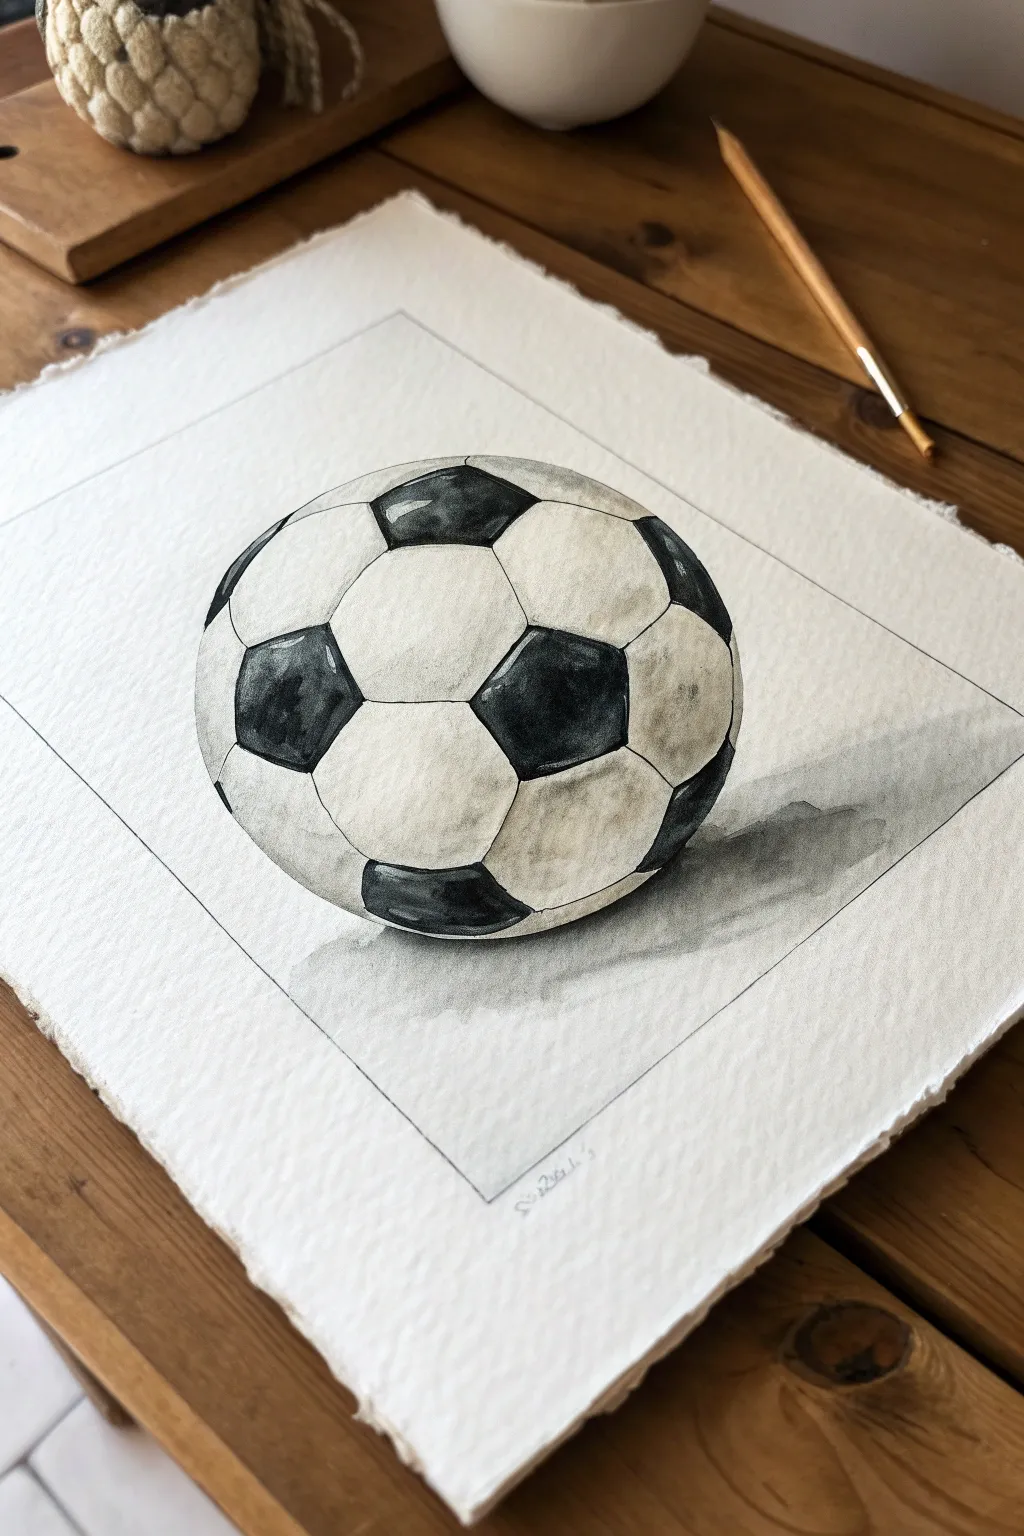
Capture the timeless look of a classic soccer ball with this monochromatic watercolor study. By utilizing the texture of cold-pressed paper and varying shades of gray, you will create a realistic, dimensional piece that feels both sporty and artistic.
Step-by-Step Guide
Materials
- Cold-pressed watercolor paper (300gsm/140lb)
- Pencil (HB for sketching, 2B for framing)
- Ruler
- Kneaded eraser
- Watercolor paint (Lamp Black, Burnt Umber)
- Round brushes (size 4 and 8)
- Two jars of water
- Paper towels
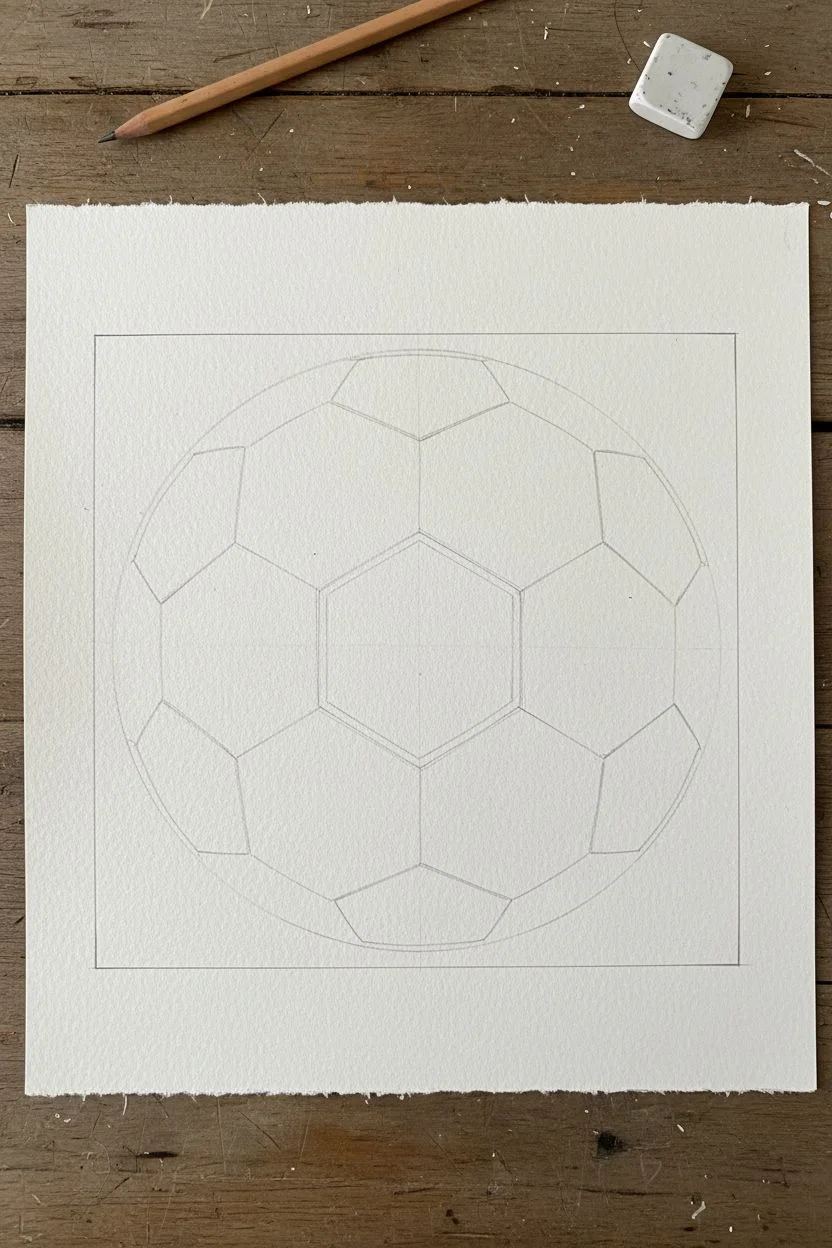
Step 1: Drafting the Geometry
-
Frame the composition:
Begin by using a ruler and a sharp pencil to draw a large square in the center of your paper. This creates the artistic ‘study’ border seen in the reference image. -
Draw the base circle:
Lightly sketch a large circle in the center of the square. Flatten the bottom curve ever so slightly to give the ball weight, so it doesn’t look like it’s floating. -
Map the central shape:
Draw a slightly tilted pentagon (5-sided shape) near the center-right of the ball. This will be your main black panel anchor. -
Connect the hexagons:
Surround that first pentagon with hexagons (6-sided shapes). Remember that as the shapes wrap around the curve of the ball, they become narrower and more distorted due to perspective. -
Complete the pattern:
Fill in the remaining gaps with alternating pentagons and hexagons until you reach the circle’s edge. Use your eraser to lighten these graphite lines until they are just barely visible content guides.
Bleeding Edges?
If black paint runs into the white panels, your paper is too wet. Wait for the white sections to be bone dry before tackling adjacent black shapes, or leave a tiny hair-line gap for safety.
Step 2: Painting the White Panels
-
Mix a dirty wash:
In your palette, water down a large amount of black paint and add a tiny speck of brown to warm it up. You want a very pale, watery gray, not pure water. -
Apply the first layer:
Using the size 8 brush, paint the ‘white’ hexagonal panels with this pale wash. Leave the center of the hexagons untouched and dry to act as the highlight. -
Soften the gradients:
With a damp, clean brush, blend the wet gray paint toward the dry white centers to create a soft, rounded gradient. The edges near the seams should be darker to suggest curvature. -
Define the shadows:
While the paper is still slightly damp, drop a slightly darker gray mix into the bottom-left edges of the white panels to emphasize the spherical form. -
Let it dry completely:
It is crucial to let these white panels bone dry before moving on, otherwise the black paint in the next step will bleed uncontrollably.
Pro Tip: Leather Texture
To get that vintage leather look, drop a tiny bead of clean water into the black panels as they start to dry. This creates ‘blooms’ that mimic the texture of worn material.
Step 3: Adding the Black Panels
-
Prepare intense black:
Mix a rich, concentrated amount of Lamp Black with just enough water to make it flow. You want high opacity here. -
Fill the pentagons:
Carefully paint the pentagonal shapes. I prefer to leave tiny, hair-thin gaps of white paper between the black shapes and the gray panels to simulate the stitching grooves. -
Create texture:
While the black paint is still wet, dab a clean, thirsty brush tip into the center of a few black panels to lift a little pigment. This creates the worn, leathery highlight seen in the photo. -
Vary the values:
Ensure the black panels on the bottom left (in shadow) are darker than those on the top right. Add a little more water to the mix for the lighter panels.
Step 4: Shadows and Finishing
-
Paint the cast shadow:
Mix a medium-gray wash. Paint a horizontal shape directly under the ball, hugging the bottom curve. -
Diffuse the shadow edges:
Immediately rinse your brush and drag clean water along the outer edges of the cast shadow to soften it out into the paper grain. -
Deepen the contact point:
Once the shadow wash is moist (not soaking), drop concentrated black right where the ball touches the ground for realistic weight. -
Refine the border:
Go back over your initial pencil frame with a ruler and a slightly darker pencil line to sharpen the presentation. -
Final touches:
Evaluate the contrast. If the white panels look too flat, add a very transparent glaze of gray to the shadowed side of the ball to unify the lighting.
Sign your name lightly near the bottom border and enjoy your realistic sports study


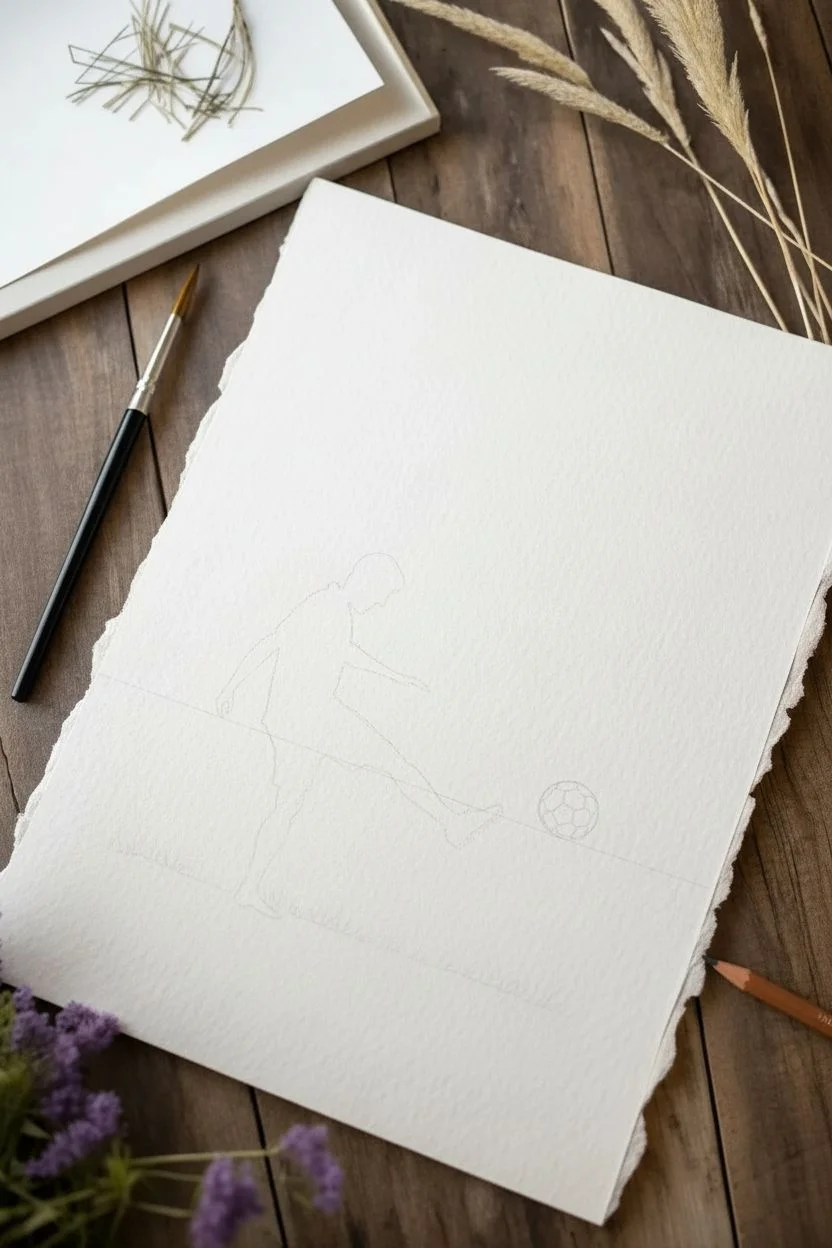
Watercolor Action Splash
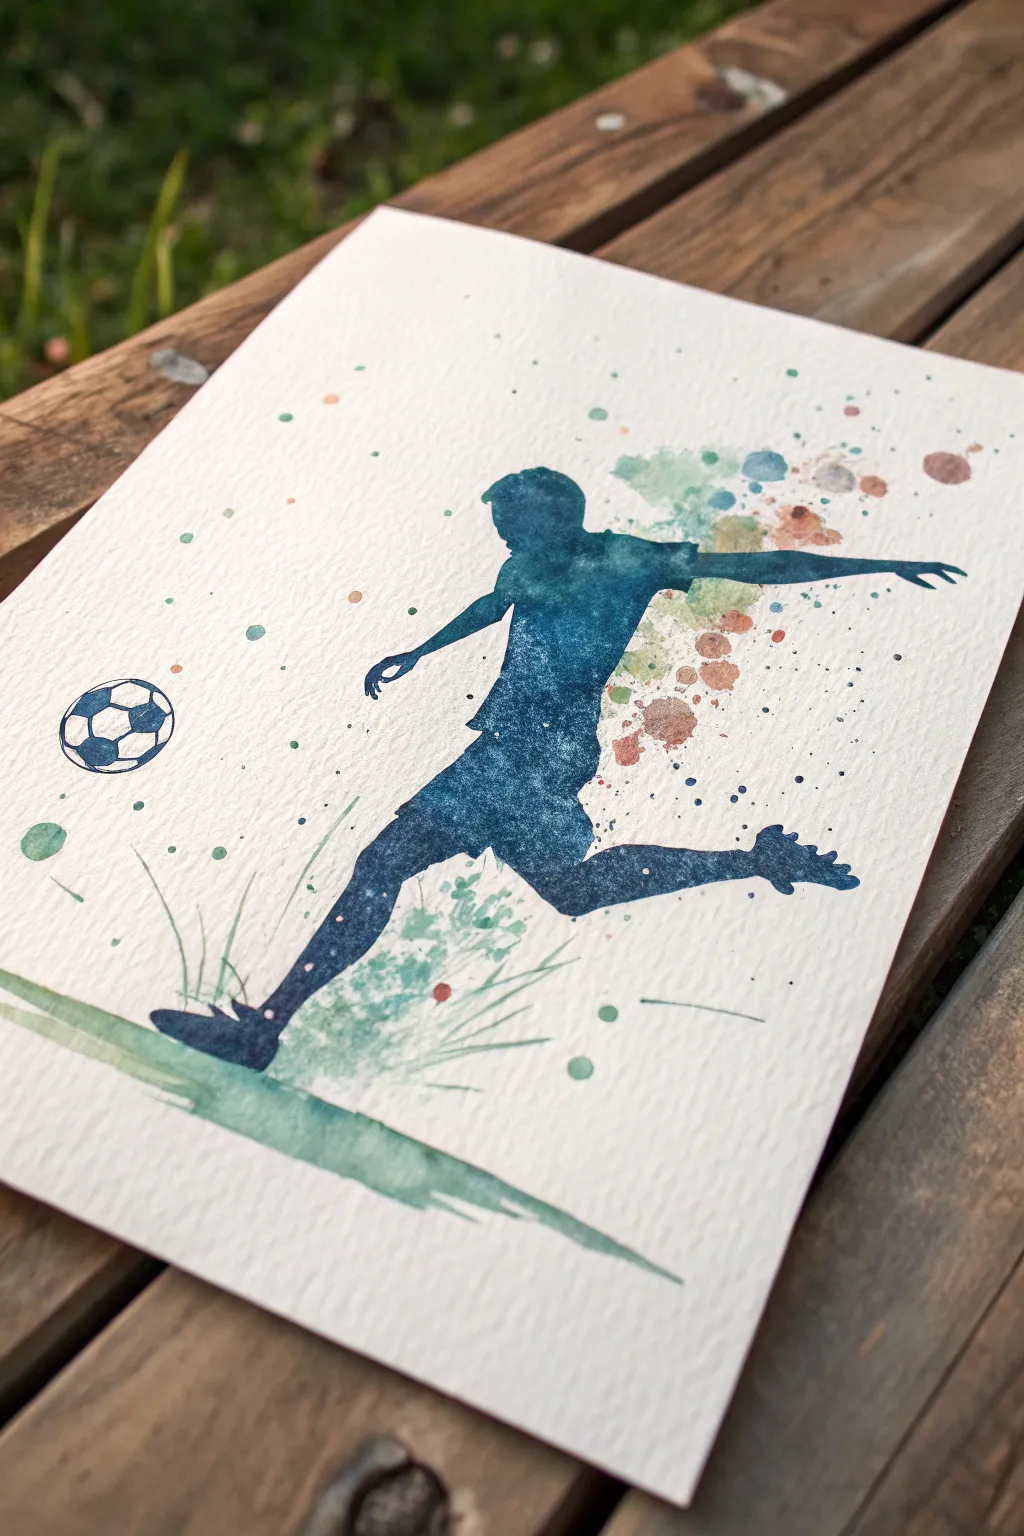
Capture the raw energy of the beautiful game with this striking watercolor project. By combining a precise silhouette with loose, expressive splashes, you will create a piece that feels like it is in constant motion.
Step-by-Step Guide
Materials
- Cold-press watercolor paper (300gsm, textured)
- Watercolor paints (Indigo, Prussian Blue, Sap Green, Burnt Sienna)
- Round brushes (size 6 and size 2)
- Fine liner brush or black waterproof pen
- Pencil and eraser
- Paper towel
- Masking tape
- Clean water
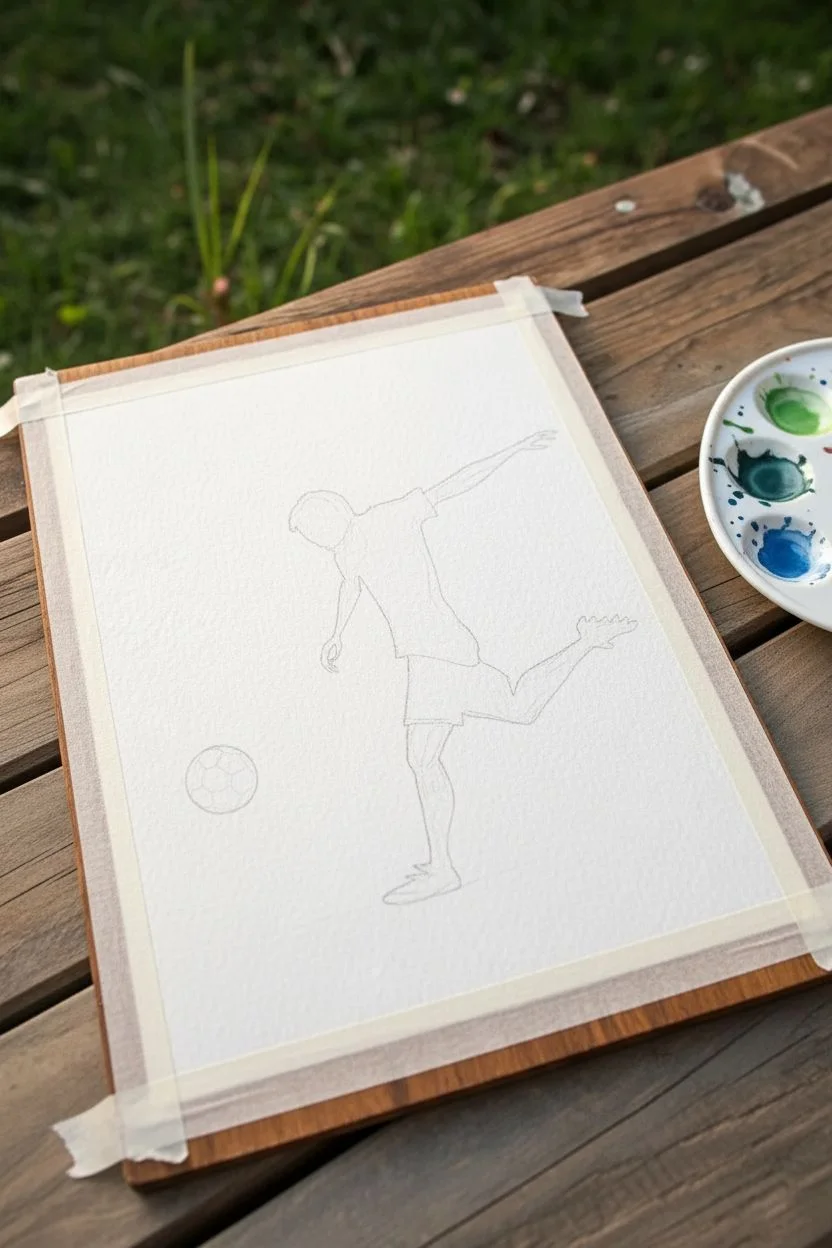
Step 1: Preparation and Sketch
-
Secure the paper:
Tape your watercolor paper down to a hard board on all four sides. This prevents buckling and gives you a nice clean border later. -
Outline the player:
Lightly sketch the silhouette of the soccer player. Focus on the dynamic angle of the kicking leg and the outstretched arm for balance. -
Position the ball:
Draw a simple circle near the kicking foot. Don’t worry about the hexagon pattern just yet; just get the size and placement right. -
Prepare your palette:
Pre-mix a puddle of watery Sap Green and a separate puddle of Burnt Sienna. Also, squeeze out some fresh Indigo or Prussian Blue for the main figure.
Pro Tip: Controlled Blooms
To get that specific cloudy texture inside the blue body, sprinkle a tiny pinch of table salt onto the wet paint. Brush it off once dry for a cool granulated effect.
Step 2: The Background Splash
-
Wet the splash zone:
Use a clean, wet brush to dampen the paper broadly behind where the player’s back and standing leg will be. Do not wet the inside of your pencil sketch. -
Drop in color:
While the paper is wet, touch your brush loaded with Sap Green and Burnt Sienna into the wet area. Let the colors bleed and bloom naturally. -
Create movement:
Load a brush with watery paint and tap it against your finger over the wet area to create erratic splatters that simulate motion and dirt. -
Add floating particles:
Switch colors and add a few smaller dots of blue and brown further away from the body to create a sense of debris flying through the air. -
Dry completely:
This is crucial: allow the background splashes to dry 100% before starting the main figure, or the dark blue will bleed into the background.
Step 3: Painting the Silhouette
-
Mix the silhouette color:
Create a rich, dark blue mixture using Indigo and Prussian Blue. You want a high pigment-to-water ratio so it’s opaque but still flows. -
Outline and fill:
Start at the head and work your way down. Carefully paint along your pencil lines with the tip of your round brush, then fill the inside. -
Add texture:
While the blue paint is still wet, drop in tiny amounts of clean water or dab it gently with a crumpled paper towel. This creates the mottled, worn-jersey texture seen in the photo. -
Define the limbs:
Paint the arms and legs, tapering your brush strokes to get sharp points for fingers and the shoe cleats. -
Connect to the ground:
As you paint the planting foot, keep the bottom edge slightly rough to suggest interaction with the grass.
Level Up: Team Colors
Make this a personalized gift by changing the ‘splash’ colors in the background to match the recipient’s favorite professional or local soccer team’s jersey colors.
Step 4: Ground and Details
-
Paint the turf:
Using your green mix, paint a swift, horizontal stroke under the player. Start from the left and pull across to the right, letting the brush run dry at the end. -
Add grass blades:
While the ground stroke is damp, use a smaller brush to flick upward strokes, creating stylized blades of grass around the planting foot. -
Detail the ball:
Once dry, use a very fine liner brush with dark blue paint, or a waterproof pen, to draw the hexagons on the soccer ball. Keep the lines thin. -
Final splatters:
I like to take a step back and add just a few last micro-splatters of blue near the feet to tie the composition together. -
Reveal the artwork:
Wait for everything to be bone dry, then gently peel off the masking tape at a 45-degree angle.
Frame this action-packed piece to inspire the athlete in your life


The Goalkeeper’s Dive
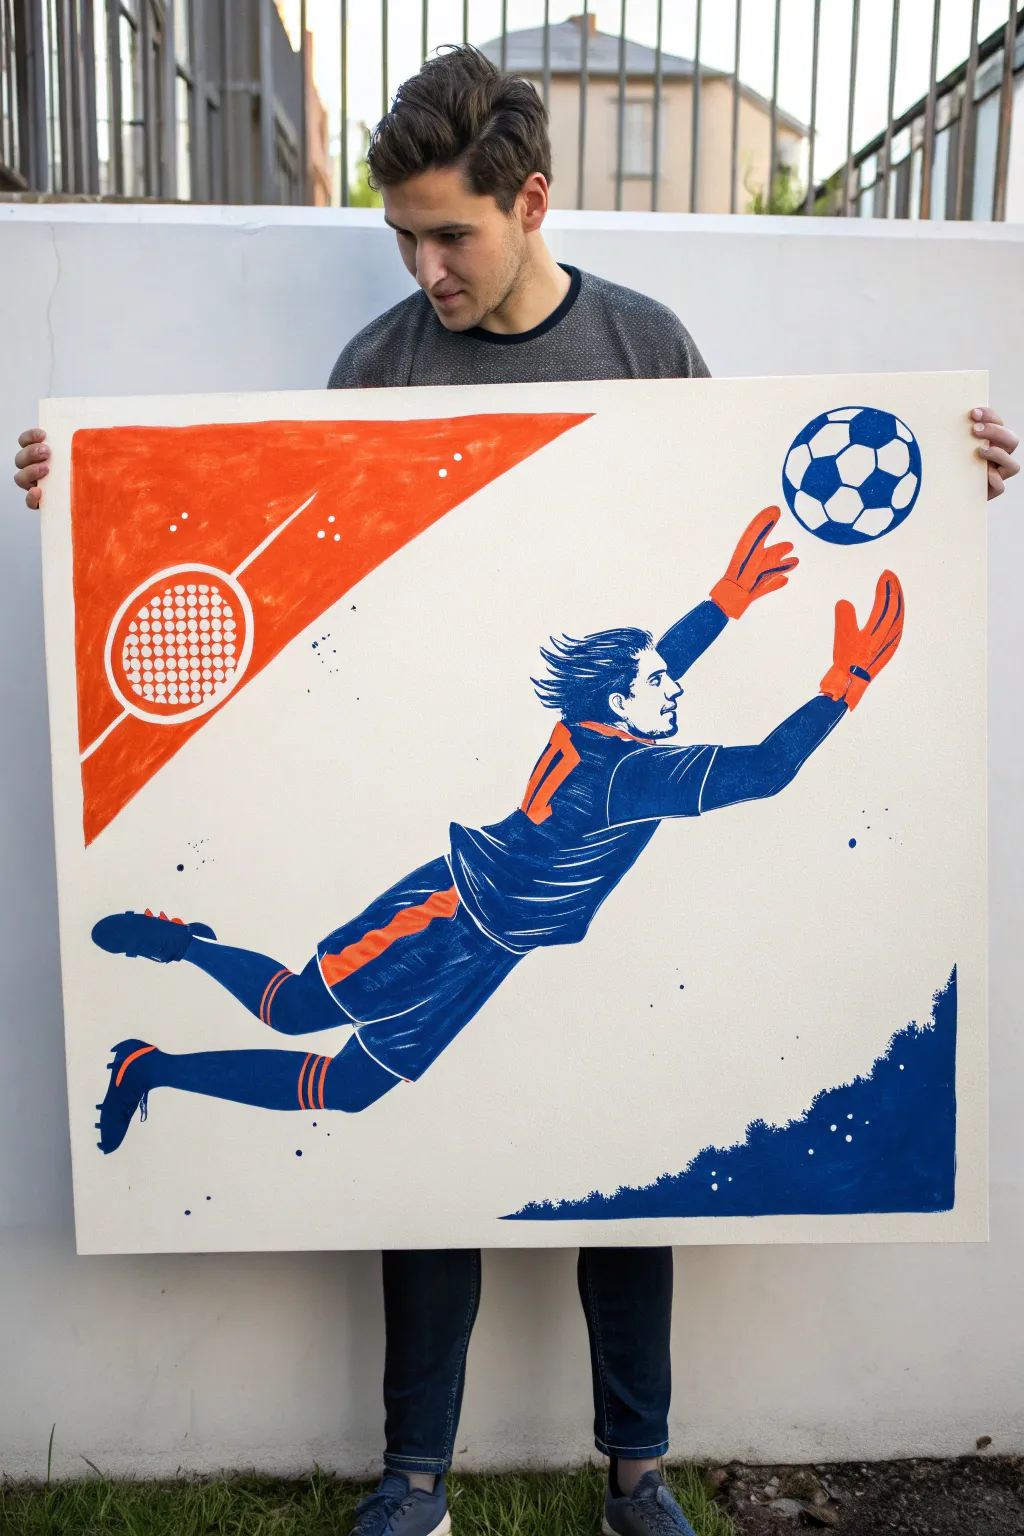
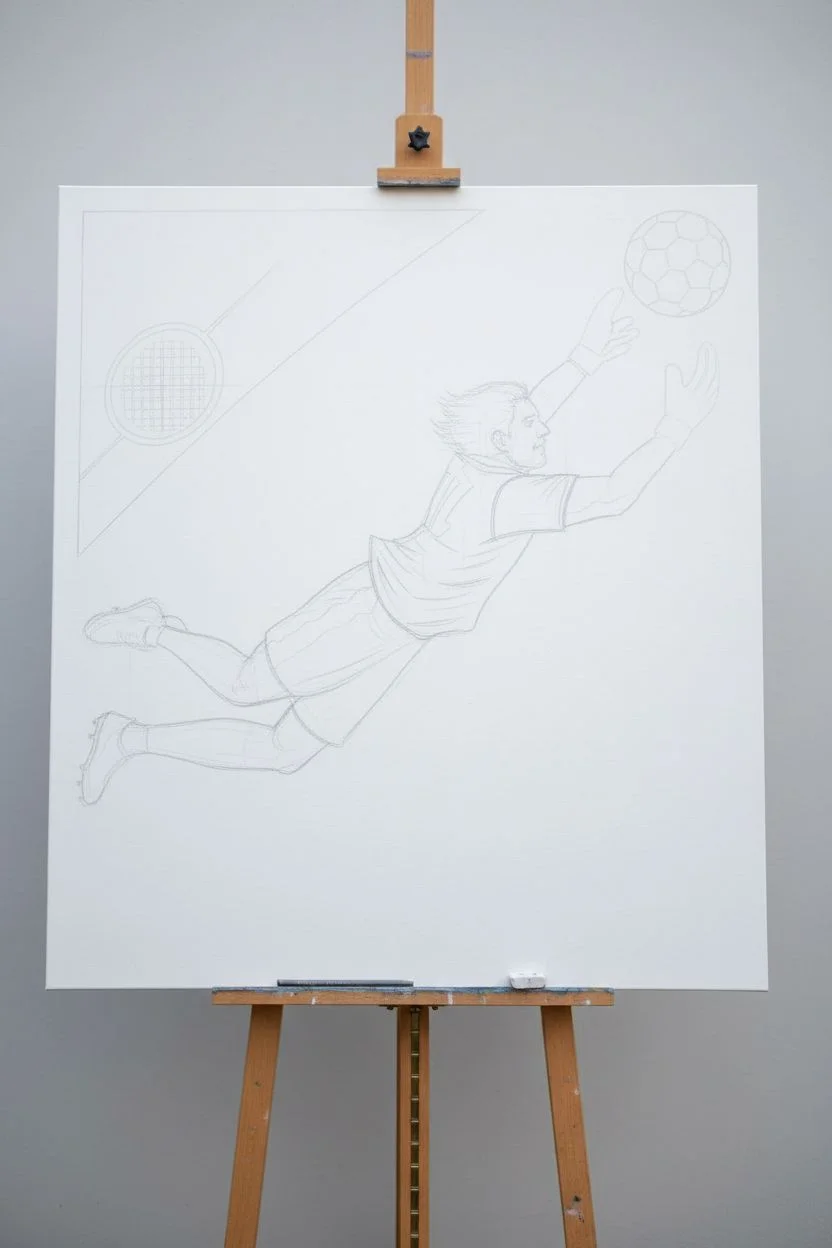
Capture the thrill of the save with this high-contrast, illustrative acrylic painting. Using a limited palette of deep blue and vibrant orange creates a striking, modern graphic look perfect for any sports fan’s room.
Detailed Instructions
Materials
- Large stretched canvas (approx. 24×36 inches)
- Acrylic paints: Titanium White, Ultramarine Blue, Cadmium Orange
- Gesso (if canvas is unprimed)
- Flat synthetic brushes (1-inch and 1/2-inch)
- Detail liner brush (size 0 or 1)
- Low-tack masking tape
- Pencil and eraser
- Ruler
- Compass or round object for tracing
Step 1: Preparation and Sketching
-
Prime the surface:
Ensure your canvas is coated with a solid layer of white gesso or acrylic paint to create a bright, smooth background. Let this dry completely. -
Draft the layout:
Lightly sketch the goalkeeper’s diving forms using a pencil. Start with a stick figure to get the angle of the dive right, then flesh out the anatomy. -
Map the geometry:
Use a ruler to mark off the large triangular section in the top left corner. Use a compass or a bowl to trace the circle detail within that triangle. -
Sketch the ball:
Draw the soccer ball in the top right corner, ensuring it aligns with the goalkeeper’s outstretched hands.
Clean Lines Hack
When using masking tape for the orange triangle, seal the tape’s edge with a thin layer of white paint first. This blocks gaps so the orange paint won’t bleed underneath.
Step 2: Blocking the Graphics
-
Tape the corner:
Apply masking tape along the diagonal line of the top-left triangle to ensure a perfectly straight edge. -
Paint the orange zone:
Fill in the masked triangle with Cadmium Orange. You may need two coats for full opacity. I like to remove the tape while the paint is still slightly tacky to avoid peeling. -
Add graphic details:
Using a smaller flat brush, paint the circle outline and the connecting line within the orange triangle using White. Fill the center with a grid of small white dots.
Level It Up
Customize the jersey! Swap the blue and orange palette for the specific colors of your favorite local club or national team to make it a personalized tribute.
Step 3: Painting the Goalkeeper
-
Fill the blue areas:
Using the flat brush and Ultramarine Blue, block in the main shapes of the jersey, shorts, socks, and hair. Ignore the fold lines for now; focus on the silhouette. -
Paint the skin tones mask:
Actually, for this high-contrast style, leave the face and arms as white negative space, only painting the blue shadow lines that define the profile and muscles. -
Add kit vibrancy:
Paint the goalkeeper’s gloves, the stripe on the shorts, and the jersey number with the same Cadmium Orange used in the background. -
Define the boots:
Paint the boots blue, adding small orange details for the studs and laces to tie the color scheme together.
Step 4: Detailing and Refining
-
Create fabric texture:
Mix a tiny amount of water with your white paint. Using your finest liner brush, paint thin, fluid lines over the blue jersey and shorts to represent wrinkles, folds, and movement. -
Detail the face:
Carefully paint the hair strands and facial profile features (eye, beard, ear) using the blue paint and the liner brush. -
Paint the ball:
Fill in the pentagons of the soccer ball with blue, leaving the hexagons white. Ensure the lines are crisp. -
Ground the figure:
In the bottom right corner, paint an irregular, jagged blue shape that resembles an abstract ground or splash, adding a few floating blue dots for energy. -
Clean up:
Use white paint to touch up any smudges outside the lines, ensuring the background remains pristine.
Hang your finished masterpiece on the wall and enjoy the energetic motion it brings to the space


Silhouette Against a Sunset
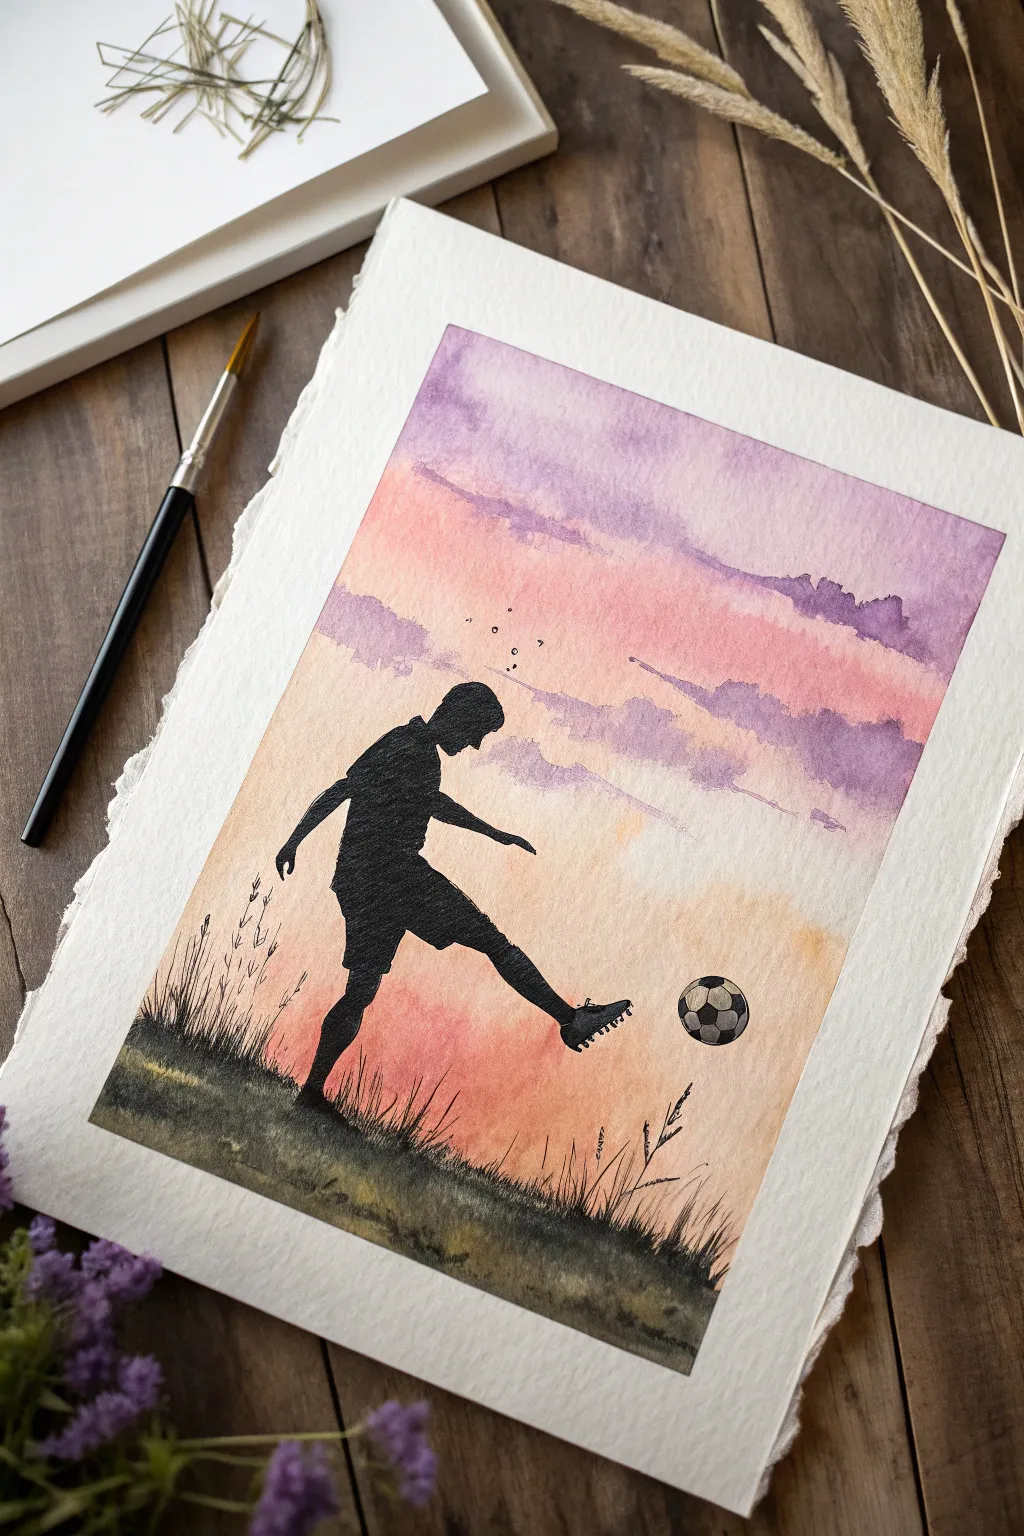
Capture the dynamic energy of the beautiful game with this atmospheric watercolor painting. You will combine soft, wet-on-wet sky gradients with a crisp, high-contrast silhouette to create a piece that feels both peaceful and action-packed.
Step-by-Step Guide
Materials
- Cold-press watercolor paper (300gsm, deckled edge preferred)
- Watercolor paints (Lavender, Rose, Peach/Yellow Ochre, Sap Green, Indigo, Lamp Black)
- Round brushes (flats for sky, sizes 2 and 6 for details)
- Fine liner or rigger brush
- HB Pencil and kneadable eraser
- Clean water and paper towels
- Masking fluid (optional)
Step 1: Sketching the Action
-
Prepare your paper:
If you are using a paper block with deckled edges, you are ready to go; otherwise, tape your sheet to a hard board to prevent buckling. -
Draft the horizon:
Using your HB pencil, lightly draw a low, uneven line across the bottom third of the paper to mark where the grass will meet the sky. -
Outline the player:
Sketch the outline of the soccer player in a kicking motion above the horizon line. Focus on the pose rather than internal details, as this will be filled in black later. -
Position the ball:
Draw the circle for the soccer ball just in front of the player’s foot, lightly marking the pentagon shapes inside so you don’t paint over the white areas later.
Pro Tip: absolute opacity
For the black silhouette, swap your watercolor for black gouache or India ink. These mediums are more opaque and dry to a solid, matte finish without streaky brushstrokes.
Step 2: Painting the Sunset Sky
-
Wet the sky area:
Using a large clean brush, apply a generous coat of clean water to the entire sky area, stopping just short of your pencil lines for the figure and ground. -
Apply the upper sky:
Load your brush with a watery mix of Lavender or purple. Paint horizontal strokes across the top third of the paper, letting the pigment flow freely on the wet surface. -
Blend in the mid-tones:
While the purple is still wet, introduce a Rose or soft pink color in the middle section. Allow it to touch and bleed slightly into the purple above for a seamless gradient. -
Warm up the horizon:
Near the bottom of the sky, paint a band of Peach or diluted Yellow Ochre. Blend this gently into the pink layer above to mimic the glow of a setting sun. -
Add cloud texture:
While the wash is still damp, dab in a slightly more concentrated purple mixture in horizontal streaks to suggest soft, drifting clouds. -
Dry completely:
This is crucial: let the background dry 100% before moving on. The paper must be bone-dry to touch, or the black silhouette will bleed.
Step 3: The Grass and Ground
-
Mix the ground color:
Create a dark, murky green by mixing Sap Green with Indigo and a touch of Black. It should be much thicker than your sky wash. -
Paint the base:
Fill in the ground area below the horizon line. I like to keep the bottom edge slightly uneven to maintain an organic, artistic feel. -
Add grassy texture:
While the ground paint is wet, drop in hints of pure black or dark brown to create depth and shadows in the turf. -
Flick the grass blades:
Using a smaller brush or rigger, use quick, upward flicking motions along the horizon line to paint grass blades overlapping the sunset sky.
Troubleshooting: bleeding edges
If black paint bleeds into the sky, stop immediately! Let it dry completely, then gently lift the mistake with a stiff, damp brush before re-painting the edge carefully.
Step 4: The Silhouette & Details
-
Fill the silhouette:
Using a size 6 round brush and creamy Lamp Black paint (or black gouache for opacity), carefully fill in the player’s body. Keep the edges sharp and clean. -
Detail the cleats:
Switch to your finest brush to paint the studs on the bottom of the soccer shoes, ensuring they look distinct against the lighter background. -
Paint the ball:
Paint the dark patches of the soccer ball with black, leaving the white paper exposed for the lighter panels. Add a tiny shadow on the bottom right of the ball for dimension. -
Add final grass overlapping:
paint a few tall, thin stalks of grass in the immediate foreground (bottom right) using black ink or thick paint to create a sense of distance. -
Add movement specks relative to the head:
Dip a fine brush in black and gently touch the paper above the player’s head to create tiny dots, representing sweat or dirt kicked up in the heat of the game.
Once the final dark details are dry, you can frame this striking piece to celebrate the passion of the sport.
BRUSH GUIDE
The Right Brush for Every Stroke
From clean lines to bold texture — master brush choice, stroke control, and essential techniques.
Explore the Full Guide
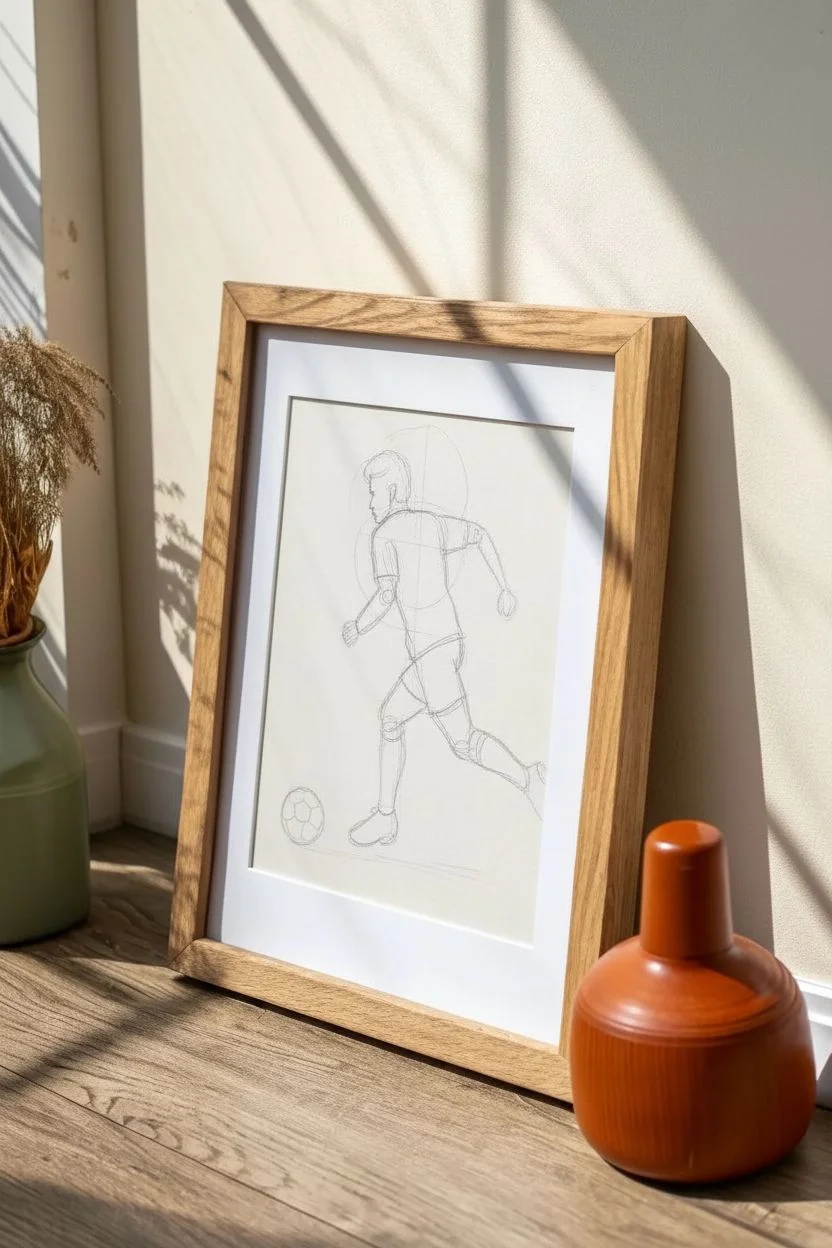
Minimalist Line Art
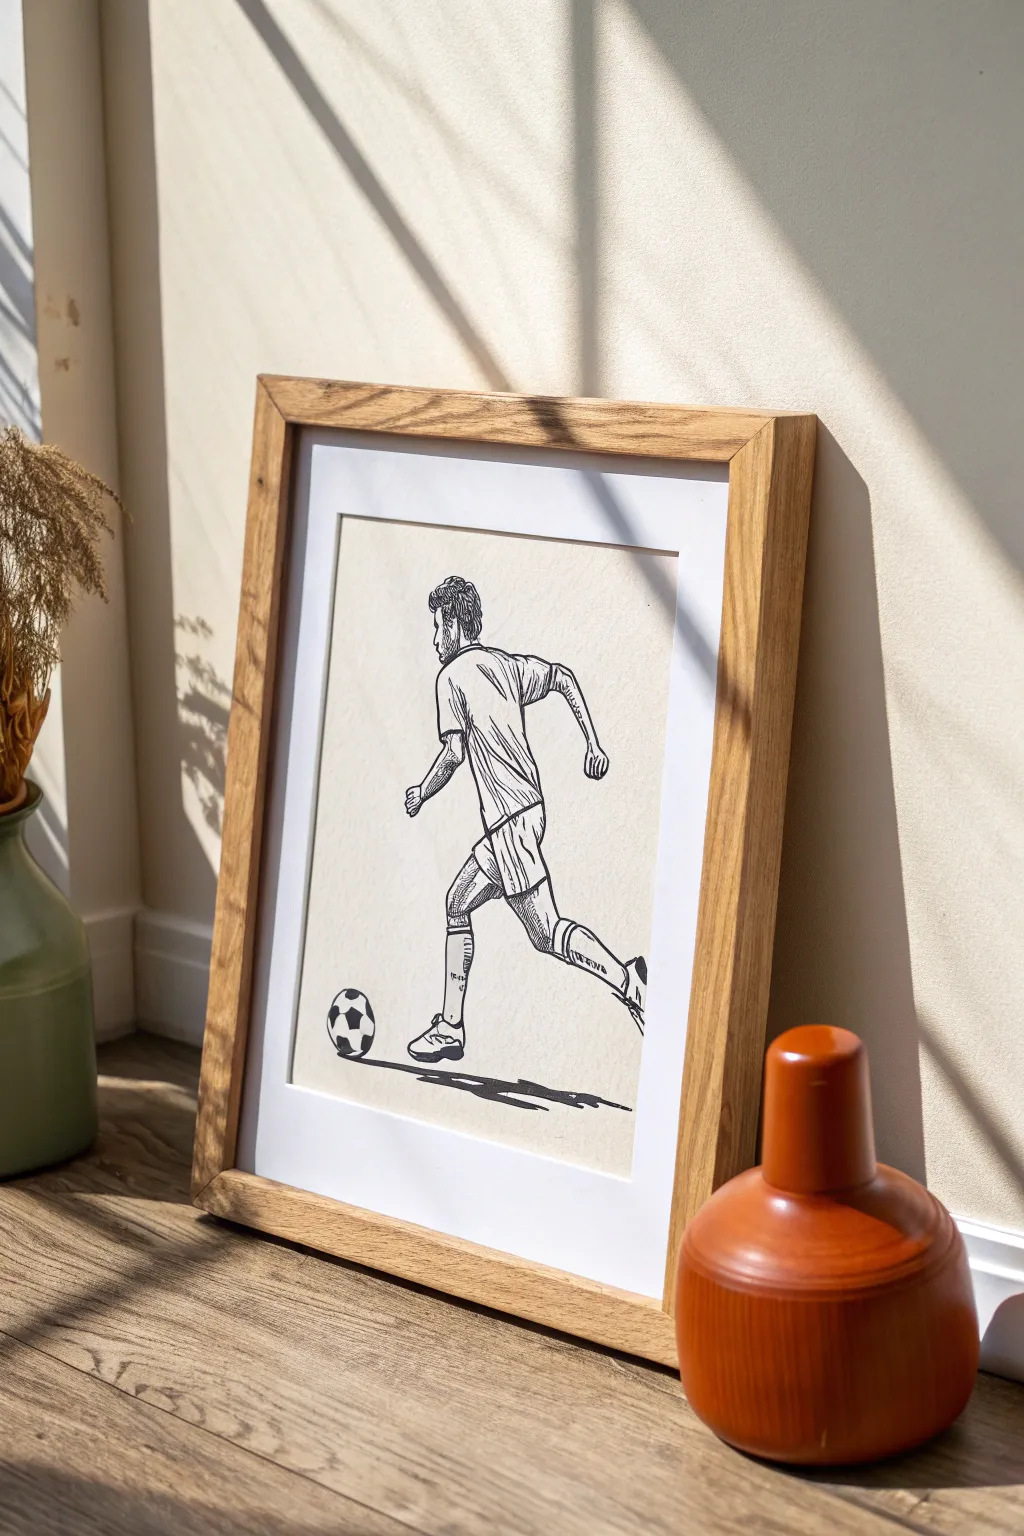
Capture the dynamic energy of the beautiful game with this polished yet minimalist ink drawing. Using precise hatching techniques and clean lines, you will create a timeless piece of art that looks professionally illustrated.
How-To Guide
Materials
- Smooth white Bristol board or hot press watercolor paper (A4 size)
- HB graphite pencil
- Kneaded eraser
- Black technical pens (sizes 0.1mm, 0.3mm, and 0.5mm)
- Ruler
- Light wood frame with white mount
Step 1: Drafting the Motion
-
Establish the spine:
Begin with your HB pencil using very light pressure. Draw a curved vertical line slightly off-center to represent the player’s spine and head position, leaning forward to suggest momentum. -
Map the limbs:
Sketch a stick-figure skeleton first. Position the left leg bent forward high at the knee, and the right leg extending back for the push-off. Angle the arms in opposition to the legs for balance. -
Flesh out the form:
Build cylindrical shapes around your stick frame to define the muscles. Pay attention to the calf of the back leg and the thigh of the front leg. -
Dress the player:
Sketch the outline of a loose-fitting jersey and shorts over the body. Add wrinkles and folds around the waist and armpits where the fabric would naturally bunch up during movement. -
Position the ball:
Draw a perfect circle slightly ahead of the front foot. It should look like it is rolling across the ground, not floating.
Smudge Patrol
Ink smears ruin minimalist art instantly. Always place a clean sheet of scrap paper under your drawing hand as a guard to prevent oils or friction from smudging fresh ink.
Step 2: Inking the Contours
-
Outline the profile:
Switch to your 0.3mm pen. Carefully trace the profile of the face and the hair. I find using short, erratic strokes here helps create the texture of hair better than a solid line. -
Define the clothing:
Ink the outer lines of the shirt and shorts. Use a slightly broken line technique—lifting the pen occasionally—to keep the drawing feeling loose and sketched rather than rigid. -
Detail the anatomy:
Outline the legs and arms. Be precise around the knees and elbows, drawing slight indentations to suggest bone structure and muscle definition. -
Draw the boots and ball:
Ink the soccer boots and the ball. For the ball, draw the classic pentagon shapes but leave some lines incomplete to simulate highlight and rotation.
Step 3: Shading and Texture
-
Basic hatching:
Using the fine 0.1mm pen, start adding shadow. Use diagonal parallel lines (hatching) on the shadowed side of the arms and the back of the neck. -
Texturing the fabric:
Add denser hatching marks on the shorts and the back of the jersey. Follow the direction of the fabric folds; this emphasizes the movement and depth of the clothing. -
Leg shadows:
Apply vertical hatching lines specifically on the back calf and under the thigh of the front leg to separate the limbs visually. -
The socks:
Draw horizontal bands on the socks, then add vertical hatching over them to show the curvature of the shin. -
Grounding the subject:
Switch to the bolder 0.5mm pen. Scribble a horizontal, elongated shadow underneath the back foot and the ball. This cast shadow anchors the player so they aren’t floating in space.
Team Spirit
Customize the artwork by sketching a specific number on the jersey back, or use a thin watercolor wash to tint the jersey stripes in your favorite club’s colors.
Step 4: Final assembly
-
Dry and erase:
Wait at least 15 minutes to ensure the ink is bone-dry. Gently run the kneaded eraser over the entire drawing to lift all graphite guidelines. -
Mount and frame:
Place your artwork behind a white mount. Clean the glass of your wooden frame to remove dust, insert the art, and secure the back.
Hang your finished striker in a well-lit spot to celebrate the artistry of the sport
Abstract Motion and Energy
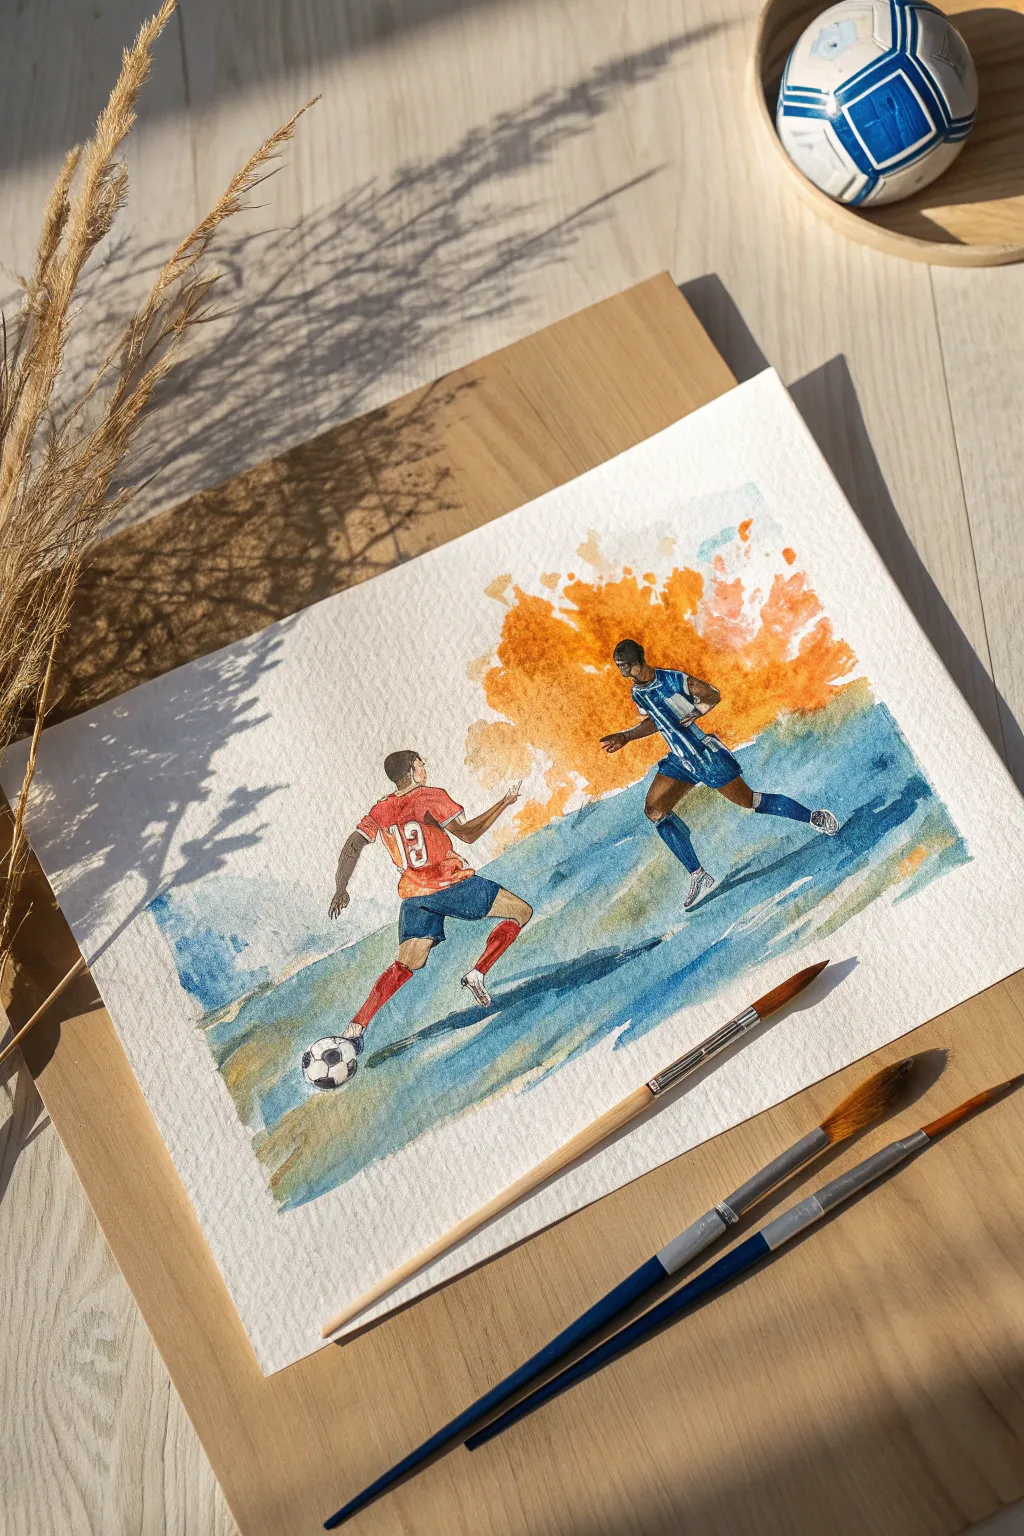
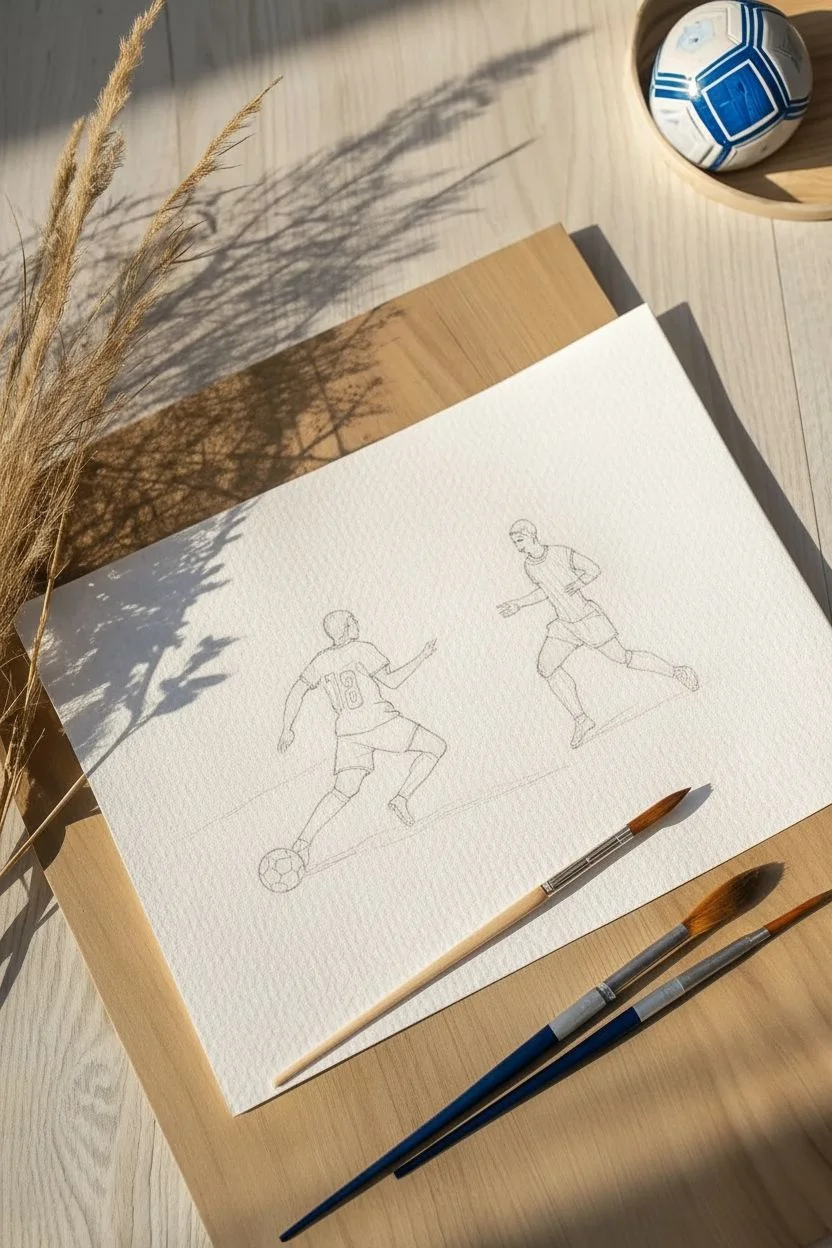
Capture the intensity of a midfield battle using expressive watercolors to convey speed and motion. This project contrasts detailed figures against an abstract, explosive background to simulate the high energy of the sport.
Step-by-Step Tutorial
Materials
- Cold-press watercolor paper (140lb/300gsm)
- Watercolor paints (Cadmium Orange, Scarlet Red, Ultramarine Blue, Burnt Sienna, Payne’s Grey)
- Round brushes (sizes 2, 6, and 10)
- HB pencil and clean eraser
- Masking tape and drawing board
- Two jars of water
- Paper towels
Step 1: Sketching the Action
-
Prepare the surface:
Tape your watercolor paper down to a board on all four sides. This ensures the paper stays flat when we apply heavy washes later. -
Outline the attacker:
Using the HB pencil, lightly sketch the figure on the left. Draw him leaning forward to show momentum, with his right leg extending to tap the ball. -
Outline the defender:
Sketch the right figure slightly behind the first, in a defensive stance with knees bent and arms out for balance. -
Add specifics:
Refine the sketches by adding clothing details like the number ’18’ on the attacker’s back and the vertical stripes on the defender’s jersey. Keep pencil lines light.
Step 2: The Abstract Background
-
Wet the sky area:
Using your largest brush, paint clean water onto the upper half of the paper, carefully painting *around* the sketched figures so they stay dry. -
Drop in the orange:
Load a size 10 brush with Cadmium Orange and touch it to the wet paper between the figures. Let the paint bloom and spread naturally outward. -
Add intensity:
While the orange is still wet, drop in hints of Scarlet Red near the figures to create a ‘burst’ effect. I like to tilt the board slightly to encourage organic movement. -
Paint the ground wash:
Mix a watery Ultramarine Blue with a touch of green or yellow ochre. Paint the lower half of the background with loose, horizontal strokes to suggest a field. -
Dry completely:
Let the background dry fully before moving on. The paper must be bone-dry to prevent the players’ colors from bleeding into the sky.
Loose & Energetic
Don’t overwork the orange background explosion. Let the watercolor do the work! If ‘cauliflower’ back-runs appear as it dries, leave them—they add perfect texture.
Step 3: Painting the Players
-
Paint skin tones:
Mix a light wash of Burnt Sienna with plenty of water. Paint the exposed arms, legs, and faces of both players using the size 6 brush. -
Attacker’s jersey:
Fill in the left player’s shirt with a bright Scarlet Red. Be very careful to leave the number ’18’ unpainted so the white paper shows through. -
Defender’s stripes:
For the right player, switch to your smallest brush. Paint thin vertical stripes with Ultramarine Blue, leaving white gaps between them for the pattern. -
Shorts and socks:
Paint both players’ shorts with a saturated blue. Add red socks to the attacker and blue socks to the defender, leaving small white highlights at the knees.
Level Up: Splatter
For extra motion, load a stiff brush with orange paint and flick the bristles to splatter small droplets around the figures. This mimics kicked-up dust or sweat.
Step 4: Details & Shadows
-
Define the ball:
Paint the geometric pentagons on the soccer ball with Payne’s Grey or black, keeping the shapes sharp against the white paper. -
Cast shadows:
Mix a transparent grey-blue. Paint elongated shadows stretching from the players’ feet toward the bottom left, mimicking the angle of the light. -
Enhance the grass:
Using a semi-dry brush with thicker blue-green paint, drag it quickly across the foreground to create streaks that look like textured grass. -
Final outlines:
Once everything is dry, mix a dark, neutral color. lightly define the edges of the shorts and shoes with a fine liner brush to make the figures pop.
Now you have a vibrant sports scene that perfectly freezes the action of the game.

PENCIL GUIDE
Understanding Pencil Grades from H to B
From first sketch to finished drawing — learn pencil grades, line control, and shading techniques.
Explore the Full Guide
Charcoal Sketch of Muddy Cleats
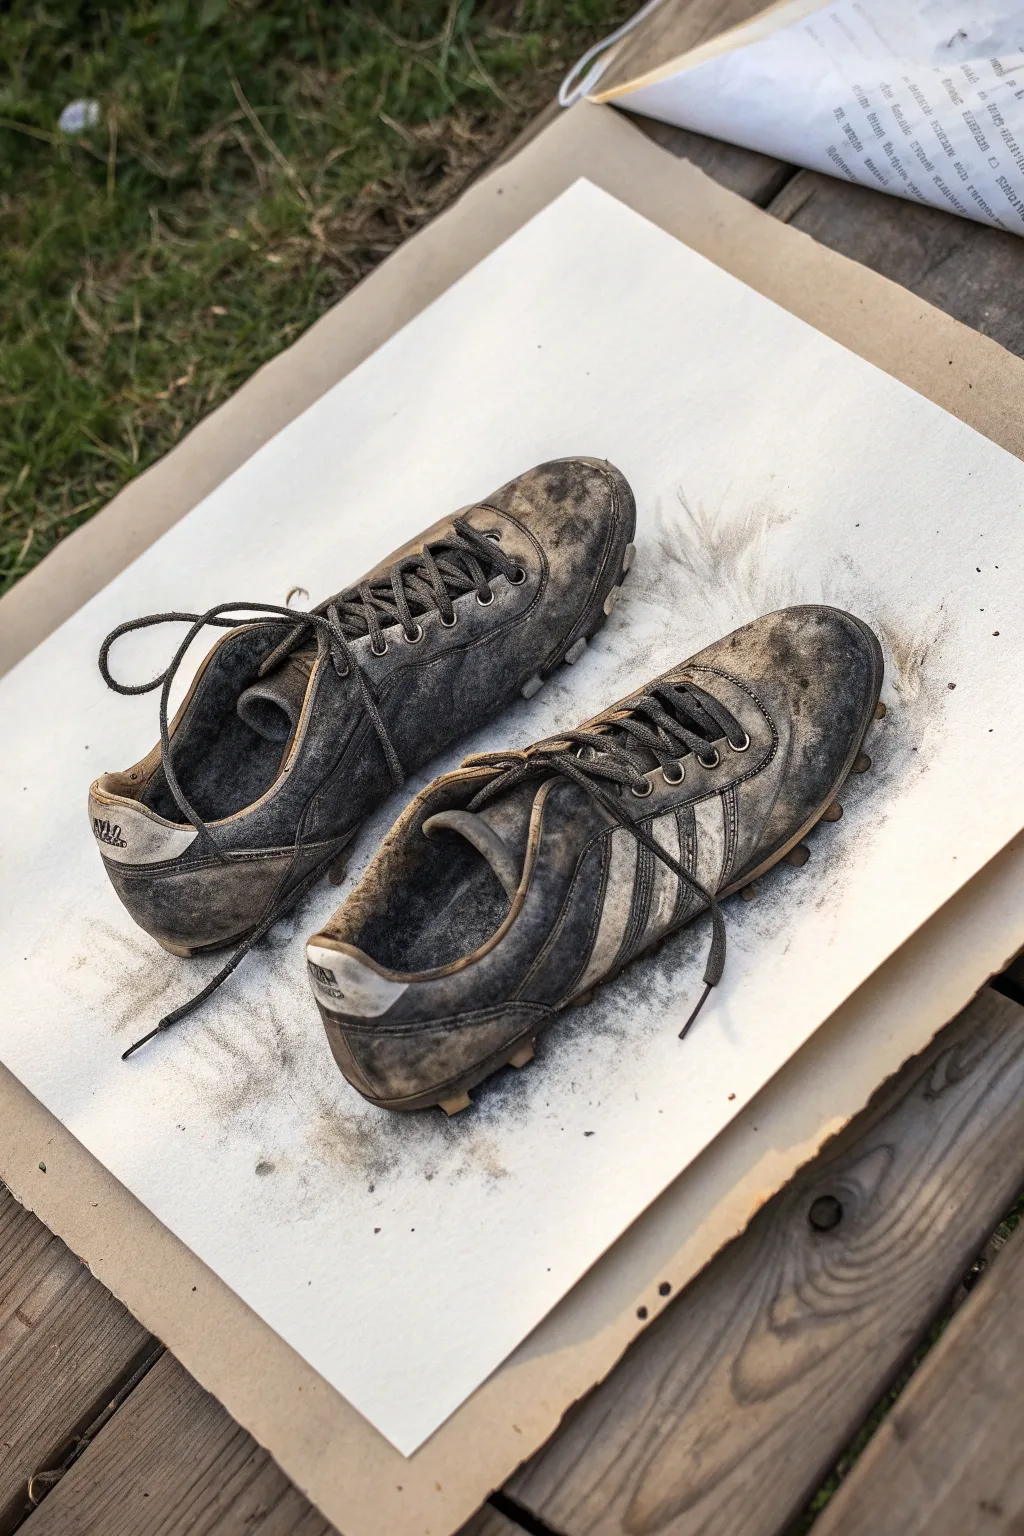
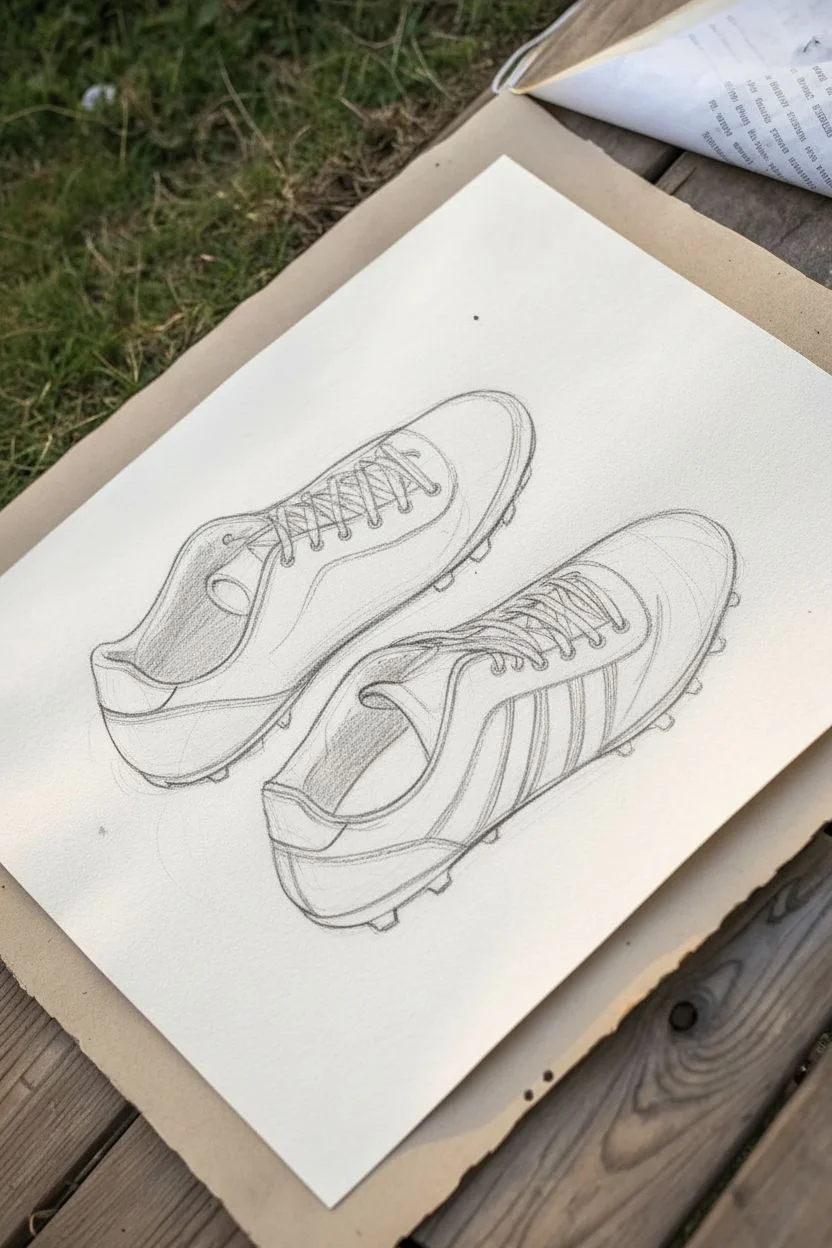
Capture the aftermath of a hard-fought match with this atmospheric charcoal study. By layering dark, compressed charcoal over smudgeable willow sticks, you will texturize a pair of cleats to look realistically worn, dirty, and triumphant.
Detailed Instructions
Materials
- Heavyweight drawing paper (Bristol or Vellum finish)
- Vine or Willow charcoal sticks
- Compressed charcoal sticks (soft and hard)
- Charcoal pencils (HB, 2B, 6B)
- Kneaded eraser
- Blending stumps (tortillons)
- Paper towel or chamois cloth
- Workable fixative spray
Step 1: Structuring the Form
-
Establish the footprint:
Begin with a stick of vine charcoal, sketching the general oval shapes of the soles to determine where the cleats sit on the paper. -
Profile the uppers:
Sketch the silhouette of the shoes lightly, focusing on the curve of the heel and the rounded toe box. -
Placement of features:
Mark the location of the side stripes, the tongue area, and the heel tabs with faint guidelines, ensuring the perspective matches. -
Refining the contours:
Go over your loose sketch with a sharpened HB charcoal pencil to solidify the outline, paying attention to the wrinkled leather areas.
Smudge Control
Charcoal gets everywhere. Place a clean sheet of scrap paper under your drawing hand to act as a bridge, preventing your palm from dragging across your finished work.
Step 2: Building Values and Grime
-
Base tone application:
Rub the side of a willow charcoal stick over the entire body of the shoe to create a mid-tone grey. -
Smudging the base:
Use a chamois or folded paper towel to rub the charcoal into the paper tooth; this creates the underlying leather color. -
Deepening the shadows:
Take a compressed charcoal stick and fill in the interior of the shoe (where the foot goes) and the deep creases; these should be the darkest points. -
Creating the mud texture:
I like to tap a soft charcoal stick against a piece of sandpaper over the drawing, letting the dust fall onto the ‘muddy’ areas, then pressing it in with my thumb. -
Defining the stripes:
Use a kneaded eraser to lift pigment away to create the three stripes, but don’t make them pristine white—leave some smudge marks. -
Scruffing the leather:
Use a charcoal pencil to draw erratic, scratchy hatching lines near the toe and heel to simulate cracked, worn leather.
Step 3: Laces and Sole Details
-
Drawing the laces:
Use a 2B charcoal pencil to draw the laces; keep the lines wavy and irregular rather than stiff. -
Casting lace shadows:
Add tiny drop shadows underneath the laces using a blending stump to lift them off the tongue visually. -
Detailing the studs:
Draw the cleats/studs on the bottom, shading the side facing away from the light source heavily. -
Adding sole texture:
Stipple (dot) the rubber sole area with a medium charcoal pencil to differentiate the rubber texture from the smooth leather.
Level Up: White Charcoal
For ultra-realism, use a white charcoal pencil or white pastel pencil at the very end to add stark highlights to the metal eyelets and wet mud spots.
Step 4: Finishing Atmosphere
-
Grounding the subject:
Rub compressed charcoal horizontally underneath the shoes to create a heavy cast shadow. -
Softening shadow edges:
Blend the edges of the cast shadow outward with a paper towel so it fades naturally into the white paper. -
High-contrast highlights:
Mold your kneaded eraser into a sharp point and tap it firmly on the laces and upper edges to create bright, clean highlights. -
Final dust off:
Lightly blow away any loose particles that aren’t part of the texture, being careful not to spit or smudge. -
Seal the deal:
Take the drawing outdoors and apply a light coat of fixative spray to prevent the heavy charcoal from smearing.
Now you have a rugged, textured piece that perfectly captures the spirit of the game.
Blueprint and Patent Style
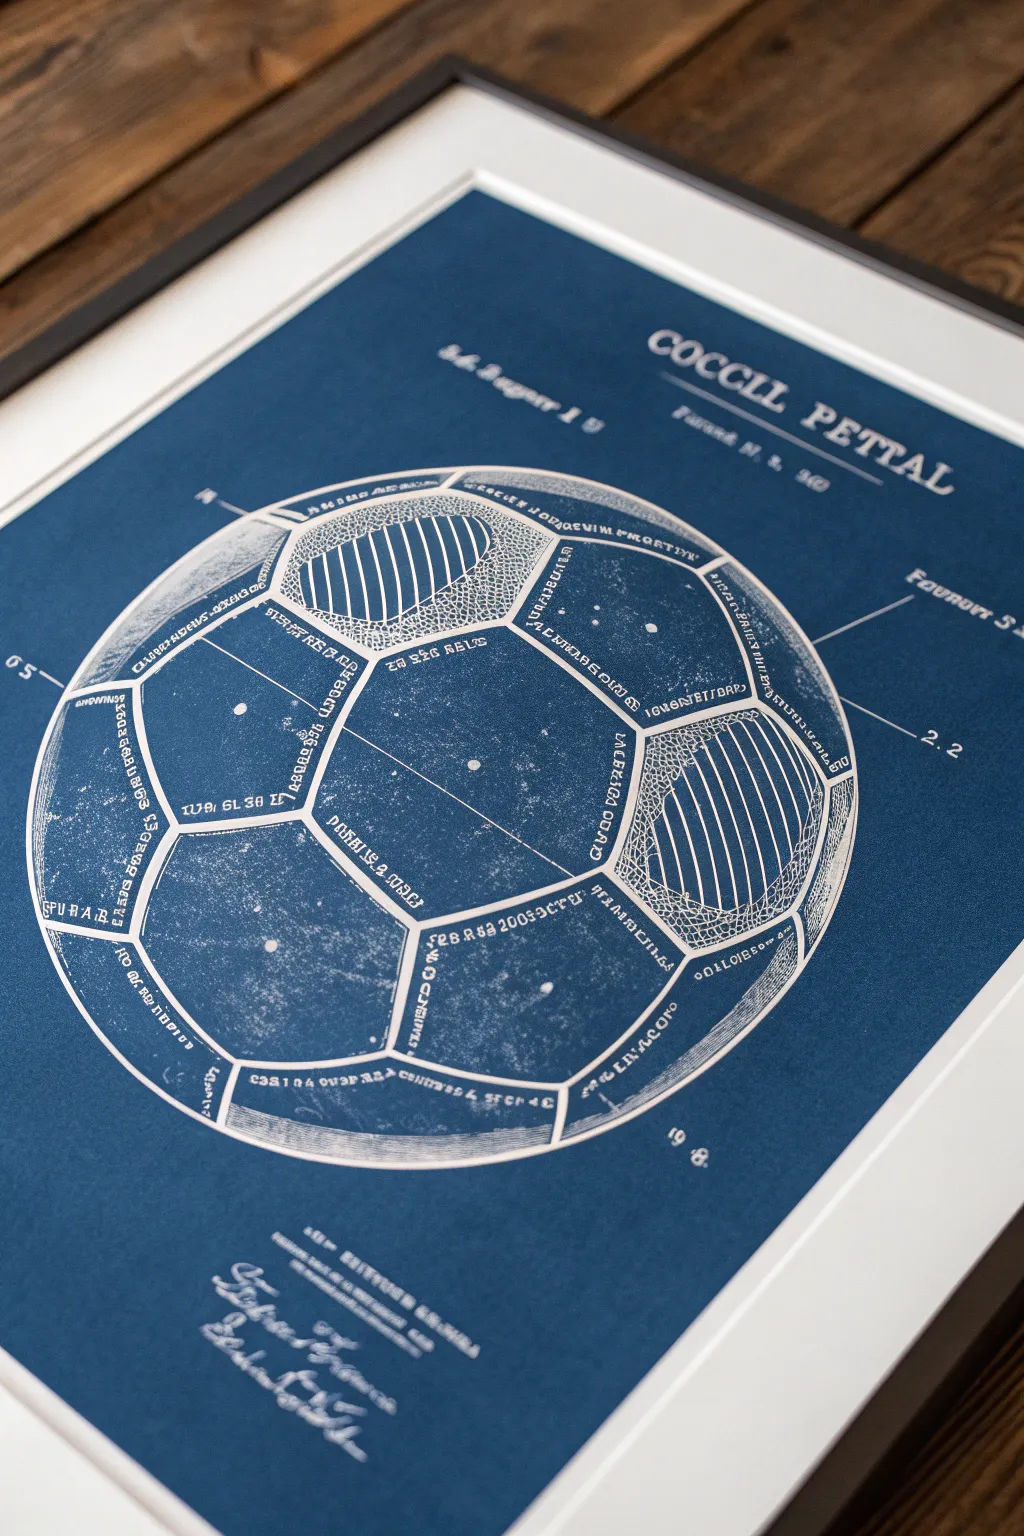
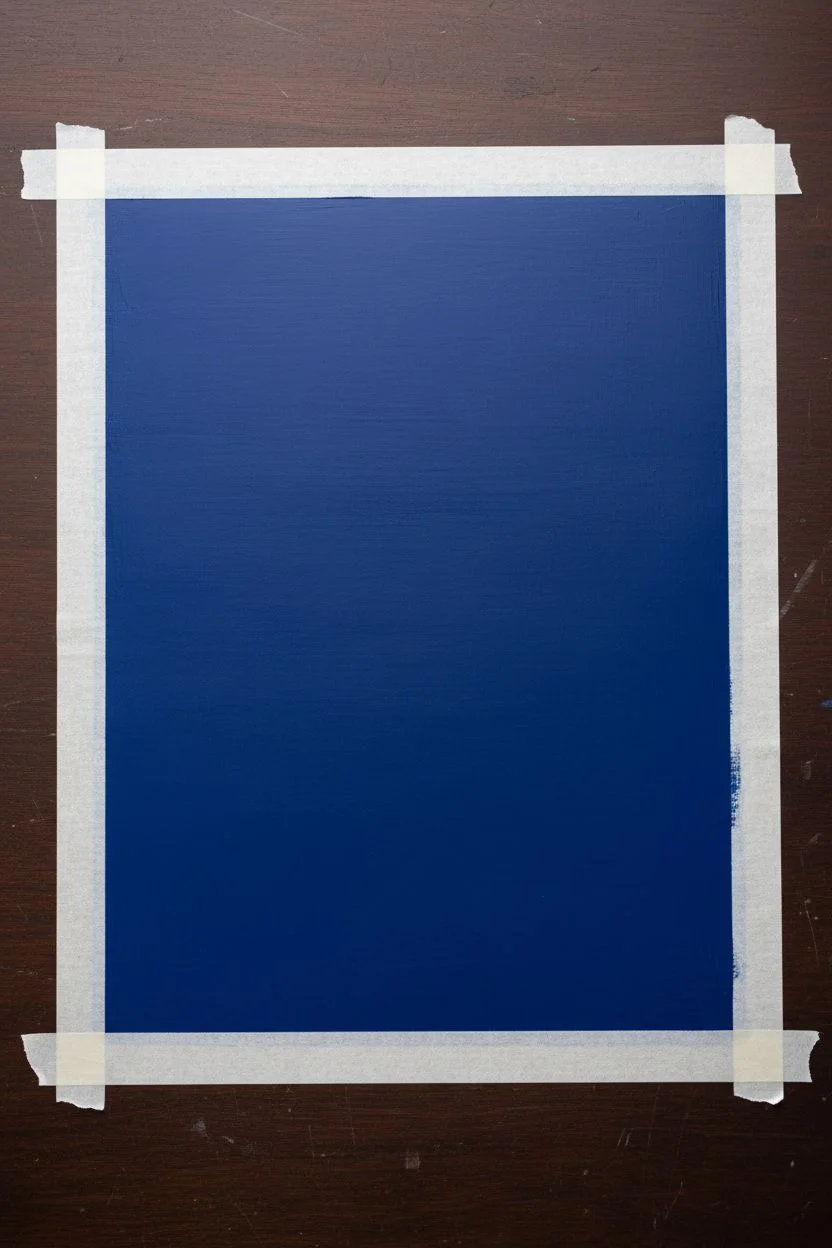
Capture the industrial elegance of classic sports design with this faux-blueprint project. By combining deep indigo backgrounds with crisp white technical lines, you can recreate the look of an antique patent diagram without needing complex chemical printing processes.
Step-by-Step Tutorial
Materials
- Smooth heavyweight white paper or Bristol board (A3 or A4)
- Acrylic paint (Indigo or Prussian Blue)
- Wide flat paintbrush
- White paint pens (fine point and extra-fine point)
- Ruler and protractor
- Compass (for drawing circles)
- HB Pencil and eraser
- Masking tape
- Black frame (optional for display)
Step 1: Creating the Blueprint Background
-
Secure the paper:
Tape your paper down to a flat work surface using masking tape along all four edges to create a clean border and prevent warping. -
Mix the blue:
Create a vintage blueprint hue by mixing Prussian Blue acrylic paint with a tiny drop of black to deepen the tone. -
Base coat:
Apply the paint in smooth, horizontal strokes across the entire paper surface, ensuring you cover everything inside the taped area. -
Second layer:
Allow the first layer to dry completely, then apply a second coat to ensure a solid, opaque finish with no white paper showing through. -
Dry time:
Let the paper dry for at least an hour; the surface must be perfectly bone-dry before you attempt any sketching.
Compass Hack
Most paint pens don’t fit in standard geometry compasses. Use electrical tape to securely strap your marker to the pencil leg of the compass for perfect white circles.
Step 2: Drafting the Geometry
-
Mark the center:
Use a ruler to lightly find the center of your paper with a pencil. -
Primary circle:
Set your compass to the desired radius of the soccer ball and lightly draw the main outer circle centered on the page. -
Panel sketching:
Lightly sketch the pentagon and hexagon panels inside the circle using a reference photo of a classic ball to get the perspective right. -
Guide lines:
Draw straight lines extending outward from specific points on the ball to the edge of the paper, mimicking technical measurement indicators. -
Text placement:
Sketch light horizontal guidelines at the top for the title and at the bottom for the signature block to ensure your lettering remains straight.
Faint White Lines?
If the blue background shows through your white lines, wait for the ink to dry and trace over them a second time. Don’t press hard, or the tip might scratch the paint.
Step 3: Inking the Technical Details
-
Outline the sphere:
Using a fine-tip white paint pen, carefully trace over your main circle; I like to attach the pen to my compass with tape for a perfect machine-made look. -
Define the panels:
Trace the internal geometric shapes of the ball panels, using a ruler for straight edges and free-handing the slight curves. -
Add hatching:
Select two or three panels to fill with diagonal hash lines or stippling (dots), which simulates the ‘shading’ found in old engravings. -
Technical lines:
Trace the straight indicator lines extending from the ball, adding small arrowheads or numbers at the ends (e.g., ’65’, ‘2.2’) to enhance the engineering aesthetic. -
Main title:
Letter the main title at the top, such as ‘SOCCER BALL’ or ‘PATENT NO. 1’, using a serif font style with thick vertical strokes. -
Detail text:
Switch to your extra-fine point pen to add smaller ‘specifications’ text around the ball; these can be actual descriptions or just scribbles that mimic small print. -
Signature block:
At the bottom, add a cursive signature and a date (e.g., ‘1985’) to serve as the ‘inventor’s’ sign-off. -
Clean up:
Wait at least 30 minutes for the white ink to cure fully, then gently erase any visible pencil lines. -
Reveal:
Slowly peel away the masking tape to reveal the crisp white border that frames your blue artwork.
Frame your finished blueprint in a simple black gallery frame to complete this sophisticated, sporty tribute.


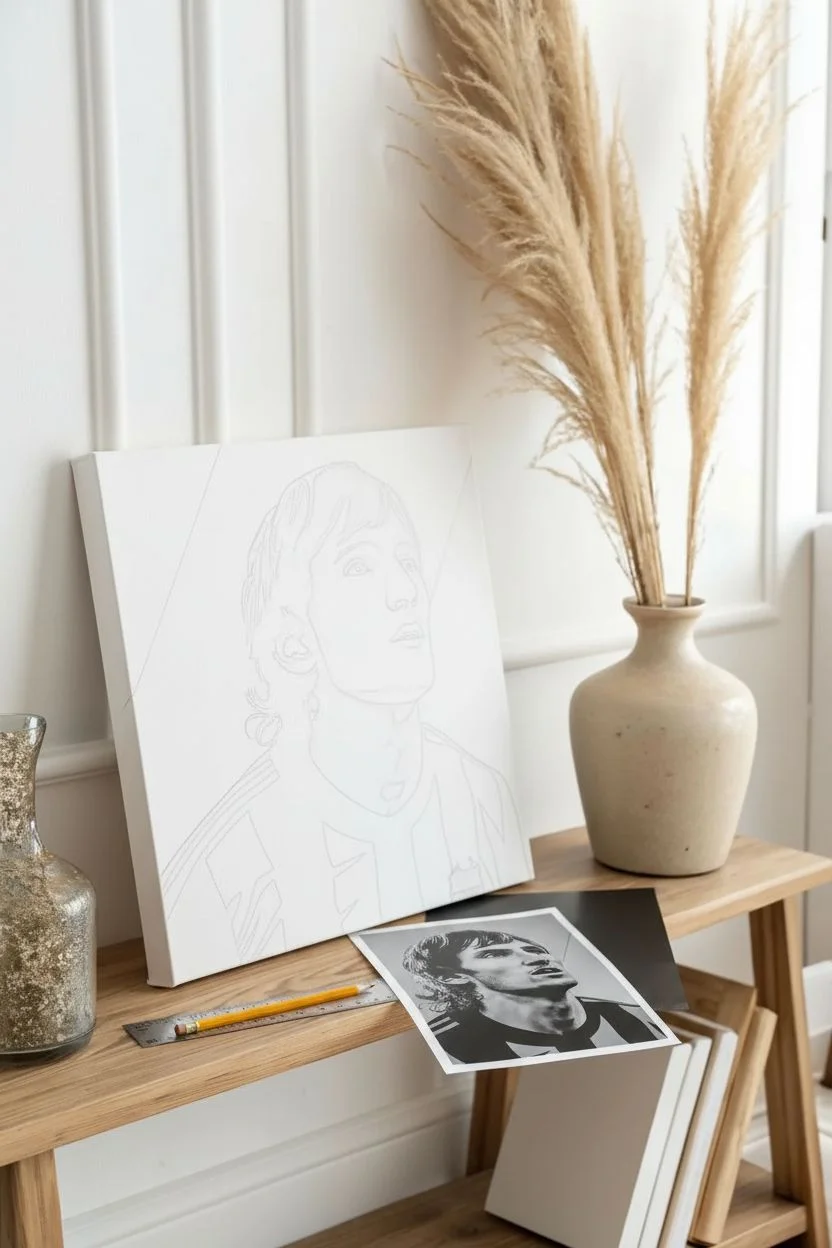
Pop Art Player Portrait
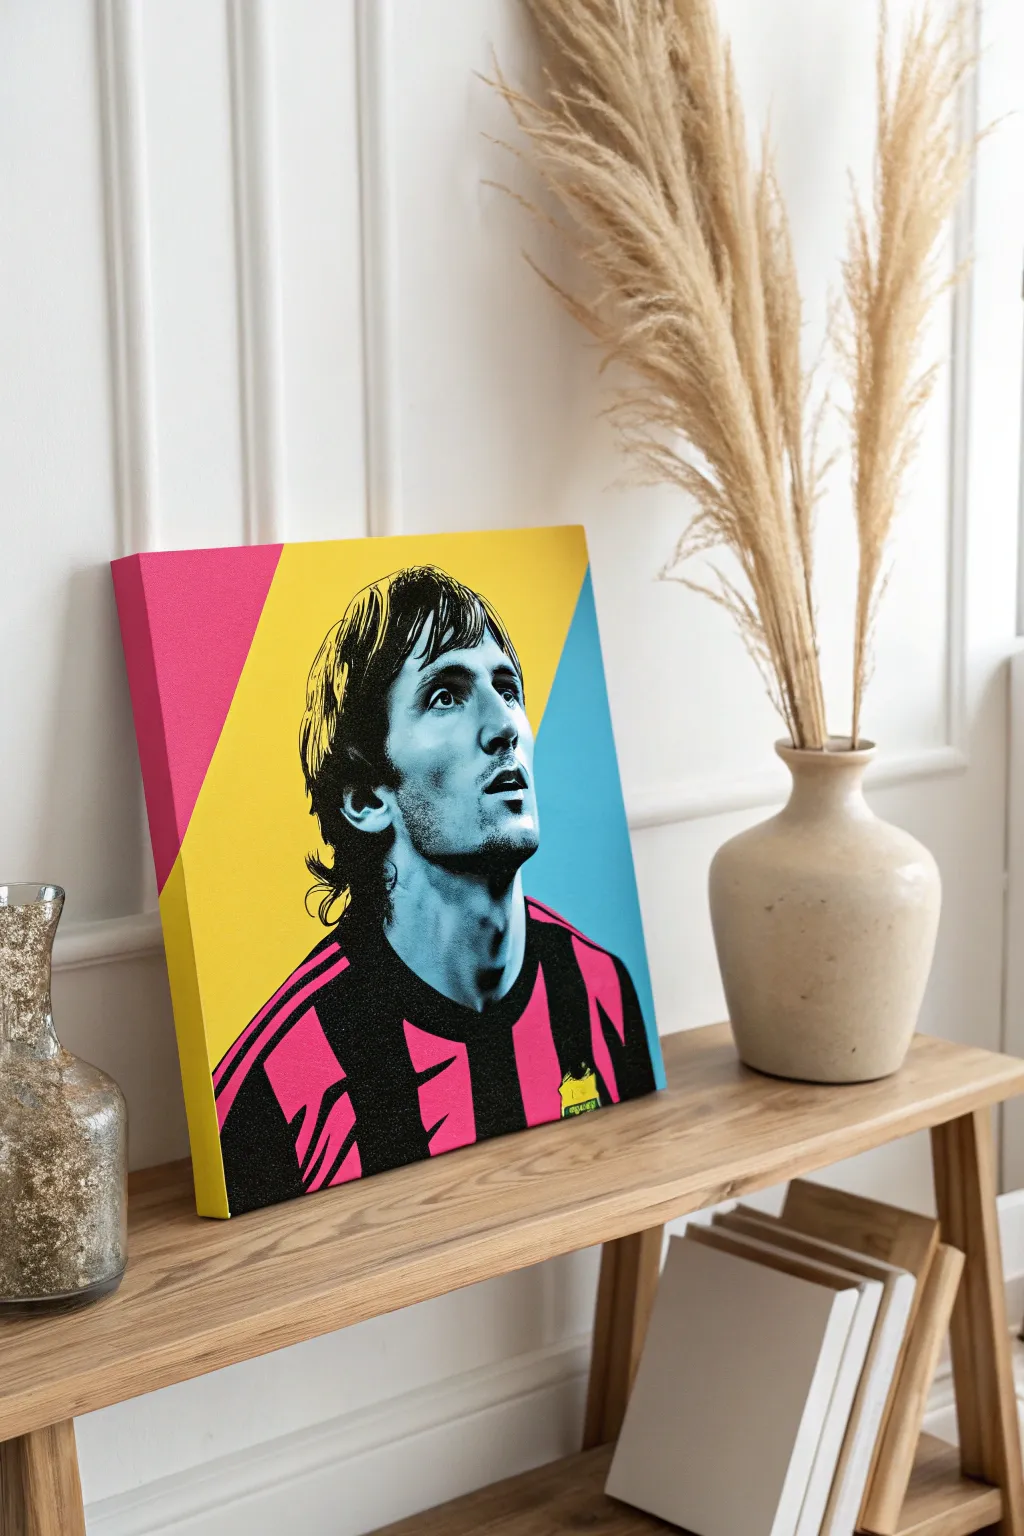
Capture the energy of the beautiful game with this bold, graphic painting style that transforms a classic player portrait into modern art. Using high-contrast shadows and a striking CMYK color palette, you will learn to layer flat colors to build a professional-looking masterpiece.
Detailed Instructions
Materials
- Square stretched canvas (e.g., 12×12 or 16×16 inches)
- Heavy body acrylic paints: Primary Yellow, Magenta, Cyan, Black
- Painter’s tape or masking tape (low tack)
- Printed reference photo (high contrast)
- Carbon transfer paper
- Pencil
- Flat synthetic brushes (medium and large)
- Fine liner brush (for details)
Step 1: Preparing the Composition
-
Edit your reference:
Choose a photo of your favorite player and use free photo editing software to apply a ‘Threshold’ or ‘Posterize’ filter. This converts the image to clear black and white shapes, which creates that stencil look. -
Print and size:
Print your edited image roughly the size of your canvas. If you don’t have a large printer, you can print it on multiple sheets and tape them together. -
Map the background:
On your bare canvas, use a pencil and a ruler to lightly draw two diagonal lines that split the background into three distinct geometric sections behind where the head will go.
Clean Lines
If paint bleeds under your tape, don’t panic. Wait for it to dry completely, then lay a ruler over the line and gently scrape the excess paint away with a craft knife or touch up with the original color.
Step 2: Blocking the Background
-
Tape the first section:
Apply painter’s tape along the pencil lines to mask off the central area so you can paint the outer edges first without worrying about steady hands. -
Paint the pink stripe:
Using a large flat brush, paint the left diagonal section with a solid coat of Magenta. Ensure the stroke direction is uniform for a smooth finish. -
Paint the blue stripe:
While the pink is wet or drying, paint the far-right triangular section with a mix of Cyan and white to create a light blue sky tone. -
Fill the center:
Once the outer sections are dry to the touch, move your tape to cover the painted edges. Fill the large central diagonal slice with a bright Primary Yellow. -
Remove tape:
Peel off the tape carefully while the paint is still slightly tacky to reveal crisp, straight geometric lines.
Level Up
Make the artwork pop by using different varnishes. Apply a high-gloss varnish only to the black painted areas and a matte varnish to the colorful background to create a stunning textural contrast.
Step 3: Layering the Portrait
-
Transfer the silhouette:
Place the carbon paper dark-side down on the dry canvas, then layer your reference print on top. Firmly trace just the outline of the head, hair, and shoulders. -
Base coat the skin:
Paint the entire face and neck shape with the same Light Blue/Cyan mix you used for the background corner. Using unnatural skin tones is key to this pop art style. -
Base coat the jersey:
Paint the shirt area with Magenta. It helps tie the composition together by reusing the background color for the subject’s clothing. -
Transfer facial details:
Once the blue face base is completely dry, place your carbon paper and reference back over the canvas. Trace the detailed black shadow shapes: the eyes, nose, mouth shadows, and hair texture.
Step 4: Defining the Legend
-
Start the shadows:
Using a medium round brush and pure Black paint, fill in the largest shadow areas first, such as the hair and the darkest parts of the neck. -
Paint the shirt stripes:
Switch to a flat brush to paint the bold black vertical stripes of the jersey. I find using a ruler as a guide for your brush helps keep these lines straight. -
Detail the features:
Switch to your fine liner brush. Carefully paint the intricate shadow shapes that define the eyes, nostrils, and lips. This high-contrast shading gives the face its form. -
Refine the hair:
Use the liner brush to add a few loose black strands around the edge of the hair to make the silhouette look more natural and less like a cutout. -
Add the focal point:
If the jersey has a team crest or logo, paint a simple yellow geometric shape on the chest to represent it, adding a tiny scribble of black for detail. -
Final inspection:
Step back and look for any areas where the colored background might need a second coat for opacity, or where black lines need sharpening.
Now hang your vibrant creation and enjoy the dynamic energy it brings to the room.
The View from the Net
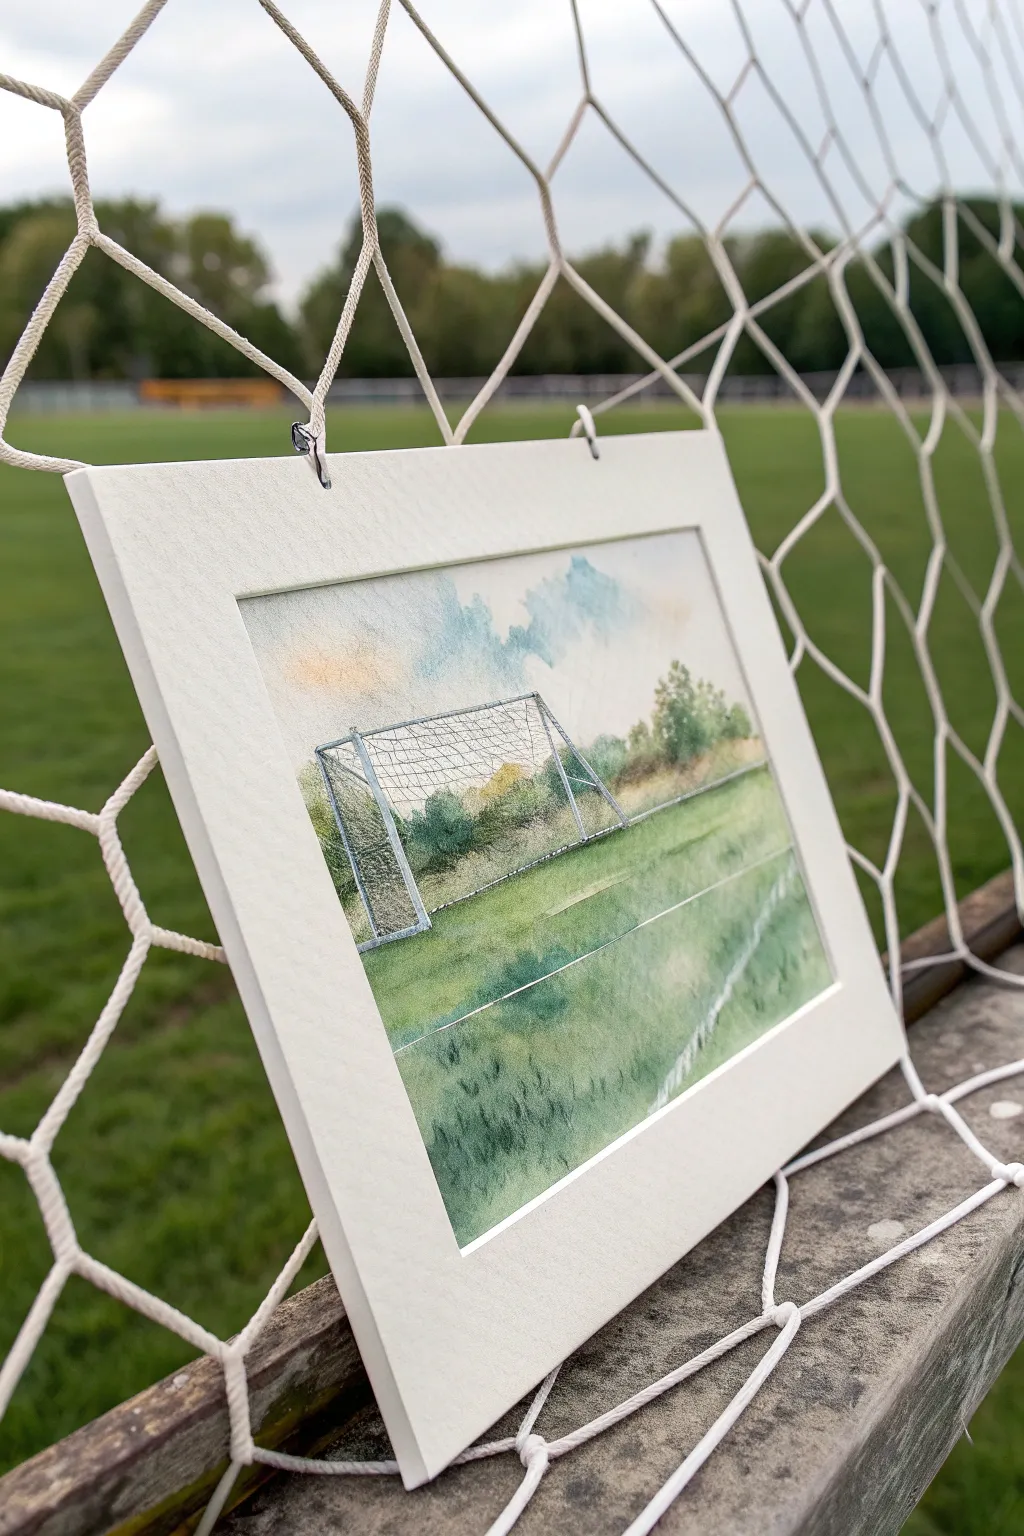
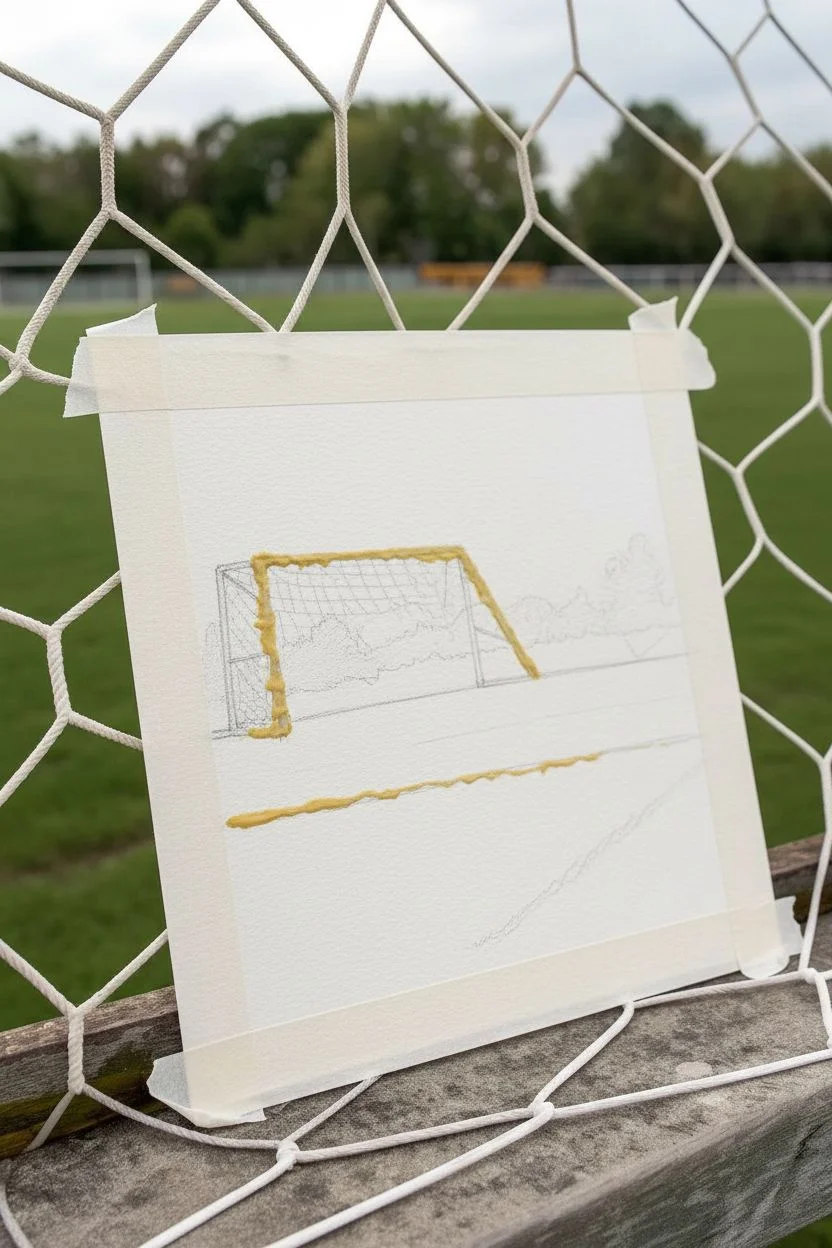
Capture the quiet anticipation of the game with this atmospheric watercolor piece looking out from the net. This project focuses on soft wet-on-wet techniques for the background and precise detailing to bring the soccer goal to life.
How-To Guide
Materials
- Cold press watercolor paper (300 gsm)
- Watercolor paints (Cobalt Blue, Sap Green, Yellow Ochre, Burnt Sienna, Paynes Grey)
- Round brushes (Size 8 and 4)
- Fine liner brush or rigger brush
- Masking fluid (liquid frisket) and applicator
- White opacity marker or white gouache
- HB pencil and eraser
- Masking tape and mounting board
Step 1: Sketching and Masking
-
Prepare the canvas:
Tape your watercolor paper down to a board on all four sides to prevent buckling when we add water. -
Draft the perspective:
Using an HB pencil, lightly sketch the horizon line about one-third of the way up the paper. Draw the soccer goal frame in the foreground, using perspective lines that angel slightly inward. -
Mask the goal posts:
Apply masking fluid carefully to the white goal posts and crossbar. This preserves the bright white paper underneath so you don’t have to paint around them. -
Mask the field line:
Draw a thin line of masking fluid across the grass area to represent the white pitch marking. Let the fluid dry completely before touching it with any paint.
Soft Focus Trick
To keep the background trees looking distant and out-of-focus, avoid hard edges. If a line looks too crisp, run a clean, damp brush along the edge to soften it back into the sky.
Step 2: Painting the Atmosphere
-
Wet the sky area:
Brush clean water over the sky portion of the paper, stopping just at the horizon line. -
Add sky colors:
Drop in a dilute wash of Cobalt Blue for the upper sky, and touch a little Yellow Ochre near the horizon for a sunset glow. -
Create the tree line:
While the sky is still damp, mix Sap Green with a touch of Burnt Sienna. Dab this unevenly along the horizon line to suggest distant trees. -
Soften the edges:
Allow the tree color to bloom slightly into the wet sky. I like to tilt the board slightly to let gravity help create organic tree shapes. -
Deepen foliage shadows:
Add a slightly more concentrated green mix to the bottom of the tree line to ground them, then let the top half of the painting dry completely.
Step 3: The Pitch and Foreground
-
Base grass layer:
Apply a wash of Sap Green mixed with plenty of water across the entire field area, going right over the masked pitch line. -
Add field texture:
While the green wash is wet, drop in horizontal strokes of darker green (Sap Green + Paynes Grey) to create the look of mown grass stripes. -
Foreground details:
Using a slightly drier brush, flick upward strokes in the bottom foreground to mimic individual blades of grass close to the viewer. -
Dry time:
Let the painting dry thoroughly. If the paper feels cool to the touch, it is still damp; wait until it is room temperature.
Troubleshooting Masking
If the masking fluid tears the paper when you remove it, the fluid likely sat too long or the paper wasn’t 100% dry. Always ensure the paper is bone dry before rubbing mask off.
Step 4: Revealing and Refining
-
Remove masking:
Gently rub away the masking fluid from the goal posts and the field line using your finger or a rubber cement pickup tool. -
Shadow the posts:
Mix a very watery grey using Cobalt Blue and Burnt Sienna. Paint a thin shadow line along one side of the white goal posts to give them cylindrical form. -
Draw the net:
Using a fine liner brush with diluted grey paint, or a fine-tip waterproof pen, carefully draw the grid of the net connected to the posts. -
Highlights:
Use a white opacity marker or white gouache to add highlights to the net where the sun hits it, or to tidy up the pitch line if needed. -
Mounting:
Once fully dry, remove the tape and place the artwork inside a bevel-cut mat to give it a professional finish.
Hang your finished piece where it can remind you of the fresh smell of the grass before kickoff.
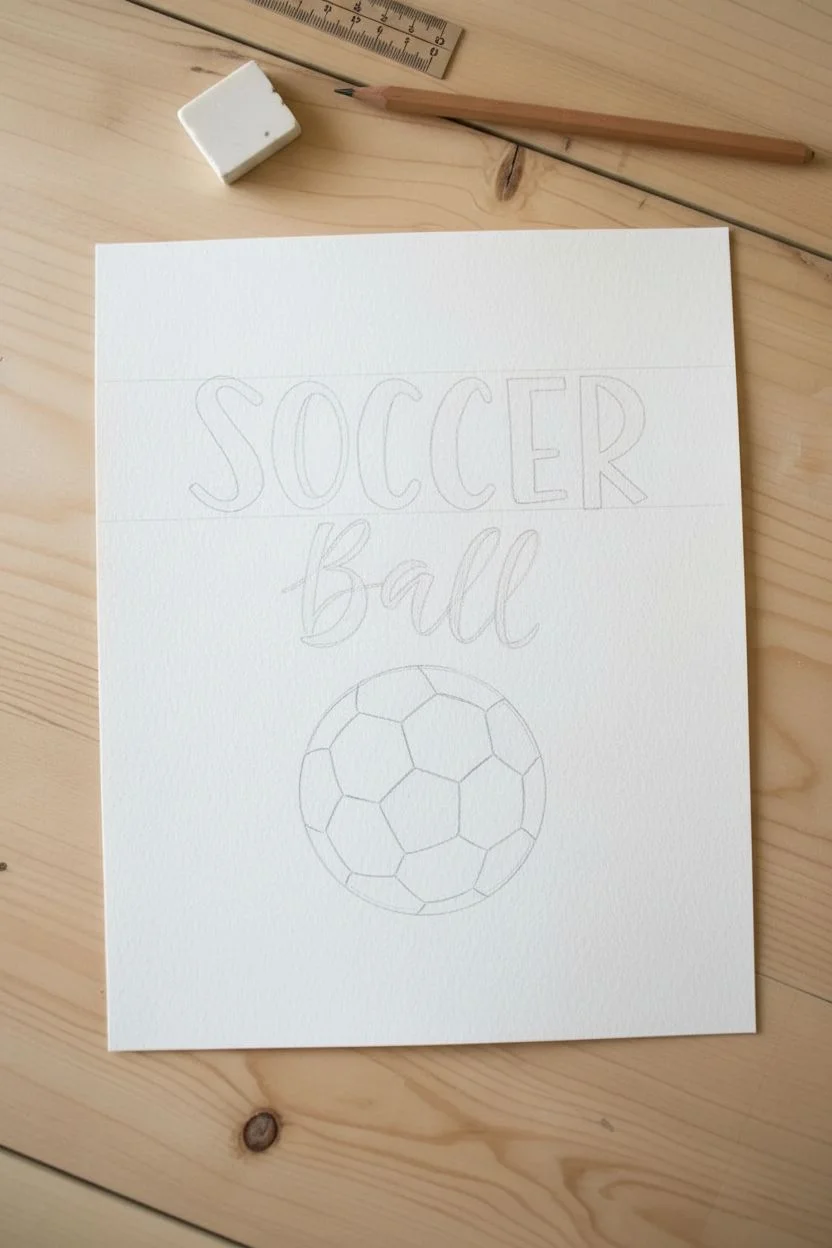
Inspirational Typography
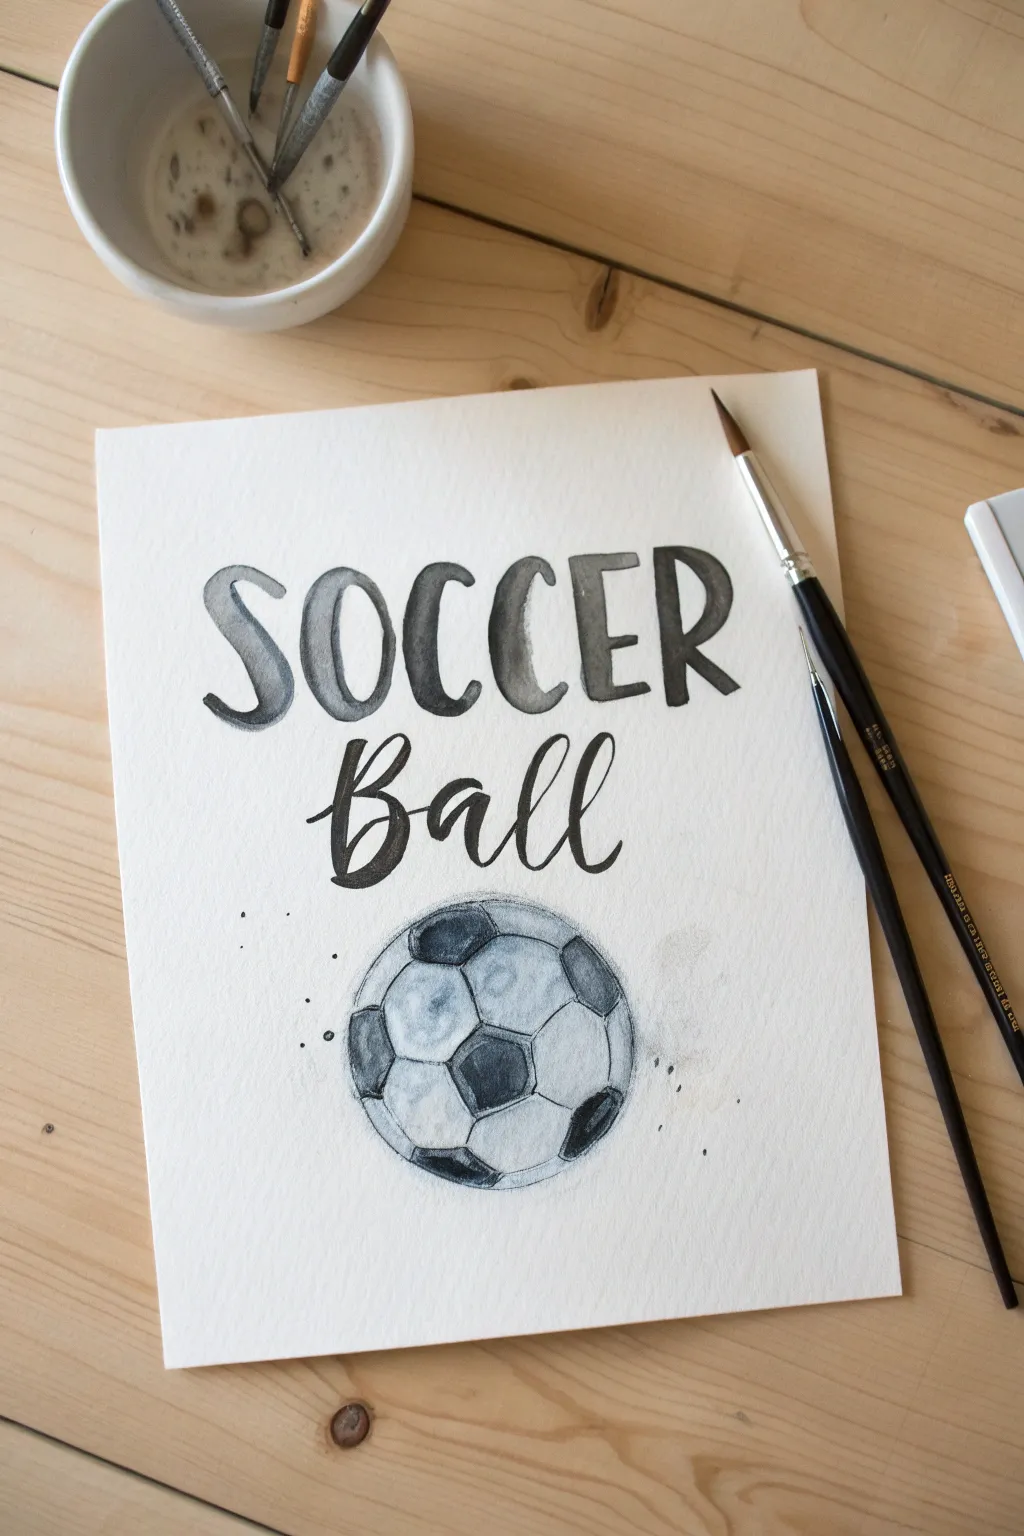
Create a stylish piece of sports art combining bold typography with a realistic watercolor illustration. This project explores varying brush pressures for lettering and shading techniques to give the soccer ball a three-dimensional pop.
Step-by-Step Tutorial
Materials
- Cold press watercolor paper (300 gsm)
- Watercolor paints (Lamp Black or Payne’s Gray)
- Round brushes (size 6 for lettering, size 2 for details)
- HB Pencil and kneaded eraser
- Compass or circular object to trace
- Clean water and palette
- Paper towels
Step 1: Sketching the Layout
-
Mark your spacing:
Begin by lightly drawing horizontal guidelines with a ruler to keep your text straight. Leave enough space at the bottom for the ball illustration. -
Draft the block letters:
Sketch the word ‘SOCCER’ in the upper section using a loose, serif style font. Draw the letters slightly larger than you might expect, as watercolor tends to shrink visually when dry. -
Add the script text:
Underneath the block letters, lightly pencil the word ‘Ball’ in a cursive script style, centering it relative to the word above. -
Outline the ball:
Use a compass or trace a circular object like a cup to draw a perfect circle centered below the text. -
Draw the geometric pattern:
Sketch the classic soccer pattern inside the circle. I find it easiest to start with a slightly off-center pentagon and draw hexagons connecting to its sides, extending to the circle’s edge. -
Clean up lines:
Use a kneaded eraser to roll over your sketch, lifting the graphite until the lines are faint guidelines rather than heavy borders.
Step 2: Painting the Typography
-
Mix a medium wash:
On your palette, dilute your black paint with water to create a medium-strength grey. It should be fluid but not transparent. -
Fill the serif letters:
Using the size 6 round brush, carefully fill in the letters of ‘SOCCER’. Allow the paint to pool slightly at the bottom of the strokes for a natural watercolor gradient. -
Add tonal variation:
While the paint is still damp, lightly touch the tip of your brush dipped in slightly darker pigment into parts of the letters to create depth and texture. -
Prepare concentrated black:
Mix a darker, more saturated batch of black paint with less water for the script text. -
Paint the script:
Switch to the smaller brush for the word ‘Ball’. Apply more pressure on the downstrokes to thicken them and lift the brush to a fine point for the thin upstrokes.
Pro Brush Tip
Control the water ratio on your brush by quickly dabbing it on a paper towel before painting the script text. This prevents the paint from bleeding uncontrollably.
Step 3: Illustrating the Ball
-
Paint the dark panels:
Using your grey wash, fill in the pentagon shapes on the soccer ball. Avoid making them distinctively solid black; let the water create some uneven texture. -
Soften the dark panels:
Before the dark panels dry completely, you can blot them gently with a clean, dry brush to lift some pigment and create a rounded highlight effect. -
Mix a shadow wash:
Dilute your black paint significantly until you have a very faint, watery grey wash for the white panels. -
Shade the white panels:
Paint the edges of the white hexagons, focusing the shading on the bottom sections of each shape to imply roundness and a light source coming from above. -
Blend the shadows:
With a clean, slightly damp brush, soften the edges of the grey shadows on the white panels so they fade smoothly into the white paper.
Level Up
Make this a personalized gift by painting the soccer ball’s ‘white’ panels with faint washes of a favorite team’s colors instead of grey shadows.
Step 4: Final Details
-
Add texture splatter:
Load a small brush with watery grey paint. Hold it over the paper and tap the handle against a pencil to sprinkle fine specks around the ball for an artistic touch. -
Let it cure:
Allow the entire painting to dry completely. If the paper feels cold to the touch, it is still wet deep down. -
Final erase:
Once you are absolutely certain the paint is bone dry, gently erase any visible pencil guidelines.
Frame your new artwork to inspire your next practice session on the field
Surreal Astronaut Soccer
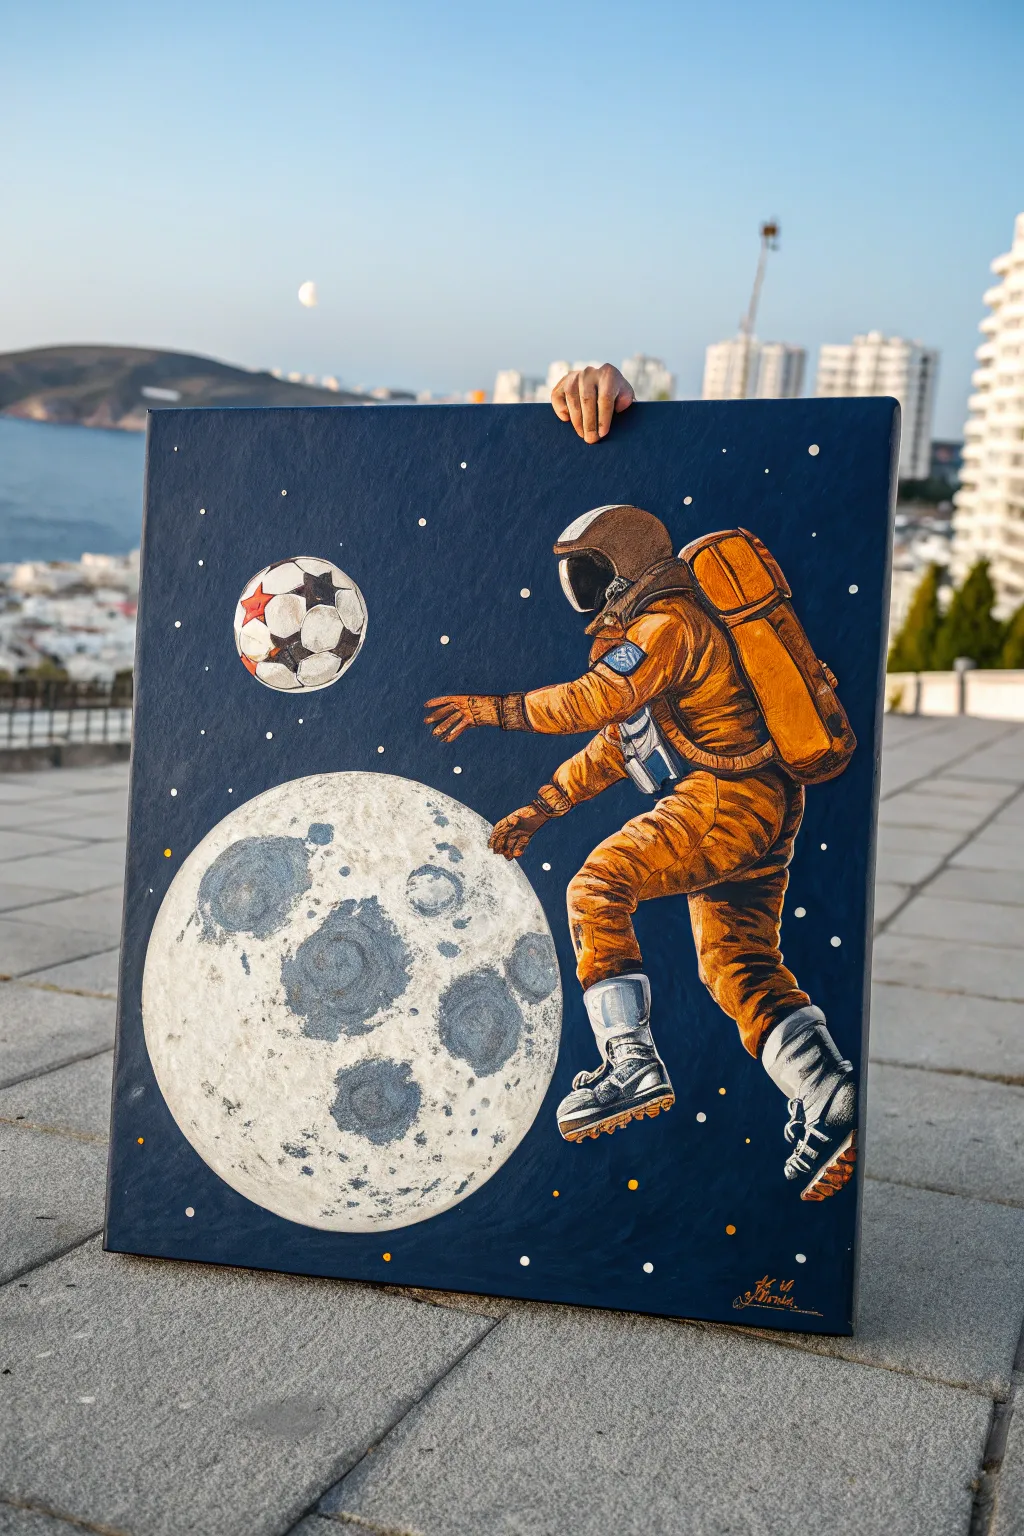
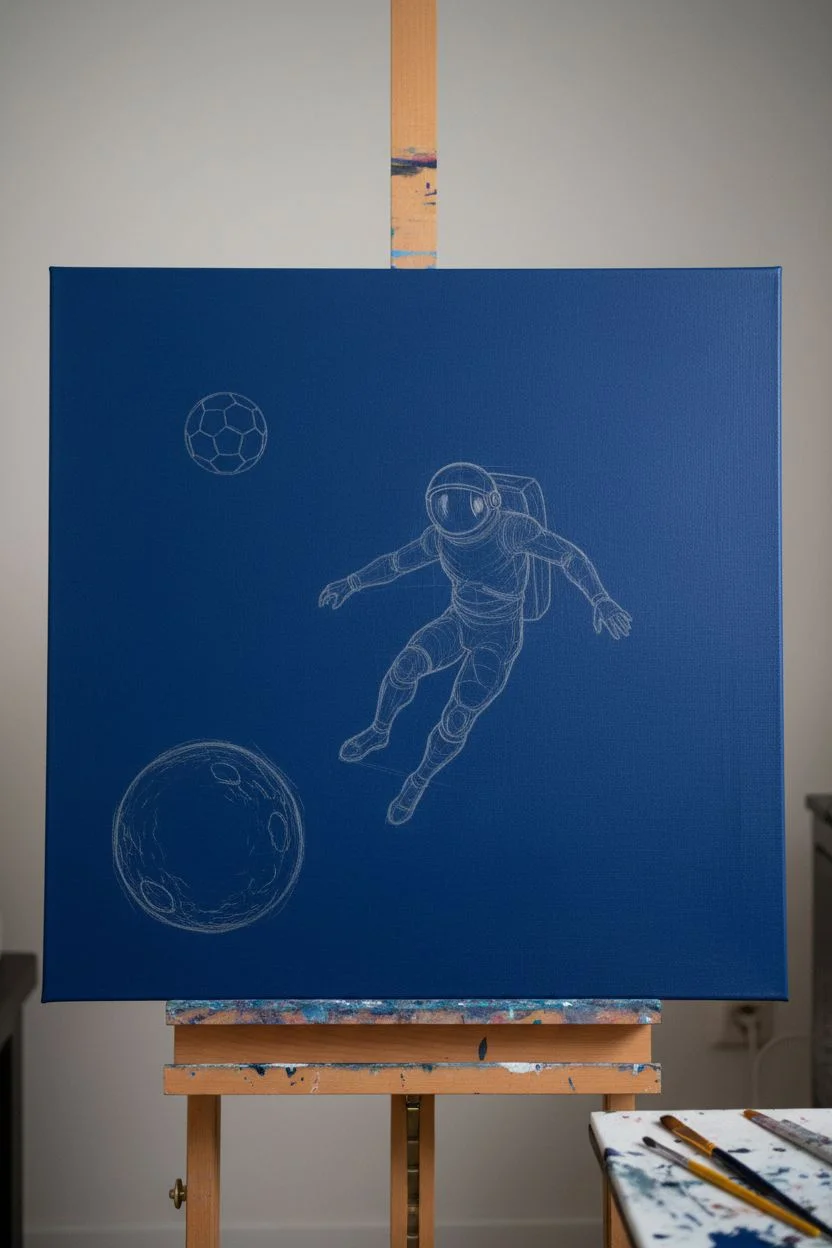
Combine the thrill of the game with the mystery of the cosmos in this surreal acrylic painting. You will create a vibrant astronaut figure popping against a deep space background, featuring a highly textured moon and a star-adorned soccer ball.
How-To Guide
Materials
- Square canvas (approx. 24×24 inches)
- Acrylic paints (Midnight Blue, Titanium White, Cadmium Orange, Burnt Sienna, Black, Silver, Yellow)
- Wide flat brush
- Small round brushes (sizes 2 and 4)
- Fine liner brush or black acrylic marker
- Natural sea sponge or crumpled paper towel
- Pencil and eraser
- Mixing palette
Step 1: Setting the Scene
-
Background base:
Mix Midnight Blue with a touch of Black to create a deep, dark navy. Cover the entire canvas with a flat brush, ensuring no white spots remain. -
Drying time:
Allow the background to dry completely. This is crucial so your pencil sketch doesn’t drag through wet paint later. -
Sketching the composition:
Lightly sketch a large circle in the bottom-left corner for the moon. Draw the astronaut floating centrally, kicking toward a smaller circle (the ball) in the upper-left.
Step 2: The Lunar Surface
-
Moon base texture:
Mix Titanium White with a tiny drop of Black to make a very light grey. Dip a sponge or crumpled paper towel into the paint and dab it to fill the moon circle, creating a cratered texture. -
Adding craters:
While the base is tacky, use a round brush with medium grey to paint irregular circular splotches. I like to soften the edges with a clean, dry brush to make them look like distant lunar seas. -
Lunar highlights:
Once the grey creates depth, dab pure white on the top-left edges of the craters to simulate light hitting the moon’s surface.
Drawing Wobbles?
If drawing the astronaut freehand is frustrating, print a photo of a spacesuit, rub pencil graphite on the back, tape it to the canvas, and trace the outline directly.
Step 3: The Astronaut
-
Suit undercoat:
Paint the silhouette of the astronaut’s suit (excluding boots and helmet visor) with an opaque layer of Cadmium Orange. You may need two coats for vibrancy against the dark background. -
Creating dimension:
Mix Burnt Sienna with your orange. Paint lines where the suit naturally folds at the knees, elbows, and waist to create shadows. -
Suit highlights:
Mix a little Yellow and White into your original orange. Paint the tops of the arms, legs, and backpack where the light source would hit. -
Helmet visuals:
Paint the helmet visor solid Black. Add a thin, curved White line along the top edge to create the look of a reflective glass surface. -
Space boots:
Fill in the chunky boots with white paint. Use diluted grey to paint the soles and the ridges/laces on the front of the boots.
3D Texture
Mix modeling paste or clean sand into your white paint for the moon phase. This creates physical, gritty craters that stand off the canvas for amazing tactile depth.
Step 4: Details & Atmosphere
-
The ball:
Paint the soccer ball white. Once dry, add the star pattern using black and red paint, mimicking the design of a professional match ball. -
Outlining:
Using a very fine liner brush with thinned black paint (or a black acrylic marker), carefully outline the astronaut, the suit pockets, tubes, and the folds to give it a graphic, illustrative style. -
Backpack unit:
Paint the life-support backpack with a more brownish-orange hue, adding vertical lines to suggest structure and tanks. -
Starry sky:
Load a toothbrush or stiff brush with white paint and flick it across the dark blue background for tiny stars. Manually paint a few larger yellow or silver dots for prominent planets.
Sign your name in the corner and get ready to launch your art gallery into orbit
Whimsical Animals Playing
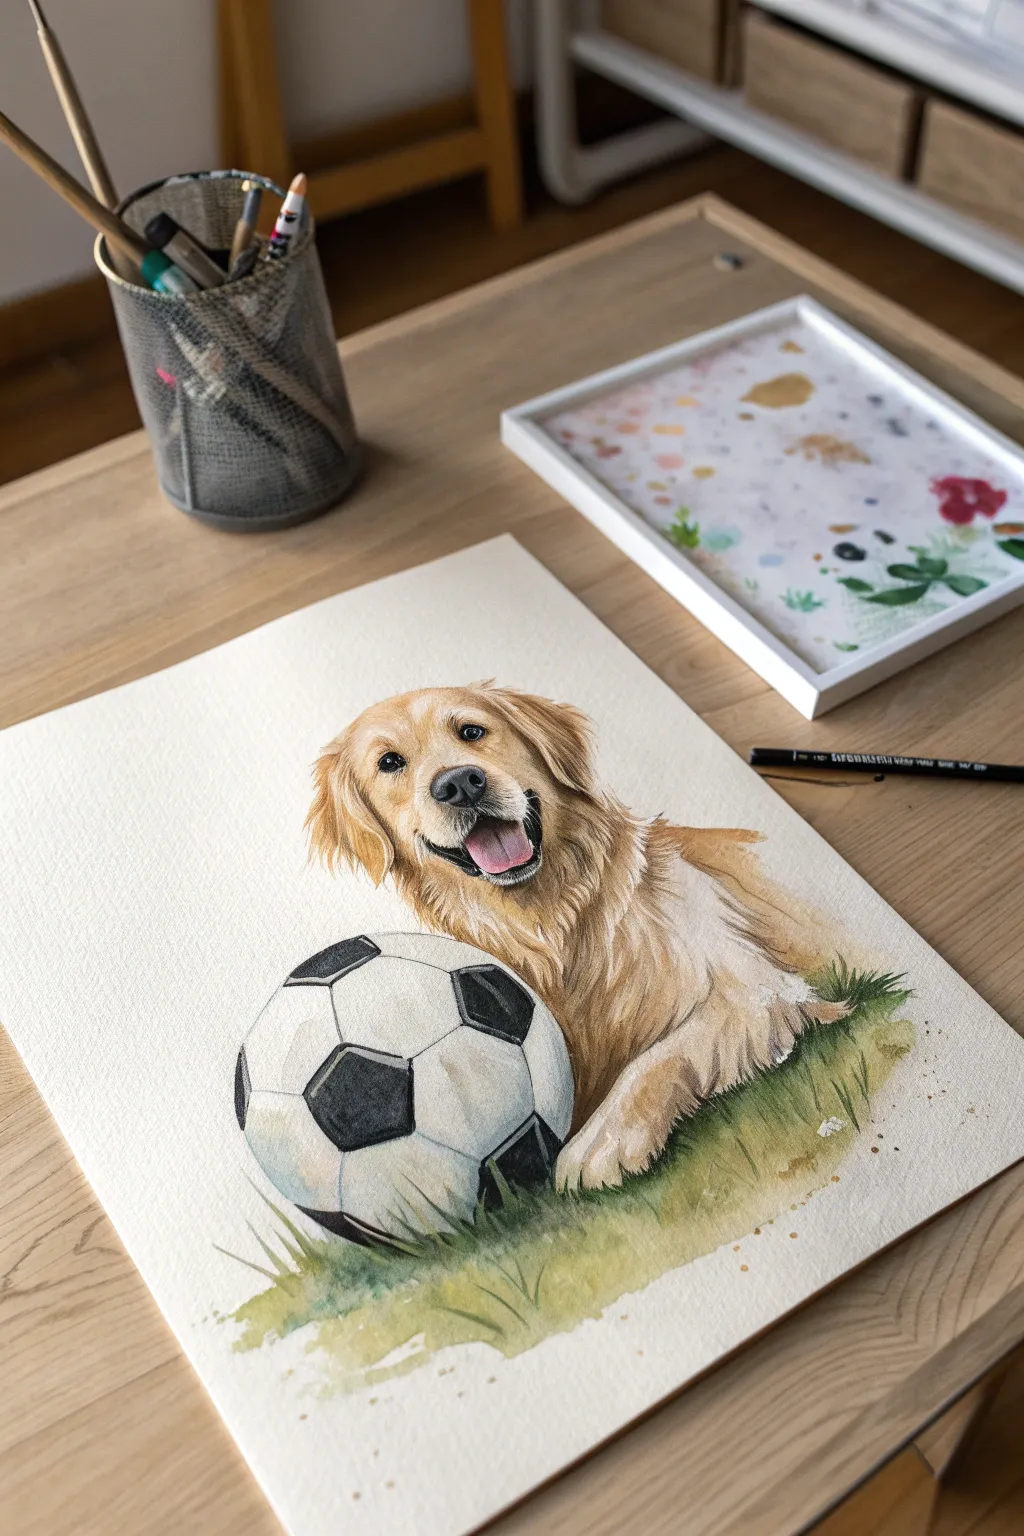
Capture the infectious joy of a Golden Retriever taking a break from the game with this detailed watercolor tutorial. The combination of soft fur textures against the geometric soccer ball creates a charming contrast perfect for pet lovers and sports fans alike.
Detailed Instructions
Materials
- Cold press watercolor paper (300gsm)
- Watercolor paints (Yellow Ochre, Burnt Sienna, Sepia, Payne’s Grey, Sap Green, Alizarin Crimson)
- Round brushes (size 8 for washes, size 4 and 00 for details)
- Masking fluid and an old synthetic brush
- HB pencil and kneaded eraser
- Two jars of water
- Paper towels
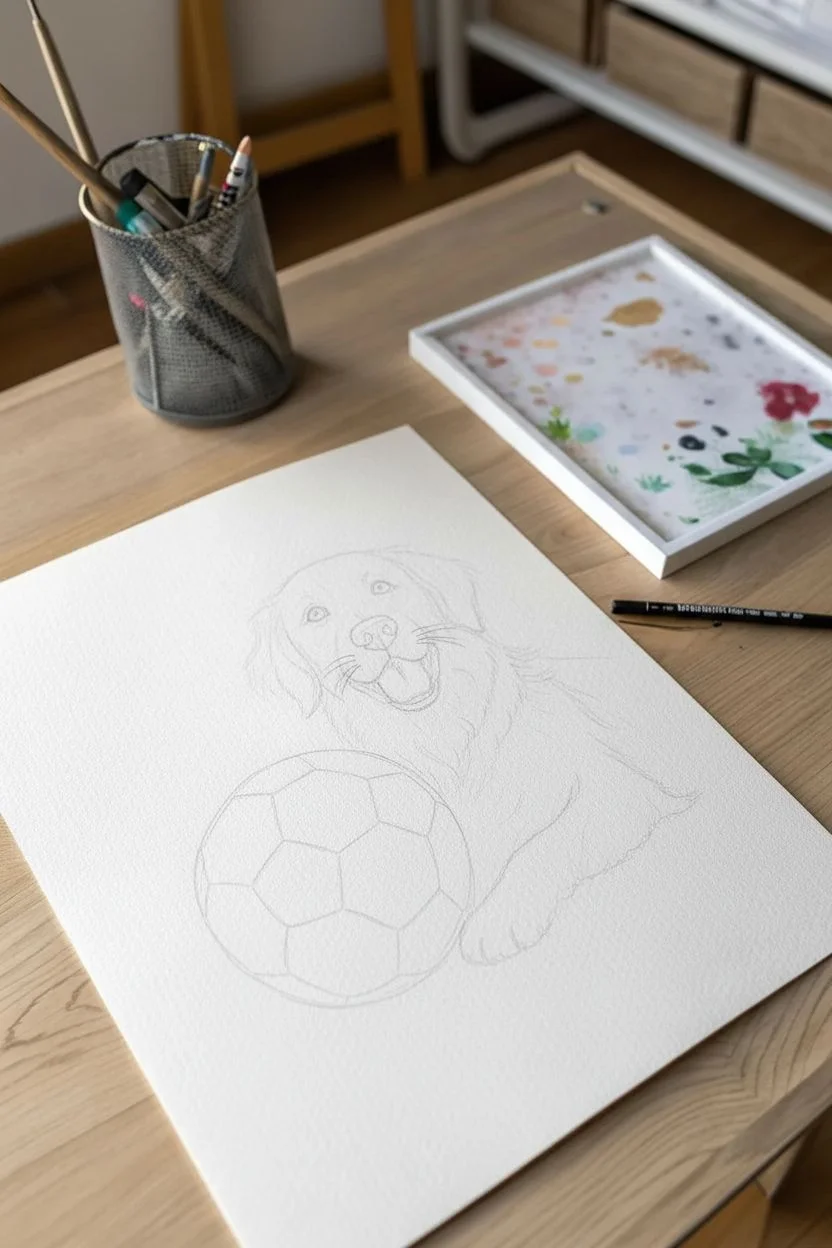
Step 1: Sketching and Masking
-
Outline the composition:
Lightly sketch the dog’s head, forepaws, and the soccer ball using an HB pencil. Pay special attention to the geometric pattern on the ball; the pentagons and hexagons need to curve with the sphere’s shape. -
Refine facial features:
Sketch the placement of the eyes, nose, and open mouth. Keep your pencil lines faint, especially in the lighter fur areas, so they don’t show through the final paint. -
Apply masking fluid:
Using an old brush, apply thin lines of masking fluid to preserve the white paper for the whiskers on the muzzle and the tiny highlight catch-lights in the eyes.
Step 2: Painting the Golden Retriever
-
First wash of fur:
Mix a watery wash of Yellow Ochre. Using a size 8 brush, apply this loosely over the dog’s head and paws, avoiding the eyes, nose, and mouth. Let the pigment bloom naturally for a soft base. -
Building depth:
While the paper is slightly damp but not soaking, drop in hints of Burnt Sienna around the ears and the side of the face to suggest shadow and form. -
The eyes:
Once the area is dry, use a size 00 brush with strong Sepia or mix of Brown and Blue to paint the irises and pupils. Leave the masked highlight area clear. The contrast here is noticeable, giving the dog its soul. -
Nose and mouth:
Paint the nose with a dark grey mix (Sepia and Payne’s Grey), stippling the texture slightly as it dries. Use a diluted Alizarin Crimson for the tongue, adding a darker shadow at the back of the mouth. -
Creating fur texture:
Switch to a size 4 brush and mix a thicker consistency of Burnt Sienna. Using the tip of the brush, flick paint in the direction of hair growth to create individual fur strands, focusing on the ears and neck ruff. -
Deepening shadows:
Mix Sepia with a touch of blue for a cool shadow tone. Glaze this under the chin, beneath the ears, and between the paws to separate the dog from the ground.
Geometry Tip
For the soccer ball, remember that lines curve more as they reach the edge of the circle. Drawing the central pentagon first and working outward helps keep the perspective accurate.
Step 3: The Soccer Ball and Grass
-
Shading the white panels:
The ‘white’ of the ball isn’t pure white. Mix a very faint blue-grey wash and paint the shadow side of the white panels to create a 3D spherical effect, leaving the top-left areas paper-white for highlights. -
Painting the black panels:
Fill in the pentagons using Payne’s Grey. Don’t make them solid black; lift out a little pigment in the center of each panel with a damp brush to show the light hitting the leather texture. -
Base grass layer:
Brush a loose wash of Sap Green mixed with Yellow Ochre under the dog and ball. I like to let the edges of this wash stay rough and uneven to permit the white background to frame the scene naturally. -
Defining grass blades:
While the green base is still damp, drop in concentrated Sap Green and Olive Green directly under the paws and ball to anchor them. -
Foreground details:
Use quick, upward flicking motions with a dry brush to pull green paint up over the bottom edges of the ball and the dog’s paws, simulating grass blades overlapping the subject.
Level Up: Muddy Paws
To add a playful storytelling element, lightly splatter a mix of watery brown paint near the paws and lower ball to simulate dirt specks from a vigorous game in the park.
Step 4: Final Touches
-
Removing the mask:
Ensure the artwork is completely bone-dry. Gently rub away the masking fluid to reveal the crisp white whiskers and eye sparkles. -
Softening whiskers:
If the white whiskers look too stark, run a clean, barely damp brush over them once to soften the edges so they integrate better with the muzzle. -
Final assessment:
Add any final dark accents to the deepest fur shadows or the crevices of the soccer ball seams to maximize contrast.
Now better step back and admire your lively, furry masterpiece before heading outside for a game of your own.


Have a question or want to share your own experience? I'd love to hear from you in the comments below!