Spin art is one of my favorite ways to get bold, energetic patterns fast—just a little paint, a spin, and instant movement on the page. If you’re craving playful experimentation with centrifugal force, these ideas will keep you happily spinning for days.
Paper Circles Vs. Paper Squares
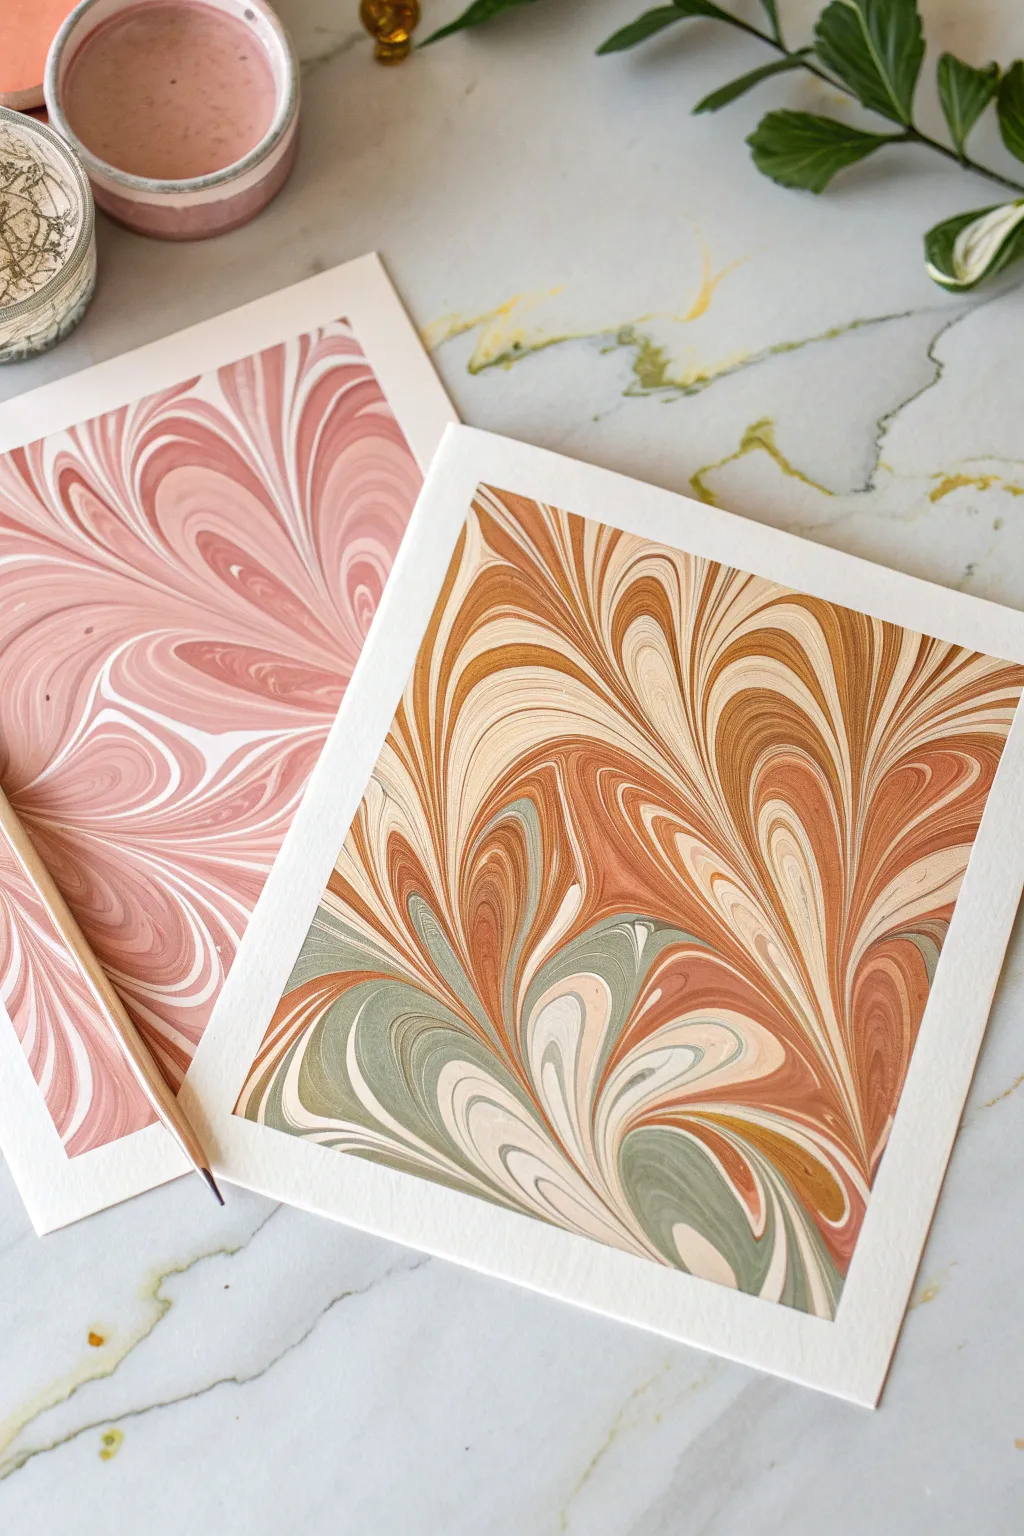
Move beyond the traditional spin art circle and embrace the elegance of square formatting with these sophisticated marbled designs. The controlled, combed patterns in earthy ochres, sage greens, and soft roses create a high-end, gallery-worthy aesthetic right at your kitchen table.
Step-by-Step Guide
Materials
- Carrageenan powder (or methyl cellulose) for size
- Large, shallow rectangular tray (larger than your paper)
- Water (distilled is best)
- Acrylic paints (fluid or high-flow)
- Synthetic ox gall (for surface tension control)
- Droppers or pipettes
- Stylus or skewer for initial swirling
- Marbling comb (fine-toothed)
- Alum powder (mordant)
- Heavyweight watercolor paper or printmaking paper, cut into squares
- Sponge or spray bottle
- Newspaper or paper towels
Step 1: Preparation
-
Prepare the Size:
Mix your carrageenan powder with water according to package instructions. Ideally, do this the night before, letting it sit to remove air bubbles and reach a thick, syrupy consistency. -
Treat the Paper:
Dissolve 1 tablespoon of alum in a cup of warm water. Sponge or spray this solution onto your square paper pieces to act as a mordant, which helps the paint stick permanently. -
Let it Dry:
Mark the back of the paper with a pencil so you know which side has the alum. Allow the treated paper to dry completely flat while you set up your paints. -
Mix Your Palette:
Prepare your acrylic colors in small cups. For the multicolor design, mix burnt sienna, yellow ochre, sage green, and cream. Add a few drops of water and a drop of ox gall to each so they float freely on the size.
Step 2: Creating the Pattern
-
Clean the Surface:
Before starting, skim the surface of your thickened water bath with a strip of newspaper to remove any dust or old paint film. -
Drop the Colors:
Using a pipette, gently drop your first color (like cream or ochre) onto the surface. It should spread into a circle. If it sinks, your paint is too thick; add a tiny bit more water. -
Build the Bullseye:
Drop the next color (burnt sienna) directly into the center of the first circle. Continue alternating colors—adding sage green and rose—into the center until you have a series of concentric rings filling the tray. -
Get Gel-Like Layers:
Ensure you have a dense accumulation of paint. The more rings you create, the more intricate your final combed design will be.
Paint Sinking?
If paint sinks to the bottom, it’s too heavy. Thin it with a drop of water. If it spreads too fast and breaks, it’s too thin—add fresh paint to thicken it.
Step 3: Combing and Printing
-
The Git-Gel Method:
Use a stylus to draw lines back and forth through the paint rings, first vertically, then horizontally. This creates a basic grid pattern often called the ‘get-gel’ or back-and-forth base. -
Create the Arches:
Take your marbling comb and drag it slowly through the size in a single direction. I find that moving slowly prevents the paint from breaking up and creates those defined, scalloped arches seen in the example. -
Lay the Paper:
Hold your alum-treated paper by opposite corners. Gently bow it slightly and lower the center onto the surface first, then roll down the corners to avoid trapping air bubbles. -
Lift the Print:
Wait a few seconds for the transfer to happen. Lift the paper up and away from the tray in one smooth, fluid motion to avoid smudging the wet design. -
Rinse Gently:
Immediately rinse the paper under a very gentle stream of water to remove the slimy carrageenan residue. Don’t rub the surface, or you might smear the pattern. -
Dry Flat:
Lay the print face up on clean paper towels or hang it on a line to dry. Once fully dry, you can press it under a heavy book to flatten the paper completely.
Metallic Accents
Add a single drop of metallic gold acrylic to your bullseye stack. It pushes other colors outward and creates shimmering veins perfect for framing.
Enjoy the meditative process of watching the patterns emerge on your new square prints


Big Blobs Wet-On-Wet Marbling
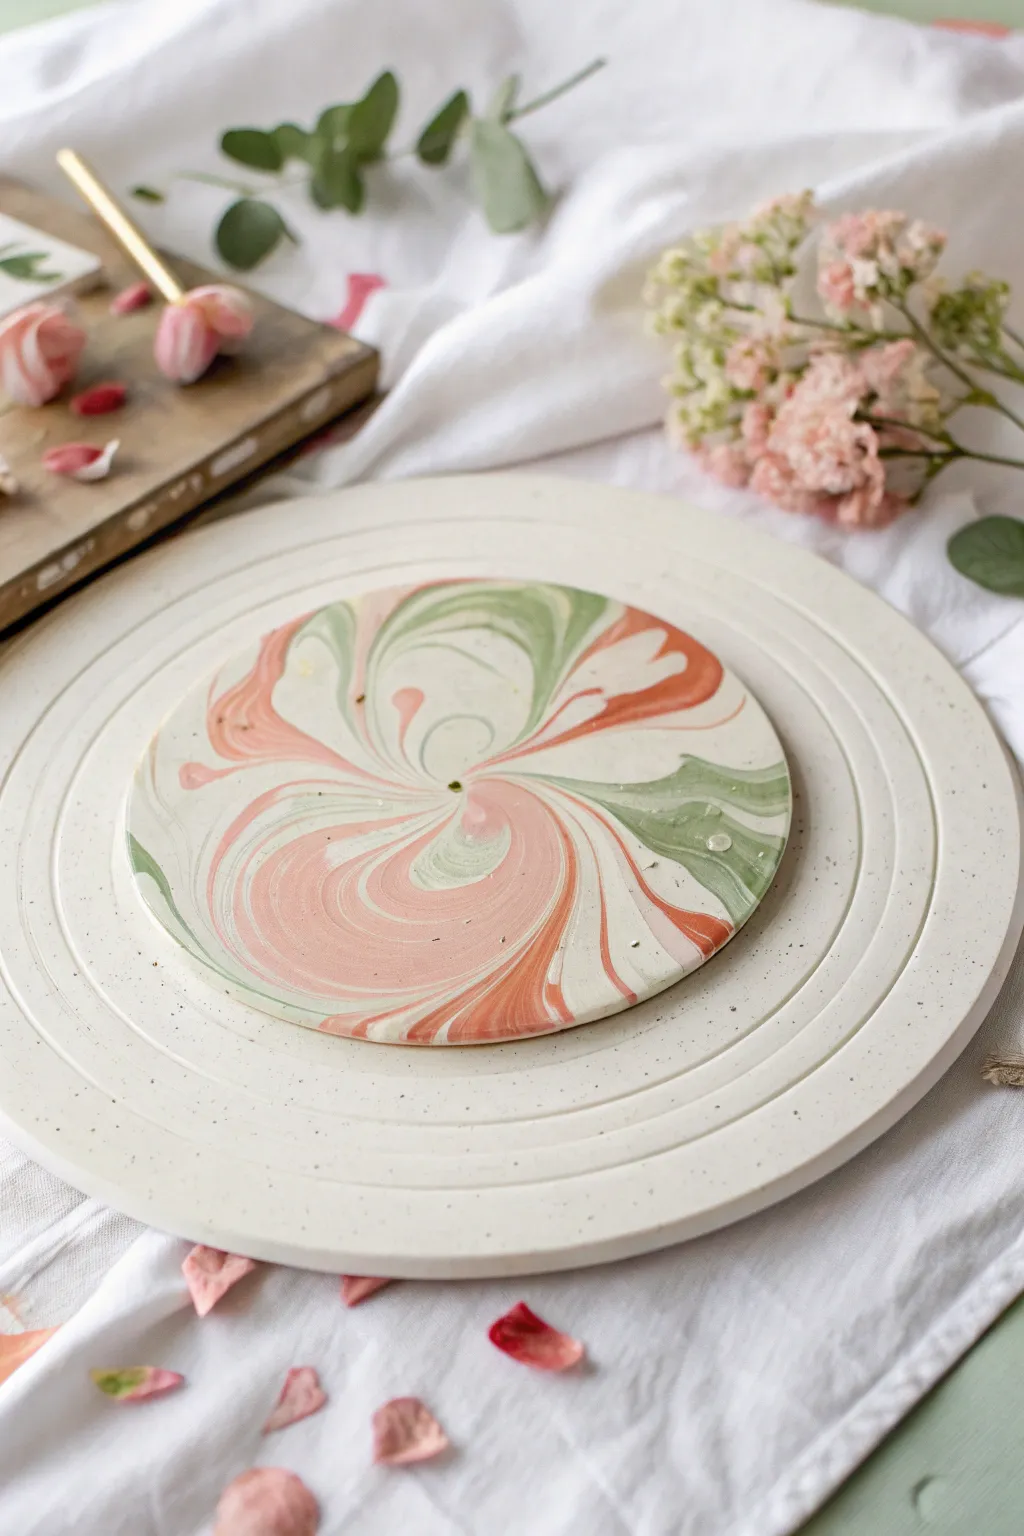
Create a stunningly smooth, marbled centerpiece or coaster using the wet-on-wet marbling technique directly on a pottery wheel. This project combines dusty rose, olive green, and creamy white slips to form broad, sweeping petals that look like a blooming flower frozen in stone.
How-To Guide
Materials
- Pottery wheel or heavy banding wheel
- Round bat or wooden board
- Stoneware clay body (white)
- Colored porcelain slips or underglazes (Dusty Rose, Olive Green, Cream, Soft Peach)
- Sponge
- Wire cutter
- Rib tool (metal or rubber)
- Needle tool
- Clear matte glaze (optional)
Step 1: Preparing the Canvas
-
Prepare your clay slab:
Begin by wedging your white stoneware clay thoroughly to remove air bubbles. Roll it out into a flat, even slab about 1/4 inch thick using a rolling pin or slab roller. -
Cut the circle:
Place your slab onto the center of your pottery wheel or banding wheel. Use a needle tool to cut a perfect circle, using the spin of the wheel to guide your hand for a clean edge. -
Smooth the surface:
With the wheel spinning slowly, run a damp sponge or soft rubber rib over the surface of the clay disk to compress the particles and create a flawlessly smooth canvas for your colors. -
Prepare your slips:
Ensure your colored slips or underglazes are the consistency of heavy cream. Pour small amounts into cups for easy pouring.
Don’t Over-Tilt
When tilting the board to warp the circles, move slowly. The heavy slip moves faster than you expect. One big tilt is better than many small wiggles.
Step 2: The Pouring Process
-
Start the spin:
Get your wheel spinning at a slow, consistent speed. Too fast, and the slip will fly off; too slow, and gravity will take over. -
Pour the base blob:
Pour a generous puddle of the cream-colored slip directly into the very center of the spinning disk. Let it naturally spread outward slightly. -
Add the first color:
While the wheel is still moving, pour a blob of the dusty rose slip directly into the center of the wet cream puddle. The centrifugal force will push the cream outward as the pink settles in. -
Layer the green:
Immediately pour a smaller amount of olive green slip into the center of the pink. Watch as the previous colors form rings moving toward the edge. -
Continue the sequence:
Repeat this bullseye pouring method, alternating between peach, cream, pink, and green. Vary the amount you pour each time to create rings of different thicknesses. -
Fill to the edge:
Continue pouring until the entire surface of the clay disk is covered in these concentric rings of wet slip.
Cracking Slips?
If the colored slip cracks while drying, it was likely too thick or dried faster than the clay base. Try thinning the slip slightly or drying much slower.
Step 3: Marbling and Shaping
-
Stop the wheel:
Gently bring the wheel to a complete stop. You should now have a pattern of perfect concentric circles. -
Tilt for organics:
Carefully pick up the bat or board holding your clay. Gently tilt it in one direction, then another. This disrupts the perfect circles and creates the wavy, organic petal shapes seen in the reference image. -
Refine the swirl:
I like to give the board one gentle rotation while tilting to encourage the center colors to spiral slightly. -
Level the surface:
Place the board back on a flat surface. Pick up the board and give it a firm, flat tap on the table to settle the slips and flatten any raised ridges. -
Clean the rim:
If slip has dripped over the edge, use your damp sponge to wipe the rim clean, creating a sharp contrast between the marbled top and the raw clay edge.
Step 4: Finishing
-
Controlled drying:
Allow the piece to dry slowly under loose plastic. Drying too fast can cause the thick slip layer to crack or peel away from the clay body. -
Bisque fire:
Once bone dry, fire the piece to bisque temperature (usually barely cone 04) according to your clay’s specifications. -
Glaze application:
Apply a clear matte glaze to protect the design without adding unwanted shine, preserving the earthy look. -
Final firing:
Fire the piece for the final time to maturity (cone 5-6 for most stoneware) to vitrify the clay and seal the surface.
This sophisticated marbling technique creates a professional ceramic look that brings sculptural beauty to your table setting


Ombre Fade With One Hue
Master the delicate art of the single-hue gradient with this simple yet stunning watercolor wash. By controlling the water-to-pigment ratio, you will create a seamless transition from a vibrant berry hue to the pure white of the paper.
Detailed Instructions
Materials
- Cold press watercolor paper (deckle edge preferred)
- Wooden drawing board or clipboard
- Watercolor paints (berry or mauve palette)
- Round watercolor brush (size 6 or 8)
- Clean water jar
- Paper towel
- Purple colored pencil
- Pink colored pencil
- Masking tape (optional)
Step 1: Preparation and Setup
-
Prepare your paper:
Select a high-quality sheet of cold press watercolor paper. The texture is crucial for this look. If using a block, leave it attached; otherwise, secure the paper to your wooden board with masking tape or simply place it centered if the paper is heavy enough to resist buckling. -
Activate the paint:
Using your brush, add a few drops of clean water to your chosen berry or mauve watercolor pan. Let the water sit for a minute to soften the pigment, creating a rich, juicy consistency. -
Load the brush:
Swirl your wet brush into the activated paint until the bristles are fully saturated with vibrant color. You want a high concentration of pigment for the very first stroke.
Control the Flow
Work quickly while the paper is wet! If an edge starts to dry, you’ll get a ‘hard line’ instead of a fade. Keep a spray bottle handy to mist the paper if needed.
Step 2: Creating the Wash
-
The initial stroke:
Starting at the very top edge of the paper, lay down a bold horizontal stroke of color. Don’t worry about making it perfectly straight; the organic edge adds character to the piece. -
Add water to the brush:
Dip just the tip of your brush into your water jar to slightly dilute the pigment held in the bristles. Do not wash the brush out completely. -
Blend downward:
Make a second horizontal stroke immediately below the first one, allowing the wet edges to touch and bleed into each other. You should see the color lighten slightly. -
Dilute again:
Dip your brush into the water again. Each time you do this, you carry less pigment and more water to the paper. -
Continue the gradient:
Apply the next stroke, overlapping slightly with the previous wet edge. Gravity will help pull the pigment down if you prop your board up slightly, but flat works too. -
Fade to pale:
Repeat the dip-and-stroke process. By the time you reach the upper-middle section of the paper, the color should be a very pale, whisper-light wash. -
The final blend:
Rinse your brush almost completely clean. Use this clear water to drag the final edge of color downward until it disappears seamlessly into the white of the paper. -
Refine the top edge:
If the top edge dried too quickly or looks uneven, you can carefully re-wet it with a small amount of pigment to intensify the starting darker band, but be careful not to introduce blooms.
Add Metallic Magic
Once fully dry, lightly splatter gold watercolor or metallic ink over the faded section for a magical, celestial stardust effect.
Step 3: Drying and Details
-
Let it dry completely:
Allow the paper to dry naturally. Do not use a heat tool, as this can push the pigment around and ruin the soft gradient effect you’ve just created. -
Check for buckling:
Once dry, if the paper has curled slightly, you can flatten it by placing it under a heavy book overnight. -
Optional pencil accent:
Take your purple colored pencil. Lightly sketch or reinforce the very top edge of the painted area to give a crisp definition to the start of the gradient. -
Feathering pencil texture:
I occasionally like to use the pink pencil to add very faint, feathery strokes into the dry watercolor wash to enhance the texture, though this step is purely optional. -
Final assessment:
Step back and view the gradient. The transition should look smooth without harsh lines between the values.
Now you have a serene, perfectly blended background ready for hand lettering or to stand alone as minimalist art


Galaxy Spin On Black Paper
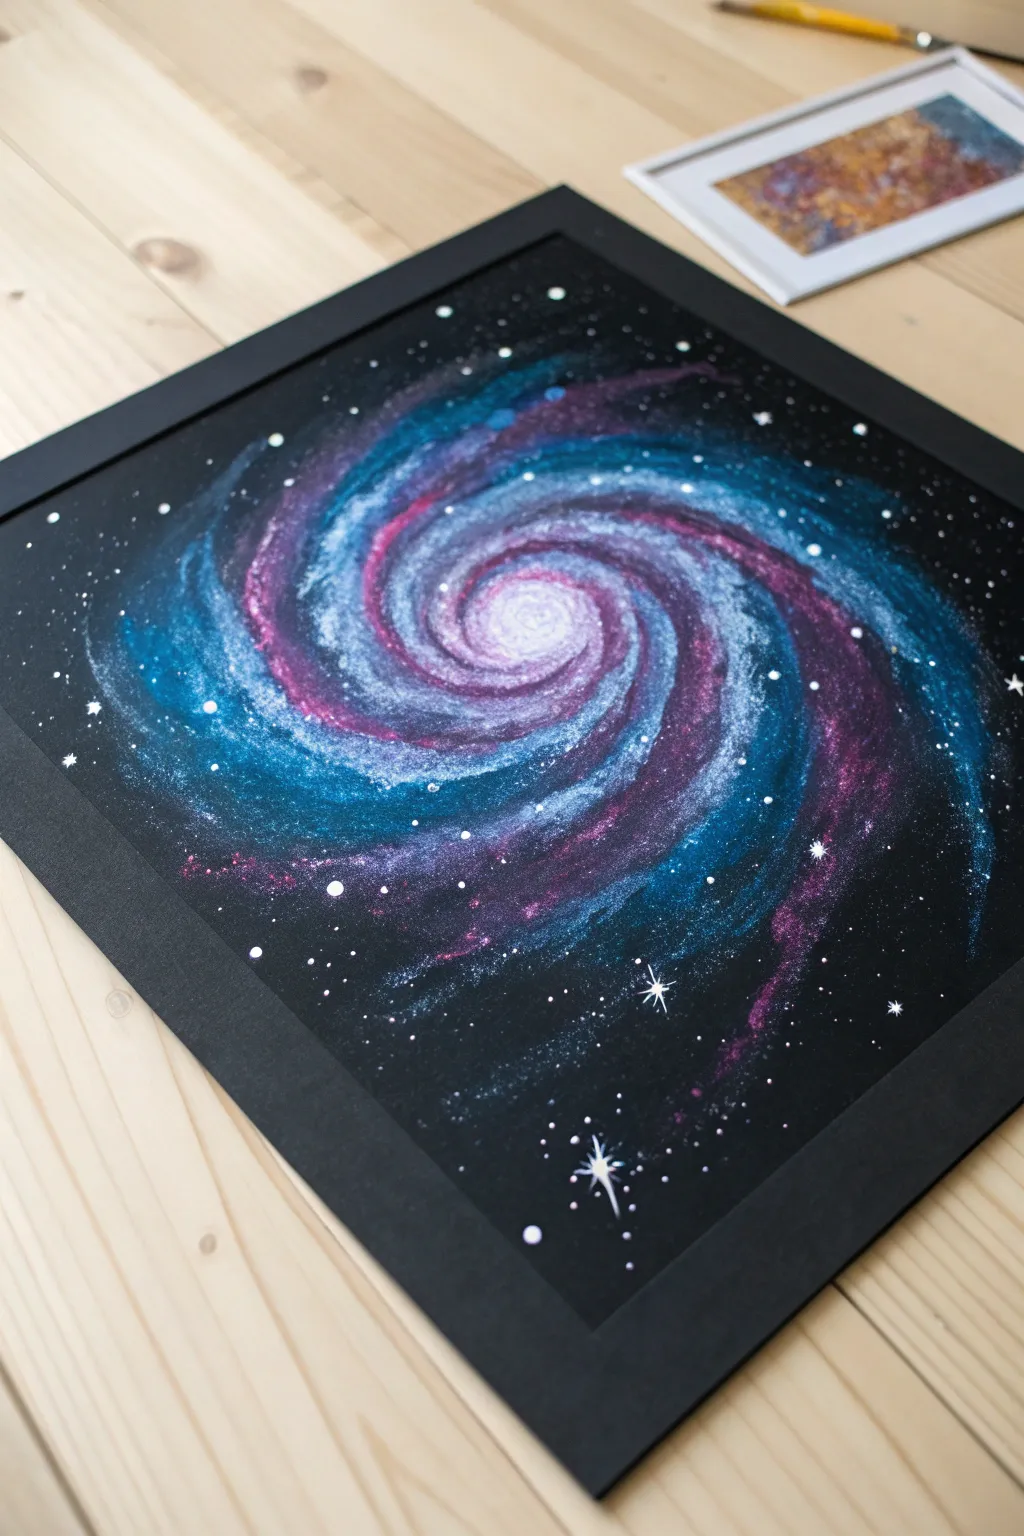
Capture the magic of deep space with this stunning galaxy spin art project. Using black paper as your void, you’ll layer vibrant blues, purples, and pinks to create a luminous, swirling nebula that pops right off the page.
Detailed Instructions
Materials
- Black cardstock or heavy mixed-media paper (square)
- Spin art machine (or a DIY version like a salad spinner/potter’s wheel)
- Acrylic paints (Titanium White, Phthalo Blue, Dioxazine Purple, Magenta)
- Iridescent or glitter medium/paint (optional but recommended)
- Stiff bristle toothbrush
- Fine detail brush (size 0 or 00)
- Cup of water
- Paper towels
- Painters tape or adhesive putty
- Black frame (optional for display)
Step 1: Setting the Stage
-
Cut and Prep:
Begin by cutting your black cardstock into a square that fits fit inside your spinning device. Secure the paper to the exact center of the spinner using a loop of painters tape or a small dab of adhesive putty on the back. -
Prepare Your Palette:
Squeeze out small amounts of white, blue, purple, and magenta acrylic paint onto a palette. You want the paint to be slightly fluid but not watery, so add a drop of water if your acrylics are heavy body. -
Test the Spin:
Give your machine a test spin to ensure the paper stays flat and practically motionless in the center while the machine rotates.
Step 2: Creating the Nebula
-
The Galactic Core:
Start the spinner at a slow to medium speed. Squeeze or drop a generous amount of Titanium White directly into the absolute center of the paper. -
Adding the First Ring:
While the white is still wet and spinning, add a ring of magenta right next to the white center. Watch as centrifugal force naturally pulls the colors outward and blends them slightly. -
Layering Cool Tones:
Move outward and add a ring of Dioxazine Purple, followed by the Phthalo Blue. I like to apply these a bit unevenly rather than in a perfect circle to give the galaxy a more organic shape. -
High Speed Spin:
Once the colors are laid down, increase the spinner speed to high. Let it spin for about 10-15 seconds to pull the paint into long, streaky arms. -
Check the Shape:
Stop the spinner and evaluate your galaxy. If the spiral arms aren’t defined enough, you can manually drag a toothpick or the back of a brush through the wet paint from the center outward to create separation. -
Adding Shimmer:
If you are using iridescent medium or glitter paint, add a few drops now while spinning slowly to add cosmic dust trails to the arms.
Muddy Colors?
If your galaxy turns brown or gray, you blended too much while wet. Clean your brush between colors and allow slight drying time between layers.
Step 3: Refining the Details
-
Remove and Dry:
Carefully remove the artwork from the spinner. Let the main spiral dry completely before moving on to the stars, or the colors will muddy. -
Enhancing the Core:
Once the base is dry, use a brush to dab a little more pure white into the very center if the spinning process made it too transparent. It should be the brightest point. -
Spattering Stars:
Dilute a small amount of white paint with water until it’s milky. Dip a toothbrush into it, point the bristles at the paper, and run your thumb across the bristles to spray fine mist ‘stars’ over the black areas. -
Painting Major Stars:
Use your fine detail brush to paint larger, specific white dots scattered around the galaxy’s edge. -
Creating Sparkles:
Select 3 or 4 of the larger stars to turn into ‘flares.’ Paint a thin vertical line through the dot, followed by a shorter horizontal line crossing it. -
Final Highlights:
Add tiny pinpoints of white inside the colored spiral arms to make the galaxy look dense with stellar matter.
Starry Control
Practice your toothbrush spattering on scrap paper first. The distance from the paper changes the size of your star clusters dramatically.
Once framed in black, your cosmic creation serves as a beautiful window into the universe
BRUSH GUIDE
The Right Brush for Every Stroke
From clean lines to bold texture — master brush choice, stroke control, and essential techniques.
Explore the Full Guide
Tape Resist Spirals And Rays
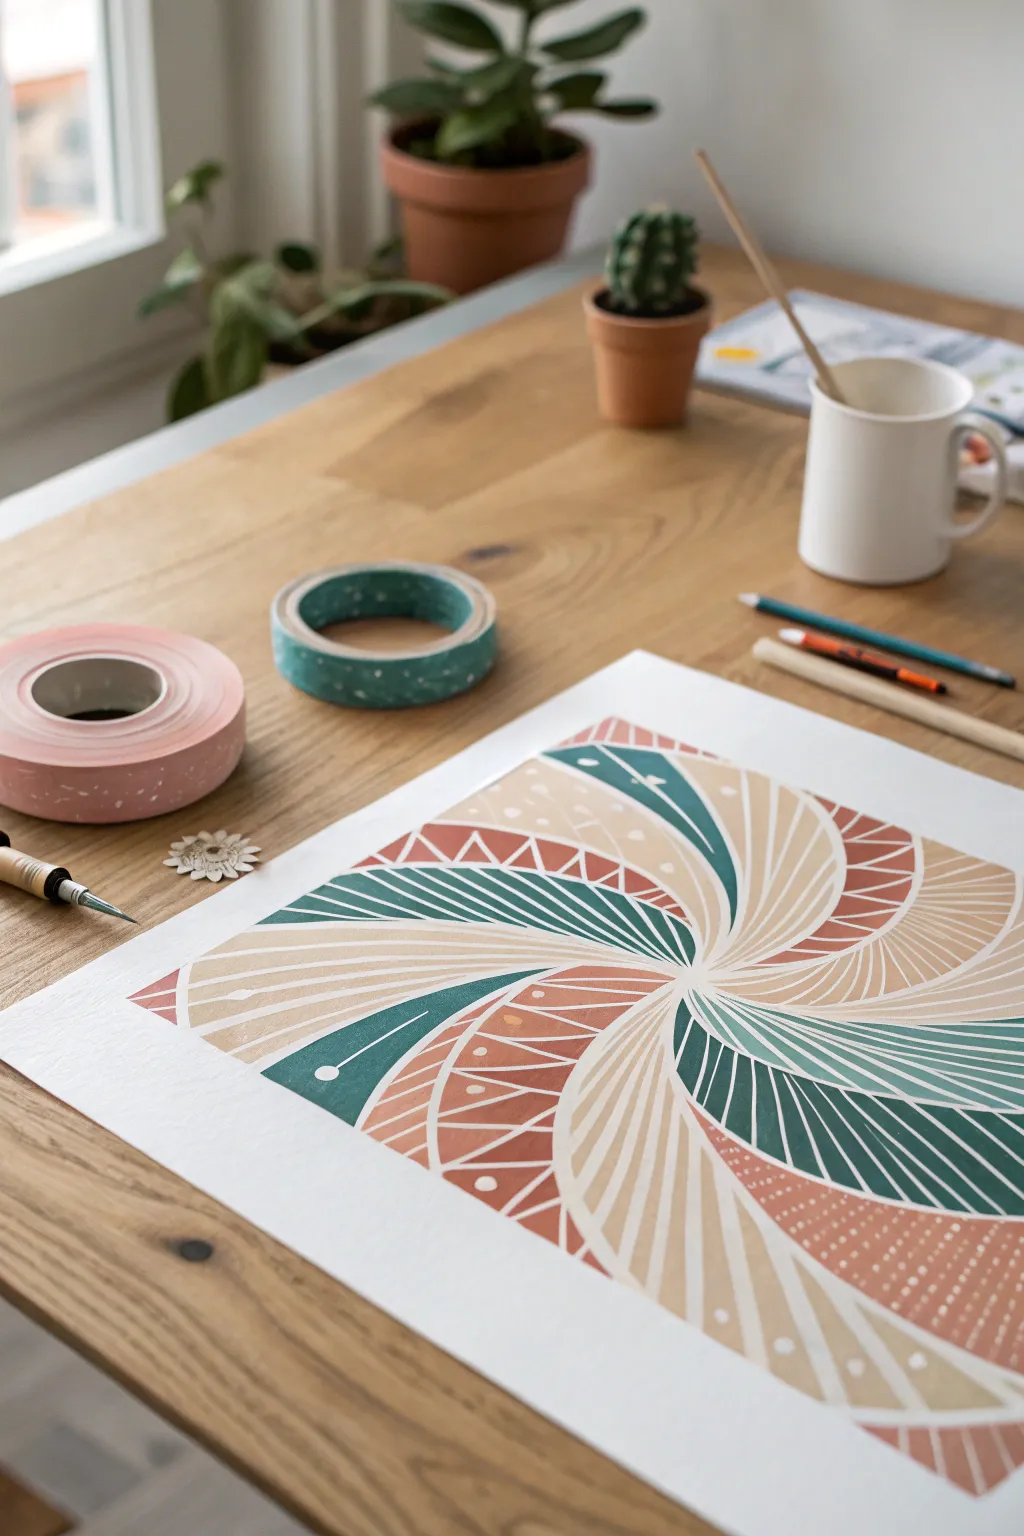
This project combines the clean lines of tape resist with the dynamic energy of radial geometry. By sectioning your paper into swirling rays and filling them with alternating patterns, you create a sophisticated, modern art piece that looks far more complex than it actually is.
How-To Guide
Materials
- High-quality watercolor paper or heavy mixed-media paper (square format)
- Washi tape or masking tape (various widths)
- Acrylic paints or gouache (teal, terracotta, beige/cream)
- Ruler
- Pencil and eraser
- Fine liner brushes
- Compass (optional but helpful)
- White gel pen or fine white paint marker
Step 1: Setting the Radial Foundation
-
Prepare your canvas:
Start with a square piece of heavy watercolor paper. Tape down the edges to your work surface to create a clean white border and prevent buckling when painting. -
Find the center:
Using a ruler, lightly mark the exact center of your paper with a pencil. This point will be the origin for your entire spiral design. -
Draw curved guidelines:
From the center point, draw 8-12 curved lines radiating outward toward the edges, creating a pinwheel effect. These lines should gently curve in the same direction to establish the ‘spin’ motion. -
Apply tape masks:
Select thin washi tape or painter’s tape. Carefully place strips along your pencil lines to mask off the boundaries between sections. Press the tape edges down firmly to ensure crisp paint lines later.
Step 2: Designing the Patterns
-
Plan your palette:
Mix three distinct color groups: a deep teal green, a warm terracotta rust, and a soft beige or cream. Having these ready will help you visualize the alternating rhythm. -
Subdivide the sections:
Within each large pie-slice section, use a pencil to lightly sketch internal patterns. Think ‘rays’ for the beige sections and geometric shapes for the colored ones. -
Sketch the fan details:
For the beige sections, draw lines radiating from the center that fan out wider as they reach the edge, mimicking the structure of a shell or folded fan. -
Add geometric motifs:
In the sections designated for color (teal and terracotta), sketch alternating motifs like triangles, dots, or concentric curves.
Clean Lines
Before painting, run a bone folder or credit card firmly over the tape edges to seal them completely and prevent paint bleed.
Step 3: Painting and Refining
-
Paint the solid blocks:
Using a flat brush, fill in the solid areas of color first. I prefer starting with the darkest teal sections to anchor the design visually. -
Create negative space geometry:
When painting the terracotta sections with triangles, carefully paint *around* your pencil lines or use thin tape strips to keep the separating lines white. -
Paint the fan lines:
Switch to a fine liner brush for the beige ‘fan’ sections. Carefully paint each stripe, leaving a thin gap of white paper between them to define the individual rays. -
Fill the curve patterns with teal:
For the teal sections with curved lines, use a steady hand to paint thin, sweeping strokes that follow the initial curve of the main section. -
Add dotted details:
Dip the end of a brush handle or use a dotting tool in white paint (or use a white gel pen after drying) to add rows of small dots within the terracotta or teal bands for texture. -
Let it dry completely:
Allow the paint to fully cure. Acrylics dry fast, but giving it an extra hour ensures you won’t smudge anything during the final reveal. -
Peel the tape:
Slowly and carefully peel away the main masking tape strips at a 45-degree angle. This reveals the crisp white boundaries that separate your main spiral sections. -
Clean up edges:
If any paint bled under the tape, use a white gel pen or a tiny bit of white gouache to tidy up the lines. -
Final touches:
Erase any visible pencil marks lightly, being careful not to rub the painted areas too vigorously.
Metallic Pop
Swap the beige paint for gold leaf or metallic gold ink in the ‘fan’ sections to make the design shimmer in the light.
Now you have a stunning, geometrically balanced artwork ready to be framed and displayed
Initial Or Word Mask In Spin Art
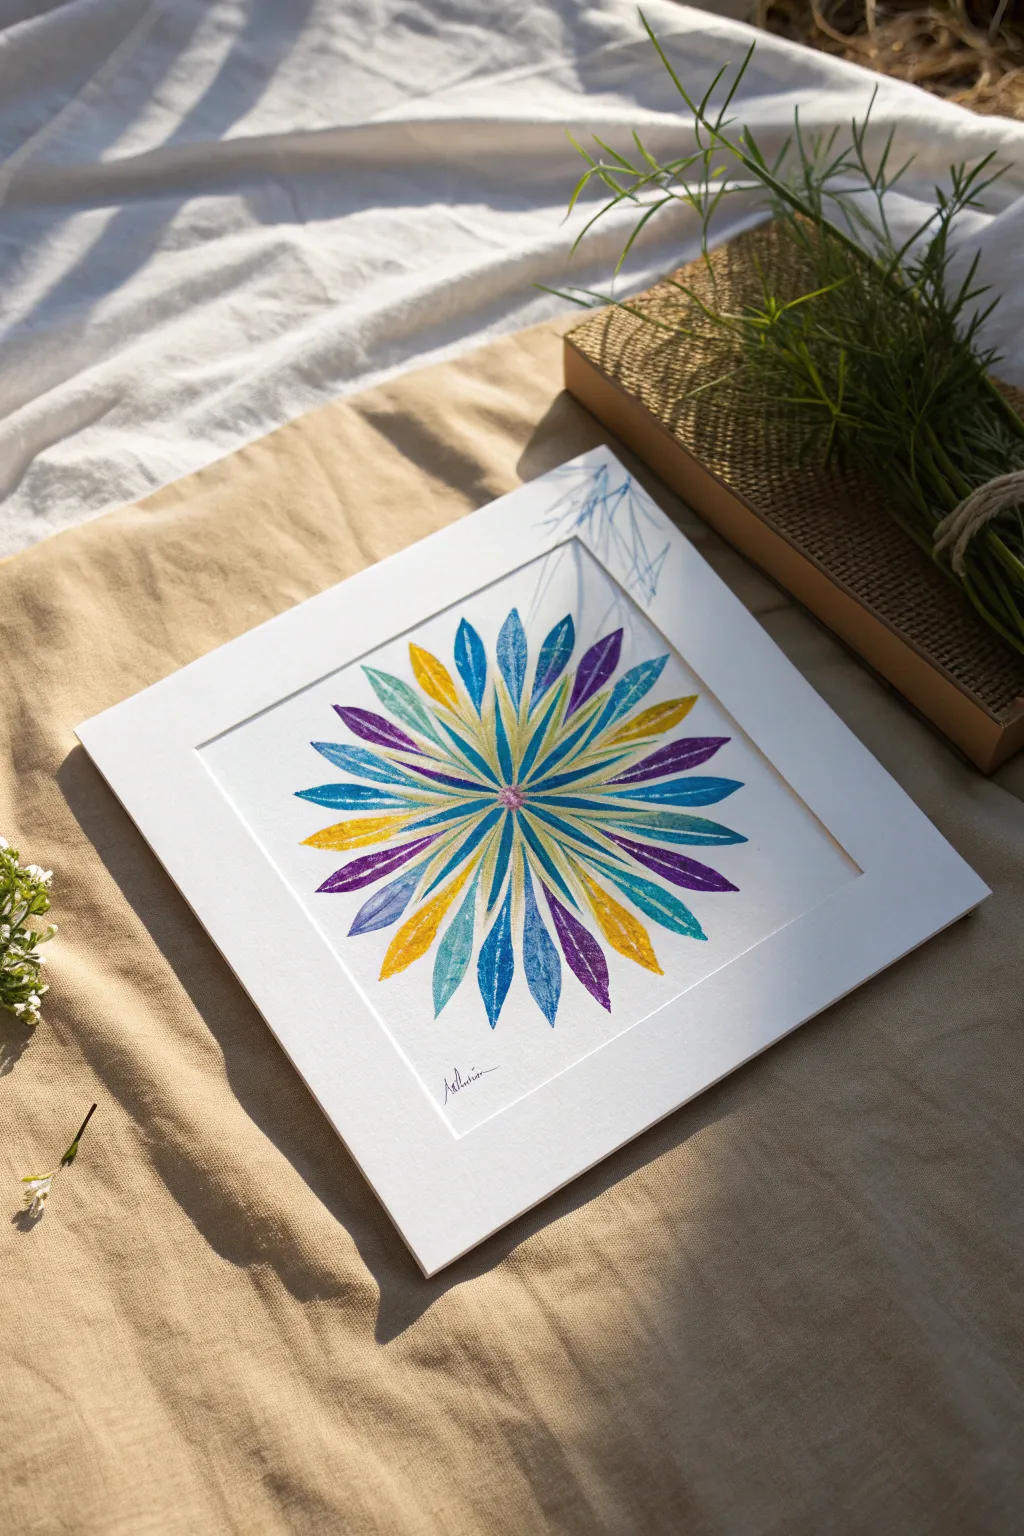
Transform a traditional spin art canvas into a structured, nature-inspired mandala using clever masking. This project combines the vibrant chaos of spinning paint with the precision of a floral stencil to create a stunning, starburst-like focal piece.
Step-by-Step Tutorial
Materials
- Square cardstock or heavy watercolor paper
- Spin art machine (or DIY salad spinner setup)
- Removable adhesive vinyl or contact paper
- Craft knife and cutting mat
- Liquid watercolor paints or diluted acrylics (blue, yellow, purple, teal)
- Squeeze bottles or droppers
- Tweezers
- Ruler and pencil
- White mat board frame (for finishing)
Step 1: Creating the Leaf Mask
-
Design your stencil:
On the backing of your adhesive vinyl, sketch a radial pattern of elongated leaf shapes. You’ll need about 16-20 leaves arranged in a circle, tapering towards a central point like spokes on a wheel. -
Cut the negative space:
Using your craft knife, carefully cut *out* the leaf shapes. For this specific ‘reverse’ stencil technique, you actually want to keep the surrounding vinyl sheet intact and discard the leaf-shaped cutouts (or save them for another project). -
Alternative: The positive mask:
Wait, looking closely at the crisp white edges in the example, let’s flip that approach. Instead, cut out the leaf shapes and place them aside. We will apply the large vinyl sheet *minus* the leaf holes onto the paper. This acts as a stencil. -
Prepping the paper:
Cut your cardstock to fit inside your spin art machine. Mark the exact center with a tiny pencil dot to help with alignment. -
Applying the stencil:
Peel the backing off your vinyl stencil (the sheet with leaf-shaped holes). Carefully center it on your cardstock and press it down firmly. I like to run a credit card over the edges to ensure no paint can seep underneath.
Bleeding edges?
If paint bled under the vinyl, your paint was likely too watery or the seal wasn’t tight. Use thicker paint next time or burnish the stencil edges harder.
Step 2: Spinning the Colors
-
Secure the paper:
Mount your masked paper into the spin art machine. Ensure it is perfectly centered to keep the spinning balanced. -
Prepare your paints:
If using acrylics, dilute them slightly with water in squeeze bottles until they have the consistency of heavy cream. You want them to flow, but not run like water. -
Start the spin:
Get the machine moving at a medium speed. A steady rotation is better than a frantic one for this precise control. -
Drop the blue:
While spinning, drop small amounts of deep blue paint near the center. Centrifugal force will pull it outward, filling the tips of the leaf stencils. -
Add contrasting yellow:
Next, add drops of yellow. Try to aim slightly further out from the center than the blue to create a gradient effect where they meet. -
Layer in purple and teal:
Alternate dropping purple and teal paints. Since the stencil is restricting where the paint lands, you don’t have to be perfect—the vinyl protects the white ‘negative space’ between the petals. -
Check coverage:
Stop the machine. Look to see if the stencil openings are fully filled with color. If you see blank spots inside the leaf shapes, give it another spin and add a tiny drop of paint specifically to that radius. -
Blot excess:
If there are heavy pools of paint sitting on top of the vinyl mask, gently blot them with a paper towel so they don’t run when you remove the sticker.
Metallic Pop
Mix a single drop of gold metallic ink into your spin cycle. It adds a shimmering vein through the petals that catches the light beautifully when framed.
Step 3: The Reveal
-
Let it dry… mostly:
Allow the paint to set for about 10-15 minutes. It shouldn’t be bone dry, but not soaking wet either. -
Peel the mask:
Using tweezers, lift one corner of the large vinyl stencil. Slowly and steadily peel it back at a sharp angle. This is the most satisfying part, revealing the crisp, colorful leaves against the white paper. -
Touch up the center:
If the very center point looks a bit empty, use a fine brush to dab a small dot of pink or purple paint right in the middle to unite the petals. -
Add signature touches:
Once fully dry, sign your name in small script at the bottom. The example shows a subtle signature that balances the composition. -
Mat and frame:
Place a clean white mat board over your artwork. This creates a professional border and draws the eye directly to your spinning flower design.
Enjoy the surprise of seeing your chaotic spin turn into a perfect geometric bloom once that mask is peeled away

PENCIL GUIDE
Understanding Pencil Grades from H to B
From first sketch to finished drawing — learn pencil grades, line control, and shading techniques.
Explore the Full Guide
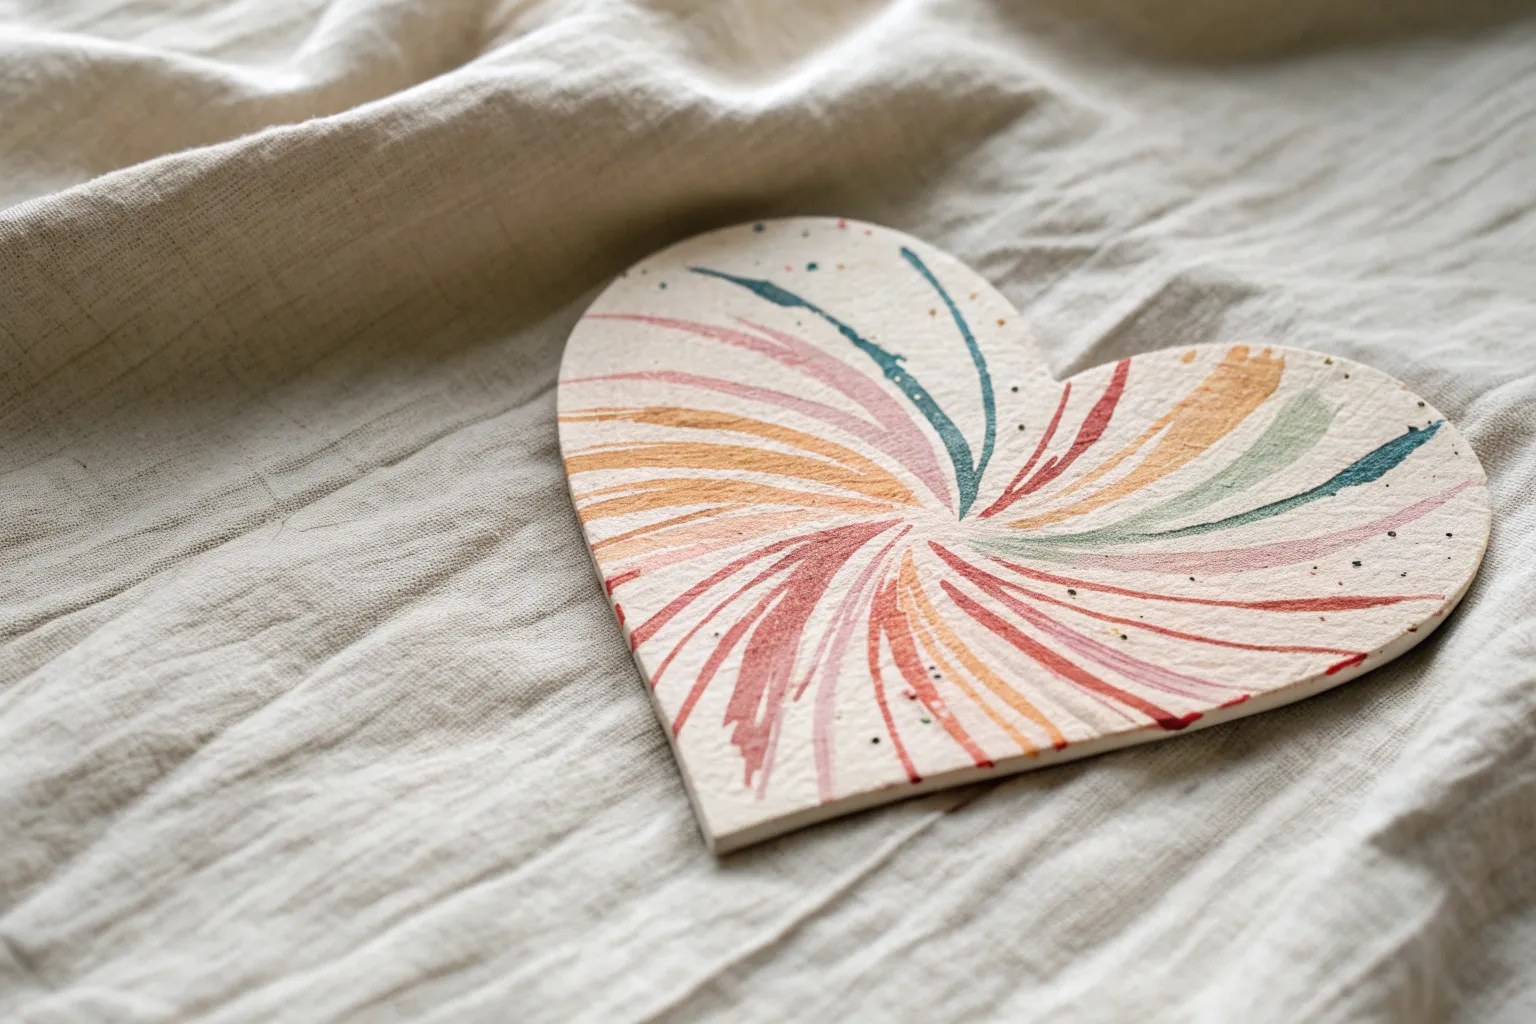
Spin Art Cards, Tags, And Bookmarks

Transform simple cardstock into elegant, high-end stationery with this clever take on paint pouring that mimics the intricate swirls of traditional stone marbling. These sophisticated gift tags feature a soft palette of sage green, dusty rose, and mustard yellow, swirled together in organic, flowing patterns that make every present feel extra special.
Step-by-Step Guide
Materials
- Heavyweight white cardstock or watercolor paper
- Acrylic craft paints (Sage Green, Dusty Rose/Terracotta, Mustard Yellow, White)
- Ppouring medium (or Floetrol)
- Small plastic cups for mixing
- Wooden craft sticks for stirring
- A spin art machine (or a DIY spinner like a salad spinner or lazy susan)
- Masking tape or painter’s tape
- Gift tag punch or scissors and a template
- Hole punch
- White paper reinforcement rings
- Natural jute twine
- Cardboard box (to catch splatters)
Step 1: Preparation and Mixing
-
Prepare your workspace:
Set up your spin art machine inside a large cardboard box to contain any flying paint. If you are using a manual spinner like a salad spinner, ensure it is clean and dedicated to crafts. -
Create the paper base:
Cut your heavyweight cardstock into rectangles slightly larger than your intended tag size. If you have a specific tag shape in mind, you can cut it out now, but working with a rectangle first often gives you more flexibility to choose the best part of the pattern later. -
Mix the pouring fluid:
In separate small cups, mix each acrylic paint color with pouring medium. Aim for a ratio of about 1 part paint to 2 parts medium. The consistency should be fluid, like warm honey, flowing easily off the craft stick without breaking. -
Adjust the flow:
Test the consistency. If the paint is too thick, add a few drops of water at a time. If it’s too thin, the colors might muddy together too quickly when spun. -
Secure the paper:
Use a loop of masking tape on the back of your cardstock to secure it firmly to the center of the spinner platform. Make sure it’s centered to help the spin remain balanced.
Keep it Fluid
If your paint streaks look jagged or dry, your mixture is too thick. Add a tiny drop of water to your paint cups to help the colors stretch into smooth curves.
Step 2: Spinning the Design
-
Apply the first puddle:
Pour a small puddle of white paint directly into the center of the paper. This acts as a wet base for the other colors to glide on. -
Layer the colors:
Dropping gently, add small puddles of sage green, dusty rose, and mustard yellow into the wet white center. Do not stir them. You can layer them on top of each other or place them side-by-side near the center. -
Start the spin:
Gently start spinning your machine or manual spinner. Don’t go to full speed immediately; a medium speed allows the paint to stretch outward into long, elegant veins rather than fine sprays. -
Observe and adjust:
Stop the spinner after a few seconds to check the pattern. If you want more color coverage, add small drops of specific colors to the center or negative spaces and spin again briefly. -
Create marble veins:
To get that specific ‘marbled’ look seen in the photo, stop the spinner while the paint is still very wet. Physically tilt the paper back and forth gently to let the centrifugal streaks warp and curve organically, mimicking stone strata. -
Final hard spin:
Give it one last quick spin to level out the paint surface and drive any excess off the edges, ensuring a flat finish when dry.
Double Sided Tags
Tape two pieces of cardstock back-to-back before spinning. When you peel them apart after spinning, you’ll have two decorated sheets to make double-sided tags
Step 3: Finishing Touches
-
Drying time:
Carefully remove the wet paper and lay it flat on a drying rack. Because of the pouring medium, this will take significantly longer to dry than standard paint—usually 24 hours is best. -
Flattening:
Once completely dry, the paper may curl slightly. Place it under a heavy book for a few hours to flatten it completely before cutting. -
Shape the tag:
Trim the corners of your rectangle to create the classic tag shape. Specifically, snip the top left and top right corners at a 45-degree angle. I prefer using a ruler to ensure both sides are symmetrical. -
Punch the hole:
Use a standard single-hole punch to create a hole centered near the top edge of the tag. -
Add reinforcement:
Stick a white paper reinforcement ring around the hole on the front side. This not only strengthens the tag but adds a crisp, professional finish that contrasts nicely with the organic paint swirls. -
Attach the twine:
Cut a length of jute twine, fold it in half, push the loop through the hole, and pull the tails through the loop to secure it with a lark’s head knot. Leave the tails long for trying onto gifts.
Attach this bespoke tag to a simply wrapped gift and watch how it instantly elevates the entire presentation


Have a question or want to share your own experience? I'd love to hear from you in the comments below!