If you love big, dramatic results fast, spray paint is basically your instant-gratification art buddy. These spray paint drawing ideas lean hard into simple stencils, smart masking, and easy layering so you can get that clean, graphic look without stressing over perfect drawing skills.
Classic Spray Paint Planets and Starfield
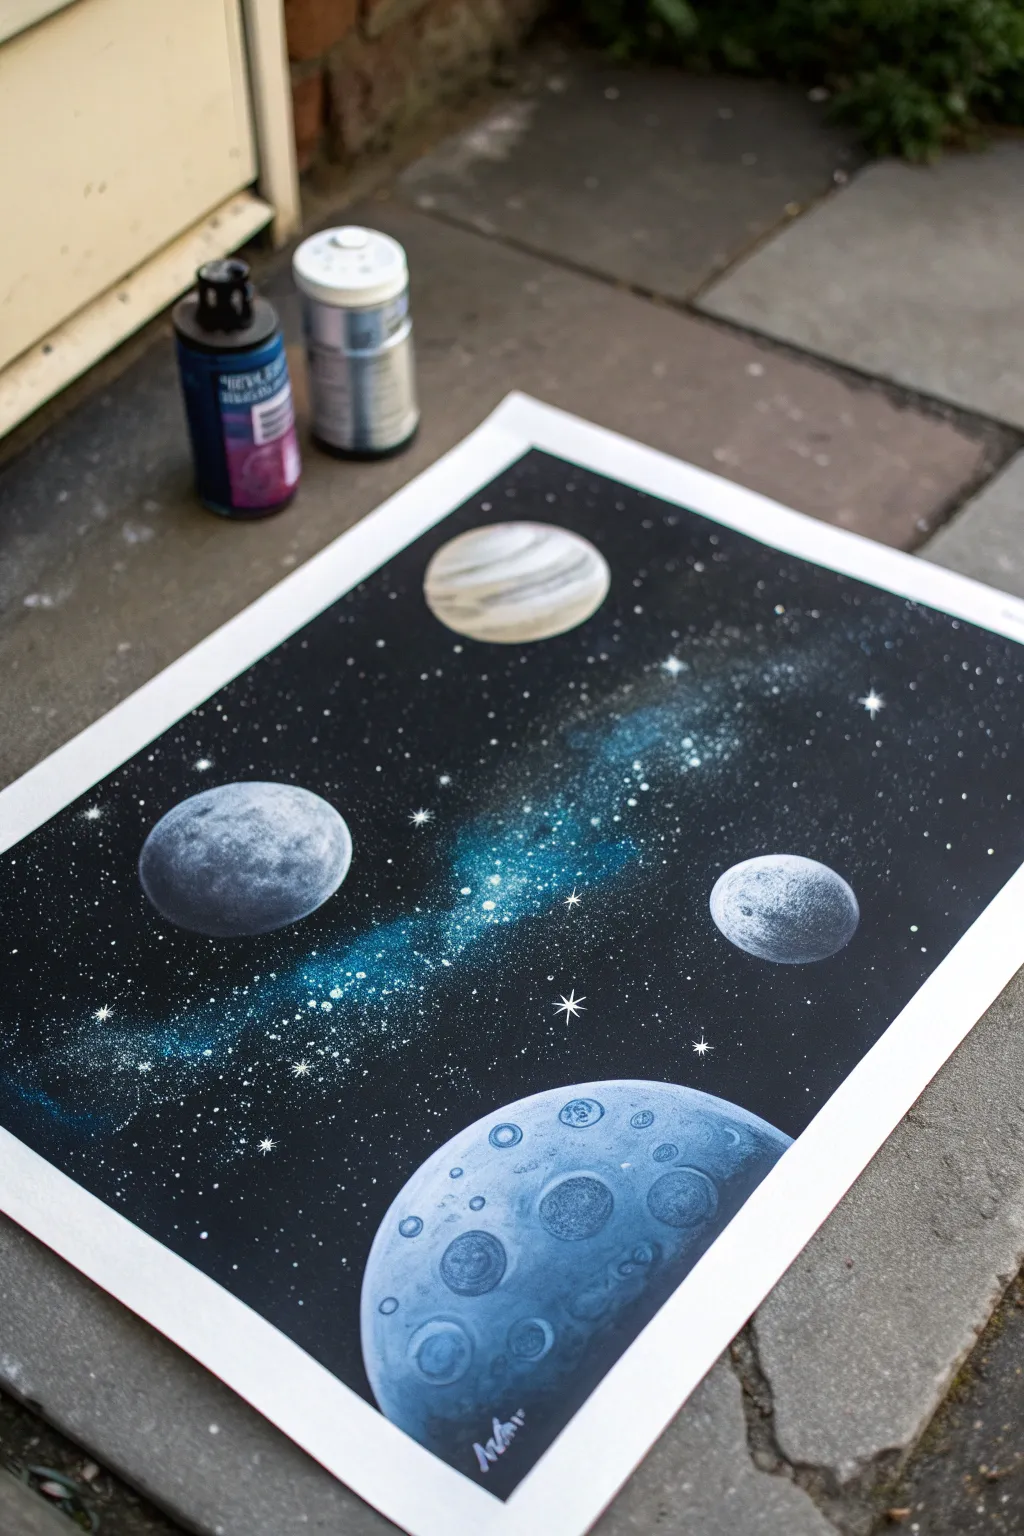
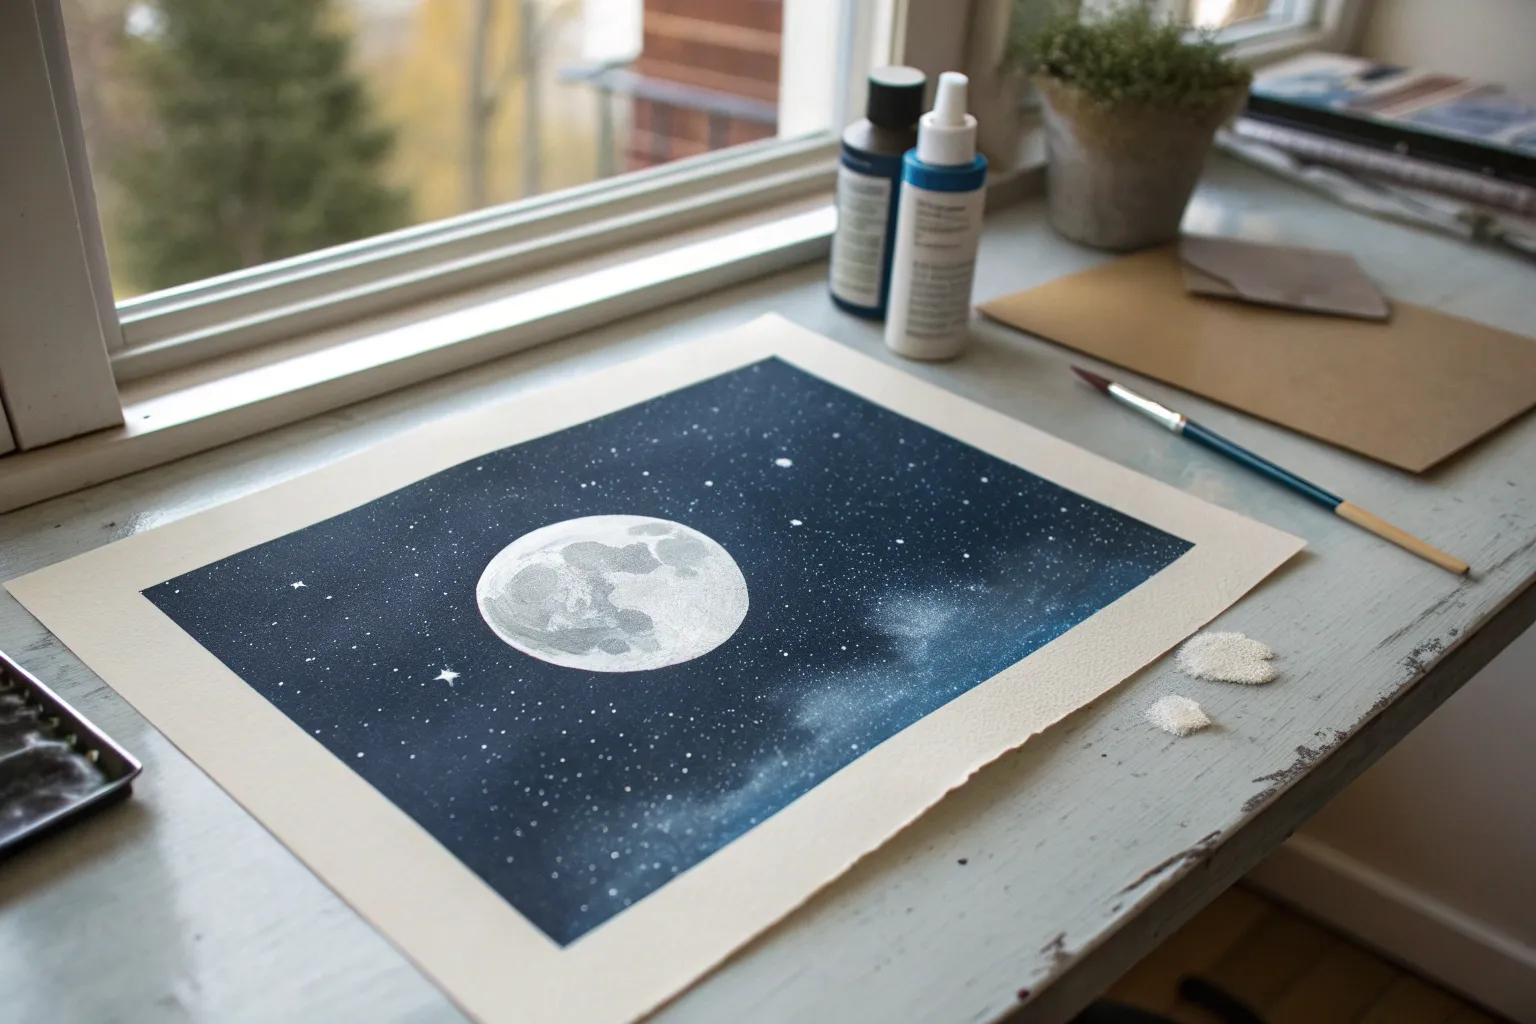
Create a stunning deep-space scene featuring detailed cratered moons and a vibrant gas giant drifting through a nebulous starfield. This project uses classic spray paint art techniques to build layers of texture and light on glossy poster board.
Step-by-Step
Materials
- Glossy poster board or heavy cardstock (white)
- Spray paint cans (Black, White, Light Blue, Dark Blue, Grey/Silver)
- Circular objects (plastic lids, bowls, or cut paper templates varying in size)
- Magazine pages or newsprint (for texture)
- Palette knife or stiff piece of card
- Cardboard box or drop cloth (for messy overspray)
- Respirator mask and gloves
Step 1: Painting the Planet Base Layers
-
Lay out your composition:
Before spraying, place your circular lids or templates on the paper to visualize where your four planets will live. You’ll need one large one at the bottom, two medium ones in the middle, and one medium one at the top. -
Spray the first planet colors:
Remove the lids. For the bottom large planet, spray a patch of Light Blue mixed with a little White. For the top planet (the gas giant), spray streaks of Grey/Silver and White. -
Add texture to the gas giant:
While the paint on the top planet is still wet, lay a crumpled piece of magazine paper over it and gently swipe across it with your hand to create streak-like bands. Peel it off to reveal the gas giant pattern. -
Paint the middle moons:
Spray two patches for the middle moons using Grey and White paint. Keep the paint wet for the next step. -
Texture the rocky moons:
Crumple a fresh piece of magazine paper into a ball, open it slightly, and dab it repeatedly onto the wet paint of the two middle moons and the large bottom planet. This lifts paint to create a rocky, cratered surface texture. -
Add shadow definition:
Lightly spray a very small burst of Black paint on the bottom-right edge of each colored patch. This pre-establishes the ‘dark side’ of your planets before masking them.
Paint Lifting?
If the magazine paper completely strips the paint to bare white, your paint layer was too thin. Apply a thicker initial coat of color before texturing.
Step 2: Creating the craters
-
Detail the large moon:
For the large blue moon at the bottom, we need specific craters. Place small bottle caps or coins onto the wet paint surface. -
Shadowing the craters:
Spray a tiny puff of Black paint on one side of these small objects to create a shadow cast. -
Remove crater masks:
Carefully lift off the caps and coins. You should see clearly defined crater rings now. -
Mask the planets:
Now, cover all four of your painted planet areas with your main circular lids or bowls. Ensure the edges are sealed tight against the paper to prevent the background black from leaking in.
Step 3: The Galaxy Background
-
Spray the deep space background:
Spray the entire remaining white space of the poster board with Black spray paint. Cover everything thoroughly. -
Create the nebula stream:
While the black is wet, spray a diagonal band of Dark Blue and Light Blue across the center, passing between the masked planets. This creates the milky way effect. -
Blend the nebula:
Mist some Black paint lightly over the edges of the blue band to soften it, so it fades naturally into the darkness rather than looking like a solid stripe. -
Flick the stars:
Spray a puddle of White paint onto a scrap piece of cardboard. Dip your fingers (gloved!) into it and flick tiny speckles over the black areas to create distant stars. I find flicking harder creates finer stars. -
Add major stars:
To make the bright, cross-shaped stars seen in the image, hold a palette knife or card upside down just above the paper and quick-spray White paint against its edge at a steep angle.
Starry Night Hack
For ultra-fine star clusters, spray white paint onto a toothbrush and run your thumb across the bristles to mist the paper.
Step 4: The Reveal
-
Dry briefly:
Wait about 2-3 minutes for the background paint to set slightly so it doesn’t drip when you move the masks. -
Remove planet masks:
Carefully lift each bowl or lid straight up. Do not slide them, or you will smear the crisp edges of your planets. -
Add reflected light (optional):
If a planet looks too flat, you can hold a curved card against the lit side and gently mist a tiny bit of White to brighten the edge. -
Sign and seal:
Sign your work in the bottom corner with a paint marker or thin brush. Allow the piece to dry completely in a well-ventilated area for at least an hour.
Now you have a professional-looking space scene ready to frame and display


Soft Galaxy Gradient Backdrop
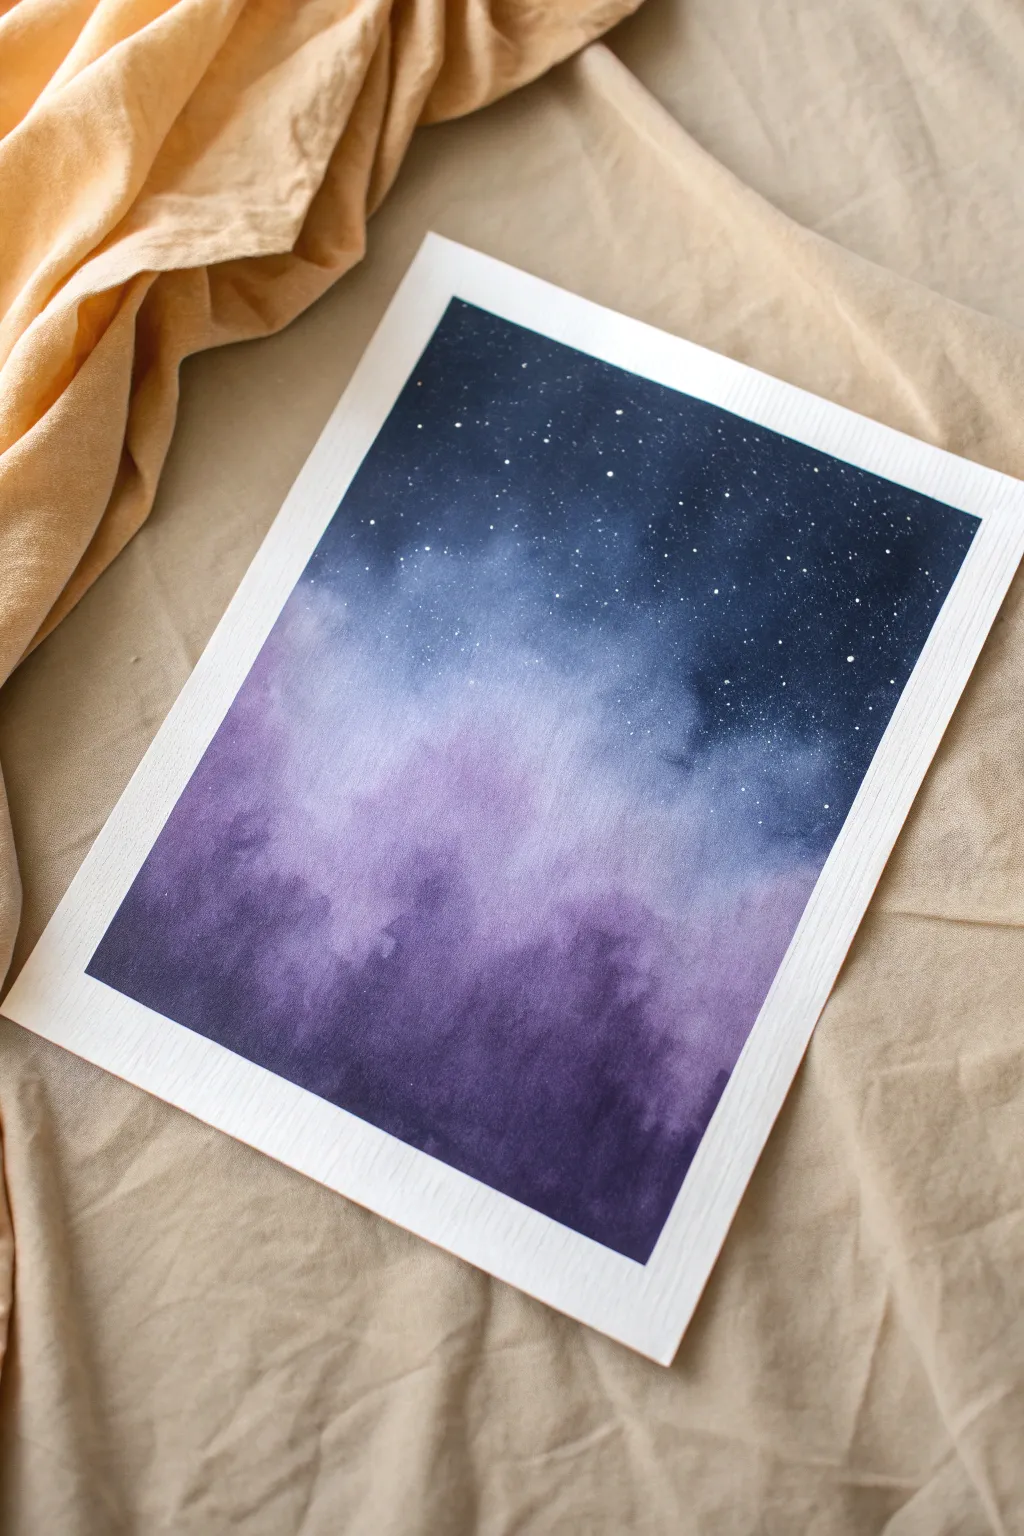
Capture the magic of a twilight sky with this soft galaxy gradient painting. Using a wet-on-wet technique, you’ll blend deep indigos into ethereal purples for a stunning piece of wall art.
How-To Guide
Materials
- Cold press watercolor paper (300 gsm)
- Painter’s tape or masking tape
- Watercolor paints (Indigo, Prussian Blue, Violet, Magenta)
- White opacity gouache or white ink
- Large flat wash brush
- Medium round brush
- Old toothbrush or stiff bristle brush
- Two jars of water (one clean, one for rinsing)
- Paper towels
- Rigid board to tape paper onto
Step 1: Preparation and Base
-
Secure the paper:
Begin by taping your watercolor paper down to a rigid board on all four sides. Press the tape edges firmly to ensure clean, crisp borders later. -
Pre-wet the paper:
Using your large flat wash brush and clean water, apply an even coat of water across the entire surface of the paper. You want a glisten, not a puddle. -
Mix your colors:
While the paper soaks, prepare your puddles of paint. You’ll need a rich Indigo, a Prussian Blue, and a vibrant Purple mixed from Violet and Magenta.
Help! My colors are muddy
This happens if you overwork the paper. Lay down your color and let the water do the blending work. Stop brushing the same spot repeatedly.
Step 2: Creating the Gradient
-
Apply the darkest tone:
Load your brush heavily with the Indigo mix. Start at the very top of the paper, painting horizontals stroke to create a deep, dark band. -
Transition to blue:
Clean your brush slightly and pick up the Prussian Blue. Apply this just below the indigo, letting the wet paper help the colors bleed into each other naturally. -
Blend downwards:
Notice how gravity helps here; I often tilt my board slightly so the paint flows down. Continue blending the blue down towards the middle of the paper. -
Introduce the purple:
Switch to your purple mixture. Start applying it near the bottom third, stroking upwards specifically to meet the blue section. -
Enhance the clouds:
To create that cloudy, nebula texture, dab concentrated purple paint into the wet purple area, letting it bloom outward. -
Soften the edges:
If a line looks too harsh, rinse your brush, dry it slightly on a towel, and gently sweep over the transition area to soften it. -
Deepen the contrast:
While still wet, drop more concentrated Indigo into the top corners to really frame the ‘sky’ and add depth. -
Final blend check:
Look at your gradient. It should flow seamlessly from dark night to soft twilight. Add small touches of water or pigment where the transition feels stuck. -
Let it dry completey:
This is crucial. Walk away and let the paper dry completely flat. The paper must be bone dry before the next step to prevent smudging.
Step 3: Stars and Details
-
Prepare the stars:
Mix a small amount of white gouache with a tiny drop of water. You want a creamy consistency that flicks easily but isn’t transparent. -
Test the consistency:
Flick the paint onto a scrap piece of paper first. If the drops are too big, the paint is too watery; if nothing comes off, it’s too thick. -
Create the galaxy:
Load an old toothbrush or stiff brush with the white mix. Use your thumb to flick the bristles over the painting, concentrating the ‘stars’ in the darker upper section. -
Add feature stars:
Use a fine liner brush or a white gel pen to manually add a few larger, brighter stars in key open areas for visual interest. -
Final dry:
Allow the white gouache specks to dry fully. -
The reveal:
Carefully peel away the masking tape. Pull the tape away from the center of the painting at a 45-degree angle to prevent tearing the paper.
Add a Silhouette
Once dry, paint a solid black mountain range or pine tree line along the very bottom edge to ground your celestial scene.
Now you have a serene piece of the cosmos ready to frame or gift


Torn-Paper Mountain Silhouettes
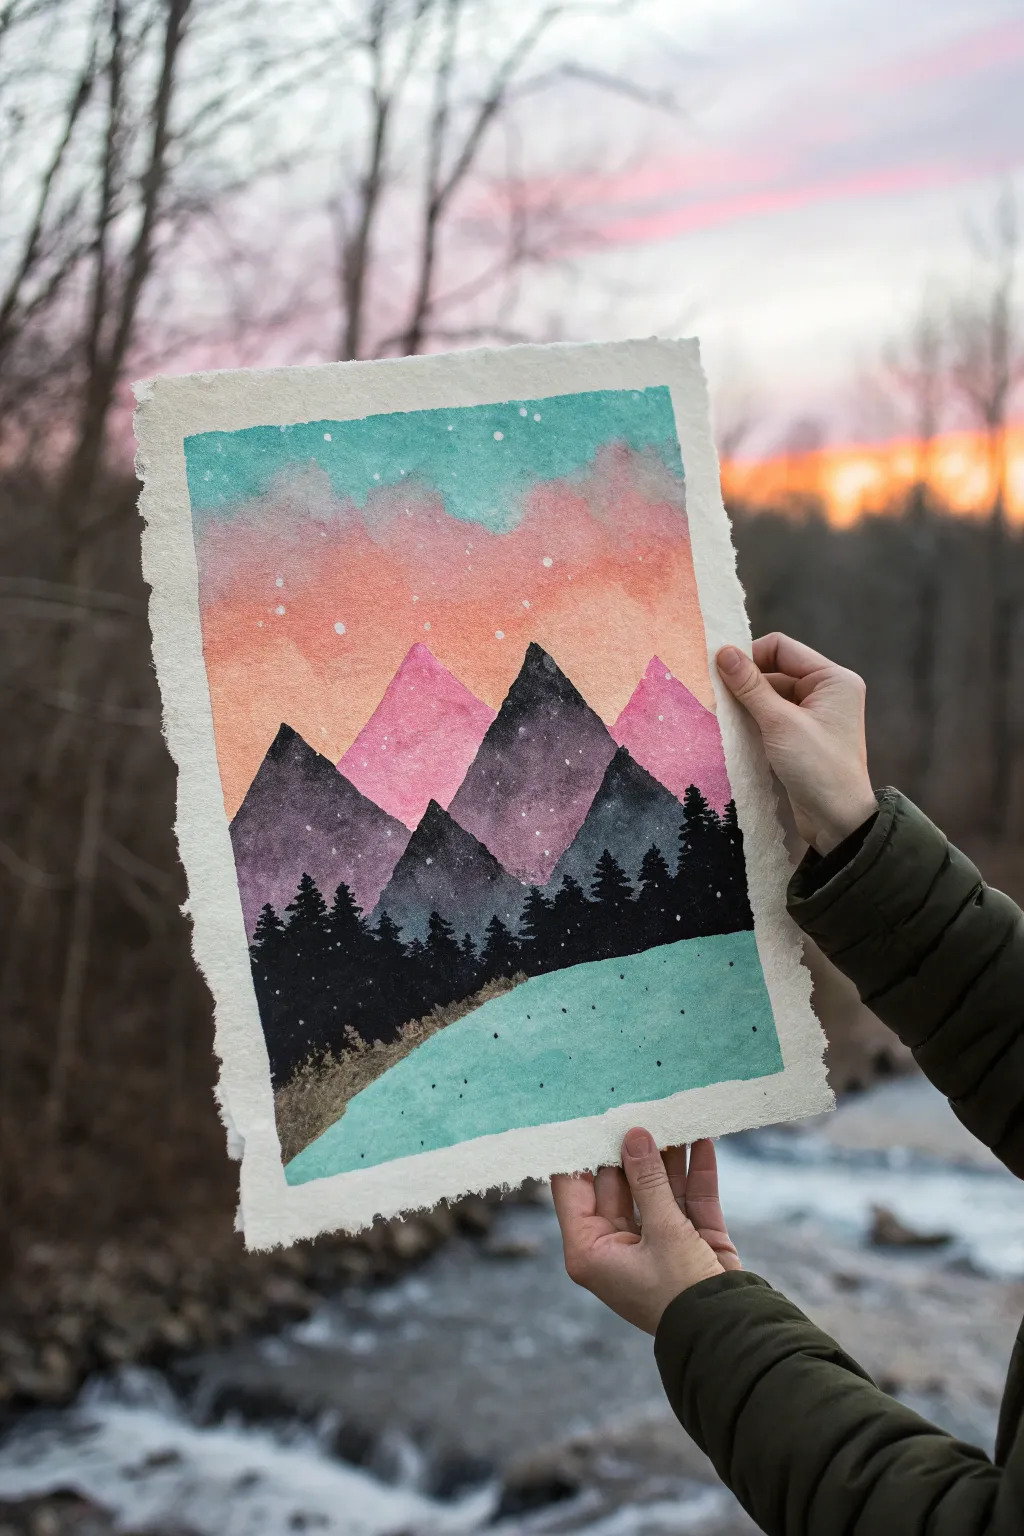
Capture the magic of an alpine twilight with this stunning mountain landscape project. Using torn paper stencils and blending techniques, you’ll create sharp mountain silhouettes against a dreamy, cotton-candy sky.
Step-by-Step Tutorial
Materials
- Heavyweight watercolor paper (rough press or deckle edge preferred)
- Spray paint or liquid watercolors (Teal, Peach, Magenta, Black)
- Painter’s tape or masking tape
- Scrap paper or cardstock (for stencils)
- White acrylic paint or opaque white ink
- Old toothbrush or stiff bristle brush
- Flat shader brush (optional)
- Metallic gold paint pen or thin brush (optional)
Step 1: Setting the Scene: The Sky
-
Tape your borders:
Begin by taping down the edges of your watercolor paper to a board. Use painter’s tape to create a crisp white border, aiming for about a half-inch margin all around. -
Create the top gradient:
Start with your teal color. Lightly spray or wash the very top third of the paper. Keep the application airy and textured—don’t worry about solid coverage. -
Blend the sunset hues:
While the top is still slightly active, introduce the peach tone below the teal. Let them meet naturally to create a soft transition, then fade the peach downward into a lighter wash. -
Add wispy clouds:
Before the sky dries completely, dab a few spots of diluted magenta or soft pink into the upper sky area to suggest wispy, floating clouds.
Tearing Technique
Pull the paper specifically toward you while tearing stencils. This creates a softer, more fibrous edge which mimics snow blowing off a mountain peak perfectly.
Step 2: Building the Mountains
-
Prepare your stencils:
Tear your scrap paper into jagged, triangular shapes. The rough, torn edge is crucial—this texture will give your mountains that organic, rocky ridge appearance. -
Layer 1: The distant peaks:
Place a torn paper stencil about halfway down the page. Use the magenta or pink spray to fill in the shape, creating the furthest, hazy mountain range. -
Shift and repeat:
Move the stencil slightly to the side and down. Apply another layer, perhaps mixing a bit of purple or grey with the pink to show depth. -
Layer 2: The mid-ground mountains:
Create a new, larger torn stencil for the darker mountains. Position these in front of the pink ones, overlapping them to push the pink range into the background. -
Darken the palette:
Fill these mid-ground peaks with a dark grey or deep purple mixture. I find that letting the texture of the paper show through keeps it looking rugged. -
Layer 3: The foreground silhouette:
For the closest range, use black paint. Paint sharp, jagged peaks that dominate the lower middle section, ensuring they are the darkest value on the page.
Metallic Magic
Mix a tiny amount of iridescent medium into your teal paint for the water section only. The lake will shimmer realistically when viewed from different angles.
Step 3: Trees, Water & Stars
-
Establish the tree line:
Using a small flat brush or a fine tip spray nozzle, create a solid black tree line at the base of your dark mountains. Use vertical dabbing motions to simulate pine tree textures. -
Refine the trees:
Take a smaller brush and detail the tops of the trees, pulling tiny pointed shapes upward to create varied heights for a realistic forest canopy. -
Mask the water line:
Place a straight piece of paper or tape horizontally across the bottom section where the water will start. -
Form the icy lake:
Fill the bottom section below the tree line with the same teal color used in the sky, creating a visual balance. Keep it fairly solid but allow some paper texture to show through. -
Add the shoreline detail:
Where the black trees meet the teal water, dab a touch of metallic gold or muddy brown paint to suggest a rocky or grassy shoreline. -
Create the stars:
Load an old toothbrush with white acrylic paint. Run your thumb over the bristles to flick tiny specks of ‘snow’ or ‘stars’ across the entire piece, focusing on the dark mountains. -
Add final sparkle:
Use a small brush or white gel pen to add a few larger, deliberate stars or snowflakes in the sky for emphasis. -
The reveal:
Once everything is completely dry—give it a good 20 minutes—slowly peel away the border tape at a 45-degree angle to reveal your crisp white edges.
Step back and admire your new mountain view, complete with that satisfying crisp border edge


Skyline Silhouette on a Nebula
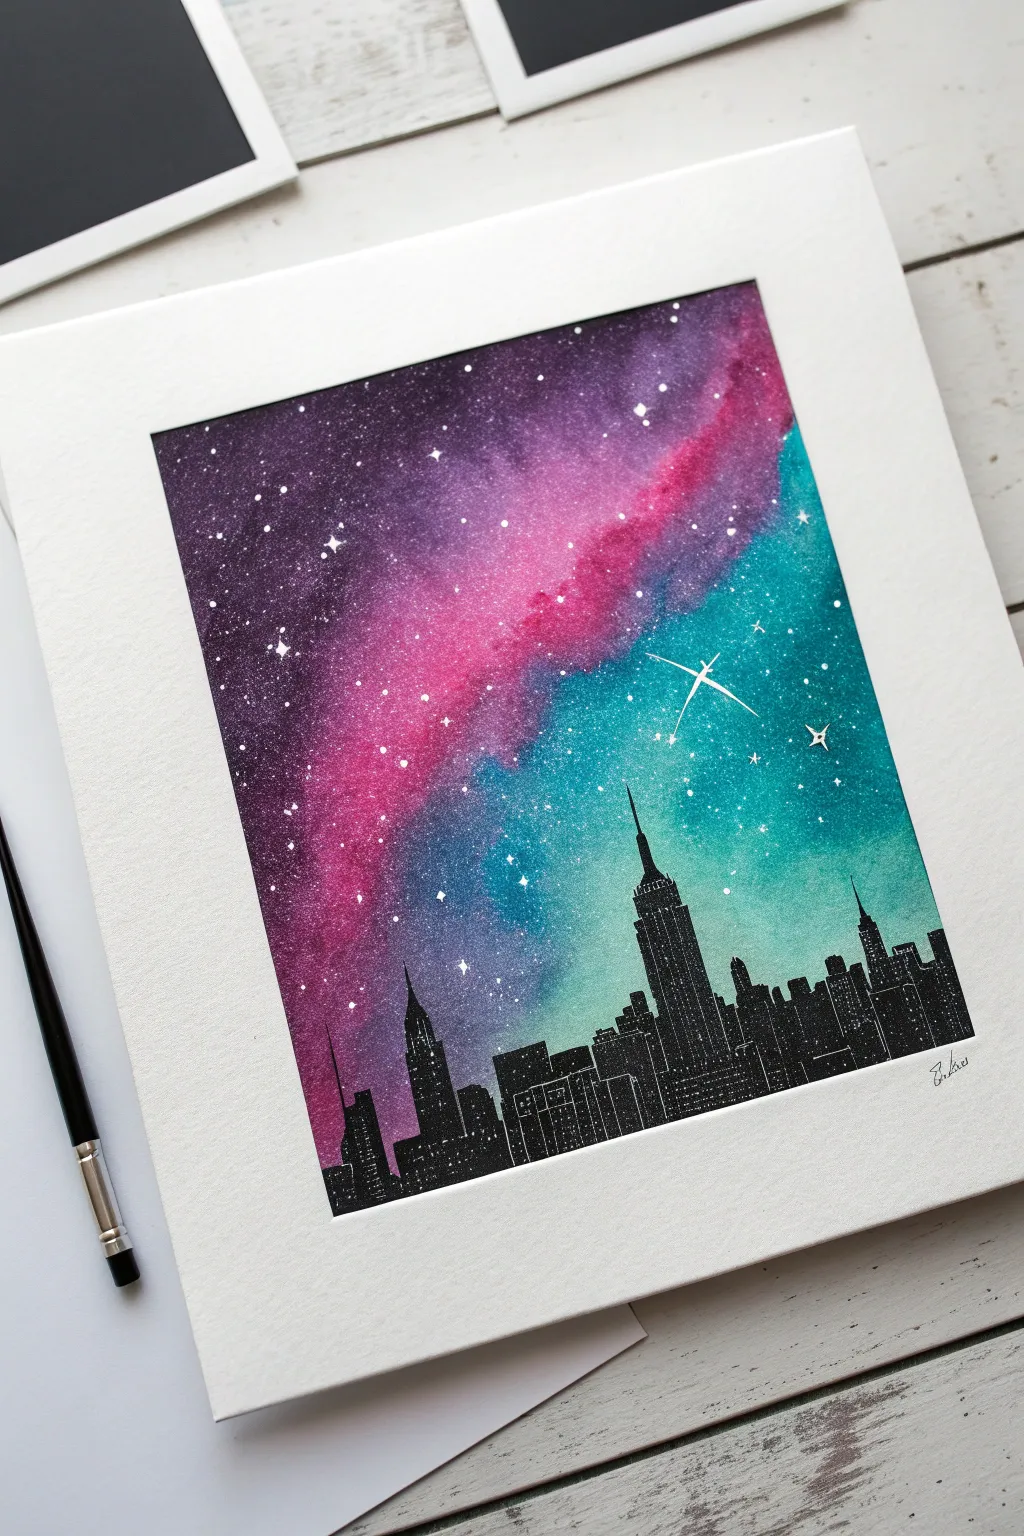
Capture the magic of an urban skyline set against the vast, colorful expanse of deep space. This project combines the blended beauty of watercolors or spray inks with precise black silhouetting to create a dreamy, contrasting masterpiece.
Detailed Instructions
Materials
- Heavyweight watercolor paper or mixed media cardstock
- Painter’s tape or masking tape
- Liquid watercolors or spray inks (Purple, Magenta, Teal/Turquoise)
- Black ink fineliner pens (various sizes, e.g., 0.1, 0.3, 0.5)
- Black posca marker or acrylic paint (optional for filling)
- White gel pen or opaque white gouache
- Small round paintbrush
- Old toothbrush (for splatter effect)
- Paper towels
- Water cups
Step 1: Setting the Stage
-
Prepare the surface:
Begin by securing your watercolor paper to a flat, hard surface using painter’s tape on all four sides. This not only keeps the paper flat when it gets wet but creates that crisp, professional border seen in the final piece. -
Wet the paper:
Using a clean, wide brush or a misting bottle, lightly dampen the entire surface of the paper inside the taped area. You want it shiny but not pooling with water; this helps the colors bleed together seamlessly.
Bloody Skylines?
If your black ink bleeds into the sky, the paint wasn’t dry enough. Salvage it by turning the bleed into “smoke” rising from the building, or simply widen the building to cover the mistake.
Step 2: Creating the Galaxy
-
Apply the teal:
Start by applying your teal or turquoise color. Focus this hue primarily in the lower right and middle-right sections of the paper, letting it diffuse softly into the wet fibers. -
Add the vibrant pink:
Introduce the magenta or bright pink ink diagonally through the center, allowing it to touch the teal edges. Watch as they blend slightly to create interesting purple transition tones. -
Deepen with purple:
Fill the remaining upper left corner with deep purple ink. Dab more pigment into the corners to create a vignette effect, making the center feel brighter and more luminous. -
Blend the transitions:
If the colors look too separated, use a slightly damp brush to gently tickle the edges where two colors meet, encouraging them to mix into a soft gradient. -
Create texture:
While the paint is still damp, you can lift tiny spots of color with a crumpled tissue to create cloud-like nebula textures, or sprinkle a tiny pinch of salt for a crystallized effect. -
Dry completely:
This is crucial: Let the background layer dry 100% before moving on. You can speed this up with a hairdryer if you’re impatient, but the paper must be bone-dry to prevent the black ink from bleeding later.
Level Up: Realism
Instead of random white dots for windows, organize them in grid patterns. Leave some buildings completely dark to create a sense of depth, as if those buildings are further in the foreground.
Step 3: The Starfield
-
Splatter stars:
Dip an old toothbrush or a stiff bristled brush into opaque white gouache or slightly watered-down white acrylic paint. Run your thumb over the bristles to flick a fine mist of ‘stars’ across the colored sky. -
Add hero stars:
Using a white gel pen or a fine brush with white paint, manually draw a few larger, brighter stars. Add a simple cross-shape to one or two of them to create a twinkling lens-flare effect.
Step 4: The Silhouette Skyline
-
Outline the iconic buildings:
Start sketching the outline of your skyline at the bottom third of the paper. Use a reference photo of New York or your favorite city to get the shapes of distinct skyscrapers like the Empire State Building correct. -
Vary the heights:
Ensure your skyline isn’t a flat wall; mix tall skyscrapers with lower, boxy buildings to create visual rhythm and depth across the horizon line. -
Fill the shapes:
Once the outline is established, use a thicker black marker or black acrylic paint to fill in the buildings completely. The silhouette should be solid and opaque against the colorful sky. -
Add architectural details:
I like to use a very fine white gel pen here to add tiny rows of windows or lit-up aerials on top of the black buildings. Keep these subtle; just enough to suggest life within the city. -
Refine the edges:
Go back with your finest black pen (0.1 or smaller) to sharpen the antennae towers and the edges of the roofs, ensuring the silhouette looks crisp against the dreamy background.
Step 5: Final Touches
-
Remove the tape:
Once you are certain the ink is dry, peel the painter’s tape away slowly and at a 45-degree angle away from the artwork to reveal your clean white border. -
Sign your work:
Add your signature in the white border or quietly in the corner of the black silhouette.
Frame your new cosmic cityscape and enjoy the view of the stars over the city
BRUSH GUIDE
The Right Brush for Every Stroke
From clean lines to bold texture — master brush choice, stroke control, and essential techniques.
Explore the Full Guide
Animal Silhouette With Cosmic Fill
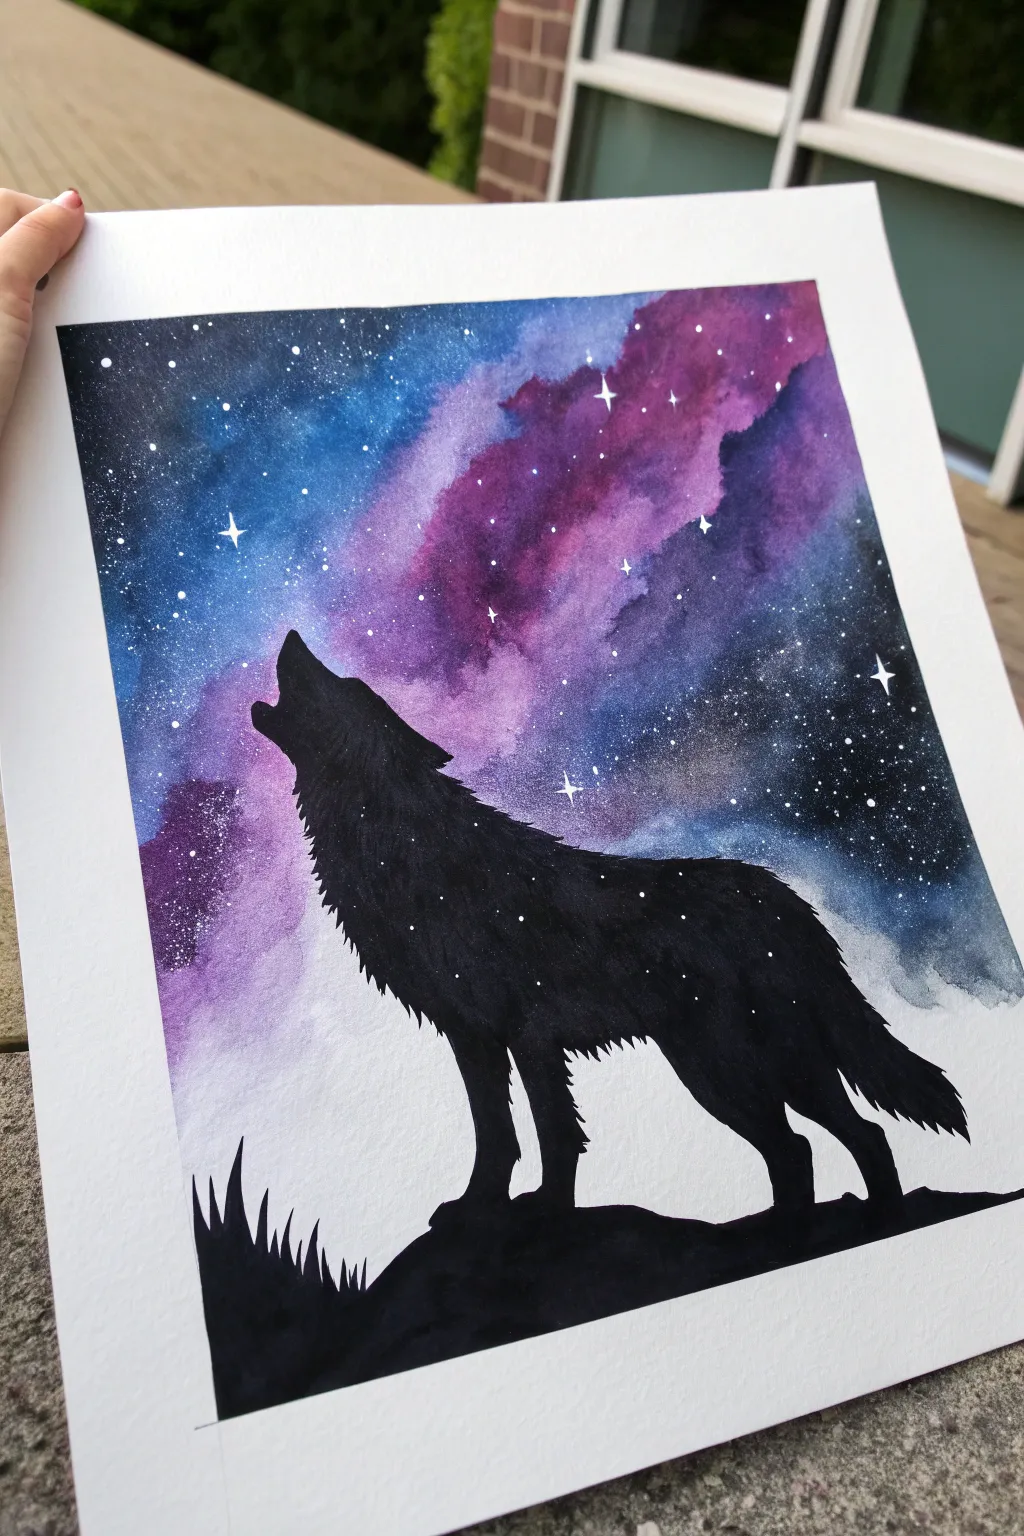
Capture the mystic beauty of a howling wolf set against a vibrant galaxy sky in this striking project. By combining wet-on-wet watercolor techniques with bold black silhouettes, you’ll create a mesmerizing contrast between the ethereal heavens and the grounded earth.
Step-by-Step Guide
Materials
- Cold press watercolor paper (300gsm recommended)
- Painter’s tape or masking tape
- Watercolor paints (Indigo, Phthalo Blue, Purple, Magenta)
- Black gouache or black acrylic paint
- Round watercolor brushes (Size 4 and 8)
- Fine liner brush (Size 0 or 00)
- White gel pen or white gouache
- Pencil and eraser
- Jar of clean water
- Paper towels
- Old toothbrush (optional for stars)
Step 1: Preparation and Sketching
-
Secure the paper:
Tape down all four edges of your watercolor paper to a hard board or table. This creates that clean, crisp white border and prevents buckling when we add water. -
Sketch the outline:
Lightly sketch the silhouette of the wolf howling and the jagged ground beneath it. Keep your pencil lines very faint since the galaxy background needs to flow behind the wolf, or you can paint around it. -
Define the horizon:
Draw the uneven, grassy terrain at the bottom. Start low on the left and slope upward towards the right to give the wolf a majestic platform.
Clean Edges Pro-Tip
To prevent paint bleeding under the tape, burnish the edges down firmly with a spoon or fingernail before you start painting.
Step 2: Painting the Galaxy Sky
-
Wet the sky area:
Using your larger brush and clean water, apply a generous wash over the entire sky area. Be careful not to puddle the water; you just want a nice, even sheen. -
Start with lighter colors:
While the paper is still wet, drop in swirls of magenta and purple diagonally across the center. Let the colors bleed and bloom naturally on the wet surface. -
Add deep blues:
Introduce Phthalo Blue and Indigo into the corners and edges of the sky. I like to let these darker colors touch the wet edges of the purple to create soft, seamless transitions. -
Darken the edges:
Intensify the corners with your darkest blue or a touch of black mixed with blue. This vignette effect pushes focus toward the center brightness. -
Create texture:
While damp, you can lift a little pigment with a thirsty (dry) brush or paper towel to create cloud-like wisps in the lighter purple areas. -
Dry partially:
Allow the sky to dry until it feels cool to the touch but isn’t glistening. This prevents the next steps from bleeding uncontrollably.
Level Up: Salt Texture
While the galaxy wash is still wet, sprinkle a pinch of table salt onto the paint. Brush it off when dry for a stunning, crystallized star effect.
Step 3: Creating the Stars
-
Splatter the stars:
Dilute a bit of white gouache or acrylic. Load an old toothbrush or a stiff brush, and gently flick the bristles to spray fine white specks across the darkest parts of the sky. -
Paint larger stars:
Using your fine liner brush or a white gel pen, add specific bright stars. Draw small crosses or four-pointed shapes for a twinkling effect on the larger ones. -
Let it dry completely:
Ensure the entire background is bone dry before moving on to the silhouette. If the paper is damp, the black paint will bleed into your beautiful sky.
Step 4: Painting the Silhouette
-
Outline the wolf:
Switch to your black gouache or acrylic for maximum opacity. Carefully trace the outline of the wolf’s head, fur, and legs with your fine liner brush. -
Fill in the form:
Use a medium brush to fill in the body of the wolf with solid black. Ensure the coverage is even so no galaxy background shows through the animal. -
Detail the fur:
Use the tip of your smallest brush to flick tiny strokes outward along the wolf’s neck and tail to simulate the texture of fur. -
Paint the terrain:
Fill in the ground area with solid black. Add jagged spikes of grass on the left side and smooth out the rock beneath the wolf’s paws. -
Connect the elements:
Make sure the wolf’s paws merge seamlessly into the black ground, anchoring the animal to the scene. -
Add internal stars:
Once the black paint is dry, add a few tiny white dots inside the wolf’s silhouette to suggest transparency or a cosmic connection. -
Reveal the border:
Gently peel away the painter’s tape at a 45-degree angle to reveal your clean white edges.
Step back and admire how the dark silhouette makes your colorful galaxy pop off the page
Hands and Fingers as Organic Stencils
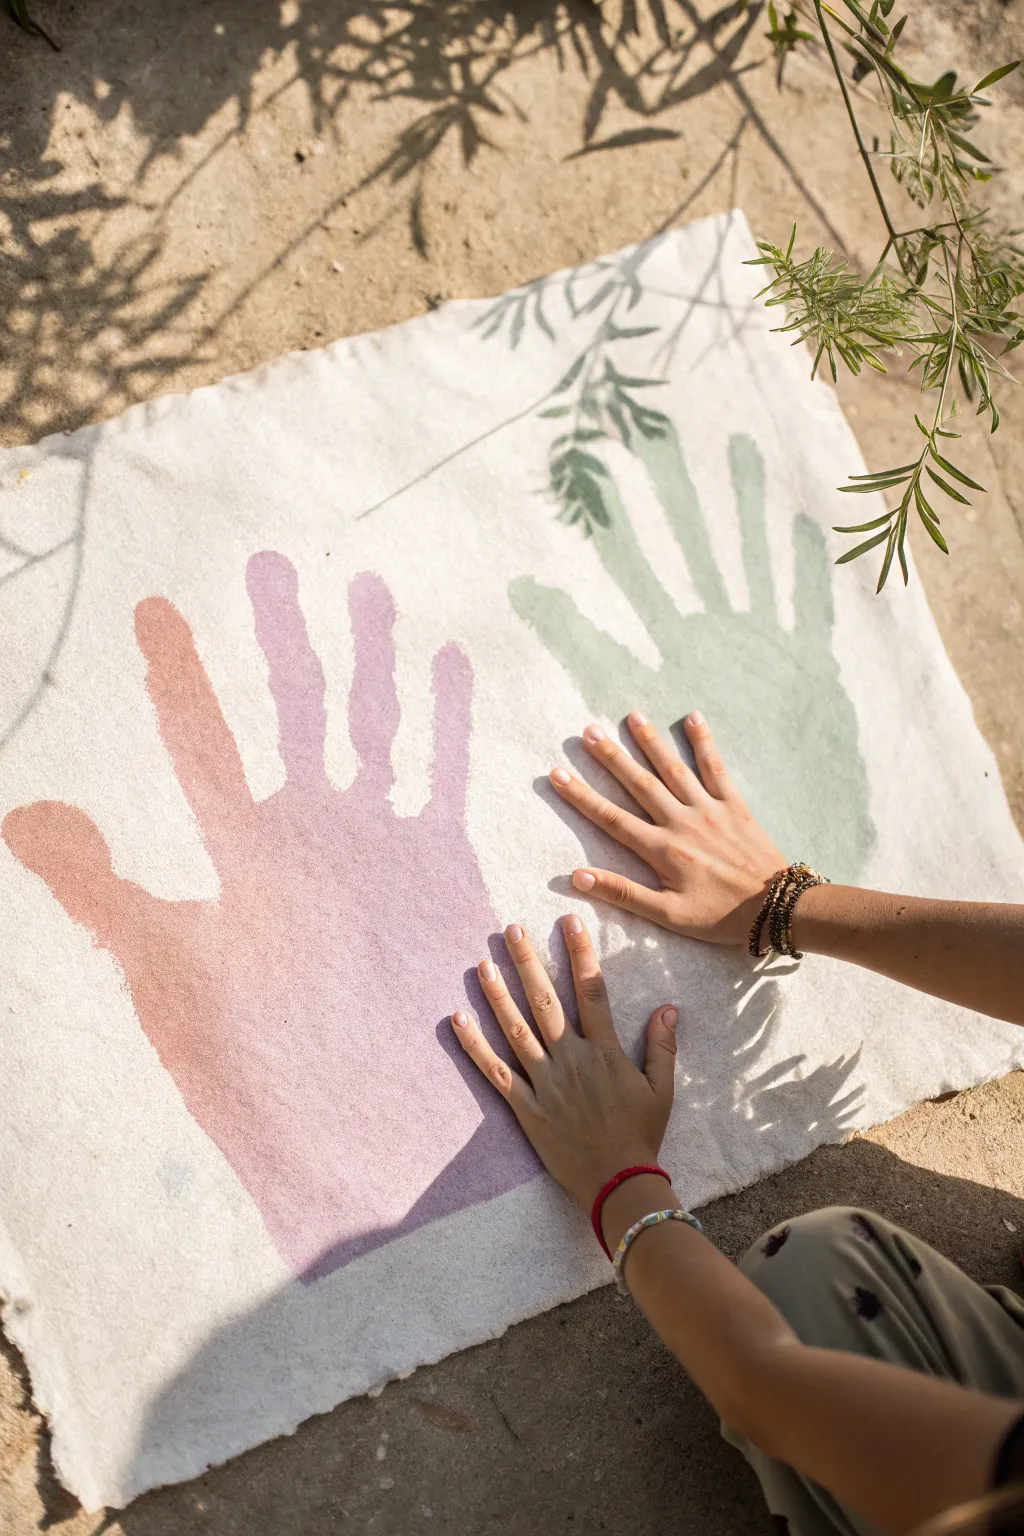
Capture the fleeting nature of hands with this delicate spray paint project that uses negative space to create soft, organic silhouettes. The dusty pink and sage green tones evoke a natural, earthy feel, perfect for a keepsake artwork on textured paper.
Step-by-Step
Materials
- Thick, handmade or raw-edge paper (approx. 18×24 inches)
- Spray paint in Matte Dusty Pink
- Spray paint in Matte Sage Green
- Heavy cardboard or cardstock (for making the stencil)
- Pencil
- Scissors or craft knife
- Masking tape or painter’s tape
- Old newspapers or a drop cloth
- Small weights (e.g., stones or coins)
Step 1: Creating the Hand Stencils
-
Trace the hand:
Begin by placing your hand (or your subject’s hand) firmly on a piece of cardstock or sturdy cardboard. Spread the fingers out wide to create a distinct, recognizable shape. -
Outline carefully:
Using a pencil, trace around the entire hand. Keep the pencil vertical to get an accurate size, rather than angling it inward. -
Refine the shape:
Lift the hand and clean up any jagged lines in your drawing, extending the wrist section down slightly to give the shape a solid base. -
Cut out the negative space:
This is crucial: you want to create a ‘female’ stencil, meaning you cut the hand shape OUT of the cardboard and discard the hand cutout itself. You will be spraying onto the paper through this hole. -
Prepare the stencil edge:
Leave plenty of cardboard border around the hand cutout (at least 4-6 inches) to protect the surrounding area from overspray later. -
Repeat for the second hand:
Create a second stencil for the other hand. I find using a separate piece for each hand allows for better placement flexibility on the final paper.
Blurred Edges?
If paint bleeds under the stencil, use a temporary spray adhesive on the back of the cardboard. A light mist helps it stick flush to the paper without tearing it upon removal.
Step 2: Preparing the Workspace
-
Set up outside:
Since you are using spray paint, find a well-ventilated area outside. Lay down a drop cloth or old newspapers to protect the ground. -
Position the paper:
Lay your textured, raw-edge paper flat on the prepared surface. If it’s curling, weigh down the corners with small stones temporarily. -
Test placement:
Place your two cardboard stencils over the paper to decide on the composition. Angle them slightly outward to mimic a natural, relaxed gesture.
Step 3: Applying the Color
-
Secure the first stencil:
Once you are happy with the position of the left hand, weigh the cardboard down around the edges so it sits flush against the paper. Tape can damage handmade paper, so weights work best. -
Spray the pink layer:
Shake the Dusty Pink spray paint can vigorously. Hold the can about 8-10 inches away. -
Apply light coats:
Spray in short, light bursts rather than a heavy stream. Aim straight down into the cutout to keep the edges sharp. Don’t flood the paper; you want a textured, slightly speckled look. -
Lift carefully:
Wait about a minute for the paint to become tacky but not fully dry, then lift the cardboard straight up to avoid smearing the crisp edges. -
Position the second stencil:
Place the right-hand stencil on the paper. I suggest leaving a comfortable gap between the two prints so they don’t feel crowded. -
Spray the green layer:
Using the Sage Green paint, repeat the spraying process. Remember to keep the can moving slightly to avoid pooling. -
Initial drying:
Remove the second stencil carefully. Let the paper sit undisturbed for about 15-20 minutes outside until it’s dry to the touch. -
Final cure:
Move the artwork to a clean, dry indoor space to fully cure for 24 hours before framing or handling excessively.
Make It 3D
Add texture by sprinkling dry sand over the wet paint immediately after spraying. Once dry, shake off the excess for a tactile, earthy finish.
Display your new artwork flat on a table or framed without glass to let the paper’s beautiful texture shine through

PENCIL GUIDE
Understanding Pencil Grades from H to B
From first sketch to finished drawing — learn pencil grades, line control, and shading techniques.
Explore the Full Guide
High-Contrast Portrait Stencil Layers
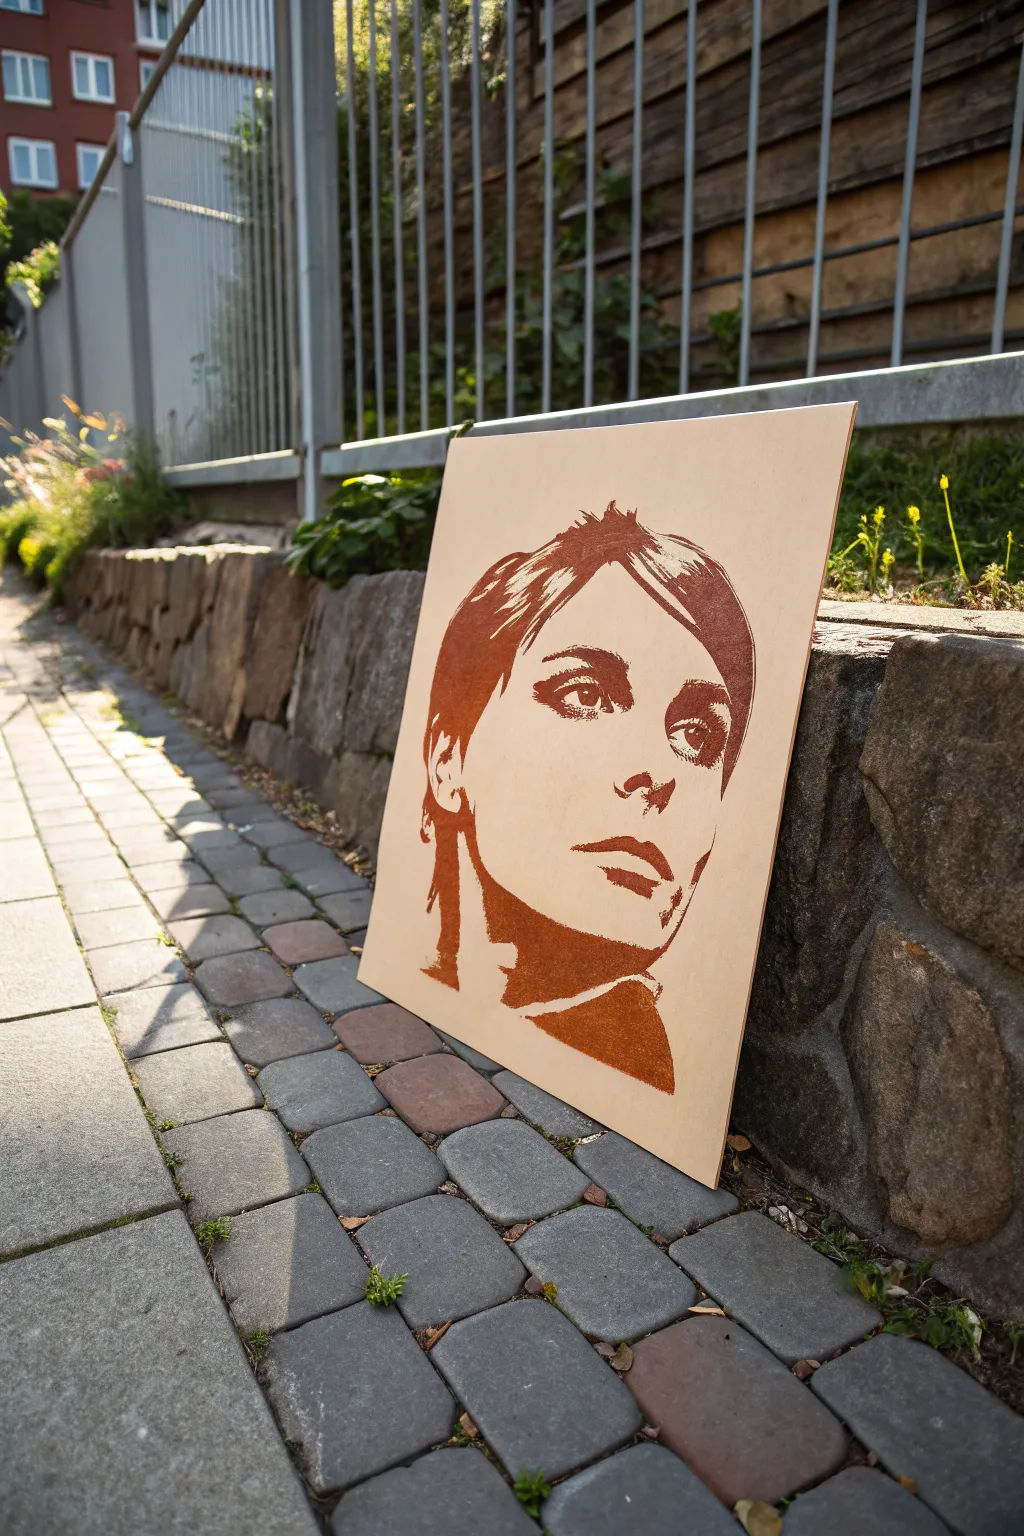
Capture the graphic elegance of a high-contrast portrait stenciled directly onto a natural wood canvas. This single-layer technique uses the wood’s own texture as a highlight, creating a warm, organic feel with deep russet or burnt sienna tones.
Step-by-Step Guide
Materials
- High-quality plywood sheet (A2 or A3 size)
- Sandpaper (220 grit)
- Tack cloth
- Digital photo editing software (Photoshop or GIMP)
- Heavy cardstock or Mylar sheets
- Craft knife or stencil cutter (Cricut/Silhouette)
- Spray adhesive (repositionable)
- Spray paint (Burnt Sienna, Rust, or Dark Brown matte)
- Painter’s tape
- Cardboard scraps
- Clear matte varnish spray
Step 1: Preparing the Canvas
-
Select the wood:
Choose a plywood sheet with a smooth, subtle grain. Birch or maple plywood works beautifully as it doesn’t have intricate knots that might interfere with facial features. -
Sand the surface:
Sand the entire face of the board with 220-grit sandpaper. You want it ultra-smooth so the stencil sits perfectly flat, preventing paint bleed. -
Clean the dust:
Wipe the board thoroughly with a tack cloth to remove every speck of sawdust. Any debris left behind will create bumps under your paint.
Step 2: Creating the Stencil Design
-
Choose the photo:
Select a portrait with strong lighting. Side lighting works best because it creates distinct shadows and highlights. -
Convert to threshold:
Open your image in editing software and desaturate it to black and white. Apply a ‘Threshold’ adjustment to reduce the image to strictly black and white pixels, eliminating grays. -
Clean up islands:
Zoom in and manually connect any ‘floating islands’ of white space to the main white areas using a bridge technique. This prevents pieces of the stencil from falling out when cut. -
Simplify the noise:
Erase tiny speckles or overly complex hair details. A cleaner, blockier shape creates a stronger visual impact when spray painted.
Bridge the Gap
When designing floating ‘islands’ (like the white of an eye), use a sharpie on your screen to visualize where connecting bridges should go before cutting material.
Step 3: Cutting and Masking
-
Cut the stencil:
Transfer your design to heavy cardstock or Mylar. If cutting by hand, use a fresh blade for every few inches of cutting to ensure crisp edges on the detailed eyes and hair. -
Apply adhesive:
Flip the stencil over and apply a light, even mist of repositionable spray adhesive. Let it sit for 60 seconds until it feels tacky, not wet. -
Position the stencil:
Center the stencil on your wooden board. Press down firmly, paying special attention to the thin bridges around the eyes and mouth to ensure they make full contact. -
Mask the perimeter:
Use painter’s tape and scrap cardboard to cover any exposed wood outside the stencil area. Overspray is the enemy here.
Paint Bleeding?
If edge crispness is poor, you sprayed too heavily. Use ‘dust coats’ that dry instantly. Heavy wet paint will always seep under mask edges via capillary action.
Step 4: Painting and Finishing
-
First pass:
Shake your burnt sienna/rust spray can for a full minute. Hold the can 10-12 inches away and apply an extremely light ‘dusting’ coat. You should still see wood through the paint. -
Build intensity:
After adhering to a 5-minute dry time, apply a second light coat. I prefer to spray in short bursts rather than long sweeps to control the accumulation. -
Final darkening:
Apply a third coat only if needed to make the darks truly opaque. The goal is a sharp, flat color without creating a thick, glossy ridge of paint. -
Remove the stencil:
Wait until the paint is dry to the touch (about 20 minutes). Carefully peel the stencil away at a sharp angle to keep the edges crisp. -
Pick out details:
If any tiny islands of stencil material got stuck in the paint (common in hair details), use the tip of a craft knife to gently lift them off. -
Seal the work:
Once fully cured (24 hours), spray a thin coat of clear matte varnish over the whole board to protect the paint and bring out the wood’s natural warmth.
Prop your finished board against a wall or mount it to add a sophisticated, modern touch to your space
Paper-Cut Collage Under Spray Paint
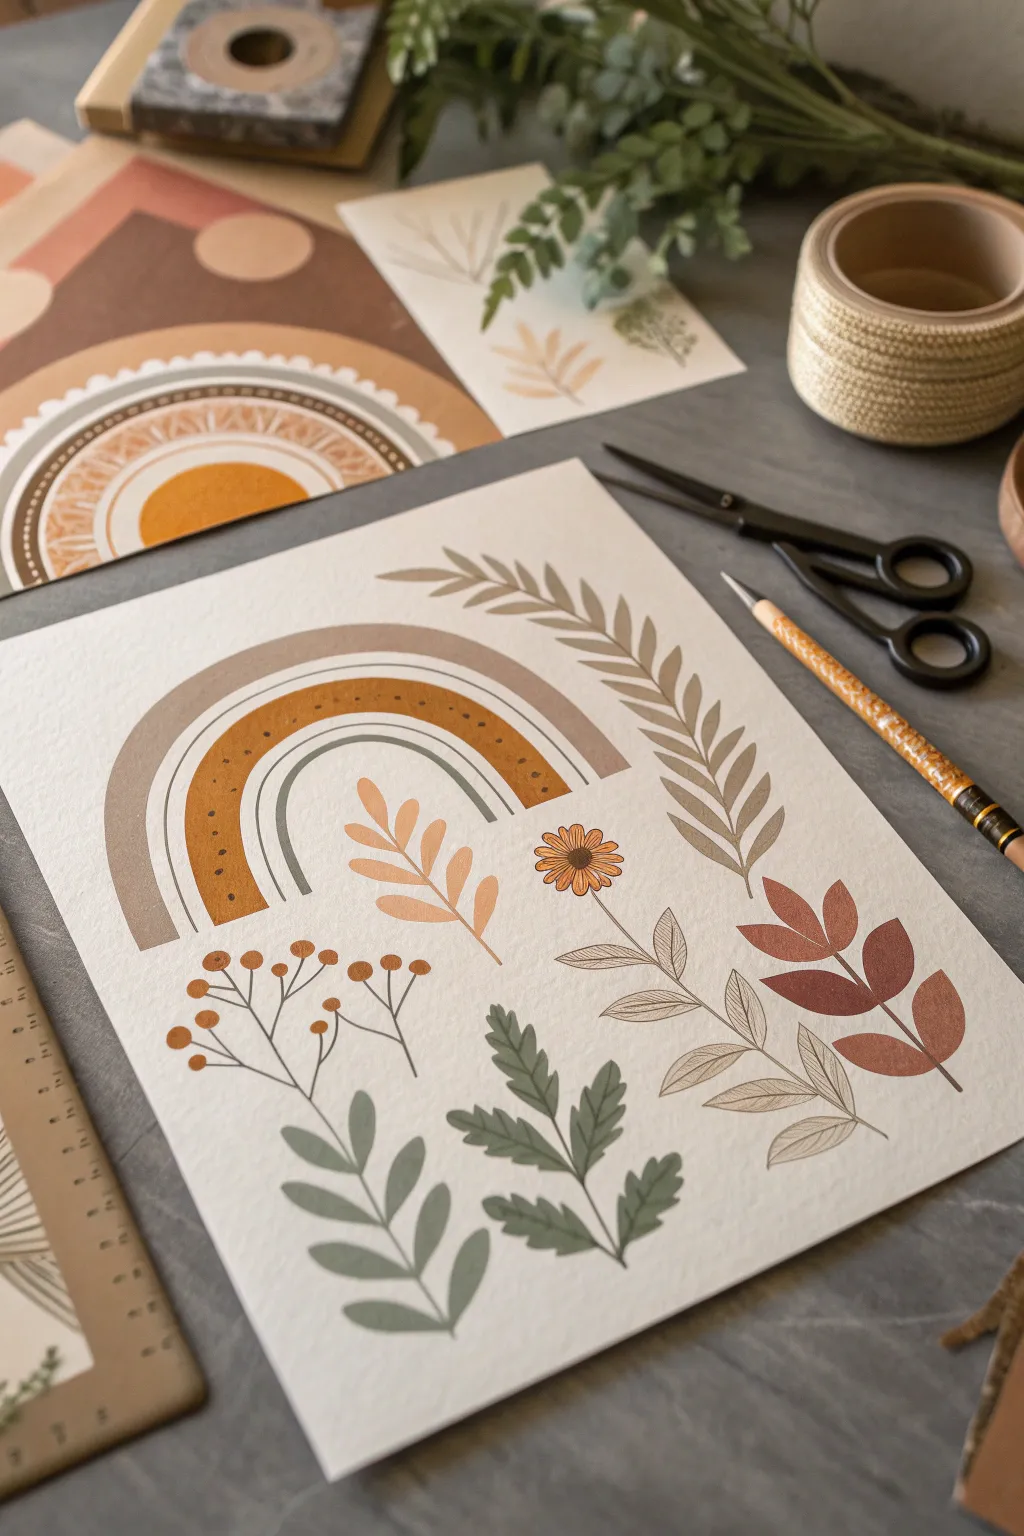
Create a stunning, earthy art print using a clever reverse-stencil technique that mimics the look of high-end collage. This project combines warm, natural tones with crisp botanical silhouettes for a trendy wall art piece.
Step-by-Step
Materials
- Heavyweight textured art paper (white or cream)
- Cardstock or acetate sheets for stencils
- Spray paints (terracotta, beige, sage green, mustard yellow, brown)
- Low-tack masking tape or painter’s tape
- X-Acto knife or craft scalpel
- Cutting mat
- Pencil
- Fine-tip black illustration pen (0.3mm or 0.5mm)
- Newsprint or cardboard drop cloth
Step 1: Design & Stencil Creation
-
Drafting the layouts:
Begin by sketching your botanical shapes and rainbow arches on scrap paper to determine the composition. You’ll need separate shapes for the rainbow bands, a variety of leaf sprigs, and a flower head. -
Transferring to stencil material:
Once you are happy with the sizes, transfer each individual shape onto cardstock or acetate. Keep distinct elements separate; for example, the rainbow arches should be cut as individual curved strips. -
Cutting the positive shapes:
Using your X-Acto knife on a cutting mat, carefully cut out the *positive* shapes (the object itself, not the hole). For this specific technique, we are blocking out areas to keep them white or painting around them. -
Cutting the negative stencils:
For the colored botanical elements like the solid leaves and rainbow bands, cut ‘negative’ stencils (windows) in larger sheets of cardstock. This allows you to spray specific colors in isolated areas without covering the whole page.
Sticky Situation
Use repositionable spray adhesive on the back of your cardstock stencils. It holds edges tight against the paper preventing fuzzy ‘underspray’ lines.
Step 2: Layering the Rainbow
-
Positioning the outer arch:
Tape your final art paper to your work surface. Place the negative stencil for the largest, outermost rainbow arch in the upper center of the page. -
Spraying the first tone:
Lightly spray a beige or taupe color over the stencil opening. Keep the can 8-10 inches away for an even, misty coat rather than a heavy, soaking layer. -
Adding the inner color:
Once the first arch is dry to the touch, switch stencils to reveal the thick inner arch. Spray this with your mustard yellow or deep ochre paint. -
Creating the outline arches:
The thin grey lines in the rainbow aren’t sprayed; they are drawn later. However, ensure you leave enough white space between your sprayed arches to accommodate them.
Step 3: Applying Botanical Colors
-
Spraying the large leaf:
Position a leaf stencil on the right side of the paper. Use a neutral beige or light brown spray paint to create the large, curving fern-like shape. -
Adding warm accents:
Move to the bottom right. Use a stencil for the three-leaf sprig and apply a reddish-brown or terracotta spray paint. I prefer to cover surrounding areas with newsprint to catch any overspray. -
Creating the green foliage:
Stencil the fern shapes at the bottom center using a muted sage green spray paint. Apply the paint in short bursts to maintain a soft texture. -
Detailing the orange sprig:
Stencil the small branch floating in the center-left using a soft peach or light orange hue.
Clogged Nozzle?
If the spray sputters, turn the can upside down and spray until clear gas comes out. Wipe the nozzle tip with a cloth dipped in mineral spirits.
Step 4: Fine Liwork Details
-
Drawing the stems:
Once all paint is completely dry (give it at least 30 minutes), use your fine-tip black pen to draw the stems connecting the sprayed leaf shapes where necessary, particularly for the multi-colored elements. -
Sketching the wire-frame botanicals:
Freehand draw the delicate line-art plants. Create the berry sprig on the left and the veined leaves on the bottom right closer to the center. -
Adding the flower detail:
If you sprayed a yellow circle for the flower center earlier, draw the petals radiating outward now. If not, draw the entire flower freely with the pen. -
Enhancing the rainbow:
Carefully draw the thin grey or black arches in the white spaces of your rainbow. Add the tiny dots inside the yellow arch for texture. -
Final leaf veining:
Go back to the large beige leaf on the right and the sage green leaves at the bottom. Draw central veins and stems directly over the dry spray paint to define the shapes.
Frame your finished piece in natural wood to compliment the warm, earthy aesthetic you have created


Scratch-Back Line Drawing in Wet Spray
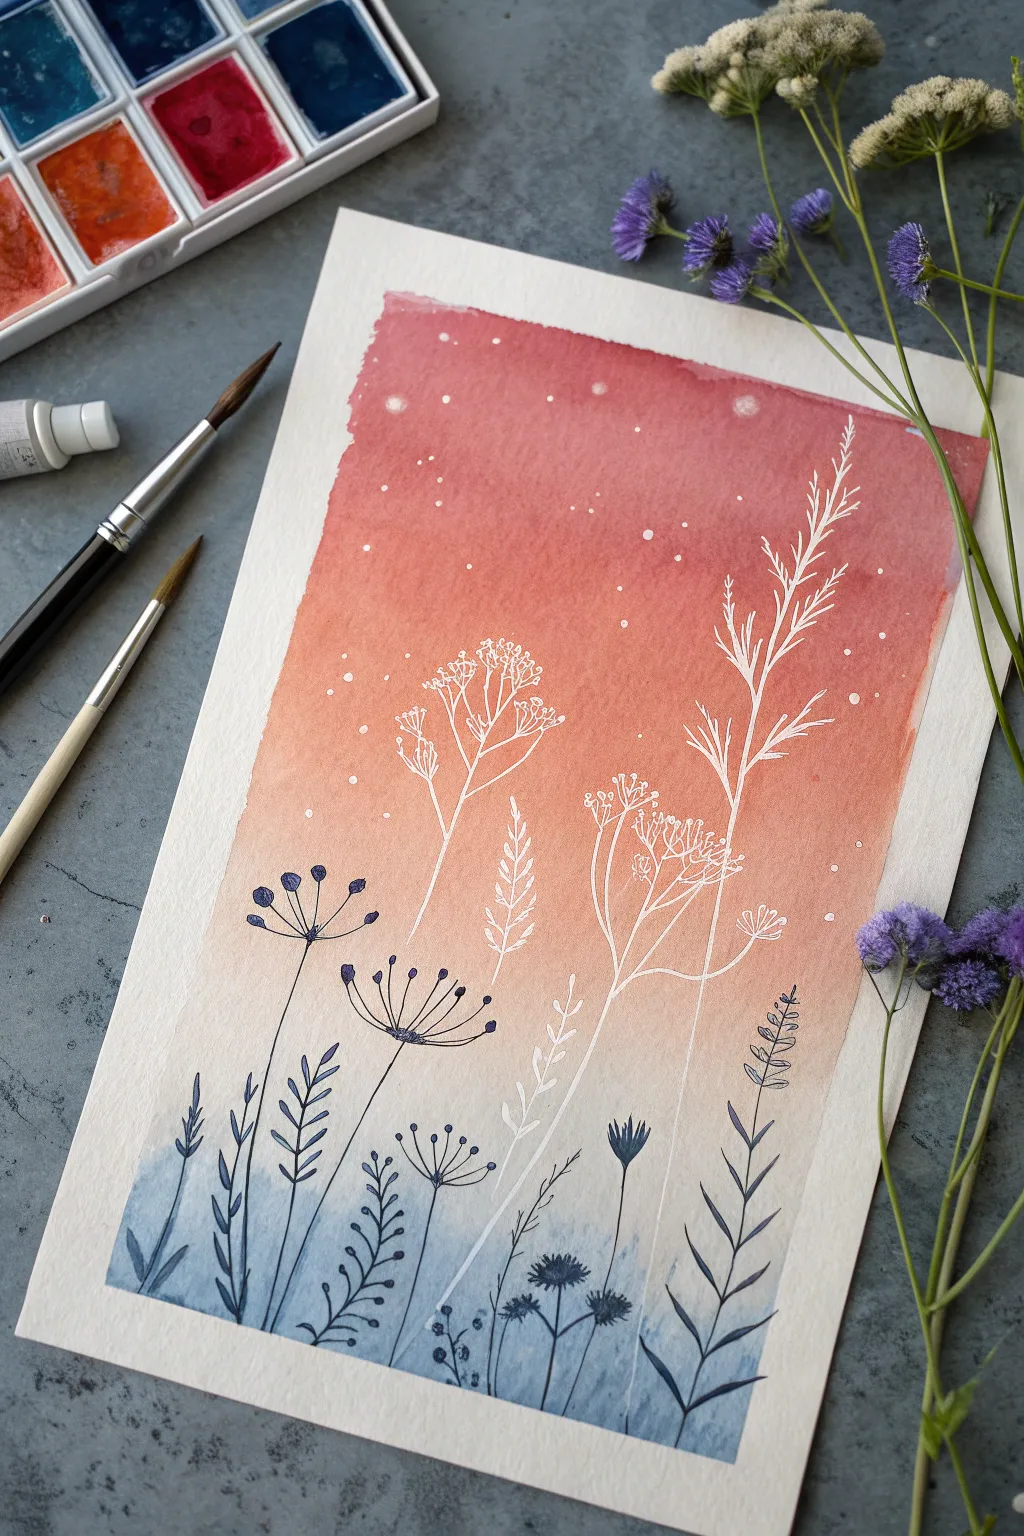
Capture the delicate beauty of wildflowers against a twilight sky using a clever resist or scratch-back technique. This project combines a warm, glowing gradient background with crisp white and dark botanical silhouettes for a striking contrast.
Step-by-Step Guide
Materials
- Heavyweight watercolor paper or mixed media paper
- Spray paints (water-based or acrylic spray recommended) in Peach, Salmon/Red, and Dusty Blue
- Masking tape or painter’s tape
- Fine-point stylus, empty ballpoint pen, or a toothpick
- Fine liner pen (Waterproof, Black or Dark Blue)
- White gel pen or fine white paint marker
- Newspaper or drop cloth (for surface protection)
Step 1: Setting the Stage
-
Prepare the Surface:
Begin by securing your paper to a flat, hard surface using masking tape. This not only holds the paper steady against the force of the spray but also creates that satisfying, crisp white border when you peel it off later. -
Establish the Horizon:
Decide where your color shift will happen. This piece features a warm sky fading into a cooler ground, so visualize a soft transition line about one-third of the way up from the bottom.
Paint drying too fast?
If the spray dries before you can scratch, mist the paper slightly with water before spraying, or just use a white gel pen over the dry paint instead.
Step 2: Creating the Atmosphere
-
Spray the Base Gradient:
Start with your peach or light orange spray paint. Hold the can about 8-10 inches away and apply a light mist across the middle and upper section of the paper. -
Clean the Nozzle:
Check the nozzle occasionally to prevent sputtering droplets, unless you want extra texture. -
Deepen the Sky:
While the first layer is still wet, introduce the salmon or reddish tone at the very top. Allow the overspray to drift down into the peach section to create a seamless blend. -
Depict the Ground:
Switch to your dusty blue spray paint. Apply this to the bottom third of the paper, letting it mist upward slightly to mingle with the peach tones, creating a soft, muddy transition that grounds the image. -
Add Texture Spots:
To mimic the starry or speckled effect seen in the reddish sky, lightly flick the nozzle or barely press the cap to release a few larger splatter droplets of the lighter peach color into the wet red paint.
Add some magic
Use a metallic silver or gold pen to add tiny highlights to the seed heads or to draw a few extra ‘stars’ in the darker sky portion.
Step 3: The Scratch-Back Technique
-
Initial Scratching:
Immediately, while the spray paint is tacky but not fully dry, use your stylus or empty ballpoint pen. Draw the stems and outlines of the larger white weeds. -
Reveal the White:
Apply firm pressure as you draw these main stalks. The tool should push the wet pigment aside or scratch into the paper’s surface slightly to reveal the white beneath. -
Refine the Negative Space:
Work quickly to add the finer branches and leaves of the white plants before the paint hardens completely.
Step 4: Detailed Line Work
-
Dry Completely:
Allow the entire background to dry fully. This is crucial; if the paint is damp, your ink pens will bleed or clog. -
Draw Dark Stems:
Using a fine black or dark blue liner pen, begin sketching the dark botanical elements. Start at the bottom blue section and pull your lines upward. -
Add Fern Details:
Draw the fern-like leaves on the bottom right. Use short, rhythmic strokes to create the leaflets extending from the main stem. -
Create Seed Heads:
For the rounder seed pods (like the dandelions), draw a central point and radiate straight lines outward, topping them with small dots or semicircles. -
Layer the Depths:
Draw some smaller, simpler grass blades at the very bottom to create a sense of density in the foreground. -
Highlight with White:
If your scratch-back lines aren’t bright enough, or if you missed a spot, trace over them now with a white gel pen to make them pop against the gradient. -
The Final Reveal:
Once all ink is dry, strictly peel the masking tape away at a 45-degree angle to reveal the clean edges.
Frame your botanical gradient to bring a touch of eternal dusk into your room


Have a question or want to share your own experience? I'd love to hear from you in the comments below!