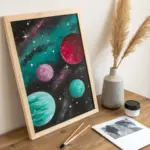
If you love big results with minimal fuss, spray paint is basically pure magic in a can. Here are my favorite spray paint ideas—from classic space scenes and crisp stencils to artsy experiments that feel like happy accidents (the good kind).
Classic Galaxy Backgrounds
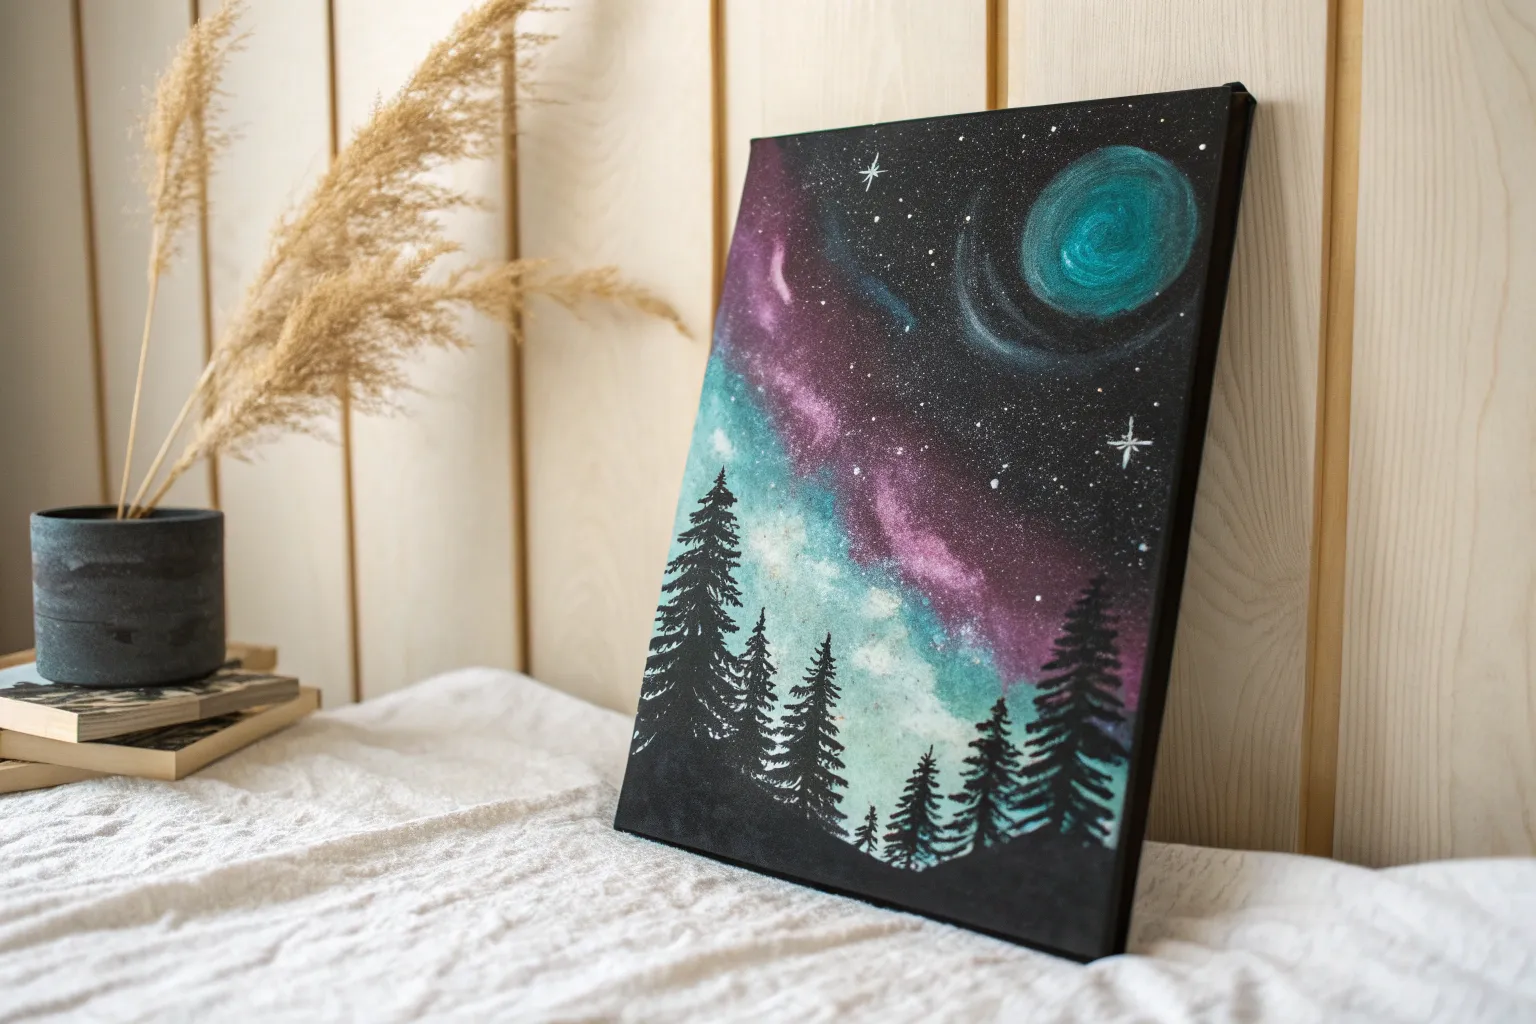
Capture the ethereal beauty of deep space with this classic galaxy spray paint technique. By layering deep blues, vibrant purples, and speckles of starlight, you’ll transform a plain canvas into a window to the cosmos.
Detailed Instructions
Materials
- Blank canvas (pre-gessoed)
- Black spray paint
- Dark blue spray paint (navy or midnight)
- Purple spray paint (violet or magenta)
- Light blue or teal spray paint
- White spray paint
- Disposable gloves
- Drop cloth or larger cardboard
- Respirator mask (for safety)
Step 1: Setting the Stage
-
Prepare your workspace:
Lay down a large drop cloth or old cardboard to protect your working surface. Spray painting gets messy, so ensure you have plenty of ventilation or work outdoors. -
Establish the darkness:
Start by spraying the entire canvas with a solid coat of black spray paint. This serves as the deep void of space and will make your colors pop later. -
Let the base set:
Allow the black base coat to dry for about 5-10 minutes. It doesn’t need to be fully cured, just tacky enough that the next layers sit on top rather than mixing into a grey mud.
Starry Precision
Instead of flicking fingers, spray white paint onto a toothbrush and run your thumb over the bristles for ultra-fine, controlled star speckles.
Step 2: Layering the Galaxy
-
Add deep blue nebulas:
Using your dark blue spray paint, spray random patches across the canvas. Focus particularly on the corners and edges, leaving some of the black background visible. -
Soften the edges:
While the paint is wet, vary your spray distance. Holding the can closer creates dense color, while pulling back creates a soft, misty fade. -
Introduce the purple:
Spray the purple paint in a diagonal streak across the canvas, overlapping slightly with the blue. This creates color complexity and suggests the shape of a nebula cloud. -
Highlight with light blue:
Take your light blue or teal paint and apply it sparingly in the center of your purple streak. This acts as the glowing heart of the galaxy. -
Blend wet-on-wet:
Since spray paint dries fast, work quickly. If colors aren’t blending well, give a quick ‘puff’ of clear coat or a tiny spritz of the darker color over the transition zones to soften harsh lines.
Planet Addition
Before painting the background, place circular lids on the white canvas. Paint over them, then remove at the end to reveal crisp white planet silhouettes.
Step 3: Creating Stars
-
Prepare for the stars:
Put on a fresh glove if your current one is covered in paint. Shake your white spray paint can vigorously. -
The finger-spritz technique:
Spray a small puddle of white paint onto a scrap piece of cardboard or directly onto your gloved fingertips. -
Flick the stars:
Immediately flick your fingers toward the canvas. The paint will fly off in tiny droplets, creating a random star field. -
Create distant stars:
For a finer mist of stars, I usually spray the white paint into the air above the canvas (not directly at it) and let the mist settle naturally onto the tacky surface. -
Add a major star:
To create a larger, brighter star, hold the white spray can incredibly close to one spot and give a tiny, quick burst. -
Final drying:
Let the entire piece dry completely in a dust-free area for at least 24 hours before moving or framing it.
Hang your new galaxy on the wall and enjoy the view of deep space without leaving your home


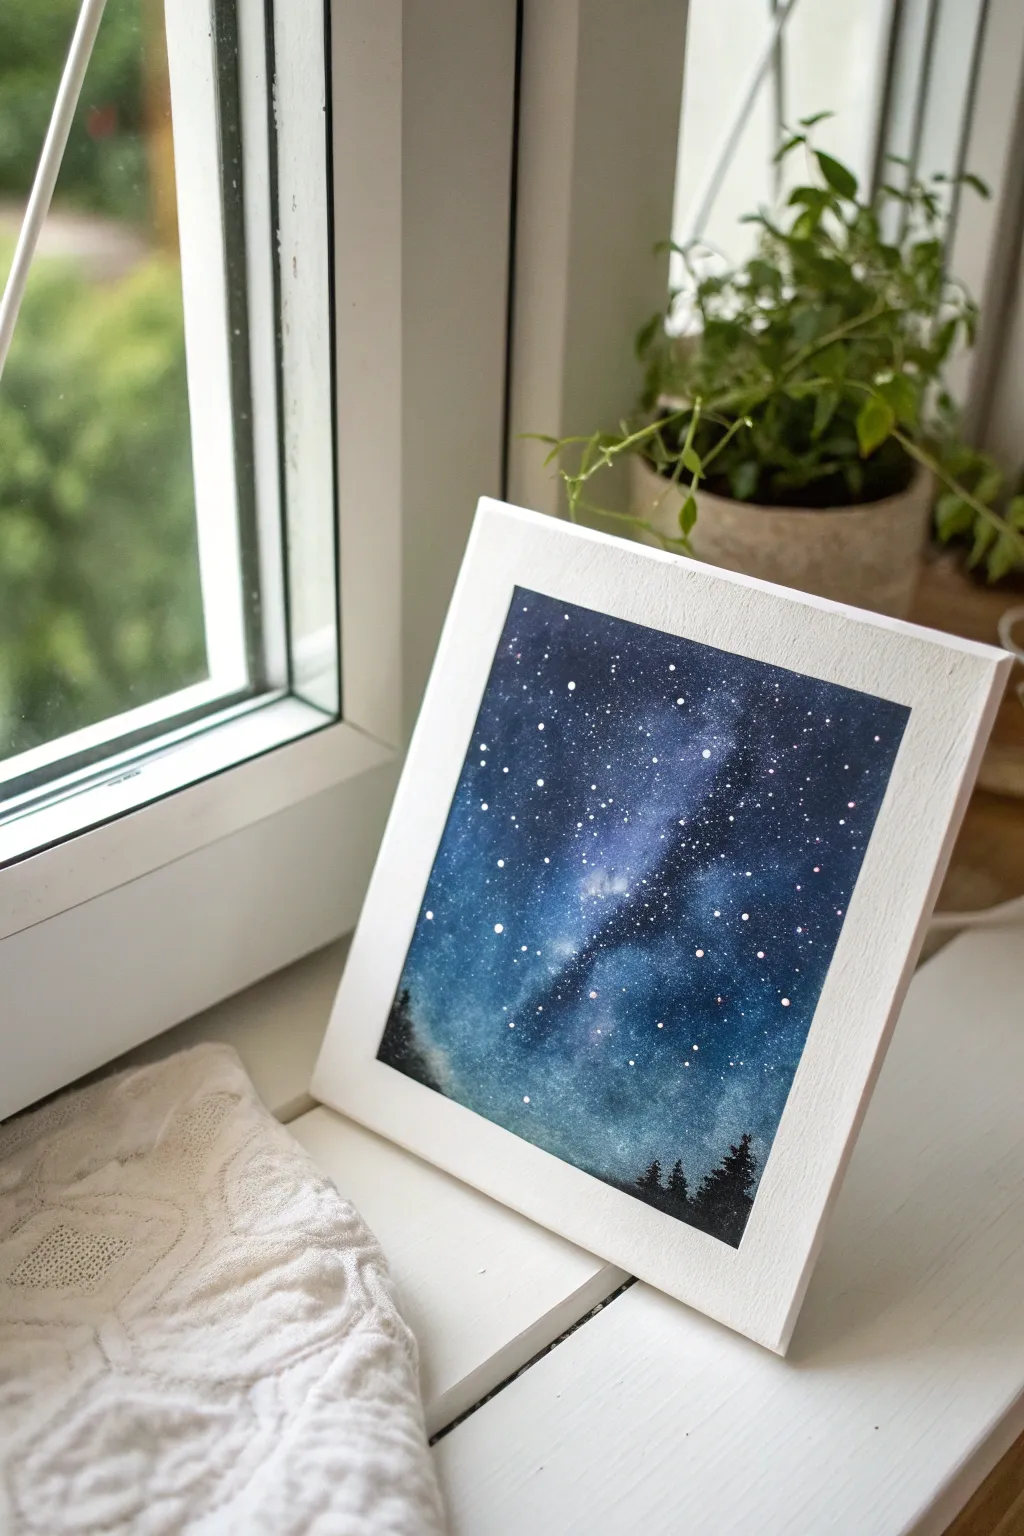
Easy Planet Paintings With Circular Masks
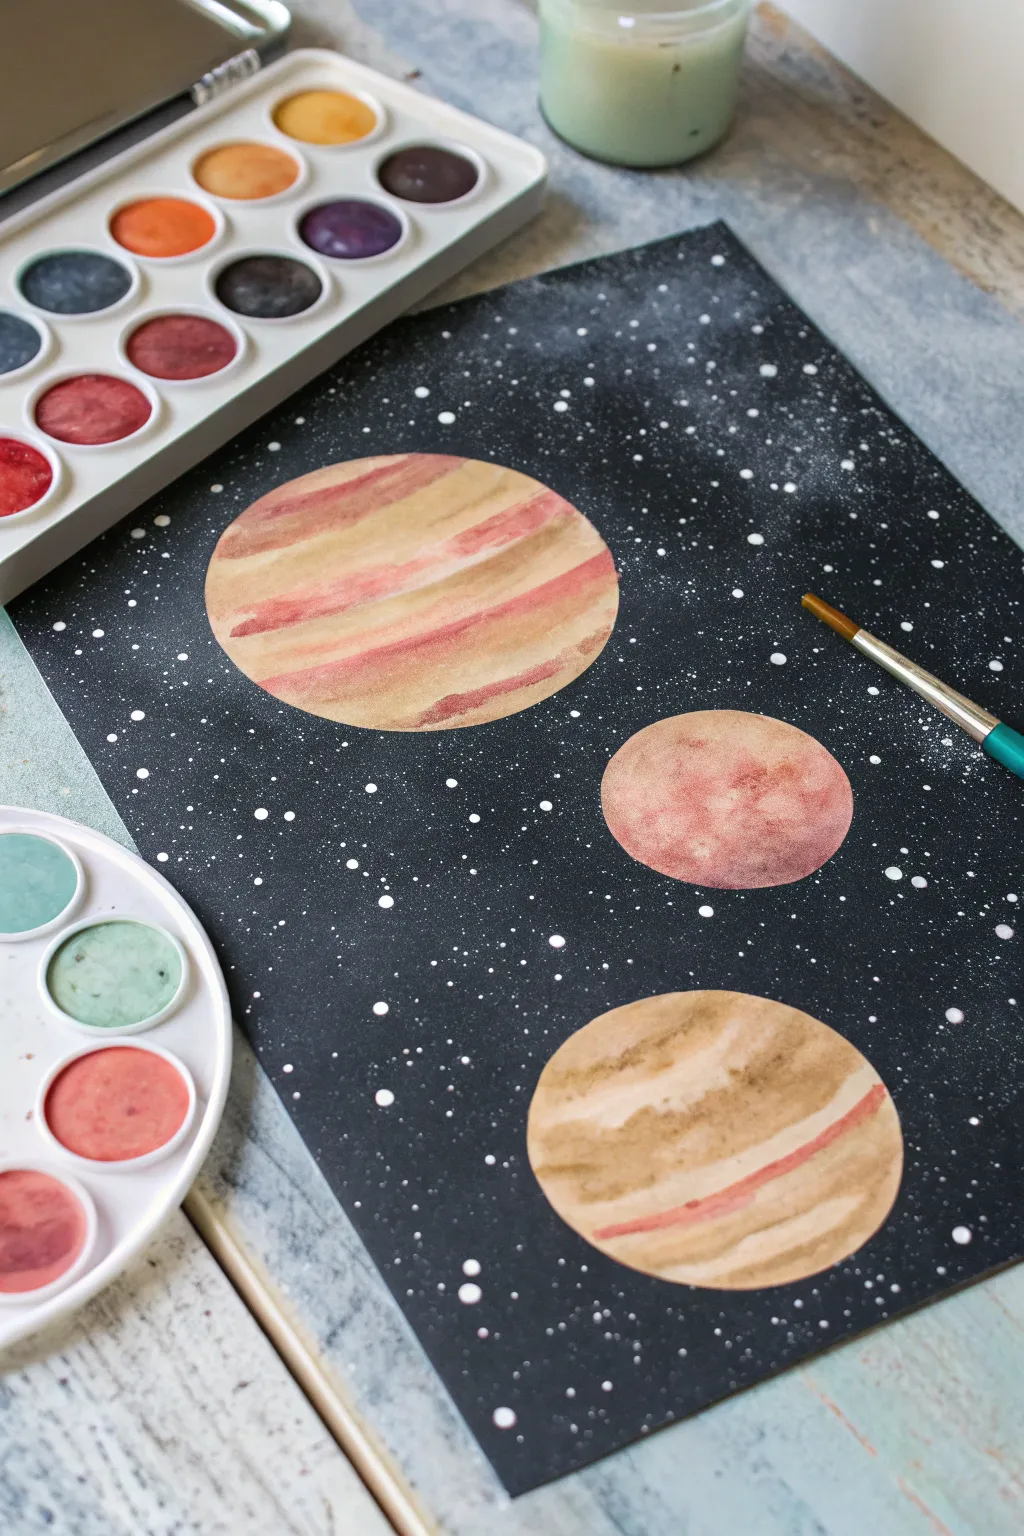
Create a stunning cosmic scene using negative space and watercolor textures to bring three distinct planets to life against a deep, starry backdrop. This mixed-media approach uses simple masking techniques to achieve crisp edges and creates a vibrant contrast against black cardstock.
Step-by-Step
Materials
- Black watercolor paper or heavy cardstock
- Watercolor paints (pan set recommended)
- Round watercolor brush (size 6 or 8)
- White acrylic paint or opaque white ink
- Old toothbrush or bristle brush
- Circular masks (adhesive paper, masking tape cut into circles, or round stickers)
- Small spray bottle with water (optional)
- Water jar
Step 1: Setting the Stage
-
Prepare the surface:
Lay down your sheet of black watercolor paper or heavy cardstock on a protected surface. Ensure the paper is clean and free of dust. -
Create the masks:
Cut out three circles from adhesive paper or masking tape. Make one large circle (Jupiter-esque), one medium circle, and one slightly smaller one to create variety in your planetary system. -
Plan the composition:
Arrange the circular masks on the black paper without sticking them down first to find a pleasing balance. A diagonal arrangement often looks dynamic. -
Apply the masks:
Once satisfied with the placement, firmly press the sticker masks onto the black paper. Rub the edges specifically to ensure a tight seal so paint doesn’t bleed underneath later.
Clean Edges Trick
If you don’t have sticker paper, trace a cup onto painter’s tape strips layered slightly overlapping on a cutting mat, then cut out the circle.
Step 2: Creating the Starfield
-
Prepare the splatter mix:
Dilute a small amount of white acrylic paint or white ink with water in a separate dish until it has a milky consistency. -
Load the brush:
Dip an old toothbrush or a stiff bristle brush into the diluted white mixture. -
Spray the stars:
Hold the brush over the black paper and run your thumb across the bristles to flick tiny droplets across the entire surface. This creates the distant star field. -
Vary the density:
Concentrate some splatters in specific areas to mimic the look of the Milky Way or dense star clusters. -
Let it dry completely:
Allow the white splatters to dry fully. This is crucial; if you touch wet acrylic, it will smear. Wait at least 15-20 minutes.
Step 3: Painting the Planets
-
Remove the masks:
Carefully peel away the three circular masks to reveal pristine black circles amidst the starry background. -
Mix the base colors:
Activate your watercolor paints with a little water. For the largest planet, mix sandy beiges and light browns. -
Paint the first layer (Large Planet):
Fill the large circle with a wash of the beige color. While it is still wet, add horizontal stripes of reddish-brown to create a gas giant effect. -
Add wet-on-wet details:
Drop in touch of darker brown or burnt sienna while the paint is damp to soften the edges of the stripes. -
Paint the medium planet:
For the middle-sized planet, use a reddish or terracotta wash. Allow the pigments to pool slightly to create a cratered, textured appearance. -
Paint the bottom planet:
For the lowest planet, replicate the striped look of the first one but vary the angle slightly. Use muted browns and a distinct coral or pinkish stripe for visual interest. -
Refine edges:
Use the tip of your round brush to carefully neaten the circular edges of each planet, ensuring they look perfectly round against the black background. -
Dry and flatten:
Let the watercolor paint dry completely. If the paper has buckled slightly from moisture, place the artwork under a heavy book overnight once it is bone dry.
Solar System Sparkle
Mix a tiny pinch of metallic watercolor or gold ink into your planet colors to give the celestial bodies a subtle, shimmering glow.
Display your finished galaxy piece in a simple frame to let the vibrant planets pop against the dark void of space

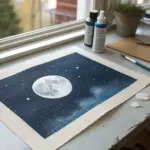
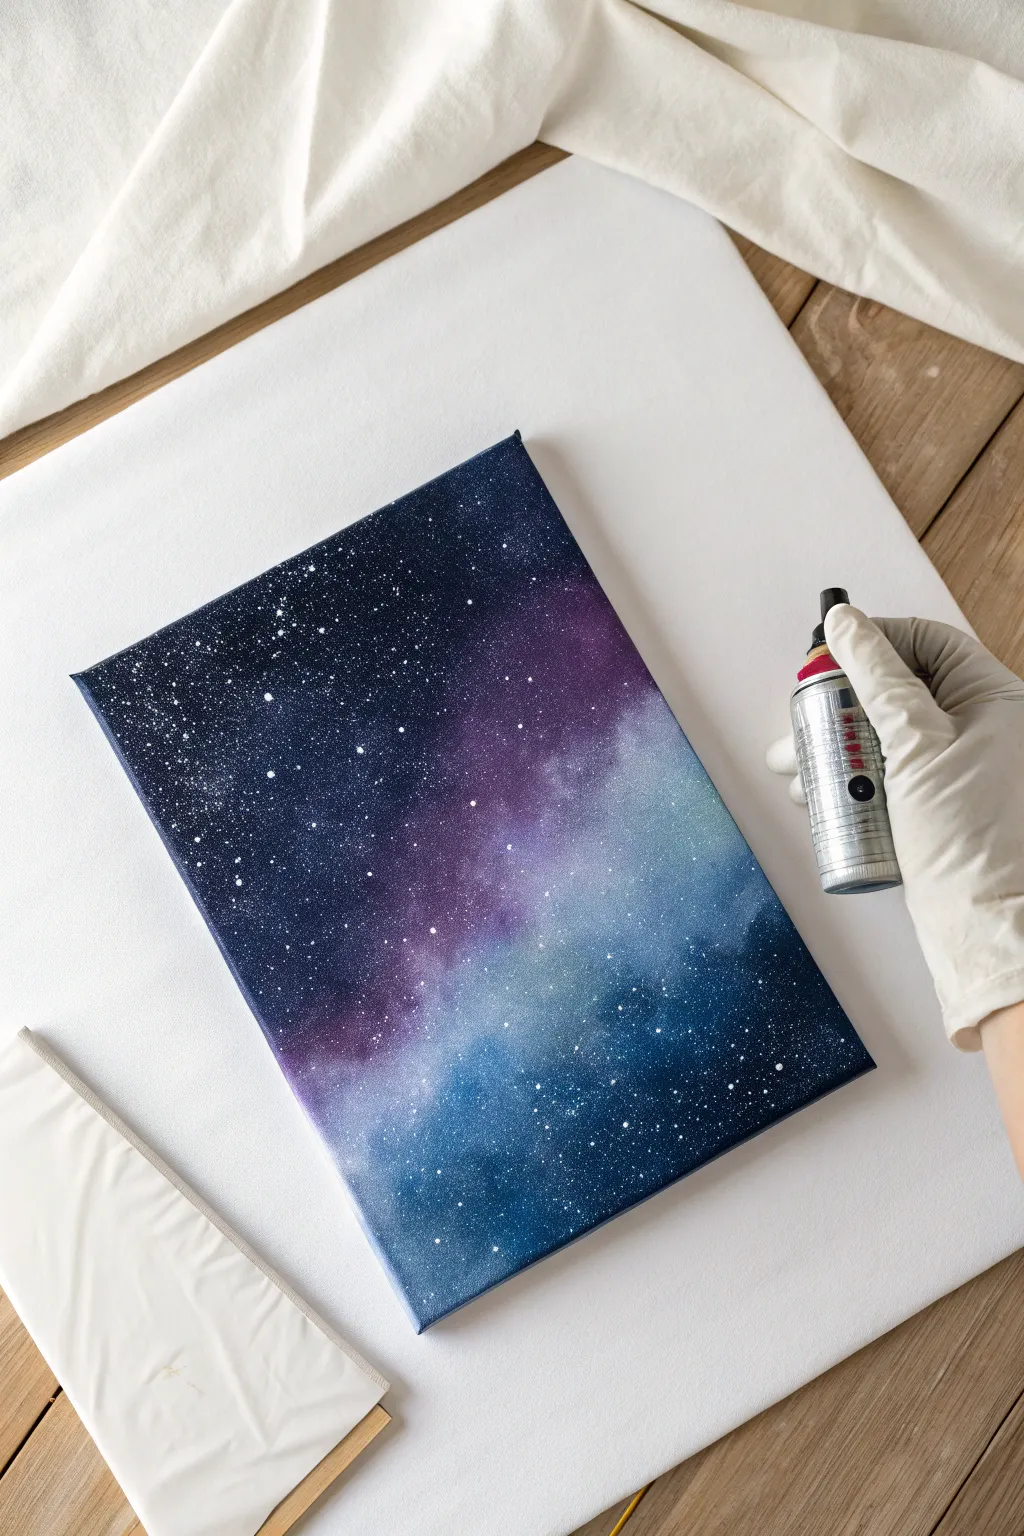
Star Speckle And Mist Effects
Capture the ethereal beauty of a starry night with this deep-space galaxy painting. Using simple spray techniques, you’ll create a layered, misty Milky Way effect that looks professionally done.
Detailed Instructions
Materials
- Square canvas board or heavy watercolor paper (e.g., 6×6 inches)
- Wide masking tape or painter’s tape
- Acrylic paints: Black, Prussian Blue, Violet, Titanium White
- Spray bottle with water (fine mist)
- Old toothbrush or stiff bristle brush
- Soft blending sponge or synthetic sponge
- Small round brush (size 0 or 1)
- Hairdryer (optional, for speed drying)
- Paper towels
- Palette or mixing plate
Step 1: Setting the Stage
-
Prepare your borders:
Begin by taping down your paper or canvas board to a flat surface. Create a clean white border by placing tape evenly along all four edges; press down firmly to prevent paint seepage. -
Lay the foundation:
Squeeze out a generous amount of black and Prussian Blue acrylic paint. Using a slightly damp sponge, dab the black paint around the outer corners and edges of the square, leaving the center empty. -
Create the mid-tones:
Take a clean side of your sponge and pick up the Prussian Blue. Blend this inward from the black edges towards the center, overlapping slightly with the black to create a smooth, dark transition.
Step 2: Building the Galaxy
-
Add vascular depth:
Mix a small amount of Violet with a touch of white to create a soft lavender. Lightly sponge this into the center area, blending it outward into the blue for a glowing nebula effect. -
Enhance the milky way:
While the paint is still tacky, take a tiny bit of Titanium White on a sponge. Dab it very sporadically through the lavender center in a diagonal swoosh pattern to suggest the Milky Way’s core. -
Mist for atmosphere:
This is where the magic happens. While the paint is still wet, spritz a fine mist of water over the white and lavender areas from about 12 inches away. Let the pigments bleed slightly to soften harsh sponge marks. -
Deepen the contrast:
I like to go back in with pure black on the very edges while the center is drying. This re-establishes the deep space look that might have faded during blending. -
Dry partially:
Allow the background to dry completely. If you are impatient, use a hairdryer on a low, cool setting to speed this up, but ensure the paper doesn’t buckle.
Starry precision
For ultra-fine mist stars without big blobs, point the toothbrush bristles upward and strike the handle against a stick, rather than using your thumb.
Step 3: Stars and Silhouette
-
Prepare the star paint:
Dilute a small dollop of Titanium White acrylic paint with water until it reaches a fluid, ink-like consistency. It should be thin enough to splatter but opaque enough to show up against the black. -
The toothbrush technique:
Dip an old toothbrush into your thinned white paint. Test it on a scrap paper first by running your thumb over the bristles. -
Create the starfield:
Hold the toothbrush over your painting and flick the bristles to create a spray of fine white speckles. Concentrate more stars along the lighter diagonal Milky Way line. -
Add major stars:
Dip the handle end of a paintbrush or a fine detailing brush into undiluted white paint. Dot a few larger, brighter stars randomly across the sky to create depth and variety. -
Paint the horizon line:
With black paint and a small round brush, paint an uneven, jagged line across the very bottom of the painting to establish the ground. -
Detail the trees:
Using the tip of your small brush, dab tiny upward strokes along the horizon line to create the silhouette of pine trees. Make them different heights for realism. -
Final drying time:
Let the entire piece dry completely. Ensure the thickest dots of white paint are solid before touching anything. -
The reveal:
Slowly and carefully peel away the masking tape at a 45-degree angle, pulling away from the center of the artwork to reveal crisp, clean white borders.
Glow in the dark
Mix phosphorescent medium into your white star paint. The artwork will look normal by day but reveal a hidden glowing galaxy when the lights go out.
Place your finished cosmic scene near a window or on a shelf to admire your handiwork


Silhouette Skylines Over Color Bursts
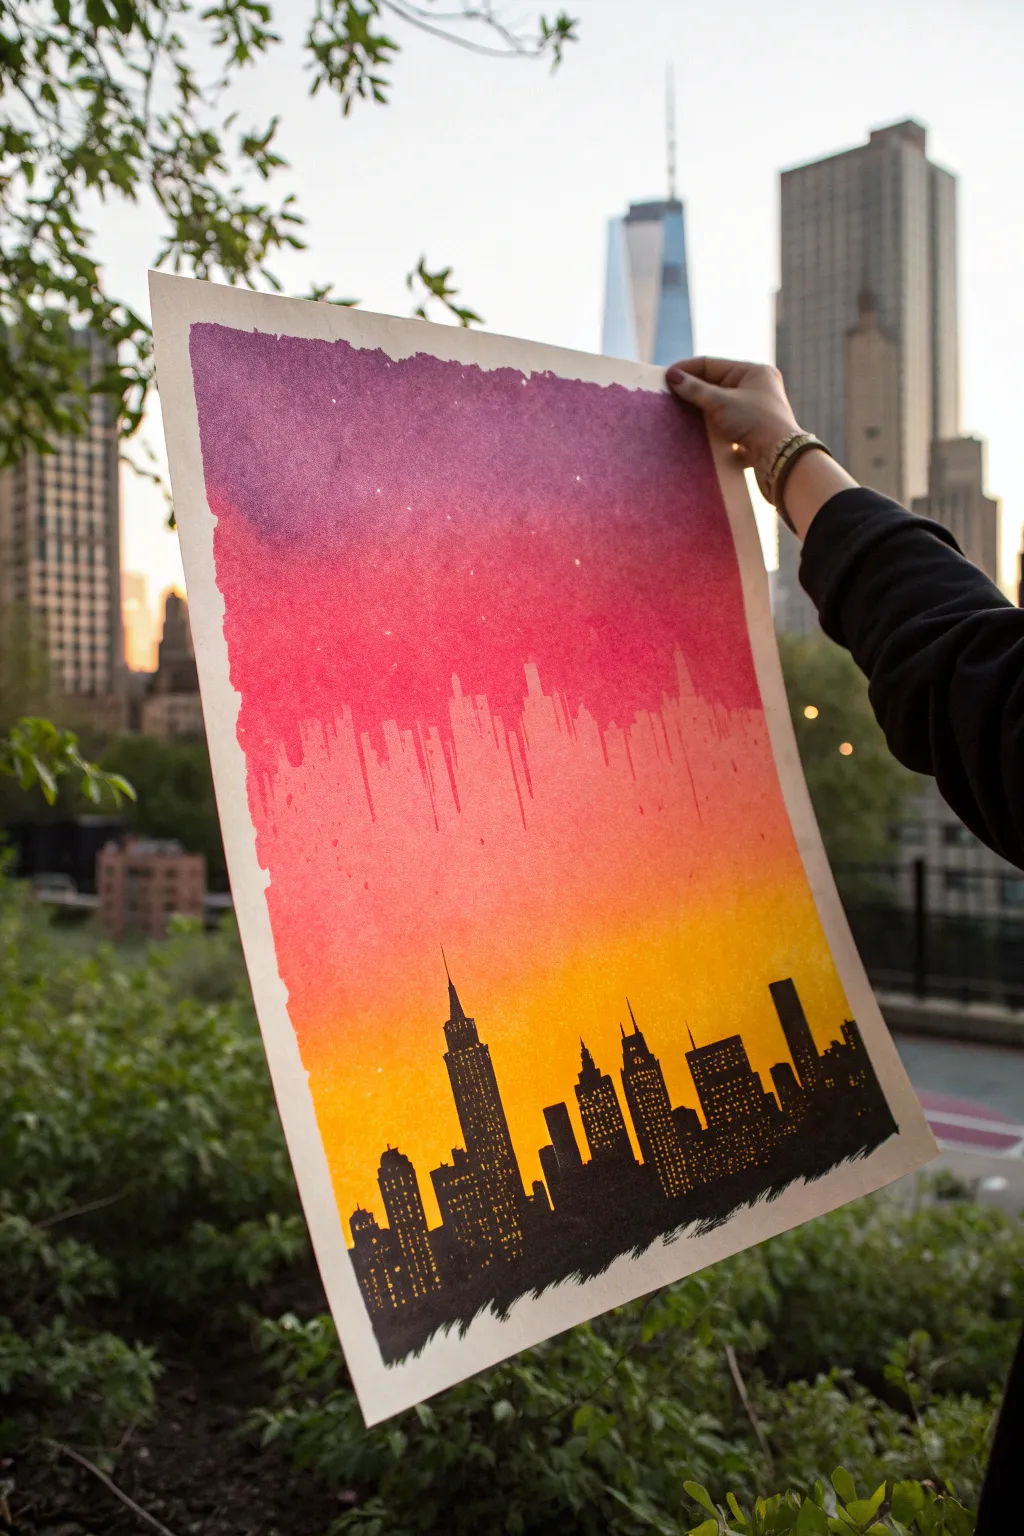
Capture the electric energy of the city at dusk with this vibrant gradient silhouette project. By combining bold spray paint bursts with crisp stencil work, you’ll create a glowing urban horizon that pops against a dreamy sunset sky.
Step-by-Step
Materials
- Heavyweight watercolor paper or mixed media cardstock (large format)
- Spray paints (purple, hot pink, orange, school bus yellow)
- Black acrylic paint
- Fine detail paintbrush (size 0 or 1)
- Medium flat paintbrush
- Painter’s tape or stencil adhesive
- Craft knife (X-Acto)
- Cutting mat
- Cardboard or drop cloth
- Pencil and ruler
- Reference photo of a skyline (NYC used here)
Step 1: Creating the Sunset Gradient
-
Prepare your workspace:
Set up in a well-ventilated area, preferably outdoors. Lay down a large piece of cardboard or a drop cloth to protect your surrounding surfaces from overspray. -
Secure the paper:
Tape your watercolor paper down to the cardboard backing. If you want a clean white border like in the photo, tape all four edges carefully; otherwise, just secure the back with rolled tape. -
Start with purple:
Shake your cans thoroughly. Begin at the very top of the paper with the purple spray paint. Hold the can about 8-10 inches away and use sweeping horizontal motions to cover the top third. -
Blend in the pink:
While the purple is still tacky, spray the hot pink directly below it. Aim slightly upward into the purple zone to create a soft, misty transition between the two colors. -
Drip technique (Optional):
If you want the subtle vertical drip effect seen in the mid-section, hold the can closer for a moment to let paint pool slightly, or tilt the board up so gravity pulls thin rivulets of pink down into the next section. -
Add the orange glow:
Continue downward with your orange spray paint. Overlap it with the bottom edge of the pink, ensuring the transition looks like a natural sunset gradient rather than distinct stripes. -
Finish with yellow:
Spray the bottom third of the paper with bright yellow. This will serve as the glowing backdrop behind the buildings and will also be the color of the lit windows later. -
Dry thoroughly:
Let the entire gradient dry completely. This is crucial—if the paint is wet, your stencil or masking tape will ruin the surface. I usually give it at least an hour.
Uneven Gradients?
If your color transitions look like stripes, lightly mist clear coat spray or transparent blender over the wet paint boundary to encourage the hues to bleed together softly.
Step 2: Building the Silhouette
-
Draft the skyline:
Lightly sketch your skyline design along the bottom third of the paper using a pencil. You can freestyle this or loosely trace a printed reference photo of a city like New York. -
Paint the base black:
Using your medium flat brush and black acrylic paint, fill in the large solid areas of the buildings. Start from the bottom edge and work your way up toward the rooflines. -
Define the spires:
Switch to a smaller brush to carefully paint the iconic tops of skyscrapers, antennas, and varying roof heights. Keep your edges crisp to maintain the silhouette effect. -
Texture the bottom:
For the very bottom edge where the buildings meet the ground (or frame), use a dry brush technique to create a rough, textured fade-out rather than a perfect line.
Window Wizardry
Instead of painting hundreds of tiny squares, use a piece of stiff mesh or tulle screen as a stencil. Sponge black paint over it to instantly create a grid of ‘lit’ windows.
Step 3: Illuminating the City
-
Plan the lights:
Visualize where the windows should be. Skyscrapers usually have grid-like patterns. You aren’t painting yellow on top; you are scratching black paint away or painting around the yellow base. -
Technique A: Negative space:
The best way to get those glowing windows is to remember the yellow spray paint base layer. If your black acrylic is thin enough, you can sometimes adhere tiny bits of tape before painting black, then peel them to reveal yellow. -
Technique B: Painting lights:
If you defined the black shape solidly first, simply mix a tiny amount of yellow acrylic with white (for opacity) and use your finest detail brush to dot in rows of windows. -
Scratch method:
Create texture on the darker buildings by gently scratching through the dry black acrylic with a craft knife tip to reveal the yellow spray paint underneath slightly. -
Final touches:
Add small red or white dots for radio tower lights if desired, and perform any touch-ups on the black silhouette to ensure it is opaque against the bright background. -
Remove tape:
Once everything is fully dry, slowly peel away your border tape at a 45-degree angle to reveal clear, crisp edges.
Hang your masterpiece on the wall and enjoy the view of a city that never sleeps
BRUSH GUIDE
The Right Brush for Every Stroke
From clean lines to bold texture — master brush choice, stroke control, and essential techniques.
Explore the Full Guide
Mountain Silhouettes With Layered Depth
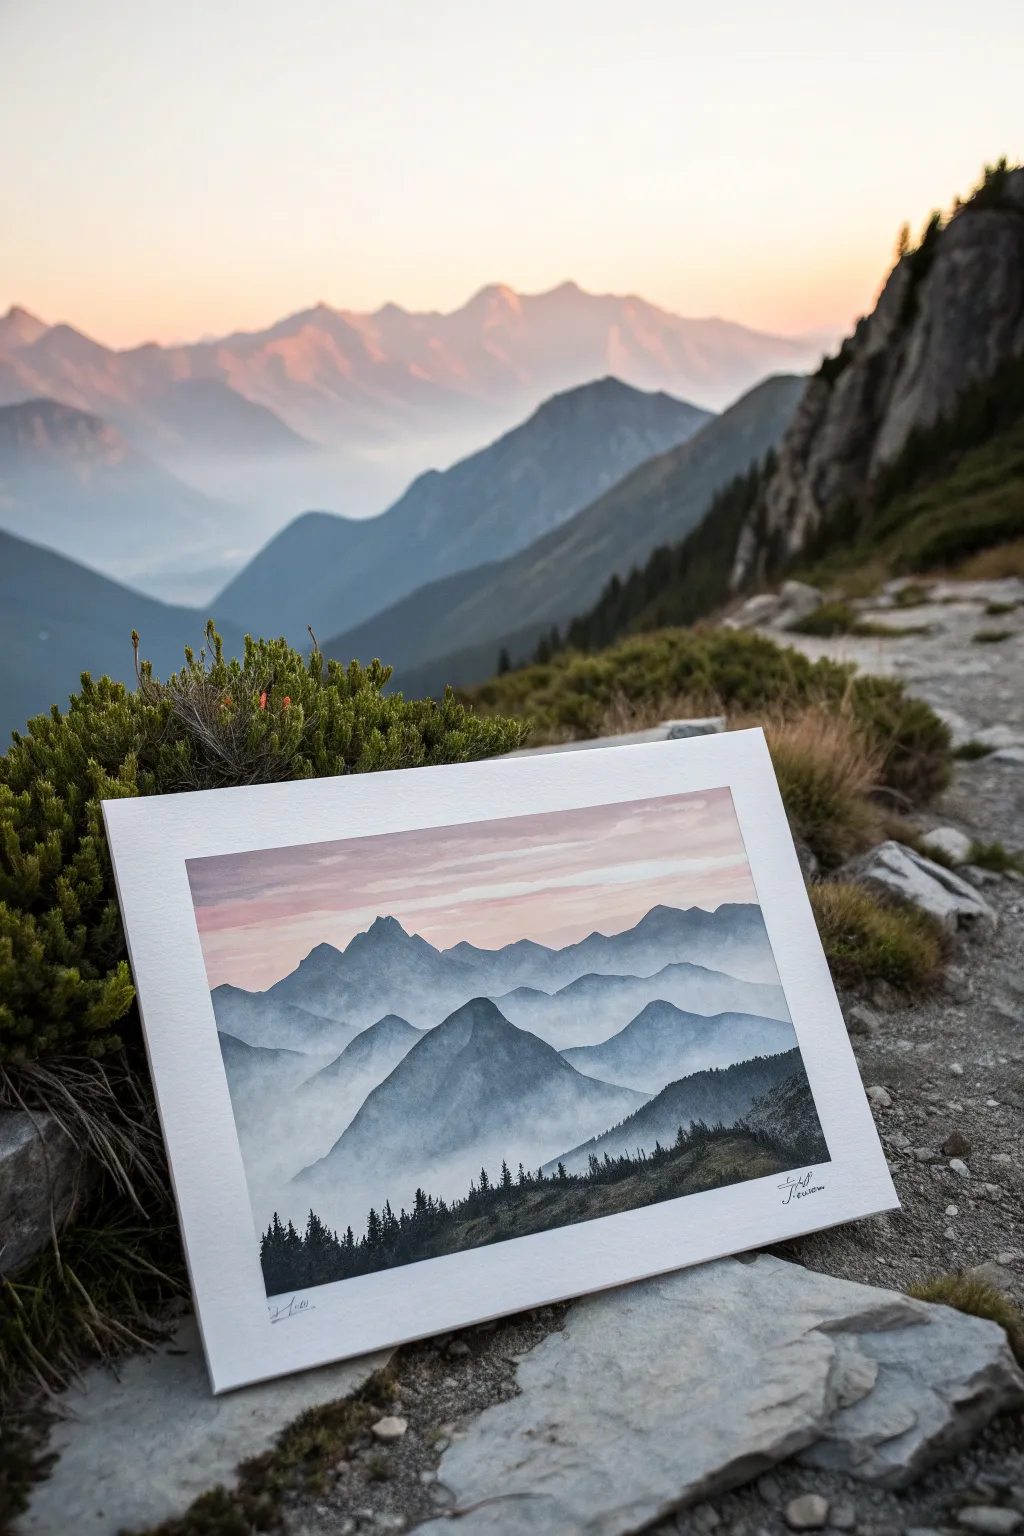
Capture the serene beauty of a mountain sunrise using simple masking techniques and spray paint. This project builds distinct layers of depth, transitioning from dark foreground pines to soft, hazy peaks against a pastel sky.
Step-by-Step Guide
Materials
- Heavyweight mixed media paper or canvas board
- Spray paint (Matte Black, Charcoal Grey, Slate Blue, Misty Blue/White, Soft Pink, Pale Orange)
- Cardstock or heavy paper for stencils
- Pencil
- Scissors or craft knife
- Masking tape
- Adhesive spray (optional but helpful)
- Small detail brush and black acrylic paint (for final trees)
Step 1: Planning and Stencils
-
Design your layers:
Visualize your composition by separating the image into 4-5 distinct depth planes. The furthest plane will be the sky, followed by distant peaks, mid-range mountains, and the immediate foreground. -
Tear the stencils:
For a rugged, organic mountain ridge look, take your cardstock and tear it lengthwise. The torn edge creates a much more natural-looking rocky silhouette than a cut line. -
Create distinct profiles:
Make about 4 different torn profiles. Ensure some have high central peaks while others are rolling hills to create variety in your landscape.
Step 2: Painting the Sky and Distance
-
Set the atmosphere:
Before laying down mountains, spray the entire top third of your paper with a gradient. Start with Pale Orange at the horizon line and fade upward into Soft Pink at the very top. -
Cloud detailing:
While the sky paint is still slightly tacky, you can gently tear a small piece of paper and hold it slightly off the surface while spraying a quick burst of white to create soft, drifting clouds. -
The furthest peaks:
Place your first torn stencil roughly one-third down from the top. This will be your most distant range. -
Apply the first mist:
Spray lightly along the torn edge of the stencil using your lightest color (Misty Blue or a mix of white and slate). Aim mostly at the edge so the bottom fades out into nothingness.
Hold it Down
Use pebbles or small weights to hold stencil edges flat against the paper. This prevents ‘underspray’ where paint sneaks under the paper and ruins the sharp mountain edge.
Step 3: Building the Ranges
-
Move forward:
Place the next stencil slightly lower than the first one. Slightly overlapping the previous layer helps create the illusion of recession. -
Deepen the tone:
For this second layer, use the Slate Blue spray paint. Spray the top edge clearly, but gently mist the bottom of this layer with white or light grey to simulate fog settling in the valley. -
The prominent mid-ground:
Position your third stencil. This should be a larger, more defined mountain shape, perhaps off-center. -
Shadow and depth:
Spray this layer with Charcoal Grey. I like to angle the spray can slightly to hit just one side of the ‘peaks’ on the stencil, giving a hint of directional sunlight. -
Dry time check:
Wait 2-3 minutes between these major layers. If the paint is too wet, moving stencils might smudge the crisp ridges you just created.
Too Much Paint?
If you sprayed too heavily and got drips, don’t wipe them! Let them dry completely, then sand them down gently and re-spray that specific layer’s mist.
Step 4: Foreground and Details
-
The final ridge:
Place your last stencil near the bottom. This edge doesn’t need to be misty; it should be sharp and high-contrast. -
Solid black base:
Spray this bottom section with solid Matte Black. Ensure full coverage to ground the entire composition. -
Adding texture:
While the black is drying, take a sponge or crumpled paper and dab the very bottom edge to give it a rocky, earthy texture. -
Manual tree details:
Once the spray paint is fully dry, use a small detail brush or a fine-tip paint marker to add tiny pine trees along the silhouette of the closest black ridge. -
Varying tree sizes:
Make the trees on the foreground ridge larger and more detailed, and add tiny vertical ticks on the grey mid-ground ridge to suggest distant forests. -
Final signature:
Sign your work in the bottom corner with a fine liner pen once everything is completely cured.
Step back and admire how the simple layers stack up to create a vast, atmospheric mountain scene.
Simple Quote Art With Letter Stencils
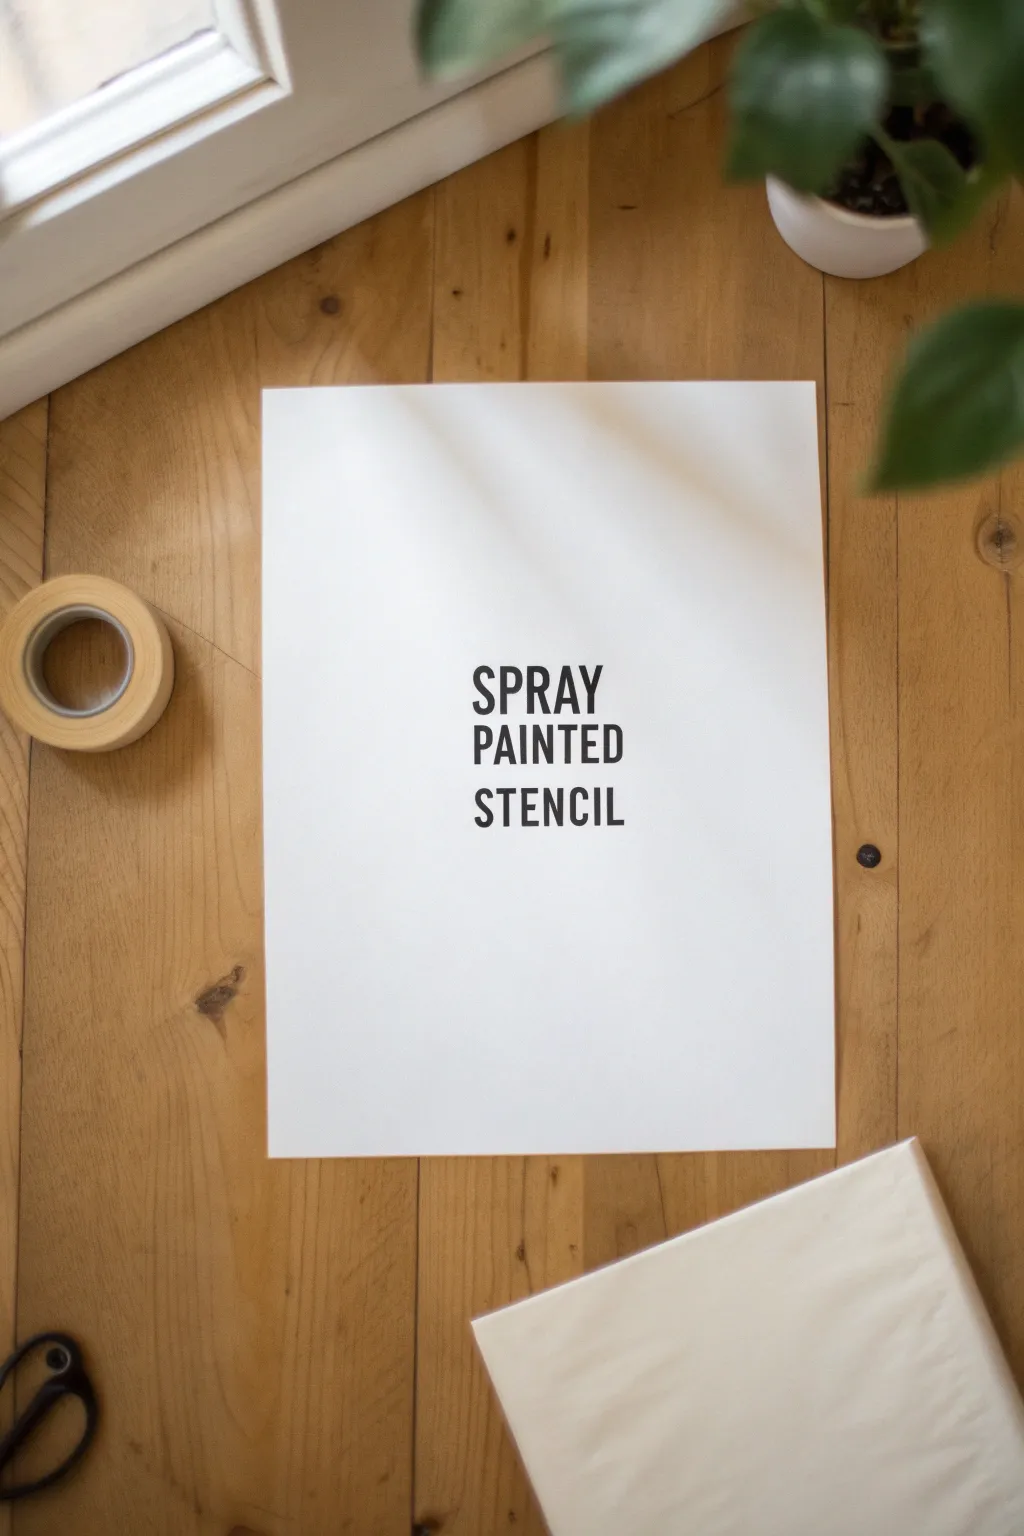
Create bold, meaningful wall art in minutes using nothing more than simple letter stencils and spray paint. This minimalist project results in crisp, industrial-style typography that stands out beautifully against a clean white background.
How-To Guide
Materials
- White heavy cardstock or art paper (A3 or similar size)
- Black matte spray paint
- Adhesive letter stencils (approx. 2-3 inches high)
- Painter’s tape or masking tape
- Ruler
- Pencil
- Scrap paper or newspaper (for masking)
- Drop cloth or cardboard (surface protection)
Step 1: Preparation and Layout
-
Prepare your workspace:
Find a well-ventilated area, preferably outdoors or in a garage with the door open. Lay down a drop cloth or a large piece of cardboard to protect your floor or table from overspray. -
Secure the paper:
Place your clean sheet of white cardstock in the center of your protected workspace. You can use small loops of painter’s tape on the back to hold it stationary if you’re working outside in a breeze. -
Plan your quote:
Lay out your stencil letters on the table first to see how much space your chosen phrase will take up. For this project, we are centering the words ‘SPRAY PAINTED STENCIL’ in three stacked lines. -
Find the center:
Using a ruler and a pencil, lightly mark the vertical center line of your paper. This will act as your anchor for aligning the text perfectly in the middle. -
Mark baselines:
Decide on the spacing between your lines of text. Lightly draw horizontal guidelines for where the bottom of each row of letters will sit. I like to leave about an inch between lines to keep it airy.
Step 2: Stenciling
-
Apply the first line:
Peel off the backing of your adhesive letter stencils for the first word. align them carefully along your top pencil guideline. Start from the center letter and work outward to ensure perfect centering. -
Press firmly:
Once the first line is positioned, press down firmly on all edges of each stencil letter. This seal is crucial to prevent paint from bleeding underneath and ruining the crisp edges. -
Continue placing letters:
Repeat the process for the second and third lines of text. Double-check your spelling and alignment before moving on to the masking phase. -
Mask the surrounding area:
Use painter’s tape and scrap paper to cover absolutely every part of the white cardstock that isn’t the letter cutouts. You want to leave *only* the letter shapes exposed. -
Verify coverage:
Look closely at the gaps between letters. Ensure your masking tape overlaps the stencil edges securely so no white paper is peeking through between the characters.
Clean Lines Secret
Spray the first coat with a clear sealer or white paint. This seals the stencil edges, so any bleed is invisible. Then spray your black on top.
Step 3: Painting and Finishing
-
Shake the can:
Shake your can of black matte spray paint vigorously for at least one minute to ensure the pigment is evenly mixed. -
Test spray:
Do a quick test spray on your drop cloth or a piece of scrap cardboard to clear the nozzle and get a feel for the paint flow. -
Apply the first coat:
Hold the can about 8-10 inches above the paper. Spray directly downward in short, light bursts. Avoid spraying at an angle, as this can force paint under the stencil edges. -
Check density:
The first coat should be light; don’t try to get solid black coverage immediately. Let it tack up for a minute or two. -
Apply second coat:
Apply a second light coat to fill in any patchy areas and achieve a solid, opaque black color. Two thin coats are always better than one thick, drippy one. -
Let it dry partially:
Wait about 5-10 minutes. You want the paint to be dry to the touch but not fully cured. Removing tape while the paint is slightly tacky often results in cleaner lines. -
Reveal the artwork:
Carefully peel away the masking tape and scrap paper first. Then, slowly lift the letter stencils straight up. Do not drag them across the paper. -
Final cure:
If there are any pencil marks visible, wait until the paint is completely bone dry (at least an hour) before gently erasing them.
Level Up: Ombre Effect
Use two compatible colors (like navy and teal). Spray the top half of the letters with one and the bottom with the other for a cool gradient fade.
Frame your new typographic artwork simply to let the bold letters speak for themselves

PENCIL GUIDE
Understanding Pencil Grades from H to B
From first sketch to finished drawing — learn pencil grades, line control, and shading techniques.
Explore the Full Guide
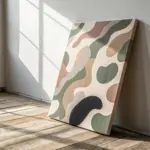
Geometric Tape Designs And Color Blocks
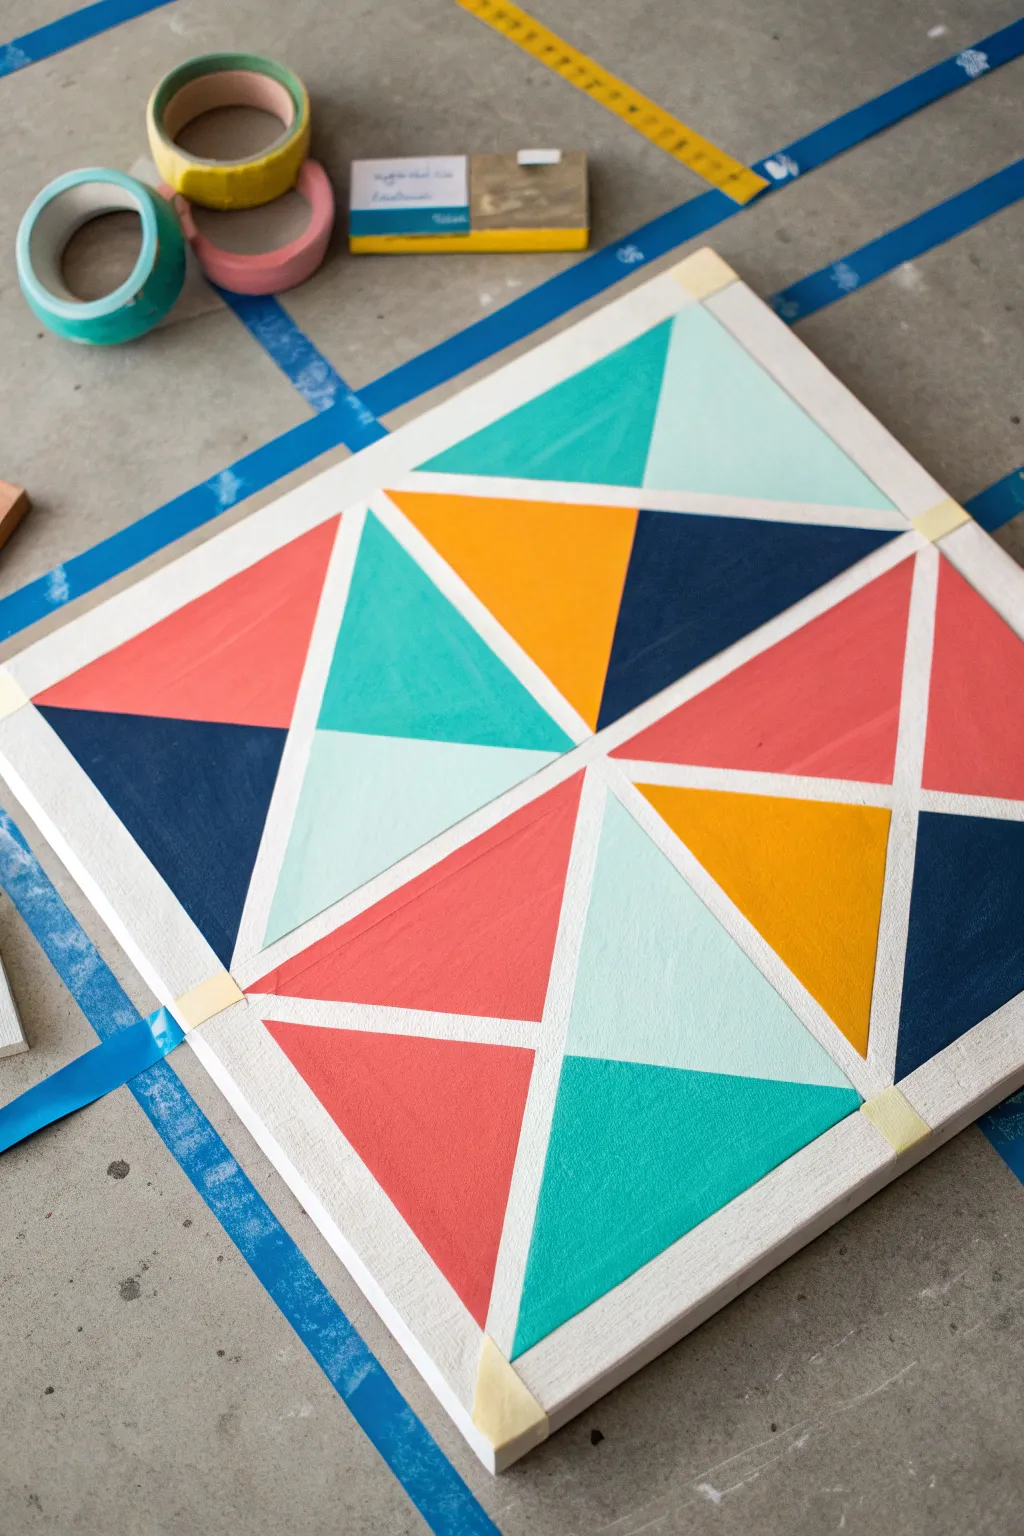
Transform a plain square canvas into a striking piece of modern art with nothing but painters tape and bold acrylic colors. This geometric design uses sharp white lines to separate vibrant triangles of coral, teal, navy, and mustard, creating a clean and professional-looking finish.
Step-by-Step
Materials
- Square primed canvas (e.g., 12×12 or 16×16 inches)
- White acrylic paint (heavy body preferred)
- Acrylic paints: Coral, Teal, Navy Blue, Mustard Yellow, Light Mint
- High-quality painters tape (0.25 to 0.5 inch width)
- Flat synthetic paintbrushes (medium and small)
- Ruler or straight edge
- Pencil
- Scissors or craft knife
- Drop cloth or protective paper
Step 1: Preparation & Base Coat
-
Prime the Surface:
Even if your canvas is pre-primed, apply a solid coat of white acrylic paint over the entire surface. This ensures your ‘lines’ revealed later will be bright and consistent. -
Dry Completely:
Allow the white base coat to dry fully. If the paint feels cool to the touch, it still holds moisture; give it another hour to ensure the tape won’t peel it up.
Bleeding Lines?
If paint bleeds under the tape, wait for it to 100% cure. Then, lay a piece of tape precisely along the line edge and paint over the mistake with your line color (white) to erase it cleanly.
Step 2: Taping the Design
-
Mark the Center:
Using a ruler and a pencil, lightly mark the exact center point on all four edges of the canvas. -
Create the Central Cross:
Run a strip of painters tape vertically from top to bottom, and another horizontally from left to right, intersecting at the center. Use your edge marks as guides. -
Establish the Diagonals:
Apply two long strips of tape diagonally from corner to corner, creating a large ‘X’ across the entire canvas. You should now have eight large triangular sections. -
Subdivide the Triangles:
Now, create the smaller triangles. Place strips of tape that connect the midpoint of each outer edge to the center of the adjacent diagonal line. This creates the ‘kite’ shapes seen in the reference. -
Seal the Edges:
Once your geometric web is taped, firmly press down all the tape edges with your finger or a bone folder. This is crucial for crisp lines. -
The Bleed-Block Trick:
I always paint a thin layer of the *white* base color over the tape edges first. This seals the tape; if any paint bleeds under, it will be white and invisible against the white base.
Add Texture
For a mixed-media look, mix a little modeling paste into the light mint or white paint before applying. This adds physical dimension to specific geometric sections.
Step 3: Painting & Finishing
-
Plan Your Palette:
Before painting, visualize or sketch where each color goes to ensure a balanced composition. Notice how no two adjacent shapes share the same color. -
Apply the First Color:
Start with the coral paint. Fill in the specific triangular sections according to your plan. Use a flat brush and stroke away from the tape edge when possible to minimize seepage. -
Add Cool Tones:
Move on to the teal and light mint sections. Apply the paint thick enough to cover the white background opaque-ly. Two thin coats are often better than one thick, gloopy one. -
Deepen with Navy:
Paint the navy blue sections. Be careful with dark colors; they are harder to fix if you accidentally brush them into a neighboring light section. -
Brighten with Mustard:
Fill the final remaining geometric spaces with mustard yellow to add a pop of warmth. -
Check for Coverage:
Inspect all painted areas. If you see streaks or canvas texture showing through, apply a second coat to those specific shapes. -
The Reveal:
Wait until the paint is dry to the touch but not fully cured (about 20-30 minutes). Carefully peel the tape off at a sharp 45-degree angle. Pulling while slightly damp prevents the paint skin from ripping. -
Touch Ups:
If any paint did bleed under the tape, use a tiny liner brush and white paint to tidy up the lines once everything is completely dry.
Hang your new geometric masterpiece in a spot that needs a burst of structured color and enjoy the clean lines
Ombre Gradients On Paper Or Canvas
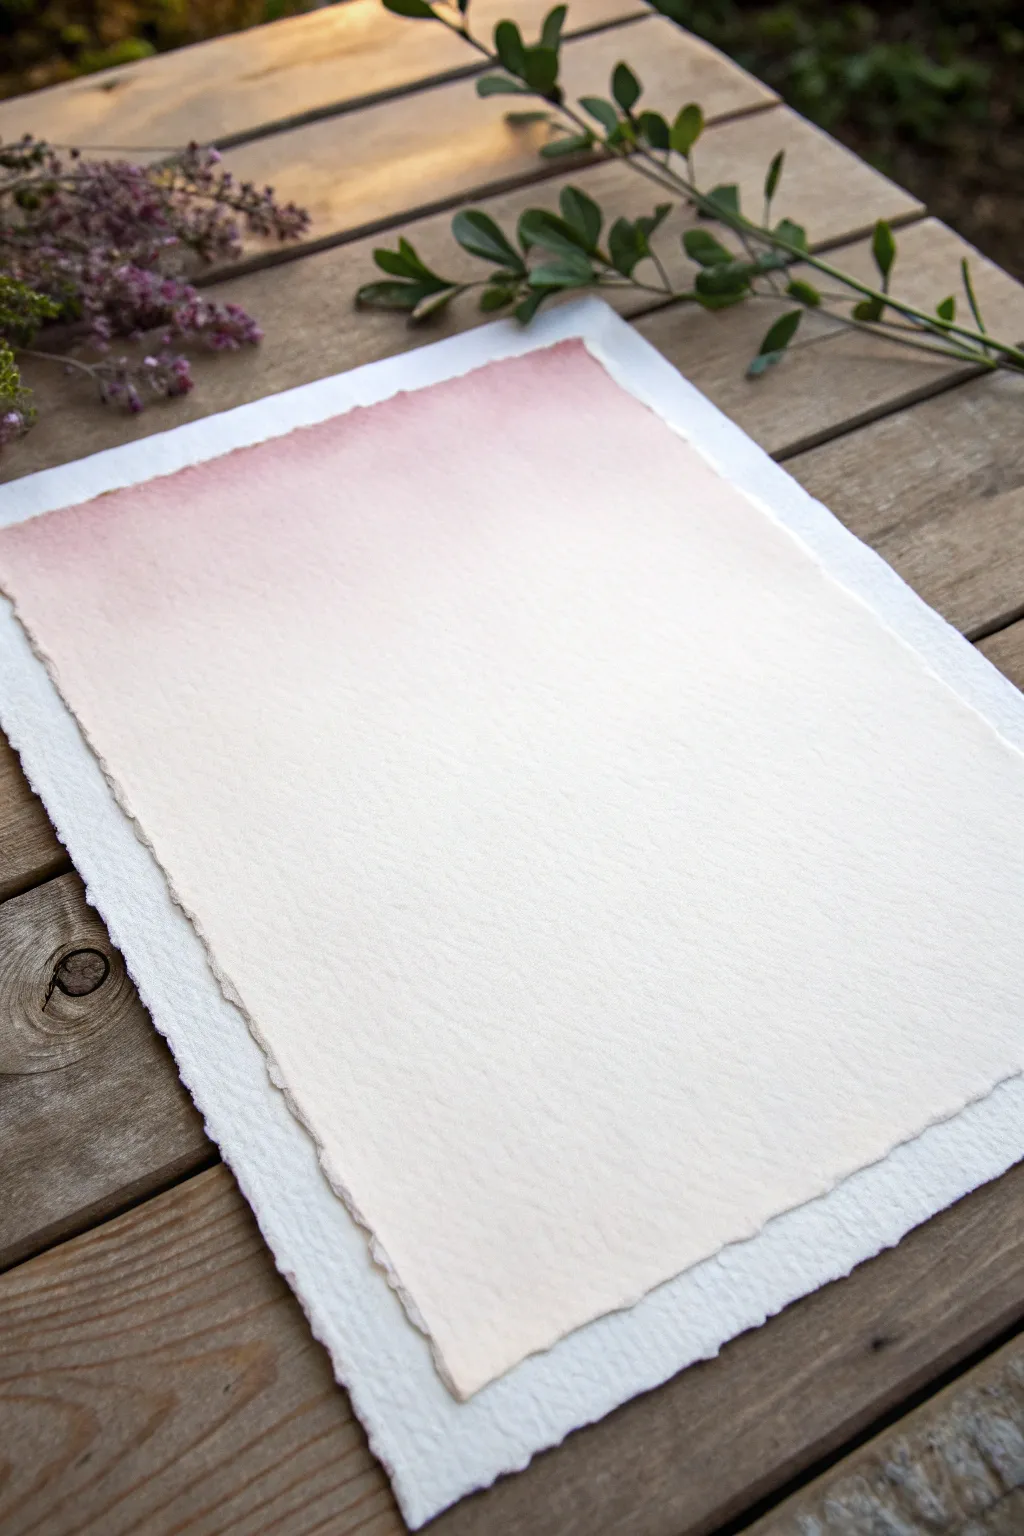
Achieve a soft, ethereal gradient that looks like a watercolor wash but is created with the delicate mist of spray paint. This technique transforms a simple sheet of handmade paper into a romantic backdrop for calligraphy, wedding invitations, or art prints.
Step-by-Step Tutorial
Materials
- High-quality deckle-edge watercolor paper (cold press creates nice texture)
- Matte spray paint in a soft pink or blush tone (low pressure can is ideal)
- Scrap cardboard or a large drop cloth
- Painter’s tape or artist’s masking tape
- A heavy board or piece of plywood (larger than your paper)
- Optional: Clean white paper for masking
Step 1: Preparation
-
Secure the workspace:
Set up your workspace in a well-ventilated area, preferably outdoors or in a garage with the door open. Lay down a large drop cloth to protect the surrounding ground. -
Prepare the backing board:
Place your heavy board or plywood on the drop cloth. This will serve as the mobile surface for your paper, allowing you to adjust angles without touching the artwork. -
Position the paper:
Lay your deckle-edge paper flat onto the center of the board. Ensure it is free of dust or lint, as spray paint will permanently trap any debris. -
Anchor the paper:
Roll small loops of painter’s tape (sticky side out) and place them underneath the corners of the paper to secure it to the board. This prevents the edges from lifting due to the air pressure of the spray can.
Step 2: Creating the Gradient
-
Shake the can:
Shake your spray paint can vigorously for at least one minute to ensure the pigment and solvents are perfectly mixed. This is crucial for a fine, non-splatter mist. -
Test the spray:
Spray a quick burst onto a piece of scrap cardboard to clear the nozzle and check the flow. You want a consistent, fine mist before moving to your art paper. -
Technique: The Overspray Method:
Position the can about 10-12 inches away from the top edge of the paper. Instead of aiming directly at the paper, aim slightly above the top edge. -
First pass:
Begin spraying in a horizontal sweeping motion, starting the spray off the paper and ending off the paper. Allow only the bottom edge of the spray fan to touch the top of your paper. -
Feathering down:
Move your hand slightly lower for a second pass if needed, but keep the majority of the paint concentrated at the very top edge. The goal is for the paint particles to fall gently onto the paper, naturally becoming sparser as they travel down. -
Assess the coverage:
Pause and step back. The transition should be extremely subtle. It is much harder to remove paint than to add it, so work in very light layers. -
Adding depth:
If you want a deeper pink at the top, spray one more focused horizontal line directly across the very top edge, keeping the can moving quickly to avoid pooling. -
Checking the fade:
Look closely at the mid-section of the paper. There should be a smooth transition from pink pixels to the white of the paper without a hard line. If you see a hard line, hold the can much further away (18 inches) and do a very quick mist over the transition area to soften it.
Splatter Control
Is your nozzle spitting dots? Wipe the tip with mineral spirits after every few passes. Always start your spray stream off the paper to catch initial spurts.
Step 3: Finishing Touches
-
Initial Drying:
Let the paper sit on the board undisturbed for about 15 to 20 minutes. Spray paint dries quickly to the touch, but the paper fibers need time to settle. -
Inspect for warping:
Because you used a light mist, the paper shouldn’t warp much, but if the edges curl slightly, you can gently weigh them down with heavy coins once the paint is dry to the touch. -
Removal:
Carefully lift the paper from the backing board, unsticking the tape loops from the back. Be gentle to maintain the integrity of the deckle edges. -
Full cure time:
Place the paper on a clean, flat surface indoors to fully cure for 24 hours before attempting to write on it or frame it. This ensures the solvents have completely evaporated. -
Flattening (Optional):
If the paper feels slightly curved after full drying, place it between two clean sheets of parchment paper and rest a heavy book on top overnight.
Metallic Magic
Once the pink ombre is dry, add a luxurious touch by lightly misting the very top edge with a gold or copper metallic spray for a shimmering finish.
This simple technique produces a sophisticated result that turns ordinary paper into a work of art ready for your next creative endeavor


Stencil Mandalas With Repeating Layers
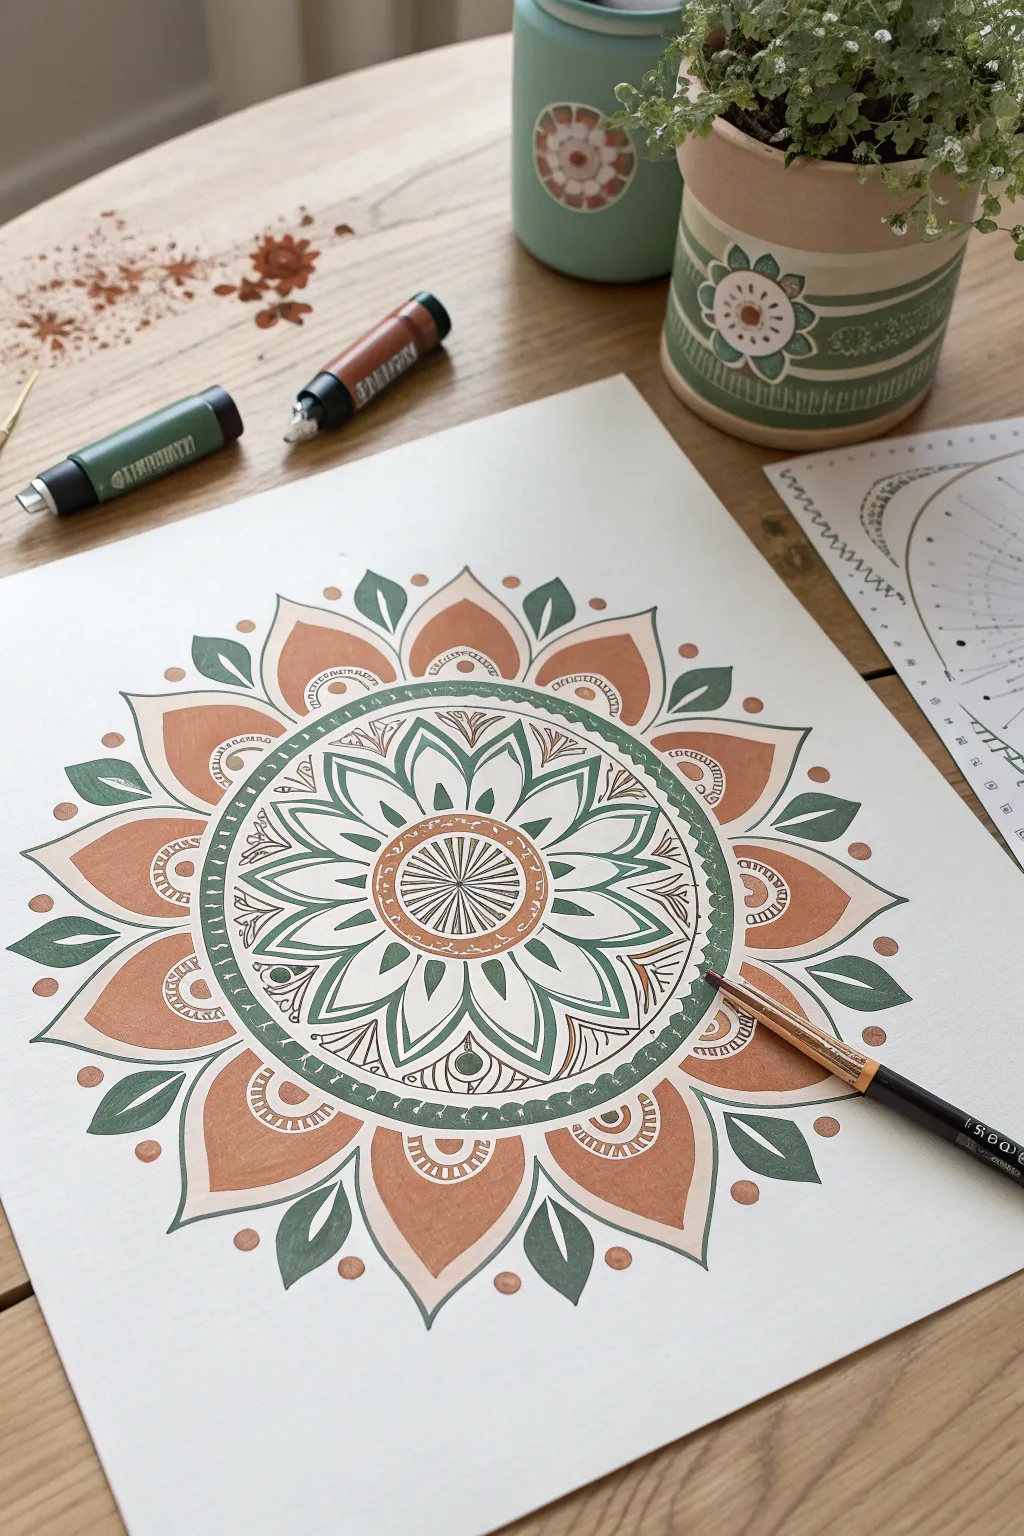
Create a soothing, geometric mandala using a clever combination of custom stencils and freehand painting. The result is a crisp, symmetrical design with warm terracotta and sage green tones that looks beautifully organic yet precise.
Detailed Instructions
Materials
- Heavyweight mixed-media or watercolor paper
- Adhesive stencil film or masking fluid
- Craft knife and cutting mat
- Spray paint (burnt orange/terracotta)
- Spray paint (sage green)
- Fine detail paintbrush (size 0 or 1)
- Fine-liner pen (black or dark brown)
- Compass and pencil
- Ruler
Step 1: Designing and Cutting the Stencils
-
Map out the structure:
Start by finding the center of your paper and use a compass to draw light concentric guide circles. These will define the boundaries for your inner star, the middle decorative ring, and the outer petals. -
Draft the petal shapes:
Sketch your repeating designs within each ring. Focus on the large outer petals and the central floral star, as these will be the primary stenciled areas. -
Prepare the masking layer:
Apply your adhesive stencil film over the paper. If you don’t have film, you can carefully lay down wide painters tape to cover the entire design area. -
Cut the negative space:
Using a sharp craft knife, carefully cut out the shapes that you want to be colored. Leave the background and the fine separation lines covered by the film.
Step 2: Applying the Spray Paint
-
Separate the color zones:
Cover the ‘green’ areas of your stencil with scrap paper or additional tape so only the ‘terracotta’ zones are exposed. This masking is crucial for clean color separation. -
Spray the first layer:
In a well-ventilated area, lightly mist the exposed terracotta sections with spray paint. Use short, controlled bursts from about 8-10 inches away. -
Check for saturation:
Allow the first light coat to dry for a few minutes, then apply a second light coat if you want a deeper, more opaque orange tone. -
Switch to green:
Once the orange paint is touch-dry, cover those areas completely. Now, expose the leaf shapes and ring details intended for the sage green spray paint. -
Apply the green tones:
Spray the sage green paint over the newly exposed stencils. I find that keeping the can vertical helps prevent drips from pooling under the stencil edges. -
Reveal the base:
Wait for all paint to be fully dry to the touch. Very slowly peel back the stencil film or tape at a sharp angle to reveal the crisp white paper lines underneath.
Crisp Lines Only
Burnish the edges of your stencil film firmly with a bone folder or credit card before spraying to prevent paint bleed.
Step 3: Hand-Painted Details
-
Define the center:
Using a fine detail brush and a small amount of dark ink or diluted paint, carefully outline the central wheel spokes to sharpen the geometry. -
Add intricacy to the rings:
In the green decorative ring, use a fine-liner pen to draw the tiny semi-circles and dots. Hand-drawing these elements is much easier than trying to cut them out of a stencil. -
Embellish the petals:
Add small flourishes, like the tiny arches inside the large orange petals, using white or cream paint and a very fine brush for contrast. -
Connect the layers:
Draw delicate connecting lines or leaves between the major petals to unify the design and fill any empty negative space that feels too open. -
Final clean up:
Erase any remaining pencil guide lines from the very first step, ensuring the paint is completely cured before rubbing over it.
Add Metallic Flair
Use a gold paint marker to outline the major petals or add center dots for a shimmering, high-end finish.
Step back and admire the perfect symmetry of your handcrafted mandala design
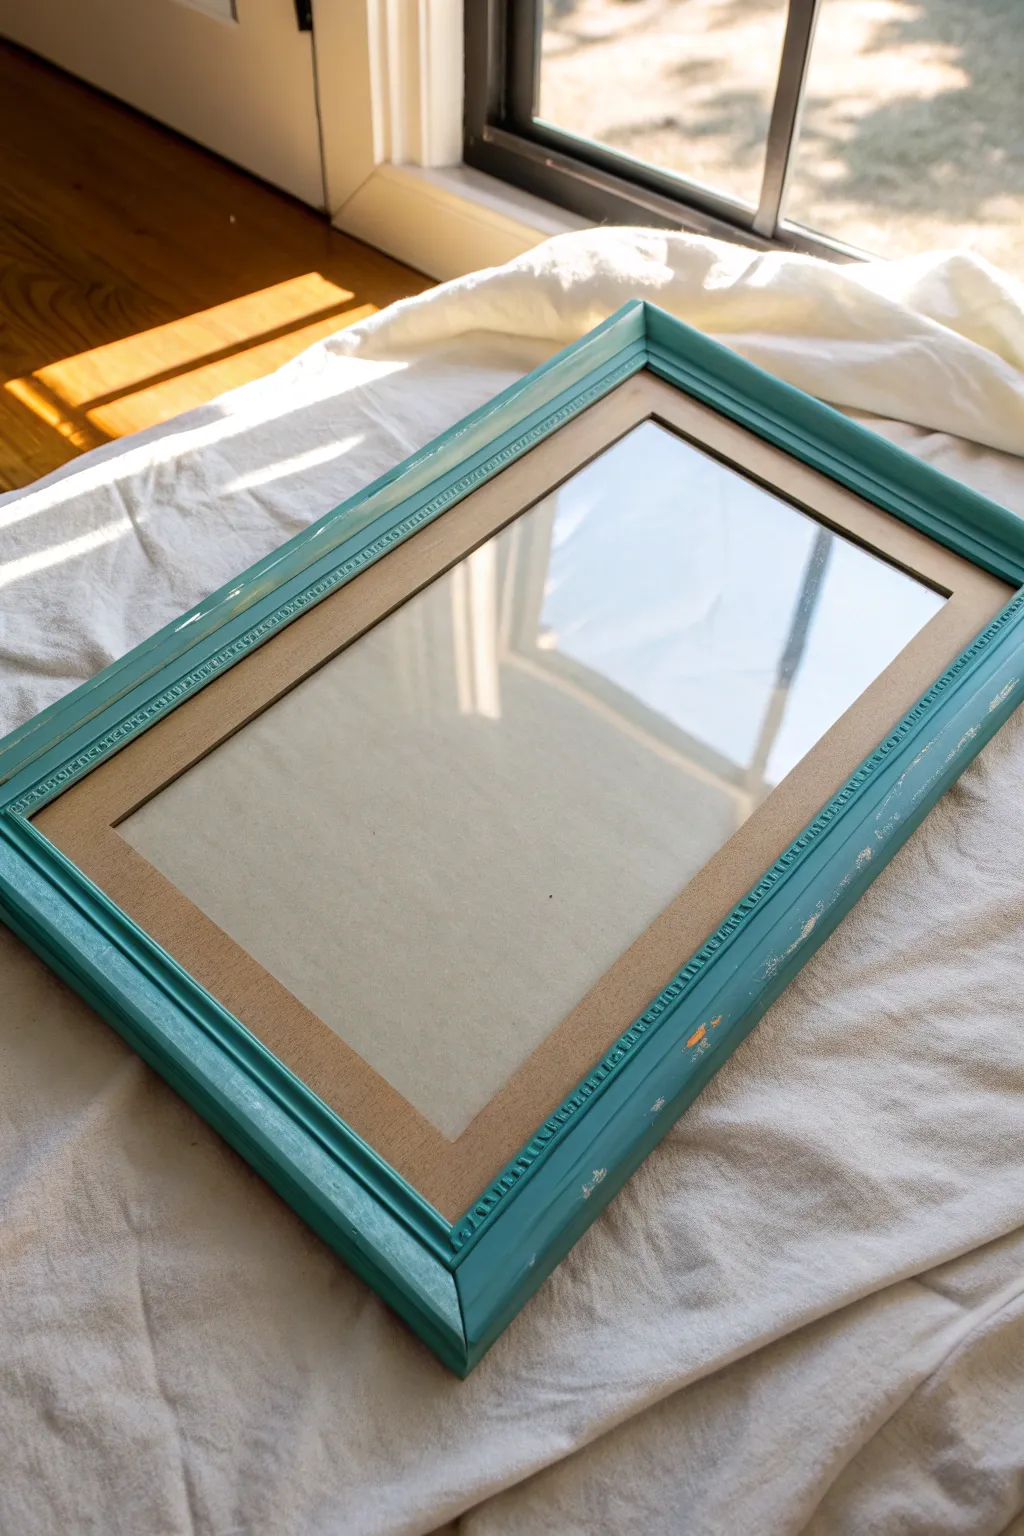
Upcycled Picture Frames With Fresh Color
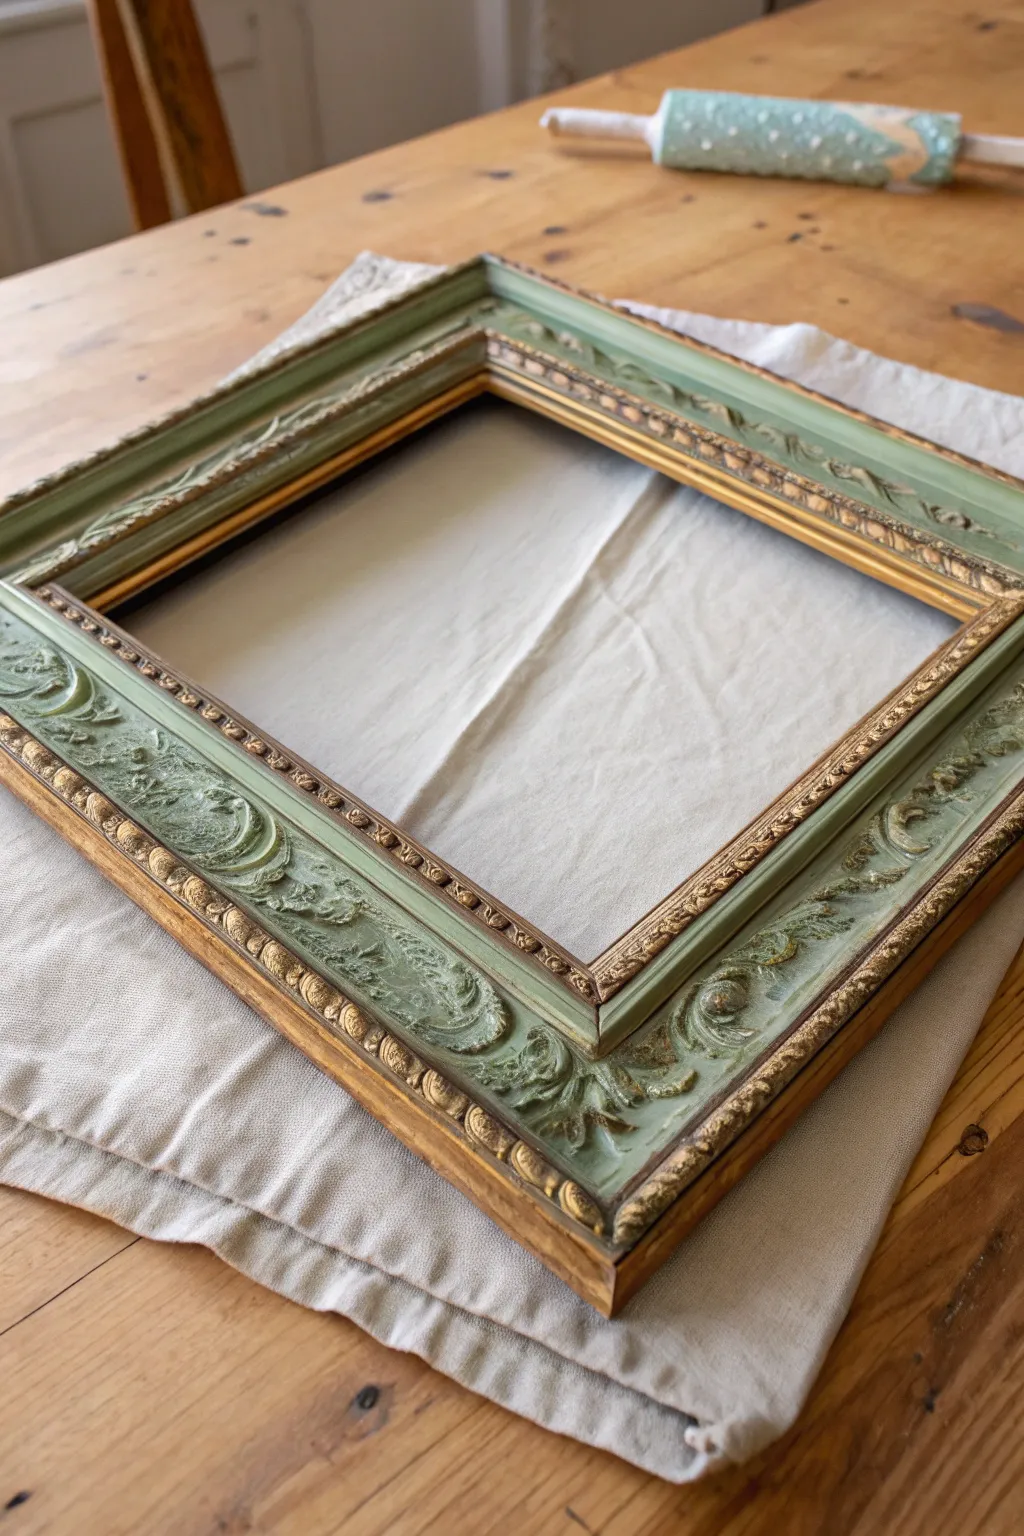
Transform a forgotten, ornate frame into a shabby-chic masterpiece using a clever combination of spray paint and hand-applied accents. This project layers soft sage green over warm gold to create a sophisticated, time-worn finish that highlights intricate molding.
How-To Guide
Materials
- Ornate wooden or resin picture frame
- Sandpaper (medium and fine grit)
- Clean tack cloth
- Gold spray paint (metallic finish)
- Sage green spray paint (matte or satin finish)
- Petroleum jelly (Vaseline)
- Artist’s brush or cotton swabs
- Clean lint-free rags
- Dark antique wax (optional for extra aging)
- Painter’s tape
Step 1: Preparation & Base Coat
-
Clean the slate:
Begin by removing any backing, glass, or existing artwork from your frame. Wipe the frame down thoroughly with a damp cloth to remove dust and grime, getting into all the crevices. -
Scuff sanding:
Using medium-grit sandpaper, lightly scuff the entire surface of the frame. This gives the paint something to grip onto. Wipe away the dust with a tack cloth. -
Tape off areas:
If there are parts of the frame you want to keep original (like a wooden back edge), mask them off carefully with painter’s tape. -
The golden layer:
Take the frame to a well-ventilated area. Apply the gold metallic spray paint as your base coat. Don’t worry about perfect coverage, but make sure the intricate carved areas and the inner rim are well coated. -
Let it shine:
Allow the gold paint to dry completely according to the manufacturer’s instructions. It needs to be fully cured before the next step to prevent lifting.
Paint Peeling Too Much?
If the green paint peels off in large sheets rather than small distressed spots, your jelly layer was too thick. Next time, use a barely-there smear.
Step 2: The Resist Technique
-
Map your highlights:
Identify the high points of the ornate molding and the inner rim where you want the gold to show through the green. -
Apply the resist:
Using a small artist brush or a cotton swab, dab small amounts of petroleum jelly onto these high points and edges. The jelly will prevent the next layer of paint from sticking in these specific spots. -
Be strategic:
I like to focus heavily on the corners and the innermost beaded edge, as these areas naturally wear down over time on real antique frames.
Step 3: Adding Color & Distressing
-
Sage green application:
Spray the entire frame with the sage green paint. Apply light, even coats to avoid drips. It will cover the gold and the petroleum jelly patches. -
Second coat:
Once the first coat is tacky but not wet, apply a second light coat of green if needed for full opacity on the flat surfaces. -
Wait for the dry:
Let the green paint dry until it is no longer wet to the touch, but not fully cured hard—usually about 30 to 45 minutes. -
The reveal:
Take a soft, lint-free rag and gently wipe over the areas where you applied the petroleum jelly. The green paint will slide right off, revealing the bright gold underneath. -
Softening edges:
If the transition between gold and green looks too sharp, use a very fine-grit sanding block to gently feather the edges. -
Extra distressing:
For a more rustic look, use the sandpaper to manually distress other raised areas where you didn’t apply jelly, exposing raw wood or more gold.
Glazing for Depth
Mix a tiny drop of brown acrylic paint with water to create a wash. Brush it over the dry green paint and wipe back immediately to age the color.
Step 4: Finishing Touches
-
Clean up:
Wipe the frame down one last time to ensure all petroleum jelly residue and sanding dust is removed. -
Antique wax (optional):
To deepen the details, brush a small amount of dark antique wax into the deepest crevices of the molding. -
Buffing:
After letting the wax sit for a few minutes, buff the high points with a clean cloth to remove excess wax, leaving the dark pigment only in the shadows. -
Final cure:
Set the frame aside in a dust-free area for 24 hours to let the paint and wax fully harden before inserting your glass and art.
This elegant technique breathes new life into thrift store finds, giving you a custom frame perfect for vintage prints or mirrors
Vase Makeovers For Instant Decor Sets
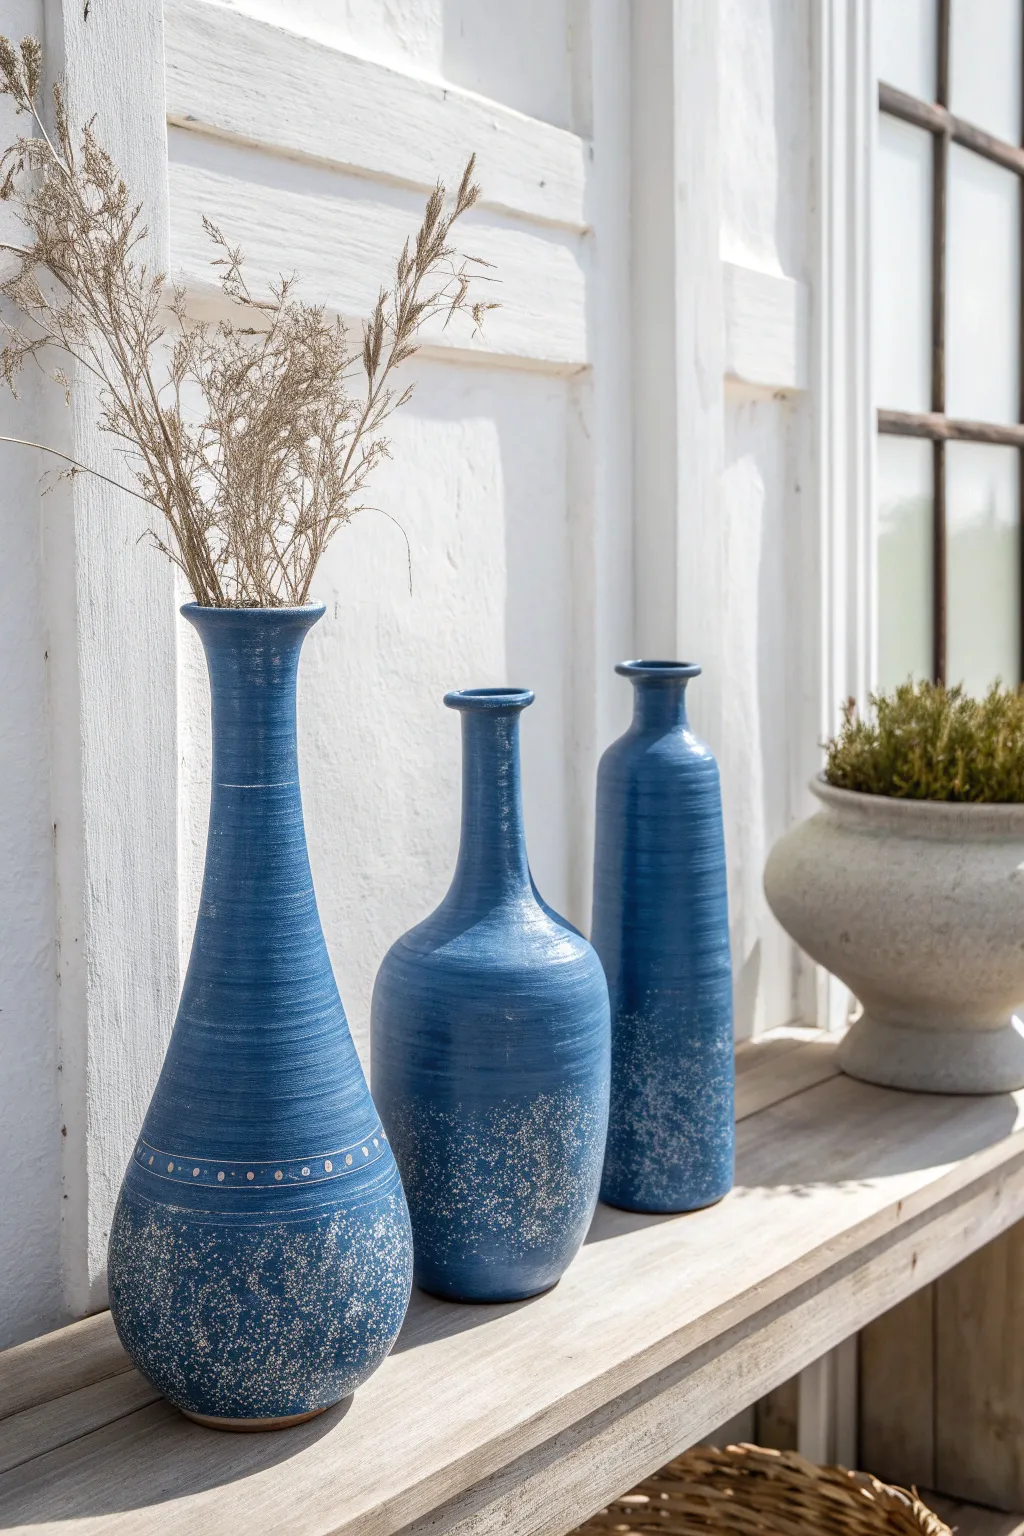
Transform mismatched glass or ceramic vessels into a cohesive, designer-style set with this layered spray paint technique. The deep matte blue base combined with a starry splatter effect creates an elegant, textured look perfect for displaying dried botanicals.
Step-by-Step
Materials
- Three glass or ceramic vases of varying heights
- Spray primer (white or grey)
- Matte navy blue spray paint
- Satin or matte white craft acrylic paint
- Stiff bristle toothbrush
- Small detail paintbrush
- Cardboard box or drop cloth
- Isopropyl alcohol and cloth
- Clear matte sealer spray (optional)
- Sandpaper (fine grit)
Step 1: Preparation and Base Coat
-
Clean the Surface:
Begin by thoroughly washing your vases with warm soapy water to remove any stickers or residue. Once dry, wipe them down with isopropyl alcohol to ensure the surface is completely free of oils. -
Scuff Sanding:
Lightly sand the surface of each vase with fine-grit sandpaper. You don’t need to remove the old finish entirely, just create enough ‘tooth’ for the primer to grip onto. -
Set Up Workspace:
Place your vases on a drop cloth or inside a large cardboard box in a well-ventilated area. Putting them on small blocks of wood can help you reach the bottom edges easily. -
Apply Primer:
Shake your primer can vigorously. Apply a thin, even coat of primer to all vases. Let this dry for about 15-20 minutes, then apply a second light coat if the original color is still showing through. -
The Blue Base:
Once the primer is fully dry, take your matte navy blue spray paint. Apply the first coat using smooth, sweeping motions, starting the spray off the object and dragging it across. -
Second Coat:
Wait for the first blue coat to become tacky but not wet (usually 15 minutes). Apply a second coat to ensure deep, opaque coverage. I find that rotating the vases slowly while spraying helps catch any missed spots. -
Full Cure:
Allow the blue base coat to dry completely according to the can’s instructions—usually at least a few hours—before moving on to the detailing phase.
Step 2: Creating the Speckle Effect
-
Prepare Splatter Paint:
Squeeze a small amount of white acrylic paint onto a palette or paper plate. Add a tiny drop of water to thin it slightly; you want a consistency similar to heavy cream so it splatters easily. -
Test Your Splatter:
Dip your stiff toothbrush into the thinned white paint. practice your splatter technique on a piece of scrap cardboard first by running your thumb bristles to flick the paint. -
Apply Speckles:
Hold the toothbrush about 6-8 inches away from the bottom of the first vase. Flick the bristles to create a dense spray of white dots, concentrating mostly on the lower third of the vase. -
Fade Upward:
As you move up the vase, pull the toothbrush further away and flick more gently. This creates a gradient effect where the speckles become sparse and fade out as they reach the middle. -
Repeat for All Vases:
Repeat this splattering process on the other two vases. Try to keep the heavy density at the bottom consistent across the set for a unified look.
Uneven Splatter?
If you get large blobs instead of mist, your paint is too thick or your brush is overloaded. Thin the paint slightly and blot excess on a paper towel before flicking.
Step 3: Detailing and Sealing
-
Hand-Painted Accents:
For the tallest vase, use your small detail paintbrush and un-thinned white acrylic paint to add a decorative ring. Paint small, evenly spaced dots in a horizontal line around the neck or lower body. -
Adding Line Details:
Using the very tip of your brush, carefully paint two thin horizontal lines framing your row of dots—one above and one below—to create a distinct band pattern. -
Review and Correct:
Check your work. If any splatter drops are too big or look messy, quickly wipe them away with a damp Q-tip before they dry, or touch them up with a dab of blue paint later. -
Final Dry:
Let all the acrylic paint details dry completely, which should take about an hour. -
Protective Seal:
To protect your work, finish with a light coat of clear matte sealer spray. This unifies the sheen of the spray paint and the acrylic speckles.
Metallic Twist
Swap the white acrylic paint for gold or copper metallic paint. The warm metal speckles against the dark matte blue create a stunning, luxurious constellation effect.
Arrange your beautiful new vase trio with some dried grasses for an effortlessly chic display
Hardware Refresh For A Quick Upgrade
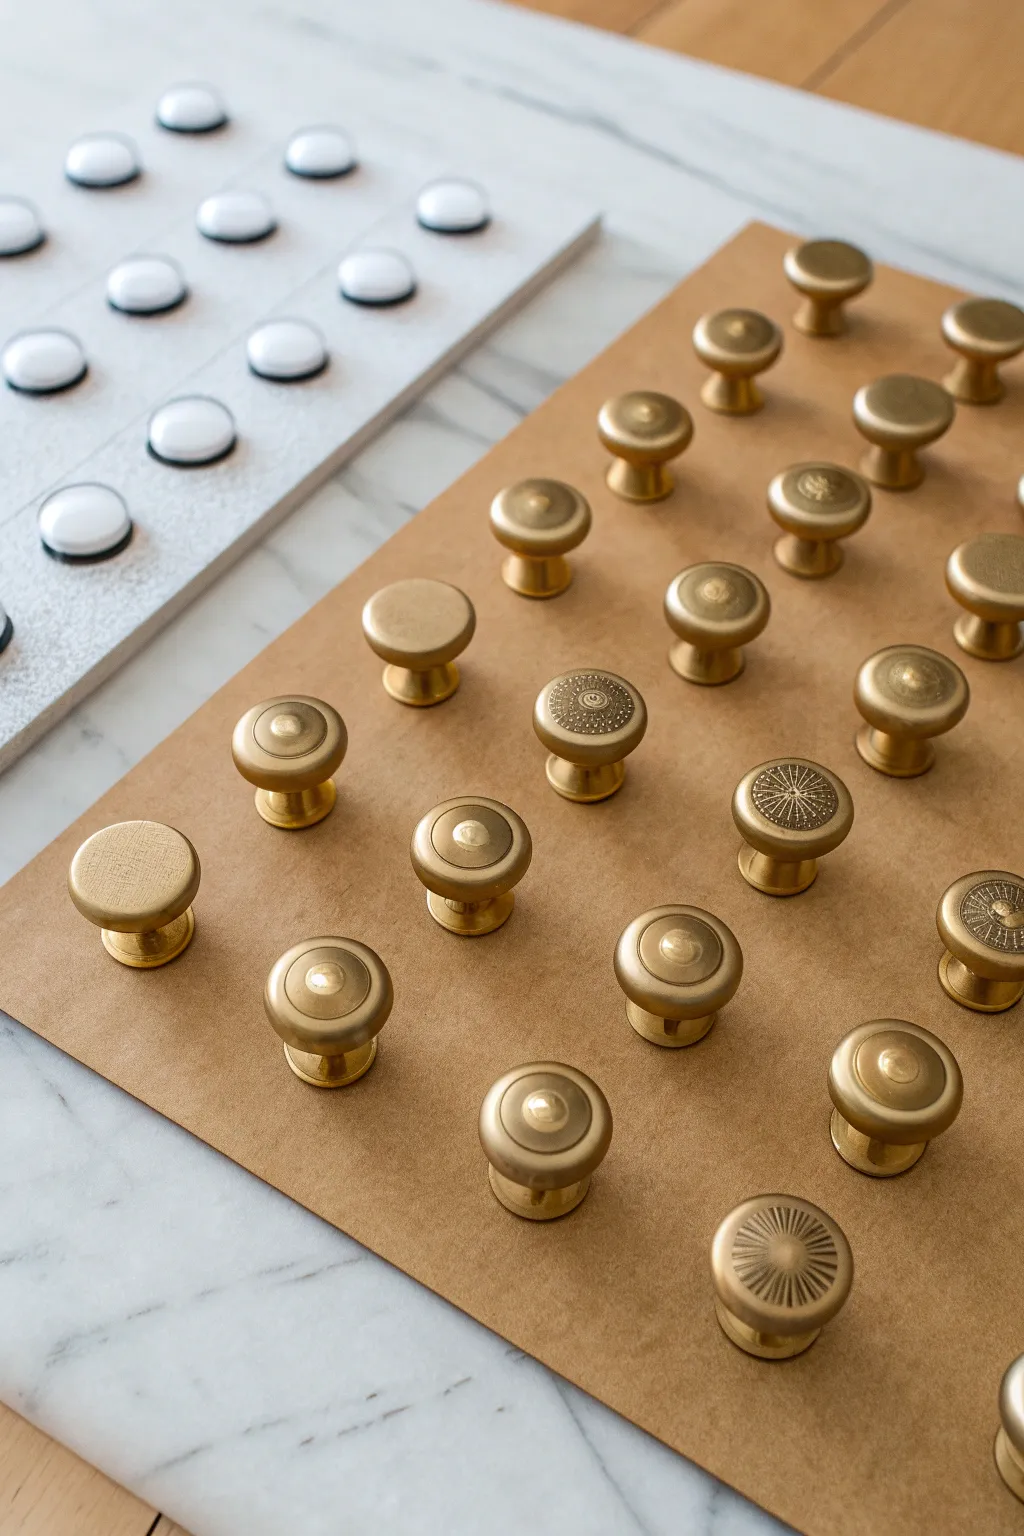
Transform mismatched or dated cabinet knobs into a cohesive, high-end collection with a simple coat of spray paint. This hardware refresh instantly mimics the look of solid brass at a fraction of the cost, giving your furniture a modern, sophisticated edge.
Detailed Instructions
Materials
- Assorted cabinet knobs (metal, wood, or plastic)
- Metallic gold spray paint (satin or metallic finish)
- Spray paint primer (suitable for your knob material)
- Large sheet of corrugated cardboard
- Degreaser or dish soap
- Sandpaper (fine grit, 220)
- Screwdriver
- Soft cloth or tack cloth
- Protective clear coat (optional, clear matte or satin)
Step 1: Preparation
-
Remove Hardware:
Unscrew all existing knobs from your cabinets or drawers. Keep the screws in a separate baggie so they don’t get lost while you work. -
Clean Thoroughly:
Scrub the knobs with warm water and a degreaser or strong dish soap. Kitchen hardware builds up distinct oily residues that will repel paint, so really ensure they are squeaky clean and dry. -
Sand Surfaces:
Lightly scuff the surface of each knob with 220-grit sandpaper. This creates ‘tooth’ for the primer to grab onto, especially if the original knobs are glossy ceramic or slick metal. -
Wipe Down:
Remove all sanding dust with a damp cloth or a sticky tack cloth. Any leftover dust will create tiny bumps in your finish. -
Prepare the Stand:
Take your sheet of cardboard and use a screwdriver or pen to poke holes through it, spaced about 2-3 inches apart. -
Mount the Knobs:
Push the mounting screws through the back of the cardboard and twist the knobs onto them from the front. This holds them upright and allows you to spray all sides evenly without touching them.
Step 2: Painting
-
Prime the Base:
Apply a thin, even coat of primer to the knobs. I prefer a gray or white primer depending on the final gold tone; gray helps build depth for darker bronzes. -
Initial Drying:
Allow the primer to dry completely according to the can’s instructions. Do not rush this step, as wet primer can crack the topcoat. -
First Coat of Gold:
Shake your gold spray paint can vigorously for at least one minute. Hold the can 8-10 inches away and spray a very light first coat, keeping the can moving constantly to avoid drips. -
Rotate and Inspect:
Walk around your cardboard stand to ensure you are hitting the knobs from every angle, including the underside of the knob head. -
Second Coat:
After the first coat is dry to the touch (usually 15-20 minutes), apply a second light coat to ensure full, opaque coverage. -
Texture Detail:
If your knobs have intricate patterns like the ones shown, do a very light misting directly from the top to ensure paint settles into the engraved grooves without flooding them. -
Buffing (Optional):
For an antique look, you can very gently rub the raised details with a soft cloth once the paint is tacky but not fully cured, though this is purely stylistic.
Drips & Runs?
If you sprayed too heavily and see a drip, let it dry completely. Don’t touch it wet! Once hard, sand the drip smooth with fine sandpaper and apply a fresh, light mist of gold.
Step 3: Finishing
-
Sealant Application:
To protect the finish from daily handling, apply a clear topcoat. A matte clear coat looks most like real brushed brass, while glossy looks more like polished gold. -
Final Cure:
Let the knobs cure on the cardboard stand for at least 24 hours. The paint needs to harden fully before it can withstand the oils from your hands. -
Reinstallation:
Unscrew the knobs from the cardboard stand and reattach them to your furniture pieces, tightening firmly.
Pro Tip: Better Grip
Warm up your spray paint can in a bowl of warm (not hot) water for 5 minutes before spraying. This thins the paint slightly for a smoother, finer mist and significantly fewer clogs.
Enjoy the elegant new look of your cabinets without the high renovation price tag
Mirror Frame Color Swaps That Pop
Give a tired old frame a vibrant new lease on life with a fresh coat of high-gloss teal spray paint. This simple update adds a pop of coastal charm to any room and turns a thrift store find into a statement piece.
Step-by-Step Tutorial
Materials
- Old wooden picture frame or mirror
- High-gloss teal spray paint (paint + primer formula recommended)
- Fine-grit sandpaper (220-grit)
- Painter’s tape
- Kraft paper or newspaper
- Glass cleaner
- Lint-free cloth
- Tack cloth
- Drop cloth or cardboard
- Respirator mask
Step 1: Preparation
-
Assess the Frame:
Begin by removing the backing, artwork, and glass from your frame if possible. If the glass is glued in or difficult to remove, you will need to mask it off meticulously later. -
Clean the Surface:
Wipe down the entire wood surface with a damp cloth to remove years of dust and grime. If there is any wax or grease, use a mild degreaser to ensure the paint will adhere properly. -
Sand the Wood:
Using 220-grit sandpaper, lightly scuff the entire surface of the frame. You don’t need to strip the old finish completely; just create enough tooth for the new paint to grab onto. -
Clean Again:
After sanding, it is crucial to remove all the fine dust. I like to run a tacky cloth over the crevices and details to pick up every last speck, ensuring a smooth final finish. -
Mask the Glass:
If you couldn’t remove the glass or mirror, cover the entire surface with kraft paper. Use painter’s tape to seal the edges right up to the frame’s lip, pressing down firmly with your fingernail to prevent paint bleed.
Step 2: Painting
-
Set the Scene:
Move your project to a well-ventilated area, preferably outdoors. Lay down a drop cloth or a large piece of cardboard to protect your working surface from overspray. -
Shake the Paint:
Shake your can of high-gloss teal spray paint vigorously for at least one full minute after the mixing ball begins to rattle. This ensures the pigment and solvents are perfectly blended. -
Test Spray:
Always do a quick test spray on a piece of scrap cardboard. This clears the nozzle and lets you get a feel for the spray pattern and pressure before hitting your project. -
First Coat:
Apply the first coat using light, sweeping motions. Start spraying off the edge of the frame, move across, and release the button only after passing the other edge. Keep this layer thin; don’t aim for full coverage yet. -
Dry Time:
Let this initial coat dry for about 15 to 20 minutes. It should be tacky but not wet before you apply the next layer. -
Second Coat:
Apply a second coat, focusing slightly more on the crevices and detailed molding sections. Change your angle of approach to ensure paint gets into the recessed areas of the frame design. -
Check for Drips:
Inspect the frame closely. If you see paint pooling, you are spraying too close or too heavily. Back up slightly and keep your hand moving constantly to avoid runs. -
Final Coat:
Apply a third and final coat to achieve that deep, wet-look gloss. This layer should provide full opacity and cover any remaining spots of the original wood tone.
Smooth Operator
To prevent the nozzle from clogging between coats, turn the can upside down and spray for 3 seconds until clear gas comes out.
Step 3: Finishing Touches
-
Cure the Paint:
Allow the frame to dry completely undisturbed. While it may feel dry to the touch in an hour, I recommend letting it cure overnight to harden the finish against scratches. -
Remove Masking:
If you masked off the glass, carefully peel away the painter’s tape. Pull the tape away from the painted edge at a 45-degree angle to get a crisp, clean line. -
Glass Cleanup:
Clean the glass or mirror insert with glass cleaner and a lint-free cloth to remove any fingerprints or smudge marks from the handling process. -
Reassemble:
Place the glass, artwork, and backing board back into the frame. Secure the backing clips or points firmly. -
Distress (Optional):
For a vintage look like the one in the photo, you can lightly sand the raised edges with fine-grit sandpaper to reveal a hint of the wood underneath, though keeping it glossy and solid is perfect for a modern pop.
Antique Glaze
Apply a dark wax or brown glaze over the dried teal paint, then wipe it back. Ideally, the dark color stays in the crevices for instant age.
Hang your brightly colored frame near a window to catch the light and enjoy the vibrant energy it brings to your space.
Lamp Base And Shade Stripe Tricks
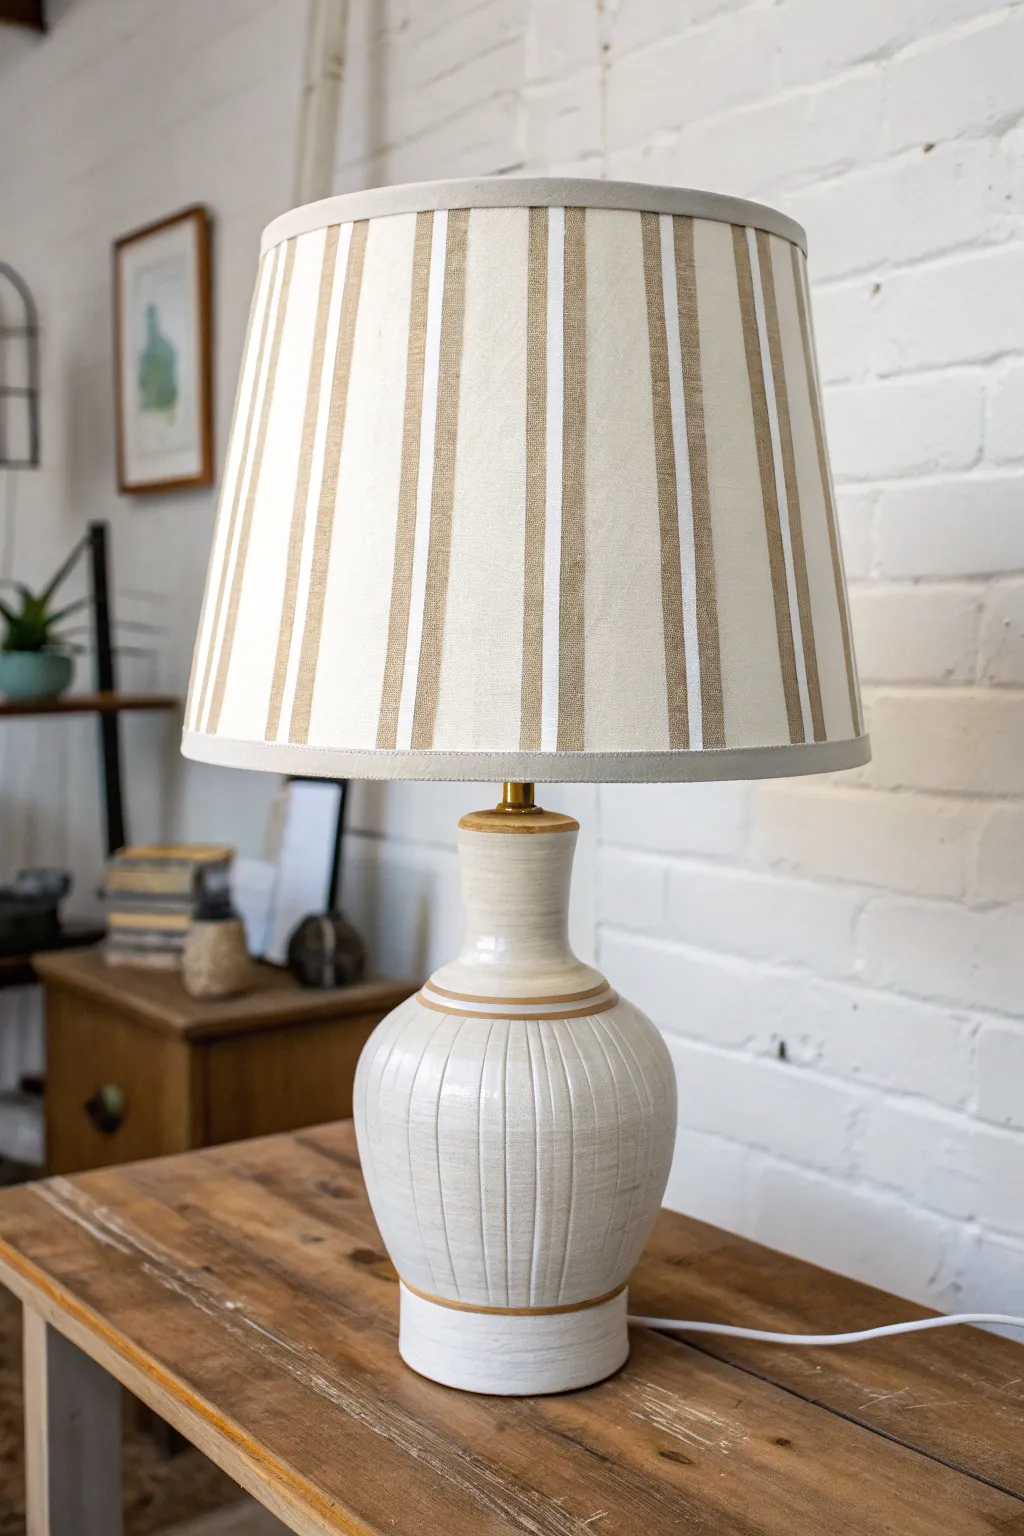
Transform a plain thrift store lamp into a high-end designer dupe using nothing but painter’s tape and spray paint. This project combines a textured, ceramic-look base with a perfectly coordinated striped shade for a cohesive, neutral aesthetic.
How-To Guide
Materials
- Old lamp with a smooth or textured base
- Plain drum lampshade (cotton or linen blend works best)
- Painter’s tape (various widths: 1-inch and 1/4-inch)
- Spray paint (Cream/Off-White in satin finish)
- Spray paint (Metallic Gold or Brass)
- Fabric spray paint (Taupe or Soft Brown)
- Spray primer (for plastics or ceramics)
- Kraft paper or newspaper
- Degreaser or soap and water
- Fine grit sandpaper (220-grit)
- Clear matte sealer spray
Step 1: Prepping The Base
-
Clean thoroughly:
Begin by removing the lampshade and harp. Wipe down the entire lamp base with a degreaser or warm soapy water to remove years of dust and oils. -
Sand surfaces:
Lightly scuff the surface of the lamp base with 220-grit sandpaper. You don’t need to strip the old finish completely, just give the new paint something to grip. -
Protect the hardware:
Wrap painter’s tape carefully around the socket, switch, and cord. If possible, stuff the cord opening with a small piece of paper to prevent overspray from getting inside.
Tape Sealing Trick
Before spraying your color, spray a light coat of the *base* color over your tape edges. This seals the tape and ensures any seep-under matches the background perfectly.
Step 2: Painting the Base Structure
-
Prime the base:
Apply a coat of primer to the entire base. Use short, sweeping bursts to avoid drips. -
Apply base color:
Once the primer is dry, spray the entire lamp base with your Cream/Off-White satin spray paint. Apply 2-3 thin coats for full coverage, letting it dry for about 15 minutes between coats. -
Mask for gold accents:
After the cream paint has cured for at least 24 hours (don’t rush this!), apply thin painter’s tape horizontally where the neck meets the body and near the base to create accent rings. -
Create vertical texture:
To mimic the grooved look if your lamp is smooth, you can use thin 1/4-inch tape vertically down the body, leaving small gaps. I find this creates a fantastic faux-fluted effect when painted over. -
Spray gold details:
Cover the rest of the cream lamp with paper, leaving only the exposed areas for the gold rings accessible. Spray your Metallic Gold paint lightly making sure to get into the grooves. -
Reveal the design:
Peel off the tape while the gold paint is still slightly tacky to ensure crisp lines. Let the base cure fully.
Step 3: Striping the Shade
-
Measure the circumference:
Measure around your lampshade to determine your stripe spacing. Divide the total circumference by an even number to ensure your pattern meets correctly at the back seam. -
Apply vertical tape:
Place strips of 1-inch painter’s tape vertically from the top rim to the bottom rim. Press firmly along the edges to prevent the fabric paint from bleeding underneath. -
Mask the rims:
Use tape to cover the top and bottom fabric trim of the shade so they remain the original color, creating a framed look. -
Cover internal hardware:
Stuff the inside of the shade with newspaper or kraft paper to protect the inner lining and the spider fitting from mist. -
Spray the stripes:
Using your Taupe fabric spray paint, apply light, even coats over the taped shade. Hold the can about 8-10 inches away to avoid soaking the fabric. -
Remove tape carefully:
Immediately after your final coat, carefully peel away the tape strips. Pulling while wet helps keep the fabric edges sharp. -
Reassemble:
Once everything is dry (give the shade a few hours), reattach the harp and shade to your newly refreshed base.
Fuzzy Lines?
If paint bled on the shade, use a small stiff brush dipped in water (for acrylic fabric paint) to gently scrub the edge while wet, or spot-clean with a stain pen when dry.
Now you have a custom, boutique-style lamp that adds texture and pattern to your room for a fraction of the retail price
Crumpled Paper Texture For Rocky Planets
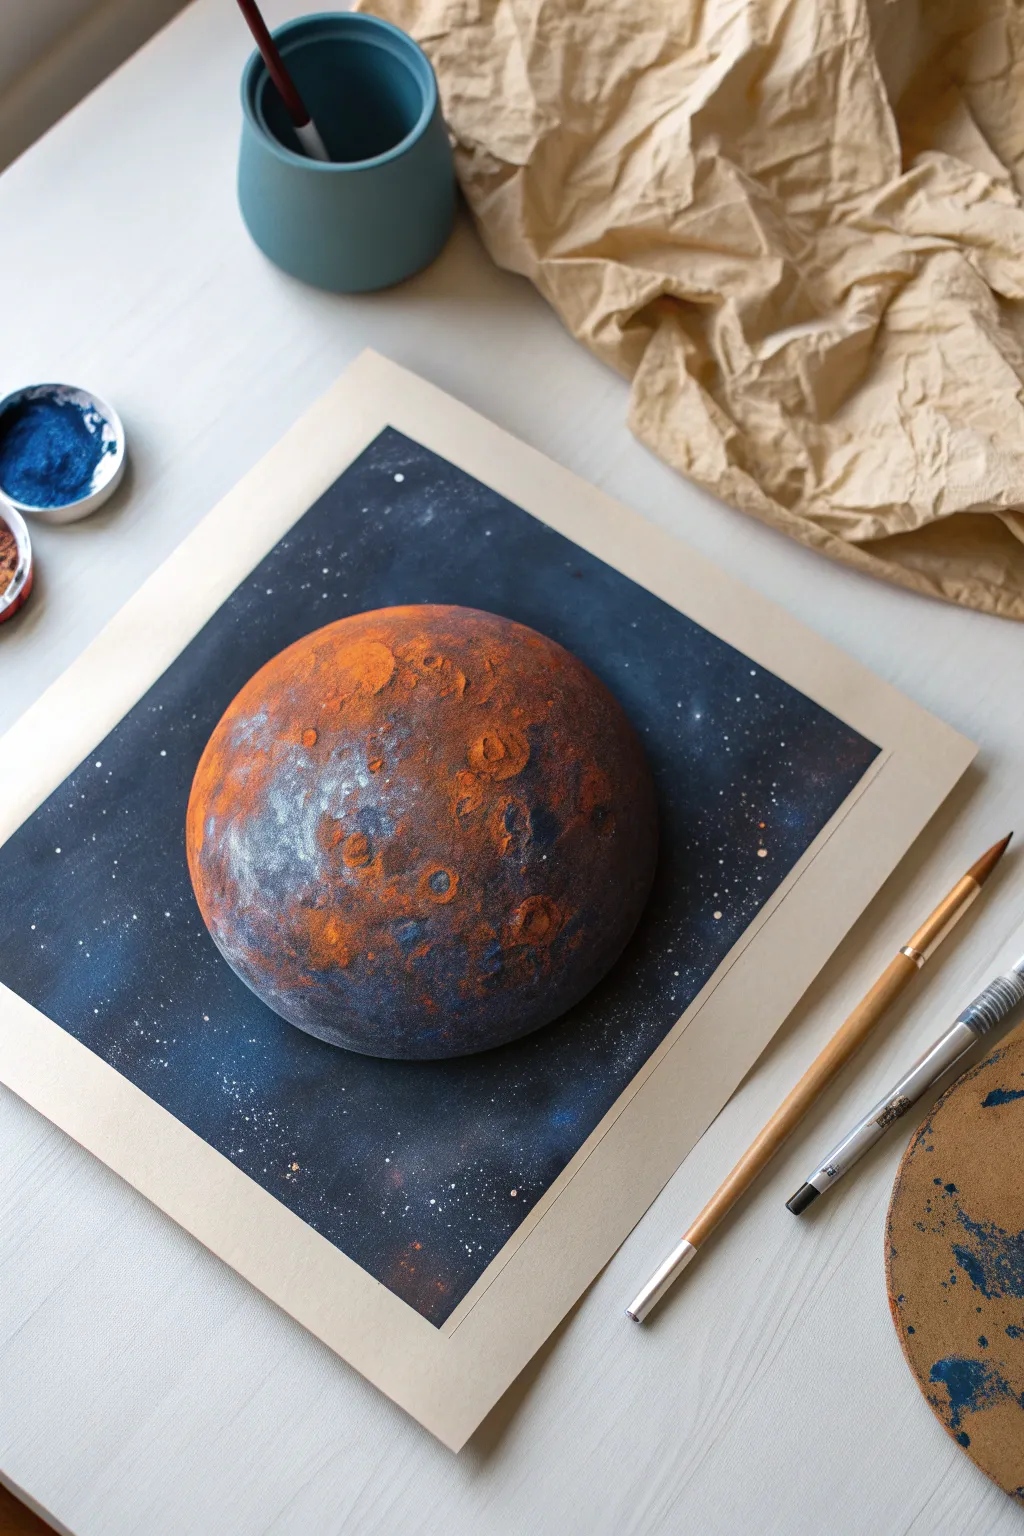
Transform a simple sheet of paper into a stunning, textured celestial body floating in deep space. This project uses the clever trick of crumpled paper stencils to create realistic rocky topography and craters without needing advanced painting skills.
Step-by-Step Guide
Materials
- Heavyweight mixed media paper or cardstock
- Spray paint (Dark Blue, Black, Burnt Orange, Rust Red, White)
- Round object (bowl or lid) for stencil
- Scrap paper or newspaper (for crumpling)
- Acrylic paints (White, Teal/Light Blue) for details
- Fine detail paintbrush
- Old toothbrush (for star splattering)
- Painter’s tape or masking tape
- Protective crafting mat
Step 1: Setting the Scene
-
Prepare the canvas:
Tape down your main sheet of mixed media paper to a flat surface using painter’s tape. This creates a clean border later and keeps the paper flat during spraying. -
Create the planet mask:
Place a round bowl or lid onto a separate piece of scrap paper and trace a circle. Cut this circle out carefully. You will use the negative space (the hole) as a stencil first. -
Position the stencil:
Lay the paper with the circular hole over your main canvas. Secure it lightly with tape so it doesn’t shift, exposing only the area where the planet will be.
Step 2: Surface Texturing
-
Apply base colors:
Spray a light, uneven layer of Burnt Orange and Rust Red into the circular opening. Don’t aim for perfect coverage; patchiness adds to the organic look. -
Crumple your texturizer:
Take a glossy magazine page or a piece of slick scrap paper and crumple it into a loose ball, then uncrumple it slightly so it has many ridges. -
Apply the texture technique:
While the orange spray paint is still wet and tacky, press the crumpled paper gently onto the planet’s surface and lift it off immediately. This removes some paint and creates vein-like textures. -
Add dimension with shadows:
Spray a quick burst of Black paint on just one side of the crumpled paper tool, then dab it along the bottom edge of your planet to create a crescent shadow. -
Dry and cover:
Let the planet area dry completely. Once dry, take the circular cutout you removed earlier (the positive mask) and place it precisely over the painted planet to protect it.
Glossy Paper Trick
Use glossy magazine pages for the crumpled texture step. Regular printer paper is too absorbent and will soak up the paint rather than lifting it to create veins.
Step 3: Deep Space & Stars
-
Spray the background:
With the planet covered, spray the entire background area with Dark Blue, concentrating Black around the corners to create a vignette effect. -
Blend the nebula:
While the dark background is wet, spritz a tiny amount of White or Teal spray paint from a distance to create faint, cloudy nebula gases. -
Splatter stars:
Spray a puddle of white acrylic or spray paint onto a palette. Dip an old toothbrush into it and flick the bristles with your thumb to mist tiny white stars across the dark backgound. -
Big impact stars:
Use a fine paintbrush dipped in white acrylic to hand-dot a few larger, brighter stars for variety. -
Reveal the planet:
Carefully peel away the circular mask covering your planet. The crisp edge between the rocky surface and the starry void should now be visible.
Solar Flare Effect
Before removing the planet mask, spray a faint white glow around just one edge of the circle. This creates a backlit ‘eclipse’ effect.
Step 4: Final Details
-
Enhance the craters:
Using a fine brush and watered-down dark acrylic paint, lightly trace semi-circles around the ‘craters’ formed by the crumpled paper texture to give them depth. -
Highlight the ridges:
I find that adding a touch of teal or white acrylic to the upper ridges of the texture makes the planet look colder and more three-dimensional. -
Add reflected light:
Paint a very thin, subtle line of white or light blue along the sun-facing curve of the planet to simulate atmospheric glow. -
Remove borders:
Wait for everything to be bone dry, then slowly peel away the painter’s tape from the edges of the paper to reveal a clean, gallery-style border.
Mount your finished cosmic landscape in a frame and enjoy your personal view of the galaxy
Reverse Stencils For Glowing Shapes
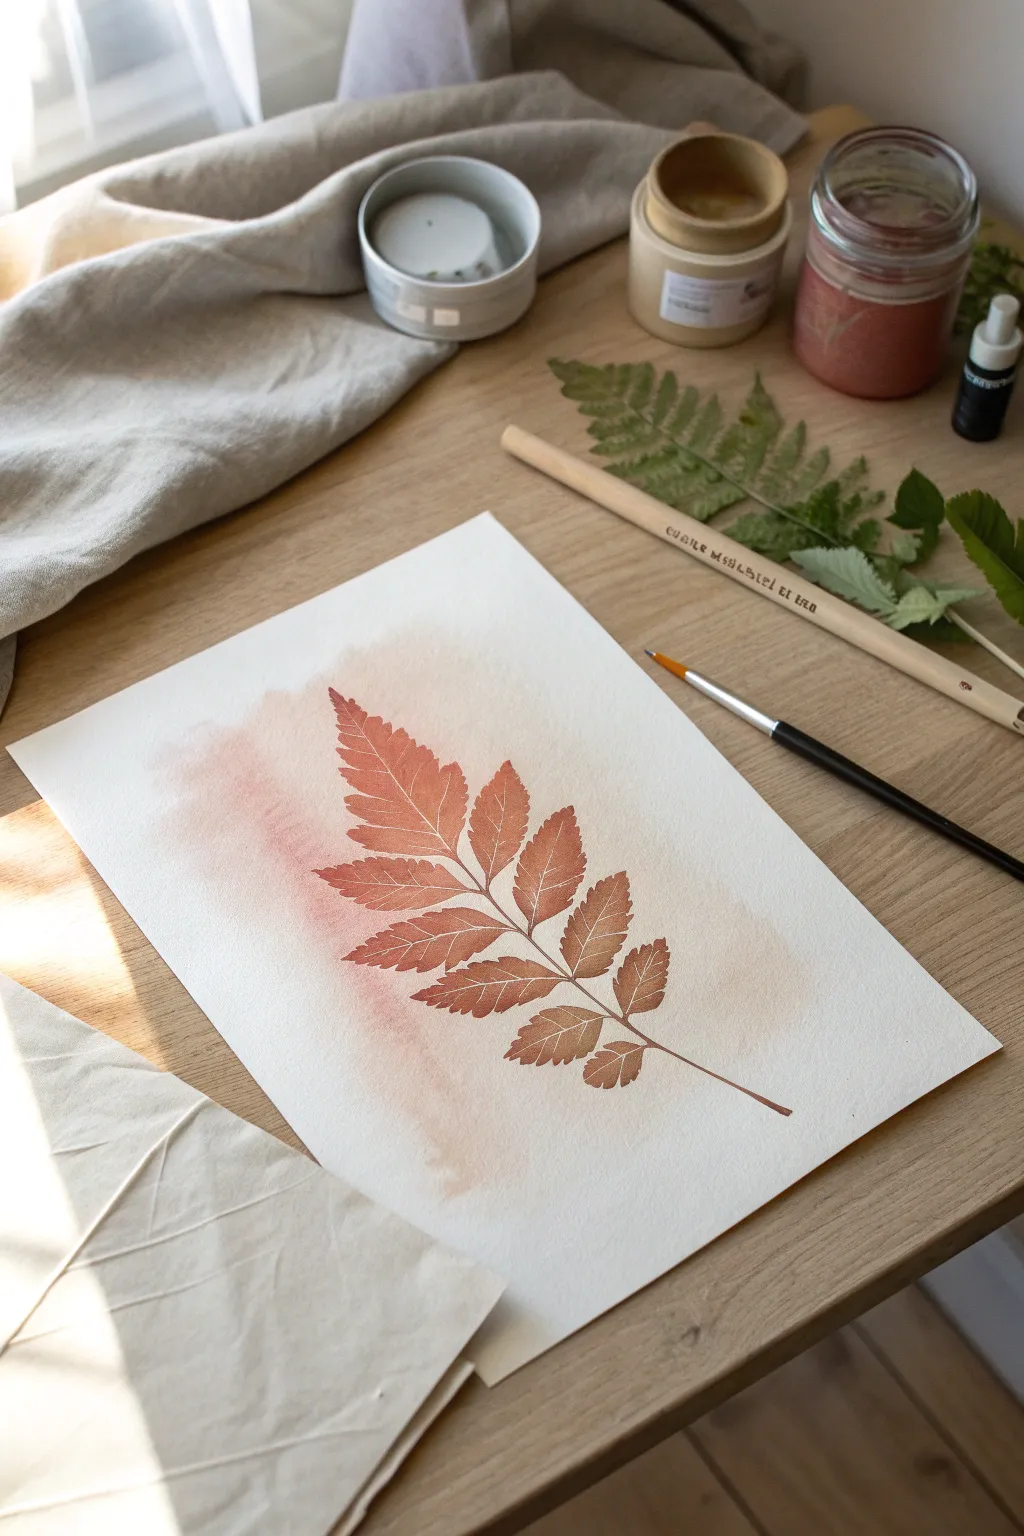
Capture the delicate structure of nature using a simple reverse stencil technique that mimics the soft, bleeding look of watercolor. By using a gentle dusting of spray paint around a real botanical specimen, you create a warm, glowing negative space that feels organic and ethereal.
Detailed Instructions
Materials
- High-quality watercolor paper (cold press texture works best)
- Matte spray paint (terracotta, rust red, or warm sienna)
- Fresh fern leaf (pressed flat for a few hours is ideal)
- Repositionable spray adhesive (low tack)
- Scrap paper or newspaper (for masking)
- Fine detail paintbrush (size 0 or 1)
- Small cup of water
- Paper plate or palette
- Weights (small clean stones or coins)
Step 1: Preparation & Masking
-
Select your botanical:
Choose a fern frond that lies naturally flat. If it’s freshly picked and curling, press it between heavy books for about 30 minutes to ensure crisp edges. -
Apply adhesive:
Take your fern to a well-ventilated area away from your final art paper. Lightly mist the *back* side of the fern with repositionable spray adhesive. Let it get tacky for 60 seconds. -
Position the stencil:
I prefer to place the fern slightly off-center on the watercolor paper for a more dynamic composition. Press down gently on the stem and each leaflet to ensure contact. -
Protect the edges:
Since we want a soft, contained glow rather than edge-to-edge color, you don’t need to mask the whole sheet, but keep scrap paper handy to catch wide overspray if you are spraying indoors.
Step 2: Applying the Color
-
Test the spray:
Shake your spray paint can vigorously. Do a test burst on scrap paper to make sure the nozzle is clear and producing a fine mist, not heavy droplets. -
First light mist:
Hold the can about 10-12 inches above the paper. Spray directly over the fern in short, controlled bursts. Aim for the center of the leaf and let the paint fade out naturally toward the paper’s edges. -
Check density:
You want a speckled, airy texture rather than a solid opaque wall of paint. The white of the paper should still show through the colored mist. -
Add depth:
Apply a second, slightly heavier pass just around the edges of the fern leaves. This concentrates the color around the silhouette, emphasizing the glowing effect. -
Drying time:
Allow the spray paint to dry to the touch. Because we applied thin layers, this should only take about 10-15 minutes.
Adhesive Ace
Don’t skip the spray adhesive! Without it, the force of the spray paint will lift the delicate fern leaves, ruining the crisp ‘reverse’ edge.
Step 3: The Reveal & Refining
-
Remove the stencil:
Carefully peel the fern off the paper, starting from the stem base and pulling slowly upward. You should see a crisp white silhouette against the warm background. -
Prepare for details:
Spray a small puddle of the same paint color onto a paper plate or palette. We will use this liquid paint for the detailing to ensure the colors match perfectly. -
Wet the brush:
Dip your fine detail brush into clean water, then into your paint puddle. You want a consistency similar to watercolor or ink. -
Paint the veins:
Inside the white silhouette, delicately paint a central line for the stem. Use the very tip of the brush to draw fine veins branching out into each leaflet. -
Soften the lines:
If a line looks too harsh, quickly dab it with a clean, slightly damp brush to feather the edge, mimicking the watercolor aesthetic. -
Add subtle texture:
Look at the edges of the painted silhouette. If there are gaps where the spray didn’t reach, you can use a very contrasting ‘dry brush’ technique to lightly bridge those gaps.
Avoid The Blob
If you get a paint puddle, dab it instantly with a corner of paper towel. Don’t wipe; blot straight down to lift the excess without smearing.
Now frame your botanical silhouette to bring a permanent touch of autumn warmth into your home
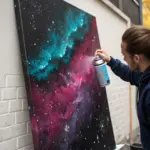
Marble And Stone Illusions With Mist Layers
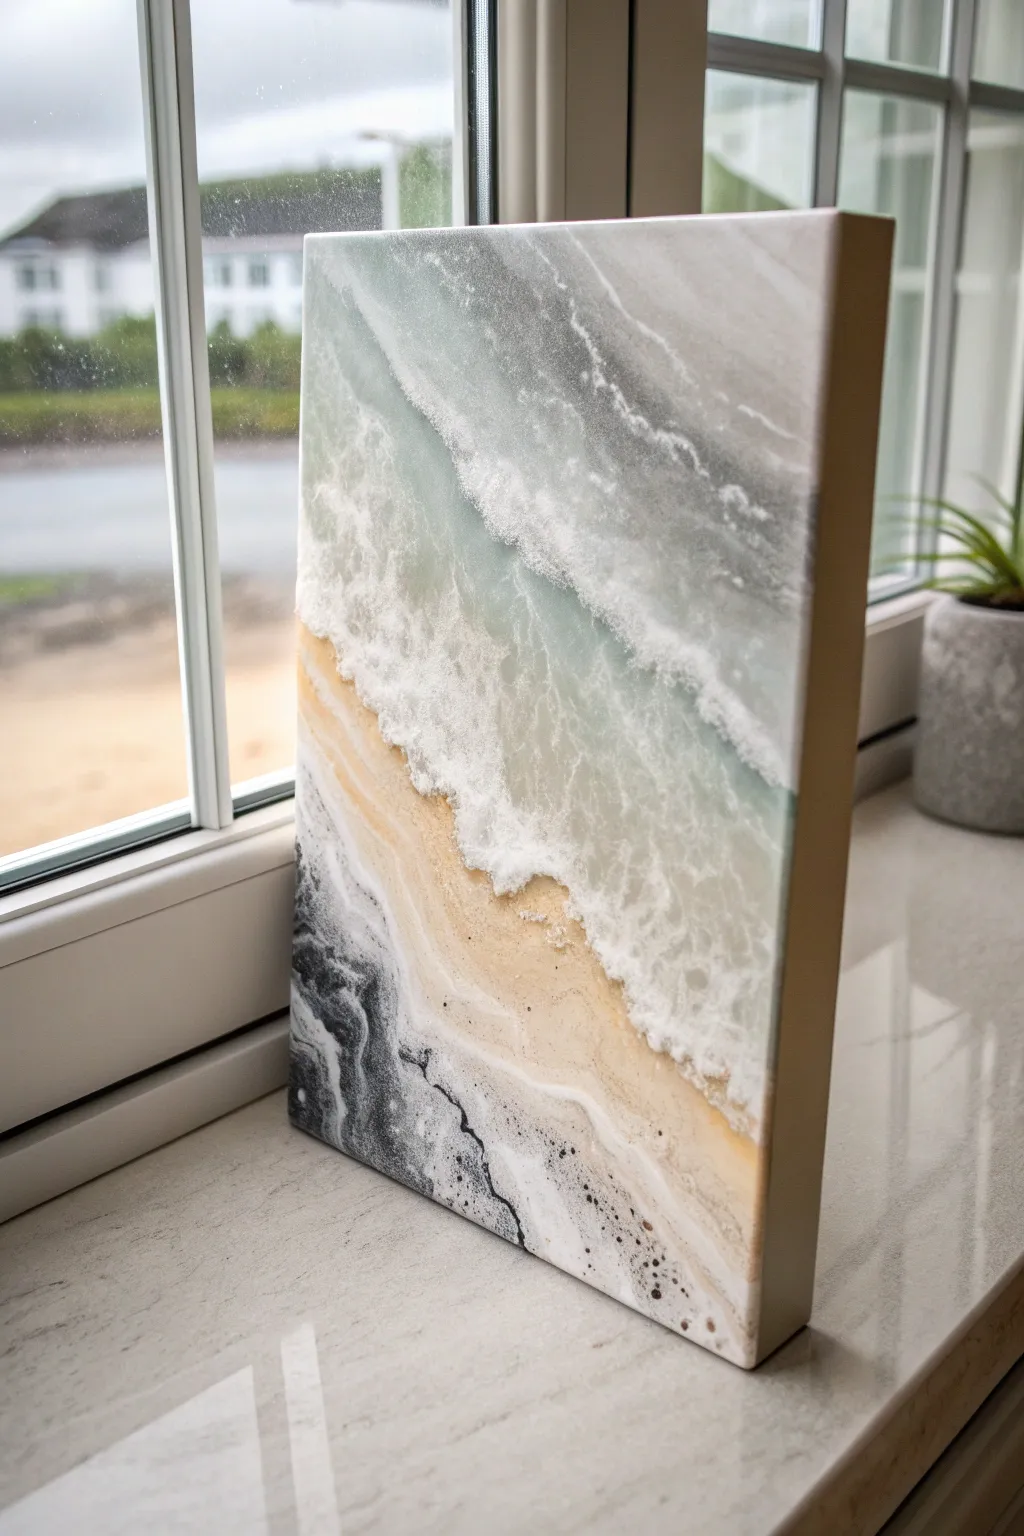
Transform a simple canvas into a stunning, high-end piece of faux-stone art that mimics the churning foam of ocean waves meeting the shore. By layering mists of spray paint and manipulating them while wet, you’ll create organic, marble-like veins that capture the movement of water.
How-To Guide
Materials
- Stretched canvas (11×14 or similar)
- White primer spray paint
- Gloss spray paint in: Teal/Seafoam Green, Sandy Beige, Dark Grey/Charcoal, and White
- Metallic gold or pearl spray paint (optional highlight)
- Water spray bottle with adjustable mist
- Plastic drop cloth
- Hairdryer or heat gun (set to low)
- Gloss clear coat/sealant
Step 1: Preparation and Base
-
Prepare your workspace:
Set up in a well-ventilated area, preferably outdoors or in a garage. Lay down your plastic drop cloth to protect surfaces from overspray. -
Prime the canvas:
Give your canvas a solid coat of white primer. This ensures your colors will pop and creates a non-porous surface that allows the liquid paint to slide around more easily. -
Establish the horizon:
Visualize a diagonal line splitting the canvas. Spray the upper left section generously with your Teal or Seafoam Green paint. Don’t worry about perfect coverage; organic blotches are better. -
Create the shoreline:
Immediately spray the Sandy Beige color across the middle section, slightly overlapping with the wet Teal paint. -
Add the deep water details:
Spray the bottom left corner with Dark Grey or Charcoal. This high-contrast area will act as the wet, stony sand or deep water churning near the rocks.
Fixing Muddy Colors
If colors blend into gray sludge, stop tilting. Let that layer dry fully, then apply fresh vibrant paint on top. Working in layers preserves clean hues.
Step 2: Creating the Marble Effect
-
Apply the mist technique:
While the colored paints are still wet, take your water bottle and spritz a fine mist over the entire surface. Watch as the water droplets repel the oil-based spray paint to create little cells. -
Add the white foam:
Hold the White spray paint can about 12 inches away and apply a light burst over the transition line between the teal and beige. This is your wave crest. -
Manipulate the flow:
Tilt the canvas gently. Let the water and paint run into each other. Gravity does the heavy lifting here, creating natural, marble-like veins. -
Force the movement:
Use a hairdryer on a low, cool setting to push the white paint ‘up’ the beach. I find blowing from the beige side toward the teal helps create that crashing wave look. -
Layering the stone texture:
Once the first layer is tacky, spray a very light, localized mist of Dark Grey into the wettest areas of the white foam to create depth and shadow. -
Stone veining:
Spritz water again directly onto the dark grey areas. The separation will look like the natural cracks found in granite or marble coastlines.
Step 3: Refining and Sealing
-
Highlighting:
If you want a touch of shimmer, mist a tiny amount of metallic gold or pearl very lightly over the sandy beige section. -
Drying phase:
Let the artwork sit flat to dry completely. Because we used water, this might take longer than standard spray paint—allow at least 24 hours for all moisture to evaporate. -
Check for flatness:
Once dry, check the surface. If the water left any deep craters that distract from the look, you can lightly sand them down with fine-grit sandpaper. -
Final gloss coat:
To achieve that wet, polished stone look seen in the photo, apply 2-3 coats of a high-gloss clear sealant. -
Curing:
Allow the final clear coat to cure according to the manufacturer’s instructions before displaying upright.
Add Resin-Like Depth
For a glass-like finish, pour a layer of clear art resin over the dried painting. It amplifies the stone effect and makes the colors incredibly vibrant.
Now you have a serene slice of the ocean frozen in faux-stone elegance to brighten your space
Glow-Like Highlights With Strategic Masking
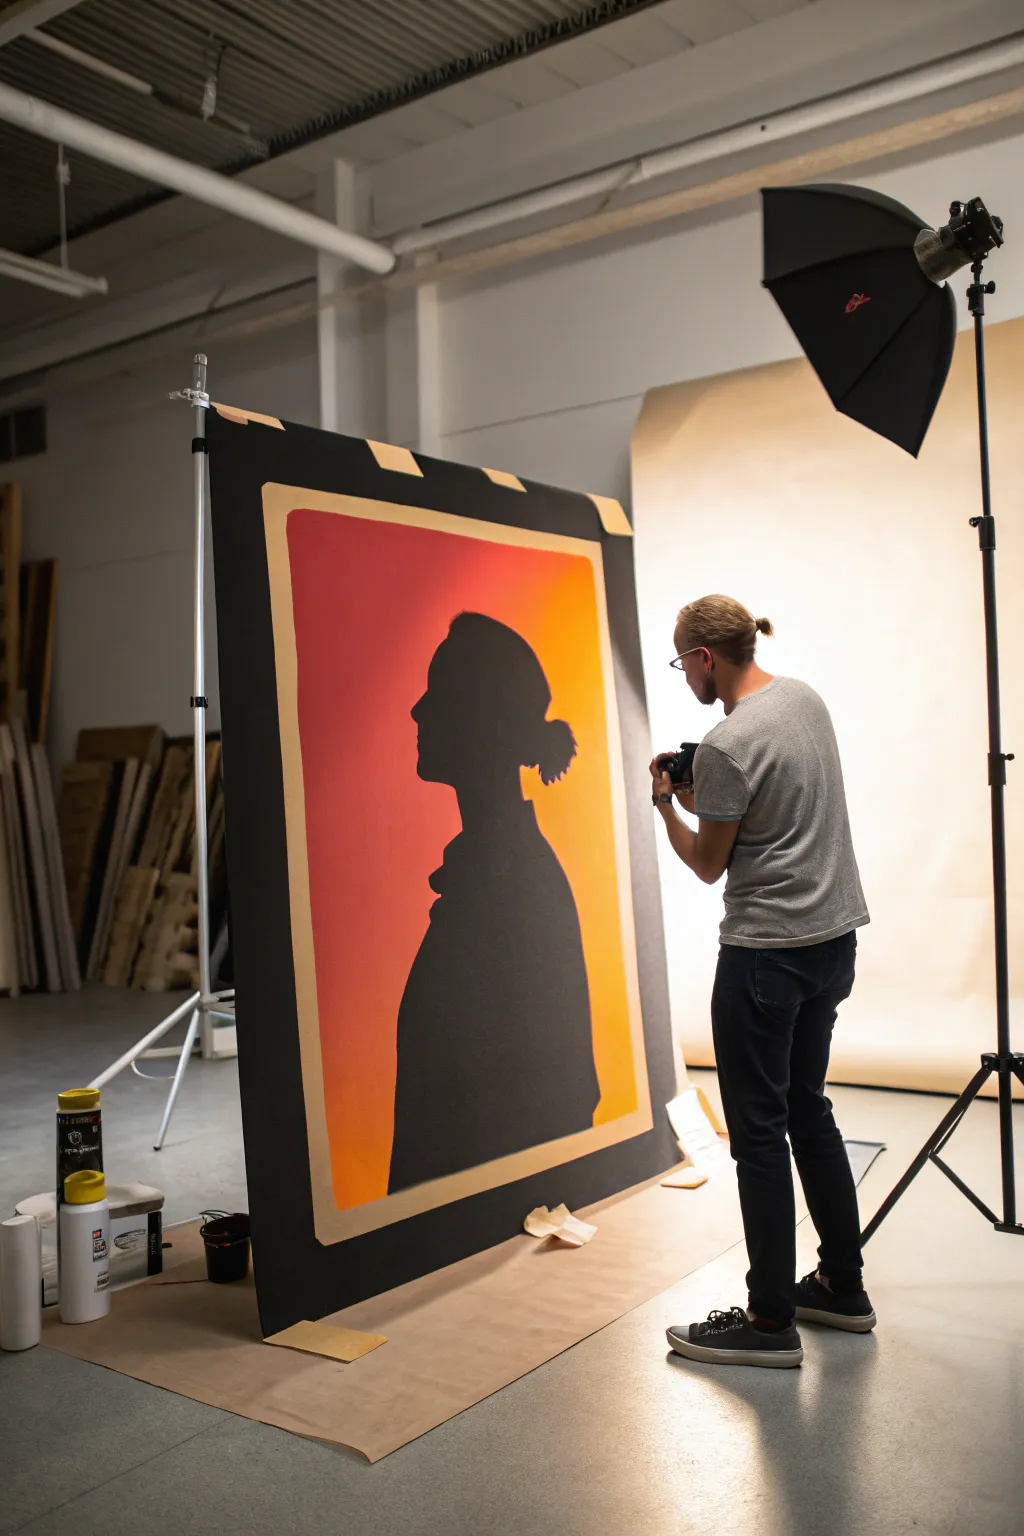
Transform a simple silhouette into a dramatic piece of art using strategic masking and vibrant spray paint gradients. This large-scale project creates a stunning, warm focal point that looks like professional studio lighting captured in a frame.
Detailed Instructions
Materials
- Large sheet of black foam core or heavy black poster board (4ft x 6ft)
- White poster board or art paper (same size as the backing)
- Spray paint (Matte Red)
- Spray paint (Safety Orange)
- Spray paint (Sun yellow)
- Removable spray adhesive or heavy weights
- Painter’s tape (blue or yellow delicate surface)
- Kraft paper or newspaper for masking
- X-Acto knife with fresh blades
- Cutting mat or scrap cardboard
- Pencil for sketching
- Projector (optional, for tracing silhouette)
Step 1: Preparing the Canvas
-
Define the frame:
Start with your large black foam core sheet. Measure a consistent border (about 4-5 inches) around the entire perimeter. This will serve as the black frame that encases the glowing artwork. -
Mask the borders:
Using painter’s tape and strips of kraft paper, carefully mask off this outer border area. You want to protect the black surface perfectly, as any stray paint spray will show up clearly against the dark background. -
Prepare the center:
Ensure the central rectangular area (inside your masked border) is clean and free of dust. This is where your gradient magic will happen.
Bleeding Lines?
If paint bled under your tape, don’t panic. Use a black paint marker to meticulously cover the mistake. Only do this once the colored paint is bone dry.
Step 2: Creating the Sunset Gradient
-
Establish the base:
Begin spraying at the top third of the open rectangle with your matte red spray paint. Hold the can about 8-10 inches away and use sweeping, horizontal motions to get even coverage without drips. -
Blend the middle:
Transition to the orange spray paint for the middle section. As you spray upwards into the red, pull the can slightly further back to create a soft, misty blend rather than a hard line. Overlap the colors significantly. -
Add the glow:
Finish the bottom third with the sun yellow paint. Blend it upwards into the orange just like you did with the previous layer. I find that doing a second light pass of yellow purely on the bottom edge really makes the ‘light source’ pop. -
Dry completely:
Let the paint cure fully. Since you will be applying a masking silhouette on top of this later, the paint needs to be completely dry to the touch, or the adhesive will ruin your gradient. Give it at least 2-3 hours.
Step 3: Designing the Silhouette
-
Trace or draw:
On a separate piece of paper or cardstock (sized to fit inside your painted rectangle), sketch the profile silhouette. Using a projector to cast a shadow on the wall and tracing it is the easiest way to get an accurate human profile. -
Cut the positive shape:
Using a sharp X-Acto knife, carefully cut out the silhouette. For this technique, we actually need clarity on which part we are using: unlike a stencil where you paint *through* the hole, here we are essentially blocking out the glowing background with a solid shape. -
Refining the plan:
Actually, looking at the reference image technique, it’s an inverted process. We need to create a large black cut-out to layer *over* the background. Take your original black board with the gradient. Now, take a second sheet of black paper or thin board the same size as the inner rectangle. -
Cutting the foreground:
On this new black sheet, draw your silhouette. Cut it out. You want the black paper to retain the shape of the person, including the shoulders and head. -
Alternative method (Blocking):
If you want the silhouette to be the *painted* part, stick a stencil down. However, for a black silhouette against a colored background, simply painting the black silhouette directly onto your dry gradient is risky. The cleanest method is the cutout overlay. -
Final Assembly:
Take your cut-out black paper silhouette. Apply spray adhesive to the back of it. Carefully mount it directly onto the dried gradient background.
Add Texture
Before the yellow layer dries, flick a tiny amount of water onto it. The paint will separate slightly, creating a cool, distressed retro film texture.
Step 4: The Reveal
-
Peel the tape:
Once your silhouette layer is adhered (or painted, if you chose to stencil black paint over the color), carefully peel away the painter’s tape and kraft paper from the outer borders. -
Clean edges:
Inspect the transition between the black frame and the colored center. If any paint bled under the tape, use a black permanent marker or a small brush with matte black acrylic to touch it up. -
Seal the work:
To equalize the sheen between the spray paint and the black board, give the entire piece a light coat of matte clear sealant. This brings the look together professionally.
Hang your vibrant silhouette in a well-lit area to let those warm gradients truly shine


Have a question or want to share your own experience? I'd love to hear from you in the comments below!