
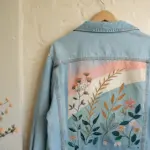
If you’ve ever stared at a plain tee and thought it needed more attitude, spray paint shirts are my favorite quick fix. From crisp stencil shapes to punchy graffiti-style text, these ideas turn fabric into a wearable canvas in one fun session.
Graffiti Name Front And Center
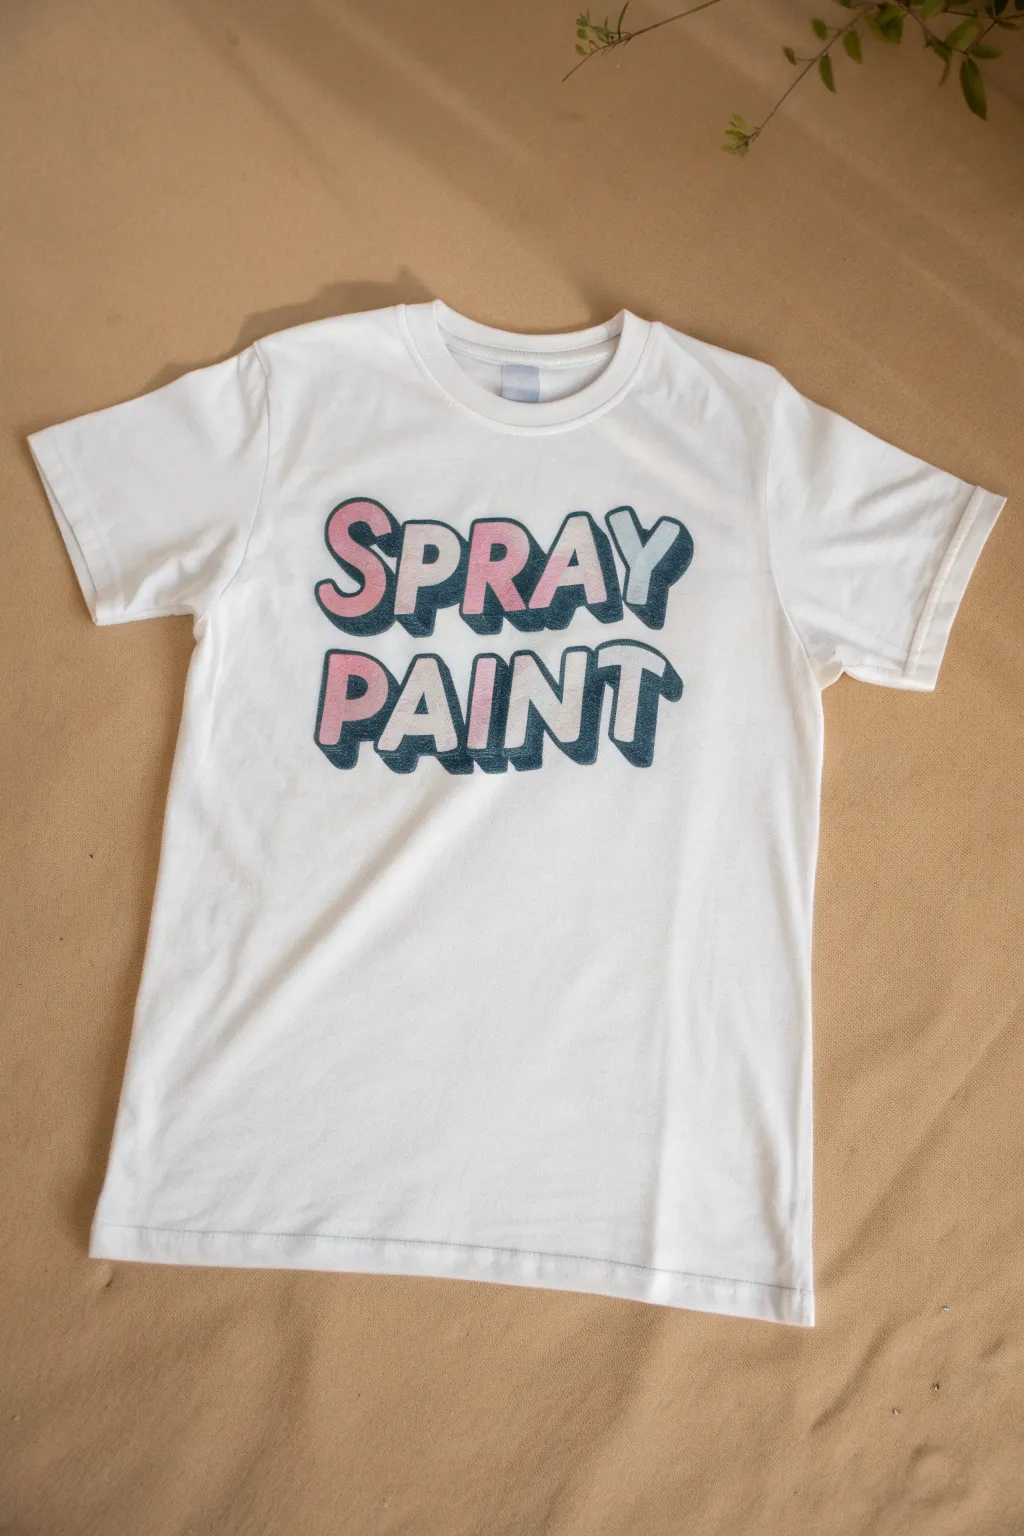
Recreate this bold, graphic look that combines the fun of bubble letters with the urban edge of street art. Using simple stenciling techniques, you can achieve crisp lines and that classic shadowed 3D effect right on a plain white tee.
Step-by-Step Tutorial
Materials
- White cotton t-shirt (pre-washed)
- Fabric spray paint (Pink and Teal/Dark Blue)
- Cardstock or acetate sheets for stencils
- Craft knife (X-Acto)
- Cutting mat
- Repositionable spray adhesive
- Computer and printer
- Painter’s tape or masking tape
- Cardboard insert for shirt
- Scrap paper or newspaper
Step 1: Design and Cut
-
Choose your font:
Begin by selecting a bold, sans-serif font on your computer. Look for something thick and blocky that mimics bubble letters or standard graffiti throw-up styles. Type out ‘SPRAY’ and ‘PAINT’ on two separate lines. -
Print the template:
Scale the text so it will span nicely across the chest of your shirt, roughly 8-10 inches wide. Print this design onto standard printer paper first to check the size. -
Transfer to stencil material:
Tape your printed design onto your cardstock or acetate sheet. Alternatively, if your printer can handle cardstock, print directly onto it to save a step. -
Cut the main letters:
Using a sharp craft knife and a cutting mat, carefully cut out the interior of the letters. Keep the ‘islands’ (the negative space inside letters like P, R, and A) safe; you will need them later. -
Create the shadow stencil:
For the 3D shadow effect seen in the image, you need a second stencil. Offset your original design slightly down and to the left on a new piece of cardstock, trace the outlines, and cut out only the crescent-moon shapes that form the shadow.
Crisp Lines Only
To prevent ‘underspray’ (fuzzy edges), press the stencil edges down with a popsicle stick right before spraying. Short paint bursts are better than one long spray.
Step 2: Prep and Spray
-
Prepare the shirt:
Slide a piece of stiff cardboard inside the t-shirt. This creates a flat surface for spraying and prevents the paint from bleeding through to the back of the shirt. -
Smooth the fabric:
Ensure the fabric is completely flat and wrinkle-free. I like to run an iron over the front area quickly just to be sure. -
Apply adhesive:
Lightly mist the back of your main letter stencil with repositionable spray adhesive. Let it get tacky for about 30 seconds before placing it on the shirt. -
Position the stencil:
Press the stencil firmly onto the center of the chest. Pay extra attention to the thin bridges between letters to ensure tight contact with the fabric. -
Place the islands:
Spray the back of those saved ‘island’ pieces (inside of A, P, R) with adhesive and place them carefully into their respective spots within the stencil openings. -
Mask off the area:
Use painter’s tape and scrap paper to cover all the exposed fabric around the stencil. You want to shield the rest of the white shirt from stray paint mist. -
Spray the pink layer:
Shake your pink fabric spray paint well. hold the can about 6-8 inches away and apply light, even coats over the ‘SPRAY’ letters. Do the same for the ‘P’ and ‘T’ in ‘PAINT’ if you want that specific alternating color look, or spray them all pink. -
Dry and remove:
Allow the paint to dry to the touch, which usually takes about 15-20 minutes. Carefully peel off the stencil and the island pieces.
Add Texture
For a gritty street texture, lightly mist the wet paint with a sprinkle of glitter or sand before it dries, then shake it off later.
Step 3: Shadows and Details
-
Align the shadow stencil:
Once the pink layer is fully dry, position your second ‘shadow’ stencil. It should align perfectly with the edges of your pink letters but extend slightly downward and to the left. -
Protect the pink:
If your shadow stencil essentially overlaps the pink areas, you might need to mask off the dried pink letters with precision tape or loose paper shapes to keep the colors crisp. -
Spray the dark layer:
Using the teal or dark blue spray paint, fill in the shadow areas. Use short, controlled bursts to avoid soaking the fabric, which can cause bleeding under the stencil edges. -
Reveal the design:
Remove the shadow stencil carefully. You should now have pink letters with a distinct dark drop shadow giving that 3D pop. -
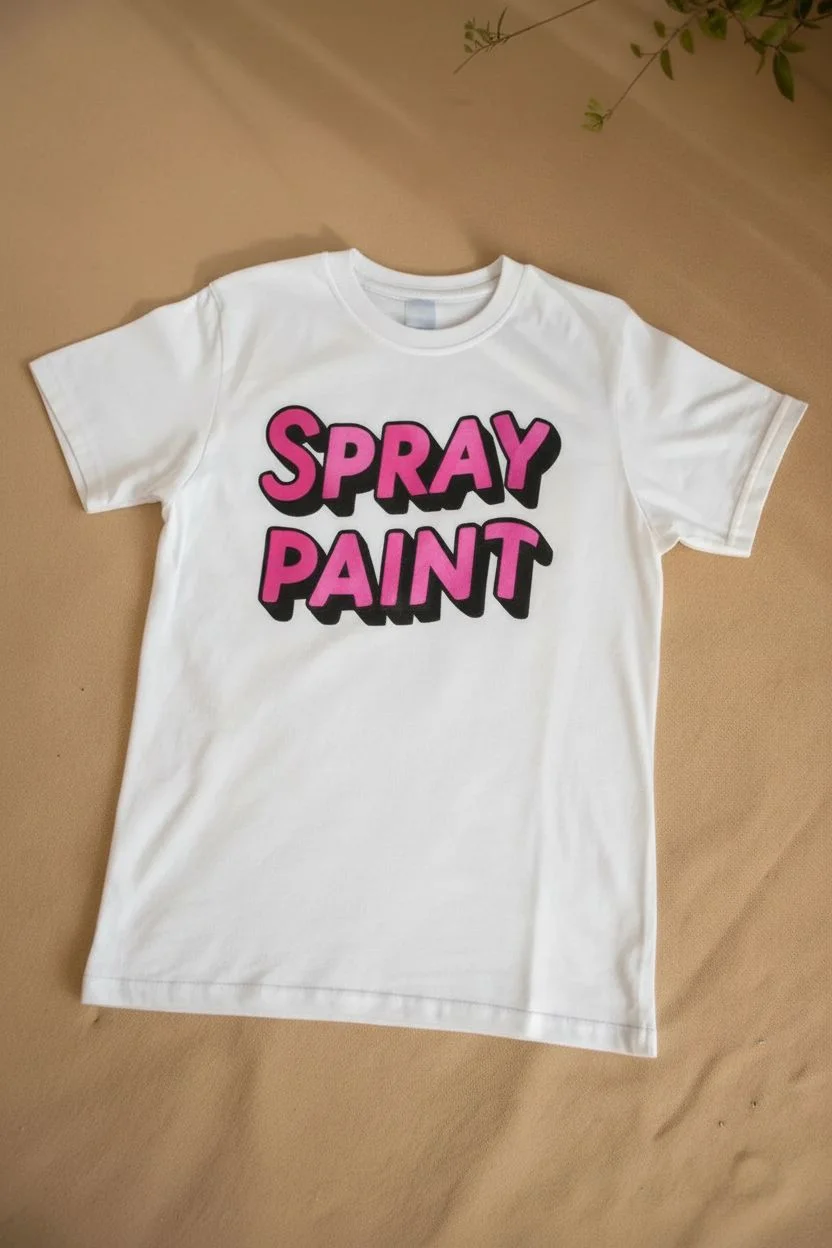
Alternating colors:
To match the image exactly, note that some letters in the bottom row are teal. You can achieve this by masking off individual letters during the first spray phase and swapping colors. -
Heat set the paint:
Once the shirt is completely dry (wait at least 4 hours, or overnight is better), heat set the design. Place a thin cloth over the artwork and iron on a high, dry setting for a few minutes to lock in the color.
Wear your new creation with pride knowing you mastered the art of fabric stenciling


Big Number Birthday Shirt
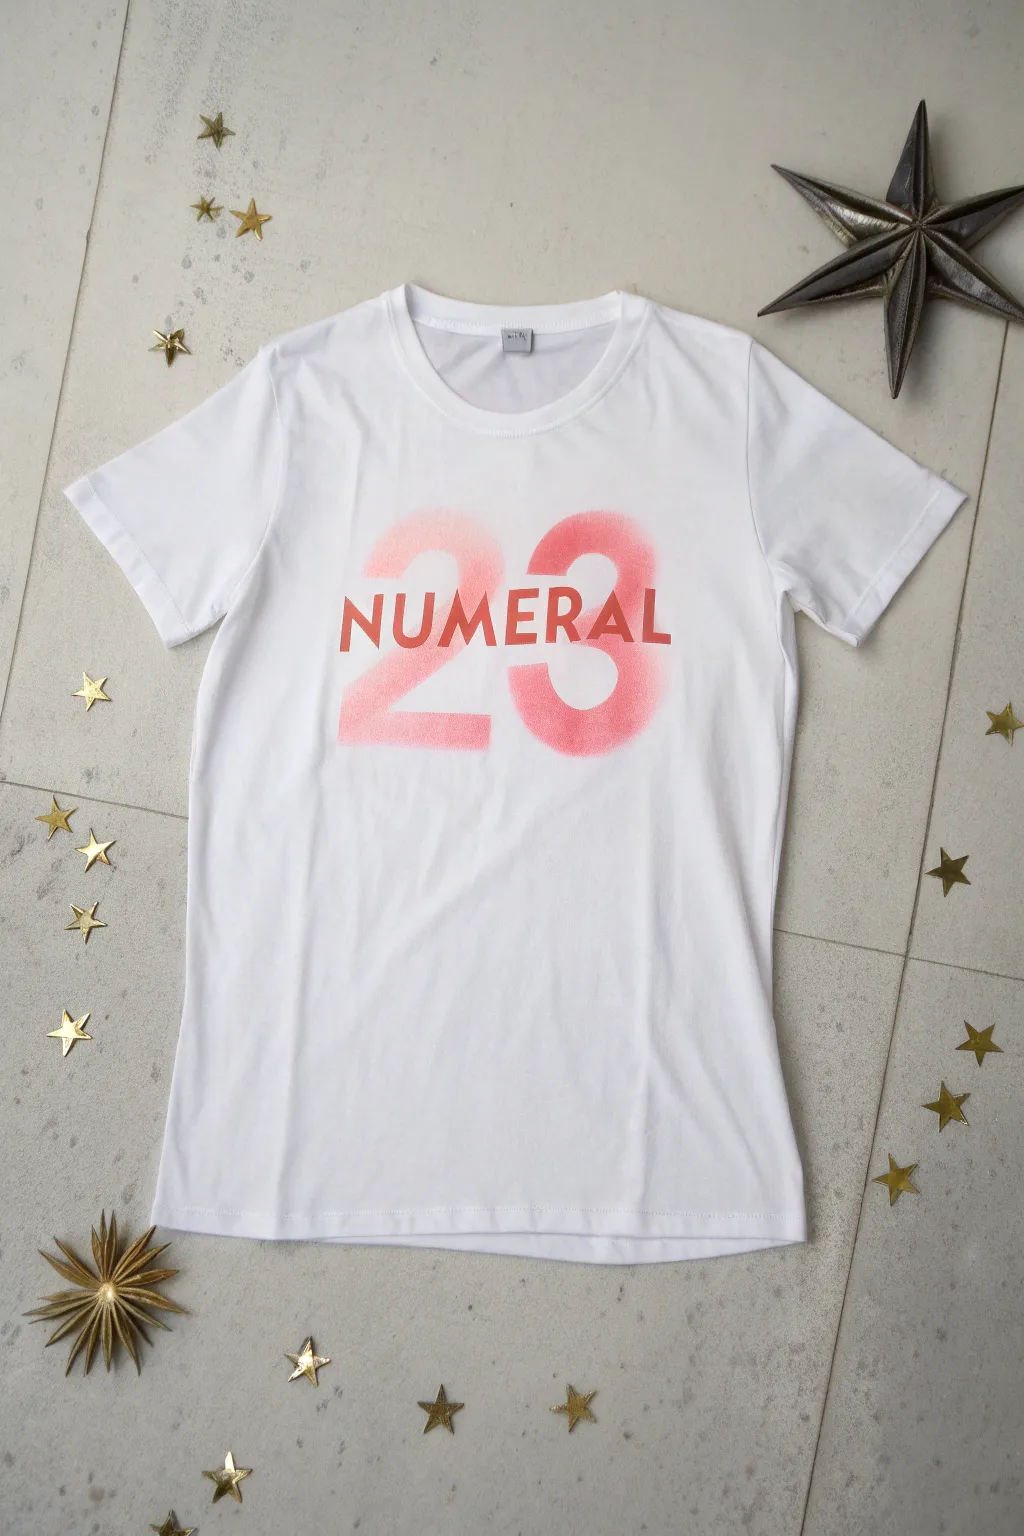
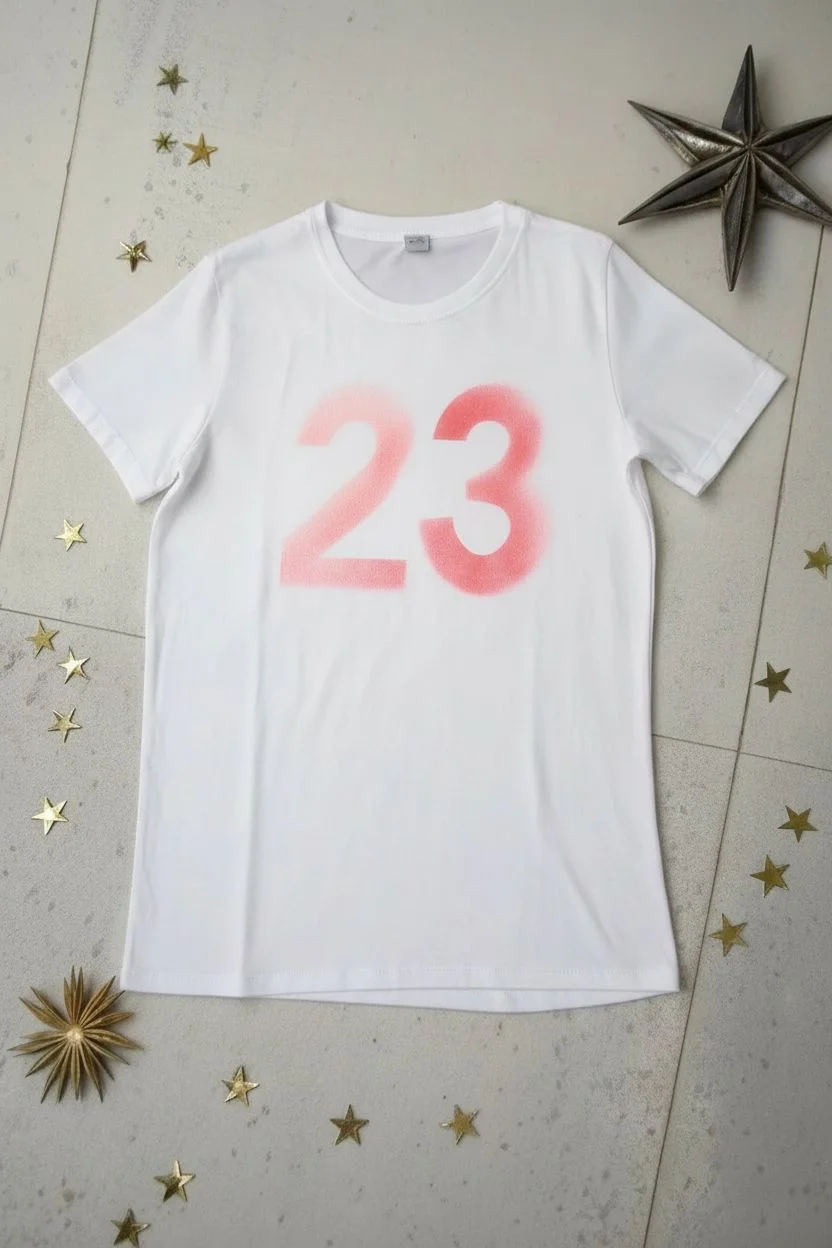
Celebrate a milestone with this striking graphic tee featuring a large, soft-focus number and bold typography. The hazy, spray-painted effect of the numerals creates a perfect backdrop for the crisp lettering layered on top.
How-To Guide
Materials
- White cotton t-shirt
- Fabric spray paint (neon pink or coral)
- Fabric paint or screen printing ink (dark red or rust)
- Adhesive cardstock or freezer paper
- Cutting machine (Cricut/Silhouette) or craft knife
- Cutting mat
- Iron and ironing board
- Cardboard insert for shirt
- Painter’s tape or masking tape
- Sponge pouncer or stencil brush
Step 1: Designing the Stencils
-
Plan your layout:
Begin by deciding on the size of your number. For a bold look like the photo, the numbers should take up a significant portion of the chest area, approximately 8-10 inches tall. -
Create the number stencil:
Cut out your chosen number (e.g., ’23’) from freezer paper or adhesive vinyl. For this specific ‘negative space’ look, you need the *outline* of the numbers, meaning you will discard the number shapes themselves and keep the surrounding paper. -
Create the text stencil:
Create a second stencil for the word ‘NUMERAL’ (or your chosen text). This time, you want the letters cut out so you can paint through them. -
Check alignment:
Before cutting, layer your digital designs to ensure the text fits perfectly across the center of the numbers.
Soft Edges
To get the hazy edge on the numbers shown in the photo, lift the edges of your stencil slightly or hold the can further away.
Step 2: Spraying the Numbers
-
Prepare the shirt:
Wash, dry, and iron your shirt to remove sizing and wrinkles. Slide a piece of cardboard inside the shirt to prevent paint from bleeding through to the back. -
Apply the number stencil:
Place your number stencil (the negative space one) onto the shirt. If using freezer paper, iron it shiny-side down until adhered. If using vinyl, smooth it down firmly. -
Mask the perimeter:
Use painter’s tape and scrap paper to cover the rest of the shirt around the stencil, leaving only the number area exposed. -
Apply the spray paint:
Shake the fabric spray paint can vigorously. Hold the can about 8-10 inches away and spray lightly. I find that quick, sweeping bursts prevent pooling. -
Build color intensity:
Apply a second light coat if needed, concentrating slighty more color at the top and bottom gradients if you want a dimensional look, but keep the edges soft. -
Remove stencil immediately:
Carefully peel away the masking tape and the stencil while the paint is still slightly tacky to avoid cracking the edges. -
Dry completely:
Allow the spray paint to dry fully according to the manufacturer’s instructions. This usually takes at least an hour.
Bleeding Lines?
If paint bleeds under the stencil, don’t panic. Use a small brush with white fabric paint to carefully touch up the errors.
Step 3: Adding the Text Layer
-
Position the text stencil:
Once the pink base is bone dry, position your ‘NUMERAL’ stencil directly over the painted numbers. Center it horizontally. -
Secure the stencil:
Iron or stick the stencil down firmly, paying special attention to the small bridges inside letters like A, R, or O. -
Load the sponge:
Dip your sponge pouncer into the dark red or rust-colored fabric paint. Dab excess paint off onto a paper towel; a ‘dry brush’ technique is crucial here. -
Stipple the text:
Gently dab the paint over the stencil openings using straight up-and-down motions. Do not brush side-to-side, as this pushes paint under the stencil. -
Ensure opacity:
Apply a second coat to the letters if the underlying spray paint color is showing through too much. -
Reveal the design:
Peel off the text stencil carefully. -
Heat set:
Once everything is dry (wait 24 hours for best results), place a thin cloth over the design and iron on high heat for 3-5 minutes to permanently set the ink.
Wear your custom creation with pride or wrap it up for a truly personalized birthday gift


Neon Ombre Fade Background
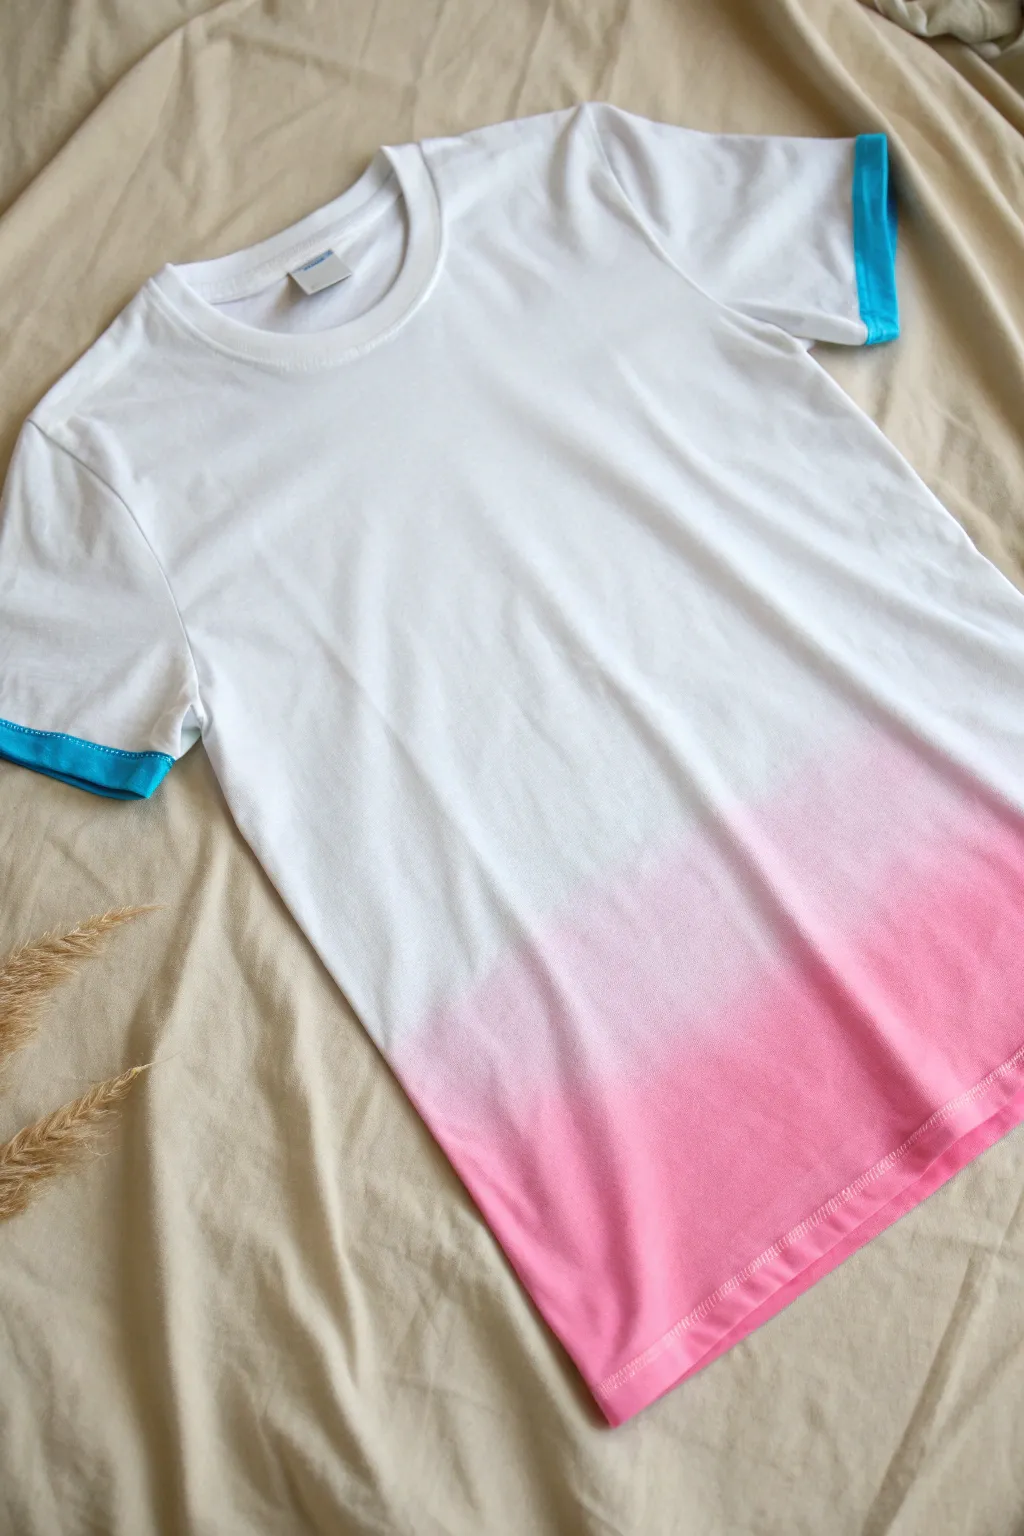
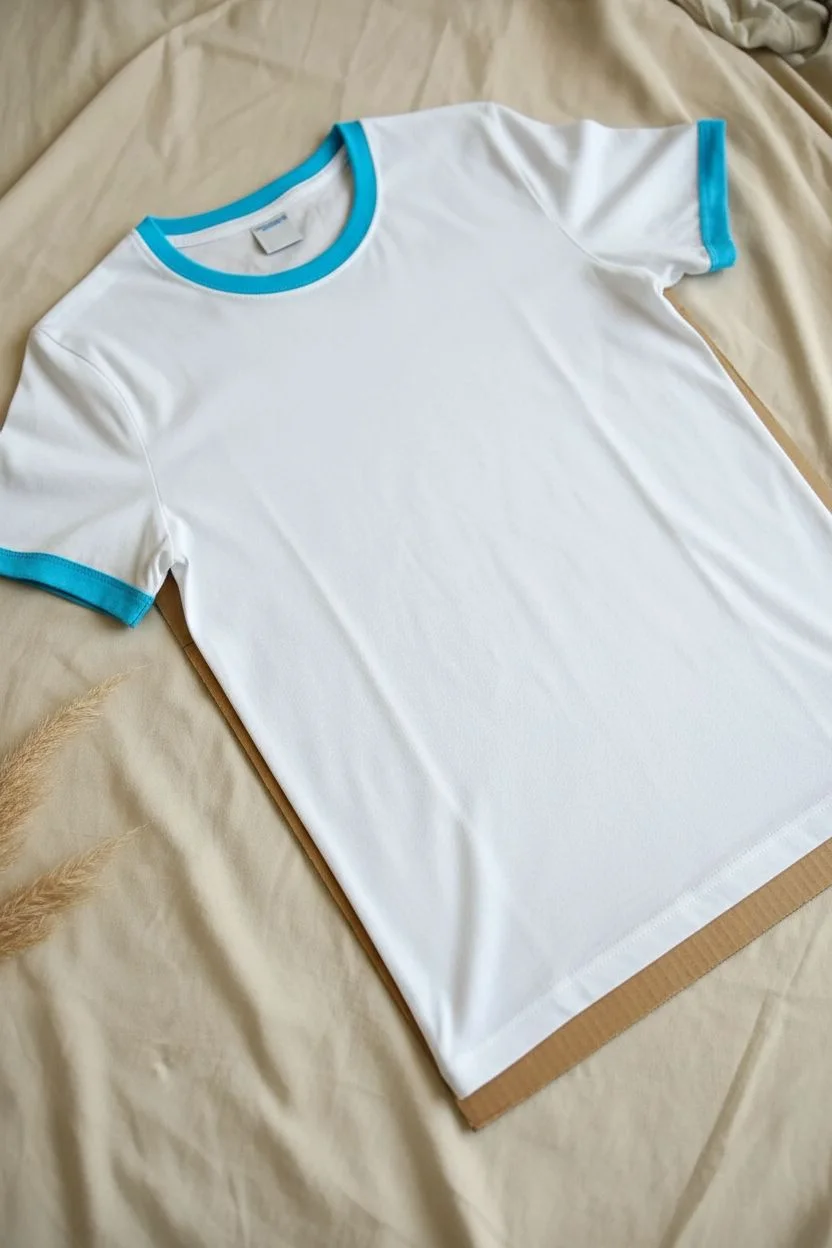
Transform a plain ringer tee into a streetwear staple with a vibrant neon pink fade. This technique creates a seamless gradient that looks professionally dipped rather than just sprayed.
Step-by-Step Tutorial
Materials
- White or light-colored ringer t-shirt (cotton/poly blend works best)
- Neon pink fabric spray paint (pump bottle or aerosol)
- Cardboard insert or shirt form
- Painter’s tape or masking tape
- Iron (for heat setting)
- Pressing cloth or parchment paper
- Drop cloth or old newspapers
- Coat hanger (optional, for drying)
Step 1: Preparation
-
Pre-wash the garment:
Before executing any dye or paint project, wash and dry your t-shirt without fabric softener. This removes factory sizing and chemicals that might prevent the spray paint from bonding properly with the fibers. -
Set up your workspace:
Fabric spray paint can travel, so cover a generous area of your table or floor with a drop cloth. I like to do this project outside if it’s not too windy to avoid any fumes indoors. -
Insert the barrier:
Slide a piece of cardboard inside the shirt. This is crucial as it prevents the paint from bleeding through the front layer onto the back layer, ensuring a clean application on both sides. -
Smooth the fabric:
Pull the shirt taut against the cardboard insert. Make sure the bottom hem is perfectly flat and free of wrinkles so the gradient applies evenly across the width.
Step 2: Creating the Ombre Effect
-
Test your nozzle:
Spray a quick burst onto a scrap piece of paper or cardboard. This clears any dried clogs and ensures you have a fine mist setting rather than a patchy stream. -
Apply the base saturation:
Start applying the neon pink paint at the very bottom hem of the shirt. Hold the bottle about 4-6 inches away and spray heavily here to get a deep, solid color saturation right at the edge. -
Work upwards:
Move the spray bottle slightly further away from the fabric (about 8-10 inches) as you move up the shirt. Apply a lighter mist here. The goal is to cover less fabric area with paint the higher you go. -
Create the fade zone:
For the softest transition where the pink meets the white, hold the bottle about 12 inches away. Do quick, sweeping passes horizontally. You want mere speckles of color here to create that dusty, fading effect. -
Blend the transition:
If you see a harsh line between heavy paint and light mist, go back over just that specific area with very quick, distant bursts of spray to soften the edge. -
Repeat on the back:
Once the front is dry to the touch, flip the shirt (keeping the cardboard inside) and repeat the exact same gradient process on the back side. -
Check the side seams:
Inspect the sides of the shirt where the front and back meet. Often, these areas get missed. Lightly spray along the seams to connect the front and back gradients seamlessly.
Splotchy Spray Fix
If your spray nozzle sputters large drops, immediately protect the wet area and use a damp sponge to dab and blend the large drop into the surrounding gradient while it’s still wet.
Step 3: Finishing Touches
-
Allow to air dry:
Let the shirt sit flat until it is completely dry. This usually takes about 4 to 24 hours depending on the brand of paint and humidity levels. -
Remove the cardboard:
Carefully slide the cardboard out of the shirt. If any paint stuck to the cardboard, peel the fabric away gently to avoid stretching. -
Prepare for heat setting:
Turn your iron to a cotton setting (no steam). Place a pressing cloth or a sheet of parchment paper over the painted area to protect your iron plate. -
Iron the design:
Press the iron over the painted sections for 3-5 minutes, moving constantly. This heat-setting process cures the paint, making it permanent and washable. -
Wait before washing:
Even after heat setting, wait at least 72 hours before throwing the shirt in the washing machine. When you do wash it, turn it inside out and use cold water for the first cycle.
Softness Secret
After the paint dries but before heat setting, scrunch and rub the painted fabric against itself. This breaks the paint’s stiffness and keeps the shirt feeling soft.
Now you have a custom, radiant shirt perfect for adding a pop of color to any casual outfit


Clean One-Color Stencil Graphic
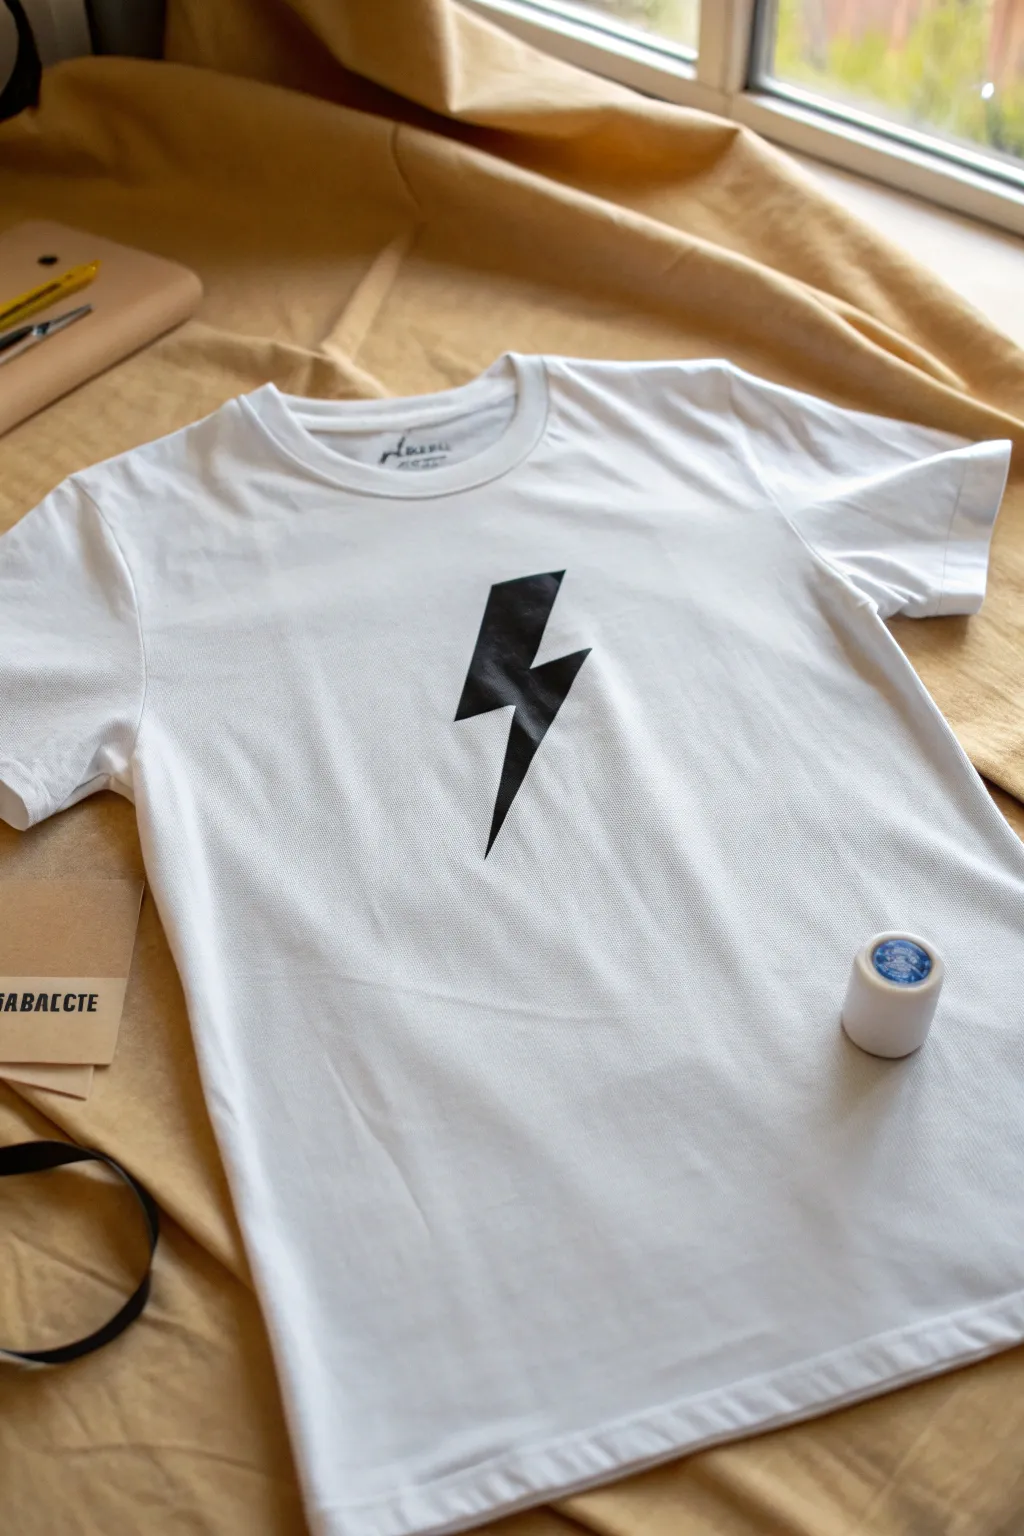
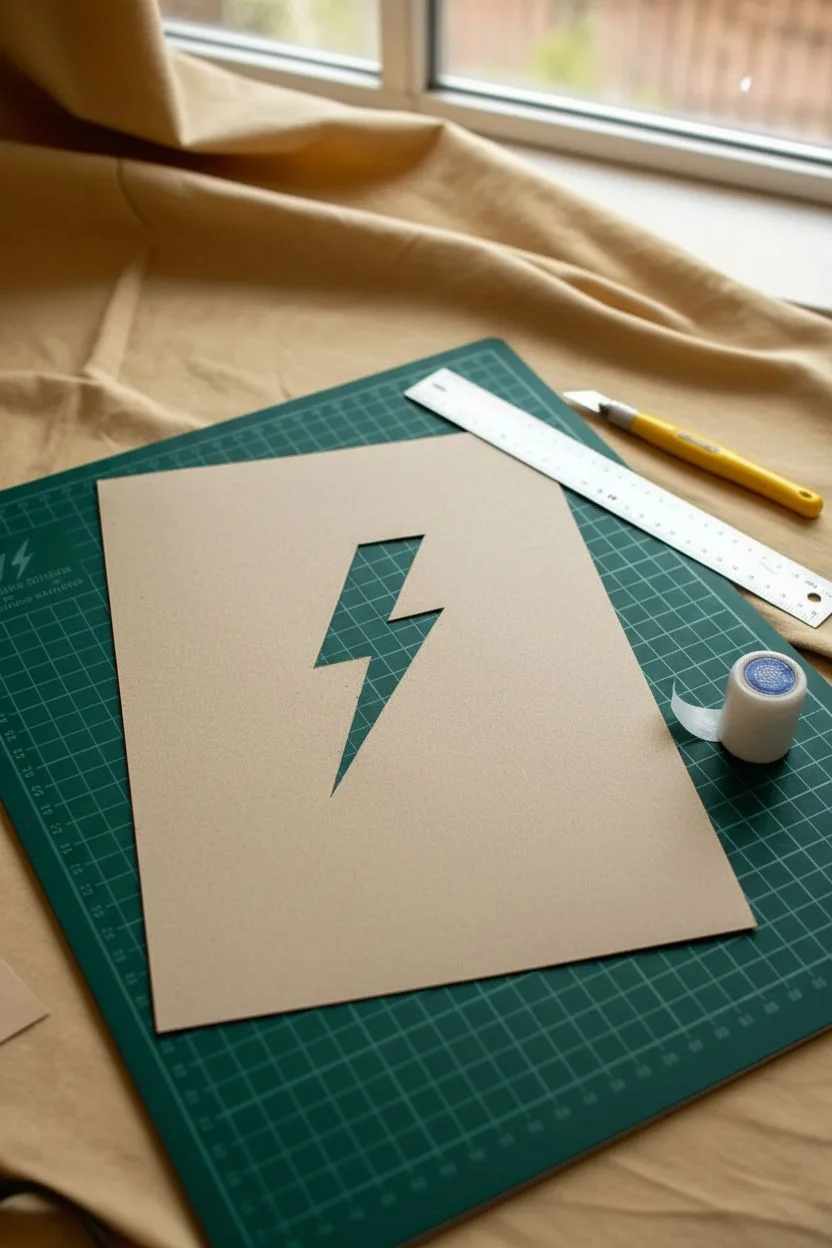
Strike a bold fashion chord with this clean, high-contrast lightning bolt tee. This graphic stencil project proves that sometimes a simple, sharp shape is the most powerful design choice you can make.
How-To Guide
Materials
- White cotton t-shirt (pre-washed)
- Black fabric spray paint or matte black fabric paint with a sponge
- Cardstock or thin plastic stencil sheer
- Craft knife (X-Acto)
- Cutting mat
- Masking tape or painter’s tape
- Paper towels
- Cardboard insert (to fit inside the shirt)
- Repositionable spray adhesive (optional but recommended)
- Iron (for heat setting)
Step 1: Preparing Your Stencil
-
Choose your design scale:
Decide how large you want the lightning bolt to be. For the impact shown in the photo, aim for a graphic that covers about a third of the chest area, roughly 6-8 inches tall. -
Draw or trace the shape:
Sketch a classic zigzag lightning bolt onto your cardstock or stencil plastic. Use a ruler to ensure the edges are perfectly straight and the angles are sharp. -
Cut out the negative space:
Place your material on a cutting mat. Using a sharp craft knife, carefully slice along the lines to remove the lightning bolt shape itself. You are keeping the outer ‘frame’, not the bolt. -
Check your edges:
Inspect the cut edges for any jagged bits or remaining paper fuzz. A clean cut now is crucial for that crisp, professional look later.
Fuzzy Edges?
If paint bled under the stencil, use a tiny brush and white fabric paint to carefully touch up the perimeter and straighten the lines.
Step 2: Setting Up the Shirt
-
Insert the barrier:
Slide a piece of scrap cardboard inside the t-shirt to sit directly underneath the chest area. This prevents paint from bleeding through to the back of the shirt. -
Smooth the fabric:
Pull the fabric taut over the cardboard insert, ensuring there are no wrinkles or folds where you plan to paint. I like to tape the excess fabric behind the cardboard to keep it tight. -
Apply adhesive:
Lightly mist the back of your stencil with repositionable spray adhesive. Let it get tacky for about 30 seconds before placing it. -
Position the stencil:
Place the stencil center-chest on the shirt. Press down firmly, paying special attention to the sharp points and corners of the lightning bolt to prevent paint seepage. -
Mask the surroundings:
Use wide painter’s tape or scrap paper to cover the rest of the shirt around the stencil. Overspray can travel surprisingly far, so protect the white fabric thoroughly.
Electrify It
Add a layer of glitter spray over the black paint while it’s still wet for a subtle shimmer that catches the light.
Step 3: Applying the Design
-
Shake the paint:
Shake your can of fabric spray paint vigorously for at least one minute to ensure the pigment is evenly mixed. -
Test the spray:
Do a quick test spray on a piece of scrap cardboard to check the nozzle flow and pressure. -
Apply the first coat:
Hold the can about 8-10 inches away from the shirt. Apply a light, even mist over the stencil opening. Do not try to get solid black coverage in one go. -
Let it tack up:
Wait about 5-10 minutes for the first layer to become tacky and slightly dry. -
Apply the second coat:
Spray a second light layer to build up the opacity. Repeat this proces until you have a solid, deep black color. -
Wait for initial drying:
Allow the paint to dry for about 20-30 minutes while the stencil is still in place. Touching wet paint can ruin those crisp lines.
Step 4: Finishing Touches
-
Remove the masking:
Carefully peel away the surrounding tape and paper protection first. -
Lift the stencil:
Slowly lift the stencil straight up and away from the fabric. Do not slide it, or you might smudge the edges. -
Dry completely:
Let the shirt sit flat for at least 24 hours to ensure the paint is fully cured. -
Heat set the design:
Turn the shirt inside out. Use an iron on the cotton setting (no steam) and iron the reverse side of the design for 3-5 minutes to lock the color into the fibers.
Enjoy wearing your strikingly simple new graphic tee
BRUSH GUIDE
The Right Brush for Every Stroke
From clean lines to bold texture — master brush choice, stroke control, and essential techniques.
Explore the Full Guide
Two-Tone Split With Text
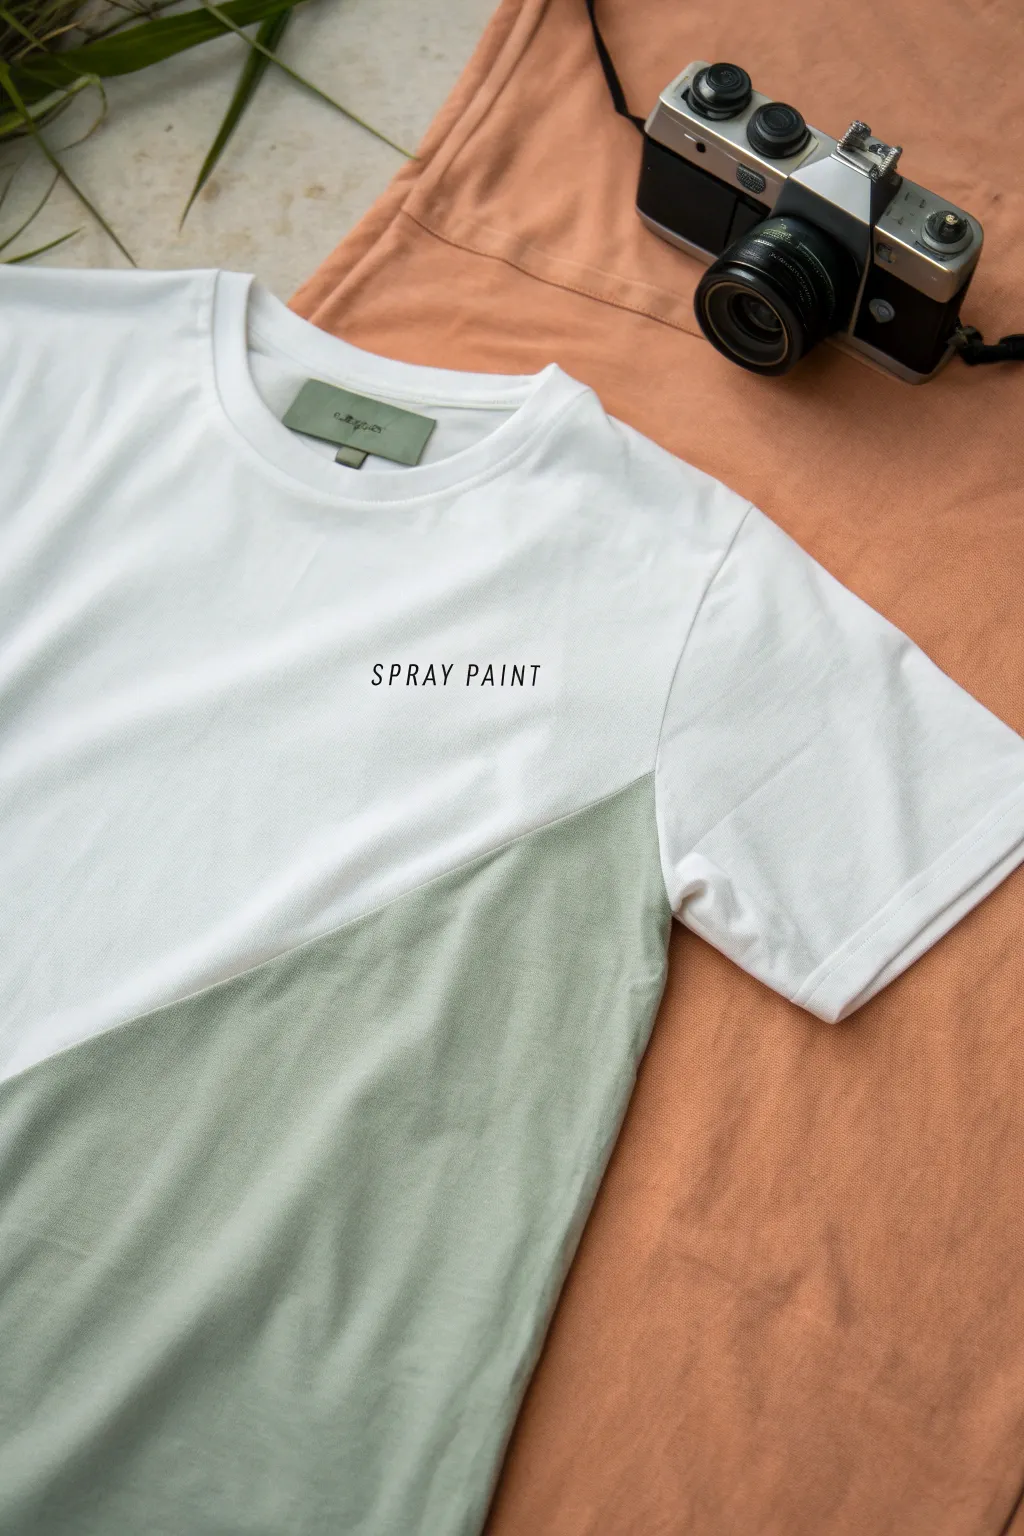
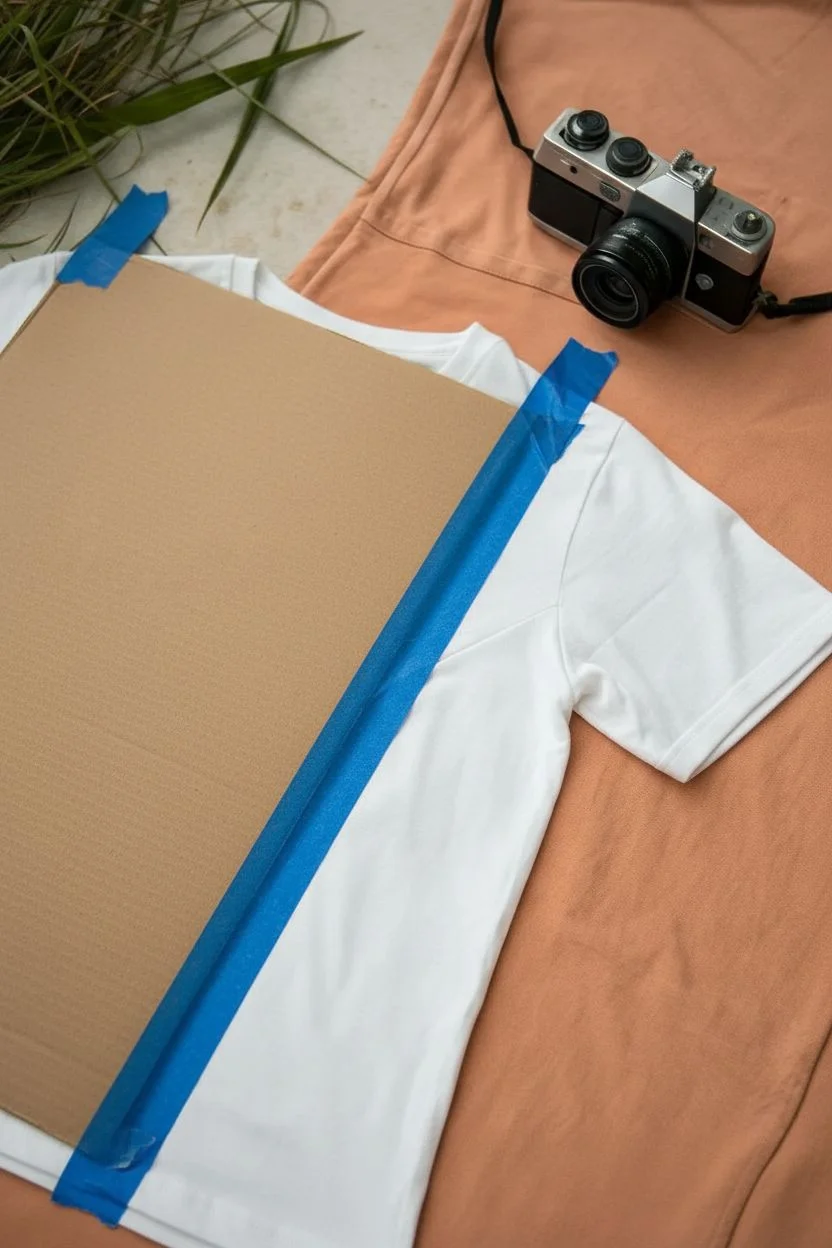
Achieve a modern, streetwear-inspired look with this crisp diagonal split design. By using fabric spray paint and a sharp mask, you can transform a plain white tee into a custom two-tone piece featuring minimalist typography.
Step-by-Step Guide
Materials
- Plain white cotton t-shirt
- Sage green fabric spray paint (soft-feel formula recommended)
- Black fabric paint (or fabric marker)
- Painter’s tape or masking tape (2-inch width)
- Large sheet of paper or cardboard (for masking)
- Small stencil letters (approx. 0.5 inch height)
- Stencil brush or sponge dauber
- Cardboard insert (to fit inside the shirt)
- Iron and ironing board
- Press cloth or parchment paper
Step 1: Preparation & Masking
-
Wash and Prep:
Begin by washing and drying your white t-shirt without using fabric softener. This removes factory sizing and ensures the paint adheres properly. -
Iron Smooth:
Give the shirt a thorough ironing to remove all wrinkles. A perfectly smooth surface is crucial for a crisp line. -
Insert Protection:
Slide a piece of cardboard inside the shirt, ensuring it is flat and covers the entire area you plan to paint. This prevents paint from soaking through to the back of the tee. -
Establish the Diagonal:
Decide on your angle. For the look in the photo, start the line at the left side seam (about waist height) and angle it down towards the bottom hem on the right. -
Apply the Main Tape Line:
Stretch your painter’s tape taut and press it firmly along your chosen diagonal line. This is your primary barrier, so make sure the edge is sealed tight against the fabric. -
Mask Off the Top:
Using your large sheet of paper or cardboard, cover the entire white section of the shirt above the tape line. Secure this masking material with additional tape so no overspray lands on the white chest area.
Step 2: Applying the Color Block
-
Test the Spray:
Shake your sage green fabric spray paint can vigorously for at least one minute. Test the spray on a scrap piece of cardboard to check the nozzle flow and color density. -
First Coat:
Hold the can about 6-8 inches away from the shirt. Apply a light, even mist over the exposed bottom section. Start spraying off the fabric and sweep across to avoid drips. -
Check the Edges:
Pay special attention to the tape line. Spray directly over the tape edge rather than underneath it to keep that line razor-sharp. -
Dry and Repeat:
Let the first coat dry for about 15-20 minutes. I like to apply a second light coat to ensure the green is opaque and solid, especially on the folds. -
Remove Masking:
Carefully peel away the paper and tape while the paint is still slightly tacky. Pull the tape away from the painted area to ensure a clean break. -
Dry Thoroughly:
Allow the green section to dry completely according to the manufacturer’s instructions, usually at least 4 hours.
Seal the Tape Edge
Before spraying green, paint a thin layer of clear fabric medium (or even white paint) along the tape edge. This seals gaps so the green won’t bleed.
Step 3: Adding the Text
-
Position the Text:
Arrange your letter stencils to spell ‘SPRAY PAINT’ (or your chosen phrase) centered on the chest, well above the green diagonal line. -
Check Alignment:
Use a ruler or a strip of tape to ensure your letters are perfectly straight and leveled horizontally. -
Secure Stencils:
Tape down the edges of the stencils so they don’t shift during painting. -
Fill the Letters:
Dip your stencil brush or sponge into a small amount of black fabric paint. Dab off excess paint onto a paper towel—’dry brushing’ prevents bleeding under the stencil. -
Apply Paint:
Gently tap the paint into the stencil openings using an up-and-down motion. Do not brush back and forth. -
Reveal Text:
Lift the stencils straight up immediately after painting to avoid smudging the crisp edges.
Use Negative Space
Reverse the concept! Keep the shirt white, but use masking tape to create the text, then spray lightly over it. Peel the tape to reveal white letters.
Step 4: Finishing Touches
-
Final Dry:
Let the text dry completely, usually for another few hours or overnight. -
Heat Set:
Place a press cloth or parchment paper over the painted designs. Iron on a high cotton setting (no steam) for 3-5 minutes to permanently seal the paint into the fibers.
Wear your new geometric masterpiece with pride, knowing you created a high-end look at home
Zodiac Word And Constellation Dots
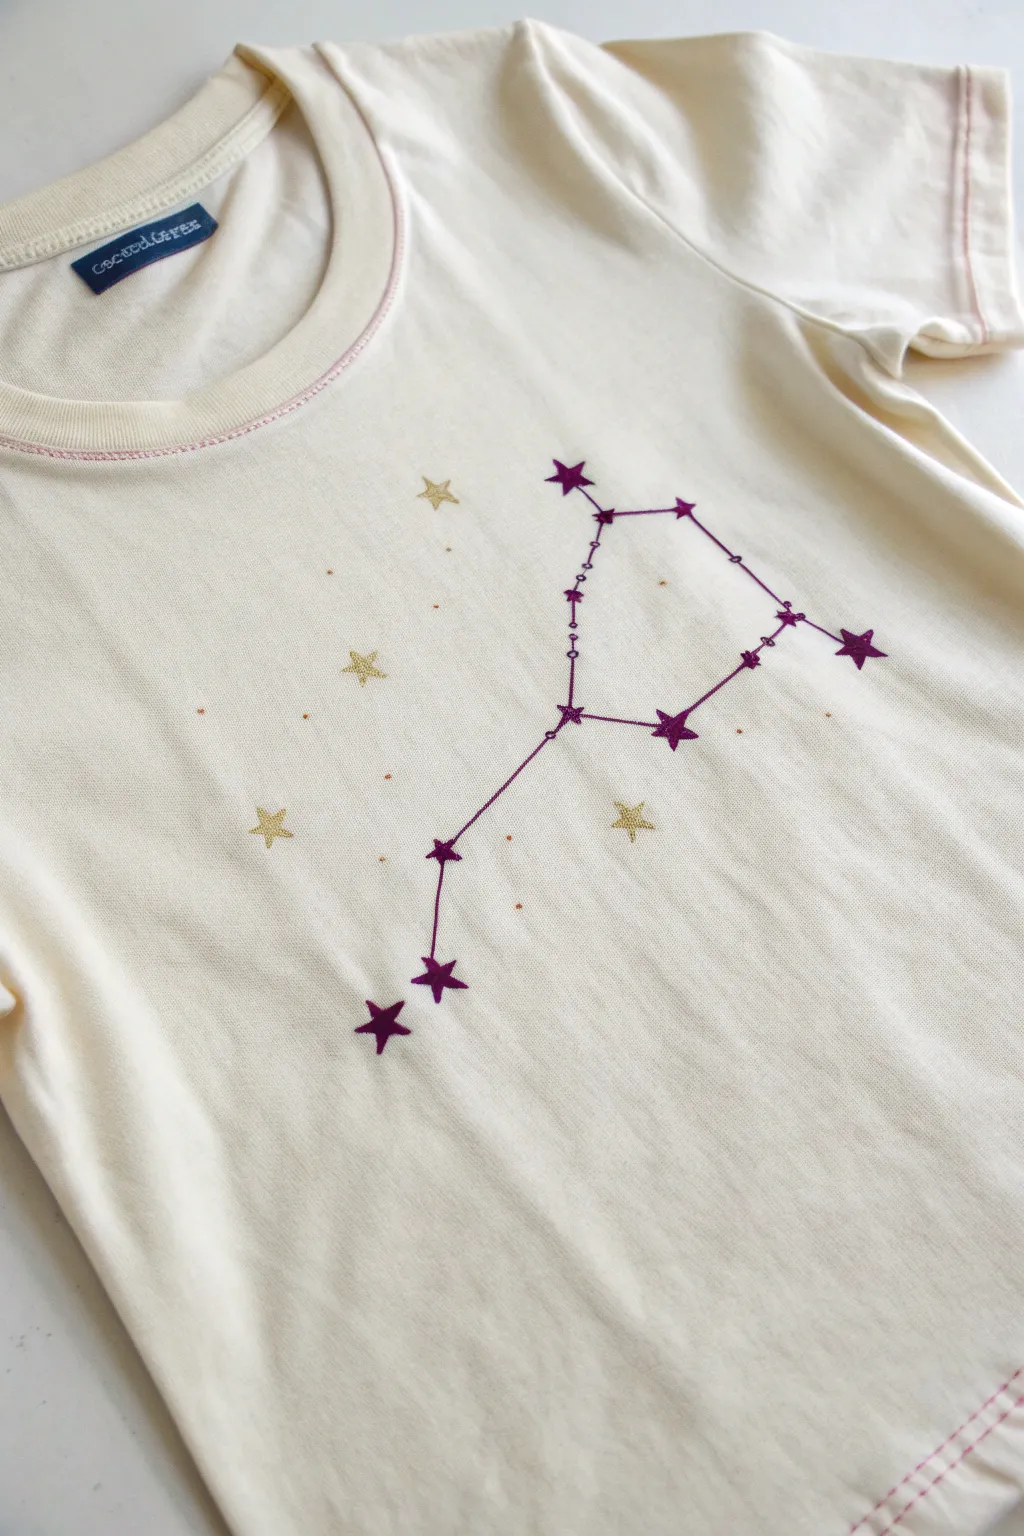
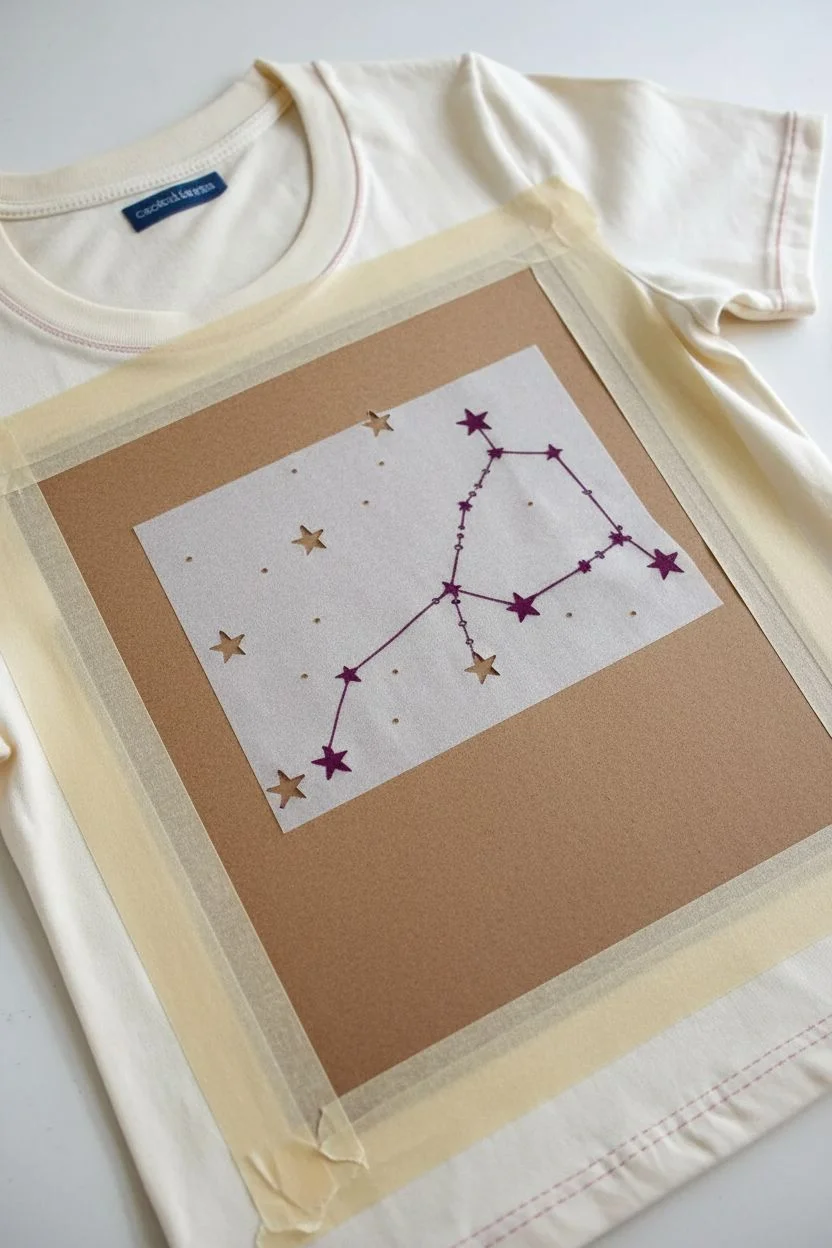
Transform a plain cream tee into a starry night masterpiece with this delicate constellation design. Using a mix of stencils and freehand techniques, you’ll create a lovely balance of deep plum stars and shimmering gold accents that feel both personal and cosmic.
Detailed Instructions
Materials
- Light cream or off-white cotton t-shirt
- Fabric spray paint (Plum/Deep Purple)
- Fabric spray paint (Metallic Gold)
- Adhesive stencil film or freezer paper
- Craft knife or cutting machine (like a Cricut)
- Iron and ironing board
- Fine-tip fabric marker (Purple/Plum)
- Small flat paintbrush
- Cardboard insert for inside the shirt
- Masking tape or painter’s tape
- Protective drop cloth
Step 1: Preparation and Stencil Creation
-
Wash and dry:
Begin by washing and drying your t-shirt without fabric softener to remove any sizing chemicals that might prevent the paint from adhering properly. -
Insert protection:
Slide a piece of cardboard inside the shirt, positioning it directly under the chest area where the design will go. Pull the fabric taut and smooth out any wrinkles. -
Design the constellation:
Select your zodiac constellation (the example uses Virgo). Draw or print the star pattern onto your stencil film or freezer paper. -
Cut the stars:
Using a craft knife, carefully cut out the main star shapes. You want crisp, sharp points for your stars. -
Apply the stencil:
Position the stencil on the shirt. If using freezer paper, iron it down (shiny side down) until it bonds. If using adhesive film, press firmly to seal the edges. -
Masking:
Use masking tape to cover a wide area around the stencil to protect the rest of the shirt from wayward overspray.
Bleeding Lines?
If your spray paint bleeds under the stencil, don’t panic. Use a fine-tip fabric marker in the same plum shade to outline the stars and sharpen the points, hiding the fuzzy edges.
Step 2: Painting the Constellation
-
Spray the purple stars:
Shake your plum fabric spray paint thoroughly. Hold the can about 8-10 inches away and apply a light, even mist over the star cutouts. Two light coats work better than one heavy one to prevent bleeding. -
Dry and remove:
Let the paint dry to the touch (usually 15-20 minutes). Carefully peel away the tape and the stencil to reveal your purple stars. -
Connect the dots:
Using a fine-tip purple fabric marker or a thin liner brush with a bit of the spray paint pooled on a palette, draw the thin lines connecting the main stars of the constellation. -
Add detail nodes:
along the connecting lines, add tiny open circles or small dots with your marker to mimic the astronomical chart look shown in the reference.
Step 3: Adding Gold Accents
-
Create gold star stencils:
Cut a few individual small star shapes from scrap stencil material. These will be for the scattered gold stars. -
Position and guard:
Place one gold star stencil near the main constellation. Use a piece of stiff cardstock or paper to shield the surrounding area immediately. -
Spray gold accents:
Give a quick, targeted burst of gold spray paint. Repeat this process for 3-5 scattered stars around the main design. -
Freehand gold dust:
Spray a small puddle of gold paint onto a paper plate. Dip the handle end of a paintbrush into the gold paint. -
Dotting technique:
Gently dot the shirt fabric to create tiny, controlled gold specks around the constellation. I find varying the pressure creates nice size variation in these ‘distant stars.’ -
Final cure:
Allow the entire design to dry for at least 24 hours. Once dry, heat set the design with an iron according to your paint manufacturer’s instructions.
Cosmic Sparkle
For extra dimension, glue tiny flat-back Swarovski crystals in the center of the largest purple stars using clear fabric glue. It catches the light beautifully.
Wear your customized astrological sign with pride knowing it is completely unique to you

PENCIL GUIDE
Understanding Pencil Grades from H to B
From first sketch to finished drawing — learn pencil grades, line control, and shading techniques.
Explore the Full Guide
Retro Music Tag Combo
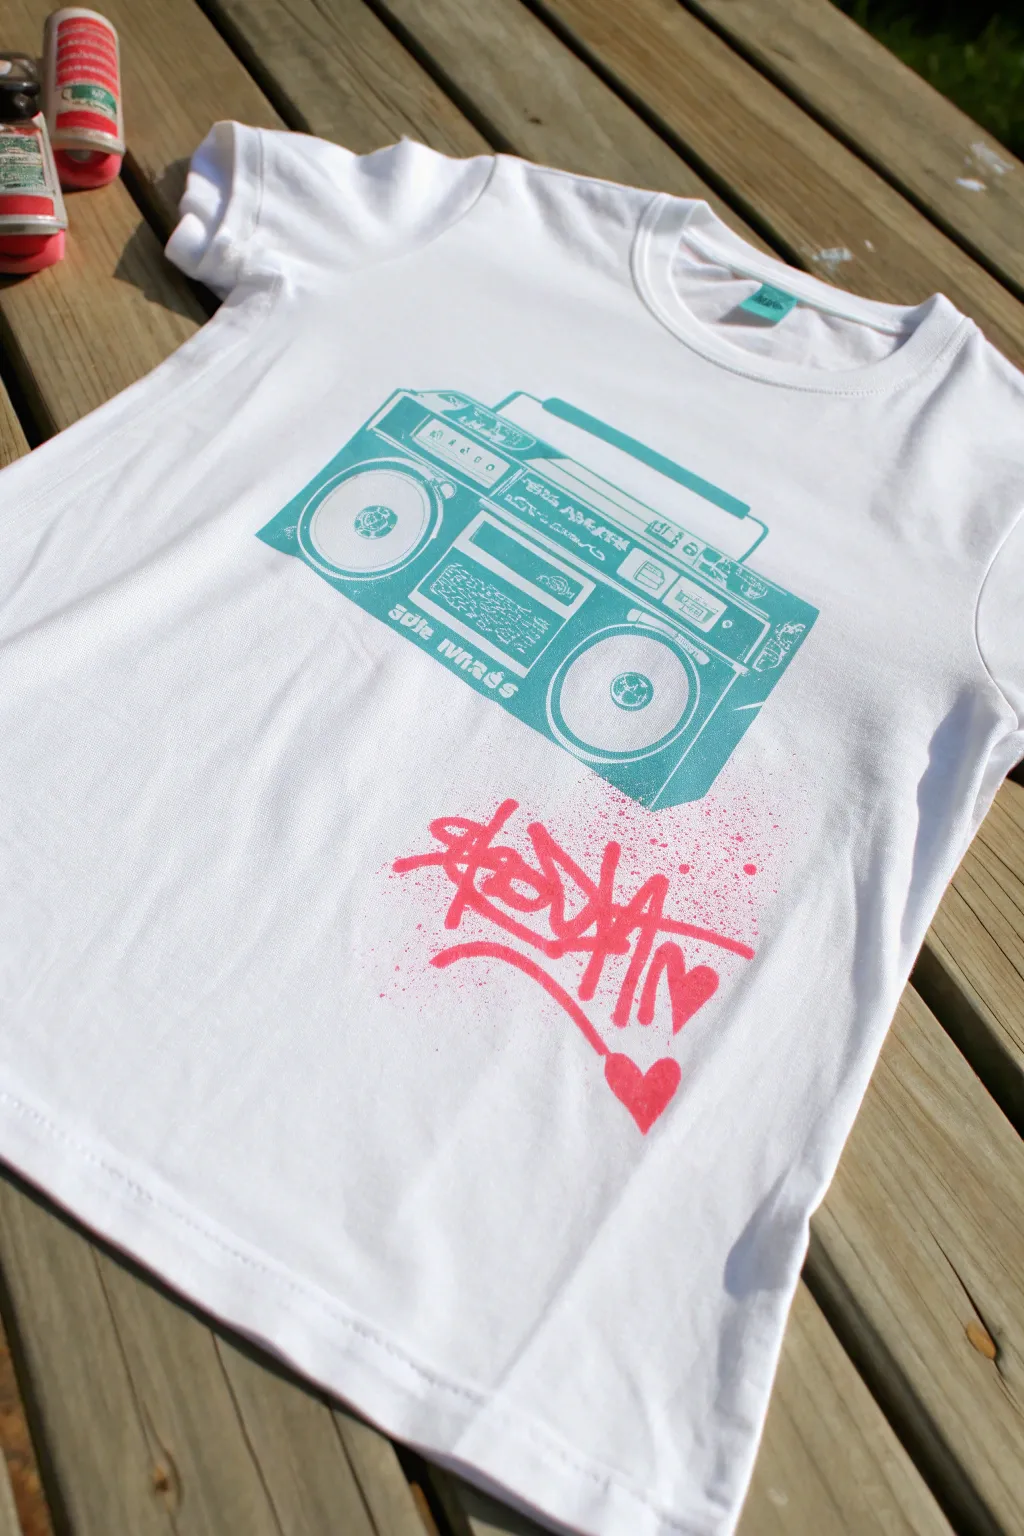
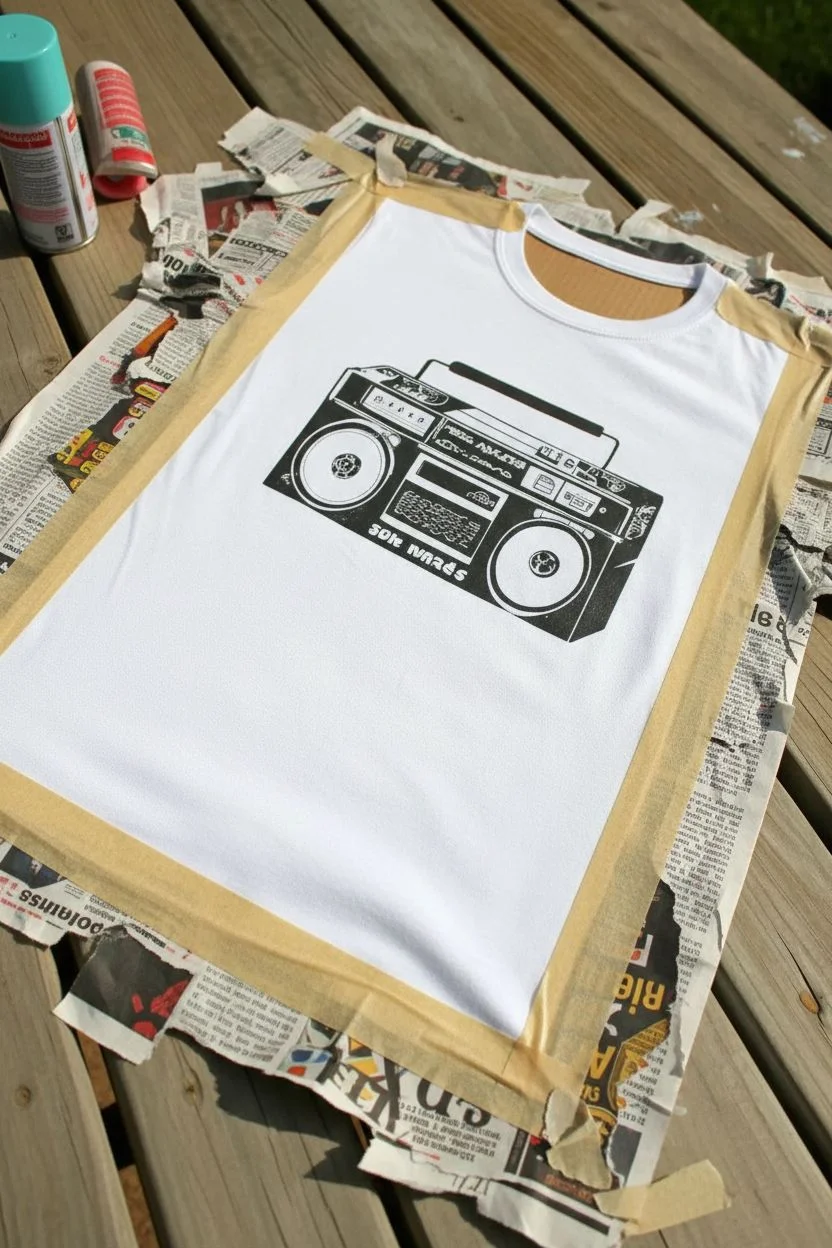
Bring the golden age of hip-hop to your wardrobe with this vibrant DIY tee. By combining crisp stenciling with loose, expressive spray paint techniques, you’ll create a retro mashup of classic hardware and urban street art.
How-To Guide
Materials
- White cotton t-shirt (pre-washed)
- Fabric spray paint (Teal/Aqua)
- Fabric spray paint (Hot Pink)
- Boombox stencil (adhesive vinyl or mylar)
- Cardboard insert for shirt
- Painter’s tape or masking tape
- Scrap paper or newspaper
- Gloves
- Stencil adhesive (if using non-adhesive stencil)
Step 1: Preparation
-
Prep the shirt:
Insert a piece of cardboard inside the t-shirt. This is crucial as it creates a flat surface for stenciling and prevents the paint from bleeding through to the back of the shirt. -
Smooth the surface:
Smooth out the fabric with your hands to remove any wrinkles. If the shirt is particularly creased, give it a quick iron before inserting the cardboard. -
Position the stencil:
Place your boombox stencil on the upper chest area of the shirt. If using an adhesive vinyl stencil, peel the backing and press it down firmly. If using mylar, apply a light mist of stencil adhesive to the back before placing. -
Secure edges:
Run your finger along all the interior edges of the stencil design to ensure a tight seal against the fabric, preventing paint seepage.
Step 2: The Boombox Layer
-
Mask the surrounding area:
Cover the exposed parts of the shirt around the stencil with scrap paper and painter’s tape. You want to make sure only the boombox shape receives the teal paint. -
First light pass:
Shake the teal fabric spray paint can vigorously. holding the can about 6-8 inches away, apply a very light, misting coat over the stencil. Don’t try to fill it in all at once. -
Build coverage:
Wait a minute for the first mist to tac up, then apply a second coat. Aim for an even, opaque finish without saturating the fabric to the point of dripping. -
Remove masking:
Carefully peel away the paper masking tape, but leave the main stencil in place for just a moment longer to ensure the edges remain crisp while the paint sets. -
Reveal the hardware:
Gently lift the boombox stencil straight up and off the shirt. Set the shirt aside or use a hair dryer on a cool setting to speed up drying before moving to the next color.
Clean Lines Hack
To prevent ‘ghosting’ or blurry edges on the boombox, don’t spray directly downward. Spray in short bursts from different angles toward the center of the stencil openings.
Step 3: Graffiti Tagging
-
Prepare for freehand:
For the pink graffiti element, I prefer to practice the motion on a piece of cardboard first. You’re aiming for a loose, swift spray motion to mimic a real tag. -
Protect the boombox:
Place a piece of clean scrap paper loosely over the dried teal boombox to protect it from stray pink overspray. -
Spray the tag:
Using the hot pink spray paint, create a stylized abstract tag or signature below the boombox. Keep the nozzle close to the fabric (about 3-4 inches) for a concentrated line. -
Add flair:
While spraying the tag, add a heart shape at the end of the line or incorporate loop designs to enhance the street-art aesthetic. -
Create splatter effects:
To get those tiny authentic speckles, press the spray nozzle down only halfway while aiming around the tag. This causes the can to ‘spit’ rather than spray a fine mist. -
Final drying:
Remove the protective paper covering the boombox. Let the shirt sit flat for at least 4 hours (or follow your specific paint’s instructions) to fully cure. -
Heat set:
Once dry, turn the shirt inside out and iron the reverse side of the design on a cotton setting (no steam) to permanently heat-set the ink into the fibers.
Level Up: 3D Effect
Before removing the boombox stencil, spray a tiny amount of black or dark grey on just the bottom right corners of the design to create a subtle shadow effect.
Wear your new retro masterpiece with pride and enjoy the vintage vibes
Floral Silhouette With Soft Fade
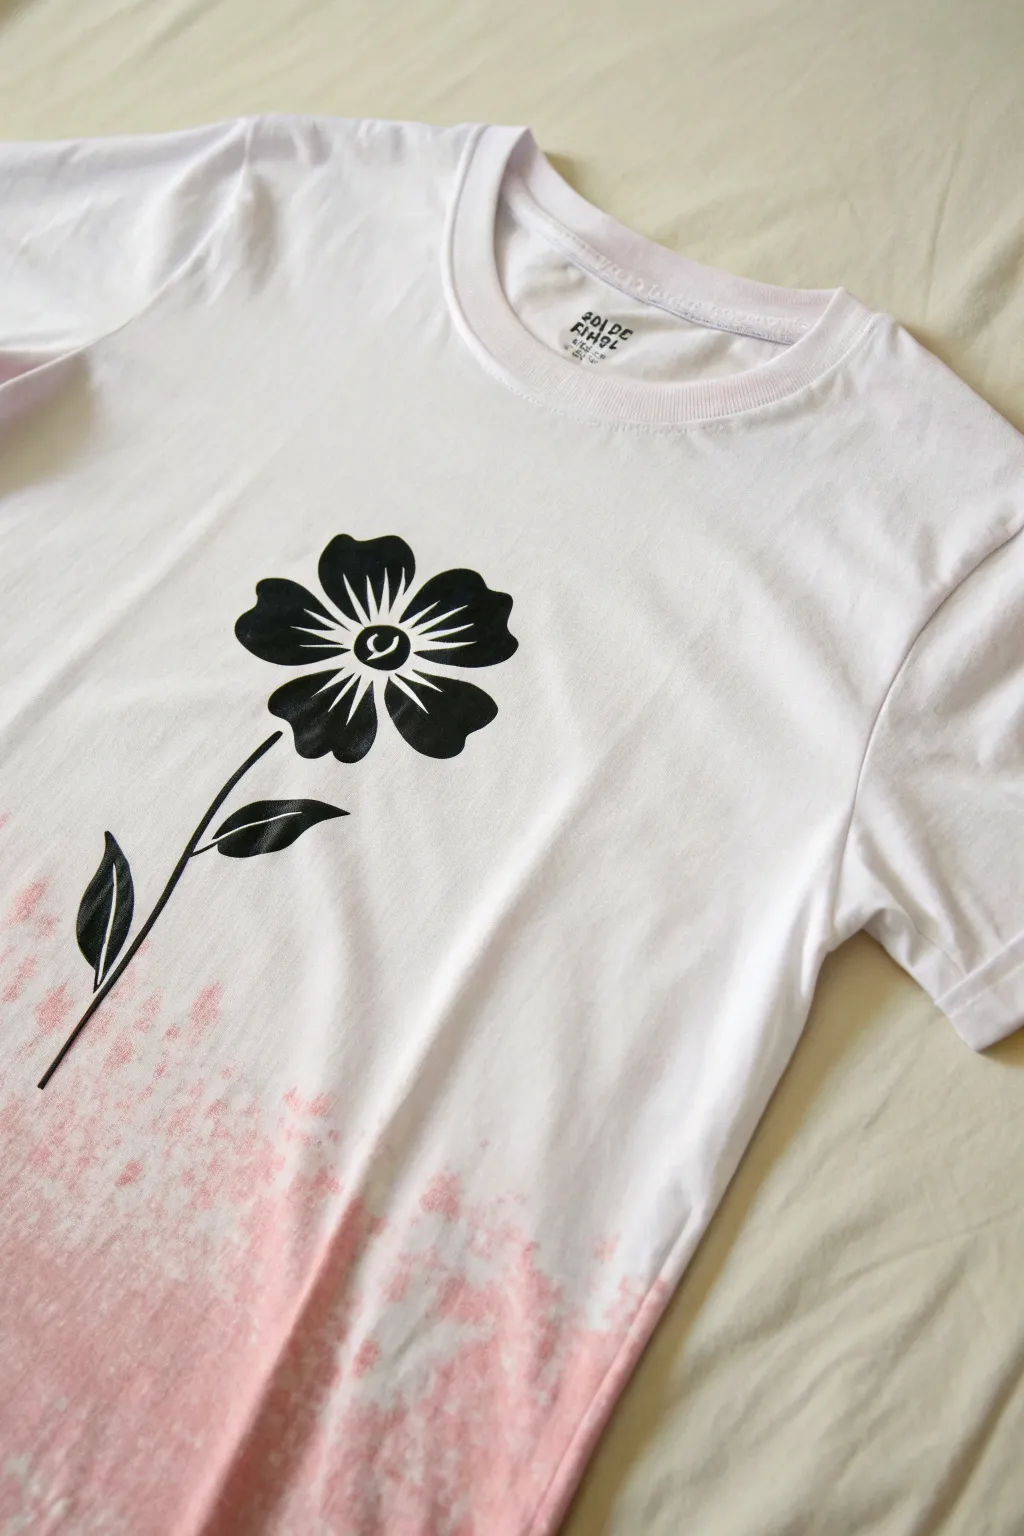
This custom shirt combines the sharp, crisp lines of a floral silhouette with the dreamy softness of a pink spray paint fade. The result is a modern, boutique-style piece that looks deceptively professional but relies on simple masking techniques.
Detailed Instructions
Materials
- White 100% cotton T-shirt
- Fabric spray paint (soft pink or coral)
- Black heat transfer vinyl (HTV)
- Electronic cutting machine (Cricut or Silhouette) or X-Acto knife
- Iron or heat press
- Cardboard or shirt form
- Masking tape or painter’s tape
- Scrap paper or plastic sheeting
Step 1: Preparation and Masking
-
Pre-wash the fabric:
Start by washing and drying your white T-shirt without fabric softener. This removes factory sizing and ensures both the vinyl and paint adhere properly to the fibers. -
Insert protective layer:
Slide a piece of cardboard or a solid shirt form inside the tee. This is crucial because fabric spray paint will bleed through to the back of the shirt if there isn’t a barrier. -
Smooth the surface:
Run a lint roller over the front and quickly iron out any major creases to ensure your masking tape sits perfectly flat against the fabric. -
Mask the upper area:
Decide where you want your fade to start. For this look, the pink begins near the bottom hem. Place a long strip of masking tape horizontally across the shirt, several inches above the bottom hem. -
Cover the rest:
Tape scrap paper or plastic sheeting to the top edge of your masking tape line. You want to completely cover the upper chest, sleeves, and neck area so absolutely no stray mist lands on the white sections.
Step 2: Creating the Ombré Fade
-
Test the spray:
Shake your can of fabric spray paint vigorously. I always do a quick test spray on a scrap piece of cardboard to check the nozzle flow and clear any sputtering. -
Apply the first pass:
Hold the can about 8-10 inches away from the shirt. Spray the very bottom hem area with a steady, sweeping motion. This area should be the most saturated pink. -
Feather the color upward:
As you move up toward your tape line, pull the can further away (about 12 inches) and spray lighter. You want a speckled, misty effect here rather than a solid blocks of color. -
Create the splatter texture:
To mimic the texture in the photo, depress the nozzle only halfway for a few bursts near the transition zone. This often creates slightly larger droplets that add artistic character. -
Let it dry:
Allow the paint to air dry completely according to the manufacturer’s instructions. Do not remove the internal cardboard yet.
Paint Bleeding Under Tape?
If your masking lines aren’t crisp, press the tape edge firmly with a fingernail before spraying. For extra security, spray a light layer of clear sealer over the tape edge first to seal the gap.
Step 3: Applying the Floral Vinyl
-
Prepare the design:
While the paint dries, prepare your black flower image. You can download a floral silhouette vector and cut it out of black HTV using a cutting machine. Be sure to mirror the image before cutting. -
Weed the design:
Remove the excess vinyl from the carrier sheet, leaving only the flower, stem, and leaves. Use a weeding tool to carefully pick out the small negative spaces inside the petals. -
Remove masking:
Once the paint is fully dry to the touch, gently peel away the masking tape and protective paper. You should have a distinct but somewhat organic line where the white meets the pink fade. -
Position the flower:
Place your weeded decal onto the shirt. Position the stem so the bottom tip overlaps into the pink painted area, while the flower head sits clearly in the white space. This bridges the two zones beautifully. -
Press the design:
Set your iron to the cotton setting (no steam) or heat up your heat press. Cover the design with a Teflon sheet or parchment paper. -
Apply heat:
Press firmly for 15-20 seconds (or follows your specific vinyl brand’s instructions). If using an iron, avoid sliding it around; just press straight down. -
Peel the carrier:
Allow the design to cool slightly if you are using a warm-peel vinyl, then slowly peel back the clear carrier sheet. If any edge lifts, lay the carrier back down and press for a few more seconds. -
Final set:
Flip the shirt inside out and press the area behind the flower for 10 seconds to help draw the adhesive into the fibers.
Level Up: Embroidered Details
Add texture by using black embroidery floss to stitch over the stem or outline a few petals after the vinyl is applied. It adds a premium, mixed-media feel.
Wear your new creation with pride knowing you mastered two different fabric art techniques in one go


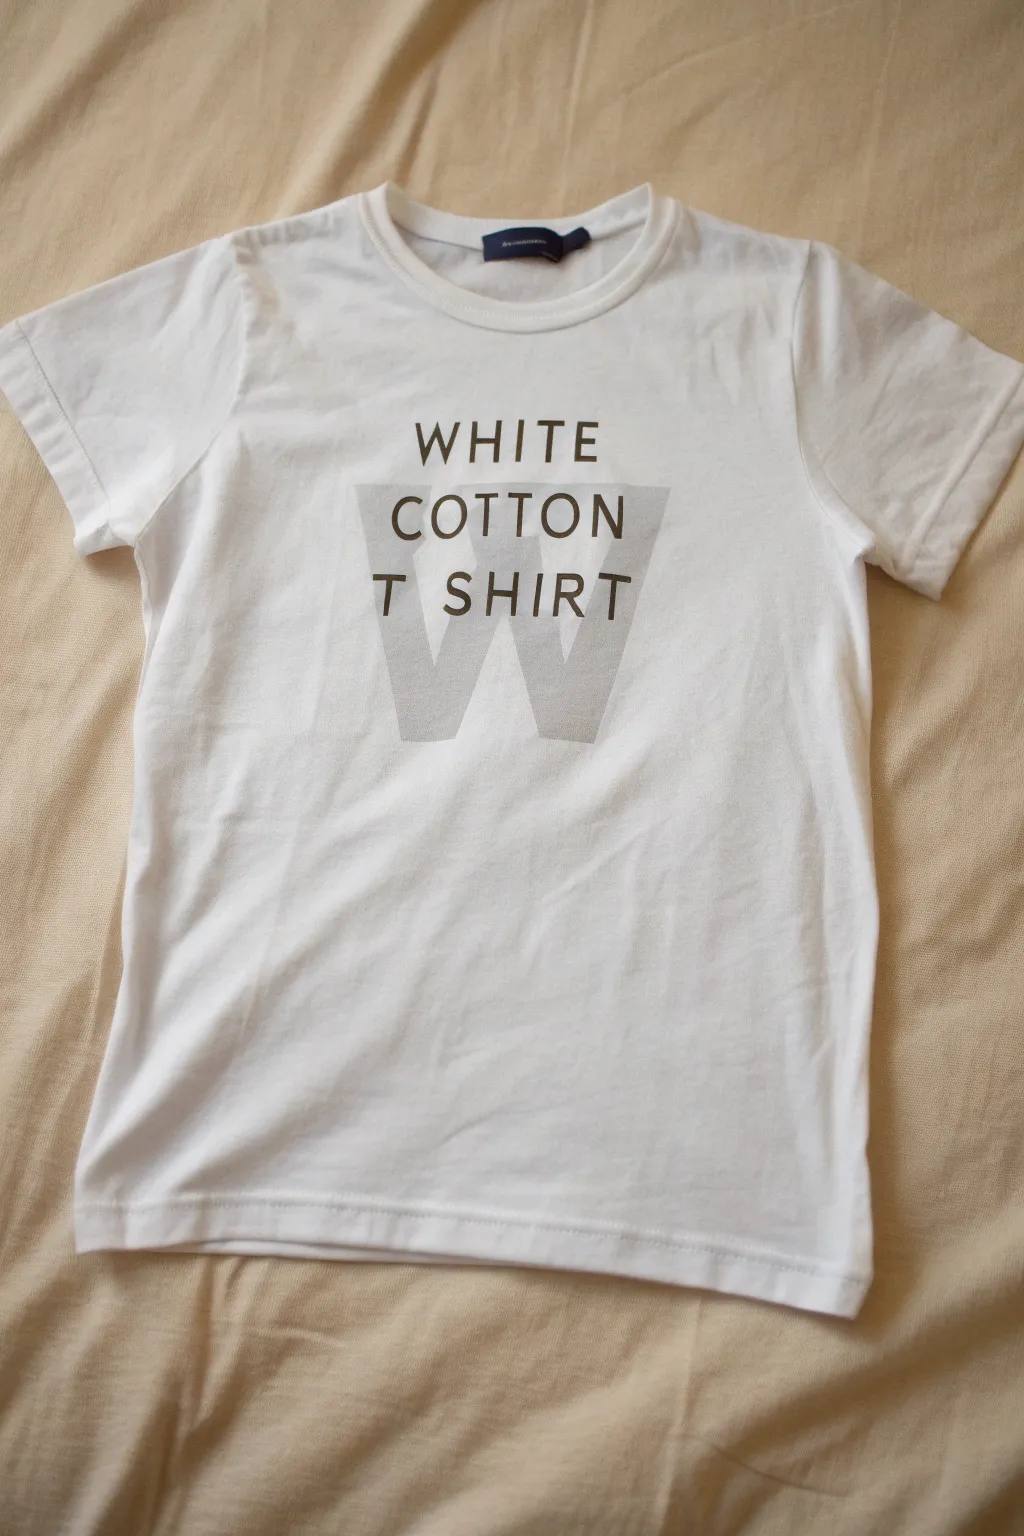
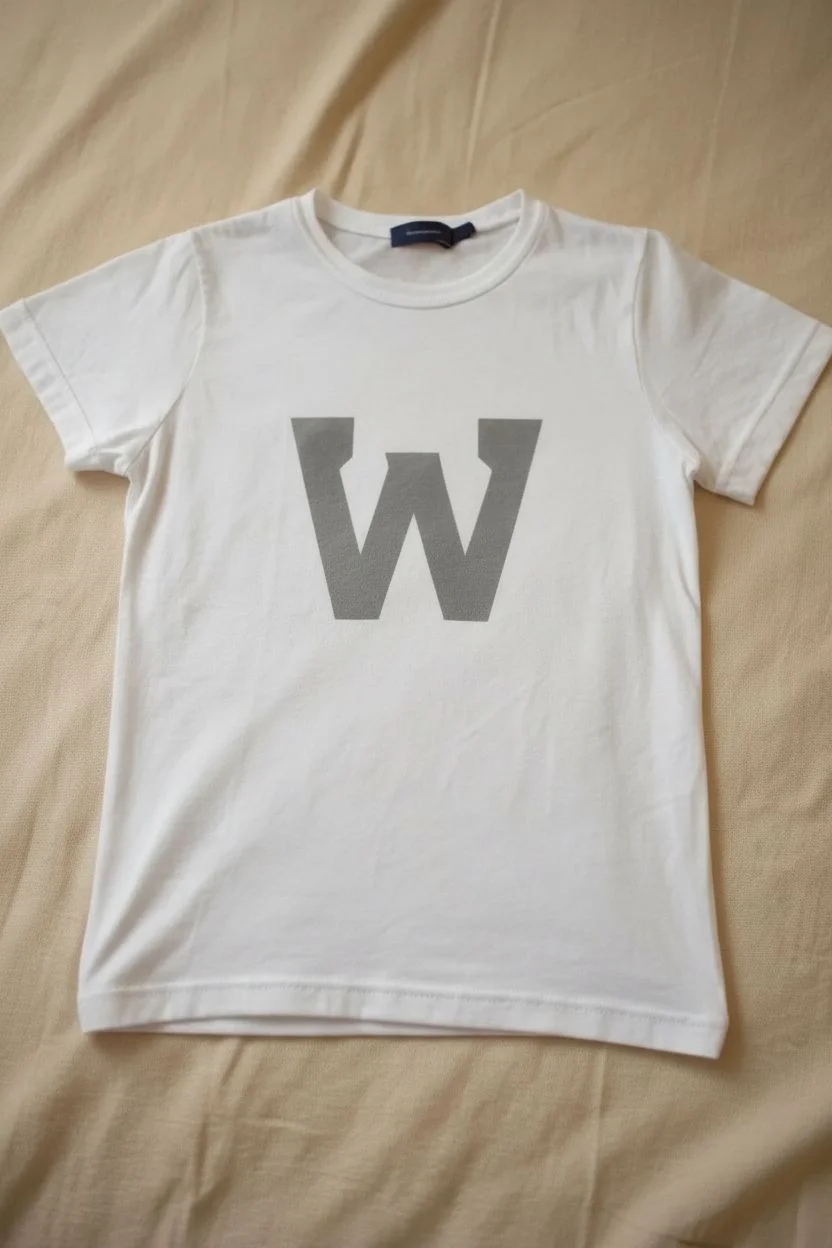
Negative-Space Letter Cutouts
Achieve a sleek, high-end look by combining crisp negative space with bold typography. This project transforms a basic white tee into a statement piece using simple masking techniques and fabric spray paint.
How-To Guide
Materials
- White cotton t-shirt (pre-washed)
- Grey fabric spray paint (matte finish)
- Black fabric paint or fabric markers
- Freezer paper or stencil vinyl
- Iron and ironing board
- Craft knife (X-Acto)
- Cutting mat
- Cardboard insert
- Painter’s tape
- Computer and printer (for template design)
- Ruler
Step 1: Design & Stencil Preparation
-
Create the Graphic:
Design a large, blocky letter ‘W’ (or your chosen initial) on your computer. Overlay the text ‘WHITE COTTON T SHIRT’ in a sans-serif font directly on top of the ‘W’ shape. -
Print the Template:
Print your design onto standard paper first to check the sizing against your shirt. The large letter should be prominent in the center chest area. -
Cut the Freezer Paper:
Cut a piece of freezer paper large enough to cover the entire front area of the shirt, leaving plenty of border room around your design. -
Trace the Shape:
Place your printed template under the freezer paper (shiny side down) and trace just the outline of the large ‘W’ shape. You don’t need to trace the smaller text yet. -
Cut the Negative Space:
Using a sharp craft knife on a cutting mat, carefully cut out the ‘W’ shape from the freezer paper. Unlike a normal stencil, you are keeping the *outside* sheet, not the letter itself. Discard the ‘W’ cutout.
Step 2: Masking & Spraying
-
Prepare the Shirt:
Slide a piece of thick cardboard inside the shirt. This is crucial to prevent paint from bleeding through to the back and keeps the fabric taut. -
Adhere the Stencil:
Position your freezer paper stencil (shiny side down) onto the shirt. Once perfectly aligned, run a hot iron (no steam) over the paper. The heat will bond the plastic coating to the fabric, creating a crisp seal. -
Protect the Edges:
Use painter’s tape to secure the edges of the freezer paper to the shirt and cover any exposed fabric outside the stencil area to catch overspray. -
Apply the Base Layer:
Shake your grey fabric spray paint thoroughly. Hold the can about 8-10 inches away and apply a light, even mist over the ‘W’ cutout. -
Build Coverage:
I prefer to apply two or three thin coats rather than one heavy one to avoid soaking the fabric. Allow about 15 minutes of drying time between each light coat. -
Remove the Mask:
Once the final coat is dry to the touch (usually 30-60 minutes), carefully peel away the freezer paper to reveal your crisp grey ‘W’ shape.
Bleeding Lines?
If paint bleeds under the stencil, use a tiny brush dipped in white fabric paint to touch up the edges. It acts like white-out for your tee.
Step 3: Adding the Typography
-
Realign the Text:
Take your original printed design (the one with the text) and place it under the cardboard insert inside the shirt, or use a new stencil if you prefer painting over markers. -
Positioning Guide:
If you can’t see the template through the shirt, measure and lightly mark the text baseline with a pencil or disappearing fabric ink ruler to ensure it’s straight. -
Lettering:
Using black fabric paint and a fine brush, or a high-quality black fabric marker, carefully hand-letter the words ‘WHITE COTTON T SHIRT’ over the grey shape. -
Refining Details:
Ensure the letters are opaque and sharp. If using paint, you may need a second pass on the letters once the first dries. -
Heat Set:
Once the entire project is completely dry (wait 24 hours to be safe), turn the shirt inside out and iron the back of the design to heat-set the ink and paint for washability.
Make It 3D
Instead of painting the text, use iron-on vinyl letters in black. The texture contrast between the sprayed paint and smooth vinyl looks professional.
Now you have a custom graphic tee that looks straight off a designer rack
Layered Stencils For 3D Depth
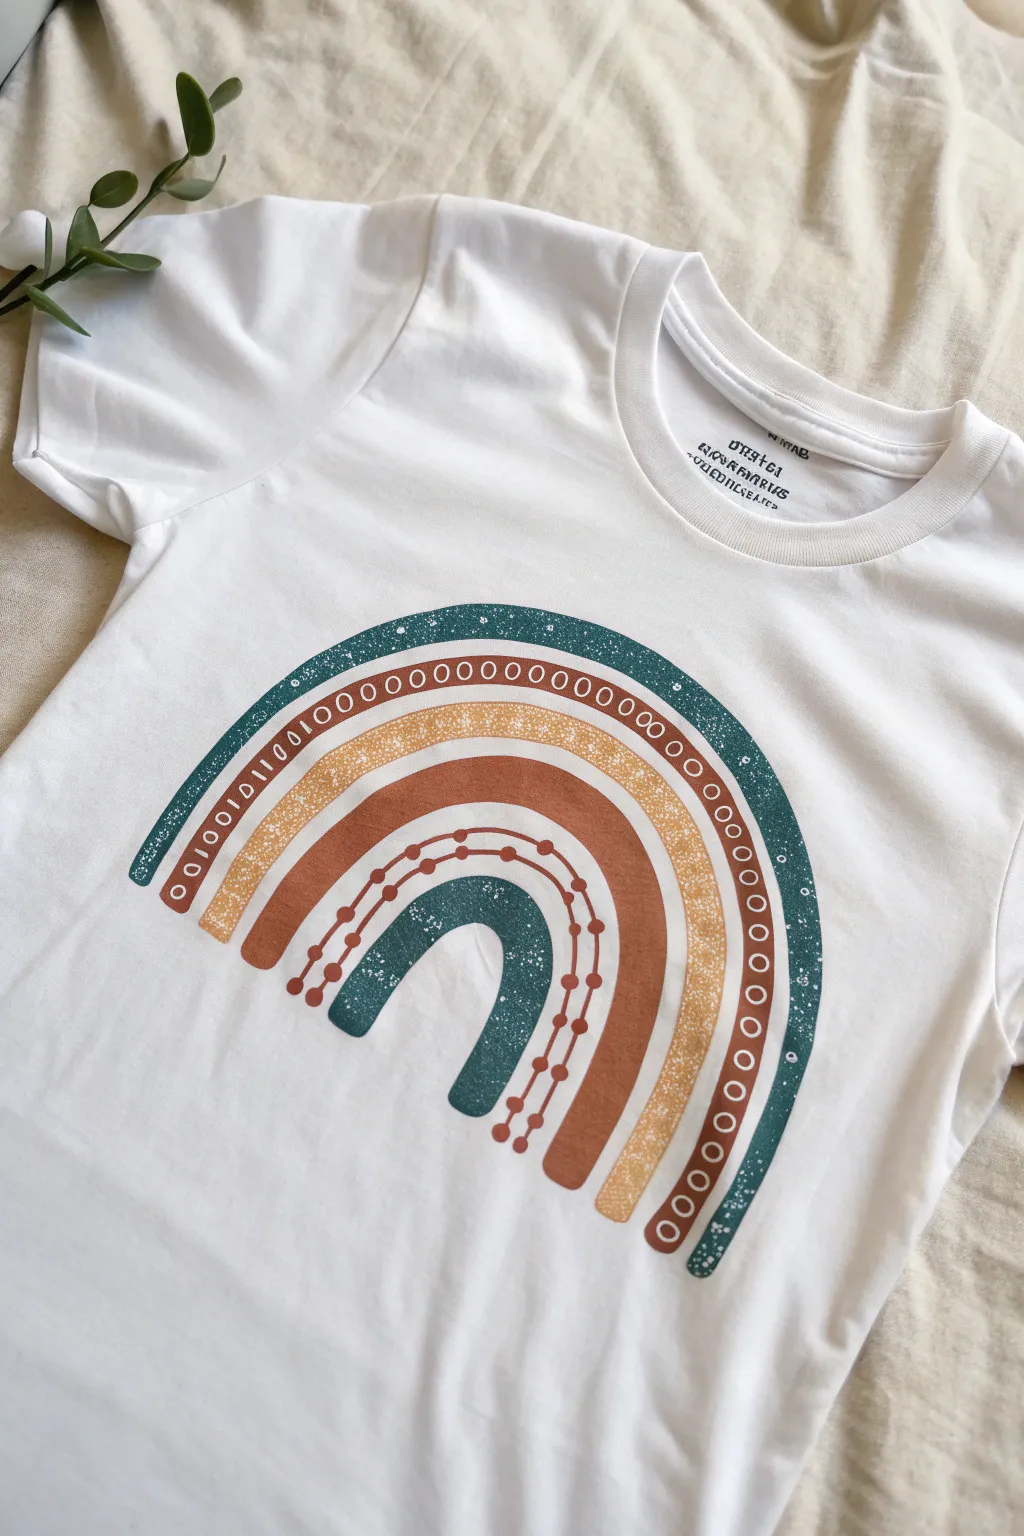
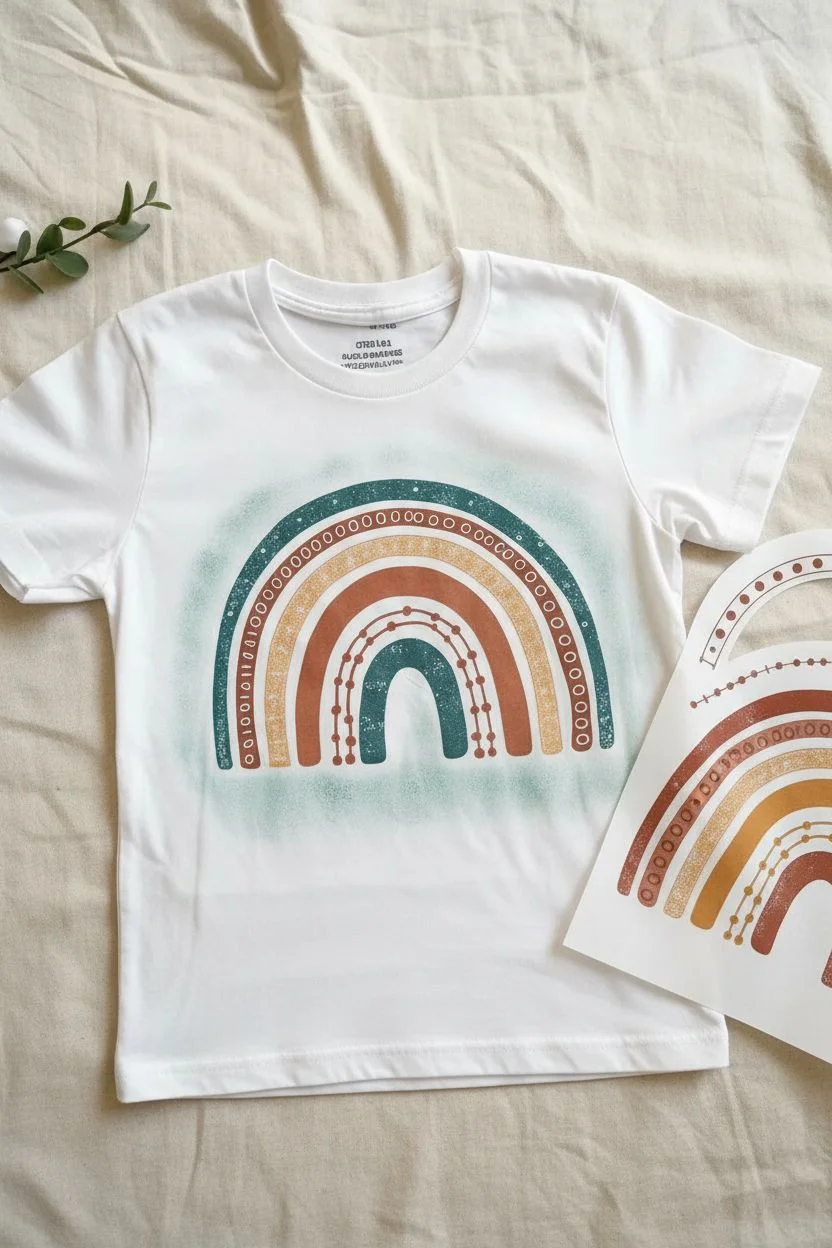
Achieve a trendy, boutique-style look with this muted boho rainbow design that uses layered stenciling to create depth and texture. The distressed finish gives it a perfectly worn-in, vintage vibe right from the start.
Step-by-Step Tutorial
Materials
- White cotton t-shirt (pre-washed)
- Fabric spray paint (Teal/Dark Green, Rust/Terracotta, Mustard Yellow)
- Freezer paper or stencil vinyl
- Cutting machine (Cricut/Silhouette) or craft knife and cutting mat
- Iron and ironing board
- Cardboard insert for the shirt
- Masking tape or painter’s tape
- Paper towels
Step 1: Designing and Cutting Stencils
-
Prepare the design layers:
Visualize your rainbow as five separate arches. You will need separate stencil pieces for each colored section to keep the lines crisp. -
Create the outermost arch:
Design the largest arch with a solid teal fill. For that distressed look, incorporate tiny speckles or ‘noise’ into the cut lines so the paint doesn’t look too solid. -
Design the middle decorative arches:
Create the second arch (rust) with a negative space circle pattern cut out of it. Create the third arch (mustard) with a solid fill. -
Create the inner arches:
Design the fourth arch as a thick rust band. Finally, create the smallest, innermost arch as a solid teal shape. -
Add detail overlays:
Design a separate overly stencil for the delicate line-and-dot detail that sits over the fourth rust arch. -
Cut the stencils:
Cut your designs out of freezer paper (shiny side down) or stencil vinyl. I prefer freezer paper for fabric because it irons on flat for a seal but peels off easily without residue.
Bleeding Lines?
If paint bleeds under the stencil, your spray was likely too heavy. Use very light, misty coats. For sharper lines, press the stencil edge down immediately before spraying.
Step 2: Applying the Base Colors
-
Prep the shirt:
Insert a piece of cardboard inside the shirt to prevent bleed-through to the back. Smooth out the fabric completely. -
Position the first layer:
Iron on the stencil for the outermost teal arch and the innermost teal arch. Ensure the edges are sealed tight. -
Spray the teal:
Hold the teal fabric spray can about 8 inches away. Apply a light mist. Don’t saturate it; a slightly uneven coat adds to the vintage aesthetic. -
Let it dry and peel:
Allow the paint to tack up for about 10-15 minutes, then carefully peel away the freezer paper to reveal your first color. -
Mask and position rust arches:
Once the teal is dry to the touch, iron on the stencils for the second arch (with the circle cutouts) and the fourth arch. -
Protect the teal:
Use scrap paper and masking tape to cover the already-painted teal sections so they don’t get hit by the rust spray. -
Spray the rust color:
Apply the rust/terracotta spray paint over the exposed stencil areas. Again, keep the coat light and airy. -
Apply the mustard arch:
Repeat the masking and stenciling process for the middle mustard yellow arch, ensuring all other areas are covered.
Step 3: Adding Details and Finishing
-
Postiion the detail stencil:
Place the delicate line-and-dot stencil over the dry fourth arch (the rust band). The openings should reveal the white shirt underneath, or you can spray a darker color through them. -
Optional hand-painting:
For very fine details like the connecting lines on the inner arch, I sometimes find it easier to use a small brush and dip it into a puddle of the spray paint rather than spraying directly. -
Create the speckled effect:
To enhance the distressed look shown in the photo, hold a can of white or light grey spray paint very far back and let a fine mist of droplets fall over the entire dried design. -
Heat set the design:
Once the shirt is completely dry (wait at least 4 hours), cover the design with parchment paper and iron it on a high cotton setting to cure the paint permanently.
Go Glitter
For a subtle pop, spray a very light layer of translucent shimmer mist over the mustard yellow arch before removing the stencil to make just that color sparkle.
Now you have a custom graphic tee that looks professionally printed and carries a lovely handcrafted charm
Tape-Resist Geometric Grid
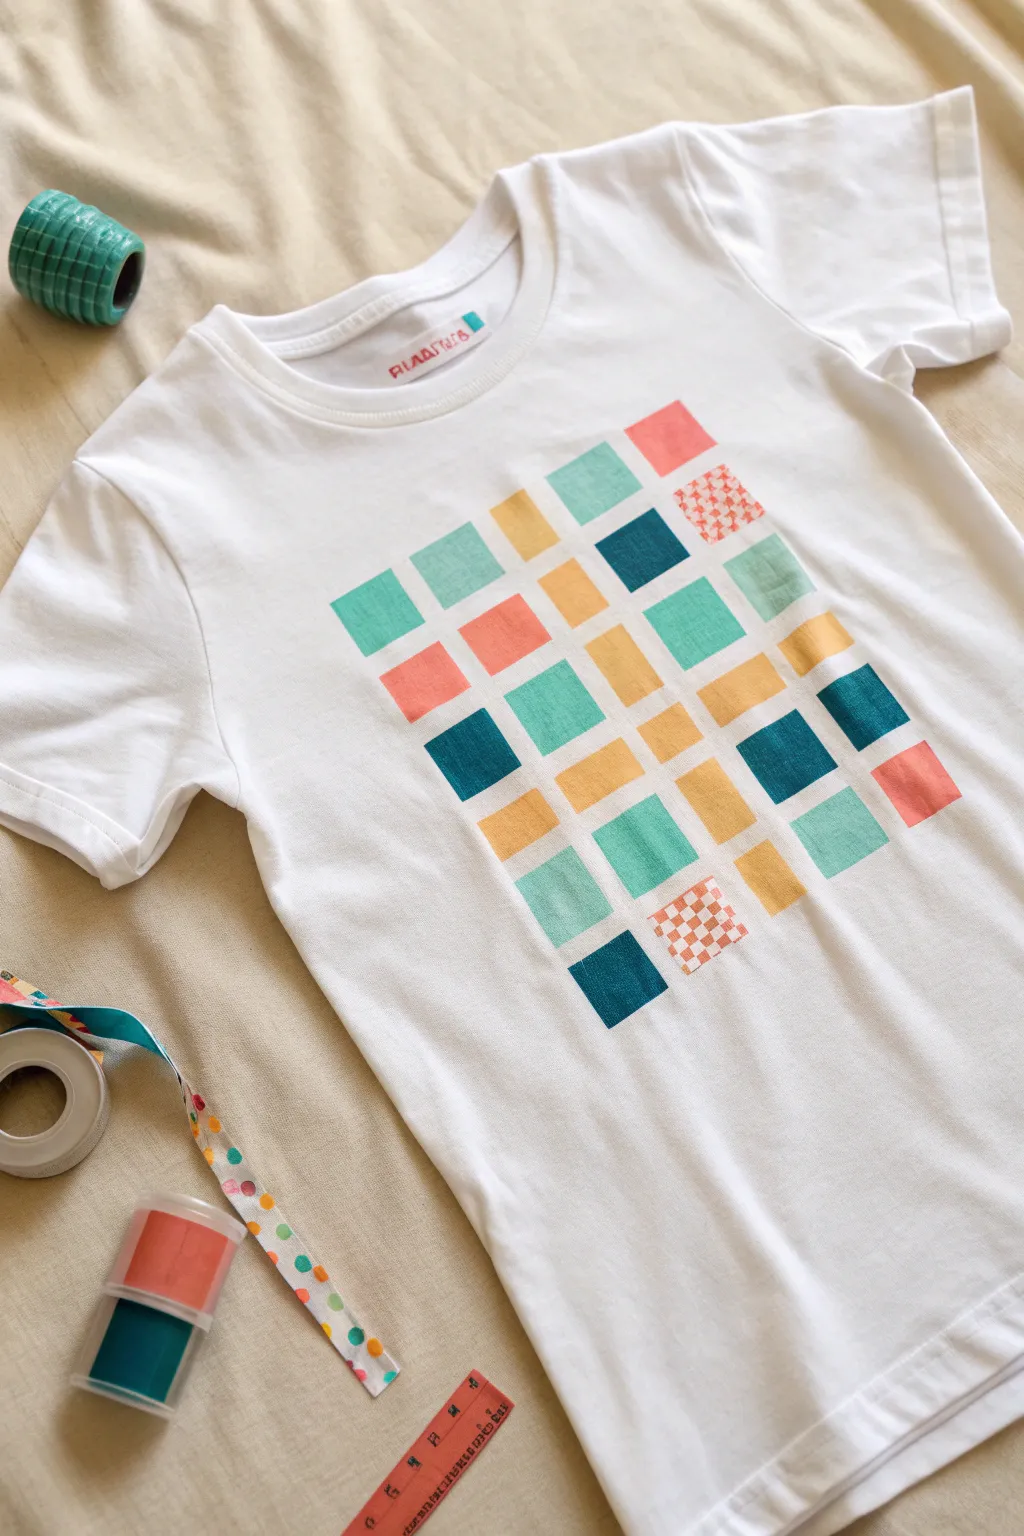
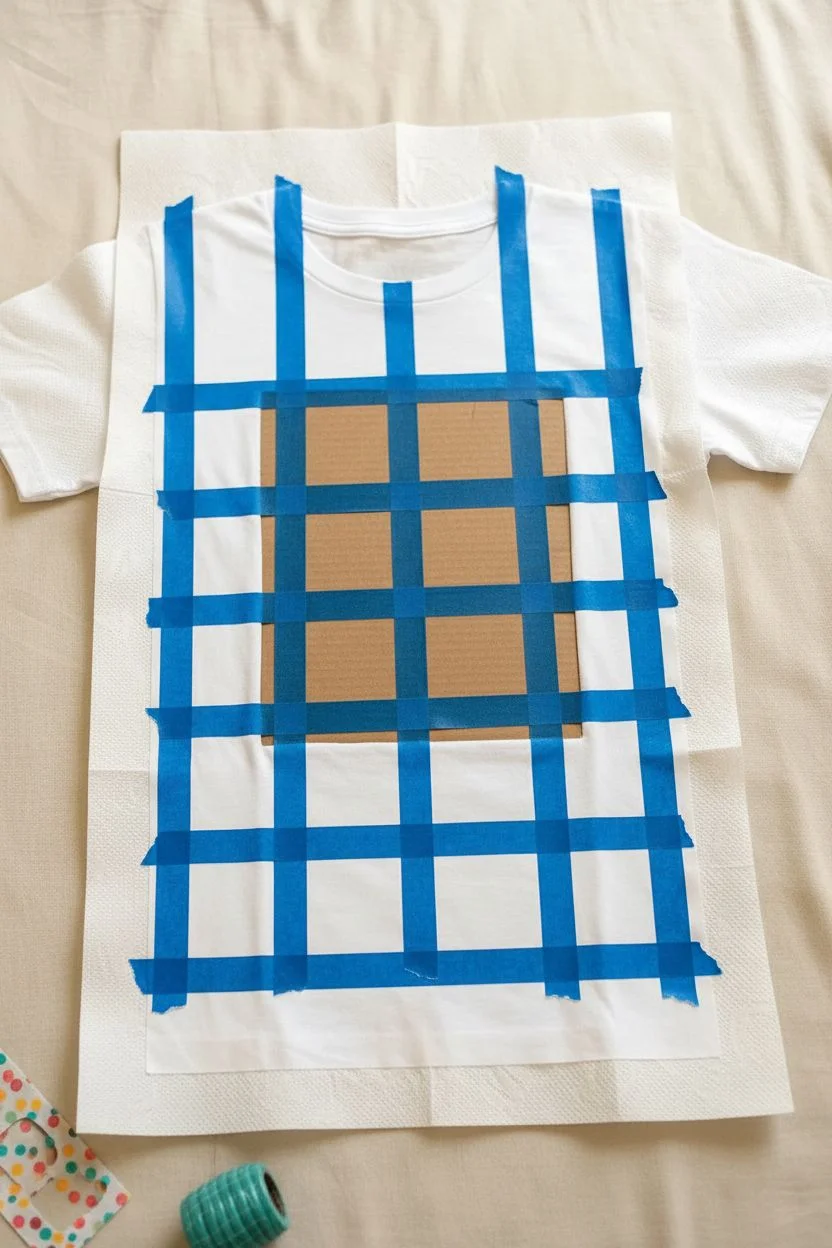
Transform a plain white t-shirt into a piece of wearable modern art with this geometric grid design. Using tape resist and a palette of coral, teal, navy, and mustard yellow, you’ll create a clean, eye-catching pattern that looks professionally printed.
Step-by-Step Guide
Materials
- White cotton t-shirt (pre-washed)
- Fabric spray paint (coral, teal, navy, mustard yellow)
- Painter’s tape or stencil tape (various widths)
- Cardboard or cutting mat (to insert inside shirt)
- Paper towels or scrap paper
- Ruler
- Patterned stencil (optional, for textured squares)
- Iron (for setting the paint)
Step 1: Preparation & Masking
-
Prep the shirt:
Begin by sliding a piece of thick cardboard or a cutting mat inside your t-shirt. This is crucial as it prevents the paint from bleeding through to the back of the shirt and gives you a smooth, flat surface to work on. -
Plan the grid:
Smooth out the fabric completely, ensuring there are no wrinkles. Lightly place a few strips of painter’s tape to establish your outer boundaries and grid structure, focusing on the center chest area. -
Create the vertical lines:
Lay down long vertical strips of painter’s tape to create the columns of your grid. Vary the spacing slightly between strips to create squares and rectangles of different widths for a more dynamic look. -
Add horizontal lines:
Apply horizontal strips of tape across the vertical ones. Press down firmly on all edges. The spaces left exposed between the tape intersections will become your colored blocks. -
Secure edges:
Run your fingernail or a plastic card along the edges of every piece of tape. You want a tight seal against the fabric to ensure crisp, clean lines and minimize paint bleed. -
Block off surrounding fabric:
Cover the rest of the t-shirt (sleeves, collar, and bottom hem) with scrap paper or paper towels, taping them down securely. You only want the specific grid area exposed to the spray.
Fuzzy Edges?
If paint bleeds under the tape, use a small fabric marker or a fine brush with white fabric paint to carefully touch up the lines and restore crispness.
Step 2: Painting the Grid
-
Select your first color:
Choose your first color, perhaps the mustard yellow. Cover all open squares *except* the ones you want to be yellow with small pieces of paper or extra tape. -
Spray the first layer:
Hold the spray can about 6-8 inches away and apply a light mist over the exposed yellow squares. It’s better to do two light coats than one heavy, soaking coat. -
Switch colors:
Once the first color is touch-dry, cover those painted squares and expose the next set of squares for your second color, like the coral. Repeat the light misting process. -
Add cool tones:
Repeat the masking and spraying process for your teal and navy blue squares. I find that placing the darker navy squares sparingly helps anchor the lighter colors. -
Create texture (optional):
For the checkered squares seen in the design, place a small patterned stencil over a blank square before spraying with coral. This adds a lovely visual texture that breaks up the solid blocks. -
Final touches:
Check for any remaining blank squares and fill them with your chosen colors, ensuring you have a balanced distribution of warm and cool tones across the grid.
Step 3: Finishing Up
-
Let it dry:
Allow the paint to dry completely. Wait at least 30 minutes to an hour, depending on your paint brand’s instructions. -
The reveal:
Carefully peel away all the painter’s tape and masking paper. This is the most satisfying part, revealing the crisp white lines between your colorful blocks. -
Remove cardboard:
Gently remove the cardboard insert from inside the shirt. -
Heat set:
To make the design permanent and washable, place a thin cloth over the painted area and iron it on a high setting (no steam) for several minutes to heat-set the pigments.
Level Up: Metallic Pop
Swap one of the solid colors for a metallic gold or silver fabric spray. One or two shimmering squares will catch the light and add a luxe feel.
Wear your new geometric masterpiece with pride and get ready for compliments on your design skills
Galaxy Mist And Star Speckles
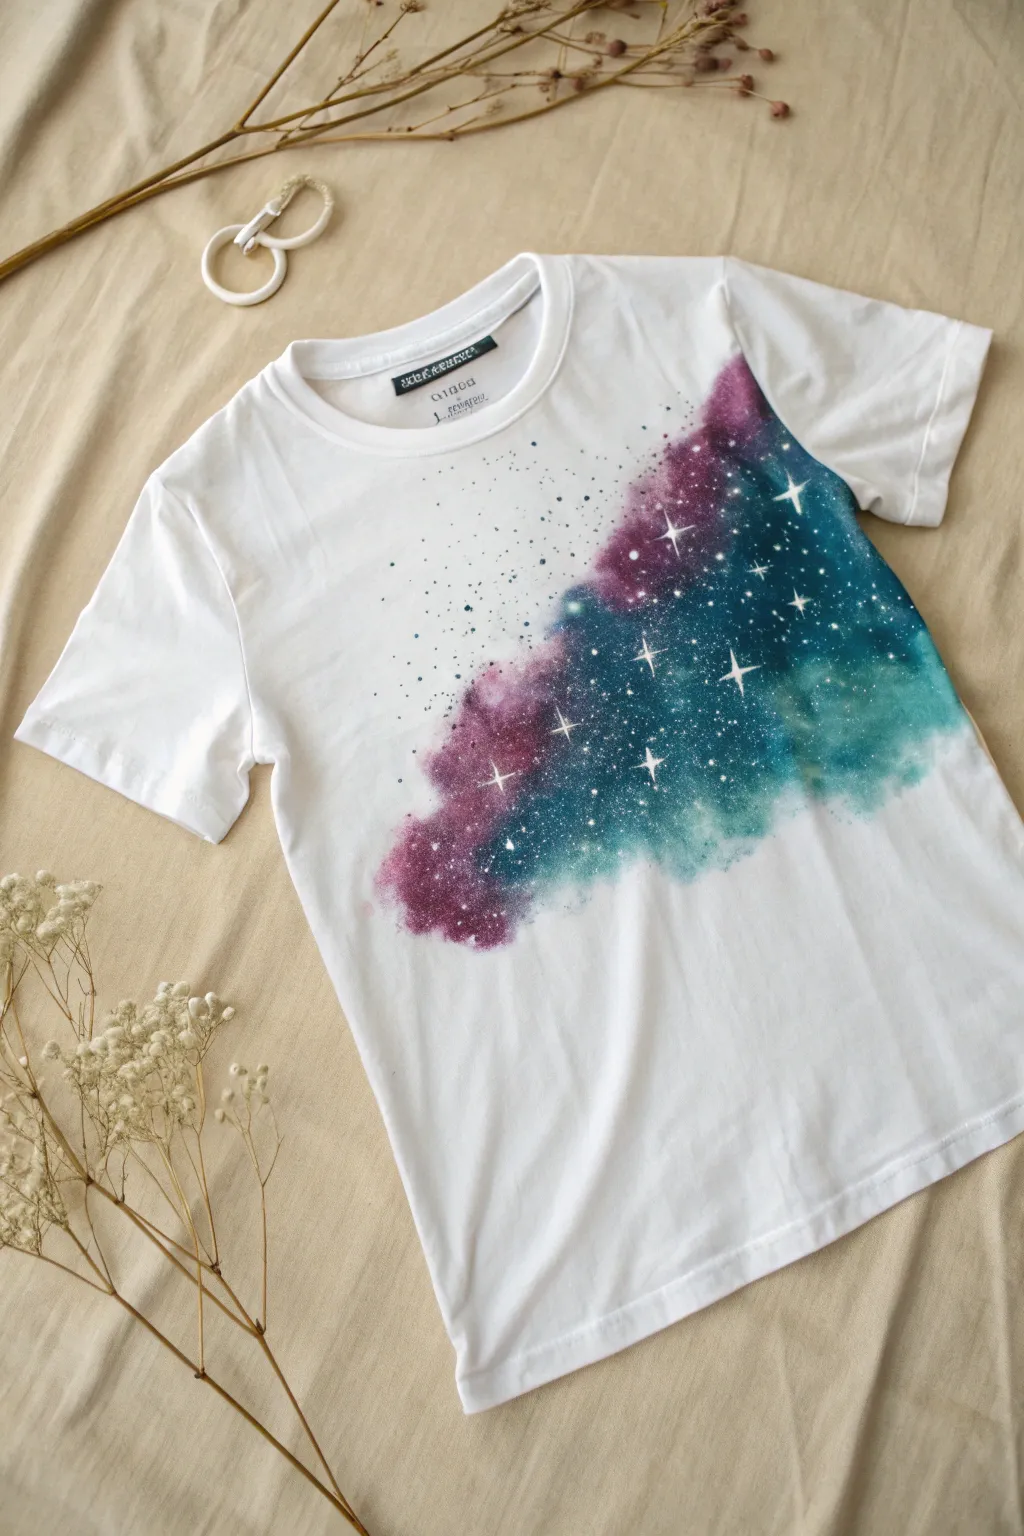
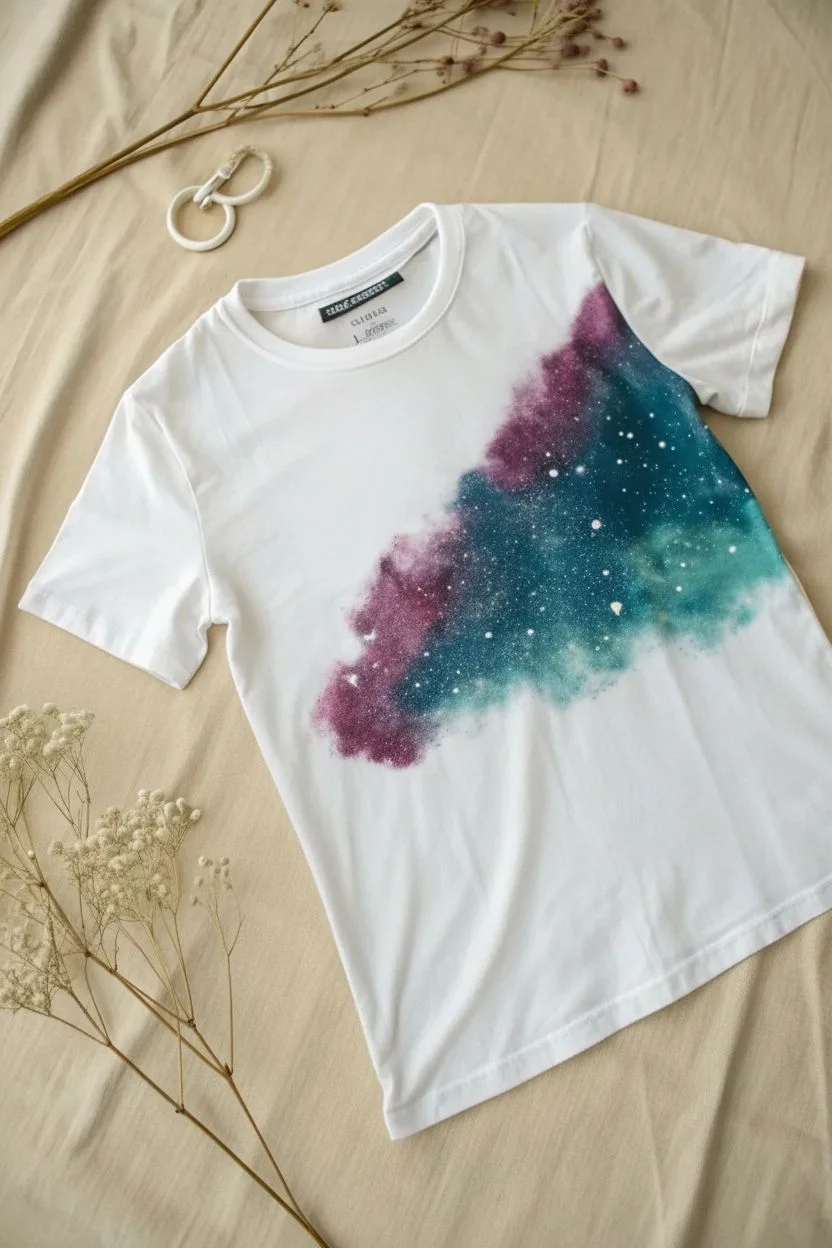
Transform a plain white tee into a piece of wearable art with this ethereal galaxy design. Using a blend of fabric spray paints and hand-painted details, you’ll create a dreamy diagonal nebula effect complete with twinkling stars.
Detailed Instructions
Materials
- White cotton t-shirt (pre-washed)
- Fabric spray paints (plum/violet, teal/turquoise, navy blue)
- White fabric paint (bottled)
- Cardboard insert for shirt
- Fine liner paintbrush
- Old toothbrush
- Paper towels or rags
- Water cup
- Painter’s tape or scrap paper (optional for masking)
Step 1: Preparation & Base Color
-
Prepare your workspace:
Lay down a protective drop cloth or old newspapers. Insert the piece of cardboard inside the t-shirt to prevent paint from bleeding through to the back layer. -
Plan the composition:
Visualize a diagonal sweeping shape starting from the lower mid-section up towards the right shoulder. You don’t need tape for this, as the misty edges are part of the charm. -
Apply the teal base:
Shake your teal fabric spray paint well. Lightly mist the center of your imagined diagonal path. Keep the nozzle about 6-8 inches away for a soft, diffuse edge. -
Add violet accents:
While the teal is still damp, spray the violet or plum color on the upper and lower edges of the teal section. Allow the colors to overlap slightly to create a blended transition. -
Deepen with navy:
Spray small bursts of navy blue into the deepest parts of the design to add depth and dimension, focusing on the spaces between the teal and violet areas. -
Blotting:
Immediately take a crumpled paper towel and gently blot the wet paint. This lifts excess liquid and creates that mottled, organic nebula texture rather than a solid block of color.
Step 2: Starry Details
-
Initial drying:
Let the spray paint layer dry until it’s tacky but not soaking wet. This usually takes about 15-20 minutes depending on humidity. -
Prepare the star paint:
Squeeze a small amount of opaque white fabric paint onto a palette or scrap cardboard. Add a tiny drop of water to thin it slightly—it should be the consistency of heavy cream. -
Create the star field:
Dip an old toothbrush into the thinned white paint. Hold it over the painted galaxy area and run your thumb across the bristles to flick tiny speckles onto the fabric. -
Vary density:
Concentrate more speckles in the darker navy areas to make them pop, and leave the lighter teal sections with fewer stars for contrast. -
Paint major stars:
Switch to your fine liner brush. Dip it into the unthinned white fabric paint to hand-paint specific larger stars. -
Draw cross stars:
For the signature ‘twinkle’ stars, paint a small vertical line intersected by a horizontal line. Make the center intersection slightly thicker and taper the points out thinly. -
Add larger dots:
Scattered among the fine spray mist and the cross stars, use the tip of your brush handle to dot a few larger, distinct round stars. -
Final drying:
Allow the shirt to dry completely flat for at least 24 hours. Don’t move the cardboard insert until it is fully dry. -
Heat setting:
Once fully dry, turn the shirt inside out and iron the design area on a cotton setting (no steam) for 3-5 minutes to permanently set the pigment.
Paint Blobs?
If your spray nozzle spits out a large droplet, don’t panic. Quickly dab it with a dry sponge or paper towel to blend it into the background texture.
Pro Tip: Depth Control
Work light to dark. I prefer misting the lighter teal first, then layering darker purple and navy on top. It makes the ‘galaxy’ feel deeper.
Enjoy wearing your personal slice of the cosmos on your next casual outing
Spray Can Icon And Splatter Frame
This project embraces a clean, graphic style by combining bold line art with the texture of fabric. It features a simplified spray paint can icon centralized on a crisp white tee, offering a nod to street art culture without the mess of actual spray paint.
Detailed Instructions
Materials
- White 100% cotton t-shirt
- Black fabric ink or screen printing ink
- Heat transfer vinyl (black) or stencil material (Mylar/freezer paper)
- Electronic cutting machine (Cricut/Silhouette) or X-Acto knife
- Iron or heat press
- Weeding tool (if using vinyl)
- Small foam pouncer or screen printing squeegee (if using stencil)
- Piece of cardboard (to place inside shirt)
- Ruler or measuring tape
Step 1: Preparation & Design
-
Pre-wash the fabric:
Start by washing and drying your white t-shirt without using fabric softener. This removes factory sizing and ensures the ink or vinyl adheres properly to the fibers. -
Prepare the workspace:
Iron the shirt flat to remove any wrinkles, focusing heavily on the center chest area where the design will go. A smooth surface is critical for clean lines. -
Create or source the design:
You need a vector or high-contrast image of a spray can. Look for a simple outlined style like the one shown—a cylinder body, a domed top, and a small nozzle. Add 3-4 small teardrop shapes above the nozzle to represent the spray. -
Choose your method:
Decide between Heat Transfer Vinyl (HTV) for a slightly raised, super-smooth finish, or a stencil with fabric ink for a softer, integrated feel. The example looks like a very clean screen print or HTV application.
Step 2: Creating the Graphic (HTV Method)
-
Cut the design:
Load your black HTV into your cutting machine with the shiny carrier sheet facing down. Mirror your design in the software before sending it to cut. -
Weed the excess:
Use a weeding tool to carefully remove all the negative space vinyl around the spray can and the tiny spray droplets. You should be left with just the black lines on the clear carrier sheet. -
Position the graphic:
Find the center of the chest by folding the shirt in half vertically and lightly pressing a crease. Align the center of your spray can design with this crease, placing it about 3-4 inches down from the collar. -
Apply heat:
Follow the temperature instructions for your specific vinyl (usually around 305°F/150°C). Press firmly with an iron or heat press for 10-15 seconds. -
Reveal the design:
Allow the vinyl to cool slightly (check if it’s a hot or cold peel) and slowly peel back the clear carrier sheet. If any edge lifts, press it again.
Clean Lines Pro-Tip
If doing the stencil method, paint a thin layer of clear medium or Mod Podge over the stencil edges first. This seals the gap so lines stay razor-sharp.
Step 3: Creating the Graphic (Stencil Method)
-
Cut the stencil:
If using freezer paper, cut your design out of the paper side so you have a negative space stencil. If using Mylar, cut with a sharp X-Acto knife. -
Secure the shirt:
Insert a piece of cardboard inside the shirt to prevent ink from bleeding through to the back. Smooth the fabric taut over the cardboard. -
Adhere the stencil:
For freezer paper, iron the stencil shiny-side down onto the shirt; the heat will temporarily seal it to the fabric. For Mylar, use a light coat of repositionable spray adhesive. -
Apply the ink:
I prefer to use a foam pouncer here. Dip it lightly into black fabric ink and dab off the excess. Apply the ink over the stencil using strictly up-and-down motions to prevent seepage under the edges. -
Remove and set:
Carefully peel away the stencil while the paint is still wet to keep edges crisp. Let it air dry completely (usually 24 hours), then heat set it with an iron to make it permanent.
Troubleshooting Lifting
If vinyl lifts when peeling the carrier sheet, lay the sheet back down and press for another 5-10 seconds with more pressure, focusing on the edges.
Step 4: Styling the shot (Optional)
-
Create background splatter:
To recreate the artistic vibe of the photo (but not on the shirt itself), lay down a drop cloth or kraft paper underneath your shirt project. -
Add contextual mess:
Dip a stiff bristle brush into blue acrylic paint, pull the bristles back, and flick splatters onto the background cloth to the left of the shirt. This implies the ‘action’ of the spray can.
Once specific heat-setting is complete, your graphic tee is ready to wear and wash


Have a question or want to share your own experience? I'd love to hear from you in the comments below!