
Spray paint on fabric is one of my favorite ways to make a T-shirt feel like a wearable canvas—fast, bold, and wonderfully unpredictable. Here are a bunch of spray paint T-shirt design ideas you can try, from classic stencil looks to more experimental, artsy effects.
Classic Stencil Graphic
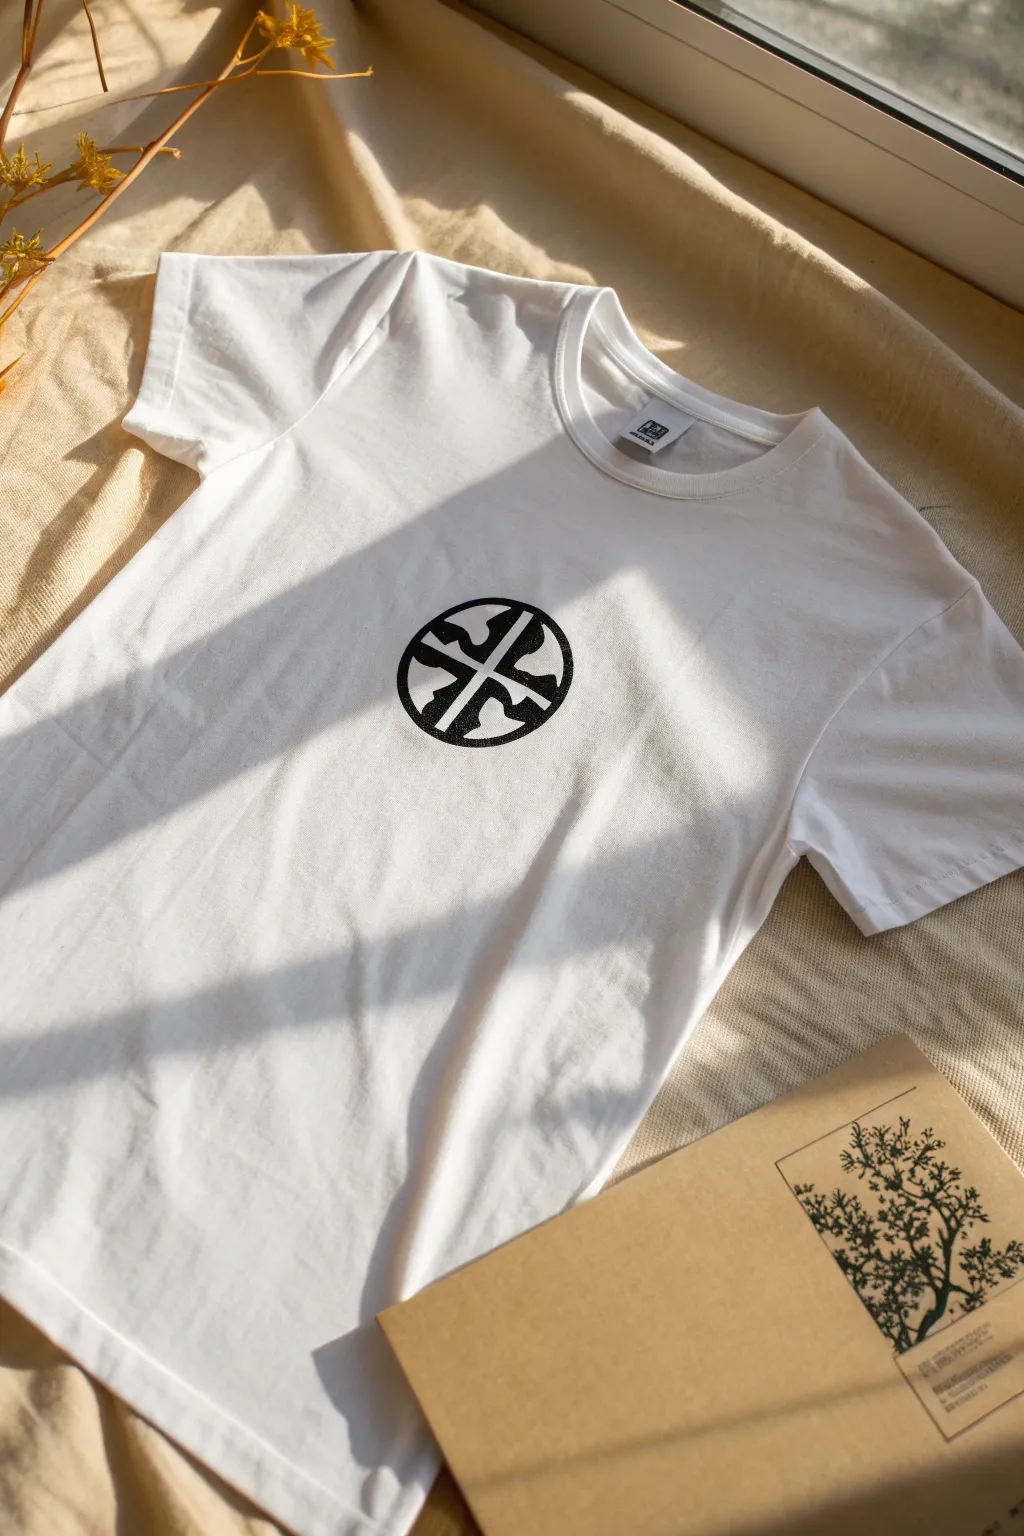
Achieve a sleek, streetwear-inspired look with this simple yet striking DIY project. Using a classic stencil technique, you’ll create a crisp, high-contrast graphic on a basic white tee that looks professionally printed.
Step-by-Step
Materials
- White cotton t-shirt (pre-washed)
- Black fabric spray paint or textile paint
- Sticky back stencil film or freezer paper
- Craft knife or scalpel
- Cutting mat
- Iron and ironing board
- Cardboard insert (to fit inside the shirt)
- Painter’s tape
- Reference image of logo (circular quadrant design)
- Pencil for tracing
Step 1: Preparing the Design
-
Draft the graphic:
Begin by drawing or printing your desired circular logo onto a sheet of paper. For this specific look, you want a thick outer ring bisected by a cross, creating four quadrants with organic, wavy negative space shapes. -
Transfer to stencil material:
Place your sticky back stencil film or freezer paper (shiny side down) over your drawing. Trace the black areas of the design carefully with a pencil; these are the parts you will eventually cut out. -
Cut the stencil:
Using a sharp craft knife on a cutting mat, carefully cut out the parts of the design that should be black. Leave the white crossbars and the organic shapes inside intact as ‘islands’ of stencil material. -
Check your edges:
Refine any jagged edges with your knife. Clean, smooth curves are crucial for that professional, sharp logo aesthetic.
Fuzzy Edges?
If lines aren’t crisp, your spray was likely too heavy or angled. Use a fabric marker or fine paintbrush with black textile paint to manually tidy up any small bleeds.
Step 2: Setting the Stage
-
Prep the shirt:
Iron your white t-shirt thoroughly to remove all wrinkles. A smooth surface is absolutely vital to prevent paint from bleeding under the stencil folds. -
Protect the back:
Insert a piece of cardboard inside the shirt, positioning it directly under the chest area where the design will go. This prevents the paint from soaking through to the back of the shirt. -
Position the stencil:
Peel the backing off your sticky stencil film or place your freezer paper (shiny side down) on the center chest area. Measure from the armpits to ensure it is perfectly centered. -
Adhere the stencil:
If using freezer paper, iron it down firmly on a medium-high setting until it bonds to the fabric. If using sticky film, press it down firmly with your fingers, paying special attention to the thin lines of the cross and the edges of the circle. -
Mask the perimeter:
Use painter’s tape to cover the fabric immediately surrounding your stencil rectangle. This protects the rest of the shirt from accidental overspray.
Step 3: Applying the Paint
-
Test spray:
Shake your black fabric spray paint can vigorously. Do a quick test spray on a scrap piece of paper or cardboard to clear the nozzle and ensure an even mist. -
First light coat:
Hold the can about 6-8 inches away from the shirt. Apply a very light misting coat over the exposed stencil area. I prefer to do multiple thin layers rather than one heavy one to avoid soaking the fabric. -
Let it tack:
Wait about 5-10 minutes for this first layer to become tacky and slightly dry. This helps seal the edges for the next pass. -
Second coat:
Apply a second, slightly heavier coat of spray paint to achieve a deep, opaque black. Ensure you are spraying directly from above, not at an angle, to prevent paint from sneaking under the stencil edges. -
Final drying:
Allow the paint to dry completely according to the manufacturer’s instructions. This usually takes at least an hour, but patience is key here.
Pro Tip: Freezer Paper
Freezer paper is the secret weapon for cheap stencils. The plastic coating on one side melts slightly when ironed, creating a temporary but tight seal on the fabric.
Step 4: The Reveal
-
Remove the masking:
Gently peel away the painter’s tape from around the stencil area. -
Lift the main stencil:
Slowly peel back the main portion of the stencil. Pull at a sharp angle close to the fabric to keep the edges crisp. -
Remove the details:
Use the tip of your craft knife or tweezers to carefully lift the small inner pieces of the stencil (the negative space shapes). Be extremely careful not to smudge the black paint if it’s still slightly tacky. -
Heat set:
Once fully dry (give it 24 hours to be safe), place a thin cloth or parchment paper over the design and iron it on a high setting to heat-set the ink, making it wash-safe.
Wear your new custom piece with pride, knowing created a professional-grade print right at home


Personalized Graffiti Name
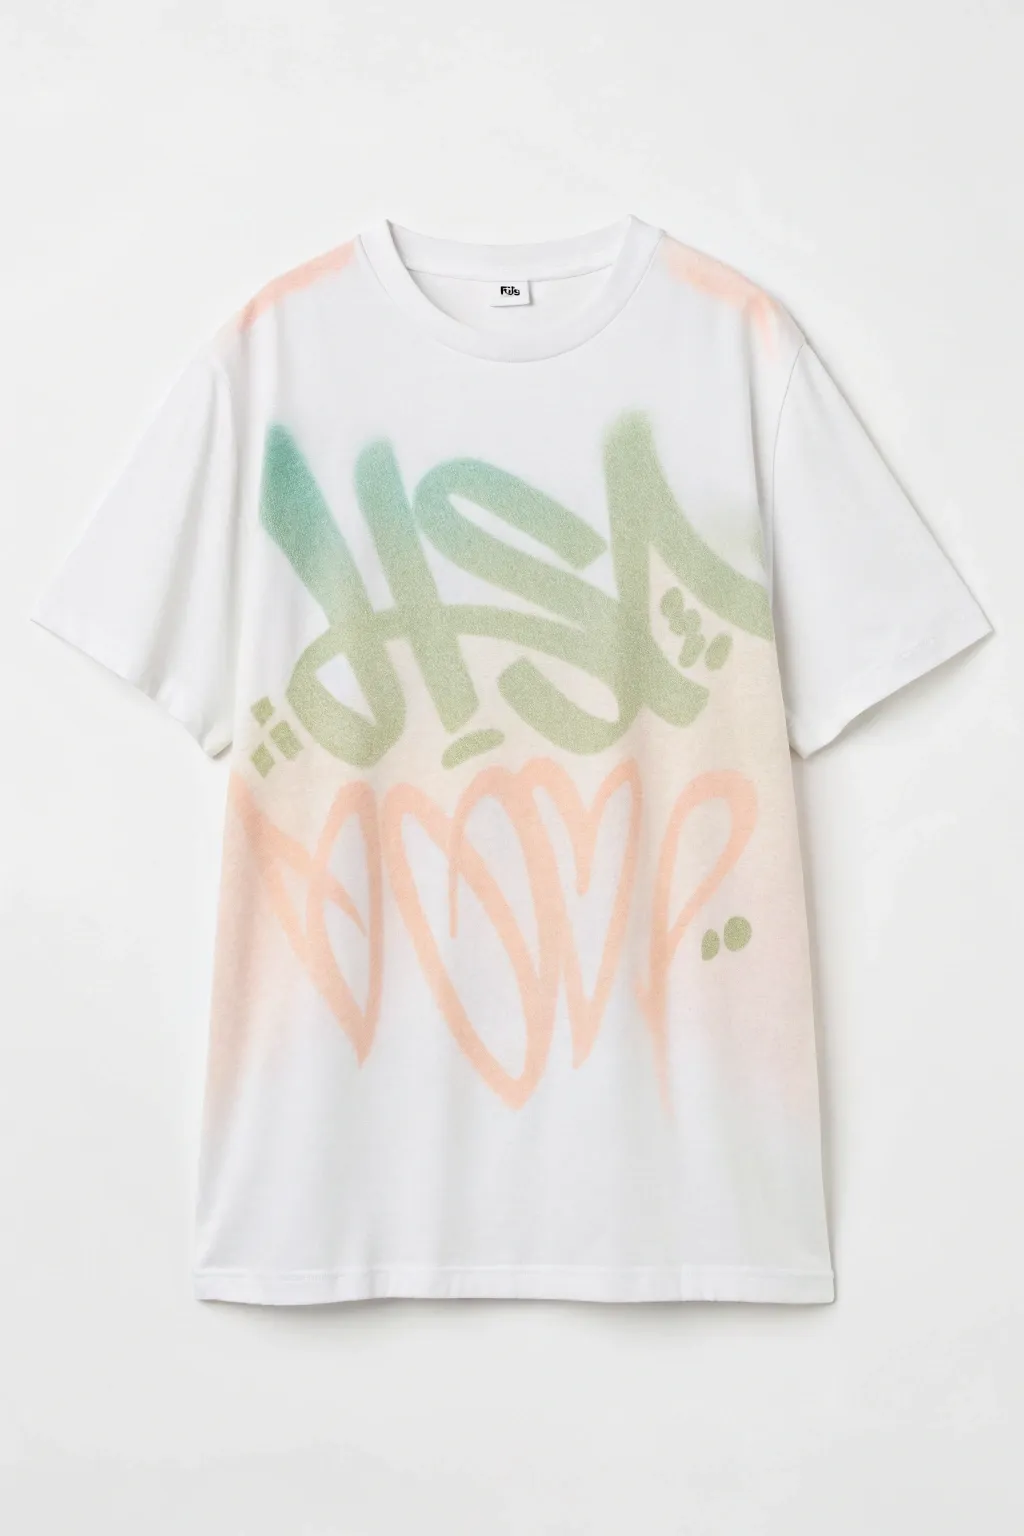
Transform a plain white t-shirt into streetwear art with soft, airbrushed-style lettering. This project uses fabric spray paint to achieve that authentic, fuzzy-edged graffiti look with gentle pastel gradients.
How-To Guide
Materials
- White cotton t-shirt (pre-washed)
- Fabric spray paint (teal/mint green)
- Fabric spray paint (light olive/sage green)
- Fabric spray paint (peach/coral)
- Cardboard insert or shirt form
- Large scrap paper or craft paper for masking
- Painter’s tape or stencil adhesive
- Pencil
- X-Acto knife or sharp scissors
- Cutting mat
Step 1: Preparation and Stencil Design
-
Pre-wash the fabric:
Begin by washing and drying your white t-shirt without adding any fabric softener. This removes sizing chemicals and ensures the paint adheres permanently to the fibers. -
Insert protective barrier:
Slide a piece of strong cardboard inside the t-shirt to separate the front from the back. This prevents paint from bleeding through to the rear of the shirt and gives you a smooth surface. -
Draft your design:
On a large sheet of thick paper, sketch out your graffiti lettering. Aim for bubble-style letters or flowing scripts like the ‘USA’ and heart motifs seen here. Keep the connecting lines thick. -
Cut the positive stencil:
This project works best with a ‘reverse stencil’ technique to get those distinct shapes. Carefully cut out the letters themselves using an X-Acto knife on a cutting mat. You will use the empty negative space as your guide. -
Alternatively, create a negative stencil:
For a sharper look, you can cut the shape out of the paper and discard the letters, keeping the paper ‘frame’ to spray through. For the soft look in the image, freehand spraying is also an option, but a stencil ensures legibility.
Step 2: Applying the Top Gradient
-
Shake the cans:
Vigorously shake your fabric spray paint cans for at least one minute to ensure the pigment and medium are perfectly mixed. -
Test opacity:
Do a quick test spray on scrap cardboard to check the nozzle flow and color density. The goal is a light mist, not a heavy soak. -
Start the teal section:
Position your nozzle about 6-8 inches from the shirt. Spray the upper left portion of your design area with the teal/mint green paint using short, controlled bursts. -
Blend in the olive tone:
While the teal is still slightly wet, pick up the light olive or sage green spray. Start spraying from the right side of the lettering, moving toward the middle to meet the teal. -
Create the gradient:
Allow the olive spray to lightly overlap the teal section in the center. I like to hold the can slightly further back here to create a softer transition between the two greens. -
Add floating accents:
Using quick, sharp bursts, add the small dot accents or ‘drips’ near the main lettering to mimic graffiti splatter.
Clogged Nozzle?
If the spray comes out in blobs, turn the can upside down and spray until clear gas comes out. Wipe the nozzle tip with warm water to clear dried paint.
Step 3: Applying the Bottom Layer
-
Re-mask if necessary:
If you used a stencil for the top, move it aside or tape off the top section to protect your fresh green work. If freehanding, simply move down. -
Design the lower motif:
The bottom section features looping, heart-like shapes. If you aren’t using a stencil, lightly sketch the path of these loops with a pencil directly on the fabric as a guide. -
Spray the peach layer:
Using the peach/coral paint, trace the lines of your bottom design. Move your arm smoothly and continuously rather than using short bursts to get those flowing, ribbon-like strokes. -
Soften the edges:
To enhance the airbrushed effect, add a very faint mist of peach around the outer edges of the heart shapes. This creates a glow rather than a hard line. -
Connect the layers:
Ensure there is a small amount of visual overlap or close proximity between the bottom peach layer and the top green layer so the design feels cohesive.
Level Up: Puff Paint
Outline your sprayed letters with white or black 3D puff paint to make the graffiti pop off the shirt and give it distinct, defined edges.
Step 4: Finishing Touches
-
Let it dry completely:
Allow the shirt to lay flat and dry for the time recommended on your specific paint can (usually 4 to 24 hours). -
Heat set the design:
Once fully dry, turn the shirt inside out. Iron the reverse side of the design on a cotton setting (without steam) for about 5 minutes to permanently set the ink. -
Final inspection:
Check for any uneven spots. Since the look is meant to be street-style and slightly imperfect, minor splatters add character.
Wear your custom graffiti tee with pride knowing it is a one-of-a-kind original


Ombre Fade Across the Chest
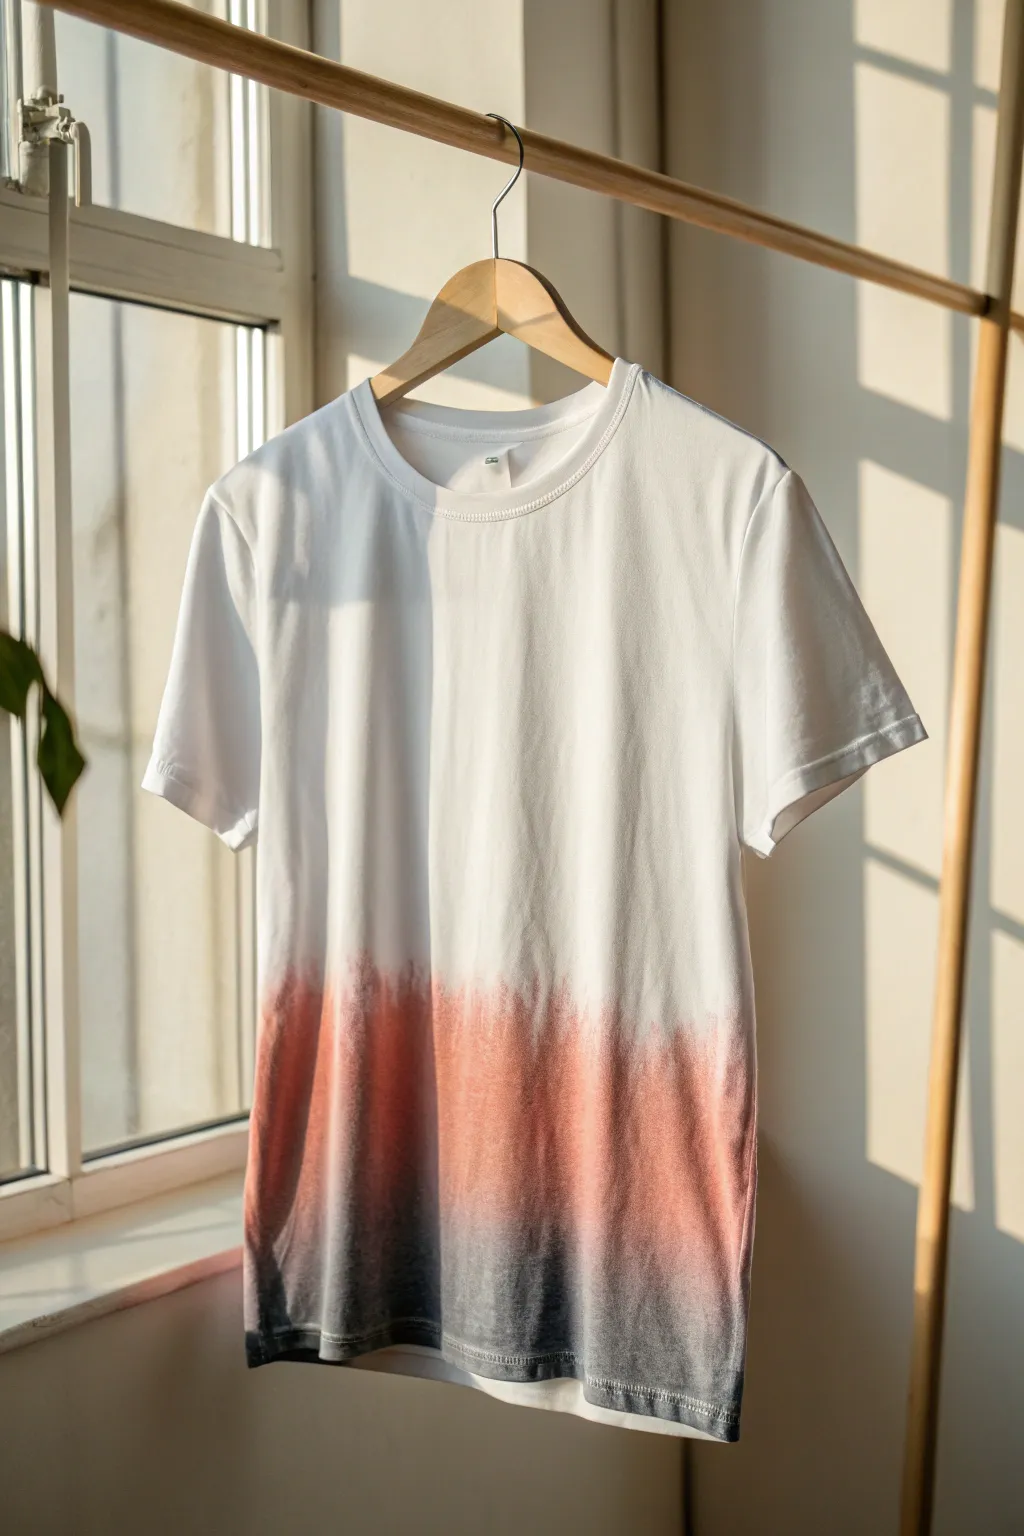
Transform a plain white tee into a wearable sunset with this subtle yet striking ombre effect. By layering fabric spray paint from the hem upwards, you’ll achieve a professional-looking gradient that blends charcoal and rust tones seamlessly into white.
Step-by-Step
Materials
- White cotton t-shirt (pre-washed)
- Fabric spray paint (Charcoal/Dark Grey)
- Fabric spray paint (Rust/Coral)
- Cardboard insert or shirt board
- Painter’s tape or masking tape
- Drop cloth or larger cardboard for workspace protection
- Paper towels
Step 1: Preparation
-
Prepare the Workspace:
Set up a well-ventilated area, preferably outdoors or near an open window. Lay down your drop cloth or large cardboard to protect surrounding surfaces from overspray. -
Insert Shirt Board:
Slide a stiff piece of cardboard inside the t-shirt. This is crucial as it prevents the paint from bleeding through to the back layer and gives you a flat, stable surface to work on. -
Smooth the Fabric:
Pull the fabric taut against the cardboard insert without over-stretching it. Smooth out any wrinkles with your hands, as creases will result in uneven dyeing lines. -
Secure the Insert:
If the shirt is loose on the board, use clips or tape on the back side of the cardboard to gather the excess fabric, ensuring the front surface remains perfectly flat. -
Mask Upper Area (Optional):
If you are worried about stray droplets hitting the pristine white upper section, loosely tape off the chest area, leaving plenty of room for the fade to settle naturally.
Splotch SOS
If the can spits a large droplet, don’t wipe it! Blot gently with a paper towel, then mist the area lightly with the same color to camouflage the spot.
Step 2: Painting the Base Layer
-
Test the Nozzle:
Before aiming at the shirt, spray a quick burst onto a scrap piece of paper or paper towel. This clears the nozzle and ensures the paint comes out in a fine mist rather than a messy stream. -
Start with Charcoal:
Begin with your darker charcoal or grey paint. Aim directly at the very bottom hem of the shirt. -
Apply the Darkest Edge:
Spray consistently along the bottom edge, holding the can about 6-8 inches away. You want this bottom-most strip to be opaque and saturated. -
Feather Upwards:
Gradually lift your aim slightly higher, increasing the distance between the can and the shirt to about 10-12 inches. Use sweeping, horizontal motions to create a softer, less saturated grey zone just above the hem. -
Check Saturation:
Ensure the bottom hemming is solid grey. If it looks patchy, go over the very edge one more time with a closer spray distance.
Level Up: Salt Texture
While the paint is still wet, sprinkle coarse sea salt over the transition area. The salt absorbs pigment, creating a cool, speckled vintage texture once dry.
Step 3: Creating the Transition
-
Introduce the Rust Color:
Shake your rust or coral fabric spray can thoroughly. Just like before, give it a test spray on your scrap paper. -
Bridge the Gap:
Start spraying the rust color right where the grey begins to fade out. Overlap slightly with the top of the grey section to blend the colors together. -
Build the Intensity:
Create a band of solid rust color above the grey. Keep your hand moving horizontally to avoid pooling liquid in one spot. -
Create the Upper Fade:
To achieve that delicate misty look where the color meets the white, pull the can back to about 15 inches away. Use quick, light bursts rather than a continuous stream. -
Soften the Line:
I like to angle the can slightly upward for this top section, so only the finest mist lands on the shirt, preventing a harsh ‘stripe’ effect. -
Spot Check:
Step back and look at the gradient from a distance. If the transition from grey to rust looks too abrupt, lightly mist a little more rust paint over the boundary line to marry the two hues.
Step 4: Finishing Touches
-
Address the Sides:
Don’t forget the side seams. Rotate the cardboard insert or carefully angle your spray to wrap the color around the sides slightly, ensuring the design doesn’t just stop abruptly at the edges. -
Initial Drying:
Let the shirt sit flat and undisturbed for at least one hour until the paint is dry to the touch. -
Remove Cardboard:
Once the front is dry, carefully remove the cardboard insert. If you want the design on the back as well, re-insert the cardboard and repeat the process on the reverse side. -
Heat Setting:
Most fabric paints require heat setting to become permanent. Once fully dry (usually 24 hours), turn the shirt inside out and iron the painted area on a cotton setting without steam for several minutes.
Wear your new ombre masterpiece with pride knowing you created that perfect fade yourself

Drips and Splatter Accents
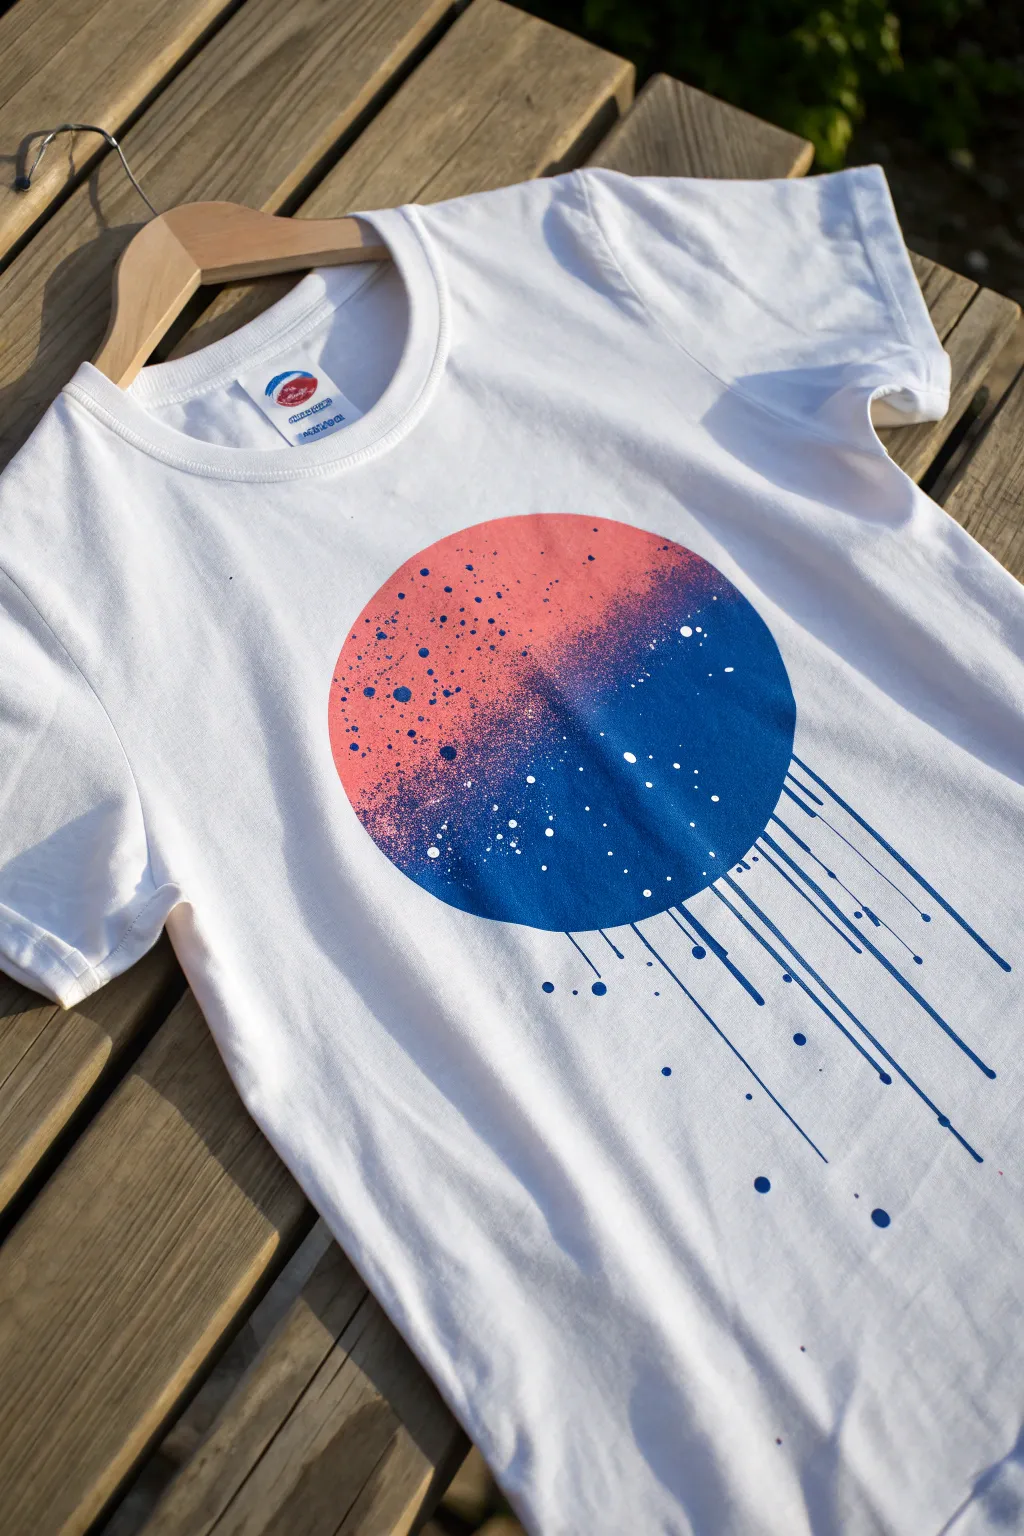
This striking design combines geometric precision with the messy energy of street art, featuring a dual-toned planetary circle that seems to melt down the shirt. The contrast between the splatter texture and the clean, linear drips creates a modern, graphic look that is surprisingly easy to achieve with simple stencils.
Detailed Instructions
Materials
- White cotton t-shirt (pre-washed)
- Fabric spray paint (Coral Pink and Deep Blue)
- Wide masking tape or painter’s tape
- Cardboard sheet or cutting mat
- Compass or large circular object (like a plate)
- X-Acto knife or craft scissors
- Cardboard insert for inside the shirt
- Scrap paper or newspaper
- Thin paintbrush (optional, for touch-ups)
Step 1: Preparation and Stenciling
-
Prep the shirt:
Begin by sliding a rigid piece of cardboard inside the t-shirt. This prevents paint from bleeding through to the back and provides a flat, stable surface for masking. -
Smooth the surface:
Pull the fabric taut against the cardboard insert and secure the excess fabric at the back with clips or tape if necessary to remove wrinkles. -
Create the circle stencil:
On a separate piece of thin cardboard or heavy cardstock, draw a large circle using a compass or by tracing a dinner plate. Carefully cut out the circle with an X-Acto knife, keeping the negative space (the hole) intact to use as your main stencil. -
Position the stencil:
Lay your stencil over the chest area of the shirt. Use masking tape to secure the edges of the cardboard to the shirt so it doesn’t shift. -
Mask the surrounding area:
Cover the rest of the exposed white shirt with newspaper or scrap paper, taping it down to the edges of your stencil. You want to ensure absolutely no overspray gets on the clean white fabric outside the circle.
Sticky Situation
Use darker tape colors (like blue painters tape) instead of cream masking tape. It makes it much easier to see your layout against the white tee before you start spraying.
Step 2: Spraying the Gradient
-
Create the divider:
To get the sharp diagonal split, place a piece of paper or cardboard across the circle stencil, covering the bottom-right portion. Leave the top-left crescent shape exposed. -
Spray the first color:
Shake your Coral Pink fabric spray well. Spray the exposed top-left section. Hold the can about 8-10 inches away for an even coat, or closer if you want heavier pooling. -
Add texture:
While the pink layer is still wet, gently press the nozzle halfway down to sputter a few larger droplets onto the pink area for that speckled, cosmic effect. -
Switch sides:
Wait a few minutes for the pink to dry slightly. Remove the divider and repurpose it (or use a fresh piece) to cover the pink section you just painted. Now the bottom-right crescent should be exposed. -
Spray the second color:
Apply the Deep Blue fabric spray to the exposed area. I like to let a little bit of blue mist cross over the boundary line to blend the gradient slightly, rather than having a perfectly hard edge. -
Review the circle:
Remove the diagonal masking paper so the full circle is visible. Add a few final spritzes of blue or pink ‘stars’ (splatters) across the opposing colors to unify the design.
Galaxy Mode
Before removing the main stencil, lightly mist a tiny bit of white fabric paint from a distance over the dried blue section to create a distant starfield effect.
Step 3: Creating the Drips
-
Prepare the drip area:
Remove the main circle stencil carefully. You should have a crisp, two-tone circle. Now, mask off the pink section of the circle completely to protect it. -
Masking vertical lines:
Using thin strips of masking tape, create vertical channels starting from the bottom of the blue section and extending downward. These gaps between the tape will become your drip lines. -
Varying line length:
Place horizontal pieces of tape at different lengths down the shirt to stop the vertical lines at random points. This creates the staggered, uneven look of the drips. -
Spraying the lines:
Cover the rest of the shirt again. Spray the Deep Blue paint into these taped channels. Because the lines are thin, use short bursts. -
De-masking:
Once the paint is tacky but not fully dry, carefully peel away all the tape and masking papers. Pull the tape away slowly at a 45-degree angle to keep lines crisp. -
Adding final dots:
To finish the effect, dip the handle end of a paintbrush into a small puddle of blue paint. Dot the fabric just below the ends of your drip lines to simulate droplets falling. -
Setting the ink:
Allow the shirt to dry for 24 hours. Iron the design (inside out or with a cloth over it) on a high heat setting to heat-set the fabric paint for washability.
Wear your new cosmic masterpiece with confidence, knowing you’ve captured a unique piece of abstract art.
BRUSH GUIDE
The Right Brush for Every Stroke
From clean lines to bold texture — master brush choice, stroke control, and essential techniques.
Explore the Full Guide
Tape-Resist Stripes
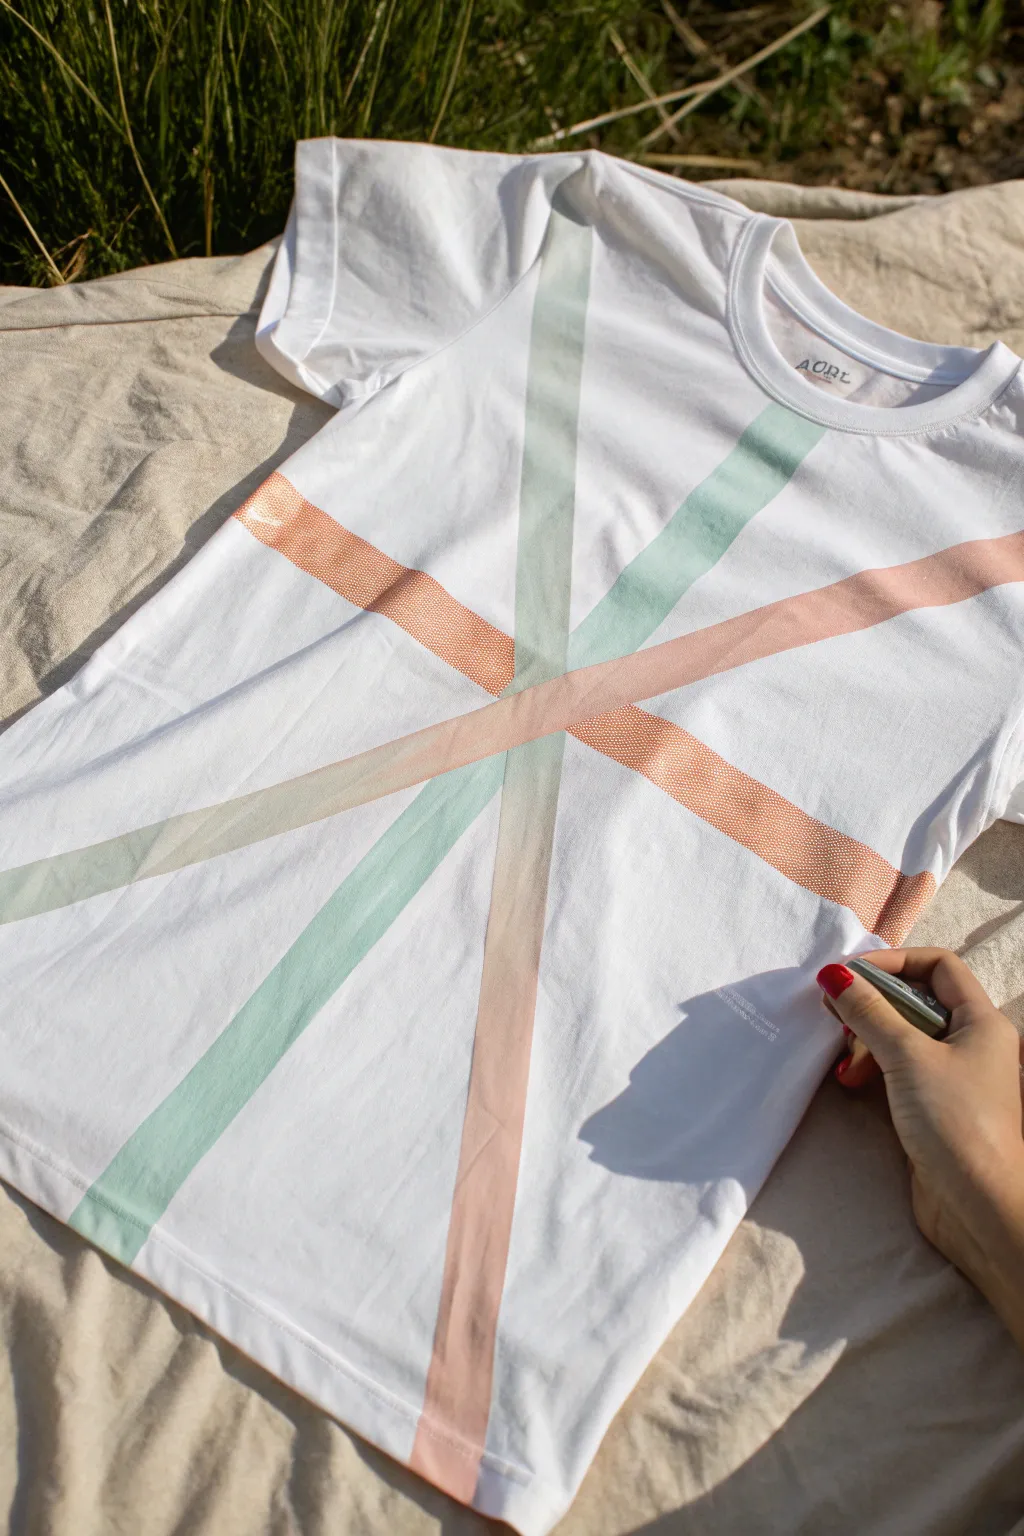
Transform a plain white tee into a piece of modern art with this simple tape-resist technique. By layering masking tape and spraying soft pastel hues, you achieve crisp, intersecting lines that look professionally printed.
Step-by-Step Guide
Materials
- White cotton t-shirt
- Fabric spray paint (peach/coral, mint green, and light grey)
- Painter’s tape or masking tape (1-inch width)
- Cardboard insert
- Drop cloth or newspapers
- Iron (for setting)
Step 1: Preparation
-
Wash and dry:
Start with a pre-washed and dried t-shirt. Do not use fabric softener, as it can prevent the paint from adhering properly to the fibers. -
Insert cardboard:
Slide a piece of flat cardboard inside the shirt. This is crucial to prevent the paint from bleeding through to the back of the tee. -
Smooth it out:
Lay the shirt flat on your work surface. Smooth out any wrinkles with your hands or give it a quick press with an iron to ensure a perfect canvas.
Bleeding Lines?
If paint seeped under the tape, use a fine tip paintbrush dipped in white patio paint or bleach (carefully!) to touch up and sharpen the edges.
Step 2: Taping the Design
-
Map your lines:
Visualize where you want your intersecting lines to go. The design works best with long lines that cross the entire body of the shirt. -
Apply first tape strip:
Place a long strip of painter’s tape diagonally across the shirt. Press down firmly along the edges to create a tight seal against the fabric. -
Create intersections:
Lay down two or three more strips of tape, ensuring they crisscross over the first one. Vary the angles to create interesting geometric shapes in the negative space. -
Seal the edges:
Run your fingernail or a credit card along the edges of every tape strip. This extra pressure is the secret to getting those super-sharp lines later.
Step 3: Spraying Color
-
Protect the area:
Use newspaper or extra tape to mask off any areas of the shirt you want to remain completely white, outside of your designated stripe zones. -
Spray the first color:
Shake your peach fabric spray well. Aim the nozzle about 6-8 inches away and spray lightly over one section of the taped design, focusing on the area around the tape. -
Add the second hue:
Switch to your mint green spray. Apply this to a different section, perhaps overlapping slightly with the peach area for a blended effect, or keeping it distinct. -
Finish with grey:
Mist the light grey spray over the remaining sections. I like to keep the spray light and airy rather than saturating the fabric completely. -
Check coverage:
Look over your work. You want the color to cleanly cover the fabric right up to the tape edge, but avoid drenching it, which can cause bleeding. -
Let it dry:
Allow the paint to dry completely. This usually takes about an hour, but check your specific paint bottle instructions.
Add Texture
Place a mesh laundry bag or lace fabric over the shirt *before* taping and spraying. This adds a cool, subtle texture pattern within your colored stripes.
Step 4: The Reveal
-
Peel carefully:
Once dry, locate the end of a tape strip. Slowly and steadily peel it back at a 45-degree angle to reveal the white lines underneath. -
Remove all tape:
Continue removing all strips of tape until your geometric design is fully exposed. -
Heat set:
Most fabric sprays require heat setting to become permanent. Iron the shirt inside out (or with a cloth over the design) on a cotton setting for several minutes.
Now you have a custom graphic tee ready for summer wear
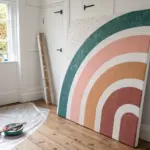
Chevron or Herringbone Masking
Transform a plain white tee into a piece of modern wearable art using sharp geometric lines and a subtle color fade. This project utilizes simple masking techniques to achieve crisp chevron patterns that look professionally printed.
Detailed Instructions
Materials
- White cotton t-shirt
- Fabric spray paint (Sage Green and Terra Cotta)
- Painter’s tape or masking tape (1/4 inch width)
- Cardboard insert or shirt form
- Ruler
- Pencil or disappearing fabric marker
- Paper towels
- Iron (optional, for heat setting)
Step 1: Preparation & Masking
-
Prepare the workspace:
Lay down a drop cloth or newspaper to protect your work surface from overspray. Smooth out your white t-shirt on a flat surface. -
Insert protection:
Slide a piece of thick cardboard inside the shirt. -
Smooth the fabric:
Ensure the fabric is taut against the cardboard but not stretched out of shape. Smoothing out wrinkles now prevents paint bleeding later. -
Find the center:
Use a ruler to find the vertical center of the shirt. Mark a small dot with your pencil or fabric marker roughly where you want the point of the lowest chevron to land. -
Plan the V-shape:
Determine the angle of your chevron. A 90-degree angle is classic, but a wider angle works well too. Lightly mark the center line vertically up the shirt to help you align the points. -
Apply the first tape line:
Take your 1/4 inch tape and lay down the first V-shape. Start from the center mark and tape upwards and outwards to the left shoulder seam. Repeat on the right side to complete the V. -
Create spacing:
To keep the lines uniform, I like to use a spare piece of tape as a spacer. Lay a strip of tape directly next to your first masking line, then place your next masking line against that spacer. -
Remove the spacer:
Peel away the spacer tape, leaving a perfect gap of exposed white fabric between your masking lines. -
Repeat the pattern:
Continue this pattern—tape, spacer, tape—until you have created five or six nested V-shapes moving up towards the neckline. -
Seal the edges:
Firmly run your fingernail or a credit card edge along every strip of tape. The key to crisp lines is ensuring the tape is fully adhered to the fabric fibers. -
Protect the rest:
Use wider tape and paper towels to cover the sleeves, neckline, and bottom of the shirt, leaving only the chevron area exposed.
Bleeding Lines?
If paint bleeds under the tape, it was likely too thick or the tape wasn’t sealed. Next time, do two very light mist coats rather than one heavy wet coat.
Step 2: Painting & Revealing
-
Start with the lighter color:
Shake your sage green fabric spray paint well. Test the nozzle on a scrap paper first to ensure an even mist. -
Apply the top gradient:
Lightly mist the top portion of the chevron design with the green paint. Hold the can about 8-10 inches away to avoid soaking the fabric. -
Transition the colors:
Allow the green mist to fade out as you reach the middle of the design. -
Apply the darker color:
Switch to the terra cotta spray paint. Start spraying from the bottom point of the design, moving upward. -
Blend the middle:
Where the green and terra cotta meet in the center, do a very light mist of the orange over the fading green to create a seamless gradient blend. -
Let it tack up:
Wait about 5 to 10 minutes for the paint to become tacky but not fully dry. -
The reveal:
Carefully peel off the tape strips. Pulling while the paint is slightly tacky helps prevent the dried paint skin from cracking along the edges. -
Final cure:
Let the shirt dry completely according to the paint manufacturer’s instructions, usually 24 to 72 hours. -
Heat set:
Once fully dry, turn the shirt inside out and iron the back of the design to heat-set the color, ensuring it survives the washing machine.
Clean Edges Trick
Before spraying color, spray a light coat of clear fabric sealer or even regular hairspray over the tape edges to seal them perfectly against bleed.
Now you have a custom graphic tee ready for your next casual outing

PENCIL GUIDE
Understanding Pencil Grades from H to B
From first sketch to finished drawing — learn pencil grades, line control, and shading techniques.
Explore the Full Guide
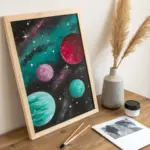
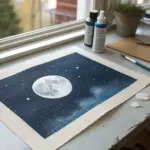
Starfield Cutout Pattern
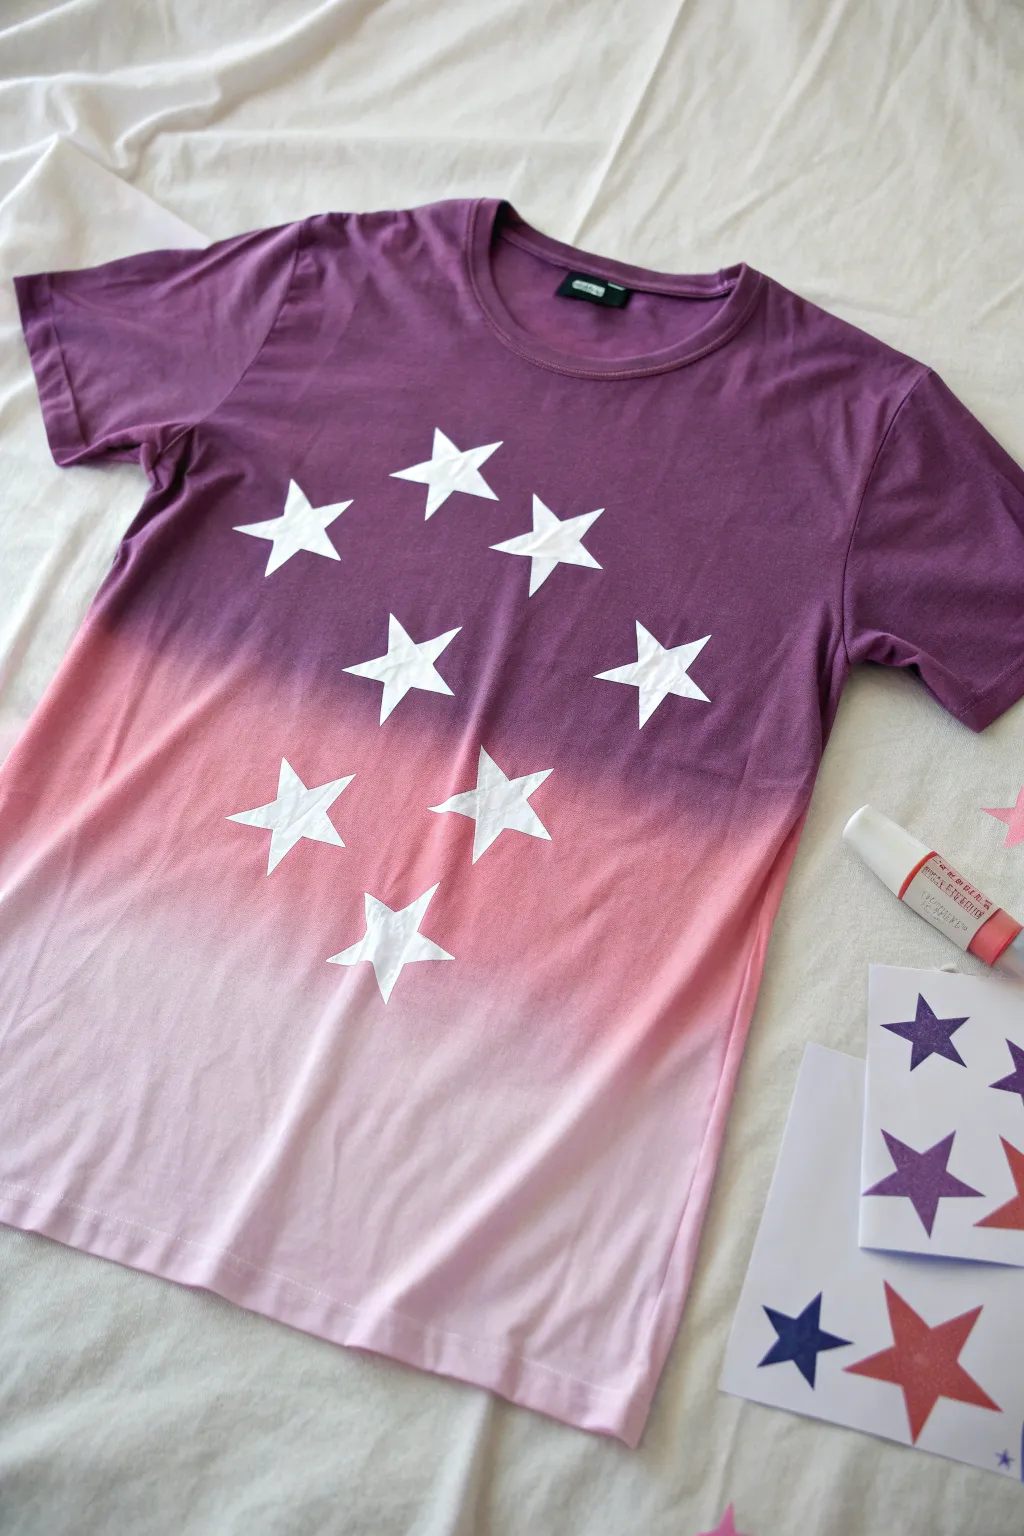
Transform a plain white t-shirt into a customized starry night sky using a simple resist technique and fabric spray paints. This project combines a dreamy purple-to-pink gradient with crisp, white negative space stars for a bold graphic look.
Step-by-Step Tutorial
Materials
- White cotton t-shirt (pre-washed)
- Adhesive sticker paper or contact paper
- Star template or stencil
- Scissors or craft knife
- Fabric spray paint (Deep Purple)
- Fabric spray paint (Hot Pink or Magenta)
- Cardboard insert for the shirt
- Protective table covering
Step 1: Preparation and Resist
-
Prepare the workspace:
Lay down a protective covering on your work surface. Slide a large piece of cardboard inside the t-shirt to prevent paint from bleeding through to the back side. -
Smooth the fabric:
Ensure the shirt is laid out completely flat and wrinkle-free. I usually run an iron over it quickly, as wrinkles can distort the spray pattern. -
Create star stickers:
Draw several five-pointed stars on the backing of your adhesive paper. Cut them out carefully with scissors or a craft knife. You will need about 7-10 stars of similar size. -
Arrange the pattern:
Peel the backing off your stars and place them firmly onto the shirt. Arrange them in a diamond or clustered formation in the center of the chest. -
Secure the edges:
Press down firmly on all edges of the star stickers. This step is crucial to prevent spray paint from seeping underneath and ruining the crisp white shape.
Bleeding Edges?
If paint seeped under your stars, use a white fabric marker or a small brush with white fabric paint to carefully touch up the edges and sharpen the points.
Step 2: Painting the Gradient
-
Start with purple:
Shake your deep purple fabric spray paint well. Begin spraying at the top shoulder area of the shirt, applying a generous, even coat. -
Fade the purple down:
Continue spraying the purple downward towards the middle of the stars, but lighten your pressure to start creating a fade. Stop the heavy purple coverage just above the center of the shirt. -
Introduce the pink:
Shake the pink/magenta spray paint. Start spraying below the heaviest purple section, overlapping slightly to blend the colors where they meet. -
Create the pink fade:
Continue spraying the pink paint downward, letting it become lighter and more misty as you reach the bottom hem. The goal is to let the white of the shirt show through at the very bottom. -
Check coverage:
Inspect the area around the star stickers. Ensure there is enough color density immediately surrounding the stickers so the shape will be defined when peeled. -
Let it dry completely:
Allow the paint to dry according to the manufacturer’s instructions. This usually takes a few hours. Do not touch the stickers while wet.
Step 3: Reveal and Finish
-
Peel the resist:
Once the paint is dry to the touch, carefully peel off each star sticker. Lift from one point and pull slowly to reveal the clean white fabric underneath. -
Remove cardboard:
Gently slide the cardboard insert out of the shirt. -
Set the ink:
Most fabric paints require heat setting to become permanent. Follow the bottle instructions, which typically involve ironing the shirt inside out or tossing it in a dryer.
Galaxy Glitter
Before peeling the stars, lightly mist a silver shimmer spray over the purple section to add a subtle, celestial sparkle to your night sky theme.
Enjoy wearing your custom celestial creation and experimenting with different color blends
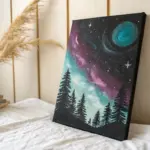
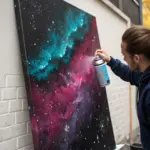
All-Over Galaxy Nebula

Transform a plain dark t-shirt into a window to the universe with this layering technique. By building up pools of purple and teal against a shadowy background, you’ll create a realistic, dreamy nebula effect that looks like it came straight from a telescope.
Detailed Instructions
Materials
- Black or navy blue cotton t-shirt
- Fabric spray paint (Purple, Teal/Cyan, White)
- Black fabric spray paint (optional, for blending)
- Large piece of cardboard (to insert inside shirt)
- Disposable gloves
- Old newspapers or drop cloth
- Scrub brush or old toothbrush (for splattering)
Step 1: Preparation
-
Prepare your workspace:
Lay down your drop cloth or newspapers in a well-ventilated area, preferably outside. Spray paint particles travel easily, so ensure you have plenty of room. -
Insert the barrier:
Slide a large piece of cardboard inside the t-shirt. This is crucial as it prevents the paint from bleeding through to the back of the shirt and keeps the fabric flat and taut. -
Tape off sleeves:
If you want the solid black sleeves shown in the example, use painter’s tape and paper to completely mask off the sleeves and the neck ribbing. Press the tape edges down firmly to ensure a crisp line.
Pro Tip: Soft Edges
To avoid harsh circles of paint, tear a hole in a piece of paper and spray through it while holding the paper 4 inches above the fabric. It acts as a soft-focus stencil.
Step 2: Creating the Nebula
-
Establish the purple base:
Shake your purple fabric spray paint well. Start by spraying asymmetrical patches on the shirt, focusing on the upper left or scattered areas. Keep the nozzle about 6-8 inches away for a soft, diffused look rather than sharp blobs. -
Add the teal highlights:
While the purple is still tacky or just dry, introduce the teal spray paint. Aim for the empty black spaces and slightly overlap the edges of the purple patches. This blending creates intermediate indigo tones. -
Blurring the edges:
The galaxy look relies on soft transitions. If any edges look too harsh, specific spray bottles allow you to adjust the nozzle for a finer mist. I prefer to do short, quick bursts from a greater distance to feather out the color. -
Building intensity:
Go back over the centers of your purple and teal patches with a second, heavier coat. This creates a ‘glow’ effect where the center of the nebula is brightest and fades out into the black fabric. -
Deepening the contrast:
If you feel you’ve covered too much of the original shirt color, you can lightly mist some black fabric spray around the outer edges of your nebula clouds to reclaim the negative space. -
Let it settle:
Allow these base color layers to dry for about 15-20 minutes. The fabric should feel dry to the touch before you start the next phase.
Troubleshooting: Too Blotchy?
If your stars look like big accidental blobs, dab them immediately with a paper towel to lift the excess, then spray a light mist of your background color (teal or purple) over the mistake to hide it.
Step 3: Adding the Stars
-
Prepare the star paint:
Take your white fabric spray paint. If the nozzle has a ‘splatter’ setting, use that. If not, spray a small puddle of white paint onto a disposable plate or piece of cardboard. -
The flicking technique:
Dip an old toothbrush or a stiff scrub brush into the white paint puddle. Point the bristles toward the shirt. -
Creating distant stars:
Run your thumb quickly across the bristles to flick tiny specks of paint onto the fabric. Do this from about a foot above the shirt to create the look of distant star clusters and dust. -
Adding major stars:
Move closer to specific areas, like the center of the teal nebula, and flick the brush with a bit more force. This will create slightly larger droplets that represent brighter, closer stars. -
Highlighting major constellations:
For the brightest stars (like the one shown in the middle of the design), hold the white spray can very close to the fabric—about 3 inches away—and give the nozzle a barely-there tap. This creates a concentrated burst.
Step 4: Finishing Touches
-
Remove masking:
Carefully peel away the tape and paper from the sleeves and neck. Do this slowly to ensure you don’t pull up any wet paint drips. -
Final drying:
Let the shirt dry completely flat for at least 24 hours. Don’t hang it up yet, as heavy paint might run. -
Heat setting:
Once fully dry, turn the shirt inside out and iron the design area on a medium heat setting (no steam) for a few minutes to cure the paint and make it washable.
Wear your new galaxy shirt with pride knowing you captured a piece of the cosmos.


Layered Stencil Color Pop
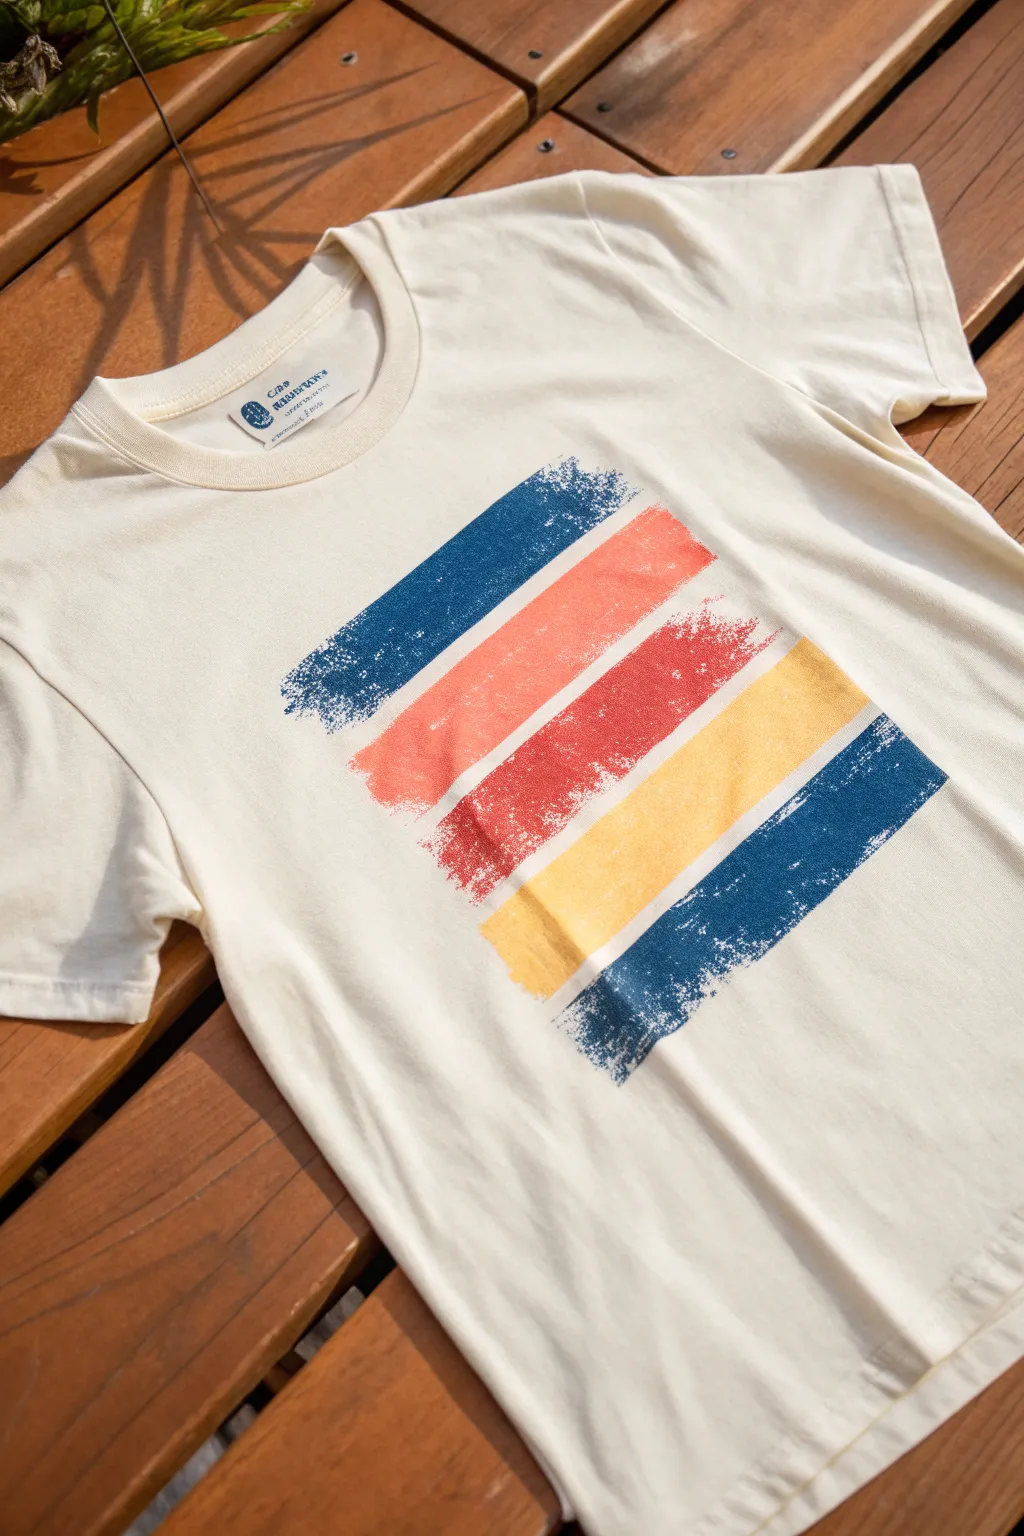
Give a plain cream T-shirt a vintage vibe with this simple yet striking layered stencil technique. The spray paint creates a natural, slightly distressed texture that mimics the look of a well-worn 70s band tee.
Step-by-Step
Materials
- Light cream or off-white cotton T-shirt
- Fabric-safe spray paint (Navy Blue, Coral Orange, Rust Red, Golden Yellow)
- Painter’s tape or masking tape (1 inch width)
- Cardstock or heavy paper
- Pencil and ruler
- X-Acto knife or craft knife
- Cutting mat
- Cardboard insert for shirt
- Old newspapers or drop cloth
Step 1: Preparation & Template Design
-
Pre-wash the fabric:
Begin by washing and drying your T-shirt without fabric softener to remove any sizing chemicals. This ensures the paint bonds properly to the fibers. -
Prepare the work surface:
Lay down newspaper or a drop cloth in a well-ventilated area, preferably outdoors. Insert a piece of cardboard inside the shirt to prevent paint from bleeding through to the back. -
Smooth the fabric:
Iron the shirt flat, paying special attention to the chest area where the design will go. A wrinkle-free surface is crucial for crisp stencil lines. -
Draft the diagonal bars:
On a piece of cardstock larger than your intended design, use a ruler to draw five parallel diagonal rectangles. Vary the lengths slightly to match the reference image, keeping them roughly equal in width. -
Cut the stencil:
Place the cardstock on your cutting mat. carefully cut out the rectangle shapes using your X-Acto knife. I find it helpful to overcut the corners slightly to ensure clean removal of the paper slivers.
Bleed-Through Blues?
If paint bleeds under the stencil, don’t panic. Use a small brush with a tiny bit of rubbing alcohol to gently lift excess paint while it’s still semi-wet.
Step 2: Securing the Stencil
-
Position the stencil:
Place your cardstock stencil onto the center of the shirt. Decide on the angle—a slight tilt creates dynamic movement. -
Tape neatly:
Use painter’s tape to secure the outside edges of the cardstock to the shirt so it doesn’t shift. -
Mask the surrounding area:
Add extra paper or tape around the stencil to protect the rest of the shirt from overspray. You want a wide buffer zone. -
Isolate the first bar:
Using additional strips of painter’s tape and scrap paper, cover up every cutout slot *except* the top one (the first blue bar).
Step 3: Painting the Gradient
-
Applying the first color:
Shake your navy blue spray paint can vigorously. Hold it about 8-10 inches away and apply a light, even coat over the exposed slot. Don’t saturate it; a little texture is good. -
Dry and reveal:
Wait 10-15 minutes for the paint to become touch-dry. Carefully peel back the masking tape covering the second slot, while simultaneously covering the blue slot you just painted. -
Coral layer:
Spray the second slot with your coral orange paint. Remember to spray directly downward, not at an angle, to prevent paint from creeping under the cardstock edges. -
Rust red layer:
Once the coral is touch-dry, mask it off and expose the third slot. Apply the rust red paint here interaction. -
Yellow layer:
Repeat the masking process: cover the red, expose the fourth slot, and spray with golden yellow. -
Final blue layer:
Finally, mask the yellow slot and expose the bottom slot. Apply the navy blue paint again to bookend the design.
Vintage Fade
For an even more distressed look, lightly sand the dried design with fine-grit sandpaper before the final wash. This mimics years of wear.
Step 4: Finishing Touches
-
Remove stencil:
Allow the entire design to dry for at least an hour. Gently peel away all tape and the cardstock stencil to reveal your crisp, colorful bars. -
Set the paint:
Once fully cured (check your paint can for duration, usually 24 hours), turn the shirt inside out and iron the reverse side of the design on a medium heat setting to heat-set the pigments.
Now you have a custom graphic tee ready for tailored denim or casual shorts
Neon-on-Black Statement
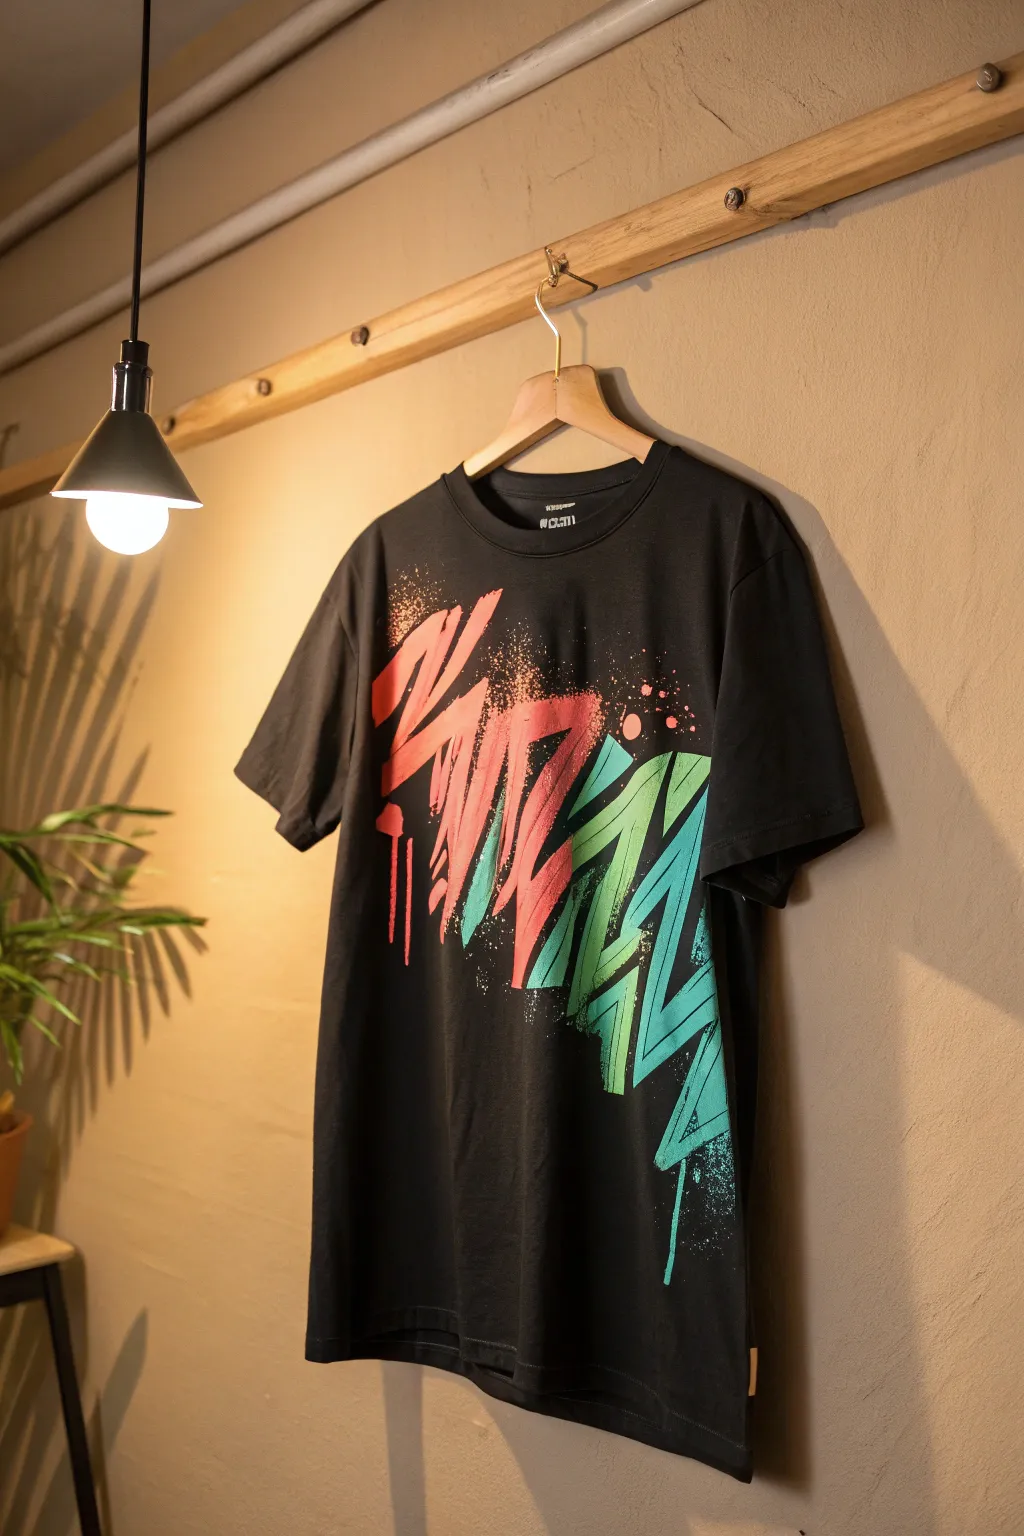
Transform a plain black t-shirt into streetwear art with this high-contrast spray paint project. The design features sharp, angular graffiti shapes in neon coral and teal that pop against the dark fabric, accented with authentic splatter effects.
Step-by-Step Tutorial
Materials
- Black cotton t-shirt (pre-washed)
- Fabric spray paint (Neon Coral/Red)
- Fabric spray paint (Neon Teal/Aqua/Green)
- Cardboard or foam board (shirt insert)
- Freezer paper or stencil vinyl
- Craft knife (X-Acto)
- Cutting mat
- Iron and ironing board
- Masking tape or painter’s tape
- Drop cloth or newspapers
- Pencil and eraser
Step 1: Design & Stencil Creation
-
Draft your shapes:
Begin by sketching your design on regular paper first. You want a series of sharp, jagged shapes resembling lightning bolts or stylized graffiti letters like ‘Z’ and ‘W’. Keep the lines thick and blocky. -
Transfer to freezer paper:
Once satisfied, redraw your design onto the non-shiny side of freezer paper. Draw the design in two main clusters: one for the top left (coral section) and one for the bottom right (teal section). -
Cut the stencils:
Using your craft knife and cutting mat, carefully cut out the interior shapes. You are creating a negative stencil, meaning you remove the parts where you want the paint to go. -
Don’t forget the bridges:
If your shapes have floating center pieces (islands), make sure to save them. You will need to iron these back onto the shirt separately to maintain the blocked-out look. -
Prepare the shirt:
Insert the cardboard or foam board inside the shirt. This is crucial to prevent paint from bleeding through to the back of the garment. Smooth out any wrinkles on the front. -
Iron on the stencil:
Position your freezer paper stencil (shiny side down) onto the shirt. Adhere it by ironing on a medium-high, dry setting. The heat temporarily bonds the paper to the fabric, creating a crisp seal.
Clean Lines Pro-Tip
Run a fingernail along the edges of the ironed-on stencil right before spraying. This extra seal ensures paint won’t bleed underneath, giving you super crisp edges.
Step 2: Painting & Splattering
-
Mask off areas:
Since we are using two different colors near each other, use masking tape and extra scrap paper to cover the bottom right ‘teal’ zone while you work on the top. -
Apply the coral layer:
Shake the neon coral fabric spray paint well. Hold the can about 6-8 inches away and spray the top left stencil section. Use short, controlled bursts rather than a continuous heavy stream to avoid soaking. -
Create the splatter effect:
To get those gritty speckles outside the main lines, gently press the nozzle only halfway down so it sputters, or flick the nozzle while spraying. Aim these splatters specifically around the top edge of the design. -
Switch zones:
Allow the coral paint to dry to the touch (usually 15-20 minutes). Carefully remove the masking tape covering the bottom section and cover up the coral section you just painted. -
Apply the teal layer:
Repeat the painting process with the neon teal spray for the lower right section. I ensure the spray gets into the corners of the ‘Z’ shapes for solid coverage. -
Teal splatter details:
Add the splatters for the teal section, focusing heavily on bottom right corner to balance the composition. Let the paint overspray slightly onto the black fabric for a street-art vibe. -
Check for gradients:
If you want a blended look in the middle where the shapes meet, you can lightly mist one color over the edge of the other, but be careful not to make the colors muddy.
Level Up: Texture
Lay a piece of mesh or tumbled netting over part of the stencil before spraying. It creates a cool, halftone grid texture within your graffiti shapes.
Step 3: Finishing Touches
-
Peel and reveal:
Once the paint is fully dry (check your can’s instructions, but usually an hour), carefully peel away the freezer paper stencil. This is the most satisfying part. -
Remove islands:
Use the tip of your craft knife or tweezers to lift off any small interior ‘island’ pieces of paper that were ironed on. -
Heat set the design:
Most fabric paints require heat setting to become permanent and washable. Place a thin cloth over the design and iron it for 3-5 minutes, moving constantly.
Now you have a custom streetwear piece ready to wear or gift
Paint Explosion Center Burst
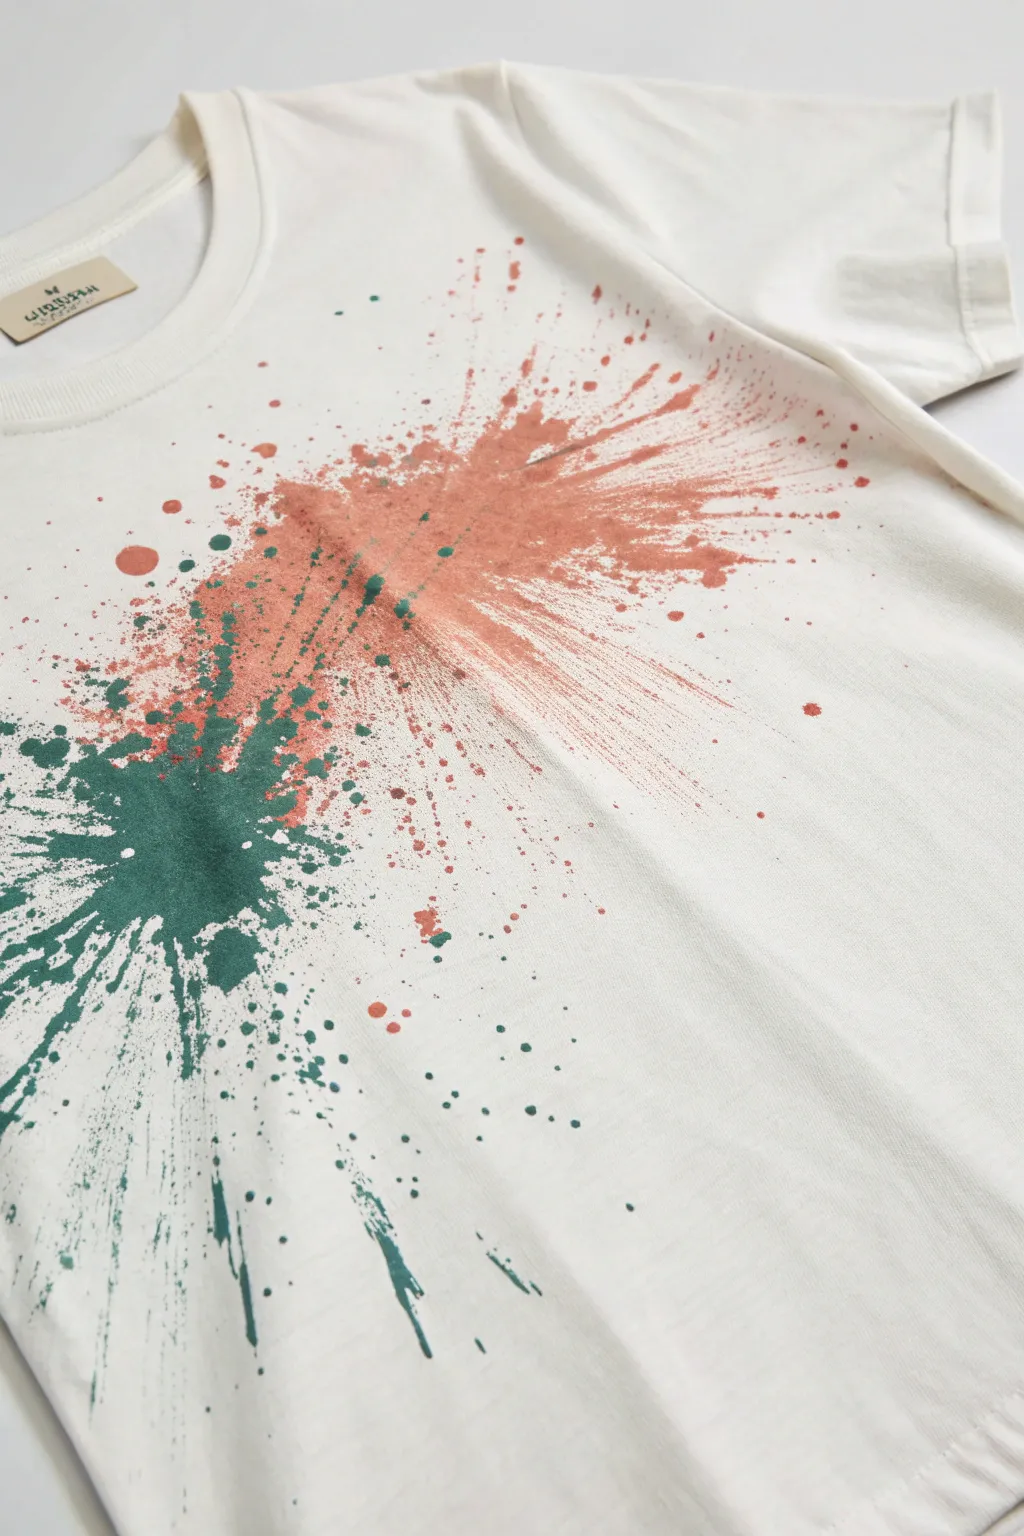
Capture the dynamic energy of a bursting paint bomb on a plain white tee with this striking design. By layering contrasting colors like warm terracotta and deep forest green, you create a vibrant collision effect that looks complex but is surprisingly simple to achieve.
Step-by-Step
Materials
- White 100% cotton t-shirt (pre-washed)
- Fabric spray paint (Terracotta/Copper)
- Fabric spray paint (Forest Green/Teal)
- Large sheet of cardboard (to insert inside shirt)
- Masking tape or painter’s tape
- Newsprint or drop cloth (for table protection)
- Disposable gloves
- Scrap paper or cardstock (for testing)
Step 1: Preparation
-
Protective Setup:
Begin by covering your entire work surface with newsprint or a drop cloth. This project gets messy, and overspray will travel further than you expect. -
Insert Barrier:
Slide a large piece of cardboard inside the t-shirt. This is crucial to prevent the paint from bleeding through to the back of the shirt and keeps the fabric taut. -
Secure the Fabric:
Smooth out the fabric completely. You can use small pieces of masking tape on the underside of the shirt to secure it to the cardboard if it feels slippery. -
Test Your Nozzles:
Shake your fabric spray cans vigorously for at least one minute. Test the spray on scrap paper first to get a feel for the pressure and nozzle width.
Clogged Nozzle?
If the can won’t sputter for droplets, hold it upside down and spray for a second to clear the line. If still stuck, wipe the nozzle tip with warm water or alcohol.
Step 2: Creating the Terracotta Burst
-
Angle the Can:
Start with the terracotta color. Position the can near the top right shoulder area, but aim diagonally downward toward the center of the chest. -
The Heavy Splash:
Hold the nozzle relatively close to the fabric (about 4-6 inches) and give a short, sharp burst. This creates the concentrated pool of color at the origin point. -
Create Force Lines:
Immediately follow the initial burst with a sweeping motion away from the center. Move your arm quickly while spraying to create the long, streaky ‘rays’ that simulate speed. -
Add Droplets:
Pull the can back to about 12 inches away. Lightly depress the nozzle just enough to sputter paint rather than spray it, adding scattered dots around the main splash.
Bleach Finish
For an edgier look, spritz a 50/50 bleach and water solution lightly over the dried paint. It will create pale halos and lighter spots for added depth.
Step 3: Applying the Teal Explosion
-
Dry Time:
I like to let the first color dry for about 15-20 minutes before starting the second. This prevents the colors from mixing into a muddy brown where they overlap. -
Positioning the Green:
Take your forest green spray. Aim this one from the bottom left rib area, angling upward toward the center, directly opposing the first splash. -
The Counter-Splash:
Execute a heavy, close-range burst to anchor the green explosion. Make sure this heavy section is dense enough to stand out against the white fabric. -
Overlap Zone:
flick your wrist quickly upward and to the right, sending streaks of green into the terracotta area. Allow the tails of the green splash to cross over the orange streaks. -
Peripheral Splatter:
Using the sputtering technique again, add green droplets near the edges of the design, keeping them loose and random to enhance the explosive look.
Step 4: Finishing Touches
-
Assess and Adjust:
Step back and look at the composition. If the center feels empty, add tiny, controlled spritzes to bridge the gap between the two main colors. -
Initial Drying:
Leave the shirt flat on the cardboard to dry untouched for at least 4 hours. Do not hang it up, or the wet paint might run. -
Heat Setting:
Once fully dry (usually after 24 hours), turn the shirt inside out. Iron the design area on a cotton setting (no steam) for 3-5 minutes to lock the color into the fibers.
Wear your new dynamic art piece with pride and enjoy the energy it brings to your outfit
Abstract Linework With Masked Strings

Achieve a breezy, coastal look with this abstract spray paint design that features soft, textured diagonals in earthy tones. The technique uses simple masking to create organic, painterly edges that look professionally applied but feel effortless.
Step-by-Step Guide
Materials
- White cotton t-shirt (pre-washed)
- Fabric spray paint (Terracotta/Peach)
- Fabric spray paint (Sage Green/Seafoam)
- Painter’s tape or masking tape
- Cardboard insert for shirt
- Scrap paper or newspaper
- Flat, hard surface
Step 1: Preparation
-
Prepare the workspace:
Lay down your drop cloth or newspaper on a flat, hard surface. Ventilation is key when working with any aerosol paints, so ensure you are in an open area or well-ventilated room. -
Insert the barrier:
Slide a piece of cardboard inside the t-shirt to prevent paint from bleeding through to the back. Smooth the fabric out as much as possible to avoid any unplanned creases. -
Plan the composition:
Visualize three diagonal bands moving from the bottom hem up towards the right armpit. The design relies on negative space, so you don’t need to cover the whole shirt.
Step 2: Creating the Masks
-
Tear the masking tape:
Instead of using the straight edge of the tape, tear long strips of painter’s tape lengthwise down the middle. You want that rough, uneven torn edge. -
Apply the first boundary:
Place a torn strip of tape diagonally across the lower section of the shirt. The torn edge should face upward, towards where you will paint. This defines the bottom edge of your lowest colored stripe. -
Mask the surrounding white:
Use paper or extra tape to cover the entire top left portion of the shirt that you want to remain pure white. Protect the sleeves and neck area thoroughly.
Torn Tape Texture
For a more organic ‘mountain range’ edge, tear the tape slowly and wiggle your wrist. Rapid straight tears look too mechanical for this soft style.
Step 3: Applying the Color
-
Shaking the paint:
Shake your fabric spray paint cans vigorously for at least one minute to ensure the pigment is evenly mixed. -
Test the spray:
Do a quick test spray on a scrap piece of cardboard to check the nozzle pressure and splatter pattern. You want a fine mist, not heavy droplets. -
Spray the first color:
Starting with the peach/terracotta shade, spray a diagonal band just above your first tape mask. Hold the can about 6-8 inches away and move quickly to keep the layer light. -
Feather the edges:
As you spray the upper edge of this peach stripe, pull the can further away or spray lighter. This creates a soft gradient transition rather than a hard line. -
Let it tack up:
Allow the first color to dry for 5-10 minutes. It doesn’t need to be fully cured, just dry to the touch so tape won’t smudge it. -
Mask the middle gap:
Place another strip of torn tape over the bottom edge of where your green stripe will go. This creates a small gap of white or light color between the bands. -
Spray the second color:
Using the sage green paint, spray the next diagonal band. Focus the heaviest color in the center of the stripe and let it fade out slightly at the top and bottom. -
Add the final accent:
If desired, add a very faint, partial third stripe or dusting of the peach color near the bottom hem to balance the composition.
Gold Dust Accent
While the paint is still wet, lightly sprinkle fine gold glitter or use a metallic gold fabric spray for a shimmering topcoat that catches the light.
Step 4: Finishing Touches
-
Remove tape carefully:
Once the paint is dry to the touch (usually 20-30 minutes), slowly peel back the masking tape. Pull away from the painted area to keep the torn edge crisp. -
Check for overspray:
Inspect the white areas. If there are tiny unintended specks, you can sometimes gently scrape them off with a fingernail before the paint fully cures. -
Air dry completely:
Let the shirt sit flat for a few hours, or as directed by your specific fabric paint brand, to ensure deep drying. -
Heat set the design:
Turn the shirt inside out and iron the painted area on a cotton setting (no steam) for several minutes. This seals the pigment into the fibers for washability.
Wear your new custom tee with pride knowing you created a unique piece of wearable art
Halftone Dot Fade
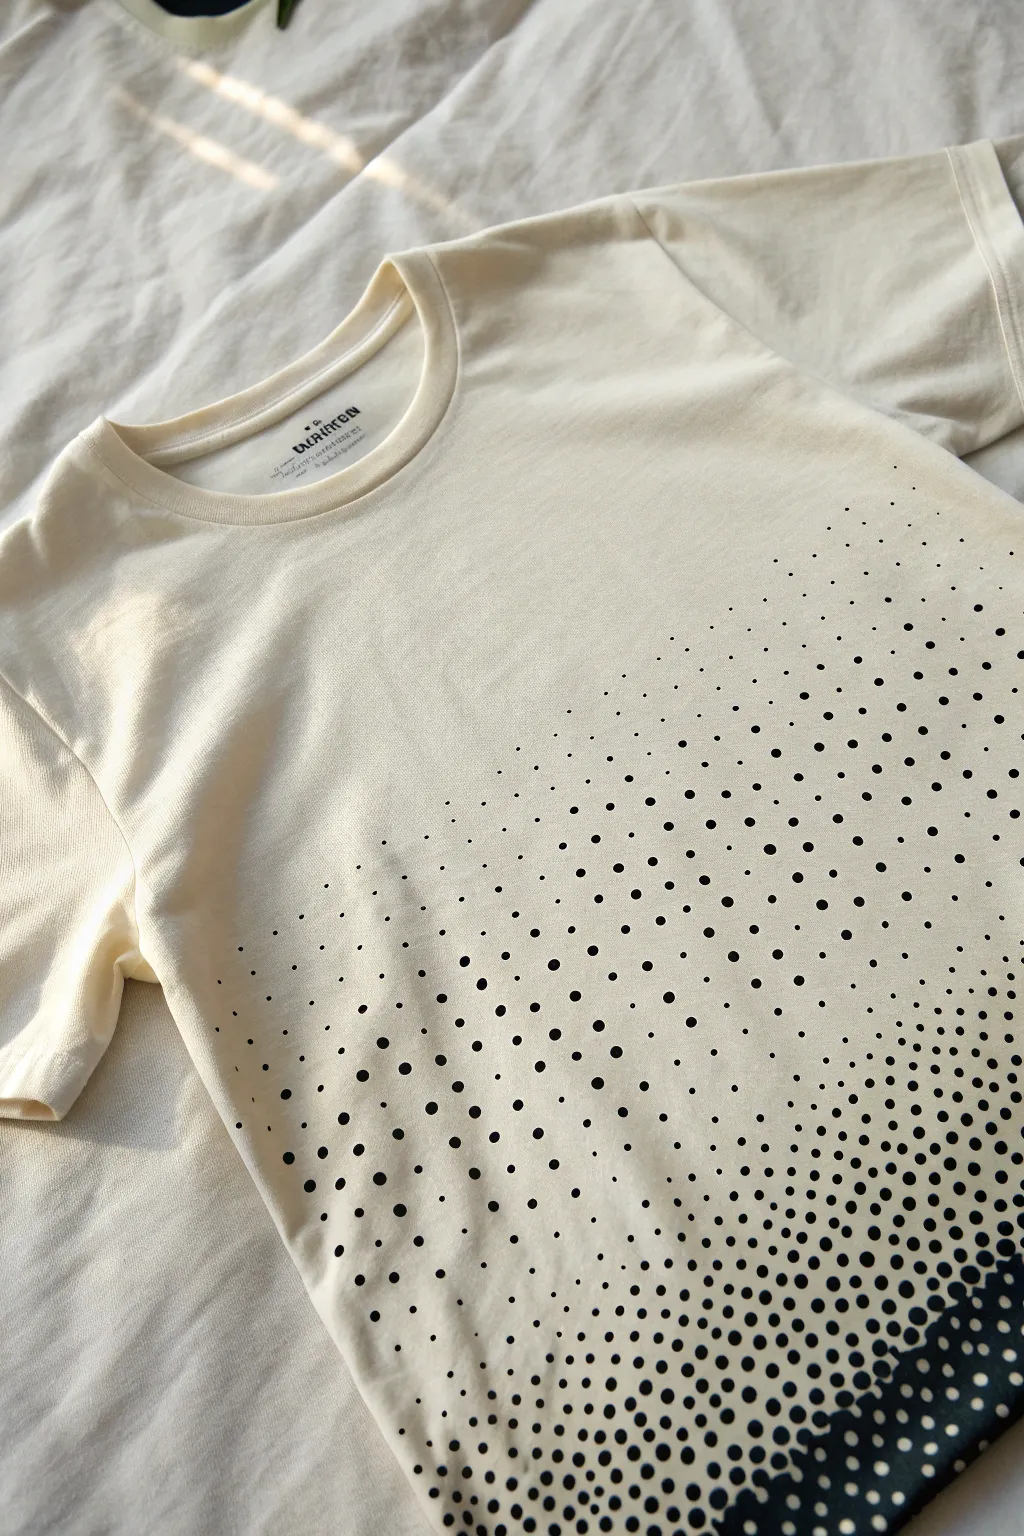
Transform a plain cream tee into a modern art piece with this striking stipple gradient effect. Using a simple stencil or freehand technique, you’ll create a cascade of dots that flow from a dense, dark hem into an airy, scattered fade.
Detailed Instructions
Materials
- Cream or off-white 100% cotton T-shirt
- Black fabric spray paint (pump action or aerosol)
- Cardboard insert (to prevent bleed-through)
- Repositionable spray adhesive
- Acetate or thick cardstock for stencil making (optional)
- Round hole punch (various sizes preferred, optional)
- Masking tape
- Scrap paper for masking
Step 1: Preparation & Setup
-
Pre-wash the fabric:
Begin by washing and drying your T-shirt without fabric softener. This removes any sizing chemicals from the manufacturing process and ensures the paint adheres permanently to the fibers. -
Insert the barrier:
Slide a rigid piece of cardboard inside the shirt. Smooth the fabric over it tightly to create a flat working surface and prevent the black paint from soaking through to the back of the shirt. -
Secure the shirt:
Use a few pieces of masking tape or clips to pull the fabric taut against the cardboard. Wrinkles will distort your dot pattern, so surface tension is key here.
Clogged Nozzle?
If the spray comes out in a stream instead of a mist, the nozzle is clogged. Soak the nozzle cap in warm soapy water or use a pin to clear the blockage before continuing.
Step 2: Creating the Halftone Stencil (Method A: Precision)
-
Design the gradient:
If you want perfect circles, create a stencil using acetate or cardstock. Use a hole punch to create a random array of holes. -
Vary density:
Punch many holes close together at one end of your stencil material (representing the bottom hem) and space them further apart as you move up. This creates the mechanical ‘fade’ structure before you even paint.
Step 3: Preparing for Freehand Spray (Method B: Organic)
-
Test your nozzle:
If you prefer an organic, splatter look without a stencil, test your spray paint nozzle on scrap cardboard first. You want to see how far you need to hold the can to get individual droplets rather than a mist. -
Practice the fade:
Practice spraying heavily in one area and then moving your hand quickly away while releasing the trigger to create a splatter fade effect.
Pro Tip: Dot Size
For a true halftone look, layer two different stencils: one with small hole punches and one with larger handheld punches. Alternating sizes creates deeper visual texture.
Step 4: Applying the Paint
-
Mask off areas:
Use paper and masking tape to cover the sleeves, collar, and the upper chest area where you want absolutely no dots. This keeps the negative space clean. -
Anchor the bottom:
Start spraying at the very bottom hem of the shirt. Hold the can or bottle closer to the fabric here (about 6 inches) to create a dense, almost solid wall of dark pigment. -
Begin the upward drift:
Slowly move the spray can upward. As you move up, pull the can further away from the shirt (10-12 inches). This naturally disperses the spray into wider, softer dots. -
Layering the density:
Return to the bottom right corner and apply a second coat. Darkness at the anchor point is crucial for the high-contrast look. -
Feather the edges:
For the middle section, use quick, short bursts of spray rather than a continuous stream. Aim for a ‘spattered’ look where individual speckles become visible against the cream background. -
Manual touch-ups:
I like to take a skewer or the end of a paintbrush, dip it in a puddle of the fabric paint, and manually dot specific areas in the fade zone. This adds larger, distinct dots that spray cans sometimes miss. -
Check the spread:
Step back from the shirt to view the overall gradient. Add tiny individual dots near the top of the fade to soften the transition from pattern to plain fabric.
Step 5: Finishing
-
Let it cure:
Allow the shirt to dry completely flat for at least 24 hours. Don’t be tempted to move it too soon, or wet dots might smear. -
Heat set the design:
Once dry, heat set the ink according to the paint manufacturer’s instructions. Usually, this involves ironing the shirt inside out (or with a cloth over the design) on a high cotton setting for 3-5 minutes.
Wear your new gradient tee with pride knowing you mastered the art of the fade
Reverse Stencil “Cutout” Lettering
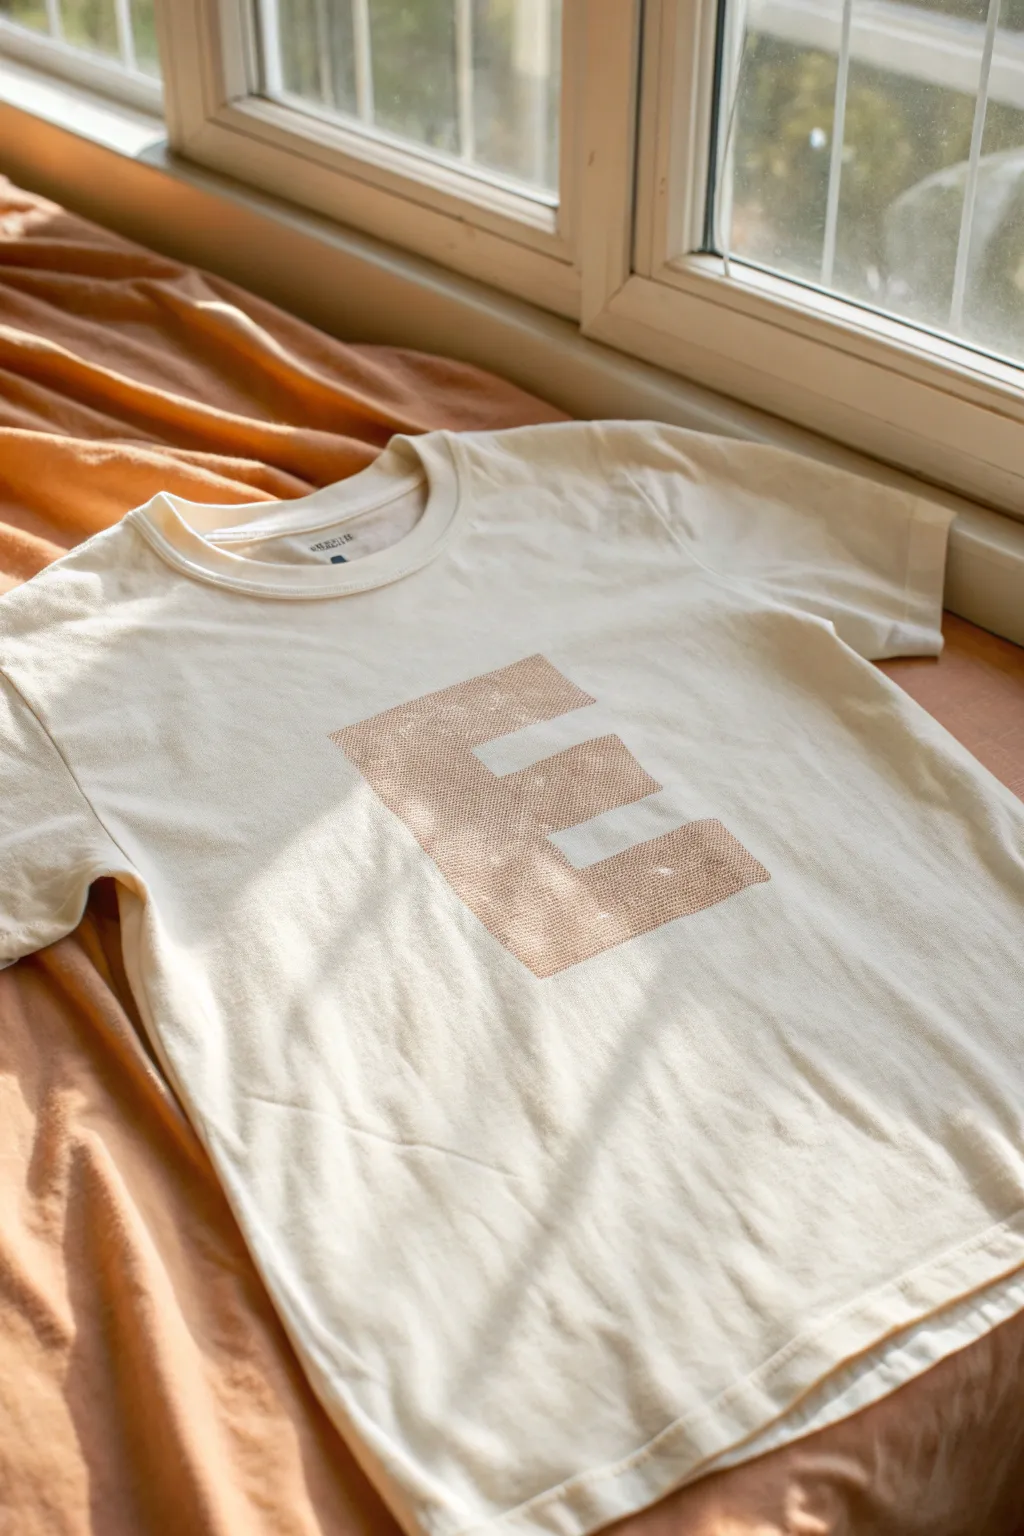
Create a bold, typographic statement piece using simple household items and a clever reverse stenciling technique. This method leaves your chosen letter standing out in a textured, speckled finish against the clean fabric of your favorite tee.
How-To Guide
Materials
- 100% Cotton T-shirt (Cream or off-white)
- Fabric spray paint (Copper or muted rust)
- Freezer paper or stencil vinyl
- Craft knife (X-Acto)
- Self-healing cutting mat
- Iron and ironing board (if using freezer paper)
- Cardboard insert (to fit inside the shirt)
- Painter’s tape or masking tape
- Pencil and ruler
- Computer and printer (optional for template)
Step 1: Design and Preparation
-
Choose your letter:
Select a bold, blocky font for your letter. Since we are creating a negative space or ‘cutout’ effect, thick sans-serif fonts work best to show off the sprayed texture. -
Create the template:
Print your chosen letter onto regular paper to use as a guide, or draw it directly onto the non-shiny side of your freezer paper. Make sure it’s large enough to be the focal point of the shirt. -
Cut the stencil boundary:
For this specific look, we aren’t cutting out the letter itself to paint through. Instead, we need a rectangular mask with the letter ‘E’ cut out of the *middle* of it. Cut a large rectangle of freezer paper that covers the main chest area. -
Cut the letter void:
Place the freezer paper on your cutting mat. carefully use your craft knife to cut out the ‘E’ shape from the center of the rectangle. Remove the ‘E’ piece; you will be painting through the hole left behind. -
Prep the shirt:
Wash and dry your shirt without fabric softener to ensure the paint adheres properly. Iron out any wrinkles to create a perfectly flat working surface.
Step 2: Securing the Stencil
-
Insert protection:
Slide a piece of cardboard inside the t-shirt. This is crucial as it prevents the paint from bleeding through to the back of the shirt. -
Position the stencil:
Place your rectangular freezer paper stencil (with the letter void) shiny-side down onto the front of the shirt. Use a ruler to ensure it is centered and straight. -
Iron into place:
Using a dry iron providing medium heat, press the freezer paper onto the fabric. The heat melts the plastic coating slightly, creating a temporary but tight seal that prevents paint from creeping under the edges. -
Protect the perimeter:
Since spray paint travels, use painter’s tape and extra scrap paper or newspaper to mask off the rest of the shirt around your rectangular stencil. You only want the paint to land inside the letter cutout.
Crisp Edge Secret
Run a fingernail along the edge of the letter cutout right after ironing the freezer paper. This extra pressure ensures the seal is tightest right where you paint.
Step 3: Painting and Finishing
-
Test the spray:
Shake your fabric spray paint can vigorously for at least one minute. Test the spray on a piece of scrap cardboard to check the nozzle flow and color density. -
Apply the first coat:
Hold the can about 8-10 inches away from the shirt. Spray in short, sweeping bursts over the cutout letter. Don’t try to get solid coverage immediately; a light mist is better to start. -
Add texture:
To achieve the speckled look seen in the project image, finish with a few spritzes where you don’t fully depress the nozzle, causing the paint to satisfy spit slightly larger droplets. -
Let it tack up:
Allow the paint to dry for about 10 to 15 minutes, just until it is tacky but not wet. -
Apply a second light coat:
If you want a deeper copper color, apply a second light coat, focusing on keeping the edges crisp. -
Wait for initial dry:
Let the paint dry for at least an hour before touching anything. patience here prevents smudging your crisp lines. -
Remove the masking:
Carefully peel away the painter’s tape and scrap paper first. Then, slowly peel up the freezer paper stencil, revealing your crisp ‘E’ design. -
Heat set the design:
Once the paint is fully cured (check bottle instructions, usually 24-72 hours), heat set the design. Cover the painted area with a pressing cloth and iron on high heat for 3-5 minutes to make it permanent.
Ombré Effect
Use two different shades of spray paint (like copper and dark brown). Spray the darker color at the bottom and fade into the lighter color at the top.
Wear your new personalized tee with pride, knowing you created a custom look with just a simple paper cutout
Layered Collage Mask Shapes
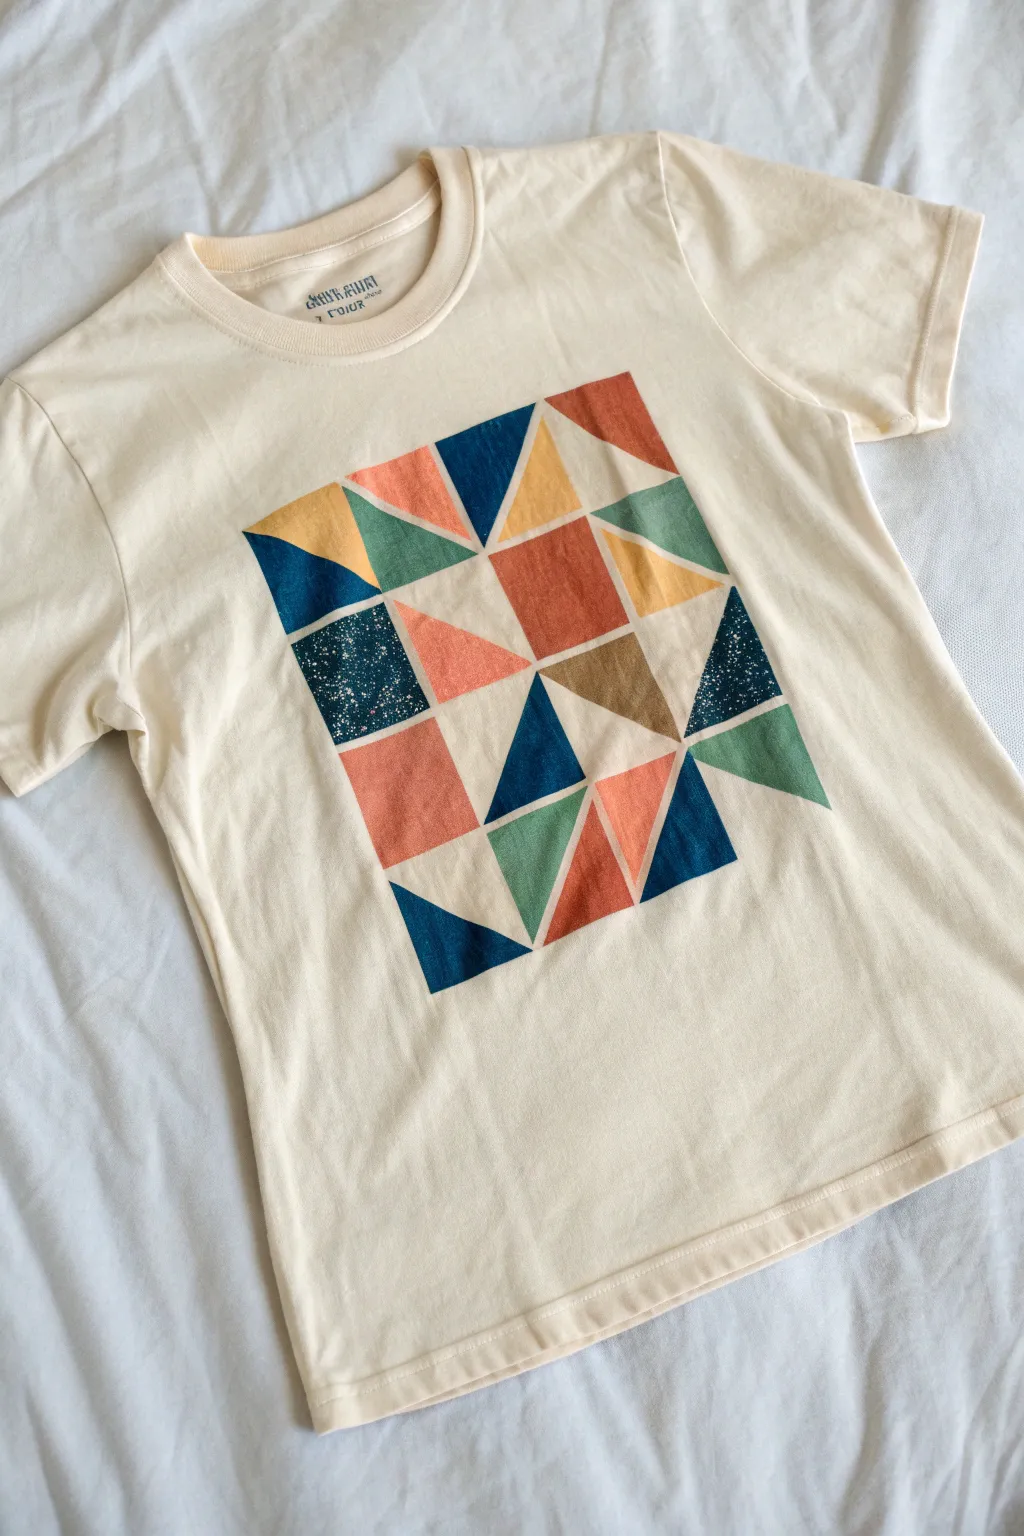
Transform a plain cream t-shirt into a piece of modern art using simple masking techniques and fabric spray paint. This design mimics the cozy, structured look of a traditional quilt block but with a contemporary, color-blocked twist involving layered geometric shapes.
Step-by-Step Tutorial
Materials
- Light cream or beige cotton t-shirt
- Fabric spray paints (Navy blue, rust orange, sage green, mustard yellow)
- Freezer paper or stencil vinyl
- Painter’s tape or masking tape (various widths)
- Craft knife and cutting mat
- Iron and ironing board
- Cardboard insert or shirt form
- Ruler or quilting square
- Pencil
- Scrap paper for testing
Step 1: Preparation and Planning
-
Pre-wash the shirt:
Begin by washing and drying your t-shirt without fabric softener to remove sizing, which ensures the paint adheres properly to the fibers. -
Insert protection:
Place a sturdy piece of cardboard or a shirt form inside the t-shirt to prevent paint from bleeding through to the back layer. -
Map out the grid:
Decide on the size of your main design rectangle on the front of the shirt. Use a ruler and very light pencil marks or a few pieces of tape to mark the outer boundaries. -
Design the mask:
On the matte side of your freezer paper, draw a large rectangle matching your shirt dimensions. Break this rectangle into a grid of squares, then divide those squares into triangles, mimicking a ‘half-square triangle’ quilt pattern.
Sharp Lines Secret
Iron your freezer paper stencil down *hard*. If edges lift, paint bleeds. A hot, dry iron ensures the sharpest geometric lines.
Step 2: Cutting and Masking
-
Cut the shapes:
Using a craft knife and ruler on a cutting mat, carefully cut out all the individual geometric shapes from the freezer paper. Keep both the positive shapes (the triangles) and the negative space handy. -
Arrange the first layer:
Iron the shiny side of the freezer paper shapes onto the shirt. Start by masking off *everything* except the areas you want to paint your first color (e.g., the navy blue triangles). The heat will temporarily bond the paper to the fabric. -
Seal the edges:
Run your fingernail or a bone folder firmly along the edges of the ironed paper to ensure a tight seal, which prevents paint from seeping underneath.
Step 3: Painting the Layers
-
Apply the first color:
Shake your navy blue spray paint vigorously. Spray a light, even coat over the exposed triangular areas. I prefer to do two thin coats rather than one heavy one to keep the fabric soft. -
Add texture:
For the speckled look seen in some navy sections, adjust the nozzle to spatter slightly or hold the can further away for a misting effect. -
Let it dry:
Allow the first color to dry to the touch. This usually takes about 15-20 minutes depending on the brand of paint. -
Re-mask for color two:
Peel off the freezer paper masks for the blue sections. Now, cover the painted blue areas with new paper shapes to protect them, and expose the areas for the next color, like rust orange. -
Apply heavier contrast:
Spray the rust orange color. Feel free to spray some areas more densely for solid blocks of color, which contrasts nicely with the speckled blue sections. -
Repeat for remaining colors:
Continue this process of drying, masking off finished areas, and exposing new ones for the sage green and mustard yellow sections. -
Creating negative space:
Ensure you leave some triangular sections completely covered throughout the whole process to retain the original cream color of the shirt as part of the pattern.
Fade & Gradient
Instead of solid fill, try spraying just one corner of a triangle heavily and letting it fade out for an ombre dimension effect.
Step 4: Finishing Touches
-
Remove all masks:
Once the final color is dry to the touch, carefully peel away all remaining freezer paper and tape to reveal the crisp geometric edges. -
Heat set the design:
Follow the manufacturer’s instructions for your specific fabric paint to heat set the design, usually by ironing the shirt inside out or placing a cloth over the design and ironing on high heat.
Enjoy the clean, modern look of your new graphic tee

Have a question or want to share your own experience? I'd love to hear from you in the comments below!