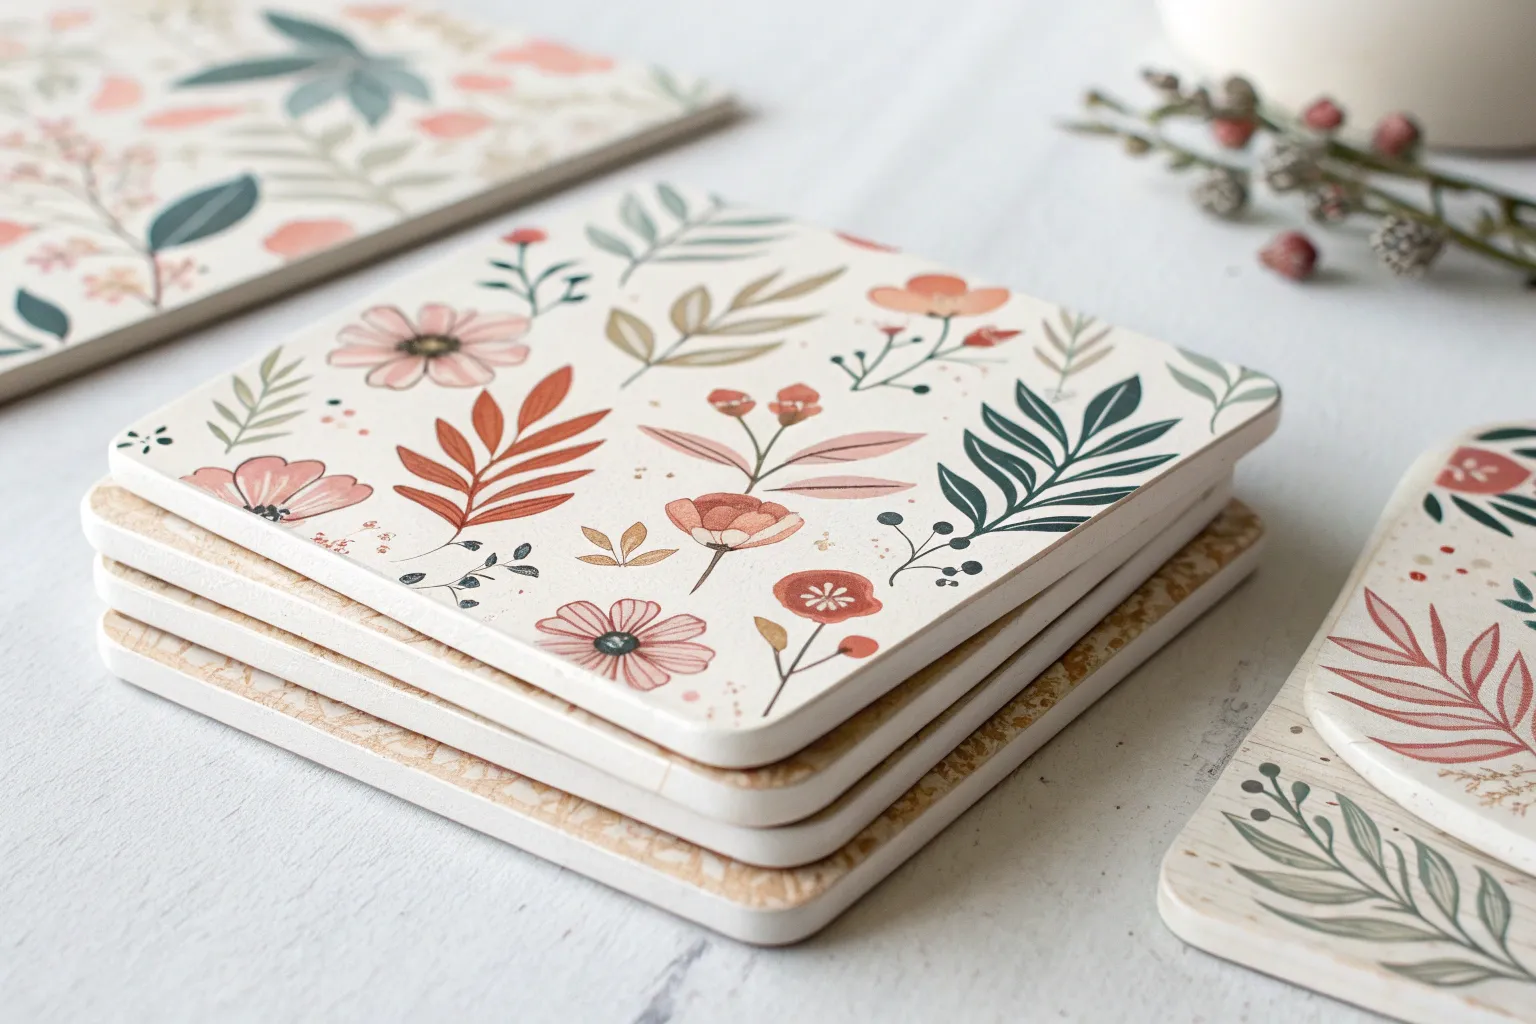
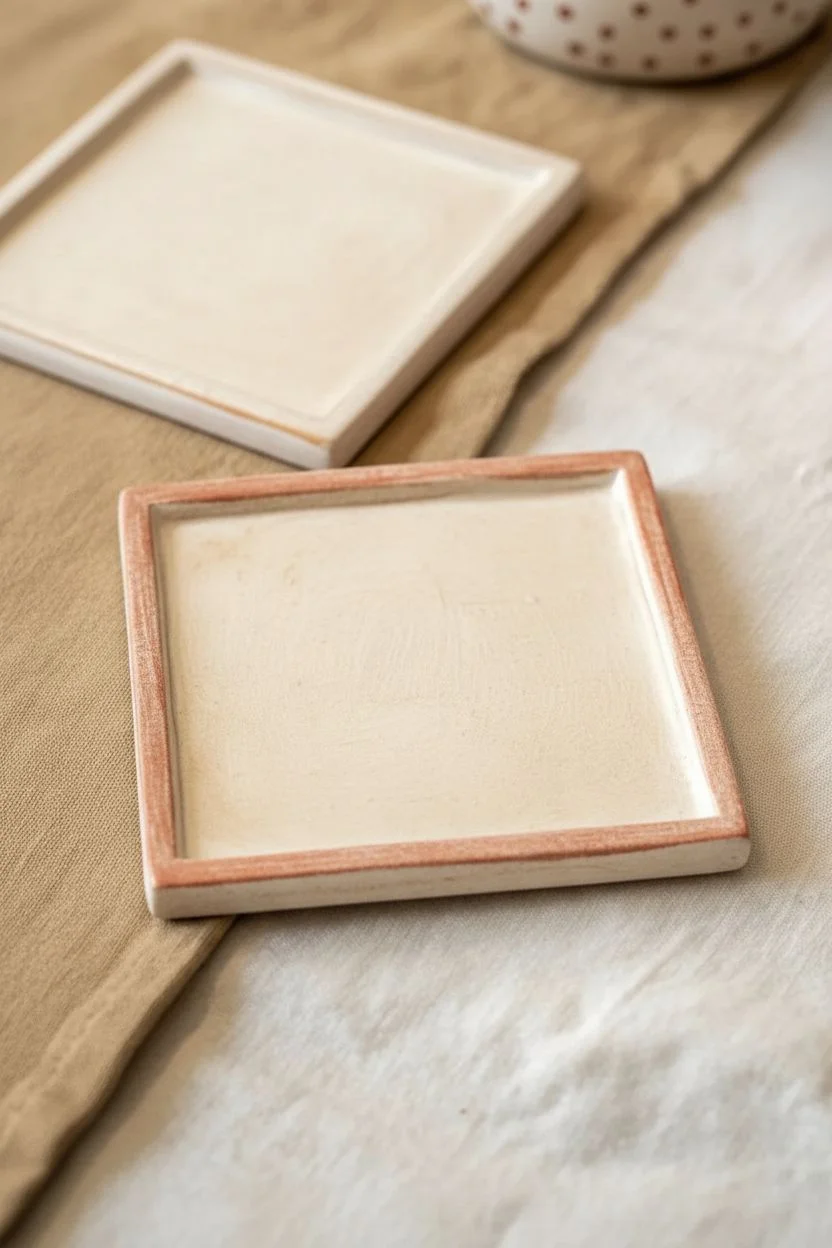
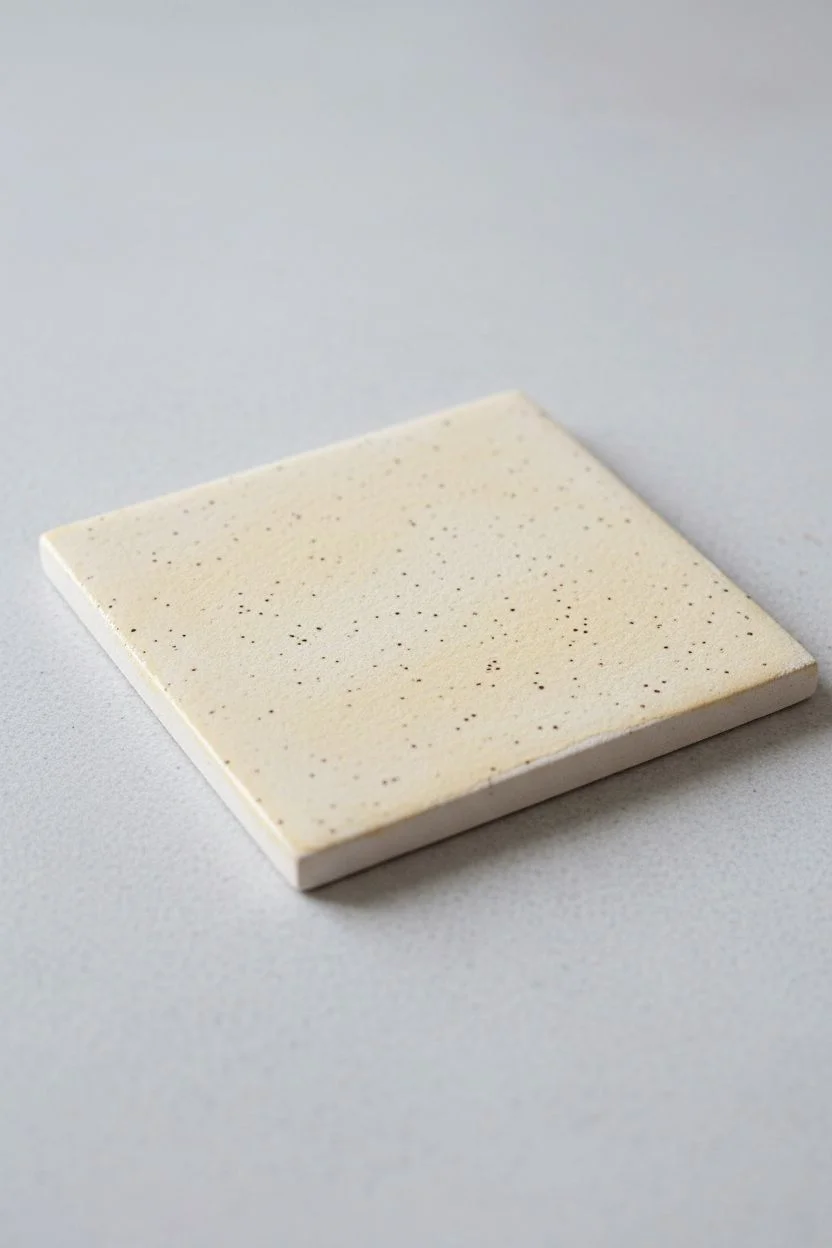
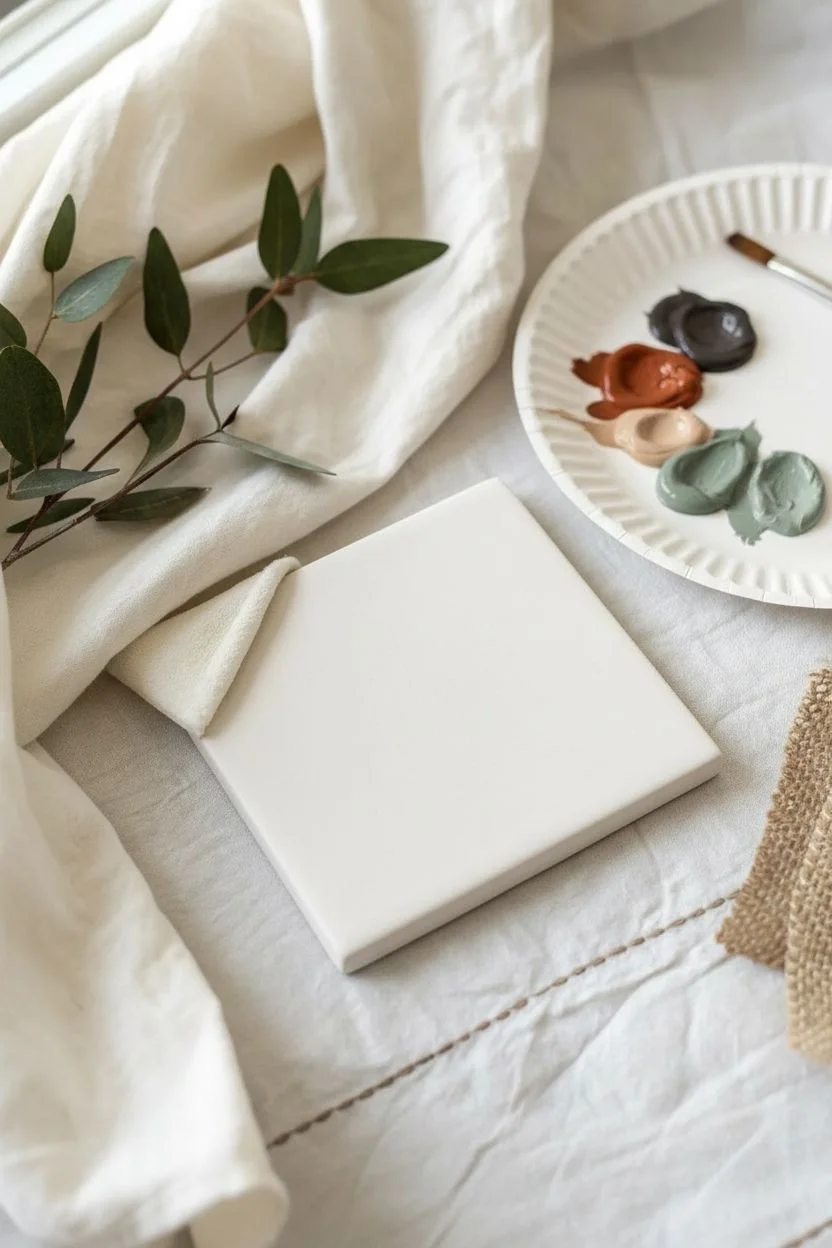
There’s something extra satisfying about painting square coasters—they’re tiny, useful, and basically a perfect little 4×4 canvas. Here are my favorite square coaster painting ideas, starting with the classics and sliding into the fun, unexpected stuff once you’re warmed up.
Color-Blocked Diagonal Triangles
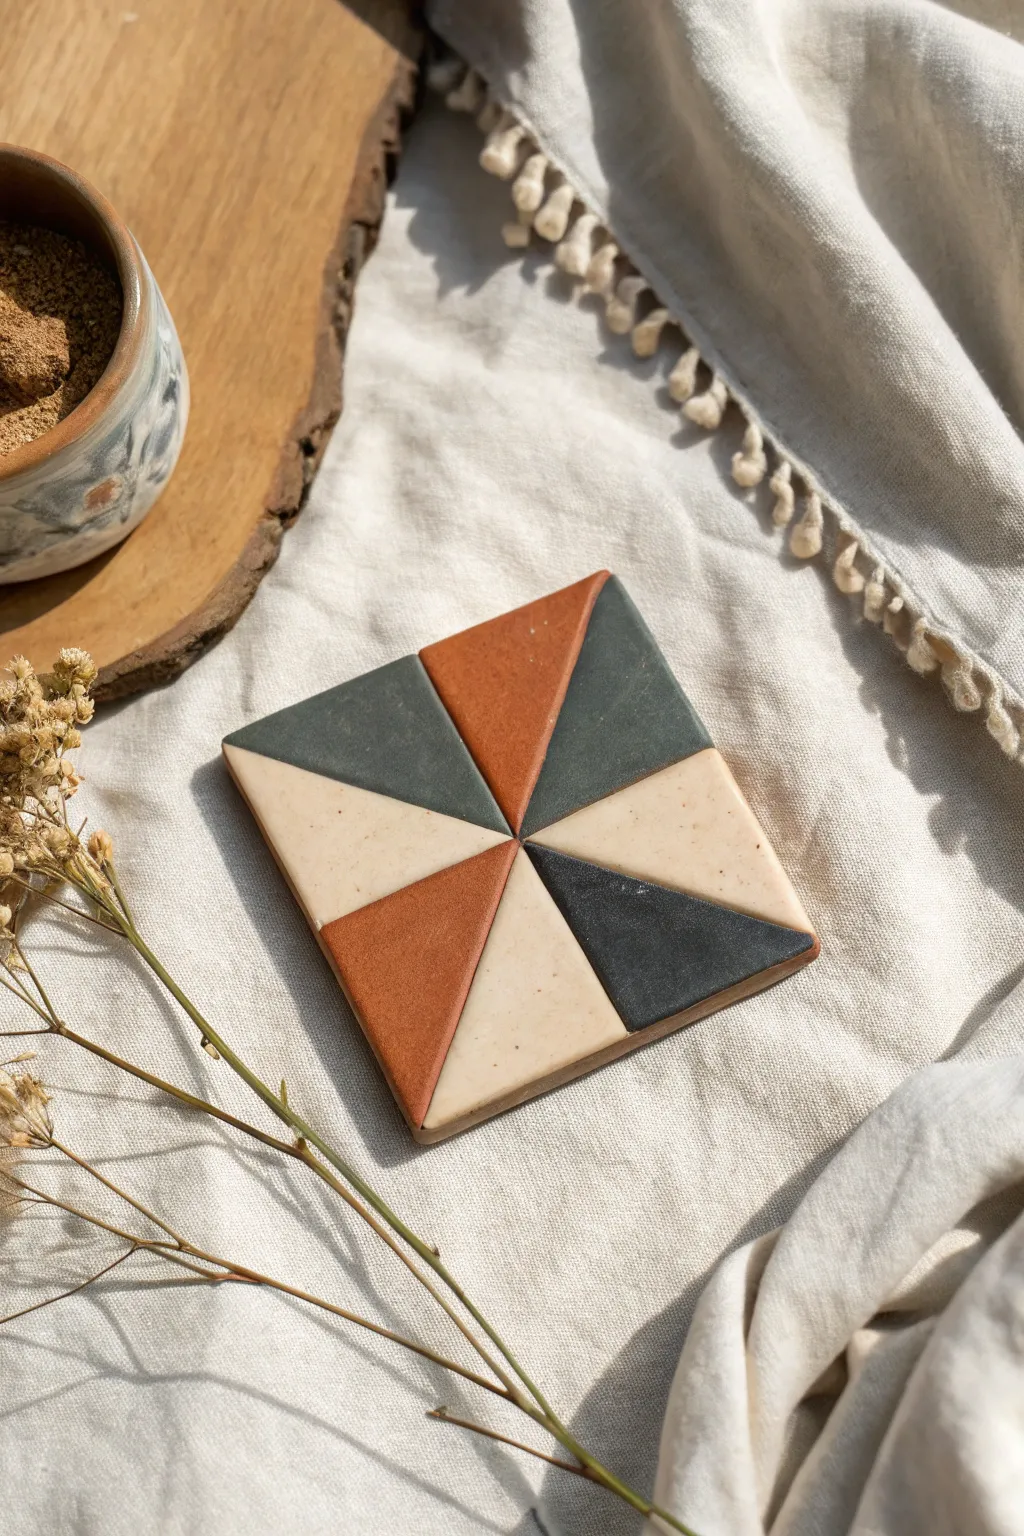
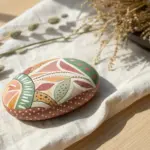
Embrace the warmth of earthy tones with this sophisticated geometric coaster design. By dividing a simple square into a radial pinwheel of eight triangles, you create a modern, dynamic look that feels both trendy and timeless.
Step-by-Step Tutorial
Materials
- Square ceramic or wood coaster blank
- Acrylic paints (Terracotta, Charcoal Grey, Cream/Off-White)
- Painter’s tape or masking tape (low tack)
- Ruler
- Pencil
- Small flat brush
- Detail liner brush
- Matte varnish or sealant
- Eraser
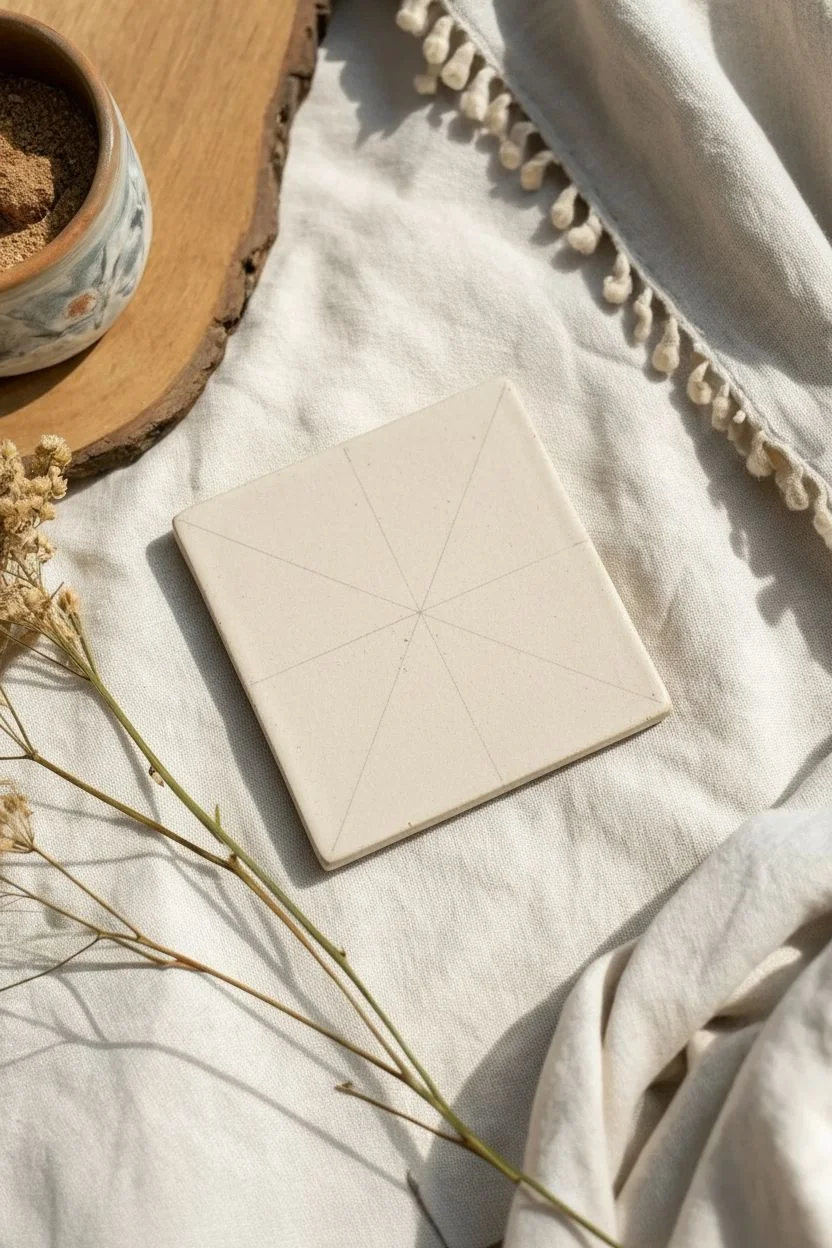
Step 1: Preparation & Mapping
-
Clean the surface:
Ensure your coaster blank is completely free of dust and grease. Wipe it down with a slightly damp cloth and let it dry thoroughly. -
Find the center:
Using your ruler, lightly draw two diagonal lines from corner to corner to form a large ‘X’. The point where they cross is your exact center. -
Draw the midpoints:
Measure the halfway point of each of the four outer edges. Mark these with a small dot. -
Connect the grid:
Draw a straight line connecting the top midpoint to the bottom midpoint, passing through the center. Repeat for the left and right midpoints. You should now have a grid dividing the coaster into 8 equal triangular wedges.
Crisp Lines Secret
Paint a thin layer of your base color (or clear medium) over the tape edge first. This seals the gap, so any bleeding matches the background underneath.
Step 2: Painting the Design
-
Plan your palette:
Decide on your color rotation. This design uses an alternating pattern: Terracotta, Cream, Charcoal, Cream, Terracotta, Cream, Charcoal, Cream. Lightly mark each triangle with a letter (T, C, G) so you don’t get confused. -
Tape the first set:
Tape off the edges of the triangles you intend to paint first (e.g., the two Terracotta sections). Press the tape down firmly, especially near the center point, to prevent bleed-under. -
Apply the first color:
Paint the two Terracotta triangles. Use smooth strokes starting from the tape and pulling inward towards the center of the triangle to keep edges crisp. -
Let it dry:
Wait until the paint is dry to the touch before carefully peeling back the tape. I prefer peeling the tape at a 45-degree angle away from the wet paint. -
Tape the opposing set:
Once the Terracotta is fully dry, tape off the boundaries for the two Charcoal Grey triangles. Ensure the tape covers the already painted edges slightly to protect them. -
Paint the dark accents:
Fill in the Charcoal sections. You might need two thin coats for this darker color to get a solid, opaque finish. -
Remove tape and dry:
Remove the tape and allow these dark sections to dry completely. Patience here ensures you don’t smudge your crisp lines.
Step 3: Finishing Touches
-
Hand-paint the cream sections:
Since taping over fresh paint specific to the remaining shapes can be tricky, carefully hand-paint the four remaining Cream triangles using a small flat brush. Use the existing painted lines as your guide. -
Refine the center:
The center point where all eight triangles meet is the hardest part. Use your finest detail liner brush to sharpen up the points if they look a little rounded or messy. -
Full dry time:
Allow the entire coaster to cure for at least a few hours, or according to your paint manufacturer’s instructions. -
Texturing (Optional):
The project image has a slight speckled, stone-like texture. You can achieve this by dipping an old toothbrush in watered-down grey paint and lightly flicking fine speckles over the surface. -
Seal the work:
Apply a coat of matte varnish to protect the paint from moisture and heat. A matte finish keeps that modern, earthy ceramic look.
Level Up: Faux Ceramic
Mix baking soda into your acrylic paint before applying. It creates a gritty, stone-like texture that mimics unglazed pottery perfectly.
Place your finished coaster on your table to add a touch of handcrafted geometric elegance to your decor


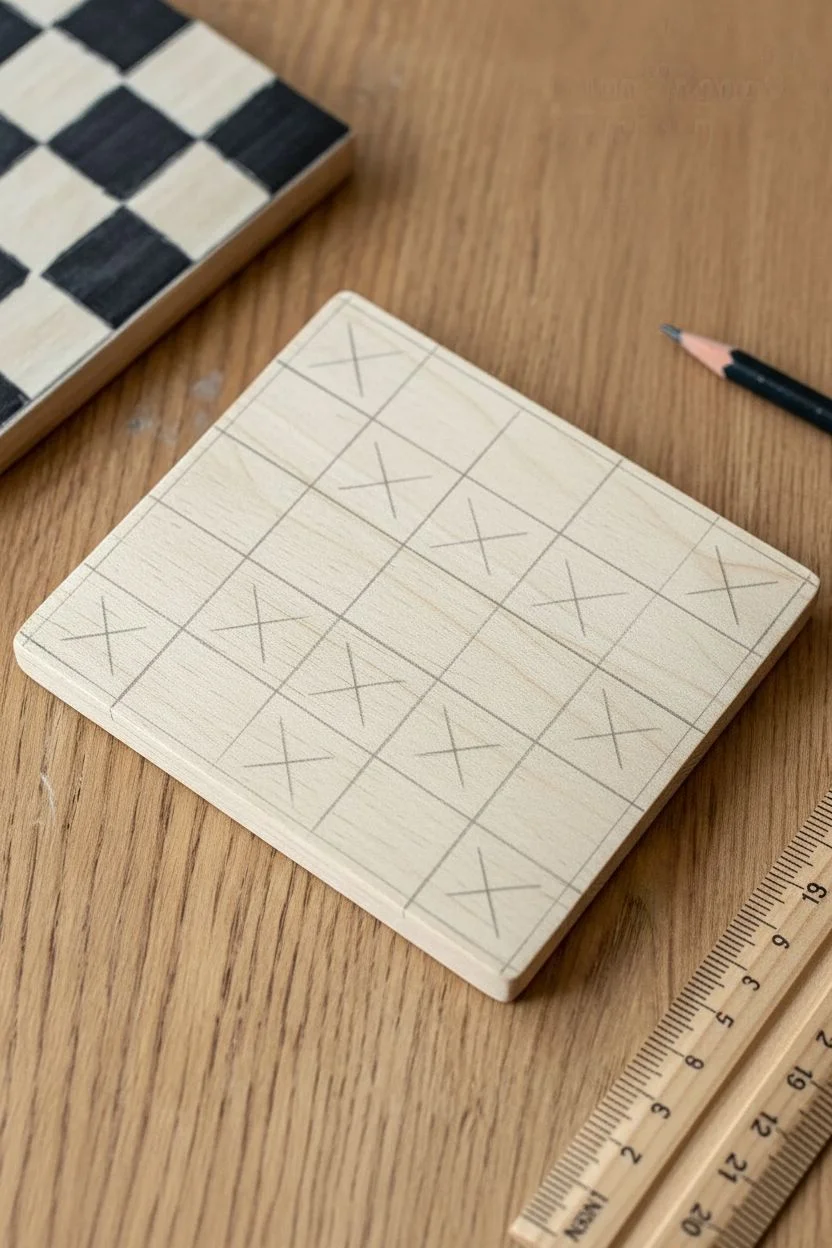
Simple Checkerboard Pattern
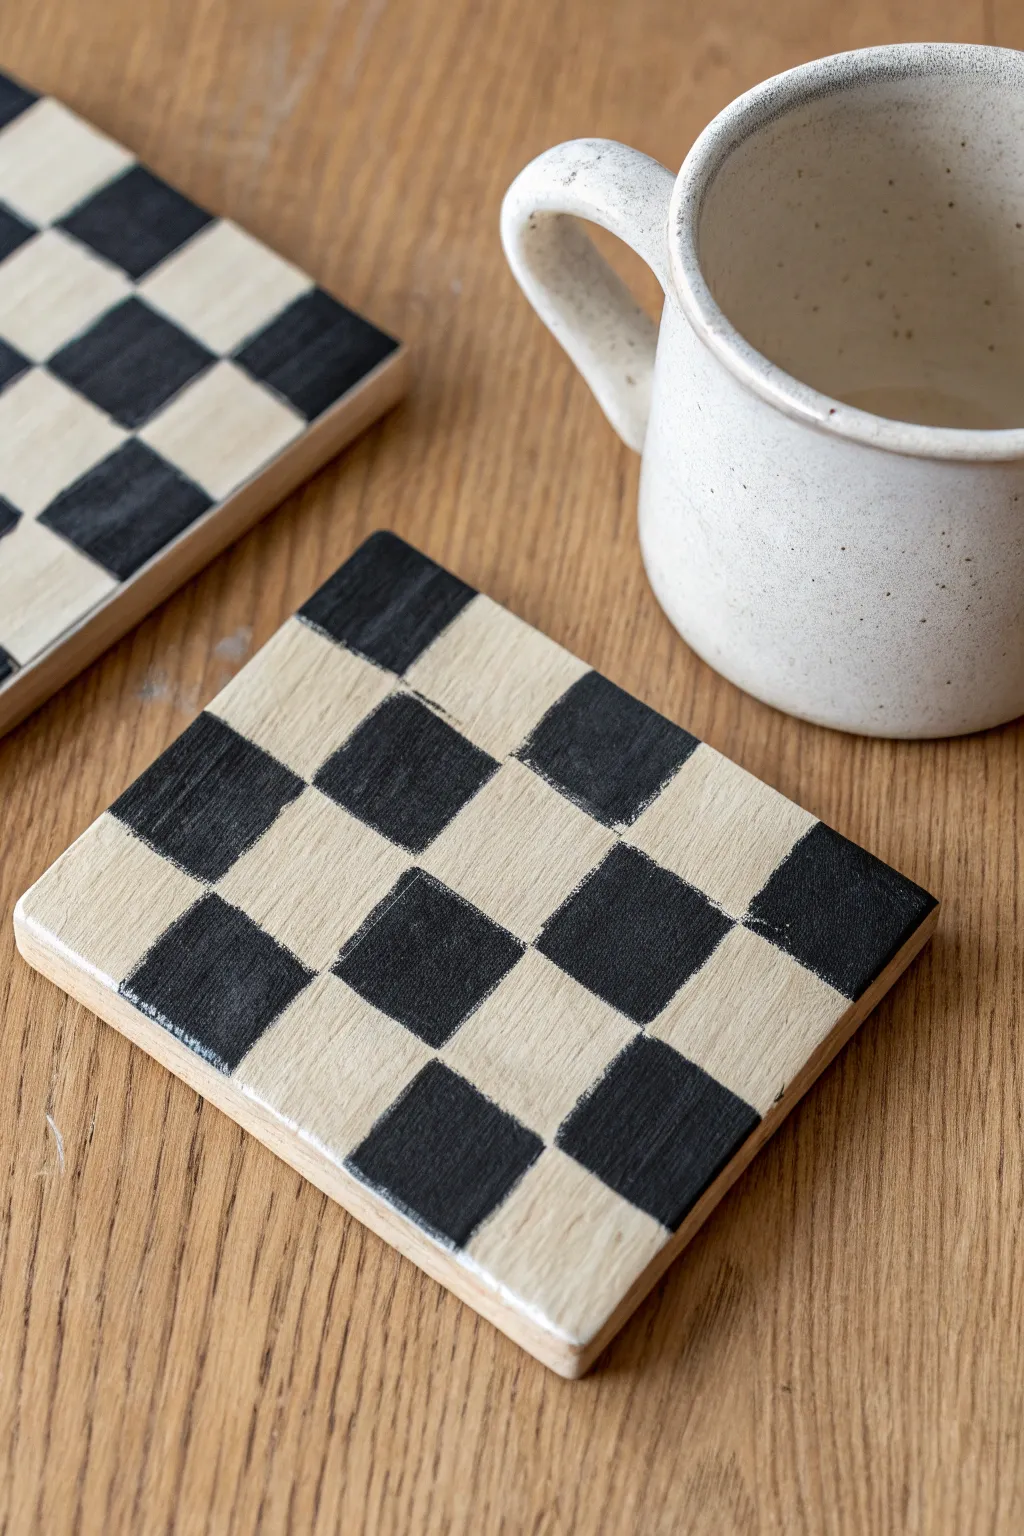
These stylish coasters combine the warmth of natural wood with a bold, graphic black checkerboard pattern. The slightly imperfect, hand-painted lines give them a charming, organic feel that looks great on any coffee table.
How-To Guide
Materials
- Square wooden coaster blanks (approx. 4×4 inches)
- Black acrylic paint
- Clear matte or satin varnish/sealer
- Flat shader brush (size 6 or 8)
- Pencil
- Ruler
- Fine-grit sandpaper (220 grit)
- Paper towel or rag
Step 1: Preparation
-
Smooth the surface:
Start by lightly sanding your wooden coaster blank with fine-grit sandpaper. You want a smooth surface for painting, so focus on any rough patches or splinters on the edges. -
Dust off debris:
Wipe the coaster down thoroughly with a dry paper towel or cloth to remove all sanding dust. Any leftover dust will get trapped in your paint later. -
Measure the grid:
Using a ruler, measure the length of your coaster. Divide this number by 5 (since the pattern is a 5×5 grid). For a standard 4-inch coaster, each square will be slightly under an inch. -
Mark the edges:
Make small, light tick marks with your pencil along all four edges of the coaster at the intervals you calculated. -
Connect the lines:
Lightly draw straight lines across the coaster to connect your tick marks, creating a full grid of squares. keep your pencil pressure very light so the graphite doesn’t show through the finished design. -
Plan your pattern:
Lightly mark an ‘X’ or a small dot inside every other square where you plan to paint black. This simple step prevents mistakes once you start painting.
Step 2: Painting
-
Load your brush:
Dip your flat shader brush into the black acrylic paint. You want enough paint for opaque coverage but not so much that it globs or drips. -
Outline the first square:
Start with a corner square marked for painting. Use the flat edge of your brush to carefully outline the inner edges of the pencil square. -
Fill in the square:
Fill in the center of the square with smooth, even strokes. I find it easiest to work in rows so I don’t accidentally smudge wet paint with my hand. -
Embrace the texture:
Don’t worry about making the coverage perfectly uniform; seeing a bit of wood grain through the black paint adds to the rustic aesthetic. -
Continue the pattern:
Move on to the next marked square in the row, repeating the outlining and filling process. Remember, you are painting every other square. -
Check your edges:
For the squares on the perimeter, carefully paint right up to the edge of the wood. You can paint the sides black if you wish, but leaving them natural looks nice too. -
dry completely:
Let the paint dry fully. Acrylics dry fast, but give it at least 20-30 minutes to ensure it won’t smear during the next step.
Clean Lines Pro-Tip
For sharper edges without tape, load paint only on the very tip of your flat brush. Press and drag steadily along the pencil line instead of using short, sketchy strokes.
Step 3: Finishing
-
Erase guidelines:
Once the paint is bone dry, take a clean eraser and gently remove any visible pencil lines in the unpainted wood squares. -
Apply the first coat of sealer:
Apply a thin layer of clear matte or satin varnish over the entire top surface. This protects the wood from condensation and stains. -
Let it cure:
Allow the first coat of sealer to dry according to the bottle’s instructions. -
Add a second coat:
Apply a second coat of sealer for extra durability. Brush in the opposite direction of your first coat to ensure full coverage.
Smudged Paint?
If you accidentally get black paint on a ‘wood’ square, wait for it to dry completely. Then, carefully sand it away with a folded piece of sandpaper until the wood shows again.
Now you have a set of trendy checkerboard coasters ready to protect your table in style


Polka Dots With a Centered Border
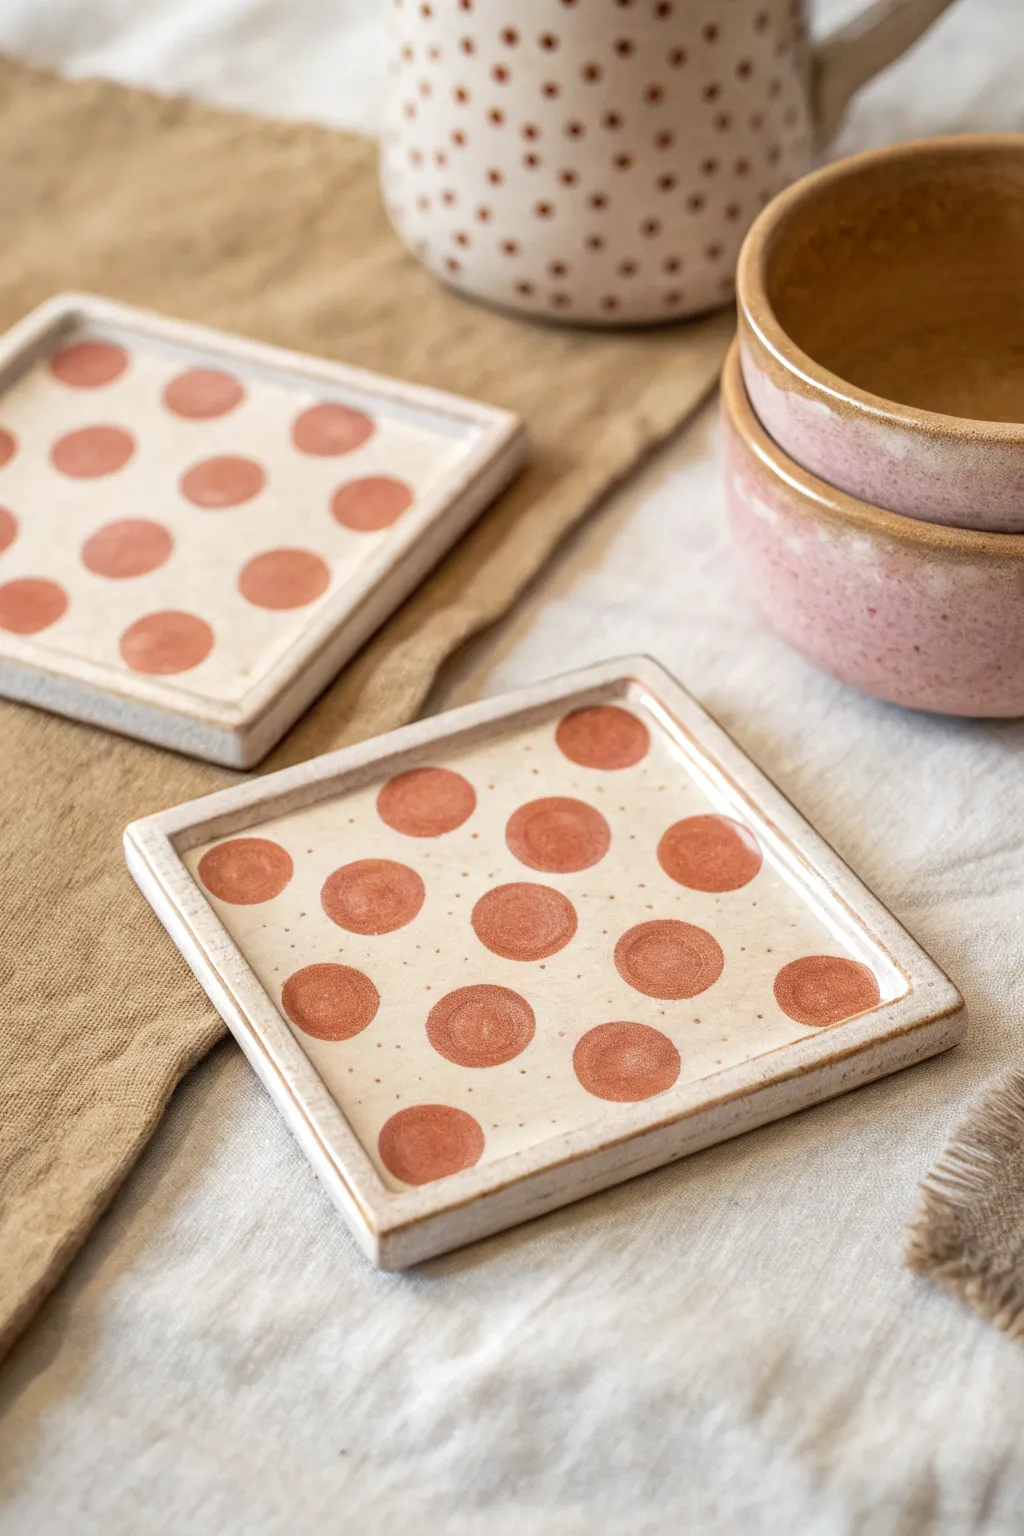
Bring a touch of artisan warmth to your coffee table with these charming hand-painted coasters. Featuring a warm cream base and imperfect, organic terracotta dots, this design mimics the cozy look of speckled stoneware.
Detailed Instructions
Materials
- Square ceramic bisqueware coasters (with raised rim)
- Cream or off-white acrylic paint (matte finish)
- Terracotta or warm rust acrylic paint
- Soft synthetic flat brush (1 inch)
- Round foam pouncer or stencil dauber (medium size)
- Small stiff-bristle brush (like a toothbrush or fan brush)
- Glazing medium (optional)
- High-gloss or satin varnish sealer
- Paper towels
- Water container
- Palette or paper plate
Step 1: Prepping the Base
-
Clean surface:
Begin by wiping down your ceramic coasters with a slightly damp cloth to remove any dust or oils from the manufacturing process. Let them dry completely. -
Base coat mixing:
Mix your cream paint with just a tiny drop of the terracotta color. This warms up the white so it looks more like natural clay rather than stark white plastic. -
First layer application:
Using your flat brush, apply an even coat of the cream mixture over the entire face and rim of the coaster. Smooth out any heavy brushstrokes before the paint starts to set. -
Drying time:
Allow the first coat to dry for about 15-20 minutes. The ceramic material tends to absorb moisture quickly, but patience here ensures a smooth finish. -
Second layer:
Apply a second coat of the cream base. Paint in the opposite direction (cross-hatching) to ensure full coverage and a solid, opaque background. -
Rim detailing:
While the second coat is still slightly wet, I like to take a very small amount of watered-down terracotta paint and run it gently along the very edge of the raised rim. This adds a subtle, weathered definition.
Step 2: Creating the Polka Dots
-
Prepare the terracotta:
Squeeze a generous amount of terracotta paint onto your palette. You want a puddle deep enough to coat your foam pouncer evenly. -
Load the pouncer:
Press your round foam pouncer straight down into the paint. Dab it a few times on a clean part of the palette to remove excess; you want a circle, not a blob. -
Center placement:
Start by stamping one dot roughly in the center of the coaster. This acts as an anchor point for the rest of your pattern. -
Fill the grid:
Stamp additional dots in a loose grid pattern around the center dot. Don’t worry about measuring perfectly; the charm of this project is the handmade, slightly organic feel. -
Partial dots:
Where the pattern meets the raised rim, allow the dots to be ‘cut off’ by the edge or skip them entirely if there isn’t enough space, keeping the design neat within the flat interior. -
Texture addition:
Once the dots are stamped, the paint might look a bit flat. Take a small round brush and swirl a tiny bit more paint into the center of each dot while wet to create a subtle textural swirl.
Uneven is Better
Don’t stress if your poucer doesn’t print a perfect circle every time. Faded edges or thicker patches of paint make the coaster look like authentic, hand-thrown pottery.
Step 3: Finishing Touches
-
The speckled effect:
Mix a very watery wash of the terracotta paint. Dip a toothbrush or stiff fan brush into it. -
Splattering:
Hold the brush over the coaster and run your thumb across the bristles to flick tiny speckles onto the surface. This mimics the look of iron flecks in clay. -
Clean up:
If any large splatters land where you don’t want them, quickly dab them up with the corner of a paper towel. -
Final dry:
Let the entire piece dry for at least 24 hours to ensure all layers are fully cured before sealing. -
Sealing:
Apply 2-3 coats of a high-quality varnish (satin or gloss works best to mimic glazed pottery). This creates a waterproof barrier for drink condensation.
Kiln-Fired Look
Mix a clear gloss medium directly into your terracotta paint. When dry, the dots will have a slight raised texture and shine, distinct from the matte background.
Once sealed and dried, stack them on your coffee table for an instant cozy, handcrafted upgrade.

Classic Gingham Squares
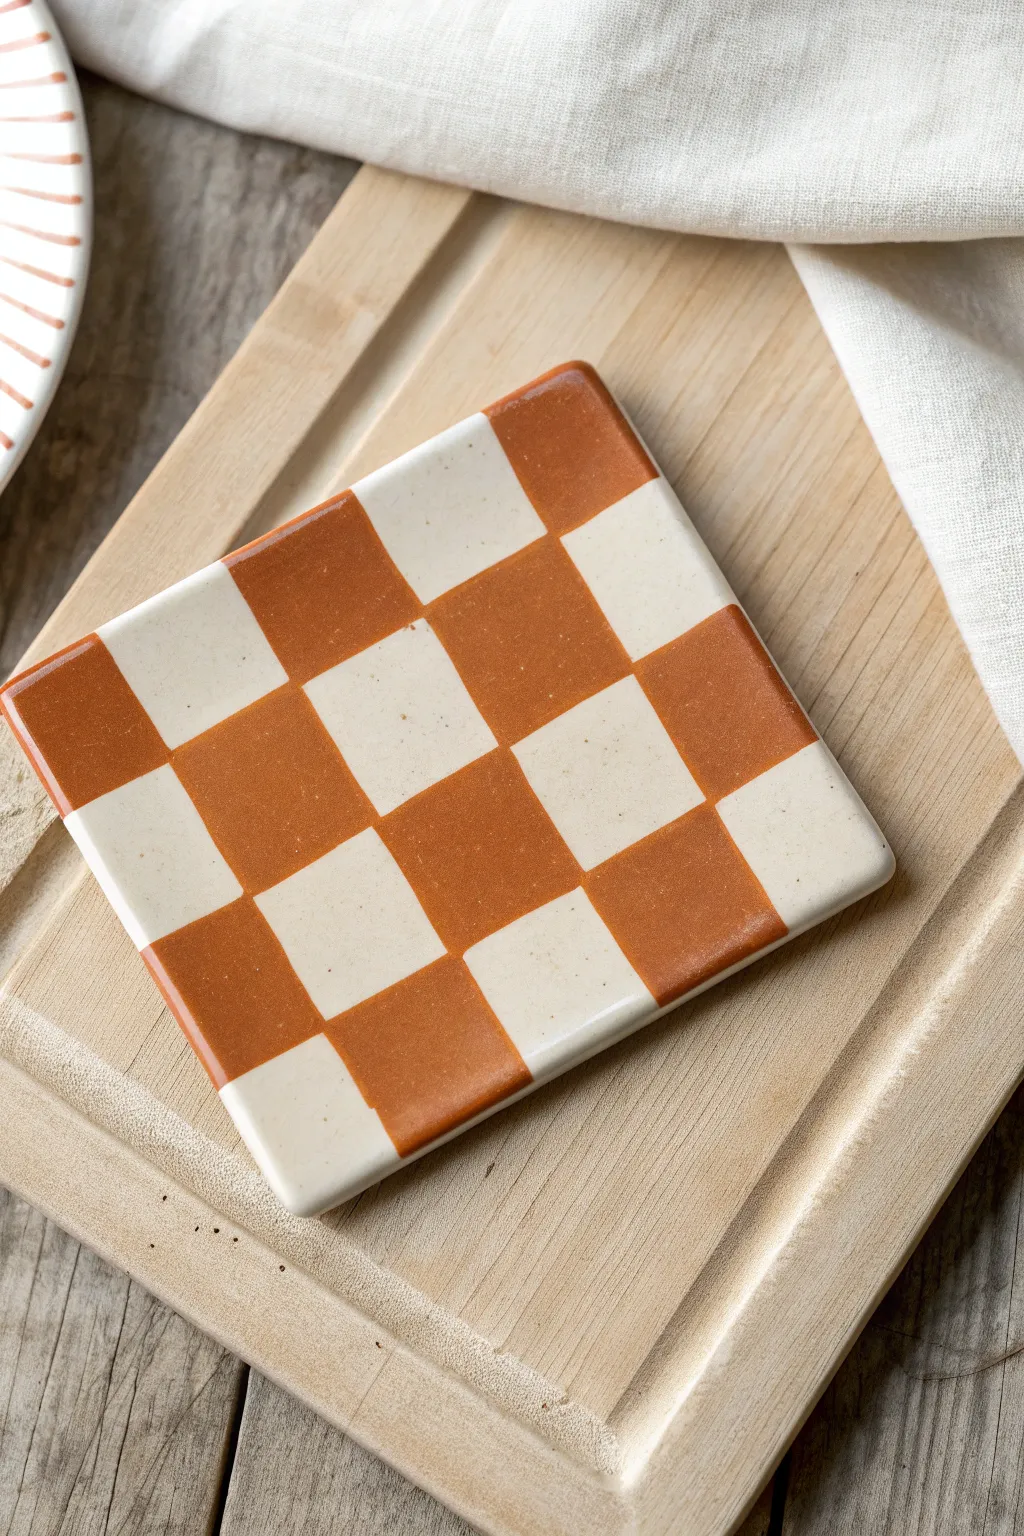
Embrace the warmth of natural tones with this simple yet striking checkerboard coaster project. The rustic combination of terracotta orange and creamy off-white creates a timeless look that feels both modern and farmhouse-chic.
Step-by-Step
Materials
- Square ceramic or air-dry clay coaster blank (approx. 4×4 inches)
- Acrylic paints: Burnt Sienna (or Terracotta), Warm White (or Cream)
- Flat shader brush (size 6 or 8)
- T-square or ruler
- Pencil
- Painter’s tape or masking tape (1/2 inch width)
- High-gloss varnish or sealant (waterproof)
- Fine-grit sandpaper (optional)
- Palette or paper plate
Step 1: Preparation & Base Coat
-
Surface Prep:
Begin by inspecting your coaster blank. If there are any rough potential snag points, lightly sand the surface with fine-grit sandpaper and wipe away the dust with a damp cloth. -
Applying the Base Color:
Squeeze a generous amount of Warm White paint onto your palette. Using your flat shader brush, apply an even coat over the entire top surface and sides of the coaster. -
Opacity Check:
Let the first layer dry completely—about 15 to 20 minutes. If the underlying material color is still showing through, apply a second coat of Warm White for a solid, opaque background. -
Full Dry Time:
Ensure the base coat is bone dry before moving on. I like to let this sit for at least an hour to prevent the tape from pulling up any paint later.
Clean Line Secret
If you struggle with freehand lines, use 1/4 inch painter’s tape to mask off the grid. Paint the expose squares, let dry, remove tape, then mask the alternate set.
Step 2: Drafting the Grid
-
Measuring the Center:
Using a ruler, find the horizontal and vertical center points of your coaster and lightly mark them with a pencil. -
Marking Columns:
Decide on your square size (for a 4×4 inch coaster, 1-inch squares work perfectly for a 4×4 grid). Lightly draw vertical lines spaced evenly across the coaster. -
Marking Rows:
Turn the coaster 90 degrees and draw horizontal lines with the same spacing to create a perfect grid of squares. -
Double Check:
Review your pencil lines to ensure they are straight and the squares look relatively uniform. Correct any crooked lines now.
Step 3: Painting the Checkers
-
Mixing the Terracotta:
Prepare your Burnt Sienna paint. If it’s too dark, mix in a tiny drop of white or yellow to achieve that warm, clay-pot hue. -
First Terracotta Square:
Start at the top left corner. Skip the first square (leaving it white) and paint the second square with the terracotta color. -
Continuing the Row:
Continue across the top row, painting every other square. Use the flat edge of your brush to cut in clean lines along your pencil marks. -
Second Row Shift:
Move to the second row down. This time, paint the first square terracotta, skip the second, and continue alternating. This creates the offset checkerboard pattern. -
Completing the Pattern:
Repeat this alternating process for the remaining rows until the entire grid is filled. Take your time near the edges to keep the squares crisp. -
Touch Ups:
Once the orange squares are dry, inspect your work. Use a small detail brush with the white base color to tidy up any smudges or uneven lines.
Make It 3D
Use actual polymer clay! Roll out white and terracotta clay, cut square tiles, and press them together into a slab before baking for a true ceramic feel.
Step 4: Sealing & Finishing
-
First Sealant Coat:
Once all paint is completely cured (wait at least 4 hours), apply a thin layer of high-gloss varnish. This mimics the glazed ceramic look of the original inspiration. -
Drying:
Allow the varnish to dry according to the bottle instructions, usually 1-2 hours. -
Second Sealant Coat:
Apply a second coat of varnish for durability, especially since coasters need to be water-resistant. -
Final Cure:
Let the coaster cure fully for 24-48 hours before placing any hot or cold drinks on it to ensure the finish doesn’t cloud or tack.
Now you have a charming, hand-painted geometric coaster ready to protect your table in style
BRUSH GUIDE
The Right Brush for Every Stroke
From clean lines to bold texture — master brush choice, stroke control, and essential techniques.
Explore the Full Guide
Easy Mandala in a Centered Circle
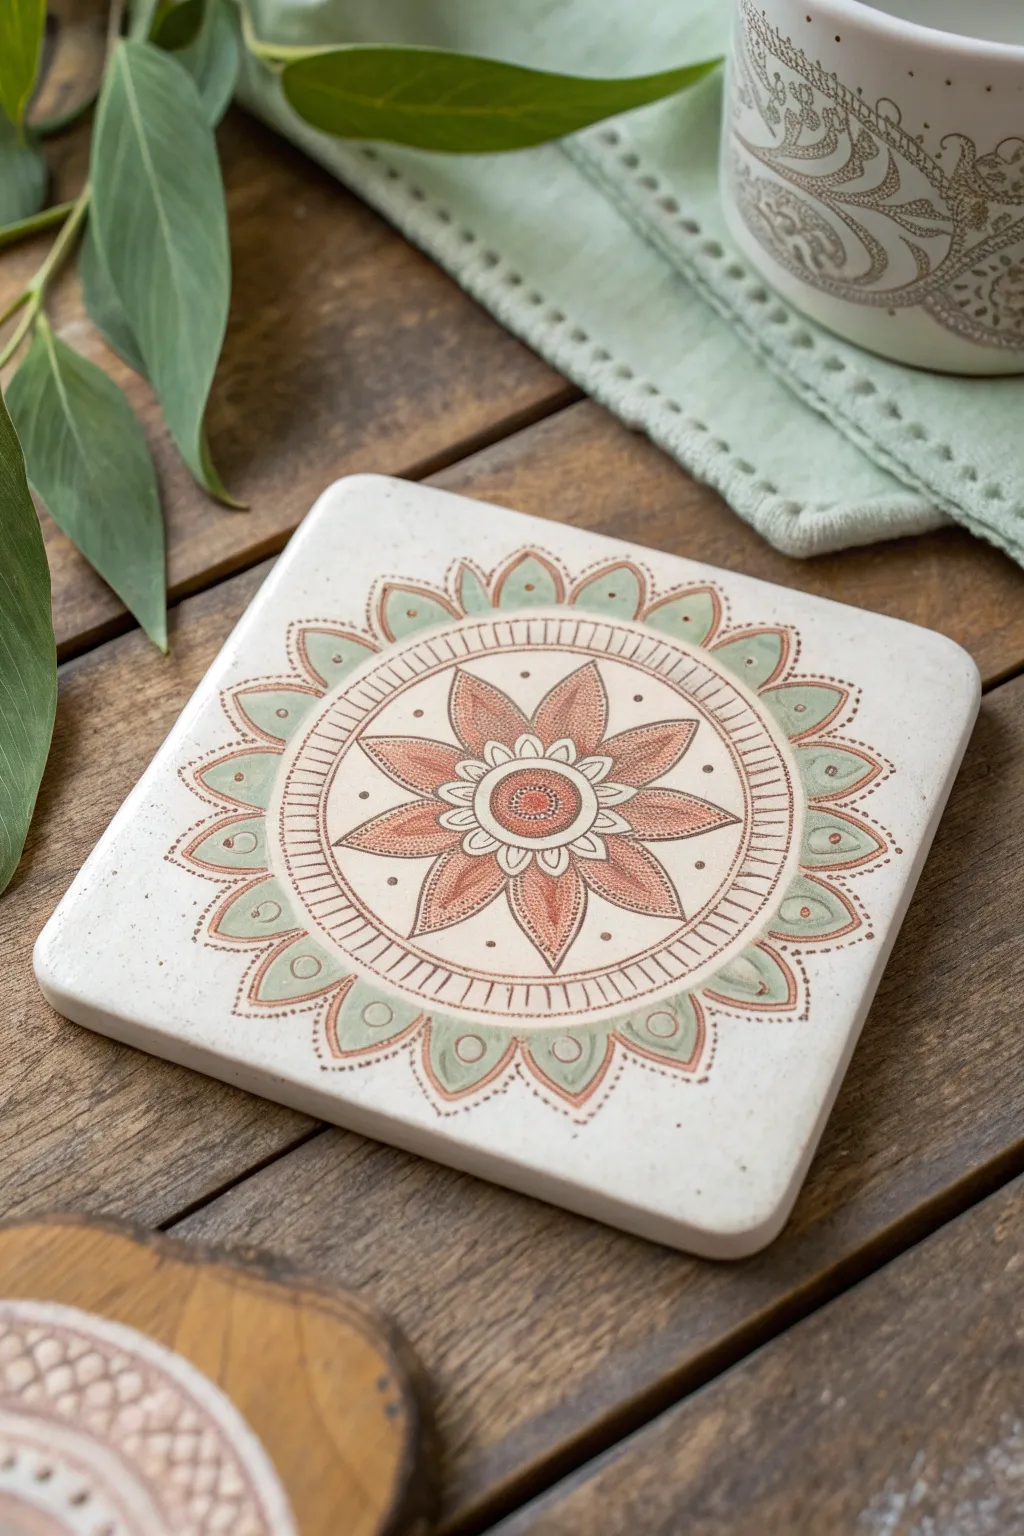
Bring a touch of organic serenity to your coffee table with this hand-painted ceramic coaster featuring a gentle mandala design. The earthy terracotta and sage green palette creates a calming, natural look that perfectly complements the intricate floral motif.
Detailed Instructions
Materials
- Square ceramic bisqueware coaster (approx 4×4 inches)
- Acrylic paints (Soft White or Cream, Terracotta/Rust, Sage Green, Dark Brown)
- Fine liner paintbrush (size 00 or 000)
- Small round paintbrush (size 2)
- Pencil and eraser
- Compass or round objects for tracing
- Ruler
- Matte finish sealant spray or varnish
- Palette for mixing
Step 1: Preparation and Base
-
Clean surface:
Begin by wiping down your ceramic coaster with a slightly damp cloth to remove any dust or oils, ensuring the paint will adhere smoothly. -
Base coat:
Apply a coat of soft white or cream acrylic paint over the entire top surface. Let it dry completely, then add a second coat for full, opaque coverage. This provides a neutral canvas for your mandala. -
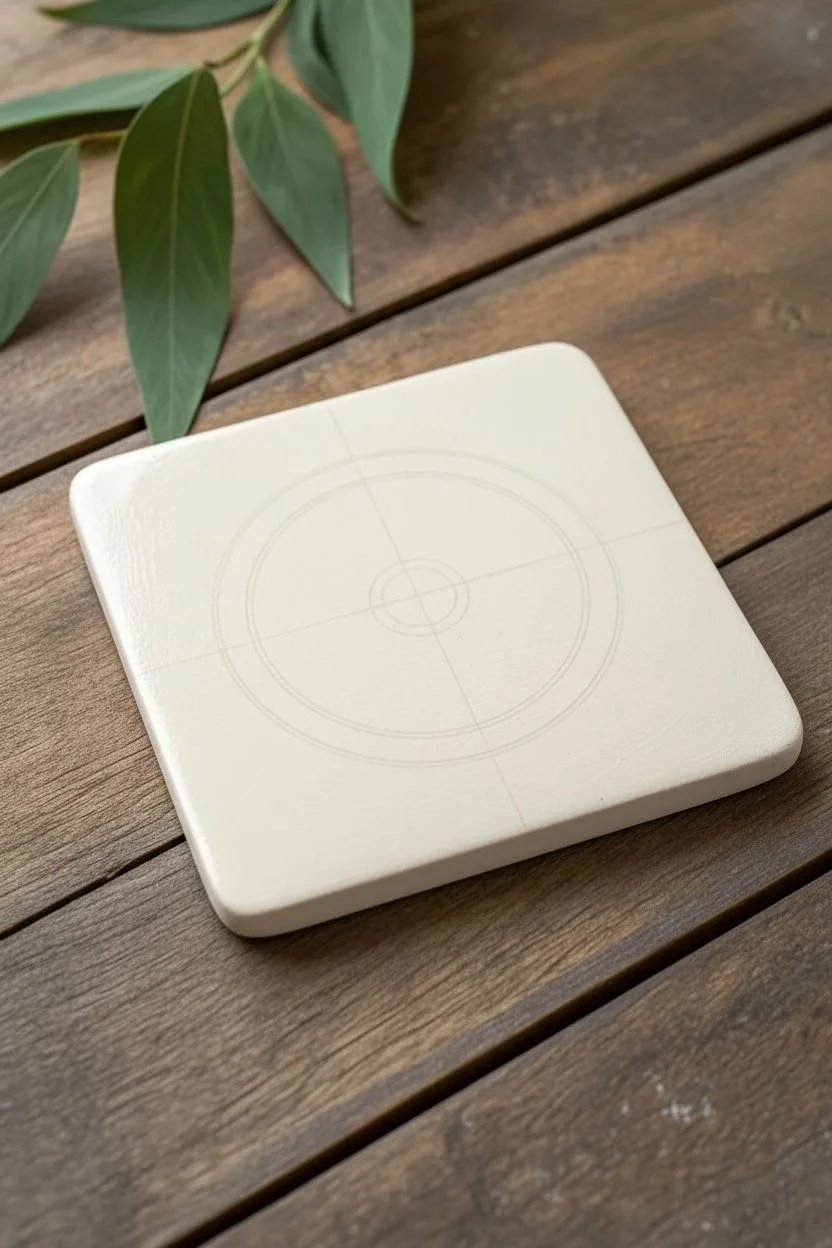
Find the center:
Using a ruler, lightly mark an ‘X’ from corner to corner with a pencil to find the exact center of the square. -
Draw guide circles:
Use a compass or small round objects (like a coin and a glass) to lightly draw three concentric circles starting from the center point. You need a small inner circle, a medium middle circle, and a larger outer circle that leaves about an inch of border.
Wobbly Lines?
If your circles aren’t perfect, embrace it. This is a “hand-drawn” style. If a mistake is too big, use a damp Q-tip to wipe away wet acrylic immediately and retry.
Step 2: Painting the Central Flower
-
Center details:
Mix a watery wash of terracotta paint. Paint a small solid circle in the very center, then outline it with a thin ring of unpainted space and a second, thin painted ring. -
Inner petals:
Sketch eight small, simple petals radiating from the center circle. Outline them with your fine liner brush using the dark brown paint, keeping the lines delicate. -
Large petals:
Draw eight larger, pointed petals extending out to the next guide circle. Position them so they sit between the smaller inner petals. -
Fill the petals:
Dilute your terracotta paint slightly to make it semi-transparent. Fill in these large petals, leaving a small white gap near the base and tip for a highlighted effect. -
Texturing:
Once dry, use the tip of your finest brush to add tiny stippled dots inside the very center circle for texture.
Step 3: Creating the Outer Rings
-
Border definition:
Use the dark brown paint to carefully outline the medium circle guide. I find steadiness improves if you rest your pinky finger on the table while painting this curve. -
Hatch marks:
In the band between the large petals and the outlined circle, paint small, evenly spaced tick marks or ‘hatch’ lines all the way around. -
Outer scalloped edge:
Use the largest pencil guide circle to paint a scalloped edge. Create roughly sixteen shallow humps or petals all around the perimeter. -
Sage accents:
Mix a watery sage green wash. Fill every other scallop shape with this green tint, or fill all of them lightly as shown in the example. -
Inner teardrops:
Inside each green scallop, paint a smaller teardrop shape. Leave the inside of the teardrop unpainted (white) to create a negative space detail.
Add Dimension
After sealing, use a white gel pen to add tiny highlights on top of the darkest brown lines or in the center of the petals for an extra pop of brightness.
Step 4: Final Details and Sealing
-
Decorative dots:
Between the large terracotta petals, place a single small brown dot in the negative space to balance the design. -
Outline refinement:
Go over any faint lines with the dark brown paint to crisp up the edges, adding tiny dots to the tips of the green scallops for a finished look. -
Erase guides:
Allow the paint to dry fully—wait at least an hour to be safe. Gently erase any visible pencil marks that weren’t covered by paint. -
Protective coat:
Ideally in a well-ventilated area, spray the coaster with a matte sealant. This protects your artwork from condensation and heat from mugs.
Now you have a functional piece of art ready to protect your table with style
Citrus Slice in the Middle
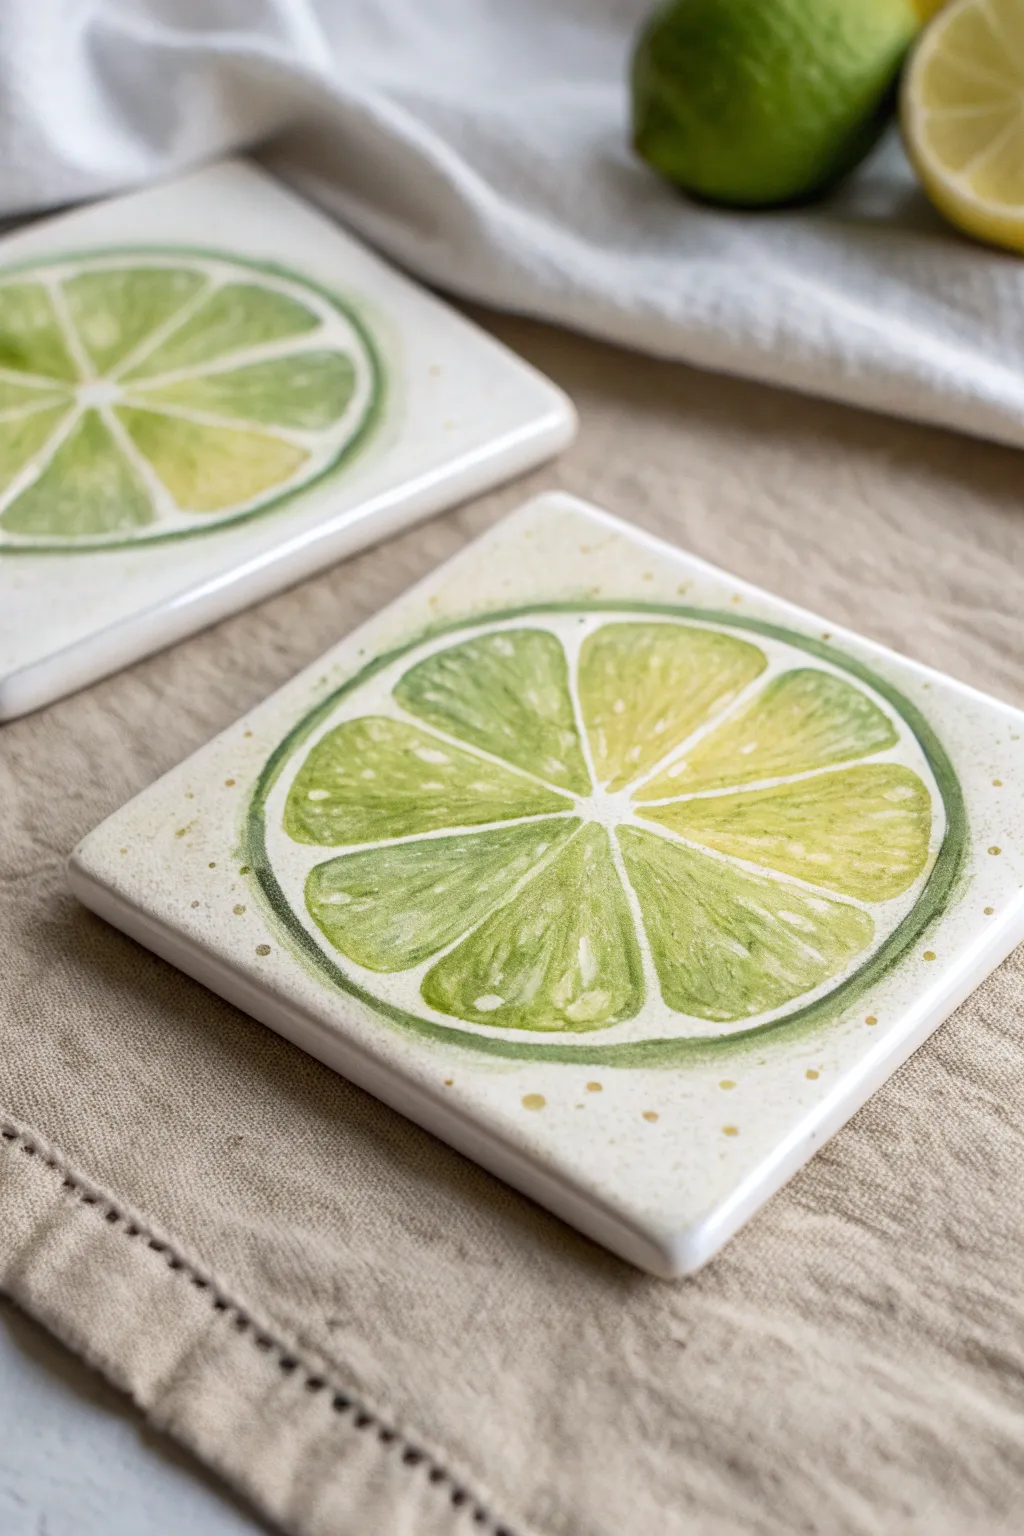
Brighten up your coffee table with these refreshing lime slice coasters that capture the juicy translucency of citrus fruit. The watercolor-style acrylic application creates a soft, organic look that feels both modern and handmade.
Step-by-Step Tutorial
Materials
- Square ceramic bisqueware tiles or coasters
- Acrylic paints (Titanium White, Sap Green, Lemon Yellow, Hooker’s Green)
- Glazing medium or water (for thinning)
- Rubbing alcohol
- Pencil (H or HB)
- Round brushes (size 4 and 2)
- Fine liner brush (size 0)
- Palette or small dish
- Clear acrylic sealer spray (gloss or satin)
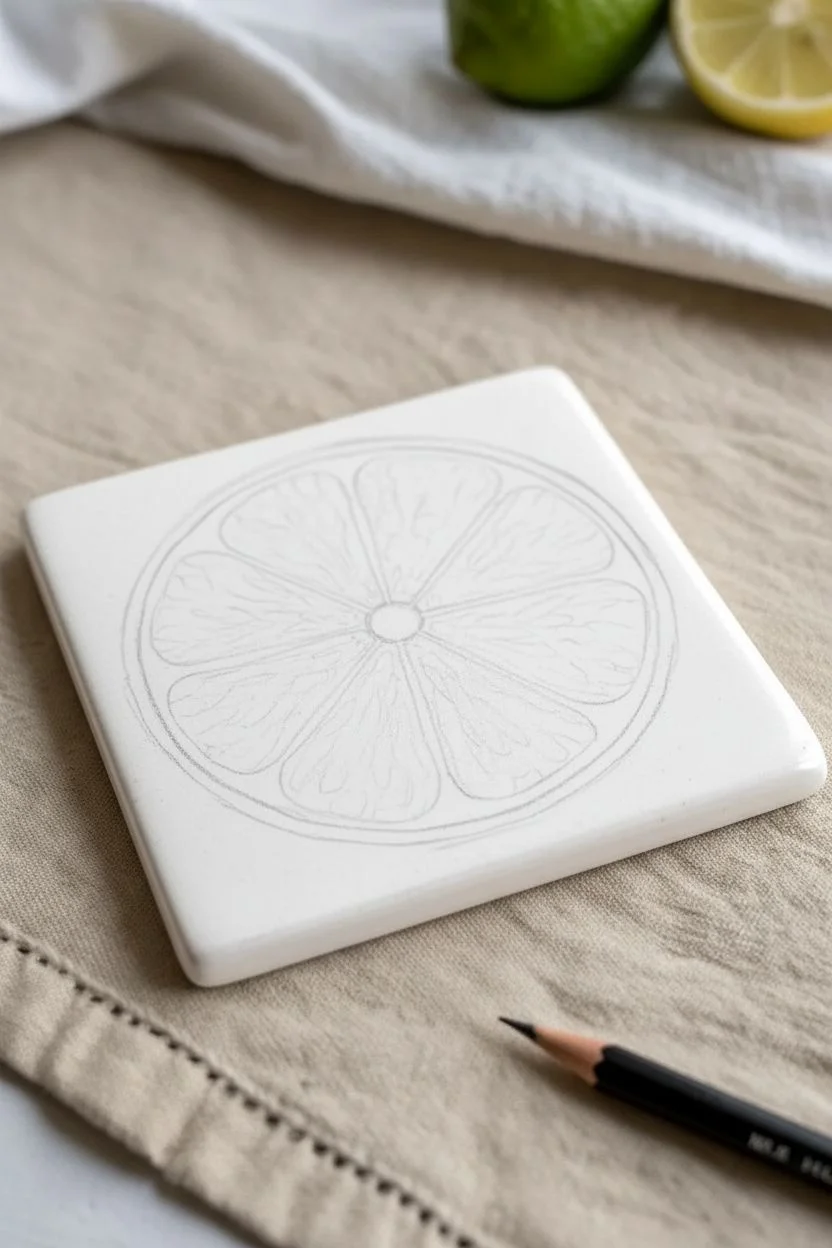
Step 1: Preparation & Sketching
-
Clean surface:
Begin by wiping down your ceramic tiles with a little rubbing alcohol to remove any oils or dust. This ensures the paint adheres properly. -
Find the center:
Ideally, locate the very center of your coaster. You can do this by lightly drawing an ‘X’ from corner to corner with your pencil, though a simple visual estimation works for a loose style. -
Outline the rind:
Lightly sketch a large circle that nearly fills the square tile. Inside that, draw a slightly smaller circle to create the thickness of the outer rind. -
Mapping the segments:
Draw the pith segments. Start by drawing a small circle in the very center, then draw straight lines radiating outward like wheel spokes. Curve the outer edges of each triangle slightly to create that natural, organic citrus shape.
Keep it Watery
To get that translucent look on ceramic without watercolor, use 60% glazing liquid to 40% acrylic paint. It mimics the texture of fruit perfectly.
Step 2: Painting the Fruit
-
Mixing the greens:
Prepare your palette by mixing a few variations of green. You’ll need a pale yellow-green (mostly Lemon Yellow with a touch of Sap Green) and a darker, fresher green. -
Adding the medium:
I like to mix a generous amount of glazing medium (or water) into the paints to make them semi-transparent; this is the secret to that juicy, watercolor effect. -
Base layer for segments:
Using the size 4 brush, fill in the fruit segments with your lightest yellow-green mixture. Keep the paint fluid and intentionally uneven to mimic pulp texture. -
Adding depth:
While the base layer is still slightly damp, drop small amounts of the darker Sap Green into the outer corners of each segment and let it bleed inward slightly. -
Painting the rind:
Mix a stronger, more opaque green using Hooker’s Green and a touch of Sap Green. With the size 2 brush, carefully paint the outer rind circle. -
Softening the edge:
Clean your brush and run slightly damp bristles along the inner edge of the green rind to soften the transition into the white pith area.
Step 3: Detailing & Finishing
-
Refining the pith:
Once the green rind is dry, use Titanium White (thinned just a little) to tidy up the pith lines between the segments. They don’t need to be perfectly straight; organic lines look better. -
Creating pulp texture:
Switch to your fine liner brush. With a slightly darker green mixture, paint tiny, faint tear-drop shapes inside the segments to suggest the individual juice sacs. -
Adding highlights:
Using pure white, add tiny little dots or dashes on the darkest parts of the green segments to make them look wet and shiny. -
Splatter effect:
Dilute a bit of yellow-green paint with water until it’s very runny. Tap your brush over the coaster to create delicate splatters around the fruit, adding energy to the composition. -
Final drying:
Allow the coasters to dry completely for at least 24 hours to ensure all moisture has evaporated from the ceramic. -
Sealing:
Spray the surface with a clear acrylic sealer. Apply 2-3 light coats rather than one heavy one to prevent drips and ensure the coaster is water-resistant.
Make a Full Set
Don’t stop at limes. Swap the colors to create a matching set featuring lemons (yellow), oranges (orange), and pink grapefruits (blush/coral).
Your fresh, zesty coasters are now ready to protect your table while looking effortlessly stylish

PENCIL GUIDE
Understanding Pencil Grades from H to B
From first sketch to finished drawing — learn pencil grades, line control, and shading techniques.
Explore the Full Guide
Corner Vines and Simple Leaves
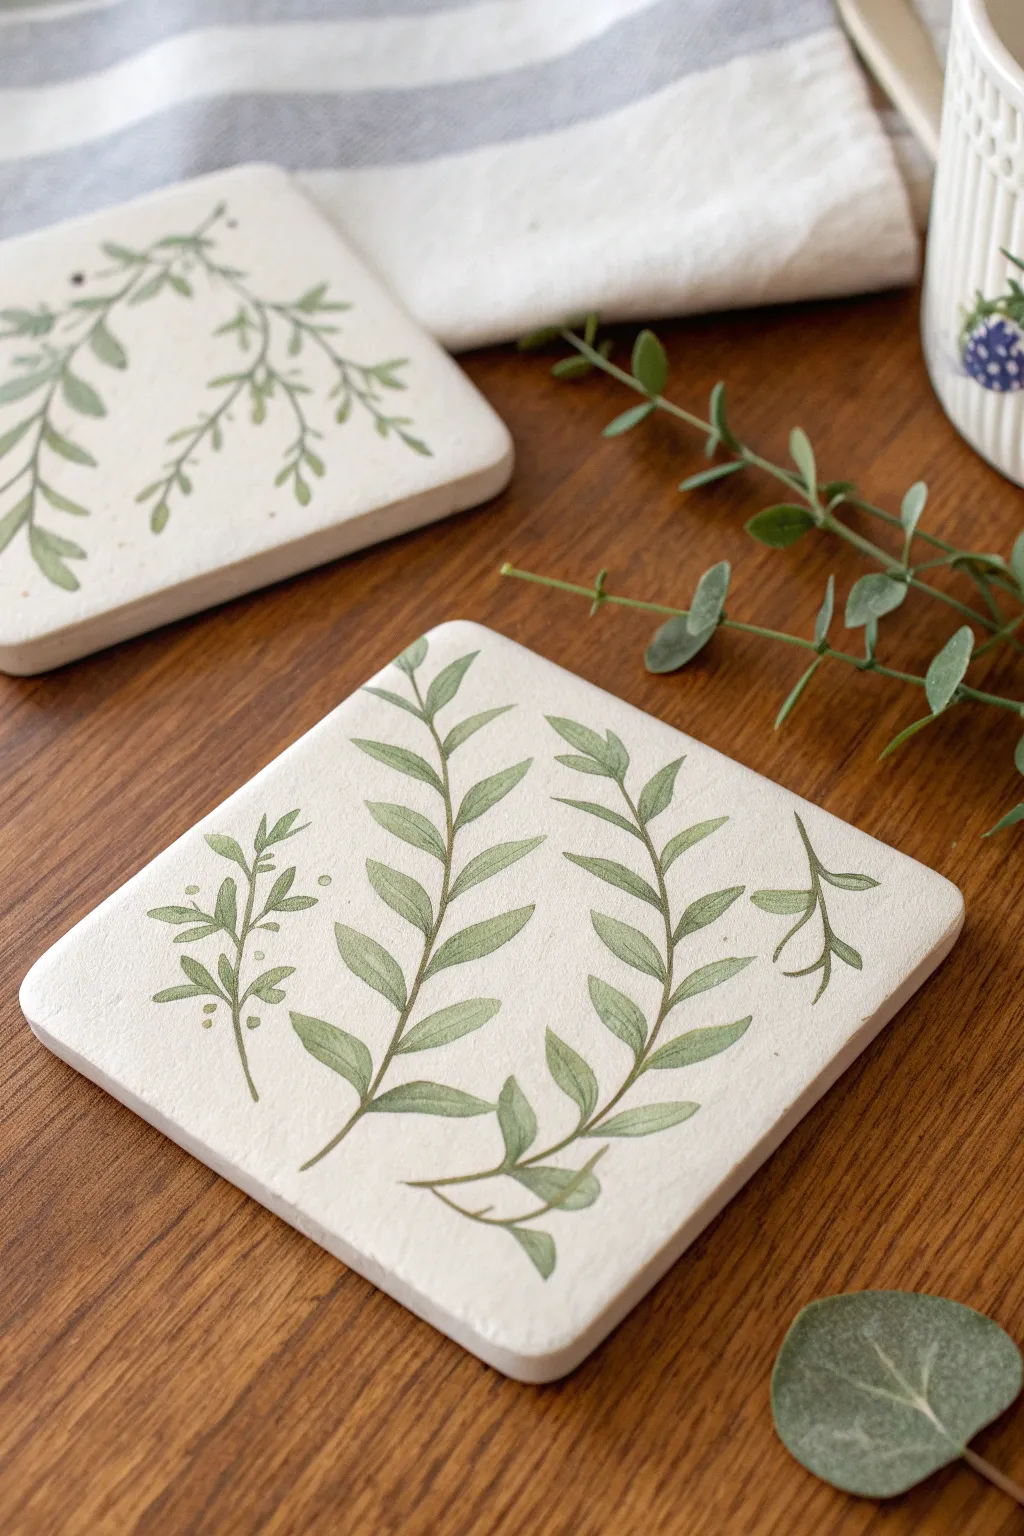
Bring a touch of nature to your coffee table with this delicate hand-painted coaster design. Using soft, muted greens and fluid brushstrokes, you can capture the elegance of crawling vines and simple leaves with ease.
How-To Guide
Materials
- Square absorbent ceramic or stone coasters (unsealed)
- Acrylic paints (Olive Green, Sap Green, Titanium White, Raw Umber)
- Small round paintbrush (size 0 or 1)
- Medium round paintbrush (size 3 or 4)
- Palette or mixing dish
- Water cup and paper towels
- Pencil (HB or lighter)
- Clear spray sealant (matte or satin finish)
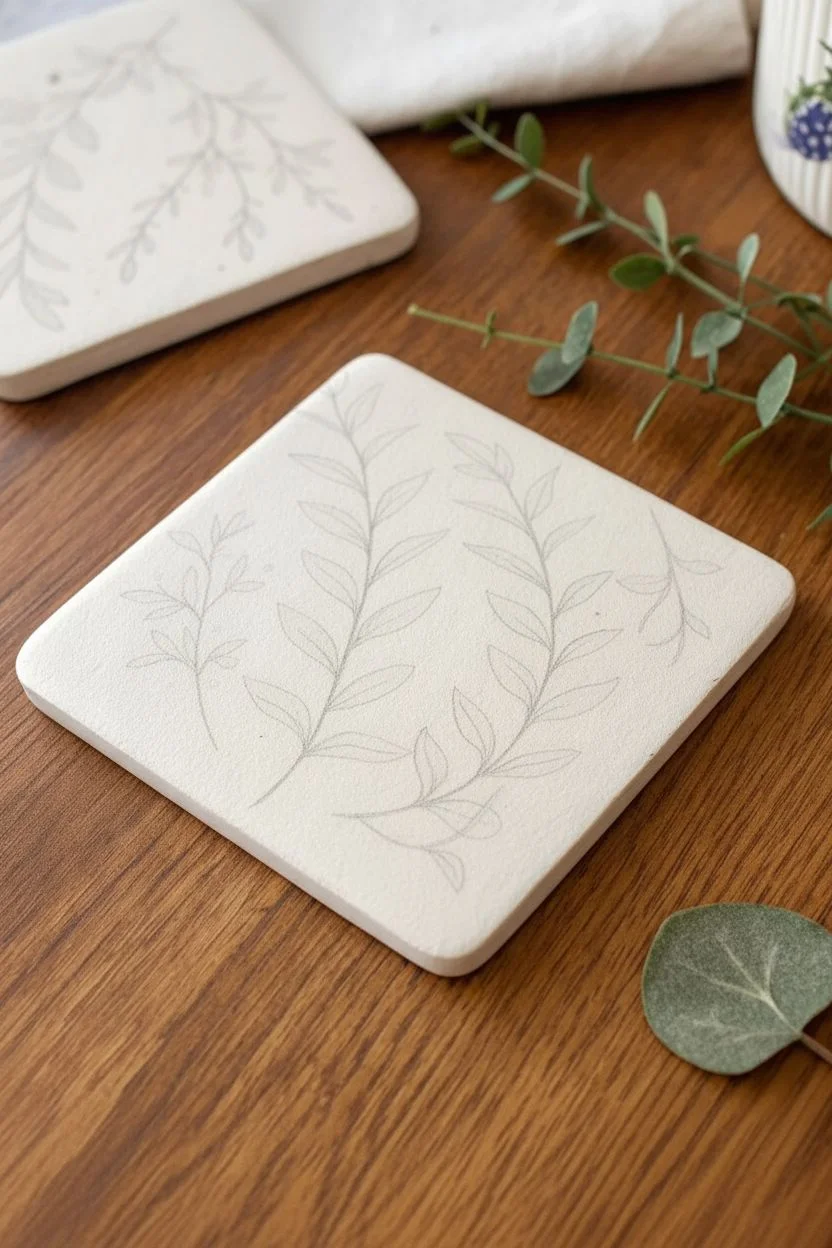
Step 1: Planning and Sketching
-
Surface Preparation:
Begin by wiping the coaster with a slightly damp cloth to remove any dust or manufacturing residue. Let it dry completely before starting to ensure the pencil marks sit cleanly on the surface. -
Main Vine Placement:
Using your pencil very lightly, draw two main curved lines starting from the bottom third of the coaster. I like to have them arc gracefully upwards towards the opposite corners, slightly overlapping at the base. -
Adding Secondary Sprigs:
Sketch two smaller, separate sprigs in the empty spaces—one near the left edge and a tinier one near the right edge. Keep these simple and less detailed than the main vines. -
Mocking Up Leaves:
Along your main vine lines, lightly mark small ticks or almond shapes where the leaves will go. Space them out evenly, alternating sides as you move up the stem to create a natural rhythm.
Step 2: Painting the Greenery
-
Mixing a Muted Green:
On your palette, mix a pea-sized amount of Olive Green with a touch of Titanium White and a tiny dot of Raw Umber. This creates that soft, earthy ‘sage’ tone seen in the reference, rather than a harsh synthetic green. -
Testing Consistency:
Add a few drops of water to your paint mix until it has the consistency of heavy cream or ink. You want it fluid enough to glide over the textured stone without skipping. -
Painting the Stems:
Load your smallest round brush (size 0 or 1) with the thinned paint. Carefully trace over your pencil lines for the stems, using light pressure to keep the lines thin and delicate. -
Starting the Main Leaves:
Switch to your medium round brush (size 3 or 4) for the leaves. Start at the base of a stem, pressing the belly of the brush down to create the widest part of the leaf, then lifting as you pull away to form a tapered point. -
Refining Leaf Shapes:
Continue painting leaves up the stem. Don’t worry if they aren’t perfect clones of each other; slight variations in size and angle make the plant look more organic. -
Painting the Side Sprigs:
Return to the smaller sprigs on the left and right. Use the tip of your small brush to dab tiny, tear-drop shaped leaves. These should look younger and smaller than the main vine leaves. -
Adding Depth:
Mix a slightly darker shade by adding more Sap Green to your original mix. While the first layer is still drying, add tiny strokes of this darker color near the base of the stems or the veins of the larger leaves. -
Softening Edges:
If any leaf looks too harsh, rinse your brush and blot it on a towel so it’s just damp. Gently run the damp brush along the edge of the wet paint to soften the look, mimicking a watercolor effect. -
Final Details:
Use the very tip of your smallest brush to add tiny dots or ‘berries’ near the smaller sprigs if you wish, or add thin connecting stems where leaves might be floating.
Paint Bleeding?
If paint bleeds into the stone’s texture, your mix is too watery. Let it dry, then paint over the blurry edge with a thicker mix of white paint to ‘erase’ it, then repaint the leaf.
Step 3: Finishing Up
-
Drying Time:
Allow the paint to dry fully. Since stone coasters are porous, the paint usually dries quickly, but give it at least 20-30 minutes to be safe. -
Erasing Markings:
Once the paint is bone dry, gently erase any visible pencil lines that weren’t covered by paint. Be careful not to rub precisely over the painted areas. -
Sealing the Artwork:
Take the coasters strictly to a well-ventilated area or outdoors. Hold the clear spray sealant about 8-10 inches away and apply a light, even coat. -
Multiple Coats:
Let the first coat dry according to the can’s instructions, then apply a second light coat. This ensures your beautiful artwork won’t run when a cold, sweating drink is placed on it.
Pro Tip: Stem Connection
When attaching leaves to the main stem, don’t just touch them together. Paint the leaf stem flowing *into* the main branch at an acute angle to look natural.
Once sealed and dried, your new coaster set is ready to protect your furniture with style
Loose Floral Spray Across One Diagonal
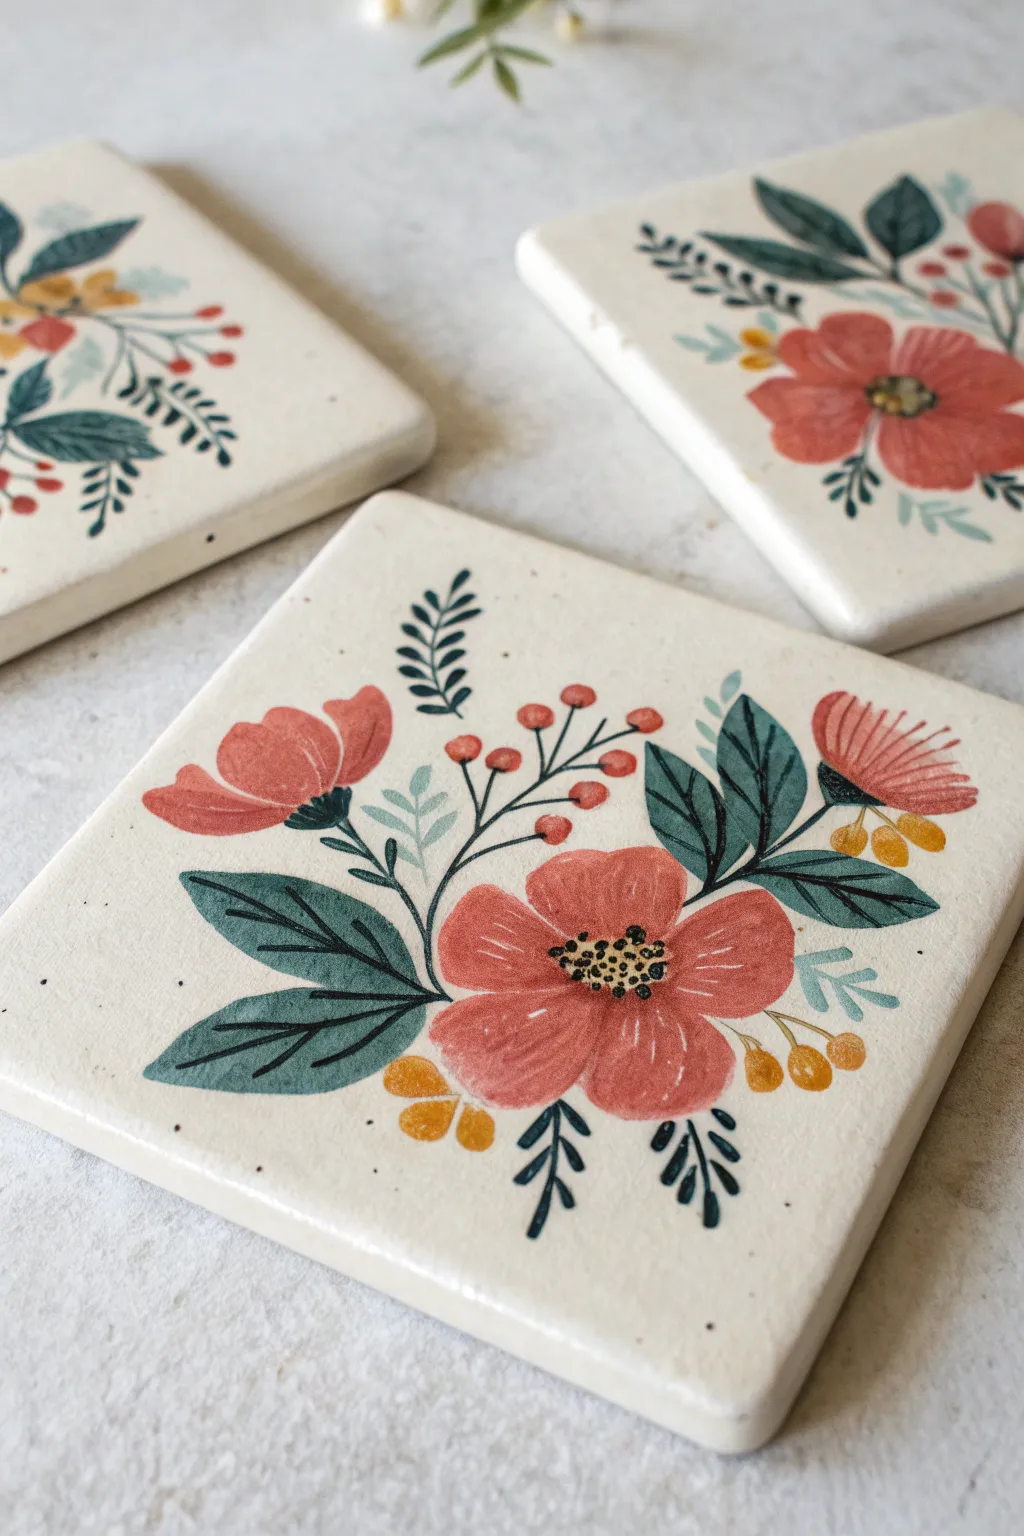
These charming coasters feature a breezy, uncomplicated floral arrangement that sweeps gracefully across the surface. The design captures a vintage, hand-painted ceramic feel with soft coral blooms and deep teal foliage against a creamy speckled background.
Step-by-Step Guide
Materials
- Square ceramic tile coasters (approx. 4×4 inches)
- Acrylic paints (Cream/Off-White, Coral Pink, Deep Teal, Golden Yellow, Black)
- Fine grit sandpaper
- Flat brush (1/2 inch) for base coat
- Round brush (size 4 or 6) for flowers
- Fine liner brush (size 0 or 00) for details
- Polyurethane sealer or spray varnish (matte/satin finish)
- Palette or small plate
- Water cup and paper towels
Step 1: Preparation & Base
-
Sand the surface:
If you are using glazed tiles, lightly scuff the shiny surface with fine-grit sandpaper to give the paint something to grip. Wipe away all dust with a damp cloth. -
Mix the base color:
Mix a generous amount of cream or off-white acrylic paint. I like to add a tiny drop of brown or ochre to warm it up so it looks like vintage pottery rather than stark white. -
Apply the base coat:
Using your flat brush, paint the entire top surface and the sides of the coaster. Ensure smooth, even strokes. -
Add the speckled texture:
While the base is still slightly tacky or just dry, dip an old toothbrush or stiff brush into diluted black or dark brown paint. Run your thumb over the bristles to flick tiny speckles across the coaster for that stoneware effect. -
Let it cure:
Allow this base layer to dry completely, preferably for an hour, before starting the floral design.
Uneven Petal Edges?
Don’t stress if your flower outlines aren’t perfect circles. Wobbly edges actually mimic the hand-painted ceramic style better than perfect shapes.
Step 2: Painting the Blooms
-
Position the main flower:
Locate the bottom-right quadrant of your coaster. Using a round brush loaded with coral pink, paint a five-petal open flower shape. Keep the edges slightly uneven for a natural, painterly look. -
Add the secondary blooms:
Paint a smaller, tulip-shaped bud in the upper-left quadrant using the same coral shade. Add another smaller bud shape near the top right corner to balance the diagonal composition. -
Layer the color:
While the pink is still wet, you can streak in a tiny bit of white or a deeper red near the center of the petals to create subtle dimension without needing perfect blending. -
Create the flower centers:
Once the pink petals are dry, use the handle end of a brush or a detail brush to dot a cluster of black spots in the center of the main flower. Add tiny white or yellow highlight dots on top of the black for contrast.
Make It a Set
Rotate the design for each coaster. Have the flowers start from a different corner on each tile so they form a continuous wreath when placed together.
Step 3: Adding Foliage & Details
-
Paint main leaves:
Using deep teal paint and a round brush, paint two large, pointed leaves extending dramatically to the left of the main flower. Press down to widen the stroke and lift up to create a sharp point. -
Add secondary leaves:
Paint a few smaller teal leaves tucking behind the upper buds. Vary the direction slightly to keep the arrangement feeling organic. -
Draw the stems:
Switch to your fine liner brush and black or very dark green paint. Draw thin, sweeping lines connecting the buds to the main cluster. Keep your hand loose to avoid shaky lines. -
Add airy branches:
Paint delicate, fern-like sprigs using fine black lines. Add small, leaf-like dashes along these stems to fill the empty white space without crowding the design. -
Incorporate berries:
Dip a small round brush or dotting tool into golden yellow paint. Add clusters of three small berries near the bottom of the main flower and interspersed near the upper stems. -
Paint red accents:
Add small red or deep coral berries on thin black stems reaching into the negative space. This ties the red from the flowers into the rest of the greenery. -
Final leaf details:
Use the liner brush to add a central vein line to the largest teal leaves for defined structure.
Step 4: Finishing Touches
-
Check composition:
Step back and look at the coaster. If a spot looks too empty, add a small black sprig or a single yellow dot to balance it out. -
Dry completely:
Let the paint cure for at least 24 hours to ensure all layers are hard and ready for sealing. -
Seal the coaster:
Apply 2-3 coats of polyurethane sealer or spray varnish. This is crucial to make the coaster waterproof and heat resistant. -
Add backing:
Once the sealer is fully cured, glue felt pads or a cork square to the bottom to protect your furniture.
Now you have a set of durable, boutique-style coasters ready for your morning coffee cup


Modern Abstract Brushstroke Swatches
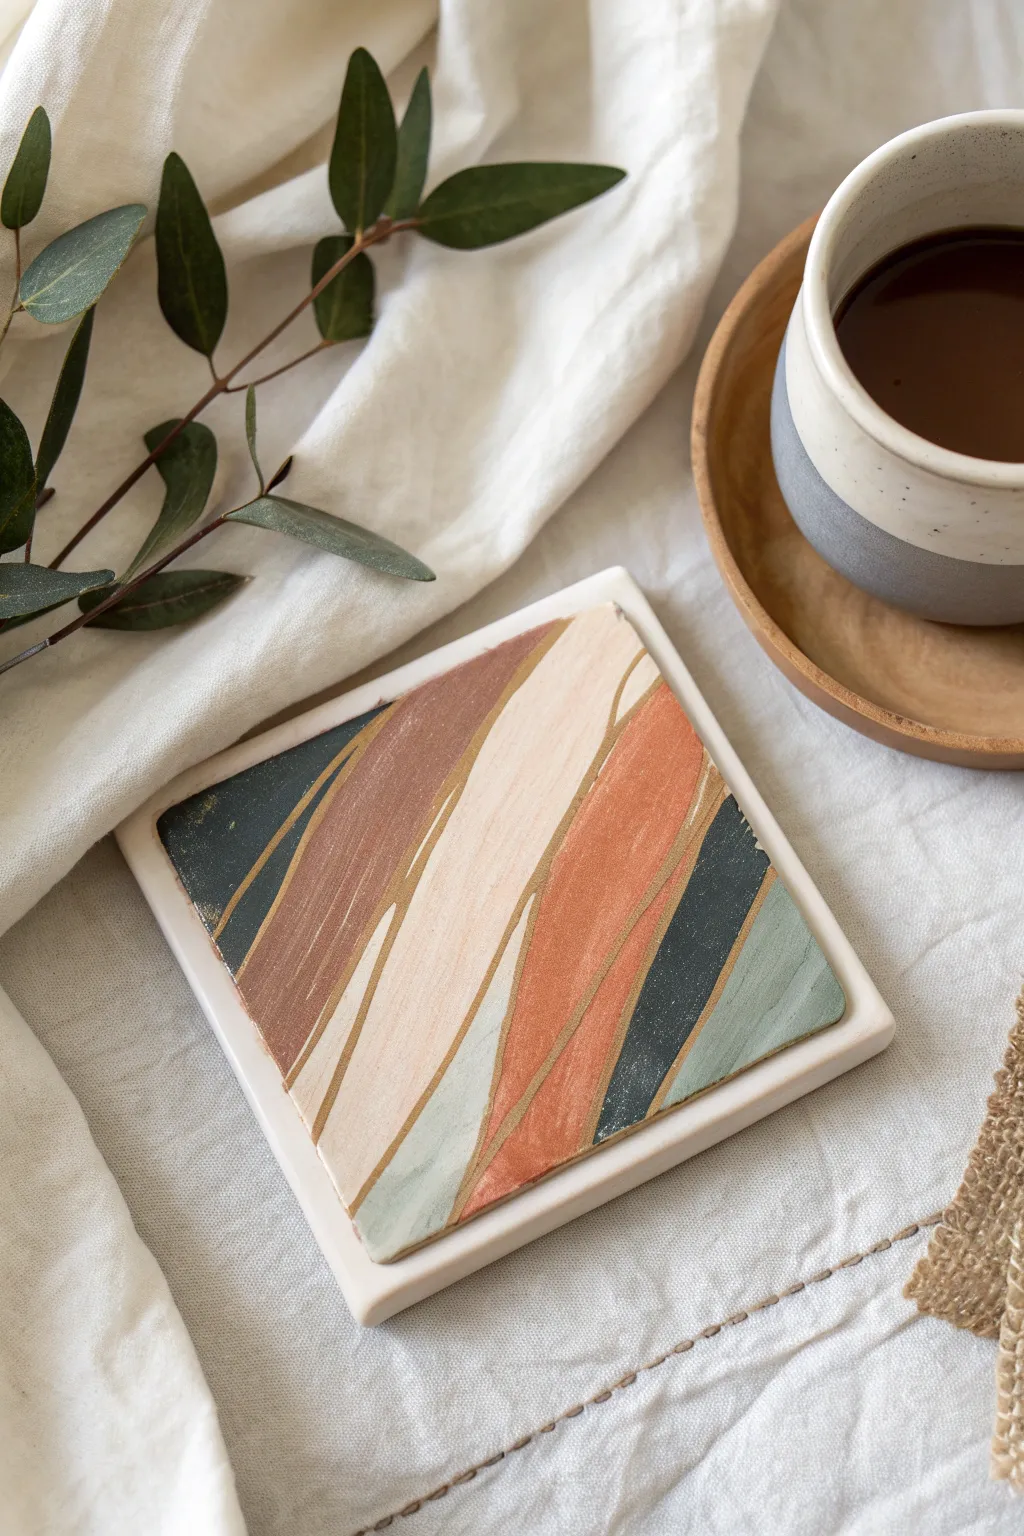
Bring a touch of modern art to your coffee table with this sophisticated coaster design featuring organic, flowing bands of color. The muted earth tones and subtle gold accents create a warm, gallery-worthy look that is surprisingly simple to achieve.
Step-by-Step Tutorial
Materials
- 4×4 inch white ceramic tiles or square clay coasters
- Acrylic craft paints (Terracotta, Cream/Beige, Chocolate Brown, Sage Green, Charcoal Grey)
- Metallic Gold liquid leaf or fine-tip paint pen
- Flat shader brushes (medium size)
- Small round detail brush (size 0 or 1)
- Palette or paper plate
- Clear acrylic sealer spray (matte or satin finish)
- Felt pads for the bottom
Step 1: Preparation & Base Work
-
Clean the surface:
Begin by wiping down your ceramic tile or clay coaster with a damp cloth or rubbing alcohol to remove any dust or oils. This ensures your paint adheres smoothly. -
Mix your palette:
Squeeze out small amounts of your five key colors: terracotta, cream, chocolate brown, sage green, and charcoal grey. If your cream is too bright, mix in a tiny drop of brown to warm it up. -
Plan the composition:
Visualize the diagonal flow of the design. The bands of color won’t be straight lines; they should curve gently and vary in width to create an organic, fluid feeling.
Step 2: Painting the Color Bands
-
Start with the dominant cream:
Load a flat shader brush with your cream or beige paint. Paint a wide, sweeping diagonal stroke through the center of the coaster. -
Add the first anchor color:
Using the terracotta or rust orange, paint a thick band next to the cream section. Let the edges touch but don’t worry about perfect lines just yet. -
Balance with dark tones:
On the opposite side of the cream band, apply a swooping section of chocolate brown. I like to taper the ends slightly to keep the movement dynamic. -
Introduce contrast:
Paint the outer corners with your darkest charcoal grey. This grounds the design and makes the lighter colors pop. -
Fill the gaps with green:
Use the sage green to fill in any remaining spaces, particularly wedged between the rust and charcoal sections. -
Refine the edges:
While the paint is still workable, use your brush to smooth out the boundaries between colors so there are no glaring white gaps, though you don’t want them to blend together muddy. -
Allow to dry:
Let the paint dry completely for at least 30 minutes. The base layer must be bone dry before adding the metallic details to prevent smudging.
Clean Lines
Work quickly when painting adjacent colors. If you make a mistake, let it dry completely, then paint over it. Wet paint on wet paint will turn muddy.
Step 3: Gold Accents & Finishing
-
Prepare the gold:
Shake your liquid gold leaf well or prime your gold paint pen on a scrap piece of paper until the flow is consistent. -
Outline the sections:
Carefully trace the seams where different colors meet with a thin line of gold. The goal isn’t geometric perfection; a shaky or varying line adds to the organic aesthetic. -
Vary line thickness:
Allow the gold line to be slightly thicker in some curves and thinner in others to mimic the natural veins found in stone or agate. -
Address the edges:
Don’t forget to carry the design—or just the gold lines—over the edge of the tile for a professional, finished appearance from all angles. -
Final drying time:
Let the metallic accents cure fully. Liquid leaf can take a bit longer than acrylics, so give it about an hour to be safe. -
Seal the artwork:
In a well-ventilated area, spray the coaster with a clear acrylic sealer. Apply 2-3 thin coats rather than one heavy one to avoid drips. -
Add protective feet:
Once the sealer is cured, flip the coaster over and attach small felt pads or a cork backing to the corners to protect your furniture.
Textured Effect
Mix a tiny amount of baking soda into your acrylic paints before applying. This creates a grainy, stone-like texture that looks deeply high-end.
Now you have a stunning piece of functional art ready to elevate your morning coffee routine
Minimal Line Art Over a Wash
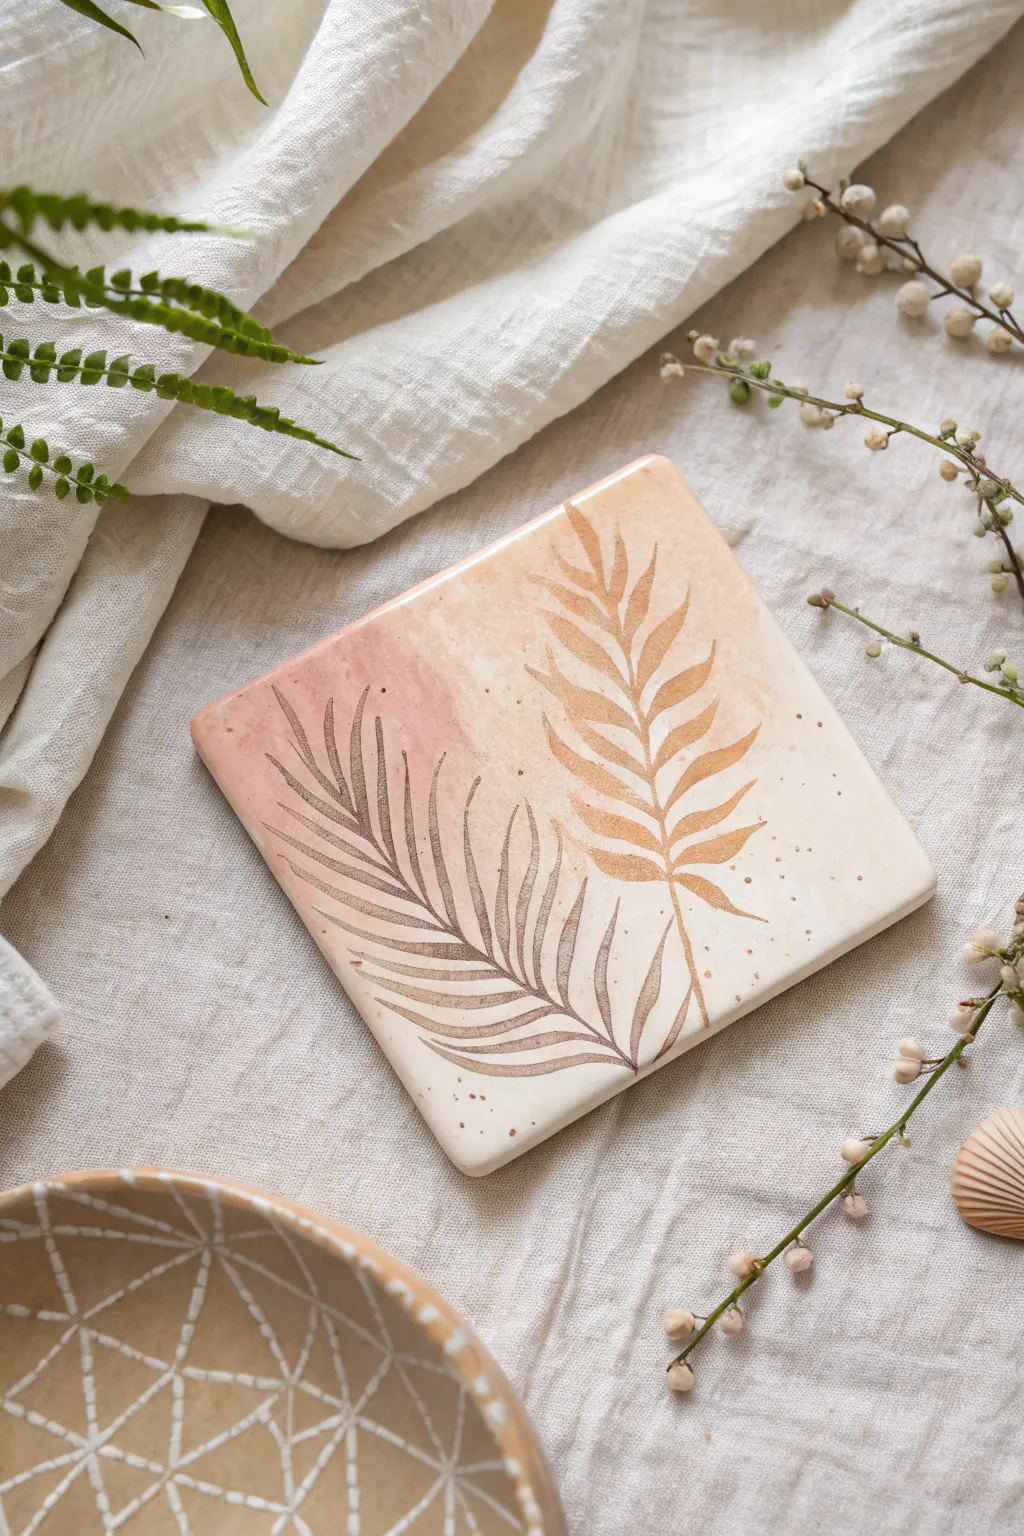
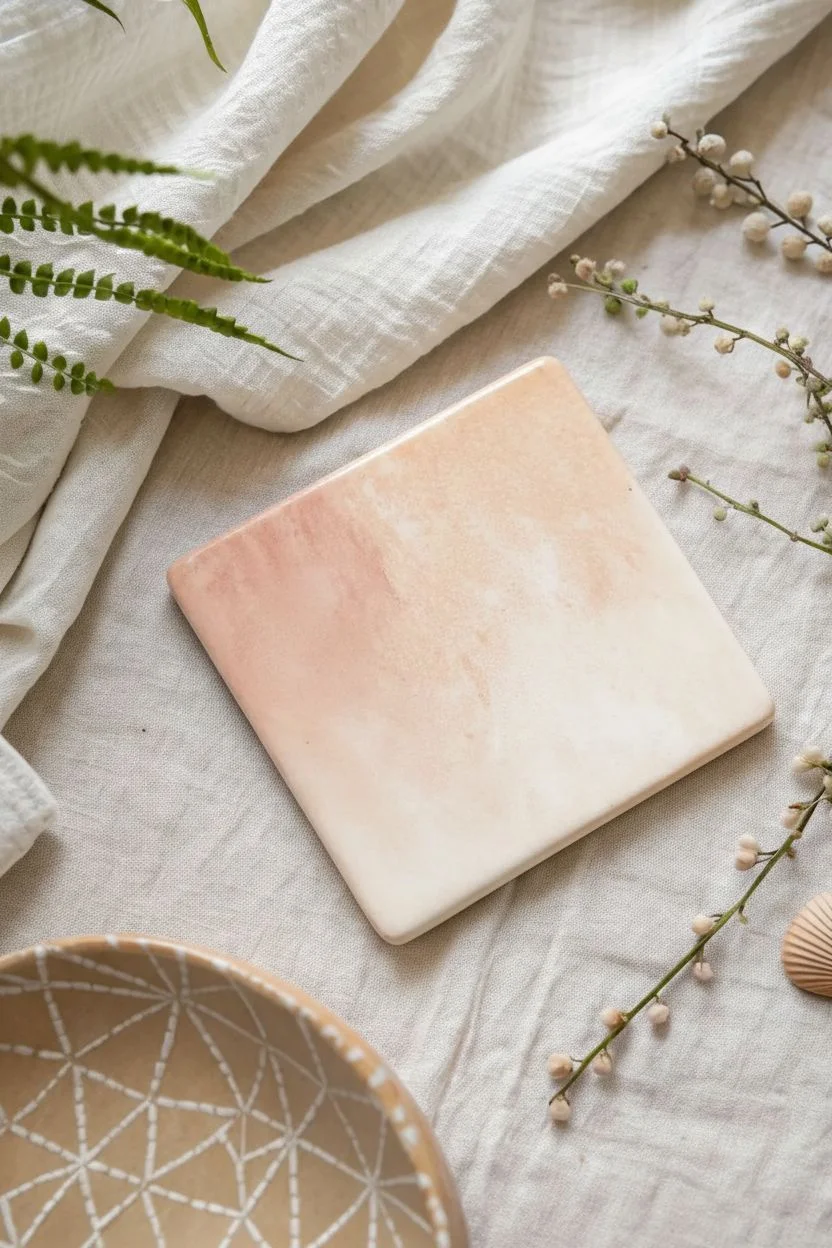
Capture the warmth of an earthy palette with this elegant coaster design, featuring stylized fern fronds over a soft, blending wash. The combination of matte terracotta tones and shimmering gold line work creates a sophisticated, bohemian accent for your table.
How-To Guide
Materials
- Square ceramic tile or tumbled stone coaster (4×4 inches)
- Acrylic paints: Burnt Sienna, Unbleached Titanium (cream), and Metallic Gold
- Water
- Glazing medium (optional but recommended for transparency)
- Wide flat paintbrush (3/4 inch)
- Fine liner paintbrush (size 0 or 00)
- pencil
- Paper towel
- Clear acrylic sealer spray (matte or satin finish)
Step 1: Creating the Ombré Wash
-
Prepare the surface:
Begin by cleaning your ceramic tile with a damp cloth to remove any dust or oils. Let it dry completely before starting. -
Mix the base colors:
On your palette, place a dime-sized amount of Burnt Sienna and a larger amount of Unbleached Titanium. To get that watercolor effect with acrylics, water down the Burnt Sienna until it is very thin, almost ink-like. Alternatively, mix it with a glazing medium. -
Apply the corner wash:
Dip your wide flat brush into the watered-down Burnt Sienna. Starting at the top-left corner, apply the paint in a diagonal motion, covering about half the coaster. -
Softening the edge:
Before the terracotta paint dries, quickly dip your brush into clear water and drag it along the inner edge of the paint to feather it out, avoiding harsh lines. -
Adding the cream transition:
While the surface is still slightly damp, take the Unbleached Titanium (thinned slightly with water) and paint the opposite bottom-right corner, brushing upwards to meet the terracotta section. -
Blend the gradient:
Use a clean, slightly damp brush to gently strokes back and forth where the two colors meet. The goal is a seamless, cloudy transition rather than a perfect gradient. -
Create texture:
While wet, you can dab the surface gently with a crumpled paper towel to lift small spots of paint, giving it an organic, stone-like texture. Let this base layer dry completely, ideally for at least 30 minutes.
Step 2: Painting the Ferns
-
Sketch the stems:
Using a pencil very lightly, draw two curved lines stemming from the bottom edge. One should curve toward the left, and the other taller stem should curve toward the top right. -
Outline the leaf shape:
Lightly sketch the general tapered shape of the fern leaves. You don’t need to draw every individual frond yet, just get the placement right. -
Load the liner brush:
Prepare your metallic gold paint. It should be fluid enough to flow off the brush but not runny. I find adding a tiny drop of water helps the metallic pigments glide smoother. -
Paint the central ribs:
Using your fine liner brush, paint the main stem lines first. Use confident strokes, pressing slightly harder at the base and lifting off as you reach the tip for a fine point. -
Start the lower leaves:
Begin with the left fern. Paint small, individual leaflets extending from the stem. Start at the bottom of the stem and work your way up. -
Refine the leaf shape:
For each leaflet, press the brush down to create the wider base of the leaf, then pull outward and lift up to create a sharp tip. -
Second fern layering:
Move to the taller right fern. Ensure the gold leaves overlap the blended background. This contrast is key to the design. -
Add detail dots:
Dip the very tip of your brush or a toothpick into the gold paint and add tiny, random dots scattered around the ferns, particularly on the right side, to mimic pollen or floating particles. -
Dry and seal:
Allow the gold paint to cure for at least an hour. Once fully dry, spray the entire coaster with a clear acrylic sealer to waterproof it and protect your artwork from hot mugs.
Too much opacity?
If your background wash looks too solid and paint-like, you haven’t used enough water. Wipe it off immediately with a wet cloth and try again with a 50/50 mix of paint and water.
Make it luxe
Instead of gold paint, use gold leaf size and genuine gold leaf sheets for the fern design. It creates a texture and shine that catches the light beautifully.
Place your finished coaster on a side table to enjoy functional art that brings a touch of nature indoors
Galaxy Night Sky With Paint Splatter Stars
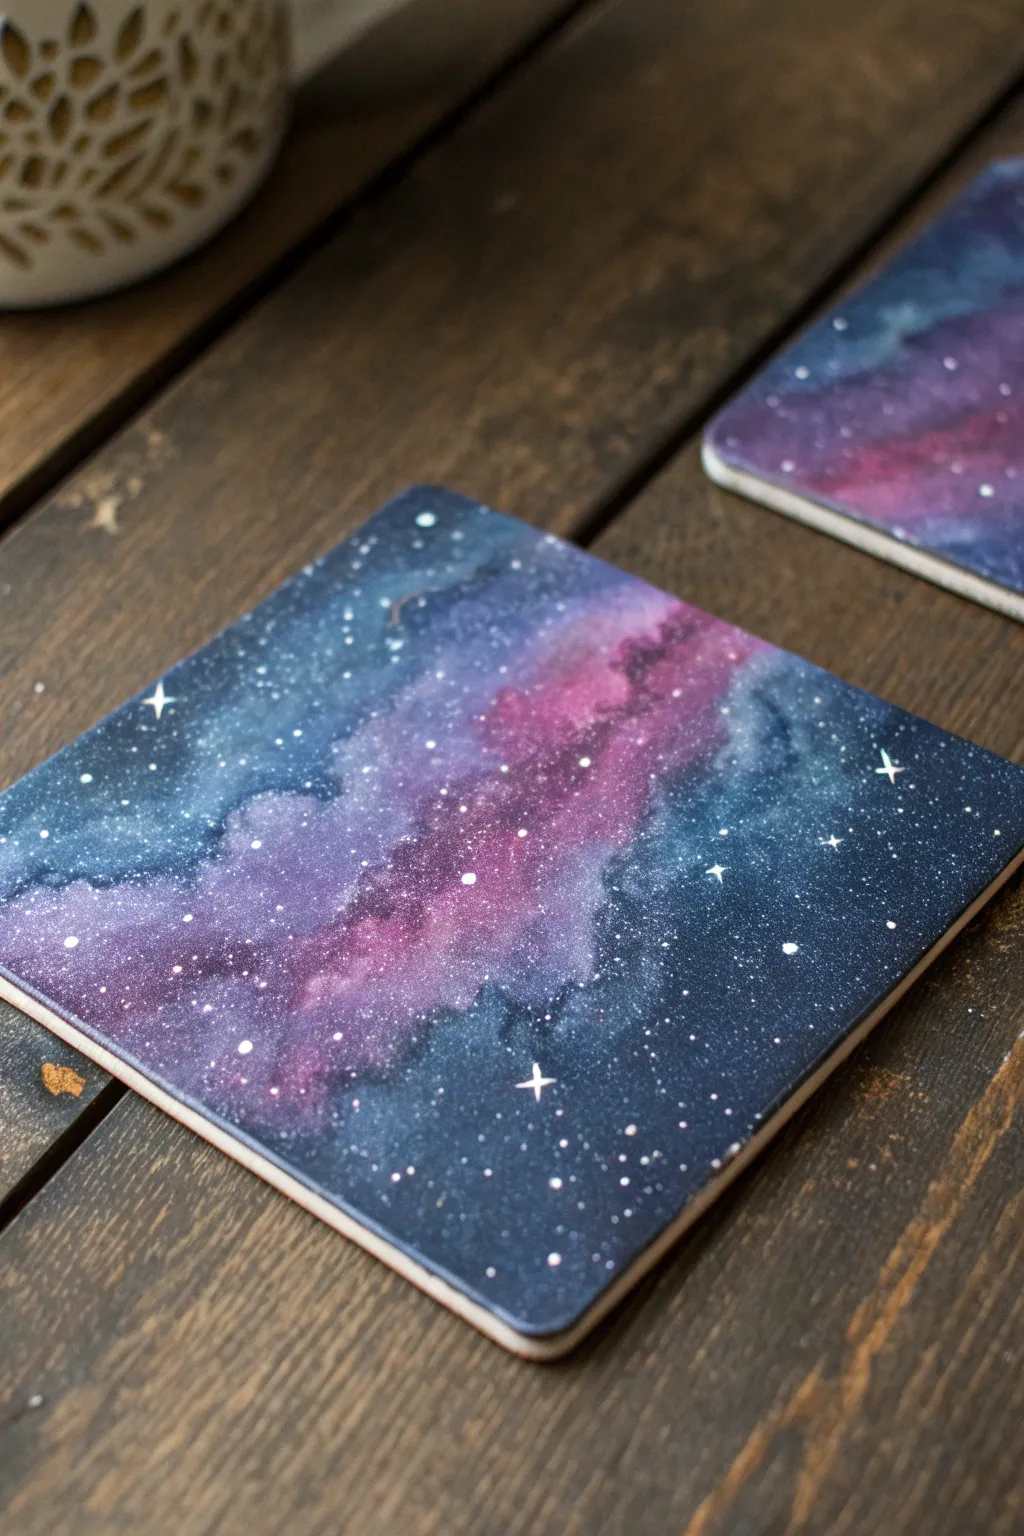
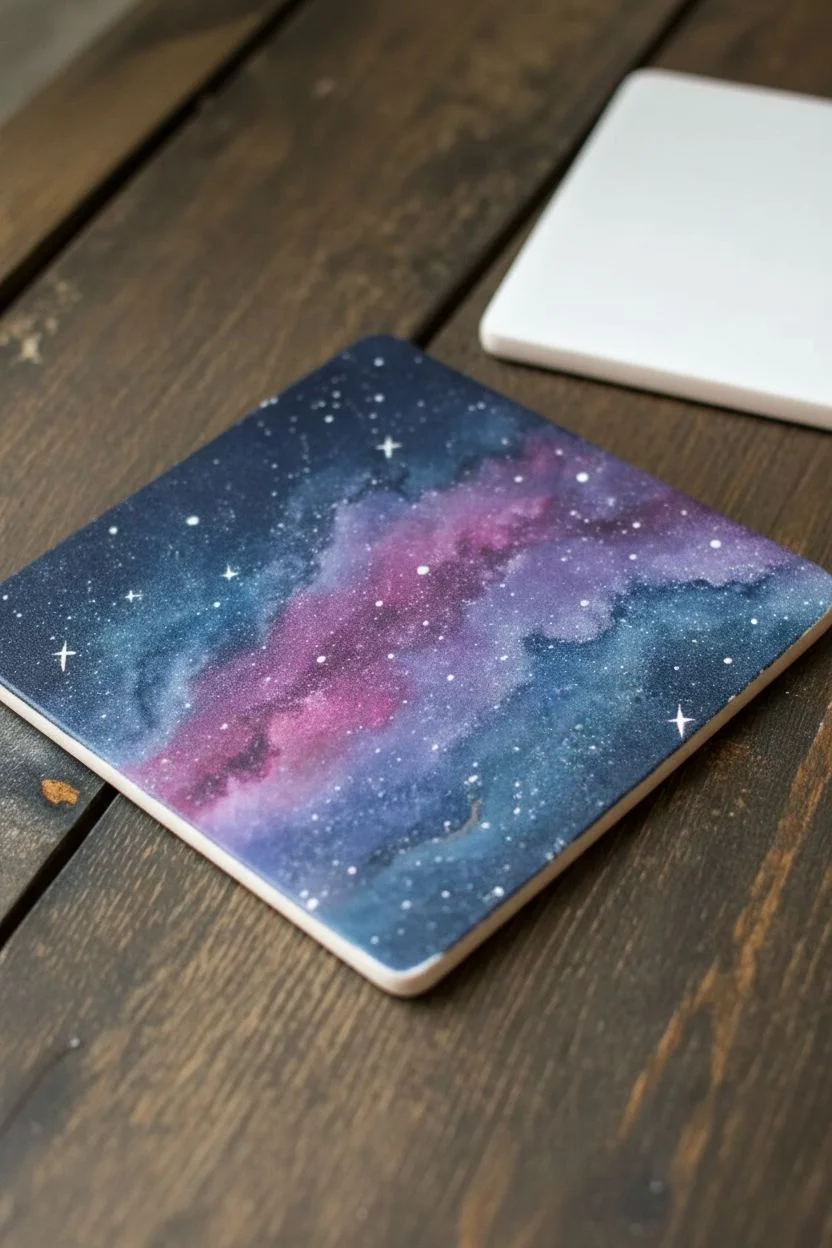
Transform plain ceramic tiles into breathtaking windows to the cosmos with this stunning galaxy painting technique. The blend of deep blues, vibrant purples, and soft teals creates a dreamy nebula effect, finished with delicate white stars that seem to twinkle right on your table.
Step-by-Step
Materials
- 4×4 inch white ceramic tiles or blank coasters
- Acrylic paints (Phthalo Blue, Dioxazine Purple, Magenta, Teal, Black, Titanium White)
- Glazing medium or water (for thinning)
- Sponge dabbers or makeup sponges
- Small flat brush
- Fine detail brush (size 0 or 00)
- Old stiff-bristled toothbrush
- Paper plate or palette
- Paper towels
- Clear acrylic sealant spray (gloss or matte)
- Cork backing sheets
Step 1: Creating the Cosmic Background
-
Prepare your base:
Wipe down your ceramic tile with a damp cloth to remove any dust or oils. Let it dry completely before starting to ensure the paint adheres properly. -
Mix your base colors:
Squeeze out your Phthalo Blue, Teal, Purple, and Black onto your palette. I like to keep a separate pile of white handy for blending later. -
Start with the dark corners:
Dip a sponge dabber into the black paint mixed with a tiny bit of Phthalo Blue. Dab this dark mixture onto the four corners of the coaster, fading it slightly as you move toward the center. -
Introduce deep blue:
Using a clean section of the sponge (or a new one), pick up the Phthalo Blue. Sponge this color next to the black areas, overlapping slightly to create a seamless transition. -
Add the teal accents:
Take a small amount of Teal paint on your sponge. Dab this sporadically near the blue sections, but leave a distinct diagonal path clear through the middle for the nebula cloud. -
Create the nebula core:
Mix a little Magenta with the Purple to create a vibrant berry shade. Use a fresh sponge to apply this color in a diagonal swoosh across the center of the coaster. -
Softening transitions:
While the paint is still tacky, use a lightly dampened sponge to dab over the edges where colors meet. This helps blur the lines and creates that misty, gas-cloud appearance found in galaxies. -
Build depth with layering:
Once the first layer is touch-dry, go back in with your black and dark blue on the edges to deepen the contrast. The nebula looks brightest when the surrounding space is very dark. -
Highlighting the nebula:
Mix a tiny amount of White with your Magenta/Purple mix to make a lighter lilac color. Lightly sponge this into the very center of your diagonal nebula strip to make it glow.
Step 2: Adding Stars and Finishing
-
Prepare the star paint:
Mix Titanium White paint with a few drops of water until it reaches the consistency of heavy cream or ink. It needs to be fluid enough to splatter but thick enough to be opaque. -
Test the splatter:
Dip an old toothbrush into the thinned white paint. Test the splatter on a piece of scrap paper first by running your thumb across the bristles. -
Create the star field:
Hold the toothbrush about 6 inches above the coaster and flick the bristles to create a spray of tiny white dots. Focus some denser clusters near the lighter nebula parts. -
Paint larger stars:
Dip the handle end of a paintbrush into the unthinned white paint. Dot a few larger stars randomly around the coaster. -
Add glimmering cross-stars:
Using your finest detail brush, select 3 or 4 of the larger dots. Carefully paint tiny vertical and horizontal lines extending from the dot to create a twinkling four-point star shape. -
Let it cure:
Allow the painted coasters to dry completely. Since we used layers of acrylic, give it at least 24 hours to ensure all moisture has evaporated. -
Seal the artwork:
In a well-ventilated area, spray the coaster with a clear acrylic sealant. Apply 2-3 light coats rather than one heavy one, letting it dry between sprays. -
Add cork backing:
Peel the adhesive backing off your cork sheet and carefully align it with the back of the tile. Press down firmly to secure it, protecting your table surfaces from scratches.
Nebula Nuance
For a truly fluid look, wet the nebula area slightly with clear water before sponging on the pinks and purples. This mimics watercolor blooming.
Too Many Stars?
If you splatter too much white, wait for it to dry, then gently sponge a thin layer of watered-down black or blue over the mistake to push those stars into the ‘background’.
Once sealed and backed, your set of custom galaxy coasters is ready to add a touch of interstellar wonder to your coffee table
Mini Mountain Sunset Landscape
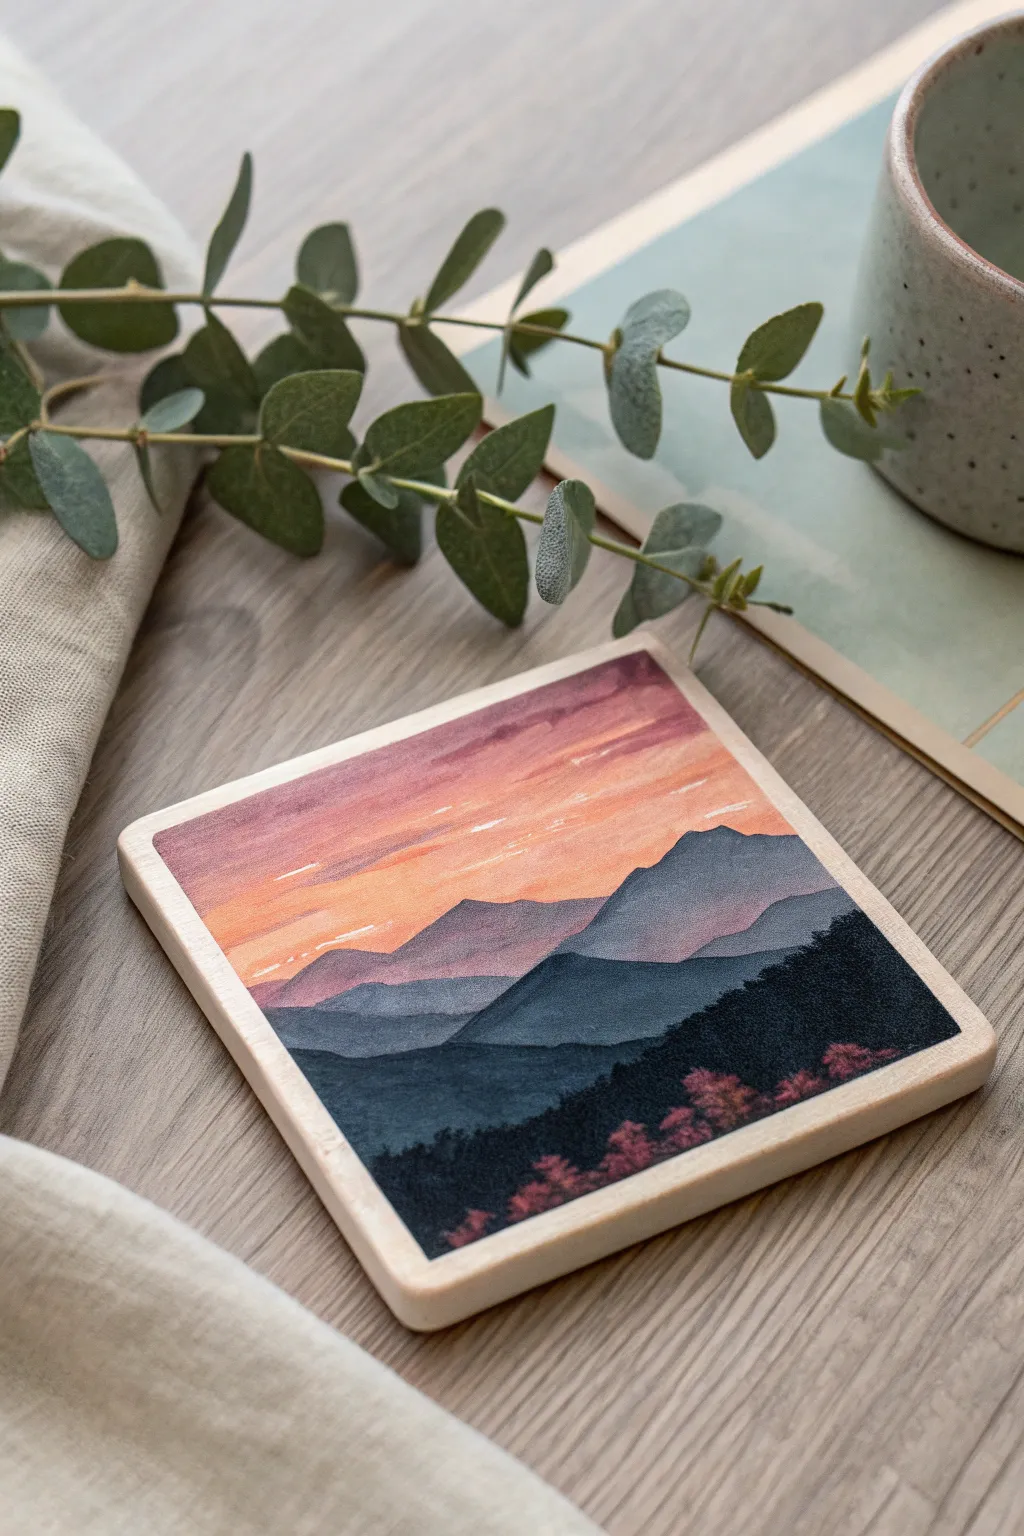
Transform a simple wooden coaster into a breathtaking vista with this mini mountain landscape. The design captures the serene transition from deep shadowy forests to a vibrant, glowing sunrise sky.
How-To Guide
Materials
- Square wooden coaster (approx. 4×4 inches)
- White gesso primer
- Acrylic paints: Titanium White, Ultramarine Blue, Mars Black, Magenta (or Crimson), Orange, Yellow Ochre
- Flat shader brushes (medium and small)
- Detail round brush (size 0 or 00)
- Blending medium or water spray bottle
- Matte or satin varnish
- Palette
- Paper towels
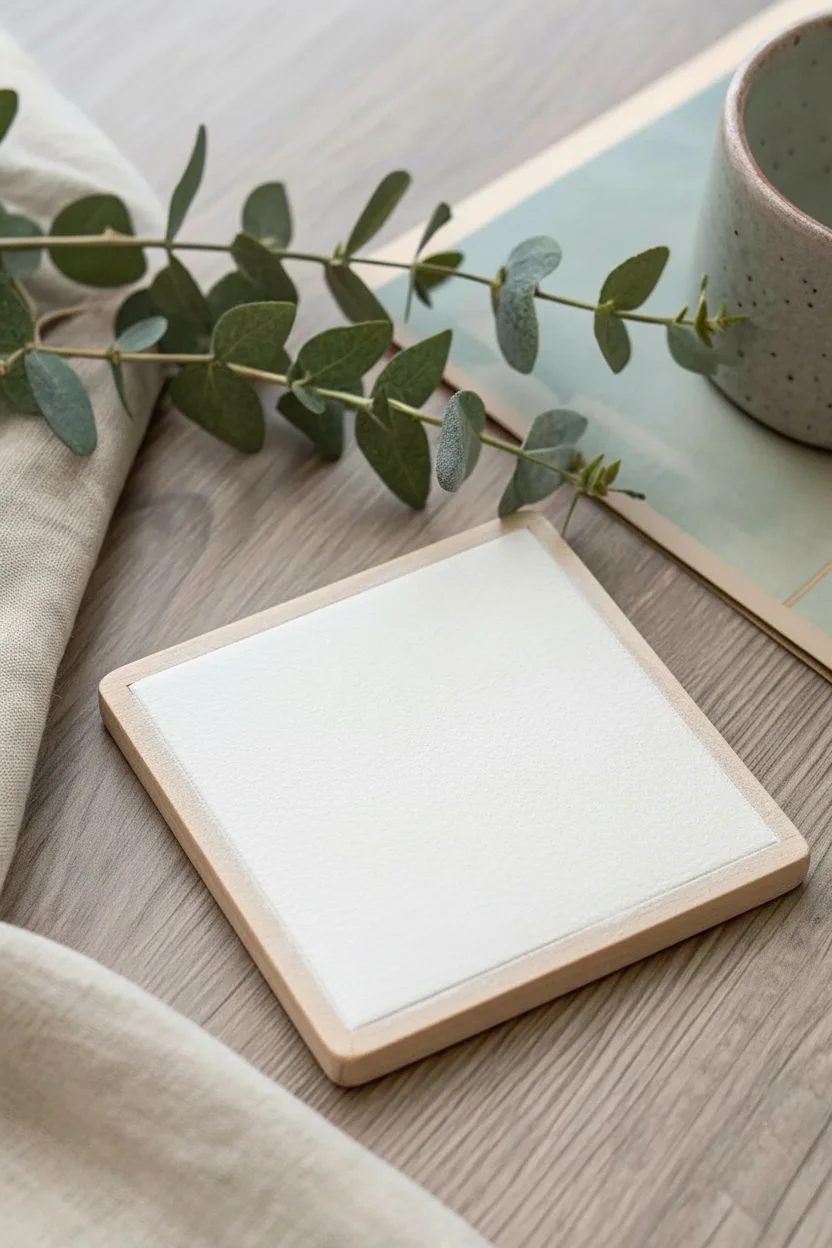
Step 1: Preparation and Base
-
Prime the surface:
Begin by applying a smooth, even coat of white gesso to the top face of the wooden coaster. The wood grain needs to be sealed so your paint glides rather than soaks in. -
Define the borders:
If you want a clean wood edge like the photo, you can carefully tape off the sides or simply paint with a steady hand, leaving a tiny rim of raw wood visible. -
Sand for smoothness:
Once the gesso is completely dry, lightly sand it with fine-grit sandpaper. This creates the perfect velvety surface for blending that delicate sky.
Smooth Blends
Work quickly on the sky! Acrylic dries fast, so adding a drop of slow-drying medium or retarder helps keep the paint wet longer for that perfect seamless gradient.
Step 2: Painting the Sky
-
Mix the sky gradient:
Prepare three main colors for the sky: a dusty rose (magenta mixed with white and a touch of blue), a vibrant coral orange, and a pale peach. Keep them wet on your palette. -
Apply the top layer:
Start at the very top edge with your dusty rose mixture. Use broad, horizontal strokes with a flat brush. -
Blend downwards:
Clean your brush slightly and pick up the coral orange. Paint immediately below the rose section, blending the wet edges together while the paint is fresh. -
Finish the horizon:
Transition into the pale peach color near the middle of the coaster. This will be the light source behind the mountains. -
Add cloud wisps:
With a clean, dry brush or a small liner, streak tiny disconnected lines of white mixed with peach across the upper sky to suggest thin, high-altitude clouds.
Step 3: Layering the Mountains
-
Mix the distant mountain color:
Create a hazy purple-grey by mixing Ultramarine Blue, a tiny dot of Magenta, and plenty of White. It needs to be lighter than you think to simulate atmospheric perspective. -
Paint the furthest range:
Paint the silhouette of the furthest mountain peaks right over the bottom of your sky gradient. Keep the shapes simple and slightly jagged. -
Darken the mix:
Add a bit more Blue and a touch of Black to your previous mixture. This slightly darker, cooler grey will be for the middle ground mountains. -
Paint the middle range:
Overlap the first mountain layer with this new color. Ensure the peaks of this layer don’t perfectly align with the ones behind it to create depth. -
Create the near mountains:
Mix a deep slate blue (Blue + Black + small amount of White). Paint a large, sloping mountain mass that dominates the lower left and right sections.
Metallic Magic
Add a touch of gold leaf or metallic gold paint to the very edges of the clouds or the mountain peaks for a coaster that shimmers when the light hits it.
Step 4: Foreground Forests
-
Establish the treeline base:
Mix almost pure Black with a hint of Blue. Paint a solid, undulating shape at the very bottom right, swooping diagonally upward. This is the heavy shadow of the nearest hill. -
Add treetop texture:
Using your smallest detail brush or a stippling motion with an old brush, tap along the top edge of this black shape to create the look of tiny pine tree silhouettes. -
Introduce foliage pops:
I like to mix a deep crimson or brownish-red. Gently stipple this color into the lower dark forest area to suggest autumn foliage catching the last light. -
Refine the highlights:
Add tiny touches of lighter pink/orange on the tips of the crimson foliage to show where the sunset light hits the trees directly.
Step 5: Finishing Touches
-
Dry completely:
Allow the painting to dry fully, preferably overnight, to ensure no moisture is trapped. -
Seal the artwork:
Since this is functional art, apply two to three thin coats of varnish. Let each coat dry before applying the next to protect against condensation.
Now you have a functional piece of art that brings a peaceful view to your coffee table
Four-Coaster Panorama That Connects in a Grid
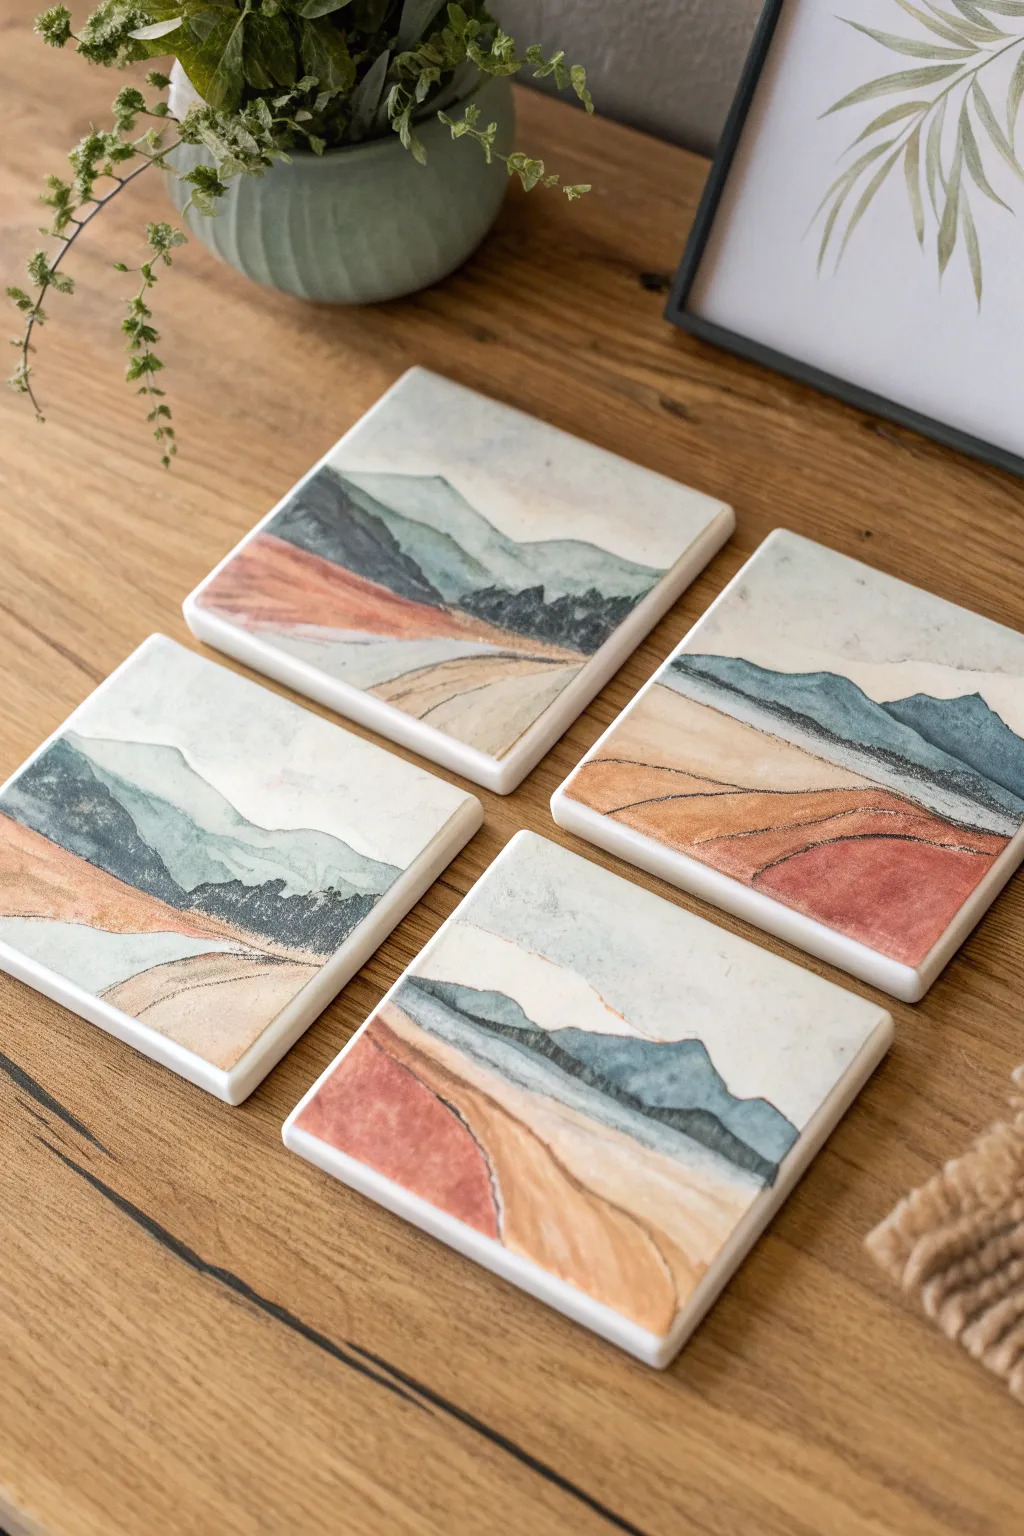
Transform four separate marble coasters into a single, breathtaking panorama of abstract rolling hills. This project uses the soft translucency of diluted acrylics or alcohol inks to capture a serene, earthy landscape that flows seamlessly across the grid.
Step-by-Step Tutorial
Materials
- 4 square absorbent stone or tumbled marble coasters (4×4 inches)
- Acrylic paints (terracotta, sage green, slate blue, beige/sand, white, Payne’s gray)
- Floating medium or glazing liquid (essential for the watercolor look)
- Wide flat wash brush (1 inch)
- Small round detail brush (size 2 or 4)
- Masking tape or painter’s tape
- Spray sealant (clear matte or satin)
- Palette for mixing
- Cork backing pads
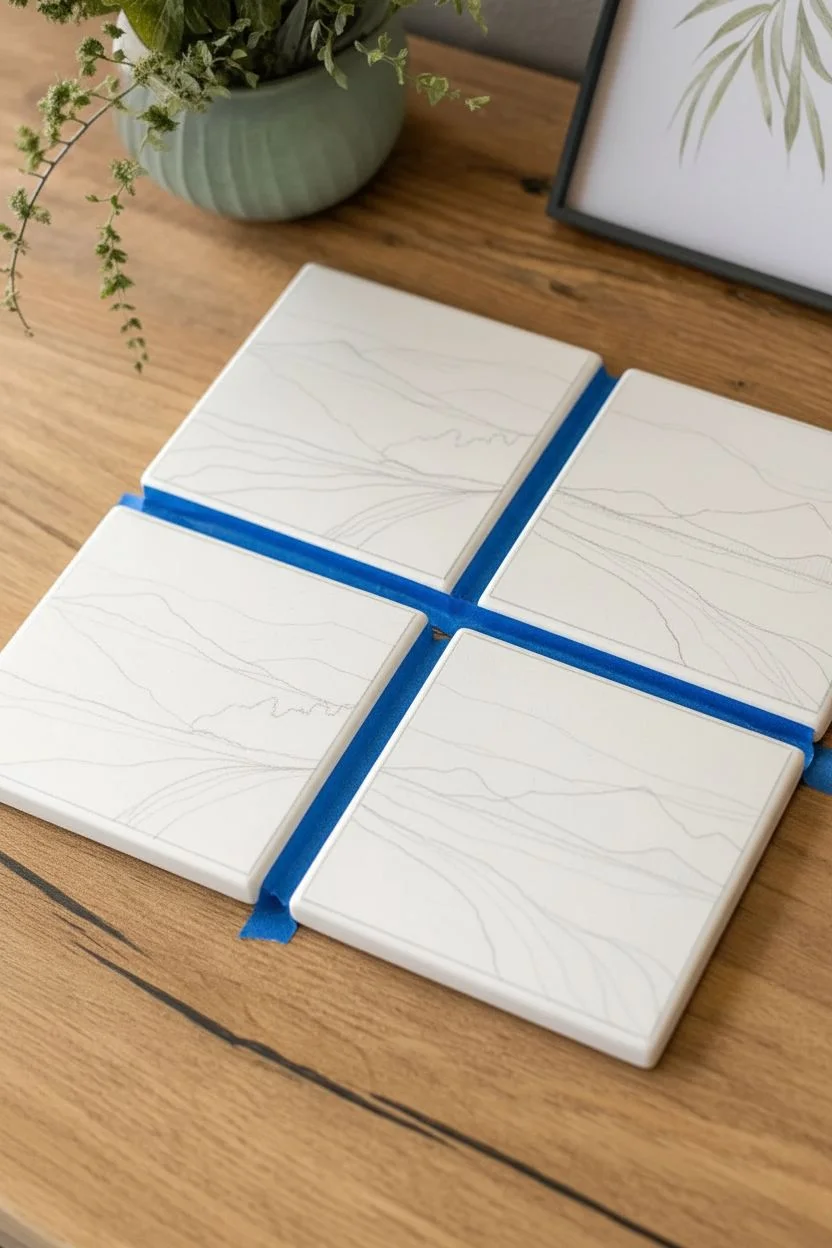
Step 1: Preparation and Planning
-
Grid Configuration:
Arrange your four coasters on a flat surface in a tight 2×2 square grid. Ensure the edges are touching perfectly so you can visualize the surface as one large canvas. -
Securing the Back:
To keep the grid stable while you sketch, apply a long strip of painter’s tape across the backs to hold the four pieces together temporarily, or simply press them firmly against a non-slip mat. -
Initial Sketch:
Lightly pencil in your horizon lines. Draw curved, flowing lines that span across the gaps from one coaster to the next. You want a foreground of rolling sand dunes, a middle ground of reddish hills, and a background of blue-green mountains.
Paint Lifting?
If the porous stone drinks the paint too fast, prime the surface first with a clear gesso or matte medium. This seals the pores and keeps your colors vibrant.
Step 2: Painting the Base Layers
-
Mixing the Sky Glaze:
Mix a large amount of white with a tiny dot of slate blue and plenty of glazing liquid. You want a very sheer, milky consistency. -
Applying the Sky:
Brush this pale mix across the top half of the upper two coasters. Use long horizontal strokes and fade it downward into nothingness before you hit the mountain line. -
Blocking the Background Mountains:
Mix slate blue with a touch of sage green and glazing liquid. Paint the most distant mountain shapes on the top two coasters. Keep the edges soft and organic rather than sharp. -
Creating the Middle Ground:
Switch to your terracotta color mixed with beige. Paint the rolling hills that occupy the center of the composition, crossing the horizontal ‘equator’ line where the top and bottom coasters meet. -
Foreground Sand Dunes:
For the bottom section, mix beige, white, and a hint of yellow ochre. Apply this to the lowest curves, ensuring the strokes follow the contour of the land.
Add Metallic Veins
Use a fine liner brush and liquid gold leaf to trace the major ridge lines of the hills. This adds a hint of luxury that sparkles when the light hits the table.
Step 3: Adding Details and Flow
-
Checking the Seams:
Pay close attention to where the coasters touch. I prefer to paint right over the gap as if it isn’t there, then gently dab the vertical edges later to ensure the design wraps slightly around the curve of the stone. -
Deepening the Contrast:
Mix a darker version of your slate blue using Payne’s gray. Use the small round brush to add shadowy crevices and definitions to the mountain peaks. -
Texture Work:
For the terracotta hills, add some dry-brush texture. Wipe most of the paint off your brush and lightly drag it across the dried surface to mimic grassy or rocky textures. -
Defining the Ridges:
Use a thin liner brush with dark brown or charcoal paint to define the flowing lines between the different colored hills. Keep these lines broken and varied so they don’t look like a cartoon outline. -
Harmonizing Layers:
If colors look too separate, create a very watery wash of beige and glaze it over transition areas between the red and blue sections to unify the lighting.
Step 4: Finishing Touches
-
Drying Time:
Allow the coasters to dry completely. Since stone is porous, it might absorb paint differently than canvas, so give it at least an hour to settle. -
Edge Cleanup:
Separate the coasters. Check the side edges; if any paint dripped, wipe it off or paint the edges a solid neutral color like gold or grey for a framed look. -
Sealing:
Take the coasters to a well-ventilated area. Apply 2-3 light coats of clear satin spray sealant. This is crucial to prevent the paint from lifting when wet glasses sit on them. -
Adding Cork Backing:
Once fully cured (check the can instructions, usually 24 hours), peel and stick a cork pad to the bottom of each coaster to protect your table surfaces.
Now you have a functional set of art that doubles as a conversation piece whenever guests lift their drinks.
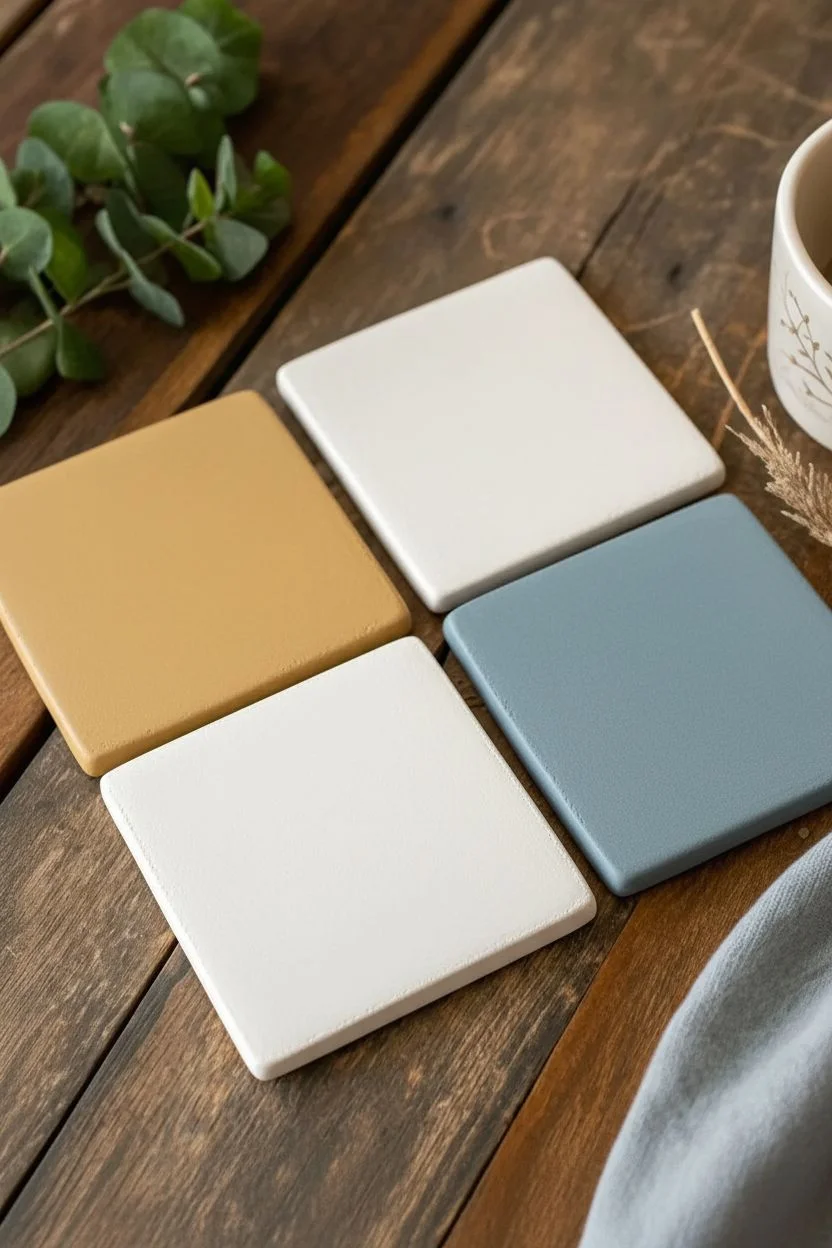
Seasonal Set of Four Mini Motifs
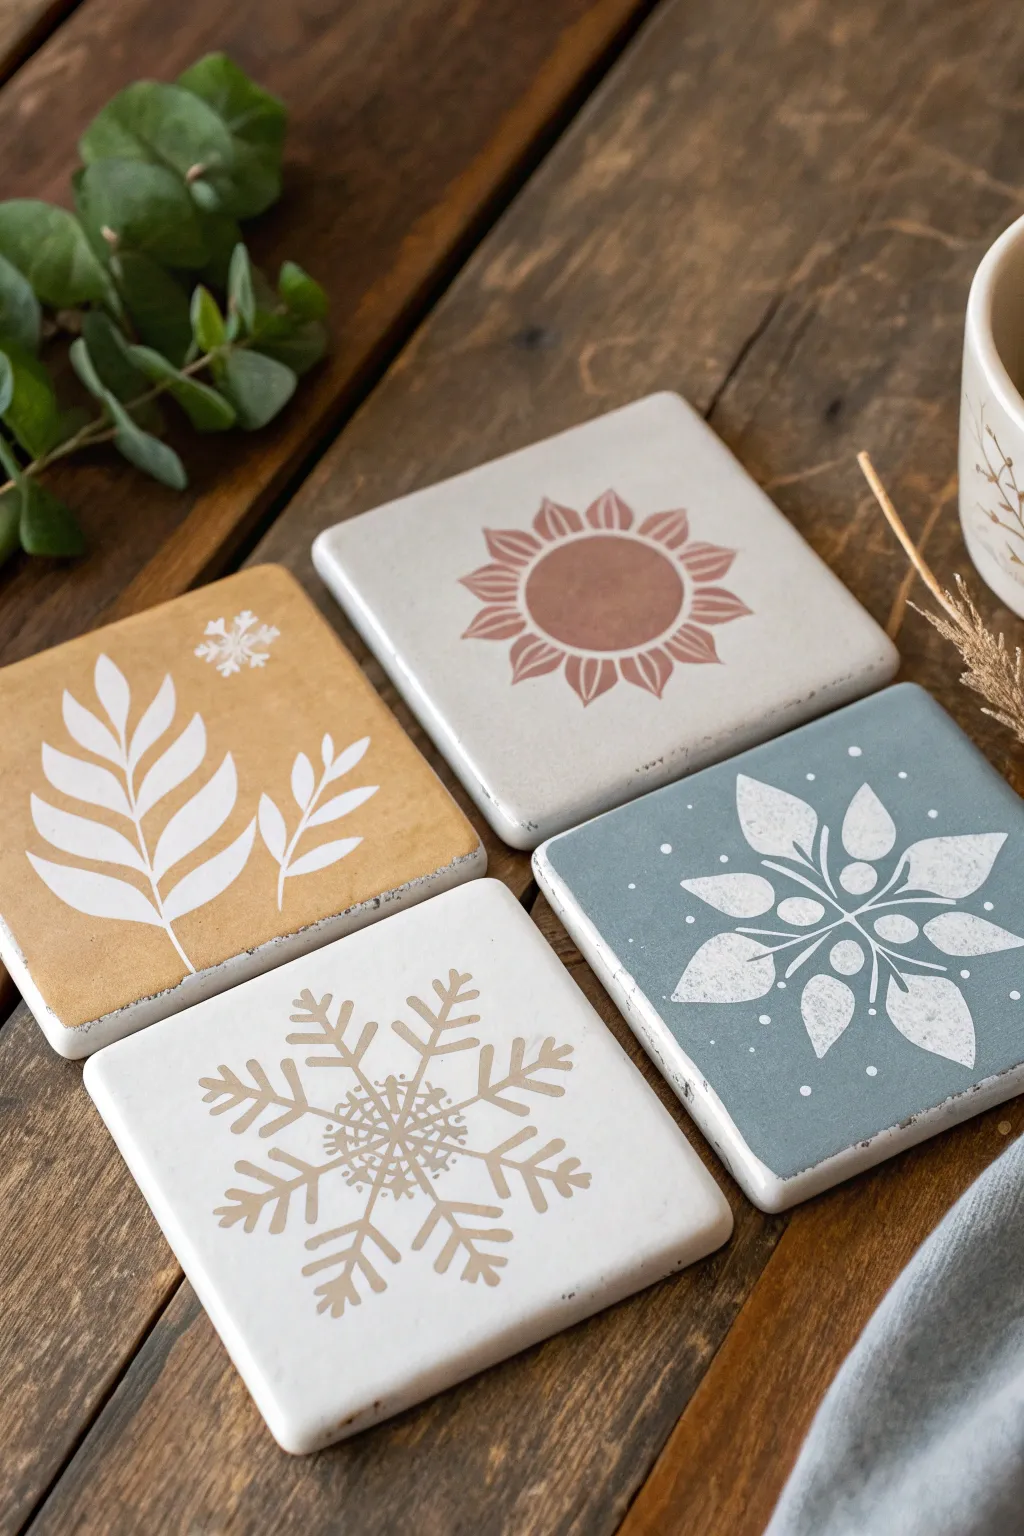
Capture the essence of all four seasons with this charming set of minimalist coasters featuring muted, earthy tones and simple botanical stencils. The distressed edges and matte finish give them a lovely, high-end rustic feel perfect for gifting or keeping.
Step-by-Step
Materials
- 4 square ceramic tiles (4×4 inch)
- Chalk paint or acrylic craft paint (Colors: Cream/Off-white, Muted Mustard, Terracotta/Dusty Rose, Slate Blue, Taupe)
- Small foam roller or pouncer sponges
- Seasonal stencils (Sunflower, Fern, Snowflake, Floral Medallion) or stencil vinyl/Cricut
- Fine grit sandpaper (220 grit)
- Matte sealer or spray varnish
- Painter’s tape
- Small flat artist brush
- Cork backing squares or felt pads
Step 1: Preparation & Base Coats
-
Clean the tiles:
Before you begin painting, wipe each ceramic tile down completely with rubbing alcohol or a damp cloth to remove any dust or oils, ensuring the paint adheres properly. -
Apply the first base color:
For the winter coaster, apply a smooth coat of your creamy off-white chalk paint using a foam roller for the best finish. Let it dry completely. -
Paint the remaining bases:
Paint the other three tiles in their respective background colors: one in Muted Mustard (Autumn), one in Slate Blue (Spring/Winter transition), and the last one also in Cream (Summer). You’ll likely need two thin coats for full coverage. -
Sand for smoothness:
Once the base coats are totally dry, lightly run a piece of fine-grit sandpaper over the surface to knock down any bumps, giving you a professional, smooth canvas.
Bleeding Lines?
If paint bleeds under the stencil, lightly sand the error away once dry, or scrape it gently with an X-Acto knife before touching up with base paint.
Step 2: Stenciling the Motifs
-
Position the snowflake stencil:
Place your large snowflake stencil centered on the white tile. Secure the edges firmly with painter’s tape to prevent slipping. -
Apply the snowflake design:
Using a pouncer sponge or stencil brush, lightly dab Taupe paint over the stencil. Use very little paint—offload most of it on a paper towel first—to prevent bleeding under the edges. -
Create the autumn leaf design:
On the Muted Mustard tile, position a fern or leaf sprig stencil. Use your Cream/Off-white paint here. I like to add a tiny decorative snowflake or star in the corner for extra detail. -
Stencil the summer sun:
For the second cream tile, center your sunflower or sunburst stencil. Use the Terracotta/Dusty Rose paint to fill in the design, keeping your sponging motion vertical. -
Add the blue floral pattern:
On the Slate Blue tile, center a floral medallion or poinsettia-style stencil. Use the Cream/Off-white paint again here, ensuring crisp contrast against the blue background. -
Remove stencils carefully:
Lift each stencil straight up while the paint is still slightly tacky to avoid pulling up dried paint chips. -
Touch up edges:
If you have any small bleeds, use a tiny artist brush with the base color to clean up the lines once the design is dry.
Step 3: Distressing & Finishing
-
Distress the edges:
Take your sandpaper and gently sand along the edges and corners of each tile. You want to reveal a bit of the raw tile underneath to create that weathered, rustic look. -
Clean surface dust:
Wipe the coasters with a dry lint-free cloth or tack cloth to remove all sanding dust before sealing. -
Apply sealer:
Spray or brush on a matte polycrylic sealer. Apply 2-3 coats, allowing proper drying time between each, to make them waterproof against condensation. -
Add backing:
Once fully cured (usually 24 hours), peel and stick cork backing squares or felt pads to the bottom of each tile to protect your furniture.
Sharper Stencils
Spray the back of your stencils with a light mist of repositionable spray adhesive. This creates a tight seal against the tile and keeps lines crisp.
Now you have a gorgeous set of custom coasters that celebrates the beauty of every season.
Raised Painted Outlines for Tactile Details
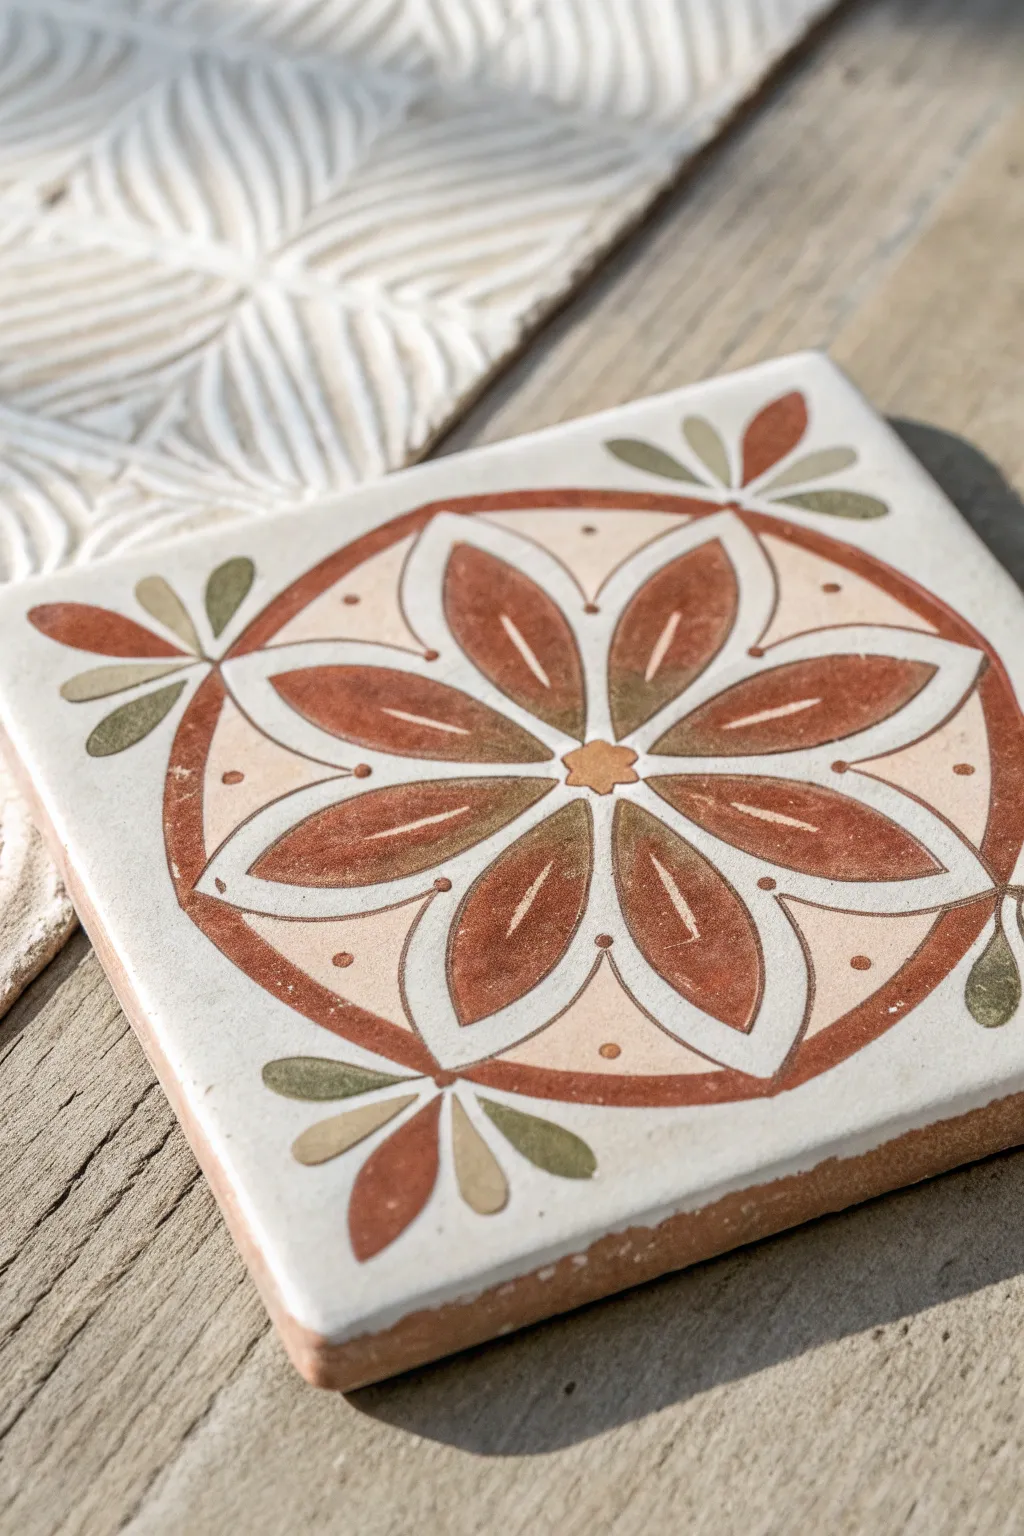
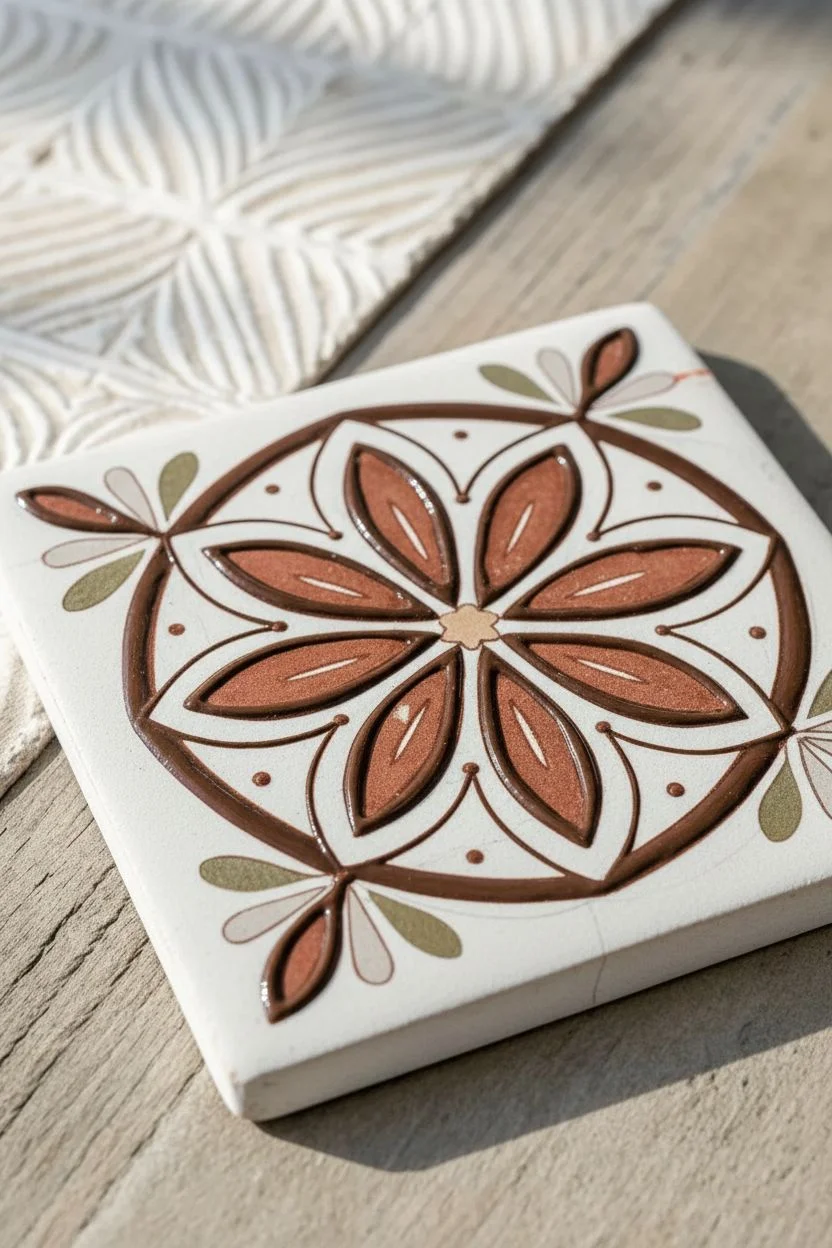
Bring a touch of Mediterranean warmth to your table with this hand-painted ceramic tile coaster. The design features an earthy floral motif with raised outline details that give the piece a beautiful, embossed texture.
Step-by-Step Guide
Materials
- 4×4 White ceramic tile (unglazed bisque preferred for texture)
- Acrylic paints (Terracotta, Olive Green, Cream/Beige, White)
- Dimensional fabric paint or relief outliner (Dark Brown or Bronze)
- Round synthetic brushes (sizes 0 and 2)
- Pencil and ruler
- Compass or circle stencil
- Palette for mixing
- Matte spray varnish
Step 1: Planning and Outlining
-
Clean surface:
Begin by wiping down your ceramic tile with a damp cloth to remove any dust or grease, ensuring a perfectly clean surface for the paint to adhere to. -
Mark center:
Using a ruler, lightly draw diagonal lines from corner to corner to find the exact center of the tile. Keep your pencil marks very faint so they are easy to erase later. -
Draw circle guide:
Use a compass or a circular stencil to draw a large circle centered on the tile, leaving about half an inch of space from the edges. -
Sketch petals:
Lightly sketch a six-petal flower within the circle. Start by marking six evenly spaced points on the circle’s perimeter, then draw curved lines connecting these points to the center. -
Add corner details:
Sketch small three-leaf sprigs in each of the four corners outside the circle, pointing inward toward the center. -
Line work:
Take your dimensional paint or relief outliner. Carefully trace over your pencil lines, creating the circle, the flower petals, and the corner sprigs. -
Inner details:
Add small details with the outliner: a small hexagon in the flower’s center, a line down the middle of each petal, and small dots in the negative space between petals. -
Dry styling:
Allow the relief outline to dry completely. This usually takes at least 2-4 hours; I prefer to let it sit overnight to ensure it’s rock-hard before painting.
Step 2: Adding Color
-
Mix base colors:
Prepare your palette. You’ll need a warm terracotta rust, a muted olive green, and a soft beige created by mixing plenty of white with a drop of the terracotta. -
Paint background:
Using the size 2 brush, fill in the circular background area behind the flower petals with your mixed beige tone. Work carefully around your raised lines. -
First petal set:
Select three alternating petals. Paint the outer shape of these petals with the terracotta color, leaving the center stripe unpainted for now. -
Second petal set:
Paint the remaining three alternating petals in the same terracotta shade. -
Inner stripe details:
Switch to your size 0 brush. Inside the first set of petals, paint one side of the center vein with olive green and the other with a watered-down terracotta for variation. -
Center accent:
Fill the small central hexagon with a solid dab of ochre or light orange paint. -
Circle border:
Paint the thick band around the petals with the solid terracotta color. You may need two coats here to get a rich, opaque finish. -
Corner sprigs:
For the corner foliage, paint the central leaf terracotta and the two side leaves olive green to balance the color distribution. -
Final touches:
Once the main colors are dry, use the tip of a toothpick or a very fine brush to add tiny white highlight dots inside the darkest parts of the border ring. -
Seal the work:
After the paint has cured for 24 hours, spray the entire coaster with a matte varnish to protect it from moisture and scratches.
Keep it flowing
If your dimensional paint bottle sputters, try tapping the nozzle tip firmly on a scrap paper to remove air bubbles before returning to your tile.
Uneven lines?
Don’t panic if a relief line goes astray. Wait for it to dry slightly until it’s rubbery, then gently lift it off with a craft knife and try again.
Now you have a stunning, tactile piece of functional art ready to hold your morning coffee
Optical Illusion Gradient for a Wow Effect
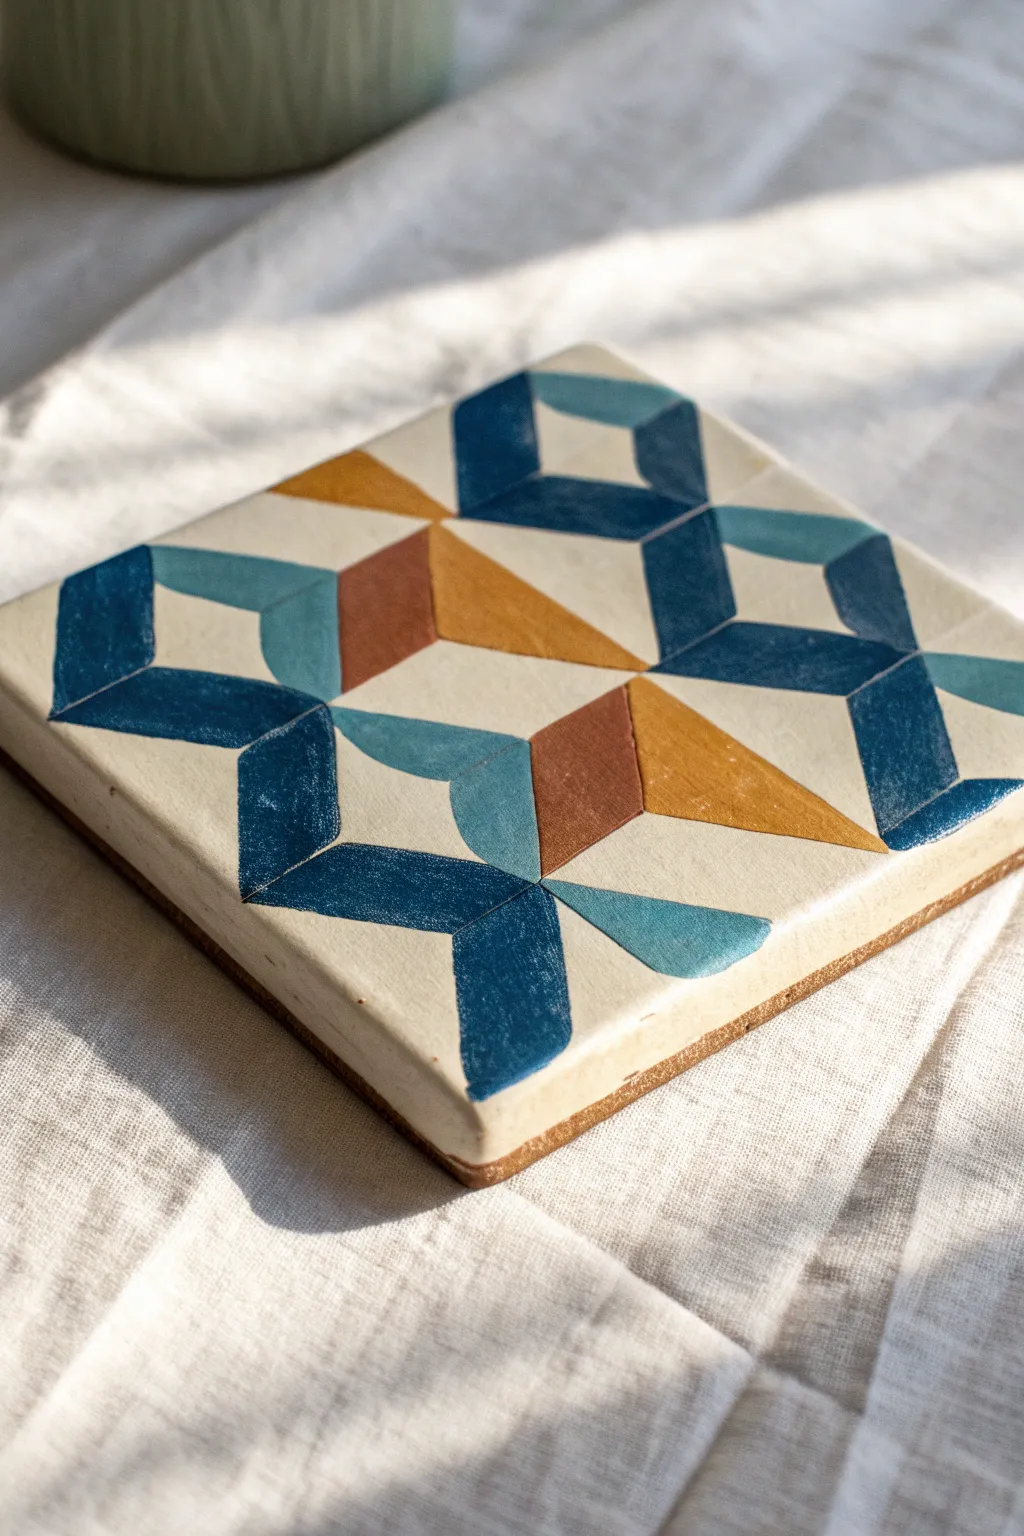
Transform a plain ceramic tile into a sophisticated piece of decor with this striking geometric pattern. By carefully placing distinct color blocks, you will create an interwoven 3D effect that looks far more complex than it actually is.
Step-by-Step Guide
Materials
- Square ceramic tile (4×4 inches)
- Acrylic paints (Navy Blue, Teal, Clay/Rust, Mustard Yellow, Cream/Off-White)
- Fine detail paintbrush (size 0 or 1 round)
- Flat shader brush (small)
- Pencil and eraser
- Ruler
- Painter’s tape or stencil tape (optional but helpful)
- Clear acrylic sealer (matte or satin finish)
- Adhesive cork sheet or cork feet
Step 1: Preparation & Base Coat
-
Clean the surface:
Wipe your ceramic tile down with a damp cloth or a little rubbing alcohol to ensure there is no dust or grease that could prevent the paint from sticking. -
Apply the background color:
Using a flat shader brush, coat the entire top and sides of the tile with your Cream or Off-White acrylic paint. This creates a uniform canvas, as raw ceramic can sometimes be too porous or uneven in color. -
Let it cure:
Allow this base coat to dry completely. A second coat might be necessary if the original tile color is showing through. It needs to be bone dry before you start drawing.
Paint Consistency
Thin your acrylics slightly with a drop of water. Heavy paint leaves ridges; ink-like paint flows better for sharp geometric lines.
Step 2: Grid & Sketching
-
Mark the center points:
Using your ruler and a pencil, lightly mark the center point of all four sides of the square tile. -
Draw the primary diamond:
Connect these four center marks to create a large diamond shape (rhombus) in the middle of your tile. -
Sketch the ‘Y’ shapes:
The pattern consists of repeating ‘Y’ or wishbone shapes that interlock. Start by drawing a vertical line down the center of the diamond, but break it into segments to leave room for the interweaving horizontal bands. -
Define the ribbon width:
Draw parallel lines next to your skeleton lines to give the geometric ribbons their thickness. The key to the 3D look is consistent width for every ‘ribbon’ segment. -
Refine the weave:
Erase intersecting lines so that certain ribbons appear to go ‘under’ or ‘over’ others. Reference the photo closely here: vertical blue shapes usually create the main structure, with angled pieces tucking underneath.
Metallic Accent
Swap the Mustard Yellow paint for Gold Leaf or metallic gold paint. It catches the light and makes the coaster look high-end.
Step 3: Painting the Design
-
Paint the Navy sections:
Start with the darkest color, Navy Blue. These are the sharp angled ‘V’ shapes on the outer edges and the vertical segments. Use your fine detail brush to get crisp edges. -
Add the Teal highlights:
Moving inward, paint the ribbon segments that connect to the navy blue but face a different light source. Use the Teal paint for these curved sections. -
Fill in the Rust/Clay tones:
Paint the parallelogram shapes near the center in the Rust or Clay color. This warm tone provides contrast against the cool blues. -
Apply the Mustard Yellow:
Fill the remaining geometric segments—usually triangular shapes pointing outward—with Mustard Yellow. I find that yellow is often translucent, so plan on doing two thin coats here for opacity. -
Clean up edges:
Once dry, use your Cream background color and the fine brush to touch up any areas where the colors might have bled outside the pencil lines or touched each other unintentionally.
Step 4: Finishing Touches
-
Seal the artwork:
After the paint has cured for at least 24 hours, apply a clear acrylic sealer. A spray sealer is easiest to avoid brush strokes, but a brush-on varnish works too. Apply 2-3 coats for durability against condensation. -
Attached the backing:
Cut a square of adhesive cork slightly smaller than your tile size. Peel the backing and stick it firmly to the underside of the coaster to prevent scratching your table.
Now you have a stunning, functional piece of art ready to protect your tabletops with style

Have a question or want to share your own experience? I'd love to hear from you in the comments below!