Square canvases are my favorite little playground because the 1:1 format naturally feels balanced and bold. If you’ve ever stared at a square surface wondering what belongs in that tidy frame, these ideas will get your brush moving fast.
Centered Single Bloom
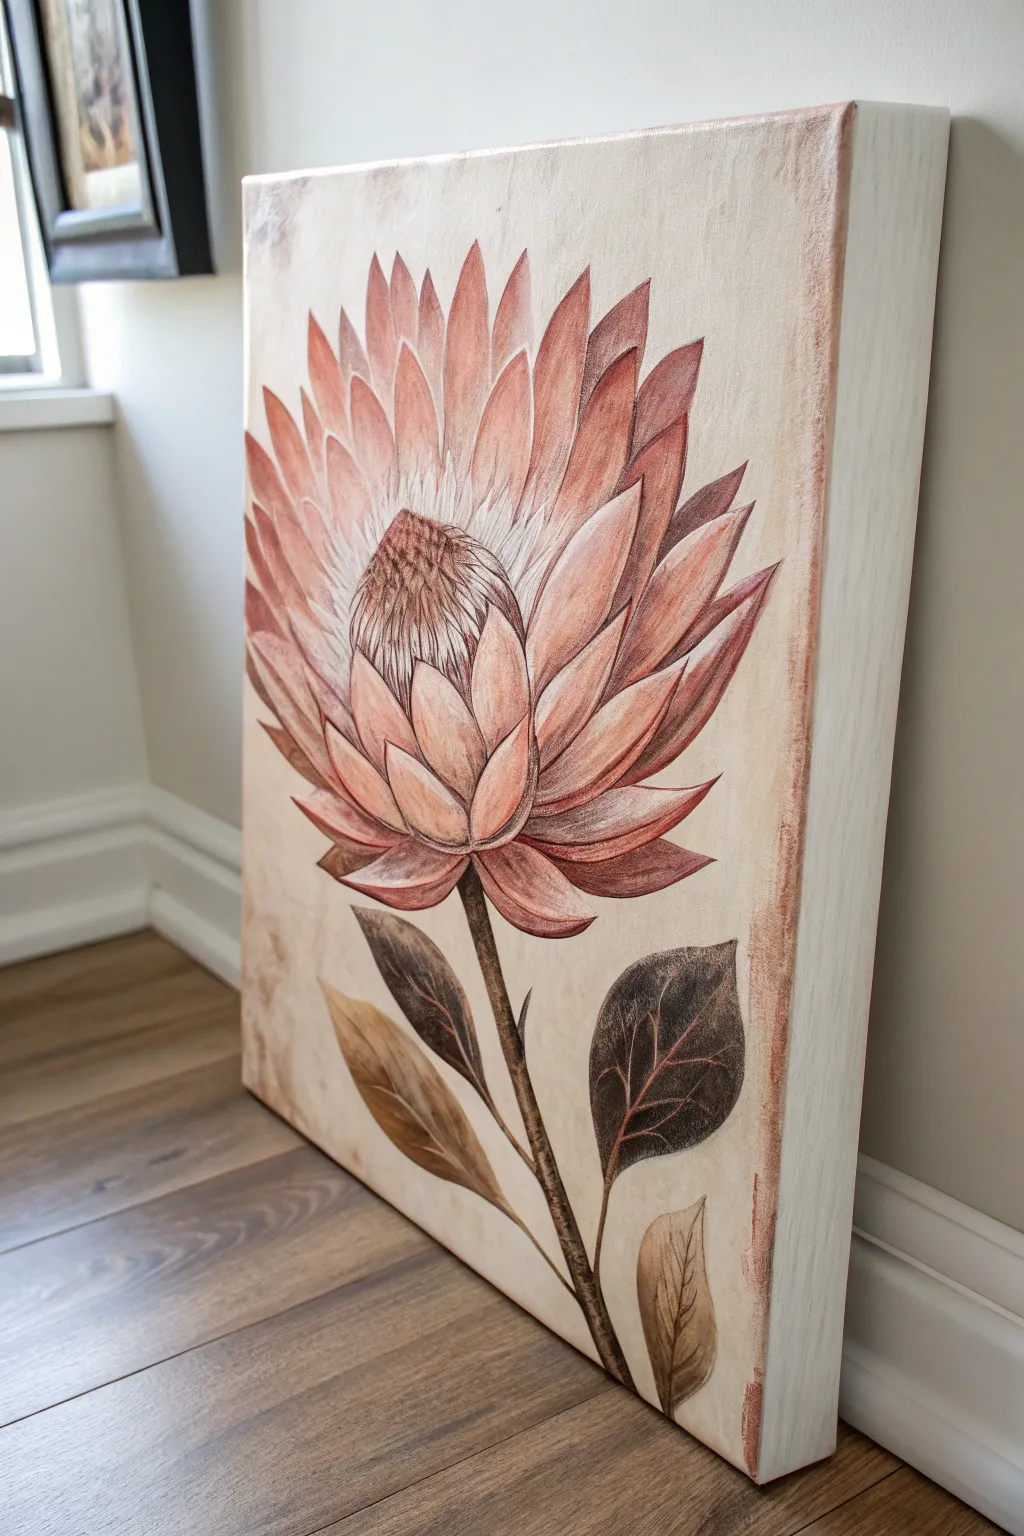
Capture the stately elegance of a King Protea with this focused study primarily using warm earthy tones and varied textures. This project achieves a vintage botanical look by combining solid acrylic blocking with delicate dry-brush detailing on a deep-edge canvas.
Detailed Instructions
Materials
- Square gallery-wrapped deep canvas (e.g., 20×20 inch)
- Acrylic paints: Titanium White, Unbleached Titanium, Burnt Umber, Burnt Sienna, Terra Cotta, Raw Sienna
- Flat shader brushes (sizes 8 and 12)
- Round detail brushes (sizes 2 and 4)
- Pencil (HB or H) for sketching
- Palette knife (optional for background texture)
- Water container and paper towels
- Matte medium or glazing liquid
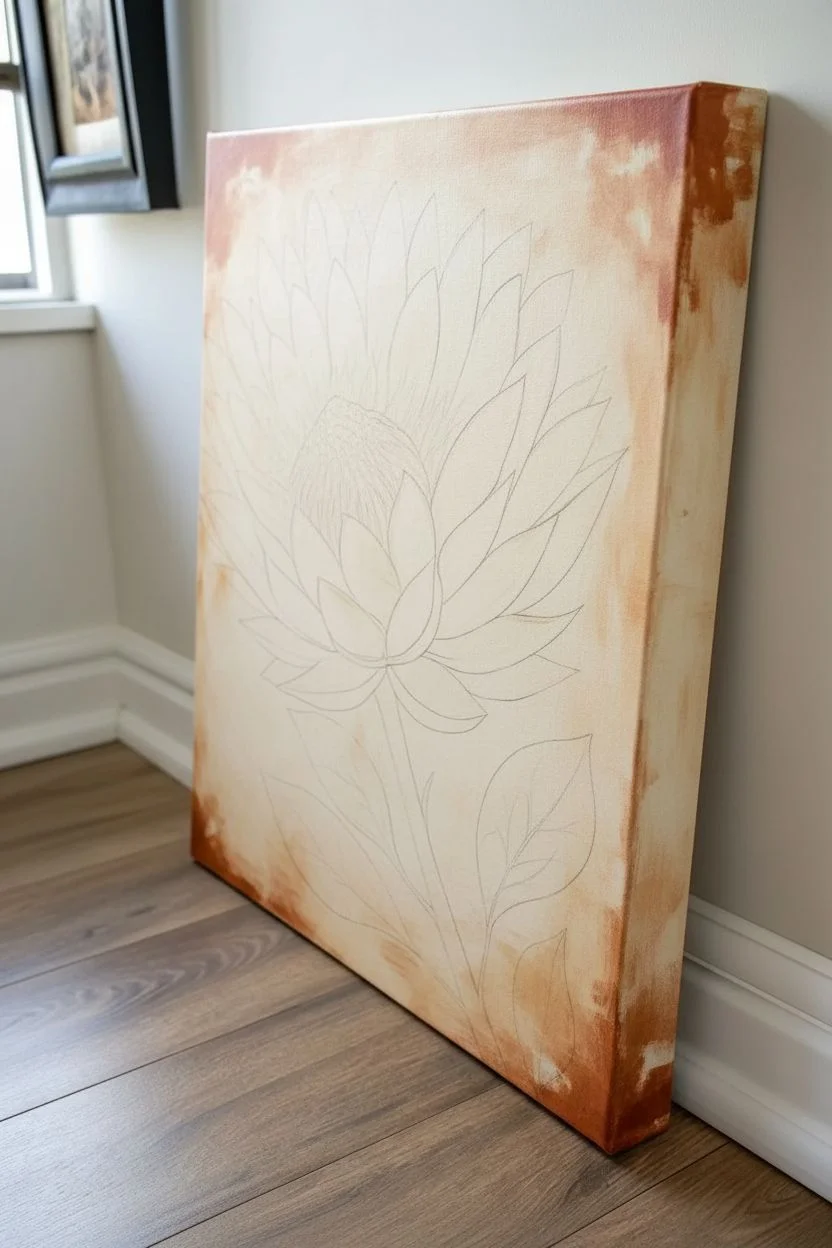
Step 1: Background & Sketching
-
Prep the canvas:
Mix Titanium White with a touch of Unbleached Titanium and Raw Sienna to create a creamy, warm parchment color. Paint the entire canvas, including the deep sides. For a rustic feel, don’t over-smooth your brushstrokes; let the texture show. -
Apply subtle aging:
While the base is mostly dry but not cured, scumble a very diluted mix of Burnt Sienna and white around the corners and edges to create a vignette effect, making the center feel brighter. -
Outline the Protea:
Using an H pencil, lightly sketch the large central flower head. Start with a cone shape for the center, surrounded by layers of pointed, artichoke-like petals radiating outward. Ensure the stem enters from the bottom center or slightly off-center. -
Sketch the leaves:
Draw three large, sturdy leaves attached to the stem—two lower ones and one higher up. Keep the lines faint so they are easily covered by paint later.
Dry Brushing Tip
Wipe almost all paint off your brush onto a paper towel before hitting the canvas. You want a dusty, scratchy look to mimic the petal’s texture.
Step 2: Blocking Colors
-
Base coat the petals:
Mix a soft pinkish-terracotta using Terra Cotta, White, and a tiny bit of Burnt Sienna. Fill in the petals, but keep the paint consistent and flat. Don’t worry about shading yet. -
Paint the stem and leaves:
Use a mix of Burnt Umber and Raw Sienna to block in the stem and leaves. The leaves should be a dark, earthy brown rather than a vibrant green to match the dried botanical aesthetic. -
Establish the center cone:
Fill the central cone area with a lighter version of your petal color, mixing in more Unbleached Titanium. This is the fuzzy part of the flower and needs a lighter base.
Make It a Set
Paint two companion canvases of the same size featuring different Protea varieties or a focus on just the foliage to create a gallery wall trio.
Step 3: Layering & Texture
-
Deepen the petal shadows:
Mix Burnt Sienna with a touch of Burnt Umber. With a damp flat brush, glide this darker color at the base of each petal where it meets the flower center, fading it outward to create depth. -
Highlight the tips:
Using a nearly dry brush with Titanium White and a drop of the base pink, feather light strokes from the tips of the petals inward. This ‘dry brush’ technique mimics the velvety texture of Protea petals. -
Detail the center cone:
Switch to a small round brush. Use Burnt Umber to create small, arched cross-hatching marks on the central cone to suggest the tightly packed florets. -
Add the ‘fuzz’:
Using Unbleached Titanium and a rigger or very fine liner brush, flick tiny lines upward from the top of the cone. These should look like soft white hairs or whiskers characteristic of the King Protea. -
Texture the leaves:
In the leaf areas, use a dry brush with a lighter brown (Raw Sienna mixed with White) to scrub in some highlights, leaving the dark underpainting visible in the veins and edges. -
Final vein details:
With thin Burnt Umber paint, re-state the central veins of the leaves for clarity, ensuring they curve naturally with the leaf shape.
Step 4: Finishing Touches
-
Enhance outlines:
Take a very thin round brush with diluted Burnt Umber and loosely outline some of the petals and leaves. Keep the line broken and organic, not a solid cartoon outline. -
Address the canvas sides:
Ensure your background wash extends over the thick edges. I like to take a bit of the Terra Cotta paint and dry-brush the very corners of the canvas edges to frame the piece. -
Clean up negative space:
If any paint smudged into the background, touch it up with the original cream color mix. You can cut back into the petals slightly to sharpen any tips that got too messy. -
Seal the work:
Once fully dry (give it at least 24 hours), apply a coat of matte varnish. A matte finish suits the rustic, earthly vibe better than high gloss.
Hang your botanical study in a well-lit spot to enjoy the warm tones and subtle textures you achieved

Bold Geometric Color Blocks
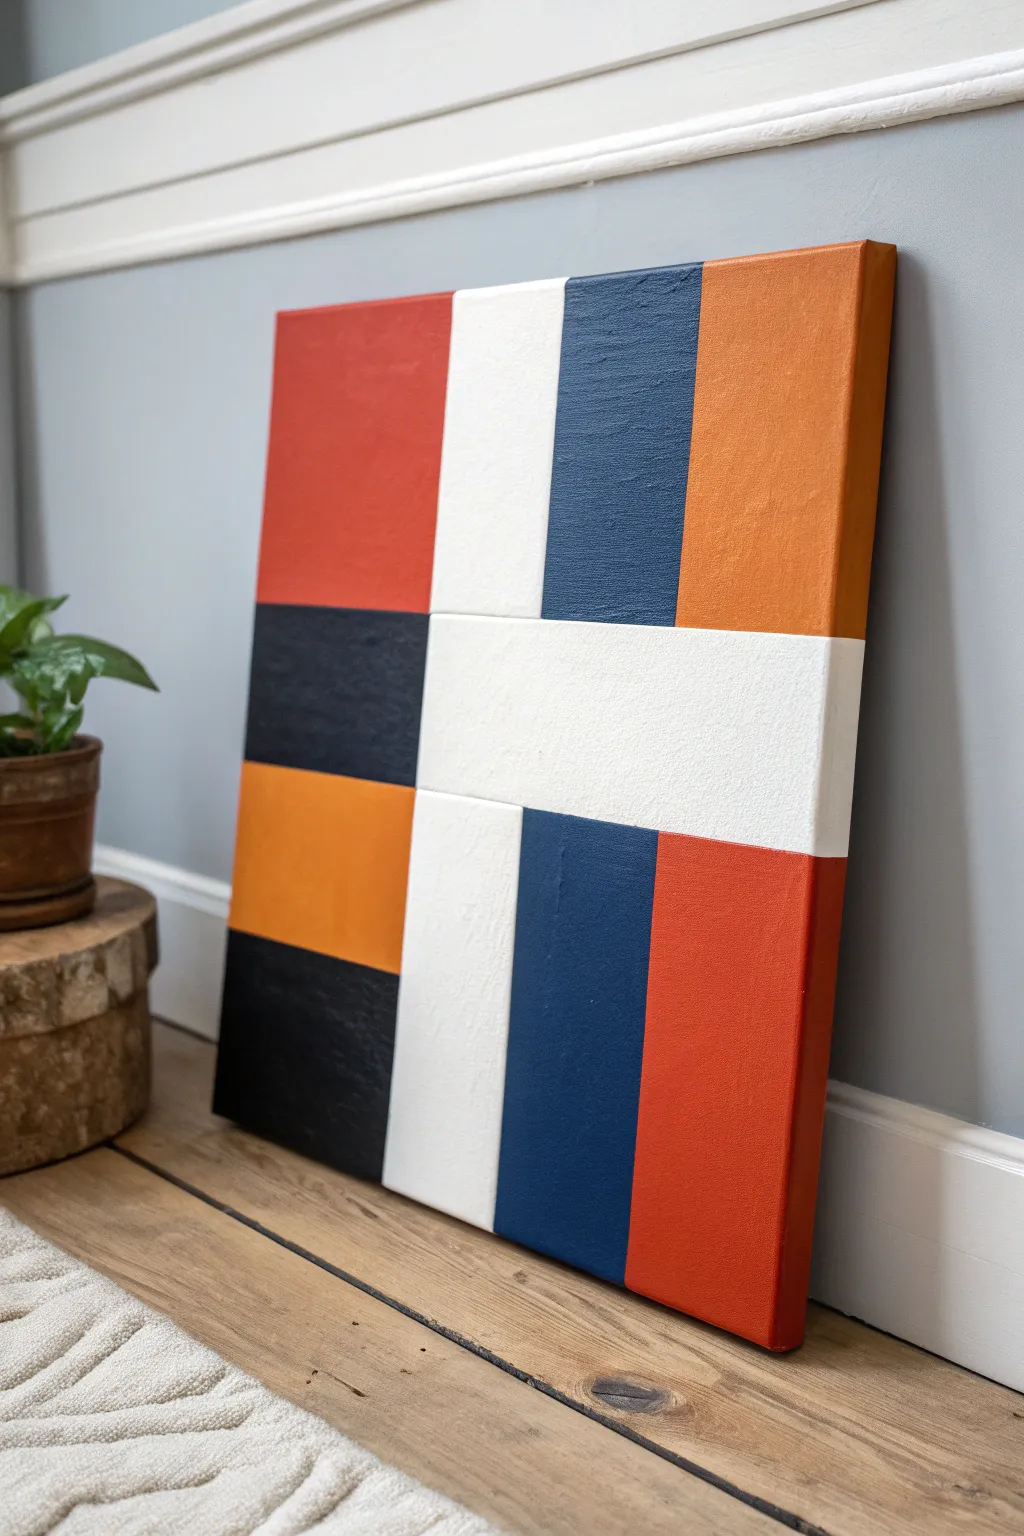

Achieve a high-impact look with minimal effort using this bold geometric color block design. The combination of deep navy, terracotta, mustard, and crisp white creates a striking modern aesthetic that instantly updates any wall.
Step-by-Step Guide
Materials
- Square stretched canvas (approx. 20×20 inches recommended)
- Acrylic paints: Burnt Orange/Terracotta, Deep Navy Blue, Mustard Yellow, Titanium White, Black
- Painter’s tape (1-inch width works best)
- Ruler or T-square
- Pencil
- Flat synthetic paintbrushes (1-inch and 2-inch)
- Palette or paper plate
- Water cup and paper towels
- Optional: Matte varnish for sealing
Step 1: Planning the Grid
-
Measure the canvas:
Start by laying your canvas flat on a protected surface. Using your ruler, measure the total width and height of the canvas to determine your grid spacing. -
Mark vertical divisions:
Divide the width by four to create four vertical columns. Make small tick marks with your pencil at the top and bottom edges of the canvas. -
Draw vertical lines:
Connect your tick marks lightly with a pencil and straightedge to create four equal vertical columns running from top to bottom. -
Mark horizontal divisions:
This design isn’t a perfect uniform grid. For the horizontal lines, you will need three rows, but they are offset. Mark a horizontal line roughly 1/3 down from the top edge. -
Create the lower section:
Mark another horizontal line roughly 1/3 up from the bottom edge. You should now have a basic grid of 12 rectangular spaces, though we will merge some of these later. -
Define the merged block (The White Cross):
Looking at the reference, the center white section spans multiple grid squares. Erase the pencil lines inside the central cross shape so you don’t accidentally paint borders there.
Bleeding Lines?
If paint bleeds under the tape, wait for it to dry completely. Then, re-tape slightly over the line and paint the correct color over the mistake for a crisp fix.
Step 2: Taping and Painting
-
Tape the first set of blocks:
Apply painter’s tape along the pencil lines for your first color group. Because the shapes touch, you cannot paint adjacent blocks simultaneously. Tape off ‘every other’ block to start. -
Seal the tape edges:
Press the tape down firmly with your fingertip or a credit card to prevent paint bleed. I sometimes do a very light layer of the background color (usually white) over the tape edge first to ensure a crisp line. -
Paint the Terracotta sections:
Using the burnt orange paint and a flat brush, fill in the top-left block and the bottom-right block. Use long, smooth strokes in one direction for a clean finish. -
Apply the Navy Blue:
Paint the designated navy sections (top, second from right; bottom, second from left). Apply two coats if the dark color looks streaky on the first pass. -
Add the Mustard Yellow:
Fill in the top-right block and the middle-left block with your mustard yellow paint. This warm tone balances the cool navy perfectly. -
Paint the Black accents:
Fill in the bottom-left corner block with black paint. Be careful here as black is hard to correct if it smudges. -
Dry and peel:
Allow these first sections to dry until they are touch-dry (usually about 20-30 minutes). Carefully peel off the tape at a 45-degree angle.
Step 3: Finishing Touches
-
Tape the remaining borders:
Once the first set of colors is fully dry, apply fresh tape over the dried painted edges to protect them while you paint the adjacent remaining sections. -
Paint the White sections:
Fill in the central cross area and top-second-from-left block with Titanium White. Even though the canvas is likely already white, painting it adds texture and ensures the finish matches the colored areas. -
Final peel and touch-up:
Remove the final pieces of tape while the paint is still slightly tacky to avoid pulling up dried acrylic skins. Check for any bleed-through. -
Correcting lines:
If you have fuzzy edges, use a small angled brush with the appropriate color to sharpen the lines freehand. -
Paint the canvas sides:
Don’t forget the edges! Extend the lines of each color block continuously over the sides of the canvas for a gallery-wrapped professional look. -
Seal the artwork:
Once the painting has cured for at least 24 hours, apply a layer of matte varnish to protect the surface from dust and UV light.
Add Texture
Mix a bit of modeling paste or baking soda into your acrylics before painting. This creates a tactile, plaster-like raised surface for a high-end look.
Hang your new geometric masterpiece in a well-lit spot to let those bold colors truly pop


Tape-Resist Square Frame Border

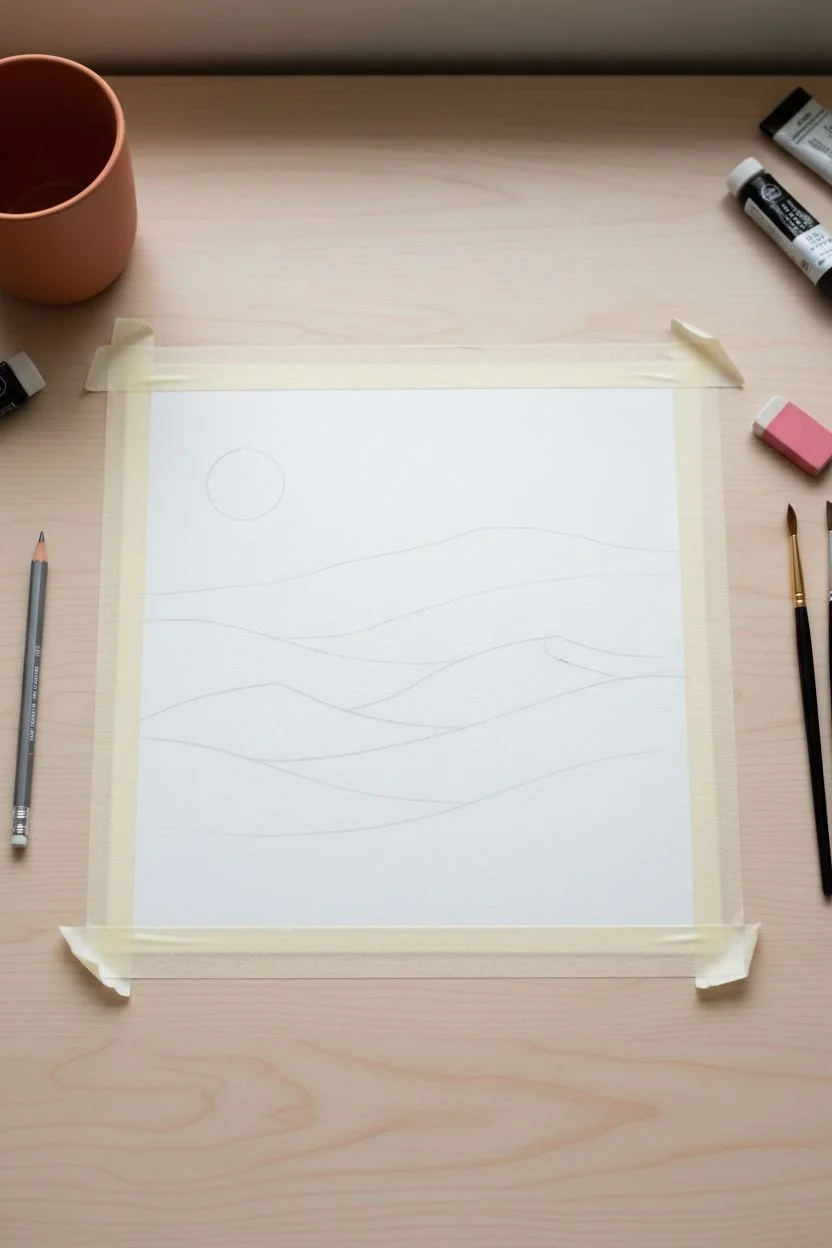
Capture the serene warmth of a desert sunset with this minimalist watercolor landscape. Using soft, layered washes and a harmonious palette of ochre, terracotta, and dusty pink, this project creates a calming focal point perfect for a square frame.
Detailed Instructions
Materials
- Cold-press watercolor paper (square sheet, slightly larger than your frame opening)
- Watercolor paints (Burnt Sienna, Yellow Ochre, Alizarin Crimson, Payne’s Grey, Sepia)
- Painter’s tape or masking tape
- Flat wash brush (medium size)
- Round brush (size 4 or 6 for details)
- Jar of clean water
- Paper towels
- Pencil and eraser
- White square frame with mat board
Step 1: Preparation and Sketching
-
Secure the edges:
Begin by taping down all four edges of your watercolor paper to your work surface. This creates a clean white border (matching the mat board look) and prevents the paper from buckling when wet. -
Sketch the horizon:
Lightly sketch the rolling hills using a pencil. Start with a high horizon line for the furthest mountain, then draw overlapping curved lines moving downward to represent closer dunes. -
Outline the sun:
In the upper left quadrant of the sky area, trace a perfect circle for the sun using a compass or a small round object like a bottle cap.
Bleeding Edges?
If paint bleeds under the tape, use a slightly damp stiff brush (like an acrylic brush) to gently scrub and lift the unwanted paint, then blot with a tissue.
Step 2: Painting the Sky and Sun
-
Wet-on-wet sky:
Clean your flat brush and apply a layer of clear water just to the sky area, carefully painting around the sun circle. -
Apply the sky wash:
Mix a very dilute wash of Yellow Ochre with a touch of Burnt Sienna. While the paper is still damp, sweep this color across the sky, letting it fade slightly as you move away from the horizon. -
Paint the sun:
Once the sky is dry to the touch, load your round brush with a saturated mix of Burnt Sienna and Alizarin Crimson. Fill in the sun circle carefully, keeping the edges crisp.
Step 3: Layering the Landscape
-
First mountain layer:
Mix a pale, dusty pink using a lot of water with Alizarin Crimson and a tiny dot of Sepia. Paint the furthest mountain shape. Let this layer dry completely before moving forward. -
Second dune layer:
For the next hill down, mix Yellow Ochre with a bit of Burnt Sienna for a sandy tone. Apply this wash, ensuring the top edge is distinct against the previous mountain. -
Third layer depth:
Create a darker terracotta shade by adding more pigment to your Burnt Sienna. Paint the central, darker dune that sits in the middle ground, adding weight to the composition. -
Foreground foundation:
Mix a light beige using mostly water and Yellow Ochre. Paint the large foreground dune area at the bottom right, sweeping the brush in the direction of the slope. -
Dark accent hill:
Mix your darkest colour: Burnt Sienna with a touch of Payne’s Grey for a deep reddish-brown. Paint the thin, contrasting hill segment on the left side, sandwiched between lighter layers. -
Bottom left corner:
Fill the final bottom left corner with a medium-strength tan wash, connecting it visually to the rest of the sandy terrain.
Make It Golden
Add a touch of metallic gold watercolor paint to the rim of the sun or the tips of the grass for a subtle shimmer that catches the light.
Step 4: Detailing and Framing
-
Add texture:
Once all layers are bone dry, use a slightly damp brush to gently lift pigment or add subtle horizontal strokes on the dunes to suggest wind-swept sand texture. -
Paint the flora:
I like to switch to a fine round brush here. Mix a dark greenish-grey using Payne’s Grey and Yellow Ochre. Paint tiny, delicate sprigs of desert grass in the bottom right and left corners. -
Peel the tape:
Ensure the painting is 100% dry. Slowly peel the painter’s tape away at a 45-degree angle to reveal your crisp, clean edges. -
Mount and frame:
Place your finished artwork behind the mat board of your white square frame, securing it in place with acid-free tape on the back.
Hang this warm, peaceful scene in a well-lit spot to enjoy those desert vibes all year round


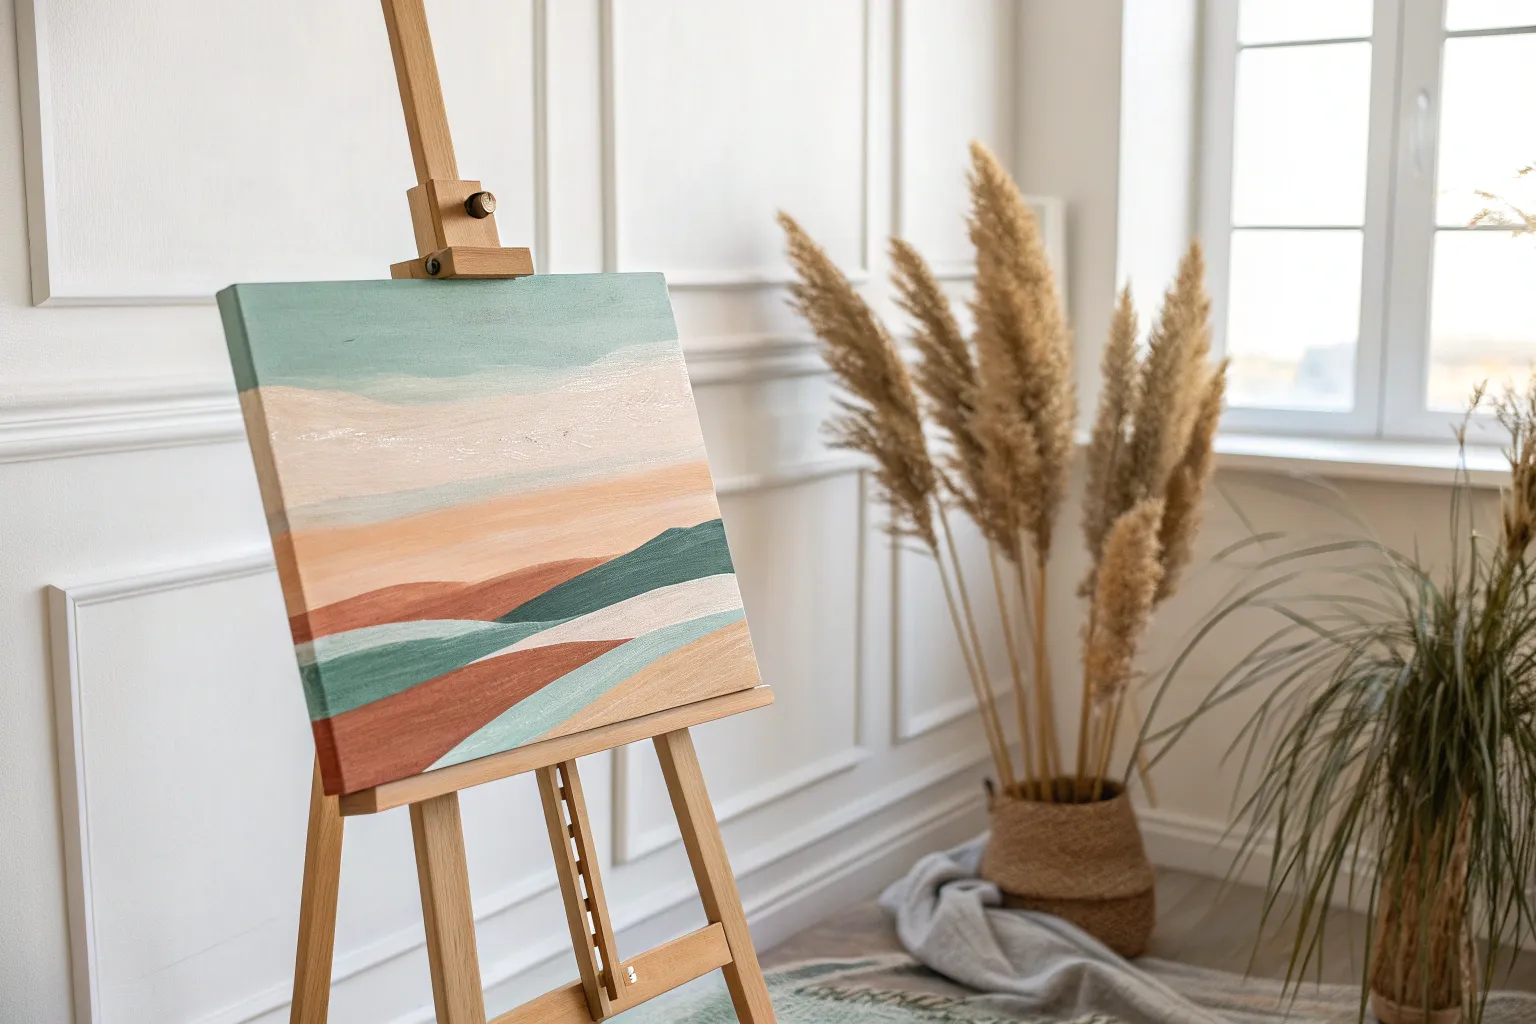
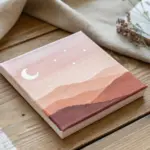
Mini Abstract With a Central Circle
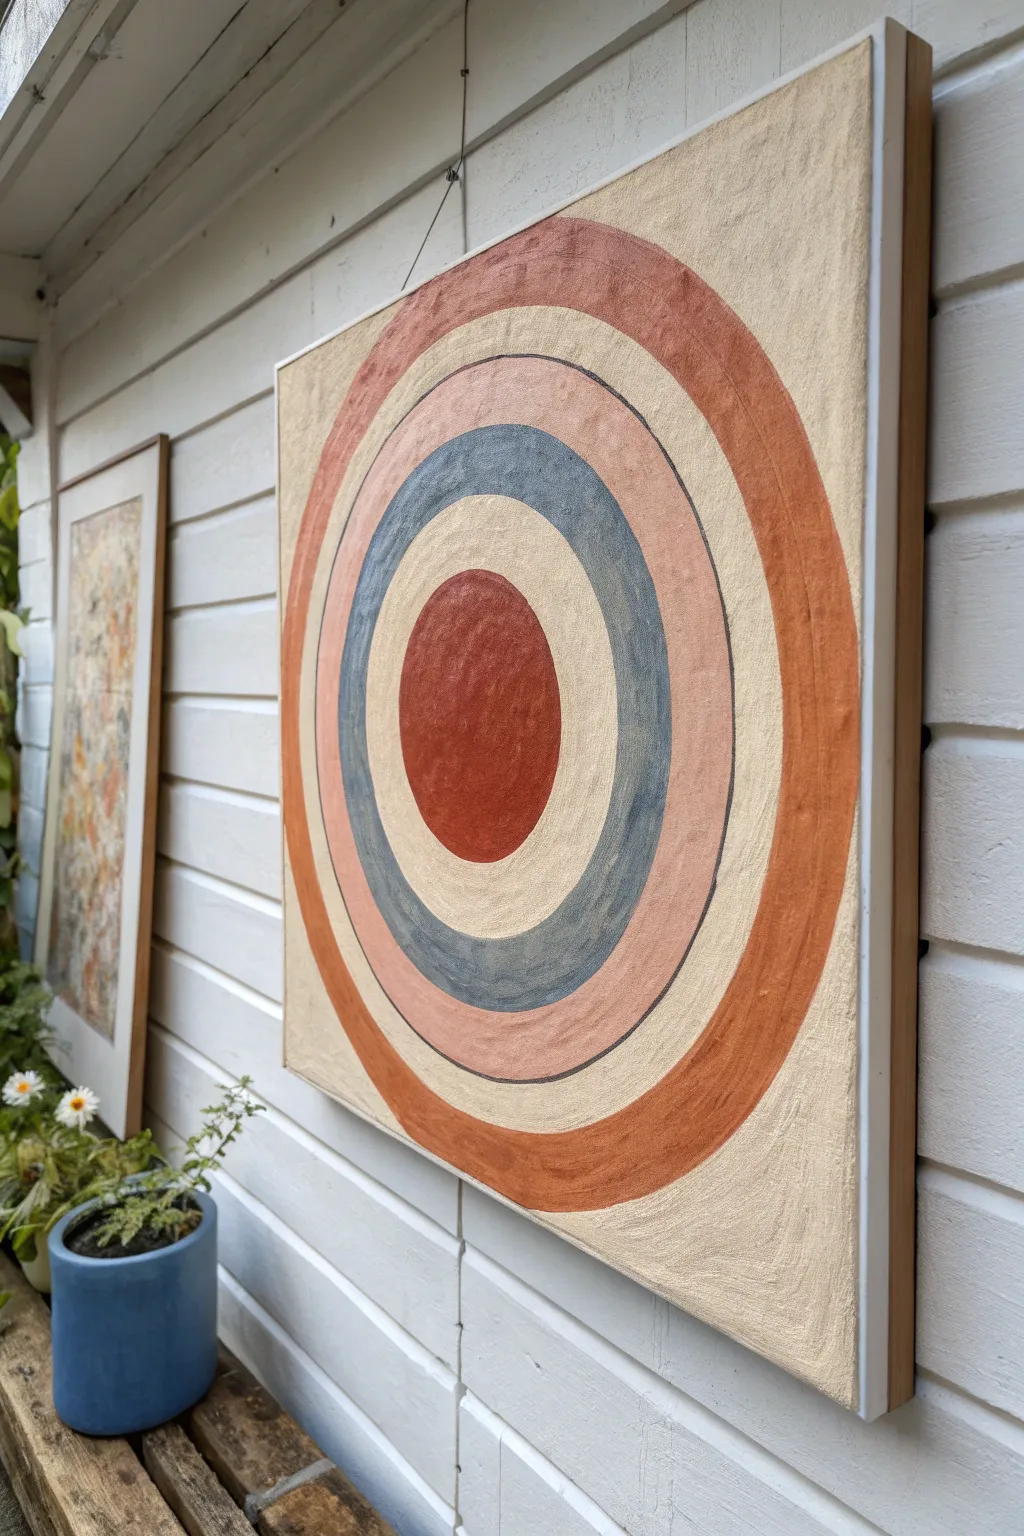
Bring mid-century modern warmth to your outdoor or indoor space with this simple yet striking geometric design. Using textured paint and earthy tones creates a calm, grounded piece that looks far more expensive than it is to make.
How-To Guide
Materials
- Large square canvas (approx. 24×24 inches or larger)
- Acrylic paints (Terra cotta, slate blue, peach/blush, beige/cream, dark charcoal)
- Texture medium (sand gel, modeling paste, or baking soda)
- Large compass or string and pushpin
- Pencil
- Assorted flat brushes (1-inch and 2-inch widths)
- Small detail brush
- Palette or paper plates for mixing
- Painter’s tape (optional for framing)
- Floating wood frame (optional)
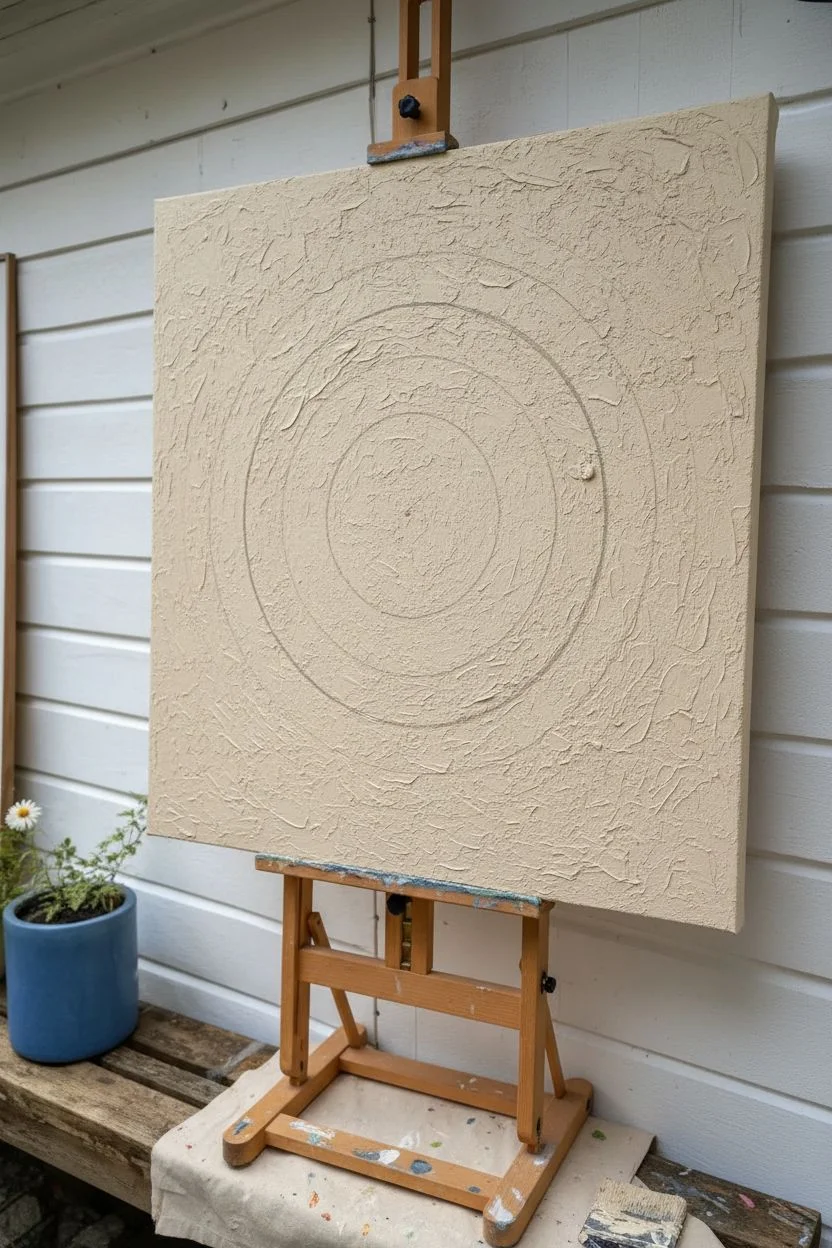
Step 1: Preparing the Base
-
Texture the background:
Mix your beige or cream acrylic paint with a texture medium. I like using a sand texture gel for this particular look to give it that organic, gritty feel visible in the photo. -
Apply the base coat:
Paint the entire canvas with your textured beige mixture. Use a large brush and apply it relatively thickly, using crisscross strokes to build up surface interest. -
Let it cure:
Allow the background to dry completely. Since the layer is textured and thick, this might take a few hours or even overnight.
Clean Curves Secret
Struggling with steady hands? Use a ‘mahl stick’ (or a yardstick propped on the easel edge) to rest your hand on while painting the fine circular outlines.
Step 2: Drafting the Design
-
Find the center:
Measure your canvas to find the exact center point and mark it lightly with a pencil. -
Create a compass:
If you don’t have a compass large enough, tie a string to a pushpin. Place the pin in the center mark and tie a pencil to the other end at the desired radius for your first circle. -
Draw the center circle:
Draw the smallest inner circle first. Keep the string taut to ensure a perfect curve. -
Outline the bands:
Lengthen the string for each subsequent ring. You will need to draw four concentric circles in total: the center dot, the cream gap, the blue ring, the pink ring, and the outer terracotta ring.
Level Up: Raw Texture
Instead of pre-mixed texture gel, mix baking soda into your acrylic paint (1 part soda to 2 parts paint). It creates a matte, stone-like finish perfect for this style.
Step 3: Painting the Rings
-
Mix the red center:
Combine terra cotta paint with a little texture medium. Paint the central solid circle carefully, using a smaller flat brush to keep the edges clean. -
Paint the blue ring:
Skip the next band (leaving it the base beige color). Mix a slate blue with a touch of grey and texture medium, then fill in the third ring. -
Add the peach ring:
Mix a muted peach or blush tone. Paint the ring immediately surrounding the blue one. If you overlap slightly, don’t worry; we will refine the lines later. -
Finish with terracotta:
Using the same terra cotta mix from the center, paint the outermost large ring. Ensure this ring is fairly wide to anchor the composition. -
Dry between coats:
Let these colored layers dry fully. If the colors look translucent, apply a second coat for opacity.
Step 4: Defining the Details
-
Prepare the outline color:
Mix a dark charcoal or soft black paint with a little water to improve the flow. You want it fluid enough to glide but not runny. -
Outline the center:
Using a fine detail brush or a liner brush, carefully trace the outer edge of the central red circle. -
Define the blue ring:
Paint a thin dark line on both the inner and outer edge of the slate blue ring. -
Outline the peach ring:
Add a thin dark line separating the peach ring from the outer terra cotta ring. -
Assess and touch up:
Step back to look at the symmetry. If any lines look shaky, you can use the background color to carefully cut back in and straighten them. -
Frame the piece:
For the professional finish shown in the image, install the canvas into a light wood floating frame.
Once hung, the warm concentric circles bring a centering, peaceful energy to your wall
BRUSH GUIDE
The Right Brush for Every Stroke
From clean lines to bold texture — master brush choice, stroke control, and essential techniques.
Explore the Full Guide
Four-Quadrant Seasonal Squares
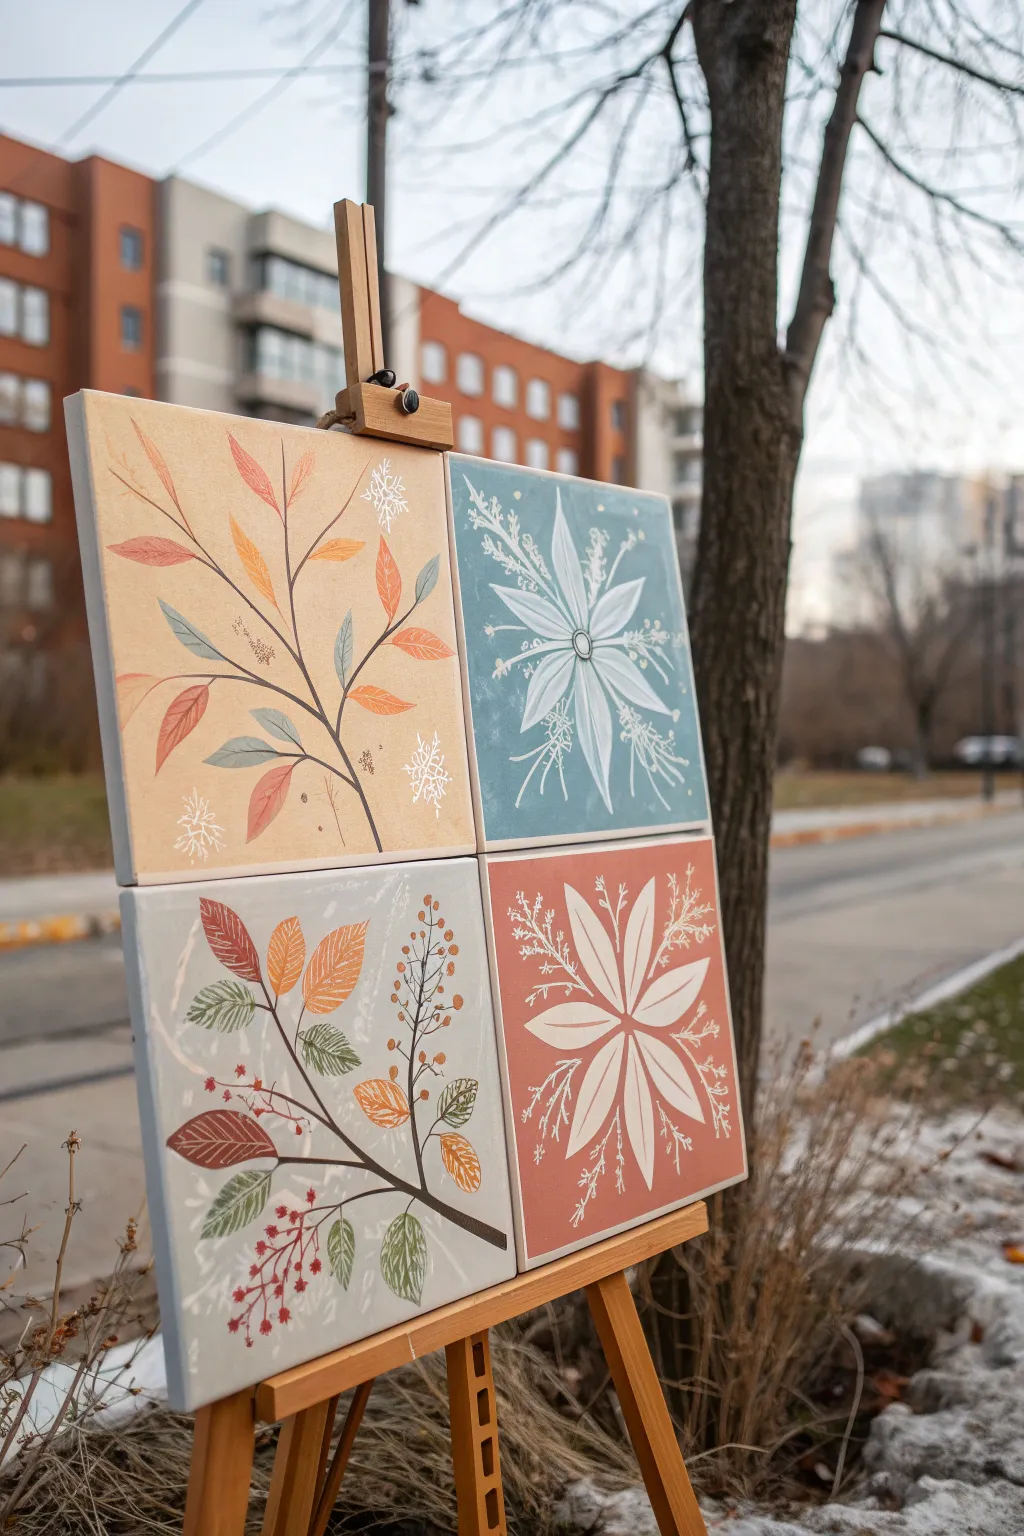
This elegant four-quadrant painting brings the outdoors in, combining stylized seasonal florals with soft, muted tones. It creates a stunning cohesive look by splitting nature-inspired motifs across four distinct squares, balancing warm autumn hues with cool wintery blues.
Step-by-Step
Materials
- 4 small square canvases (e.g., 6×6 or 8×8 inches)
- Acrylic paints: beige/tan, muted teal blue, dusty terra cotta, sage green, deep brown, white, cream
- Gesso (white)
- Painter’s tape or masking tape
- Flat brush (1 inch)
- Round detail brushes (sizes 2 and 4)
- Fine liner brush (size 0 or 00)
- Pencil and eraser
- Optional: White paint pen (fine tip) for snowflakes
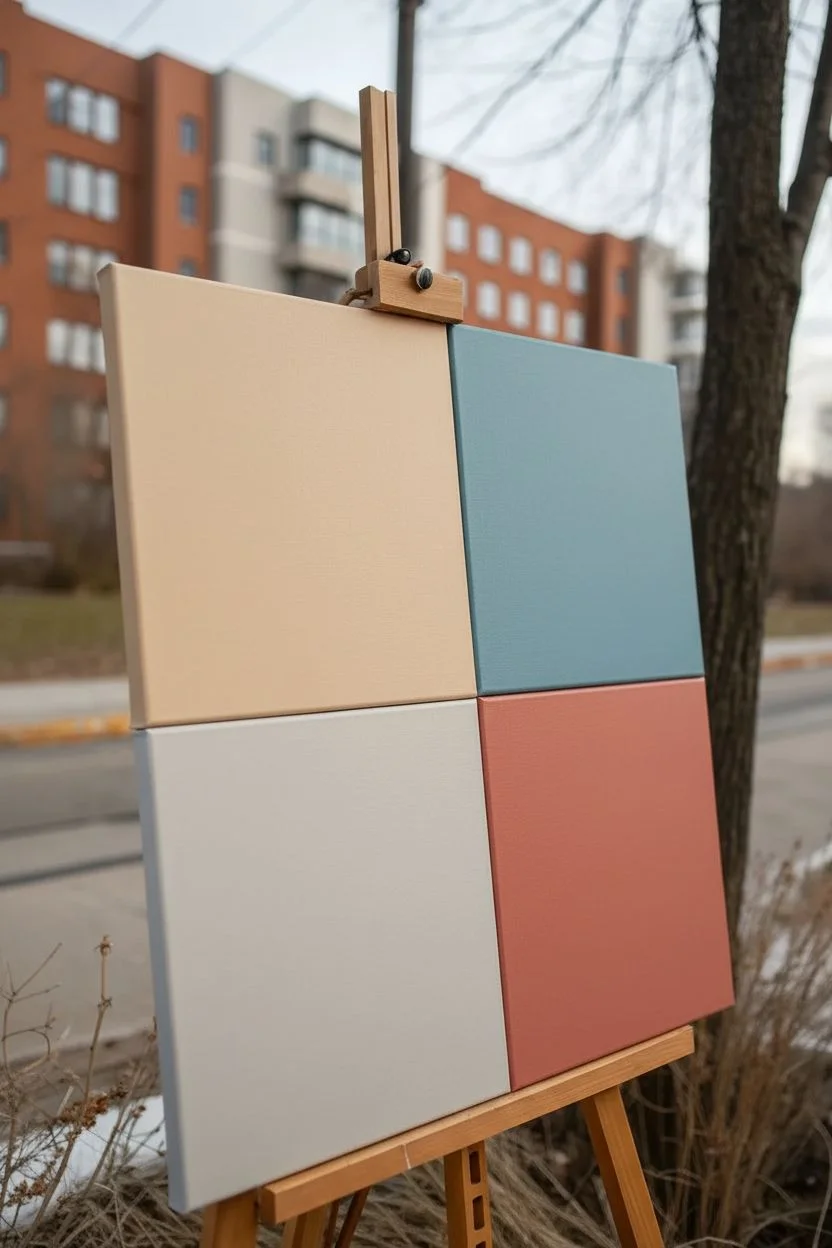
Step 1: Setting the Backgrounds
-
Prepare the surfaces:
Begin by arranging your four canvases in a square grid—two on top, two on the bottom. Decide which canvas will be which quadrant before applying any paint. -
Mix the base colors:
You will need three main background colors. Mix a soft sandy beige for the top-left, a muted teal-blue for top-right, a light grey-cream for bottom-left, and a dusty terra cotta red for bottom-right. -
Apply base coats:
Using a flat brush, paint each canvas its designated color. Apply two thin coats rather than one thick one to ensure smooth, opaque coverage, letting the first coat dry completely before adding the second. -
Dry check:
Ensure all four canvases are bone dry. If the paint feels cool to the touch, it still needs more time.
Step 2: Sketching the Motifs
-
Top-left branch:
Lightly sketch a central branch curving from the bottom right corner toward the top left. Add offshoot branches that fan out, leaving space for simple, oval-shaped leaves. -
Bottom-left complexity:
Sketch a thicker branch entering from the right side. Draw larger, serrated elm-like leaves and a separate sprig of berries clustering near the bottom. -
Right-side florals:
On the top-right and bottom-right canvases, mark the center point. Sketch a large, star-burst flower shape on each, using long, pointed petals that radiate outward symmetrically.
Clean Lines Pro Tip
For the ultra-fine white details, thin your acrylic paint with a drop of water or flow medium until it has an ink-like consistency. This helps the brush glide smoothly without skipping.
Step 3: Painting the Foliage
-
Stem work:
Use your size 2 round brush and deep brown paint to fill in the stems you sketched on the left-side canvases to create a strong anchor for the leaves. -
Leaf blocking:
For the top-left panel, paint the leaves in alternating shades of soft orange, sage green, and muted pink. Keep the paint relatively flat. -
Textured leaves:
On the bottom-left panel, paint the serrated leaves. I like to mix a little white into the green and orange paints here to give them a slightly frost-kissed look. -
Berry details:
Using the tip of a small round brush or the back end of a brush handle, dot vibrant red berries onto the berry sprigs in the bottom-left quadrant.
Shaky Hands?
If painting the delicate white fern shapes is difficult with a brush, use a white Posca paint pen (0.7mm tip). It gives you the control of a marker with the opacity of paint.
Step 4: Adding White Accents
-
Petal painting:
Move to the right-side canvases. Use a creamy white paint to fill in the large petals. You might need two coats here to make the white pop against the darker blue and red backgrounds. -
Intricate veining:
Once the leaves on the left panels are dry, use a liner brush with slightly watered-down white paint to draw delicate veins down the center of each leaf. -
Snowflake detailing:
This is where the magic happens. On the top-right blue panel, use a fine liner brush or white paint pen to draw fragile, crystalline fern shapes between the main flower petals. -
Mirroring the design:
Repeat the crystalline fern process on the bottom-right red panel, ensuring the white lines are thin and crisp. -
Final frost:
Add tiny white snowflake stars randomly in the empty spaces of the top-left beige panel to tie the winter theme together across the quadrants. -
Center points:
Finish the flowers on the right by painting a small circle in the center of the petals, adding a tiny dot in the middle for depth.
Arrange your four completed canvases on the wall or an easel to reveal the full seasonal story
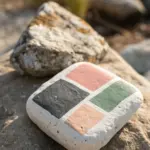
Nine-Piece Square Grid Series
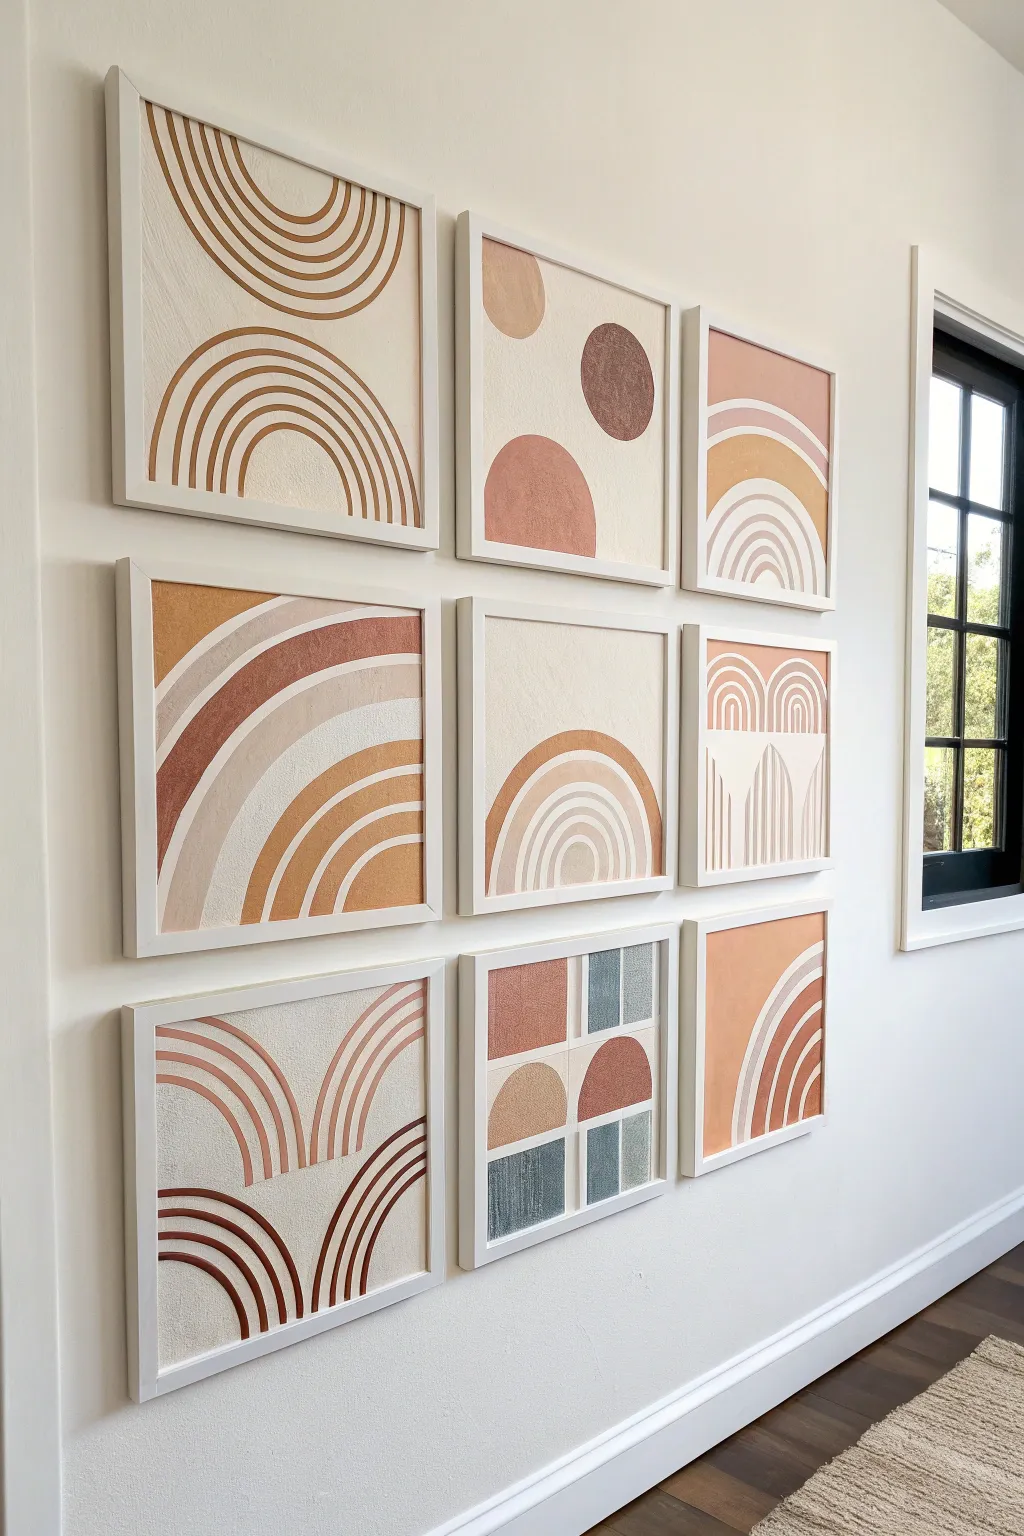
Transform a blank wall into a gallery-worthy feature with this nine-piece series of textured, abstract geometric art. Using a palette of warm terracotta, muted rust, and calming neutrals, these square canvases create a cohesive yet dynamic visual rhythm perfect for modern interiors.
Step-by-Step Guide
Materials
- 9 Square wooden painting panels or heavy cardstock (12×12 inches recommended)
- 9 Matching white shadow box or deep-set frames
- Modeling paste or joint compound
- Palette knives (assorted shapes)
- Acrylic paints (terracotta, burnt sienna, dusty pink, muted blue, warm beige, white)
- Pencil and eraser
- Ruler
- Compass or round objects for tracing
- Painter’s tape or masking tape
- Fine-grit sandpaper
- Matte varnish spray
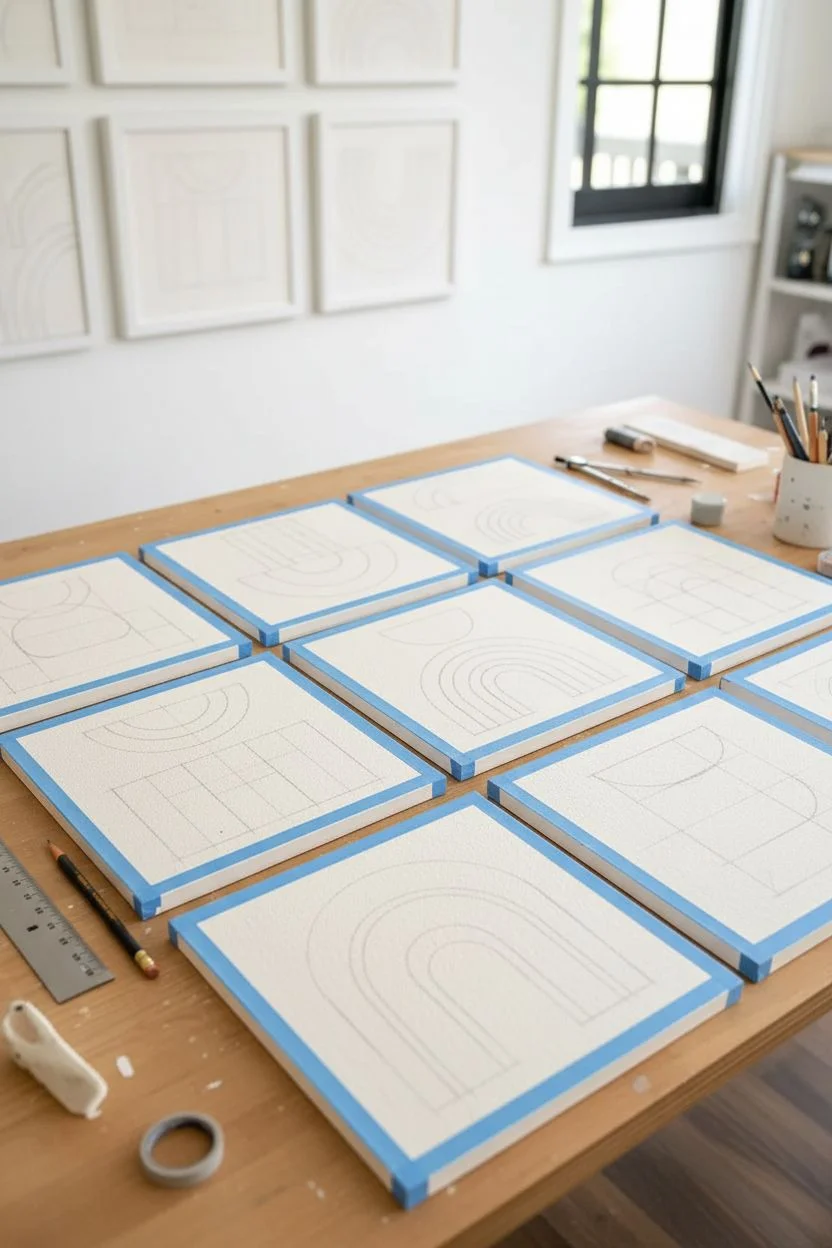
Step 1: Planning and Surface Prep
-
Prepare the grid layout:
Before touching a brush, sketch out a nine-square grid on a piece of paper. Assign a general design to each square so the collection feels balanced. Notice how some squares in the example use full arches, others use split circles, and the bottom right introduces a unique checkered element. -
Prime the surface:
If you are using wood panels, apply a coat of white gesso to seal the wood. If using heavy cardstock or illustration board, ensure it’s thick enough to handle moisture without warping. Tape the edges of your panels with painter’s tape to create a clean border if you plan to leave a white margin. -
Draft the designs:
Lightly sketch your geometric shapes onto each panel using a pencil. Use a ruler for straight lines and a compass for the arches and circles to ensure precision. Keep the lines faint so they are easy to cover later.
Textured Lines
Use an old credit card with notches cut into the edge as a makeshift comb. It creates perfect, uniform parallel lines in wet plaster for the arch designs.
Step 2: Creating Texture
-
Mix the texture medium:
For that raised, tactile look, mix your acrylic paints directly with modeling paste. I like to aim for a 50/50 ratio, but you can adjust based on how thick you want the texture. Create separate mixtures for your rust, beige, and blue tones. -
Apply base layers:
Start with the flattest areas of color. Use a palette knife to spread the tinted paste onto the larger shapes, like the solid sun circles or the wide background arches. Smooth it out reasonably well, but leave some surface variation for character. -
Sculpt the arches:
For the rainbow-style arches (like in the top-left panel), apply a thick layer of paste in the approximate area. While it’s still wet, use the edge of a clean palette knife or a combing tool to scrape away narrow lines, revealing the white background underneath. -
Layering shapes:
Some designs require overlapping elements. Let your first layer dry until it’s firm to the touch (usually 1-2 hours) before applying a second shape over it. This prevents the colors from muddying together. -
Checkered detail:
For the bottom-middle panel with the color blocks, use painter’s tape to mark off the grid. Apply your textured paint into the squares, then carefully peel the tape while the paint is still slightly wet to ensure sharp, crisp edges.
Metallic Accent
Mix a small amount of gold leaf flakes into the modeling paste for one accent shape per row to add a subtle glimmer that catches the light.
Step 3: Refining and Assembly
-
Add line work:
Once the main blocks of color are dry, go back in with a smaller brush or a fine-tip palette knife to add the delicate white lines seen in the middle-right panel. You can achieve this by painting white over the dried color or by scraping through wet paint. -
Sand for distressed effect:
If the texture feels too rough or sharp once fully dry, lightly run fine-grit sandpaper over the surface to knock down high peaks. This gives it a weathered, soft aesthetic. -
Seal the artwork:
Spray each panel with a matte varnish. This protects the textured surface from dust and unifies the sheen of the different paint mixtures. -
Mounting:
Place your finished artworks into the white frames. If you are using shadow boxes, you can adhere the panel to the backboard using double-sided foam tape to create a ‘floating’ illusion. -
Hanging the grid:
Measure your wall carefully. To replicate the look in the image, keep the spacing between frames tight—about 2 to 3 inches apart. Use a level to ensure your rows are perfectly straight.
Step back and admire how the individual squares come together to form a stunning, large-scale statement piece

PENCIL GUIDE
Understanding Pencil Grades from H to B
From first sketch to finished drawing — learn pencil grades, line control, and shading techniques.
Explore the Full Guide
Monochrome Value Study in a Square
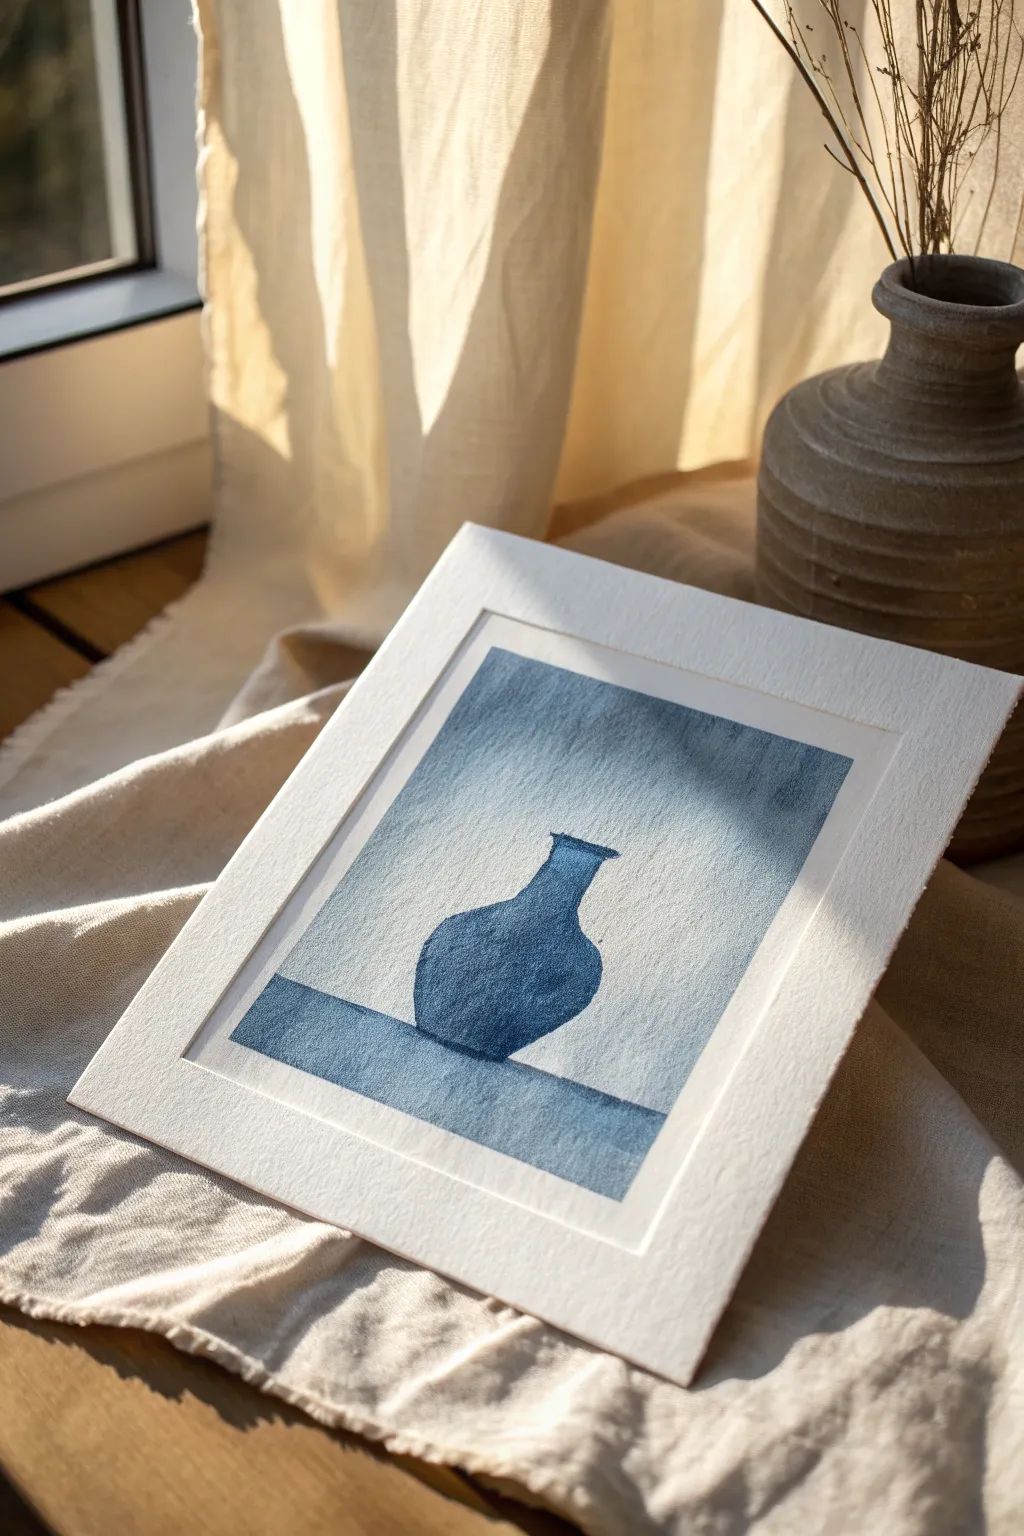
This serene project explores tonal values using a single shade of deep blue to capture the simple elegance of a ceramic vessel. Perfect for beginners, this monochromatic study teaches you how to build dimension through layering rather than complex color mixing.
Detailed Instructions
Materials
- Cold press watercolor paper (square format)
- Indigo or Prussian Blue watercolor paint
- Round watercolor brush (size 6 or 8)
- Flat shader brush (optional, for background)
- Pencil (HB or lighter)
- Kneaded eraser
- Two jars of water (one for rinsing, one for clean water)
- Paper towels
- Mixing palette
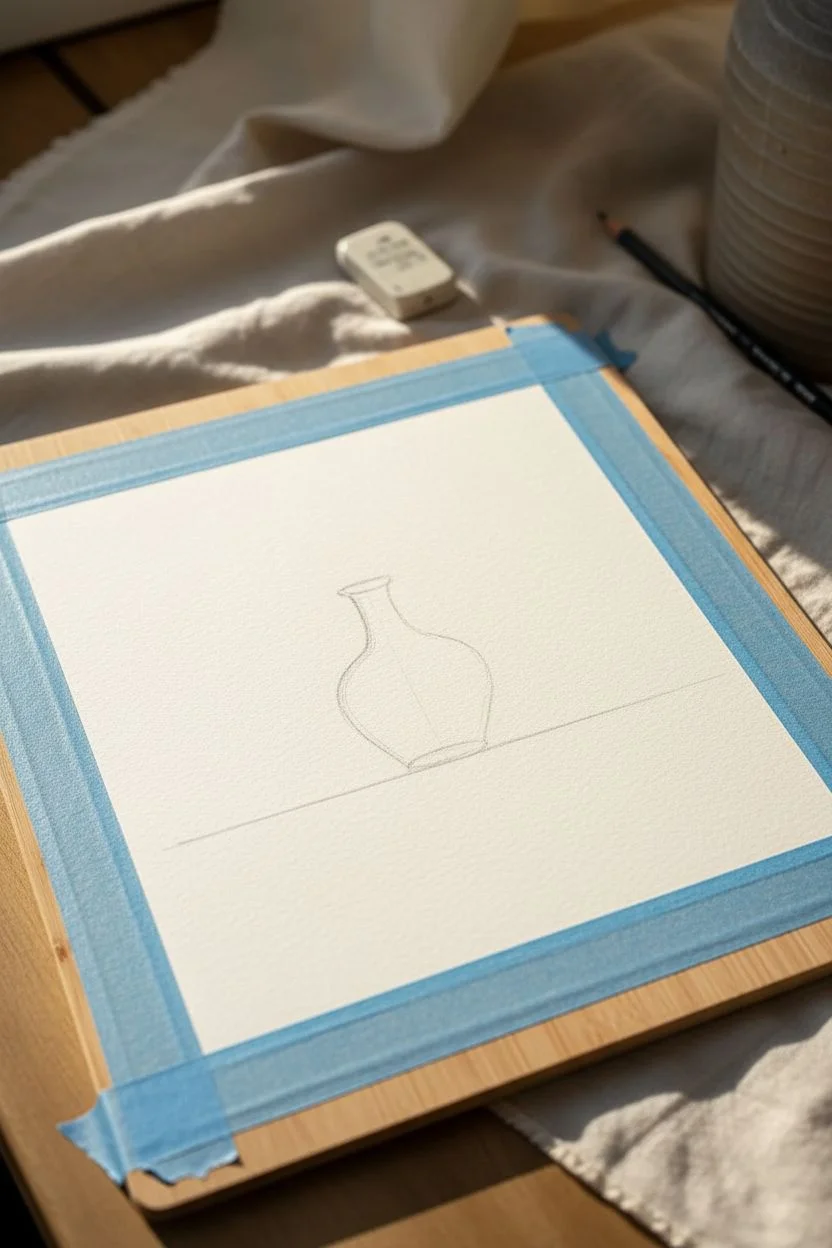
Step 1: Preparation and Sketching
-
Prepare your paper:
Cut your watercolor paper into a square format if it isn’t already. Tape down the edges to a board with painter’s tape to create a crisp, clean border and prevent buckling when wet. -
Map out the horizon:
Lightly draw a straight horizontal line about one-third of the way up from the bottom of the paper. This establishes the table surface where your vase will sit. -
Sketch the vase silhouette:
In the center, lightly sketch the outline of a simple bottle vase. Start with a narrow neck that curves outward into a bulbous body before tapering slightly at the base. Keep your pencil lines very faint so they disappear under the paint. -
Refine the shape:
Ensure the vase sits solidly on your horizon line. Use your kneaded eraser to lift any heavy graphite marks, leaving only a ghost of the image to guide you.
Uneven Background?
If your background wash looks streaky, that’s okay! In monochrome studies, these ‘blooms’ create a beautiful, organic texture that mimics old cyanotype photography.
Step 2: Painting the Background
-
Mix a light wash:
Dilute your Indigo or Prussian Blue paint with plenty of water on your palette. You want a very pale, transparent tea-like consistency for the background areas. -
Wash the wall area:
Using a large round or flat brush, paint the area above the horizon line and around the vase. Apply the wash loosely, allowing for some unevenness which adds texture and atmosphere. -
Add the table surface:
While the wall area is drying, paint the table surface below the horizon line. Use a slightly more saturated mix of blue here to differentiate the horizontal plane from the vertical wall. -
Let it dry completely:
It is crucial to let this first layer dry entirely before painting the vase, otherwise the dark blue of the vase will bleed into your background.
Use Texture Medium
Mix a little Granulation Medium into your blue paint. This separates the pigment particles as they dry, creating a speckled, vintage texture perfect for monochrome.
Step 3: Defining the Vessel
-
Mix a medium value:
Create a stronger mixture of your blue paint. Ideally, this should be about 50% opacity—darker than the background but not full strength yet. -
Base coat the vase:
Carefully paint the entire shape of the vase with this medium-strength blue. Use the tip of your round brush to get clean edges along the silhouette. -
Observe the light source:
Decide where your light is coming from (in the example, it appears usually diffuse or from the top left). While the paint is still damp, you can lift a tiny bit of pigment on the lighter side with a clean, thirsty brush to suggest highlights. -
Add a shadow accent:
While the vase layer is wet, drop a tiny bit of concentrated pigment into the curve of the vase on the shadow side to start building volume wet-in-wet. -
Wait for drying:
Let this base layer of the vase dry completely to the touch. The paper should feel room temperature, not cool.
Step 4: Adding Depth and Shadow
-
Mix the darkest value:
Prepare a thick, creamy mixture of your blue paint with very little water. This will be your darkest shadow tone. -
Paint the shadow side:
Apply this dark paint to the shadowed side of the vase (usually the side opposite the light source). Curve your brushstrokes to follow the round form of the belly of the vase. -
Soften the edge:
Immediately rinse your brush, dry it slightly on a paper towel, and run the damp brush along the edge of the dark paint you just laid down. This softens the transition into the medium blue base, creating a round, 3D effect. -
Darken the rim:
Use the tip of your small brush to add a thin dark line along the rim of the vase and underneath the lip to define the opening. -
Ground the object:
Paint a slice of dark shadow on the table surface right underneath the vase. This contact shadow anchors the object so it doesn’t look like it’s floating. -
Final assessment:
Step back and look at your tonal values. If the vase looks too flat, add another glaze of dark blue to the shadow side once the paper is dry. -
Remove tape:
Once the painting is 100% dry, carefully peel away the painter’s tape at a 45-degree angle to reveal your crisp, clean borders.
Frame your study with a wide white mat to emphasize the stark beauty of the single color used
Stained-Glass Style Geometric Lines
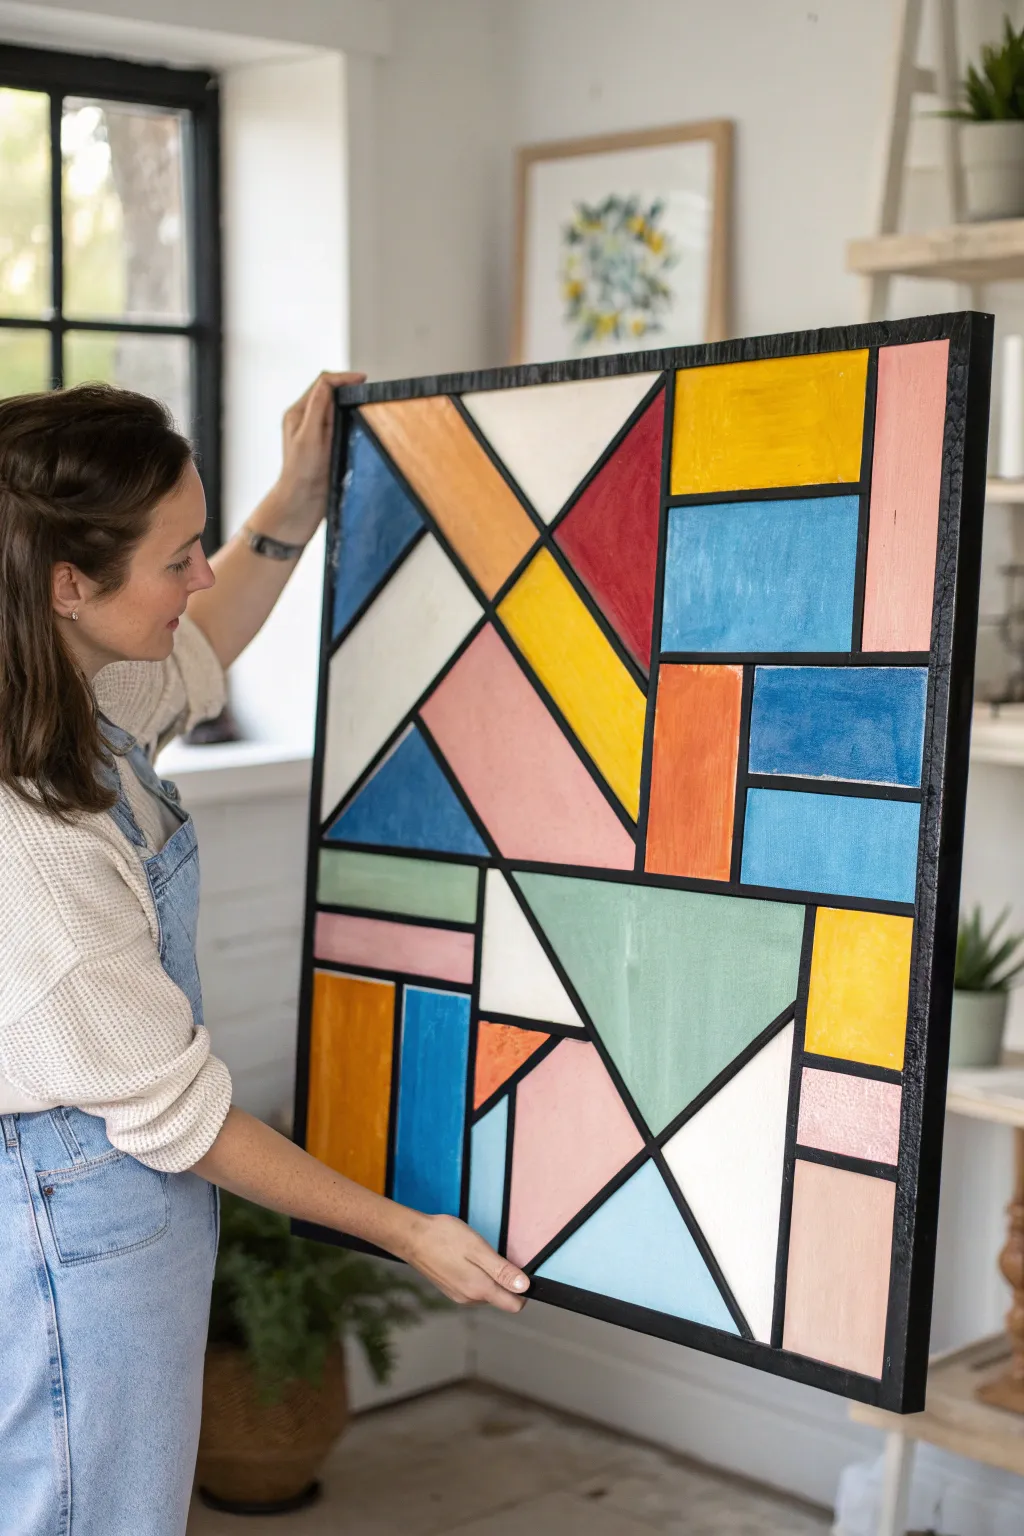
Bring the classic elegance of stained glass into your home without soldering a single joint with this striking geometric canvas. Thick, raised black lines separate vibrant blocks of color, creating textural depth and a modern art look that is surprisingly achievable for beginners.
How-To Guide
Materials
- Large square canvas (approx. 24″x24″ or 30″x30″) or wood panel
- Pencil and long ruler (or yardstick)
- Black acrylic paint (heavy body preferred) or black relief outliner paint
- Assorted acrylic paints (mustard yellow, teal blue, sage green, salmon pink, terracotta, white, navy, red)
- Flat shader brushes (various sizes: 1/2 inch, 1 inch)
- Round detail brush (size 2 or 4)
- Painter’s tape (optional)
- Palette or paper plate
- Water cup and paper towels
- Matte or satin varnish (optional finishing coat)
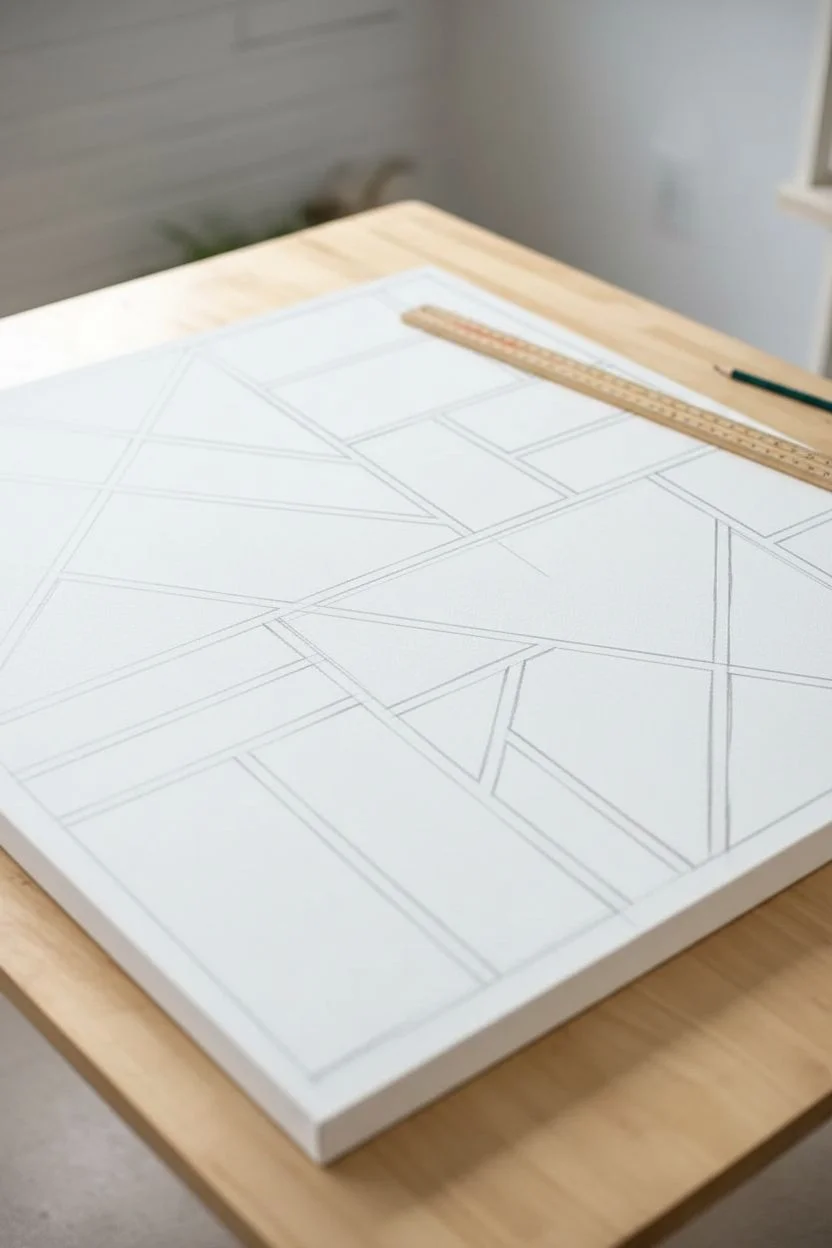
Step 1: Planning the Geometry
-
Map out your grid:
Start with a clean, white canvas. Using your ruler and pencil, lightly draw a few primary dividing lines. For this specific ‘stained glass’ look, avoid a perfect grid; instead, draw intersecting diagonal and horizontal lines to create interesting asymmetry. -
Subdivide the shapes:
Look for large empty spaces in your initial sketch and break them down further. Add triangles inside rectangles or split a large square with a diagonal slash. Aim for a mix of shapes—triangles, trapezoids, and rectangles. -
Refine the composition:
Step back and look at your pencil sketch. Ensure there’s a good balance of large and small shapes. Erase any lines that feel too cluttered or confusing before you commit to paint.
Step 2: Creating the ‘Lead’ Lines
-
Mix your liner color:
To mimic the look of lead came in stained glass, you need thick, opaque black lines. If using standard acrylic, mix a little matte medium or use heavy body black paint to ensure good coverage. -
Outline the shapes:
Using a steady hand and a medium round brush (or a relief outliner tube for a raised effect), trace over your pencil lines. Make these lines deliberately thick—about 1/4 inch wide—to serve as bold borders for your colors. -
Don’t forget the edges:
Paint the outer perimeter of the canvas black as well, creating a frame that matches the internal lines. I find painting the sides of the canvas black gives the piece a really professional, finished appearance. -
Allow specifically long drying time:
Let the black outlines dry completely before moving on. Since the black paint is thick, give it at least 2-3 hours. If you rush this, wet black paint will bleed into your light colors later.
Clean Lines Hack
For ultra-crisp black lines without a shaky hand, paint the whole canvas black first. Then, use painter’s tape to mask off your ‘lead’ lines and just paint the colored shapes inside the open squares.
Step 3: Adding the Color
-
Plan your palette:
Select a color palette that feels retro yet fresh. For this project, mix muted versions of primaries: a mustard yellow, a dusty rose pink, a sage green, and a denim blue, balanced with bright white and terracotta. -
Paint the first color group:
Start with one color, say the mustard yellow. Select 2-3 non-adjacent shapes to fill with this color. Using your flat brush, carefully paint inside the black lines. -
Create texture:
Don’t worry about the paint being perfectly smooth. Use visible brushstrokes in different directions to mimic the slightly wavy, imperfect texture of real glass. -
Continue filling shapes:
Move to your next color (e.g., sage green) and fill in another set of shapes. Keep colors separated to maintain balance. Rinse your brush thoroughly between color changes. -
Add the neutrals:
Use white or cream for several shapes to give the eye a place to rest. This high contrast against the black lines is key to the stained-glass effect. -
Address opacity:
Some colors, especially yellows and whites, create a better effect with two coats. allow the first layer to dry to the touch before adding a second for solid, opaque coverage. -
Touch-ups:
Inevitable slips happen. Once the colored sections are fully dry, take a small detail brush with black paint and tidy up any lines where the colored paint might have strayed over the border.
Textured Glass Effect
Mix a clear gloss gel medium into your colored paints. The gel holds brushstrokes, creating physical ridges that catch the light exactly like ripple-textured cathedral glass.
Step 4: Finishing touches
-
Check for gaps:
Inspect the canvas closely for any tiny white specks of unpainted canvas between the color and the black line. Fill these in carefully. -
Seal the artwork:
Once the entire painting has cured (usually 24 hours), apply a varnish. A gloss varnish mimics shiny glass, while a matte varnish gives a more modern, illustrative feel.
Hang your new geometric masterpiece in a well-lit spot to let those bold colors truly pop


Spiral Composition Inside the Square
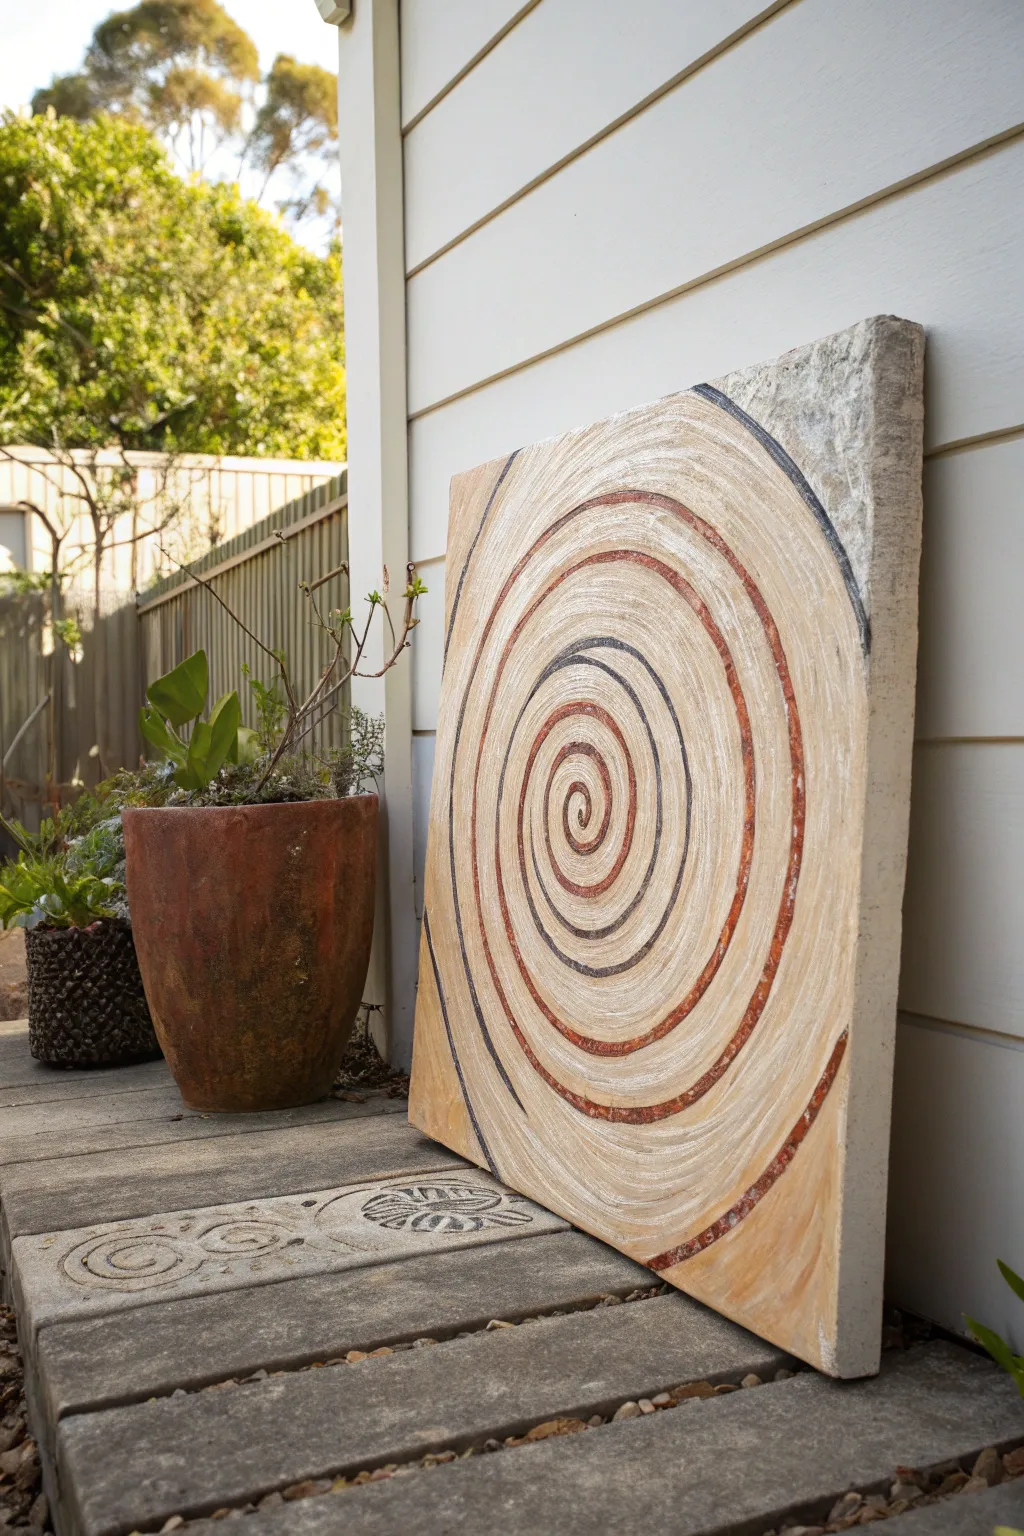
This textured acrylic painting captures the raw beauty of natural elements through a hypnotic spiral design. Using warm ochres, deep terracottas, and charcoal tones on a square canvas, you can create a centerpiece that feels both ancient and modern.
Step-by-Step Guide
Materials
- Square stretched canvas (gallery profile preferred for depth)
- Acrylic modeling paste or heavy texture gel
- Palette knives (wide and narrow)
- Acrylic paints: Raw Sienna, Burnt Sienna, Mars Black, Titanium White, Unbleached Titanium
- Combs or texture tools (optional)
- Large flat brush
- Fine liner brush
- Sandpaper (medium grit)
- Matte spray varnish
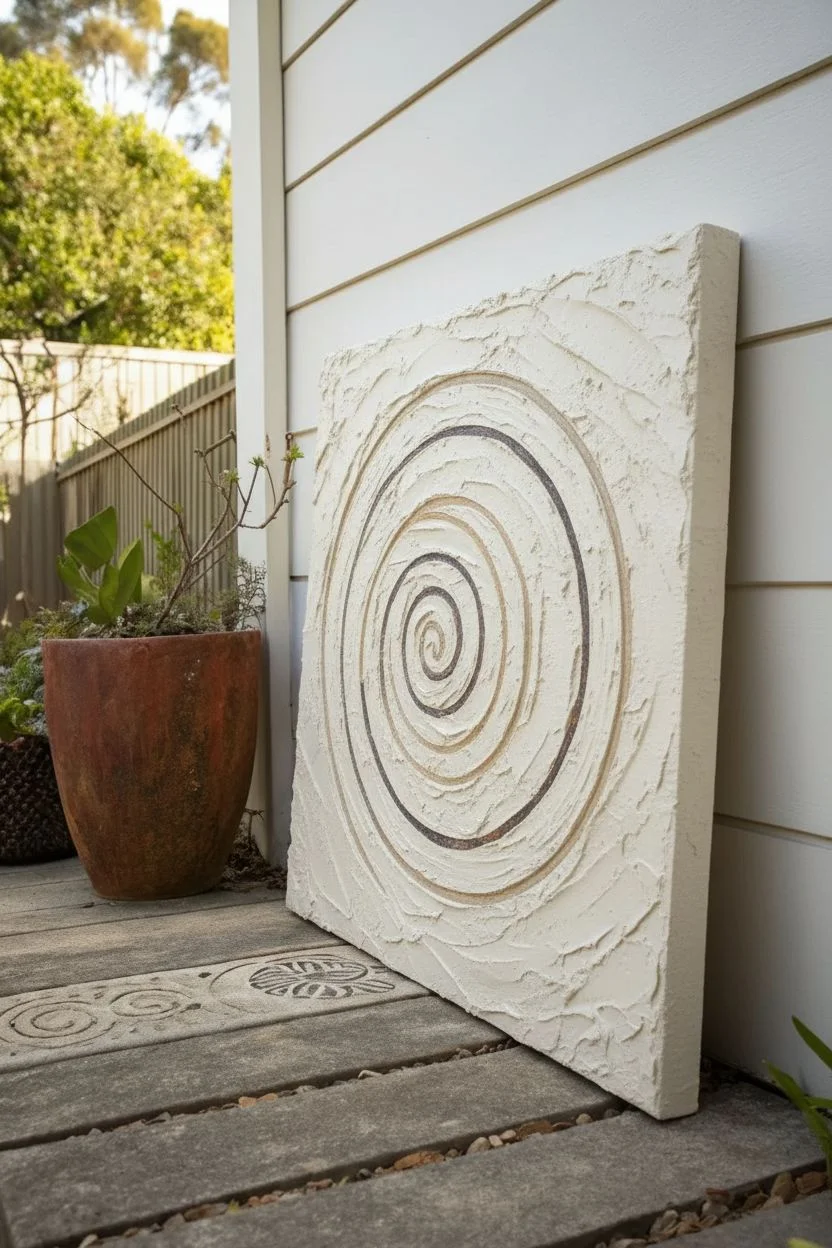
Step 1: Preparing the Textured Base
-
Prime the Surface:
Start by ensuring your canvas is clean and taut. If you want that stone-like quality seen in the photo, apply a base coat of gesso mixed with a tiny bit of sand or grit. -
Apply Modeling Paste:
Using a wide palette knife, spread a generous layer of modeling paste across the entire canvas surface. It doesn’t need to be perfectly smooth; variations add character. -
Create the Groove Guide:
While the paste is still wet, use the tip of a palette knife or a blunt stick to lightly trace your spiral path. Start from the center and work your way out to the edges. -
Enhance the Texture:
Use a texturing comb or the serrated edge of a tool to drag along the direction of the spiral. This creates those directional striations that mimic carved stone. -
Allow to Cure:
Let the texture paste dry completely. This is crucial—I usually leave it overnight to ensure the thickest parts are solid before painting.
Step 2: Layering the Background Colors
-
Base Wash:
Mix Unbleached Titanium with a touch of Raw Sienna and a lot of water to create a wash. Brush this over the dried texture to stain the ‘stone’ surface. -
Dry Brushing Highlights:
Load a dry flat brush with a mixture of Titanium White and a tiny drop of Raw Sienna. Lightly drag it over the raised textures to make the striations pop. -
Adding Ancient Patina:
Dab small amounts of watered-down grey or diluted black into specific corners or random patches, then wipe it back with a rag to simulate weathering. -
Roughing the Edges:
If you want the edges to look rugged like the reference, smudge some darker paint along the perimeter and tap it with a dry sponge.
Too much texture?
If your modeling paste ridges are too sharp after drying, sanding them down before painting is easier than fixing it later. Use a fine-grit block.
Step 3: Painting the Spiral
-
Defining the Path:
Identify the primary spiral groove you carved earlier. This will be the roadmap for your colored lines. -
Applying the Terracotta:
Mix Burnt Sienna with a little texture paste or use heavy body paint. Paint a thick, broken line following the spiral, leaving gaps occasionally for a weathered look. -
Adding the Charcoal Line:
Using Mars Black (or a dark charcoal grey), paint a thinner companion line alongside the terracotta one. Let the lines intertwine or separate slightly as they move outward. -
Create Depth:
Where the lines curve, feather the edges slightly with a dry brush so they look like they are embedded in the stone rather than just sitting on top. -
Mixing the Cream Tones:
For the spaces between the colored spirals, mix a creamy beige using White and Raw Sienna. Paint this into the negative spaces to clean up the design. -
Final Distressing:
Once the spiral lines are dry, take your sandpaper and very lightly scuff specific areas of the paint to reveal the texture underneath.
Pro Tip: Organic Lines
Don’t try to make the spiral mathematically perfect. A shaky hand actually helps mimic the natural, hand-carved stone aesthetic shown here.
Step 4: Finishing Touches
-
Corner details:
Inspect the corners of the canvas. Following the reference, you might want to leave an upper corner slightly lighter or ‘unfinished’ to suggest broken stone. -
Review Contrast:
Step back and check the spiral. If the center feels lost, darken the central coil slightly to draw the eye inward. -
Seal the Work:
Apply a coat of matte spray varnish. This protects the textured ridges from dust and unifies the sheen of the different paints without making it glossy. -
Display Prep:
Since this is a tactile piece, ensure the sides of your canvas are painted a neutral stone color to complete the 3D object effect.
Hang your new textural piece in a spot with side lighting to really dramatically emphasize the relief work you created
Symmetrical Mandala-Inspired Pattern
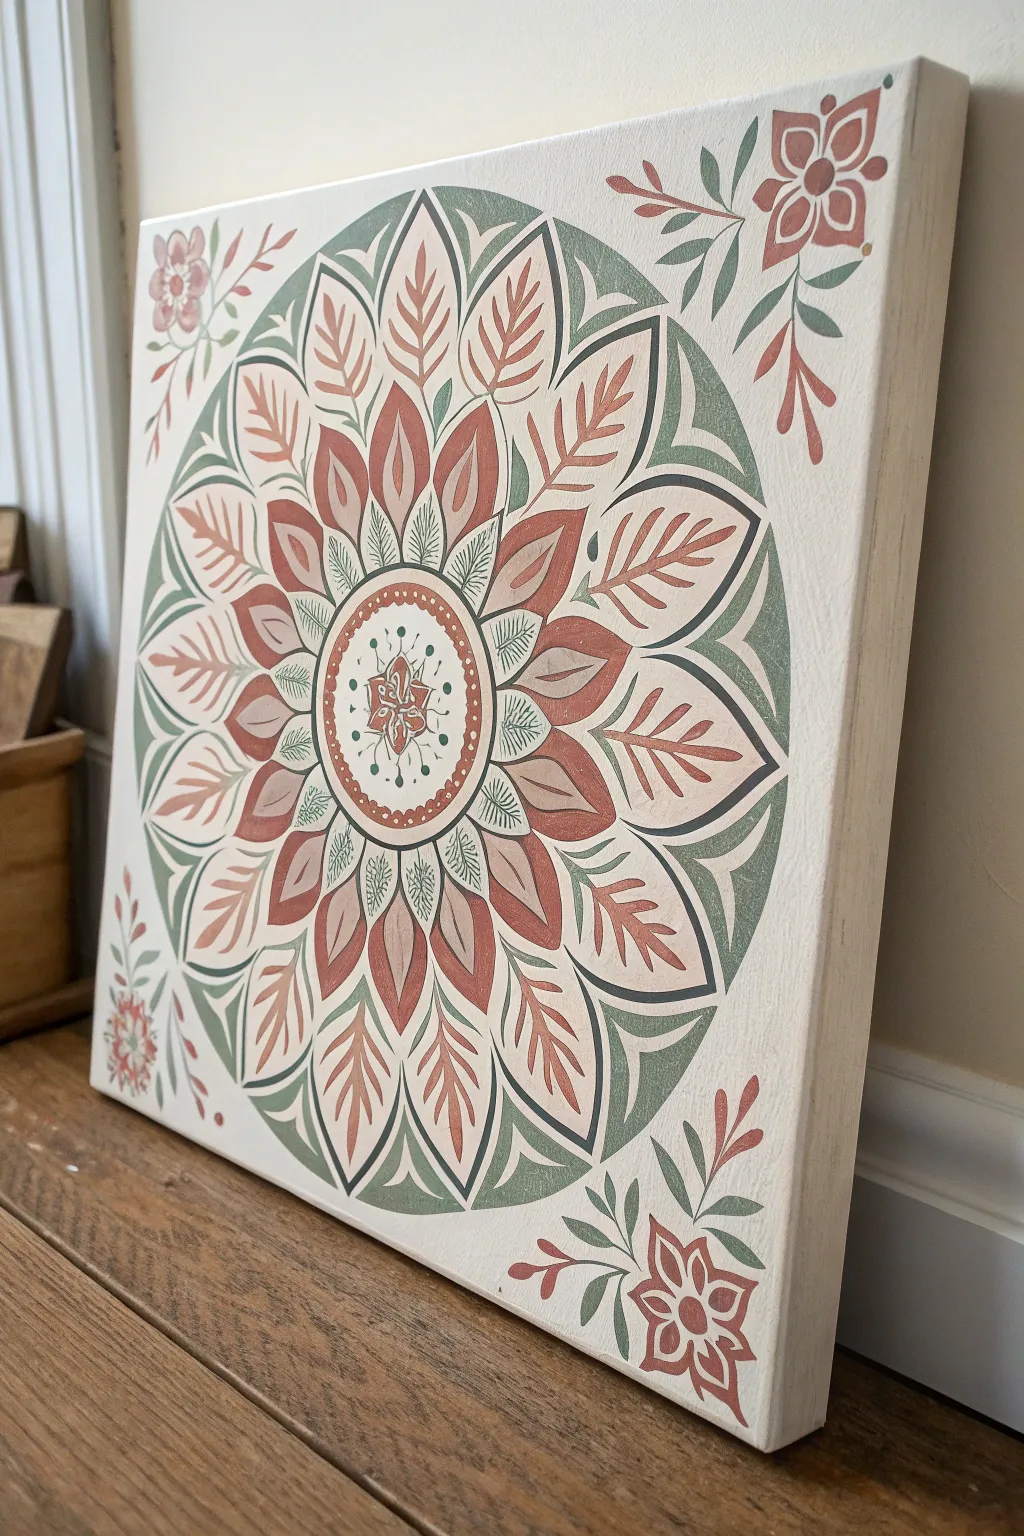
Bring a touch of serene, Scandinavian-inspired folk art to your walls with this symmetrical mandala painting. Featuring a soothing palette of sage green and terracotta on a cream canvas, this circular botanical design radiates warmth and balance.
Step-by-Step
Materials
- Square stretched canvas (12×12 or similar)
- Acrylic paints: Cream/Off-white, Sage Green, Terracotta/Rust Red, Dark Charcoal/Soft Black
- Compass and ruler
- Pencil and eraser
- Assorted brushes: lush round brush, fine liner brush
- Palette and water cup
- Paper towel
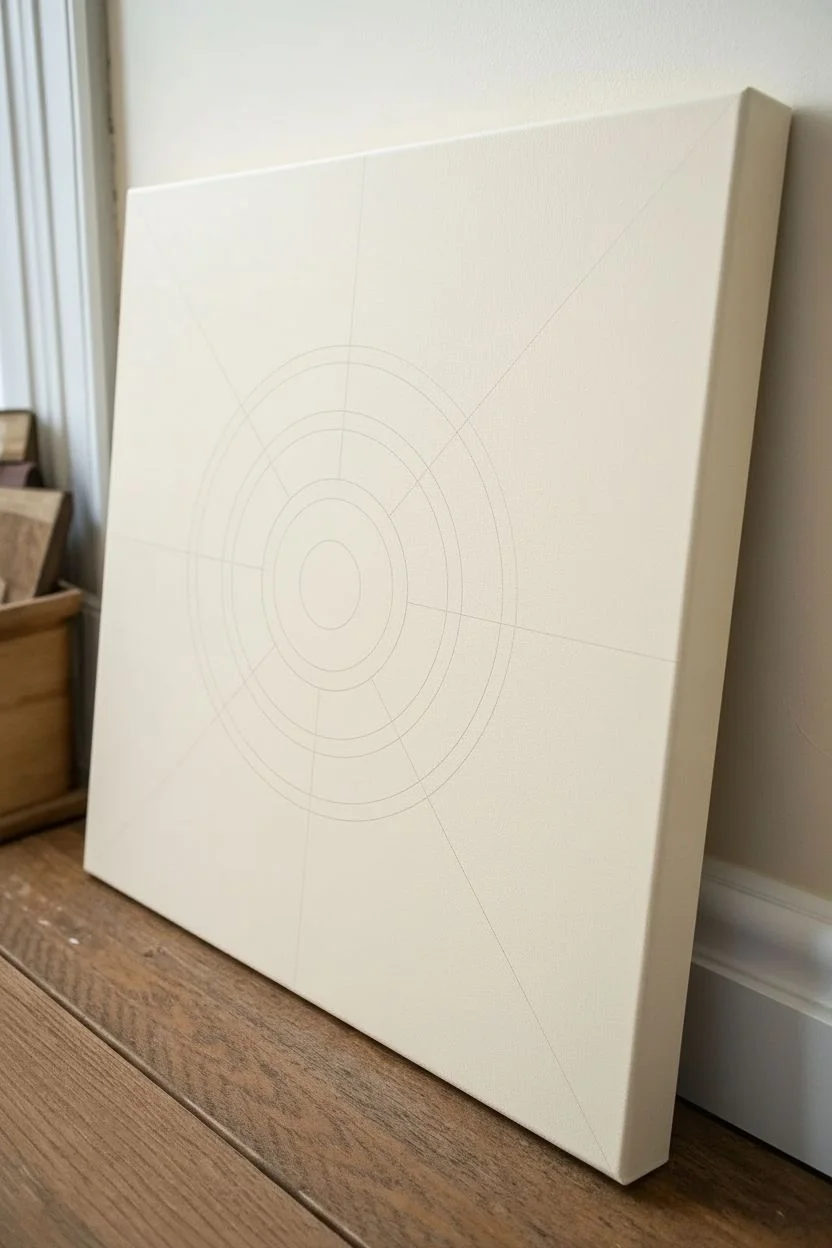
Step 1: Base and Structure
-
Priming the canvas:
Begin by coating your entire canvas with a layer of cream or warm off-white acrylic paint. Ensure you cover the sides for a finished look. Let this base coat dry completely before proceeding. -
Finding the center:
Use a ruler to lightly draw diagonal lines from corner to corner to pinpoint the exact center of your square canvas. Mark this spot with a pencil. -
Drawing the concentric circles:
Using a compass, draw a series of concentric circles radiating from the center point. You will need a small inner circle for the core, a middle band for the first petal layer, and a large outer circle that nearly touches the edges of the canvas. -
Dividing the mandala:
Lightly divide your circle into equal segments like a pie—aim for 12 or 16 sections to guide the symmetrical petal placement. Keep these pencil lines very faint so they are easy to erase later.
Wobbly circles?
If your hand isn’t steady enough for perfect circles, trace household objects like bowls or plates for your guidelines instead of using a compass.
Step 2: Available Shapes and Petals
-
Painting the central flower:
In the very center circle, paint a small four-pointed star shape using your terracotta paint. Add tiny dots or lines in sage green around it for detail. -
Defining the core ring:
Mix a small amount of water into your terracotta paint to make it fluid. Carefully paint a thin ring around your central flower motif. Inside this ring, add small dots or a scalloped edge. -
Sketching the petal shapes:
Use your pencil to sketch the large, leaf-like petals radiating outward. In the specific design shown, there are primary leaf shapes that curve gently, alternating with smaller filler shapes. -
Blocking in the green background:
Focus on the outer ring of the mandala. Using sage green, paint the negative space behind where the outer leaves will go, creating a bold colored ring that defines the circular boundary of the design.
Step 3: Layering Colors and Details
-
Filling the primary petals:
Paint the main leaf shapes in the middle ring using the terracotta/rust color. Use a round brush to get smooth curves. Leave a tiny gap between these shapes and the central ring. -
Adding the leaf veins:
Once the terracotta leaves are dry, switch to a cream color (the same as your background). Paint a central stem line and v-shaped veins inside each terracotta leaf. This negative-painting technique makes the design pop. -
Painting the outer leaves:
For the outermost layer overlapping the green ring, paint large, varied leaf shapes in cream. Then, go back inside them with terracotta to paint the veins, reversing the technique you just used. -
Detailing with charcoal:
Take your fine liner brush and the dark charcoal paint. Outline the major sections of the mandala to give it crisp definition. I find that breaking the line occasionally keeps it looking organic rather than rigid. -
Adding inner botanical details:
In the spaces between the main terracotta petals, use your fine brush to paint delicate, fern-like sprigs in sage green or charcoal. These fine lines add texture and complexity.
Make it dimensional
add tiny dots of 3D fabric paint or ‘liquid pearls’ in white or gold along the mandala rings for texture you can physically feel.
Step 4: Corner Accents and Finishing
-
Drafting corner motifs:
The corners of the square canvas look empty, so sketch a simple floral motif in each one—a single flower flanked by two leaves, pointing inward toward the mandala. -
Painting the corner flowers:
Paint the corner flower petals in terracotta and the leaves in sage green. Keep the style consistent with the center—simple shapes with clear outlines. -
Refining outlines:
Go over the corner motifs with your fine charcoal liner brush. Add a few tiny dots or floating leaves around them to fill the space gently. -
Erasing guidelines:
wait for the paint to be 100% bone dry—seriously, give it extra time. Then, gently erase any visible pencil marks from your initial grid and circles. -
Applying varnish:
Seal your artwork with a layer of matte or satin varnish to protect the paint and unify the sheen of the different colors.
Hang your new symmetrical masterpiece in a cozy nook to enjoy its calming rhythm.
Negative Space Silhouette in a Square
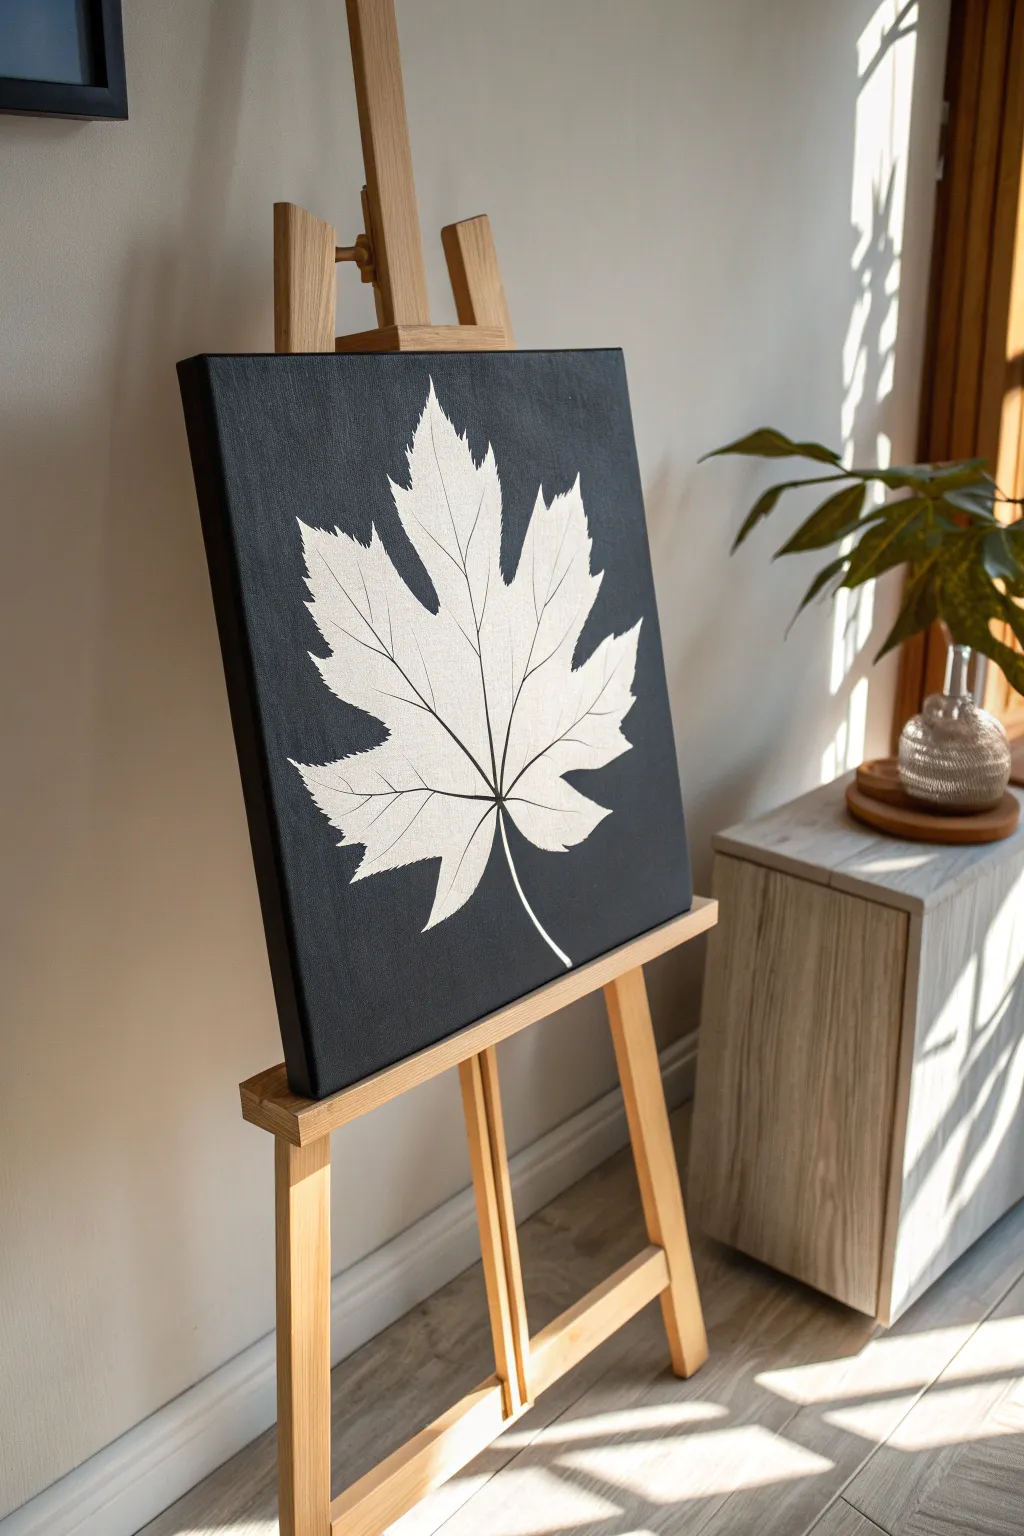
Capture the stark beauty of nature with this high-contrast square canvas project. By utilizing negative space and crisp linework, you will create a stunningly detailed white maple leaf that pops dramatically against a deep matte black background.
How-To Guide
Materials
- Square stretched canvas (e.g., 12×12 or 16×16 inches)
- Matte black acrylic paint
- Flow improver or water
- Wide flat brush (for the background)
- Fine liner brush (size 0 or 00)
- Black fine-tip paint pen or micron pen (archival ink)
- Real maple leaf (pressed flat) or a printed stencil
- Graphite transfer paper
- Pencil (HB or H)
- Painter’s tape or masking fluid (optional)
- Palette
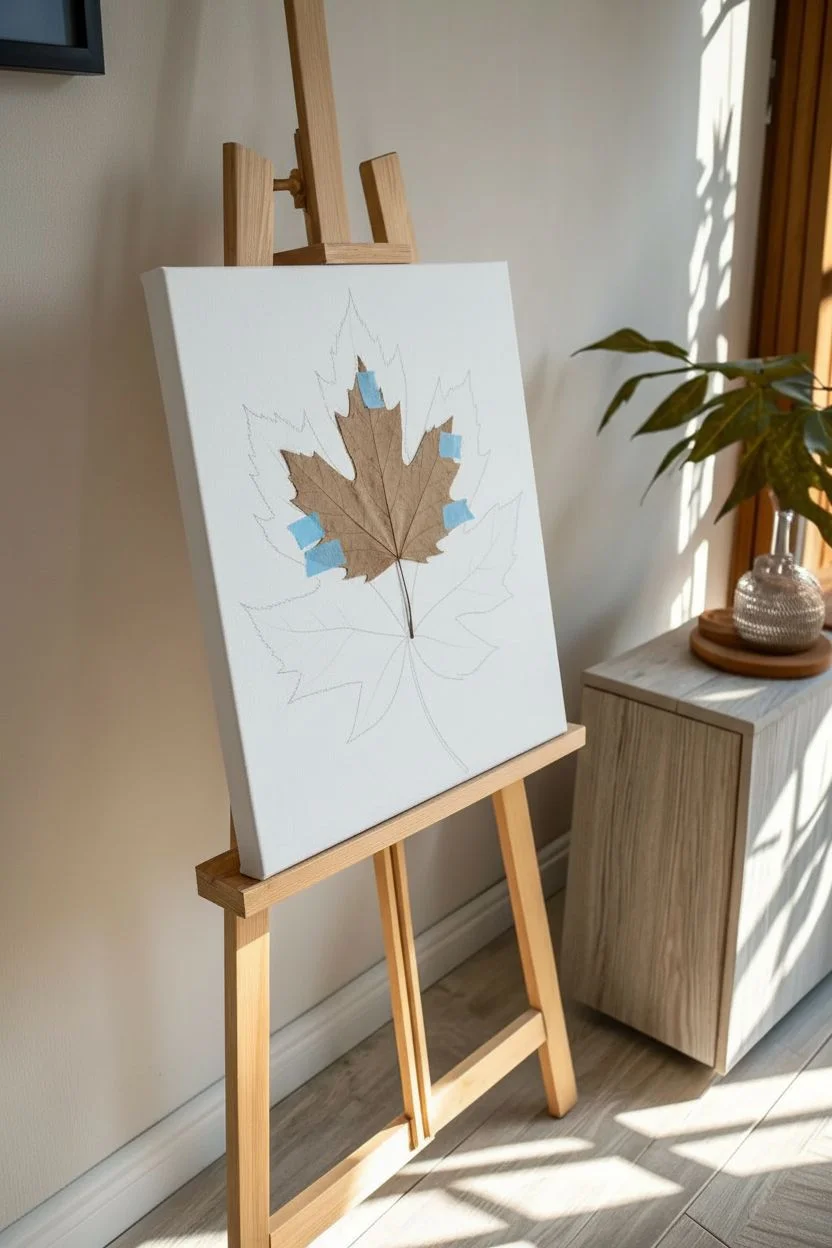
Step 1: Preparation and Layout
-
Source your subject:
Find a large, intact maple leaf. If it’s autumn, grab a real one and press it flat inside a heavy book for 24 hours. Alternatively, find a high-resolution silhouette image online and print it to scale so it fills about 80% of your canvas. -
Center the design:
Position your leaf or paper template directly in the center of the clean, white canvas. Use tiny loops of painter’s tape on the back to hold it temporarily in place so it doesn’t shift while you work. -
Trace the perimeter:
Using a light hand and a sharp pencil, trace the exact outline of the leaf onto the canvas. Be precise with the jagged edges and the stem. If you are using a paper printout, you can slip graphite transfer paper underneath and trace over the lines to transfer the image. -
Refine the sketch:
Remove the leaf or template. Check your pencil line for any faint spots and gently define them. The goal is a crisp, clean contour that separates the ‘leaf’ space from the background.
Fixing Shaky Lines
Painting veins is tricky! If your hand shakes, use a ‘mahl stick’ (or a clean ruler) to bridge across the canvas. Rest your wrist on it to stabilize your hand without touching wet paint.
Step 2: Creating the Negative Space
-
Outline with paint:
Load a small round brush with matte black acrylic paint. Carefully paint along the *outside* edge of your pencil line. -
Establish the border:
Create a buffer zone of black paint about an inch wide around the entire leaf shape. This protects the delicate white shape from accidental splashes when you fill the rest. -
Fill the background:
Switch to your wide flat brush. Fill the large open areas of the canvas with the black acrylic. Ensure you paint the sides (edges) of the canvas as well for a professional, gallery-wrapped heavy look. -
Apply a second coat:
Let the first layer dry completely (about 20-30 minutes). I find that a second coat is almost always necessary to achieve that pitch-black, void-like coverage without seeing brushstrokes. -
Touch up edges:
Once dry, inspect the boundary between black and white. Use your smallest brush to sharpen any points on the leaf serrations that might have gotten rounded off.
Pro Tip: Masking Fluid
For ultra-crisp edges without anxiety, paint the leaf shape with liquid masking fluid first. Paint the black background freely, let dry, then peel the mask to reveal perfect white canvas.
Step 3: Detailing the Veins
-
Sketch the main veins:
Lightly sketch the primary vein structure inside the white leaf shape using a pencil. Start with the central vein running from stem to tip, then add the main branches radiating to the leaf lobes. -
Begin the primary lines:
Using a black fine-tip paint pen or a liner brush with slightly thinned black paint, trace over your main center vein. Keep the line steady but allow it to taper naturally as it reaches the top. -
Add secondary branches:
Draw the veins that extend into the main lobes of the leaf. These should connect smoothly to your central line. -
Create the fine network:
This is where patience pays off. Start adding the tiny, intricate tertiary veins that branch off the main lines. These lines should be extremely thin—barely a whisper. -
Vary line weight:
Ensure the lines get thinner the closer they get to the edge of the leaf. Heavier lines at the stem base and hair-thin lines at the tips add realism. -
Clean up:
If you make a small smudge inside the white leaf, wait for it to dry, then carefully dab a tiny bit of white acrylic over the mistake to erase it. -
Final assessment:
Step back five feet. Check if the veins read clearly or if the black background needs one final spot-check for opacity.
Hang your bold monochrome masterpiece in a well-lit area to let the contrast truly shine
Edge-to-Edge Pattern Tile Painting
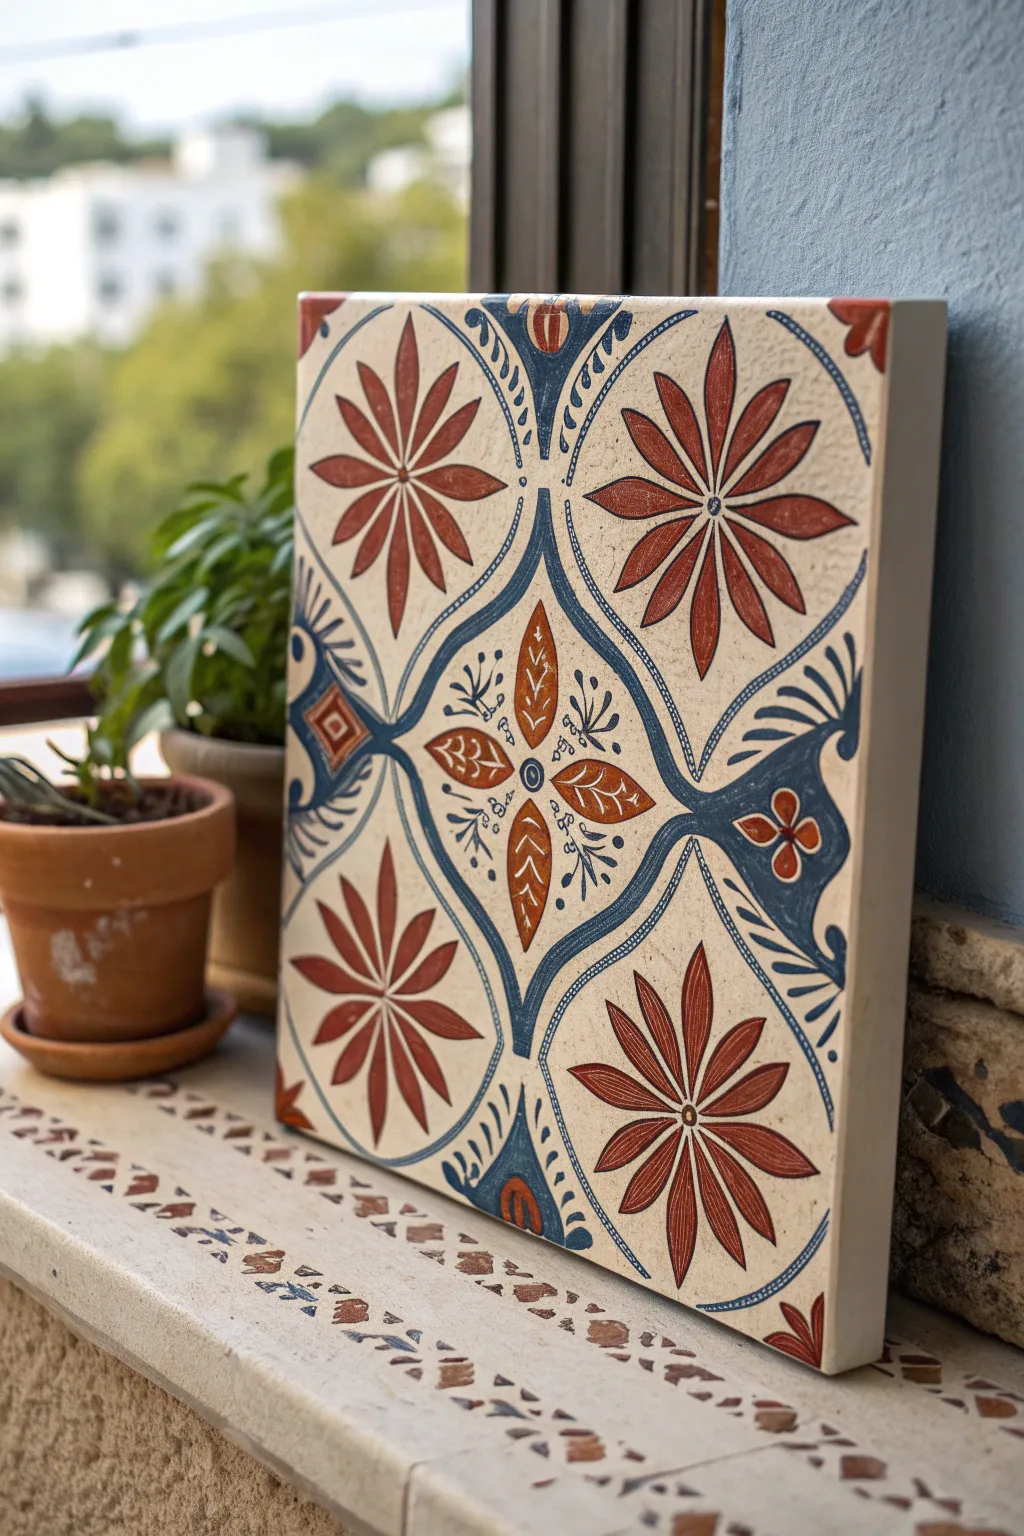
Transform a simple square canvas into a striking piece of Mediterranean-inspired decor that mimics the look of hand-painted glazed ceramic. This project uses a clever combination of matte and textured paints to replicate the aged, authentic feel of traditional tile patterning.
Detailed Instructions
Materials
- Square chunky canvas (12×12 inch or similar deep edge)
- Acrylic heavy body paints: Titanium White, Unbleached Titanium (beige), Burnt Sienna, Cadmium Red, Navy Blue
- Texture paste or modeling paste
- Flat shader brushes (sizes 6 and 10)
- Round detail brush (size 1 or 2)
- Ruler and pencil
- Carbon transfer paper (optional)
- Compass or circular stencils
- Matte varnish
- Fine grit sandpaper (220 grit)
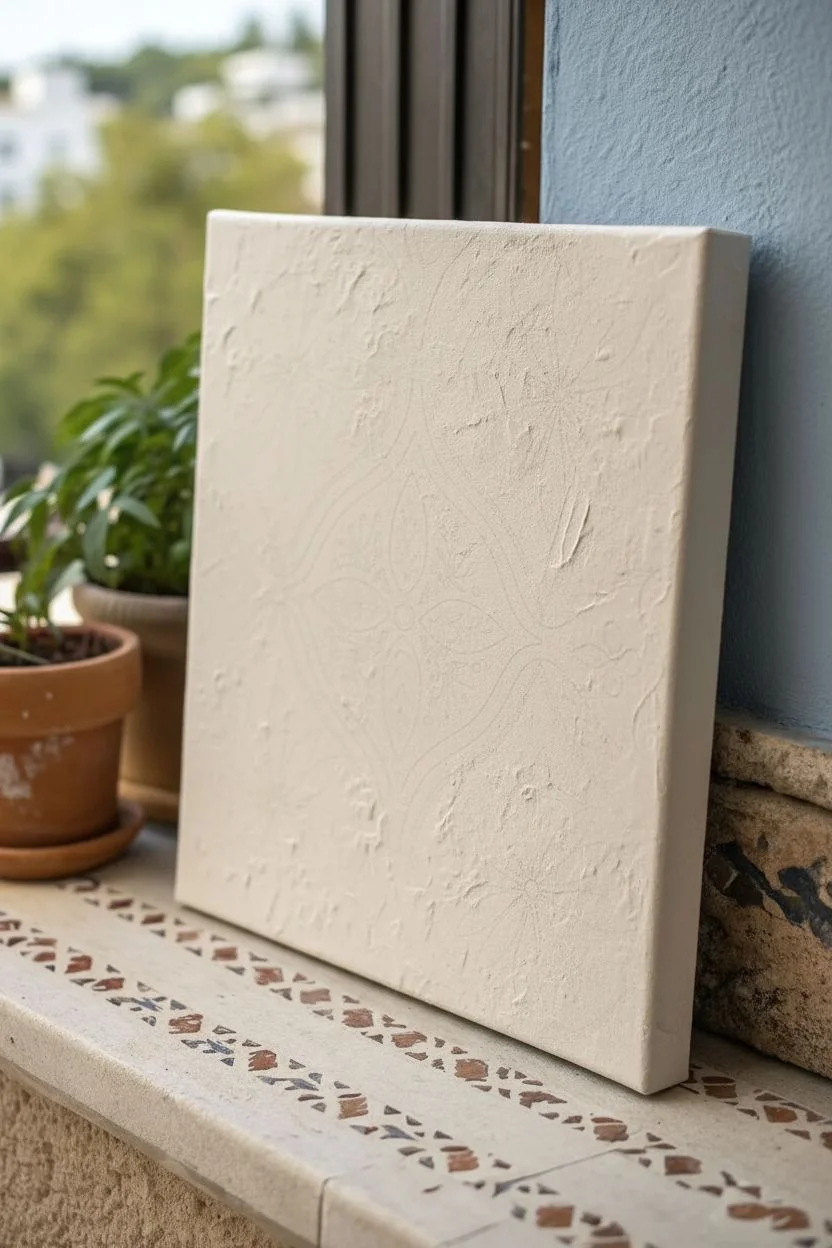
Step 1: Base Preparation
-
Texture the surface:
To mimic the imperfect surface of fired clay, mix a small amount of texture paste with Unbleached Titanium acrylic paint. Apply this mixture unevenly across the entire canvas face and sides using a stiff brush or palette knife. You want subtle ridges and bumps, not high peaks. -
Base coat application:
Once the texture layer is bone dry, paint a solid coat of Unbleached Titanium mixed with a tiny drop of White. This off-white, creamy color will serve as the ‘grout’ and background tone. Paint the sides as well for a finished look. -
Sand for age:
Lightly sand high spots of the dried base coat with fine-grit sandpaper. This knocks back the texture just enough to make it look like worn ceramic rather than fresh plaster.
Wobbly Lines?
Don’t panic if your blue lines aren’t straight. Authentic Azulejo tiles are hand-painted and full of imperfections. Vary pressure on the brush to embrace the organic look.
Step 2: Geometric Layout
-
Find the center:
Using your ruler, lightly mark the exact center of the canvas with a pencil. Draw a vertical and horizontal line intersecting at this point to divide the canvas into four equal quadrants. -
Draw the ogee framework:
Sketch the curvy, vase-like shape (ogee arch) in the center. The top and bottom points should align with your vertical center line, and the widest parts should touch the horizontal center line. Try to make the curves symmetrical. -
Mark corner quadrants:
In each of the four corners, sketch a quarter-circle arc. These arcs should curve inward, creating a space for the corner floral motifs. -
Sketch the florals:
Lightly draw the eight-petaled flower shapes. Place one full flower inside each of the four corner zones you just created. Draw a central four-petaled floral motif inside the central ogee shape.
Pattern Transfer Trick
Instead of freehanding symmetrical shapes, draw one quarter of the design on paper, trace it onto transfer paper, and rotate it 90 degrees four times to get perfect symmetry.
Step 3: Painting the Pattern
-
Mix the terracotta hue:
Create a warm, earthy red by mixing Burnt Sienna with a touch of Cadmium Red. I like to keep this color slightly translucent so the texture underneath shows through, mimicking glaze. -
Paint the petals:
Using your size 6 flat shader brush, paint the petals of the large corner flowers with the terracotta mix. Use a single stroke from the center outward for each petal to get a clean, tapered shape. -
Fill the center motif:
Use the same terracotta mix to paint the four fat leaves in the very center of the canvas. Add a small dot in the middle of this cluster. -
Create the blue outline:
Load a round detail brush with Navy Blue paint. Carefully outline the central ogee shape. You want a line that varies slightly in thickness to look hand-painted. -
Add inner blue details:
Paint a second, thinner blue line parallel to the first one, just inside the ogee shape. Connect these lines with tiny horizontal dashes to create a ladder-like or stitched effect. -
Paint corner accents:
In the negative space between the corner flowers and the central shape, paint the triangular corner accents in Navy Blue. These often look like stylized fan shapes or partial leaves. -
Add fine line flourishes:
Switch to your smallest round brush. Add the delicate whispy vines and dots surrounding the central terracotta flower. Keep your hand loose; these don’t need to be perfectly symmetrical.
Step 4: Finishing Touches
-
Clean up edges:
If your paint went over the lines, use a little of your base unbleached titanium color to tidy up the shapes. A little overlap is authentically ceramic, so don’t be too perfect. -
Simulate age spots:
Water down a tiny bit of Burnt Sienna until it is like tea. Flick a stiff brush over the canvas to create microscopic speckles, or dab a few faint spots with a sponge to look like worn glaze. -
Seal the artwork:
Apply a coat of satin or gloss varnish. While I usually prefer matte for paintings, a satin finish here really sells the illusion of a fired ceramic glaze.
Once hung, this faux-tile canvas will add a convincing touch of artisanal charm to your wall.


Have a question or want to share your own experience? I'd love to hear from you in the comments below!