
A good stage backdrop is like a giant canvas—it sets the mood before anyone even says a word. Here are my favorite stage backdrop ideas that range from classic, crowd-pleasing looks to artsy, unexpected setups you can really make your own.
Layered Drapes With Uplighting
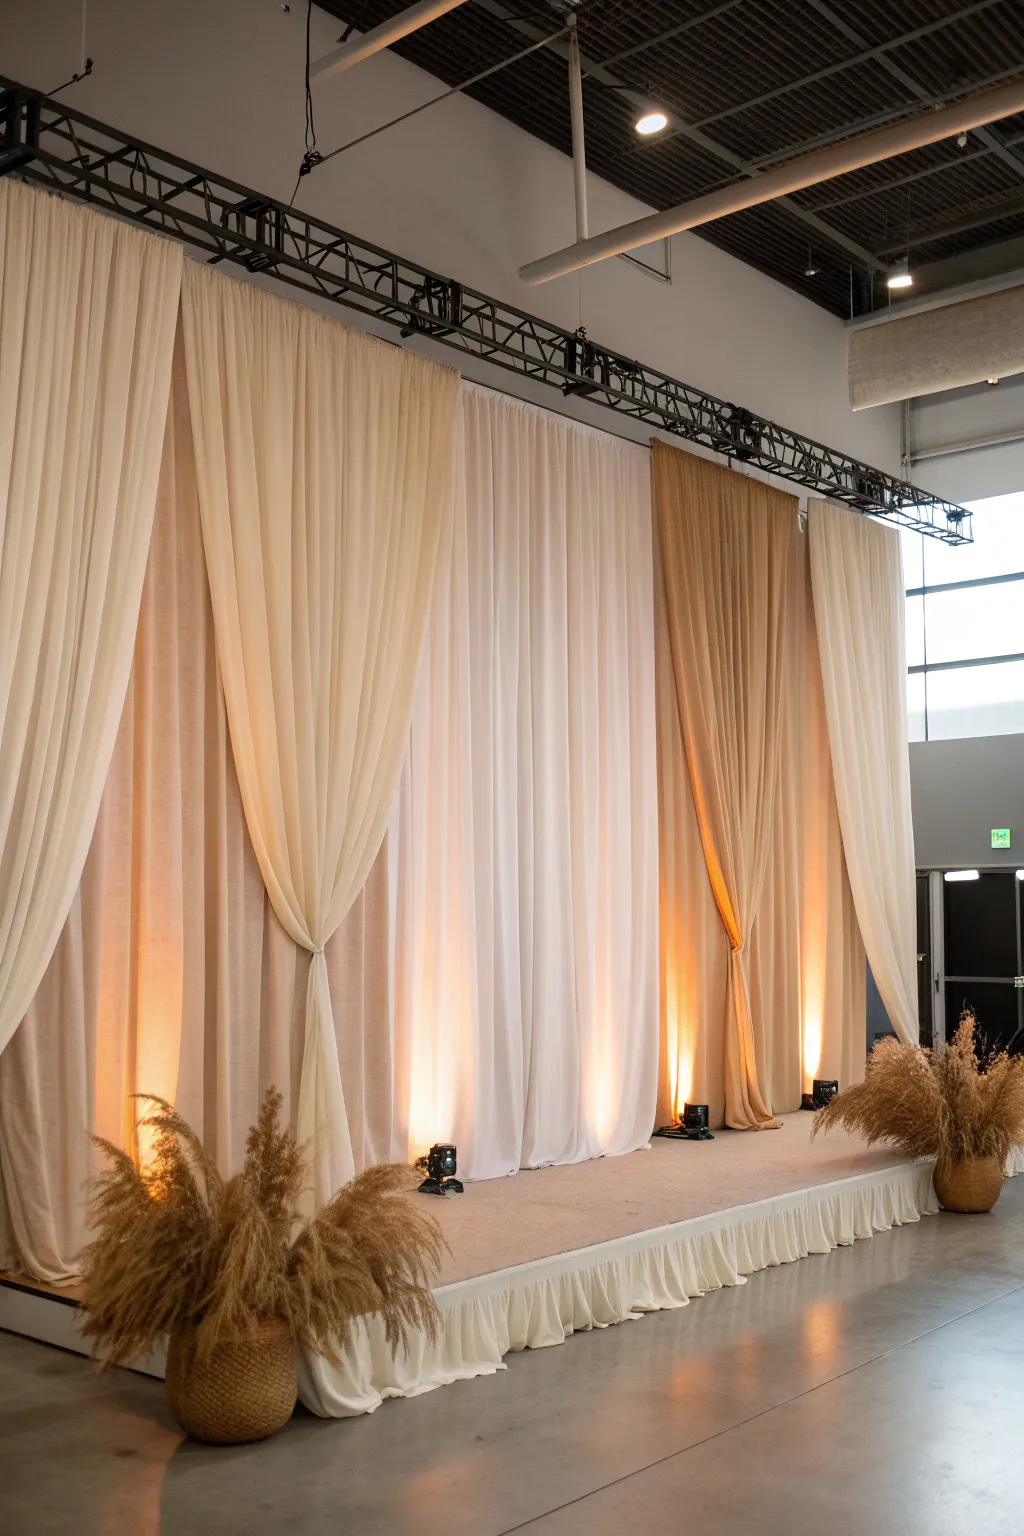
Transform a plain venue wall into a sophisticated focal point using soft, flowing fabrics and strategic lighting. This layered drape design creates depth and warmth, perfect for weddings, galas, or upscale corporate events.
Detailed Instructions
Materials
- Pipe and drape system (uprights, bases, crossbars)
- White or ivory shear voile fabric panels (base layer)
- Champagne or light beige chiffon fabric panels (middle layer)
- Tan or caramel chiffon fabric panels (accent layer)
- Zip ties or pipe cleaners
- LED uplights (warm white or amber capability)
- Dried pampas grass plumes
- Large woven geometric baskets
- Scissors
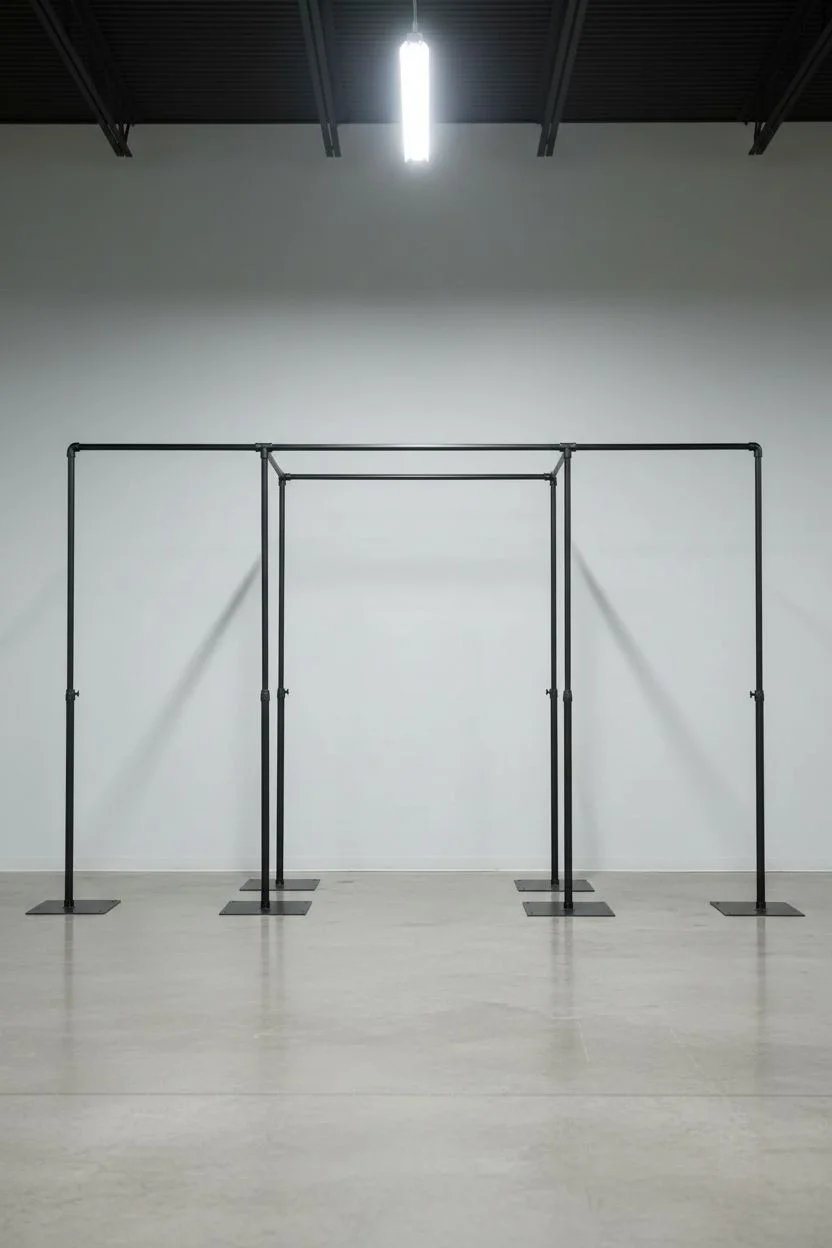
Step 1: Setting the Structure
-
Assemble the pipe frame:
Begin by setting up your pipe and drape hardware. Place the heavy base plates where you want the corners of your backdrop to be. Insert the upright poles into the bases and raise them to your desired height, ensuring they are level. -
Attach the crossbar:
Connect the horizontal crossbar between the uprights. Make sure it’s locked securely in place. If your backdrop is wider than 10 feet, use a center support upright to prevent sagging. -
Safety check:
Give the frame a gentle shake to ensure stability. Double-check that all locking mechanisms are engaged before hanging any weight on the bar.
Step 2: Layering the Fabric
-
Hang the base layer:
Slide the rod pockets of your white or ivory voile panels onto the crossbar. Gather the fabric significantly; you want full, rich pleats rather than a flat sheet. Aim for 2-3 times the width of the bar in fabric fullness. -
Add the middle layer:
Directly over the base layer, add panels of the champagne or beige chiffon. Focus these panels towards the outer thirds of the backdrop, leaving the center white section visible. -
Introduce the accent color:
Finally, layer in the tan or caramel chiffon panels. These should be placed strategically to create vertical color blocking sections. -
Create the crossover effect:
Take a panel of the lighter beige fabric from the left side and gently pull it towards the center. -
Secure the gather:
About one-third of the way up from the floor, gather this panel and secure it to the upright or a hidden weight behind the fabric using a zip tie or clear fishing line. Repeat this crossover process symmetrically if desired, though the example shows a relaxed, gathered drape effect. -
Floor pooling:
Ensure all fabric panels are long enough to touch the floor with a few inches of excess. Arrange the bottoms to puddle slightly for a romantic, luxurious look.
Fabric Weight Matters
Use heavier fabrics for the back layer to block light, and sheer voiles for the front layers to catch the uplighting beautifully.
Step 3: Lighting and Styling
-
Position the baskets:
Place your large woven baskets at the base of the backdrop. One large arrangement usually looks best on the left, with a slightly smaller one on the right for balance. -
Arranging pampas grass:
Insert the dried pampas grass plumes into the baskets. Create a fan shape, ensuring the stems are dense enough to look lush. I find it helps to place floral foam inside the baskets to hold the stems at specific angles. -
Place the uplights:
Set your LED uplights on the floor, tucking them slightly behind the fabric folds or the baskets so the hardware is concealed but the light beam is unobstructed. -
Aim the beams:
Angle the lights upward to wash the fabric with light. Aim them specifically at the ‘valleys’ of the drapes to emphasize the texture and folds. -
Color selection:
Set the lights to a warm amber or soft white hue. Avoid cool blue tones, as the goal is to enhance the creamy warmth of the fabric layers. -
Final adjustments:
Step back about 20 feet to view the whole setup. Tweak any fabric folds that look uneven and fluff the pampas grass one last time.
Add a Floral Header
Integrate a lush floral garland along the top crossbar, letting greenery spill down over the upper edge of the drapes for an organic touch.
Now step back and enjoy the soft, inviting glow of your professional-grade stage design


Classic Curtain Wall With Swags
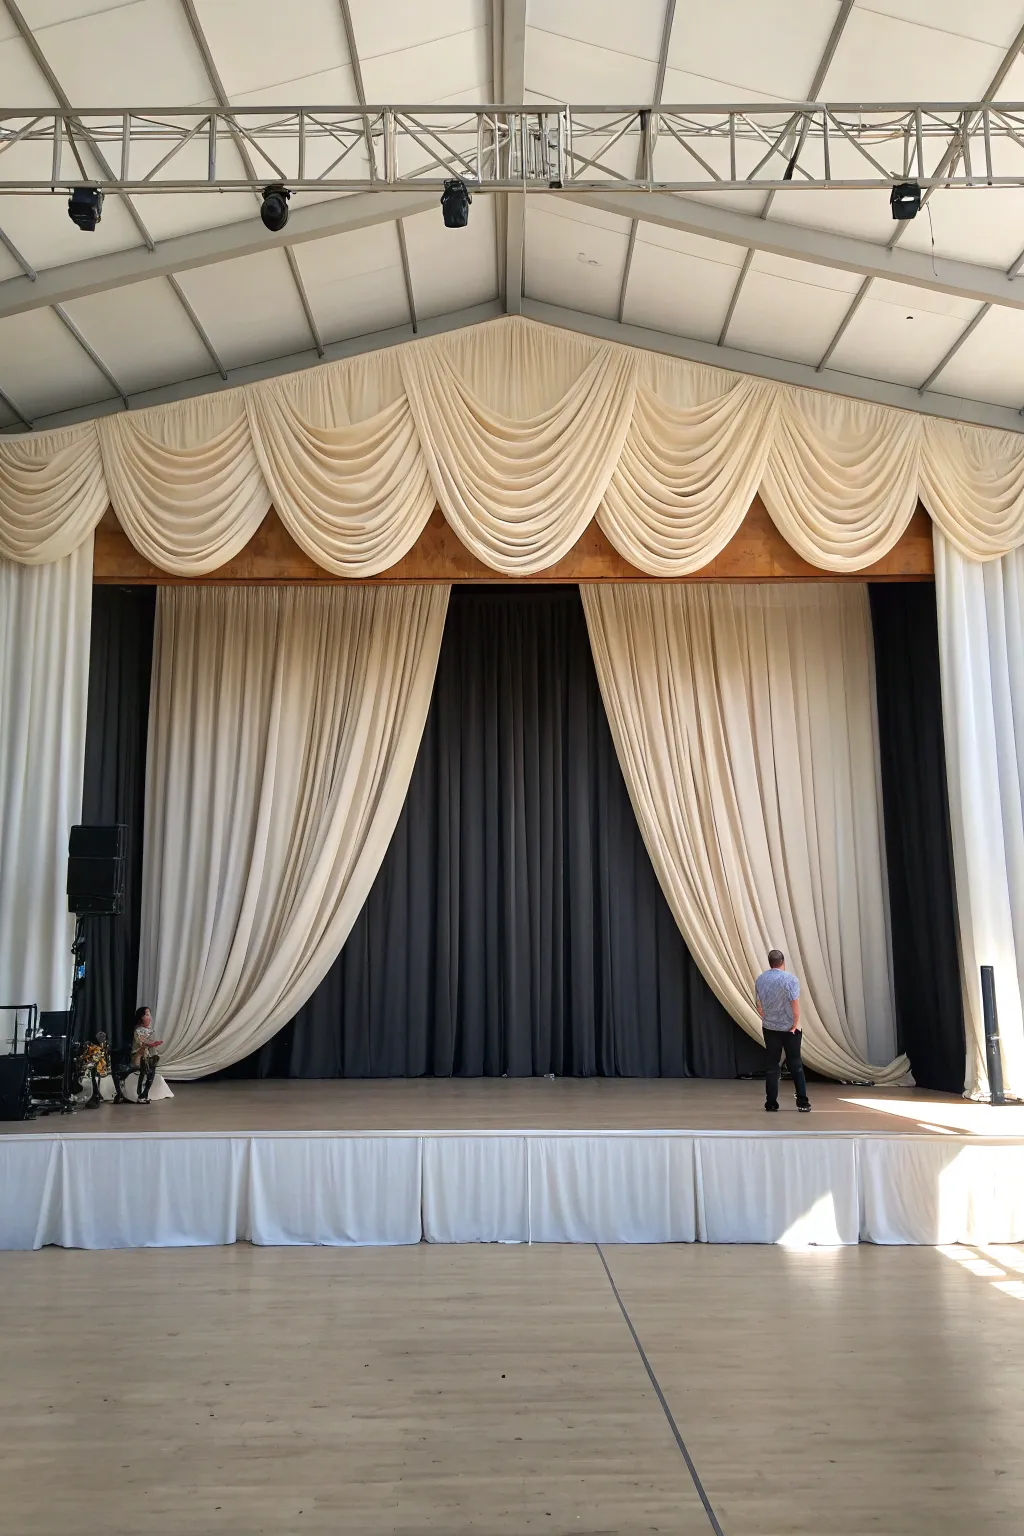
Transform a plain stage into a theater-ready venue with this classic layered curtain design featuring a dramatic valance. The combination of flowing cream swags against a stark black backdrop creates depth and professionalism for any performance space.
Step-by-Step
Materials
- Heavyweight black velour or velvet fabric (back curtain)
- Cream or off-white draping fabric (poly-satin or chiffon recommended for flow)
- Pipe and drape system (crossbars, uprights, and bases)
- Wooden header board or truss system (for valance attachment)
- Staple gun and heavy-duty staples
- Fabric shears
- Measuring tape
- Ladder
- Safety pins or gaffer tape
- Tie-backs or fabric strips
- White skirting fabric (for stage front)
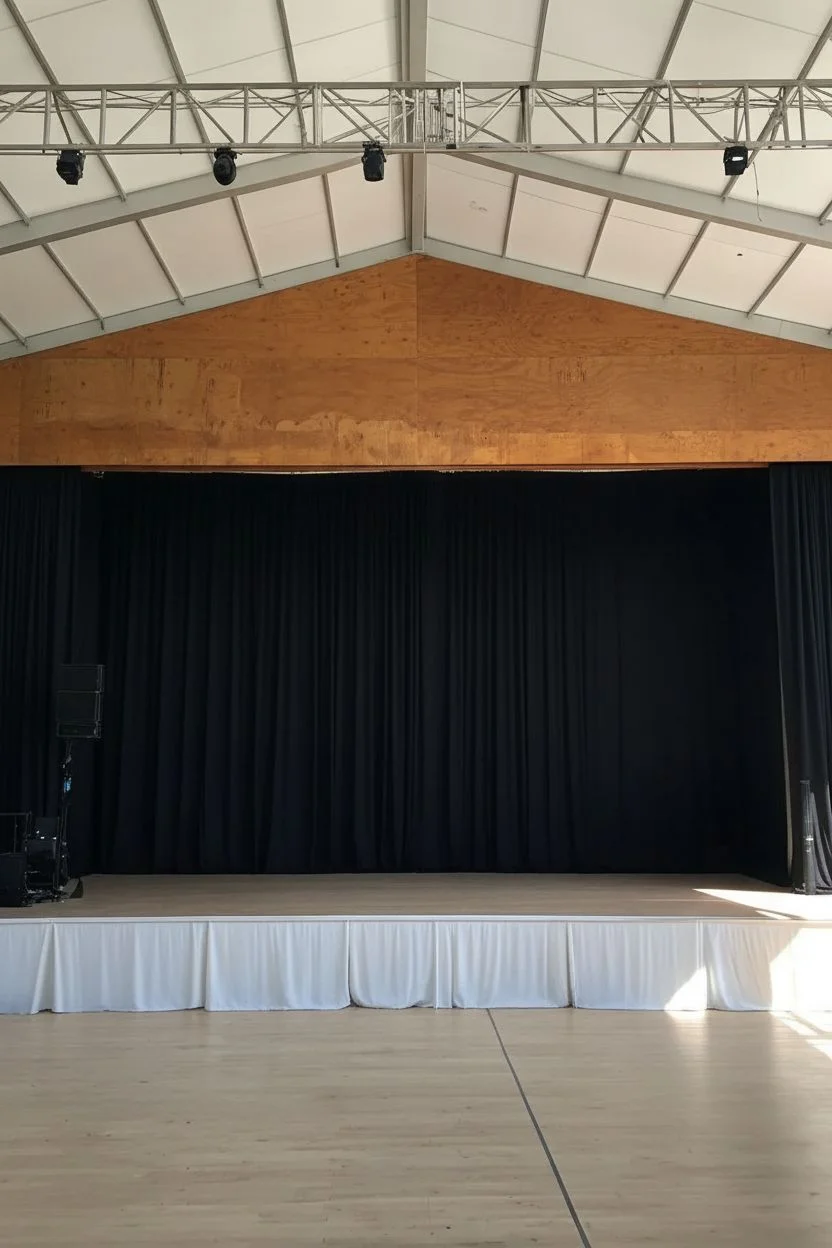
Step 1: Setting the Black Foundation
-
Measure the space:
Begin by accurately measuring the full width and height of your stage opening. You will need enough black fabric to cover the entire back wall with roughly 50% fullness for pleating. -
Install the back support:
Set up your rear pipe and drape crossbar or truss at the desired height. Ensure the uprights are weighted securely for stability. -
Hang the black backdrop:
Slide the rod pocket of your black velour panels onto the rear crossbar. If using ties, secure them tightly at 6-inch intervals. -
Adjust fullness:
Spread the black panels evenly across the width. I like to fluff the pleats manually to ensure no light bleeds through from behind.
Sagging Swags?
If your swags look flat rather than full, you likely didn’t use enough fabric width. Unstaple one side and add more material to the ‘droop’ before re-securing to create deeper, richer folds.
Step 2: Creating the Cream Valance
-
Prepare the timber header:
If you don’t have a front truss, mount a wooden header board horizontally across the top front of your stage opening. This provides a solid surface for stapling the complex swags. -
Cut swag fabric segments:
Calculate your swags. For the look in the photo, you need a central focal point and symmetrical swags radiating out. Cut wide rectangular lengths of cream fabric—they need to be significantly wider than the finished swag width to allow for the drooping effect. -
Form the center swag:
Start dead center. Staple the top left corner and top right corner of your first fabric piece to the header board, gathering the fabric in your hands to create pleats before stapling. -
Refine the droop:
Allow the fabric between the staples to hang down naturally in a U-shape. Adjust the depth of the curve until it looks pleasing, then verify the pleats are smooth. -
Layer side swags:
Working outward from the center, overlap the next swag’s starting point with the previous swag’s ending point. This hides the attachment mechanics. -
Create the cascade ends:
For the far left and right ends of the valance, allow the fabric to trail down vertically rather than looping back up, creating a framing ‘jabot’ effect.
Step 3: Installing the Front Legs
-
Hang the front panels:
Install a second crossbar or track just directly behind your valance but in front of the black curtain. Hang two large panels of the cream fabric here. -
Position the overlap:
Ensure these cream panels meet or slightly overlap in the center of the stage initially to confirm you have enough material for a full close if needed. -
Create the opening:
Gently pull the cream panels open towards the sides (stage left and stage right). This reveals the black void behind. -
Sweep and shape:
Create a dramatic curve by pulling the fabric back low and wide. The gathered curve should mirror the curves of the valance swags above. -
Secure the pullback:
Use tie-backs or heavy-duty gaffer tape (hidden behind the fabric) to secure the cream curtains to the side uprights. Make sure the tension is even on both sides for symmetry.
Add Uplighting
Place LED par cans at the base of the cream curtains pointing upward. The folds in the fabric catch the light beautifully, allowing you to change the color of the ‘white’ curtain instantly.
Step 4: Final Details
-
Skirt the stage:
Attach white skirting fabric to the front edge of the stage platform using heavy-duty staples or velcro clips. Pleat it evenly for a polished look. -
Steam for perfection:
Use a vertical garment steamer to remove any packaging fold lines or installation wrinkles from the cream swags and legs. -
Check sightlines:
Step back into the ‘audience’ area to spot any gaps where backstage equipment might be visible and adjust the black curtains accordingly.
With the fabric perfectly draped, your stage is now a professional focal point ready for any production


Greenery Wall With Hanging Vines
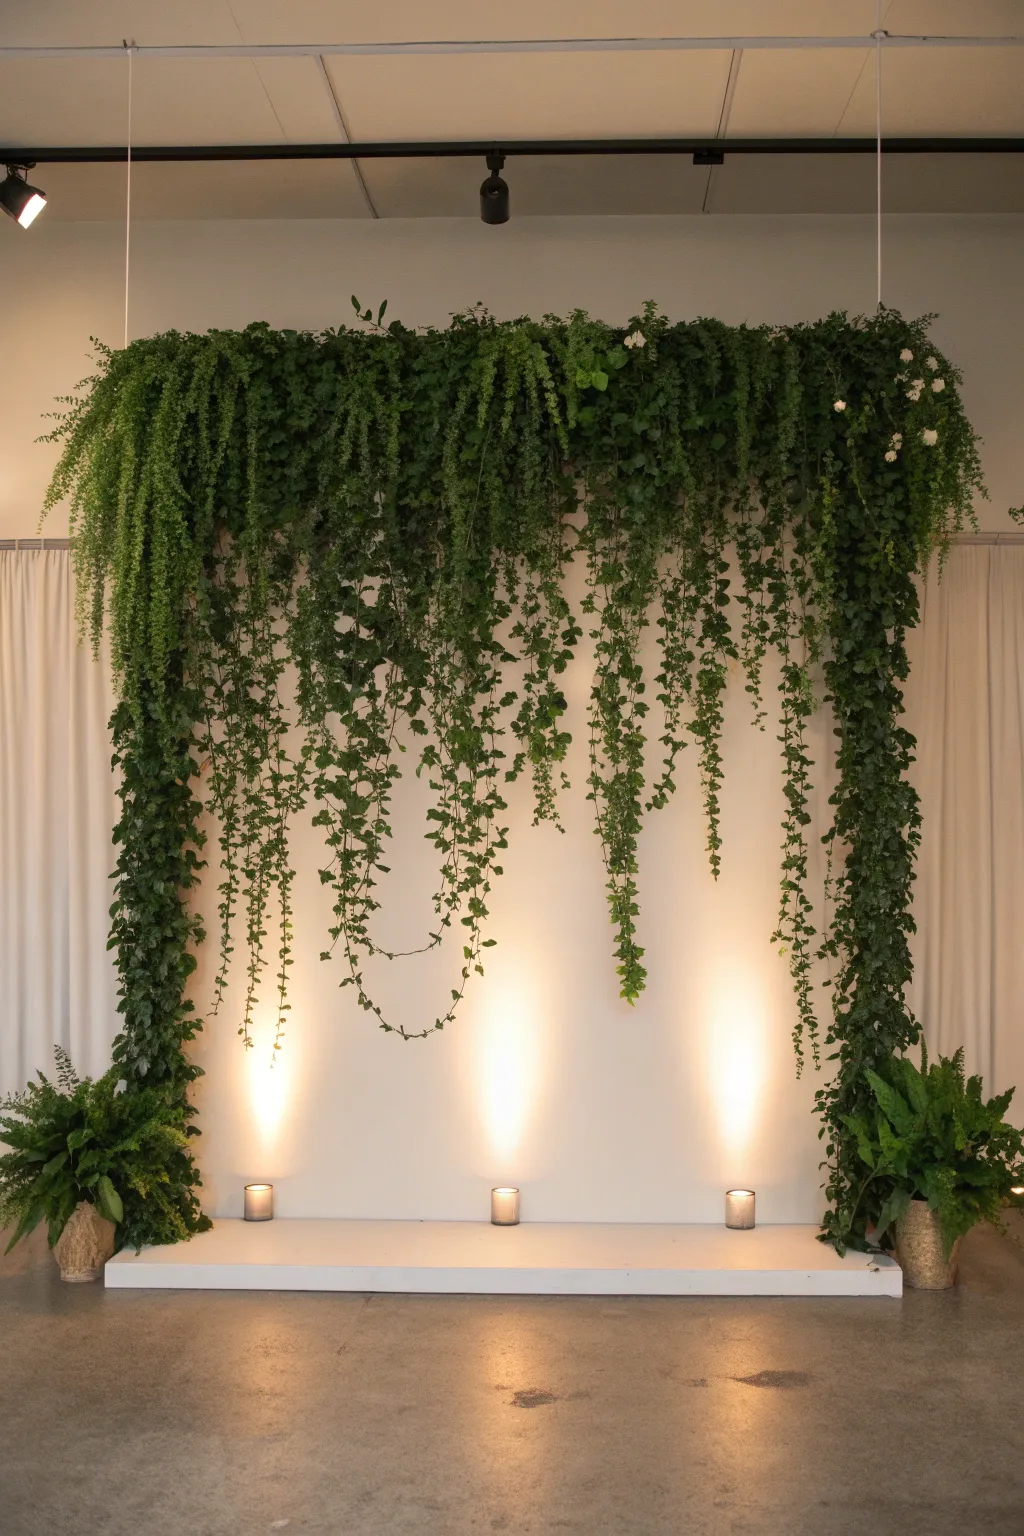
Bring the outdoors in with this lush, ethereal backdrop that transforms any stage into a secret garden. This project balances dense, textural foliage at the top with delicate, trailing vines to create a romantic and immersive focal point.
Step-by-Step
Materials
- Freestanding backdrop stand (pipe and drape system) or wooden frame
- Chicken wire or plastic floral netting (approx 8-10 feet wide)
- Heavy-duty zip ties (black or green)
- Assorted artificial greenery garlands (ivy, ruscus, boxwood)
- Individual long-hanging vine stems (essential for the cascading effect)
- Faux asparagus fern bunches (for the dense top texture)
- Wire cutters
- Floral wire (green)
- Step ladder
- 3 LED uplights (warm white)
- White fabric draping (optional, for sides)
- Two large potted ferns (Boston or similar)
Step 1: Constructing the Framework
-
Setup the stand:
Assemble your backdrop stand to the desired height. For a grand stage effect like the photo, aim for at least 8 to 10 feet tall. -
Create the grid:
Unroll the chicken wire or floral netting along the top crossbar of your stand. This is the crucial anchor point for all your greenery. -
Secure the mesh:
Using heavy-duty zip ties, secure the wire mesh firmly to the top bar every 6 inches. Ensure it hangs down about 12-18 inches to give you plenty of surface area for attaching the upper foliage.
Step 2: Building the Dense Header
-
Establish the base layer:
Take your thickest, darkest greenery garlands (like boxwood or heavy ivy) and weave them horizontally through the chicken wire to hide the mechanics. -
Add volume:
Layer in the asparagus fern bunches. I find pushing the stems directly into the mesh and bending the back wire creates the most secure hold. -
Create the projection:
Don’t just lay greens flat; pull some bunches forward so they overhang the bar, creating a 3D ledge effect rather than a flat wall. -
Fill the corners:
Concentrate extra volume on the upper left and right corners to create a slight framing effect, tapering the density slightly as you move toward the center.
Tangled Vines?
If lightweight plastic vines won’t hang straight, gently heat them with a hairdryer on low for 10 seconds, then pull straight down and hold until cool to remove kinks.
Step 3: Creating the Cascade
-
Install the pillars:
On the far left and right edges, attach long, thick garlands that reach all the way to the floor. These act as the ‘columns’ of your green arch. -
Start the main vines:
Begin attaching individual trailing vines to the underside of your top greenery mass. Space them irregularly to look natural. -
Vary the lengths:
Cut your vines to different lengths. Keep the vines on the outer edges longer (touching the floor) and gradually shorten them as you move toward the center, but avoid a perfect symmetrical arch shape. -
Connect the loops:
Take two long strands of ivy near the center-left and drape them across to the center-right, letting them dip low. Secure the ends with floral wire to create that signature suspended loop seen in the photo. -
Check density:
Step back about 10 feet to view the composition. The center wall should still be visible through the vines; you want transparency here, not a solid wall.
Level Up: Real Blooms
Insert water tubes with fresh white roses or wisteria into the dense upper greenery just before the event for a fragrant, high-end touch that pops against the dark green.
Step 4: Lighting and Details
-
Position the pots:
Place your two large potted ferns at the base of the main greenery columns on the far left and right. This grounds the structure and hides the bottom of the backdrop stand. -
Wrap the pots:
If your pots aren’t decorative, wrap them in burlap or place them in woven baskets to match the organic vibe. -
Set the stage:
Place three battery-operated LED uplights on the floor against the back wall. Space them evenly: one left, one center, one right. -
Adjust the beam:
Angle the lights straight up or slightly toward the wall. This backlighting creates silhouettes of the vines and adds depth to the empty space behind the greenery. -
Final fluff:
Gently fluff the asparagus ferns at the top and untangle the hanging vines so they swing freely.
With the lights dimmed and the uplights glowing, your botanical backdrop is ready to enchant guests


Backlit Scrim For Silhouettes
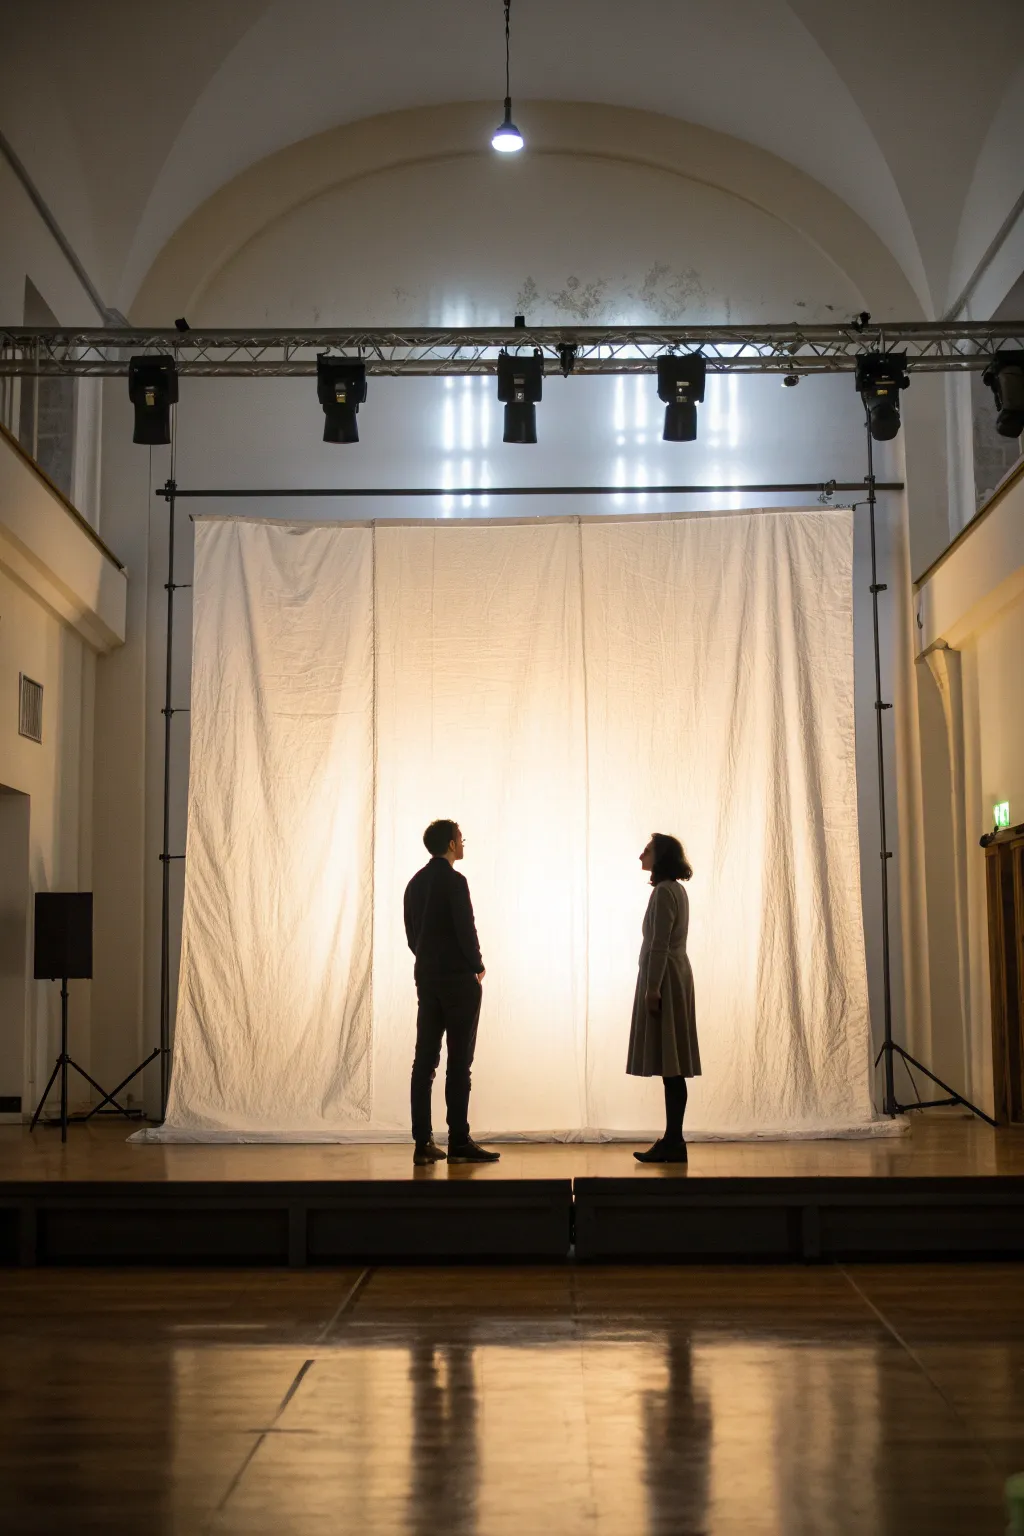
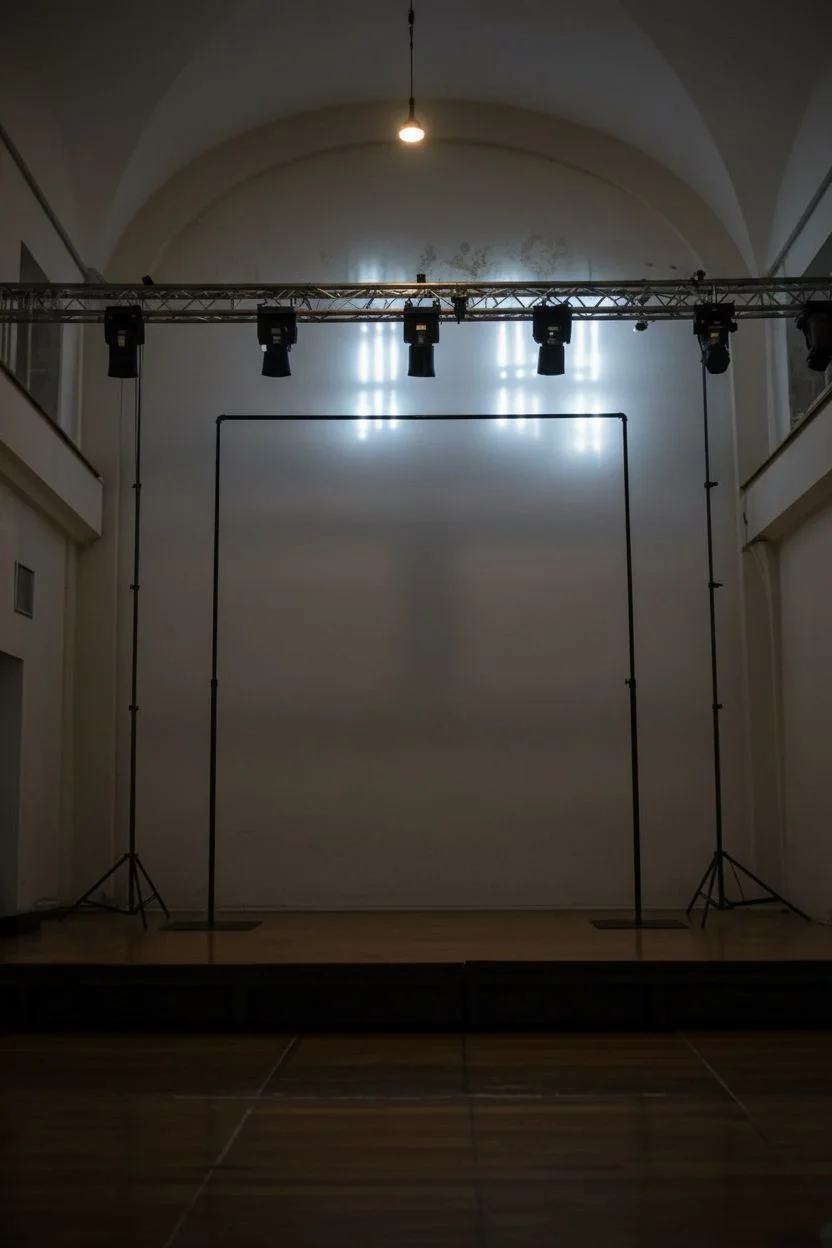
Transform a simple fabric drop into a dramatic, glowing centerpiece for your stage. This backlit scrim creates mesmerizing silhouettes and soft, atmospheric lighting by using the texture of wrinkled fabric to catch and diffuse rear illumination.
Step-by-Step Tutorial
Materials
- Large white muslin or cotton backdrop (seamless or stitched panels)
- Black pipe and drape system (uprights, crossbars, and base plates)
- Wide-beam LED par lights or floodlights
- Stage clips or clamps
- Gaffer tape
- Safety cables
- Stepladder
- Iron or steamer (optional, depending on desired texture)
Step 1: Setting the Structure
-
Assess the space:
Begin by measuring the stage width and height. You need enough depth behind the backdrop—at least 4 to 6 feet—to place lighting instruments without creating hot spots. -
Assemble the frame:
Set up your pipe and drape system. Place the heavy base plates on the floor, insert the uprights, and raise them to your desired maximum height, ensuring they are level. -
Secure the crossbar:
Attach the horizontal crossbar to the uprights. Double-check all connections to ensure the frame is completely stable before adding any weight.
Step 2: Hanging the Fabric
-
Prepare the fabric panels:
If your muslin isn’t wide enough, stitch panels together vertically. For this specific look, standard vertical seams are perfectly acceptable and add to the architectural feel. -
Create the rod pocket:
Sew a generous rod pocket along the top edge of the fabric if one doesn’t exist, or prepare to use stage clips. A pocket provides a cleaner, straighter hang. -
Mount the curtain:
Slide the crossbar through the rod pocket or clamp the top edge of the fabric securely to the bar. Raise the crossbar back into position on the uprights. -
Adjust the drape:
Let the fabric hang freely. For this specific aesthetic, do not stretch it tight. The charm lies in the slight ripples and natural vertical folds, which capture the light beautifully. -
Secure the bottom:
Ensure the fabric touches the floor. You can gently tape the bottom corners to the stage floor with gaffer tape to prevent it from swinging from air currents, while keeping the middle loose.
Uneven Glow?
If you see bright ‘hot spots’ on the fabric, move your lights further back or add diffusion gels to the fixtures to spread the beam wider.
Step 3: Lighting the Scrim
-
Position the lights:
Place your LED par cans or floodlights behind the fabric, facing the audience. Position them on the floor aiming up (uplighting) or mount them on a rear truss aiming down. -
Check beam angles:
I prefer to angle the lights so they wash across the back of the fabric rather than pointing directly perpendicular to it. This emphasizes the texture and creates a softer glow. -
Set the intensity:
Turn on the rear lights. Adjust the brightness to ensure the fabric glows white but doesn’t blind the audience through the weave of the cloth. -
Color temperature:
Choose a warm white or daylight white setting on your LEDs to match the clean, gallery-like look in the reference image.
Add Dimension
Place a second layer of sheer voile in front of the muslin. It creates a moir effect and softens the light further for a dreamier look.
Step 4: Final Touches
-
Masking the sides:
If the frame is visible on the sides, use black Duvetyne or masking curtains on separate stands to frame the white scrim and hide the backstage area. -
Test reflectivity:
Have a person stand in front of the lit backdrop. Check from the audience perspective to ensure their silhouette is crisp and dark against the bright field. -
Manage wrinkles:
Decide on the texture. If deep creases from folding are distracting, use a handheld steamer to soften them, but leave the gentle vertical draping intact. -
Cable management:
Secure all lighting cables behind the drop with gaffer tape to prevent tripping hazards for actors moving behind the scenes.
Watching your actors become striking, high-contrast figures against this luminous wall makes the minimal effort completely worthwhile
BRUSH GUIDE
The Right Brush for Every Stroke
From clean lines to bold texture — master brush choice, stroke control, and essential techniques.
Explore the Full Guide
Modular Foam Board Shapes

Create a stunning, high-impact backdrop using simple modular arched shapes arranged in a rhythmic, Art Deco-inspired pattern. This project relies on layers of dimensional foam board to produce a professional-looking relief texture that catches stage lighting beautifully.
Step-by-Step Tutorial
Materials
- 4×8 foot sheets of XPS rigid foam insulation (1-inch thick)
- Plywood or MDF sheets (for the base wall)
- Wooden framing lumber (2x4s for support structure)
- Jigsaw or hot wire foam cutter
- Construction adhesive (foam-safe)
- Latex paint (Cream/Off-white for base)
- Latex paint (Terracotta/Coral)
- Latex paint (Teal/Turquoise)
- Fine-grit sandpaper or sanding block
- Paint rollers and brushes
- Compass or string and pencil for large circles
- Utility knife
- Spackle or wood filler (optional for smoothing foam)
Step 1: Designing and Base Construction
-
Plan your layout:
Begin by sketching your wall dimensions on graph paper. Determine the size of your arches pattern; for a standard 8-foot wall, arches with a roughly 24-inch diameter work well to create a bold pattern without being overwhelming. -
Build the support frame:
Construct a sturdy vertical frame using 2×4 lumber. Ensure it has triangular ‘jack’ braces at the back so the wall can stand independently without tipping over. -
Attach the base panels:
Screw your plywood or MDF sheets onto the front of the wooden frame to create a smooth, continuous canvas. Countersink the screws so they don’t protrude. -
Prime the base:
Roll a coat of primer over the entire wooden face. Once dry, paint the background in a neutral cream or off-white color. Use a matte finish to reduce glare under stage lights.
Step 2: Fabricating the Foam Arches
-
Create a template:
Make a master template for your arch shape out of cardboard or thick paper. The shape is essentially a semi-circle with two or three concentric ridges carved into it. To simplify, you can cut separate nesting semi-circle rings. -
Mark the foam:
Trace your template onto the XPS foam sheets. Nest the shapes as tightly as possible to minimize waste. You will need enough shapes to cover the wall in your planned overlapping scale pattern. -
Cut the shapes:
Using a hot wire cutter or a jigsaw with a fine-tooth blade, carefully cut out each arch. If using a jigsaw, go slowly to prevent the foam from tearing or melting. -
Refine the edges:
Lightly sand the cut edges of the foam with fine-grit sandpaper. I find holding the sanding block at a slight angle helps create a cleaner, more finished bevel. -
Create the relief detail:
To achieve the grooved look seen in the photo, you can score the foam deeply with a utility knife or router, or simpler yet, layer smaller semi-circle rings on top of larger solid semi-circles to build actual physical depth. -
Seal the foam:
Foam is thirsty and rough. Coat the front and sides of each shape with a mixture of PVA glue and water or a specialized foam primer to create a paintable skin.
Melting Foam Warning
Avoid spray paints directly on raw foam! The propellants in many aerosols will eat XPS foam instantly. Use acrylic latex house paint or seal thoroughly first.
Step 3: Painting and Assembly
-
Paint the arches:
Divide your foam shapes into two groups. Paint one group in your Terracotta hue and the other in Teal. Use a mini roller for smooth coverage, applying 2-3 coat for full opacity. -
Dry run the layout:
Lay your shapes out on the floor first to confirm the pattern. The classic ‘fish scale’ pattern relies on offsetting rows—each arch sitting in the valley between the two below it. -
Install the bottom row:
Starting at the bottom center of your wall, apply foam-safe construction adhesive to the back of your first arch and press it firmly into place. Use a level to ensure it’s perfectly straight. -
Complete the first layer:
Continue attaching arches along the bottom row, alternating colors or grouping them as desired. The reference image features color blocking, where large sections transition from coral to teal. -
Install subsequent rows:
Begin the second row. Position these arches so their center point aligns with the seam between the two arches below. This overlapping scale effect covers the gap and builds the pattern. -
Trim the edges:
When you reach the sides or top of the wall, your arches will hang over. Use a sharp utility knife to trim the foam flush with the edge of the plywood backing for a clean silhouette. -
Touch ups:
Once all adhesive is cured, inspect the wall for any scuffs or white foam showing through. Use a small artist’s brush to touch up the paint on the edges and cut lines.
Add Subtle Lighting
Install LED strip lighting underneath the bottom edge of key arches to backlight the layer above, enhancing the 3D relief effect.
Step back and admire how simple geometric repetitions have transformed flat boards into a dynamic, architectural feature wall.
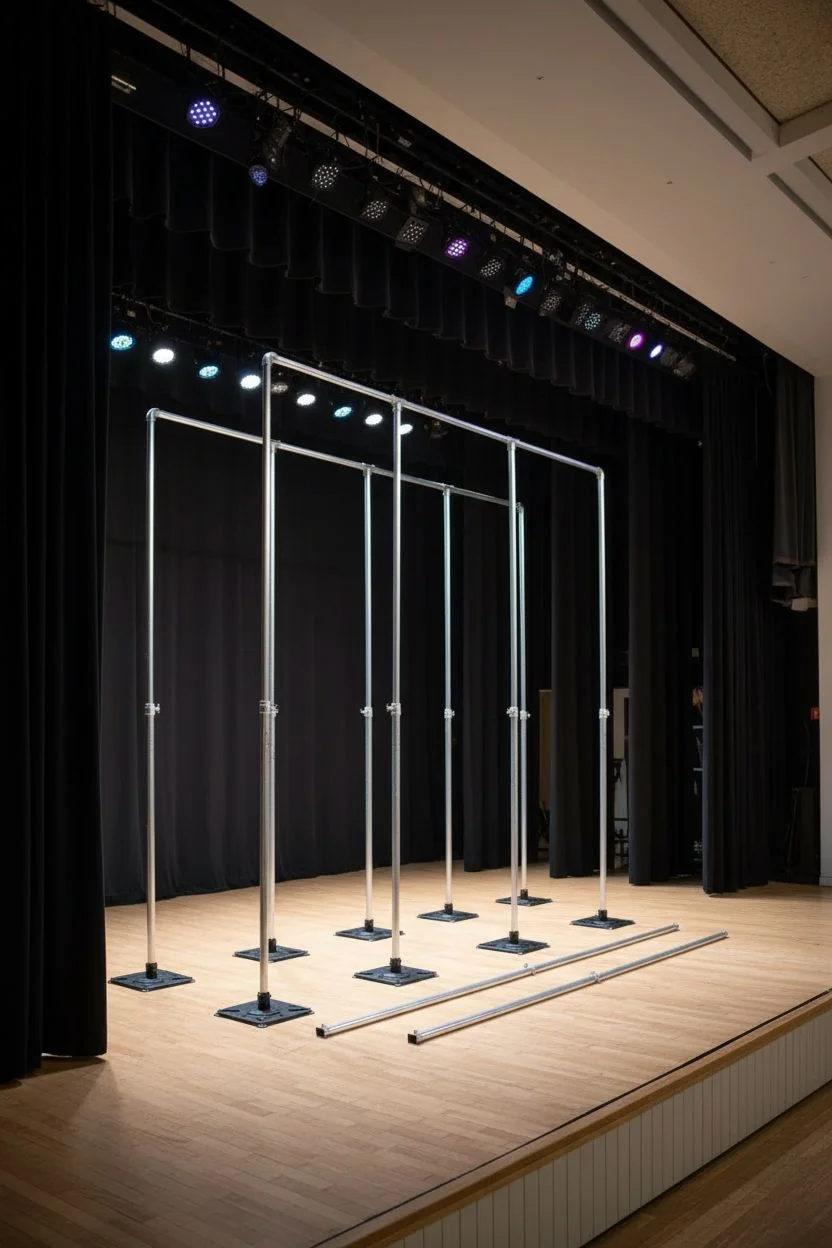
Reflective Fringe For Moving Light
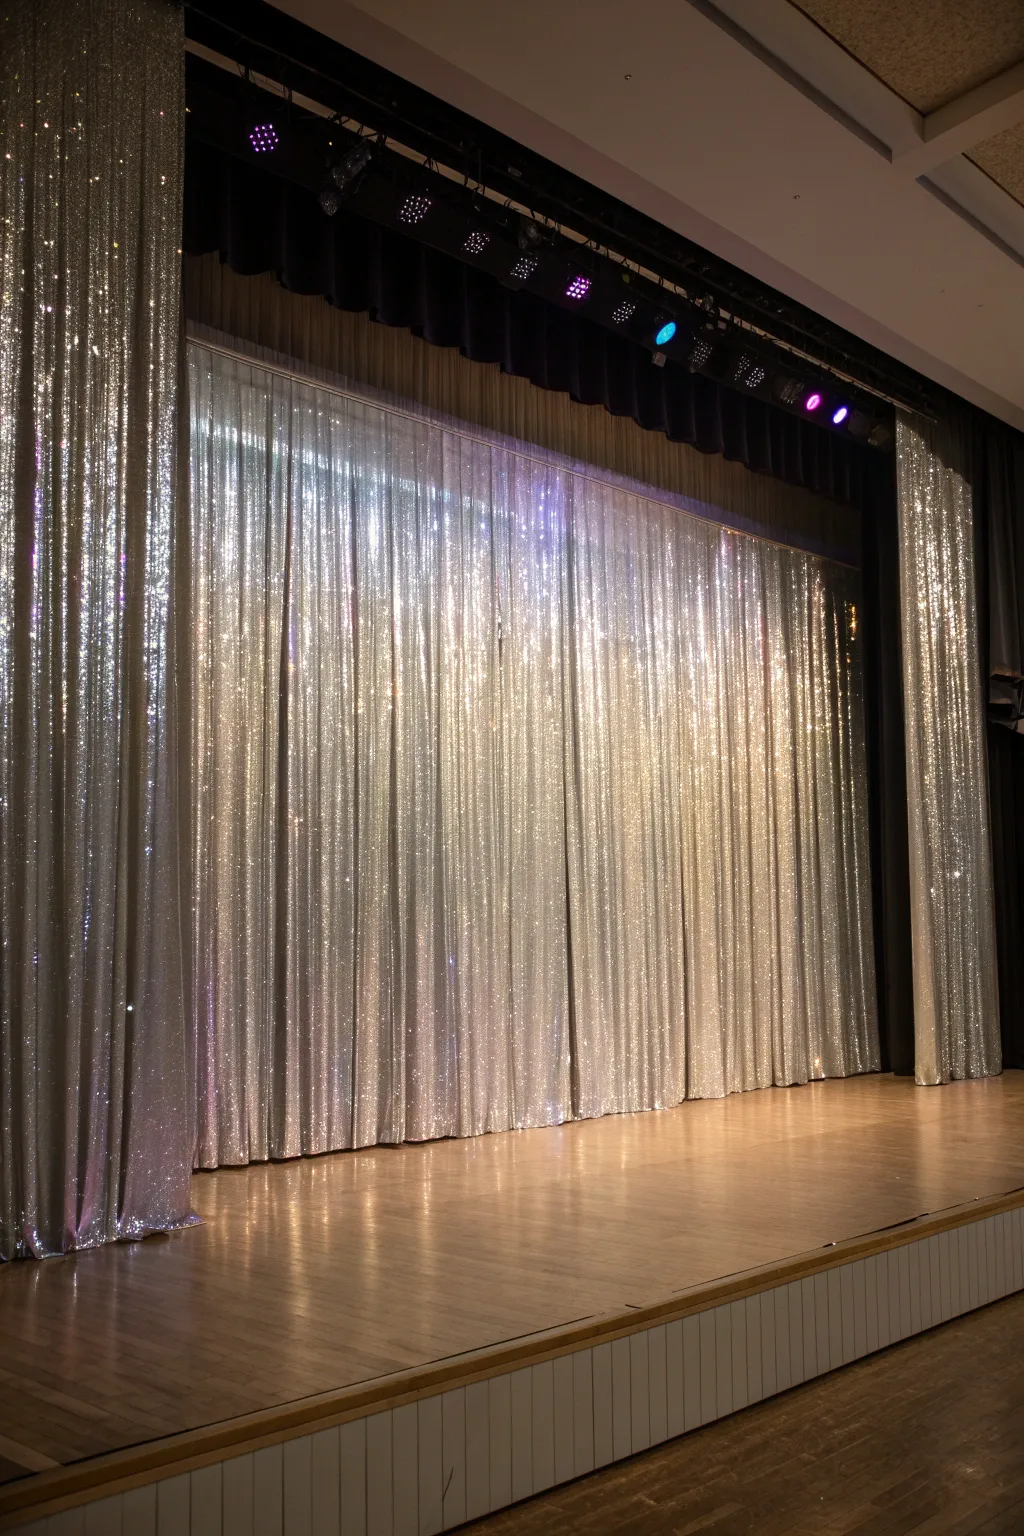
Transform a plain stage into a dazzling focal point with this high-impact, reflective backdrop project. Using affordable sequin curtains, you create a surface that catches moving lights beautifully, adding movement and glamour to any performance space.
Step-by-Step
Materials
- Heavy-duty pipe and drape system (uprights, crossbars, and base plates)
- Silver sequin backdrop curtains (panels usually come in 8ft to 10ft lengths)
- Large safety pins or backdrop clips
- Cable ties or zip ties (black)
- Stepladder
- Measuring tape
- Optional: Black velour drapes (for side masking)
- Clean cloth (for polishing base plates)
Step 1: Setting the Framework
-
Assemble the hardware:
Begin by setting up your pipe and drape hardware. Place the heavy base plates at equal intervals along the back of the stage where you want the curtain wall to stand. -
Install uprights:
Insert the vertical upright poles into the base plates. Ensure they are fully seated and tighten any locking mechanisms so they are sturdy and safe. -
Adjust the height:
Extend the uprights to your desired stage height. It is crucial to measure the height of your sequin panels first; you want the crossbar to be just high enough that the curtain kisses the floor without bunching excessively. -
Prepare crossbars:
Lay your horizontal crossbars on the floor between the uprights to check spacing before lifting them. This saves you from adjusting heavy bases later.
Handling Sequins
Sequins snag easily! Wear tight-fitting gloves during setup to prevent catching your skin or nails on the delicate discs, and lift panels rather than dragging them.
Step 2: Hanging the Sequin Panels
-
Slide on the panels:
Thread the rod pocket of your silver sequin curtains onto the crossbar. It’s much easier to do this while the crossbar is detached or only hooked on one side if you have a helper. -
Determine fullness:
For that professionally rich look seen in the photo, you need substantial gathering. Don’t stretch the fabric flat; instead, push the panels together to create deep ripples. I usually aim for 50% more width than the pole length to ensure lush folds. -
Lift and lock:
Once the curtains are threaded, lift the crossbar and hook it into the slots on the uprights. Make sure both sides click securely into place. -
Repeat for width:
Continue this process across the entire width of the stage. If you have multiple sections, butt the uprights close together so there are no visible gaps in the sequin wall.
Step 3: Refining the Pleats
-
Join the panels:
Where two curtain panels meet on a single rod, overlap the edges slightly. Use a small safety pin behind the fabric to secure them together so no light peeks through the seam. -
Dress the drapes:
Starting from the top, run your hands down the pleats to encourage them to hang straight. If the sequins catch on each other, gently shake the fabric near the bottom to release the snag. -
Hide the hardware:
If your crossbar is visible at the ends, pull the fabric slightly over the edge and secure it with a clip or zip tie to the back of the upright. -
Add side masking:
To frame the shiny wall, install separate uprights on the far left and right. Hang standard black velour drapes here to create ‘legs’ or wings, focusing the audience’s eye on the center shimmer.
Layer Up
Place a solid white or gray pipe-and-drape panel behind the sequin curtain. This adds opacity, ensuring stage lights don’t shine through the sheer backing.
Step 4: Lighting Considerations
-
Position the lights:
The magic of this backdrop is entirely dependent on lighting. Aim moving head lights or colored LED pars from the top truss downwards onto the fabric. -
Select colors:
Silver is a neutral reflector, so it will take on whatever color you project. Use cool blues, purples, and magentas to replicate the icy, glamorous look in the photo. -
Test reflectivity:
Turn on the house lights and stage lights to check for dead spots. Adjust the angles of your fixtures so the light rakes across the sequins, creating high-contrast sparkles rather than a flat wash. -
Final check:
Do a final walk-through across the stage. Check for any raised hems or uneven pleating and adjust as necessary before showtime.
Step back and enjoy the incredible depth and sparkle your new professional backdrop adds to the venue


Have a question or want to share your own experience? I'd love to hear from you in the comments below!