When I’m planning a stage background, I think about one thing first: what do you want the audience to feel the second the lights come up. These stage background ideas range from classic painted scenery to light-driven setups, so you can match the vibe whether it’s cozy, dramatic, modern, or totally dreamy.
Painted Sunset Sky Gradient
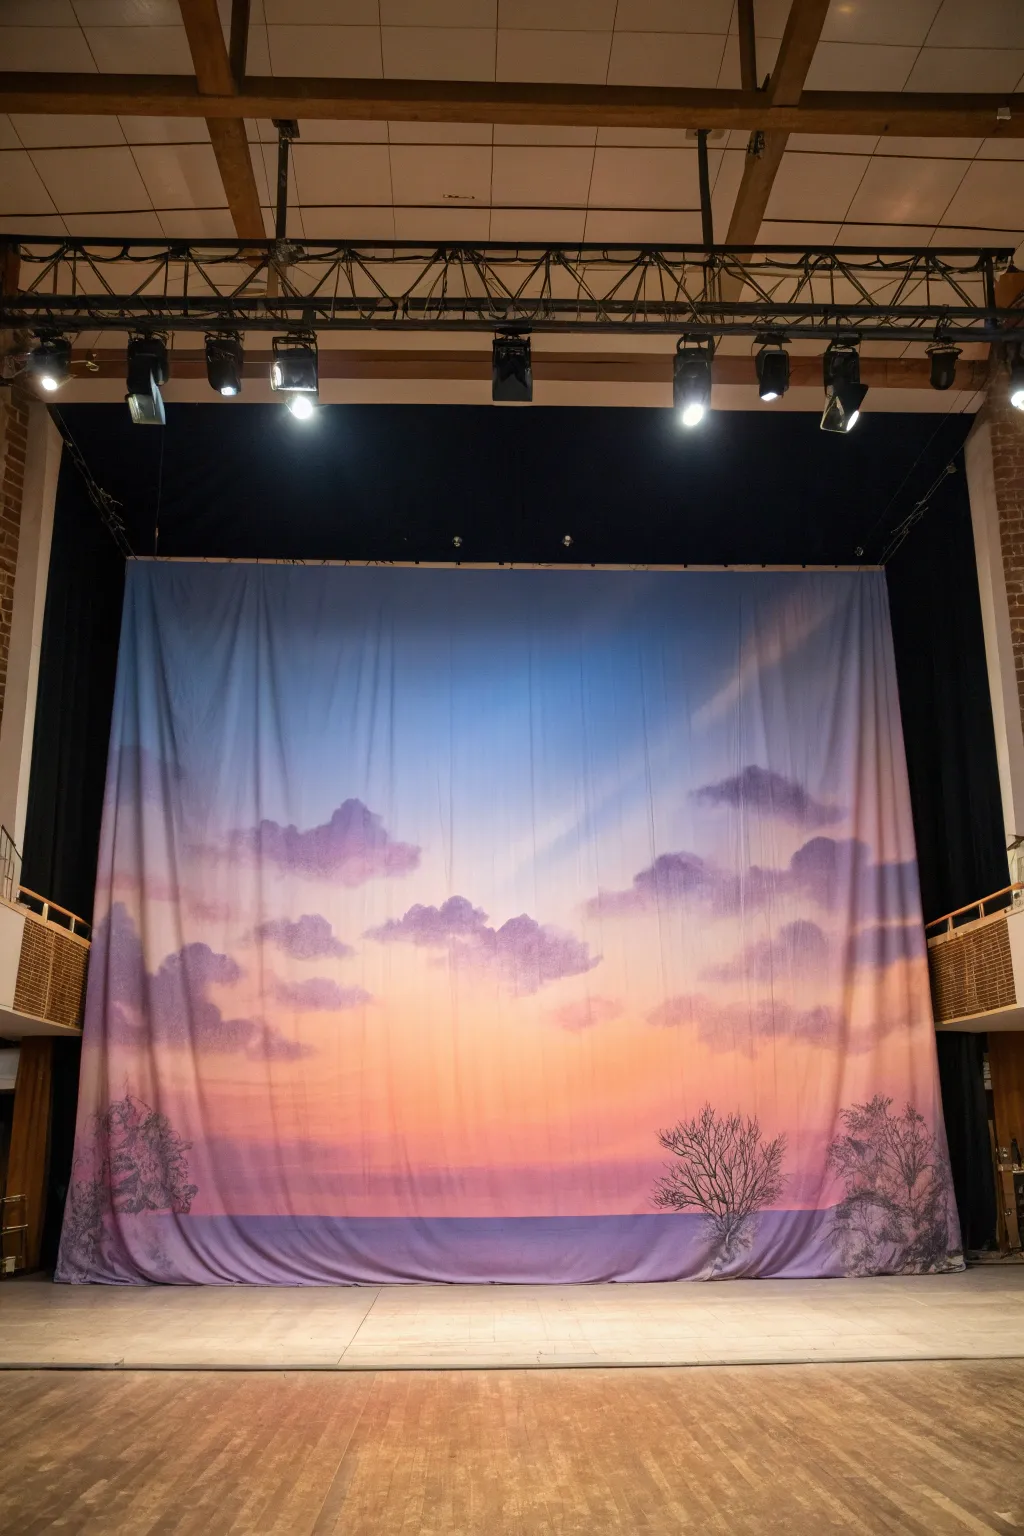
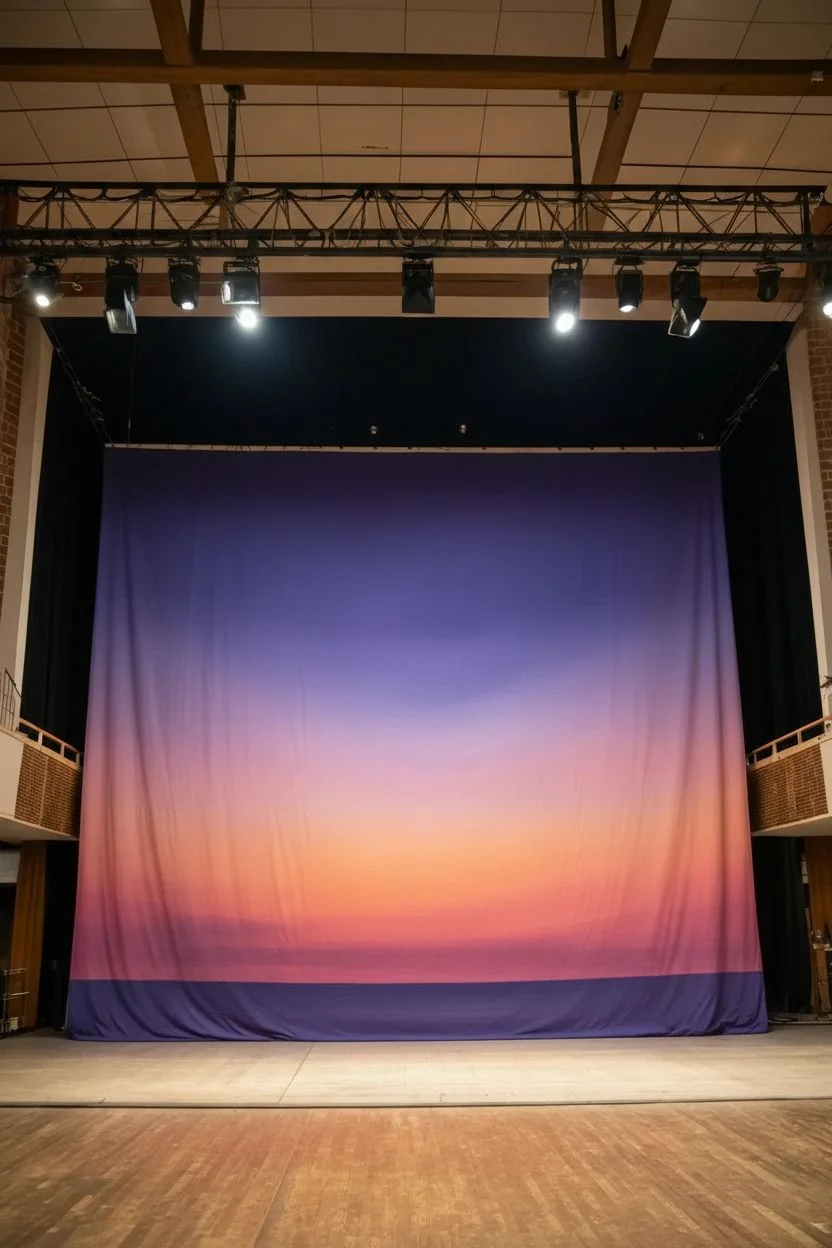
Transform a plain stage curtain into a breathtaking vista with this painted sunset sky gradient. This large-scale project creates an ethereal atmosphere using soft color transitions from deep twilight blues to warm, glowing oranges, anchored by delicate silhouette trees.
Step-by-Step
Materials
- Large canvas or heavy muslin backdrop (sized to your stage)
- Acrylic latex mural paints (Deep Violet, Ultramarine Blue, Magenta/Rose, hues of Orange, Lavender)
- White acrylic paint (large bucket for mixing)
- Large paint rollers and extension poles
- Assorted roller covers (medium nap)
- Wide paintbrushes (4-6 inch)
- Sea sponges or large texture sponges
- Drop cloths
- Projector (optional but helpful)
- Charcoal or chalk for sketching
- Paint sprayer (optional for smoother gradients)
Step 1: Preparation & Base Gradient
-
Surface Prep:
Begin by hanging your canvas or laying it flat on a very large, protected surface. If the fabric is wrinkled, steam it out now, as painting over creases creates permanent lines. Ensure your drop cloths extend well beyond the edges. -
Mapping the Horizon:
Mark your horizon line with charcoal or chalk. For this specific look, place it quite low—about 1/5th from the bottom—to emphasize the vastness of the sky. This will be where your water or distant land meets the sky. -
Mixing the Gradient Colors:
Prepare your palette in large buckets. You need a distinct progression: deep blue-violet for the top, transitioning into lighter periwinkle, then soft lavender, shifting to warm pinks, and finally a glowing orange near the horizon. -
Applying the Top Layer:
Starting at the very top, use a roller to apply the Deep Violet and Ultramarine mix. Work in horizontal sections. Don’t worry about perfect coverage yet; just get the color onto the fabric while it’s wet. -
Creating the Mid-Sky Transition:
Before the top layer dries completely, begin applying the lighter periwinkle and lavender mix below it. Use a clean roller or a wide brush to feather the wet edges together, blending upwards into the dark blue to eliminate hard lines. -
Warming the Horizon:
As you move lower towards the horizon line, introduce the magenta and rose tones. I like to keep a bucket of water handy to slightly dampen the brush, which helps the acrylics glide and blur into the purple section above. -
The Sunset Glow:
Right above the horizon line, apply your brightest orange mixed with a little white. This ‘glow’ should be intense but soft. Blend it upward into the pinks so the transition looks like natural light fading. -
Painting the Water/Ground:
Below the horizon line, paint a solid, deep purple-blue strip to represent the distant water or ground. Keep this stroke horizontal and relatively flat compared to the billowy sky above.
Seamless Blending
Keep a spray bottle of water handy. Mist the fabric lightly before rolling paint to keep the acrylics wet longer, allowing for smoother, softer color gradients without harsh stripes.
Step 2: Clouds & Atmosphere
-
Drafting Cloud Shapes:
Once the background gradient is dry to the touch, use chalk to lightly sketch the placement of the clouds. Focus on the sides and bottom-middle for composition balance, leaving the center sky relatively clear. -
Base Cloud Color:
Mix a hazy purple-grey color. Using a sponge or a dry scruffy brush, dab in the main body of the clouds. Keep the edges soft and irregular; avoid making perfect cotton-ball shapes. -
Adding Highlights:
Mix a light lavender-pink (lighter than your sky color). Dab this onto the top and right edges of the clouds where the imaginary setting sun would hit them. This gives them volume and fluffiness. -
Deepening Shadows:
Take a slightly darker violet hue and gently sponge the undersides of the clouds. This grounds them in the scene and enhances the 3D effect against the glowing background. -
Softening Edges:
Use a clean, dry brush to lightly sweep over the cloud painting while it’s still tacky. This ‘sfumato’ technique blurs any harsh sponge marks and integrates the clouds into the atmosphere.
Step 3: Foreground Silhouettes
-
Sketching the Trees:
At the bottom corners, sketch the skeletal shapes of winter trees. Vary the heights, making the ones on the edges taller to frame the stage. -
Painting Trunks:
Using a smaller brush and a mix of black and deep purple (pure black can look too flat), paint the main trunks. Keep the lines somewhat jagged and organic rather than perfectly straight. -
Detailing Branches:
Switch to a liner brush or a rigger brush for the fine branches. Use a loose, shaky hand motion to create twiggy, natural-looking lattice patterns at the ends of the branches. -
Adding Base Texture:
Stipple some dark texture at the very bottom edge of the canvas to simulate bushes or ground cover, anchoring the trees so they don’t look like they are floating. -
Final Glaze (Optional):
If any gradient transitions look too harsh, mix a very watery glaze of the background color and wash it over the area to unify the tone once everything is fully dry.
Add a Starry Night
Once dry, flick a toothbrush loaded with watered-down white paint across the upper dark blue section to create a field of faint, early evening stars.
Hang your masterpiece and light it warmly to bring the sunset colors to life


Storybook Forest Scenery Mural
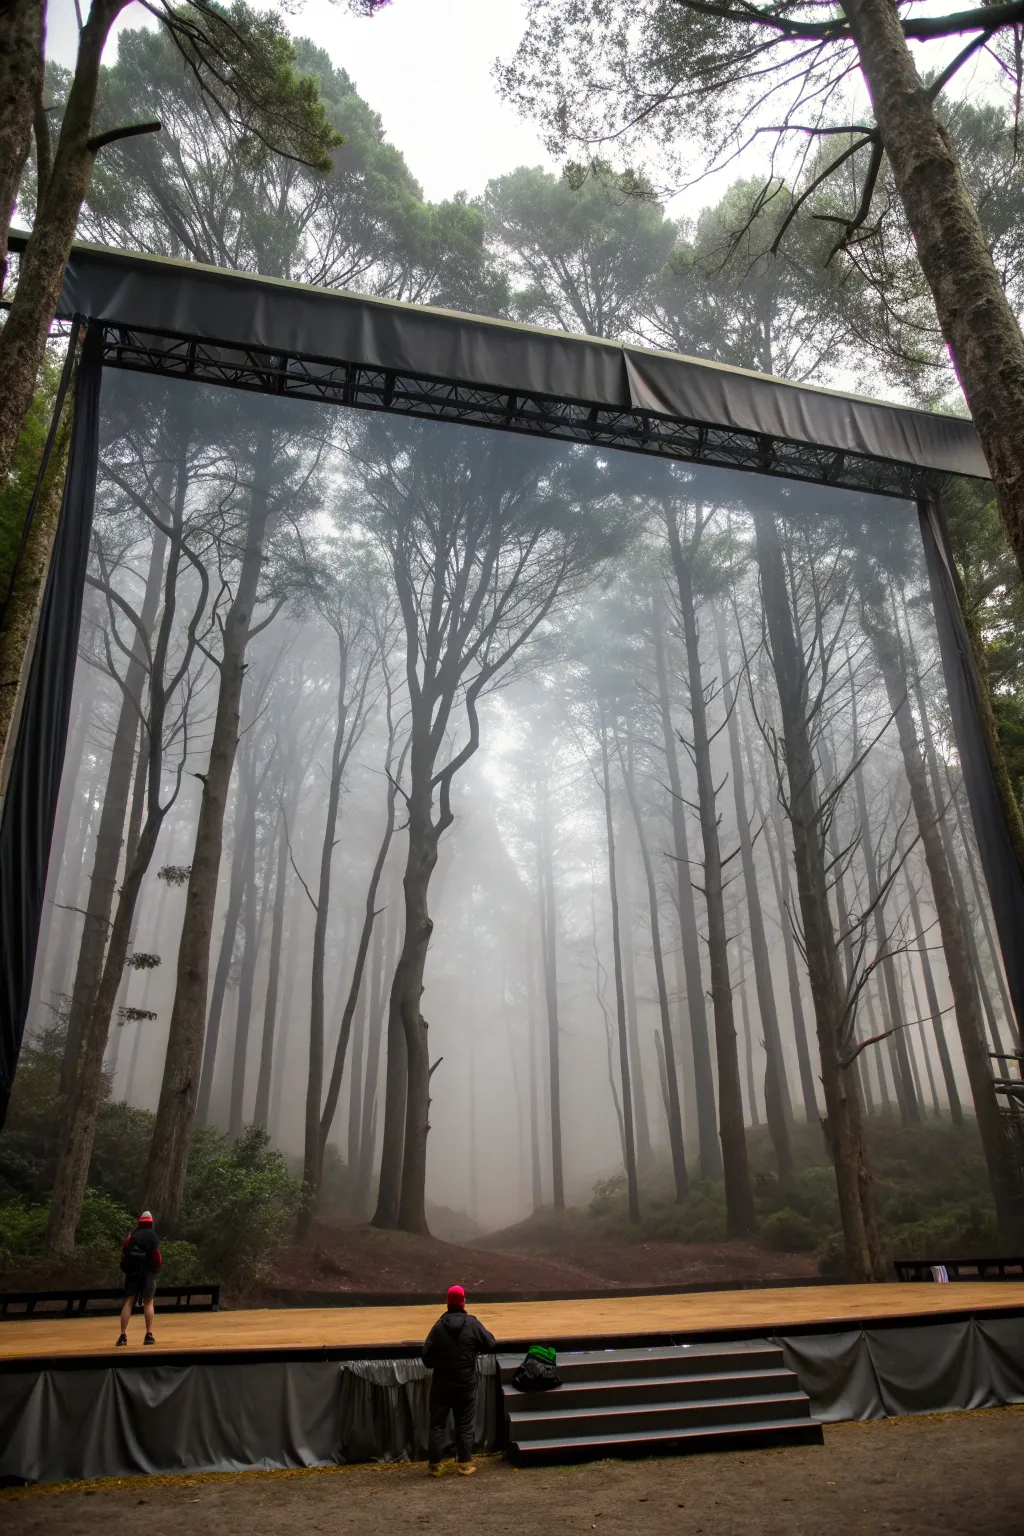
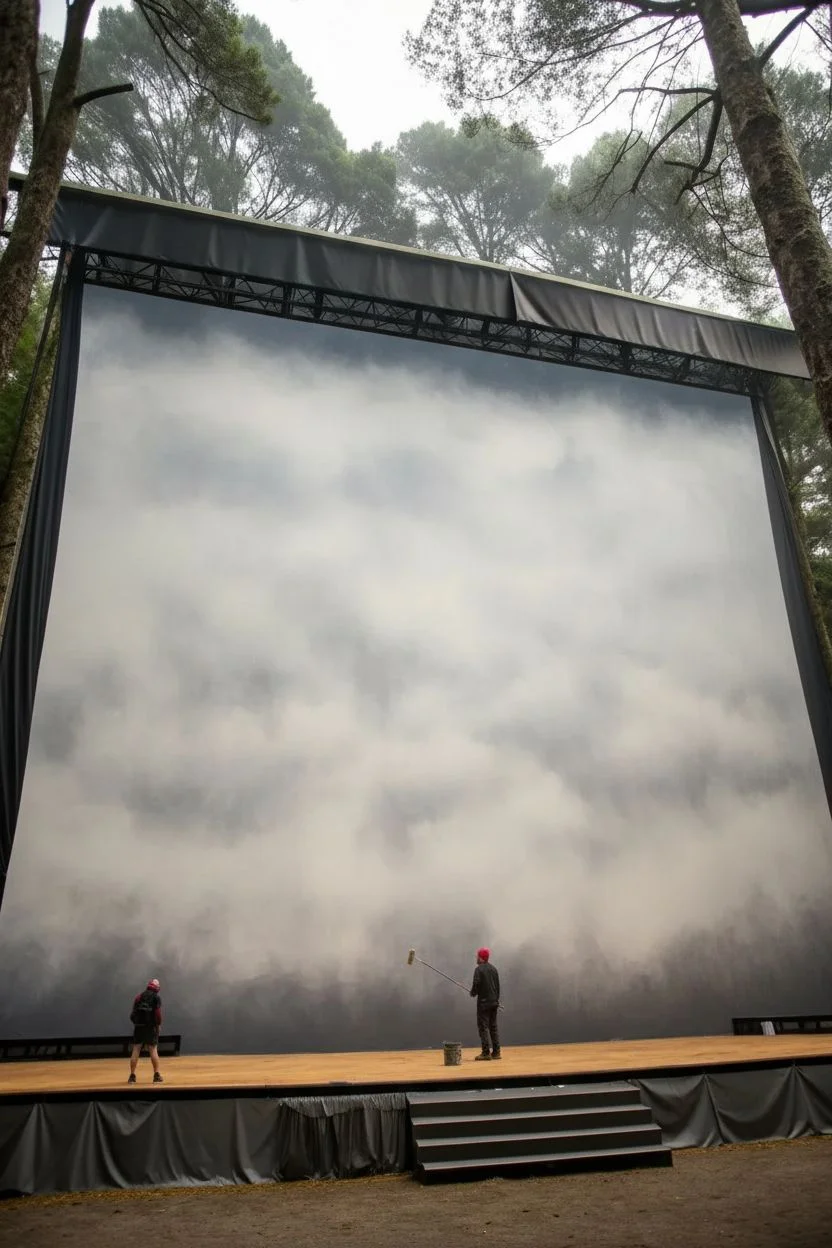
Transform your stage into an ethereal, foggy woodland with this large-scale backdrop tutorial. By layering translucent washes and sharp silhouettes, you’ll achieve a haunting depth that draws the audience deep into the forest.
Step-by-Step Tutorial
Materials
- Large painter’s drop cloth, canvas, or theatrical scrim fabric (sized to your stage)
- Black latex house paint (flat or matte finish)
- White latex house paint (flat or matte finish)
- Grey latex house paint (medium shade)
- Large paint rollers with extension poles
- Assorted synthetic brushes (2-inch to 4-inch sizes)
- Spray bottle filled with water
- Paint sprayer (airless or HVLP) – highly recommended for mist effects
- Chalk line or charcoal for sketching
- Drop cloths for floor protection
- Mixing buckets
Step 1: Preparation and Background
-
Surface Setup:
Stretch your fabric taut vertically. If painting on the floor, ensure it is perfectly flat and taped down to prevent wrinkling as the paint dries. -
Base Mist Layer:
Mix a very dilute wash of white and light grey paint (70% water to 30% paint). Using a sprayer or a large roller, apply this hazy base coat over the entire center area, fading out slightly towards the edges. -
Creating Depth:
While the base is still slightly damp, spray or roll a darker grey gradient at the very bottom and top edges to create a vignette effect, focusing the light in the center of the forest.
Uneven Fog?
If your mist looks blotchy, don’t paint over it immediately. Use a spray bottle of water to re-wet the area and wipe gently with a large sponge to smooth the transition.
Step 2: Painting the Distant Trees
-
Sketching the Horizon:
Use charcoal lightly to mark vertical lines where your trees will stand. Keep the composition dense but random—nature rarely creates perfect rows. -
Ghost Trees:
Mix a pale grey shade only slightly darker than your background mist. Paint thin, vertical trunks in the background, keeping edges soft. I like to dry-brush these slightly to make them look like they are receding into the fog. -
Adding Mid-Ground Trunks:
Create a medium-grey mixture. Paint a second layer of trees that are slightly wider and more defined than the ghost trees, placing them sporadically to overlap the background layer. -
Softening the Edges:
Immediately use a clean, damp brush or a spray bottle of water to feather the edges of these mid-ground trees, ensuring they don’t look like stickers pasted on a background.
Depth Perception
Make the foreground trees sharp and dark, and the background trees blurry and light. This ‘atmospheric perspective’ is the key trick to making a flat wall look like a deep forest.
Step 3: The Foreground Giants
-
Blocking the Main Trees:
Mix your darkest charcoal grey or soft black. Identify two or three focal points for your ‘hero’ trees—the largest ones in the foreground. -
Painting the Silhouette:
Using a 4-inch brush, paint the trunks of these main trees. They should be significantly thicker than the others and can have slight curves or irregularities to show age. -
Branch Structure:
Switch to a smaller 2-inch brush to pull branches out from the main trunks. Remember that pine branches often start growing upwards before weighing down at the tips. -
Detailing Bark Texture:
Don’t paint every piece of bark. Instead, create texture by leaving small gaps in your paint coverage or scumbling the brush along the edges to simulate rough surfaces. -
Canopy Density:
Stipple or dab the brush at the top corners of the canvas with the dark mixture to Suggest a dense canopy overhead, framing the scene.
Step 4: Atmospheric Effects
-
The Fog Glaze:
Once the trees are dry, mix an extremely thin ‘glaze’ of white paint and water (think skim milk consistency). Lightly mist or dry-roll this over the mid-ground trees to push them back visually. -
Ground Integration:
Darken the very bottom of the canvas with black paint to anchor the trees, blending it upwards into the grey trunks so the trees appear to grow out of the shadows. -
Highlighting:
Use a small amount of pure white on a dry brush to hit the edges of the foreground trees where the ‘light’ from the misty center would hit them. -
Final Scrub:
Step back about 20 feet to view the work. If any tree looks too sharp, scrub it gently with a damp rag to blur it back into the atmosphere.
Enjoy the dramatic, moody atmosphere this backdrop brings to your production


Night City Skyline Silhouette
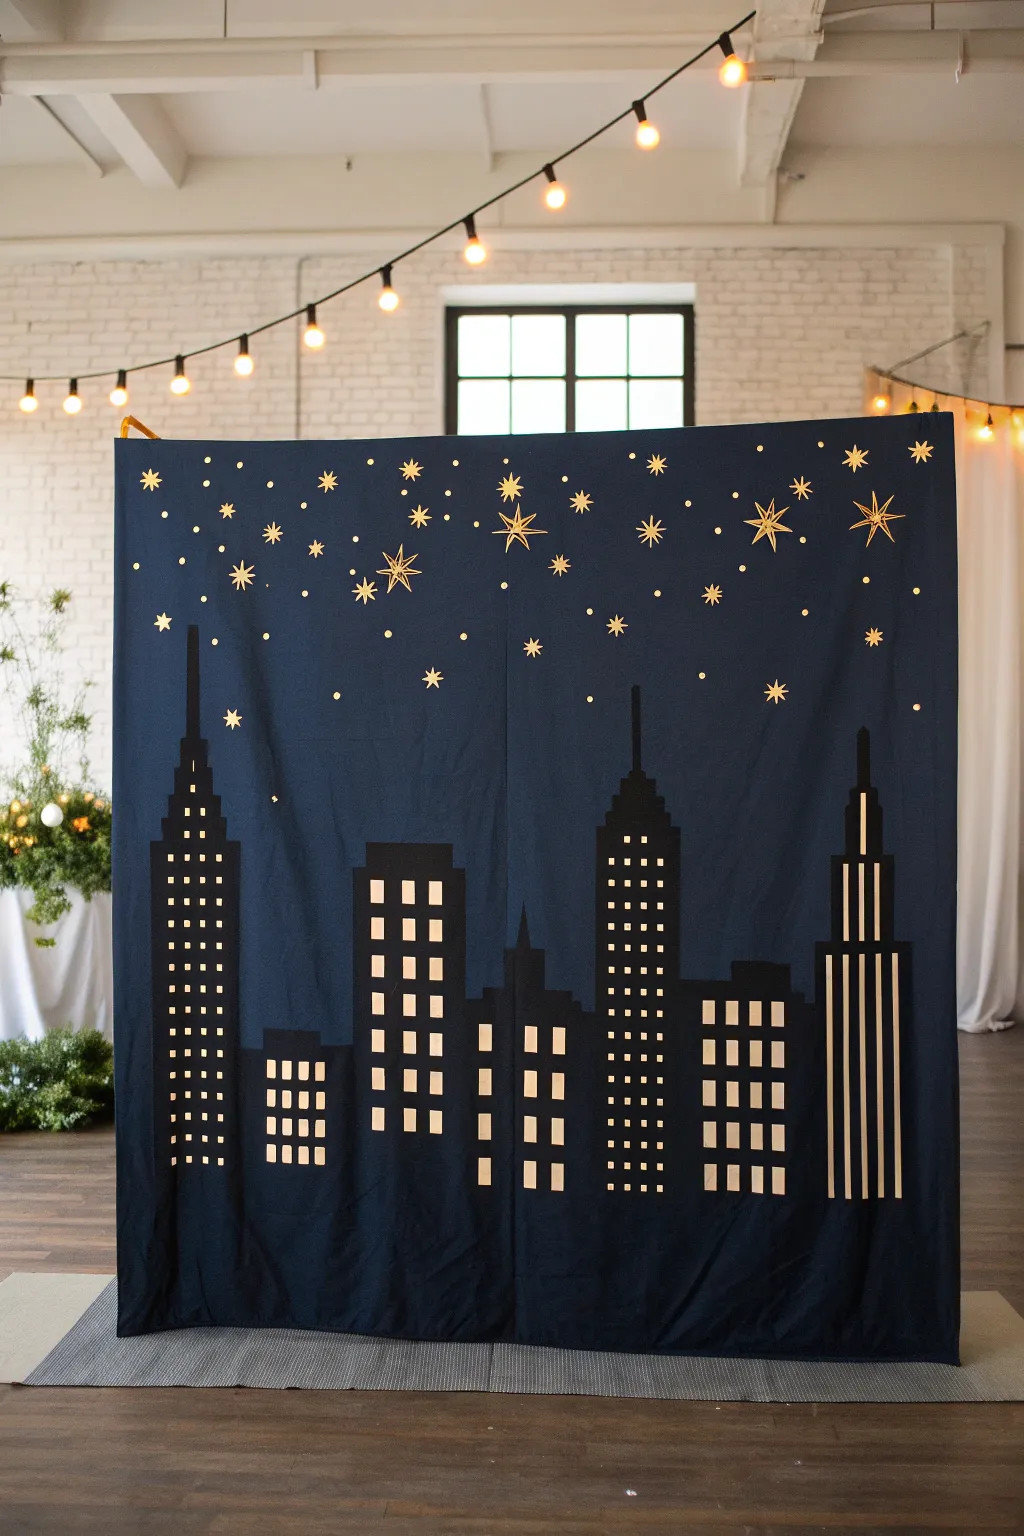
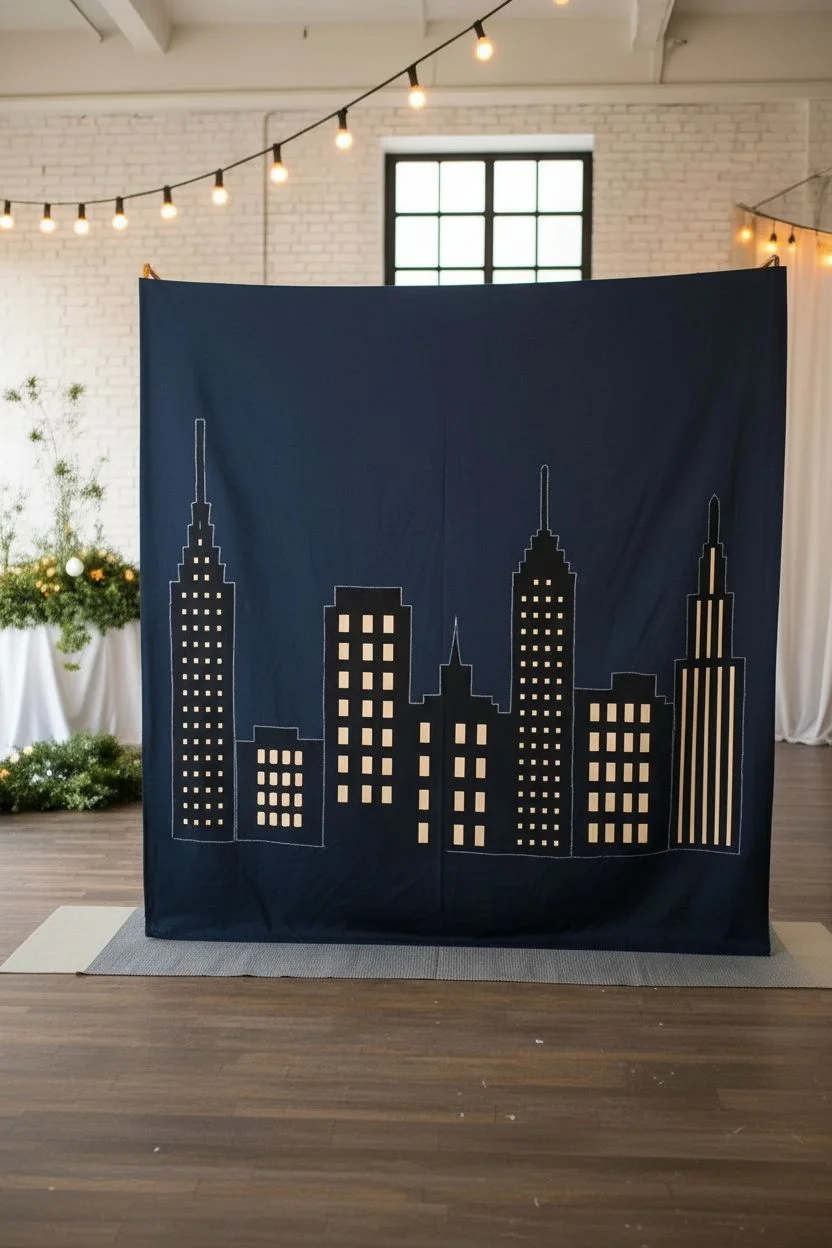
Bring the magic of an urban evening to your stage with this stunning fabric backdrop. Featuring sleek black silhouettes against a deep navy sky, the scene is illuminated by golden cut-out windows and a constellation of shimmering stars.
Step-by-Step
Materials
- Two large panels of navy blue cotton or canvas fabric (floor-to-ceiling length)
- Black felt or heavy cotton fabric (for the buildings)
- Gold metallic iron-on vinyl (HTV) or gold fabric paint
- Adhesive gold vinyl or cardstock (for stars)
- Fabric glue or sewing machine
- Sharp fabric scissors
- Measuring tape and yardstick
- Chalk or fabric pencil
- Iron and ironing board
- Optional: Grommets or rod pocket supplies for hanging
Step 1: Planning the Skyline
-
Prepare the base:
Lay your two large navy blue panels side-by-side on a large, flat surface. Ensure the edges meet cleanly in the center, as this split allows for easy entry and exit if used as a curtain. -
Draft the city grid:
Using your yardstick and chalk, lightly sketch a horizon line across both panels about one-third to one-half of the way up from the bottom. This will be the base height for your smaller buildings. -
Design the skyscrapers:
Sketch the outlines of your tall skyscrapers onto the black fabric. Aim for variety: include stepped designs like the Empire State Building, pointed spires, and flat-topped towers. -
Cut the silhouettes:
Carefully cut out your black building shapes. I find it helpful to leave an extra inch of fabric at the bottom of each building to hem or wrap under later.
Wrinkle Rescue
If fabric glue causes puckering, place parchment paper over the area and press with a warm iron (no steam) to flatten the bond before it fully cures.
Step 2: Constructing the City
-
Arrange the composition:
Place your cut-out black buildings onto the bottom section of the navy panels. Overlap them slightly to create depth, ensuring the tallest towers are spaced out for visual balance. -
Secure the skyline:
Once satisfied with the arrangement, secure the black buildings to the navy background using fabric glue for a quick fix, or stitch along the edges for a more durable finish. -
Create the windows:
Cut small rectangles and squares from your gold iron-on vinyl. Varying the sizes helps distinguish office buildings from residential blocks. -
Apply the lights:
Arrange the gold squares in grid patterns on the black buildings. Use your iron to press them into place according to the vinyl manufacturer’s instructions, ensuring the heat is evenly distributed. -
Add vertical details:
For buildings with vertical stripes (like the one on the far right), cut long, thin strips of gold vinyl and iron them vertically to mimic pinstripe architecture.
Glow Up
Cut small holes in the center of the largest stars and poke strands of battery-operated fairy lights through from the back for real twinkling effects.
Step 3: Stars & Finishing Touches
-
Design the stars:
On your adhesive gold vinyl or cardstock, draw various star shapes. distinct 5-point stars, 8-point bursts, and simple small diamonds working best. -
Cut the celestial bodies:
Cut out your stars. You’ll need roughly 30–50 stars of varying sizes to fill the upper expanse of the backdrop effectively. -
Map the night sky:
Lay the stars out on the upper navy section. Group smaller stars together to suggest distant clusters and place the larger, detailed stars more sporadically. -
Attach the stars:
Peel and stick the stars firmly onto the fabric. If you want a permanent hold, a dab of fabric glue behind each one is a smart move. -
Prepare for hanging:
Fold the top edge of your navy panels over by about 3 inches and sew a straight line across to create a rod pocket, or install grommets every 12 inches. -
Hang and adjust:
Slide your backdrop onto a pipe and drape support or curtain rod. Steam out any wrinkles that formed during the crafting process to ensure the city looks sharp.
Step back and admire your glittering metropolis as it sets the perfect mood for your event


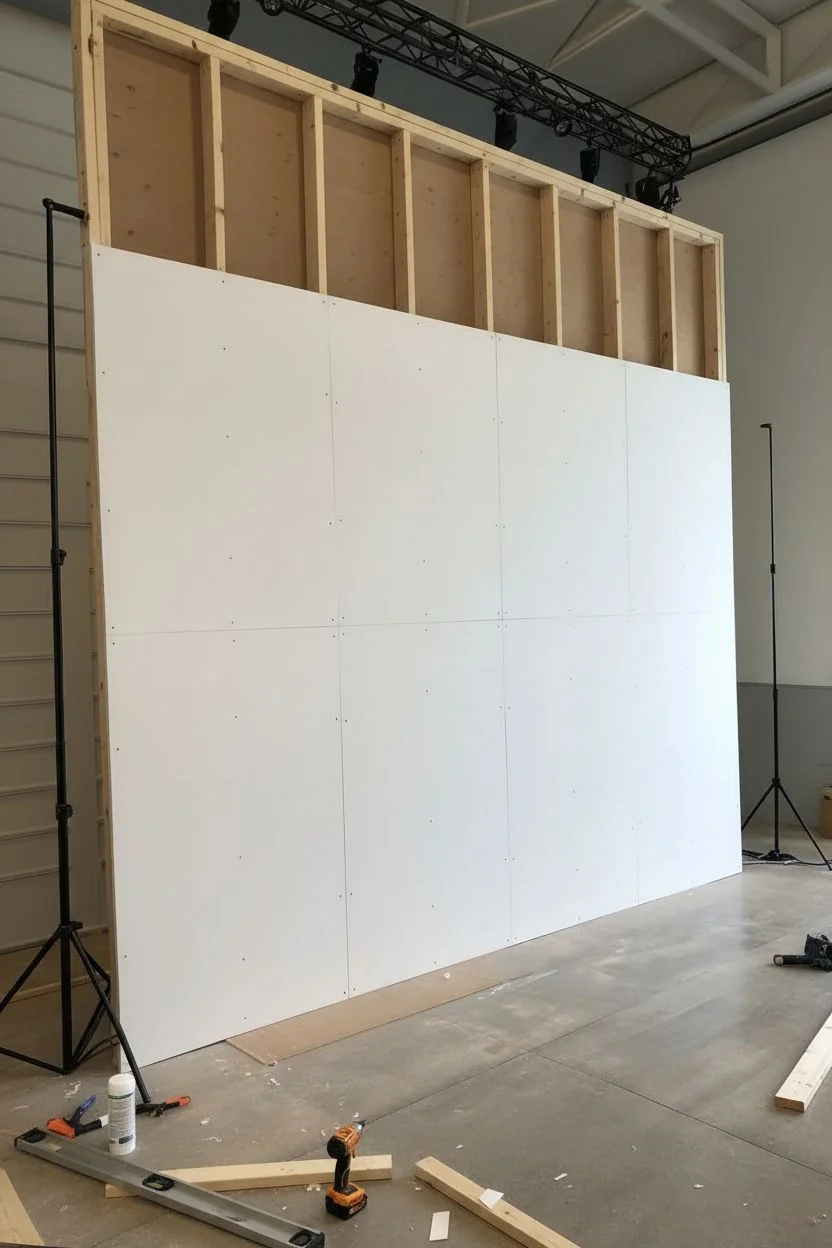
Bold Geometric Color-Block Wall
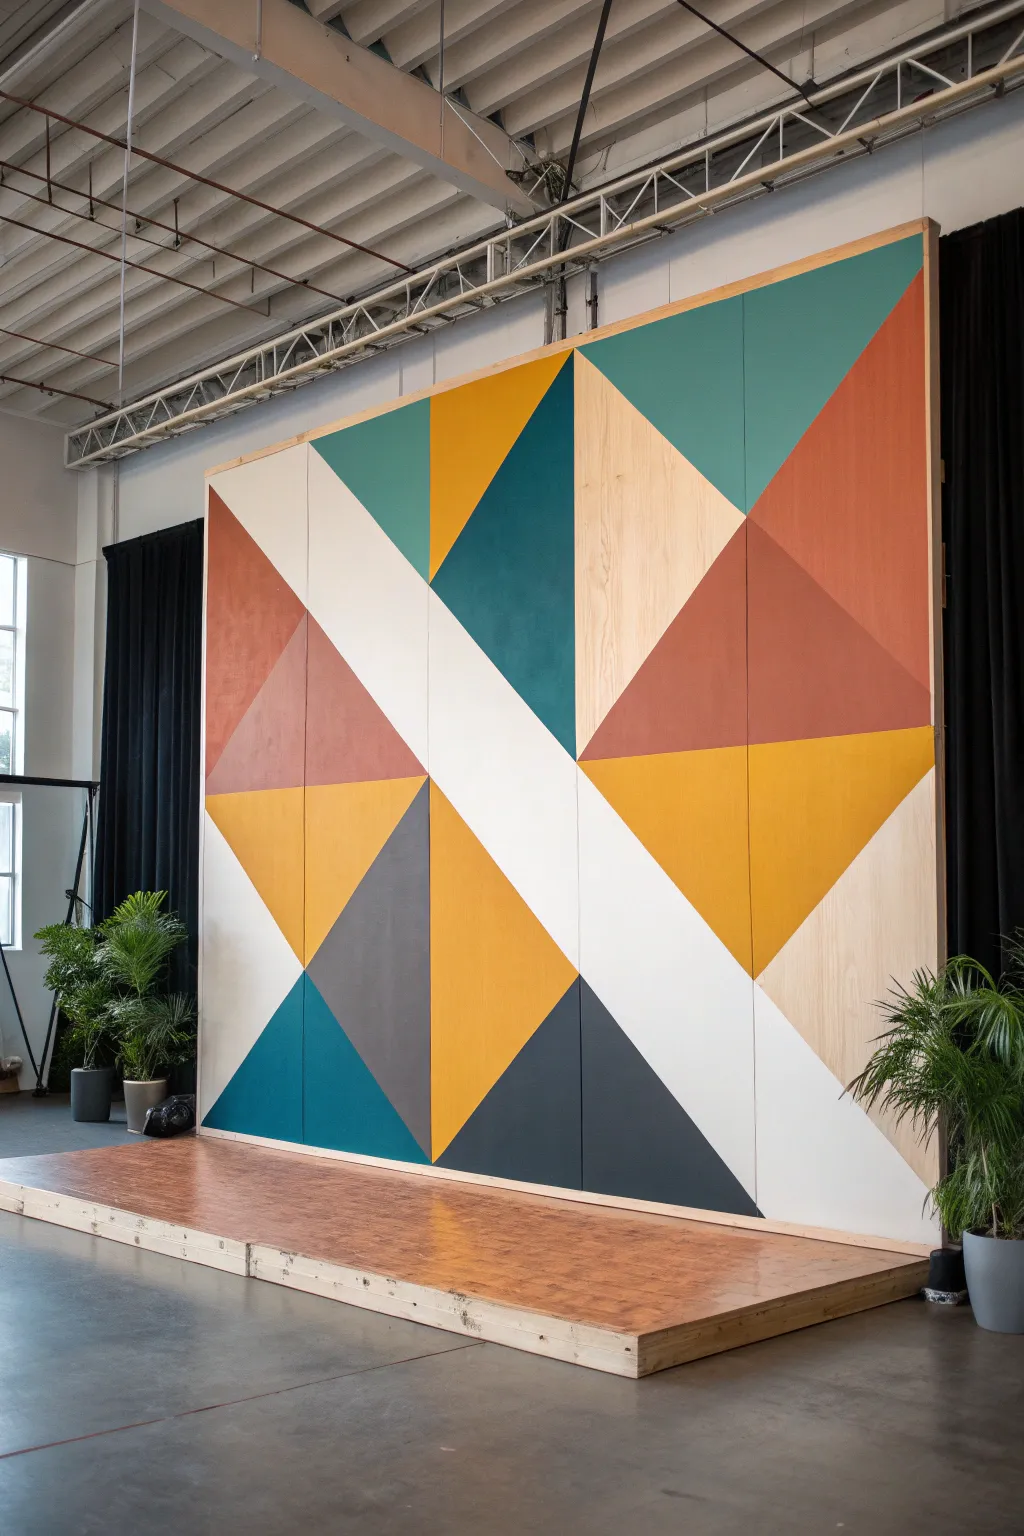
Transform a plain stage into a dynamic focal point with this bold, large-scale geometric wall. Featuring a modern palette of teal, rust, ochre, and slate, this plywood-based build uses simple triangular masking to create striking visual depth.
How-To Guide
Materials
- 4-6 Sheets of 4×8 ft birch plywood (depending on desired width)
- 2×4 lumber for framing and bracing
- Circular saw or table saw
- Painter’s tape (FrogTape recommended for crisp lines)
- Interior latex paint (Deep Teal, Burnt Orange/Rust, Mustard Yellow, Slate Grey, Dark Blue, White)
- Clear matte polyurethane sealer
- Paint rollers (foam and medium nap)
- Paint tray and liners
- Straight edge or long ruler
- Pencil and chalk line tool
- Sandpaper (120 and 220 grit)
- Drill and screws
Step 1: Planning and Surface Prep
-
Map your grid:
Before buying wood, sketch your design on graph paper. The reference image uses a grid system where each 4×8 panel is treated as a canvas composed of large triangles. Decide if you want a continuous pattern across joined panels or individual standalone panels. -
Sand the plywood:
Lay your plywood sheets flat. Sand the entire surface with 120-grit sandpaper to remove any rough patches or splinters, then follow up with 220-grit for a smooth painting surface. Wipe away all dust with a tack cloth. -
Prime the surface:
Apply a coat of high-quality primer to the plywood. Even if your paint includes primer, raw wood drinks up liquid, so a dedicated primer ensures your colors stay vibrant and opaque. Let this dry completely. -
Base coat application:
Identify the lightest colors in your design (the white and natural wood tones). It’s easier to paint the whole section white first and mask over it later than to try to cut in white paint next to dark colors.
Bleed Prevention
Paint bleeding under the tape? Before adding color, brush a clear matte medium over the tape edge. This seals the gap invisibly so your colored paint lines stay razor sharp.
Step 2: Drafting the Design
-
Mark the center points:
Using a measuring tape, mark the exact center of your plywood sheets, as well as the midpoints on each edge. These reference points are crucial for creating symmetrical triangles. -
Snap the lines:
Use a chalk line tool to connect your reference marks. Snap lines diagonally from corner to corner and from edge midpoints to create the intersecting triangles seen in the design. -
Identify color zones:
Lightly write the intended color code (e.g., ‘T’ for Teal, ‘O’ for Orange) inside each resulting triangle with a pencil. This simple step prevents confusion once you start taping and painting.
Step 3: Painting the Geometry
-
Tape the first set of shapes:
Apply painter’s tape along the outside of the lines for your first color group. You cannot paint adjacent shapes simultaneously, so choose non-touching triangles first. -
Seal the tape edge:
I always run a credit card or putty knife firmly over the tape edge to ensure a tight seal. For extra crispness, paint a thin layer of the *base* color over the tape edge to seal it before applying the new color. -
Apply the first colors:
Using a small foam roller for smooth application, fill in the first set of triangles. Apply two coats, allowing proper drying time between them significantly improves opacity. -
Remove tape while damp:
Carefully peel off the tape while the second coat is still slightly tacky. Pulling at a 45-degree angle away from the paint helps prevent peeling. -
Tape and paint remaining shapes:
Once the first set of shapes is fully dry (give it at least 2-3 hours), tape off the remaining triangles. The tape will now go over your freshly painted (and dry) sections, so be gentle. -
Detail work:
Check for any bleed-through or uneven lines. Use a small artist’s brush to touch up intersections where multiple colors meet.
Pro Tip: Sheen Matters
Stick to matte or eggshell finishes for stage backdrops. Glossy paint reflects stage lights, creating glare that ruins photos and video. Matte absorbs light for rich color.
Step 4: Assembly and Staging
-
Build the rear frame:
Construct a simple frame using 2x4s to support the plywood panels. The frame should be slightly smaller than the panel dimensions so it remains hidden from the front view. -
Attach panels to frame:
Screw the painted plywood panels onto the frame from the front. You can countersink the screws and dab a little matching paint over the heads to hide them. -
Connect the panels:
Align the panels side-by-side on your stage platform. Use C-clamps at the back or screw the frames together to ensure a seamless look where the geometric lines flow from one panel to the next. -
Secure the base:
Ideally, anchor the wall to the stage floor using L-brackets behind the structure, or use sandbags on the rear frame legs for stability and safety.
With your massive geometric puzzle complete and assembled, you now have a professional-grade backdrop ready for any performance or presentation
BRUSH GUIDE
The Right Brush for Every Stroke
From clean lines to bold texture — master brush choice, stroke control, and essential techniques.
Explore the Full Guide
Classic Drapery Swags and Pleats
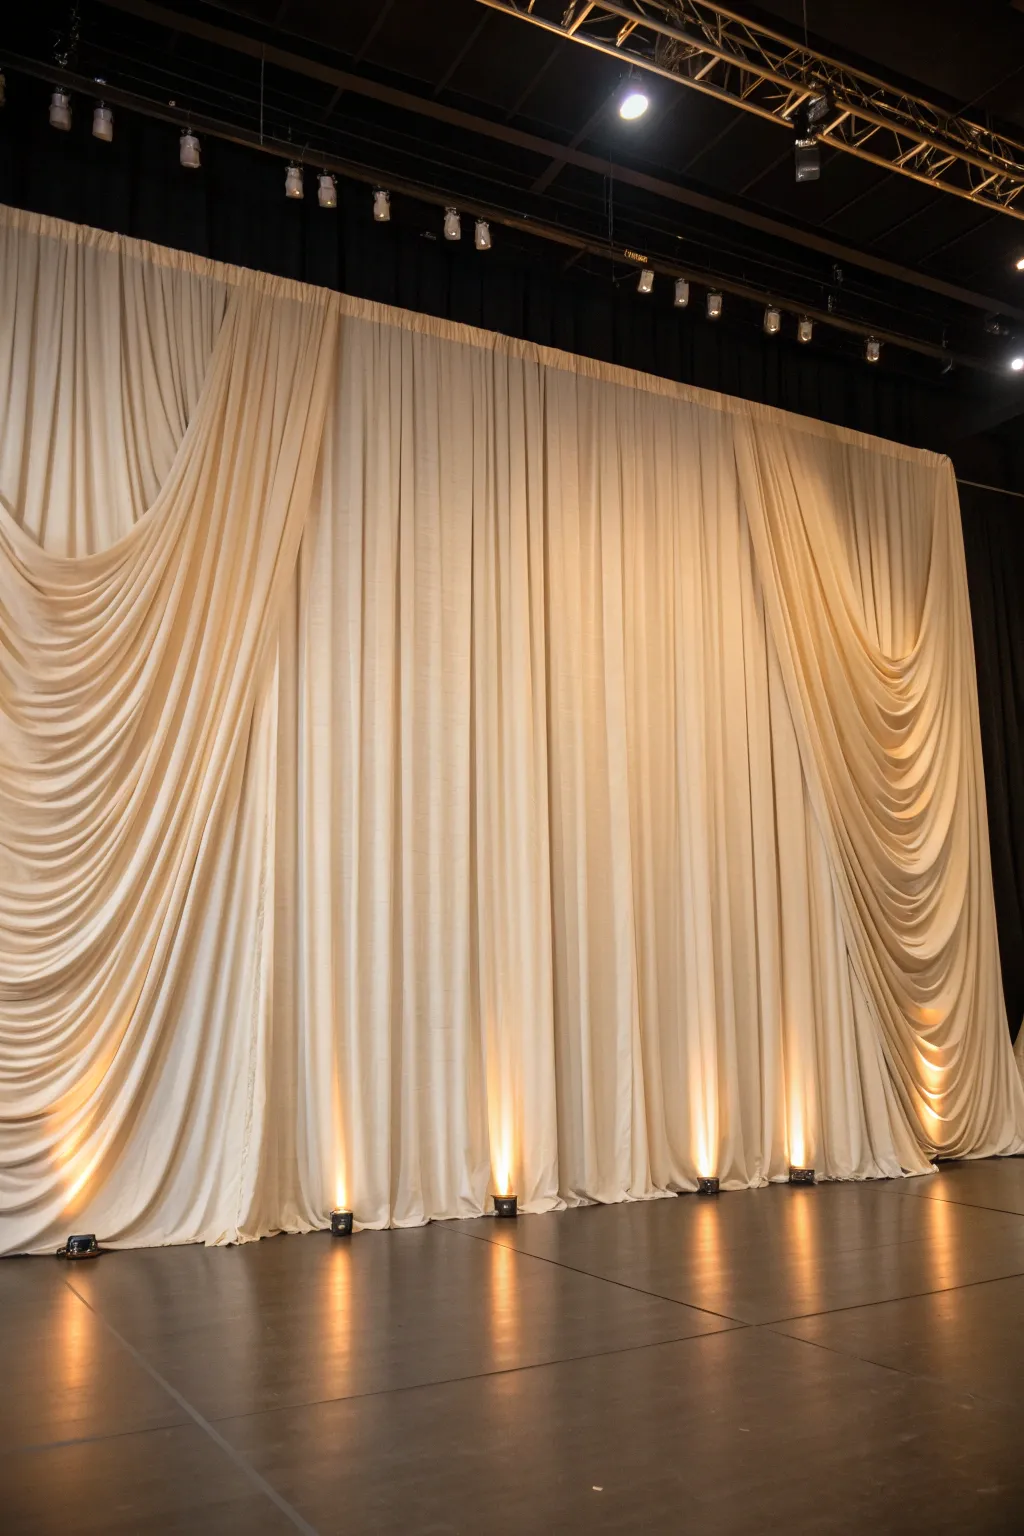
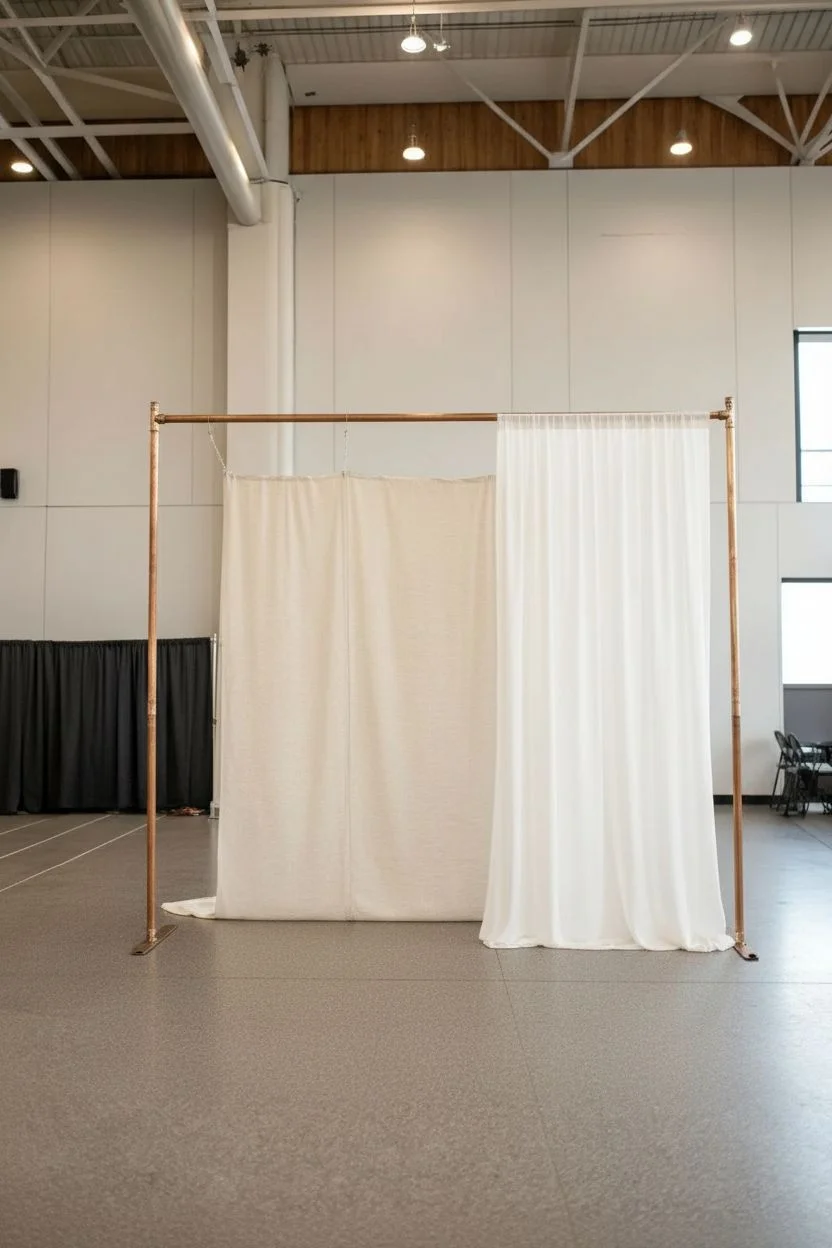
Transform a plain stage into a luxurious focal point with this classic ivory drapery setup featuring structured box pleats and dramatic, sweeping swags. The interplay of soft fabric folds and warm uplighting creates an atmosphere of timeless elegance perfect for galas or weddings.
Step-by-Step Tutorial
Materials
- Ivory drape panels (banjo cloth or velour, approx 12-16ft height)
- Pipe and drape hardware (uprights, crossbars, base plates)
- Valance hangers or S-hooks
- Clear fishing line or drapery ties
- Gaffer tape
- Steamer
- LED uplights (warm white/amber capabilities)
- Safety pins
- Ladder
Step 1: Setting the Structure
-
Assemble the Framework:
Begin by setting up your pipe and drape hardware. Place the heavy base plates at equal intervals along the back wall of your stage area, sliding the upright poles onto the pins. -
Secure the Crossbars:
Slide your telescopic crossbars into the slots at the top of the uprights. Ensure the entire framework is level and stable before adding any weight. -
Double-Bar Setup:
For this specific look, I prefer using a double-crossbar system if available. Place a second crossbar slightly in front of the first one; this allows you to hang the main pleated curtain on the back bar and the decorative swags on the front bar for better depth. -
Hang the Base Layer:
Slide the rod pockets of your main ivory panels onto the back crossbar. Gather the fabric evenly to create dense, vertical fullness—aim for at least 50% fullness for a rich look.
Step 2: Creating the Swags
-
Position the Side Panels:
On the front crossbar (or on top of the base layer if using a single bar), hang two extra-long panels on the far left and right sides. These need to be significantly longer than the stage height to allow for the draping effect. -
Anchor the Top Corner:
Secure the top outer corner of your left swag panel firmly to the end of the crossbar using a strong clamp or by bunching it tightly on the pole. -
Form the First Swoop:
Gather the fabric in your hands about 3-4 feet down from the top edge. Lift this gathered point up and attach it to the crossbar about 2-3 feet inward from the corner. -
Refine the Pleats:
While holding the gathered bunch, carefully arrange the hanging fabric into distinct folds. The goal is to have smooth, U-shaped curves cascading down. -
Secure with Ties:
Use clear fishing line, zip ties, or specialized drapery ties to fix this gathered point to the crossbar. Ensure the tie is hidden behind the folds of the fabric. -
Create the Second Swoop:
Repeat the process by gathering the fabric another few feet down and attaching it further inward on the crossbar. Depending on your fabric length, you might create 2 or 3 distinct swag levels. -
Mirror the Design:
Move to the right side of the stage and replicate the exact same swagging process, ensuring symmetry in height and width with the left side. -
Adjust the Falls:
Let the remaining fabric at the ends of the swags puddle slightly on the floor or hang straight down specifically at the outer edges to frame the stage.
Drooping Swags?
If your swags look messy, the fabric is likely too heavy for the tie. Reinforce the attachment point with a clamp or wider strip of fabric rather than a thin string to distribute the weight.
Step 3: Finishing Touches
-
Steam the Fabric:
This is crucial for a professional finish. Run a commercial steamer over all vertical pleats and carefully along the severe curves of the swags to remove shipping creases. -
Hide the Mechanics:
If any crossbars are visible in the gaps between swags, use small strips of matching ivory fabric or a simple straight valance to cover the hardware. -
Pin for Perfection:
Where the swags meet the vertical drapes, use safety pins behind the fabric to keep the folds exactly where you want them, preventing them from shifting during the event. -
Position Uplights:
Place LED par can lights at the base of the drapes. Focus one light directly under each column of vertical pleats and one beneath the lowest point of each swag. -
Dial in the Color:
Set your lights to a warm white or soft amber hue. Angle them sharply upward to catch the texture of the gathered fabric, emphasizing the depth of your folds. -
Clean the Floor:
Tape down all lighting cables with gaffer tape and tuck them under the bottom hem of the drapes so the stage floor looks immaculate.
Add Sparkle
Hang a layer of sheer voile or a crystal beaded curtain behind the main swags but in front of the back flat drape. The uplights will catch the texture for a magical effect.
Step back and admire how the simple addition of curved lines and warm light turns standard fabric into a grand entrance
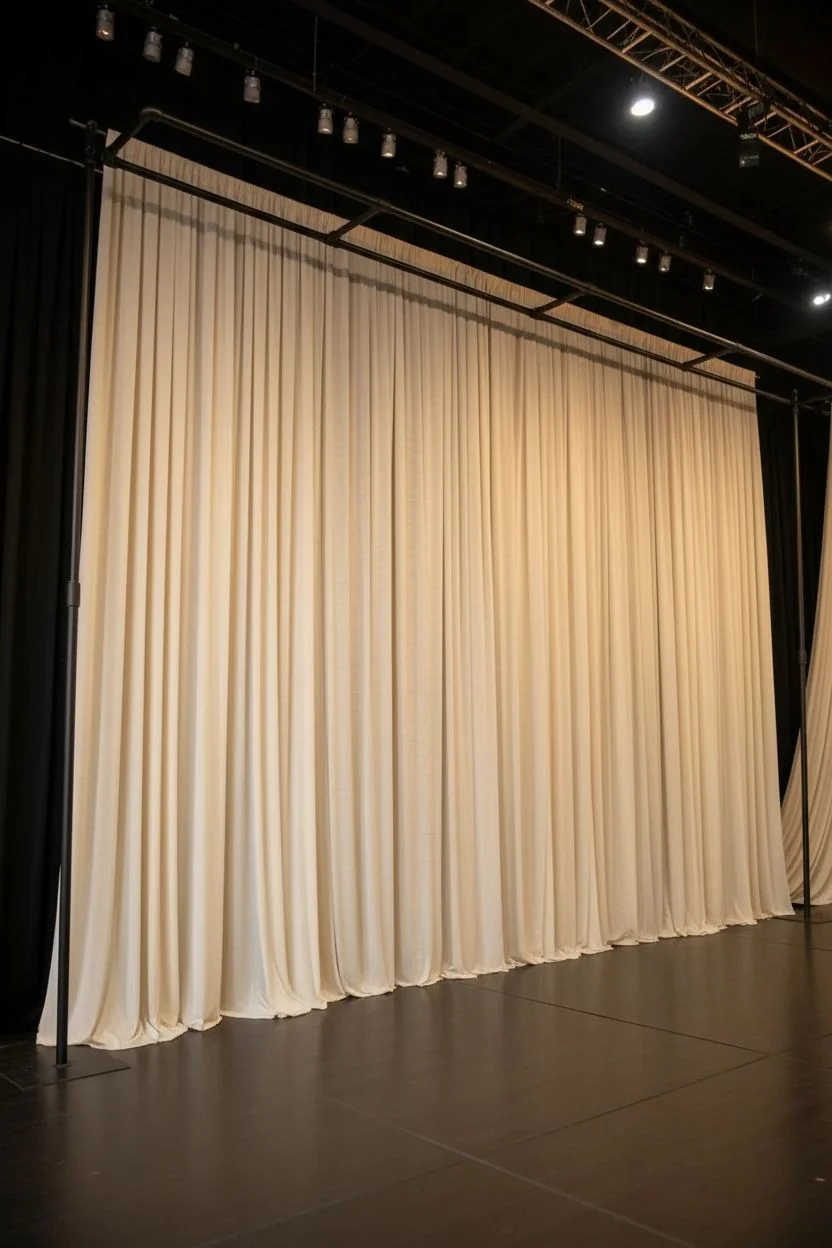
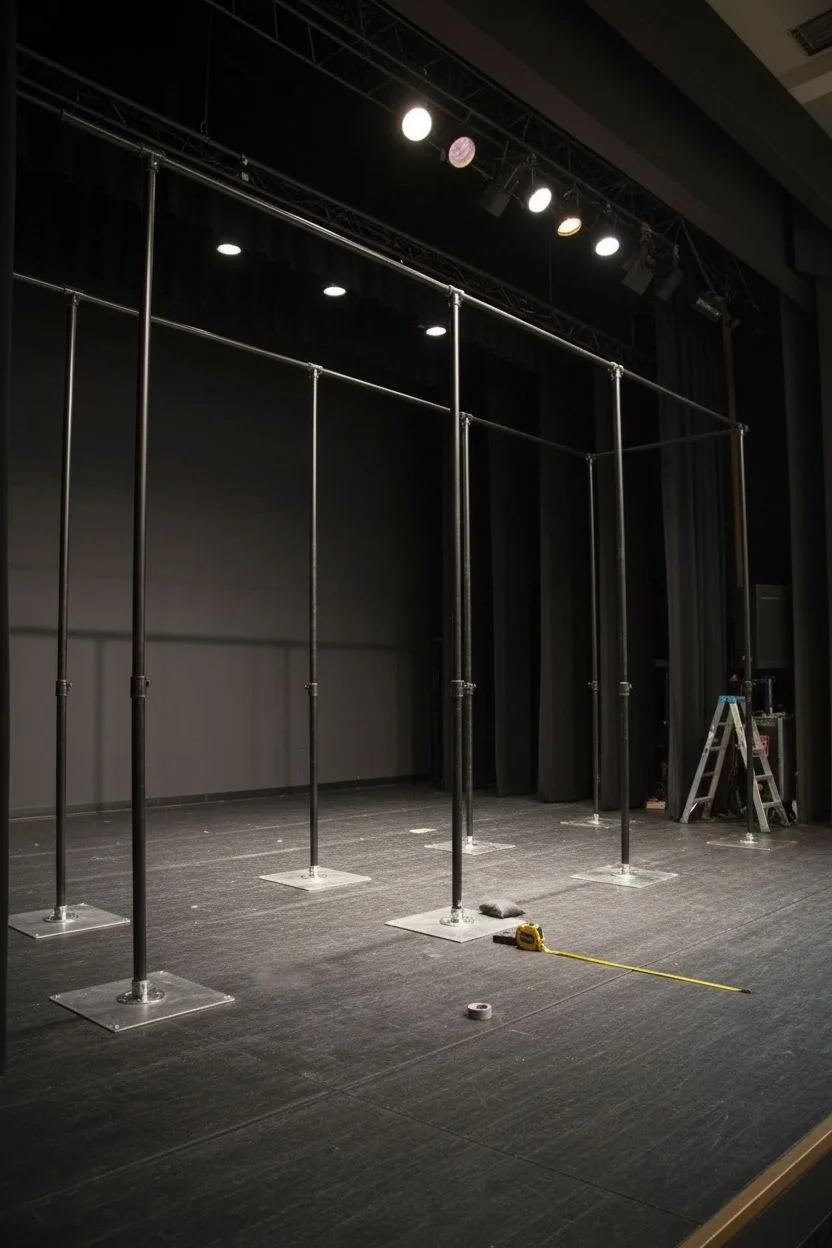
Black Drape With Concert Beam Lighting
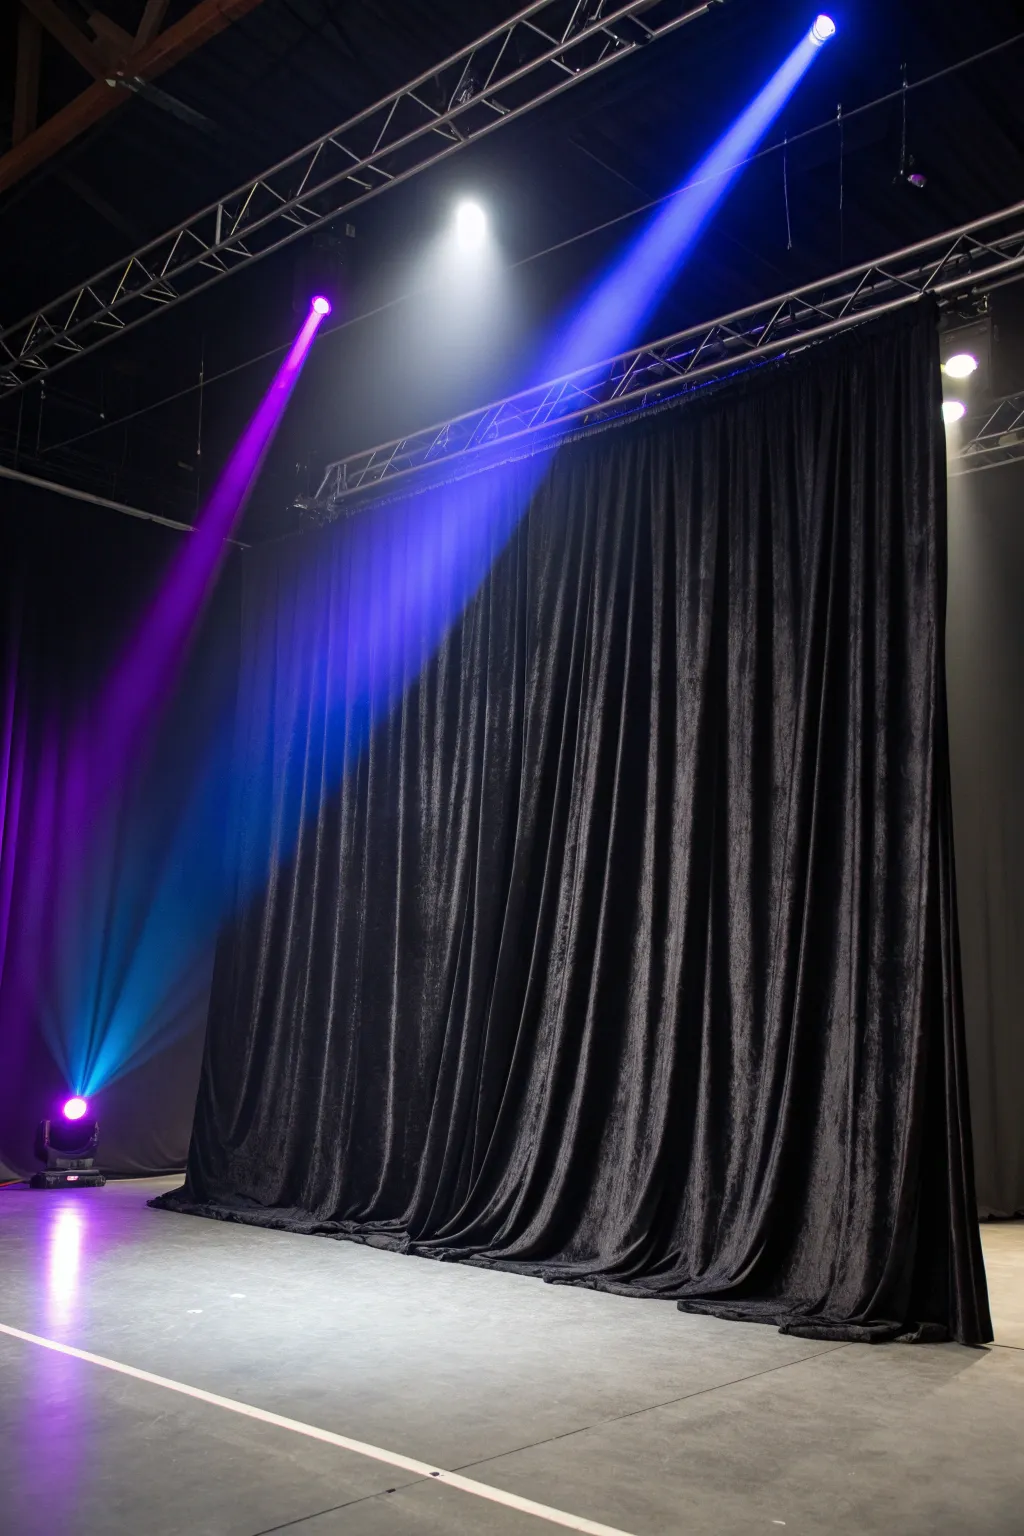
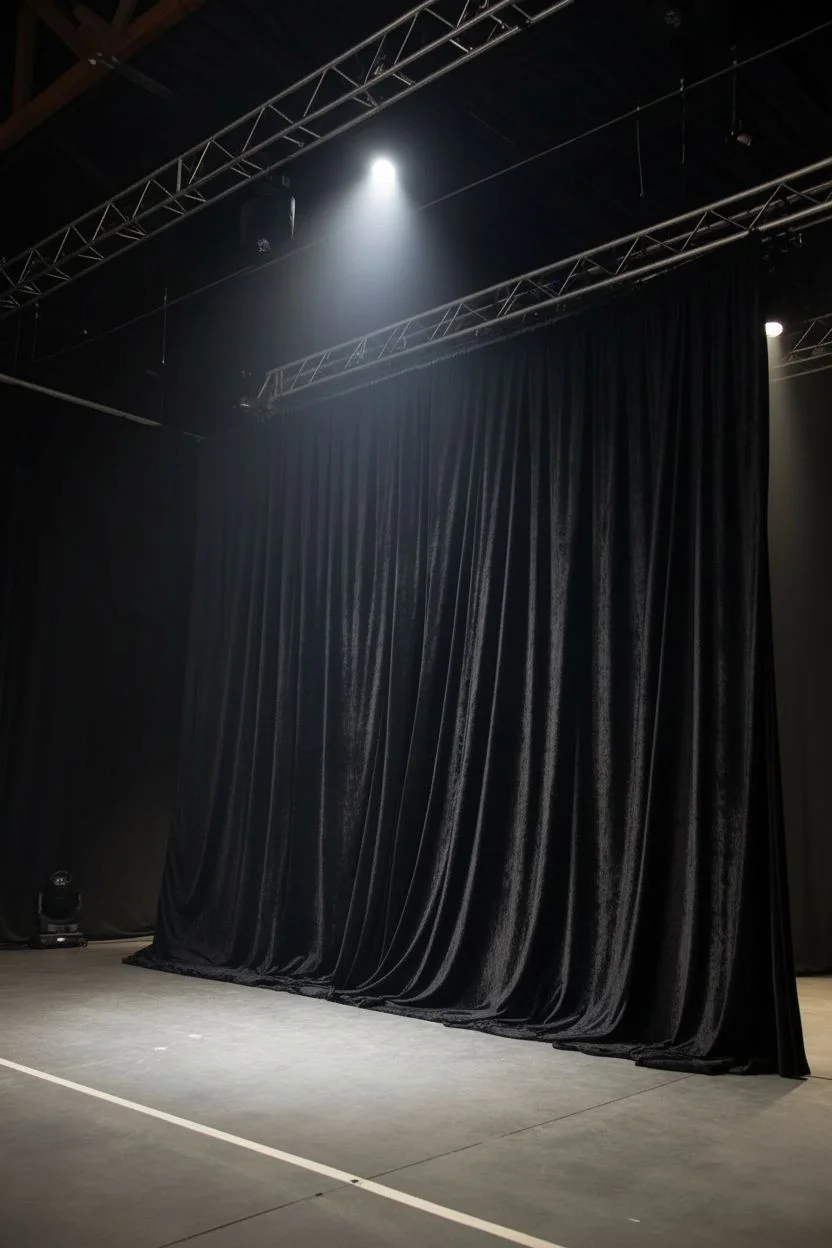
Transform a plain performance space into a professional venue using majestic black drapes and dramatic beam lighting. This setup creates depth, hides backstage clutter, and provides a polished, high-contrast canvas for any event.
Detailed Instructions
Materials
- Heavyweight black velour or velvet drapes (with grommets or ties)
- Pipe and drape support system (stands and crossbars) or overhead trussing
- Beam moving head lights (2-4 units)
- DMX controller or lighting desk
- Power cables and extension cords
- Gaffer tape
- Safety cables (if hanging lights overhead)
- Hazer or fog machine (essential for visible beams)
Step 1: Building the Black Canvas
-
Assess the space:
Begin by measuring the width and height of your stage area. You want the drapes to extend well beyond the visible performance area to mask the wings properly. -
Set up the support structure:
Assemble your pipe and drape stands or prepare the overhead truss depending on your venue’s capabilities. Ensure the crossbar is level and high enough to create a grand sense of scale. -
Hang the primary drapes:
Attach your black velour drapes to the crossbar. Tie them securely or use the grommets. Allow the fabric to puddle slightly on the floor (like in the photo) for a luxurious, tailored look that prevents light leaks from underneath. -
Create the pleats:
Once hung, manually adjust the fabric to create deep, even folds. This fullness absorbs light better and looks richer than flat fabric. -
Adding wing curtains (optional):
If you have depth, set up secondary black drapes perpendicular to the back wall on the sides. This masks the entrance/exit points for performers.
Step 2: Installing the Lighting Rig
-
Position the overhead truss:
If you are using a suspended truss like the one in the reference, lower it to a workable height before attaching fixtures. -
Mount the top beams:
Clamp your moving head beam lights onto the truss. Position one near the center-left and another near the center-right to create crossing patterns. -
Secure with safety cables:
Always loop a safety cable through the fixture and around the truss. This is a non-negotiable step for overhead rigging. -
Place floor fixtures:
Position a moving head light on the floor, stage left or right. This uplighting angle adds drama and highlights the texture of the drapery. -
Cable management:
Run power and DMX data cables neatly along the truss or floor. Use gaffer tape to secure floor cables so they don’t become trip hazards.
Beam Visibility Issues
Can’t see the light shafts clearly? You need more particulate in the air. Increase the output of your hazer, or ensure HVAC vents aren’t blowing the haze away too quickly.
Step 3: Focus and Programming
-
Power up:
Turn on your lighting console and fixtures to ensure all connections are working properly. -
Introduction of haze:
Turn on your hazer. Let it run until a fine, even mist fills the room. I find that without haze, the stunning beams you see in the photo will be invisible to the eye. -
Focus the overhead beams:
Using your controller, point the overhead lights downwards and across the stage. Use a cool blue or white color for that stark, modern contrast against the black. -
Focus the floor beam:
Direct the floor fixture upward, perhaps in a contrasting color like magenta or purple. Aim it so it cuts through the overhead beams. -
Fine-tuning beam width:
Adjust the zoom or iris on your fixtures to create tight, pencil-thin shafts of light rather than wide washes. -
Final look check:
Step back to the audience perspective. Ensure the black drapes are absorbing the spill light and that your beams look sharp and distinct in the haze.
Add Movement
Program a slow pan/tilt movement effect on your console. Subtle movement of the beams creates a ‘searchlight’ effect that looks dynamic and grand.
Now you have a professional-grade backdrop ready for any performance or presentation

PENCIL GUIDE
Understanding Pencil Grades from H to B
From first sketch to finished drawing — learn pencil grades, line control, and shading techniques.
Explore the Full Guide
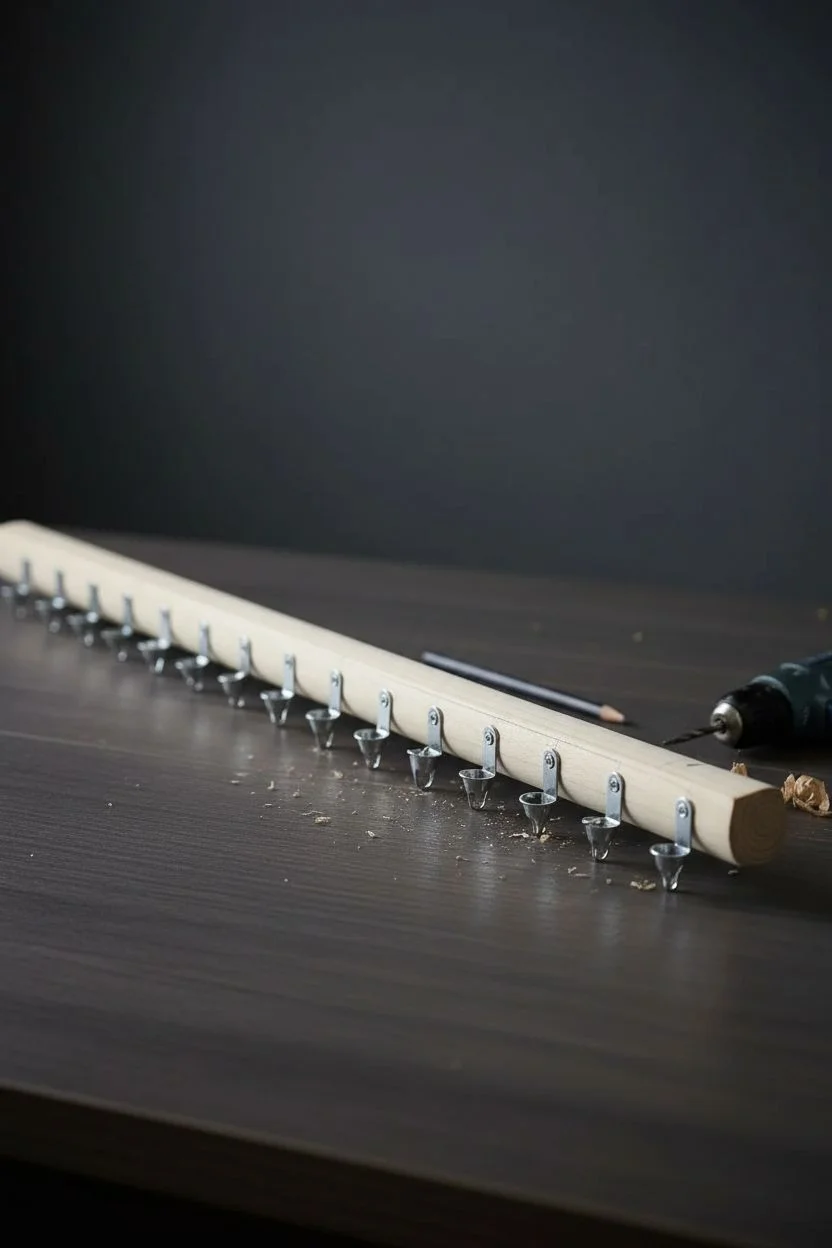
Fairy Light Star Curtain
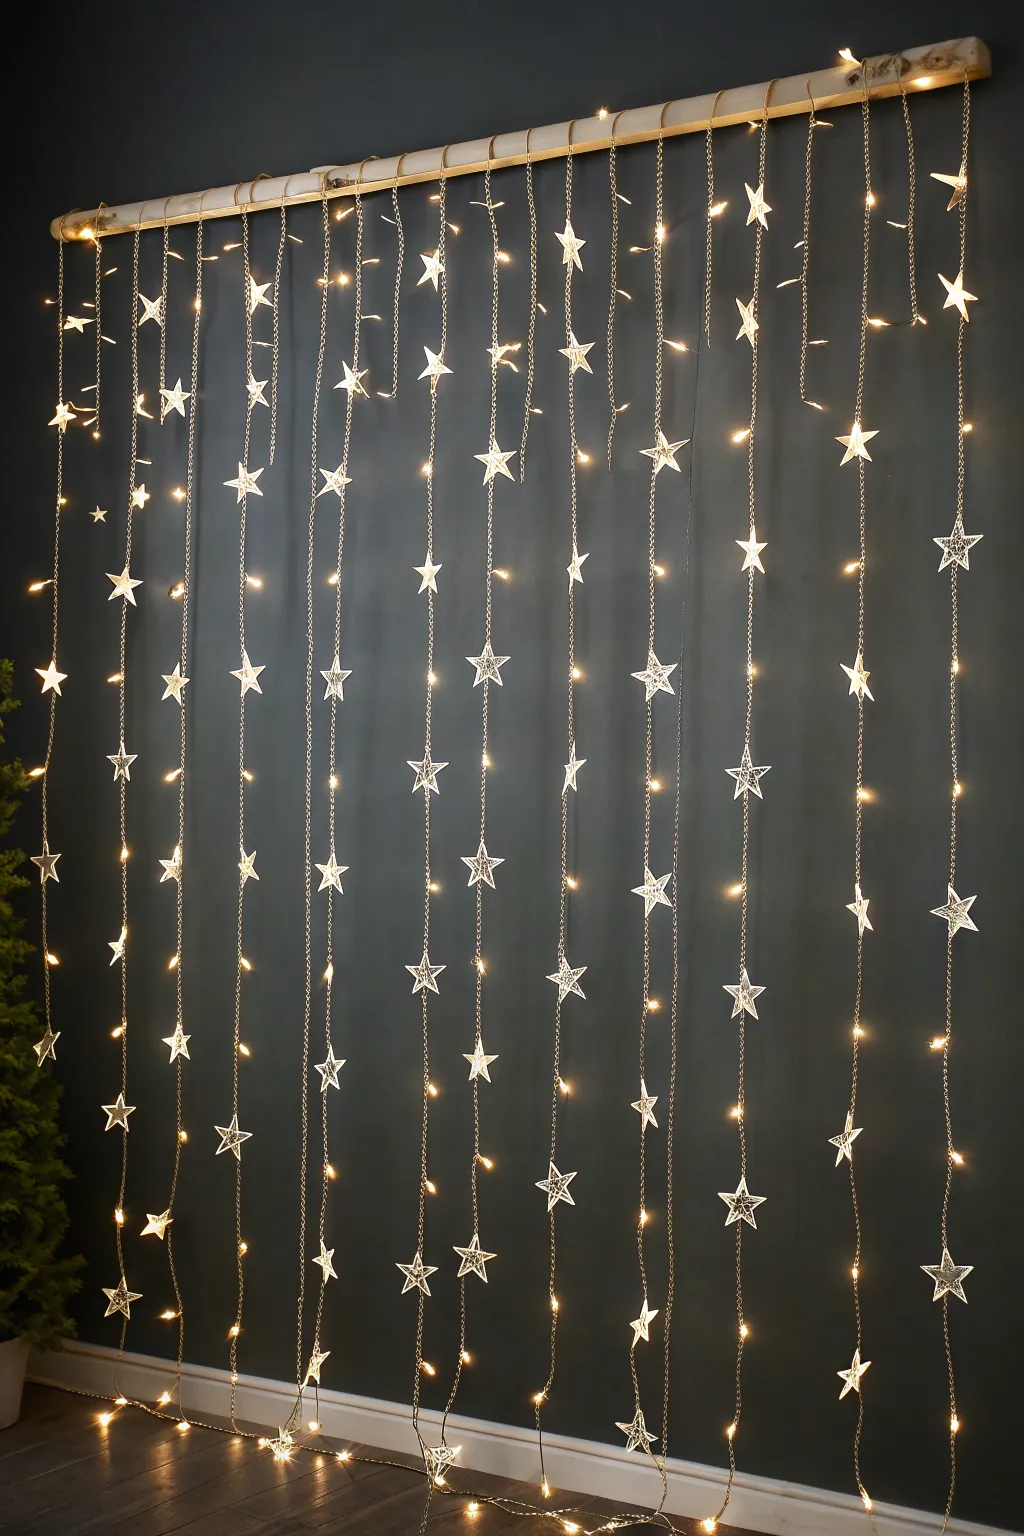
Transform any blank wall into a magical night sky with this enchanting glowing backdrop. Combining natural wood textures with delicate star cutouts and warm fairy lights creates a dreamy atmosphere perfect for stages or cozy corners.
Step-by-Step
Materials
- Long birch branch or wooden dowel (approx. 5-6 feet)
- Warm white LED fairy light strings (plug-in or battery operated)
- Silver jewelry chain or thin crafting chain
- Silver star ornaments (wire or cutout style)
- Small screw eyes or cup hooks
- Clear fishing line or thin jewelry wire
- Needle-nose pliers
- Drill with small bit (optional)
- Ceiling hooks or wall brackets for mounting
Step 1: Prepare the Beam
-
Select your wood:
Choose a sturdy birch branch for a rustic look or a smooth dowel for a modern finish. Ensure it spans the width of the area you want to cover. -
Mark spacing:
Lay the branch on a flat surface. Using a pencil, mark even intervals along the bottom where your light strands and chains will hang, spacing them about 3-4 inches apart. -
Install hooks:
Screw small cup hooks or eye screws into your marked spots. If the wood is hard, I find pre-drilling a tiny pilot hole prevents splitting.
Tangle-Free Setup
Work with gravity! Hang the main beam first, then attach each vertical strand one by one. Attaching strands while the beam is on the floor guarantees a knotted mess.
Step 2: Assemble the Vertical Strands
-
Measure and cut chain:
Cut lengths of silver chain to create the non-lighted vertical drops. Vary the lengths slightly for a more organic feel, ensuring they reach almost to the floor. -
Attach stars to chain:
Using small jump rings and pliers, attach your silver star ornaments to these chains at random intervals. Leave about 12-18 inches between stars on a single strand. -
Prepare light drops:
Uncoil your fairy lights. If using a curtain-style light set, the vertical drops are ready. If using single strands, drape them to create vertical lines. -
Secure stars to lights:
Attach additional star ornaments directly to the fairy light wire using thin jewelry wire or clear fishing line. Be gentle not to crimp the electrical wire.
Step 3: Final Assembly
-
Mount the beam:
Secure the wooden beam to your wall or ceiling brackets before attaching the long tangled strands to make the process manageable. -
Hang the chains:
Hook your prepared silver chain strands onto alternating hooks on the wooden beam. -
Drape the lights:
Weave the main horizontal wire of your fairy lights along the top of the branch, securing it with zipties or wire so the vertical light strands fall between the chain strands. -
Adjust vertical variance:
Step back and look at the bottom hem of the curtain. Trim chains or fold up wire ends to ensure they don’t drag too much on the floor. -
Final fluff:
Gently rotate the stars so they face forward and untangle any wires that may have twisted during hanging. -
Power up:
Plug in your lights and dim room lighting to test the spacing and effect.
Add Extra Sparkle
Mix in a few strands of crystal beads or mirror garland alongside the chains to catch and refract the light from the LEDs for a shimmering effect.
Now you have a stunning backdrop that brings starlight indoors regardless of the weather
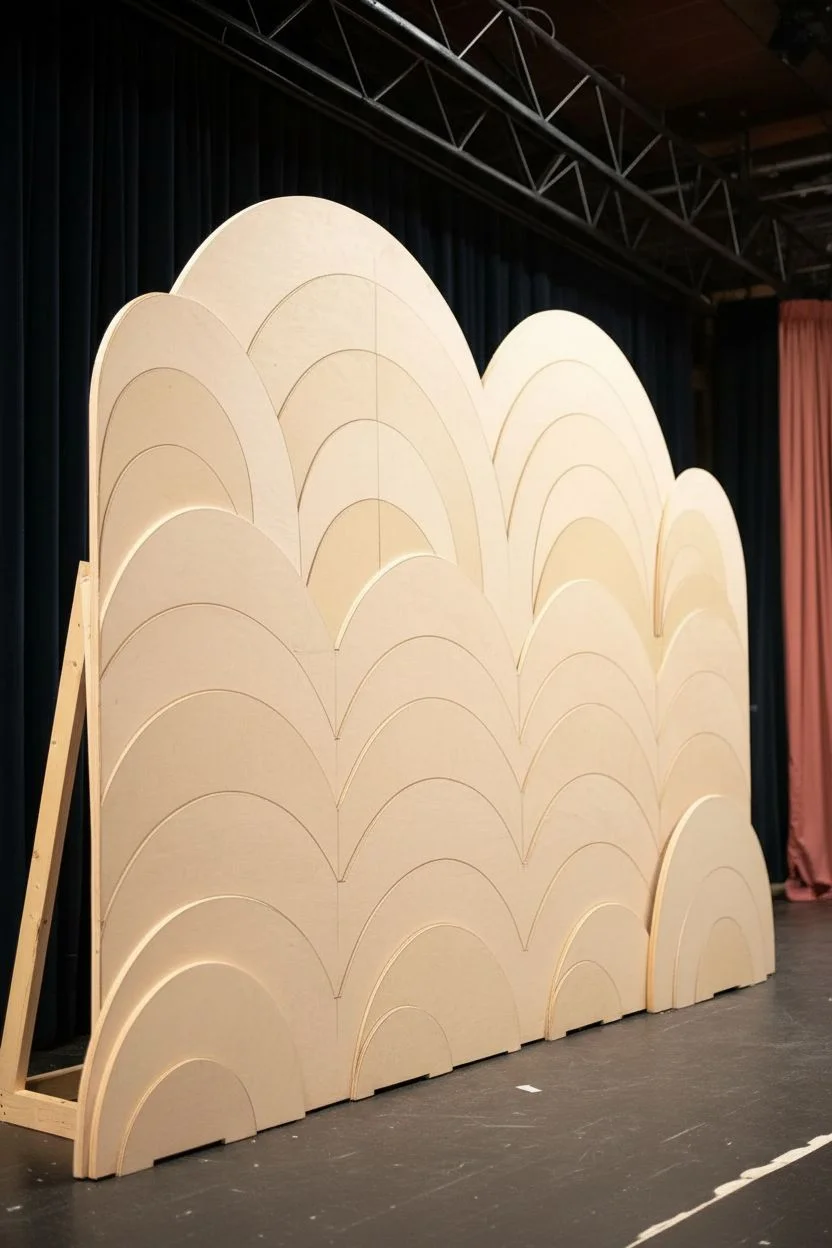
Layered Paper Cutout Scenic Depth
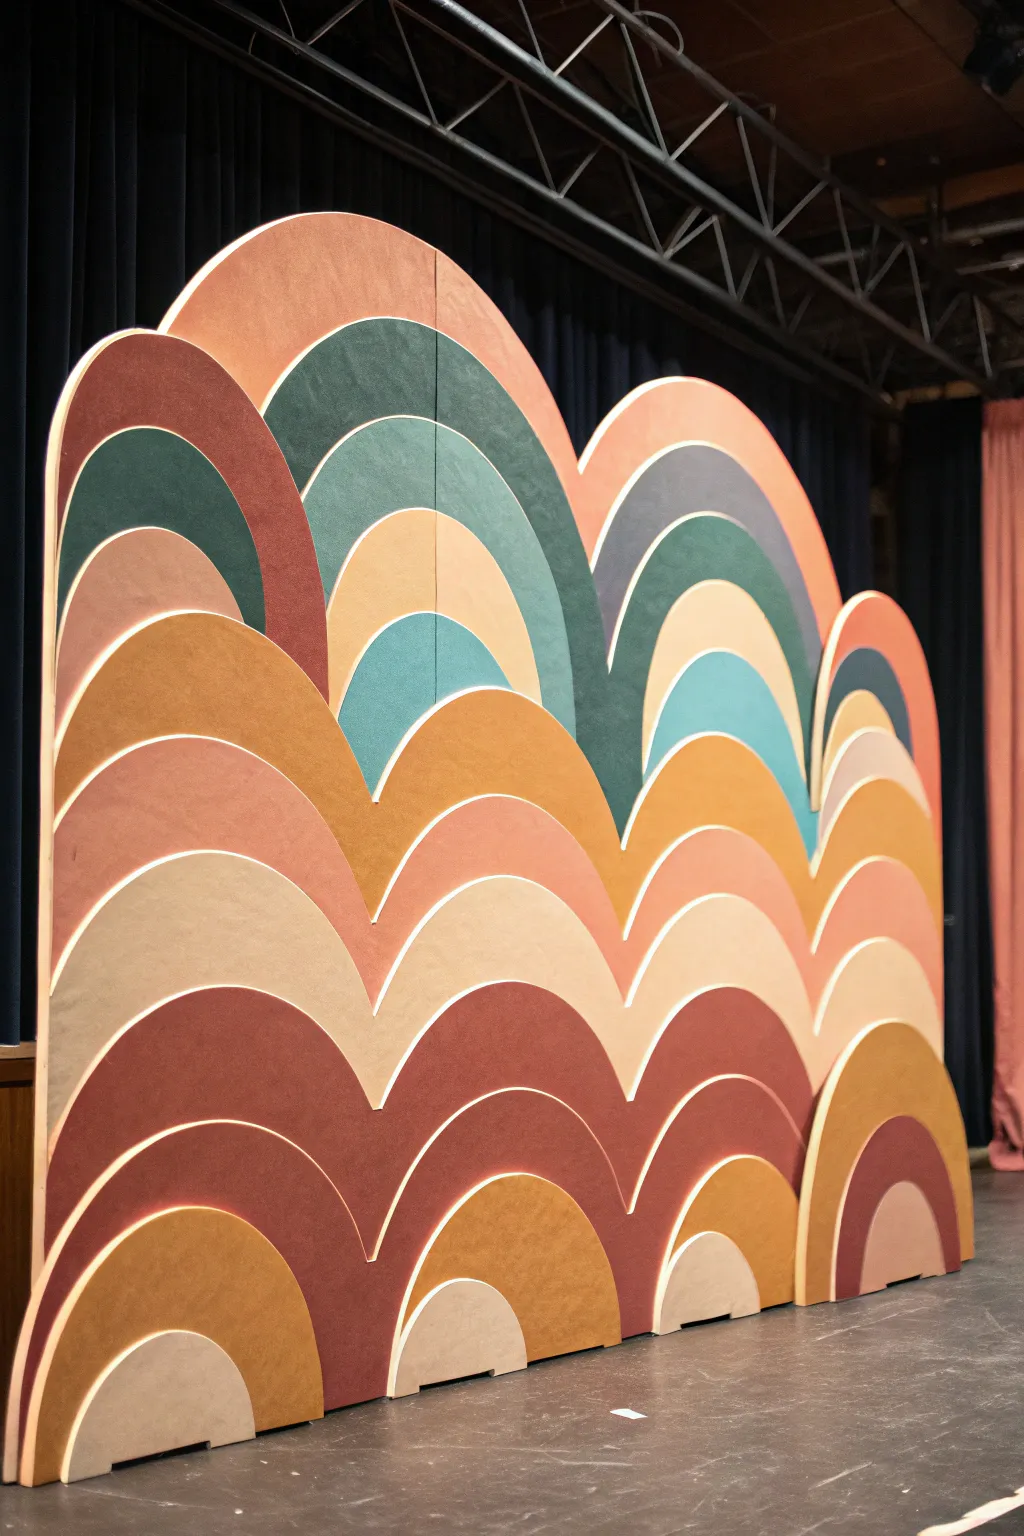
This stunning stage background captures the trendy 70s revival aesthetic with its repeating arch motifs and rich, earthy color palette. By layering large, painted panels, you create a sense of significant scenic depth that looks professional under stage lighting.
How-To Guide
Materials
- 4 large sheets of 1/2-inch plywood or MDF (4’x8′)
- Jigsaw with scrolling blade
- Orbital sander with 120 and 220 grit pads
- Primer (white latex or gesso)
- Flat interior latex paint (Rust, Terracotta, Mustard, Sage Green, Teal, Beige)
- Small foam paint rollers and tray
- Painter’s tape
- Mechanical pencil and string (for compass)
- Measuring tape
- Wood glue
- 2×4 lumber for rear bracing/stands
- Drill and 1.5-inch wood screws
- Matte clear topcoat (optional)
Step 1: Planning and Cutting the Arches
-
Map out the design:
Sketch your layout on graph paper first. The design consists of four main vertical sections tailored to fit standard plywood widths. Plan for the tallest arches in the back and the shortest in the front to maximize depth. -
Draw the curves:
Lay your plywood sheets flat. Create a makeshift giant compass by tying a string to a pencil and pinning the other end at the bottom center of the board. Draw your largest outer arch first, maximizing the board’s height. -
Nest the internal shapes:
Using the same center point, shorten your string incrementally to draw the smaller internal arches within the main shape. I like to space these about 6-8 inches apart to ensure each color band is distinct and bold. -
Cut the outer silhouette:
Using a jigsaw, carefully cut along only the outermost line of your design to create the main panel shape. Go slowly around the curves to keep the edge smooth and perpendicular to the face.
Clean Curves
Jigsaw struggling with tight curves? Use a ‘scrolling’ blade, which is much thinner than a standard wood blade and designed specifically for turning tight corners without binding.
Step 2: Creating the Relief Effect
-
Mark the layers:
For a true 3D look, you aren’t just painting stripes; you can physically layer materials. If you have extra wood, cut separate semi-circle pieces for the bottom-most ‘hills’ and glue them onto the main panel face. -
Score the separation lines:
For the painted arched stripes that aren’t separate wood pieces, use a utility knife to lightly score the pencil lines. This helps stop paint bleed later. -
Sand the edges:
Run an orbital sander along all cut edges. Start with 120 grit to remove splinters, then switch to 220 for a furniture-grade smoothness. Don’t forget to sand the face of the wood lightly to help the primer adhere.
Step 3: Painting the Gradient
-
Prime the surface:
Apply a coat of white primer to the entire front and the cut edges. The edges are porous and soak up paint, so a second coat of primer there is usually necessary. -
Tape the curves:
Once the primer is fully bone-dry, tape off alternating arches. Use high-quality flexible painter’s tape designed for curves to get a crisp line. -
Apply the first colors:
Roll on your first set of colors (e.g., the rust and the beige). Use a small foam roller for a smooth, texture-free finish. Apply two thin coats rather than one thick one. -
Reveal and switch:
Peel the tape while the paint is still slightly tacky to prevent chipping. Allow these sections to dry completely—usually at least 4 hours—before taping over them to paint the remaining alternating bands. -
Paint the edges:
Carefully paint the 1/2-inch thick edge of the plywood using the color of the outermost arch. This makes the prop look solid and finished from the audience’s angle.
Avoid Paint Bleed
Paint the base color over your tape edge first to seal it. Once dry, paint the new color on top. This ensures any bleed is the base color, leaving a razor-sharp line.
Step 4: Assembly and Staging
-
Build the rear jacks:
Construct simple triangular stage jacks (L-braces) using 2×4 lumber. You will need one jack for every 3-4 feet of width to keep the panels stable. -
Attach the panels:
Screw the jacks into the back of your plywood panels. Ensure the screws are shorter than the combined thickness of the jack and panel so they don’t poke through your beautiful paint job. -
Arrange the layers:
Position the panels on stage. Place the tallest, widest panels slightly upstage, and overlap the shorter panels downstage. This staggering hides the stands and enhances the physical depth. -
Touch up:
Once everything is screwed in place, do a final walkthrough with a small brush to touch up any scuffs or screw heads that might be visible.
Step back and admire how the warm tones and layered shapes transform your stage into a cozy, retro landscape


Oversized Hand-Lettered Title Backdrop

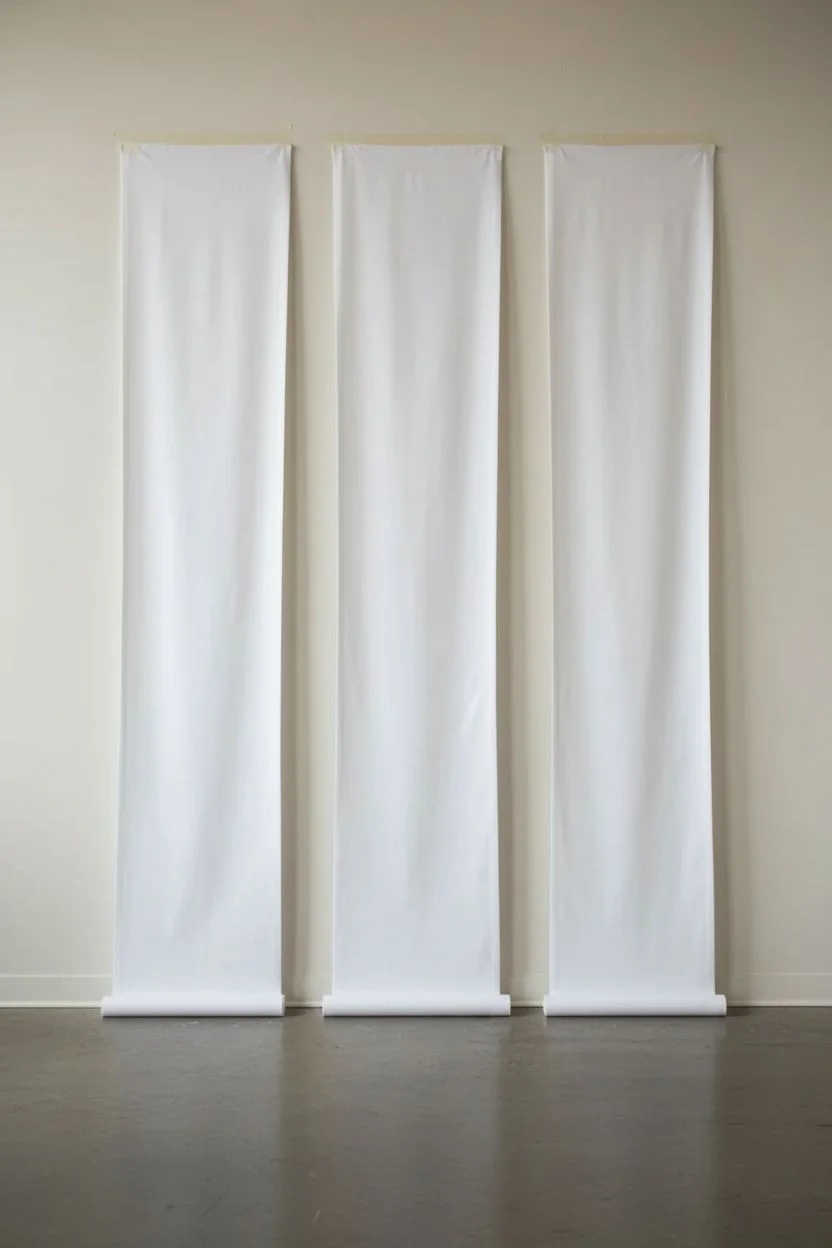
Transform your stage presence with these elegant, grand-scale banners that combine crisp typography with loose, artistic brushwork. The natural drape of canvas fabric adds a soft, professional texture while the abstract peach accents provide warmth and visual grounding.
Step-by-Step
Materials
- Heavyweight cotton canvas or drop cloth (three long strips)
- Fabric paint or high-quality acrylic paint (black for text, peach/orange for accents)
- Wide flat paintbrush (2-3 inch) for the colored bottom
- Detail brushes (flat and round) for lettering
- Projector (essential for scaling typography)
- Pencil or chalk
- Painter’s tape or gaffer tape
- Water spray bottle
- Wooden dowels or PVC pipe for weighting the bottom hems
- Sewing machine or fabric glue (for hemming)
Step 1: Preparation & Layout
-
Measure and cut your fabric:
Determine the height of your stage rigging. Cut three strips of heavyweight canvas: two narrower side panels and one wider center panel. Ensure you have an extra 6 inches at the top and bottom of each for rod pockets. -
Create the rod pockets:
Fold over the top and bottom edges of each fabric strip to create a pocket large enough for your hanging hardware and bottom weights. Sew a straight stitch across, or use heavy-duty fabric glue if you want a no-sew option. -
Hang or tape the canvas:
For the painting process, it is best to pin the fabric vertically against a flat wall. If a wall isn’t available, tape it securely to a clean floor to prevent shifting. -
Design your typography:
Create your text layout digitally first using a classic serif font like Garamond or Caslon. The center alignment is crucial for this three-panel design.
Clean Lines Pro-Tip
For ultra-crisp lettering edges, use a specialized “dagger stripper” brush. Its angled, long bristles handle curves and straight lines better than standard flats.
Step 2: Lettering Application
-
Project the design:
Set up your digital projector and cast the image onto the center canvas panel. Adjust the distance until the text fills the upper-middle portion nicely, leaving plenty of white space above and below. -
Trace the outlines:
Using a pencil or light chalk, carefully trace the outline of every letter. Be precise with the serifs and thin lines, as these details define the style. -
Fill in the lettering:
Using black fabric paint and a small flat brush, begin filling in the letters. I prefer to start with the straight edges of the letters first to establish crisp boundaries. -
Refine the edges:
Switch to a fine round brush to sharpen the corners of the serifs and smooth out any curves. Take your time here; crisp edges make the banner look professional. -
Let the text cure:
Allow the black paint to dry completely according to the manufacturer’s instructions before starting the bottom section to avoid accidental smudging.
Step 3: The Painterly Base
-
Mix your accent color:
Prepare your peach or light orange paint. Since you want a slightly translucent, watercolor look, mix the acrylic with a textile medium or thin it slightly with water. -
Establish the horizon line:
Mentally mark where you want the color to begin—about the bottom 1/5th of the banners. It shouldn’t be a straight line, but rather a jagged, organic collection of strokes. -
Apply the main strokes:
Using a wide, dry brush, apply the paint in upward, diagonal strokes. Start heavy at the bottom and lift pressure as you sweep upward to create that streaky, dry-brush texture. -
Layer for depth:
While the first layer is still tacky, go back in with slightly more saturated paint in selective areas to create depth and shadow within the brushstrokes. -
Add splatter effects:
Dip a smaller brush into watered-down paint. Tap the handle against your finger to flick small droplets of paint above the main color block, adding energy to the composition. -
Create continuity:
If painting the panels side-by-side, ensure the brushstrokes flow visually from one banner to the next, creating a cohesive landscape effect across the gap.
Bleeding Paint?
If paint bleeds into the canvas weave, your paint is too watery. Switch to a heavy-body acrylic or mix in a clear fabric gel medium to thicken the consistency.
Step 4: Finishing & Installation
-
Insert bottom weights:
Once fully dry, slide wooden dowels or PVC pipes into the bottom pockets. This weight is essential to pull the fabric taut and prevent it from curling or swaying on stage. -
Steam the fabric:
Hang the banners and use a garment steamer to release any creases or fold lines. A smooth surface reflects light better and looks cleaner. -
Final rigging check:
Secure the top pockets to your stage truss or hanging bar, ensuring the spacing between the three panels is even—usually about 2 to 4 inches apart looks best.
Step back and admire how the simple combination of bold text and artistic color creates a stunning focal point for your stage
Panoramic Banner Panel “Windows”
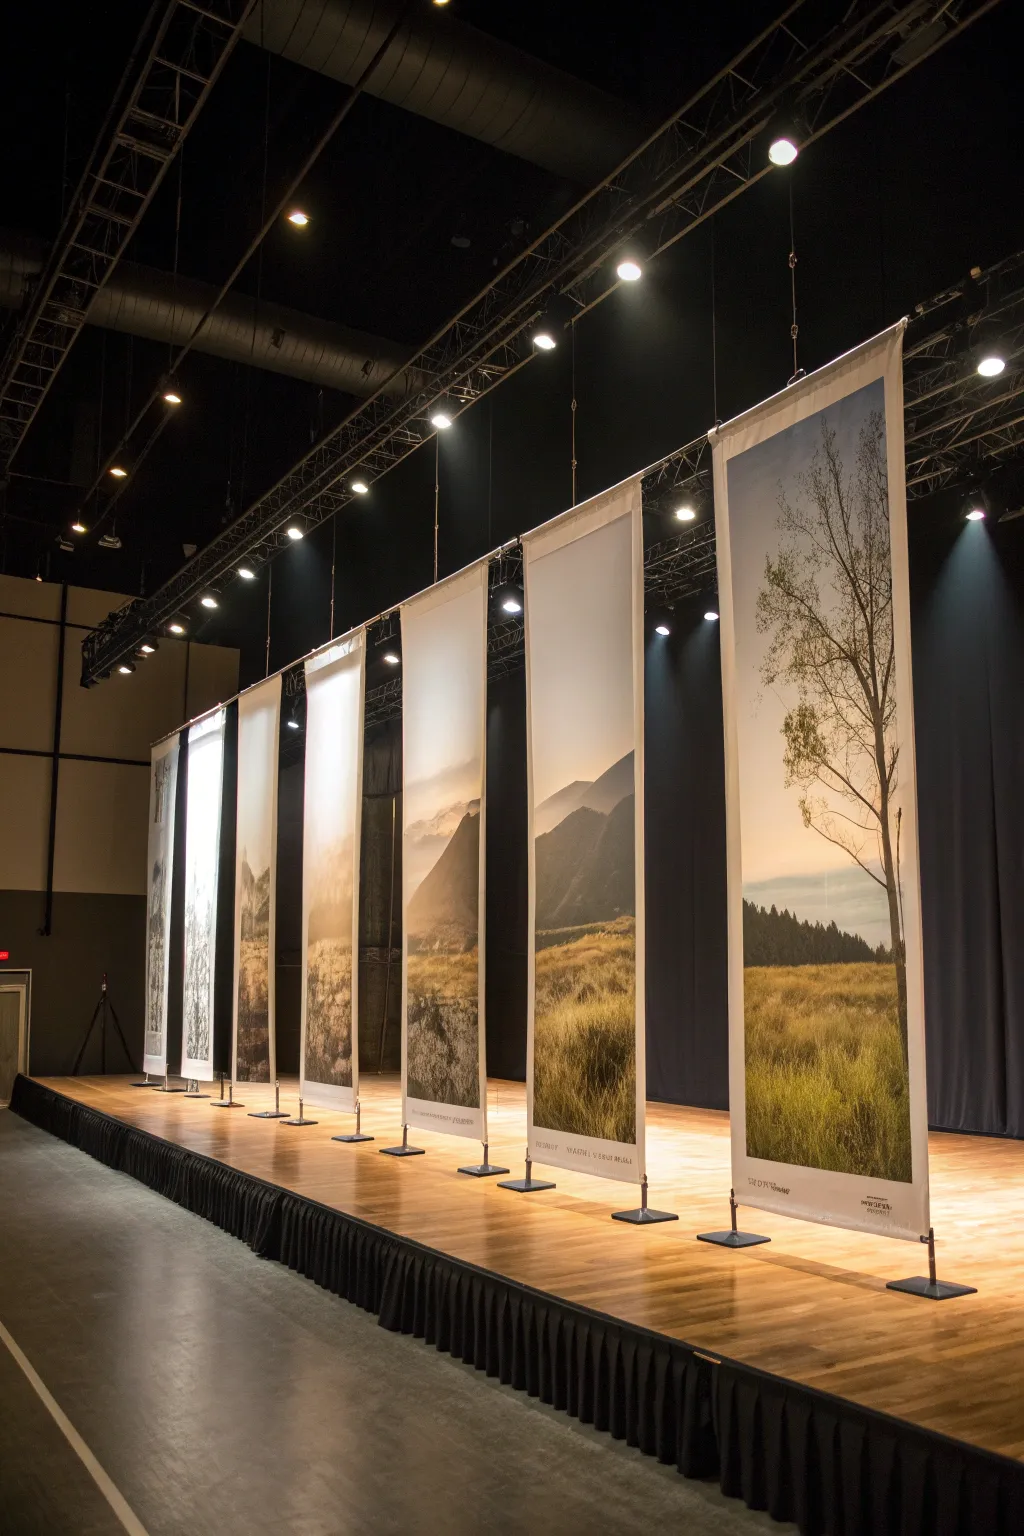
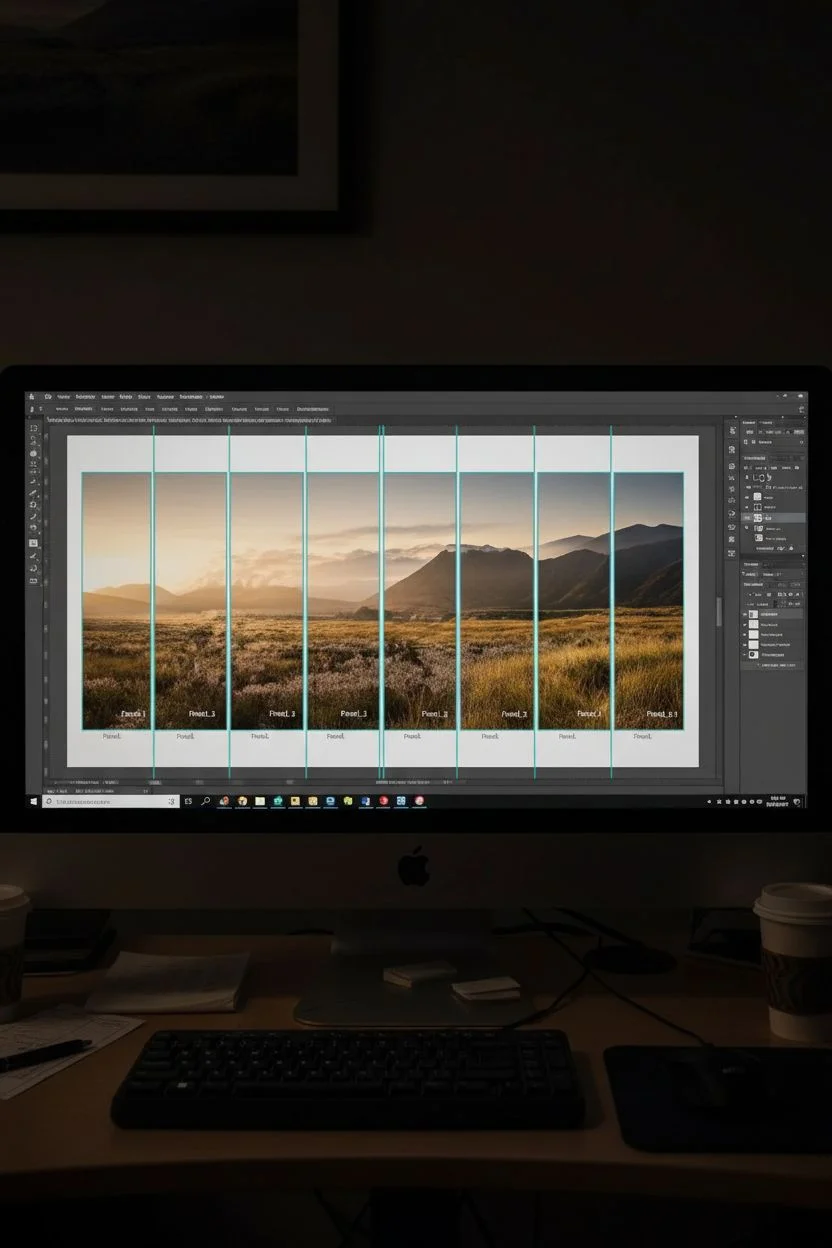
Transform a blank stage into a breathtaking landscape with this clever “window” effect. By splitting a single ultra-wide panoramic image across several vertical banners, you create depth and visual intrigue while avoiding the cost of a massive single backdrop.
How-To Guide
Materials
- High-resolution panoramic digital image (300 DPI at full scale)
- Heavy-duty printable vinyl or polyester banner fabric
- Aluminum or PVC piping (1-inch diameter) for top and bottom pockets
- Grommets and setting tool (optional, alternative to pole pockets)
- Heavy fishing line or clear monofilament (50lb test or higher)
- Black metal floor stands or weighted base plates
- Zip ties or s-hooks
- Measuring tape
- Computer with photo editing software (Photoshop or similar)
- Access to a large-format printer (or a professional print service)
Step 1: Digital Preparation & Design
-
Select the Right Image:
Choose a high-resolution landscape photo with a strong horizon line. The image needs to be extremely wide to accommodate being split into 5-7 panels without losing quality. -
Set Your Dimensions:
Measure your total stage width and height. Determine how many panels you want (the example uses seven) and calculate the width of each strip, leaving about 6-12 inches of negative space between each panel in your calculations. -
Slice the Image in Software:
Open your image in photo editing software. Use the ‘Slice’ tool or manually crop the image into vertical strips matching your calculated dimensions. Ensure each strip is a distinct section of the panorama. -
Add Bleed and Pockets:
When setting up the print files, add 3-4 inches of extra material at the very top and very bottom of each file. I prefer to mirror the image edge here so the wrap-around looks continuous. -
Export for Print:
Save each panel as a separate high-quality TIFF or PDF file. Label them sequentially (e.g., Panel_1_Left to Panel_7_Right) to avoid confusion during installation.
Pro Tip: Consistent Gaps
Cut a ‘spacer’ piece of wood or cardboard to the exact width of the gap between panels. Use this physical guide during hanging to ensure perfect spacing without constant measuring.
Step 2: Fabrication & Printing
-
Choose Your Material:
Select a matte finish vinyl or a dense polyester fabric. Matte is crucial for stage work because glossy vinyl will reflect stage lights and ruin the effect for the audience. -
Printing Process:
Send your files to a large-format printer. Ask for a ‘pole pocket’ finish on the top and bottom edges. If doing this yourself with plotting paper, print and then manually fold and glue the pockets. -
Prepare Structural Supports:
Cut your aluminum or PVC pipes to be exactly the width of the banners. You will need two pipes per banner: one for the top header and one for the bottom weight. -
Insert the Rods:
Slide the cut pipes into the top and bottom sewn pockets of each banner. This ensures the banners hang perfectly straight and don’t curl at the edges.
Troubleshooting: Curling Edges
If vertical edges curl inward, the material is too light. Slide thin metal rods or adhesive stiffening strips along the vertical non-pocketed edges on the back side.
Step 3: Installation & Rigging
-
Establish Rigging Points:
On your stage’s lighting truss or fly system, mark the center point. Measure outwards to mark the suspension points for each banner, maintaining that consistent 6-12 inch gap you planned earlier. -
Attach the Suspension Line:
Tie your heavy-duty clear monofilament to the top pipe of the center banner. Using clear line makes the banners appear to float magically in the air. -
Hang the Center Panel:
Raise the center panel first. Secure the monofilament to the truss. Use a level to ensure the pole is perfectly horizontal. -
Deploy Outward:
Work your way out from the center, hanging the remaining panels to the left and right. Having a spotter in the audience area is helpful here to check alignment visually. -
Anchor the Bottoms:
For the floor connection, attach the bottom pipe of each banner to a heavy floor base. You can use simple weighted base plates with a small vertical spigot that connects to the banner’s bottom pipe. -
Tension the System:
Adjust the turnbuckles or simply pull the line taut before securing the bottom bases. The goal is to have the banner taut enough to look like a solid panel, but not so tight it rips the seams. -
Final Lighting Check:
Turn on your stage lights. Adjust the angle of any front lighting to minimize shadows cast by the banners onto the back black curtain.
Step back and admire how a single landscape has been transformed into a modern architectural statement on your stage
Warm Wood Slat Texture Wall
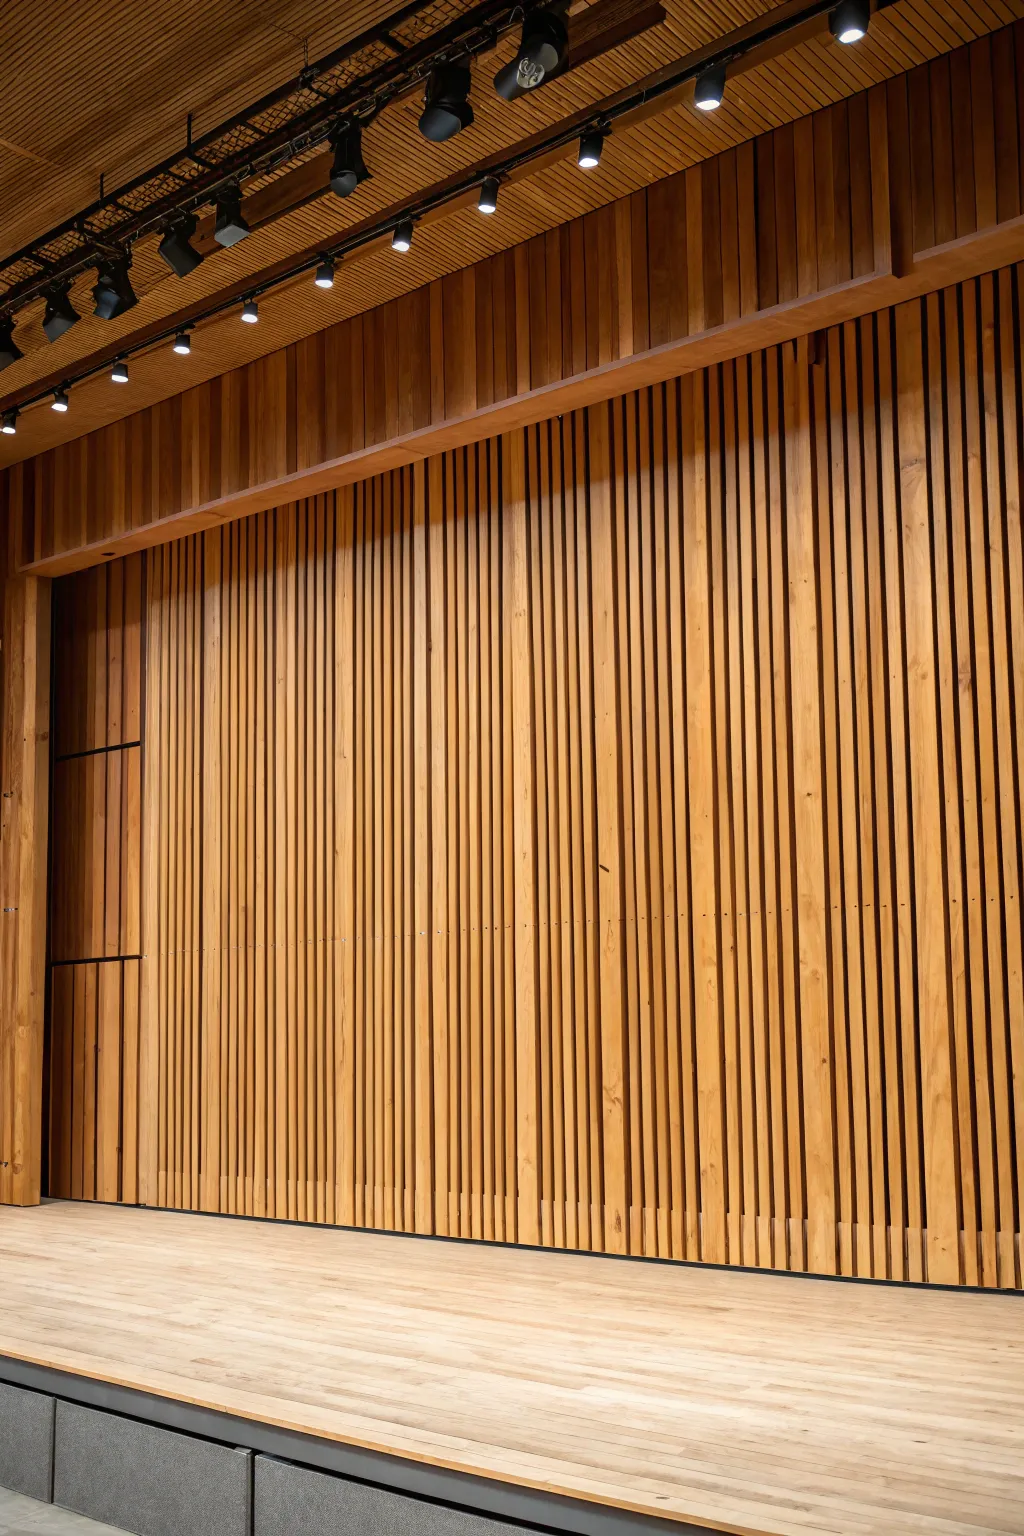
Bring warmth and sophisticated acoustics to your stage with this stunning wood slat feature wall. This project creates a high-end, textured backdrop using vertical timber battens that play beautifully with stage lighting.
Detailed Instructions
Materials
- 1×2 or 1×3 Hardwood or Pine Boards (quantity based on wall width)
- Black Landscape Fabric or Acoustic Felt panels
- Furring Strips (1×2 lumber)
- Black Paint (Flat or Matte finish)
- Wood Stain (Warm Oak or Teak)
- Water-based Polyurethane Sealer
- Construction Adhesive
- Trim Head Screws (Black)
- Brad Nailer and 2-inch nails
- Table Saw or Miter Saw
- Laser Level
- Spacer Block (custom cut)
- Paint Roller and Brush
- Sanding Block (120 and 220 grit)
Step 1: Preparation and Background
-
Measure the space:
Begin by measuring the precise height and width of your stage wall. Calculate the number of vertical slats needed by deciding on your gap size; a 1/2-inch to 3/4-inch gap usually looks best for stage aesthetics. -
Prepare the substrate:
Clean the existing wall surface thoroughly to ensure adhesives will bond correctly. If there are any protruding nails or uneven bumps, remove or sand them flush for a flat working area. -
Black out the wall:
Paint the entire background wall with flat black paint. This is crucial as it creates the deep shadow ‘void’ between the slats. I like to do two heavy coats to ensure no original wall color peeks through under bright stage lights. -
Install horizontal furring (optional):
If your wall is uneven or you need to mount acoustic felt, install horizontal 1×2 furring strips every 24 inches vertically. Paint these black as well so they vanish behind the final slats. -
Apply acoustic backing (optional):
For better sound control, staple black landscape fabric or adhere black acoustic felt panels directly over the black-painted wall or furring strips. This creates a professional, matte background texture.
Step 2: Wood Preparation
-
Cut boards to length:
Cut all your vertical slat boards to match the height of your wall. If your ceiling is high, you may need to scarf joint two boards together, cutting them at a 45-degree angle for a seamless transition. -
Rip the width:
Using a table saw, rip your boards to a uniform width if they aren’t already perfect. 1.5 inches to 2 inches is a standard modern width for these slats. -
Sand the surfaces:
Sand all visible faces of the slats with 120-grit sandpaper to remove mill marks, then finish with 220-grit for a smooth touch. -
Apply stain:
Apply your chosen warm wood stain to the front and sides of every slat. Ensure you don’t miss the edges, as these will be visible from side angles. -
Seal the wood:
Once dry, apply a coat of satin or matte water-based polyurethane. This protects the wood and reduces glare under harsh stage lighting.
Slats Bowing Out?
If a board is warped, cut it into two or three pieces at the installation studs. Nailing shorter sections forces the wood straight easier than fighting a long, bowed board.
Step 3: Installation
-
Set the first slat:
This is the most critical step. Using a laser level, install your first slat at the far corner of the wall. It must be perfectly plumb, or the error will compound across the entire wall. -
Secure the slat:
Attach the slat using dots of construction adhesive on the back and secure it with a brad nailer (or black trim screws if using furring strips). I prefer brad nails for a cleaner look that requires less filling. -
Create a spacer:
Cut a scrap piece of wood to the exact width of your desired gap. Use this as a guide to position the next board perfectly parallel to the first. -
Install remaining slats:
Working your way across the wall, press the spacer block against the installed slat, slide the new slat tight against the spacer, check for plumb, and nail it in place. -
Check for drift:
Every 5-10 slats, check your work with the laser level again. Wood isn’t always straight, and spaces can drift. Adjust slightly if needed to keep everything vertical. -
Add the header trim:
Install a wider, horizontal wood board across the top of the slats (the ‘header’) to conceal the uppers cuts and give the installation a finished, framed appearance. -
Touch up fastenings:
If you see any shiny nail heads, dab them with a color-matched putty or a tiny dot of stain. If you used screws, ensure they are countersunk.
Add Lighting Drama
Install an LED strip channel hidden behind the top header facing downward. The light will graze the slats, creating deep shadows and emphasizing the ribbed texture.
Step back and admire the incredible depth and rhythm this feature wall adds to your venue
3D Geometric Tile Backdrop
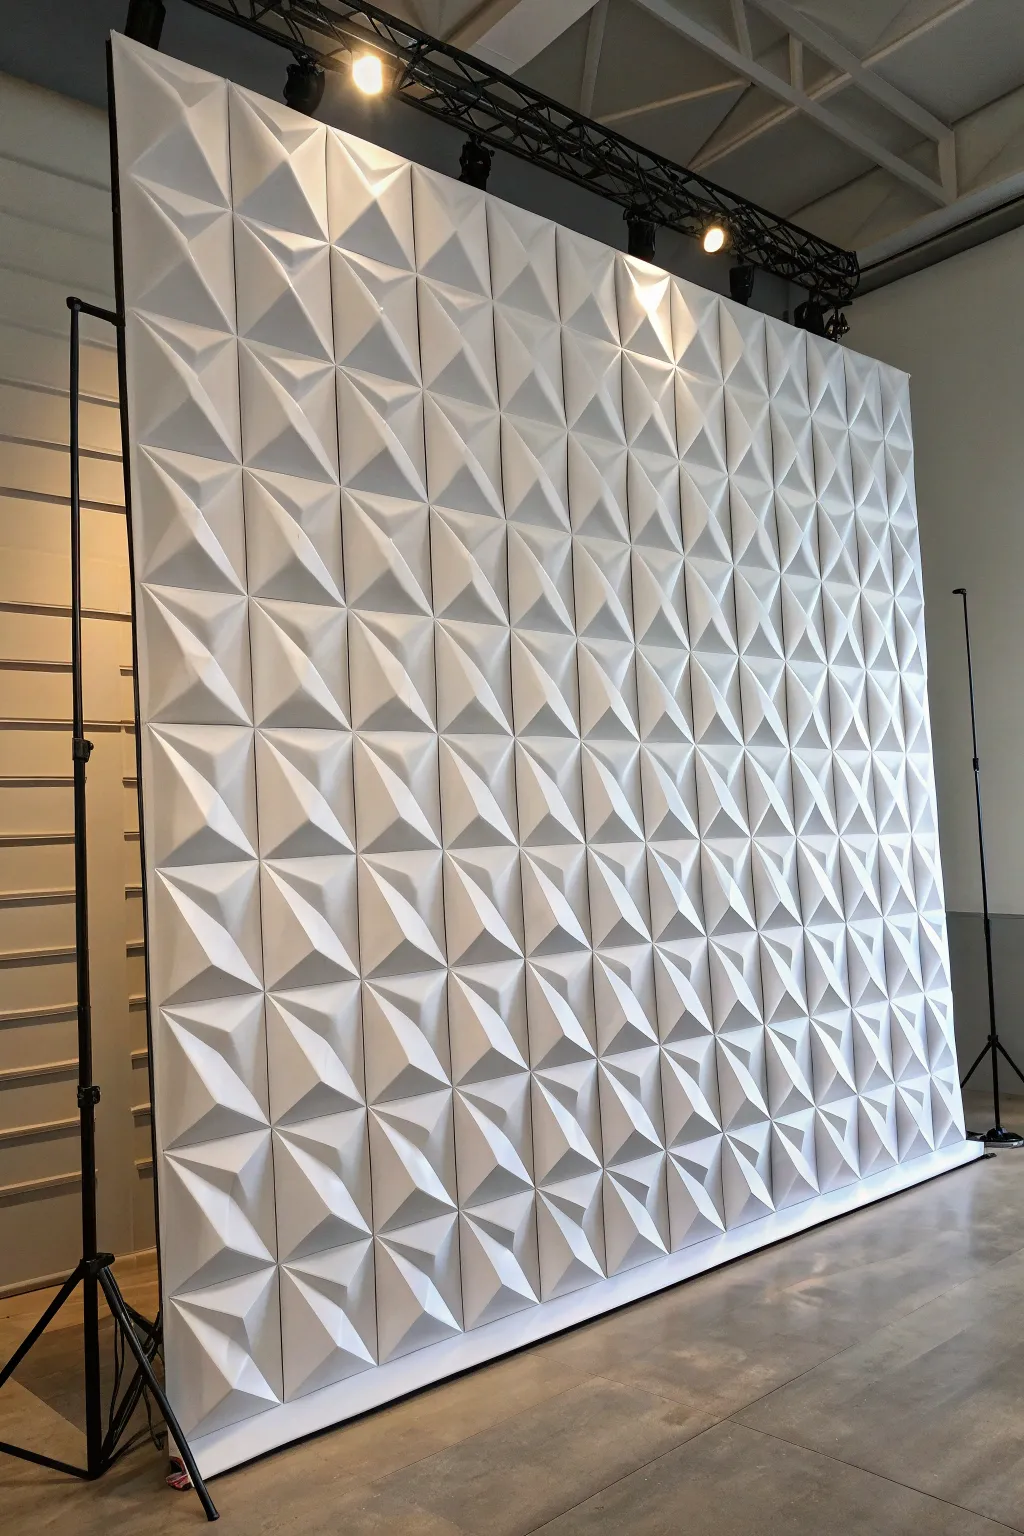
Transform any flat stage into a high-end architectural feature with this striking 3D geometric wall. Using lightweight, pre-molded PVC or fiber panels, you can build a textured brilliant white surface that catches studio lighting beautifully.
Step-by-Step Tutorial
Materials
- 3D Geometric Wall Panels (PVC or plant fiber, approx. 19.7″ x 19.7″ each)
- Plywood or MDF sheets (for the backing structure)
- 2×4 Lumber (for framing)
- Construction adhesive (heavy-duty, instant grab)
- Caulking gun
- White matte paint (spray or roller)
- Sanding block (fine grit)
- Painters tape
- Backdrop stands or C-stands with crossbars (for support)
- Zip ties or heavy-duty clamps
- Level
- Tape measure
- Utility knife or heavy-duty shears
Step 1: Planning and Structure
-
Measure your space:
Determine the desired height and width of your backdrop. This specific design relies on a grid, so calculate dimensions based on the size of your chosen 3D tiles (usually 50cm x 50cm or roughly 20 inches square) to minimize cutting. -
Build the frame:
Construct a simple rectangular frame using 2×4 lumber to match your total dimensions. Add vertical cross-braces every 16-24 inches to ensure the structure is rigid enough to hold the weight of the panels. -
Attach the substrate:
Screw sheets of thin plywood or MDF to the front of your sophisticated frame. Ensure the seams are flush and the surface is completely flat, as any warping will make tile alignment difficult later. -
Prime the surface:
Roll a coat of white primer over the plywood substrate. Since the 3D tiles are white, a dark wood background might show through gaps; white primer ensures a seamless look.
Seamless Success
Use a white, paintable silicone caulk for seams. It remains flexible, preventing cracks if the backdrop is moved or flexed during transport.
Step 2: Installing the 3D Panels
-
Dry fit the layout:
Lay your tiles out on the floor first. Check for any manufacturing defects and verify the pattern orientation so that all the geometric peaks and valleys align perfectly. -
Mark your guidelines:
Draw a straight vertical line down the exact center of your plywood wall and a horizontal line across the middle. Starting from the center ensures your pattern remains symmetrical at the edges. -
Apply adhesive:
Using a caulking gun, apply heavy-duty construction adhesive to the flat back sections of your first panel. Focus on the perimeter and the center contact points. -
Place the center panel:
Align your first panel perfectly with your crosshair guidelines in the center of the wall. Press firmly for 10-15 seconds to ensure the glue grabs securely. -
Continue the grid:
Working outwards from the center, install the next panels in the row. Butt the edges as tightly as possible against the previous tile to minimize visible seams. -
Check level frequently:
After every few tiles, place a long level across the top edges. It is crucial to catch any ‘drift’ early, as a tilted row will be very noticeable once the whole wall is done. -
Cut edge pieces:
If your wall dimensions require partial tiles at the edges, carefully measure the gap. Mark the cut line on the back of the tile and use a sharp utility knife or heavy-duty shears to trim it to size.
Lighting Drama
Add RGB LED strips along the bottom or top edge. Since the surface is 3D, colored uplighting will cast amazing shadows and highlight the geometry.
Step 3: Finishing Touches
-
Fill the seams:
For a truly professional, monolithic look, apply paintable decorators caulk or joint compound to the unexpected gaps between tiles. Wipe away excess immediately with a damp finger or cloth. -
Sand joints smooth:
Once the filler is dry, gently sand the seams with a fine-grit sanding block. You want the surface to feel like one continuous sculpture rather than individual squares. -
Paint the assembly:
To unify the texture of the filler and the plastic panels, paint the entire wall. I prefer using a sprayer for this step to get into all the geometric nooks without pooling paint. -
Apply a second coat:
Inspect the wall from different angles. Apply a second light coat of matte white paint to ensure consistent coverage and eliminate any sheen variations. -
Mount the wall:
Lift the finished wall panel upright. Secure it to your backdrop stands or stage truss using heavy-duty clamps or by bolting it to the supports for safety.
With your geometric wall standing tall, adjust your studio lights to see how shadows play across the faceted surface for a futuristic effect
Faux Stained Glass Light Panels
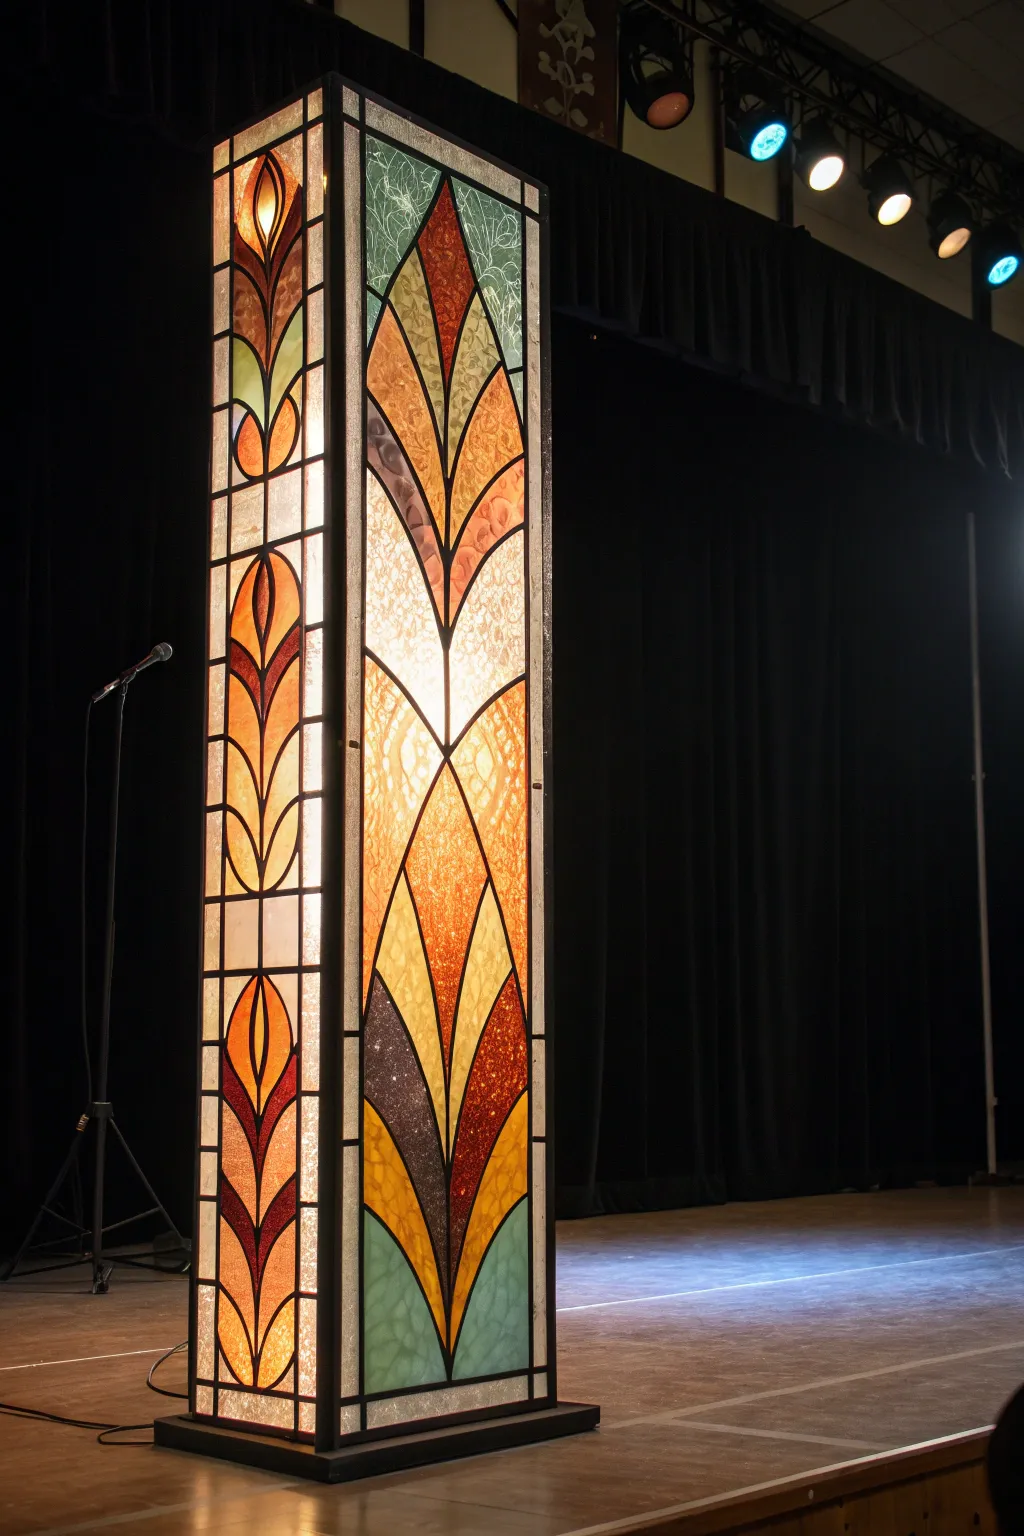
Transform your stage with this towering, illuminated faux stained glass pillar that captures the elegance of Art Nouveau design. Using simple materials like plexiglass and translucent paints, you can create a striking, glowing prop that adds depth and warm, colorful light to any performance space.
Step-by-Step
Materials
- 4 Sheets of clear plexiglass or acrylic (approx. 2ft x 6ft each)
- Wooden frame lumber (1×2 pine strips)
- Black adhesive lead strips or 1/4 inch black automotive pinstriping tape
- Gallery Glass window color paints (Amber, Kelly Green, Royal Blue, Ruby Red, Amethyst)
- Crystal Clear gallery glass (textures)
- Black acrylic paint (matte)
- Wood glue and screws
- LED light strips or internal up-lighting fixture
- Fine grit sandpaper
- Ruler and permanent marker
- Isopropyl alcohol
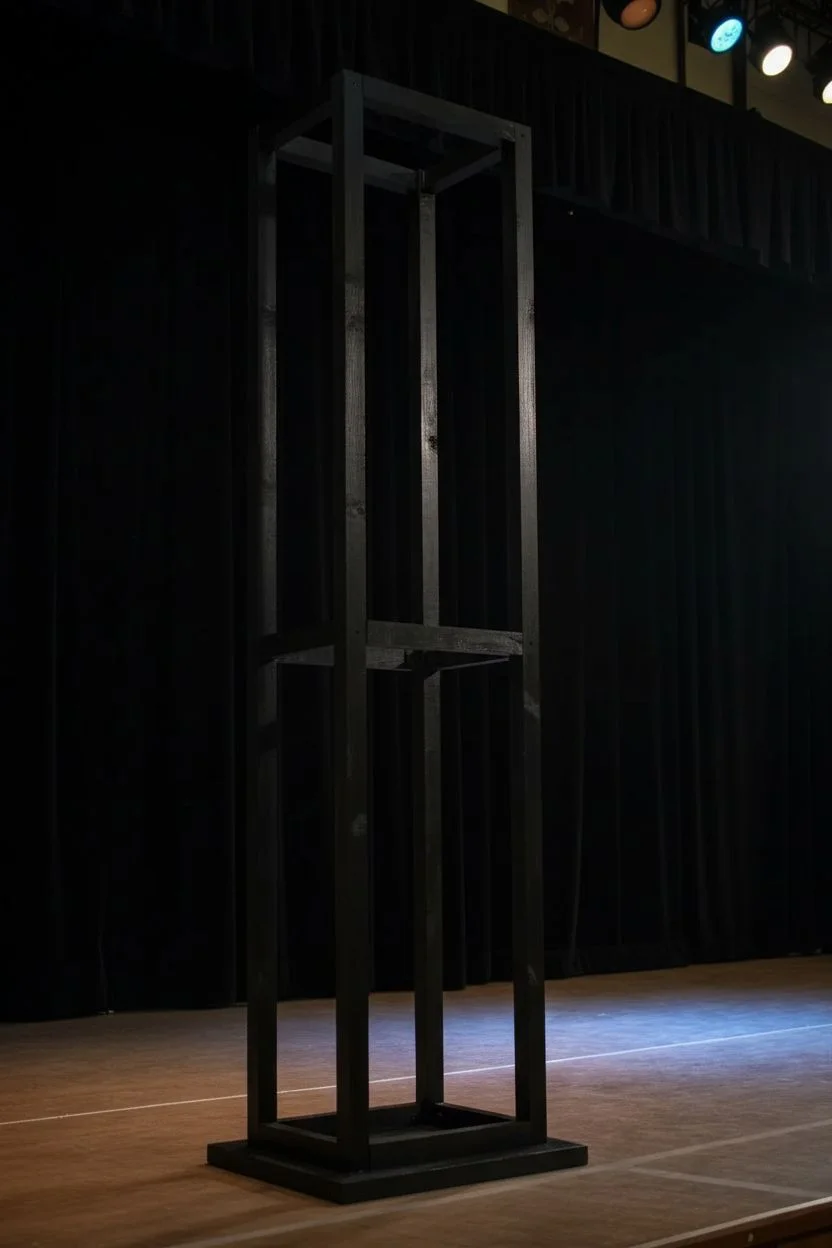
Step 1: Building the Skeleton
-
Cut the frame pieces:
Begin by cutting your 1×2 pine lumber to match the height of your plexiglass sheets. You will need four long vertical corner posts and eight shorter horizontal support pieces to create top and bottom braces. -
Construct the tower frame:
Assemble the wood into a tall rectangular box frame using wood glue and screws. Ensure the corners are perfectly square so the structure stands straight on stage without wobbling. -
Paint the woodwork:
Coat the entire wooden frame in matte black acrylic paint. I find that a matte finish absorbs stage light better, making the structural wood disappear so the audience focuses only on the glowing glass. -
Prepare the base:
Attach a slightly wider, heavier wooden platform to the bottom of the frame to act as a stabilizer, painting it black to match.
Fixing Bubbles
If you see tiny air bubbles in your wet paint, pop them immediately with a needle. If they dry, they create white pinholes that let raw light through.
Step 2: Designing the Glass
-
Clean the plexiglass:
Peel the protective film off your acrylic sheets and wipe them down thoroughly with isopropyl alcohol to remove any oils or residue that might repel the paint. -
Draft the pattern:
To ensure symmetry, draw your pattern on a long roll of butcher paper first. The design in the image uses repeating organic arches and leaf-like tear drops typical of deco style. -
Transfer the design:
Place your paper template underneath the clear plexiglass. The transparency allows you to see the lines clearly without dirtying the surface you need to paint. -
Apply the leading lines:
Using adhesive lead strips or black pinstriping tape, trace over all your pattern lines on the front of the plexiglass. Press down firmly to create a barrier that will hold the wet paint. -
Create the grid:
Don’t forget the geometric border. Use the tape to create the rectangular grid pattern running down the sides of the main design, which mimics traditional leaded reinforcement bars.
Dimensional Lead
For a more realistic, raised look, dispense ‘Liquid Lead’ from a squeeze bottle instead of tape. It takes practice but creates organic, bumpy solder lines.
Step 3: Painting the Glass
-
Fill the amber sections:
Start with the large central shapes. Generously squeeze Amber window color into the tear-drop sections, pushing the paint right up to the black tape barrier to prevent gaps. -
Add texture:
While the paint is wet, swirl it gently with a toothpick or small brush. This creates variations in thickness that will look like hand-rolled glass when backlit. -
Paint the cool tones:
Fill the corner accents and leaf shapes with your Greens and Blues. Vary the saturation by applying thicker coats for darker areas and thinner coats for brighter spots. -
Apply the warm accents:
Use Ruby Red or darker orange tones for the tips of the leaf shapes to create a gradient effect, blending it slightly into the amber while wet for a natural transition. -
Frost the clear areas:
For the background areas that look white or textured in the photo, apply ‘Crystal Clear’ texture medium. Dab it on with a sponge to create a frosted privacy-glass look that diffuses the light. -
Let it cure:
Allow the panels to dry flat for at least 24 to 48 hours. The paint will look milky when wet but clears up beautifully as it dries.
Step 4: Final Assembly
-
Mount the panels:
Carefully screw or glue the finished plexiglass panels onto your black wooden frame from the inside, ensuring the painted side faces inward to protect it from scratches during transport. -
Seal the seams:
Run a strip of black gaffer tape or electrical tape along the vertical corners where the plexiglass sheets meet to block any light leaks at the seams. -
Install the lighting:
Place an LED uplight at the bottom base of the tower, aiming straight up. Alternatively, run LED tape lights up the inside corners of the wooden frame for even illumination from top to bottom. -
Final test:
Turn on the lights in a dark room to check for uneven coverage. If you see spots that are too transparent, you can dab a little more paint on the inside face to increase opacity.
Once illuminated, your handcrafted tower will cast a warm, cathedral-like glow across the stage
Floral Frame and Ground Border
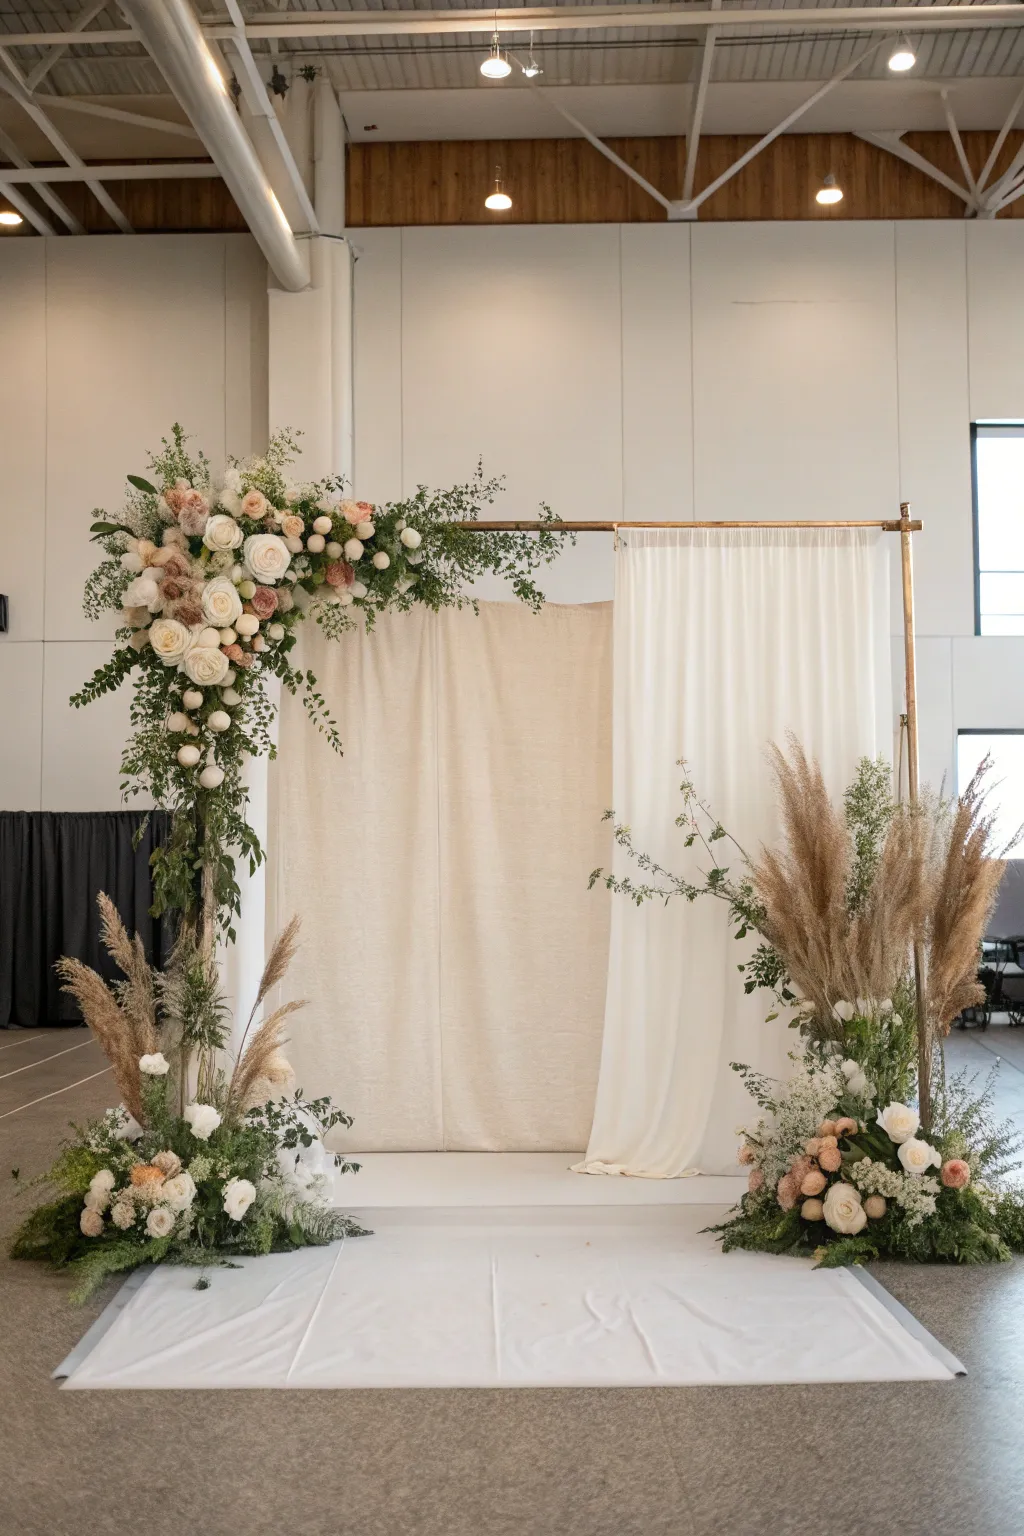
Transform any event space with this romantic, asymmetrical backdrop that balances industrial structure with soft textures. Featuring a warm copper frame, layered fabric draping, and lush clusters of pampas grass and roses, this setup creates a stunning focal point for vows or photos.
Detailed Instructions
Materials
- Copper piping (3/4 inch diameter): two 7-foot lengths and one 6-foot length
- Two 90-degree copper elbow fittings
- Heavy-duty fishing line or floral wire
- Zip ties (clear and green)
- Floral foam cages (large rectangular size)
- Chicken wire
- Cream linen fabric panel (approx. 4ft wide)
- Sheer white voile fabric panel (approx. 4ft wide)
- Dried pampas grass (tall plumes)
- Fresh roses (Quicksand or Sahara, and white)
- Carnations (peach/blush tones)
- Italian Ruscus and Eucalyptus greenery
- White sheet or drop cloth (for the floor base)
- Weighted base plates or sandbags (for stability)
Step 1: Constructing the Frame
-
Assemble the copper arch:
Connect your two 7-foot vertical copper pipes to the 6-foot horizontal top bar using the 90-degree elbow fittings. You can use copper glue for a permanent hold, or simply press-fit them firmly if you want to disassemble it later. -
Secure the base:
Insert the vertical pipes into weighted base plates. If you don’t have professional pipe and drape bases, you can secure the pipes into buckets of quick-set concrete or use sturdy sandbags hidden behind the fabric to ensure the frame doesn’t tip. -
Hang the fabric layers:
Drape the cream linen fabric over the left side of the top bar, letting it pool slightly on the floor. Use clear zip ties or heavy-duty clips behind the fabric to keep it in place. -
Add the sheer layer:
Hang the sheer white voile on the right side of the frame. Allow it to overlap the cream fabric slightly in the middle to create depth and texture contrast.
Keep it Fresh
Soak floral foam for at least 30 minutes before starting. For an outdoor event, mist the finished flowers with a hydration spray to prevent wilting.
Step 2: Creating the Corner Arrangement
-
Mount the mechanics:
Secure a large block of soaked floral foam (in a cage) to the upper left corner of the copper frame using multiple heavy-duty zip ties. Ensure it is extremely stable, as this will get heavy. -
Establish the shape with greenery:
Insert long stems of Italian Ruscus and Eucalyptus into the foam, extending them outwards to the left and downwards. This creates the cascading L-shape that defines the silhouette. -
Insert focal flowers:
Place your largest white roses and peach carnations into the center of the arrangement, grouping them slightly for visual impact. I like to angle the bottom flowers downward so they look like they are tumbling. -
Add textural fillers:
Fill in gaps with smaller spray roses and more greenery to hide the floral foam completely. Keep the arrangement loose and airy rather than tight and ball-like.
Wobbly Frame?
If the copper pipes bow under the weight of the floral cage, insert a steel rebar rod inside the horizontal copper pipe for invisible reinforcement.
Step 3: Building the Ground Meadows
-
Prepare the floor mechanics:
Place two large floral foam cages on the floor. One goes at the bottom left foot of the frame, and the other creates a standalone island on the bottom right. -
Position the pampas grass:
Insert tall stems of dried pampas grass into the back of both ground arrangements. Fan them out vertically to add height and drama, aiming for the grass to reach about waist-high on the right side. -
Create the greenery base:
Surround the base of the pampas grass with generous amounts of fern and eucalyptus to ground the arrangement and hide the mechanical base. -
Layer in the blooms:
Add clusters of roses and carnations low within the greenery. On the left side, nestle them close to the copper pipe. On the right, cluster them at the front of the pampas grass for a meadow-like effect. -
Connect the scene:
Place a clean white runner or sheet on the floor connecting the two ground arrangements to create a cohesive ‘stage’ area. -
Final adjustments:
Step back about ten feet to view the whole installation. If the top arrangement looks too heavy, add a few more trailing greens to the bottom left arrangement to visually balance the weight.
Now you have a breathtaking, professional-looking backdrop ready for the perfect photo opportunity
Balloon and Streamer Color Cloud
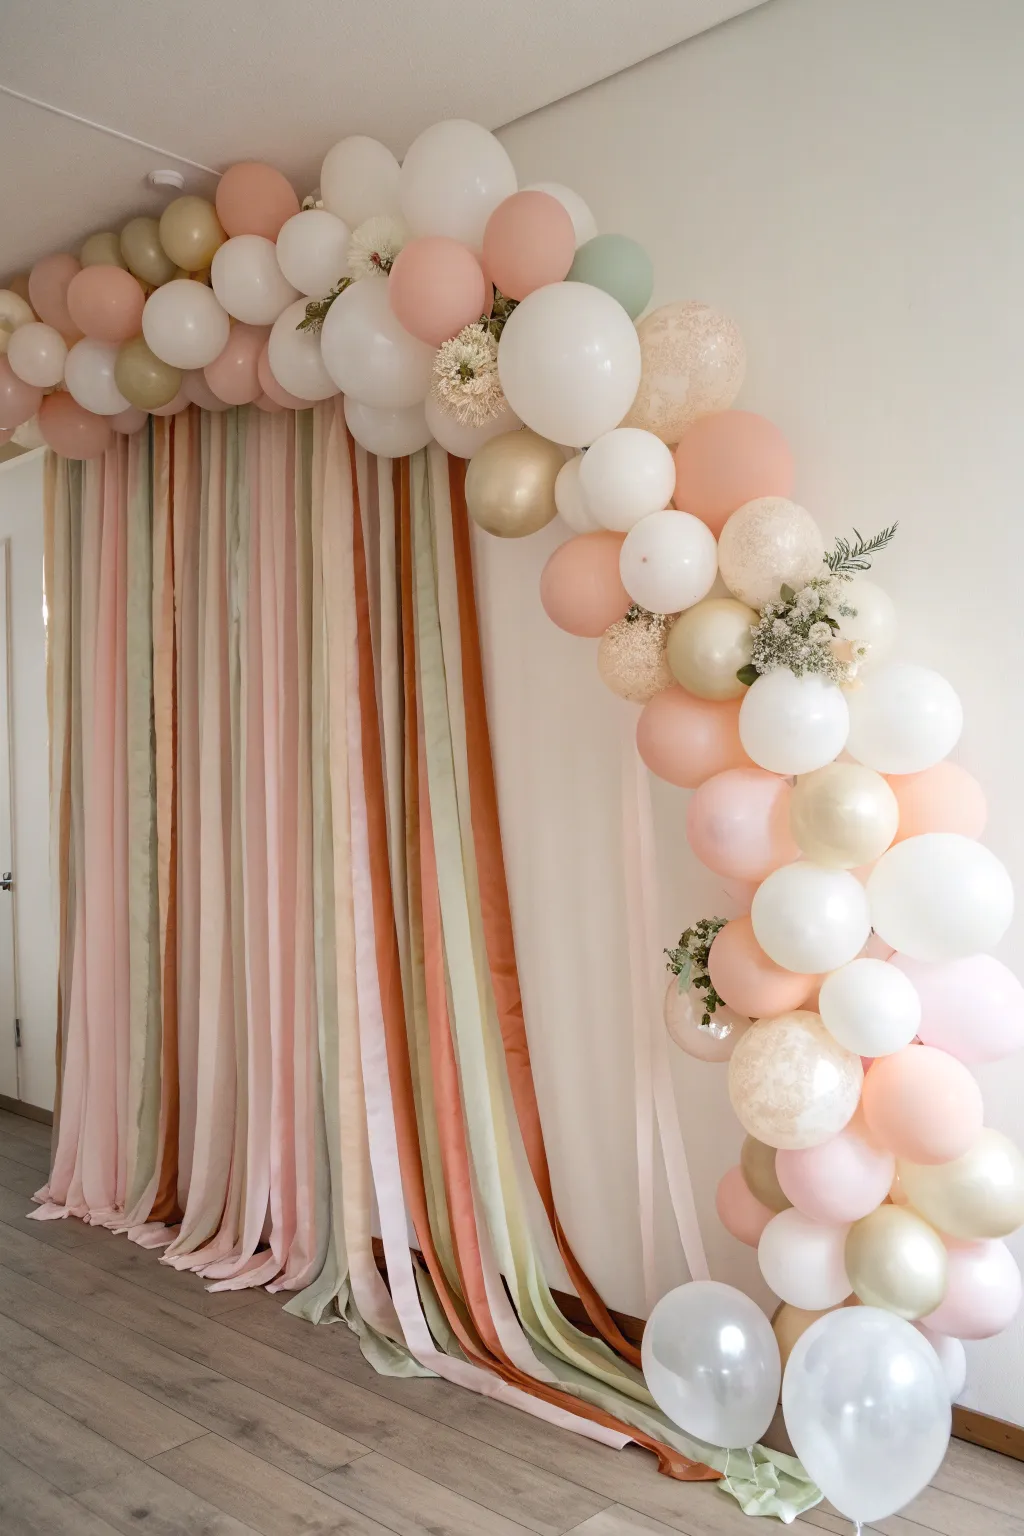
Transform any blank wall into a dreamy event focal point with this cascading installation of soft pastel balloons and trailing crepe paper streamers. The combination of varied balloon sizes and textured floral accents creates an organic, cloud-like shape that floats effortlessly above a curtain of muted colors.
Step-by-Step
Materials
- Latex balloons (white, blush pink, peach, sage green, gold/champagne)
- Clear confetti-filled balloons
- Different balloon sizes (5-inch, 11-inch, and 18-inch)
- Crepe paper streamer rolls (blush, dusty rose, sage green, cream, burnt orange)
- Balloon decorating strip or fishing line
- Command hooks or heavy-duty gaffer tape
- Low-temperature glue gun or glue dots
- Faux greenery sprigs (baby’s breath or similar fine florals)
- Scissors
- Balloon hand pump or electric pump
Step 1: Setting the Stage with Streamers
-
Prepare your anchor points:
Begin by determining the width of your backdrop. Attach Command hooks or a sturdy tension rod near the ceiling where you want the streamers to hang. Ensure your anchor system is wide enough to accomodate the full curtain effect. -
Cut streamers to length:
Unroll your crepe paper streamers and cut them into long strips. Measure the height from your anchor point to the floor, adding an extra 1-2 feet so they can pool elegantly on the ground. -
Create the base layer:
Start attaching the lightest colors (cream and pale blush) to your hanging mechanism first. Overlap them slightly to ensure the wall doesn’t peek through too much. -
Layer in accent colors:
Build dimension by adding strips of sage green, dusty rose, and burnt orange over your base layer. I like to alternate colors randomly rather than in a strict pattern to keep the look organic. -
Twist and drape:
Once hung, gently run your fingers down a few of the streamers to straighten them, but allow them to twist naturally near the bottom where they hit the floor for that relaxed, flowing texture.
Step 2: Constructing the Balloon Garland
-
Inflate your base balloons:
Inflate the majority of your 11-inch balloons in white, blush, and peach. Don’t overinflate them; keep them round rather than pear-shaped for a professional look. -
Prepare size variety:
Inflate the 5-inch mini balloons and any larger 18-inch statement balloons. Keeping varied sizes is the secret to a dynamic, professional-looking garland structure. -
Assemble the main strip:
Begin inserting the knotted ends of your 11-inch and 18-inch balloons into the holes of your decorating strip. alternate colors and place larger white balloons at somewhat regular intervals to anchor the design visually. -
Create the arch shape:
Lift the balloon strip and secure it to the wall above the streamers using Command hooks. Create an asymmetric arch shape that starts high on the left and curves down towards the right. -
Fill in the gaps:
Take your 5-inch balloons and the gold/champagne accent balloons. Use glue dots or a low-temp glue gun to stick these into any gaps in the main garland, hiding the strip and adding depth. -
Add texture with specialty balloons:
Intersperse the clear confetti-filled balloons or textured patterned balloons throughout the cluster. These add visual interest without overpowering the soft color palette.
Double-Stuffing Trick
To get custom pastel hues, put a colored balloon inside a white one before inflating. This mutes bright colors.
Step 3: Final Styling Touches
-
Review the color flow:
Step back and check the color distribution. Ensure the sage green balloons are spaced out to echo the green streamers below. -
Insert floral accents:
Take small sprigs of faux baby’s breath or greenery. Tuck the stems gently between the balloons where they touch. The friction should hold them in place, but a dot of glue adds security. -
Adjust the streamer floor:
Return to the bottom of the streamers. Arrange the excess length on the floor so it sweeps slightly to one side or fans out naturally. -
Secure loose ends:
If any balloons feel loose or floppy, use a loop of clear fishing line or extra glue dots to secure them to their neighbors for a tight, cohesive cluster.
Add Sparkle
For an evening event, weave a strand of battery-operated fairy lights through the balloon garland for a soft glow.
Now you have a stunning, photo-ready backdrop that adds softness and celebration to your space
Metallic Fringe Shimmer Curtain
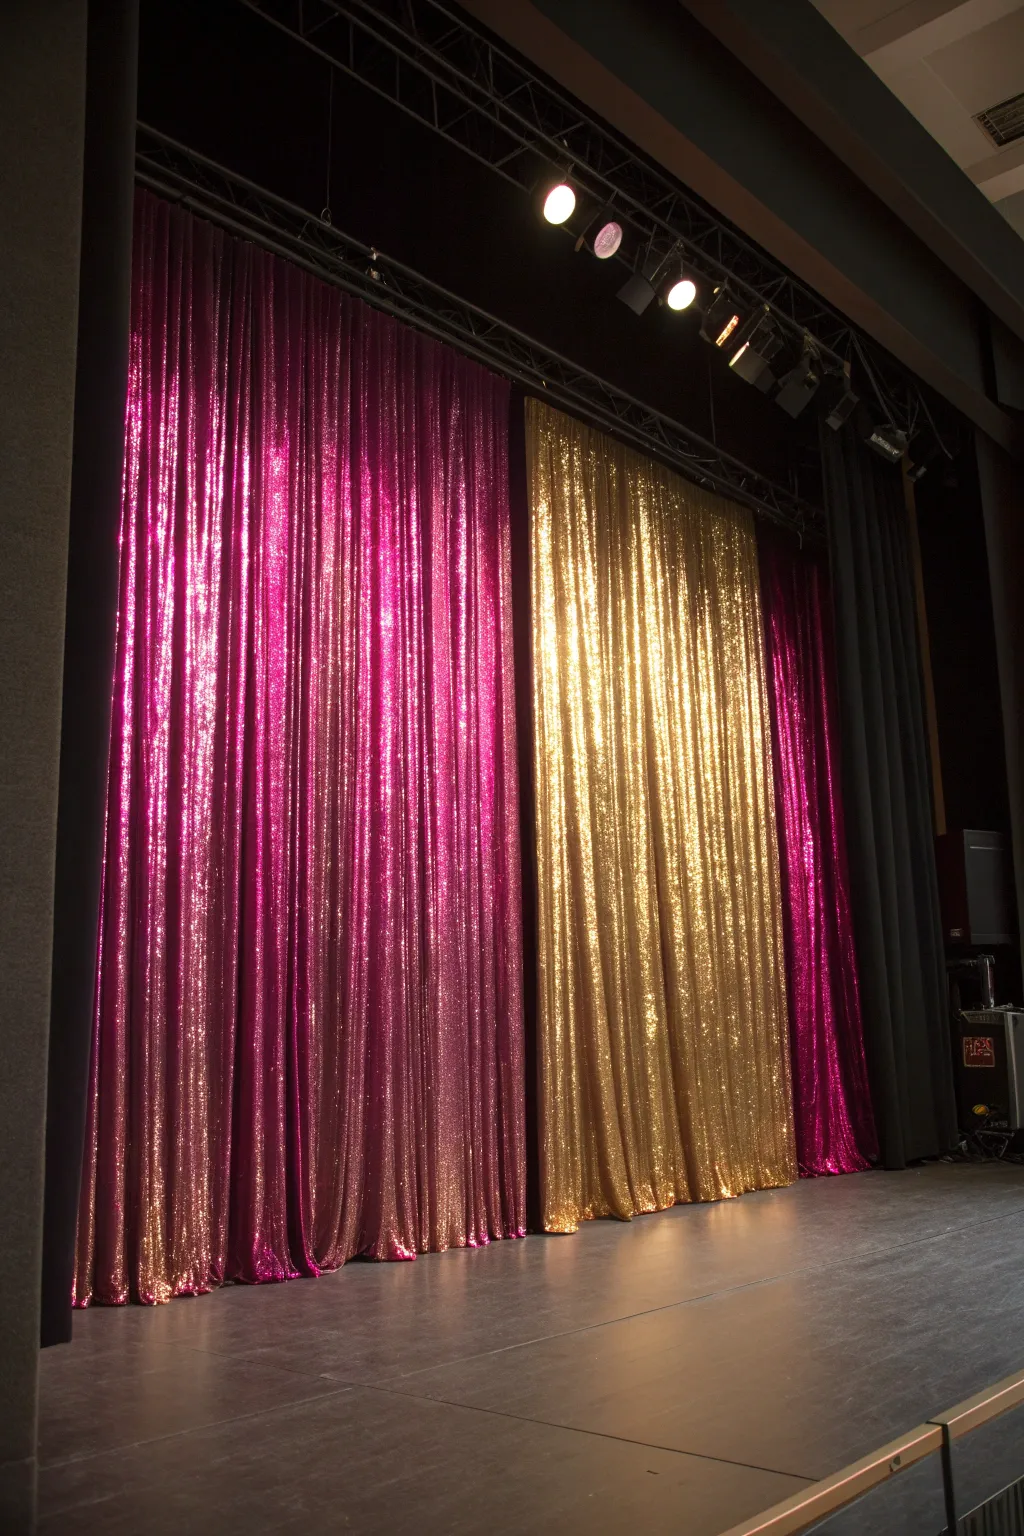
Transform a plain stage into a dazzling focal point with these floor-to-ceiling sequin drapes. The combination of vibrant magenta and classic gold creates a rich, professional theater look that catches stage lights beautifully.
Detailed Instructions
Materials
- Heavy-duty pipe and drape system (crossbars and uprights)
- Black blackout fabric (velvet or heavy cotton) for side masking
- Magenta sequin fabric (minimum 4-inch rod pocket)
- Gold sequin fabric (minimum 4-inch rod pocket)
- Heavy-duty zip ties or stage clips
- Stepladder
- Measuring tape
- Gaffer tape (black)
- Fabric steamer (optional but recommended)
Step 1: Planning and Framework
-
Measure the space:
Begin by measuring the total width and height of your stage area. You need to determine how many panels of fabric are required to create a gathered, pleated look. A good rule of thumb is 1.5 to 2 times the width of the space for fullness. -
Set up the hardware:
Assemble your pipe and drape system. Place your upright bases firmly on the stage floor, spacing them according to the length of your crossbars. -
Secure the uprights:
Raise the uprights to your desired height, ensuring they are level. If your rig is very tall, I recommend weighing down the base plates with sandbags for safety. -
Install the truss or crossbar:
Attach the horizontal crossbars to the uprights. Ensure all connections are locked tight, as sequin fabric can be surprisingly heavy.
Patchy Sparkle?
If the sequins look thin or see-through, hang a cheap black bedsheet or liner behind the sequin fabric. This blocks rear light and makes the colors pop.
Step 2: Hanging the Sequin Panels
-
Prepare the magenta panels:
Start with the magenta sequin fabric. Slide the rod pocket over the crossbar. If your crossbar is already up, you might need to use stage clips or ties if the fabric doesn’t have open-ended pockets. -
Gather the first section:
Bunch the magenta fabric towards the left side of the stage. Adjust the folds so they hang in uniform, vertical pleats. This gathering creates that dense, rich shimmer seen in the photo. -
Add the gold center:
Next, slide on the gold sequin panels. Position these in the center-right area, directly next to the first block of magenta fabric. Ensure there is no gap between the colors; overlap the edges slightly by an inch or two. -
Finish with magenta:
Add the final section of magenta fabric on the far right. This creates a balanced, asymmetrical layering effect or can be pushed to the far edge for depth. -
Install side masking:
Hang the solid black velvet curtains on the far left and right ends of the pipe system. These ‘legs’ frame the glittery backdrop and hide any backstage areas or upright poles.
Step 3: Refining the Look
-
adjust the hem:
Check the bottom of the curtains. They should just kiss the floor or puddle slightly. If they are too long, you can hem them, but for a temporary stage, folding the excess under and taping it with gaffer tape on the back is a quick fix. -
Check for fullness:
Step back into the ‘house’ (audience area) to check the pleating. If the fabric looks too flat or stretched, gently scrunch the panels closer together on the rod to increase the density of the sequins. -
Manage light leaks:
Look for any gaps where the back wall shows through. Use small safety pins or clips on the back side of the fabric to secure panels together and maintain opacity. -
Steam heavily:
Sequin fabric can hold creases from packaging. Use a fabric steamer to gently release any horizontal fold lines, being careful not to melt the sequins. Steam from the back side of the fabric if possible. -
Set lighting angles:
Adjust your overhead stage lights. Aim spots downwards at a steep angle to graze the texture of the sequins, which maximizes the sparkle effect seen in the reference image.
Add Dimension
Use uplighting cans at the base of the gold curtain. Amber or warm white light from below creates a dramatic ‘fire’ effect on the metallic texture.
Step back and admire how professional lighting brings your glamorous backdrop to life
Painted Backdrop With Projection Overlay


Bring the serene beauty of the coast to any stage with this large-scale painted canvas backdrop. Featuring soft, billowing pink clouds meeting a gentle ocean horizon, this piece creates a dreamy, atmospheric setting perfect for photo ops or theatrical productions.
Step-by-Step Guide
Materials
- Large canvas drop cloth (approx. 6′ x 9′ or custom size)
- Wooden backdrop stand or pipe-and-drape frame
- Gesso primer (white)
- Acrylic paints: Titanium White, Ultramarine Blue, Cerulean Blue, Alizarin Crimson, Yellow Ochre, Burnt Umber
- Large house painting brushes (3-4 inch)
- Medium artist brushes (1-2 inch filbert or flat)
- Sea sponge (natural)
- Water spray bottle
- Mixing buckets or large palette trays
- Drop cloth (for floor protection)
- Painter’s tape or clamps
Step 1: Preparation & Sky Base
-
Set up the workspace:
Begin by hanging your canvas securely on your frame or finding a large vertical wall space. While you can paint on the floor, painting vertically allows you to step back and gauge the perspective more accurately. -
Prime the surface:
Apply a generous coat of white gesso over the entire canvas using a large house painting brush. This stiffens the fabric and prevents the paint from soaking in too quickly. -
Mix sky colors:
Create three main sky mixtures in buckets: a pale blue (White + tiny dot of Cerulean), a soft violet-grey (White + Ultramarine + Alizarin Crimson), and a warm cloud white (White + hint of Yellow Ochre). -
Block in the sky:
Starting from the top third, use the pale blue mixture to paint patches of open sky. Keep the strokes loose and random, leaving large white spaces for the clouds. -
Create cloud masses:
Load a large brush with your warm cloud white and fill in the unpainted areas. Don’t worry about perfect blending yet; just get the shapes of large, billowing cumulus clouds established.
Step 2: Painting the Clouds
-
Add cloud shadows:
Take your violet-grey mixture and apply it to the undersides and shadowed pockets of the clouds. Use a scrubbing motion with a dryer brush to keep edges soft. -
Blend wet-on-wet:
While the paint is still tacky, use a clean, slightly damp large brush to soften the transition between the blue sky, white highlights, and violet shadows. A quick mist from your spray bottle helps move the paint if it’s drying too fast. -
Introduce pink tones:
Mix a delicate salmon pink using White, a touch of Alizarin Crimson, and Yellow Ochre. I like to dry-brush this onto the edges of the clouds where the light would hit, creating that sunset glow. -
Define the horizon:
Determine your horizon line about one-third of the way up from the bottom. Use a level or a long straightedge to mark this line faintly with pencil or chalk—it must be perfectly straight.
Keep Edges Soft
Clouds should rarely have hard outlines. Keep a damp rag handy to smudge edges while paint is wet, creating that misty, vaporous look.
Step 3: Painting the Ocean
-
Mix ocean colors:
Prepare a deep teal (Cerulean + a touch of Burnt Umber) for the distant water, and a lighter, frothy aqua (White + Cerulean + Ultramarine) for the foreground waves. -
Paint the distance:
At the horizon line, paint a horizontal band of the lightest blue-grey, blending into the deeper teal as you move downward. The horizon line should be crisp against the sky. -
Create wave movement:
As you move toward the bottom of the canvas, switch to diagonal, sweeping strokes to simulate rolling waves coming toward the viewer. -
Add wave highlights:
Using pure Titanium White on a loaded filbert brush, paint the crests of the waves in the foreground. Use a ‘slap and drag’ motion to mimic the texture of sea foam. -
Detail the splash:
Use a natural sea sponge dipped in thin white paint to gently dab texture along the very bottom edge and wave crests, creating sea spray. -
Refine transitions:
Step back about 10 feet. Look for areas in the water that look too striped and blend them horizontally with a large, dry soft brush to unify the ocean surface. -
Final touches:
Add a few touches of the pink sky color into the wet water areas to reflect the sky above, tying the two halves of the painting together visually.
Projection Ready
Since this is for projection overlay, keep the central cloud area lighter. This acts as a natural ‘screen’ for projecting text or gobos.
Once dry, your custom seascape is ready to transport audiences to the shoreline
Scrim for Shadow Silhouettes
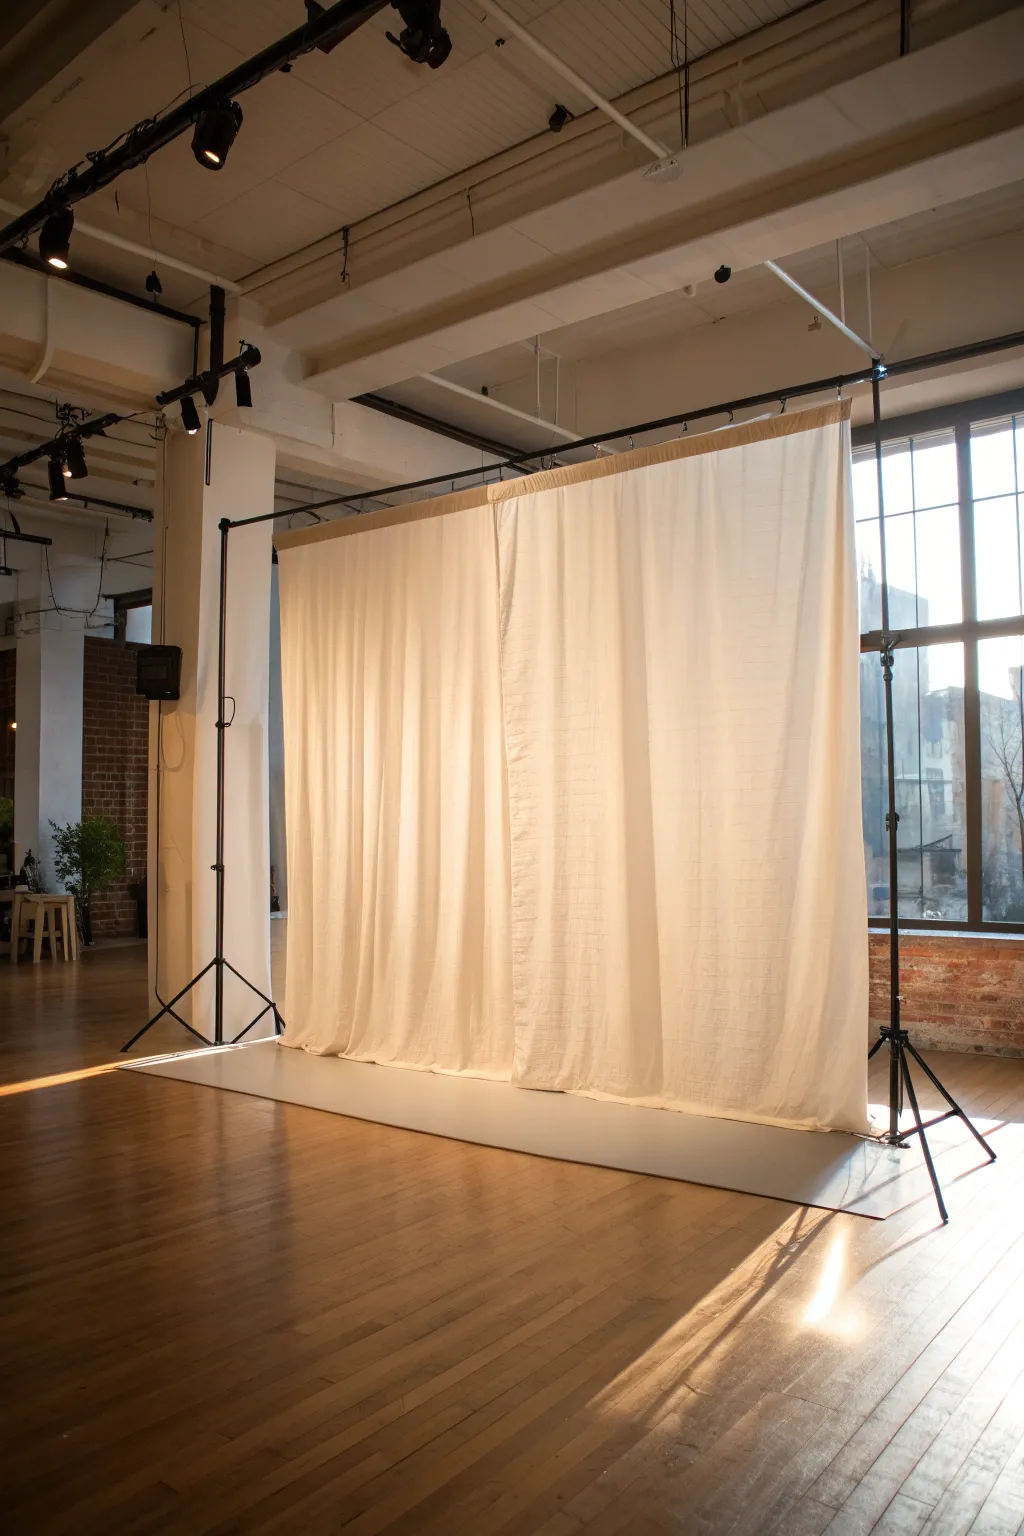
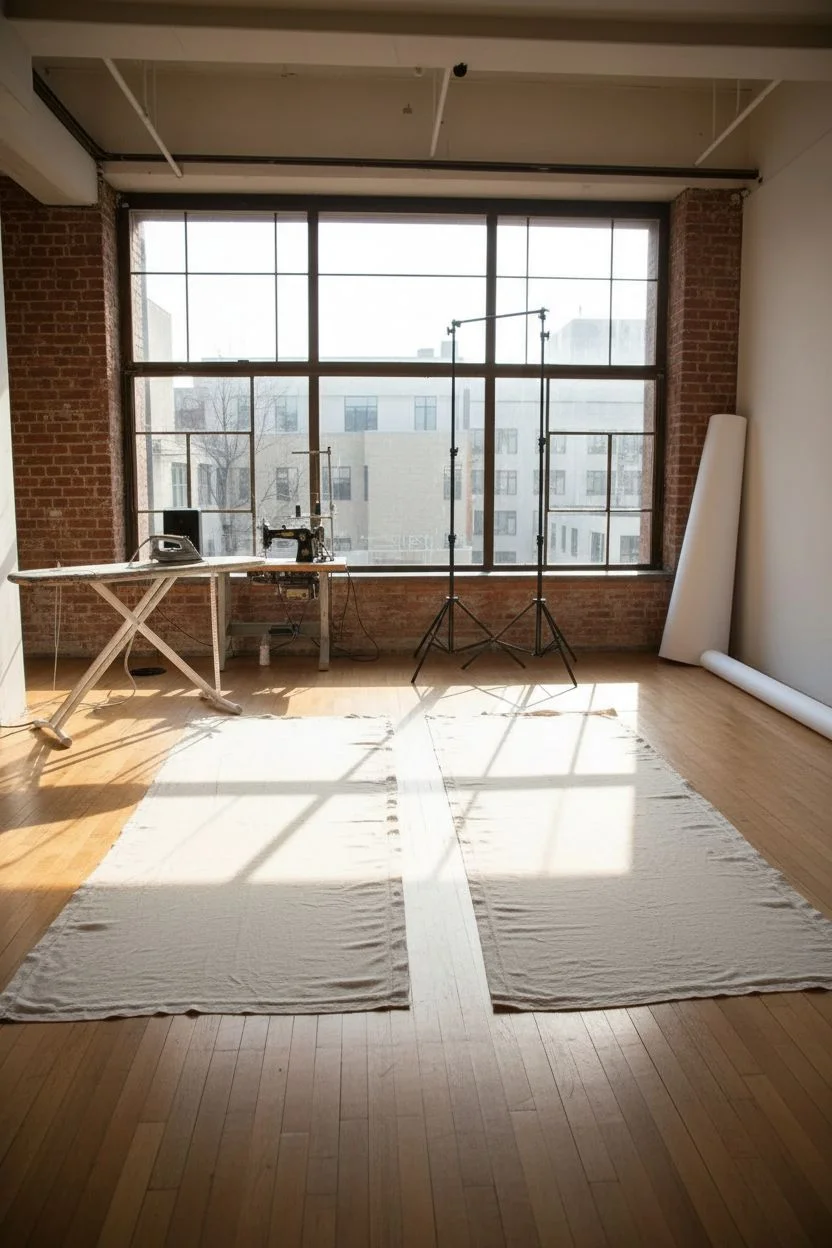
Create a clean, ethereal canvas for shadow play or minimalist photography with this large-scale fabric scrim setup. The loose, draped texture captures light beautifully while providing a distinct separation between subject and background.
How-To Guide
Materials
- 2 Large backdrop stands (heavy-duty)
- Extensible crossbar (telescopic pole)
- 2 Large panels of unbleached muslin or linen fabric (approx. 10×12 ft each)
- Sewing machine with matching thread
- Measuring tape
- Iron and ironing board
- Seamless background paper (white, 9ft wide)
- Gaffer tape
- Steamer (handheld)
Step 1: Fabric Preparation
-
Measure and Cut:
Begin by measuring your studio height to determine the necessary length for your panels. Cut two identical pieces of muslin or linen, ensuring you leave an extra 6 inches at the top for the rod pocket and 2 inches at the bottom for a hem. -
Hem the Edges:
To prevent fraying and give a polished look, fold the vertical edges over by half an inch, press with an iron, fold again, and sew a straight stitch all the way down. Repeat this for all vertical sides. -
Create the Rod Pocket:
At the top edge of each panel, fold the fabric down 4 inches to create a generous loop. Pin it in place. I prefer to double-check the width against the crossbar diameter here to ensure an easy slide. Sew two parallel lines of stitching across the width to secure the pocket strongly. -
Iron the Seams:
Press all your new seams flat with a hot iron. This sets the stitches and ensures the fabric will hang straight without puckering at the edges.
Wrinkle Rescue
Using a spray bottle with warm water can relax stubborn creases if you don’t have a steamer. Mist lightly and let gravity do the work as it dries.
Step 2: Stand Assembly
-
Set Up Supports:
Position your two heavy-duty tripod stands approximately 10 to 12 feet apart. Extend the legs fully for maximum stability, locking the base knobs tightly. -
Thread the Fabric:
Slide the telescopic crossbar through the rod pockets of both fabric panels. Gather the fabric slightly as you go; the bunching creates that lovely vertical texture seen in the reference. -
Mount the Crossbar:
With the help of a friend, lift the crossbar and mount it onto the top spigots of your two tripod stands. Secure the wing nuts or locking mechanisms immediately. -
Raise to Height:
Evenly raise the vertical columns of the stands until the bottom of the fabric just grazes the floor. It’s crucial to raise both sides in increments to keep the system balanced.
Level Up: Backlighting
Place a strong, warm light source behind the fabric to turn the backdrop into a giant softbox or to create sharp silhouettes of objects behind it.
Step 3: Floor & Finishing
-
Lay the Flooring:
Roll out a length of white seamless paper directly underneath the fabric. It should extend several feet in front of the backdrop to create a clean stage floor. -
Secure the Paper:
Use gaffer tape to tape down the front corners of the paper to the studio floor. This prevents curling and tripping hazards during use. -
Adjust the Drapes:
Spread the two fabric panels along the crossbar until they meet in the center. Overlap them slightly (about 2-3 inches) to prevent a light gap, or leave a slit if you want light to peek through. -
Steam the Fabric:
This final step makes all the difference. Use a handheld steamer to release deep creases from storage. Run the steamer from top to bottom, letting the weight of the water vapor pull the fabric straight. -
Final Styling:
Check the bottom hem line. If the fabric is puddling too much, raise the stands slightly. For a breezy look, twist the fabric edges slightly to encourage natural folds.
Now you have a professional-grade scrim ready to transform any space into a theatrical stage
Live-Evolving Chalk Art Back Wall

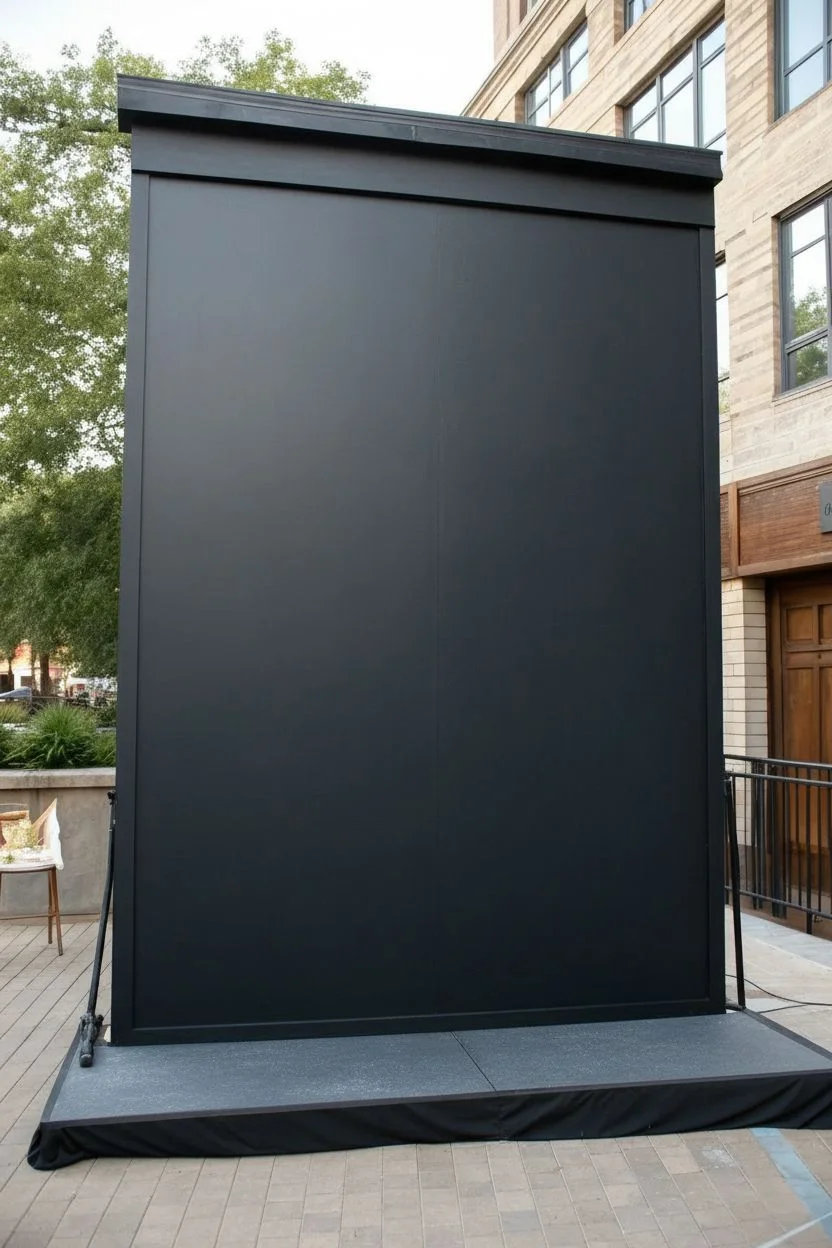
Transform a simple stage into an elegant focal point with this massive, freestanding chalkboard wall showcasing delicate botanical illustrations. The stark contrast of white chalk on a matte black surface creates a sophisticated, customizable canvas perfect for weddings, events, or live art performances.
Detailed Instructions
Materials
- Three 4×8-foot plywood sheets (3/4-inch thick)
- 2×4 lumber for framing and bracing
- Matte black chalkboard paint (gallon)
- White paint pens (broad and fine tips)
- Standard white chalk sticks
- Chalk snap line tool
- Measuring tape and pencil
- Power drill and wood screws
- Paint roller with foam cover
- Globe string lights (optional for top)
- Damp cloth or sponge
Step 1: Building the Structure
-
Construct the main frame:
Build a sturdy frame using your 2×4 lumber. You will need a base structure that is at least 8 feet tall and 8 to 12 feet wide, depending on your stage size. Ensure you build triangular ‘jack’ braces for the back so the wall stands freestanding safely. -
Attach the panels:
Mount your plywood sheets vertically onto the frame front. Use wood screws countersunk slightly below the surface. Seamlessly joining the panels is crucial here, so push them tight against each other. -
Fill the seams:
Use wood filler over the screw holes and the vertical seams where the plywood sheets meet. Sand everything perfectly smooth once dry; any texture here will interrupt your chalk lines later. -
Prime and paint:
Apply a coat of dark primer to the wood. Once dry, roll on at least two to three coats of high-quality chalkboard paint. Use a foam roller to minimize texture, and let it cure for the manufacturer’s recommended time, usually 24-48 hours. -
Adding trim:
Frame the top and sides with simple 1×4 painted wood trim to give it a finished, architectural look. For the top header, I like to build a small overhang box to hide the wiring if you plan to add lights.
Step 2: Designing the Chalk Layout
-
Season the board:
Before drawing your final design, take a stick of broad chalk and rub it sideways over the entire surface, then wipe it off with a dry cloth. This ‘seasons’ the paint so your first drawings don’t ghost permanently. -
Mark the borders:
Use a chalk snap line to create the crisp, straight rectangles seen in the reference. You need an outer border about 6 inches from the edge, and two inner rectangular panels separated by a central vertical line. -
Draft the inner frames:
Using a measuring tape and a light pencil or faint chalk, mark the inner double-lines. These lines act as the container for your main content area, separating it from the decorative floral border. -
Sketch the floral placement:
Roughly sketch the flow of the vines with regular chalk. Focus on the corners first—the reference shows leafy branches extending inward from the top corners and climbing up from the bottom corners.
Drawing Pro-Tip
For perfectly symmetrical vines, draw one side first, snap a photo, flip the image horizontally on your phone, and use that reference to draw the mirroring side.
Step 3: Executing the Illustration
-
Ink the straight lines:
For the geometric borders that won’t change, use a broad-tip white paint pen and a long straightedge. This ensures these structural lines remain heavily opaque and bright white compared to the softer chalk art. -
Draw the main stems:
Switch to a standard chalk stick or a chalk marker. Draw the central spines of your leaves and vines. Keep the lines fluid and organic, allowing them to curve gently parallel to the frame edges. -
Add leaf details:
Flesh out the vines with leaves. The reference uses a mix of long, fern-like leaves and broader, ovate leaves. alternate the leaf placement on the stem for a natural look. -
Create the top flourish:
In the center top space between the two panels, draw a symmetrical, ornamental scroll design. Start from the center point and work outward to ensure balance. -
Detail the corner blooms:
At the bottom corners, draw larger, chrysanthemum-style flowers. Start with a tight center swirl and add layers of petals radiating outward. These anchor the bottom of the design visually. -
Refine with contrast:
Go back over your chalk lines to vary the line weight. Make the outer edges of leaves thicker and the inner veins thinner. Creating this variety prevents the drawing from looking flat. -
Clean up edges:
Use a slightly damp Q-tip or a precision eraser to sharpen the points of your leaves and clean up any smudges or sketch lines that are no longer needed. -
Final touches:
Hang a strand of bistro lights across the top header using screw hooks. I find that warm led bulbs bring out the richness of the black paint best.
Troubleshooting Smudges
If you make a mistake with a paint pen, use a little rubbing alcohol on a rag to remove it. For regular chalk, a microfiber cloth with water works best to prevent cloudy streaks.
Now you have a stunning, professional-grade backdrop ready for interaction or display


Have a question or want to share your own experience? I'd love to hear from you in the comments below!