There’s something ridiculously satisfying about turning a plain little stone into a tiny piece of art you can hold in your palm. These stone painting ideas are the kind I reach for again and again in my studio—easy to start, fun to personalize, and totally display-worthy.
Classic Dot Mandala Stones

Embrace the elegance of high contrast with this striking black and white mandala stone using simple dotting techniques. The concentric patterns create a mesmerizing optical effect that looks far more complex than it actually is.
Detailed Instructions
Materials
- Smooth, round or oval river stone (approx. 3-4 inches wide)
- Black acrylic paint (matte base)
- White acrylic paint (high opacity or heavy body)
- Acrylic fluid medium (optional, for flow)
- Set of dotting tools (graduated sizes from 1mm to 8mm)
- Fine detail paintbrush (size 00 or 000)
- White charcoal pencil or chalk
- Compass or circle template
- Ruler
- Matte spray varnish
Step 1: Preparation and Base
-
Clean the stone:
Wash your stone thoroughly with soap and water to remove any dirt or oils that could prevent paint adhesion, then let it dry completely. -
Apply the base coat:
Paint the entire surface of the stone with black acrylic paint. You may need two thin coats to get a solid, opaque coverage without brushstrokes. -
Find the center:
Once dry, use your ruler to estimate the center of the stone and mark a tiny dot with your white charcoal pencil. -
Draft guide lines:
Using a compass or circle template, very lightly sketch a few concentric guide circles radiating from the center. These will help keep your pattern symmetrical.
Oops! Uneven Dots?
If a dot looks wonky or runs, wait for it to dry completely. Then, paint over it with black base paint, let that dry, and re-dot white on top. Don’t wipe wet paint.
Step 2: The Central Motif
-
Place the center dot:
Dip a medium-sized dotting tool (around 4-5mm) into your white paint and place a single, perfect dot right on your center mark. -
Create the first ring:
Using a much smaller tool (approx 1-2mm), place a ring of tiny dots immediately surrounding the central dot. Keep them tight but not touching. -
Extend the petals:
For the petal effect, use a slightly larger tool (3mm). Place a dot just outside the previous ring at the 12, 3, 6, and 9 o’clock positions, then fill in equally between them. -
Add detail dots:
Take your smallest tool or a toothpick and place a tiny ‘walking dot’ between the larger petal dots to connect the visual flow. -
Build the second layer:
Move outwards to your next guide circle. Use a medium tool to place evenly spaced dots all around the perimeter. -
Form the secondary ring:
Using a smaller tool, place two smaller dots in the gap between each of the medium dots you just placed.
Step 3: Expanding the Mandala
-
Create the large circle border:
About half an inch from the current pattern edge, use a large tool (6mm) to place a ring of bold white dots. Leave generous space between them. -
Frame the large dots:
Switch to a very fine tool. Carefully place tiny dots that encircle each of those large 6mm dots, creating a ‘flower’ or ‘framed pearl’ look for each one. -
Add floating accents:
In the empty black space between your central motif and this new outer ring, place single, medium-sized dots to fill the negative space without crowding it. -
Refine the edges:
Near the edge of the stone, add partial semi-circles of dots that look like they are ‘falling off’ the edge, giving the design a continuous feel. -
Clean up guidelines:
The charcoal lines are usually visible at this stage. Once the paint is 100% dry (give it a few hours), gently wipe away the white pencil marks with a damp cotton swab. -
Seal the artwork:
Finish by applying a light coat of matte spray varnish to protect the paint from chipping and to unify the sheen of the black background.
Go Metallic
Swap the plain white paint for metallic silver or pearl. The shimmer adds a mesmerizing depth against the matte black background while keeping the monochromatic vibe.
Enjoy the meditative process of watching your monochromatic masterpiece unfold one dot at a time


Simple Daisy Garden Stones
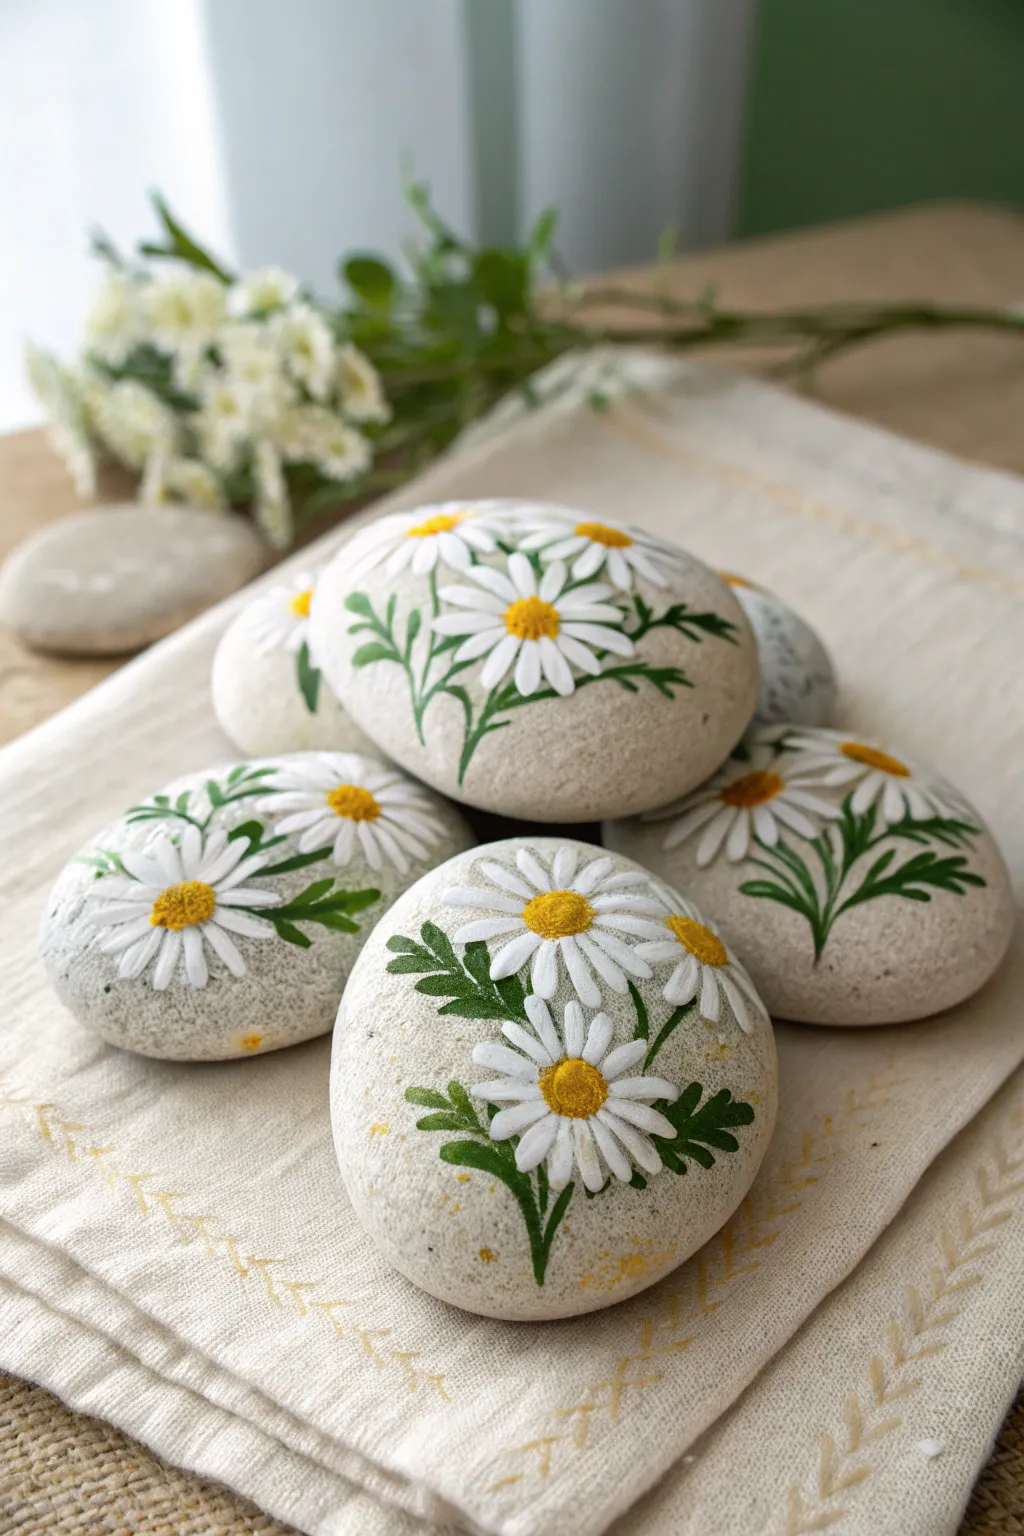

Transform smooth river rocks into a blooming eternal garden with these charming painted daisy stones. Their soft white petals and raised yellow centers create a delightful texture that looks lovely nestled among your potted plants or displayed on a windowsill.
How-To Guide
Materials
- Smooth river rocks (flat or rounded, approx. 3-4 inches)
- White acrylic paint (heavy body or multi-surface)
- Yellow acrylic paint (cadium or golden yellow)
- Leaf green acrylic paint
- Dark green acrylic paint (optional, for shading)
- Fine round paintbrush (size 1 or 2)
- Detail liner brush (size 00 or 0)
- Water cup and palette
- Clear matte or satin varnish spray
Step 1: Preparation and Base Layer
-
Select your canvas:
Choose stones that have a relatively smooth surface. While slightly bumpy textures can add character, a smoother rock makes painting the delicate petals much easier. -
Clean the surface:
Wash your stones thoroughly with soap and water to remove any dirt or oils. Let them dry completely, ideally in the sun, to ensure no moisture is trapped inside. -
Plan the composition:
Look at the shape of your stone. Decide where the main flower heads will sit—usually, offsetting two or three flowers creates a more natural, organic look than centering a single bloom.
Paint too sheer?
If your white paint looks streaky or transparent, paint a base layer of light grey or primer where the flower will go first. Let it dry, then apply the white on top for solid coverage.
Step 2: Painting the Petals
-
Load the brush:
Using your fine round brush, pick up a generous amount of white acrylic paint. You want the paint to be thick enough to be opaque but fluid enough to pull into a shape. -
Paint the first center petal:
Start by visualizing the center of the flower (where the yellow disc will go). Place your brush tip down near that center and pull outward, lifting pressure as you reach the petal tip to create a tapered point. -
Complete the flower circle:
Work your way around the invisible center circle, painting petals outward in a starburst pattern. Don’t worry if they aren’t perfectly uniform; nature is rarely perfect. -
Layering for opacity:
Once the first layer of white is dry to the touch, go over the petals again. This second coat ensures the bright white pops against the grey stone background. -
Add partially hidden flowers:
If your stone is large enough, paint half-blooms peeking out from behind the main flower or curving around the edge of the stone to create depth.
Add a bug!
Make your garden stone even cuter by painting a tiny red ladybug climbing one of the stems or sitting on a white petal. Use a toothpick to dot the black spots.
Step 3: Adding Greenery
-
Paint the stems:
Switch to your leaf green paint. Draw thin, slightly curved lines extending downward from the flower heads. I find that creating a gentle ‘S’ curve makes the stem look more graceful than a straight line. -
Create the leaves:
Along the stems, paint small, fern-like leaves. Use the tip of your detail brush to flick paint outward from the stem, creating jagged or lobed edges typical of daisy foliage. -
Add depth to leaves:
While the green is still slightly wet, or after it dries, mix a tiny bit of dark green or brown into your green. Add tiny shadows at the base of the leaves where they meet the stem. -
Highlight the foliage:
Mix a little yellow or white into your green and add very subtle highlights to the tips of the leaves for a sun-kissed effect.
Step 4: The Pollen Centers
-
Paint the base yellow disc:
Dip your round brush into the yellow paint. Dab a round circle right in the center where your white petals meet. It should overlap the base of the petals slightly. -
Creating texture:
This is crucial for the realistic look shown in the photo. Instead of brushing flat, use a stippling motion (dabbing up and down) with thick paint to build up physical texture on the yellow center. -
Shading the center:
Mix a tiny dot of orange or light brown into your yellow. Stipple this darker shade just on the bottom edge of the yellow circle to give it a 3D, domed appearance. -
Final highlights:
Add a tiny speck of white or pale yellow to the very top of the yellow center to represent light hitting the pollen.
Step 5: Finishing Touches
-
Check your edges:
Inspect the petals for any grey stone showing through where you don’t want it. Touch up the white tips if necessary for a crisp finish. -
Let it cure:
Allow the stones to dry completely, ideally overnight. Heavy body acrylics used for texture can take longer to dry than thin layers. -
Seal the artwork:
Take the stones outside and spray them with a clear matte or satin varnish. This protects the paint from chipping and weather if you plan to keep them in the garden.
Arrange your finished stones together in a basket or scatter them individually to spread a little joy around your home


Ladybug and Leaf Stones
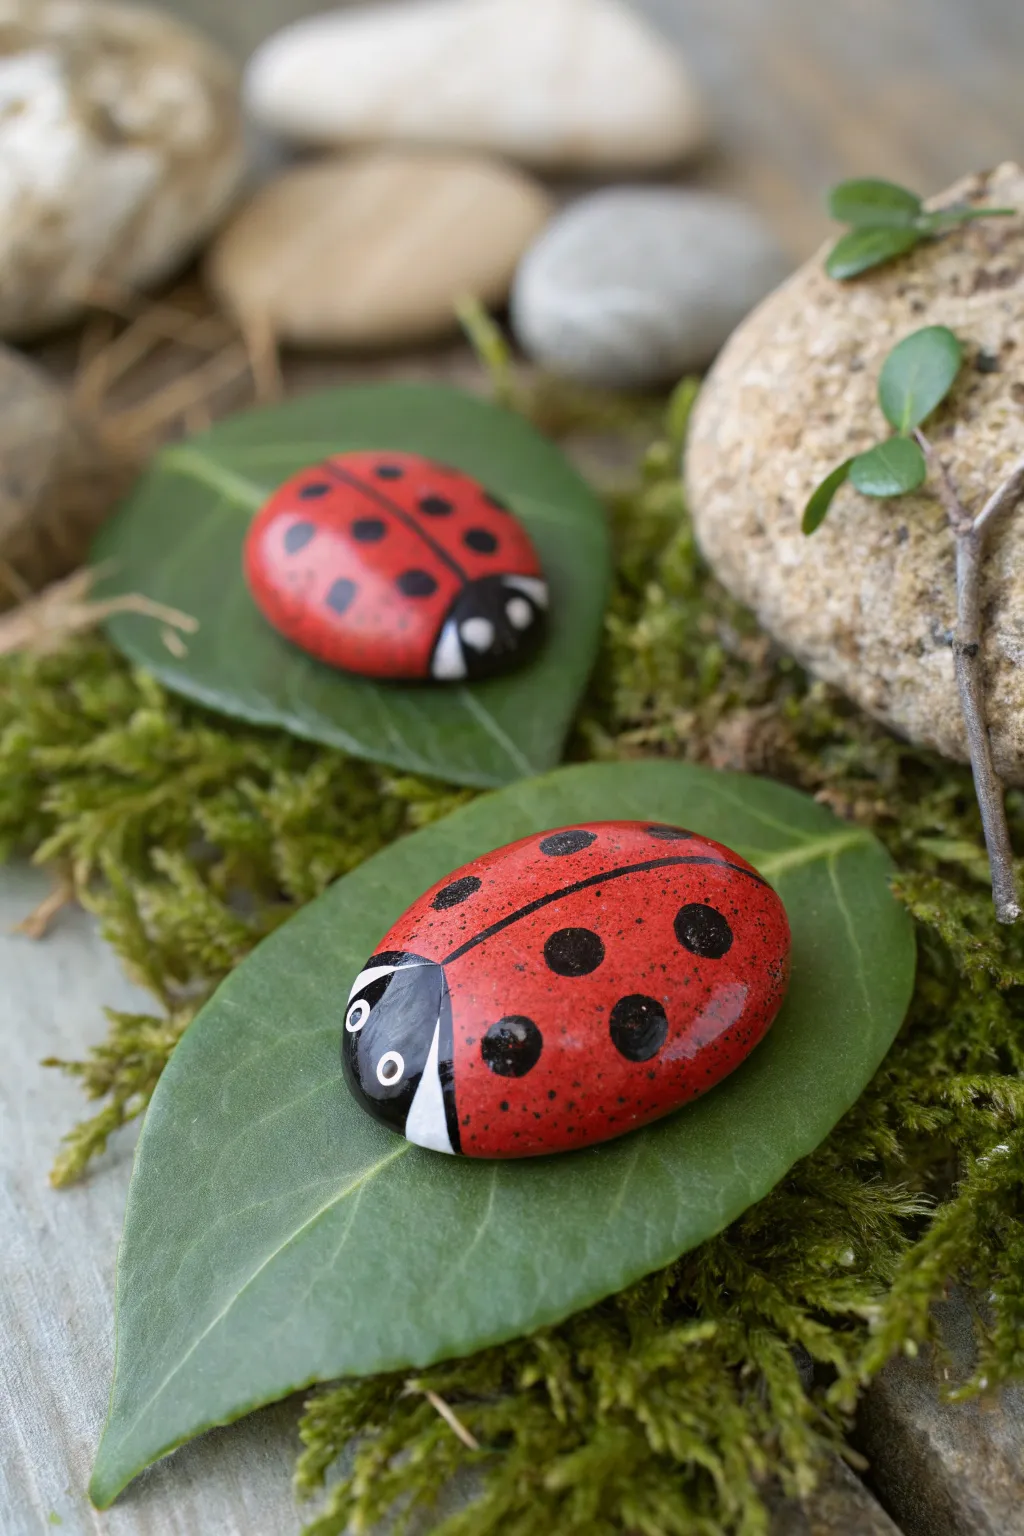
Bring your garden to life with these adorably realistic painted stone ladybugs. Their bright red backs and shiny finish make them look almost ready to crawl off their leaves, adding a charming pop of color to any planter or shelf.
Step-by-Step
Materials
- Smooth, oval-shaped stones (cleaned and dried)
- Red acrylic paint (bright cherry red)
- Black acrylic paint
- White acrylic paint
- Pencil
- Fine detail paintbrush (size 0 or 00)
- Medium flat paintbrush
- Dotting tool or toothpick
- High-gloss varnish or sealant (spray or brush-on)
- Water cup and paper towels
Step 1: Base Coloring
-
Select the perfect stones:
Look for stones that are naturally smooth and rounded, mimicking the domed shape of a ladybug’s back. Wash them thoroughly with soap and water to remove any dirt or oils, and let them dry completely before starting. -
Sketch the outline:
Using a pencil, lightly draw a curved line across the front third of the stone to separate the head from the body. Then, draw a straight line down the center of the body to represent the wings’ dividing line. -
Paint the body red:
Fill in the larger body section with your bright red acrylic paint. You may need two or three thin coats to get a vibrant, opaque color. Allow each layer to dry fully so you don’t lift the previous paint. -
Paint the head black:
Carefully paint the smaller front section solid black. Use a steady hand near the red dividing line to keep the edge crisp. If you make a mistake, let it dry and touch it up later.
Natural Texture
Don’t aim for perfect, uniform black dots. Varying the size and spacing slightly makes the ladybug look more organic and less like a cartoon.
Step 2: Adding Details
-
Draw the wing divider:
Once the red base is totally dry, use your fine detail brush and black paint to draw a thin line down the center of the red body, tracing over your pencil mark. -
Add the large spots:
Using a dotting tool or the back end of your paintbrush dipped in black paint, place several large, distinct dots on both sides of the wing divider. Try to keep them somewhat symmetrical. -
Create speckles:
Dip an old toothbrush or a stiff brush into slightly watered-down black paint. Run your finger across the bristles to flick tiny speckles onto the red body for a natural texture. Practice on paper first to control the spray. -
Create the white face markings:
Paint two small, triangular shapes on the sides of the black head section using white paint. This creates the ‘false eye’ pattern common on ladybugs. -
Add the eyes:
Inside the black head area, use a small dotting tool to place two small white dots for eyes. Let clarity emerge by adding a tiny black pupil dot inside each white circle once dry. -
Refine the edges:
Check the perimeter of your stone. Depending on the rock’s shape, you might want to extend the paint slightly down the sides so it looks good from all angles.
Garden Display
For outdoor use, adhere your finished ladybug to a sturdy rock or tile using strong outdoor glue so it doesn’t get lost in the soil.
Step 3: Finishing Touches
-
Apply the varnish:
This is the most crucial step for that realistic ‘wet shell’ look shown in the photo. Apply a coat of high-gloss varnish over the entire painted surface. -
Let it cure:
Allow the varnish to dry completely according to the manufacturer’s instructions. A second coat can add even more depth and durability if the stone will live outside. -
Create a display:
For the full effect, find a nice green leaf (real or faux) to place your new friend on. Dark, glossy leaves like ivy or camellia work wonderfully to highlight the bright red stone.
Place your shiny new beetles among some moss or potted plants to surprise your visitors with a bit of whimsy


Bee and Honeycomb Stones
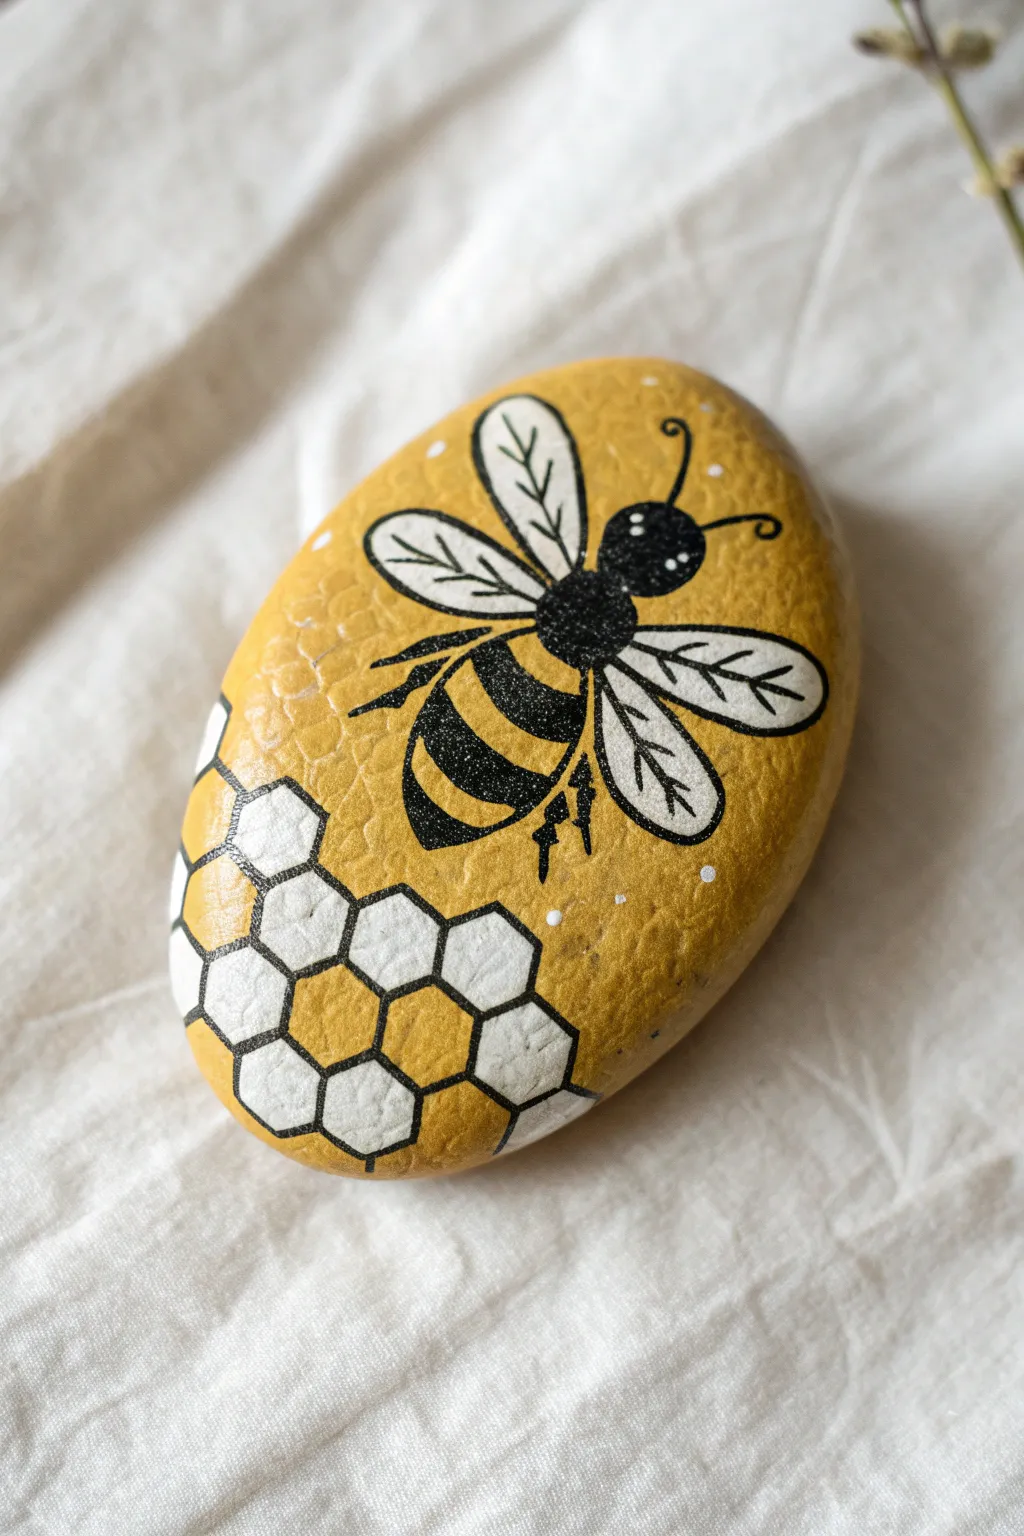

Bring a little buzz to your garden or desk with this charming painted stone featuring a detailed bee and a geometric honeycomb pattern. The warm mustard yellow background contrasts beautifully with the crisp black and white details, creating a delightful piece of pocket-sized art.
Step-by-Step Tutorial
Materials
- Smooth, oval river stone (cleaned and dried)
- Acrylic paints: Mustard yellow, white, black
- Posca paint pens or fine liner brush: Black (extra fine and medium tip), White
- Flat paintbrush (medium)
- Pencil and eraser
- Matte or glossy sealant (spray or brush-on)
Step 1: Base Coat & Sketching
-
Clean your canvas:
Begin by scrubbing your stone with soapy water and letting it dry completely to ensure the paint adheres properly. -
Apply the background:
Using a flat paintbrush, coat the entire top surface of the stone with mustard yellow acrylic paint. You may need two or three coats for full opacity; let each layer dry before adding the next. -
Sketch the design:
Once the base is bone-dry, lightly sketch the outline of your bee in the center and a cluster of hexagons in the bottom left corner using a pencil. Keep the pressure light to avoid grooving the paint.
Clean Lines Trick
If you struggle drawing perfect hexagons freehand, cut a tiny hexagon template from stiff cardstock and trace around it for the honeycomb pattern.
Step 2: Painting the Honeycomb
-
Fill the white hexagons:
Select a few random hexagons from your sketch to paint white. Using a small brush or a white paint pen, fill these shapes in completely. Just like with the background, a second coat will make the white pop against the yellow. -
Leave some yellow:
Leave the remaining sketched hexagons unpainted so the mustard yellow background shows through, creating a pattern of filled and empty combs. -
Outline the grid:
With a fine-tip black paint pen or a very thin liner brush, carefully trace the outlines of all the hexagons. Ensure the lines connect neatly at the corners to maintain the geometric look.
Step 3: Creating the Bee
-
Paint the wings:
Start with the bee’s wings. Fill the two teardrop shapes on each side with white paint. Let this dry completely before moving on to the black details. -
Draw the head and thorax:
Using black paint or a medium black pen, fill in a round circle for the head and a fuzzy, slightly larger oval for the thorax (the middle section). -
Start the abdomen:
Outline the bee’s bottom section (abdomen). Draw curved black bands across it, leaving stripes of the yellow background visible between them to create the classic bumblebee pattern. -
Detail the wings:
Once the white wing paint is dry, outline the wings with your fine black pen. Add a central vein down the middle of each wing and small branching veins for realistic detail. -
Add legs and antennae:
Draw delicate, curved antennae emerging from the head. Sketch thin legs extending from the thorax and abdomen; vary the angles to make the bee look like it’s crawling.
Add some sparkle
Mix a tiny amount of iridescent medium into the white paint for the wings to give them a subtle, insect-like shimmer when the light hits the stone.
Step 4: Final Details & Sealing
-
Highlight the eyes:
Dip the tip of a toothpick or a very fine tool into white paint and place two tiny dots on the black head for eyes. This small touch brings the character to life. -
Add decorative dots:
Scatter a few tiny white dots around the bee and near the honeycomb area. I find this simple addition adds a whimsical, finished feel to the composition. -
Clean up lines:
Look over your work for any shaky lines. You can carefully touch up yellow areas with your base paint or sharpen black lines with your pen. -
Dry time:
Allow the stone to sit undisturbed until every bit of paint is cured. Thick layers of acrylic can take a few hours to fully set. -
Seal to protect:
Finish by applying a coat of sealant. A spray sealer works best to prevent smearing your fine line work. Apply in light, even mists.
Now you have a sweet, permanent garden resident that won’t ever sting you
BRUSH GUIDE
The Right Brush for Every Stroke
From clean lines to bold texture — master brush choice, stroke control, and essential techniques.
Explore the Full Guide
Cute Woodland Animal Stones
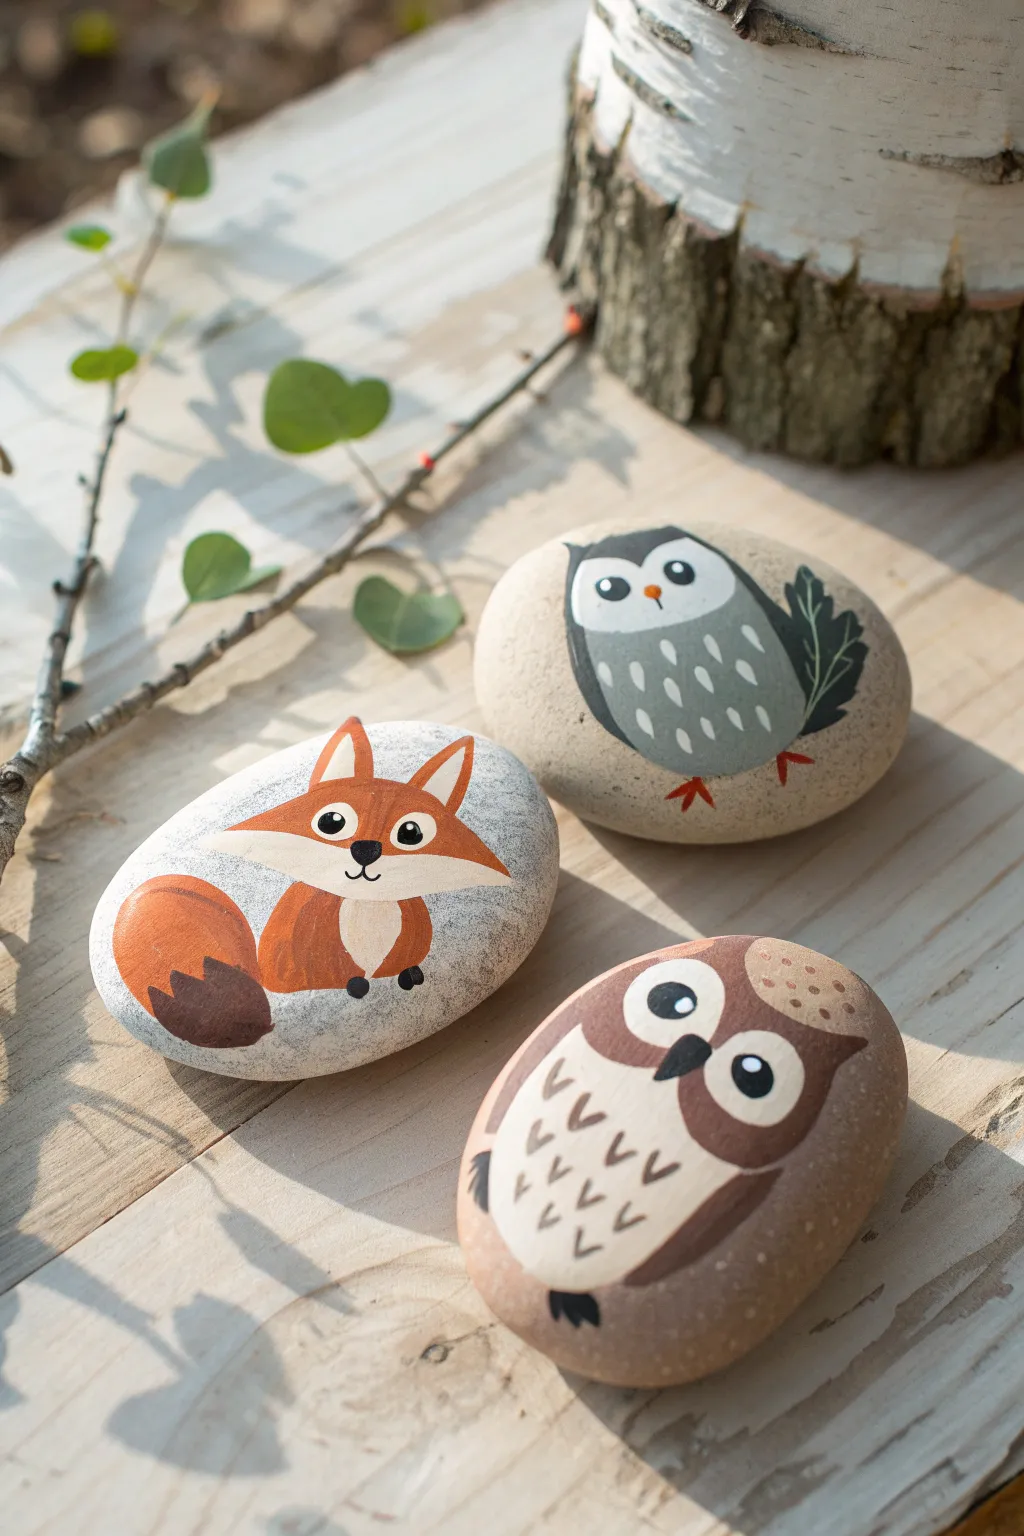
Bring the forest floor to life with this charming set of hand-painted woodland creatures. These stylized animal portraits—a rusty red fox and two wise owls—turn ordinary smooth garden rocks into adorable decorative pieces perfect for a desk or garden shelf.
Step-by-Step
Materials
- Smooth, flat river rocks (oval shapes work best)
- Acrylic paints (Titanium White, Burnt Sienna/Rust Orange, Dark Brown, Grey, Black)
- Fine liner or detail paintbrushes (sizes 00 and 0)
- Medium flat paintbrush (size 4 or 6)
- Pencil for sketching
- Matte or satin varnish/sealer
- Palette or paper plate for mixing
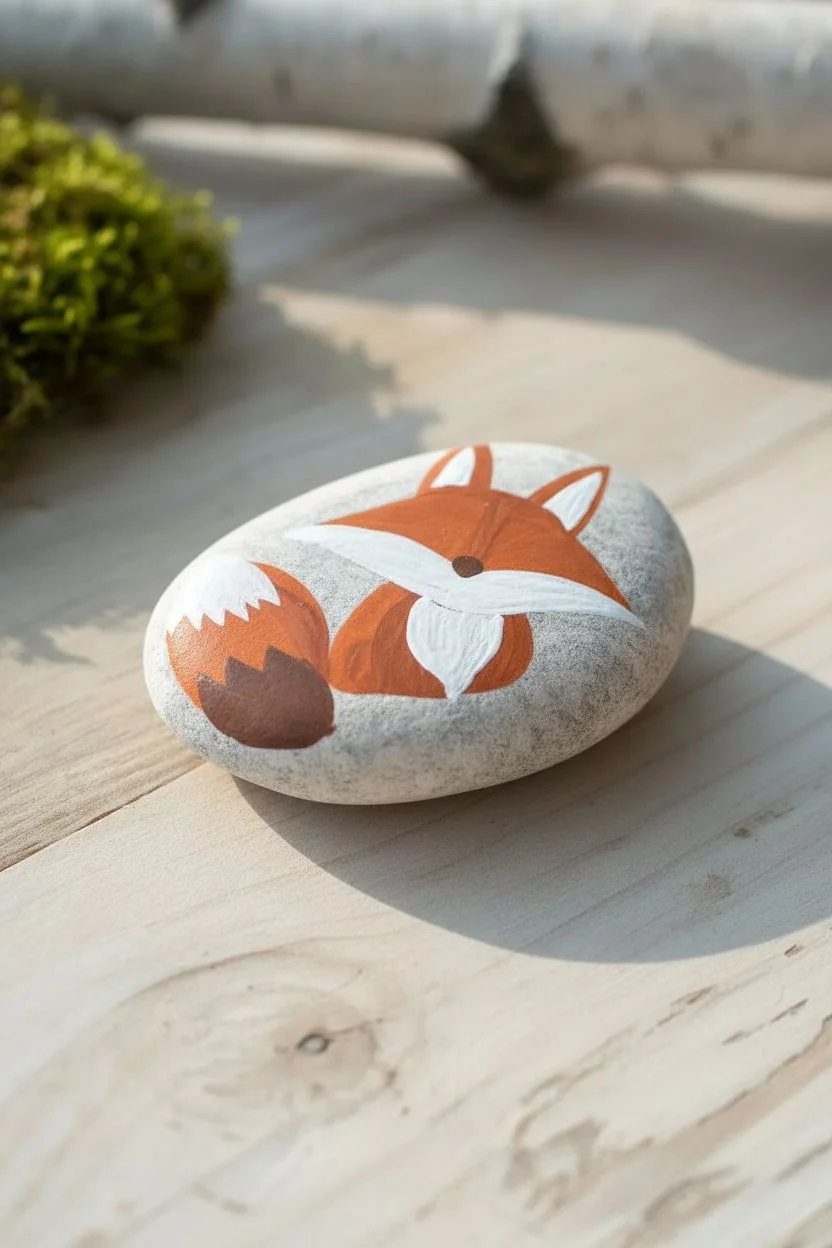
Step 1: Painting the Rusty Fox
-
Initial Sketch:
Select a light-colored, elongated stone for the fox. Sketch a wide triangle for the face and a curved body shape underneath, adding a large, fluffy tail swooping to the left. -
Base Color Blocking:
Using a rust-orange color (mix Burnt Sienna with a touch of red if needed), paint the top ‘mask’ area of the fox’s face, leaving the cheeks and muzzle bare stone or painted white. -
Filling the Body:
Continue with the rust-orange paint to fill in the main body shape and the tip of the tail, keeping the strokes smooth. -
The White Details:
With a clean brush, paint the chest patch, the cheeks, and the very tip of the tail with titanium white. You may need two coats here to cover the stone texture completely. -
Adding the Tail Accent:
Paint the main fluffy section of the tail with a chocolate brown tone, creating a nice contrast against the orange and white tip. -
Face and Paws:
Using a fine detail brush and black paint, add two paws at the bottom of the body. Paint a small, rounded triangular nose and two wide, expressive eyes with white pupils. -
Ears and Outlining:
Add triangles for ears. I like to outline the ears and the top of the head very lightly with a darker shade of rust to make them pop.
Stone Selection Tip
Look for stones with a naturally smooth, unpitted surface. If your rock is too rough, prime it first with a mix of white glue and white paint to create a silky canvas.
Step 2: Crafting the Grey Owl
-
Owl Outline:
Choose a rounder stone for the grey owl. Sketch an egg shape for the body and larger circles for the eyes. -
Grey Body Fill:
Paint the main oval body shape with a medium grey acrylic. If you want a wing detail, paint a dark leaf-shape (almost black or dark green) on the right side. -
Bright Eyes:
Paint two large white circles for the eyes. This creates that classic wide-eyed owl look. -
Feather Details:
Using a lighter grey or white, paint small vertical dashes on the belly area to simulate soft chest feathers. -
Beak and Feet:
With a bright orange paint, add a small diamond shape for the beak between the eyes and little clawed feet at the bottom. -
Black Defines:
Outline the eyes carefully with black paint and add pupils. Add a brow line above the eyes to give the owl a slightly surprised expression.
Step 3: Designing the Brown Owl
-
Base Shape:
On a brownish or tan stone, outline a large white heart-shaped face mask (the facial disk). -
Painting the Mask:
Fill in this heart shape with cream or off-white paint. This acts as the background for the owl’s face. -
Outer Feathers:
Paint the area surrounding the face mask with a warm medium brown, creating the head and body shape. -
Chest Pattern:
Below the face, paint the chest cream-colored. Once dry, use a detail brush with brown paint to make small ‘V’ shapes for feather texture. -
Facial Features:
Paint two large black circles for eyes inside the cream mask, adding tiny white reflection dots. Add a dark beak. -
Finishing Touches:
For texture, you can add tiny dots on top of the head using the handle end of your paintbrush dipped in light brown paint. -
Sealing the Set:
Allow all stones to dry completely (at least 24 hours is best). Apply a coat of matte or satin varnish to protect your artwork from scratches and weather.
Uneven Coverage?
If your light colors look streaky over dark stones, don’t just keep layering wet paint. Let the first coat dry 100% before adding a second; it prevents dragging.
Arrange your finished trio among some moss or potted plants to give them a perfect little habitat.
Sea Turtle and Wave Stones
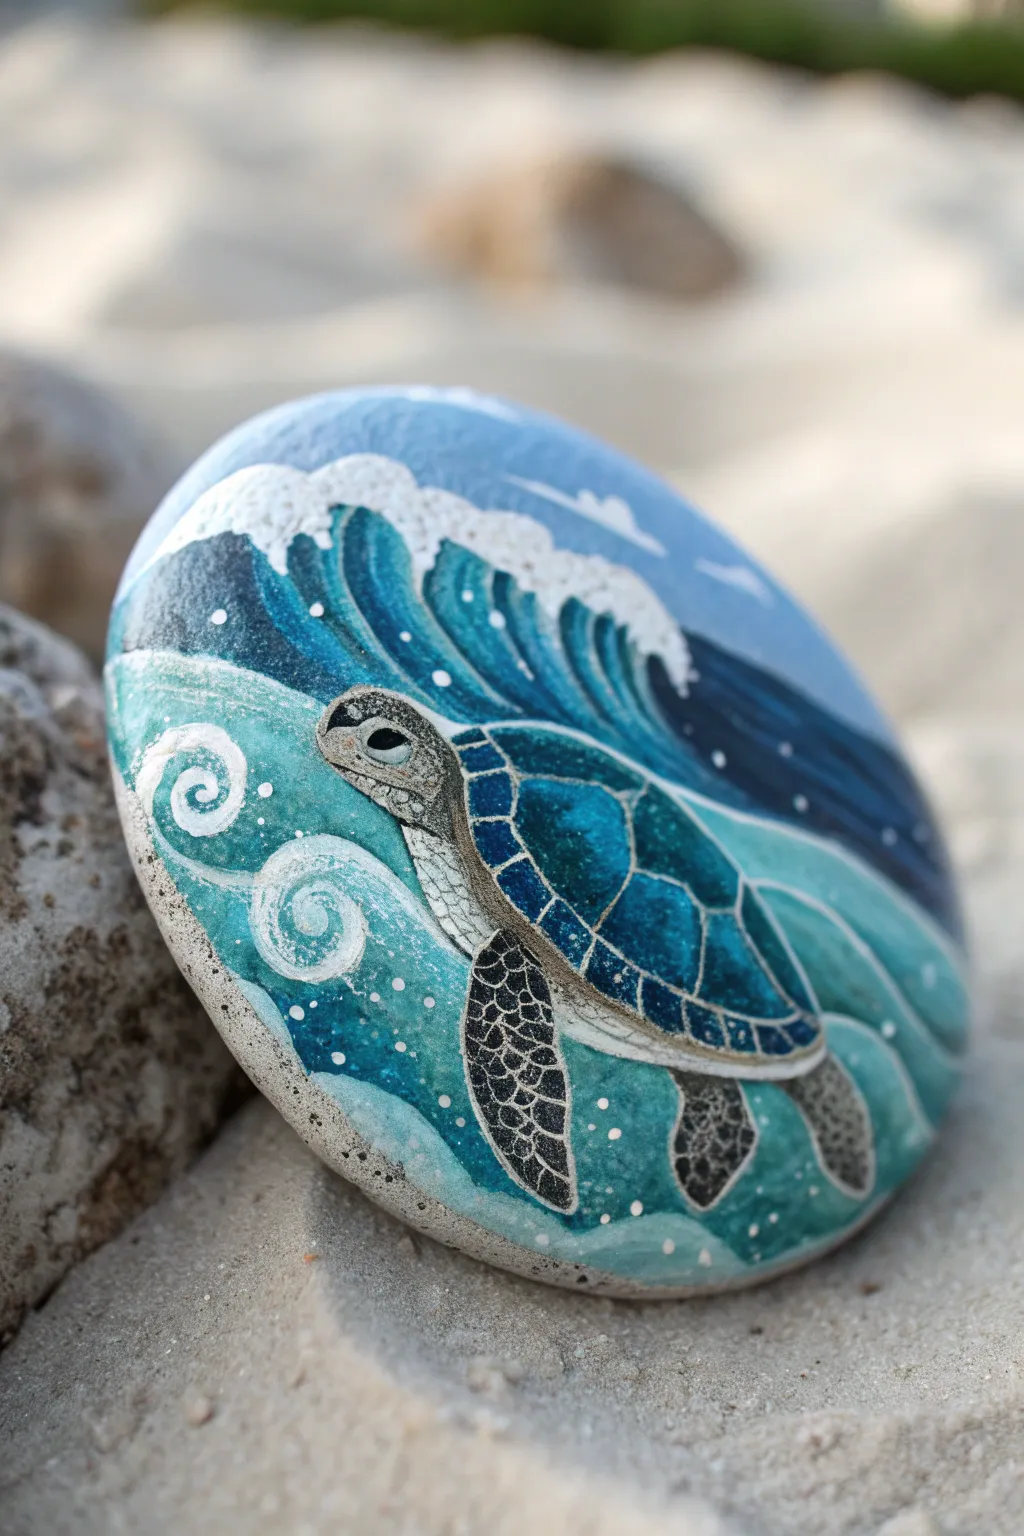
Capture the serene beauty of the deep blue sea with this vibrant stone painting project featuring a majestic sea turtle riding the currents. The design combines stylized crashing waves with realistic shell textures for a stunning, multifaceted piece.
How-To Guide
Materials
- Smooth, round river stone (approx. 4-5 inches)
- Acrylic paints: White, Phthalo Blue, Teal/Turquoise, Black, Dark Grey, Light Grey
- Pencil and eraser
- Fine liner brushes (size 00 or 000)
- Small flat brush (size 2 or 4)
- Acrylic paint markers (White, Black – extra fine tip)
- Spray varnish or sealant (glossy finish)
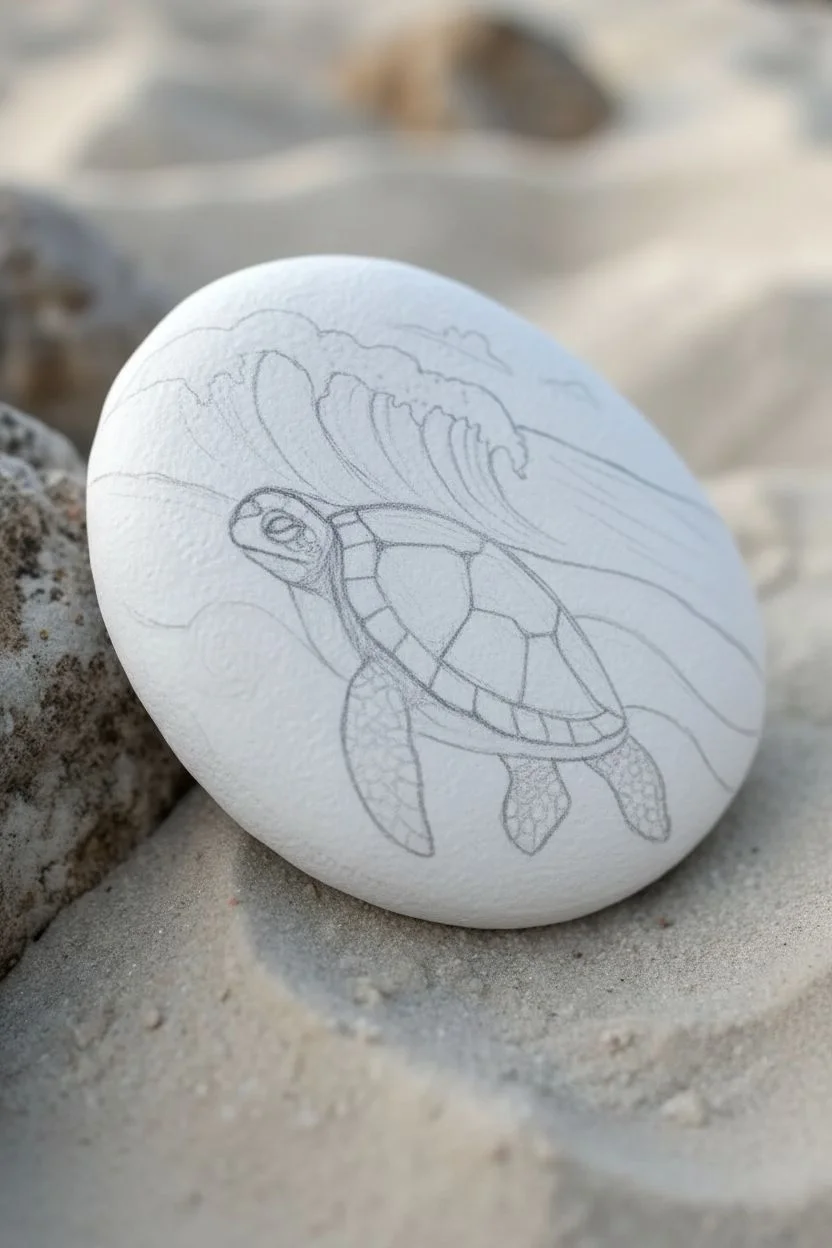
Step 1: Preparation and Base Sketch
-
Surface Prep:
Begin by washing your stone thoroughly with soap and water to remove any dirt or oils. Let it dry completely before you start. -
Base Coating:
Apply a solid base coat of white acrylic paint to the front surface of the stone. This primes the surface and ensures your blue ocean colors will pop vividly later on. Let this dry fully. -
Rough Sketching:
Using a pencil, lightly continually sketch the outline of the turtle in the center. Draw the oval shell, the fins extending outward, and the head looking left. Then, sketch the horizon line of the large wave crashing behind it.
Paint Lifting?
If your second layer of paint pulls up the first layer, the base wasn’t fully dry. Use a hair dryer on a low setting between layers to speed up the process and ensure a hard surface.
Step 2: Painting the Ocean Backdrop
-
Deep Ocean Water:
Mix Phthalo Blue with a tiny drop of black to create a deep navy. Paint the upper right section of the water curve, creating the shadowy depth behind the wave. -
Teal Currents:
For the water surrounding the turtle, mix Teal and White to get a bright aquamarine color. Paint the space around the turtle, blending it gently into the darker blue areas using a damp brush for a soft transition. -
Wave Definition:
Take your pure Phthalo Blue and paint vertical, curved strokes inside the main crashing wave to mimic the movement of water rising up. Maintain the pencil outline of the foamy crest; don’t paint over it yet.
Add Sparkle
Mix a tiny amount of iridescent medium or fine silver glitter into your teal paint for the lighter water sections. It makes the ocean shimmer beautifully in sunlight.
Step 3: Detailing the Turtle
-
Shell Base Color:
Fill in the turtle’s shell with a medium blend of Phthalo Blue and Teal. While wet, dab a little lighter teal in the center of each scute (shell segment) to suggest convexity. -
Skin Texture:
Paint the fins and head with a light grey base. Once dry, I like to use a very diluted black wash over the fins to create shadows before adding the details. -
Shell Segmentation:
Using your finest brush or a white paint pen, carefully outline the segments of the shell. Keep the lines crisp and thin. -
Skin scales:
Switch to a black fine liner brush or pen. Draw small, irregular polygon shapes on the fins and head to create the scaly skin pattern. Fill in the spaces between these scales with dark grey or black. -
The Eye:
Paint a small black oval for the eye, leaving a tiny white dot near the top for a lifelike reflection. Outline the eye area with a slightly darker grey to give it depth.
Step 4: Waves and Highlights
-
Foam Crests:
Load your brush with thick titanium white paint. Stipple (dab repeatedly) the paint along the top edge of your big wave to create fluffy, crashing sea foam. -
Water Movement:
Paint sweeping, decorative spirals in the lighter teal water on the left side. These stylized swirls give the impression of currents and movement. -
Bubbles and Spray:
Use a dotting tool or the back of a paintbrush handle dipped in white to add scattered dots throughout the water, mimicking air bubbles and sea spray. -
Final Contrast:
Add thin white lines following the curve of the dark blue wave to show water tension. Add a few small white highlights to the top of the turtle’s shell for a wet look. -
Sealing:
Allow the stone to cure for 24 hours. Finish with a glossy spray varnish to protect the paint and give the water a permanent ‘wet’ sheen.
Now you have a stunning piece of ocean art that brings a coastal vibe to any room or garden

PENCIL GUIDE
Understanding Pencil Grades from H to B
From first sketch to finished drawing — learn pencil grades, line control, and shading techniques.
Explore the Full Guide
Rainbow Gradient Stones
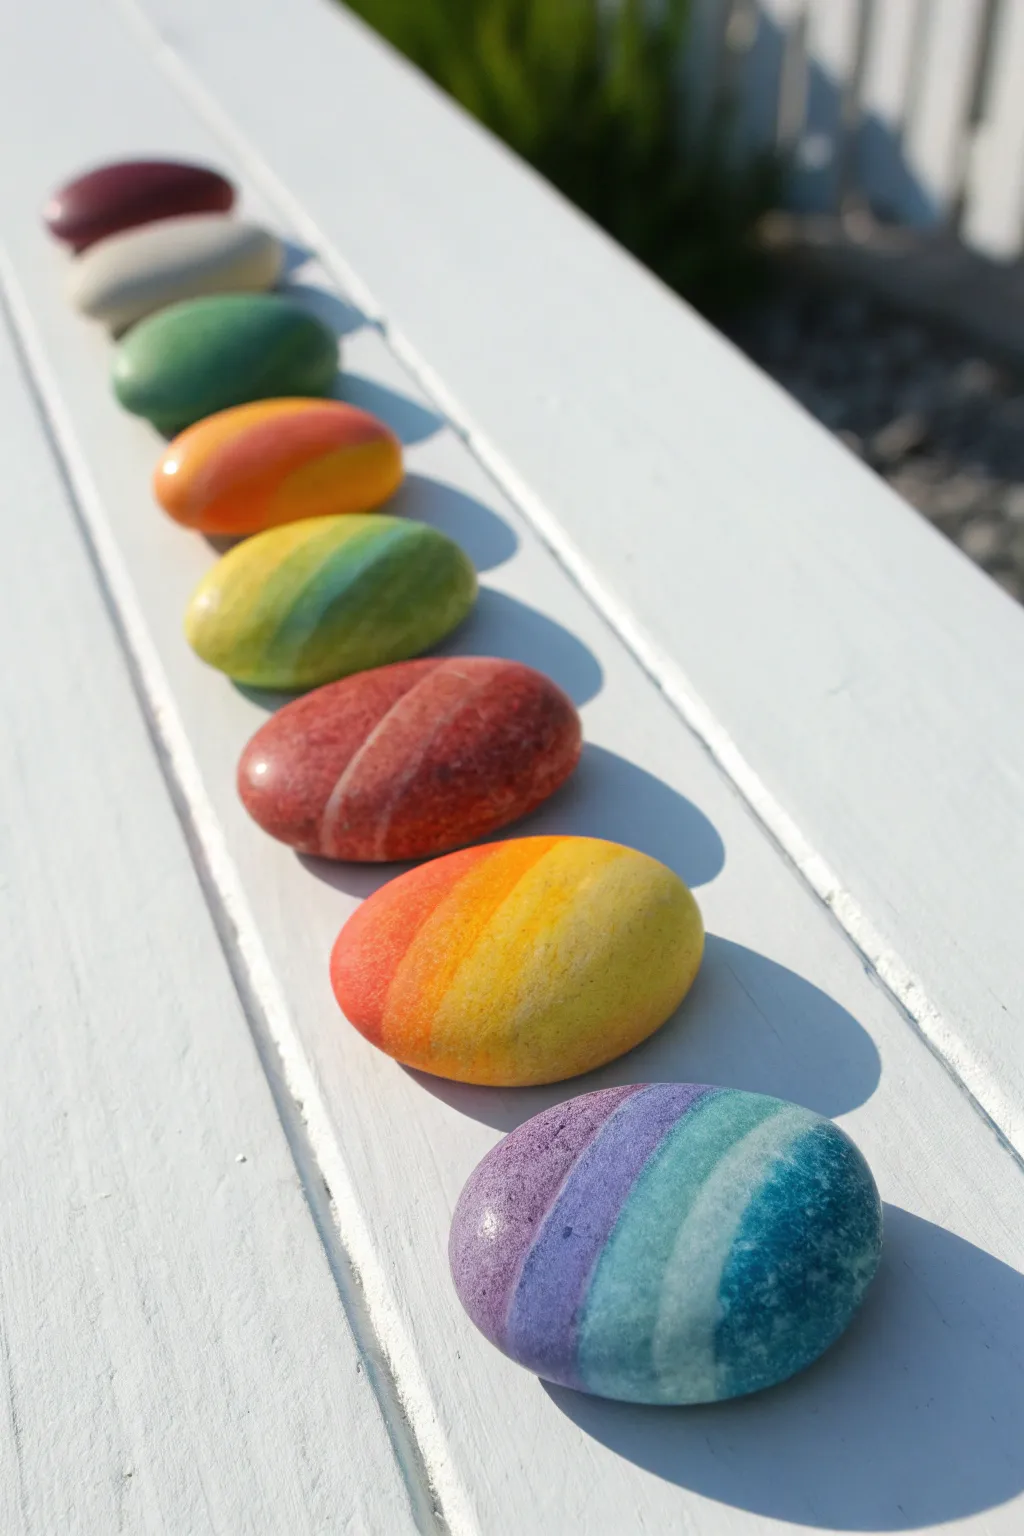
Transform smooth river rocks into vibrant gems with seamless color transitions that mimic a real rainbow. These cheerful stones feature soft, blended stripes that are perfect for brightening up a garden path or hiding around your neighborhood for others to find.
Step-by-Step Tutorial
Materials
- Smooth, flat river stones (assorted sizes)
- Acrylic paints (red, orange, yellow, green, blue, purple, white)
- Flat shader brushes (sizes 4 and 6)
- Soft synthetic blending brush or makeup sponge
- Mod Podge or clear acrylic sealer (spray or liquid)
- Palette or paper plate
- Cup of water and paper towels
- Soap and water for cleaning stones
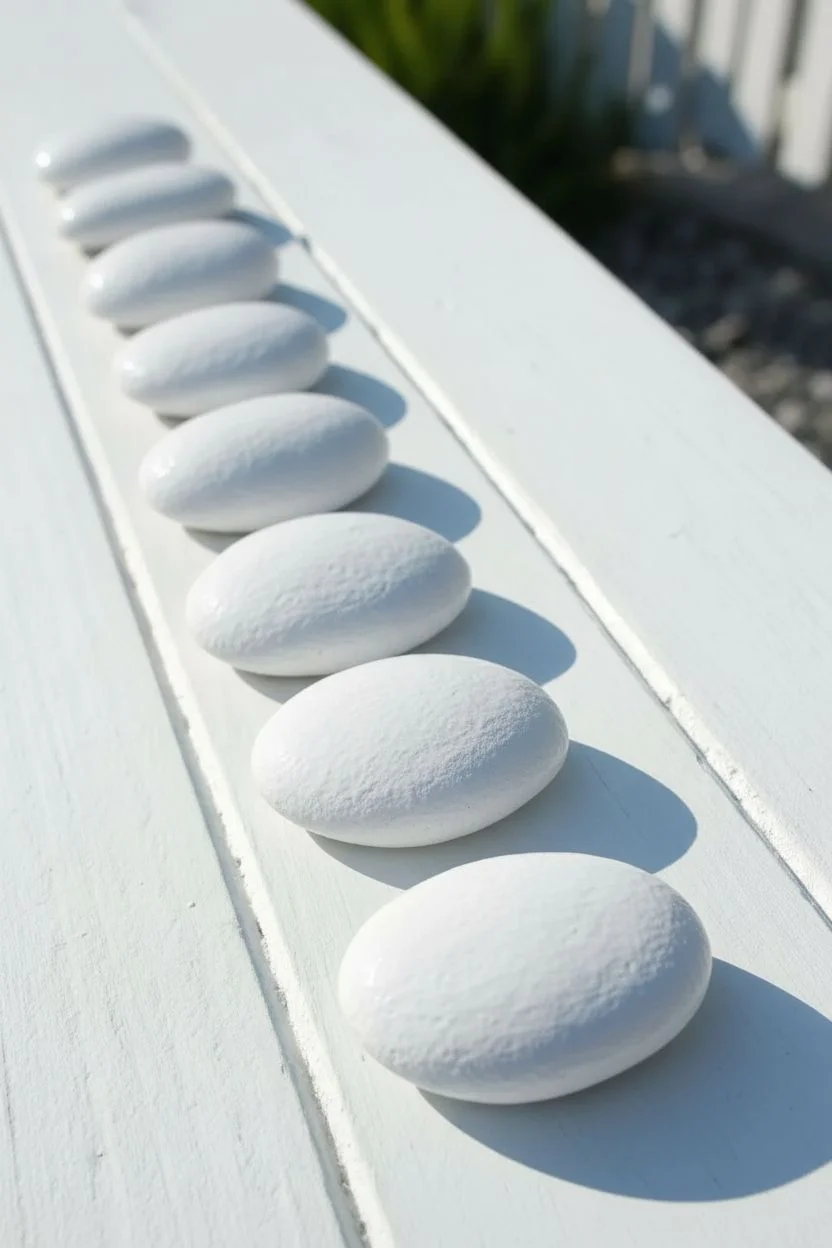
Step 1: Preparation
-
Clean the canvas:
Begin by thoroughly washing your stones with warm soapy water to remove any dirt or oils. Use a scrub brush if necessary to get into any crevices. -
Dry completely:
Set the stones out in the sun or use a towel to dry them completely. Moisture trapped in the stone can affect paint adhesion later. -
Prime the surface:
Paint a thin base coat of white acrylic paint over the top surface of each stone. This crucial step ensures your colors pop vividly rather than being absorbed by the dark rock.
Paint drying too fast?
Acrylics dry quickly outdoors. Use a retarder medium mixed into your paint to extend drying time, giving you longer to perfect that smooth gradient blend.
Step 2: Painting the Gradients
-
Plan your palettes:
Decide on the color combination for each stone. You can do a full rainbow on a large stone, or break it up into segments like ‘warm tones’ (red-orange-yellow) and ‘cool tones’ (blue-green-purple) for smaller ones. -
Load the first color:
Starting with the cooler toned stone first (the front one in the example), load your flat brush with purple paint and apply a stripe to the far left edge of the stone. -
Apply the adjacent color:
Clean your brush quickly and load it with a medium blue. Paint a stripe directly next to the purple while the purple paint is still wet. -
Blend the transition:
While both stripes are wet, locate the line where purple meets blue. Gently stroke your brush back and forth over this seam to blur the hard line and create a soft gradient. -
Continue the spectrum:
move to the next color in your sequence (a lighter blue or teal). Paint a stripe next to the medium blue, ensuring the previous paint remains wet for blending. -
Wet-on-wet technique:
I like to keep a slightly damp brush nearby; if your acrylics are drying too fast, a tiny touch of water (or glazing medium) on your brush helps re-activate the paint for smoother blending. -
Adding texture:
Notice the example stones have a slightly textured, almost spongy look. You can achieve this by dabbing the wet paint with a small piece of sponge instead of stroking it, creating a soft, stippled effect. -
Repeating for warm stones:
For the next stone, switch to warm colors. Paint a broad stripe of red, followed immediately by orange. -
Blending warm tones:
Use a clean brush to blend the red into the orange. Since yellow is very translucent, apply a thicker layer of yellow next to the orange to allow it to stand out. -
Create variation:
Mix up your patterns. Try painting one stone with diagonal stripes (like the green/yellow stone) and another with horizontal bands. This variety makes the collection more interesting. -
Detail work:
If you want the distinct white separation lines seen on the textured red stone, paint your color blocks first, let them dry, and then carefully drag a very thin, watered-down white line between the sections. -
Touch ups:
Once the first layer is dry, check for patchiness. You may need a second coat of specific colors, especially yellows and lighter greens, to get full opacity.
Step 3: Finishing
-
Allow to cure:
Let your stones dry completely for at least 24 hours. Acrylics dry to the touch quickly but take longer to fully cure. -
Seal the deal:
Apply a coat of clear acrylic sealer or Mod Podge. A glossy finish mimics the look of wet, polished river stones. -
Weatherproofing:
If these will live outside, use an outdoor-rated spray sealer to protect your beautiful gradients from rain and sun fading.
Smoother Blends
Don’t overwork the paint. Lay the colors down side-by-side and do one or two confident blending strokes across the seam, then leave it alone.
Now you have a stunning set of colorful stones ready to brighten up any corner of your home
Sweet Heart Message Stones
These charming painted stones combine simple heart motifs with rough, natural textures for a heartfelt gift that feels both primitive and polished. Wrapped in humble jute twine, they make perfect paperweights or small tokens of affection.
How-To Guide
Materials
- Smooth, rounded river stones (one beige/tan, one white)
- Acrylic paint (Deep Red, Burnt Orange, Black, White)
- Fine grit sandpaper
- Pencil
- Fine-point black paint marker or permanent marker
- Small round paintbrush (size 2 or 4)
- Detail brush (size 0)
- Jute twine
- Scissors
- Matte sealant spray or varnish
Step 1: Painting the Base Hearts
-
Stone preparation:
Begin by washing your stones with soap and water to remove any dirt or oils. Let them dry completely, or speed up the process with a hairdryer if needed. -
Sketch center heart:
Lightly sketch a large, prominent heart shape in the center of your stone using a pencil. For the white stone, position it slightly off-center to leave room for smaller hearts. -
Base coat application:
Fill in the large pencil heart with deep red acrylic paint. Use your small round brush and aim for distinct brushstrokes rather than a perfectly smooth finish to enhance the rustic look. -
Adding variety:
On the white stone, sketch and paint two smaller hearts: one in burnt orange near the bottom right, and another near the top left. This creates a scattered pattern. -
Second coat:
Once the first layer is dry to the touch, apply a second coat of red and orange paint if the stone’s color is showing through too clearly, though a little transparency adds character. -
Outline hearts:
Using a very fine black marker or a size 0 brush with black paint, draw a few empty heart outlines on the white stone to fill in the gaps.
Natural Distress Tip
Instead of painting scratch marks, utilize the stone’s natural pits. Let the paint skip over deep pores, leaving tiny unpainted dots that add instant texture.
Step 2: Detailing and Distressing
-
Outlining the main shapes:
Carefully outline your painted red and orange hearts with the thin black marker. I find outlining quickly actually helps keep the line looking organic and shaky, which fits the style. -
Creating the distressed look:
Dip a nearly dry brush into a tiny amount of off-white or beige paint. Lightly dry-brush scratches and scuff marks over the red hearts to simulate wear and tear. -
Adding texture:
You can also take a piece of fine sandpaper and gently rub the dried paint in the center of the hearts. This reveals the stone underneath and softens the bold red color. -
Speckling effect:
Dilute a drop of brown or orange paint with water. Dip an old toothbrush or stiff brush into it, and flick tiny droplets over the white stone to give it an aged, speckled appearance. -
Sealing the artwork:
Allow all paint and ink to dry completely for at least an hour. Apply a coat of matte spray varnish to protect the design without making it too glossy.
Step 3: The Final Flourish
-
Measuring the twine:
Cut a length of jute twine approximately four times the length of your stone. It is better to have too much than too little. -
Vertical wrap:
Place the center of the twine on top of the stone, running vertically across the main heart. Flip the stone over and cross the twine ends on the back. -
Horizontal wrap:
Bring the ends back to the front, crossing them horizontally over the first vertical strand to create a ‘plus’ sign shape. -
Securing the cross:
Thread the ends under the vertical strand where they intersect to lock the position in place right over the heart. -
Tying the bow:
Tie a simple shoelace bow directly over the intersection. Adjust the loops so they are even and trim the tails if they look too long.
Gift Tag Addition
Thread a small kraft paper tag onto the twine before tying the final bow. Write a date or initials on it for a personalized anniversary keepsake.
Place your finished stone on a sunny windowsill or gift it to someone special to weigh down their papers with love


Kind Quote Stones for Sharing
These beautifully understated stones bring a touch of personalized charm to any garden path or planter. Featuring warm terracotta tones, crisp off-white bases, and delicate star motifs, this project focuses on clean lettering and natural color palettes.
Step-by-Step Tutorial
Materials
- Smooth river stones (various sizes, preferably round/oval)
- White matte acrylic paint or gesso
- Terracotta or warm brown acrylic paint
- Metallic gold acrylic paint or paint pen
- Fine-point paint marker (dark brown/espresso)
- Small flat paintbrush
- Fine liner paintbrush
- Pencil for drafting
- Spray sealant (matte finish)
Step 1: Preparation & Base Coats
-
Select your canvas:
Begin by cleaning your stones thoroughly with soapy water and a scrub brush to remove any dirt or moss. Let them dry completely, ideally in the sun, to ensure no moisture is trapped inside. -
Prime the white stones:
For the lighter stones, apply a coat of white matte acrylic paint. You may need two thin coats rather than one thick one to get that smooth, opaque finish that looks like natural marble. -
Create the terracotta stone:
Choose a rounded stone for the accent piece. Paint the entire surface with a warm terracotta or rust-colored acrylic paint. Allow this to dry fully before handling. -
Observe natural textures:
I like to leave one or two larger grey stones unpainted to serve as a natural base for the arrangement, just like the grey stone supporting the white ones in the original design.
Uneven Surfaces?
If the stone is too pitted for a marker, apply a layer of clear matte medium first. This fills the tiny holes, creating a smoother surface for writing without changing the stone’s color.
Step 2: Adding the Lettering
-
Draft the text:
Using a pencil very lightly, sketch out your chosen phrases on the dried white stones. For this look, aim for a fluid, casual script style. -
First phrase:
On the top white stone, carefully trace over your pencil lines with a dark brown fine-point paint marker to write ‘off white Stand’ (or your preferred quote). Keep the downstrokes slightly thicker if possible. -
Second phrase:
On the lower white stone, write ‘Stracota tones’ using the same dark brown marker. Ensure the spacing is centered and balanced on the stone’s curve. -
Clean up lines:
If your marker skips over the texture of the stone, touch up the lettering with a very fine liner brush and a tiny bit of thinned brown acrylic paint to sharpen the edges.
Step 3: Decorative Accents
-
Drafting the stars:
On the terracotta stone, lightly mark positions for three small stars. Draw a simple cross first, then add smaller diagonal lines between the main arms. -
Painting the white stars:
Using your fine liner brush and white paint, carefully paint the stars on the terracotta stone. Make the center point slightly larger and taper the lines outward to a sharp point. -
Adding the gold burst:
On a separate small white stone (or the back of one of the lettered ones), paint a singular, larger starburst using metallic gold paint. This adds a subtle luxurious element. -
Detailing the gold star:
Once the gold paint is dry, you can use a very sharp pencil or a needle to gently scratch fine lines radiating from the center if you want extra texture. -
Refining the white stars:
Go back to your terracotta stone. If the white paint looks translucent against the dark background, apply a second layer to the stars to make them pop.
Crisp Lettering
Rest your hand on a small bean bag or rolled-up towel while writing. This isolates your wrist movement, giving you steadier control for those delicate cursive loops.
Step 4: Finishing Touches
-
Erase guidelines:
Once the lettering and stars are 100% dry, gently erase any visible pencil marks. Be careful not to rub too hard over the paint. -
Seal the artwork:
Take the stones to a well-ventilated area and apply a light coat of matte spray sealant. This is crucial if they are living outdoors. -
Avoid gloss:
Stick to a matte finish sealant to maintain that organic, chalky look seen in the photo; a glossy finish would make them look too synthetic. -
Garden placement:
Arrange your finished stones in a small cluster within your gravel or mulch bed, tilting them slightly upward so the text is easily readable.
Now you have a serene set of custom stones ready to add a thoughtful touch to your outdoor sanctuary
Four-Season Tree Series Stones
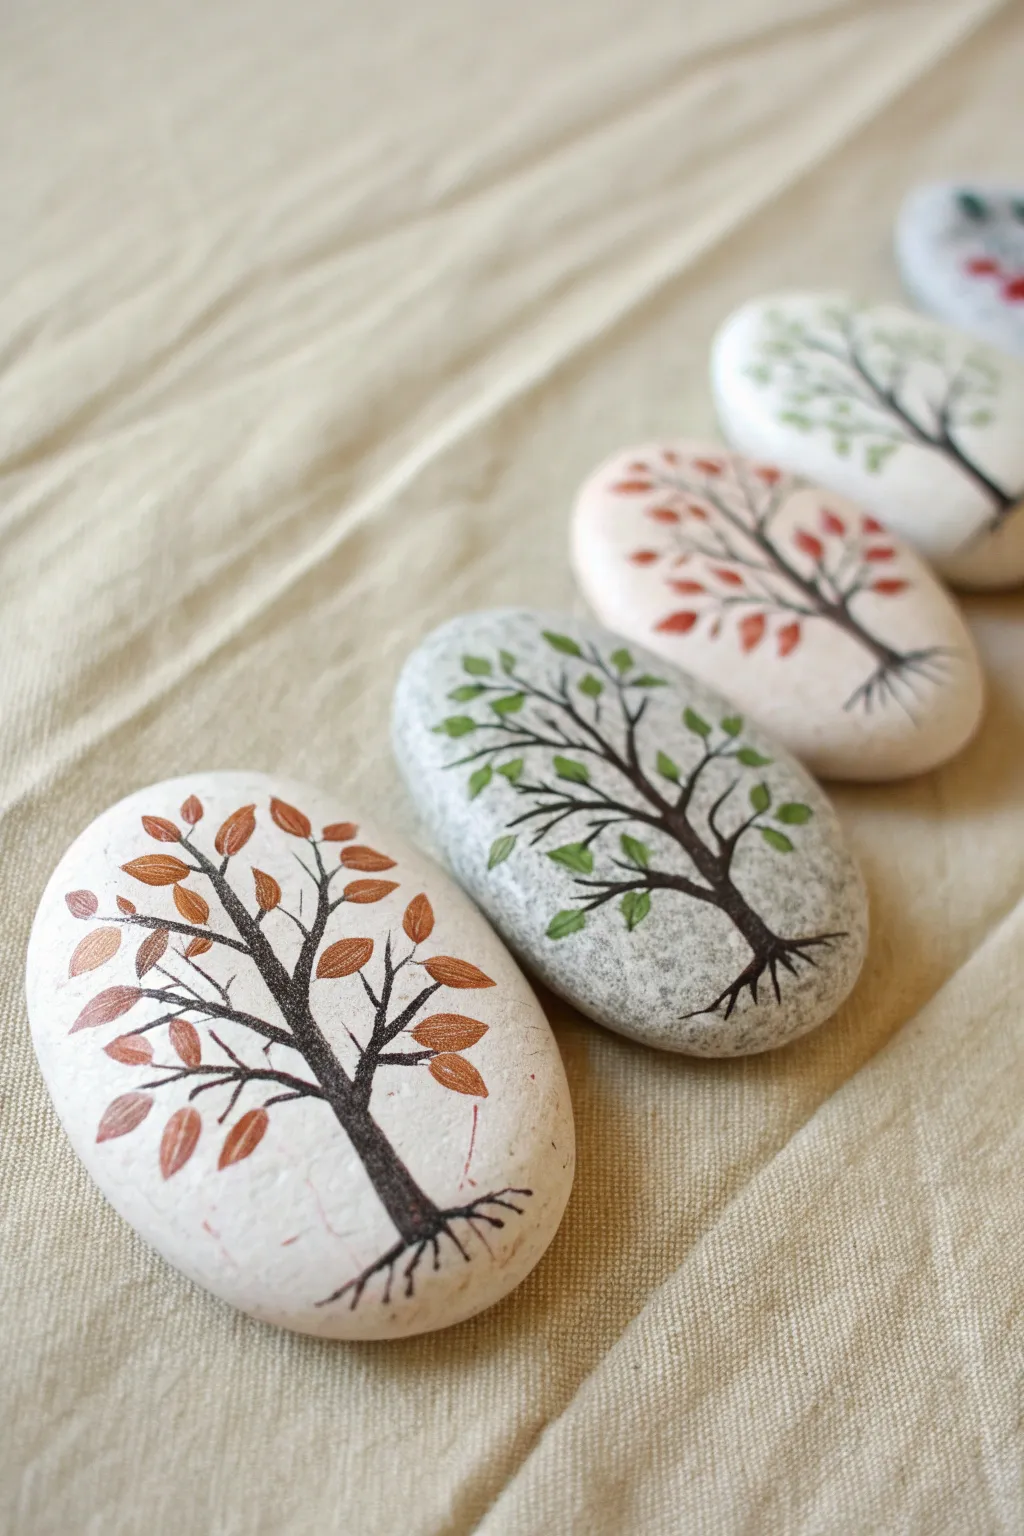
Capture the changing beauty of nature with this elegant series of painted stones, each depicting a tree in a different seasonal palette. The organic shapes of the river rocks combined with delicate linework create a minimalist yet striking display piece.
How-To Guide
Materials
- Smooth, flat river stones (preferably light-colored or grey)
- Black acrylic paint or fine-point POSCA paint pen (extra fine 0.7mm recommended)
- Acrylic paints in seasonal colors: copper/rust orange, leaf green, warm red, and white
- Small round paintbrushes (sizes 0 and 000)
- Pencil and eraser
- Matte or satin varnish sealer
- Water cup and paper towels
Step 1: Preparation & Planning
-
Stone Selection:
Choose 4-5 stones that are relatively flat and smooth. A mix of white and grey stones adds nice variety to the background canvas, just like in the photo. -
Surface Cleaning:
Wash your stones thoroughly with soap and water to remove any dirt or oils. Let them dry completely before starting. -
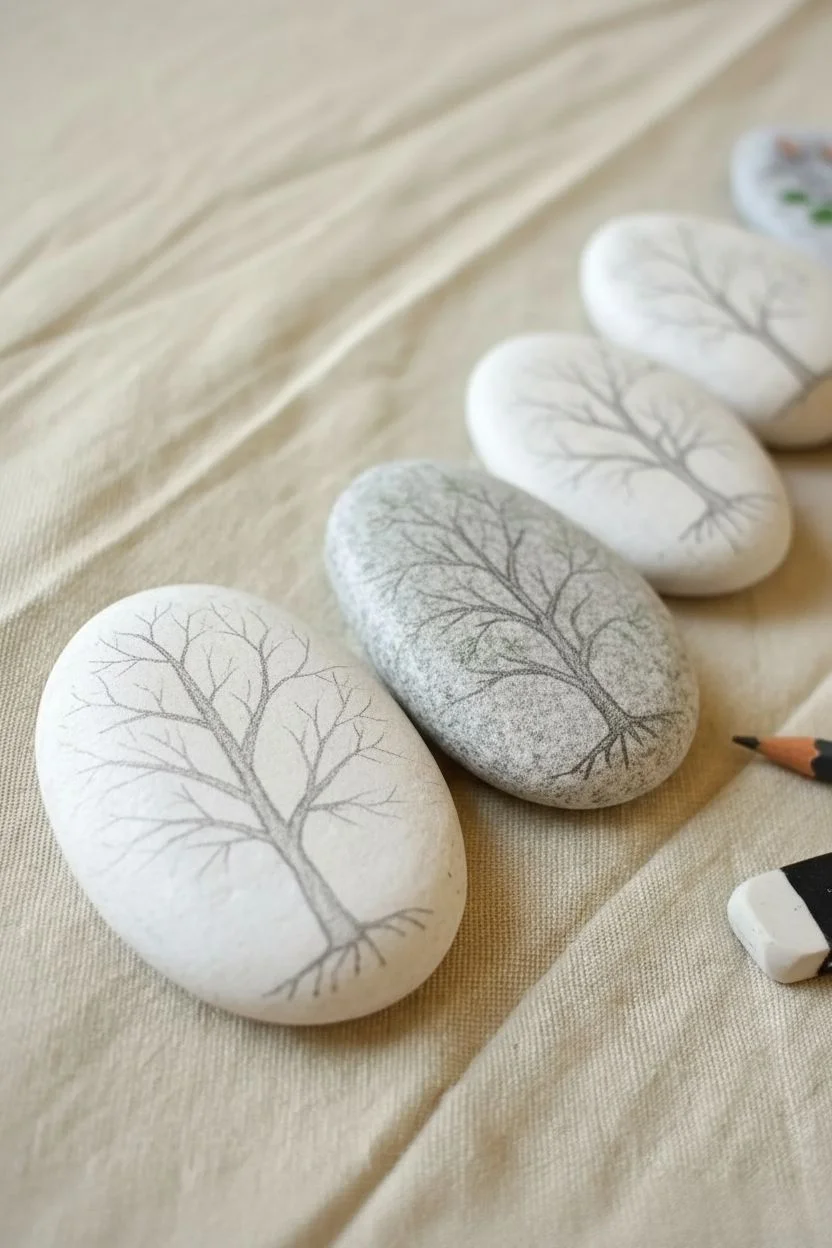
Sketching the Skeleton:
Lightly sketch the main trunk and primary branches with a pencil. Aim for a Y-shape structure that branches out naturally, keeping the trunk grounded near the bottom edge.
Step 2: Painting the Tree Structure
-
Trunk Base:
Using black acrylic paint and a size 0 brush, or a black paint pen, draw the main trunk. Thicken the base slightly where it meets the ‘ground’ to give it weight. -
Root Details:
Add small, spindly roots extending from the base of the trunk. These anchor your tree visually so it doesn’t look like it’s floating. -
Branching Out:
Extend the main branches upwards. As you move away from the trunk, make your lines thinner and more delicate. A very light hand is key here. -
Fine Twigs:
Switch to your smallest brush or extra-fine pen tip to add tiny twig offshoots. These will hold your leaves later.
Pro Tip: Steady Hands
Rest the side of your hand on the table or even on the stone itself to stabilize your brush strokes. This is crucial for getting crisp, thin branch lines.
Step 3: Adding Seasonal Foliage
-
Autumn Stone (Foreground):
For the first stone, mix a copper or rust-orange color. Paint small, almond-shaped leaves scattered along the branches. Don’t overfill; leave space for the black branches to show through. -
Varied Leaf Angles:
Ensure the leaves point in different directions to look natural. Some should be attached directly to twigs, while others can float slightly near tips. -
Summer Stone (Middle):
On a grey stone, use a vibrant leaf green. Paint similar almond shapes, clustering them slightly more densely to represent a full summer canopy. -
Leaf Texture Shortcut:
I particularly like using a single brush stroke for leaves—press down the belly of the round brush and lift quickly to create a tapered point naturally. -
Late Fall Stone:
For the third stone, use a warm red or burnt sienna. Make the leaves slightly sparser than the summer tree to suggest leaves beginning to fall. -
Winter/Spring Variation:
For the final stone in the background, you can use a pale mint green or white to suggest early spring buds or snow-dusted branches.
Level Up: Metallic Seasons
Swap standard acrylics for metallic gold, bronze, or silver paints for the leaves. This adds a stunning shimmer when the light hits the curved stone surface.
Step 4: Finishing Touches
-
Cleanup:
Once the paint is fully dry, gently erase any visible pencil marks that weren’t covered by paint. -
Sealing:
Apply a thin coat of matte or satin varnish. This protects the paint from chipping and gives the stones a professional, unified finish.
Arrange your finished stones in a line or cluster to bring a touch of the outdoors into your home
Cat Silhouette Night Stones
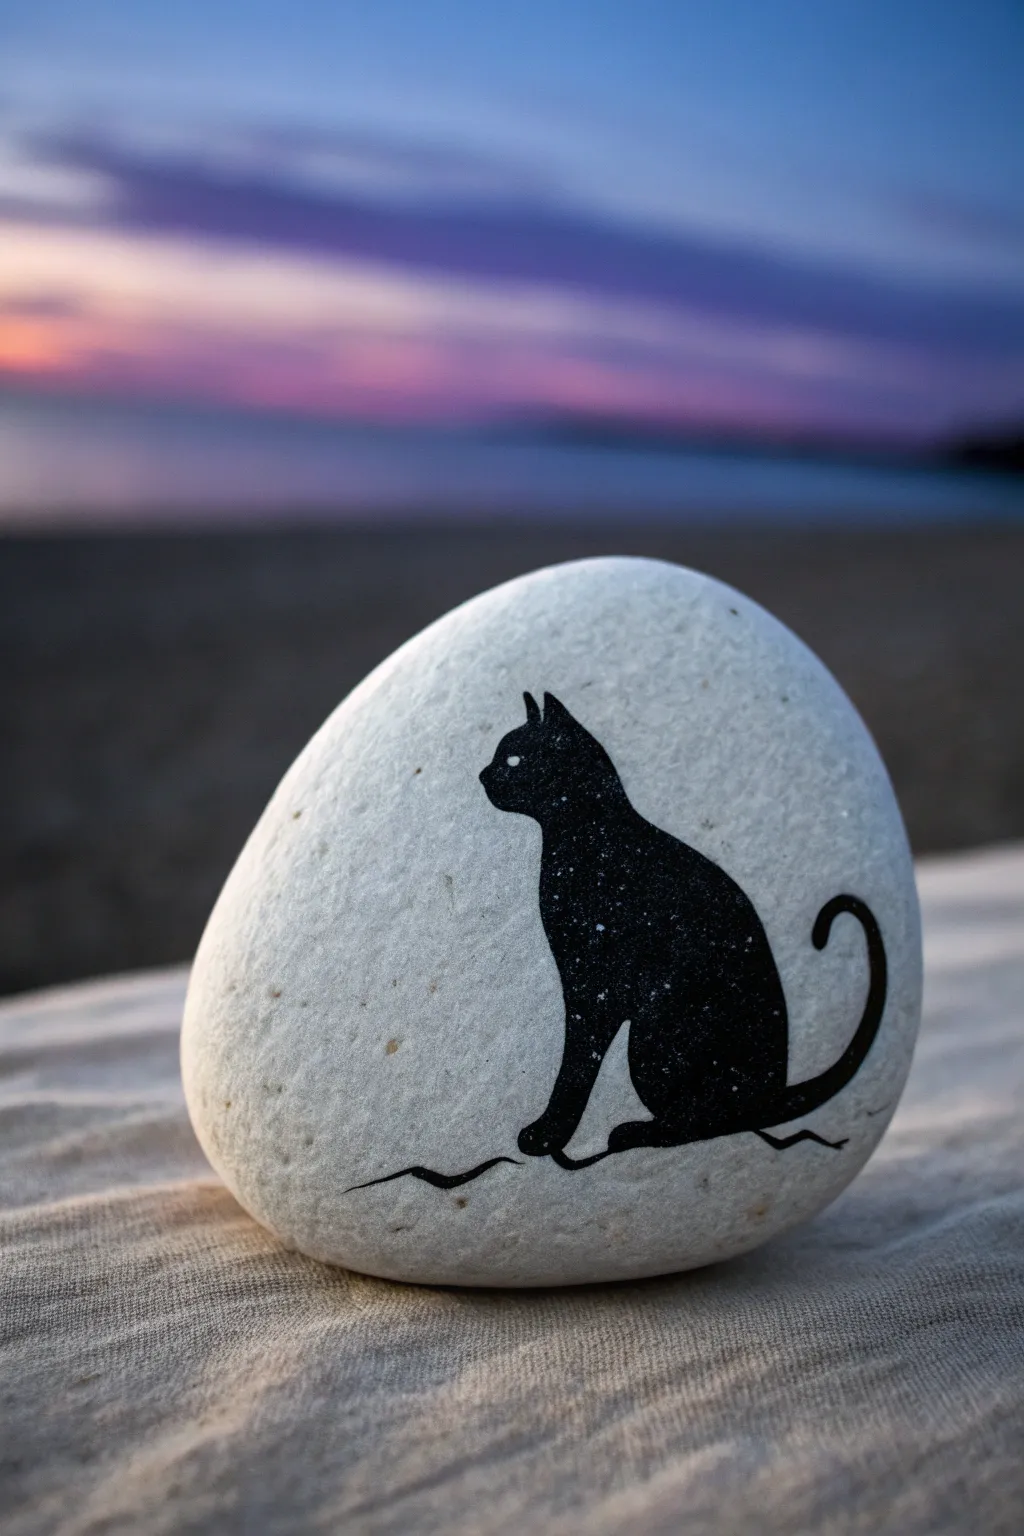
This elegant project captures the quiet grace of a cat gazing into the distance, rendered boldly in black ink against a natural white canvas. It is a deceptively simple design that turns an ordinary smooth stone into a striking piece of miniature art perfect for paperweights or garden accents.
Step-by-Step Tutorial
Materials
- Smooth, rounded white or light-grey river stone (roughly palm-sized)
- Fine-grit sandpaper (optional)
- Pencil (HB or lighter)
- Black acrylic paint or a black paint marker (fine and medium tips)
- Fine detail paintbrush (if using bottle paint)
- Clear matte or satin varnish spray
Step 1: Preparation and Sketching
-
Surface Prep:
Begin by washing your stone thoroughly with soap and water to remove any dirt or oils. If the surface feels rough, I like to gently rub it with fine-grit sandpaper to create a smoother canvas for the ink. -
Base Alignment:
Orient the stone so it sits flat and stable on your work surface. Identify the widest, smoothest face where your cat will be painted. -
The Ground Line:
Using your pencil lightly, draw a wavy, uneven line near the bottom third of the stone. This serves as the ground or perch for the cat and shouldn’t be perfectly straight. -
Drafting the Body:
Sketch the main shape of the cat’s body sitting on the ground line. Think of it as a teardrop shape that is wider at the bottom (the haunches) and tapers up towards the neck. -
Adding the Head:
Draw a smaller oval on top of the tapered neck area for the head. Add two small triangles for the ears, keeping them alert and pointed upwards. -
Refining the Profile:
Connect the head and body smoothly. Give the face a slight profile indentation for the nose area so it isn’t just a round ball. -
Sketching the Tail:
Draw a curving line starting from the lower back of the cat. Loop it upwards into a gentle ‘C’ or hook shape, keeping the thickness consistent.
Clean Edges
If your paint bleeds into the stone’s texture, wait for it to dry, then use a white paint marker or a tiny brush with white acrylic to ‘erase’ the mistake and sharpen the edge.
Step 2: Painting the Silhouette
-
Outlining in Black:
Take your fine-tip black paint marker or a detail brush loaded with black acrylic. Carefully trace over your pencil outlines, starting with the ears and head to establish the delicate shapes first. -
Defining the Eyes:
Before filling in the body, carefully mark a small circle or almond shape where the eye will be. You want to leave this area unpainted (negative space) so the white stone shows through. -
Filling the Shape:
Switch to a medium-tip marker or a slightly larger brush. Fill in the entire body of the cat with solid black, being extremely careful to paint *around* the eye area you marked. -
Inking the Tail:
Paint the tail with a steady hand. Since tails are thin, use the fine tip again to ensure the line remains crisp and doesn’t get blobby. -
Painting the Ground:
Trace the wavy ground line you sketched earlier. You can make this line slightly thinner than the cat’s outline to give it a delicate, illustrative feel. -
Touch-ups:
Inspect the silhouette for any uneven edges or spots where the stone shows through the black paint. Apply a second coat if necessary to get a truly opaque, deep black. -
Eye Detail:
If you accidentally got paint in the eye area, wait for the black to dry completely, then add a tiny dot of white paint to reclaim the highlight.
Starry Night
After the black cat is dry, flick a toothbrush loaded with diluted white paint over the stone to create a tiny galaxy of stars around the silhouette.
Step 3: Finishing Touches
-
Cleaning Up:
Once the paint is fully dry, gently erase any visible pencil marks that might be peeking out from behind the black paint. -
Sealing the Artwork:
Take the stone to a well-ventilated area. Apply a light, even coat of clear matte or satin varnish to protect the paint from chipping without making the stone look like plastic. -
Final Cure:
Allow the varnish to cure for at least 24 hours before placing the stone outside or handling it excessively.
Now you have a serene little companion that requires no feeding but always looks perfectly poised
Tiny Sunset Landscape Stones
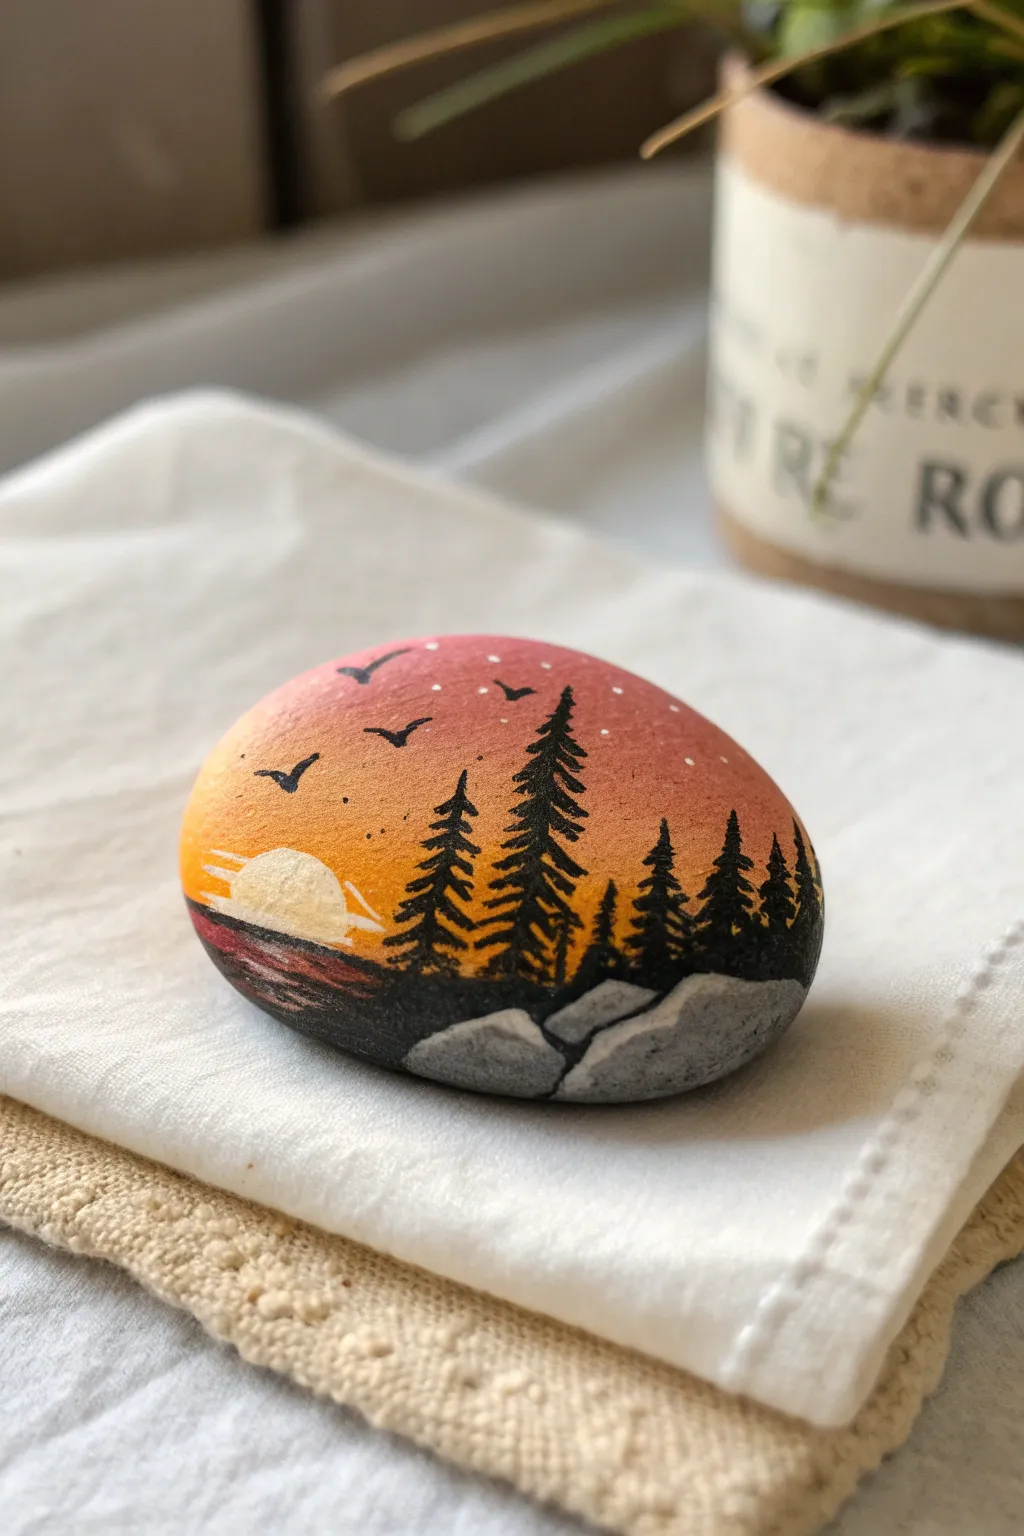

Capture the magic of twilight in the palm of your hand with this stunning sunset stone. Using a smooth gradient and bold silhouettes, you’ll create a peaceful forest scene that feels both vast and intimate.
Step-by-Step Guide
Materials
- Smooth, round river stone (light colored preferred)
- Acrylic paints: Titanium White, Cadmium Yellow, Orange, Red or Magenta, Black, Dark Gray, Light Gray
- Makeup sponge or small crafting sponge
- Fine liner brush (size 0 or 00)
- Flat brush (small)
- Palette or wax paper
- Cup of water
- Paper towels
- Sealer (spray varnish or Mod Podge)
Step 1: Creating the Sunset Gradient
-
Prepare your canvas:
Begin by washing your stone with soapy water and drying it completely. If your rock is dark, paint a base coat of white acrylic over the top surface and let it dry fully. This ensures your sunset colors will pop brilliantly rather than looking muddy. -
Load the sponge:
Squeeze out small amounts of yellow, orange, and red (or magenta) paint onto your palette. Take your slightly damp makeup sponge and dab it into the yellow paint, then dab off the excess on a paper towel. -
Apply the horizon line:
Sponge the yellow paint across the lower middle section of the rock. This will form the glowing horizon light. Use a tapping motion to create a soft texture rather than streaks. -
Blend the mid-tones:
Pick up some orange paint on the same sponge (or a clean edge) and dab it just above the yellow, slightly overlapping the two colors. Tapping repeatedly over the seam will blend them into a seamless transition. -
Complete the sky:
Dip into the red or magenta paint and sponge the very top area of the rock, blending it downwards into the orange. You want a smooth gradient from red at the top to bright yellow at the horizon. -
Let it cure:
Allow the gradient layer to dry completely. Acrylics dry fast, but because sponging can leave thicker deposits, give it about 10-15 minutes.
Step 2: Painting the Foreground
-
Sketch the treeline base:
Using a small flat brush and black paint, create an uneven, slightly bumpy black horizon line across the bottom third of the stone, covering where the yellow sky ends. This establishes the ground. -
Paint the tree trunks:
Switch to your fine liner brush. Paint thin, vertical lines rising from the black ground. Vary the heights—make one or two taller trees as focal points in the center, and shorter, clustered trees toward the sides. -
Add pine branches:
Starting from the top of a trunk, use the very tip of your fine brush to flick tiny horizontal dashes outward. As you move down the trunk, make the dashes slightly wider and angle them downward to mimic the shape of a pine tree. -
Fill in the forest:
Repeat this for all your vertical lines. Don’t worry about perfection; real trees are irregular. Overlap branches between trees to create a dense forest feel. -
Add the snowy rocks:
At the bottom right corner, paint rounded shapes using dark gray paint to represent large boulders in the foreground. Once dry, highlight the top ridges of these rocks with light gray or off-white to give them dimension.
Gradient Success
If your sponge pulls up paint instead of laying it down, you’re pressing too hard or the paint is too tacky. Let it dry fully before trying to add another layer.
Step 3: Adding Details and Highlights
-
Paint the setting sun:
Dip a small brush into pure white paint (maybe mixed with a tiny drop of yellow). Paint a semi-circle resting on the horizon line on the left side, partially obscured by the trees or just behind them. -
Create sun rays and reflection:
Add a few very thin, horizontal white streaks across the sun to simulate clouds breaking the light. Add a few reddish-brown horizontal strokes in the dark foreground area below the sun to suggest reflected light on water or wet ground. -
Paint the birds:
Using your finest brush and thinned black paint (add a drop of water to improve flow), paint tiny ‘V’ or ‘M’ shapes in the upper sky for silhouetted birds. Vary their sizes to show depth. -
Add starry specks:
If you want a magical touch, dip a toothpick or the very tip of a brush into white paint and dot a few tiny stars in the darker red part of the sky. -
Seal your work:
Once the painting is totally dry (give it a few hours to play it safe), apply a coat of spray sealer or brush-on varnish to protect the artwork and make the colors shine.
Starry Night Twist
Swap the warm sunset colors for dark blues and purples to turn this into a midnight forest scene, using a silver gel pen for a bright moon.
Now you have a serene piece of nature art that perfectly captures the quiet beauty of dusk.
Cactus and Desert Bloom Stones
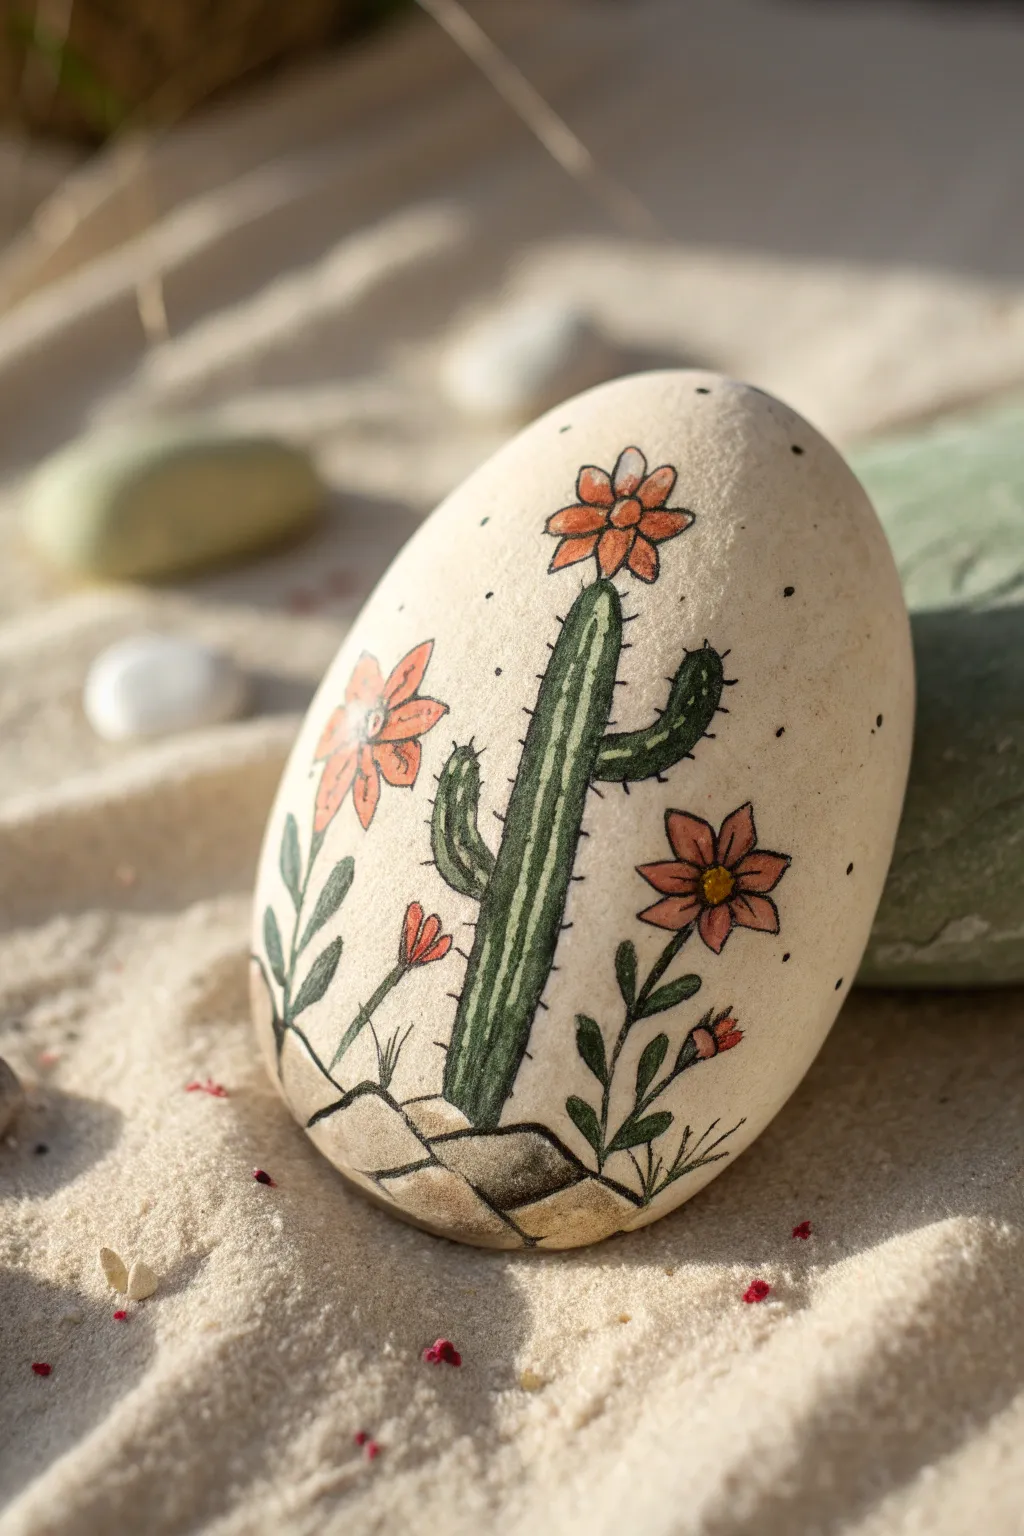

Bring a touch of the arid wilderness to your garden or desk with this charming painted stone featuring a flowering cactus and delicate desert blooms. The warm cream background and detailed line work give it a lovely, illustrative botanical style.
How-To Guide
Materials
- Smooth, egg-shaped river rock (light beige or cream color)
- Acrylic paints (olive green, bright orange, yellow, black, brown, cream/white)
- Fine-point black permanent marker or liner pen (01 or 03 size)
- Small round paintbrushes (sizes 0 and 2)
- Very fine liner brush
- Pencil and eraser
- Matte spray sealant
Step 1: Preparation & Sketching
-
Stone Selection:
Begin by finding a smooth, upright-standing stone. A light-colored rock works best so you don’t have to paint a full base coat, but if your rock is dark, paint the entire surface with a cream or off-white acrylic paint and let it dry completely. -
Draft the Design:
Using a pencil, lightly sketch your composition. Draw a small cluster of geometric rocks at the very bottom center. -
Add Vegetation:
Sketch a central cactus rising from the rocks with two arms—one small low arm on the left and a larger bent arm on the right. Add stems for flowers flanking the cactus on both sides. -
Flower Placement:
Draw simple five-petal flower shapes: one sitting directly on top of the main cactus stem, and others blooming from the side stems you just drew.
Step 2: Painting the Base Colors
-
Paint the Cactus:
Load your small round brush with olive green paint. Fill in the cactus shape, being careful to stay within your pencil lines. You may need two coats for opaque coverage. -
Paint Elements Green:
Using the same olive green, carefully paint the leaves and stems of the side flowers. For these thinner lines, switch to your fine liner brush for better control. -
Add the Blooms:
Mix a bright orange with a tiny touch of white to soften it slightly. Paint all the flower petals. Use a cheerful yellow for the tiny centers of the open flowers. -
Grounding Rocks:
Paint the geometric rocks at the base using a light brown or tan color. If your stone is already tan, you can use a darker brown wash to define them instead. -
Dry Time:
Allow all the paint layers to dry completely. This is crucial because drawing ink over wet paint will ruin your pen.
Ink Bleeding Prevention
Ensure paint is 100% dry before outlining. If ink skips or drags, the paint is still damp or too textured. Lightly sanding the base coat before painting helps.
Step 3: Detailing & Linework
-
Outline the Scene:
Once the paint is bone dry, take your fine-point black decorative pen. Carefully outline the cactus, the flower petals, leaves, and the rocks at the base. -
Cactus Texture:
To give the cactus dimension, draw vertical lines running up the main stem and the arms. I find that slightly breaking these lines makes them look more organic. -
Spines and Prickles:
Along the edges of the cactus and the internal vertical lines, add tiny horizontal dashes or small ‘v’ shapes to represent the prickly spines. -
Rock Details:
Add definition to the base rocks by outlining them and adding a few internal cracks or texture lines to make them look weathered. -
Leaf Veins:
Add a simple center line to the larger green leaves on the left side of the composition.
Fixing Wobbly Lines
If your outlining hand shakes, rest your pinky finger on the dry part of the stone for stability. Thicken lines slightly to hide any minor tremors.
Step 4: Final Touches
-
Stippling Texture:
Using your black pen, gently dot the background area around the cactus. Concentrate more dots near the plant and fewer as you move outward to create a subtle shading effect. -
Highlights:
Dip a very fine brush or a toothpick into white paint. Add a tiny dot of white to the cactus green (between the lines) or on the flower petals to simulate shine. -
Clean Up:
Checking your work, erase any visible pencil marks that weren’t covered by paint or ink. -
Seal the Art:
Finish by applying a coat of matte spray sealant. This protects the acrylic and ink from chipping or fading over time.
Now you have a low-maintenance botanical beauty that will never need watering
Underwater Window Stones
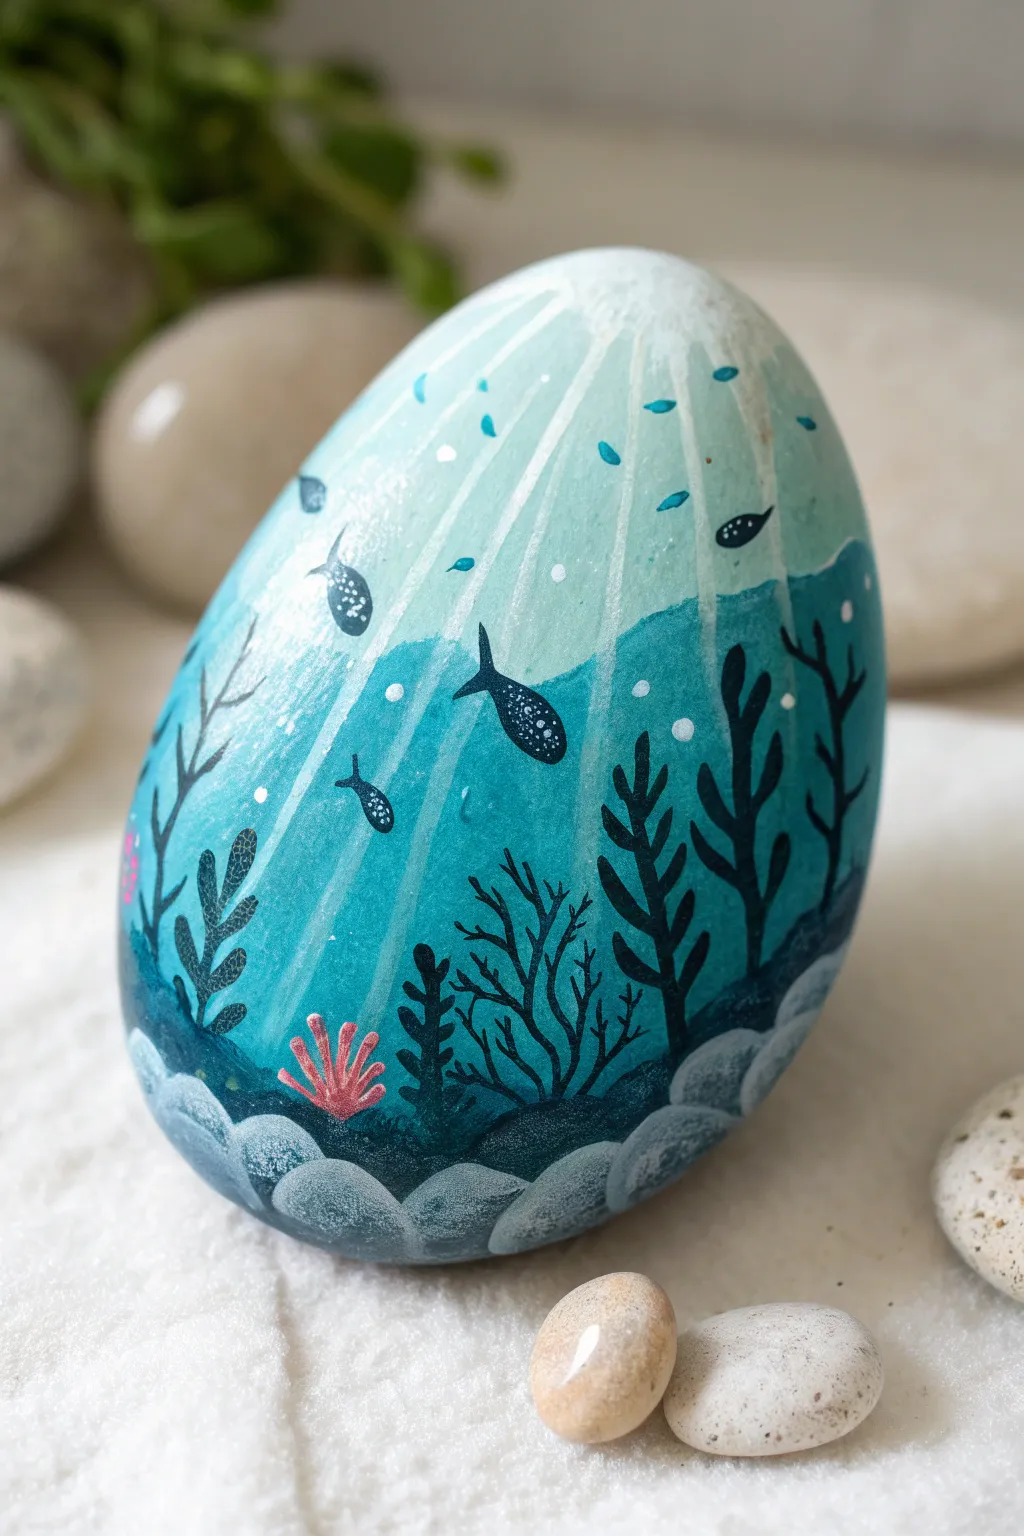
Transform a smooth, egg-shaped rock into a mesmerizing view of the ocean depths. This piece captures the serene beauty of light filtering through the water, illuminating silhouettes of sea life and coral reefs.
Step-by-Step Tutorial
Materials
- Smooth, egg-shaped river stone (cleaned and dried)
- White acrylic paint or gesso (for priming)
- Acrylic paints: Light cyan, turquoise, deep teal/navy blue, black, white, coral pink
- Paintbrushes: Flat shader brush (medium), fine liner brush (00 or 000), small round brush
- Blending sponge or soft dry brush
- Palette
- Water cup and paper towels
- Matte or glossy varnish (spray or brush-on)
Step 1: Preparing the Canvas
-
Prime the Surface:
Since rocks are naturally porous and dark, start by coating your clean, dry stone with a layer of white acrylic paint or gesso. This creates a bright base that will make your blue ocean tones truly pop. -
Create the Gradient Base:
Mix a very pale cyan (almost white) and apply it to the top tapered point of the egg. This will be your light source. -
Deepen the Waters:
While the top paint is still wet, introduce a true turquoise color towards the middle of the stone. Use horizontal strokes to blend it seamlessly into the pale top section. -
Darken the Depths:
For the bottom third of the stone, blend in a deep teal or navy blue. The goal is a smooth ombre effect transition from light at the top to dark at the bottom. Let this base layer dry completely.
Smooth Gradients
Work quickly while the acrylics are wet to get that seamless fade. If the paint dries too fast, a drop of flow improver or water on your brush helps the colors glide together.
Step 2: Painting the Sunbeams
-
Mix a Glaze:
Dilute white acrylic paint with a generous amount of water or glazing medium until it is semi-translucent. -
Draft the Rays:
Using a flat brush, paint straight rays extending from the very top center of the stone (the light source) downwards. Fan them out slightly as they reach the bottom. -
Soften the Edges:
Before the rays dry, lightly dab the edges with jagged, uneven strokes or a clean damp brush to make them look like refracted light shimmering through water rather than solid stripes.
Make It Glow
Mix a tiny bit of metallic pearl ease paint into your white sunbeams or fish scales. The subtle shimmer will make the water look magical when the stone catches sunlight.
Step 3: Building the Seascape
-
Establish the Foreground:
Using your deepest teal or navy blue mixed with a touch of black, paint rolling, hill-like shapes along the bottom edge of the stone to represent the seabed. -
Add Texture to Rocks:
Mix a slightly lighter grey-blue color. Using a small round brush, paint curved, scalloped shapes along the bottom edge to create the look of rounded sea rocks or bubbly ocean floor textures. -
Plant the Kelp:
With a fine liner brush and black paint (or very dark navy), paint vertical, wandering lines rising from the seabed. -
Detail the Vegetation:
Add small, leaf-like offshoots to your vertical kelp lines. Keep the shapes organic and flowing upward, varying their heights and thickness for a natural look. -
Add a Pop of Color:
Switch to a corral pink or salmon color. Paint a small, branched coral shape in the foreground, tucking it between the darker kelp silhouettes to create depth.
Step 4: Adding Life and Details
-
Paint Fish Shadows:
Using dark navy or black, paint small, simple fish silhouettes swimming diagonally through the mid-section of the water. Vary their sizes to imply distance. -
Highlight the Fish:
Once the silhouettes are dry, use a tiny dot of white paint to add speckled details on the fish bodies, mimic glistening scales catching the light. -
Create Distant Shoals:
With a lighter teal color, paint tiny dashes or smaller fish shapes higher up in the lighter water area. These will look further away in the background. -
Add Bubbles:
Using pure white paint and a dotting tool or the back of a brush handle, place tiny dots randomly throughout the water. Cluster a few near the plants and fish. -
Final Highlights:
Add a few broken white lines or dashes floating in the water current to enhance the feeling of movement and light refraction. -
Protect Your Work:
For a ‘wet’ look that suits the theme perfectly, finish the stone with a coat of high-gloss varnish once the paint is fully cured.
Now you have a tranquil piece of the ocean to hold in the palm of your hand
Goofy Monster Face Stones
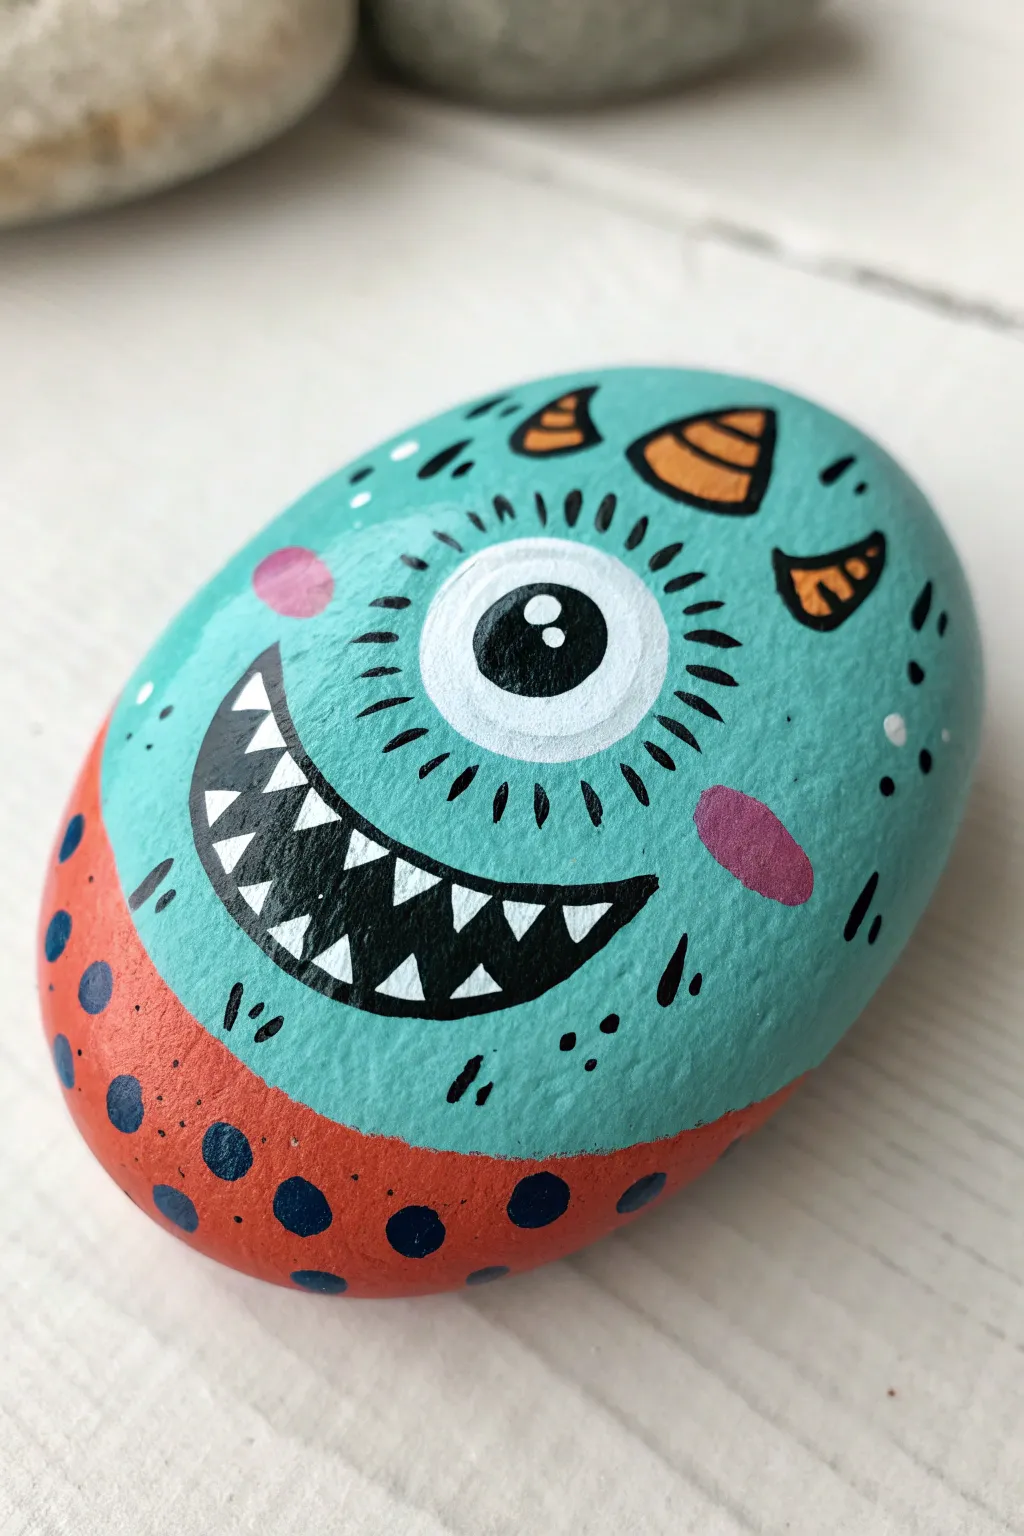
Turn a smooth oval pebble into a delightful little monster with a single, expressive eye and a cheeky grin. This vibrant teal and orange design features fun details like tiny horns and polka dots, making it a perfect beginner-friendly character to paint.
Step-by-Step
Materials
- Smooth, oval river rock (palm-sized)
- Acrylic paints: Teal/Aqua, Bright Orange, White, Black, Purple
- Posca paint pens or fine liner brushes (Black and White)
- Flat paintbrush (medium)
- Fine detail paintbrush
- Dotting tool or toothpick
- Spray sealer or varnish (matte or glossy)
Step 1: Base Layers
-
Clean the canvas:
Start by scrubbing your stone with soap and water to remove any dirt or oils. Let it dry completely before you begin painting. -
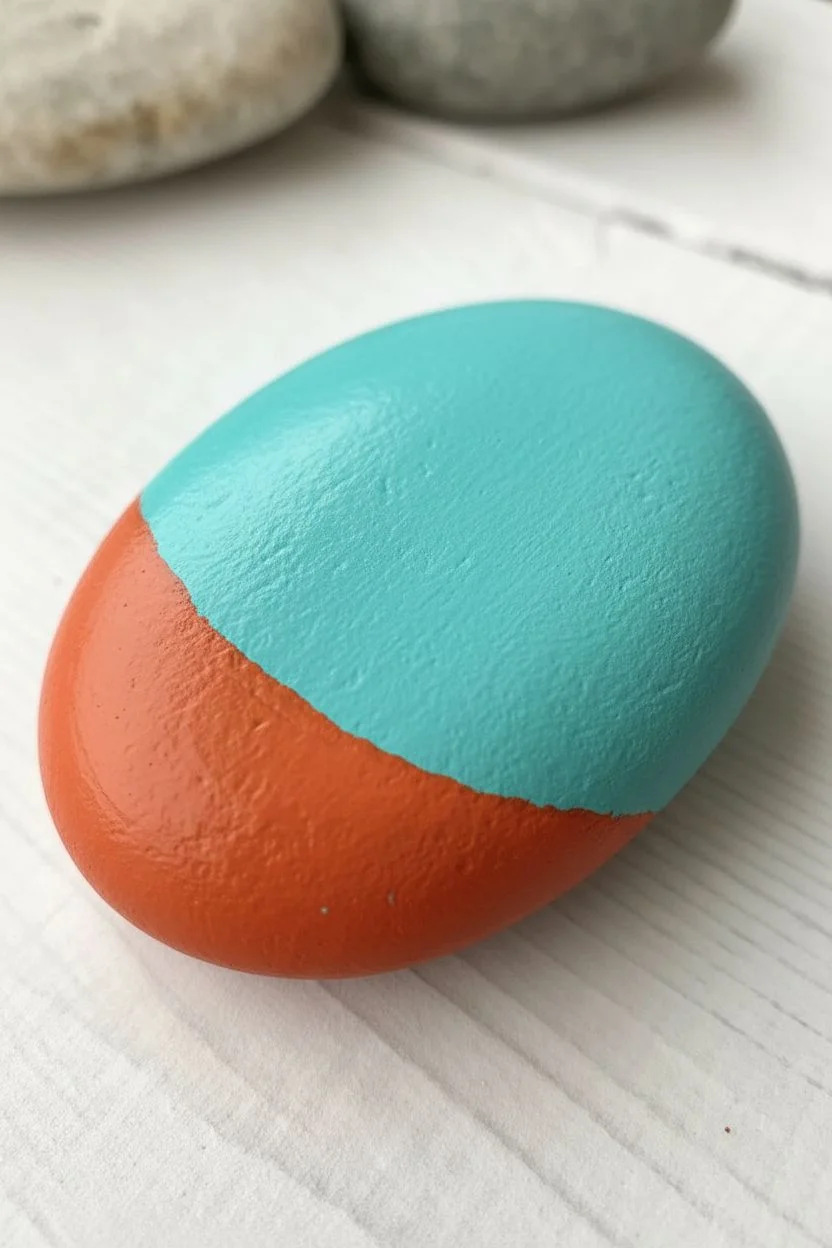
Main body color:
Using a flat brush, paint the upper two-thirds of the rock with a bright teal or aqua acrylic paint. You may need two coats for opaque coverage, letting the first coat dry fully before adding the second. -
Orange bottom:
Paint the bottom third of the rock with a vibrant orange paint, creating a curved line where it meets the teal to mimic the monster’s rounded bottom. -
Smooth transition:
Ensure the line between the teal and orange is relatively clean, but don’t worry about perfection as we will add details later.
Clean Lines Tip
Use a black Posca paint pen for the heavy black outlines and eyelashes. It gives much sharper control than a brush and stops the lines from getting wobbly.
Step 2: Facial Features
-
The cyclops eye:
Paint a large white circle right in the center of the teal section. This will be the monster’s single, prominent eye. -
The pupil:
Once the white circle is dry, paint a smaller black circle in the center. Add a tiny white dot in the upper right part of the pupil for a ‘catchlight’ reflection. -
Adding horns:
Paint three small, rounded triangles in orange near the top edge of the teal section for the horns. One central horn and two slightly smaller ones on the sides work well. -
Cheeky grin:
Using black paint and a fine brush, draw a large crescent moon shape below the eye for the mouth. Fill it in completely with black. -
Teeth:
carefully paint small white triangles inside the black mouth area. Pointed zig-zags work best to give him some monster teeth. -
Rosy cheeks:
Paint two small, soft ovals in purple or pink on either side of the mouth for blush marks.
Step 3: Details & Outlines
-
Outline the mouth:
I prefer to use a fine black paint pen here to crisp up the edges of the mouth if the paint was a bit uneven. -
Eye details:
Using a fine liner brush or black pen, draw small radiating lines around the white of the eye to create texture and emphasis. -
Horn stripes:
Add thin black outlines to the orange horns and draw small horizontal stripes across them for texture. -
Polka dots:
Dip a dotting tool or the back of a paintbrush into dark blue or black paint. Add polka dots all over the orange section at the bottom. -
Monster fuzz:
Draw tiny, short black dashes scattered around the teal face to suggest fur or texture. -
Final highlights:
Add a few tiny white dots or dashes on the teal skin for extra shine and character. -
Seal it up:
Once everything is completely dry—give it a few hours—finish with a coat of spray sealer to protect your monster from the elements.
Paint Not Covering?
If your teal or orange looks streaky, stop painting! Let it dry 100% before adding another thin layer. Wet-on-wet touchups usually lift the paint off.
Now you have a quirky little rock friend to hide in the garden or keep on your desk
Painted Rock Tic-Tac-Toe Set
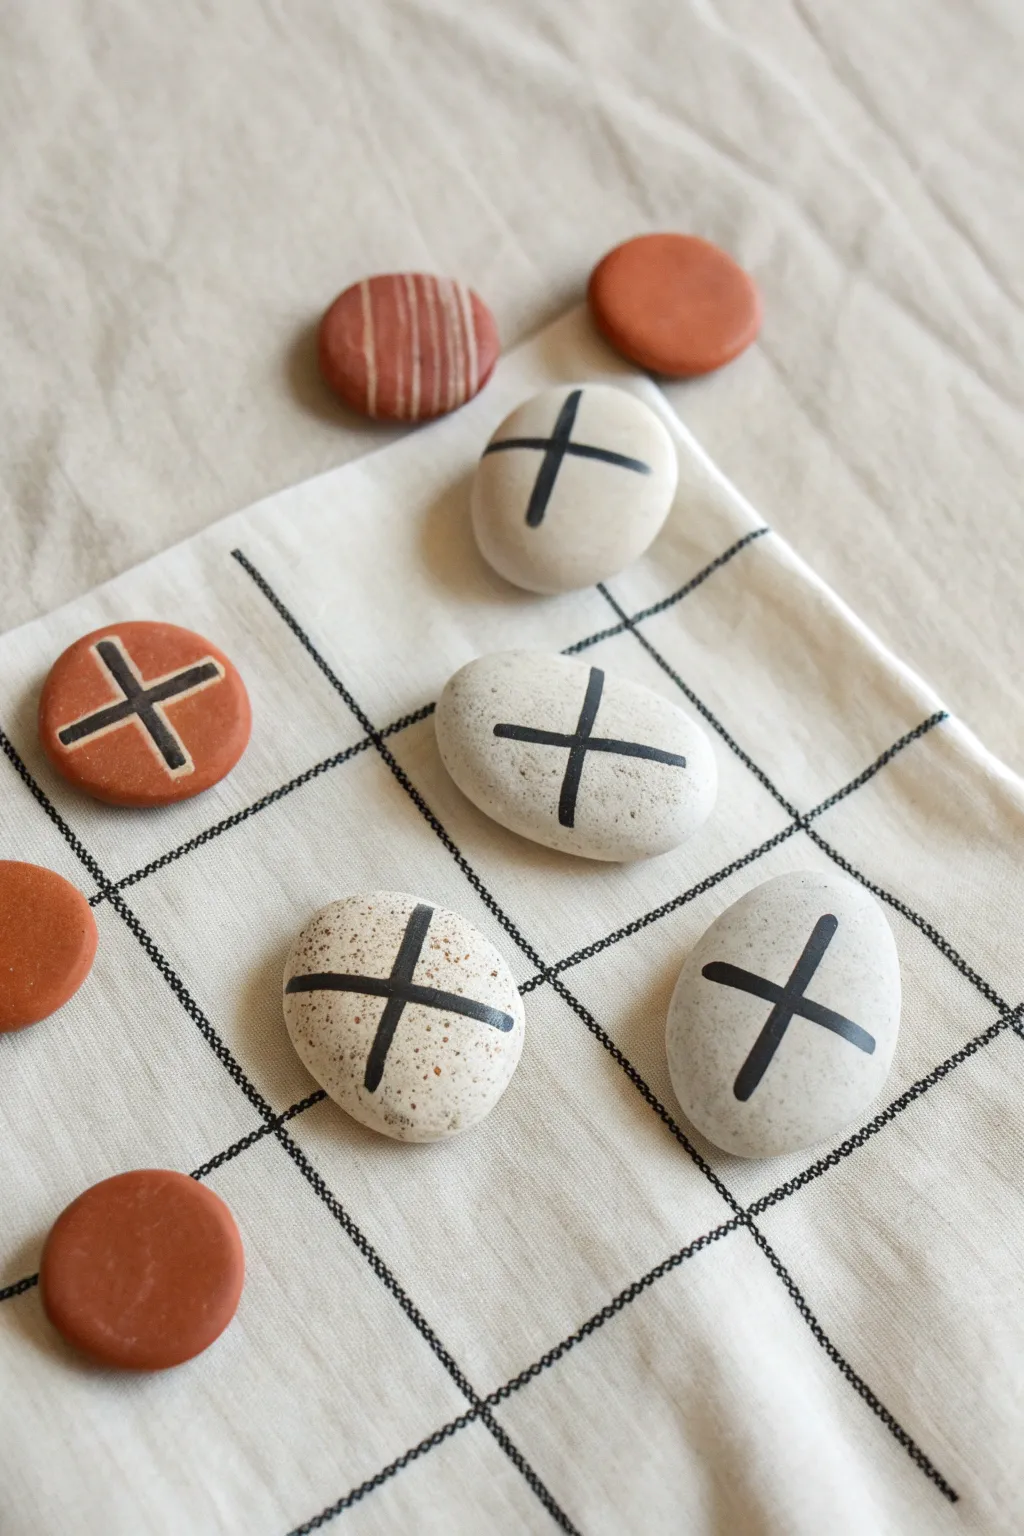
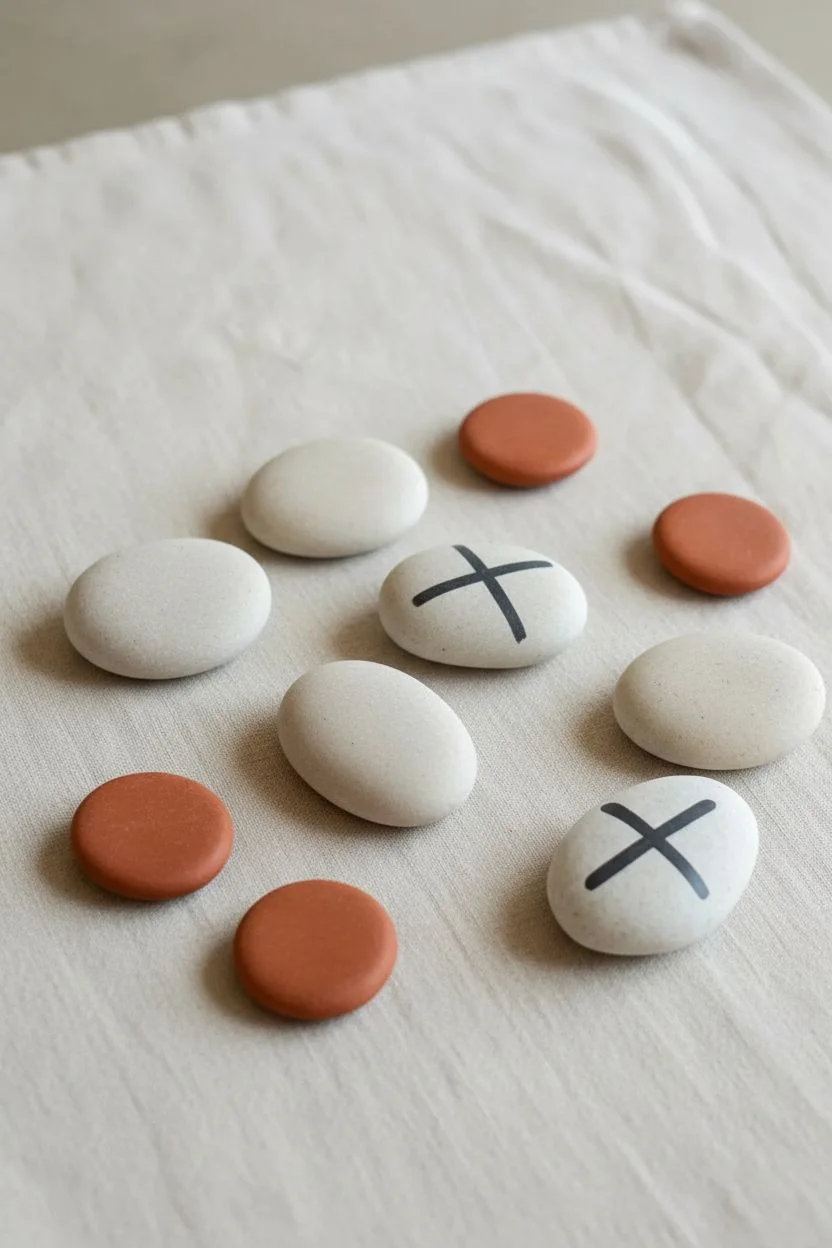
Transform a classic game into a chic coffee table centerpiece with smooth stones and clean lines. This project uses natural textures and a simple grid cloth to create a portable, earthy set perfect for lazy afternoons.
How-To Guide
Materials
- 5 smooth, oval stones (light grey or white)
- 5 smooth, round stones (terracotta or reddish-brown)
- Black acrylic paint or extra-fine black paint pen
- Small flat paintbrush (if using liquid paint)
- Matte sealant spray or varnish
- Small square of linen or cotton fabric (cream or off-white)
- Lead pencil
- Ruler
Step 1: Preparing the Stones
-
Selection and Cleaning:
Begin by selecting your stones. You want a distinct visual difference, so look for five light, oval-shaped stones for one team and five reddish-brown, rounder stones for the opposing team. Wash them thoroughly with soapy water and scrub away any dirt or moss. Let them dry completely in the sun. -
Surface Prep:
Inspect the stones for any rough patches. If a stone is too gritty, you can lightly sand it with fine-grit sandpaper to ensure your paint lines will be crisp.
Natural Stone Tip
Can’t find distinct colors? Paint half your rocks a solid base color (like matte white or sage green) before adding the tic-tac-toe symbols.
Step 2: Painting the Game Pieces
-
Drafting the X Marks:
Take your five light-colored oval stones. Using a pencil, lightly sketch a large ‘+’ or ‘X’ shape across the center of each one. Aim for the lines to intersect exactly in the middle of the stone’s face. -
Painting the First Line:
Using your black paint pen or a small flat brush loaded with black acrylic, trace the vertical line of your cross. Go slowly to keep the edges straight. If using a brush, I prefer to pull the brush towards me for better control. -
Completing the Cross:
Once the first line is tacky or dry, paint the horizontal line across it. Make sure the width of the lines is consistent—about 3-4mm thick looks best for this minimalist style. -
Drafting the O Marks:
For the opposing team (the reddish stones), you have a choice. You can either paint a large ‘O’ or, for a unique twist like the project photo, paint a similar cross design but perhaps inverted or simply rely on the stone’s natural color difference to distinguish the teams. If painting crosses, repeat the drafting process. -
Painting the Red Stones:
Apply black paint to your design on the reddish stones. The black contrasts beautifully against terracotta tones. Allow all stones to dry undisturbed for at least 30 minutes. -
Cleaning up Edges:
Inspect your lines. If any paint bled into the stone’s texture, you can carefully scratch it away with a toothpick while the paint is still semi-fresh, or touch it up with a tiny bit of paint that matches the stone’s natural color if you have a complex palette. -
Sealing the Deal:
To protect your artwork from chipping during gameplay, spray a thin coat of matte sealant over the top of each stone. Glossy sealant works too, but matte keeps that natural, organic look.
Travel Pouch Upgrade
Sew a simple drawstring into the edge of your game board fabric. When you’re done playing, cinch it up to turn the board into a storage bag.
Step 3: Creating the Game Board
-
Measuring the Fabric:
Cut your linen or cotton fabric into a neat square, approximately 12×12 inches. You can hem the edges or let them fray slightly for a rustic aesthetic. -
Planning the Grid:
Lay the fabric flat. Use your ruler and pencil to mark out a standard 3×3 grid. Start by finding the center point and measuring outwards to ensure the squares are large enough to comfortably hold your stones. -
Drawing the Board Lines:
Instead of a single line, draw a ‘stitched’ look. Use your black paint pen to create a line that mimics stitching—short dashes intersected by tiny perpendicular lines. Alternatively, paint a solid, thin black line. -
Adding Grid Texture:
If you want the textured look shown in the inspiration, create a double line of small dashes. This mimics a woven thread and adds a high-end textile feel to the simple cloth. -
Final Assembly:
Let the fabric paint dry completely (check the manufacturer’s instructions, usually 1-2 hours). Once dry, iron the back of the fabric to set the paint if required. -
Setup:
Place your fabric board on a flat surface, arrange your beautiful new stone pieces, and you are ready to play.
Enjoy challenging your friends to a match on this stylish, handmade set that doubles as decor.
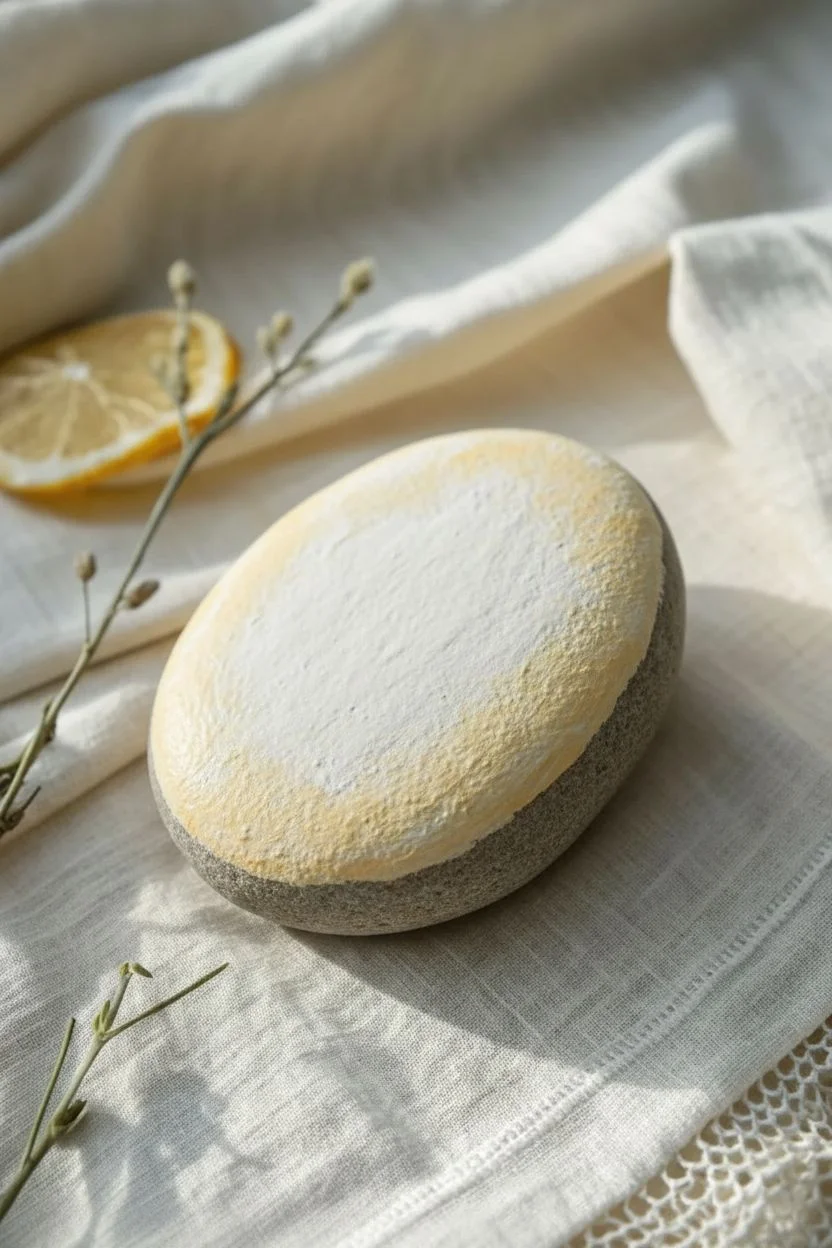
Fruit Slice Stones That Look Juicy
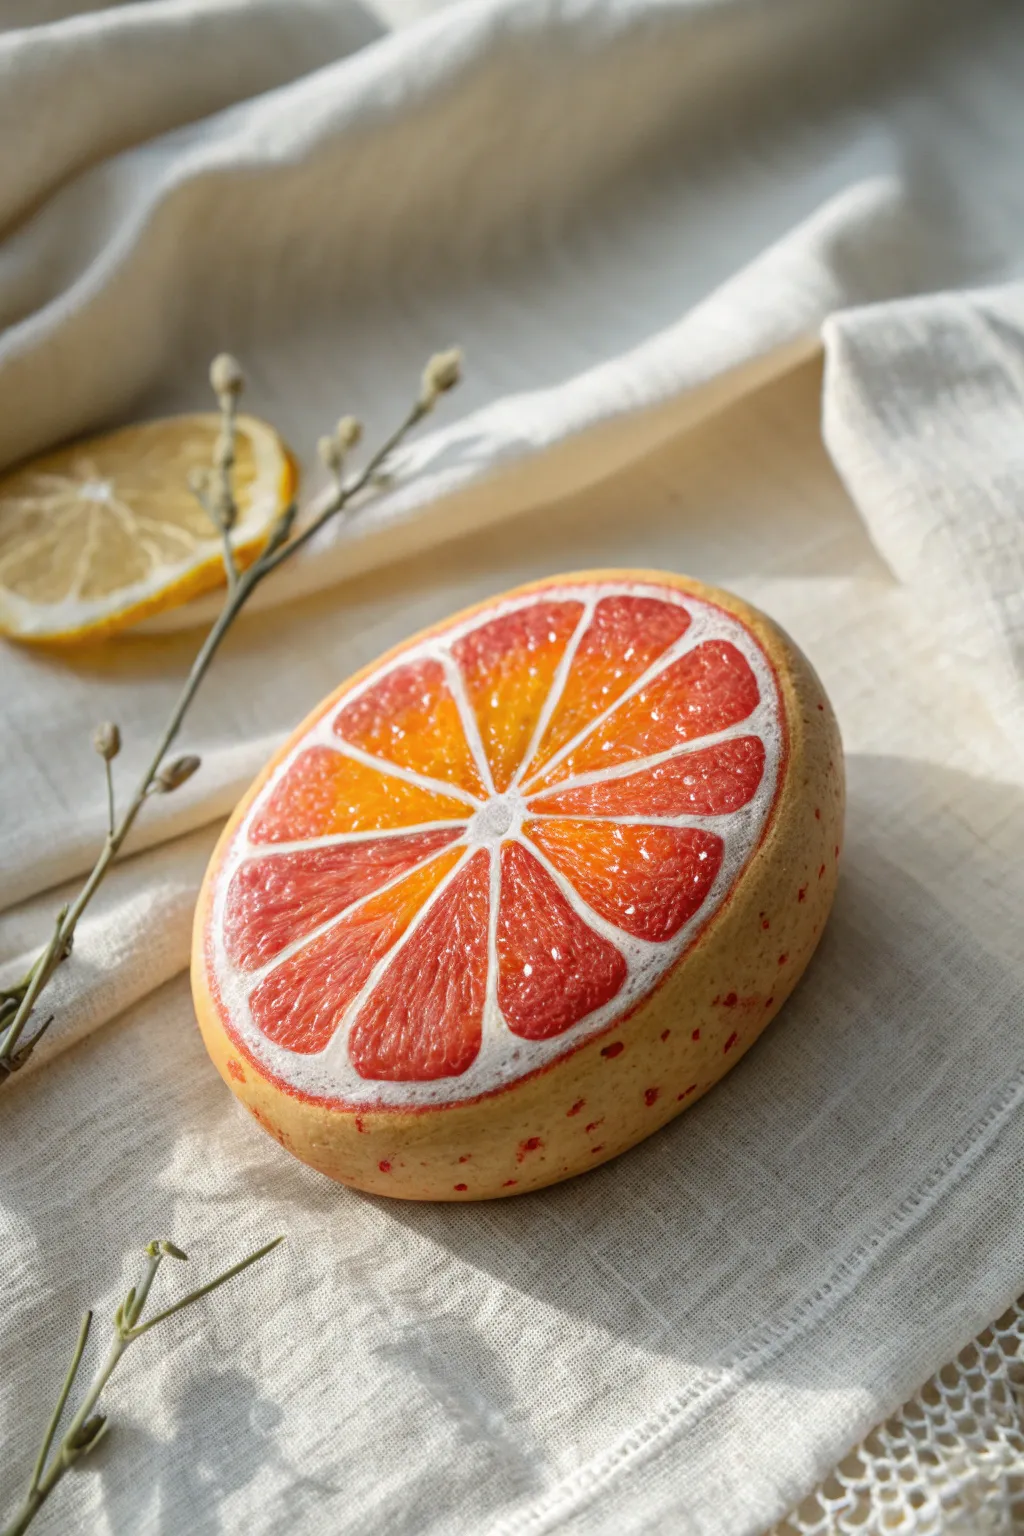
Transform a simple garden stone into a zesty slice of summer with this hyper-realistic grapefruit painting project. The vibrant gradients of red and orange against the crisp white pith create an illusion so juicy, you might be tempted to take a bite.
Step-by-Step Guide
Materials
- Smooth, oval-shaped river stone
- Gesso primer (white)
- Acrylic paints: Titanium White, Cadmium Red, Cadmium Orange, Yellow Ochre, Burnt Sienna
- Small flat brush (size 4 or 6)
- Fine liner brush (size 0 or 00)
- Pencil
- Palette for mixing
- Gloss varnish or resin (essential for the juicy look)
- Water cup and paper towels
Step 1: Preparation and Base Coat
-
Clean the stone:
Scrub your stone thoroughly with soap and water to remove any dirt or oils, then let it dry completely. This ensures the paint adheres properly. -
Prime the surface:
Apply a coat of white gesso to the top surface of the stone where you intend to paint the fruit slice. This creates a bright, neutral background that will make the subsequent citrus colors pop. -
Mix the rind color:
Mix a pale, creamy yellow using a lot of Titanium White, a touch of Yellow Ochre, and a tiny dot of Orange. You want a color that resembles the outer skin of a grapefruit. -
Paint the background:
Paint the entire primed area with your rind mixture. Don’t worry about being perfectly smooth; a little texture mimics the fruit’s skin.
Step 2: Drafting the Segments
-
Draw the pith circle:
Once the base is dry, lightly use a pencil to draw a large oval shape leaving about a quarter-inch border from the edge of the stone. This border will be the pith and rind. -
Mark the center:
Place a small dot in the approximate center of your oval. It doesn’t need to be geometrically perfect; nature is rarely perfectly symmetrical. -
Sketch the segments:
Draw lines radiating from the center dot to the edge of the pith oval, creating triangular wedges. Aim for 10-12 segments, curving the corners slightly so they look like soft fruit sacs rather than sharp geometric triangles.
Cloudy Varnish?
If your gloss coat looks milky, you likely applied it while the paint was arguably damp or the environment was too humid. Let it cure fully in a warm, dry room; it may clear up.
Step 3: Painting the Fruit Flesh
-
Create a gradient palette:
Prepare three distinct mixes on your palette: a deep red-orange (Cadmium Red + Orange), a medium bright orange, and a lighter yellow-orange. -
Block in the segments:
Start painting the segments. I find it effective to paint the outer edge of each wedge with a darker red-orange and transition to the lighter yellow-orange near the center. -
Blend the gradients:
While the paint is still wet within each segment, use your brush to gently blend the colors together. You want a soft transition from the darker ‘rind’ end to the lighter ‘pith’ end. -
Add variance:
Don’t make every segment identical. Make some slightly redder and others more orange to mimic the natural variation found in real citrus fruit. -
Refine the pith lines:
Use your fine liner brush and pure Titanium White to re-define the lines between the segments. Keep these lines thin and crisp, widening slightly where they meet the outer rind.
Make a Fruit Salad
Use this same technique with different palettes to make a bowl of stone fruit: Lime green for limes, bright yellow for lemons, or deep orange for tangerines.
Step 4: Adding Texture and Detail
-
Stipple for texture:
Mix a watery glaze of white paint. Using your smallest brush, gently stipple tiny dots and faint lines inside the colored segments to suggest the individual juice sacs. -
Define the center core:
Paint the small center circle with solid white, blending it slightly outward into the radiating lines. -
Detail the rind:
On the outer yellow border (the skin), use a toothbrush or stiff brush to flick tiny speckles of Burnt Sienna or diluted Orange. This replicates the porous texture of citrus zest. -
Add red speckles:
Add a few tiny, intentional dots of red paint on the yellow skin area, particularly near the bottom edge, to show ripeness or bruising.
Step 5: Final Glazing
-
Dry thoroughly:
Ensure the paint is absolutely bone dry before proceeding to the final step. Any moisture trapped underneath can cause cloudiness. -
Apply the ‘juice’:
Apply a thick, even coat of high-gloss varnish or clear resin over the fruit slice area. This is the magic step that makes the fruit look wet and freshly cut.
Place your finished stone in a fruit bowl or on a sunny windowsill to trick your guests with its realistic zestiness
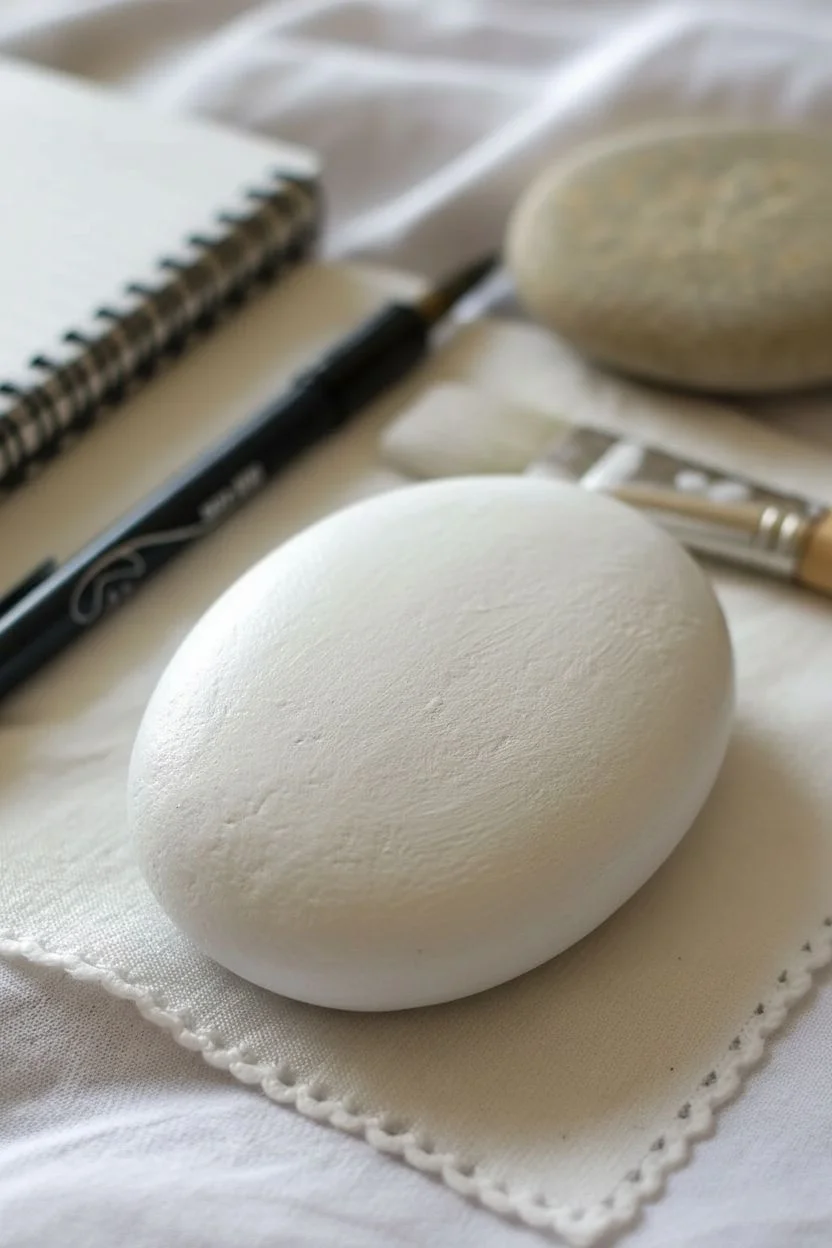
Zentangle Doodle Pattern Stones
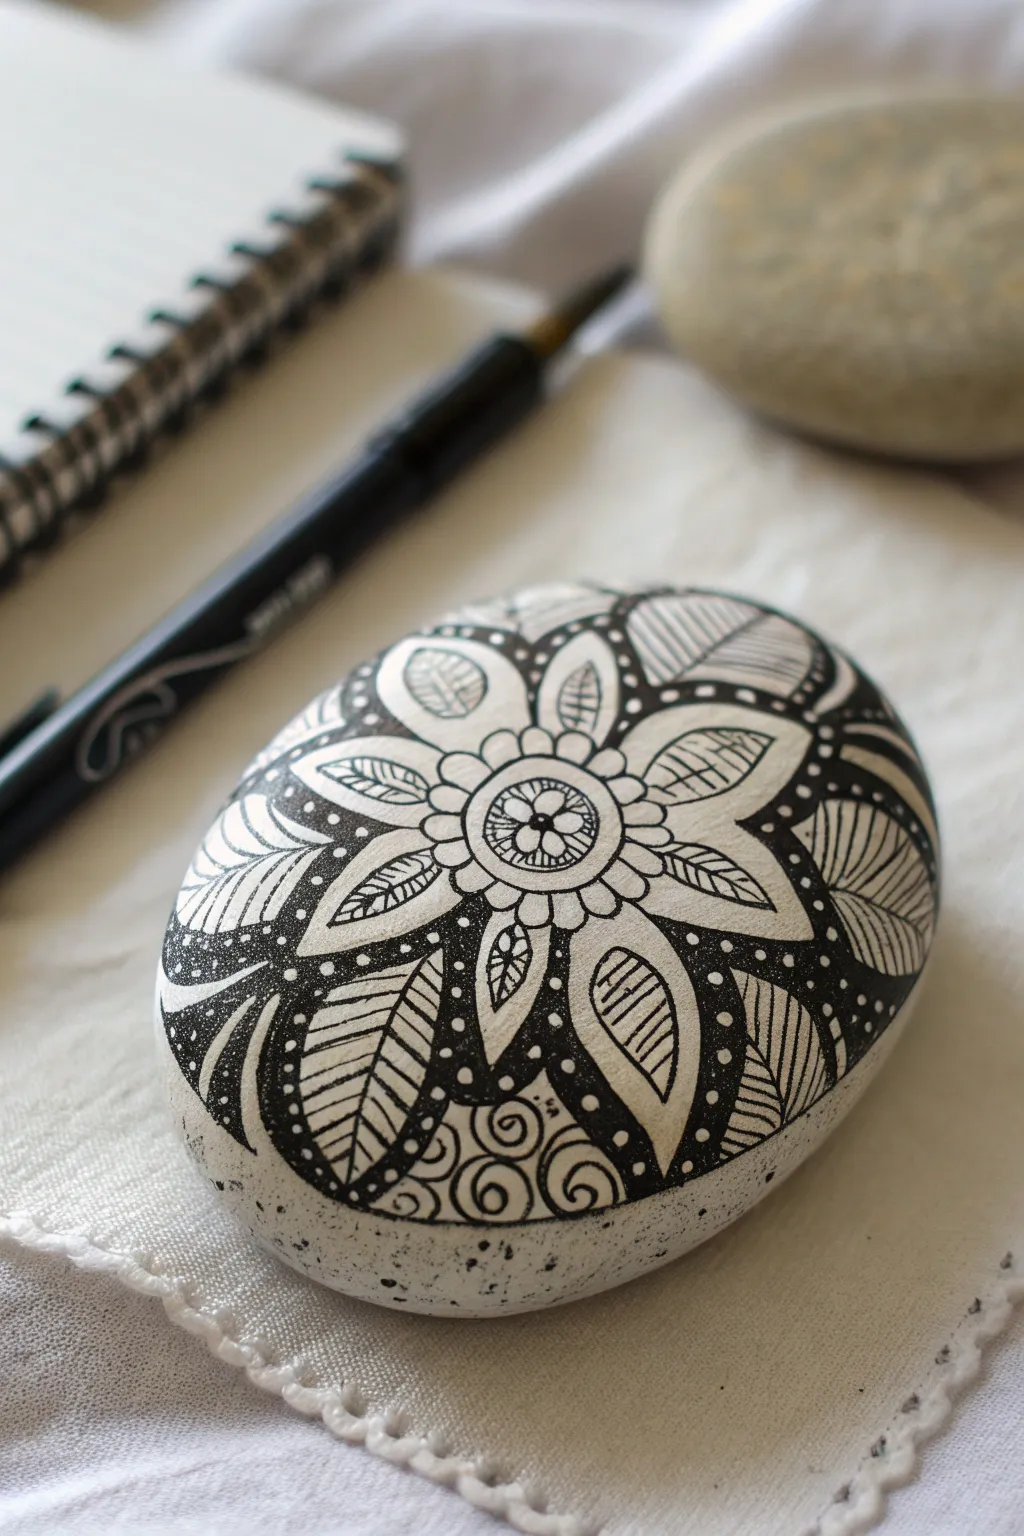
Transform a simple smooth rock into a mesmerizing piece of monochromatic art using intricate patterns and bold contrast. This project features a central floral mandala design that expands outward, utilizing negative space and fine line work to create a striking visual impact.
Step-by-Step Tutorial
Materials
- Smooth, oval-shaped river stone (cleaned and dried)
- White acrylic paint or gesso (matte finish)
- Wide flat paintbrush
- Pencil (HB or 2B)
- Eraser
- Fine-point black permanent marker or technical drawing pen (0.5mm)
- Thicker black marker (for filling large areas)
- White gel pen (optional, for corrections)
- Clear matte varnish sealer
Step 1: Preparation & Base Coat
-
Clean the canvas:
Begin by scrubbing your stone with soap and water to remove any dirt or oils that might repel the paint. Let it dry completely in the sun or with a quick blast from a hairdryer. -
Apply the foundation:
Using a wide flat brush, paint the entire top surface of the stone with white acrylic paint. You want a solid, opaque background, so applying two thin coats is better than one thick, gloppy one. -
Dry thoroughly:
Wait for the white base to be completely bone-dry. If the paint is even slightly tacky, your drawing pens might snag or bleed.
Smudge Prevention
If your hand tends to smudge the ink while drawing, rest your wrist on a clean scrap of paper or a paper towel while you work to protect the white surface.
Step 2: Sketching the Framework
-
Find the center:
With a pencil, lightly mark a small circle in the middle of the stone. This doesn’t have to be geometrically perfect; eyeballing it adds organic charm. -
Draw the core flower:
Sketch a simple five-petaled flower around the center circle. Add a second layer of slightly larger petals behind the first set to build dimension. -
Add radiating petals:
Extend the design outward by drawing larger, elongated leaf or petal shapes radiating from the central flower toward the edges of the stone. -
Section the background:
Lightly sketch the curves that define the negative space between the large petals. These areas will eventually be filled with black ink.
Step 3: Inking the Design
-
Outline the center:
Using your fine-point black pen, carefully trace over the central circle and the small flower petals. Add a tiny dot in the very middle and draw a grid pattern inside the core circle for texture. -
Detail the inner petals:
Draw lines radiating outward inside the smaller petals. This hatching technique gives the flower shading and depth. -
Outline main leaves:
Trace the large, main leaf shapes with a steady hand. Inside each leaf, draw a central vein line. -
Add leaf veins:
Fill the large leaves with diagonal stripes or ‘veins.’ Vary the spacing slightly to keep the look hand-drawn and organic rather than rigid. -
Create the background contrast:
Switch to your thicker marker to color in the background areas between the leaves. This is where the magic happens—the high contrast makes the white design pop. -
Refine the edges:
I like to go back with the fine pen to sharpen the edges where the black background meets the white leaves, ensuring crisp, clean lines.
Add a Pop of Color
Once the black ink is dry, use watered-down acrylics or watercolor pencils to add a sheer wash of teal or purple to specific petals for a stained-glass effect.
Step 4: Decorative Accents
-
Add stippled details:
Along the outer curves of the leaves, inside the black background areas, gently tap your fine pen to create a line of white dots (negative space) or use a white gel pen over the black ink for easier control. -
Draw bottom spirals:
At the bottom of the design (or any open space remaining), draw simple, curling spiral shapes to frame the mandala and break up the symmetry. -
Flicker pattern:
Add small, speckly dots around the very bottom edge of the stone to create a fading, stippled texture that transitions into the raw stone or white base. -
Erase pencil marks:
Once you are absolutely certain the ink is dry (give it at least 15 minutes), gently erase any visible pencil sketches. -
Seal the artwork:
Finish by applying a clear matte varnish. Brush it on lightly to avoid smearing the ink, which protects your intricate doodle from scratches and fading.
Set your finished stone on a desk or shelf to add a touch of modern, meditative Zen to your space
Geometric Op-Art Illusion Stones
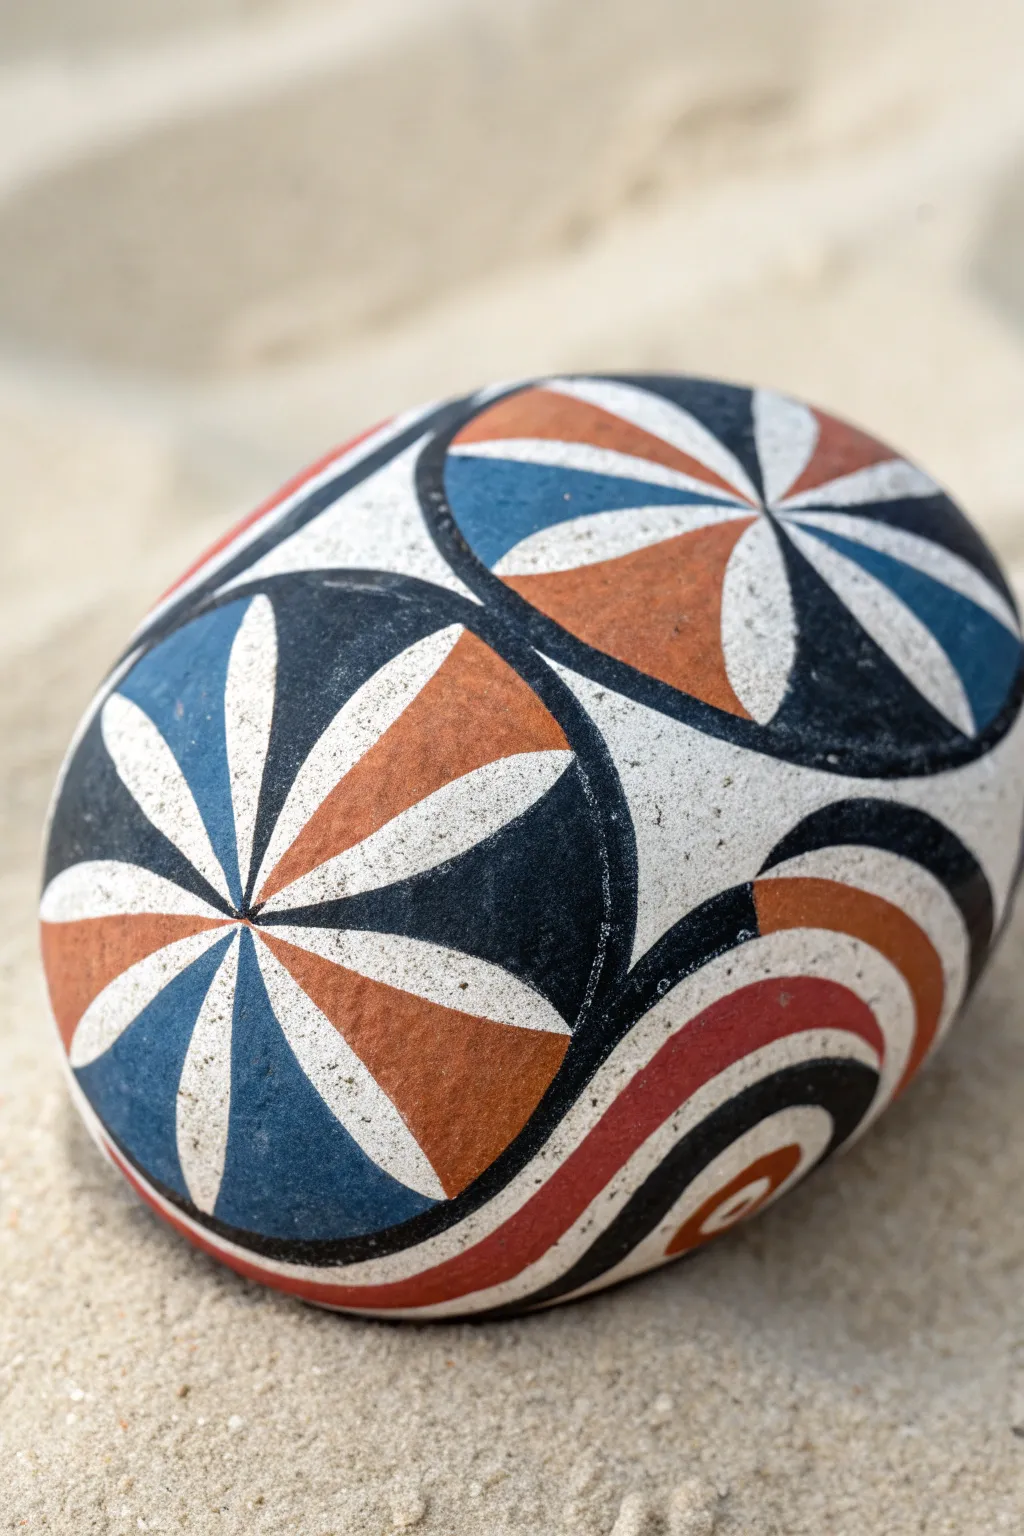
This striking stone painting project utilizes bold radial symmetry and an earthy retro color palette to create an optical art masterpiece. The overlapping circular motifs and precise linework give the illusion of complex depth on a simple smooth rock.
Detailed Instructions
Materials
- Smooth, oval-shaped river stone
- Gesso or white acrylic primer
- Acrylic paints (White, Black, Denim Blue, Terracotta/Burnt Orange, Dark Red)
- Pencil for sketching
- Compass or circle stencil tool
- Ruler or straight edge
- Fine liner brush (size 0 or 00)
- Small flat brush (size 2 or 4)
- Matte finish spray varnish
Step 1: Base Preparation
-
Clean the canvas:
Begin by thoroughly washing your stone with warm soapy water to remove any dirt or oils. Let it dry completely in the sun or with a hair dryer. -
Prime the surface:
Apply a coat of white gesso or primer to the entire top surface of the stone. This ensures your colors will be opaque and vibrant. -
Smooth the base:
Once the first coat is dry, apply a second layer if you can still see the greyness of the stone underneath. Sand lightly if any brush strokes are too prominent.
Clean Lines Secret
For super crisp straight lines inside the circles, use thin strips of washi tape or painter’s tape to mask off the petal sections before painting.
Step 2: Drafting the Design
-
Set the center points:
Using a pencil, lightly mark the centers for your main circular elements. For this design, imagine two large tangent circles dominating the face of the stone. -
Draw the circles:
Use a compass or a circle stencil to draw the large circles. Allow them to curve off the edge of the stone to create a sense of continuity. -
Create the radial segments:
Find the center of each circle and heavily dot it with your pencil. Use a ruler to draw straight lines radiating outward from this center point, dividing the circle like a pie. -
Refine the wedges:
Instead of straight pie slices, curve the lines slightly inward as they reach the center point to create that distinct ‘petal’ or ‘propeller’ shape seen in the image. -
Sketch the side swirls:
On the lower right/side of the stone, sketch partial concentric curves to create the swooping linear pattern that fills the negative space.
Step 3: Blocking Colors
-
Paint the white petals:
I like to start with white to keep things clean. Paint every alternating petal with opaque white acrylic, ensuring sharp edges. -
Apply the blue tones:
Mix a muted denim blue. Fill in opposing sections of the pinwheel design, typically focusing on the left-side segments of your main circles. -
Add the terracotta warmth:
Using your burnt orange or terracotta paint, fill in the segments opposite the blue ones. Use a small flat brush for the wider outer areas and switch to a liner near the center. -
Fill the side details:
Paint the curved stripes on the side. Alternate between dark red, white, and a touch of terracotta, following the pencil curves you sketched earlier.
Metallic Twist
Replace the black outlines with gold or copper paint pen lines. The metallic shimmer adds a modern, cloisonné-style effect to the retro pattern.
Step 4: Defining Outlines
-
Start the outlining:
Load your finest liner brush with thinned black acrylic paint (inky consistency). Carefully trace the outer perimeter of your main circles first. -
Define the petals:
Paint thin black lines separating every color block within the circles. These lines should taper slightly as they meet in the center divot. -
Fill negative spaces:
Paint the empty spaces between the circles and the background curves with solid black. This high contrast is what makes the geometric shapes pop. -
Sharpen the edges:
Go back over your white, blue, and orange sections. If the paint bled or looks messy, carefully tidy up the edges right up to your black outlines.
Step 5: Finishing Touches
-
Add texture (optional):
To mimic the stone texture in the reference image, you can lightly stipple some diluted grey or black dots onto the white sections using an old toothbrush or stiff brush. -
Final smooth coat:
Check for any pencil marks peeking through or uneven coverage. Apply a final thin layer of color where needed to ensure opacity. -
Seal the work:
Allow the stone to cure for 24 hours. Ideally, use a matte spray varnish to protect the paint without adding an unnatural glossy sheen.
Place your geometric creation on a desk or shelf to admire the satisfying precision of your work
Glow-in-the-Dark Constellation Stones
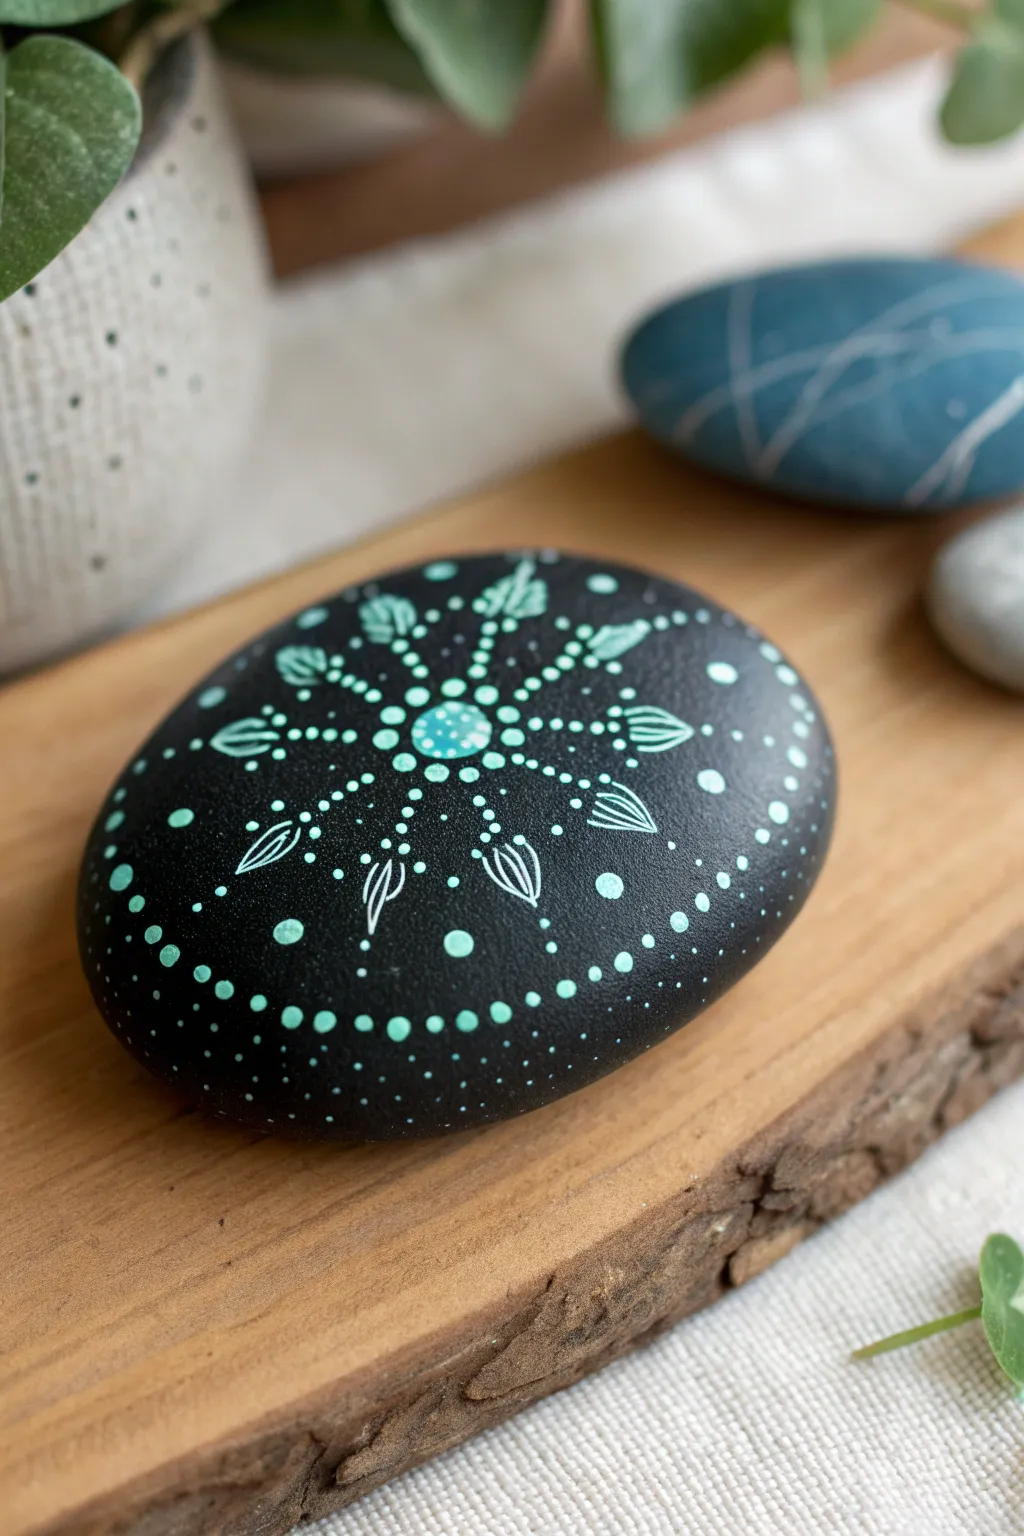
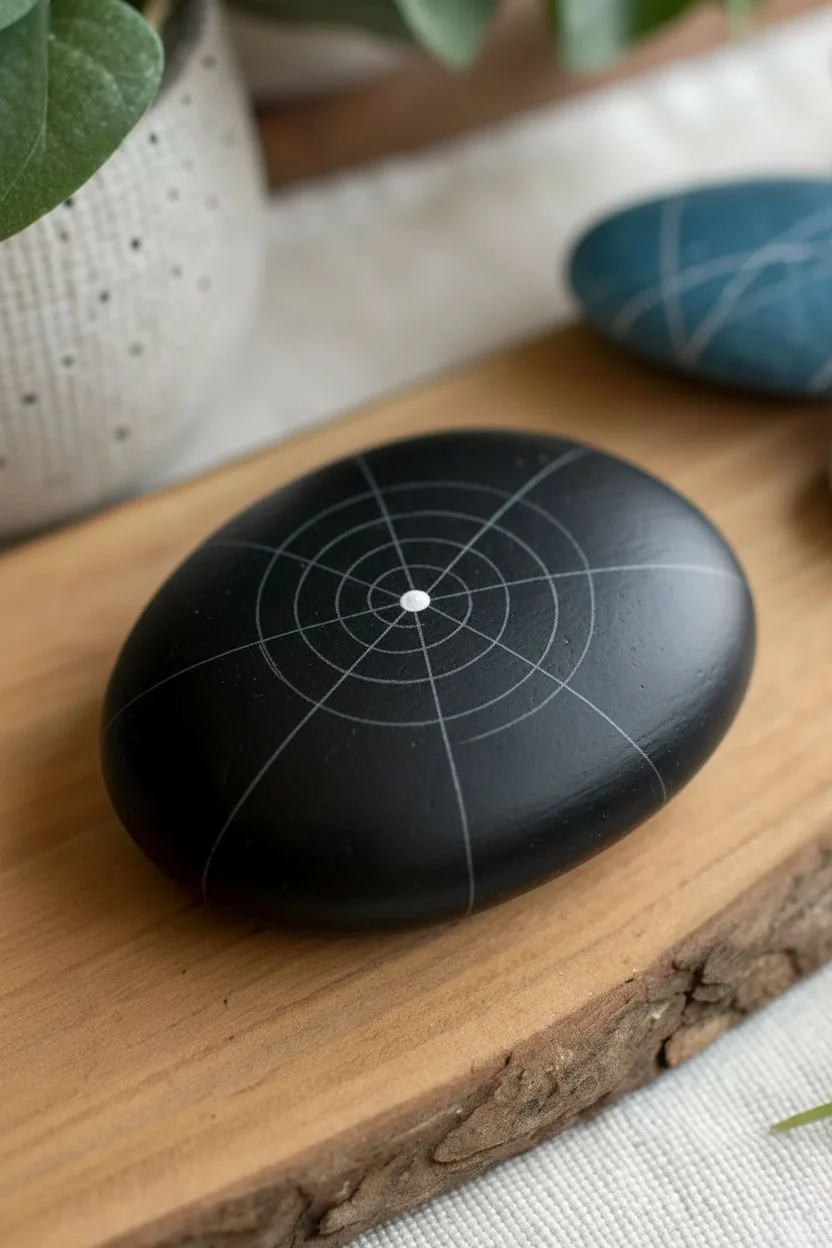
Transform a simple river rock into a mesmerizing piece of art with this crisp, geometric mandala design. The striking contrast between the matte black background and the fresh mint green paint creates a modern, calming aesthetic perfect for any desk or garden.
Step-by-Step
Materials
- Smooth, oval river stone (approx. 3-4 inches wide)
- Black acrylic paint (matte finish recommended)
- Mint green or light teal acrylic paint
- Flat paintbrush (for base coat)
- Dotting tools (various sizes)
- Fine liner brush (size 0 or 00)
- White charcoal pencil or chalk pencil
- Ruler
- Paper plate or palette
- Varnish or sealant (matte or satin)
- Cup of water
- Paper towels
Step 1: Preparing the Canvas
-
Clean the stone:
Begin by washing your stone with warm soapy water to remove any dirt or oils. Scrub gently with an old toothbrush if needed. Let it dry completely before painting. -
Apply the base coat:
Using your flat paintbrush, apply a coat of black acrylic paint to the top surface of the stone. Smooth out your brushstrokes as you go. -
Ensure full coverage:
Allow the first coat to dry, then inspect the stone. Apply a second coat of black paint to ensure the surface is completely opaque and dark. Let this dry thoroughly. -
Mark the center:
Find the approximate center of your stone. Using a white charcoal pencil, make a tiny dot to mark this spot. This will anchor your entire mandala design. -
Create guidelines:
Lightly sketch a few concentric circles radiating from your center point to help keep your design symmetrical. You can also draw faint lines dividing the stone into 8 equal pie slices.
Step 2: Painting the Mandala Core
-
Paint the central dot:
Load a medium-sized dotting tool with mint green paint. Press it firmly onto your center mark to create the primary focal point. -
Add the first ring:
Switch to a smaller dotting tool. carefully place a ring of small dots immediately surrounding the central dot. Ensure they are spaced evenly. -
Create the second ring:
Using a slightly larger dotting tool than the previous step, add a second ring of dots. Place these dots in the gaps between the dots of the first ring. -
Paint the starburst spikes:
From the second ring of dots, use your fine liner brush to pull tiny lines of paint outward. These should look like thin rays extending from the center.
Uneven Dots?
Work with a wet cloth nearby. Acrylic dries fast, but if you wipe a wonky dot immediately with a damp Q-tip, you can erase it and try again without ruining the black base.
Step 3: Adding Geometric Details
-
Draft the petal shapes:
At the equal intervals marked by your guidelines (about 8 spots around the circle), use the liner brush to paint outline shapes that resemble leaves or arrowheads pointing outward. -
Fill the petals:
Inside each leaf outline, paint a central line or ‘vein’. Add two smaller curved lines on either side of the vein to give the shape texture and detail. -
Connect with dots:
Between each painted petal shape, use a small dotting tool to create a line of graduating dots that connect the inner rings to the outer area. -
Expand the pattern:
Moving further out, add larger individual dots between the tips of your petal shapes. These serve as anchors for the outer edge of the design. -
Add floating accents:
Place tiny micro-dots around the larger outer dots to create a ‘sparkle’ effect. This softens the transition between the design and the empty black space.
Glow Up
Mix a tiny amount of glow-in-the-dark medium into your mint paint for the central dot and outer ring. By day it looks pastel, but at night your mandala will subtly shine.
Step 4: Finishing Touches
-
Create the outer border:
Near the edge of the stone, use a medium dotting tool to create a widely spaced ring of dots that frames the entire mandala. -
Fill the gaps:
Go back in with your smallest tool and add tiny filler dots in any large empty black spaces to make the design feel cohesive and dense. -
Clean up guidelines:
Once the paint is 100% dry (give it at least an hour), use a damp Q-tip or a soft eraser to gently remove any visible charcoal pencil marks. -
Seal the artwork:
Apply a coat of clear varnish or sealant over the entire stone. This protects the paint from chipping and makes the colors pop.
Place your finished stone in a sunny spot and enjoy the intricate details you’ve created.
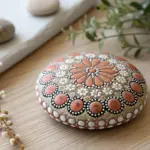
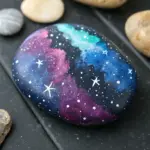
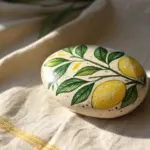

Have a question or want to share your own experience? I'd love to hear from you in the comments below!