
There’s something so satisfying about turning a plain little stone into a tiny burst of summer color. These summer rock painting ideas are all about easy, sunny motifs you can paint fast, show off outside, and keep coming back to all season long.
Watermelon Wedge Rocks
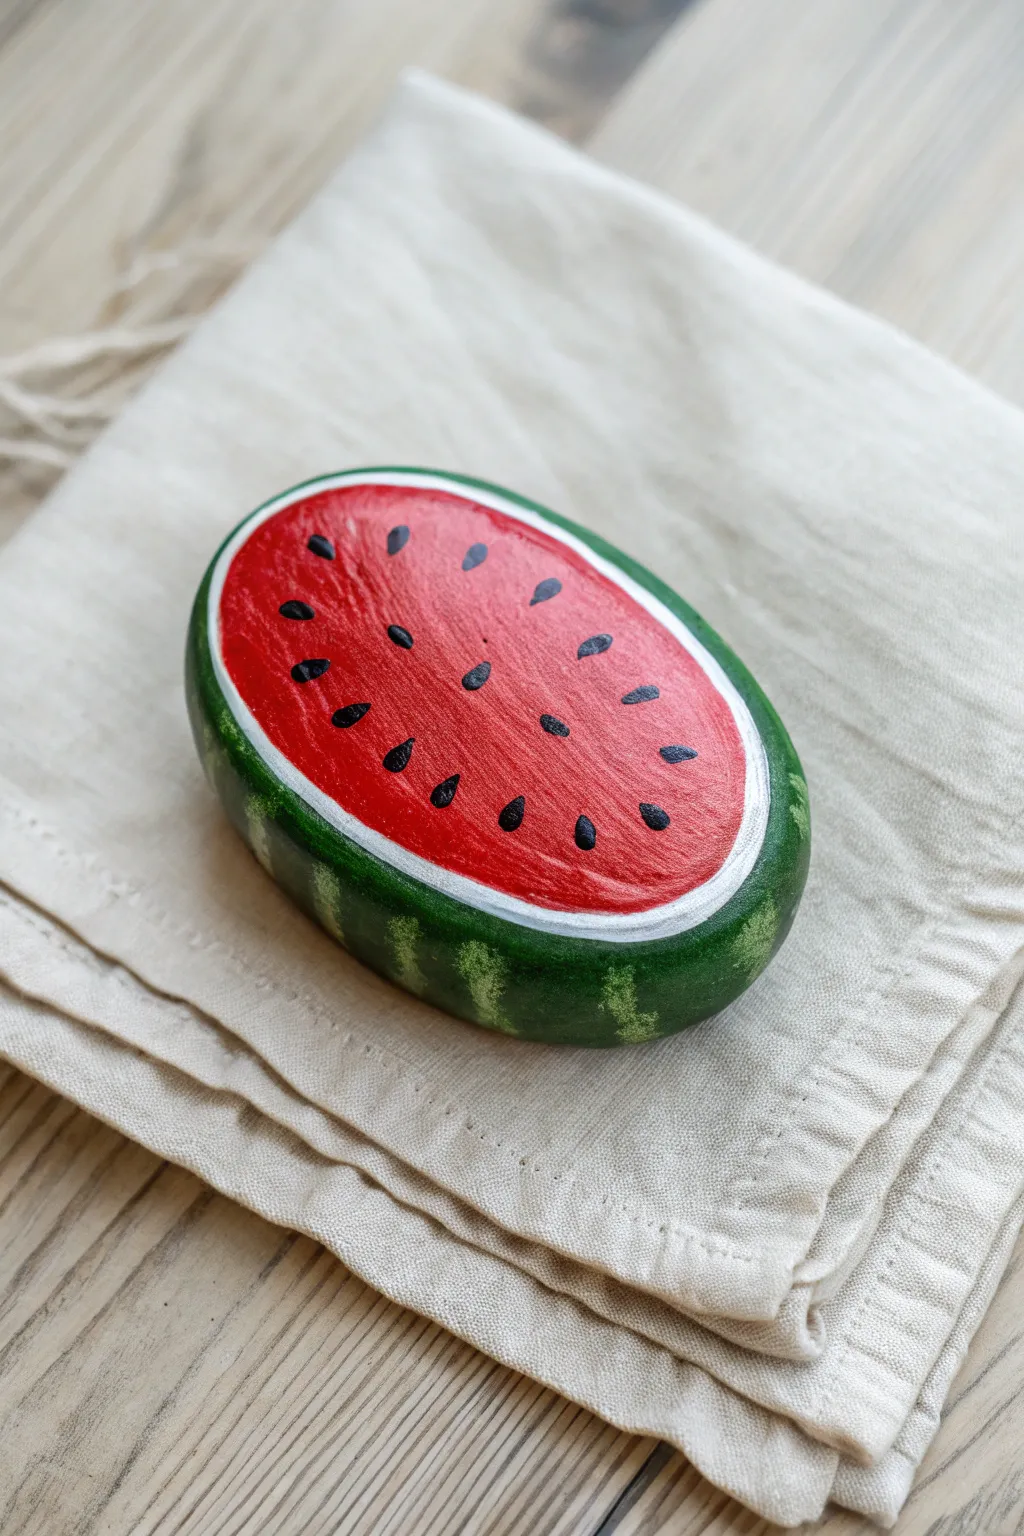
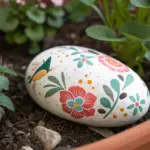
Bring a taste of summer to your garden with this refreshingly realistic watermelon wedge painted rock. Using a smooth, oval stone, you’ll layer vibrant reds and greens to create a juicy-looking piece of fruit that never spoils.
How-To Guide
Materials
- Smooth, oval-shaped river rock
- Acrylic paints (dark green, light green, bright red, white, black)
- Flat paintbrush (medium size)
- Fine detail paintbrush (liner brush)
- Water cup and paper towels
- Pencil (optional)
- Clear sealant (spray or brush-on)
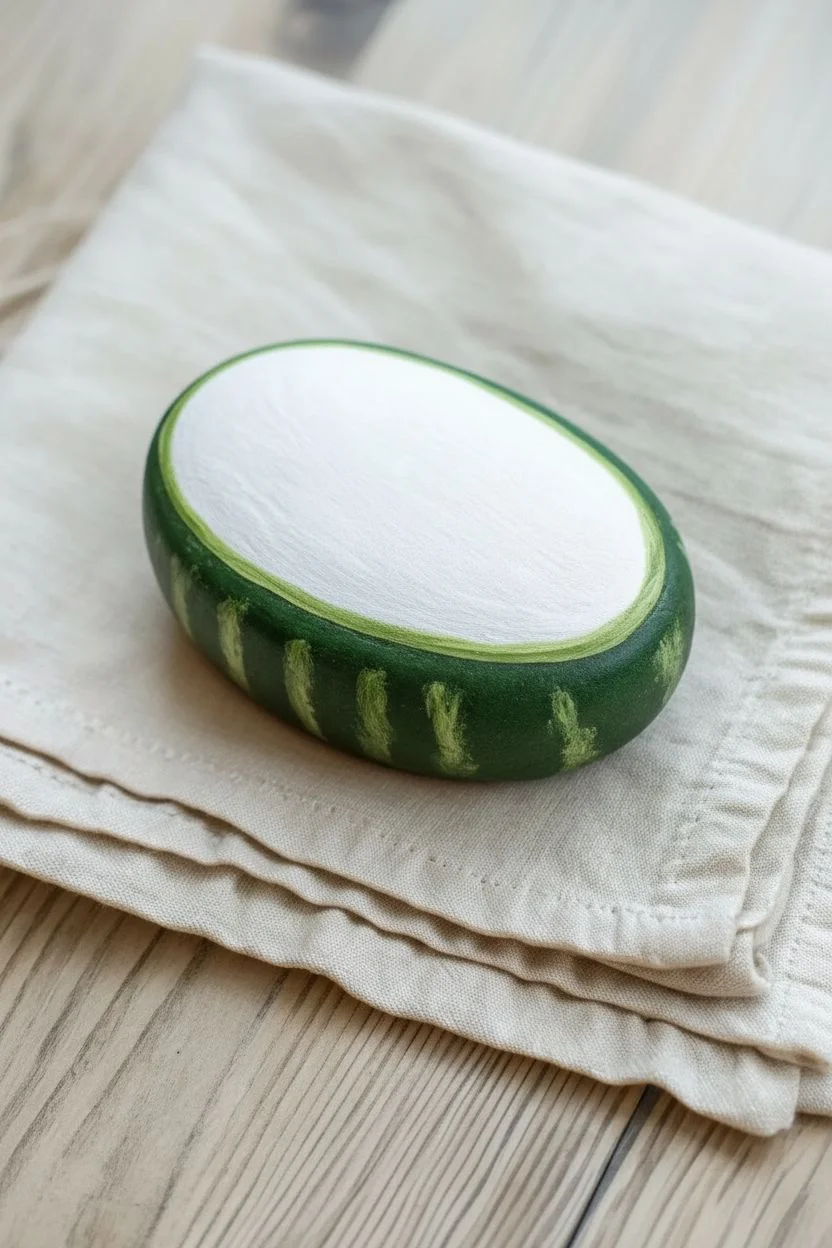
Step 1: Painting the Base & Rind
-
Clean your canvas:
Start by scrubbing your rock with soap and water to remove any dirt or oils. Let it dry completely in the sun or with a hairdryer before you begin. -
Apply the rind base:
Paint the entire surface of the rock on all sides with a deep, forest green acrylic paint. This creates the outer skin of the watermelon. -
Ensure opacity:
Depending on the darkness of your initial stone, you might need a second coat of deep green. Let the paint dry fully between layers. -
Add rind stripes:
Mix a small amount of light green or yellow-green paint. Using a slightly dry brush, paint vertical, irregular stripes along the curved sides of the rock, mimicking the natural patterns of a watermelon rind. -
Feather the edges:
Soften the edges of these light green stripes so they blend slightly into the dark background rather than looking like harsh lines. I find tapping the wet paint gently with my finger helps blur it just right. -
Define the face:
Determine which side of the rock will be the flat cut surface. Paint a large, solid white oval on the top face, leaving a rim of green visible around the edges. -
Dry completely:
Allow this white layer to dry thoroughly. This is crucial because it acts as a primer to make the red paint pop.
Step 2: Adding the Juicy Details
-
Paint the flesh:
Load your brush with bright red paint. Fill in the center of the white oval, leaving a thin, consistent white border between the red fruit and the green rind. -
Texture the red:
To give the illusion of fruit texture, don’t smooth the red paint out perfectly. Small ridges or variations in stroke direction can add visual interest. -
Let it set:
Wait for the red layer to become touch-dry. If the red looks too translucent, apply a second coat for a richer color. -
Plan seed placement:
Visualize where your seeds will go. They should be scattered somewhat randomly in a loose ring pattern, pointing generally toward the center. -
Paint the seeds:
Using your finest detail brush and black paint, create small teardrop shapes on the red surface. Press down lightly at the start of the stroke and lift up quickly to make the point. -
Vary the sizes:
Make some seeds slightly larger and others smaller to keep the look organic. -
Add seed highlights:
Once the black seeds are dry, add a tiny speck of white or a very pale grey to the rounded top of each seed. This reflection makes them look wet and shiny. -
Clean up lines:
Check the white rind line. If any red or green has smudged onto it, carefully touch it up with fresh white paint for a crisp separation. -
Seal the artwork:
Once your masterpiece is fully cured (usually 24 hours), apply a clear weather-resistant sealer to protect your fruit from the elements.
Uneven Rind Lines?
If your hand shakes while painting the white rim, try resting your wrist on the table for stability. You can also clean up wobbles by painting over them with the dark green rind color.
Bite Mark Twist
For a fun variation, paint a jagged semi-circle bite mark on one side of the red area. Use white for the teeth marks and darker red for depth to show someone already had a snack.
Now place your rock in the garden and see if anyone does a double-take at this delicious-looking stone


Citrus Slice Rocks in Lemon, Lime, and Orange
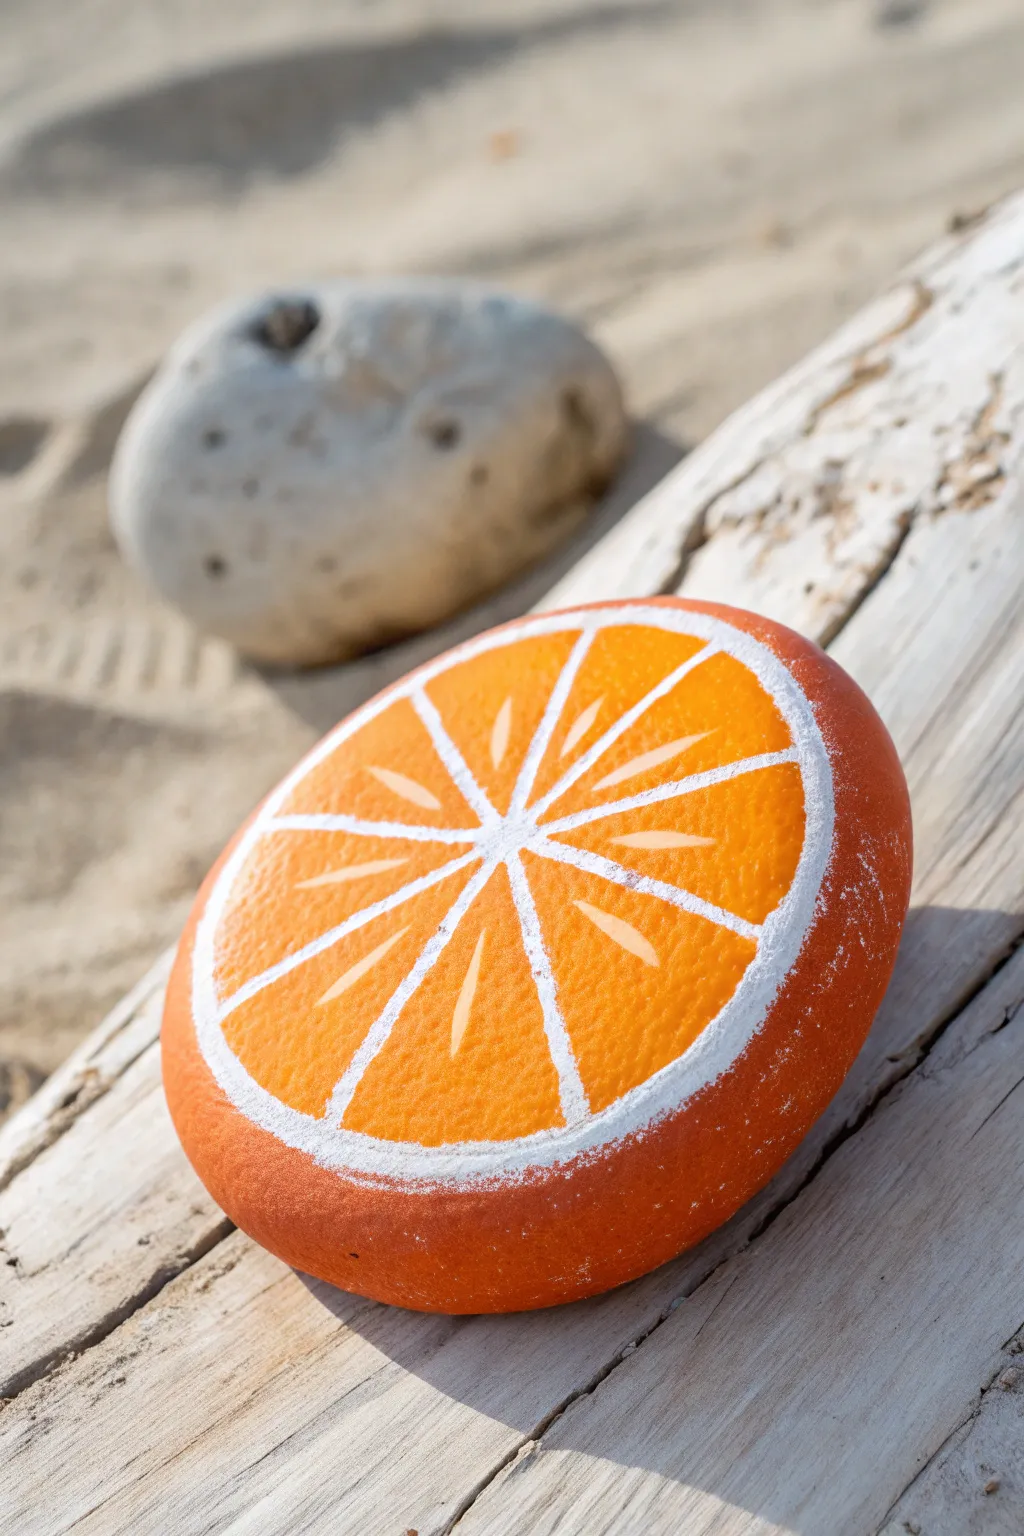
Bring a burst of citrusy summer vibes to your garden or windowsill with this vibrant orange slice rock painting. Its realistic texture and juicy colors make it a refreshing piece of décor that looks almost good enough to eat.
Detailed Instructions
Materials
- Smooth, round river rock (approx. palm-sized)
- White gesso or primer paint
- Acrylic paints: Bright orange, titanium white, light yellow/cream, dark orange (for shading)
- Medium flat brush
- Fine liner brush (size 0 or 00)
- Small round sponge applicator or stiff bristle brush (for texture)
- Matte or satin sealant spray
Step 1: Base Preparation
-
Clean the stone:
Wash your chosen rock thoroughly with soapy water to remove any dirt or sand, then let it dry completely in the sun. -
Prime the surface:
Apply a solid coat of white gesso or white acrylic paint to the top face of the rock. This creates a bright base that will make your citrus colors truly pop later on. -
Dry thoroughly:
Wait for the primer layer to cure completely before moving on to the colored layers.
Make It Look Juicy
Add a tiny touch of gloss varnish specifically to the inner fruit segments after sealing. This makes the ‘fruit’ look wet and freshly cut against the drier-looking peel.
Step 2: Creating the Orange Base
-
Paint the background:
Using your medium flat brush, cover the entire primed area with a bright, standard orange acrylic paint. Extend this color slightly over the curved edge of the rock to mimic the peel. -
Add a second coat:
Acrylic yellows and oranges can be translucent, so applying a second coat ensures opaque, vibrant coverage. -
Dry between coats:
Ensure the orange base is dry to the touch so your white details don’t blend and turn peachy.
Step 3: Structure and Rind
-
Paint the center point:
Dip your fine liner brush in titanium white paint and place a small dot in the exact center of the rock face. -
Draw the main axis:
Paint a straight line vertically through the center dot, but stop about a half-inch before the edge of the rock. -
Complete the spokes:
Continue painting four or five more lines intersecting through the center point like bicycle spokes, keeping them evenly spaced. -
Create the inner rind:
Connect the outer tips of your spoke lines with a circular white line. This forms the pithy white layer inside the orange skin. -
Thicken the lines:
Go back over your white lines to make them slightly bolder and opaque. The center strokes should be slightly thicker near the outside edge and taper as they reach the middle.
Create a Whole Bowl
Don’t stop at oranges! Use the same technique with bright yellow to make lemons, deep emerald green for limes, or ruby red for grapefruits to fill a decorative garden bowl.
Step 4: Texturing the Fruit
-
Mix a lighter orange:
On your palette, mix a small amount of bright orange with a tiny dot of titanium white or cream to create a lighter, highlighting shade. -
Stipple the segments:
Using a small sponge applicator or a stiff, dry brush, gently dab this lighter orange mixture inside each triangular segment. Focus on the center of the segments, leaving the edges darker. -
Add texture to the peel:
Take a shade of orange slightly darker than your base coat and lightly stipple the outer edge (the peel) to give it that pitted, citrus skin texture. -
Paint juicy highlights:
Using your finest liner brush and a pale cream or very light orange, paint tiny teardrop or seed shapes inside a few segments to mimic juice vesicles.
Step 5: Finishing Touches
-
Refine the white pith:
If your stippling overlapped the white lines, use your liner brush to carefully touch up the white pith lines for a crisp look. -
Seal the rock:
Once fully dry, spray the rock with a clear sealant. A satin finish works best here to mimic the slight sheen of a fresh orange slice without being overly glossy. -
Cure:
Let the sealant cure according to the manufacturer’s instructions before placing your rock outside.
This sunny little rock is now ready to brighten up any corner of your patio or garden


Popsicle Rocks With Bold Stripes

Transform smooth river stones into a charming collection of never-melting summer treats using bold stripes and sweet details. These colorful popsicle rocks capture the nostalgic fun of the ice cream truck with their vibrant layers and faux sprinkle toppings.
Step-by-Step Tutorial
Materials
- Smooth oval-shaped rocks (river rocks work best)
- Acrylic paints (various colors like pink, yellow, teal, brown, white)
- Pencil
- Painter’s tape or masking tape (optional but helpful for straight lines)
- Flat paintbrushes (small and medium)
- Small round detail brush
- White or clear gesso (optional primer)
- Clear acrylic sealer (matte or gloss)
Step 1: Preparation and Base
-
Clean Your Canvases:
Begin by thoroughly washing your rocks with soap and warm water to remove any dirt or oils. Let them dry completely before starting, as moisture can trap beneath the paint and cause peeling later. -
Prime the Surface:
If your rocks are dark, apply a coat of white gesso or white acrylic paint to the top surface. This step isn’t strictly necessary, but I find it helps the subsequent bright colors pop much more vividly. -
Sketch the Sections:
Using a pencil, lightly draw horizontal lines across the rock to divide it into two, three, or four sections. These will become your flavor stripes. Keep the lines slightly curved to mimic the roundness of a real popsicle.
Paint Bleeding?
If paint bleeds under tape or lines get messy, let it dry 100%. Then, scrape the excess gently with a toothpick or paint over the mistake with the base color.
Step 2: Painting the Stripes
-
Start with the Lightest Color:
Choose your first flavor color—perhaps a vanilla cream or a pale yellow. Paint one section of the rock with this hue using a flat brush. Don’t worry about perfect edges yet if you’re painting adjacent sections. -
Apply the Middle Tones:
Move on to your medium shades, such as strawberry pink or mint green. Carefully paint the next section, using the flat edge of your brush to create a clean line where the colors meet. -
Add Darker Layers:
Paint the remaining sections with your darkest colors, like a rich chocolate brown or deep blue raspberry. Ensure the paint is opaque; you might need a second coat for lighter colors once the first is dry. -
Create Dipped Effects:
For a ‘chocolate-dipped’ look, paint the top third of the rock with brown paint. Instead of a straight line, use a slight wave pattern at the bottom of the brown section to look like dripping chocolate. -
Refine the Edges:
Go back with a small flat brush to touch up the lines between colors. A steady hand is key here, or you can use small strips of painter’s tape if you struggle with freehand straight lines.
Add Dimension
Mix puffy fabric paint or 3D paint for the sprinkles or ‘drizzled’ toppings. This adds a raised, tactile texture that makes the treats look even more real.
Step 3: Adding the Details
-
Mix Sprinkle Colors:
On your palette, prepare small dabs of 3-4 bright contrasting colors for the sprinkles. White, hot pink, bright yellow, and teal work beautifully against chocolate backgrounds. -
Paint the Sprinkles:
Using your smallest round detail brush, paint tiny dashes scattered randomly across the top section or the ‘chocolate’ area. Keep the dashes short and vary their angles for a realistic look. -
Add Texture:
For some rocks, you can create a dot pattern instead of dashes. Simply dip the non-brush end of your paintbrush into the paint and dot it onto the rock surface. -
Highlight the Gloss:
Add a few tiny white curved lines or dots near the top or sides of the ‘chocolate’ sections. This small detail mimics the reflection of light on a shiny coating.
Step 4: Finishing Touches
-
Let Everything Cure:
Allow the painted rocks to sit undisturbed for at least an hour or two. The thick layers of acrylic need to be fully dry before sealing. -
Seal the Design:
Apply a coat of clear acrylic sealer. A gloss finish makes them look like melting popsicles, while a matte finish gives them a smooth, frozen look.
Display your stone treats in a bowl or scatter them in the garden for a playful summer surprise


Happy Sunshine Face Rocks

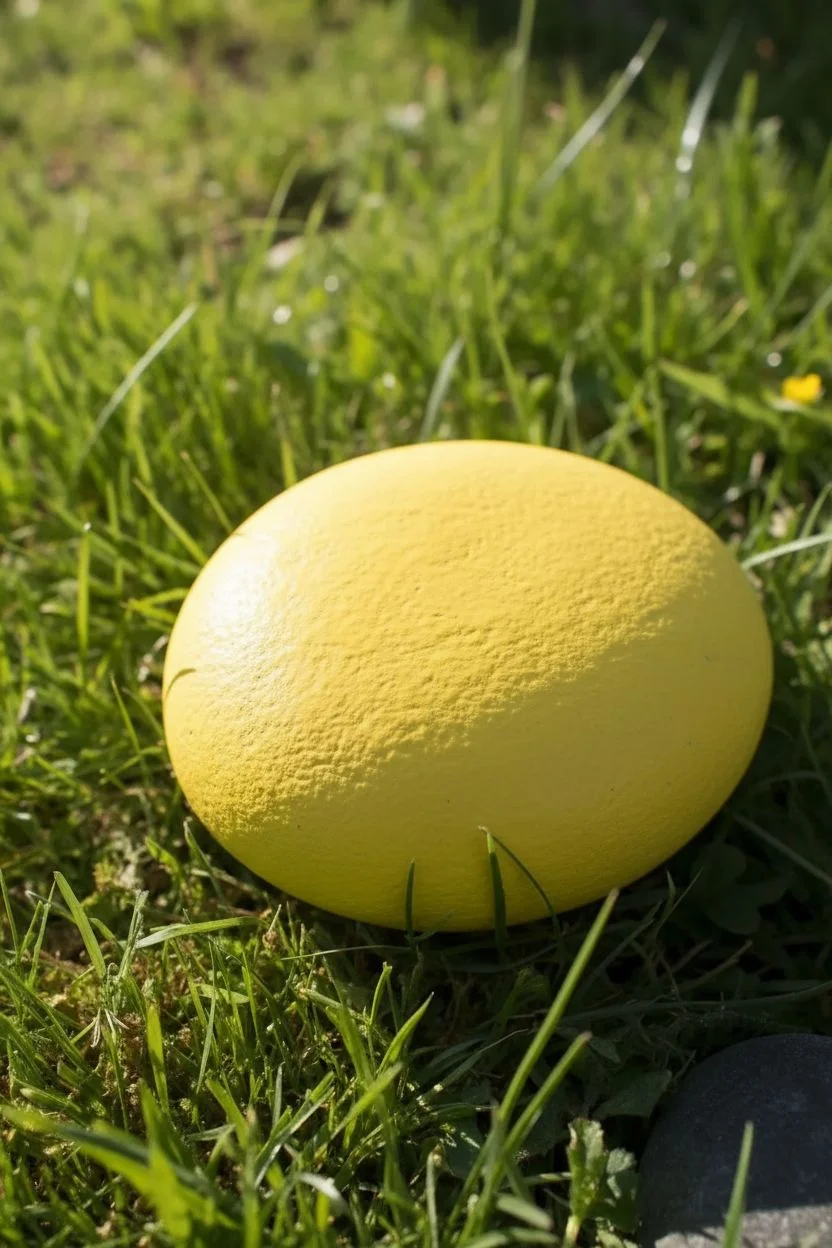
Spread a little warmth with this cheerful, bright yellow sun rock that radiates positivity. Its smooth, rounded surface is perfect for capturing a simple but expressive smiley face complete with playful sun rays.
Step-by-Step Guide
Materials
- Smooth, oval-shaped river rock
- Bright yellow acrylic paint
- Black acrylic paint or a black paint pen (Posca pens work great)
- Wide flat paintbrush
- Fine detail paintbrush (if painting facial features)
- Jar of water and paper towels
- Clear acrylic sealer spray (glossy finish recommended)
Step 1: Preparing the Canvas
-
Clean the stone:
Before you begin, scrub your rock thoroughly with warm soapy water to remove any dirt or oils that might prevent the paint from sticking. Let it dry completely. -
Base coat application:
Using your wide flat brush, load up a generous amount of bright yellow acrylic paint. Apply a smooth, even coat across the entire top surface of the rock. -
Assess the coverage:
Bright yellows can sometimes be translucent. If the rock’s natural color shows through after the first coat dries, don’t hesitate to add a second or even third layer for full opacity. -
Smooth it out:
As you apply your final yellow layer, use long, light strokes to minimize brush marks, aiming for a consistent, sunny texture. -
Dry time:
Allow the yellow base to dry completely. It should feel chalky and not tacky to the touch before you attempt to add any black details.
Sun-Kissed Base
For the most vibrant yellow, paint a coat of titanium white on the rock first. This acts as a primer and makes the yellow pop instantly.
Step 2: Bringing the Sun to Life
-
Plan the face:
Visualize where the face will sit. The eyes should be near the upper-middle of the rock, leaving plenty of room below for a wide, sweeping smile. -
Draw the eyes:
Using a black paint pen or a fine detail brush, paint two large, solid black ovals for the eyes. Slant them slightly inward toward each other to give the face a friendly expression. -
Add the spark:
If you’re feeling precise, leave a tiny dot of unpainted yellow (or add a white dot later) inside the black eyes for a ‘glint’ of life, though solid black works perfectly for this bold style. -
Create the smile:
Starting below the left eye, draw a long, uplifting curve that stretches all the way to underneath the right eye. The curve should be U-shaped and wide. -
Dimples and details:
At the very ends of your smile line, add tiny perpendicular cross-hatches or small ticks to suggest dimples or smile lines.
Garden Glow
Use glow-in-the-dark paint for the white ‘glint’ in the eyes or for the sun rays so your sunshine face lights up your garden path at night.
Step 3: Radiating Rays
-
Start the rays:
Around the perimeter of the face, you will paint short, dash-like lines to represent sun rays. Start at the very top center to anchor your design. -
Work your way around:
Continue adding these black dashes around the upper curve of the rock, spacing them roughly a half-inch apart. Try to angle them outward, pointing away from the center of the face. -
Vary the lengths:
For a more organic, hand-drawn look, don’t worry about making every ray identical. I like to alternate slightly between shorter and longer dashes. -
Extend to the bottom:
Continue the pattern of rays around the bottom curve of the rock, framing the smile. Ensure the rays angle downwards here. -
Refine the lines:
Go back over any sun rays that look too faint. The black should be opaque and bold against the yellow background. -
Final drying:
Let the black paint dry completely for at least an hour to prevent smudging during the sealing process. -
Seal the deal:
Take the rock outside and spray it with a glossy clear acrylic sealer. This will protect your art from the elements and give the yellow a permanent wet-look shine.
Place your little sun in a garden patch or on a windowsill to brighten up even the cloudy days
BRUSH GUIDE
The Right Brush for Every Stroke
From clean lines to bold texture — master brush choice, stroke control, and essential techniques.
Explore the Full Guide
Sunflower and Wildflower Garden Rocks
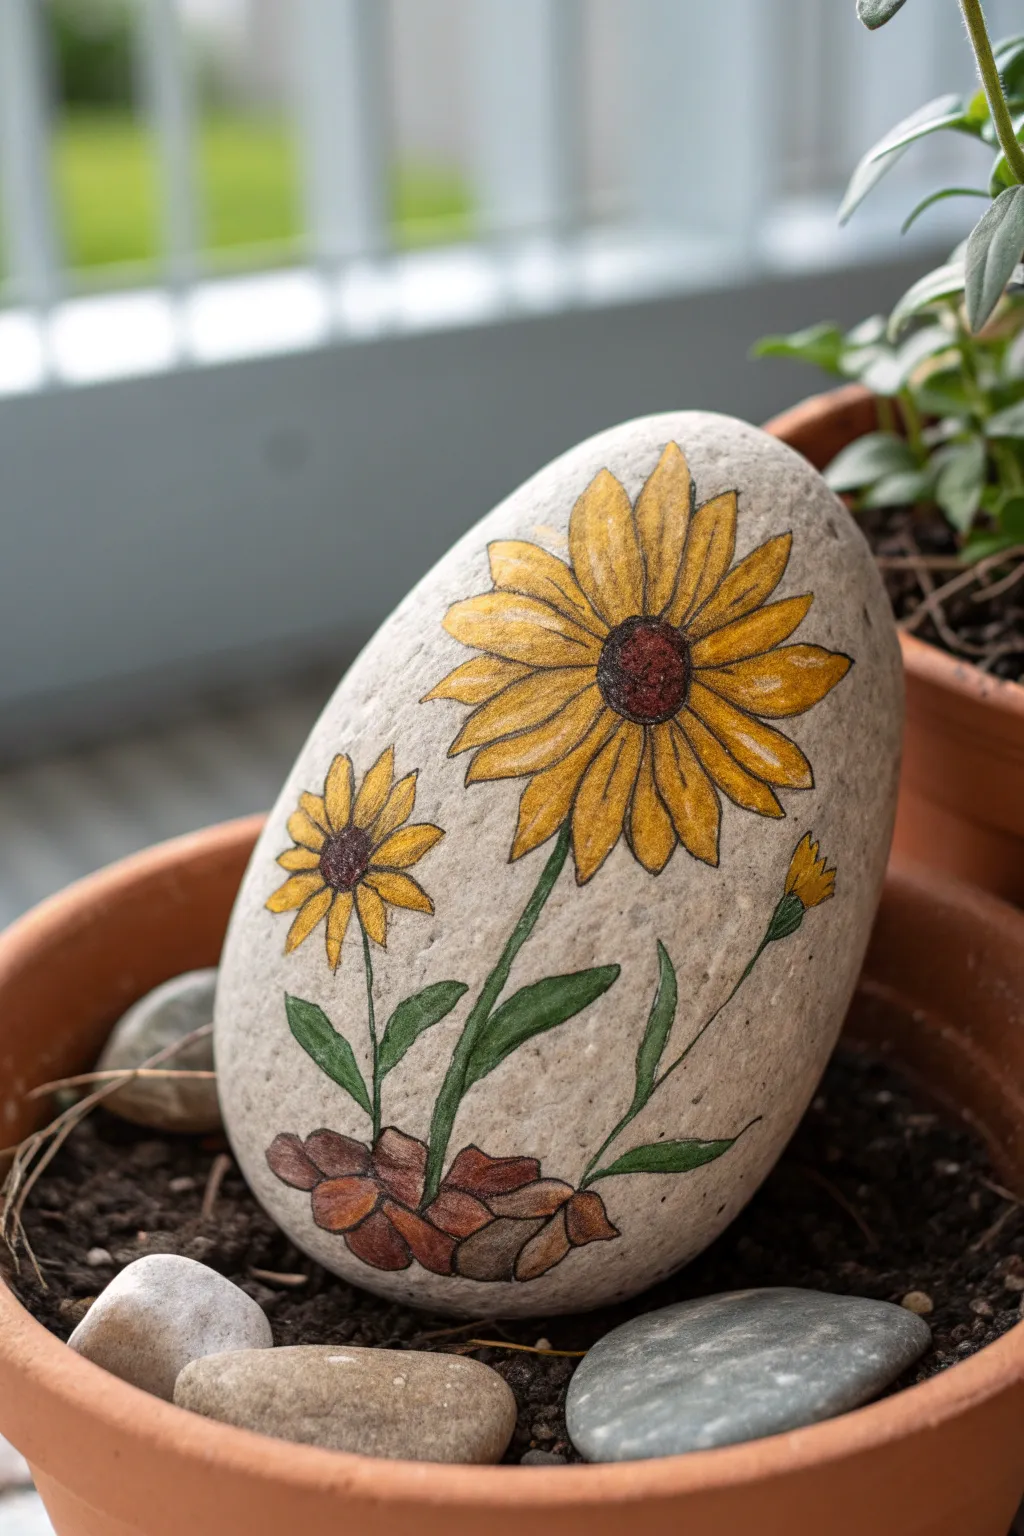
Bring a permanent burst of sunshine to your potted plants with this delightful sunflower rock. The style mimics a hand-drawn botanical sketch, using fine lines and shading to create a warm, rustic look that blends perfectly with nature.
Step-by-Step Tutorial
Materials
- Smooth, oval river rock (approximately 4-6 inches tall)
- Fine-grit sandpaper (optional)
- Pencil and eraser
- Fine-tip black permanent marker or paint pen (0.5mm or 0.7mm)
- Acrylic paint pens or acrylic paints (Yellow, Ochre, Brown, Dark Green, Light Green)
- Small detail paintbrush (if using bottle acrylics)
- Clear matte or satin sealant spray
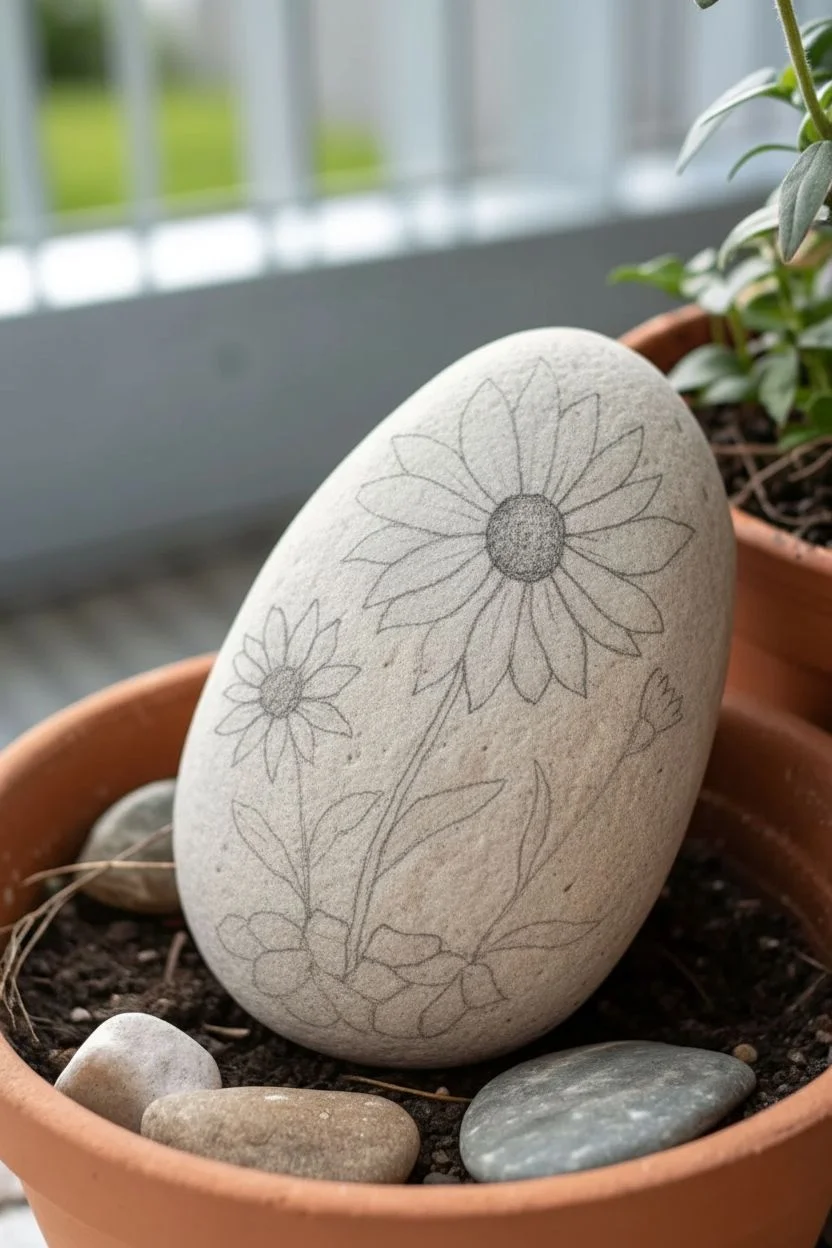
Step 1: Preparation & Sketching
-
Clean the canvas:
Scrub your rock with warm soapy water to remove any dirt or grease. Let it dry completely in the sun. If the surface is too bumpy, you can lightly sand it, but this design works well with natural texture. -
Position the main flower:
Using a pencil, lightly draw a circle for the center of the large sunflower in the upper right quadrant of the rock. -
Draft the petals:
Pencil in the petals around the center circle. Make them slightly irregular—some overlapping, some slightly bent—to give it a natural look. -
Add the smaller bloom:
Draw a smaller, similar flower shape on the lower left side. This one should be about half the size of the main sunflower. -
Connect the stems:
Draw slender stems curving down from both flowers towards the bottom center of the rock. Add a tiny bud on a stem leaning to the right. -
Ground the design:
Sketch a small cluster of rocks or soil at the very base where the stems meet, grounding your illustration.
Step 2: Outlining & Base Coloring
-
Ink the lines:
Trace over your pencil sketch with a fine-tip black marker or paint pen. Keep your hand loose; sketchy lines add to the charm here. -
Erase pencil marks:
Once the ink is 100% dry, gently erase any visible pencil guidelines to keep the artwork clean. -
Flower centers:
Fill the centers of the flowers with a dark brown paint. I like to stipple this (dotting motion) to create a seeded texture. -
Yellow wash:
Color in the petals with a bright yellow. It doesn’t need to be perfectly opaque; letting some of the rock’s grey show through helps with the sketched effect. -
Greenery base:
Fill the stems and leaves with a vibrant grass green color. -
Color the rocks:
Use shades of reddish-brown or terra cotta to color the stones at the base of the stems.
Pro Tip: Transparency
Don’t over-saturate the paint. If using acrylics, water them down slightly to act like watercolors, allowing the natural stone texture to remain visible.
Step 3: Shading & Texturing
-
Deepen the centers:
Add a reddish-brown ring inside the dark brown flower centers to give them depth and warmth. -
Add petal detail:
Using an ochre or darker yellow pen, draw thin lines from the center of the flower moving outward into each petal. This creates the ribbed texture. -
Shadowing the leaves:
Take a dark green pen and add a line down the center of each leaf. Add a little shading where the leaves attach to the stem. -
Define the rocks:
Add some darker brown shading to the cracks and undersides of the rock cluster at the bottom. -
Final outline touch-up:
If any paint covered your original black lines, go back over them lightly with your fine-tip black pen to crisp up the edges. -
Seal the art:
Once absolutely dry, spray the rock with a clear matte or satin sealant. This protects it from rain and sun damage if you place it outside.
Level Up: Bee Happy
Paint a tiny bumblebee hovering near the large sunflower. Use a small dot of yellow and two tiny white tear-drop shapes for wings to bring life to the scene.
Place your warm and cheerful creation in a garden pot to greet visitors with an eternal bloom
Ocean Wave Rocks With White Foam Lines
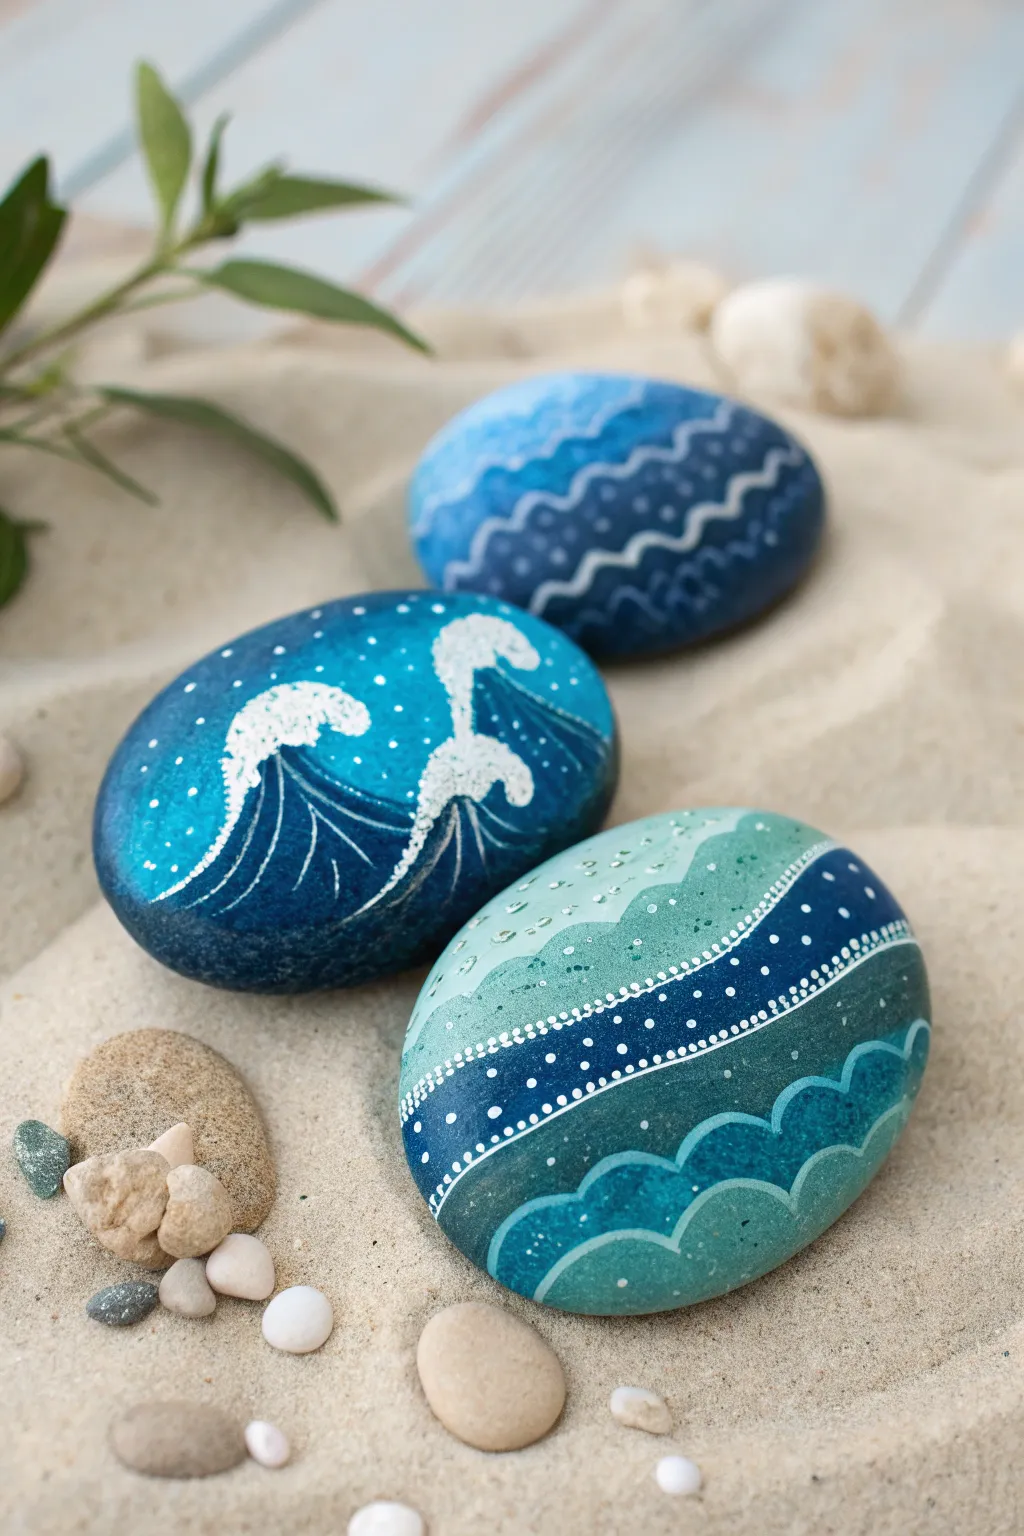
Capture the rhythm of the sea with these beautifully detailed ocean rocks, featuring crashing waves, delicate foam, and undulating patterns. This trio of designs ranges from abstract flowing lines to realistic cresting waves, perfect for bringing a piece of the beach home with you.
Step-by-Step
Materials
- Smooth, oval river rocks (approx. 3-4 inches wide)
- Acrylic paints (Dark blue, phthalo blue, turquoise/teal, white, light blue)
- Flat paintbrushes (medium and small)
- Fine detail liner brush (size 0 or 00)
- Dotting tools (various sizes)
- Spray gloss varnish or sealant
- Palette or paper plate for mixing
- Cup of water and paper towels
Step 1: Preparation & Base Coats
-
Clean the canvas:
Wash your rocks thoroughly with soap and water to remove any dirt or oils. Let them dry completely, preferably in the sun, to ensure the paint adheres properly. -
Prime the background:
For all three designs, start by painting a solid base color if your rocks are dark. A coat of white or light blue helps the subsequent blues pop, though painting directly on light-colored stones works too.
Paint Blobs?
If your white foam dots look too flat, wait for the first layer to dry and add a second dot on top. This builds 3D texture for realistic sea foam caps.
Step 2: Design 1: The Cresting Wave (Left Rock)
-
Establish the deep ocean:
Paint the entire surface of your first rock with a deep, rich phthalo, shading into unbleached titanium or lighter blue towards the top left to suggest light hitting the water. -
Outline the wave shape:
Using a small flat brush and a lighter blue mix, paint two large, curved triangle shapes rising from the bottom right to the top left. These are the bodies of your waves. -
Add movement:
With a liner brush and very light blue paint, draw thin, curved lines sweeping upward within the dark blue wave bodies. This mimics the water being pulled up into the crest. -
Create the foam cap:
Dip a small round brush or a large dotting tool into pure white paint. Stipple (tap repeatedly) along the top edge of your wave shapes to create the fluffy, churning sea foam. -
Detail the spray:
Use your smallest dotting tool or the tip of a toothpick to add tiny white dots floating around the foam caps, representing the sea spray flying off the wave.
Step 3: Design 2: The Patterned Tide (Top/Back Rock)
-
Create an ombré base:
Paint horizontal bands of blue across this rock, starting with dark navy at the bottom and gradually mixing in white as you move to the top for a gradient effect. Blend the wet edges for a smooth transition. -
Draw scalloped lines:
Once dry, use a liner brush with light blue or white paint to draw wavy, scalloped lines horizontally across the rock. I find it easier to pull the brush towards me rather than pushing it away. -
Add interior details:
Inside the darker blue bands, add small semi-circles or hash marks with a fine brush to mimic the texture of distant rippling water.
Add Sparkle
Mix a tiny amount of iridescent medium or fine silver glitter into your white paint for the wave crests to mimic sunlight glistening on the water.
Step 4: Design 3: The Geometric Current (Right/Front Rock)
-
Block out color sections:
Divide the rock into three organic sections using wavy lines. Paint the bottom section teal, the middle section a dark navy, and the top section a soft mint or light turquoise. -
Define the boundaries:
Use a liner brush and white paint to trace over the wavy lines where your colors meet. Make these lines deliberate and smooth. -
Dot the borders:
Using a small dotting tool, place a row of evenly spaced white dots along the interior of the navy blue band, following the curve of the wave. -
Add the bottom scallops:
On the bottom teal section, paint large, open semi-circles in a lighter teal shade to represent rolling swells near the shore. -
Texturize the top:
In the top light section, add very diluted transparent ‘bubbles’ or tiny dots to suggest effervescence on the water’s surface.
Step 5: Finishing Touches
-
Let it cure:
Allow all the rocks to dry completely. Acrylics dry fast to the touch, but giving them an hour ensures the thick white foam dots are solid all the way through. -
Seal the deal:
Spray the rocks with a high-gloss varnish. This not only protects your work from chipping but creates a ‘wet’ look that makes the ocean themes distinctively realistic.
Now you have a serene set of ocean-inspired stones to decorate your garden or desk

PENCIL GUIDE
Understanding Pencil Grades from H to B
From first sketch to finished drawing — learn pencil grades, line control, and shading techniques.
Explore the Full Guide
Palm Tree Sunset Silhouette Rocks
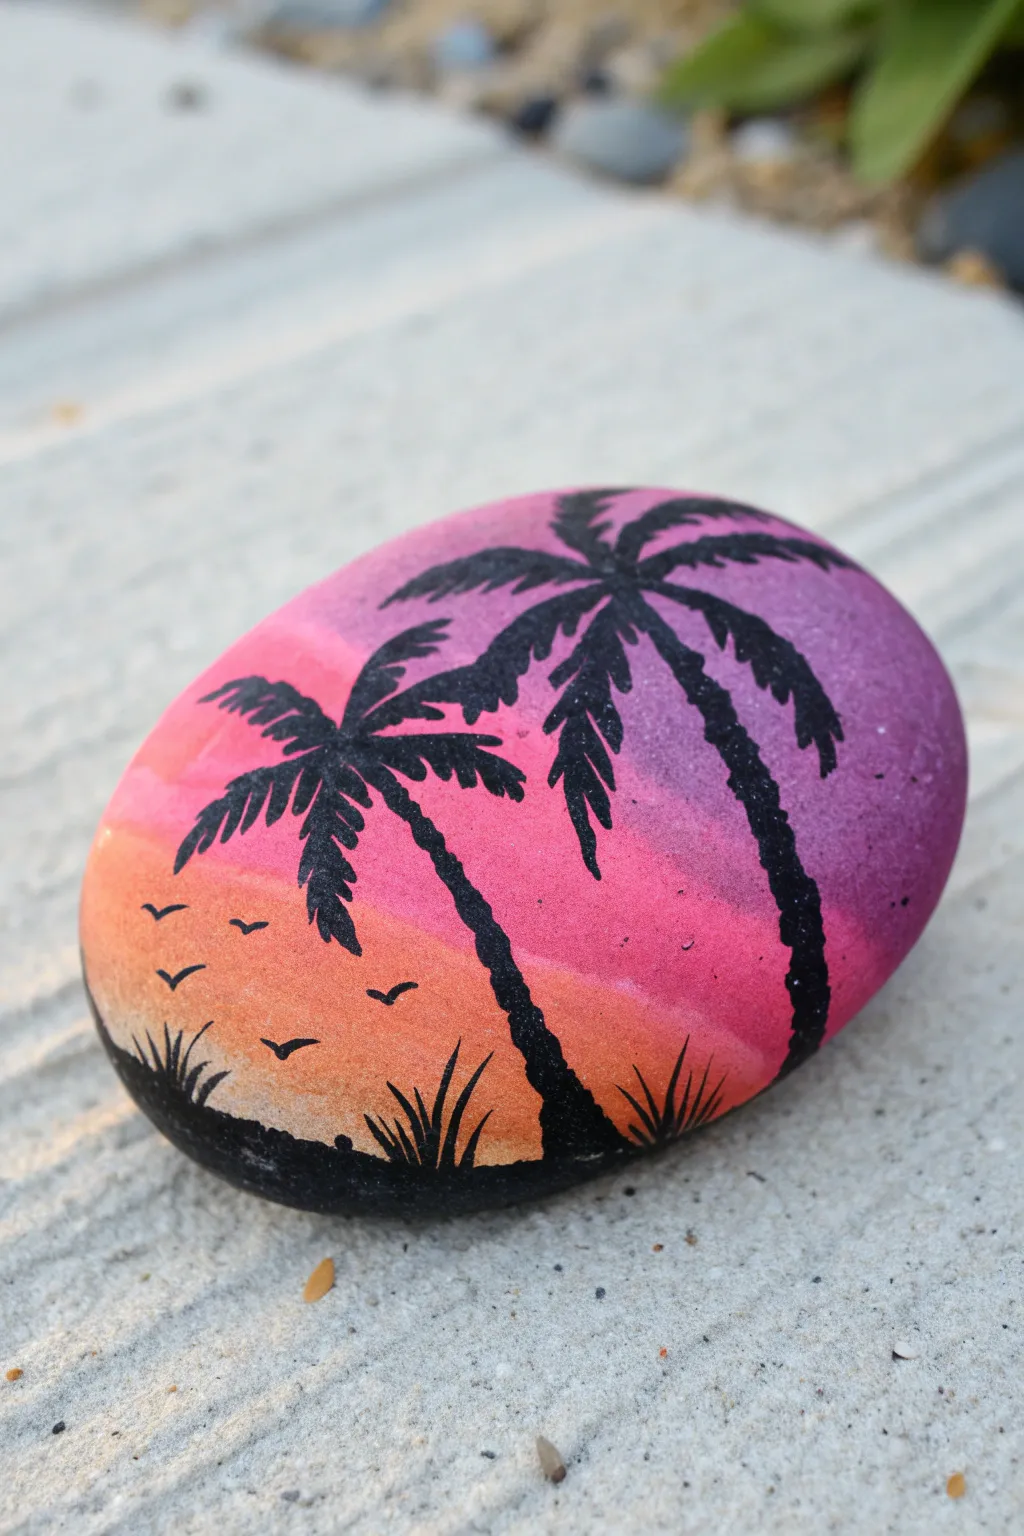
Capture the warmth of a summer evening with this vibrant sunset palm tree silhouette project. By blending warm acrylics into a seamless gradient, you’ll create a glowing backdrop for striking black silhouettes that really pop.
Step-by-Step Guide
Materials
- Smooth, oval-shaped river rock
- White acrylic paint (for priming)
- Orange acrylic paint
- Pink (magenta or hot pink) acrylic paint
- Purple acrylic paint
- Black acrylic paint or black paint pen
- Makeup sponge or sponge dabber
- Fine liner paintbrush (size 0 or 00)
- Small flat paintbrush
- Clear sealant spray or varnish
Step 1: Preparing the Canvas
-
Clean the surface:
Wash your rock thoroughly with soap and water to remove any dirt or oils, then let it dry completely. -
Prime the rock:
Using a flat brush, paint the entire top surface of the rock with a layer of white acrylic paint. This primer coat ensures your sunset colors will look bright and true rather than muddy against the dark stone.
Uneven Blending?
If your gradient looks blocky, lightly dampen your sponge (squeeze out all excess water!) before blending. The moisture helps the acrylics fuse together more smoothly.
Step 2: Painting the Sunset Gradient
-
Prepare the palette:
Squeeze out small amounts of orange, pink, and purple paint onto your palette. -
Apply the orange base:
Dip a corner of your makeup sponge into the orange paint and dab it onto the bottom third of the rock. Apply it thickly enough to cover the white primer. -
Add the middle pink layer:
Next, dab pink paint across the middle section of the rock using a clean part of the sponge. -
Blend the transition:
While both paints are still wet, lightly tap the sponge over the line where orange meets pink to create a soft, blurred transition between the colors. -
Apply the purple sky:
Add purple paint to the very top section of the rock, covering the remaining white space. -
Final smooth blend:
Use the sponge to tap gently between the pink and purple sections. I find that bouncing the sponge up and down slightly helps lock the gradient together without dragging the paint. -
Let it cure:
Allow the gradient background to dry completely before touching it with black paint. You can speed this up with a hair dryer on a cool setting if you’re impatient.
Add Sparkle
Mix a tiny amount of fine iridescent glitter into your clear sealant topcoat. It will make the ocean sunset shimmer as if the light is hitting the water.
Step 3: Adding the Silhouette Details
-
Paint the ground:
Use black acrylic paint and a small brush to paint a solid, slightly uneven strip along the very bottom edge of the rock to represent the shoreline. -
Draft the trunks:
Using a fine liner brush or a paint pen, draw two curved lines extending upward from the ground. Make the larger tree curve slightly right and the smaller tree curve left. -
Create palm centers:
At the top of each trunk, paint 5-7 curved lines radiating outward like the spokes of a wheel to serve as the main branches for the leaves. -
Detail the fronds:
With your finest brush or pen, make tiny flicks or short strokes hanging down from each branch line to create the feathery look of palm leaves. -
Add grass tufts:
At the base of the trees, flick your brush upward quickly starting from the black shoreline to create sharp, grassy spikes. -
Paint flying birds:
In the open orange space on the left, add three or four small ‘V’ shapes with extended wings to represent birds flying in the distance. -
Seal the artwork:
Once the black paint is bone dry, spray or brush a coat of clear sealant over the rock to protect the finish and give it a professional shine.
Display this little slice of paradise on your desk or hide it in a park for someone to find
Seashell and Starfish Beachcomber Rocks
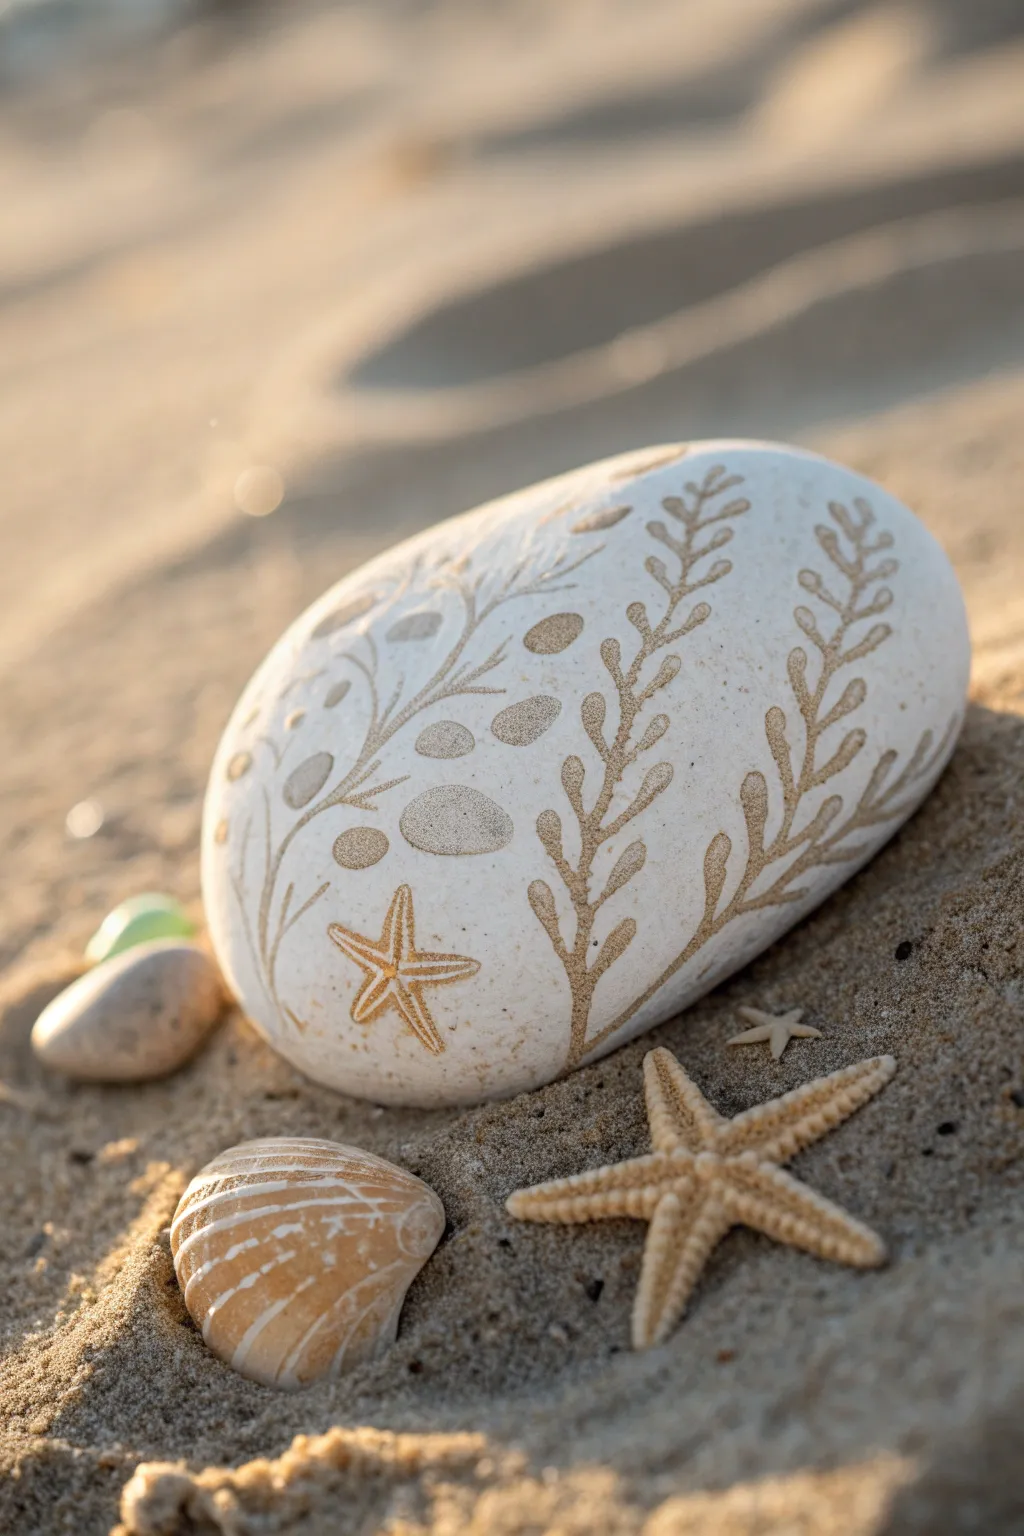
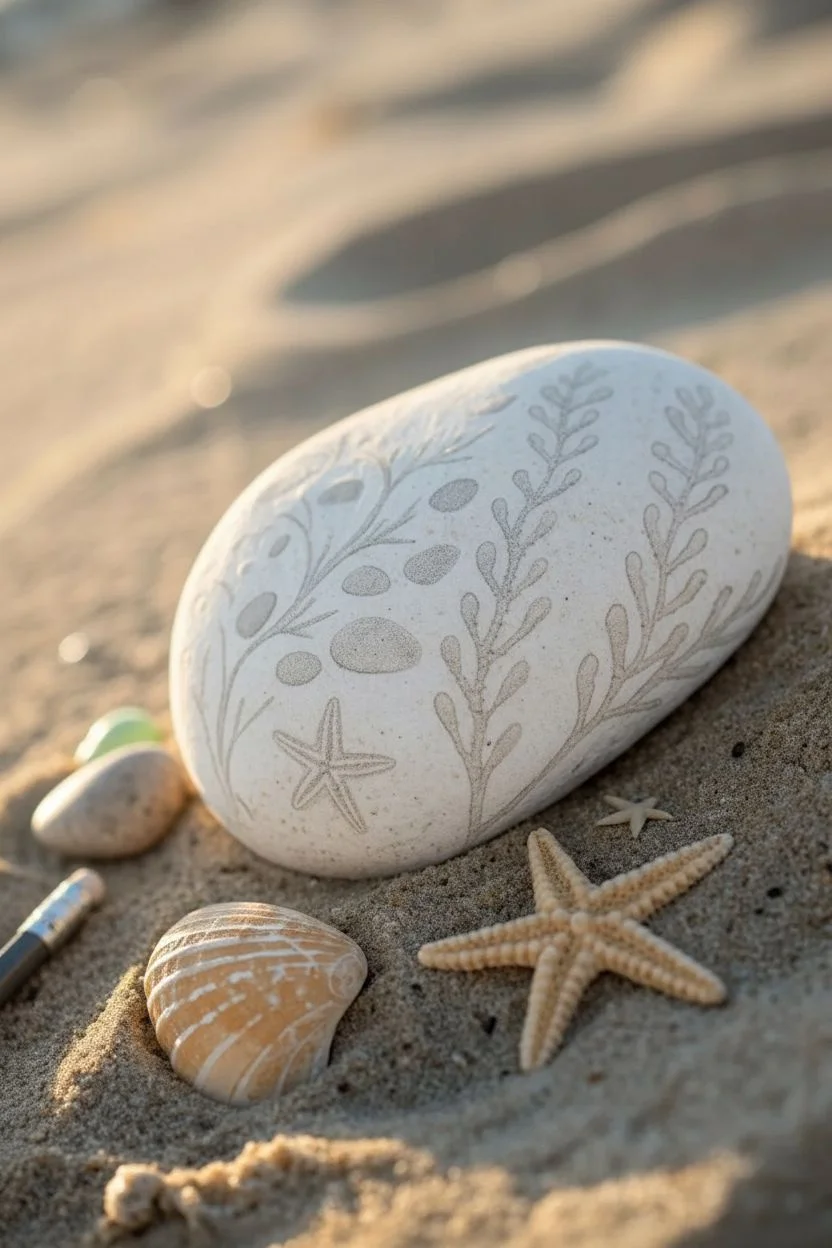
Capture the delicate beauty of a tide pool with this elegant rock art project. Using a smooth white stone as your canvas, you’ll create shimmering, fossil-like impressions of seaweed and starfish that gleam in the sun.
Step-by-Step Tutorial
Materials
- Large, smooth white river rock or beach pebble
- Pencil (HB or lighter)
- Metallic gold paint marker (fine point)
- Metallic gold paint marker (extra fine point)
- Burnishing tool or small rounded stylus (optional)
- Matte spray sealer
- Soft eraser
Step 1: Preparation & Sketching
-
Find the perfect canvas:
Begin by selecting a stone that is exceptionally smooth and light in color, preferably white or light grey. Wash it thoroughly with soapy water and let it dry completely to ensure the marker ink adheres properly. -
Plan the composition:
Visualize three main stalks of seaweed rising from the bottom edge of the stone. Imagine them swaying gently in the water, curving slightly to the left or right to fit the contours of your rock. -
Lightly sketch the stems:
Using your pencil, draw the central lines for the seaweed stems. Keep your pressure very light so the graphite doesn’t smear or show through the gold ink later. -
Add the leaves:
Sketch small, teardrop or oval-shaped leaves branching off the stems in pairs. Vary the sizes, making them smaller near the tips of the stems, just like real seaweed. -
Place the starfish:
Find an open spot near the base of the stems and sketch a small, five-pointed starfish. Keep the arms slightly curved to suggest movement and life. -
Fill the negative space:
In the open areas between the branches, lightly pencil in several circles of varying sizes to represent bubbles or small pebbles drifting in the current.
Ink Flow Fix
If the marker skips on the rock surface, press the tip on a scrap paper to re-saturate it. Don’t press hard on the rock itself, or you might flood the design with too much ink.
Step 2: Inking the Design
-
Start with the main stems:
Shake your fine point gold paint marker well. Carefully trace over the central stem lines first, using a confident, continuous motion to keep the lines smooth. -
Outline the leaves:
working from the bottom up, outline each individual leaf. Make sure the gold ink connects cleanly with the main stem you just drew. -
Fill in the foliage:
I like to switch to the extra fine marker here for more control. Gently fill the inside of the leaves with small stippling dots or tiny hatched lines rather than solid color; this creates a textured, ‘etched’ look. -
Create the starfish detail:
Outline your starfish sketch with the fine point marker. Then, draw a faint line down the center of each arm and add tiny dots along the edges to mimic the texture of a real sea star. -
Add dimension to the bubbles:
Outline the circles you sketched earlier. Instead of filling them in completely, use stippling (lots of tiny dots) concentrated on one side of the circle to create a shading effect. -
Intensify the texture:
Go back over key areas like the base of the stems and the starfish center with a second layer of dots or lines. This builds up the opacity and makes the gold really pop against the white stone.
Step 3: Finishing Touches
-
Let the ink cure:
Allow the gold paint to dry for at least 15 to 20 minutes. It needs to be completely set before you touch the stone again. -
Clean up sketch lines:
Once the paint is totally dry, gently use a soft eraser to remove any visible pencil marks. Be careful not to rub too hard over the painted areas. -
Seal the artwork:
Take the rock outside or to a well-ventilated area. Hold the can about 12 inches away and apply a light, even coat of matte spray sealer. -
Final cure:
Let the sealer dry completely according to the manufacturer’s instructions before displaying your beautiful beach treasure.
Add Subtle Shading
For a deeper etched look, use a very light beige or taupe colored pencil to add faint shadows underneath the gold leaves and starfish arms to make them lift off the stone.
Place your finished piece near a window where the sunlight can catch the metallic details throughout the day


Flip-Flop Pattern Rocks
Capture the essence of a sunny day at the shore with this cheerful painted rock featuring a pair of vibrant flip-flops resting on the sand. This project uses simple shapes and layering to create a mini vacation scene that fits right in the palm of your hand.
Step-by-Step Guide
Materials
- Smooth, oval river rock (cleaned and dried)
- White acrylic paint or gesso (for priming)
- Acrylic paints: teal/turquoise, coral red, orange, yellow, white, navy blue
- Pencil for sketching
- Fine liner brush (size 0 or 00)
- Small flat brush
- Dotting tool or toothpick
- Gloss varnish or sealer
Step 1: Preparing the Canvas
-
Prime the surface:
Start by coating the top surface of your clean rock with a layer of white acrylic paint or gesso. This ensures your vibrant beach colors will pop against the gray stone. Let this base coat dry completely. -
Block in the background:
Divide your rock visually into two sections. Paint the top two-thirds with a smooth coat of teal or turquoise paint to represent the water or a beach towel. -
Paint the sandy bottom:
For the bottom third, paint a creamy white or very light beige. Don’t worry about a perfectly straight horizon line; a slightly organic curve looks more natural. allow the background layers to dry fully before moving on.
Step 2: Sketching and Base Shapes
-
Sketch the outline:
Lightly sketch two oval shapes for the soles of the flip-flops using a pencil. Position them side-by-side, slightly angled away from each other for a casual look. -
Base coat the soles:
Fill in your sketched ovals with a solid coral red or salmon color. You may need two coats here to get opaque coverage over the background colors. -
Add the stripes:
Once the red base is dry, paint a wide band across the middle of each flip-flop sole using yellow and white. I like to alternate thin stripes of orange within this band to add detail and interest.
Uneven Dots?
If your polka dots look messy or uneven, let them dry, touch up with the base color, and try again using the flat end of a drill bit or a specialized ball stylus for perfect circles.
Step 3: Detailing the Flip-Flops
-
Outline the soles:
Using your fine liner brush and black or very dark grey paint, carefully outline the entire shape of each flip-flop sole to define them cleanly against the background. -
Paint the straps:
Draw an inverted ‘V’ shape starting from the top center of each sole, curving down to the sides. Paint these thick straps in a deep teal color, making sure the connection points look secure. -
Highlight the straps:
Mix a slightly lighter teal or add a touch of white to your strap color. Paint a thin line down the center of each strap to create a 3D effect, making them look rounded and rubbery. -
Add polka dots:
Dip a dotting tool or the tip of a toothpick into white paint. Add tiny polka dots to the red sections of the flip-flop soles (the heel and toe areas) for a cute patterned texture. -
Create shadows:
Mix a watery grey or diluted black paint. softly paint a shadow to the right side of each strap and underneath the soles on the ‘sand’ to ground the shoes so they don’t look like they are floating.
Add Realistic Sand
While the bottom white paint is still wet, sprinkle a tiny pinch of real fine sand or glitter onto it. Seal it in later with varnish for genuine texture.
Step 4: Atmospheric Touches
-
Decorate the background:
Return to your teal background area. Use your dotting tool and white paint to create scattered polka dots throughout the upper teal section, giving it a playful, bubbly texture. -
Add wavy sand lines:
On the bottom white section, paint horizontal, wavy lines using diluted orange or red paint. These mimic the ripples of sand or the edge of the tide coming in. -
Splatter texture:
Load a toothbrush or stiff brush with watered-down blue paint. Gently flick the bristles to create a fine mist of speckles over the bottom white area, resembling wet sand or sea spray. -
Final outline check:
Go over any outlines that may have gotten covered by the background texture. Ensure the straps have a thin black outline to make them stand out clearly. -
Seal the artwork:
Once absolutely everything is dry, apply a coat of gloss varnish. This protects your work from chipping and gives the water and flip-flops a freshly wet, shiny look.
Place your finished stone on a porch step or garden path to keep the summer spirit alive all year round
Tropical Leaf Rocks With Punchy Greens
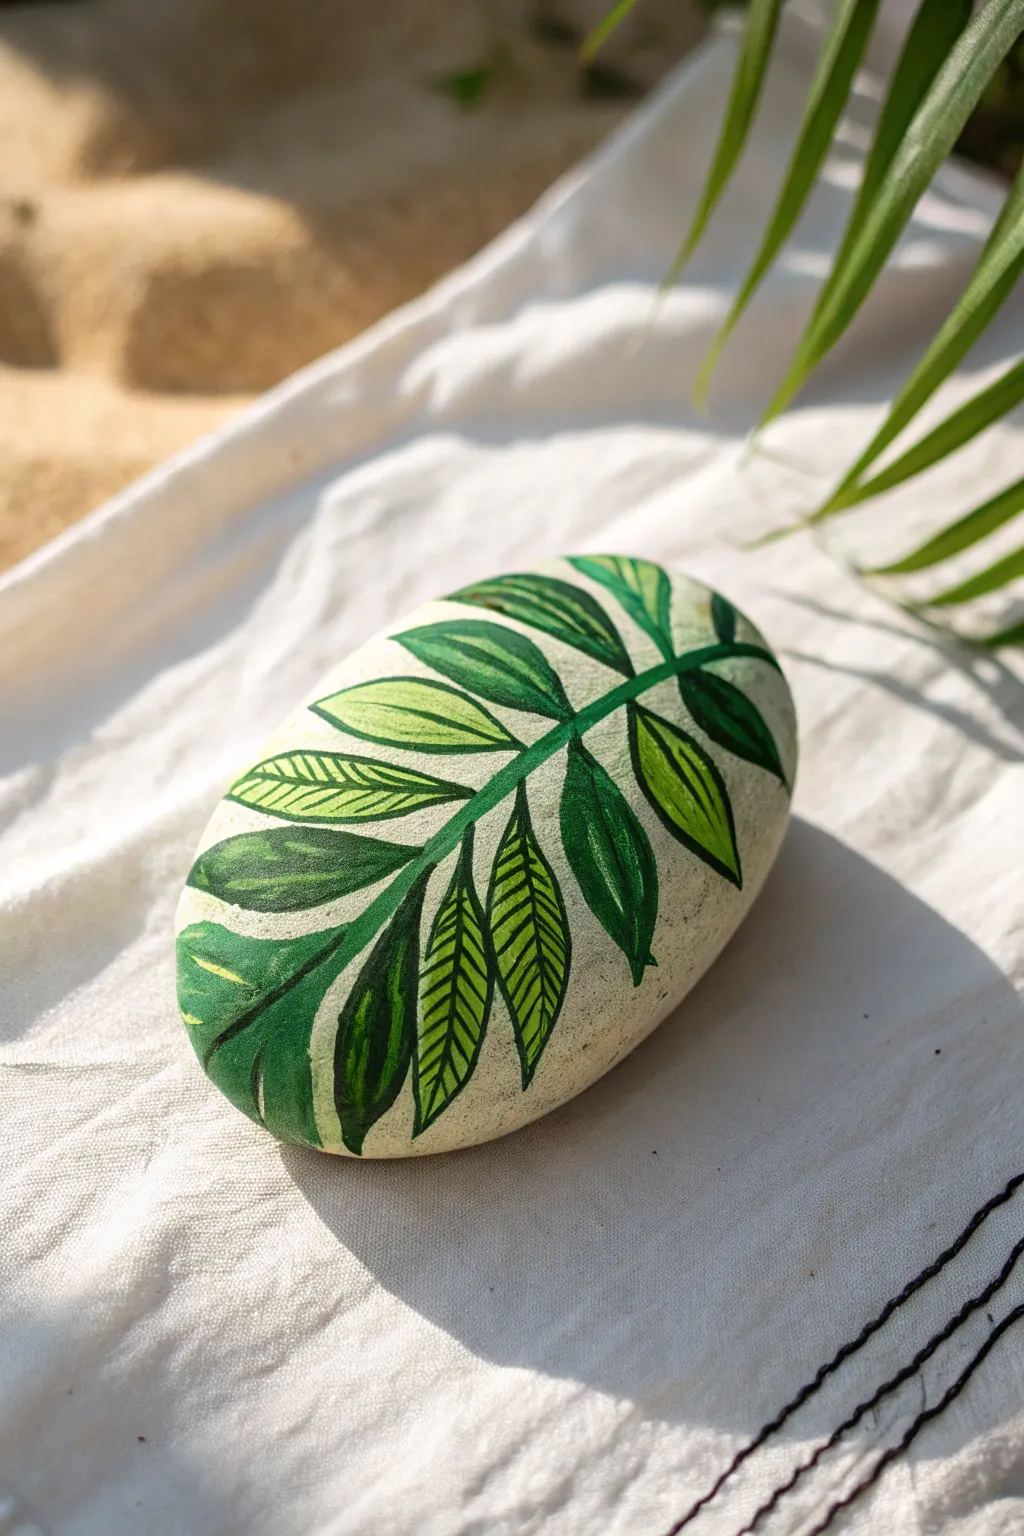
Bring the breezy vibes of a tropical island into your home with this simple yet striking botanical rock art. The contrast of punchy, vibrant greens against a smooth, pale stone creates a modern decor piece that feels fresh and summery.
How-To Guide
Materials
- Smooth, oval river rock (medium size)
- Acrylic paints: white, light beige/sand, dark forest green, lime green, medium leaf green
- Flat shader brush (size 6 or 8)
- Fine liner brush (size 0 or 00)
- Pencil for sketching
- Palette or mixing plate
- Cup of water and paper towels
- Matte or satin sealant spray
Step 1: Prepping the Canvas
-
Clean and Dry:
Start by scrubbing your river rock with warm, soapy water to remove any dirt or grit. Let it dry completely in the sun or with a cloth; moisture inside the stone can ruin your paint later. -
Base Coat Mixing:
Mix a generous amount of white acrylic paint with a single drop of light beige or sand color. You want an off-white, creamy tone that looks natural but provides a consistent canvas. -
Apply the Base:
Using a flat shader brush, coat the entire top surface of the rock. You might need two or three thin coats to get full opacity, letting each layer dry for about 10-15 minutes in between.
Step 2: Sketching the Frond
-
Establish the Spine:
Once the base is bone dry, take a pencil and lightly draw a curved line down the center of the rock. This will be the main stem (rachis) of your tropical leaf. -
Leaf Outline:
Sketch almond-shaped leaflets extending outward from the center spine. Vary the sizes slightly—make them smaller near the tip and larger towards the middle. -
Refine the Shapes:
Don’t stress about perfect symmetry; natural leaves have quirks. Ensure the tips of the leaves point slightly towards the top of the rock.
Clean Lines Hack
Work from the center stem outward. Turn the rock frequently as you paint so your hand is always pulling the brush stroke toward you, which gives you much steadier control over fine lines.
Step 3: Painting the Greens
-
Dark Green Foundations:
Load your fine liner brush with dark forest green. Use this to paint the central stem first, anchoring your design. -
Blocking in Solids:
Select a few scattered leaves to be solid dark green. Fill these in carefully, using the liner brush for crisp edges and the shader brush for the centers. -
Medium Tones:
Mix your medium leaf green. Paint a few other leaves in this solid color. I find alternating the colors creates a nice rhythm across the stone. -
Lime Green Highlights:
Finally, paint the remaining solid leaves with your bright lime green. If the lime is too transparent, mix in a tiny dot of white to boost opacity.
Go glam
For a luxe touch, swap the lime green paint for a metallic gold. Paint just one or two leaflets in gold to catch the sunlight and give the rock a chic, high-end finish.
Step 4: Adding Detail & Texture
-
Layering Veins:
Now for the fun part: adding the intricate details. On the solid light green leaves, use your dark forest green and the liner brush to paint thin, diagonal veins. -
Creating Contrast:
On the darker leaves, you can use the lighter green paint to add simple highlight lines down the center or along one edge. -
The Striped Effect:
For a stylized look, leave some leaves unpainted initially, then use the dark green to paint parallel diagonal lines directly over the cream background inside the pencil outline. -
Clean Up:
Check your edges. If any green went outside the lines, use a small brush with your base cream color to tidy up the perimeter. -
Final Dry:
Let the rock sit undisturbed for at least an hour to ensure the thickest parts of the paint are fully cured. -
Sealing:
Take the rock outside and spray it with a matte or satin sealant. This protects your hard work from scratches and UV fading.
Place your warm tropical artwork on a desk or windowsill to enjoy a splash of summer greenery all year round
Butterfly Rocks in Bright Summer Colors
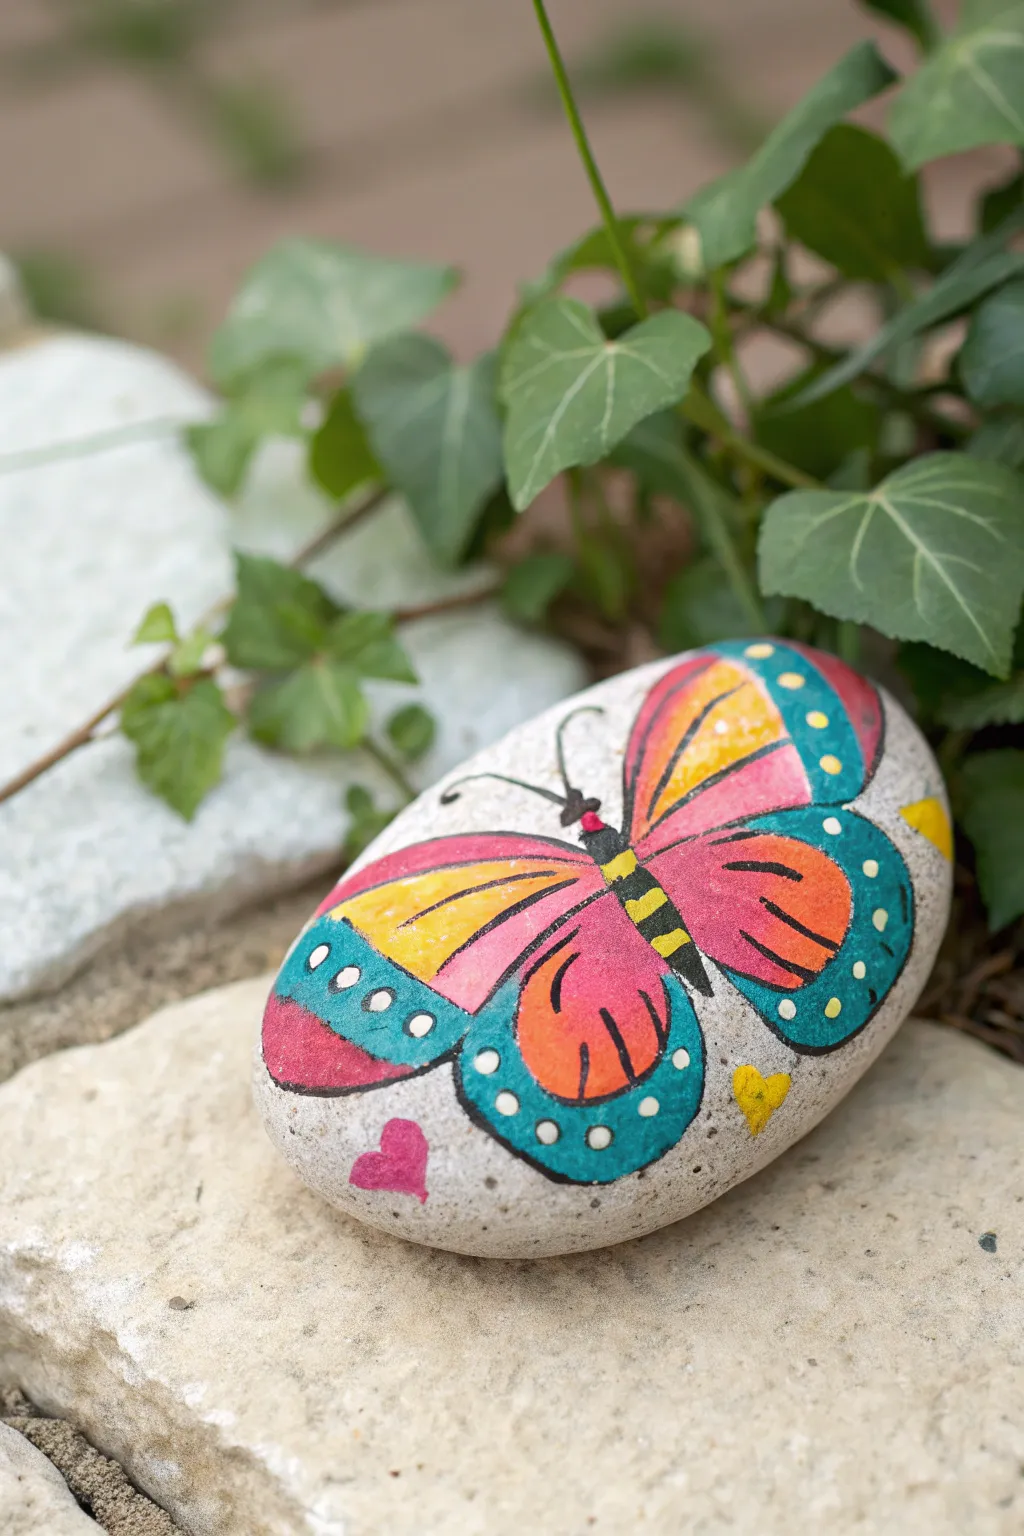
Capture the fluttering beauty of summer with this vibrant butterfly rock painting, featuring wings of hot pink, sunny yellow, and cool teal. This cheerful design is perfect for brightening up garden paths or hiding for neighbors to find on their daily walks.
Step-by-Step Tutorial
Materials
- Smooth, oval river rock (approx. 4-5 inches)
- Acrylic paints (White, Hot Pink, Bright Yellow, Orange, Teal/Turquoise, Black)
- Fine detail paintbrush (size 0 or 00)
- Small flat paintbrush (size 2 or 4)
- Paint pens (optional, for outlining)
- Pencil for sketching
- Clear acrylic sealant spray (gloss finish)
- Cup of water and paper towel
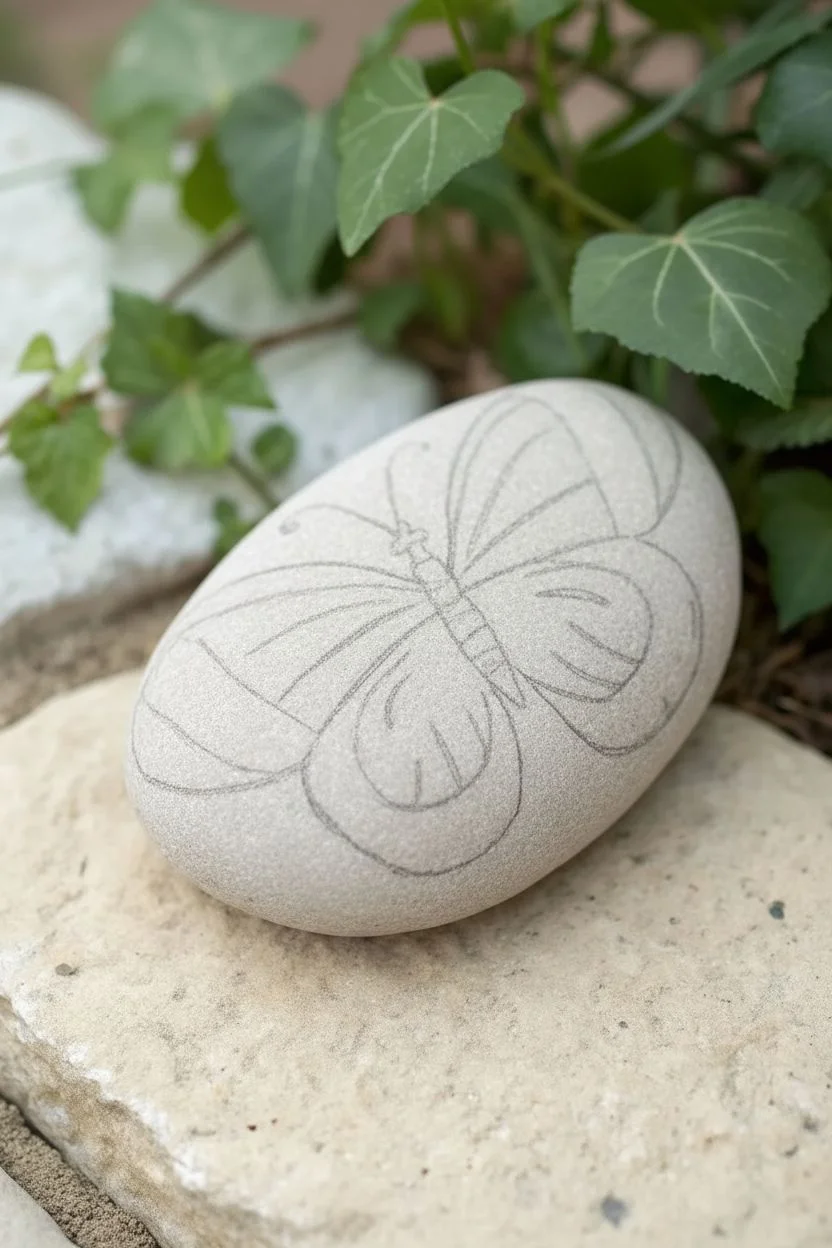
Step 1: Preparation & Sketching
-
Clean the canvas:
Begin by scrubbing your rock with soap and water to remove any dirt or grit. Let it dry completely in the sun before you start. -
Base coat consideration:
Since this rock is naturally a lovely light grey, you can leave the background raw for a natural look. If your rock is dark, paint a white oval in the center where the butterfly will go to make the colors pop later. -
Sketch the body:
Using a pencil, lightly draw a long, slender oval for the butterfly’s body in the center of the rock. Angle it slightly diagonally for a dynamic look. -
Outline the wings:
Sketch two large upper wings that curve upward and two slightly smaller, rounded lower wings. They should meet at the butterfly’s thorax.
Step 2: Painting the Wings
-
Start with pink:
Load your small flat brush with hot pink paint. Fill in the majority of the top wings and the inner section of the bottom wings, leaving space near the edges for other colors. -
Add sunny yellow:
While the pink is still slightly wet (or dry if you prefer sharp lines), paint a stripe of bright yellow along the upper edge of the top wings. -
Blend the orange:
Add a touch of orange between the pink and yellow sections on the top wing. You can gently blend these while wet to create a sunset gradient effect. -
Create the teal borders:
Using your teal or turquoise paint, carefully fill in the outer edges of all four wings. create a thick, scalloped border that hugs the pink sections. -
Fill the body:
Paint the central body of the butterfly black. Once dry, add thin yellow stripes horizontally across the abdomen for contrast.
Smooth Operator
If you struggle with shaky hands on the fine black outlines, rest your wrist on the table or use a Posca paint marker instead of a brush for better control.
Step 3: Detailing & Finishing
-
Outline the wings:
Switch to your finest detail brush or a black paint pen. Carefully outline the entire shape of the wings, separating the teal border from the inner pink colors with a thin black line. -
Add veins:
Paint thin black lines radiating from the body outward through the pink sections of the wings to resemble veins. -
Dot the edges:
Dip the non-brush end of your paintbrush into white or pale yellow paint. Dot small circles along the teal border of the wings for a decorative pattern. -
Antennae time:
Draw two thin, curved lines extending from the head for antennae. Add tiny curls at the very tips. -
Sweet extras:
Around the butterfly, paint a few small hearts. I like using leftover pink and yellow paint to tie the color scheme together. -
Seal to protect:
Once the paint is thoroughly dry (give it at least an hour), take the rock outside and spray it with a clear gloss sealant to protect it from weather.
Glitter Wing Upgrade
Before the sealant step, add a layer of clear glitter paint over just the pink sections of the wings to make your butterfly sparkle in the sunlight.
Place your colorful creation in the garden and watch it bring a smile to everyone who passes by
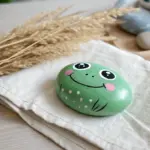
Bee, Ladybug, and Garden Bug Rocks


Brighten up your planters or walkway with this trio of charming garden bugs painted on smooth river stones. This project features a cheerful yellow bumblebee, a classic red ladybug, and a delicate flower scene that captures the essence of a sunny summer day.
Step-by-Step
Materials
- Smooth, flat river rocks (various shapes)
- Acrylic paints (yellow, red, black, white, green, silver/metallic grey)
- Posca paint pens or fine-tip acrylic markers (black, white)
- Assorted paintbrushes (flat shader, fine liner)
- Pencil and eraser
- Clear spray sealant or varnish (matte or gloss)
Step 1: Preparation & Base Coats
-
Clean the rocks:
Begin by scrubbing your stones with warm soapy water to remove any dirt or oils. Let them dry completely, ideally in the sun, to ensure the paint adheres properly. -
Paint the background colors:
For the bee rock, paint the entire surface with a bright, sunny yellow acrylic paint. You may need two coats for full opacity. -
Prime the ladybug rock:
Coat the ladybug rock with a solid layer of white paint. Since rocks can be porous, a slightly thicker second coat will create a smoother canvas for your details. -
Prep the flower rock:
For the rock featuring the flower and tiny bee, leave the natural stone color as the background. If your stone is too dark, you can paint a light grey coat instead to help the colors pop.
Uneven Paint Coverage?
If your yellow or white base coats look streaky, apply thin layers and let them dry completely between coats. Avoid glopping on thick paint, which can crack later.
Step 2: Painting the Bumblebee Rock
-
Outline the bee:
Once the yellow base is fully dry, lightly sketch the bee’s oval body shape and wings with a pencil. -
Add the stripes:
Using black paint or a thick black paint marker, block in the head and the thick stripes across the body. Leave yellow spaces between them. -
Wing details:
Paint the wings using a silver or metallic grey paint. If using regular grey, I like to mix in a tiny drop of white to make it look translucent. -
Legs and antennae:
Switch to your finest liners brush or a fine-tip black pen. Carefully draw the thin antennae curving from the head and the delicate legs extending from the body. -
Highlights:
Add a small white dot to the eye area for a ‘catchlight’ and use a fine black pen to outline the wings for definition.
Hidden Messages
Flip the rocks over and write sweet nature-themed messages like “Bee Kind” or “Nature Lover” on the bottom before sealing them for a fun surprise.
Step 3: Creating the Ladybug
-
Shape the body:
On your white rock, paint a large red oval in the center. This will be the ladybug’s shell. -
Head and line:
Paint a black semi-circle at the top of the red oval for the head. Draw a straight line down the center of the red oval to split the wings. -
Spots and legs:
Use a dotting tool or the back of a paintbrush to create firm, round black spots on the red shell. Paint six small legs extending outward, bent at the joints. -
Antennae details:
Draw two curved antennae coming from the head. Adding small circular tips at the end makes them look more cartoon-like and friendly.
Step 4: The Flower Scene Rock
-
Paint the stem:
On the natural grey stone, paint a green stem curving upward with a few leaves branching off. -
Add the daisy:
At the top of the stem, paint a yellow center dot. Surround it with small, teardrop-shaped white petals to form a daisy. -
Mini bee body:
Paint a tiny black oval near the flower or on a leaf to represent a small foraging bee. -
Mini bee stripes:
Once the black dot is dry, use a very fine yellow paint pen or a toothpick dipped in yellow paint to add two tiny stripes across the bee’s back.
Step 5: Finishing Touches
-
Dry completely:
Allow all the rocks to sit undisturbed for at least 24 hours to ensure the paint creates a hard shell. -
Seal the rocks:
Take the rocks outside and spray them with a clear acrylic sealer. This protects your artwork from rain and UV fading if you plan to keep them in the garden.
Place your new buggy friends among your potted plants or hide them in a park for others to find and enjoy
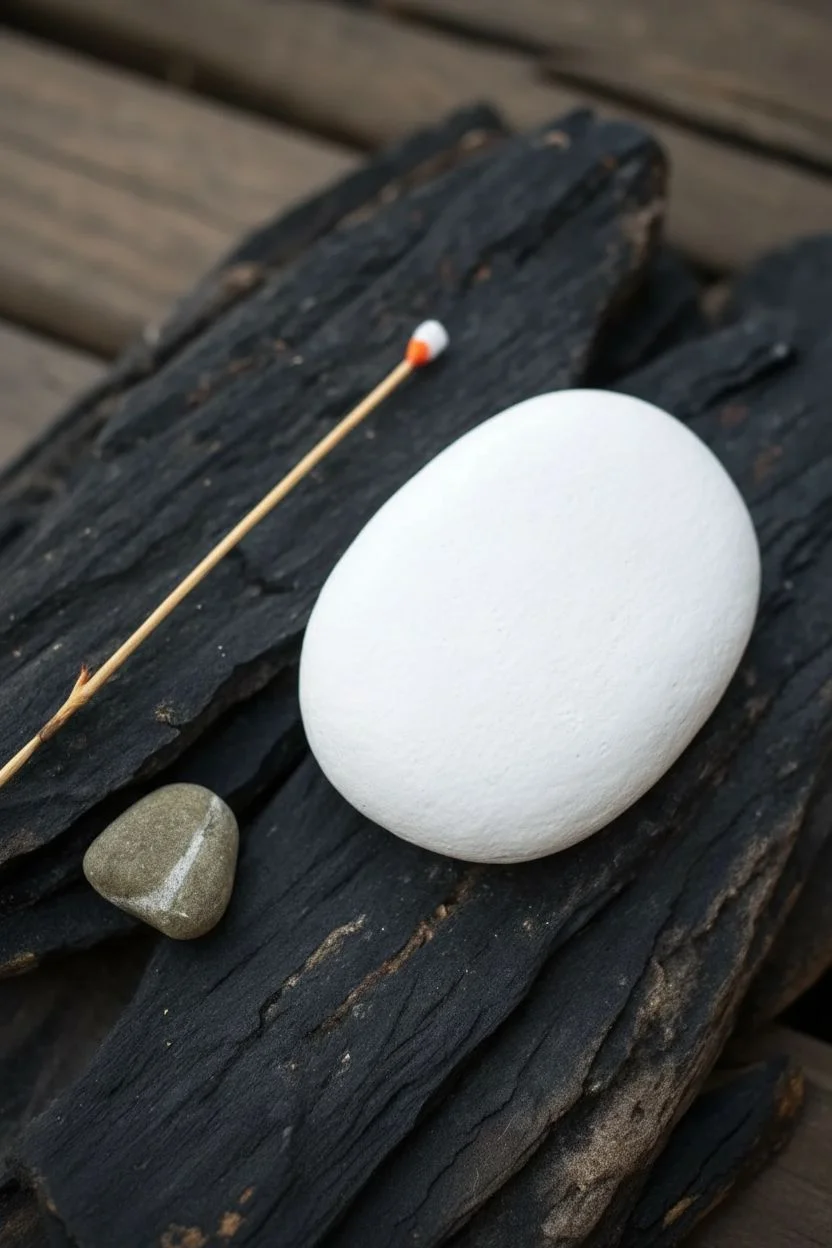
Campfire Night Rocks With Toasty Treats
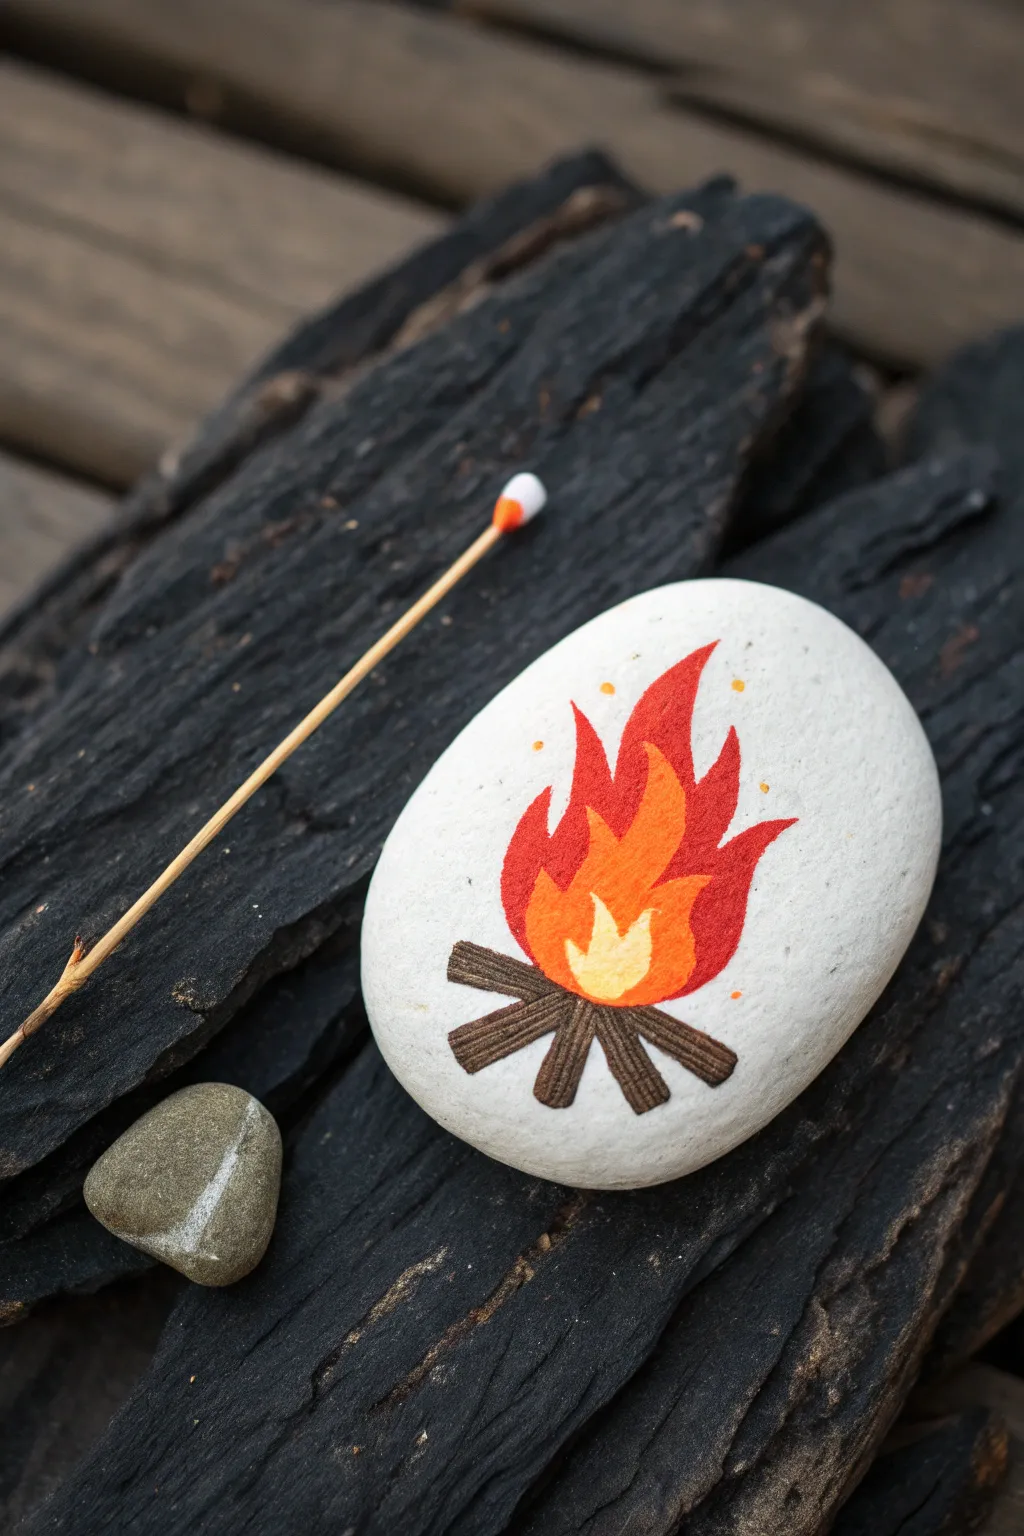
Capture the warmth of a summer bonfire with this adorable painted rock project featuring vibrant flames and rustic logs. Its high-contrast design on a smooth white stone makes it a perfect little decoration for your desk or mantelpiece.
How-To Guide
Materials
- Smooth, oval river rock (approx. 2-3 inches)
- White acrylic paint (base coat)
- Acrylic paints: Dark brown, mocha/light brown, bright red, orange, sunny yellow
- Fine detail paintbrush (size 0 or 00)
- Medium flat paintbrush
- Pencil for sketching
- Matte or satin sealant spray
Step 1: Preparation & Base Coat
-
Clean the Stone:
Begin by washing your rock with warm, soapy water to remove any dirt or oils. Let it dry completely before starting. -
Apply the Base Layer:
Using your medium flat brush, paint the entire top surface of the rock with white acrylic paint. This creates a bright canvas that makes the flame colors really pop. -
Add a Second Coat:
Once the first layer is dry to the touch, apply a second coat of white to ensure full, opaque coverage without streaks. Allow this to dry thoroughly.
Fixing Wobbly Lines
If your flame edges look uneven, wait for the paint to dry fully. Then, use white paint on a small brush to ‘cut back’ into the design and reshape the edges.
Step 2: Drafting the Design
-
Sketch the Outline:
Lightly sketch the campfire design onto the dried white surface with a pencil. Start with four logs radiating outward at the bottom, then draw the flame tiers above them. -
Define Flame Layers:
Within your flame outline, sketch three distinct zones: a large outer shape for the red, a smaller inner shape for the orange, and a tiny central teardrop for the yellow heart.
Glow In The Dark
Mix a little glow-in-the-dark medium into your yellow and orange paints. The fire will faintly glow after the lights go out for a real camping vibe.
Step 3: Painting the Flames
-
Paint the Outer Flame:
Load your fine detail brush with bright red paint. Carefully fill in the largest, outermost flame shape, keeping your edges crisp and sharp. I find it helps to rotate the rock as you navigate curves. -
Add the Middle Flame:
Once the red is slightly tacky or dry, fill in the middle flame section with bright orange paint. Cover the area completely so no white shows through. -
Create the Core:
Paint the smallest, central flame shape with sunny yellow paint. This represents the hottest part of the fire and adds dimension. -
Add Embers:
Using the very tip of your detail brush, dab a few tiny dots of orange and yellow floating above the main flame to simulate rising sparks.
Step 4: Painting the Logs
-
Base the Logs:
Fill in the four log rectangles with your dark brown paint. Ensure the tops of the logs tuck neatly under the bottom of the flame shape. -
Create Wood Grain:
Mix a tiny bit of white with your brown paint or use a mocha shade. Using your finest brush, paint straight, thin lines lengthwise down each log to mimic wood texture. -
Refine Edges:
If any paint overlapped where it shouldn’t have, use a touch of white paint to clean up the exterior edges of the design for a polished look.
Step 5: Finishing Touches
-
Let it Cure:
Allow the rock to sit undisturbed for at least an hour to ensure all paint layers are completely dry. -
Seal the Design:
Spray the rock with a clear matte sealant. This protects your artwork from chipping and keeps the white background looking fresh.
Enjoy the cozy atmosphere your painted campfire rock brings to your space
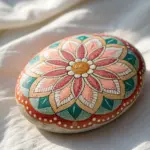
Neon Dot Mandala Rocks in a Summer Palette
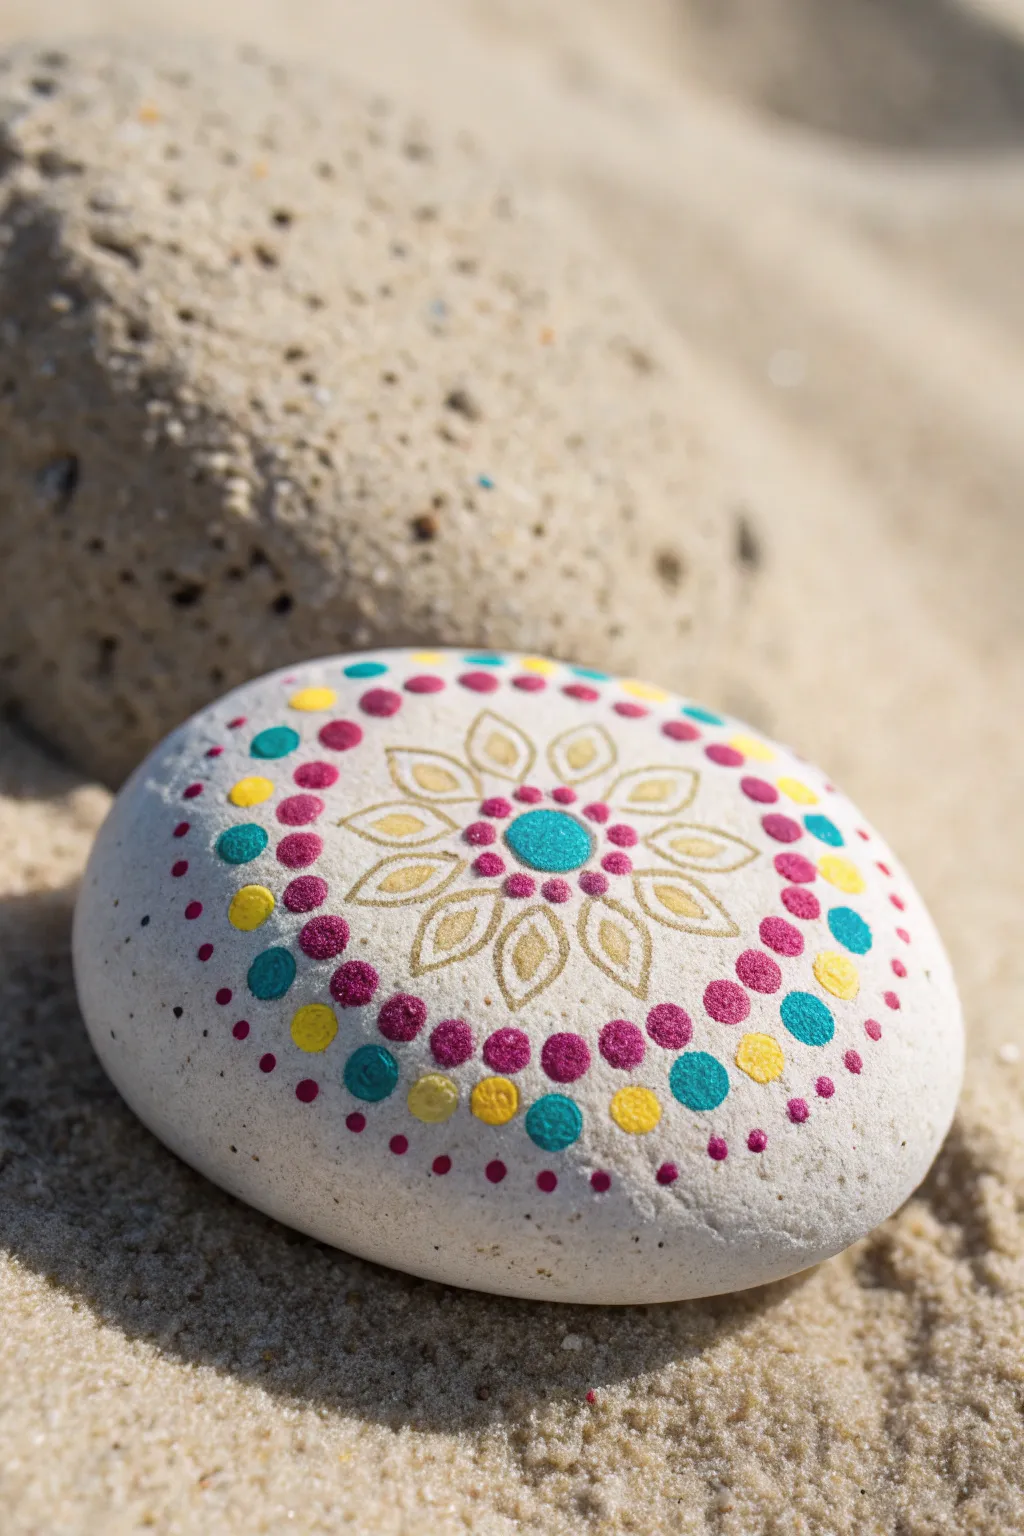

Capture the essence of a bright summer beach day with this elegant mandala stone. Featuring a delicate gold-outlined flower center surrounded by vibrant rings of teal, magenta, and sunny yellow, this design perfectly balances intricate linework with playful dotting.
Step-by-Step Tutorial
Materials
- Smooth, oval river rock (approx. 3-4 inches wide)
- White acrylic paint or gesso (for base coat)
- Metallic gold paint pen (fine tip/0.7mm)
- Acrylic craft paints: Teal/Turquoise, Magenta/Berry, Bright Yellow, Metallic Gold
- Dotting tools (various sizes, or improvised tools like toothpicks and brush ends)
- Matte or satin sealant spray
- Pencil and eraser
Step 1: Preparation & Base
-
Clean the Stone:
Begin by washing your stone with warm soapy water to remove any dirt or oils that might prevent paint adhesion. Let it dry completely in the sun. -
Priming:
Apply a coat of white acrylic paint or gesso to the smoother side of the rock. This creates a bright canvas that makes the neon colors pop. Let it dry, and add a second coat if the stone’s natural color is still showing through. -
Finding Center:
Lightly mark the center of your stone with a pencil. This small dot will be the anchor for your entire mandala design.
Oops! Dots merging?
If dots are running together, your paint is too thin or you’re placing them too fast. Let the inner ring dry for 5 minutes before starting the next ring.
Step 2: The Gold Flower Core
-
Drawing the Inner Petals:
Using your fine-tip gold paint pen, draw eight small, teardrop-shaped petals radiating from your center mark. Keep them close together but not quite touching in the middle. -
Adding Outer Petals:
Draw a second layer of slightly larger petals in the gaps between the first set. This creates a lovely blooming effect. I like to keep lines delicate here for a light, airy look. -
Inner Details:
Inside each of the larger outer petals, draw a smaller teardrop shape using the same gold pen. -
The Centerpiece:
Dip a medium-sized dotting tool into teal paint. Place a generous, perfect dot right in the center of your flower diagram. -
Accenting the Core:
Using a very small tool or toothpick, add tiny magenta dots in the v-shaped spaces between the inner ring of gold petals, hugging the central teal dot.
Textured Touch
For a tactile 3D effect, mix a drop of heavy gel medium into your acrylic paints to make the dots stand up physically like little jewels.
Step 3: Radiating Dot Patterns
-
First Ring – Magenta:
Load a small-to-medium dotting tool with magenta paint. Place a dot at the tip of each inner gold petal. Try to keep them uniform in size. -
Second Ring – Yellow:
Using bright yellow paint, place dots at the tips of the *outer* gold petals. These should align radially with the gaps of the inner ring. -
Third Ring – Alternating Colors:
This ring sits just outside the gold flower boundary. Use teal paint to place dots between the yellow ones, creating a wider circle that fully encases the flower motif. -
Building the Gradient:
Switch to magenta paint and a slightly larger dotting tool. Place a ring of dots outside the previous teal/yellow ring, focusing on tight spacing for a solid band of color. -
The Yellow Band:
Using the same tool size as the previous step, add a full ring of yellow dots. Nest them into the crevices of the magenta ring for a honeycomb-like fit. -
Teal Accents:
This is your largest dot ring. Dip a large dotting tool into teal paint. Place these impactful dots intermittently around the yellow ring—roughly every third or fourth space depending on your rock’s circumference. -
Filling the Gaps:
Fill the spaces between the large teal dots with smaller magenta dots to complete the circle. -
Final Outer Ring:
Using a very small tool and magenta paint, add a dainty final ring of small dots around the outer edge to gently fade the design into the white background.
Step 4: Finishing Touches
-
Cleanup:
Once the paint is bone dry, gently erase any visible pencil marks from the center or guidelines you may have made. -
Seal and Protect:
To preserve your beachy masterpiece against the elements, spray the rock with a clear matte or satin sealant. Let it cure fully before moving it.
Place your finished mandala on a sunny windowsill or hide it at the beach for a stranger to find


Have a question or want to share your own experience? I'd love to hear from you in the comments below!