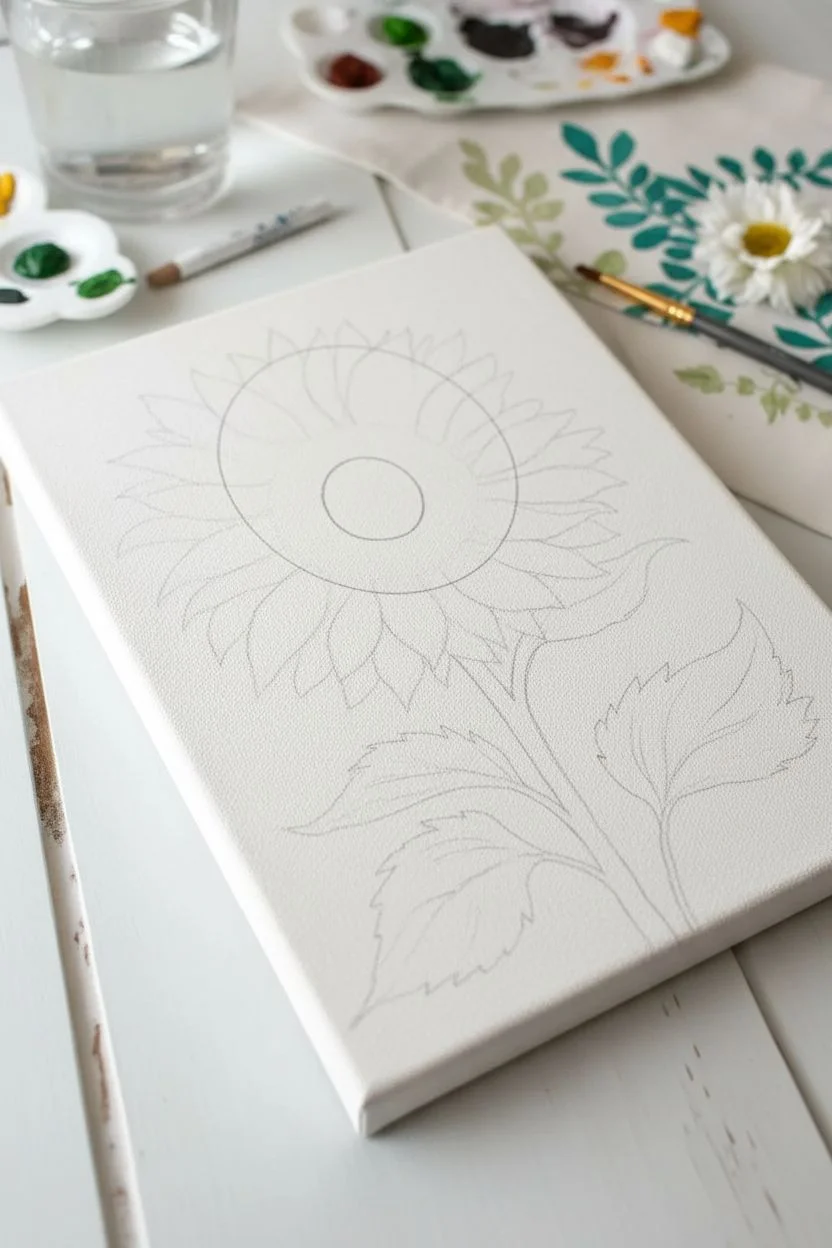
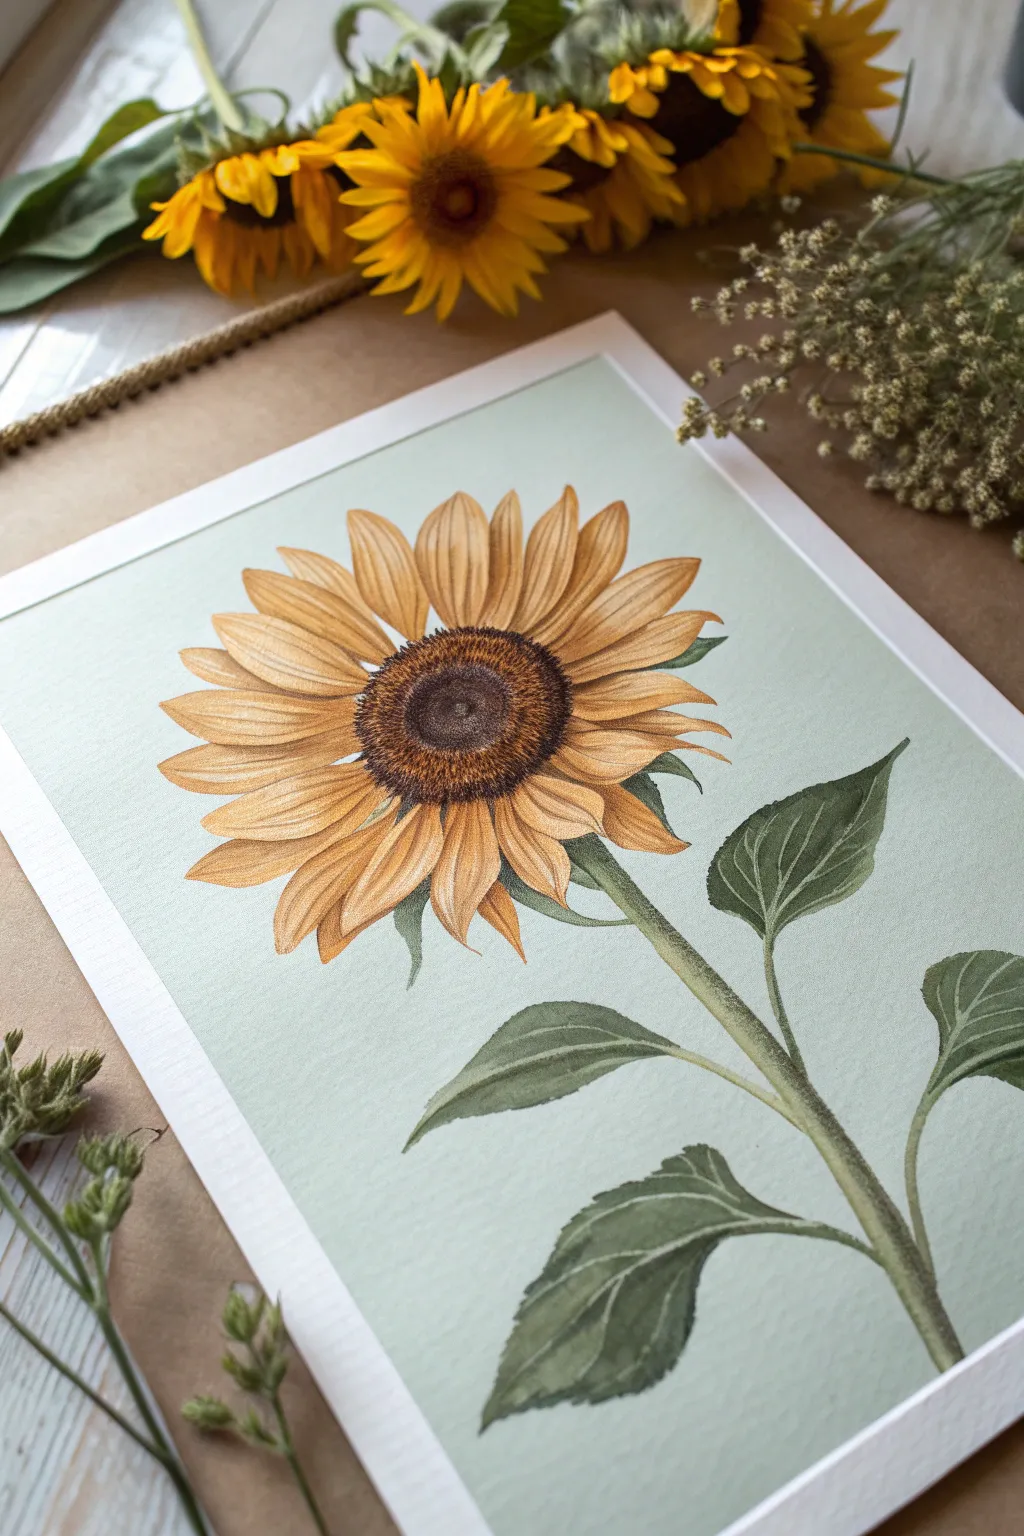
Sunflowers are my favorite subject when I want something cheerful, bold, and instantly recognizable on the page. Here are sunflower painting ideas I’d totally pull out in a studio session—starting classic and easy, then getting more playful as we go.
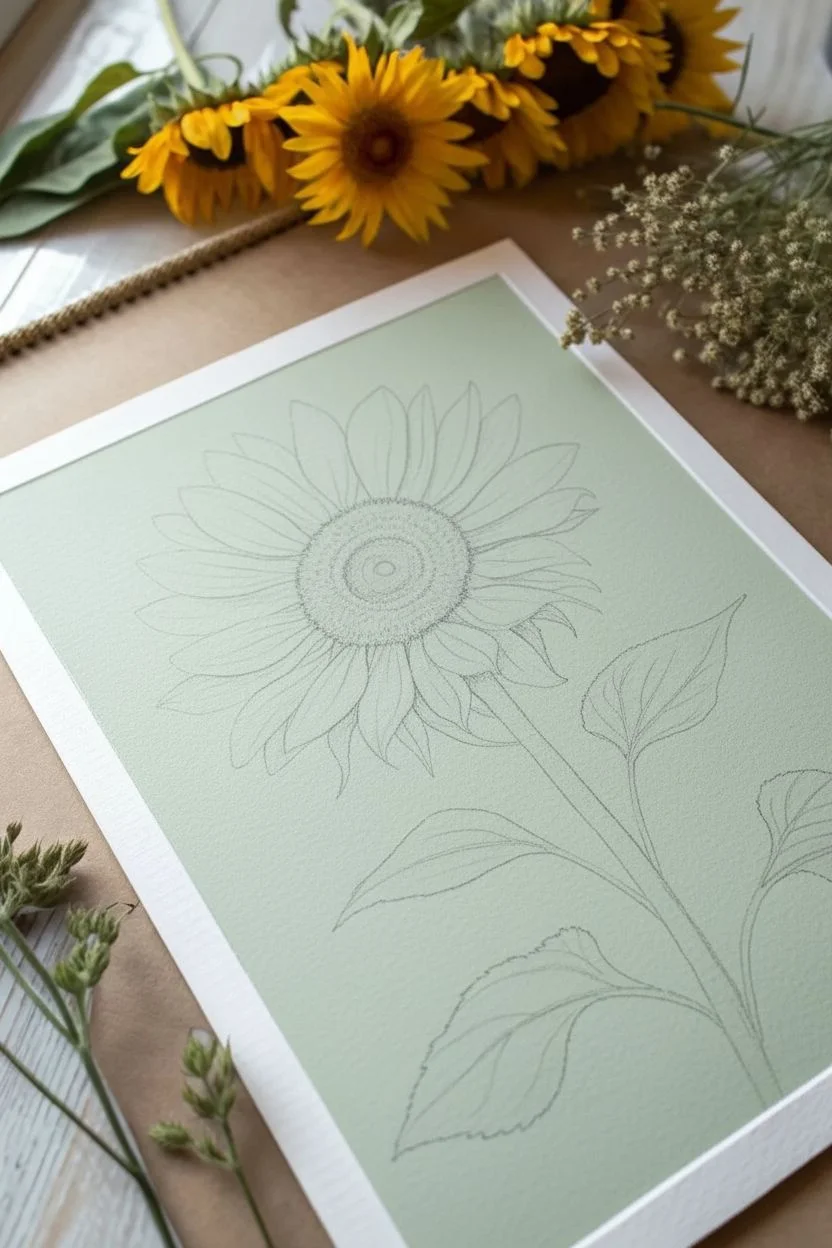
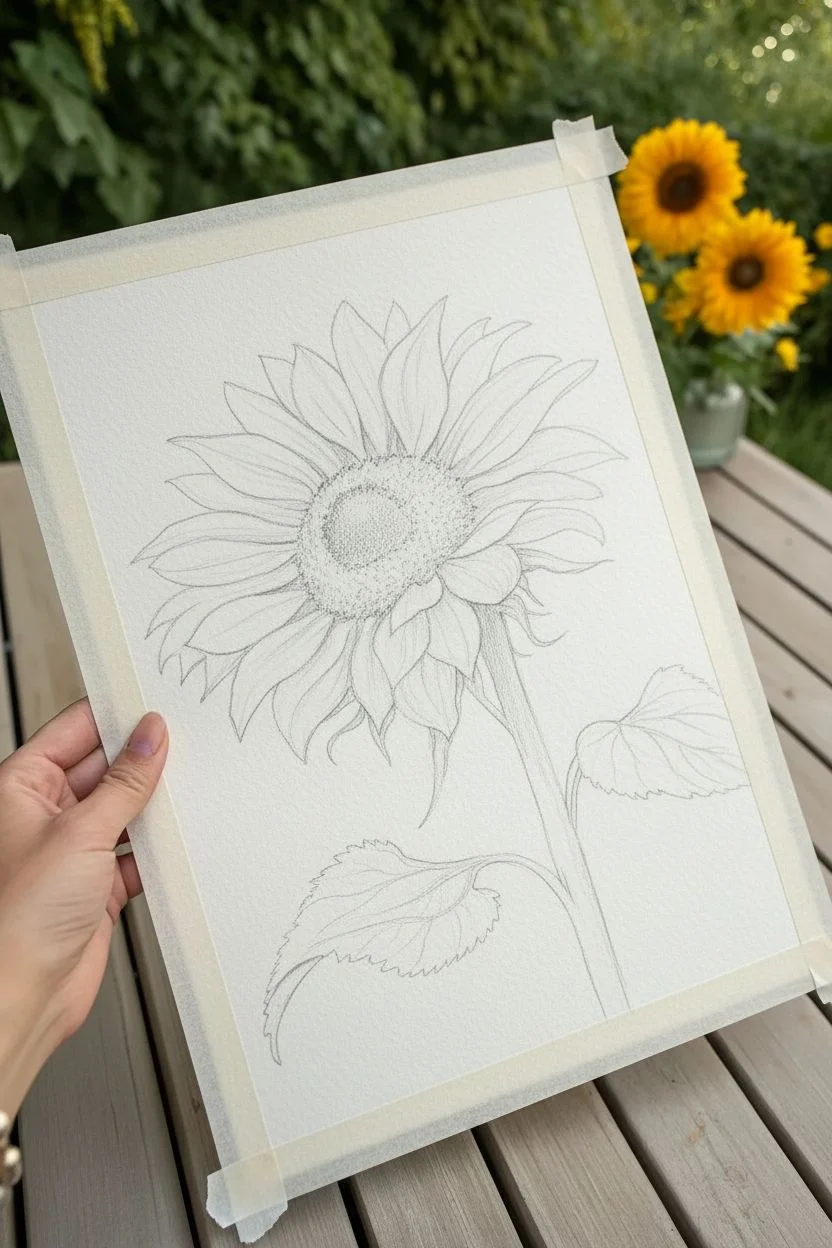
One Stem, One Bloom: Easy Sunflower on a Neutral Background
Capture the delicate warmth of late summer with this elegant single-stem sunflower study. Using watercolor to build subtle layers, you’ll create a piece that feels both botanical and wonderfully free-form, perfect for displaying on a standing card or framing.
How-To Guide
Materials
- Cold-pressed watercolor paper (300 gsm recommended)
- Watercolor paints (Yellow Ochre, Cadmium Yellow, Burnt Umber, Burnt Sienna, Sap Green, Hooker’s Green)
- Round brushes (flats for washes, precision rounds sizes 2, 4, and 6)
- Pencil (HB or 2H for light sketching)
- Kneaded eraser
- Two jars of water
- Paper towels or a cotton rag
- Masking tape (optional, to secure paper)
Step 1: Sketching the Structure
-
Map the center:
Begin by lightly sketching an oval for the sunflower’s center. Position it slightly above the middle of the paper, tilting it just a bit to the right to give the flower a natural, gazing posture. -
Outline the petals:
Around the central oval, sketch two rows of petals. Draw the front petals as jagged, leaf-like shapes pointing outward. Add a second layer of petal tips peeking out from behind the first layer to create volume. -
Draw the stem and leaves:
Extend a curved line downwards from the flower head for the stem. It shouldn’t be perfectly straight; a slight organic S-curve adds life. Add pairs of leaves moving down the stem—one set high near the bloom, another in the middle, and a larger pair near the base. -
Refine the sketch:
Go over your sketch to clean up lines. Use a kneaded eraser to lift off excess graphite until the guide is barely visible, ensuring the pencil marks won’t dirty your yellow paint later.
Preserve the Highlight
Leave a tiny triangular sliver of unpainted white paper on the top edge of the brown center. It mimics light hitting the seeds and instantly makes the flower look 3D.
Step 2: Painting the Bloom
-
Base wash for petals:
Mix a watery wash of Yellow Ochre and lightly fill in the petals. Don’t worry about staying perfectly inside the lines or covering every white spot—leaving some white paper creates lovely highlights. -
Add petal definition:
While the first layer is still slightly damp, drop in touches of Cadmium Yellow near the base of the petals (where they meet the center). This wet-on-wet technique adds a natural gradient. -
Shadows and depth:
Once the yellow is dry, mix a tiny bit of Burnt Sienna with your yellow to create a golden-brown tone. Use a size 4 brush to paint thin lines or veins on the petals and deeper shadows where petals overlap. -
Texture the center:
For the seed head, mix Burnt Umber with a touch of purple or dark blue to get a deep, rich brown. Stipple the paint onto the center oval using the tip of your brush to mimic the seed texture. -
Darken the core:
While the center is damp, drop concentrated dark brown into the very middle and the lower left edge of the seed head. This creates a rounded, 3D effect.
Muddy Petals?
If your yellow petals look dirty, you likely painted the brown center before the petals were dry. Make sure the yellow is 100% bone dry before letting brown paint touch it.
Step 3: Stems and Leaves
-
First green wash:
Mix Sap Green with plenty of water. Paint the entire stem and fill in the leaf shapes with this pale, translucent green. -
Adding leafy shadows:
Before the green fully dries, drop cooler, darker Hooker’s Green into the shadowed areas of the leaves—usually the underneath sides or where the leaf twists. -
Defining the sepals:
Paint the small, green leafy bits (sepals) directly under the yellow petals. Use a darker green here to create strong contrast against the bright yellow. -
Leaf detailing:
Let the greenery dry completely. Take a fine liner brush (size 2) and a mix of green and brown to paint delicate veins on the leaves. Keep your hand loose so the veins look organic, not stiff. -
Stem texture:
Run a thin line of darker green along one side of the stem (the shadowed side) to give it cylindrical form.
Step 4: Final Touches
-
Review contrast:
Step back and look at your painting. If the center looks too flat, stipple in a few dots of almost black paint. If the petals need separation, add very thin lines of diluted orange-brown. -
Soften edges:
I find that occasionally a hard edge can look distracting. If any shadow lines look too harsh, use a clean, damp brush to gently scrub and soften them. -
Protect the surface:
Since watercolor is fragile, if you plan to display this without glass, consider a light mist of fixative once completely dry to protect against humidity.
Now that your sunflower is complete, find a bright spot on a desk or shelf to let its cheerful energy shine.


Stippled Seeds: A Super Textured Sunflower Center
This project combines the delicate precision of stippling with warm, earthy washes to create a stylized sunflower that feels both botanical and illustrative. The result is a highly textured piece where the center becomes a mesmerizing focal point of tiny, meticulous dots.
Step-by-Step Guide
Materials
- Heavyweight watercolor paper (300gsm cold press, subtle texture)
- Fine liner pens (Black, sizes 0.1, 0.3, and 0.5mm)
- Watercolor paints (Yellow Ochre, Burnt Sienna, Raw Umber, Sap Green)
- Round watercolor brush (size 6 or 8)
- Pencil and eraser
- Compass or circular object (optional for the center)
Step 1: Sketching the Framework
-
Define the Center:
Start by lightly sketching a perfect circle in the upper-middle section of your paper. Inside this, sketch two smaller concentric circles. This creates three distinct zones: the dark central seed head, the lighter middle ring, and the outer rim where the petals attach. -
Draft the Petals:
Draw the petals radiating outward from the center. Make them slightly pointed and overlapping. Aim for two layers: a front layer of full, broad petals, and a back layer of petal tips peeking out between them for depth. -
Add the Stem:
Curving gently from the bottom edge, sketch a thick stem that connects to the flower head. Add a single leaf branching off the side to balance the composition.
Patience is Key
Don’t rush the stippling! Hold your pen vertically and tap gently. Slanted strokes create tiny dashes, not dots, which ruins the texture effect.
Step 2: Inking the Details
-
Outline the Petals:
Using your 0.3mm fine liner, carefully ink the outlines of your petals. Use a confident, continuous line rather than sketchy strokes. Ink the stem and leaf leaf outlines as well. -
Stipple the Dark Center:
Switch to a 0.5mm pen for the innermost circle. Fill this area densely with dots. The dots should be very close together, creating a nearly solid black appearance that lightens slightly towards the edge of this inner zone. -
Create the Middle Ring:
For the middle ring of the center, use the 0.3mm pen. Place simple, evenly spaced dots in a radial pattern. Leave plenty of white space here; this area serves as a lighter highlight between the dark center and the dark outer rim. -
Texture the Outer Rim:
The outermost ring of the center needs a medium density. Using the 0.1mm pen, create a gradient that is darker near the petals and lighter near the middle ring. This adds a three-dimensional curvature to the seed head. -
Decorative Stem Details:
For a whimsical touch, add a trail of dotted lines following the curve of the stem on either side, like floating pollen or energy lines. Ink the small spots on the stem itself.
Step 3: Adding Washes of Color
-
Base Layer for Petals:
Mix a watery wash of Yellow Ochre. Paint the petals, starting from the center and pulling the color outward. Let the paint pool slightly at the base of the petals for natural shading. -
Back Layer Shading:
For the petals in the background layer (the ones peeking through gaps), use a mix of Burnt Sienna and Yellow Ochre. This darker, reddish-brown tone pushes them visually behind the brighter front petals. -
Texturizing the Petals:
While the petal wash is still slightly damp, I like to drop in tiny speckles of concentrated Burnt Sienna near the base of each petal. The wet paper will diffuse the dots slightly, creating that lovely grainy texture seen in the reference. -
Coloring the Center:
Once the ink is fully dry, apply a very light wash of Yellow Ochre over the middle ring of the center. Use a watered-down Raw Umber for the outer ring to tint the paper without obscuring your ink dots. -
Painting the Stem:
Use Sap Green mixed with a touch of Raw Umber for the stem to keep it earthy rather than vibrant green. Paint the stem, avoiding the small decorative spots if you want them to remain light, or paint over them for a subtle look. -
Final Contrast Check:
Once everything is bone dry, use your 0.1mm pen to go back over any stippled areas that got washed out by the paint. Add a few more crisp dots to the petal bases to reinforce the connection to the center.
Salt Texture Hack
Sprinkle table salt on the wet petal paint. Let it dry completely, then brush it off. It creates stunning, organic starburst textures effortlessly.
Frame your piece without glass initially to really appreciate the tactile difference between the smooth paper and the raised ink texture


Loose Brushstroke Sunflower With Painterly Petals
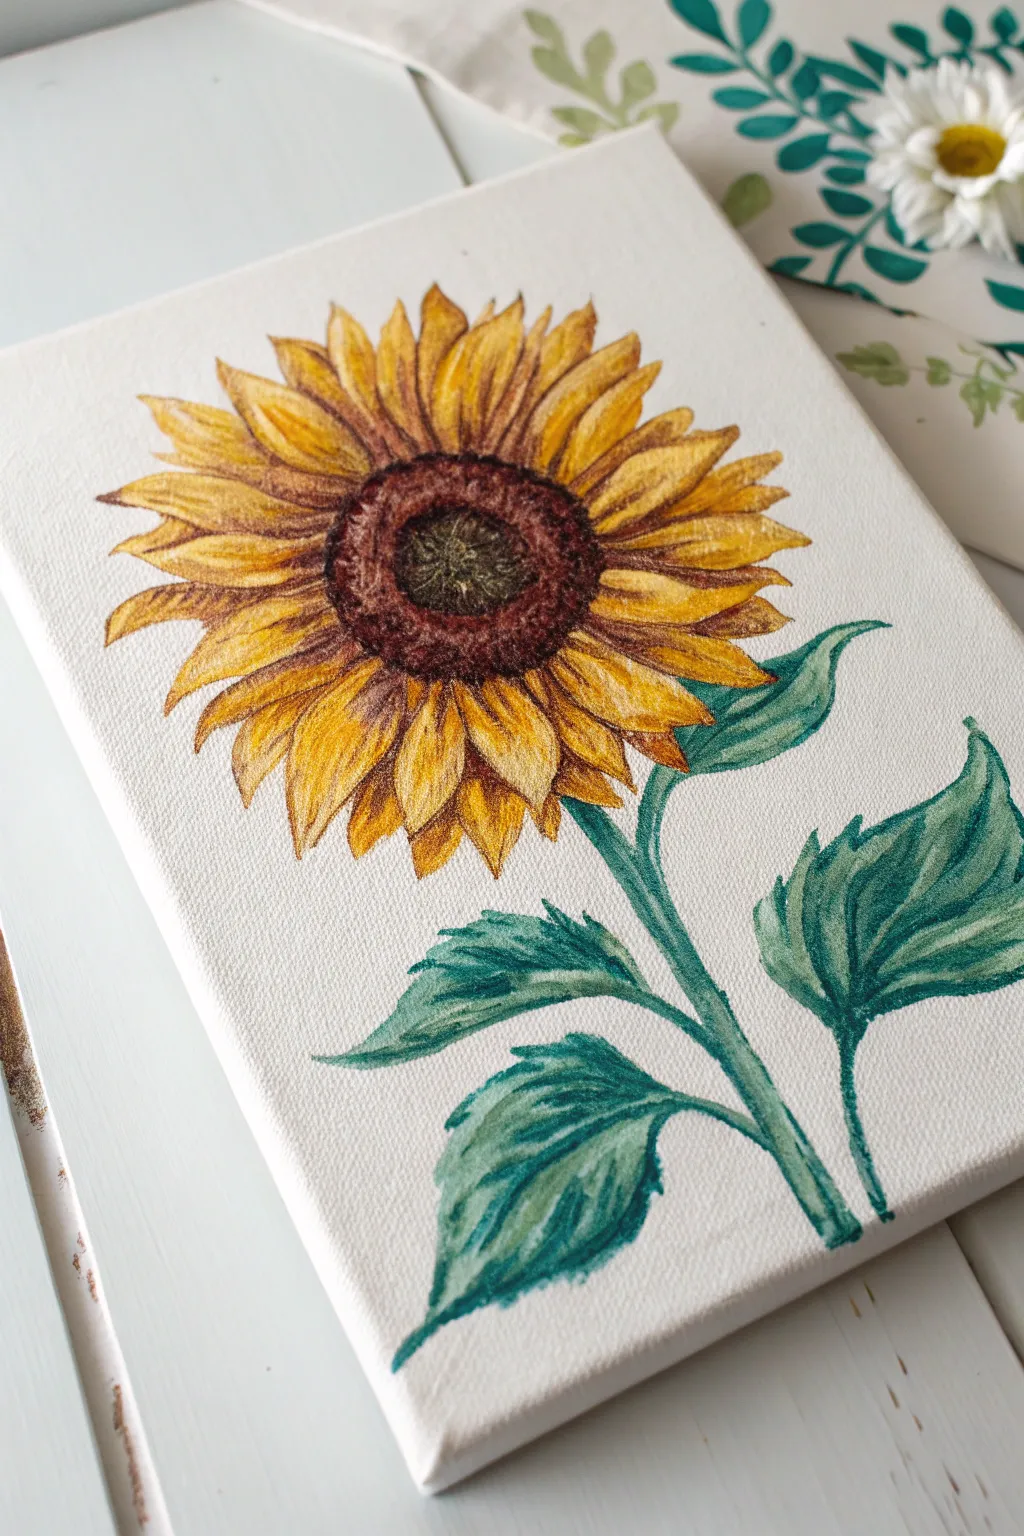
Capture the radiant warmth of late summer with this detailed sunflower study on canvas. Using careful layering and attention to texture, you’ll create a piece where the petals seem to glow and the leaves dance with life.
How-To Guide
Materials
- Small rectangular stretched canvas (approx. 5×7 or 6×8 inches)
- Acrylic paints (Cadmium Yellow, Yellow Ochre, Burnt Sienna, Burnt Umber, Sap Green, Viridian, Titanium White)
- Set of synthetic brushes (round size 2 and 4, fine liner size 00)
- Pencil (HB) for sketching
- Palette or mixing plate
- Cup of water and paper towels
Step 1: Sketching the Structure
-
Outline the center:
Begin by lightly drawing a large oval shape in the upper center of your canvas. Inside this oval, draw a slightly smaller, concentric oval to separate the dark seed center from the lighter rim where the petals attach. -
Sketch the petals:
Draw the petals radiating outward from the center oval. Make them slightly irregular—some overlapping, some twisting slightly at the tips. Aim for two layers of petals: a front row that is fully visible and a back row peeking out from behind. -
Add the stem and leaves:
Sketch a sturdy, slightly curved stem extending from the bottom of the flower head to the bottom right of the canvas. Add three large, jagged leaves: two emerging from the left side of the stem and one larger leaf on the right.
Fuzzy Texture Fix
If the center looks too flat, wait for it to dry completely. Then, mix a light tan color and dry-brush tiny dots over the brown area to bring back the 3D seed texture.
Step 2: Painting the Flower Head
-
Base coat the petals:
Mix a medium yellow using Cadmium Yellow and a touch of Yellow Ochre. Fill in all the petal shapes with this base color. Don’t worry about shading yet; just get a solid coat of color down. -
Darken the center:
While the petals dry, mix Burnt Umber with a tiny bit of Burnt Sienna. Paint the entire center disc of the sunflower. Use a stippling motion (tapping the brush tip perpendicular to the canvas) to create immediate texture resembling seeds. -
Create the inner ring:
Load your brush with pure Burnt Umber or mix in a touch of black for a darker shade. Stipple a dense, dark ring around the very outer edge of the seed center, defining the separation between the seeds and petals. -
Highlight the very center:
Mix a small amount of Sap Green into your brown mix to create a mossy, greenish-brown tone. Gently stipple this into the very middle of the seed head to simulate the younger, unripe seeds often found there.
Step 3: Adding Depth to Petals
-
Shadow the petal bases:
Using a small round brush, apply Burnt Sienna at the base of each petal where it meets the center. Use short, flicking strokes outward to blend the color into the yellow, creating a gradient. -
Define individual petals:
Mix Yellow Ochre with a touch of Burnt Sienna to create a shadow tone. Paint thin lines along one side of the overlapping petals to separate them visually from the ones behind them. -
Add bright highlights:
Mix Cadmium Yellow with a little Titanium White. Paint streaks along the tips and central ridges of the petals to make them look sun-drenched and dimensional. -
Deepen the contrast:
I like to go back in with a fine liner brush and very dark brown to add tiny, sharp shadows in the deepest crevices between petals near the center.
Level Up: Dew Drops
Add a realistic touch by painting a small, transparent water droplet on a single petal. Use white for the highlight and a dark shadow underneath to create the illusion of volume.
Step 4: Painting Stem and Leaves
-
Base the greenery:
Mix Sap Green with a touch of White to create a mid-tone green. Paint the stem and fill in the leaf shapes completely. -
Shadow the leaves:
Mix Viridian with Sap Green for a cooler, darker shadow color. Paint the veins of the leaves and add shading to the undersides and areas where the leaves twist or fold. -
Texture the leaves:
Using a relatively dry brush with your darker green mix, add directional strokes that follow the shape of the leaf growth. This enhances the rough, hairy texture typical of sunflower leaves. -
Highlight the stem:
Add a thin line of light green (Yellow + Sap Green + White) along the left side of the stem and the top ridges of the leaves to indicate the light source coming from the upper left. -
Refine the edges:
Use your smallest brush to tidy up the jagged edges of the leaves. You want them to look crisp and defined against the white canvas background.
Step back and admire how a few simple colors have blossomed into a vibrant botanical portrait.


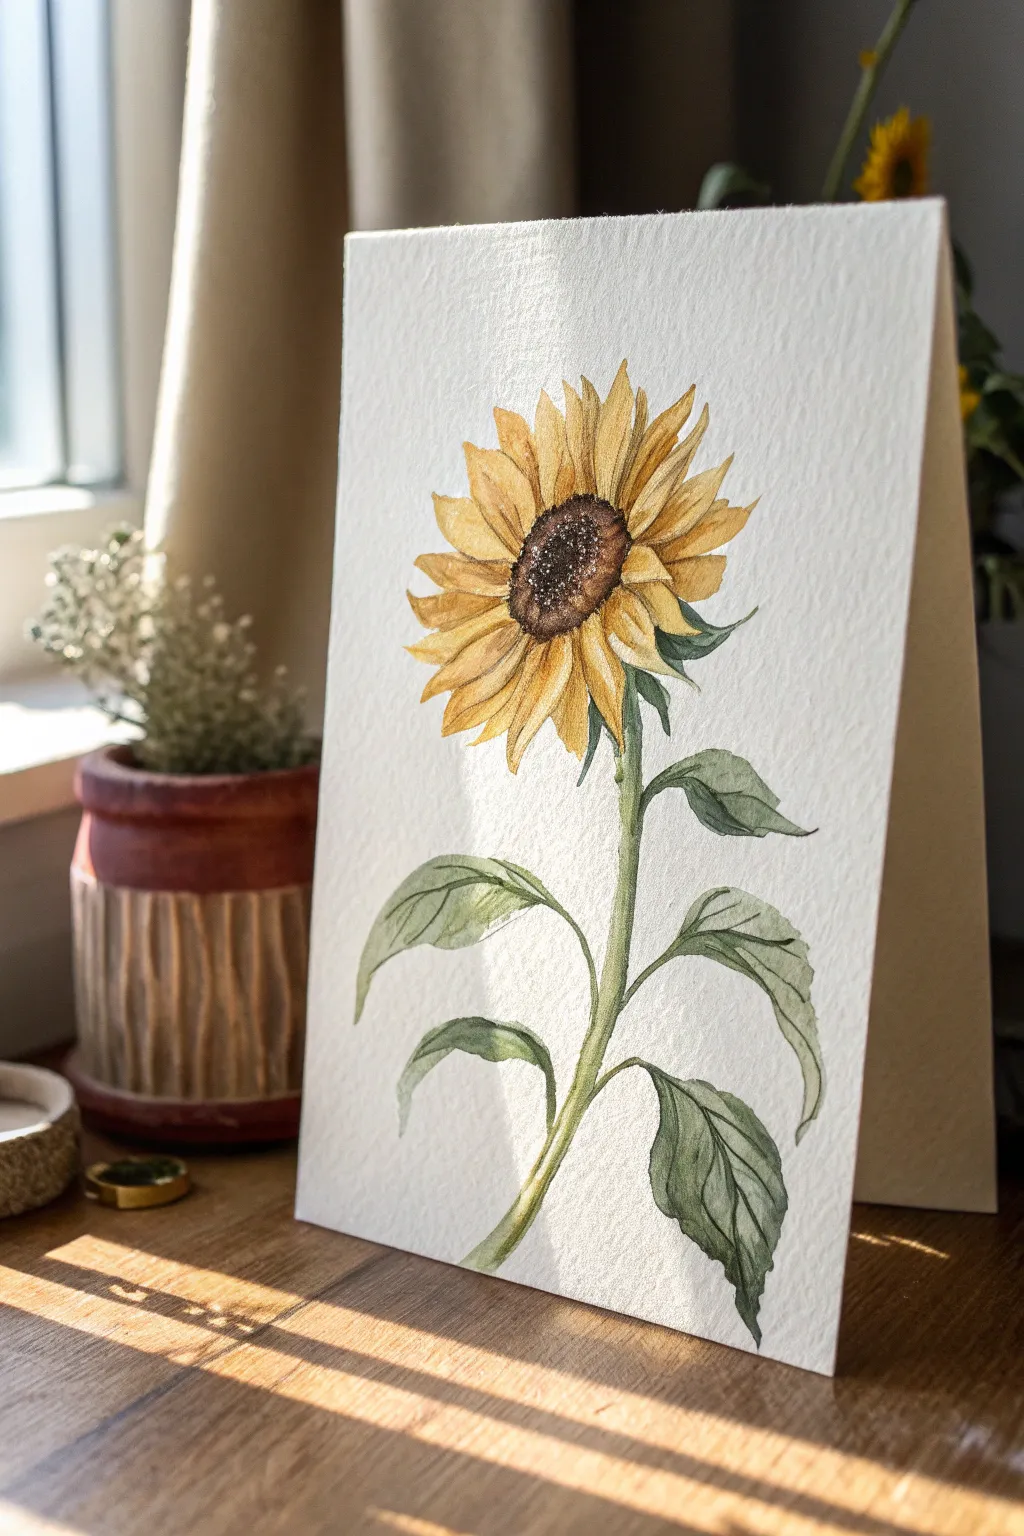
Soft Watercolor Sunflower With a Wet-on-Wet Glow
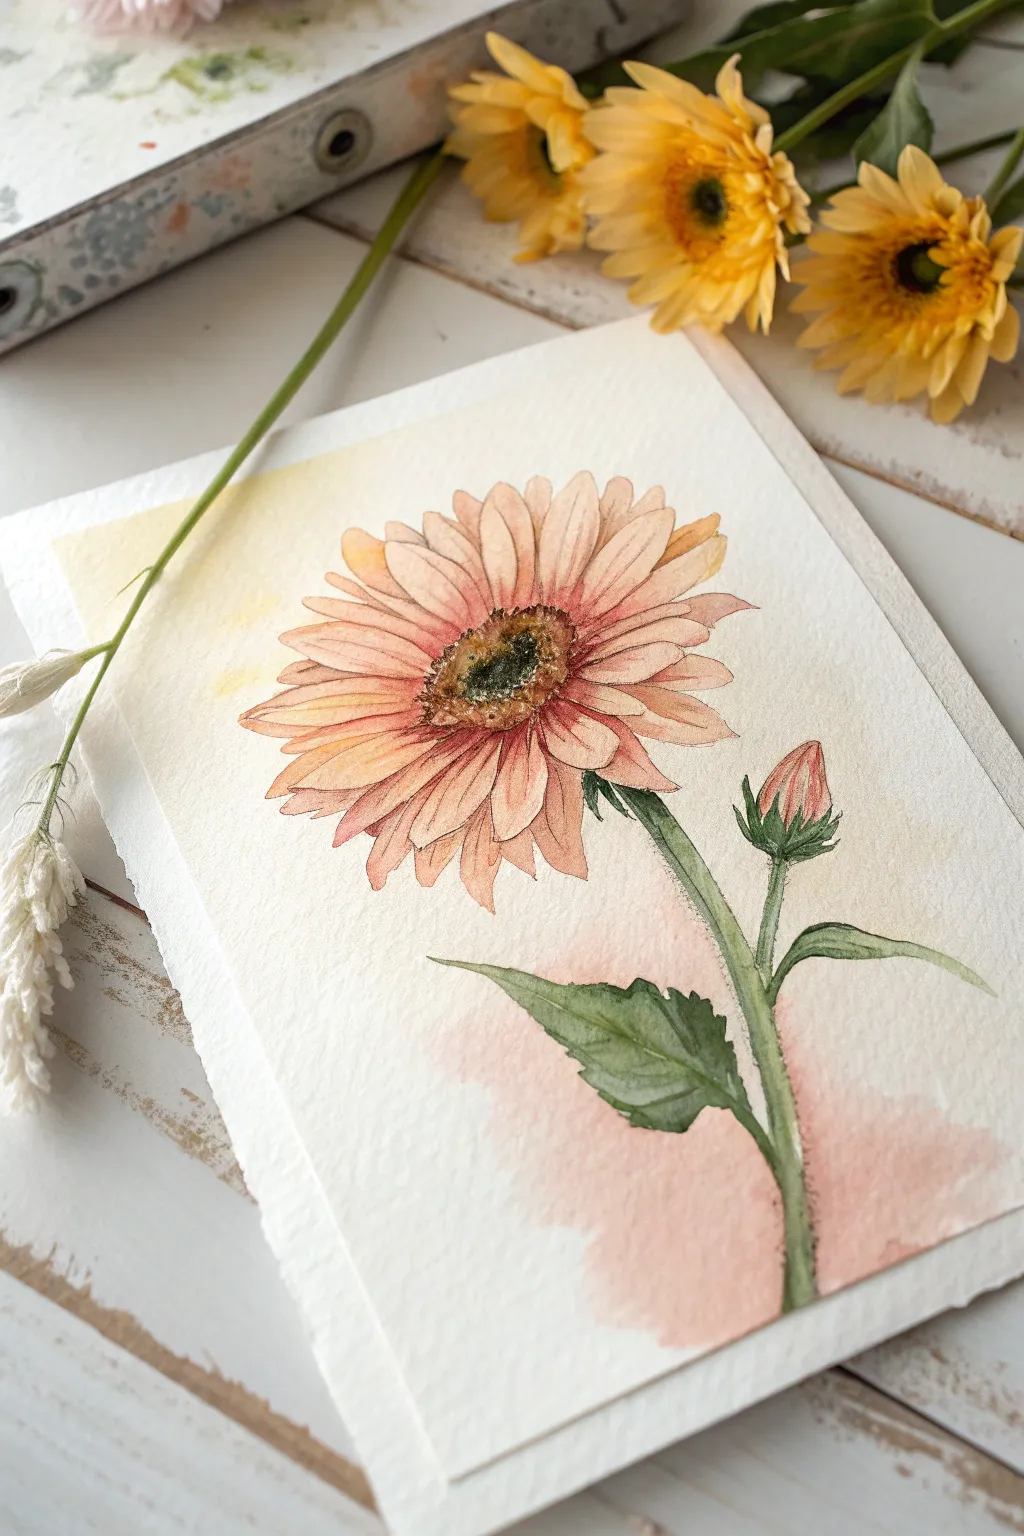
Capture the delicate beauty of a sunflower with this soft, glowing watercolor study. Using gentle washes and precise layering, you’ll create a piece where warm peach tones melt into creamy backgrounds.
Detailed Instructions
Materials
- Cold press watercolor paper (300 gsm)
- Pencil (HB or 2H)
- Kneaded eraser
- Watercolors: Peach, Quinacridone Rose, Cadmium Yellow, Sap Green, Burnt Umber, Sepia
- Round brushes (sizes 2, 6, and 8)
- Fine liner brush or waterproof ink pen (optional)
- Clean water and paper towels
- Masking tape (to secure paper)
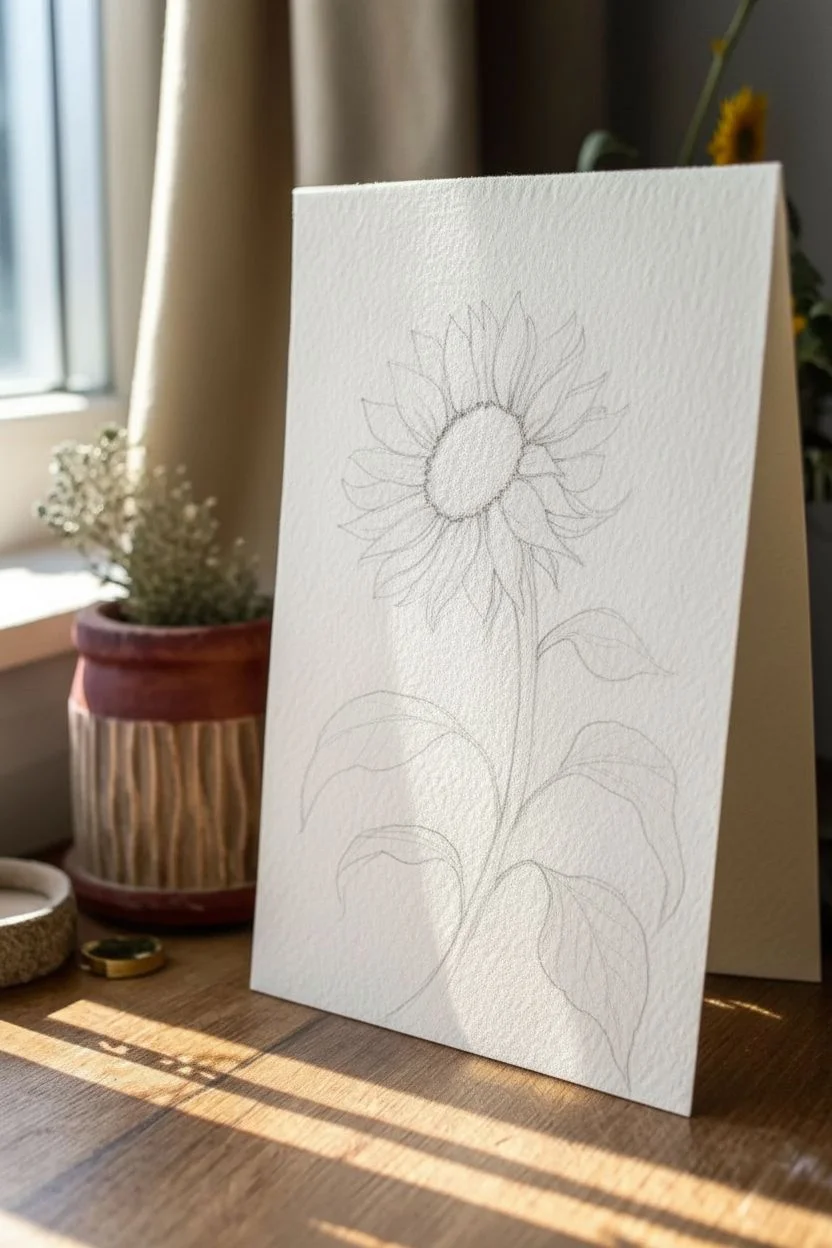
Step 1: Initial Sketching
-
Outline the center:
Begin by lightly sketching a slightly flattened oval for the flower’s center. Position it slightly off-center and tilted to the left for a dynamic composition. -
Draft the petals:
Draw two rows of petals radiating from the center. Keep the petals long, slender, and slightly irregular—some overlapping and others curving gently. Don’t worry about perfect symmetry. -
Add stem and bud:
Sketch a thick, sturdy stem leaning to the right. Add a large, singular leaf midway down the stem and a small, tightly closed bud branching off to the right side. -
Refine and lighten:
Go over your sketch to add details like the jagged edge of the leaf. Use your kneaded eraser to roll over the paper, lifting excess graphite until the lines are faint guides.
Step 2: Painting the Flower
-
Base wash for petals:
Mix a very diluted wash of Peach with a touch of Cadmium Yellow. Paint the petals with this pale mixture, leaving tiny slivers of white paper between them to define their separation. -
Deepen the petal shadows:
While the first layer is growing tacky but not fully dry, drop a slightly stronger mix of Peach and Quinacridone Rose into the base of the petals near the center. Let the color bleed outward naturally. -
Texture the center:
Using your small brush, dab a mix of Cadmium Yellow and Sap Green into the very middle of the flower center. While wet, dot the outer rim of the center with Burnt Umber to create depth and texture. -
Paint the bud:
Apply the same peach-pink mix to the closed petals of the bud. Use a darker concentration on the underside to suggest roundness.
Bloom Factor
To get that fuzzy texture in the center, sprinkle a tiny pinch of salt onto the wet paint of the core disc. Brush it off only when completely dry.
Step 3: Stems and Leaves
-
First green layer:
Paint the stem, the leaf, and the bracts (the green base) of the bud with a light wash of Sap Green. Keep this layer fairly transparent. -
Adding dimension:
Once the green is dry, mix Sap Green with a little Sepia. Use a size 2 brush to paint the veins of the leaf and the shadowed side of the stem. -
Detailing the sepals:
Use the darker green mix to add small, spiky details to the green base of the flower bud, mimicking the texture of sunflower greenery.
Make It Pop
Use white gouache or a white gel pen to add tiny highlight dots to the very center of the core and the shiny top curve of the flower bud.
Step 4: Defining and Refining
-
Outline work:
This step brings the illustration style to life. Using a very fine liner brush with sepia paint (or a waterproof pen), carefully outline the petals, stem, and leaf layers. Keep the line weight delicate and broken in places. -
Petal striations:
With a very dry, small brush and the peach-rose mix, paint fine lines radiating from the center of each petal outwards. This mimics the natural texture of the sunflower. -
Darkening the core:
Intensify the contrast in the flower’s center by stippling dark Sepia or nearly-black paint right where the petals meet the center disc.
Step 5: Atmospheric Glow
-
Prepare the background:
Clean your large brush thoroughly. Wet the background area specifically at the top left and bottom right corners, avoiding the painted flower closely. -
Apply the yellow glow:
Drop a very watery wash of Cadmium Yellow into the top left wet area. Let it diffuse softly towards the flower without touching it. -
Apply the pink wash:
Similarly, drop a watery wash of muted pink or peach into the bottom right wet area behind the stem. This creates that lovely wet-on-wet glow seen in the reference. -
Final drying:
Allow the entire piece to dry completely flat. If the paper has buckled slightly, you can place it under a heavy book once it is bone dry.
Now step back and admire the gentle warmth of your new floral masterpiece
BRUSH GUIDE
The Right Brush for Every Stroke
From clean lines to bold texture — master brush choice, stroke control, and essential techniques.
Explore the Full Guide
Gouache Sunflower With Matte, Velvety Color Blocks
Capture the delicate beauty of a sunflower with the opaque, velvety finish that only gouache can provide. This project focuses on clean lines, subtle gradients, and a soft, uniform background to create a piece reminiscent of vintage botanical illustrations.
Step-by-Step
Materials
- Cold press watercolor paper or mixed media paper (heavyweight)
- Gouache paints (Yellow Ochre, Burnt Sienna, Burnt Umber, Titanium White, Sap Green, Olive Green)
- Painter’s tape or masking tape
- Pencil (HB or H for light lines)
- Clean water and mixing palette
- Flat brush (3/4 inch or similar)
- Round brushes (sizes 2, 4, and 6)
- Fine liner brush (size 0 or 00)
Step 1: Preparation & Sketching
-
Prep the paper:
Tape down all four edges of your paper to a flat board or your work surface. This creates that crisp white border seen in the reference and prevents the paper from buckling when we add the background wash. -
Tint the background:
Mix a large amount of Titanium White with a tiny touch of Sap Green and maybe a dot of blue to get a very pale, milky sage color. Using your broad flat brush, apply an even coat across the entire paper (within the tape). Let this dry completely until it’s matte. -
Structural lines:
Lightly sketch a large oval in the upper center for the flower head and a long, curved line extending downward for the stem. Add simplified shapes for the two large leaves. -
Petal outline:
Refine the flower head sketch. Draw two rows of petals: a front row of larger, wider petals and a back row of smaller ones peaking through the gaps. Keep your pencil pressure very light so the graphite doesn’t smudge into the yellow paint later. -
Center details:
Sketch the disk center. Draw two distinct zones: a darker, tighter circle in the very middle, and a textured ring surrounding it where the florets meet the petals. -
Leaf details:
Flesh out the leaves attached to the stem. Notice how they fold and twist slightly; draw jagged edges and indicate the central vein.
Don’t Overwork
Gouache reactivates with water. If you stroke the same spot too many times while layering, you’ll lift the paint underneath. Lay the color down and leave it be!
Step 2: Painting the Flower Head
-
Base layer for petals:
Mix Yellow Ochre with Titanium White to create a creamy, buttery yellow. Paint the base layer of all the petals. Gouache dries quickly, so work petal by petal to get smooth coverage. -
Shading the petals:
While the base is dry, mix pure Yellow Ochre with a tiny bit of Burnt Sienna. Using a size 4 round brush, gently streak this darker color from the base of the petal upwards to create the ribbed texture and shadow. -
Petal definitions:
I like to use a very diluted Burnt Umber to carefully outline the petals where they overlap. This separation is key for the illustrative style. Add tiny splits at the tips of a few petals for realism. -
Center layout:
Paint the entire center circle with a base of Burnt Sienna. Let it dry completely. -
Darkening the core:
Mix Burnt Umber with a touch of purple or black to get a deep, dark brown. Stipple this color into the very center of the disk using the tip of a dry brush to mimic the seed texture. -
The transition ring:
Using a mix of Burnt Sienna and Yellow Ochre, stipple the outer ring of the disk. Blend this slightly into the dark center so there isn’t a harsh line, but a gradient of texture.
Antique Aesthetics
To enhance the vintage botanical poster look, try painting the background in a warm beige tea-stain color instead of sage green, or add the scientific name in neat script at the bottom.
Step 3: Stem & Leaves
-
Stem base:
Mix Olive Green with a little White and Yellow Ochre for a muted, natural green. Paint the stem with a steady hand, making it slightly thicker at the bottom. -
Leaf base coats:
Fill in the leaf shapes with a slightly darker version of your stem green (more Olive Green, less White). Ensure the edges are crisp against the pale background. -
Adding veins:
Once dry, mix a very pale green (almost white-green). Use your fine liner brush to paint the central vein and the smaller branching veins on the leaves. -
Leaf shading:
Glaze a thin, watery layer of darker green on one side of the central vein to show the dip in the leaf surface. -
Shadows and depth:
Add a few touches of the dark green mix right where the stem meets the flower head and under the heavy leaves to ground them.
Step 4: Finishing Touches
-
Highlighting:
Use a small brush with pure White (or very pale yellow) to add dry-brush highlights to the tips of the petals and the highest ridges of the leaves. -
Clean up:
Check for any pencil lines showing through and gently erase them if the paint is bone dry. If you made mistakes on the background, you can touch them up with your original background mix. -
The reveal:
Slowly peel away the painter’s tape at a 45-degree angle. This reveals the clean white border that frames your vintage-style botanical art.
Step back and admire the soft, timeless quality of your handcrafted botanical study
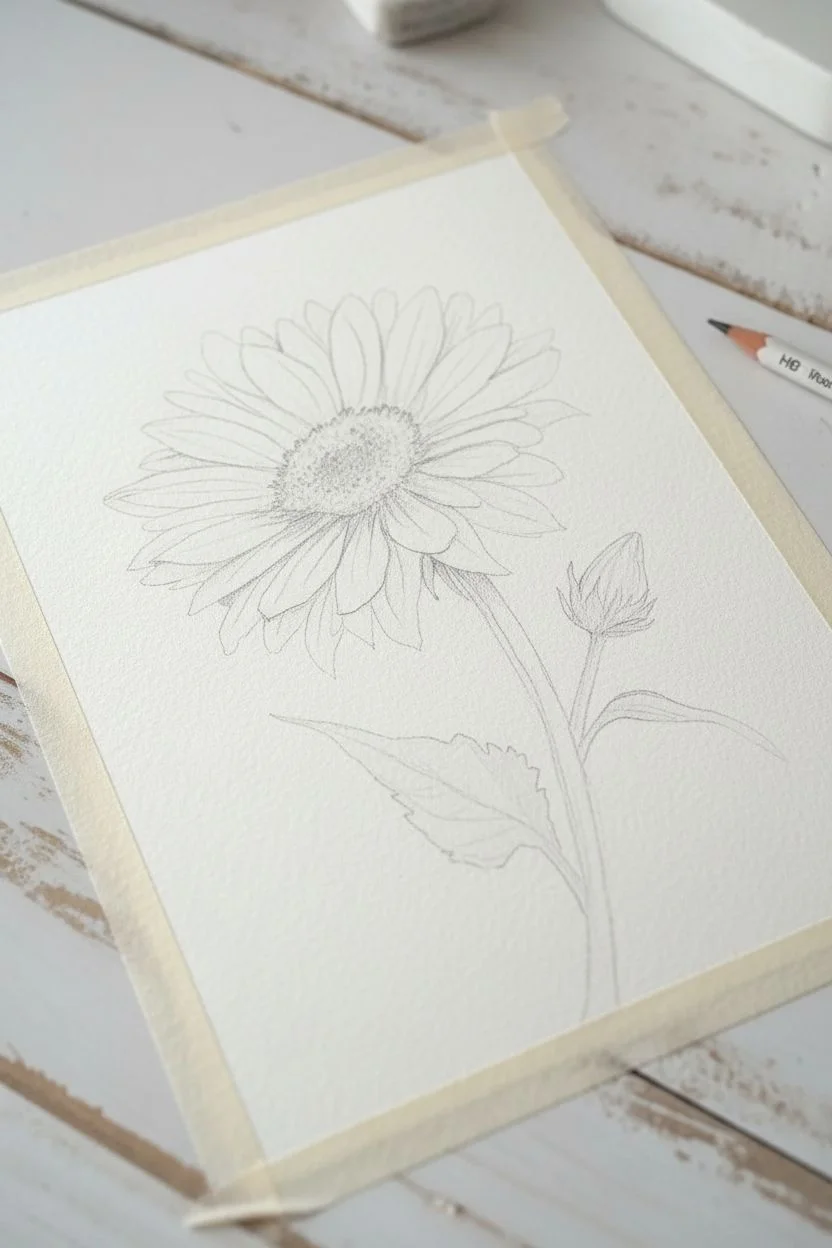
Minimal Ink Lines + Wash: Sunflower Sketch Painting
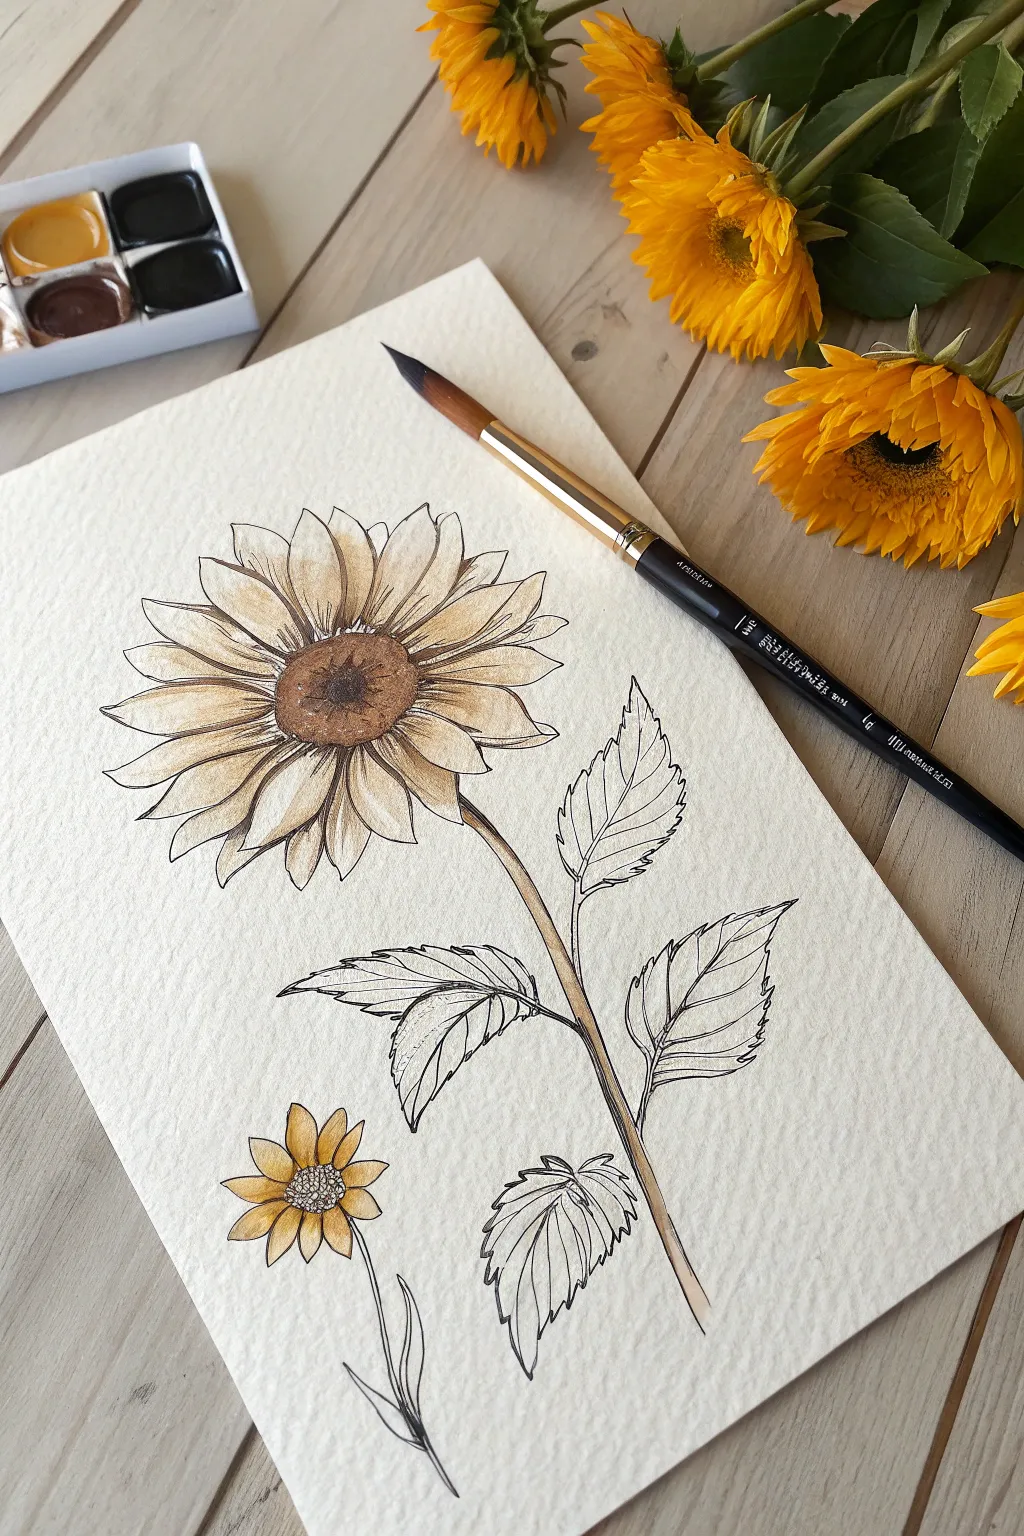
This elegant project combines the crisp definition of ink illustration with the soft, organic flow of watercolor washes. The result is a vintage botanical style study that feels both precise and effortlessly artistic, perfect for framing or a sketchbook page.
Step-by-Step Guide
Materials
- Cold press watercolor paper (approx. 140lb/300gsm)
- Fine liner pen (waterproof ink, size 0.1 or 0.3)
- Watercolor paints (Yellow Ochre, Burnt Sienna, Payne’s Grey/Black, Sap Green)
- Round watercolor brush (size 6 or 8)
- Pencil (HB) and kneadable eraser
- Clean water and blending palette
Step 1: Pencil Structure
-
Map the main flower:
Start lightly with your HB pencil. Draw a medium-sized oval near the upper center of your page for the sunflower seed head. Don’t press hard; these lines are just guides. -
Sketch the petals:
Radiating from the center oval, sketch two layers of petals. The front layer should have slightly wider, overlapping shapes, while the back layer peeks through the gaps. -
Draw the stem:
Extend a gently curved line downwards from the flower head. Add a slight thicker width to it so it isn’t just a single stick-figure line. -
Add foliage:
Draw three large leaves branching off the stem—one on the left, two on the right. Give them jagged, serrated edges typical of sunflower leaves. -
Include the bud:
Near the bottom left, sketch a smaller, younger flower or bud with simpler petals and a thin, curving stem.
Loose Lines
Don’t try to fill every shape perfectly with paint. Letting the color ‘miss’ the ink lines slightly adds to that charming, illustrative sketchbook aesthetic.
Step 2: Inking the Outline
-
Ink the flower center:
Check that your pencil sketch looks balanced. Then, using your waterproof fine liner, trace the center oval. Use small stippling dots or tiny circles near the edges to suggest texture. -
Outline petals:
Trace the flower petals. Instead of perfect continuous lines, allow your hand to wobble slightly or lift the pen occasionally for a more organic, sketch-like feel. -
Add petal details:
Draw thin, quick lines from the base of each petal moving outward to indicate creases and form. -
Ink the leaves:
Outline the leaves, ensuring you capture those serrated edges. Draw a central vein line down the middle of each leaf, followed by smaller veins branching out. -
Finalize the sketch:
Ink the stems and the small lower flower. Once the ink is completely dry (wait at least 5 minutes), gently erase all visible pencil marks.
Antique Effect
Use a warm, cream-colored paper instead of bright white. This instantly gives the artwork a nostalgic, botanical study vibe suitable for vintage decor.
Step 3: Watercolor Wash
-
Prepare your palette:
Mix a watery wash of Yellow Ochre. You want this color to be quite transparent, like tea, rather than thick and opaque. -
Base petal wash:
Apply this pale yellow wash to the sunflower petals. I like to leave small slivers of white paper near the tips or edges to act as highlights. -
Darken the center:
While the petals dry, mix Burnt Sienna with a touch of Payne’s Grey to create a warm brown. Paint the center disk of the large sunflower. -
Paint the stem:
Clean your brush and pick up a very dilute mix of Yellow Ochre and a tiny hint of Green or Brown. Paint a single, translucent stroke down the main stem. -
Tint the small flower:
Use the same Yellow Ochre wash for the small bud at the bottom, keeping it light and airy.
Step 4: Deepening Values
-
Shadowing the petals:
Once the first layer is dry, use a slightly more concentrated Yellow Ochre or add a drop of Burnt Sienna to your mix. Paint near the base of the petals where they meet the center to create depth. -
Texture the center:
Take a fairly dry brush with dark brown paint and dab the center of the sunflower, specifically around the lower right edge, to give it a 3D rounded appearance. -
Stem shadows:
Run a thin line of darker brown/green wash along one side of the stem to indicate shadow. -
Review contrast:
Step back and look at the painting. If a section looks too flat, add a tiny bit more pigment, but remember the goal is a soft, minimal wash.
Allow your piece to dry fully before deciding if you want to frame it or add it to your art journal portfolio

PENCIL GUIDE
Understanding Pencil Grades from H to B
From first sketch to finished drawing — learn pencil grades, line control, and shading techniques.
Explore the Full Guide
High-Contrast Color Pop: Sunflower on a Purple Background
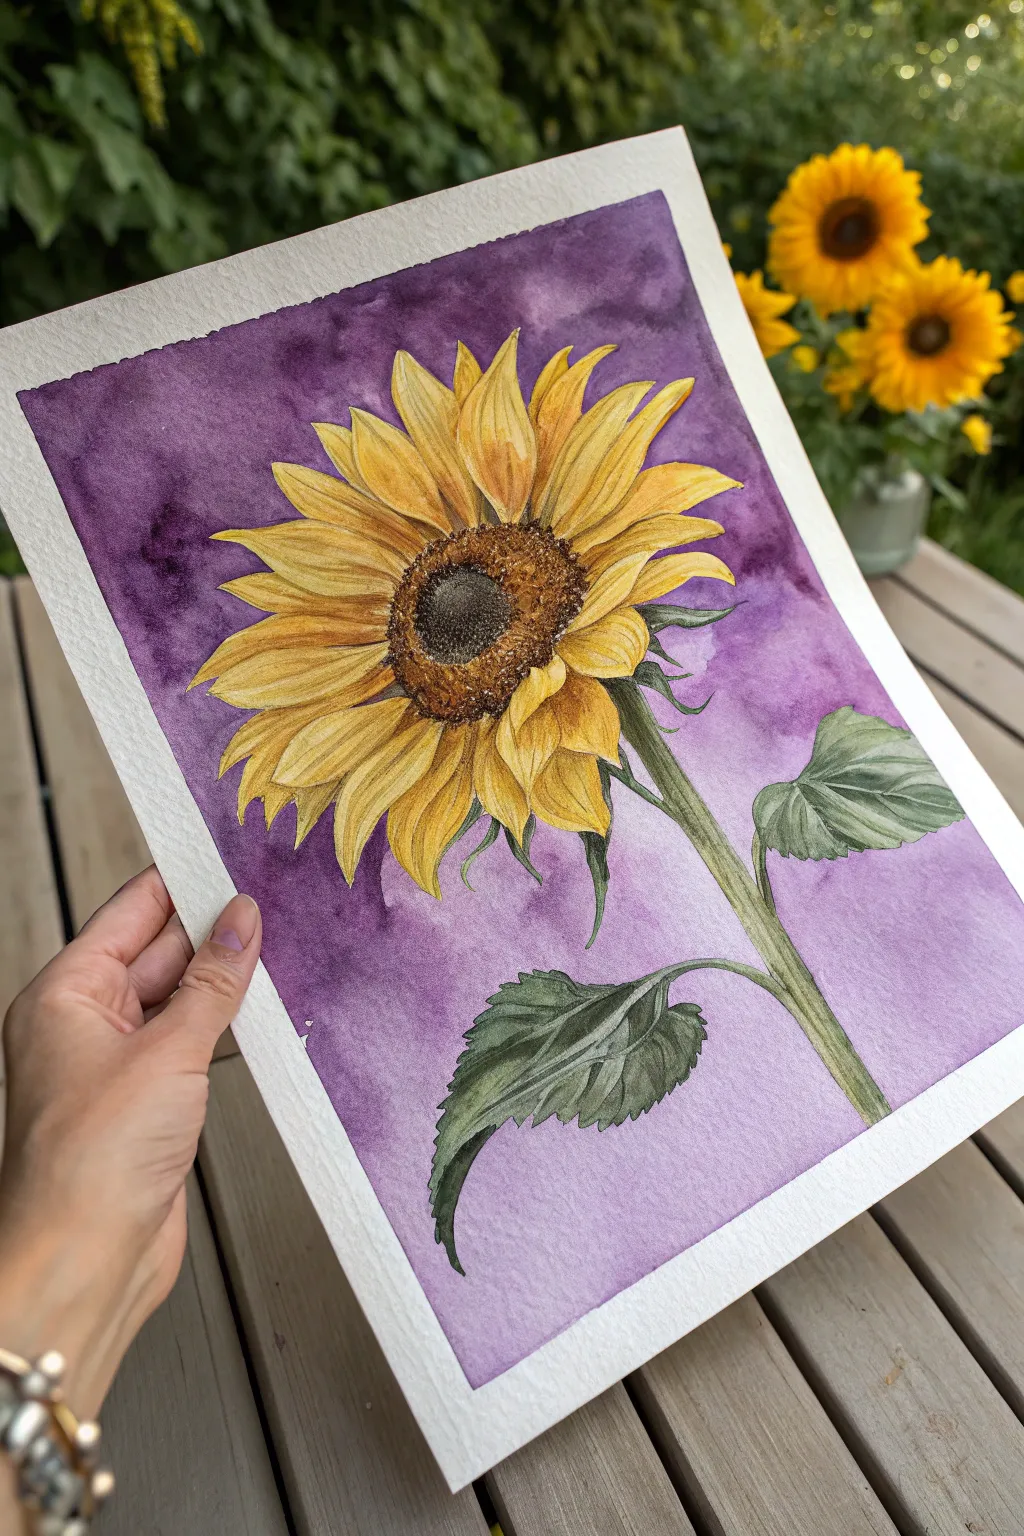
Capture the breathtaking contrast of complementary colors with this vibrant watercolor project. By placing a warm, golden sunflower against a moody, deep purple wash, you create an artwork that instantly pops off the page.
How-To Guide
Materials
- Cold press watercolor paper (300 gsm or heavier)
- Painter’s tape or masking tape
- Pencil (HB or H) and kneadable eraser
- Watercolors: Cadmium Yellow, Yellow Ochre, Burnt Sienna, Burnt Umber, Sap Green, Dioxazine Purple, Alizarin Crimson
- Round brushes (sizes 2, 6, and 10)
- Two jars of water
- Paper towels
- Clean palette
Step 1: Preparation and Sketching
-
Secure the Paper:
Tape down all four edges of your watercolor paper to a sturdy board or table. This creates that clean white border seen in the reference image and prevents the paper from buckling under heavy washes. -
Map Out the Flower:
Lightly sketch the sunflower using an HB pencil. Start with a large oval for the center, tilted slightly towards the bottom left. Don’t press too hard, as graphite can be tricky to erase once painted over. -
Define the Petals:
Sketch the petals radiating outward. Notice how the petals in the reference overlap and curve; make some tips sharp and others slightly rounded. Vary their lengths to keep it looking natural rather than like a stiff diagram. -
Add Stem and Leaves:
Draw the thick, sturdy stem extending downwards. Add two large, jagged leaves on the right side of the stem, sketching in the primary veins to guide your painting later. -
Refine and Lighten:
Use a kneadable eraser to gently lift up excess graphite. You want the lines to be barely visible—just enough to guide your brush without showing through the yellow paint.
Muddy Purple?
If your purple background looks dull or grey near the petals, you likely touched the wet yellow paint. Let the flower dry 100% before starting the background.
Step 2: Painting the Sunflower
-
Petal Base Layer:
Mix a watery wash of Cadmium Yellow. Paint each petal, dropping in a tiny touch of Yellow Ochre near the base while it’s still wet to start building depth. Leave a few tiny slivers of white paper for highlights. -
Petal Shadows:
Once the first layer is dry, mix Yellow Ochre with a tiny dot of Burnt Sienna. Use a size 6 brush to paint the shadows where petals overlap or fold. This separates the individual petals and gives the flower volume. -
Center Texture – First Pass:
For the seed head, wet the center area and drop in patches of Burnt Sienna and Yellow Ochre. While damp, dab in Burnt Umber around the outer ring to create a concave shape. -
Center Texture – Detailing:
When dry, use your smallest brush (size 2) to stipple tiny dots of dark Burnt Umber and concentrated Burnt Sienna in the center. I like to leave the very middle slightly lighter to show where the light hits. -
Stem and Leaves Foundation:
Paint the stem and leaves with a light wash of Sap Green. While wet, drop in a slightly darker mix (Sap Green plus a touch of purple or blue) into the shadowed areas under the leaves. -
Leaf Veins and Texture:
Once the green layer is dry, use a darker, thicker green mix to paint the negative space between the veins. This makes the lighter veins pop forward, mimicking the texture shown in the photo.
Add Salt Texture
Sprinkle a pinch of table salt onto the purple background while it’s still very wet. As it dries, the salt pushes pigment away, creating starry textures.
Step 3: The Purple Background
-
Mixing the Purple:
Prepare a large amount of Dioxazine Purple. To make it more natural and less ‘jarring,’ mix in a tiny bit of Alizarin Crimson or even a speck of the green you used for the leaves. -
Wet-on-Dry Outline:
Using a size 6 brush, carefully paint the purple around the complex shapes of the petals and leaves. Take your time here—the sharp edge between the yellow and purple is crucial for this style. -
Filling the Background:
Switch to your largest brush. Work quickly to fill the rest of the background while the edges you just painted are still damp to avoid hard lines forming. Let the purple vary in intensity—allow some water blooms to create that dreamy, mottled texture. -
Deepening Values:
While the background is still slightly damp, drop more concentrated purple pigment into the corners and directly around the bright yellow flower head to maximize contrast.
Step 4: Final Details
-
Sharpening Edges:
Check the edges where the yellow meets the purple. If any yellow looks washed out near the purple, add a thin, crisp line of concentrated Yellow Ochre to redefine the petal shape. -
Final Stem Hairs:
Sunflowers have fuzzy stems. Use a fairly dry size 2 brush with dark green to make tiny, quick flicks along the stem’s edge to suggest that texture. -
The Reveal:
Wait until the painting is completely bone dry. Slowly peel off the tape at a 45-degree angle, away from the painting, to reveal your crisp white border.
Frame your high-contrast masterpiece or gift it to someone who needs a little sunshine in their day
Circular Design: A Sunflower Wreath Around an Empty Center
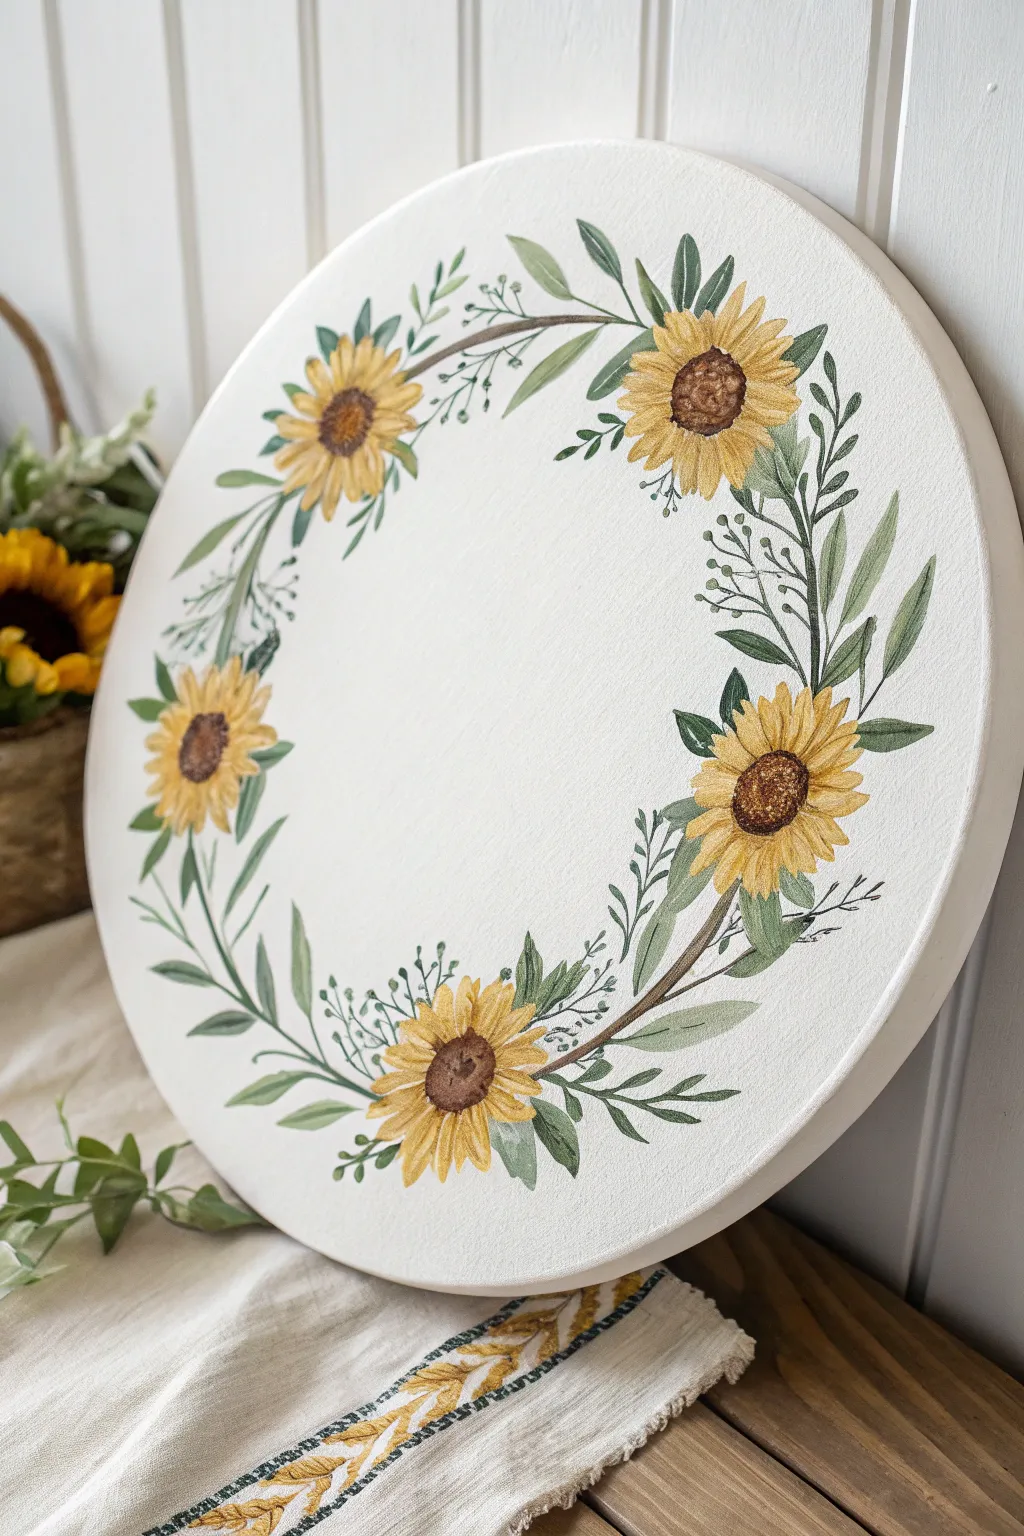
Capture the warmth of late summer with this charming circular design, featuring delicate sunflowers dancing around an open center. Using watered-down acrylics or gouache on a round canvas creates a soft, translucent effect that perfectly mimics a vintage botanical illustration.
Step-by-Step Guide
Materials
- Round stretched canvas (10-12 inch diameter)
- Pencil (HB or H for light lines)
- Acrylic paints (Yellow Ochre, Cadmium Yellow, Burnt Umber, Burnt Sienna, Sap Green, Olive Green, Titanium White)
- Round synthetic brushes (sizes 2, 4, and 6)
- Detail liner brush (size 0 or 00)
- Palette for mixing
- Water cup and textured paper towels
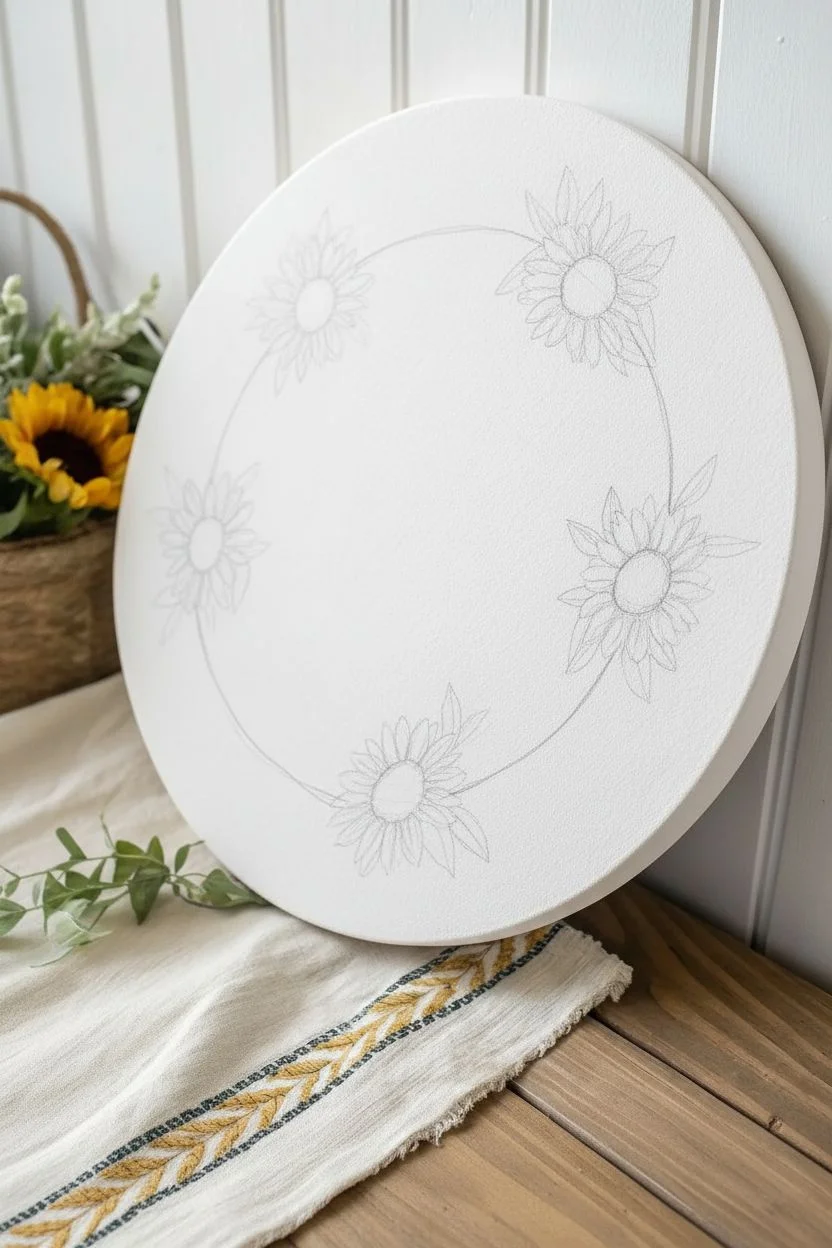
Step 1: Sketching the Layout
-
Establish the circle:
Begin by lightly marking a large circle about 1.5 inches away from the canvas edge. This doesn’t need to be perfect; it simply acts as a guide for your vine placement. -
Position the blooms:
Mark five evenly spaced spots along your guide circle. At each spot, sketch a simple oval to represent the center of a sunflower. -
Sketch the petals:
Draw the petals radiating outward from each center. Aim for a slightly messy, natural look where petals vary in size and some overlap others. -
Add connecting vines:
Connect the flowers with a single, winding vine line that loops gently between them, creating the wreath’s structure.
Pro Tip: Translucency
Treat your acrylics like watercolor by using plenty of water. This glazing technique allows the white of the canvas to illuminate the colors from beneath.
Step 2: Painting the Sunflowers
-
Base layer for petals:
Mix Cadmium Yellow with a touch of White and water it down to a milky consistency. Fill in the petal shapes, keeping the paint thin enough so the canvas texture shows through. -
Add petal depth:
While the base is semi-dry, load a size 4 brush with Yellow Ochre. Add strokes from the flower center moving outward about halfway up the petals to create shadow and depth. -
Highlighting:
Mix a pale creamy yellow using mostly White and a dot of Cadmium Yellow. Use the very tip of your brush to add highlights to the tips of the petals that would catch the light. -
Texture the centers:
Mix Burnt Umber with a tiny bit of Burnt Sienna. Using a size 2 brush, dab (don’t stroke) paint into the center ovals to build a stippled texture. -
Darken the core:
Once the brown centers are dry to the touch, mix a darker brown or black wash. Stipple this only in the very middle of each center disk to make them look concave and realistic. -
Pollinated centers:
Dip a dry, small brush or even a toothpick into pure Yellow Ochre or Gold paint. Gently dot the brown centers to mimic pollen texture.
Step 3: Painting the Greenery
-
Paint the main vine:
Mix Burnt Umber and a little water to create an inky consistency. With your liner brush, trace the vine lines connecting the flowers. Keep your hand loose for organic curves. -
Light green base leaves:
Mix Olive Green with a little White. Paint larger, broader leaves tucking out from behind the sunflowers. I like to vary the pressure on the brush to get tapered leaf tips. -
Darker foliage accents:
Use pure Sap Green to paint smaller, slender leaves that overlap the vine. These darker leaves add visual weight and contrast against the white background. -
Delicate sprigs:
Using your smallest liner brush and a diluted dark green mix, paint tiny sprigs with very small leaves or buds extending outward from the main wreath to fill empty gaps. -
Final dry brushing:
Take a nearly dry brush with a tiny amount of white paint and lightly whisk it over the highlighted side of the largest leaves to soften their appearance.
Level Up: Lettering
Use the empty negative space in the center to paint a family name, a short quote like ‘Hello Sunshine’, or a significant date in elegant script.
Hang your beautiful floral round on a gallery wall or prop it on a shelf for an instant touch of sunshine


Pattern Play: Repeating Sunflower Motif for a Wallpaper Look
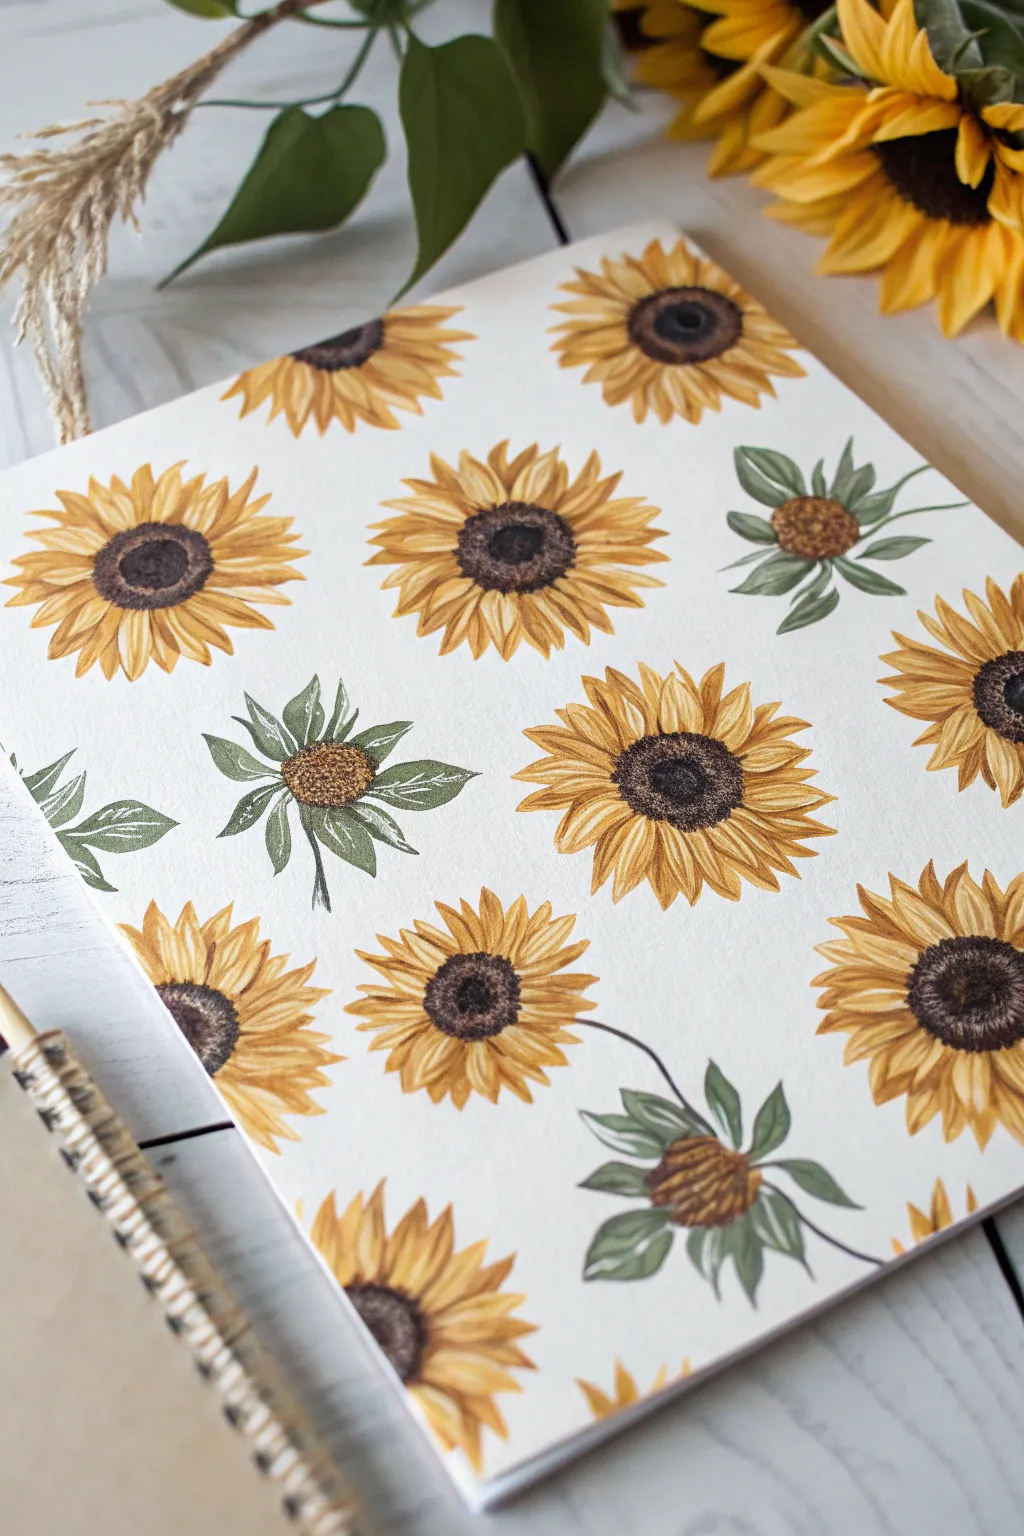
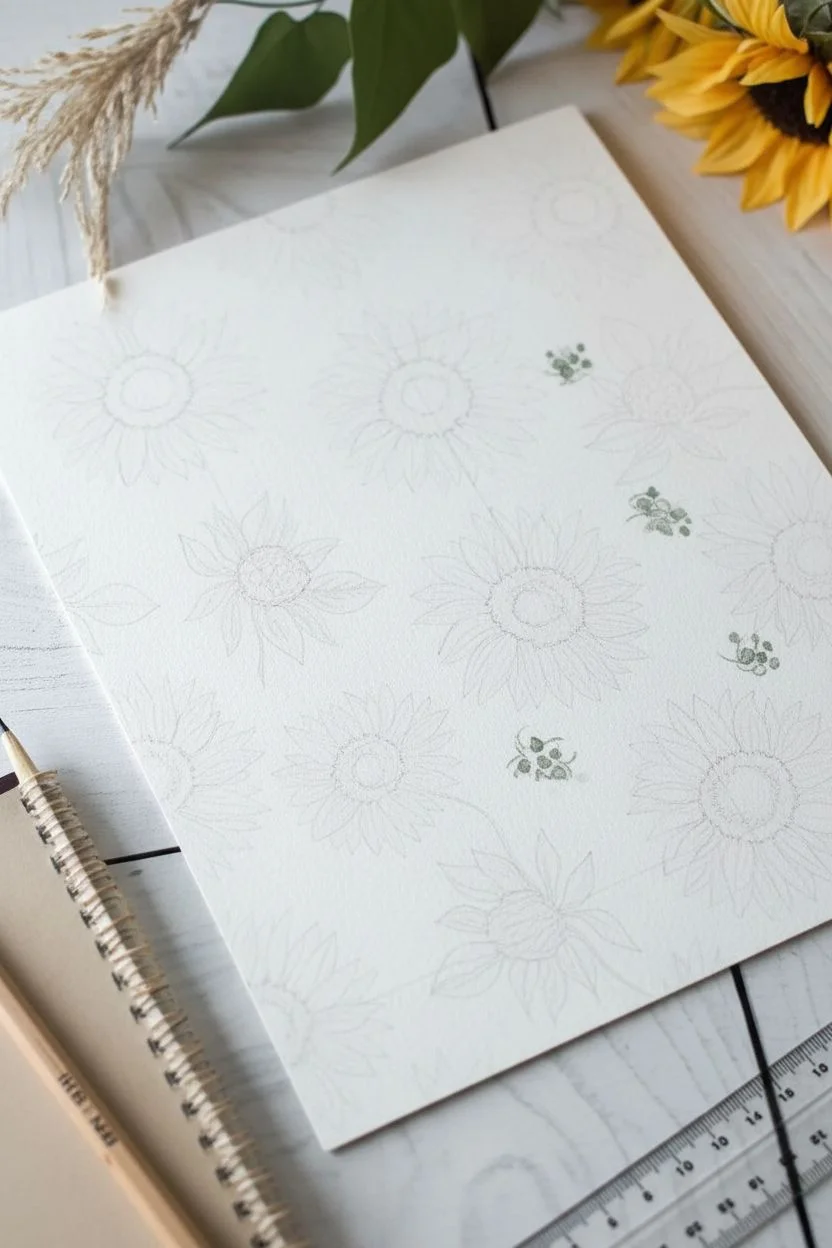
Capture the charm of vintage botanical wallpaper by creating a repeating sunflower motif. This project uses loose yet detailed watercolor techniques to build a grid of blooms that feels organic and handcrafted.
How-To Guide
Materials
- Cold press watercolor paper (block or pad)
- Watercolor paints (Yellow Ochre, Cadmium Yellow, Burnt Sienna, Burnt Umber, Sap Green, Hooker’s Green)
- Round watercolor brushes (sizes 2, 4, and 6)
- Pencil (HB or H)
- Ruler
- Clean water and paper towels
- Mixing palette
Step 1: Planning the Grid
-
Measure your spacing:
Begin by lightly marking a grid on your paper using a ruler and an H pencil. Aim for spacing that allows about 1.5 to 2 inches between the centers of each flower, creating a staggered or diamond pattern rather than a perfect square grid. -
Lightly sketch the centers:
At each grid intersection, draw a small circle for the flower center. Don’t worry about making them perfect circles; slight irregularities add to the natural look. -
Add petal guidelines:
Sketch faint radiating lines outward from the centers to indicate where the petals will flow. Vary the angles slightly so some flowers look tilted. -
Plan the greenery:
Randomly select a few spots within the negative space to sketch small green buds or foliage clusters. This breaks up the yellow dominance and creates visual rhythm.
Uneven Spacing?
If your grid feels too rigid, deliberately offset every other row. This creates a more dynamic ‘half-drop’ repeat typical in wallpaper design.
Step 2: Painting the Blooms
-
Base wash for petals:
Mix a watery wash of Cadmium Yellow and Yellow Ochre. Using your size 6 brush, paint the basic petal shapes. Keep them loose and leave tiny slivers of white paper between petals for separation. -
Deepening the color:
While the first layer is still slightly damp, drop in stronger Yellow Ochre or a touch of Burnt Sienna near the base of the petals (closest to the center) to create depth. -
Painting the centers:
Mix Burnt Umber with a tiny bit of blue or black to get a deep brown. Using the size 4 brush, stipple small dots to fill the flower centers, creating a textured, seed-like appearance. -
Adding the halo:
Ring the dark center with a lighter wash of Burnt Sienna where the seeds meet the petals. This transition softens the contrast. -
Define the petals:
Once the yellow base is dry, use a size 2 brush and a slightly darker golden-brown mix to paint thin veins or outline the edges of select petals for definition.
Add Vintage Flair
Once dry, wash the entire paper with very dilute tea or coffee. This tints the brightness down to an antique cream color.
Step 3: Adding Greenery & Detail
-
Paint the leaves:
Mix Sap Green with a touch of Yellow Ochre for a warm, natural green. Paint the small leaves around the buds or tucked behind the main blooms. -
Detail the buds:
For the unopened buds, paint a tight cluster of green sepals (leaf-like structures) enclosing a hint of yellow or brown in the center. -
Darken the shadows:
Mix a darker green using Hooker’s Green and a touch of red. Apply this to the base of the leaves and the underside of the buds to give them volume. -
Texture the seeds:
I like to go back into the dark centers with my smallest brush and add tiny dots of very dark brown or black to emphasize the seed texture. -
Erase guidelines:
Ensure the paint is completely bone-dry, then gently erase any visible pencil grid marks with a kneaded eraser. -
Final assessment:
Step back and check your pattern. If any area looks too empty, add a small floating leaf or a stray petal to balance the composition.
Now you have a stunning sheet of hand-painted pattern art ready to be framed or used as custom wrapping paper
Modern Frame It: Sunflower Inside Geometric Shapes
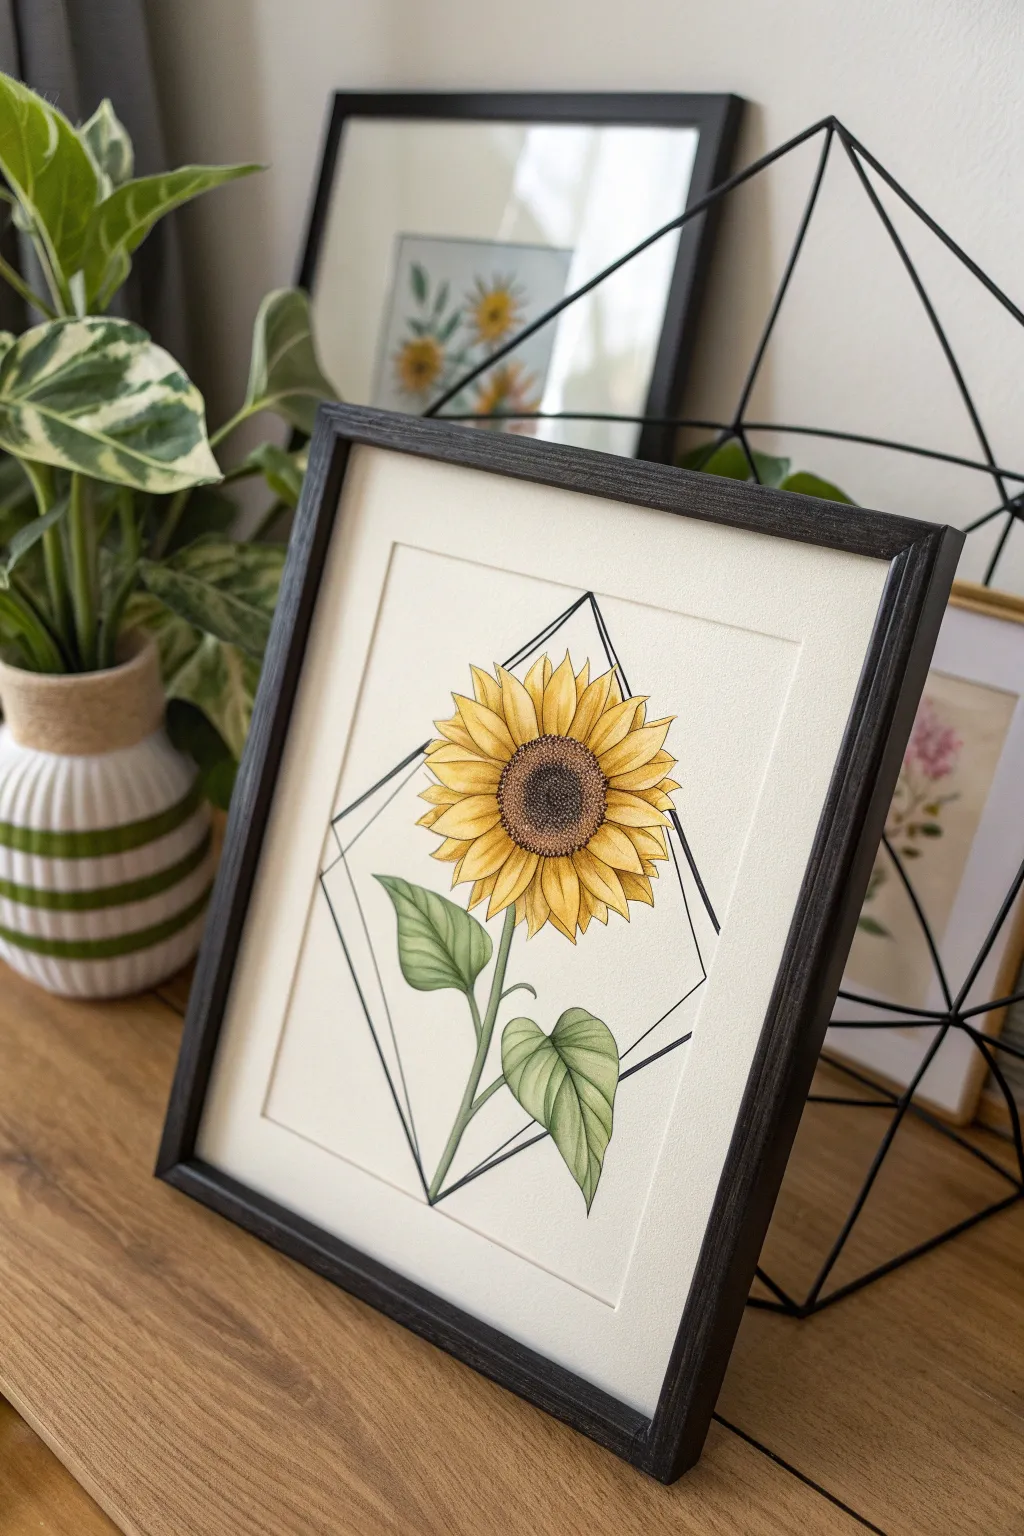
Blend botanical grace with clean geometric lines in this striking wall art project. The contrast between the organic curves of the sunflower and the sharp black framing creates a sophisticated, modern aesthetic perfect for any minimalist space.
Step-by-Step Guide
Materials
- Cold press watercolor paper (white or cream)
- Pencil (HB) and eraser
- Ruler
- Waterproof fine liner pen (black, 0.5mm and 0.8mm)
- Watercolor paint set (yellows, browns, greens)
- Small round brushes (size 2 and 4)
- Clean water and paper towels
- Black wooden frame with matting
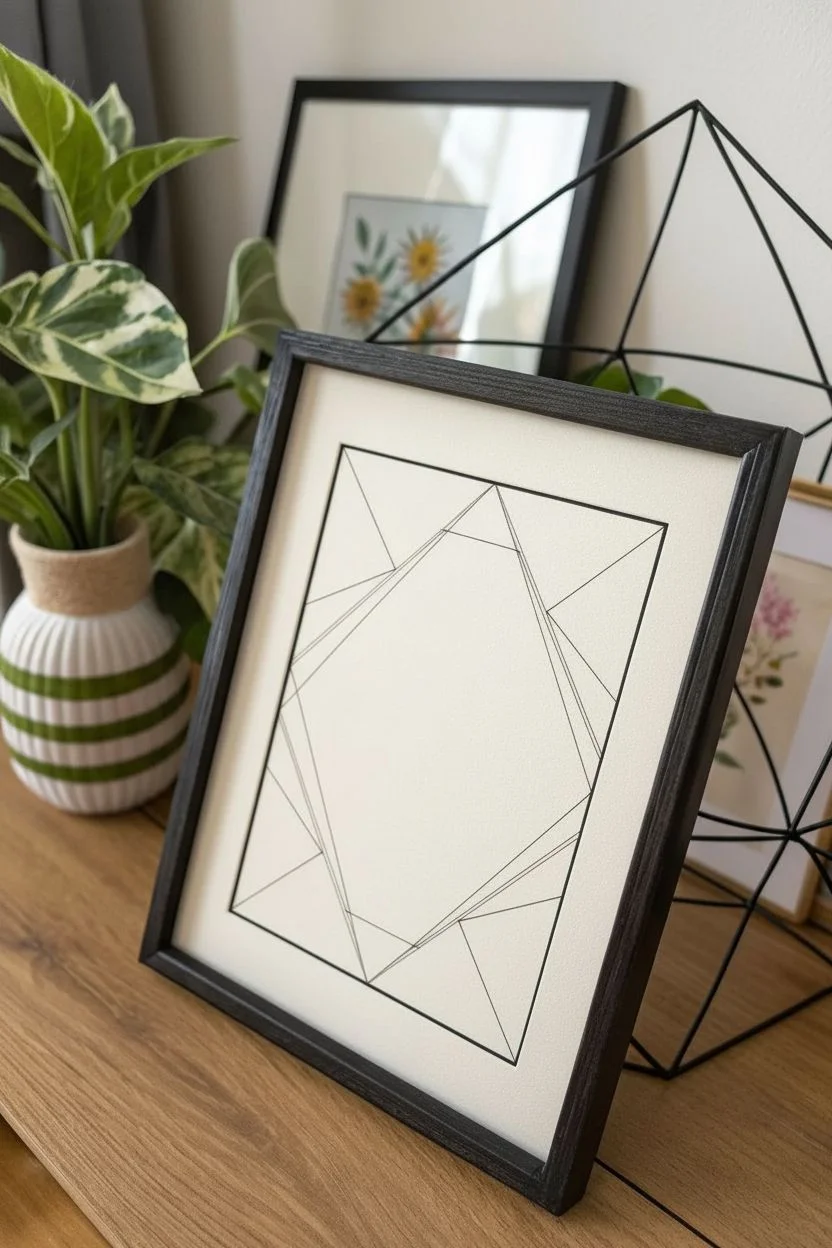
Step 1: Drafting the Geometry
-
Measure your boundaries:
Start by measuring the opening of your frame’s matting. Lightly mark this rectangular boundary on your watercolor paper so you know exactly where to center your composition. -
Draw the main diamond:
Find the center of your paper. Using your ruler, draw a large diamond shape (rhombus) in pencil. I find it helpful to mark the top, bottom, and side midpoints first to ensure the diamond is symmetrical. -
Add intersecting angles:
Create the secondary geometric framing by drawing two smaller, intersecting diamond or triangle lines behind the main shape. These should look like they are ‘floating’ behind the primary diamond to create depth. -
Ink the geometry:
Carefully trace over your pencil lines with a ruler and the 0.5mm waterproof fine liner. Keep the lines crisp and confident. Let the ink dry completely before erasing any pencil construction lines.
Oops! Wobbly Lines?
If your geometric lines aren’t perfectly straight, thicken them slightly with a 0.8mm pen to mask the wobble. Just ensure you keep the thickness consistent.
Step 2: Sketching the Bloom
-
Place the flower center:
Lightly sketch a circle for the sunflower’s disk right in the middle of your diamond. It shouldn’t be perfectly round; give it a slightly rough edge where the seeds meet the petals. -
Draft the petals:
Draw the first layer of petals radiating outward. Some should overlap the geometric lines you just drew. This is key—the flower needs to look like it is bursting out of the frame. -
Add petal layers:
Fill in the gaps with a second layer of petals behind the first. Keep the shapes fairly uniform but allow for natural slight twists and curves at the tips. -
Draw the stem and leaves:
Sketch a sturdy stem extending downward to the bottom point of the diamond. Add two large, heart-shaped leaves on either side, ensuring they stay confined within or just touch the geometric borders. -
Ink the botanical elements:
Switch to your 0.3mm or 0.5mm pen to ink the flower. When you reach the geometric lines, remember that the flower is in *front*. Stop your geometric lines where they meet the petals to create the illusion of overlap.
Step 3: Watercolor Techniques
-
Base wash for petals:
Mix a bright, clean yellow (like Cadmium Yellow) with plenty of water. Apply a light wash to all the petals. Don’t worry about shading yet; just get the color down. -
Deepen the shadows:
Once the base is dry, mix a little ochre or light brown into your yellow. Paint thin streaks from the base of the petals outward to suggest texture and shadow. -
Texture the center:
For the disk, use a stippling motion (tiny dots) with dark brown paint. Make the outer ring of the center darker than the middle to give it a convex, 3D appearance. -
Paint the leaves:
Use a sap green for the leaves. Apply a lighter wash first, then come back with a darker blue-green mix to paint the veins and shaded areas closer to the stem. -
Final ink touches:
After the paint is bone dry, use your finest pen to reinforce any lines that got washed out. You can add tiny stippling dots to the center disk for extra texture.
Level Up: Gold Leaf
Apply liquid gold leaf or metallic gold watercolor to the geometric frame lines instead of black ink for a luxurious, glamorous finish.
Step 4: Framing
-
Mount artwork:
Place your dried painting behind the mat board. Use acid-free tape to secure it to the back of the mat, ensuring the geometric shape is perfectly centered. -
Clean and close:
Wipe the inside of the frame glass to remove dust or fingerprints. Insert the matted artwork and secure the backing clips.
Hang your new masterpiece in a well-lit spot to let those yellow hues really shine.
Add Words: Sunflower Painting With Hand-Lettered Text
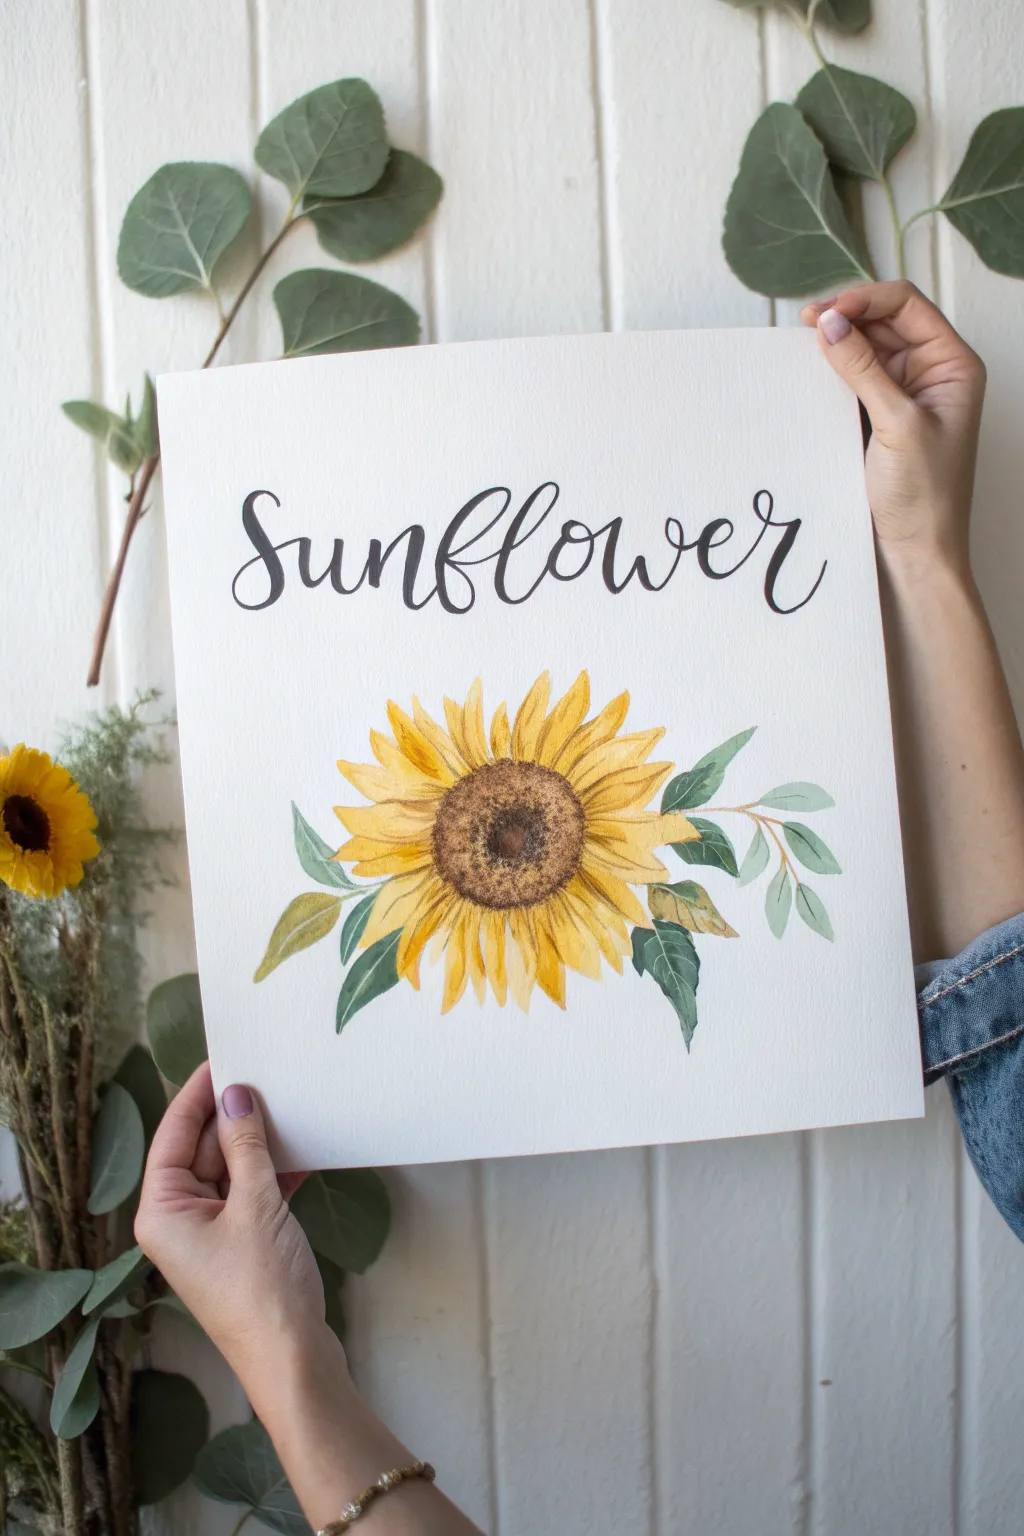
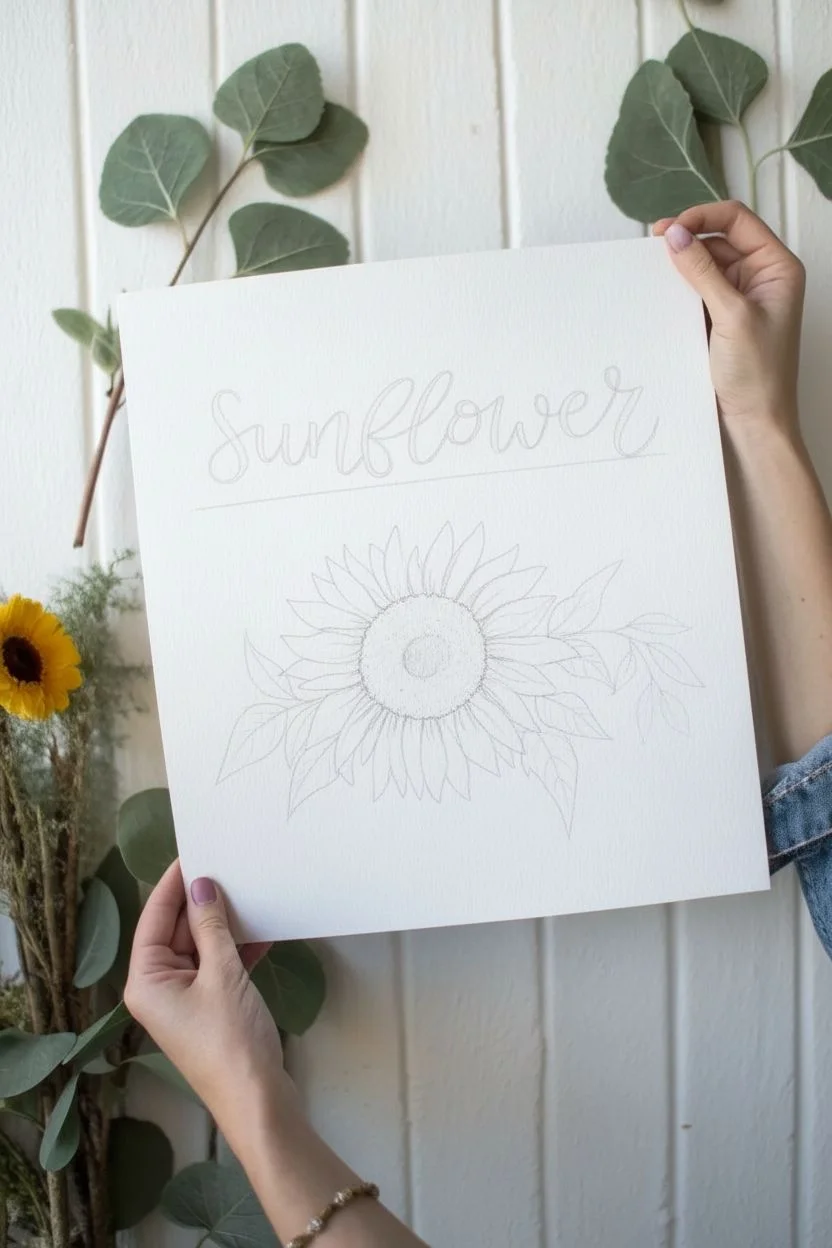
This elegant watercolor project combines a vibrant, detailed botanical illustration with sophisticated hand lettering. The creamy watercolor paper provides a perfect backdrop for the golden yellows of the sunflower and the dark, flowing script above it.
Step-by-Step Tutorial
Materials
- Hot press watercolor paper (smooth finish, 140lb)
- Watercolor paints (Cadmium Yellow, Yellow Ochre, Burnt Sienna, Burnt Umber, Sap Green, indigo)
- Round watercolor brushes (sizes 6, 2, and 0 for details)
- Brush pen or black India ink with a dip pen
- Pencil (HB or lighter)
- Kneaded eraser
- Ruler
- Paper towels and water cup
Step 1: Sketching the Layout
-
Establish the baseline:
Begin by lightly drawing a straight horizontal line with your ruler about one-third of the way down the page. This will be the baseline for your lettering. -
Outline the flower center:
Find the visual center of the bottom two-thirds of the paper. Lightly sketch a slightly flattened oval to represent the seed head of the sunflower. -
Draft the petals:
Sketch two layers of petals radiating from the center. Start with the front layer of shorter petals, then add longer, pointed petals behind them. Keep the shapes organic and slightly irregular. -
Add foliage:
Draw leaves extending from the sides of the flower. Include a few larger, darker leaves near the base and softer, eucalyptus-style sprigs reaching outward to the right. -
Pencil the text:
Using your baseline guide, lightly sketch the word ‘Sunflower’ in a flowing cursive script. Ensure the loops of the ‘S’, ‘f’, and ‘l’ are balanced and tall.
Ink Bleeding?
If ink feathers on the paper, your watercolor paper might be too textured or damp. Ensure paper is 100% dry and use smooth hot-press paper for crisp lines.
Step 2: Painting the Sunflower
-
Base layer for petals:
Mix a light wash of Cadmium Yellow. Paint the entire shape of the petals, keeping the application wet and loose. Let this base layer dry completely. -
Deepening the petals:
Mix Yellow Ochre with a touch of Burnt Sienna. Apply this darker mix to the base of the petals (nearest the center) and pull the color outward in thin streaks to create texture. -
Painting the center:
Fill the center oval with a wash of Burnt Sienna. While it is still slightly damp, drop in concentrated dots of Burnt Umber around the outer ring to create a fuzzy, three-dimensional look. -
Adding texture details:
Once the seed head is dry, use your size 0 brush with very dark brown or black to stipple tiny dots in the very center, suggesting individual seeds. -
Defining petal separation:
Use a diluted pale brown mix to paint thin shadow lines between overlapping petals. This separates the layers and adds depth to the flower.
Level Up: Gold Accents
Once the painting is dry, use metallic gold watercolor to add tiny highlights to the seed center or trace the thin upstrokes of the lettering for shimmer.
Step 3: Painting the Foliage
-
Base greens:
Mix Sap Green with a little yellow for the large leaves near the flower head. Paint these in a single smooth layer. -
Cooler leaves:
For the sprigs extending to the right, mix Sap Green with a touch of Indigo or blue to create a cooler, sage-green tone. Paint the stems and small oval leaves. -
Leaf shading:
Add a second layer of slightly darker green to the lower half of the larger leaves to suggest curvature or shadow.
Step 4: Inking the Lettering
-
Prepare the lettering tool:
If using a dip pen, load your nib with India ink. If using a brush pen, ensure the tip is sharp. Test the flow on a scrap piece of paper first. -
Trace the downstrokes:
Begin tracing your pencil sketch. Apply firm pressure on the downstrokes to make them thick and bold. Go slowly to maintain steady lines. -
Complete the upstrokes:
Use very light pressure for the upstrokes, creating a thin, hairline connector between the letters. Join these smoothly with your thick downstrokes. -
Clean up:
Wait at least 30 minutes for the ink to fully cure. Here I prefer to wait an hour just to be safe. Once dry, gently erase all pencil guidelines with a kneaded eraser.
Now you have a stunning piece of botanical art ready to be framed or gifted to brighten someone’s day
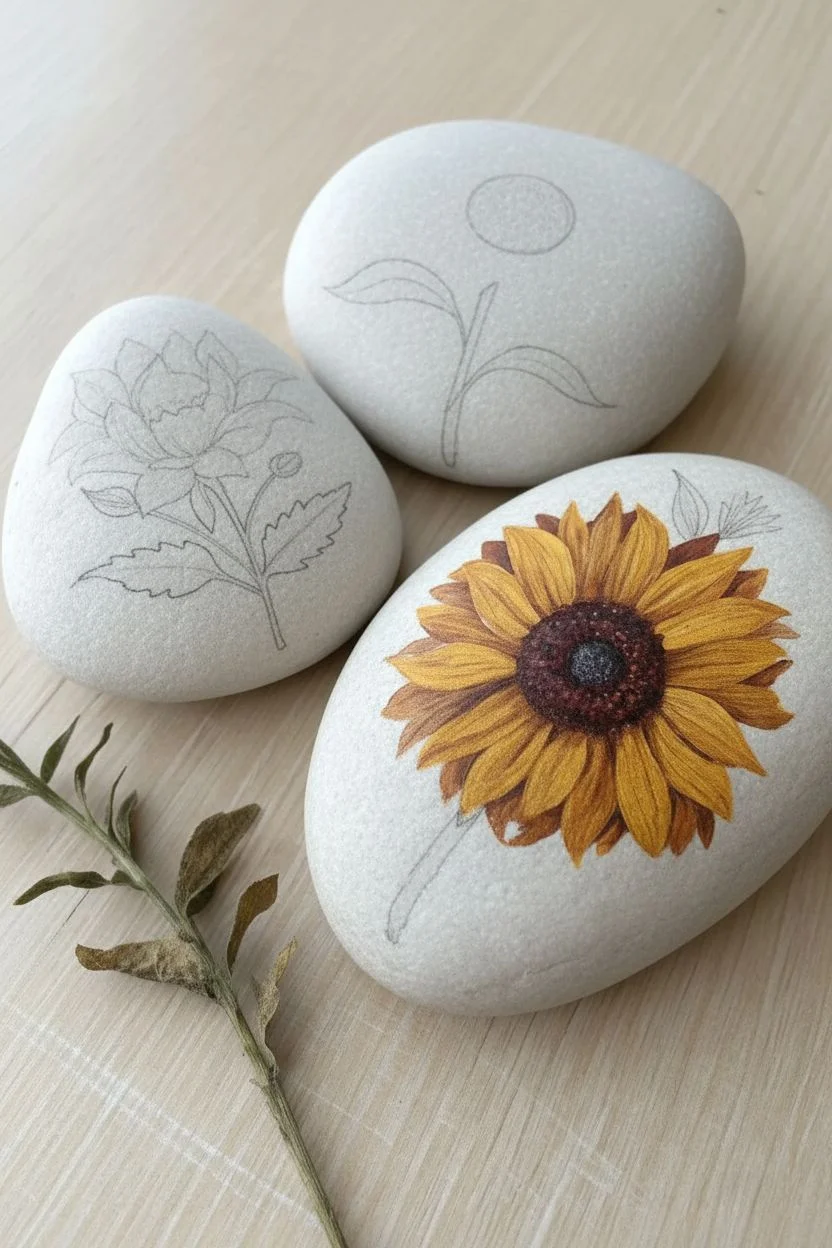
Tiny Surface Project: Sunflower Rock Painting Set
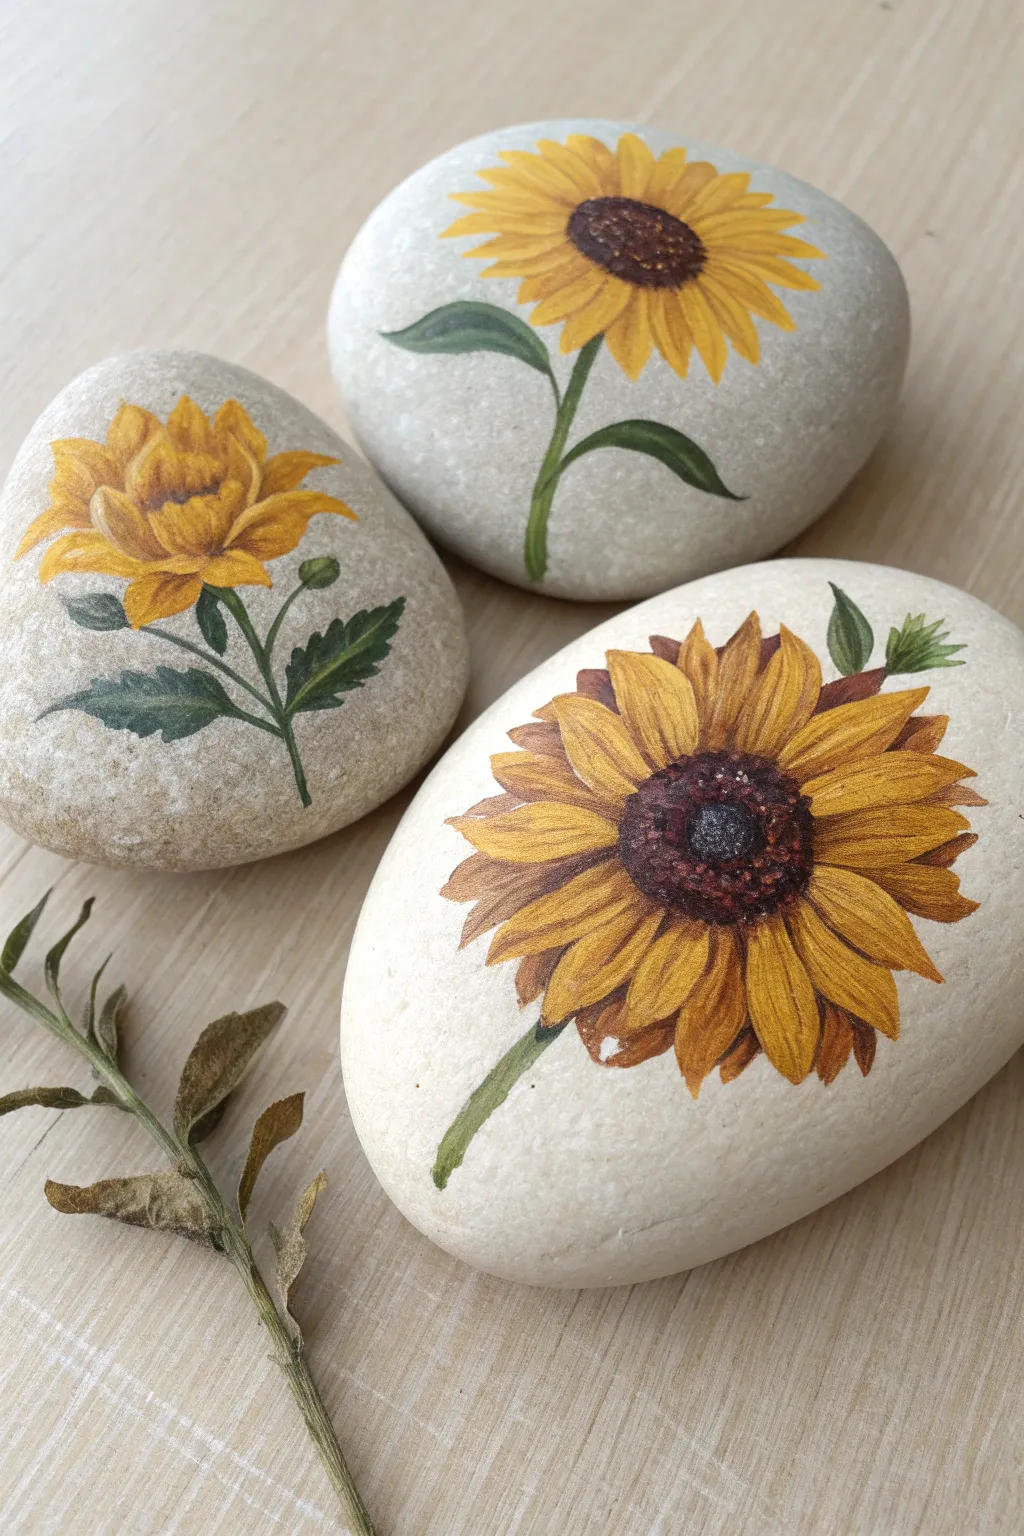
Transform smooth river rocks into permanent blooms with these detailed sunflower studies. This project focuses on capturing the realistic textures of petals and heavy seed heads through careful layering on a natural stone canvas.
Step-by-Step
Materials
- Smooth, rounded river stones (light grey or beige)
- Acrylic paints (Titanium White, Cadmium Yellow, Yellow Ochre, Burnt Sienna, Burnt Umber, Sap Green, Olive Green)
- Fine detail brushes (sizes 0, 00, and 1)
- Liquid acrylic medium or water for thinning
- HB pencil for sketching
- Matte or satin varnish spray
- Palette for mixing
Step 1: Preparation & Base Sketching
-
Stone Selection:
Begin by selecting three smooth, flat stones. Wash them thoroughly with soapy water and let them dry completely to ensure the paint adheres properly. -
Priming the Surface:
While you can paint directly on the stone, applying a thin, diluted wash of Titanium White over the area where the flower will sit helps the yellow pigments pop later. Keep this layer translucent so the stone’s texture still shows through. -
Sketching the Guidelines:
Using a light hand and an HB pencil, sketch the circular centers for your flowers. For the top stone, draw a simple circle; for the bottom right, make a large, slightly flattened oval to show perspective. -
Mapping the Leaves:
Lightly sketch the stems and leaf shapes. For the left stone, draw a branching stem with serrated leaves. For the others, stick to simple, curved stems.
Step 2: Petal Foundations
-
Base Yellow Layer:
Mix Cadmium Yellow with a touch of Titanium White. Paint the base shape of the petals, extending outward from your pencil centers. Don’t worry about shading yet; just block in the solid color. -
Adding Warmth:
While the base is dry to the touch, mix Yellow Ochre with a tiny bit of water. Paint thin strokes starting from the base of each petal (nearest the center) and flicking outward to create a preliminary shadow. -
Defining the Edges:
On the bottom right stone—the large close-up bloom—use a mix of Burnt Sienna and Yellow Ochre to outline the individual petals, separating them visually from one another. -
Petal Texture:
Using your smallest brush (size 00), paint very fine lines of pure Cadmium Yellow and White along the length of the petals to simulate the ribbed texture of the flower.
Fixing Translucent Yellows
Yellow paint is notoriously see-through. If your petals look dull against the grey rock, paint a solid white silhouette of the petals first, let it dry, then paint the yellow on top.
Step 3: The Seed Heads
-
Dark Base Center:
Fill in the circular centers with Burnt Umber. For the large flower on the bottom right, make the center darker and more prominent, mixing in a touch of black if needed for depth. -
Stippling Texture:
Once the brown base is dry, take a size 0 brush with a small amount of lighter brown (Burnt Sienna mixed with Ochre). Use a tapping or stippling motion to create the bumpy texture of seeds. -
Highlighting Seeds:
I like to add tiny dots of white or pale yellow to the very center of the seed head on the large flower. This makes it look like the light is catching the individual seeds. -
Deepening Shadows:
Glaze a very watered-down Burnt Umber around the immediate ring where the petals meet the center. This shadow lifts the center forward, making it look 3D.
Pro Tip: Natural Shadows
Don’t use black to darken your yellow paint; it will turn olive green. Instead, use small amounts of purple or brown mixed into the yellow to create rich, warm shadows.
Step 4: Greenery & Finishing Touches
-
Stem Structure:
Paint the stems using Sap Green. Keep your brush strokes long and fluid to mimic the natural curve of a plant stem. -
Leaf Detailing:
Fill in the leaf shapes with Olive Green. For the serrated leaves on the left stone, use the tip of your brush to carefully flick paint outward to create jagged edges. -
Veins and Highlights:
Mix a light green (Sap Green + White) and paint very thin vein lines on the leaves. Add a darker green shadow on the underside of where the leaves attach to the stem. -
Final Cleanup:
Check your edges. If any paint went astray, you can gently scrape it off with a damp toothpick or paint over it with a color matching your stone if necessary. -
Sealing the Artwork:
Allow the stones to cure for at least 24 hours. Finish with a matte or satin spray varnish to protect the paint from chipping without adding an unnatural high gloss.
Arranged together or scattered in a garden, these blooming stones will bring a touch of sunshine to any corner
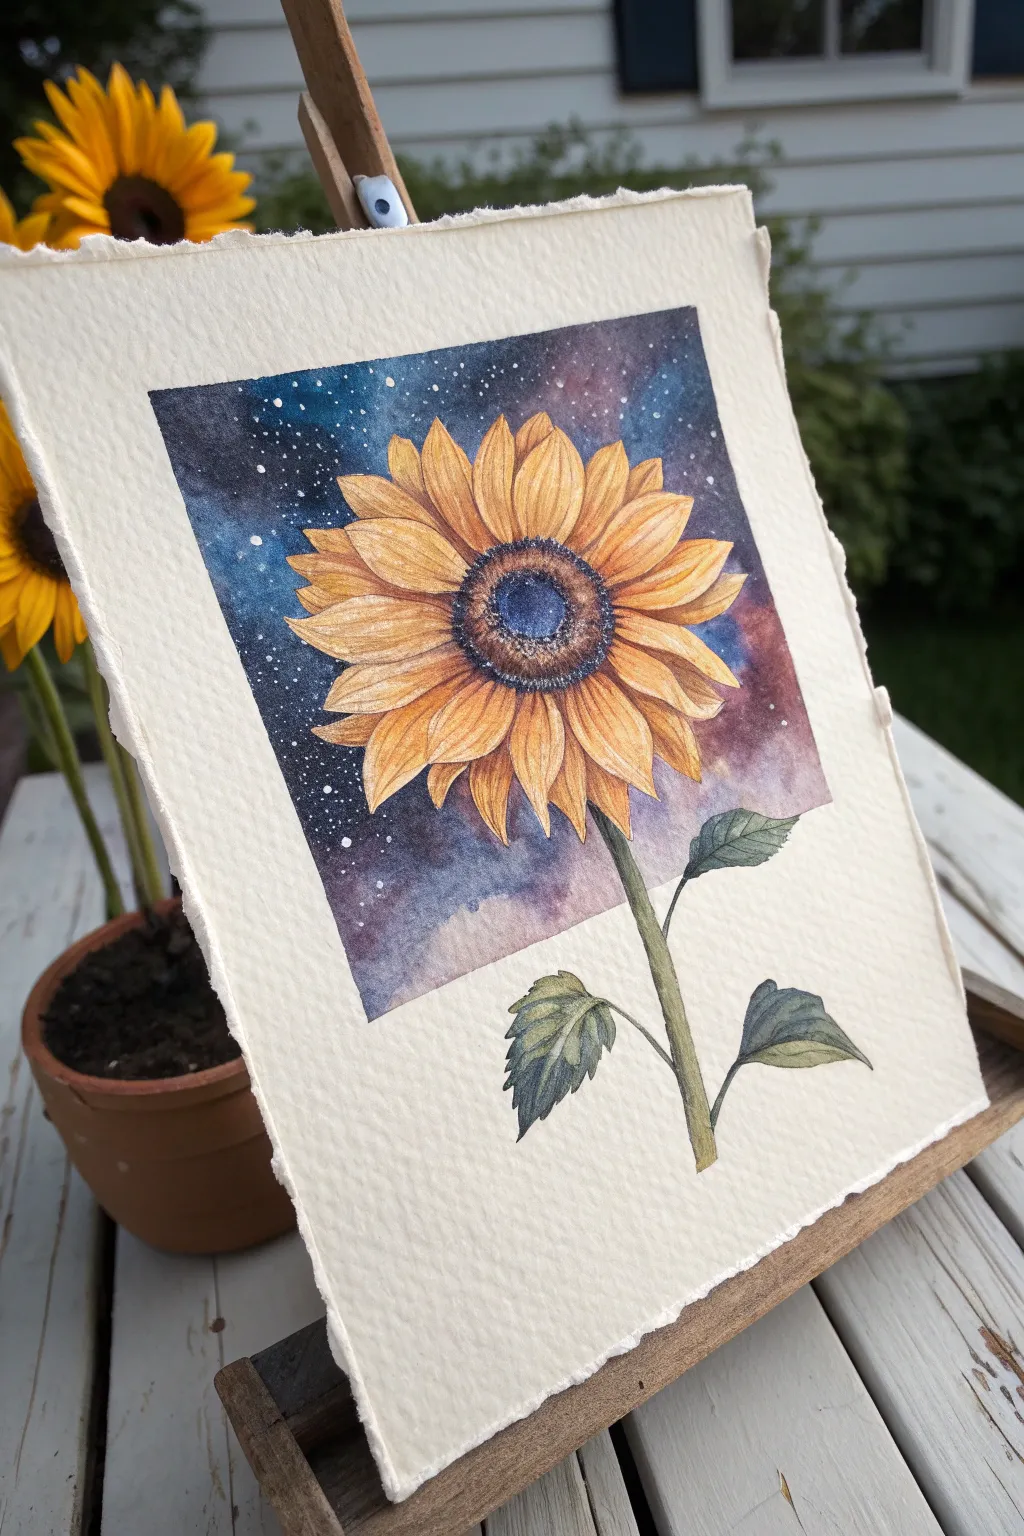
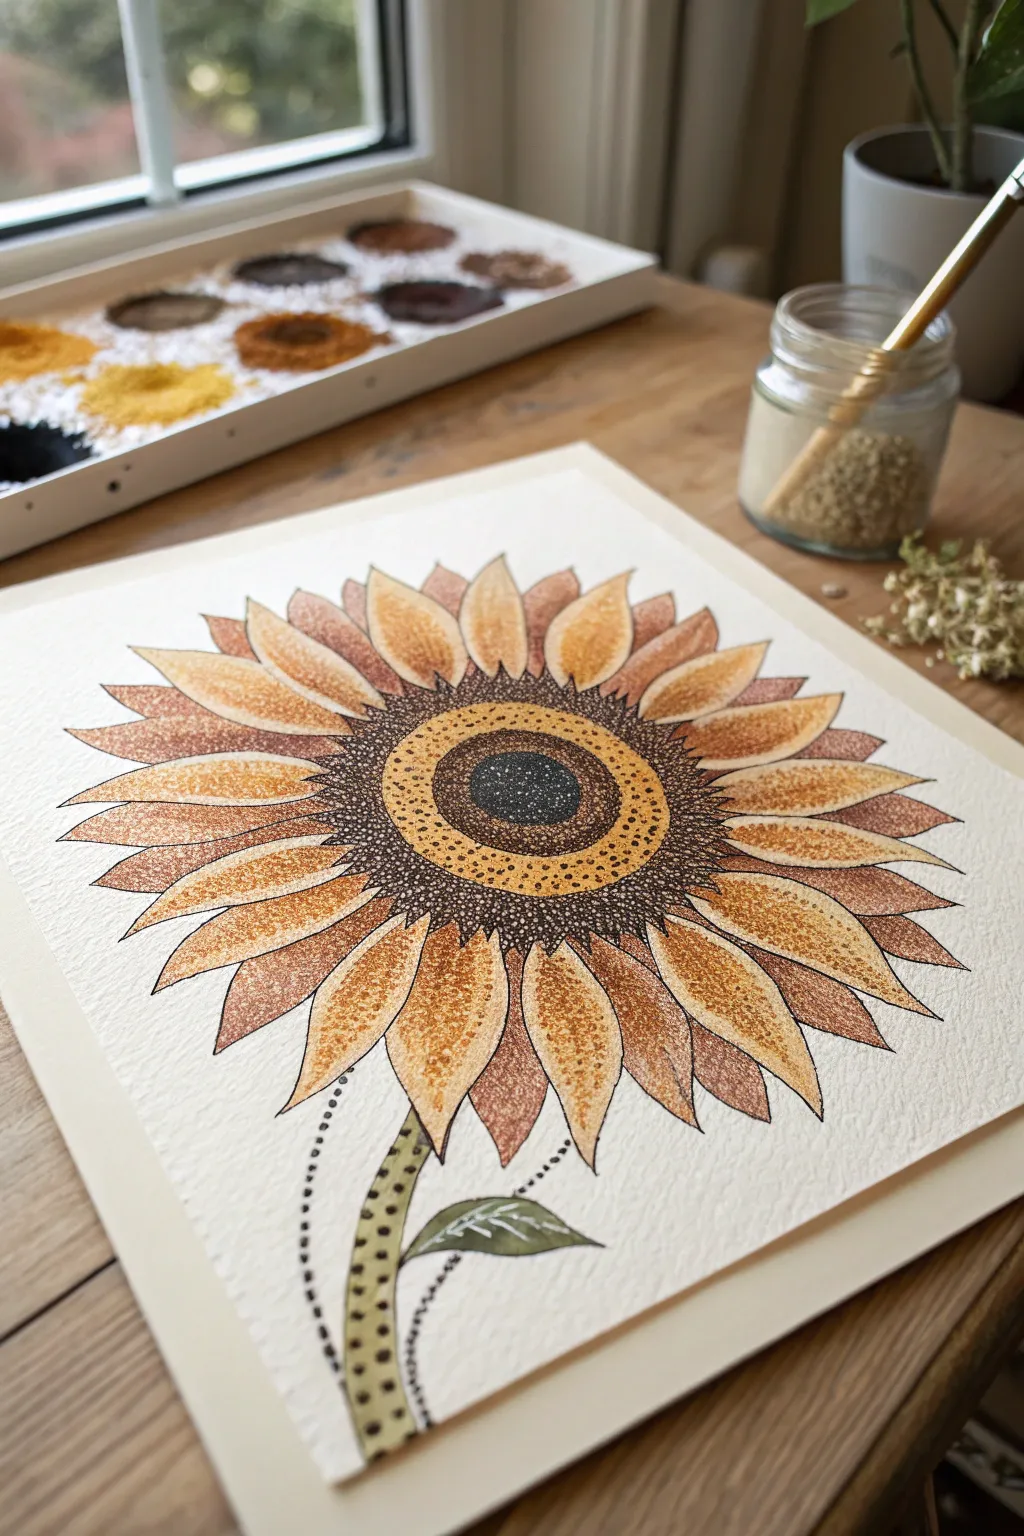
Surreal Twist: A Sunflower With a Starry Galaxy Center

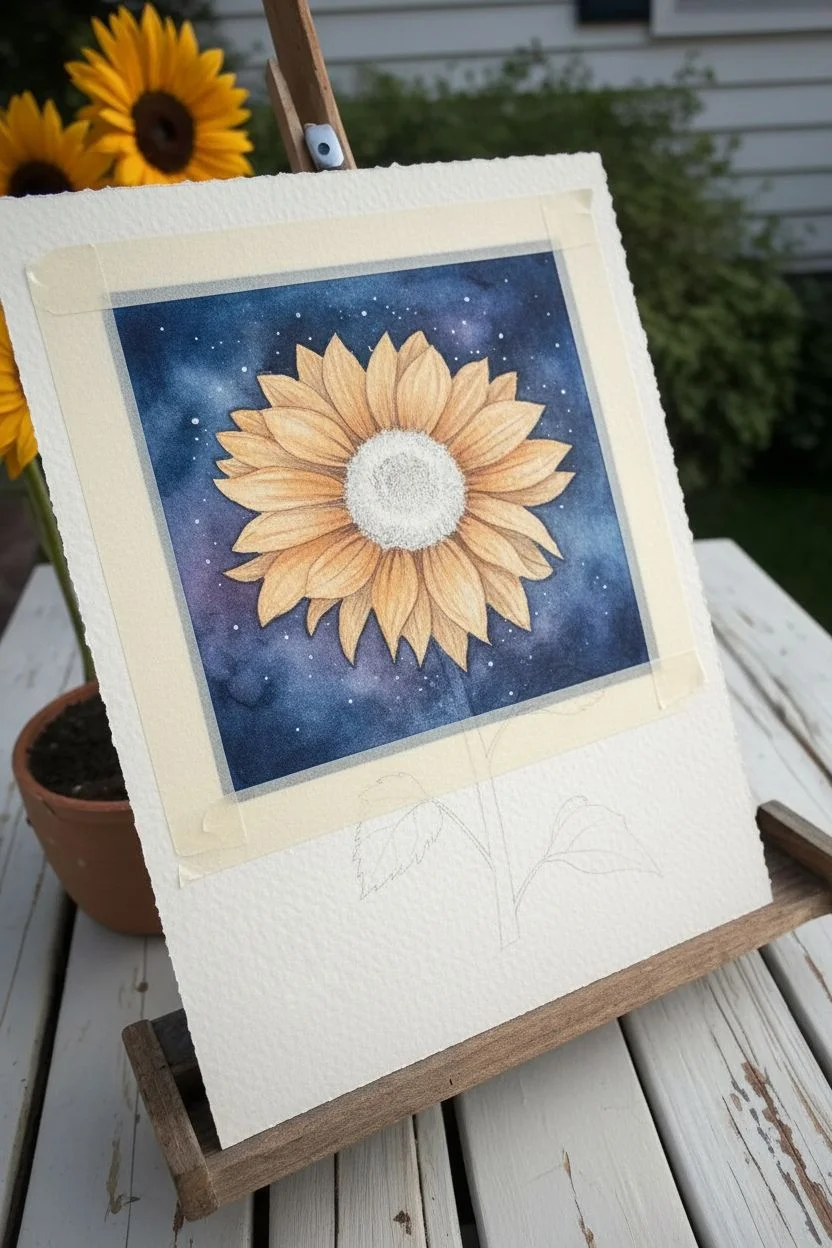
Blend the warmth of earthly florals with the cool mystery of space in this surreal watercolor piece. This project features a detailed sunflower with a galaxy center set against a starry, contained background, while the stem breaks free into negative space.
Detailed Instructions
Materials
- Cold press watercolor paper (140lb/300gsm)
- Watercolor paints (Yellow Ochre, Burnt Sienna, Payne’s Grey, Indigo, Alizarin Crimson, Sepia, Sap Green)
- Pencil (HB or H)
- Kneaded eraser
- Masking tape (for straight edges around the background box)
- White gouache or white gel pen
- Round brushes (Sizes 2, 4, and 8)
- Two jars of water
- Paper towels
Step 1: Drafting and Masking
-
Define the composition:
Begin by lightly sketching a square or rectangle in the upper center of your paper to define the galaxy background area. Don’t press too hard, as you want these lines to be faint guideposts. -
Sketch the sunflower:
Draw the large sunflower head inside the box, ensuring the petals extend near the edges. Draw the stem and leaves extending downwards, well outside the box boundary. -
Apply masking tape:
Carefully place masking tape along the four straight lines of your background box. Important: You must cut the tape or carefully work around the stem if it overlaps the bottom line, but for this specific composition, the stem starts below the box, so just tape the box perimeter cleanly.
Clean Edges
To prevent paint bleeding under your masking tape, burnish the tape edges down firmly with a spoon handle or your fingernail before you start painting the background.
Step 2: The Galaxy Background
-
Wet-on-wet preparation:
Using your largest brush and clean water, wet the area inside the taped box, carefully painting *around* the sunflower petals. You want the paper damp but not puddling. -
Drop in deep blues:
While the paper is wet, drop in Indigo and Payne’s Grey. Concentrate the darkest values at the top corners and closest to the flower petals to create contrast. -
Add cosmic variation:
While still wet, touch in bits of Alizarin Crimson or a muted purple in cloud-like formations to break up the blue and create that nebula effect. -
Create the stars:
Wait for the shine to leave the paper (damp, not soaking). Load a stiff brush or toothbrush with white gouache and flick tiny speckles over the dark background. Protect the flower sketch with a scrap piece of paper if needed. -
Let it dry completely:
Allow this layer to bone dry before removing the tape. Peeling tape off damp paper will tear it.
Metallic Magic
Swap the white gouache stars for metallic gold watercolor or ink in the center of the flower. This creates a stunning shimmer when the light hits the artwork.
Step 3: Painting the Flower
-
Petal base wash:
Mix a watery Yellow Ochre. Paint the petals with a light wash. I like to keep the tips of the petals lighter and the areas near the center slightly more saturated. -
Add petal texture:
Once the base is dry, use a size 2 brush and a mix of Burnt Sienna and Yellow Ochre to paint fine lines radiating from the center of the flower outward. This mimics the texture of sunflower petals. -
Deepen the shadows:
Mix a small amount of brown or violet into your yellow to create a shadow color. Paint thin glazes where petals overlap each other to create depth and separation. -
The galaxy center:
Instead of brown seeds, we are painting a mini galaxy. Wet the center circle. Drop in bright blue, Indigo, and a touch of purple. Let the colors bleed together naturally. -
Center details:
Once the center is dry, dot the outer rim of the center circle with dark brown or Indigo stippling to suggest the transition from seeds to petals. Add tiny white stars to the very center with your gel pen or gouache.
Step 4: Stem and Leaves
-
Stem base layer:
Paint the stem using Sap Green mixed with a little Yellow Ochre for an organic, warm green tone. -
Leaf washes:
Fill in the leaf shapes with a watery layer of your green mix. While wet, drop a slightly darker green (Sap Green + heavy Indigo) into the shadowed areas near the stem. -
Leaf veining:
Wait for the leaves to dry completely. Using your smallest brush and a dark green mix, paint the delicate veins. Keep your hand loose to avoid stiff lines. -
Final dry brush texture:
Use a nearly dry brush with a small amount of dark paint to add subtle texture to the fuzzy stem and the rough edges of the leaves.
Remove the tape slowly at a 45-degree angle to reveal your crisp, cosmic masterpiece, ready for display


Have a question or want to share your own experience? I'd love to hear from you in the comments below!