
There’s something magical about painting a sunrise—it’s basically an excuse to play with juicy color blends and soft light. Here are my favorite sunrise painting ideas you can make as simple or as detailed as you want, depending on your mood.
Mountain Ridge Sunrise Layers
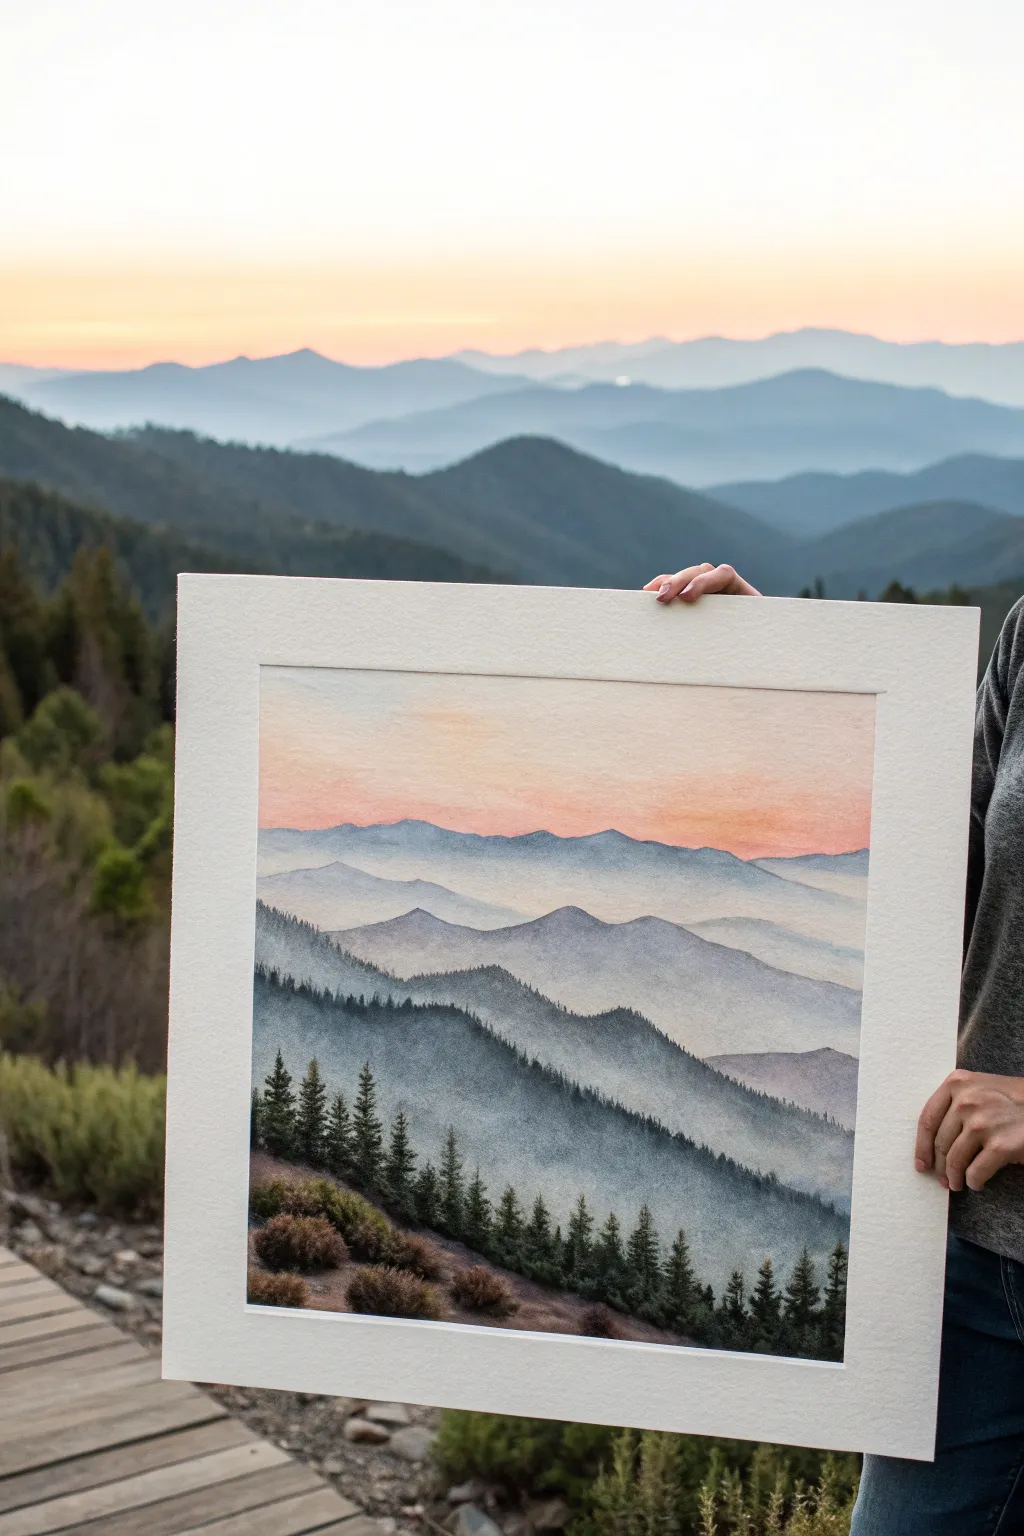
Capture the serene beauty of a mountain sunrise with this layered watercolor landscape. By using atmospheric perspective and careful glazing, you’ll create depth that makes the distant peaks fade softly into the morning light.
Step-by-Step Guide
Materials
- Cold press watercolor paper (140lb/300gsm, 12×12 inches suggested)
- Watercolor paints: Indigo, Paynes Gray, Sap Green, Burnt Sienna, Alizarin Crimson, Cadmium Yellow
- Large flat wash brush (1 inch)
- Round brushes (sizes 4, 8, and 12)
- Rigger or liner brush for tree details
- Masking tape
- Two jars of water
- Paper towels
- Mixing palette
Step 1: Setting the Sky
-
Prepare the Paper:
Tape your watercolor paper down firmly to a board on all four sides. This prevents buckling and ensures you have a crisp white border, just like the example image. -
Wet the Sky Area:
Using your large flat brush, apply clean water to the top third of the paper. You want the surface to be glistening but not forming puddles. -
Paint the Gradient:
Mix a very dilute wash of Cadmium Yellow and immediately paint a horizontal strip across the wet paper, about 1/3 down from the top. -
Blend the Sunrise:
While the yellow is still wet, introduce a soft mix of Alizarin Crimson just above it. Let the colors bleed slightly to create a peach-colored transition. -
Top Sky Wash:
Finish the sky by blending a very faint wash of clear water or an extremely pale blue at the very top edge, ensuring there are no hard lines.
Water Control
If your mountains create ‘cauliflower’ blooms, your brush has too much water. Dry your brush on a paper towel before softening the bottom edges of the ridges.
Step 2: Distant Peaks
-
Draft the Layer Lines:
Once the sky fits is bone-dry, lightly sketch the undulating lines of the mountain ranges with a hard pencil (H or 2H). Focus on creating overlapping ‘V’ shapes for valleys. -
First Mountain Layer:
Mix a very watery puddle of Indigo and Alizarin Crimson. This farthest range should be barely visible—almost transparent. Paint the shape and fade the bottom edge out with clean water. -
Second Layer:
Add a tiny bit more pigment to your mix. Once the first layer is dry, paint the next ridge down. The key here is patience; if the paper is damp, you lose the distinct ridge line. -
Building Colors:
As you move down the paper, gradually add more Indigo and a touch of Paynes Gray to your mix. Each successive mountain range should be slightly darker and cooler than the one behind it. -
Creating Mist:
For the middle layers, paint the sharp top edge of the ridge, then quickly rinse your brush and drag clean water along the bottom of that shape to soften it into a misty white fog.
Add Birds
Use an ultra-fine liner brush with black gouache to add three or four tiny ‘m’ shapes in the upper sky for soaring birds, giving the vast landscape scale.
Step 3: Foreground Detail
-
Darkest Ridge:
For the large mountain shape nearest to the viewer, mix a strong, saturated color using Indigo and Sap Green. This needs to be dark to push the pale mountains back. -
Texture the Slope:
While masking the bottom of this dark ridge, use a ‘dry brush’ technique to scumble some texture downwards, suggesting dense forest cover on the distant slope. -
Suggesting Distant Trees:
Along the crest of this dark ridge, use the tip of your size 4 round brush to dab tiny, irregular vertical marks. These imply the tops of fir trees silhouetted against the mist. -
Foreground Ground Cover:
Mix Burnt Sienna with a little Paynes Gray for the immediate foreground (bottom left). Paint rough, earthy patches to ground the composition. -
Painting the Pines:
Load your liner or small round brush with a thick, creamy mix of Sap Green and Indigo. Paint vertical lines for tree trunks in the foreground. -
Adding Pine Needles:
Using swift, downward strokes, add branches to your trunks. Start narrow at the top and flare out wider at the bottom. Keep the texture loose rather than painting individual needles. -
Ground Integration:
Use the Burnt Sienna mix to paint around the base of the trees, adding small rounded shapes for bushes. I find dropping darker pigment into the wet bushes adds nice dimension. -
Final White Border:
Wait until the painting is completely dry to the touch—cold to the touch means it’s still damp. Carefully peel away the masking tape at a 45-degree angle to reveal your crisp white mat.
Now you have a tranquil sunrise landscape that perfectly mimics the depth of the real horizon


Lake Sunrise Reflections With Streaks
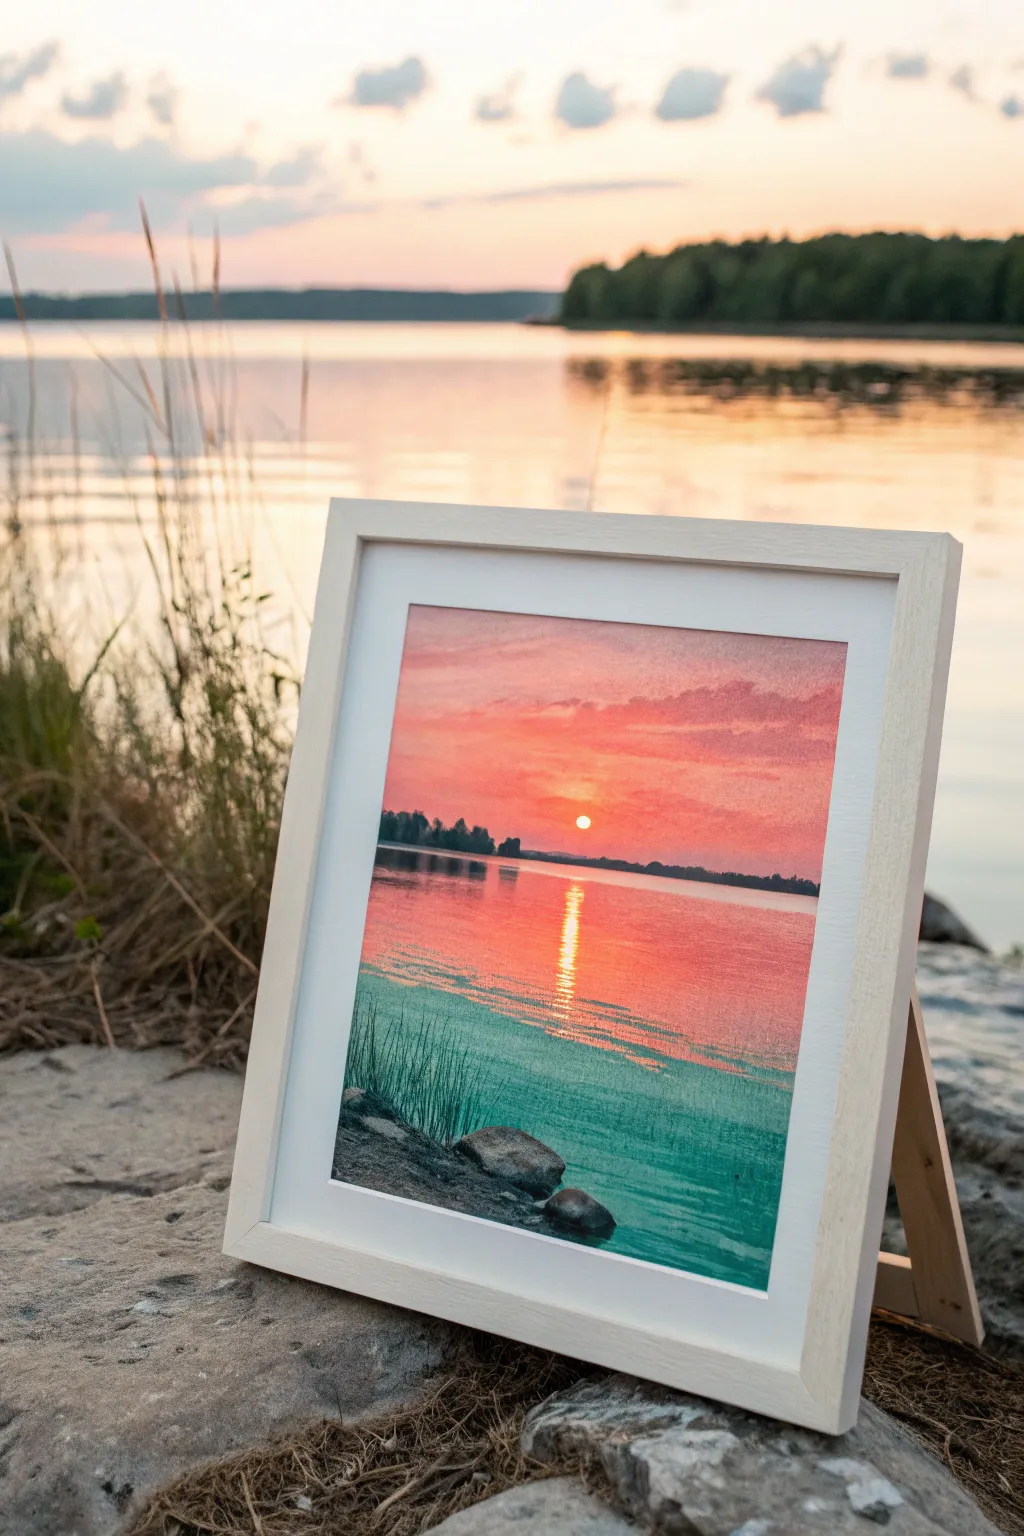
Capture the serene beauty of daybreak with this vibrant painting that focuses on the dramatic interplay between water and light. You will layer washes of pink, coral, and teal to create a luminous scene where a bright sun casts a distinct, rippled reflection across a calm lake surface.
Step-by-Step
Materials
- Watercolor paper (cold press, 300gsm)
- Watercolor paints (Alizarin Crimson, Cadmium Yellow, Cobalt Turquoise, Indigo, Lamp Black)
- Masking fluid or white wax crayon
- Large flat wash brush (1 inch)
- Medium round brush (size 6 or 8)
- Small liner brush (size 2)
- Two jars of water
- Paper towels
- Painter’s tape
- Drawing board
- Mixing palette
Step 1: Preparation and Sketching
-
Secure the paper:
Tape your watercolor paper down firmly to a drawing board on all four sides. This prevents the paper from buckling when we add heavy washes of water later. -
Establish the horizon:
Using a pencil, lightly draw a straight horizon line about one-third of the way up from the bottom of the paper. Keep this line level, as water always sits flat. -
Mask the sun:
To keep the sun perfectly bright, paint a small circle of masking fluid just above the center of your horizon line. Alternatively, you can draw this circle heavily with a white wax crayon to resist the paint. -
Protect the reflection:
Apply a vertical, slightly broken line of masking fluid directly underneath the sun, extending downward into the water area. This will preserve the brilliant white highlights of the sun’s reflection on the water’s surface.
Unwanted Blooms?
If you see cauliflower-like backruns in your sky, you likely added wet paint to a drying wash. Embrace them as clouds, or gently lift them out with a dry brush while damp.
Step 2: Painting the Sky
-
Wet the sky area:
With your large clean wash brush, wet the entire paper above the horizon line with clear water until it glistens evenly. -
Apply the first glow:
While the paper is wet, mix a watery Cadmium Yellow and drop it around the masked sun area, letting it bleed outward softly. -
Introduce pink hues:
Mix a vibrant coral using Alizarin Crimson and a touch of yellow. Brush this across the upper sky, blending it down toward the yellow glow but not covering it completely. -
Deepen the upper sky:
While the paint is still damp, add horizontal streaks of slightly stronger pink and violet near the top edge to suggest distant clouds catching the morning light. -
Let it dry completely:
Allow the sky section to dry thoroughly. If the paper feels cool to the touch, it is still wet; wait until it is room temperature.
Step 3: Creating the Lake
-
Base wash for water:
Mix a wash of Cobalt Turquoise with a tiny hint of Indigo. Using horizontal strokes, paint the water area below the horizon, working carefully around your masked reflection line. -
Reflecting the sky:
While the turquoise wash is wet, drop in horizontal streaks of your coral pink mixture near the horizon line and through the center of the lake to mirror the sky colors. -
Strengthening the foreground:
Load your brush with more saturated Turquoise and add darker, distinct horizontal lines near the bottom of the paper to simulate ripples closest to the viewer. -
Adding shallow water details:
Once the base wash is semi-dry, use a smaller brush to paint thin, vertical grassy strokes in the bottom left corner using a mix of Indigo and Green to suggest reeds.
Add Texture
Sprinkle a tiny pinch of table salt onto the wet turquoise paint in the bottom foreground. When dry and brushed off, it creates a sandy, grainy texture perfect for shorelines.
Step 4: Final Details
-
Paint the distant treeline:
Mix a dark grey-purple using Indigo and Alizarin Crimson. With a small round brush, paint a silhouette of trees along the horizon line, varying the heights to look natural. -
Remove the masking:
Once the painting is 100% bone dry, gently rub away the masking fluid from the sun and the reflection path to reveal the white paper underneath. -
Tint the sun:
If the white sun looks too stark, glaze a very pale wash of yellow over the sun disk and the reflection path to integrate it into the scene. -
Enhance the sparkle:
I like to take a slightly damp, stiff brush and gently lift a few horizontal lines across the water’s reflection path to soften the edges where the masking fluid was. -
Add foreground rocks:
Using a dark mix of Lamp Black and brown, paint a few rounded rock shapes in the immediate bottom foreground to anchor the composition. -
Frame and finish:
Carefully peel off the tape at a 45-degree angle to reveal crisp white borders, and place your finished piece in a simple white frame.
Step back and enjoy the peaceful morning atmosphere you have captured on paper


Sunrise With Big Soft Clouds
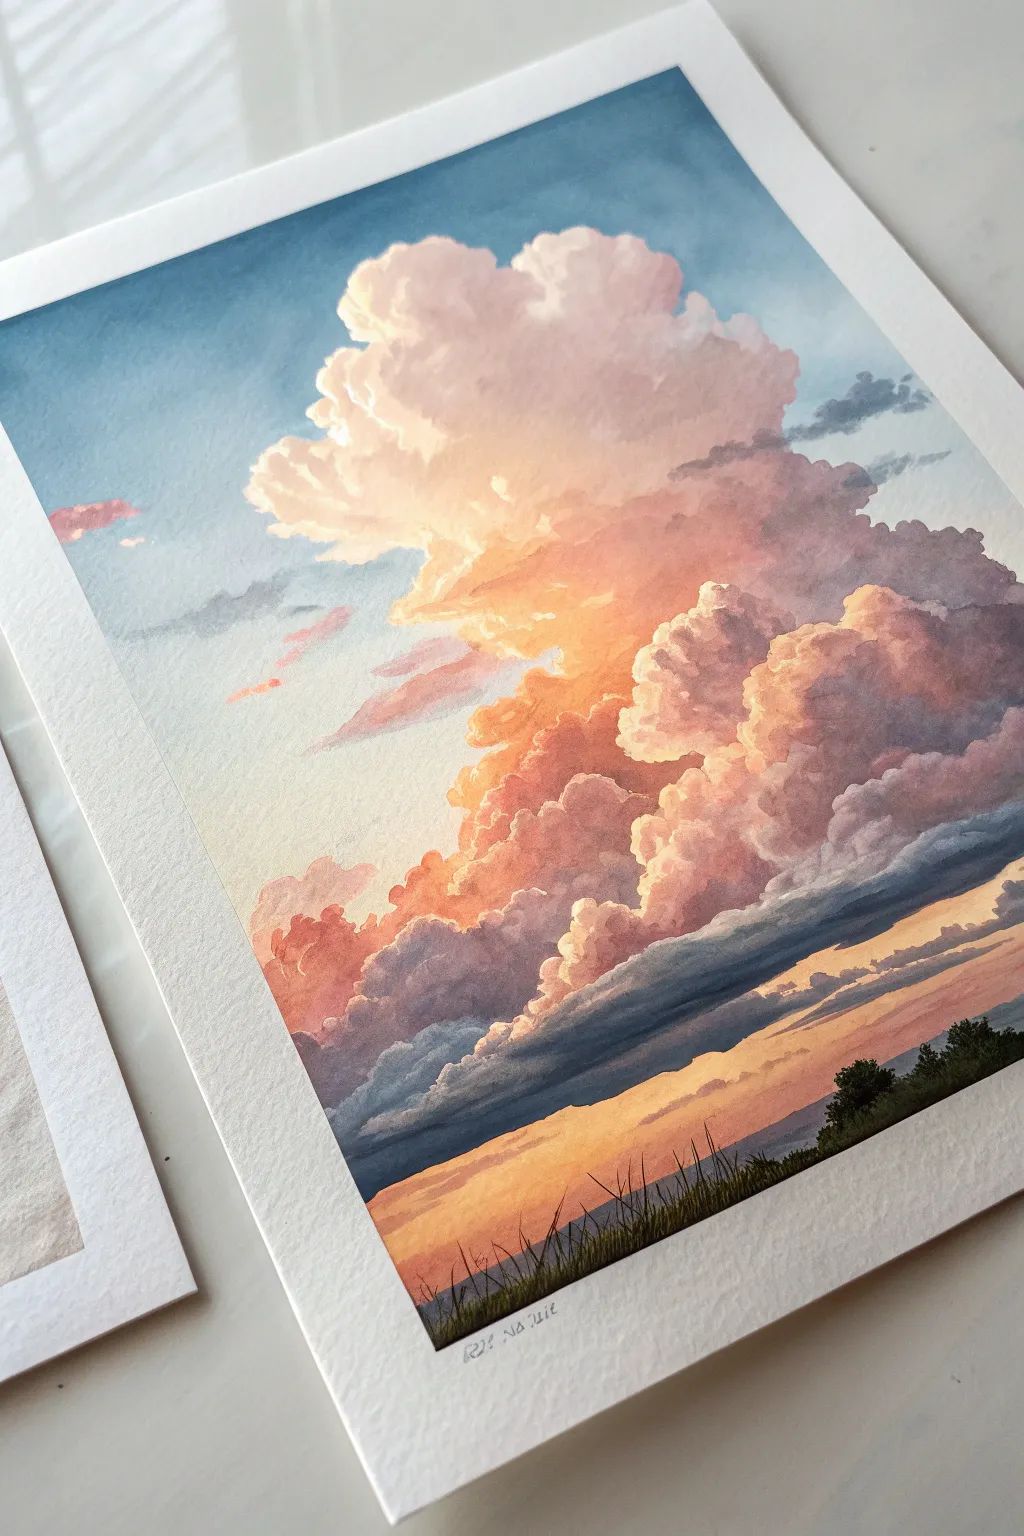
Capture the majestic glow of morning light hitting a towering cloud formation in this vibrant painting. The piece features dramatic contrasts between the soft, sun-drenched upper clouds and the moody, shadowed landscape below.
Step-by-Step Guide
Materials
- Cold press watercolor paper (300 gsm or heavier)
- Masking tape
- Watercolors or Gouache (Primary colors plus Burnt Sienna and Payne’s Grey)
- Round brushes (Large size 10-12, Medium size 6, Small detail size 0-2)
- Mixing palette
- Two jars of water
- Clean rag or paper towels
Step 1: Setting the Sky Gradation
-
Prepare the paper:
Tape down all four edges of your watercolor paper to a board to prevent buckling and create that crisp white border seen in the reference. -
Sketch the cloud outline:
Using a very hard pencil (like 2H), lightly sketch the towering shape of the main cloud accumulation. Keep the lines faint so they don’t show through the paint later. -
Mix the sky blue:
Create a gradient wash for the background sky. Start at the top left with a mix of Cerulean Blue and a touch of Ultramarine. -
Paint the background sky:
Paint around your cloud shape, starting with the darker blue at the top and adding more water as you move down towards the horizon to fade it into a very pale, almost white blue. Let this dry completely.
Step 2: Building the Cloud Structure
-
Base glow:
Mix a warm, pale yellow-orange. Apply this wet-on-dry to the center-left area of the cloud where the light hits strongest, softening the edges with a clean, damp brush. -
Initial pink volume:
While the yellow is still slightly damp, introduce a soft salmon pink (mix red with a lot of water and a tiny bit of yellow) to the middle and upper sections of the cloud. -
Define the puffy edges:
Use a medium round brush to dab paint along the top edges of the cloud. I like to leave small gaps of unpainted white paper at the absolute peaks to represent the brightest highlights. -
Mid-tone shadows:
Mix a dusty purple using Alizarin Crimson and a touch of blue. Apply this to the underside of the main cloud puffs to give them volume and weight. -
Softening transitions:
Use a clean, damp brush to gently blend the purple shadows up into the pinks and oranges, ensuring there are no harsh lines within the cloud mass itself.
Edge Control
Keep edges soft within the cloud mass but crisp against the blue sky. A damp brush (not dripping) is your best tool for blending internal shadows without creating blooms.
Step 3: The Darker Lower Atmosphere
-
Dark cloud base:
Create a heavy cloud bank color using Payne’s Grey mixed with a bit of purple. Paint a distinct, horizontal band of clouds cutting across the lower third of the main structure. -
Layering the bottom:
Paint the bottom-most clouds with a deep, bluish-grey, making this the darkest part of the sky element to anchor the composition. -
Sunrise horizon:
Beneath the dark cloud bank, paint the distant horizon sky with a vibrant gradient of orange fading into warm yellow, mimicking the sun just below the horizon. -
Atmospheric blending:
Allow the bottom edge of the dark grey clouds to bleed slightly into the orange horizon wet-on-wet for a misty, atmospheric look.
Gouache Power
Mix white gouache into your pinks and oranges for the cloud body. It adds opacity that makes the clouds look dense and solid compared to the transparent sky.
Step 4: Foreground Details
-
Silence the foreground:
Mix a very dark, near-black green using Sap Green and Payne’s Grey. Paint the silhouette of land at the very bottom. -
Add trees and texture:
Using the tip of your brush, stipple in the shapes of distant trees on the right side of the hill. -
Grass details:
Switch to your smallest liner or detail brush. With quick, upward flicking motions, add delicate blades of grass along the ridge line. -
Final highlights:
If needed, use white gouache to reclaim any lost highlights on the very top edges of the main cumulus cloud. -
Reveal:
Wait until the paper is bone dry, then carefully peel away the masking tape at a 45-degree angle to reveal the clean edges.
Now you have a stunning morning sky that glows right off the paper


Sunrise Through Tall Pines
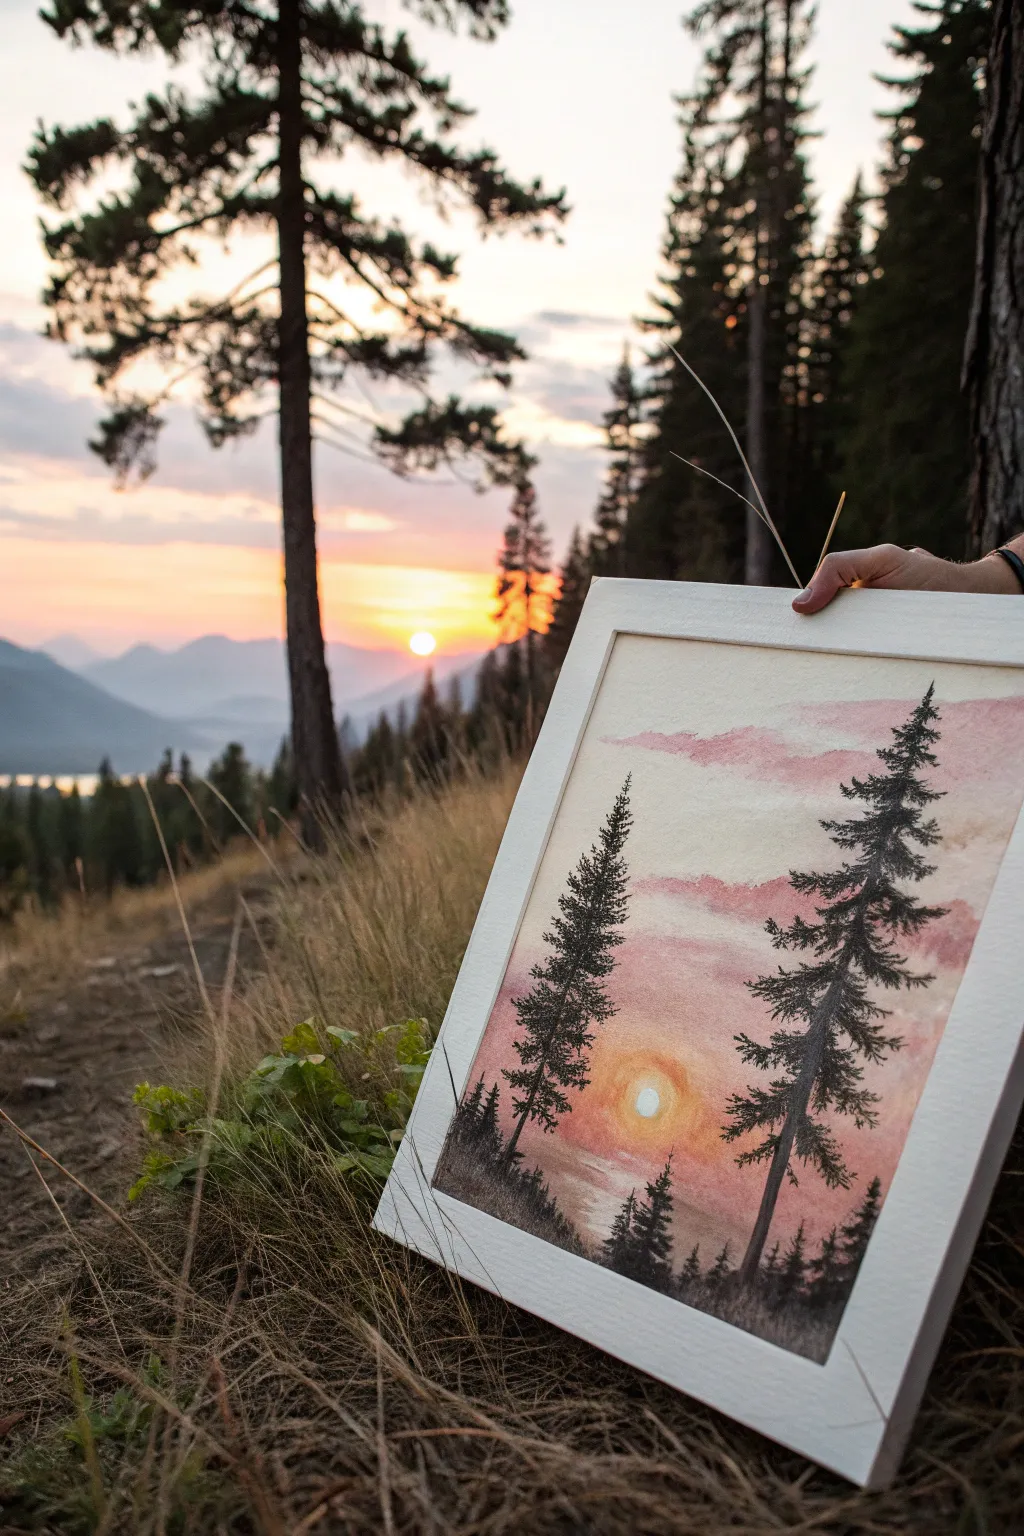
Capture the serene beauty of daybreak with this watercolor landscape, featuring striking evergreen silhouettes against a soft, blushing sky. This project explores wet-on-wet blending techniques to create atmospheric clouds and a glowing sun that seems to radiate warmth from the paper.
Step-by-Step
Materials
- Cold press watercolor paper (140lb/300gsm)
- Watercolor paints (Alizarin Crimson, Winsor Orange, Yellow Ochre, Burnt Umber, Indigo or Ivory Black)
- Masking fluid or white gouache
- Painter’s tape
- Flat wash brush (3/4 inch)
- Round brushes (size 6 and size 2)
- Rigger or liner brush
- Clean water and mixing palette
- Paper towels
Step 1: Setting the Scene
-
Prep the paper:
Tape down your watercolor paper to a board using painter’s tape to create a clean, crisp border and prevent buckling when wet. -
Mask the sun:
Decide where your sun will sit, slightly off-center near the bottom third. Apply a small circle of masking fluid to preserve the pure white of the paper. Let it dry completely. -
Pre-wet the sky:
Using your large flat brush, apply clean water across the entire sky area, stopping just short of the very bottom where the ground will be. The paper should be glistening but not pooling.
Natural Imperfection
When painting pine branches, hold the brush loosely at the end of the handle and wiggle it as you make strokes. This uncontrolled motion creates more realistic, organic foliage shapes.
Step 2: Painting the Sky
-
The first wash:
Mix a very dilute wash of Yellow Ochre. While the paper is still wet, brush this gently around the masked sun area, letting it diffuse outward to create a warm halo. -
Adding the rose tones:
Mix Alizarin Crimson with a touch of Winsor Orange to get a soft salmon pink. Apply this horizontally across the upper sky, leaving gaps for the pale yellow to show through. -
Creating cloud layers:
While the pink is still damp, darken your mixture slightly with a tiny bit of Burnt Umber. Use the side of your round brush to sweep in horizontal cloud streaks wet-into-wet for soft edges. -
Deepening the horizon:
Near the bottom of the sky (the horizon line), intensify the orange and pink tones. This suggests the thicker atmosphere where the sun is rising. -
Lifting highlights:
If the clouds look too heavy, use a clean, thirsty brush or the corner of a paper towel to lift out small streaks of paint, creating fluffy white tops to the clouds. -
Dry time:
Allow this initial sky layer to dry completely. The paper must be bone dry before you start the sharp details of the trees.
Add Morning Mist
Before the dark trees dry completely, lift a horizontal line of pigment near the base with a damp brush. This creates a subtle ‘fog’ effect settling in the valley floor.
Step 3: The Foreground Pines
-
Mixing the darks:
Create a rich, dark mixture for the trees. I prefer mixing Indigo with Burnt Umber rather than using straight black, as it gives a more natural, deep shadow tone. -
The main tree trunk:
Using your size 6 round brush, paint a straight vertical line on the right side of the paper for the tallest pine. Taper it so it’s thinner at the top. -
Adding branches:
Switch to your smaller brush. Start from the top of the tree and dab small irregular marks downward, widening the silhouette as you descend to mimic pine boughs. -
Texture technique:
Use a dry-brush effect—where the brush has pigment but very little water—for the tips of the branches to suggest needles catching the light. -
The secondary tree:
Paint a second, slightly smaller pine on the left side to balance the composition. Ensure the branches are asymmetrical; nature is rarely perfect. -
Painting the undergrowth:
Using the dark mixture, fill in the bottom edge of the paper with jagged vertical strokes to represent distant grasses and smaller shrubs. -
Mid-ground trees:
Dilute your dark mix slightly with water to make a grey-purple tone. Paint smaller, fainter tree shapes between the two main pines to create depth and distance.
Step 4: Final Touches
-
Reveal the sun:
Once the painting is 100% dry, gently rub off the masking fluid with your finger or a rubber cement pickup to reveal the stark white sun. -
Soften the sun:
If the sun’s edge looks too sharp, take a damp brush and very gently trace the perimeter to blur the hard line into the surrounding yellow glow. -
Detail work:
Use the liner brush to add a few tiny, wispy branches sticking out from the main trunks or the grassy foreground for extra realism. -
Remove tape:
Slowly peel away the painter’s tape at a 45-degree angle to reveal your clean white border.
Frame your masterpiece in white or light wood to complement the airy morning feeling you have created
BRUSH GUIDE
The Right Brush for Every Stroke
From clean lines to bold texture — master brush choice, stroke control, and essential techniques.
Explore the Full Guide
Tropical Palm Sunrise Silhouette
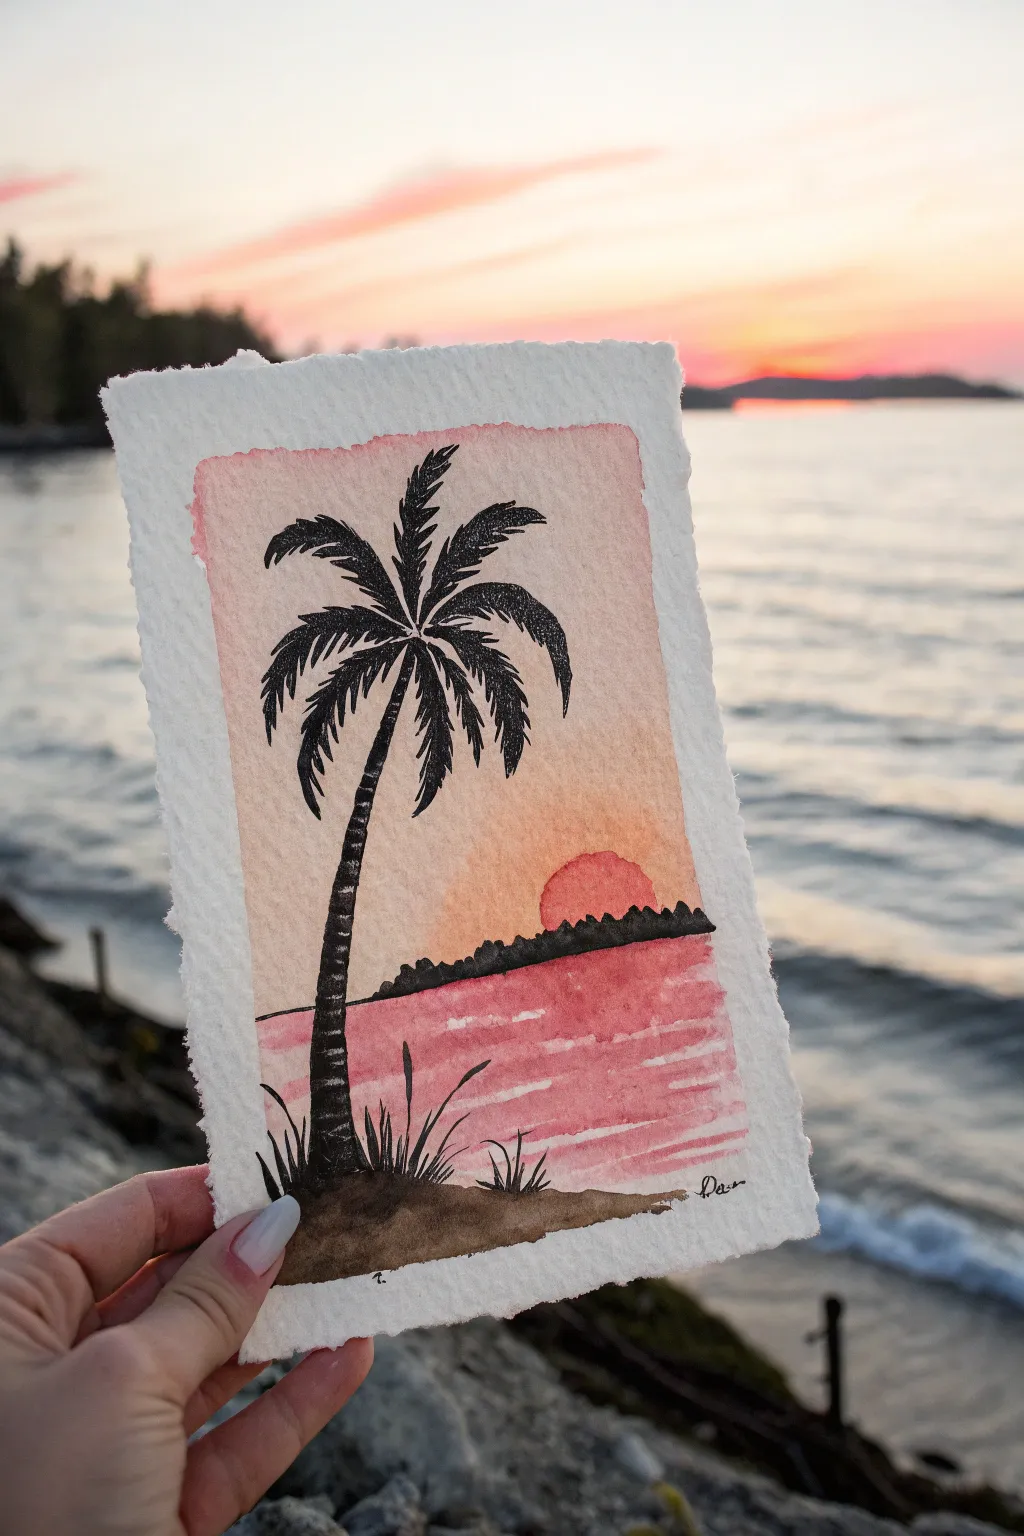
Capture the serene beauty of a tropical dawn with this charming watercolor mini-painting. Featuring a striking black palm silhouette against a soft wash of peach and pink, this project is perfect for creating handmade greeting cards or small framed art.
Detailed Instructions
Materials
- Cold press watercolor paper (approx. 4×6 inches)
- Masking tape or painter’s tape
- Watercolor paints (Peach, Rose/Pink, Burnt Umber, Black)
- Small round brush (size 2 or 4)
- Fine liner brush (size 0 or 00)
- Jar of clean water
- Paper towel
- Pencil (optional)
Step 1: Setting the Scene
-
Prepare the paper:
Tear your watercolor paper to size if you want those lovely decked edges shown in the photo, or cut it cleanly with scissors. Tape the paper down to a flat surface on all four sides if you want a white border, or work freely if you prefer the loose edge look. -
Light sketch:
Using a pencil very lightly, mark a horizon line about one-third up from the bottom. Sketch a small circle for the sun just above this line and a sloping mound for the sand at the bottom left.
Pro Tip: Deckled Edges
To get soft, torn edges like the photo, crease your paper deeply, run a wet brush along the fold line, wait 30 seconds, and pull the paper apart gently.
Step 2: Painting the Sky and Water
-
Sky wash:
Load your round brush with a watery mix of peach or light orange paint. Apply this to the sky area, starting darker at the horizon line and fading out as you go upward. -
Add warmth:
While the peach is still wet, drop a touch of rose or soft pink into the upper corners and blend it gently downwards for a gradient effect. -
Sun detail:
Paint the sun circle with a slightly more concentrated orange or reddish-pink tone so it stands out against the lighter sky. -
Water base:
For the water, use a rosy pink wash. Paint horizontal strokes below the horizon line, leaving thin slivers of white paper showing through to represent glimmering ripples. -
Dry time:
Let these background washes dry completely. If you are impatient like me, you can use a hairdryer on a low setting to speed this up.
Step 3: Creating the Silhouettes
-
Distant land:
Mix a dark color using black and a touch of brown. With your fine brush, paint a jagged, low strip of land right along the horizon line, covering the bottom of the sun slightly. -
Sand dune base:
Switch to a dark brown (Burnt Umber). Paint the sloping sand dune in the bottom left corner, making it solid and opaque. -
Trunk structure:
Using black paint and the liner brush, draw the trunk of the palm tree. Start from the sand dune and curve it slightly upward, ending with a thinner point. -
Trunk texture:
Add small horizontal dashes or ridges along the trunk to give it that segmented palm tree texture. -
Palm fronds spine:
From the top of the trunk, paint 5-7 curved lines radiating outward like fireworks. These are the spines of your palm leaves. -
Adding the leaves:
Along each spine, use quick, flicking motions with the tip of your brush to paint the individual leaves. The paint should be thick and black for a sharp silhouette. -
Grassy details:
At the base of the tree on the sand dune, use upward flicking strokes to create tufts of tall grass. -
Final touches:
Add a few small birds in the sky or extra ripples in the water with your finest brush if the composition feels too empty.
Troubleshooting: Blobs
If your black silhouette bleeds into the pink background, stop immediately! It means the background wasn’t 100% dry. Let it dry fully before trying to fix edges.
Once the black ink is fully dry, peel off any tape and sign your miniature masterpiece.
Birds in Flight Across the Sunrise
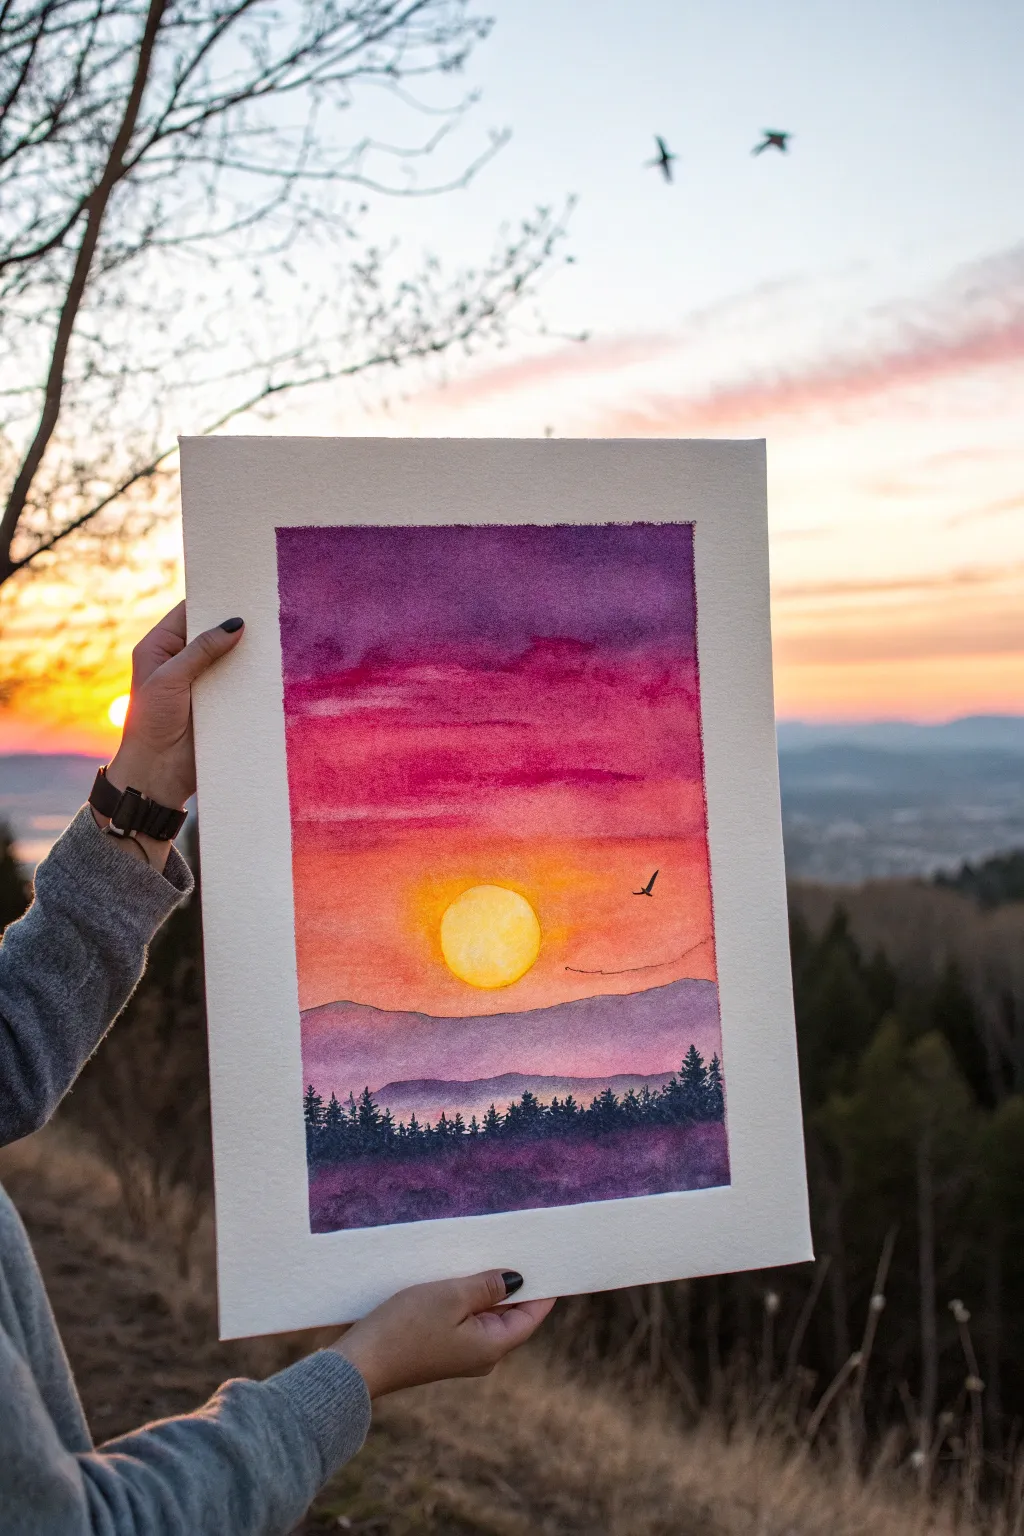
Capture the serene beauty of daybreak with this vibrant watercolor landscape featuring a glowing sun and silhouetted pines. By blending rich purples into warm oranges, you’ll create a breathtaking backdrop for a lone bird taking flight across the morning sky.
How-To Guide
Materials
- Cold press watercolor paper (140lb/300gsm)
- Masking tape or painter’s tape
- Watercolor paints (Purple/Violet, Magenta/Rose, Cadmium Orange, Cadmium Yellow, Payne’s Gray or Black)
- Round brushes (large size 10-12 for washes, small size 2-4 for details)
- Clean water jar
- Paper towels
- Pencil (HB or lighter)
- Drawing board or hard surface
Step 1: Preparing the Sky
-
Tape the borders:
Begin by taping down all four edges of your watercolor paper to a board. This creates the crisp white border seen in the example and prevents the paper from buckling during the heavy washes. -
Sketch the sun:
Lightly draw a circle for the sun in the lower-middle section of the paper. Keep the pencil lines very faint so they don’t show through the yellow paint later. -
Pre-wet the paper:
Using your large clean brush, apply a layer of clean water across the entire sky area, stopping just above where you want the horizon line to be. Avoid wetting inside the sun circle. -
Paint the sun:
Load a clean, damp brush with concentrated Cadmium Yellow. Carefully fill in the sun circle, letting the color become slightly more intense at the edges. Let this dry completely before moving to the sky to prevent bleeding.
Sun Safety
To keep your sun perfectly round and bright yellow, you can apply liquid masking fluid over the circle before you start the sky wash. Rub it off only after the sky is totally dry.
Step 2: Painting the Gradient Sky
-
Start the top wash:
Mix a deep, rich purple. With your large brush, paint a bold horizontal stripe across the very top of the paper. The wet paper will help soften the edges immediately. -
Transition to pink:
While the purple is still wet, rinse your brush slightly and pick up your Magenta or Rose color. Apply this directly below and slightly into the purple, blending them downwards. -
Add the orange glow:
Rinse your brush thoroughly. Pick up vibrant Cadmium Orange and paint the area surrounding the sun, blending it upwards into the pink layer. Be careful not to paint over your yellow sun. -
Soften the sun’s halo:
Using a clean, damp brush, gently tickle the edge where the yellow sun meets the orange sky to create a soft, glowing transition rather than a hard outline. -
Create horizontal streaks:
While the sky is still damp, I like to take a slightly drier brush with purple or deep pink and drag a few horizontal lines across the upper sky to simulate wispy cloud layers. -
Let it dry:
Allow the entire sky section to dry completely. If the paper feels cool to the touch, it is still wet.
Step 3: Mountains and Foreground
-
Paint distant mountains:
Mix a watered-down, pale purple wash. Paint a rolling mountain shape just below the orange sky area. This layer should be transparent enough to look far away. -
Add the second range:
Once the first mountain range is dry, mix a slightly darker, more saturated purple. Paint a second mountain range overlapping the bottom of the first one to create depth. -
Paint the foreground base:
Mix your darkest color—a combination of Purple and Payne’s Gray. Fill in the bottom section of the painting completely with this solid dark mass to represent the ground.
Cauliflower Blooms?
If you see water marks or ‘blooms’ forming in your sky, it means you added water to a section that was already half-dry. Avoid touching drying areas; let them be and fix later with a glaze.
Step 4: Silhouettes and Details
-
Paint pine trees:
Switch to your smallest detail brush. Using the dark purple/gray mix, paint small vertical lines rising from the foreground, then tap the brush side-to-side to create jagged pine tree branches. -
Vary tree heights:
Ensure the trees have different heights to look natural. Make the ones on the edges slightly taller to frame the composition. -
Add the bird:
With the tip of your smallest brush and dark paint (or a fine black pen if you aren’t confident with a brush), paint a small ‘V’ shape with extended wings to the right of the sun. -
Add the faint wire:
Paint a very faint, thin curved line below the bird, perhaps suggesting a distant power line or landscape contour, using a diluted dark mix. -
Peel the tape:
Wait until the painting is 100% bone dry. Slowly peel the tape away at a 45-degree angle to reveal your crisp, professional edges.
Frame your masterpiece in a simple white mat to let those sunrise colors truly shine

PENCIL GUIDE
Understanding Pencil Grades from H to B
From first sketch to finished drawing — learn pencil grades, line control, and shading techniques.
Explore the Full Guide
Sunrise With Reeds and Cattails in Front
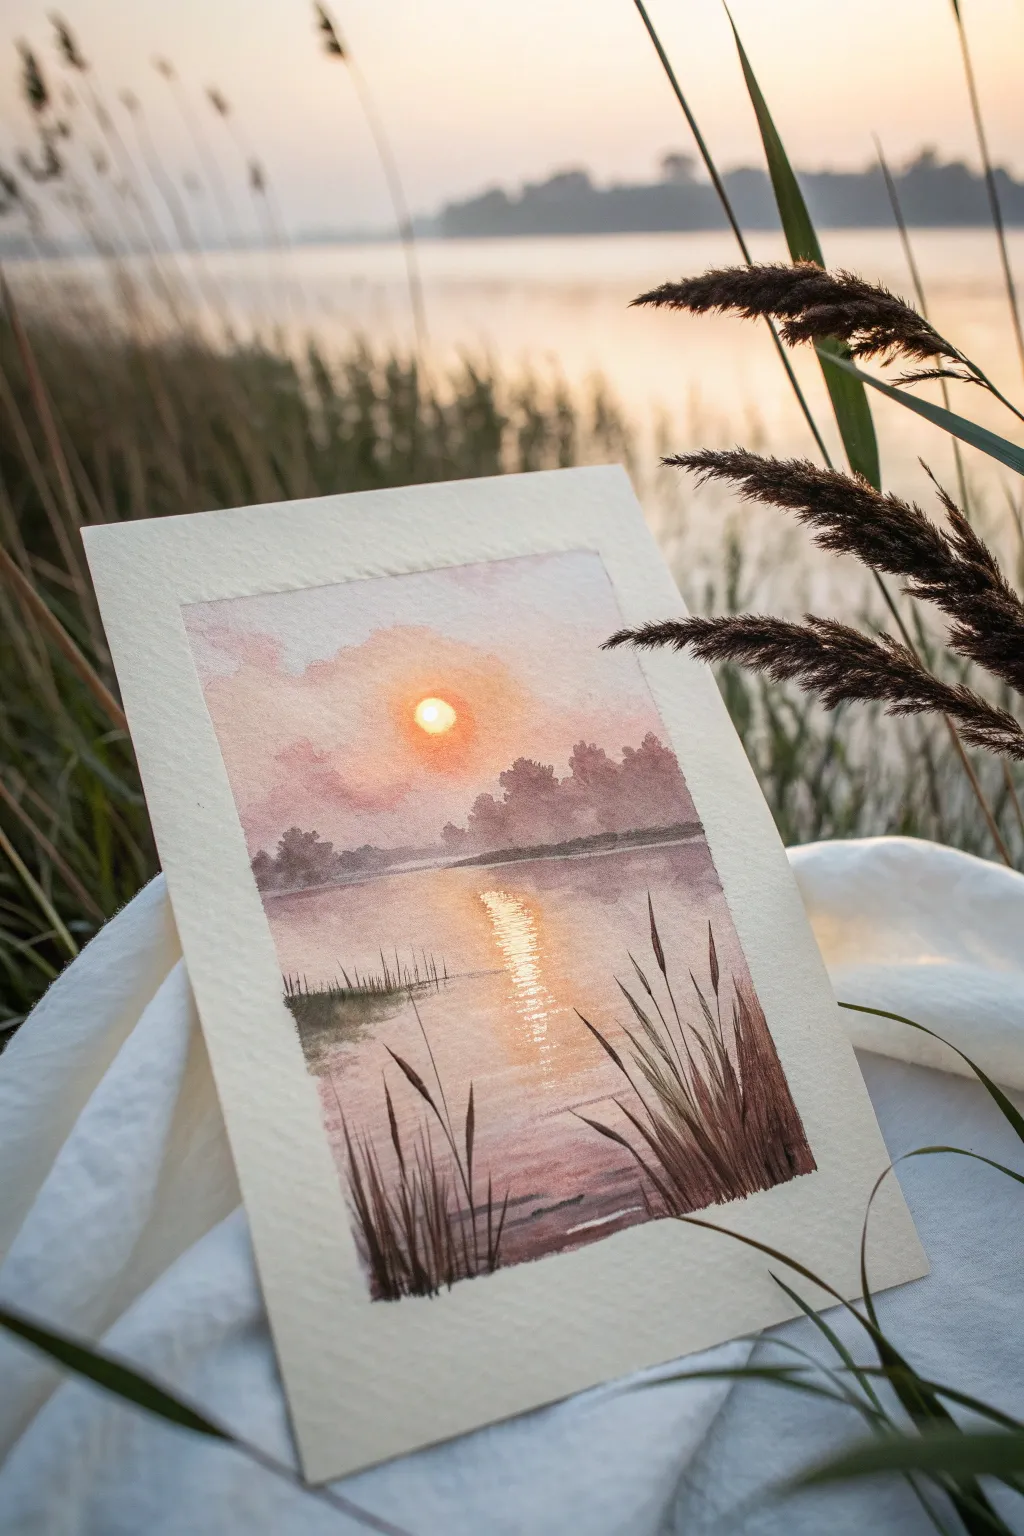
Capture the serene beauty of a misty sunrise over calm water with this watercolor tutorial. By combining soft wet-on-wet washes for the sky with crisp, detailed brushwork for the reeds, you’ll create a stunning landscape full of depth and atmosphere.
How-To Guide
Materials
- Cold press watercolor paper (300 gsm)
- Masking tape
- Watercolor paints (Cadmium Orange, Alizarin Crimson, Burnt Sienna, Payne’s Gray, Yellow Ochre, Ultramarine Blue)
- Round brushes (sizes 8, 4, and 0 or rigger brush)
- Clean water jars
- Paper towels
- Palette for mixing
Step 1: Setting the Sky and Sun
-
Prepare your paper:
Tape your watercolor paper down to a board on all four sides. This creates a clean white border and prevents buckling while working with wet washes. -
Outline the composition:
Lightly sketch a horizontal line about a third of the way up from the bottom for the horizon. Add a small circle for the sun just above the center. -
Wet the sky area:
Using your largest clean brush, apply a coat of water to the entire sky area, carefully painting *around* the sun circle so it stays dry and white. -
Paint the sun’s halo:
Drop a mix of Cadmium Orange and Yellow Ochre around the dry sun circle. Let the wet paper diffuse the color outward, creating a soft, glowing halo. -
Add rosy clouds:
While the paper is still damp, mix Alizarin Crimson with a touch of Cadmium Orange. Dab this soft pink mix into the sky area, leaving some lighter spaces near the sun. -
Deepen the upper sky:
Add a tiny bit of Ultramarine Blue to your pink mix to create a soft violet-grey. Apply this loosely to the top corners and edges of the sky to frame the light.
Fixing “Cauliflowers”
If water blossoms appear in your sky, wait until it’s fully dry, then gently scrub the edge with a damp stiff brush and dab with a tissue to blend.
Step 2: Horizon and Water Reflection
-
Paint the distant trees:
Mix Payne’s Gray and Alizarin Crimson for a muted purple-grey. While the sky is barely damp (not soaking), dab in the tree shapes along the horizon line. Soft edges are desirable here to suggest distance. -
Wash the water:
Wet the water area below the horizon. Mirror the sky colors, applying the pinkish-orange wash, but leave a vertical column of white paper directly under the sun for the reflection. -
Strengthen the reflection:
While the water wash is wet, paint horizontal streaks of orange and yellow across the white reflection column. Let the edges bleed slightly into the surrounding pink water. -
Define the waterline:
Once the sky and water are dry, use a size 4 brush with a darker mix of Payne’s Gray and Burnt Sienna to paint a thin, broken line right under the trees to separate land from water.
Level Up: Birds
Add 2-3 tiny, V-shaped silhouettes of birds in the distance using your smallest brush and dark grey paint to add life and scale to the sky.
Step 3: Foreground Details and Reeds
-
Paint distant shoreline reeds:
On the left side, closer to the horizon, paint very small, vertical strokes using a dilute watery green-grey mix to suggest a patch of reeds in the middle distance. -
Mix dark foreground color:
Create a rich, dark brown using Burnt Sienna and Payne’s Gray. The mixture should be creamy, not too watery, to ensure crisp lines. -
Draft the main reeds:
Using your smallest brush or a rigger brush, paint long, sweeping vertical lines starting from the bottom edge on the right side. Vary the heights and angles for a natural look. -
Add seed heads:
At the tips of some taller stalks, gently press the brush side to create the thicker, cigar-shaped heads of cattails or fluffy grass tops. -
Layer foliage:
Add shorter, grass-like strokes at the base of your reed cluster on the right and a smaller cluster on the bottom left corner to balance the composition. -
Highlight the reflection path:
If the sun reflection looks too flat, you can carefully scratch out a few horizontal highlights using a razor blade or white gouache to simulate sparkling ripples. -
Final touches:
Assess the contrast. If the foreground reeds need to be darker against the sunset, add a second layer of dark pigment over the dry paint. -
Reveal the border:
Wait until the painting is completely bone-dry. Peel the masking tape away slowly at a 45-degree angle to reveal clear, crisp edges.
Now you have a tranquil sunrise scene perfect for framing or gifting to a nature lover.
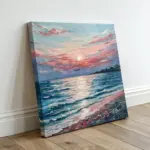
Rocky Shore Sunrise With Warm Highlights
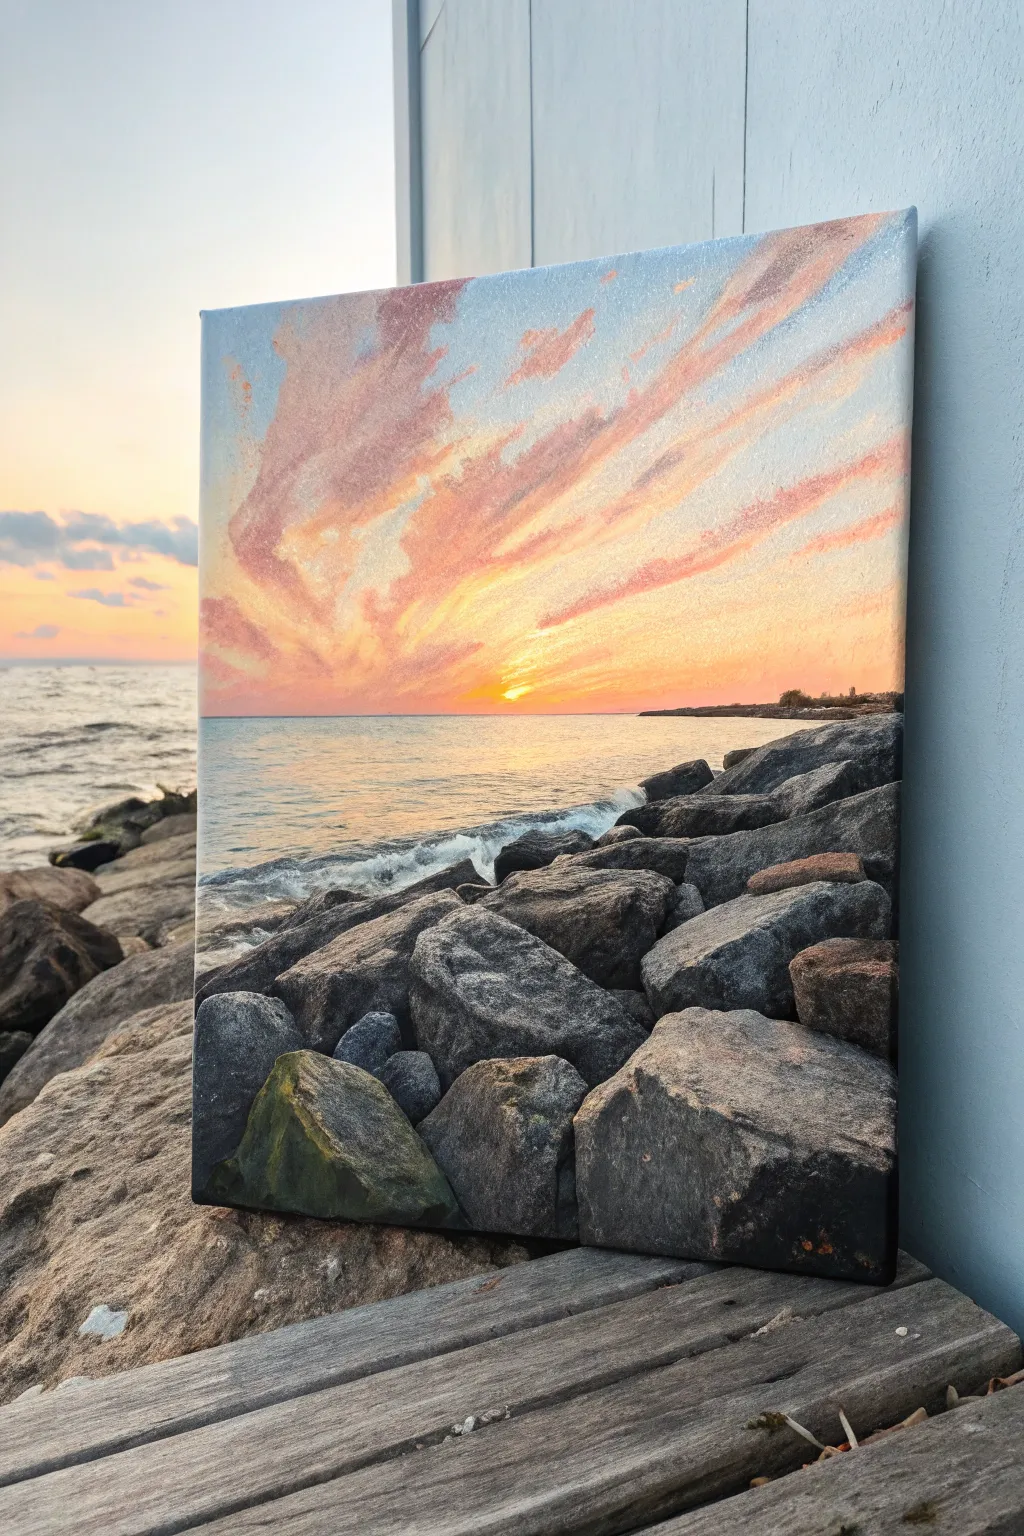
Capture the serene beauty of a rocky coastline at sunrise with this vibrant acrylic painting tutorial, where warm, glowing skies meet cool, rugged stones. This project focuses on balancing soft cloud textures with the hard, solid forms of shoreline rocks.
Step-by-Step Guide
Materials
- Square stretched canvas (e.g., 12×12 or 16×16 inches)
- Acrylic paints (Titanium White, Cadmium Yellow, Cadmium Orange, Alizarin Crimson, Ultramarine Blue, Burnt Umber, Mars Black, Phthalo Blue)
- Assorted brushes: 1-inch flat wash, medium filbert, lush round scenic brush, painter’s knife (optional)
- Palette
- Water cup
- Paper towels
- Mist spray bottle
Step 1: Sky and Horizon
-
Establish the horizon line:
Use a ruler or straight edge to lightly draw a horizontal line about one-third of the way up from the bottom of the canvas. This will separate your sky from the sea. -
Prime the sky:
Mix a very pale blue using Titanium White and a tiny dot of Phthalo Blue. Apply this to the upper right corner of the sky area, fading it out as you move toward the horizon and the left side. -
Create the sun’s glow:
Where the sun will rise just above the horizon, paint a semi-circle of pure Titanium White mixed with a touch of Cadmium Yellow. Blend this outwards into a soft, warm orange glow using Cadmium Orange. -
Paint the cloud base:
Mix Alizarin Crimson with White to create a soft pink. Using a filbert brush, sweep in diagonal streaks starting from the sun area and radiating outward to the top left. These are the undersides of the clouds catching the light. -
Add cloud definition:
While the pink is still tacky, mix a slightly darker purple-grey for the shadowed parts of the clouds. Suggest the volume of the clouds by dabbing this color on the upper edges of your pink streaks. -
Intensify the sunrise:
Return to the horizon line near the sun. Glaze a thin layer of bright orange and yellow to make the light source pop. Ensure the transition from the bright sun to the cooler upper sky is seamless.
Muddy Clouds?
If your pinks and blues are mixing into a dull grey, let the blue sky layer dry completely before painting the pink clouds on top. Clean brushes often.
Step 2: The Sea
-
Block in the water:
Mix Ultramarine Blue with White and a touch of the sky’s pink. Paint the water area, using horizontal strokes. Keep the color lighter near the horizon and gradually darker as you come forward. -
Reflect the sunrise:
Directly under the sun, drag streaks of yellow and orange vertically into the wet blue paint to create the sun’s reflection on the water. -
Add wave movement:
Use a small round brush with white paint to create delicate, thin horizontal lines representing distant waves. Closer to the foreground, make these lines slightly thicker and more erratic. -
Paint the shoreline foam:
Where the water will meet the rocks, stipple pure white paint to create the look of crashing foam and sea spray. Keep the edges soft.
Textured Realism
Mix a bit of modeling paste or fine sand into your grey rock paint. This adds physical grit to the foreground, making the stones tactile and 3D.
Step 3: The Rocky Foreground
-
Map out the rock shapes:
Using a mix of Burnt Umber and Mars Black, sketch the outlines of the large boulders in the foreground. Fill them in with a dark gray base coat (black + white). -
Establish rock planes:
Imagine the light hitting the rocks from the sunrise. Mix a lighter grey-blue and paint the top surfaces of the rocks facing the sky. Leave the sides facing away dark. -
Add warmth to the rocks:
To tie the rocks into the scene, glaze a very thin layer of the orange/pink sky color onto the sun-facing edges of the rocks. This reflects the warm light. -
Create rocky texture:
Use a scrunched-up piece of paper towel or a dry stiff brush to dab lighter grey and brown texture onto the rock faces. This mimics the rough, pitted surface of granite. -
Deepen the shadows:
Mix Mars Black with Phthalo Blue for a deep, cool shadow color. Apply this into the crevices between the rocks to separate them visually and add depth. -
Highlight the edges:
With a fine liner brush and nearly pure white paint, add sharp highlights to the wettest edges of the rocks where the sea spray hits them. -
Include subtle details:
I like to add touches of moss or algae by mixing a dull green (Yellow + Blue + Brown) and dry-brushing it near the waterline on a few rocks. -
Final adjustments:
Step back and check the contrast. If the sun doesn’t feel bright enough, add one final dot of pure white in the center. Ensure the water foam overlaps the base of the rocks slightly.
Allow your masterpiece to dry fully before sealing it with a gloss varnish to make those colors truly sing


Winter Snowbank Sunrise Contrast
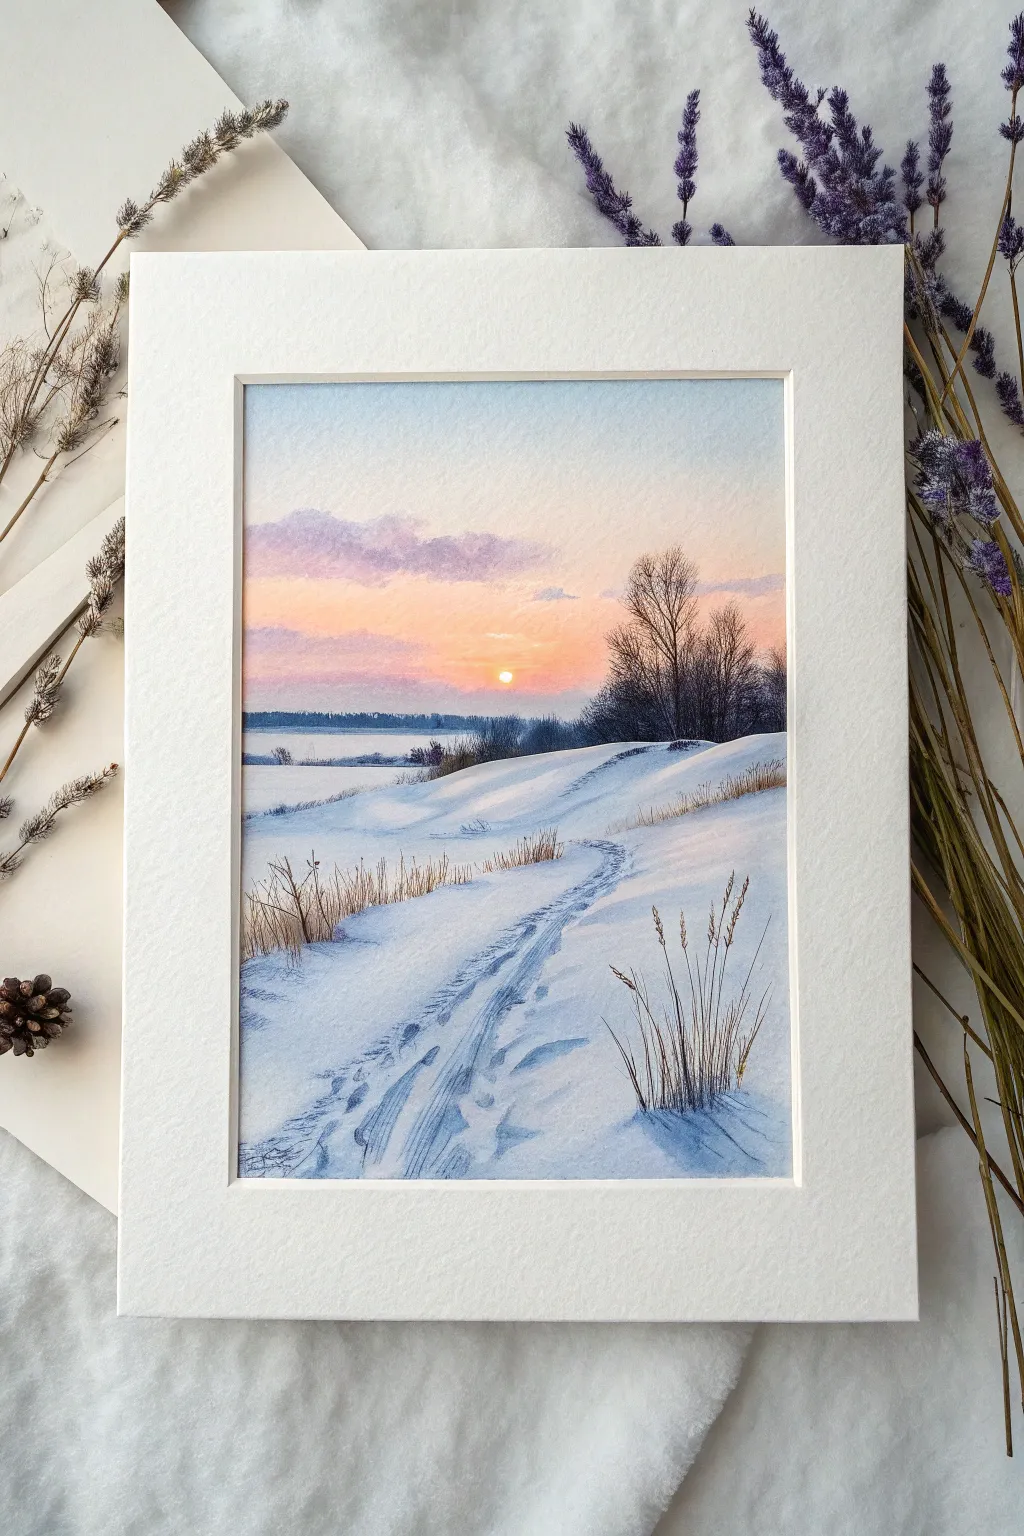
This serene watercolor painting captures the hush of a snowy morning with gentle pink and purple hues hitting fresh powder. You’ll layer soft washes to create the glowing sky and use distinct brushstrokes for the textured snow path and dried grasses.
How-To Guide
Materials
- Cold Press watercolor paper (300 gsm)
- Watercolor paints (Ultramarine Blue, Alizarin Crimson, Cadmium Yellow, Burnt Umber, Paynes Gray)
- Masking fluid and applicator
- Flat wash brush (1-inch)
- Round brushes (size 4 and 8)
- Rigger or liner brush for fine details
- Paper towels
- Artist tape and board
Step 1: Preparing the Glow
-
Secure the paper:
Tape your watercolor paper down to a board on all four sides. This ensures a clean white border and prevents buckling when we add wet washes. -
Sketch the horizon:
Lightly sketch the horizon line about one-third of the way up the page. Draw the gentle curves of the snowbanks and trace the winding path leading into the distance. -
Mask the sun:
Apply a tiny dot of masking fluid exactly where the sun will sit, just above the horizon. This preserves pure white paper for the brightest point of the painting.
Softening Edges
If your cloud edges dry too hard, gently scrub the edge with a clean, damp stiff brush to soften the pigment back into the sky.
Step 2: Painting the Sky
-
Wet-on-wet sky base:
With your flat brush, wet the entire sky area with clean water. The paper should glisten but not have puddles. -
Add the yellow glow:
Drop a dilute wash of Cadmium Yellow around the masked sun area, letting it diffuse softly outward. -
Introduce sunset pinks:
While still wet, mix a soft peach using Alizarin Crimson and a touch of yellow. Paint this horizontally above the yellow zone, blending the edges. -
blue sky gradient:
At the very top of the paper, apply a light wash of Ultramarine Blue, pulling it down to meet the pinks. Let these colors mingle naturally on the paper. -
Define the clouds:
Once the shine has just left the paper (damp but not soaking), use a mix of Alizarin Crimson and Ultramarine Blue to dab in soft purple cloud shapes. Soften the edges if they look too harsh.
Step 3: The Middle Ground
-
Distant trees:
Mix a cool greyish-purple. Using a size 8 round brush, paint the distant tree line along the horizon. Keep the pigment lighter for trees further away to create atmospheric perspective. -
Mid-ground shadows:
For the darker clump of trees on the right, use a stronger mix of Payne’s Gray and Alizarin Crimson. Paint vertical strokes, letting the tops remain wispy for branches. -
Remove the mask:
Once the sky involves is bone dry, gently rub off the masking fluid to reveal the crisp white sun.
Add Sparkle
Splatter tiny droplets of white gouache or opaque white watercolor in the foreground to simulate fresh, falling snowflakes or frost.
Step 4: Snow and Foreground
-
Base snow shadows:
Snow isn’t actually white in paintings; it reflects the sky. Mix a very watery Ultramarine Blue with a hint of purple. Paint the shadow side of the snowbanks, leaving the tops distinct white. -
Carving the path:
Use the same blue-purple mix to define the sled tracks. Start wider in the foreground and narrow the lines as they recede to create depth. -
Texturing the tracks:
While the path wash is damp, drop slightly darker blue pigment into the deepest ruts of the tracks to imply crunchiness and depth. -
Dry brushing:
Load a round brush with dry-ish blue paint. Drag it lightly across the foreground snow to create a sparkling, textured surface effect. -
Adding grass stalks:
Mix Burnt Umber with a little blue for a dark brown. Using your liner brush, flick quick, upward strokes to create the dried grasses poking through the snow. -
Highlighting the grass:
I like to add tiny touches of yellow ochre or raw sienna to the tips of the closer grasses to show them catching the late afternoon light. -
Final touches:
Assess the contrast. If the foreground shadows need more punch, glaze a thin layer of Cobalt Blue over the track indentations.
Peel off your tape carefully to reveal the crisp border that frames your peaceful winter scene
Foggy Meadow Sunrise Glow
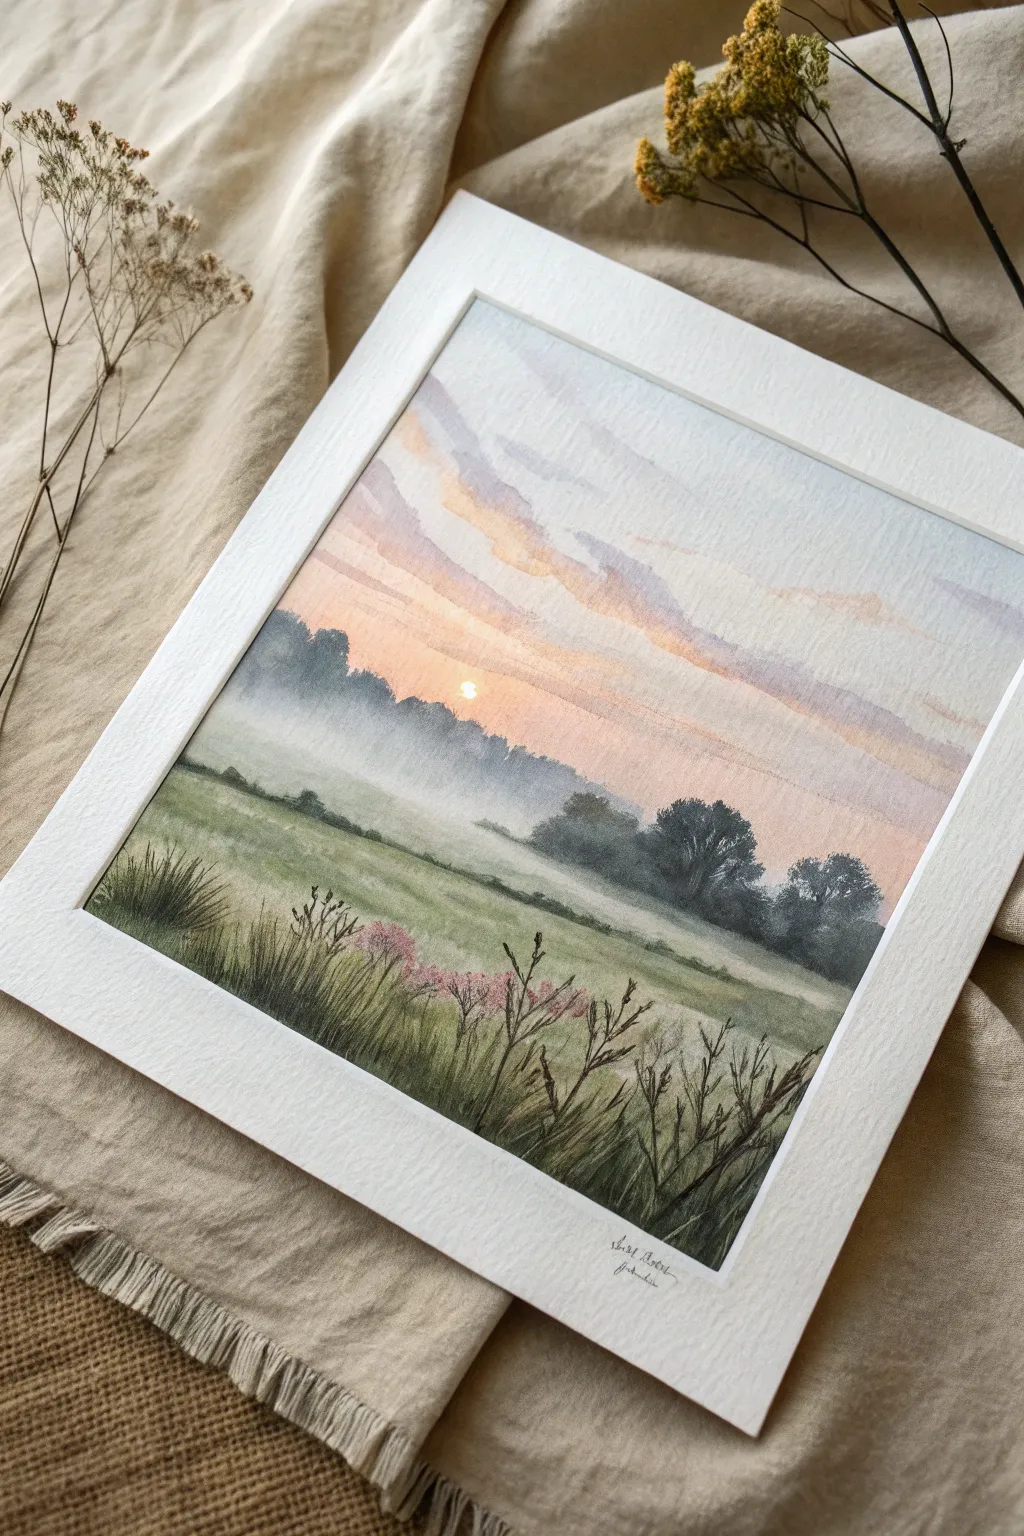
Capture the serene transition from night to morning with this soft and atmospheric watercolor landscape. This piece focuses on delicate wet-in-wet blending for the sky and distant trees, contrasted by precise dry-brush details in the grassy foreground.
Step-by-Step Guide
Materials
- Cold press watercolor paper (300 gsm)
- Watercolor paints (Indigo, Burnt Sienna, Payne’s Gray, Yellow Ochre, Alizarin Crimson, Sap Green)
- White gouache (optional highlights)
- Masking tape
- Flat wash brush (1 inch)
- Round brushes (sizes 6 and 2)
- Rigger or liner brush
- Two jars of water
- Matted frame (white)
Step 1: Preparation and Sky
-
Tape and Wet:
Begin by taping down all four edges of your watercolor paper to a board to create a clean white border. Using your large flat brush, wet the entire upper two-thirds of the paper with clean water until it glistens evenly but isn’t dripping. -
Initial Sky Gradient:
Mix a very dilute wash of Indigo with a touch of Alizarin Crimson to make a soft lavender-blue. Apply this to the top third of the paper, letting the color naturally diffuse downwards. -
Sunrise Warmth:
While the paper is still wet, introduce a gentle wash of Yellow Ochre and a tiny dot of Alizarin Crimson across the middle section to create a warm peach glow. Allow this peach tone to bleed slightly up into the blue sky. -
Cloud Streaks:
Using a size 6 round brush and a slightly thicker mixture of the lavender-blue, paint horizontal, sweeping strokes across the sky to suggest clouds. Soften the edges with a damp brush if they look too harsh. -
The Sun:
While the peach area is still damp, lift out a small circle of paint using a clean, thirsty brush or a paper towel to create the sun. If you want it brighter later, you can add a dot of white gouache or pure yellow.
Step 2: The Foggy Horizon
-
First Tree Line:
Mix Payne’s Gray with a little Indigo for a cool, dark blue-grey. While the bottom of the sky is barely damp, paint the distant tree shapes along the horizon line. Let the paint bloom slightly into the wet sky to simulate fog. -
Adding Depth:
Once the first layer of trees is semi-dry, add a second, slightly darker layer of trees in front of them using a drier mix of pigment. This creates atmospheric perspective. -
Mist Transition:
Use a damp, clean brush to blur the bottom edge of the tree line, dragging the pigment downwards into what will become the meadow. This creates the illusion of ground mist settling on the grass.
Wet-in-Wet Wisdom
To get that milky, foggy effect on the tree line, wait for the paper to lose its shine but still feel cool to the touch before painting the trees. Timing is everything.
Step 3: Foreground Meadow
-
Meadow Wash:
Paint the bottom third of the paper with a horizontal wash of Sap Green muted with a touch of Burnt Sienna. Keep the color lighter near the horizon and darker near the bottom edge. -
Texture Building:
While the meadow wash is drying, faint horizontal strokes of darker green can be added to suggest undulating land or paths in the distance. -
Detailed Grasses:
Let the paper dry completely. Switch to your rigger or liner brush. Mix a dark, concentrated green using Sap Green and Payne’s Gray. -
Flicking Technique:
Using upward flicking motions, paint individual blades of grass in the immediate foreground. Vary the height and direction of the blades to make it look natural. -
Wildflowers:
Mix a watery pink using Alizarin Crimson. Gently dab small clusters of color onto the tops of some grass stems to suggest wildflowers. -
Defined Silhouettes:
Add a few darker, thicker weeds or seed heads in the very front right corner using a nearly black mix of green. This high-contrast element pushes the misty background further back. -
Final Touches:
Once everything is bone dry, carefully peel away the masking tape at a 45-degree angle to reveal the crisp white edges. Sign your work in the white border for a professional look.
Make it Sparkle
Mix a tiny amount of iridescent medium into your Yellow Ochre for the sun. It will add a barely-there shimmer that catches the light like a real sunrise.
Place your finished piece in a simple white frame to let the soft colors truly shine.
Minimal Line Art Over a Sunrise Wash
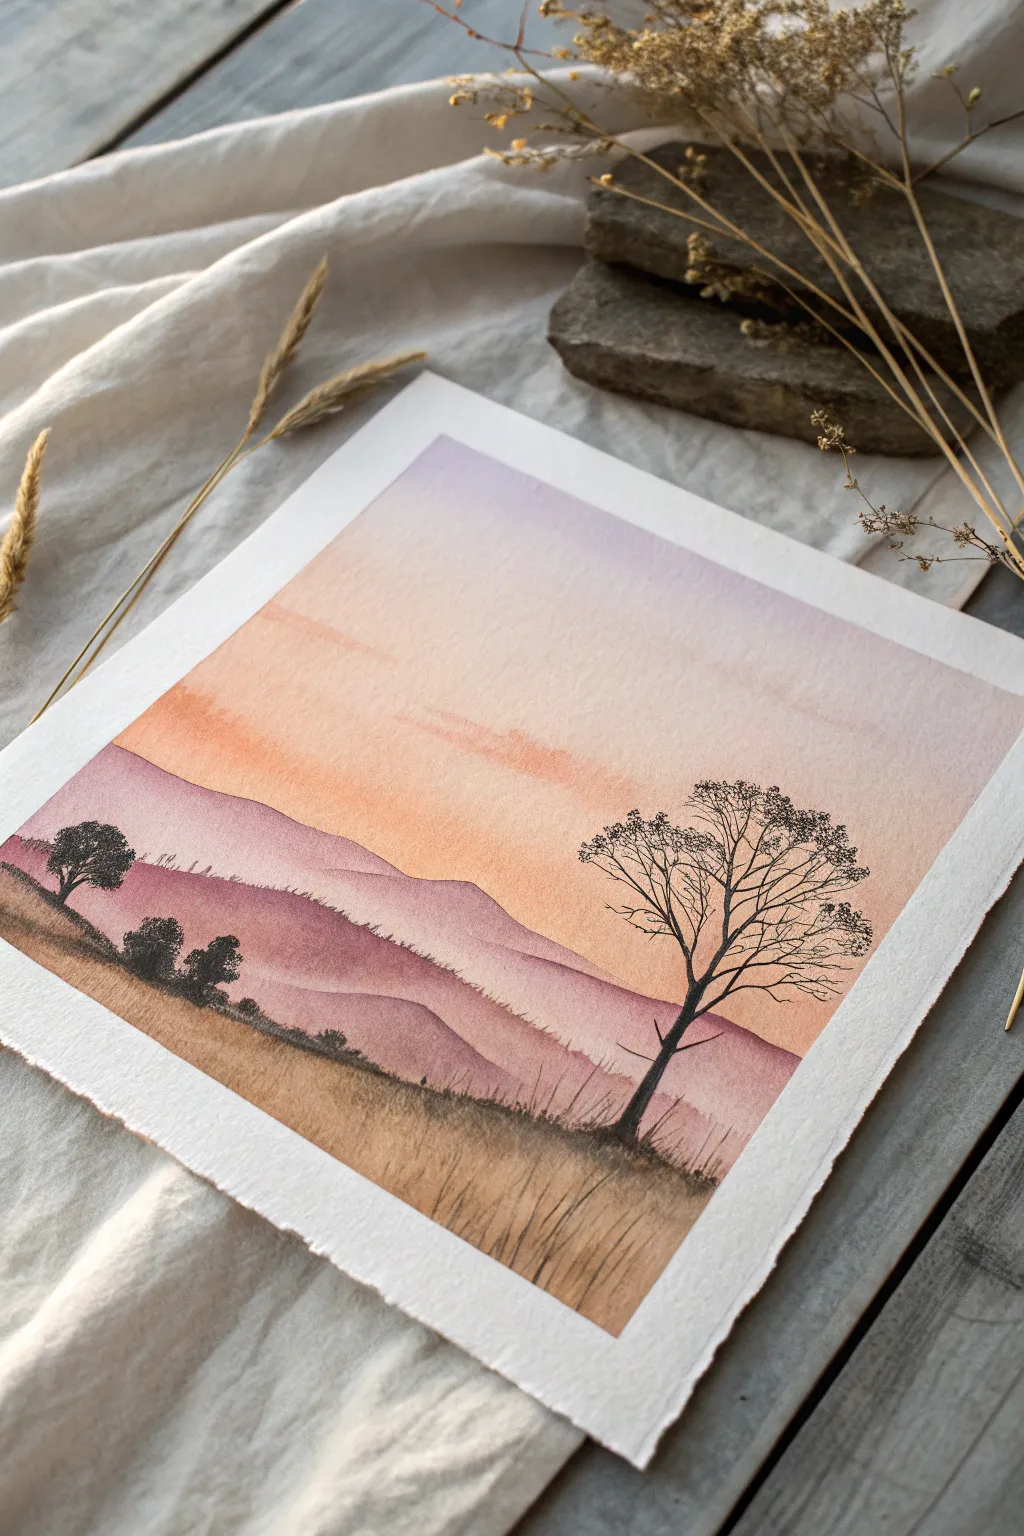
Capture the serene beauty of dawn with this mixed-media landscape that combines fluid watercolor washes with precise ink detailing. The result is a striking contrast between the soft, blending colors of a sunrise and the crisp, dark silhouettes of nature.
How-To Guide
Materials
- Cold press watercolor paper (300 gsm)
- Watercolor paints (Purple/Violet, Cadmium Orange, Burnt Sienna, Yellow Ochre)
- Flat wash brush (1 inch)
- Round watercolor brushes (Size 4 and 8)
- Fine liner pens (Black, sizes 0.1, 0.3, and 0.5)
- Masking tape
- Clean water jar and paper towels
- Pencil and eraser
Step 1: Creating the Sunrise Sky
-
Prepare your canvas:
Begin by taping down all four edges of your watercolor paper to a board or table. This creates that crisp white border and prevents buckling when the paper gets wet. -
Wet the sky area:
Using your large flat brush and clean water, apply a gentle wash over the top two-thirds of the paper. You want the paper glistening, but not swimming in puddles. -
Apply the purple gradient:
Load your brush with a diluted violet or purple. Starting at the very top edge, sweep the color across, letting it naturally diffuse downward into the wet paper. -
Blend in the warmth:
Clean your brush quickly and pick up a soft orange. Start painting just below where the purple ends, slightly overlapping the two colors so they merge into a soft, mauve transition hue. -
Finish the sky wash:
Continue bringing the orange wash down to about the middle of the page, gradually lightening the pigment load as you go lower. Let this layer dry completely before moving on.
Pro Tip: Atmospheric Depth
Keep your ink lines thinner and lighter for objects in the background. Use your thickest pen only for the foreground tree and grass to dramatically increase the sense of distance.
Step 2: Layering the Mountains
-
Paint the distant ridge:
Mix a watery purple with just a touch of orange to gray it down. Using a round brush, paint a jagged mountain silhouette horizontally across the paper, overlapping the bottom of your sky gradient. -
Softening the edge:
While the paint is still wet, rinse your brush and drag clean water along the bottom edge of this mountain shape to fade it out. This creates a misty, atmospheric look. -
Paint the middle ground:
Once the first ridge is semi-dry, mix a slightly more saturated purple. Paint a second, lower mountain range in front of the first, varying the height of the peaks to create depth. -
Add the foreground hill:
Switch to a mix of Burnt Sienna and Yellow Ochre. Paint the rolling hill in the immediate foreground, covering the bottom third of the paper. Use horizontal strokes to mimic the lay of the land. -
Texture the grass:
While the ochre wash is damp, drop in small touches of darker brown or pure Burnt Sienna near the bottom edge to suggest shadows and uneven terrain. Let the entire painting dry completely.
Troubleshooting: Ink Bleeding
If your fine liner lines start to feather or spread, your paper isn’t dry enough. Touch the paper with the back of your hand; if it feels cool to the touch, it’s still damp inside.
Step 3: Adding Ink Details
-
Outline the main tree:
With a 0.5 fine liner, draw the main trunk of the large tree on the right side. Start thicker at the base and taper the line as you move upward, letting the branches twist naturally. -
Branch structure:
Switch to a 0.3 pen to add the secondary branches. I find it helpful to use shaky, organic movements rather than straight lines to make the wood look aged and realistic. -
Fine twigs and leaves:
Using your finest 0.1 pen, add the delicate outer twigs. Stipple tiny dots or small scribble marks at the ends of the branches to suggest sparse clusters of leaves against the light. -
Add distant trees:
On the left side of the painting, use the 0.3 pen to draw smaller, simpler tree silhouettes on the distant hill. Keep these shapes more solid and less detailed to push them into the background. -
Detail the foreground grass:
Use quick, upward flicking motions with the 0.1 pen along the bottom foreground to create individual blades of tall grass. Concentrate these in the corners to frame the scene. -
Final touches:
Review the composition and add tiny textural dots or small lines on the mountain ridges to suggest rough terrain or vegetation. -
The reveal:
Once the ink is fully dry, carefully peel away the masking tape at a 45-degree angle to reveal your clean, professional border.
Frame your new landscape and enjoy the peaceful morning vibes it brings to your space
Surreal Double-Sun Sunrise Dreamscape

Capture the serene beauty of a breaking dawn with this soft, atmospheric watercolor landscape. You’ll create a glowing horizon where pink skies melt into the sea, framed by silhouetted dune grass for beautiful depth.
Step-by-Step Tutorial
Materials
- Cold press watercolor paper (300 gsm)
- Watercolor paints (Alizarin Crimson, Cadmium Yellow, Ultramarine Blue, Burnt Umber, Payne’s Gray)
- Masking tape
- Flat wash brush (3/4 inch)
- Round brushes (sizes 4 and 8)
- Rigger or liner brush
- White gouache (optional)
- Palette
- Water containers
- Paper towels
- White mat frame
Step 1: Setting the Scene
-
Prepare the paper:
Tape down your watercolor paper to a board on all four sides. This prevents buckling when we add water and creates that crisp, clean border you see in the final piece. -
Sketch the horizon:
Lightly draw a straight horizontal line about one-third of the way up from the bottom of the paper. Keep this line faint, as watercolor is transparent and you don’t want graphite showing through. -
Pre-wet the sky:
Using your large flat brush and clean water, wet the entire sky area above the horizon line. The paper should glisten evenly but not have standing puddles.
Step 2: Painting the Sky
-
Apply the sun’s glow:
While the paper is wet, drop a small circle of diluted Cadmium Yellow just above the center of the horizon. Soften the edges so it blurs outwards. -
Add warmth:
Mix a soft peach using Cadmium Yellow and a touch of Alizarin Crimson. Paint horizontal strokes starting at the horizon and moving upward, carefully working around the sun to keep it white. -
Deepen the upper sky:
Mix a purple-grey using Alizarin Crimson and Ultramarine Blue. Brush this into the top third of the sky while it’s still damp, letting it blend downward into the peach tones for a soft gradient. -
Create cloud layers:
With a slightly thicker mixture of your purple-grey, add horizontal streaks across the middle of the sky. The wet paper will soften these edges, making them look like distant cloud banks. -
Define the sun:
If the sun has lost its brightness, use a clean, damp brush to lift a small circle of pigment right in the center of the yellow glow.
Sun Bleeding Too Much?
If your sun loses its shape, wait for the paper to dry completely. Then, use a damp, stiff brush to scrub a circle and dab with a paper towel to lift the paint.
Step 3: The Ocean and Reflection
-
Start the water:
Allow the sky to dry completely. Then, re-wet the water section below the horizon. Mix a greyish-blue using Ultramarine and a touch of Burnt Umber. -
Establish the horizon line:
Run a stroke of the dark blue-grey right along the horizon line using a round brush. Ensure this line is perfectly straight to anchor the viewer’s eye. -
Paint the reflection:
Leave a vertical column of white paper directly under the sun. Paint horizontal streaks of peach and pink (mirrored from the sky) on either side of this reflection. -
Add water texture:
While the wash is still damp, use a smaller round brush with darker blue paint to add thin, horizontal ripples. I like to let these lines break apart as they cross the reflection area.
Use a Rigger Brush
For the most realistic dune grass, use a ‘rigger’ brush. Its long bristles hold more paint and create fluid, continuous lines that naturally taper at the end.
Step 4: Foreground Details
-
Dry completely:
Ensure the entire painting is bone dry before proceeding. If the paper is cool to the touch, it’s still damp. -
Mix the sand color:
Mix a very pale wash of Burnt Umber and Yellow Ochre. Apply this to the bottom inch of the painting to suggest the wet shoreline. -
Mix the grass color:
Create a dark, shadowy green-black mixture using Payne’s Gray and a little Burnt Umber. It needs to be thick and opaque. -
Paint grass clumps:
Using the rigger or liner brush, paint long, sweeping strokes starting from the bottom corners and flickering upward. Vary the pressure to create tapered blades. -
Add variety:
Make some grass blades cross over each other and vary their heights. The grass should be taller on the sides and get shorter toward the center to frame the view. -
Final highlights:
If you want extra sparkle on the water, use a tiny dot of white gouache right in the center of the sun reflection on the water. -
Frame it:
Once fully dry, peel off the tape carefully. Place your finished piece in a clean white mat frame to make the colors pop.
Place your framed artwork near a window to let the natural light enhance the peaceful morning mood you’ve created


Have a question or want to share your own experience? I'd love to hear from you in the comments below!