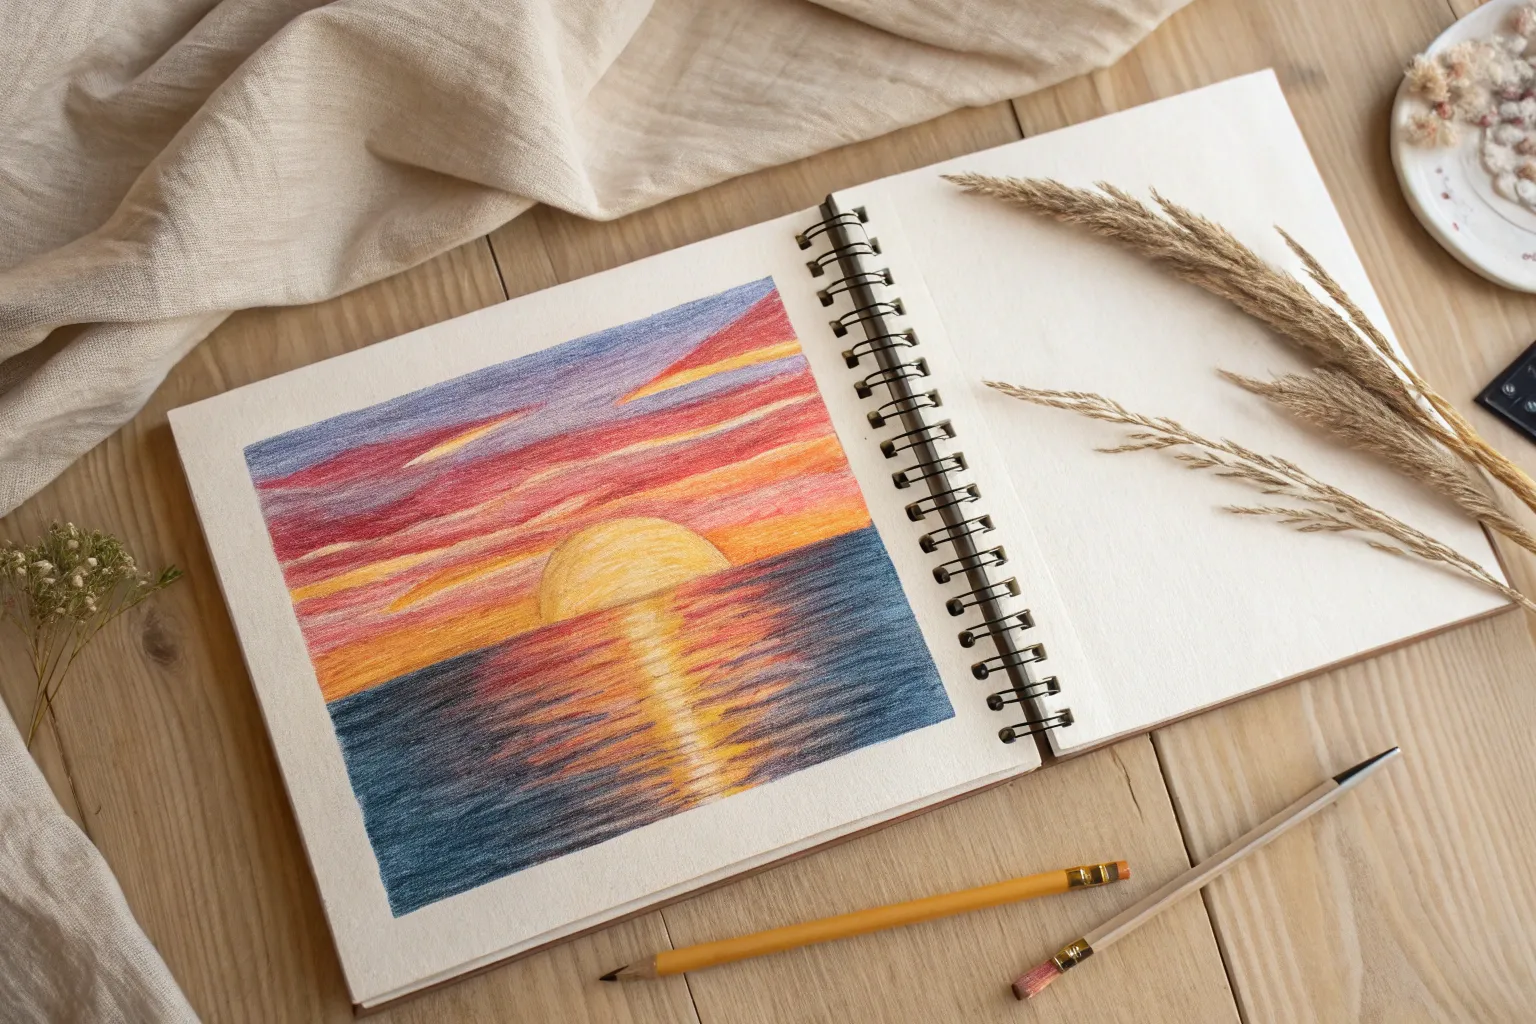
If you’re craving that calm, glowy vibe on paper, sunsets are the sweetest place to start. You can keep the shapes simple and let color gradients and silhouette contrasts do all the heavy lifting.
Classic Beach Horizon With Palm Silhouettes
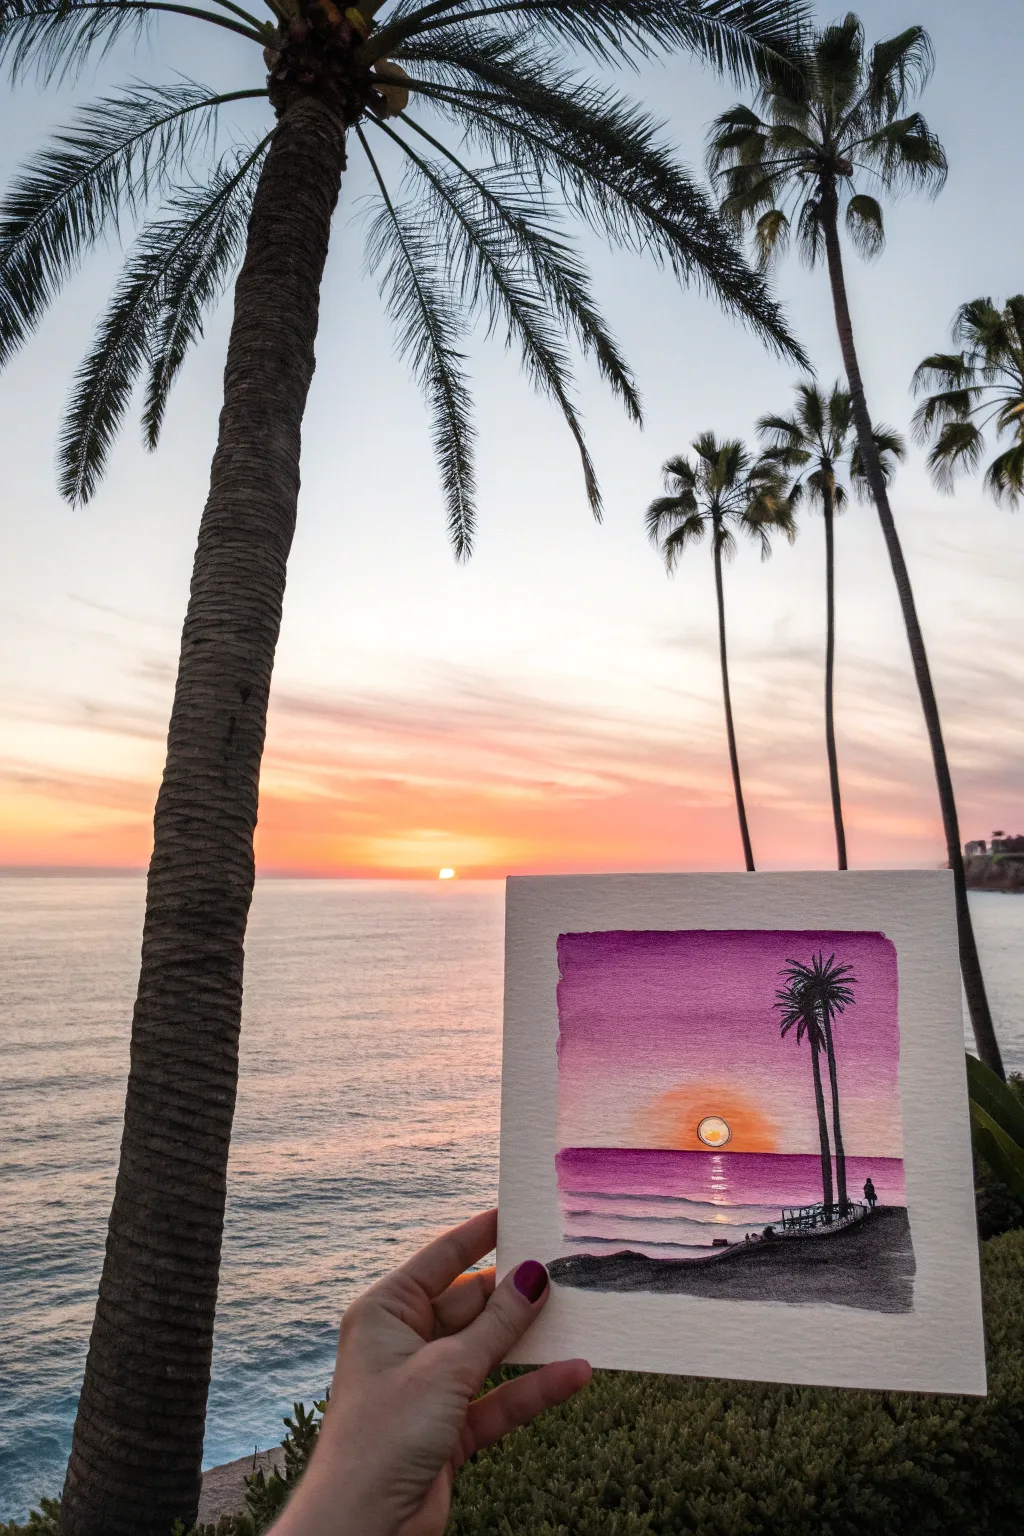

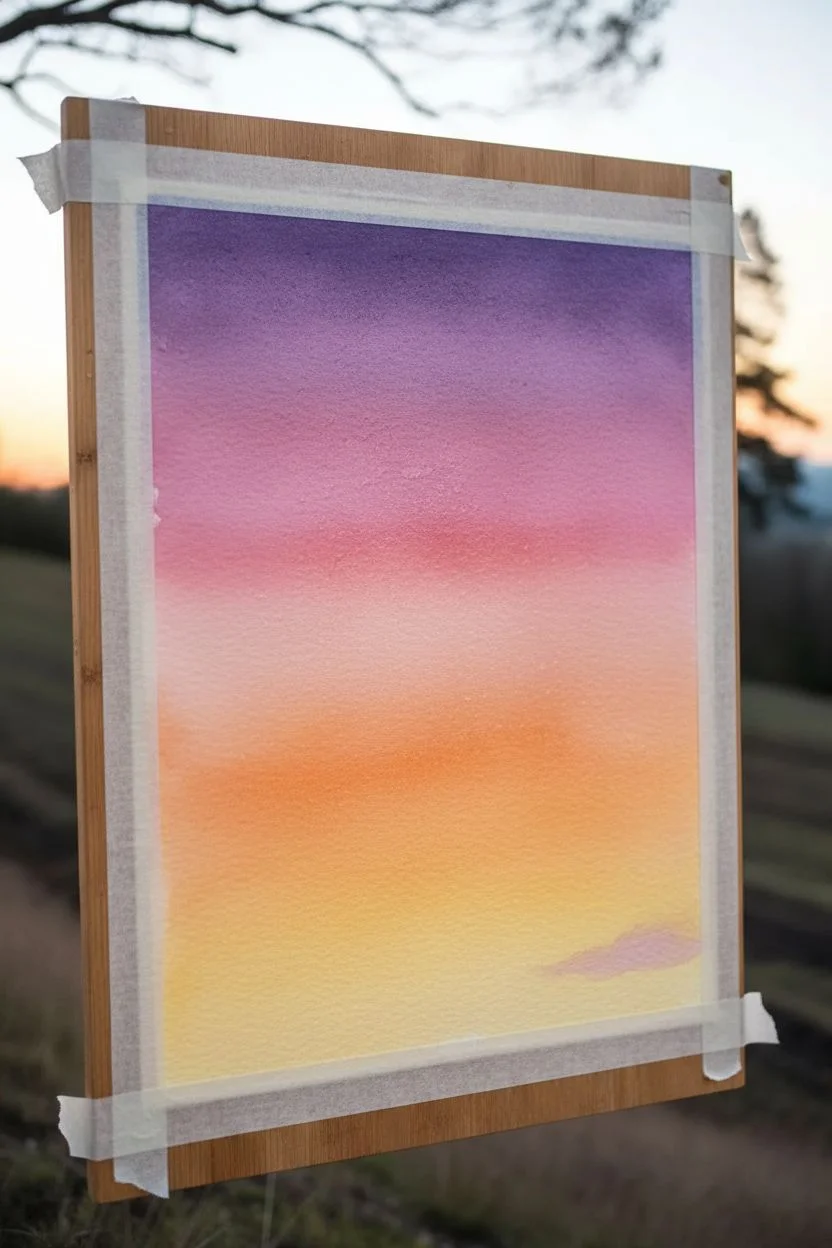
Capture the magic of twilight with this vibrant watercolor study featuring bold silhouettes against a glowing horizon. This project blends soft, wet-into-wet sunset gradients with crisp, dry-brushed foreground details for a striking contrast.
Step-by-Step
Materials
- Cold press watercolor paper (square format)
- Masking tape (washi or painter’s tape)
- Watercolor paints (Purple, Magenta, Cadmium Orange, Cadmium Yellow, Indigo/Black)
- White gouache or white gel pen
- Round brushes (flats for washes, fine liners for details)
- Clean water and blending palette
- Paper towels
Step 1: Setting the Scene
-
Prepare the borders:
Begin by taping down all four edges of your square watercolor paper to a drawing board. This not only creates that crisp, professional white border seen in the photo but also prevents the paper from buckling during heavy washes. -
Sketch the horizon:
Lightly sketch a horizontal line about one-third of the way up from the bottom to separate the sea from the sky. Add a small semi-circle in the center for the sun, but keep pencil marks extremely faint.
Sun Glow Tip
To make the sun look blindingly bright, lift a bit of pigment right around the sun’s edge with a damp, clean brush while the sky is still wet. This creates a soft, glowing halo effect.
Step 2: The Glowing Sky
-
Wet the sky area:
Using a large clean brush, apply a generous coat of clean water to the entire sky area, stopping right at the horizon line. Avoid getting water inside the sun circle. -
Lay the purple base:
Load your brush with a rich purple. Start painting at the very top edge of the sky, sweeping horizontally. Let the color fade naturally as you move downward, keeping the pigment strongest at the top corners. -
Blend in magenta:
While the purple is still wet, introduce a bright pink or magenta in the middle section of the sky. Blend it upwards into the purple to create a smooth transition. -
Create the solar glow:
Rinse your brush thoroughly. Pick up a warm orange mixed with a little yellow and paint around the sun area, blending it carefully into the pink above. Leave a tiny halo of white paper around the sun for maximum brightness. -
Paint the sun:
Fill the sun circle with a pale yellow wash. For a brighter look, you can leave the center of the sun paper-white and just tint the edges yellow.
Bleeding Horizon?
If your sky colors bleeds into your ocean, you didn’t let the sky dry enough. Use a clean, damp brush to gently ‘erase’ the bleed, then let it fully dry before re-establishing the horizon line.
Step 3: The Reflective Ocean
-
Mirror the colors:
Once the sky is damp (not soaking), begin the water section. Start just below the horizon with a deep purple or magenta, mirroring the colors directly above the horizon line. -
Add reflected light:
In the center of the water, directly below the sun, leave streaks of white paper or use very pale pink wash to represent the sun’s reflection on the waves. -
Define the waves:
While the water layer is drying, use a slightly thicker purple mix to paint horizontal lines growing wider towards the bottom of the page to suggest rolling waves. -
Intensify the horizon:
Run a thin line of deep purple or indigo along the horizon line to clearly separate the sky from the sea. I find this creates instant depth. -
Dry completely:
Allow the entire painting to dry completely. The paper must be bone-dry before adding the silhouettes to avoid bleeding.
Step 4: Silhouettes and Details
-
Paint the shoreline:
Mix a dense black or dark indigo. Paint the foreground rocky shoreline at the bottom, creating an uneven, organic texture for the beach. -
Add palm trunks:
Using a fine liner brush and your dark mixture, paint two tall, slender lines for the palm tree trunks on the right side. Make them slightly curved to look natural. -
Create palm fronds:
At the top of the trunks, use quick, flicking stokes to paint the palm leaves exploding outward. Let the bristles split slightly to mimic the texture of the fronds. -
Add the figure:
Carefully paint a tiny silhouette of a person standing on the shoreline near the trees. This adds a sense of scale and story to the piece. -
Highlight the reflection:
Use white gouache or a white gel pen to add crisp, thin horizontal lines in the water specifically down the center path of the reflection to make the water sparkle. -
The Reveal:
Once fully dry, slowly peel away the masking tape at a 45-degree angle to reveal your clean white borders.
Now you have a stunning sunset memory captured on paper


Calm Lake With Mirror Reflection
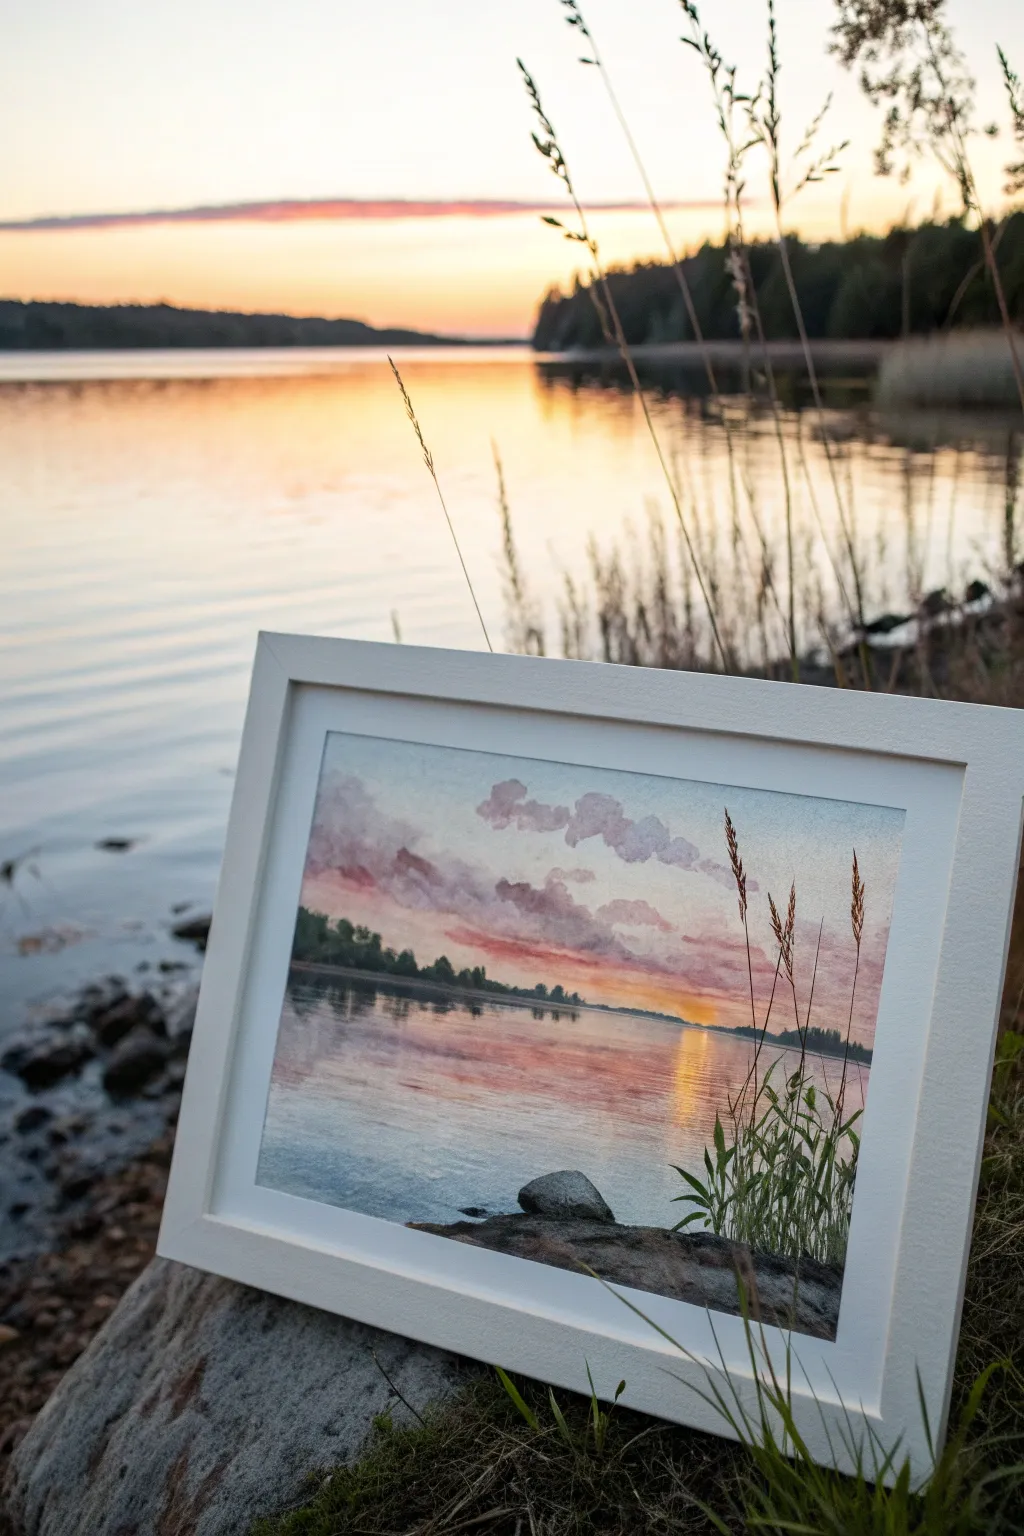
Capture the serene beauty of a calm lake at twilight with this watercolor project. By balancing soft wet-on-wet skies with crisp foreground details, you’ll create a mirror-like reflection that brings a sense of peace to any room.
How-To Guide
Materials
- Cold press watercolor paper (300 gsm)
- Watercolor paints (Indigo, Alizarin Crimson, Cadmium Yellow, Burnt Sienna, Sap Green)
- Flat wash brush (large)
- Round brushes (size 6 and size 2)
- Masking fluid (optional)
- Artist tape
- Mixing palette
- Paper towels
- Two jars of water
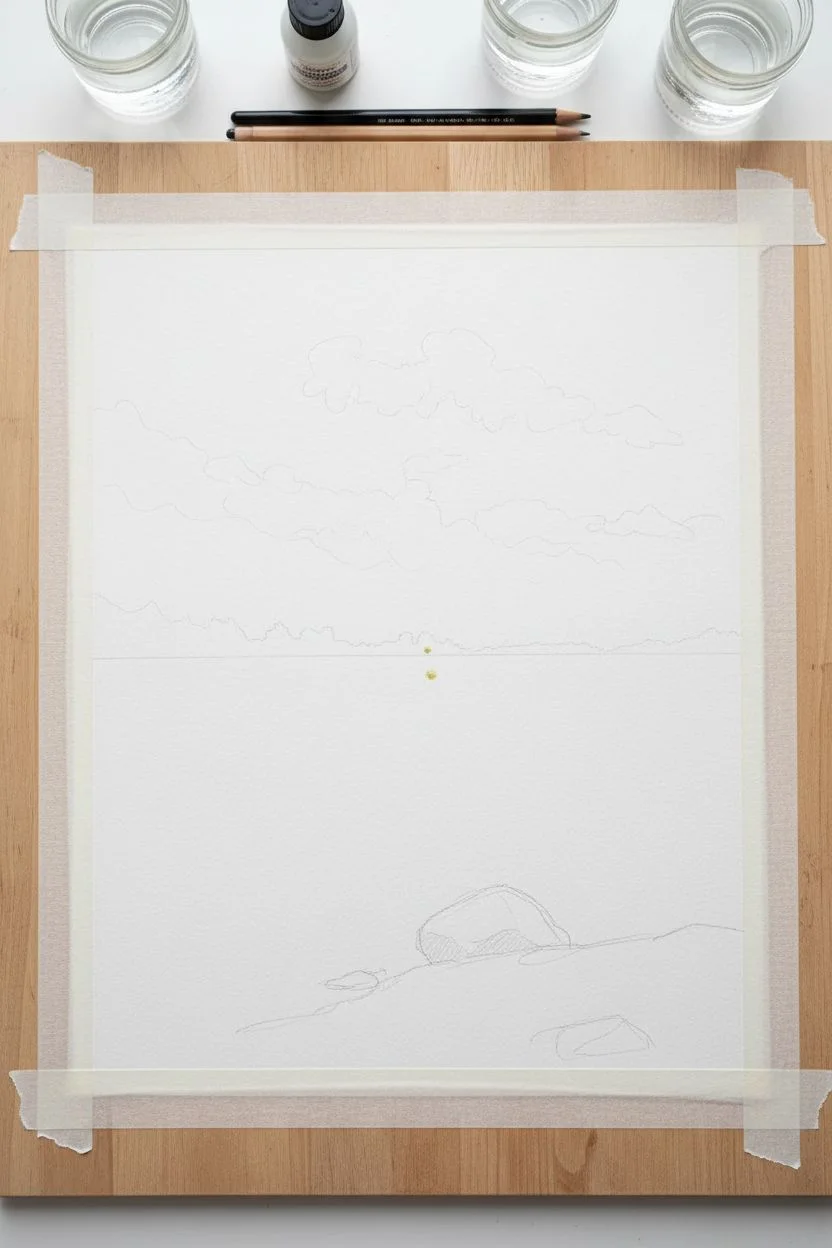
Step 1: Setting the Scene
-
Paper preparation:
Tape your watercolor paper down to a board on all four sides. This prevents buckling when we add water and creates that clean, crisp border shown in the final piece. -
Horizon line:
Lightly sketch a straight horizon line just below the center of the paper using a hard pencil. Add faint outlines for the foreground rocks and the general shape of the clouds. -
Masking highlights:
If you want to preserve the brightest white glints on the water or the sun’s position, apply a tiny dot of masking fluid now and let it dry completely.
Step 2: Painting the Sky
-
Wet-on-wet base:
Using your large flat brush, wet the entire sky area with clean water. The paper should glisten but not have puddles. -
Golden glow:
Drop a dilute wash of Cadmium Yellow near the horizon line where the sun is setting. Let it bleed naturally upwards, fading into white. -
Adding warmth:
While the paper is still damp, introduce a soft mix of Alizarin Crimson above the yellow. Allow these colors to merge slightly without overworking them, creating that soft gradient. -
Cloud shadows:
Mix a soft purple using Alizarin Crimson and a touch of Indigo. Use a round brush to dab in the cloud shapes while the paper is still damp for soft edges. Let the sky dry completely.
Muddy Waters?
If your sky colors turn muddy, you might be over-brushing while the paper is drying. Once you lay down a color in a wet-on-wet wash, try not to touch it again until it’s fully dry.
Step 3: Creating the Reflection
-
Wetting the water:
Wet the lake area below the horizon line with clean water, skipping over the foreground rocks. -
Mirroring colors:
Repeat the sky process in reverse. Add the yellow near the horizon and the pink/purple mix further down. The reflection should be slightly duller than the sky, so use a little less pigment. -
Ripples:
While the water area is drying but still damp, drag a mostly dry brush horizontally across the reflection to suggest subtle ripples disrupting the mirror surface.
Level Up
Use a white gel pen to add tiny, crisp highlights to the very tips of the water ripples or the edges of the foreground reeds to make the lighting pop.
Step 4: Defining the Landscape
-
Distant trees:
Mix a dark, cool green using Indigo and Sap Green. With a size 6 brush, paint the distant treeline along the horizon. vary the height to make it look like natural foliage. -
Tree reflections:
Immediately paint the reflection of the trees into the water directly below them. Soften the bottom edge of this reflection with a clean, damp brush so it fades into the water. -
Foreground rocks:
Paint the rocks in the immediate foreground using a mix of Indigo and Burnt Sienna. Keep the top edges crisp against the water. -
Rock shading:
Once the base rock color is dry, add darker shadows to the bottom and crevices of the stones to give them weight and dimension.
Step 5: Final Details
-
Adding vegetation:
Using your smallest round brush (size 2) and a dark green mix, paint the tall grasses and reeds in the bottom right corner. -
Seed heads:
Use a light brown mix to dab the tips of the taller grasses, creating the seed heads seen in the reference. -
Finishing touches:
Remove any masking fluid you applied. Peel off the tape gently at an angle to reveal your clean white border.
Frame your painting with a wide mat to enhance the peaceful atmosphere of your landscape


Sun Half-Set Behind Simple Mountains
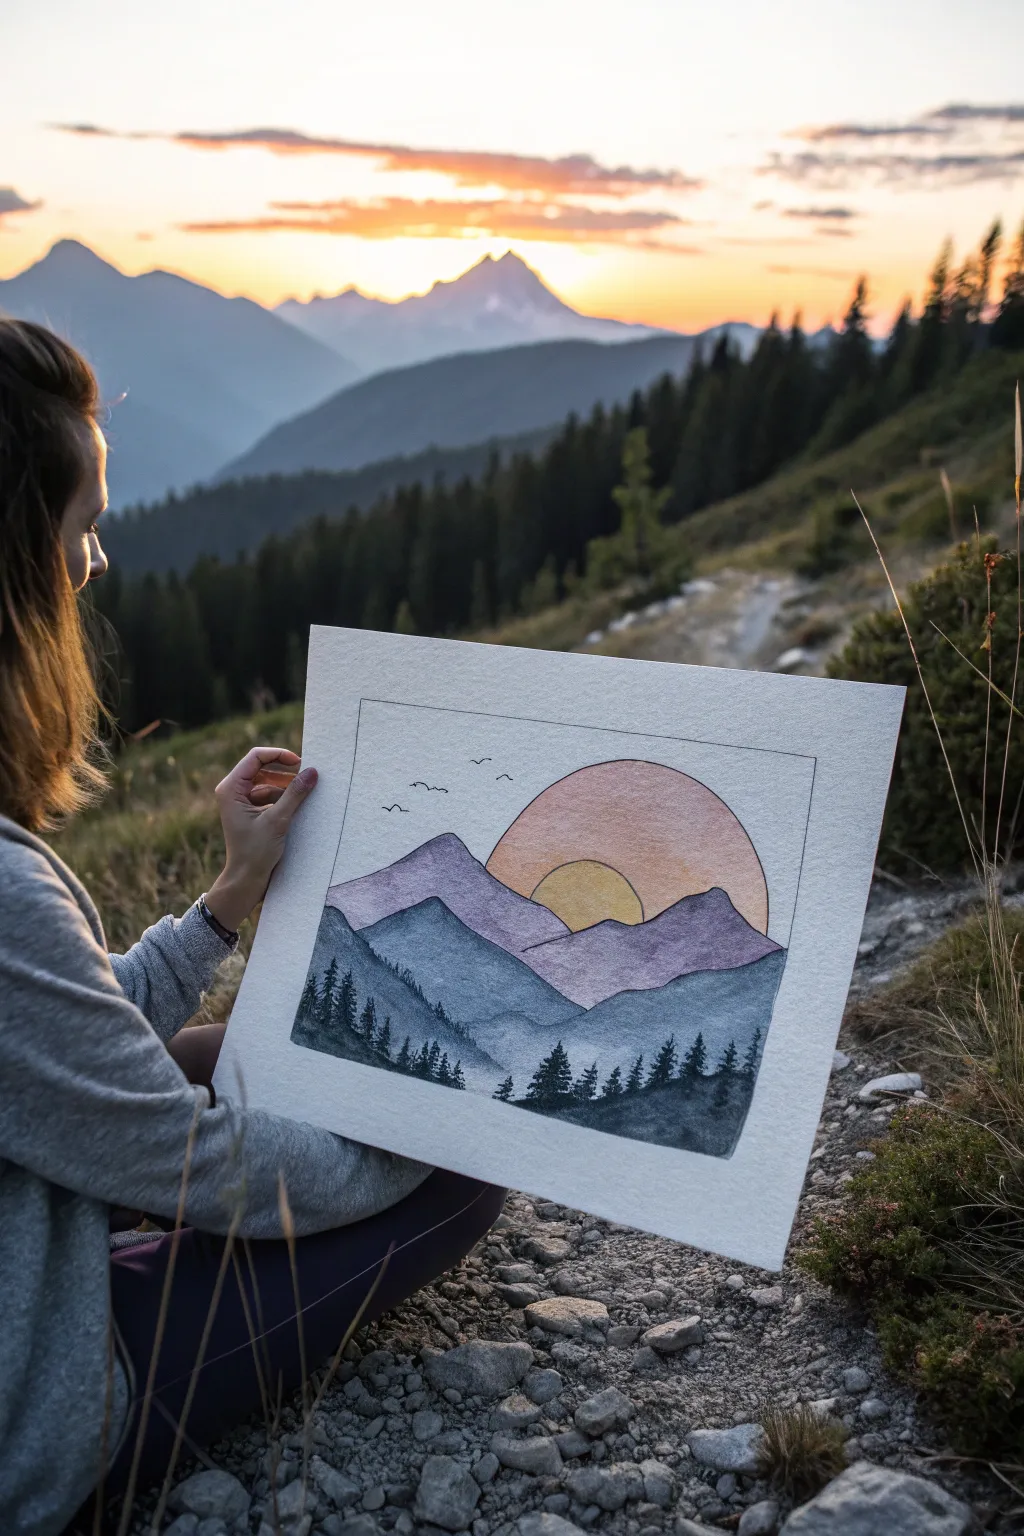
Capture the serenity of alpine peaks with this approachable line and wash project. By combining crisp ink outlines with soft watercolor washes, you’ll create a layered landscape featuring a warm, glowing sun tucked behind cool, misty ranges.
Step-by-Step Guide
Materials
- Cold press watercolor paper (approx. 9×12 inches)
- Waterproof fineliner pens (sizes 01 and 05, black)
- Watercolor paints (Payne’s Grey, Indigo, Alizarin Crimson, Cadmium Yellow, Orange)
- Pencil and eraser
- Ruler
- Round watercolor brushes (size 4 and 8)
- Jar of clean water
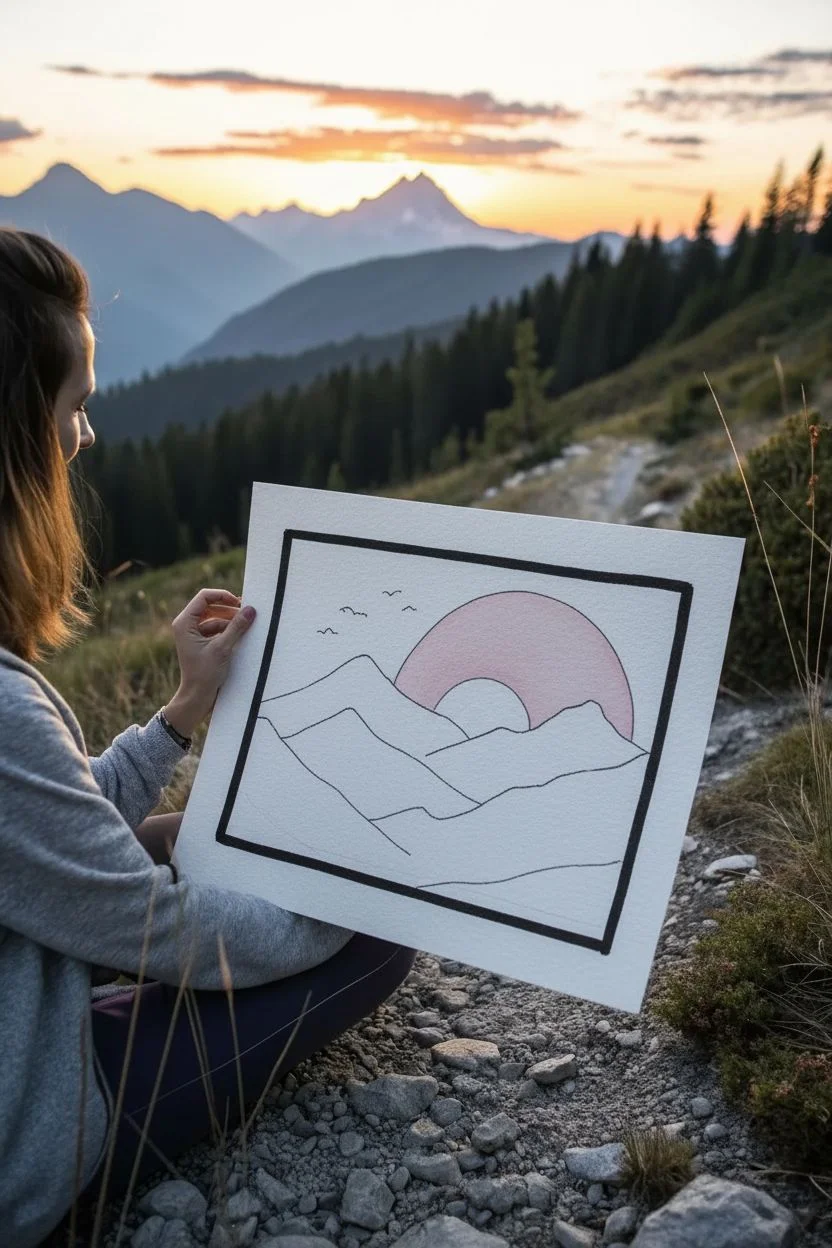
Step 1: Sketching the Layout
-
Create the border:
Start by using your ruler and pencil to draw a crisp rectangular border on your paper. Leave a generous margin of white space around the outside to frame the artwork beautifully. -
Outline the sun:
Lightly sketch a large semi-circle dominating the upper right quadrant. Inside this, near the bottom center of the large arc, draw a smaller semi-circle for the setting sun itself. -
Map the mountains:
Draw three distinct layers of mountains. The furthest back should be the highest and overlap the large sun circle. Creating jagged, uneven peaks makes them look more natural than perfect triangles. -
Ink the structural lines:
Once happy with the composition, go over your pencil lines with a waterproof fineliner. Use the 05 pen for the main border and the mountain ridges to give them weight. -
Add nature details:
Switch to a finer 01 pen to sketch tiny birds in flight on the left side. Don’t worry about erasing pencil marks yet; watercolor pigment can trap graphite, so wait until the very end.
Bleeding Lines?
If your black ink smudges when you paint over it, stop immediately. Your pen likely isn’t waterproof. Allow the ink to dry for at least 24 hours before painting, or switch to a pigment liner.
Step 2: Painting the Sky
-
Mix the sun colors:
Prepare a watery mix of Cadmium Yellow for the inner sun and a soft, diluted Orange for the larger sun halo. -
Paint the inner sun:
Carefully fill the small, central semi-circle with your yellow wash. Keep the edges neat against the ink lines. -
Wash the outer halo:
Paint the larger semi-circle with the orange wash. I like to keep this wash quite flat and even to contrast with the textured mountains below. -
Let it dry completely:
It is crucial to let the sky sections dry fully before starting the mountains to prevent the colors from bleeding into one another.
Step 3: Layering the Mountains
-
Mix the distant purple:
Creating atmospheric perspective is key here. Mix a pale, dusty purple using Alizarin Crimson and a touch of Indigo. Dilute it heavily with water so it remains light. -
Paint the furthest range:
Apply this pale purple wash to the mountain range furthest in the back. The lightness suggests distance. -
Mix a mid-tone blue:
For the middle mountain range, mix Indigo with a little Payne’s Grey. You want a cool, medium-blue tone that is darker than your purple layer. -
Paint the middle range:
Fill in the middle section of mountains. While the paint is still wet, you can drop in tiny hints of darker pigment near the peaks for subtle texture. -
Mix the darkest foreground:
For the closest mountain layer, use a concentrated mix of Payne’s Grey. It should be nearly black but still transparent enough to look like watercolor. -
Paint the foreground:
Apply the dark grey wash to the bottom-most mountain shape. This anchors the painting and provides strong contrast against the bright sun.
Clean Edges Pro-Tip
For that crisp, professional border, apply painter’s tape or washi tape over your pencil border lines before you start painting to preserve perfect white margins.
Step 4: Final Details
-
Dry and detailed trees:
Wait until the paint is bone-dry. Using your slightly thicker brush with a very concentrated black or dark grey paint, dab in vertical tree shapes along the bottom ridge. -
Refine the forest:
Use the tip of the brush to flick upward, creating the pointed tops of pine trees. Vary their heights to make the forest line look organic. -
Erase pencil lines:
Once the paper is completely dry and cool to the touch, gently erase any visible pencil marks to clean up the drawing.
Now you have a peaceful mountain keepsake that captures the quiet magic of sunset


Golden Hour Field With Tall Grass Silhouette
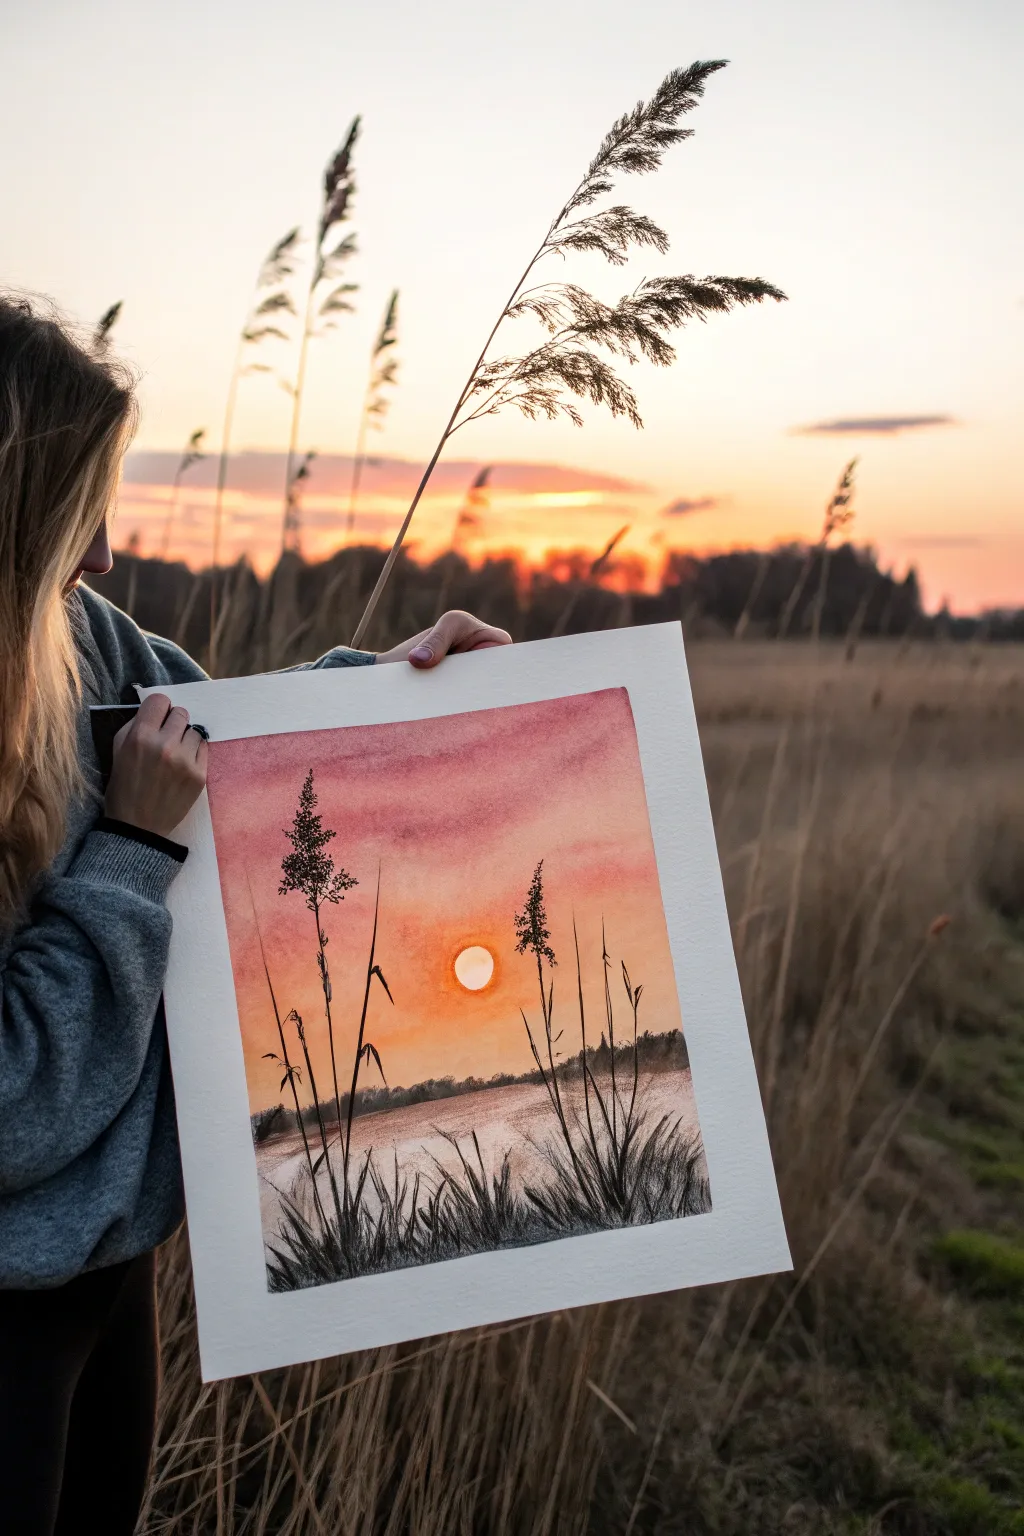
Capture the serene beauty of a setting sun filtering through tall reeds with this warm watercolor project. You’ll layer soft oranges and pinks to create a glowing sky before grounding the scene with striking black silhouettes.
Detailed Instructions
Materials
- Cold-press watercolor paper (300 gsm)
- Watercolor paints (Cadmium Orange, Alizarin Crimson, Yellow Ochre, Burnt Sienna)
- Black ink or black gouache
- Large flat brush (1-inch)
- Round brush (size 6 or 8)
- Fine liner brush or rigger brush
- Masking tape
- Clean water and palette
- Paper towels
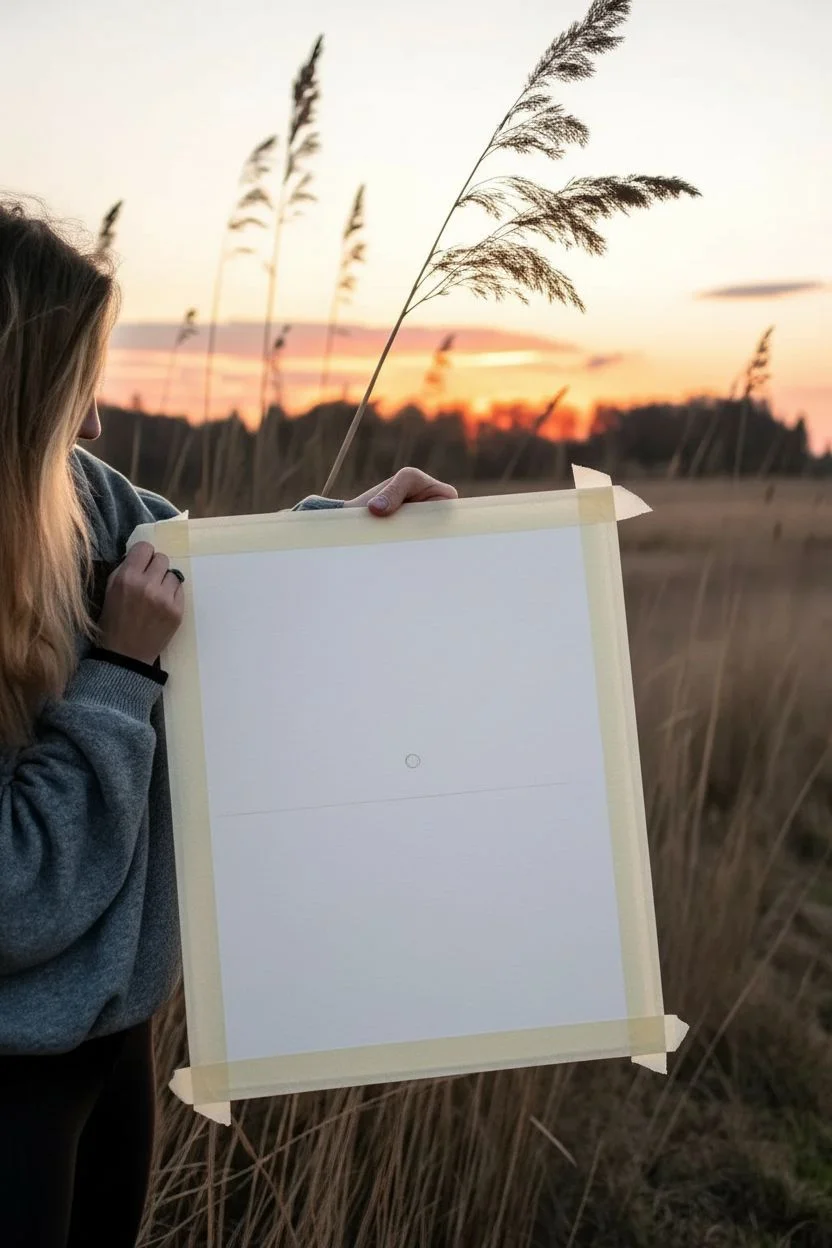
Step 1: Setting the Scene
-
Prepare your paper:
Tape down all four edges of your watercolor paper to a board or table. This creates a clean white border and prevents the paper from buckling during the wet wash stages. -
Define the horizon:
Lightly sketch a horizontal line about one-third of the way up from the bottom of the paper. This will separate your sky from the water and foreground. -
Mask the sun:
Decide where your sun will sit, slightly off-center in the sky area. You can carefully paint around a small circle, or apply a small dot of masking fluid if you want a perfect white or pale yellow edge.
Wet-on-Wet Magic
Work quickly while the paper is wet to ensure your sky gradient is smooth. If it dries, re-wet the whole section carefully.
Step 2: Painting the Sky
-
Wet the sky area:
Using your large flat brush, apply clean water to the entire sky section above your horizon line. The paper should be glistening but not holding puddles. -
Apply the first glow:
Load your brush with a watery mix of Yellow Ochre and drop it around the sun area. Allow it to bleed outward, keeping the center brightest. -
Add warmth upwards:
While the paper is still wet, mix Cadmium Orange and begin painting above the yellow zone. Use broad, horizontal strokes. -
Deepen the upper sky:
Blend Alizarin Crimson with a touch of the orange for a dusty pink hue. Apply this to the top third of the sky, letting it softly merge with the orange below to create a seamless gradient. -
Refine the sun:
If you painted around the sun, soften the edges slightly with a clean, damp brush so the sun looks like it’s radiating light rather than being a hard sticker.
Texture Trick
Use a dry brush technique with slightly thicker black paint on the foreground grass to mimic the rough texture of dried reeds.
Step 3: Creating the Water
-
Mirror the colors:
Below the horizon line, wet the paper again. Mirror your sky colors in reverse order—start with the pinkish tones at the very bottom edges, moving into orange and yellow near the horizon. -
Leave highlights:
Leave several horizontal white streaks or gaps in your paint application on the water. These unpainted areas mimic the reflection of light dancing on the ripples. -
Define the distant shore:
Mix a diluted grey-purple using blue and a tiny bit of brown. Paint a soft, indistinct line of trees or land right along the horizon line while the paper is slightly damp to keep the edges fuzzy. -
Full dry:
Let the entire painting dry completely. The paper must be bone dry before adding the sharp silhouettes, or the ink will bleed.
Step 4: The Silhouettes
-
Start the foreground grass:
Switch to black ink or gouache for maximum opacity. Using a medium round brush, paint the dense, grassy clumps at the very bottom of the page. -
Add tall stalks:
Take your fine liner or rigger brush. With a flicking motion, pull long, thin lines upward from the clumps. Vary the heights and angles so they look natural, not like a picket fence. -
Paint the seed heads:
Select two or three of the tallest stalks to feature prominent reed heads. Use a stippling motion (tapping the brush tip) to create textured, fluffy shapes at the tips. -
Add delicate details:
Draw very fine, bent leaves or broken stems drooping down. These small imperfections make the foliage look realistic. -
Final touches:
Review the foreground. If the base looks too uniform, add a few more erratic grass heavy strokes to suggest density and shadow. -
Reveal:
Once the black ink is totally dry, carefully peel away the masking tape at a 45-degree angle to reveal your crisp white border.
Frame this piece with a wide mat to really make those sunset colors pop against the dramatic black reeds
BRUSH GUIDE
The Right Brush for Every Stroke
From clean lines to bold texture — master brush choice, stroke control, and essential techniques.
Explore the Full Guide
Sunset Over City Skyline Silhouette

Capture the magic of a city waking up as the sun goes down with this vibrant skyline silhouette. By blending a dramatic sunset gradient with crisp architectural shapes, you’ll create a striking contrast that celebrates urban beauty against nature’s backdrop.
How-To Guide
Materials
- Cold press watercolor paper (minimum 140lb)
- Masking tape or painter’s tape
- Watercolor paints (Purple, Magenta, Red, Orange, Yellow)
- Black ink or technical drawing pens (fine and broad tips)
- Black gouache or acrylic paint (optional for opacity)
- White gel pen
- Flat watercolor brush (1/2 inch or larger)
- Medium round brush
- Pencil and eraser
- Pencil sharpener
- Ruler
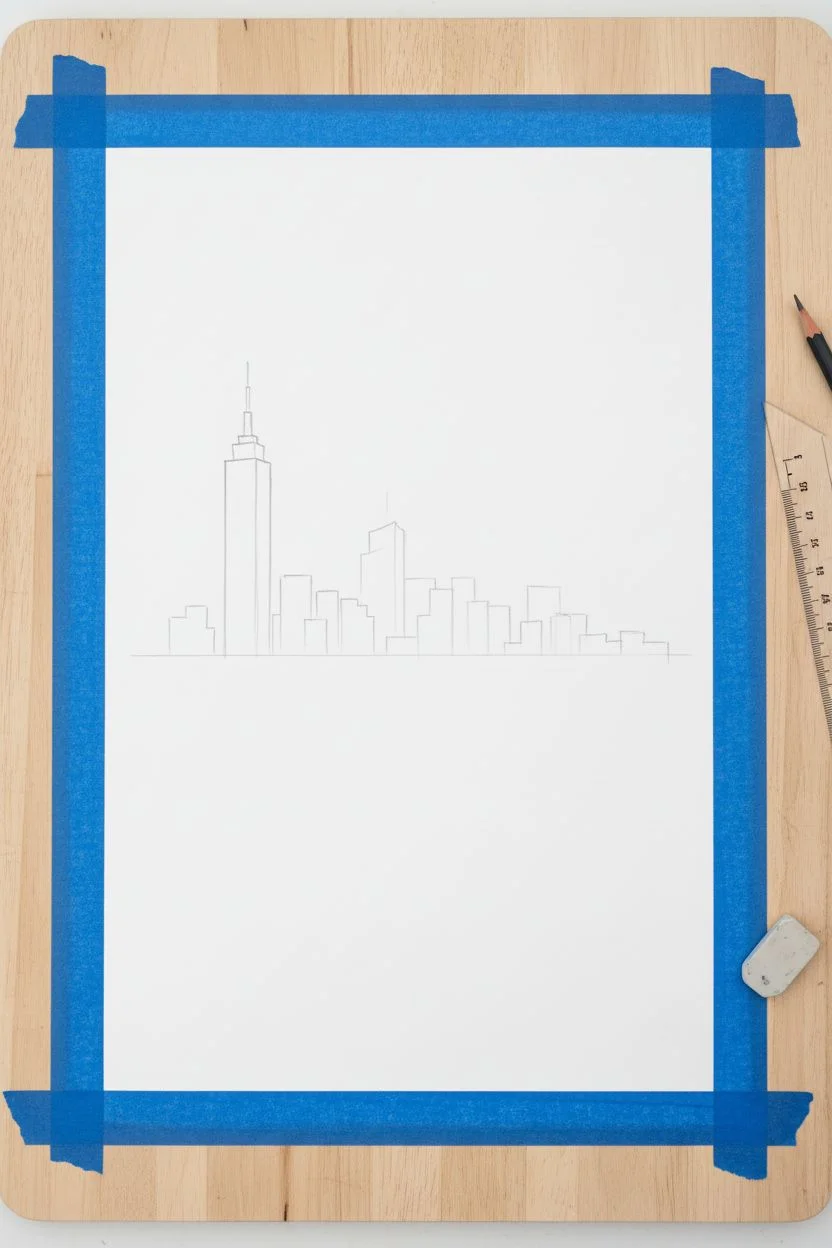
Step 1: Setting the Stage
-
Tape the edges:
Begin by securely taping down all four edges of your watercolor paper to your work surface. This creates that crisp, professional white border seen in the photo and prevents the paper from buckling when wet. -
Sketch the horizon:
About one-third of the way up from the bottom, use a ruler to lightly draw a straight horizon line. This will serve as the base for your city. -
Draft the iconic tower:
Sketch the main skyscraper on the left side. It’s the focal point, so draw a tall, rectangular structure that tapers near the top, finishing with a distinctive needle antenna. -
Outline the city grid:
Fill in the rest of the skyline with varied rectangular heights. Don’t worry about windows yet; just focus on getting an interesting rhythm of tall and short buildings across the horizon line.
Bleeding Edges?
If paint leaks under your tape, wait until completely dry. Then, use a small amount of white acrylic paint or white gouache to clean up the border edges carefully.
Step 2: Painting the Sunset Sky
-
Prepare your palette:
Squeeze out your sunset colors: deep violet, magenta, bright crimson, orange, and a warm yellow. Having them ready is crucial for wet-on-wet blending. -
Start at the top:
Load your large flat brush with the deep violet paint. Apply a bold stroke across the very top of the paper, ensuring the color is saturated. -
Gradient transition:
rinse your brush slightly and pick up magenta. Paint directly below the violet, slightly overlapping the wet edge so the purple bleeds down into the pink. -
Heating up the sky:
Before the previous layer dries, move to your red and orange hues. Paint broad horizontal strokes, blending downwards. I like to let the water do some of the mixing here to keep the transition soft. -
The golden horizon:
As you approach the sketched skyline, switch to your brightest yellow. Paint right over your pencil sketches (the black link will cover this later), leaving a small round circle unpainted if you want a white sun, or paint it solid yellow to add the sun later with gouache. -
Add cloud texture:
While the orange and yellow section is still damp, lift out a few horizontal streaks using a clean, thirsty brush, or dab in a slightly darker orange to suggest thin cloud layers. -
Dry completely:
This is the most critical patience test. Let the paper dry 100% completely. If it’s cold to the touch, it’s still wet.
Step 3: Constructing the Silhouette
-
Outline the buildings:
Using a fine-tip black marker or a small brush with black ink, carefully trace the outline of your building sketches. Be precise with the antenna on the main tower. -
Fill the silhouette:
Switch to a larger brush or broad marker to fill in the building shapes solid black. If using paint, black gouache works beautifully here for a matte, opaque finish that hides the background completely. -
Create the sun:
If you painted over the sun area earlier, use a dab of white gouache or a white paint pen to place a small, crisp circle low in the sky, nestled between the buildings. -
Add ground details:
Paint the area below the horizon line solid black. You can roughen the top edge of this lower section slightly to suggest treetops or smaller structures in the foreground.
Pro Tip: Depth of Field
Make distant buildings a surprisingly dark grey instead of pure black. This slight tonal shift pushes them back into the distance, giving your flatness amazing 3D depth.
Step 4: Illuminating the City
-
Drafting windows:
Once the black ink is fully dry, use a white gel pen or a very fine brush with white gouache to draw grids of windows on select buildings. -
Varying the lights:
Don’t put windows on every building. Leave the main tower mostly dark silhouette, perhaps adding just a few vertical highlight lines or horizontal vents near the base for scale. -
Texturing the foreground:
For the shorter buildings in the foreground, use tighter grid lines to simulate distance and density. -
Final touches:
Check for any light spots in your black silhouette and touch them up. Ensure the antenna line is sharp and straight. -
The reveal:
Slowly peel away the masking tape at a 45-degree angle to reveal your crisp white borders.
Now you have a stunning piece of urban art that captures the peaceful transition from day to night
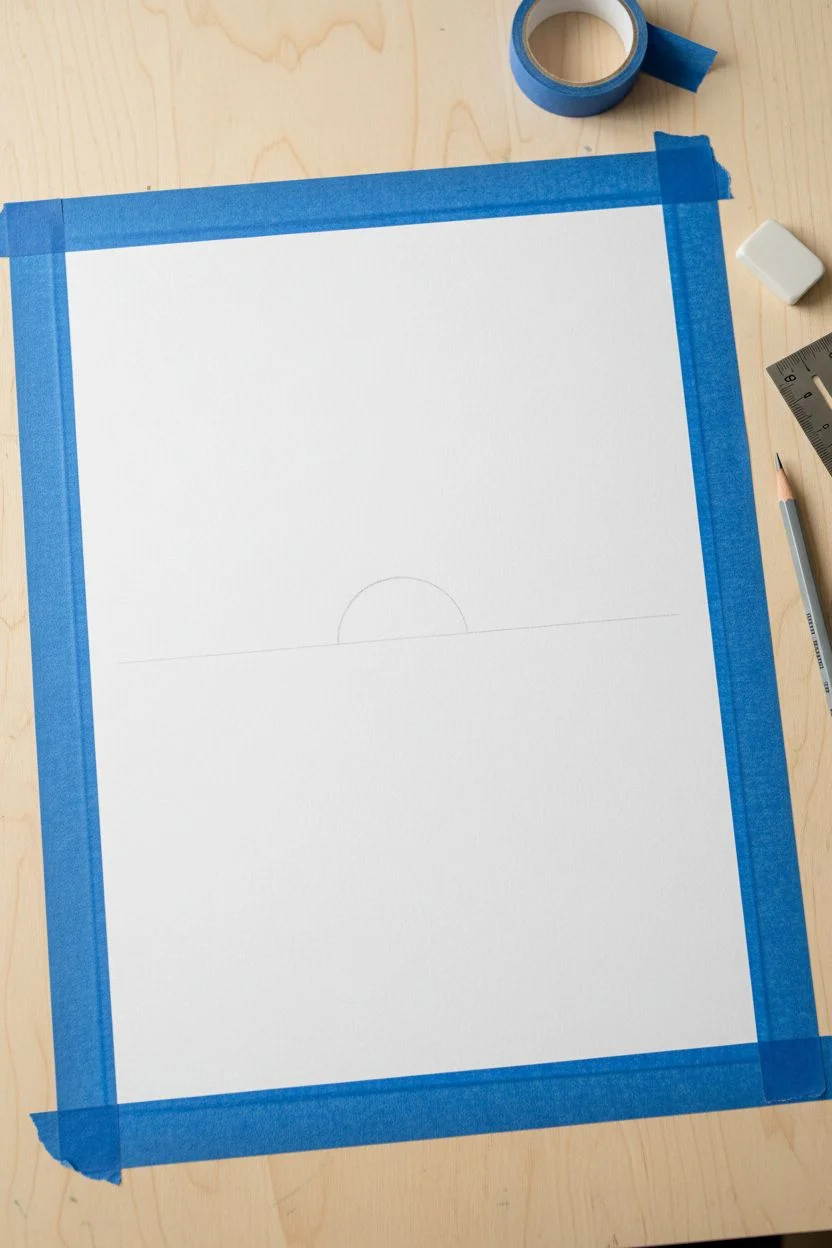
Dock or Pier Leading Into the Sunset
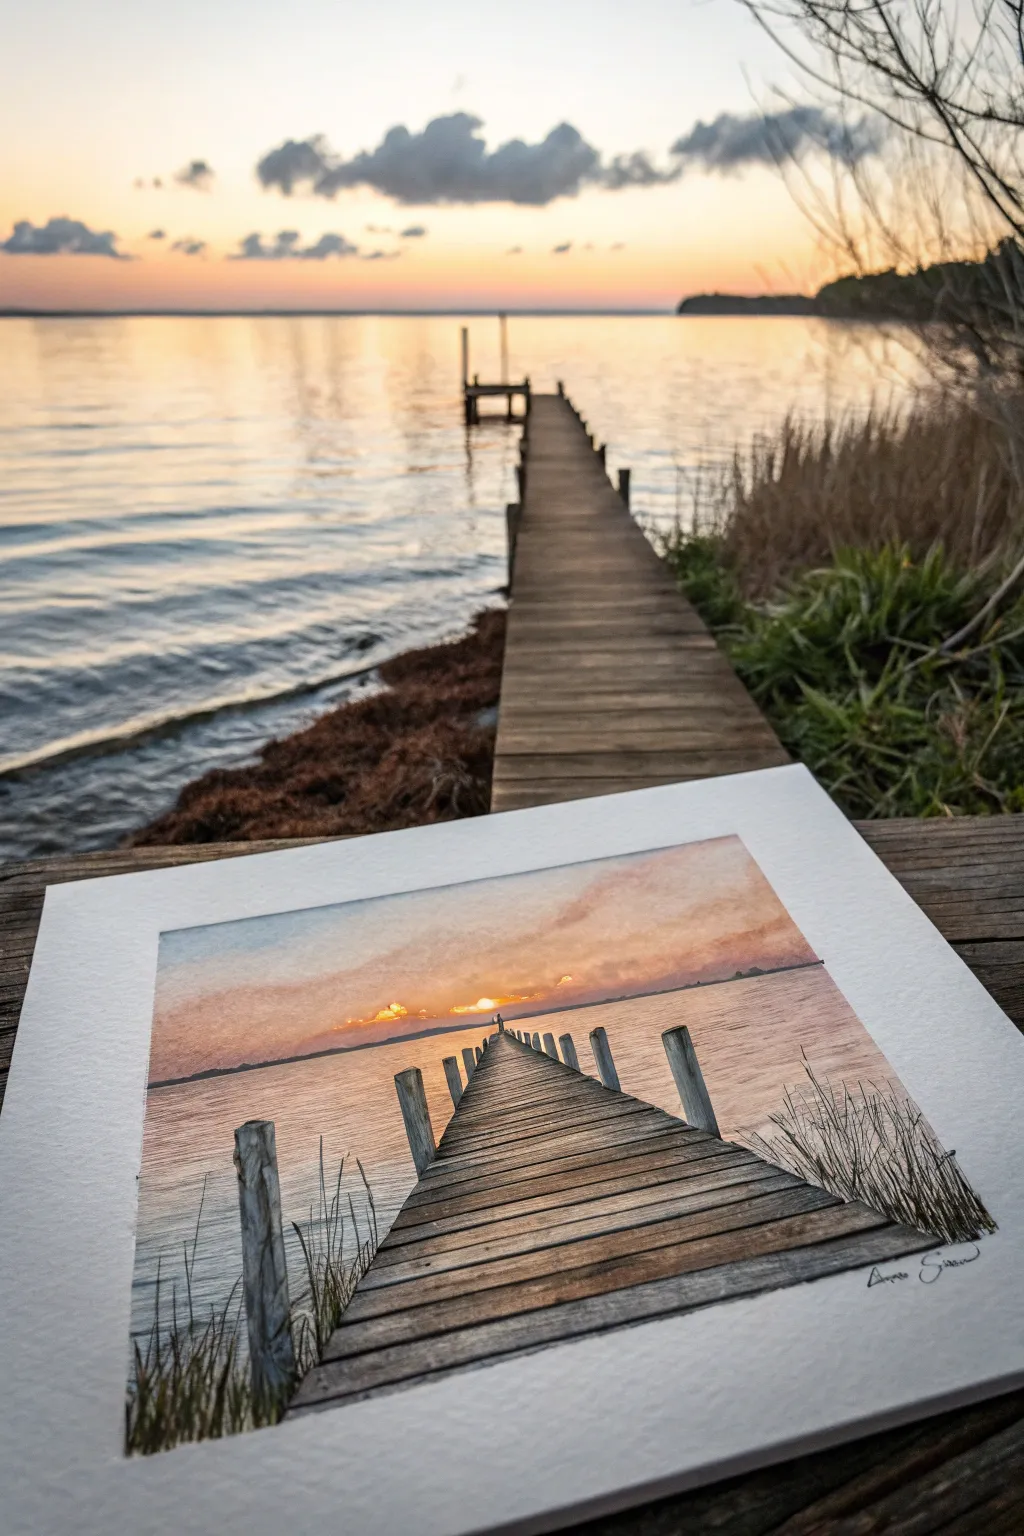
Capture the serene beauty of a lakeside dock leading directly into a glowing horizon with this perspective-focused project. This tutorial guides you in creating a warm, inviting scene where the wooden planks of a pier draw the viewer’s eye straight toward a soft, setting sun.
Detailed Instructions
Materials
- Heavyweight watercolor paper or mixed media paper (smooth texture preferred)
- Pencil (HB) and eraser
- Ruler
- Watercolor paints (Yellow Ochre, Burnt Sienna, Payne’s Grey, Alizarin Crimson, Ultramarine Blue)
- White gouache or white gel pen
- Fine liner pens (Black, 0.1mm and 0.3mm)
- Round watercolor brushes (Size 4 and 8)
- Flat shader brush
- Masking tape
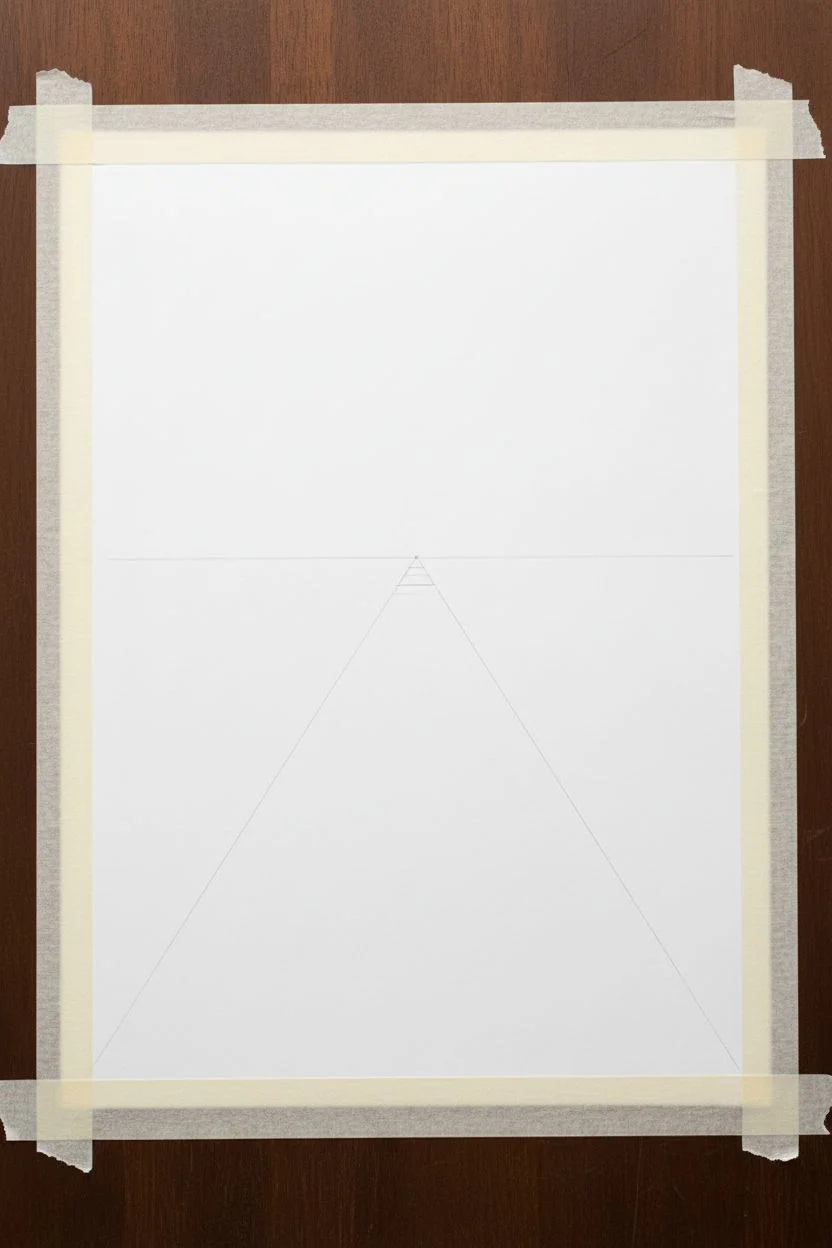
Step 1: Setting the Perspective
-
Tape the borders:
Begin by taping down all four edges of your paper to a board with masking tape. This creates a clean, professional white border around your finished piece and prevents the paper from buckling when wet. -
Establish the horizon:
Use your ruler to draw a faint horizontal line about one-third of the way up from the bottom of the page. This will be your water line. -
Locate the vanishing point:
Mark a small dot near the center of your horizon line where the sun will be setting. All diagonal lines for the pier will converge at this single point. -
Outline the pier:
From the vanishing point, draw two diagonal lines extending outward toward the bottom corners of the paper. Keep the angle fairly narrow to create a sense of distance.
Uneven Planks?
If your pier planks look crooked, don’t worry. Use a ruler to re-check your perspective lines. Remember, horizontal lines must stay perfectly parallel to the bottom of the page.
Step 2: Drawing the Details
-
Sketch the planks:
Draw horizontal lines across the pier to form the wooden planks. Space them closer together near the horizon and gradually farther apart as they come toward the foreground to enhance the depth effect. -
Add vertical posts:
Sketch vertical posts along both sides of the pier. Like the planks, these should appear smaller and closer together in the distance, becoming taller and more spaced out as they approach the viewer. -
Create distant land:
Lightly sketch a thin, uneven strip of land on the horizon line on either side of the pier, keeping it low profile so it doesn’t distract from the sky. -
Incorporate foreground grass:
Draw faint, upward-curving lines in the bottom corners near the pier entrance to represent tall grasses or reeds growing at the water’s edge.
Step 3: Painting the Sky and Water
-
Wet-on-wet sky wash:
Lightly wet the sky area with clean water. Drop in dilute Yellow Ochre near the vanishing point, blending it upward into a soft Alizarin Crimson, and finally a touch of Ultramarine Blue at the very top. -
Reflect colors in water:
While the sky dries, replicate these colors in the water section. Use horizontal brushstrokes to mirror the sky gradient, keeping the yellow tones concentrated around the pier’s reflection. -
Deepen the horizon:
Once the first layer is dry, mix a touch of Payne’s Grey with Alizarin Crimson to paint the distant strip of land, creating a silhouette effect against the glowing sky. -
Add cloud definition:
Using a slightly drier brush, dab small amounts of a purple-grey mix into the sky to suggest soft, scattered clouds. Soften the edges with a clean, damp brush.
Level Up: Texture
Sprinkle a tiny pinch of salt onto the wet pier paint while it dries. Brush it off later to create a weathered, grainy wood texture that looks incredibly realistic.
Step 4: Defining the Pier
-
Base coat for wood:
Paint the pier planks with a wash of Burnt Sienna. I prefer to vary the water ratio slightly here so some planks look lighter and others darker, adding natural variety to the wood. -
Shadowing the planks:
Mix Burnt Sienna with a little Payne’s Grey. Use a fine brush to paint thin lines between the planks and add wood grain texture to the foreground boards. -
Paint the posts:
Color the vertical posts using a grey-brown mix. Add a darker shadow on the side of each post facing away from the setting sun to give them dimension. -
Inking the details:
Once the paint is fully dry, use your 0.1mm pen to outline the posts and planks loosely. Don’t make the lines perfect; broken likes look more organic and rustic. -
Detailing the grass:
Use the fine liner or a small brush with dark green-black paint to define the reeds in the foreground, ensuring they overlap the water slightly. -
Final highlights:
Use white gouache or a gel pen to touch the top edges of the closest posts and add a few sparkles on the water near the horizon. -
Remove the tape:
Peel the masking tape away slowly at a 45-degree angle to reveal your crisp, white border.
Step back and admire how your simple lines have transformed into a peaceful escape into the sunset

PENCIL GUIDE
Understanding Pencil Grades from H to B
From first sketch to finished drawing — learn pencil grades, line control, and shading techniques.
Explore the Full Guide
Big Cloud Shapes Catching the Last Light
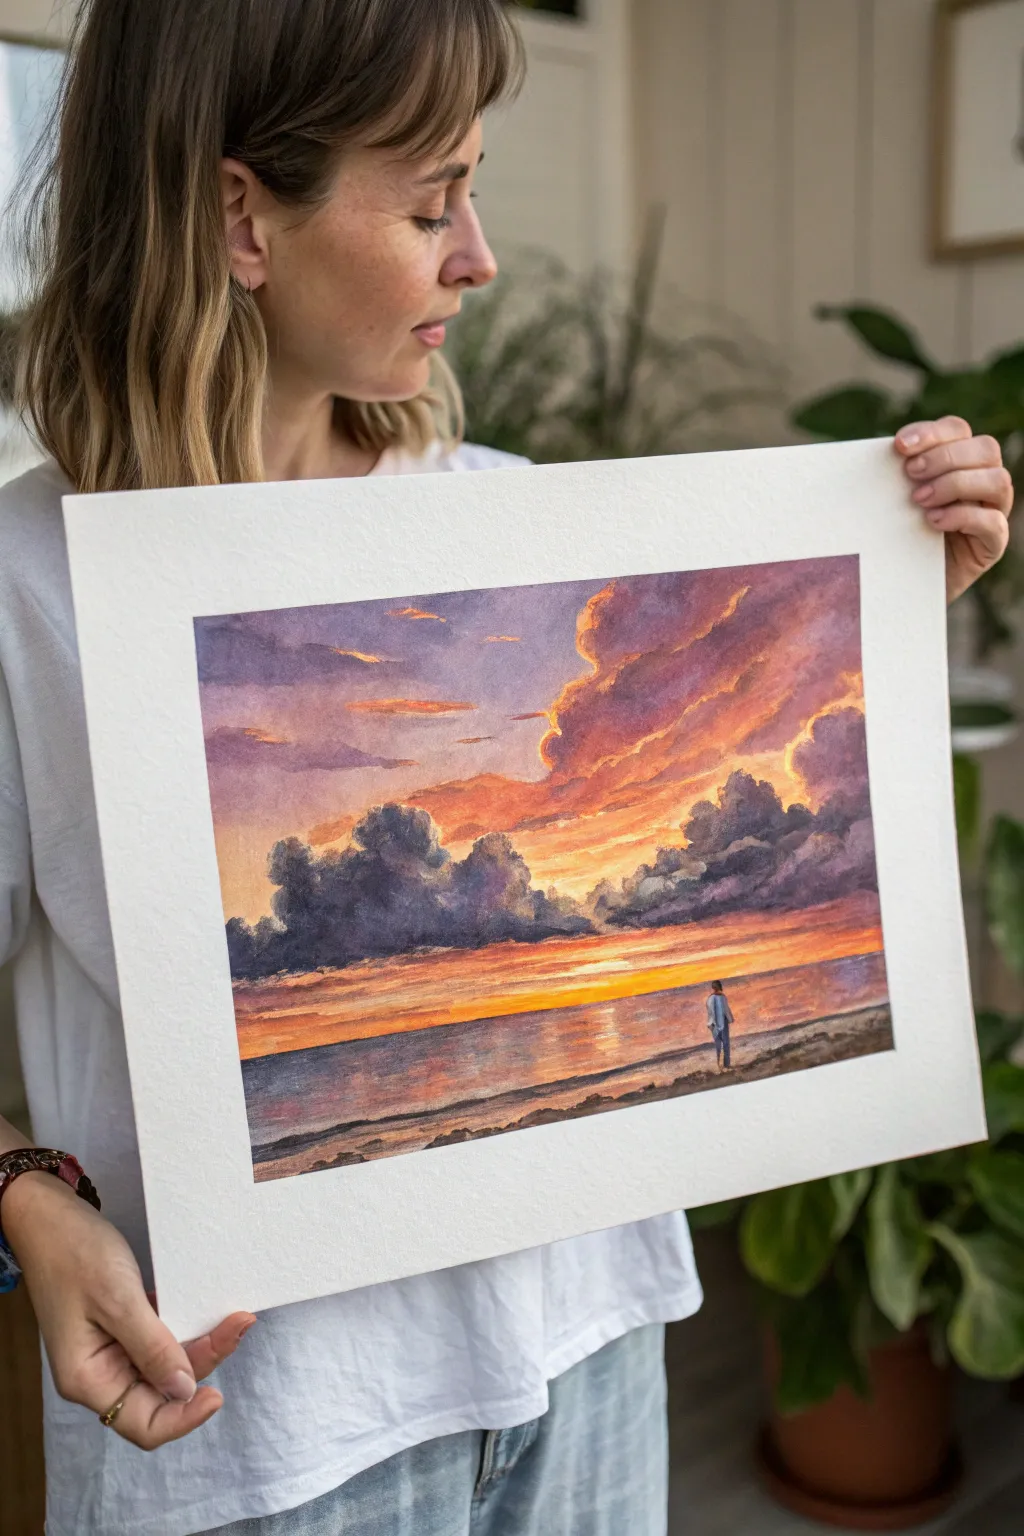
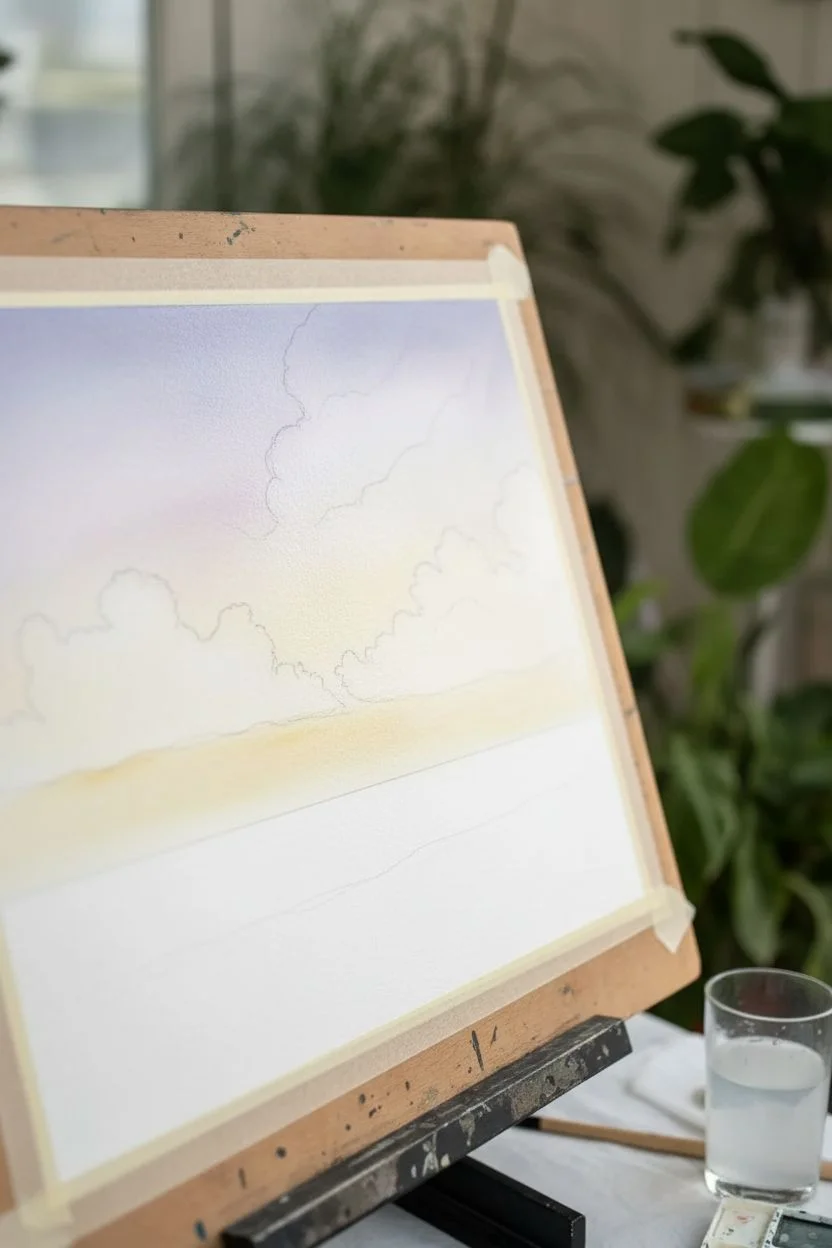
Capture the dramatic beauty of towering clouds catching the final rays of sunlight in this vibrant watercolor landscape. The contrast between the deep purple shadows and glorious fiery oranges creates a breathtaking atmosphere that feels both peaceful and grand.
Step-by-Step
Materials
- Cold press watercolor paper (140lb/300gsm, white)
- Watercolor paints (Ultramarine Blue, Alizarin Crimson, Cadmium Yellow, Burnt Sienna, Payne’s Gray)
- Masking fluid (optional)
- Round brushes (sizes 4, 8, and 12)
- Flat wash brush (1 inch)
- Two jars of water
- Paper towels
- Pencil (HB) and kneaded eraser
Step 1: Planning and Underpainting
-
Horizon Line:
Begin by taping down your paper edges to a board. Use your pencil to lightly sketch the horizon line about one-third of the way up from the bottom of the page. -
Cloud Shapes:
Lightly outline the large cloud formations in the middle sky. Focus on the bulky, irregular shapes rather than tiny details, leaving plenty of open sky above them. -
Initial Wash:
Wet the entire sky area with clean water using your flat brush. While the paper is glistening, drop in a very pale wash of yellow near the horizon line where the sun sets. -
Upper Sky Gradient:
While the paper is still damp, mix a soft violet using Ultramarine and Alizarin Crimson. Paint the very top of the sky, letting it fade gently as it moves down toward the yellow horizon.
Don’t Make Mud
If your oranges and purples are mixing into brown, your layers are too wet. Let the orange layer dry fully before applying the purple cloud shadows over the top.
Step 2: Building the Vibrant Sky
-
Warm Undersides:
Mix a vibrant orange using Cadmium Yellow and a touch of Alizarin Crimson. Paint the undersides of where your main clouds will be, letting this color bleed slightly into the damp sky for a soft glow. -
Defining the Streaks:
Using a size 8 round brush, add horizontal streaks of orange and thin purple lines in the upper sky to suggest high-altitude cirrus clouds catching the light. -
Drying Time:
Allow this initial sky layer to dry completely. The paper must be bone dry before we add the heavy cloud shapes to prevent them from becoming a muddy blur.
Step 3: The Majestic Clouds
-
Cloud Shadows Base:
Mix a dark, stormy purple-grey using Ultramarine, Alizarin Crimson, and a touch of Burnt Sienna to neutralize it. This will be the body of your main clouds. -
Painting the Mass:
Load your size 8 brush and paint the main cloud bodies. Keep the edges ragged and irregular. Crucially, leave the top ridges unpainted so the underlying orange wash shows through as a highlight. -
Softening Edges:
While the cloud paint is wet, rinse your brush, dry it slightly on a towel, and run the damp bristles along some of the top edges to soften the transition between shadow and glowing highlight. -
Deepening Shadows:
Drop darker pigment (Payne’s Gray mixed with purple) into the bottom-center of the cloud masses while they are still wet to create volume and weight. -
Distant Clouds:
Paint smaller, flatter cloud shapes near the horizon using a paler, more watered-down version of your purple mix to create atmospheric perspective.
Pro Tip: Soft Glow
To make the cloud edges really glow, paint the orange highlight first, let it dry, then paint the purple shadow but leave a tiny sliver of gap before the highlight.
Step 4: Sea and Foreground
-
Ocean Gradient:
Wet the ocean area. Paint horizontal strokes of purple and dark blue at the bottom corners, transitioning to bright orange and yellow in the center where the sun reflects. -
Water Texture:
Once the initial sea wash is dry, use a smaller brush with drier dark paint to add thin horizontal lines across the water, mimicking gentle waves breaking the reflection. -
Sandy Shore:
Paint the beach foreground with a mix of Burnt Sienna and a little violet. Use swift, horizontal strokes that get darker near the bottom edge of the paper. -
The Solitary Figure:
With a small size 4 brush and thick opaque paint (like Payne’s Gray or a very dark blue), carefully silhouette the small figure standing at the water’s edge. -
Figure Details:
Add a tiny suggestion of a shadow extending from the figure onto the sand. I like to keep this loose rather than overly detailed to maintain the mood. -
Final Touches:
Evaluate your painting. If the cloud highlights aren’t bright enough, you can lift a little color with a damp brush or add a touch of white gouache to the very brightest rims.
Now step back and admire how the colors interact to create a warm, radiant sunset scene on your paper
Forest Line Sunset With Pine Tree Silhouettes
Capture the magic of twilight with this mixed-media landscape that contrasts vibrant sunset colors against stark black pines. This tutorial combines soft watercolor blending with sharp ink details to create a stunning miniature window into the forest.
Step-by-Step Guide
Materials
- Thick watercolor paper (cold press with texture is best)
- Watercolor paints (yellow, orange, red, purple)
- Flat shader brush (size 6 or 8)
- Fine liner pen (black, waterproof, size 0.1 and 0.5)
- Black brush pen or thick marker
- Masking tape or washi tape
- Small palette for mixing
- Jar of clean water
- Paper towels
Step 1: Preparing the Sky Gradient
-
Define the boundaries:
Begin by taping down the edges of your watercolor paper to a board. This keeps the paper flat while it receives water and creates a satisfying crisp white border when peeled away. -
Define the horizon line:
Decide where your tree line will sit. Since this painting focuses on the sky, place your horizon line quite low—about one-third of the way up from the bottom of the paper. -
Wet the sky area:
Using your flat brush and clean water, gently wet the paper area above your imaginary horizon line. You want it damp and glistening, but not forming puddles. -
Layer the yellow glow:
Load your brush with a bright lemon yellow. Apply it horizontally right at the center of the wet area, leaving a small, almost white circle in the middle for the sun if you wish, or just keeping the center brightest. -
Blend in the orange:
While the yellow is still wet, mix a warm orange. Paint this in horizontal strokes immediately above and below the yellow strip, letting the wet paper bleed the colors together softly. -
Add the twilight reds:
Move to a deeper red or crimson hue. Apply this further away from the sun, near the top edge of your sunset strip and just along the bottom horizon area. -
Deepen the edges:
For the very top of the sky and the distant hills, mix a touch of purple into your red. Apply this to the outer edges to simulate the cooling atmosphere as night approaches. -
Let it dry completely:
This is crucial. The paper must be bone-dry before you add trees, or the ink will bleed into spiderwebs. I usually wait at least 30 minutes or use a hairdryer on a low setting.
Bleeding Ink?
If your black ink creates fuzzy edges aka ‘feathers’, your paper is still damp. Stop immediately, let it dry fully (test with the back of your hand), and then resume.
Step 2: Inking the Forest Silhouette
-
Draft the horizon shape:
Using your black brush pen or marker, draw a rolling, uneven line across the bottom over your darkest paint. This creates the distant ground and hills. -
Establish the tree trunks:
Switch to your finer pen. Draw vertical lines for the tree trunks. Vary their heights and spacing—group two or three together, then leave a gap, just like a natural forest. -
Start the pine branches:
Starting from the top of a trunk, make small, jagged zig-zag motions downward. Keep the top very narrow and pointed, gradually widening the branches as you move down the tree. -
Thicken the foliage:
Go back over your trees with the thicker brush pen or marker to fill in the dense centers of the pines. Leave the outer tips delicate and scratchy to mimic needles. -
Overlap the trees:
Ensure some trees are drawn slightly in front of others by overlapping their branches. This adds depth so the forest doesn’t look like a single flat wall. -
Add ground details:
Use the brush pen to fill in the entire bottom area solid black, connecting all the tree bases. Add tiny upward textured strokes along the ridgeline to suggest grass or small bushes. -
Final inspection:
Look for any gaps in the black ink that show paper through. Fill them in to make the silhouette distinct and sharp against the colorful background.
The Sun Pop
To make the sun extra bright, leave a tiny circle unpainted. If you accidentally paint over it, use a dab of white gouache or a white gel pen at the very end.
Peel off your tape carefully to reveal the clean edges and enjoy your portable sunset view


Desert Sunset With Cactus Silhouettes
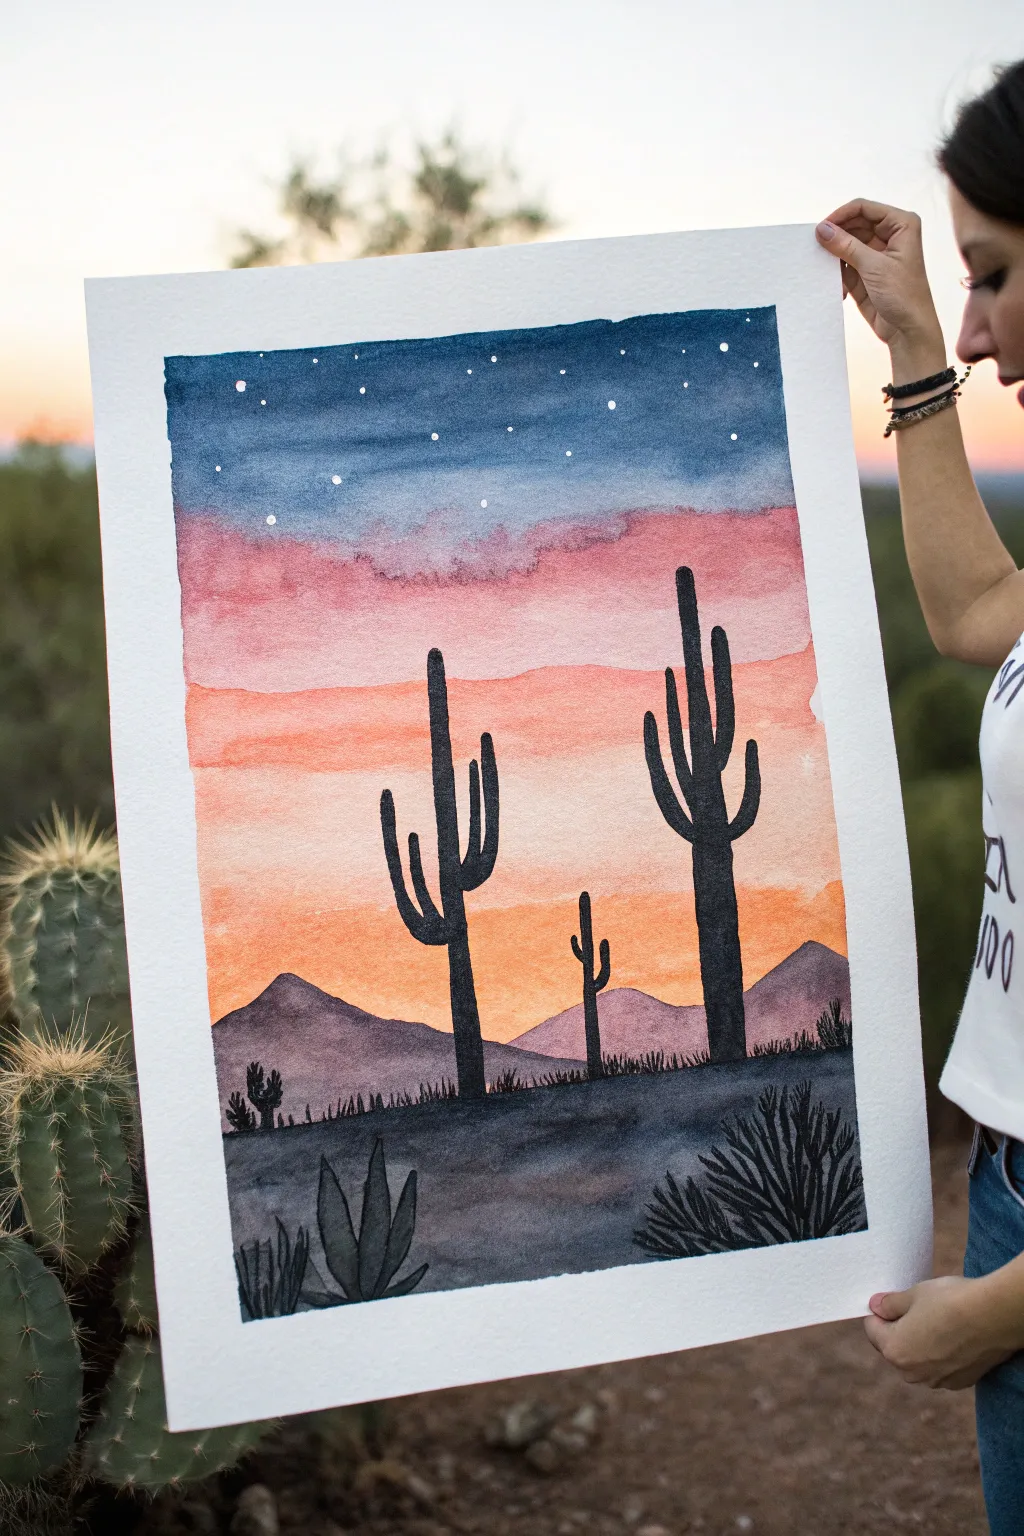
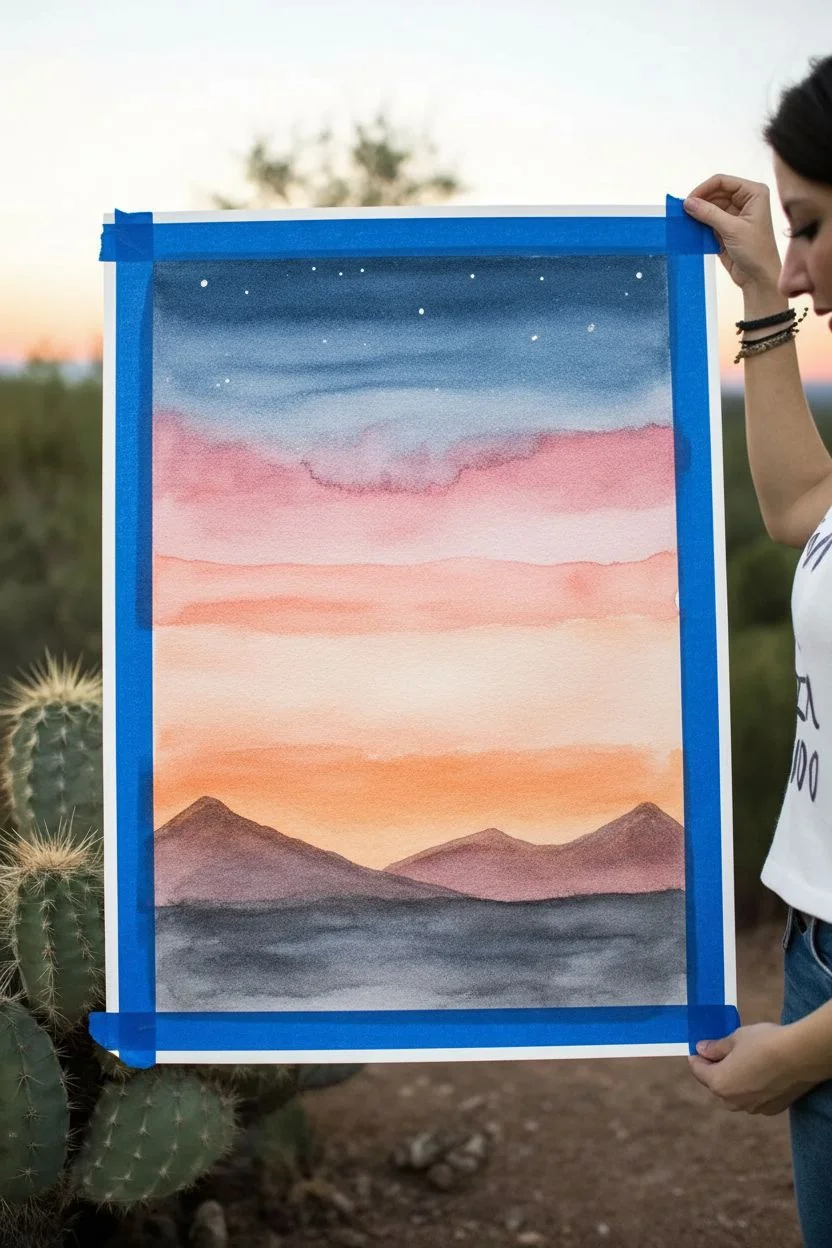
Capture the magic of twilight in the desert with this vibrant watercolor painting featuring bold cactus silhouettes against a fiery sky. The blend of deep blues, pinks, and oranges creates a stunning backdrop for simple yet striking black foreground elements.
Detailed Instructions
Materials
- Cold press watercolor paper (140lb/300gsm recommended)
- Watercolor paints (Indigo, Ultramarine Blue, Alizarin Crimson, Cadmium Orange, Lemon Yellow)
- Black gouache or concentrated black watercolor
- White gouache or white gel pen
- Large flat wash brush
- Medium round brush (size 6 or 8)
- Small detail brush (size 0 or 2)
- Masking tape
- Jar of clean water
- Paper towels
- Pencil and eraser
Step 1: Painting the Sky Gradient
-
Secure the Paper:
Begin by taping your watercolor paper down to a flat board or table using masking tape. This creates a clean white border and prevents the paper from buckling when wet. -
Wet the Sky Area:
Using your large flat brush and clean water, apply an even coat of water to the entire paper surface. This ‘wet-on-wet’ technique allows the colors to blend seamlessly. -
Apply the Night Sky:
Load your brush with Indigo or a deep navy blue. Paint a horizontal band across the top quarter of the paper, letting the color bleed downwards slightly. -
Transition to Twilight:
Mix a lighter blue (Ultramarine) with plenty of water. Apply this just below the dark indigo band, blending the edges where they meet to create a soft transition. -
Add Cloud Layers:
While the paper is still damp, mix a purplish-pink using Alizarin Crimson and a touch of blue. Paint loose, horizontal strokes across the middle section to suggest soft cloud layers. -
Warm the Horizon:
Switch to Cadmium Orange diluted with water. Paint a band below the pink clouds, then blend into a yellowish-orange near the bottom third of the paper. Leave the very bottom area slightly lighter for the glow behind the mountains. -
Create Texture:
I like to lift a little pigment here and there with a thirsty (clean, damp) brush while the paint is drying to create soft cloud highlights. -
Let it Dry Completely:
Allow the background wash to dry completely. The paper must be bone-dry before you add the sharp silhouettes, or the black paint will bleed into the sky.
Step 2: Adding the Landscape
-
Sketch the Outline:
Lightly sketch the horizon line for the distant mountains and the foreground hill. Mark the positions of your three main cacti to ensure balanced composition. -
Paint Distant Mountains:
Mix a diluted watery black or a deep purple-grey. Paint the distant mountain range shapes. Because this paint is transparent, the sunset colors will slightly show through, pushing these mountains into the distance. -
Block in the Foreground:
Using thick black gouache or concentrated black watercolor, paint the immediate foreground hill. This should be solid and opaque to contrast with the colorful sky. -
Add Texture to the Ground:
While the black foreground is wet, you can drop in slightly watered-down black in areas to create uneven terrain texture, but keep the overall value very dark.
Bleeding edges?
If paint bleeds under tape, use a slightly damp, stiff brush to gently scrub away the mistake, then dab with a paper towel. Or, cover it with a white gel pen later.
Step 3: Silhouettes and details
-
Paint the Main Cacti:
Switch to your medium round brush. using the opaque black paint, fill in the sketched cactus shapes. Ensure the edges are crisp and clean against the sky. -
Add Cactus Arms:
Carefully add the arms to your Saguaro cacti. Vary the heights and thickness to make them look organic. Remember that cactus arms curve upwards. -
Detail the Foreground:
Using your smallest detail brush, paint tiny vertical lines along the horizon of the foreground hill to represent distant grass or small shrubs. -
Paint Foreground Agave:
In the bottom corners, paint spiky agave plant shapes or heavier brush. Use quick, confident strokes starting from the base and flicking upward to get sharp points. -
Create Stars:
Dip a small brush or a toothbrush into white gouache. Tap the brush handle against your finger to splatter tiny white dots over the dark blue section of the sky. -
Enhance Stars:
Use a white gel brush or the tip of a fine brush to add a few larger, deliberate stars among the splatter for variety. -
Reveal the Border:
Once absolutely everything is dry, slowly peel off the masking tape at a 45-degree angle to reveal your crisp white edges.
Make it shimmer
Mix a tiny amount of iridescent medium or metallic watercolor into your star splatter paint. The stars will catch the light subtly when viewed from different angles.
Frame your desert masterpiece and enjoy the warmth it brings to your wall
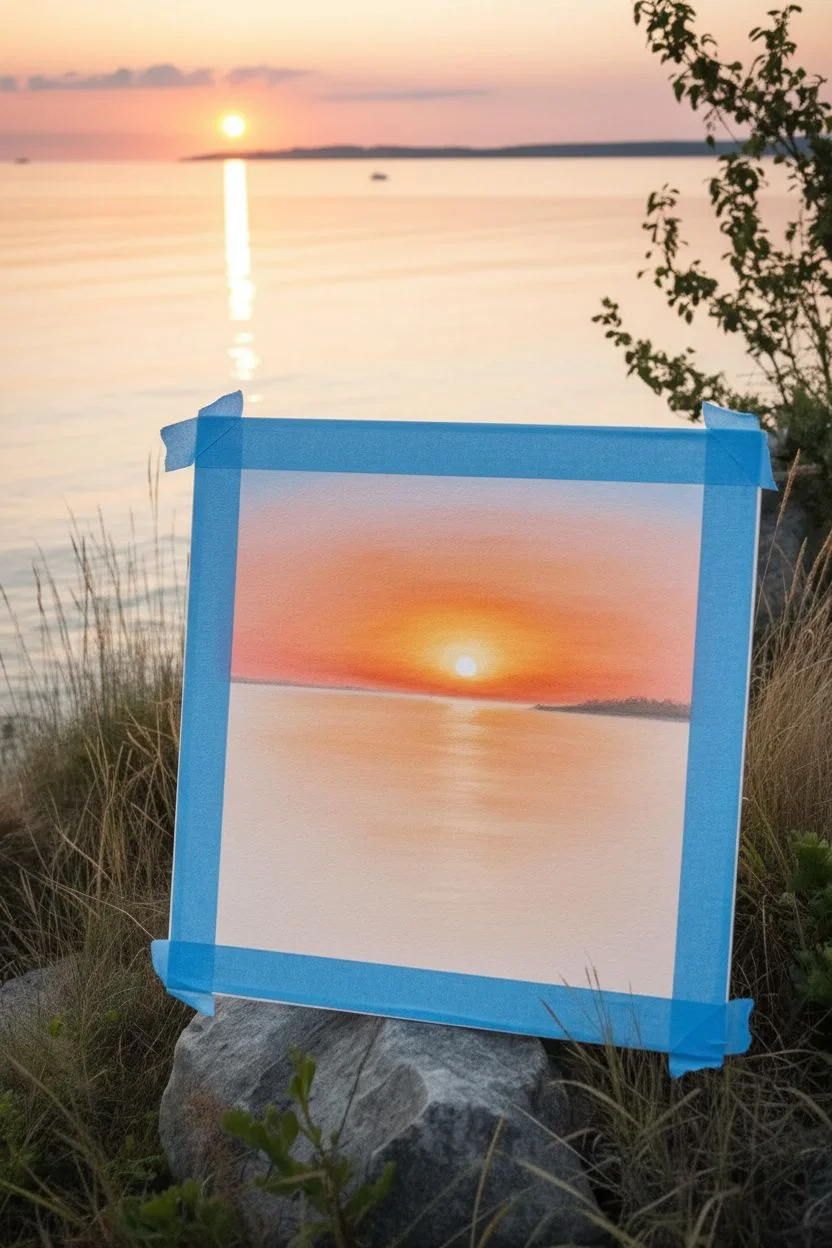
Sun Rays Breaking Through a Hazy Horizon
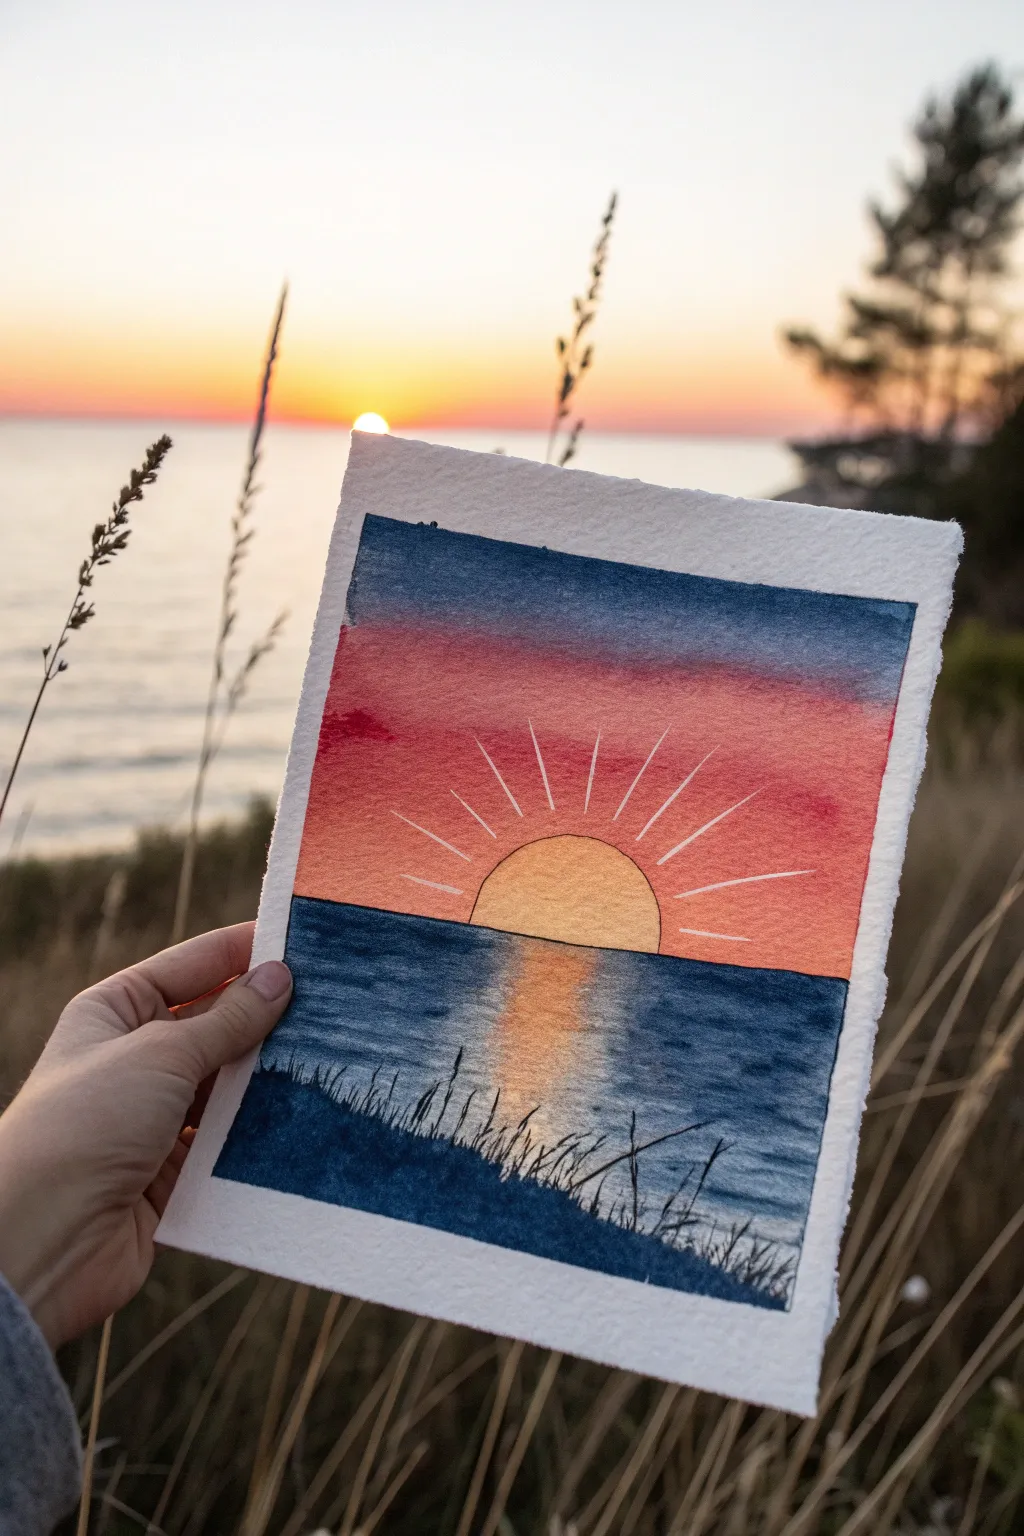
Capture the serene beauty of the sun dipping below the horizon with this vibrant watercolor project. The piece features a striking gradient sky, a sparkling reflection on the water, and delicate white rays that give the sun a graphic, modern feel.
Step-by-Step Tutorial
Materials
- Cold press watercolor paper (approx. 5×7 inches)
- Masking tape or painter’s tape
- Watercolor paints (Indigo, Alizarin Crimson, Cadmium Orange, Cadmium Yellow)
- Round watercolor brushes (size 6 and size 2)
- White gel pen or fine white gouache
- Pencil and eraser
- Jars of water and paper towels
Step 1: Preparation and Sketching
-
Tape the Edges:
Begin by taping down all four edges of your watercolor paper to a board or table. This creates that crisp, clean border you see in the photo and prevents the paper from buckling when wet. -
Sketch the Horizon:
Lightly draw a straight horizontal line across the paper, positioning it just below the halfway mark. This separates your sky from the sea. -
Outline the Sun:
Draw a semi-circle resting directly on the horizon line in the center of the page. Keep your pencil lines faint so they don’t show through the yellow paint later.
Bleeding Lines?
If your horizon line is bleeding, ensure the sky is 100% dry before painting the water. Use a hairdryer on a low setting to speed up the process.
Step 2: Painting the Sky Gradient
-
Wet the Sky Area:
Using your larger brush and clean water, apply a thin, even coat of water to the entire sky area, carefully avoiding the inside of the sun shape. -
Apply Blue at the Top:
Load your brush with Indigo or a deep blue mixed with a touch of crimson. Apply this dark band across the very top of the sky, letting the wet paper help diffuse the edge downwards. -
Add the Red Band:
Rinse your brush and pick up Alizarin Crimson. Paint a band of red just below the blue, allowing them to touch and bleed together slightly to create a purple transitions. -
Transition to Orange:
Without waiting for the red to dry, switch to Cadmium Orange. Paint the next section down, blending it softly into the red above it. -
Finish with Yellow:
For the area nearest the horizon and around the sun, use a warm yellow. Blend this up into the orange for a seamless sunset gradient. Let the entire sky dry completely before moving on.
Step 3: Painting the Ocean and Sun
-
Fill in the Sun:
Once the sky is bone dry, paint the sun semi-circle with a solid, warm yellow-orange mix. Let this dry. -
Base Ocean Layer:
Mix a watery version of your Indigo paint. Apply a wash over the water area, leaving a vertical column of white or very pale paper directly under the sun for the reflection. -
add the Reflection Color:
While the water area is still damp, drop some orange and yellow paint into that pale center column, simulating the sun’s reflection on the waves. -
Deepen the Sea:
Once the initial wash is dry, use a more concentrated Indigo to paint horizontal strokes across the water. Leave the colorful reflection area mostly untouched, but darken the edges and the horizon line for contrast.
Pro Tip: Radiant Glow
For a brighter shine, lift out a tiny bit of color from the center of the sun with a damp paper towel while the paint is still wet.
Step 4: Foreground and Details
-
Paint the Foreground Silhouette:
Mix a very thick, dark Indigo (almost black). Paint a sloping hill shape at the bottom left corner, covering the bottom edge of the water. -
Add Grass Details:
Switch to your smallest brush (size 2). Using the same dark mixture, flick varied, thin lines upward from the hill silhouette to create tall grasses. -
Draw the Sun Rays:
Wait until the painting is absolutely dry. take your white gel pen and draw straight lines radiating outward from the sun’s curve into the sky. -
Highlight the Reflection:
Use the white gel pen to add a few horizontal scribble lines over the orange reflection in the water to suggest glistening ripples. -
The Reveal:
Carefully peel away the masking tape at a 45-degree angle to reveal your clean white borders.
Frame your mini masterpiece or gift it to someone who brings sunshine to your life
Two-Tone Sunset With a Single Silhouette Shape
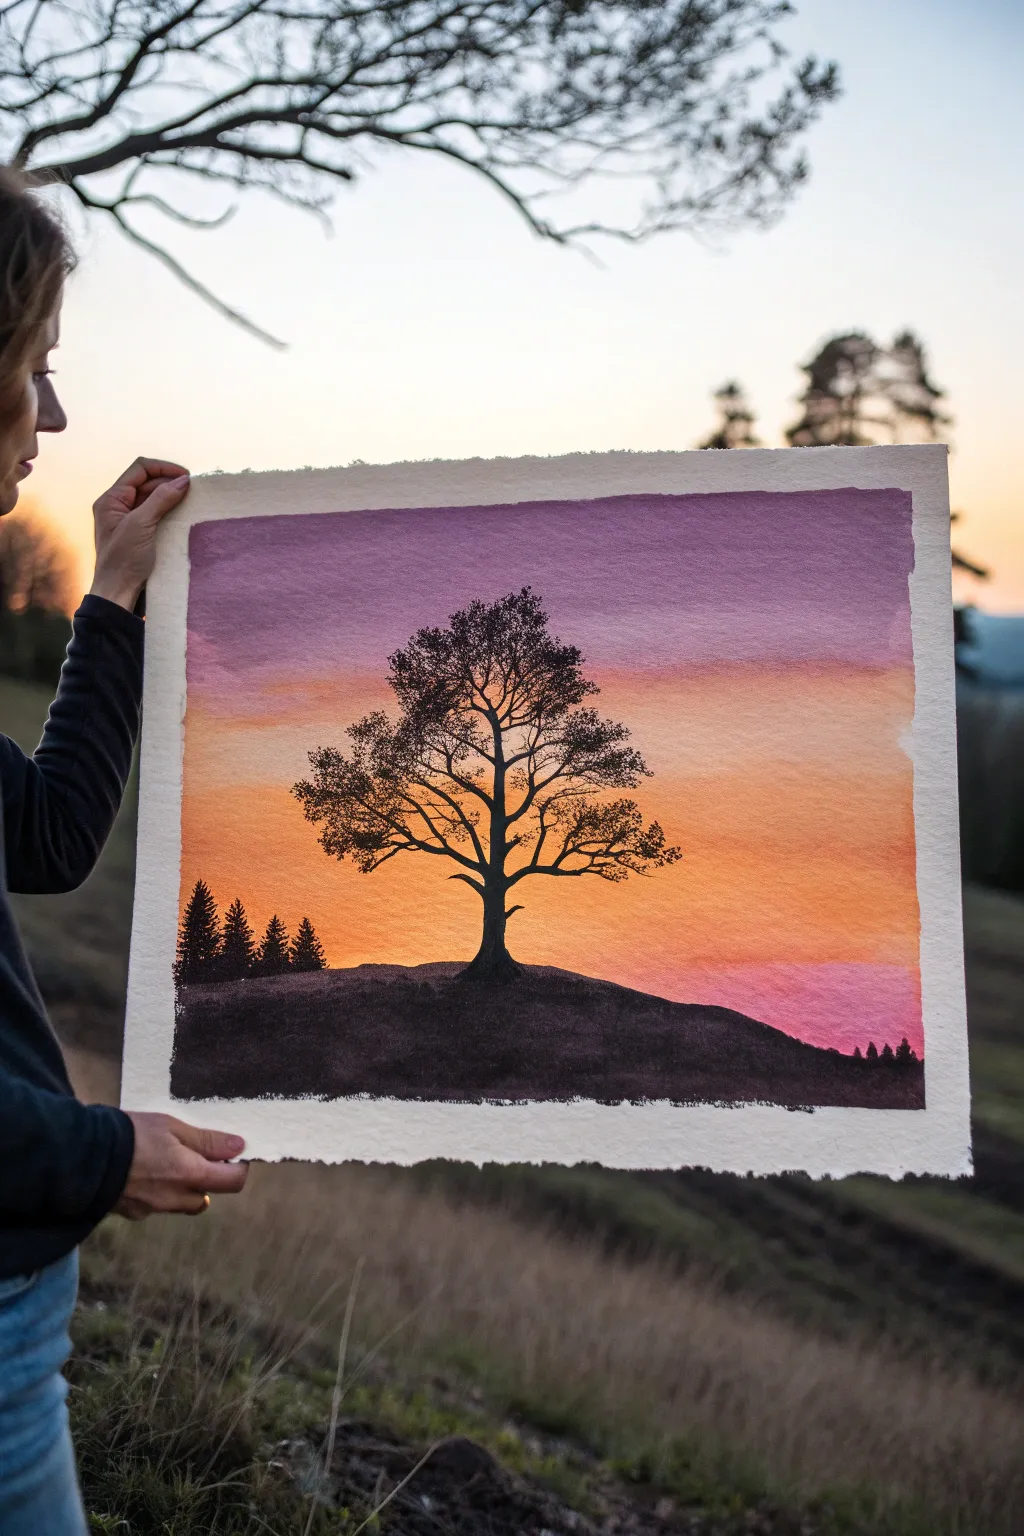
Capture the magic of twilight with this striking watercolor project featuring a lone oak tree silhouetted against a vibrant gradient sky. The contrast between the deep purple-to-orange wash and the crisp black ink creates a dramatic, peaceful scene.
Detailed Instructions
Materials
- Cold press watercolor paper (140lb/300gsm)
- Masking tape
- Watercolor paints: Purple/Violet, Rose Madder, Cadmium Orange, Cadmium Yellow
- Black India ink or highly pigmented black gouache
- Large flat wash brush (1 inch or larger)
- Round watercolor brush (size 6 or 8)
- Fine liner brush (size 0 or 00) for detailing
- Palette for mixing
- Two jars of water
- Paper towels
Step 1: Preparing the Sky gradient
-
Secure the paper:
Tape down all four edges of your watercolor paper to a board using masking tape. This creates that crisp white border seen in the final piece and prevents the paper from buckling when wet. -
Pre-wet the surface:
Using your large flat brush and clean water, apply a very even layer of water across the entire area inside the tape. The paper should be glistering with a sheen, but not holding puddles. -
Start the top sky layer:
Load your brush with a watery mix of purple or violet paint. Apply this to the top third of the paper using horizontal strokes, letting the color bleed downwards slightly. -
Transition to warmth:
Rinse your brush and pick up a soft rose or pink hue. Blend this directly underneath the purple while the paint is still wet, allowing them to fuse naturally. -
Create the glowing horizon:
Switch to your orange and yellow mixes. Paint the middle section with bright orange, fading into a yellow near the bottom third, leaving the very bottom area slightly lighter for the glow behind the hill. -
Add lower sky details:
While the wash is still damp but not soaking, add a faint touch of pinkish-purple to the bottom right corner to suggest low-hanging clouds or atmospheric density. -
Dry thoroughly:
Allow the background wash to dry completely. The paper must be bone-dry and warm to the touch before adding the silhouette, or the black ink will bleed into spiderwebs.
Step 2: Painting the Silhouette
-
Outline the hill:
Using medium-consistency black ink or gouache and a round brush, paint the gentle slope of the hill at the bottom. The hill should rise slightly in the middle where the tree will sit. -
Fill the foreground:
Fill in the entire hill shape with solid black. Ensure it is opaque; you may need a second coat once the first dries if you can still see the sunset colors through it. -
Add distant trees:
On the left side of the hill, paint three or four small, triangular pine tree shapes. Keep them simple and slightly jagged to mimic fir trees. -
Start the main trunk:
In the center of the hill mound, use your round brush to paint the main trunk of the oak tree. Make the base thick and sturdy, tapering as it reaches upward. -
Branch structure:
Switch to a smaller brush.Extend two or three main thick branches out horizontally and diagonally from the trunk. Oak trees have somewhat jagged, angular branching patterns rather than smooth curves. -
Detailing the canopy:
Use the fine liner brush to add many smaller twigs growing from the main branches. Let your hand tremble slightly to create organic, natural-looking irregularities. -
Stippling the leaves:
Load a round brush with fairly dry black ink. Gently stipple or dab the brush tip around the outer branches to create clusters of leaves. Don’t make it a solid mass; leave ‘sky holes’ where the sunset peeks through. -
Refining the shape:
Step back and look at the tree’s overall balance. Add more leaf clusters to the left or right to round out the canopy shape if it feels lopsided. -
Final touches:
Add a few tiny vertical strokes to the far right of the hill to suggest distant grass or a tiny tree line, balancing the composition with the pines on the left. -
The Reveal:
Once the black ink is totally dry, carefully peel away the masking tape at a 45-degree angle to reveal your clean, sharp edges.
Bleeding Lines?
If your black ink bleeds into the sky, the paper was too damp. Blot immediately with a tissue, let dry fully, then paint over the error with opaque black gouache to reshape the tree.
Add Depth
Mix a tiny bit of the sky purple into your black paint for the nearest ground elements. It creates a subtle color harmony that makes the black look less ‘flat’ and more atmospheric.
Frame your silhouette against a light source to see those vibrant sunset colors truly pop
Sunset Reflection With Sparkle Highlights on Water
Capture the serene beauty of golden hour with this mixed-media landscape that focuses on light dancing across calm water. By layering soft pastels or watercolors with precise pencil details, you will create a glowing horizon that looks like it’s illuminating the room from within.
Step-by-Step Tutorial
Materials
- Heavyweight mixed-media paper or cold-press watercolor paper
- Soft pastels (pan or stick) in orange, yellow, pink, and pale blue
- Colored pencils (wax or oil-based) in dark grey, deep green, brown, and cool grey
- White gouache or white gel pen
- Masking tape
- Blending sponge or soft tissue
- Workable fixative spray
- White mat board frame (for display)
Step 1: Setting the Glowing Sky
-
Prepare your surface:
Tape down all four edges of your paper to a sturdy board. This creates a crisp white border and prevents the paper from buckling if you choose to use watercolor washes. -
Establish the horizon:
Lightly sketch a straight horizontal line about one-third of the way up from the bottom. This separates the sky from the water. -
Apply base sky colors:
Start with your soft pastels. Apply a vibrant orange and heavy yellow right at the center of the horizon where the sun sits. As you move upward, blend into softer pinks and faint blues at the very top. -
Creating the sun:
Leave a small, circular area of the paper pure white at the center of your yellow zone, or lift the pigment out carefully with a kneaded eraser to create the blindingly bright sun. -
Blend the sky:
Using a sponge or soft tissue, blend the sky colors horizontally. Smooth transitions are key here to evoke a calm atmosphere.
Step 2: Mirroring the Light on Water
-
Reflect the sky colors:
Mirror your sky colors into the water area. Apply the same intense orange and yellow directly under the sun, fading into muted brownish-pinks towards the sides. -
Blend the water:
Blend these pigments horizontally, just like the sky, but keep the vertical column under the sun the brightest and warmest area. -
Add distant land:
Using a dark grey or deep violet colored pencil, draw a very thin, flat strip of land on the horizon line. Add tiny bumps for distant trees, keeping everything silhouetted. -
Fix the background:
I like to give the drawing a light coat of workable fixative at this stage. It prevents the sky dust from smudging into the foreground details we are about to add.
Muddy colors?
If your water reflection looks dull, you likely over-blended. Re-apply a layer of bright orange pencil or pastel on top without smudging it to bring back that intense glow.
Step 3: Building the Rocky Foreground
-
Sketch the rocks:
In the bottom right corner, use a cool grey pencil to sketch rough, rounded stone shapes piling up from the edge. -
Shade the stones:
Fill in the rocks with layers of grey and brown pencil. Press harder on the sides facing away from the sun to create deep shadows, leaving the tops lighter where they catch the sunset. -
Enhance rock texture:
Add stippling or small scumbling marks on the rocks to mimic rough stone texture. Don’t smooth this out; the texture contrasts nicely with the smooth water. -
Draw foreground grasses:
With a sharp dark green or brown pencil, flick upward strokes from behind and around the rocks to create tall, thin grasses. Make them sway slightly to suggest a breeze. -
Add floating debris:
Draw a few small, darker specks or a thin vertical stick in the water near the foreground to add depth and scale.
Textural Depth
Scrape little bits of pastel dust onto wet paper for the foreground rocks before drawing details. This creates a gritty, organic texture that looks like real stone.
Step 4: Final Sparkle and Framing
-
Create water ripples:
Using a sharp colored pencil in a slightly darker shade than your water (like a burnt sienna), draw thin horizontal lines across the water reflection to suggest ripples breaking the light. -
Add the highlights:
This is the ‘sparkle’ step. Use white gouache or a gel pen to add tiny, intense dots and dashes down the center of the sun’s reflection. Add a few highlights to the tops of the foreground rocks too. -
Final adjustments:
Step back and check your contrast. If the silhouette of the land needs to be darker to pop against the sun, layer more dark pencil over it now. -
Revealing the edge:
Carefully peel away the masking tape. Pull away from the painting at a 45-degree angle to ensure a clean, sharp white border. -
Frame your work:
Place a clean white mat board frame over the image to finalize the presentation, making those sunset colors truly sing.
Place your finished piece near a window to let natural light enhance the warm tones you’ve captured
Moon and Sunset Together in a Twilight Gradient
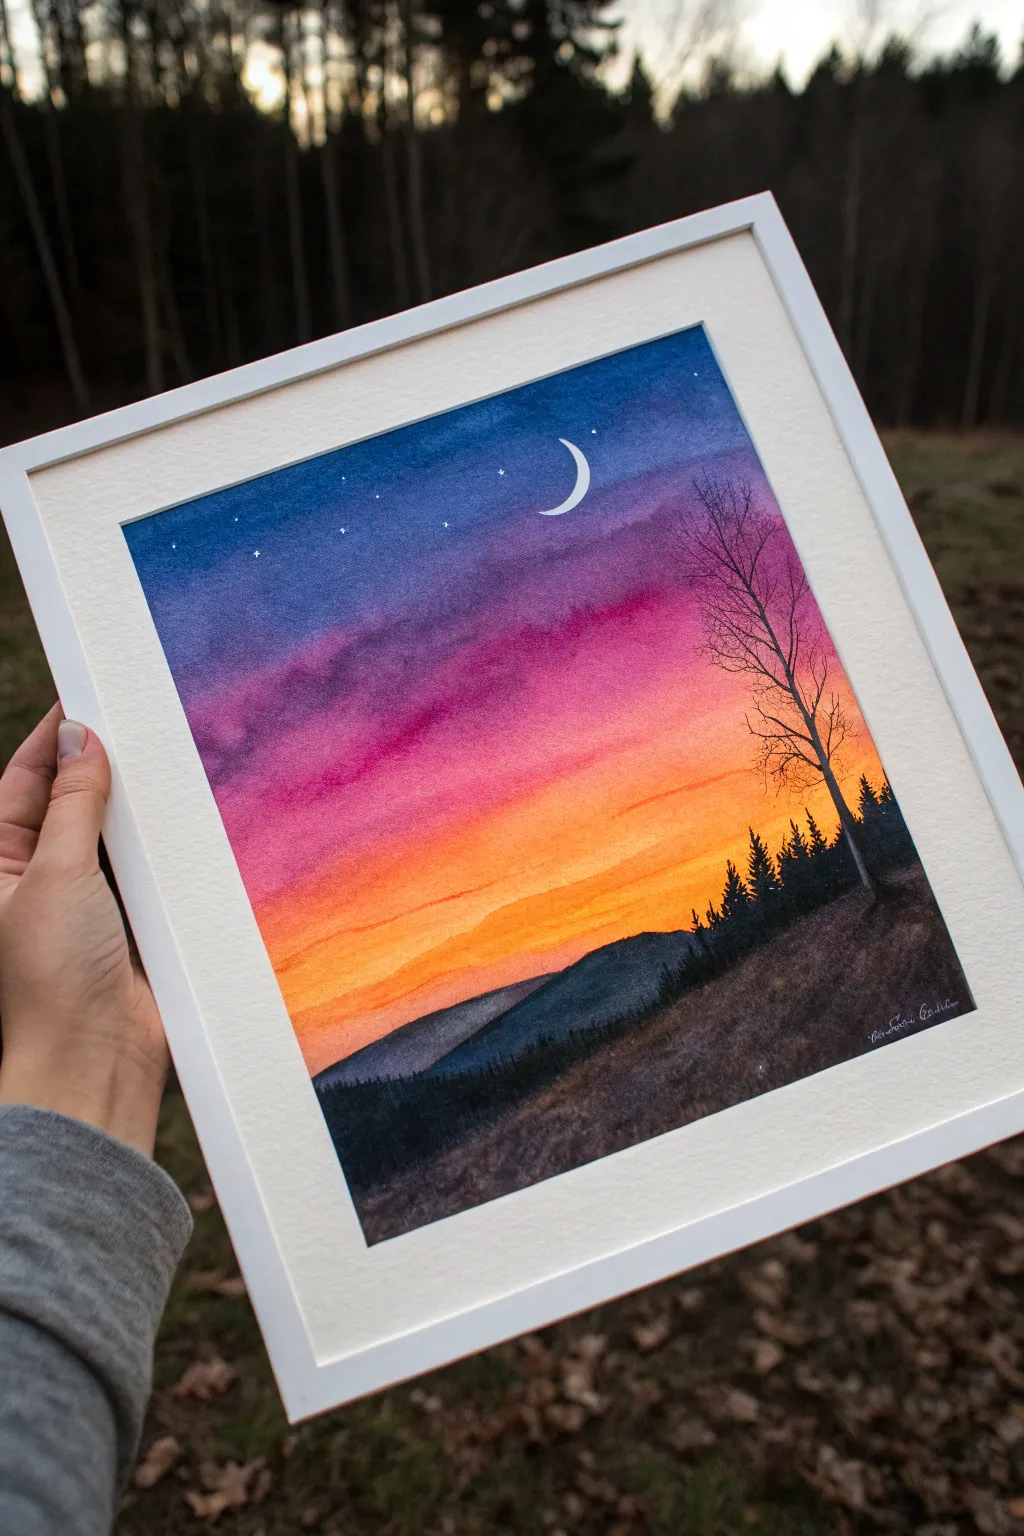
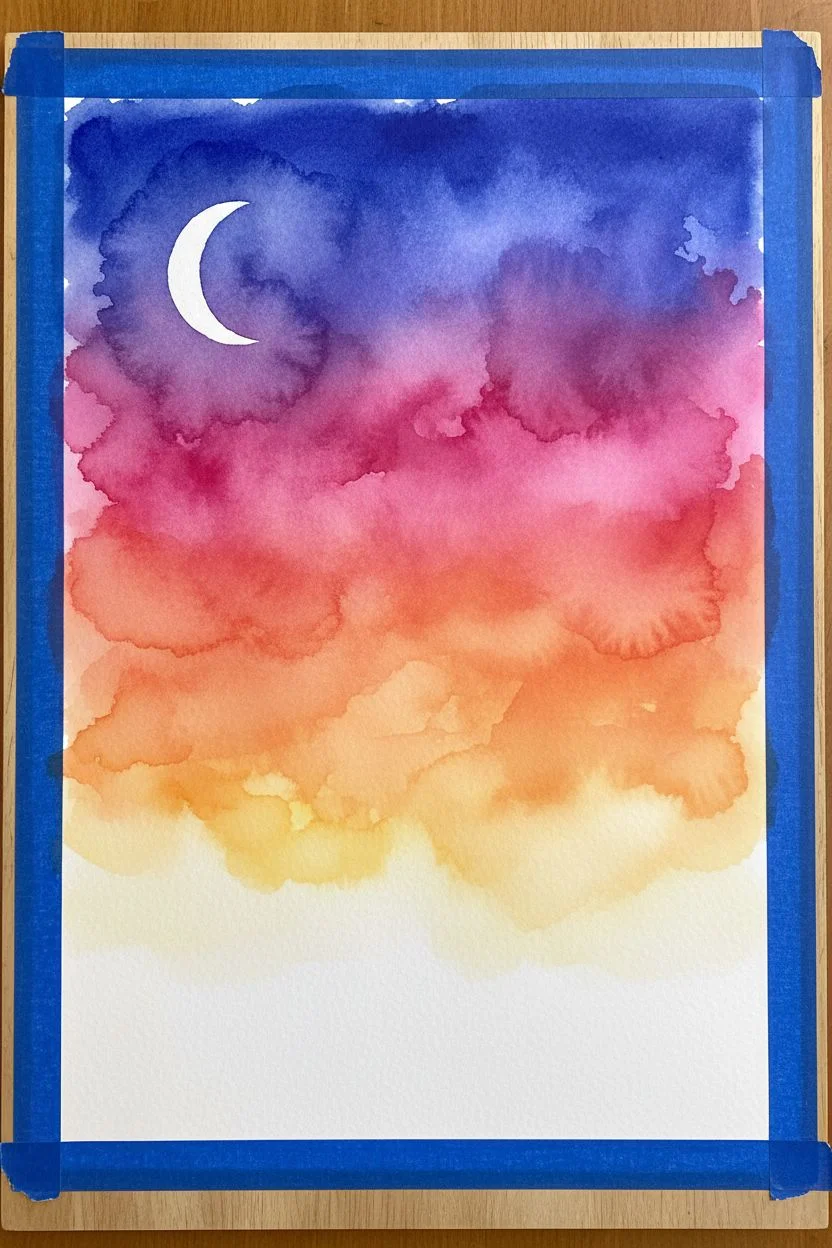
Capture the magical moment where day meets night with this vibrant watercolor landscape painting. This project focuses on mastering wet-on-wet blending to create a seamless gradient sky, accented by a delicate crescent moon and silhouetted trees.
Step-by-Step
Materials
- Cold press watercolor paper (300gsm, taped down)
- Watercolor paints (Indigo, Purple/Violet, Magenta, Cadmium Orange, Yellow Ochre, Lamp Black/Payne’s Gray)
- Large flat wash brush or mop brush
- Medium round brush (size 6 or 8)
- Fine liner brush (size 0 or 1)
- White gouache or white gel pen
- Masking fluid (optional) or white crayon
- Painter’s tape or Washi tape
- Water jars and paper towels
Step 1: Preparing the Sky
-
Tape and Wet:
Begin by taping down all four edges of your watercolor paper to a board. This creates the crisp white border seen in the framed piece. Once secure, wet the entire sky area (leaving the bottom quarter dry for the ground) with clean water using your large brush. The sheen should be even, but not puddling. -
Reserve the Moon:
Before painting, you need to save the white of the paper for the moon. You can do this by carefully painting a small crescent shape with masking fluid and letting it dry completely. Alternatively, simply paint around the shape very carefully in the next steps.
Clean Edges Pro Tip
To prevent paint bleeding under your tape, run a bone folder or the back of your fingernail firmly along the tape edge before you start painting.
Step 2: Painting the Gradient
-
Yellow Horizon:
Start at the bottom of your wet sky area. Load your brush with a watered-down Yellow Ochre and paint a horizontal strip. Let the color flow slightly upwards. -
Orange Transition:
While the yellow is still wet, introduce a vibrant Cadmium Orange just above it. Overlap the edges slightly so the orange bleeds softly into the yellow, creating a glowing horizon line. -
Magenta Layer:
Moving upward, switch to a rich Magenta or Alizarin Crimson. Paint this across the middle of the sky, blending the bottom edge into the orange wet-on-wet to avoid hard lines. -
Deepening to Purple:
Gradually mix some Violet or Purple into your Magenta mix as you move higher. This middle section should act as the bridge between the warm sunset and the cool night sky. -
Indigo Night:
For the very top of the sky, use a concentrated Indigo or a mix of Ultramarine Blue and black. Paint the top strip and blend it downwards into the purple layer. The gradient should now span from dark blue at the top to bright yellow at the bottom. -
Refining the Clouds:
While the paper is still damp, you can lift out faint diagonal streaks using a clean, slightly damp brush to suggest soft cloud movement in the purple and orange sections. -
Dry Completely:
This is crucial—let the entire sky layer bone dry. If the paper feels cool to the touch, it’s still wet.
Level Up: Birds
Add a flock of tiny silhouette birds flying diagonally across the orange section to bring movement and life to the still landscape.
Step 3: Land and Details
-
Distant Hills:
Mix a diluted Payne’s Gray or a shadowed version of your Indigo. Paint the distant rolling hill silhouette near the horizon line. Keep this layer fairly transparent to suggest atmospheric perspective. -
Foreground Slope:
Mix a darker, thicker black-brown color. Paint the large sloping hill in the foreground, covering the bottom right corner and sloping down towards the left. Use a dry brush technique slightly near the bottom to suggest grassy texture. -
Tree Line:
Using a smaller round brush and opaque black paint (or thick Payne’s Gray), dab in the tops of the distant pine trees along the ridgeline of the foreground hill. Vary their heights to look natural. -
The Bare Tree:
Switch to your fine liner brush. On the right side of the foreground hill, paint a tall, slender tree trunk reaching up into the purple sky. Add main branches extending outward. -
Twig Details:
I like to use a very light touch here—add tiny, intricate twigs to the ends of the branches. Make the lines as thin as possible to mimic the delicate silhouette shown in the reference.
Step 4: Finishing Touches
-
Reveal the Moon:
If you used masking fluid, gently rub it off now to reveal the crisp white crescent. If you painted around it, refine the edges with a bit of white gouache if needed to make it sharp. -
Starry Night:
Using white gouache or a white gel pen, add tiny dots in the blue section of the sky for stars. Concentrate them near the top. -
The Reveal:
Carefully peel away the painter’s tape at a 45-degree angle to reveal your clean white borders. Sign your name in the bottom corner with a white pen or fine brush.
Frame your new twilight masterpiece in a simple white frame to let those sunset colors truly pop
Abstract Sunset Shapes Using Bold, Layered Silhouettes
Capture the serene transition of day into night with this vibrant watercolor landscape featuring layered mountain silhouettes. This project focuses on mastering gradient washes and atmospheric perspective to create depth, from a glowing orange sun down to deep indigo peaks.
Step-by-Step Guide
Materials
- Cold press watercolor paper (minimum 140lb/300gsm)
- Watercolor paints (Cadmium Orange, Alizarin Crimson, Quinacridone Rose, Ultramarine Blue, Payne’s Gray, Lamp Black)
- Round watercolor brushes (Size 4, 8, and a smaller liner brush for details)
- Masking fluid or white gouache (for the sun)
- Pencil and eraser
- Painter’s tape or masking tape
- Wooden drawing board
- Two jars of water
- Paper towels
Step 1: Preparation and Sketching
-
Prepare the surface:
Tape your watercolor paper down firmly to a wooden board or visible workspace. This prevents buckling and creates a beautiful crisp white border around your final piece. -
Map out the layers:
Lightly sketch wavy, organic lines across your paper to represent the mountain ridges. Start near the top third for the first ridge and work your way down, creating about 5-6 distinct layers. Make each one slightly different in shape to look natural. -
Reserve the sun:
Draw a small circle in the sky area for the sun. Carefully apply masking fluid inside this circle and let it dry completely. Alternatively, you can paint around it carefully, but masking fluid ensures a perfect edge.
Step 2: Painting the Sky
-
Wet-on-wet sky technique:
Using your largest brush, wet the sky area above the first mountain ridge with clean water until it glistens slightly but isn’t pooling. -
Apply the warm glow:
Load your brush with a watery mix of Cadmium Orange. Start painting from the top edge, bringing the color down over the masked sun and stopping right at the edge of your first pencil line. -
Adding texture:
While the sky is still damp, dab in a slightly more concentrated orange near the horizon line to create a soft, clouded effect. Let this layer dry completely before moving on.
Don’t Rush the Dry
Patience is key for layered landscapes. If you paint a new mountain ridge while the one above it is still wet, the colors will bleed together and you’ll lose that distinct ridge line.
Step 3: Layering the Mountains
-
Mix your base gradient:
Prepare puddles of paint on your palette: a light orange-pink for the top mountains, transitioning into cooler purples and blues for the lower ones. This project relies on ‘atmospheric perspective,’ meaning colors get darker and cooler as they come forward. -
First ridge:
Paint the most distant mountain ridge using a mix of Orange and a touch of Rose. Keep it pale and watery. Ensure the paint creates a ‘hard edge’ along the top pencil line, but consider softening the bottom edge if you want a misty look. -
Second ridge:
Once the previous layer is dry to the touch, mix a slightly darker pink using Quinacridone Rose. Paint the second ridge, overlapping the bottom of the first one if transparency occurs, though opaque layering usually looks cleaner here. -
Third ridge:
Add a tiny drop of Ultramarine Blue to your pink mix to create a soft violet. Paint the third layer, carefully following the undulating curve of your sketch. -
Fourth ridge:
Increase the blue content. Use a mix of Ultramarine and Alizarin Crimson for a rich purple. The color should be significantly deeper than the previous layer. -
Fifth ridge:
For the second-to-last layer, mix Payne’s Gray with your purple to desaturate it and make it deeper. Paint this wide section, ensuring solid coverage. -
Final foreground layer:
Mix your darkest color using Payne’s Gray and a touch of Lamp Black or deep blue. Paint the bottom-most mountain shape solid and dark to anchor the composition.
Fixing Water Blooms
If you see ‘cauliflower’ blooms in your sky, wait until it’s completely dry. Then, use a damp stiff brush to gently scrub and soften the edges, or glaze over it with a fresh layer.
Step 4: Details and Finishing
-
Remove the mask:
Once the paper is bone dry, gently rub off the masking fluid from the sun area closer to the top. If the white is too stark, you can wash a very faint pale yellow over it. -
Paint the trees:
Switch to your fine liner brush or smallest round brush. Using the same dark mix from the final mountain layer (or pure black), paint small vertical lines along the bottom edge to create tree trunks. -
Add foliage:
Using a stippling motion (tapping the brush tip), add texture to the tops of your tree trunks to suggest pine needles. Vary the heights—some trees should be tall and prominent, others short and shrub-like. -
Final check:
Erase any visible pencil lines gently. I check the edges at this stage; if any paint bled under the tape, you can touch it up with white gouache. -
Reveal:
Slowly peel off the painter’s tape at a 45-degree angle away from the painting to reveal the crisp white frame.
Frame your piece in a simple white frame to highlight the vibrant sunset colors and enjoy your peaceful mountain view


Have a question or want to share your own experience? I'd love to hear from you in the comments below!