Surrealism backgrounds are where reality gets delightfully wobbly—like your scene is happening inside a half-remembered dream. If you want backdrops that feel uncanny, poetic, or playful, these ideas will give you lots of ways to bend space, scale, and logic.
Floating Islands and Land Chunks
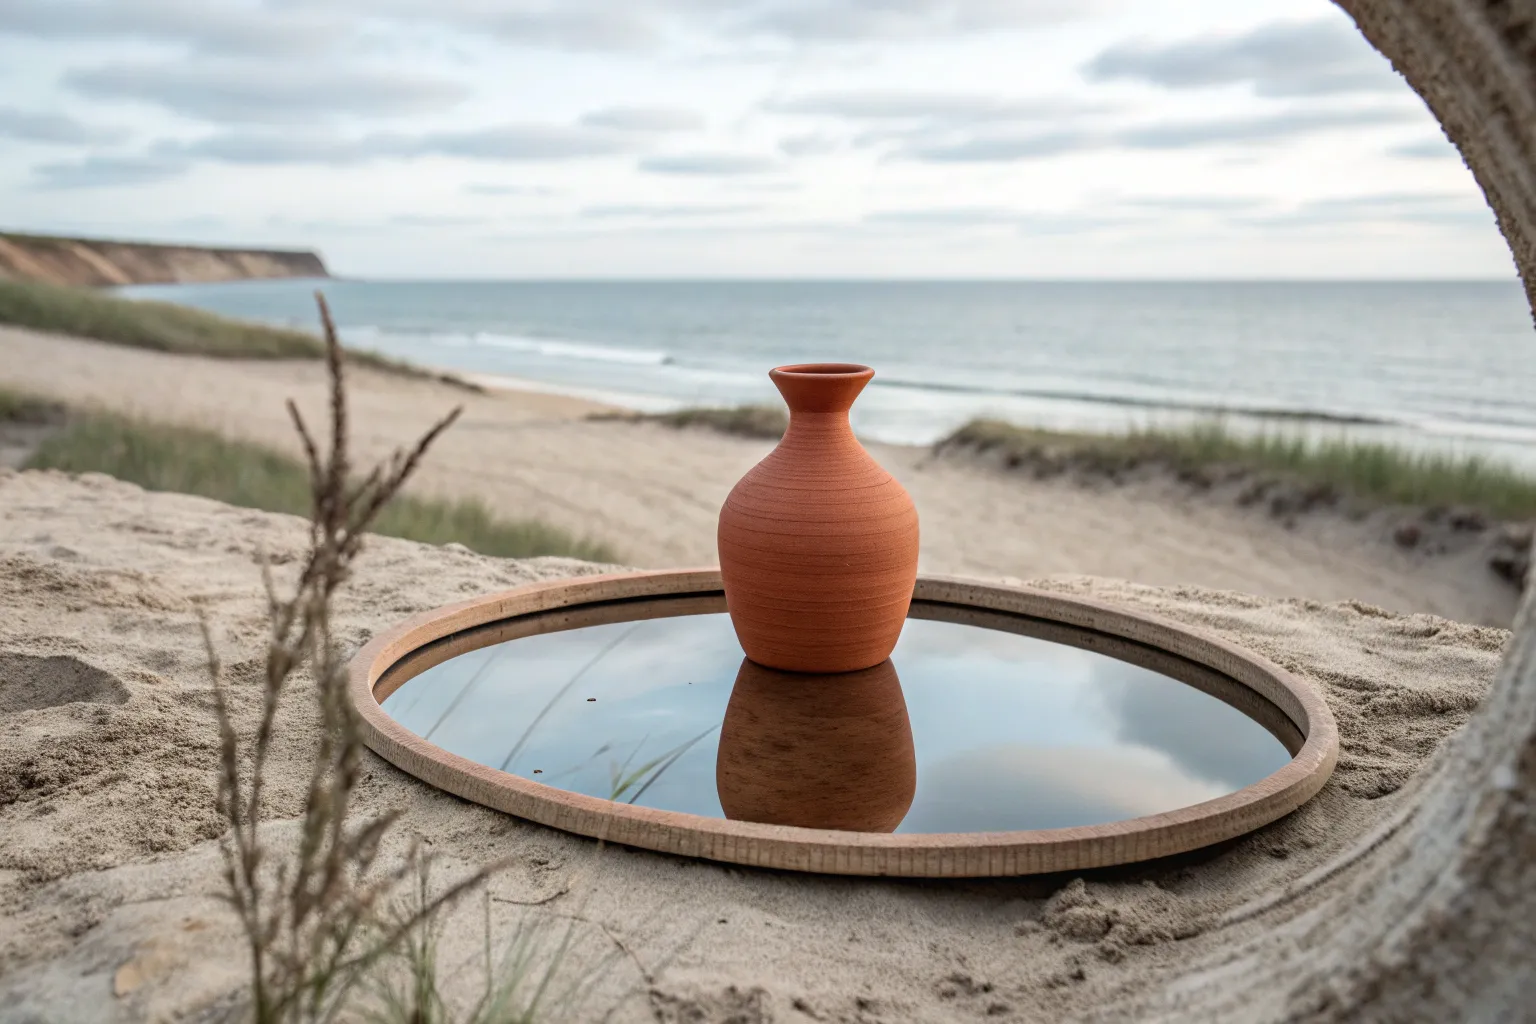
Master the art of photo manipulation by creating a surreal yet realistic floating island landscape. This tutorial guides you through Compositing multiple stock images to build a moody, gravity-defying scene complete with a cascading waterfall and a lonely sentinel tree.
Step-by-Step
Materials
- High-resolution stock photo of a cliff edge or rock overhang
- Stock photo of a waterfall
- Stock photo of a lone, windswept tree
- Stock photo of a rocky riverbed or pool
- Stock photo of distant misty mountains
- Adobe Photoshop (or similar layering software like GIMP/Affinity)
- Graphics tablet (optional but recommended for masking)
- Digital brush pack: Cloud/Fog and Water Splashes
Step 1: Setting the Scene
-
Canvas Setup:
Create a vertical document (e.g., 2000x3000px at 300dpi) to accommodate the tall composition. Import your misty mountain background image first, resizing it to fill the upper two-thirds. -
Establishing the Base:
Import the riverbed or pool image and place it at the bottom. Use a large, soft eraser or a layer mask to blend the horizon line with the mountain background, creating a seamless foggy transition. -
Creating the Overhang:
Isolate the cliff edge from your source photo using the Pen Tool or Object Selection Tool. Position it in the center or slightly right-of-center, ensuring it looks like it’s hovering. -
Shaping the Underside:
To sell the ‘floating’ effect, mask away any ground connecting the cliff to the bottom edge. I find it helpful to use a rough textured brush on the mask here to make the rock bottom look jagged and natural rather than perfectly smooth.
Step 2: Compositing the Key Elements
-
Adding the Waterfall:
Place your waterfall stock image over the cliff edge. Change the layer Blending Mode to ‘Screen’ or ‘Lighten’ to drop out the darker backgrounds, masking the edges so the water appears to flow naturally from the green grass lip. -
Refining the Water Flow:
Duplicate the waterfall layer if it looks too faint. Use a Warp Tool to slightly bend the water streams if they don’t perfectly align with the cliff’s geometry. -
Creating the Splash Zone:
At the bottom where the water hits the pool, use your splash brushes with white paint to create mist and impact foam. Lower the opacity to around 70% to keep it misty. -
Planting the Tree:
Extract your wind-blown tree and place it on the highest point of your floating island. Use the Clone Stamp tool to add grass tufts around the base of the trunk to root it into the landscape. -
Adding the Swing Detail:
Using a small, hard round brush (2-3px) in dark grey, hand-draw two vertical lines hanging from a sturdy branch to create a swing. This tiny detail adds immense scale and narrative.
Water Not Bending?
If the waterfall looks stiff, use Edit > Puppet Warp. Place pins at the top and bottom, then nudge the middle pins to curve the water stream to match gravity.
Step 3: Atmosphere and Color Grading
-
Matching Color Tones:
The floating island might look too warm or cool compared to the background. Add a Curves adjustment layer clipped to the island layer, adjusting the Blue and Red channels until the rock tones match the moody environment. -
Shadows and Depth:
Create a new layer set to ‘Multiply’ and paint dark, desaturated green/grey under the cliff overhang to deepen the shadows. This emphasizes the form. -
Adding Mist:
Create a new layer above everything and gently paint distinct cloud or fog patches using a very light grey color. Focus on the transition area between the waterfall and the pool to hide hard edges. -
Global Color Grade:
Add a Gradient Map adjustment layer on top of everything. Choose a dark green to cream gradient and set the layer mode to ‘Soft Light’ at 20-30% opacity to unify the colors. -
Final Dodge and Burn:
Create a new layer filled with 50% Grey set to ‘Overlay’. Use the Dodge tool to highlight the water crests and the Burn tool to darken the crevices in the rock face for dramatic contrast. -
Sharpening:
Flatten your image (or create a stamp visible layer), run a High Pass filter with a low radius (1-2px), and set it to Overlay. This brings out the crisp details in the grass and rock textures.
Pro Tip: Scale Check
Zoom in and ensure the grass blade size on the island matches the grass size in the foreground. Consistent texture sizing is the secret to a believable composite.
Now you have a stunning, surreal landscape ready to transport viewers to another world


Endless Checkerboard Floors
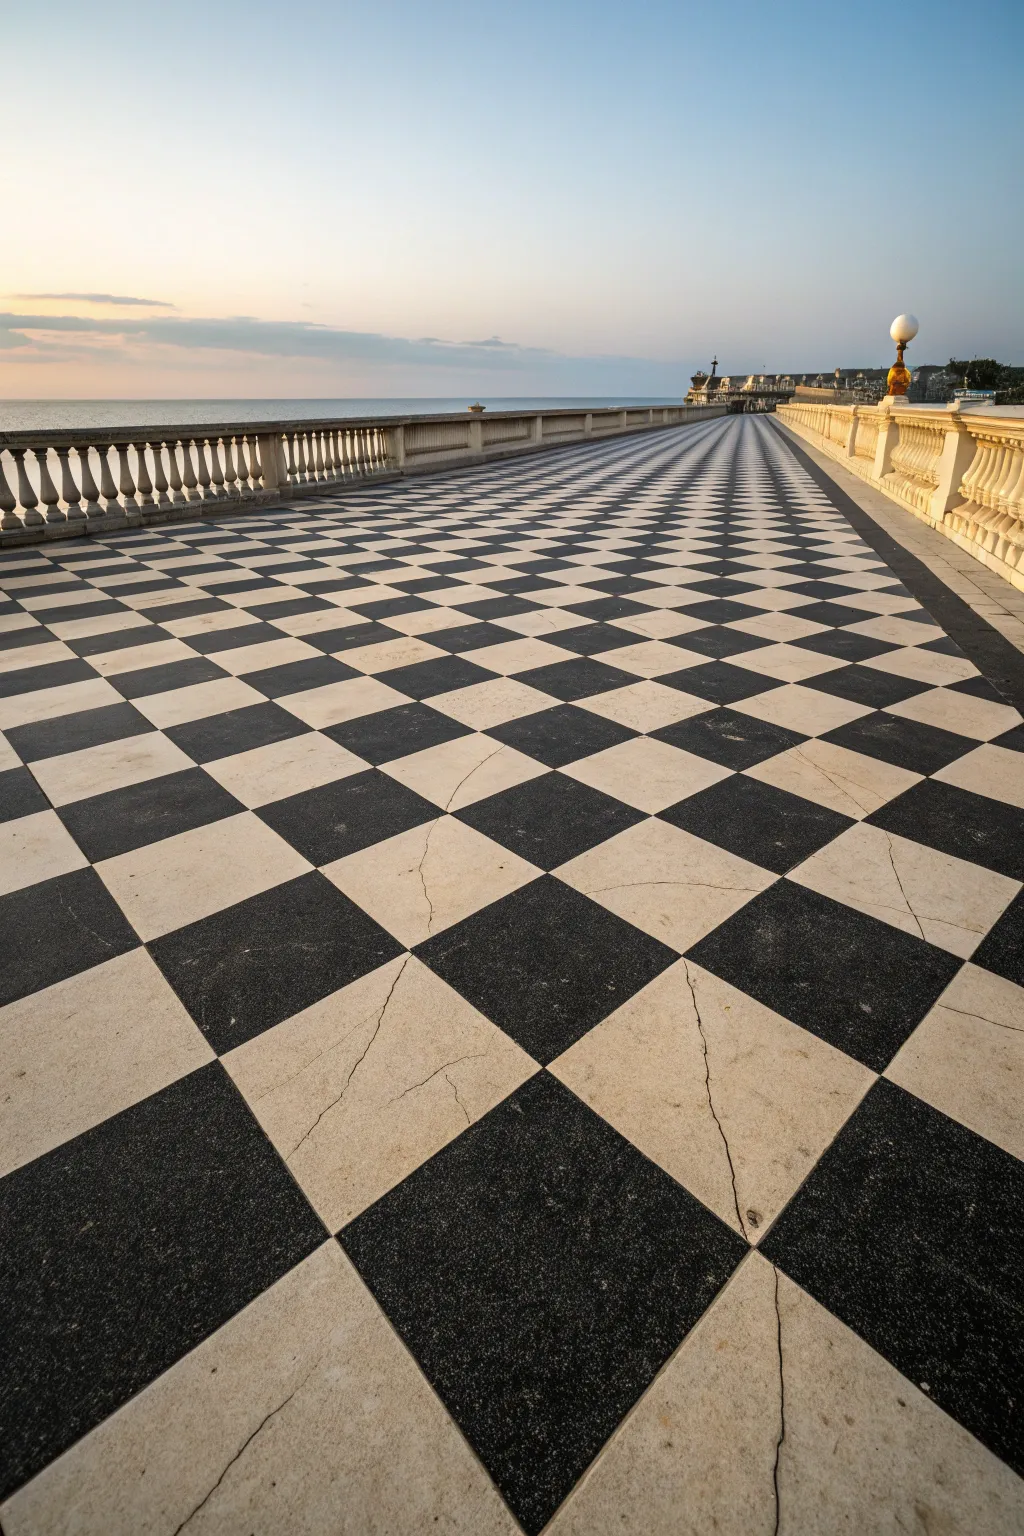
Learn to capture the striking depth and perspective of a seaside checkerboard terrace in acrylics. This tutorial guides you through creating a surreal, infinite walkway that merges architectural structure with a soft sunset sky.
Step-by-Step Guide
Materials
- Large canvas (e.g., 18×24 inches)
- Acrylic paints: Titanium White, Mars Black, Ultramarine Blue, Yellow Ochre, Burnt Sienna, Payne’s Grey
- Flat brushes (1 inch and 1/2 inch) for large areas
- Round brushes (size 2 and 4) for details
- Ruler or T-square
- Painter’s tape (low tack)
- Pencil (HB or 2H)
- Palette knife (optional, for mixing)
- Jar of water and paper towels
Step 1: Setting the Scene
-
Establish the horizon line:
Begin by drawing a faint horizontal line with your pencil and ruler about one-third down from the top of the canvas to separate the sky from the sea. -
Map the vanishing point:
Mark a single vanishing point on the far right side of your horizon line. This point will anchor the perspective of the entire tiled floor. -
Draw the main perspective lines:
Using your ruler, radiate diagonal lines outward from the vanishing point across the bottom two-thirds of the canvas. These lines will form the longitudinal seams of your checkerboard pattern. -
Sketch the balustrade:
On the left side, sketch a low wall running parallel to the horizon, slightly angled towards the vanishing point, adding vertical ticks to mark where the columns will go later. -
Line the horizon details:
Lightly sketch the shapes of the distant buildings and pier structures on the far right, near the vanishing point.
Grid Master Tip
To get the horizontal spacing perfect, use a logarithmic spacing guide or simply halve the distance each time you move a step closer to the horizon.
Step 2: Painting the Atmosphere
-
Paint the sky gradient:
Mix a blend of Ultramarine Blue and Titanium White. Start painting at the very top, gradually adding a touch of Yellow Ochre and more White as you descend towards the horizon for a soft sunset glow. -
Add cloud whisks:
While the sky paint is still slightly tacky, use a dry brush with a tiny bit of Grey/Purple mix to drag faint, horizontal streaks near the horizon, simulating distant clouds. -
Paint the sea:
Combine Ultramarine Blue with a touch of Payne’s Grey and White. Paint the strip of water horizontally, ensuring the value is slightly darker than the sky to create separation. -
Create distant structures:
Using a small round brush and a mix of Earth tones and Grey, fill in the silhouette of the pier and buildings on the right, keeping edges slightly soft to suggest atmospheric depth.
Wobbly Lines?
If your black squares bleed into the white, let everything dry completely, then use a white paint pen or a fine liner brush with heavy body white to clean up the edges.
Step 3: The Checkerboard Floor
-
Define the horizontal grid:
Draw horizontal lines across your radiating perspective lines. The spacing between horizontal lines must get progressively tighter as they approach the horizon to create the illusion of distance. -
Base coat the light tiles:
Mix Titanium White with a tiny drop of Yellow Ochre for a warm off-white. Fill in the ‘white’ squares of the checkerboard. Don’t aim for perfect opacity yet; a little texture looks like stone. -
Fill the dark tiles:
Use Mars Black to fill the alternate squares. I prefer adding a tiny bit of blue to the black for the tiles closest to the viewer to reflect the ambient sky light. -
Age the tiles:
Once dry, use a very watery wash of Burnt Sienna to glaze over random sections of the white tiles, simulating weathering and dirt. -
Add cracks and imperfections:
With your smallest round brush (size 2) and thinned grey paint, wiggle thin, irregular lines across a few foreground tiles to create realistic stone cracks.
Step 4: Balustrade and Highlights
-
Paint balustrade base:
Paint the railing and base wall using a mix of White, Ochre, and Grey. Keep the side facing the viewer slightly darker than the top edge to show dimension. -
Detail the columns:
Using the small brush, paint the vertical balusters. Add a vertical highlight of pure White on the right side of each column (sun side) and a shadow line on the left. -
Refine the perspective line:
Run a clean, dark grey line along the base of the wall where it meets the checkerboard floor to ground the structure. -
Final lighting adjustment:
Glaze the distant end of the floor (near the horizon) with a very thin, watery white wash. This ‘aerial perspective’ makes the end of the pier look further away.
Step back and admire your surreal, infinite walkway stretching toward the calm sea.


Staircases Leading Nowhere
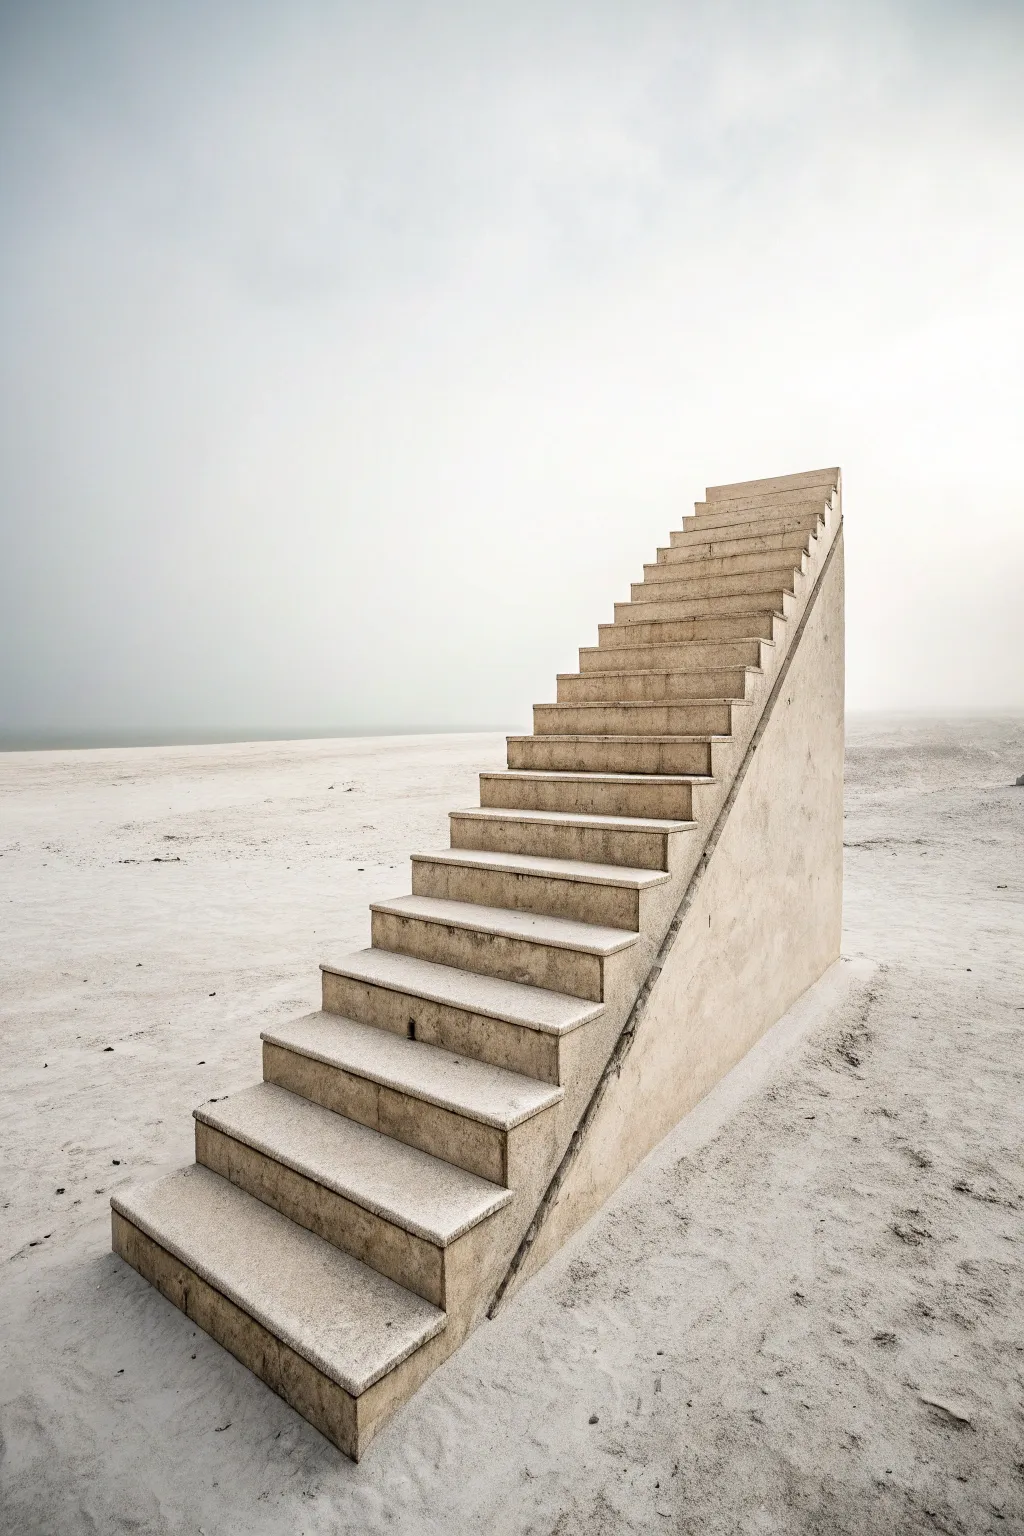
Capture the dreamlike isolation of a staircase ascending into emptiness with this photomanipulation project. Using digital compositing techniques, you’ll blend textures and lighting to create a hauntingly serene composition that defies logic.
Step-by-Step Guide
Materials
- Digital painting software (Photoshop, Procreate, or GIMP)
- Graphics tablet (optional but recommended)
- Stock photo: Concrete or stone staircase (side profile)
- Stock photo: Sandy beach or desert landscape
- Stock photo: Concrete texture overlay
- Soft round brushes
- Grunge or texture brushes
Step 1: Setting the Scene
-
Prepare the Canvas:
Create a new document with a vertical aspect ratio, around 3000×4500 pixels for high detail. Fill the background layer with a soft, pale gray-beige color (#E0E0D8) to establish the foggy atmosphere immediately. -
Import the Landscape:
Place your sandy beach or desert image onto the canvas. Position it so the horizon line is low, about one-third of the way up the canvas. -
Desaturate and Fade:
Apply a ‘Black & White’ adjustment layer or desaturate the landscape image to remove vibrant colors. Lower the opacity of this layer to around 60-70% so it blends into your gray background. -
Create the Fog:
Add a new layer above the landscape. Use a large, soft round brush with flow set to 10% and paint white or pale gray haze over the horizon line, blurring the distinction between the sky and the ground.
Step 2: Constructing the Staircase
-
Isolate the Stairs:
Open your staircase stock photo. Use the Pen Tool or Object Selection Tool to meticulously cut out the staircase from its original background. Since this is an architectural element, ensure your edges are sharp. -
Placement and Perspective:
Paste the cutout stairs into your main document. Position them centrally, rising from the bottom third towards the upper right. If the perspective doesn’t match a low eye line, use the ‘Perspective Warp’ or ‘Distort’ transform tools to correct it. -
Defining the Wedge:
If your stock photo lacks the solid concrete side wall (the triangular wedge shape), you’ll need to draw it. Use the Polygonal Lasso tool to create a triangle shape underneath the stairs, filling it with a solid concrete color sampled from the steps. -
Texture Blending:
Import a concrete texture image and clip it to your staircase layer (Create Clipping Mask). Change the blending mode to ‘Overlay’ or ‘Soft Light’ to add grit and realism to the surface.
Pro Tip: Match the Haze
Sample colors directly from the sky when painting the fog over the distant parts of the stairs. This creates a convincing depth-of-field effect quickly.
Step 3: Lighting and Integration
-
Global Lighting Check:
Identify the light source in your background (it seems diffused overhead). Create a ‘Curves’ adjustment layer clipped to the stairs to brighten the top of the steps and darken the side panel slightly for dimension. -
Contact Shadows:
Create a new layer named ‘Shadows’ underneath the staircase layer. Using a soft black brush with low opacity, paint a thin, dark line right where the concrete meets the sand to ground the object. -
Cast Shadows:
On the same shadow layer, paint a softer, more diffused shadow extending slightly to the right of the structure, mimicking the soft ambient light of a foggy day. -
Sand Buildup:
To make the stairs look settled, I like to create a new layer on top and paint small piles of sand at the base using a textured ‘speckle’ brush. Color pick the sand from your background for accuracy. -
Weathering the Concrete:
Add a ‘levels’ adjustment layer or use the Burn tool to darken the bottom edges of the staircase slightly, suggesting moisture absorption or dirt accumulation from the ground.
Troubleshooting: Flat Look
If the stairs look like a sticker, check your ambient occlusion. Darken the deepest crevices between the steps using a small brush set to Multiply.
Step 4: Atmospheric Touches
-
Distant Fade:
Select the very top portion of the stairs with a large, feathered selection. Lightly brush over it with the background sky color on a low opacity layer to make the top steps recede into the fog. -
Noise and Grain:
Add a new layer on top of everything, fill it with 50% gray, and add ‘Noise’ (around 3-5%). Set this layer to ‘Overlay’ mode to unify the photo elements and the digital painting. -
Color Grading:
Finally, add a ‘Color Balance’ adjustment layer. Push the midtones slightly towards cyan and yellow to achieve that cold, sterile surrealist palette.
Enjoy the mysterious silence of your new surrealist landscape artwork


Desert Emptiness With One Strange Object
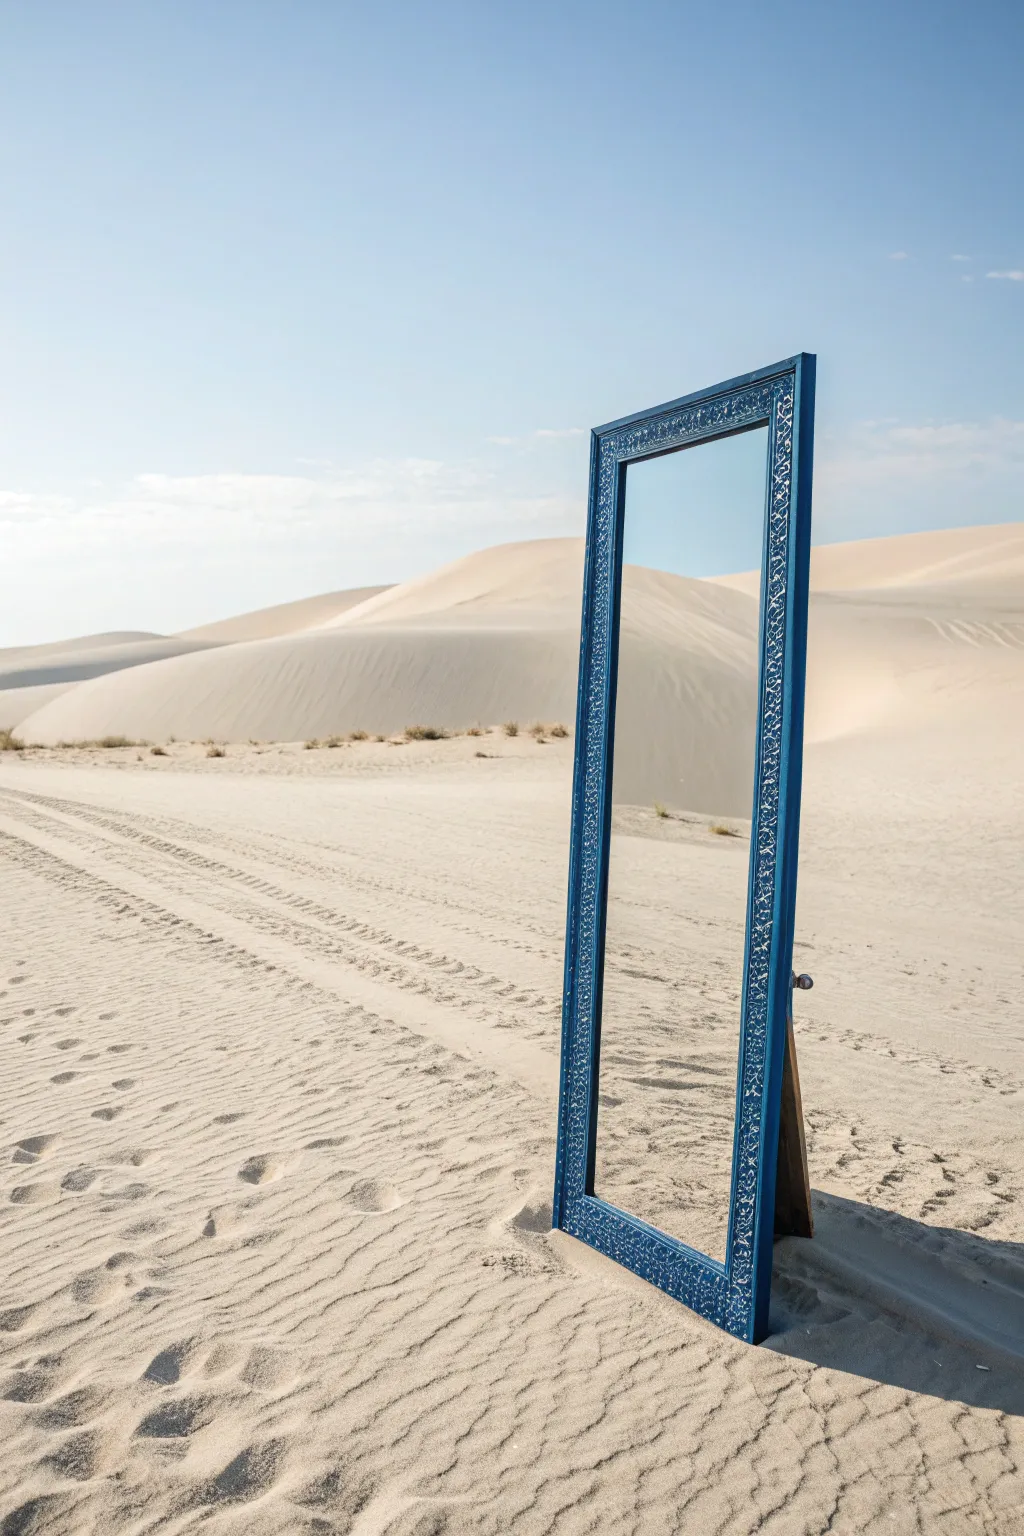
This photography project creates a striking surrealist image by placing a domestic object in a desolate environment. The result is a mysterious composition where the reflection seamlessly blends with the surroundings, challenging the viewer’s perception of reality.
Detailed Instructions
Materials
- Full-length standing mirror with easel back
- Blue painter’s tape or stencil vinyl (optional)
- Blue acrylic or spray paint (specifically a deep azure or royal blue)
- White acrylic paint (for detailing)
- Fine detail paintbrush or white paint pen
- Sandpaper (medium grit)
- Camera with a wide-angle or standard lens (35mm or 50mm)
- Tripod (essential for stability on sand)
Step 1: Preparing the Prop
-
Source the mirror:
Find a full-length standing mirror. Thrift stores are excellent for this. Look for a frame with a bit of width (at least 2-3 inches) to allow room for the decorative pattern. -
Prepare the surface:
Lightly sand the frame to remove any glossy finish or varnish. This helps the new paint adhere better. Wipe it down with a damp cloth to remove the dust. -
Apply the base color:
Mask off the mirror glass completely with newspaper and painter’s tape. Paint the entire frame with your deep blue paint. Two to three thin coats usually provide the best coverage and finish. Let it dry completely. -
Add the intricate pattern:
For the ornate white design seen in the image, you have two options. Hand-painting freeform organic swirls and leaves with a white paint pen is often easiest. Alternatively, use a stencil for a more uniform look. -
Detailing the pattern:
If hand-painting, focus on creating a repeating vine-like motif along the side rails and the top header. Keep the lines delicate and consistent to mimic a carved or inlaid look. -
Seal the prop:
Once the designs are dry, apply a clear matte sealer to the frame to protect the paint from the abrasive sand during the shoot.
Wind Stability
Mirrors act like sails in open areas. Bring sandbags to weigh down the back easel stand (hidden from view) to prevent it from shattering.
Step 2: Setting the Scene
-
Scout the location:
Find a location with clean, sweeping sand dunes. A beach with large dunes or an actual desert location is ideal. You want an area that looks untouched, without many footprints. -
Position the mirror:
Set up the mirror on a slight slope or flat section of the sand. Extend the easel leg so it stands firmly. Bury the feet of the mirror slightly into the sand (about an inch) to hide the transition and ensure stability against wind. -
Check the reflection:
Adjust the angle of the mirror. This is crucial. Tweak the tilt until the reflection in the glass shows only the sky and the distant dunes, eliminating the camera or photographer from the reflection. -
Manage footprints:
Be incredibly mindful of where you walk. Approach the mirror from behind or from the side chosen for the shadow to keep the foreground sand pristine.
Step 3: Photography & Composition
-
Set up the tripod:
Position your camera low to the ground. A lower angle emphasizes the vastness of the sand and makes the mirror feel like a doorway or portal. -
Check lighting:
Shoot during the ‘golden hour’ or when the sun is at an angle that casts distinct shadows across the dunes, adding depth to the sand ripples. Side lighting works best for texture. -
Compose the shot:
Frame the image so the mirror is off-center (adhering to the rule of thirds). Ensure the horizon line in the reflection aligns or interacts interestingly with the real horizon line. -
Focus settings:
Use a narrower aperture (higher f-stop like f/8 or f/11) to keep both the frame texture and the distant sand dunes in reasonably sharp focus. -
Clean reflections:
Take a test shot and zoom in on the mirror glass. Ensure you aren’t accidentally capturing your own silhouette or tripod leg. Shift your angle slightly if needed. -
Shooting variations:
Take multiple exposures, experimenting with placing the mirror deeper in the scene or turning it slightly to catch different parts of the sky gradient.
Invisible Photographer
Shot yourself in the reflection? Use a tripod and a remote timer. Step far away or duck behind a dune during the exposure.
Once edited for contrast and color, you’ll have a beautifully surreal image that turns a simple household object into a portal to nowhere


Have a question or want to share your own experience? I'd love to hear from you in the comments below!