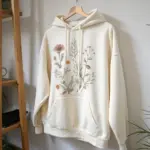
If you’ve been craving easy T-shirt drawing ideas that look cool without feeling intimidating, you’re in the right place. I’m sharing my favorite simple T-shirt designs you can draw by hand—clean lines, cute doodles, and clever placement that makes it feel instantly wearable.
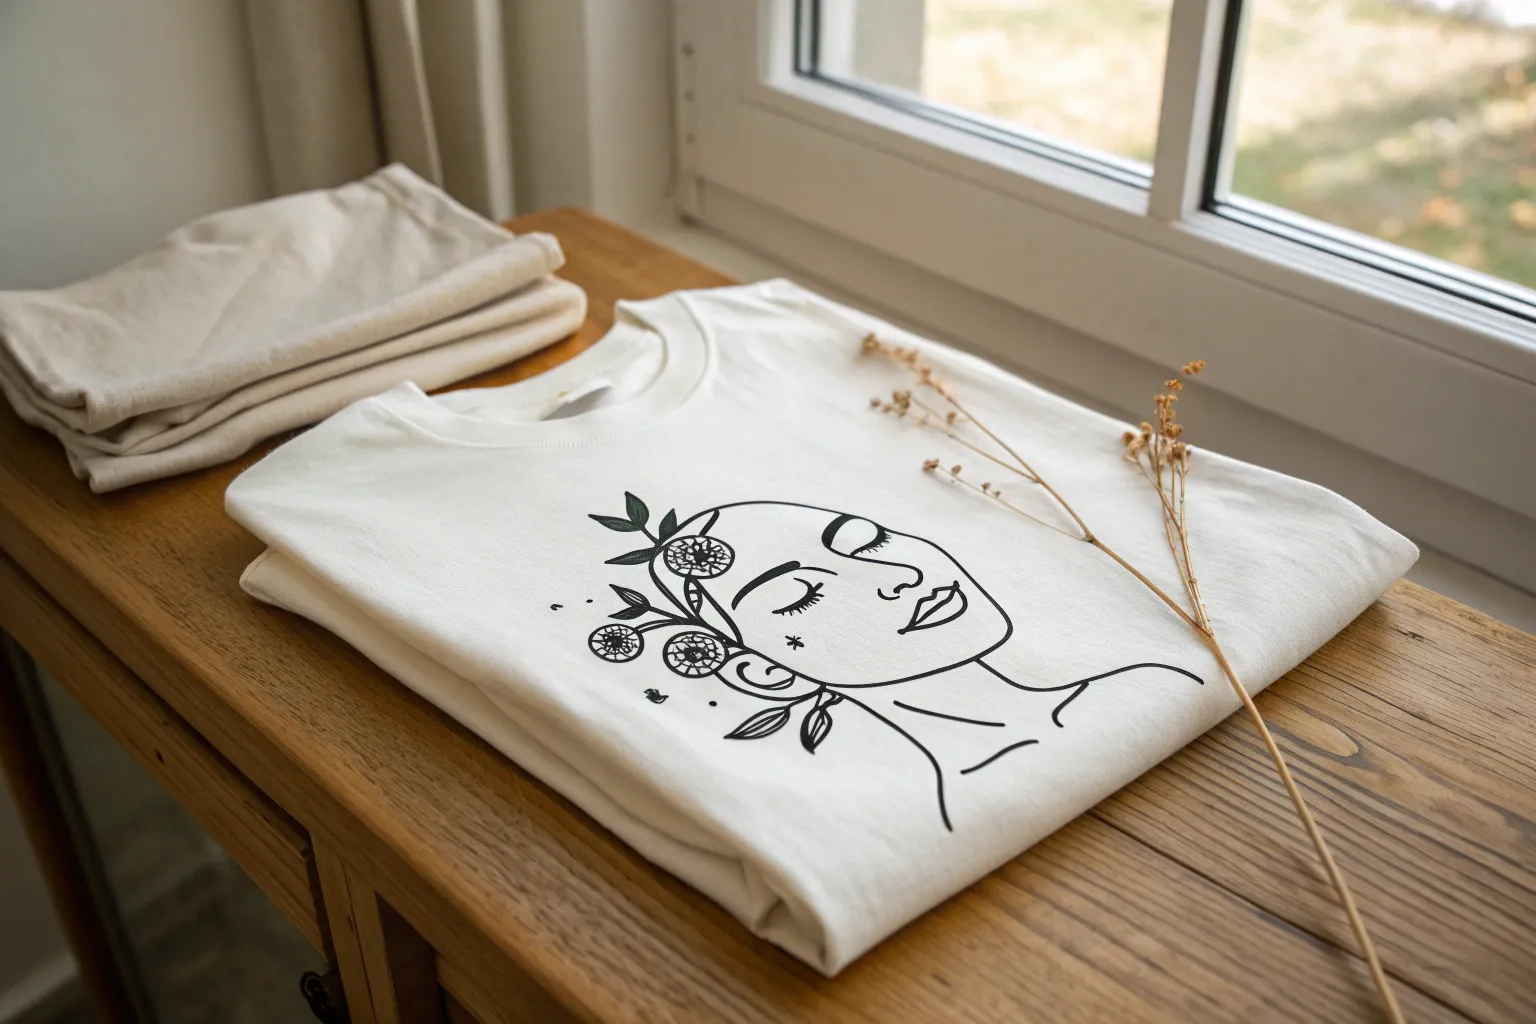
Minimalist Line-Art Face
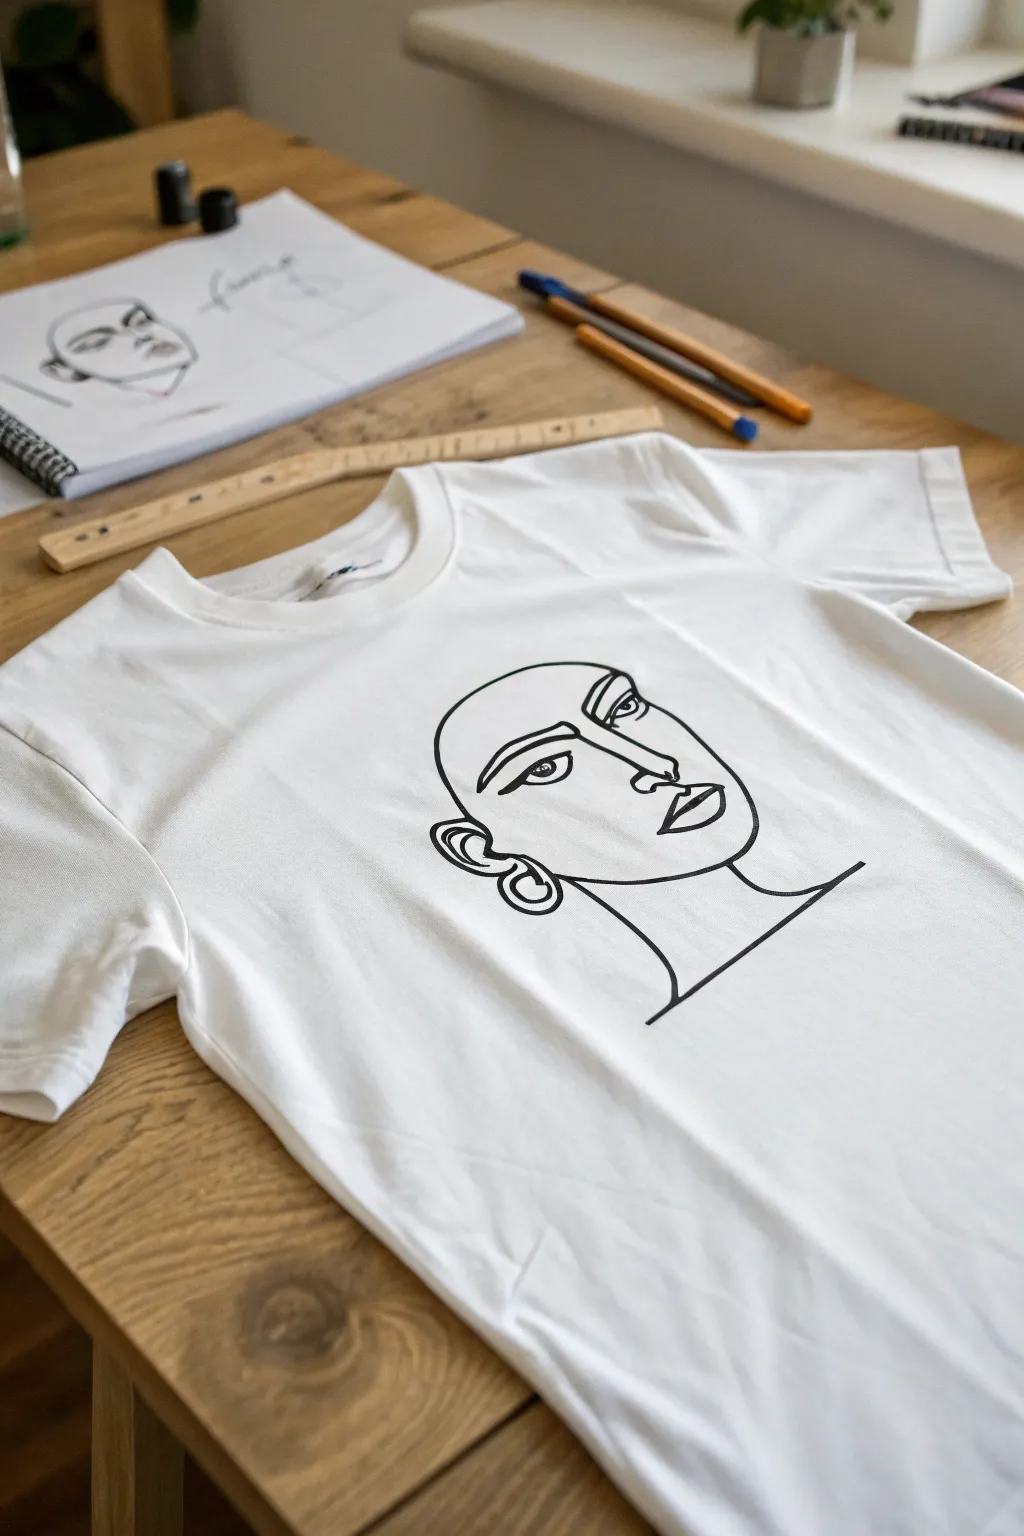
Transform a plain white t-shirt into a wearable piece of modern art with this simple yet striking line-art face design. This project focuses on clean aesthetic and confident strokes, resulting in a professional-looking graphic tee perfect for a casual, artistic vibe.
Detailed Instructions
Materials
- High-quality white cotton t-shirt
- Fabric marker (black, fine or medium tip)
- Black fabric paint (optional, for bolder lines)
- Fine liner paintbrush (if using paint)
- Sketchbook or printer paper
- Pencil and eraser
- Cardboard insert or baking paper
- Iron (for heat setting)
- Masking tape
Step 1: Preparation and Sketching
-
Pre-wash the fabric:
Before anything else, wash and dry your t-shirt without fabric softener. This removes factory sizing and ensures the ink binds directly to the fibers. -
Draft your design:
Grab your sketchbook and practice drawing the face. Start with a continuous line style—draw a rounded jawline, an ear with loop earrings, and stylized facial features like the heavy-lidded eye and defined nose. -
Refine the artwork:
Once you are happy with a sketch, redraw it cleanly on a fresh sheet of paper that fits the size of the shirt front. Go over your final lines with a dark marker so they are easily visible. -
Prepare the workspace:
Lay your ironed t-shirt flat on a hard surface. Place a piece of cardboard or several sheets of baking paper inside the shirt to prevent ink from bleeding through to the back. -
Position the template:
If your shirt is thin enough, slide your drawing inside the shirt, on top of the cardboard barrier. Adjust it until it is centered on the chest area. -
Secure the fabric:
Use small pieces of masking tape to gently pull the fabric taut (but not stretched) and secure the template in place so nothing shifts while you work.
Step 2: Transfer and Inking
-
Trace lightly:
Using a soft pencil, lightly trace the design onto the fabric. Even if you can see the template clearly, having a faint pencil guide on the surface helps prevent mistakes with permanent ink. -
Start the main outline:
Begin with the fabric marker or a brush loaded with fabric paint. Start at the top of the head curve. Maintain a steady hand and pull the line towards you for better control. -
draw the facial features:
Move inward to the face. Carefully draw the eye, focusing on the heavy upper lid and the pupil. I find that holding your breath for a second during the intricate curves helps steady the hand. -
Add the nose and mouth:
Connect your lines fluidly. Draw the nose bridge descending from the brow, then shape the lips. Keep the lines consistent in thickness to maintain that minimal graphic look. -
Detail the accessories:
Draw the ear and the distinctive hoop earrings. Make sure the concentric circles of the earrings are clean, as these geometric shapes draw the eye. -
Complete the neck:
Finish the drawing by extending the neck lines downward to anchor the head, giving the composition a grounded feel. -
Check line weight:
Step back and look at your design. Go back over any lines that look too thin or shaky to unify the thickness across the entire drawing.
Bleeding Lines?
If ink starts feathering into the fabric, you’re pressing too hard or the ink flow is too heavy. Move the pen faster across the surface to prevent pooling.
Step 3: Finishing Touches
-
Remove the template:
Carefully remove the tape and slide the cardboard and paper template out from inside the shirt. -
Let it dry:
Allow the design to air dry completely. For fabric markers, this might be quick, but give it at least an hour; for paint, wait 24 hours. -
Heat set the design:
Turn the t-shirt inside out. Iron the back of the design on a cotton setting (no steam) for several minutes to lock the pigment into the fabric fibers.
Add a Splash of Color
Use a single contrasting color of fabric paint to fill in just the earrings or the lips. This creates a bold focal point without ruining the minimal vibe.
Wear your new custom tee with pride knowing it is a one-of-a-kind creation


Tiny Pocket Doodle Icon
Transform a plain pocket tee into a custom piece with this minimalistic leaf design. Using fabric-safe ink, you’ll sketch a delicate branch that looks like it’s tucked neatly into your pocket for a subtle, nature-inspired touch.
Step-by-Step Guide
Materials
- Light-colored cotton t-shirt with a pocket
- Black fabric marker or permanent fine-liner (e.g., Sharpie)
- Piece of cardboard or thick cardstock
- Pencil (optional)
- Iron (for heat setting)
Step 1: Preparation
-
Prepare the surface:
Before you begin, wash and dry your t-shirt without fabric softener to remove any sizing chemicals that might prevent ink adhesion. Lay the shirt flat on a smooth table. -
Insert backing:
Slip a small piece of cardboard or heavy cardstock inside the shirt, positioning it directly behind the pocket area. This is crucial to prevent the ink from bleeding through to the back of the shirt. -
Smooth the fabric:
Gently pull the fabric taut, especially around the pocket, ensuring there are no wrinkles or bumps that could catch your pen tip.
Bleeding Lines?
If you notice the ink spreading (feathering) into the fabric grain, move your pen faster. Slow movements allow the fabric to soak up too much ink in one spot.
Step 2: Drafting the Design
-
Visualize placement:
Decide where your branch will originate. For this design, it looks best if the stem appears to grow out from the bottom corner or side seam of the pocket. -
Light pencil sketch:
I prefer to lightly sketch the main curve of the stem first with a pencil. Keep the pressure very light so you don’t damage the fabric fibers. -
Mark leaf positions:
Add small faint dashes along the stem where you want your leaves to sit, alternating sides as you go up for a natural organic look.
Step 3: Inking the Stem
-
Test your pen:
On a scrap piece of fabric or an hidden inner seam, test your fabric marker to see how much the ink spreads. This helps you gauge how fast to move your hand. -
Commit to the stem:
Start drawing the main stem using your black fabric marker. Begin at the bottom edge of the pocket and draw a confident, slightly curved line upwards and diagonally across the pocket. -
Extend past the edge:
Let the tip of the stem extend slightly past the top stitching of the pocket, creating movement and height.
Make It 3D
Use white fabric paint or a white gel pen to add tiny highlights to the tips of the leaves after the black ink is dry for a dimensional pop.
Step 4: Detailed Leaves
-
Draw the bottom leaf:
Start with the lowest leaf. Draw a simple teardrop or almond shape attached to the stem. Keep the lines crisp and connected. -
Add the central vein:
Draw a straight line down the center of the leaf shape, stopping just short of the tip. -
Detail the veins:
From the central vein, add tiny diagonal hatch marks pointing upwards to represent the leaf’s texture. Keep these lines fine and evenly spaced. -
Work upwards:
Move up the stem, adding the next leaf on the opposite side. Repeat the almond shape, ensuring it’s roughly the same size as the first one. -
Continue the pattern:
Continue alternating leaves as you climb the stem. As you reach the top, you can make the leaves slightly smaller to mimic new growth. -
Cross the seam:
When drawing leaves over the pocket’s thick top hem, engage the fabric firmly with your other hand to keep it from bunching up under the pen tip. -
Final check:
Look over your design. Strengthen any lines that look too thin or faint, particularly around the edges of the leaves.
Step 5: Finishing Up
-
Let it dry:
Allow the ink to dry completely for at least 24 hours. Don’t rush this, or the ink might smudge during the setting process. -
Heat set the ink:
Once dry, run a hot iron (no steam) over the design for a few minutes to permanently set the ink into the fabric fibers.
Wear your new custom tee with pride knowing it’s a one-of-a-kind creation


Simple Heart With Rays
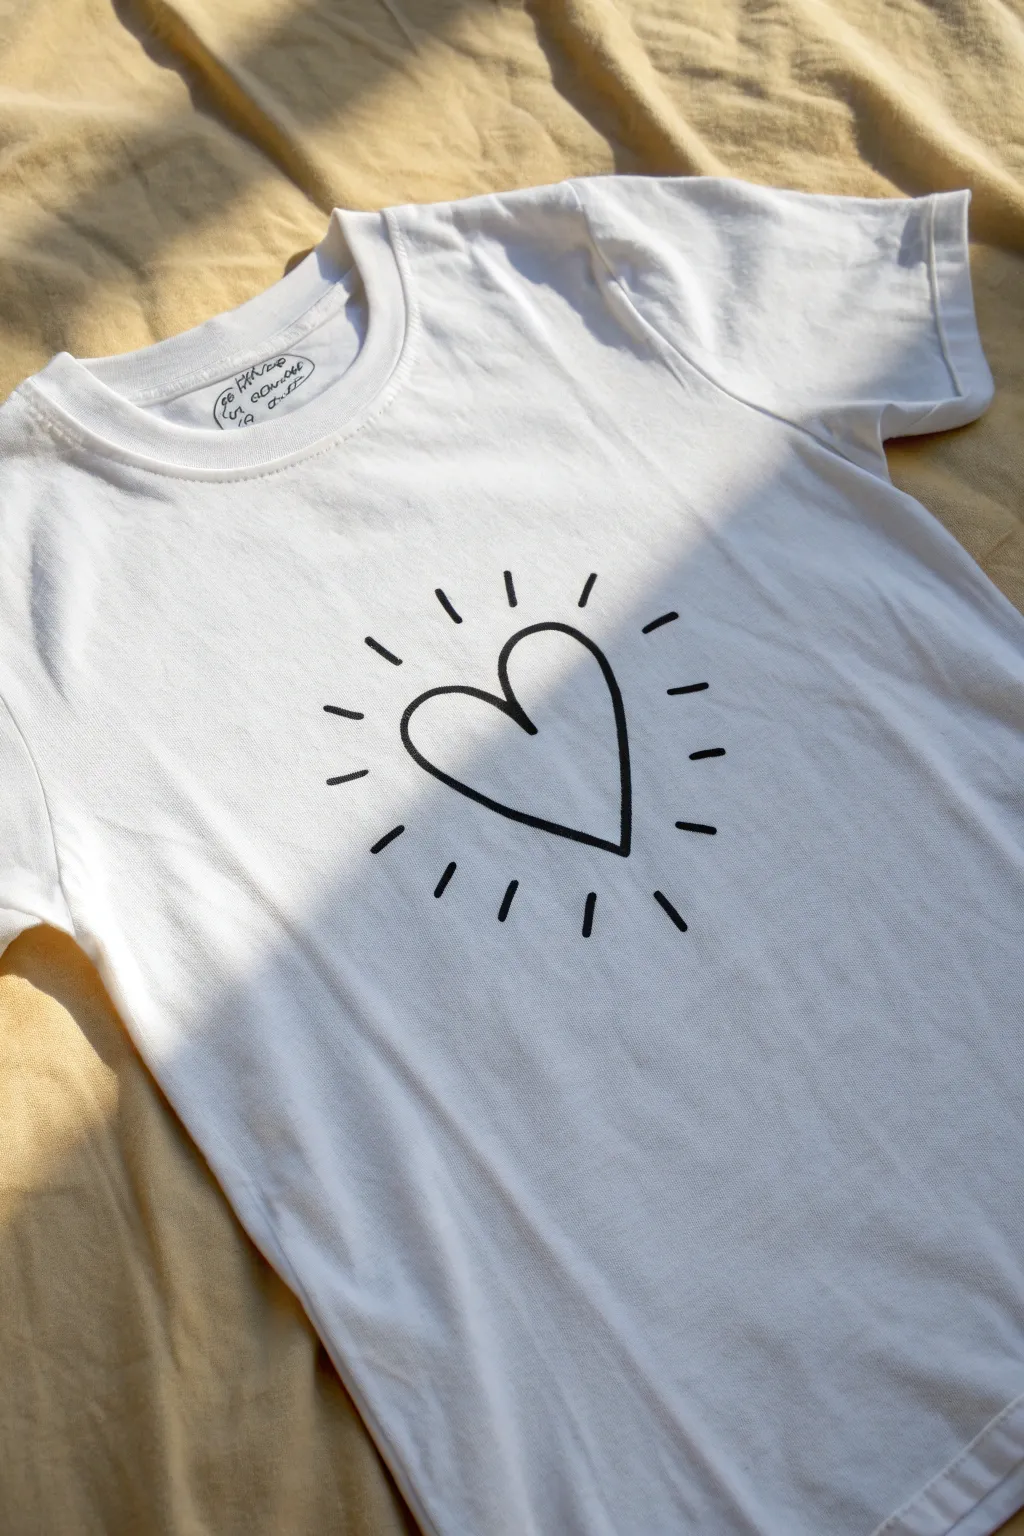
Transform a plain white t-shirt into a charming statement piece with this minimalist design. The high-contrast black ink on white cotton creates a clean, graphic look that feels both handmade and modern.
How-To Guide
Materials
- Plain white cotton t-shirt (pre-washed)
- Black fabric marker (medium or brush tip)
- Piece of cardboard or thick paper
- Iron (for heat setting)
- Paper for sketching
- Pencil
- Tape (optional)
Step 1: Preparation
-
Wash and dry the shirt:
Before you begin, make sure your t-shirt has been washed and dried without using fabric softener. This removes sizing chemicals that can prevent the ink from bonding properly. -
Prepare the work surface:
Find a flat, hard surface to work on. Lay your t-shirt out flat, smoothing away any large wrinkles or creases. -
Insert the barrier:
Slide a piece of cardboard or thick paper inside the shirt, positioning it directly under the chest area where you plan to draw. This is crucial to stop the ink from bleeding through to the back of the shirt. -
Secure the fabric:
If the fabric is bunching up, you can use a little painter’s tape or masking tape to gently pull the shirt taut against the cardboard backing.
Uneven Lines?
If your lines look shaky, embrace it as part of the style, or go over the line again to thicken it slightly, which tends to smooth out wobble.
Step 2: Drafting the Design
-
Practice the shape:
On a separate piece of scrap paper, practice drawing the heart shape a few times. The style shown here is a bit loose and organic, with the left lobe slightly higher than the right. -
Find the center:
Locate the visual center of the chest area on your shirt. I usually place designs about 3-4 inches down from the collar seam. -
Lightly sketch the heart:
Using a pencil very lightly, draw the outline of your heart directly onto the fabric. Don’t press hard; you just want a faint guide that will be covered by ink later. -
Mark the rays:
Lightly mark small dashes around the heart where the rays will go. Space them apart roughly an inch or so to ensure they look balanced.
Make it Pop
Use a metallic gold or silver fabric marker to add a second set of smaller rays in between the black ones for a subtle shimmer.
Step 3: Inking the Heart
-
Prepare the marker:
Shake your fabric marker well if required by the manufacturer, and test the flow on a paper towel. -
Start the outline:
Begin at the top center dip of the heart. Draw the left curve downward in one confident, smooth motion. Stop at the bottom point. -
Complete the outline:
Go back to the top center and draw the right curve meeting the bottom point. It’s okay if the lines aren’t perfectly symmetrical; that adds to the hand-drawn charm. -
Thicken the line:
Go over the outline a second time to thicken the stroke, giving it a bold, illustrative weight. Pay attention to the junctions, making sure the point and the dip are clearly defined.
Step 4: Adding the Rays and Finishing
-
Draw the main rays:
Start by drawing the four main directional rays: top, bottom, left, and right. These should point directly away from the center of the heart. -
Fill in the gaps:
Add two intermediate rays between each of the main four rays. Aim for roughly equal spacing, but keep the loose, hand-drawn feel. -
Adjust ray length:
Make sure the rays are short—about half an inch to an inch long—and don’t touch the heart outline itself. Leave a small gap of white space between the heart and the start of each ray. -
Let it dry:
Allow the ink to dry completely. This usually takes at least 24 hours, but check your specific marker’s instructions. -
Heat set the design:
Once dry, set your iron to the cotton setting (no steam). Place a thin cloth over the design and iron it for a few minutes to lock the ink into the fibers permanently.
Now you have a custom, minimalist tee ready to wear or gift


Cute Smiley With Blush Dots
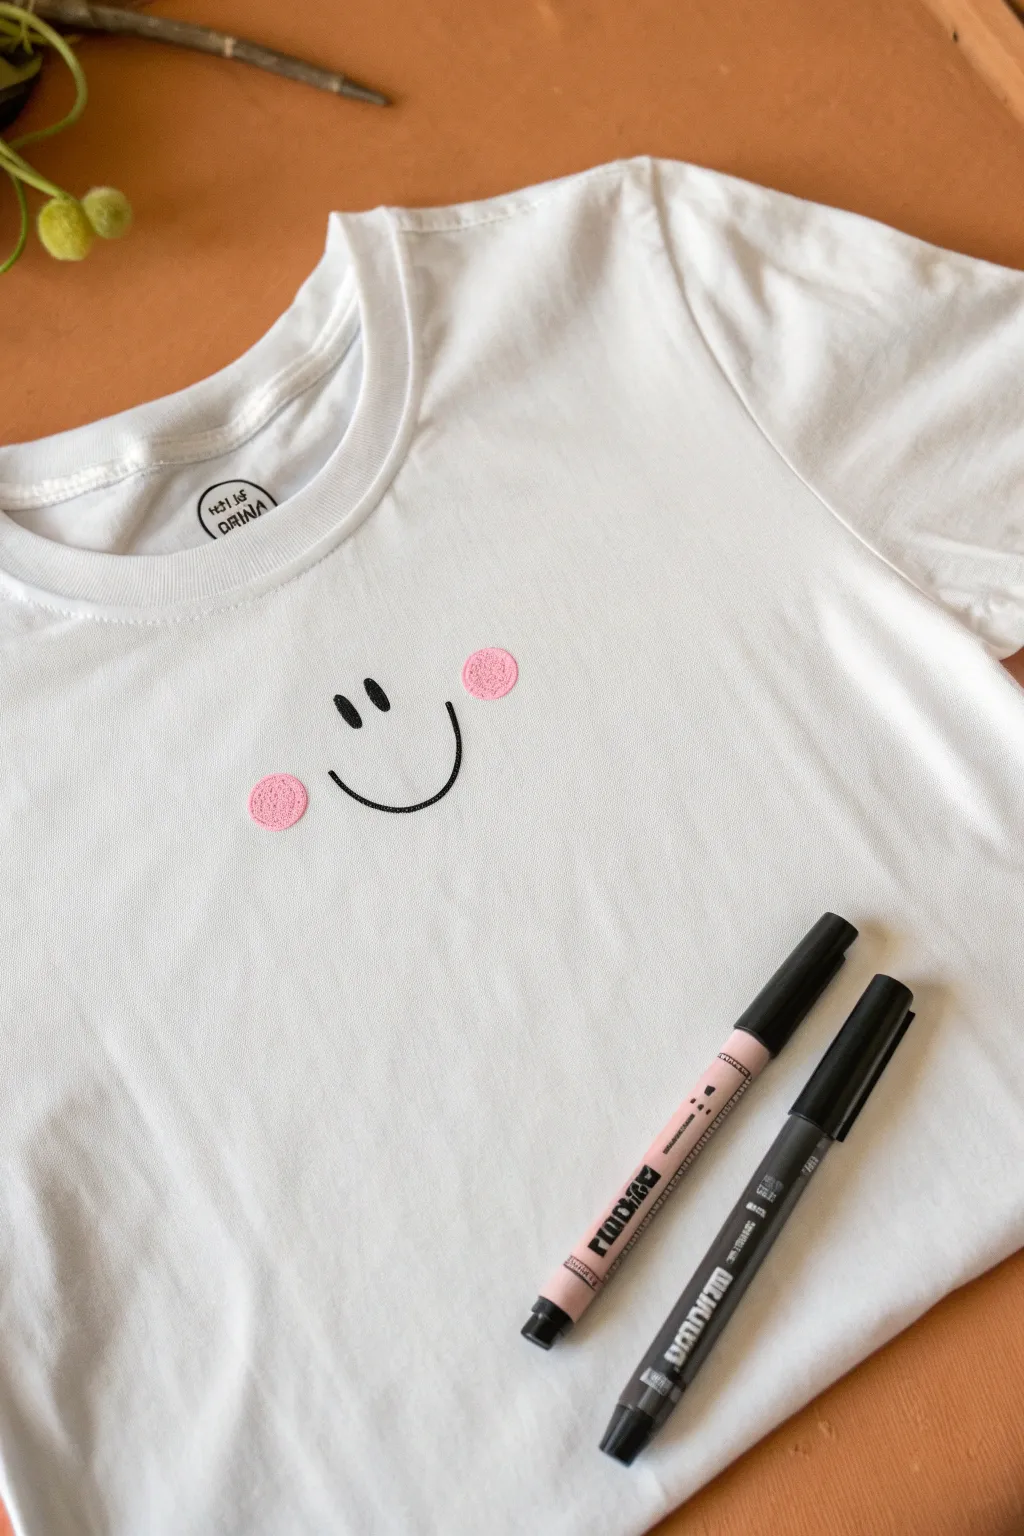
This ridiculously cute and simple design proves that less really is more when it comes to DIY fashion. With just a few basic strokes and some clever stippling, you can transform a plain white tee into a happy-go-lucky statement piece.
Step-by-Step Tutorial
Materials
- Plain white cotton t-shirt (pre-washed)
- Black fabric marker or permanent marker (medium tip)
- Pink fabric marker or paint pen (posca style works well)
- Cardboard or stiff paper (to place inside the shirt)
- Iron (optional, for heat setting)
- Pencil (optional, for sketching)
Step 1: Preparation & Layout
-
Prep your canvas:
Before uncapping any markers, slide a piece of cardboard or stiff paper inside the t-shirt. This is crucial as it prevents the ink from bleeding through to the back of the shirt while you work. -
Smooth it out:
Pull the fabric taut against the cardboard insert. You want a smooth, wrinkle-free surface for drawing so your lines don’t skip or warp. -
Find the center:
Decide on the placement of your face. For this look, aim for the upper chest area, centered horizontally. It sits higher than a standard logo but lower than the collar. -
Lightly sketch (optional):
If you’re nervous about freehanding, use a pencil to very lightly mark the position of the eyes and the curve of the smile. Keep these marks faint so they don’t show later.
Step 2: Drawing the Base Face
-
Draw the first eye:
Using your black fabric marker, draw a short, vertical oval or thick line for the left eye. It should be about half an inch tall. -
Draw the second eye:
Move over about an inch and draw the second eye, trying to match the height and thickness of the first one. Perfection isn’t necessary; a little asymmetry adds charm. -
Create the smile:
Starting below the left eye, draw a simple ‘U’ curve to form the smile. End the curve just under the right eye. Keep the line weight consistent with the eyes. -
Check the ink flow:
If your black lines look a bit faded or uneven, go over them one more time to ensure a solid, crisp black color.
Bleeding Lines?
If ink spreads into fabric fibers (bleeding), you’re pressing too hard or moving too slow. Use lighter, faster strokes for sharper edges.
Step 3: Adding the Blush
-
Position the cheeks:
Visualize where the blush should go. You want these spots to sit slightly higher than the ends of the smile and just outside the width of the eyes. -
Start stippling:
With the pink marker, do not color in a solid circle. Instead, gently tap the tip of the marker onto the fabric to create small dots. -
Build the shape:
Continue tapping dots in a cluster to form a rough circle shape on the left cheek. The dots should be close together but distinct, creating a textured look. -
Create the second cheek:
Repeat the stippling process for the right cheek. Try to make this circle roughly the same size as the first one. -
Refine the edges:
If the circles look too messy, add a few more tiny dots around the perimeter to round out the shape. -
Let it set:
Allow the ink to dry completely. This usually takes about 15 to 30 minutes depending on your marker brand. -
Heat set the design:
To ensure your design survives the wash, set your iron to the cotton setting (no steam). Place a thin cloth over the drawing and iron over it for a few minutes to lock in the color.
Pro Tip: Tester Fabric
Test your markers on an scrap piece of similar fabric first! Cotton blends absorb ink differently than 100% cotton, affecting drying time and bleed.
Now you have a cheerful custom tee ready for sunny days
BRUSH GUIDE
The Right Brush for Every Stroke
From clean lines to bold texture — master brush choice, stroke control, and essential techniques.
Explore the Full Guide
Daisy Chain Outline Border
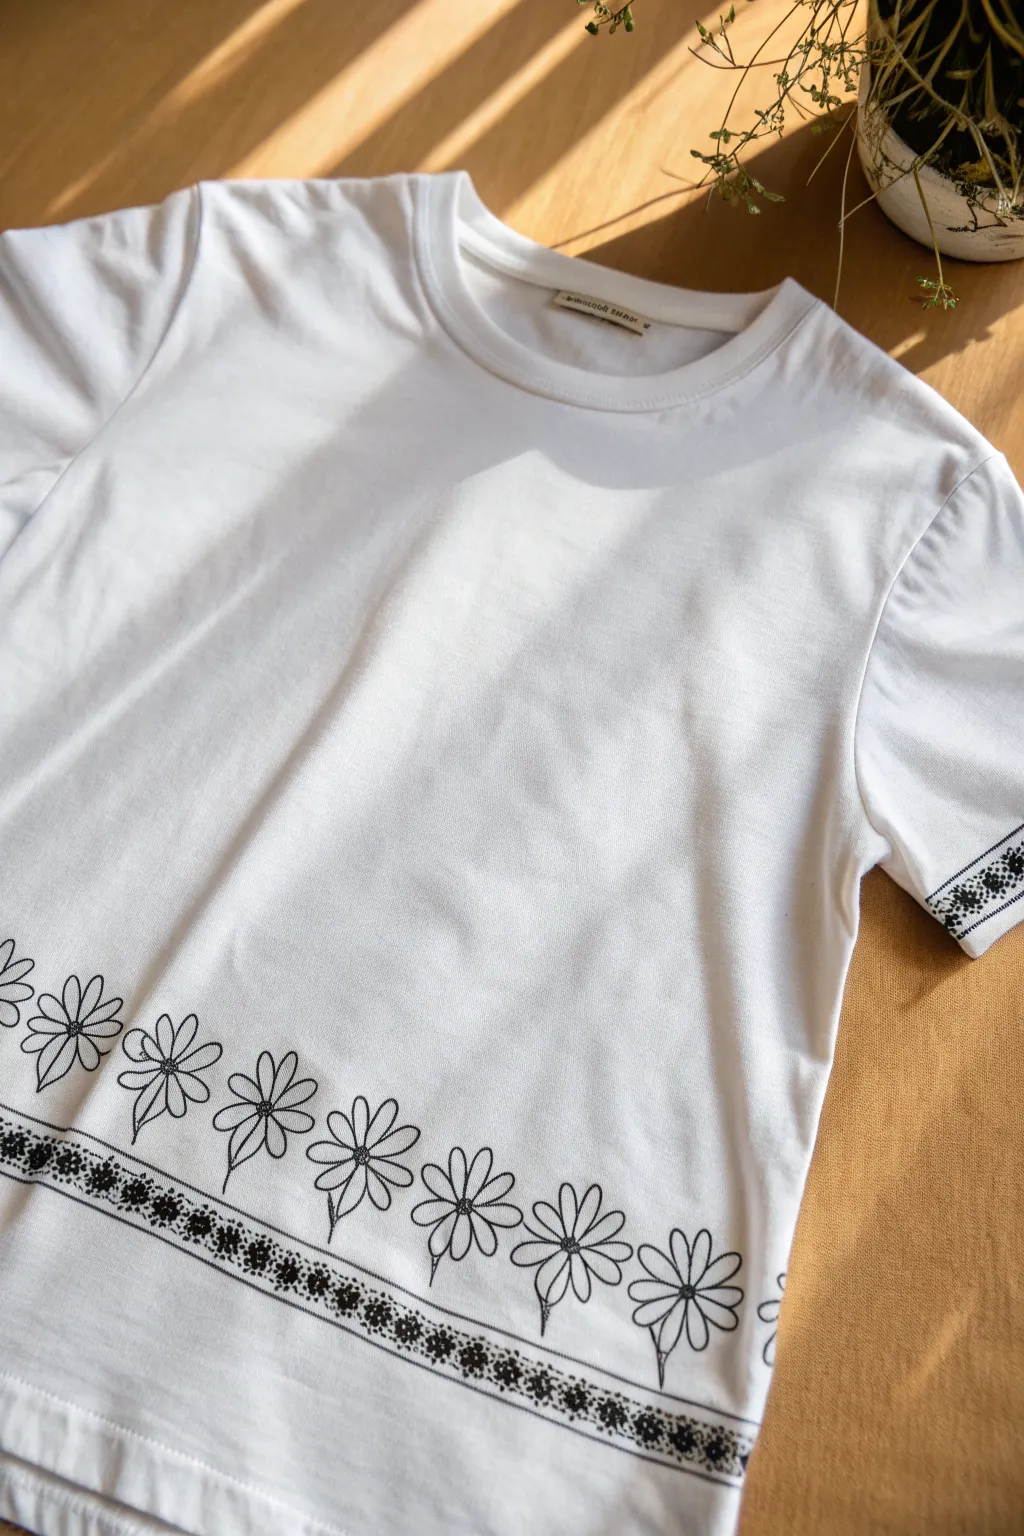
Transform a plain white tee into a boutique-style piece with this elegant linear floral design. The high-contrast black ink creates a modern look while the simple daisy chain adds a touch of whimsical sweetness to the hemline.
Detailed Instructions
Materials
- White cotton t-shirt (pre-washed)
- Black fabric marker (fine tip)
- Black fabric marker (medium tip)
- Ruler
- Pencil
- Cardboard insert or stiff cutting mat
- Iron (for heat setting)
Step 1: Preparation & Guidelines
-
Prepare your shirt:
Start by washing and drying your t-shirt without fabric softener to ensure the ink adheres properly. Iron out any wrinkles, paying special attention to the bottom hem and sleeve cuffs. -
Insert protection:
Slide a piece of cardboard or a stiff cutting mat inside the shirt. Position it directly under the bottom hem area where you will be drawing to prevent ink from bleeding through to the back. -
Measure the bottom border:
Using your ruler and a pencil, lightly draw a horizontal line about 1 inch (2.5 cm) up from the very bottom edge of the shirt. This will be the top line for the decorative geometric band. -
Measure the daisy baseline:
Draw a second light pencil line roughly 1.5 to 2 inches (4-5 cm) above your first line. This will serve as the ground level where the daisy stems will start.
Bleeding Lines?
If ink feathers into the fabric, you’re pressing too hard or the cotton is too loose. Stretch the fabric slightly taut against the cardboard (clip it down) and use lighter, faster strokes.
Step 2: Drawing the Geometric Band
-
Outline the band:
With the fine-tip black fabric marker, draw a straight line directly over your bottom pencil guide. Draw a second parallel line about 0.5 inches (1.2 cm) below it to create a narrow channel. -
Create the sections:
Inside this channel, draw small vertical lines every half-inch to create a series of small boxes. Don’t worry if they aren’t perfectly identical; the hand-drawn look adds character. -
Fill the pattern:
Inside every other box, draw a tiny four-petaled flower shape. In the alternating boxes, make a densely stippled cluster of dots. This creates the intricate-looking darker band shown in the reference. -
Repeat on sleeves:
Move the cardboard to the sleeve cuffs and repeat this exact process—two parallel lines with the alternating flower-and-dot pattern inside.
Add Pop of Color
Once the black outline is dry, use yellow watered-down fabric paint or a yellow fabric highlighter just in the centers of the daisies for a sunny, cheerful accent.
Step 3: Sketching the Daisies
-
Sketch the flower centers:
Switch back to your pencil. Along the upper baseline you marked earlier, lightly sketch small circles for the flower heads. Space them somewhat evenly, but vary the heights slightly so they look natural. -
Add the stems:
Draw simple, slightly curved lines connecting your floating flower circles down to the baseline. I find that giving the stem a tiny ‘S’ curve makes them look wind-blown and organic. -
Draw the petals:
Lightly sketch 5-7 long, oval petals radiating from each center circle. Ensure the petals don’t overlap too much with neighboring flowers unless you want a dense field look.
Step 4: Inking & Finishing
-
Ink the stems:
Using the medium-tip fabric marker, trace over your pencil lines for the stems. Start from the bottom and flick your wrist upward for a tapered, natural stroke. -
Ink the petals:
Carefully trace the daisy petals. When you close the loop of each petal, let the lines cross just slightly at the center connection point to mimic the hasty, sketched style of the original. -
Add center details:
For the centers of the daisies, use the fine-tip marker to stipple a small cluster of dots rather than drawing a solid circle. This adds texture. -
Erase guidelines:
Allow the ink to dry completely (check your marker’s instructions, but 1 hour is usually safe). Gently erase any visible pencil marks. -
Heat set the design:
Turn the shirt inside out. run a hot iron (no steam) over the back of the drawing for several minutes to lock the ink into the fibers.
Now you have a custom, effortlessly chic tee that looks perfect tucked into your favorite jeans
Simple Mountain Horizon Line
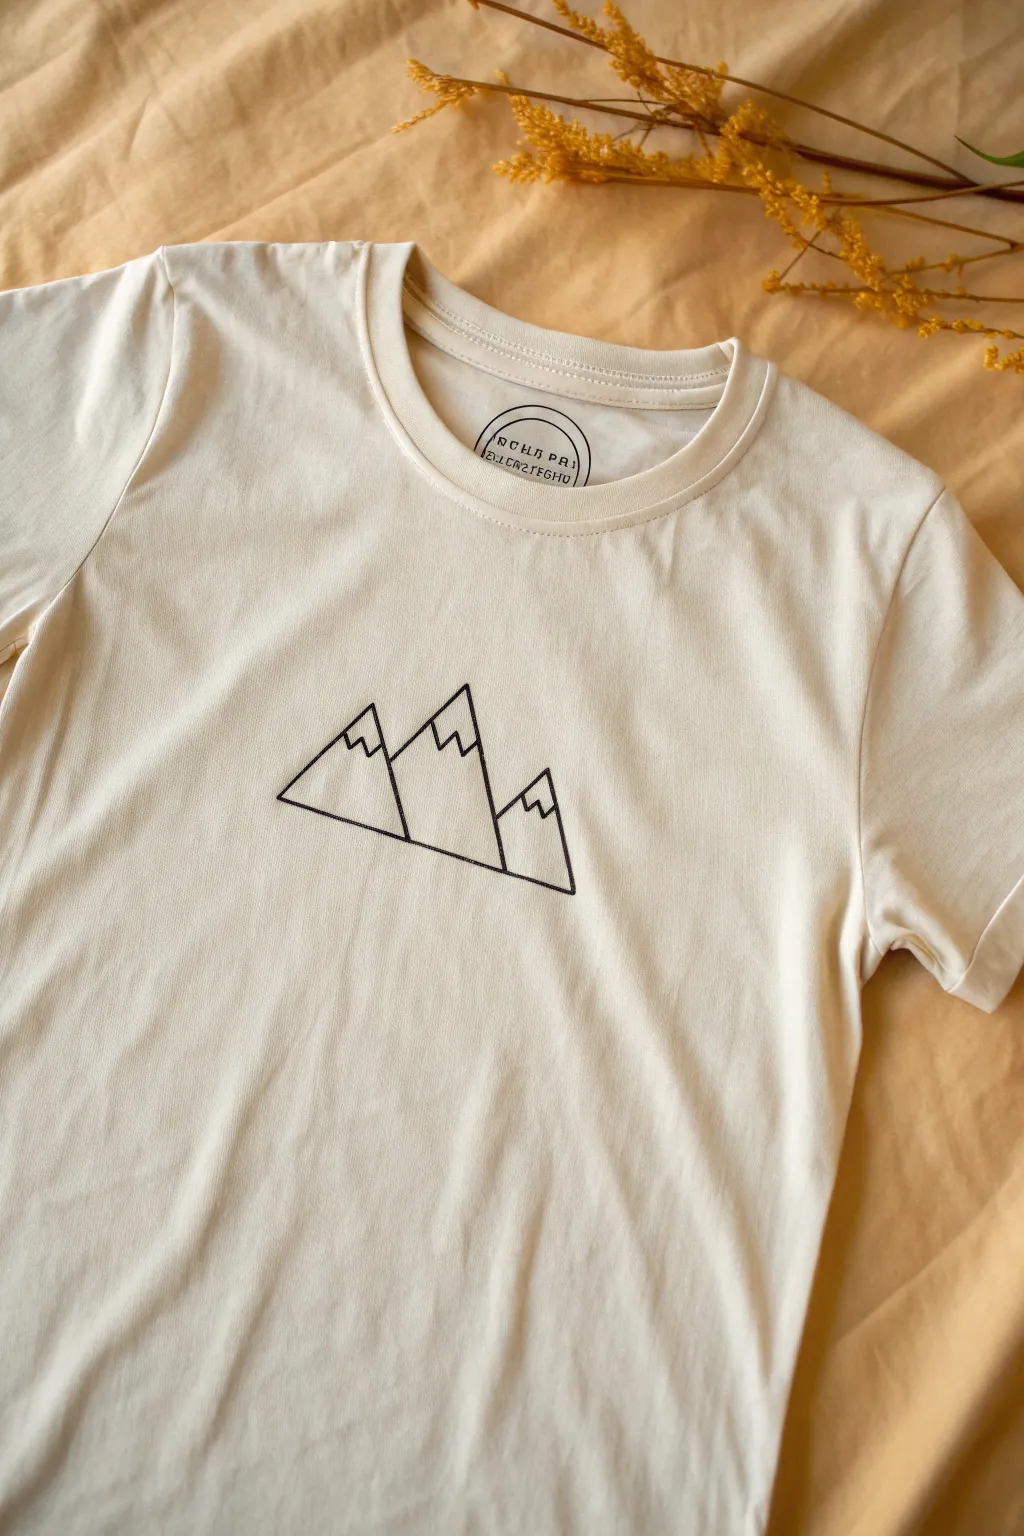
This tutorial guides you through creating a clean, geometric mountain design that looks professionally printed but is simple enough for beginners. Using fabric markers or fabric paint, you’ll achieve crisp black lines on a cream tee for that trendy, effortless outdoor aesthetic.
Step-by-Step Tutorial
Materials
- Cream or off-white cotton t-shirt
- Black fabric marker (fine or medium tip) OR black fabric paint with a thin liner brush
- Cardboard or parchment paper (to insert inside the shirt)
- Ruler or straight edge
- Pencil or disappearing fabric ink pen
- Iron (for heat setting)
- Masking tape or painter’s tape (optional)
Step 1: Preparation and Layout
-
Prep your canvas:
Start by washing and drying your t-shirt without fabric softener to ensure the fibers are ready to accept the pigment. Iron out any wrinkles to create a smooth surface. -
Protect the back:
Slip a piece of stiff cardboard or a few layers of parchment paper inside the shirt. This prevents ink from bleeding through to the back layer and provides a solid surface for drawing. -
Find the center:
Locate the center of the chest area where you want the design to sit. For this minimal look, centering it horizontally about 3-4 inches down from the collar usually looks best. -
Draft the base line:
Using your pencil and ruler, lightly sketch a straight horizontal line. Do not make this line perfectly flat; angle it slightly downward to the right if you want to match the reference image exactly, or keep it straight for a classic look. -
Sketch the triangles:
Draft three interconnected triangles sitting on your base line. The middle triangle should be the tallest and widest, overlapping the others slightly. The left one is medium-sized, and the right one is the smallest.
Bleeding Lines?
If ink bleeds into the fabric grain, you’re pressing too hard or the fabric is too damp. switch to a finer tip pen and use lighter swift strokes.
Step 2: Inking the Design
-
Outline the main shapes:
Take your black fabric marker or paint brush. Carefully trace the outer perimeter of your three mountain shapes. I find it helpful to pull the pen towards me rather than pushing it away for straighter lines. -
Add snow caps:
Draw jagged, zig-zag lines near the top of each triangle to create the snow-capped peaks. Keep these lines fairly simple—just two or three points per mountain. -
Close the shapes:
Ensure all your corners connect cleanly. If you drafted overlapping lines, decide which mountain is ‘in front’ (usually the central one) and stop your ink lines where the foreground mountain begins. -
Thicken the lines:
Go over your lines a second time to bold them up. The aesthetic here relies on a consistent line weight, so try to make the stroke width uniform throughout the design. -
Clean up details:
Check for any gaps in your ink. If you used paint, smooth out any globs or uneven textures while it is still wet.
Level Up: Retro Vibe
Add a small circle (sun) behind the peaks in a muted mustard yellow or terracotta orange for a retro 70s sunset effect.
Step 3: Finishing Touches
-
Let it dry:
Allow the design to dry completely. If you used a marker, this might take an hour; for fabric paint, leave it flat for at least 4-6 hours or overnight. -
Erase guidelines:
Once the ink is fully dry, gently erase any visible pencil marks. If you used a disappearing ink pen, they may have already vanished or might need a quick dab of water. -
Heat set the design:
Turn the t-shirt inside out. Set your iron to the cotton setting (no steam) and press the back of the design area for 3-5 minutes to lock the ink into the fibers. -
Final check:
Turn the shirt right side out and inspect your handiwork. Your new custom graphic tee is ready to wear.
Wear your new minimalist mountain tee with pride knowing it’s a one-of-a-kind creation

PENCIL GUIDE
Understanding Pencil Grades from H to B
From first sketch to finished drawing — learn pencil grades, line control, and shading techniques.
Explore the Full Guide
Sun And Moon Minimal Duo
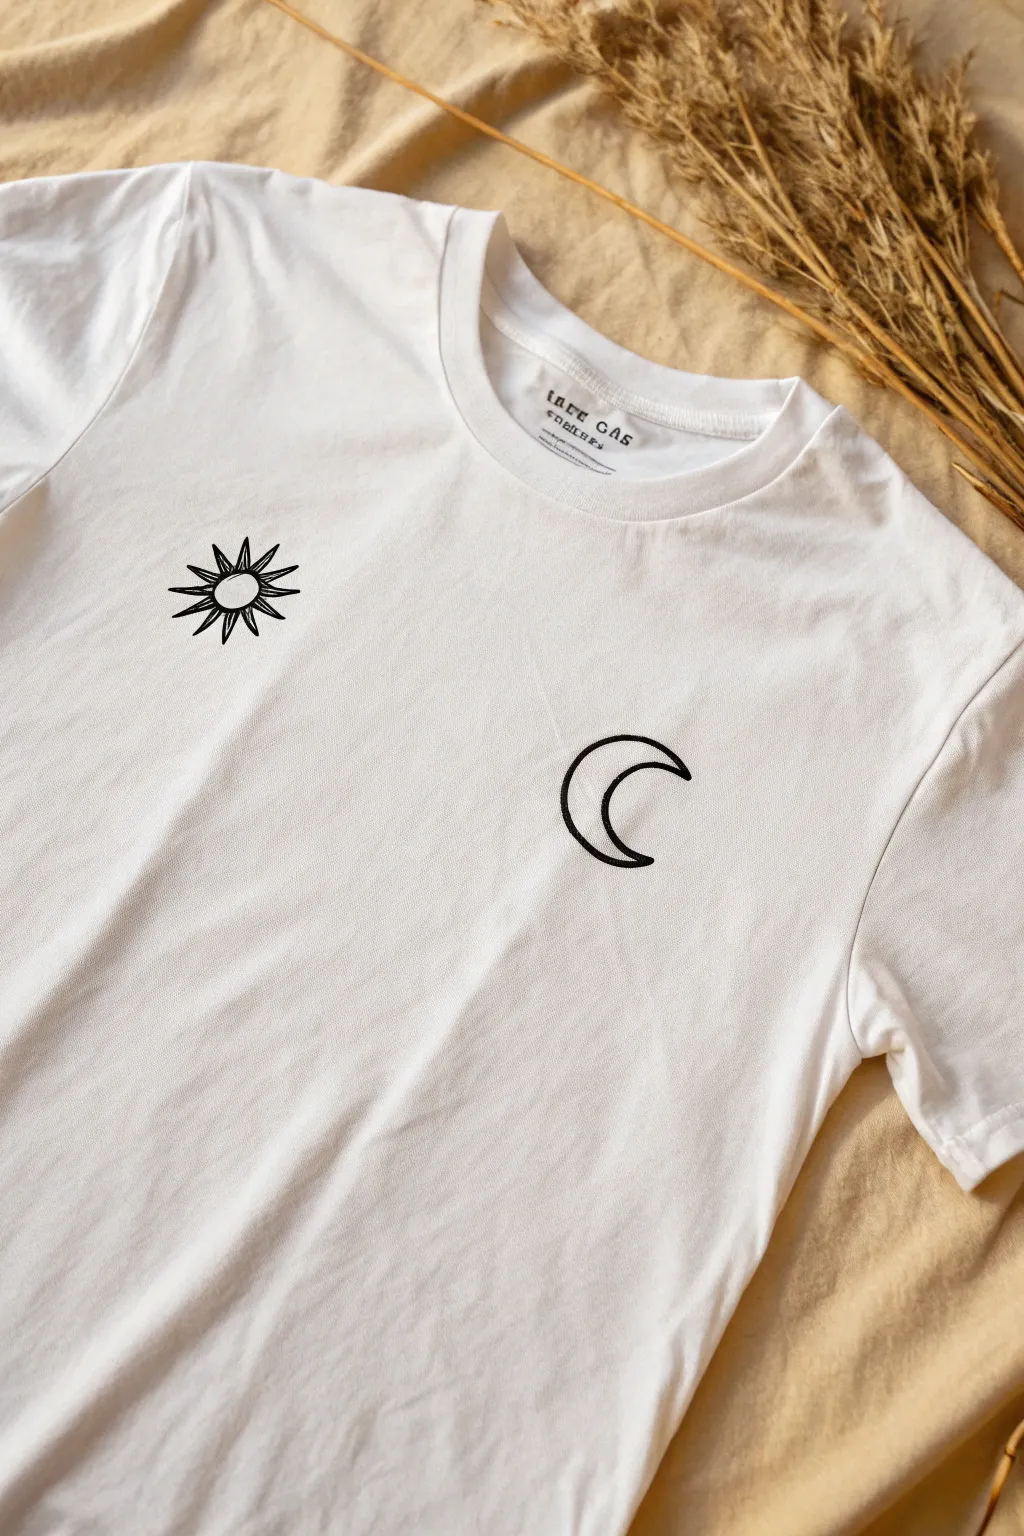
Transform a plain white tee into a piece of wearable art with this minimalist sun and moon design. The stark black ink against white fabric creates a trendy, balanced look that is both simple to execute and striking to wear.
Detailed Instructions
Materials
- White cotton t-shirt
- Cardboard or cutting mat (to place inside the shirt)
- Black fabric marker or fabric paint pen (fine tip)
- Pencil (HB or lighter)
- Eraser
- Ruler
- Iron (for setting the ink)
- Pressing cloth or parchment paper
Step 1: Preparation & Layout
-
Prepare the workspace:
Lay your t-shirt flat on a hard, smooth surface. Smooth out any wrinkles with your hands to ensure an even canvas. -
Insert protective layer:
Slide a piece of cardboard or a cutting mat inside the shirt, positioning it directly under the chest area where you plan to draw. This prevents ink from bleeding through to the back of the shirt. -
Determine placement:
Using a ruler, measure down from the shoulder seams to find a symmetrical height for both designs. Typically, 4-6 inches down from the collar seam works well for a chest pocket placement vibe. -
Mark anchor points:
Make a tiny, faint dot with your pencil on both the left and right chest areas to mark the center of where your sun and moon will go.
Bleeding Lines?
If ink starts feathering into the fabric, you’re pressing too hard or moving too slowly. Use lighter pressure and faster strokes to keep lines crisp.
Step 2: Drafting the Design
-
Sketch the sun’s center:
On the left side of the shirt (your right if facing it), lightly sketch a small circle using your pencil. This will be the face of the sun. -
Add sun rays:
Draw triangular spikes radiating outward from the circle. Aim for about 10-12 rays, keeping them roughly equal in size, though slight variations add hand-drawn charm. -
Sketch the moon outline:
On the opposite side, sketch a ‘C’ shape to form the outer curve of the crescent moon. Ensure it is roughly the same height as the complete sun design to maintain balance. -
Complete the moon:
Draw the inner curve of the crescent, tapering the ends to sharp points that meet the outer curve. I like to step back here to check that the visual weight of both icons feels equal.
Celestial Sparkle
Add tiny dots or small four-pointed stars around the moon using silver fabric paint for a subtle pop of galactic texture.
Step 3: Inking
-
Test the marker:
Before touching the shirt, scribble with your fabric marker on a scrap piece of paper or fabric to ensure the ink flows smoothly and isn’t dried out. -
Outline the sun:
Start tracing your pencil lines on the sun. Use a steady hand and pull the marker towards you for better control. Outline the central circle first. -
Fill the sun’s rays:
Trace the triangular rays. Then, carefully color inside the circle and the rays until they are solid black, paying attention to the edges for a crisp look. -
Outline the moon:
Move to the moon side. Trace the outer and inner curves with confident, continuous strokes to avoid jagged lines. -
Fill the moon:
Color in the crescent shape thoroughly. Make sure the points of the crescent remain sharp and defined; you might need just the very tip of the marker for these ends.
Step 4: Finishing Touches
-
Let it dry:
Allow the ink to dry completely. This usually takes about 1-2 hours depending on your specific marker brand, but check the manufacturer’s instructions. -
Erase guidelines:
Once you are 100% sure the ink is dry, gently erase any visible pencil marks. Be careful not to smudge the fabric or stretch the knit too much. -
Heat set the design:
Place a pressing cloth or parchment paper over the design. Set your iron to the cotton setting (no steam) and press firmly over the artwork for 2-3 minutes to lock the ink into the fibers.
Now you have a custom, boutique-style tee ready for your next casual outing
Simple Butterfly Outline
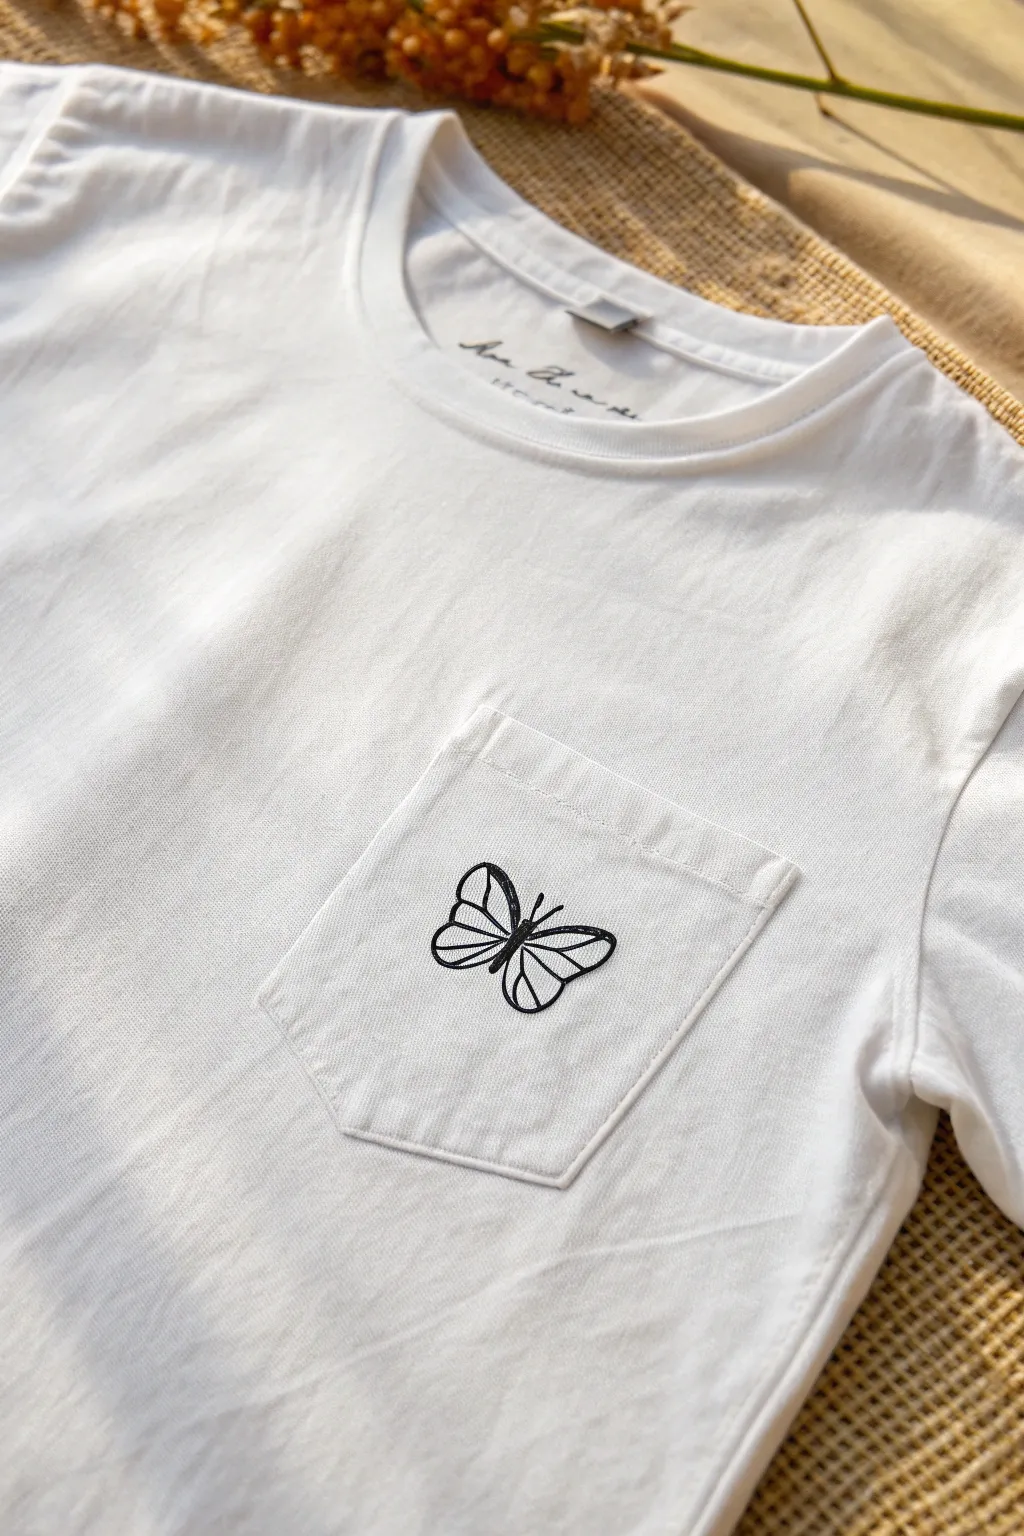
Transform a plain white tee into a charming statement piece with just a few simple lines. This minimalist butterfly design sits perfectly on the pocket, adding a delicate, hand-drawn touch to your everyday wardrobe.
How-To Guide
Materials
- White cotton t-shirt with a chest pocket
- Black fine-tip fabric marker or fabric pen
- Small piece of cardboard (to fit inside the pocket)
- Pencil (optional, for sketching)
- Iron
- Ironing board or heat-safe surface
Step 1: Preparation
-
Prepare the surface:
Lay your t-shirt flat on a hard, even surface. Smooth out any wrinkles on the pocket area specifically, as bumps can cause your lines to skip. -
Insert the barrier:
Cut a small piece of cardboard slightly smaller than the pocket itself. Slide this inside the pocket carefully. -
Why the barrier matters:
This cardboard prevents the ink from bleeding through the single layer of the pocket and staining the shirt fabric underneath.
Ink Bleeding?
If the fabric marker ink spreads into the cotton fibers (spiderwebbing), try spraying the pocket with a light coat of hairspray or starch before drawing to seal the fabric surface.
Step 2: Sketching the Outline
-
Start with the body:
If you are confident, go straight to the marker. If not, lightly sketch with a pencil first. Draw a thin, vertical oval in the center of the pocket for the butterfly’s thorax. -
Draw the top wings:
Starting from the top third of the body, draw a curved line extending outward and upward, looping back down to the middle of the body. Do this for both the left and right sides. -
Draw the bottom wings:
Create the lower wings by drawing smaller loops that start where the top wings ended, curving down and connecting back to the bottom of the body. -
Add the antennae:
Draw two short, delicate lines extending from the top of the body for the antennae.
Step 3: Inking the Design
-
Trace the main lines:
Take your black fabric marker using a fine tip. Carefully trace over your pencil lines (or your mental image) for the body and the outer shape of the wings. -
Fill the body:
You can fill in the central body oval completely with black ink to anchor the design, or leave it as an outline for a lighter look. -
Add wing details:
Draw the internal structure of the wings. Start from the body and draw lines radiating outward toward the edges of the wings. -
Create segments:
Connect these radiating lines with gentle curves to create the classic paneled look of a butterfly wing. -
Refine the lines:
Go back over any lines that look too faint. I find a second pass often makes the black pop much better against the white cotton. -
Let it dry:
Allow the ink to dry completely. This usually takes about 24 hours, but check your specific marker’s instructions.
Add a Splash of Color
Once the black outline is dry, use watercolor-style fabric paints or colored markers to fill in just one or two segments of the wings for a subtle pop of pastel color.
Step 4: Heat Setting
-
Prep the iron:
Set your iron to the cotton setting (high heat) and ensure the steam function is turned off. -
Protect the design:
Place a thin piece of scrap cotton cloth or parchment paper over the drawing to protect your iron plate. -
Apply heat:
Press the iron explicitly over the design area. -
Keep it moving:
Move the iron slowly in circles for about 3 to 5 minutes to fully heat-set the ink into the fibers. -
Final cool down:
Remove the protective cloth and the cardboard insert once the fabric has cooled down.
You now have a custom piece of wearable art that looks effortlessly stylish


Geometric Shapes Stack
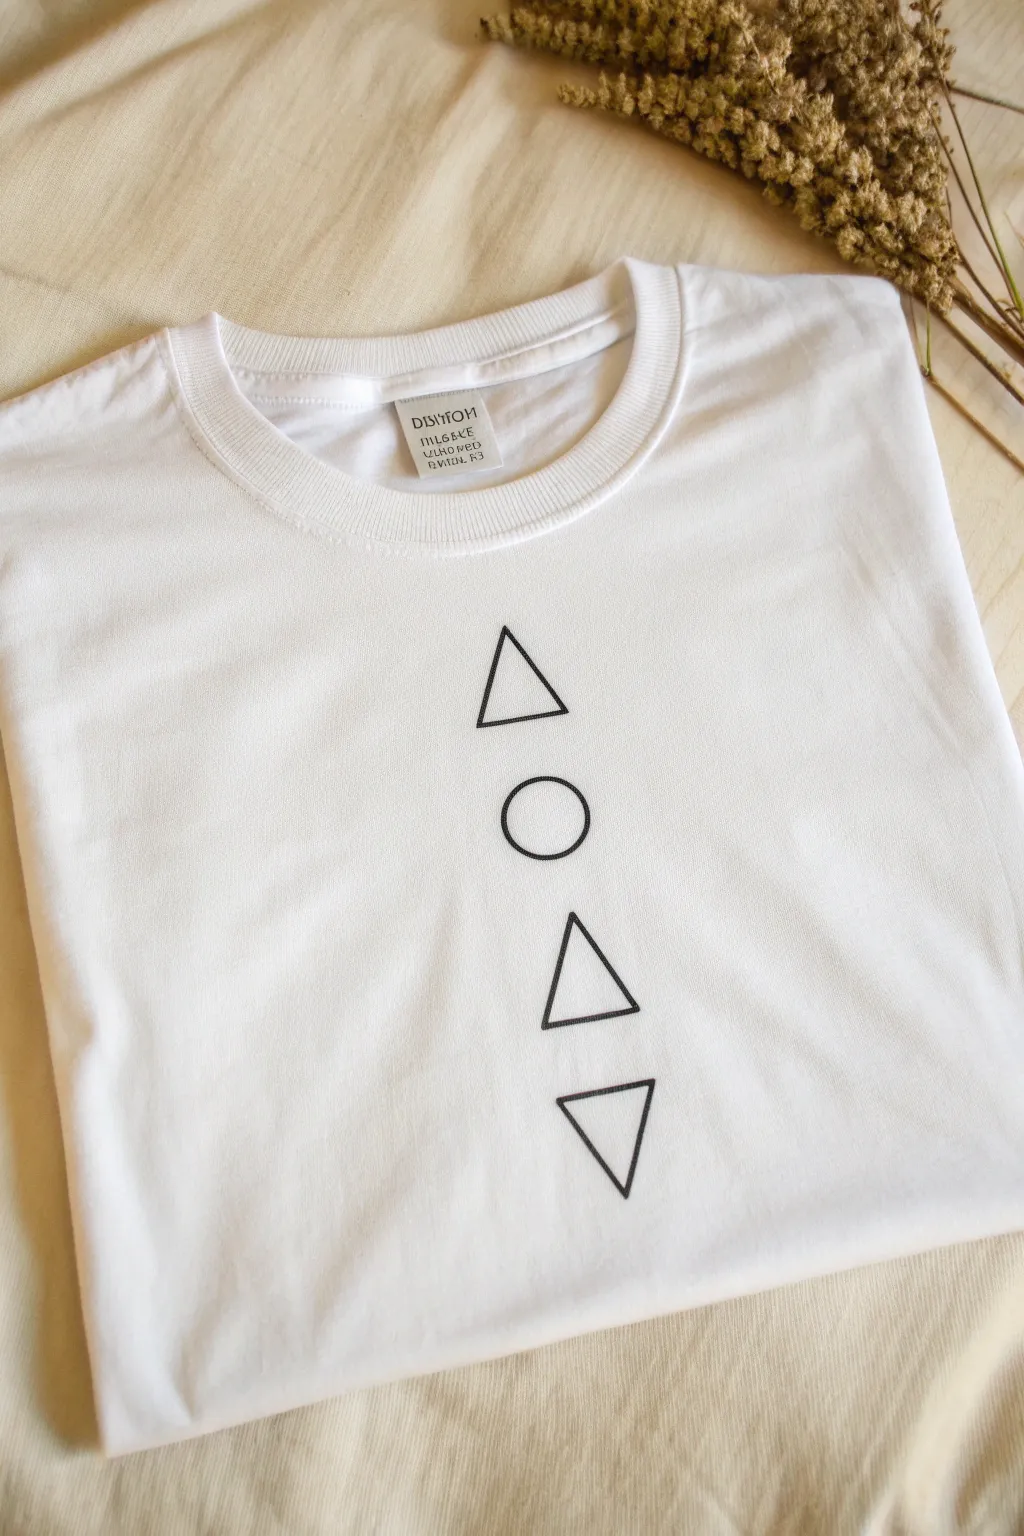
Achieve a sleek, modern look with this ultra-simple geometric line art design. This project focuses on clean linework and perfect alignment to create a vertical totem of shapes that feels both cryptic and stylish.
Step-by-Step
Materials
- White cotton t-shirt (pre-washed)
- Black fabric marker (medium or fine tip)
- Ruler
- Compass or roll of masking tape (for circle)
- Piece of cardboard (to fit inside shirt)
- Pencil
- Iron (for heat setting)
- Ironing board or flat surface
- Eraser
Step 1: Preparation and Planning
-
Prepare the fabric canvas:
Start by washing and drying your t-shirt without fabric softener to remove any sizing chemicals that might repel ink. Give it a quick iron to ensure you have a perfectly smooth surface to work on. -
Insert the barrier:
Slide a piece of cardboard or thick paper inside the shirt. This is crucial as it prevents the marker ink from bleeding through to the back of the shirt and creates a firm surface for drawing. -
Find the center line:
Using your ruler, lightly mark a vertical center line down the front of the shirt with a pencil. This guide will ensure your geometric stack stays perfectly straight. -
Mark horizontal guides:
Decide on the spacing for your four shapes. I find that leaving about 1 to 1.5 inches between each shape creates a nice balance. Make small horizontal tick marks on your center line where the top and bottom of each shape should sit.
Placement Pro Tip
Start the top shape about 3-4 inches below the collar seam. This ‘sweet spot’ ensures the design sits firmly on the chest rather than riding up too close to the neckline.
Step 2: Drafting the Design
-
Draft the top triangle:
Starting at your top mark, use the ruler to lightly sketch an equilateral triangle pointing upwards. Keep your pencil pressure very light so it’s easy to erase later. -
Draft the circle:
Move to the next position. Use a compass or trace the inside of a masking tape roll to sketch a circle. Ensure the center of the circle aligns perfectly with your vertical guide line. -
Draft the middle triangle:
Below the circle, sketch the second upward-pointing triangle. Ideally, try to keep the width of the base consistent with the top triangle for visual harmony. -
Draft the bottom triangle:
For the final shape, sketch an inverted triangle (pointing down). This completes the stack. Step back and check your alignment now before committing to ink.
Bleeding Lines?
If ink spreads into fabric fibers (feathering), you’re pressing too hard or moving too slowly. Use a lighter touch and slightly faster strokes for crisp edges.
Step 3: Inking and Finishing
-
Test your marker:
Before touching the shirt, test your fabric marker on a scrap piece of similar fabric to check the flow and line width. -
Ink the top triangle:
Place your ruler against the pencil lines of the top triangle. Run the fabric marker along the edge of the ruler for a crisp, straight line. Ink all three sides. -
Ink the circle:
Carefully trace over your pencil circle. Since you can’t easily use a ruler here, go slowly. Use your whole arm to move the pen rather than just your wrist to get a smoother curve. -
Ink the remaining triangles:
Move down to ink the second upward triangle and the final downward triangle, using the ruler again for sharp edges. -
Thicken the lines (optional):
If you want a bolder look like the example image, go over your lines a second time. This evens out any shakiness and makes the black pop against the white cotton. -
Let the ink dry:
Allow the design to air dry completely. This usually takes about one to two hours, depending on the brand of marker used. -
Erase guidelines:
Once the ink is fully dry, gently erase any visible pencil marks. Be careful not to scrub too hard over the inked areas. -
Heat set the design:
Set your iron to the cotton setting (no steam). Place a thin cloth over the design and iron over it for 3-5 minutes to lock the ink into the fibers.
Wear your new geometric creation with pride knowing you made it yourself
Half-Mandala Neckline Accent
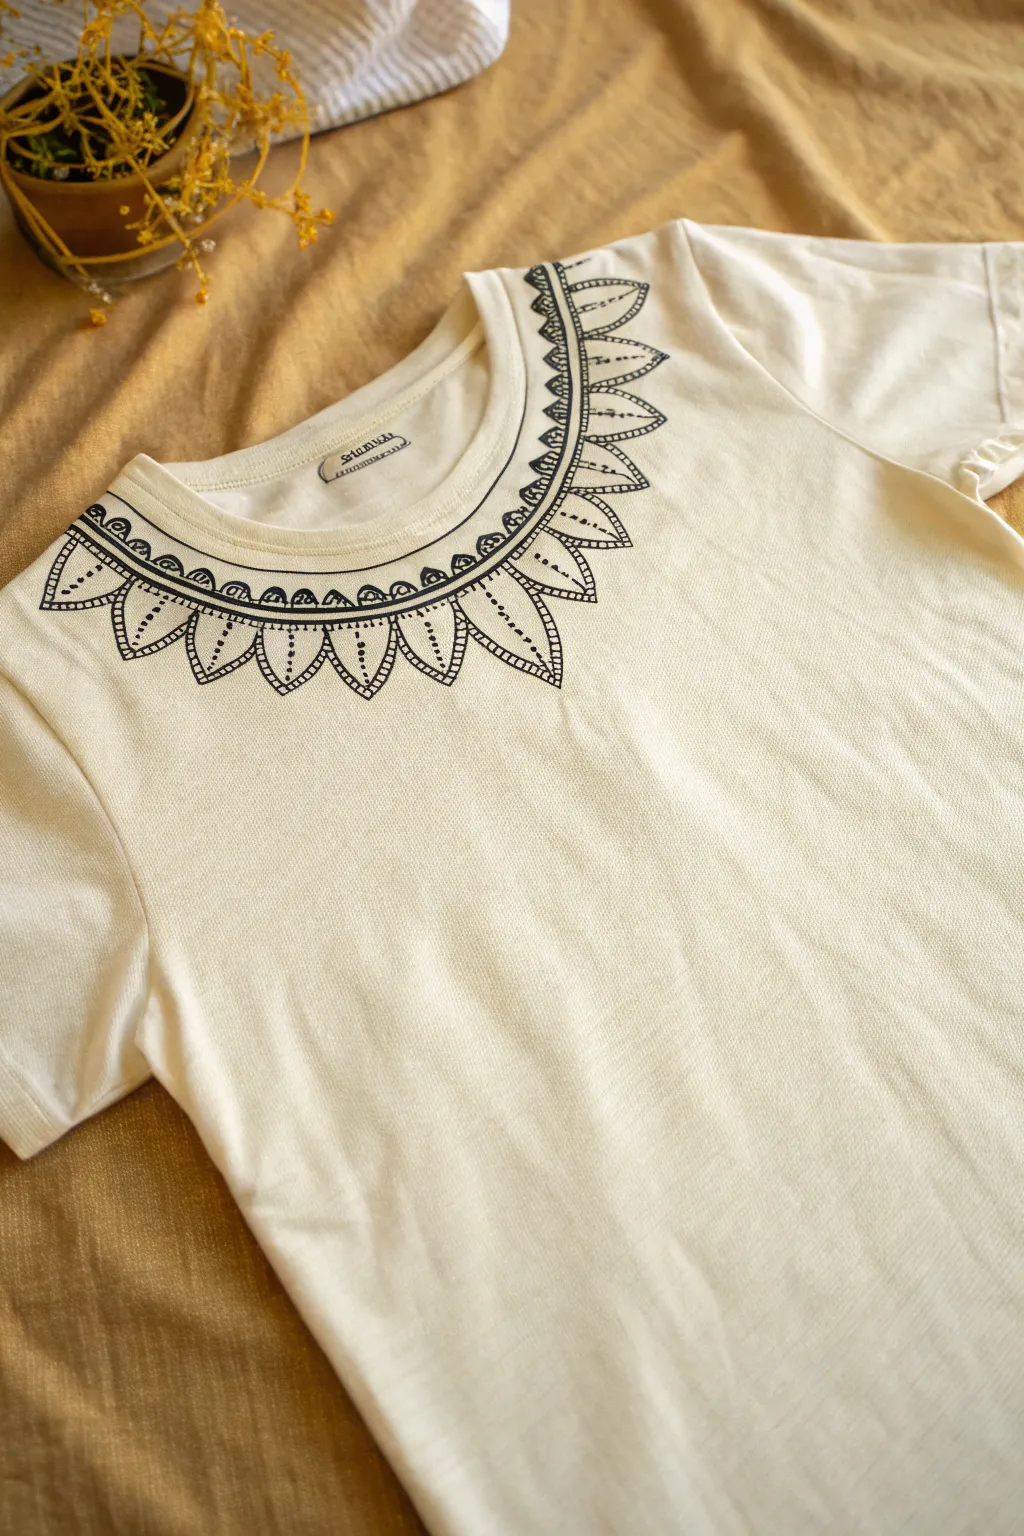
Transform a plain cream tee into a boho-chic statement piece with this elegant neckline design. Using simple geometric shapes like scallops and dots, you’ll create a striking black-on-cream collar that mimics intricate embroidery.
Step-by-Step Tutorial
Materials
- Cream or off-white cotton t-shirt (pre-washed)
- Black fine-tip fabric marker or fabric pen
- Cardboard or stiff paper (to place inside shirt)
- Pencil (HB or lighter)
- Eraser
- Measuring tape (optional)
- Iron (for heat setting)
Step 1: Preparation & Mapping
-
Prepare the workspace:
Lay your t-shirt flat on a hard, smooth surface. Smooth out any wrinkles around the neckline area specifically. -
Insert the barrier:
Slide a piece of cardboard inside the shirt, positioning it directly under the neckline. This prevents ink from bleeding through to the back of the shirt and gives you a firm drawing surface. -
Sketch the base curve:
Using a light pencil, lightly sketch a guideline curve about 1 to 1.5 inches below the existing ribbed collar. This will define the outer boundary of your first decorative band.
Pro Tip: Fabric Tension
Use masking tape to gently stretch and secure the shirt to the cardboard. Taut fabric prevents the marker from snagging and creates much sharper lines.
Step 2: Drawing the Inner Collar Band
-
Outline the inner rim:
Take your black fabric marker and carefully trace just underneath the thick ribbed stitching of the collar to create a solid starting line. -
Create the double line:
Draw a second curved line parallel to your first one, following the pencil guide you made earlier. This creates a focused ‘band’ around the neck. -
Add the scallops:
Inside this band, draw a continuous series of small, semi-circle scallops. Keep them uniform in size, connecting them end-to-end like a chain. -
Detail the scallops:
Place a small dot in the center of each scallop. Then, draw a tiny dot in the V-shaped space between the top of the scallops and the upper line. -
Thicken the borders:
Go over the top and bottom boundary lines of this band one more time to thicken them slightly, making the section distinct.
Troubleshooting: Bleeding Ink
If ink starts feathering, you’re pressing too hard or moving too slowly. Use a lighter touch and faster strokes. A higher cotton blend shirt also helps reduce bleed.
Step 3: Creating the Petal Layer
-
Sketch petal guides:
With your pencil, lightly sketch large, pointed petal shapes radiating outward from the collar band. They should look like oversized sunflower petals. -
Ink the peta outlines:
Trace over your pencil petal shapes with the black fabric marker. I like to pull the pen toward me for smoother curves. -
Add inner petal details:
Inside each large petal, draw a smaller, matching petal shape. This creates a ‘double outline’ effect that adds depth. -
Fill with dashed lines:
Inside the gap between the large outer petal and the smaller inner petal, draw short, perpendicular dashes all the way around the curve. This mimics stitching. -
Draw the central vein:
Draw a straight line down the center of each inner petal, stopping just short of the tip. -
Stipple the veins:
Add a series of small dots along that central vein line to give the design texture and visual interest.
Step 4: Finishing Touches
-
Let the ink settle:
Allow the fabric marker to dry completely for at least one hour before touching the surface. -
Erase guidelines:
Gently erase any visible pencil marks, being careful not to smudge the black ink. -
Heat set the design:
Turn the t-shirt inside out and iron the reverse side of the neckline on a medium-high cotton setting (no steam) to lock the ink into the fibers permanently.
Enjoy wearing your custom-designed tee that combines simple drawing with effortless style
Single-Line Cat Silhouette
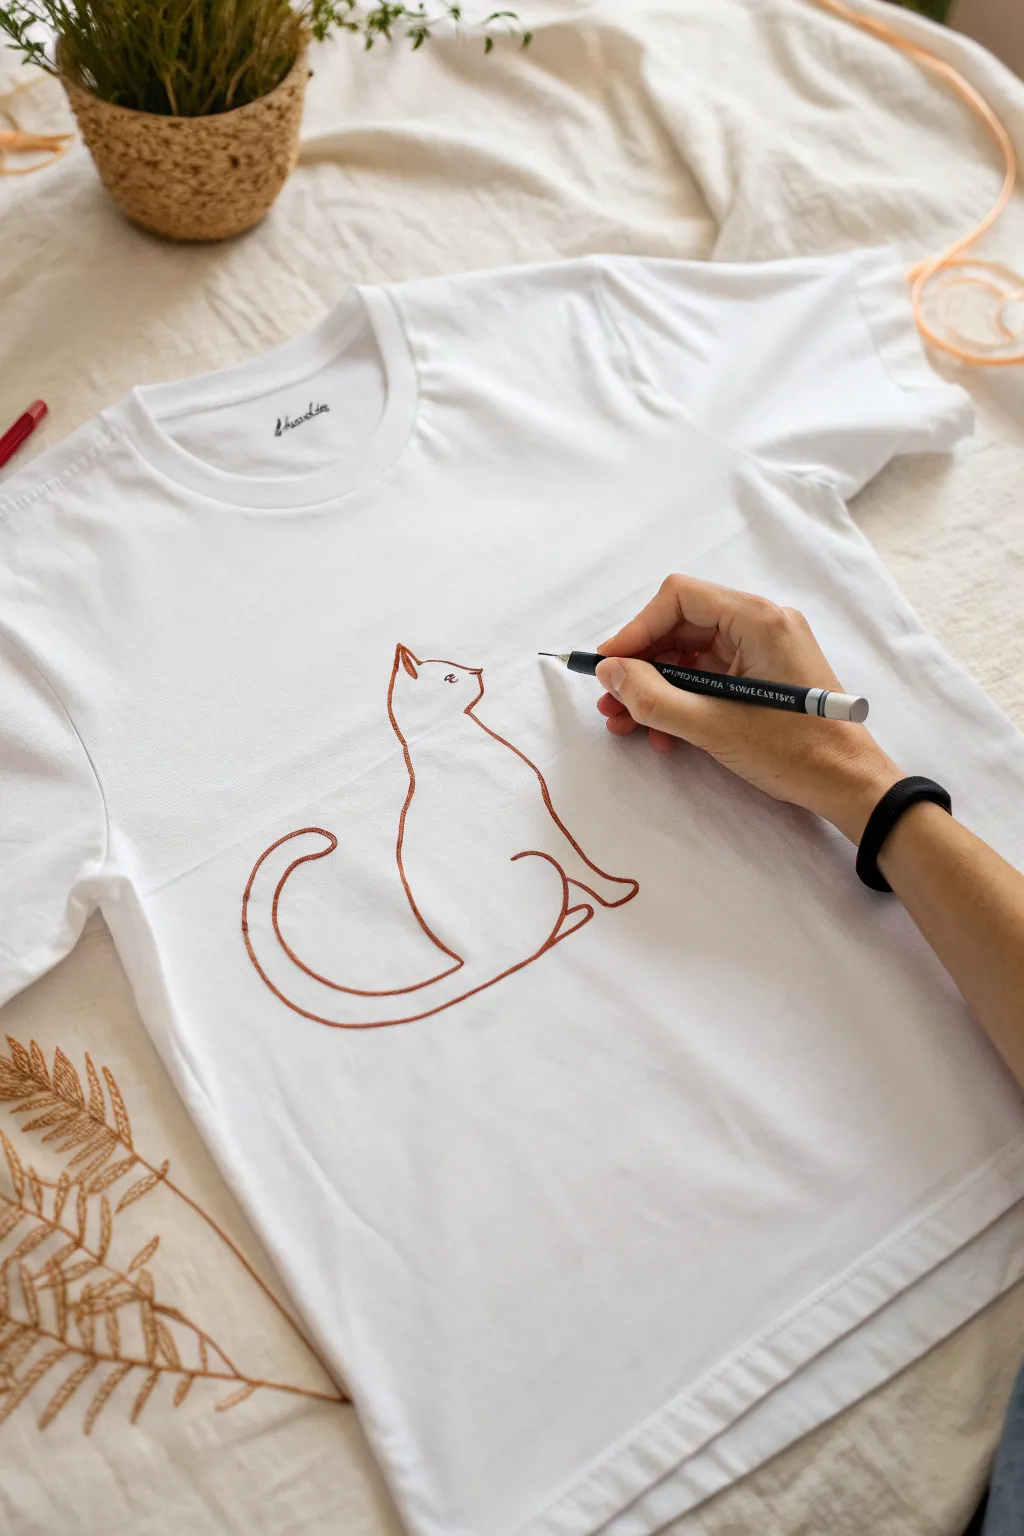
Embrace the elegance of simplicity with this continuous-line cat silhouette that turns a plain white tee into a piece of wearable art. The copper-brown ink gives it a warm, modern aesthetic that feels effortlessly chic and is surprisingly easy to execute.
How-To Guide
Materials
- High-quality white cotton t-shirt (pre-washed)
- Fabric marker or fabric paint pen (copper or rust brown)
- Cardboard or cutting mat (to place inside the shirt)
- Pencil (for sketching)
- Eraser
- Iron (for heat setting)
- Pressing cloth or parchment paper
Step 1: Preparation & Sketching
-
Prep the canvas:
Begin by washing and drying your t-shirt without fabric softener to ensure the ink adheres properly. Iron out any wrinkles in the center chest area where you plan to draw. -
Create a barrier:
Slide a piece of thick cardboard or a cutting mat inside the t-shirt, directly underneath the area you will be decorating. This is crucial to prevent the ink from bleeding through to the back of the shirt. -
Check the placement:
Stand back or hold the shirt up to your body to visually confirm exactly where the center of the chest is. You want the cat to sit comfortably in the middle, not too high near the collar or too low on the stomach. -
Draft the outline:
Using a pencil very lightly, sketch the outline of the cat. Start with the pointed ears and the curve of the head. -
Connect the body:
Draw a smooth, sloping line down for the back, extending it into the long curve of the tail. -
Detail the posture:
Sketch the front chest line coming down from the chin, swelling slightly for the chest, then curving into the front legs and seated haunches. -
Refine the lines:
Look over your pencil sketch. The beauty of this design is the smooth flow, so soften any jagged corners or hesitant lines with your eraser until the pencil guide looks fluid.
Step 2: Inking the Design
-
Test your marker:
On a scrap piece of similar fabric, test your fabric marker to check the ink flow and line thickness. This helps you avoid a sudden blob of ink when you start on the real shirt. -
Start at the ears:
Begin inking at the top of the head. Draw the first ear triangle, moving slowly to ensure the line is solid and dark. -
Trace the back connection:
Pull the pen down from the neck, creating the long, elegant curve of the cat’s back. Keep your hand steady and try to maintain consistent pressure. -
Form the tail:
Continue that back line directly into the tail. Loop it up and around in a ‘C’ shape. I like to rotate the shirt slightly here to get a better angle for keeping the curve smooth. -
Complete the tail loop:
Bring the line back from the tip of the tail to connect with the base of the body. Ensure this connection point is clean and doesn’t showcase a heavy overlap mark. -
Draw the front profile:
Go back to the chin area. Draw the line downward to form the chest and the front leg. -
Define the legs:
Create the subtle indentations that suggest the paws and the seated rear leg. These small hooks and curves are essential for making the shape recognizable as a cat. -
Close the shape:
Connect your final line at the bottom of the seated haunch, completing the silhouette. -
Add facial details:
carefully add a tiny dot for the eye and a small curved line for the nose profile. These should be delicate touches. -
Thicken the lines:
Go over the entire outline a second time. This adds richness to the copper color and smooths out any minor wobbles from the first pass.
Stretch it Out
Tape the fabric taut against your cardboard insert. Loose fabric can drag under the pen nib, causing skips or snags in your smooth lines.
Step 3: Finishing Touches
-
Let it dry:
Allow the ink to dry completely. This usually takes about 1-2 hours, but check your specific marker’s instructions. -
Erase pencil marks:
Once the ink is fully dry, gently erase any visible pencil sketch lines that didn’t get covered by the marker. -
Heat set the design:
Place a pressing cloth or parchment paper over the design. Iron on a cotton setting (no steam) for several minutes to permanently set the ink into the fabric fibers.
Ink Bleeding?
If the ink starts feathering, stop immediately. Your fabric might be too damp or have sizing. Let it dry fully or switch to a finer tip pen for crisp edges.
Now you have a charming, minimalist graphic made entirely by hand tailored to your style
Food Doodle Trio

This custom t-shirt project embraces a playful, minimalist aesthetic with clean black linework on fresh white fabric. It features a stacked design of simple food doodles—a pizza slice and an apple—labeled with quirky, mismatched text for a humorous touch.
Step-by-Step Tutorial
Materials
- White cotton t-shirt (pre-washed)
- Black fabric marker (fine or medium tip)
- Pencil (HB or lighter)
- Ruler or straight edge
- Piece of cardboard (to fit inside the shirt)
- Iron (for heat setting)
- Ironing board or heat-safe surface
- Press cloth or parchment paper
Step 1: Preparation & Layout
-
Pre-wash the fabric:
Before starting any design work, wash and dry your white t-shirt without using fabric softener. This removes sizing chemicals that can prevent the ink from bonding properly. -
Insert the barrier:
Slide a piece of sturdy cardboard inside the shirt, positioning it directly under the area where you plan to draw. This is crucial to stop the ink from bleeding through to the back layer of the shirt. -
Smooth the surface:
Pull the fabric taut against the cardboard and smooth out any wrinkles with your hand or a quick pass of the iron. A flat surface ensures your lines won’t skip or distort. -
Mark the center line:
Using a ruler and a very light pencil touch, find the vertical center of the chest area. Lightly sketch a vertical guide line to help align your text and drawings. -
Plan vertical spacing:
Mark horizontal ticks along your center line for where each element will go. You need six distinct levels: ‘PIZZA’, the slice, ‘CUP’, the apple, and ‘FRUIT’. Leave about 1.5 to 2 inches between each section.
Fixing Wobbly Lines
If a line goes crooked, thicken the entire outline slightly to hide the mistake. A bolder, ‘sketchy’ style often looks even better and hides errors effectively.
Step 2: Sketching the Design
-
Sketch the first text:
At the top mark, lightly pencil in the word ‘PIZZA’ in all capital, sans-serif letters. Keep the lettering heavily spaced and casual. -
Draw the pizza slice:
Below the first word, sketch a downward-pointing triangle. Add a curved line at the top for the crust providing it with a bit of thickness. -
Detail the pizza:
Draw small circles inside the triangle for pepperoni slices. I like to make them slightly irregular so they look hand-drawn rather than stamped. -
Sketch the middle text:
Below the pizza slice tip, pencil in the word ‘CUP’. Center it visually rather than mathematically, as the P in cup can make it look off-balance. -
Draw the apple:
Beneath ‘CUP’, outline a simple apple shape. Start with a dip for the top stem area, round out the shoulders, and taper slightly toward the bottom. -
Add apple details:
Add a small stem sticking out of the top dip and a single leaf curving to the right. Keep the shape recognizable but simplified. -
Sketch the final text:
Under the apple, write the word ‘FRUIT’ in the same capital style as the previous words.
Use Tape for Text
Place strips of masking tape above and below your text lines before drawing. This creates a perfect channel to keep your letter height consistent.
Step 3: Inking & Finishing
-
Trace top text:
Take your black fabric marker and carefully trace over the ‘PIZZA’ pencil lines. Move your arm, not just your wrist, to keep lines steady. -
Ink the pizza slice:
Trace the pizza outline next. When doing the pepperoni circles, you can fill them in completely black or leave them as outlines depending on your preference; the original uses open circles. -
Ink the middle section:
Trace the word ‘CUP’. Maintain consistent pressure on the marker tip to ensure the line weight matches the first word. -
Ink the apple:
Go over the apple sketch with the marker. Focus on smooth curves for the fruit’s body to avoid jagged edges. -
Trace final text:
Finish the inking process by tracing ‘FRUIT’ at the bottom. Double-check that all pencil lines are covered or look intentional. -
Let ink dry:
Allow the shirt to sit undisturbed for at least one hour (or however long your specific marker brand recommends) to prevent smudging. -
Erase guidelines:
Once the ink is fully dry, gently erase any visible pencil marks. Be careful not to scrub too hard over the ink itself. -
Heat set the design:
Place a detailed press cloth or parchment paper over the design. Iron on medium-high heat (no steam) for 3-5 minutes to permanently set the ink into the fibers.
Wear your new conversational piece with pride and enjoy the confusing looks.
Split Panel: Sketch To Shirt Transfer
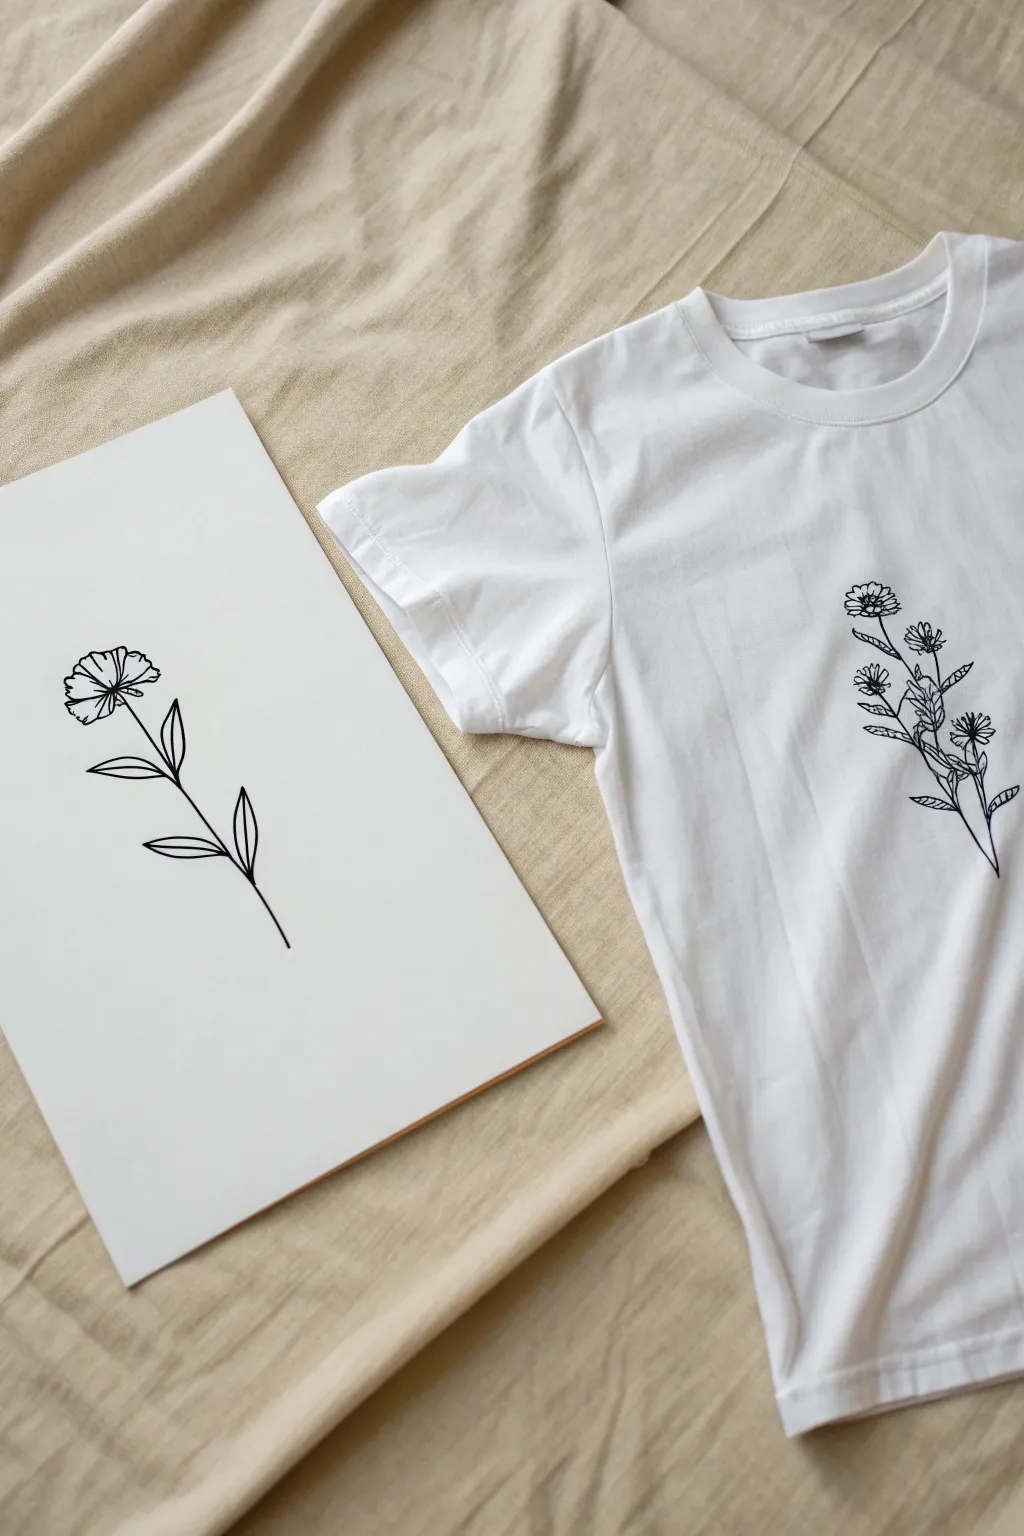
Transform a basic white tee into a custom piece of wearable art by taking a simple line drawing and transferring it directly onto fabric. This project bridges the gap between your sketchbook and your wardrobe using accessible materials for a clean, minimalist look.
Detailed Instructions
Materials
- White cotton t-shirt
- Heavyweight drawing paper or cardstock
- Black fine-point permanent marker (0.5mm or 0.7mm)
- Black fabric marker or fabric paint pen
- Pencil (HB or H)
- Eraser
- Iron and ironing board
- Masking tape or painter’s tape
- Piece of cardboard (t-shirt insert)
Step 1: Planning and Sketching
-
Prepare your paper:
Select a piece of cardstock or heavy drawing paper that is roughly the size you want your final design to be. A standard A4 or letter-sized sheet works well for a chest placement. -
Sketch the stem foundation:
Using a pencil with a light touch, draw a slightly curved vertical line to serve as the main stem of your flower. Keep the line organic rather than perfectly straight. -
Add leaf structures:
Draw simple leaf shapes extending from the stem. Start near the bottom and alternate sides as you move up, keeping the shapes pointed and slender for an elegant look. -
Draft the flower head:
At the top of the stem, sketch an oval or circle as a guide. Fill this in with simple petal shapes, radiating outward from a central point. -
Refine the lines:
Go over your pencil sketch and darken the lines you want to keep. Feel free to add a second, smaller flower cluster branching off the main stem if you want more complexity. -
Ince the final design:
Take your black fine-point permanent marker and trace over your final pencil lines. Make sure the lines are solid and bold enough to be seen through fabric. -
Clean up the sketch:
Once the ink is completely dry, gently erase all visible pencil marks so only the clean black design remains.
Ink Bleeding?
If lines look fuzzy, your marker tip might be dwelling too long in one spot. Move the pen at a steady, moderate pace and ensure the fabric is pulled taut but not over-stretched.
Step 2: Transferring onto Fabric
-
Prepare the shirt:
Iron your white t-shirt thoroughly to remove all wrinkles. Smooth fabric is crucial for a clean line transfer. -
Position the design:
Slide your drawing inside the t-shirt. Adjust the paper until the design is positioned exactly where you want it on the chest area. -
Secure the template:
Once positioned, I usually use a small piece of masking tape to secure the paper to the inside of the shirt so it doesn’t shift while drawing. -
Insert protective layer:
Slide a piece of cardboard inside the shirt, placing it exclusively *under behind* the paper sketch. This prevents ink from bleeding through to the back of the shirt. -
Trace stem and leaves:
Using your fabric marker, adhere the fabric to the paper by pressing down firmly with your non-drawing hand. Trace the stem and leaves carefully, moving slowly to prevent the fabric from bunching. -
Trace the flowers:
Continue tracing the intricate petals of the flower head. Use light pressure first to establish the shape, then go back over it if you need a bolder line. -
Check for gaps:
Lift the top layer of fabric slightly to separate it from the paper template. Check for any missed spots or faint lines that need reinforcing. -
Remove the template:
Carefully remove the paper template and the cardboard insert from inside the shirt. -
Set the ink:
Most fabric markers require heat setting. Place a clean cloth over your design and iron it on a medium-high setting for 3-5 minutes (or follow your specific marker’s instructions).
Pro Tip: Light Box Hack
If your t-shirt fabric is too thick to see the drawing clearly, tape your design and shirt onto a window on a sunny day. The sunlight acts as a natural lightbox for easy tracing.
Now you have a custom-designed floral tee ready to wear or gift.
Stained-Glass Style Simple Shape
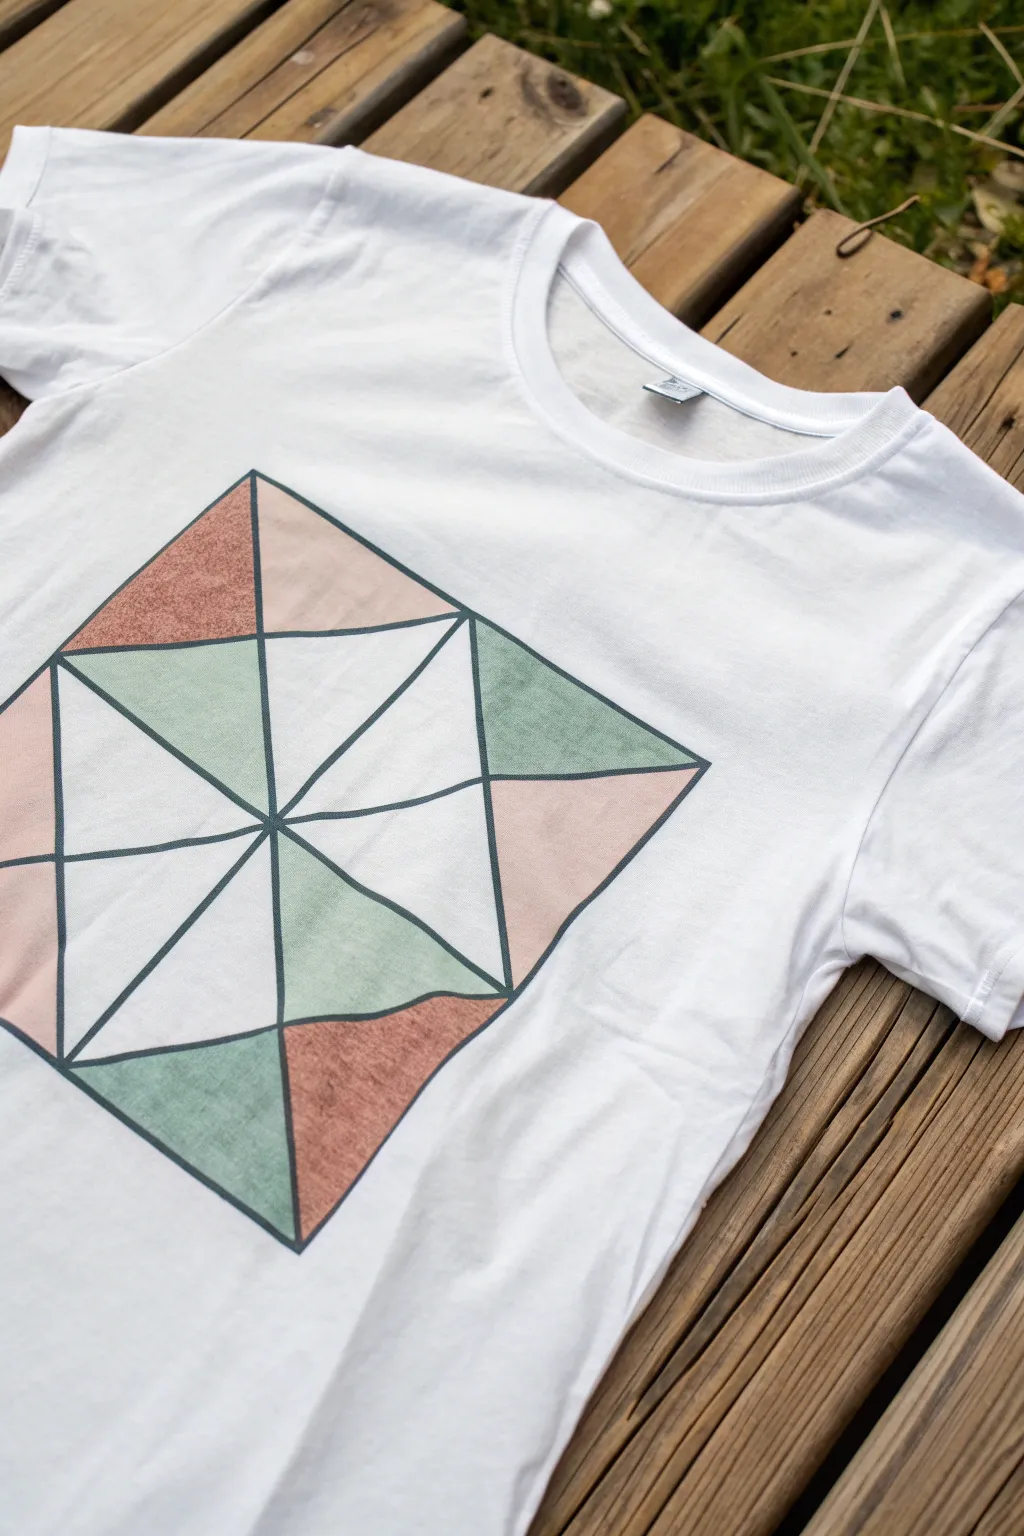
Transform a plain white t-shirt into a piece of modern art with this geometric, stained-glass inspired design. Using simple painter’s tape and soft fabric paints, you can create crisp lines and a subtle, washed-out color palette that looks professionally printed.
How-To Guide
Materials
- White cotton t-shirt (pre-washed)
- Cardboard insert
- Fabric medium
- Acrylic craft paints (terra cotta, sage green, blush pink, beige)
- Painter’s tape or masking tape (various widths)
- Black fabric marker or fine-tip black puffy paint
- Sponge brushes or stencil brushes
- Ruler
- Pencil
- Iron (for heat setting)
Step 1: Preparation and Mapping
-
Prepare your canvas:
Start by sliding a piece of cardboard inside your t-shirt. This is crucial as it prevents paint from bleeding through to the back of the shirt and gives you a firm surface to draw on. -
Smooth the fabric:
Ensure the front of the shirt is completely smooth and taut against the cardboard. If there are wrinkles, give it a quick press with an iron before you begin. -
Mark the outer boundary:
Using a ruler and a pencil, lightly draw a large square in the center of the chest area. Rotate it so it sits like a diamond shape, with corners pointing up and down. -
Create the grid:
Draw a vertical line straight down the center of your diamond, and a horizontal line across the middle, dividing the diamond into four smaller quadrants. -
Add diagonal details:
Within those quadrants, use your ruler to sketch diagonal lines connecting the center point to the outer edges, creating a series of varied triangles. Don’t worry about perfect symmetry; these angular shapes mimic broken glass.
Bleeding Lines?
If paint bleeds under the tape, wait for it to dry completely. Then, use a stiff, damp brush to gently scrub the excess away, or widen your black outline slightly to cover the mistake.
Step 2: Painting the Panels
-
Mix your colors:
Mix your acrylic paints with fabric medium according to the bottle instructions (usually 1:1 or 2:1). This creates a softer, flexible texture that won’t crack. I like to dilute the mix slightly with water for that vintage, washed look. -
Select the first color zones:
Identify all the triangles you want to paint terra cotta. It helps to look at the reference image to balance the colors. Mark them lightly with a tiny dot of paint. -
Tape off sections:
Use painter’s tape to mask off the boundaries of your first set of triangles. Press the edges of the tape down firmly with your fingernail to prevent paint from sneaking underneath. -
Apply the first color:
Using a sponge brush, dab the terra cotta paint into the exposed fabric triangles. avoid brushing side-to-side, as this can force paint under the tape. Use an up-and-down blotting motion. -
Remove tape and dry:
Carefully peel back the tape while the paint is still slightly wet to keep the lines crisp. Let these sections dry to the touch, or speed it up with a hair dryer on a cool setting. -
Repeat for sage green:
Once the first color is dry, tape off the next set of triangles intended for the sage green. Ensure you aren’t placing tape over wet paint. -
Paint the green sections:
Blot your sage green mixture into these new sections. Try not to oversaturate the brush; thin, even layers work best for a soft fabric feel. -
Finish with pink and beige:
Repeat the taping and painting process for the remaining blush pink and beige (or unpainted white) sections until your geometric pattern is filled.
Add Texture
For a worn, vintage look, lightly sand the dried painted areas with fine-grit sandpaper before heat setting. This distresses the image and makes the shirt feel super soft immediately.
Step 3: Outlining and Setting
-
Outline the shapes:
Once all paint requires is completely dry, take your black fabric marker or fine-tip black paint. Carefully trace over your initial pencil lines and the boundaries between colors. -
Refine the thickness:
Go over the lines a second time if needed to create a bold, consistent width that mimics the lead came used in real stained glass windows. -
Let it cure:
Allow the entire design to dry for at least 24 hours. This ensures the paint bonds properly with the fibers. -
Heat set the design:
Turn the shirt inside out or place a pressing cloth over the design. Iron on a high cotton setting (no steam) for 3-5 minutes to permanently set the colors so they survive the wash.
Now you have a custom graphic tee that brings a cool, geometric edge to your everyday wardrobe
Doodle Constellation Scatter
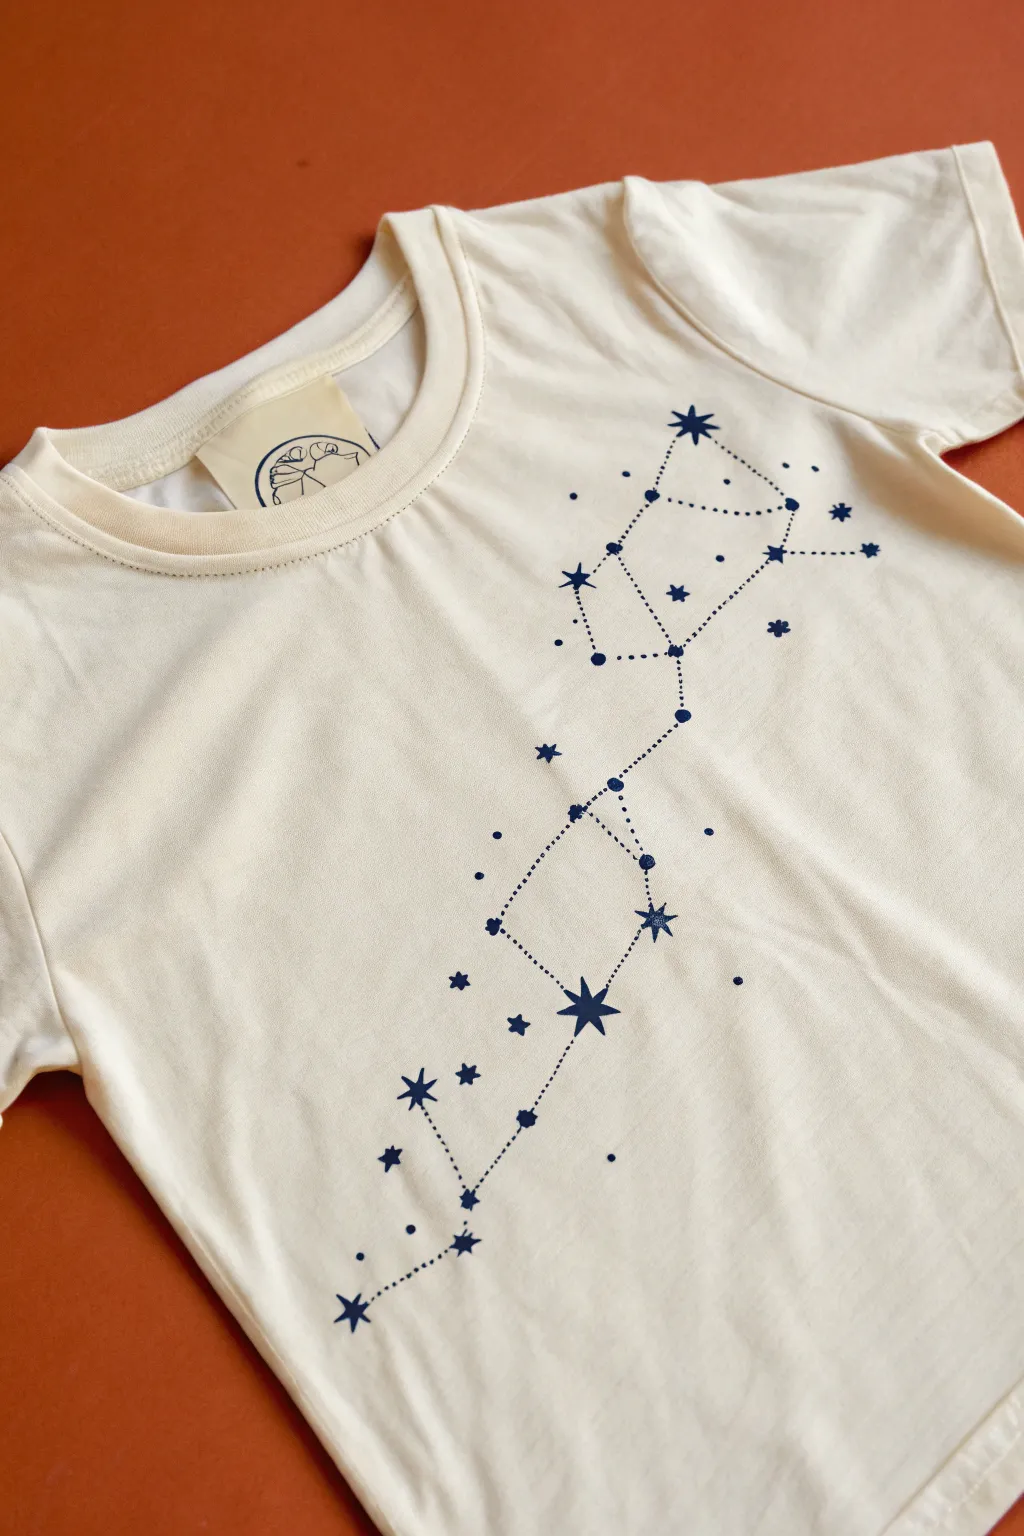
Transform a plain cream tee into a starry masterpiece with this simple constellation design. Using fabric markers or paint, you’ll create a connected star map that mimics the look of delicate embroidery without picking up a needle.
Step-by-Step Guide
Materials
- Light cream or off-white cotton t-shirt
- Dark navy blue fabric marker (fine tip)
- Dark navy blue fabric marker (medium or brush tip)
- Ruler or straight edge
- Cardboard insert
- Tailor’s chalk or disappearing ink fabric pen
- Iron (for heat setting)
Step 1: Preparation and Mapping
-
Prep the shirt:
Wash and dry your t-shirt without fabric softener to ensure the ink adheres properly. Iron out any wrinkles to create a smooth canvas. -
Protect the back:
Slide a piece of cardboard or thick paper inside the shirt. This prevents the ink from bleeding through to the back layer of fabric while you work. -
Plan the placement:
Lay the shirt flat. Decide where your constellation will flow. The design in the image starts high on the left shoulder and cascades diagonally down toward the right hip. -
Mark the star points:
Using your tailor’s chalk or disappearing ink pen, lightly tap small dots where each major star will go. Don’t worry about the lines yet; just focus on the spacing of the stars. -
Review the layout:
Step back and look at your chalk dots. The pattern should look balanced but asymmetrical. Adjust any dots that feel too clustered or too far apart.
Bleeding Lines?
If the ink starts feathering into the fabric grain, stop immediately. Switch to a finer tip marker or move the tip faster across the surface to deposit less ink.
Step 2: Drawing the Stars
-
Draw the largest stars:
Identify the 3-4 focal points of the constellation. I like to use the medium-tip marker here to draw five- or six-pointed stars at these key locations. Fill them in solid blue. -
Add medium stars:
Locate the secondary connecting points in your pattern. Draw slightly smaller, solid stars at these junctions. -
Create the heavy dots:
For the ‘joints’ of the constellation that aren’t full stars, use the medium marker to press down and create solid, distinct circles. These act as anchors for your lines. -
Scatter tiny stars:
Switch to your fine-tip marker. Draw tiny, delicate five-point stars randomly around the main path, just like the floating stars seen in the reference image. -
Add background speckles:
Using the very tip of the fine marker, gently dot the fabric in empty spaces. These represent distant stars and add texture to the negative space.
Step 3: Connecting the Constellation
-
Connect the main path:
Use your ruler and the fine-tip marker to connect the major stars and heavy dots. Instead of a solid line, create a dashed or dotted line to mimic a running stitch. -
Keep dots consistent:
Try to keep the spacing between your ink dots relatively even. This consistency is what sells the ‘stitched’ effect. -
Add branching lines:
Connect the outlying stars to the main path. Refer to your chalk guide to see which stars connect to form the specific constellation shape. -
Check connections:
Ensure every major star is connected to at least one other point. The design should look like a cohesive web, not isolated clusters. -
Clean up guidelines:
If you used tailor’s chalk, gently brush it away. If you used disappearing ink, wait the required time for it to fade or dab with a damp cloth if instructed. -
Let it dry:
Allow the ink to dry completely. This usually takes about 24 hours, but check your specific marker’s instructions. -
Heat set the design:
Once dry, turn the shirt inside out and iron the back of the design on a cotton setting (no steam) for several minutes to lock the color in permanently.
Pro Tip: Hidden Meaning
Use a real star map app to plot out your own zodiac sign or a specific constellation like Orion or Cassiopeia for a personalized touch.
Now you have a custom celestial tee ready for your next stargazing adventure
Have a question or want to share your own experience? I'd love to hear from you in the comments below!