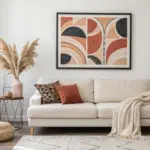
If you love bold color with crisp edges, tape art is basically your best studio buddy. I’m sharing my favorite tape art ideas that give you that super-satisfying peel reveal—from classic geometrics to a few unexpected twists.
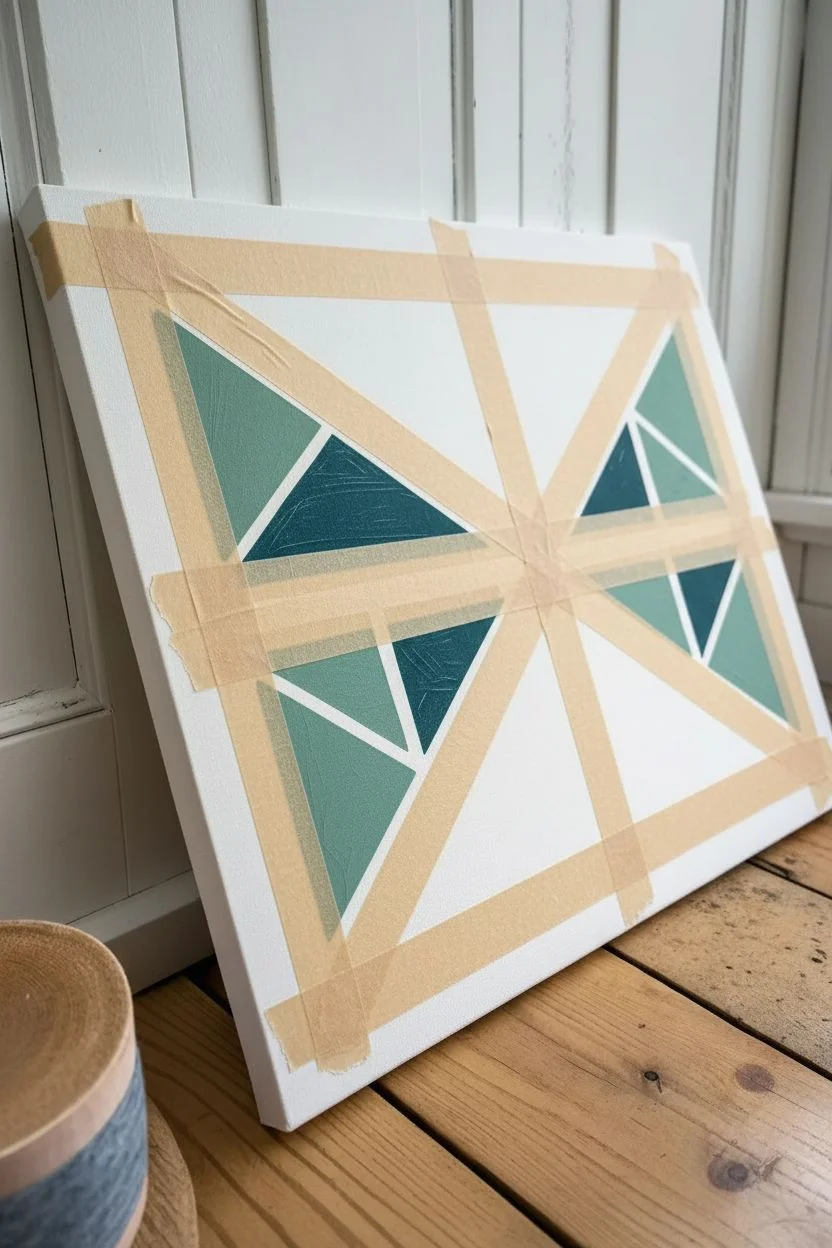
Classic Geometric Tape-Resist Mosaic

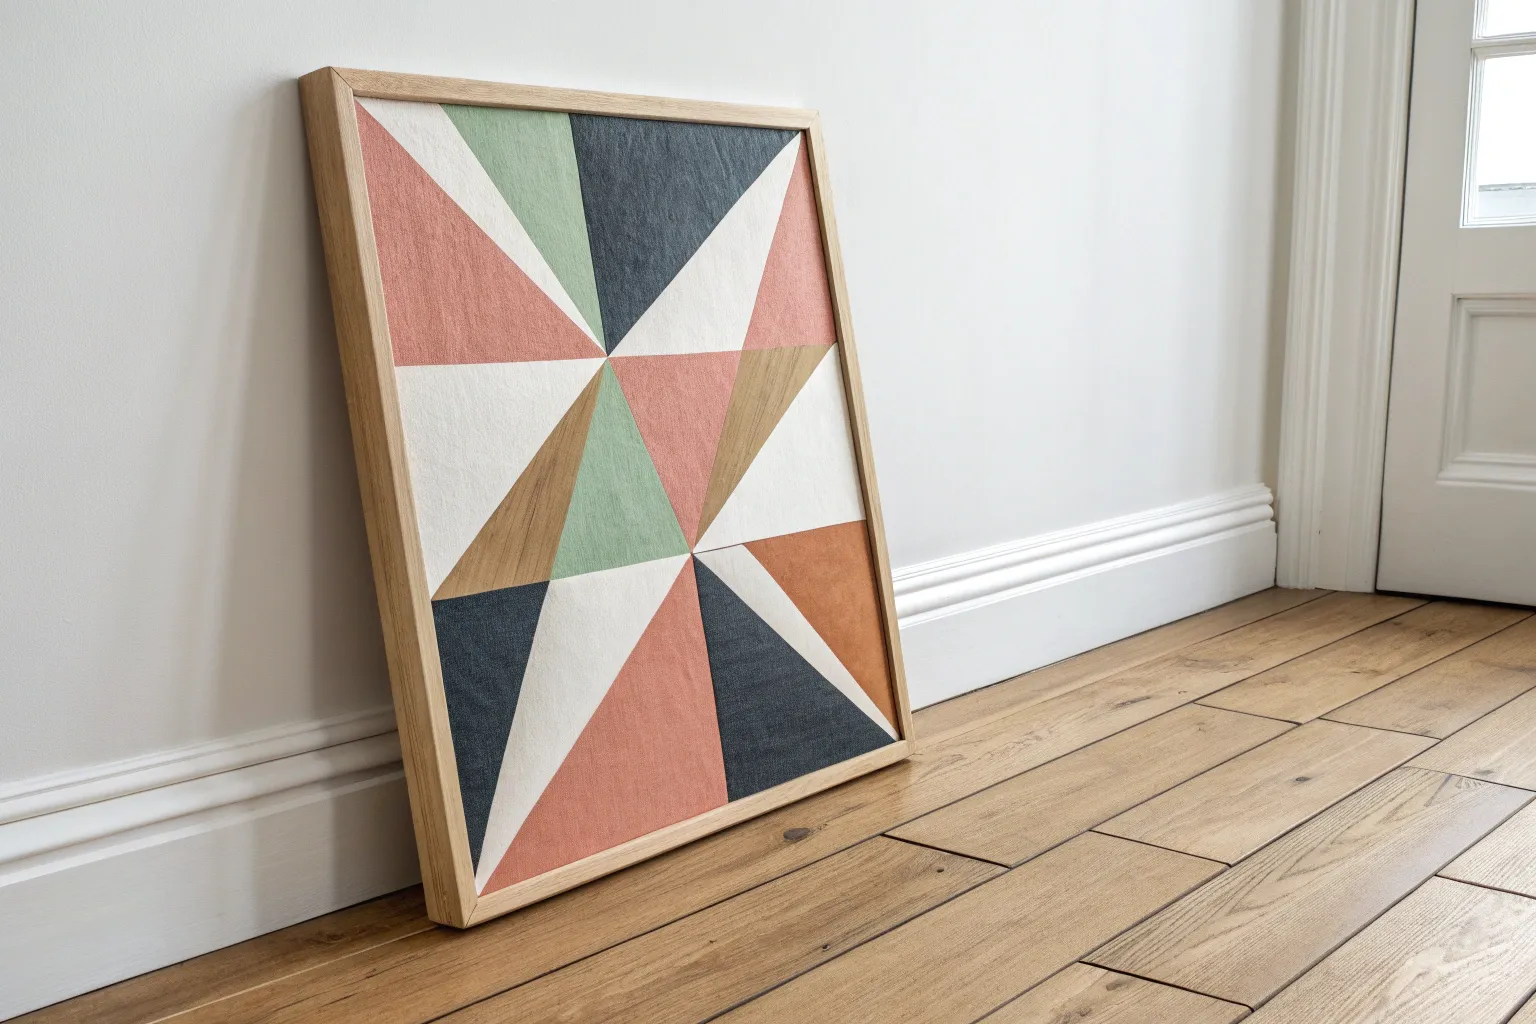
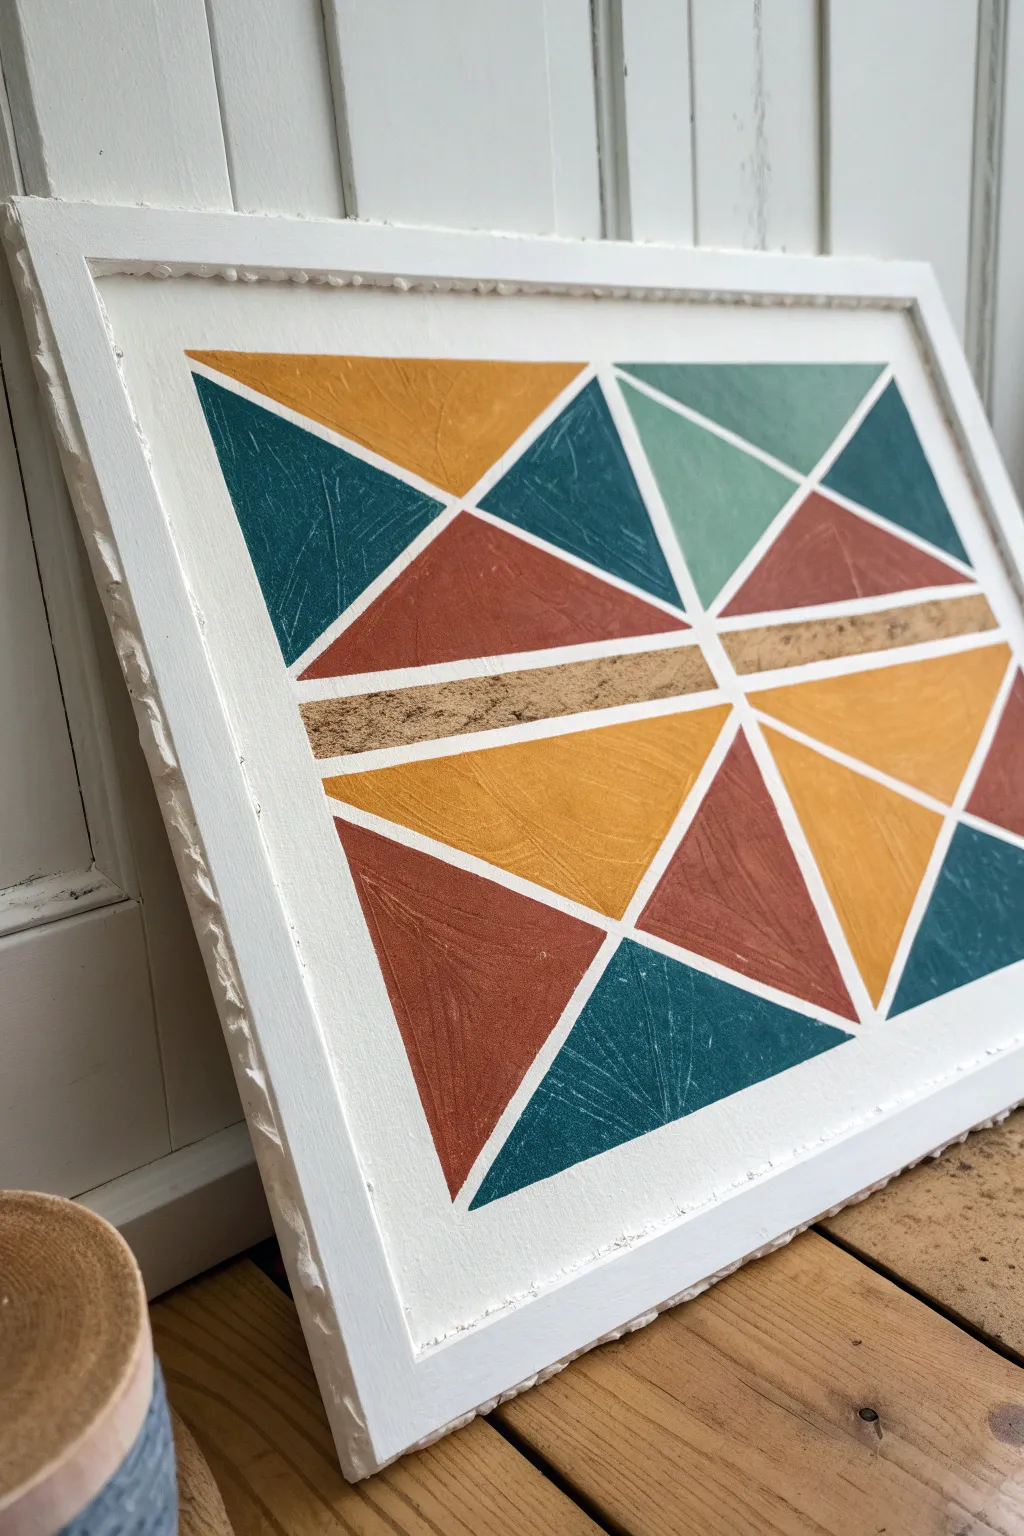
Transform a plain drop cloth or rug into a vibrant, modern statement piece with this classic tape-resist technique. The crisp white lines created by the tape reveal a striking geometric mosaic that brings energy to any floor or wall.
Step-by-Step
Materials
- Large heavy-weight canvas drop cloth or rug
- Painter’s tape (1-inch width works well)
- Acrylic craft paints or fabric paints (teal, ochre, coral, red, pink, beige)
- Paintbrushes (various sizes, focusing on flat brushes)
- Paper plate or paint palette
- Drop cloth or plastic sheeting (to protect the floor underneath)
- Iron (optional, for smoothing canvas)
Step 1: Preparation and Taping
-
Prep the surface:
Begin by laying out your canvas drop cloth or rug on a flat surface. If it has deep creases from being folded, give it a quick pass with an iron to ensure your lines will be straight. -
Protect your workspace:
Since paint might bleed through thinner fabrics, lay down a plastic sheet or old cardboard underneath your project area to keep your floor safe. -
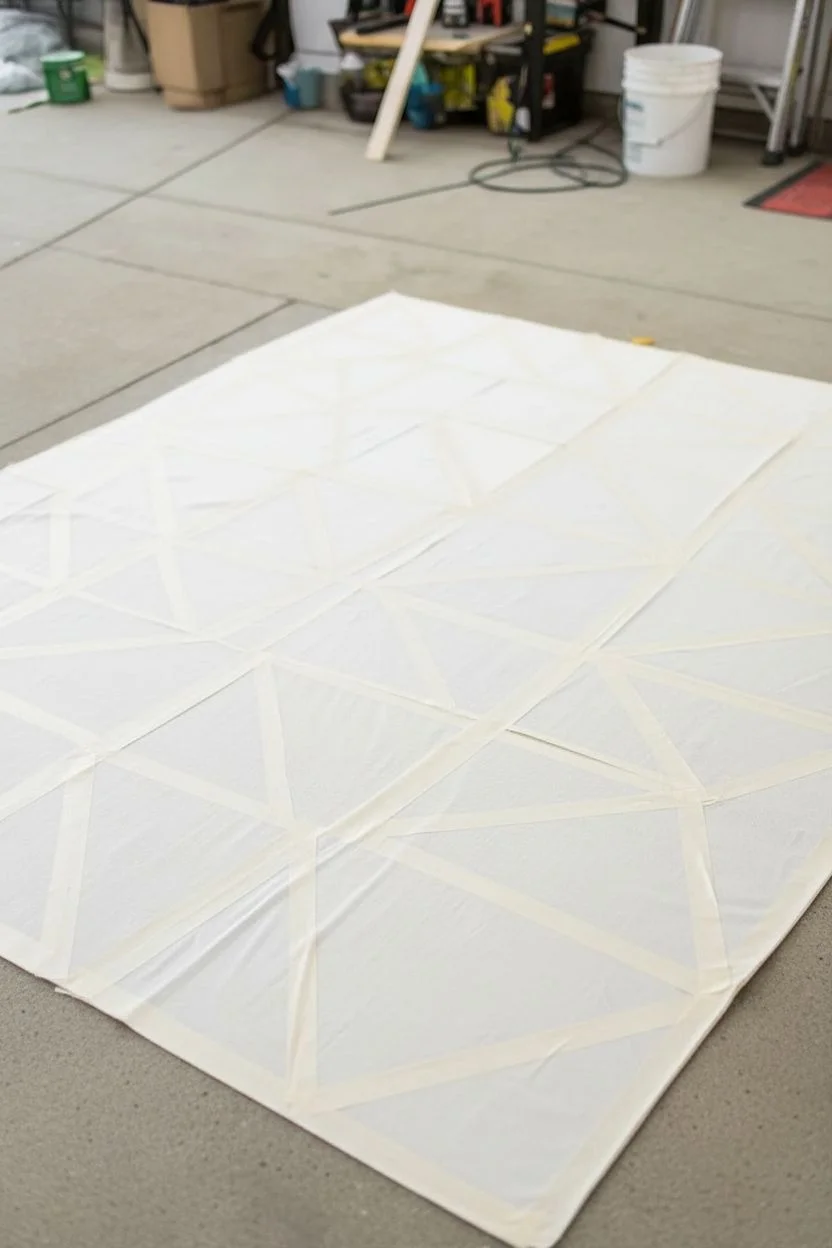
Create the framework:
Start applying your painter’s tape. Create large, random intersecting lines across the entire surface. Think of this as drawing with tape; there is no wrong way to do it. -
Form the triangles:
Once you have your main lines, add smaller strips of tape connecting the larger ones to break up big spaces creating a variety of triangle sizes. -
Seal the edges:
I like to run a credit card or a flat tool firmly over all the tape strips. This extra pressure seals the edges and is crucial for achieving those crisp, sharp lines later.
Step 2: Painting the Mosaic
-
Plan your palette:
Pour your chosen colors onto a palette. Aim for a mix of warm tones (yellows, reds, pinks) and cool tones (teals, blues) to create balance. -
Start with key colors:
Pick your first bold color, perhaps a deep red or teal, and paint a few scattered triangles across the canvas. Avoid painting adjacent shapes the same color. -
Work outward:
Continue filling in sections with different shades. Use a flat brush to push paint away from the tape edge rather than toward it to minimize seepage. -
Add softer tones:
Incorporate your neutral beige or lighter yellow tones. These lighter sections give the eye a place to rest and make the brighter colors pop. -
Maintain consistency:
Ensure the paint coverage is opaque. You may need a second coat on lighter colors or thinner fabrics to get a solid, rich look. -
Check for gaps:
Scan the entire piece for any missed spots or uneven strokes within the triangles and touch them up while the paint is still workable.
Pro Tip: Crisp Lines
Before applying color, paint a thin layer of white (or your base color) over the tape edges. This seals the tape so any bleeding is invisible.
Step 3: Finishing Up
-
Let it set:
Allow the paint to dry until it is tacky but not fully hardened. Removing tape too late can sometimes peel up dried paint chips. -
The big reveal:
Slowly peel back the painter’s tape at a 45-degree angle. This is the most satisfying part as you watch the clean white grid emerge. -
Final drying time:
Let the entire project dry completely, usually overnight, before walking on it or hanging it up. -
Optional sealing:
If this is intended as a floor cloth, consider applying a clear polyurethane sealer or fabric medium to protect your hard work from foot traffic.
Level Up: Texture Play
Mix a fabric medium or textile additive into your acrylics. This keeps the painted canvas soft and flexible rather than stiff and crunchy.
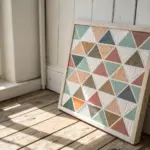
Enjoy the colorful transformation your new geometric artwork brings to the space


Crisp Stripe Color-Block Painting

Create a calming, organized display of color with this simple yet satisfying tape art project. By combining distinct masking lines with soft watercolor blends, you’ll produce a gradient chart that transitions beautifully from warm terracottas to cool sage greens.
Detailed Instructions
Materials
- Cold press watercolor paper (A4 or roughly 9×12 inches)
- Painter’s tape or artist’s masking tape (low tack)
- Watercolor paints (terracotta, burnt sienna, yellow ochre, sap green, indigo)
- Flat shader watercolor brush (size 1/2 inch or 3/4 inch)
- Ruler
- Pencil
- Paper towel
- Two water jars (one for rinsing, one for clean water)
- Mixing palette
Step 1: Grid Preparation
-
Measure margins:
Begin by deciding on the size of your swatches. A standard size like 1×2.5 inches works well. Use your ruler to lightly mark a central vertical gutter about 1 inch wide down the middle of the paper. -
Mark horizontal lines:
Mark out horizontal rows for your swatches. Leave about a 1/2 inch gap between each row of color to ensure distinct separation. -
Apply vertical tape:
Place a long strip of tape vertically down the page to mask off the central gutter. Then, place strips on the far left and right to define the outer edges of your columns. -
Apply horizontal tape:
Tape across the paper horizontally to define the spaces between the rows. You are essentially creating a grid of open rectangular windows where the paint will go. -
Seal the edges:
Run your fingernail or a bone folder firmly along every edge of the tape. This is the most crucial step to prevent paint from bleeding under the tape and ruining that crisp line.
Bleeding Lines?
If paint bleeds under the tape, try applying a very thin layer of clear matte medium or white gouache along the tape edge first to seal it before adding color.
Step 2: Mixing Palette
-
Prepare the warm earth tones:
On your palette, mix a rich terracotta using burnt sienna and a touch of red. For the lighter peach tones, water this mix down significantly or add a tiny bit of yellow ochre. -
Prepare the cool earth tones:
Mix your greens. Start with sap green and dampen it with a touch of burnt sienna or red to make it earthy. Add a tiny dot of indigo to create the deeper, moodier teal-green shades.
Step 3: Painting the Swatches
-
Start with the darkest warm:
Begin at the top right with your strongest terracotta mix. Load your flat brush and apply the paint smoothly, trying to keep the wash even without puddling. -
Lighten the wash:
For the top left block and the row below, dilute your terracotta mix with water. This creates the softer, peachier variations seen in the reference. -
Transition to beige:
For the middle rows, mix a very dilute wash of yellow ochre with a tiny hint of the terracotta. This creates the neutral sand and beige tones that bridge the gap between red and green. -
Introduce the green:
Moving down the chart, start painting the lower blocks with your sage green mixes. Use the flatter, yellow-based greens for the middle section transitions. -
Paint the deep greens:
Finish the bottom rows (especially the bottom center swatches) with your cooler, bluer green mixes. I like to layer this slightly to get a deeper opacity. -
Let it dry completely:
Wait until the paper is bone dry. This is harder than it sounds, but if the paper is cool to the touch, it’s still wet. Patience here prevents the tape from ripping surface fibers.
Add Detail
Once dry, use a fine micron pen to write the color mix names (e.g., ‘Burnt Sienna + 50% Water’) delicately under each swatch for a scientific look.
Step 4: The Reveal
-
Peel horizontally first:
Slowly peel off the horizontal tape strips first. Pull the tape away at a severe 45-degree angle, keeping it close to the paper surface. -
Remove vertical strips:
Carefully remove the long vertical strips last. This order usually minimizes the risk of lifting adjacent tape or paint. -
Clean up edges:
If there’s a tiny bit of bleed where the paper texture was too deep, you can sometimes gently scrape it away with a craft knife or cover it with a tiny dab of white gouache.
Now you have a serene, structured piece of art that celebrates the subtle beauty of color mixing


Chevron and Zigzag Tape Patterns
Create a striking piece of wall art using simple masking techniques and bold, metallic tones. This project combines the precision of geometric patterns with the organic flow of watercolor or ink, resulting in a modern zigzag design with crisp white negative space.
Step-by-Step Tutorial
Materials
- Heavyweight watercolor paper (cold press for texture)
- Painter’s tape or drafting tape (low tack)
- Ruler
- Pencil
- Eraser
- Copper or bronze metallic ink/paint
- Black India ink or watercolor
- Small round paintbrush (size 4 or 6)
- Small mixing dish
- Water jar
Step 1: Planning the Grid
-
Paper measurement:
Begin by laying your watercolor paper flat on a sturdy surface. Use your ruler to find the center vertical line, but don’t draw it yet; just mark the top and bottom edges lightly. -
Marking vertical columns:
Decide on the width of your zigzags. Mark equal vertical intervals across the top and bottom edges of the paper (e.g., every 2 inches) to create columns. -
Establishing horizontal peaks:
Along the side edges of the paper, mark horizontal intervals. These marks dictate where the ‘points’ of your zigzags will land. Keep the spacing consistent for a uniform look. -
Connecting the dots:
Using a pencil and ruler, lightly draw faint guidelines connecting your marks. You specifically want to mark the peaks and valleys of the chevrons so you know exactly where to place your tape.
Bleeding Lines?
If ink bleeds under the tape, try applying a clear layer of matte medium over the tape edges first. This seals the gap before you add color.
Step 2: Applying the Resist
-
Cutting the tape:
Cut your low-tack tape into thin strips if it isn’t already narrow. You need strips that are significantly thinner than the painted sections will be. -
Laying the first diagonal:
Start at the top left. Apply a strip of tape diagonally downwards to the first ‘valley’ mark you made. Press it down firmly to seal the edge. -
Completing the zigzag line:
Place the next strip of tape starting from that valley point and going diagonally up to the next ‘peak’ mark. Continue this pattern across the entire width to form one continuous masked zigzag line. -
Repeating the rows:
Move down to your next set of marks and repeat the taping process. Ensure the gap between the tape lines—the area you will eventually paint—is roughly uniform, though minor variations add charm. -
Sealing the edges:
Run your fingernail or a bone folder firmly over all the tape edges. This is crucial to prevent the runny ink from bleeding underneath and ruining your crisp white lines.
Add Depth
Mix a tiny drop of black into your copper ink for the ‘valleys’ of the chevron pattern to create a subtle shadow effect and 3D illusion.
Step 3: Painting the Pattern
-
Preparing the copper:
Shake your metallic copper or bronze ink well. Pour a small amount into a mixing dish. If using watercolor, mix a rich, opaque puddle. -
Painting the first color:
Fill in alternating rows with the copper ink. Use confident strokes, painting right over the tape edges to ensure full coverage. I find it helpful to paint all the copper sections first to keep the brush clean. -
Preparing the black:
Clean your brush thoroughly. Pour out your black India ink or mix a deep black watercolor. You want a strong, solid shade for high contrast. -
Filling the gaps:
Paint the remaining empty rows with the black ink. Be careful near the edges of the paper if you haven’t taped the border, keeping your hand steady. -
Checking consistency:
Look over your wet paint. If the copper looks too translucent, you can carefully add a second layer once the first is semi-dry to boost the metallic shine. -
Drying time:
Let the artwork sit undisturbed until it is completely bone dry. Ink can pool near the tape edges, so give it extra time—im patience here is risky.
Step 4: The Reveal
-
Removing the tape:
Once dry, verify the paper isn’t cool to the touch. Slowly peel back the tape at a 45-degree angle. Pull away from the painted area to minimize paper tearing. -
Erasing guidelines:
After all tape is removed, take a soft eraser and gently remove any visible pencil marks from the white separating lines. -
Final touches:
Inspect the white lines. If a tiny bit of paint bled through, you can carefully scrape it away with a craft knife or cover it with a dab of white gouache.
Frame your geometric masterpiece behind glass to protect the metallic sheen and enjoy modern structure on your wall


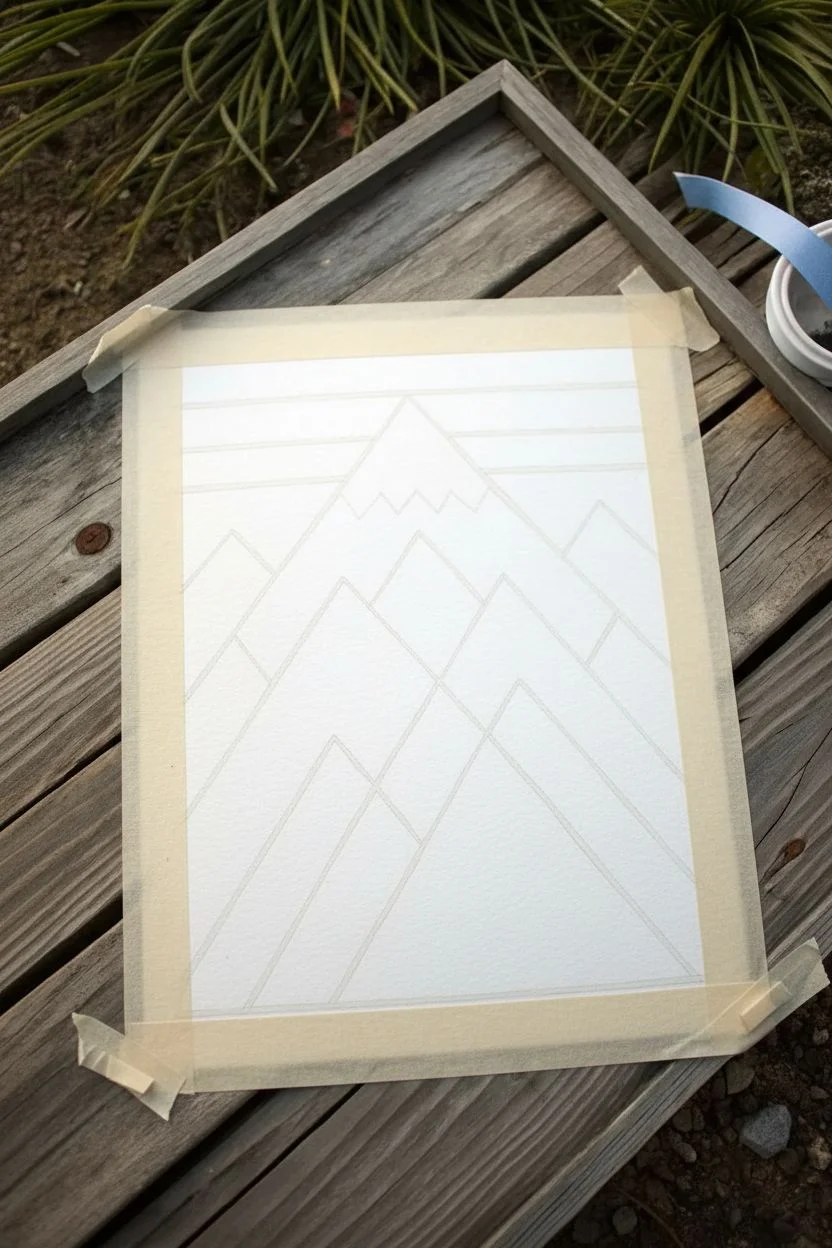
Triangle Mountain Landscape With Tape Lines
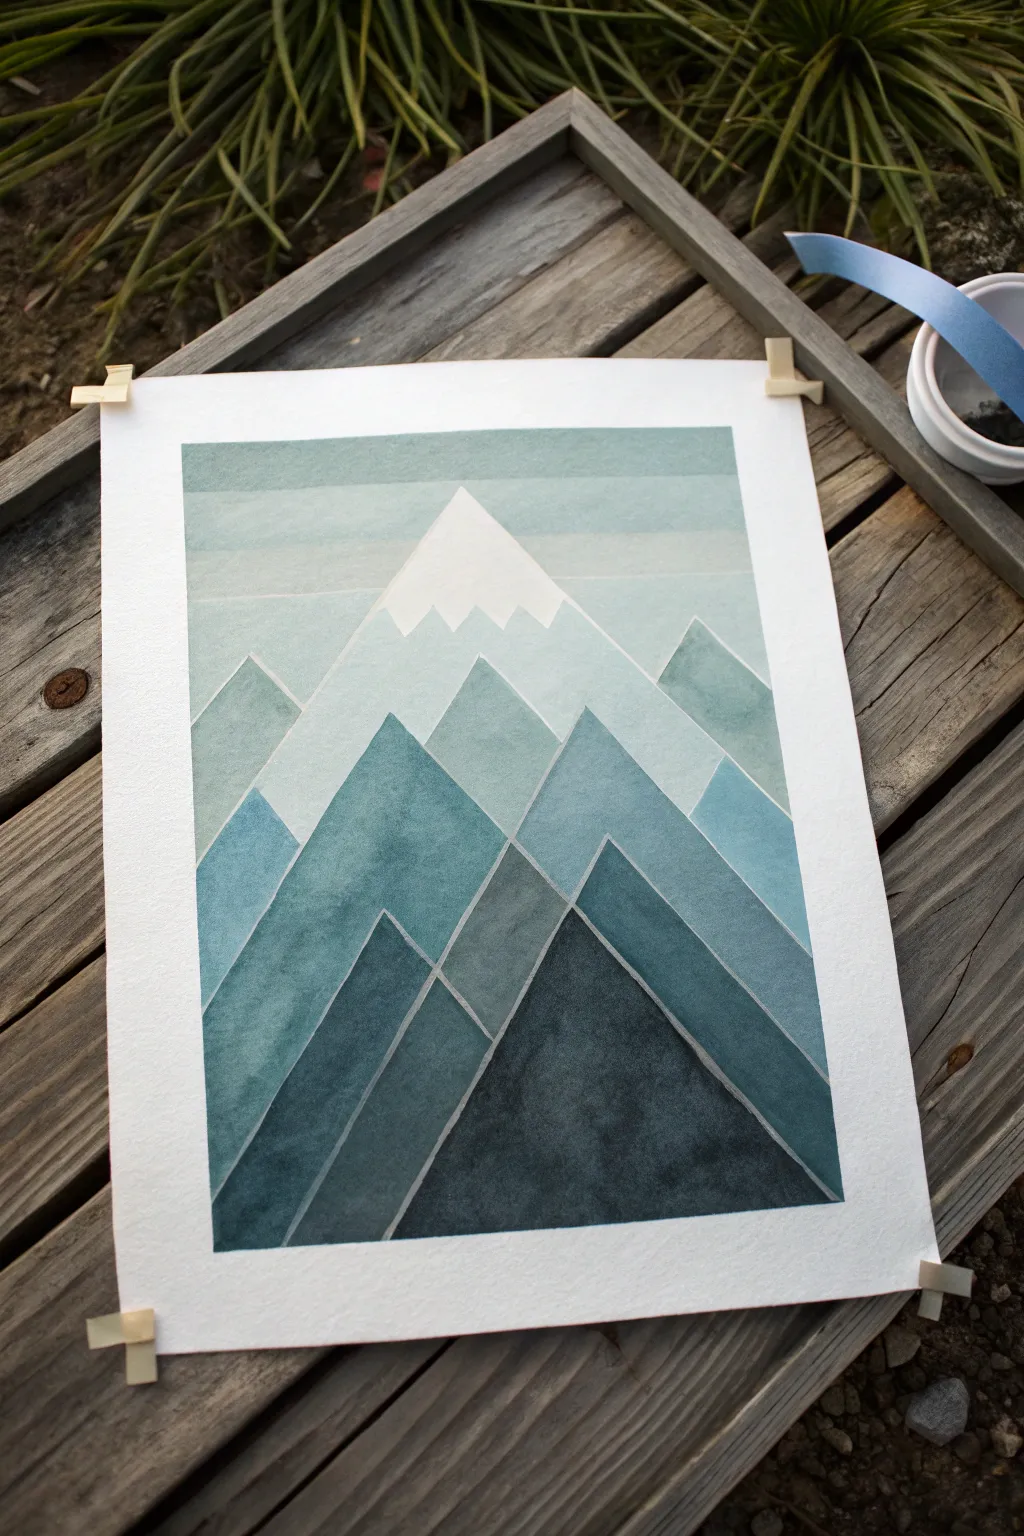
This soothing mountain landscape uses simple geometric triangles and negative space to create depth and atmosphere. By using thin tape to mask off your lines, you will achieve crisp, professional-looking white borders between your blended watercolor washes.
Step-by-Step Tutorial
Materials
- Watercolor paper (cold press, heavy weight)
- Watercolor paints (blues, teals, and payne’s grey)
- Artist tape or fine line masking tape (1/8 inch width)
- Painter’s tape (for borders)
- Flat wash brush (medium size)
- Round brush (small for details)
- Rigid board or table surface
- Pencil and eraser
- Palette for mixing
Step 1: Preparation and Masking
-
Secure the paper:
Begin by taping your watercolor paper down to a rigid board or flat surface. Use painter’s tape along all four edges to create a clean border and prevent the paper from buckling when it gets wet. -
Sketch the mountains:
Lightly sketch your mountain range using distinct triangular shapes. Start with the largest, central peak at the top and layer smaller triangles in front as you move down the page. Visualize how they overlap. -
Mask the sky lines:
Apply horizontal strips of your fine line tape across the sky area to separate the graduated color layers. These lines don’t need to be perfectly straight; a slight angle adds character. -
Tape the mountain shapes:
Carefully apply the fine line tape over your pencil lines to define the triangular mountain slopes. Ensure the tape is pressed down firmly, especially where strips cross each other, to stop paint from seeping underneath. -
Add snow cap details:
For the largest jagged snow cap on the main peak, you can either mask distinct zigzag shapes or leave this area blank if you have a steady hand. Masking ensures the sharpest white highlight.
Step 2: Painting the Gradient Landscape
-
Mix your palette:
Prepare a range of blue-green tones. You will need a very watery, pale teal for the sky and progressively darker, saturated shades (adding indigo or Payne’s grey) for the lower mountains. -
Paint the sky layers:
Start at the very top of the paper. Use your palest wash to fill the horizontal sky sections. Vary the intensity slightly between stripes to create an atmospheric banded look. -
Paint the distant peaks:
Moving to the top-most mountain layer (just below the snow cap), apply a light, misty blue-grey wash. These mountains are farthest away, so they should be less saturated than the foreground. -
Deepen the middle ground:
As you move down to the middle row of triangles, create a slightly darker teal mix. Apply the paint evenly within the taped boundaries, letting the water do the work to smooth out the brushstrokes. -
Darken the foreground:
For the bottom-most triangles, use your darkest, most pigment-heavy mix. A deep indigo or navy works perfectly here to anchor the composition. -
Add texture (optional):
While the paint is still damp in the darker sections, you can drop in tiny amounts of clear water or slightly different pigment shades to create a blooming, stone-like texture.
Bleeding Lines?
If paint bleeds under your tape, try burnishing the tape edges with a bone folder or spoon before painting. You can also seal the edge with a thin layer of clear medium first.
Step 3: Revealing the Design
-
Wait for complete dryness:
This is crucial: ensure the entire painting is bone dry. If the paper is cool to the touch, it is still damp. Removing tape too early will tear the paper and bleed the paint. -
Peel the mountain tape:
Slowly peel up the fine line masking tape. Pull the tape away from the paper at a 45-degree angle to minimize the risk of tearing the surface. -
Touch up edges:
Inspect your white lines. If any paint has seeped under the tape, use a minimal amount of opaque white gouache or a white gel pen to tidy up the intersections. -
Remove border tape:
Finally, remove the thicker border tape from the edges of your paper to reveal the clean, white frame around your finished geometric landscape.
Pro Tip: Atmospheric Depth
To maximize depth, follow the rule of ‘atmospheric perspective’: objects get lighter and bluer the farther away they are. Keep your darkest darks strictly in the front row.
Now you have a serene, geometric mountain range ready to be framed and displayed
BRUSH GUIDE
The Right Brush for Every Stroke
From clean lines to bold texture — master brush choice, stroke control, and essential techniques.
Explore the Full Guide
Radiating Sunburst Tape Art
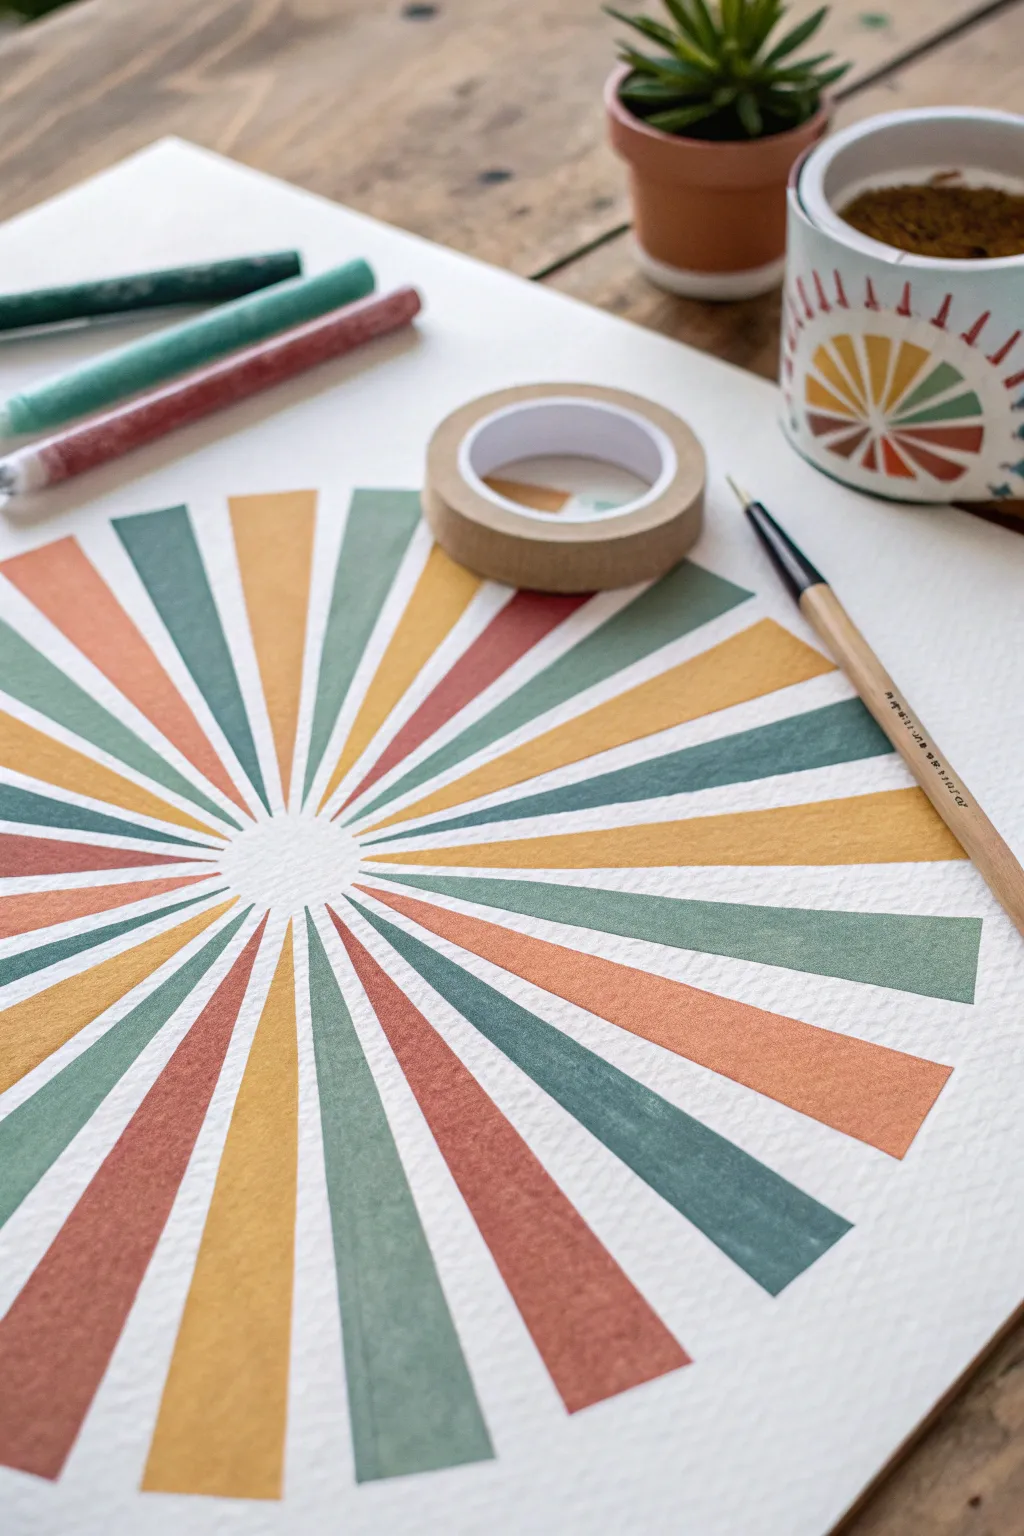
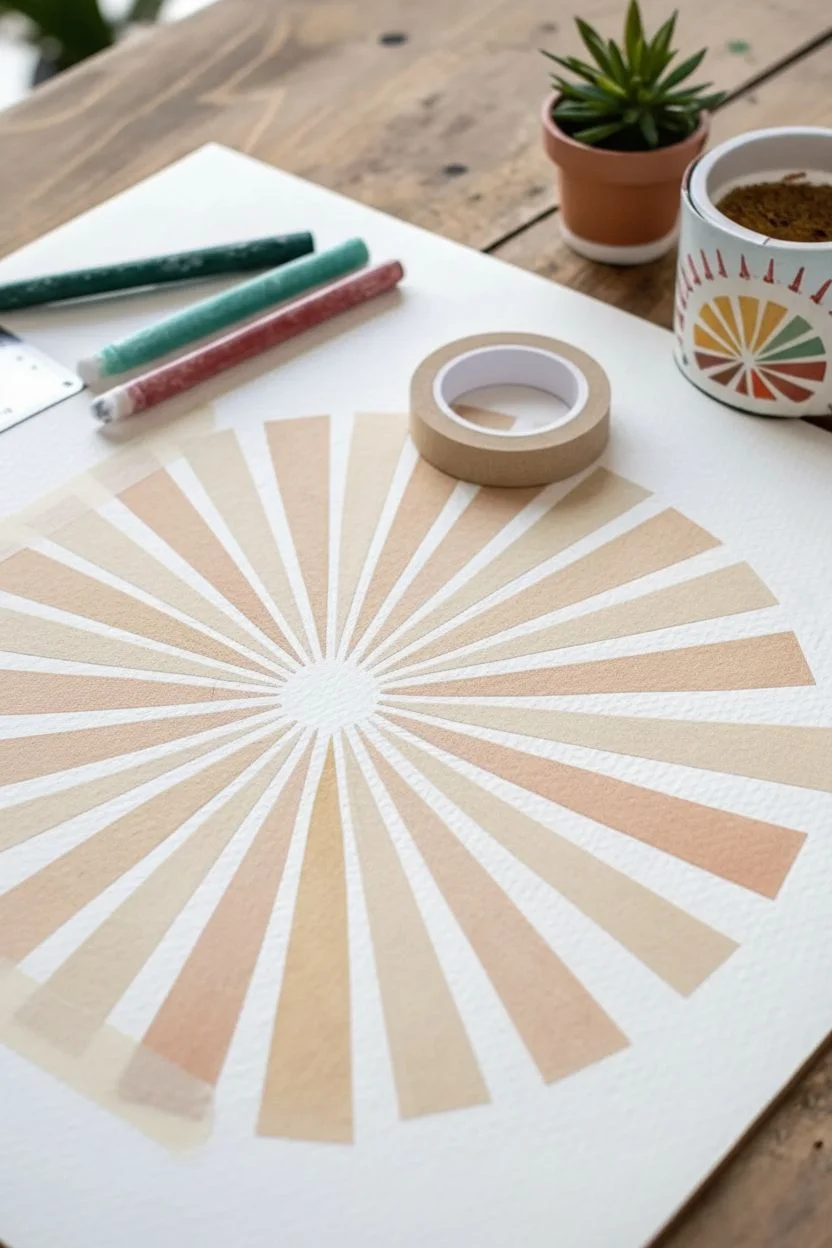
Create a stunning focal point with this geometric sunburst design that combines crisp lines with soft, textured color. Using a simple masking technique on watercolor paper, this project features a harmonious palette of terracotta, mustard, sage, and teal radiating from a central point for a retro-inspired look.
Step-by-Step Guide
Materials
- Heavyweight watercolor paper (cold press adds nice texture)
- Washi tape or low-tack painter’s tape (various widths)
- Watercolor paints or gouache
- Medium round paintbrush (size 6 or 8)
- Pencil
- Circular object or compass (optional)
- Eraser
- Ruler
Step 1: Setting the Structure
-
Find your center:
Begin by placing your watercolor paper on a flat surface. Identify where you want the center of your sunburst to be. It doesn’t have to be the exact mathematical center of the page; slightly offsetting it can create dynamic tension. -
Mark the sun:
Using a pencil very lightly, draw a small circle in the center. This will remain white (unpainted) and serves as the anchor for all your radiating beams. -
Establish the first tape lines:
Tear off a strip of washi tape. Place one end at the edge of your center circle and extend it outwards to the edge of the paper. Repeat this directly opposite the first strip to create a straight line across the page, interrupted by the circle. -
Divide the space:
Place two more strips of tape perpendicular to the first set, creating a cross shape. From here, continue adding tape strips in the gaps, angling them so they all originate from that central circle boundary. -
Check the spacing:
As you add more tape, try to keep the triangular wedges of exposed paper somewhat equal in width, though slight variations add hand-crafted charm. Ensure all tape strips are pressed down firmly, especially near the center circle.
Step 2: Bringing in Color
-
Prepare your palette:
Mix your paints to achieve that earthy, vintage vibe. You’ll need four distinct hues: a warm terracotta rust, a muted mustard yellow, a soft sage green, and a deeper teal blue. Test them on a scrap piece of paper first. -
Start with terracotta:
Select a random wedge to begin. Load your brush with the terracotta paint and fill in the shape. Paint away from the taper edge to avoid pushing paint under it. Choose another wedge two or three spaces away and paint that one terracotta as well. -
Apply the mustard tone:
Clean your brush and switch to the mustard yellow. Fill in wedges adjacent to or near your terracotta sections. I find that scattering the colors randomly rather than following a strict pattern makes the final piece feel more organic. -
Fill with sage and teal:
Continue the process with your sage green and teal paints. Work your way around the circle until every exposed white wedge is filled with color. -
Ensure even coverage:
Check for any pale spots. Since watercolor paper has texture, you may need a second pass of paint to get that solid, opaque look shown in the example, particularly with the darker teal.
Bleed-Through Blues?
If paint seeps under the tape, wait for it to dry completely. Then, use a white gel pen or opaque white gouache to carefully touch up the bleeding and restore the crisp edge.
Step 3: The Reveal
-
Let it dry completely:
This is crucial—wait until the paint is bone dry to the touch. If the paper feels cool, it’s still damp. Rushing this step is the easiest way to ruin crisp lines. -
Peel the tape slowly:
Pick a corner of the tape at the outer edge of the paper. Gently peel it back at a sharp 45-degree angle, pulling away from the painted area. Go slowly to prevent tearing the paper surface. -
Clean up edges:
Once all the tape is removed, use a clean eraser to gently remove any visible pencil marks from the central white circle. -
Flatten the artwork:
If the watercolor paper has buckled slightly from the moisture, place the finished (dry) artwork under a heavy stack of books overnight to flatten it out perfectly.
Add Texture
For a mixed-media twist, once the paint is dry, use colored pencils or oil pastels to add shading or patterns on top of the painted wedges before removing the tape.
Frame your new geometric masterpiece to bring a burst of warmth to any wall
Stained-Glass Floral Tape Outlines

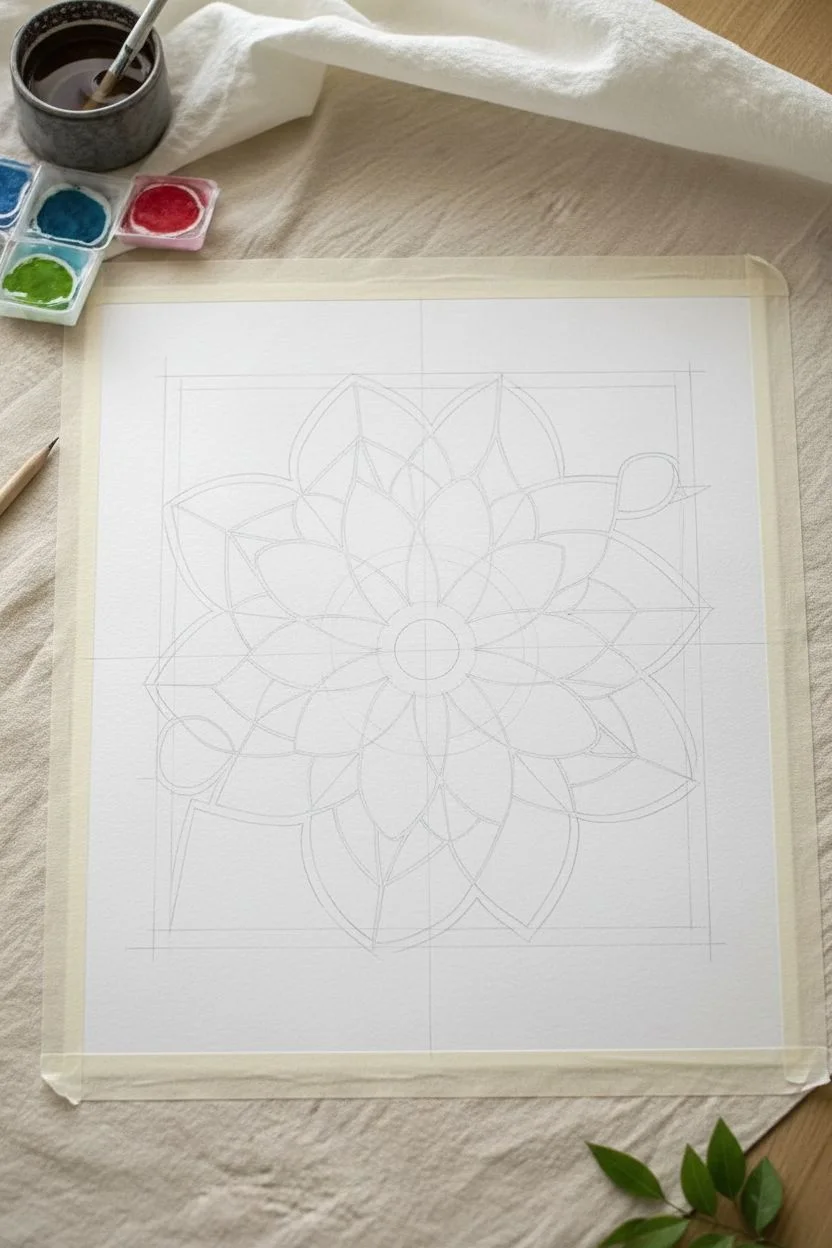
Recreate the delicate beauty of leaded glass on paper using a clever tape-resist technique. This method yields crisp, brilliant floral patterns separated by sharp white lines, creating a mesmerizing kaleidoscope effect.
Step-by-Step Guide
Materials
- High-quality watercolor paper (cold press, heavy weight)
- Artist’s masking tape or thin painter’s tape (1/8 inch or 1/4 inch width)
- Pencil and eraser
- Ruler
- Compass (for drawing circles)
- Watercolor paints (pan set or tubes)
- Small round brushes (size 2 and 4)
- Jar of water
Step 1: Planning the Geometry
-
Define the Frame:
Begin by lightly taping down your watercolor paper to a flat surface. Use a ruler and pencil to draw a large square in the center of the paper, leaving a generous margin. This will be the outer boundary of your stained-glass panel. -
Draw the Grid:
Using a ruler, lightly draw faint pencil lines connecting the opposite corners of your square to find the exact center point. You may also want to draw vertical and horizontal bisecting lines to help with symmetry. -
Sketch the Base Circles:
Place your compass point on the center mark. Draw a small inner circle, followed by a medium circle, and finally a large circle that touches the edges of your square. These concentric rings will guide your petal placement. -
Draft the Petals:
Sketch a flower pattern radiating from the center. Start with eight main petals reaching the middle circle, then add outer leaves or petal tips that extend to the larger circle. Keep your lines light and clean.
Bleeding Lines?
If paint bleeds under the tape, wait for it to dry. Then, use a white gel pen or opaque white gouache to carefully paint over the mistake and restore the crisp line.
Step 2: Applying the Resist
-
Cut the Tape Strips:
This is the most crucial step for the stained-glass look. Cut thin strips of masking tape. If you only have standard width tape, use scissors or a craft knife on a cutting mat to slice it into very narrow 1/8-inch ribbons. -
Outline the Main Petals:
Carefully apply the thin tape strips over your pencil lines. I find it easiest to start with the central flower petals. Press down firmly on the edges of the tape to ensure a tight seal against the paper. -
Create Curves:
For the curved edges of the petals, use shorter, small pieces of tape that slightly overlap, or gently bend flexible masking tape as you adhere it. The goal is to cover every single pencil line you want to remain white. -
Tape the Frame:
Tape off the outer square border and the diagonal background sections. Ensure the intersections where the tape strips meet are pressed down securely so paint doesn’t seep underneath.
Add Texture
Sprinkle coarse salt onto the wet painted sections before they dry. Brush it off later to create a crystallized, vintage glass texture within the colored panels.
Step 3: Painting the Glass
-
Plan Your Palette:
Select a color scheme that mimics stained glass. Deep reds, golds, emerald greens, and royal purples work beautifully. Mix your paints with a moderate amount of water—you want the color to be vibrant, not too washed out. -
Paint the Center:
Start filling in the central flower shapes. Drop wet paint into the center of a taped section and gently push it toward the tape edges with your brush tip, letting the tape act as a barrier. -
Add Variation:
To get a realistic glass effect, try dropping a tiny bit of darker pigment into the wet paint at the corners of a petal. This creates a gradient that simulates light passing through uneven glass thickness. -
Paint the Greenery:
Move outwards to the leaf shapes. Use a mix of emerald and sap green. Paint alternating sections to allow neighboring wet spots to dry slightly, preventing accidental bleeding if the tape fails. -
Fill the Background:
Paint the corner sections outside the main mandala. Using contrasting colors like deep violet or azure blue here will make the central flower pop. -
Let it Dry Completely:
Patience is key here. Allow the painting to dry fully. Whatever you do, don’t rush this step, as peeling tape from damp paper will tear the surface.
Step 4: The Reveal
-
Peel the Tape:
Once the paper is bone dry, select a corner of tape. Pull it back slowly at a 45-degree angle, close to the paper surface. Reveal the crisp white lines underneath. -
Clean Up:
If any pencil lines are still visible in the white spaces, use a clean eraser to gently remove them. Be careful not to smudge the painted areas.
Enjoy the satisfying moment of peeling the tape to reveal your luminous design

PENCIL GUIDE
Understanding Pencil Grades from H to B
From first sketch to finished drawing — learn pencil grades, line control, and shading techniques.
Explore the Full Guide
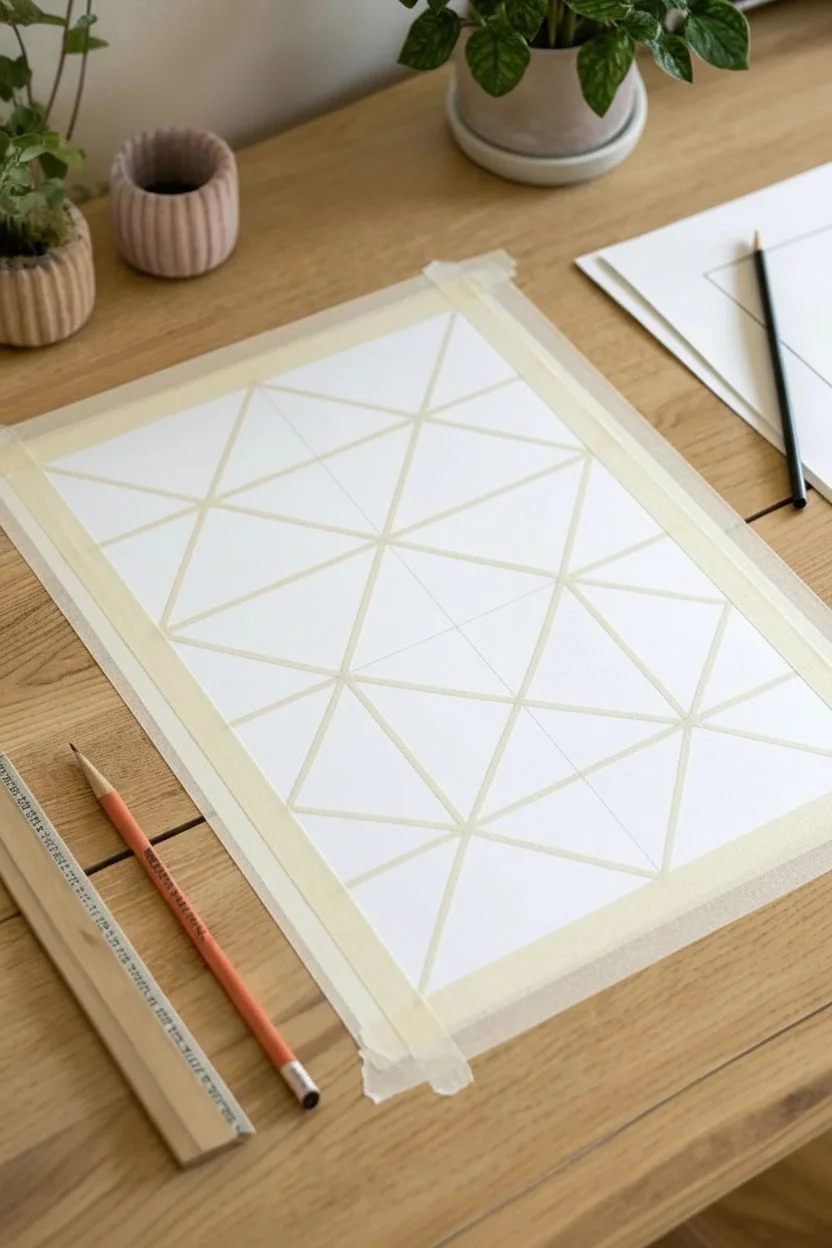
Ombre Fade Over Tape for a Soft Gradient Reveal
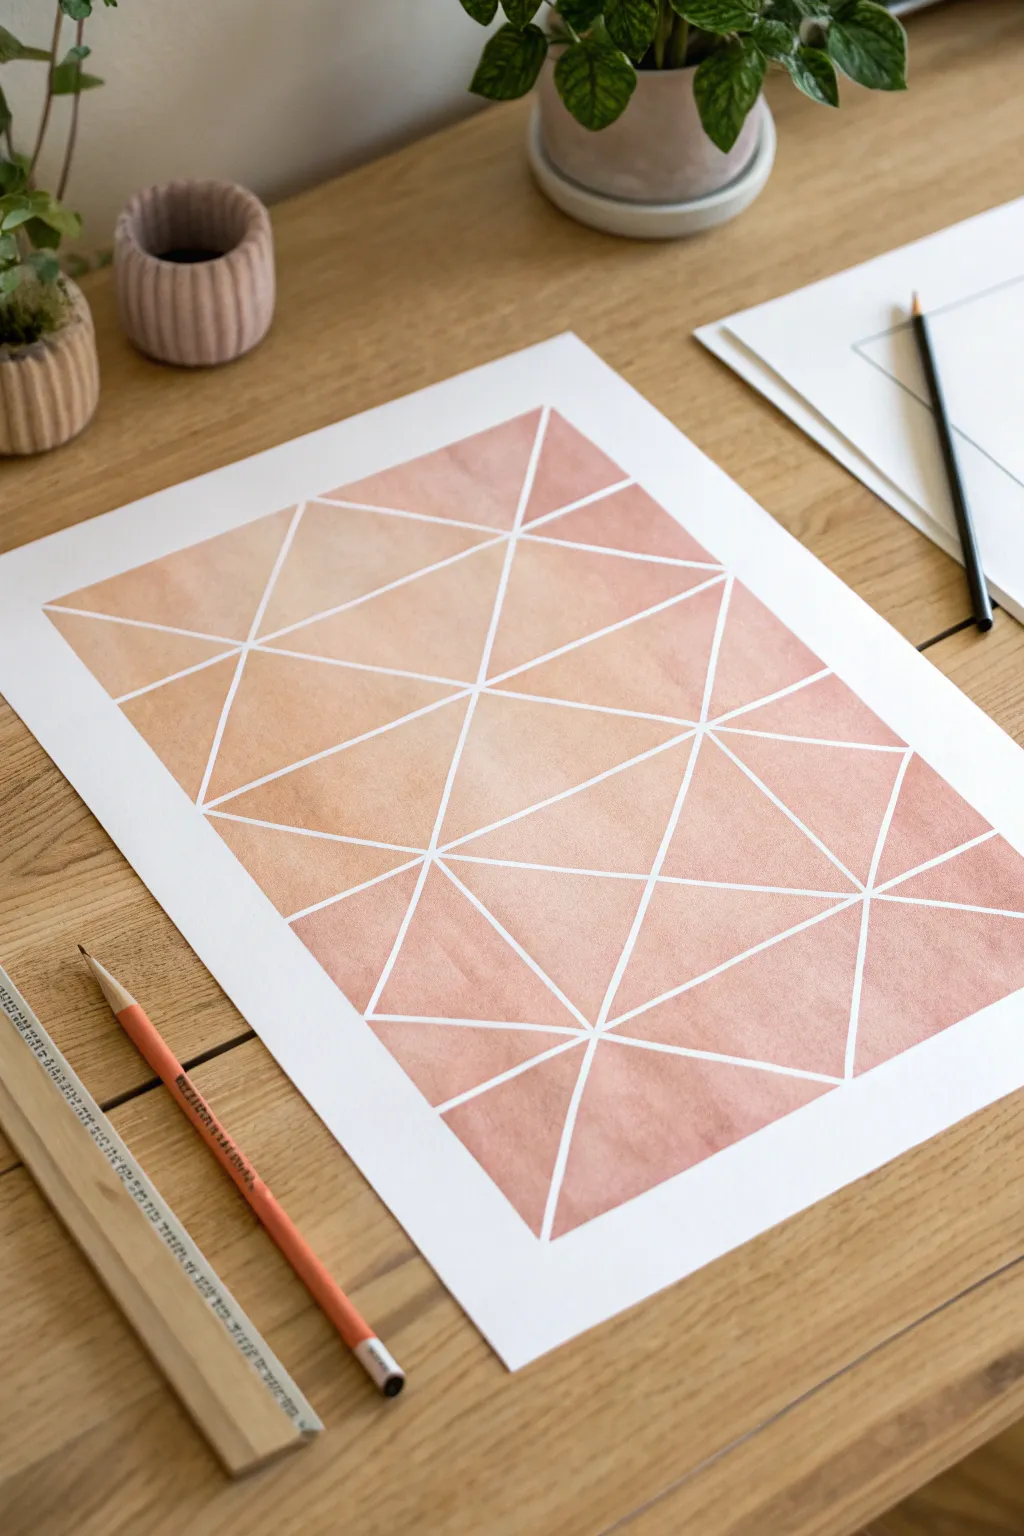
Create a calming, warm-toned geometric masterpiece using the magic of tape resist and soft watercolor blending. This project explores delicate gradients that shift from sandy beige to dusty terra cotta, all framed by crisp, consistent white lines.
Detailed Instructions
Materials
- High-quality watercolor paper (cold press, heavy weight)
- Painter’s tape or artist’s drafting tape (1/4 inch or similar thin width)
- Watercolor paints (Burnt Sienna, Yellow Ochre, Alizarin Crimson)
- Flat wash brush (1/2 inch or 3/4 inch)
- Round detail brush (size 4 or 6)
- Palette for mixing
- Pencil and ruler
- Masking fluid (optional, but tape is preferred here)
- Board or desk surface to secure the paper
- Hairdryer (optional for speeding up drying)
Step 1: Planning and Taping
-
Secure your surface:
Begin by taping down all four edges of your watercolor paper to your work surface. This creates a clean white border around the final piece and prevents the paper from buckling when it gets wet. -
Find the center:
Using your pencil and ruler, lightly mark a central vertical line and horizontal line to help orient your geometric grid. You don’t need a heavy hand here; just faint guide marks will do. -
Lay the primary grid:
Apply your thin painter’s tape in long, straight diagonal lines across the paper. Aim to create large diamond or kite shapes first. Press the tape down firmly, especially at the edges, to ensure paint doesn’t seep underneath. -
Subdivide into triangles:
Add additional strips of tape to bisect your larger shapes, turning diamonds into varied triangles. I like to keep the angles relatively consistent to maintain a cohesive structural look. -
Double-check the seal:
Run your fingernail or a bone folder along every single edge of the tape. This is the secret to those perfectly crisp white lines later on.
Bleeding Lines?
If paint is bleeding under the tape, use a thicker watercolor paper or seal the tape edges with a tiny bit of clear water or matte medium before painting color.
Step 2: Mixing and Painting the Gradient
-
Prepare the palette:
Mix three puddles of water. In the first, add a touch of Yellow Ochre for a light, sandy tone. In the second, mix Burnt Sienna with a hint of orange for a mid-tone. In the third, create a deeper terracotta using Burnt Sienna and a drop of Alizarin Crimson. -
Start with the lightest wash:
Using your flat brush, load up the lightest sandy color. Apply this wash primarily to the top third of the paper, painting right over the tape. It’s okay if the color is uneven; watercolor loves texture. -
Introduce the mid-tone:
While the top section is still slightly damp, pick up your mid-tone orange-brown mix. Begin painting the middle section of the grid, allowing the top edge of this color to gently bleed into the lighter section above. -
Deepen the bottom:
Apply the darkest terracotta mix to the bottom third of the composition. Work quickly so you can blend the upper edge of this dark color into the mid-tone section before anything dries completely. -
Refine individual cells:
Switch to your round brush. Go back into specific triangles and drop in slightly more pigment while they are wet to create variation. Some triangles can be darker than their neighbors to add visual depth. -
Blot for texture:
If a section feels too heavy or dark, use a clean, thirsty brush or a corner of a paper towel to lift a little pigment out of the center of a triangle. This creates a lovely ‘glow’ effect. -
Let it dry completely:
Walk away and let the piece dry fully. The paper must be bone dry before you attempt to remove the tape, or you risk tearing the surface. A hairdryer on a cool setting can speed this up.
Metalic Accents
Once the paint is dry and tape is removed, use a gold pen and a ruler to trace along one side of select white lines for a glamorous shadow effect.
Step 3: The Reveal
-
Find a starting edge:
Locate an end of the tape that overlaps others. It’s usually easiest to remove the last pieces you laid down first. -
Peel slowly and low:
Pull the tape back against itself at a sharp 45-degree angle, keeping your hand close to the paper surface. Do not pull straight up, as this creates tension that tears paper. -
Reveal the border:
Finally, remove the tape securing the paper to the table. This is the most satisfying part, revealing that pristine outer edge that frames your ombre grid. -
Final touches:
Inspect your white lines. If any paint snuck under the tape, you can gently scrape it away with an X-Acto knife or cover it with a tiny dab of opaque white gouache.
Step back and admire the warm, structured glow coming from your geometric creation
Torn-Edge Tape for Organic Geometric Texture
This striking wall art combines bold triangles with an organic feel, thanks to softly textured edges and a warm, cohesive color palette. The thick white negative space creates a stained-glass effect that makes the earthy tones pop against the rustic white frame.
Step-by-Step Guide
Materials
- White or cream canvas board or heavy cardstock (approx. 11×14 inches)
- Painter’s tape or masking tape (1/2 inch to 1 inch width)
- Acrylic paints (Teal, Rust/Terracotta, Mustard Yellow, Sage Green, Beige/Gold)
- Flat paintbrushes (medium size)
- Palette or paper plate
- Pencil and ruler
- Paper towels
- Rustic white wooden frame (optional, for display)
Step 1: Planning and Taping
-
Prepare the Base:
Start with a clean canvas board or sturdy cardstock. If you want a textured base, you can apply a thin layer of white gesso or primer first and let it dry completely. -
Mark the Center:
Using your ruler and pencil, lightly mark the vertical and horizontal center lines of your canvas to help guide your layout. -
Create the Central Horizontal Strip:
Apply two horizontal strips of tape across the middle of the canvas, leaving a gap of about 1.5 inches between them. This gap will become the textured beige strip later. -
Form the Main X Shape:
Create the large triangular sections by running tape diagonally from the corners towards the center point. You want to create a large ‘X’ shape that intersects your horizontal band. -
Subdivide the Triangles:
Within the large triangular spaces you’ve just created, add more strips of tape to break them down into smaller triangles. Follow the pattern in the reference: create a mix of right-angled and isosceles triangles. -
Torn Edge Technique:
To achieve the organic look mentioned in the article title, gently tear the edges of the tape strips that will form the boundaries of your shapes, rather than cutting them perfectly straight. Press these torn edges firmly onto the canvas. -
Seal the Edges:
I like to run a fingernail or a credit card firmly over all tape edges to prevent paint bleed-under. This is crucial for crisp(ish) lines.
Step 2: Painting the Colors
-
Paint the Central Strip:
Mix a beige or golden-brown acrylic paint. Apply this to the horizontal strip in the middle. Dab the paint on rather than brushing smoothly to create a slight stone-like texture. -
Apply the Rust Tone:
Select 3-4 triangular sections scattered across the design for your rust/terracotta color. Apply the paint generously, brushing in varying directions to add subtle movement. -
Add the Mustard Yellow:
Fill in the large triangular sections adjacent to the corners with mustard yellow. This warm tone anchors the composition. -
Introduce the Teal:
Paint several of the remaining triangles in a deep teal blue. This cool tone provides a beautiful contrast to the rust and yellow. -
Finish with Sage Green:
If you have any remaining small triangles (like the one in the top right quadrant), fill them with a soft sage green. -
Second Coats:
Allow the first layer of paint to dry to the touch (about 10-15 minutes). Apply a second coat to any colors that look streaky or transparent. -
Create Texture:
Before the second coat dries completely, you can lightly stipple the surface with a dry brush or a crumpled paper towel to enhance the rustic feel.
Bleeding Lines?
If paint bleeds under the tape, wait for it to dry completely. Then, use a white paint pen or a small brush with white acrylic to carefully paint over the mistake and restore the sharp edge.
Step 3: The Reveal
-
Peel When Damp:
This is the most satisfying part. Start peeling the tape off while the paint is still slightly tacky, but not wet. Pull slowly at a 45-degree angle away from the painted area. -
Remove Horizontal Tape:
Carefully remove the horizontal strips that defined the central band last. -
Touch Ups:
If any paint seeped under the tape, use a small detail brush with white paint to carefully clean up the distinct white lines. -
Framing:
Once fully dry (give it at least an hour), place your artwork into a rustic white frame to complement the clean white lines of the design.
Make it Metallic
Swap the beige paint in the central strip for a metallic gold leaf or gold acrylic paint. This adds a subtle shimmer that catches the light and elevates the earthy tones around it.
Hang your new geometric masterpiece in a spot where it can catch natural light to show off those textures


Curved Tape Arches and Scallop Patterns
Create a sophisticated fish-scale or scallop pattern using simple masking techniques and craft paint. This method reveals crisp, curved geometric lines against a neutral background, perfect for custom wall art or decorative runners.
Detailed Instructions
Materials
- Long sturdy paper (watercolor paper or heavy cardstock)
- Painter’s tape or masking tape (approx. 1 inch width)
- Circle punch or large circle template
- Scissors or craft knife
- Cutting mat
- Pencil
- Beige or tan acrylic paint (or color of choice)
- Foam roller or flat paintbrush
Step 1: Preparation
-
Cut the Paper:
Begin by cutting your heavy paper to the desired size. A long, rectangular format works beautifully for this repeating pattern. -
Create Tape Circles:
On a clean cutting mat, lay down several long strips of masking tape. Use your circle punch or a template and craft knife to cut out numerous tape circles. You need quite a few to fill the page. -
Cut Semicircles:
Cut each of your tape circles perfectly in half to create semicircles. These will form the ‘scales’ of your design. -
Border the Page:
Apply strips of painter’s tape along all four edges of your paper to create a clean, uniform white border around the final artwork.
Bleed-Through Blues?
To prevent paint bleeding, seal the tape edges with a clear matte medium or a thin layer of the base paper color before applying your main color.
Step 2: Creating the Pattern
-
Start the First Row:
Place your first row of tape semicircles along the bottom edge of the paper inside the border. The flat edge of the semicircle should face down. -
Spacing Matters:
Leave a small, uniform gap between each semicircle in the row. This gap will become the vertical line of the scallop pattern. -
Start the Second Row:
Begin the next row above the first. Position the flat bottom of the new semicircle so it bridges the gap between the two semicircles below it. -
Overlap Correctly:
Ensure the curved top of the lower row slightly overlaps or just touches the flat bottom of the upper row. -
Continue the Pattern:
Repeat this brick-laying pattern, moving upward row by row. Maintain consistent spacing between the shapes to keep the grid aligned. -
Fill the Gaps:
You will notice small ‘diamond’ or triangular shapes of exposed paper forming between the curves. This is exactly what you want. -
Trim the Edges:
When you reach the side borders, you may need to trim your tape semicircles to fit flush against the side masking tape. -
Press Down Firmly:
Once the entire pattern is laid out, run your finger or a bone folder over all the tape edges. Securing the edges prevents paint from bleeding under the curves.
Step 3: Painting and Reveal
-
Prepare the Paint:
Pour a small amount of tan or beige acrylic paint onto a palette. I find that slightly thinning the paint helps it lay flatter. -
Apply the Paint:
Using a foam roller for the smoothest finish, roll the paint over the entire paper surface. If sketching with a brush, use broad strokes. -
Dry and Repeat:
Let the first coat dry to the touch. If the color looks uneven, apply a second thin coat for solid coverage. -
Wait for Drying:
Allow the paint to dry completely. It should not feel cool or tacky to the touch. -
Peel the Scales:
Carefully peel up the semicircle tape pieces. Start from one corner and pull slowly at a 45-degree angle. -
Remove the Border:
Finally, peel away the border tape to reveal the crisp white frame around your scalloped design.
Metallic Upgrade
Swap the matte beige paint for a metallic gold or copper acrylic. The shimmer adds an Art Deco vibe that looks incredibly high-end on wall art.
Hang your new geometric masterpiece in a simple wooden frame to complement the organic scallop shapes
Oversized Collaborative Tape Mural Layout
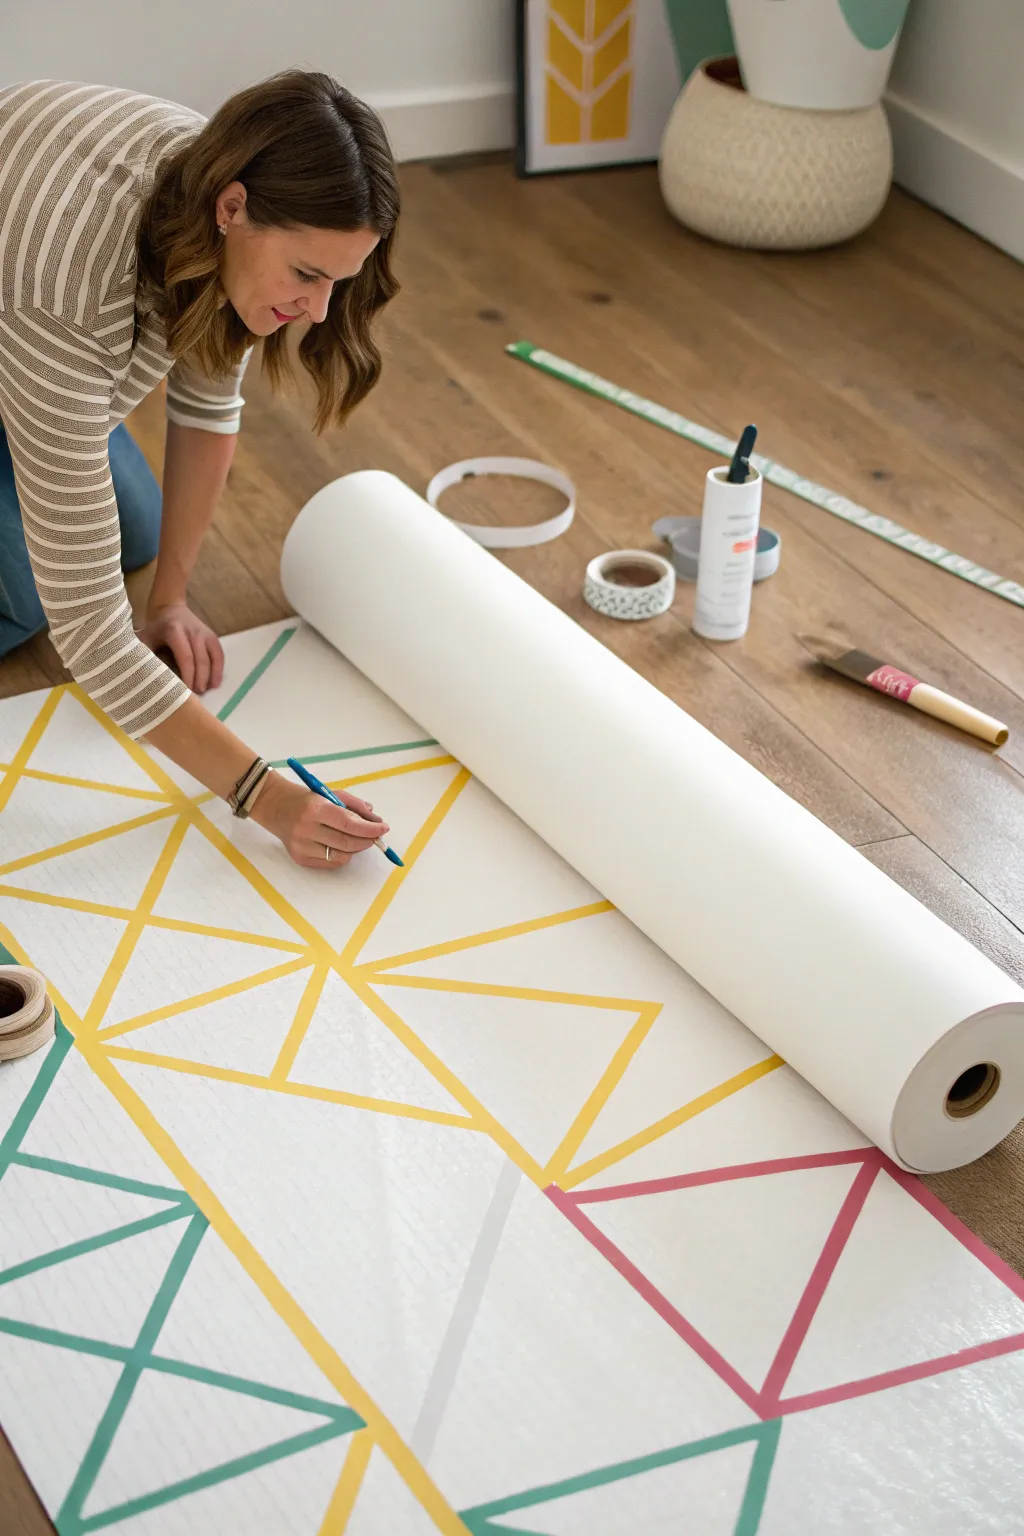
Transform a plain roll of paper into a stunning piece of modern art using nothing but colorful tape and a bit of geometry. This oversized mural features striking triangles and intersecting lines in a vibrant palette of teal, mustard yellow, and rose pink, perfect for a statement wall or collaborative group project.
Step-by-Step
Materials
- Large roll of white butcher paper or seamless background paper
- Washi tape or painter’s tape in three colors (Tea, Yellow, Deep Pink/Rose)
- Ruler or straight edge (yardstick is ideal)
- Pencil
- Scissors
- Craft knife (optional)
- Wallpaper smoother or squeegee tool
- Weights (to hold paper corners down)
- Painter’s tape (for securing paper to floor)
Step 1: Preparation & Layout
-
Prepare your canvas:
Clear a large section of floor space. Unroll your white paper to the desired length of your mural. Use small pieces of painter’s tape or heavy objects (like nearby decor items) to weigh down the corners so the paper lays perfectly flat. -
Visualize the grid:
Before laying tape, lightly sketch a very loose plan with a pencil. You don’t need a strict grid, but marking a few key intersection points helps ensure your triangles stay balanced rather than becoming lopsided. -
Establish the primary lines:
Choose your first tape color (yellow is used here for the central structure). Lay down long, continuous strips to create the main ‘skeleton’ of the design. These lines should span across large sections of the paper, creating open triangular spaces. -
Create the first triangles:
Using the same primary color, add shorter strips connecting the long lines. This starts forming the distinct triangle shapes. Vary the sizes—some large, some small—to keep the visual rhythm interesting.
Wrinkle Rescue
If the tape creates a wrinkle while laying a long line, don’t just press it down. Gently lift the tape back up to the wrinkle point, pull it slightly taut, and re-lay it smoothly.
Step 2: Adding Color & Detail
-
Introduce the second color:
Switch to your teal or green tape. Look for empty zones adjacent to your yellow framework. Apply tape to form new triangles that nestle against or intersect the existing yellow lines. -
Connect the shapes:
When lines intersect, overlap the tape slightly. Don’t worry about perfect corners yet; let the tape run a bit long if needed, as you can trim it later for a crisp finish. -
Add the accent color:
Bring in the third color (rose pink). Use this sparingly to create focal points. I like to place these ‘pop’ colors on the outer edges or centrally in the largest white spaces to draw the eye. -
Smooth the tape:
Take a wallpaper smoother or a clean squeegee tool and run it firmly over every line of tape. This is crucial for adhesion and ensures no air bubbles are trapped underneath. -
Refine the intersections:
Inspect where different color tapes cross over. If you want a cleaner look where one color stops at another, use a craft knife to gently slice the top layer of tape and peel away the excess overlap.
Step 3: Finishing Touches
-
Check for gaps:
Stand back and look at the overall composition. If there are awkward white gaps, add a small connecting line to close the shape. -
Trim the edges:
Once the design is complete, use long scissors or a craft knife with a straight edge to trim the top and bottom of the paper roll if it’s uneven. -
Reinforce ends:
If you plan to hang this vertically, reinforce the top edge on the back with extra packing tape so it doesn’t tear when mounted.
Make It Collaborative
Turn this into a coloring-book style activity. Create only the outlines with black tape, then have kids or guests fill inside the triangles with paint, markers, or patterned stickers.
Now you have a bold, graphic backdrop ready to hang for a party or creative photo booth


Have a question or want to share your own experience? I'd love to hear from you in the comments below!