Whenever I want a wall to feel like a giant canvas (without the stress), I reach for painter’s tape and let those clean edges do the heavy lifting. Here are my favorite tape DIY wall painting ideas—from classic stripes to bold, artsy layouts that look way more complicated than they actually are.
Crisp Classic Stripes
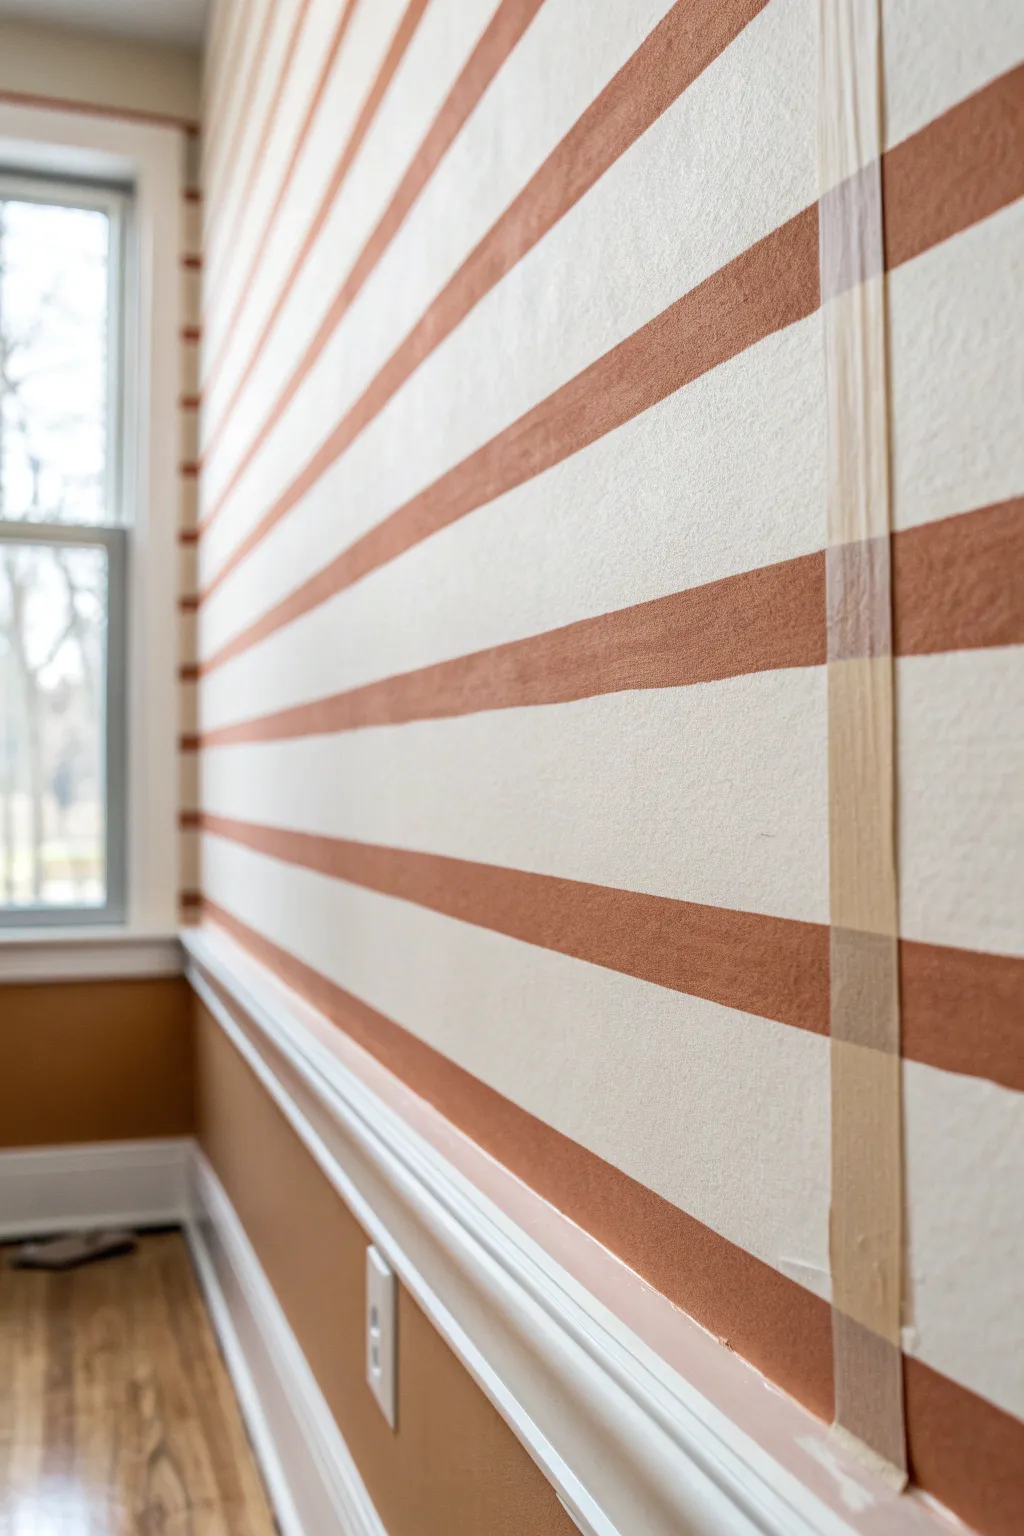
Transform a plain wall into a warm, structured feature with these classic horizontal stripes. By combining a creamy off-white base with rich, earthy terracotta tones, this project adds architectural interest and cozy depth to any room.
Step-by-Step Guide
Materials
- Creamy off-white latex wall paint (eggshell or satin finish)
- Terra-cotta or burnt orange latex wall paint (eggshell or satin finish)
- High-quality painter’s tape (1.5 or 2 inch width)
- Paint roller frame and covers (3/8 inch nap)
- Angled sash brush (2 inch)
- Level (laser level highly recommended)
- Measuring tape
- Pencil
- Credit card or putty knife
- Drop cloths
- Damp rag
Step 1: Preparation & Base Coat
-
Clear the area:
Remove any furniture, outlet covers, or switch plates from the wall you intend to paint. Lay down drop cloths to protect your flooring. -
Clean the surface:
Wipe down the wall with a damp rag to remove dust and oils, ensuring the paint adheres properly. If there are holes, patch and sand them smooth now. -
Apply the base color:
Roll on two coats of your creamy off-white paint over the entire wall area above the chair rail. Allow the paint to cure fully—I recommend waiting at least 24 to 48 hours before taping to prevent peeling later.
Step 2: Measuring & Taping
-
Plan your stripe width:
Decide on the width of your stripes. A standard, pleasing width is often between 4 to 6 inches, but measure your total wall height to ensure you end with a full stripe at the top or bottom. -
Mark the wall:
Starting from the chair rail or base molding, use a measuring tape and pencil to make small tick marks vertically up the wall at your chosen intervals. -
Establish level lines:
Using a laser level (or a long spirit level), lightly trace horizontal pencil lines across the wall connecting your tick marks. This ensures your stripes don’t slant as they travel across the room. -
Apply the tape:
Run your painter’s tape along the pencil lines. Crucially, place the tape on the *outside* of the stripes that will remain white. This protects the base color while exposing the area for the terracotta paint. -
Seal the edges:
Once taped, run a credit card or putty knife firmly over the tape edges. This pressure activates the adhesive and prevents bleed-under. -
The sealing trick:
For razor-sharp lines, brush a very thin layer of your *base color* (the cream paint) over the edge of the tape that faces the stripe area. Let this dry completely; it fills any tiny gaps with the base color so the dark color won’t bleed.
Tape Tip
Place a small piece of tape inside the zones that need to stay white as a remind marker. It keeps you from accidentally painting the wrong stripe.
Step 3: Painting the Stripes
-
Cut in the edges:
Use your angled sash brush to carefully paint the terracotta color along the corners, ceiling line, and molding edges within the exposed stripe areas. -
Roll the first coat:
Use a small roller or a standard roller to apply the terracotta paint between the tape lines. Don’t overload the roller; visible drips can ruin the effect. -
Apply the second coat:
Once the first coat is dry to the touch (usually 2-4 hours), apply a second coat for rich, opaque coverage. -
Remove tape promptly:
Here I prefer to pull the tape while the second coat is still slightly tacky, not fully cured. Pull the tape slowly at a 45-degree angle away from the painted edge.
Level Up: Texture
Mix a glaze medium into the terracotta paint and apply it with a sponge or rag for a faux-limewash texture instead of a solid flat stripe.
Step 4: Finishing Touches
-
Inspect for bleeds:
Check your lines closely. If any tiny bleeds occurred, wait for the paint to dry fully before touching them up with a small artist’s brush. -
Clean up:
Reattach your outlet covers and move furniture back into place once the wall is completely dry.
Enjoy the rhythmic balance and warm energy your new feature wall brings to the space


Two-Tone Half Wall Split
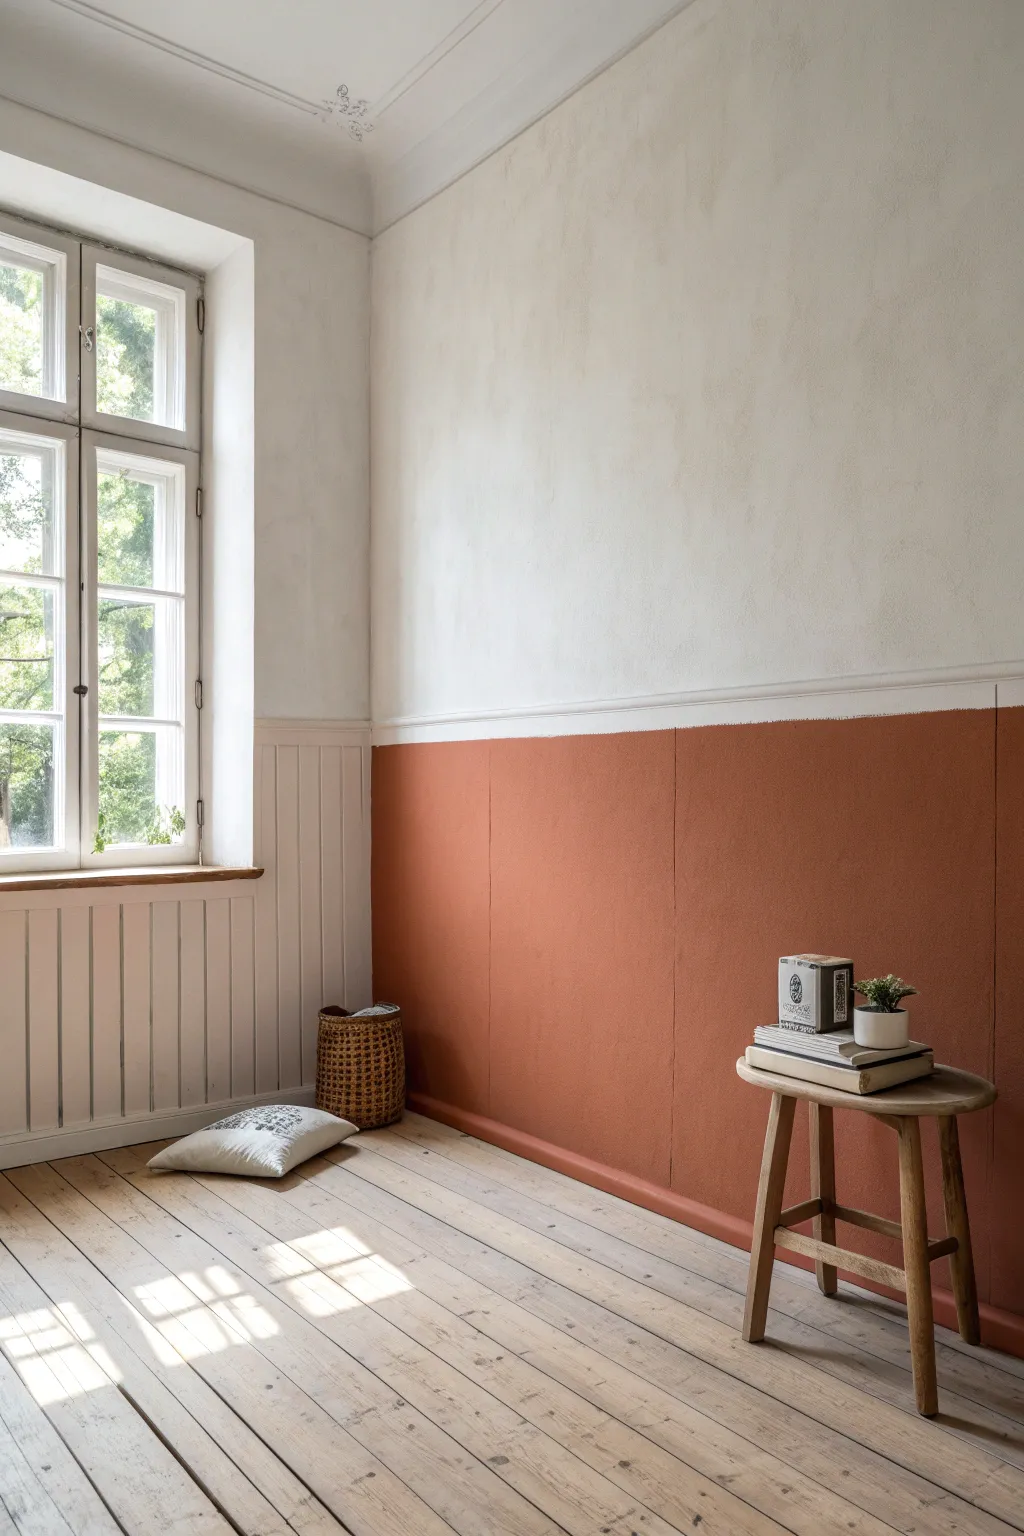
Transform a plain room into a warm, inviting sanctuary with this earthy two-tone wall treatment. By combining a creamy textured upper wall with a rich terracotta lower section, you achieve a grounded, timeless look reminiscent of Mediterranean interiors.
How-To Guide
Materials
- Painter’s tape (high quality)
- Drop cloths
- Spackle (if patching holes)
- Sandpaper (120 and 220 grit)
- Primer (suitable for interior walls)
- Cream or off-white latex paint (matte or eggshell)
- Terracotta/Burnt Orange latex paint (matte finish)
- Decorative chair rail molding (optional but recommended)
- Construction adhesive or finish nails
- Caulk and caulking gun
- Paint rollers (medium nap for texture)
- Angled sash brush (2-2.5 inch)
- Level or laser level
- Pencil
- Measuring tape
Step 1: Preparation & Mapping
-
Clear and Clean:
Remove all furniture from the wall area and lay down drop cloths to protect your beautiful wood floors. Wipe the walls down with a damp cloth to remove dust and oils. -
Patch Imperfections:
Inspect the wall for nail holes or dents. Fill these with spackle, let it dry completely, and sand smooth with 120-grit sandpaper. -
Determine Height:
Decide where you want the color split to be. The traditional height for wainscoting is about 32 to 36 inches, but going slightly higher can create a modern feel. Measure from the floor up and mark your desired height with a pencil at several intervals. -
Draw the Line:
Using a long level or a laser level, connect your pencil marks to create a straight, continuous horizontal line across the entire wall. This is your most critical guide.
Pro Tip: Seamless Seal
To get a razor-sharp line on textured walls, run a thin bead of clear paintable caulk along the tape edge before painting. Wipe away the excess, let dry, then paint.
Step 2: Painting the Upper Wall
-
Cut In the Ceiling:
Start by using your angled brush to cut in the cream paint along the ceiling line and corners of the upper section. -
Roll the Top:
Use a roller to paint the upper section with your cream color. Paint slightly below your pencil line to ensure no gaps appear later. -
Second Coat:
Allow the first coat to dry according to the manufacturer’s instructions, then apply a second coat for a rich, opaque finish. Let this cure fully—ideally overnight—before applying tape.
Step 3: Creating the Split
-
Apply Tape:
Once the top paint is fully cured, apply painter’s tape along your pencil line. Place the tape on the *upper* side of the line, covering the cream paint you want to protect. -
Seal the Edge:
Run a credit card or putty knife firmly along the bottom edge of the tape to ensure a tight seal. I always like to lightly brush a tiny bit of the *cream* paint over the tape edge first; this seals any air pockets and ensures crisp lines. -
Install Trim (Optional):
If you are using a chair rail trim like in the photo, install it now centering it over the line. If going for a seamless painted line without wood trim, skip this step.
Troubleshooting: Paint Bleed
If paint bled under the tape, don’t panic. Wait for it to dry completely, then re-tape a hairline away from the mistake and touch up with the original background color.
Step 4: Applying the Terracotta
-
Cut In Baseboards:
Use your angled brush to paint the baseboards and corners with the terracotta color first. Painting the baseboards the same color as the wall creates a seamless, modern look. -
Roll Surface:
Load your roller with the terracotta paint. Apply it to the lower wall section using ‘W’ motions to distribute the paint evenly. -
Texture Note:
If your wall is smooth but you want the textured plaster look from the image, use a thicker nap roller (1/2 inch or more) or mix a texture additive into your paint. -
Second Coat:
Wait for the first coat to dry deeply, then apply a second coat of terracotta to ensure the color is vibrant and consistent. -
Remove Tape:
While the second coat is still slightly tacky (not wet, but not fully dry), carefully peel off the painter’s tape at a 45-degree angle. This prevents the paint from peeling up with the tape.
Step 5: Finishing Touches
-
Caulk Trim:
If you installed a chair rail, run a thin bead of caulk along the top and bottom edges where it meets the wall, and smooth it with a damp finger. -
Paint Trim:
Paint the chair rail using a small brush. In the example, it matches the upper wall, so use your cream paint carefully. Keep a damp rag handy for drips. -
Final Inspection:
Check your lines and corners. Use a small artist’s brush to touch up any tiny bleeds or imperfections.
Step back and enjoy the grounded warmth and architectural interest your new two-tone feature wall brings to the space.

Simple Color-Block Rectangles
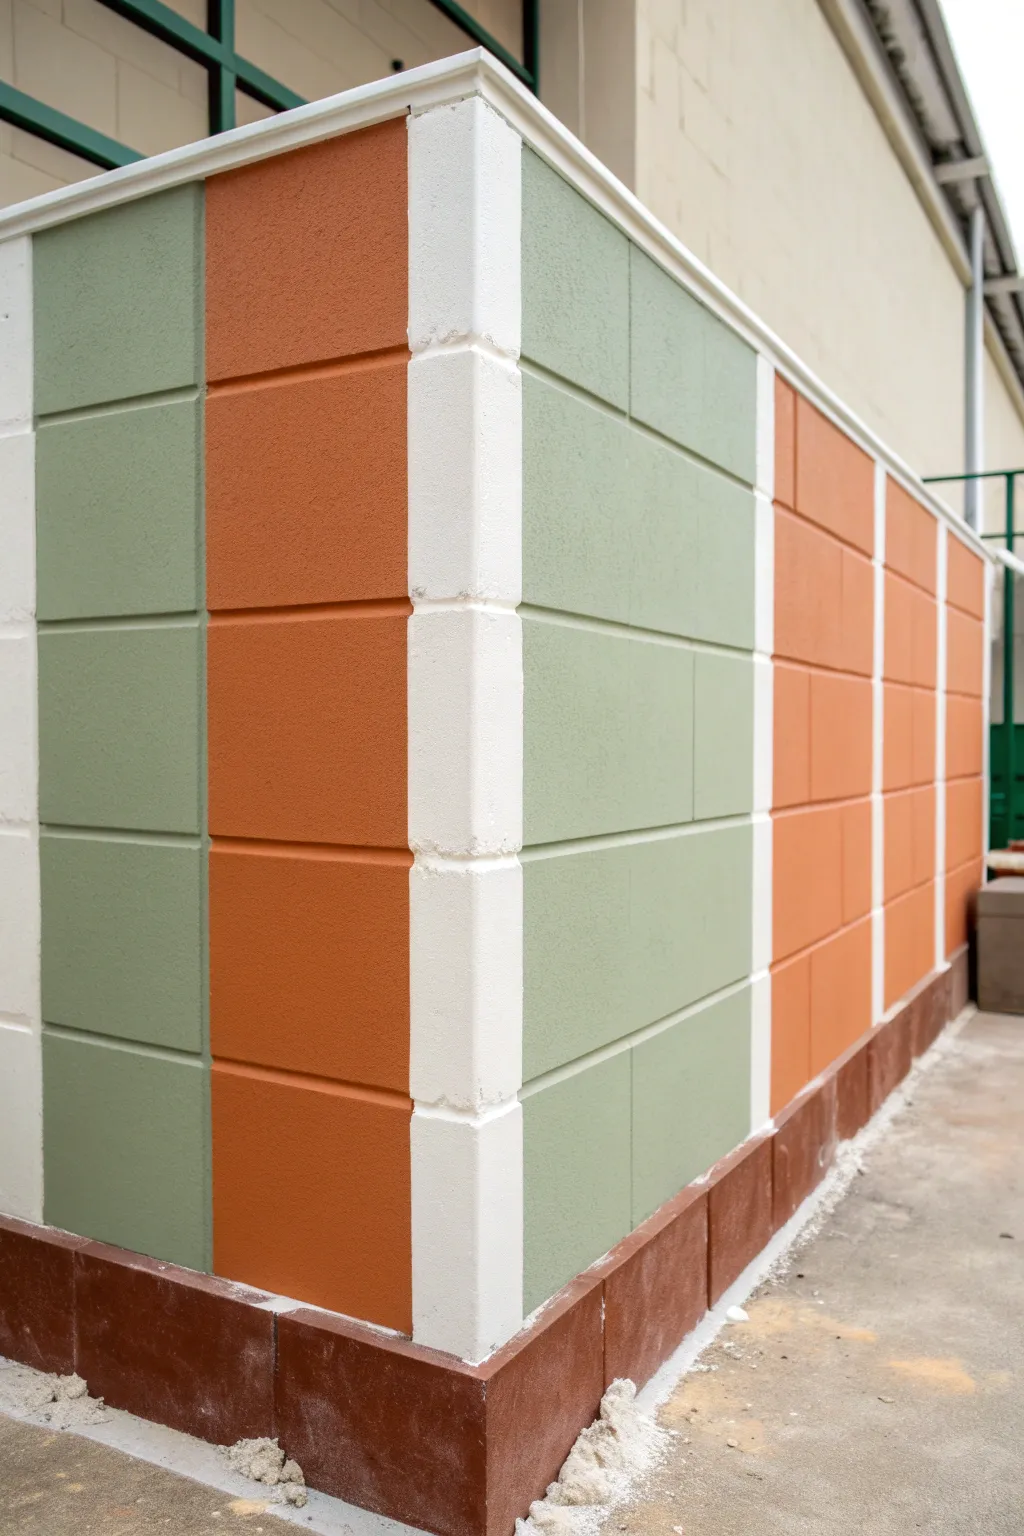
Transform a plain corner or garden wall into a structured architectural feature with this clever taping technique. By alternating vertical stripes of sage green and terracotta orange against a bright white background, you create the illusion of clean, modern masonry.
Step-by-Step
Materials
- Exterior masonry primer
- High-quality exterior acrylic latex paint (White/off-white for base)
- Exterior acrylic latex paint (Sage Green)
- Exterior acrylic latex paint (Terracotta Orange)
- Exterior acrylic latex paint (Dark Red/Brown for base trim)
- Painter’s tape (1-inch width for grout lines)
- Painter’s tape (2-inch width for masking trim)
- Paint rollers and tray
- Small angled sash brush
- Measuring tape
- Level or laser level
- Pencil
- Drop cloths
Step 1: Preparation and Base Coat
-
Clean the surface:
Before painting, ensure your wall is completely clean. If this is an exterior wall, pressure wash it lightly or scrub with a stiff brush and TSP substitute to remove dirt, mold, or loose paint. Let it dry completely. -
Prime the wall:
Apply a coat of high-quality masonry primer to seal the surface. This is crucial for concrete or stucco walls to ensure the paint adheres properly and lasts longer. -
Apply the ‘grout’ color:
Roll on two coats of your white or off-white base color over the entire wall area. This color will eventually become the lines between your colored blocks, so ensure the coverage is solid and opaque. -
Let the base cure:
Allow the white base coat to dry thoroughly, preferably for at least 24 hours. If the paint is even slightly tacky, the tape you apply in the next phase might pull it up.
Step 2: Taping the Grid
-
Mark vertical guides:
Decide on the width of your columns. Using a measuring tape and pencil, make small marks along the top and bottom of the wall to indicate where your vertical grout lines will go. -
Apply vertical tape:
Run long strips of 1-inch painter’s tape vertically, connecting your top and bottom marks. Use a level or laser level to ensure these lines are perfectly plumb. -
Mark horizontal guides:
Determine the height of your rectangular blocks. Mark these intervals along your vertical tape lines to keep everything aligned. -
Tape horizontal lines:
Apply horizontal strips of tape across the vertical columns. Press the tape down firmly, especially at the intersections and on textured surfaces, to prevent paint bleed. -
Seal the tape edges:
I like to take a tiny bit of the *white base paint* and brush it lightly over the edges of the tape. This seals the tape line so if any paint bleeds under, it’s just the white color, keeping your final lines crisp.
Bleeding Lines?
If paint bleeds on a textured wall, don’t wipe it while wet. Let it dry completely, then carefully touch it up with the base color and a tiny artist brush.
Step 3: Painting the Color Blocks
-
Plan your pattern:
Look at your grid and decide which columns will be green and which will be orange. In this design, the corner column remains white, while the flanking columns alternate colors. -
Paint the green columns:
Using a small roller or brush, fill in the rectangles designated for the sage green. Be careful to stay inside the taped vertical boundaries of that column. -
Paint the terracotta columns:
Switch to a fresh roller or brush and fill in the terracotta orange columns. Apply two coats if necessary to get a rich, saturated color that hides the white base. -
Detail the corner:
If you are replicating the image exactly, leave the vertical column directly on the corner white. This acts as a visual break and highlights the architectural shape. -
Remove tape while damp:
Carefully peel off the painter’s tape before the colored paint is 100% dry. Pull the tape away from the fresh paint at a 45-degree angle to slice through the film cleanly.
Make It 3D
Add a drop shadow! Paint a thin line of darker grey along the bottom and right side of every colored rectangle to make the blocks look like they pop out.
Step 4: Finishing the Base Trim
-
Mask the painted wall:
Once the main wall is fully dry (give it another 24 hours), apply a strip of wide painter’s tape horizontally along the bottom edge of your color blocks to protect them. -
Paint the baseboard area:
Apply the dark red/brown paint to the bottom section of the wall. This darker color grounds the design and hides dirt splashes from the ground. -
Remove final masking:
Peel off this final strip of tape to reveal the clean separation between your geometric wall and the dark base trim. -
Touch ups:
Inspect the lines for any imperfections. Use a small artist’s brush and your original colors to tidy up any spots where the paint might have jumped the line.
Step back and admire how simple paint and tape turned a flat surface into a structured, colorful feature wall

Bold Diagonal Color Split
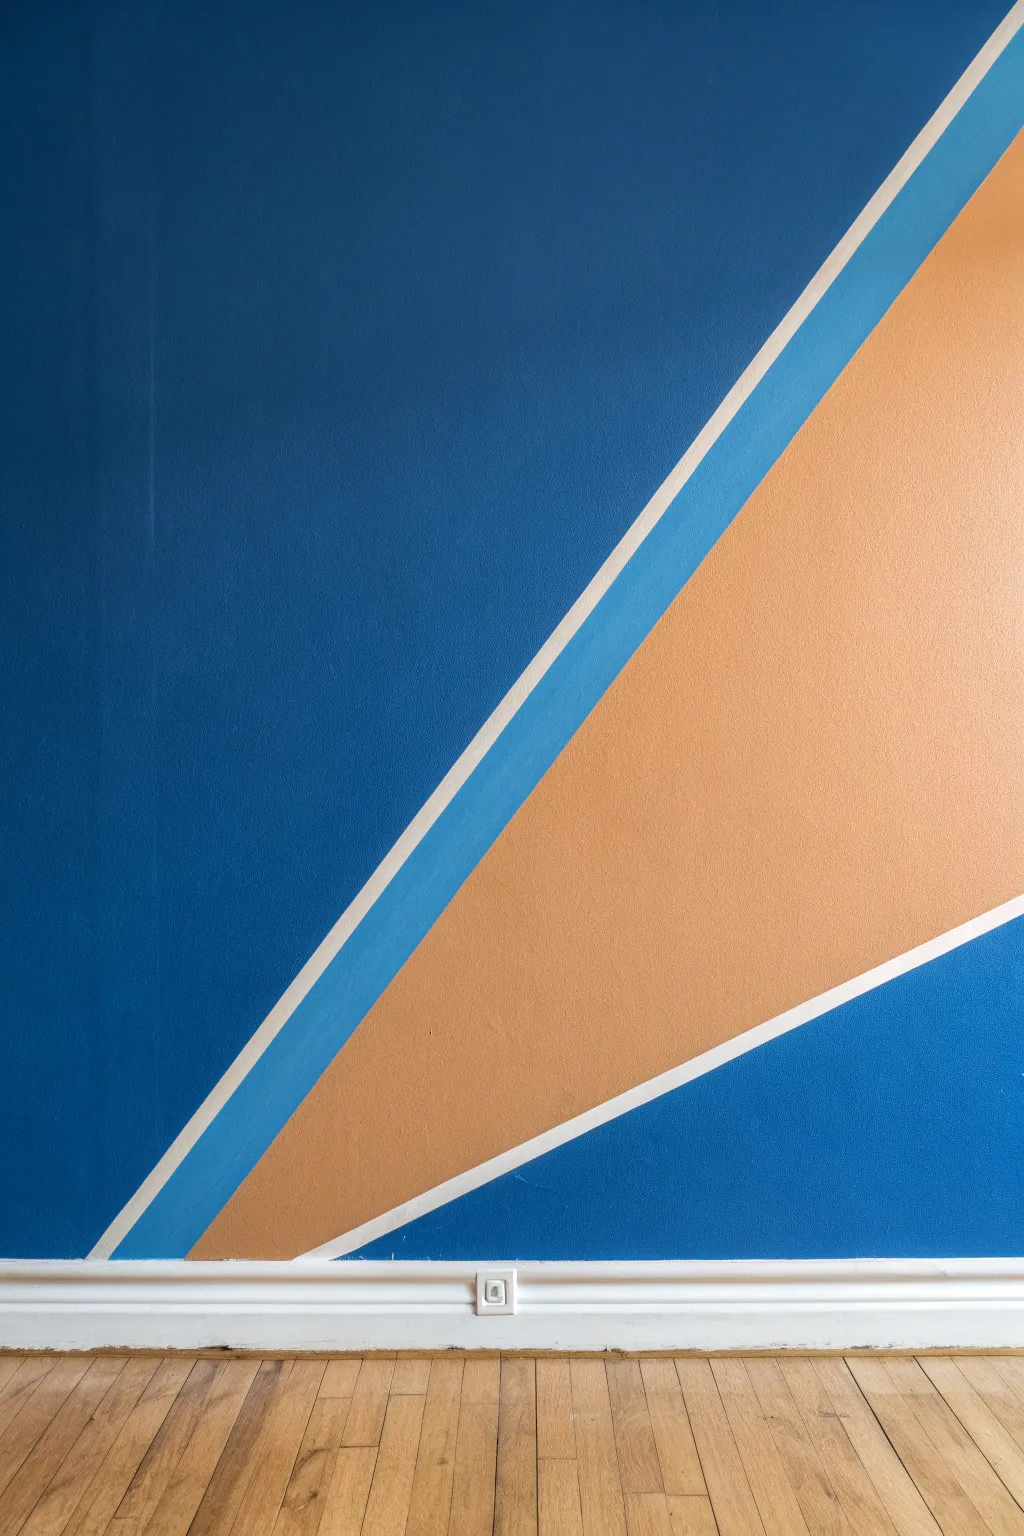
Transform a plain wall into a bold statement piece with this striking three-tone geometric design. Using sharp diagonal lines and a contrasting palette of deep blue, sky blue, and warm peach, you’ll create a dynamic focal point that energizes any room.
How-To Guide
Materials
- Painter’s tape (1.5 inch or 2 inch width)
- Deep royal blue interior paint
- Medium sky blue interior paint
- Warm peach or terra cotta interior paint
- White interior paint (or your existing base color)
- Paint rollers (microfiber covers recommended)
- Small angled sash brush
- Paint tray and liners
- Drop cloths
- Measuring tape
- Pencil
- Level or straight edge
- Damp cloth
Step 1: Preparation and Base
-
Clear and clean:
Begin by removing any furniture from the wall area and laying down drop cloths to protect your flooring. Wipe the wall down with a damp cloth to remove dust, ensuring your tape will stick properly. -
Assess base color:
If your wall isn’t already white (or the color you want the thin separating lines to be), paint the entire wall with your base white paint now. Allow this to cure for at least 24-48 hours before applying any tape. -
Tape the baseboards:
Run a strip of painter’s tape along the top edge of your baseboard to protect the trim from paint drips.
Step 2: Mapping the Design
-
Mark the first diagonal:
Decide where you want your main diagonal split to start. In the example, it begins near the bottom left corner and shoots up to the top right. Make a small pencil mark at your start and end points. -
Apply the main tape line:
Stretch a long piece of painter’s tape between your two marks. Ask a friend to hold one end taut while you press it down to ensure a perfectly straight line. This will become the prominent white stripe. -
Add the secondary stripe:
To create the parallel blue stripe, place a second strip of tape parallel to the first one. The distance between these two pieces of tape determines the width of that sky-blue accent band—aim for about 4-5 inches. -
Third tape line:
Apply a third strip of tape parallel to the second one. The space between the second and third tape strips will be your sky-blue section. The remaining large triangular area below this line will be peach. -
Seal the edges:
Firmly run your finger or a plastic credit card along the edges of all tape strips to prevent paint bleed. I always take a minute here to double-check the seal.
Bleed Blocker
Use ‘Yellow Frog Tape’ for delicate surfaces if you recently painted the base coat. It has lower adhesion and won’t pull up your fresh white background.
Step 3: Painting the Sections
-
Paint the base coat technique:
For razor-sharp lines, lightly brush a small amount of your *base wall color* (white) over the edges of the tape first. This seals any tiny gaps with white paint so the colored paint won’t seep under. -
Apply the dark blue:
Using a roller, fill in the large upper-left section with your deep royal blue paint. Cut in near the ceiling and corners with your angled brush. -
Paint the sky blue stripe:
Carefully paint the narrow channel between the first and second tape lines using the sky blue paint. A small 4-inch roller works perfectly here for smooth coverage. -
Apply the peach tone:
Fill the large bottom-right triangle with your warm peach paint. Be sure to carry the color all the way down to the taped baseboard. -
Second coats:
Once the first coat is dry to the touch (usually 2-4 hours), apply a second coat to all three colored sections to ensure rich, opaque coverage.
Metallic Pop
Instead of leaving the diagonal dividing line white, hand-paint it gold or copper after the other colors dry for a luxurious, high-end finish.
Step 4: The Reveal
-
Time the removal:
Don’t wait for the paint to fully cure. Removing the tape while the paint is slightly tacky (about an hour after the final coat) helps prevent peeling. -
Peel carefully:
Slowly pull the tape off at a 45-degree angle, pulling away from the painted edge. This reveals the crisp white lines separating your bold colors. -
Touch ups:
Inspect your lines. If any paint bled through, create a crisp edge by touching it up with a tiny artist’s brush and your base white paint.
Step back and admire how this simple taping technique completely changes the architecture and energy of your space
BRUSH GUIDE
The Right Brush for Every Stroke
From clean lines to bold texture — master brush choice, stroke control, and essential techniques.
Explore the Full Guide
Modern Triangle Wall Scatter

Transform a plain wall into a geometric masterpiece with this scattered triangle design featuring an earthy palette of sage, terracotta, and teal. Using a clever tape-resist method, this mural creates crisp, clean lines and a modern quilt-like aesthetic that brings warmth and structure to any room.
Step-by-Step
Materials
- Painter’s tape (0.94-inch or 1-inch width for best visibility)
- Interior latex paint (base wall color, typically white or off-white)
- Interior latex paint samples (Sage Green, Forest Green, Teal, Blush Pink, Terracotta, Charcoal Grey)
- Small foam rollers (4-inch size)
- Small angled paintbrush (1.5-inch)
- Plastic paint tray with multiple liners
- Measuring tape
- Pencil
- Level (2-foot or longer)
- Drop cloth
- CRAFT KNIFE (optional for trimming tape corners)
Step 1: Planning and Taping
-
Prep the surface:
Begin by ensuring your wall is clean and painted with your desired base color. In this design, the base color forms the separation lines between triangles, so a fresh coat of white or off-white is essential if the current paint looks dingy. -
Visualizing the grid:
This design relies on a grid structure, even though not every ‘slot’ is filled. Imagine a grid of squares on your wall, then imagine drawing a diagonal line through each square to create two triangles. This is the underlying geometry. -
Mark horizontal guides:
Using your measuring tape and pencil, mark horizontal rows up the wall. A spacing of about 12 to 14 inches between rows works well for this scale. Use a long level to lightly draw these horizontal lines across the wall. -
Mark vertical guides:
Mark vertical lines along your horizontal guides at the same interval (e.g., if rows are 12 inches high, make vertical marks every 12 inches). This creates your invisible grid of squares. -
Tape the long diagonals:
Now, apply painter’s tape diagonally across your grid blocks. For a cohesive look like the photo, try to keep all diagonal lines running parallel in one direction for large sections, or alternate directions between columns. Tape entire long diagonal strips first rather than individual small pieces. -
Tape the grid lines:
Apply tape over your pencil marks for the horizontal and vertical grid lines. You will now see a wall covered in taped ‘squares’ cut in half by diagonals. -
Select your active shapes:
The beauty of this design is the ‘scatter’ effect. You don’t paint every single triangle. Look at your taped wall and place a small piece of tape or a sticky note inside the triangles you plan to leave blank (white). The reference image shows dense clusters that fade out toward the edges. -
Seal the tape edges:
This is a crucial step often skipped. Paint a thin layer of your *base wall color* over the edges of all the tape. This seals the tape and prevents colored paint from bleeding under, ensuring your final white lines are razor-sharp.
Step 2: Painting the Triangles
-
Plan your color distribution:
I find it helpful to assign colors before opening cans. Mark each ‘active’ triangle with a letter (G for Green, P for Pink, etc.) to ensure a balanced distribution of light and dark tones across the wall. -
Start with the lightest colors:
Pour your lightest color (blush pink or light sage) into a tray. Use a small foam roller to fill in all triangles assigned to this color. Foam rollers give a smoother finish than brushes on flat walls. -
Apply darker tones:
Move on to your mid-tones (terracotta, teal). Be careful not to cross over the tape lines into neighboring triangles that are meant to be different colors. -
Finish with deep accents:
Apply the darkest shades (forest green, charcoal grey) last. These act as anchors for the visual weight of the wall. Use the angled brush for tight corners if the roller misses them. -
Apply a second coat:
Let the first coat dry to the touch (usually 30-60 minutes). Apply a second coat to all colored triangles to ensure solid, opaque coverage without streaks.
Bleed-Proof Lines
If you have textured walls, sealing the tape edge with the BASE color is mandatory. Without it, the texture bumps create gaps for colored paint to seep through.
Step 3: The Reveal
-
Remove tape while damp:
Don’t wait for the paint to fully cure. When the second coat is tacky but not wet, slowly peel off the tape. Pull the tape back upon itself at a 45-degree angle for the cleanest edge. -
Touch ups:
Once the tape is removed, you might spot a tiny bleed or a pencil mark still visible. Use a small artist’s brush and your base white paint to carefully touch up these areas. -
Erase guidelines:
If any pencil marks from your initial grid remain in the unpainted white sections, gently erase them now that the paint is dry enough to touch safely.
Metallic Mix-Up
Swap one of the earth tones for a metallic gold or copper paint. Scatter 3-5 metallic triangles throughout the design to catch the light and add glamour.
Step back and admire the sophisticated pattern you have built with just tape and patience
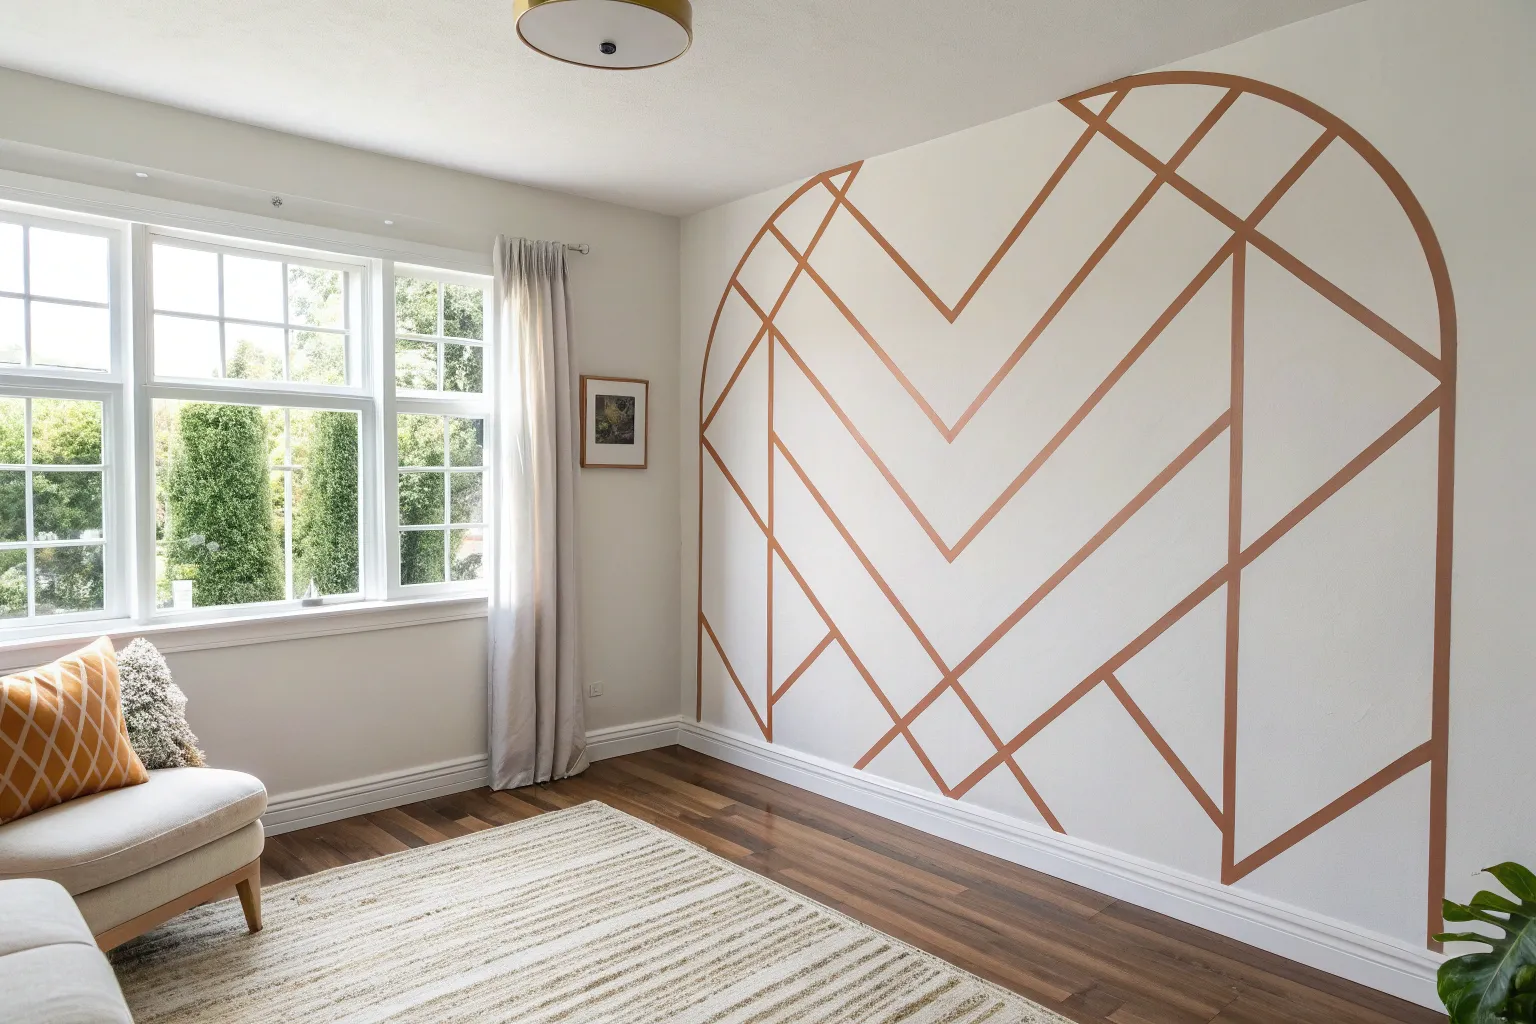
Big Geometric Accent Wall
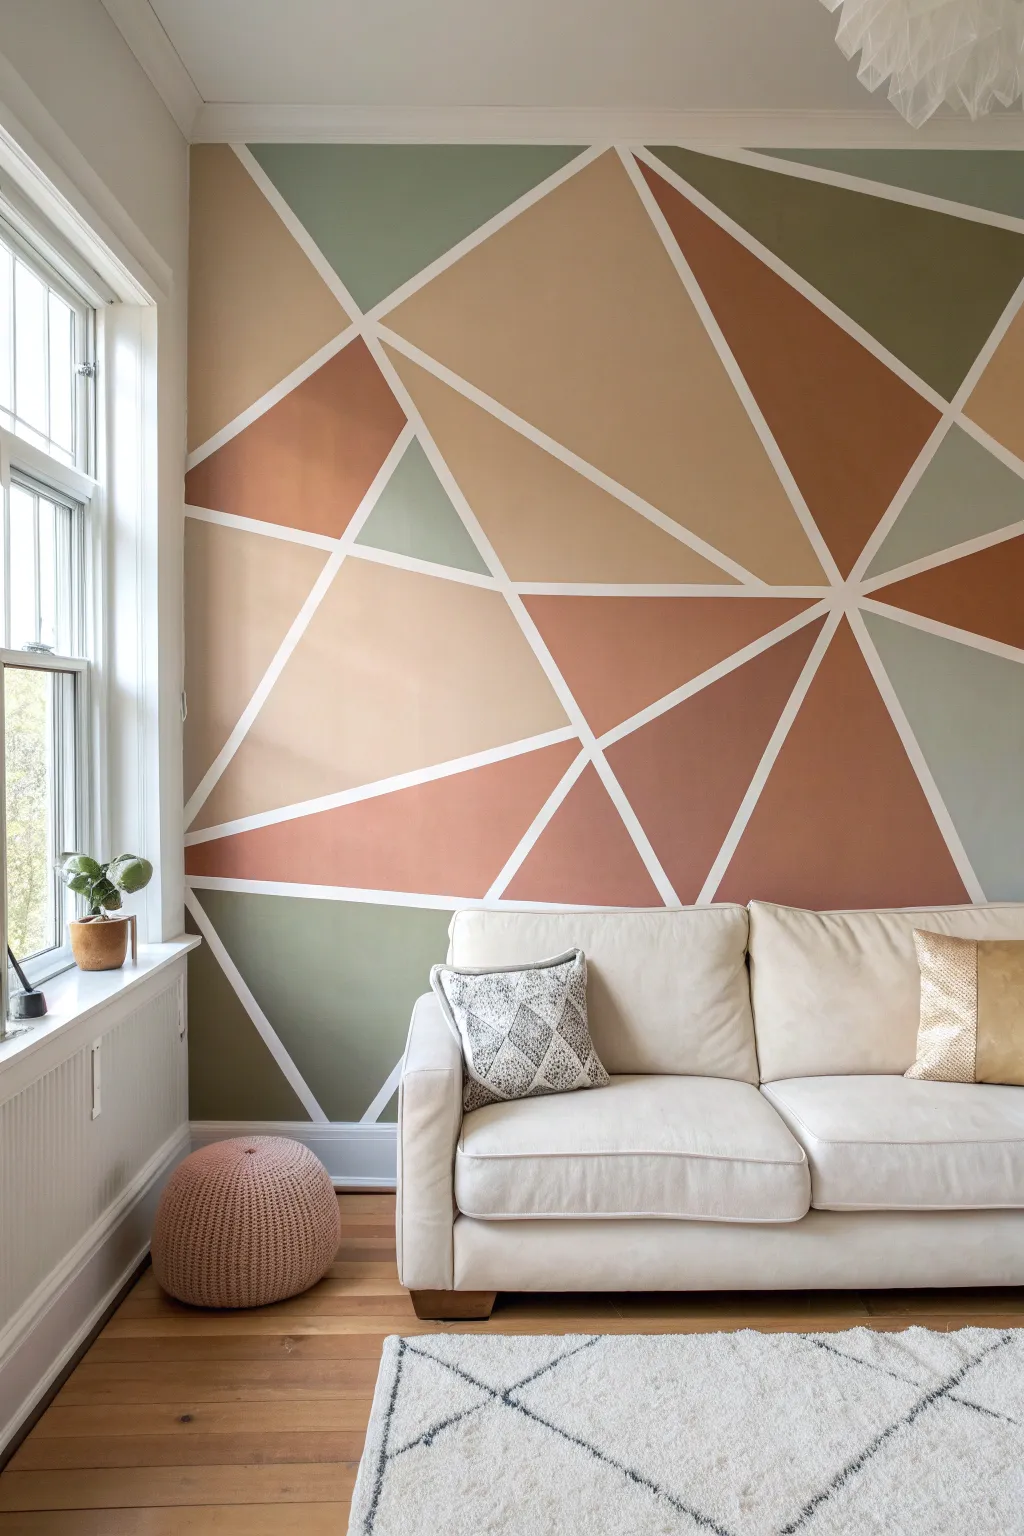
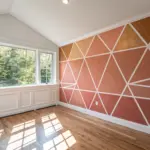
Transform a plain white wall into a modern art piece with this striking geometric mural. Featuring a warm palette of terracotta, sage, and beige intersected by crisp white lines, this project adds architectural interest and depth to any living space.
How-To Guide
Materials
- Painter’s tape (1-inch width for best visibility)
- Interior wall paint (Semi-gloss or Satin)
- Colors: Terracotta, Deep Sage Green, Sandy Beige, Cream
- Paint rollers (mini foam rollers work great for sections)
- Small angled sash brush (2 inch)
- Drop cloths
- Stir sticks
- Paint trays and liners
- Ladder or sturdy step stool
- Utility knife or scissors
- Damp rag for clean up
Step 1: Preparation & Taping
-
Clear and clean:
Begin by moving all furniture away from the wall to give yourself ample working space. Wipe down the wall surface with a damp cloth to remove any dust or oils that might prevent the tape from sticking properly. -
Protect the perimeter:
Apply painter’s tape along the ceiling line, baseboards, and adjacent walls. Lay down your drop cloths to protect the flooring from potential splatters. -
Establish the focal point:
Decide where the lines will converge. In the reference image, the lines radiate from a point slightly to the right of center. Place your first few strips of tape starting from this imaginary focal point and extending outward to the edges of the wall. -
Create the triangles:
Continue adding long strips of painter’s tape, intersecting them to create large triangular and trapezoidal shapes. Aim for a mix of sizes—some large anchoring shapes and smaller connecting ones—to keep the composition dynamic. -
Press and seal:
Once you are happy with the layout, run a credit card or a putty knife over every strip of tape. Pressing down firmly is crucial to prevent paint from bleeding under the edges. -
The base coat trick:
I always recommend painting a thin layer of your existing wall color (usually white) over the edges of the tape first. This seals the tape so any bleed-through matches the base color, ensuring your final colored lines remain razor sharp.
Bleed-Through Blues
If you see jagged lines after peeling, clean them up by placing a straight edge or ruler over the line and running a tiny artist brush with the line color along it for a crisp fix.
Step 2: Painting the Sections
-
Plan your palette:
Before opening paint cans, stick small pieces of masking tape on each geometric section and label them with the color code (e.g., ‘G’ for Green, ‘T’ for Terracotta). This helps visualize the color balance so you don’t end up with two identical colors touching. -
Start with the lightest tone:
Open the Cream or lightest beige paint first. Use a mini roller to fill in the designated sections. Painting the light colors first is forgiving if you accidentally cross a line into a darker zone. -
Cut in the corners:
Use the angled sash brush to carefully paint the corners and sharp angles of the triangles where the roller can’t reach. Ensure smooth coverage without thick globs of paint in the corners. -
Apply the mid-tones:
Move on to the Sandy Beige and Terracotta colors. Apply two coats if necessary, allowing sufficient drying time between layers to ensure richness and opacity. -
Finish with the darkest shade:
Paint the Deep Sage Green sections last. These darker tones ground the mural and provide the necessary contrast against the white lines. -
Check for coverage:
Step back and inspect the wall for any patchy areas or thin spots. Touch up any sections that need a little extra pigment to look solid and uniform.
Step 3: The Reveal
-
Initial drying:
Let the paint dry until it is tacky but not fully cured—usually about an hour after the final coat. Peeling tape off fully dried paint can sometimes pull up chips of the finish. -
Peel carefully:
Slowly peel the tape off at a 45-degree angle, pulling it back onto itself. Maintain a steady, slow pace to ensure the cleanest possible lines. -
Touch ups:
If any paint did bleed through or if a bit of the base coat peeled, don’t panic. Use a tiny artist’s brush and the appropriate color (or white for the lines) to meticulously fix those small imperfections.
Metallic Touch
For a glamorous twist, use metallic gold or copper masking tape (washi tape) over the white lines after the paint is fully cured to add a shimmering, inlaid metal effect.
Step back and admire how this simple taping technique has completely redefined the energy of your room

PENCIL GUIDE
Understanding Pencil Grades from H to B
From first sketch to finished drawing — learn pencil grades, line control, and shading techniques.
Explore the Full Guide
Diamond Lattice Grid
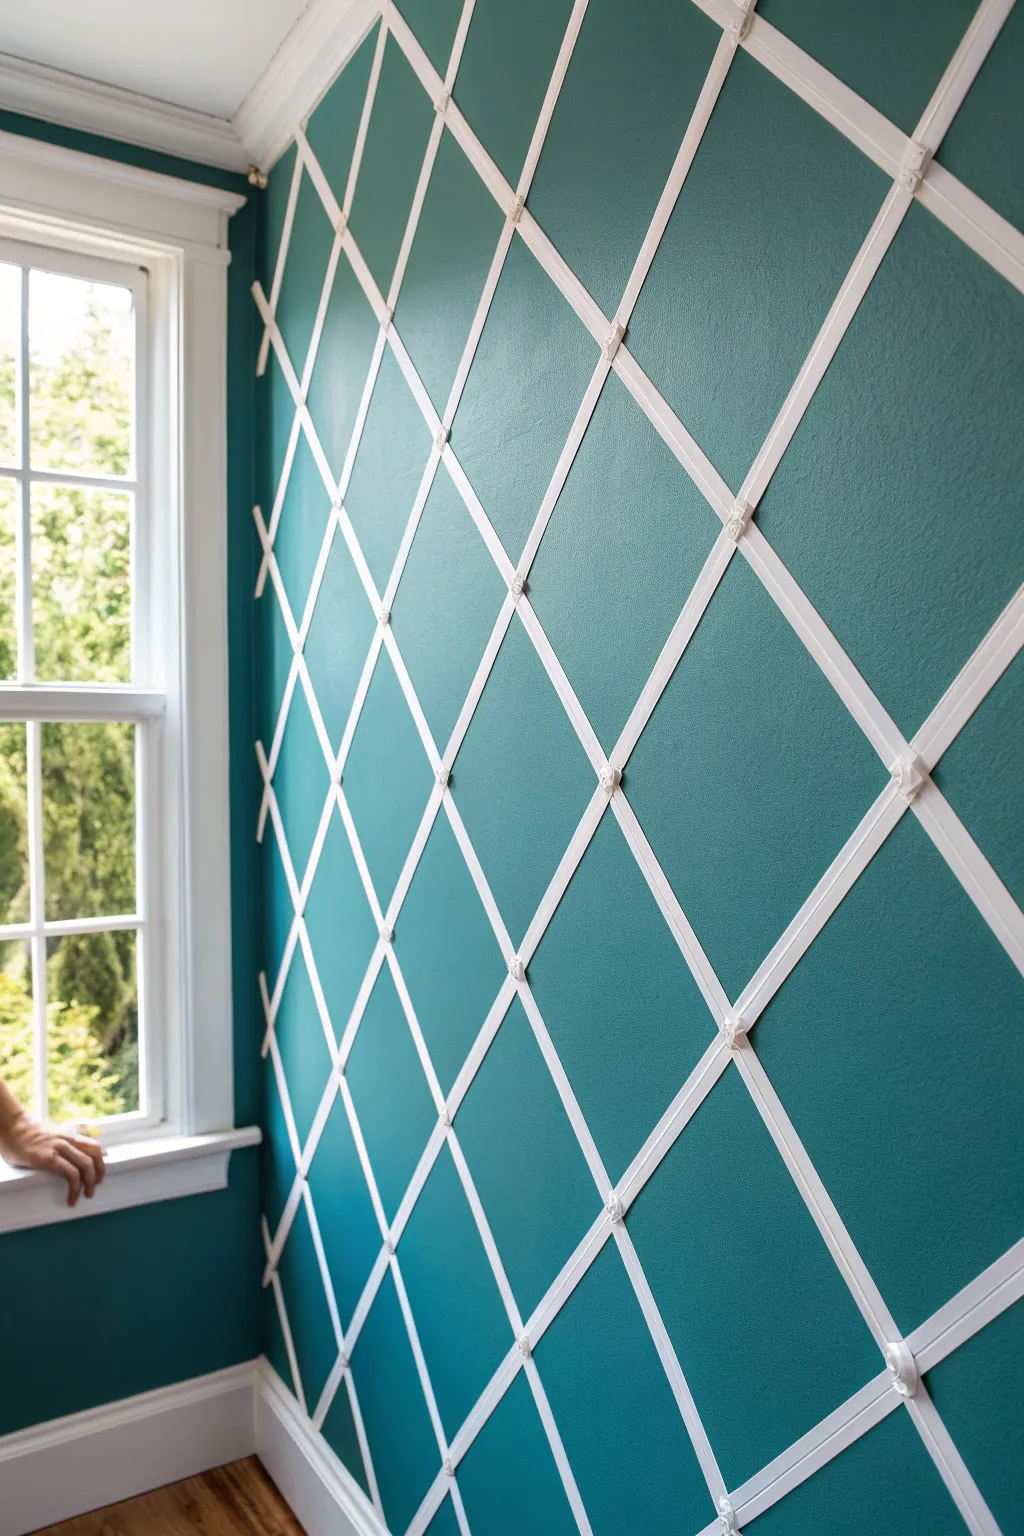
Transform a plain wall into an elegant focal point with this sophisticated diamond lattice grid. The deep teal backdrop creates a rich contrast against the crisp white lines, mimicking the look of traditional trellis work.
Step-by-Step Tutorial
Materials
- Deep teal interior latex paint (satin or eggshell finish)
- Painter’s tape (1/4 inch or 1/2 inch width)
- White semi-gloss paint
- Measuring tape
- Level (2-foot or 4-foot)
- Pencil or chalk line
- Paint roller and tray
- Small foam roller or high-quality sash brush
- Utility knife or razor blade
- Drop cloth
Step 1: Preparation and Base Coat
-
Prepare the workspace:
Clear the area in front of your wall and lay down a drop cloth to protect your floors from any accidental drips. -
Clean the surface:
Wipe down the wall with a damp cloth to remove dust and oils, ensuring the tape will adhere properly later. -
Roll the base color:
Pour your deep teal paint into the tray and apply an even coat over the entire wall using a standard roller. -
Apply a second coat:
Once the first coat is dry (usually 2-4 hours), apply a second coat to ensure rich, opaque coverage without streaks and let it cure for at least 24 hours.
Step 2: Mapping the Grid
-
Determine diamond size:
Decide on the height and width of your diamonds; a 12-inch to 18-inch width usually looks proportional for standard walls. -
Find the center:
Measure the width of the wall to find the exact horizontal center and mark it lightly with a pencil at the top and bottom. -
Mark vertical reference lines:
From your center line, measure outwards in equal increments based on your chosen diamond width, marking these intervals along the ceiling line and baseboard. -
Create diagonal guides:
Using a long straight edge or a chalk line (snapped very lightly), connect the top center mark to the first side mark at the bottom to establish your primary diagonal angle.
Seal the deal
Painting over tape edges with the BASE wall color first seals gaps. If paint bleeds, it matches the wall, keeping your white lines razor sharp.
Step 3: Taping the Pattern
-
Apply first functional tape set:
Apply your painter’s tape along your pencil guides in one diagonal direction, keeping the tape on the *outside* of your measurement line so the painted line remains true to size. -
Check for consistency:
Use a spacer (a piece of cardboard cut to the exact gap size) to verify the distance between tape strips remains consistent as you move across the wall. -
Apply opposing diagonals:
Tape the diagonal lines running in the opposite direction to complete the diamond grid, creating ‘X’ intersections across the wall. -
Seal the edges:
Run a credit card or putty knife firmly over all tape edges to prevent paint bleed. I find this extra pressure is critical for crisp lines. -
The ‘base coat’ trick:
Briefly brush a very thin layer of the *teal* base color over the tape edges; this seals any tiny gaps with the wall color, ensuring the white lines will be perfectly sharp.
Go 3D
For true dimension, replace the painted white lines with actual thin white lattice moulding or ribbon, glued or pinned at the intersections.
Step 4: Revealing the Design
-
Paint the lattice lines:
Using a small foam roller or brush, apply the white semi-gloss paint securely between the taped lines. -
Detail the intersections:
Pay special attention to the ‘X’ intersections where the tape overlaps multiple times, dabbing paint gently to ensure full coverage in the crevices. -
Apply second white coat:
Let the white paint dry to the touch, then apply a second coat to ensure the bright white pops against the dark teal. -
Remove tape promptly:
While the final coat of white paint is still slightly tacky (not fully dry), slowly peel back the tape at a 45-degree angle. -
Add faux-detail (optional):
To mimic the rosette pins seen in the inspiration image, you can use a small round stencil or stamp with white paint at each grid intersection. -
Touch up:
Use a small artist’s brush to correct any minor bleeds with the original teal paint for a flawless finish.
Step back and admire how this classic pattern adds immediate architectural depth to your room
Skinny-Line Pinstripe Overlay
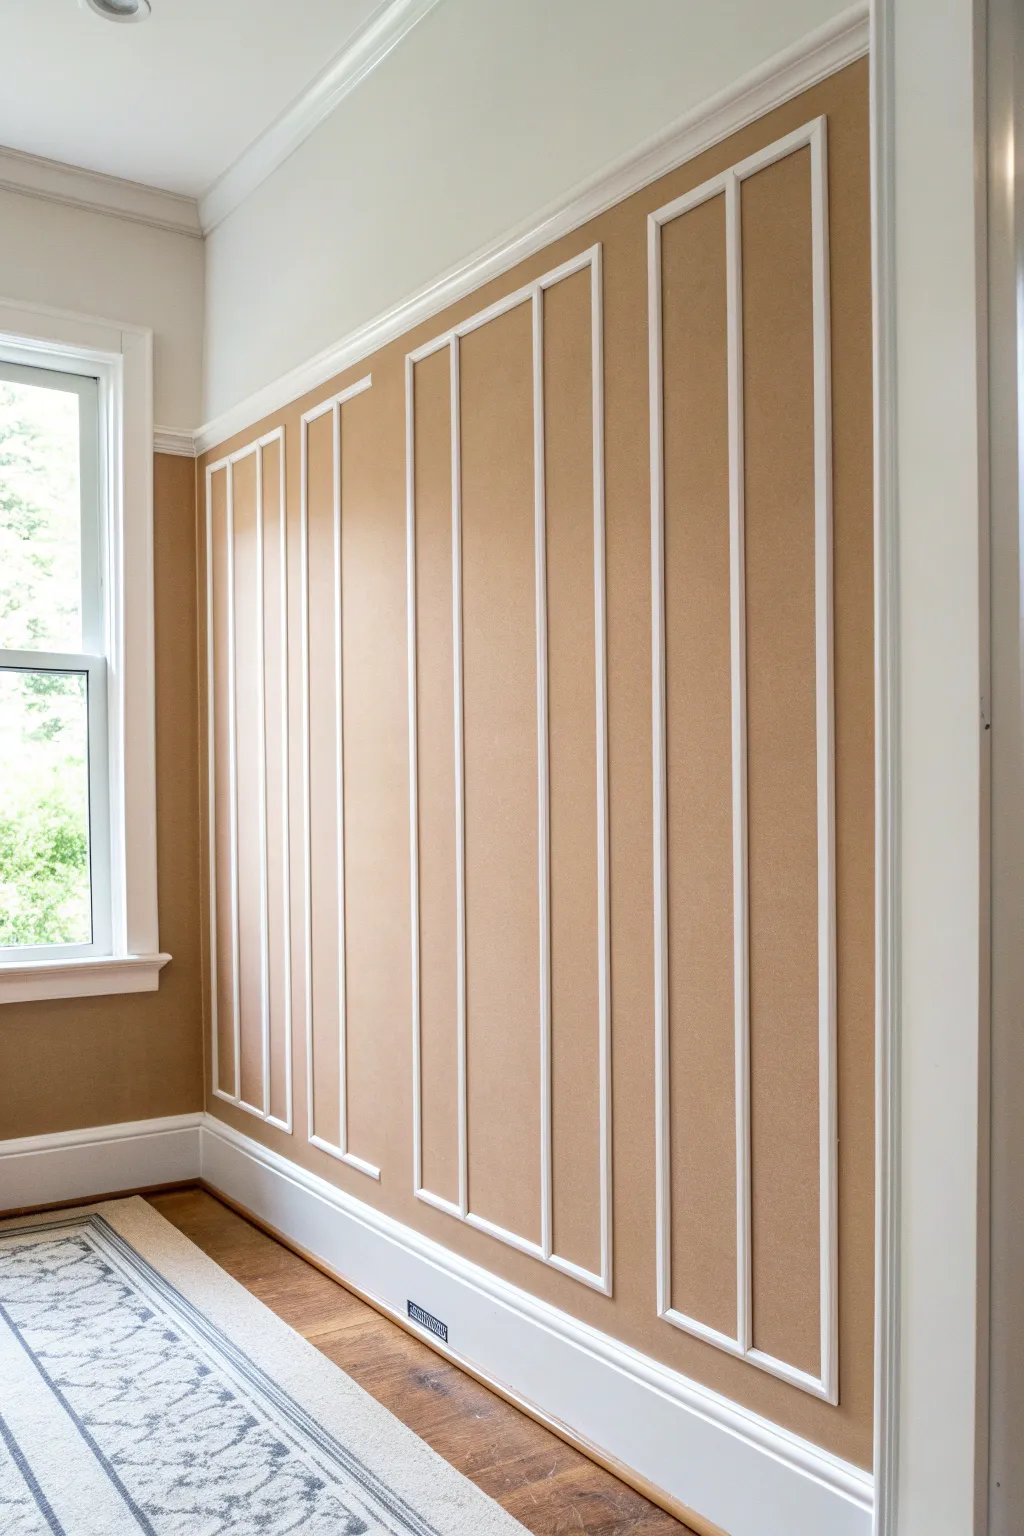
Achieve the sophisticated look of expensive wainscoting and custom molding without making a single cut or nailing any wood. This project uses strategic taping and clever painting techniques to create a dimensional pinstripe overlay that tricks the eye.
Step-by-Step Guide
Materials
- Base wall paint (satin or eggshell finish) – beige/tan color
- Trim paint (semi-gloss) – stark white
- Painter’s tape (1-inch width)
- Painter’s tape (1/4-inch width or delicate surface tape)
- Laser level or 4-foot bubble level
- Measuring tape
- Pencil
- Paint roller and tray
- Angled sash brush (2-inch)
- Edging tool (optional)
- Plastic drop cloths
Step 1: Preparation and Base Coat
-
Clear and clean:
Remove any artwork, nails, or switch plate covers from the wall you intend to transform. Wipe the wall down with a damp cloth to remove dust and let it dry completely. -
Protect the area:
Lay down plastic drop cloths to protect your flooring. Mask off the existing baseboards, crown molding, or adjacent walls with your standard painter’s tape to ensure crisp edges. -
Apply the background color:
Roll on your base wall color—in this case, a warm, medium-tone tan or beige. Apply two coats for even coverage, allowing the manufacturer’s recommended drying time between coats. -
Dry thoroughly:
This is crucial: allow the base coat to cure for at least 24-48 hours. Since you will be applying a lot of tape over this paint, complete curing prevents the tape from peeling up your fresh work.
Secret to Crisp Lines
Always burnish your tape edges with a putty knife or credit card before painting. This pressure activates the adhesive and creates the tightest possible seal against the wall texture.
Step 2: Drafting the Design
-
Determine proportions:
Measure the total width and height of your wall space. Decide how many ‘panels’ you want; the example shows tall vertical rectangles spaced evenly. A gap of 4-6 inches between panels usually looks balanced. -
Set vertical guides:
Using a laser level (or a long level and pencil), lightly mark the vertical center lines for each of your intended pinstripe boxes. -
Mark horizontal boundaries:
Decide on the top and bottom margins. Measure down from the ceiling (or crown molding) and up from the baseboard about 4-5 inches and lightly mark these limit lines across the wall.
Uneven Spacing?
If your wall width doesn’t divide perfectly, adjust the outer margins rather than the space between panels. Keeping the inter-panel gaps consistent is key to a professional look.
Step 3: Taping the Pattern
-
Apply the vertical tape:
Using your 1/4-inch tape, create the vertical sides of your rectangles. Run the tape from your top margin mark down to your bottom margin mark. Keep the tape taut to ensure straight lines. -
Create the horizontal tape lines:
Connect the vertical strips at the top and bottom with horizontal pieces of 1/4-inch tape to close the rectangles. Use a straight edge or credit card to press the tape edges down firmly to prevent bleed. -
Build the outer mask:
Now, place a strip of wider painter’s tape immediately *outside* of your 1/4-inch tape rectangle. Do this on all four sides of every rectangle. -
Create the inner mask:
Similarly, place strips of wider painter’s tape immediately *inside* the 1/4-inch tape rectangle. You should now have a sandwich: wide tape, skinny tape, wide tape. -
Remove the skinny tape:
Here is the magic step: carefully peel away and remove the original 1/4-inch skinny tape from the center. You are left with a perfectly uniform 1/4-inch gap between two wide pieces of masking tape.
Step 4: Painting the Pinstripes
-
Seal the edges:
I like to take a tiny bit of the base wall color (the tan) and lightly brush it over the exposed gap. This seals the tape edges; if any paint bleeds under, it will match the wall and be invisible. -
Apply the white paint:
Once the seal coat is dry, use your small brush or a mini foam roller to apply the semi-gloss white paint into the gap. Use a dabbing motion rather than long strokes to avoid forcing paint under the tape. -
Second coat:
Apply a second coat of white paint for solid opacity. The contrast needs to be sharp for the faux-molding effect to work. -
Remove tape while damp:
Don’t wait for the paint to dry completely. While the second coat is still slightly tacky, slowly peel back the masking tape at a 45-degree angle. This ensures a crisp line without pulling up dried paint chips. -
Clean up:
Inspect your lines. If there are any small bleeds, use a tiny artist’s brush and your base color to touch them up.
Step back and admire how a simple paint trick has added architectural depth and elegance to your room without the dust of carpentry.


Painted Headboard With Tape Edges
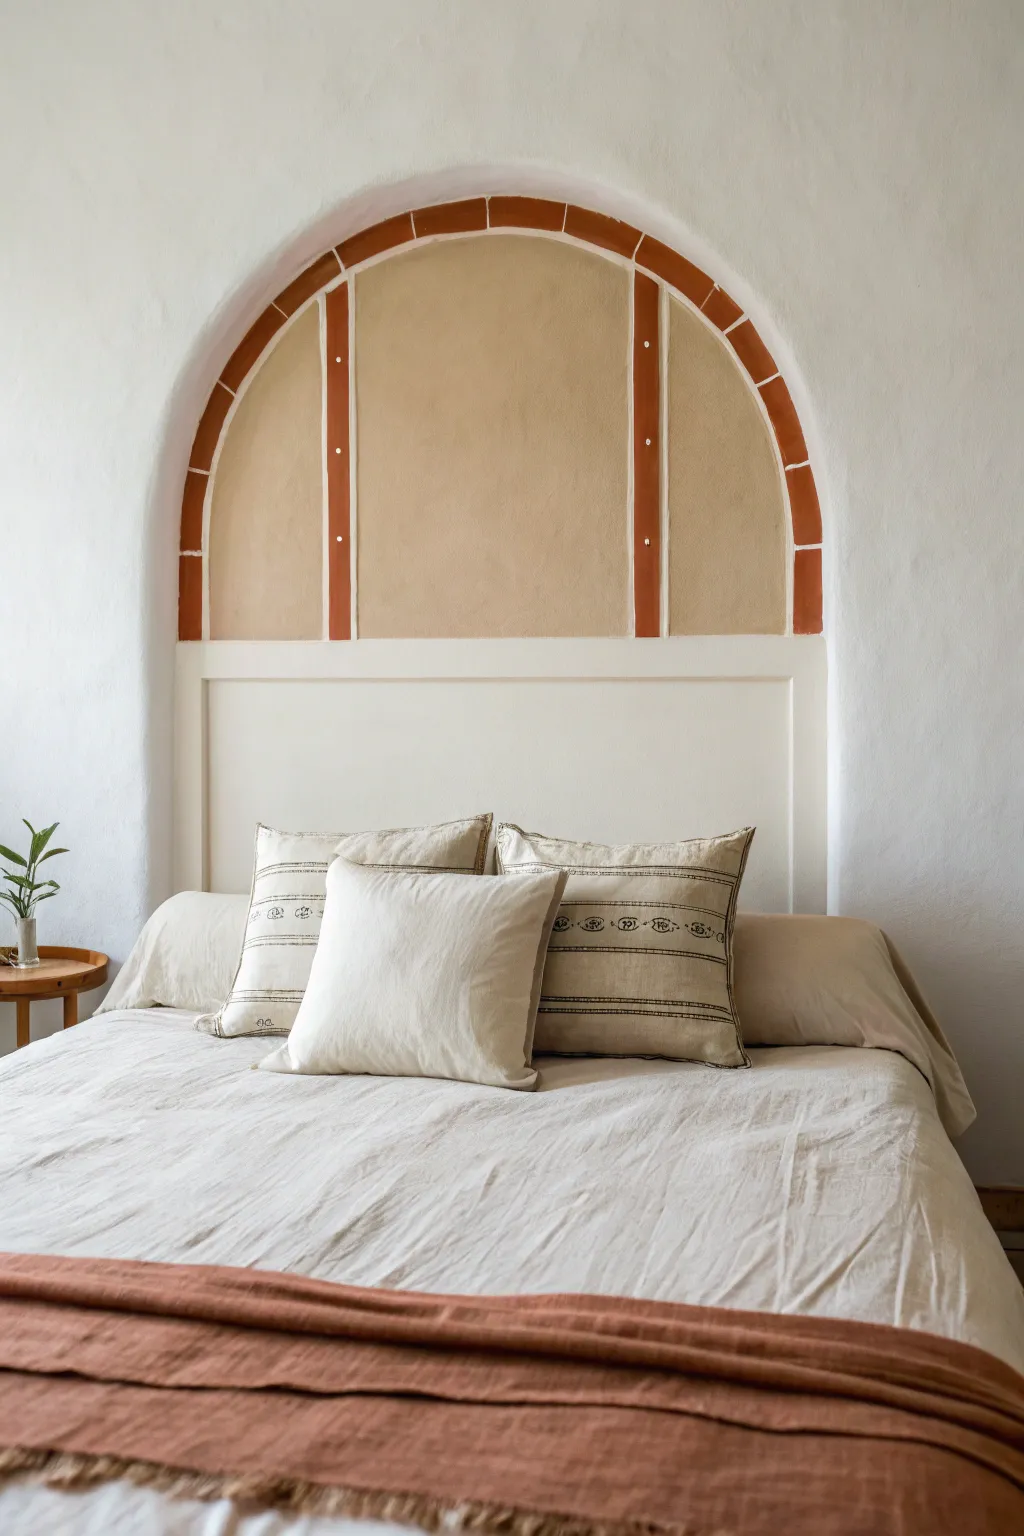
Transform a plain white bedroom wall into a Mediterranean-inspired retreat with this painted faux arch headboard. Featuring warm terracotta accents and textured neutral tones, this design mimics the look of an inlaid architectural feature without any renovation.
Step-by-Step
Materials
- Painter’s tape (various widths: 1-inch and 2-inch)
- Pencil
- String and pushpin (for drawing the arch)
- Level
- Measuring tape
- Paint roller and tray
- Small angled sash brush
- Detail artist brush
- Base wall color paint (white)
- Terracotta/Burnt Orange paint (for the trim)
- Warm Beige/Tan paint (for the fill)
- Damp cloth
Step 1: Planning and Marking
-
Measure the Width:
Determine the desired width of your headboard. Measure the width of your bed frame and add 3-5 inches on each side to ensure the design frames the bed nicely. -
Mark the Vertical Sides:
Using a level and a pencil, draw two vertical lines upward from the floor (or baseboard) to your desired height where the curve of the arch will begin. Ensure these lines are perfectly plumb. -
Draw the Arch:
Find the center point between your two vertical lines. Tie a string to a pencil, pin the other end of the string to the center point on the wall, and adjust the length to meet the top of your vertical lines. Swing the pencil in a semi-circle to create a perfect arch. -
Outline the Trim:
To create the outer ‘brick’ trim effect, shorten your string by roughly 2 inches and draw a second, smaller inner arch. Use a ruler to extend the vertical lines down for this inner section as well. -
Mark Segment Lines:
Using a ruler, lightly mark small horizontal lines across the 2-inch gap between your arches at regular intervals. These will become the mortar lines between the faux terracotta bricks.
Bleed-Proof Lines
If you have textured walls, always seal your tape with the base wall color first. It fills the tiny gaps in the texture so your colored paint can’t sneak under properly.
Step 2: Taping the Design
-
Tape the Outer Edges:
Apply painter’s tape along the outside of your main arch and vertical lines. For the curved section, use many small overlapping pieces of tape or flexible masking tape to navigate the bend smoothly. -
Tape the Inner Fill Area:
Apply tape along the *inside* edge of exact inner arch line you drew. This protects the center space while we work on the trim. -
Create the Vertical Dividers:
Measure and mark two vertical columns inside the main arch shape if you want the panelled look shown in the photo. Tape off these columns, leaving a gap for the terracotta paint. -
Seal the Edges:
Press down firmly on all tape edges with a credit card or your fingernail. I like to paint a very thin layer of the existing white wall color over the tape edges first; this seals the tape and ensures crisp lines later.
Step 3: Painting the Detail
-
Paint the Terracotta Trim:
Using the terracotta/burnt orange paint and a small brush, fill in the arched border and the vertical divider stripes. You don’t need to be perfect since the tape is guiding you. -
Apply a Second Coat:
Allow the terracotta paint to dry to the touch, then apply a second coat for rich, opaque coverage. -
Remove Trim Tape:
Carefully peel off the tape bordering the terracotta sections while the paint is still slightly tacky to prevent peeling. Let this dry completely—preferably overnight. -
Create Faux Bricks:
Once dry, use a small detail brush and your white base wall paint to hand-paint the small ‘mortar’ lines you penciled earlier over the terracotta arch. This breaks the solid line into brick-like segments.
Plaster Texture
Mix a small amount of baking soda or plaster powder into your beige paint for the inner panels. This adds grit and dimension, making the ‘wall’ look like real adobe.
Step 4: Filling the Panels
-
Re-tape for the Fill:
Once the terracotta paint is fully cured, apply fresh tape directly over the dried terracotta edges to protect them. You are now exposing the large beige panels. -
Paint the Beige Panels:
Using a small roller or sash brush, paint the large interior sections with your warm beige color. A roller adds a slight texture which mimics plaster. -
Check for Coverage:
Apply a second coat of beige if the wall color is showing through. Ensure the paint gets right up to the tape edge for a seamless meeting point with the terracotta. -
Final Reveal:
Slowly peel away the final tape strips. Use the small artist brush to touch up any tiny spots where the colors might have bled or missed meeting each other.
Step back and admire how this simple paint project completely redefines the focal point of your room without taking up any floor space
Clean Arch Nook Highlight
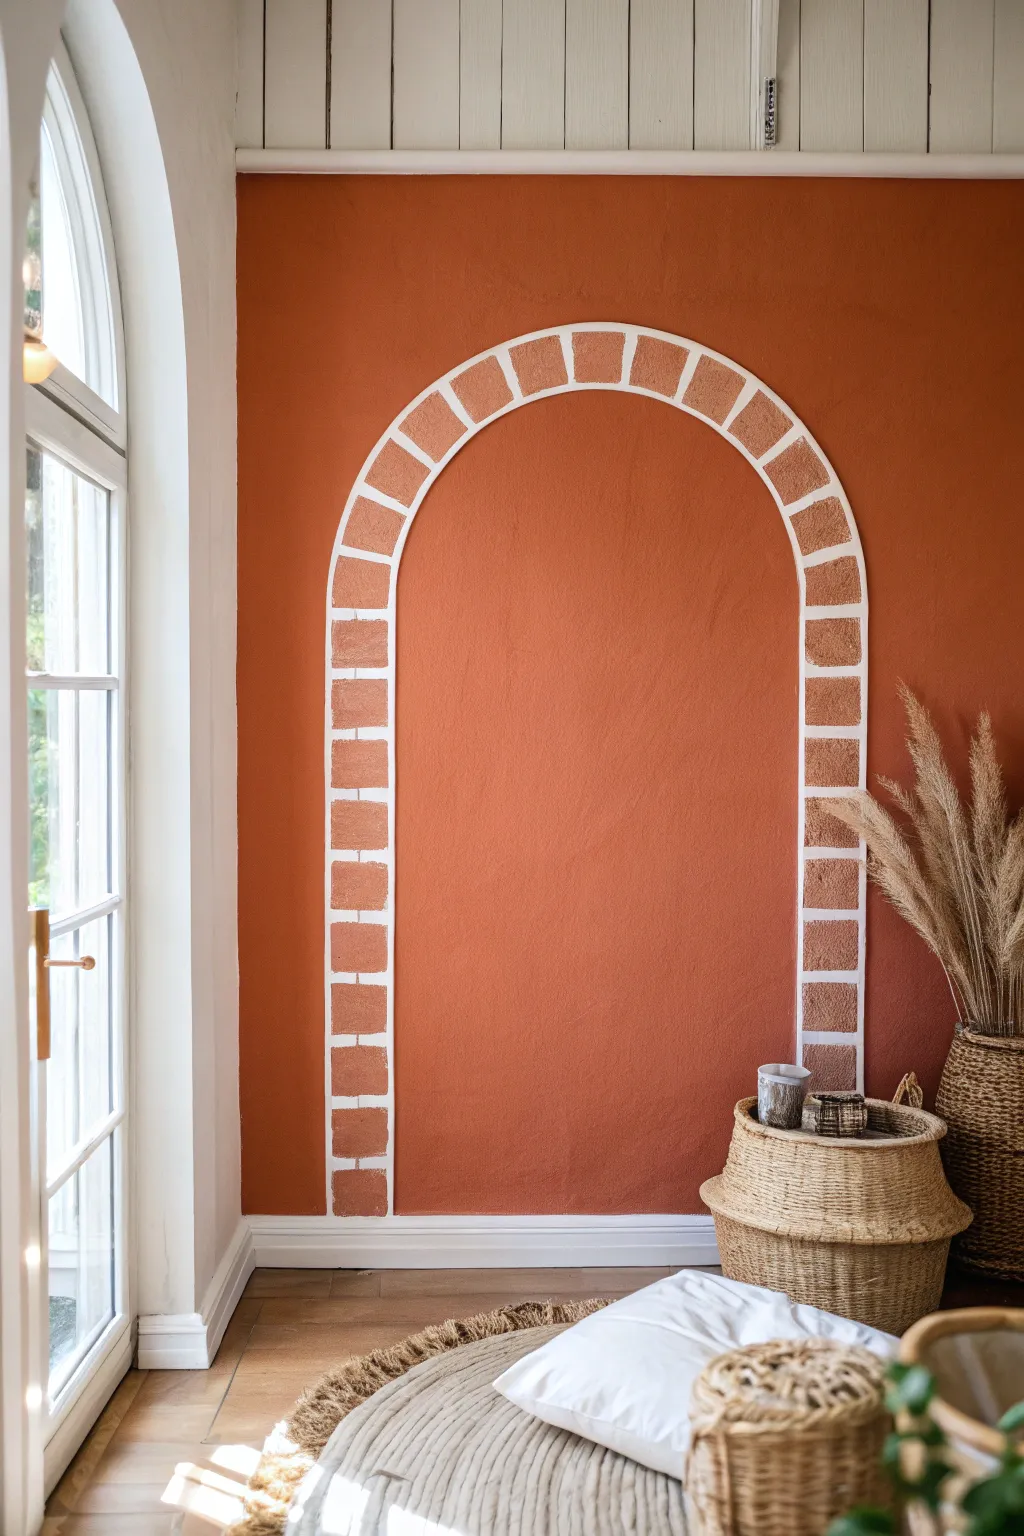
Transform a plain wall into an architectural feature with this clever tape-resist painting technique. This project creates the illusion of a rustic brick or stone archway using warm terracotta tones and crisp white grout lines.
Step-by-Step Guide
Materials
- Terracotta or burnt orange interior wall paint
- White interior wall paint (or existing wall color)
- Painter’s tape (1-inch width)
- Pencil
- String and push pin (or thumbtack)
- Measuring tape
- Level
- Small foam roller
- Paint tray
- Small angled paintbrush for touch-ups
- Drop cloth
Step 1: Preparation and Mapping
-
Prep the surface:
Begin by cleaning the wall surface thoroughly to remove any dust or oils that might prevent the tape from sticking properly. Lay down a drop cloth to protect your flooring. -
Base coat check:
Ensure your wall has a solid base coat. This project relies on the ‘grout’ lines being white, so if your wall isn’t already white, apply a coat of white paint to the area where the arch will be and let it dry completely. -
Measure the width:
Decide on the total width of your arch. Mark the center point of this width on the wall at the height where you want the curve to begin. -
Draw the outer arch:
Create a makeshift compass by tying a string to a pencil. Pin the string at your center mark. Adjust the string length to half your total arch width and lightly draw the outer semicircle. -
Draw the inner arch:
Shorten the string by roughly 6-8 inches (depending on how thick you want your brick border to be) and draw a second, smaller semicircle inside the first one using the same center point. -
Extend the legs:
Use a long level or straight edge to draw vertical lines extending straight down from the ends of both the inner and outer semicircles to the floor or baseboard.
Tape Sealing Trick
Painting over the tape edges with your *base* wall color first locks the seal. Any paint that bleeds under will match the wall, keeping your final lines perfect.
Step 2: Taping the Design
-
Tape the vertical borders:
Apply painter’s tape along the *outside* of your outer pencil lines and the *inside* of your inner pencil lines. This preserves the exact width of your brick border. -
Tape the curve:
Carefully tape the curved sections. You may need to use small, overlapping pieces of tape to negotiate the turn smoothly without buckling, or use flexible curve tape if you have it. -
Mark horizontal bricks:
Starting from the floor, measure equal brick heights (around 3-4 inches) up the vertical legs. Place horizontal strips of tape at these marks to separate the individual bricks. -
Mark the keystones:
For the curved section, the ‘bricks’ or voussoirs need to angle toward the center. Use your string attached to the center center point as a guide to angle your tape strips correctly, radiating outward like sun rays. -
Seal the edges:
Run your finger or a plastic card firmly over all tape edges. I like to do a quick pass of the base wall color (white) over the tape edges now; this seals them and prevents the terracotta paint from bleeding under.
Step 3: Painting and Reveal
-
Paint the background:
Use a roller to paint the interior of the arch (the large empty space) with your terracotta color first. -
Paint the bricks:
Fill in the rectangular and wedge-shaped brick spaces between your tape lines. Use a small roller for speed, or a brush for more control to ensure you get full coverage. -
Paint the exterior:
Paint the rest of the wall outside the arch with the terracotta color to match, blending carefully up to the outer tape line. -
Second coat:
Allow the first coat to dry according to the can’s instructions, then apply a second coat to ensure a rich, opaque color. -
Remove tape:
While the second coat is still slightly tacky (not fully cured), slowly peel off the tape at a sharp 45-degree angle. This helps keep the paint lines crisp. -
Clean up details:
Inspect your work for any small bleeds or rough spots. Use a small angled artist brush and your white base paint to touch up the grout lines if necessary.
Rustic Texture Upgrade
Mix a small amount of baking soda or texture additive into your terracotta paint. This gives the ‘bricks’ a realistic, stony feel compared to the smooth wall.
Step back and admire how this simple geometric illusion adds depth and warmth to your room
Faux Tile Backsplash Grid
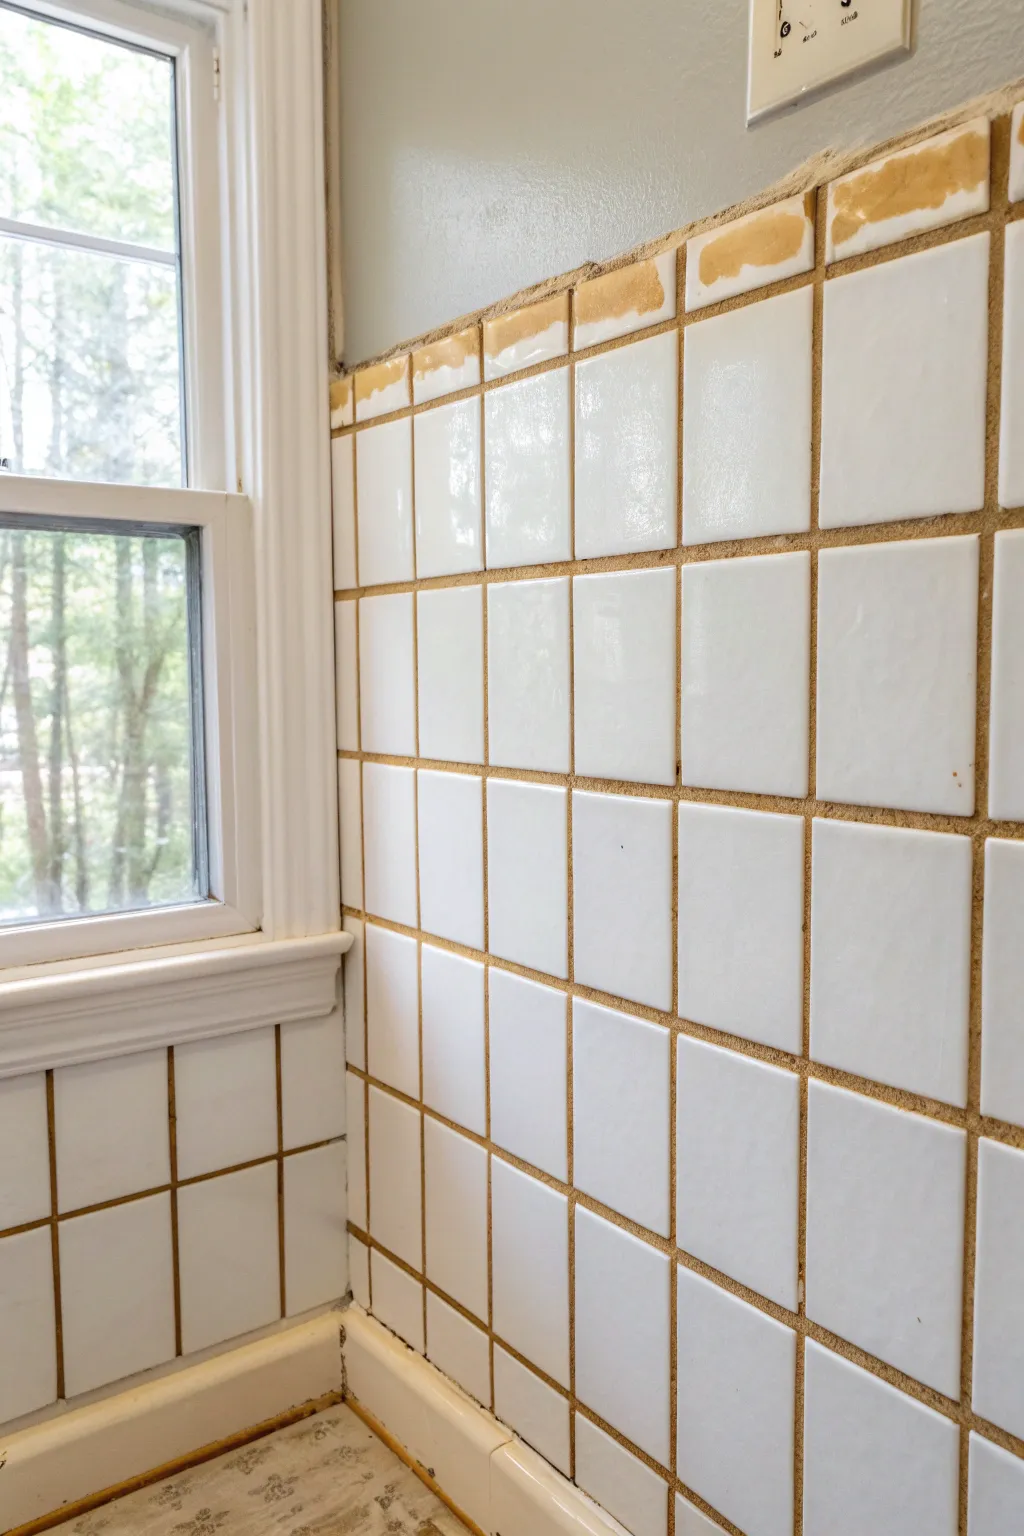
Transform a plain wall into a classic tiled look without laying a single ceramic piece. This clever painting technique uses thin masking tape to create crisp grout lines and glossy paint to mimic the sheen of real porcelain squares.
Detailed Instructions
Materials
- Base wall paint (grout color, e.g., tan or grey)
- High-gloss white paint (or tile color of choice)
- 1/4 inch or 1/8 inch masking tape (painter’s tape)
- Measuring tape
- Pencil
- Level (long spirit level)
- Small foam roller
- Paint tray
- Utility knife or scissors
- Drop cloth
- Sandpaper (medium grit)
Step 1: Preparation and Base Coat
-
Prepare the surface:
Begin by cleaning the wall thoroughly to remove any grease or dust, which is crucial for good paint adhesion. If the wall has existing texture, you might want to sand it down slightly for a smoother, more tile-like finish. -
Protect the area:
Lay down a drop cloth over your workspace or countertops and tape off the trim, ceiling, and window frames to prevent accidental splatters. -
Apply the grout color:
Paint the entire wall area with your chosen grout color base coat. This is the color that will peek through the lines later. Allow this coat to dry completely, preferably overnight, as the tape will need a fully cured surface to stick to without peeling up paint.
Pro Tip: Texture Trick
To mimic the uneven, hand-made look of artisanal Zellige tiles, apply the white paint slightly thicker in some areas or use a brush for the final coat to add subtle texture.
Step 2: Creating the Grid
-
Measure vertical lines:
Decide on the size of your faux tiles (e.g., 4×4 inches). Use your measuring tape and pencil to mark intervals horizontally along the top and bottom of the wall. -
Tape vertical lines:
Run long strips of your thin masking tape vertically connecting your top and bottom marks. Use the long level to ensure these lines are perfectly plumb (straight up and down). -
Measure horizontal lines:
Mark the vertical intervals along the side of the wall or window frame to establish the height of your tiles rows. -
Tape horizontal lines:
Apply the tape horizontally across the wall. I find it helpful to press the tape down firmly as I go to prevent paint bleed later. Check each line with the level to ensure it is perfectly straight. -
Seal the tape edges:
For razor-sharp lines, run a very light layer of the *base* (grout) paint color over the tape edges. This seals the tape; if any paint bleeds under, it will match the grout line, keeping your final white squares pristine.
Step 3: Painting the Tiles
-
Apply the first top coat:
Once the sealing layer is dry, use a small foam roller to apply the high-gloss white paint. A foam roller is best here because it leaves a smooth finish without heavy brush brushstrokes, mimicking the surface of ceramic. -
Let it dry:
Allow the first coat to dry to the touch according to the can’s instructions. -
Apply the second coat:
Roll on a second coat of the high-gloss paint to ensure solid coverage and a deep, reflective shine. -
Check for coverage:
Inspect the squares to make sure the grout color isn’t showing through the middle of the tiles. Add a third thin coat if necessary.
Level Up: Top Edge Detail
Don’t just stop the paint abruptly. Plan your grid so the top row of ’tiles’ ends with a finished ‘bullnose’ edge by painting a rounded strip of trim to match the tiles.
Step 4: The Reveal
-
Time the removal:
Ideally, remove the tape while the final coat of paint is still slightly tacky but not wet. This prevents the paint from drying into a hard shell over the tape, which can cause chipping. -
Peel the tape:
Slowly and carefully pull the tape off at a 45-degree angle. Start with the vertical strips, or whichever layer you applied last. -
Touch up:
Inspect your grid for any small bleeds or uneven edges. Use a tiny artist’s brush and the appropriate paint color (grout or tile) to fix any imperfections. -
Final clean up:
Remove the protective painter’s tape from the trim and window frames.
Enjoy your sophisticated, budget-friendly backsplash that looks just like the real deal without the heavy renovation work
Honeycomb Hexagon Illusion
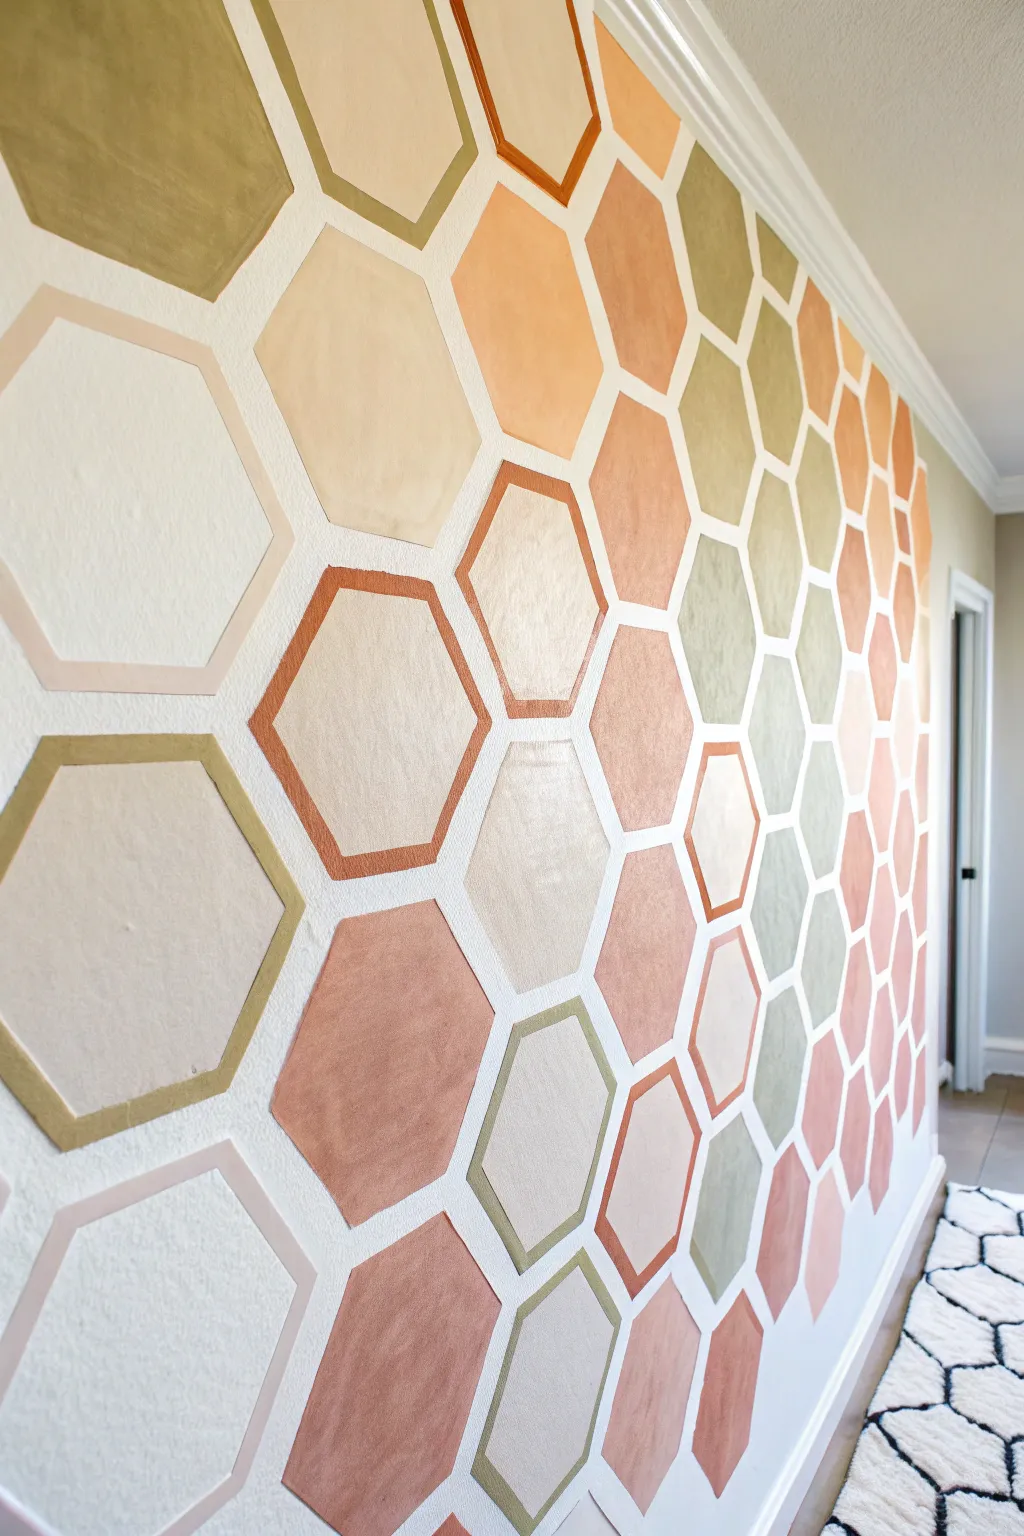
Transform a plain wall into a striking focal point with this honeycomb illusion that plays with depth and warm, earthy tones. By combining solid shapes with clever outlining, you can create a dynamic 3D effect that feels modern yet organic.
Step-by-Step Guide
Materials
- Latex interior wall paint (terracotta, sage green, ochre, peach, beige)
- White base wall paint (for touch-ups)
- High-quality painter’s tape (0.94 inch or similar narrow width)
- Hexagon stencil or cardboard template
- Pencil
- Level
- Small foam roller
- Small angled sash brush
- Artist’s liner brush
Step 1: Planning and Layout
-
Prep the surface:
Begin with a clean, dry wall painted in your desired base color—white or off-white works best to make the colors pop. Wipe down the surface to remove dust or grease. -
Create a template:
Cut a hexagon shape out of sturdy cardboard or cardstock. Make sure all sides are equal length to ensure the pattern creates a perfect honeycomb tessellation. -
Establish the first row:
Determine where you want the pattern to be most dense. Place your template on the wall, use a level to ensure the top edge is perfectly horizontal, and lightly trace it with a pencil. -
Trace the pattern:
Continue tracing the template across the wall, aligning the sides of the new hexagon with the previous ones. Leave a consistent gap between shapes if you are freehanding the tape, or trace them touching if you plan to tape over the pencil lines.
Step 2: Taping the Design
-
Apply the grid tape:
Apply painter’s tape over your pencil lines to create the white grid. Press the edges of the tape down firmly with a credit card or putty knife to prevent paint bleed. -
Seal the tape edges:
I like to brush a very light coat of the white base wall paint over the tape edges first. This seals the tape, ensuring that if any paint bleeds under, it’s white and invisible. -
Map out your colors:
Step back and plan your color distribution. Use small pieces of colored tape or sticky notes to mark which hexagon will get which paint color to ensure a balanced, random look. -
Designate style variations:
Decide which hexagons will be fully filled and which will be ‘hollow’ (outlined). Mark the hollow ones specifically so you don’t accidentally fill them in.
Clean Lines Secret
Always peel tape toward yourself at a 45-degree angle while the paint is still slightly damp. This prevents the dried paint film from ripping off the wall.
Step 3: Painting and detailing
-
Paint the solid blocks:
Using a small foam roller or brush, fill in the designated solid hexagons. Work one color at a time to minimize brush washing. -
Apply the outlines:
For the hollow hexagons, paint a thick band of color inside the taped area, leaving the center of the hexagon empty (showing the original wall color). -
Add a second coat:
Once the first coat is dry to the touch, apply a second coat to ensure rich, opaque coverage, especially for the darker terracotta and ochre shades. -
Remove the tape:
While the paint is still slightly tacky (don’t wait for it to fully cure), carefully peel off the tape at a 45-degree angle to reveal the crisp white grid underneath. -
Refine the hollow shapes:
For the outlined hexagons, you now need to create the inner edge. Use your template to trace a smaller hexagon inside the painted area, or freehand it for a looser look. -
Paint the inner borders:
Use an angled sash brush to carefully paint up to the inner pencil line of the hollow hexagons, creating a designated colored border that floats within the white grid. -
Touch up lines:
Inspect your white grid lines. Use a small artist’s brush and your base white paint to fix any spots where the color might have bled or the line looks uneven.
Metallic Accent Upgrade
Paint the inner border of the ‘hollow’ hexagons with metallic gold leaf or gold paint instead of flat color for a glamorous, light-catching finish.
Step back and enjoy the modern warmth this geometric mural brings to your room
Ombre Blocks With Tape Borders
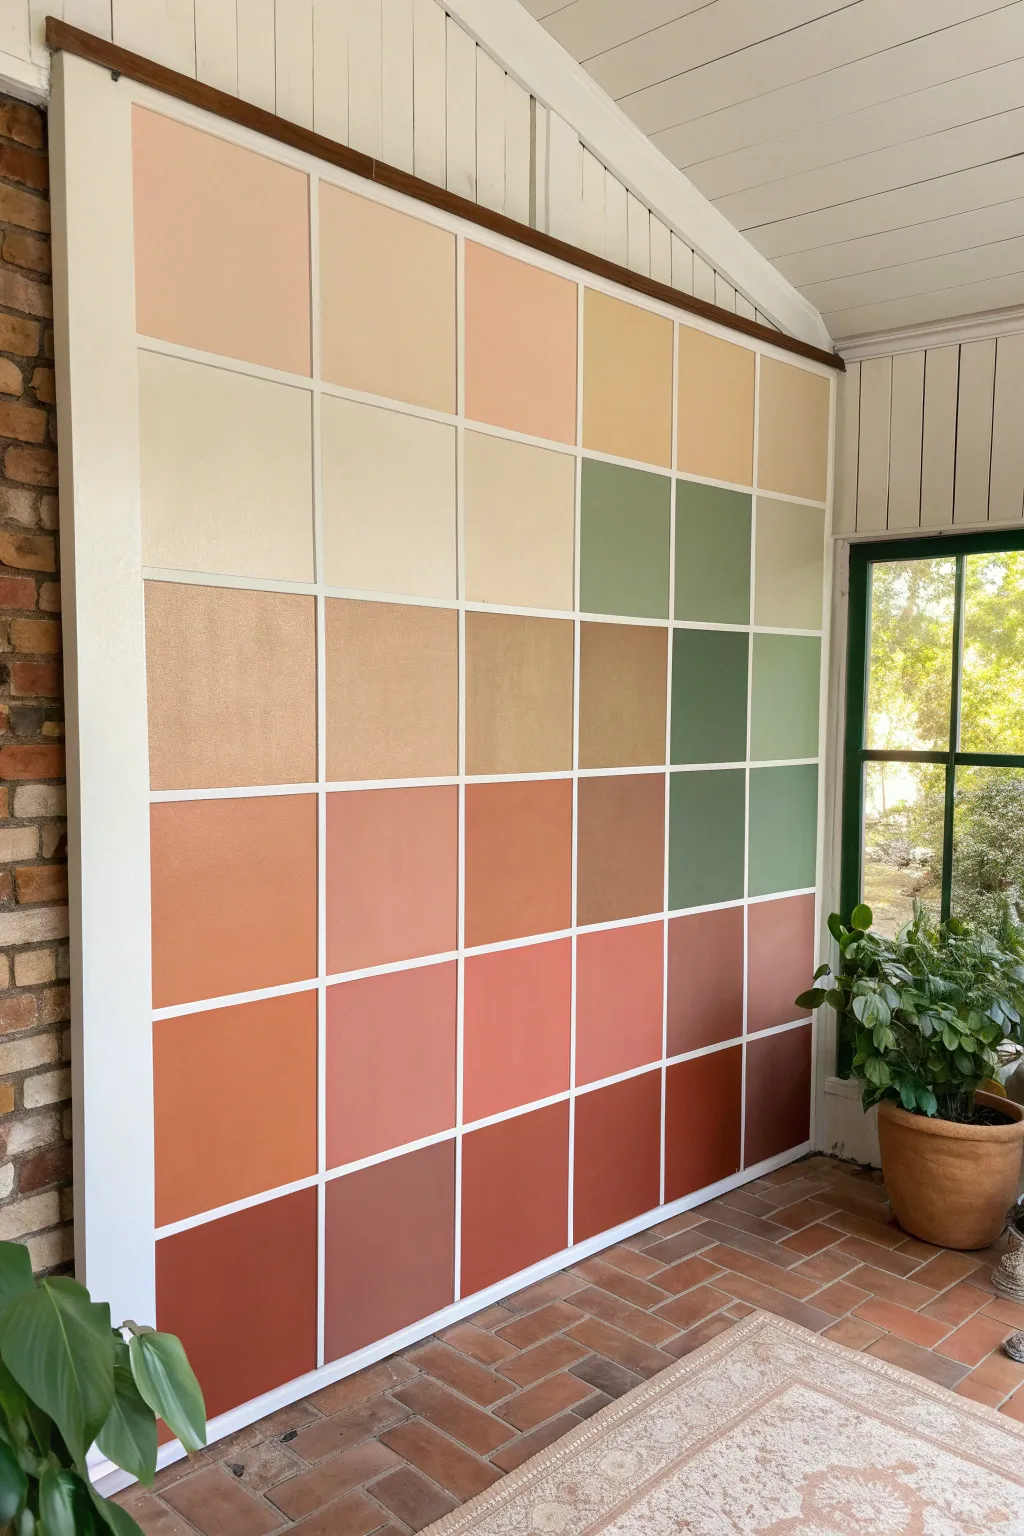
Transform a blank wall into a stunning geometric focal point using nothing but painter’s tape and a curated palette of earthy tones. This grid design creates clean, satisfying lines while showcasing a soft gradient from deep rust to airy cream and sage.
Step-by-Step
Materials
- Painter’s tape (1-inch width)
- Laser level or long straight edge
- Measuring tape
- Pencil
- Paint rollers (mini foam rollers work best)
- Paint tray and multiple liners
- Base wall paint (white or off-white)
- 6-8 Sample pots of paint (rust, terracotta, dusty pink, beige, cream, sage green)
- Drop cloths
- Utility knife
Step 1: Preparation and Grid Layout
-
Prepare the surface:
Start by ensuring your wall is clean, dry, and painted with your desired base color. Since the lines between the blocks will reveal this color, a fresh coat of bright white creates the crispest contrast. -
Measure your wall:
Measure the total height and width of the area you want to cover. To get squares like the example, divide your total width by the number of columns you want (here, there are 6 columns) to determine the square size. -
Mark vertical guides:
Using a pencil and measuring tape, make small tick marks along the floor and ceiling to indicate where your vertical lines will go. Double-check your math to ensure equal spacing. -
Establish horizontal guides:
Repeat the marking process up the side walls to determine the height of each row. This project features roughly 6-7 rows rising from the floor. -
Apply vertical tape:
Apply strips of painter’s tape vertically, connecting your floor and ceiling marks. A laser level is incredibly helpful here to ensure the lines remain perfectly plumb. -
Apply horizontal tape:
Apply the horizontal tape strips across the vertical ones. Press the tape down firmly, especially at the intersections where the tape layers overlap. -
Seal the tape edges:
I always take a moment to paint a thin layer of the base wall color (white) over the tape edges. This seals the tape and prevents the colored paint from bleeding underneath later.
Bleed-Through Blues?
If paint sneaks under the tape, wait for it to dry fully. Then, place a piece of tape precisely over the colored square edge and dab white paint on the line to crisp it back up.
Step 2: Painting the Gradient
-
Plan your palette:
Arrange your paint pots on the floor before you start. The goal is a gradient: darkest rust colors at the bottom, moving to mid-tone terracottas, then pale pinks/beiges, and finally creams or greens at the very top. -
Paint the bottom row:
Pour your darkest rust color into a tray. Use a mini foam roller to fill in the squares on the bottom row. Roll gently to avoid pushing paint under the tape. -
Mix transition shades:
For the second row up, you can use the next lighter shade in your collection, or mix a little of the bottom color with the next shade to create a smoother transition. -
Continue upward:
Work your way up the wall, row by row. Wash your roller or switch to a fresh liner when changing color families drastically, like switching from the reddish tones to the beige tones. -
Introduce the accent color:
As seen in the right-hand columns, introduce the sage green tones in the upper-middle section. This breaks up the warmth and adds visual interest to the gradient. -
Finish the top rows:
Complete the highest squares with your lightest creams and palest peaches. These light colors will help the room feel taller and more open. -
Apply a second coat:
Depending on the opacity of your paint, the darker squares will likely need a second coat. Allow the first layer to dry to the touch before re-rolling.
Step 3: The Reveal
-
Time the removal:
Do not let the paint dry completely before removing the tape, as it can chip. Wait until the paint is tacky but set—usually about 30 to 45 minutes after the final coat. -
Peel the tape:
Slowly peel the tape away at a 45-degree angle. Pull gently and steadily. Remove the vertical strips first, followed by the horizontal ones, or whichever is easiest based on your layering. -
Touch up:
Inspect the white grid lines. If any color bled through, use a small artist’s brush and your base white paint to carefully conceal the imperfections.
Custom Colors
Buy just 3 colors: dark rust, ochre, and green. Mix them with a gallon of white in varying ratios to create every intermediate shade shown here without buying 20 sample pots.
Step back and admire how a simple grid and some thoughtful color mixing completely reinvented your space
Metallic Tape-Line Glam
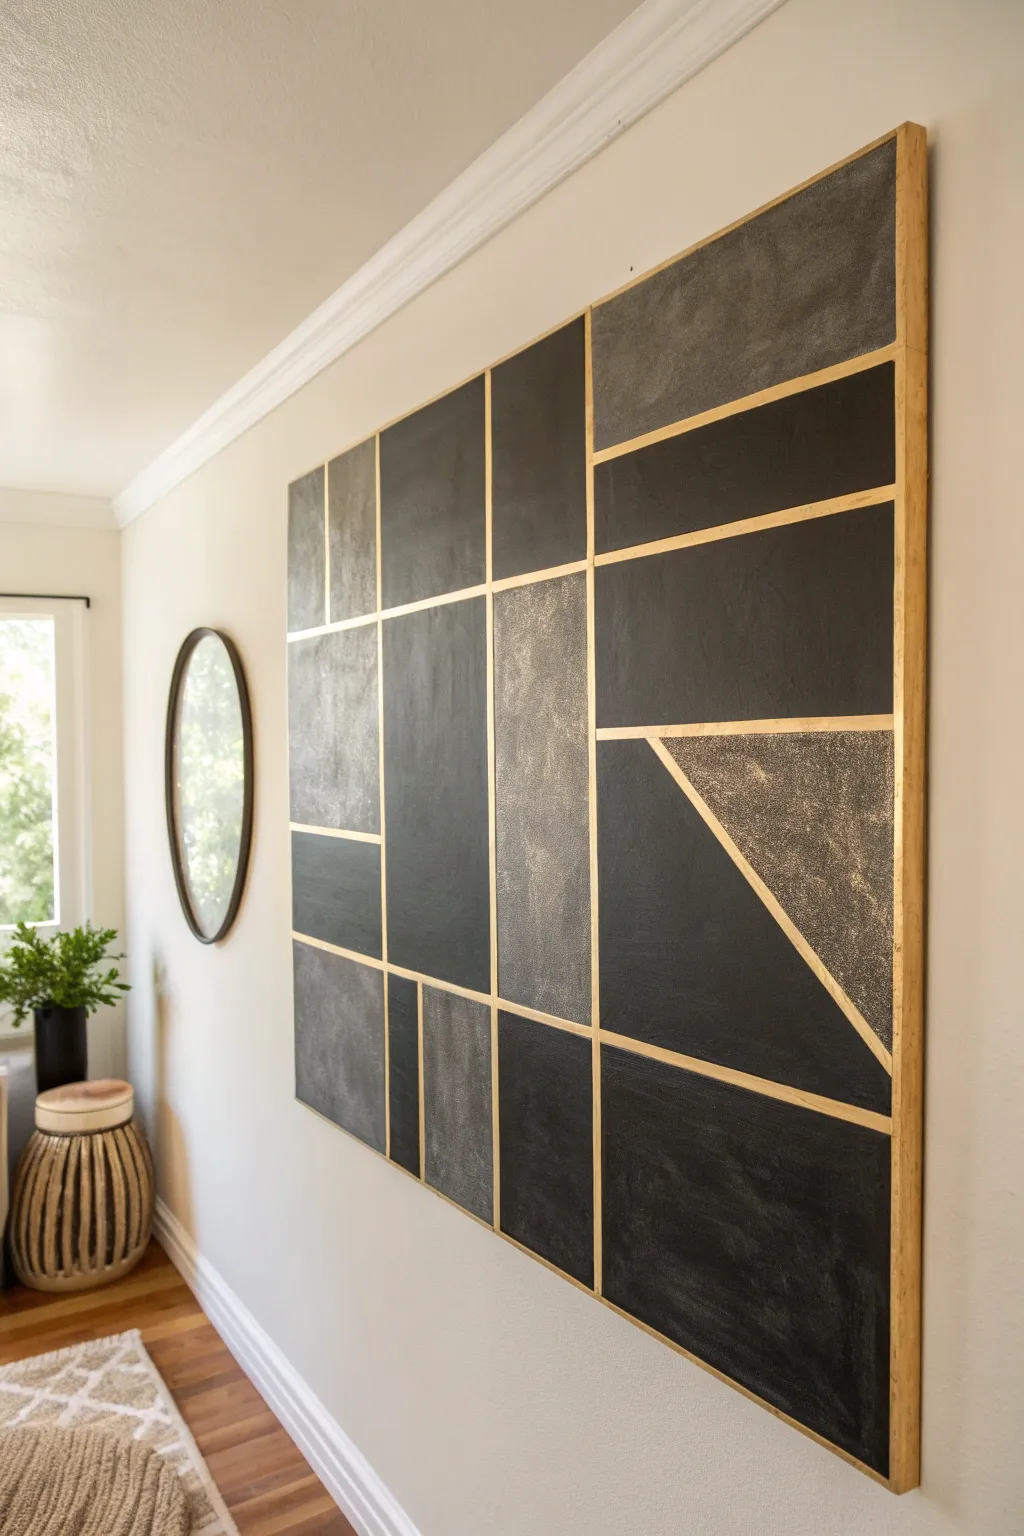
Transform a blank canvas into a stunning modern focal point with this high-contrast geometric wall art. Combining deep charcoal hues, stark blacks, and striking gold metallic tape, this project creates an illusion of intricate tiling that adds instant sophistication to any room.
Detailed Instructions
Materials
- Large plywood sheet or blank canvas (ideally 36×48 inches)
- Black acrylic paint (matte finish)
- Charcoal grey acrylic paint (textured or stone effect preferred)
- Gold metallic washi tape or graphic artist tape (1/4 inch width)
- Painter’s tape or masking tape
- Light wood trim pieces (1×2 inch lumber)
- Wood glue and finishing nails
- Paint rollers and tray
- Straight edge or ruler
- Pencil
- Craft knife or scissors
- Clear matte sealant spray (optional)
Step 1: Planning and Preparation
-
Prepare the base:
Begin with a large sheet of plywood cut to your desired dimensions, or purchase a large-scale heavy-duty canvas. If using wood, sand the surface lightly to ensure it is smooth and ready for adhesion. -
Prime the surface:
Apply a base coat of primer or a neutral grey paint to the entire board. This ensures your darker colors will be opaque and rich without needing excessive coats later on. -
Draft the grid:
Lightly sketch your geometric design onto the board using a pencil and a long straight edge. Mimic the layout in the photo by creating a mix of squares, varying rectangles, and a large triangle section to add asymmetry. -
Apply the gold tape lines:
Carefully run your gold metallic tape along every pencil line you just drew. This tape acts as both the separator for your paint and the final decorative element, so ensure it is pressed down firmly to prevent paint bleed.
Step 2: Painting the Sections
-
Plan your color map:
Decide which shapes will be solid black and which will be textured charcoal. I find it helpful to put a tiny piece of painter’s tape in the ‘charcoal’ sections so I don’t accidentally paint them black in the heat of the moment. -
Paint standard black sections:
Using a small roller or brush, fill in the designated black rectangles with matte black acrylic paint. Be careful to paint right up to the edge of the gold tape without completely flooding over it. -
Create texture for grey sections:
For the charcoal grey sections, use a textured stone-effect paint or mix a little sand or baking soda into standard grey acrylic. This difference in texture adds depth resembling slate tiles. -
Apply grey paint:
Dab or roll the textured grey mixture into the remaining shapes. A stippling motion with a stiff brush can help enhance the stony look of these particular blocks. -
Clean up edges immediately:
While the paint is still slightly wet, wipe away any major accidental smudges on top of the gold tape with a damp cloth, though avoid disturbing the paint lines themselves.
Seal Sharp Lines
Before painting colors, brush a layer of clear matte medium over the gold tape edges. This seals the tape and prevents dark paint from bleeding underneath.
Step 3: Refining and Sealing
-
Let it cure:
Allow the entire piece to dry completely, preferably overnight. The textured sections may take longer to set than the flat black acrylic. -
Clean the tape lines:
If paint dried on top of the gold tape, verify it’s fully dry, then gently scrape the excess paint off the tape surface using a fingernail or a very dull plastic edge to reveal the metallic shine. -
Seal the surface:
Spray the entire artwork with a light coat of clear matte sealant. This protects the paint and stops the gold tape from peeling up over time.
Texture Twist
Mix metallic copper or silver powder into the grey textured paint sections. It adds subtle shimmer that catches the light differently than the flat black.
Step 4: Framing and Mounting
-
Measure the frame:
Measure the outer edges of your finished canvas or board. Cut your light wood trim pieces to length, mitering the corners at 45 degrees if you prefer a seamless join, or just using simple butt joints. -
Attach the frame sides:
Apply wood glue to the edge of the canvas/board and press the first wood trim piece against it. Secure it with finishing nails hammered through the trim into the side of the board. -
Complete the frame:
Repeat this for all four sides, ensuring the corners meet neatly. The light wood tone contrasts beautifully with the industrial dark colors of the art. -
Install hanging hardware:
Flip the artwork over carefully and attach heavy-duty D-rings or a French cleat system, as the wood and paint can make this piece surprisingly heavy. -
Final wipe down:
Give the gold lines one last polish with a soft microfiber cloth to remove any dust or fingerprints before hanging the piece in your chosen spot.
Hang your new masterpiece and enjoy the gallery-worthy drama it brings to your space
Corner Wrap Geometry
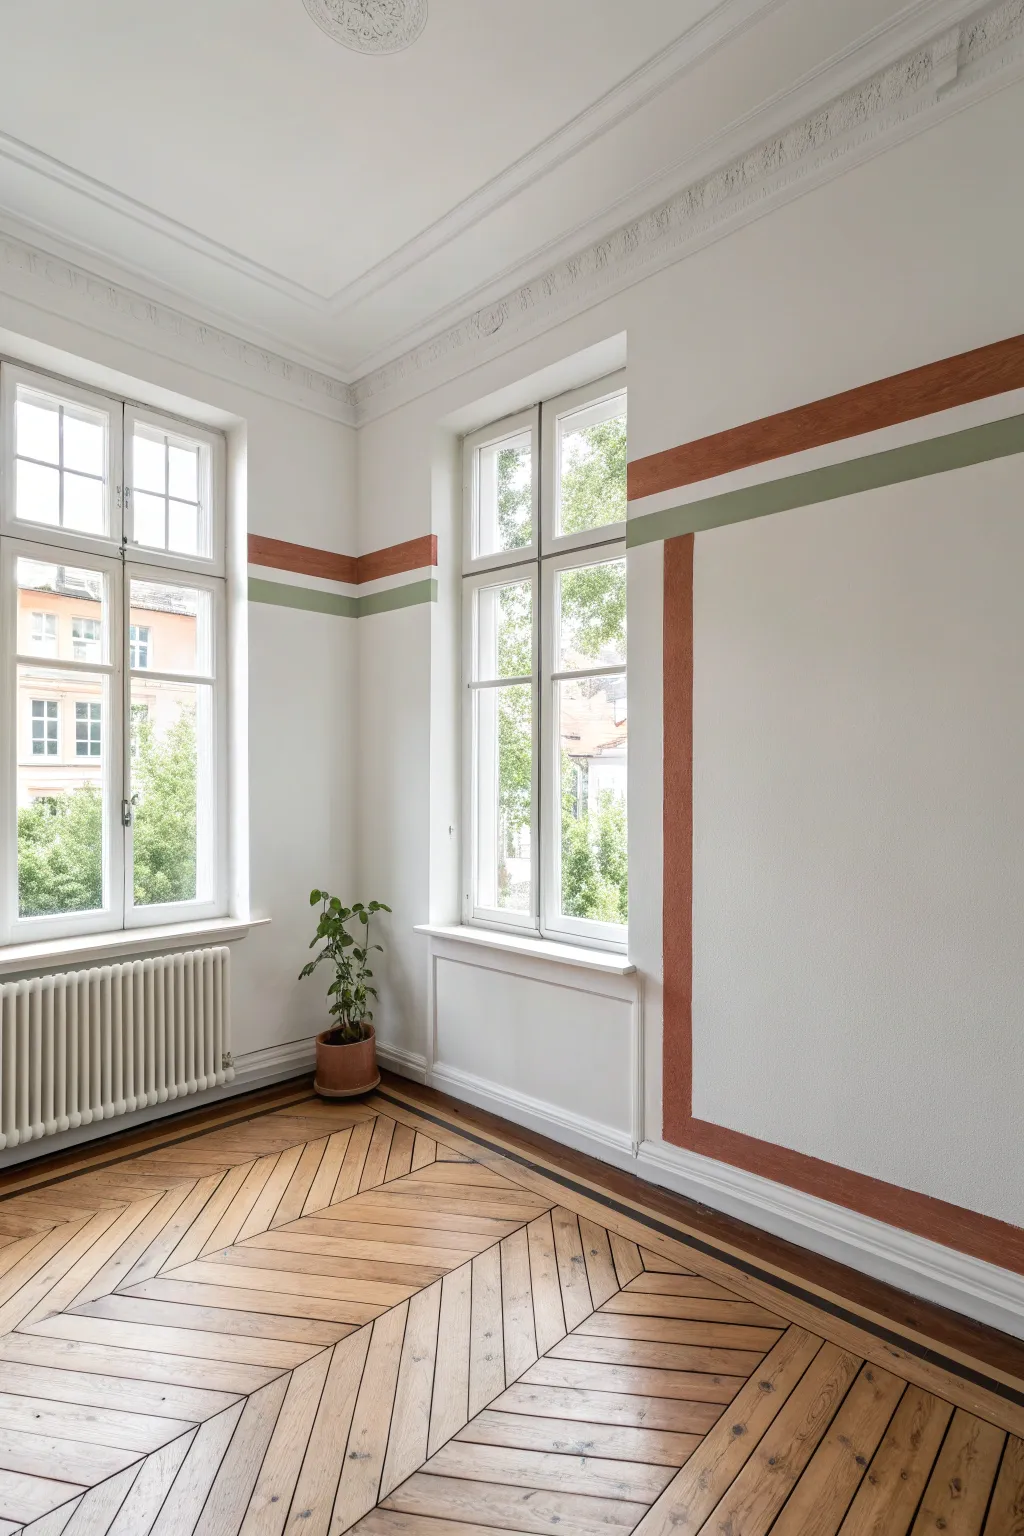
This elegant wall treatment divides your space visually without overwhelming it, using a classic combination of earthy terracotta and calming sage green. By wrapping horizontal lines around corners and framing perpendicular wall sections, you create architectural interest that elevates plain white walls.
Step-by-Step Guide
Materials
- High-quality painter’s tape (multi-surface)
- Laser level or spirit level
- Measuring tape
- Pencil
- White wall paint (matching your base color)
- Terracotta orange interior latex paint (eggshell or matte finish)
- Sage green interior latex paint (eggshell or matte finish)
- Small foam roller
- Angled sash brush (1.5 – 2 inch)
- Paint tray and liners
- Drop cloth
Step 1: Planning and Marking
-
Assess the wall height:
Determine the ideal height for your horizontal band. In rooms with tall windows like this, positioning the stripe just below the window lintel or in the upper third of the wall creates a nice sense of scale. -
Measure the vertical drop:
Decide where your vertical ‘frame’ box will descend. This design features a large vertical rectangle on a perpendicular wall. Measure the width of this box and how far down it will go—typically stopping just above the baseboard. -
Set up your level lines:
Using a laser level is a game-changer here. Project a horizontal line across the corner and onto the adjacent walls to ensure your stripes stay perfectly straight despite uneven floors or ceilings. -
Mark the stripe widths:
Use a pencil to lightly mark the top and bottom edges of the terracotta stripe (approx. 4 inches wide) and the sage stripe (approx. 2-3 inches wide), leaving a crisp white gap (approx. 1 inch) between them.
Laser Accuracy
Walls are almost never perfectly straight. Always trust your level, not the ceiling line or floor, when plotting horizontal stripes.
Step 2: Taping the Design
-
Tape the horizontal terracotta lines:
Apply painter’s tape along the top and bottom pencil marks for the upper terracotta stripe. Press the edges down firmly with your thumb or a plastic card to prevent bleeding. -
Tape the vertical frame:
On the feature wall, tape out the vertical drop lines connecting to the horizontal terracotta stripe to form the large rectangle shape shown in the reference image. -
Tape the sage green lines:
Position tape for the lower sage green stripe. This stripe runs parallel to the horizontal terracotta section but does *not* outline the vertical box. -
Verify the gap:
Double-check the spacing between the two colored stripes. The white negative space is crucial for this look, so ensure your tape lines here are perfectly parallel. -
Seal the tape edges:
Here is a step I never skip: lightly paint over the edge of the tape with your existing white wall paint. This fills any tiny gaps under the tape so the colored paint can’t seep through, ensuring a razor-sharp line.
Step 3: Painting the Colors
-
Cut in the terracotta:
Once the white sealing layer is dry, use your angled sash brush to carefully paint the corners and edges of the terracotta stripe and the large vertical rectangle frame. -
Roll the terracotta sections:
Use a small foam roller to fill in the rest of the terracotta areas. The foam roller provides a smooth finish without brush marks. Apply two thin coats rather than one thick one. -
Paint the sage stripe:
Switch to a clean brush and roller (or wash thoroughly) and apply the sage green paint to the lower horizontal stripe. Be careful not to drip onto the white space above. -
Manage the corners:
Pay extra attention where the stripes wrap around the inner corner of the room. Dab the paint gently into the corner crevice to ensure full coverage without pooling. -
Check for consistency:
Allow the first full coat of both colors to dry according to the can’s instructions (usually 2-4 hours), then assess if a second coat is needed for full opacity.
Paint Bleed Fix
Lines blurry? Let the paint fully dry, then re-tape exactly over the line and paint the correction color over the tape edge to reseal it.
Step 4: The Big Reveal
-
Time the removal:
Don’t wait for the paint to cure completely. Remove the tape while the final coat is still slightly tacky to the touch to prevent the paint skin from peeling up with the tape. -
Peel carefully:
Pull the tape slowly at a 45-degree angle away from the painted edge. Steadiness is key here. -
Touch up imperfections:
If any paint bled through despite your best efforts, use a tiny artist’s brush and your white wall paint to correct the line once everything is fully dry.
Step back and enjoy how simple lines have transformed the room’s architecture into a piece of art.
Stairwell Stripe Flow
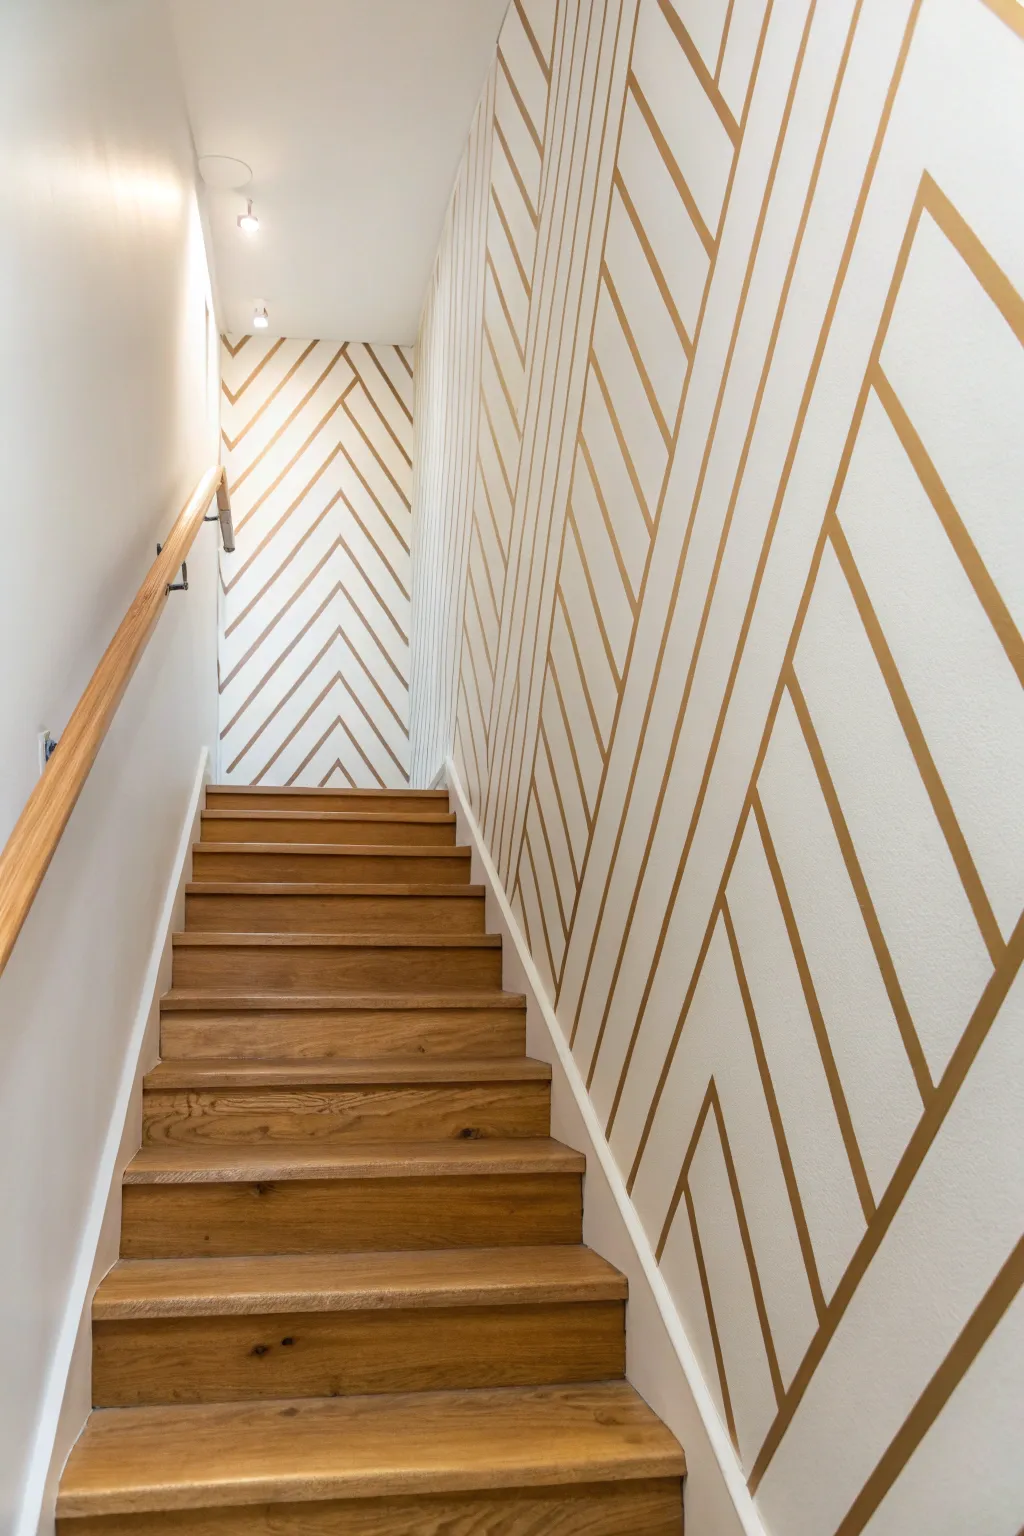
Transform a plain stairwell into a striking architectural feature with this metallic chevron mural. The continuous geometry draws the eye upward, creating a seamless flow that perfectly complements warm wood tones.
Step-by-Step Tutorial
Materials
- White or off-white base wall paint (eggshall or satin finish)
- Metallic gold or bronze wall paint
- High-quality painter’s tape (1-inch width)
- Laser level or long spirit level
- Measuring tape
- Pencil
- Putty knife or credit card
- Small foam roller
- Angled sash brush
- Drop cloths
- Ladder (safe for stair use)
Step 1: Preparation & Base Coat
-
Prepare the area:
Clear the stairwell and lay down drop cloths to protect the wooden treads. Since working on stairs can be tricky, ensure you have a specialized ladder setup or stabilizer for safety. -
Apply base color:
If your walls aren’t already the desired background shade, apply two coats of a crisp white or off-white paint. An eggshell or satin finish works best here as it is easier to wipe clean in a high-traffic area like a stairwell. -
Plan the chevron angle:
Determine the central axis for your V-shapes. The design shown centers the peak of the chevron roughly at standing eye-level on the side wall, sloping downwards. -
Mark the centerline:
Using a laser level or long straight edge, lightly mark a vertical centerline on the main wall where the points of your chevrons will align.
Bleeding Lines?
If paint bleeds under the tape, wait for it to dry fully. Then, place a new piece of tape precisely over the metallic line and touch up the bleed with your white base color.
Step 2: Taping the Design
-
Tape the first V-shape:
Start with the central chevron. Place a strip of painter’s tape starting from your centerline mark, angling it down at approximately 45 degrees. Repeat on the other side to complete the V. -
Create spacing guide:
To keep the stripes uniform, cut a small block of wood or cardboard to the exact width you want between the gold stripes. Use this spacer to position your next row of tape perfectly parallel to the first. -
Continue the pattern:
Work outwards from that central V, using your spacer to lay down subsequent tape lines. Ensure the tape strips are long enough to reach all trim and corners. -
Handle the corner transition:
When you reach the corner where the side wall meets the back wall, carefully press the tape into the crease. The design should appear to ‘fold’ and continue onto the back wall without breaking the line. -
Verify alignment:
Step back frequently to check that the lines on the back wall align visually with the side wall lines. Adjust the angle slightly if walls aren’t perfectly square. -
Seal the edges:
Once all tape is applied, run a putty knife or credit card firmly over every edge of the tape to prevent bleed-under. -
Apply the ‘bleed’ coat:
I always paint a thin layer of the *base* wall color over the edges of the tape first. This seals the tape line so any paint that bleeds under is just the background color, ensuring razor-sharp lines later.
Step 3: Painting & Reveal
-
Mix the metallic paint:
Stir your gold or bronze metallic paint thoroughly. Metallic pigments settle quickly, so remix it occasionally throughout the painting process to keep the shimmer consistent. -
Paint the stripes:
Use a small foam roller to apply the metallic paint between the tape lines. A foam roller provides a smoother finish for metallics than a nap roller. -
Cut in corners:
Use the angled sash brush to carefully paint the metallic color into the corners and along the skirting boards where the roller can’t reach. -
Apply second coat:
Let the first coat dry completely, then apply a second coat for full opacity and a rich, reflective finish. -
Remove tape:
While the second coat is still slightly tacky (not fully dry), slowly peel off the painter’s tape at a 45-degree angle away from the fresh paint. -
Touch up:
Inspect the lines for any small imperfections. Use a tiny artist’s brush and the background white paint to tidy up any errant metallic spots.
Level Up: Texture
For a more dynamic look, mix a glazing medium with the metallic paint to make it translucent, or use varying widths of tape to create an irregular, modern barcode effect.
Step back and admire how the shining lines pull the whole architectural space together giving your home a custom designer feel
Layered Tape Reveal Lines
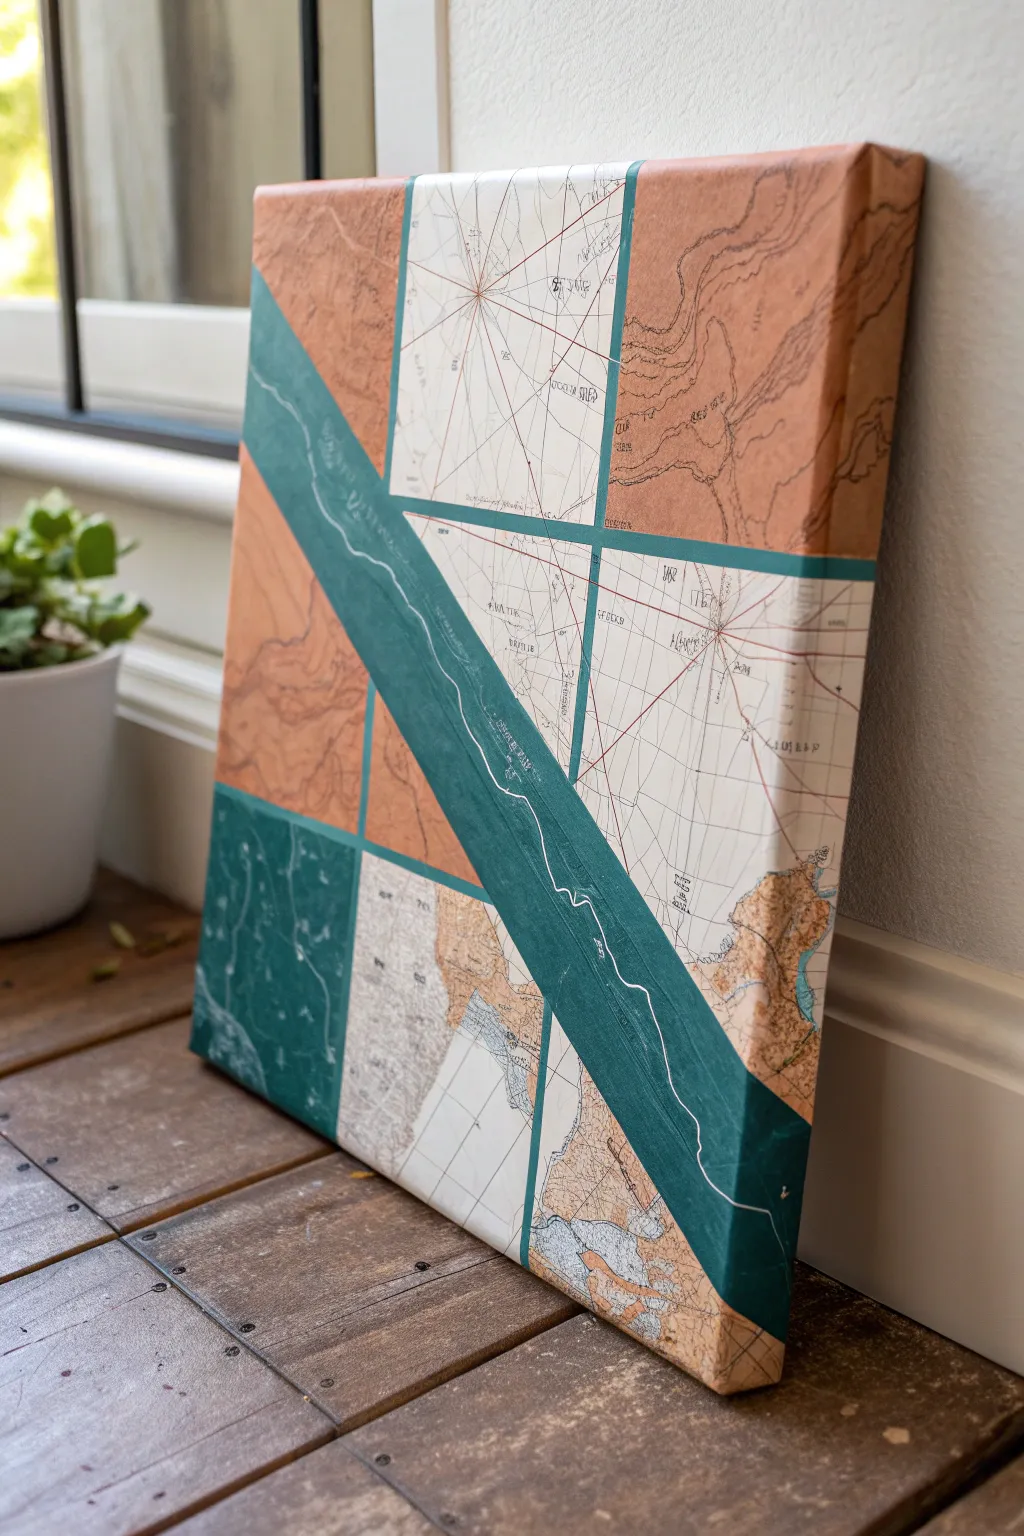
This striking mixed-media piece combines the sharp geometry of modern art with the nostalgic warmth of vintage cartography. By using painter’s tape to mark off zones, you create a structured layout where solid colors and intricate map details play against each other perfectly.
Detailed Instructions
Materials
- Square stretched canvas (approx. 16×16 or 20×20 inches)
- Vintage paper maps (or high-quality prints)
- Painter’s tape (0.25-inch or 0.5-inch width)
- Matte finish Mod Podge or decoupage glue
- Acrylic paint: Deep teal/emerald green
- Acrylic paint: White (fine tip marker or liner brush)
- Foam brushes and small synthetic brushes
- Exacto knife or craft blade
- Scissors
- Ruler or straight edge
Step 1: Planning and Taping
-
Map Layout:
Begin by laying your blank canvas flat. Cut your vintage maps into large, rough shapes that will cover different quadrants of the canvas. You don’t need to glue them yet; just dry-fit them to envision where the land contours and grid lines look best. -
Initial Tape Design:
Apply your painter’s tape directly onto the blank canvas to create your geometric boundaries. Create a strong diagonal line first—this will be the solid painted ‘river’ section later—and then intersect it with vertical or horizontal lines to form distinct geometric zones. -
Seal the Tape:
Firmly press down all tape edges with a credit card or your fingernail. To ensure razor-sharp lines later, brush a very thin layer of matte medium or white base paint over the tape edges to seal them preventing any bleed-under.
Step 2: Decopaging the Maps
-
Cutting to Shape:
Select which geometric zones will feature maps. Place a piece of map paper over a specific zone and crease the paper along the taped boundaries to create a cutting guide. -
Trimming:
Remove the map paper and cut it slightly smaller than the creased lines so it fits comfortably within the taped borders without overlapping onto the tape itself. -
Adhering the Maps:
Apply an even coat of Mod Podge to the canvas surface within a chosen zone. Place your cut map piece onto the wet glue. -
Smoothing:
Immediately smooth the paper from the center outward using a brayer or clean fingers to eliminate air bubbles and wrinkles. -
Top Coat:
Once the paper is positioned, brush a thin layer of Mod Podge over the top of the map to seal it. Repeat this process for all sections designated for map paper.
Tape Tearing Paper?
If tape pulls up bits of the map paper, heat the tape gently with a hair dryer on low for 10 seconds before peeling. This softens the adhesive for a gentle release.
Step 3: Painting the Color Zones
-
Mixing Color:
Prepare your deep teal acrylic paint. I like to mix a touch of burnt umber into standard teal to match the vintage, earthy tone of the maps. -
Painting Solids:
Identify the remaining empty zones on your canvas, including the large diagonal strip. Paint these areas with the teal mixture using a foam brush for a smooth finish without brushstrokes. -
Side Coverage:
Don’t forget to wrap the design around the edges. Carry both the map paper and the paint over the sides of the canvas for a professional, gallery-wrapped look. -
Drafting the River:
Once the teal paint is dry to the touch, use a pencil to lightly sketch a wandering, organic line down the center of the main diagonal painted strip. This represents a river or trail. -
Painting the Line:
Using a fine liner brush and thinned white acrylic paint (or a white paint pen), carefully trace over your pencil line. Keep your hand loose to mimic natural topographical curves.
Level Up: Topo Texture
Before painting the solid teal sections, mix modeling paste into your acrylics. Apply it with a palette knife to create raised, 3D textures mimicking mountain terrain.
Step 4: The Reveal
-
Removing Tape:
Wait until the paint is mostly dry but strictly not fully cured. Slowly peel back the painter’s tape at a 45-degree angle. This reveals the crisp white canvas lines separating your maps and painted zones. -
Touch Ups:
Inspect the white lines. If any paint bled through, use a tiny brush with white gesso or paint to cover the imperfections. -
Final Varnish:
Allow the entire piece to dry overnight. Finish with a spray-on matte varnish to unify the sheen of the paper and paint.
Hang your new personalized map art in a spot where the light catches those crisp geometric divides
Abstract Freeform Tape Mosaic
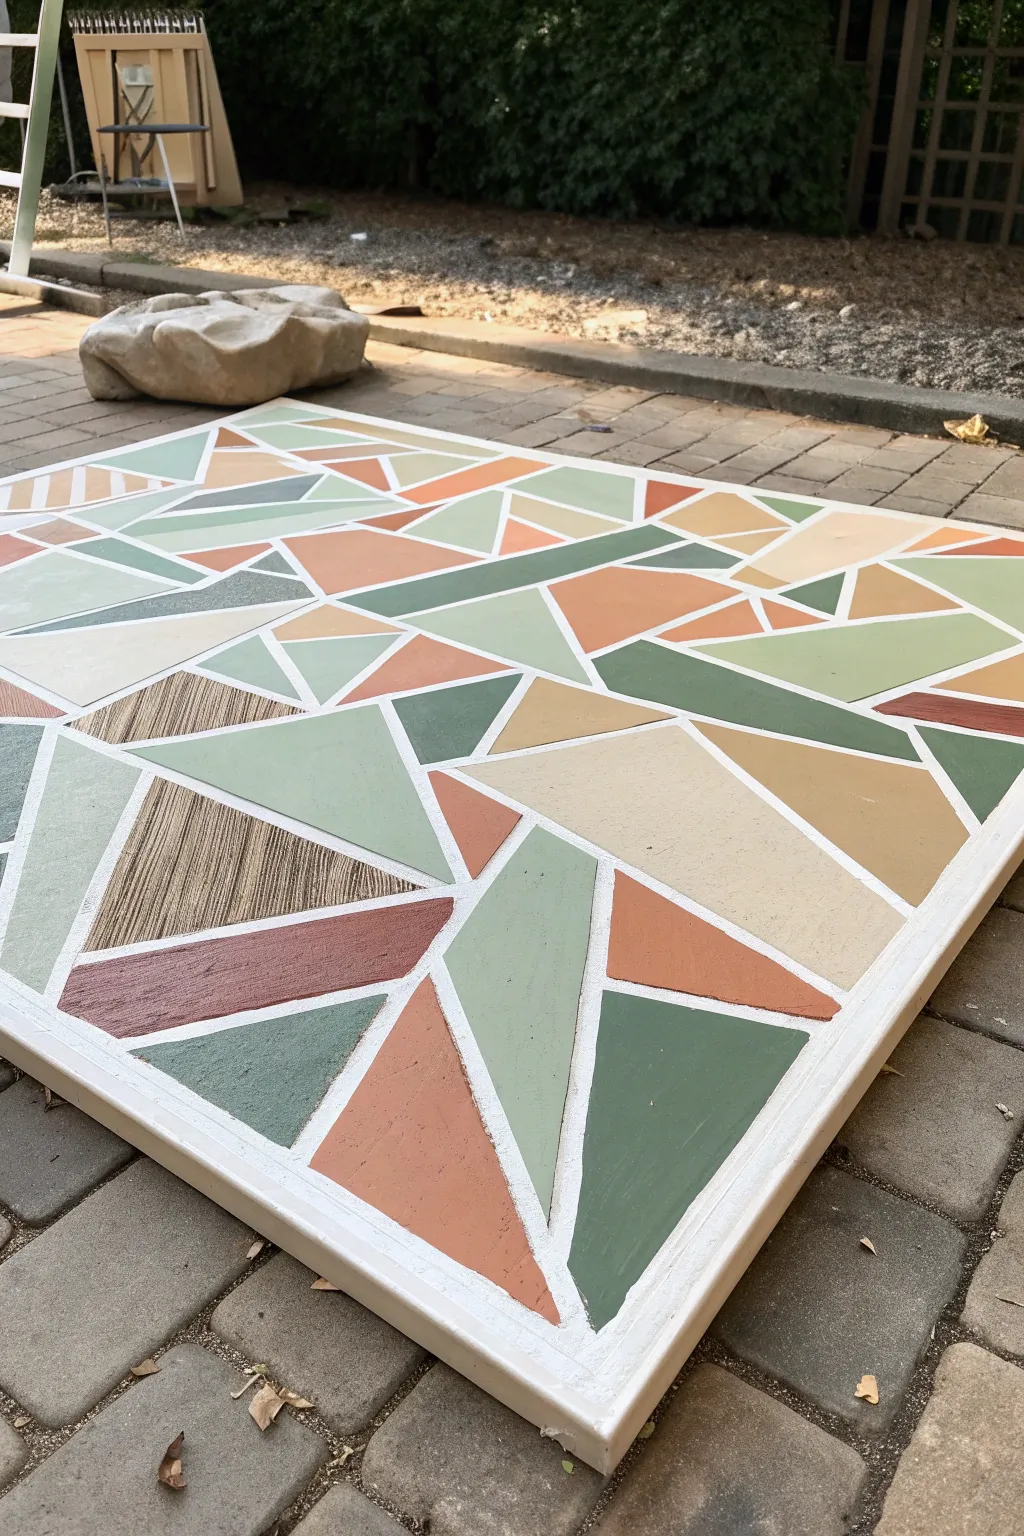
Transform a blank canvas into a stunning, oversized geometric mosaic using muted, earthy tones and crisp white lines. This project blends sharp angles with soothing colors like sage, terracotta, and cream for a modern yet organic piece of wall art.
Step-by-Step Tutorial
Materials
- Large stretched canvas or primed wooden board (approx. 36×36 inches)
- Painter’s tape (various widths, 1/4 inch or 1/2 inch work best)
- Acrylic paints (Sage Green, Terracotta, Cream/Beige, Dark Forest Green, Mocha Brown)
- Flat paintbrushes (various sizes)
- White gesso or primer (optional but recommended)
- Clear matte varnish or sealant
- Pencil
- Ruler or straight edge
- Palette or paper plates for mixing
- Drop cloth
Step 1: Preparation & Taping
-
Prime the surface:
If you are using raw wood or an unprimed canvas, apply a coat of white gesso to ensure a bright, consistent base. Let this dry completely. -
Create the border:
Apply a strip of painter’s tape along the outer edges of your canvas to create a clean, uniform white frame around the entire artwork. -
Map out the major lines:
Start applying long strips of painter’s tape across the canvas. I like to make a few large ‘X’ shapes or diagonal lines that span from edge to edge to establish the main structure. -
Subdivide the sections:
Within the large open spaces you’ve just created, add shorter strips of tape to break them down into smaller triangles and polygons. Aim for variety in size and shape. -
Check the intersections:
Look closely at where the tape strips cross over each other. Trim any loose overlapping ends with craft scissors or a craft knife for sharp corners, though simple layering works too. -
Seal the tape edges:
To prevent paint bleed, paint a thin layer of your base white color (or clear matte medium) over all the tape edges. This locks the seal and ensures crisp lines later.
Bleed-Proof Lines
Before adding color, paint over your tape edges with the *base* canvas color (white). This seals the gaps, so any seepage is invisible, leaving you with razor-sharp lines.
Step 2: Applying Color
-
Plan your palette:
Pour your acrylic paints onto the palette. Mix a few custom shades—perhaps lighten the sage with white or darken the terracotta with a touch of brown—to add depth. -
Start with the lightest tones:
Begin painting the cream and beige sections. Select scattered triangles across the canvas to paint with these light colors so the balance feels even. -
Add the mid-tones:
Next, fill in sections with your sage green and terracotta orange. Try not to put two sections of the exact same color right next to each other. -
Apply the darkest accents:
Use the dark forest green for a few select shapes. These dark values act as anchors for the composition, drawing the eye in. -
Create the faux texture:
For the unique textured section seen in the reference, mix a mocha brown with a bit of glazing medium. Apply it to a shape, then drag a dry, stiff-bristled brush through the wet paint to mimic wood grain. -
Second coat:
Once the first layer is dry to the touch, apply a second coat to any colors that look streaky or uneven. The lighter beiges often need this extra coverage.
Step 3: Revealing & Finishing
-
Wait for partial dryness:
Let the paint dry until it is firm but not fully cured—usually about 30 to 45 minutes. Removing tape from rock-hard paint can sometimes chip the edges. -
The peel:
Slowly peel back the painter’s tape at a 45-degree angle. Pull gently and steadily to reveal the crisp white lines underneath. -
Touch-ups:
If any paint bled through, don’t panic. Use a small detail brush and white paint to tidy up the lines once the color blocks are completely dry. -
Seal the artwork:
Finish the piece by applying a coat of clear matte varnish. This unifies the sheen of the different paints and protects your hard work from dust.
Textural Contrast
Instead of just flat paint, mix baking soda into the terracotta paint for a rough, clay-like texture, or use high-gloss varnish on just the dark green shapes for visual pop.
Hang your new geometric masterpiece and admire the clean, calming structure it brings to your space
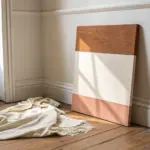

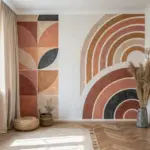

Have a question or want to share your own experience? I'd love to hear from you in the comments below!