Teal is one of those colors that instantly sets a mood—calm, deep, and just a little mysterious. Here are my favorite teal painting ideas that let teal take center stage, from classic nature scenes to playful, unexpected twists.
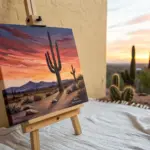
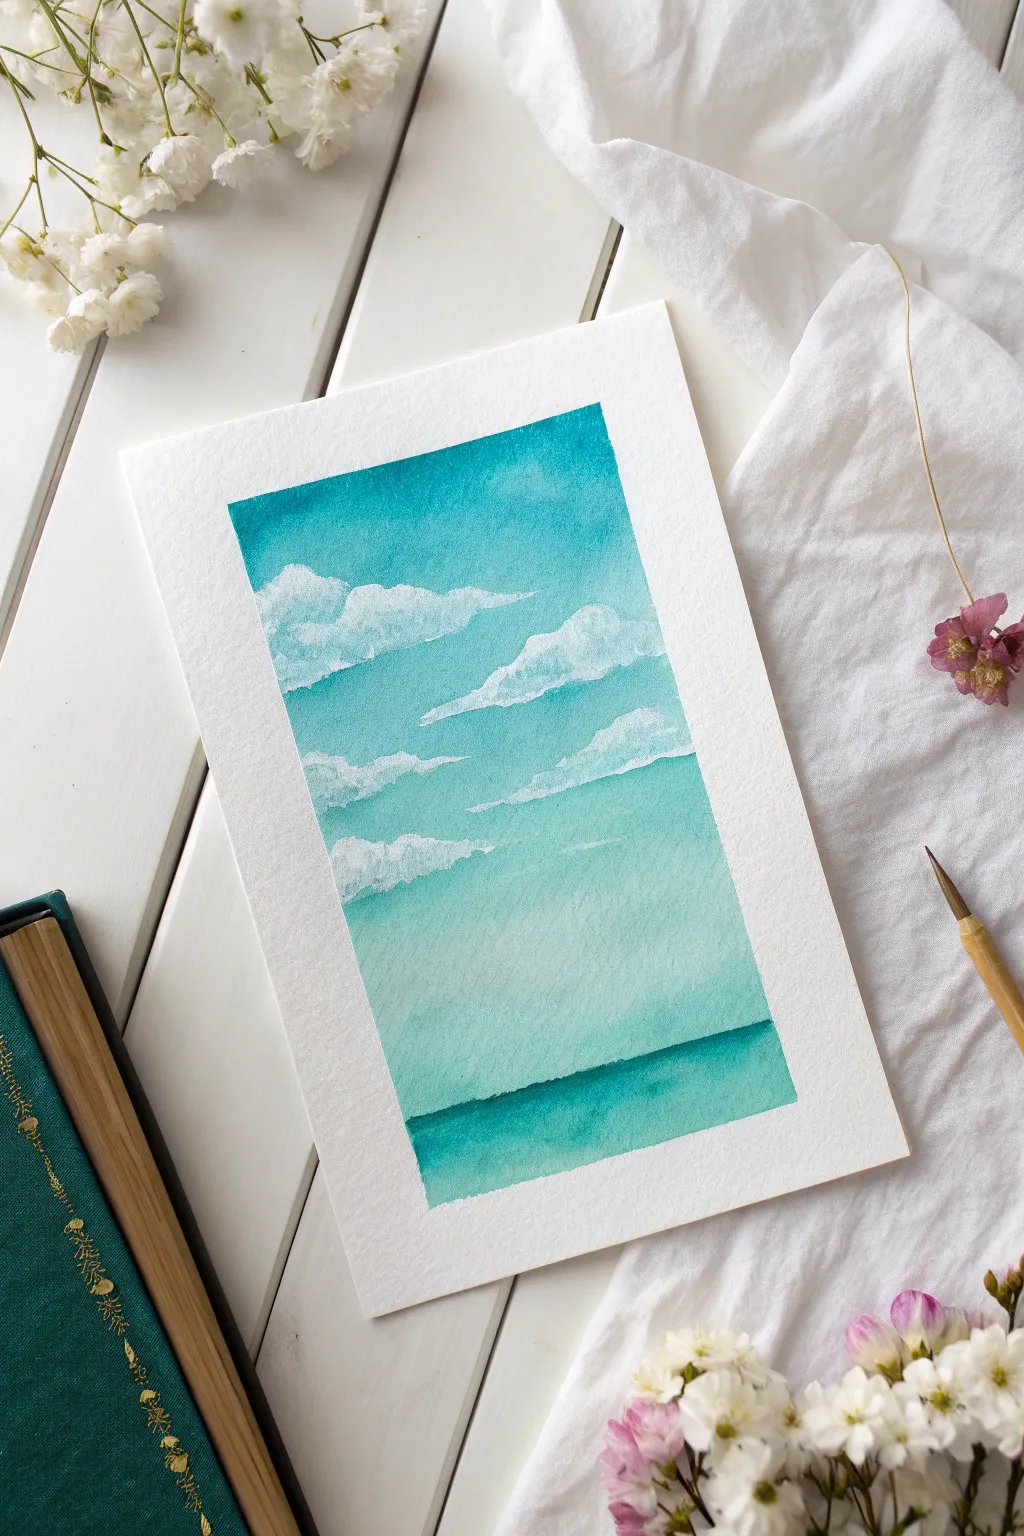
Teal Ocean Horizon at Sunset
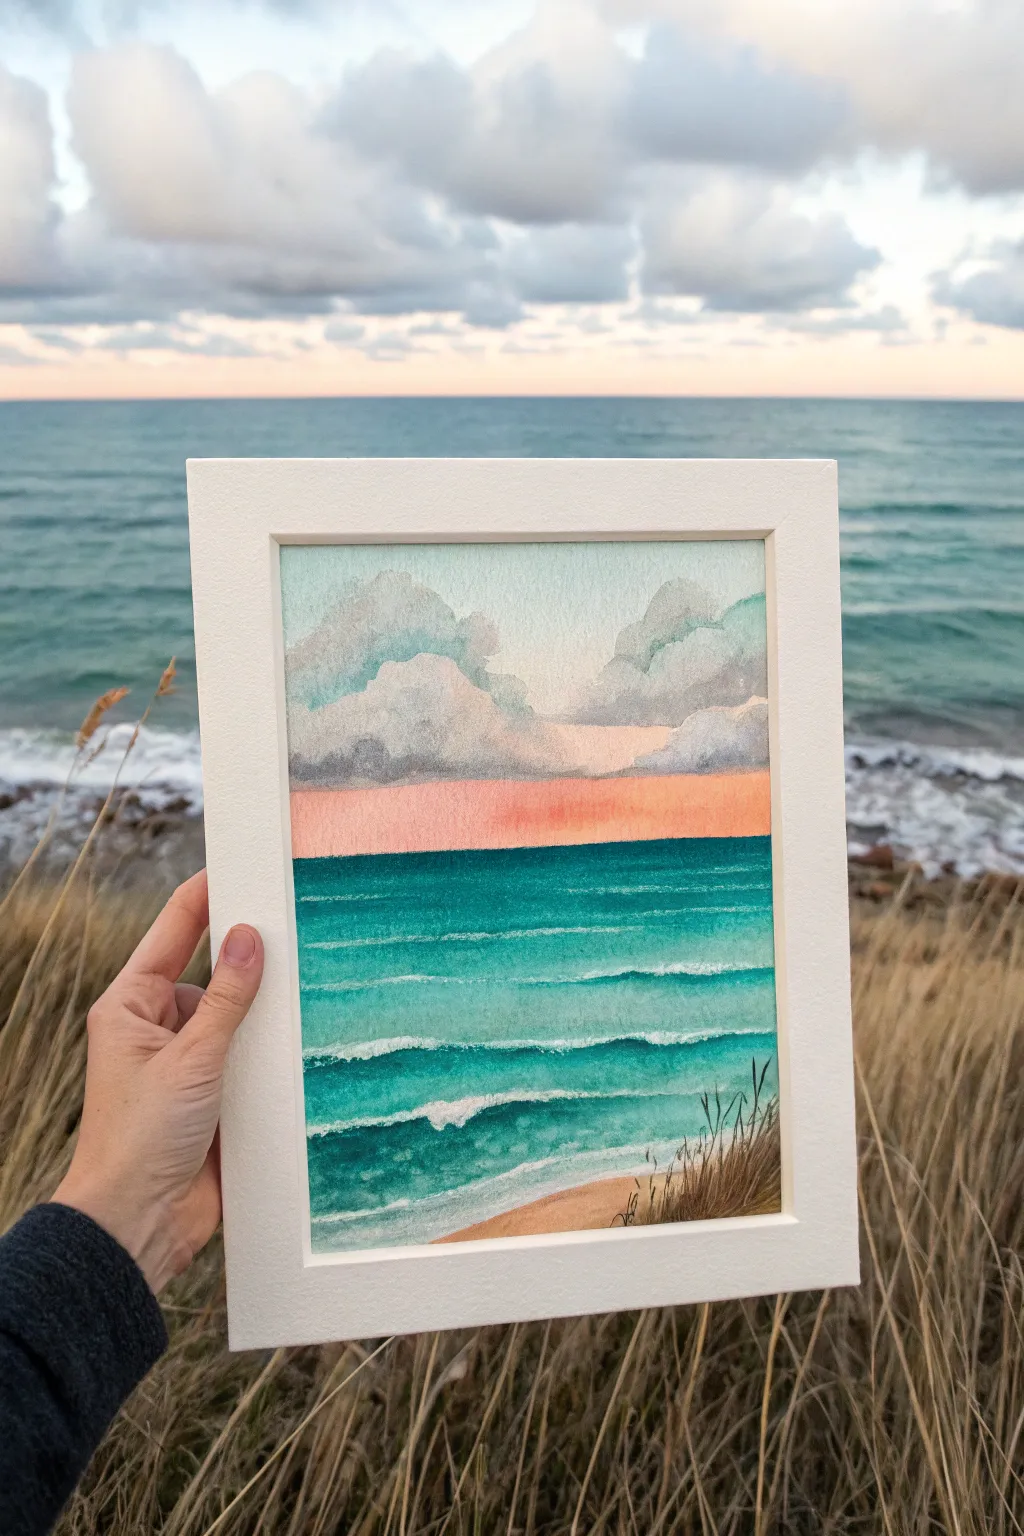
Capture the magic of twilight at the beach with this soothing watercolor landscape, blending gentle teal waves with a warm, glowing horizon. This project perfectly balances loose, wet-on-wet sky techniques with structured brushwork for the crashing ocean waves.
Detailed Instructions
Materials
- Cold press watercolor paper (140 lb/300 gsm)
- Watercolor paints (indanthrene blue, teal or turquoise, cadmium orange, burnt sienna, sepia)
- White gouache or white ink for highlights
- Round watercolor brushes (size 8 for washes, size 2 for details)
- Painter’s tape or masking tape
- Drawing board or hard surface
- Two jars of water
- Paper towels
- Pencil and eraser
Step 1: Preparation & Sky
-
Secure the paper:
Tape down all four edges of your watercolor paper to your board. This creates a crisp white border and prevents the paper from buckling when wet. -
Sketch the horizon:
Lightly draw a straight horizontal line about two-thirds down the page to separate the sky from the sea. Add a gentle curve at the very bottom right for the sand dune. -
Wet the sky area:
Using your larger brush and clean water, thoroughly wet the paper above the horizon line. The surface should glisten but not have standing puddles. -
Paint the clouds:
Mix a soft grey-blue using indanthrene blue rapidly with plenty of water. Drop this color onto the wet paper to form fluffy cloud shapes, leaving white space for the brightest parts of the clouds. -
Add cloud shadows:
While the paper is still damp, drop a slightly more concentrated grey-blue mixture into the bottom edges of the clouds to create volume and shadow. -
Create the sunset glow:
Rinse your brush thoroughly. Mix a watery wash of cadmium orange or a soft peach tone. Paint a horizontal band right above the horizon line, letting it bleed naturally upward into the bottom of the damp clouds without overpowering them. -
Let it dry:
Wait for the sky section to dry completely before moving on to the ocean. If the paper is cool to the touch, it’s still wet.
Step 2: The Teal Ocean
-
Establish the horizon line:
Load your brush with a deep teal color. Carefully paint a straight, sharp line right against the bottom of the sunset strip. -
Gradient wash:
Pull the teal color downwards. As you move closer to the foreground, add a tiny bit more water to your brush to slightly lighten the value, but keep the color vibrant. -
Create wave separation:
While painting the body of water, leave thin, horizontal slivers of white paper unpainted. These negative spaces will serve as the crests of the distant waves. -
Deepen the troughs:
Mix a darker version of your teal (perhaps adding a touch of indigo). Paint underneath the white wave crests to create depth and shadow in the water. -
Structure the foreground waves:
For the nearest waves, use more defined, sweeping strokes. I find that curving the strokes slightly upwards helps mimic the movement of water rushing toward shore. -
Dry completely:
Allow the ocean layer to dry fully so crisp details can be added later without bleeding.
Wet-on-Wet Wisdom
Work quickly on the sky layer. If the paper starts to dry while blending clouds into the sunset, stop manipulating the paint to avoid creating jagged ‘cauliflower’ blooms or hard edges.
Step 3: Foreground & Details
-
Paint the sand:
Mix a light wash of burnt sienna and ochre. Paint the triangular section in the bottom right corner for the beach, softening the edge where it meets the water. -
Add whitecaps:
Using white gouache or opaque white ink on a small detail brush, reinforce the white wave crests. Add little dabs of white foam where the waves break and churn near the shore. -
Paint dune grass:
Mix a dark brown-black using sepia and blue. Using your smallest brush, flick quick, upward strokes from the bottom right corner to create thin, wild dune grass. -
Vary the grass:
Make sure the grass blades vary in length and direction. Some should bend in the wind to add movement to the scene. -
Final reveal:
Once everything is bone dry, carefully peel away the painter’s tape at a 45-degree angle to reveal the clean, crisp border.
Sparkle Technique
For a glittering water effect, lightly sprinkle coarse salt onto the teal ocean wash while it is still very wet. Brush the salt off once the paint is totally dry for a textured look.
Step back and admire your tranquil seascape, bringing a breath of fresh ocean air into your home


Teal Mountain Mist Landscape
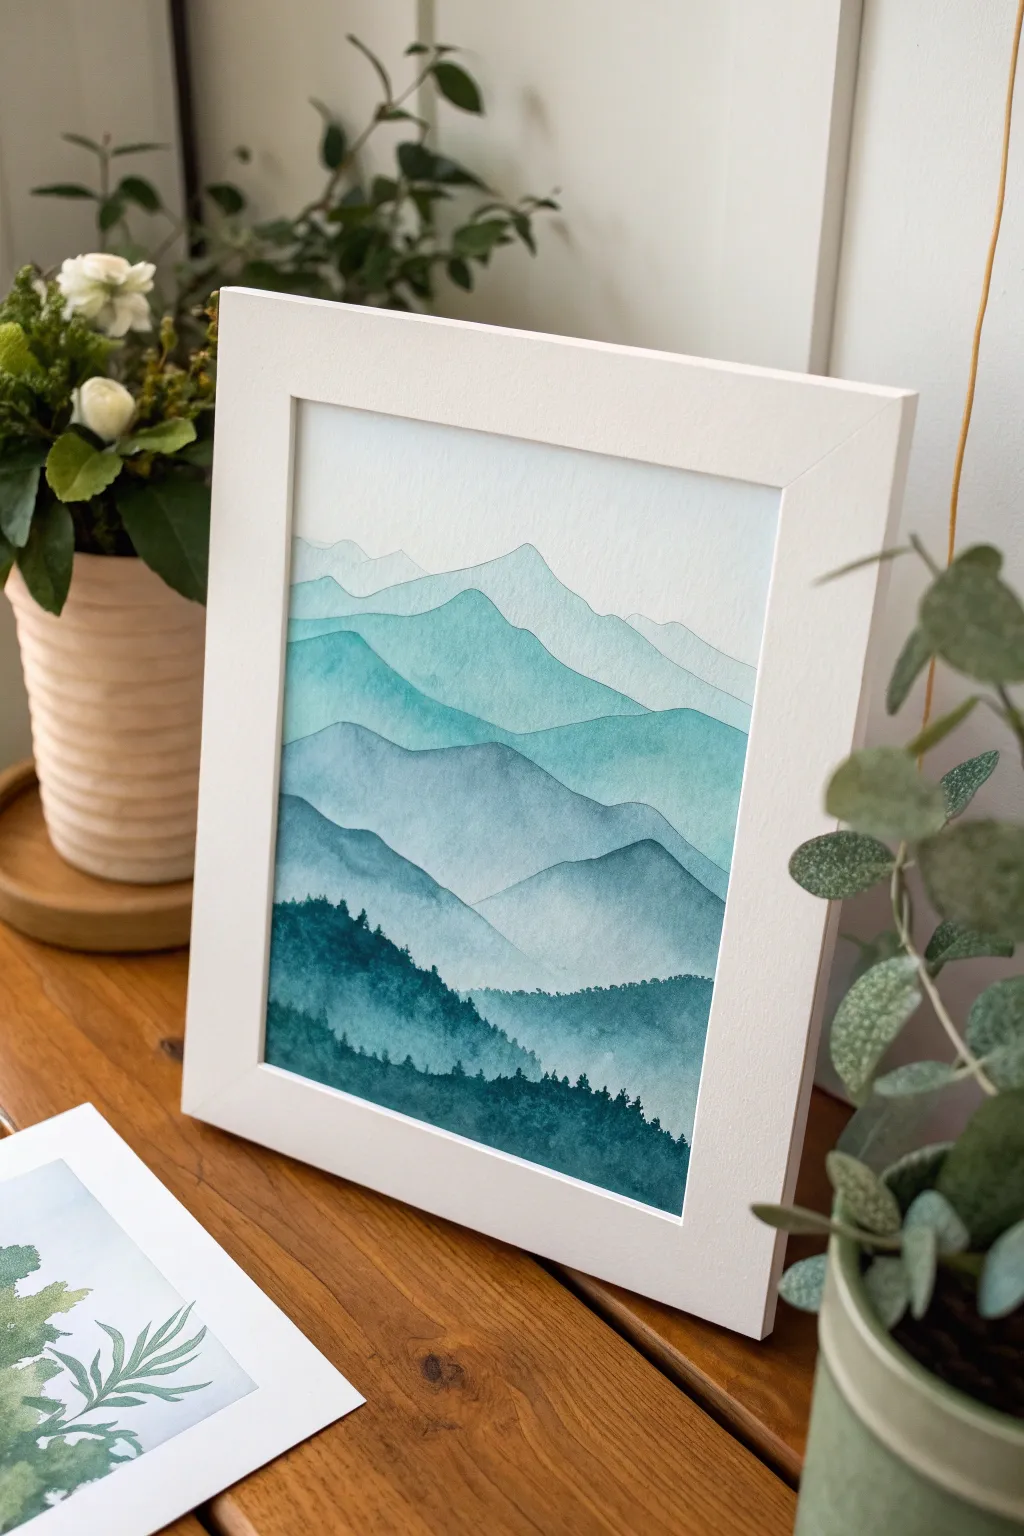
Capture the serene beauty of distant peaks fading into the fog with this stunning layered watercolor landscape. By using progressively darker shades of teal and precise brushwork, you’ll create a sense of depth that draws the viewer right into the scene.
Step-by-Step
Materials
- Cold-press watercolor paper (140lb/300gsm)
- Watercolor paints (Phthalo Blue, Phthalo Green, Indigo, Payne’s Grey)
- Masking tape
- Drawing board or hard surface
- Round brushes (sizes 4, 8, and 12)
- Two jars of water
- Paper towels
- Palette for mixing
- Pencil (HB or lighter)
Step 1: Preparation & Sketching
-
Secure Your Paper:
Begin by taping your watercolor paper down firmly to your board on all four sides. This prevents the paper from buckling when it gets wet and creates that crisp, professional white border seen in the final piece. -
Outline the Layers:
Using a light pencil, gently sketch the contour lines of your mountain ranges. Start from the top (furthest away) and work downward. Create 6-7 distinct layers with jagged, uneven peaks to mimic natural terrain, ensuring they overlap interestingly.
Fixing “Cauliflowers”
Did uneven drying cause water blooms? Don’t panic. Once dry, lightly scrub the area with a stiff, damp brush to soften the edges, or glaze a slightly darker layer over it to hide the texture.
Step 2: Painting the Sky & Distant Peaks
-
Mix the Lightest Wash:
Create a very dilute, watery mix of Phthalo Blue with a tiny touch of Payne’s Grey. The goal is an extremely faint, almost white-blue tone. -
Paint the Sky (Optional):
If you want a subtle sky, wet the area above the first mountain line with clean water, then drop in your faint blue mix. Let it fade to white as it nears the mountain top. Allow this to dry completely. -
First Mountain Range:
Load your size 8 brush with the same very pale blue-grey mix. Paint the first, most distant mountain shape. Keep the top edge crisp against the sky, but you can soften the bottom edge of this shape with a little water to create a misty effect. -
Dry Time:
Let this first layer dry completely. This is crucial—if the paint is wet, the next layer will bleed into it and you will lose the defined ridge line.
Add Metallic Magic
For a magical touch, use metallic gold watercolor paint or a gold leaf pen to outline just the very tips of one or two mountain ridges, catching the light like a sunrise.
Step 3: Building the Middle Layers
-
Darken the Mix:
Add a small amount of Phthalo Green to your existing blue puddle to shift it towards teal, and slightly reduce the water content to make the color richer. -
Second Layer Application:
Paint the second mountain range below the first. Carefully trace the pencil line where it overlaps the first mountain to keep a sharp edge, then fill in the body of the shape. -
Adding Variation:
While the paint is still wet on the paper, I sometimes drop a tiny bit of clean water or a slightly different blue hue into the wet area. This creates subtle ‘blooms’ that look like shifting mist or rock textures. -
Third and Fourth Layers:
Continue this process for the next two layers. With each new ridge, add more Phthalo Green and perhaps a touch of Indigo to your mix. The color should be getting noticeably deeper and more vibrant teal with every step downward. -
Softening Bottoms:
As you paint these middle layers, you can use a clean, damp brush to drag the bottom edge of the wet paint downwards, fading it out. This ensures the layer underneath doesn’t have a hard line showing through the subsequent mountains.
Step 4: The Foreground & Trees
-
Mixing the Deepest Teal:
For the bottom-most layers, mix a saturated, dark color using Phthalo Green, Indigo, and less water. This needs to be a strong, moody teal to anchor the composition. -
Painting the Foothills:
Paint the second-to-last layer. This layer is quite dark but still retains the smooth, wash-like quality of the mountains above. Ensure the top edge is sharp against the lighter teal above it. -
Detailing the Tree Line:
Switch to your smallest brush (size 4). For the final, closest layer at the very bottom, paint the top ridge not as a smooth line, but using tiny, vertical stippling motions to suggest the tops of pine trees. -
Filling the Foreground:
Fill the rest of the bottom shape with your darkest, most concentrated paint mixture. If you want even more texture, dab in pure Indigo while it’s wet to create shadows in the forest density. -
Final Touches:
Once everything is bone dry, gently erase any visible pencil lines. Finally, peel off the masking tape slowly at a 45-degree angle to reveal your clean edges.
Frame your misty masterpiece in a simple white frame to let those beautiful teal transitions truly shine
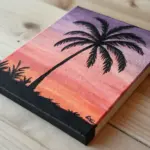
Teal Forest Silhouettes
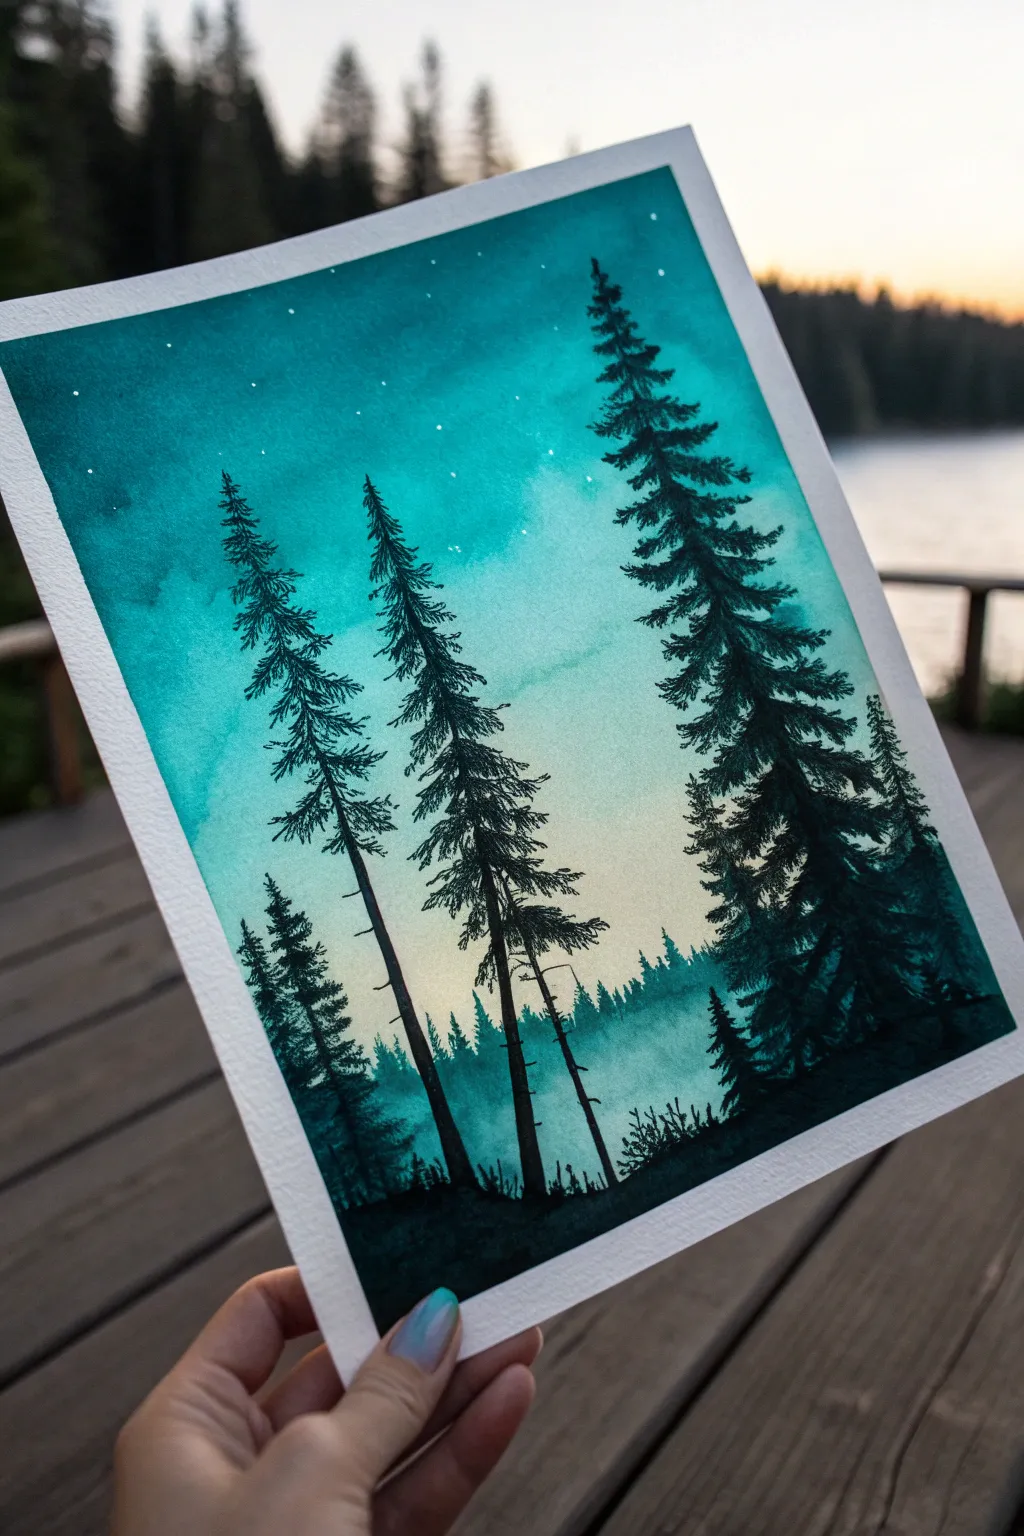
Capture the serene beauty of a twilight forest with this atmospheric watercolor painting. You’ll create a glowing teal gradient sky that fades into mist, contrasted against sharp, striking silhouettes of tall pine trees.
Step-by-Step Tutorial
Materials
- Cold Press watercolor paper (300 gsm)
- Painter’s tape
- Watercolor paints (Turquoise, Phthalo Blue, Teal, Indigo)
- Black gouache or waterproof black ink
- Round brushes (large for washing, sizes 2 and 6 for details)
- White gel pen or white gouache
- Clean water jars
- Paper towels
Step 1: Creating the Gradient Sky
-
Prepare your canvas:
Start by taping down all four edges of your watercolor paper to a board or table. This creates that crisp, professional white border and prevents buckling while the paper is wet. -
Mix your teal:
On your palette, prepare a large puddle of a rich teal color. I like to mix Phthalo Blue with a touch of Emerald Green or just use a straight Cobalt Turquoise to get that vibrant base. -
Wet the paper:
Using your largest clean brush, apply clear water to the entire sky area, stopping about an inch from the bottom edge. The paper should glisten but not have standing puddles. -
Start the wash:
Load your large brush with the intense teal mixture. Start painting at the very top of the paper, moving horizontally back and forth to lay down the darkest pigment. -
Fade the gradient:
As you move down the paper, gradually dilute the paint on your brush with more water. The color should transition from a deep, space-like teal at the top to a pale, misty wash near the bottom. -
Create the misty horizon:
At the bottom third of the paper, where the sky meets the future ground, use almost pure water to soften the edge so the teal fades into the white of the paper completely. -
Starry details:
While the sky is drying but still slightly damp, you can lift out tiny spots for soft stars, or wait until it’s bone dry to add crisp stars later. Let this layer dry completely before moving on.
Starry Splatter
For a more natural galaxy look, load an old toothbrush with white gouache and flick the bristles to spray fine mist stars over the dark sky.
Step 2: Building the Distant Forest
-
Mix a hazy mid-tone:
Create a watery, diluted mix of your teal and a tiny bit of Indigo or Paynes Gray. You want a semi-transparent blue-grey color for the distant trees. -
Paint the background tree line:
Along the bottom horizon (where your sky faded to white), paint a jagged, small tree line. Keep these shapes loose and indistinct to simulate distance and fog. -
Add some depth:
While this background layer is still wet, drop in slightly darker pigment at the very base of these tiny trees to ground them. -
Dry thoroughly:
Ensure this background layer is completely dry to the touch. If you proceed too soon, the sharp foreground trees will bleed into the mist.
Step 3: Painting the Silhouette Pines
-
Prepare your dark pigment:
Switch to black gouache or very concentrated black watercolor. The goal is an opaque, matte black silhouette that will popping against the glowing sky. -
Paint the main trunks:
Using a size 6 round brush, paint three main vertical lines for your foreground trees. Vary their heights and thicknesses; make the one on the right the thickest and tallest. -
Texture the trunks:
The lines shouldn’t be perfect ruler-straight poles. Add slight wobbles and breaks to mimic natural bark and growth patterns. -
Start the branches:
Switch to your smaller size 2 brush. Starting from the top of the rightmost tree, flick your brush outward and slightly downward to create pine branches. -
Build the foliage:
Work your way down the trunk, making the branches wider as you descend. Use a stippling or tapping motion to create the look of needles rather than smooth leaves. -
Repeat for the left trees:
Paint the branches on the two thinner trees on the left. Keep these sparser near the top and denser near the bottom to create variety in the composition. -
Add the ground:
Connect the base of your trees with irregular, dark mounds of earth. Use the black paint to fill in the bottom edge completely, grounding the scene. -
Tiny details:
Use the very tip of your smallest brush to add tiny vertical lines along the ground for grass, or small saplings poking up between the large trees. -
Final stars:
Using a white gel pen or a tiny dot of white gouache, add the stars back into the dark teal sky at the top for a magical finish. -
Reveal:
Peel off the painter’s tape slowly, pulling away from the painting at a 45-degree angle to reveal your crisp white borders.
Add a Moon
Before the sky dries, lift a small circle of paint with a clean, damp tissue to create a glowing, soft full moon behind the trees.
Step back and admire your moody, peaceful forest scene.
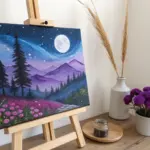

Glowing Full Moon in a Teal Sky
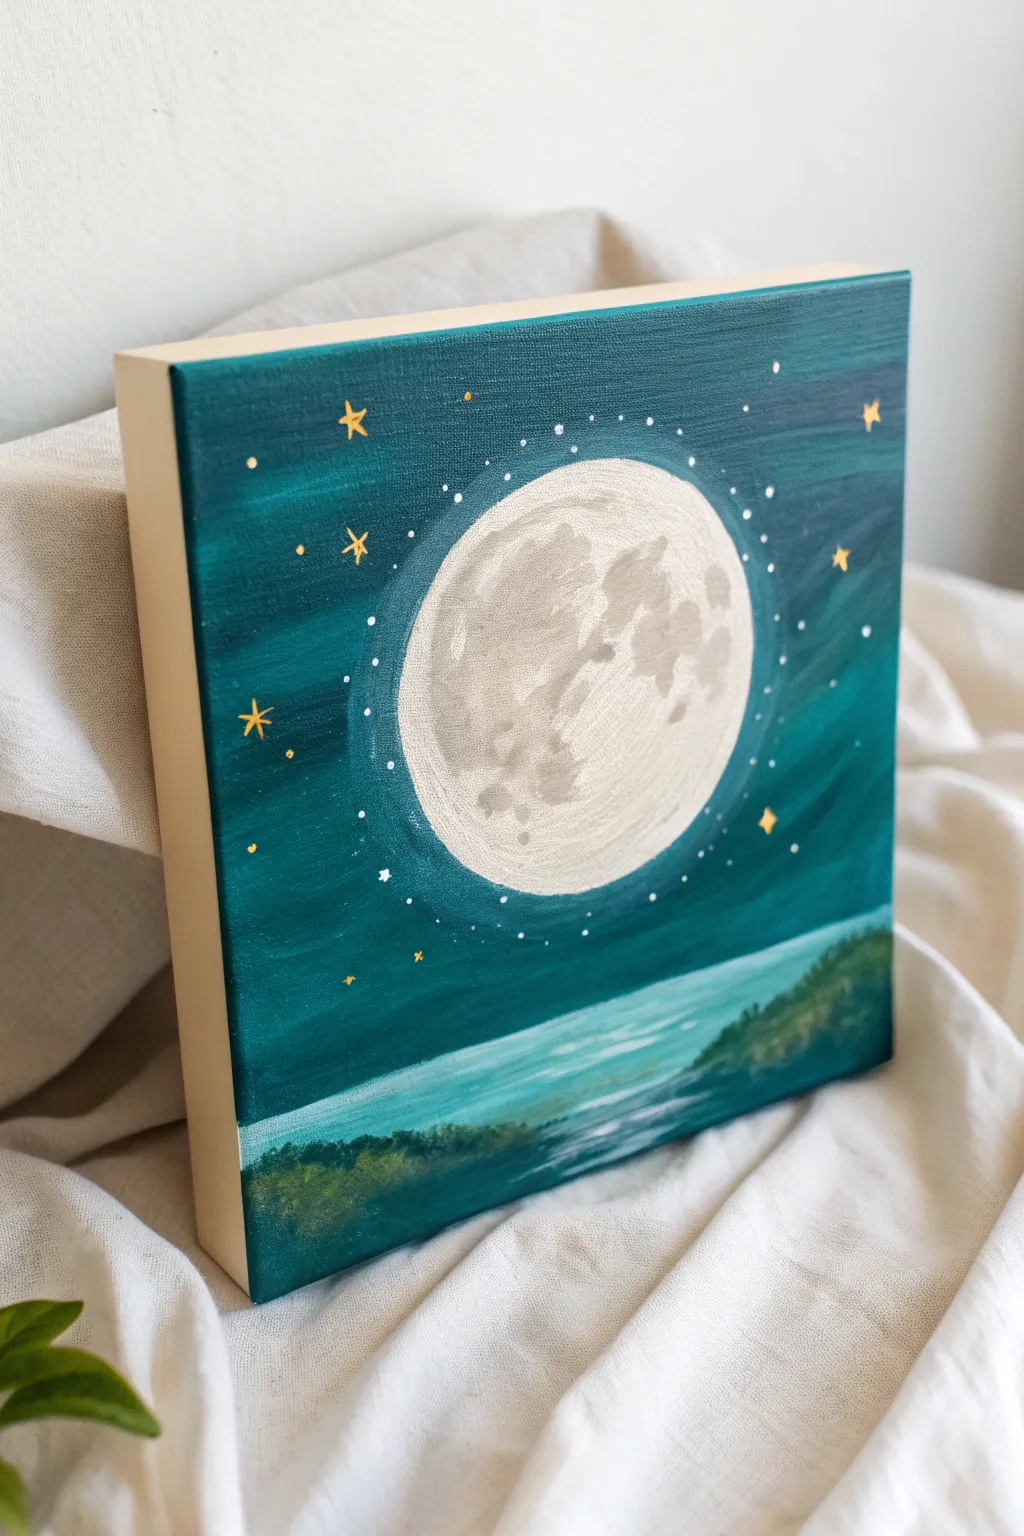
Capture the serene glow of a full moon rising over shadowy waters with this moody acrylic painting. The rich, monochromatic teal background makes the warm white moon pop, creating a striking piece of decor for any night sky lover.
How-To Guide
Materials
- Square wood panel or stretched canvas (approx. 6×6 or 8×8 inches)
- Acrylic paints: Titanium White, Phthalo Green, Mars Black, Burnt Umber, Metallic Gold
- Flat shader brush (size 6-8)
- Small round brush (size 0-2)
- Detail liner brush (size 00 or 000)
- Palette or mixing plate
- Cup of water and paper towels
- Compass or a round object to trace (like a jar lid)
Step 1: Setting the Scene
-
Mix the base color:
Start by creating a deep, rich teal shade. Mix a substantial amount of Phthalo Green with a touch of Mars Black and a tiny bit of Titanium White to soften it. You want a dark, intense turquoise color. -
Paint the background:
Using your flat shader brush, cover the top two-thirds of the canvas with this dark teal mixture. Apply horizontal strokes to keep the texture smooth. Save some of this mix for later steps. -
Add atmospheric streaks:
While the background is still slightly wet, mix a lighter teal by adding more Titanium White to your base color. Create subtle, horizontal streaks across the sky to simulate thin atmospheric clouds or wind. -
Establish the horizon:
For the bottom third, add a bit more white to your teal mix to create a distinct separation for the water line. Paint this section with horizontal strokes, blending slightly upwards into the darker sky area.
Step 2: Creating the Moon
-
Outline the orb:
Once the background is completely dry, use a compass or trace a circular object (like a jar lid) in the center of the sky area. Use a very light pencil or white chalk pencil so it shows up against the dark paint. -
Base coat the moon:
Fill in the circle with pure Titanium White using a round brush. You may need two coats to ensure it is fully opaque and hides the teal background underneath. -
Mix crater colors:
Create a light grey-beige color. Mix Titanium White with a tiny dot of Burnt Umber and the smallest speck of black. It should be very subtle, barely darker than white. -
Paint the maria:
Using the reference image or a photo of the real moon, paint the ‘maria’ (the dark spots) with your grey-beige mix. Focus on irregular, organic shapes, mostly clustered on the right side and bottom left. -
Soften the edges:
I find it helpful to use a damp, clean brush to gently blur the edges of your grey shapes into the white background while the paint is still wet. This soft blending makes the craters look realistic rather than like cartoon spots.
Clean Circles
If you struggle painting a perfect circle, cut a stencil out of sticky notes or masking tape. Stick it to the dry canvas and paint the white moon inside it to get a crisp edge.
Step 3: Details & Illumination
-
Add the glowing halo:
Mix a very translucent glaze using water and Titanium White (or clear glazing medium). Paint a thin, transparent ring around the outside of the moon to make it look like it’s glowing. -
Dot the halo ring:
Dip the very tip of your smallest brush or a toothpick into pure White. Create a ring of tiny, evenly spaced dots surrounding the moon, sitting just outside the painted edge. -
Paint the landscape:
Mix a dark green-black color using Phthalo Green and Mars Black. Using the corner of your flat brush, dab in a vague tree line or landmass along the horizon on the right side and bottom left corner. -
Highlight the water:
With a thin brush and watered-down white paint, add a few squiggly horizontal lines on the ‘water’ surface below the moon to represent reflection. -
Add gold stars:
Switch to your metallic gold paint. Use a detail brush to paint small five-point stars scattered randomly across the teal sky. Vary their sizes slightly for interest. -
Add distant stars:
Using the back of your brush handle or a dotting tool, place tiny dots of gold and white paint in the empty spaces to represent distant stars. -
Final touches:
Review your painting. If the moon needs more brightness, add a final highlight of pure white to the brightest smooth areas of the lunar surface.
Glow Up
Mix glow-in-the-dark medium into your final layer of white paint on the moon. The artwork will look normal by day but will magically illuminate when the lights go out.
Allow your starry night landscape to dry completely before displaying it on a shelf or wall
BRUSH GUIDE
The Right Brush for Every Stroke
From clean lines to bold texture — master brush choice, stroke control, and essential techniques.
Explore the Full Guide
Teal Water Ripples Close-Up
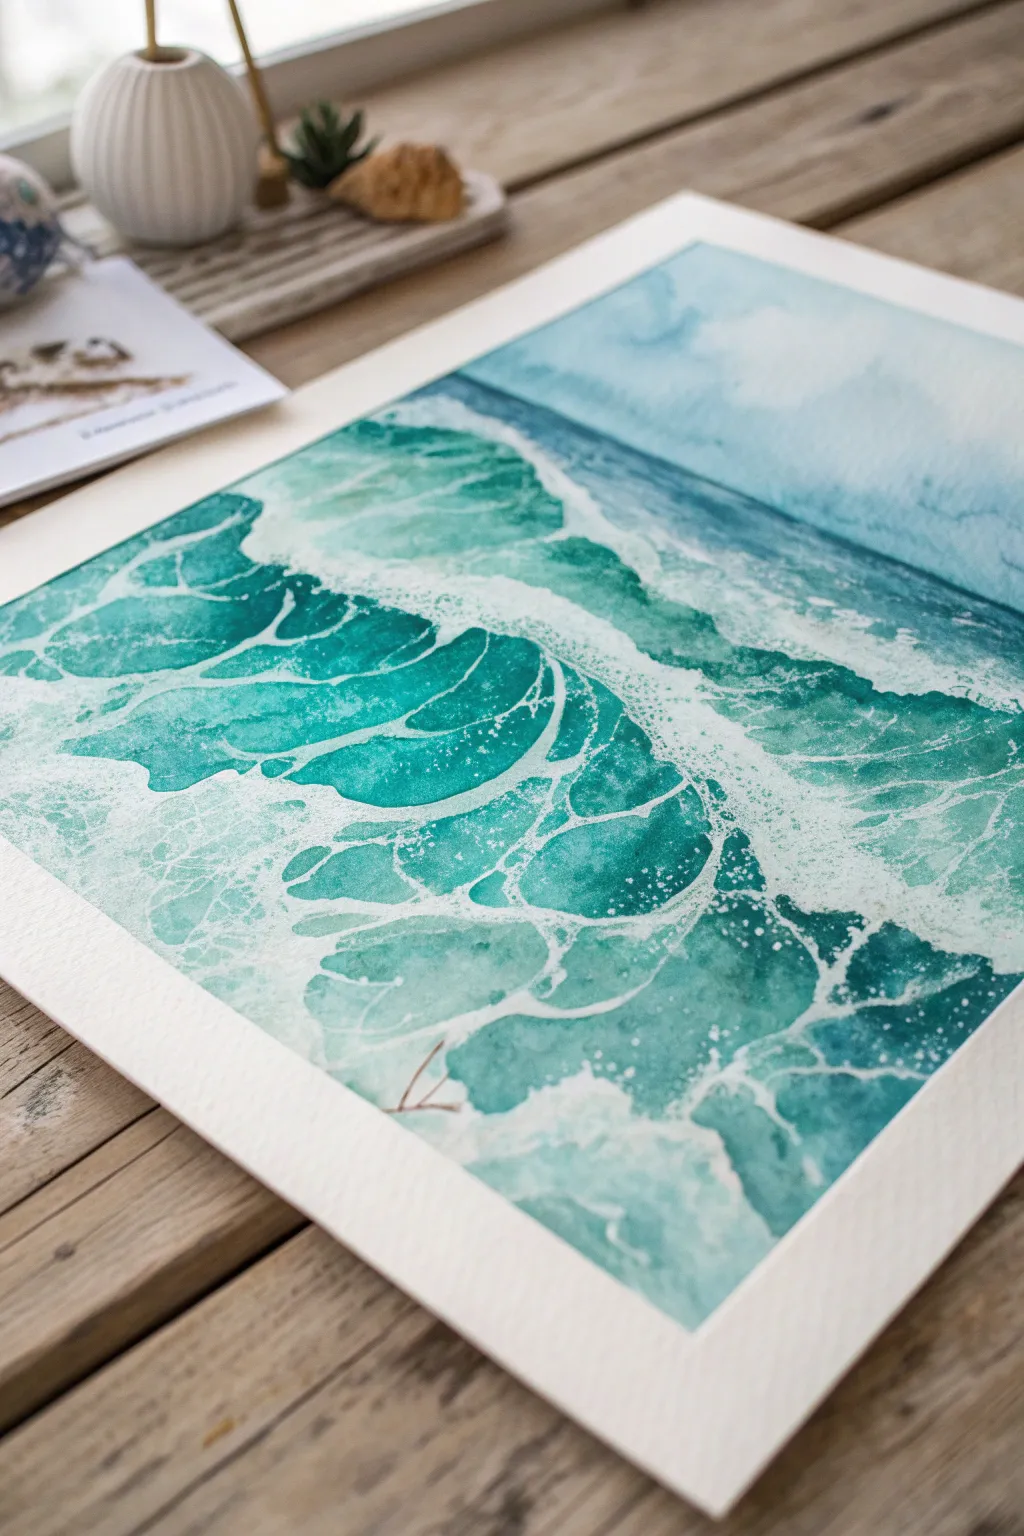
Capture the mesmerizing movement of the sea with this focused study of crashing waves and delicate sea foam. Using a blend of wet-on-wet and masking techniques, this project creates a realistic, textured look that brings the ocean’s energy right onto your paper.
Step-by-Step Tutorial
Materials
- Cold press watercolor paper (300 gsm or heavier)
- Masking fluid (drawing gum)
- Old brush or ruling pen for masking fluid
- Watercolor paints: Phthalo Turquoise, Cobalt Teal, Prussian Blue, Indigo
- Large flat wash brush
- Medium round brush (size 6 or 8)
- Small detail brush (size 0 or 2)
- Palette for mixing
- Two jars of water
- Paper towels
- Masking tape
Step 1: Preparation and Masking
-
Secure the paper:
Tape your watercolor paper down to a board on all four sides. This prevents buckling and creates that clean, crisp white border seen in the vibrant finished piece. -
Sketch the flow:
Lightly sketch the main directional lines of the wave. You don’t need to draw every bubble, just mark where the heavy foam separates the deep water from the shallow wash. -
Apply masking fluid:
Using an old brush or a ruling pen, apply masking fluid to preserve the stark white foam. Focus on the organic, web-like patterns where the wave is breaking. -
Create fine details:
For the delicate lace-like foam in the foreground, splatter small dots of masking fluid or use a very fine tool to draw wandering, interconnected lines. -
Let it cure:
Allow the masking fluid to dry completely. It should feel rubbery and not tacky to the touch before you introduce any water.
Save Your Brushes
Never use your good watercolor brushes for masking fluid! The latex dries quickly and will ruin the bristles. Use a cheap craft brush or coat the bristles in bar soap first.
Step 2: Painting the Ocean Depths
-
Pre-wet the paper:
Use your large flat brush to wet the entire paper surface with clean water. The paper should be glistening but not forming puddles. -
Lay the base wash:
Mix a light wash of Cobalt Teal and paint over the entire wet surface. Let the color flow naturally, keeping it lighter near the bottom foreground. -
Deepen the background:
While the paper is still damp, drop in Phthalo Turquoise and a touch of Prussian Blue into the top third of the painting to represent the deeper, distant water. -
Create the wave shadow:
Load your medium round brush with a stronger mix of Phthalo Turquoise and Indigo. Paint directly under the main masked ‘crash’ zone to create the shadow cast by the wave. -
Blend the mid-tones:
Soften the edges of your dark shadows with a damp brush, blending them downward into the lighter teal areas to suggest the curve of the water. -
Dry thoroughly:
Allow this first layer to dry completely. The paper must be bone dry before the next step to prevent mud.
Step 3: Refining and Revealing
-
Glazing layers:
Mix a watery glaze of Phthalo Turquoise. Paint negative shapes inside the ‘loops’ of the foam patterns in the foreground to give the water volume. -
Add motion contrast:
I like to add a few horizontal strokes of Indigo in the darkest crevices of the wave to exaggerate the movement. -
Remove the mask:
Once the paint is 100% dry, gently rub off the masking fluid with your finger or a rubber cement pickup tool to reveal the crisp white paper underneath. -
Soften the foam:
The white lines might look too stark. Using a clean, damp scrub brush, gently soften some of the hard edges of the white foam to make it look wet and misty. -
Shadow the foam:
Mix a very faint, watery violet-grey. delicately paint the underside of the thickest foam clumps to give them 3D form. -
Final splatter:
Load a toothbrush or stiff brush with white gouache (optional) or masking fluid and flick a fine mist over the crash zone for extra spray texture.
Make it Sparkle
Mix a tiny amount of iridescent medium into your clear water jar before the final glazing step. It gives the teal water a subtle shimmer when the light hits it.
Now you have a dynamic slice of the ocean preserved forever in paint
Teal Waves With White Foam
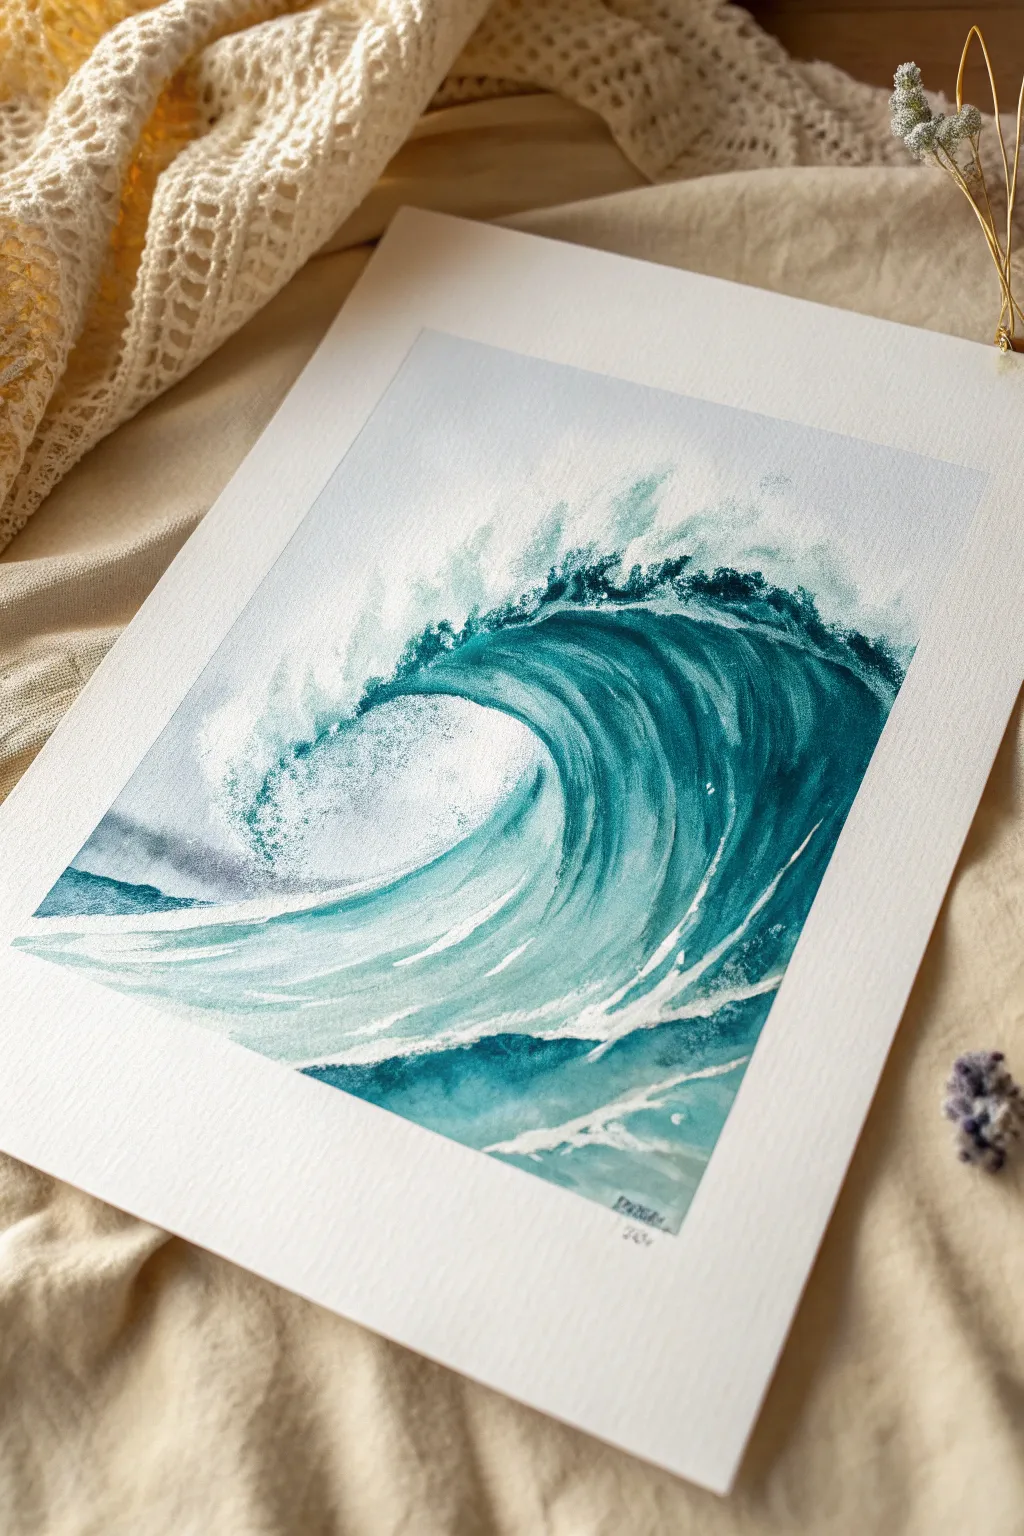
Capture the raw energy of the ocean with this dynamic watercolor study of a curling wave. The piece features a striking gradient of deep teal to pale turquoise, accented by dynamic white foam that brings movement and life to the composition.
Detailed Instructions
Materials
- Cold press watercolor paper (300 gsm)
- Watercolor paints (Phthalo Blue, Viridian Green, Indigo, Payne’s Gray)
- White gouache or white acrylic ink
- Masking fluid (drawing gum)
- Synthetic round brushes (sizes 4, 8, and 12)
- Fine detail brush or rigger brush
- Old toothbrush (for splattering)
- Paper towels
- Masking tape
- Two jars of water
Step 1: Preparation and Sketching
-
Secure the paper:
Tape down all four edges of your watercolor paper onto a flat board using masking tape. This creates the crisp white border seen in the image and prevents buckling when the paper gets wet. -
Light pencil outline:
Using a hard pencil (like an H or 2H), very lightly sketch the main curve of the wave. You only need to mark the top crest, the inner curl (the barrel), and the general flow of the foreground water. Keep lines faint so they don’t show through. -
Apply masking fluid:
Preserve your brightest whites by applying masking fluid to the crashing foam at the top lip of the wave and the splashing spray in the barrel. Use an old brush or a silicone tool for this, applying it in jagged, organic dots and dashes.
Muddy Waters?
If your teal looks dull, you likely over-blended. Watercolor loses freshness if overworked. Lay down the stroke and leave it alone, even if it isn’t perfect.
Step 2: Painting the Wave Body
-
Mix your teal:
Create a rich teal base by mixing Phthalo Blue with a touch of Viridian Green. Prepare a watery, pale version and a saturated, dark version. -
Wet-on-wet sky:
Lightly wet the sky area above the wave with clean water. Drop in very faint, diluted blue-gray wash to suggest an overcast atmosphere, fading it out as it nears the top of the wave. -
The barrel gradient:
Begin painting the inside of the wave curl. Start at the top right under the foam with your darkest teal mixture (add a tiny bit of Indigo for depth). Pull this color downward into the curve. -
Transition to light:
As you move toward the left side of the barrel where the light hits (the ‘eye’ of the wave), dilute your paint significantly. Let the dark teal fade into a very pale, almost white-blue. This creates the translucent effect. -
Define the face:
Paint the vertical face of the wave using vertical, curved brushstrokes that follow the water’s movement. Use the medium-strength teal here, leaving small gaps of white paper occasionally to suggest reflections.
Pro Tip: Gouache Magic
Unlike watercolor, white gouache is opaque. Use it thick for the brightest foam highlights, but water it down to a milky consistency for sea mist and transparent spray.
Step 3: Foreground and Movement
-
Foreground water:
Paint the water in front of the wave using horizontal sweeping strokes. Alternate between the pale teal and a slightly darker turquoise to create ripples leading up to the main wave. -
Deepen shadows:
Once the first layer is damp (not soaking), go back into the darkest part of the curl and the bottom shadow of the wave with a mix of Teal and Payne’s Gray. This high contrast makes the wave look three-dimensional. -
Dry partially:
Allow the main painting to dry until it is cool to the touch but no longer shiny.
Step 4: Foam and Details
-
Remove masking fluid:
Gently rub away the masking fluid with your clean finger or a rubber cement pickup to reveal the crisp white paper underneath. -
Soften harsh edges:
Take a clean, damp brush and gently scrub the edges of the newly revealed white areas to soften them slightly, blending certain parts back into the teal so the foam doesn’t look like a sticker. -
Spindrift and spray:
Load a rigger brush or fine detail brush with white gouache (consistency of heavy cream). Paint thin, trailing lines flicking backward from the wave’s crest to mimic wind-blown spray. -
Texture the foam:
Dab opaque white gouache onto the main crash zone. Don’t paint a solid block; use a stippling motion to create the texture of aerated water. -
Add motion lines:
Paint sweeping, thin white lines following the curve of the wave face and the foreground ripples. I find that varied line pressure helps these look more organic and fluid. -
The splatter technique:
Dip an old toothbrush into diluted white gouache. Run your thumb over the bristles to flick tiny droplets near the crest and the crash zone for a chaotic, misty effect. -
Final touches:
Add a few final dabs of pure white highlights on the darkest part of the water effectively boosting the contrast. Let it dry completely before peeling off the tape.
Peel back the tape to reveal your crisp edges and enjoy the refreshing energy of your seascape

PENCIL GUIDE
Understanding Pencil Grades from H to B
From first sketch to finished drawing — learn pencil grades, line control, and shading techniques.
Explore the Full Guide
Teal Tropical Leaves Study
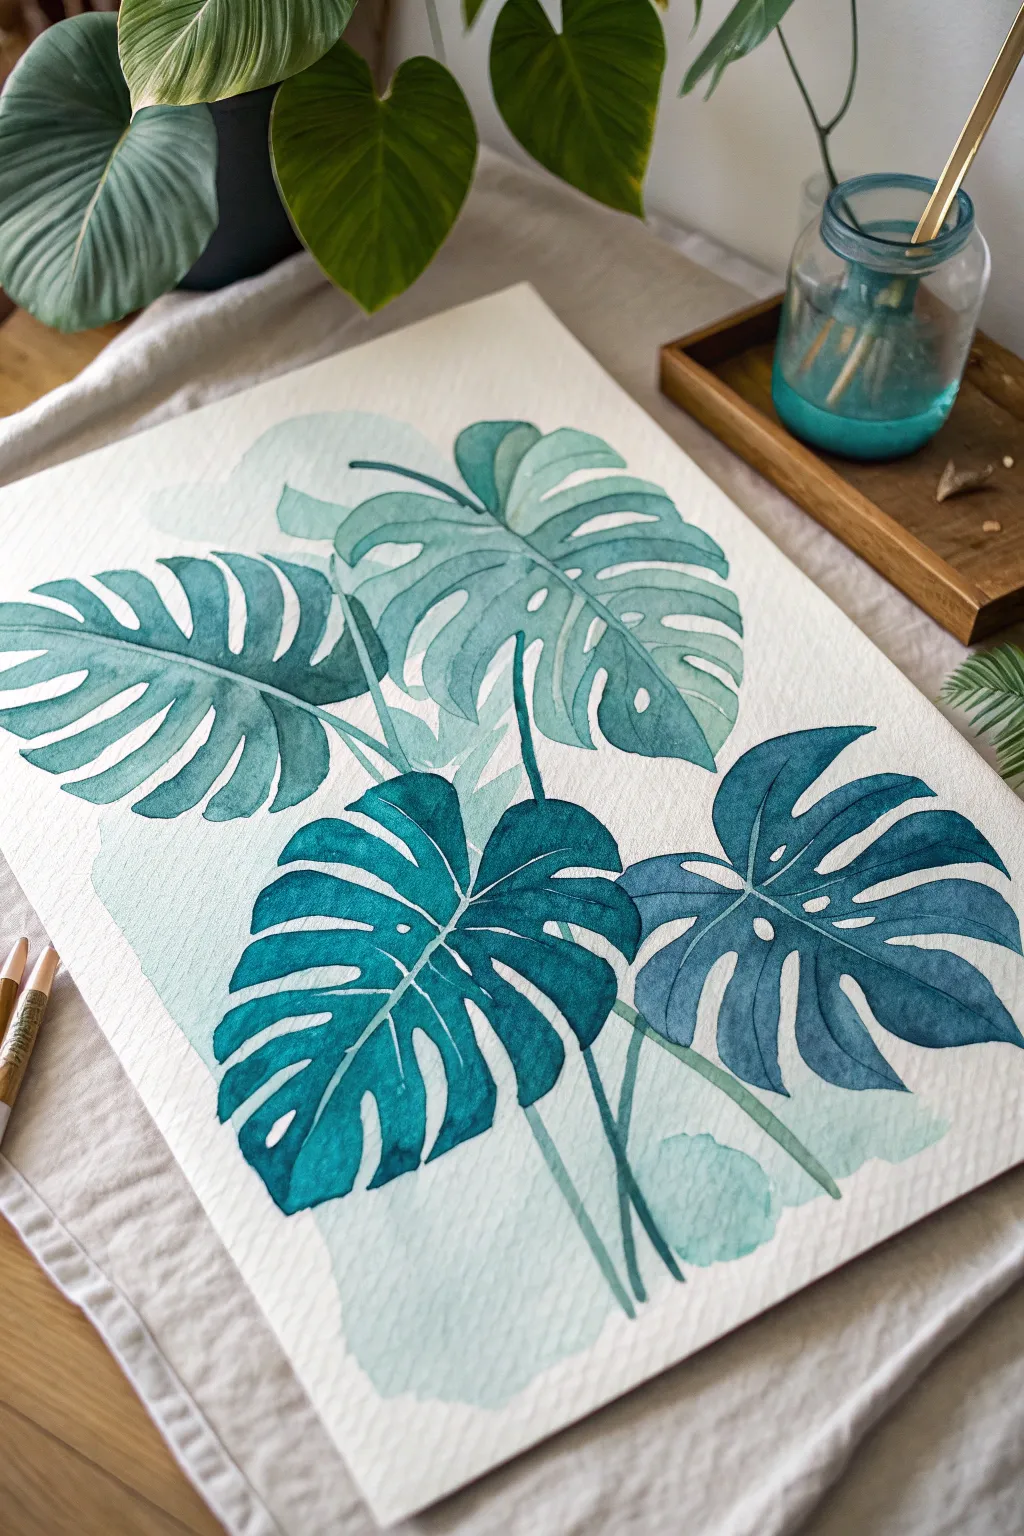
This elegant watercolor study explores the depth and versatility of a single teal hue, layered to create lush, dimensional Monstera leaves. The finished piece features overlapping botanical forms on textured paper, perfect for bringing a calm, tropical vibe to any space.
Step-by-Step
Materials
- Cold press watercolor paper (140lb/300gsm)
- Watercolor paints: Phthalo Green, Phthalo Blue (or a pre-mixed Teal)
- Round watercolor brushes (Size 4, 8, and 12)
- Pencil (HB or 2H)
- Kneaded eraser
- Two jars of water
- Paper towels
- Masking tape
Step 1: Preparation and Sketching
-
Prepare your workspace:
Begin by taping down your watercolor paper to a hard board or table. This prevents buckling when the paper gets wet. Ensure your water jars are filled—one for rinsing dirty brushes, one for clean water. -
Sketch the composition:
Lightly sketch the outlines of four large Monstera leaves. Place two higher up and two lower down to create balance. Focus on their distinct heart shapes and split edges. -
Add the fenestrations:
Sketch the characteristic holes (fenestrations) inside the leaves. Keep the pencil lines very faint so they won’t show through the translucent watercolor later. -
Draw the stems:
Connect the leaves with long, slender stems that converge toward the bottom center of the page. Let them cross over each other naturally. -
Refine with an eraser:
Use a kneaded eraser to gently lift any heavy graphite. You want barely visible guidelines known as ‘ghost lines’ to guide your painting.
Fixing Blooms
Did water create a cauliflower-like ‘bloom’ on a leaf? Wet the area slightly with a clean brush and lift the excess pigment with a paper towel, then re-glaze once dry.
Step 2: Mixing and First Washes
-
Mix your base teal:
Combine Phthalo Green and Phthalo Blue to create a rich teal. Create a large puddle of a very watered-down, pale version of this mix for your background and lightest leaves. -
Paint the background wash:
Using your largest brush, lay down a loose, abstract wash of the palest teal behind the leaves. It doesn’t need to fill the page; soft, organic edges add to the artistic feel. -
Paint the background leaves:
Identify the two leaves in the back (the upper ones). Paint them with a light-to-medium wash of teal. Use a ‘wet-on-dry’ technique to keep the edges crisp against the white paper. -
Let it dry completely:
Patience is key here. Verify the paper is cool to the touch but not damp before proceeding, or your layers will bleed together.
Level Up: Salt Texture
While the background wash is still wet, sprinkle a pinch of table salt on it. As it dries, the salt pushes pigment away, creating a starry, organic texture.
Step 3: Layering Depth and Detail
-
Mix a darker value:
Add more pigment to your teal mix to create a bold, saturated deep teal. This will be used for the foreground leaves. -
Paint the foreground leaves:
Carefully paint the two lower, prominent leaves with this saturated mix. Paint around the veins if you want to leave white highlights, or paint the whole leaf solid for now. -
Create overlaps:
Where the dark foreground leaves overlap the lighter background ones, ensure a clean edge. The contrast between the pale wash and the dark pigment creates instant depth. -
Add the stems:
Switch to a size 4 brush. Using the medium-dark teal, paint the long stems with confident, single strokes to avoid wobbles. -
Add vein details (background):
Once dry, use a slightly darker version of the background color to paint thin vein lines on the upper leaves. This subtle ‘tone-on-tone’ effect adds texture without overpowering the foreground. -
Add vein details (foreground):
For the dark bottom leaves, I like to use a very concentrated, almost dry-brush mix of teal to deepen the shadows along the central veins, making the leaf look folded.
Step 4: Final Touches
-
Enhance the shadows:
Evaluate your contrast. If the leaves look flat, glaze a transparent layer of dark teal where the leaves overlap or tuck under one another. -
Review edges:
Check the edges of your leaves. If any paint strayed, you can gently lift it with a clean, damp brush, or sharpen the edge with a bit more dark paint. -
Remove tape:
Wait until the painting is bone dry. Peel the masking tape away slowly at a 45-degree angle to reveal the clean white border.
Step back and admire how using just one color in varying strengths has created a vibrant, dimensional botanical study
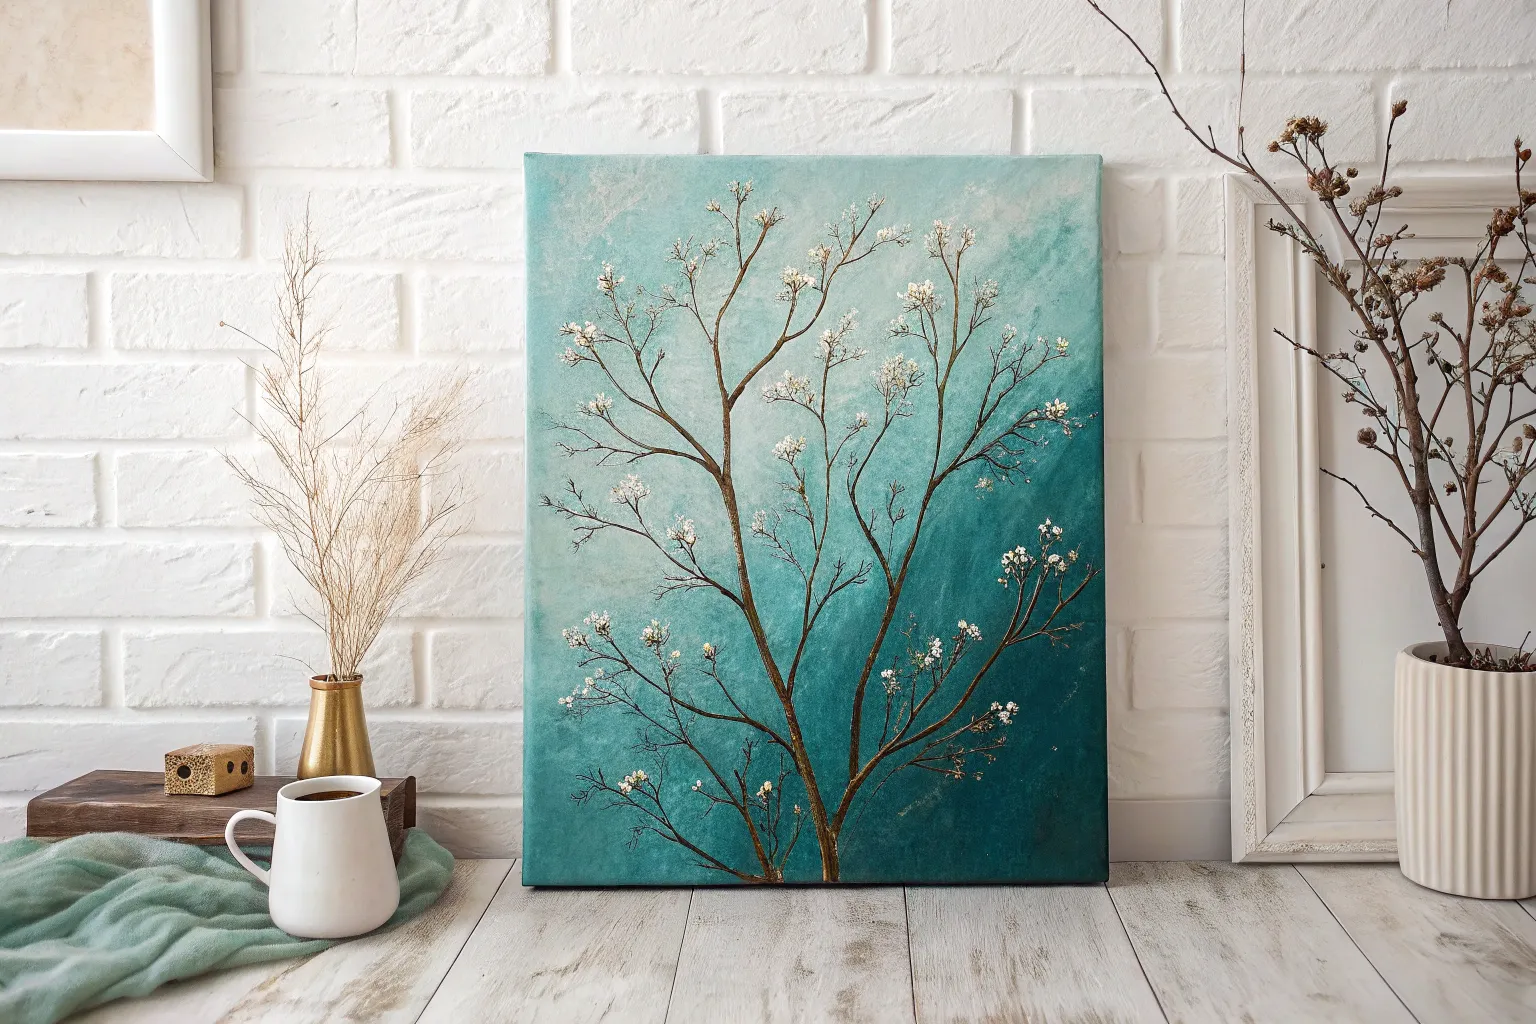
Fantasy Tree With Teal Foliage
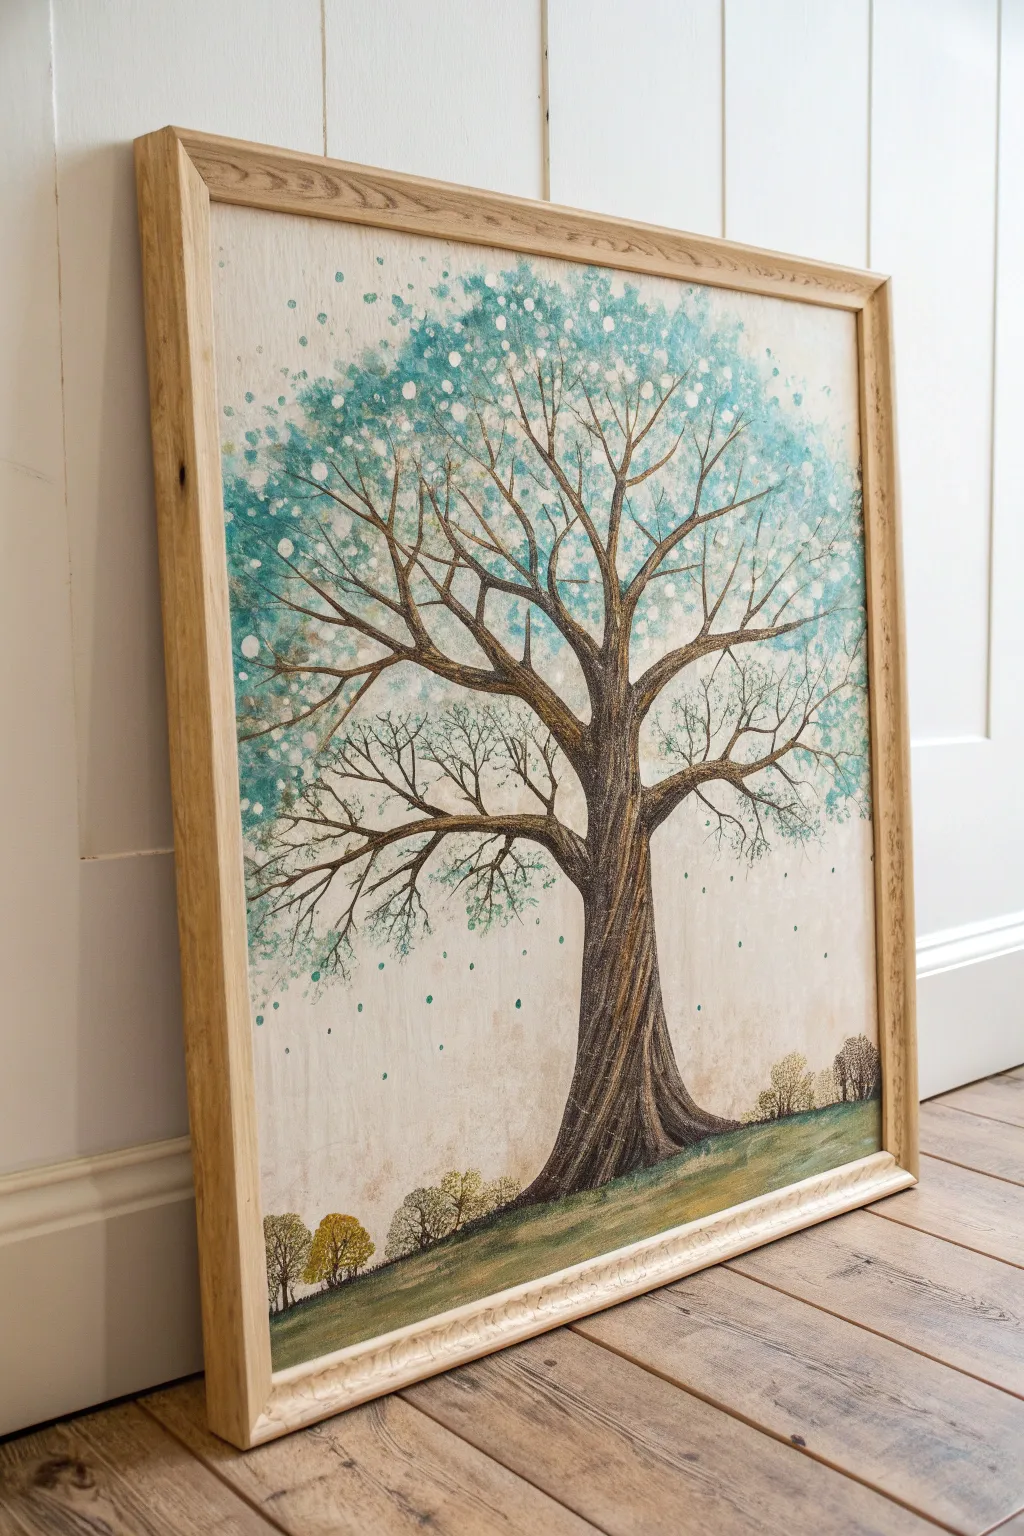
Capture the magic of nature with this illustrative tree painting, featuring a majestic twisted trunk and a cloud-like canopy of teal blooms. The soft, textured background and delicate falling leaves give this piece a dreamy, storybook quality perfect for bringing tranquility to any room.
Detailed Instructions
Materials
- Canvas or heavy watercolor paper (square format)
- Acrylic paints: Raw Umber, Burnt Sienna, Titanium White, Teal, Turquoise, Yellow Ochre, Sap Green
- Fine liner brushes (sizes 0 and 1)
- Flat shader brush (size 6)
- Round brush (size 4)
- Sea sponge or scrunched cling film
- Palette and water cup
- Pencil and eraser
- Light wood frame (optional)
Step 1: Preparing the Atmosphere
-
Prime the background:
Begin by creating an aged, parchment-like background. Mix a large amount of Titanium White with a tiny dot of Raw Umber and a touch of Yellow Ochre. Paint the entire surface with this off-white cream color. -
Add texture:
While the background paint is still slightly damp, dap a dry paper towel or sponge randomly across the surface to lift small bits of pigment and create a subtle, mottled texture. Let this layer dry completely. -
Establish the ground line:
About two inches from the bottom, paint a sloping ground line using a mix of Sap Green and Raw Umber. Keep the paint somewhat translucent so the ground feels soft rather than solid.
Pro Texture Tip
For the bark, keep your paint slightly dry. A ‘dry brush’ technique drags pigment across the surface, naturally creating rough, wood-like textures without needing to paint every single line.
Step 2: Structuring the Tree
-
Sketch the trunk:
Lightly sketch the main trunk shape with a pencil. Focus on a wide, sturdy base that tapers intimately as it climbs, slighting twisting the form to give it character. -
Base coat the bark:
Fill in the trunk silhouette using a flat brush and a dark mix of Raw Umber and Burnt Sienna. Don’t worry about perfect coverage; letting some brushstrokes show adds to the bark effect. -
Define the branches:
Using a smaller round brush, extend the main branches outward. Ensure the branches taper naturally—thick where they connect to the trunk and whisper-thin at the tips. -
Add wood grain details:
Once the dark base is dry, use a fine liner brush with a lighter brown (mix your base brown with white). Paint long, flowing vertical lines up the trunk to mimic deep grooves and twisted bark texture. -
Highlight the form:
Add a final layer of highlights to the right side of the trunk and branches using pale tan to suggest a light source.
Level Up: Metallic Pop
Mix a tiny amount of gold acrylic paint into your Yellow Ochre for the distant shrubs or the tree highlights. It will catch the light subtly giving the piece a magical glow.
Step 3: Creating the Teal Foliage
-
Sponge the canopy base:
Dip a natural sea sponge (or scrunched plastic wrap) into a mix of Teal and Titanium White. Lightly blot the sponge around the upper branches to form the general shape of the foliage. -
Layering depth:
Reload your sponge with a darker Turquoise paint. Stipple this color near the center of the tree and the bottom of the canopy clusters to create shadow and volume. -
Adding brightness:
I like to finish the sponging phase by dabbing pure white or very pale mint green on the outermost edges of the canopy to make it look like sunlight hitting the leaves. -
Floating leaves:
Using your smallest round brush or the handle end of a paintbrush, dot small circles of teal and white floating downward below the lowest branches to simulate falling leaves.
Step 4: Finishing Touches
-
Paint distant shrubbery:
along the horizon line, paint tiny silhouette trees using Sap Green and Yellow Ochre. Make strokes vertical and small to suggest distance. -
Refine the connections:
Check where the branches meet the leaves. Use your liner brush and dark brown paint to extend tiny twig-like lines that disappear into the teal foliage, connecting the structure to the canopy. -
Final assessment:
Step back and look for balance. If the canopy feels too heavy on one side, add a few more sponge dabs or falling leaf dots to the opposite side.
Once dry, frame your piece in natural wood to echo the organic feel of your beautiful tree creation


Teal Butterflies as Tree Leaves
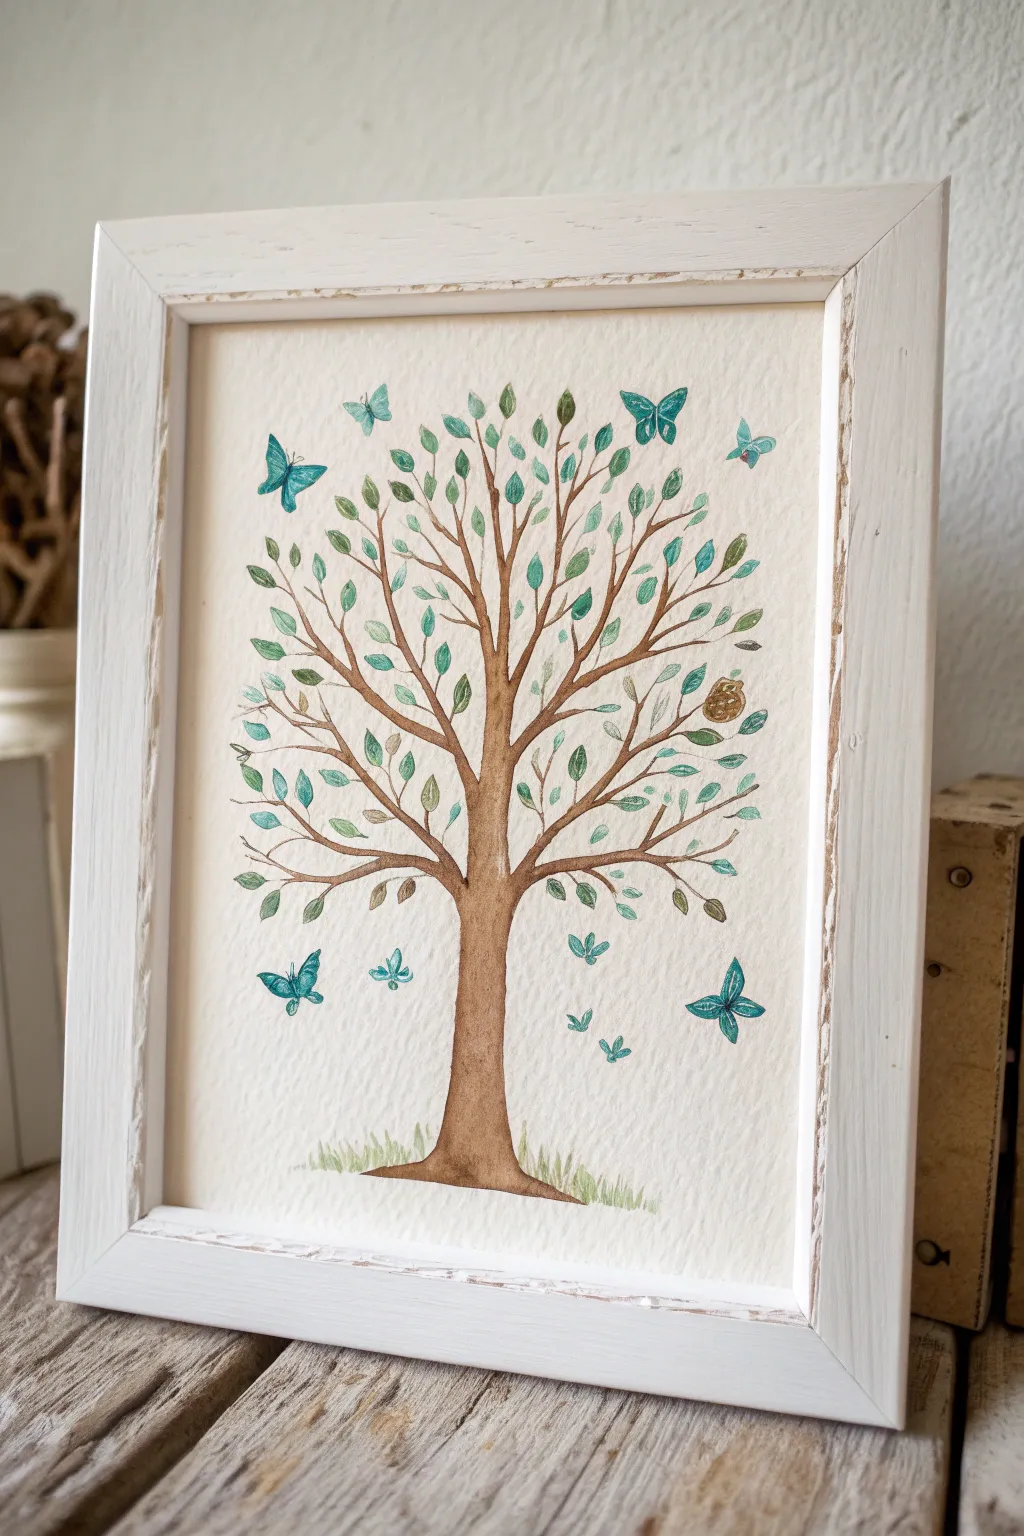
This delicate watercolor piece transforms a simple tree study into a magical scene by incorporating teal butterflies among the leaves. The finished artwork, framed in distressed white wood, has a lovely, airy quality perfect for a nursery or quiet reading nook.
Step-by-Step
Materials
- Cold press watercolor paper (approx. 140lb/300gsm)
- Watercolor paints (burnt umber, teal, sap green, turquoise)
- Round watercolor brushes (size 2 and size 6)
- Pencil (HB or lighter) and eraser
- Mixing palette
- Jar of clean water
- Paper towels
- Distressed white wooden frame
Step 1: Sketching the Structure
-
Plan the composition:
Begin by lightly sketching the trunk of the tree in the center of your paper. Make the base wider at the grass line and taper it as it moves upward. -
Map out the branches:
Sketch a network of branches radiating outward. Keep your lines loose and organic, avoiding perfect symmetry to make the tree look natural. -
Placement markers:
Lightly mark small ovals where you plan to place leaves, and sketch faint outlines for the larger butterflies—some flying near the top, others near the base.
Brush Technique Tip
For perfectly tapered leaves, press the belly of the round brush down on the paper and lift up quickly as you drag it back. This creates a natural point.
Step 2: Painting the Tree
-
Base trunk layer:
Mix a watery wash of burnt umber. Using your size 6 brush, fill in the trunk and main branches. Keep the wash light initially. -
Adding dimension:
While the paint is still damp but not dripping, drop slightly darker brown pigment along one side of the trunk to suggest shadow and bark texture. -
Extending the branches:
Switch to your size 2 brush for the finer outer branches. Use the tip of the brush to create thin, tapering lines that reach toward the corners of the paper. -
The snail detail:
If you wish to include the small snail or knot shown in the example, paint a small spiral shape on a lower branch using a mix of brown and yellow ochre. -
Grounding the tree:
At the very base of the trunk, paint short, upward flicks using a pale green wash to create a soft grassy texture.
Step 3: Leaves and Butterflies
-
Mixing teal shades:
Prepare three puddles of paint: a pure teal, a tealy-green mix, and a lighter watery turquoise. This variety adds depth to the foliage. -
Painting leaf clusters:
Using the size 2 brush, press and lift to create small, almond-shaped leaves along the branches. I prefer to alternate colors slightly for a vibrant look. -
Varying leaf density:
Place some leaves singly and others in small bunches of two or three. Leave plenty of white space between them to maintain the artwork’s airy feeling. -
Butterfly wings:
For the butterflies, use your richest teal color. Paint two larger upper wings and two smaller lower wings, leaving tiny gaps of white paper between them to define the shape. -
Wing transparency:
Dilute your paint slightly for the butterflies further away or smaller in size, making them appear softer and more distant. -
Adding the bodies:
Once the wings are fully dry, use a very fine line of dark brown or black to paint the slender body and antennae of each butterfly. -
Floating leaves:
Consider painting a few small leaves or butterfly shapes detached from the tree, floating in the air, to simulate movement and wind.
Make It Personal
Hide tiny initials of family members in the bark pattern or turn the leaves into fingerprints for a collaborative family tree keepsake.
Step 4: Finishing Touches
-
Depth assessment:
Step back and look at the composition. If the tree looks too flat, add a second layer of brown glaze to the shadowed side of the trunk. -
Enhancing details:
Use a nearly dry brush with dark teal paint to add tiny veins to a few of the larger leaves or patterns on the butterfly wings. -
Final drying:
Let the painting dry completely flat for several hours to prevent the paper from buckling. -
Framing:
Place your finished artwork into the distressed white frame. Using a mat board is optional, but the rustic frame style complements the organic nature of the painting perfectly.
Hang your new masterpiece in a spot where it catches the morning light to really make those teal tones sing
Teal Botanical Line Art Over Wash
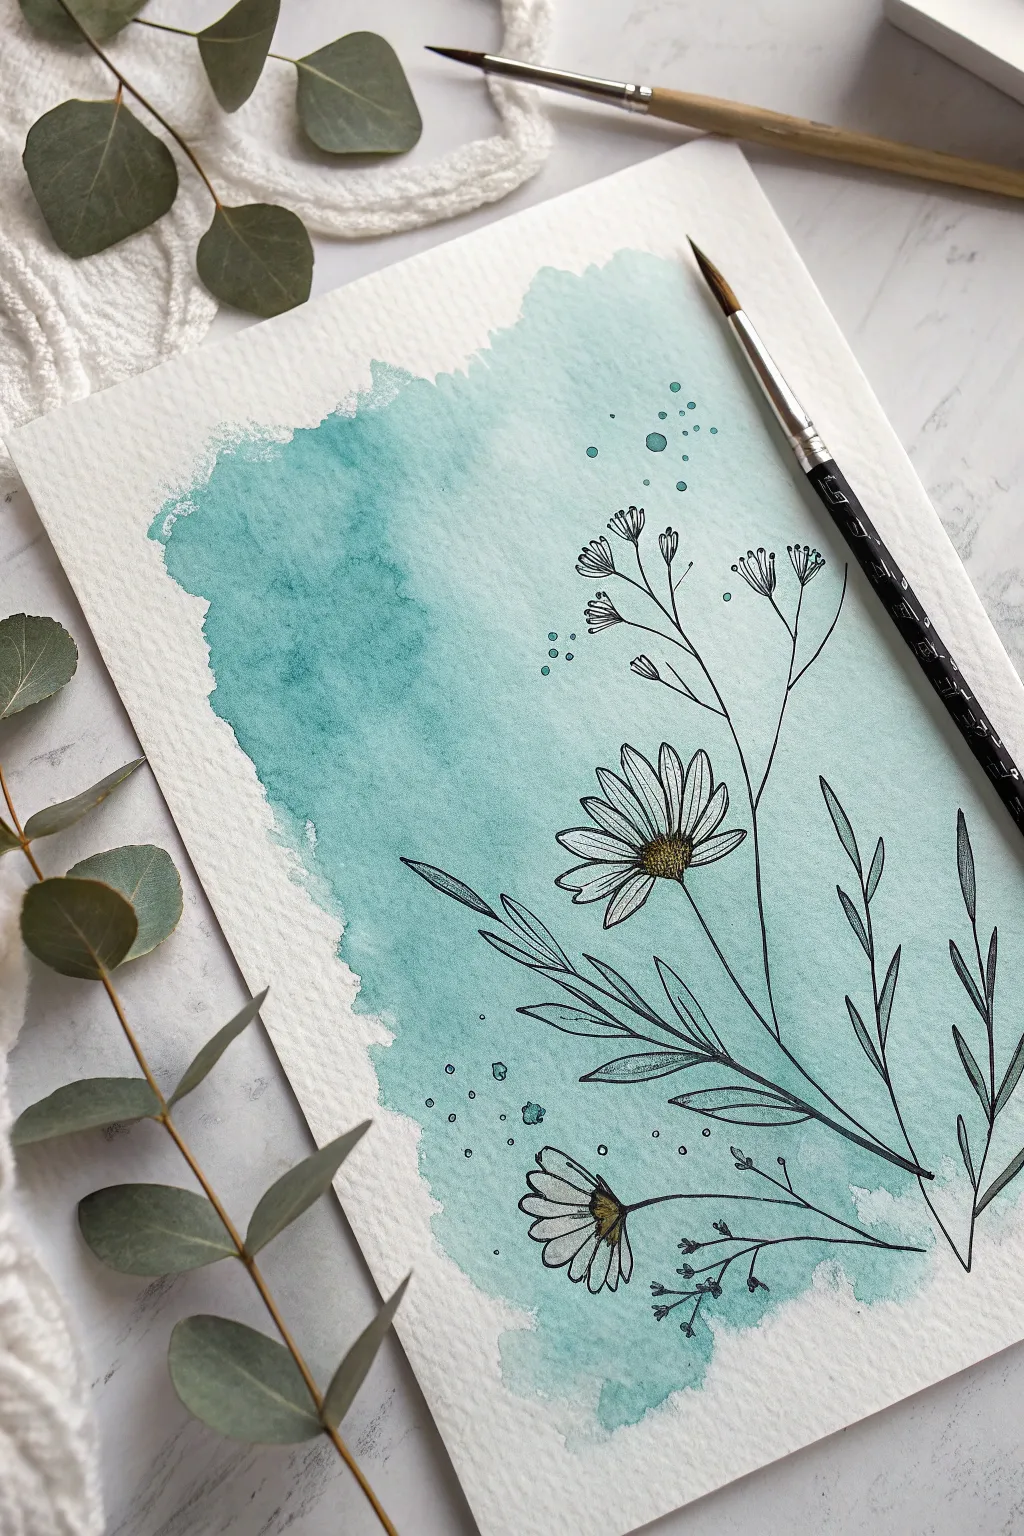
Marrying the unpredictability of watercolors with the precision of ink pen creates a striking contrast that feels both modern and delicate. This project layers crisp botanical line art over a loose, textured teal wash for a result that is effortlessly elegant.
Step-by-Step Guide
Materials
- Cold press watercolor paper (A4 or similar size)
- Teal watercolor paint (or mix phthalo blue and viridian)
- Round watercolor brush (size 10 or 12)
- Fine liner pen (sizes 03 and 05, waterproof/archival)
- Clean water jar
- Paper towels
- Pencil and eraser (optional for sketching)
Step 1: Creating the Abstract Base
-
Prepare your palette:
Mix a generous puddle of teal watercolor. You want a medium consistency—not too thick like syrup, but not so watery that the color looks weak. Test it on a scrap piece of paper first. -
Wet the paper zone:
Using your large round brush and clean water, paint an irregular, large shape in the center of your paper. Don’t worry about perfect edges; the jagged texture is part of the charm. -
Drop in the color:
Load your brush with the teal paint and touch it to the wet area you just created. Watch as the pigment blooms and spreads naturally into the wet fibers. -
Guide the wash:
Gently push the color around to fill the shape, leaving some areas slightly lighter for tonal variety. Avoid overworking it, as you want to preserve that fresh watercolor look. -
Create edge texture:
Use the tip of your brush to intentionally roughen the edges of your wash, creating a ‘dry brush’ effect at the borders where the paint creates scratchy, textured marks against the white paper. -
Add gentle splatters:
I like to dilute the remaining paint on my brush slightly and tap the handle against a finger to flick small droplets around the upper right and lower left areas of the wash. -
Let it dry completely:
This is crucial. You must wait until the paper is bone dry and flat before adding ink. If it’s cool to the touch, it’s still damp.
Step 2: Drawing the Botanical Lines
-
Plan your composition:
Visualize two main stems: one large stem curving upward toward the right, and a smaller stem curving downward near the bottom left. You can lightly pencil these in if you feel unsure. -
Draw the main stems:
Using your thicker fine liner (05), draw the primary stalk lines. Keep your hand loose to create organic, slightly wavering lines rather than ruler-straight ones. -
Outline the main daisy:
Near the center spread, draw an oval center for the main flower. Radiate long, slender petals outward. Don’t close every petal shape perfectly; broken lines add artistic flair. -
Add the secondary flower:
Draw a smaller, partially open daisy at the bottom of the composition, facing slightly downward/left to balance the weight of the piece. -
Stipple the centers:
Using the finer pen (03), add tiny dots (stippling) inside the flower centers. Pack them densely on one side to suggest depth and shadow. -
Sketch the leaves:
Along the main stems, add long, lance-shaped leaves. Draw a central vein in each leaf, but keep the vein line extremely thin or broken. -
Add delicate filler sprigs:
Draw very thin, branching stems extending upward and outward. Top these fine lines with tiny clusters of circles or little distinct ‘fan’ shapes to mimic baby’s breath. -
Incorporate floating details:
Draw small floating circles or bubbles near the ink splatters you made earlier, integrating the painted texture with the drawing. -
Enhance with line weight:
Go back over the shadowed sides of the stems and leaves with your 05 pen to thicken those lines, giving the drawing more volume and presence. -
Final assessment:
Erase any visible pencil marks gently. If the composition feels too empty in spots, add a few tiny dots or a small extra leaf to balance it out.
Bleeding Lines?
If your ink feathers or spreads like spiderwebs, your paper was likely still damp. Use a hairdryer on the low setting to ensure moisture has fully evaporated before inking.
Metallic Pop
Once the black ink is dry, add touches of gold metallic watercolor or a gold gel pen to the centers of the daisies or the tips of the leaves for a luxurious shimmer.
Frame this piece behind glass to protect the delicate paper surface and enjoy your serene botanical artwork
Teal Jellyfish Drift Scene
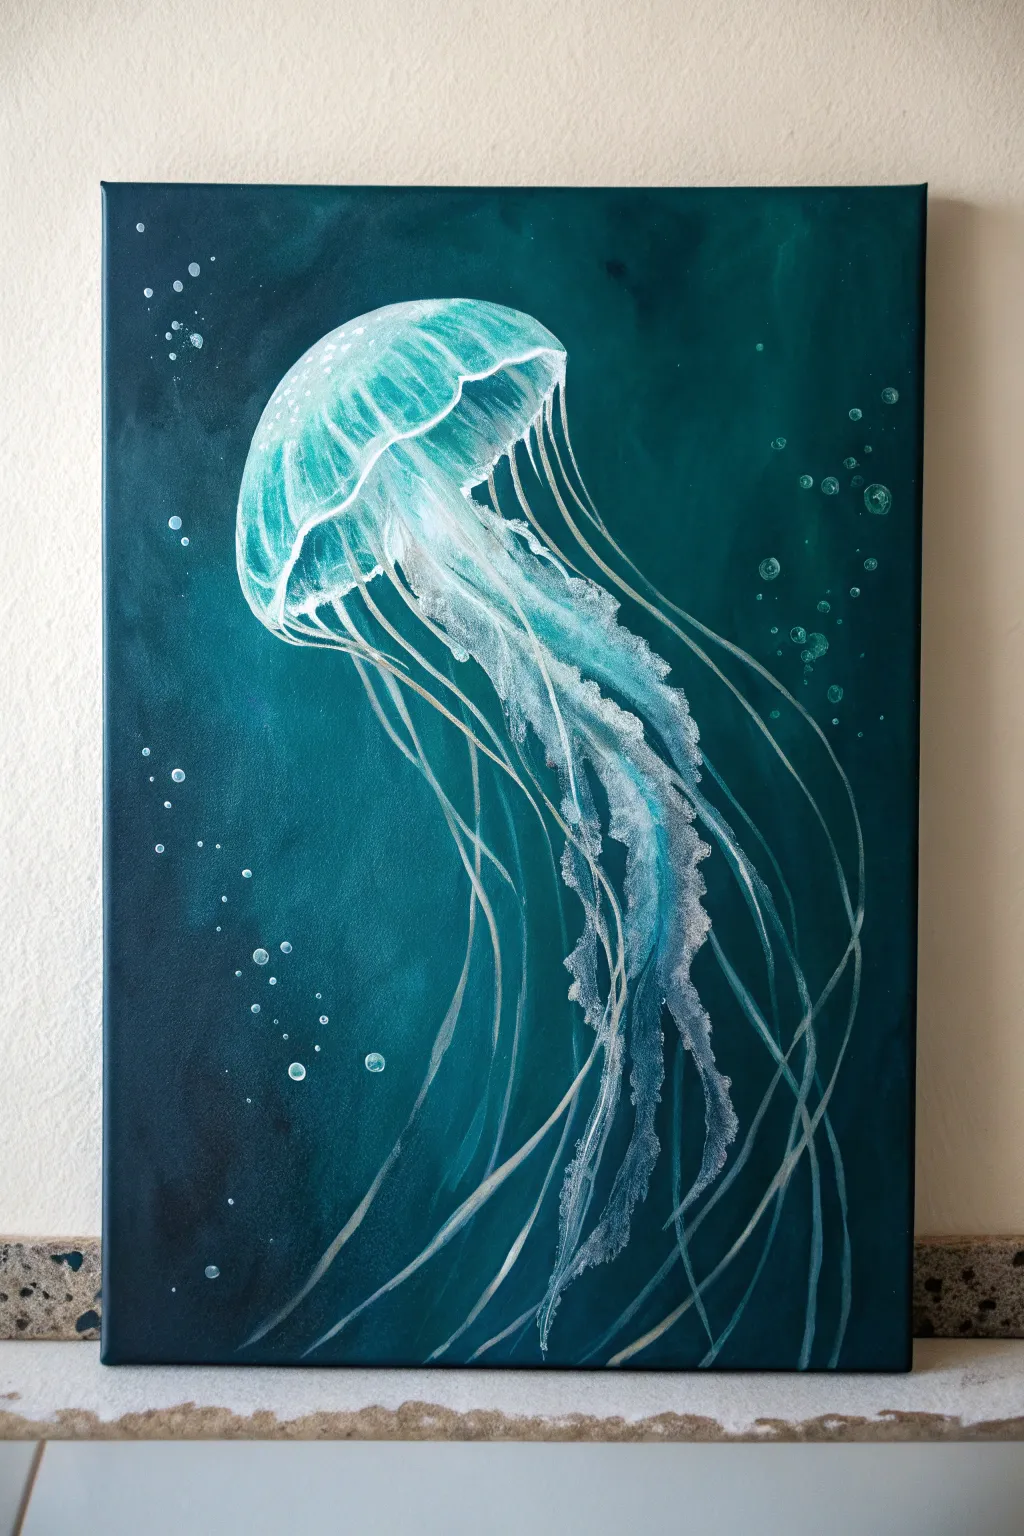
Dive into the depths of your imagination with this stunning teal jellyfish acrylic painting. You will learn to create a glowing, translucent effect against a deep ocean background, perfect for adding a touch of marine serenity to any room.
Step-by-Step Guide
Materials
- Rectangular stretched canvas (e.g., 16×20 inches)
- Acrylic paints: Phthalo Blue, Phthalo Green, Titanium White, Mars Black
- Large flat brush (1-2 inch) for blending
- Medium filbert brush
- Small round detail brush (size 0 or 1)
- Palette for mixing
- Cup of water
- Paper towels or rag
- Chalk or pastel pencil (white or light blue) for sketching
Step 1: Creating the Deep Ocean Background
-
Mix the base colors:
Start by mixing a dark teal using Phthalo Blue and Phthalo Green with a touch of Mars Black. Prepare a second, slightly lighter teal by adding less black and a tiny dot of white. -
Apply the dark corners:
Using your large flat brush, paint the four corners of the canvas with the darkest teal mixture. Use long, sweeping strokes that curve slightly inward toward the center to create a vignette effect. -
Blend the gradient:
While the paint is still wet, introduce your lighter teal mixture into the center of the canvas. Blend outwards into the dark corners using a crisscross motion to ensure a smooth transition without harsh lines. -
Smooth the finish:
Once the canvas is covered, take a clean, dry brush and very lightly sweep over the entire surface to soften brushstrokes and create a murky, underwater atmosphere. Let this background dry completely before proceeding.
Step 2: Drafting the Jellyfish Shape
-
Sketch the bell:
Use a piece of chalk or a pastel pencil to lightly draw a mushroom-cap or bell shape near the upper-left quadrant of the canvas. Keep the lines faint so they don’t show through later. -
Mark the flow:
Lightly sketch curved guide lines flowing downward and to the right from the bottom of the bell. These will help you place the tentacles later and ensure the jellyfish looks like it is drifting.
Dry Brushing Tip
For the ruffled tentacles, wipe most paint off your brush first. This ‘dry brush’ technique creates a fuzzy, organic texture perfect for sea life.
Step 3: Painting the Luminous Bell
-
Lay the foundation:
Mix a semi-transparent glaze using water and Titanium White. Using your filbert brush, wash this thin layer over the top curve of the jellyfish bell to establish where the light hits. -
Add structure:
Switch to a brighter teal (Phthalo Green + White) and paint vertical, curved striations inside the bell. These lines should mimic the ribs of an umbrella, curving with the shape of the dome. -
Enhance the rim:
Use a small amount of pure Titanium White on a round brush to outline the scalloped bottom edge of the bell. Make this line slightly irregular and wiggly to suggest organic movement. -
Build translucency:
Layer more watered-down white over the center of the bell, leaving the edges slightly darker. This layering technique helps the jellyfish look see-through and gelatinous.
Unsteady Hands?
If painting long thin lines is hard, add a drop of flow improver or water to the paint. Fluid paint drags less, giving smoothest lines.
Step 4: Detailed Tentacles and Bubbles
-
Start the oral arms:
For the thick, frilly ‘oral arms’ in the center, mix a light teal with white. Use the tip of your filbert brush in a dabbing motion to create a textured, ruffly appearance flowing down from the center of the bell. -
Texture the ruffles:
I like to go back over these central arms with almost pure white on the very tips of the ruffles. Keep your brush somewhat dry to get a scratchy, textured look that contrasts with the smooth background. -
Paint the long tentacles:
Switch to your smallest liner brush. Mix a fluid,inky white paint (add water if needed). Paint long, flowing lines extending from the rim of the bell all the way to the bottom right corner. -
Vary line weight:
As you paint the long tentacles, vary the pressure on your brush. Press down for thicker sections and lift up for hairline thin sections. This makes the tentacles look dimensional. -
Add fading tails:
Paint a few faint, ghostly tentacles behind the main ones using a watered-down gray-teal mix. This adds depth, making some parts feel further away than others. -
Create distinct bubbles:
Dip the handle end of a paintbrush into white paint mixed with a little water. Dot small circles around the jellyfish and in the empty space on the right. -
Give bubbles dimension:
Once the white dots are dry, paint a tiny crescent of dark teal inside the bottom of each bubble, leaving a white rim, to make them look hollow and spherical. -
Final highlights:
Review your work and add sharp touches of pure white to the brightest part of the bell and the most prominent frills of the tentacles to make the image pop.
Step back and admire the glowing, ethereal drift of your underwater creation
Teal Koi Fish in Teal Water
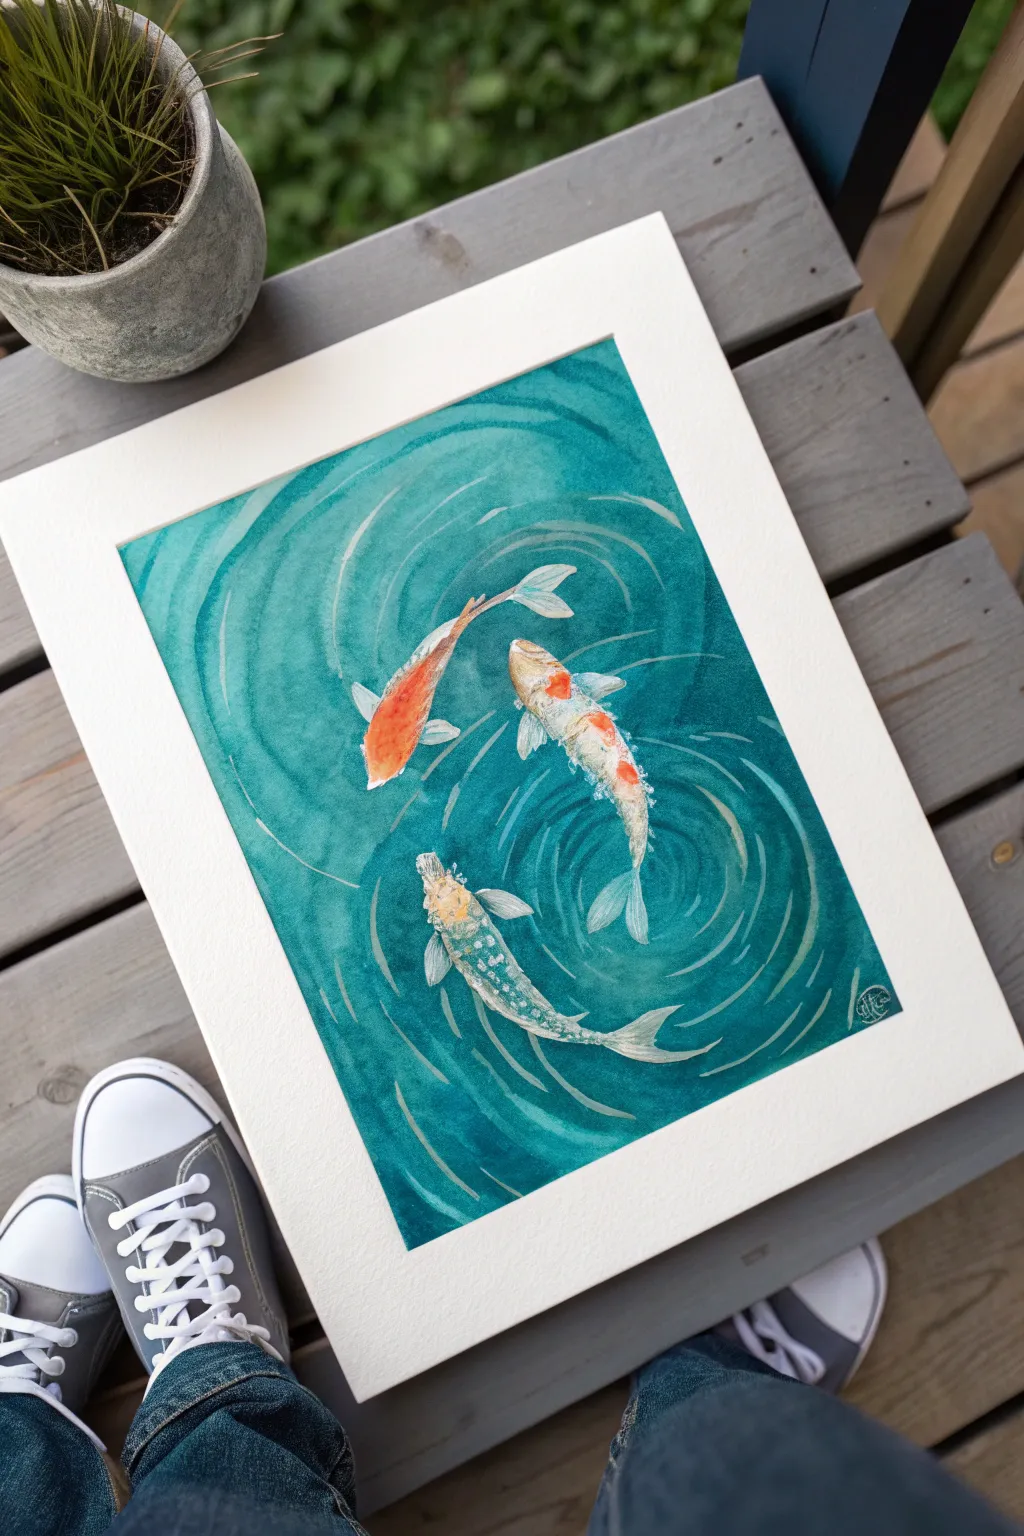
Capture the serene movement of a koi pond with this monochromatic study in teal and orange. Using watercolor techniques like wet-on-wet and lifting, you’ll create rippling water that seems to shimmer around the vibrant fish.
Detailed Instructions
Materials
- Cold press watercolor paper (300 gsm)
- Watercolor paints (Phthalo Green, Prussian Blue, Cadmium Orange, Burnt Sienna, White Gouache)
- Round brushes (large size 10 or 12, medium size 6, fine detail size 0 or 2)
- Masking fluid (drawing gum) and old brush
- Pencil (HB) and eraser
- Two jars of water
- Paper towels
- Mixing palette
- Painter’s tape
Step 1: Preparation and Sketching
-
Secure the paper:
Tape your watercolor paper down to a board on all four sides. This prevents buckling and leaves a crisp white border around the edge of your finished piece. -
Sketch the composition:
Lightly sketch three koi fish swimming in a circular formation. Place one near the top left, one central, and one lower down, creating a natural flow. Keep the pencil lines faint so they don’t show through the transparent paint later. -
Map the ripples:
Draw faint, concentric circles radiating out from the fish to guide where your water ripples will go. These don’t need to be perfect; organic, wavy lines look more natural. -
Protect the highlights:
Using an old brush or a silicone tool, apply masking fluid over the entire body of each fish. Also, add thin, curved lines of masking fluid along the tops of your ripple sketches to preserve the white paper for the water’s highlights.
Clean Edges Trick
Use a hairdryer to accelerate drying, but ensure the masking fluid is fully dry naturally first. Heat can bake masking fluid into the paper, making it impossible to remove.
Step 2: Painting the Water
-
Mix your teal:
Create a large puddle of deep teal on your palette. I like to mix Phthalo Green with a touch of Prussian Blue to get that deep, oceanic tone seen in the reference. -
First wash:
Wet the paper around the masked areas with clean water. While wet, drop in a light wash of your teal mix, letting the color flow freely but keeping it lighter than the final result. -
Build depth:
While the paper is still damp, charge in more concentrated pigment into the areas between the ripples. This negative painting technique defines the lighter ripples by darkening the water around them. -
Refine the ripples:
Once the initial wash is semi-dry, use a medium brush to paint distinct, swirling strokes of dark teal following the circular ripple guides. Leave gaps where the lighter wash shows through to create the illusion of movement. -
Add deep contrast:
Mix a very saturated, dark teal (less water, more paint). Carefully paint around the immediate outline of the masked fish to make them pop later, and deepen the shadows in the water’s corners. -
Dry completely:
Let the background dry fully. If the paper feels cool to the touch, it’s still wet. Paint must be bone dry before removing masking fluid to avoid tearing the paper.
Step 3: Bringing the Koi to Life
-
Remove masking:
Gently rub away the masking fluid with a clean finger or a rubber cement pickup tool, revealing the stark white shapes of the fish and ripples. -
Base coat for fish:
For the orange fish, apply a dilute wash of Cadmium Orange. For the white/calico fish, use a very watery wash of grey (mix blue and orange) to create subtle shadows on their bodies, leaving the tops white. -
Adding patterns:
While the base is damp on the orange fish, drop in Burnt Sienna near the spine to create a rounded form. For the calico fish, paint specific orange patches wet-on-dry for crisp edges. -
Scale details:
Switch to your smallest brush. Mix a slightly darker version of your fish base colors and paint tiny ‘C’ shapes or cross-hatching to suggest scales, particularly along the spine. -
Fins and tails:
Use very dilute paint to color the fins, keeping them translucent. Add fine lines to suggest the delicate bones within the fins. -
Highlighter touches:
If you lost any ripple highlights, use a small amount of white gouache to reinstate thin, crisp lines on the water’s surface or to add a sparkle to the fish scales.
Metallic Magic
Mix a tiny amount of iridescent medium or silver watercolor into your ripple highlights. This makes the water shimmer beautifully when the light hits the painting.
Peel off the tape carefully to reveal your serene pond scene ready for framing
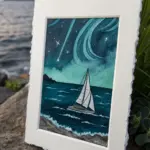
Teal Galaxy Nebula Blend
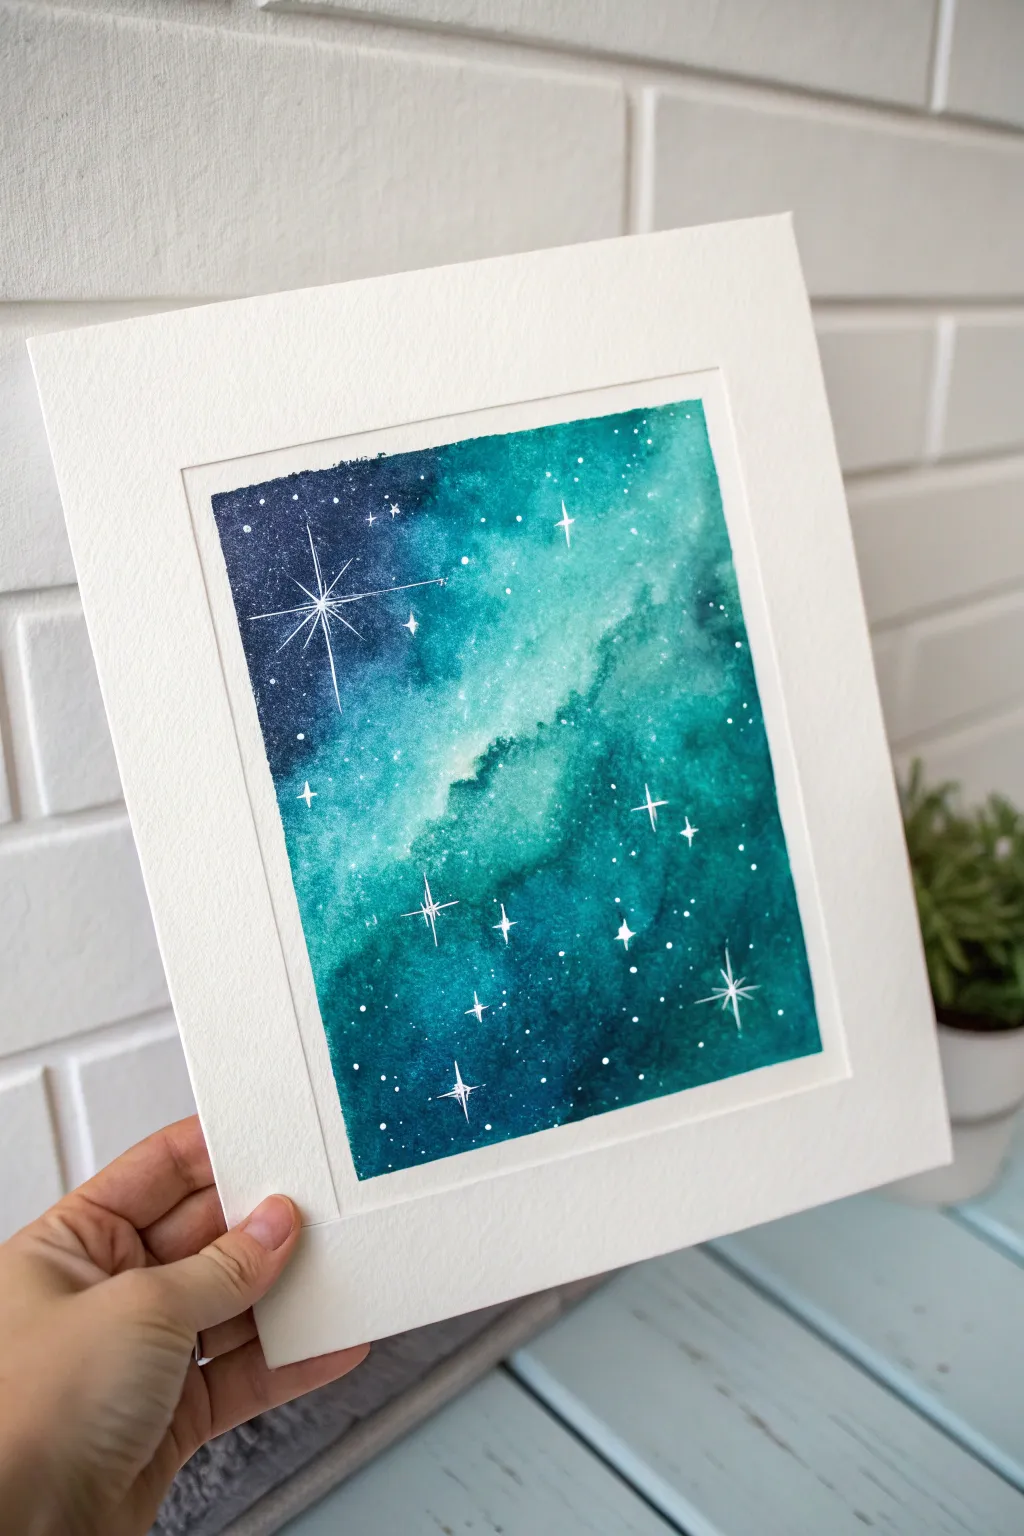
Capture the mysteries of the cosmos with this stunning watercolor project that blends deep indigos with shimmering teals. The result is a misty, ethereal galaxy effect punctuated by crisp, white starlight, perfect for framing.
Step-by-Step Guide
Materials
- Cold press watercolor paper (cut to size, e.g., 5×7 inches)
- Watercolor paints: Indigo, Phthalo Blue, Emerald Green or Viridian, Turquoise
- Large round watercolor brush (size 10 or 12)
- Small liner brush or round brush (size 0 or 1)
- White opacity medium: Gouache, white ink, or a white gel pen
- Clean water
- Paper towels
- Masking tape
- Pencil and ruler (for marking borders lightly)
Step 1: Preparation and Base Layer
-
Tape your edges:
Begin by taping down your watercolor paper to a hard board using masking tape. This creates that crisp, clean white border seen in the final piece and prevents the paper from buckling heavily while wet. -
Pre-wet the paper:
Use your large brush to apply a layer of clean water across the entire area inside the tape. The paper should be glisten with a satin sheen, but pools of water shouldn’t be forming. -
Establish the light path:
While the paper is wet, drop in a very diluted, watery mix of Turquoise or Emerald Green diagonally across the center. This pale diagonal wash will become the glowing heart of your nebula cloud. -
Add mid-tone texture:
Load your brush with a stronger mix of Turquoise and dab it along the edges of your pale diagonal path. Let the paint bleed naturally into the clear water, creating soft, feathery edges.
Star Burst Precision
If you struggle painting thin lines for starbursts, switch to a white gel pen. It offers more control than a brush for those geometric spikes.
Step 2: Building Depth
-
Introduce deep blues:
While the paper is still damp, mix a strong concentration of Phthalo Blue. Apply this to the corners of the painting, working inwards toward the teal nebula. -
Deepen the shadows:
Mix Indigo with a touch of the Phthalo Blue to get a near-black navy. Drop this potent color into the very top left and bottom right corners to create deep space contrast. -
Soften the transitions:
Clean and dampen your brush. Gently touch the areas where the dark blue meets the lighter turquoise nebula to encourage a smooth gradient, avoiding harsh lines. -
Create texture blooms:
For that mottled, cloud-like galaxy texture, you can drop tiny droplets of clear water into the drying damp paint. This pushes pigment away and creates organic ‘cauliflowers’ or blooms. -
Let it dry completely:
This step is crucial. The paper must be bone dry before moving on to the stars. If it feels cool to the touch, it’s still wet. I usually wait until the paper flattens out slightly.
Step 3: Starlight Details
-
Prepare opaque white:
Mix your white gouache or ink to a creamy consistency. It needs to be thick enough to be opaque against the dark background, but thin enough to flow off a detailed brush. -
Paint the main star:
Using your finest liner brush or a gel pen, locate the dark blue area in the upper left. Draw a vertical line, then a horizontal line crossing it. Add two smaller diagonal lines to form an eight-point starburst. -
Add secondary stars:
Scattered around the nebula, paint 3-4 smaller four-point stars (just a simple cross shape). Vary their sizes to create a sense of distance. -
Dot the constellations:
Dip just the very tip of your brush or a toothpick into the white. Gently dot the paper to create distant stars. Cluster them in some areas and leave others sparse for a natural look. -
Create a splatter field:
Load a brush with watery white gouache. Tap the handle of the brush against another brush or your finger over the painting to spray a fine mist of tiny stars across the nebula. -
Final reveal:
Once the white stars are fully dry, carefully peel away the masking tape at a 45-degree angle to reveal your crisp edges.
Muddy Color Issues?
If your teal and indigo turn grey where they meet, you are overworking the blend. Let the wet-on-wet technique do the work; touch the paper less.
Place your finished galaxy in a simple white mat to make those deep teal tones truly pop
Teal Geode Slice Abstract
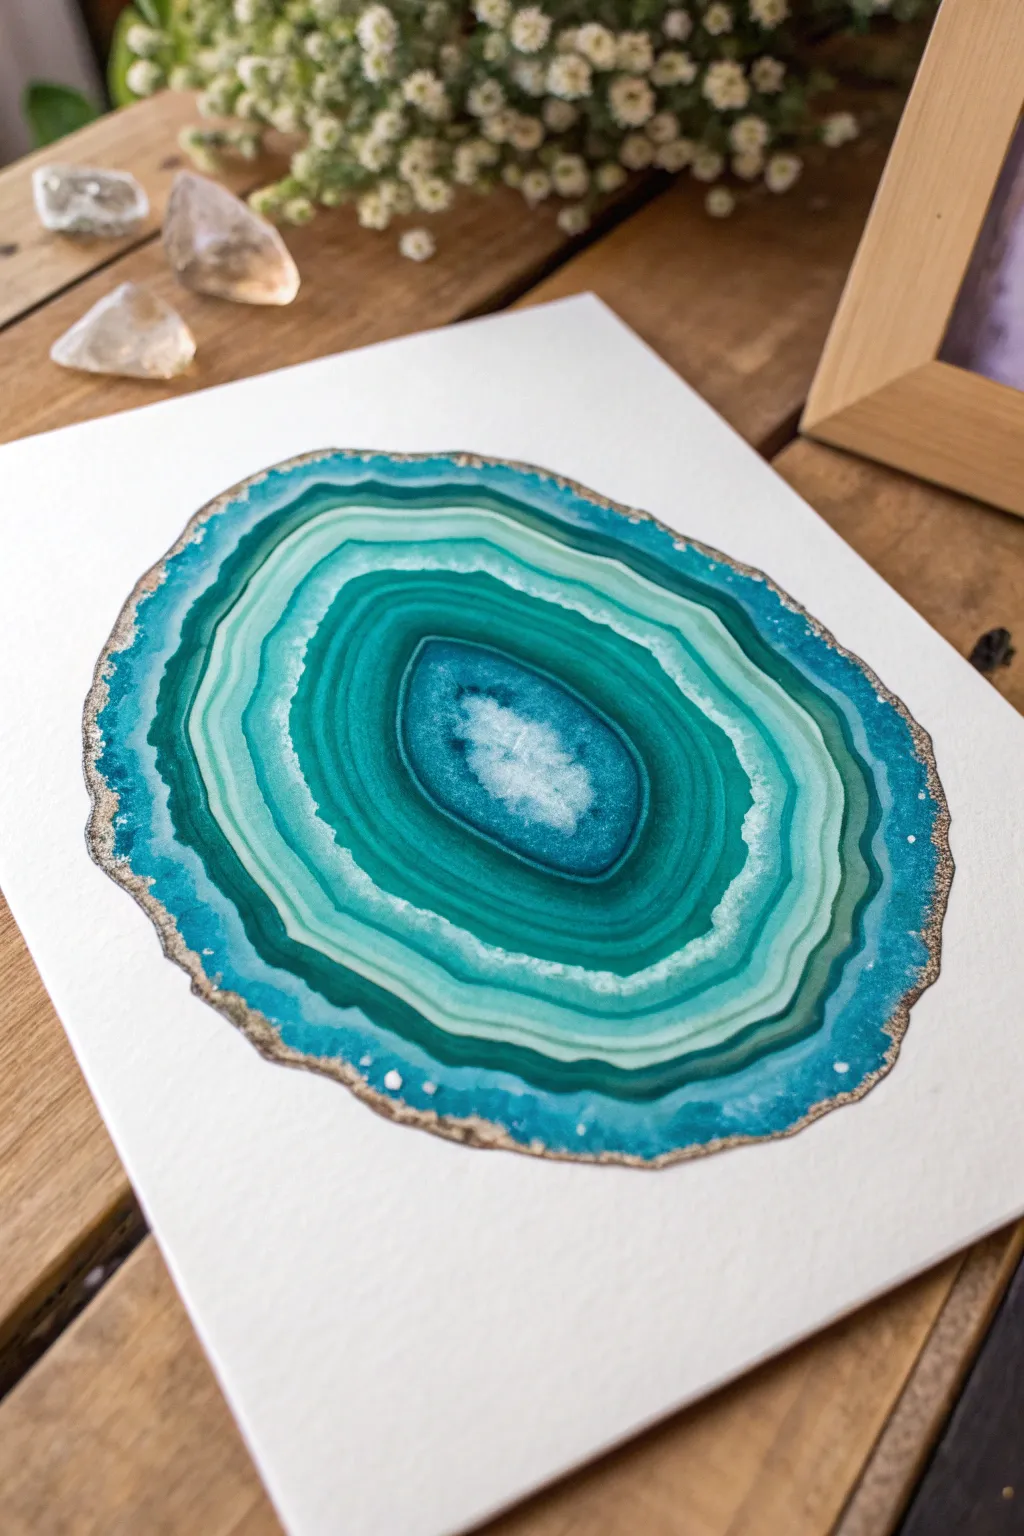
Capture the natural beauty of a geode slice with this detailed watercolor tutorial, featuring mesmerizing layers of teal and turquoise banding. The crystalline center and metallic gold edge add a luxurious finish that makes this piece pop off the paper.
How-To Guide
Materials
- Cold press watercolor paper (heavier weight, 300gsm recommended)
- Watercolor paints (phthalo blue, emerald green, turquoise, payne’s gray)
- Masking fluid
- Coarse sea salt or kosher salt
- Round watercolor brushes (size 2, 6, and 10)
- Gold metallic paint or gold leaf pen
- Clean water and mixing palette
- Paper towels
- Pencil and eraser
Step 1: Planning and Center Formation
-
Outline the Shape:
Lightly sketch an irregular oval shape on your paper to define the geode’s boundary. Agates are never perfect circles, so let your hand wobble slightly to create natural imperfections. -
Define the Center:
Draw a smaller, rougher almond shape in the very center. This will be the crystalline geode cavity. -
Protect the Center:
Apply masking fluid to the very center area you just drew. This reserves the pure white of the paper for the brightest focal point later. -
Create the First Wash:
Mix a diluted wash of teal using turquoise and plenty of water. Paint a ring around the masked center, keeping the edges soft and wet. -
Add Texture:
While this inner ring is still wet, drop in a few grains of coarse salt. As it dries, the salt will push the pigment away, creating a perfect crystalline texture.
Step 2: Building the Rings
-
Mix Your Palette:
Prepare three distinct pools of color: a watery pale aqua, a vibrant mid-tone teal, and a deep blue-green mixed with a touch of Payne’s gray for depth. -
Paint the Next Ring:
Once the center salt layer is dry and brushed away, paint a thick band of the mid-tone teal around the previous layer. Leave a tiny sliver of dry white paper between rings occasionally to create separation. -
Soften the Edges:
Dip a clean, damp brush into water and run it along the outer edge of your new band to feather it outwards, creating a soft transition for the next color. -
Introduce Contrast:
Switch to your smallest brush and the deep blue-green mix. Paint a very thin, jagged line right next to the pale aqua ring. This high-contrast line mimics the hard mineral deposits found in real stones. -
Paint the Outer Body:
Using your largest brush, lay down a broad, sweeping area of the vibrant turquoise. Allow the color to pool slightly in some areas for natural variation in opacity. -
Create Bleeds:
While the broad turquoise ring is wet, touch the tip of your brush loaded with dark teal into the wet paint. Watch the color bloom and spread organically. -
Form the Outer Crust:
Paint the final outer ring using your darkest blue-green mixture. Make the outer edge rugged and uneven, simulating the rough rock exterior. -
Let it Dry Completely:
Allow the entire piece to bone dry. This is crucial before removing masking fluid or adding metallic details to prevent smudging.
Natural Imperfection
Don’t fix ‘mistakes’ like uneven drying or water blooms (backruns). In geode painting, these unpredictable watermarks look exactly like natural mineral formations.
Step 3: Refining Details
-
Reveal the Core:
Gently rub away the masking fluid from the center cavity to reveal the crisp white paper underneath. -
Paint the Crystal Cavity:
With a very diluted wash of blue, lightly glaze over parts of the white center, leaving sharp white highlights to look like sparkling crystals. -
Add White Veins:
If you lost some of your white separation lines, use white gouache or a white gel pen to draw thin, shaky lines between some of the color bands. -
Gild the Edge:
Load a small brush with metallic gold paint. Carefully trace the rough outer perimeter of the agate, varying the line thickness. -
Add Inner Sparkle:
Add tiny flecks of gold to the transition areas between rings and a few dots in the center cavity to tie the piece together.
Add Dimension
Once fully dry, re-wet just the darkest thin bands and lift a tiny bit of color with a thirsty brush to create a 3D translucent effect in the stone layers.
Frame your gemstone slice in a simple wood frame to complement the organic feel of the piece
Teal and Metallic Leaf Accents
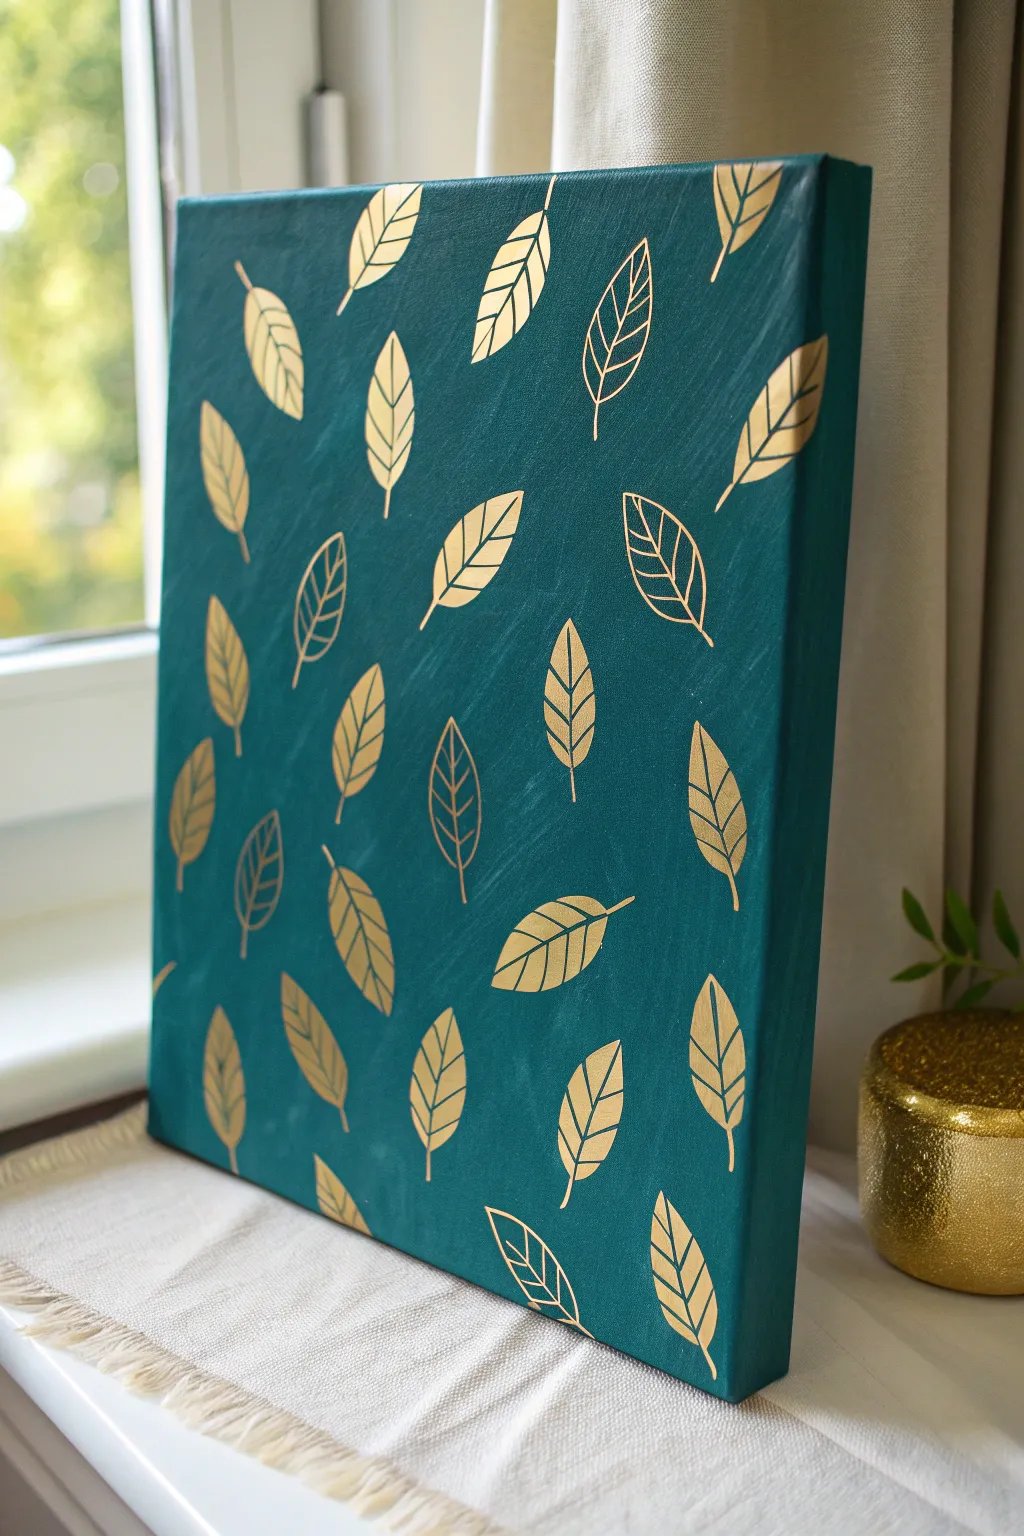
This elegant project pairs a rich, deep teal background with simple, stylized gold leaf motifs for a striking contrast. It brings a touch of modern luxury to any room, reflecting light beautifully through the metallic details.
Detailed Instructions
Materials
- Square stretched canvas (12×12 or similar)
- Deep teal acrylic paint
- Wide flat brush or foam brush
- Metallic gold paint pen (medium tip)
- Fine liner brush
- Gold acrylic paint (optional, for filling)
- Pencil and eraser
- Leaf stencil or cardstock for template
- Ruler (optional, for spacing guidance)
Step 1: Preparing the Base
-
Prime the canvas:
If your canvas isn’t pre-primed, apply a coat of gesso. Even on pre-primed canvases, a fresh layer helps the paint adhere more smoothly. -
Apply the first teal coat:
Using a wide flat brush, cover the entire front surface with deep teal acrylic paint. Use long, horizontal strokes to ensure even coverage. -
Paint the edges:
Don’t forget the sides of the canvas! Wrap the color around the edges to give the piece a finished, gallery-style look without needing a frame. -
Let it dry completely:
Allow the first coat to dry fully. If the white of the canvas is still peeking through, apply a second coat for a truly opaque, rich background. -
Smooth the surface:
Once the final coat is bone dry, run your hand over it. If there are raised brush textures that interfere with drawing, you can very lightly sand it, though a little texture adds character.
Clean Lines Hack
If you struggle with shaky painterly lines, use a gold permanent marker instead of a paint pen. It offers more control and dries instantly.
Step 2: Designing the Pattern
-
Create a leaf template:
Sketch a simple, symmetrical leaf shape on piece of cardstock and cut it out. A shape about 2-3 inches long works well for this scale. -
Plan the layout:
Lay your canvas flat. Place your template on the canvas to visualize the spacing. You want a scattered, organic look rather than a rigid grid. -
Trace the shapes:
Lightly trace around your template with a pencil. Rotate the template randomly for each leaf—some pointing up, some down, some angled—to create movement. -
Add floating leaves:
Ensure some leaves ‘fall off’ the edges of the canvas. Trace these partial shapes at the borders to make the pattern feel continuous and infinite. -
Check balance:
Step back and look at your pencil marks. If any area looks too empty, add another leaf. If it’s too crowded, erase one. Balance is key here.
Level Up: Texture
Instead of paint, use gold leaf sheets and sizing glue for the solid leaves. It creates a genuine metallic texture that catches light brilliantly.
Step 3: applying the Gold Details
-
Outline in gold:
Taking your gold paint pen, carefully trace over the pencil outlines of your leaves. Keep a steady hand to ensure clean, crisp edges. -
Draw the center vein:
Draw a slightly curved line down the center of each leaf, connecting from the base to the tip. -
Add the veins:
Draw diagonal lines branching from the center vein to the outer edge. Space them evenly to create a stylized, geometric leaf structure. -
Determine fill style:
Decide on your variation. In the example, some leaves are solid gold, while others remain outlined with just veins. This mix adds visual interest. -
Fill selected leaves:
For the solid leaves, use gold acrylic paint and a fine liner brush (or the pen if it has good flow) to color them in completely. I find painting in thin layers prevents globs. -
Detail the outlined leaves:
For the ‘skeleton’ leaves, simply thicken the existing vein lines slightly with your pen to make them stand out against the dark teal. -
Clean up:
Once the gold is fully dry, gently erase any visible pencil marks that weren’t covered by the paint. -
Seal the work:
Apply a clear satin varnish spray to protect the painting and keep the metallic sheen from tarnishing over time.
This sophisticated piece is now ready to add a warm glow to your walls or mantle
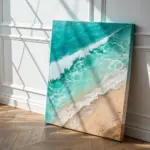
Teal Ombre Gradient With Soft Clouds
This peaceful watercolor study captures the ethereal beauty of a teal sky fading into a calm horizon. By mastering a smooth wet-on-wet gradient and lifting out soft cloud shapes, you’ll create a soothing piece perfect for any minimalist space.
Step-by-Step
Materials
- Cold press watercolor paper (300 gsm)
- Masking tape or washi tape
- Watercolor paints: Phthalo Green, Cobalt Turquoise, or Winsor Green (Blue Shade)
- Wide flat wash brush (1-inch)
- Round brush (size 6 or 8)
- White gouache or white ink (opaque)
- Two jars of water
- Paper towels or cotton rag
- Mixing palette
Step 1: Preparation & Gradient Base
-
Secure the paper:
Tape down all four edges of your watercolor paper to a board or hard surface. This creates that crisp white border visible in the final piece and prevents the paper from buckling when wet. -
Mix your palette:
Prepare a generous amount of teal paint. You’ll need a gradient of strength, so on your palette, mix a concentrated pool of teal (Phthalo Green with a touch of blue) and a second, much more watery pool for the lighter areas. -
Wet the sky area:
Using your wide flat brush and clean water, dampen the paper from the top edge down to about an inch from the bottom tape line. The sheen should be even, not puddling. -
Apply the darkest tone:
Load your brush with the concentrated teal mixture. Apply a horizontal stroke across the very top of the paper, letting the pigment start to flow downward into the damp surface. -
Create the fade:
Clean your brush slightly and pick up paint from the lighter, watery pool. Make horizontal strokes overlapping the bottom of the dark band, pulling the color downward. -
Wash to transparency:
Continue moving down the page, adding more water to your brush as you go. By the time you reach the bottom third of the sky, the color should be a barely-there whisper of teal. -
Dry the base layer:
Let this sky gradient dry completely. If the paper feels cool to the touch, it’s still damp. Be patient to avoid back-runs.
Step 2: Clouds & Horizon
-
Mix the cloud white:
Squeeze out a small amount of white gouache. You want a creamy consistency—thick enough to cover the teal but thin enough to manipulate. -
Paint cloud tops:
Using the round brush, dab the white gouache to form the fluffy top edges of the clouds. Focus on the upper third of the painting for the largest cloud bank. -
Soften the bottoms:
Rinse your brush and shake off excess water so it’s damp. Gently drag the bottom edge of the wet white gouache downward, fading the cloud into the blue background rather than leaving a hard line. -
Add floating clouds:
Paint thinner, flatter cloud streaks in the middle section of the sky. Keep these wispy and less dense than the top formation to create a sense of distance. -
Mask the horizon line:
Once the sky is fully dry, place a strip of tape horizontally across the bottom, leaving the bottom inch (the sea area) exposed. This ensures a razor-sharp horizon line. -
Paint the sea:
Re-wet the exposed bottom strip with clean water. Drop in your concentrated teal mix, ensuring it’s darker than the sky directly above it to ground the composition. -
Add sea depth:
While the sea strip is still wet, drop a tiny bit of darker blue or more intense teal right along the bottom tape line to suggest depth in the foreground. -
The big reveal:
Wait until the paint is bone dry. Carefully peel off the horizon tape first, then the border tape, pulling away from the painting at a 45-degree angle to avoid tearing the paper.
Fixing Hard Edges
If your gradient dried with harsh lines, re-wet the entire sky with clean water and gently lift pigment with a thirst brush to smooth transitions.
Add Sparkle
For a magical touch, flicker tiny droplets of white gouache across the dried sky to mimic distant stars or glistening sea spray.
Now step back and enjoy the calming simplicity of your monochrome landscape painting
Teal Ink Drip and Splash Abstract
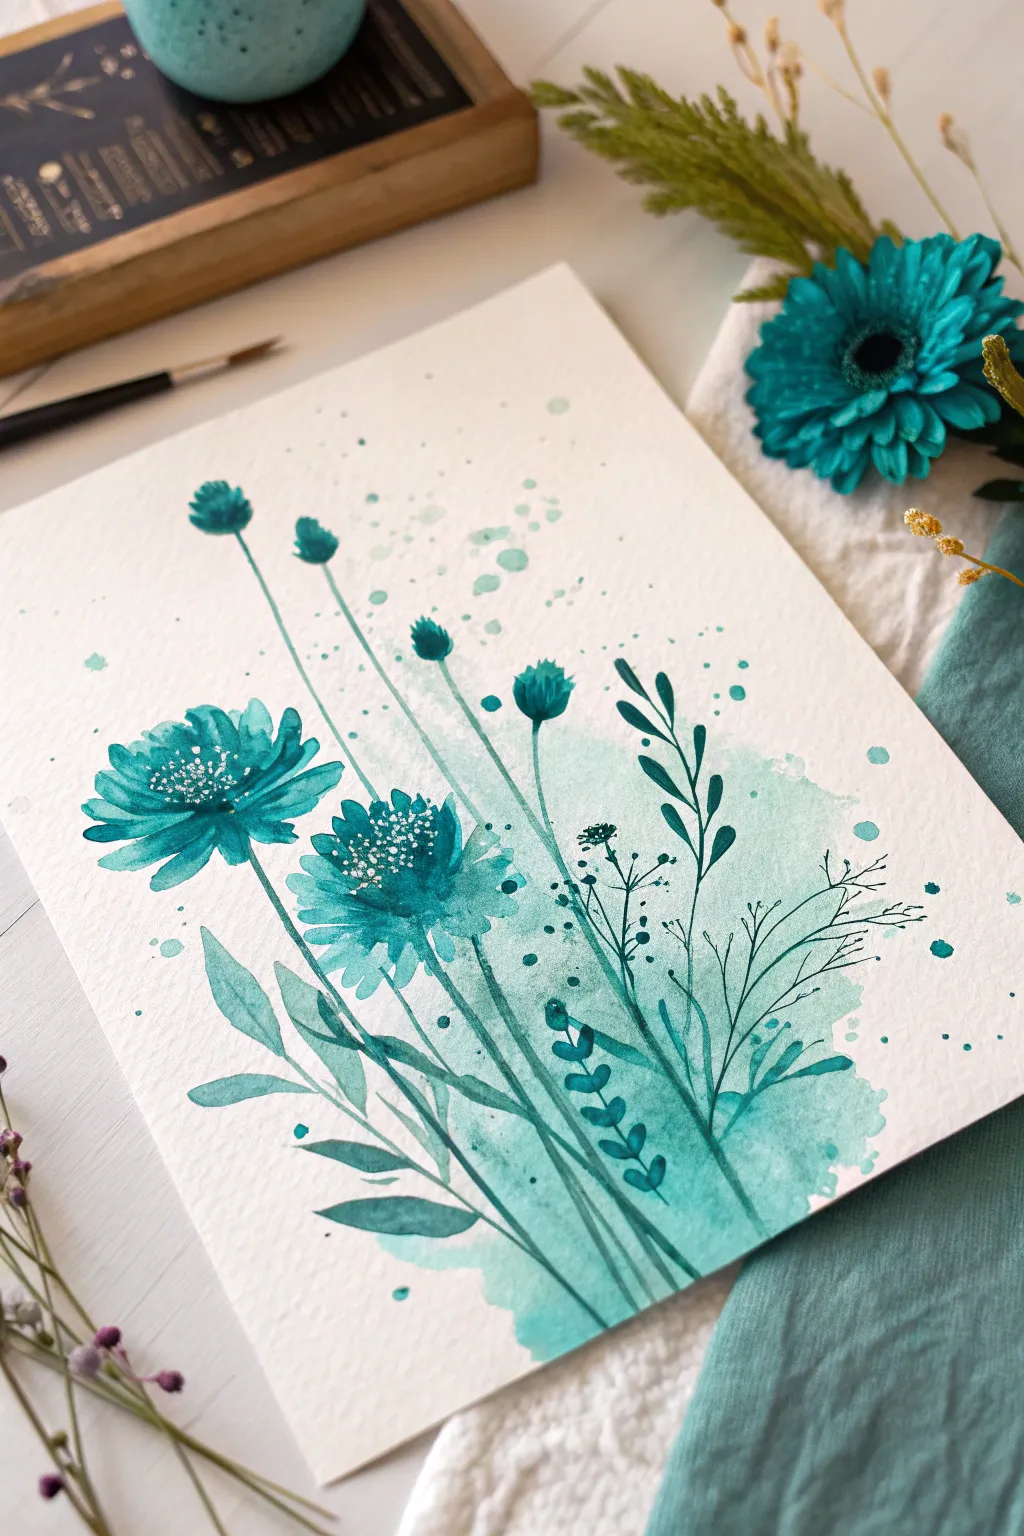
Capture the delicate beauty of wildflowers with this monochromatic teal watercolor study. Combining loose, fluid washes with precise botanical details creates a dreamy, ethereal composition perfect for beginner artists.
Step-by-Step Guide
Materials
- Cold press watercolor paper (300 gsm)
- Teal watercolor paint or liquid ink
- Payne’s Gray or a darker blue (for deepening values)
- White gouache or white gel pen
- Round watercolor brush (size 6 or 8)
- Detail brush (size 0 or 1)
- Clean water and jar
- Paper towels
- Pencil (HB or H) and kneaded eraser
Step 1: Planning and Background
-
Sketch the layout:
Begin by lightly sketching the placement of your main flowers. Draw three or four main blooms at varying heights, slightly off-center to create visual interest. Mark simple lines for the stems, letting them curve naturally. -
Prepare the wash:
Mix a watery puddle of teal paint. You want this to be quite transparent. Using your larger round brush, lay down a loose, organic wash of color near the base of the stems, letting it fade upwards. -
Add background texture:
While the base wash is still wet, drop in slightly more concentrated teal ink into the wet areas to create soft blooms. Let this layer dry completely before moving on.
Water Control
If a paint puddle forms on your paper, dry your brush on a paper towel and touch it to the puddle. The thirsty brush will lift the excess water instantly.
Step 2: Painting the Blooms
-
First flower layer:
Using a medium consistency of teal, paint the petals of the main flowers. Use short, flicking strokes that start from the center and move outward to mimic the ragged edges of cornflowers or bachelor’s buttons. -
Vary the saturation:
As you paint different flowers, add a tiny bit more water to your brush for some petals and more pigment for others. This variation creates depth and prevents the painting from looking flat. -
Paint the buds:
For the unopened buds higher up on the stems, paint small, tight oval shapes. Leave a few small gaps of white paper within these shapes to suggest highlights. -
Define the centers:
While the flower heads are still slightly damp, drop a deeper mix of teal (mixed with a touch of Payne’s Gray) into the very center of the bloom to create a shadow core.
Step 3: Stems and Foliage
-
Draw the stems:
Switch to your detail brush. With a steady hand, pull long, thin lines from your flower heads down to the base. It helps to pull the stroke toward your body rather than pushing it away. -
Leaf variation:
Add leaves along the lower stems. Paint broader, lance-shaped leaves near the bottom using the belly of your round brush, and thinner, more delicate leaves as you move upward. -
Add silhouette foliage:
To fill empty spaces without adding clutter, paint simple, fern-like or branch-like silhouettes in a lighter wash of teal. These should look like they are sitting behind the main flowers. -
Integrate the base:
Softly blend the bottom of your stems into the initial background wash you created. If the line is too harsh, use a damp, clean brush to soften the edges where the stem meets the wash.
Metallic Magic
Mix a tiny amount of silver iridescent medium into your final teal wash. It adds a subtle shimmer that mimics morning dew on the petals.
Step 4: Details and Splatter
-
Deepen shadows:
Once the first layers are dry, mix your darkest teal value. Add thin lines to separate overlapping petals and define the undersides of the leaves. -
Inking the details:
Use the tip of your smallest brush to add tiny, twig-like details and extra thin stems sticking out from the main bouquet. -
Create the splatter:
Load a wet brush with teal paint. Hold it over the paper and tap the handle against another brush to create a spray of droplets. Focus this splatter around the top of the flowers to mimic pollen or atmosphere. -
Add white accents:
I like to wait until the painting is bone dry for this step. Use white gouache or a gel pen to add tiny stamen dots in the center of the dark flower heads. -
Final highlights:
Add a few very tentative white lines on the lightest leaves to suggest veins or catching light, keeping it subtle.
Frame this serene botanical piece with a wide white mat to let the teal tones really breathe
Teal Impasto Texture Landscape
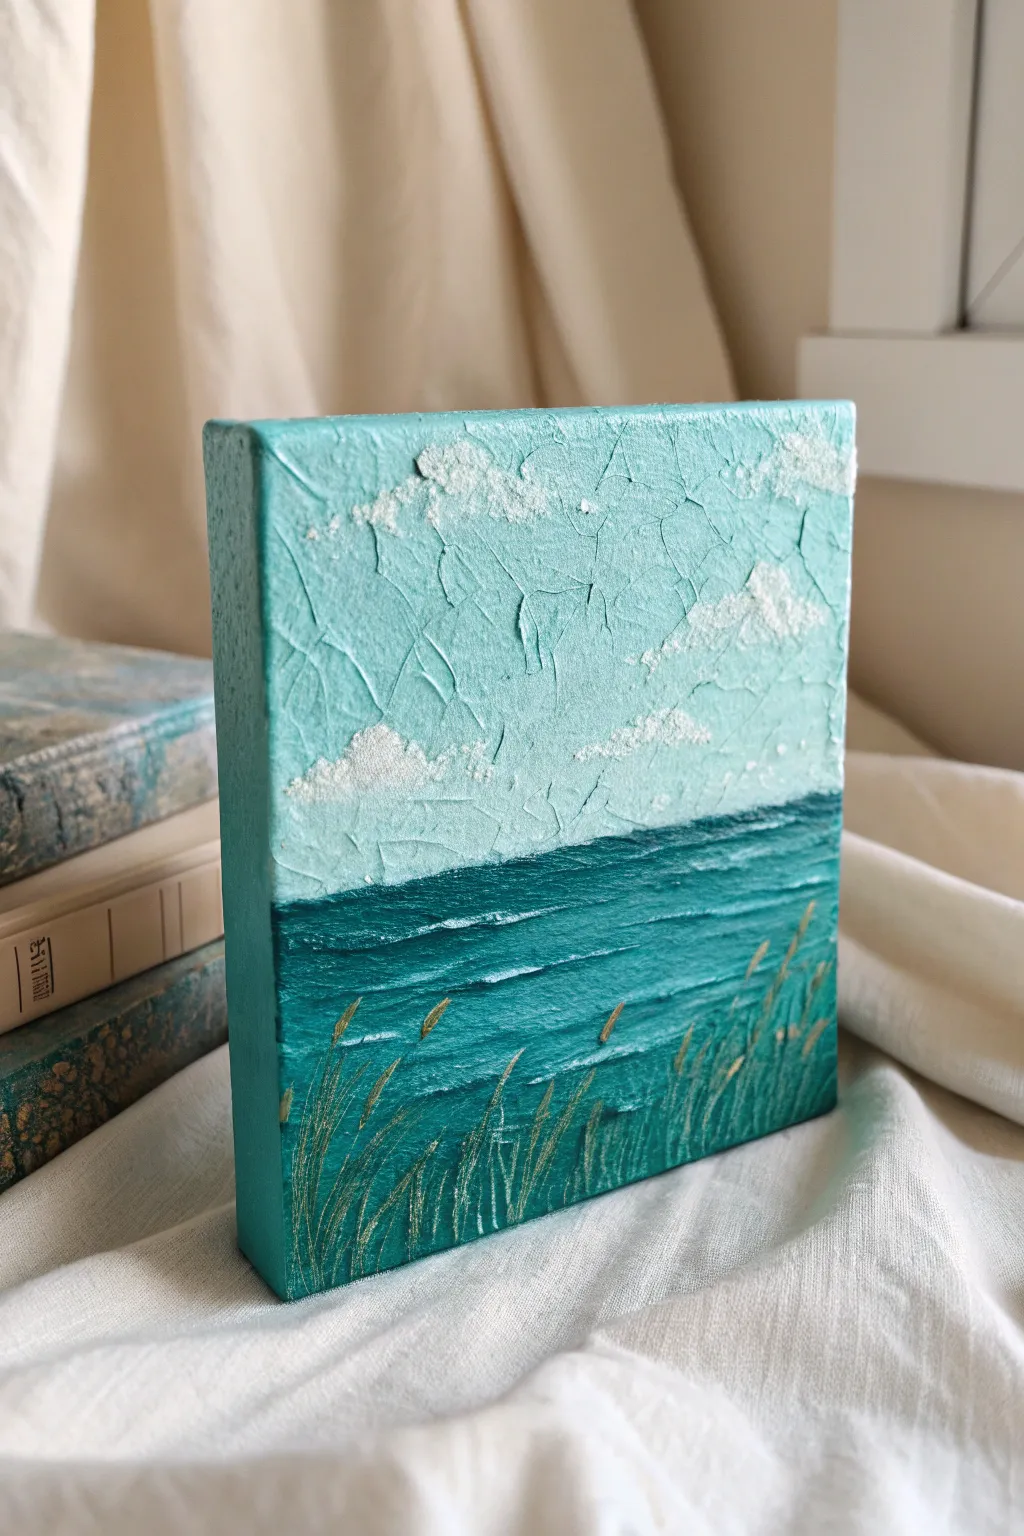
This petite landscape captures the serene beauty of a coastal horizon using rich impasto textures. By combining crackle paste effects with heavy body acrylics, you’ll create a tactile piece that feels as dynamic as the sea itself.
How-To Guide
Materials
- Small square gallery-wrapped canvas (e.g., 6×6 inch)
- Heavy body acrylic paint (Teal, Phthalo Blue, Titanium White, Raw Umber)
- Acrylic crackle paste medium
- Modeling paste or heavy gel medium
- Palette knife (trowel shape)
- Flat synthetic brush (1-inch)
- Small round detail brush (size 1 or 2)
- Metallic gold acrylic paint
- Hairdryer (optional)
Step 1: Building the Textured Sky
-
Prepare the Horizon Line:
Measure roughly two-thirds down the canvas and lightly mark a straight horizontal line with a pencil. This will separate your sky from the ocean. -
Apply Crackle Paste:
Using a palette knife, spread a generous layer of crackle paste over the entire sky area above your horizon line. Aim for an uneven thickness—thicker areas will crackle deeply, while thinner spots will have subtle fissures. -
Create Cloud Forms:
While the paste is wet, dab a bit of extra modeling paste or heavy gel in random clusters to form fluffy cloud shapes. Don’t smooth these out; leave peaks and valleys for texture. -
Texture the Edges:
Extend the texture paste around the sides of the canvas on the top portion. This gallery-wrap effect ensures the painting looks finished from every angle without a frame. -
Let it Crackle:
Set the canvas aside to dry completely. This is crucial—crackle medium needs time (often several hours or overnight) to shrink and form those distinctive fissures. Avoid using a hairdryer here, as it can disrupt the natural cracking process.
Cracks Not Appearing?
If your crackle paste dries too smooth, you likely applied it too thinly. The medium needs bulk to pull apart as it shrinks. Next time, try applying it as thick as a coin.
Step 2: Painting the Ocean
-
Mix the Deep Teal:
On your palette, mix Teal with a touch of Phthalo Blue and a tiny dot of Raw Umber to create a deep, rich ocean color. -
Apply Base Ocean Layer:
Paint the bottom third of the canvas with this dark teal mixture using your flat brush. Ensure you cover the sides of the canvas on the bottom section as well. -
Add Impasto Waves:
Mix modeling paste into your teal paint to create a thick, frosting-like consistency. Use the palette knife to spread this horizontally across the water area, creating raised ridges that mimic rolling waves. -
Highlight the Water:
Mix a lighter version of teal by adding some White. Drag your palette knife lightly over the tops of the textured wave ridges to catch the high points, adding depth and movement to the water.
Golden Hour Glow
Add warmth by dry-brushing a hint of metallic gold or copper onto the edges of the clouds and the caps of the waves, simulating a sunrise hitting the textures.
Step 3: Coloring the Sky
-
Wash the Sky:
Once the sky texture is fully dry and hard, mix a very watery wash of light teal (Teal + lots of White + water). Brush this over the entire sky area, letting the paint sink into the cracks. -
Wipe and Reveal:
While the wash is still wet, gently wipe the surface with a lint-free cloth or paper towel. This leaves the darker pigment inside the cracks while keeping the surface protruding areas pale and airy. -
Highlight Clouds:
Use a dry brush with pure Titanium White to dry-brush the raised cloud formations you created earlier. This emphasizes their fluffiness against the crackled blue sky.
Step 4: Final Details
-
Deepen the Horizon:
Run a thin line of your darkest blue-teal mix right along the horizon line to create visual separation between the sky and the sea. -
Paint the Grass Stalks:
Switch to your small detail brush. Using metallic gold paint mixed with a tiny bit of green/teal to harmonize it, paint thin, curving lines rising from the bottom edge into the water area. -
Add Seed Heads:
At the tips of your grass lines, dab small, elongated dots of pure metallic gold to represent the seed heads catching the light. -
Vary Height and Direction:
Ensure your grasses aren’t uniform soldiers; cross some stalks over others and vary their heights to make the foreground look organic and windswept. -
Final Seal:
Once everything is bone dry (give the thick impasto a good 24 hours), seal the entire piece with a satin varnish to protect the textures and unify the sheen.
Display your textured mini-masterpiece near a window where natural light can play off the ridges and cracks
Teal Negative Space Mandala
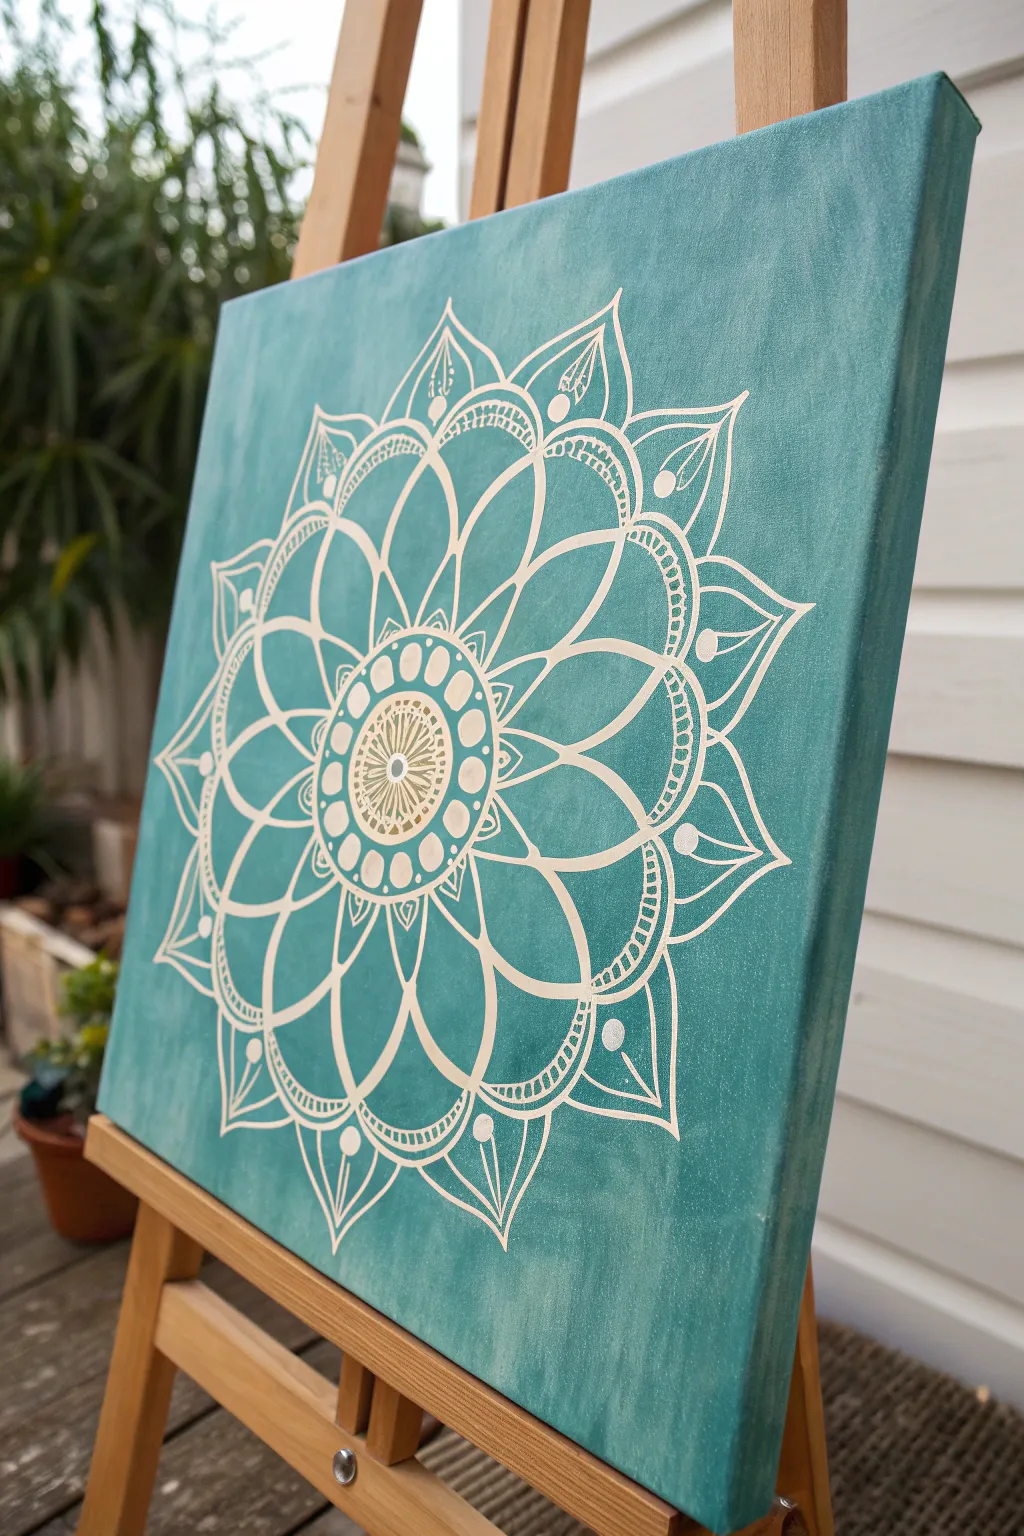
This soothing canvas project combines a vibrant teal background with the crisp elegance of a white mandala design. The striking contrast creates a mesmerizing focal point that adds a touch of bohemian serenity to any room.
Step-by-Step Tutorial
Materials
- Square stretched canvas (12×12 or 16×16 inches)
- Teal acrylic paint (satin or matte finish)
- Titanium White acrylic paint
- Gesso (optional but recommended for smoother lines)
- Wide flat brush (for background)
- Fine liner brush (size 0 or 00)
- Round brush (size 2)
- Compass and pencil
- Ruler
- Eraser
- Protractor
Step 1: Preparing the Canvas
-
Prime the surface:
Start by applying a thin coat of gesso to your canvas if it isn’t already primed. This creates a smoother surface which is crucial for painting fine, crisp lines later. -
Apply the base color:
Using your wide flat brush, paint the entire canvas with the teal acrylic paint. I like to brush in different directions to give the background a bit of subtle texture rather than a perfectly flat finish. -
Paint the edges:
Don’t forget to paint the sides of your canvas with the same teal color so the artwork looks finished even without a frame. -
Add a second coat:
Let the first layer dry completely to the touch. Apply a second coat of teal to ensure opaque, rich coverage without any white canvas showing through.
Smooth Operator
Add a few drops of fluid medium or water to your white paint until it has the consistency of heavy cream. This helps create long, unbroken lines without drag.
Step 2: Drafting the Design
-
Find the center:
Once the teal paint is fully dry, use a ruler to lightly mark the exact center of your canvas with a pencil. -
Draw guide circles:
Using a compass, draw a set of concentric circles radiating from the center point. Create about 5-6 rings with varying distances between them to serve as guides for your petal layers. -
Mark radial lines:
Use a protractor to mark degrees around your outermost circle—every 30 or 45 degrees usually works well. Use a ruler to connect these marks through the center, creating ‘slices’ like a pie. These lines ensure your mandala remains symmetrical. -
Sketch the pattern:
With a light hand, pencil in your mandala design. Start with a central flower shape, then add layers of petals that grow larger as they move outward. Include details like inner scallops and small circles within the petals.
Step 3: Painting the Mandala
-
Mix your white paint:
Prepare your Titanium White paint. You might need to thin it slightly with a drop of water or flow medium to help it glide off the liner brush smoothly. -
Outline the center:
Begin painting from the center outward to avoid smudging your work. Use the fine liner brush to trace the innermost circle and the first ring of small petals. -
Fill the central details:
For the very center decorative circle, create a textured look by painting tiny radiating dashes or dots instead of solid lines. -
Paint main petal outlines:
Move to the next layer of larger petals. Use steady pressure on your brush to create consistent white lines. If you want line variation, press slightly harder on the curves and lift up at the points. -
Add decorative elements:
Within the large middle petals, verify your pencil sketch and paint in the delicate inner arches or ‘double outlines’ that give the piece depth. -
Create dot details:
Using the back end of your brush handle or a dotting tool, dip into the white paint and stamp perfect circles where your design calls for dots—usually at petal tips or in negative spaces between petals. -
Complete the outer layer:
Trace the final, largest outer petals. These often have elegant, pointed tips. Ensure the tips align with your radial guide lines. -
Connect the layers:
Look for gaps in the design. Add small connecting lines or tiny arches between the petal layers to make the whole mandala feel cohesive and interconnected.
Wobbly Lines?
Don’t panic! Let the white mistake dry. Then, carefully paint over the error with your background teal color to ‘erase’ it, and try the line again.
Step 4: Finishing Touches
-
Erase guide lines:
Allow the white paint to dry completely—ideally overnight. Once you are certain it’s dry, gently erase any visible pencil marks. Be gentle to avoid rubbing off the acrylic paint. -
Seal the artwork:
Apply a clear varnish (gloss or satin) over the entire painting. This protects the surface from dust and unifies the sheen of the teal background and white lines.
Hang your finished mandala in a well-lit spot where the teal can truly pop against the white details

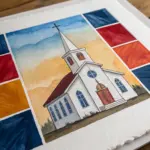

Have a question or want to share your own experience? I'd love to hear from you in the comments below!