A plain teapot is basically a tiny, curvy canvas just begging for color, pattern, and personality. Here are my favorite teapot painting ideas—starting with the classic crowd-pleasers and drifting into the delightfully unexpected.
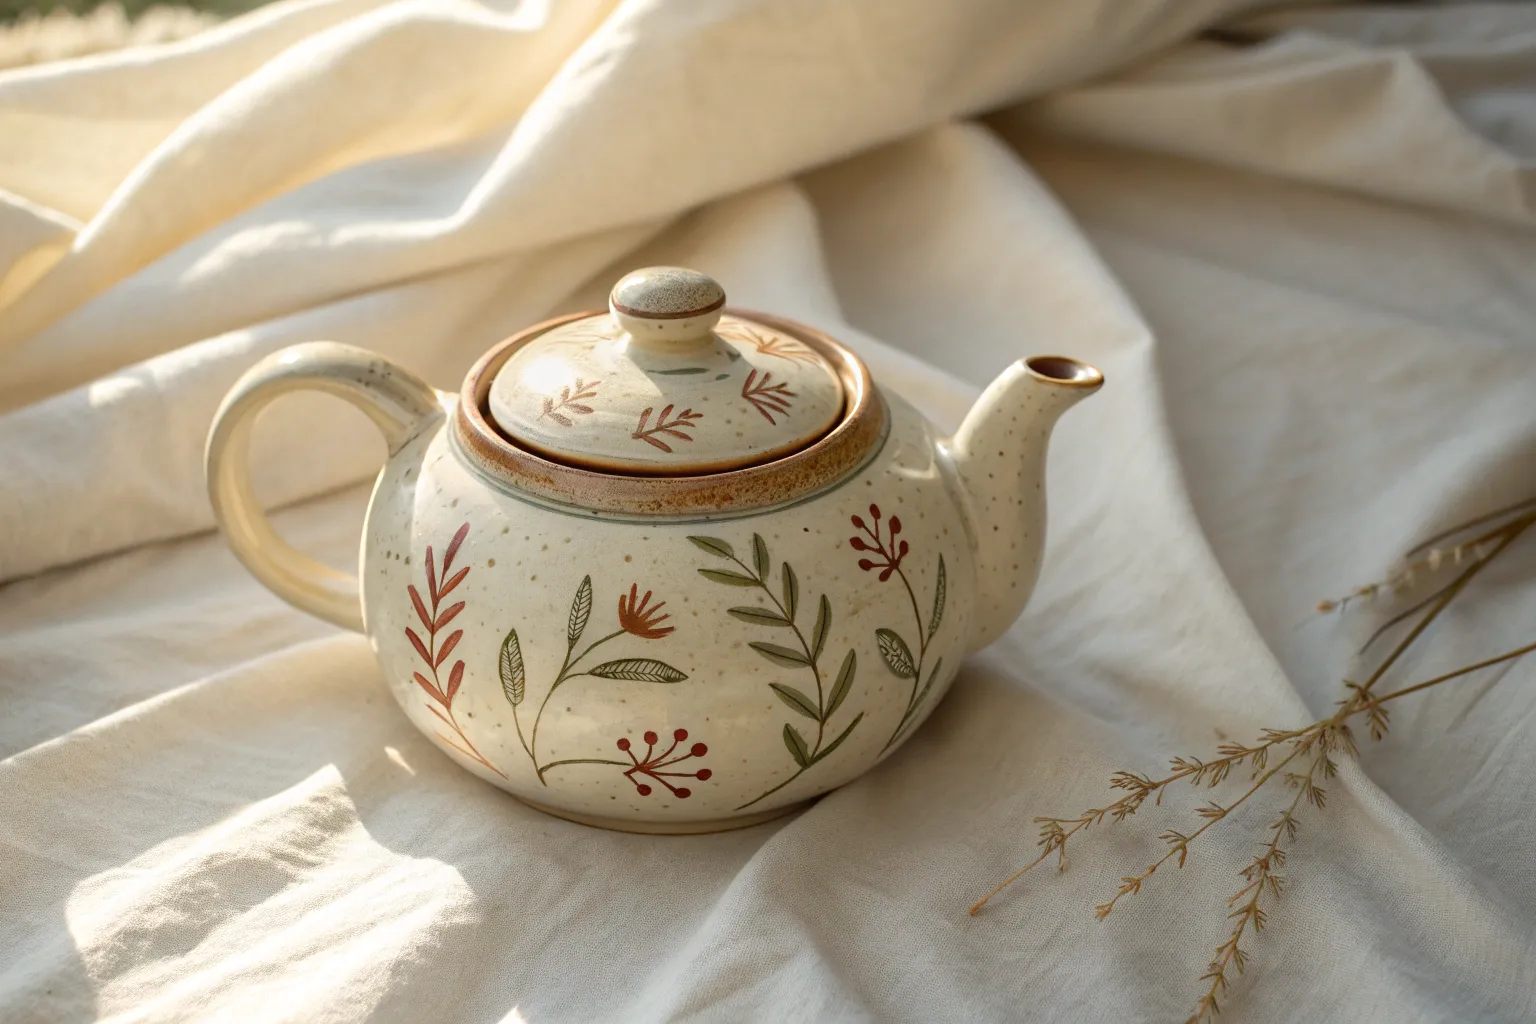
Classic Wildflower Wrap
Transform a plain ceramic teapot into an English garden centerpiece with this delicate wildflower design. Using fine lines and soft, watercolor-style glazes or acrylics, you’ll create an airy botanical wrap that feels both vintage and fresh.
Step-by-Step Guide
Materials
- White ceramic teapot (clean and dry)
- Ceramic paints (bake-on type) or multi-surface acrylics
- Colors: Dusty pink, sage green, cornflower blue, antique white, raw umber
- Fine liner brush (size 00 or 000)
- Small round brush (size 2)
- Rubbing alcohol and cotton pads
- Palette or ceramic tile
- Pencil (HB or lighter)
- Oven (if using bake-on paints)
Step 1: Preparation & Planning
-
Clean the surface:
Before laying down any color, wipe the entire exterior of the teapot with rubbing alcohol on a cotton pad. This removes invisible oils or fingerprints that prevent paint from adhering properly. -
Sketch the layout:
Since ceramic surfaces are slick, lightly sketch your main flower stems using a pencil. Alternatively, use a dry-erase marker for guidelines that can be easily wiped away later. -
Plan variety:
Ensure you vary the heights of your stems. I like to group flowers in clusters of three—tall, medium, and short—to create a natural, organic rhythm around the curve of the pot.
Steady Hand Trick
Rest your pinky finger on the dry surface of the teapot while painting. This anchors your hand, allowing you to pull smooth, clean lines for the thin stems.
Step 2: Painting the Blooms
-
Mix your pinks:
Mix a dusty pink shade with a tiny touch of raw umber to desaturate it. You want a vintage look, not a neon candy pink. -
Paint the main petals:
Using the size 2 round brush, gently press and lift to create the petals for the large pink cosmos-style flowers. Keep the paint slightly translucent to mimic a watercolor effect. -
Add detail to petals:
While the pink is still tacky, streak in a tiny bit of darker crimson at the base of the petals to create depth. -
Create blue accents:
Switch to a muted cornflower blue. Paint slender, elongated leaves or buds on separate stems. These act as cool-toned companions to the warm pink flowers. -
Paint faint fillers:
Mix a very pale antique white or beige. Dab small clusters of dots or faint lines in the background areas to suggest dried grasses or baby’s breath.
Step 3: Stems & Fine Lines
-
Mix the greenery:
Prepare a sage green on your palette. For some stems, mix in a little blue; for others, add a touch of brown. Variation in green tones makes the bouquet look realistic. -
Draw the main stems:
Using your finest liner brush (000), pull long, confident strokes from the base of the teapot up to your flower heads. Let the lines wobble slightly for a natural feel. -
Add leaves:
Attach leaves to the stems using quick, pressure-sensitive strokes. Press down for the belly of the leaf and lift up sharply for the tip. -
Outline work:
Once the color blocks are dry, use a thinned-down brownish-black paint and the liner brush to add extremely fine outlines and details to the petals and leaves. This illustrative style defines the shape.
Gold Leaf Glamour
Once the paint is cured, apply tiny flecks of gold leaf to the center of the flowers or the tips of the leaves for a luxurious, light-catching finish.
Step 4: Lid & Finish
-
Decorate the lid:
Don’t forget the top. Paint a single small sprig or a few loose petals on the lid to tie the design together without overcrowding it. -
Review and refine:
Step back and look at the composition. If there are large empty gaps, add a floating seed pod or a tiny falling petal. -
Clean up guidelines:
If you used a pencil or marker for the initial sketch, gently wipe away visible marks with a damp q-tip, being careful not to touch the wet paint. -
Curing process:
Let the teapot dry for at least 24 hours. Following the manufacturer’s instructions for your specific paint, place the teapot in a cool oven, heat to the specified temperature (usually 300°F-350°F), bake for 30 minutes, and let it cool inside the oven.
Now brew your favorite blend and enjoy the garden vibes right at your kitchen table


Blue-and-White Porcelain Style
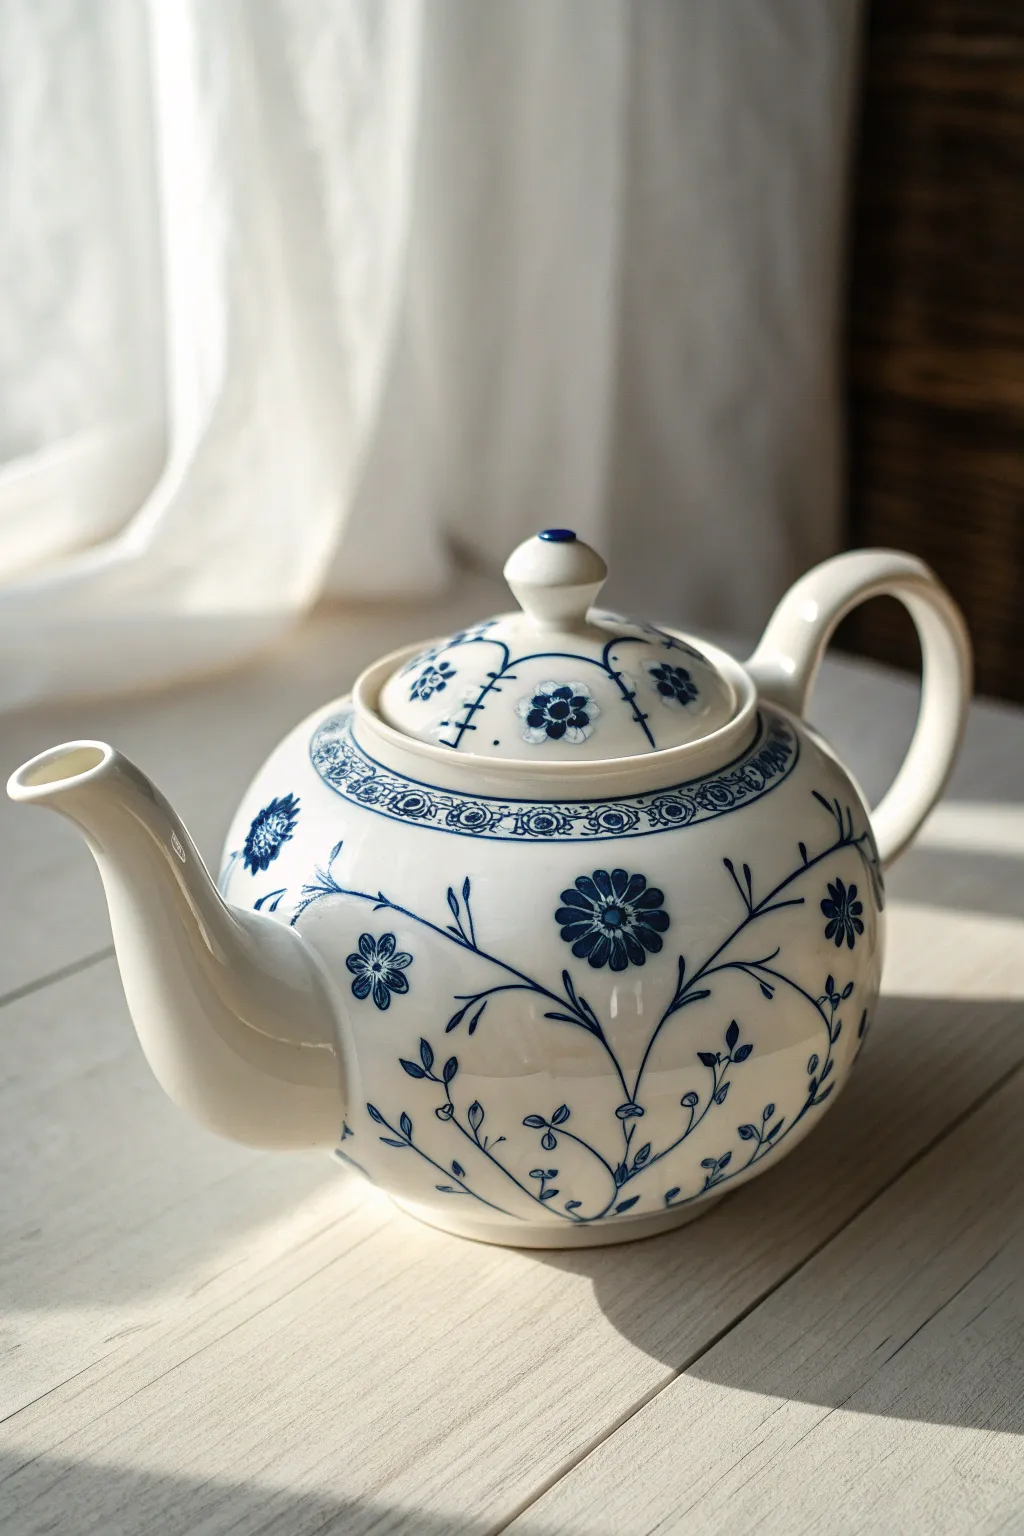
Transform a plain ceramic teapot into a piece of classic elegance with this tutorial inspired by traditional Chinoiserie patterns. Using delicate vine work and rich cobalt hues, you’ll create a stunning focal piece that looks like authentic antique porcelain.
Step-by-Step Tutorial
Materials
- White ceramic teapot (glazed)
- Pebeo Porcelaine 150 paint (Marsellus Blue or Lapis Blue)
- Rubbing alcohol
- Cotton rounds
- Fine liner brush (size 0 or 00)
- Small round brush (size 2)
- Palette or small dish
- Pencil (optional)
- Cotton swabs (for mistakes)
- Oven (for curing)
Step 1: Preparation & Planning
-
Clean the Surface:
Begin by thoroughly wiping down the entire teapot with rubbing alcohol and cotton rounds. This removes oils and fingerprints that could prevent the paint from adhering properly. -
Plan the Main Elements:
Visualize the placement of the large flowers on the central belly of the pot. You can lightly sketch the main circle positions with a pencil, though keep in mind pencil on glaze can be faint and smudgy. -
Prepare Your Palette:
Squeeze a small amount of the blue porcelain paint onto your palette. If the paint feels too thick for fine lines, you can thin it very slightly with the specific medium for that brand, but usually, it’s best straight from the bottle.
Smudged Lines?
If you smudge wet paint, dampen a Q-tip with rubbing alcohol for a precision eraser. It cleans the ceramic surface perfectly without damaging surrounding dry areas.
Step 2: The Central Motif
-
Paint the Main Flower Center:
Using the size 2 round brush, pick a central spot on the teapot’s belly and paint a solid blue circle about the size of a dime to serve as the flower’s heart. -
Add Inner Details:
While the center is wet, carefully lift out a tiny dot of paint in the very middle using a clean, dry brush tip or a toothpick to create a highlight, or wait for it to dry and add a white dot later. -
Create the Petals:
Switch to your fine liner brush. Paint a ring of small, elongated oval petals radiating outward from the center circle. Leave a tiny gap between the petals and the center to keep the design crisp. -
Second Layer of Petals:
Paint a second, slightly longer row of petals behind the first, staggering them in the gaps of the first row to create a full, chrysanthemum-like appearance. -
Repeat the Motif:
Paint two or three similar flowers spaced around the belly of the teapot. I like to vary the sizes slightly, making the side flowers a bit smaller than the central one.
Level Up: Texture
Mix a tiny amount of relief outliner medium with your blue paint. This creates slightly raised finish, mimicking the tactile feel of authentic hand-painted porcelain.
Step 3: Vines and Foliage
-
Draft the Main Stems:
Using the liner brush, paint long, sweeping, curved lines connecting the flowers. Allow these stems to arc gracefully upwards and downwards, wrapping around the curvaceous form of the teapot. -
Add Secondary Branches:
From the main stems, pull out smaller, thinner offshoot branches. Keep your hand loose to ensure the lines look organic rather than stiff. -
Paint the Leaves:
Along the stems, add small, almond-shaped leaves. Use a ‘press and lift’ motion with the brush: press down to widen the leaf base, then lift while dragging to create a sharp point. -
Incorporate Tiny Buds:
At the ends of some smaller branches, paint tiny three-petal buds or small solid dots to balance out the negative space and add intricacy.
Step 4: Lid & Rim Details
-
Define the Collar:
Around the opening of the teapot (the collar), paint a circular border. Inside this border, paint a repeating pattern of small geometric shapes or loops to mimic a lace edge. -
Decorate the Lid:
On the lid, paint a smaller version of the main vine pattern. Create four distinct sections separated by curved lines radiating from the knob. -
Knob Detail:
Paint the very top of the lid knob solid blue. This acts as a satisfying ‘crown’ for the piece. -
Paint the Patterns:
Inside the four lid sections, paint a single small flower or rosette to tie it back to the main body design.
Step 5: Finishing Touches
-
Review and Refine:
Check your work for any uneven lines. If you spot a mistake, use a damp cotton swab to gently wipe it away before it dries. -
Dry Time:
Let the teapot dry for at least 24 hours. This is crucial to ensure the moisture evaporates before heat setting. -
Bake to Cure:
Place the teapot in a cool oven, then set the temperature to 300°F (150°C). Bake for 35 minutes. Turn the oven off and let the teapot cool completely inside the oven to prevent cracking.
Once baked and cooled, your beautiful new teapot is ready to serve your favorite brew in style


Simple Polka Dots and Banding
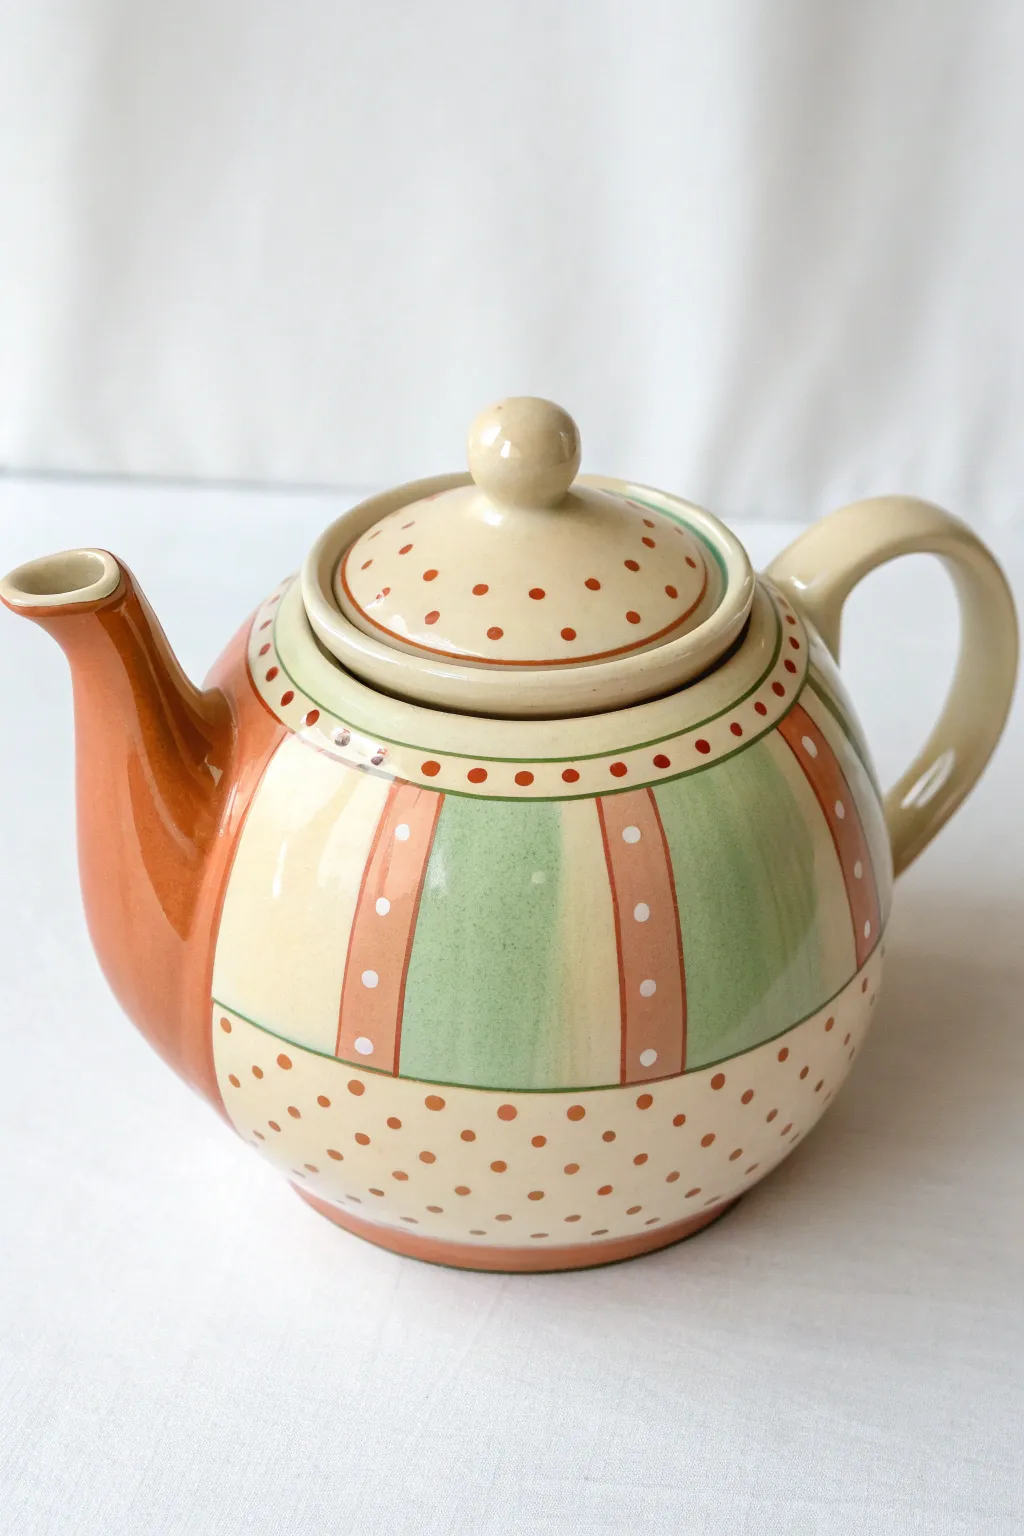
This charming project transforms a plain ceramic teapot into a cozy, cottage-core centerpiece featuring a mix of soothing sage green, warm terracotta, and creamy beige. The design combines structured vertical stripes with playful polka dots and banding for a look that feels hand-painted yet refined.
How-To Guide
Materials
- Plain white or cream ceramic teapot (clean and dry)
- Pebeo Porcelaine 150 paints (or similar high-quality ceramic paint)
- Colors: Terracotta/Rust Orange, Sage Green, Cream/Warm Beige, White
- Flat shader brushes (medium and small)
- Fine liner brush (size 0 or 00)
- Dotting tools (various sizes) or ends of brush handles
- Masking tape or painter’s tape (1/4 inch width is ideal)
- Rubbing alcohol and cotton pads
- Oven for curing (if using bake-on paints)
Step 1: Preparation & Base Coats
-
Clean surface:
Before you begin, wipe down the entire teapot with rubbing alcohol on a cotton pad to remove any oils or fingerprints that could prevent paint adhesion. -
Apply base color:
Using a wide flat brush, paint the main body and lid in a creamy warm beige. You may need two coats for full opacity, letting the first coat dry for about an hour before applying the second. -
Paint the spout:
While the body dries, carefully paint the entire spout with your terracotta orange paint. Use a medium flat brush for the larger areas and switch to a smaller brush near the connection point to get a crisp line. -
Define the sections:
Visualize the teapot in horizontal thirds. The middle section will house the stripes. Lightly mark faint horizontal guidelines with a pencil if needed to separate the top shoulder, the main belly, and the bottom base.
Step 2: Adding the Vertical Stripes
-
Tape the vertical lines:
Use your masking tape to create vertical sections around the belly of the teapot. You want to create wide spaces for the green stripes and narrower spaces for the terracotta bands. -
Paint green panels:
Fill in the wider taped sections with sage green paint. Use smooth, vertical strokes to minimize brush marks. I like to remove the tape while the paint is still slightly tacky to prevent peeling. -
Create terracotta bands:
Once the green is dry to the touch, freehand or tape off the narrower vertical strips between the green panels. Paint these with the terracotta color. -
Add white accents:
Dip a small dotting tool into white paint. Carefully place three to four evenly spaced dots down the center of each vertical terracotta band.
Fixing Smudged Dots
If a dot smudges or loses its round shape, let it dry completely. Then, use a toothpick to gently scrape it off, or paint over it with the background cream color.
Step 3: Detailed Banding & Dots
-
Create horizontal dividers:
Using a fine liner brush and the terracotta paint, draw two thin horizontal rings: one encompassing the top shoulder of the pot and one defining the bottom base area. -
Decorate the shoulder:
In the cream space between the top of your vertical stripes and the lid opening, add a row of small terracotta dots. Space them slightly closer together than the dots on the stripes. -
Fill the bottom section:
For the bottom third of the teapot, create a field of polka dots. Use a medium-sized dotting tool dipped in terracotta paint, arranging the dots in an alternating brick-lay pattern. -
Detail the base:
Finish the very bottom edge of the teapot with a solid band of terracotta paint to ground the design.
Pro Tip: Consistent spacing
Cut a small piece of cardstock to the width of the gap you want between stripes. Use this as a physical spacer when applying your tape to ensure every section is identical.
Step 4: Lid Decoration & Finishing
-
Paint the lid rim:
Paint a thin terracotta band around the outer edge of the lid. -
Dot the lid:
Add small terracotta dots in a random or circular pattern on the top surface of the lid. -
Dry thoroughly:
Allow the painted teapot to dry for at least 24 hours to ensure all layers are hardened. -
Bake to cure:
Place the teapot in a cold oven. Set the temperature to 300°F (150°C) or as directed by your paint manufacturer. Bake for 35 minutes, then turn the oven off and let the teapot cool down completely inside.
Once cooled, your new teapot is ready to serve warm brews with a lovely handcrafted touch


Lemon Branch Tea Time
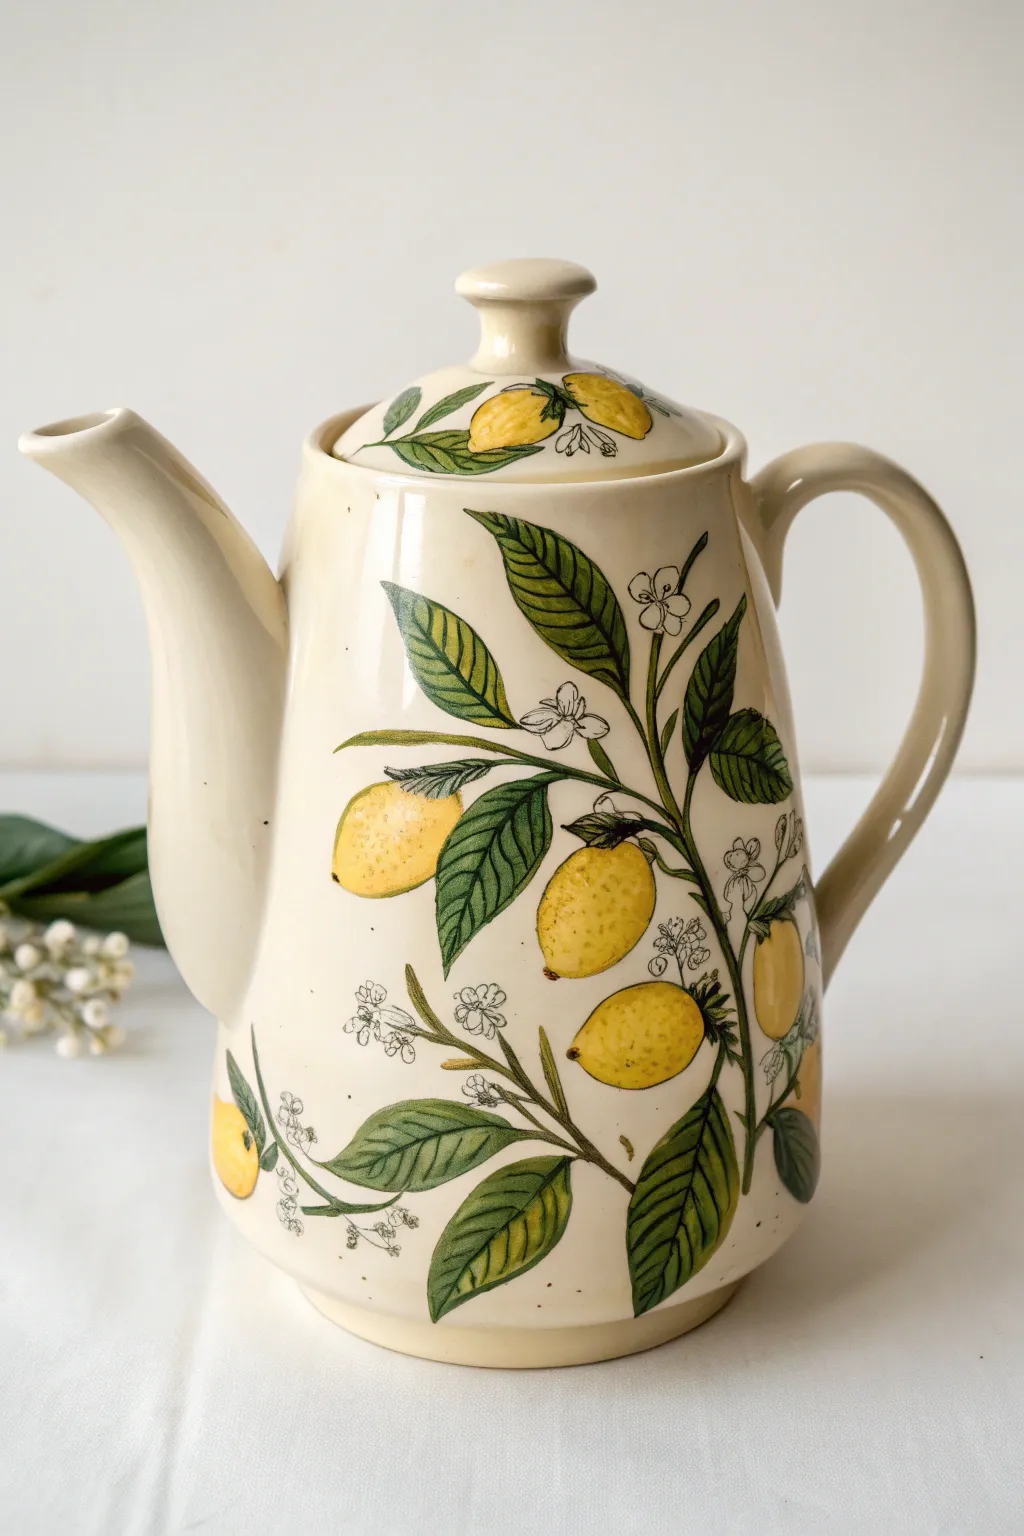
Transform a plain ceramic teapot into a piece of Mediterranean-inspired art with this detailed botanical design. Featuring vibrant lemons, lush green foliage, and delicate white blossoms, this project brings a refreshing, vintage feel to your kitchen decor.
Detailed Instructions
Materials
- Plain cream or white ceramic teapot (tall, coffee-pot style)
- Ceramic or enamel paints (Yellow, Dark Green, Light Green, White, Brown, Black)
- Set of small synthetic brushes (sizes 0, 2, and 4)
- Fine liner brush (size 00 or 000)
- Rubbing alcohol and cotton pads
- Soft pencil or carbon transfer paper
- Palette for mixing colors
- Oven (if using heat-set paints)
- Clear ceramic sealant (optional, depending on paint type)
Step 1: Preparation and Sketching
-
Clean the Surface:
Begin by thoroughly cleaning the teapot with rubbing alcohol and a cotton pad. This removes any oils or fingerprints that could prevent the paint from adhering properly. -
Plan the Layout:
Visualizing the composition is key. Imagine a central branch growing diagonally upwards from the bottom right to the top left, with secondary branches drooping slightly with the weight of the fruit. -
Sketch the Outline:
Lightly sketch your design directly onto the ceramic using a soft pencil. Draw the main woody stems first, then add oval shapes for the lemons and teardrop shapes for the leaves. Don’t press too hard to avoid scratching the glaze. -
Add Blossom Placement:
Mark small clusters where the white flowers will go. These act as beautiful negative space against the heavier lemons and leaves. -
Lid Details:
Don’t forget the lid. I like to sketch a smaller matching sprig with one lemon and a couple of leaves on the top surface.
Uneven Coverage?
If the yellow paint looks streaky, don’t rush. Let the first coat dry completely, then stroke the second coat in the opposite direction (cross-hatching) to smooth it out.
Step 2: Base Painting
-
Paint the Lemons:
Using a size 4 brush, fill in the lemon shapes with a bright, sunny yellow. Apply thin, even coats. You may need 2-3 coats for full opacity, letting the paint dry between layers. -
Base the Leaves:
Mix a mid-tone green and fill in the leaf shapes. Ensure the edges are crisp. While painting, try to leave tiny gaps near the stems where the leaves attach to create natural definition. -
Paint the Stems:
Use a dark brown paint with a size 2 brush to trace over your stem sketches. Connect the leaves and lemons to the main branch structure carefully. -
Blossom Foundation:
Using a small brush, dab pure white paint into the blossom clusters. Keep these shapes loose and organic, resembling small five-petal flowers.
Step 3: Detailing and Values
-
Shade the Lemons:
Once the yellow base is dry, mix a tiny amount of brown or orange into your yellow to create a shadow tone. Stipple this onto the bottom and sides of the lemons to give them roundness and texture. -
Add Leaf Veins:
Switch to your fine liner brush. Darken your green slightly with a touch of black or blue. Carefully paint a central vein down each leaf, followed by delicate diagonal veins branching out. -
Highlight the Greens:
Mix a lighter, yellowish-green. Add subtle highlights to the upper curves of the leaves where the light would naturally hit, giving the foliage depth. -
Define the Blossoms:
Use your finest brush and diluted black or grey paint to outline the tiny white petals. Add tiny stamens in the center of the flowers for realism. -
Fine Black Outlining:
This is the crucial step for the vintage illustration look. Use the 000 liner brush and black paint to outline the lemons, leaves, and major stems. Keep the line weight very thin and occasionally broken for an artistic, hand-drawn effect. -
Add Speckles:
Dip an old toothbrush or stiff brush into diluted brown paint and gently flick it (test on paper first!) to add tiny speckles around the design for an antique finish.
Level Up: Texture
Before the yellow paint on the lemons fully dries, tap it gently with a dry sponge or stiff brush. This creates a pitted texture mimicking real citrus skin.
Step 4: Finishing
-
Curing:
Allow the paint to dry completely for at least 24 hours. If using oven-bake ceramic paints, follow the manufacturer’s instructions to bake the teapot, usually around 300°F (150°C) for 35 minutes. -
Sealing:
If your paints require a sealant, apply a clear gloss varnish over the painted areas once the piece has fully cooled. This protects your hard work from chipping during hand washing.
Now you have a stunning, hand-painted centerpiece ready to brighten up your next afternoon tea
BRUSH GUIDE
The Right Brush for Every Stroke
From clean lines to bold texture — master brush choice, stroke control, and essential techniques.
Explore the Full Guide
Rose Bouquet Center Medallion
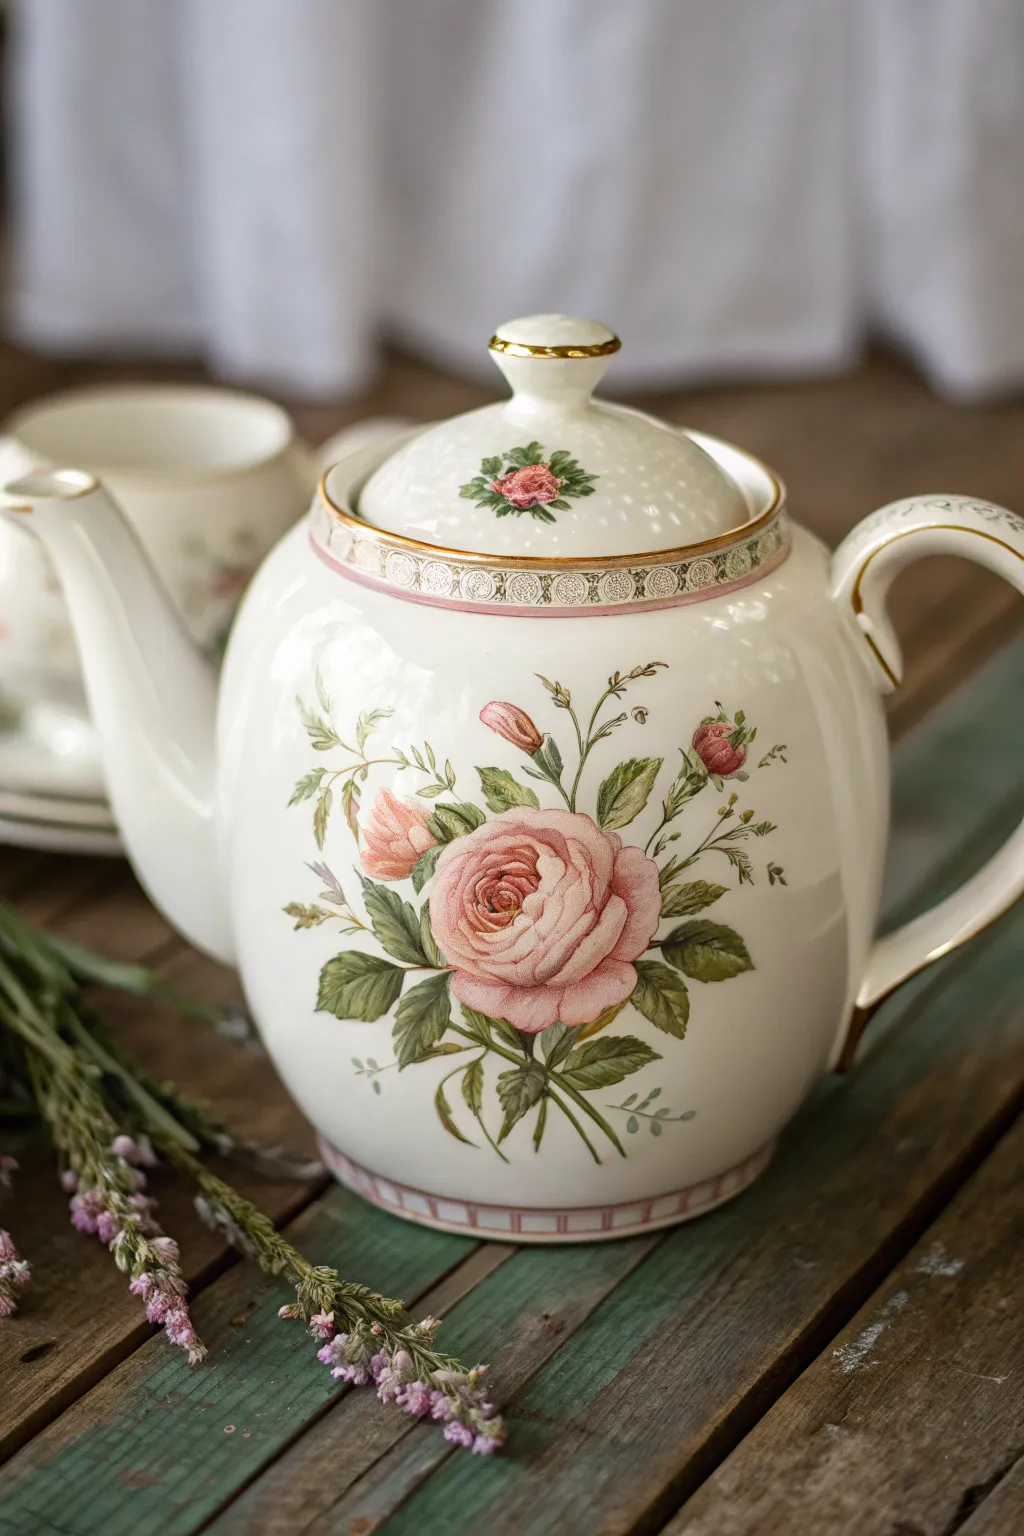
Transform a plain white ceramic teapot into an heirloom-quality piece featuring a central medallion of soft pink roses and delicate greenery. This project uses china paints or bakeable ceramic enamels to achieve a delicate, translucent botanical look reminiscent of classic porcelain patterns.
Step-by-Step Tutorial
Materials
- White ceramic teapot (smooth glaze)
- Ceramic paints or china paints (Rose Pink, White, Deep Red, Sap Green, Olive Green, Brown)
- Pebeo Porcelaine 150 Outliner (Gold)
- Fine detail brushes (size 0, 00)
- Small round brush (size 2)
- Rubbing alcohol and cotton pads
- Carbon paper (for tracing)
- Pencil
- Palette for mixing
- Oven (for curing)
Step 1: Preparation & Layout
-
Clean the Surface:
Begin by wiping the entire teapot down with rubbing alcohol to remove any oils or fingerprints. This ensures the paint adheres properly. -
Draft the Design:
Lightly sketch your rose bouquet on paper first to fit the tea pot’s rounded belly. The composition should feature one large central bloom, a smaller bud above it, and two smaller buds to the sides. -
Transfer the Outline:
Tape your sketch over a piece of carbon paper onto the center of the teapot. Trace only the main shapes of the flowers and stems using a pencil. Do not trace shading; keep lines very faint.
Step 2: Painting the Roses
-
Base Color:
Mix a soft pastel pink using Rose Pink and plenty of White. With the size 2 round brush, fill in the main rose shape with this light base coat. -
Defining Petals:
While the base is still slightly tacky, use a size 0 brush loaded with unmixed Rose Pink to create the ‘cup’ shape in the center of the bloom. Paint curved C-strokes radiating outward to suggest overlapping petals. -
Deepening Shadows:
Mix a tiny touch of Deep Red into your pink. Apply this darker shade into the deepest crevices of the central swirl and under the larger outer petals to give the flower dimension. -
Highlighting:
Using pure White on a clean detail brush, add highlights to the top edges of the outermost petals where the light would naturally hit. -
Painting the Buds:
Paint the smaller rosebuds using the same technique: a light pink base, followed by a darker pink streak down one side to show the tightly wound petals.
Brush Control Trick
When painting curved porcelain surfaces, hold the brush perpendicular to the pot and rotate the actual teapot with your other hand, rather than moving your wrist.
Step 3: Adding Greenery
-
Stems and Vines:
Dilute your Brown paint slightly for fluidity. Using the liner brush (00), paint thin, sweeping lines for the main stems connecting the buds to the central vine. -
Leaf Base Layers:
Use Sap Green to paint the leaf shapes. Vary the sizes, placing serrated rose leaves near the base of the flower and longer, smoother leaves extending outward. -
Leaf Shading:
While the green is wet, touch the base of each leaf with Olive Green or a mix of Green and Brown to create depth near the stem. -
Veining Details:
I like to wait for the green base to dry to the touch before using the 00 brush and a dark mixed green to paint extremely fine veins on the larger leaves. -
Fine Ferns:
Add delicate, wispy fern-like sprigs extending from the bouquet edges using the very tip of your detail brush and a pale, watery green.
Vintage Patina
For an antique look, very lightly sponge a translucent wash of sepia or warm beige around the edges of the artwork to mimic aged porcelain glazing.
Step 4: Borders & Accents
-
Lid Decoration:
Paint a very small, simplified version of the rose motif (just the center bud and two leaves) on the top of the lid. -
Gold Rim:
Using the gold outliner or gold ceramic paint, carefully trace the rim of the lid and the upper rim of the teapot opening. Steady your hand by resting your pinky finger on the pot. -
Patterned Band:
Below the rim, paint a thin band of pink. Once dry, use the gold outliner to create tiny repetitive geometric patterns or loops over the pink band for an elegant border. -
Final Cleanup:
Check for any stray paint marks or smudges. Use a cotton swab dipped in alcohol or water to gently erase them before baking. -
Curing:
Follow the manufacturer’s instructions for your specific paint brand to bake the teapot in a home oven. This usually involves placing the pot in a cold oven, heating to 300°F (150°C), and baking for 35 minutes before letting it cool inside the oven.
Once cooled, your hand-painted teapot is ready to serve tea with a touch of classic elegance
Minimal Botanical Line Art
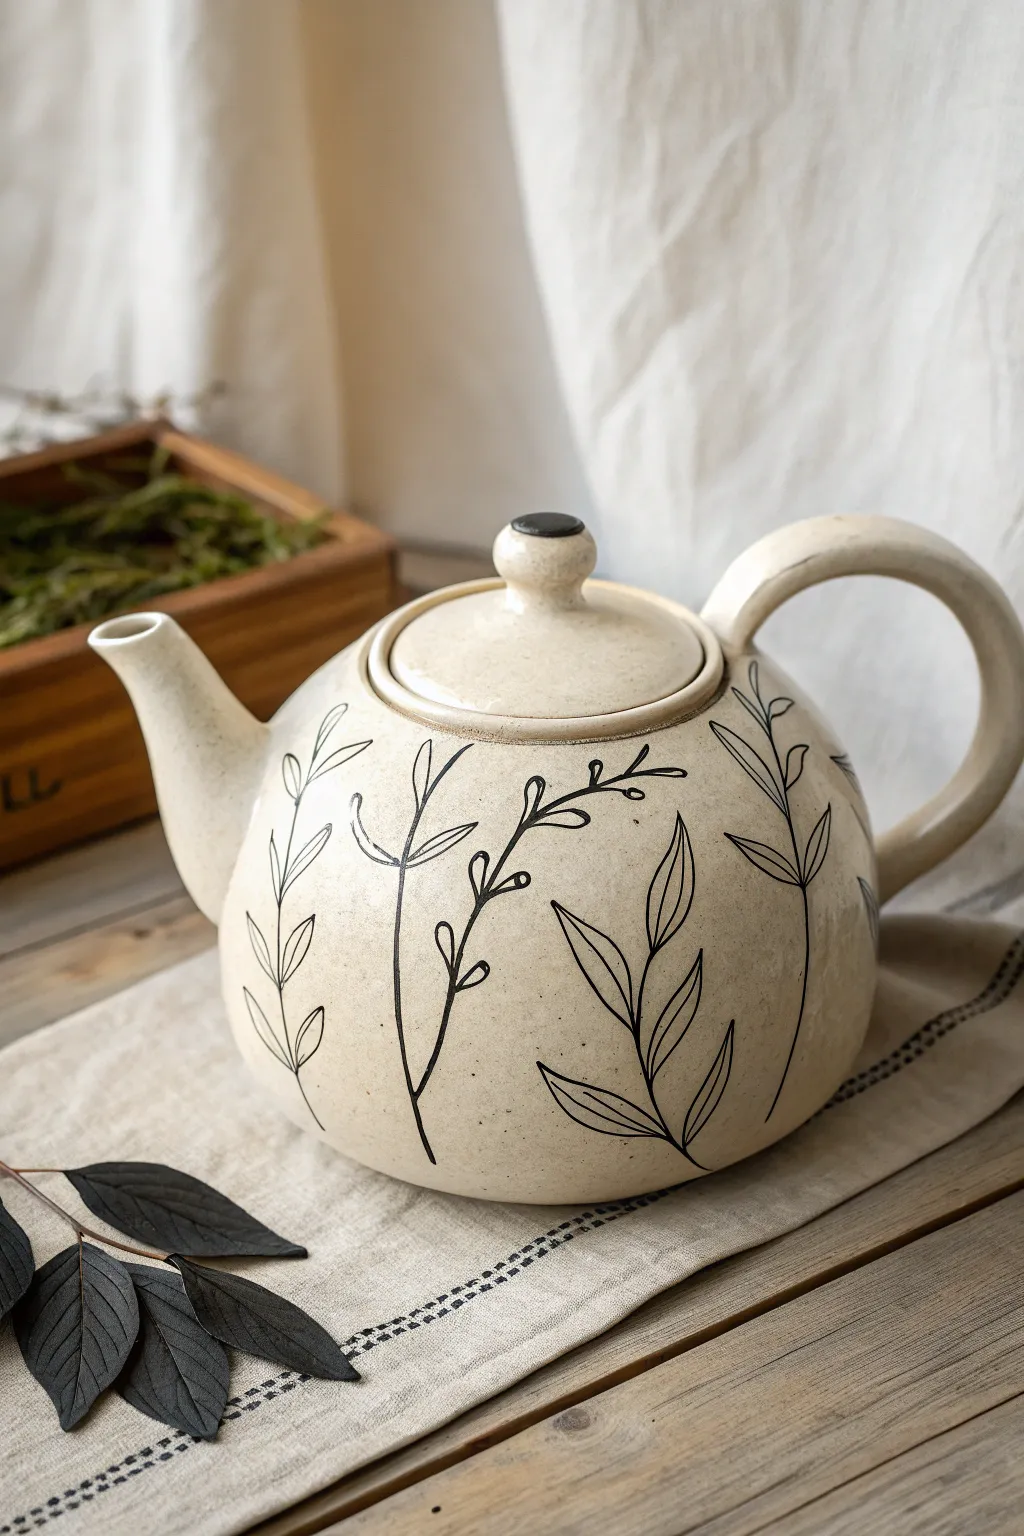
Transform a plain ceramic teapot into a piece of modern art with this elegant and understated botanical design. The contrast of crisp black lines against a soft cream background creates a timeless look that feels both organic and refined.
Step-by-Step Guide
Materials
- Plain cream or beige ceramic teapot (glazed or bisque)
- Black porcelain shimmer paint or oil-based paint marker
- Fine liner brush (size 0 or 00, if using liquid paint)
- Rubbing alcohol
- Cotton rounds
- Pencil (HB or lighter)
- Kneaded eraser
- Paper towels
- Oven (for curing, if required by paint type)
Step 1: Preparation and Planning
-
Clean surface:
Before you begin, wipe down the entire exterior of the teapot with rubbing alcohol and a cotton round. This vital step removes oily fingerprints and dust that could prevent the paint from adhering properly. -
Sketch the stems:
Using a very light touch with your pencil, sketch long, curving lines to represent the main stems. Start from the bottom of the pot and extend upwards, allowing them to follow the natural curve of the vessel. -
Add leaf positions:
Mark out where your leaves will go. Vary the spacing—some stems can have opposite leaves, while others look distinct with alternating placement. Keep the shapes loose and ghostly at this stage. -
Review composition:
Step back and look at the teapot from a distance. Ensure the design wraps nicely around the curve and isn’t too clustered in one spot. Use your kneaded eraser to gently lift and adjust any lines that feel awkward.
Ink refusing to stick?
Glazed surfaces can be slippery. If paint beads up, wipe it off and lightly buff the area with fine-grit sandpaper (400+) to give the surface ‘tooth’ for better adhesion.
Step 2: Painting the Botanicals
-
Prepare your tool:
If using a paint marker, shake it well and pump the nib on a scrap paper until the ink flows smoothly. If using a brush and jar paint, load your fine liner with a thin consistency of black paint. -
Trace the main stems:
Start by inking over your pencil lines for the main stems first. Use a confident, steady hand, pulling the stroke towards you for better control. Don’t worry if the line wavers slightly; organic imperfections add character. -
Draw the leaf spines:
Extend a small, thin line outward from the main stem for each leaf’s central vein. Curve these slightly upwards to suggest growth and movement. -
Outline the leaf shape:
Start at the base of the vein you just drew, curve outward to create the leaf belly, and bring it back to a point at the tip of the vein. Repeat for the other side of the leaf to close the shape. -
Add variance:
For visual interest, designate one or two stems to be different species. On these, draw smaller, rounded leaflets or tiny buds instead of the longer, pointed leaves. -
Refine the lid:
Add a very simple, single curving line or a tiny sprig of leaves to the lid of the teapot. This ties the separate piece into the overall design without overwhelming it. -
Thicken select lines:
Go back over the base of the main stems and slightly thicken the line weight where they meet the bottom of the pot. This grounds the plant visually.
Steady your hand
Place your pinky finger against the dry surface of the teapot to act as a stabilizer while drawing. This ‘bridge’ technique gives you smoother, more controlled curves.
Step 3: Finishing Touches
-
Dry time:
Let the paint sit for at least an hour until it is dry to the touch. Be careful not to smudge your work as you inspect it. -
Erase guidelines:
Once you are absolutely certain the ink is dry, gently dab (don’t rub hard) with a kneaded eraser to lift any remaining visible pencil marks. -
Check for gaps:
Inspect the lines for any skips or thin spots where the glaze resisted the paint. Carefully touch these up with the very tip of your tool. -
Cure the paint:
Follow the manufacturer’s instructions for your specific paint or marker. This usually involves placing the teapot in a cold oven, heating it to around 300°F – 350°F, and baking for 30 minutes before letting it cool inside the oven.
Now you have a stunning, minimal centerpiece ready for your next tea time

PENCIL GUIDE
Understanding Pencil Grades from H to B
From first sketch to finished drawing — learn pencil grades, line control, and shading techniques.
Explore the Full Guide
Geometric Color Block Panels
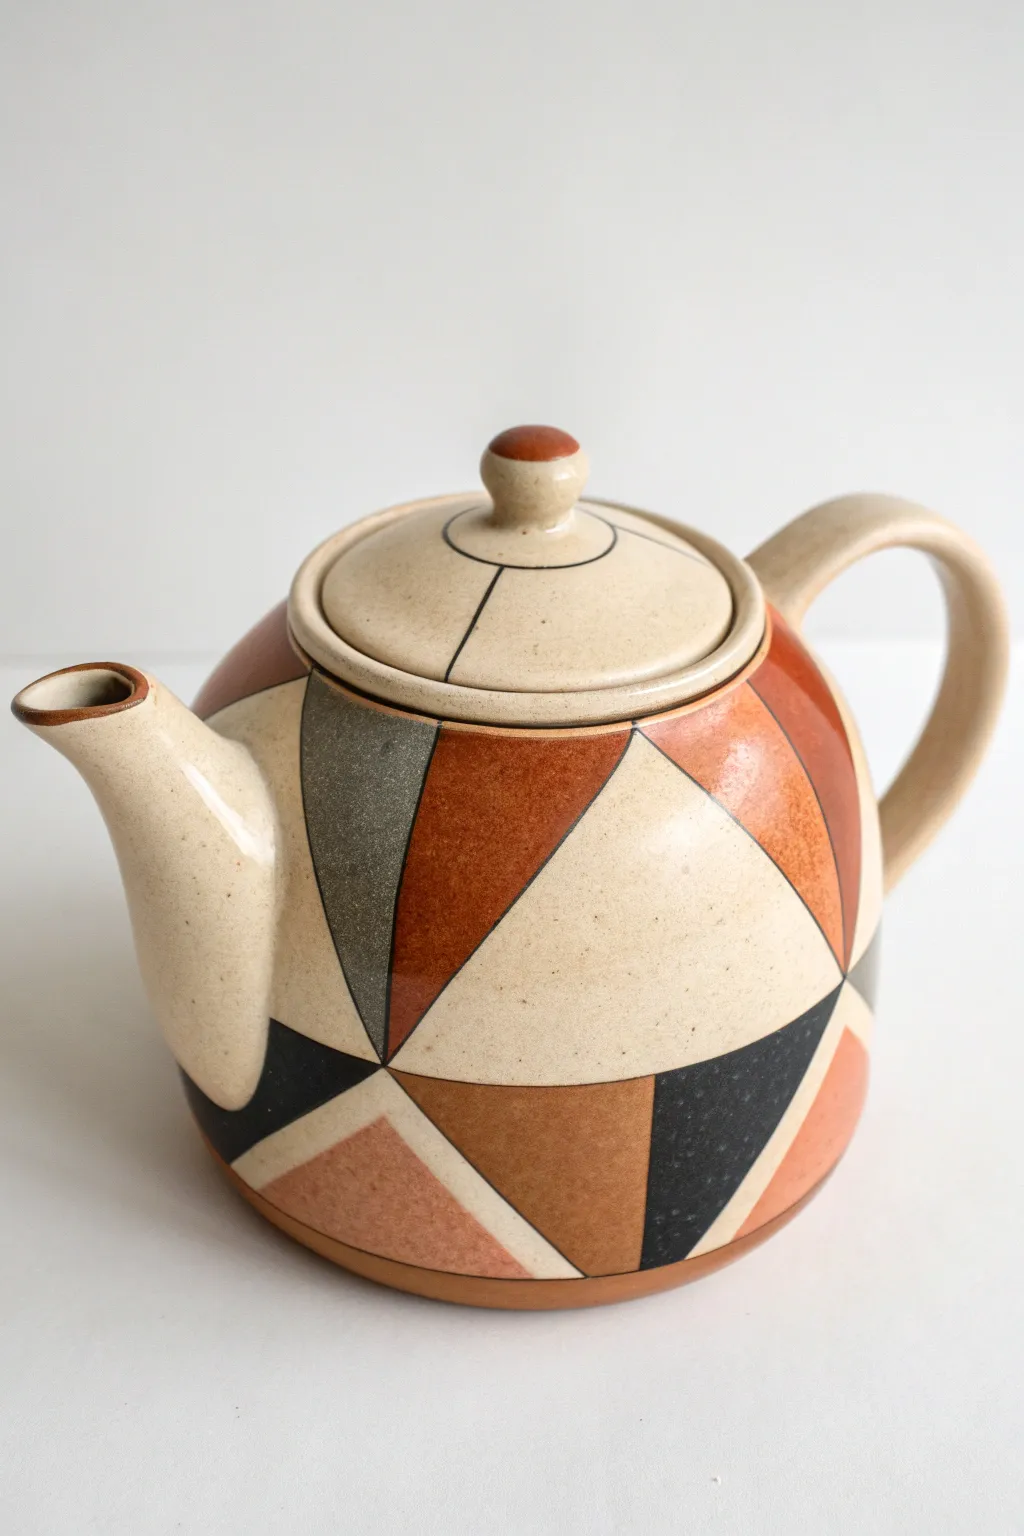
Transform a plain ceramic teapot into a modern art piece with this striking geometric design. By using high-contrast triangles and earthy tones, you’ll create a sophisticated, patterned look that feels both retro and contemporary.
Step-by-Step
Materials
- Plain ceramic teapot (white or cream)
- Ceramic or porcelain paints (terracotta, burnt orange, grey-blue, black, cream)
- Fine liner brush (size 0 or 00)
- Small flat brush (size 2 or 4)
- Medium round brush
- Pencil (HB) or disappearing ink marker
- Compass or round object (optional, for planning)
- Rubbing alcohol
- Cotton pads
- Palette
- Oven (for curing paint)
Step 1: Preparation & Mapping
-
Clean the surface:
Before laying down a single stroke, wipe the entire exterior of the teapot with rubbing alcohol and a cotton pad. This removes invisible oils or fingerprints that could prevent your paint from adhering properly. -
Establish the focal points:
Using a pencil or disappearing ink marker, lightly draw a horizontal line around the widest part of the teapot’s belly. This will serve as the central anchor for your triangles. -
Sketch the primary triangles:
Draw large, upward-pointing triangles stemming from the bottom edge of the pot, letting their points touch your central line. Ensure they are roughly equal in width. -
Fill the negative space:
Connect the points of your lower triangles to create downward-pointing triangles that originate from the top section of the teapot body. The goal is to tessellate the shapes so they lock together like a puzzle. -
Detail the lid:
Don’t forget the lid. Draw a circle around the handle knob, then sketch radial lines extending outward to the lid’s edge, creating pie-slice segments that mirror the body’s geometry.
Tape it Straight
Struggling with straight lines? Use thin painter’s tape or graphic art tape to mask off the triangles before painting. Peel it off while the paint is still slightly wet for crisp edges.
Step 2: Painting the Panels
-
Mix your palette:
Squeeze out your ceramic paints. You want an earthy palette: terracotta, a deep burnt orange, a muted grey-blue, and a dark charcoal or black. -
Apply the first color:
Start with your lightest color, perhaps a cream or soft beige if you aren’t leaving the base ceramic exposed. Use a small flat brush to fill in scattered triangles, keeping the edges as straight as possible. -
Paint the warm tones:
Switch to your terracotta paint. Fill in adjacent triangles, being careful not to paint two identical colors side-by-side. The contrast is key here. -
Add depth with dark orange:
Use the burnt orange shade for the next set of triangles. I find that applying two thin coats rather than one thick gloop results in a smoother, more professional finish. -
Introduce the cool tone:
Paint selected triangles with the grey-blue shade. This cool tone breaks up the warmth and adds a sophisticated, mid-century modern feel to the composition. -
Anchor with black:
Finally, fill in the remaining triangles with black or dark charcoal. These dark blocks provide visual weight and make the lighter colors pop. -
Paint the lid segments:
Repeat this color-blocking process on the lid. Alternate colors in the pie-shaped segments you sketched earlier, ensuring they coordinate with the body below.
Step 3: Refining & Finishing
-
Let the base dry:
Allow the painted blocks to dry completely. This usually takes about an hour, but check your specific paint instructions. -
Outline the shapes:
Using a size 0 fine liner brush and black paint, carefully trace the lines between every color block. This “grout line” effect cleans up any messy edges where colors meet. -
Add the circle detail:
On the lid, paint a crisp black circle outlining where the handle knob meets the lid surface. This emphasizes the radial design. -
Detail the spout and handle:
Paint a thin rim of terracotta or brown around the opening of the spout and the underside of the lid rim to tie the piece together. -
Clean up stray marks:
Once the paint is dry to the touch, use a damp Q-tip or a soft eraser to gently remove any visible pencil lines that weren’t covered by paint. -
Cure the paint:
Follow your paint manufacturer’s guide to cure the piece. This typically involves baking the teapot in a home oven for 30-45 minutes to make the design durable and washable.
Metallic Upgrade
Swap the black outline for a metallic gold or copper liner. The shimmer adds a luxurious, high-end finish that looks incredible against the matte earthy paint tones.
Pour yourself a cup of tea in your new geometric masterpiece and enjoy the cozy vibes you’ve created
Ombre Fade Around the Belly
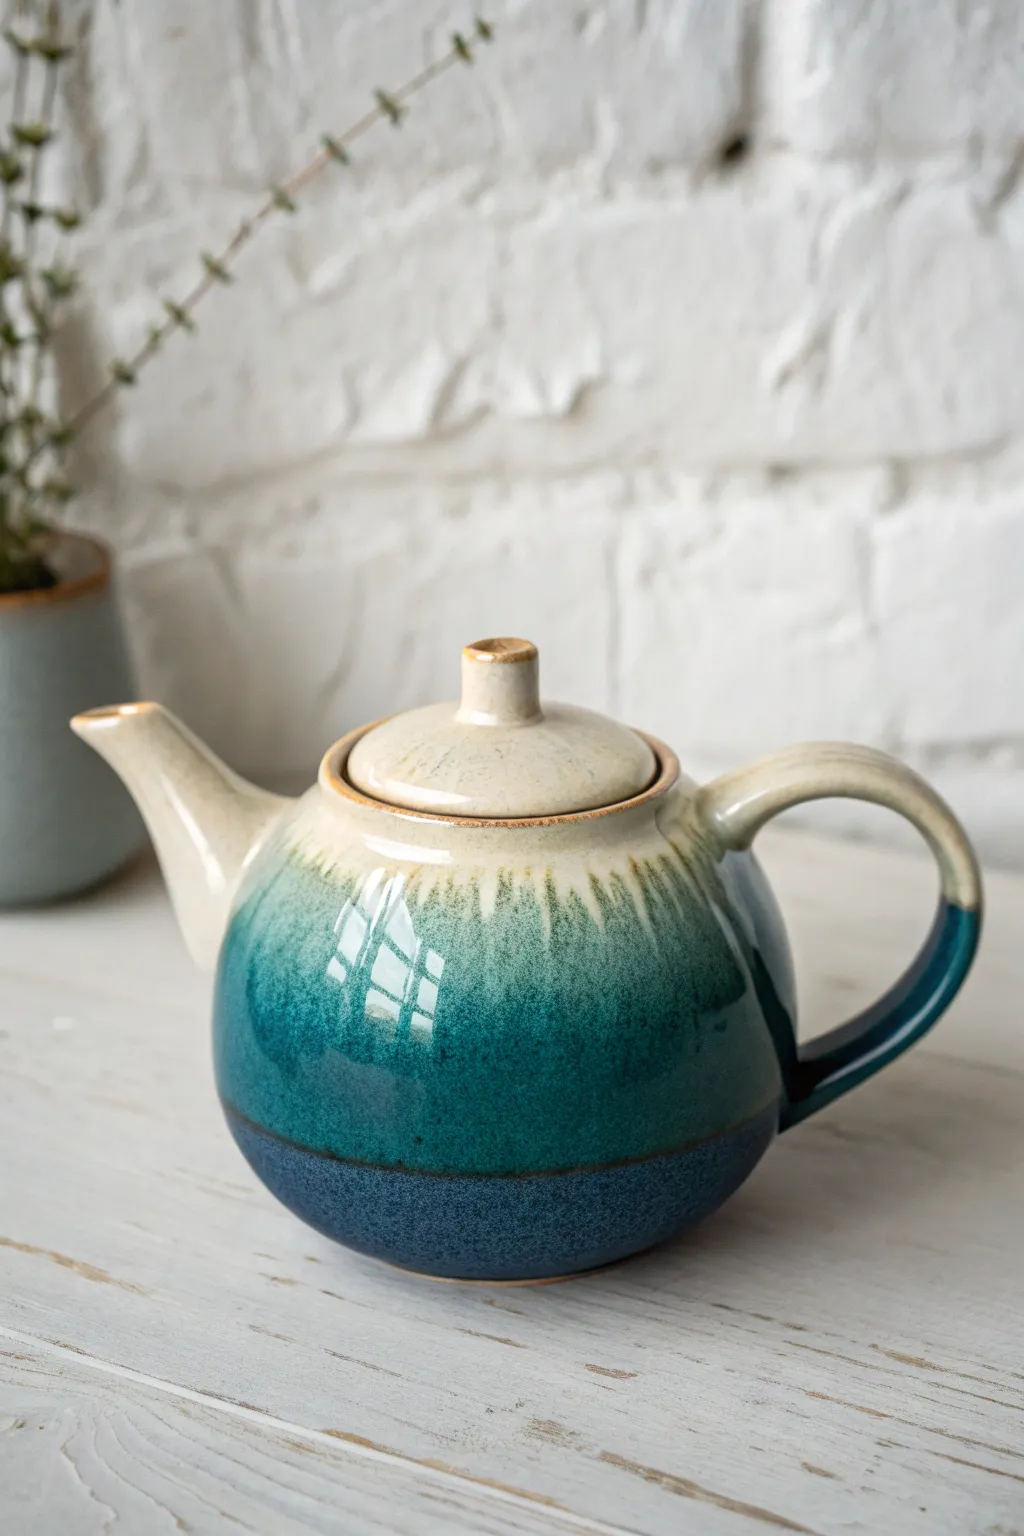
Create a stunning focal point for your tea service with this tri-tone ombre teapot, reminiscent of where the ocean meets the sky. This project uses reactive glazes to achieve that beautiful, organic dripped effect where the colors merge.
How-To Guide
Materials
- Bisque-fired ceramic teapot (cleaned and dust-free)
- Creamy beige reactive glaze (e.g., stoneware cream)
- Teal green glaze (translucent or semi-opaque)
- Dark navy blue underglaze or glaze
- Soft fan brush
- Medium round brush
- Clean sponge
- Water bowl
- Wax resist (liquid)
- Kiln (or access to a firing service)
Step 1: Preparation and Base
-
Clean surface:
Begin by wiping down your bisque teapot with a slightly damp sponge. This removes any kiln dust that could prevent the glaze from adhering properly. -
Wax the bottom:
Apply a coat of wax resist to the very bottom foot of the teapot. This ensures no glaze runs onto the kiln shelf during firing, which makes clean-up much easier. -
Apply the dark base:
Stir your dark navy blue glaze thoroughly. Using the fan brush, paint the bottom third of the teapot, curving your brush strokes to follow the round belly of the pot. -
Layer the handle:
Continue that dark navy blue up the bottom half of the handle. It doesn’t need to be a perfect straight line; a natural fade works best. -
Second coat:
Let the first navy coat dry until it’s chalky to the touch, then apply a second coat to ensure a deep, rich color after firing.
Drips running too far?
If your test tiles show the glaze running too much, make the overlap band between colors narrower or apply slightly thinner coats near the bottom.
Step 2: Creating the Mid-Tone
-
Apply the teal:
Clean your brush and switch to the teal green glaze. Apply this color to the middle section of the teapot, slightly overlapping the top edge of the navy blue. -
Blend the transition:
Where the teal meets the navy, use a slightly damp brush to feather the edges together gently. You want them to mingle, not create a hard stripe. -
Handle continuation:
Paint the upper curve of the handle with the teal glaze, blending it down into the navy section you painted earlier. -
Build opacity:
Apply 2-3 coats of the teal glaze, allowing drying time between each. I find that three coats usually give that lush, gem-like finish shown in the photo.
Step 3: Top Glaze and Interaction
-
Cream top coat:
Using the creamy beige glaze, paint the top shoulder of the teapot, the spout, and the lid. Be generous with the application here. -
Create the drip zone:
Bring the cream glaze down so it overlaps the top edge of the teal by about half an inch. This overlap is crucial for the reactive effect. -
Encourage interaction:
Dab a little extra cream glaze right at the transition line where it meets the teal. The thickness here will cause gravity to pull the glazes down during firing, creating those beautiful vertical drip marks. -
Spout detailing:
Ensure the spout is fully coated in cream, blending slightly into the teal at the very base of the neck. -
Lid matching:
Glaze the lid entirely in the cream color. You can add a tiny touch of teal to the rim if you want it to visually connect with the pot body.
Add some sparkle
For a magical touch, sprinkle a tiny pinch of crushed glass or silica sand on the shoulder overlap to create crystalline textures in the melt.
Step 4: Finishing and Firing
-
Check the foot:
Flip the pot over and use a sponge to wipe away any stray glaze droplets that might have landed on the waxed bottom. -
Rim cleanup:
Ensure the internal rim where the lid sits is clean or thinly glazed to prevent the lid from fusing to the pot during firing. -
Fire the piece:
Load the teapot into the kiln and fire according to the specific cone temperature recommended on your glaze bottles (usually Cone 5 or 6 for stoneware).
Once the kiln cools, you will have a beautiful, durable teapot ready for your next cozy afternoon brew


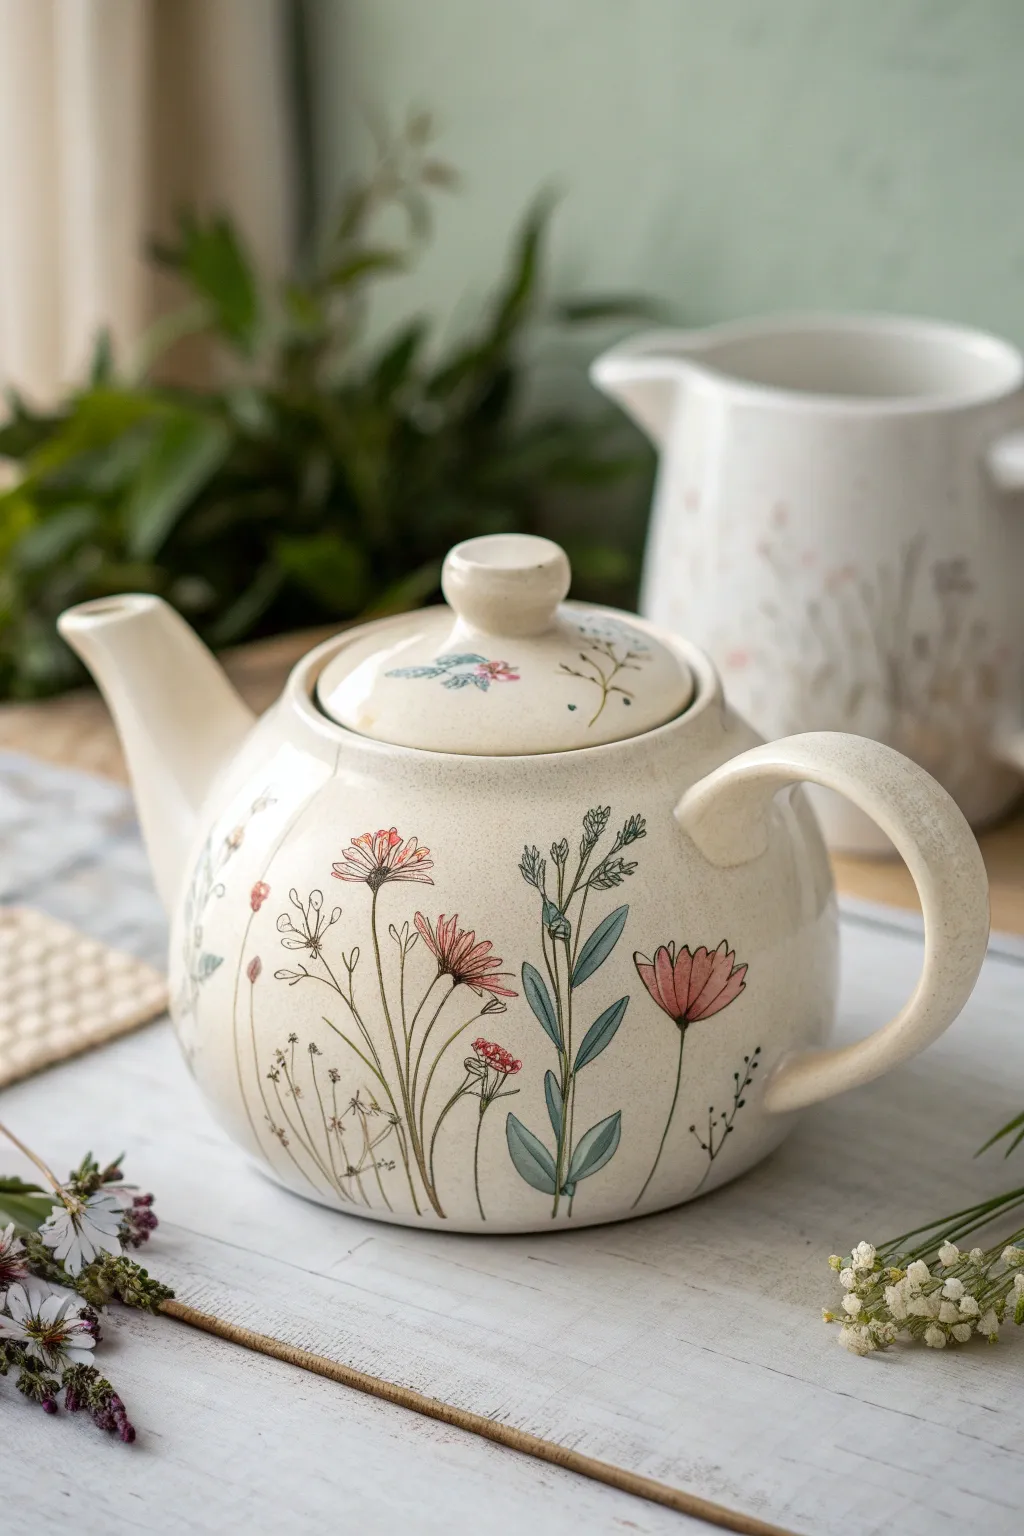
Loose Brushstroke Florals
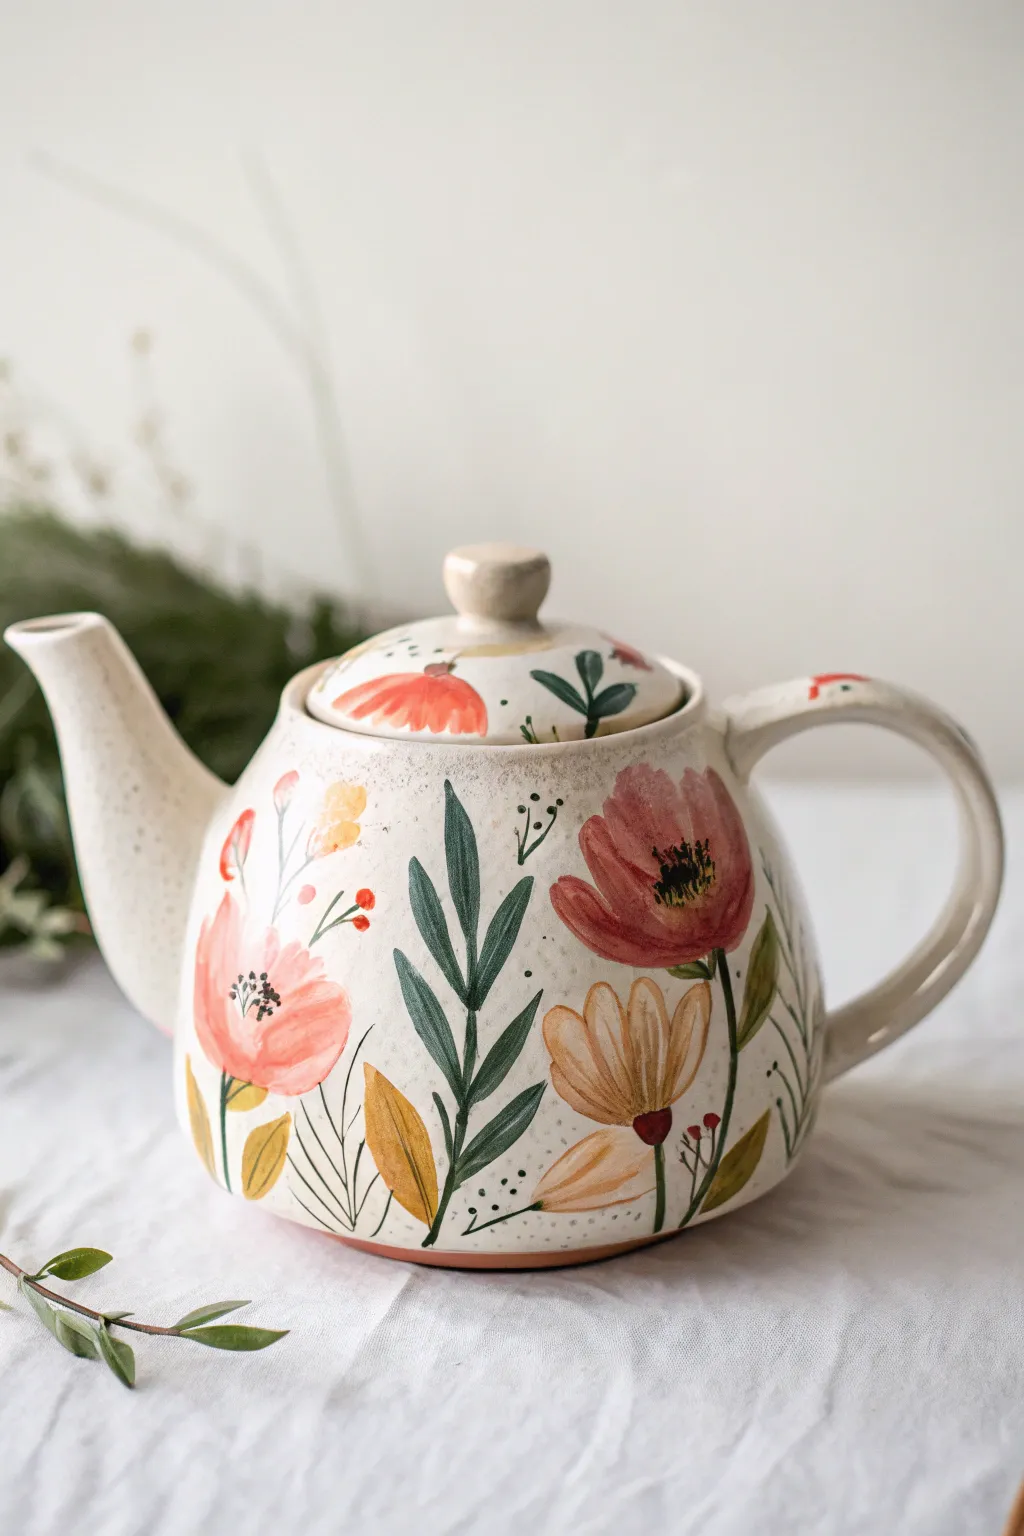
Transform a plain ceramic teapot into a garden-inspired centerpiece with these loose, painterly florals. By mimicking the look of watercolor on pottery, you’ll achieve a soft, romantic finish full of charming imperfections.
Step-by-Step
Materials
- Blank bisque or glazed ceramic teapot (white or cream)
- Ceramic paints or underglazes (currant red, dusty rose, mustard yellow, forest green, sage green, black)
- Detail brushes (sizes 0, 2, and 4)
- Round brush (size 6)
- Palette for mixing
- Water cup
- Paper towels
- Clear glazing medium (if using ceramic paints)
Step 1: Planning and Base Work
-
Clean the Surface:
Ensure your teapot is completely free of dust and oils by wiping it down with a damp sponge or rubbing alcohol. Let it dry fully before starting. -
Sketch the Layout:
Lightly sketch the placement of your main flowers using a standard pencil. Don’t worry about erasing later; the graphite burns off in the kiln or disappears under opaque ceramic paints. -
Add Speckling:
To mimic the rustic pottery look, dilute a tiny amount of black or dark brown paint with water. Dip an old toothbrush or stiff brush into it and run your thumb across the bristles to flick tiny speckles randomly over the teapot’s surface.
Paint Consistency Pro-Tip
To get that specific loose shape, load your brush heavily with watered-down paint. I press the belly of the brush down first, then drag, letting the brush shape do the work for me.
Step 2: Painting the Main Blooms
-
Mix Your Pink:
Mix a soft, dusty pink shade on your palette. If your paint is too thick, thin it slightly with glazing medium to achieve that translucent, watercolor effect. -
Paint the Large Petals:
Using the size 6 round brush, lay down broad, sweeping strokes to form the large open flower shapes. Keep the edges soft and don’t overwork them; gaps and uneven opacity add to the charm. -
Layer the Color:
While the first layer is still tacky but not wet, add a slightly darker concentration of pink near the center of the bloom to create depth. -
Create Mustard Accents:
Using the size 4 brush, paint the secondary flowers in a muted mustard yellow. Focus on simple tear-drop shapes that radiate from a center point. -
Lid Decoration:
Don’t forget the lid. Add a smaller version of the pink flower and a few stray petals or leaves that seem to ‘fall’ over the edge.
Step 3: Adding Foliage and Stems
-
Establish Main Stems:
Switch to your size 2 brush and load it with forest green. Paint thin, confident vertical lines extending from the bottom of the flowers down toward the base of the teapot. -
Paint Broad Leaves:
Using the ‘press and lift’ technique, create the classic leaf shapes. Press the brush down to widen the stroke and lift as you pull away to create a sharp point. -
Vary the Greens:
Mix a lighter sage green and add smaller, whimsical leaves or fern-like fronds in between the darker stems. This color variation prevents the design from looking flat. -
Add Leaf Veins:
Once the broad green leaves are touch-dry, use the size 0 liner brush with a slightly darker green mix to draw a simple central vein line down only the largest leaves. -
Scattered Berries:
Using the handle end of a brush or a detail tool, dot tiny clusters of red or orange berries at the ends of thin, wispy stems for a pop of contrast.
Level Up: Texture
Before painting, try lightly sanding the bisqueware in random patches. The paint will absorb differently in rough vs. smooth areas, creating an even more organic, vintage texture.
Step 4: Refining Details
-
Flower Centers:
Dip your finest brush (size 0) into black paint. Create the stamens by painting tiny, delicate lines radiating from the flower centers, tipped with small dots. -
Linear Accents:
Add very thin, sketch-like outlines to just one side of some leaves or petals using diluted black or dark brown. This loose outlining emphasizes the illustrative style. -
Handle Accents:
Add a small floral motif or a single leaf creeping up the base of the handle and spill a tiny bit of pattern onto the spout. -
Final Inspection:
Check for any unwanted smudges and clean them up with a damp cotton swab. Ensure the speckles from the first step still show through in the negative spaces. -
Seal or Fire:
If using air-dry ceramic paints, apply a gloss varnish after 24 hours. If using underglazes, dip the piece in clear glaze and fire it in a kiln according to the clay manufacturer’s instructions.
Now brew your favorite tea and enjoy a cozy afternoon with your beautiful handmade creation
Dot Mandala Spotlight
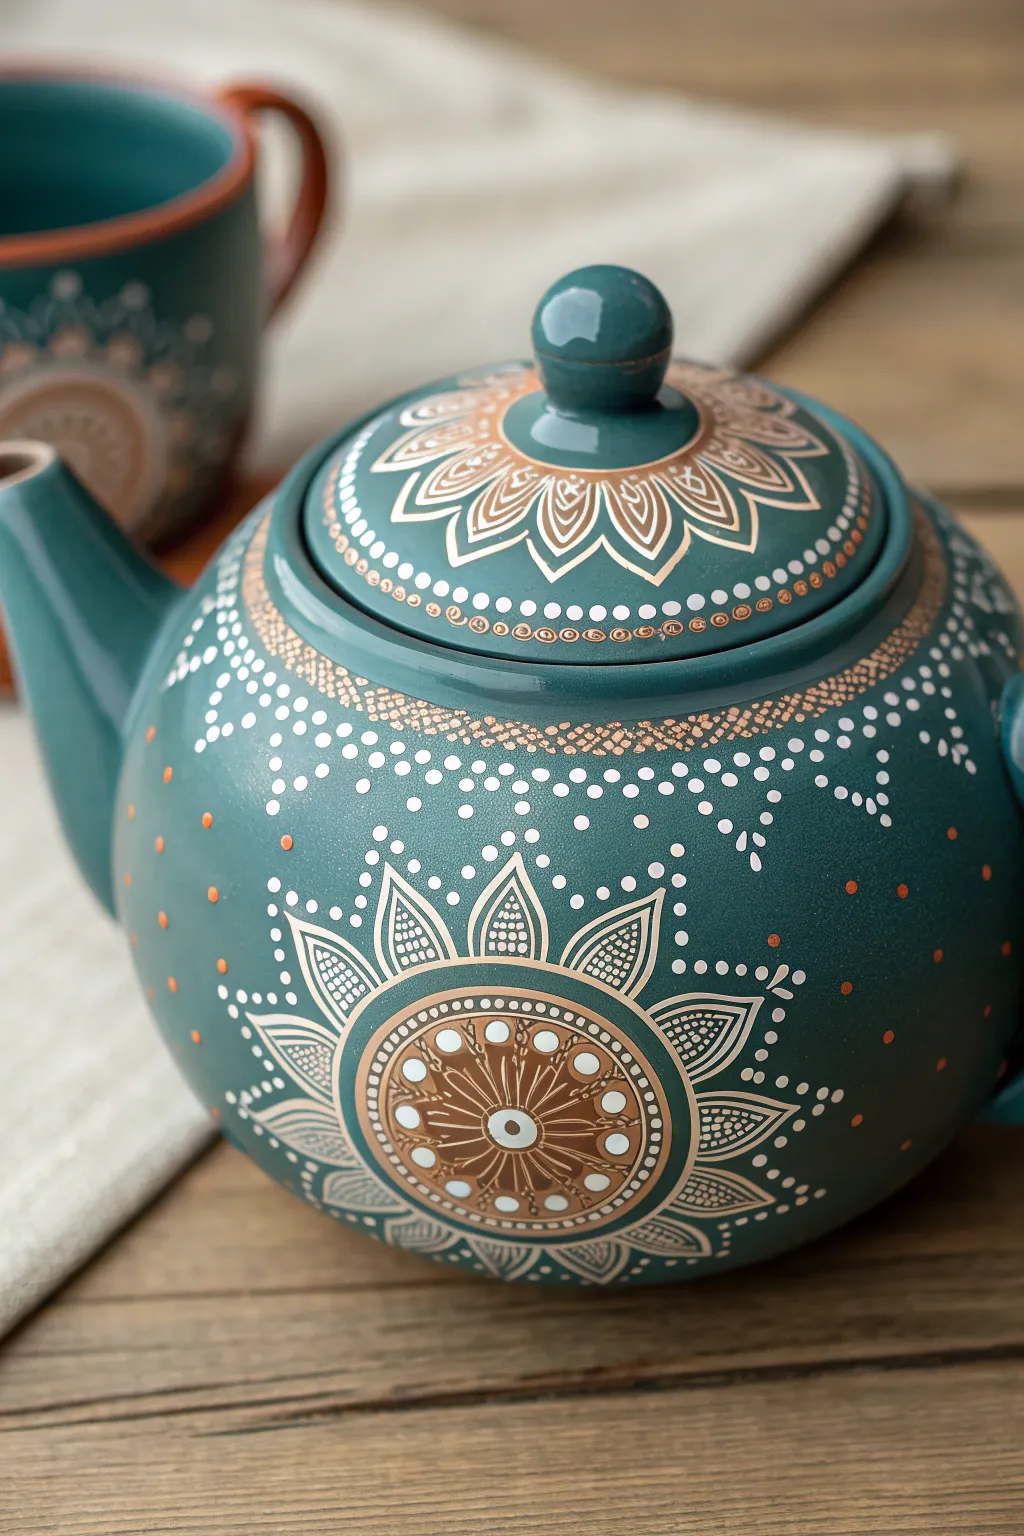
Transform a plain ceramic teapot into a stunning centerpiece with this intricate dot mandala design. Featuring a rich teal base accented with metallic copper, gold, and crisp white dots, this project combines symmetry with free-flowing elegance.
How-To Guide
Materials
- Ceramic teapot (clean, smooth surface)
- Multi-surface acrylic paints: Teal (base), Metallic Copper, Metallic Gold, Titanium White, Burnt Orange
- Dotting tools (various sizes from micro to large ball stylus)
- Fine liner brush (size 0 or 00)
- Compass and white chalk pencil (for guidelines)
- Rubbing alcohol and cotton pads
- High-gloss varnish (brush-on or spray)
- Palette
Step 1: Preparation & Base Coat
-
Prepare the surface:
Clean the entire teapot thoroughly with rubbing alcohol on a cotton pad to remove oils and fingerprints, ensuring the paint adheres properly. -
Apply base color:
Using a soft, wide brush, paint the teapot with the teal acrylic paint. You will likely need 2-3 coats for full opacity, letting each coat dry completely before applying the next. -
Mark guidelines:
Once fully dry, find the center point on the side of the pot. Use a compass with a chalk pencil to lightly draw concentric circles radiating from this center point to help align your mandala layers.
Uneven Dots?
If your dots have pointy peaks, your paint is too thick. Mix in a drop of pouring medium or water to smooth it out. For flat dots, reload the tool for every single dot.
Step 2: Painting the Main Mandala
-
Start the center:
Place a large white dot in the absolute center of your side design. Surround this with a ring of tiny metallic copper dots using your smallest tool. -
Create the sunburst core:
Paint thin, radiating lines extending outward from the center circle using metallic copper paint and a fine liner brush, creating a wheel-spoke effect. -
Add circle details:
Between these spokes, add medium-sized white dots. Outline the entire central circular section with a solid ring of copper paint. -
Form the petals:
Draw petal outlines extending from the central circle using the fine liner brush and copper paint. These should look like stylized sunflower petals. -
Fill the petals:
Inside each petal shape, use white paint and a very fine dotting tool (or toothpick) to create a mesh-like pattern of tiny dots. -
Add outer accents:
At the tip of each petal, place a single, distinct white dot. This helps define the starburst shape against the teal background. -
Expand the design:
Moving outward from the petal tips, create a dispersed pattern of white dots. Start these dots closer together near the petals and space them further apart as they move away to create a fading effect.
Go 3D
Use 3D fabric paint or ‘pearl’ pens for the white dots instead of standard acrylics. This creates actual tactile bumps that feel amazing to touch.
Step 3: Lid & Neck Detailing
-
Paint the lid center:
Paint the knob of the lid in a solid teal if it isn’t already. At the base of the knob, paint a ring of copper petals pointing outward. -
Detail the lid petals:
Just like on the pot body, fill these copper petal outlines with tiny white micro-dots for texture. I find a toothpick works best for these tiny areas. -
Add the neck band:
Where the lid meets the pot, create a decorative band. Use copper paint to create a crisscross or lattice pattern around the rim. -
Embellish the band:
Place tiny gold dots at the intersections of your lattice pattern to add sparkle and dimension. -
Draping dots:
Beneath the neck band, paint curved swags of white dots that ‘hang’ like a necklace, varying the dot size from large to small for a tapered look.
Step 4: Finishing Touches
-
Scattered highlights:
Fill any large empty teal spaces with sparse, random orange and copper dots to balance the composition without overcrowding it. -
Remove chalk lines:
Allow the paint to cure for at least 24 hours. Gently wipe away any visible chalk guidelines with a damp Q-tip. -
Seal the artwork:
Apply two coats of high-gloss varnish to protect the paint and give the teapot a professional ceramic glaze finish.
Once sealed, display your beautiful teapot proudly as a piece of functional art on your kitchen table
Bee and Blossom Garland
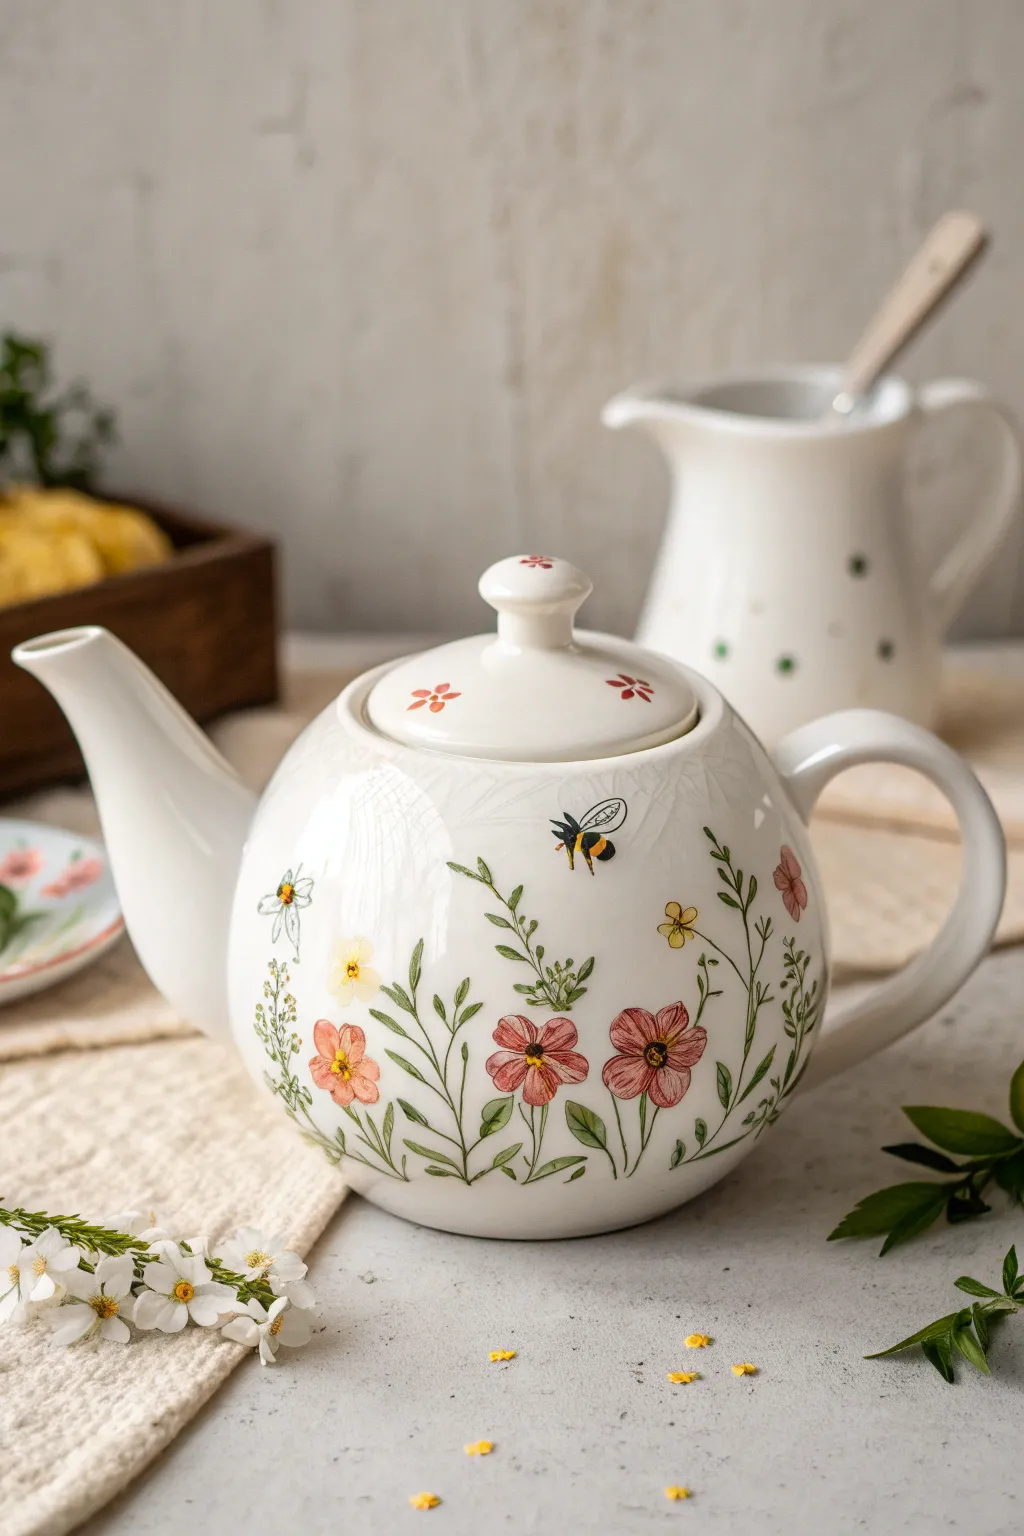
Transform a plain white teapot into a cozy meadow scene with this delicate floral design. Featuring whimsical wildflowers and a singular buzzing bee, this project uses ceramic paints to create a charming centerpiece for your afternoon tea.
Step-by-Step Guide
Materials
- White ceramic teapot (clean and dry)
- Porcelain or ceramic paints (water-based or oven-bake)
- Paint colors: Soft pink, rose red, golden yellow, sage green, olive green, black, white
- Fine detail brushes (size 0 and 00)
- Small round brush (size 2)
- Rubbing alcohol and cotton pads
- Paper palette
- Cup of water
- Pencil (optional)
Step 1: Preparation and Planning
-
Clean the surface:
Before putting brush to ceramic, wipe the entire exterior of the teapot with rubbing alcohol on a cotton pad. This removes invisible oils or fingerprints that prevent paint adhesion. -
Sketch the layout:
Using a very light touch with a pencil, map out the general curve of your garden. You don’t need to draw every petal, but mark the positions for the three large pink flowers and the central bee to ensure balanced spacing.
Paint Consistency Pro-Tip
If your ceramic paint feels thick or dragging, mix in a tiny drop of ceramic paint medium (not water) to smooth it out without breaking the binder.
Step 2: Painting the Greenery
-
Establish the stems:
Mix a small amount of sage green with a tiny drop of water to improve flow. Using your size 0 liner brush, paint thin, wavy vertical stems rising from the bottom edge of the teapot. -
Add leaf variety:
Vary your leaf shapes to create interest. For some stems, press the brush down and lift to create almond-shaped leaves; for others, dab small, quick strokes for a ferns-like texture. -
Darken for depth:
While the first layer is drying, mix a darker olive green. Go back in and add a few stems in the background or darken the base of the leaves to give the meadow depth. -
The wildflower buds:
At the tops of the thinner stems, add tiny clusters of dots in green to represent unopened buds or seed heads.
Level Up: 3D Texture
Use outliner relief paste for the flower centers or bee wings. This adds a raised, tactile element that makes the artwork pop off the smooth porcelain.
Step 3: Blooming the Flowers
-
Base petals for pink blooms:
Load the size 2 round brush with soft pink paint. Create the large five-petaled flowers by pressing the brush belly down and pulling toward the center. Don’t worry about complete opacity; a little transparency looks like watercolor. -
Yellow wildflower accents:
Rinse your brush and switch to golden yellow. Paint small, simple four-petal scatter flowers between the larger pink blooms to fill the gaps in the garland. -
White daisy details:
Using white paint, add a few small daisy-like shapes near the left side or edges of the composition. You might need two coats of white to make it stand out against the white ceramic if your paint is thin. -
Detailing the pink flowers:
Once the pink base is dry to the touch, use a fine liner brush with rose red or a darker pink. Paint fine lines radiating from the center of each petal outward to create texture and veining. -
Flower centers:
Dip the back end of a brush handle into black or dark brown paint and dot the centers of the pink and yellow flowers. Add tiny yellow highlights on top of the dark centers for dimension.
Step 4: The Bee and Finishing Touches
-
Paint the bee body:
Locate the empty spot above the flowers. Paint a small oval shape in yellow, and a smaller black circle for the head. -
Stripes and wings:
Wait for the yellow to dry completely so the colors don’t muddy. I like to use the finest brush available here to carefully paint two black stripes across the yellow body. Outline two delicate teardrop wings using a very watered-down gray or black. -
Lid decoration:
Don’t forget the lid! Paint three or four tiny, simplified versions of the red flowers scattered around the top curve to tie the design together. -
Curing the paint:
Follow the specific instructions on your paint bottle. Most ceramic paints require air drying for 24 hours, followed by baking in a home oven (usually around 300°F/150°C for 35 minutes) to make the design dishwasher safe.
Enjoy your beautifully personalized teapot during your next relaxing tea break
Tea Leaf Pattern Repeat
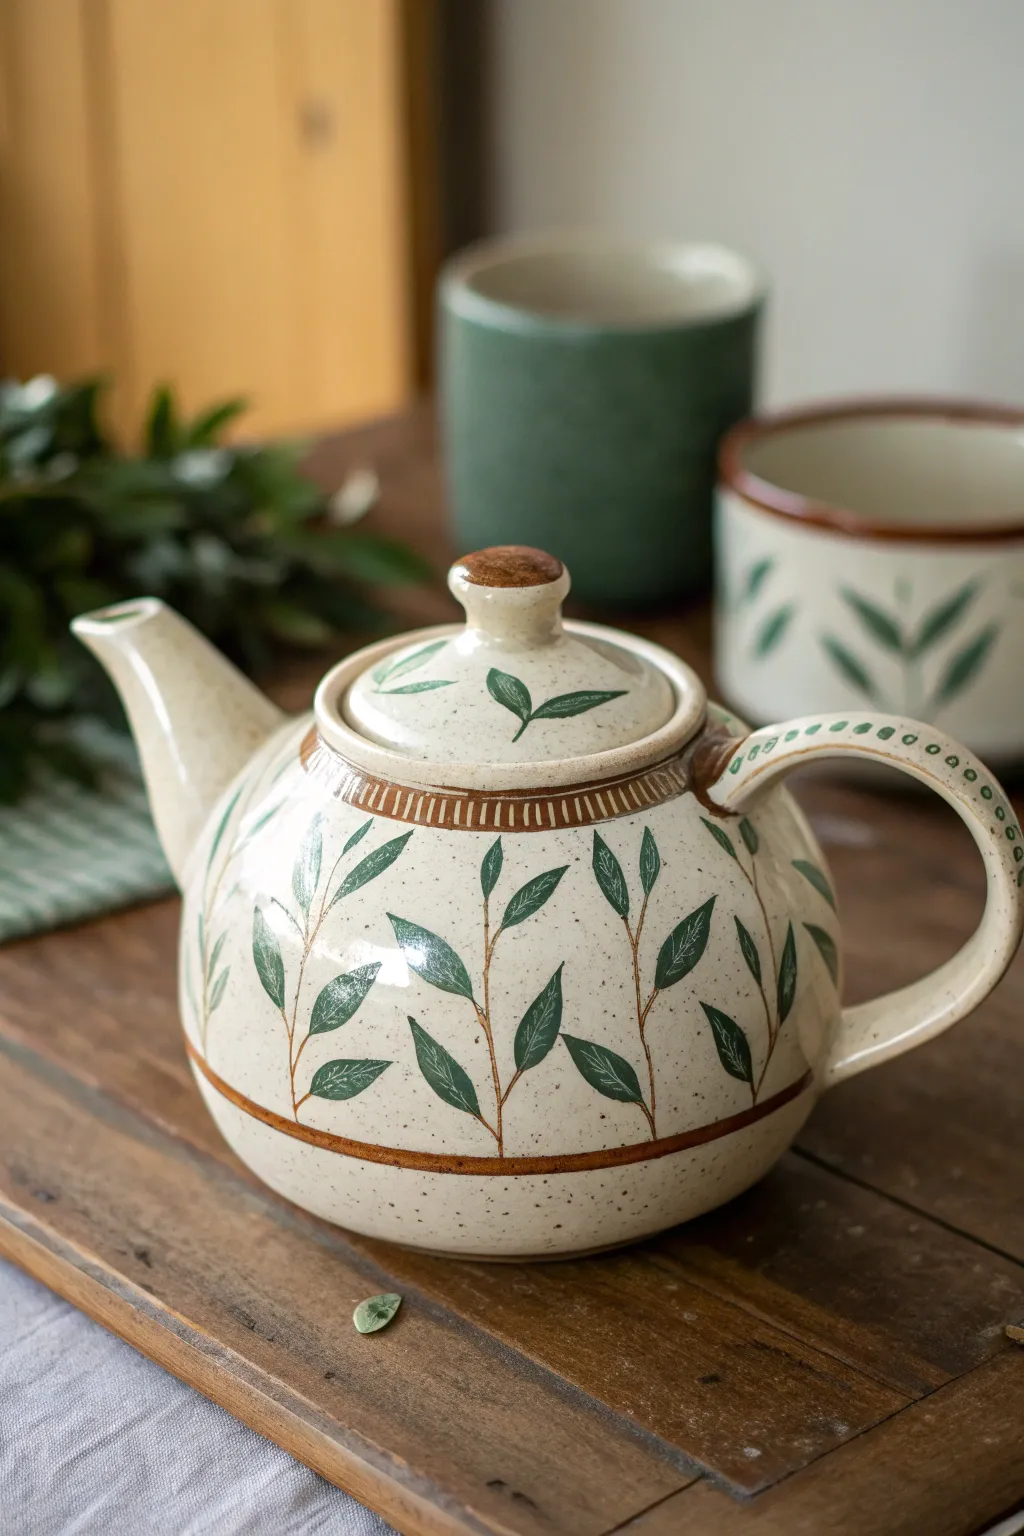
Transform plain ceramic ware into a cozy tea-time essential with this delicate leaf motif. The speckled cream base and rhythmic green foliage create an earthy, organic look that feels both rustic and refined.
Detailed Instructions
Materials
- Bisque ceramic teapot (or glazed ceramic if using enamel paints)
- Underglaze (Cream/Speckled White, Forest Green, Burnt Sienna)
- Clear dipping glaze
- Fine liner brush (size 0 or 00)
- Small round brush (size 2)
- Medium flat brush
- Pencil
- Lazy Susan or banding wheel (optional)
Step 1: Base Preparation
-
Clean surface:
Begin by wiping down your bisque teapot with a slightly damp sponge. This removes any dust that could prevent the glaze from adhering properly. -
Apply base color:
Using a medium flat brush, apply three even coats of a speckled cream or oatmeal underglaze over the entire exterior. I like to let each coat dry until it’s chalky to the touch before adding the next. -
Mark guidelines:
Once the base is fully dry, lightly sketch horizontal guide lines with a pencil around the belly of the teapot where your leaf patterns will sit. The pencil lead will burn off in the kiln.
Brushwork Secret
Load your brush fully but wipe the tip once. Press down firmly for the leaf belly, then lift quickly for a sharp point.
Step 2: Painting the Structure
-
Create the bottom border:
Mix a small amount of Burnt Sienna underglaze. Using a steady hand or a pottery wheel to spin the pot, paint a medium-thick band around the lower third of the teapot. -
Add the top border:
Paint a similar brown band around the collar of the teapot, just below where the lid sits. -
Detail the collar:
Above the top brown band, use your fine liner brush to add small vertical tick marks, creating a ‘piano key’ effect around the rim. -
Paint the stems:
Using the Burnt Sienna and a liner brush, paint thin, vertical stems rising from the bottom border. Keep them slightly wavy and organic rather than perfectly straight. -
Branch out:
Add small Y-shaped branches stemming off the main vertical lines. Stagger them so the pattern doesn’t look too grid-like.
Variation Idea
Try using an autumnal palette instead! Swap the forest green for rusty oranges and deep ochres for a fall-themed set.
Step 3: Adding Foliage & Finish
-
Start the leaves:
Switch to your Forest Green underglaze. Use the round brush to press and lift, creating teardrop-shaped leaves at the tip of each brown branch. -
Refine the shape:
Go back over the leaves to sharpen the tips. They should look crisp and pointed, not rounded. -
Veining detail:
For extra dimension, you can use a fine sgraffito tool to gently scratch a center line through the wet green paint, revealing the cream underneath, or simply leave them solid as shown here. -
Decorate the lid:
Repeat a simplified version of the leaf pattern on the lid. Paint a single leaf or two floating on the curve, and paint the handle of the lid solid brown. -
Handle details:
On the main teapot handle, use the tip of your round brush to dot green spots in a line following the curve of the handle. -
Final drying:
Allow all decoration to dry completely, preferably overnight. The underglaze should feel totally dry and room temperature. -
Glazing:
Dip the entire piece into a clear transparent glaze. Ensure you shake off excess drips quickly. -
Fire the piece:
Fire the teapot in a kiln according to the clay and glaze manufacturer’s instructions (usually Cone 5 or 6 for stoneware).
Brew your favorite blend and enjoy the charm of your handmade tea service
Cherries on the Lid and Spout
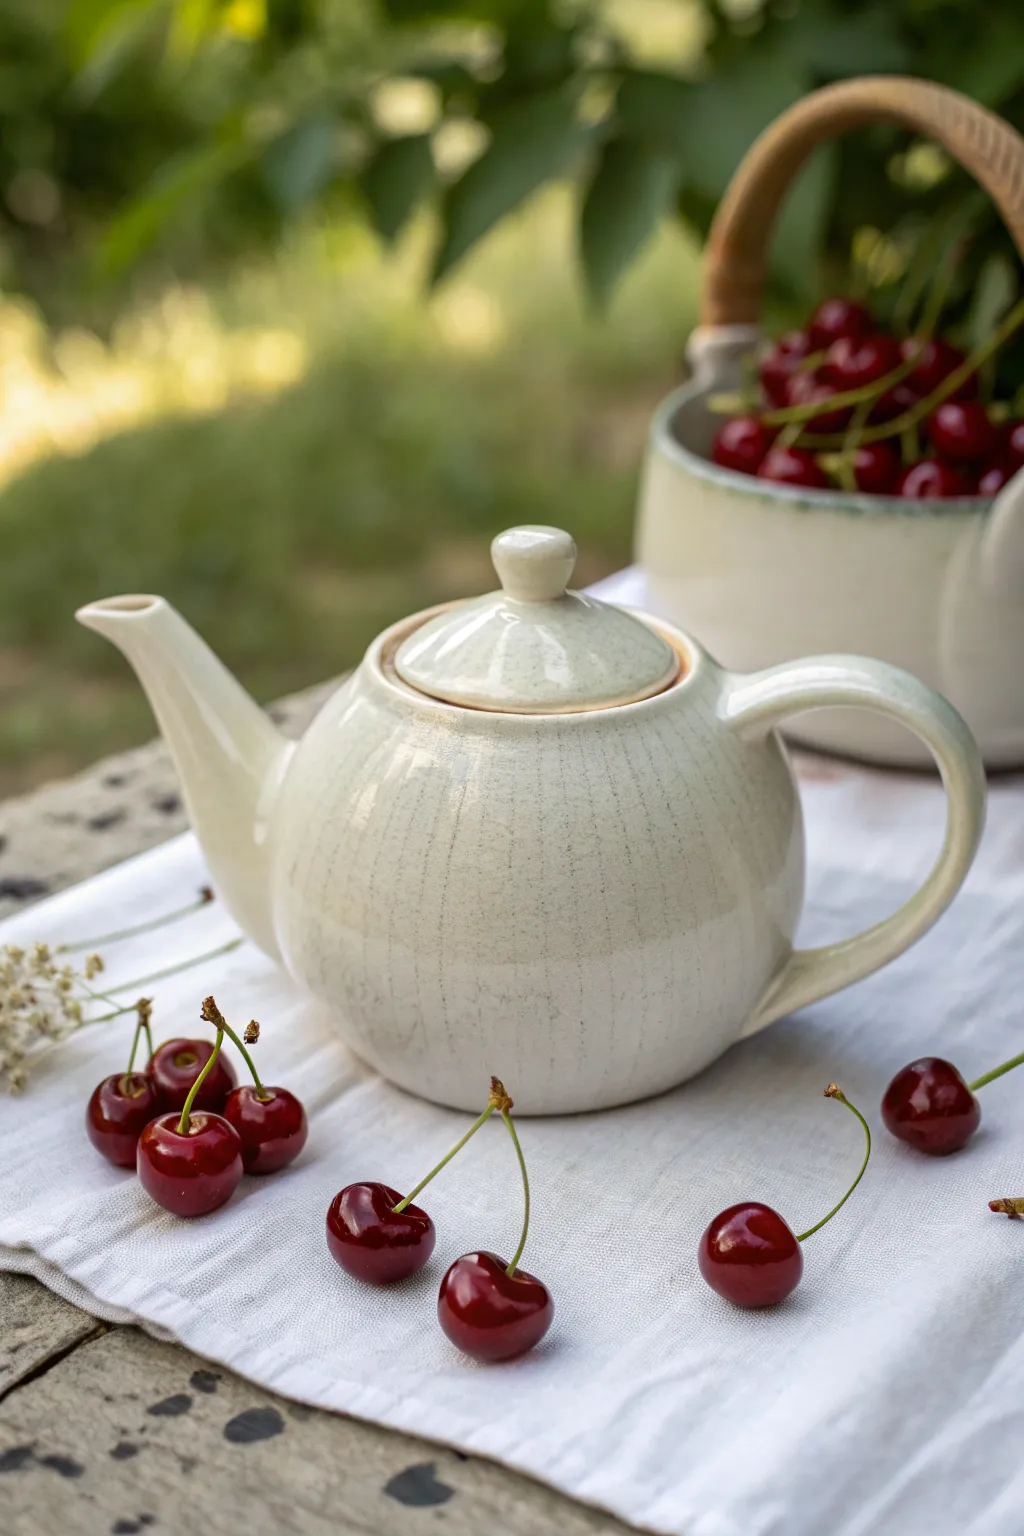
Bring a touch of summer harvest to your tea time with this minimalistic design featuring luscious cherries. By focusing on delicate details on the lid and spout rather than covering the whole pot, you create an elegant, nature-inspired piece that feels fresh and modern.
Step-by-Step
Materials
- White ceramic teapot (clean and dry)
- Ceramic or porcelain paints (Dark Red, Crimson, Leaf Green, Brown, White)
- Rubbing alcohol and cotton pads
- Fine liner brush (size 0 or 00)
- Small round brush (size 2)
- Glazed ceramic sealer (optional, bake-on)
- Palette or small plate
- Water cup and paper towels
Step 1: Preparation & Planning
-
Clean the surface:
Before you start painting, it is crucial to remove any oils or fingerprints from the ceramic. Wipe the lid, spout, and upper rim of the teapot thoroughly with rubbing alcohol on a cotton pad. -
Visualize placement:
Decide where your cherries will rest. For this look, plan for a small cluster of two or three cherries sitting right on the rim of the lid, perhaps with a stem trailing down, and a singular cherry near the spout opening. -
Practice your shapes:
I usually grab a piece of scrap paper to practice the round cherry shapes and thin, curving stems to ensure my hand is steady before touching the ceramic.
Fixing Smudges
Wet paint on slick ceramic can slide. If you smudge a cherry, wipe it away immediately with a damp Q-tip dipped in alcohol, let dry, and repaint.
Step 2: Painting the Fruit
-
Base layer for cherries:
Using your small round brush, mix a bit of Dark Red with Crimson. Paint small, perfect circles on the lid rim and near the spout. Keep them opaque but not too thick to avoid drips. -
Adding dimension:
While the red is still slightly wet, dip the very tip of your brush into a tiny amount of darker red or purple. Blend this into the bottom curve of each cherry to create a shadow effect. -
Create the shine:
This is the most important detail for realism. Take your fine liner brush with a tiny dot of White paint. Add a small, curved highlight near the top left or right of each cherry to make it look glossy and wet. -
Let it dry:
Allow the red paint to dry completely (about 20-30 minutes) so you don’t smudge your work while painting the stems.
Step 3: Stems & Greenery
-
Mixing stem color:
Mix a light brown with a touch of green on your palette. You want a natural, woody stem color. -
Drawing the stems:
Using the fine liner brush, paint thin lines extending from the tops of your cherries. For the lid cluster, have the stems meet at a central point; for the spout, let the stem curb gracefully along the ceramic form. -
Adding connection points:
Paint a tiny, slightly thicker nub where the stem meets the fruit. You can add a speck of brown here to show that little indentation found on real cherries. -
Leaf details:
If you wish, add a single small green leaf at the junction where stems meet. Use a ‘press and lift’ motion with the round brush to create a simple leaf shape.
Level Up: Texture
Create a vintage look by lightly sponging a faint, speckled cream color over the white ceramic before painting the cherries to mimic aged stoneware.
Step 4: Finishing & Curing
-
Review and refine:
Look over your work. If edges look messy, you can gently scratch away excess dried paint with a wooden toothpick or clean up with a damp cotton swab. -
Curing process:
Follow the specific instructions on your ceramic paint bottle. Most require air drying for 24 hours, followed by baking in a home oven (usually around 300°F/150°C for 30 minutes) to make the design dishwasher safe. -
Cool down:
Leave the teapot in the oven while it cools down completely to prevent thermal shock and cracking.
Now you have a charming custom teapot that looks perfect for a garden tea party
Soft Watercolor Wash Look
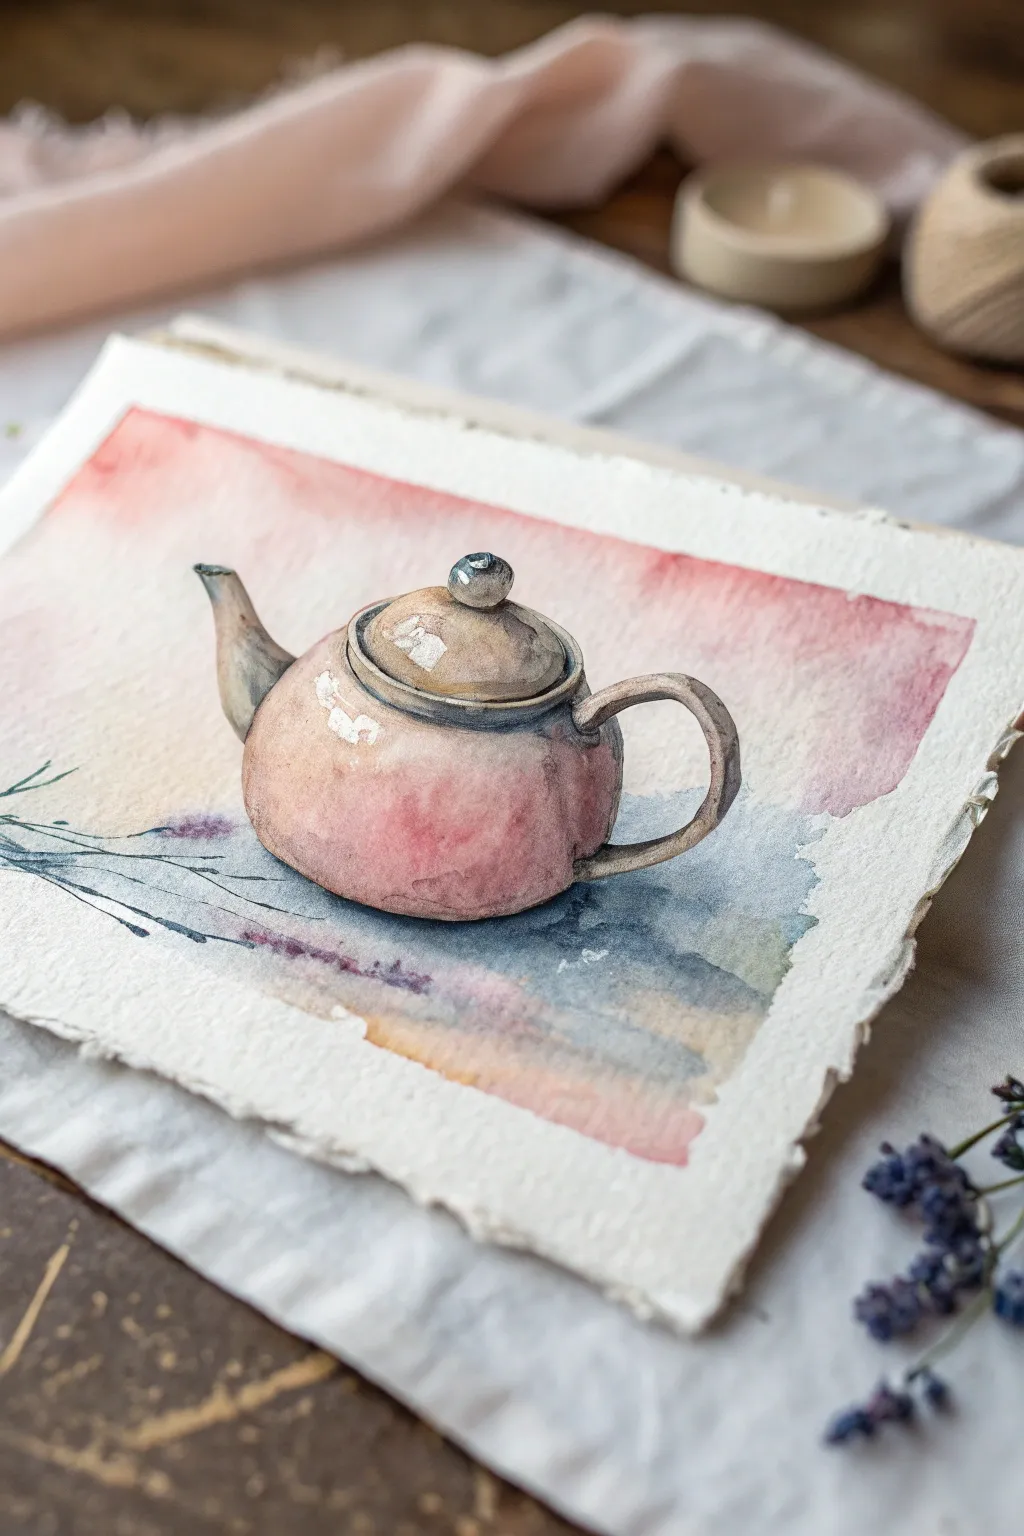
This project explores the beautiful interplay between a soft, atmospheric background and a sharply defined, dimensional subject. By layering watercolor glazes on textured paper, you will create a teapot that appears to pop right off the page.
Step-by-Step Guide
Materials
- Cold press watercolor paper (deckle edge preferred)
- Watercolor paints (Payne’s Gray, Indigo, Burnt Sienna, Rose Madder/Alizarin Crimson, Lavender)
- Round brushes (sizes 2, 6, and 10)
- Pencil (HB or 2H)
- Kneaded eraser
- White gouache or white gel pen for highlights
- Two jars of water
- Paper towel
Step 1: Preparation and Sketching
-
Prepare your paper:
If you are using a loose sheet of deckle-edge paper, tape it down lightly to a board to prevent buckling, but leave the rough edges visible. -
Sketch the silhouette:
Using your pencil, lightly draw the outline of the teapot. Focus on the round, squat body, the curved spout, and the handle loop. -
Refine the lid details:
Sketch the lid sitting slightly inside the rim, adding the distinct round knob on top. Keep lines faint so they don’t show through the transparent paint later. -
Add environmental lines:
Draw faint horizon lines and hints of branches or lavender stems in the lower left corner to ground the composition.
Pro Tip: Lost and Found Edges
Let the background wash slightly overlap the teapot’s edge in shadow areas, but keep the lit side crisp. This variety makes the object feel more integrated into the space.
Step 2: Painting the Background
-
Wet the background area:
Using clean water and your size 10 brush, wet the paper around the outside of the teapot sketch. Avoid getting water inside the teapot shape. -
Apply the warm wash:
Drop in a watery mix of Rose Madder or light red into the upper section of the background. Let it bloom and spread naturally into the wet paper. -
Introduce cool tones:
While the paper is still damp, introduce a mix of Payne’s Gray and Lavender to the lower section to create a soft, abstract ground. -
Soften the edges:
Allow the colors to bleed out toward the deckle edges of the paper, but stop before you reach the absolute edge to leave a nice white border. -
Add vague foliage:
With a smaller brush and a slightly thicker mix of indigo/gray, paint very loose, twig-like lines into the damp wash on the left side so they blur softly. -
Let it dry completely:
This is crucial. The background must be bone dry before you start painting the main subject to ensure crisp edges.
Step 3: Painting the Teapot
-
Base layer of the body:
Mix a diluted warm pink/terracotta color. Paint the entire body of the teapot, leaving small white gaps for potential high-contrast highlights. -
Establish the shadows:
While the base is damp, drop a mix of Burnt Sienna and a touch of Purple into the bottom curve and the right side of the pot to create volume. -
Paint the lid and rim:
Use a cooler gray tone for the rim of the teapot. Paint the lid with a mix of brown and gray, darkening the edges where the lid meets the pot. -
Detail the spout and handle:
Paint the spout and handle with your gray/brown mix. Notice how the handle gets darker underneath; adding this shadow helps it look rounded rather than flat. -
Deepen the shadows:
Once the first layer is dry, mix a stronger, less watery shadow color (Indigo and deep red). Glaze this over the darkest parts of the teapot belly and under the rim. -
Add texture marks:
Using a dry brush technique with thicker paint, gently scumble some texture onto the side of the pot to mimic an aged ceramic surface.
Troubleshooting: Bloom Marks
If you get ‘cauliflower’ blooms in your wash, don’t panic. Wait for it to dry, then gently scrub the edge with a damp stiff brush to soften the unwanted texture.
Step 4: Final Details and Highlands
-
Define the crevices:
Use your smallest brush (size 2) and a dark pigment to outline the separation between the lid and the pot, and the base of the knob. -
Ground the object:
Paint a sharp, dark cast shadow directly underneath the teapot using a concentrated dark blue-gray. This anchors the object to the surface. -
Add final highlights:
Using white gouache or a gel pen, add crisp reflection points on the knob, the curve of the lid, and the widest part of the teapot body. -
Review and refine:
Step back to see if the contrast is strong enough. I usually find I need to darken the shadow right under the object one last time.
Now you have a charming, rustic teapot illustration ready to be framed or gifted
Stenciled Damask-Inspired Motifs
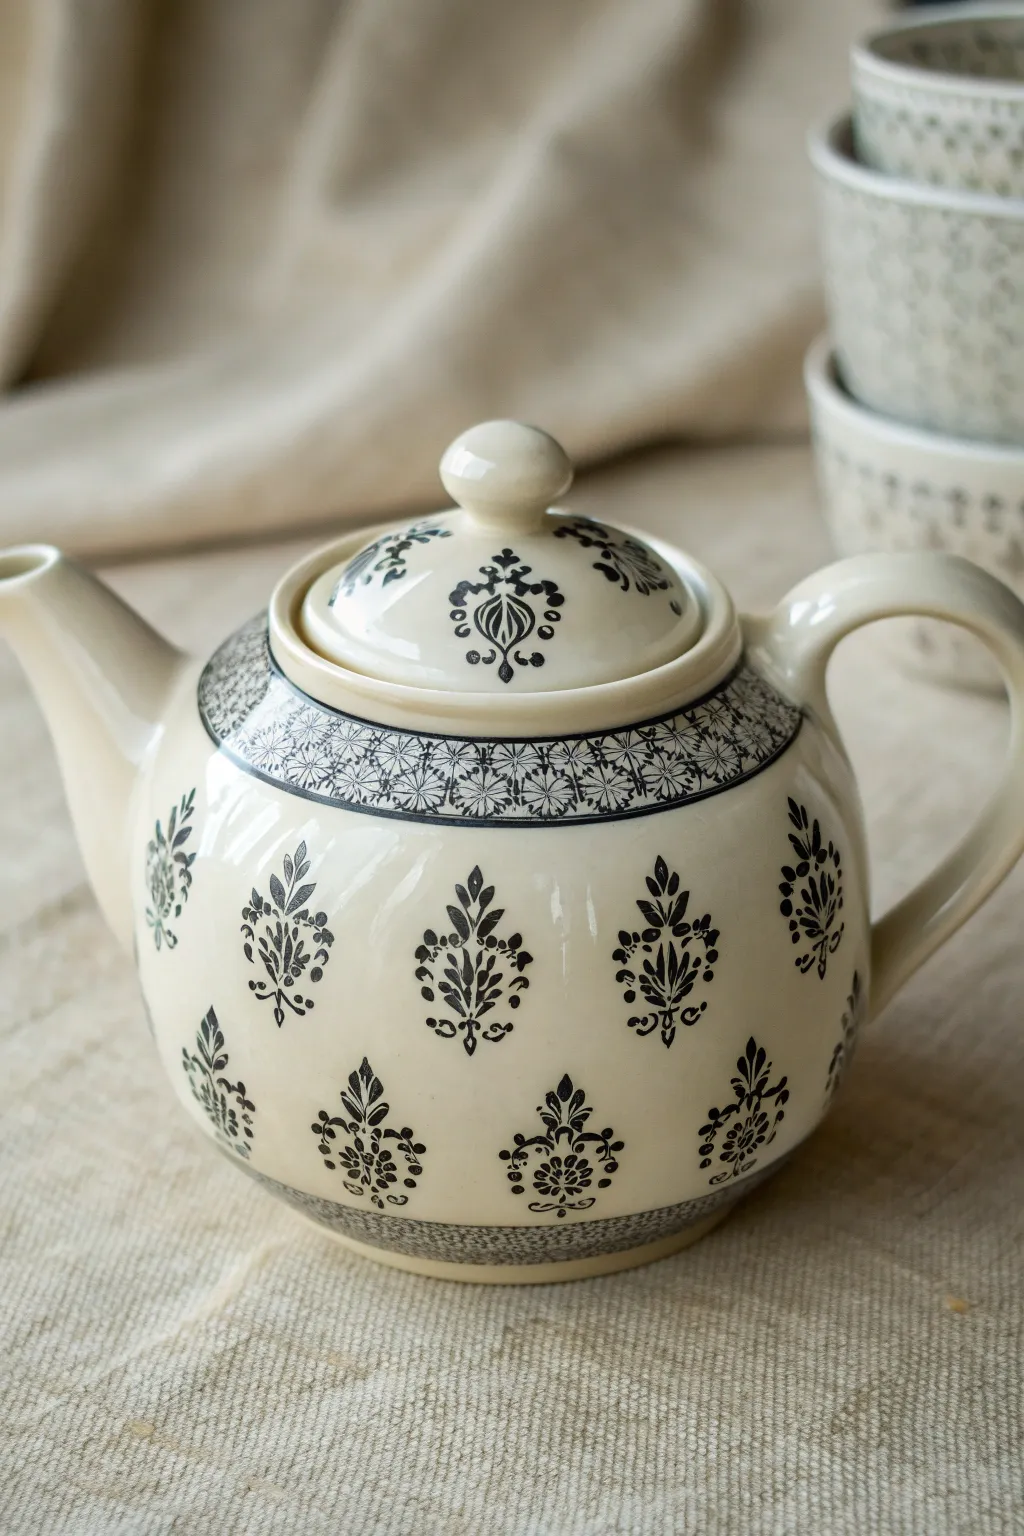
Transform a plain ceramic teapot into a timeless centerpiece with this sophisticated stenciling project. By layering intricate black damask motifs over a creamy base, you’ll achieve a high-end, hand-painted look that rivals expensive boutique pottery.
Step-by-Step Tutorial
Materials
- Plain cream or off-white ceramic teapot (glazed)
- Peel-and-stick stencils (small damask/floral medallion designs)
- Peel-and-stick stencil border strip (geometric/floral)
- Black porcelain or glass paint (opaque)
- High-density foam pouncers or stencil brushes (small size)
- Rubbing alcohol and cotton pads
- Painter’s tape
- Cotton swabs (for cleanup)
- Oven (for curing, if paint requires)
Step 1: Preparation & Planning
-
Clean surface:
Begin by thoroughly wiping down the entire teapot with rubbing alcohol and a cotton pad. This removes any invisible oils or fingerprints that could prevent the paint from adhering properly. -
Map out spacing:
Before peeling any stencils, hold your damask motifs against the teapot to visualize spacing. You want a consistent ‘polka dot’ style arrangement where the motifs are evenly staggered around the belly of the pot. -
Mark positions:
Use small pieces of painter’s tape to mark the center point of where each main motif will go, creating a grid-like guide to keep your pattern vertical and straight.
Fixing Smudges
If paint bleeds under the stencil, don’t panic. Wait for it to dry slightly, then use a toothpick to gently scrape the excess paint off the glazed ceramic cleanly.
Step 2: Stenciling the Body
-
Apply the first stencil:
Peel the backing off your main damask stencil and press it firmly onto the flattest part of the teapot’s curve. Rub over the edges well to ensure a tight seal, preventing paint bleed. -
Load the pouncer:
Dip your foam pouncer into the black porcelain paint, then dab almost all of it off onto a paper towel. The sponge should feel almost dry to the touch—this is the secret to crisp lines. -
Stipple the paint:
Using a straight up-and-down motion, lightly tap the paint through the stencil openings. Build up opacity slowly with thin layers rather than one thick glob. -
Remove and repeat:
Carefully peel back the stencil while the paint is still slightly wet. Move to the next marked spot and repeat the process around the middle circumference of the teapot. -
Clean stencil:
If paint starts building up on the stencil edges after a few uses, gently wipe it clean or wash and dry it before continuing. This keeps your lines sharp. -
Add the lower row:
Once the middle row is dry to the touch, offset your placement for the lower row, placing these motifs in the gaps between the upper ones.
Step 3: Adding Detail & Borders
-
Tape the upper border:
Apply your geometric border stencil around the shoulder of the teapot, just below the lid opening. Use painter’s tape to mask off areas you don’t want painted if the stencil strip is too wide. -
Stipple the border:
Fills in the border using the same ‘dry brush’ pouncing technique. Since this surface is often curved, work in small sections, pressing the stencil down as you go. -
Create the bottom rim:
Apply a matching border stencil or a simple line of paint near the base of the teapot to anchor the design visually. -
Decorate the lid:
Place a single, smaller damask motif centered on the lid. Curve the flexible stencil around the knob carefully to get good contact. -
Add knob accents:
I like to finish the look by very lightly stippling the very top of the steam hole or knob handle, tying the lid into the rest of the piece.
Vintage Look
For an aged, antique appearance, lightly sand the dried black paint with fine-grit sandpaper before baking to create a distressed, worn effect.
Step 4: Finishing Touches
-
Clean edges:
Inspect your work for any smudges or ‘fuzzy’ edges. Use a damp cotton swab or a toothpick to gently scrape away excess paint before it fully hardens. -
Dry time:
Allow the teapot to air dry for at least 24 hours (or as specified by your paint manufacturer) before handling. -
Bake to cure:
To make the design dishwasher safe, place the teapot in a cool oven, set the temperature to 300°F (150°C), and bake for 30 minutes. Let it cool completely inside the oven.
Now brew your favorite blend and enjoy serving tea with a stunning piece of art you created yourself.
Sponge-Stippled Speckle Glaze Effect
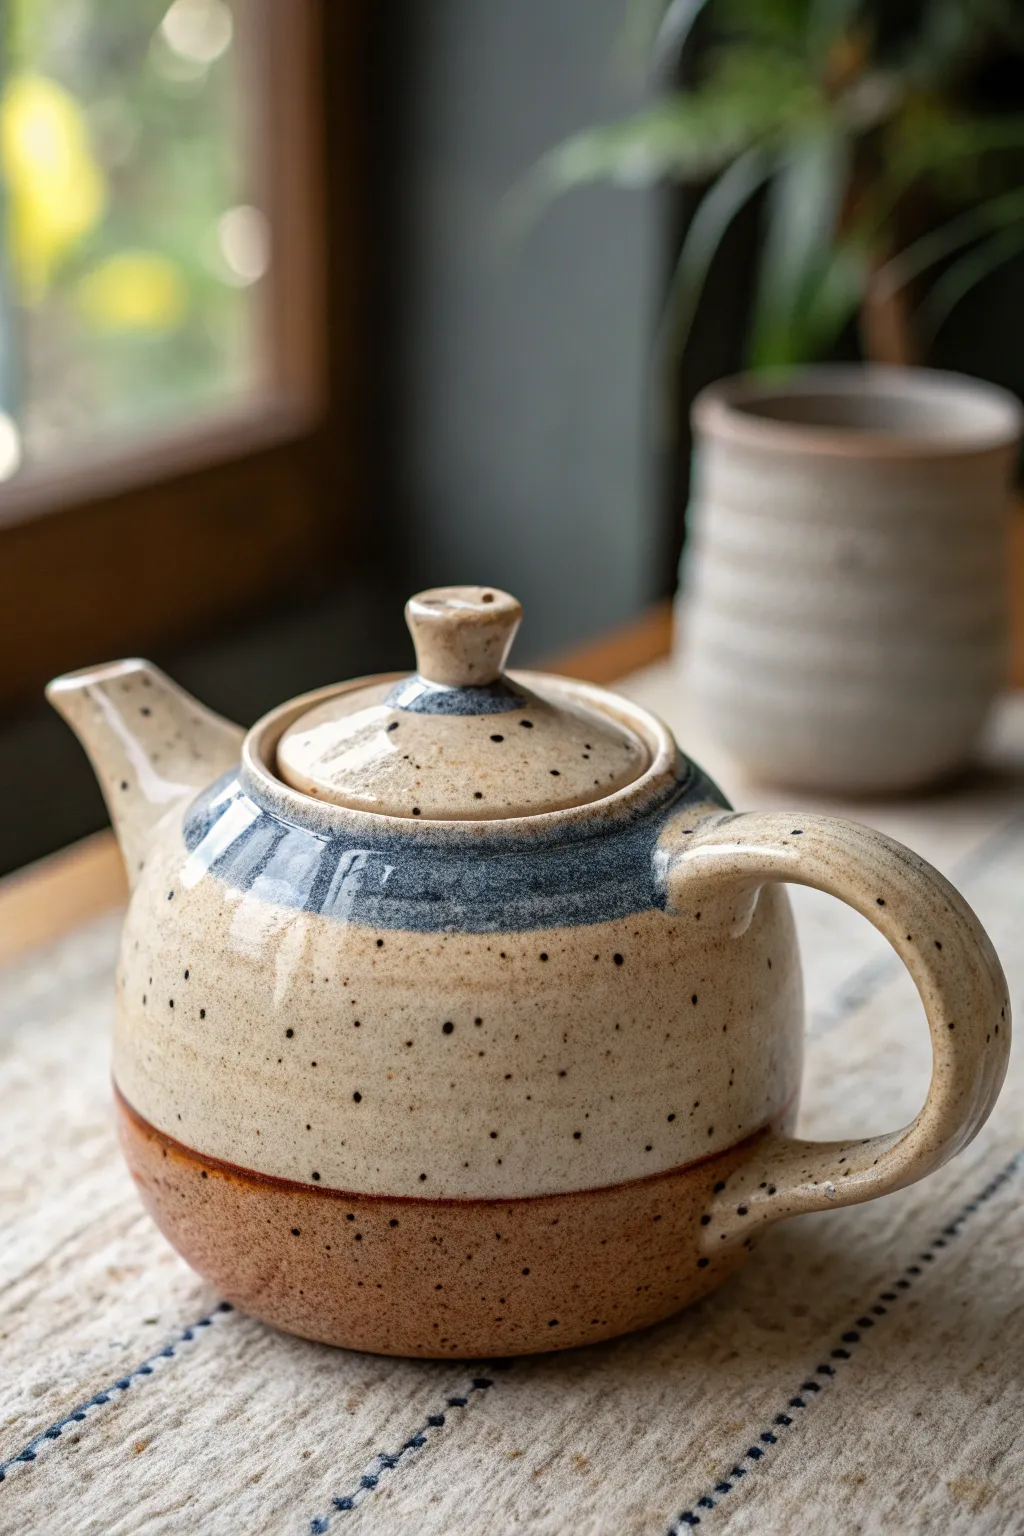
Embrace the rustic charm of handmade pottery without needing a kiln with this clever painting technique. You’ll layer warm earth tones and a unique stippling method to mimic the look of speckled stoneware glaze, creating a cozy focal point for your kitchen table.
Detailed Instructions
Materials
- Ceramic teapot (bisque or a plain white glazed one, cleaned thoroughly)
- Acrylic craft paints (terracotta/burnt sienna, cream/warm beige, slate blue)
- Black liquid acrylic paint or ink
- Satin or gloss spray sealer (food-safe if for actual use)
- Small sea sponge or stippling brush
- Soft synthetic flat brushes
- Painter’s tape (low tack)
- Old toothbrush
- Palette or paper plate
- Water cup and paper towels
Step 1: Base Coat and Color Blocking
-
Prep the surface:
Begin by cleaning your teapot thoroughly with soapy water and drying it completely. If you are painting over a slick glazed surface, gently sand it with fine-grit sandpaper to give the paint some tooth. -
Tape the bottom section:
Decide how high you want your bottom earthy band to go—usually about one-third up the pot. Apply a strip of painter’s tape horizontally around the circumference of the teapot to create a crisp line. -
Paint the base terracotta:
Using a flat brush, paint the bottom exposed section below the tape with your terracotta or burnt sienna paint. This mimics the look of raw clay found in traditional pottery. Apply two coats for solid opacity. -
Apply the creamy middle:
Once the bottom is dry to the touch, remove the tape. Now, paint the large middle section of the teapot, including the spout and handle, with your warm cream or beige paint. Carefully cut in along the terracotta line for a clean edge. -
Add the blue accent band:
Near the top rim or shoulder of the teapot, paint a freehand band of slate blue. It doesn’t need to be perfectly straight; a slightly organic, wavy edge adds to the hand-thrown aesthetic. Blend the bottom edge of the blue slightly into the cream while the paint is still wet for a soft transition. -
Paint the lid:
Paint the main dome of the lid in the same cream color and the knob in the terracotta shade. You can add a small ring of blue around the base of the knob to tie the design together.
Uneven Splatter?
If your toothbrush creates streaks instead of dots, the paint is too thick. Add a drop more water. If dots are too big, dab off excess paint on a paper towel first.
Step 2: Creating the Speckled Glaze Texture
-
Prepare the speckle mix:
Dilute a small amount of black acrylic paint or ink with water until it has a milky consistency. You want it fluid enough to flick but pigmented enough to show up. -
Test your splatter:
Dip an old toothbrush into the black mixture. Hold it over a piece of scrap paper and run your thumb across the bristles to test the spray pattern. You aim for a mix of tiny dots and slightly larger uneven spots. -
Splatter the teapot:
Holding the toothbrush about 6-8 inches away, gently flick the speckles over the entire teapot. Rotate the pot as you go to ensure even coverage. -
Control the density:
I prefer to apply more speckles on the cream and blue sections to mimic how iron flecks appear in reduction firing. Go lighter on the terracotta bottom section. -
Add larger textural spots:
Dip the very tip of a stiff paintbrush or a toothpick into undiluted black paint. Randomly touch it to the surface to create a few larger, more distinct freckles amongst the fine mist. -
Refine the surface:
If any speckles land where you don’t want them or look too smeared, quickly dab them away with a damp Q-tip before they dry.
Pro Tip: Authentic Depth
Mix a tiny drop of brown into your black splatter mix. Pure black can look flat, but a deep brownish-black looks more like natural iron deposits in clay.
Step 3: Finishing and Sealing
-
Let it cure:
Allow the paint to dry completely, ideally overnight. This ensures the underlying layers won’t lift when you apply the sealer. -
Apply a gloss coat:
To truly mimic the look of fired ceramic glaze, apply a high-gloss varnish to the cream and blue sections. Use a soft brush to avoid brushstrokes. -
Matte the bottom:
For the terracotta bottom, use a matte varnish or leave it unsealed (if purely decorative) to maintain the contrast between the shiny ‘glazed’ top and the matte ‘raw clay’ bottom. -
Final inspection:
Check for any missed spots or uneven shine. Add a second coat of gloss if needed to get that wet, glassy finish.
Place your newly painted pot by a sunny window and enjoy the warm, artisanal vibe it brings to your space
Marbled Swirls on a Curved Surface
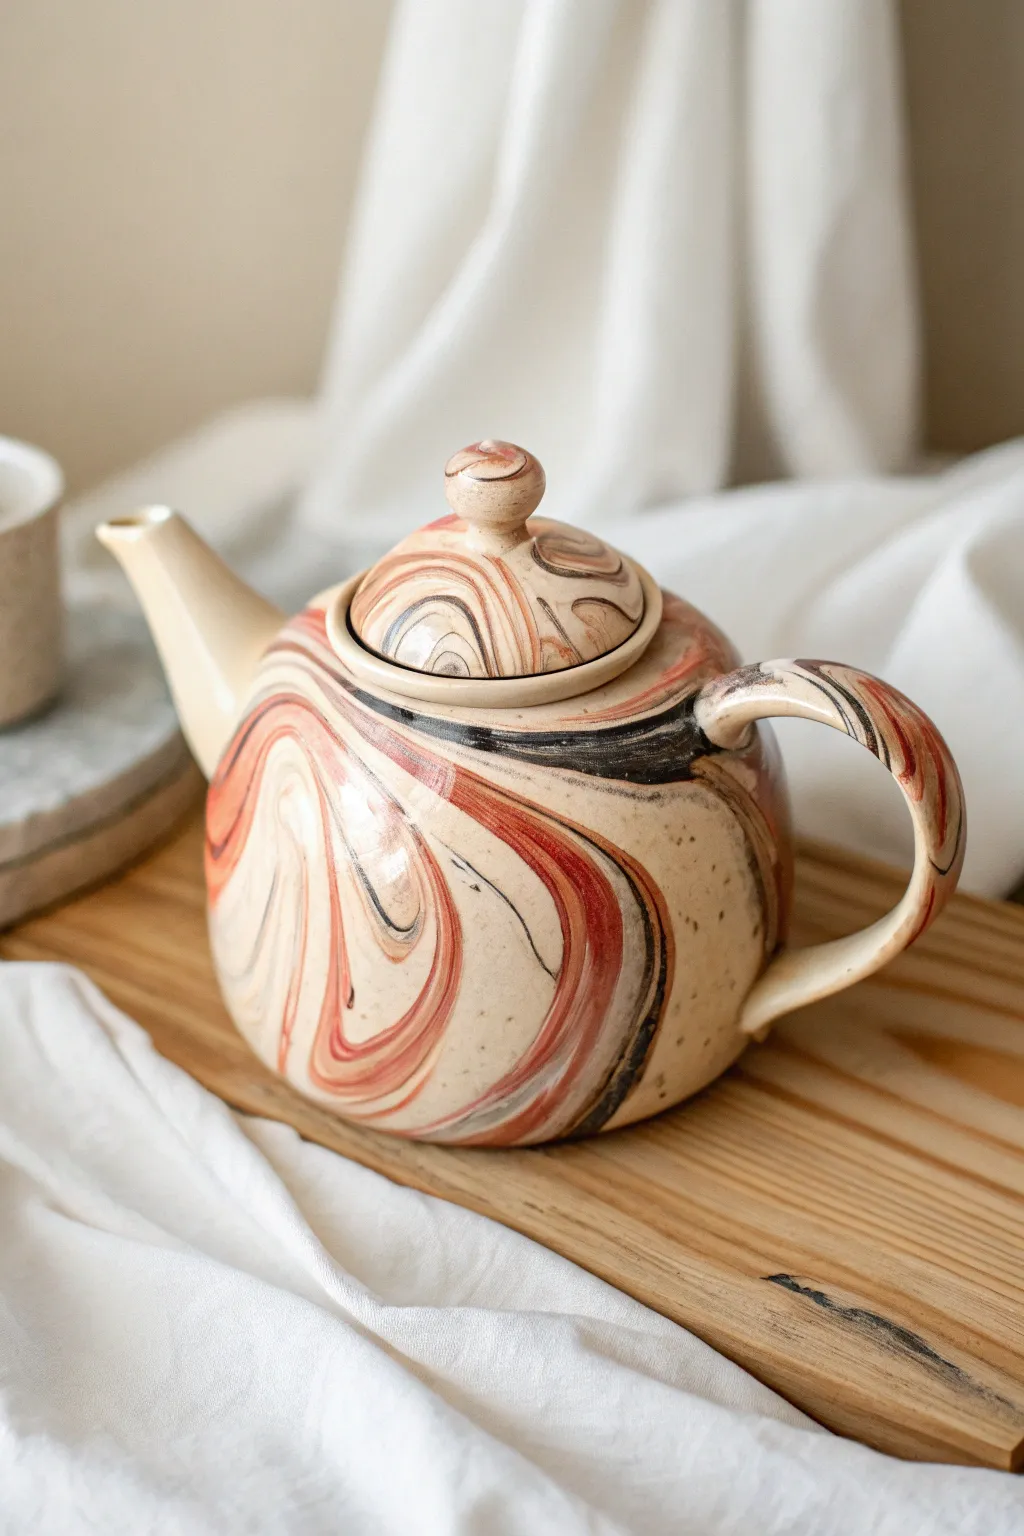
Transform plain ceramic into a stunning focal piece with this fluid marbling technique featuring warm rust, charcoal, and creamy beige tones. The result captures the organic movement of agate stone, wrapping beautifully around the teapot’s curved surface.
How-To Guide
Materials
- Plain bisque or glazed ceramic teapot (beige or cream base is ideal)
- Pebeo ceramic paints or high-quality acrylic enamels (Rust/Copper, Black, Cream/Beige)
- Pouring medium (if using acrylics)
- Large plastic bin or deep basin (for dipping)
- Water (for hydro-dipping method)
- Wooden skewers or toothpicks
- Painter’s tape
- Clear gloss ceramic sealer or spray varnish
- Gloves
- Degreaser or rubbing alcohol
- Paper towels
Step 1: Preparation
-
Clean the Surface:
Before you begin, wipe down the entire teapot with rubbing alcohol or a mild degreaser. This removes any finger oils or dust that might repel the paint and ensures a perfect bond. -
Masking Off:
Carefully apply painter’s tape to areas you want to keep paint-free. I usually tape off the very bottom rim and sometimes the inside of the spout to keep the pouring clean. -
Prepare the Lid Separately:
Roll a small piece of tape into a loop and stick it to the underside of the lid handle, or tape the underside of the lid completely so paint doesn’t get into the part that sits in the teapot.
Water Temperature Matters
Use lukewarm water for your dipping bath. Cold water can verify the paint too fast, causing clumps, while hot water can break down the binder.
Step 2: Creating the Marble Bath
-
Set Up the Basin:
Fill your plastic bin with enough room-temperature water to completely submerge the teapot. Make sure the container is deep enough so the teapot doesn’t hit the bottom. -
Prepare the Paints:
If you are using specific marbling paints, shake them well. If using acrylic enamels, mix them with a pouring medium until they have a fluid, milk-like consistency that floats easily. -
Drop the Colors:
Start by dripping your dominant color (the cream or beige) onto the surface of the water. Let it spread out naturally. -
Add Accent Tones:
Drop in the rust or copper paint into the center of the cream. Follow this with smaller drops of black or charcoal. Do not stir yet; just let the drops sit on the surface tension. -
Swirl the Pattern:
Using a wooden skewer, very gently drag the tip through the floating paint. Create S-curves or figure-eight motions to marble the colors without muddying them together.
Step 3: The Dipping Process
-
Dip the Lid:
Process the lid first as a test. Hold it by the knob (or a taped handle improvised on the bottom) and dip it slowly at a 45-degree angle into a nice section of the pattern. -
Submerge and Clean:
Push the lid fully under the water. While it is submerged, blow on the surface of the water to disperse the remaining paint film, then pull the lid out through the clear water. -
Position the Teapot:
Put on your gloves. Hold the teapot firmly, perhaps by the inside of the opening. Identify the best part of the paint swirl on the water surface. -
Execute the Dip:
Dip the teapot in a slow, rolling motion. Start with the belly of the pot contacting the paint, rolling slightly to coat the sides and spout. The rolling motion helps wrap the pattern around the curves. -
Remove and Rest:
Once coated, push the debris away from the surface again before lifting the teapot out. Set it gently on a drying rack or hang it if you have rigged a wire hook.
Paint Sinking?
If your paint drops sink to the bottom instead of floating, your mixture is too heavy. Add a tiny bit more water or marbling medium to lighten the density.
Step 4: Finishing Touches
-
Check for Drips:
Inspect the bottom edge for any paint drips that are gathering. Gently dab them away with a paper towel before they dry into bumps. -
Initial Cure:
Let the teapot sit undisturbed for at least 24 hours. Marbling paint can be thick in areas and needs time to fully set. -
Clean the Edges:
Once dry to the touch, peel off your painter’s tape slowly. If the paint edge is jagged, you can clean it up carefully with a damp cotton swab or a craft knife. -
Seal the Work:
Apply a clear, food-safe gloss varnish or spray sealer over the painted areas to protect the design and give it that high-shine ceramic look. Apply two thin coats rather than one thick one. -
Final Bake (Optional):
If your specific paint brand requires heat setting to become dishwasher safe, place the teapot in a cold oven, heat to the manufacturer’s specified temperature, and let it cool down inside the oven.
Now you have a functional piece of art that looks like it was carved from polished agate stone.
Galaxy Night Sky Teapot
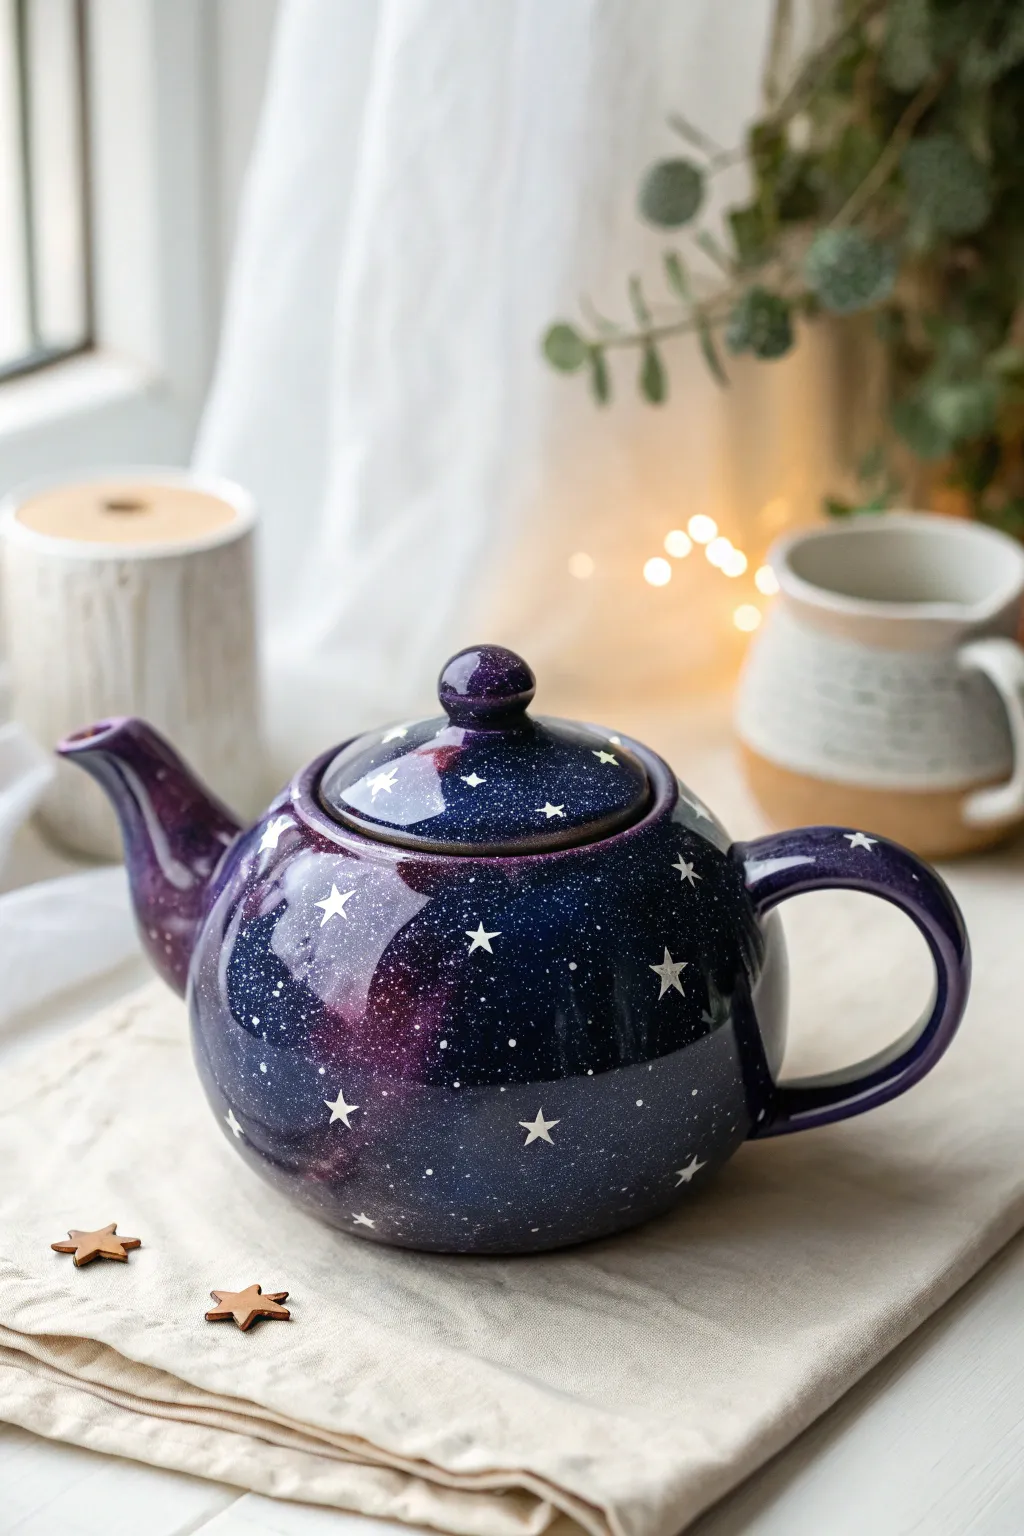
Transform a plain ceramic teapot into a breathtaking slice of the universe with this galaxy-themed painting guide. The finished piece features deep, swirling nebulas of indigo and violet, scattered with delicate white stars that seem to twinkle against the dark glaze.
Step-by-Step Tutorial
Materials
- White or light-colored ceramic teapot (cleaned and dried)
- Pebeo Porcelaine 150 paints (or similar high-gloss ceramic paint)
- Colors: Deep Blue, Purple, Black, White, and Fuchsia
- Soft cosmetic sponges or dabbers
- Fine detail paintbrush (size 0 or 00)
- Old toothbrush
- Rubbing alcohol
- Paper towels
- Palette or paper plate
- Oven (for curing)
Step 1: Preparation and Base Coat
-
Clean surface:
Before you begin, wipe the entire teapot down with rubbing alcohol and a paper towel. This removes oils and fingerprints that could prevent the paint from adhering properly. -
Load your palette:
Squeeze out generous amounts of Deep Blue, Purple, and Black onto your palette. Keep them slightly separated but ready to mix. -
Start sponging:
Dip a cosmetic sponge into the Deep Blue first. Dab it onto the teapot in random, cloudy patches, covering about 50% of the surface. Don’t aim for solid coverage; a little translucency creates depth. -
Add purple tones:
Using a fresh side of the sponge (or a new one), pick up the Purple paint. Sponge this into the empty spaces and slightly overlap the edges of the blue areas to create a seamless transition. -
Deepen the void:
Take a tiny amount of Black on a sponge. Gently dab it into the areas where the blue and purple meet, or at the very bottom of the pot, to create the illusion of deep space shadows.
Step 2: Creating the Nebula
-
Highlighting:
Mix a tiny drop of White with your Purple to make a lighter lavender shade. Lightly sponge this into the center of your largest purple patches to make them glow. -
Adding warmth:
If you want a hint of warmth like in the photo, dab a very small amount of Fuchsia mixed with Purple into a few select spots. Keep this subtle to maintain the deep night sky look. -
Blend whilst wet:
While the paint is still tacky, use a clean, dry sponge to softly tap over the boundaries where colors meet. This blurs the hard edges and creates a smoky nebula effect. -
First drying phase:
Let this base layer dry for at least one hour. It needs to be dry to the touch before we add the stars so they stay crisp white.
Nebula Depth Trick
Don’t over-blend! Let some base white ceramic show through your dark blue sponge layers very faintly. It creates natural-looking ‘gaseous’ transparency.
Step 3: Stars and Details
-
Prepare the stars:
Pour out a small amount of White paint. If it feels too thick, thin it slightly with a drop of water so it flows easily off a brush. -
Splatter technique:
Dip an old toothbrush into the thinned white paint. Test it on a paper towel first, then run your thumb across the bristles to flick tiny specks of ‘distant stars’ all over the teapot. -
Painting large stars:
Using your fine detail brush (size 0), paint distinct five-pointed stars. Start by painting a small cross, then add a diagonal X over it, tapering the ends to sharp points. -
Placement strategy:
Scatter these larger stars randomly. Place them over the darker ‘void’ areas to make them pop, and add a few to the lid as well. -
Adding twinkle:
For a few stars, add a tiny dot of white in the very center to increase the brightness. I find this really helps sell the glowing effect. -
Clean up edges:
If any paint got onto the inner rim or spout where you drink from, wipe it away with a damp cloth now for food safety.
Splotchy Stars?
If your toothbrush splatter creates big globs, the paint is too thin or the brush is overloaded. Dab excess paint onto paper before flicking it at the pot.
Step 4: Curing
-
drying time:
Allow the teapot to dry completely for at least 24 hours. The paint must be fully hardened before baking. -
Bake to set:
Place the teapot in a cold oven. Set the temperature to 300°F (150°C). Once the oven reaches temperature, bake for 35 minutes. -
Cool down:
Turn the oven off and leave the teapot inside to cool down gradually with the oven. Taking it out while hot could crack the ceramic.
Once fully cooled, your teapot is ready to serve starlit tea at your next gathering
Animal Character Teapot Transformation
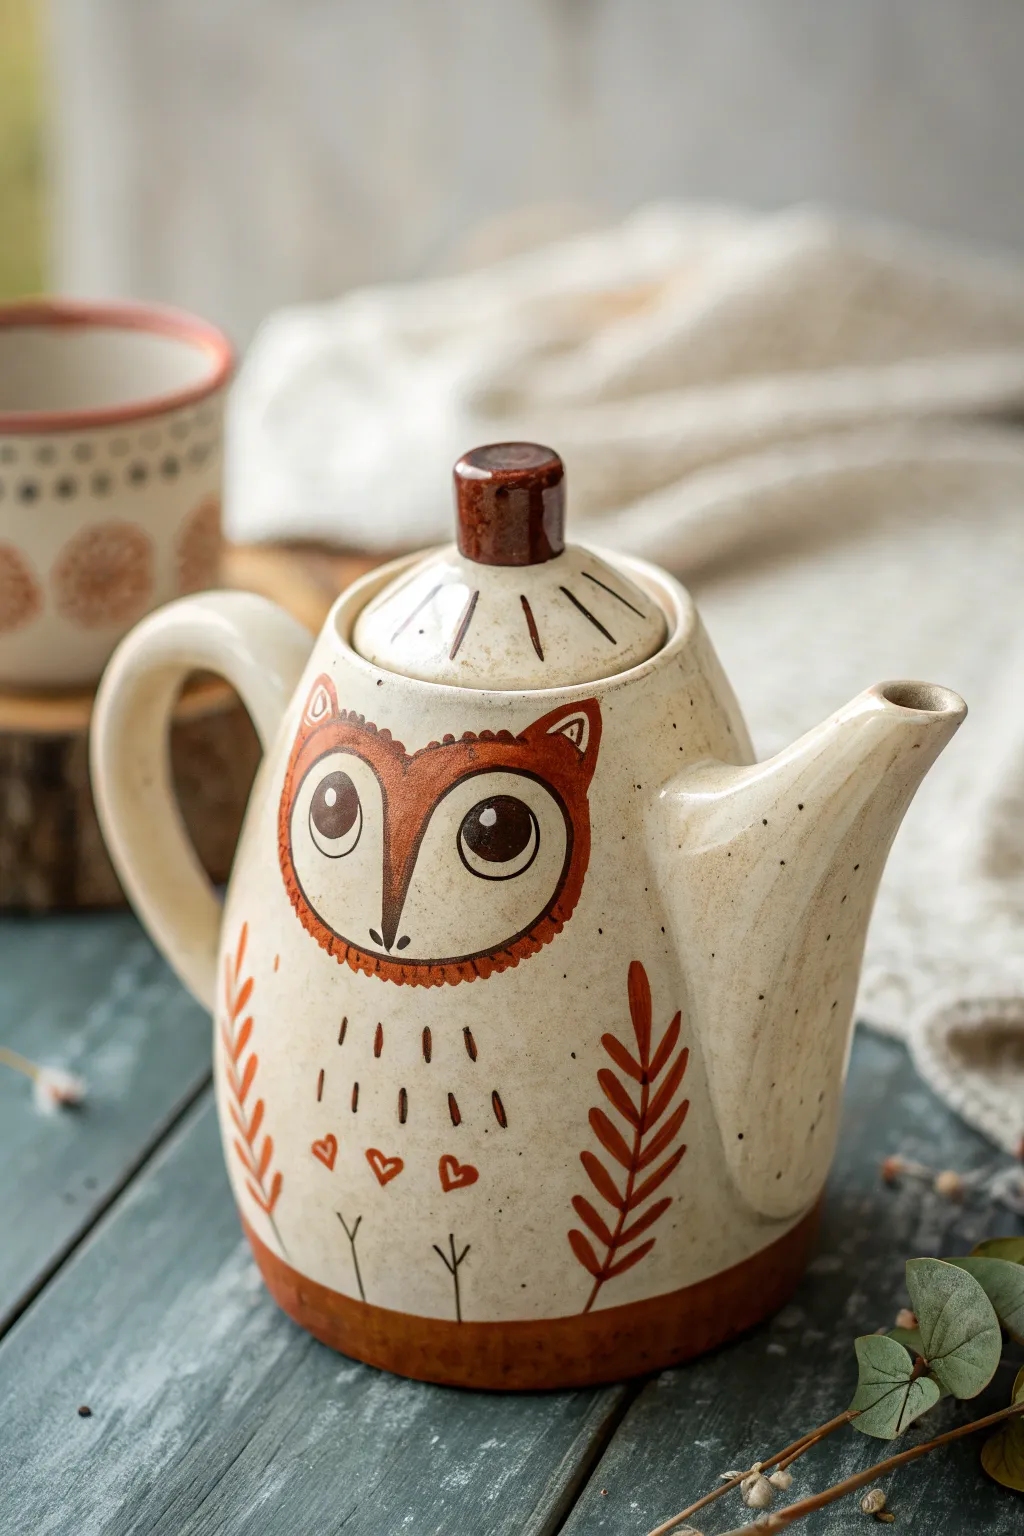
Turn a plain ceramic teapot into a woodland treasure with this charming owl transformation. Featuring rusty orange hues and simple linework, this folk-art look adds cozy character to your afternoon tea ritual.
Step-by-Step Guide
Materials
- Plain white or cream ceramic teapot
- Ceramic paints (Rust/Terracotta, Dark Brown, Cream/Off-White)
- Glazed ceramic surface conditioner (alcohol or primer)
- Fine liner brush (size 0 or 00)
- Small round brush (size 2 or 4)
- Pencil for sketching
- Clear ceramic sealant or glaze (optional)
- Oven for curing (if paint requires heat setting)
Step 1: Preparation & Mapping
-
Clean the Surface:
Before you begin, wipe the entire outer surface of the teapot with rubbing alcohol to remove any oils or dust. This ensures the paint adheres properly to the glaze. -
Position the Face:
Using a soft pencil, lightly sketch the large heart-shaped mask for the owl’s face centered on the teapot’s body. The top points should act as ears. -
Add Facial Features:
Inside the heart shape, draw two large circles for the eyes and a long, slender triangle pointing downward for the beak. -
Sketch the Details:
Lightly mark the position of the feathers on the belly using small dashes, and draw two large, leafy branches curving up the sides of the teapot.
Step 2: Painting the Owl
-
Fill the Face Mask:
Mix a warm rust or terracotta color. Using the small round brush, fill in the upper ‘ear’ sections of the face mask, leaving the center and bottom area cream. -
Define the Eyes:
Paint the large eye circles with a cream or off-white color if your teapot isn’t already that shade. Let this layer dry completely. -
Outline the Features:
Switch to your fine liner brush and dark brown paint. Carefully outline the large heart-shaped face mask. -
Create Texture:
Add small, short strokes along the bottom edge of the face outline to simulate feathers or fur texture. -
Paint the Pupils:
Inside the eye circles, paint large dark brown pupils. Leave a tiny white dot in each for a sparkle of life, or add it later with white paint. -
Draw the Beak:
Paint the long triangular beak in dark brown, extending it from between the eyes down to the bottom of the face mask.
Fixing Smudges
Made a mistake? Use a damp cotton swab or a toothpick to gently scrape away wet paint before it dries on the ceramic glaze.
Step 3: Body Details & Lid
-
Paint Belly Feathers:
Using the dark brown paint and liner brush, create the belly pattern. Paint three small hearts near the bottom, and vertical dashes above them. -
Add Foliage:
Paint the side branches using rust paint. Create a central stem and paint simple, oval-shaped leaves extending outward. -
Base Border:
Paint a thick band of rust color along the very bottom edge of the teapot to frame the design. -
Stem Accents:
Add tiny Y-shaped twigs rising from the bottom border using thin brown lines. -
Lid Decoration:
Paint the knob of the lid in a solid dark brown. Add a circle of rust dashes or lines radiating from the center knob.
Level Up: Texture
Use a sponge to dab the rust color on the face mask instead of brushing it solid. This creates a fluffy, feathery texture.
Step 4: Finishing Touches
-
Dry and Cure:
Let the paint dry for at least 24 hours. Follow the manufacturer’s instructions for your specific paint, which usually involves baking the teapot in a home oven to set the design. -
Seal (Optional):
If your paint requires it, apply a coat of clear ceramic glaze or sealant to protect your artwork from chipping.
Now you have a cozy, custom teapot ready for your next brewing session
Steampunk-Inspired Metallic Details
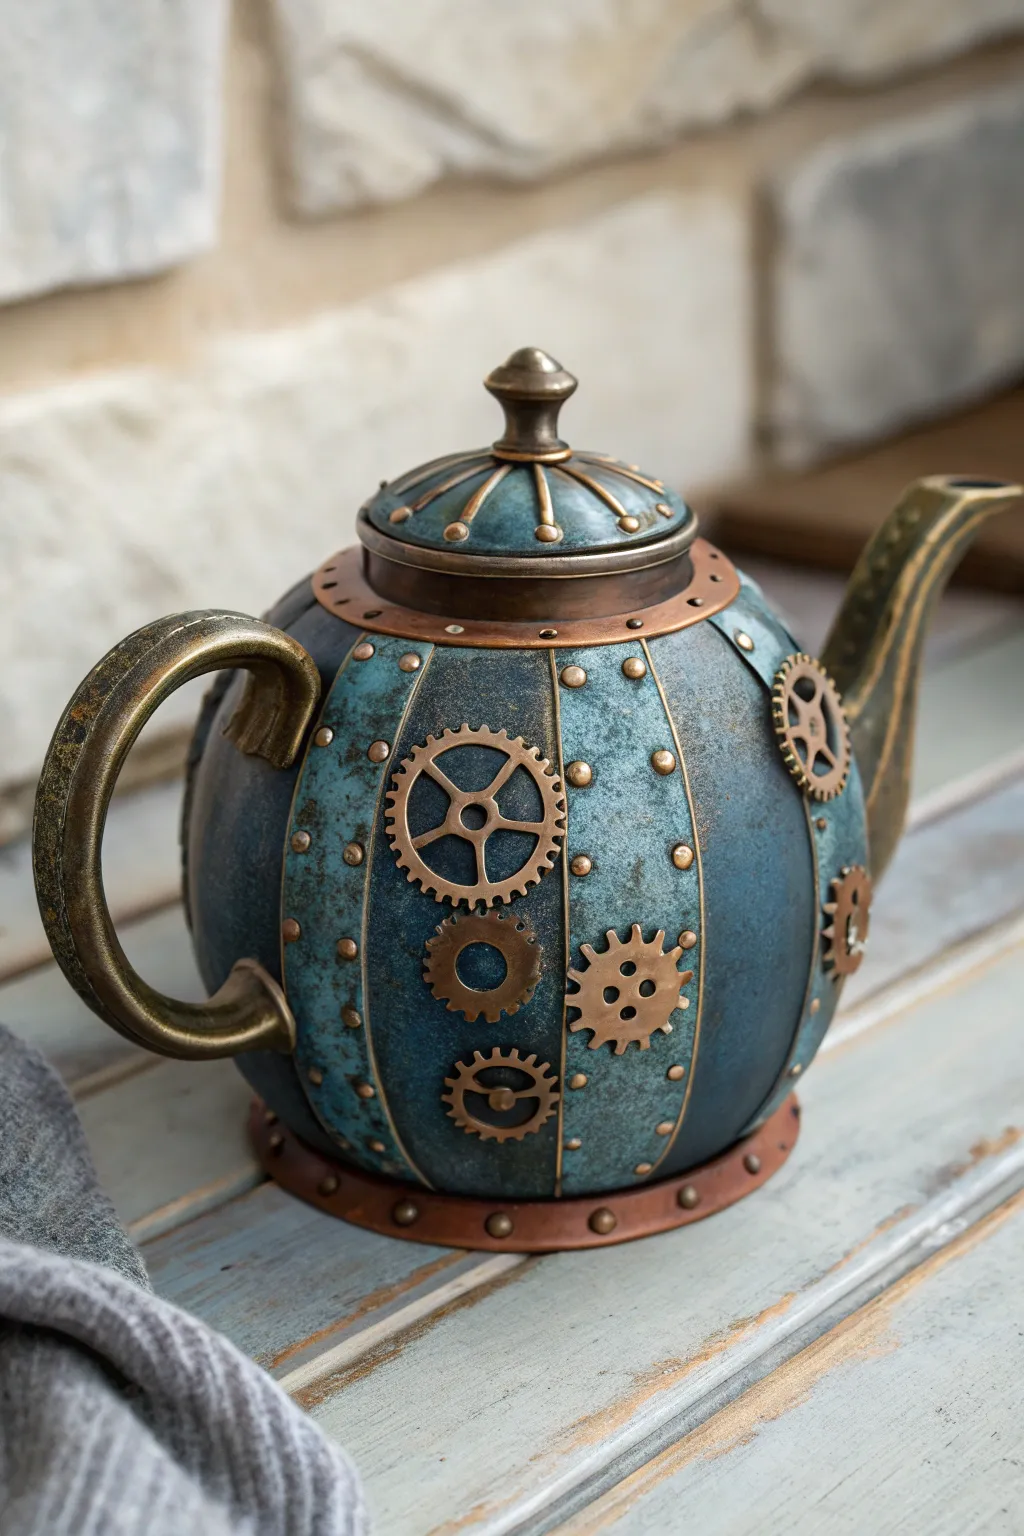
Transform an ordinary ceramic teapot into a marvel of Victorian science fiction with this detailed painting guide. By layering metallic finishes and attaching simple hardware, you’ll create a piece that looks like it belongs in the engine room of a steam-powered airship.
Step-by-Step Tutorial
Materials
- Ceramic teapot (clean and dry)
- Spray primer (matte black or dark grey)
- Teal or turquoise acrylic paint (matte)
- Metallic copper acrylic paint
- Metallic bronze or brass acrylic paint
- Dark brown antiquing wax or glazing medium
- Assorted metal gears and cogs (craft embellishments)
- Half-pearl stickers or craft rivets
- High-strength craft glue (E6000 or strong super glue)
- Small flat paintbrush
- Fine detail paintbrush
- Sponge or stippling brush
- Painters tape (narrow width)
Step 1: Base Coat & Panels
-
Prime the Surface:
Clean your teapot thoroughly with alcohol to remove oils. In a well-ventilated area, spray the entire teapot with a matte black or dark grey primer. Let this cure completely according to the can’s instructions to ensure your paint adheres well. -
Map Out the Sections:
Visualize vertical segments around the belly of the teapot. Use narrow painter’s tape to mark off these vertical stripes—these taped areas will eventually become the copper bands, while the exposed areas will be painted blue. -
Apply the Base Teal:
On the exposed sections between the tape, apply a coat of teal or turquoise matte acrylic. Don’t worry about making it perfectly smooth; a little texture adds to the weathered metal look. -
Sponge for Texture:
While the second coat of teal is impressive, I prefer to use a sponge or stippling brush to dab on a slightly lighter or darker teal mixture. This mottling effect mimics the uneven oxidation found on real aged copper. -
Remove the Tape:
Carefully peel away the painter’s tape while the paint is still slightly tacky to avoid chipping the edges. You should now have clean black lines separating your teal panels.
Dry Brushing Secret
When applying ‘dirt’ or grime, use a brush that is almost completely dry of paint. Test on a paper towel first; you want a faint smudge, not a solid stroke.
Step 2: Metallic Detailing
-
Paint the Vertical Bands:
Using a small flat brush and metallic copper paint, carefully fill in the vertical stripes where the tape used to be. You may need two coats to get a rich, solid metal look. -
Detail the Handle and Spout:
Paint the handle and spout entirely with bronze or brass metallic paint. Feather the edges slightly where these parts meet the body of the pot to blend the transition. -
Add the Lid Accents:
Paint the lid with the same teal base, but add copper or brass detailing to the rim and the knob. If the lid has raised ridges, highlight those with copper to match the body bands. -
Create the Bottom Rim:
Paint a solid band of copper around the very bottom edge of the teapot. This grounds the design and makes it look like a structural metal base.
Functional Twist
Want to use this for serving? Only paint the outside and keep the paint and glue away from the pouring lip and interior to ensure it stays food safe.
Step 3: Aging & Assembly
-
Apply Antiquing Glaze:
Mix a small amount of dark brown paint with glazing medium or water. Lightly brush this over the teal sections and immediately wipe most of it back with a cloth. The dark color will settle into the textures, making the ‘metal’ look dirty and old. -
Distress the Edges:
Using a dry brush technique with just a tiny bit of black or dark brown paint, darken the specific areas where the teal meets the copper bands. This adds shadow and dimension. -
Prepare the Gears:
Select your gears. If they are bright new brass, dull them down with a wash of black paint or use your bronze paint to make them match the handle. -
Attach the Gears:
Using strong craft glue, adhere the gears to the center of the teal panels. Group them in clusters of two or three for visual interest, ensuring they look like they could actually interact. -
Add the Rivets:
Take your half-pearl stickers or craft rivets and paint them copper if they aren’t already. Glue these along the vertical copper bands and around the rim of the lid to simulate heavy industrial fasteners. -
Final Patina Touch:
For an extra realistic touch, dab a tiny bit of watered-down light green paint around the base of the gears and rivets to simulate verdigris corrosion. -
Seal the Project:
Once everything is completely dry—give it at least 24 hours—spray the entire piece with a clear matte or satin sealer to protect your paint job and secure the adhered elements.
Place your finished masterpiece on a shelf or table and enjoy the timeless, mechanical charm it brings to the room


Have a question or want to share your own experience? I'd love to hear from you in the comments below!